Embed Size (px)
Citation preview

USER MANUALWELCOME TO LUMO LIFTThanks for purchasing Lumo Lift. We’re excited that you have taken your first step towards better posture.
Lumo Lift is designed to help you build better posture habits over time.
www.lumolift.com/[email protected]+1 (877) 702-7866

2
WHAT’S IN THE BOX 3
LUMO LIFT SPECIFICATIONS 3
SETTING UP YOUR LUMO LIFT 4
DASHBOARD FEATURES 20
USING YOUR LUMO LIFT 27
TROUBLESHOOTING 28
TABLE OF CONTENTS

3
WHAT’S IN THE BOX
Lumo Lift
USB Charger Extra Magnetic Clasp
Magnetic Clasp
ALSO INCLUDED
CompatibilityiOS 10 and newer.Android 5.0 and newer.
Battery1-2 days on single charge.Fully charges in 2-4 hours.
MemoryUp to 4 weeks of local activity data storage.Lifetime activity data storage in the cloud.
Materials + WeightSensor: Electroplated thermoset plastic. 11.50gMagnetic clasps: Solid aluminum + rare earth magnet. 1.00g
LUMO LIFT SPECIFICATIONS
1 2

4
STEP 1 CHARGE YOUR LUMO LIFT
Plug the USB charger into your computer or a wall adapter. Ensure that the golden
charging dots on the back of the sensor line up with the golden prongs on the
charging dock. The sensor will light up with an orange LED while charging and a
green LED once the charge is complete. A full charge takes 2-4 hours.
DOWNLOAD THE LUMO LIFT APPFind and open the “Lumo Lift” App from the Google Play Store.
SETTING UP YOUR LUMO LIFT
STEP 2

5
CREATE AN ACCOUNT USING THE LUMO LIFT APP
1. Open the Lumo Lift app on your supported mobile device.
2. Select “Sign Up”.
3. Enter your name and email address.
STEP 3

6
PERSONALIZE
1. Select your gender by tapping either
the “female” or “male” icon on the screen.
Then, press “NEXT”.
2. Enter your birthdate and press
“NEXT”.
STEP 4

7
3. Enter your height and press “NEXT”. 4. Enter your weight and press “NEXT”.

8
5. Select a posture goal and press “NEXT”. 6. Make sure you have all of the accessories in
the box and press “CONNECT YOUR LIFT”.

9
First, make sure your device’s Bluetooth is turned on. Remove your Lumo Lift from the USB charger and press your Lumo Lift for 5 seconds to connect.
STEP 5 CONNECT YOUR LUMO LIFT

10
You will see this screen once your Lumo Lift has successfully connected.
Your Lumo Lift may need a firmware update. This step is to ensure your Lumo Lift operates with the latest firmware and bug fixes.
CONNECT YOUR LUMO LIFT
Make sure the location services are enabled at both the device and app level.
Device level: Settings > Location > toggle OFF, then ON.
App level: Settings > Applications > Application Manager > Lumo Lift > App Permissions > Location > toggle OFF, then ON.

11
STEP 6 WEAR YOUR LUMO LIFT
Pull the magnetic clasp off your Lumo Lift. Wear your Lumo Lift sensor under your shirt with
the gold dots facing towards your body. The magnetic clasp attaches to the outside of your
clothing. Ideal placement for the sensor is directly beneath the collarbone, halfway between the
tip of the shoulder and neck. We recommend experimenting with placement. Over time, you’ll
learn what placement works best for you and your activities. See “Details on how to wear” on
the next page of this manual for more information.

12
WEAR YOUR LUMO LIFT
Double check that you are wearing it correctly before moving on. You may use a mirror to
check placement. Avoid wearing loose clothing when using your Lumo Lift, as this may
affect the sensor’s accuracy.

13
1. Remove the magnetic clasp
from your Lumo Lift.
2. Place your Lumo Lift under
your shirt, right below your
collarbone and use the magnetic
clasp to secure it in place.
3. Get into your best posture
and press your Lumo Lift once
to set your Target Posture.
You can also use Lumo Lift adhesives to wear your Lumo Lift. Learn how by clicking here, or visiting www.lumobodytech.com/adhesives
DETAILS ON HOW TO WEAR
14
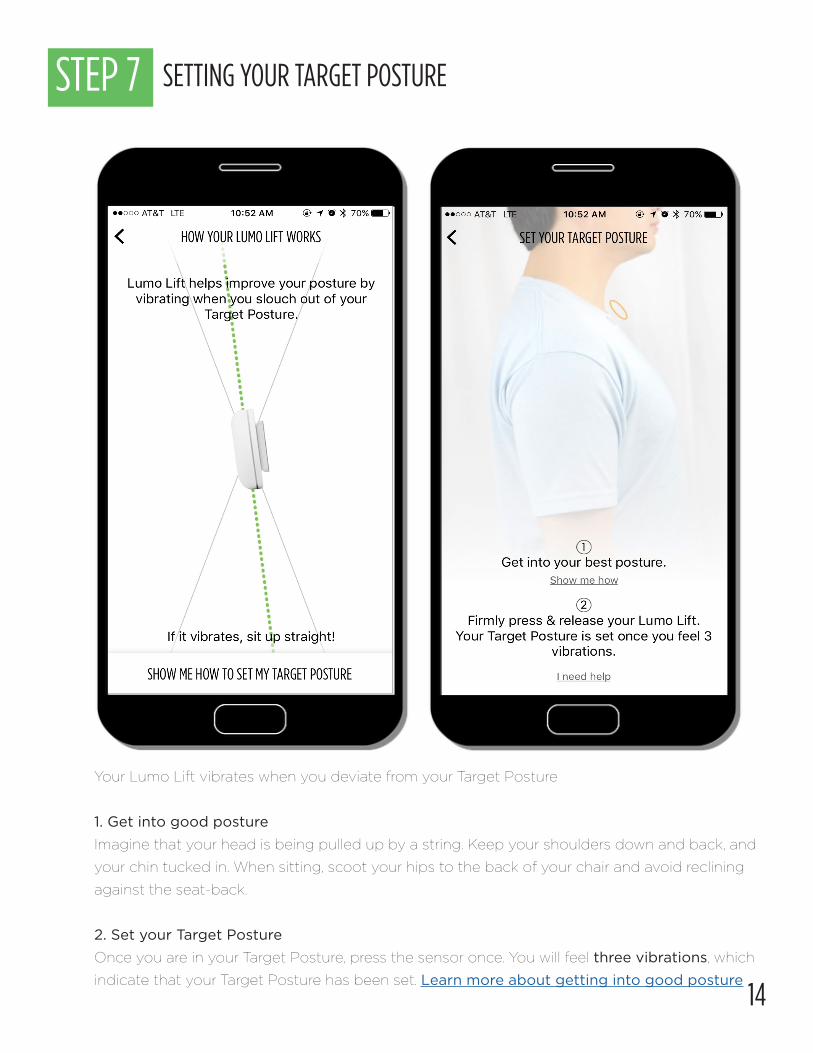
STEP 7 SETTING YOUR TARGET POSTURE
Your Lumo Lift vibrates when you deviate from your Target Posture
1. Get into good postureImagine that your head is being pulled up by a string. Keep your shoulders down and back, and
your chin tucked in. When sitting, scoot your hips to the back of your chair and avoid reclining
against the seat-back.
2. Set your Target PostureOnce you are in your Target Posture, press the sensor once. You will feel three vibrations, which
indicate that your Target Posture has been set. Learn more about getting into good posture

15
SETTING YOUR TARGET POSTURE
You will see this screen, once your “Target Posture”
has been set.

16
STEP 8 SETTING AND TESTING YOUR FEEDBACK DELAY
We recommend that you start with a
Posture Feedback Delay of 15 seconds.
You can adjust this later in “Settings”.
Slouch to try your delay.

17
SETTING AND TESTING YOUR FEEDBACK DELAY
After the delay countdown
has finished, get back into
your best posture.
If the delay feels right, press
“SET THIS AS MY DELAY”.

18
You have successfully set your Posture Feedback Delay
SETTING AND TESTING YOUR FEEDBACK DELAY

19
NOTIFICATIONSAllowing notifications helps you get the most out of your Lumo Lift experience.
Notifications include low battery alerts, reminders to keep moving, and kudos
when you hit your goals.
Tap “ENABLE NOTIFICATIONS” to get
the most out of your Lumo Lift.
STEP 9
20
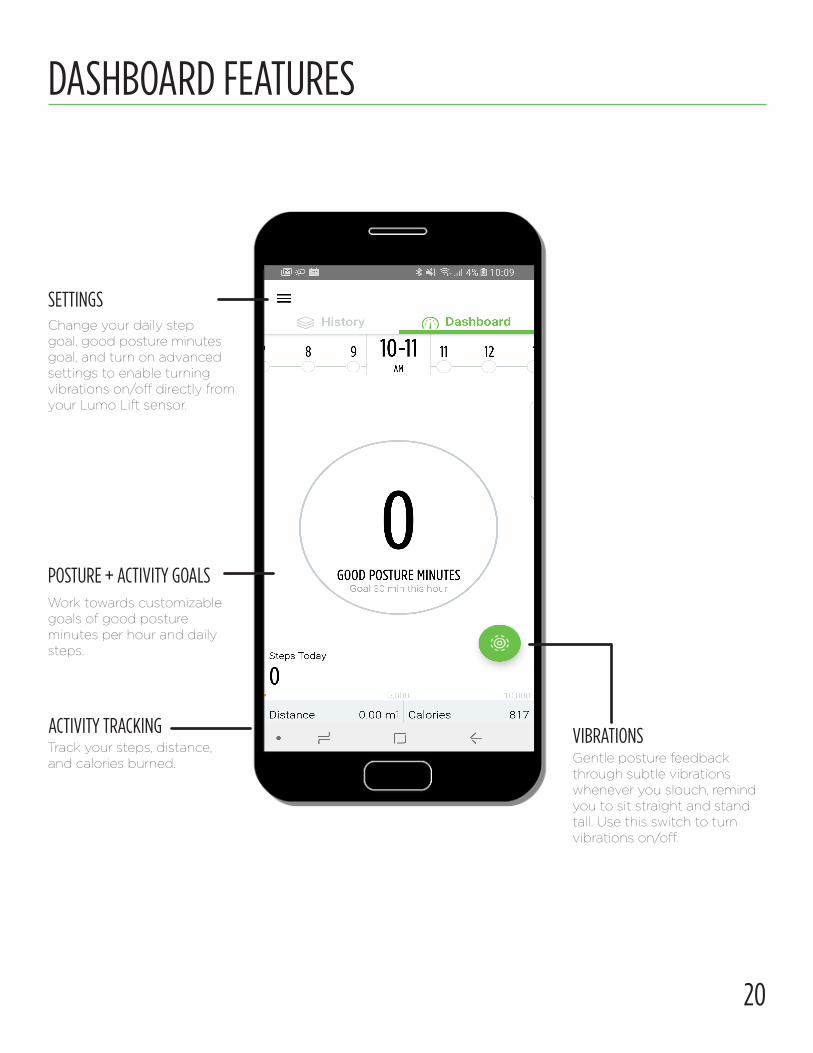
DASHBOARD FEATURES
Gentle posture feedback through subtle vibrations whenever you slouch, remind you to sit straight and stand tall. Use this switch to turn vibrations on/off.
Work towards customizable goals of good posture minutes per hour and daily steps.
VIBRATIONS
POSTURE + ACTIVITY GOALS
SETTINGSChange your daily step goal, good posture minutes goal, and turn on advanced settings to enable turning vibrations on/off directly from your Lumo Lift sensor.
ACTIVITY TRACKINGTrack your steps, distance, and calories burned.

21
VIEW YOUR HISTORICAL DATA

22
CHANGE YOUR POSTURE FEEDBACK DELAY
Lumo Lift helps improve your posture by vibrating when you slouch out of your Target Posture. You can se-
lect how long your Lumo Lift should wait before alerting you of bad posture. This can be adjusted in the app
under Settings > Posture Feedback Delay. We recommend 30 seconds to start. Once you feel your posture
improving, you can lower the delay. Experiment to find a delay that works for you.

23
SET YOUR DAILY STEP GOAL
Lumo Lift automatically tracks your daily step count, and recommends a daily step count of 10,000 steps,
which roughly translates to about 5 miles of walking. You can customize this number by opening the Lumo
Lift app and going to Settings > Steps.

24
TURN VIBRATIONS ON/OFF
Gentle posture feedback through subtle vibrations whenever you slouch, remind you to sit straight and stand tall. Use this switch to turn vibrations on/off.
VIBRATIONS

25
TURN VIBRATIONS ON/OFF
The Vibrations can be turned ON/ OFF from the Lift Sensor, if the option is chosen as above, from the “Advanced Settings”.

26
USING YOUR LUMO LIFTSTEPS FOR DAILY USAGE1. Set your Target Posture Frequently Setting your Target Posture frequently helps your Lumo Lift track your
posture more accurately. Set your Target Posture every morning when you
put your Lumo Lift on and anytime you change positions, like from sitting to
standing.
To set your Target Posture, imagine that your head is being pulled up by a
string. Keep your shoulders down and back, and your chin tucked in. When
sitting, scoot your hips to the back of your chair and avoid reclining against
the seat-back. Once you are in your Target Posture, press the sensor once.
You will feel three vibrations, which indicate that your Target Posture has
been set.
2. Customize your Vibration Feedback Experiment with the different vibration settings to find the perfect experience
for your needs.
- We recommend starting with a 30 second Posture Feedback Delay or
adjusting to a longer delay if necessary as you begin working on your
posture. Shorter delays should be reserved for short periods of time when
you want to focus on your posture, like 10 minutes at your desk after lunch.
- We recommend turning vibrations off when you are in a situation where
you know you will be out of good posture, like when you are relaxing on the
couch. To do this you can either turn the vibrations off from the Lumo Lift
App or follow the instructions on Page 17 to enable using your Lumo Lift
sensor to turn vibrations off/on.
3. Check that your Lumo Lift is Charged There are two ways to check if your Lumo Lift needs to charge.
- From the sensor: Press your Lumo Lift once to check if the LED lights up
green or orange. Green means you are good to go. Orange means you will
need to charge your Lumo Lift soon.
- From the app: Open the app and tap on the Settings gear icon in the upper
right corner of the screen. The battery percentage will be displayed at the
top of the Settings screen.

27
TROUBLESHOOTINGMY LUMO LIFT WON’T CONNECT TO THE APPIf you have any issue related to sensor connectivity -- either during on-boarding, finding the sensor
while
connecting to the app, or the app being unable to automatically reconnect to the sensor, please
follow the steps below to troubleshoot the issue.
1. Confirm that the sensor is charged: Place it on the charger. When it is fully-charged, the LED turns
green. Open the Lift app and try to connect to the sensor. (Tap the menu icon on the top left ->
select the Sensor image -> select Add A New Lumo Lift Sensor.)
2. If the Lumo Lift app is running on other nearby devices, it is possible that the sensor is connected
to another device, and the sensor can only connect to one device at a time. Move to an area where
you are certain there are no instances of the Lift app running. Open the Lift app and try to connect
to the sensor.
3. Try a sensor cradle reset: Place the sensor in the charging cradle, with the cradle connected to a
USB power source (e.g. a USB port on a laptop, or a USB charging block). With the sensor in the
cradle, press and hold the sensor button for 15-20 seconds or until the device LED flashes blue /
purple and vibrates once. Open the Lift app and try to connect to the sensor.
4. The bluetooth stack on the Android device can, at times, prevent the connection to the Lift sen-
sor. Toggle Bluetooth off, then on (Android Settings -> Bluetooth -> Off / On). Open the Lift app
and try to connect to the sensor.
5. Try rebooting the Android device. Performing a reboot may require different steps depending
on the specific device, but for most devices, press and hold the Power and Volume Down buttons
simultaneously until the device shuts down and you see the reboot animation, or a screen pops up
with a Reboot (or Restart) option. After the device reboots, open the Lift app and try to connect to
the sensor.
6. Location services must be enabled to allow the Lift app to scan for nearby Lift devices and es-
tablish a connection. Locations services must be enabled at the device level, and at the app level.
Device level: Mobile device Settings -> Location -> toggle OFF, then ON. App level: Mobile device
Settings -> Applications -> Application Manager -> Lumo Lift -> App permissions -> Location tog-
gle OFF, then ON. After enabling location services for the device and the Lift app, open the Lift app
and try to connect to the sensor.

28
TROUBLESHOOTINGMY LUMO LIFT WON’T CONNECT TO THE APPIf you have any issue related to sensor connectivity -- either during on-boarding, finding the sensor
while
connecting to the app, or the app being unable to automatically reconnect to the sensor, please
follow the steps below to troubleshoot the issue.
1. Confirm that the sensor is charged: Place it on the charger. When it is fully-charged, the LED turns
green. Open the Lift app and try to connect to the sensor. (Tap the menu icon on the top left ->
select the Sensor image -> select Add A New Lumo Lift Sensor.)
2. If the Lumo Lift app is running on other nearby devices, it is possible that the sensor is connected
to another device, and the sensor can only connect to one device at a time. Move to an area where
you are certain there are no instances of the Lift app running. Open the Lift app and try to connect
to the sensor.
3. Try a sensor cradle reset: Place the sensor in the charging cradle, with the cradle connected to a
USB power source (e.g. a USB port on a laptop, or a USB charging block). With the sensor in the
cradle, press and hold the sensor button for 15-20 seconds or until the device LED flashes blue /
purple and vibrates once. Open the Lift app and try to connect to the sensor.
MY LUMO LIFT IS DISCONNECTED AFTER FIRST-TIME SET UPIf you open the app and your data is not updating, please follow the recommended troubleshoot-
ing steps below:
1. Turn Bluetooth off/on. You can access this under iOS Settings -> Bluetooth.
2. Go back to the Lumo Lift app and confirm within the Lumo Lift app’s settings whether the
sensor is connected. To do this, click on the settings icon. You should see a message which states
“Connected.”
WHY DOES MY LUMO LIFT “BUZZ” WHEN I AM IN GOOD POSTURE?If your Lumo Lift is buzzing too often, try setting your Target Posture every time you change posi-
tions. Your Lumo Lift may be tracking a previous posture and providing inaccurate feedback.
You can also try increasing your posture feedback delay.
If your Lumo Lift isn’t buzzing enough, try adjusting your posture feedback delay to a shorter
time interval, and setting your Target Posture again.
MY LUMO LIFT DOES NOT “BUZZ” WHEN I AM SLOUCHING

29
HOW DO I HARD RESET MY LUMO LIFT?To do a hard reset of your Lumo Lift, complete the following steps:
1. Place your Lumo Lift in the charging dock (make sure it is plugged into a power source)
2. Press and hold the button for 10-15 seconds or until the device LED flashes blue/purple and
vibrates once.
MY LUMO LIFT IS FLASHING DIFFERENT COLORSIf the LED on your Lumo Lift flashes when the Lumo Lift is connected to the charger, or the LED
flashes immediately after it is removed from the charger, or the LED remains on after removal from
the charger, please follow these steps to troubleshoot the issue.
Try a Hard Reset: Place the sensor in the charging dock. Make sure the charger is connected to a
power source. Press and hold the sensor button for 10-15 seconds or until the device LED flashes
blue/purple and vibrates once.
MY LUMO LIFT GOT WETIf you accidentally washed your Lumo Lift, or if your Lumo Lift has been subject to any water
damage, please try the following to revive your Lumo Lift:
1. Take your wet Lumo Lift and dry it carefully from the outside as best you can.
2. Place the sensor in bowl or rice for 3-4 days until all moisture has been removed.
3. Try a hard reset.
MY LUMO LIFT DOES NOT CHARGEIf your Lumo Lift is not charging, try the following steps to resolve the issue:
1. Clean the sensor and the charging dock of any dust. Make sure the gold dots on your Lumo Lift
are aligned with the gold pegs on the charging dock.
2. Place the Lumo Lift on the charger, and make sure an orange or green LED appears.
3. Unplug the charger and plug it into a different USB port or power source and try to charge the
Lumo Lift again. If you don’t see the LED light up, your charger may not be receving power.
If you are still unable to charge your Lumo Lift, please submit a help request here.

30
NEED TO REPORT A BUG?
You can ‘Report a Bug’ through the Send Feedback feature within “Settings”. Write a detailed description of the bug and send it to us.

NEED MORE HELP?www.lumolift.com/[email protected]+1 (877) 702-7866