Embed Size (px)
Citation preview

User manual- College login
A Smart Education Portal

1
Co
Contents JnanaBhumi- A Smart Education Portal....................................................................................................... 3
Home Page Website: ..................................................................................................................................... 3
College login summary ................................................................................................................................. 3
1. Login ...................................................................................................................................................... 4
2. Change Password: ................................................................................................................................ 4
3. Enter the employee details ................................................................................................................... 4
4. Digital signature registration: .............................................................................................................. 7
5. College Registration ........................................................................................................................... 10
5.1. Confirm College Details ................................................................................................................... 10
5.2. Confirm Current Affiliation Details: ................................................................................................ 13
5.3. College Course details (2017-18): ................................................................................................... 15
5.3.1. New Course Request ............................................................................................................... 15
5.4. Confirm Details of governing body ................................................................................................. 16
5.5. Bank Details: ................................................................................................................................... 18
5.6. College attached Hostel details: ..................................................................................................... 18
5.7. Forward to university ...................................................................................................................... 21
6. Sections ............................................................................................................................................... 25
6.1. Section Creation .......................................................................................................................... 25
6.2. Student section mapping ............................................................................................................ 26
7. New Admission Registration: ............................................................................................................. 26
New Admission ....................................................................................................................................... 26
7.1. Student Registration ................................................................................................................... 27
7.2. Student Personal Details: ............................................................................................................ 27
7.3. Admission Details ........................................................................................................................ 30
7.4. Scholarship Details: ..................................................................................................................... 33
8. Renewal/Promoted to second year & above with scholarship ........................................................ 34
8.1. Renewal student confirmation ................................................................................................... 34
8.2. Attendance .................................................................................................................................. 35

2
8.2.1. Section Creation ...................................................................................................................... 35
8.3. Student section mapping ............................................................................................................ 36
8.4. Daily attendance. ........................................................................................................................ 36
8.4.1. Student Roll Number entry ..................................................................................................... 37
8.4.2. Daily Attendance entry. .......................................................................................................... 39
8.5. Monthly attendance ................................................................................................................... 39
9. AADHAR Authentication of students .................................................................................................. 40

3
JnanaBhumi- A Smart Education Portal Ensuring inclusive and equitable quality education and promoting lifelong learning opportunities for all is among the UNDP Sustainable Development Goals and is a key focus area of the Government of Andhra Pradesh under the leadership of Shri. Nara Chandrababu Naidu, Honorable Chief Minister of Andhra Pradesh. JnanaBhumi, a Student cum Educational Institution Management System is an extension of this aforementioned vision and an effort to provide swift, on time in full services seamlessly to the student community of Andhra Pradesh. This is a platform that will drive change by leveraging on the network of colleges, universities and students
Home Page Website: jnanabhumi.ap.gov.in
Figure 1 Home Page

3
College login summary College login has the following services
• College employee details entry • Registering, confirming college related information • Student admissions • Student scholarship forms • Student attendance • Student academics

4
1. Login Click on Login button.
Login with College Id
2. Change Password: This is a mandatory step for the user.
Steps involved to change password
• Enter old password • Enter new password • Renter new password to confirm it.
3. Enter the employee details • The college principal has to enter and confirm the college employee details for
digital key registration. • At least details of two persons (Principal & other person) to be inserted to
procced to next screen. • Enter and confirm all the details. • If the data entered is wrong, click reset button.

5
S no Field Name Description Error Message 1 Designation
type Drop down – select the designation type from the list
Please select the designation type
2 Designation Drop down – Select the designation from the list
Please select the designation
3 Employee type Drop down – Select the employee type from the list
Employee type required
4 AADHAR Text field- enter the AADHAR number of the employee
AADHAR number required
5 Name Text field- enter the name of the employee
Name required
6 Date of birth Date picker- select the date from the calendar
DOB required
7 Gender Select box- select the gender Gender required 8 Date of
entering service Date picker- select the date from the calendar
9 Present designation from
Date picker- select the date from the calendar

6
10 Qualification Drop down- select employee qualification from the drop down list
Qualification required
11 Scale Text field- enter the employee pay scale
Pay scale required
12 Mobile number Text field – enter the employee mobile number
Mobile number required
13 Confirm mobile number
Text field – re-enter the employee mobile number
Mobile number required
14 Email Text field – enter employee email id
Email id required
15 Confirm email Text field – re-enter the employee email id
Email id required
16 Employee profile
Text field – enter the employee profile
17 Employee photo
Upload the employee photo
• When user press save to insert the data, navigates to screen showing message “ successfully inserted “ & Asking for Digital sign key for the user.
• If the user selects “Yes” • If the user selects “No” and clicks “submit” button, then proceed to next
screen.

7
4. Digital signature registration: Instructions for Digital signature registration
• Connect the DSK dongle in USB port. (Please use ePAss2003Auto Dongle) • Select the RUN button when a window prompts for confirmation • Enter the “Digital Signature Dongle Password” when is asks for enter
password. • After successful sign-in, a window prompts the message “ Digital Signed
Successfully/Registered Successfully) • After Registration please take printout of the file and get signed by the
principal and forward it to affiliating authority.
Steps for Digital signature registration
• Click on digital signature registration • Select YES for “Do you have Digital signature key” • Select name of the principal/Authorized signatory of trust from the drop
down list .If the name is not in the list, then click “Register Employee “to insert employee details.
• Click “Register “.

8
A message/warning box asking to run the application will display when user clicks on “Register”.
• When user clicks” Run”, navigates to screen asking password of the DSK. • Enter password & click OK.

9
• When user clicks “OK”, the name of the authorized trust will falls into the table.
• To register the DSK, user has to click on “FILE “to get DSK request letter.

10
• After Registration please take printout of the file and get signed by the principal and forward it to affiliating authority.
5. College Registration
5.1. Confirm College Details • The process starts with college registration. • College details will display here and user can edit the details. • The concerned Scholarship person assigned by college principal (in Employee
details Screen) are displayed in the drop down box. • Check all the details and click on “confirm & next” button to navigate to next
screen.

11
S no Field Name Description Error Message 1 College name
and code Text field –user to enter Please enter college
name 2 Boys/Girls/Co-
Education Drop down – Select the college nature from the list
Please Select college
3 Telephone with STD Code
Text field- Enter the Telephone number
Please enter telephone number
4 Reenter Telephone with STD Code
Text field- Enter the Telephone number
Telephone Required
12
5 Year of establishment
Text field- Enter the year Please enter year
6 Email Text field- Enter the email id Please enter email id 7 Re-enter email Text field- Re-Enter the email id Please enter email id 8 Road no/Street
No Text field- Enter the Road No/Street No
Address Required
9 District Drop down- Select District from the list
Please select District
10 Land Mark Text field- Enter the landmark 11 Mandal Drop down- Select mandal from
the list Please enter college name
12 Village/ward Drop down- Select village from the list
Please enter college name
13 Pin code Text field- Enter the pin code Please enter correct pin code
14 Concerned scholarship assistant
Drop down- select the concern person
Concern name required

13
5.2. Confirm Current Affiliation Details: This service enables user to edit the Affiliation Details of the selected college.
• Using the dropdown boxes select the District, Mandal and Course group. • User can edit University Details. • User can enter /edit Minority details • To enter admission details of students by universities /Colleges • User to enter the CET/NON-CET details-
If CET is selected, system displays the CET details. User to select check box of the required CET and enter the college code provided by convener
• Next step after the Affiliation details is Course details of the colleges.
14
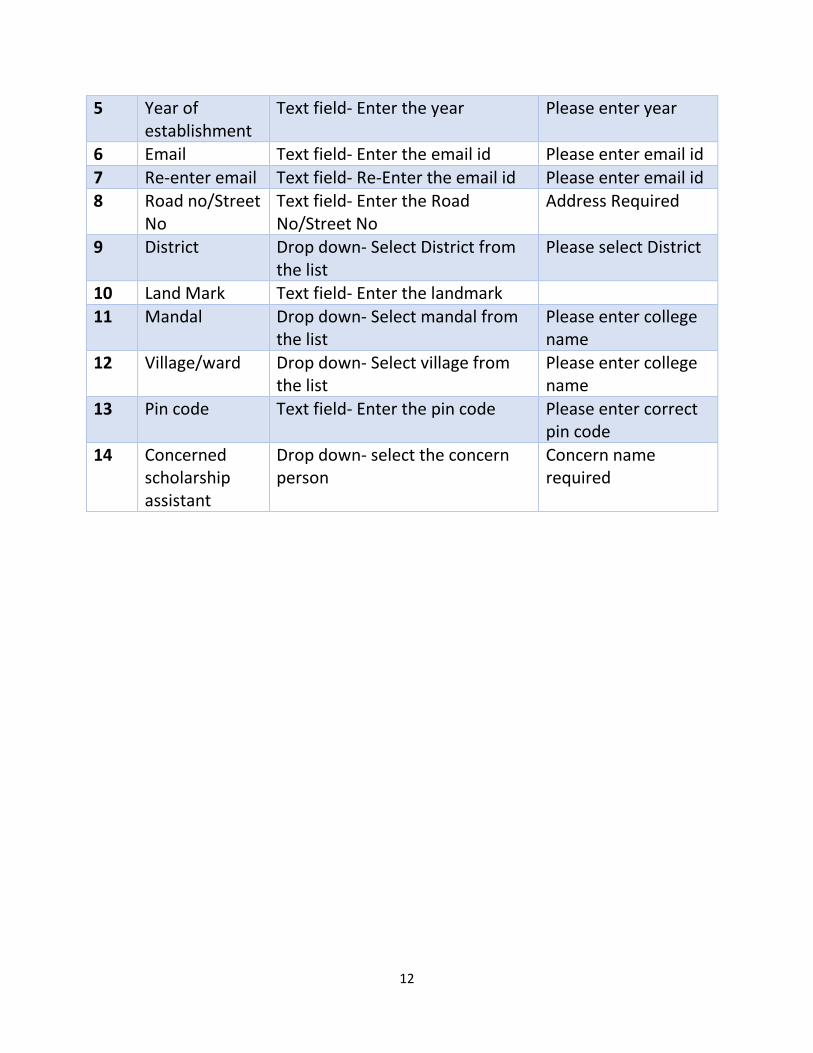
S no Field Name Description Error Message
University Details
1 University Affiliated
Drop Down- select the university from the list
University Affiliation required
2 Document No Text field- Enter the Telephone number
Please enter valid month
3 Nature of the college
Drop Down – Select from the list
Please select the college type
4 Date to which Affiliation is valid
Text field- Enter the date(DD/MM/YYY)
Please enter valid date
5 Document Date Text field- Enter the date(DD/MM/YYY)
6 Approval Authority
Drop down- Select from the list
Approval authority required
Minority Status 7 Minority status Drop down box-Select Yes or
No Please select Minority status
8 Document Number
Text field- Enter the document number
Minority Document number required
9 Minority type Drop Down – Select from the list
Please select Minority type
10 Document date Text field – enter the date (DD/Mm/YYYY)
Please enter valid date
11 CET/NON-CET Check box- Select the CET/NON CET
If CET is selected, system displays the CET details. User to select check box of the required CET and enter the college code provided by convener
Please select admission of student type.
15
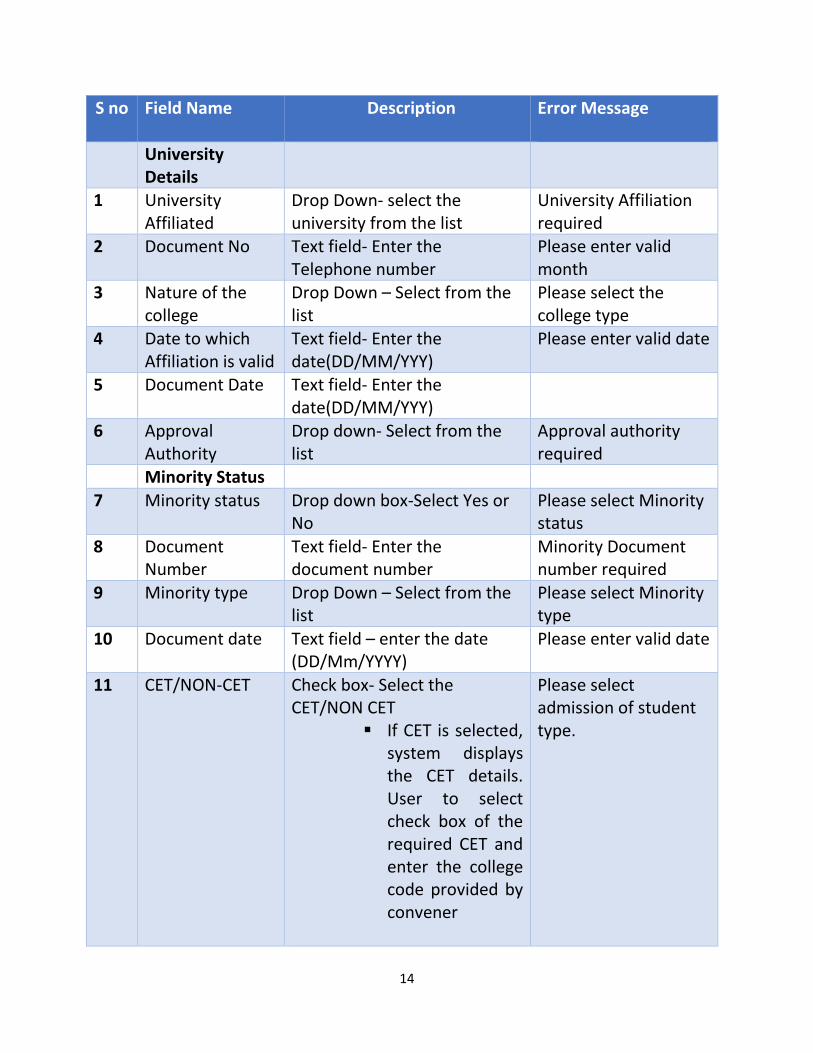
5.3. College Course details (2017-18): • The course details inserted in University login falls in this section. • User to enter the intake strength of each course. • If the course is not available in the college, delete the course with delete
option. • Select course type as regular /self-financed • Select the course medium of instruction.
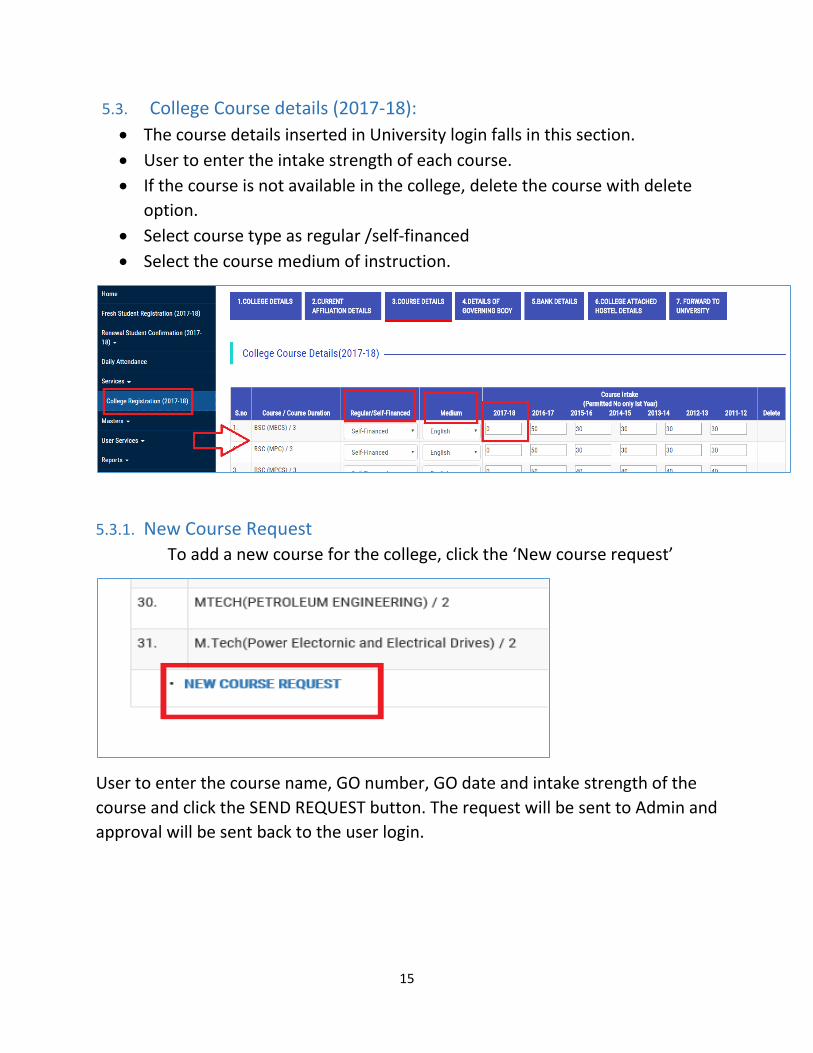
5.3.1. New Course Request To add a new course for the college, click the ‘New course request’
User to enter the course name, GO number, GO date and intake strength of the course and click the SEND REQUEST button. The request will be sent to Admin and approval will be sent back to the user login.

16
S no
Field Name Description Error Message
1 Select Course Drop down- Select the course name from the list
Please select course
2 GO NO Text field-Enter the GO number GO No Required 3 GO Date Text field- Enter the GO date Please enter valid date 4 2017-18
course intake strength
Text field- Enter the intake number
5 Regular/Self-financed
Select regular/self-financed Select the type
6 Medium Select medium of instruction Medium required 7 Send request Button
5.4. Confirm Details of governing body • In this section, user to enter the details of governing body. • Please update once the all the data is entered.

17
S no Field Name Description Error Message 1 Name of the
Trust/Society Text box- Enter the name Name of the
trust/Society required 2 Registration
Number Text Box- enter the Registration number
Registration number required
3 Registration Date Text box- enter the Registration date
Please enter valid date
4 Name of the chairman
Text box- Enter the name of chairman
Name of the chairman required
5 Mobile number of chairman
Text box- Enter the mobile number of chairman
Chairman mobile required
6 Road no/Street No/Door No
Text box – Enter the Road No/Street No
Address required
7 District Drop down box- Select the district from the list
Please select district
8 Mandal /Municipality
Drop Down- Select the mandal from the list
Please select mandal
9 Village / ward Drop down- Select the village from the list
Please select village
10 Landmark Text box- enter the landmark 11 Pin code Text box- enter the pin code Pin code required 12 Telephone of the
office Text Box- Enter the telephone number of the office
Office Telephone required

18
5.5. Bank Details: • In this section, system to display the bank details of the college.
5.6. College attached Hostel details: This section allows user to enter the hostel details if selected YES.
If selected YES, then enter the hostel details as mentioned below.

19
S no Field Name Description Error Message Hostel Details
1 Hostel Name Text box- Enter the Hostel name
Hostel Name required
2 Hostel Permission date
Text Box- enter the date(DD/MM/YYYY)
Please enter valid date
3 Permission document Proceeding No
Text box- enter the document Number
Permission document No required
4 Proceeding date Text box- Enter the Date (DD/MM/YYYY)
Proceeding date Required
Address Details 5 Whether hostel
located in college campus?
Drop down- Select from the list (Yes/No)
Whether hostel located in college campus?
6 Road no/Street No/Door No
Text box – Enter the Road No/Street No
Road/Street No required
7 District Drop down box- Select the district from the list
Please select District
8 Mandal /Municipality
Drop Down- Select the mandal from the list
Please select mandal
20
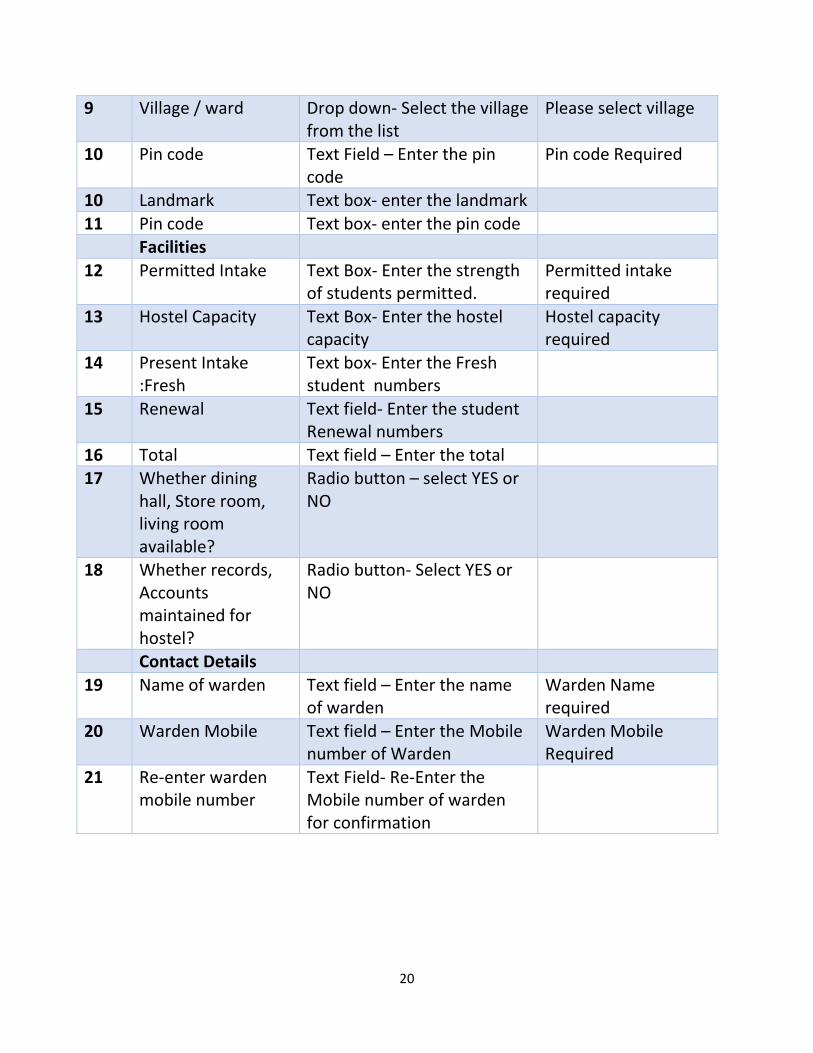
9 Village / ward Drop down- Select the village from the list
Please select village
10 Pin code Text Field – Enter the pin code
Pin code Required
10 Landmark Text box- enter the landmark 11 Pin code Text box- enter the pin code Facilities 12 Permitted Intake Text Box- Enter the strength
of students permitted. Permitted intake required
13 Hostel Capacity Text Box- Enter the hostel capacity
Hostel capacity required
14 Present Intake :Fresh
Text box- Enter the Fresh student numbers
15 Renewal Text field- Enter the student Renewal numbers
16 Total Text field – Enter the total 17 Whether dining
hall, Store room, living room available?
Radio button – select YES or NO
18 Whether records, Accounts maintained for hostel?
Radio button- Select YES or NO
Contact Details 19 Name of warden Text field – Enter the name
of warden Warden Name required
20 Warden Mobile Text field – Enter the Mobile number of Warden
Warden Mobile Required
21 Re-enter warden mobile number
Text Field- Re-Enter the Mobile number of warden for confirmation

21
5.7. Forward to university All the details furnished in the following screens are displayed in this screen
• College details screen • Current affiliation details screen • Course details screen • Details of governing body screen • Bank details screen • College attached hostel details screen
Steps to forward with digital sign Key:
• Plug in DSK to the computer( Desktop/laptop) • Click on forward with digital signed copy.
• A message/warning box asking to run the application will display when user clicks on “forward with digital signed copy”.

22
• When user clicks” Run”, navigates to screen asking password of the DSK. • Enter password & click OK.

23
• When user clicks “OK”, the documents are digitally signed and to display a message box with message “ Documents are digitally signed”
• To view the digitally signed documents, click on “Digital Signed Copy”.
24
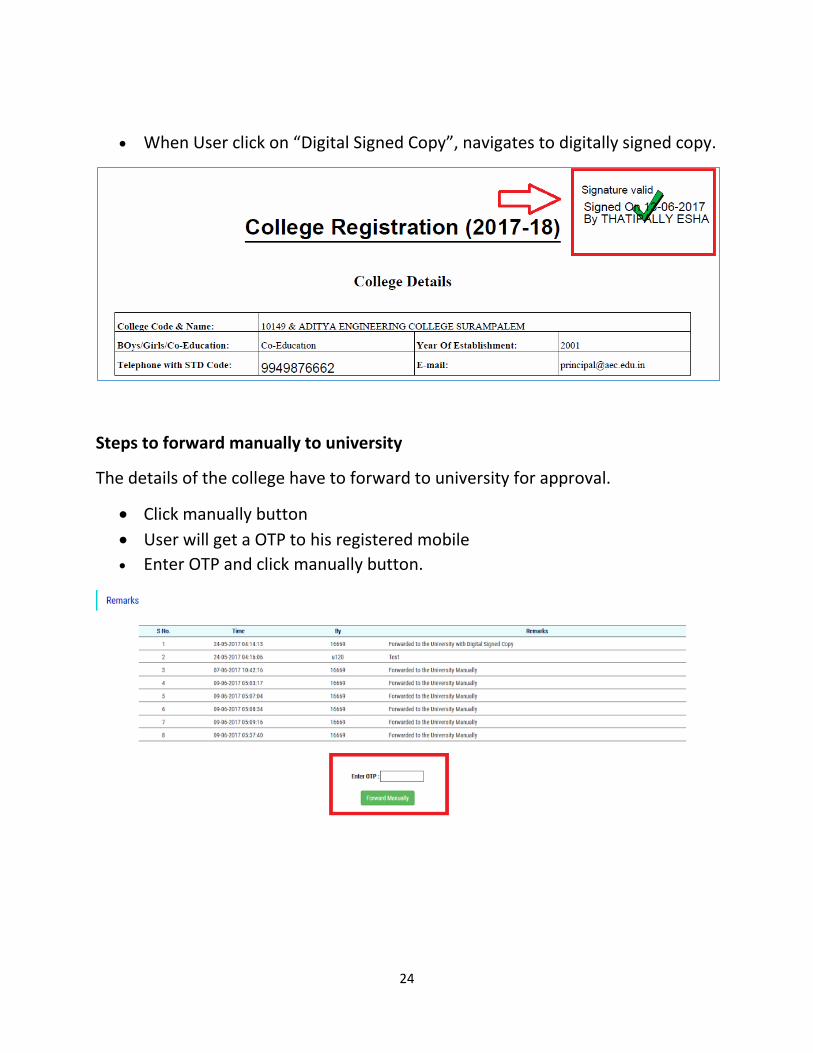
• When User click on “Digital Signed Copy”, navigates to digitally signed copy.
Steps to forward manually to university
The details of the college have to forward to university for approval.
• Click manually button • User will get a OTP to his registered mobile • Enter OTP and click manually button.

25
6. Sections 6.1. Section Creation
This section allows user to create student section.
To create a section:
• Click on section creation • Select the course details from the drop down list. • Enter the section of the year with department and click submit.
26
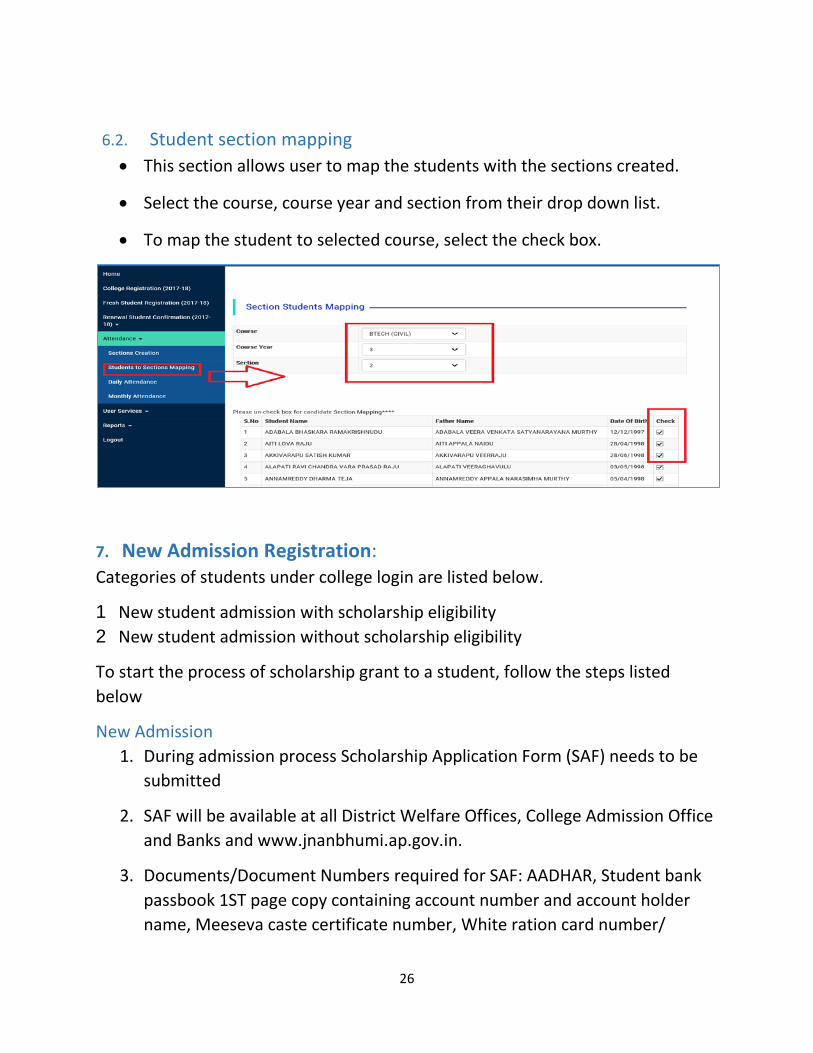
6.2. Student section mapping • This section allows user to map the students with the sections created.
• Select the course, course year and section from their drop down list.
• To map the student to selected course, select the check box.
7. New Admission Registration: Categories of students under college login are listed below.
1 New student admission with scholarship eligibility 2 New student admission without scholarship eligibility
To start the process of scholarship grant to a student, follow the steps listed below
New Admission 1. During admission process Scholarship Application Form (SAF) needs to be
submitted
2. SAF will be available at all District Welfare Offices, College Admission Office and Banks and www.jnanbhumi.ap.gov.in.
3. Documents/Document Numbers required for SAF: AADHAR, Student bank passbook 1ST page copy containing account number and account holder name, Meeseva caste certificate number, White ration card number/

27
income certificate number, Mobile number, Email id (as entered on scholarship application form)
4. Student Copy of SAF needs to be retained by the student.
7.1. Student Registration • To register a fresh student in the system, click on ‘Fresh Student
Registration’. • Select the SSC type of the student using radio buttons. • Enter the SSC hall ticket number, SSC pass year of the student and click
‘Proceed’ to next page. • New page displays ‘Student Personal details’, ‘Admission details’ and
‘Scholarship details’ • Student will get an OTP to his registered mobile number upon admission.
Important Note:
It is advised that student should not change registered mobile number throughout the process.
7.2. Student Personal Details: The student SSC details and AADHAR details appear for view only. They
cannot be edited. AADHAR Number field is mandatory field. Enter the AADHAR number of
the student Error Message when user forgot to select check box.
To check the SSC & AADHAR details are of same person, select YES or NO
• In this section, the basic personal details of the student to display and they can be editable.
• All the star marked fields’ details are mandatory.
When clicks on ‘save’, navigates to ‘Admission Details’ section. The inserted data falls into student login to get confirmation from the student. Once student confirms the inserted data, again falls into college login.

28
S no Field Name Description Error Message Personal Details
1 Mothers Name Text box- editable -auto populated
2 Gender Radio button- Select MALE/FEMALE/TRANSGENDER-Auto populated
3 Religion Drop Down- select religion from the list –Auto populated
4 Caste Drop Down – Select the caste from the list-Auto populated
Caste required
5 Sub caste Drop Down – select the sub caste from the list-Auto populated
Sub caste required
6 Parent/husband Occupation
Drop down – Select occupation from the list- Auto Populated
7 Mother tongue Drop down – Select from the list-Auto populated

29
Present Address Details
9 State Drop down – Select state from the list-Auto populated
Please select state
10 District Drop down box- Select the district from the list-Auto populated
Please select District
11 Mandal /Municipality Drop Down- Select the mandal from the list-Auto populated
Please select mandal
12 Village / ward Drop down- Select the village from the list-Auto populated
Please select village
13 Habitation Drop down – Select from the list.
Habitation Required
14 Street/Landmark Text box- enter the Street/landmark
15 Door Number Text Box- Enter/Edit the door number
Door No required
16 Pin code Text box- enter the pin code Other Details 17 Mobile Number Text Box- Enter/Edit the
student Mobile number. Mobile number required
18 Confirm Mobile Number
Text Box- Re- Enter/Edit the Mobile number
19 email Text box- Enter the email Email required 20 Confirm email Text box- Re-Enter/edit the
21 Parent/Guardian Mobile number
Text field – Enter the mobile number
Parent/guardian mobile required
22 Identification Marks 1 Text Field 23 Identification Marks 2 Text field

30
7.3. Admission Details • This section displays the admission details of student and special category
details. • If special category is applicable, then select the categories specified in the
page. • Select the type of the category from the drop down box and upload the
documents (certificates) related to the category. • If Physical Challenged, select YES and enter the details, upload the related
documents.

31
S no Field Name Description Error Message Admission Details
1 Course Details Drop down- Select Course from the list
Select the course
2 Year of Study Drop down- Select year from the list
Select year
3 Admission Category Drop Down- select admission category from the list
Select the admission category
4 Second language Drop Down – Select the language from the list
Second language required
5 Date of admission Text field – enter the date of admission of student
Please enter valid date
6 Admission category Drop down – Select admission category from the list
Select admission category

32
Special Category details If applicable
7 CAP category (Children of Armed Personnel)
Select the category Drop down – Select Priority from the list Upload the related document for the category
8 Sports Category Select the category Drop down – Select type from the list Upload the related document for the category
9 NCC category Select the category Drop down – Select type of certificate from the list Upload the related document for the category
10 NSS Category Select the category Upload the related documents
11 Extracurricular Activity
Select the category Upload the related documents
12 Physically Challenged
Select YES or No
13 Saderam Number Text box- enter the saderam number
• System asks for eligibility of student for scholarship with a dialogue box asking to select YES or NO.
• If selected YES, student is eligible for scholarship. • Click on save, system navigates to next page of SCHOLARSHIP DETAILS
of student.

33
7.4. Scholarship Details: • This section allows user to enter/upload the caste certificate, income
certificate and bank account details. • Verification (hard copy verification) of the caste, income, and bank
details to be done by user. • To complete the entry of the scholarship details, click save.
S no Field Name Description Error Message 1 Scholarship Details Drop down- Select type from
the list
2 Caste certification details
Text box- enter the mee seva caste certificate number.
3 Income certificate details
Drop Down- select document from the list Text box- enter mee seva income certificate number.
Bank details 5 Bank IFSC code Text field – enter the bank
IFSC code. Bank IFSC code required
6 Bank account Number
Text box- Enter the bank account number
Bank Account details required
7 Confirm bank account number
Text field – Re-enter the bank account number.

34
8. Renewal/Promoted to second year & above with scholarship The categories of students under this section are
• Promoted to second year & above with scholarship eligibility • Promoted to second year & above without scholarship eligibility.
For a 2nd year or above student availing scholarship, college should confirm the student details popped up on the screen.
• Before biometric authentication student can modify details such as email id, mobile number and bank account number
• Students 2nd year and above not availing scholarship shall also follow the fresh admission
To process the scholarship of the students under this category, follow the steps listed below.
8.1. Renewal student confirmation 1. Click on Renewal student confirmation & select the course. 2. Select the student using checkbox and enter the following details
a) Section of the student b) Admission date c) Previous exam hall ticket number
3. By clicking submit, system generates username/login id of students and inserted data falls into student login to get confirmation from the student. Once student confirms the data, again falls into college login.

35
8.2. Attendance 8.2.1. Section Creation This section allows user to create student section.
To create a section:
• Click on section creation • Select the course details from the drop down list. • Enter the section of the year with department and click submit.

36
8.3. Student section mapping • This section allows user to map the students with the sections created.
• Select the course, course year and section from their drop down list.
• To map the student to selected course, select the check box.
8.4. Daily attendance. Steps to insert daily attendance of the students
• Principal to assign daily attendance service to a person (maker).

37
1. Click om Maker services 2. Select the person from the list 3. Press ASSIGN button to assign the Attendance Submission service to the
selected person
8.4.1. Student Roll Number entry • Maker (person assigned for the Attendance Submission service) has to
enter the student Roll No in the form.
--- Indicates No Admissions in the course.
--- Indicates Roll Numbers are mapped.
--- Indicates Roll Numbers are not mapped.
---- indicates Roll numbers are partially mapped.( Some sections left with students roll numbers not mapped )
• Select the course in which the student roll numbers are to be mapped

38
• Enter the student roll number and click “Confirm” to map the roll number to student.

39
8.4.2. Daily Attendance entry. • Go to services, select the Daily attendance entry.
1. Select SUBMITT ABSENTEES LIST. 2. Click on selected course and enter the absentees roll number (Absent
Student roll number). 3. Click “Submit Absentees list “to insert the absent student list.
8.5. Monthly attendance • To insert the monthly attendance of the students, click on the Student monthly
attendance entry.

40
1. Select the course & year, the students in the selected course & year will display in the table as shown.
2. Enter the no of working days of the student 3. Click submit to insert the monthly attendance of the student.
Submission of student monthly attendance is completed with message displayed in the next screen as shown in the picture.
9. AADHAR Authentication of students Student has to give biometric authentication at college level to confirm bank details.

41
This is the final step in the grant process of scholarship to students. College management has to authenticate the AADHAR details of the student.
1. Go to services and select the AADHAR Authentication for students. 2. Course wise students list will display and user have to authenticate all the
students in the course.
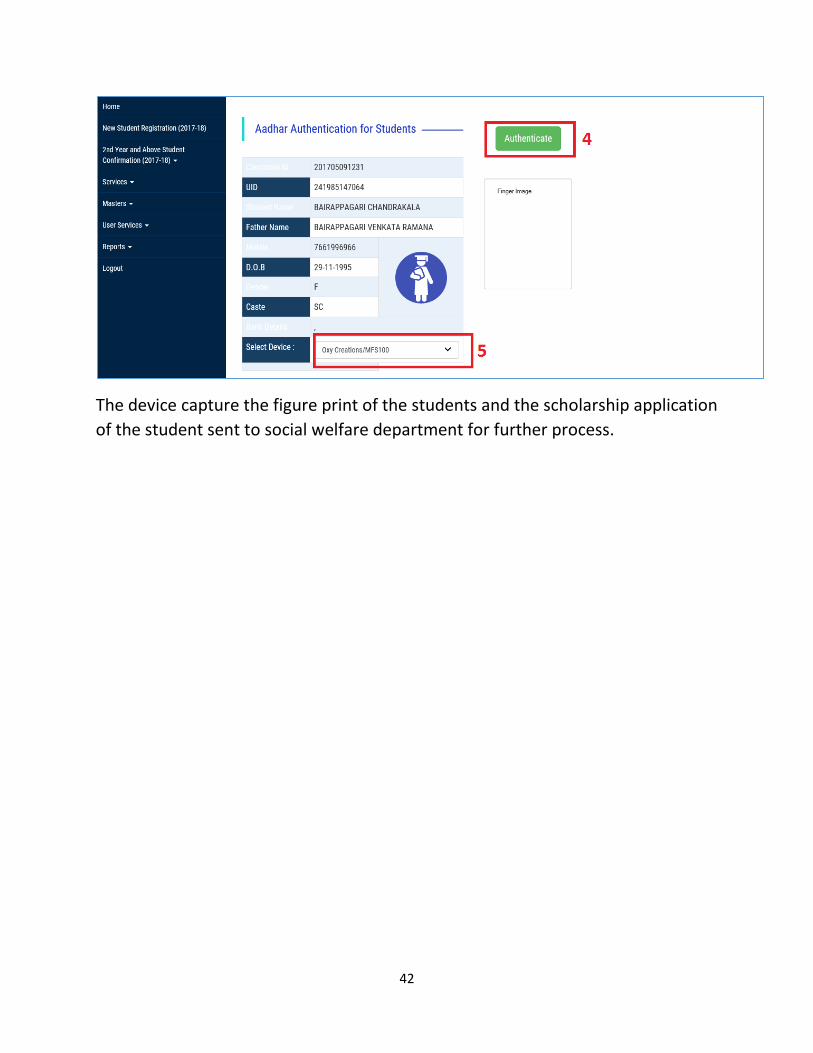
3. To authenticate the Student AADHAR details , click on “Authenticate Now” 4. Student UID details will display in the next screen and Click on the
“Authenticate” button. 5. Select the Authentication device from the list.
42
The device capture the figure print of the students and the scholarship application of the student sent to social welfare department for further process.