Embed Size (px)
Citation preview

Page 1 of 108
User Manual
1. Login by DDO
All the DDOs in Haryana State have been given User IDs in Budget Allocation and
Monitoring System. The DDOs have to use the same User ID and Password in eSalary
Software also. First of all a DDO has to double click on the icon given on the desktop
of his computer, to open Internet Explorer. In the address bar he has to write the
www.hrtreasuries.gov.in, the official website of Treasuries and Accounts Department
will appear. On this page look for the link given for eSalary software. By clicking on
this link DDO will be redirected to the website of eSalary. On the eSalary website
DDO will see the Login page like this -->
DDO has to give his Budget Allocation and Monitoring System’s User ID here in front
of ‘Enter User Name’ and the same Password, which he has been using in BAMS in
front of ‘Enter Password’. After this he has to select the financial year in which he
wants to work. And at last he has to enter the five digit random number given in a
green box, in the box given in front of ‘Enter Code’. He has to click on ‘Login’ button
to log into his account after he has done the above steps.
In the bottom of the page a line is given “Esalary can also be accessed through web
site http://esalaryhry.nic.in “. You may also go this site from this link.
2. Edit User Profile
On first time when he will login the screen ‘Edit User Profile’ will appear.
Page 2 of 108
On this page he will see his Profile, which has been created in BAMS. He can
Enter/Update his Profile information, like he can give his current designation or he
can change the name and designation and other information as well, if the
information displayed here relates to the person who was having the charge of DDO
before him. He can give his email Id and Mobile number also. DDO registration No.
and his DTO registration No. are being displayed, these are not required to be
entered. DDO TAN No. as allotted by Income Tax Deptt. to a DDO is also required to
be entered.
On entering the TAN No. a confirmation dialogue box will appear, in which TAN No.
Page 3 of 108
and Name, TAN Name and address will be shown, DDO has to confirm that all the
information shown in this box is correct and related to him, for this he has to click on
the ‘Confirm’. If the information displayed does not relate to him, he has to click on
‘Cancel’ button. By this the wrong TAN No. entered will be cleared and the DDO has
to re-enter the TAN No.
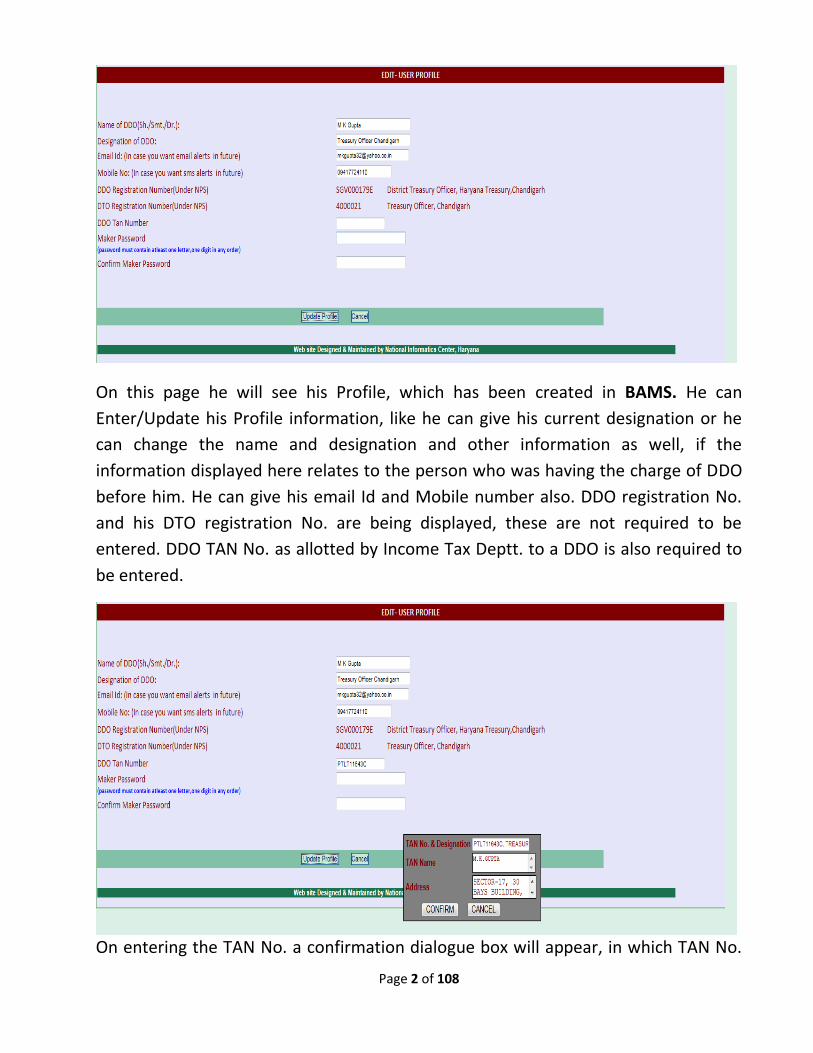
3. Creation of Maker Password
At last he has to enter Maker’s Password. Maker is the person who will make all the
entries in the software on behalf of DDO and DDO is Checker. Maker can log into the
software with the same User Id which is used by DDO to log into the software. Like
here the DDO’s User ID is “ddotaa2”. So the User ID for Maker also will be “ddotaa2”.
The difference will only be of the Passwords. The DDO will login by his User ID and
password allotted to him in BAMS whereas the Maker will login by DDO’s User ID
and Maker Password, which is to be created by DDO in his ‘Edit User Profile’ on his
first log into the software. At the end of the editing of User Profile DDO will give
Maker Password and will re-enter the same password to confirm it. At last he will
click on ‘Update Profile’ button.
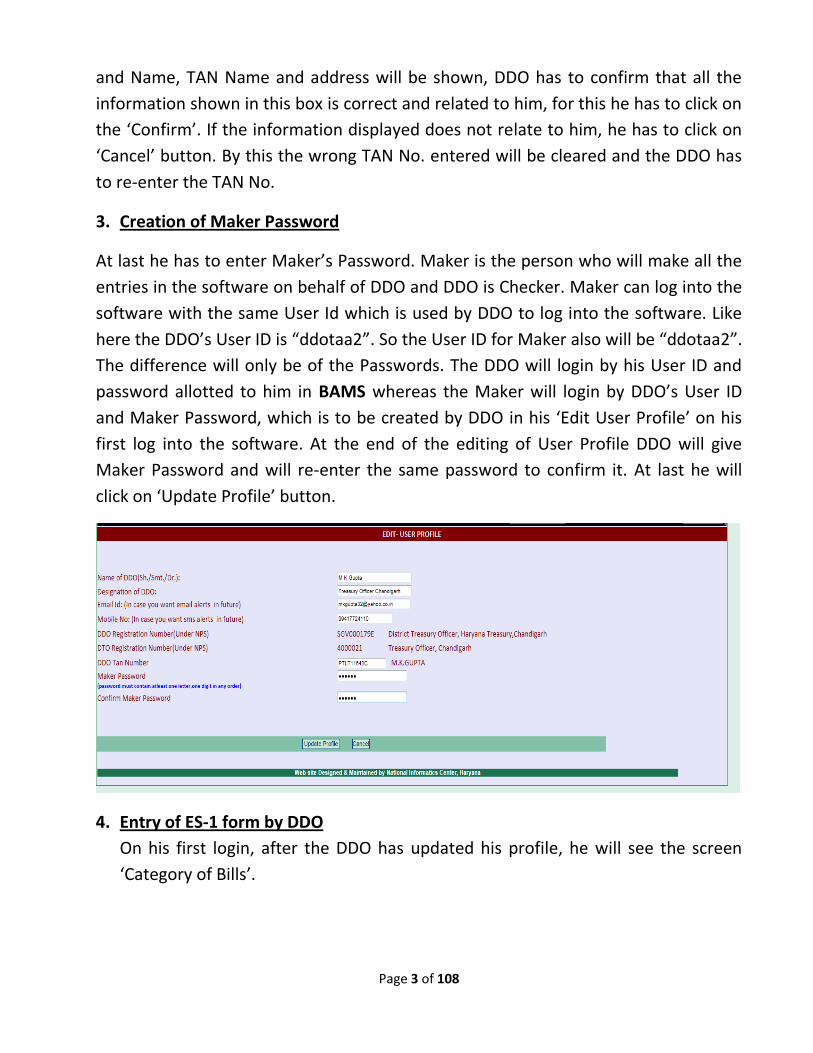
4. Entry of ES-1 form by DDO
On his first login, after the DDO has updated his profile, he will see the screen
‘Category of Bills’.
Page 4 of 108
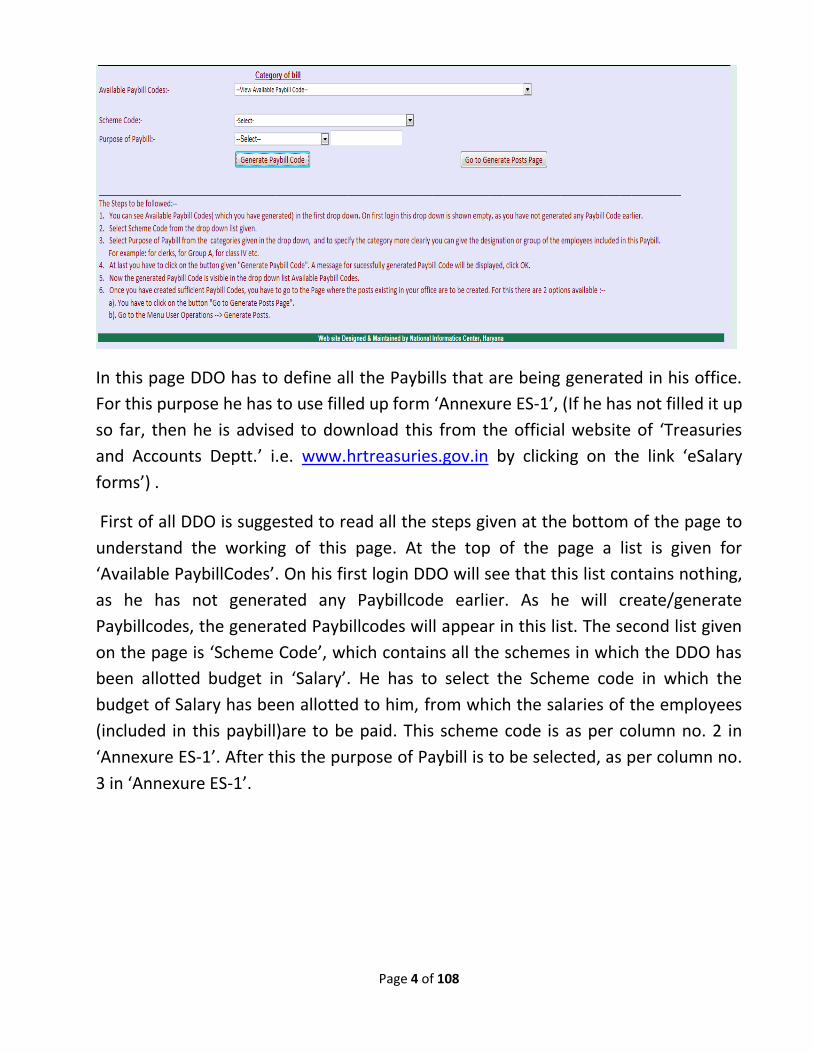
In this page DDO has to define all the Paybills that are being generated in his office.
For this purpose he has to use filled up form ‘Annexure ES-1’, (If he has not filled it up
so far, then he is advised to download this from the official website of ‘Treasuries
and Accounts Deptt.’ i.e. www.hrtreasuries.gov.in by clicking on the link ‘eSalary
forms’) .
First of all DDO is suggested to read all the steps given at the bottom of the page to
understand the working of this page. At the top of the page a list is given for
‘Available PaybillCodes’. On his first login DDO will see that this list contains nothing,
as he has not generated any Paybillcode earlier. As he will create/generate
Paybillcodes, the generated Paybillcodes will appear in this list. The second list given
on the page is ‘Scheme Code’, which contains all the schemes in which the DDO has
been allotted budget in ‘Salary’. He has to select the Scheme code in which the
budget of Salary has been allotted to him, from which the salaries of the employees
(included in this paybill)are to be paid. This scheme code is as per column no. 2 in
‘Annexure ES-1’. After this the purpose of Paybill is to be selected, as per column no.
3 in ‘Annexure ES-1’.
Page 5 of 108
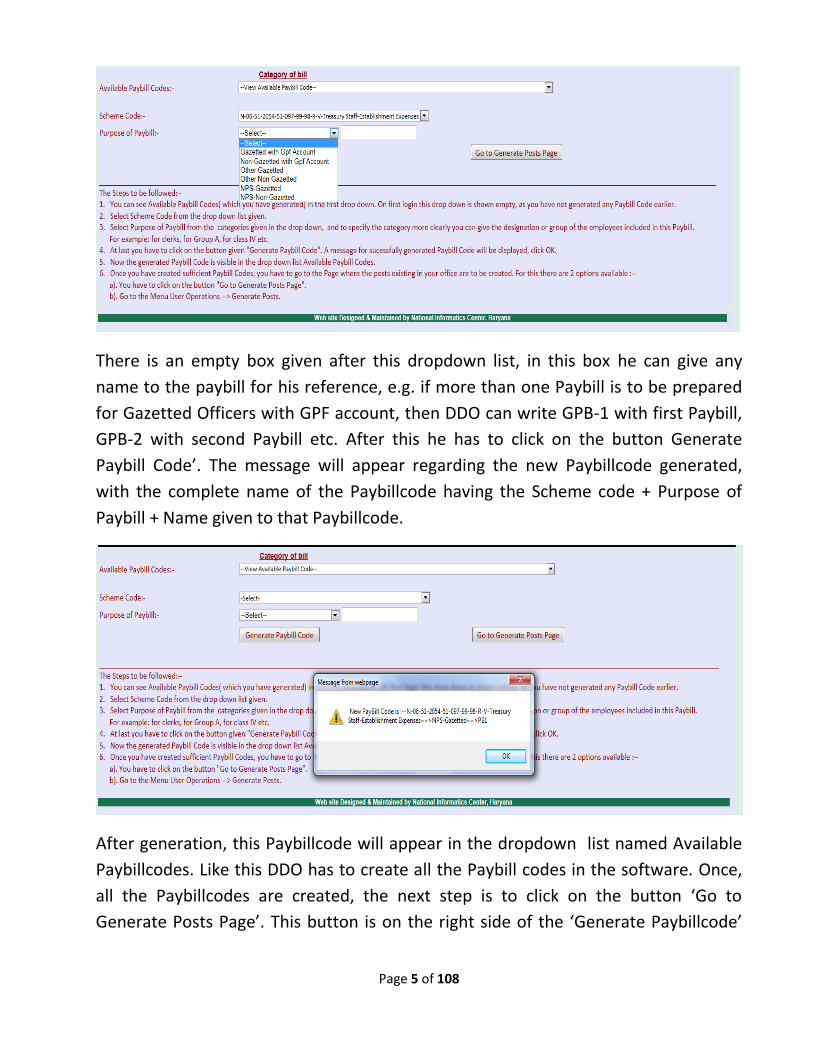
There is an empty box given after this dropdown list, in this box he can give any
name to the paybill for his reference, e.g. if more than one Paybill is to be prepared
for Gazetted Officers with GPF account, then DDO can write GPB-1 with first Paybill,
GPB-2 with second Paybill etc. After this he has to click on the button Generate
Paybill Code’. The message will appear regarding the new Paybillcode generated,
with the complete name of the Paybillcode having the Scheme code + Purpose of
Paybill + Name given to that Paybillcode.
After generation, this Paybillcode will appear in the dropdown list named Available
Paybillcodes. Like this DDO has to create all the Paybill codes in the software. Once,
all the Paybillcodes are created, the next step is to click on the button ‘Go to
Generate Posts Page’. This button is on the right side of the ‘Generate Paybillcode’
Page 6 of 108
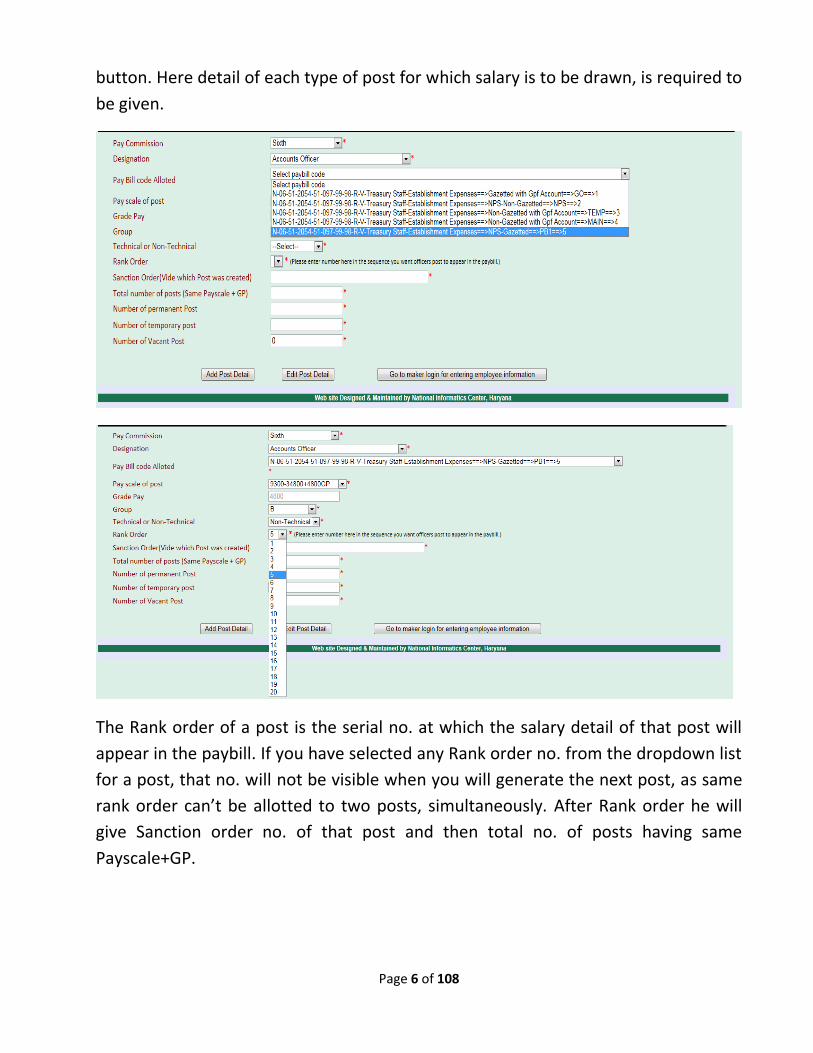
button. Here detail of each type of post for which salary is to be drawn, is required to
be given.
The Rank order of a post is the serial no. at which the salary detail of that post will
appear in the paybill. If you have selected any Rank order no. from the dropdown list
for a post, that no. will not be visible when you will generate the next post, as same
rank order can’t be allotted to two posts, simultaneously. After Rank order he will
give Sanction order no. of that post and then total no. of posts having same
Payscale+GP.
Page 7 of 108
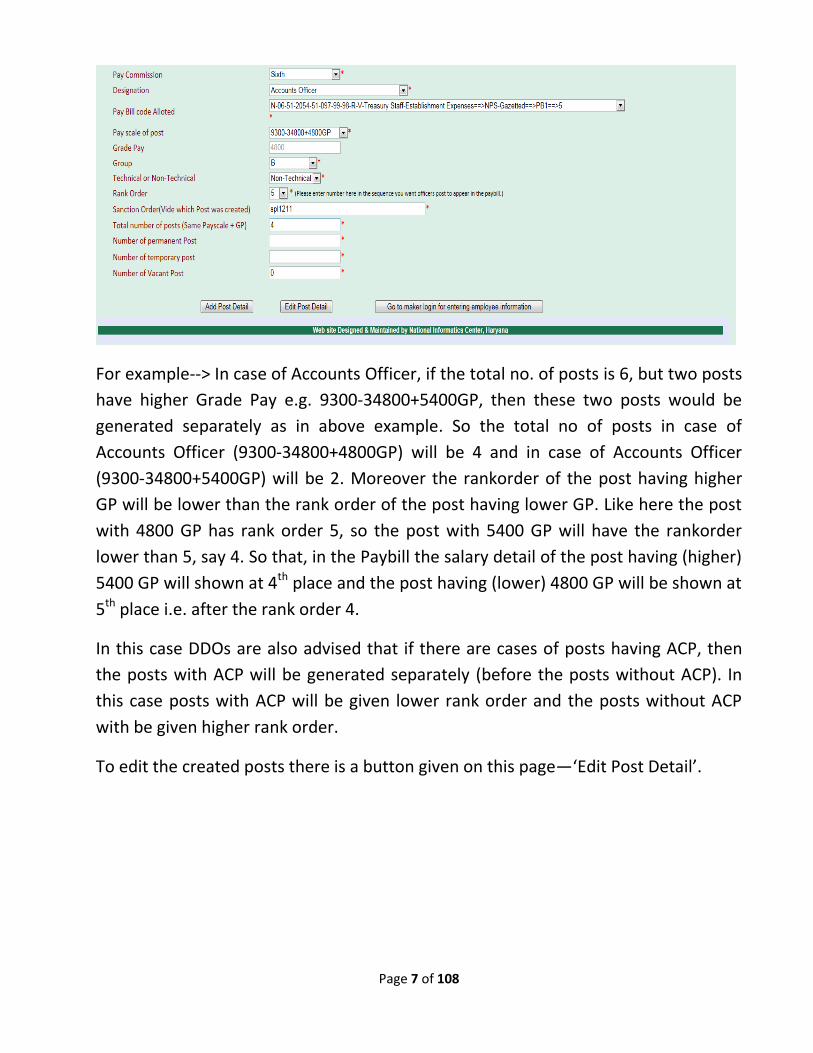
For example--> In case of Accounts Officer, if the total no. of posts is 6, but two posts
have higher Grade Pay e.g. 9300-34800+5400GP, then these two posts would be
generated separately as in above example. So the total no of posts in case of
Accounts Officer (9300-34800+4800GP) will be 4 and in case of Accounts Officer
(9300-34800+5400GP) will be 2. Moreover the rankorder of the post having higher
GP will be lower than the rank order of the post having lower GP. Like here the post
with 4800 GP has rank order 5, so the post with 5400 GP will have the rankorder
lower than 5, say 4. So that, in the Paybill the salary detail of the post having (higher)
5400 GP will shown at 4th place and the post having (lower) 4800 GP will be shown at
5th place i.e. after the rank order 4.
In this case DDOs are also advised that if there are cases of posts having ACP, then
the posts with ACP will be generated separately (before the posts without ACP). In
this case posts with ACP will be given lower rank order and the posts without ACP
with be given higher rank order.
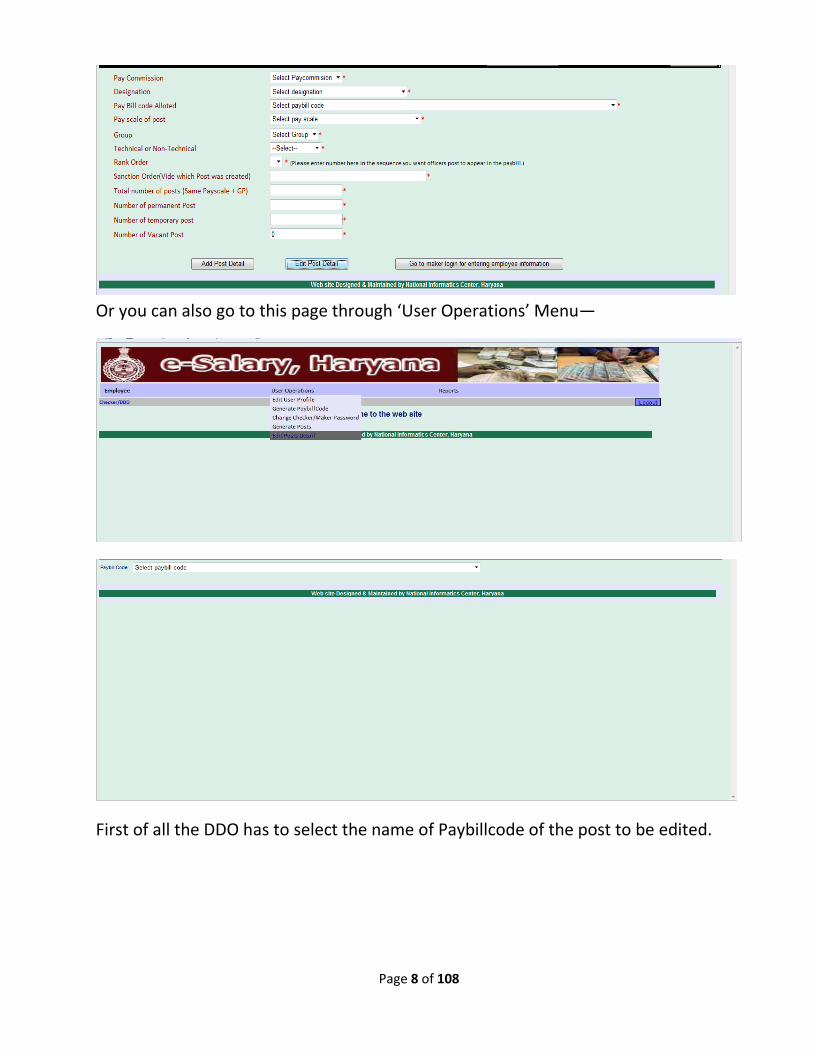
To edit the created posts there is a button given on this page—‘Edit Post Detail’.
Page 8 of 108
Or you can also go to this page through ‘User Operations’ Menu—
First of all the DDO has to select the name of Paybillcode of the post to be edited.
Page 9 of 108
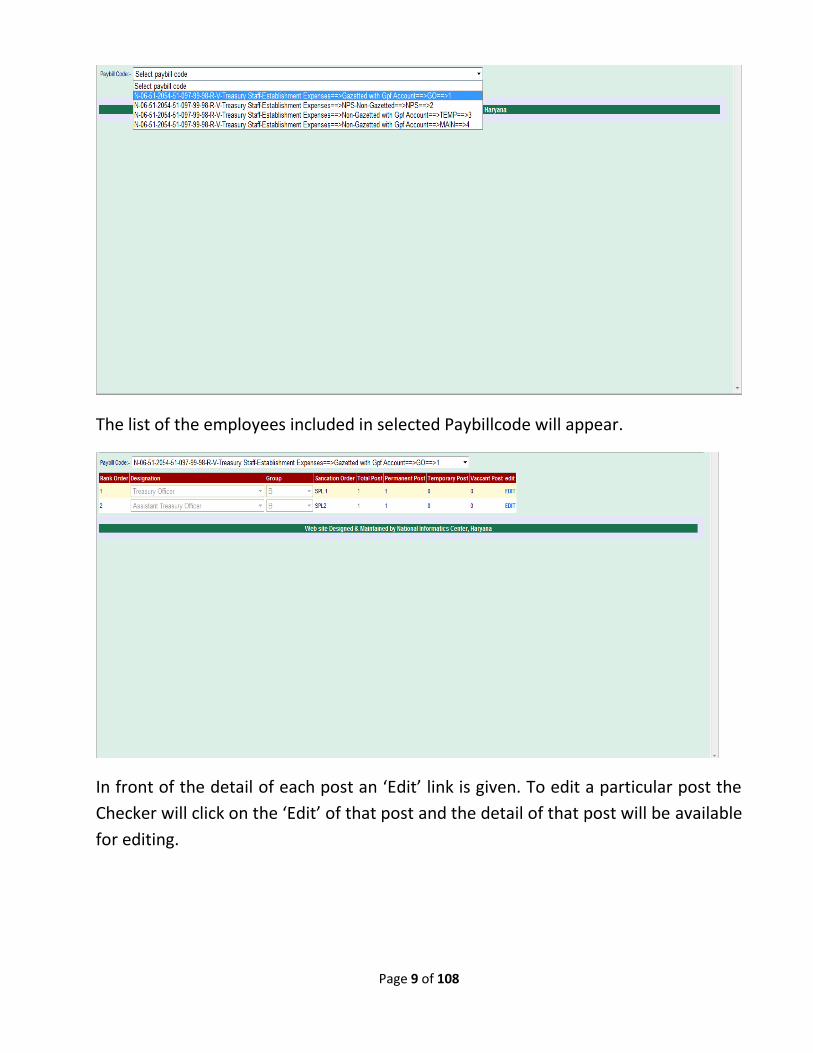
The list of the employees included in selected Paybillcode will appear.
In front of the detail of each post an ‘Edit’ link is given. To edit a particular post the
Checker will click on the ‘Edit’ of that post and the detail of that post will be available
for editing.
Page 10 of 108
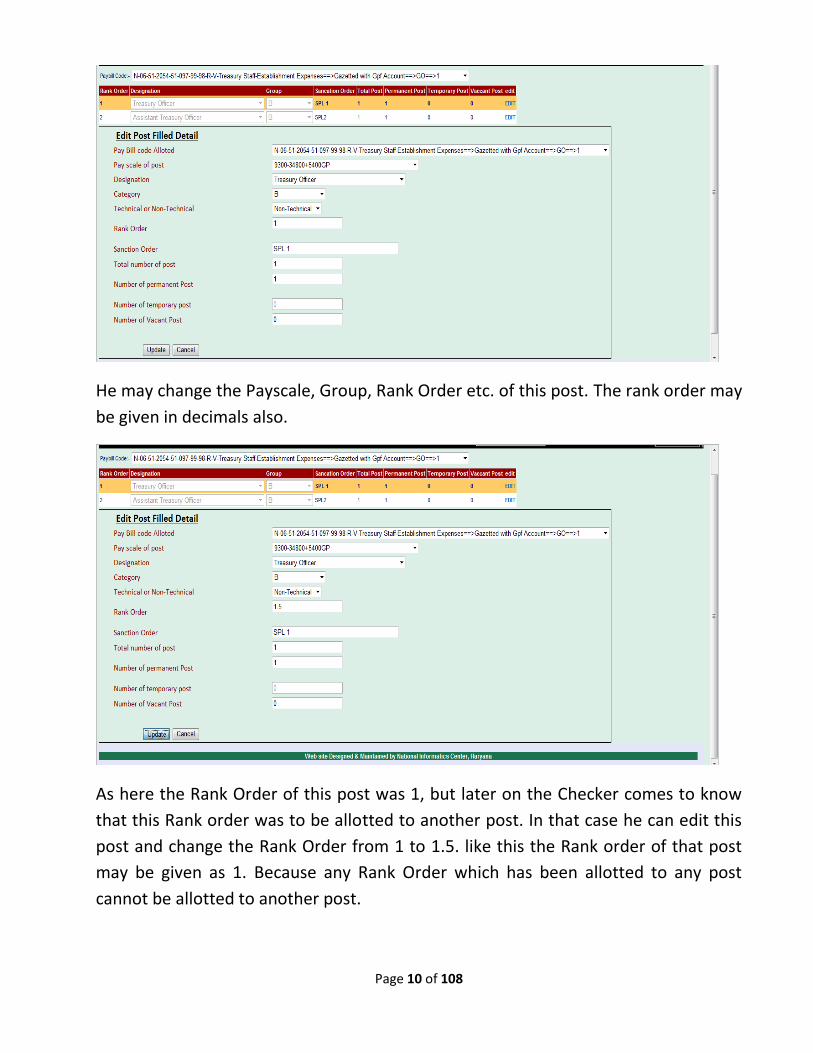
He may change the Payscale, Group, Rank Order etc. of this post. The rank order may
be given in decimals also.
As here the Rank Order of this post was 1, but later on the Checker comes to know
that this Rank order was to be allotted to another post. In that case he can edit this
post and change the Rank Order from 1 to 1.5. like this the Rank order of that post
may be given as 1. Because any Rank Order which has been allotted to any post
cannot be allotted to another post.
Page 11 of 108
Like this DDO will generate all the posts given in all the Paybillcodes as per the
entries made by him in ‘Annexure ES-1’.
After completing this job DDO has to click on the ‘LOGOUT’ button given in the top
right side of the page.
5. Handing over of Annexure ES-2 and Annexure ES-3 to the Maker
In ‘Annexure ES-2’ the verifying official, who will be dealing clerk/official, will verify
the details, from the office records and make corrections with a red pen, wherever
required. Any unfilled information will also be filled up by checking from office
records or by asking from the employees. This ‘Annexure ES-2’ will then be signed by
the dealing clerk/official as well as by the DDO.
In ‘Annexure ES-3’, which has been filled by ‘Verifying Official’, the employee will
verify that the information given in the ‘Annexure ES-3’ is correct, and will make
corrections with red ink, wherever required.
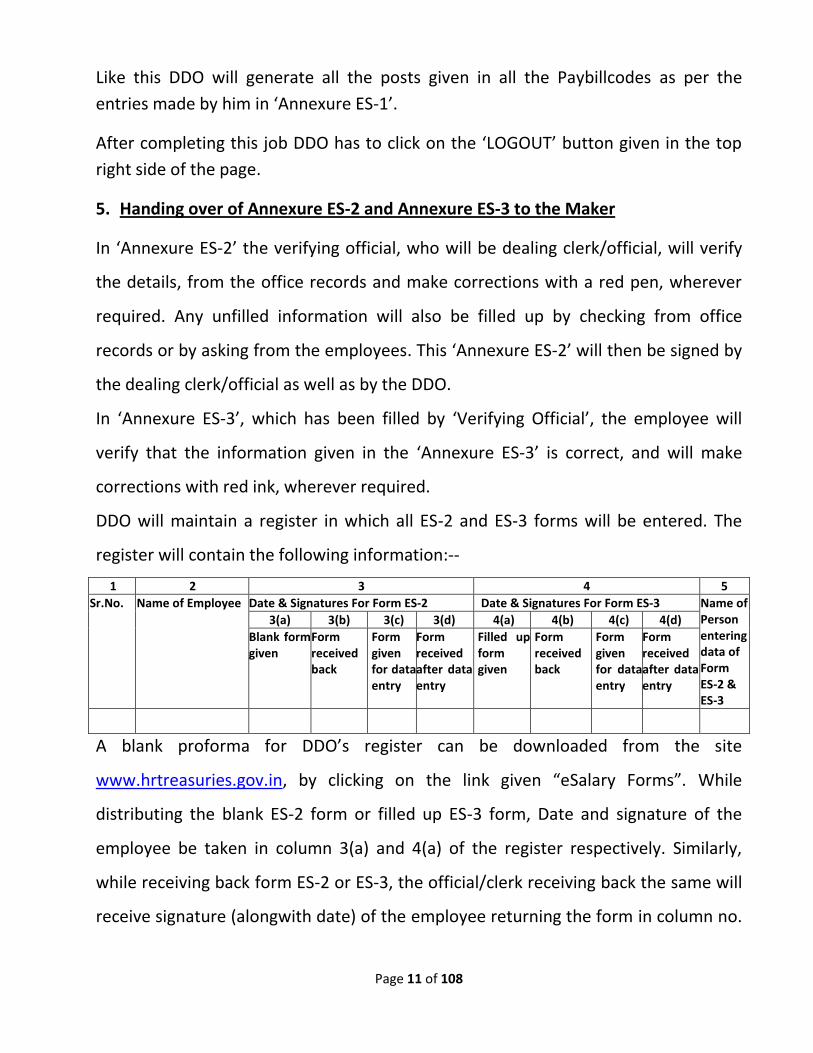
DDO will maintain a register in which all ES-2 and ES-3 forms will be entered. The
register will contain the following information:--
1 2 3 4 5
Sr.No. Name of Employee Date & Signatures For Form ES-2 Date & Signatures For Form ES-3 Name of Person entering data of Form ES-2 & ES-3
3(a) 3(b) 3(c) 3(d) 4(a) 4(b) 4(c) 4(d)
Blank form given
Form received back
Form given for data entry
Form received after data entry
Filled up form given
Form received back
Form given for data entry
Form received after data entry
A blank proforma for DDO’s register can be downloaded from the site
www.hrtreasuries.gov.in, by clicking on the link given “eSalary Forms”. While
distributing the blank ES-2 form or filled up ES-3 form, Date and signature of the
employee be taken in column 3(a) and 4(a) of the register respectively. Similarly,
while receiving back form ES-2 or ES-3, the official/clerk receiving back the same will
receive signature (alongwith date) of the employee returning the form in column no.
Page 12 of 108
3(b) and 4(b) respectively. It should be ensured that Sr.No. is also mentioned on the
forms ES-2 and ES-3, before they are distributed.
For purpose of entering data, DDO will hand over these forms to the
concerned person (Maker) and take his signature & date in column 3(c) and 4(c).
Name of person will be mentioned in column no. 5. Maker password and User ID will
be provided to him by DDO.
Once the data is entered, the above said person will hand over the form ES-2
and ES-3 alongwith a copy of the print out taken from the eSalary system for
verification and put his signature & date in column 3(d) and 4(d) of the register.
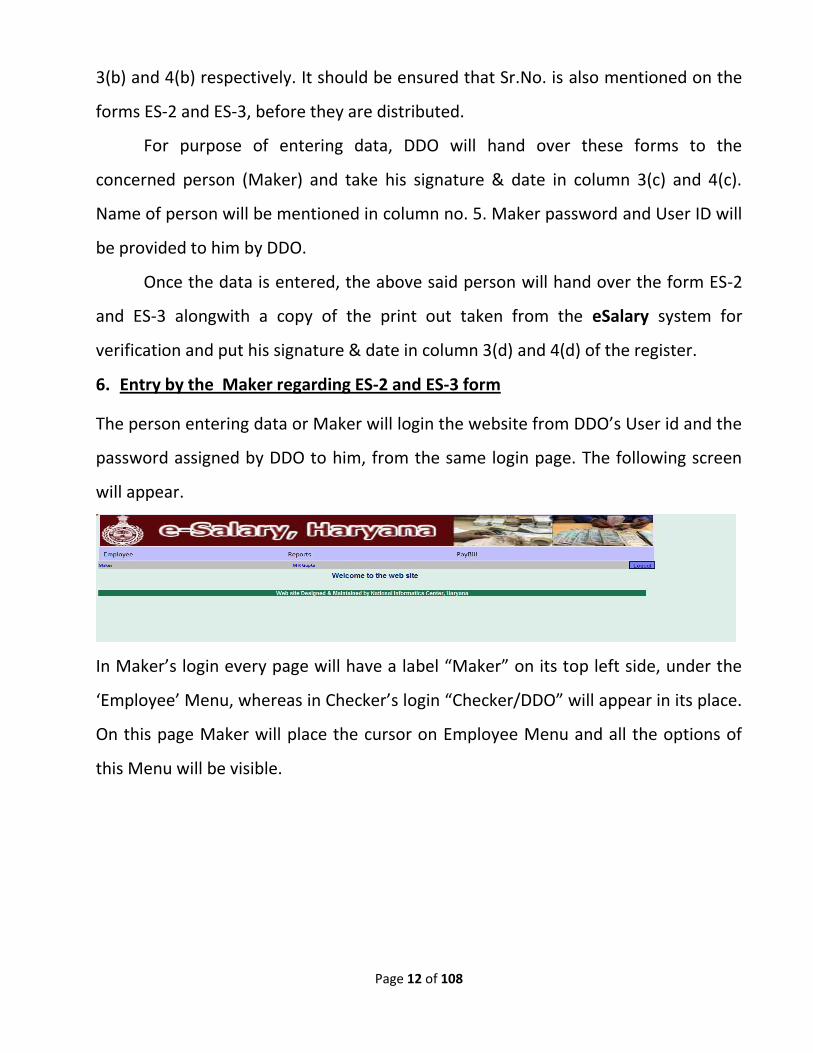
6. Entry by the Maker regarding ES-2 and ES-3 form
The person entering data or Maker will login the website from DDO’s User id and the
password assigned by DDO to him, from the same login page. The following screen
will appear.
In Maker’s login every page will have a label “Maker” on its top left side, under the
‘Employee’ Menu, whereas in Checker’s login “Checker/DDO” will appear in its place.
On this page Maker will place the cursor on Employee Menu and all the options of
this Menu will be visible.

Page 13 of 108
The first option in this Menu is ‘Allotment of Unique Code for Payee(UCP for EPS)’.
This option of allotment of UCP is to be used only for those cases where UCP has not
already been allotted for EPS by the Treasury. It is also possible that due to some
technical reasons this facility is not enabled for the time being. In such cases, DDO
should approach Treasury for allotment of UCP. Further, in case the employee is not
having any PAN, then only Treasury Office can allot the UCP and so the DDO should
contact Treasury Office for the same. In case the facility is enabled then by clicking
on this option user will see this screen:--
In this page user has to fill all the information of a payee, which is required for UCP
generation like Name, Payee Type--- Employee, Others, Third Party.
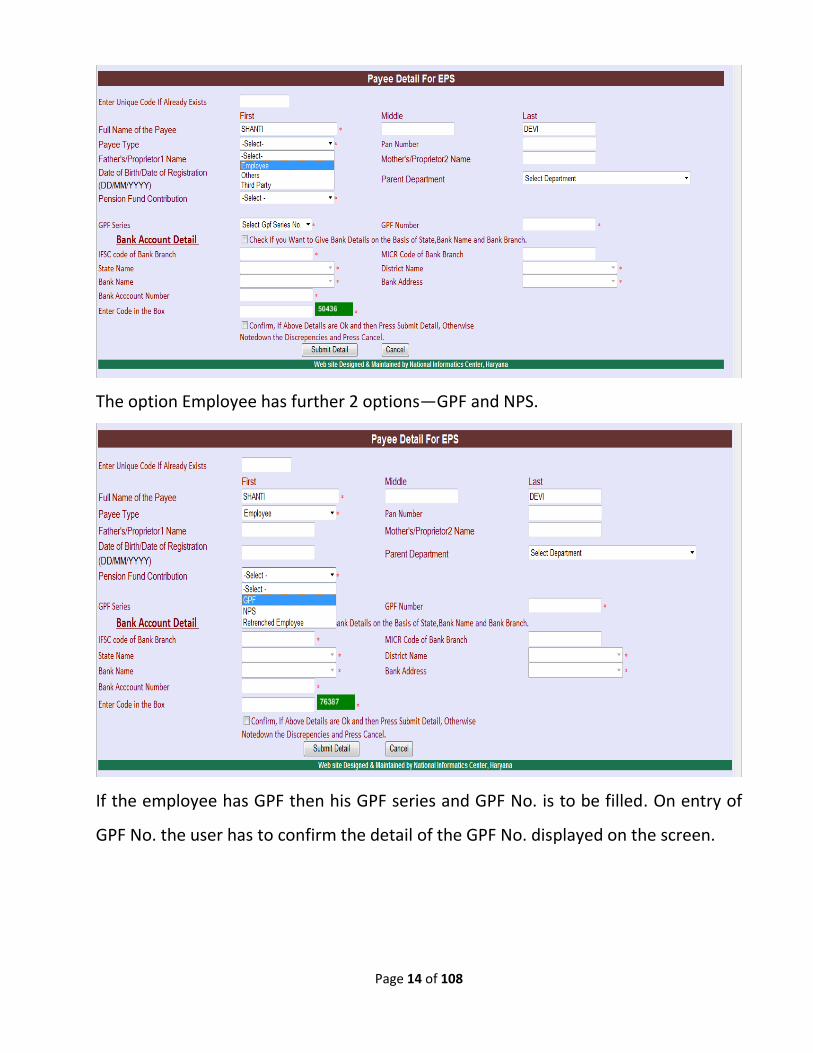
Page 14 of 108
The option Employee has further 2 options—GPF and NPS.
If the employee has GPF then his GPF series and GPF No. is to be filled. On entry of
GPF No. the user has to confirm the detail of the GPF No. displayed on the screen.

Page 15 of 108
By clicking on ‘Confirm’ button, the GPF detail window will disappear and by clicking
on ‘Cancel’ GPF No. entered will be cleared.
And in case the employee is on deputation in Haryana Govt. then the Maker will click
on the checkbox given against the line “On Deputation from Govt. of India or Other
State.”
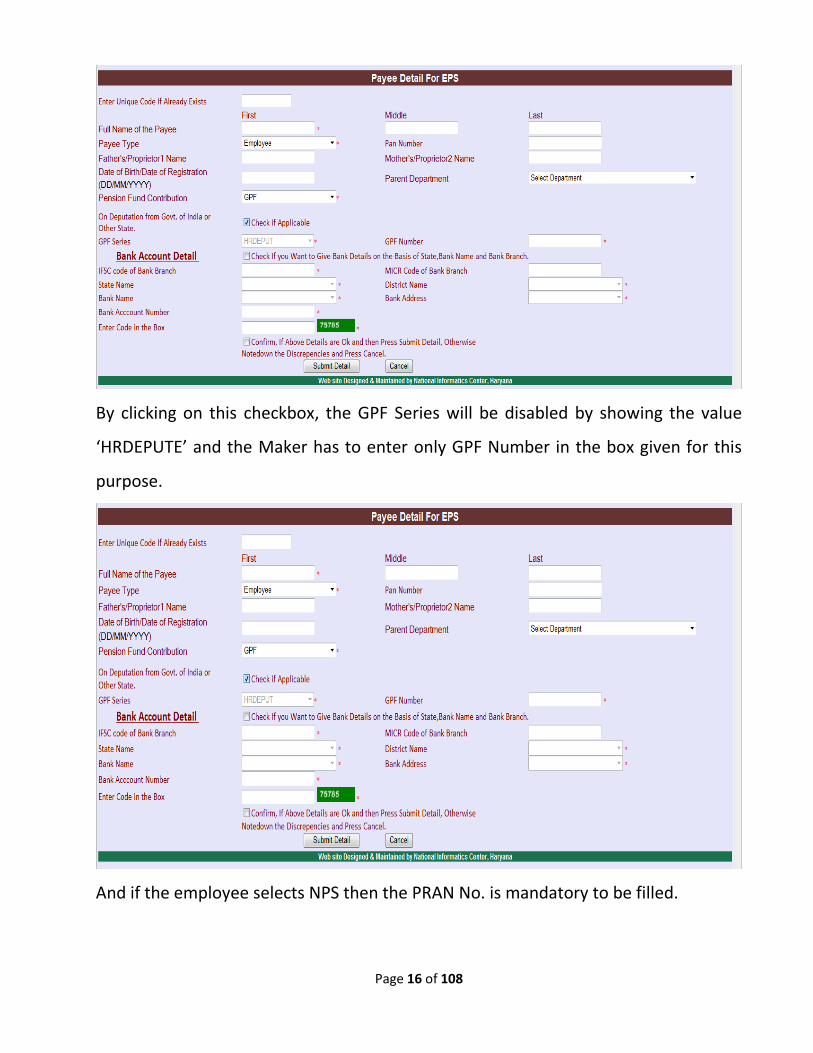
Page 16 of 108
By clicking on this checkbox, the GPF Series will be disabled by showing the value
‘HRDEPUTE’ and the Maker has to enter only GPF Number in the box given for this
purpose.
And if the employee selects NPS then the PRAN No. is mandatory to be filled.
Page 17 of 108
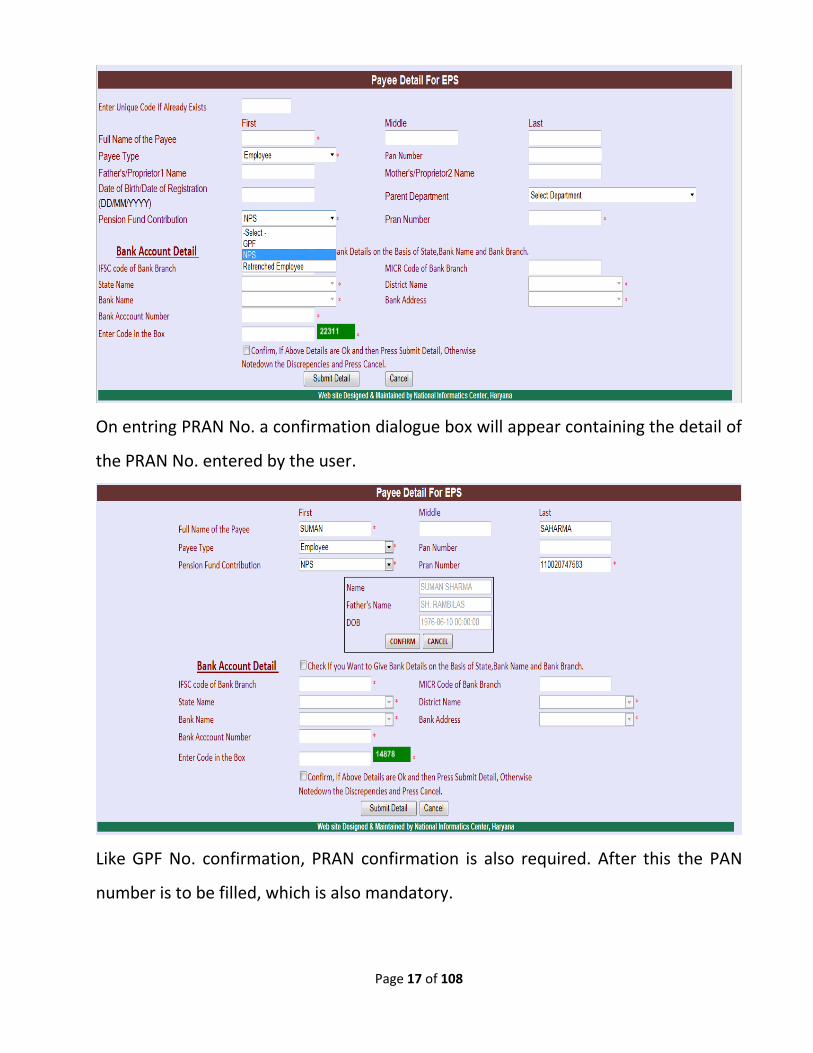
On entring PRAN No. a confirmation dialogue box will appear containing the detail of
the PRAN No. entered by the user.
Like GPF No. confirmation, PRAN confirmation is also required. After this the PAN
number is to be filled, which is also mandatory.
Page 18 of 108
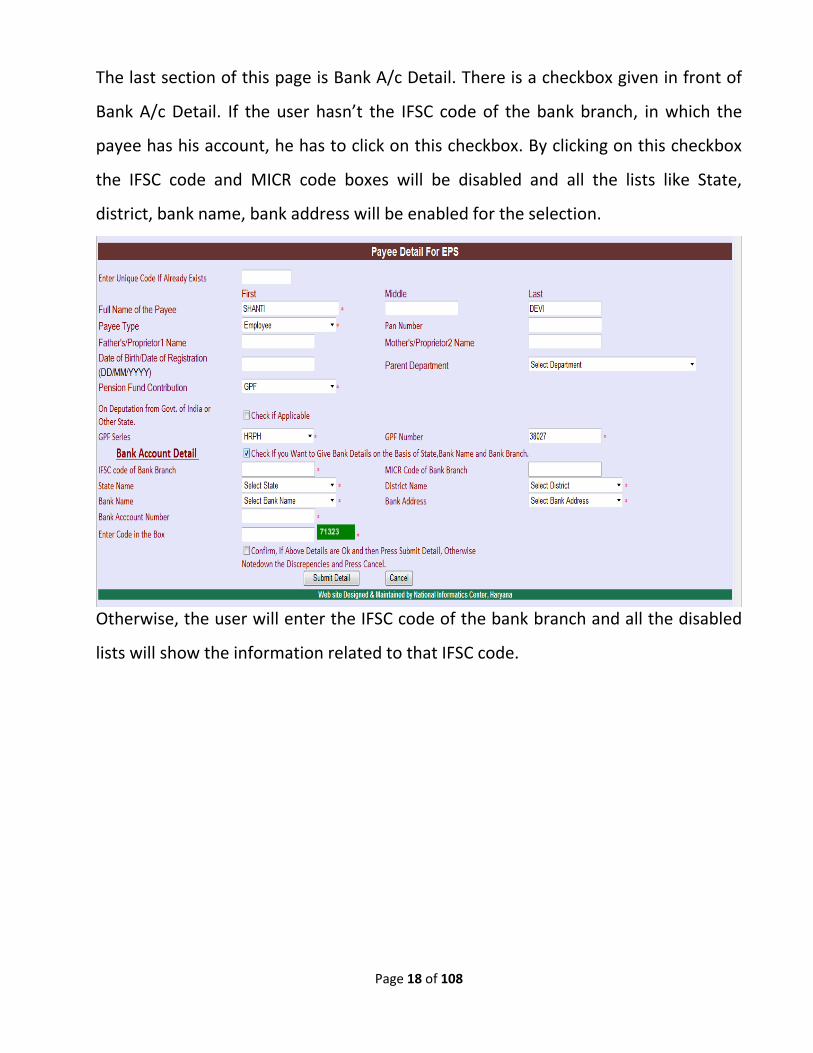
The last section of this page is Bank A/c Detail. There is a checkbox given in front of
Bank A/c Detail. If the user hasn’t the IFSC code of the bank branch, in which the
payee has his account, he has to click on this checkbox. By clicking on this checkbox
the IFSC code and MICR code boxes will be disabled and all the lists like State,
district, bank name, bank address will be enabled for the selection.
Otherwise, the user will enter the IFSC code of the bank branch and all the disabled
lists will show the information related to that IFSC code.
Page 19 of 108
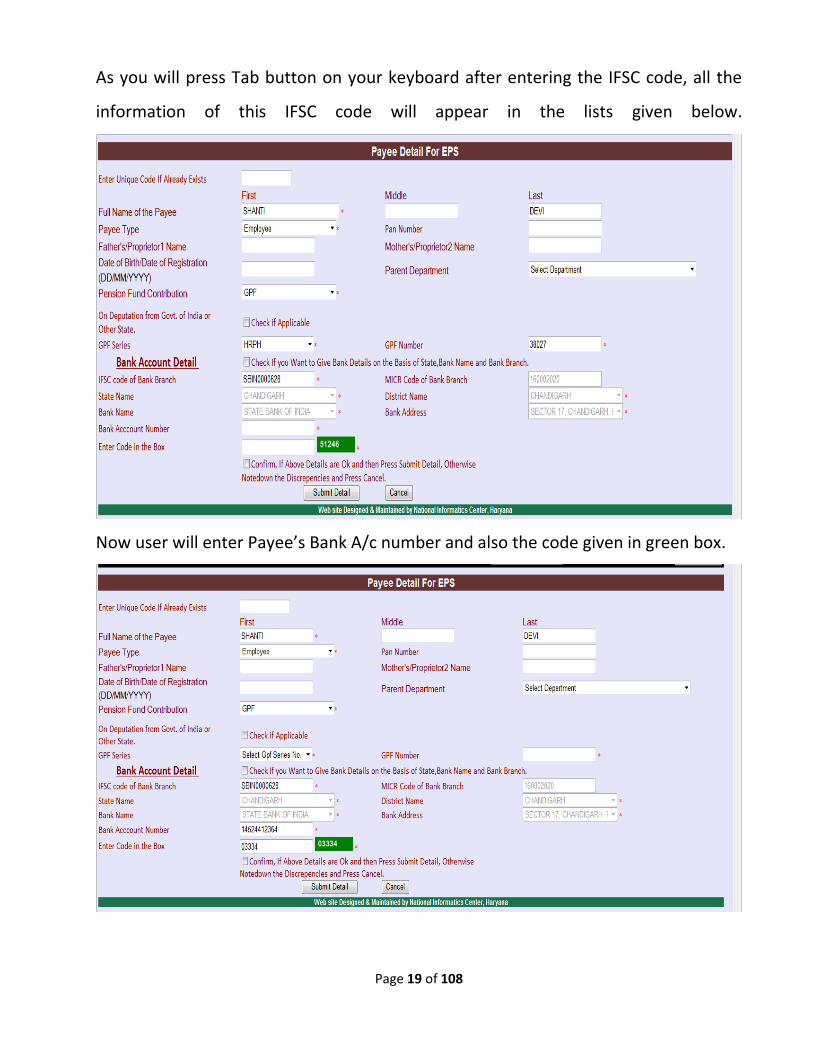
As you will press Tab button on your keyboard after entering the IFSC code, all the
information of this IFSC code will appear in the lists given below.
Now user will enter Payee’s Bank A/c number and also the code given in green box.
Page 20 of 108
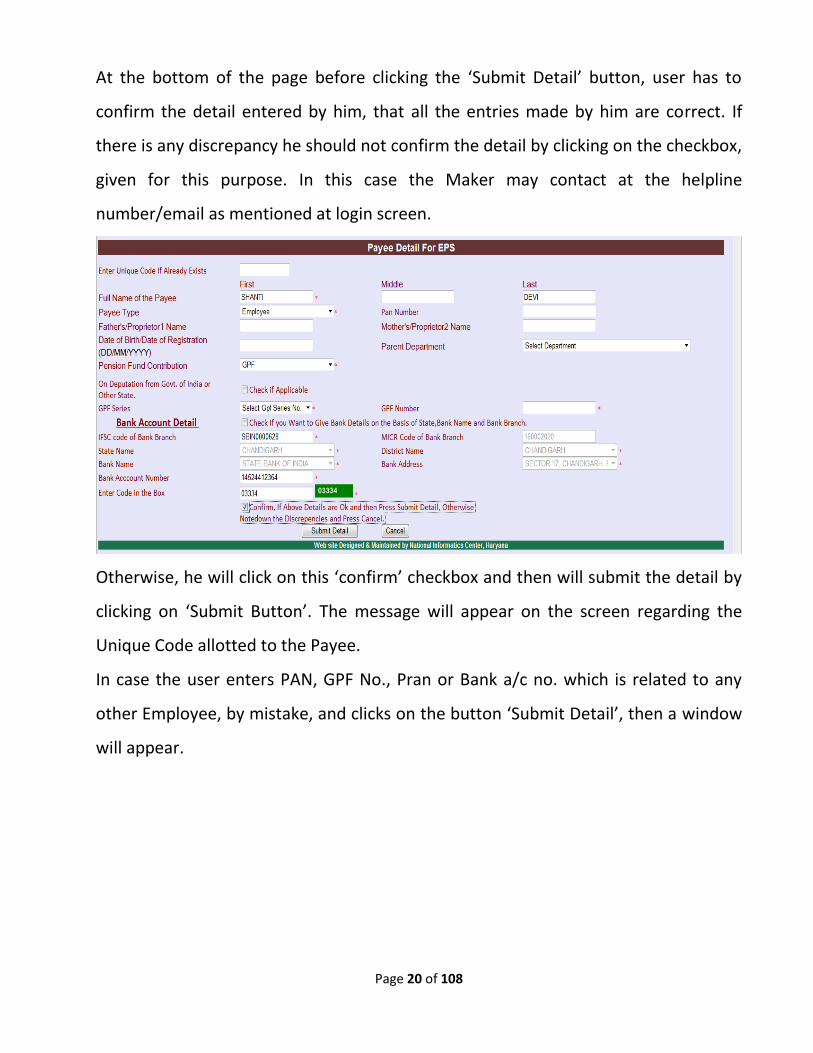
At the bottom of the page before clicking the ‘Submit Detail’ button, user has to
confirm the detail entered by him, that all the entries made by him are correct. If
there is any discrepancy he should not confirm the detail by clicking on the checkbox,
given for this purpose. In this case the Maker may contact at the helpline
number/email as mentioned at login screen.
Otherwise, he will click on this ‘confirm’ checkbox and then will submit the detail by
clicking on ‘Submit Button’. The message will appear on the screen regarding the
Unique Code allotted to the Payee.
In case the user enters PAN, GPF No., Pran or Bank a/c no. which is related to any
other Employee, by mistake, and clicks on the button ‘Submit Detail’, then a window
will appear.
Page 21 of 108
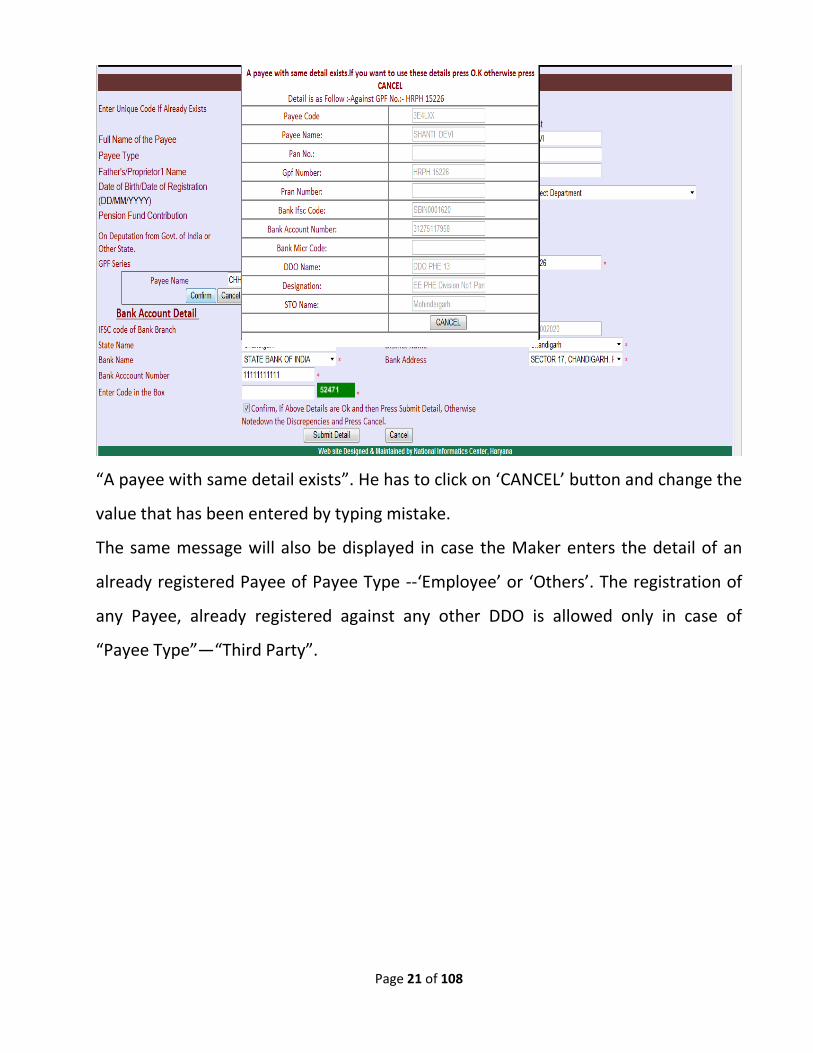
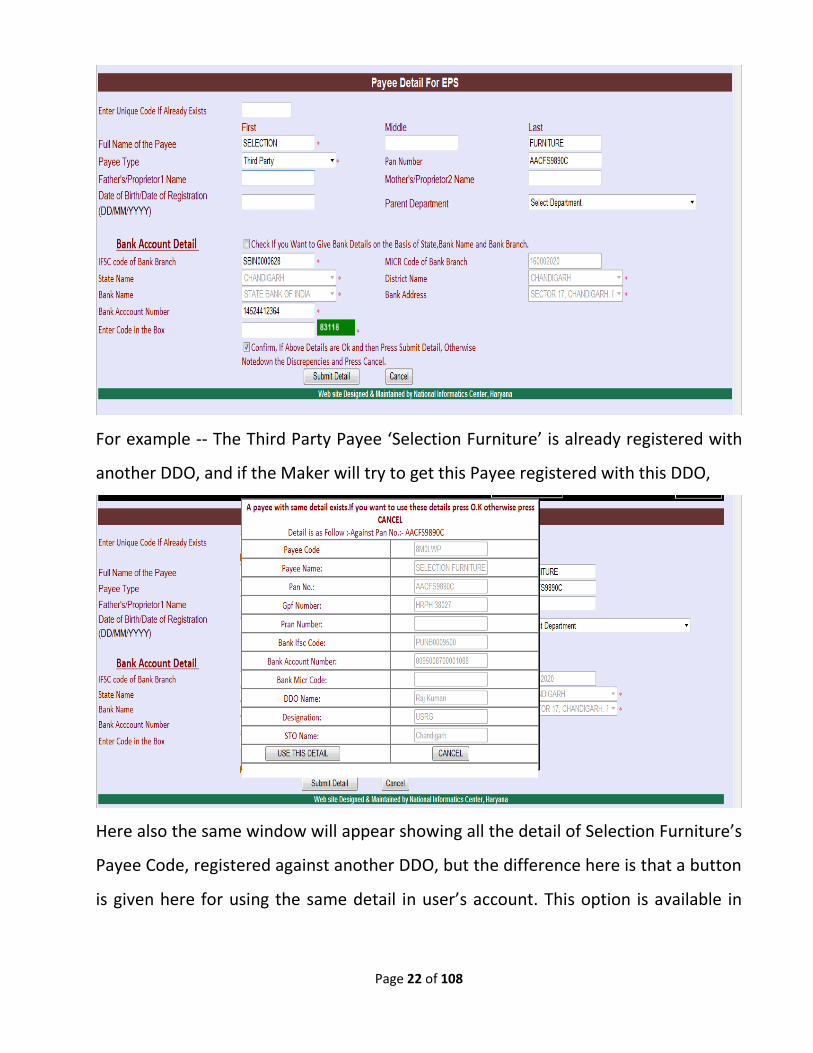
“A payee with same detail exists”. He has to click on ‘CANCEL’ button and change the
value that has been entered by typing mistake.
The same message will also be displayed in case the Maker enters the detail of an
already registered Payee of Payee Type --‘Employee’ or ‘Others’. The registration of
any Payee, already registered against any other DDO is allowed only in case of
“Payee Type”—“Third Party”.
Page 22 of 108
For example -- The Third Party Payee ‘Selection Furniture’ is already registered with
another DDO, and if the Maker will try to get this Payee registered with this DDO,
Here also the same window will appear showing all the detail of Selection Furniture’s
Payee Code, registered against another DDO, but the difference here is that a button
is given here for using the same detail in user’s account. This option is available in
Page 23 of 108
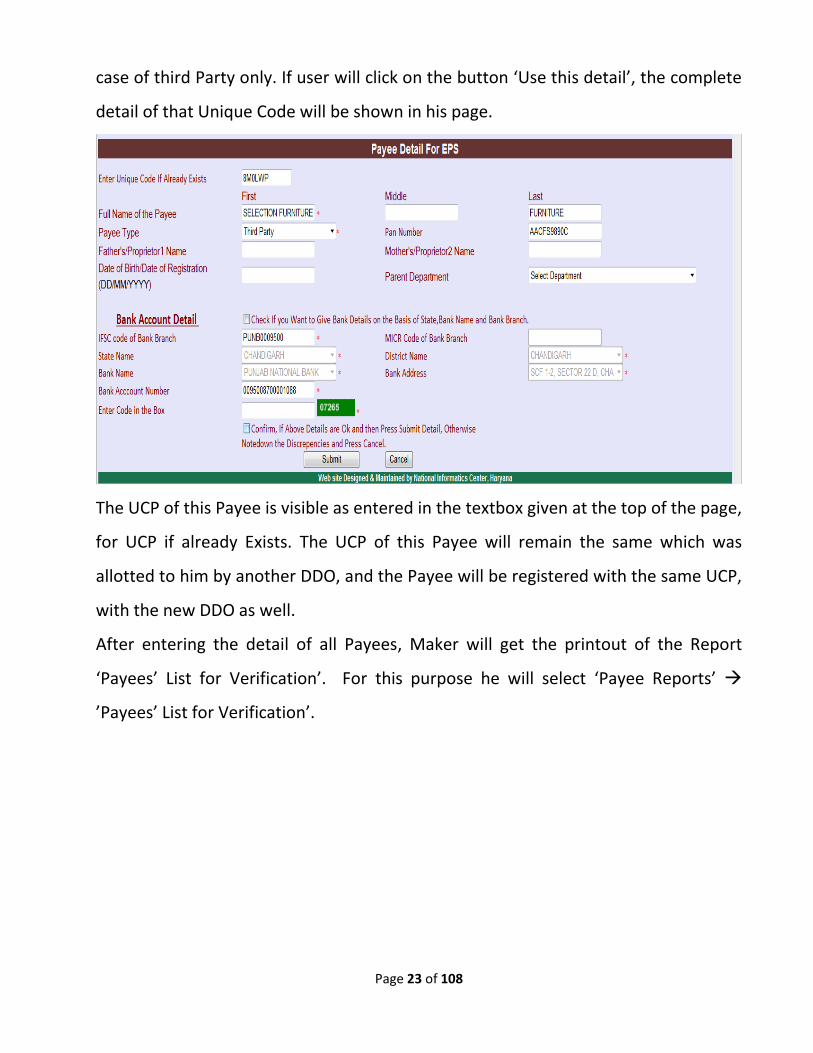
case of third Party only. If user will click on the button ‘Use this detail’, the complete
detail of that Unique Code will be shown in his page.
The UCP of this Payee is visible as entered in the textbox given at the top of the page,
for UCP if already Exists. The UCP of this Payee will remain the same which was
allotted to him by another DDO, and the Payee will be registered with the same UCP,
with the new DDO as well.
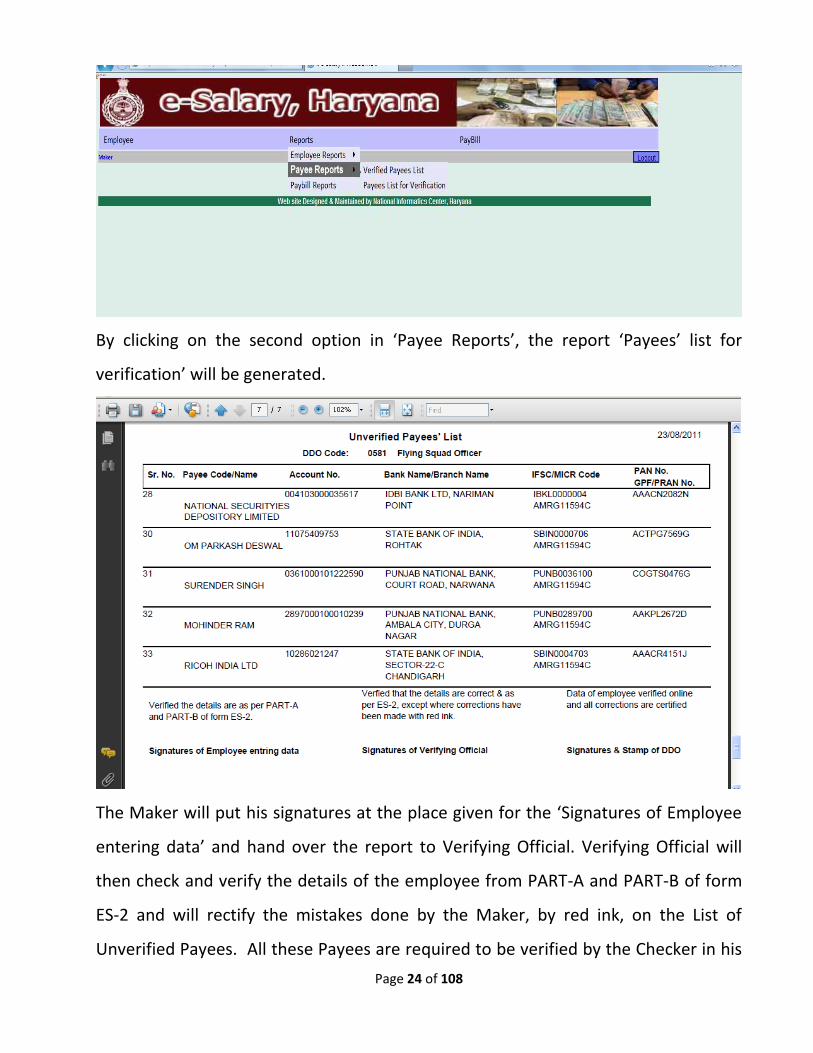
After entering the detail of all Payees, Maker will get the printout of the Report
‘Payees’ List for Verification’. For this purpose he will select ‘Payee Reports’
’Payees’ List for Verification’.
Page 24 of 108
By clicking on the second option in ‘Payee Reports’, the report ‘Payees’ list for
verification’ will be generated.
The Maker will put his signatures at the place given for the ‘Signatures of Employee
entering data’ and hand over the report to Verifying Official. Verifying Official will
then check and verify the details of the employee from PART-A and PART-B of form
ES-2 and will rectify the mistakes done by the Maker, by red ink, on the List of
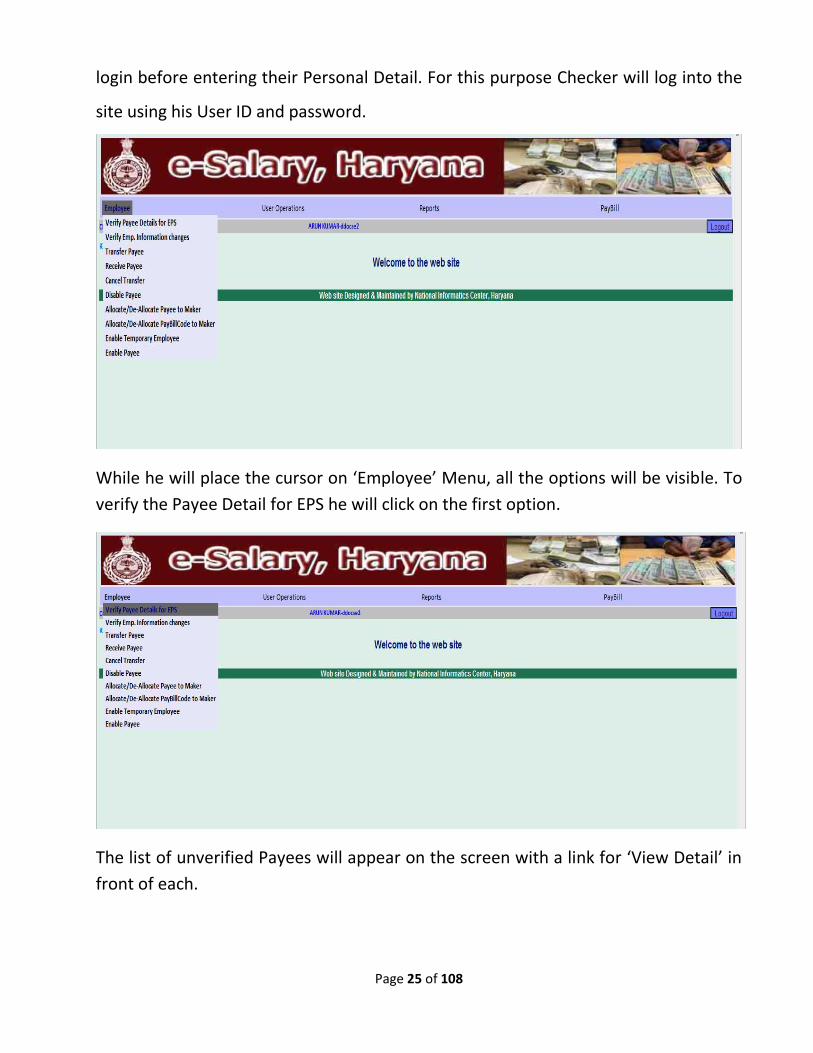
Unverified Payees. All these Payees are required to be verified by the Checker in his
Page 25 of 108
login before entering their Personal Detail. For this purpose Checker will log into the
site using his User ID and password.
While he will place the cursor on ‘Employee’ Menu, all the options will be visible. To
verify the Payee Detail for EPS he will click on the first option.
The list of unverified Payees will appear on the screen with a link for ‘View Detail’ in
front of each.
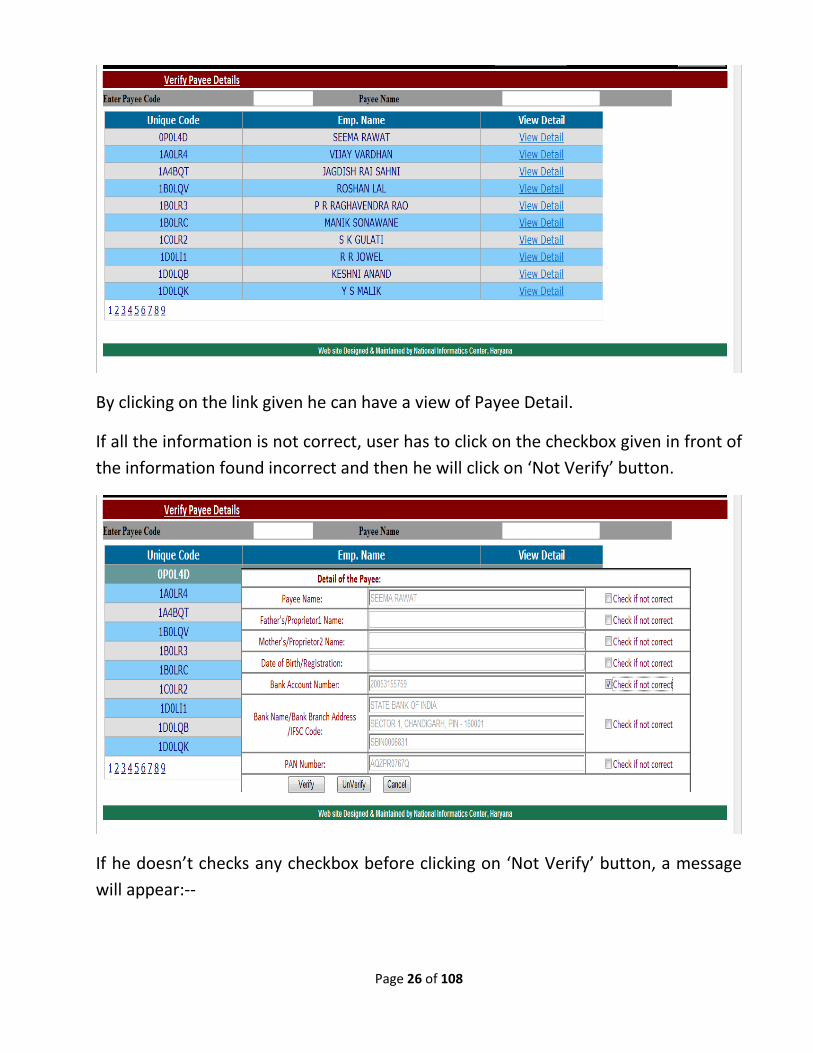
Page 26 of 108
By clicking on the link given he can have a view of Payee Detail.
If all the information is not correct, user has to click on the checkbox given in front of
the information found incorrect and then he will click on ‘Not Verify’ button.
If he doesn’t checks any checkbox before clicking on ‘Not Verify’ button, a message
will appear:--
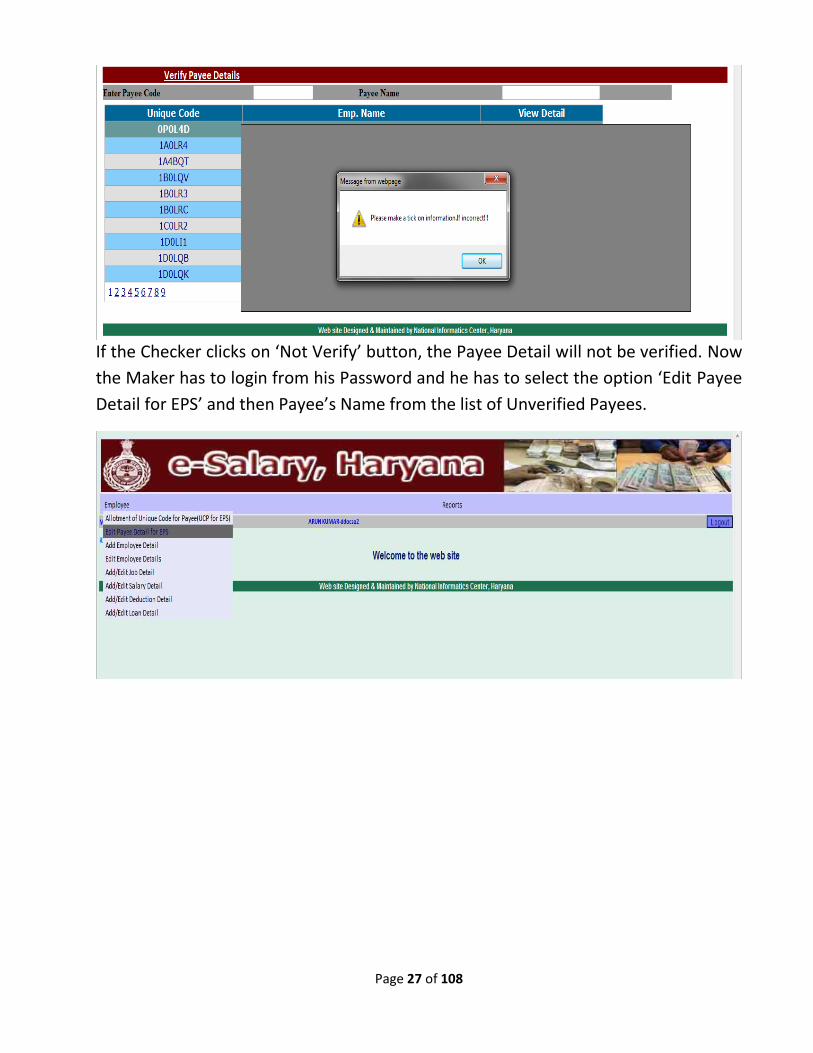
Page 27 of 108
If the Checker clicks on ‘Not Verify’ button, the Payee Detail will not be verified. Now
the Maker has to login from his Password and he has to select the option ‘Edit Payee
Detail for EPS’ and then Payee’s Name from the list of Unverified Payees.
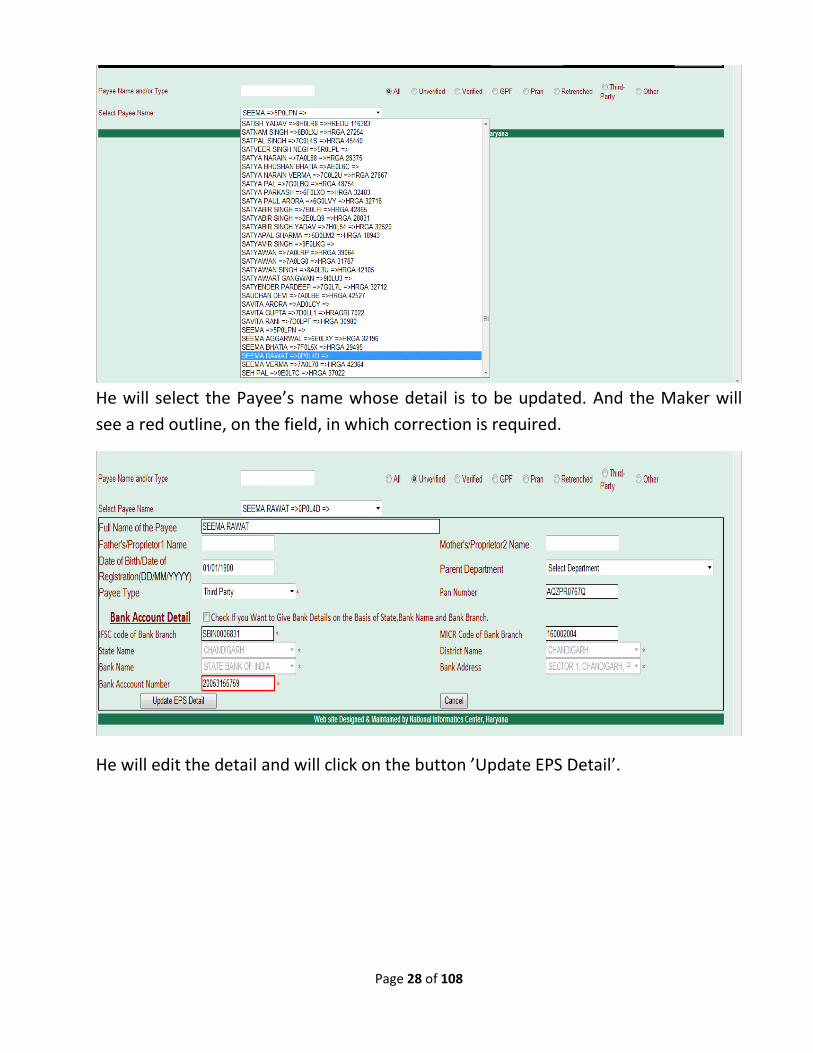
Page 28 of 108
He will select the Payee’s name whose detail is to be updated. And the Maker will
see a red outline, on the field, in which correction is required.
He will edit the detail and will click on the button ’Update EPS Detail’.

Page 29 of 108
Now in DDO’s Login when he will ‘View Detail’ of the same Payee.
All the fields edited by the Maker will be shown with red background. DDO needs to
verify the details after ensuring the correctness of this data.
If complete detail of the Payee is correct then user will click on ‘Verify’ button, record
will be verified and will disappear from the list of Payees to be verified.
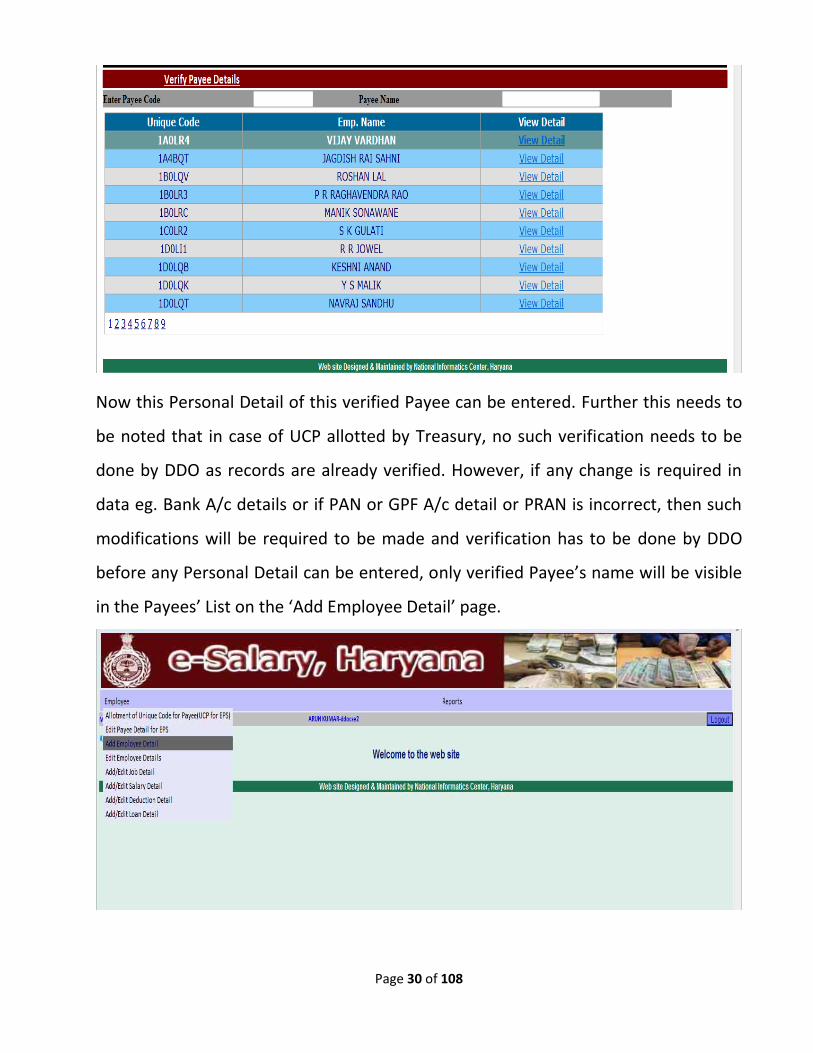
Page 30 of 108
Now this Personal Detail of this verified Payee can be entered. Further this needs to
be noted that in case of UCP allotted by Treasury, no such verification needs to be
done by DDO as records are already verified. However, if any change is required in
data eg. Bank A/c details or if PAN or GPF A/c detail or PRAN is incorrect, then such
modifications will be required to be made and verification has to be done by DDO
before any Personal Detail can be entered, only verified Payee’s name will be visible
in the Payees’ List on the ‘Add Employee Detail’ page.

Page 31 of 108
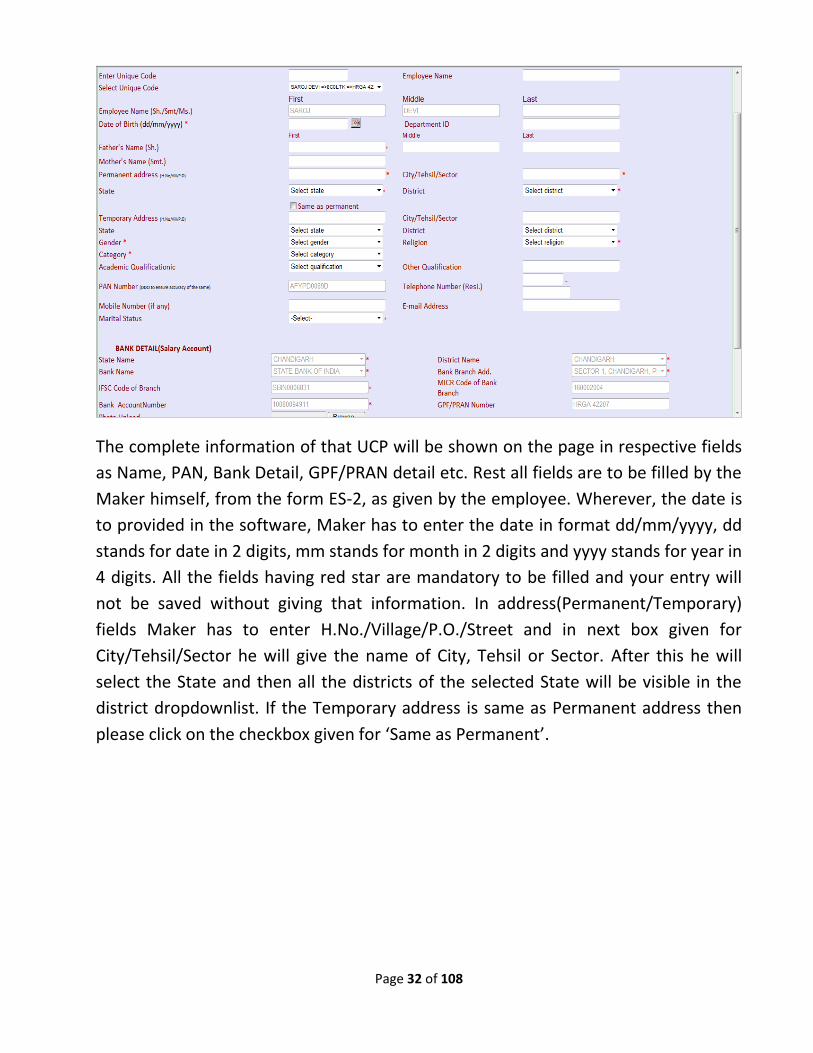
To add an Employee’s detail (which has been given in PART-C of ES-2), Maker will
click on the option “Add Employee Detail”. The page ‘Master Information of
Employee’ page will appear.
On the top of the page a dropdown list is given to select the UCP(Unique Code of
Payee). Here only the Employees whose UCP is enabled and verified by DDO, will be
shown. On selecting the UCP the Employees detail fields will be shown on the page.
Page 32 of 108
The complete information of that UCP will be shown on the page in respective fields
as Name, PAN, Bank Detail, GPF/PRAN detail etc. Rest all fields are to be filled by the
Maker himself, from the form ES-2, as given by the employee. Wherever, the date is
to provided in the software, Maker has to enter the date in format dd/mm/yyyy, dd
stands for date in 2 digits, mm stands for month in 2 digits and yyyy stands for year in
4 digits. All the fields having red star are mandatory to be filled and your entry will
not be saved without giving that information. In address(Permanent/Temporary)
fields Maker has to enter H.No./Village/P.O./Street and in next box given for
City/Tehsil/Sector he will give the name of City, Tehsil or Sector. After this he will
select the State and then all the districts of the selected State will be visible in the
district dropdownlist. If the Temporary address is same as Permanent address then
please click on the checkbox given for ‘Same as Permanent’.
Page 33 of 108
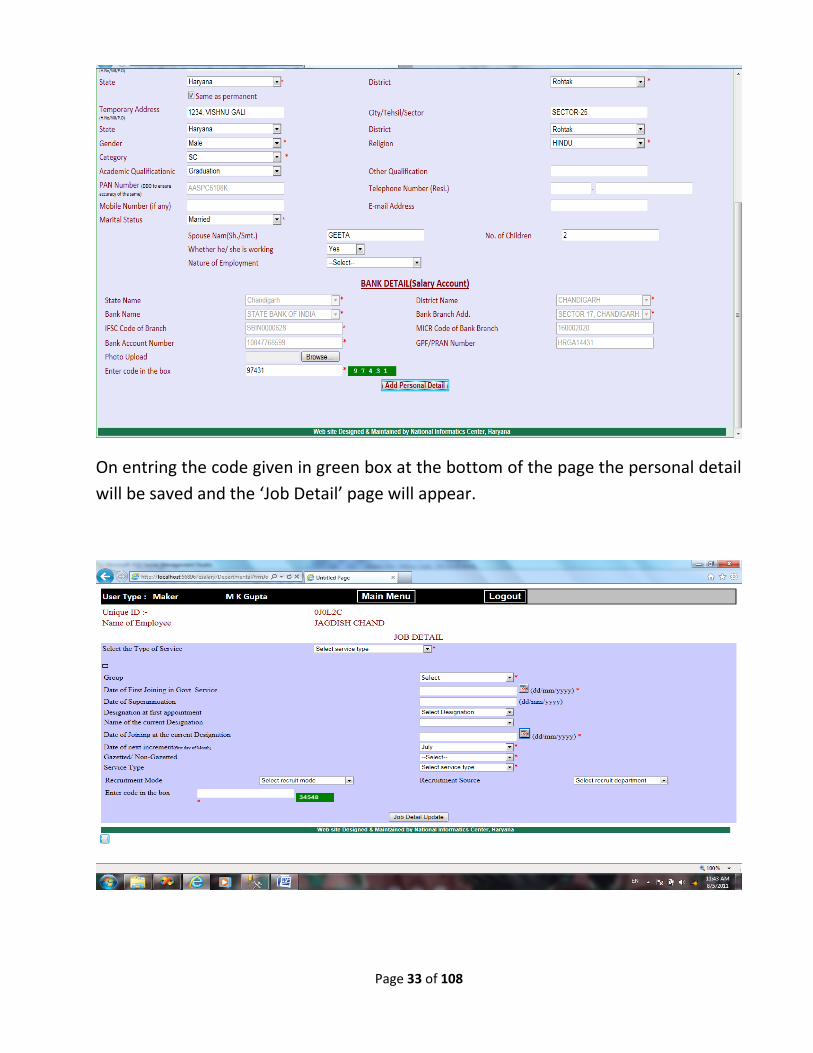
On entring the code given in green box at the bottom of the page the personal detail
will be saved and the ‘Job Detail’ page will appear.
Page 34 of 108
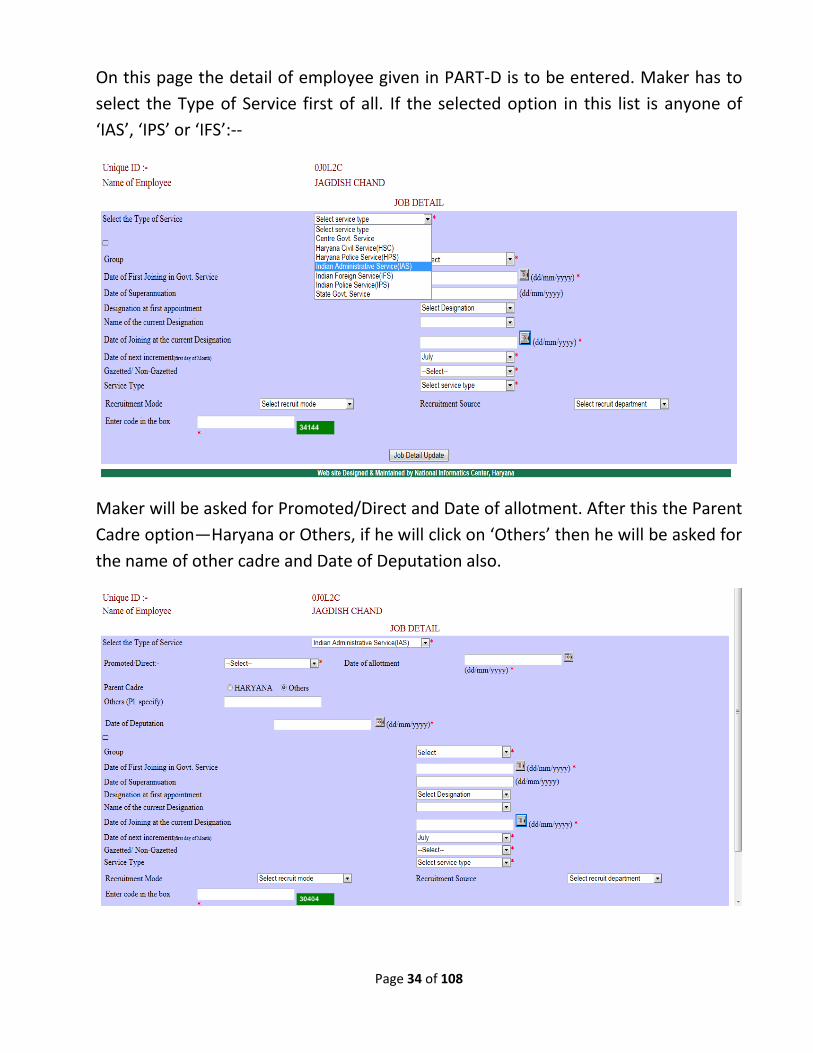
On this page the detail of employee given in PART-D is to be entered. Maker has to
select the Type of Service first of all. If the selected option in this list is anyone of
‘IAS’, ‘IPS’ or ‘IFS’:--
Maker will be asked for Promoted/Direct and Date of allotment. After this the Parent
Cadre option—Haryana or Others, if he will click on ‘Others’ then he will be asked for
the name of other cadre and Date of Deputation also.
Page 35 of 108
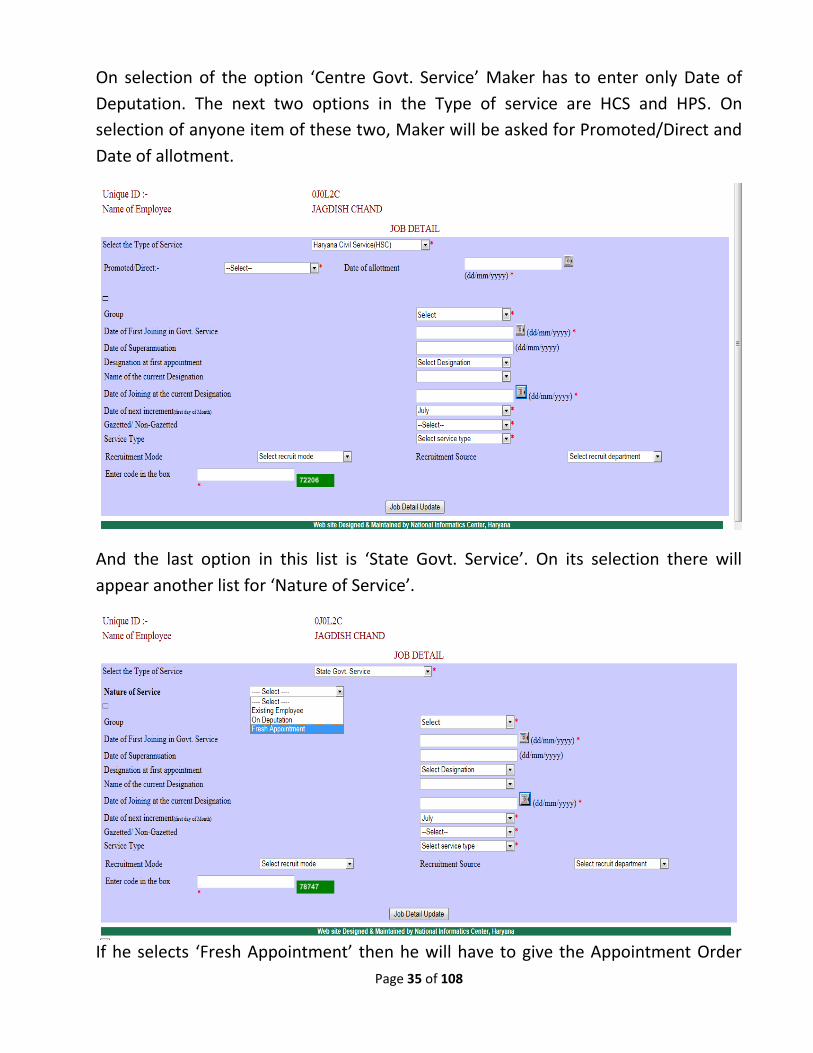
On selection of the option ‘Centre Govt. Service’ Maker has to enter only Date of
Deputation. The next two options in the Type of service are HCS and HPS. On
selection of anyone item of these two, Maker will be asked for Promoted/Direct and
Date of allotment.
And the last option in this list is ‘State Govt. Service’. On its selection there will
appear another list for ‘Nature of Service’.
If he selects ‘Fresh Appointment’ then he will have to give the Appointment Order
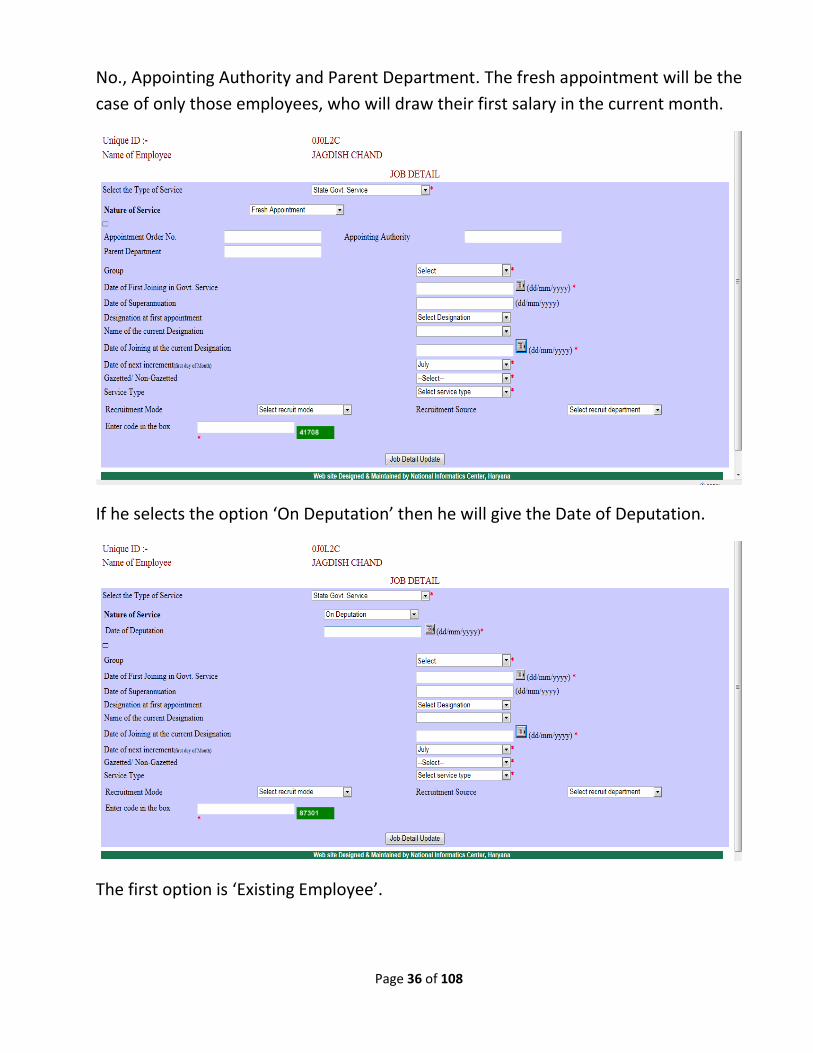
Page 36 of 108
No., Appointing Authority and Parent Department. The fresh appointment will be the
case of only those employees, who will draw their first salary in the current month.
If he selects the option ‘On Deputation’ then he will give the Date of Deputation.
The first option is ‘Existing Employee’.
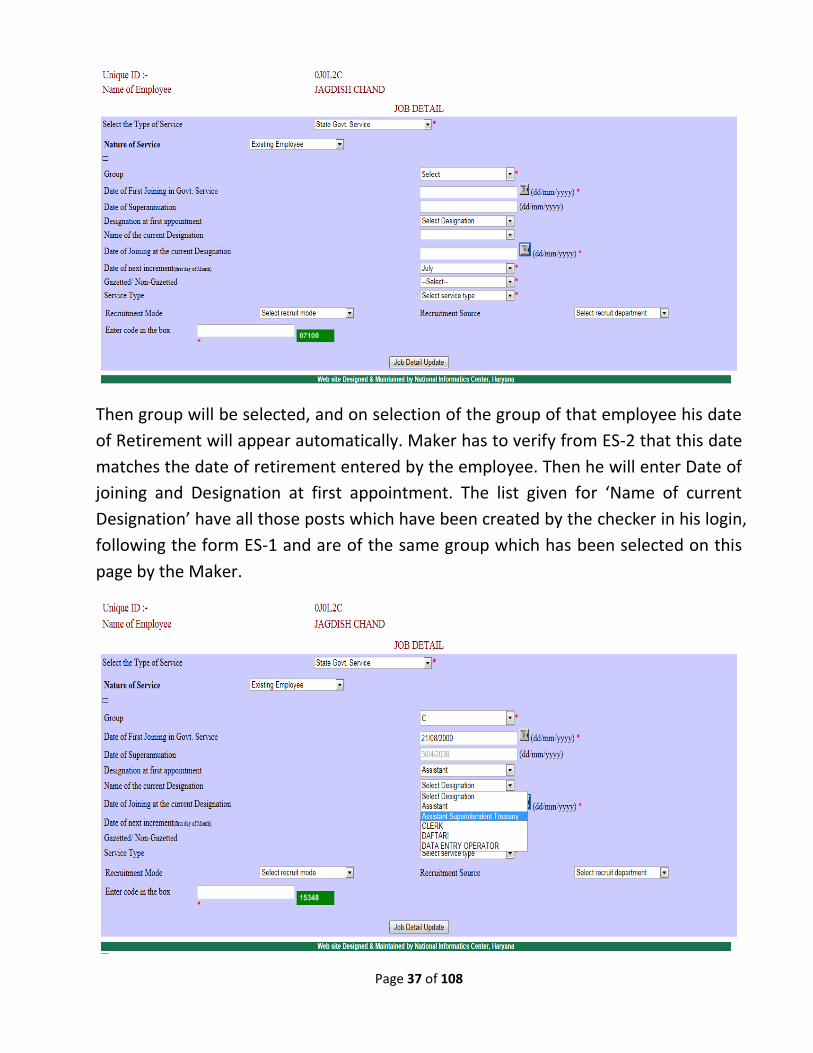
Page 37 of 108
Then group will be selected, and on selection of the group of that employee his date
of Retirement will appear automatically. Maker has to verify from ES-2 that this date
matches the date of retirement entered by the employee. Then he will enter Date of
joining and Designation at first appointment. The list given for ‘Name of current
Designation’ have all those posts which have been created by the checker in his login,
following the form ES-1 and are of the same group which has been selected on this
page by the Maker.
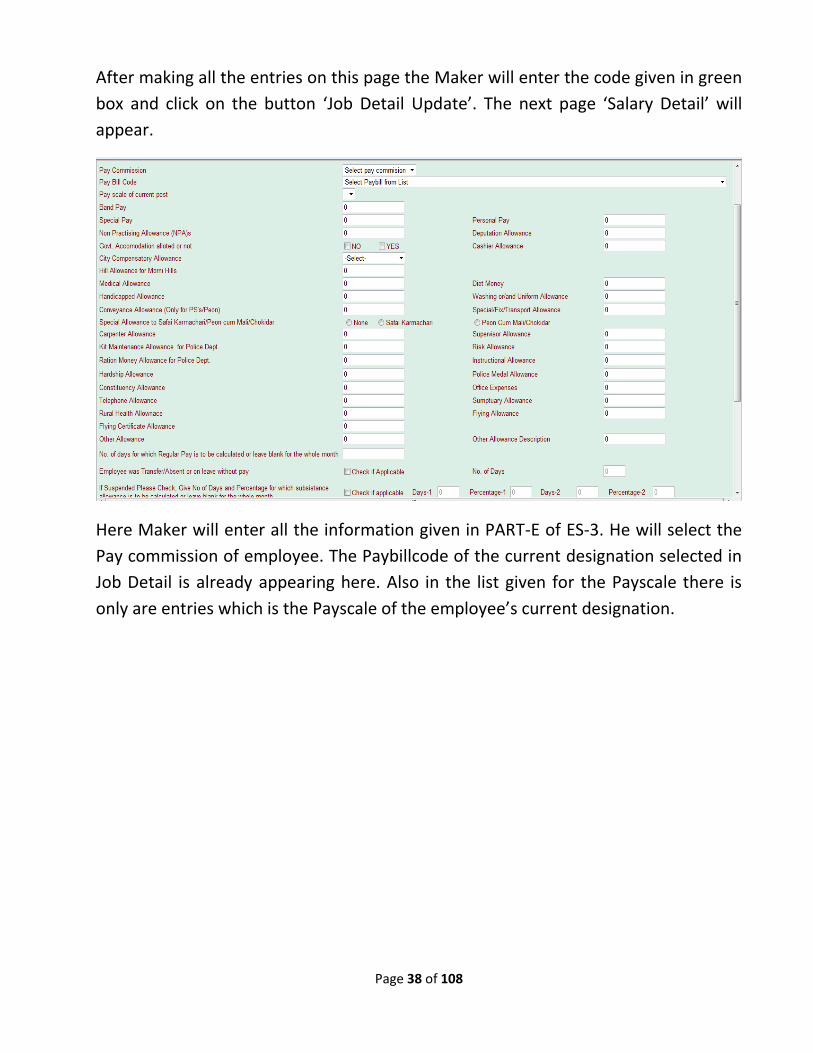
Page 38 of 108
After making all the entries on this page the Maker will enter the code given in green
box and click on the button ‘Job Detail Update’. The next page ‘Salary Detail’ will
appear.
Here Maker will enter all the information given in PART-E of ES-3. He will select the
Pay commission of employee. The Paybillcode of the current designation selected in
Job Detail is already appearing here. Also in the list given for the Payscale there is
only are entries which is the Payscale of the employee’s current designation.
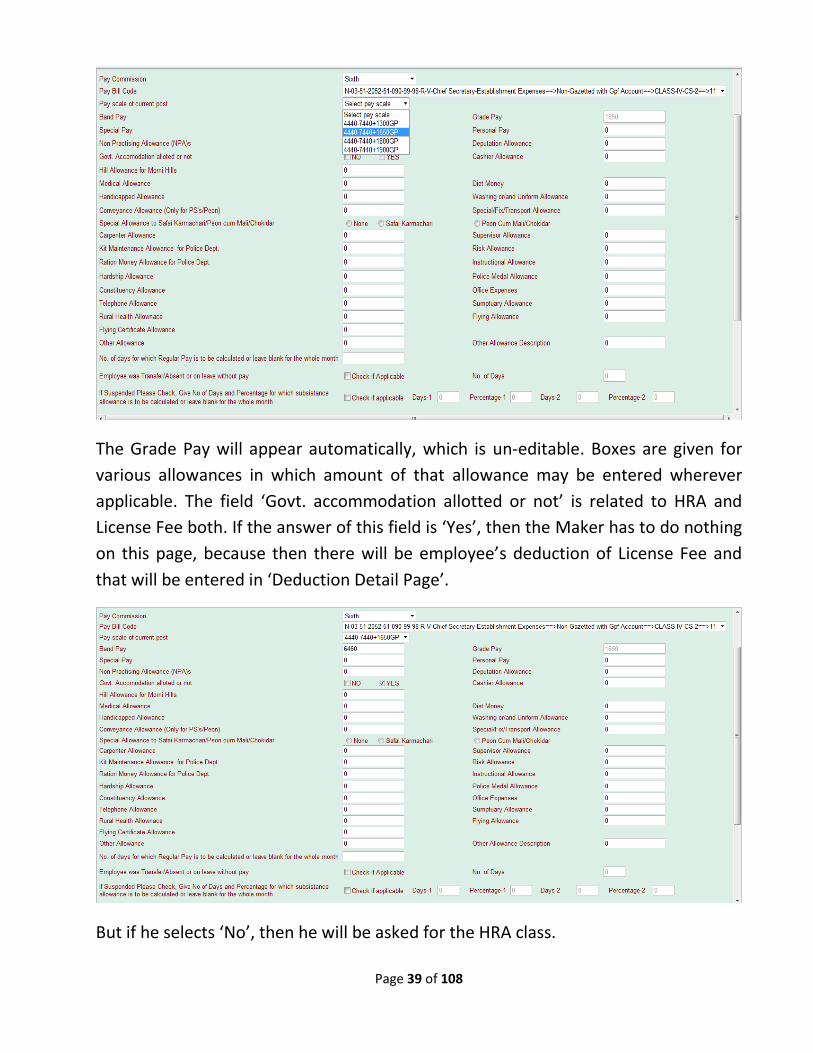
Page 39 of 108
The Grade Pay will appear automatically, which is un-editable. Boxes are given for
various allowances in which amount of that allowance may be entered wherever
applicable. The field ‘Govt. accommodation allotted or not’ is related to HRA and
License Fee both. If the answer of this field is ‘Yes’, then the Maker has to do nothing
on this page, because then there will be employee’s deduction of License Fee and
that will be entered in ‘Deduction Detail Page’.
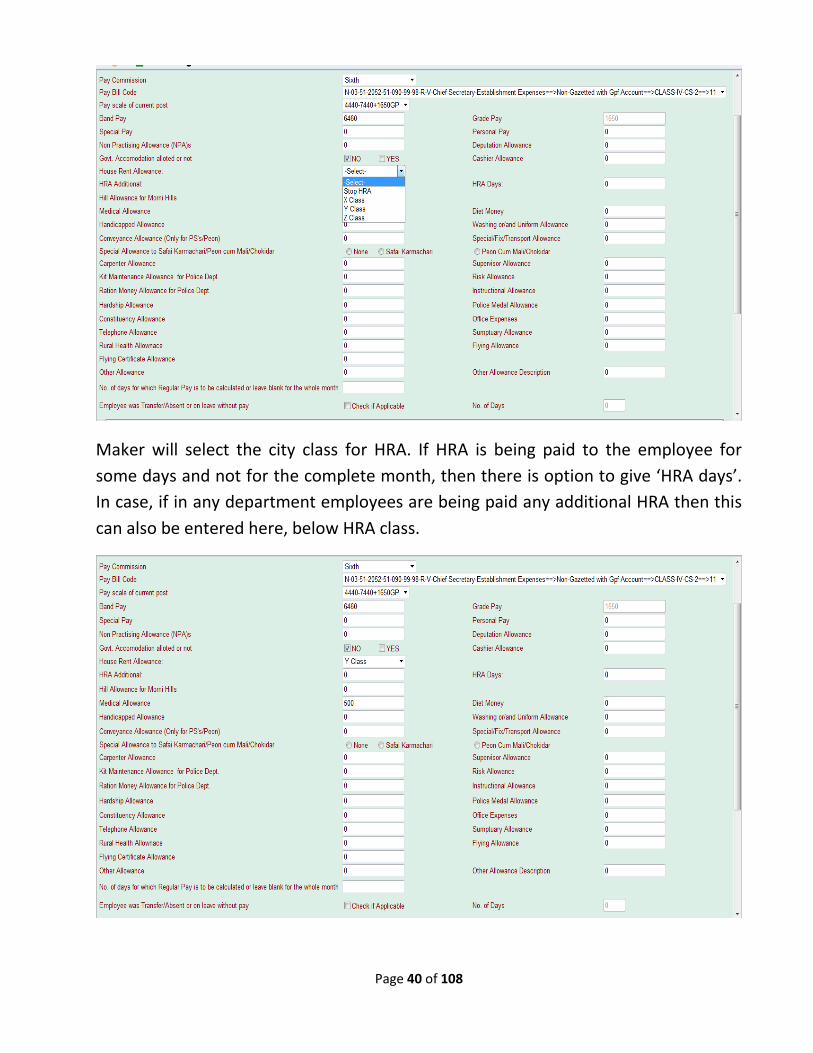
But if he selects ‘No’, then he will be asked for the HRA class.
Page 40 of 108
Maker will select the city class for HRA. If HRA is being paid to the employee for
some days and not for the complete month, then there is option to give ‘HRA days’.
In case, if in any department employees are being paid any additional HRA then this
can also be entered here, below HRA class.

Page 41 of 108
If the employee relates to Group D, then the Maker will see another allowance
named ‘Special Allowance to Safai Karamchari/Peon cum Mali/Chowkidar’.
Amount for Medical allowance is to be given in case of each employee who is being
paid fixed medical allowance. At the end of the page, ‘No of days’ are to be entered if
the employee is to be given the salary for less than one month. If the salary is to be
paid for the whole month then this field should be left blank.
In case the Maker enters the days in this field then there will appear three options, a)
Employee was Transfer/Absent or was on leave without pay. b) If Suspended Please
Check, Give No of Days and Percentage for which subsistence allowance is to be
calculated or leave blank for the whole month. c) Check for Insert detail for other Pay
Band if Employee have.
Page 42 of 108
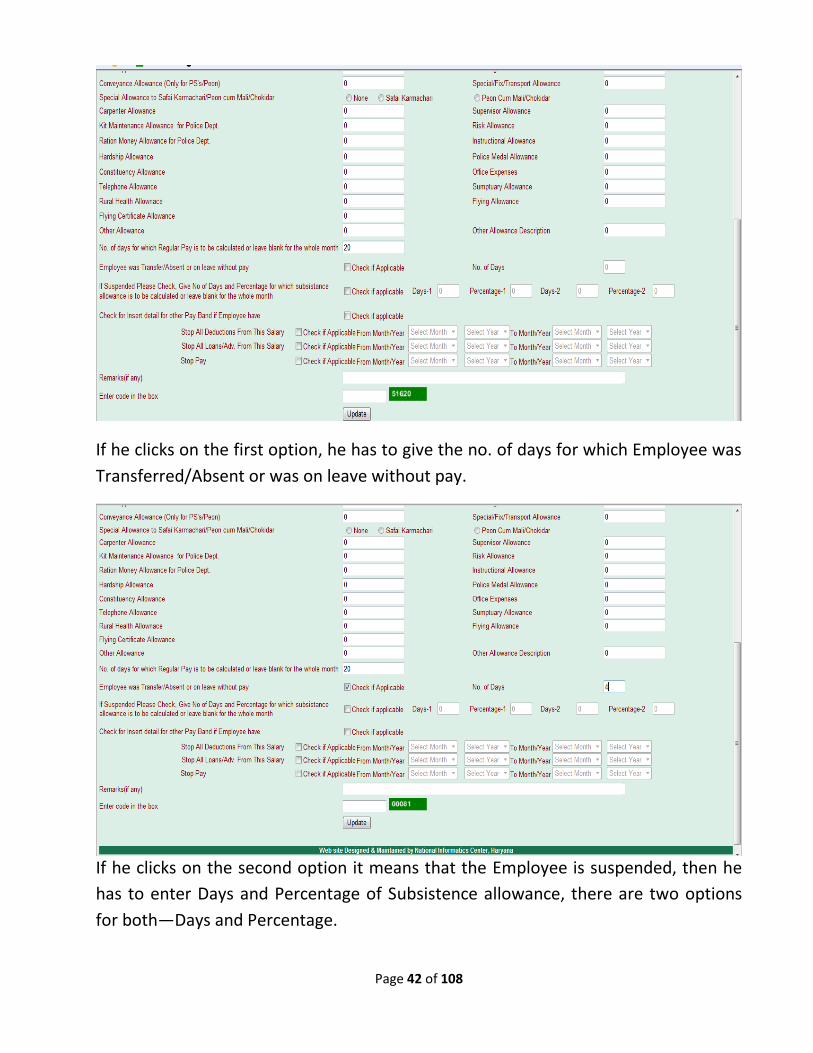
If he clicks on the first option, he has to give the no. of days for which Employee was
Transferred/Absent or was on leave without pay.
If he clicks on the second option it means that the Employee is suspended, then he
has to enter Days and Percentage of Subsistence allowance, there are two options
for both—Days and Percentage.
Page 43 of 108
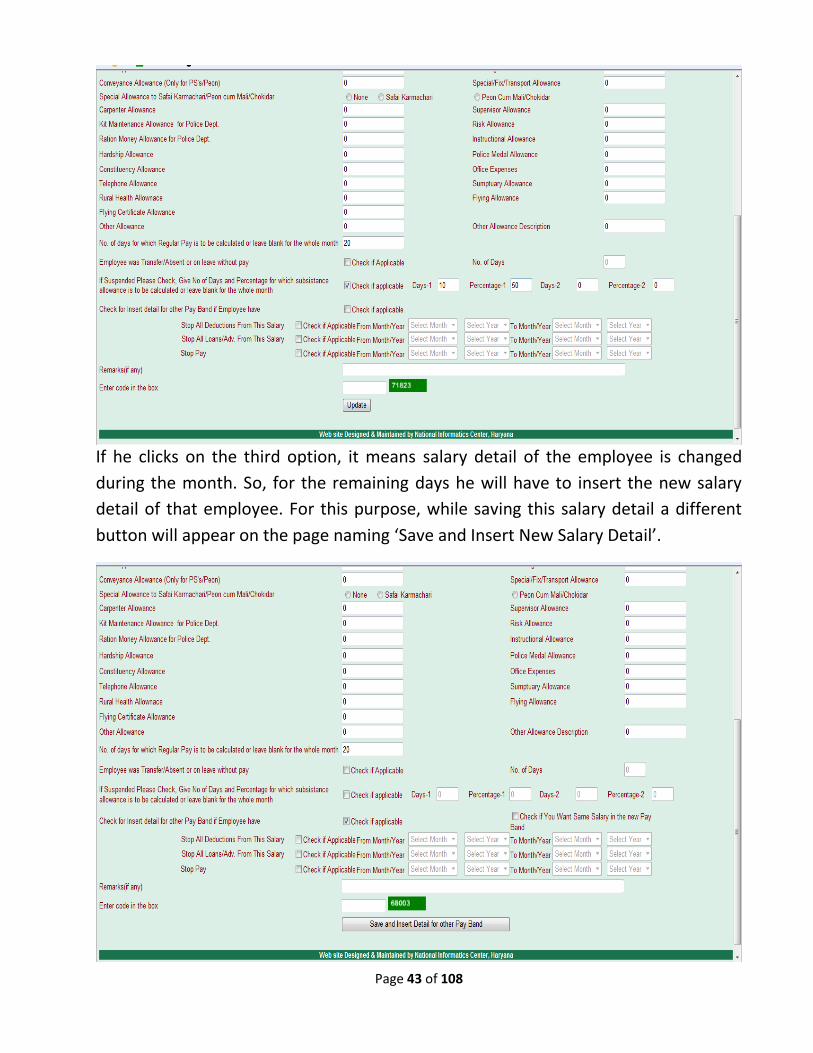
If he clicks on the third option, it means salary detail of the employee is changed
during the month. So, for the remaining days he will have to insert the new salary
detail of that employee. For this purpose, while saving this salary detail a different
button will appear on the page naming ‘Save and Insert New Salary Detail’.
Page 44 of 108
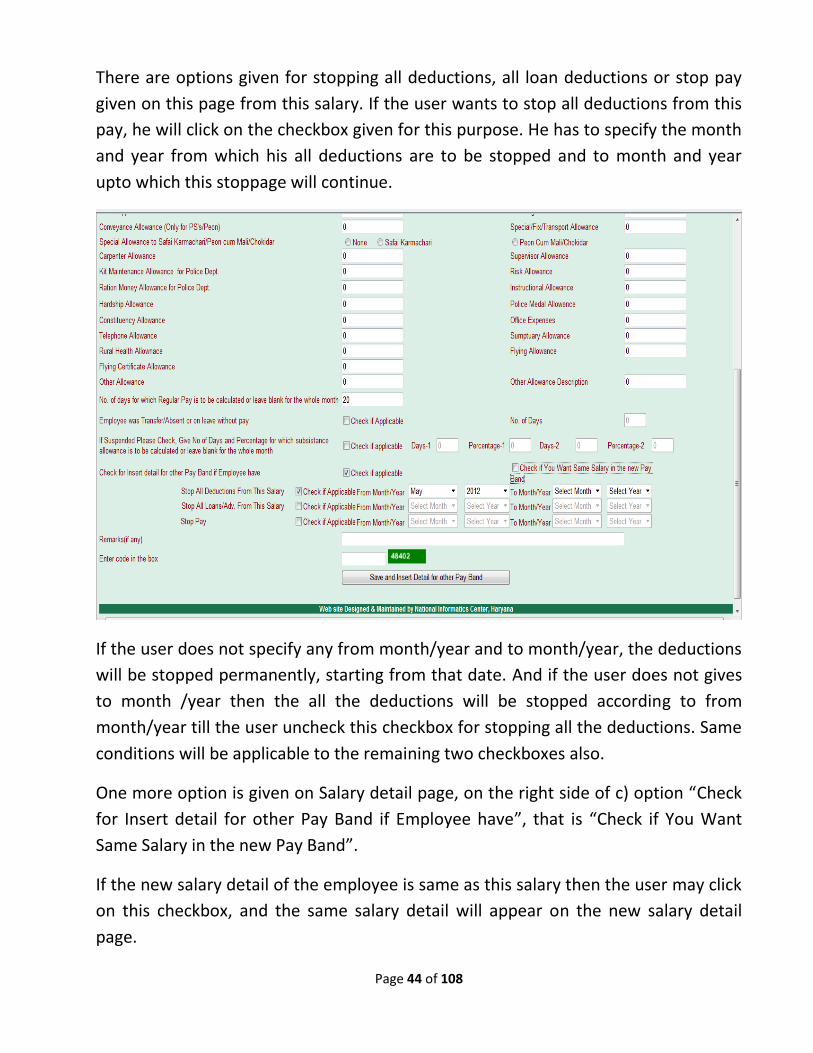
There are options given for stopping all deductions, all loan deductions or stop pay
given on this page from this salary. If the user wants to stop all deductions from this
pay, he will click on the checkbox given for this purpose. He has to specify the month
and year from which his all deductions are to be stopped and to month and year
upto which this stoppage will continue.
If the user does not specify any from month/year and to month/year, the deductions
will be stopped permanently, starting from that date. And if the user does not gives
to month /year then the all the deductions will be stopped according to from
month/year till the user uncheck this checkbox for stopping all the deductions. Same
conditions will be applicable to the remaining two checkboxes also.
One more option is given on Salary detail page, on the right side of c) option “Check
for Insert detail for other Pay Band if Employee have”, that is “Check if You Want
Same Salary in the new Pay Band”.
If the new salary detail of the employee is same as this salary then the user may click
on this checkbox, and the same salary detail will appear on the new salary detail
page.

Page 45 of 108
By clicking on the button “Save and Insert Detail for other Pay Band”, this Salary
detail will be saved and a new page for inserting new Salary Detail of the same
employee will appear.
Page 46 of 108
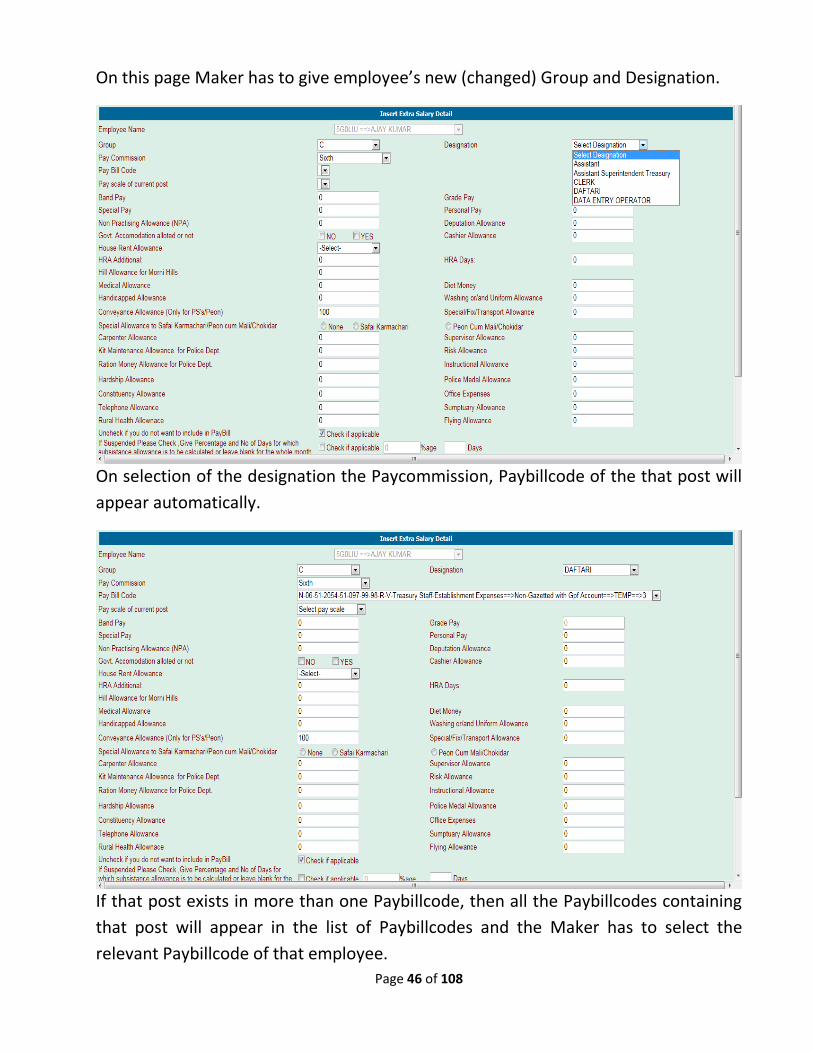
On this page Maker has to give employee’s new (changed) Group and Designation.
On selection of the designation the Paycommission, Paybillcode of the that post will
appear automatically.
If that post exists in more than one Paybillcode, then all the Paybillcodes containing
that post will appear in the list of Paybillcodes and the Maker has to select the
relevant Paybillcode of that employee.

Page 47 of 108
Now the Maker will select the Payscale for this designation and all remaining entries
will be made like he had filled the Salary detail page.
The last field on the Salary Detail page is about suspended employees. If the
employee is suspended the Maker will click on the check box given for this purpose
at the bottom of the page.
Page 48 of 108
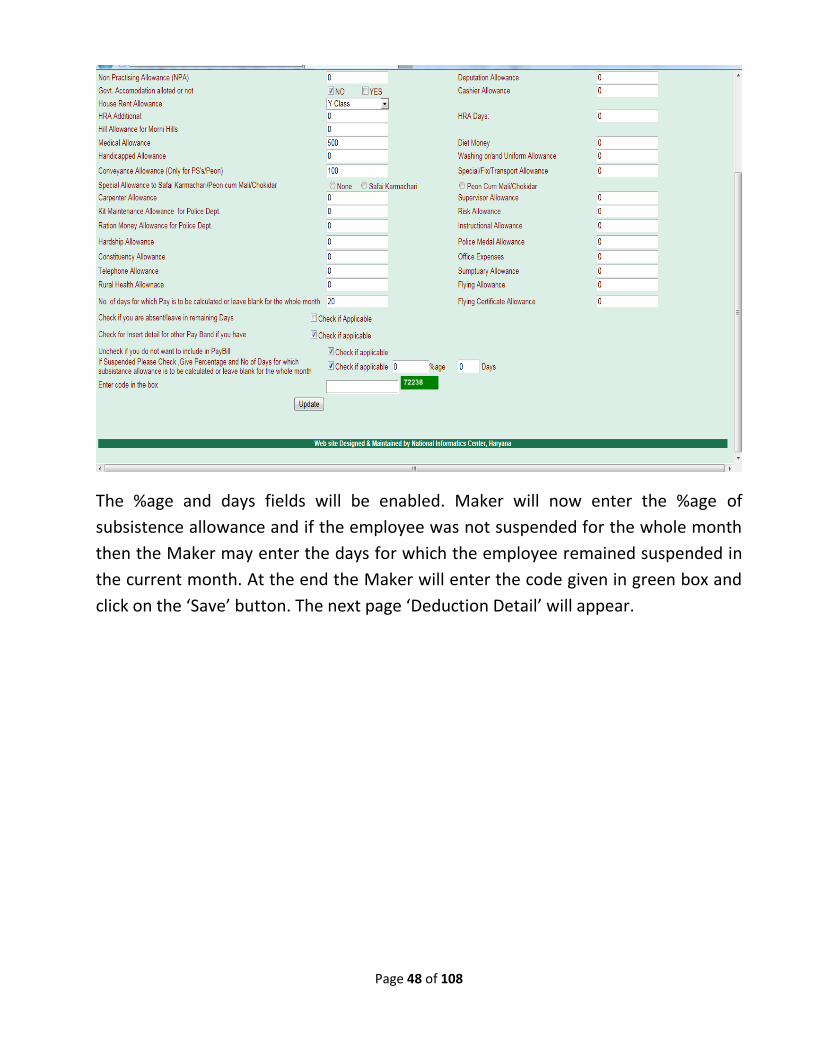
The %age and days fields will be enabled. Maker will now enter the %age of
subsistence allowance and if the employee was not suspended for the whole month
then the Maker may enter the days for which the employee remained suspended in
the current month. At the end the Maker will enter the code given in green box and
click on the ‘Save’ button. The next page ‘Deduction Detail’ will appear.
Page 49 of 108
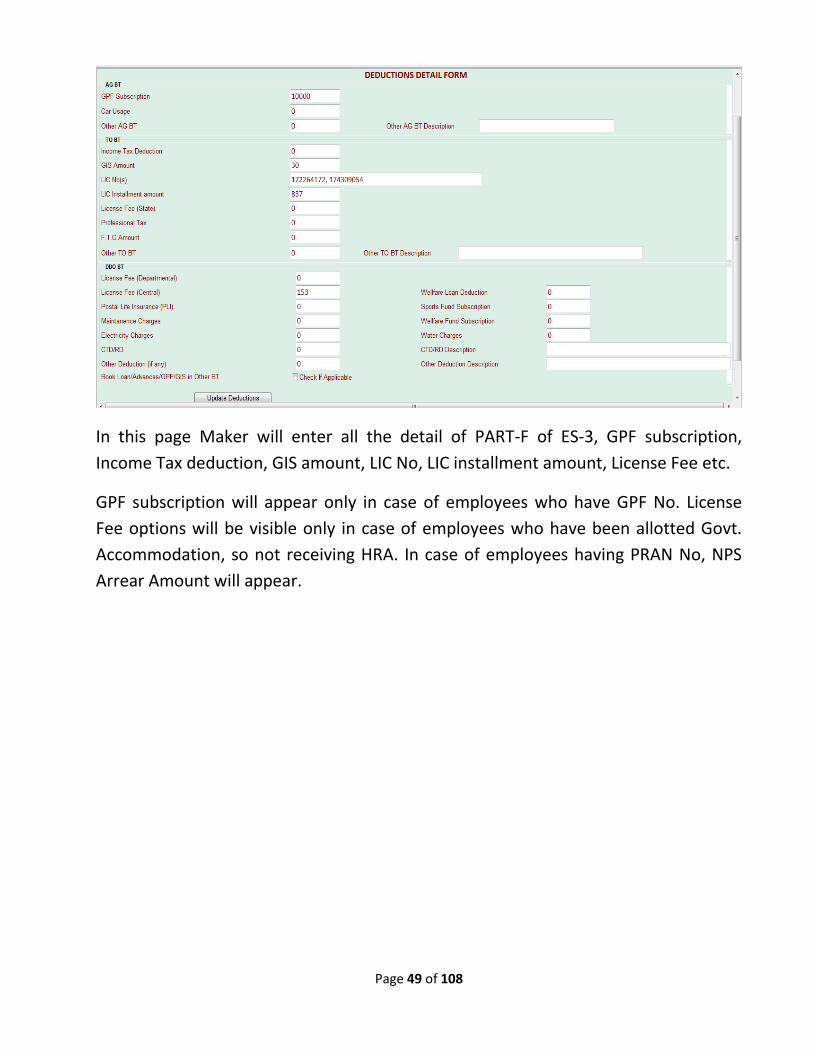
In this page Maker will enter all the detail of PART-F of ES-3, GPF subscription,
Income Tax deduction, GIS amount, LIC No, LIC installment amount, License Fee etc.
GPF subscription will appear only in case of employees who have GPF No. License
Fee options will be visible only in case of employees who have been allotted Govt.
Accommodation, so not receiving HRA. In case of employees having PRAN No, NPS
Arrear Amount will appear.
Page 50 of 108
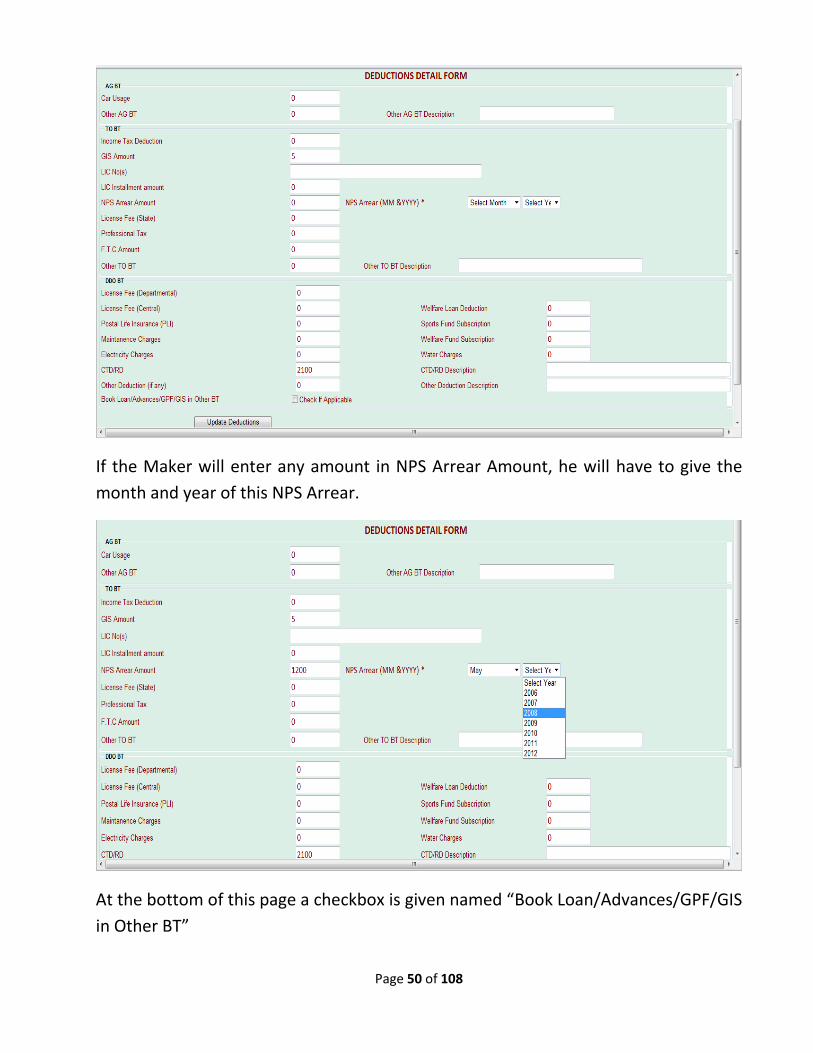
If the Maker will enter any amount in NPS Arrear Amount, he will have to give the
month and year of this NPS Arrear.
At the bottom of this page a checkbox is given named “Book Loan/Advances/GPF/GIS
in Other BT”
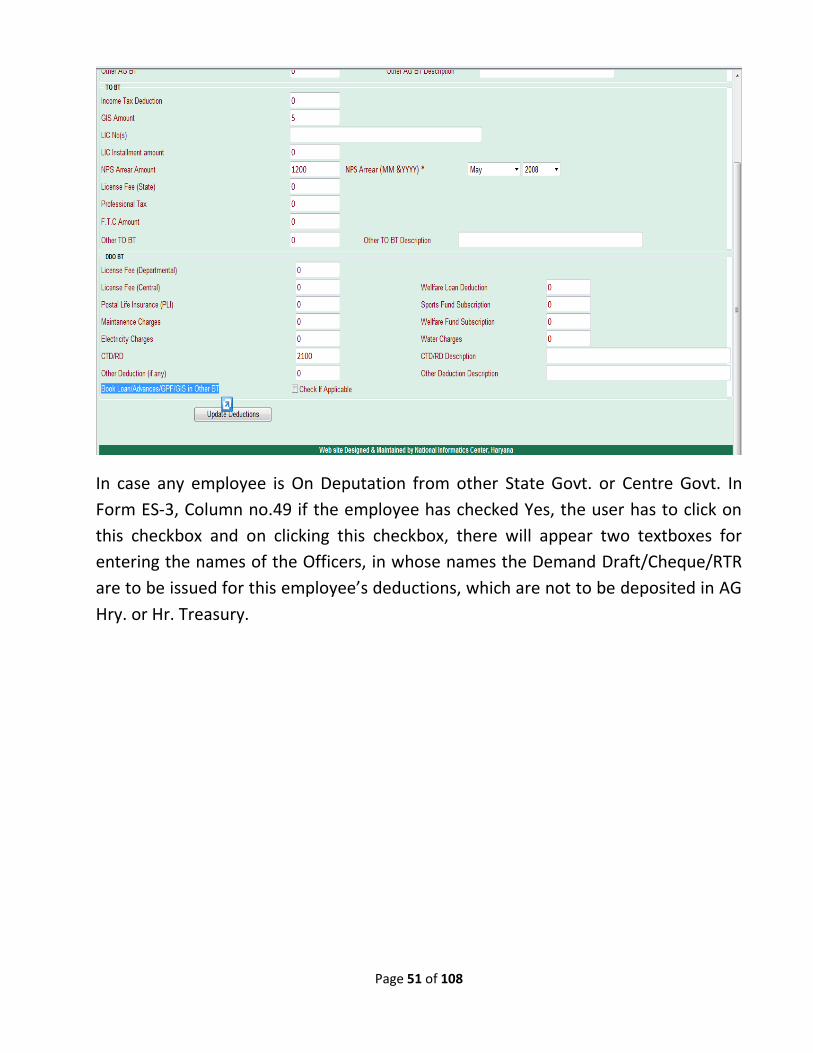
Page 51 of 108
In case any employee is On Deputation from other State Govt. or Centre Govt. In
Form ES-3, Column no.49 if the employee has checked Yes, the user has to click on
this checkbox and on clicking this checkbox, there will appear two textboxes for
entering the names of the Officers, in whose names the Demand Draft/Cheque/RTR
are to be issued for this employee’s deductions, which are not to be deposited in AG
Hry. or Hr. Treasury.

Page 52 of 108
After this step the Maker will save this page and the new page for Loans and
advances detail will appear.
Page 53 of 108
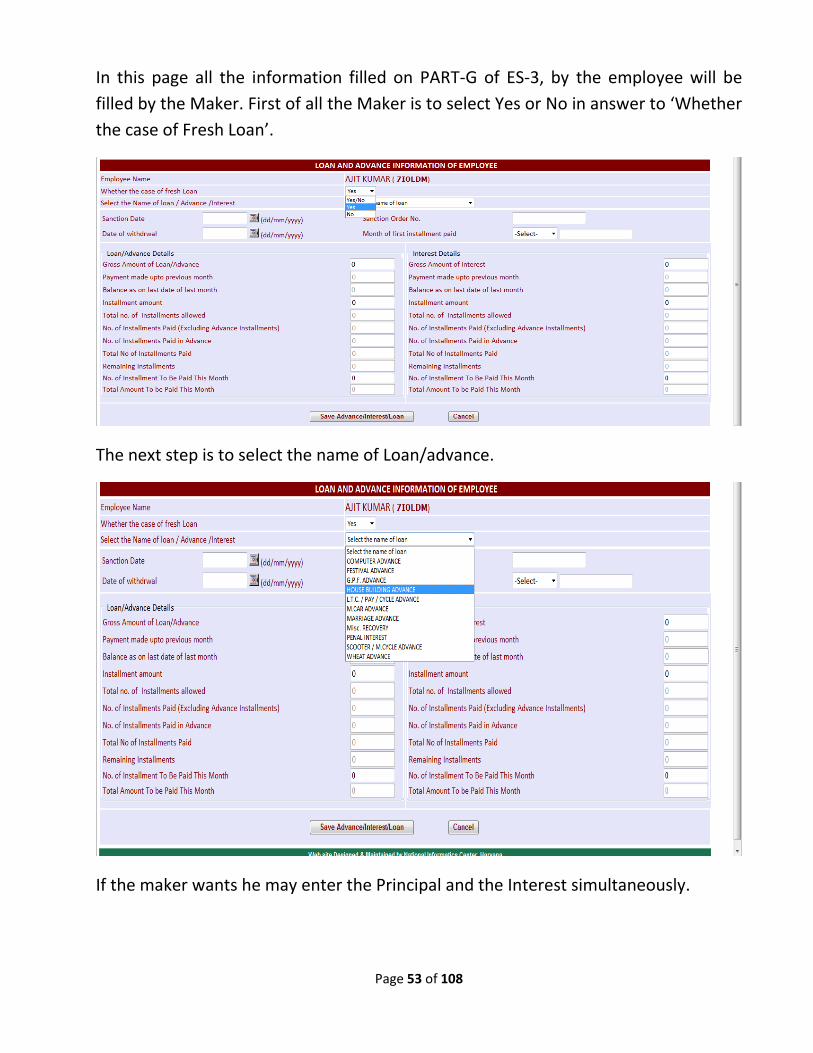
In this page all the information filled on PART-G of ES-3, by the employee will be
filled by the Maker. First of all the Maker is to select Yes or No in answer to ‘Whether
the case of Fresh Loan’.
The next step is to select the name of Loan/advance.
If the maker wants he may enter the Principal and the Interest simultaneously.
Page 54 of 108
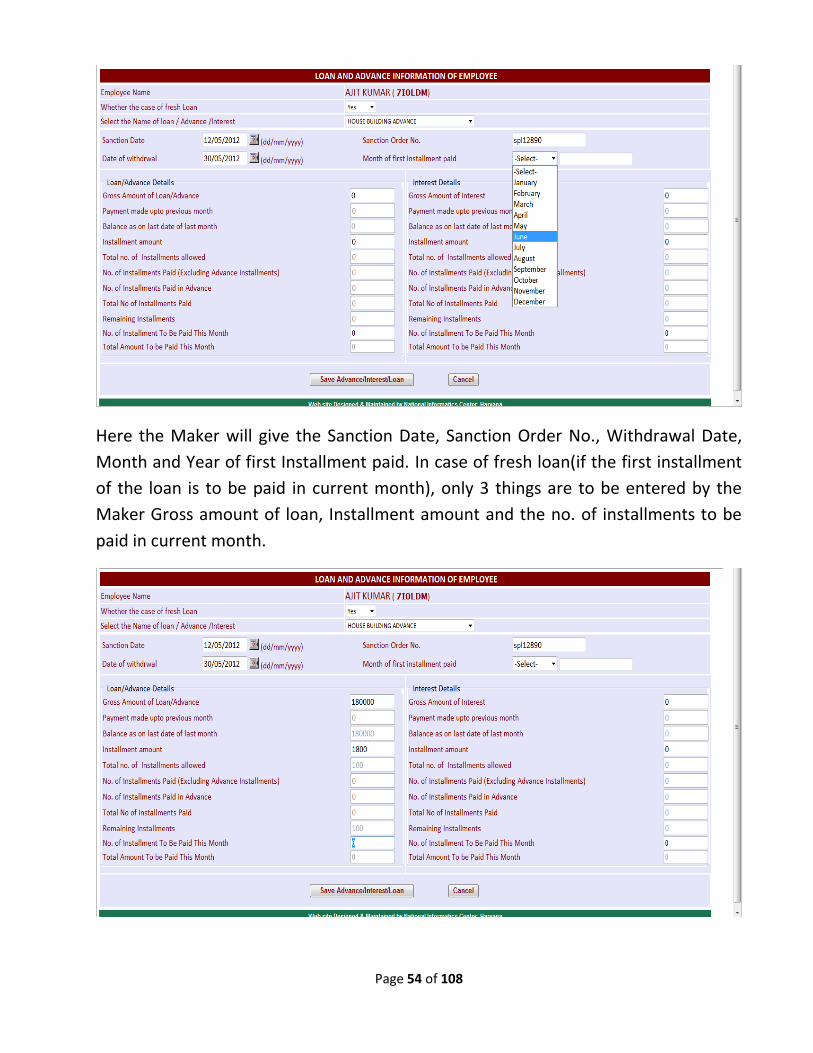
Here the Maker will give the Sanction Date, Sanction Order No., Withdrawal Date,
Month and Year of first Installment paid. In case of fresh loan(if the first installment
of the loan is to be paid in current month), only 3 things are to be entered by the
Maker Gross amount of loan, Installment amount and the no. of installments to be
paid in current month.
Page 55 of 108
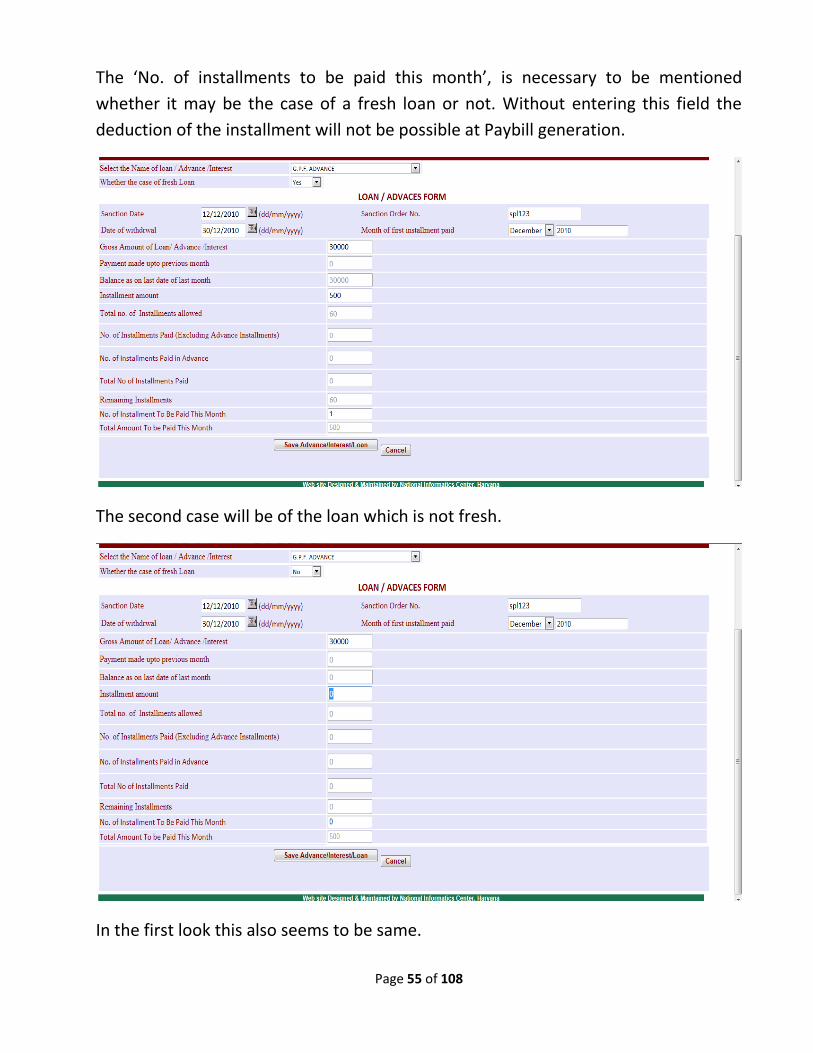
The ‘No. of installments to be paid this month’, is necessary to be mentioned
whether it may be the case of a fresh loan or not. Without entering this field the
deduction of the installment will not be possible at Paybill generation.
The second case will be of the loan which is not fresh.
In the first look this also seems to be same.
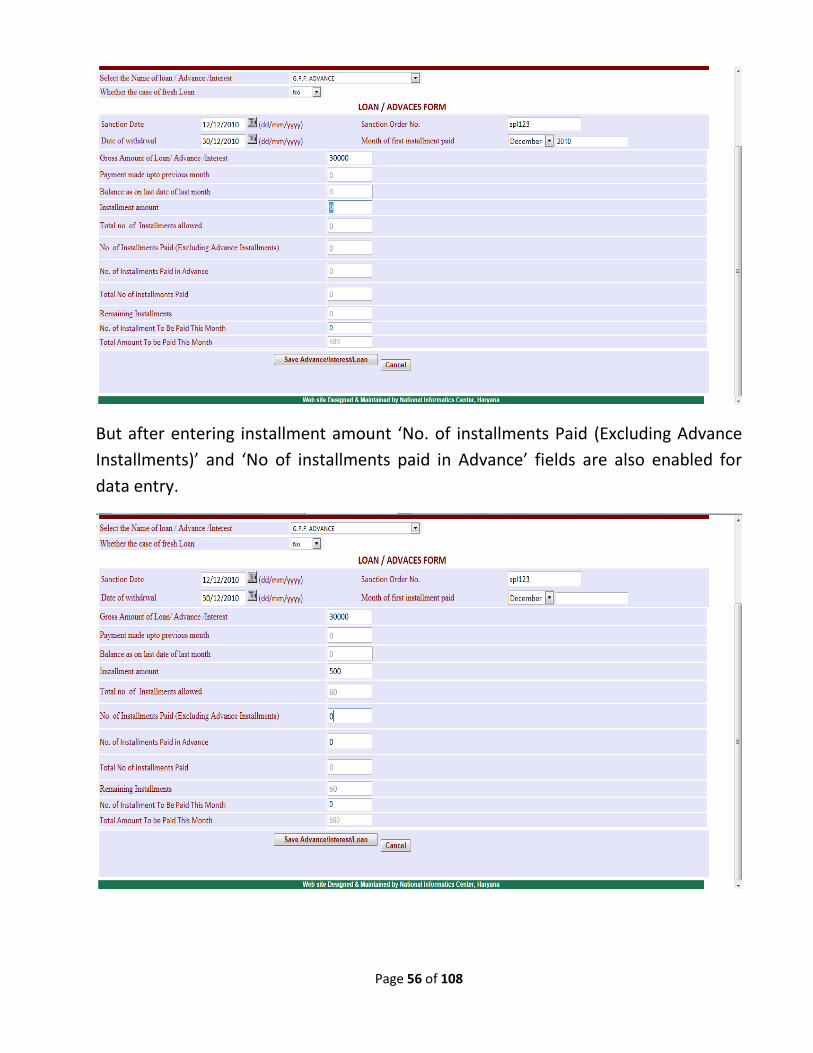
Page 56 of 108
But after entering installment amount ‘No. of installments Paid (Excluding Advance
Installments)’ and ‘No of installments paid in Advance’ fields are also enabled for
data entry.
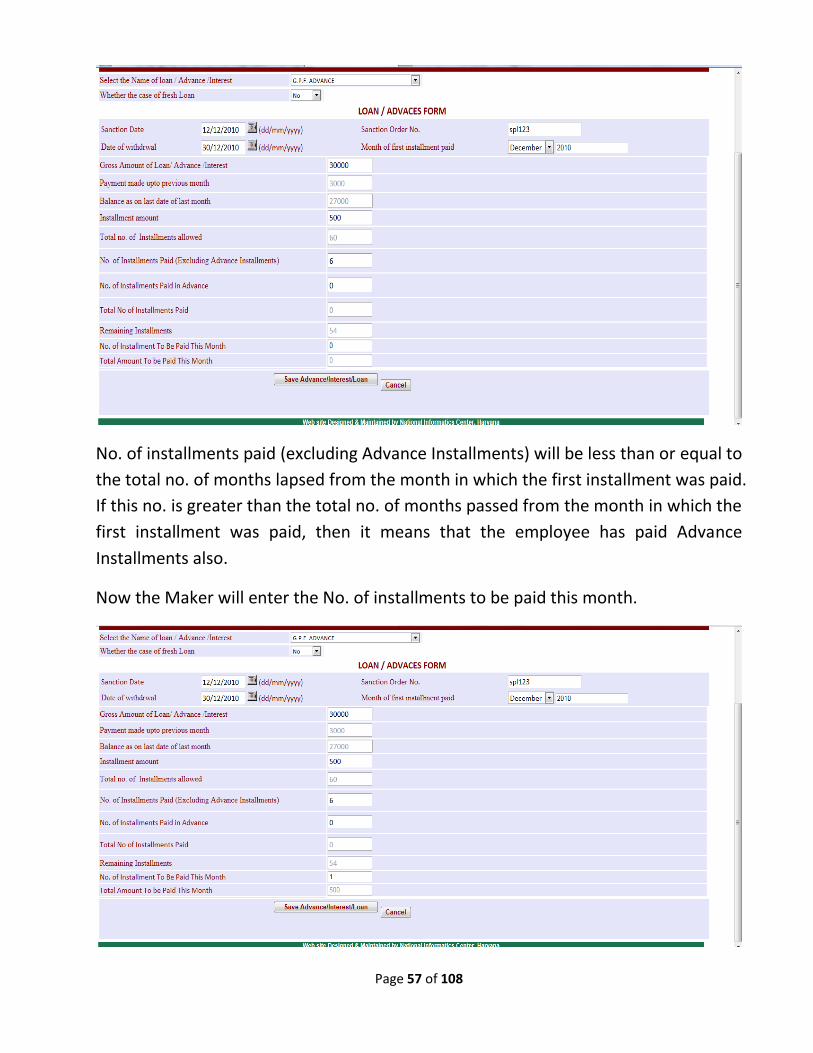
Page 57 of 108
No. of installments paid (excluding Advance Installments) will be less than or equal to
the total no. of months lapsed from the month in which the first installment was paid.
If this no. is greater than the total no. of months passed from the month in which the
first installment was paid, then it means that the employee has paid Advance
Installments also.
Now the Maker will enter the No. of installments to be paid this month.
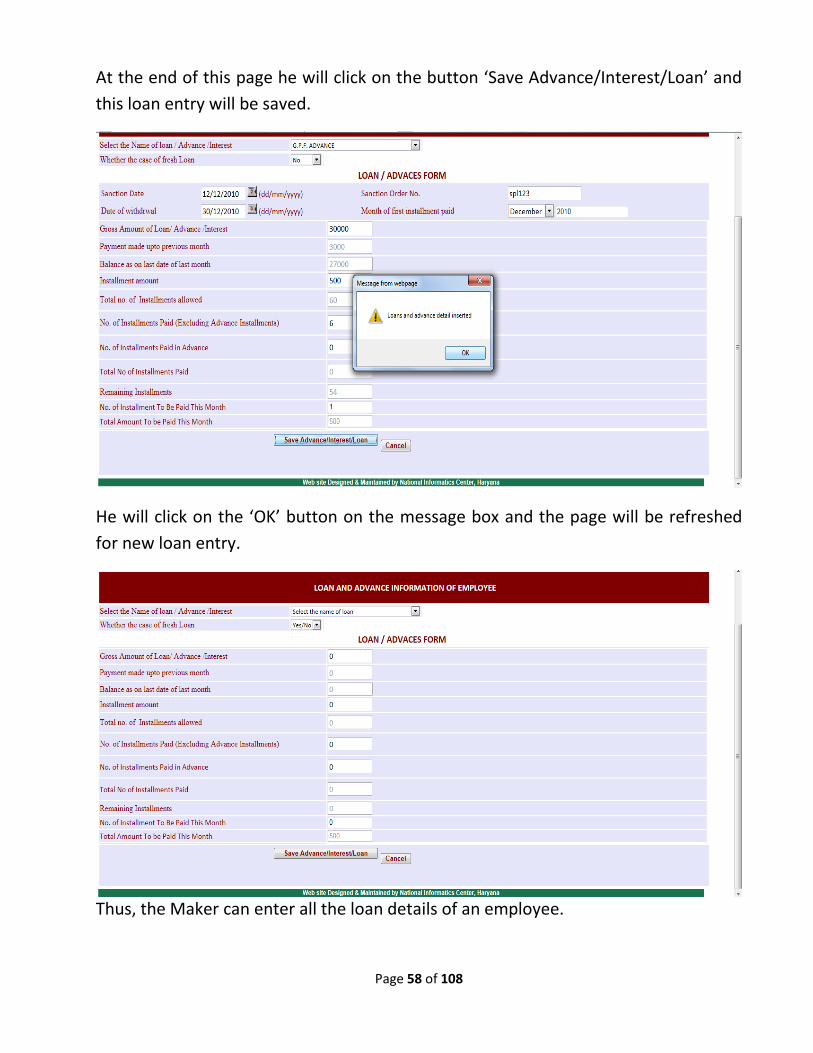
Page 58 of 108
At the end of this page he will click on the button ‘Save Advance/Interest/Loan’ and
this loan entry will be saved.
He will click on the ‘OK’ button on the message box and the page will be refreshed
for new loan entry.
Thus, the Maker can enter all the loan details of an employee.
Page 59 of 108
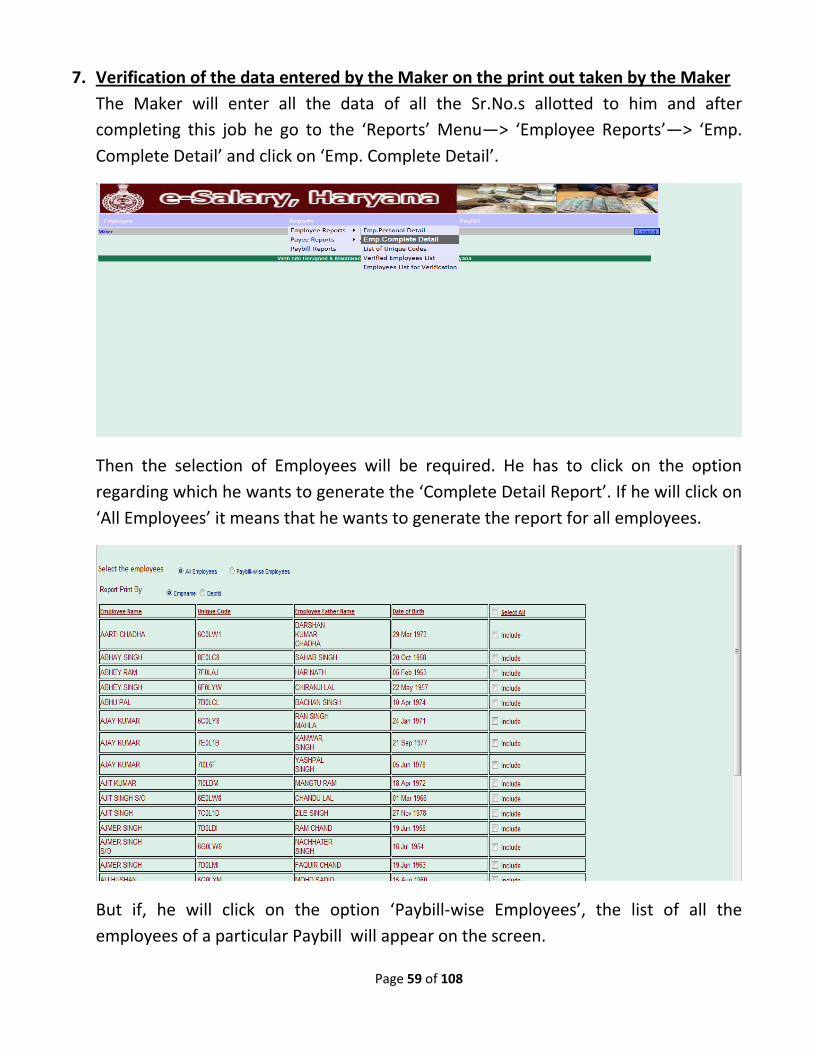
7. Verification of the data entered by the Maker on the print out taken by the Maker
The Maker will enter all the data of all the Sr.No.s allotted to him and after
completing this job he go to the ‘Reports’ Menu—> ‘Employee Reports’—> ‘Emp.
Complete Detail’ and click on ‘Emp. Complete Detail’.
Then the selection of Employees will be required. He has to click on the option
regarding which he wants to generate the ‘Complete Detail Report’. If he will click on
‘All Employees’ it means that he wants to generate the report for all employees.
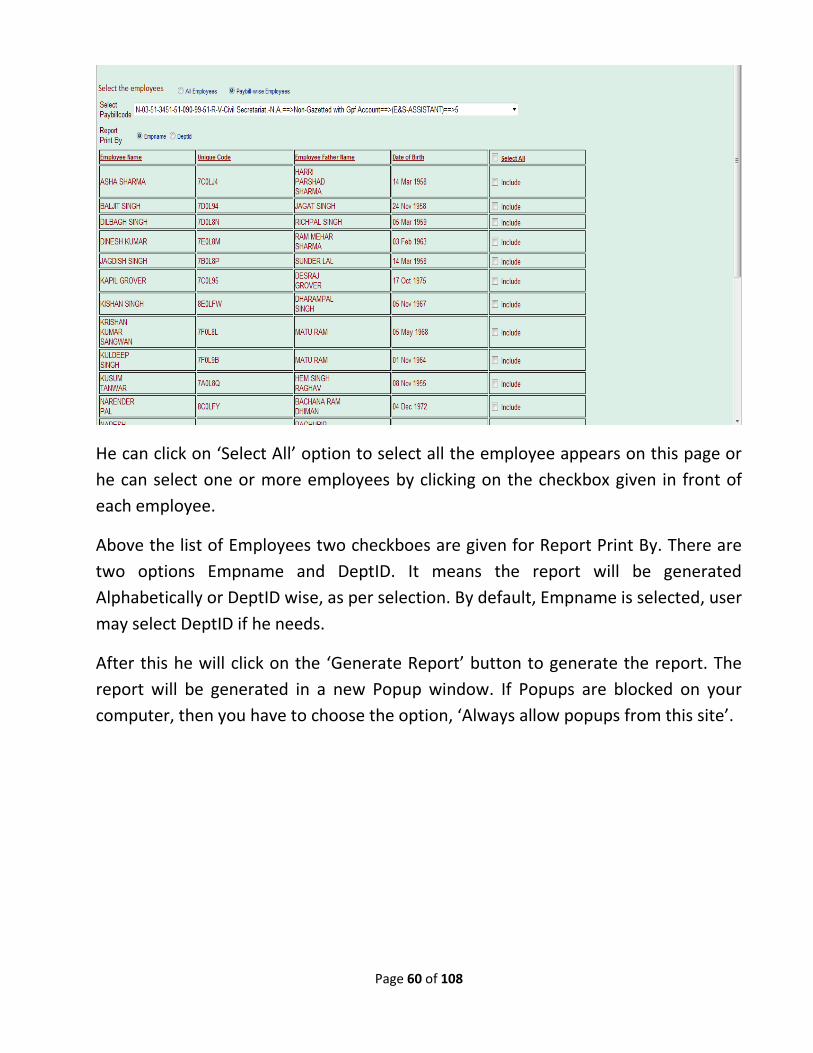
But if, he will click on the option ‘Paybill-wise Employees’, the list of all the
employees of a particular Paybill will appear on the screen.
Page 60 of 108
He can click on ‘Select All’ option to select all the employee appears on this page or
he can select one or more employees by clicking on the checkbox given in front of
each employee.
Above the list of Employees two checkboes are given for Report Print By. There are
two options Empname and DeptID. It means the report will be generated
Alphabetically or DeptID wise, as per selection. By default, Empname is selected, user
may select DeptID if he needs.
After this he will click on the ‘Generate Report’ button to generate the report. The
report will be generated in a new Popup window. If Popups are blocked on your
computer, then you have to choose the option, ‘Always allow popups from this site’.
Page 61 of 108
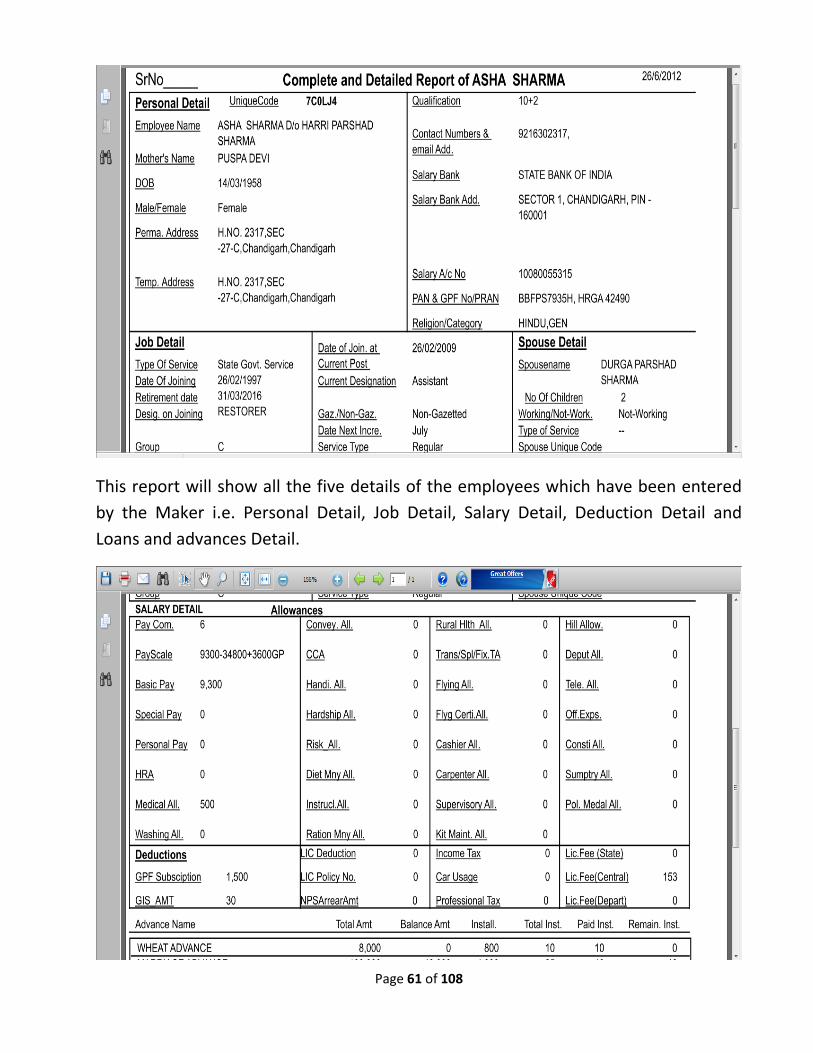
This report will show all the five details of the employees which have been entered
by the Maker i.e. Personal Detail, Job Detail, Salary Detail, Deduction Detail and
Loans and advances Detail.
Page 62 of 108
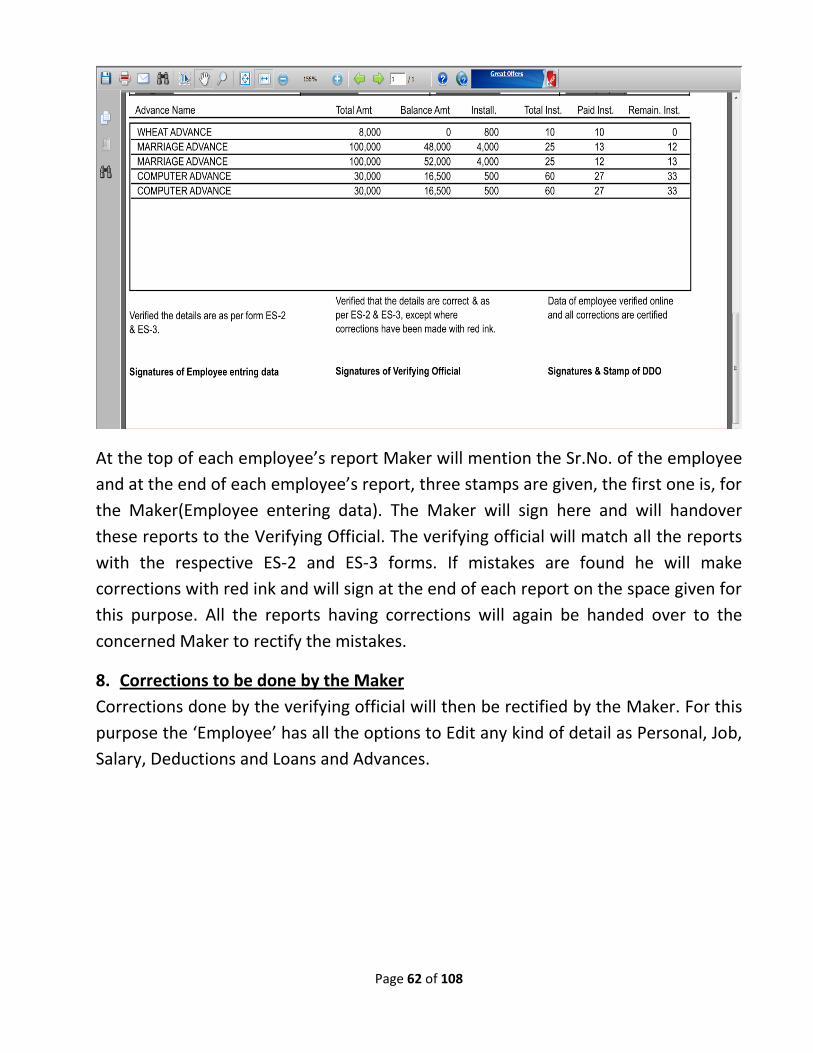
At the top of each employee’s report Maker will mention the Sr.No. of the employee
and at the end of each employee’s report, three stamps are given, the first one is, for
the Maker(Employee entering data). The Maker will sign here and will handover
these reports to the Verifying Official. The verifying official will match all the reports
with the respective ES-2 and ES-3 forms. If mistakes are found he will make
corrections with red ink and will sign at the end of each report on the space given for
this purpose. All the reports having corrections will again be handed over to the
concerned Maker to rectify the mistakes.
8. Corrections to be done by the Maker
Corrections done by the verifying official will then be rectified by the Maker. For this
purpose the ‘Employee’ has all the options to Edit any kind of detail as Personal, Job,
Salary, Deductions and Loans and Advances.
Page 63 of 108
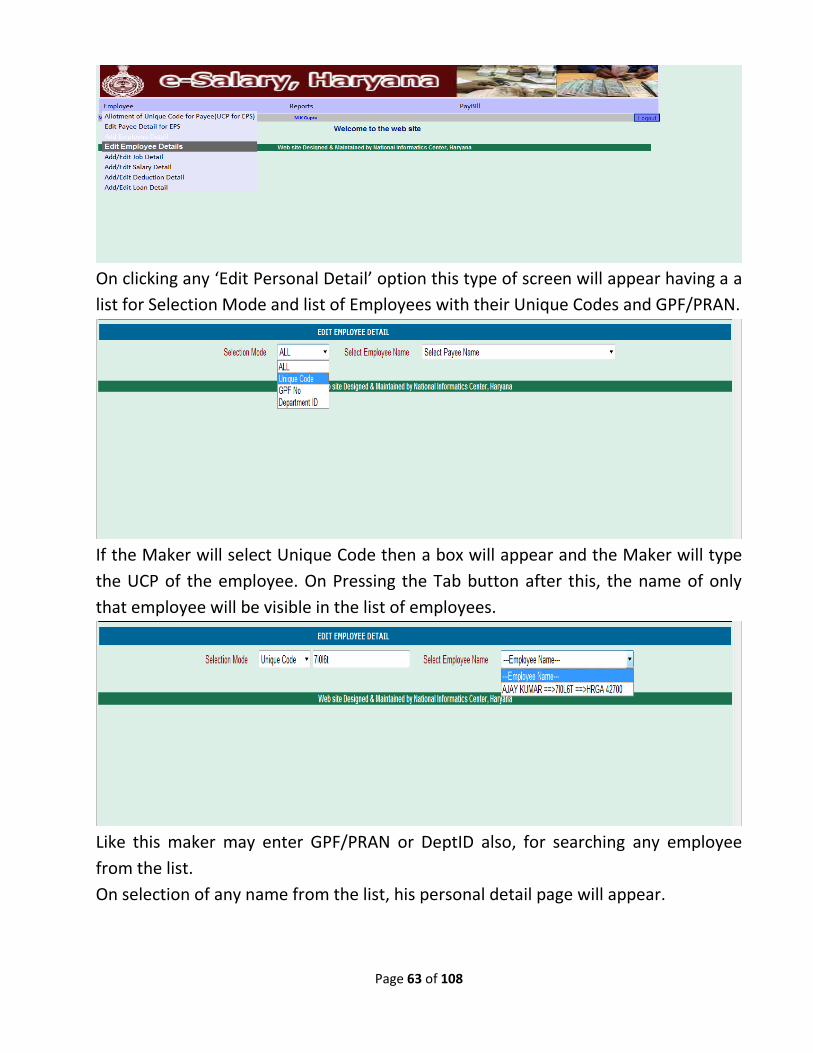
On clicking any ‘Edit Personal Detail’ option this type of screen will appear having a a
list for Selection Mode and list of Employees with their Unique Codes and GPF/PRAN.
If the Maker will select Unique Code then a box will appear and the Maker will type
the UCP of the employee. On Pressing the Tab button after this, the name of only
that employee will be visible in the list of employees.
Like this maker may enter GPF/PRAN or DeptID also, for searching any employee
from the list.
On selection of any name from the list, his personal detail page will appear.
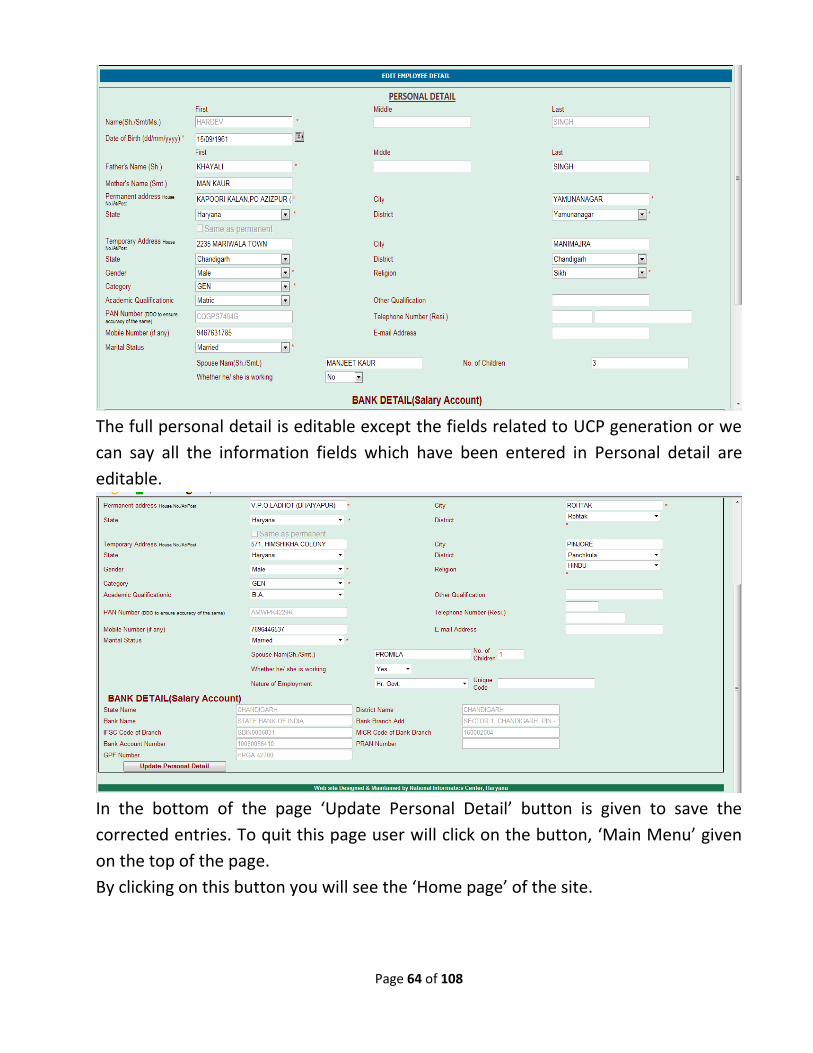
Page 64 of 108
The full personal detail is editable except the fields related to UCP generation or we
can say all the information fields which have been entered in Personal detail are
editable.
In the bottom of the page ‘Update Personal Detail’ button is given to save the
corrected entries. To quit this page user will click on the button, ‘Main Menu’ given
on the top of the page.
By clicking on this button you will see the ‘Home page’ of the site.
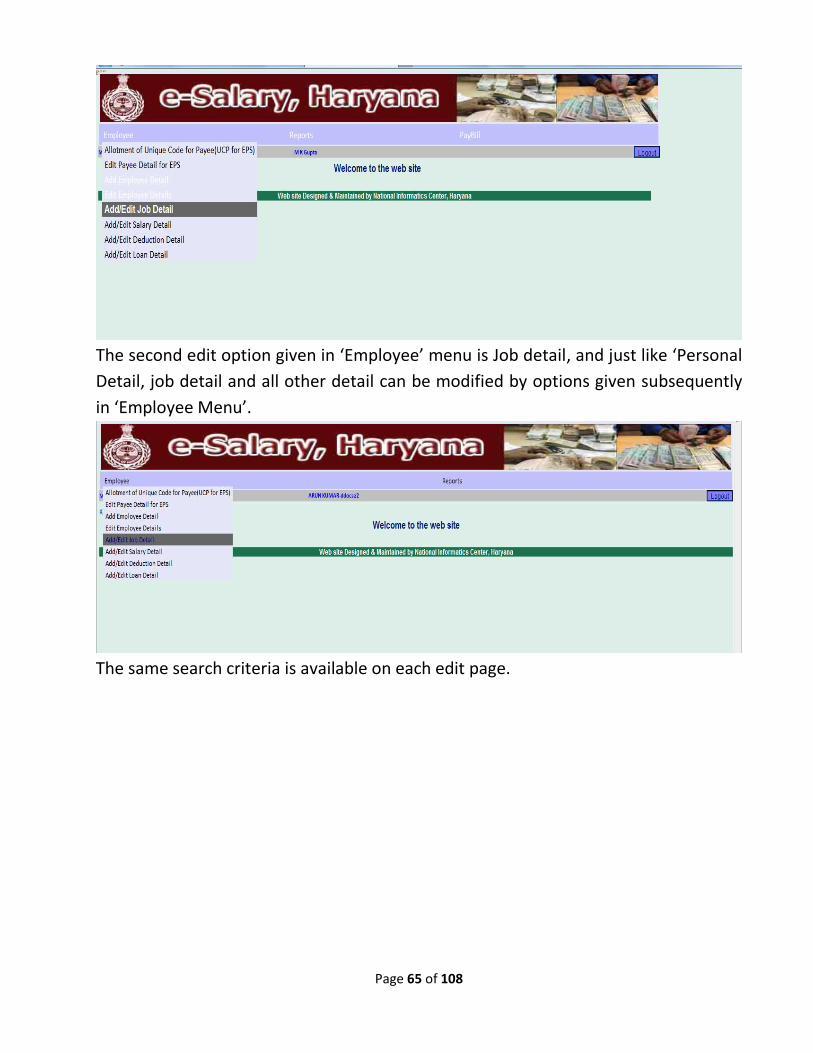
Page 65 of 108
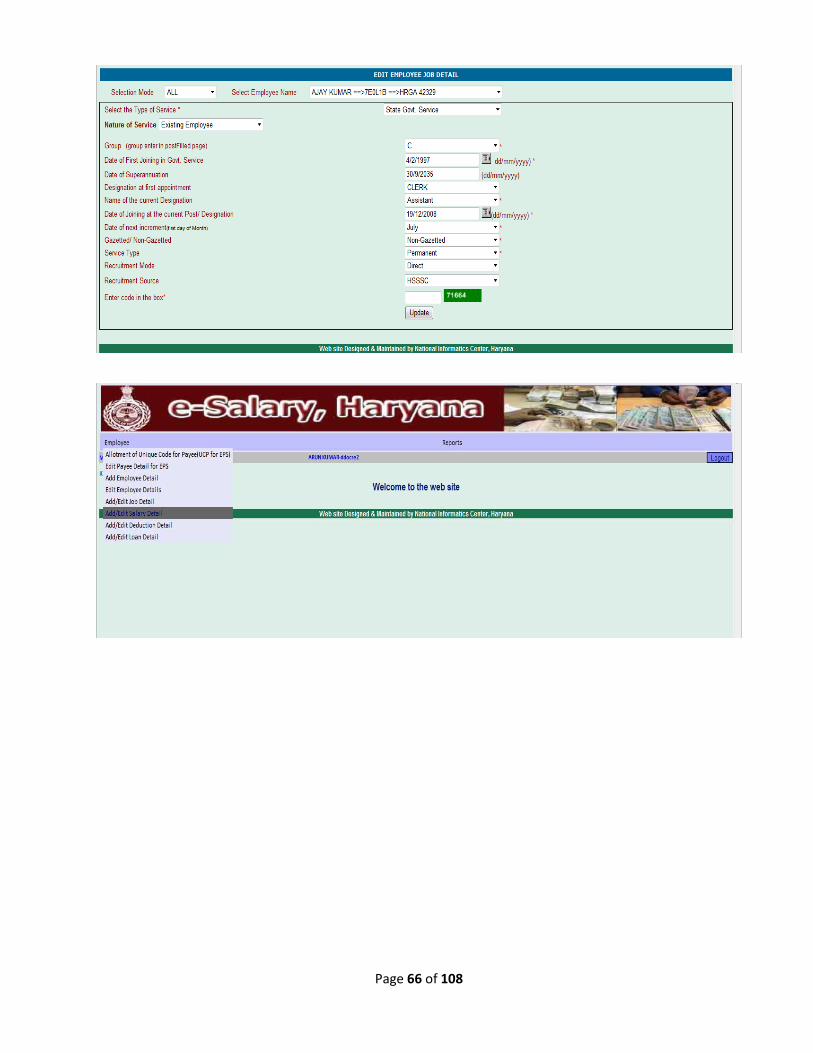
The second edit option given in ‘Employee’ menu is Job detail, and just like ‘Personal
Detail, job detail and all other detail can be modified by options given subsequently
in ‘Employee Menu’.
The same search criteria is available on each edit page.
Page 66 of 108
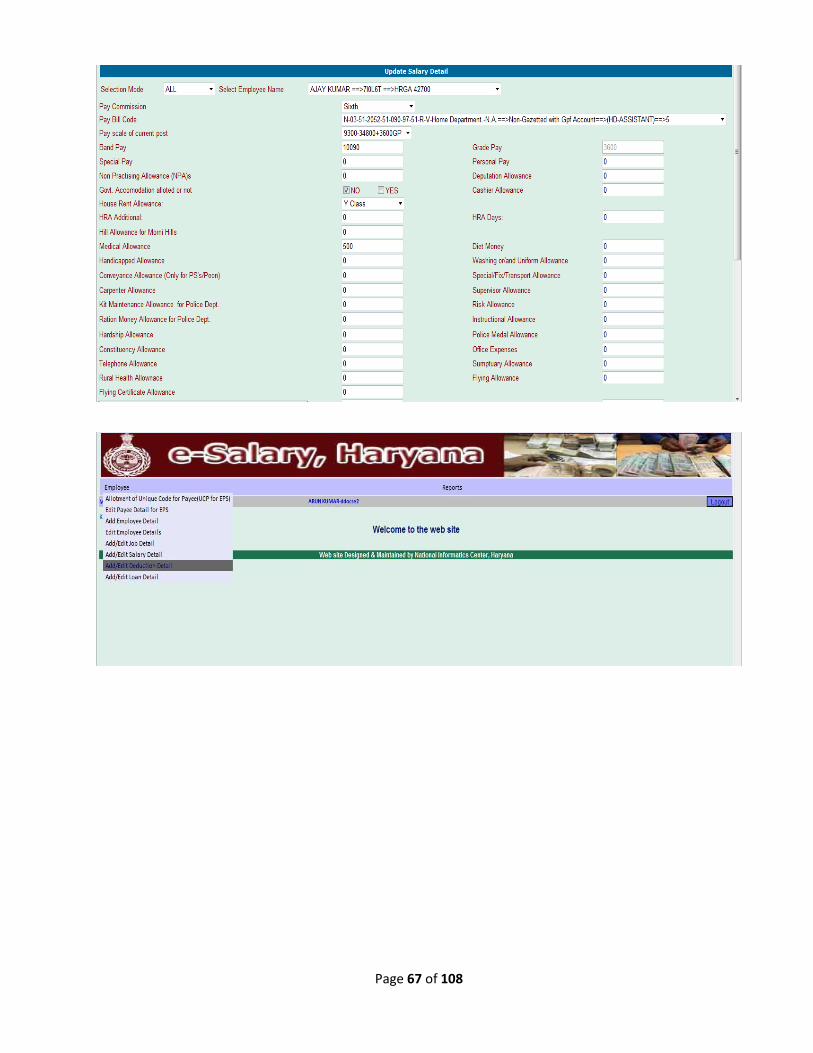
Page 67 of 108

Page 68 of 108
Here only those Loans will be visible for editing, which are related to this employee.
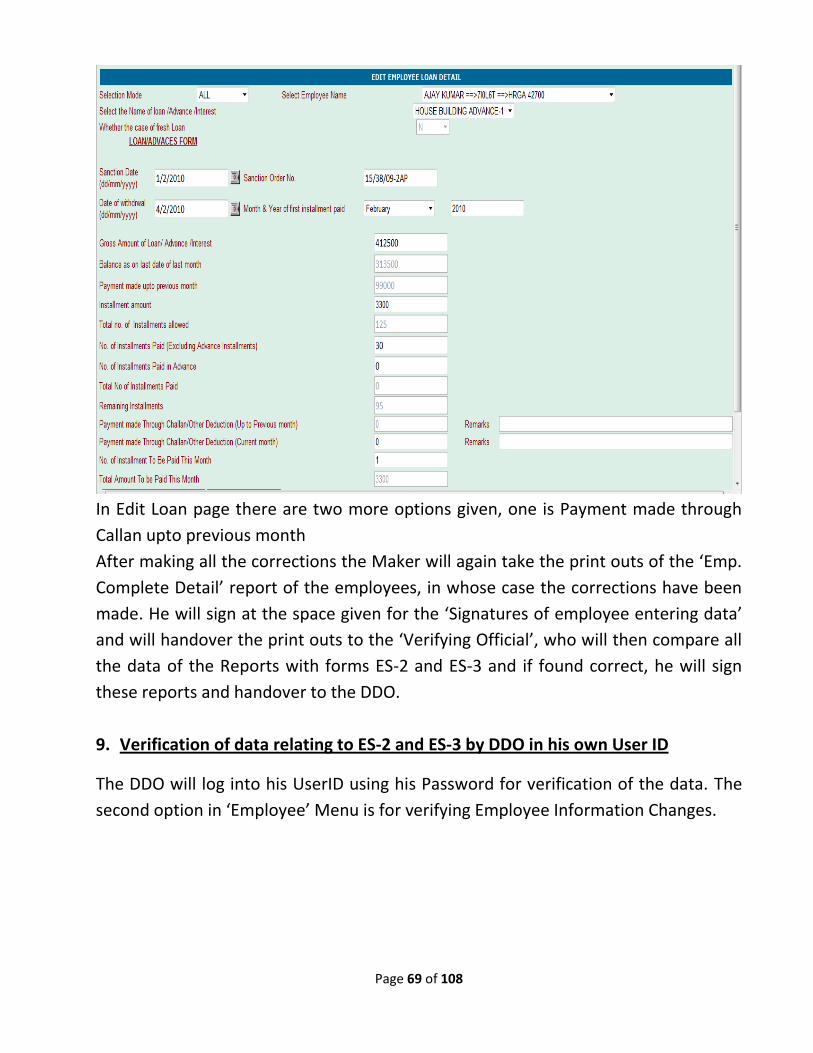
Page 69 of 108
In Edit Loan page there are two more options given, one is Payment made through
Callan upto previous month
After making all the corrections the Maker will again take the print outs of the ‘Emp.
Complete Detail’ report of the employees, in whose case the corrections have been
made. He will sign at the space given for the ‘Signatures of employee entering data’
and will handover the print outs to the ‘Verifying Official’, who will then compare all
the data of the Reports with forms ES-2 and ES-3 and if found correct, he will sign
these reports and handover to the DDO.
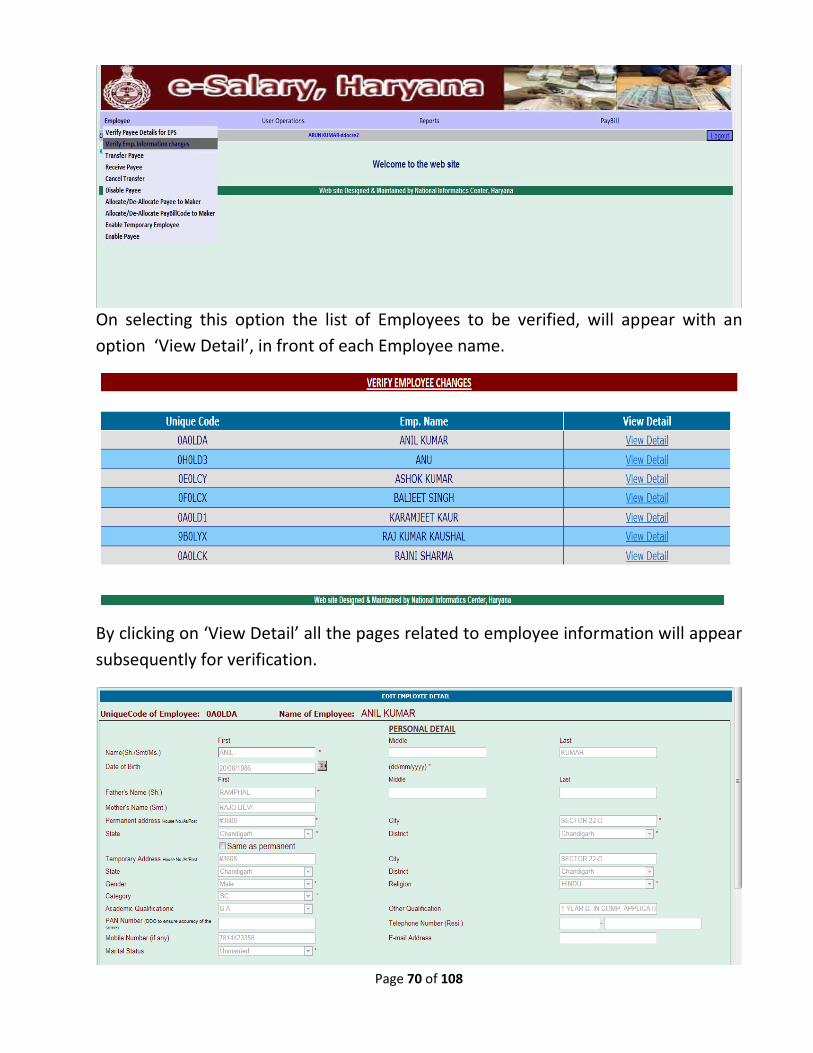
9. Verification of data relating to ES-2 and ES-3 by DDO in his own User ID
The DDO will log into his UserID using his Password for verification of the data. The
second option in ‘Employee’ Menu is for verifying Employee Information Changes.
Page 70 of 108
On selecting this option the list of Employees to be verified, will appear with an
option ‘View Detail’, in front of each Employee name.
By clicking on ‘View Detail’ all the pages related to employee information will appear
subsequently for verification.
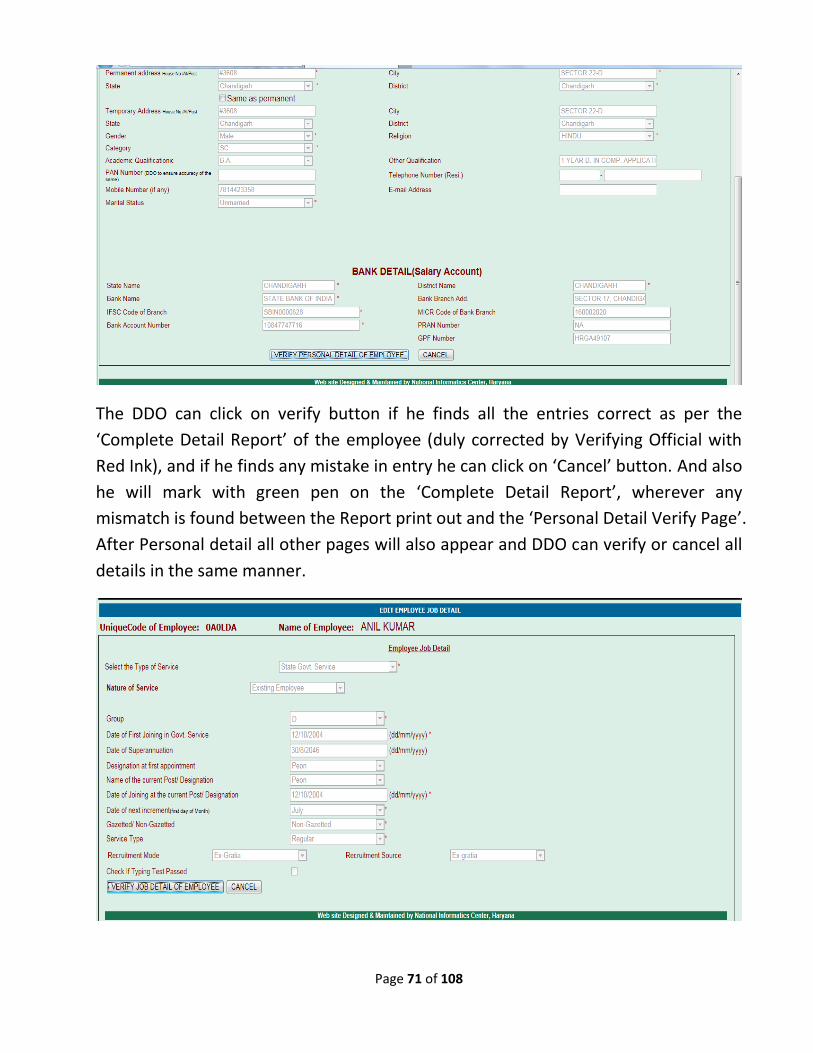
Page 71 of 108
The DDO can click on verify button if he finds all the entries correct as per the
‘Complete Detail Report’ of the employee (duly corrected by Verifying Official with
Red Ink), and if he finds any mistake in entry he can click on ‘Cancel’ button. And also
he will mark with green pen on the ‘Complete Detail Report’, wherever any
mismatch is found between the Report print out and the ‘Personal Detail Verify Page’.
After Personal detail all other pages will also appear and DDO can verify or cancel all
details in the same manner.

Page 72 of 108
When he will verify the last detail of the Employee, the message ’Record verified
successfully will appear. By clicking on OK this employee’s Name and Unique Code
Page 73 of 108
will disappear from the list of Employees for verification. Now the DDO will put his
signatures at the space given for this purpose, on the ‘Complete Detail Report’ of the
employee, whose complete record has been verified successfully.
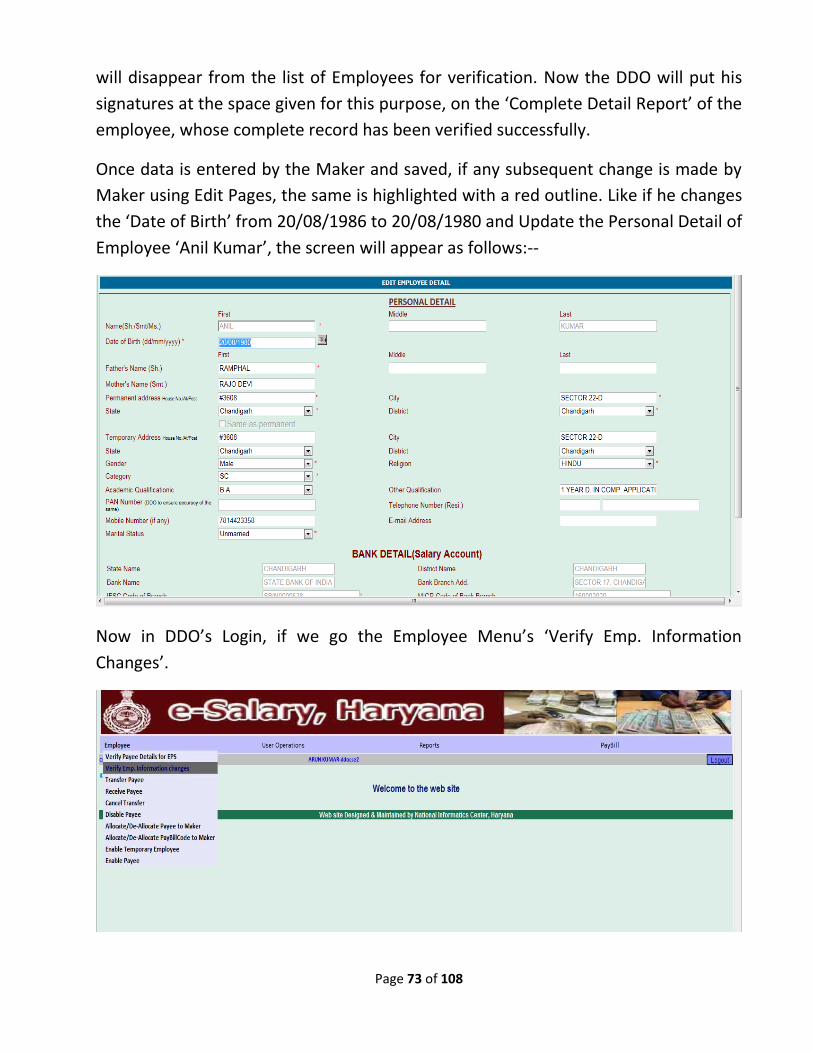
Once data is entered by the Maker and saved, if any subsequent change is made by
Maker using Edit Pages, the same is highlighted with a red outline. Like if he changes
the ‘Date of Birth’ from 20/08/1986 to 20/08/1980 and Update the Personal Detail of
Employee ‘Anil Kumar’, the screen will appear as follows:--
Now in DDO’s Login, if we go the Employee Menu’s ‘Verify Emp. Information
Changes’.
Page 74 of 108
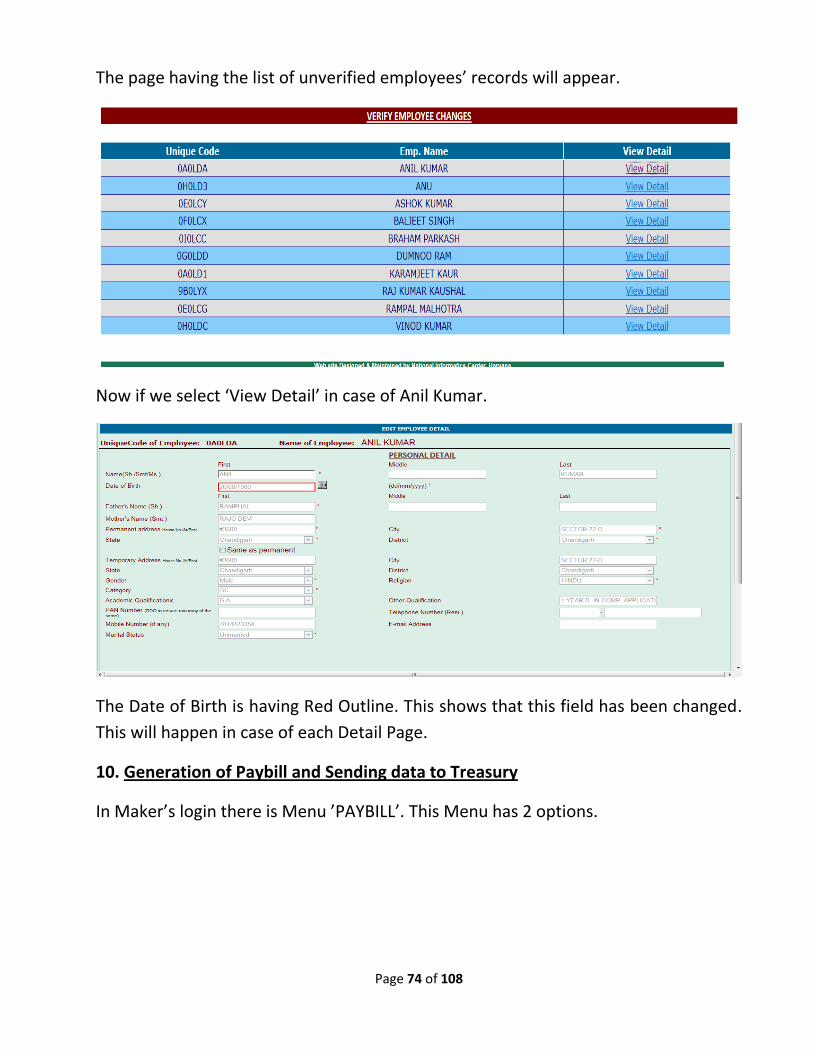
The page having the list of unverified employees’ records will appear.
Now if we select ‘View Detail’ in case of Anil Kumar.
The Date of Birth is having Red Outline. This shows that this field has been changed.
This will happen in case of each Detail Page.
10. Generation of Paybill and Sending data to Treasury
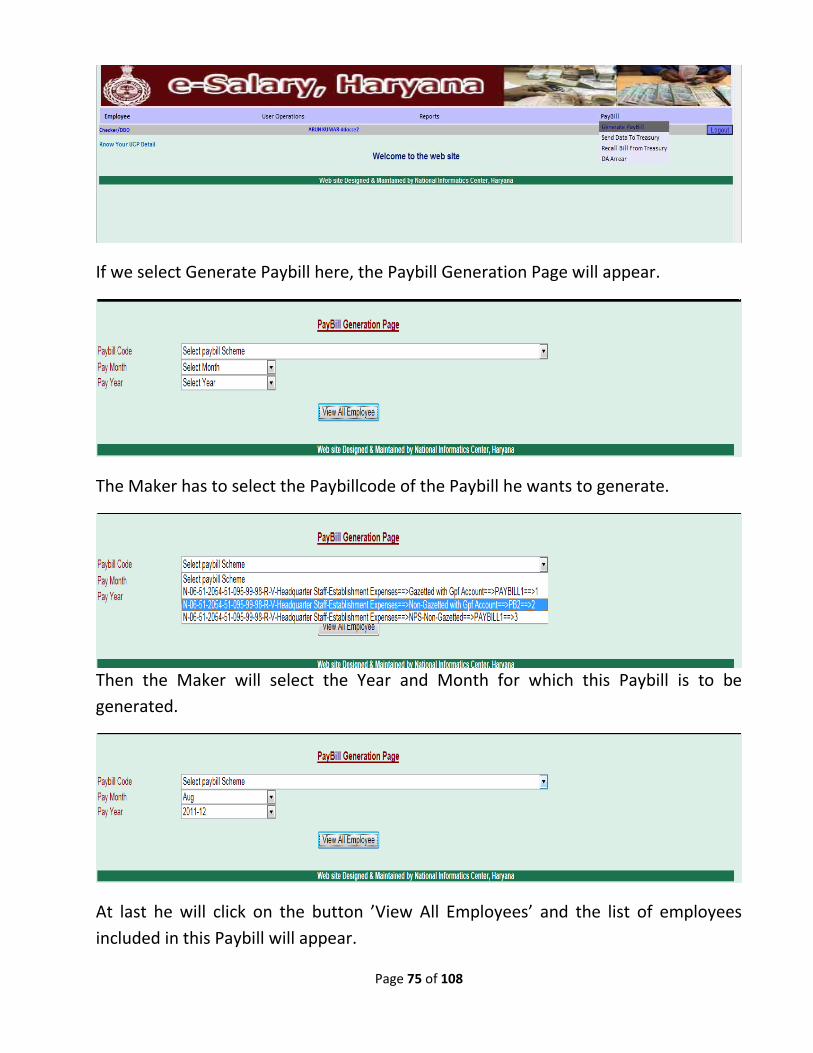
In Maker’s login there is Menu ’PAYBILL’. This Menu has 2 options.
Page 75 of 108
If we select Generate Paybill here, the Paybill Generation Page will appear.
The Maker has to select the Paybillcode of the Paybill he wants to generate.
Then the Maker will select the Year and Month for which this Paybill is to be
generated.
At last he will click on the button ’View All Employees’ and the list of employees
included in this Paybill will appear.
Page 76 of 108
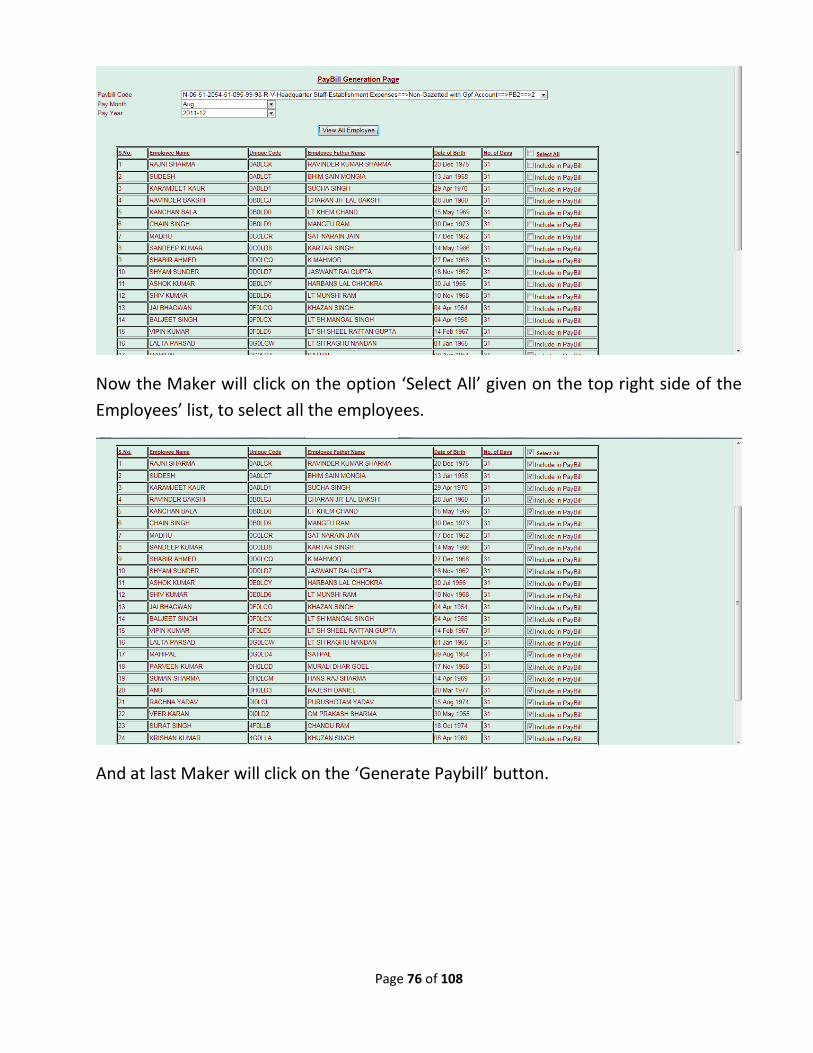
Now the Maker will click on the option ‘Select All’ given on the top right side of the
Employees’ list, to select all the employees.
And at last Maker will click on the ‘Generate Paybill’ button.
Page 77 of 108
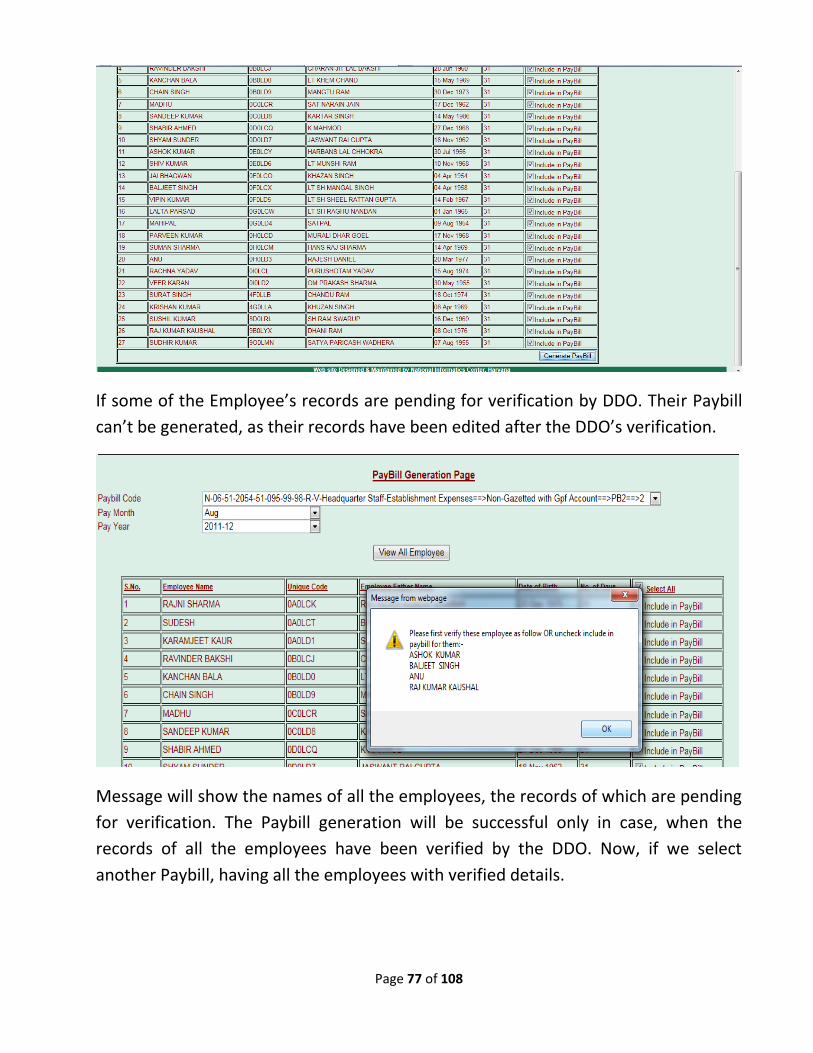
If some of the Employee’s records are pending for verification by DDO. Their Paybill
can’t be generated, as their records have been edited after the DDO’s verification.
Message will show the names of all the employees, the records of which are pending
for verification. The Paybill generation will be successful only in case, when the
records of all the employees have been verified by the DDO. Now, if we select
another Paybill, having all the employees with verified details.
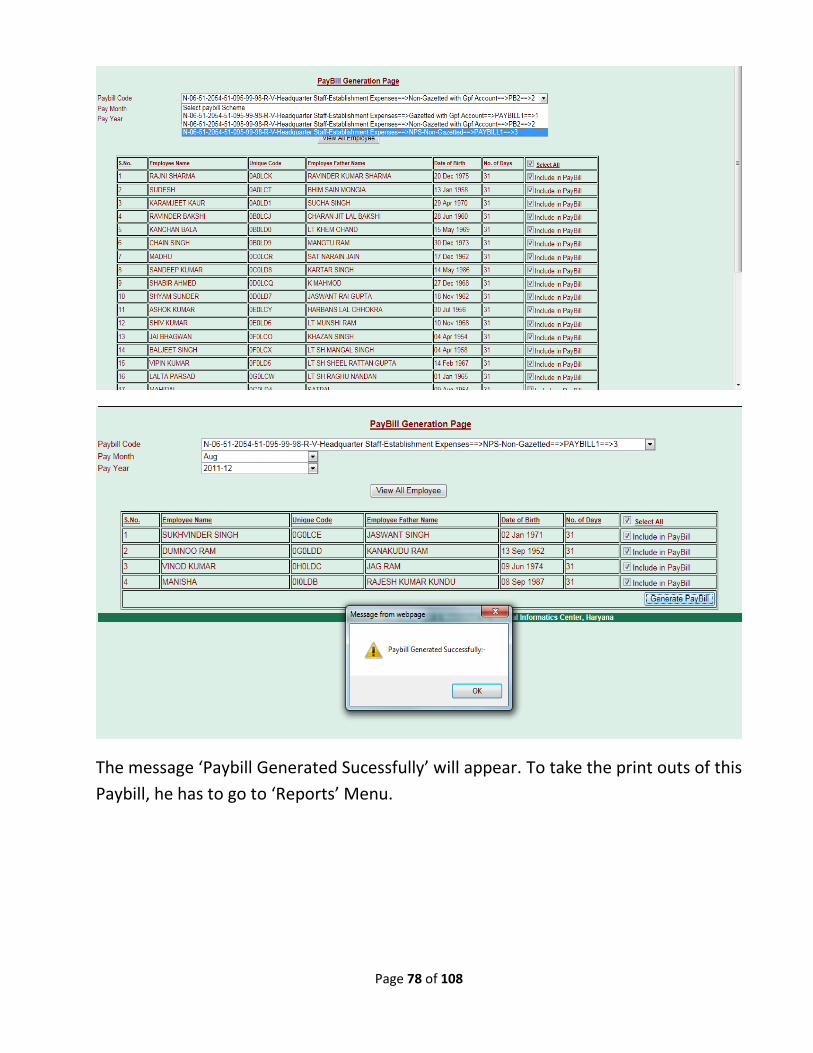
Page 78 of 108
The message ‘Paybill Generated Sucessfully’ will appear. To take the print outs of this
Paybill, he has to go to ‘Reports’ Menu.
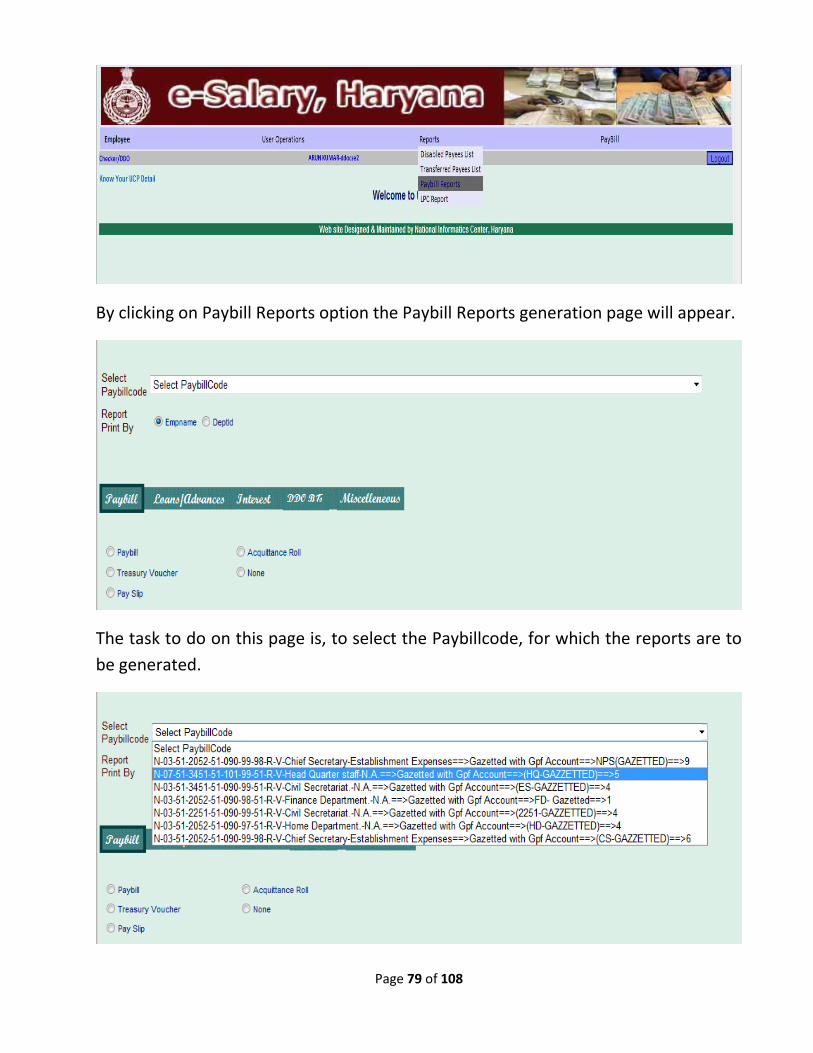
Page 79 of 108
By clicking on Paybill Reports option the Paybill Reports generation page will appear.
The task to do on this page is, to select the Paybillcode, for which the reports are to
be generated.
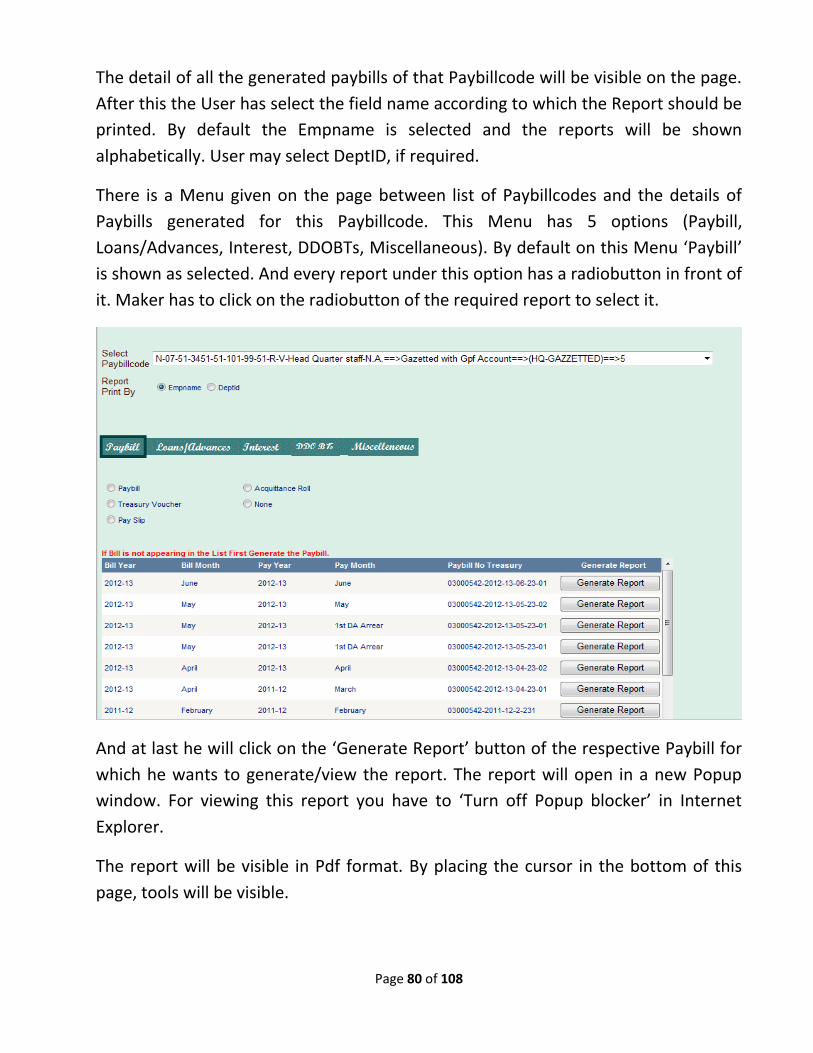
Page 80 of 108
The detail of all the generated paybills of that Paybillcode will be visible on the page.
After this the User has select the field name according to which the Report should be
printed. By default the Empname is selected and the reports will be shown
alphabetically. User may select DeptID, if required.
There is a Menu given on the page between list of Paybillcodes and the details of
Paybills generated for this Paybillcode. This Menu has 5 options (Paybill,
Loans/Advances, Interest, DDOBTs, Miscellaneous). By default on this Menu ‘Paybill’
is shown as selected. And every report under this option has a radiobutton in front of
it. Maker has to click on the radiobutton of the required report to select it.
And at last he will click on the ‘Generate Report’ button of the respective Paybill for
which he wants to generate/view the report. The report will open in a new Popup
window. For viewing this report you have to ‘Turn off Popup blocker’ in Internet
Explorer.
The report will be visible in Pdf format. By placing the cursor in the bottom of this
page, tools will be visible.
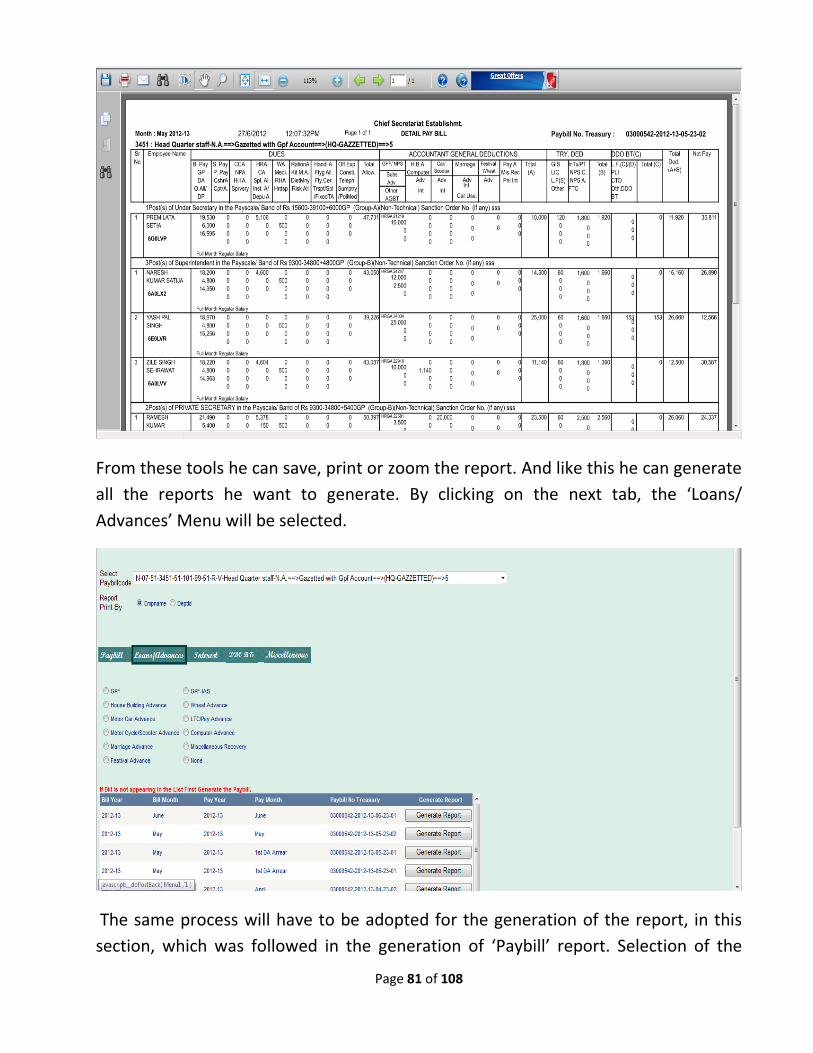
Page 81 of 108
From these tools he can save, print or zoom the report. And like this he can generate
all the reports he want to generate. By clicking on the next tab, the ‘Loans/
Advances’ Menu will be selected.
The same process will have to be adopted for the generation of the report, in this
section, which was followed in the generation of ‘Paybill’ report. Selection of the
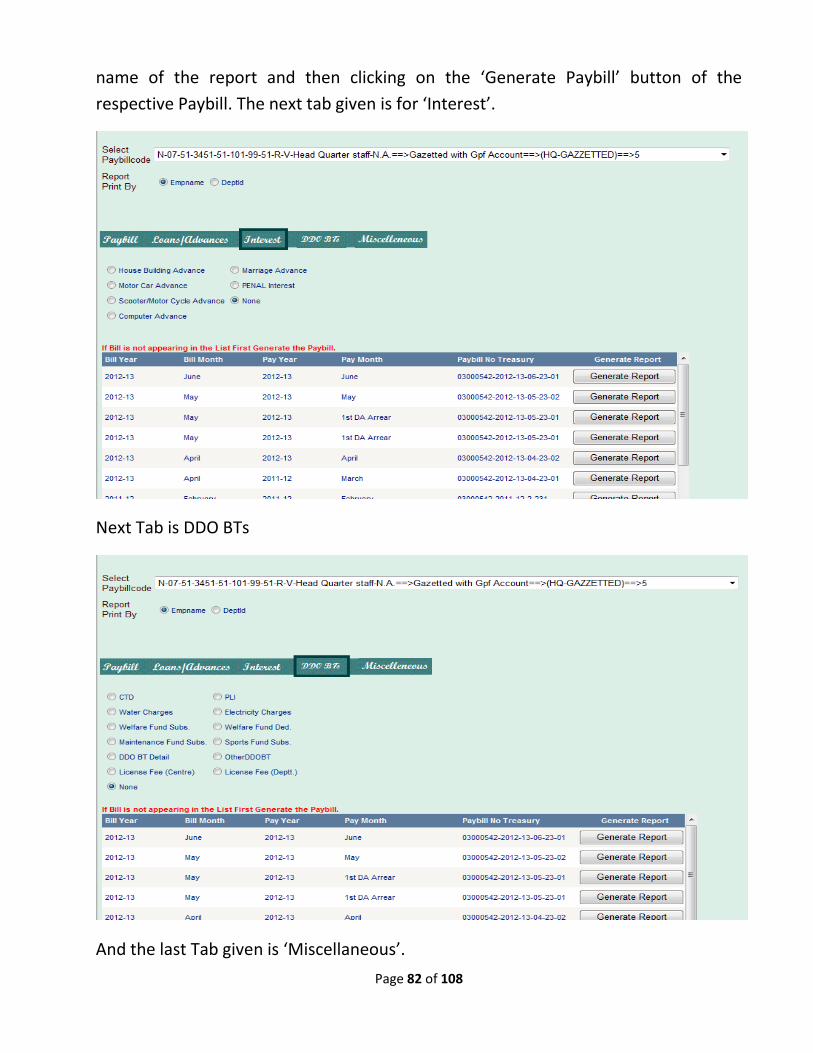
Page 82 of 108
name of the report and then clicking on the ‘Generate Paybill’ button of the
respective Paybill. The next tab given is for ‘Interest’.
Next Tab is DDO BTs
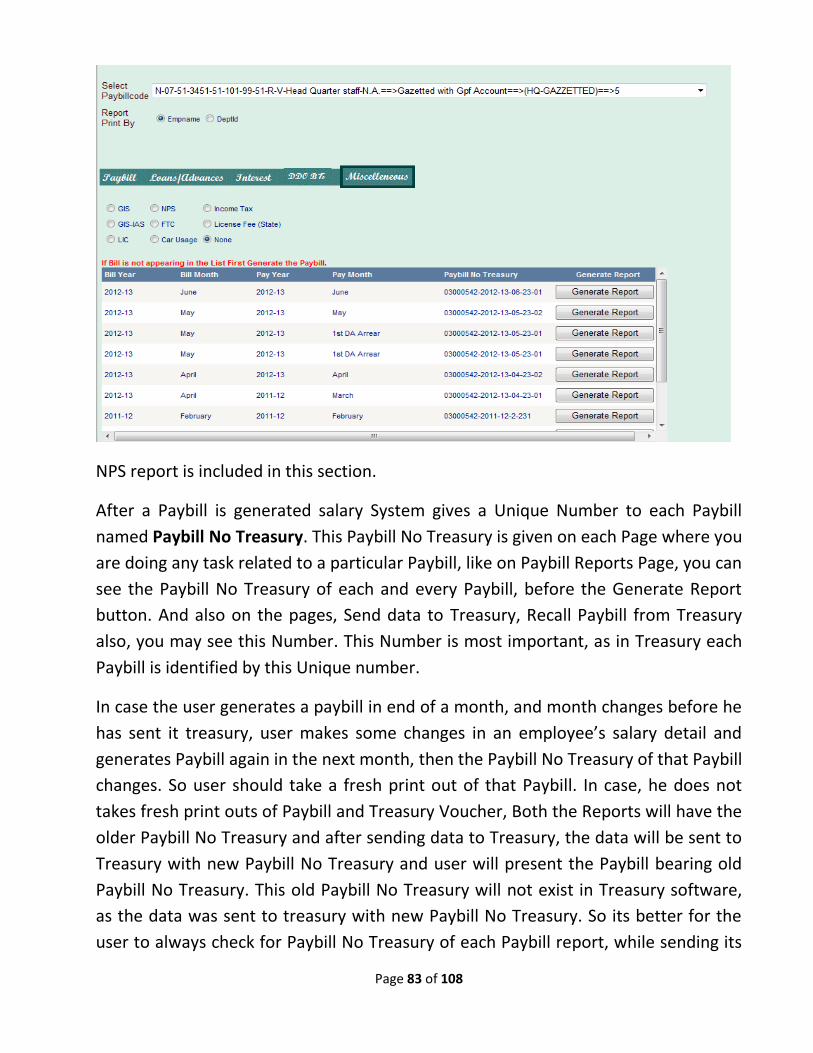
And the last Tab given is ‘Miscellaneous’.
Page 83 of 108
NPS report is included in this section.
After a Paybill is generated salary System gives a Unique Number to each Paybill
named Paybill No Treasury. This Paybill No Treasury is given on each Page where you
are doing any task related to a particular Paybill, like on Paybill Reports Page, you can
see the Paybill No Treasury of each and every Paybill, before the Generate Report
button. And also on the pages, Send data to Treasury, Recall Paybill from Treasury
also, you may see this Number. This Number is most important, as in Treasury each
Paybill is identified by this Unique number.
In case the user generates a paybill in end of a month, and month changes before he
has sent it treasury, user makes some changes in an employee’s salary detail and
generates Paybill again in the next month, then the Paybill No Treasury of that Paybill
changes. So user should take a fresh print out of that Paybill. In case, he does not
takes fresh print outs of Paybill and Treasury Voucher, Both the Reports will have the
older Paybill No Treasury and after sending data to Treasury, the data will be sent to
Treasury with new Paybill No Treasury and user will present the Paybill bearing old
Paybill No Treasury. This old Paybill No Treasury will not exist in Treasury software,
as the data was sent to treasury with new Paybill No Treasury. So its better for the
user to always check for Paybill No Treasury of each Paybill report, while sending its
Page 84 of 108
data to treasury, whether the Paybill No Treasury given on the “Send Data to
Treasury Page” and Paybill Report matches or not. The Number given on the page
“Send Data to Treasury” will always be the fresh number and your Paybill Reports
should also have the same number.
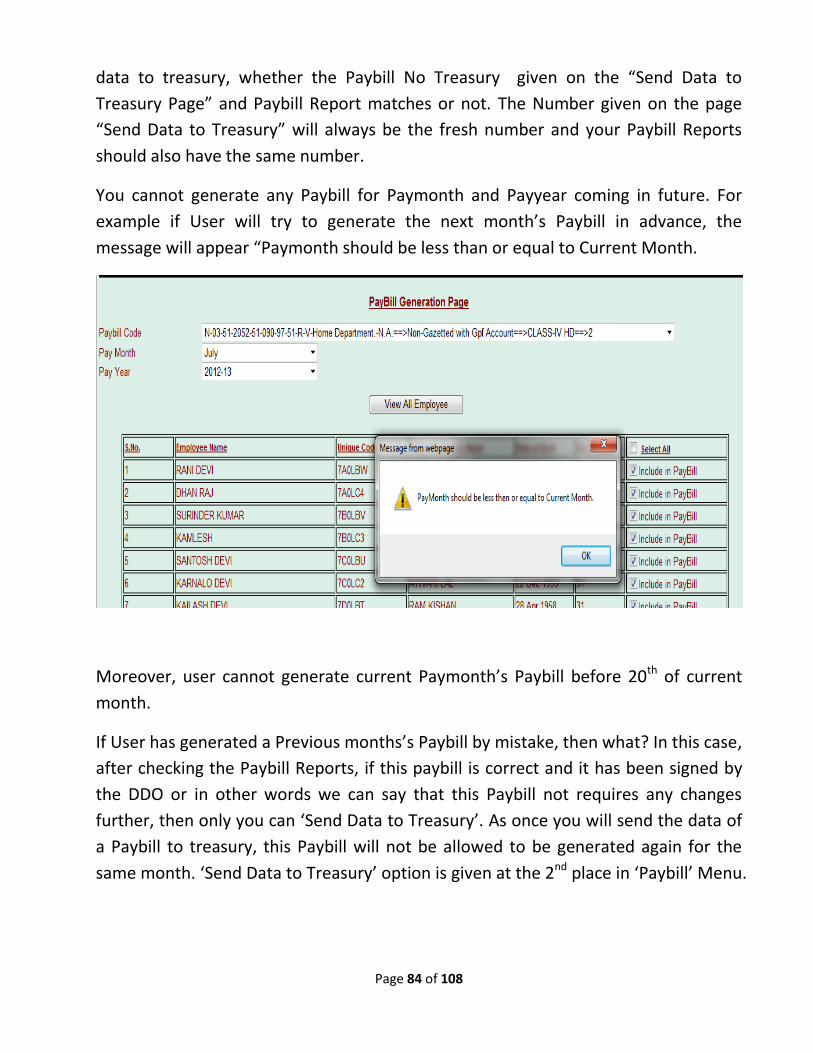
You cannot generate any Paybill for Paymonth and Payyear coming in future. For
example if User will try to generate the next month’s Paybill in advance, the
message will appear “Paymonth should be less than or equal to Current Month.
Moreover, user cannot generate current Paymonth’s Paybill before 20th of current
month.
If User has generated a Previous months’s Paybill by mistake, then what? In this case,
after checking the Paybill Reports, if this paybill is correct and it has been signed by
the DDO or in other words we can say that this Paybill not requires any changes
further, then only you can ‘Send Data to Treasury’. As once you will send the data of
a Paybill to treasury, this Paybill will not be allowed to be generated again for the
same month. ‘Send Data to Treasury’ option is given at the 2nd place in ‘Paybill’ Menu.
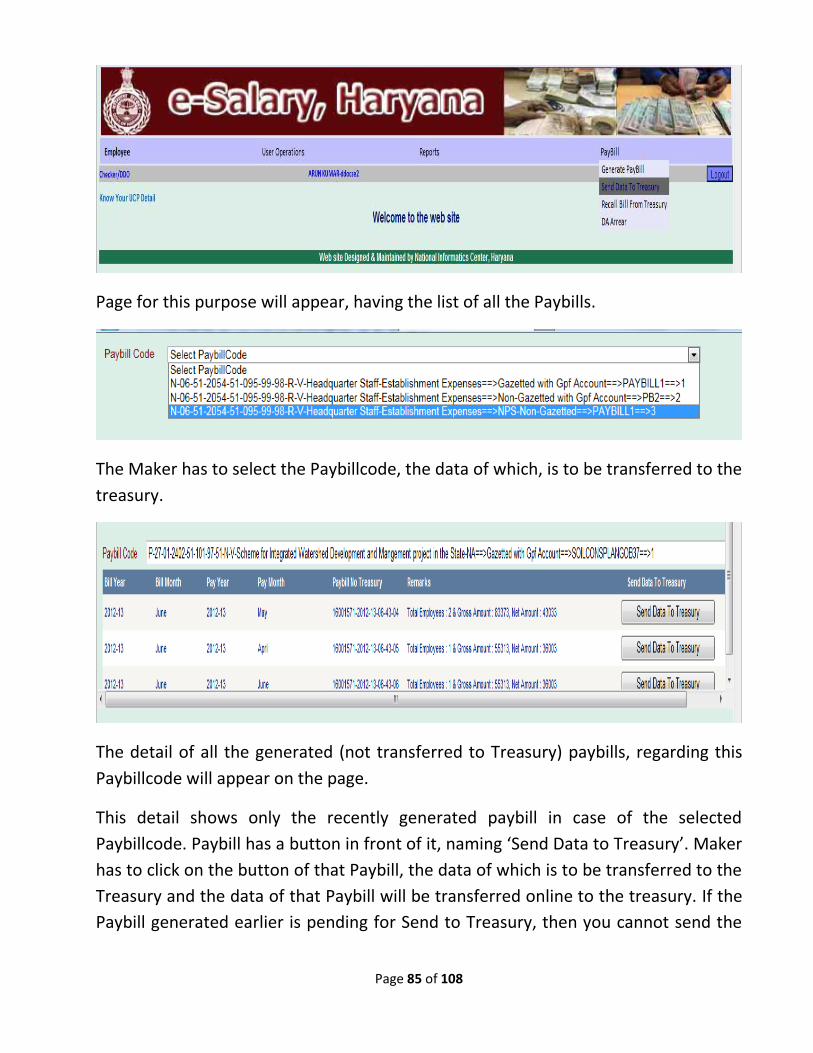
Page 85 of 108
Page for this purpose will appear, having the list of all the Paybills.
The Maker has to select the Paybillcode, the data of which, is to be transferred to the
treasury.
The detail of all the generated (not transferred to Treasury) paybills, regarding this
Paybillcode will appear on the page.
This detail shows only the recently generated paybill in case of the selected
Paybillcode. Paybill has a button in front of it, naming ‘Send Data to Treasury’. Maker
has to click on the button of that Paybill, the data of which is to be transferred to the
Treasury and the data of that Paybill will be transferred online to the treasury. If the
Paybill generated earlier is pending for Send to Treasury, then you cannot send the
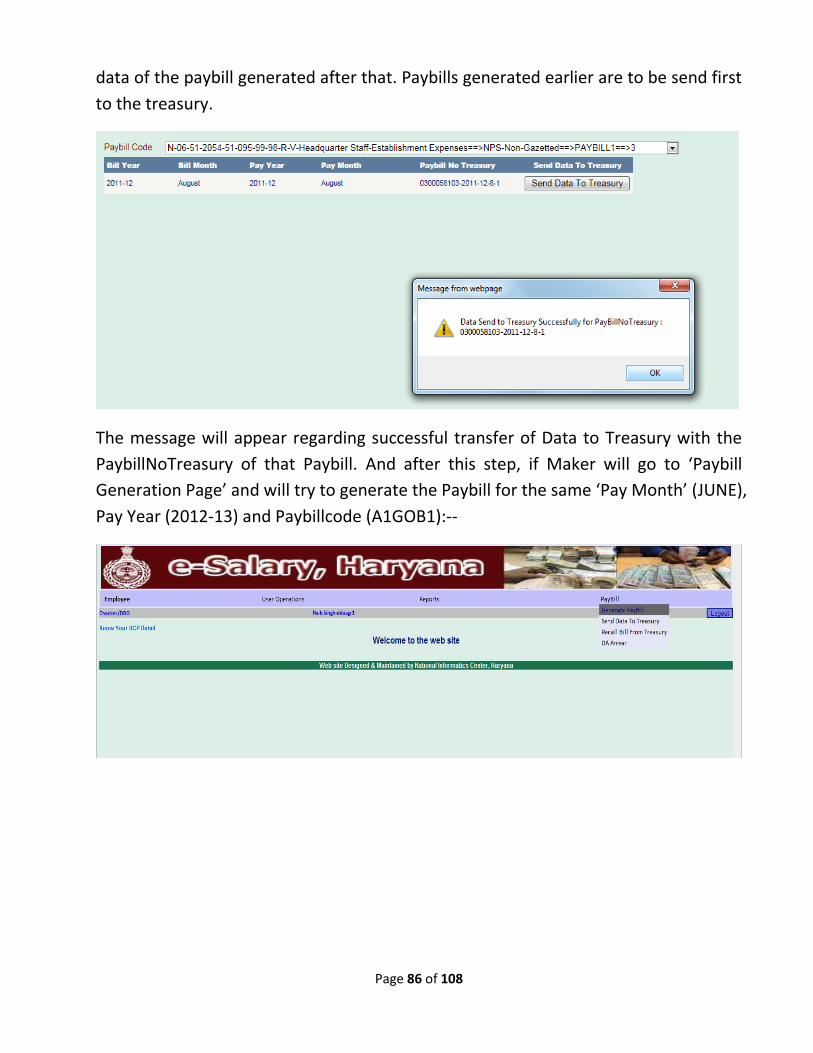
Page 86 of 108
data of the paybill generated after that. Paybills generated earlier are to be send first
to the treasury.
The message will appear regarding successful transfer of Data to Treasury with the
PaybillNoTreasury of that Paybill. And after this step, if Maker will go to ‘Paybill
Generation Page’ and will try to generate the Paybill for the same ‘Pay Month’ (JUNE),
Pay Year (2012-13) and Paybillcode (A1GOB1):--

Page 87 of 108
The message shows that the data of this Pay Month and Pay Year for this particular
Employee has already been sent to Treasury.
11. Transferring and Receiving an Employee by DDO
This option is available in DDO’s login. In his login, he will click on the third option in
‘Employee’ Menu – ‘Transfer Employee’.

Page 88 of 108
A screen like this will appear for transferring the employee.
In this the list of employees registered in his office will appear.

Page 89 of 108
On selecting the employee, all detail of that Payee will appear.
Now the DDO will select the Treasury Code and Treasury to which this Payee is to be
transferred.
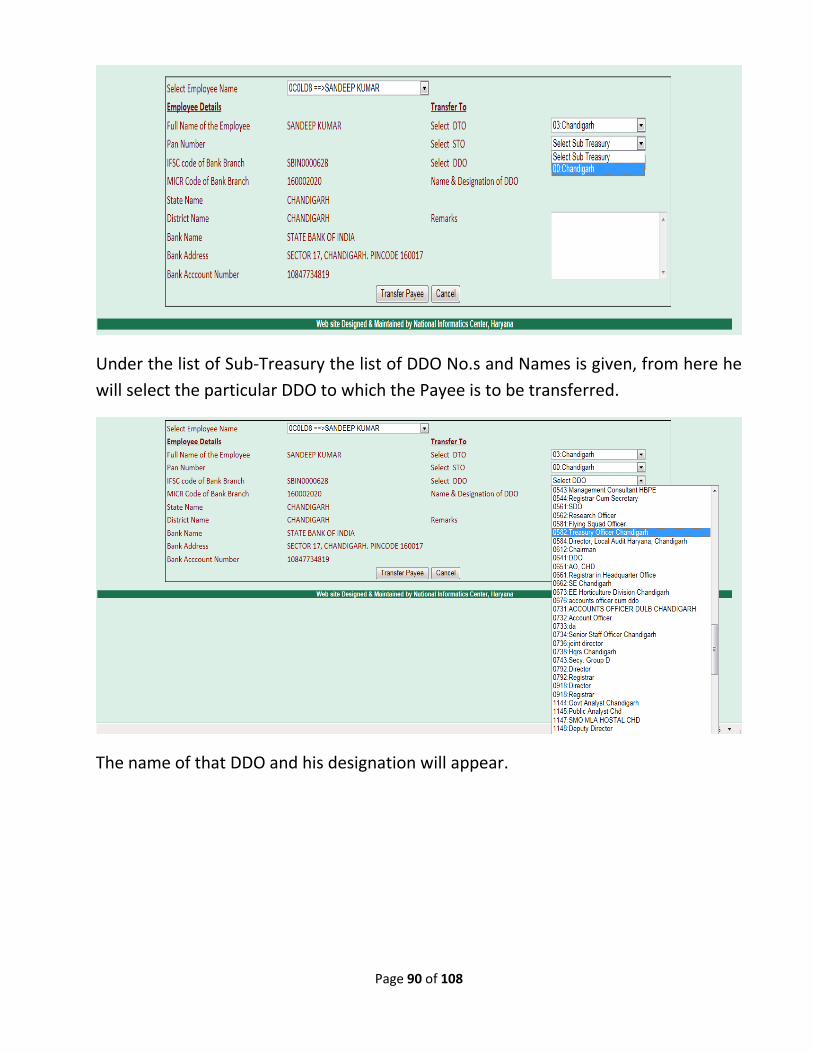
Sub-Treasury is to be selected under this Treasury.
Page 90 of 108
Under the list of Sub-Treasury the list of DDO No.s and Names is given, from here he
will select the particular DDO to which the Payee is to be transferred.
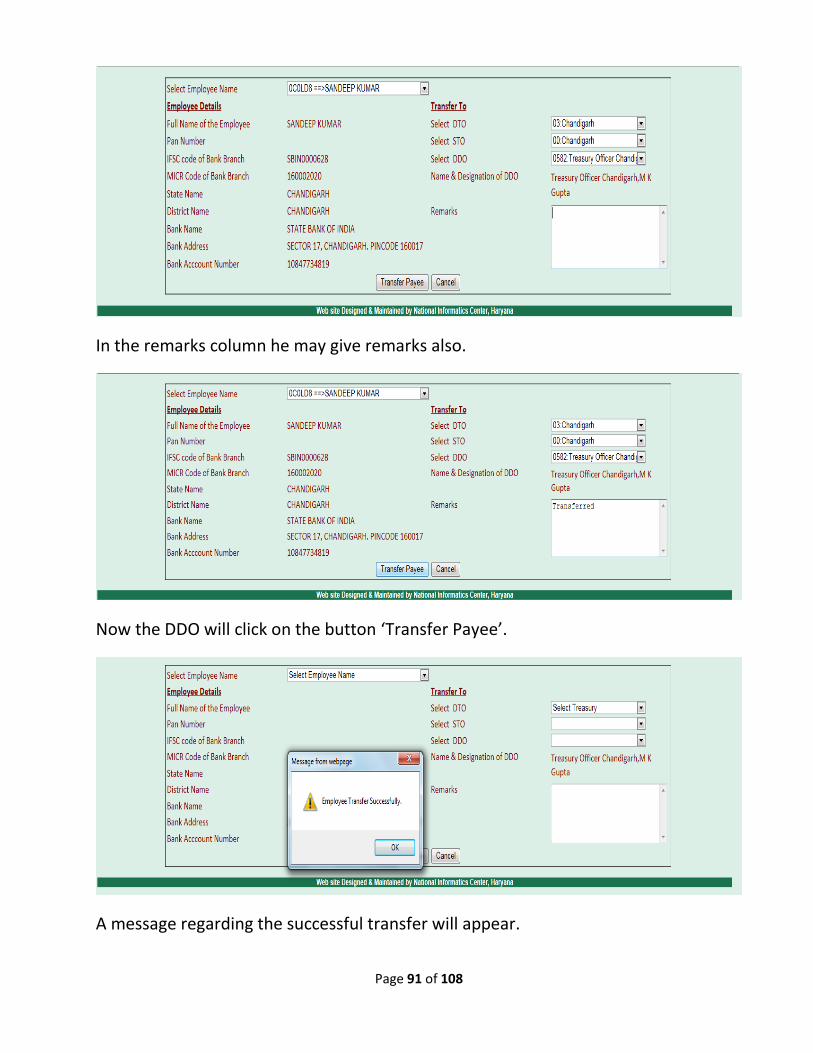
The name of that DDO and his designation will appear.
Page 91 of 108
In the remarks column he may give remarks also.
Now the DDO will click on the button ‘Transfer Payee’.
A message regarding the successful transfer will appear.
Page 92 of 108
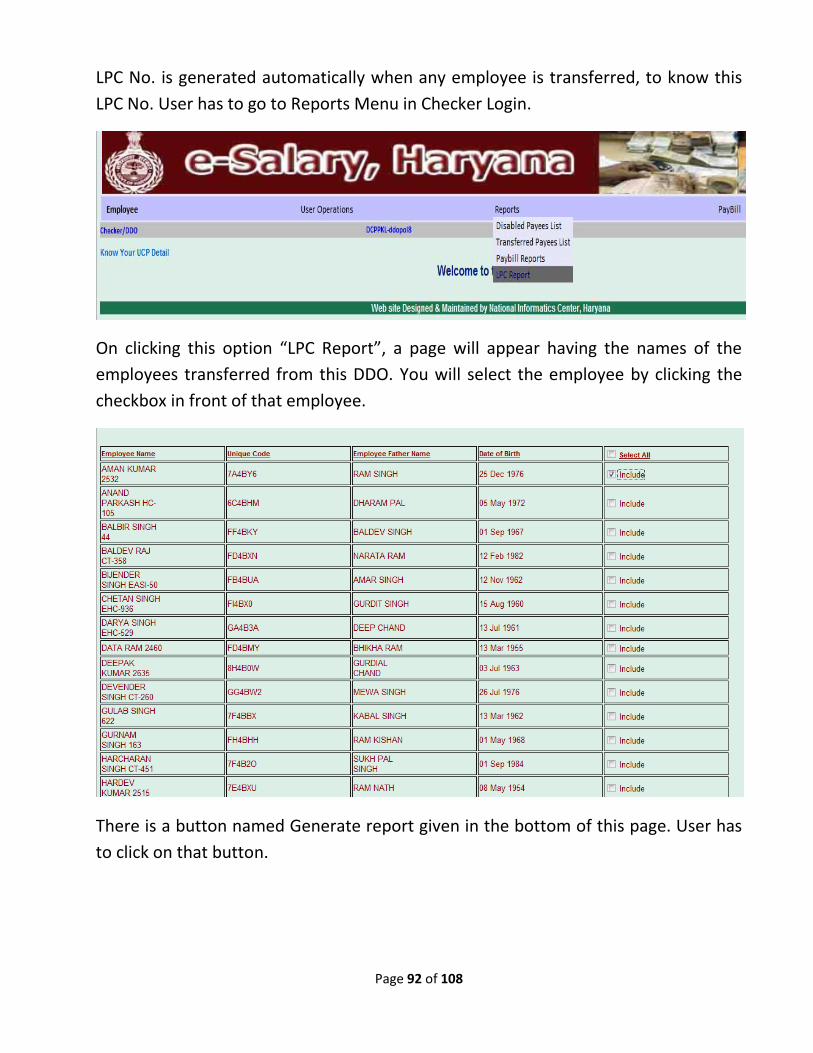
LPC No. is generated automatically when any employee is transferred, to know this
LPC No. User has to go to Reports Menu in Checker Login.
On clicking this option “LPC Report”, a page will appear having the names of the
employees transferred from this DDO. You will select the employee by clicking the
checkbox in front of that employee.
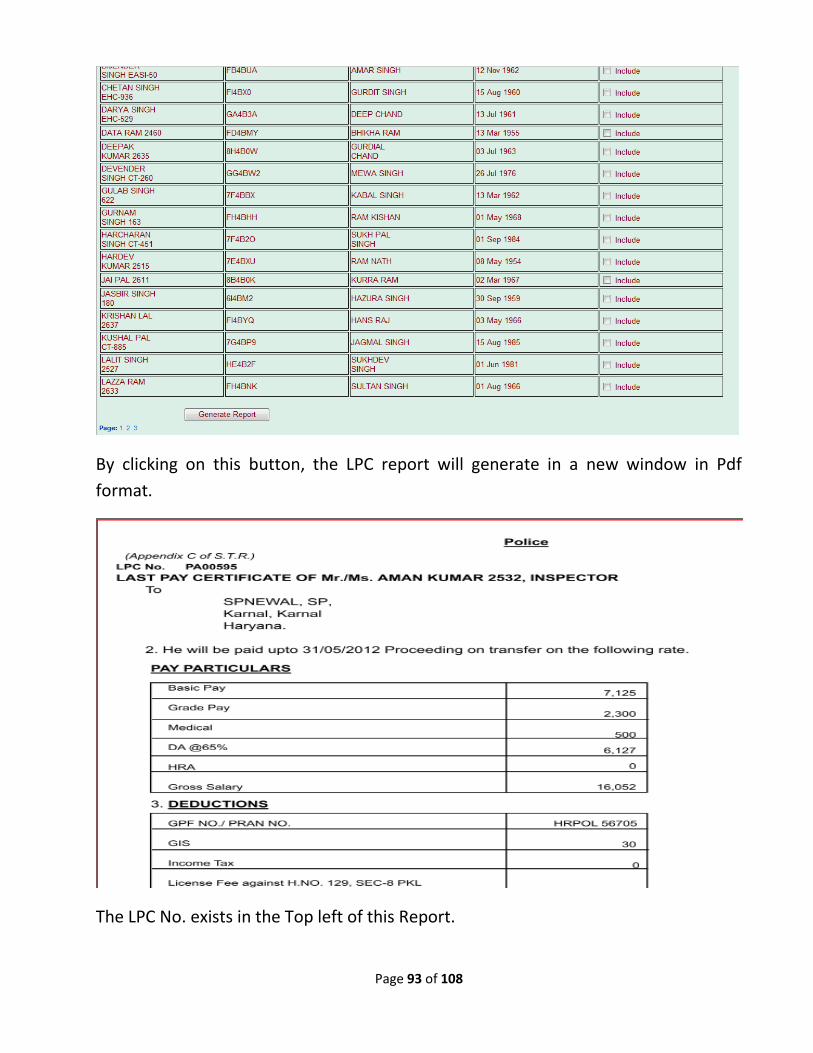
There is a button named Generate report given in the bottom of this page. User has
to click on that button.
Page 93 of 108
By clicking on this button, the LPC report will generate in a new window in Pdf
format.
The LPC No. exists in the Top left of this Report.
Page 94 of 108
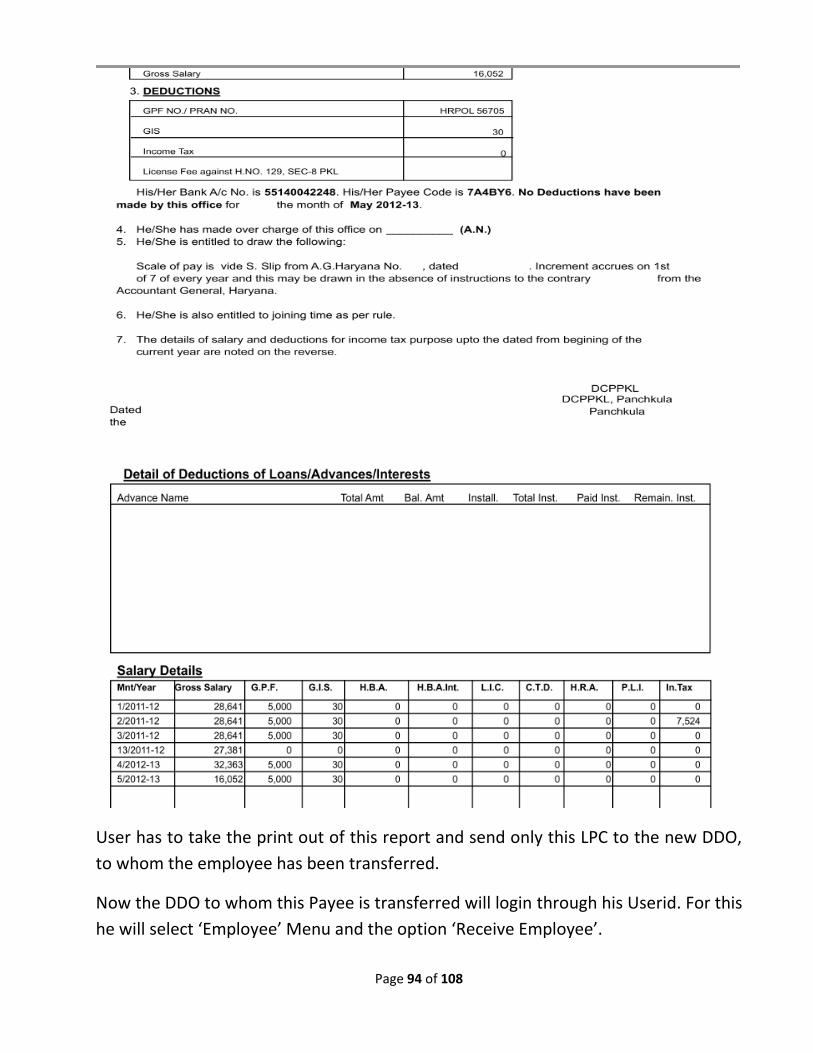
User has to take the print out of this report and send only this LPC to the new DDO,
to whom the employee has been transferred.
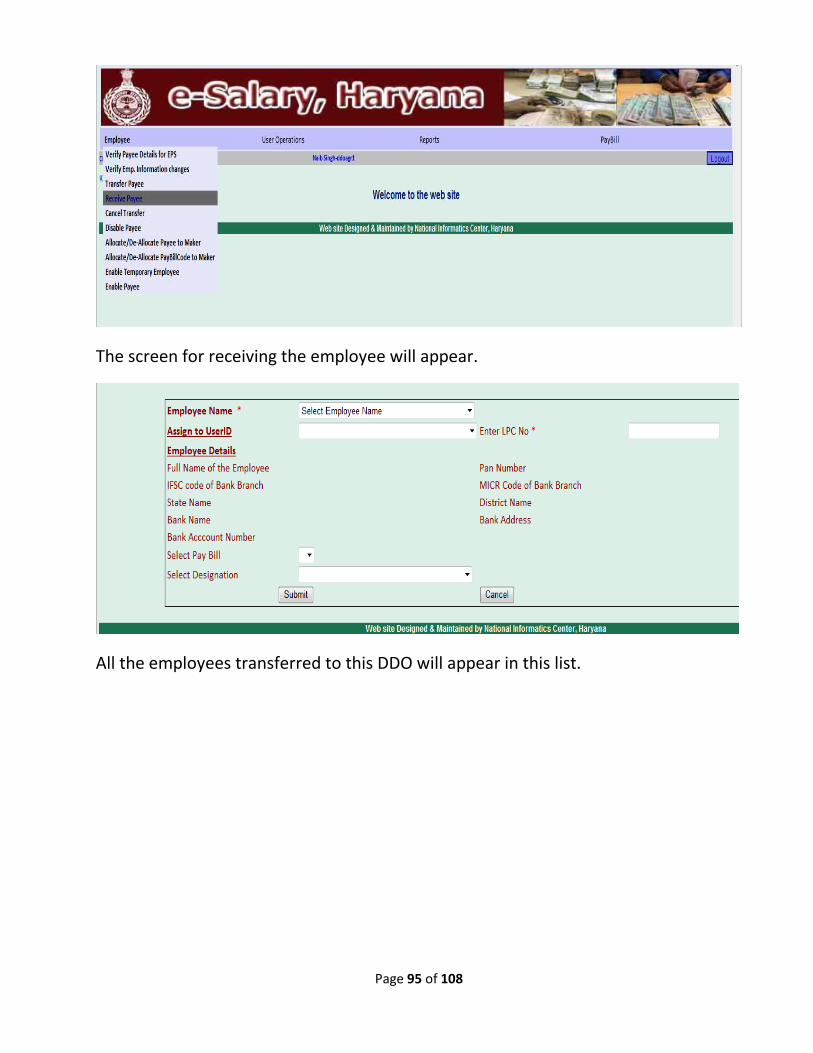
Now the DDO to whom this Payee is transferred will login through his Userid. For this
he will select ‘Employee’ Menu and the option ‘Receive Employee’.
Page 95 of 108
The screen for receiving the employee will appear.
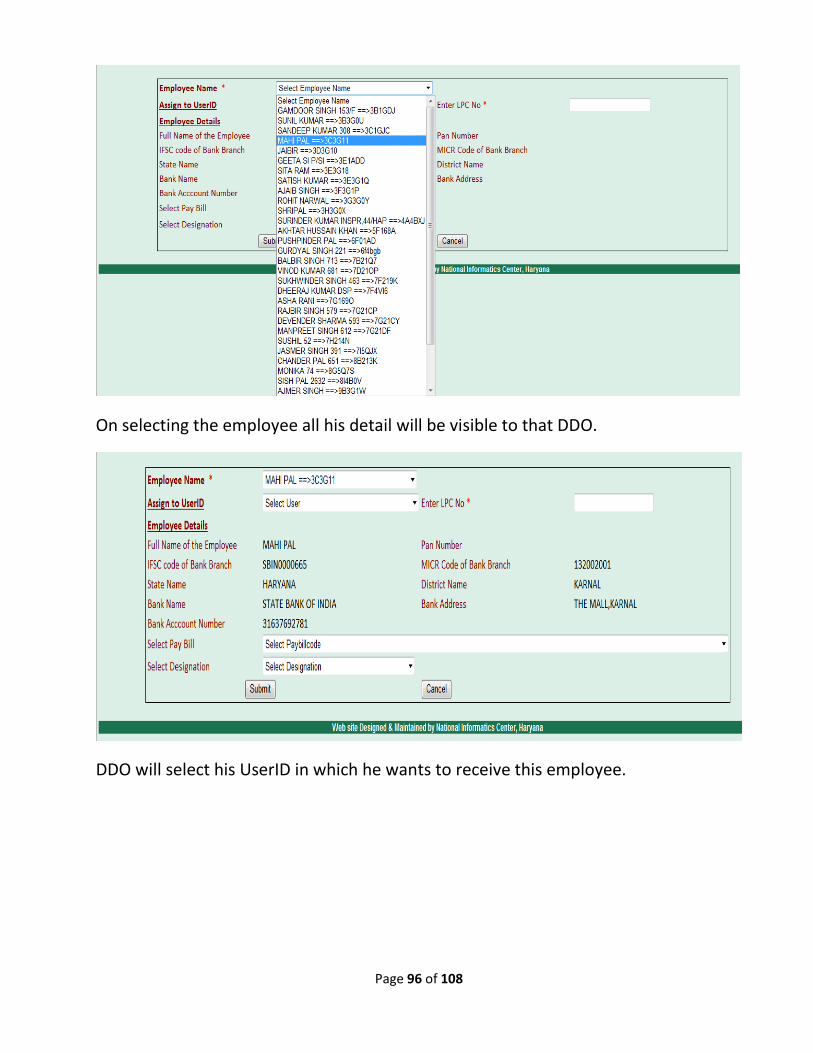
All the employees transferred to this DDO will appear in this list.
Page 96 of 108
On selecting the employee all his detail will be visible to that DDO.
DDO will select his UserID in which he wants to receive this employee.
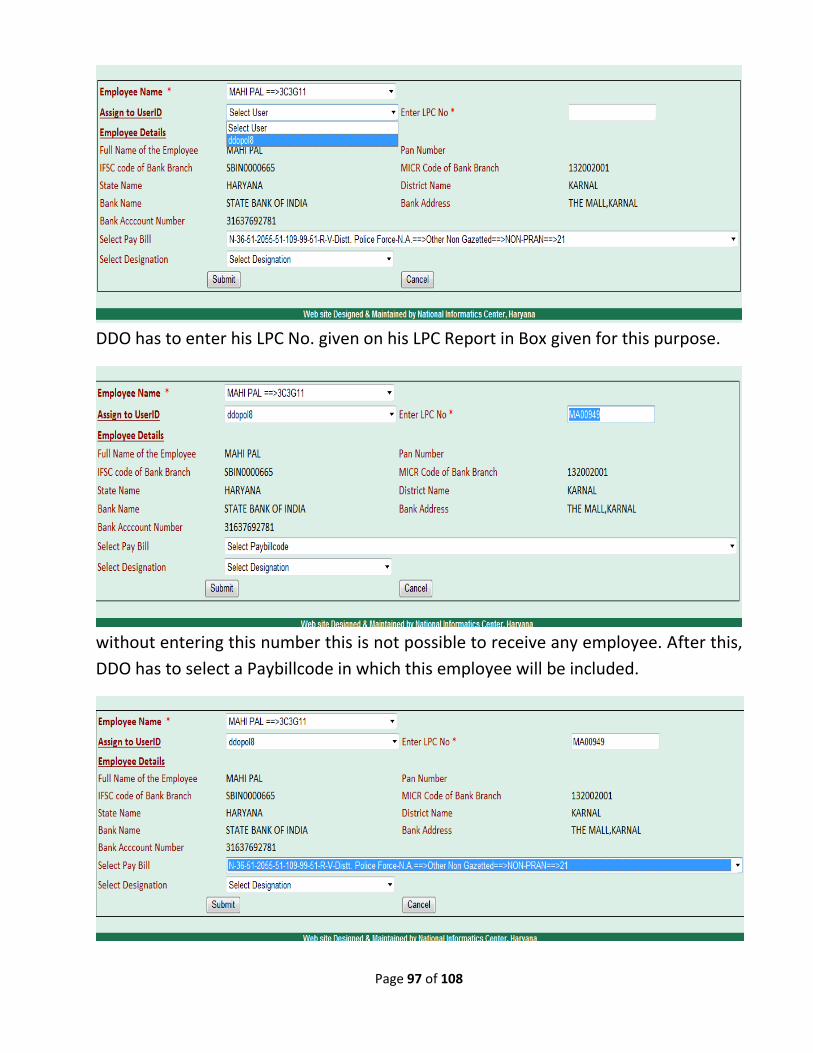
Page 97 of 108
DDO has to enter his LPC No. given on his LPC Report in Box given for this purpose.
without entering this number this is not possible to receive any employee. After this,
DDO has to select a Paybillcode in which this employee will be included.
Page 98 of 108
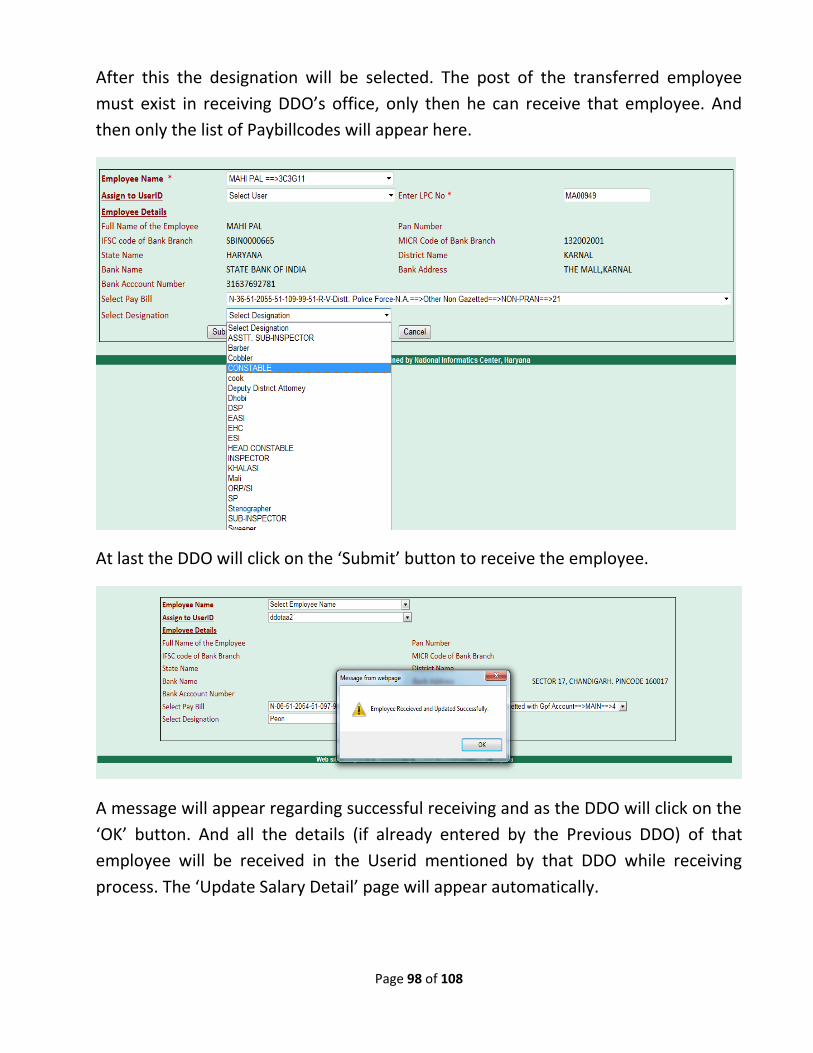
After this the designation will be selected. The post of the transferred employee
must exist in receiving DDO’s office, only then he can receive that employee. And
then only the list of Paybillcodes will appear here.
At last the DDO will click on the ‘Submit’ button to receive the employee.
A message will appear regarding successful receiving and as the DDO will click on the
‘OK’ button. And all the details (if already entered by the Previous DDO) of that
employee will be received in the Userid mentioned by that DDO while receiving
process. The ‘Update Salary Detail’ page will appear automatically.
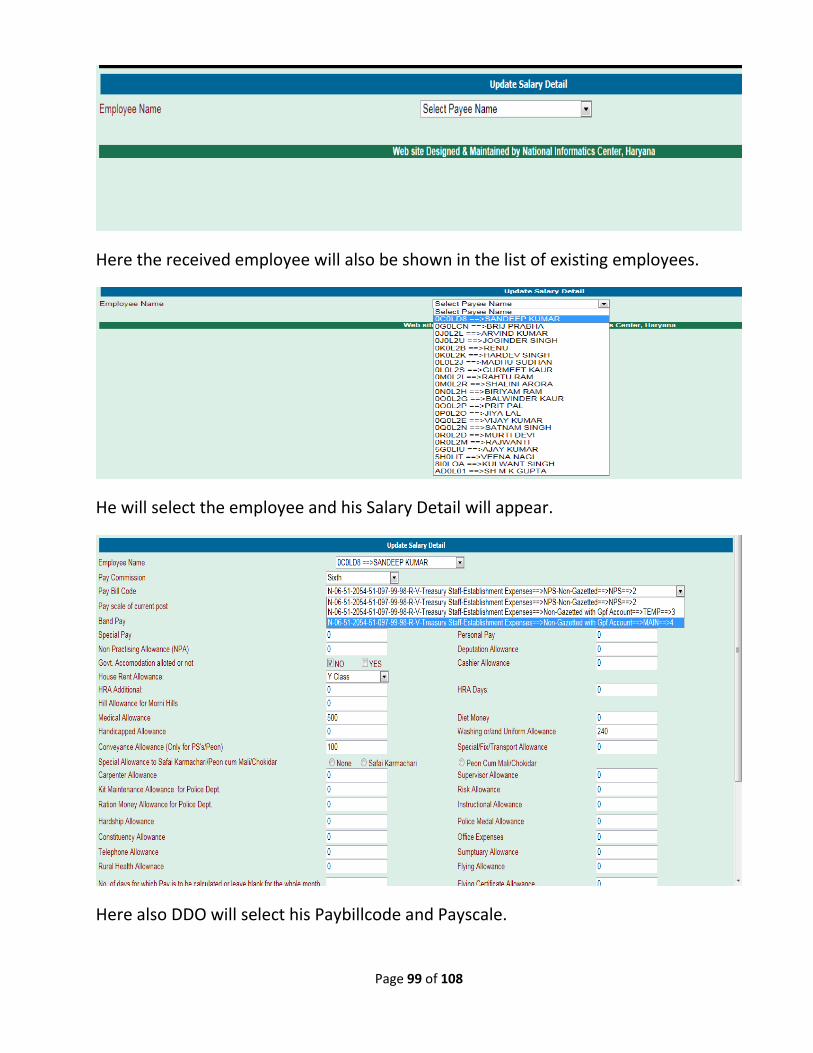
Page 99 of 108
Here the received employee will also be shown in the list of existing employees.
He will select the employee and his Salary Detail will appear.
Here also DDO will select his Paybillcode and Payscale.

Page 100 of 108
And if any other change is also required in Employee’s salary, DDO may change. Now
he will enter the code and click on the ‘Update’ button.
Now the task of receiving the Employee is completed.
User may also wish to Cancel the act of Transferring any employee, for example if
any employee gets his transfer cancelled, in that case Checker has an option to
“Cancel Transfer” in Employee Menu.
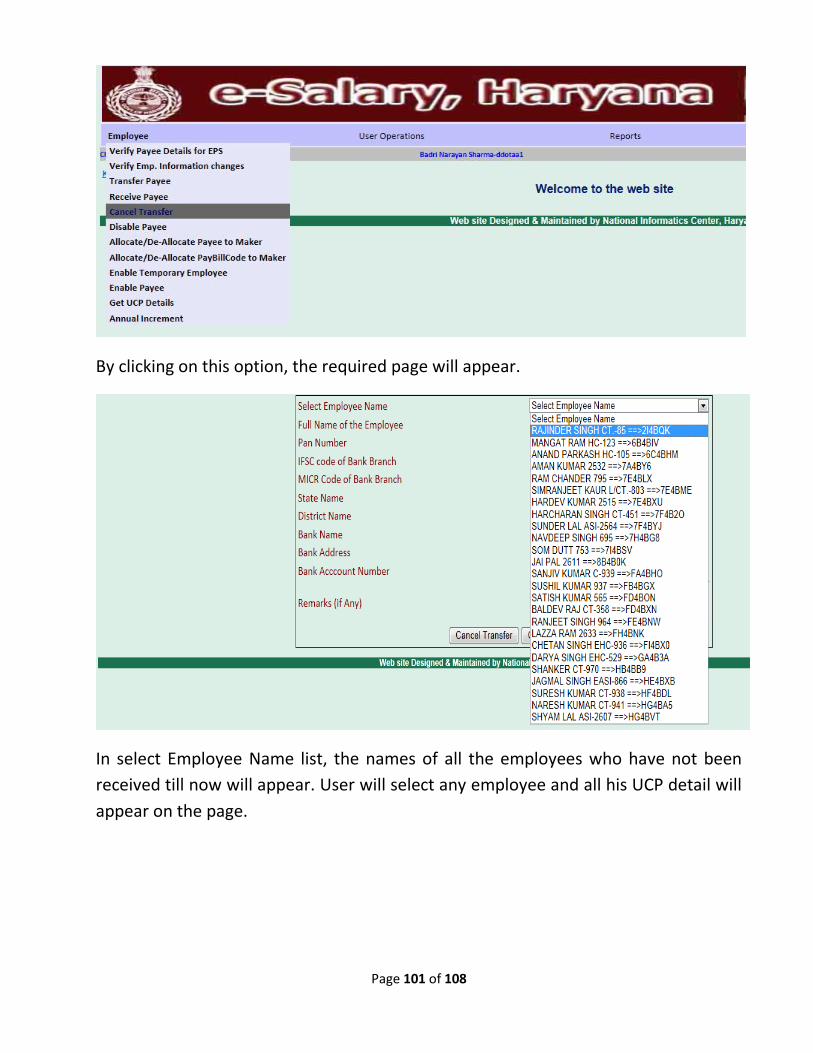
Page 101 of 108
By clicking on this option, the required page will appear.
In select Employee Name list, the names of all the employees who have not been
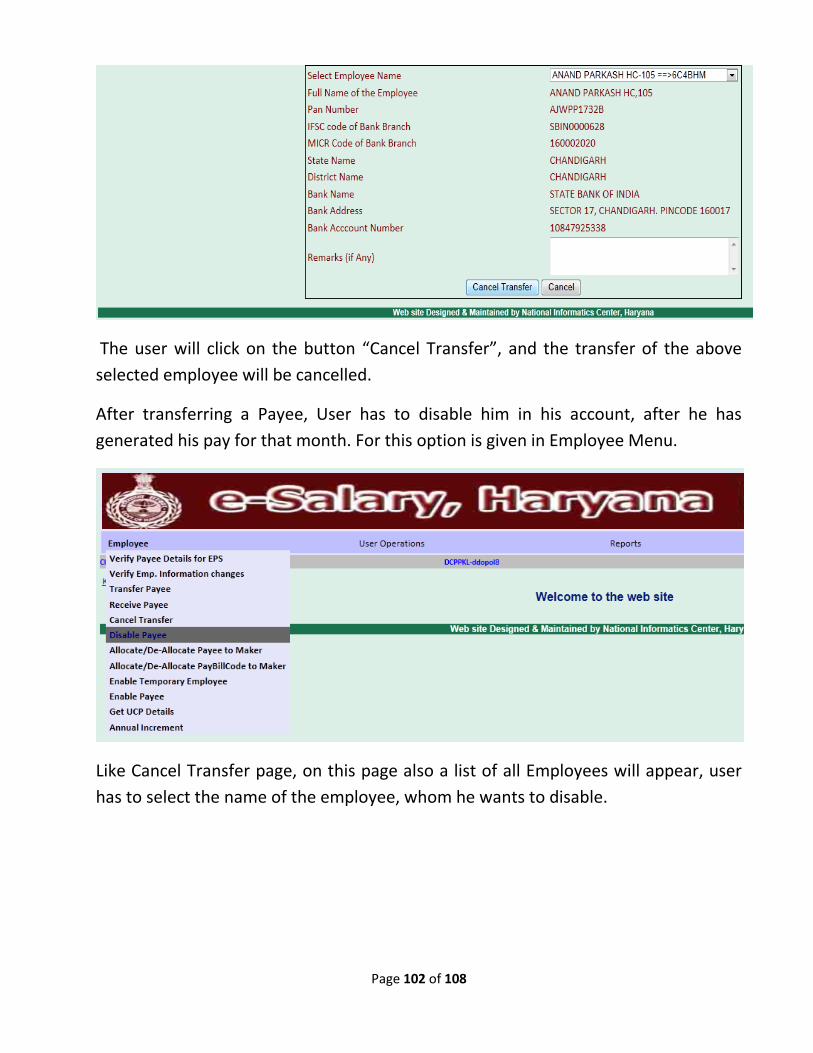
received till now will appear. User will select any employee and all his UCP detail will
appear on the page.
Page 102 of 108
The user will click on the button “Cancel Transfer”, and the transfer of the above
selected employee will be cancelled.
After transferring a Payee, User has to disable him in his account, after he has
generated his pay for that month. For this option is given in Employee Menu.
Like Cancel Transfer page, on this page also a list of all Employees will appear, user
has to select the name of the employee, whom he wants to disable.
Page 103 of 108
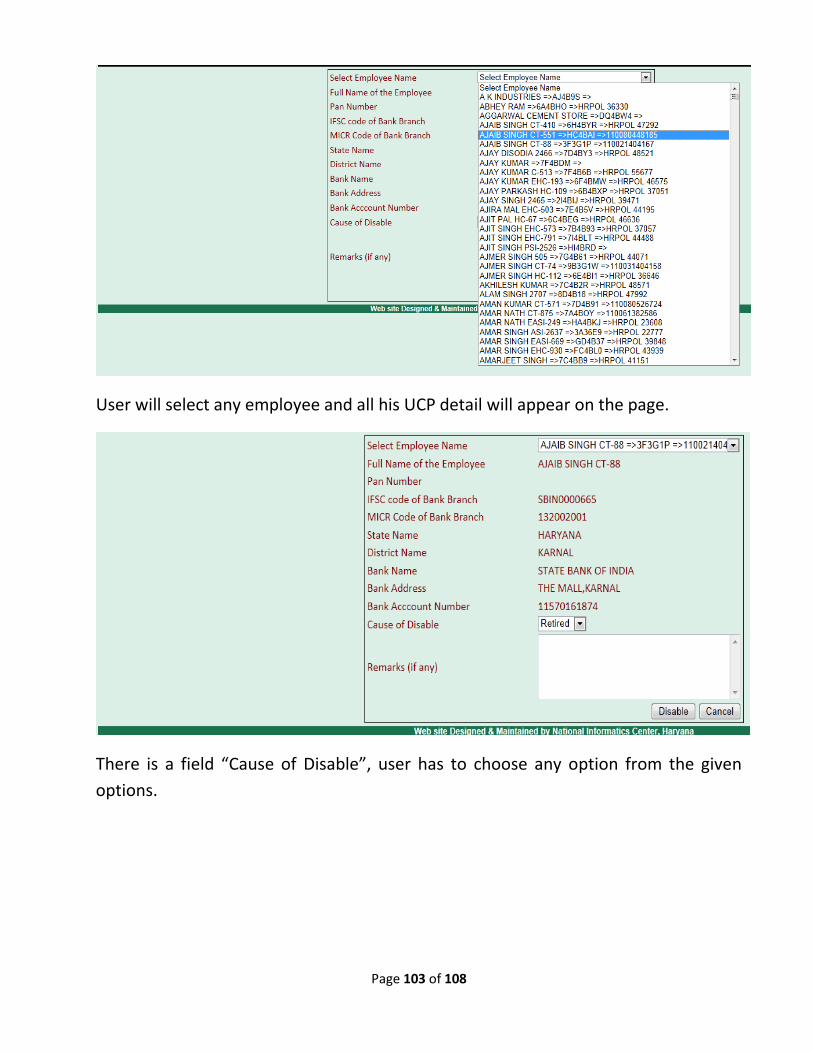
User will select any employee and all his UCP detail will appear on the page.
There is a field “Cause of Disable”, user has to choose any option from the given
options.

Page 104 of 108
There is a box given for Remarks also. If user wants to enter any Remarks , he can.
At last user has to click on the button “Disable”, and the selected Payee will be
disabled from his account.
The next 2 options are Enable Temporary Payee and Enable Payee.
In Enable Payee option user has to just do the same thing as he has done in the page
Disable Payee. For this he will select “Enable Payee”. This option is used if the user
wants to permanently Enable the payee.
Page 105 of 108
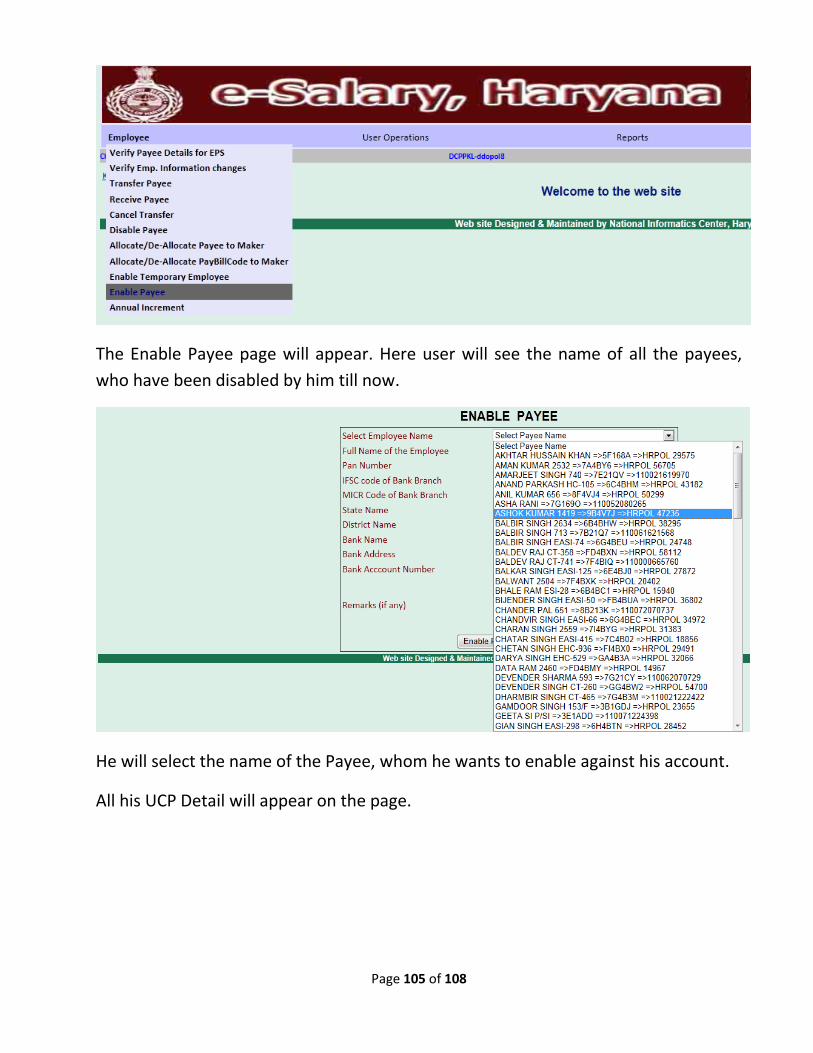
The Enable Payee page will appear. Here user will see the name of all the payees,
who have been disabled by him till now.
He will select the name of the Payee, whom he wants to enable against his account.
All his UCP Detail will appear on the page.
Page 106 of 108
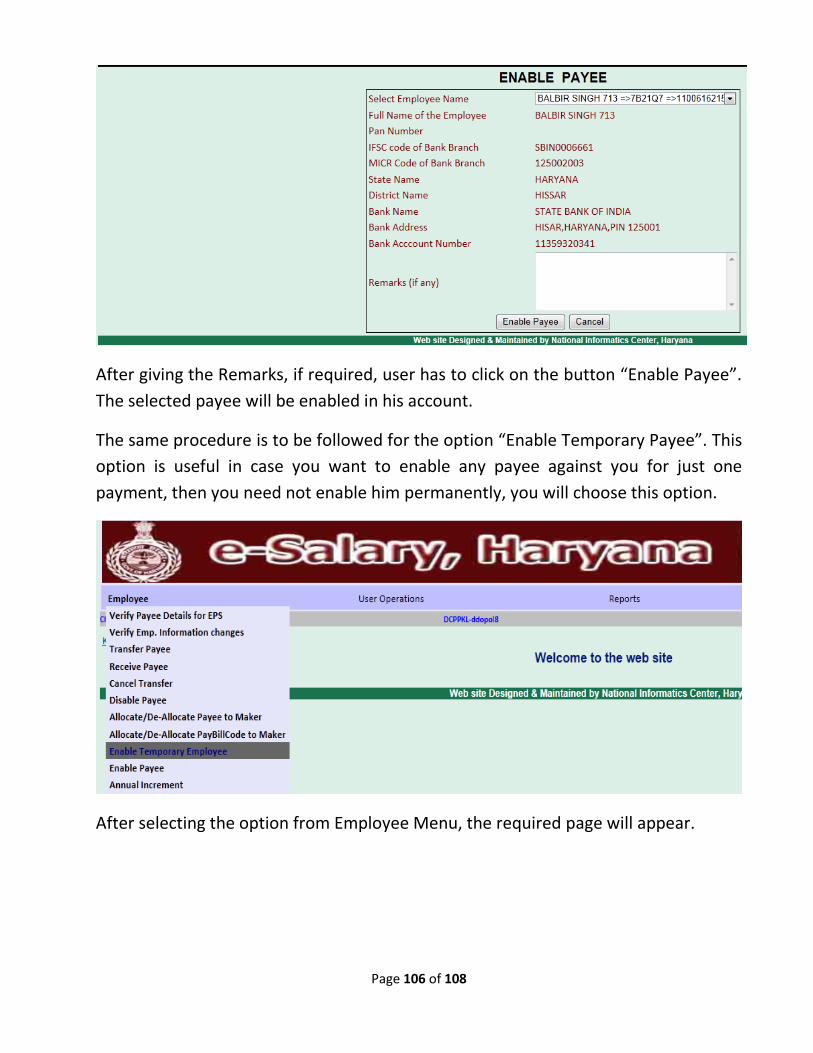
After giving the Remarks, if required, user has to click on the button “Enable Payee”.
The selected payee will be enabled in his account.
The same procedure is to be followed for the option “Enable Temporary Payee”. This
option is useful in case you want to enable any payee against you for just one
payment, then you need not enable him permanently, you will choose this option.
After selecting the option from Employee Menu, the required page will appear.
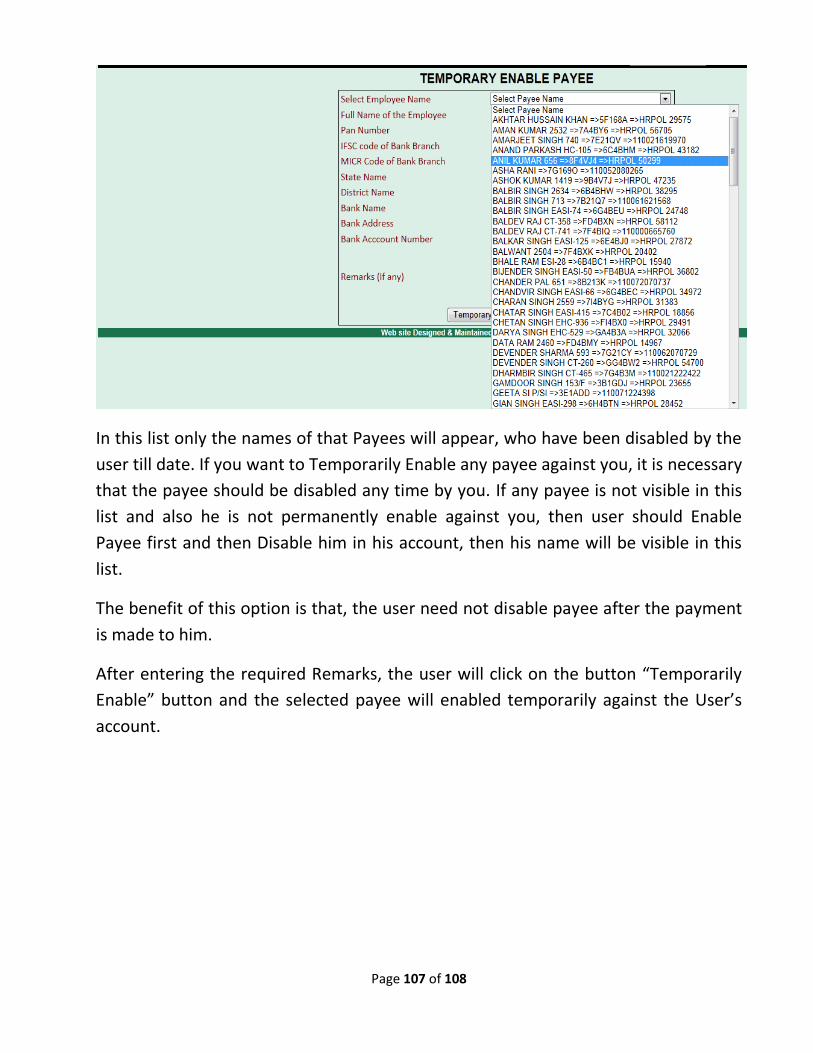
Page 107 of 108
In this list only the names of that Payees will appear, who have been disabled by the
user till date. If you want to Temporarily Enable any payee against you, it is necessary
that the payee should be disabled any time by you. If any payee is not visible in this
list and also he is not permanently enable against you, then user should Enable
Payee first and then Disable him in his account, then his name will be visible in this
list.
The benefit of this option is that, the user need not disable payee after the payment
is made to him.
After entering the required Remarks, the user will click on the button “Temporarily
Enable” button and the selected payee will enabled temporarily against the User’s
account.

Page 108 of 108