Embed Size (px)
Citation preview
User & Maintenance Guide SSPND-EN-WR / SSPND-EN-SM
User Guide – SSPND-EN-SM / WR P a g e | 0 042516
© Copyright 2016. Status Solutions, LLC. All Rights Reserved. The information contained within this document is proprietary and confidential and intended for use only by Status Solutions, Certified Valued Business Partners, and Customers. Information subject to change without notice
User & Maintenance Guide
SSPND-EN-WR / SSPND-EN-SM
User & Maintenance Guide SSPND-EN-WR / SSPND-EN-SM
User Guide – SSPND-EN-SM / WR P a g e | 1 042516 © Copyright 2016. Status Solutions, LLC. All Rights Reserved. The information contained within this document is proprietary and confidential and intended for use only by Status Solutions, certified Valued Business Partners, and users. Information subject to change without notice
Table of Contents
Overview ......................................................................................................................................... 2
Features ....................................................................................................................................... 2
Specifications............................................................................................................................... 2
Part Numbers .................................................................................................................................. 3
Pendants ...................................................................................................................................... 3
Alarm Clearance Card Part Number ............................................................................................ 3
Replacement Parts ...................................................................................................................... 3
Alarm and Reset (clear) ................................................................................................................... 4
Enroll the Pendant .......................................................................................................................... 5
Test the Pendant ............................................................................................................................. 5
Battery Replacement ...................................................................................................................... 6
Low Battery Indication .................................................................................................................... 6
Pendant Accessory Assembly Procedure ........................................................................................ 7
Pendant Care Guidelines................................................................................................................. 8
Water Resistant ........................................................................................................................... 8
Cleaning ....................................................................................................................................... 8
Storage Mode.................................................................................................................................. 9
Put the Pendant in Storage Mode ............................................................................................... 9
Remove the Device from Storage Mode ................................................................................... 10
Tracking Feature ........................................................................................................................... 10
Pendant Indicators ........................................................................................................................ 11

User & Maintenance Guide SSPND-EN-WR / SSPND-EN-SM
User Guide – SSPND-EN-SM / WR P a g e | 2 042516 © Copyright 2016. Status Solutions, LLC. All Rights Reserved. The information contained within this document is proprietary and confidential and intended for use only by Status Solutions, certified Valued Business Partners, and users. Information subject to change without notice
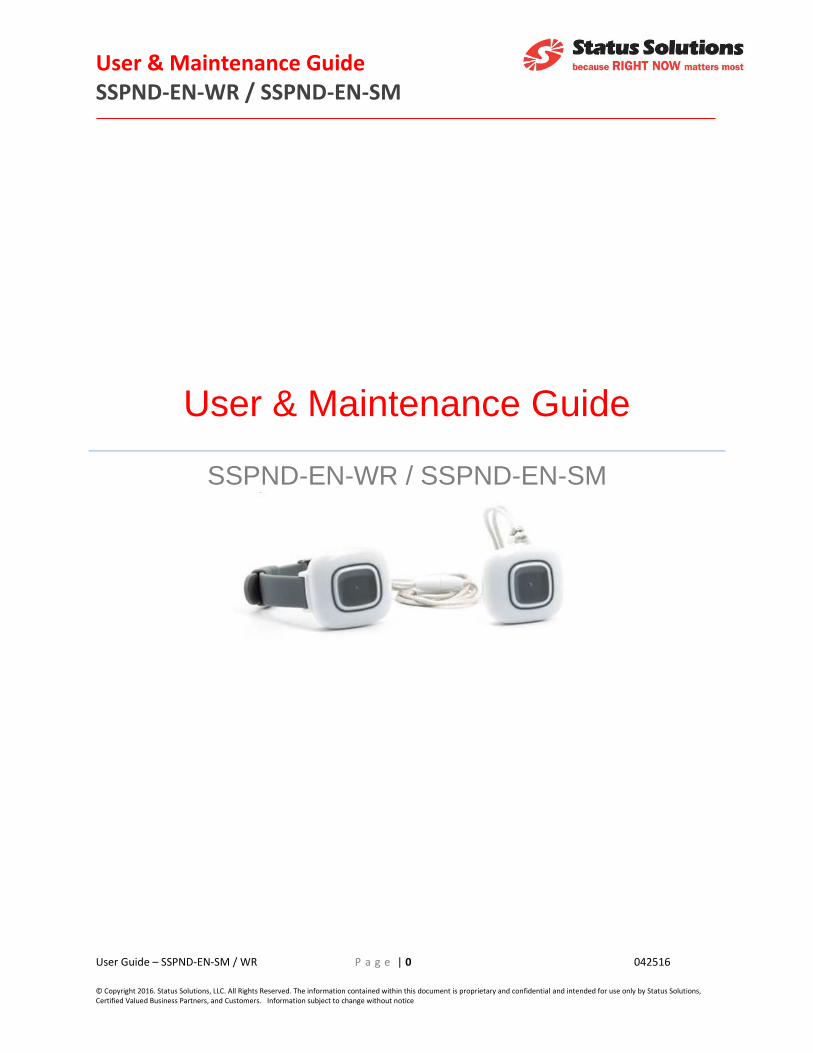
Overview Two Models available. The functionality and size of the pendant is the same. The different models are made up of a Wrist Worn Model and a Lanyard Model. The Lanyard model can be modified for a belt clip model with the belt clip kit.
Features
Small, light and water resistant
Bright lights signal alarm activation, alarm clearance and low battery conditions
Vibration feature confirms alarm activation
Alarm clearance with magnetic card or button press pattern
*Adjustable lanyard with breakaway feature
*Replaceable 16mm silicone wristband with adjustable buckle closure
*These two pendants have different physical attributes, (one is designed for watchband and the other for the lanyard), and therefore they aren’t interchangeable.
Specifications
Dimensions: 1.6” x 1.6” x 0.5” (4 x 4 x 1.25 cm)
Weight: 0.6 oz (17 g)
Estimated battery life: One year*
Internal battery types: User replaceable Panasonic CR2032 lithium metal coin-cell battery.
Operating environment: o Temperature: 32°F to 140°F (0°C to 60°C)
Environment: Water Resistant to IP67 standard
Storage requirements: Ambient conditions of 69° to 73°F (20.5° to 22.8° C)
EchoStream® frequency: 902-928 MHz, frequency hopping spread spectrum
Check-in time frequency: 60 minutes * Assuming five alarm activations per day and alarm clearance within ten minutes of alarm activation.
User & Maintenance Guide SSPND-EN-WR / SSPND-EN-SM
User Guide – SSPND-EN-SM / WR P a g e | 3 042516 © Copyright 2016. Status Solutions, LLC. All Rights Reserved. The information contained within this document is proprietary and confidential and intended for use only by Status Solutions, certified Valued Business Partners, and users. Information subject to change without notice
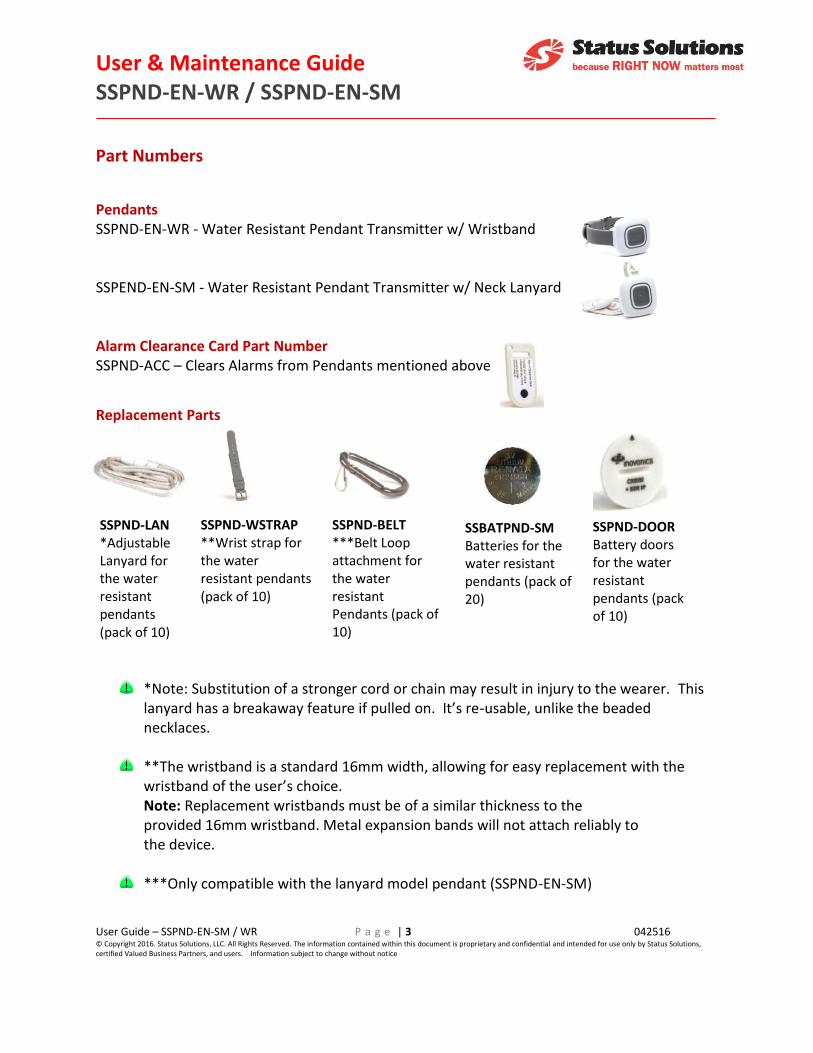
Part Numbers
Pendants SSPND-EN-WR - Water Resistant Pendant Transmitter w/ Wristband SSPEND-EN-SM - Water Resistant Pendant Transmitter w/ Neck Lanyard Alarm Clearance Card Part Number SSPND-ACC – Clears Alarms from Pendants mentioned above.
Replacement Parts
*Note: Substitution of a stronger cord or chain may result in injury to the wearer. This lanyard has a breakaway feature if pulled on. It’s re-usable, unlike the beaded necklaces.
**The wristband is a standard 16mm width, allowing for easy replacement with the
wristband of the user’s choice. Note: Replacement wristbands must be of a similar thickness to the provided 16mm wristband. Metal expansion bands will not attach reliably to the device.
***Only compatible with the lanyard model pendant (SSPND-EN-SM)
SSPND-LAN *Adjustable Lanyard for the water resistant pendants (pack of 10)
SSPND-WSTRAP **Wrist strap for the water resistant pendants (pack of 10)
SSPND-BELT ***Belt Loop attachment for the water resistant Pendants (pack of 10)
SSBATPND-SM Batteries for the water resistant pendants (pack of 20)
SSPND-DOOR Battery doors for the water resistant pendants (pack of 10)
User & Maintenance Guide SSPND-EN-WR / SSPND-EN-SM
User Guide – SSPND-EN-SM / WR P a g e | 4 042516 © Copyright 2016. Status Solutions, LLC. All Rights Reserved. The information contained within this document is proprietary and confidential and intended for use only by Status Solutions, certified Valued Business Partners, and users. Information subject to change without notice
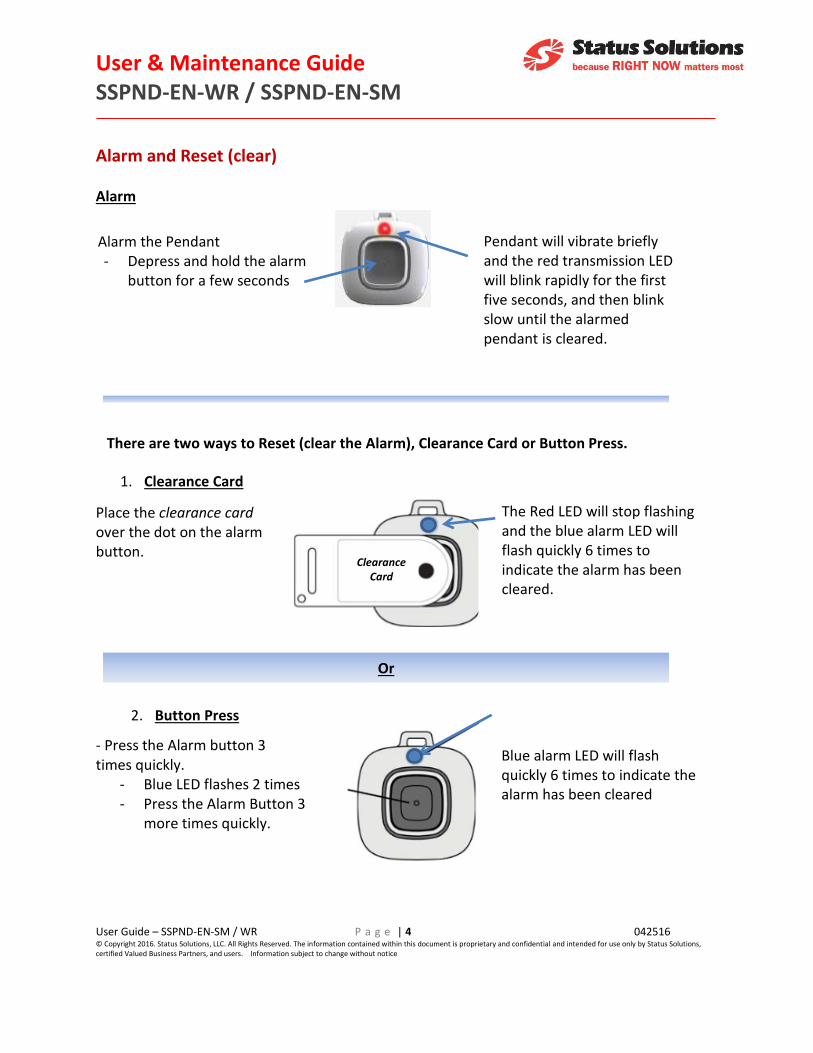
Alarm and Reset (clear) Alarm
Alarm the Pendant - Depress and hold the alarm
button for a few seconds
Pendant will vibrate briefly and the red transmission LED will blink rapidly for the first five seconds, and then blink slow until the alarmed pendant is cleared.
Place the clearance card over the dot on the alarm button.
The Red LED will stop flashing and the blue alarm LED will flash quickly 6 times to indicate the alarm has been cleared.
Clearance Card
- Press the Alarm button 3 times quickly.
- Blue LED flashes 2 times - Press the Alarm Button 3
more times quickly.
Blue alarm LED will flash quickly 6 times to indicate the alarm has been cleared
There are two ways to Reset (clear the Alarm), Clearance Card or Button Press.
1. Clearance Card
2. Button Press
Or
User & Maintenance Guide SSPND-EN-WR / SSPND-EN-SM
User Guide – SSPND-EN-SM / WR P a g e | 5 042516 © Copyright 2016. Status Solutions, LLC. All Rights Reserved. The information contained within this document is proprietary and confidential and intended for use only by Status Solutions, certified Valued Business Partners, and users. Information subject to change without notice
Enroll the Pendant The transmitter sends a check-in message to SARA every 60 minutes for the purposes of
supervision. The transmitter must be enrolled and supervised.
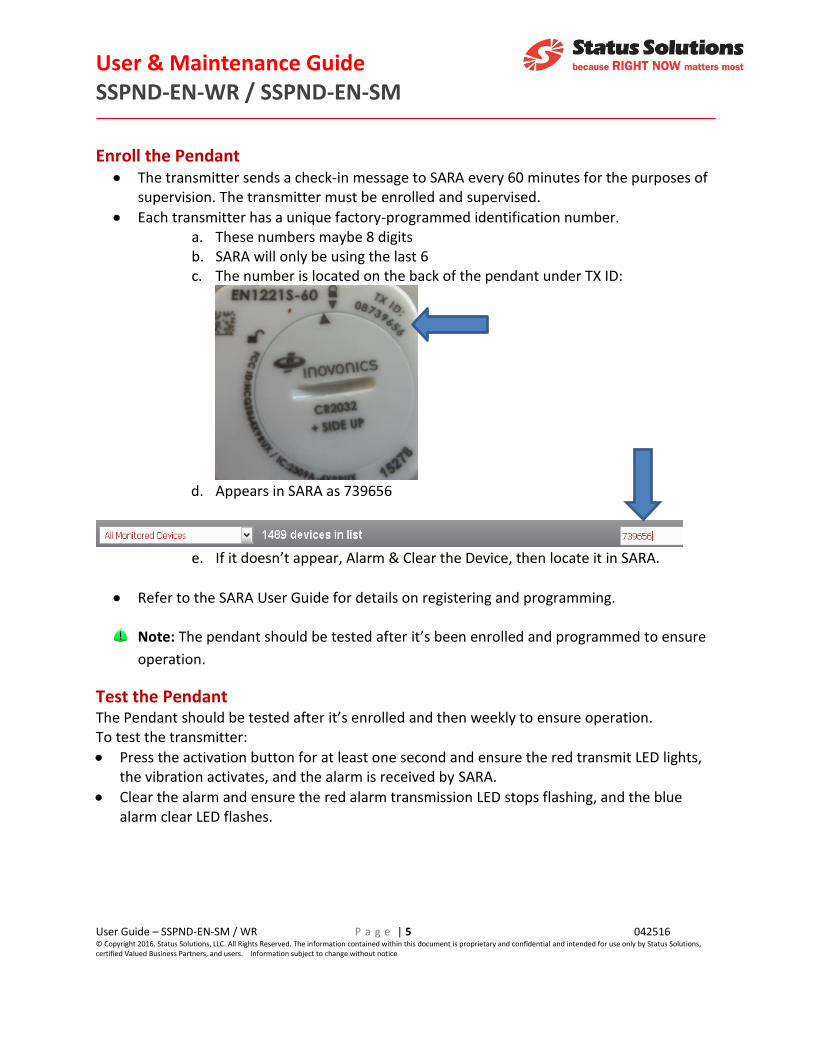
Each transmitter has a unique factory-programmed identification number. a. These numbers maybe 8 digits b. SARA will only be using the last 6 c. The number is located on the back of the pendant under TX ID:
d. Appears in SARA as 739656
e. If it doesn’t appear, Alarm & Clear the Device, then locate it in SARA.
Refer to the SARA User Guide for details on registering and programming.
Note: The pendant should be tested after it’s been enrolled and programmed to ensure
operation.
Test the Pendant The Pendant should be tested after it’s enrolled and then weekly to ensure operation. To test the transmitter:
Press the activation button for at least one second and ensure the red transmit LED lights, the vibration activates, and the alarm is received by SARA.
Clear the alarm and ensure the red alarm transmission LED stops flashing, and the blue alarm clear LED flashes.
User & Maintenance Guide SSPND-EN-WR / SSPND-EN-SM
User Guide – SSPND-EN-SM / WR P a g e | 6 042516 © Copyright 2016. Status Solutions, LLC. All Rights Reserved. The information contained within this document is proprietary and confidential and intended for use only by Status Solutions, certified Valued Business Partners, and users. Information subject to change without notice
Battery Replacement
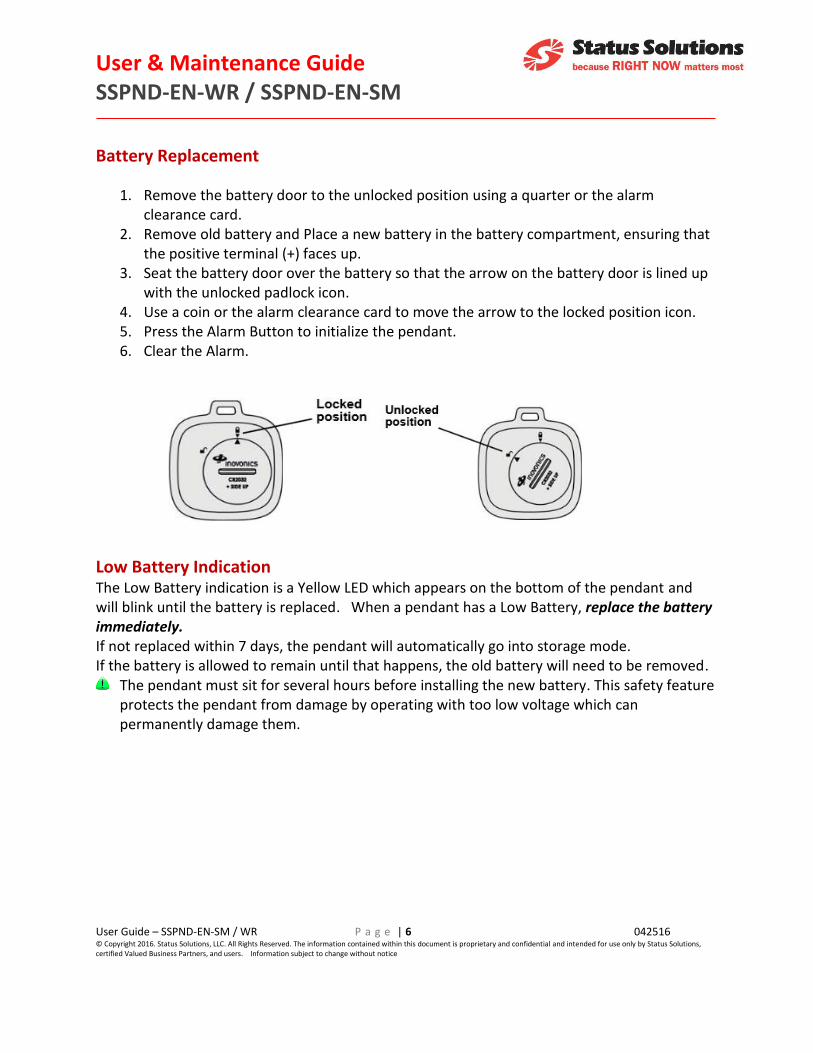
1. Remove the battery door to the unlocked position using a quarter or the alarm clearance card.
2. Remove old battery and Place a new battery in the battery compartment, ensuring that the positive terminal (+) faces up.
3. Seat the battery door over the battery so that the arrow on the battery door is lined up with the unlocked padlock icon.
4. Use a coin or the alarm clearance card to move the arrow to the locked position icon. 5. Press the Alarm Button to initialize the pendant. 6. Clear the Alarm.
Low Battery Indication The Low Battery indication is a Yellow LED which appears on the bottom of the pendant and will blink until the battery is replaced. When a pendant has a Low Battery, replace the battery immediately. If not replaced within 7 days, the pendant will automatically go into storage mode. If the battery is allowed to remain until that happens, the old battery will need to be removed.
The pendant must sit for several hours before installing the new battery. This safety feature protects the pendant from damage by operating with too low voltage which can permanently damage them.
User & Maintenance Guide SSPND-EN-WR / SSPND-EN-SM
User Guide – SSPND-EN-SM / WR P a g e | 7 042516 © Copyright 2016. Status Solutions, LLC. All Rights Reserved. The information contained within this document is proprietary and confidential and intended for use only by Status Solutions, certified Valued Business Partners, and users. Information subject to change without notice
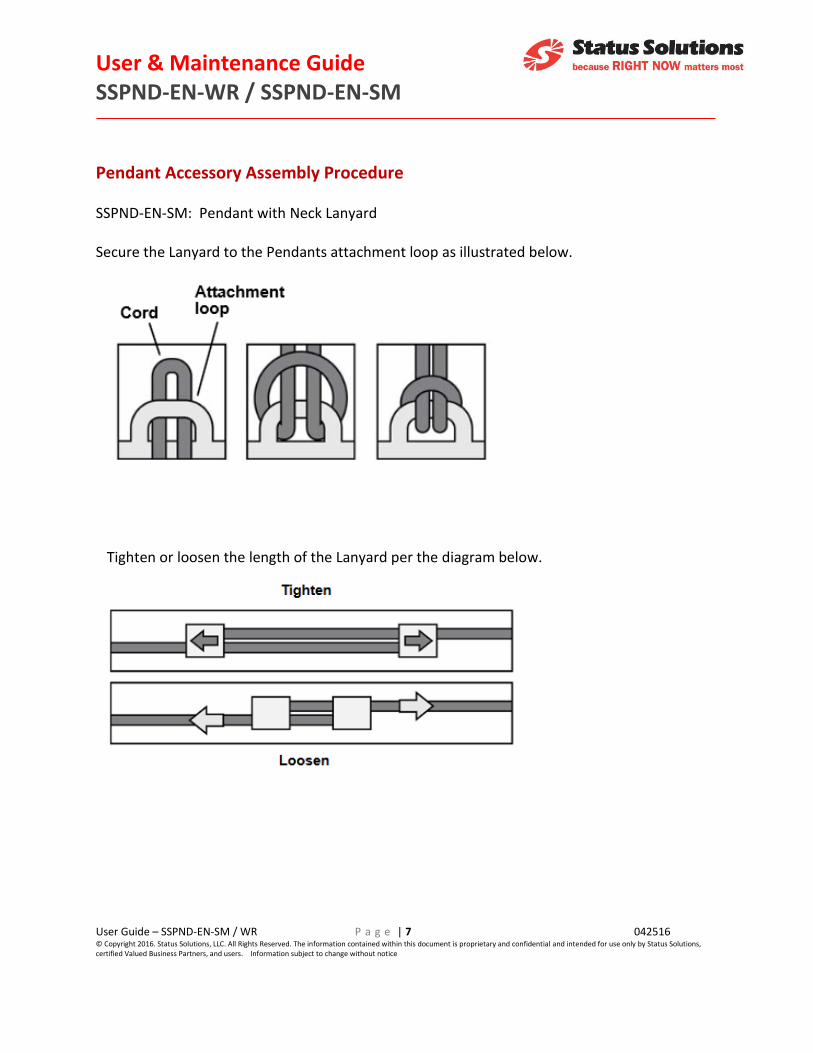
Pendant Accessory Assembly Procedure SSPND-EN-SM: Pendant with Neck Lanyard Secure the Lanyard to the Pendants attachment loop as illustrated below.
Tighten or loosen the length of the Lanyard per the diagram below.
User & Maintenance Guide SSPND-EN-WR / SSPND-EN-SM
User Guide – SSPND-EN-SM / WR P a g e | 8 042516 © Copyright 2016. Status Solutions, LLC. All Rights Reserved. The information contained within this document is proprietary and confidential and intended for use only by Status Solutions, certified Valued Business Partners, and users. Information subject to change without notice
Pendant Care Guidelines
In order for your pendants to have the proper longevity there are some simple guidelines that should be adhered to. Practicing these is highly suggested and if proper care is taken they should last many years without problems.
Water Resistant Pendants are water resistant.
Not approved for Water exercise, hydrotherapy/hot tubs, steam rooms and saunas. Shower, ok, but, do not spray water directly on the device at distances of less than 12 Inches and avoid spraying water at extremely high pressure. Bath, ok, but only momentary submersion is permissible at water temperatures less than 105°F. Extended submersion of the device is not recommended.
Cleaning Cleaning should be performed with battery door in place and locked. Pendant should be cleaned with hand using damp cloth and mild soap, or disinfectant wipes designed for household use.
Do Not Use The following products should never be used to clean the pendant:
• Strong cleaning agents such as ammonia, bleach, alcohol or Quaternary disinfectant. • Abrasive or powder cleansers. • Alcohol-based hand sanitizers. • The following equipment and processes must never be used:
o Steam autoclave or commercial sterilization procedures using heat, o Chemical, gas or radiation techniques. o Dishwasher or washing machine. o Soaking or suspending the pendant in water or other liquids.
• Using any of these products or processes will damage the pendant.
User & Maintenance Guide SSPND-EN-WR / SSPND-EN-SM
User Guide – SSPND-EN-SM / WR P a g e | 9 042516 © Copyright 2016. Status Solutions, LLC. All Rights Reserved. The information contained within this document is proprietary and confidential and intended for use only by Status Solutions, certified Valued Business Partners, and users. Information subject to change without notice
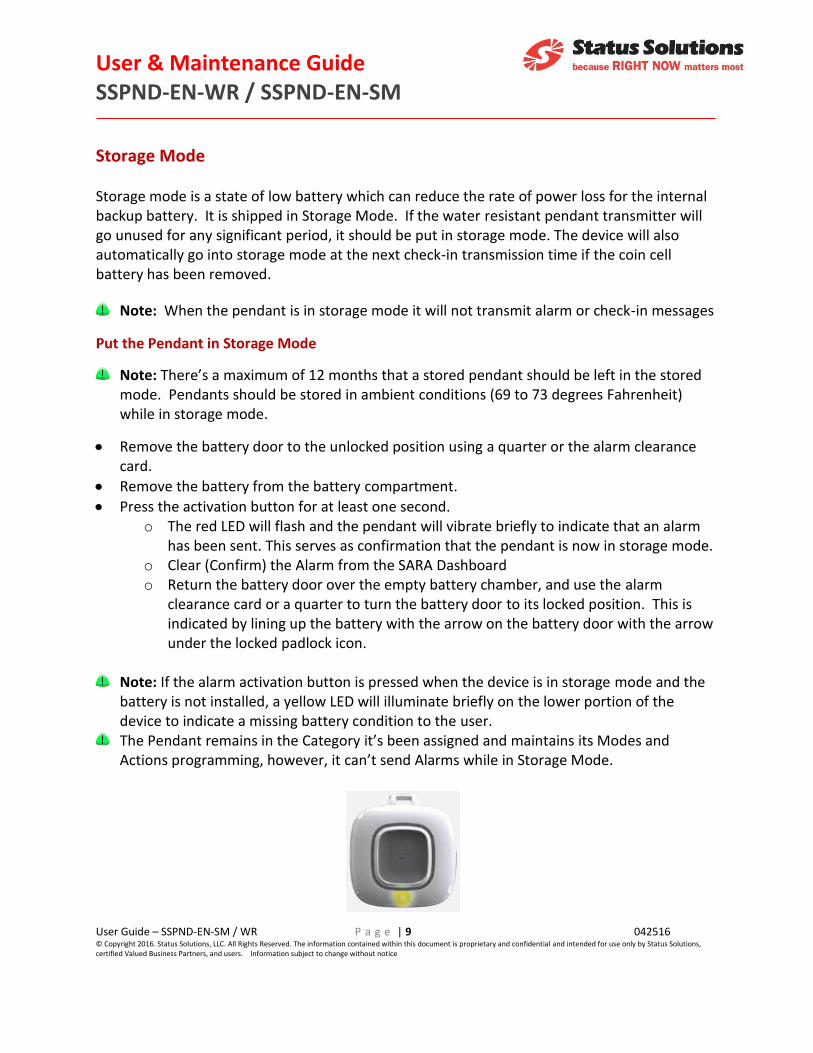
Storage Mode Storage mode is a state of low battery which can reduce the rate of power loss for the internal backup battery. It is shipped in Storage Mode. If the water resistant pendant transmitter will go unused for any significant period, it should be put in storage mode. The device will also automatically go into storage mode at the next check-in transmission time if the coin cell battery has been removed.
Note: When the pendant is in storage mode it will not transmit alarm or check-in messages
Put the Pendant in Storage Mode
Note: There’s a maximum of 12 months that a stored pendant should be left in the stored mode. Pendants should be stored in ambient conditions (69 to 73 degrees Fahrenheit) while in storage mode.
Remove the battery door to the unlocked position using a quarter or the alarm clearance card.
Remove the battery from the battery compartment.
Press the activation button for at least one second. o The red LED will flash and the pendant will vibrate briefly to indicate that an alarm
has been sent. This serves as confirmation that the pendant is now in storage mode. o Clear (Confirm) the Alarm from the SARA Dashboard o Return the battery door over the empty battery chamber, and use the alarm
clearance card or a quarter to turn the battery door to its locked position. This is indicated by lining up the battery with the arrow on the battery door with the arrow under the locked padlock icon.
Note: If the alarm activation button is pressed when the device is in storage mode and the
battery is not installed, a yellow LED will illuminate briefly on the lower portion of the device to indicate a missing battery condition to the user.
The Pendant remains in the Category it’s been assigned and maintains its Modes and Actions programming, however, it can’t send Alarms while in Storage Mode.
User & Maintenance Guide SSPND-EN-WR / SSPND-EN-SM
User Guide – SSPND-EN-SM / WR P a g e | 10 042516 © Copyright 2016. Status Solutions, LLC. All Rights Reserved. The information contained within this document is proprietary and confidential and intended for use only by Status Solutions, certified Valued Business Partners, and users. Information subject to change without notice
Remove the Device from Storage Mode
To remove the device from storage mode:
Remove the battery door to the unlocked position using a quarter or the alarm clearance card.
Place a battery in the battery compartment, ensuring that the positive terminal (+) faces up.
Seat the battery door over the battery so that the arrow on the battery door is lined up with the unlocked padlock icon.
Use the SSPND-ACC alarm clearance card or a quarter to turn the battery door to line up the arrow on the battery door with the arrow under the locked padlock icon.
Press the activation button for at least one second. • The red LED will flash and the pendant will vibrate briefly to indicate that an alarm has
been sent. This serves as confirmation that the pendant is no longer in storage mode. • To cause the red LED to cease flashing, clear the alarm sent when you activated the
pendant per section “There are two ways to clear the alarm”.
Note: If the alarm activation button is pressed when the device is not in storage mode and the battery is not installed, the red LED will blink rapidly for five seconds, the pendant will vibrate, and an alarm will be sent with a missing battery message. The alarm clearance function is not enabled in this situation. Subsequent button presses will cause the yellow LED to illuminate briefly on the lower portion of the device to indicate a missing battery condition to the user.
Tracking Feature
These devices have a 1-hour check-in supervision interval. (this may impact usefulness for bread crumb trails via SPS). If you need the 3 minute check-in supervision interval, we recommend the SSPND-EN.
User & Maintenance Guide SSPND-EN-WR / SSPND-EN-SM
User Guide – SSPND-EN-SM / WR P a g e | 11 042516 © Copyright 2016. Status Solutions, LLC. All Rights Reserved. The information contained within this document is proprietary and confidential and intended for use only by Status Solutions, certified Valued Business Partners, and users. Information subject to change without notice
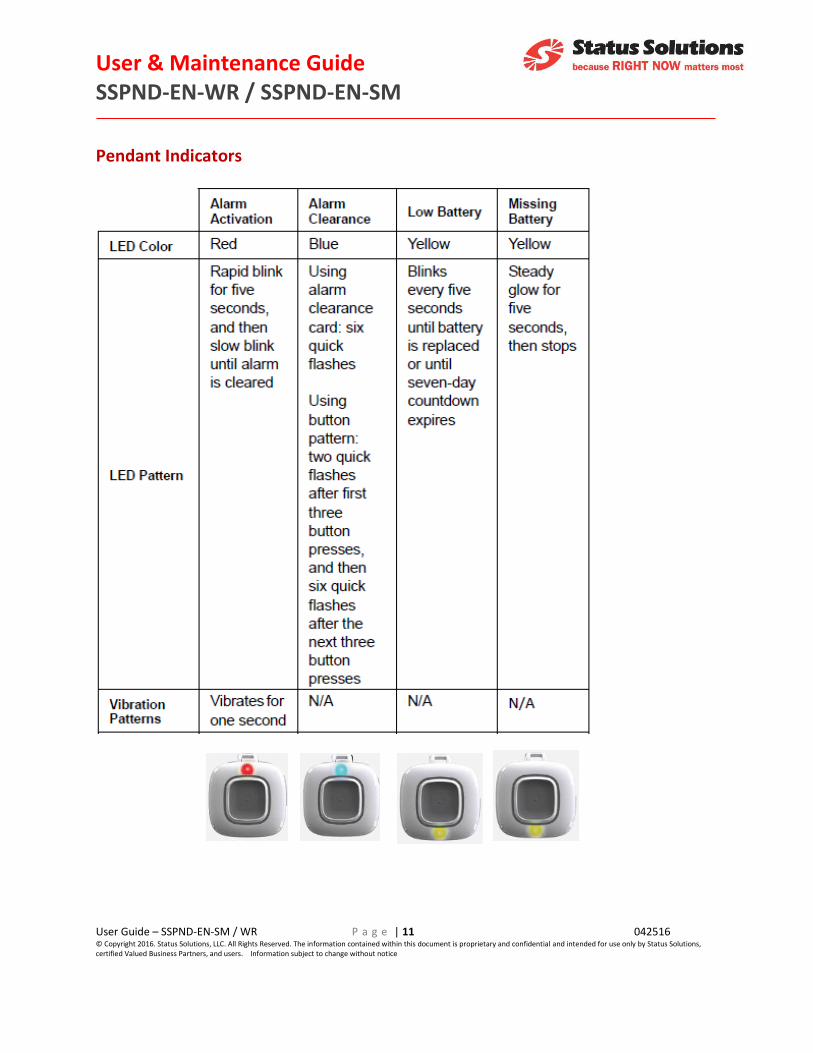
Pendant Indicators


![Emg 1553 Type Tr-4657 User and Sm [ET]](https://img.dokumen.tips/doc/110x75/543ebaa7afaf9f255e8b4ae5/emg-1553-type-tr-4657-user-and-sm-et.jpg)
