Embed Size (px)
Citation preview

WebEROC Login
User Guide with
Concept of Operations
ntr


Contents
CHAPTER 1: INTRODUCTION .......................................................................................................................... 1
1.1 PURPOSE ................................................................................................................... 1
1.2 AUDIENCE .................................................................................................................. 1
1.3 REVISION HISTORY...................................................................................................... 1
1.4 OVERVIEW.................................................................................................................. 1
CHAPTER 2: LOGGING IN TO WEBEOC® ....................................................................................................... 2
2.1 INTRODUCTION ........................................................................................................... 2
2.2 LOGGING IN TO WEBEOC® .......................................................................................... 3
2.3 LOGGING OUT…………………………………………………………………………………….5
CHAPTER 3: CONTROL PANEL ....................................................................................................................... 6
3.1 INTRODUCTION ........................................................................................................... 6
3.2 CONTROL PANEL SECTIONS ......................................................................................... 7
CHAPTER 4: SIGN IN / SIGN OUT .................................................................................................................. 10
4.1 INTRODUCTION ......................................................................................................... 10
4.2 SIGNING IN TO WEBEOC® .......................................................................................... 10
4.3 SIGNING OUT ............................................................................................................ 11
CHAPTER 5: CHECKLIST ............................................................................................................................... 13
5.1 INTRODUCTION ......................................................................................................... 13
5.2 VIEWING THE CHECKLIST .......................................................................................... 13
CHAPTER 6: MISSION/RESOURCE REQUEST ............................................................................................. 15
6.1 INTRODUCTION ......................................................................................................... 15
6.2 ASSIGNING MISSION/RESOURCE REQUEST ................................................................... 15
6.3 ACCEPTING A MISSION/RESOURCE REQUEST ............................................................... 19
6.4 REASSIGNING A MISSION/RESOURCE REQUEST ............................................................ 20
6.5 MAP REQUESTS………………………………………………………………………………….21
CHAPTER 7: POSITION LOG .......................................................................................................................... 22
7.1 INTRODUCTION .......................................................................................................... 22
7.2 VIEWING POSITION LOGS AND GENERATING REPORTS .................................................. 22
7.3 ADDING A NEW POSITION LOG .................................................................................... 23
7.4 UPDATING AN EXISTING POSITION LOG ......................................................................... 25
CHAPTER 8: SIGNIFICANT EVENTS ............................................................................................................. 27
8.1 INTRODUCTION ............................................................................................................ 27
8.2 UPDATING SIGNIFICANT EVENTS ................................................................................... 27

CHAPTER 9: WORKING (SITREP) .................................................................................................................. 29
9.1 INTRODUCTION ............................................................................................................ 29
9.2 ENTERING WORKING SITREP INFORMATION .................................................................... 31
CHAPTER 10: PUBLISHED SITREPS ............................................................................................................. 33
10.1 INTRODUCTION .......................................................................................................... 33
10.2 VIEWING PUBLISHED SITREPS (INCIDENT BRIEFING) ...................................................... 33
CHAPTER 11: INCIDENT ACTION PLAN (IAP) .............................................................................................. 34
11.1 INTRODUCTION .......................................................................................................... 33
11.2 COMPLETING THE IAP FORM ....................................................................................... 35
CHAPTER 12: PUBLISHED INCIDENT ACTION PLANS (IAPS) ................................................................... 37
12.1 INTRODUCTION BOARD NOT COMPLETE ................................................................... 37
12.2 VIEWING PUBLISHED IAPS .......................................................................................... 37
CHAPTER 13: PRESS RELEASE .................................................................................................................... 38
13.1 INTRODUCTION .......................................................................................................... 38
13.2 VIEWING PRESS RELEASES......................................................................................... 38
CHAPTER 14: EOC STATUS BOARDS .......................................................................................................... 39
14.1 INTRODUCTION .......................................................................................................... 39
14.2 INTRODUCTION TO THE EOC TIMELINE BOARD………………………………………………….40
14.3 VIEWING THE EOC TIMELINE BOARD ........................................................................... 40
CHAPTER 15: HOSPITALS BOARD ............................................................................................................... 42
15.1 INTRODUCTION .......................................................................................................... 42
15.2 VIEWING THE HOSPITALS BOARD ................................................................................ 42
15.3 ADDING A NEW RECORD ............................................................................................ 42
15.4 UPDATING A RECORD ................................................................................................ 45
15.5 DELETING A RECORD ................................................................................................ 46
CHAPTER 16: CONTACTS………………………………………………………………………………….48
16.1 INTRODUCTION ......................................................................................................... 48
16.2 VIEWING CONTACT INFORMATION .............................................................................. 48
16.3 ADDING AND UPDATING A CONTACT ............................................................................ 49
16.4 DELETING A CONTACT ............................................................................................... 51
CHAPTER 17: MESSAGES ............................................................................................................................. 52
17.1 INTRODUCTION .......................................................................................................... 52
17.2 VIEWING MESSAGES .................................................................................................. 52
17.3 COMPOSING MESSAGES ............................................................................................. 53

CHAPTER 18: FILE LIBRARY ......................................................................................................................... 55
18.1 INTRODUCTION .......................................................................................................... 55
18.2 ACCESSING THE FILE LIBRARY .................................................................................... 55
APPENDIX 1 - GLOSSARY ........................................................................................................... 58
Appendix 2 - Position Prefix Codes ............................................................................................................... 59
Appendix 3 - Resource Request Process ..................................................................................................... 60
Appendix 4 - EOC Table of Organization ...................................................................................................... 61

Broward County Emergency Management WebEOC® User Guide and Concept of Operations 1
1 Introduction
1.1 PURPOSE
The purpose of this document is to provide step-by-step instructions on using WebEOC® as an end
user as well as to address the overall conceptual management of an emergency situation in
Broward County. This document will also outline applicable operational policies for the
implementation of WebEOC® in the Broward County Emergency Operations Center (EOC).
1.2 AUDIENCE
This document is for WebEOC® users supporting the Broward County Emergency Operations Center
(EOC) instance of WebEOC®, which includes the EOC Command Staff, Broward County employees,
municipal response personnel, and other authorized partner organizations and disaster response
stakeholders.
1.3 REVISION HISTORY
Version Revision Date Description
1.0 March 19, 2009 Initial Document
2.0 July 12, 2016 Update Revision PJS
1.4 OVERVIEW
WebEOC® is an application used by Broward County staff, municipalities, and Command Staff
to monitor and manage day-to-day activities during an incident. WebEOC® can be used during
the planning, mitigation, response and recovery phases of any emergency. All crisis information
in WebEOC® will be universally available to authorized users everywhere.

Broward County Emergency Management WebEOC® User Guide and Concept of Operations 2
2 Logging in to WebEOC®
2.1 INTRODUCTION
The WebEOC® System Administrator assigns a username and password to each
ESF/Unit/Municipality. It is the responsibility of the ESF/Unit leader to distribute the usernames
and passwords to their staff. Upon logging in to WebEOC®, you will be able to select all available
Positions within the ESF/Unit from a drop-down list and serve or function in that capacity. You
can only serve in one position at a time. If you choose to switch Positions, you may click on the
Position Title on the Control Panel and select the new Position from the drop-down list.
Every official Position in every Standard Operation Position (SOP) will have a Position name. All
Positions in the Broward County EOC will be prefaced with a “BC” (e.g., BC Operations Section
Chief). All Positions external to the Broward EOC will be prefaced with a two-letter code as
illustrated in Appendix 2.
ESFs/Units may elect to have a generic “staff member” Position for field staff or unassigned folks
(with limited permissions). Users unsure of the Position they are to occupy, will login to these
“Staff” Positions, or contact your ESF/Unit Leads for your Position.
EOC Guest
1. There will be no “anonymous” positions in WebEOC®.
2. There will be a single user called “eocguest” and a position called “BC EOC Guest.” This is a multi-user position that will be used for individuals not previously registered or trained in the WebEOC® system.
3. This position will be in the ALL EOC group and will have limited access to display (i.e., view only) boards.
4. The password for “eocguest” will be changed for every event and must be requested through the WebEOC® Administrator .

Broward County Emergency Management WebEOC® User Guide and Concept of Operations 3
2.2 LOGGING IN TO WEBEOC®
Step Action
1 Open your web browser.
2 Type https://eoc-web.bc-eoc.org/eoc7/ in the address bar and then press Enter.
Result: The WebEOC Login window appears.
3 Enter the username and password given to you by your ESF/Unit Lead.
REMINDER: user name is not case sensitive, but the password is.
4 Click OK.
Note: After 4 failed attempts, the user will be “locked out” of the system for 15 minutes. After the 15 minutes wait, the user can re-attempt to login again.
Result: A secondary login window appears, prompting you to select the Position and Incident you wish to log in to. If not working a real Incident, use the Training incident.
5 Select the appropriate Position and Incident from the drop-down list.
In this example, the user is logged in as ESF 3; hence, the Incident drop-down list contains only ESF 3 positions to select from.
Select a Position & Incident

Broward County Emergency Management WebEOC® User Guide and Concept of Operations 4
6 Click OK to continue the login.
Result: The Additional Login Information window opens.
7 Enter the following information in the Login window:
Name - (Required field). Enter your full name, first and last name.
Location - (Required field). Enter your current location. Be as specific as possible (i.e., Broward EOC, ESF #, name of shelter, municipal EOC, etc.). Do not enter addresses.
Phone Number - (Required field). Enter the best phone number (use hyphens in the phone number: i.e., 954-555-1212) to contact you during the operational period in which you are logging in; it may be a cellular telephone number or the telephone extension on the phone in front of you. It will probably not be your day-to-day work contact number.
Email - enter the email address to contact you at anytime should there be any questions. This may likely be your work email address. This field is optional.
Comments - leave this field blank.
8 Click OK.
Result: If you have logged in successfully, the Notifications Page will appear

Broward County Emergency Management WebEOC® User Guide and Concept of Operations 5
9 To access the Control Panel, click on the drop down menu to the left of the home page tab
10 Immediately after logging in, you will need to Sign In to WebEOC®. Refer to the chapter titled ‘Signing In/Signing Out’ for detailed instructions on Signing In
2.3 LOGGING OUT OF WEBEOC®
Before logging off, be sure to save any process(es) / record(s) that may be in progress.
Step Action
1 To log off from WebEOC®
Click Logout in the header section of WebEOC®

Broward County Emergency Management WebEOC® User Guide and Concept of Operations 6
3 Control Panel
3.1 INTRODUCTION
The WebEOC® Control Panel is the primary navigation tool for WebEOC®. It is a user's means of
accessing boards, menus, plug-ins and links. The items that are available to you in the Control
Panel are based on your assigned position and user permissions granted to you by the
WebEOC® System Administrator.
The Control Panel is grouped into four (4) sections: Boards, Menus, Tools, and Plugins.
Figure 1: Example of a Typical Control Panel
Click on the board name to
view entries/information.
Star next to Board name
indicates new information.
This ESF menu is only visible
when a user is logged in as
an ESF#/Unit. In this
example, the user is logged
in as ESF 3.

Broward County Emergency Management WebEOC® User Guide and Concept of Operations 7
3.2 CONTROL PANEL SECTIONS
Below is the list of some of the sections that may be visible to you in the Control Panel based on your
permissions. This list is subject to change as new sections and boards may be added.
BOARDS
Sign In/Out
You are required to Sign in to WebEOC® when you begin
your shift and to Sign out at the end of your shift. Use the
Sign In/Out board to Sign In immediately after logging in
and to Sign Out at the end of your shift.
Checklists The EOC Position Checklist describes the role and
responsibilities of each position on the EOC staff roster.
Mission/Resource Request
A “mission” is defined as any task, objective or purpose
assigned to a position or group (e.g., ESF or unit) requiring
some degree of action or outcome. Missions are goal-
oriented and are assigned to specific ESFs or Units.
Requests for resources (i.e., tangible commodities) should
also be made using this board.
Position Log
The Position Log board provides users with a method of
documenting actions taken by the personnel in each
Position in the EOC during each shift. This is where all
pertinent information surrounding an Incident is stored.
EOC personnel will use the Position Log to enter all of the
activities and actions taken during their “shift” or
operational period.
Significant Events
The Significant Events Board in WebEOC® is used to track
events and activities and log “who did what when.” The
Significant Events board provides the real-time chronology
of actions taken during an event, from beginning to end.
Working SitRep
The Working SitRep (Situation Report) board is used by
each ESF/Unit to enter on-going significant situational
awareness information.
Incident Action Plan (Published)
Once the Planning Section has approved the Incident Action
Plan (IAP), the IAP will be published to the Incident
Action Plan (Published) board. Published IAPs can be
viewed by all ESFs/Units but can only be edited by users
within the Planning Section.
Incident Files The Incident Files board allows you to add files needed for
a specific incident. These files will not appear in any other
incident.
Incident Links The incident Links board allows you to add URL Website
links needed for a specific incident. These links will not
appear in any other incident
Messages
Messages is an email tool used to communicate to
WebEOC® users as well as and non- WebEOC® users.
Messages are less formal than Missions, in that they do not
require tracking. An example of a message would be a

Broward County Emergency Management WebEOC® User Guide and Concept of Operations 8
general announcement or a reminder of a date/time of a
conference call or meeting.
Since messages are “real time” and there is no “queuing”
system, they will not be received if the intended recipient is
not logged in. As such, messages are not considered formal
communication. No mission assignments or resource
requests should be conveyed via “messages.”
Press Release The Press Release board is used to display press releases
and announcements.
Situation Reports (Published)
Once the Planning Section has reviewed, edited, and
approved the Working Situation Reports (SitReps), the
Working SitReps will be published to the Situation
Reports (Published) board. Published SitReps can be
viewed by all ESFs/Units but can only be edited by users
within the Planning Section.
Weather Dashboard- Miami A screen of active radars
MENUS
EOC Status Boards
The EOC Status Boards provides read-only status
information for the boards displayed. Changes to
information on this Board can only be made by the
ESF/Unit responsible for the information.
ESF Menu
The ESF Menu is where an ESF can change the data on the
boards that are their responsibility within the EOC Status
Boards.
ICS Forms This is the location to find FEMA/ICS forms. It is an
electronic copy that you can save or print.
Links This is listing of URL website links that may be
useful/helpful to you during an activation.
Region 7 Boards
This allows you to see specific boards (and the
information) from all 4 county’s within our region
(Broward, Miami-Dade, Monroe and Palm Beach)
Training
This board houses a link to the current WebEOC On-line
Refresher Tutorial and the NIMS Training Tracker, which
shows the ICS/NIMS classes that are required for your
specific position and what has been provided to Broward
County Emergency Management Division.
PLUGINS
File Library
The File Library is used to upload and share documents and
files with other users through WebEOC®. The file could be
a procedure, a situation report, a pdf file, an image, or other
file types. Depending on the permissions granted, users
may add, view, and/or delete files from the File Library.
WebEOC Mapper A tool used to create a dynamic, geographically-based
common operating picture through a map-based interface.

Broward County Emergency Management WebEOC® User Guide and Concept of Operations 9
Following are several tips and tricks to make using WebEOC® even easier:
Any WebEOC® Board may be opened in a new window that can be moved and resized.
Multiple Status Boards and/or multiple copies of Status Boards,Plugins or Links may be
opened for simultaneous display. They will have separate tabs at the top of the page.
Color-coding Conventions in WebEOC® Boards
Certain WebEOC® fields are color-coded in order to help strengthen their visual impact, especially
for display boards. To establish direction for the Broward instance of WebEOC®, the following
spectrum of color-coding has been established:
Red Orange Yellow Blue Green
High Severity Low
Urgent Immediacy Routine
Little/none/closed Functionality Full/open

Broward County Emergency Management WebEOC® User Guide and Concept of Operations 10
4 Sign In / Sign Out
4.1 INTRODUCTION
Immediately after logging in to WebEOC®, you need to sign in on the Sign In/Out Board. Signing in
at the beginning of your shift and signing out at the end of your shift is required of all personnel
working a shift. The Sign In and Sign Out times are used to compensate you for the actual hours that
you worked.
4.2 SIGNING IN TO WEBEOC®
Step Action
1 Click Sign In/Out from the Control Panel.
Result: The Sign In/Out window appears.
2 Click Sign In.
Result: The New Record window appears with the login information already populated.
Click here

Broward County Emergency Management WebEOC® User Guide and Concept of Operations 11
3 The majority of the fields are populated from the information you filled in when you logged in. Complete the remaining fields:
Agency: Enter the name of your agency/department
Email: Enter an email address where you can be reached
The Branch field is automatically filled in based on your ESF or Unit.
4 Click Save.
Result: The Sign In/Out windows reappears with your Position, name, and the time you logged in.
5 Click “X” in the Sign In/Out window to close it.
4.3 SIGNING OUT
At the end of your shift, you will need to sign out of WebEOC®.
Step Action
1 Click Sign In/Out from the Control Panel.
2 Click Sign Out on the top right-hand side of the page.
Result: The Sign Out/History window appears.
Populate these two fields

Broward County Emergency Management WebEOC® User Guide and Concept of Operations 12
3 Locate your name in the list and click the Sign Out button adjacent to your name.
4 Click OK from the Sign Out dialog box.
Result: The date and time that you signed out appears in the Log Out Time column
adjacent to your name.
Section Position Agency Name Contact# Log In Time
Log Out Time
Infrastructure
BC Ops ESF#03 County Facilities Infrastructure Unit Leader
Public Works
Casey Smith
954-555-1212 12/30/2014 13:43:05
12/30/2014 13:53:29
5 Click “X” on the Sign In/Out tab to close it.

Broward County Emergency Management WebEOC® User Guide and Concept of Operations 13
5 Checklist
5.1 INTRODUCTION
The Checklist board contains lists which describe the role and responsibilities for each position on the
EOC staff roster.
It is strongly recommended that you view the Checklist board directly after you Sign In in order to
familiarize yourself with the role and responsibilities of each position.
5.2 VIEWING THE CHECKLIST
Step Action
1 Click Checklist from the Control Panel.
Result: The Checklist window appears displaying all of the EOC Positions.
2 Click on the Checklist folder to bring up the list of available checklists and chose a folder from the folder list.
Folder List
ESF1 Checklists
All Staff Checklists
Branch Director Checklists
Description
.
.
Choose a folder from the Folders list...
.
.
RReultesRESul

Broward County Emergency Management WebEOC® User Guide and Concept of Operations 14
3 To view the checklist, click on the “View Attachment” button
Add File Return to Folder List
Description Created By Date Added View Update Delete
All EOC
Staff
Checklist
WebEOC
Administrator
04/01/2014
10:41:08 View
Attachment
Update
4 Review the role and responsibilities outlined in the document
5 Close the document when you have completed your review.

Broward County Emergency Management WebEOC® User Guide and Concept of Operations 15
6 Mission/Resource Request
6.1 INTRODUCTION
A “mission” is defined as any task, objective or purpose assigned to a Position or group (i.e., ESF or
Unit) requiring some degree of action or outcome. An example of a mission is: “Traffic control is
required at the intersection of Broward Blvd and University Dr.” Missions are goal-oriented and are
assigned to specific ESFs or Units. Resources (i.e., tangible commodities) are when you need an
item pulled from inventory. Resources can be equipment, people or food/water. An example of a
Resource request is: ”Police Officers needed to control traffic at intersection of Broward Blvd and
University Dr.” Mission/Resource Requestss are formal “assignments” and therefore, require follow-
up and tracking.
The Mission/Resource Request board provides the ability to assign Missions and/or Resources and
monitor their status. Missions/Resource Requests can be edited by clicking the Update button.
Users who have been assigned a mission/resource request have the ability to “Accept”, “Complete”,
“Cancel” or characterize the task as a task "In Progress". Supervisors whose ESF/units have been
assigned a mission/resource requests have the ability to “Reassign” a request that is incomplete or
misrouted. Members of the receiving staff may also provide comments with their new status.
6.2 ASSIGNING MISSION/RESOURCE REQUEST
Step Action
1 Click Mission/Resource Request from the Control Panel.
Result: The Mission/Task window appears.

Broward County Emergency Management WebEOC® User Guide and Concept of Operations 16
2 To create a new mission or task, click New Entry.
Result: The Mission/Resource Request Display window appears.
3 If at any time you need to view the Mission Process Flow, click on the Mission/Resource Process Flow hyperlink located at the top of the Mission/Task Display window. The Mission/Resource Process Flow will appear in a separate window.

Broward County Emergency Management WebEOC® User Guide and Concept of Operations 17
4 Complete the fields as required in the REQUEST section (used for both Mission and Resource Requests)
Priority: select Low, Medium, High or Immediate (for Life Safety, only)
Entry Title: Type in a quick synopsis of what you are requesting. (ie: “Generator needed”)
Mission/Resource Description: enter a detailed description of the mission/task or objective. Be as specific as possible, provide as many facts and as much information as possible.
Attachment: click Browse to attach any relevant documents that may be helpful to the recipient. Examples might include site maps, photos, equipment specifications, etc.
Location: enter the exact address of the location of the mission/task or resource request..
Contact: enter the full name, phone number and email of the person to contact regarding this mission/task or resource request.
Mission Request Box: If this is a mission request only, click the box and some of the fields will close.

Broward County Emergency Management WebEOC® User Guide and Concept of Operations 18
5 Complete the fields as required in the REQUEST STATUS section (used for both Mission and Resource Requests)
Status field: Select the appropriate status from the drop-down list.
o Assigned: select this status if you are assigning a mission/resource request to an ESF/Unit. This is the status used if you are adding a New Entry.
o Accepted: select this status if you are accepting a mission/resource request that was assigned to your ESF/Unit. This status is used to acknowledge receipt of a mission/resource request that is not being worked on immediately, such as a low request.
o In Progress: select this status if your ESF/Unit has started working on a mission/resource request that was assigned to you. In which case, a brief note on the progress should be made in the “Response” section of the form.
o Complete: select this status if the mission/task has been completed. A notation describing the details regarding the completion should be entered in the “response” text box. In addition, the date and time should be entered in the “Time Completed” field at the bottom of the form.
o Canceled: select this status if the Mission/Resource request was made in error or is a duplicate.
o Reassigned: select this status if the Mission/Resource request was made to the incorrect ESF.
Assigned To: select the ESF/Unit in which to assign the mission/resource request to from the drop down list. If you need some reference assistance, click the View Org Chart located to the right of the drop down list. NOTE: If this field is left blank, the request will remain in limbo.
Time Assigned: this is automatically entered, but can be edited if there was a delay in obtaining information, etc.
Time Due: this is date and time when the mission/resource request should be completed. This is automatically entered and is based on the priority level chosen.
6 Complete the fields in the sections, as required for RESOURCE only (not needed for Missions.)
Resource Name: fill in resource name and justification as to why it is needed. Order Information: used when requesting resources from the State EOC. Requestor: Name, phone number and email of the person requesting the resource,
if it is someone other than the originator.
Secondary Point-of-Contact: If there is an alternate point of contact, in case Point of Contact Person is not available.
Delivery Point of Contact: Information on who should be contacted at resource destination.
7 When finished, click Save.

Broward County Emergency Management WebEOC® User Guide and Concept of Operations 19
6.3 ACCEPTING A MISSION/RESOURCE REQUEST Once the mission/resource request is assigned and accepted by an ESF/Unit, the ESF/Unit can
begin working on the mission.
Responsibilities of the ESF/Unit:
It is the responsibility of the Mission Tracking Unit to monitor the status of all missions
occurring in the EOC to monitor for “Overdue” requests.
The Mission Tracking Unit will physically notify (i.e., visit and communicate with) each
ESF/Unit Supervisor regarding all incomplete or outstanding missions at least once each
operational period.
ESF/Supervisors, Branch Directors, and Section Chiefs will also monitor the status of their
respective missions on a regular basis (at least twice during each operational period).
The individual within ESF/Unit that completes the mission will need to complete and close the
mission. A notation describing the details regarding the completion will be entered in the
“response” text box. The date and time will be automatically be entered in the “Time
Completed” field .
Step Action
1 Click Mission/Resource Request from the Control Panel.
Result: The Mission/Resource window appears.
2 Click Update adjacent to the task that was assigned to you.
Result: The Mission/Resource Request display window appears.
3 Click on the Status drop-down list and select Accepted.
Note: Once you start working a request the status should be In Progress.

Broward County Emergency Management WebEOC® User Guide and Concept of Operations 20
4 Click Save.
Result: The Mission/Resource Request display window reappears displaying the status change.
6.4 REASSIGNING A MISSION/RESOURCE REQUEST
In situations where an ESF or unit may have been inappropriately assigned to perform a mission/resource request, the mission/resource request will need to be reassigned to a more appropriate ESF/unit. Whenever a mission/resource request is reassigned, a comment by the reassigning party providing rationale must be placed in the “response” text box.
Procedure:
Any EOC staff member subordinate to the rank of ESF or Unit Supervisor must first discuss the mission/resource request with their ESF or Unit Supervisor and explain why the mission/resource request should be reassigned. Once an EOC member has received verbal approval to proceed, the user will locate the mission/resource request in WebEOC®.
Municipal representatives should address mis-assigned mission/resource requests with the Municipal Services Branch Director.
Click on the Status drop-down list and select Reassigned as the new status.
Click on the Assigned To drop-down list and select the ESF/Unit you are reassigning the mission/resource request to.
In the “Response” text box, place a comment indicating rationale for the reassignment of the mission/resource request. The notation must end with the user’s full name.
Click on Save.
The mission/resource request will now be assigned to the new ESF/unit or the originating ESF/unit. The newly assigned ESF/unit will:
Click Update adjacent to the mission/resource request that was assigned to you.
Click on the Status drop-down list and select Accepted.
Click Save.
The ESF will begin work on the mission/resource request.
The originating ESF/Unit will follow the same process, except the mission/resource request will be assigned to a more appropriate ESF/Unit from the drop down list.
Click Save.

Broward County Emergency Management WebEOC® User Guide and Concept of Operations 21
6.5 Map Requests
This button is used to request maps and/or geographic data from the GIS (Geographic Information
Systems) Unit.
Step.
Action
1 Click on the Map Request button
2 Click on the Add New Record button
3 Fill in all of the information boxes and the drop down menues. Make sure that you are very clear and concise in your request. The product will only be as good as your request. Click on the Save button.

Broward County Emergency Management WebEOC® User Guide and Concept of Operations 22
7 Position Log
7.1 INTRODUCTION
The Position Log board allows users to document all of the activities and/or actions that are performed
during a shift.
7.2 VIEWING POSITION LOGS
Step Action
1 Click Position Log from the Control Panel.
Result: The Position Log window appears.
2 Click on the filter for the section of the log you wish to view. For example, to view the
Position Logs documented for the Recovery Branch, click Branch-Recovery.
Result: The Position Log window appears displaying all the entries for that section. In this example, the Recovery Branch Log window appears.

Broward County Emergency Management WebEOC® User Guide and Concept of Operations 23
3 Click on another position log filter to view other position logs.
4 Click “X” when you are finished viewing to close the window.
7.3 ADDING A NEW POSITION LOG
Step
Action
1 Click Position Log from the Control Panel.
Result: The Position Log window appears.
2 Click New Record.
Result: The New Record window appears displaying the login information of the user making the entry. (This information is located at the bottom of the New Record window).

Broward County Emergency Management WebEOC® User Guide and Concept of Operations 24
3 Complete all the fields for the new record.
Date/Time:This field is auto-filled; however, if you want to change the information, click
the calendar icon to select a date and then enter the time (hour and minutes) in the
appropriate fields.
Event Type: Click on the drop-down menu and chose the event type (ie: Hurricane,
bomb threat, oil spill, etc)
Priority: use the drop-down menu to pick the priority (low,med, high, immediate [life
safety only])
Point of Contact Name/Number: enter the name and phone number of the point of
contact
Attachment: click Browse to attach a document to this postion log
Details: enter a detailed description of the activities that you performed during your shift
4 Post to BC Significant Events: check this box only if the activity that you are recording is
critical enough to be posted on the Significant Events board.
Note: When a user checks the “Post to BC Significant Events” checkbox, the information in
the corresponding Postion Log will then be reviewed by the respective ESF/Unit Lead,
Branch Director, Section Chief, or WebEOC Controller. Upon reviewing the logs, they will
determine what information gets posted to the Significant Events board.
5 Click Save to save the information.

Broward County Emergency Management WebEOC® User Guide and Concept of Operations 25
7.4 UPDATING AN EXISTING POSITION LOG
Step Action
1 Click Position Log from the Control Panel.
Result: The Position Log window appears.
2 Click Update Record adjacent to the Position Log you wish to modify.
Result: The Update Record window appears.
3 You will need to enter the updated information in the Details field. All previous notes entered
into the Details field will appear under the Record History field.
.

Broward County Emergency Management WebEOC® User Guide and Concept of Operations 26
4 Click Save to save the information.
Result: The updated information appears in the Position Log window. The updated information
is also automatically sent to the Significant Events board by the system, if the box was
checked and approved previously

Broward County Emergency Management WebEOC® User Guide and Concept of Operations 27
8 Significant Events
8.1 INTRODUCTION
The Significant Events board is used to post critical information regarding an Incident. All users who
are logged into the Incident can view entries to the Significant Events board. An ESF/Unit Supervisor
first reviews all events prior to posting them to the Significant Events board. If an ESF/Unit Supervisor
approves an “event” as significant, then the event will be displayed on the Significant Events status
board1. In the absence of the ESF/Unit Supervisor, the “event” requires approval from the Branch
Director, Section Chief, or WebEOC Controller.
The WebEOC Controller will be able to view all “unapproved” events tagged as “significant events.”
Based on the judgment of the Controller and the nature of the incident, the Controller may contact the
ESF/Unit Supervisor or Branch Director/Section Chief to encourage them to read the event and
consider approval of the “significant event” as soon as possible.
Below are a few examples of Significant Events:
1. Infrastructure Failure: Bridge is out, building is damaged or collapsed
2. Shelter Status: Open/Closed
3. Information: Evacuation location
4. Situational Awareness: Latest updates on fire, Hazmat spill update
5. Current Conditions: Hurricane is 10 miles away
8.2 UPDATING SIGNIFICANT EVENTS
Step Action
1 Click Significant Events from the Control Panel.
Result: The Broward County EOC Significant Events window appears displaying a list of the latest Significant Events.
1 In the case of municipalities, “events” will be approved by the Municipal Services Branch Director. In the absence of the Municipal Services Branch Director, “events” will be approved by the Operations Section Chief.

Broward County Emergency Management WebEOC® User Guide and Concept of Operations 28
2 Below is an example of the contents of the Significant Events board.
Note: The most recent significant event is listed at the top of the list. Headline news is listed on top, click on the headline name and It will bring you to the article.
3 Click Update adjacent to the significant event you wish to modify.
Result: The Position/Event Reporting Log screen appears.
4 You will need to enter the updated information in the Details field. All previous notes
entered into the Details field will appear under the Record History field.
Click in the New Entries/Updates field and enter the updated information. 5 Click Save to save the information.
Result: The updated information appears in the Broward County EOC Significant Events
window, as well as on the Position Log.
.

Broward County Emergency Management WebEOC® User Guide and Concept of Operations 29
9 Working (SitRep)
9.1 INTRODUCTION
The Working SitRep (Situation Report) board is used by each ESF/Unit to enter on-going
significant situational awareness information. It is the responsibility of the ESF/Unit Supervisor to
assign only one ESF/Unit staff member at a time from their ESF/Unit to enter information in the
Working SitRep board. This is to prevent information that is being written in the Working SitRep
board from being overwritten by someone else.
Below is the process for entering/reviewing information in the Working SitRep board.
(Process continued on next page)
ESF/Unit Supervisors assigns staff member from their ESF
or Unit to enter information in the Working SitRep board.
Assigned ESF/Unit staff member enters information in
the Working SitRep board.
When complete, assigned ESF/Unit calls or sends a
message to ESF/Unit Supervisor to review the working
SitRep.
ESF/Unit Supervisor reviews and edits (if necessary) the
working SitRep.
When complete, ESF/Unit Supervisor calls or sends a
message to Branch Director to review the working
SitRep.
1
2
3

Broward County Emergency Management WebEOC® User Guide and Concept of Operations 30
Note: SitReps are published every 12 hours during an emergency.
Planning Section will review and edit (if necessary) the
working SitRep.
Upon completion, Planning Section Chief will mark it
as “Approved” and publish it to the Situation Reports
(Published) board.
Once the SitRep is published, only the Planning
Section can make changes to it.
All users will have access to view the Situation Reports
(Published) board.
Branch Director will review and edit (if necessary) all of
the ESF’s/Unit’s Working SitReps that fall under their
control during the reporting period.
4
5
6

Broward County Emergency Management WebEOC® User Guide and Concept of Operations 31
9.2 ENTERING WORKING SITREP INFORMATION
Step Action
1 Click Working SitRep from the Control Panel.
Result: The Broward County Working Situation Report window appears .
2 Click Update to begin entering Situation Report information.
Note: If the Working Copy has “Gathering Input” under the status, as indicated above, you can start updating your Working Situation Report (SitRep) information. If the Working Copy has “Under Review-Report Pending” under the status, as indicated below, the Working SitRep has been locked by the Planning Section in preparation of publishing the Situation Report. Once it has been published, it will be unlocked for input.

Broward County Emergency Management WebEOC® User Guide and Concept of Operations 32
3 The section questions on the left side of the Working Situation Report will differ for each ESF/Unit based on the username that you are logged into (i.e., ESF 3, 6, 8, or 12), . Fill in the situational awareness information for your ESF/Unit.
4 Click “X” to close the Broward County Situation Report tab

Broward County Emergency Management WebEOC® User Guide and Concept of Operations 33
10 Published SitReps
10.1 INTRODUCTION
Once the Planning Section has reviewed, edited, and approved the Working SitReps, the Working
SitReps will be published to the Situation Reports (Published) board. Published SitReps can be
viewed by all ESFs/Units.
10.2 VIEWING PUBLISHED SITREPS
Step Action
1 Click Situation Reports (Published) from the Control Panel.
Result: The SitRep (Published) window appears displaying a list of the Published SitReps for specific operational periods.
2 Click View (the clipboard icon) adjacent to the Published SitRep you wish to view.
Result: The Situation Report window appears displaying a summary of the all of the SitReps from all ESFs/Units.
3 Click “X” to close the Situation Report window after viewing.

Broward County Emergency Management WebEOC® User Guide and Concept of Operations 34
11 Incident Action Plan (IAP)
11.1 INTRODUCTION
The Incident Action Plan (IAP) is published once per operational period. The IAP is comprised of the IAP Cover Sheet, the Published SitREP (which will be incorporated into the ICS-201, Incident Briefing), and additional documents as listed on the ICS-202, Incident Objectives. The Planning Section (Situation Unit) will develop the IAP by collating information on various status boards and information sources within the EOC.
The IAP consists of the following forms:
IAP Cover Sheet
ICS-201 Incident Briefing (Published SitRep)
ICS-202 Incident Objectives
ICS-203 Organizational Assignment List (to be filled out by all Supervisory positions)
ICS-205 Incident Communications Plan (to be filled out by ESF 2)
ICS-207 Organization Chart
ICS-230 Daily Meeting Schedule
Additional attachments as applicable
The ICS-203 Organizational Assignment List, provides the names of personnel assigned to leadership positions for the next operational period. This form lists personnel assigned to Command, Command Staff, Section Chiefs, Branch Directors, and ESF/Unit Supervisors. This form is implemented in WebEOC® as a status board that will be filled in by each of the above positions. The Situation Unit will review this form each operational period and incorporate it into the IAP.
The ICS-205 Incident Communications Plan, will be developed by ESF#2 Communications, and incorporated into the IAP by the Situation Unit.
The Emergency Management Director via a hardcopy signature will approve the IAP prior to publishing by the Planning Section.
Refer to the EOC Timeline board as it is a dynamically updating board that displays when the various planning products associated with the IAP are due and by whom.
The IAP data will be preserved from the previous Operational Periods so that it can be edited to be applied to the new Operational Period.
Each position logged onto WebEOC® will have a link on the menu bar to the current published IAP.

Broward County Emergency Management WebEOC® User Guide and Concept of Operations 35
11.2 COMPLETING THE IAP ICS 203 FORM
tep Action
1 Branch Directors or Section Chiefs can click ORG Assignment Input – ICS 203 from the Boards Section of the Control Panel.
Result: The ICS 203 form appears.
2 Click on the Edit This Page tab.
Result: An editable version of the form appears.
3 Complete the fields for your Branch or Section

Broward County Emergency Management WebEOC® User Guide and Concept of Operations 36
4 Click Save to save the record(s).
5 Click “X” to close the window.

Broward County Emergency Management WebEOC® User Guide and Concept of Operations 37
12 Published Incident Action Plan (IAP)
12.1 INTRODUCTION
Once the Planning Section has reviewed, edited, and approved the IAP, the approved IAP will be
published to the Incident Action Plan (Published) board. Published IAPs can be viewed by all
ESFs/Units.
12.2 VIEWING PUBLISHED IAPS
Step Action
1 Click Incident Action Plan (Published) from the Control Panel.
Result: The Incident Action Plan (Published) window appears.
2 Click View to view the Published IAP for a specific operational period.
Result: The Published IAP window appears displaying the Published IAP for the specific operational period.
3 Click Print PDF to print the Published IAP.
If you wish to view or print all of the forms from the IAP Main View window, click View / Print IAP.
4 Click Return to Main View to return to the IAP Published window.
5 Click “X” to close the IAP Published window after viewing.

Broward County Emergency Management WebEOC® User Guide and Concept of Operations 38
13 Press Release
13.1 INTRODUCTION
The Press Release board allows users to view press releases as they occur. ESF #14 is responsible
for the development and release of accurate and complete public information regarding an incident
and for publishing the information in the Press Release board. All users will be able to view the press
releases listed in the Press Release board.
13.2 VIEWING PRESS RELEASES
Step Action
1 Click Press Release from the Control Panel.
Result: The Published Press Release window appears displaying a list of the all the announcements that have been released to the public for a specific incident.
2 Click Press Release URL adjacent to the Press Release you wish to view.
Result: The Press Release opens in a new window.
Broward County Emergency Management WebEOC® User Guide and Concept of Operations 39
14 EOC Status Boards
14.1 INTRODUCTION
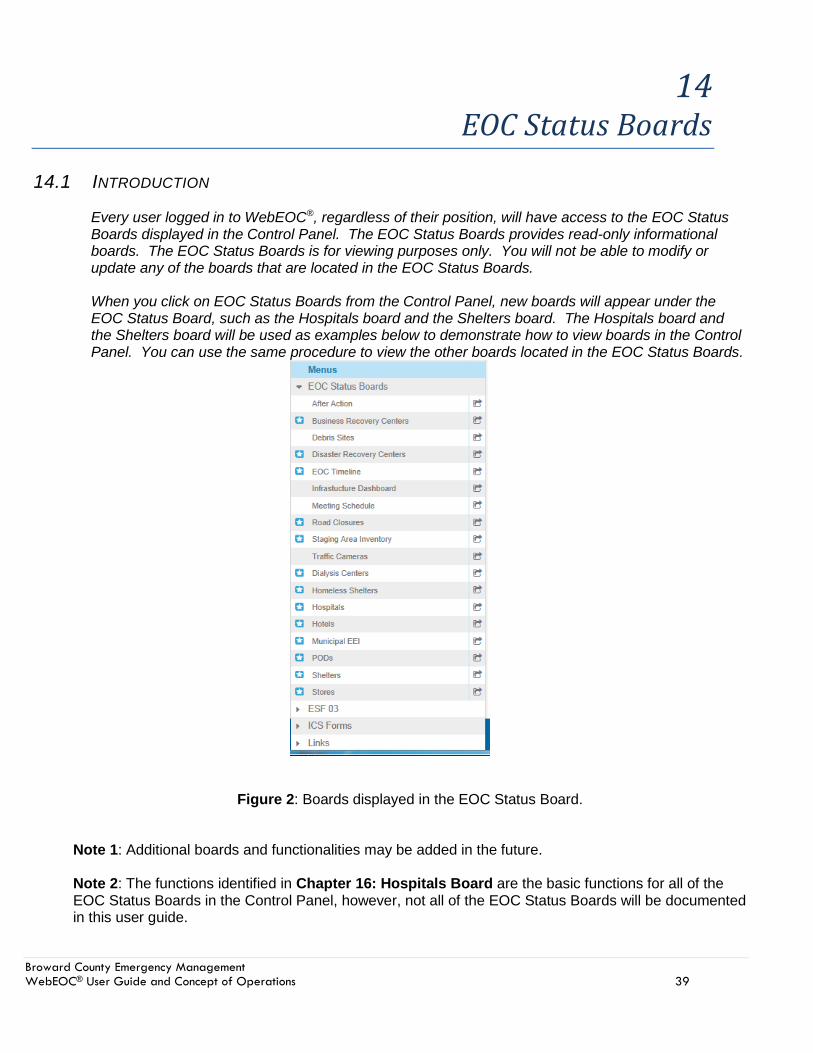
Every user logged in to WebEOC®, regardless of their position, will have access to the EOC Status Boards displayed in the Control Panel. The EOC Status Boards provides read-only informational boards. The EOC Status Boards is for viewing purposes only. You will not be able to modify or update any of the boards that are located in the EOC Status Boards. When you click on EOC Status Boards from the Control Panel, new boards will appear under the EOC Status Board, such as the Hospitals board and the Shelters board. The Hospitals board and the Shelters board will be used as examples below to demonstrate how to view boards in the Control Panel. You can use the same procedure to view the other boards located in the EOC Status Boards.
Figure 2: Boards displayed in the EOC Status Board.
Note 1: Additional boards and functionalities may be added in the future. Note 2: The functions identified in Chapter 16: Hospitals Board are the basic functions for all of the EOC Status Boards in the Control Panel, however, not all of the EOC Status Boards will be documented in this user guide.

Broward County Emergency Management WebEOC® User Guide and Concept of Operations 40
14.2 EOC TIMELINE BOARD
The EOC Timeline board allows ESFs/Units to view what meetings/activities are coming up. It is
strongly recommended that you view the EOC Timeline board directly after you view the Checklist
board in order to familiarize yourself with the timeline and deadlines of all the activities.
14.3 VIEWING THE EOC TIMELINE BOARD
Step Action
1 Click EOC Status Boards from the Control Panel.
Result: The Boards window names appear under the EOC Status Board heading..

Broward County Emergency Management WebEOC® User Guide and Concept of Operations 41
2 Click EOC Timeline.
Result: The EOC Timeline window appears with a running clock of all the activities. The activities are divided in rows displaying the time the activities are due, the activity name, and the Sections responsible for the activities.
This board also utilizes the color code convention. It starts out as blue, changes to yellow at 30 minutes before it’s due, then changes to orange (as shown) 15 minutes before it is due and finally, turns to red 5 minutes before it is due.

Broward County Emergency Management WebEOC® User Guide and Concept of Operations 42
15 Hospitals Board
15.1 INTRODUCTION In the Hospitals board, you can view information such as the Hospital name; operational status, power status, and ER status; and the occupancy. Additional information on the Hospital can be obtained by clicking on the Details button.
15.2 VIEWING THE HOSPITALS BOARD
Step
Action
1 Click EOC Status Boards from the Control Panel.
Result: The Status Board menu appears
2 Click Hospitals.
.
3 To view the details for a specific hospital, click the Details button adjacent to the hospital
name.
Result: The information for the specified hospital appears.

Broward County Emergency Management WebEOC® User Guide and Concept of Operations 43
4 To return to the hostipals list, click Return to List.
15.3 ADDING A NEW RECORD
Only users with specific access rights and assigned positions will be able to modify boards in
WebEOC® (i.e., most ESF #8 personnel are able to modify the Hospitals board).
In this example, we will add a new record to the Hospitals board. Although the procedure below refers to the Hospitals board, you can use this same procedure to add a new record for the other boards in the Control Panel, that your ESF is responsible for, by selecting the appropriate board.
Step
Action
1 Select the ESF username that you are logged in as from the Menus section of the Control
Panel. In this example, the user is logged in as ESF8; therefore, ESF 08 is displayed in the
Menus Section
Result: The Boards window appears displaying the boards that you have access to.
2 Click on the the name of board you wish to add a new record.
Result: The Hospital Status Board will open
3 Click on the Add Hospital Button on the upper right hand side of the screen
Result: The New Record form appears in a separate window

Broward County Emergency Management WebEOC® User Guide and Concept of Operations 44
4 Complete all the fields for the new record.
Note: WebEOC® can geocode street addresses and generate a display to show the address
on a map.
In order to do so accurately, the address that you enter in the Address field must be entered
in the following format:
Street, City, State, Zip. The street name, city, state, and zip code must be separated by
commas. For example: 120 NE 10th St, Plantation, FL, 33324
5 After you have entered the address, click on Get Address.
Result: A drop-down list appears below the Address field and the Lat/Long field is
automatically populated by the system.
6 Click the Address drop-down list to verify that the address is correct.
7 Click Map It if you wish to see a map for the specified address.
8 Click Save to save the information for the new record.
9 Click “X” to close the New Record window.
Address drop-down list appears
Lat/Long field is automatically populated by the system.

Broward County Emergency Management WebEOC® User Guide and Concept of Operations 45
10 Click on the board to verify that the new record has been added.
In this example, click on Hospital Status.
Result: The new record appears at the top of the list.
15.4 UPDATING A RECORD
In this example we will update the Hospitals board. Although the procedure below refers to the Hospitals board, you can use this same procedure to update the other boards in the Control Panel, that your ESF is responsible for, by selecting the appropriate board.
Step Action
1 Click the ESF username that you are logged in as from the Menus section of the Control
Panel. In this example since we are logged in as ESF8, ESF 08 is displayed in the
Menus section.
Result: The list of Boards that you have access to will appear under the ESF 08

Broward County Emergency Management WebEOC® User Guide and Concept of Operations 46
2 Click on the board which contains the record that you wish to update.
In this example, click on Hospital Status.
Result: The list of all the hospitals in the system appears in a separate window.
3 Click on Update.
Result: The Update Record window appears for the specified hospital.
4 Modify the record as necessary.
5 Click Save to save the record information.
Result. The Hospitals Status window reappears.
6 Click “X” to close the window.
15.5 DELETING A RECORD
In this example, we will delete a record in the Hospitals board. Although the procedure below refers to the Hospitals board, you can use this same procedure to delete the other boards in the Control Panel that your ESF is responsible for, by selecting the appropriate board.

Broward County Emergency Management WebEOC® User Guide and Concept of Operations 47
Step Action
1 Click the ESF username that you are logged in as from the Menus section of the Control
Panel. In this example, the user is logged in as ESF8, therefore ESF 08 is displayed in
the Menus section.
Result: The Boards window appears displaying the boards that you have access to.
2 Click on the board which conatins the record that wish to delete. In this example, click
on Hospital Status.
Result: The list of all the records in the system appears in a window.
In this example, the list of all of the hospitals appears.
3 Click on the record that you wish to delete. In this example, click the update buttonl.
Result: The Update Record window appears.
4 Go to the very bottom of the page and click the box next to Remove Hospital. Click
save and that hospital will be removed.

Broward County Emergency Management WebEOC® User Guide and Concept of Operations 48
16 Contacts
16.1 INTRODUCTION
WebEOC® contains one contact database, but it is filtered so that each ESF/Unit only has access to their own contact list. Each ESF/Unit will have the capability to create their own contact information. For example, if you logged in as ESF #8, you will need to click on the ESF 08 link that appears in the Menus section of the Control Panel. Information recorded for each contact includes, but is not limited to, agency (or person) name, office/mobile telephone numbers, email addresses, and special notes or comments for the contact. Users will be able to add their own contacts and edit those contacts that they create, but will not be able to view or edit contacts that were created by another user. The Contacts board is designed this way for confidentiality purposes.
16.2 VIEWING CONTACT INFORMATION
Step Action
1 Select the ESF username that you are logged in as from the Menus section of the
Control Panel. In this example, the user is logged in as ESF8; therefore ESF 08 is
displayed in the Menus section.
Result: The Boards window appears displaying the boards that you have access to.
2 Click Contacts.
Result: The Contacts window appears.

Broward County Emergency Management WebEOC® User Guide and Concept of Operations 49
3 Click Details adjacent to the contact name to view all the details for that contact.
Result: The Contact Details window appears.
4 Click Return to List when you have finished viewing the contact information.
16.3 ADDING AND UPDATING A CONTACT
Step Action
1 Select the ESF username that you are logged in as from the Menus section of the
Control Panel. In this example, the user is logged in as ESF8; therefore, ESF 08 is
displayed in the Menus section.
Result: The Boards window appears displaying the boards that you have access to. 2 Click Contacts from the Boards window.
Result: The Contacts window appears.
3 If adding a new contact, click Add New record Or
If updating an existing contact, click Update.
Result: The Contacts window appears.
Add new contact
Update contact

Broward County Emergency Management WebEOC® User Guide and Concept of Operations 50
4 Enter or modify the following information as applicable:
• Contact Name: enter the contact’s name
• Contact Agency: enter the contact’s agency name
• Address: WebEOC® can geocode street addresses and generate a display to
show the address on a map. In order to do so accurately, the address that you
enter in the Address field must be entered in the following format:
12345 NW Street, City, State, Zip
The street name, city, state, and zip code must be separated by commas.
• After you have entered the address, click on Get Address.
Result: A drop-down list appears below the Address field and the Lat/Long field is
automatically populated by the system.
Click the Address drop-down list to verify that the address is correct.
Lat/Long field is automatically populated by the system.
Click Map It if you wish to see a map for the specified address
Phone Numbers: enter home, work, and cell phone numbers for this contact
E-mail: enter email addresses for this contact
5 Click Save to save the information for the contact.
Click Address drop-down
list

Broward County Emergency Management WebEOC® User Guide and Concept of Operations 51
16.4 DELETING A CONTACT
Step Action
1 Select the ESF username that you are logged in from the Menus section of the
Control Panel. In this example, the user is logged in as ESF8; therefore, ESF 08 is
displayed in the Menus section.
Result: The Boards window appears displaying the boards that you have access to.
2 Click Contacts from the Boards window.
Result: The Contact List window appears.
3 Click Update adjacent to the contact you wish to delete.
Result: The Contacts window for the selected contact appears.
4 Check the Remove Entry checkbox to remove the contact list.
5 Click Save.

Broward County Emergency Management WebEOC® User Guide and Concept of Operations 52
17 Messages
17.1 INTRODUCTION
The Messages board allows WebEOC® users to communicate with each other via an internal
messaging link. Users can send email messages to email accounts internal and external to
WebEOC®. All messages sent or received by the user are seen by all users regardless of the
incident that the user is logged in to. Since messages are “real time” and there is no “queuing”
system, they will not be received if the intended recipient is not logged in. As such, messages
are not considered formal communication. No mission assignments or resource requests should
be conveyed via “messages.”
17.2 VIEWING MESSAGES
If you have a new message, a star will appear to the left of the board name on the Control
Panel.
Step Action
1 Click Messages from the Boards section of the Control Panel.
Result: The Messages window appears and displays the Inbox.

Broward County Emergency Management WebEOC® User Guide and Concept of Operations 53
2 Find the message you want to view and click on the Select button to open the message.
Result: The Message Detail window appears.
3 Click Reply to Sender or Forward to reply to or forward the message.
Result: The message opens in the Compose New Message window.
4 Complete the following fields as necessary:
To: Select the recipient(s) from Positions or Groups.
Note: It is suggested that you always send to a group, as a specific position may
not be on staff when the message is sent.
Message: Enter the text of the message to the message details box. .
Attachment: If attaching a file, click Browse to choose the file to attach.
5 Click Send to send the message. After you send your message, you will automatically
return to your Inbox.
17.3 COMPOSING MESSAGES
Step Action
1 Click Messages from the Boards section of the Control Panel.
Result: The Messages window appears and displays the Inbox.

Broward County Emergency Management WebEOC® User Guide and Concept of Operations 54
2 Click New Message button.
Result: The Compose New Message window appears.
3 Complete the following fields as necessary:
To: Select the recipient(s) from Positions or Groups.
Note: It is suggested that you always send to a group, as a specific position may
not be on staff when the message is sent.
Subject: Complete the subject field. (a required field)
Priority: Select the priority for the message (High, Normal, Low).
Message: Enter the text of the message to the message details box.
Attachment: If attaching a file, click Browse to choose the file to attach
4 To spell-check your message, click Spell Check.
5 Click Send to send the message. After you send your message, you will automatically be returned to your Inbox.
Note: The recipients of your email will receive notification of the new message.
Note: You have the ablity to send a message to an external email; however, they will not be able to reply back to you.

Broward County Emergency Management WebEOC® User Guide and Concept of Operations 55
18 File Library
18.1 INTRODUCTION
The File Library contains a growing list of relevant documents including Checklists, EOC Documents, Operations documents, WebEOC® User Guide/Concept of Operations Guide as well as other documents. Depending on the permissions granted, users may upload, view, share documents, and/or delete files from the library.
18.2 ACCESSING THE FILE LIBRARY
Step Action
1 Click File Library from the Control Panel.
Result: The Folder List window appears displaying a list of all of the documents in
the library.
2 To View the documents in the library:
Step Action
1 Click the folder from the Folder List window. For example, select EOC
Documents.
Result: The File List window appears displaying a list of all of the folders in the
library.

Broward County Emergency Management WebEOC® User Guide and Concept of Operations 56
2
Click the down-arrow in the View column adjacent to the document you wish to view.
3 A box will open giving you the option to Open or Save the document. Click Open.
Once open you can print the document, if you desire.
.
4 Click on the “X” in the upper right hand corner to close the document,

Broward County Emergency Management WebEOC® User Guide and Concept of Operations 57
Appendix

Broward County Emergency Management WebEOC® User Guide and Concept of Operations 58
Appendix 1 - Glossary
Account A record or entry in the WebEOC® involving a specific individual. The password-protected account identifies the specific position(s) the individual can function in during activation of the EOC.
Event See “Significant Event.”
Position A specific rank within the Broward EOC as depicted by the table of organization. All WebEOC® users must login to a specific position. There are no “anonymous” positions. An individual can only serve in one position at a time. Each position within WebEOC® is associated with specific permissions and authorizations (i.e., access rights, read-write permissions, etc.) based on the roles and responsibilities of the position/function.
Priority: Immediate Life-safety, only.
Priority: High Urgent; must be addressed within 1 hours.
Priority: Medium Moderate; must be addressed within 2-6 hours.
Priority: Low Routine; should be addressed within the next 6-12 hours.
Resource Request Tangible assets or commodities (i.e., equipment, personnel, or supplies) that are exchanged among entities (i.e., ESFs) or must be acquired by the Logistics Section.
Significant Event An important or noteworthy operational occurrence related to the incident obtained from a trustworthy source that the entire EOC needs to be aware or deserves consideration.

Broward County Emergency Management WebEOC® User Guide and Concept of Operations 59
Appendix 2 - Position Prefix Codes
Code Entity
BC Broward County CC Cooper City CK Coconut Creek CS Coral Springs DN Dania Beach DR Deerfield Beach DV Davie FL Ft Lauderdale HB Hillsboro Beach HD Hallandale Beach HW Hollywood LH Lauderhill LL Lauderdale Lakes LP Lighthouse Point LS Lauderdale by the Sea LZ Lazy Lake MDC Miami-Dade County MG Margate MM Miramar NL North Lauderdale OP Oakland Park PB Pompano Beach PBC Palm Beach County PD Parkland PK Pembroke Park PL Plantation PP Pembroke Pines SN Sunrise SR Sea Ranch Lakes SW Southwest Ranches TM Tamarac WM Wilton Manors WP West Park WS Weston

Broward County Emergency Management WebEOC® User Guide and Concept of Operations 60
Appendix 3 - Resource Request Process

Broward County Emergency Management WebEOC® User Guide and Concept of Operations 61
Appendix 4 - EOC Table of Organization