Embed Size (px)
Citation preview

Page 1 November 2019
User Guide for iTrent Employee Self-Service: The integrated HR and
Payroll system.
Welcome to iTrent step-by-step guidance. This document outlines
• How to navigate iTrent Payroll System
• How to view and update personal information including address, contact information, emergency
contacts and bank details
• How to view payslips & P60’s
• How to submit timesheets and expense claims
• How to view your employment details
Table of Contents
Click on an item to navigate to that page.
1 Helplines, user guides, FAQ’s and links to systems 2
2 Deadlines for submissions and approvals 2
3 Welcome & Introduction 3
4 Logging into iTrent Employee Self-Service 3
4.1 Browsers 3
4.2 Logging in 4
4.3 Login account if you are a Visiting Lecturer or Casual Worker 4
4.4 Planned maintenance of iTrent 5
5 Personal Details 5
5.1 Personal Details – Changes you can make 5
5.2 Contract end dates, and contracts closing. 6
5.3 Contract naming conventions 6
6 Pay & Benefits – Payslips & P60’s 7
6.1 E-Form Preferences – Emailed Payslips 7
7 Time & Expenses 9
7.1 Completing your timesheet, a Step by Step Guide 9
7.2 Your Claim 9
7.3 Expense Claims 11
7.4 Claim Status for Timesheets & Expenses 12
7.5 When will My Claim Be Paid? 13
7.6 How do I check previous claims? 13
7.7 Timesheet amendments 14
8 Converting minutes into decimal 17

Page 2 November 2019
1 Helplines, user guides, FAQ’s and links to systems
Helplines Please contact
All pay-related queries [email protected] or
0115 977 6728
Pay related queries cover issues like: If your net pay (the amount you have received) looks
wrong and you would like to know how it is calculated. How your sick pay is calculated and
deducted.
Queries on contracts, line manager queries,
update personal and employee details.
In order to process your query quickly please email only one of the above email addresses.
Emailing more than one creates additional “jobs” in the system, leading to duplication and may
cause confusion. Additional “jobs” are also created when staff respond to emails that they are
copied into, so please refrain from cc’ing people, where possible.
User guides and FAQs Please access
• Visiting Lecturer & Casual Worker One
Page Guide - Setting up a new or updated
contract.
• Frequently Asked Questions for Payroll
and HR systems.
https://www.rca.ac.uk/more/work-rca/visiting-
lecturers-and-casual-workers/
Links to systems Please access
iTrent the integrated HR and Payroll system Employees: iTrent Employee Self-Service
Managers: iTrent People Manager
Stonefish – for Casual Workers and Visiting
Lecturers to set up on a new contract.
Stonefish
2 Deadlines for submissions and approvals
As a reminder, the following dates for timesheet activity and for contracts to be submitted are:
Activity Deadline
New contracts to be submitted and ‘Terms
of Engagement’ accepted.
3rd of each month
Timesheet submission 10th of each month
Page 3 November 2019
Authorisation 15th of each month
Data Protection
The data contained in this system and its usage is subject to general data protection regulations
and the Royal College of Art’s Information Systems Security and Acceptable Use Policy,
available from https://intranet.rca.ac.uk/information-security-policy/
3 Welcome & Introduction
Welcome to your User Guide for iTrent Employee Self-Service and People Manager, the
integrated HR and Payroll system.
3.1 Employee Self-Service
Allows employees to view and update their information which is held on the Royal College of
Art’s Human Resources database, iTrent, including:
● Personal Data: including your address, contact information, emergency contact(s), bank
details and any sensitive information.
● Your payslips
● Your current employment details
Should you have any queries regarding your data held within the system, or if you need to
update a field that is “read only”, then please inform the HR team by emailing [email protected].
3.2 Manager Self-Service
This is for Staff who are set up as authorising/reporting managers in iTrent.
Authorising/reporting managers are enabled access to the People Manager functionality of
iTrent.
People Manager, known as RCA MSS, allows
● Managers to review limited personal and employment details for the people who are set up
as reporting to them
● View and authorise (or reject) holiday requests and Time & Expenses claims
● View Sickness and Holiday Absence details
● Redirection of Authorisation tasks to cover a period of their own absence
4 Logging into iTrent Employee Self-Service
4.1 Browsers
Whether you are using a laptop or a desktop computer, iTrent Employee Self-Service can
currently be accessed by the following supported browsers:
● Internet Explorer 11
● Microsoft Edge
● Google Chrome
Mozilla Firefox; Safari can currently cause some issues so are not recommended.
You should always ensure that you are using the most recent version of your browser.

Page 4 November 2019
Important tip: always use your computer’s mouse or trackpad to ‘click through’, instead of
using keyboard shortcuts such as ‘enter’.
4.2 Logging in
1. Launch one of the supported web browsers
2. Follow this link to the login page: https://roycali.webitrent.com/roycali_ess/ess/#/login
3. The Login screen will appear:
4. Enter your normal College username
(forename.surname)
5. Enter your normal College password
6. Click Login
Contracted staff: You should have already been provided access to the service, however if
you have yet to receive this or you are unable to log into the system please contact
4.3 Login account if you are a Visiting Lecturer or Casual Worker
In order to receive an iTrent login account, you must have accepted your Terms of
Engagement and completed your right to work checks. Please reference stages 1- 3 of this
Visiting Lecturer & Casual Worker Guide: Setting up a new or updated contract.
Page 5 November 2019
4.4 Planned maintenance of iTrent
At regular intervals, our iTrent (payroll system) will undergo scheduled maintenance. During
this period you will be unable to submit your timesheet. Typically the system is offline part of
the weekend. The upcoming schedule is shown in your ESS.
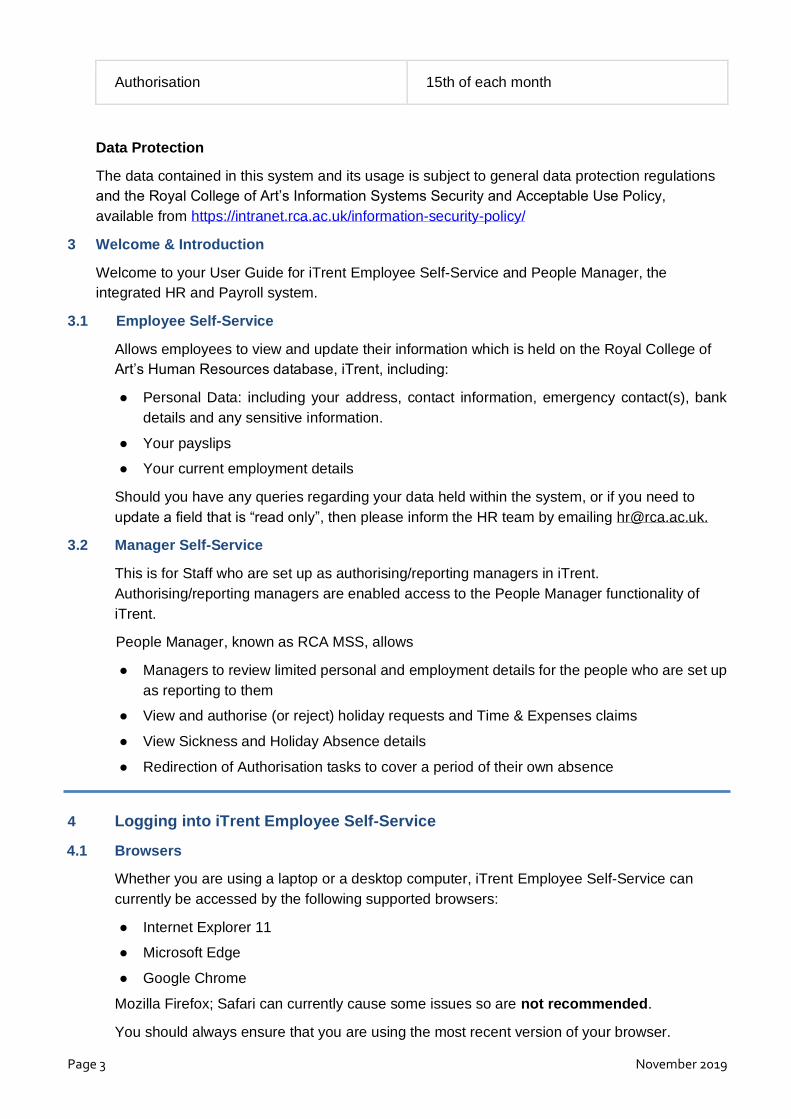
5 Personal Details
This page allows you to view, and edit, your personal details, contact information, emergency
contacts, bank account information and any sensitive information.
By clicking in the relevant boxes you will then be presented with further information where you
can also amend the details.
Important: If you pay into a pension scheme, and have changed your personal Information, you
may need to change your Nominated Beneficiary. To do so, please contact the HR team
5.1 Personal Details – Changes you can make
Below is a table which summarises the changes you can make in each of the sections of this
page. Any other amendments will need to be emailed to the HR Team at [email protected] for
them to change on your behalf.
Area What changes you can make
Personal information
(Includes name, date of birth and
marital status)
Sensitive information (including
ethnicity, religion, nationality and
more)
You are able to amend your marital status and
preferred name.
You are able to populate or update the choices that
apply to you. This is not mandatory and is your
decision to complete.
Contact information New address - use ‘Add address’ to enter a new
address.
Page 6 November 2019
● Home address
● Home correspondence
● mobile phone number
● personal email address
Amend address - clicking in the relevant boxes, to
update existing information
Add contact details - to add new methods of
contact such as a new number or an email address.
Emergency contact information
(Name and contact details)
Your emergency contacts are the people we will
contact first in emergency situations and it is
important to keep us up to date of any changes.
You can add or change your emergency contact
details.
Bank Details
This page will allow you to change your bank details. Please note these important points:
1. When saving your details, if the sort code you enter is not recognised by Employee Self-
Service and you receive an error message then please email [email protected] with details
of the sort code and it will be added into the system. Your bank account will not be
updated until the sort code is correct.
2. A change of sort code will take immediate effect. Please do not change your bank
details at the end of the month as the payroll may have already been processed.
3. Please keep your existing bank account open until you have received your salary in the
new bank account given.
If you are unsure please contact [email protected] to enquire if payroll has been
processed.
Employment
Everything under the employment section of Employee Self-Service is read only and
therefore cannot be amended.
If you believe that any of the information held in this section is incorrect e.g. Reporting
Manager, please ask your manager to send an email to [email protected].
If you require further information on your employment history please email [email protected].
5.2 Contract end dates, and contracts closing.
Contracts will be automatically closed three months after the ‘end date’ stated. You and your
line manager will receive a reminder two months before your contract ends, that your contract
will expire soon. At this point, you and your line manager can have a discussion about whether
a new contract needs to be raised.
• Once your contract has expired, you and your line manager will receive another
notification.
5.3 Contract naming conventions
We have made changes to the naming conventions of your contract, to make it easier for you
to choose the right contract when completing your timesheet.

Page 7 November 2019
From August 26 2019, instead of a series of numbers, your contract title will now have ‘Job
title - Job Type Programme - Department - Project Code.’ For example, for a new contract for
a Casual Worker will look like: "CW-Administration-870007-Academic Development Office".
6 Pay & Benefits – Payslips & P60’s
This page displays your payslip details for the last 12 months, which you are able to click into
to view more details.
• You can use the scroll bar to scroll back through previous months’ payslips. By
clicking into one of these payslips you will be able to view more details.
• Payments, deductions and net pay totals are shown for the current month.
• Please note that when clicking on a payslip the system is generating a copy for
you to view/download. The latest payslip only appears after all payroll processes are
finished for that particular month and may be several days after emailed payslips are
submitted.
• You can also view and download your P60 documents.
6.1 E-Form Preferences – Emailed Payslips
In order to receive your payslip via email each month you will need to set up your ‘E-Payslip
Delivery options’. This is available on the homepage:

Page 8 November 2019
1. By entering an email address as well as a password (with confirmation) and ‘saving’ you
will now receive payslips automatically via email. This password is for the emailed payslips
only and is separate to your login details.
2. These are sent out as payroll is calculating so as a result will be received the day before
payday.
3. Please ensure that the Email payslip box is ticked.
4. When you receive your payslip via email you will be presented with the following when
attempting to open it:
• This is the password you set-up in the ‘E-form Preferences’ screen.
• If you are unable to recall what this password is then you will need to update your
password through the ‘E-form Preferences’ screen. You will need to remove the existing
information and enter new details and save.
• This new password will only apply to new emailed payslips. To view/open previous
payslips you will need to go back to the Pay & Benefits screen
Page 9 November 2019
7 Time & Expenses
7.1 Completing your timesheet, a Step by Step Guide
Before you complete a claim form, please read the information below:
● A new claim form should be started for each month. You can add your hours all in one
sitting, or bit by bit – as long as your claim is submitted by the deadline (10th of the
month).
● Time & Expenses should be claimed on a monthly basis and not be accrued over several
months1.
● Deadline: All claims should be submitted by the 10th of each month and authorised by
the 15th to ensure payments are made in the same month. Timesheets authorised after
the monthly cut-off will be processed in the following pay run.
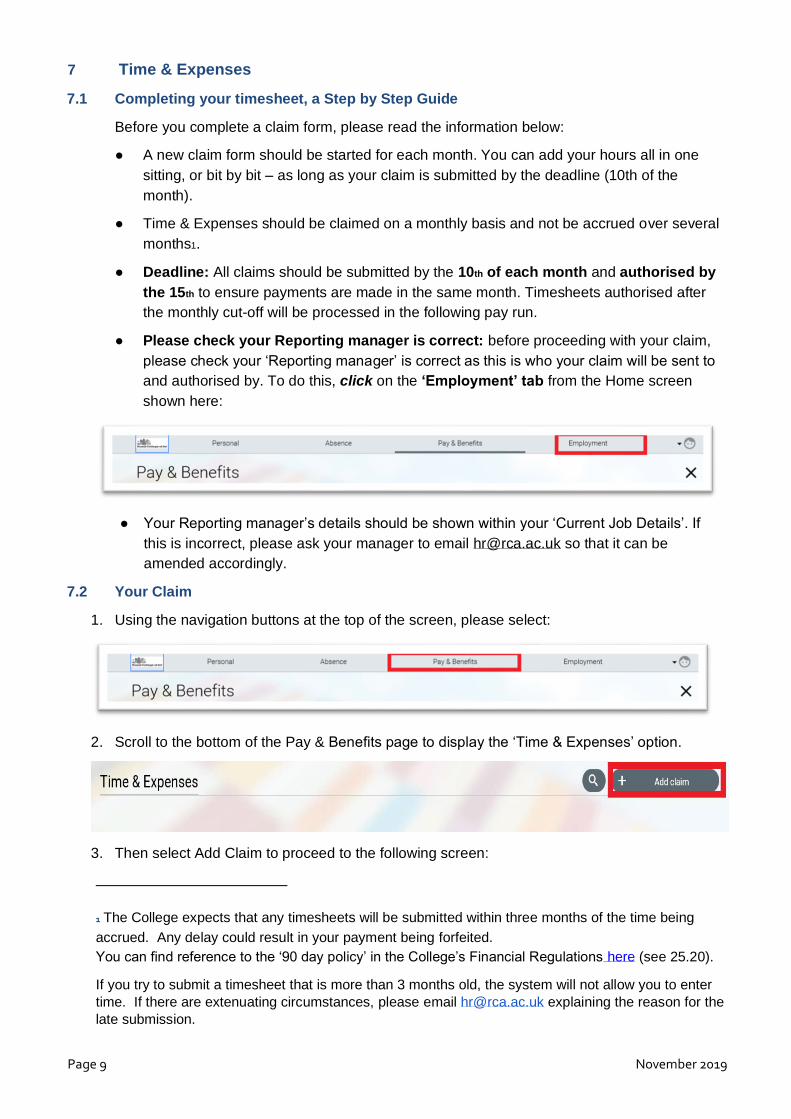
● Please check your Reporting manager is correct: before proceeding with your claim,
please check your ‘Reporting manager’ is correct as this is who your claim will be sent to
and authorised by. To do this, click on the ‘Employment’ tab from the Home screen
shown here:
● Your Reporting manager’s details should be shown within your ‘Current Job Details’. If
this is incorrect, please ask your manager to email [email protected] so that it can be
amended accordingly.
7.2 Your Claim
1. Using the navigation buttons at the top of the screen, please select:
2. Scroll to the bottom of the Pay & Benefits page to display the ‘Time & Expenses’ option.
3. Then select Add Claim to proceed to the following screen:
1 The College expects that any timesheets will be submitted within three months of the time being
accrued. Any delay could result in your payment being forfeited.
You can find reference to the ‘90 day policy’ in the College’s Financial Regulations here (see 25.20).
If you try to submit a timesheet that is more than 3 months old, the system will not allow you to enter
time. If there are extenuating circumstances, please email [email protected] explaining the reason for the
late submission.

Page 10 November 2019
4. Use the first day of your claim as the start date, entered as DDMMYYYY or use the calendar
button beside to select the date.
5. The ‘Job title’ field should automatically populate. If you have more than one position, you will
need to choose the position you are claiming against from the drop down list. Please refer to
the “Project Code” list to ensure that you are claiming against the correct position. The
Project Code list can be found on the homepage of ESS. See screenshot below:
6. If this field does not auto populate, please email: [email protected]
7. Select from the next drop down list the appropriate ‘claim template’ from the following:
• Casual Hourly Claim – if your rate of pay is hourly and you are a ‘Casual Worker’
• Visiting Lecturer Daily Claim – if your rate of pay is daily and you are a ‘Visiting
Lecturer’

Page 11 November 2019
8. Click the button at the bottom of the ‘Time and Expenses’ window to enter details
for the selected Claim Form. You will be presented with this form to complete.
9. Enter the date of the claim – entered as DDMMYYYY or use the calendar icon.
• If you are a Visiting Lecturer, enter the days worked into the box that is highlighted
grey
• If you are a Casual Worker, enter the hours worked into the box that is highlighted
grey. The total for that day will update automatically.
Note: hours must be entered in decimal format. For example, if you are claiming for 2hrs
30mins overtime, this would be 2.5. Claiming 2.30 instead of 2.5 will result in you being
under paid. Please reference our conversion table on the last page of this document.
10. To add / remove a line to your claim form, click the or buttons.
11. Saving you can at any time and return to this claim sheet later if you
have further claims to make for the same month or if anything needs editing.
12. To return to the saved draft you should click on Time & Expenses Claims on the Pay &
Benefits screen. This will take you back into the claim. This claim form will remain on your
profile until authorised.
13. When you are ready to send the claim to your Manager for authorisation click on the
claim form.
14. A box will appear to re-enter your Self-Service password before clicking ‘Submit’ again.
You are now declaring the claim as true and valid.
Your Manager will receive an email notification to log into People Manager to authorise the
claim.
NB: Your Manager is responsible for checking the claim form before authorising.
7.3 Expense Claims
If you have incurred expenses due to travel, then these should be added to your claim. On the
claim form there is an area for expenses:
Page 12 November 2019
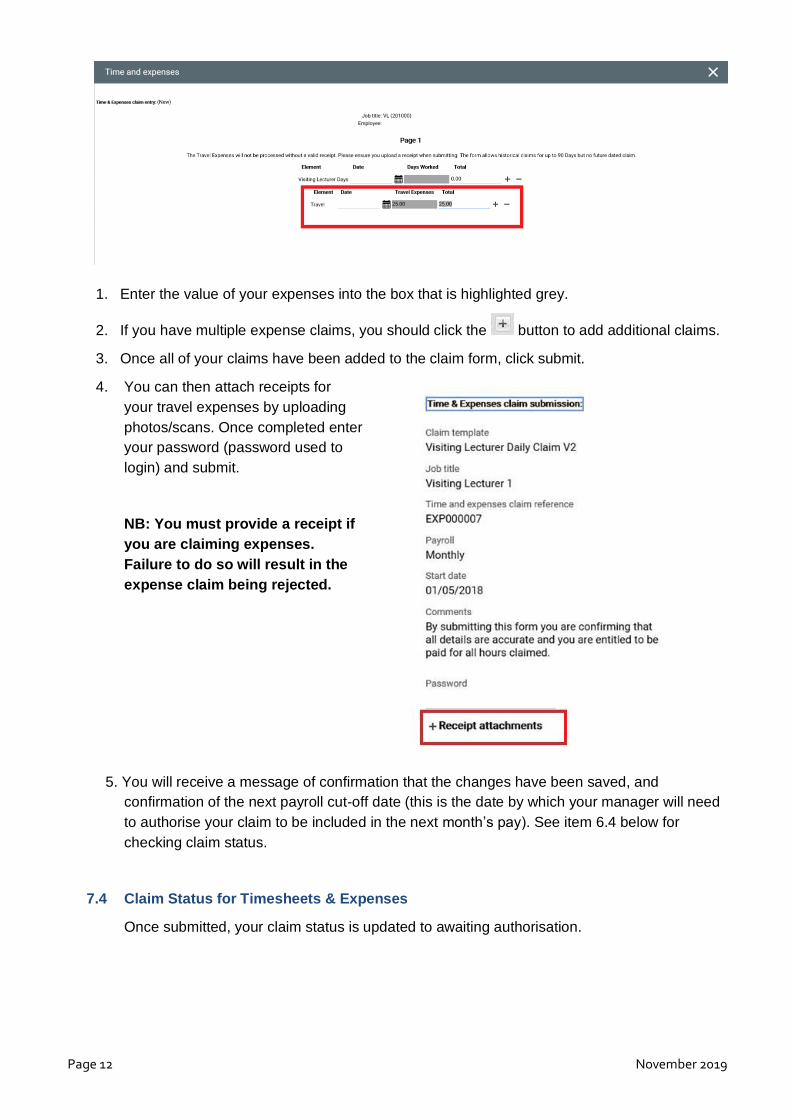
1. Enter the value of your expenses into the box that is highlighted grey.
2. If you have multiple expense claims, you should click the button to add additional claims.
3. Once all of your claims have been added to the claim form, click submit.
4. You can then attach receipts for
your travel expenses by uploading
photos/scans. Once completed enter
your password (password used to
login) and submit.
NB: You must provide a receipt if
you are claiming expenses.
Failure to do so will result in the
expense claim being rejected.
5. You will receive a message of confirmation that the changes have been saved, and
confirmation of the next payroll cut-off date (this is the date by which your manager will need
to authorise your claim to be included in the next month’s pay). See item 6.4 below for
checking claim status.
7.4 Claim Status for Timesheets & Expenses
Once submitted, your claim status is updated to awaiting authorisation.

Page 13 November 2019
Once your manager has authorised your claim, it will change to ‘Authorised’.
7.5 When will My Claim Be Paid?
By clicking on the Pay & Benefits section from the Homepage you will be able to see when
claims that are awaiting authorisation will be paid by looking at the cut-off date. If your claim
was authorised on or before this date it will be paid that month:
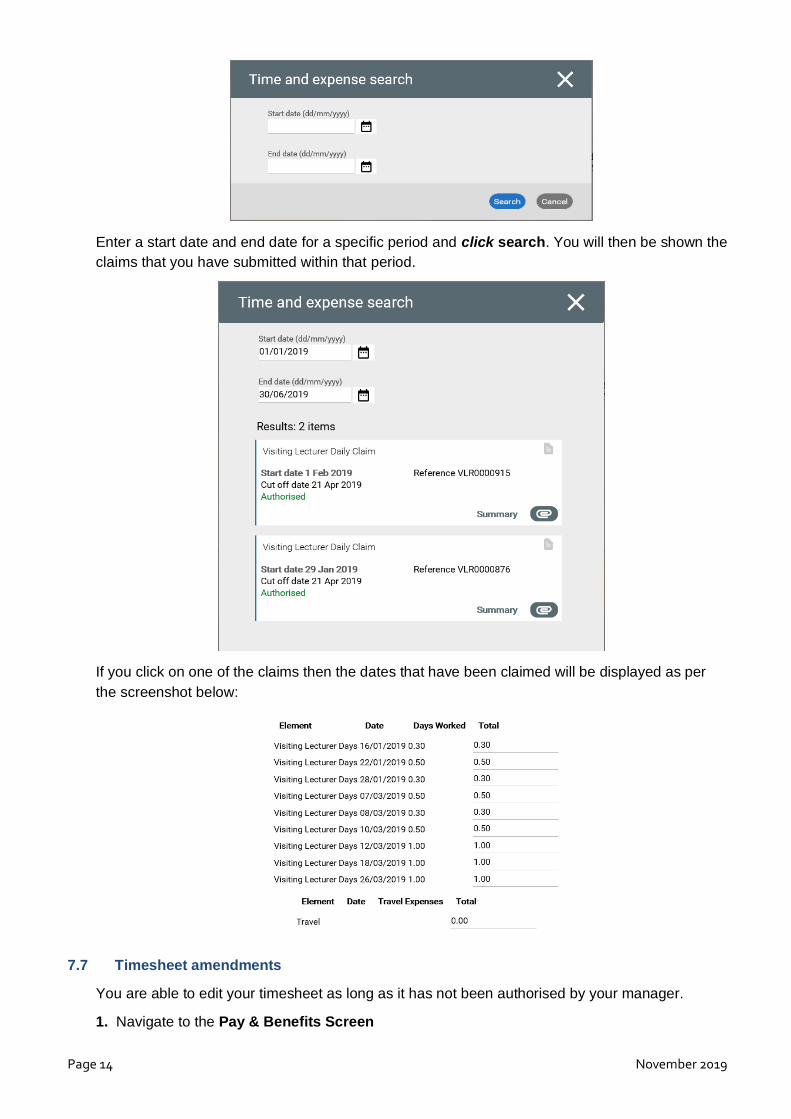
You can search for previous claims by clicking on the Magnifying Glass button and
using the calendar to search between dates.
The magnifying glass is available on the “Pay & Benefits” main screen.
7.6 How do I check previous claims?
Once logged into iTrent, navigate to the Pay & Benefits screen. Scroll down to Time &
Expenses and click the magnifying glass towards the right hand side of the screen.
You will be prompted with the following screen:
Page 14 November 2019
Enter a start date and end date for a specific period and click search. You will then be shown the
claims that you have submitted within that period.
If you click on one of the claims then the dates that have been claimed will be displayed as per
the screenshot below:
7.7 Timesheet amendments
You are able to edit your timesheet as long as it has not been authorised by your manager.
1. Navigate to the Pay & Benefits Screen
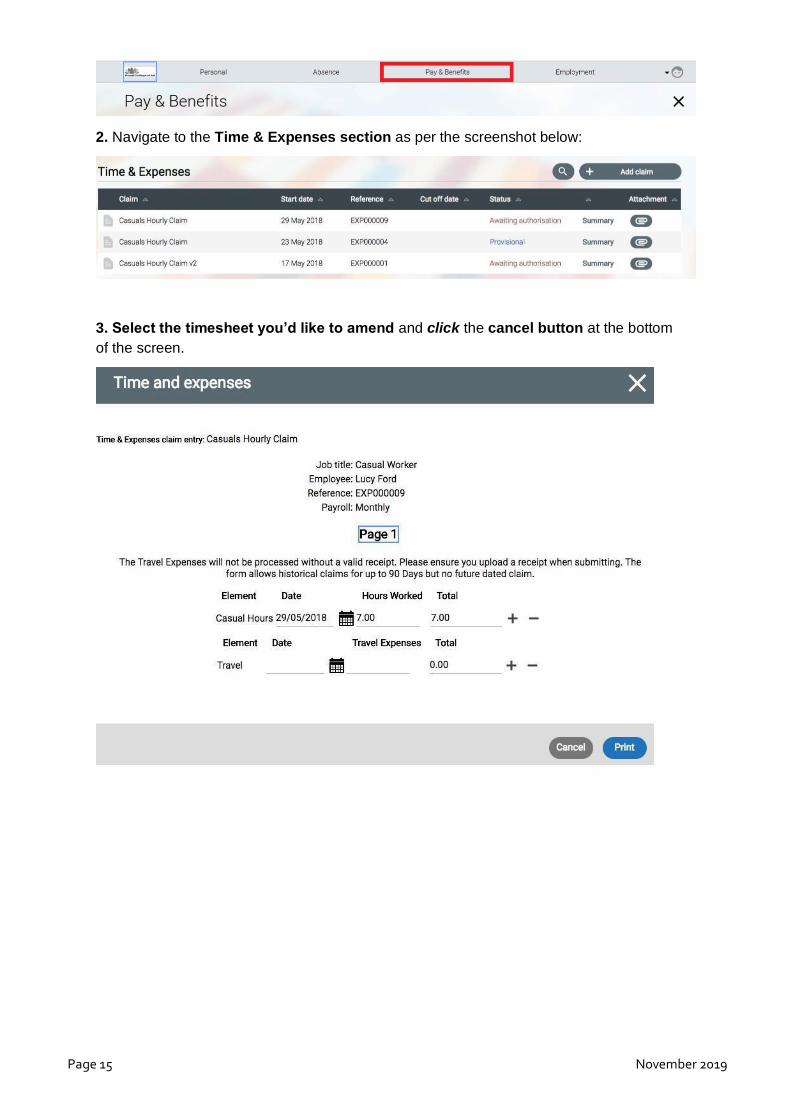
Page 15 November 2019
2. Navigate to the Time & Expenses section as per the screenshot below:
3. Select the timesheet you’d like to amend and click the cancel button at the bottom
of the screen.

Page 16 November 2019
4. You will be prompted with the following message. Enter password and click cancel to
proceed.
3. You will be notified that your timesheet will be returned to provisional status.
Click OK to continue.
4. Your timesheet will be updated to provisional status and can be accessed on the Time &
Expenses menu. Click on the timesheet status to access.
Page 17 November 2019
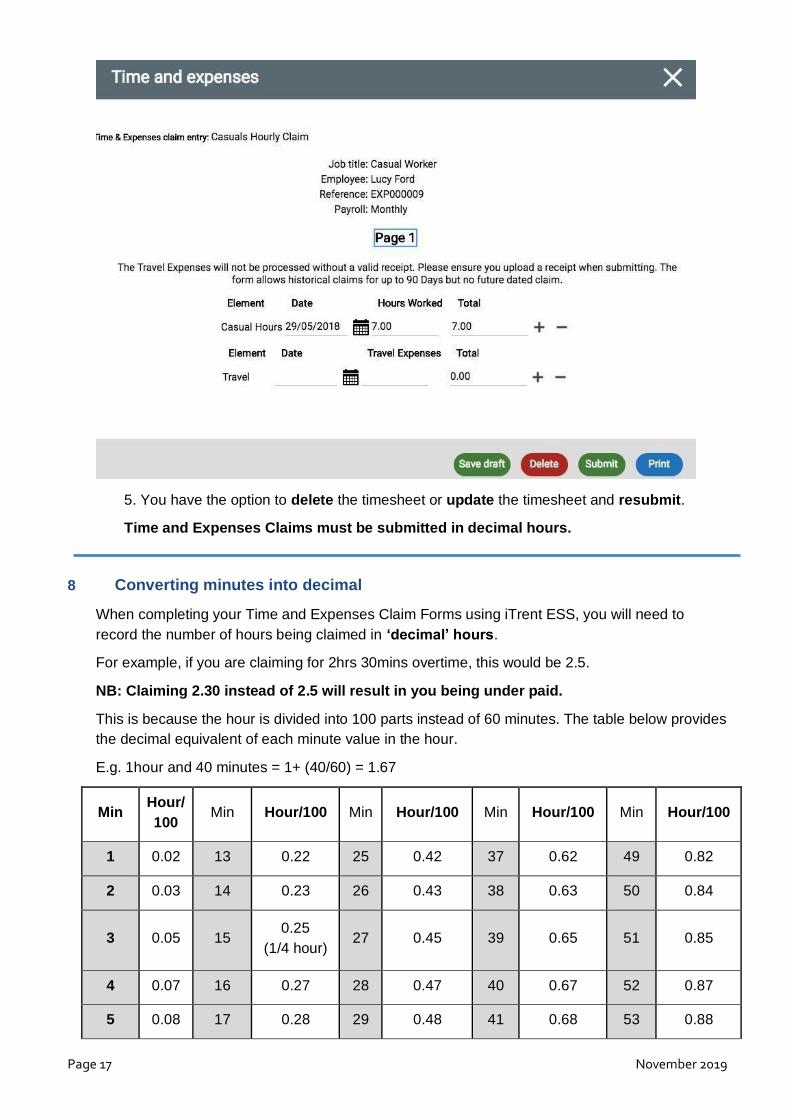
5. You have the option to delete the timesheet or update the timesheet and resubmit.
Time and Expenses Claims must be submitted in decimal hours.
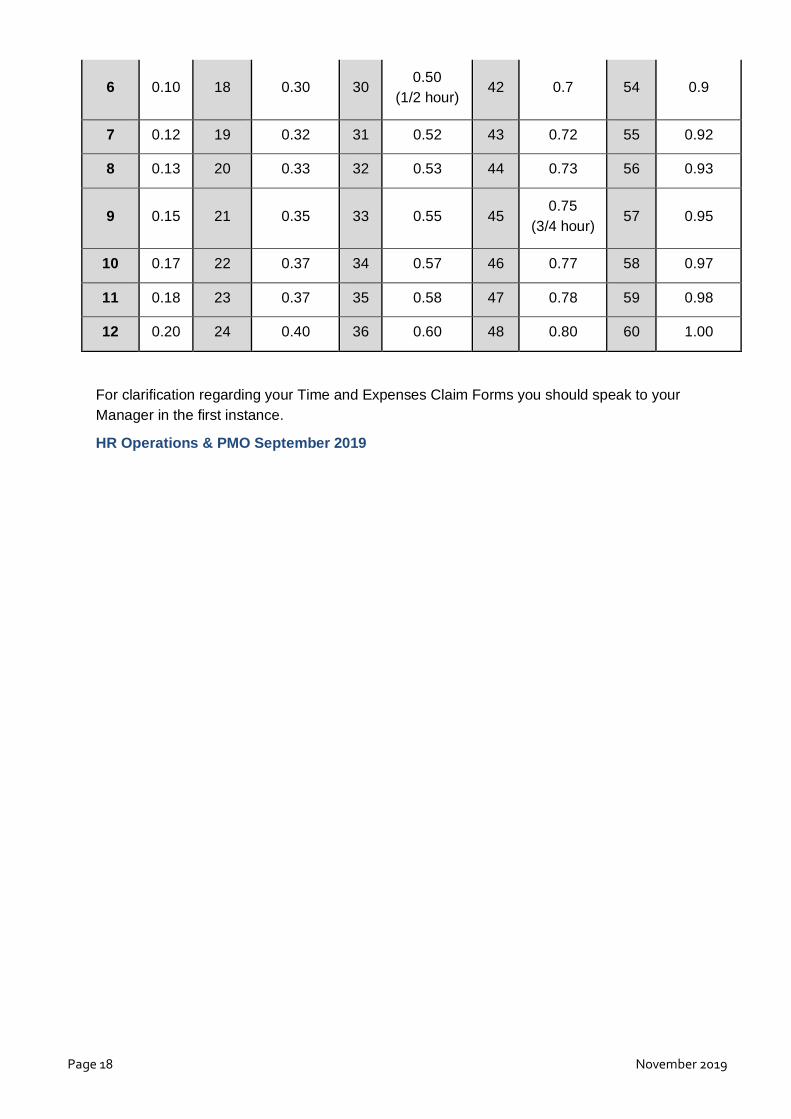
8 Converting minutes into decimal
When completing your Time and Expenses Claim Forms using iTrent ESS, you will need to
record the number of hours being claimed in ‘decimal’ hours.
For example, if you are claiming for 2hrs 30mins overtime, this would be 2.5.
NB: Claiming 2.30 instead of 2.5 will result in you being under paid.
This is because the hour is divided into 100 parts instead of 60 minutes. The table below provides
the decimal equivalent of each minute value in the hour.
E.g. 1hour and 40 minutes = 1+ (40/60) = 1.67
Min Hour/
100 Min Hour/100 Min Hour/100 Min Hour/100 Min Hour/100
1 0.02 13 0.22 25 0.42 37 0.62 49 0.82
2 0.03 14 0.23 26 0.43 38 0.63 50 0.84
3 0.05 15 0.25
(1/4 hour) 27 0.45 39 0.65 51 0.85
4 0.07 16 0.27 28 0.47 40 0.67 52 0.87
5 0.08 17 0.28 29 0.48 41 0.68 53 0.88
Page 18 November 2019
6 0.10 18 0.30 30 0.50
(1/2 hour) 42 0.7 54 0.9
7 0.12 19 0.32 31 0.52 43 0.72 55 0.92
8 0.13 20 0.33 32 0.53 44 0.73 56 0.93
9 0.15 21 0.35 33 0.55 45 0.75
(3/4 hour) 57 0.95
10 0.17 22 0.37 34 0.57 46 0.77 58 0.97
11 0.18 23 0.37 35 0.58 47 0.78 59 0.98
12 0.20 24 0.40 36 0.60 48 0.80 60 1.00
For clarification regarding your Time and Expenses Claim Forms you should speak to your
Manager in the first instance.
HR Operations & PMO September 2019