Embed Size (px)
DESCRIPTION
Manual del brick de arduino version makerduino
Citation preview

www.makerstudio.cc
1
User Guide for Arduino Electronic Bricks Advanced Kit v2.0
By Maker Studio
Catalog
Introductions ...................................................................................................................... 2
Install Arduino IDE .............................................................................................................. 3
Download and Install Arduino Library for the Kit ................................................................ 5
Experiment 01 - Blinking LED .............................................................................................. 6
Experiment 02 - The Fading RGB LED ................................................................................ 10
Experiment 03 - Read the Button Input ............................................................................ 11
Experiment 04 - Read the Memorial Button Input ............................................................ 12
Experiment 05 - Read LED Button Input by External Interrupt .......................................... 13
Experiment 06 - Control the Relay .................................................................................... 14
Experiment 07 - Control the Buzzer .................................................................................. 15
Experiment 08 - Get Real Time Clock ................................................................................ 16
Experiment 09 - Read the Water Sensor ........................................................................... 17
Experiment 10 - Read the Momentary Touch Button Input .............................................. 18
Experiment 11 - Read the Toggle Touch Button Input ...................................................... 19
Experiment 12 - Read the Humidity and Temperature Sensor .......................................... 20
Experiment 13 - Read the Light Sensor ............................................................................. 21
Experiment 14 - Read the Tilt Sensor ................................................................................ 22
Experiment 15 - Infrared Remote Control ......................................................................... 23
Experiment 16 - PIR motion Sensor .................................................................................. 24
Experiment 17 - Display Characters on I2C 1602 LCD ........................................................ 25
Experiment 18 - RF Transmitter ........................................................................................ 26
Experiment 19 - RF Receiver ............................................................................................. 27
Experiment 20 - Control Servo Motor ............................................................................... 28
Experiment 21 - Measure Distance by Ultrasonic Sensor .................................................. 29
Experiment 22 - Distance controlled Breathing LED Light ................................................. 30
Reference Link .................................................................................................................. 31

www.makerstudio.cc
2
Introductions
Electronic Bricks is a series of electronic modules implementing specified functions with
unified pin header interface. They are just like the bricks used for building a house, with
which you can build your project easily from the ground without bothering with the messing
bread board circuits. Concentrate your energy more in your idea and have fun from Electronic Bricks Advanced Kit for Arduino.
www.makerstudio.cc
3
Install Arduino IDE
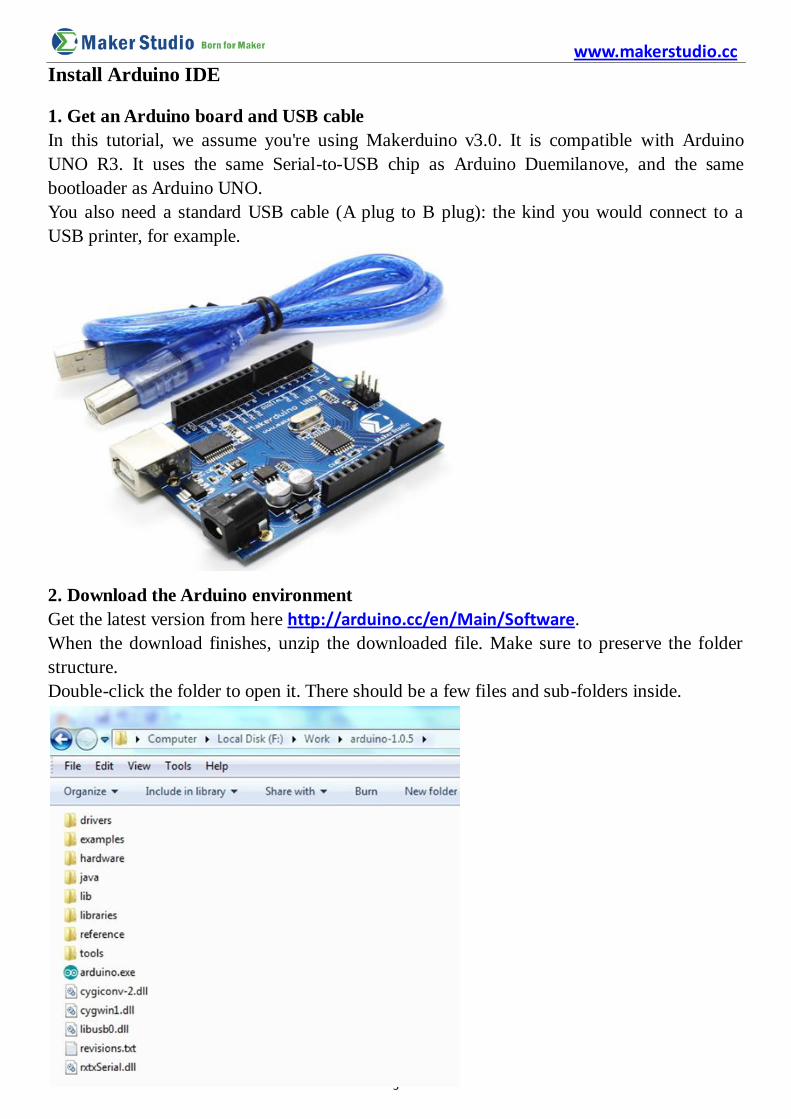
1. Get an Arduino board and USB cable
In this tutorial, we assume you're using Makerduino v3.0. It is compatible with Arduino
UNO R3. It uses the same Serial-to-USB chip as Arduino Duemilanove, and the same
bootloader as Arduino UNO.
You also need a standard USB cable (A plug to B plug): the kind you would connect to a
USB printer, for example.
2. Download the Arduino environment
Get the latest version from here http://arduino.cc/en/Main/Software.
When the download finishes, unzip the downloaded file. Make sure to preserve the folder
structure.
Double-click the folder to open it. There should be a few files and sub-folders inside.
www.makerstudio.cc
4
3. Connect the board
Connect the Arduino board to your computer using the USB cable. The green power LED
(labeled ON) should go on.
4. Install the drivers
When you connect the board, Windows should initiate the driver installation process (if you
haven't used the computer with an Arduino board before).
On Windows 7/8, the driver should be automatically downloaded and installed. If it does not
work for you, it can also be installed manually:
When asked Can Windows connect to Windows Update to search for software?
Select No, not this time. Click next.
Select Install from a list or specified location (Advanced) and click next.
Make sure that Search for the best driver in these locations is checked; uncheck
Search removable media; check include this location in the search and browse to the
drivers/FTDI USB Drivers directory of the Arduino distribution. Click next.
The wizard will search for the driver and then tell you that a "USB Serial Converter"
was found. Click finish.
The new hardware wizard will appear again. Go through the same steps and select the
same options and location to search. This time, a "USB Serial Port" will be found.
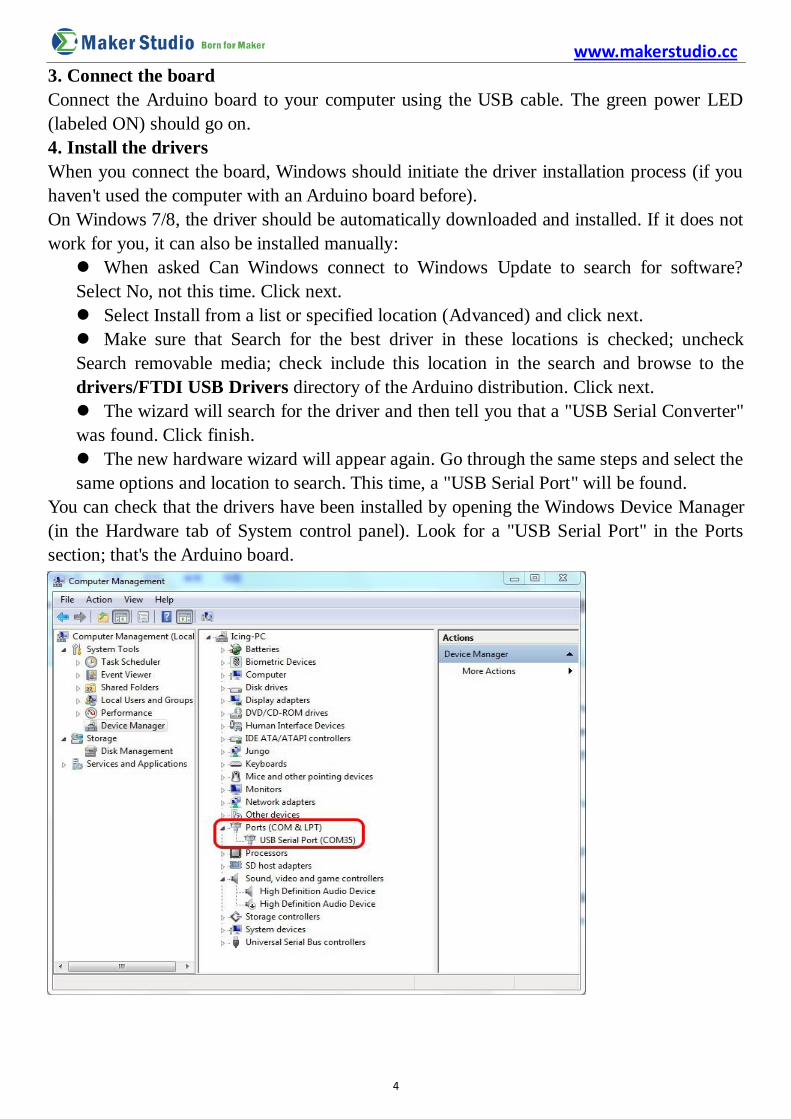
You can check that the drivers have been installed by opening the Windows Device Manager
(in the Hardware tab of System control panel). Look for a "USB Serial Port" in the Ports
section; that's the Arduino board.
www.makerstudio.cc
5
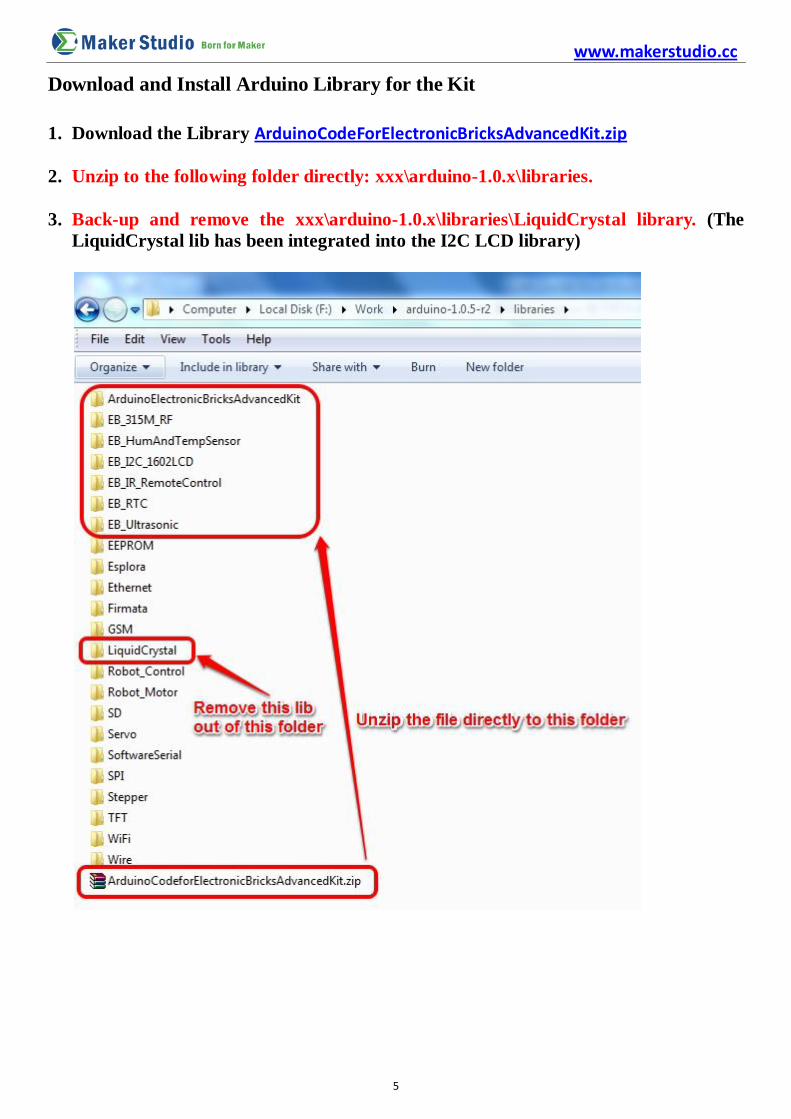
Download and Install Arduino Library for the Kit
1. Download the Library ArduinoCodeForElectronicBricksAdvancedKit.zip
2. Unzip to the following folder directly: xxx\arduino-1.0.x\libraries.
3. Back-up and remove the xxx\arduino-1.0.x\libraries\LiquidCrystal library. (The
LiquidCrystal lib has been integrated into the I2C LCD library)
www.makerstudio.cc
6
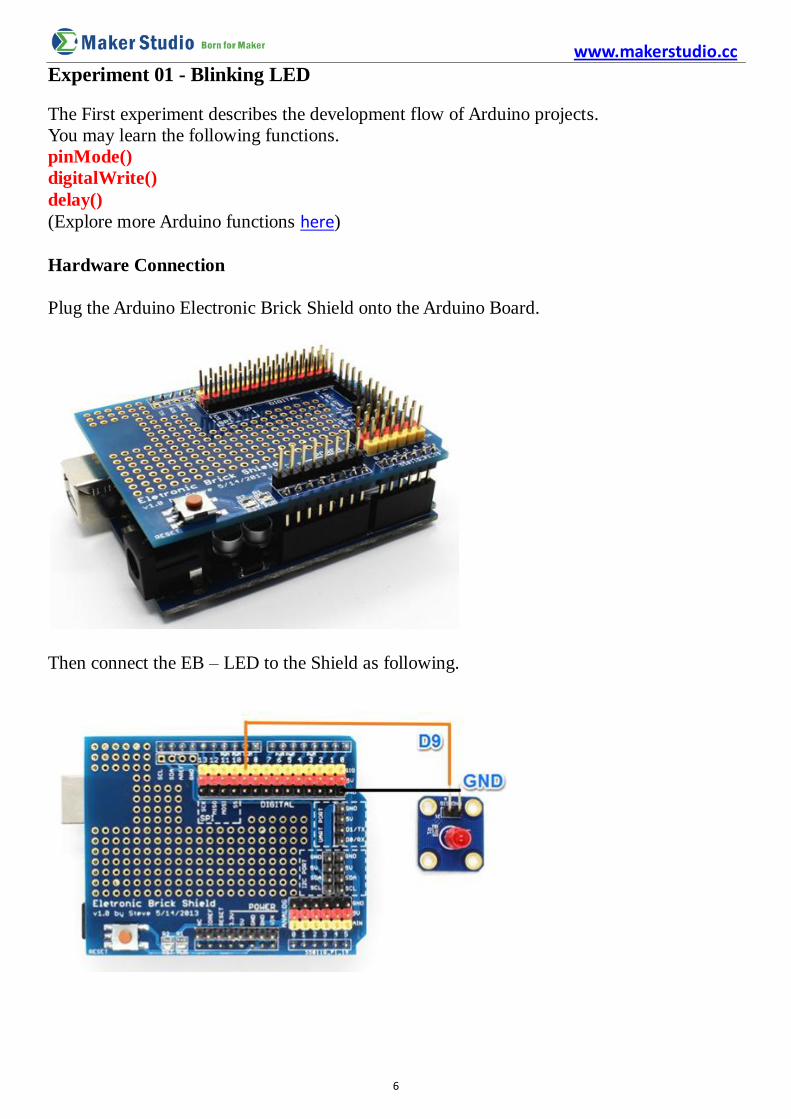
Experiment 01 - Blinking LED
The First experiment describes the development flow of Arduino projects.
You may learn the following functions.
pinMode()
digitalWrite()
delay()
(Explore more Arduino functions here)
Hardware Connection
Plug the Arduino Electronic Brick Shield onto the Arduino Board.
Then connect the EB – LED to the Shield as following.
www.makerstudio.cc
7
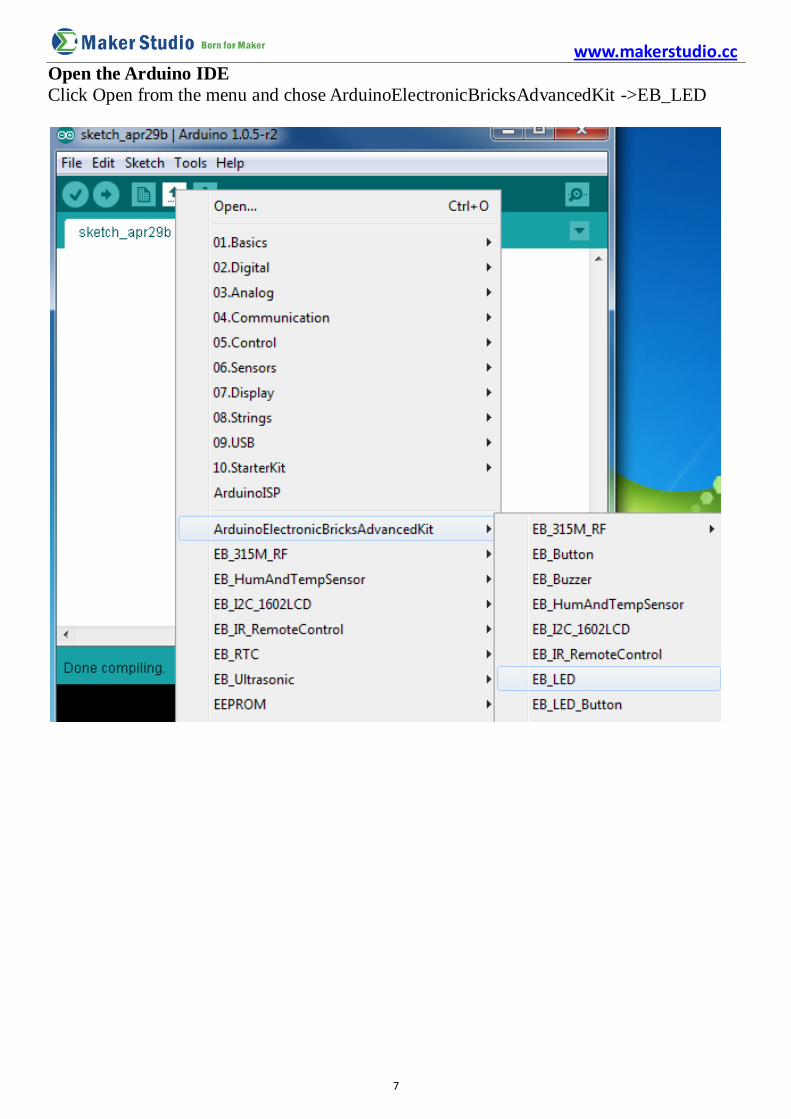
Open the Arduino IDE
Click Open from the menu and chose ArduinoElectronicBricksAdvancedKit ->EB_LED

www.makerstudio.cc
8
Arduino Sketch of EB_LED.ino
Click Tools->Serial Port, and choose the right com port, which will list after the driver
successfully installed

www.makerstudio.cc
9
Click Tools->Board, then choose Arduino Uno
Click Upload, the Sketch will be compiled and uploaded to the board.
The down area of IDE shows following information if success.
The LED of the EB will be blinking every one second.
www.makerstudio.cc
10
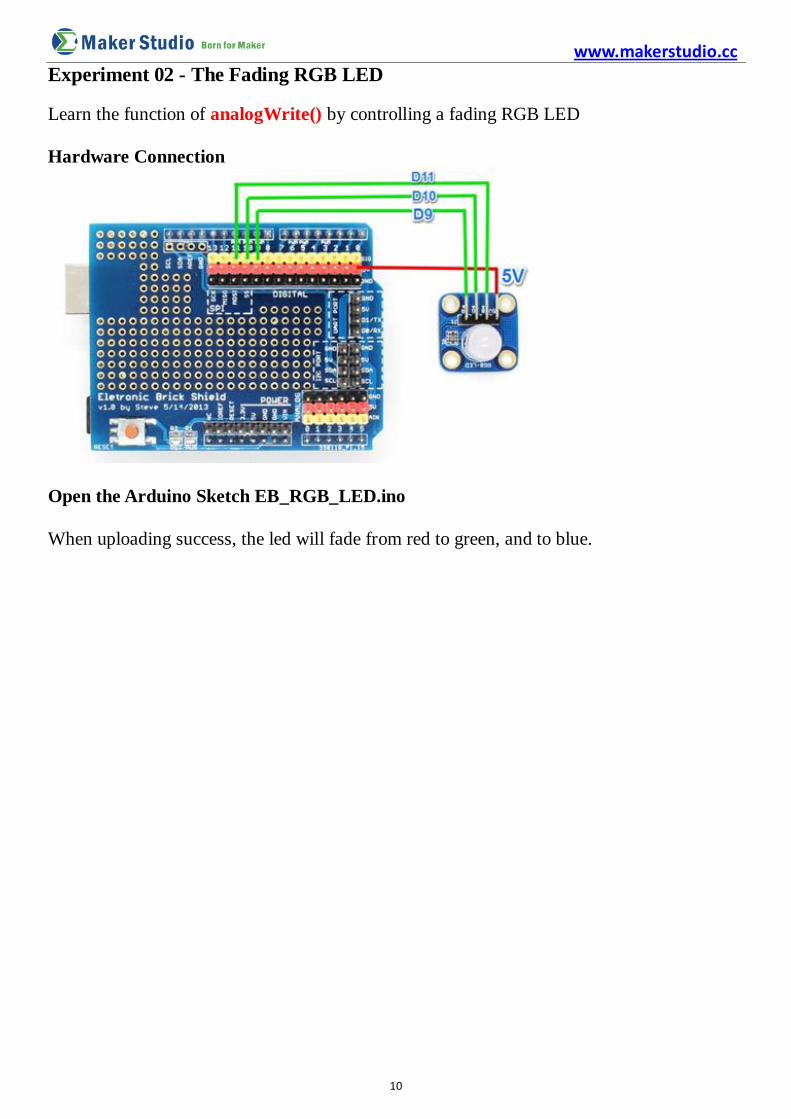
Experiment 02 - The Fading RGB LED
Learn the function of analogWrite() by controlling a fading RGB LED
Hardware Connection
Open the Arduino Sketch EB_RGB_LED.ino
When uploading success, the led will fade from red to green, and to blue.

www.makerstudio.cc
11
Experiment 03 - Read the Button Input
Learn the function of digitalRead() by playing with EB – Button.
Hardware Connection
Open the Arduino Sketch EB_Button.ino
When uploading success, Click Serial Monitor tool
When the button is pressed once, the Monitor displays as following.
www.makerstudio.cc
12
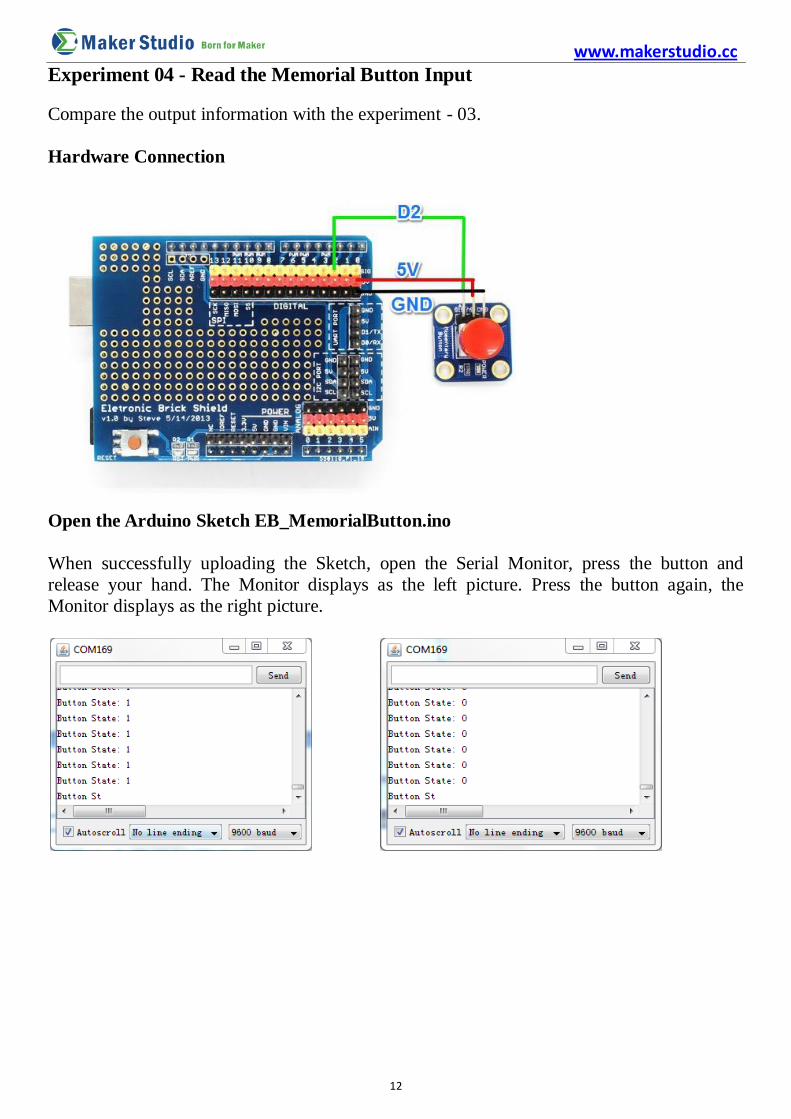
Experiment 04 - Read the Memorial Button Input
Compare the output information with the experiment - 03.
Hardware Connection
Open the Arduino Sketch EB_MemorialButton.ino
When successfully uploading the Sketch, open the Serial Monitor, press the button and
release your hand. The Monitor displays as the left picture. Press the button again, the
Monitor displays as the right picture.

www.makerstudio.cc
13
Experiment 05 - Read LED Button Input by External Interrupt
Learn to use the function of attachInterrupt(1, pushButton, RISING),
Refer here: http://arduino.cc/en/Reference/AttachInterrupt
Hardware Connection
Open the Arduino Sketch EB_LED_Button.ino
When successfully uploading the Sketch, open the Serial Monitor, and it displays as left
picture. The output changes every time the button pressed as the right picture.
www.makerstudio.cc
14
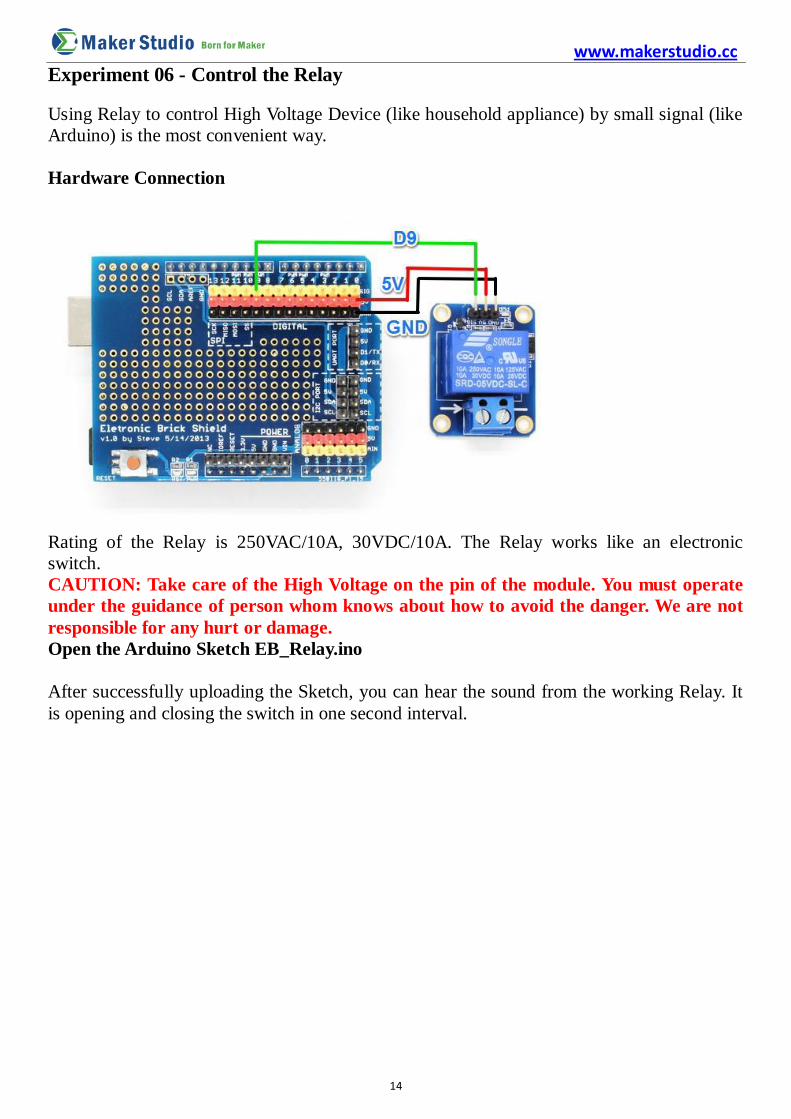
Experiment 06 - Control the Relay
Using Relay to control High Voltage Device (like household appliance) by small signal (like
Arduino) is the most convenient way.
Hardware Connection
Rating of the Relay is 250VAC/10A, 30VDC/10A. The Relay works like an electronic
switch.
CAUTION: Take care of the High Voltage on the pin of the module. You must operate
under the guidance of person whom knows about how to avoid the danger. We are not
responsible for any hurt or damage.
Open the Arduino Sketch EB_Relay.ino
After successfully uploading the Sketch, you can hear the sound from the working Relay. It
is opening and closing the switch in one second interval.
www.makerstudio.cc
15
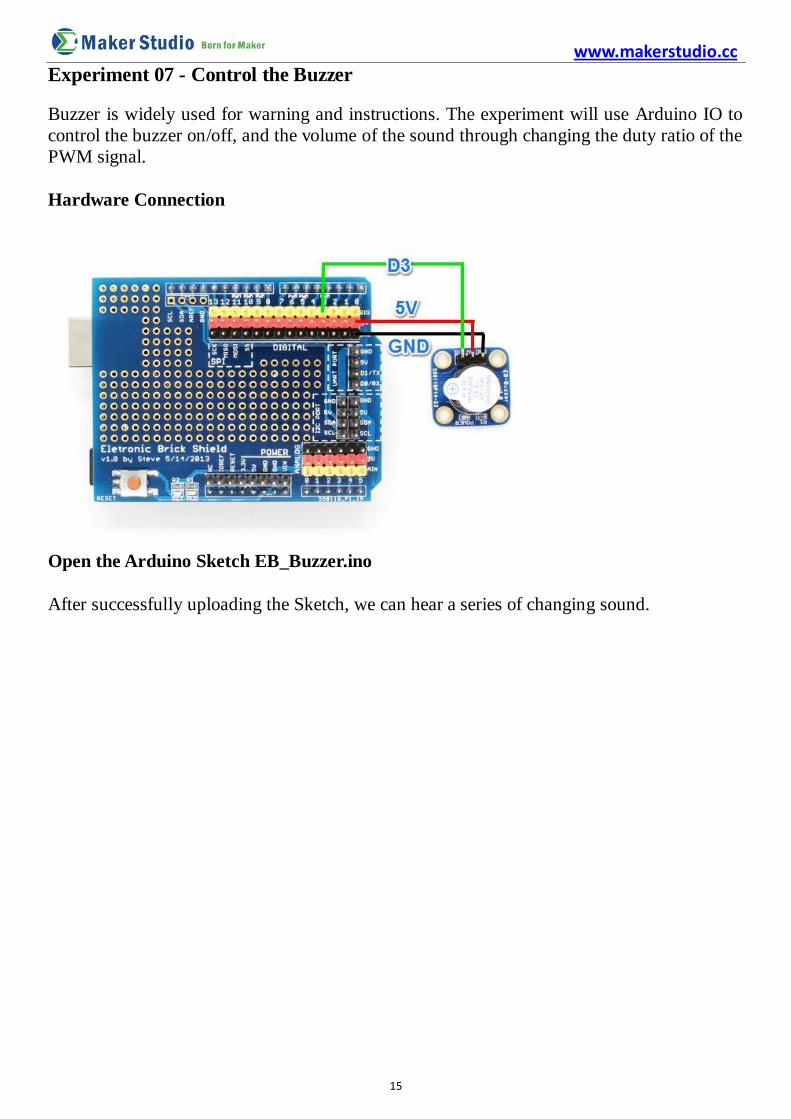
Experiment 07 - Control the Buzzer
Buzzer is widely used for warning and instructions. The experiment will use Arduino IO to
control the buzzer on/off, and the volume of the sound through changing the duty ratio of the
PWM signal.
Hardware Connection
Open the Arduino Sketch EB_Buzzer.ino
After successfully uploading the Sketch, we can hear a series of changing sound.
www.makerstudio.cc
16
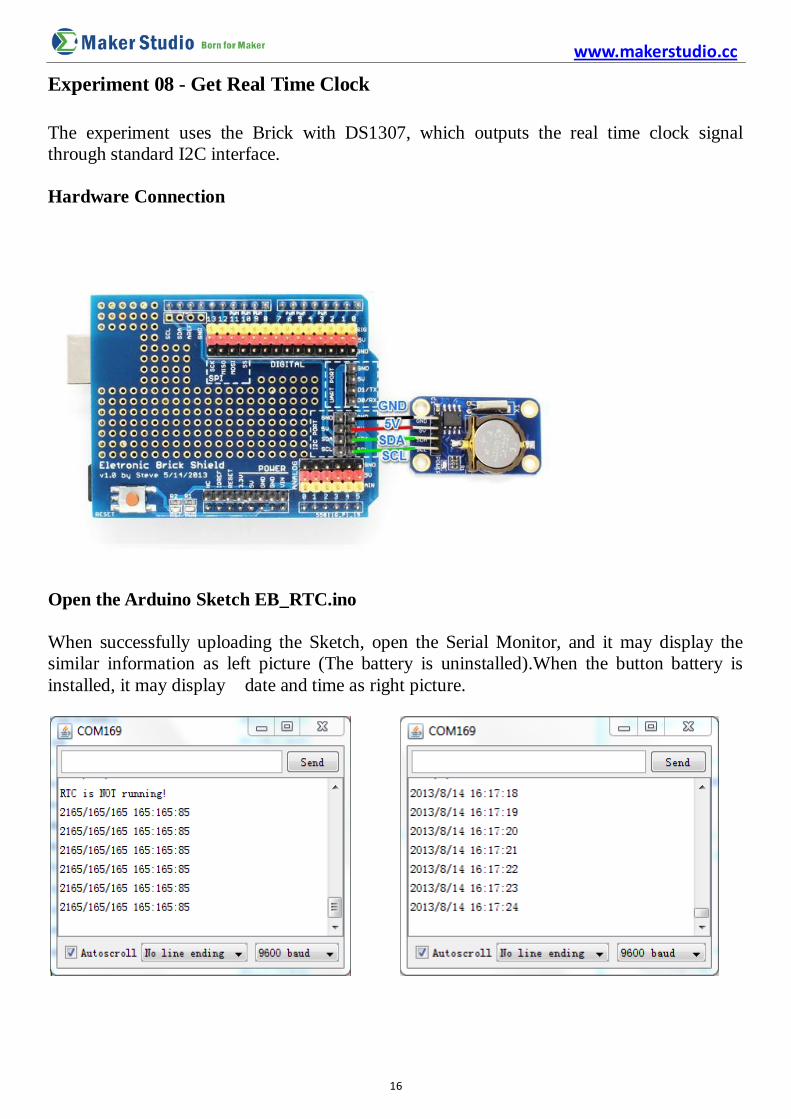
Experiment 08 - Get Real Time Clock
The experiment uses the Brick with DS1307, which outputs the real time clock signal
through standard I2C interface.
Hardware Connection
Open the Arduino Sketch EB_RTC.ino
When successfully uploading the Sketch, open the Serial Monitor, and it may display the
similar information as left picture (The battery is uninstalled).When the button battery is
installed, it may display date and time as right picture.
www.makerstudio.cc
17
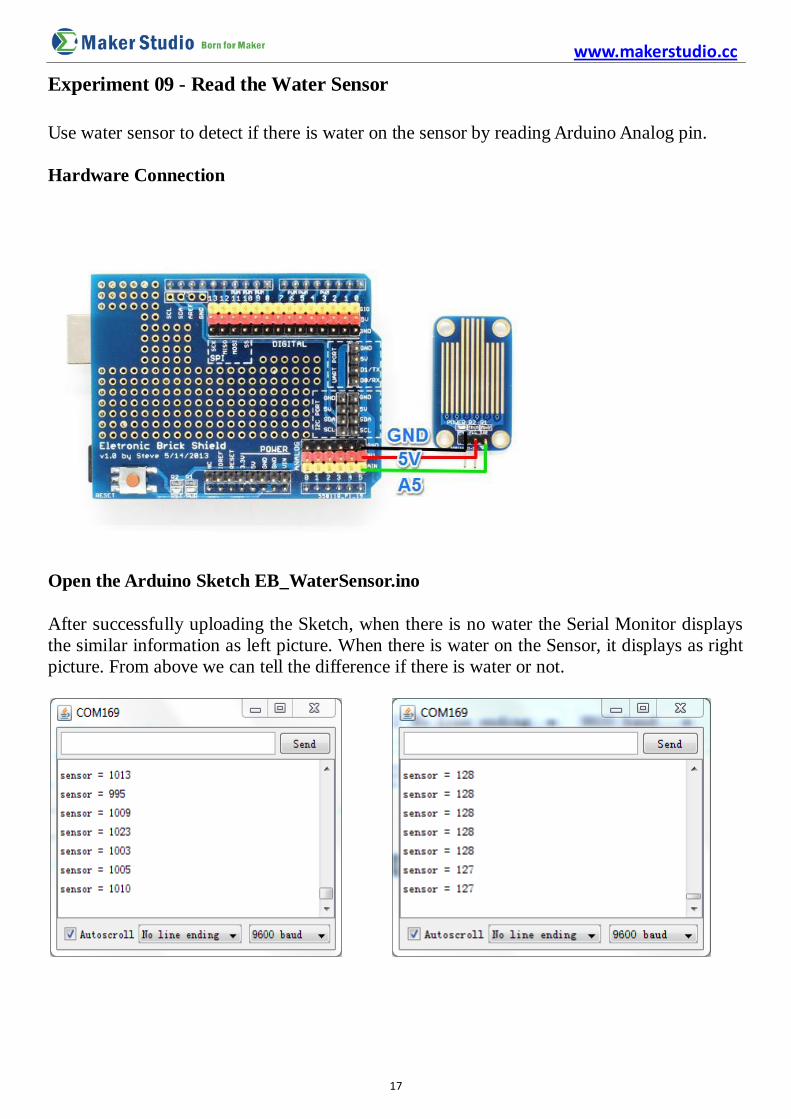
Experiment 09 - Read the Water Sensor
Use water sensor to detect if there is water on the sensor by reading Arduino Analog pin.
Hardware Connection
Open the Arduino Sketch EB_WaterSensor.ino
After successfully uploading the Sketch, when there is no water the Serial Monitor displays
the similar information as left picture. When there is water on the Sensor, it displays as right
picture. From above we can tell the difference if there is water or not.
www.makerstudio.cc
18
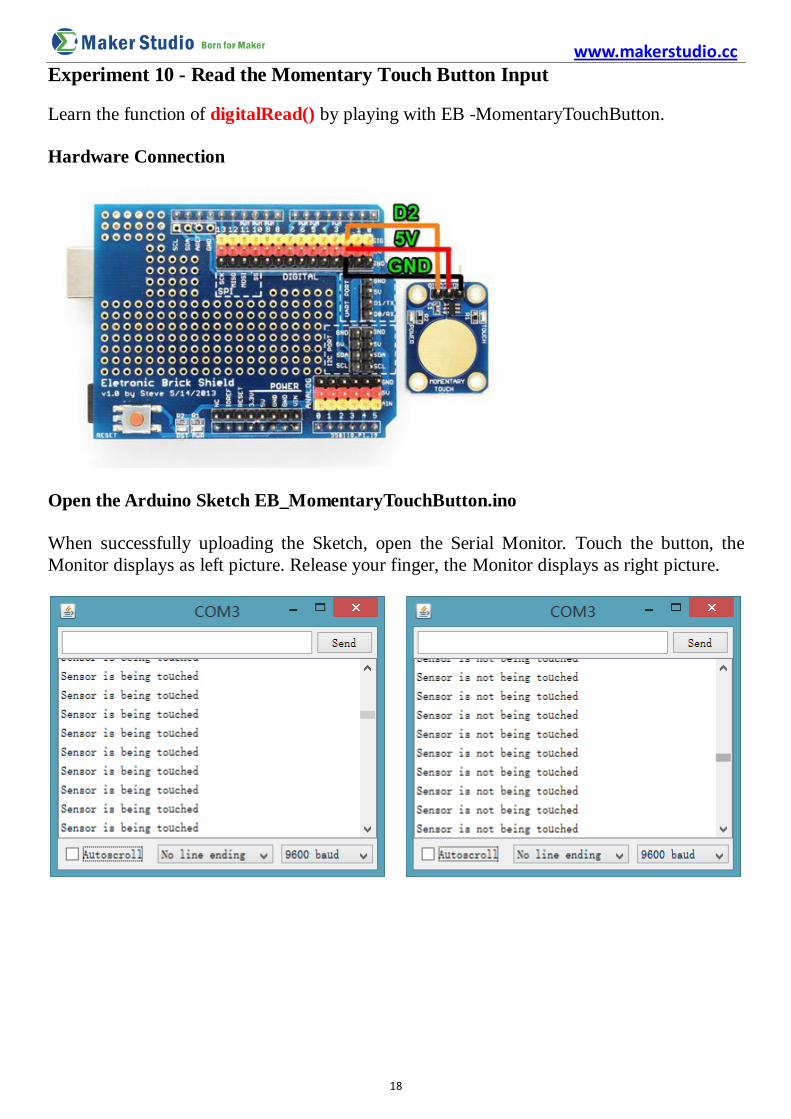
Experiment 10 - Read the Momentary Touch Button Input
Learn the function of digitalRead() by playing with EB -MomentaryTouchButton.
Hardware Connection
Open the Arduino Sketch EB_MomentaryTouchButton.ino
When successfully uploading the Sketch, open the Serial Monitor. Touch the button, the
Monitor displays as left picture. Release your finger, the Monitor displays as right picture.

www.makerstudio.cc
19
Experiment 11 - Read the Toggle Touch Button Input
Compare the output information with the experiment - 10.
Hardware Connection
Open the Arduino Sketch EB_ToggleTouchButton.ino
No touch, no information.
When the button is touched, the Monitor displays as following.
www.makerstudio.cc
20
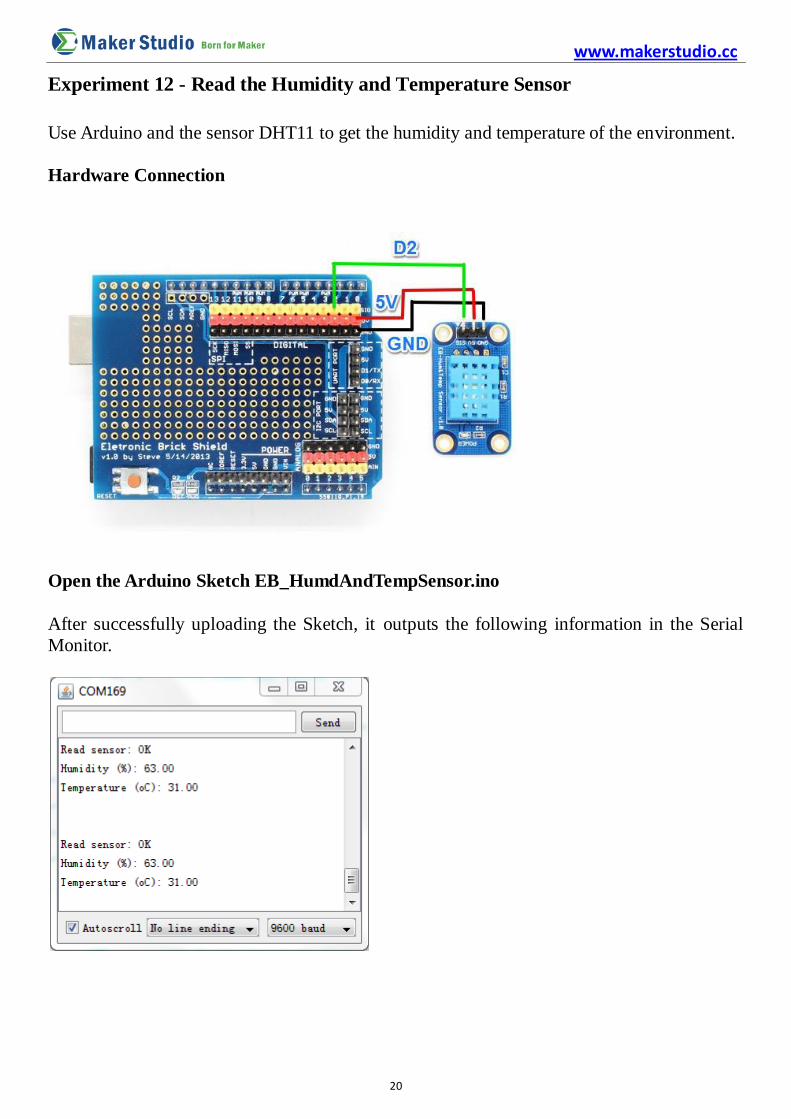
Experiment 12 - Read the Humidity and Temperature Sensor
Use Arduino and the sensor DHT11 to get the humidity and temperature of the environment.
Hardware Connection
Open the Arduino Sketch EB_HumdAndTempSensor.ino
After successfully uploading the Sketch, it outputs the following information in the Serial
Monitor.

www.makerstudio.cc
21
Experiment 13 - Read the Light Sensor
We can get the light information through Light Dependent Resistor (LDR)
Hardware Connection
Open the Arduino Sketch EB_LightSensor.ino
After successfully uploading the Sketch, the Serial Monitor outputs information as left
picture under the lamp. When hiding the senor by hand, the output value decreases as the
right picture. From above we can tell there is little light sensed.
www.makerstudio.cc
22
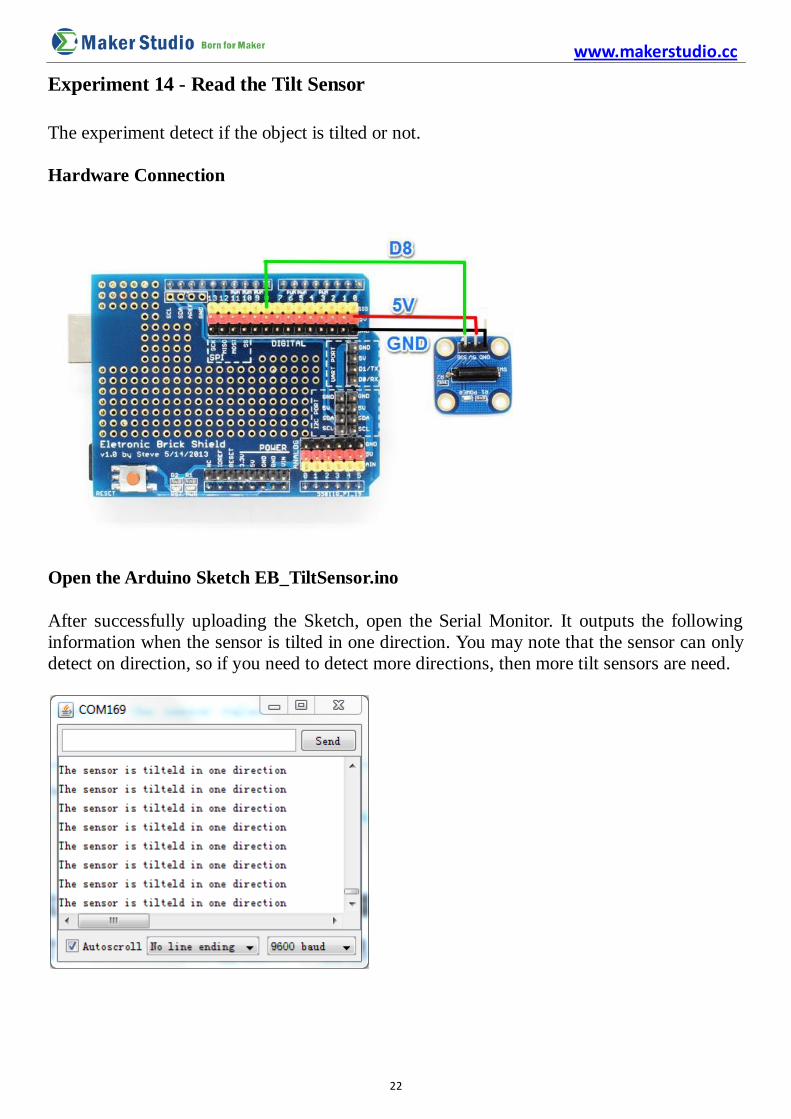
Experiment 14 - Read the Tilt Sensor
The experiment detect if the object is tilted or not.
Hardware Connection
Open the Arduino Sketch EB_TiltSensor.ino
After successfully uploading the Sketch, open the Serial Monitor. It outputs the following
information when the sensor is tilted in one direction. You may note that the sensor can only
detect on direction, so if you need to detect more directions, then more tilt sensors are need.
www.makerstudio.cc
23
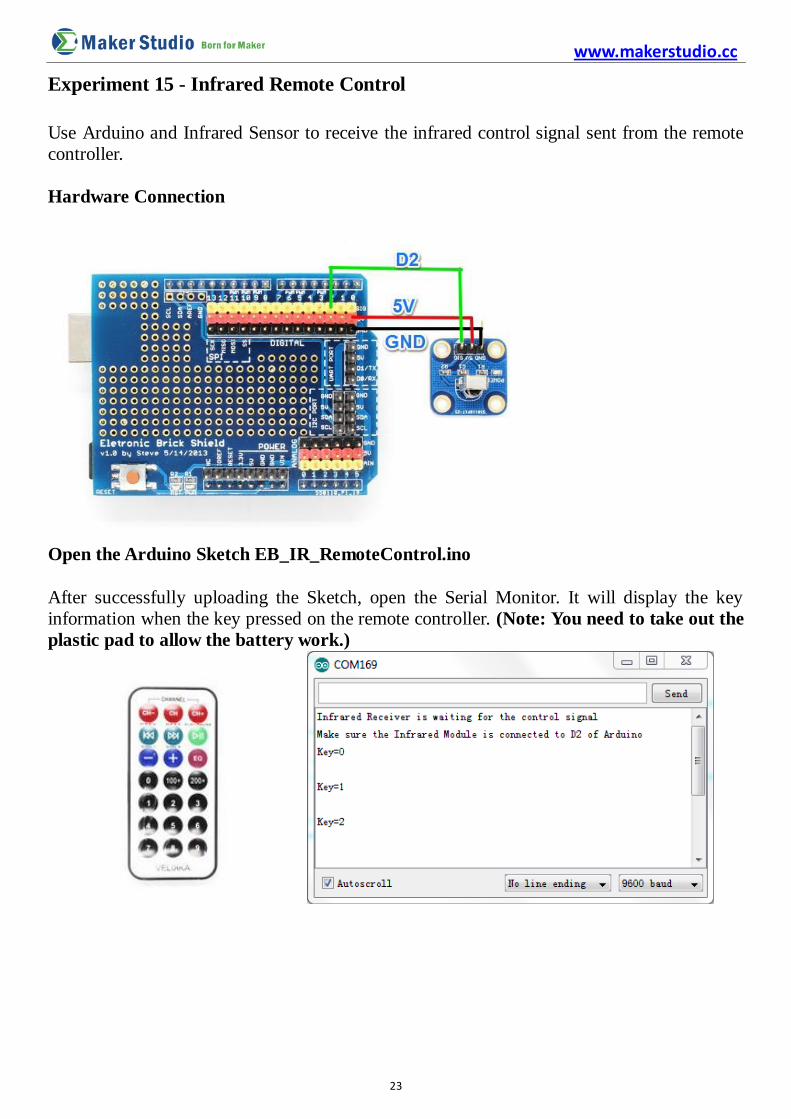
Experiment 15 - Infrared Remote Control
Use Arduino and Infrared Sensor to receive the infrared control signal sent from the remote
controller.
Hardware Connection
Open the Arduino Sketch EB_IR_RemoteControl.ino
After successfully uploading the Sketch, open the Serial Monitor. It will display the key
information when the key pressed on the remote controller. (Note: You need to take out the
plastic pad to allow the battery work.)
www.makerstudio.cc
24
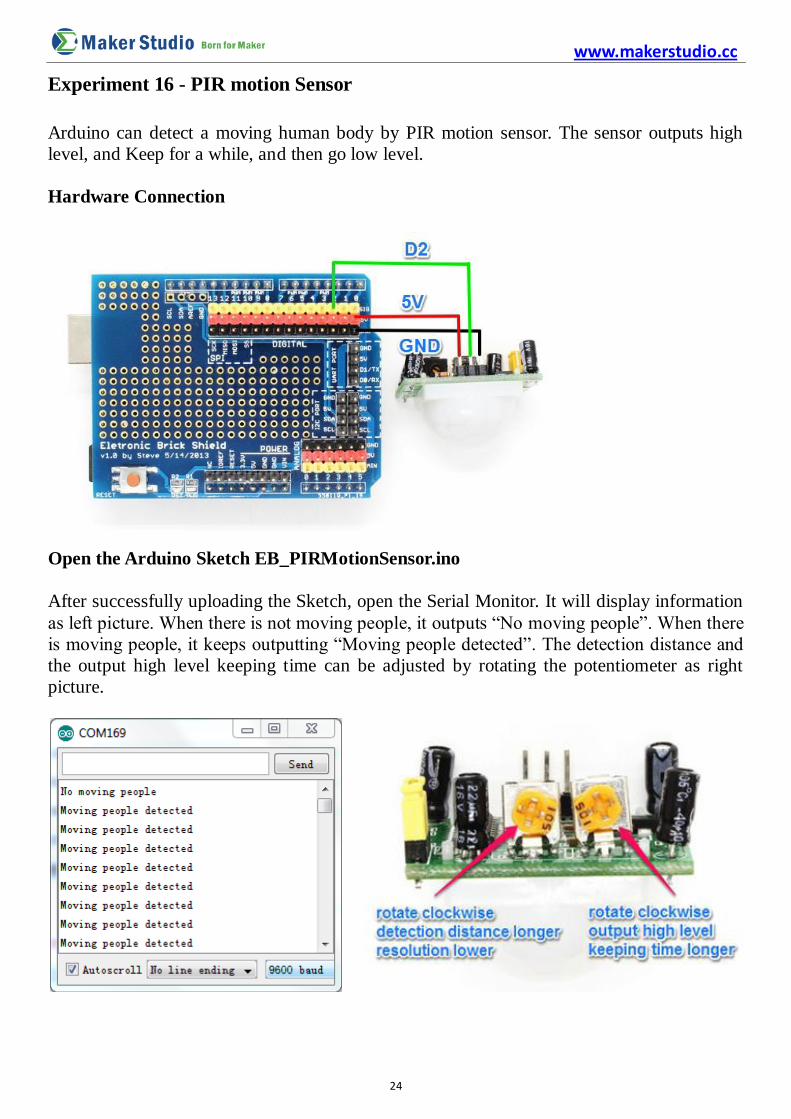
Experiment 16 - PIR motion Sensor
Arduino can detect a moving human body by PIR motion sensor. The sensor outputs high
level, and Keep for a while, and then go low level.
Hardware Connection
Open the Arduino Sketch EB_PIRMotionSensor.ino
After successfully uploading the Sketch, open the Serial Monitor. It will display information
as left picture. When there is not moving people, it outputs “No moving people”. When there
is moving people, it keeps outputting “Moving people detected”. The detection distance and
the output high level keeping time can be adjusted by rotating the potentiometer as right
picture.

www.makerstudio.cc
25
Experiment 17 - Display Characters on I2C 1602 LCD
Use Arduino control I2C 1602 LCD and display characters. The hardware is updated based
on the product from Adafruit and the library is open source.
Hardware Connection
Open the Arduino Sketch EB_I2C_1602LCD.ino
After successfully uploading the Sketch, when the backlight is on, the LCD displays
characters as left picture. When the backlight is off, the LCD displays characters as right
picture.
www.makerstudio.cc
26
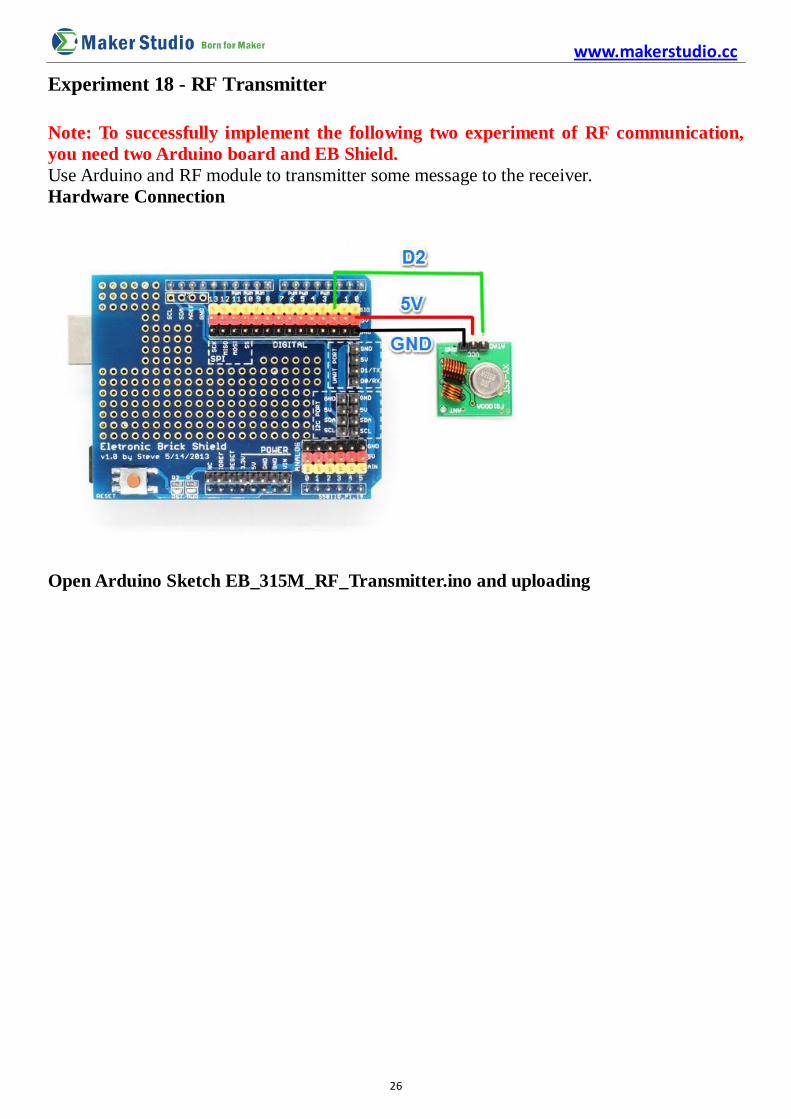
Experiment 18 - RF Transmitter
Note: To successfully implement the following two experiment of RF communication,
you need two Arduino board and EB Shield.
Use Arduino and RF module to transmitter some message to the receiver.
Hardware Connection
Open Arduino Sketch EB_315M_RF_Transmitter.ino and uploading
www.makerstudio.cc
27
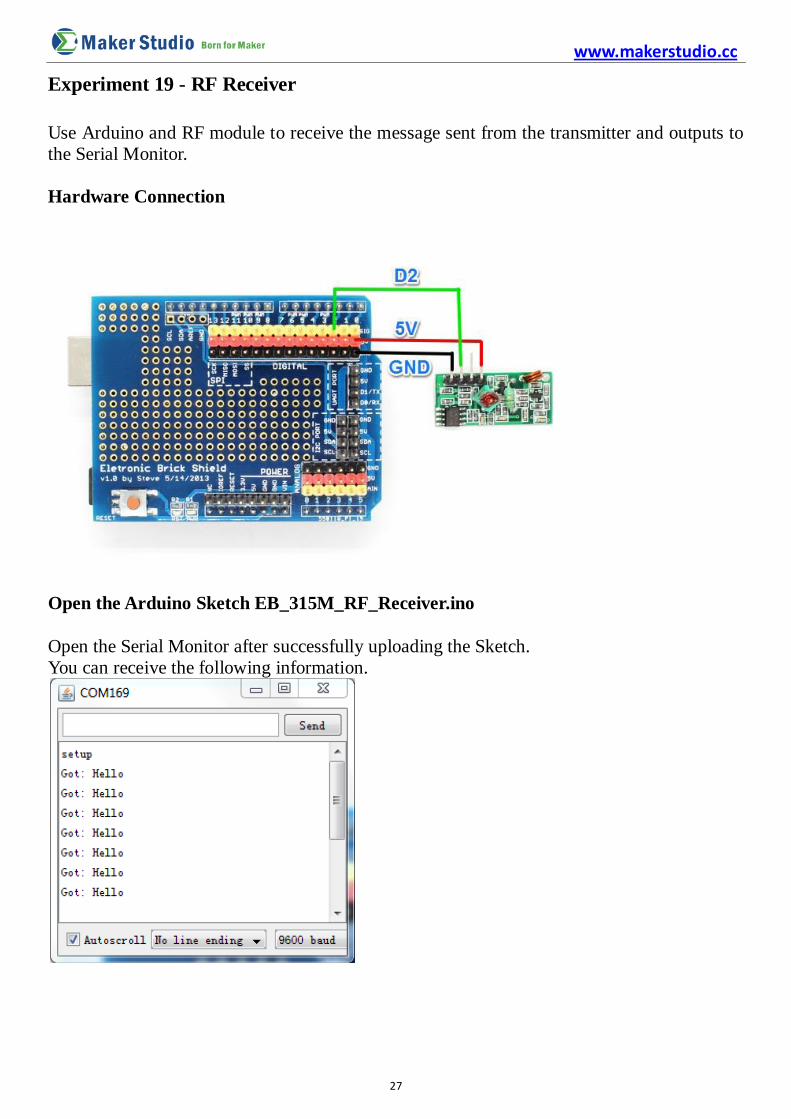
Experiment 19 - RF Receiver
Use Arduino and RF module to receive the message sent from the transmitter and outputs to
the Serial Monitor.
Hardware Connection
Open the Arduino Sketch EB_315M_RF_Receiver.ino
Open the Serial Monitor after successfully uploading the Sketch.
You can receive the following information.

www.makerstudio.cc
28
Experiment 20 - Control Servo Motor
Use Arduino to control 9g servo motor rotate between 0~180 degree.
Hardware Connection
Connect Servo to D9
Open Arduino Sketch EB_Servo.ino
After successfully uploading the Sketch, the gear of the servo rotates between 0~180 degree.
www.makerstudio.cc
29
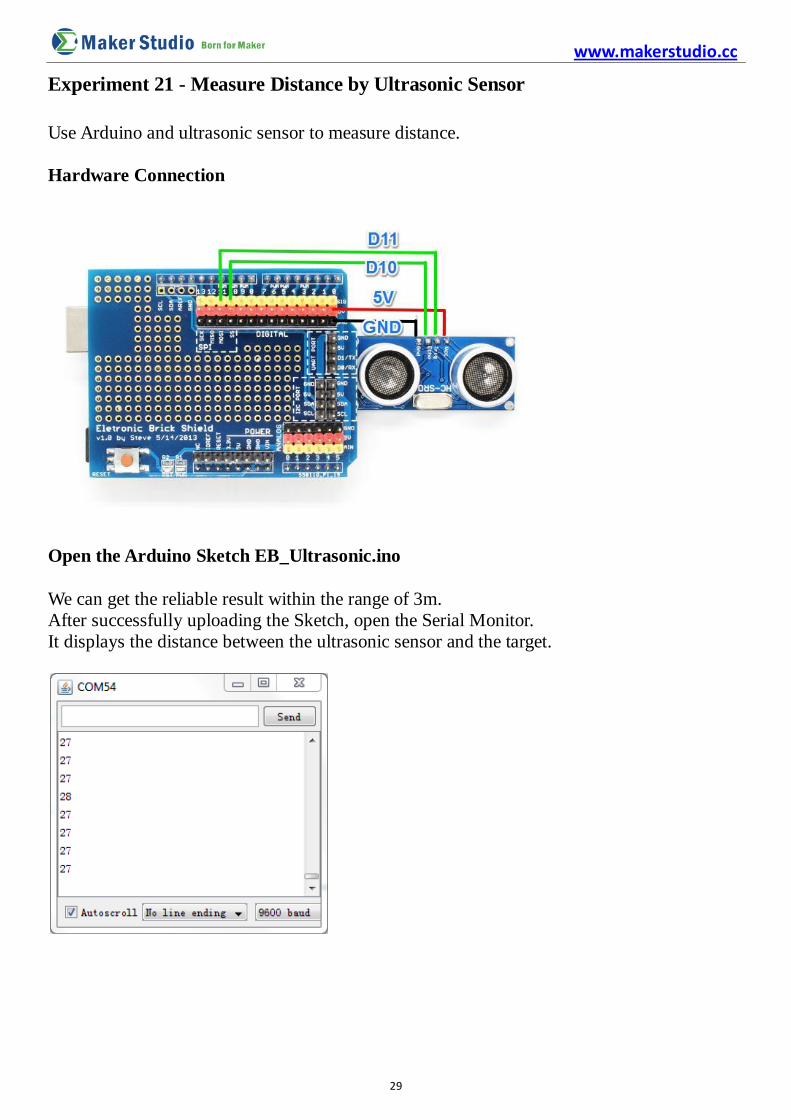
Experiment 21 - Measure Distance by Ultrasonic Sensor
Use Arduino and ultrasonic sensor to measure distance.
Hardware Connection
Open the Arduino Sketch EB_Ultrasonic.ino
We can get the reliable result within the range of 3m.
After successfully uploading the Sketch, open the Serial Monitor.
It displays the distance between the ultrasonic sensor and the target.
www.makerstudio.cc
30
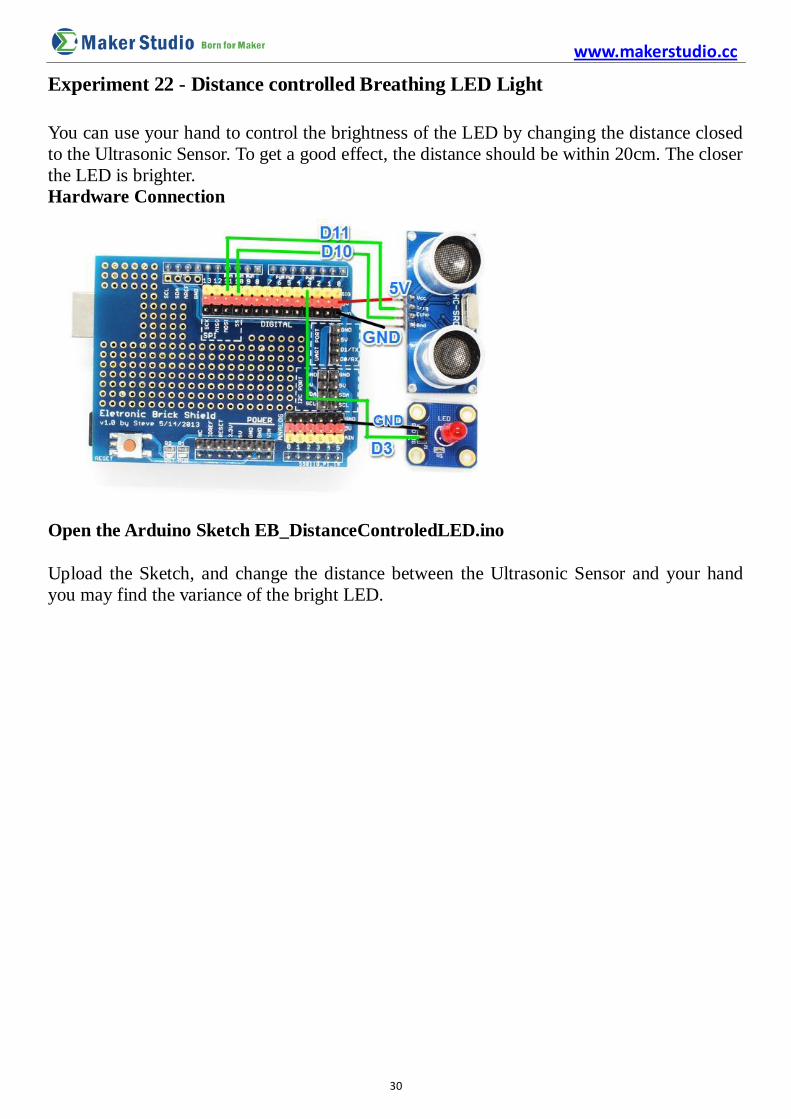
Experiment 22 - Distance controlled Breathing LED Light
You can use your hand to control the brightness of the LED by changing the distance closed
to the Ultrasonic Sensor. To get a good effect, the distance should be within 20cm. The closer
the LED is brighter.
Hardware Connection
Open the Arduino Sketch EB_DistanceControledLED.ino
Upload the Sketch, and change the distance between the Ultrasonic Sensor and your hand
you may find the variance of the bright LED.

www.makerstudio.cc
31
Reference Link
Arduino functions: http://arduino.cc/en/Tutorial/HomePage
More Arduino Kit: http://makerstudio.cc/index.php?main_page=index&cPath=2


![Which Arduino Kit Should I Buy[1] - Quad Split Sites:podcast.uctv.tv/webdocuments/steam/Supplies-and-Sourcing-List.pdf · 1 Day Lesson Plan Arduino Kit Which Arduino Kit Should I](https://img.dokumen.tips/doc/110x75/5aaee7dc7f8b9adb688cf532/which-arduino-kit-should-i-buy1-quad-split-sites-day-lesson-plan-arduino-kit.jpg)