Embed Size (px)
Citation preview
User Guide
N1000-006
WE
B V
ER
SIO
N

& Energy Solutions
NoticeAlthough the information contained within this user guide is believed to be accurate at the time of printing, it is not guaranteed to be without fault and is subject to change without notice. Future software releases may change the features or operation of this product. For current information contact:
Leviton Lighting Division20497 SW Teton, Tualatin, OR 97062
Mailing Address:PO Box 2210Tualatin, OR 97062
Customer Service: (800)736-6682Technical Support: (800)959-6004 Fax: (503)404-5601Internet: www.lms.leviton.com/les
Copyright © 2016Leviton Manufacturing Company Incorporated.All Rights Reserved.
WE
B V
ER
SIO
N

Page i
Table of Contents
Chapter 1 Introduction...............................................1About the Console ......................................................... 2
Features.............................................................. 2Specifications ...................................................... 2Warnings ! .......................................................... 2Console Controls.................................................. 3Rear Panel .......................................................... 4
Using this Guide ............................................................ 4Text Conventions ................................................. 4Terminology Definitions........................................ 4
Contacting Technical Support ......................................... 5
Chapter 2 Operation ...................................................7Console Setup............................................................... 8
Power On ............................................................ 8Internal Battery Operation.................................... 8Auto Memory....................................................... 8Console Reset...................................................... 8
Master Fader and Bump Button ...................................... 8Setting Channel Levels................................................... 9
Setting Channel Levels using Faders...................... 9Setting Channel Levels using the Keypad..............10Setting a Range of Channels................................10Channel Bump Buttons........................................11Clearing Channel Levels.......................................11
Scenes ........................................................................12Recording Scenes to Submasters .........................12Recording Scenes to Scene Memory .....................13Recalling Submaster Scenes ................................14Submaster Bump Buttons ....................................14Recalling Memory Scenes ....................................14Modifying Submaster Memory..............................15Modifying Scene Memory.....................................16Clearing Scene Levels..........................................17
Chases ........................................................................18Channel Chase....................................................18Channel Chase + Scene ......................................19Sub Chase..........................................................19Chase Fade ........................................................20
Auto Fade....................................................................21Auto Fade a Single Channel .................................21Auto Fade a Range of Channels ...........................21
DMX IN .......................................................................22Backup Console ..................................................22Recording an Emergency Backup Scene................22Emergency Backup Scene Fade Time ...................23Recording a Snapshot Scene................................23Warranty............................................................24
WE
B V
ER
SIO
N

Page 1
Chapter 1 Introduction
This chapter is intended to orient you to the console and user guide.
The following sections are covered:
• About the Console• Features• Specifications• Warnings• Console Controls• Rear Panel
• Using this Guide• Text Conventions• Terminology Definitions
• Contacting Technical Support
WE
B V
ER
SIO
N

Chapter 1 Introduction
2 egaP N1000-006 User Guide
About the Console
Thank You for purchasing the Leviton N1000-006 lighting control console! The N1000-006 is a compact yet powerful console, perfectly designed for small size applications. To optimize the performance of this product, please read this user guide carefully to familiarize yourself with the basic operations of the unit.
FeaturesSmall and lightDMX OUT: Controls up to 512 DMX channelsDMX IN: Functions as an Emergency Backup console46 Scene MemorySix dual-purpose channel faders / programmable scene submastersSix dual-purpose channel bump buttons / submaster bump buttonsProgrammable Chase Function
SpecificationsPower supply: DC 12V/ 1AControl signal: DMX512 / 1990DMX Connectors: XLR 5-pin Female, XLR 5-pin MaleWeight: 3.0 Kg (6.6 Lbs)Dimensions: 262L x 132W x 45H mm (10.3L x 5.2W x 1.8H inches)
Warnings
Cautions
To avoid fire, shock or death, do not remove the ground prong from the power cord.To avoid fire, shock or death, do not expose the unit to rain, moisture or other contaminants.To avoid shock, never operate this unit with its cover removed.
Do not operate this unit if it becomes damaged in any way.Do not operate this unit if power cord is frayed or broken.If the unit has been stored in a cold environment (below 40ºF), do not turn the power on until itwarms up or else damage may occur.Make sure that the main’s power outlet matches the required voltage for your unit.
WE
B V
ER
SIO
N
Page 3
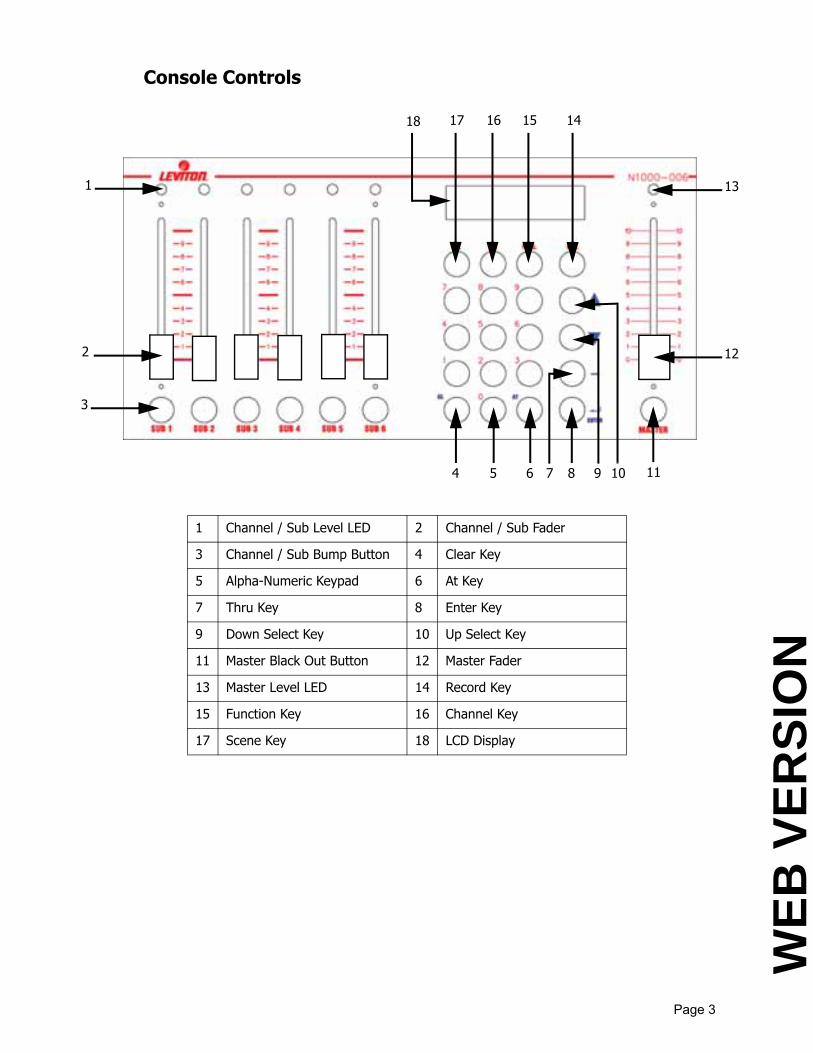
Console Controls
1 Channel / Sub Level LED 2 Channel / Sub Fader
3 Channel / Sub Bump Button 4 Clear Key
5 Alpha-Numeric Keypad 6 At Key
7 Thru Key 8 Enter Key
9 Down Select Key 10 Up Select Key
11 Master Black Out Button 12 Master Fader
13 Master Level LED 14 Record Key
15 Function Key 16 Channel Key
17 Scene Key 18 LCD Display
1
3
4 65 8 117 9 10
12
13
1415161718
2
WE
B V
ER
SIO
N
Chapter 1 Introduction
Page 4 N1000-006 User Guide
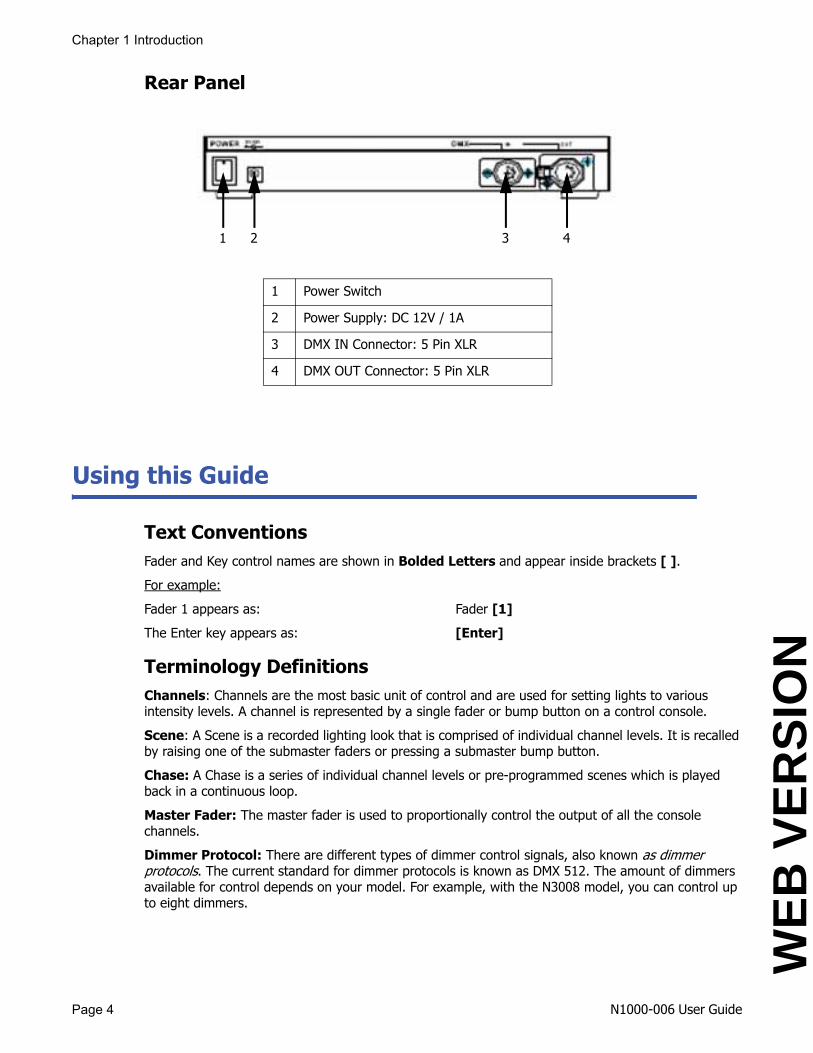
Rear Panel
Using this Guide
Text Conventions Fader and Key control names are shown in Bolded Letters and appear inside brackets [ ].
For example:
Fader 1 appears as: Fader [1]
The Enter key appears as: [Enter]
Terminology DefinitionsChannels: Channels are the most basic unit of control and are used for setting lights to various intensity levels. A channel is represented by a single fader or bump button on a control console.
Scene: A Scene is a recorded lighting look that is comprised of individual channel levels. It is recalled by raising one of the submaster faders or pressing a submaster bump button.
Chase: A Chase is a series of individual channel levels or pre-programmed scenes which is played back in a continuous loop.
Master Fader: The master fader is used to proportionally control the output of all the console channels.
Dimmer Protocol: There are different types of dimmer control signals, also known as dimmer protocols. The current standard for dimmer protocols is known as DMX 512. The amount of dimmers available for control depends on your model. For example, with the N3008 model, you can control up to eight dimmers.
1 Power Switch
2 Power Supply: DC 12V / 1A
3 DMX IN Connector: 5 Pin XLR
4 DMX OUT Connector: 5 Pin XLR
1 2 3 4
WE
B V
ER
SIO
N
5 egaP
Contacting Technical Support
If you cannot find answers in the user guide, please contact Technical Support at www.leviton.com/les and we will be glad to answer your questions. You may also call us during regular business hours at 1-800-959-6004. Please have the console model number and serial number available when you call.
Contact Information
Leviton Lighting & Energy Solutions Division20497 SW Teton, Tualatin, OR 97062
Mailing Address:PO Box 2210Tualatin, OR 97062
Customer Service: (800)736-6682
Technical Support: (800)959-6004
Fax: (503)404-5601Internet: www.leviton.com/les
WE
B V
ER
SIO
N

Page 7
Chapter 2 Operation
The following sections are covered in this chapter:
• Console Setup• Power On• Internal Battery Operation• Auto Memory• Console Reset
• Master Fader and Bump Button• Setting Channel Levels
• Setting Channel Levels using Faders• Setting Channel Levels using the Keypad• Setting a Range of Channels• Channel Bump Buttons• Clearing Channel Levels
• Scenes• Recording Scenes to Submasters• Recording Scenes to Scene Memory• Recalling Submaster Scenes• Submaster Bump Buttons• Recalling Memory Scenes• Modifying Submaster Memory• Modifying Scene Memory• Clearing Scene Levels
• Chases• Channel Chase• Channel Chase + Scene• Sub Chase• Chase Fade
• Auto Fade• Auto Fade a Single Channel• Auto Fade a Range of Channels
• DMX IN• Backup Console• Recording a Emergency Backup Scene• Recording a Snapshot Scene
WE
B V
ER
SIO
N
Chapter 2 Operation
8 egaP N1000-006
Console Setup
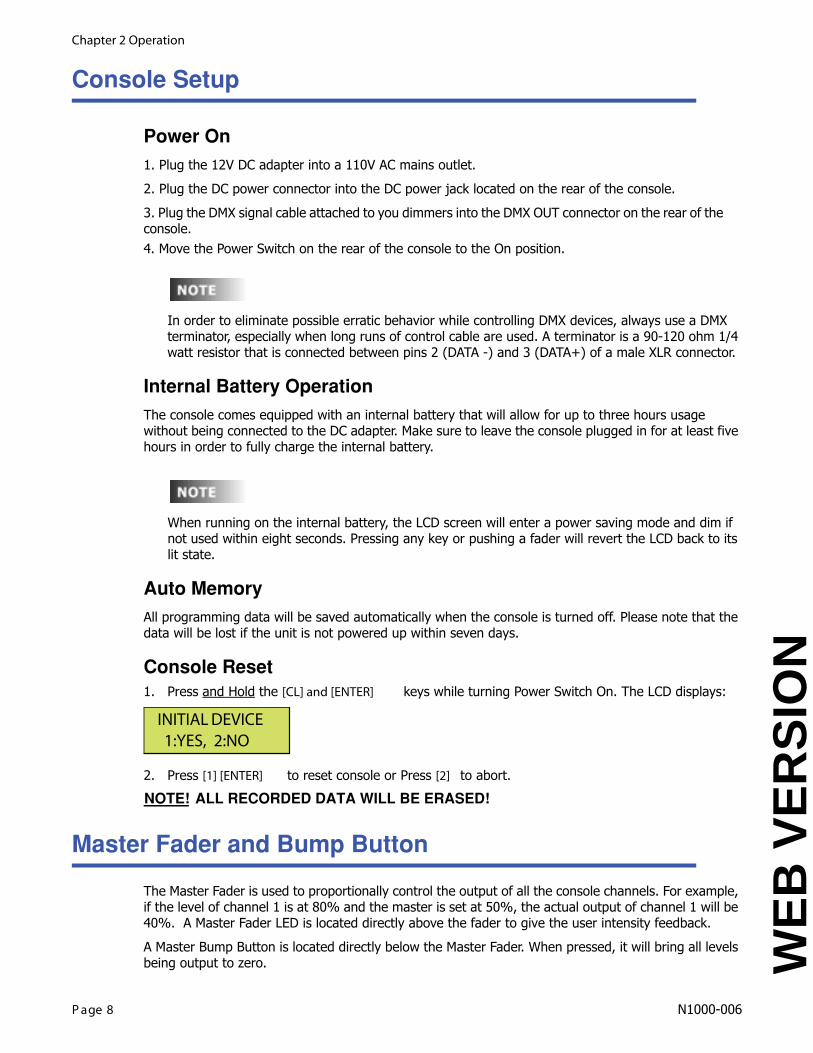
Power On
1. Plug the 12V DC adapter into a 110V AC mains outlet.
2. Plug the DC power connector into the DC power jack located on the rear of the console.
3. Plug the DMX signal cable attached to you dimmers into the DMX OUT connector on the rear of the console.4. Move the Power Switch on the rear of the console to the On position.
In order to eliminate possible erratic behavior while controlling DMX devices, always use a DMX terminator, especially when long runs of control cable are used. A terminator is a 90-120 ohm 1/4 watt resistor that is connected between pins 2 (DATA -) and 3 (DATA+) of a male XLR connector.
Internal Battery Operation
The console comes equipped with an internal battery that will allow for up to three hours usage without being connected to the DC adapter. Make sure to leave the console plugged in for at least five hours in order to fully charge the internal battery.
When running on the internal battery, the LCD screen will enter a power saving mode and dim if not used within eight seconds. Pressing any key or pushing a fader will revert the LCD back to its lit state.
Auto Memory
All programming data will be saved automatically when the console is turned off. Please note that the data will be lost if the unit is not powered up within seven days.
Console Reset1. Press and Hold the [CL] and [ENTER] keys while turning Power Switch On. The LCD displays:
2. Press [1] [ENTER] to reset console or Press [2] to abort.
ALL RECORDED DATA WILL BE ERASED!NOTE!
Master Fader and Bump Button
The Master Fader is used to proportionally control the output of all the console channels. For example, if the level of channel 1 is at 80% and the master is set at 50%, the actual output of channel 1 will be 40%. A Master Fader LED is located directly above the fader to give the user intensity feedback.
A Master Bump Button is located directly below the Master Fader. When pressed, it will bring all levels being output to zero.
INITIAL DEVICE 1:YES, 2:NO
WE
B V
ER
SIO
N
Page 9
Setting Channel Levels
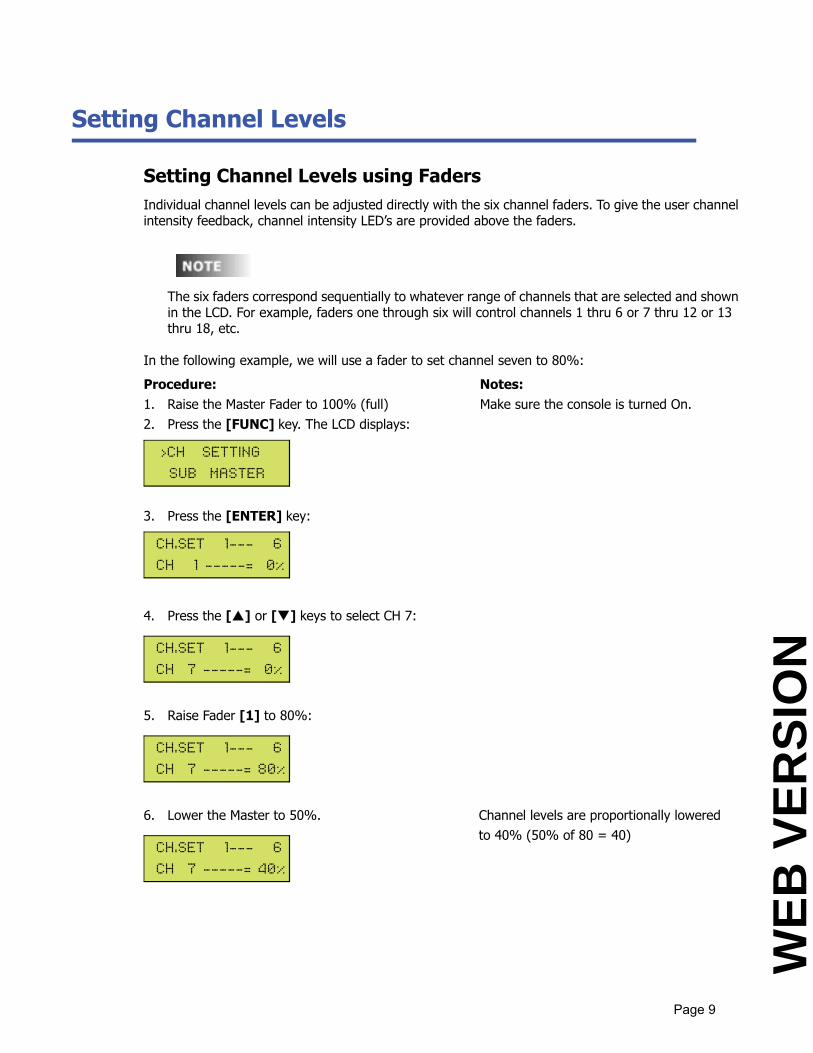
Setting Channel Levels using FadersIndividual channel levels can be adjusted directly with the six channel faders. To give the user channel intensity feedback, channel intensity LED’s are provided above the faders.
The six faders correspond sequentially to whatever range of channels that are selected and shown in the LCD. For example, faders one through six will control channels 1 thru 6 or 7 thru 12 or 13 thru 18, etc.
In the following example, we will use a fader to set channel seven to 80%:
Procedure: Notes:1. Raise the Master Fader to 100% (full) Make sure the console is turned On.2. Press the [FUNC] key. The LCD displays:
3. Press the [ENTER] key:
4. Press the [ ] or [ ] keys to select CH 7:
5. Raise Fader [1] to 80%:
6. Lower the Master to 50%. Channel levels are proportionally lowered to 40% (50% of 80 = 40)
>CH SETTING SUB MASTER
CH.SET 1--- 6 CH 1 -----= 0%
CH.SET 1--- 6 CH 7 -----= 0%
CH.SET 1--- 6 CH 7 -----= 80%
CH.SET 1--- 6 CH 7 -----= 40%
WE
B V
ER
SIO
N
Chapter 2 Operation
Page 10 N1000-006
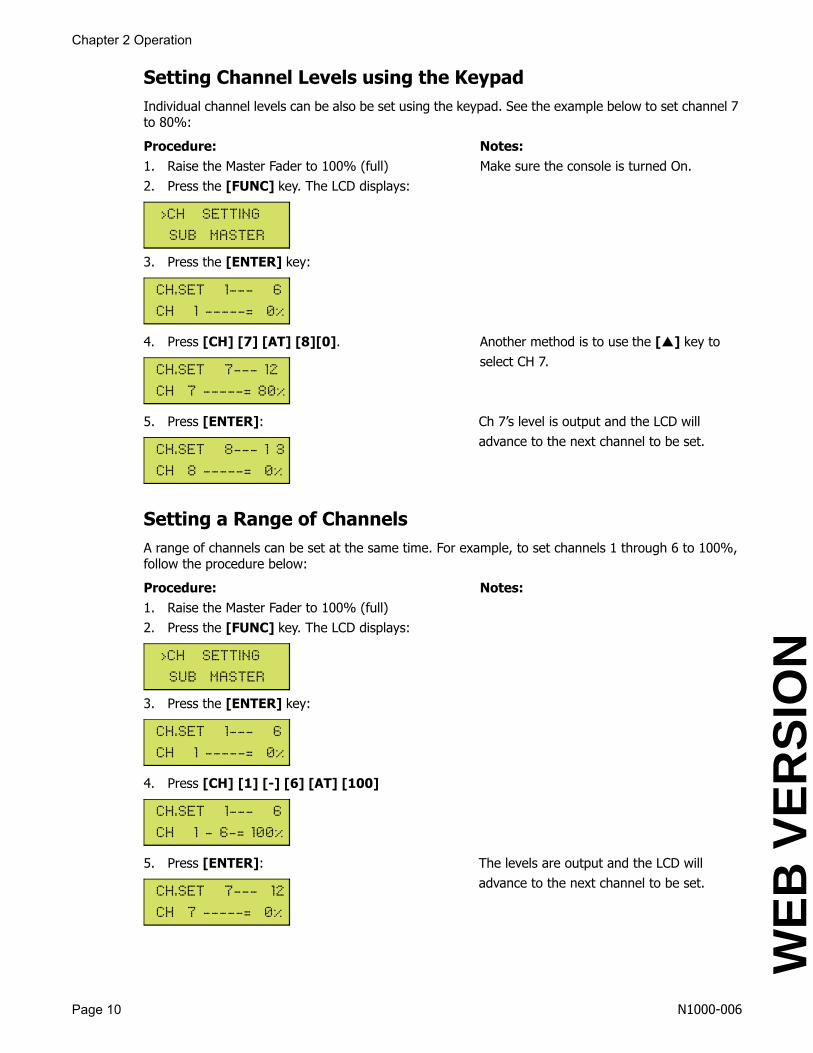
Setting Channel Levels using the KeypadIndividual channel levels can be also be set using the keypad. See the example below to set channel 7 to 80%:
Procedure: Notes:1. Raise the Master Fader to 100% (full) Make sure the console is turned On.2. Press the [FUNC] key. The LCD displays:
3. Press the [ENTER] key:
4. Press [CH] [7] [AT] [8][0]. Another method is to use the [ ] key toselect CH 7.
5. Press [ENTER]: Ch 7’s level is output and the LCD will advance to the next channel to be set.
Setting a Range of ChannelsA range of channels can be set at the same time. For example, to set channels 1 through 6 to 100%, follow the procedure below:
Procedure: Notes:1. Raise the Master Fader to 100% (full)2. Press the [FUNC] key. The LCD displays:
3. Press the [ENTER] key:
4. Press [CH] [1] [-] [6] [AT] [100]
5. Press [ENTER]: The levels are output and the LCD will advance to the next channel to be set.
>CH SETTING SUB MASTER
CH.SET 1--- 6 CH 1 -----= 0%
CH.SET 7--- 12 CH 7 -----= 80%
CH.SET 8--- 1 3 CH 8 -----= 0%
>CH SETTING SUB MASTER
CH.SET 1--- 6 CH 1 -----= 0%
CH.SET 1--- 6 CH 1 - 6-= 100%
CH.SET 7--- 12 CH 7 -----= 0%
WE
B V
ER
SIO
N
Page 11
Channel Bump ButtonsPressing the bump buttons located below each fader allows individual channels to change quickly to full intensity (100%) while in CH. SET mode.
Clearing Channel LevelsThere are two ways to clear the levels of all channels while in CH. SET mode :
Procedure: Notes:1. Press the [CL] and [CH] keys at the same time
- OR -
1. Lower the Master Fader to 0%, then Press the[MASTER] key.
WE
B V
ER
SIO
N

Chapter 2 Operation
Page 12 N1000-006
Scenes
As mentioned earlier, a scene is a recorded lighting look that is comprised of individual channel levels. With this console, up to 46 scenes may be recorded for future playback.
There are two methods of recording and recalling scenes. The first way is by recording a scene to one of the six submasters. The scene can then be recalled by either raising a sub fader or pressing a sub bump button. The second method is by recording a scene to the 40 scene memory bank. The memory scene is then recalled by using the scene [SC] key.
Recording Scenes to SubmastersIn this example, we will set levels on channels one through six and record them into submaster one.
Procedure: Notes:1. Raise the Master Fader to 100% (full)2. Press the [FUNC] key. The LCD displays:
3. Press the [ENTER] key:
4. Press [CH] [1] [-] [6] [AT] [100] [ENTER]
5. Press the [REC] key.
6. Press the [SUB1] key:
7. Press [ENTER] Sub is recorded. Pressing any other keybesides [ENTER] will cancel the recording.
Any previously recorded memory scene (see next section, Recording Scenes to Scene Memory ) can be re-recorded into a sub fader for quick access. First, recall the scene as noted in the Recalling Memory Scenes section further below, then follow Step 5 above.
>CH SETTING SUB MASTER
CH.SET 1--- 6 CH 1 -----= 0%
CH.SET 1--- 6 CH 1 - 6-= 100%
RECORD TO SC _ KEYIN SC 1...40
SAVE TO SUB1ENT=SURE ANY=NO
WE
B V
ER
SIO
N

Page 13
Recording Scenes to Scene MemoryIn this example, we will set levels on channels one through six and record them into scene one.
Procedure: Notes:1. Raise the Master Fader to 100% (full)2. Press the [FUNC] key. The LCD displays:
3. Press the [ENTER] key:
4. Press [CH] [1] [-] [6] [AT] [100] [ENTER]:
5. Press [REC] [1]:
6. Press [ENTER]: If a scene has been previously recorded, awarning will appear. Press [1] to continue.
7. Enter a name using the keypad: Keypad numbers 0 - 9 represent the alphabet. See Alpha-Numeric chart below.
8. Press [ENTER] Scene is recorded.
Alpha-Numeric chart
1 A B C 6 P Q R
2 D E F 7 S T U
3 G H I 8 V W X
4 J K L 9 Y Z -
5 M N O 0 Sp
>CH SETTING SUB MASTER
CH.SET 1--- 6 CH 1 -----= 0%
CH.SET 1--- 6 CH 1 - 6-= 100%
RECORD TO SC _ KEYIN SC 1...40
OVERWRITE DATA? 1:YES , 2:NO
Name: ABC KEYIN ENGLISH
WE
B V
ER
SIO
N

Chapter 2 Operation
Page 14 N1000-006
Recalling Submaster ScenesTo playback submasters, see the procedure below. In this example, we are recalling a submaster that was previously recorded as submaster 1.
Procedure: Notes:1. Press the [FUNC] key. The LCD displays: Make sure the Master is at 100%.
2. Press the [ ] key to select the sub function:
3. Press [ENTER] to select sub:
4. Press and Hold [SUB1] key: Sub level is output at 100%.
-OR-5. Raise Fader [1]: Sub level is output at given level.
Submaster Bump ButtonsAs shown in Step 4 above, pressing the bump buttons located below each fader allows individual submasters to change quickly to full intensity (100%) while in SUB MASTER mode.
Recalling Memory ScenesFollow the steps below to playback a scene that was recorded to memory. In this example, we are recalling a scene that was previously recorded as scene 1.
Procedure: Notes:1. Press the [FUNC] key. The LCD displays: Make sure the Master is at 100%.
2. Press the [ ] key to select the sub function:
(Continued on next page)
>CH SETTING SUB MASTER
CH SETTING >SUB MASTER
SUB MASTER 1--6 LEVITON CORP.
LOAD SUBSCENE 1
SUB MASTER 1--6 SUB1 = 100%
>CH SETTING SUB MASTER
CH SETTING >SUB MASTER
WE
B V
ER
SIO
N

Page 15
Recalling Memory Scenes (Con’t)Procedure: Notes:3. Press [ENTER] to select scene:
4. Press the [SC] key:
5. Press [1]:
6. Press [ENTER]: Scene is output at recorded levels.
Modifying Submaster MemoryAfter you have recorded channel levels into a submaster, you can modify the channel levels. Follow the example below.
Procedure: Notes:1. Press the [FUNC] [ ]. The LCD displays:
2. Press [ENTER]:
3. Raise the submaster fader you wish to modify:
4. Press the [CH] key:
5. Press [1] [AT] [50] You can also select a range of channels. Forexample, [1] [-] [6] [AT] [50].
(Continued on next page)
SUB MASTER 1--6 LEVITON CORP.
LOAD SCENE _ KEYIN SC 1...40
LOAD SCENE 1 ABC
SUB MASTER 1--6 LEVITON CORP.
CH SETTING >SUB MASTER
SUB MASTER 1--6 LEVITON CORP.
SUB MASTER 1--6 SUB1 = 100%
CHANNEL MODIFY CH 1 -----= 100%
CHANNEL MODIFY CH 1 -----= 50%
WE
B V
ER
SIO
N

Chapter 2 Operation
Page 16 N1000-006
Modifying Submaster Memory (Con’t)6. Press [ENTER] to complete the operation:
Modifying Scene MemoryAfter you have recorded channel levels into a scene, you can modify the channel levels. See the following example.
Procedure: Notes:
1. Press the [FUNC] [ ]. The LCD displays:
2. Press [ENTER]:
3. Press the [SC] key:
4. Press [1] or the scene # you wish to modify:
5. Press [ENTER]:
6. Press the [CH] key:
7. Press [1] [AT] [50] to modify: You can also select a range of channels. Forexample, [1] [-] [6] [AT] [50].
8. Press [ENTER] to complete the operation:
SUB MASTER 1--6 LEVITON CORP.
CH SETTING >SUB MASTER
SUB MASTER 1--6 LEVITON CORP.
LOAD SCENE _ KEYIN SC 1...40
LOAD SCENE 1 ABC
SUB MASTER 1--6 LEVITON CORP.
CHANNEL MODIFY CH 1 -----= 100%
CHANNEL MODIFY CH 1 -----= 50%
SUB MASTER 1--6 LEVITON CORP.
WE
B V
ER
SIO
N

Page 17
Clearing Scene LevelsThere are two ways to clear the levels of a scene while in SUB MASTER mode:
Procedure: Notes:1. Press the [CL] and [SC] keys at the same time
- OR -
1. Lower the Master Fader to 0%, then Press the
[MASTER] key.
After clearing the levels, you must re-record the scene in order for the new levels to be saved.
WE
B V
ER
SIO
N
Chapter 2 Operation
Page 18 N1000-006
Chases
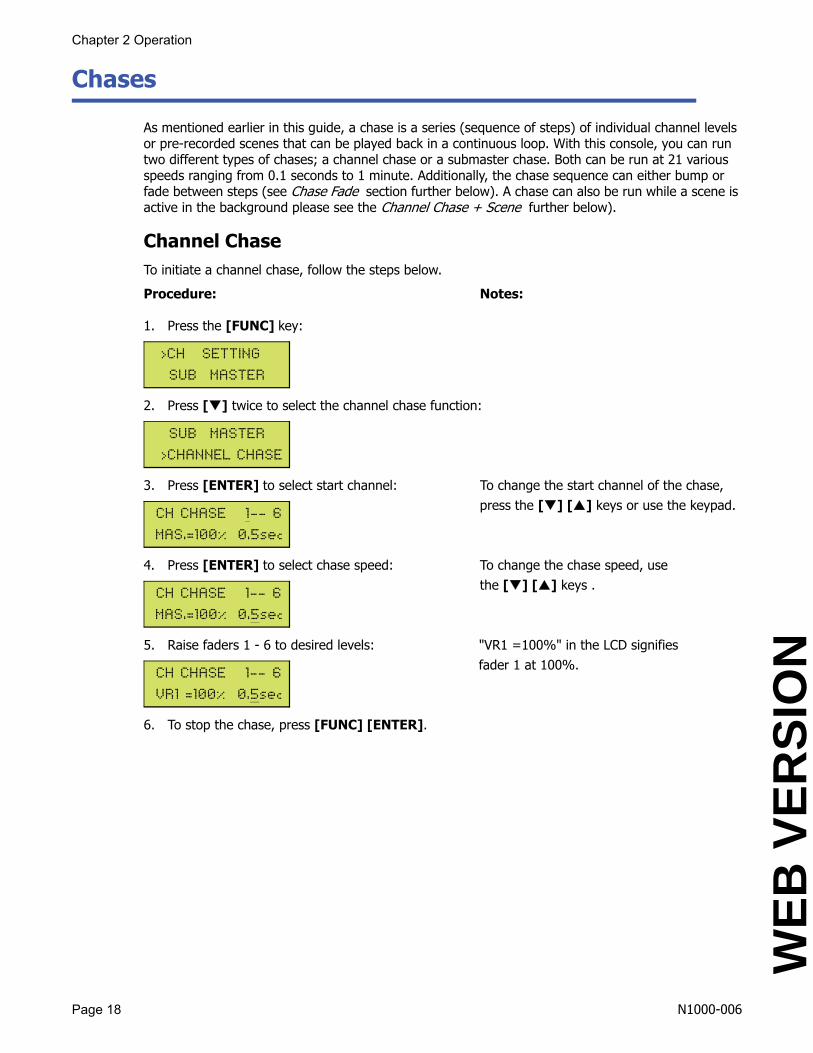
As mentioned earlier in this guide, a chase is a series (sequence of steps) of individual channel levels or pre-recorded scenes that can be played back in a continuous loop. With this console, you can run two different types of chases; a channel chase or a submaster chase. Both can be run at 21 various speeds ranging from 0.1 seconds to 1 minute. Additionally, the chase sequence can either bump or fade between steps (see Chase Fade section further below). A chase can also be run while a scene is active in the background please see the Channel Chase + Scene further below).
Channel ChaseTo initiate a channel chase, follow the steps below.
Procedure: Notes:
1. Press the [FUNC] key:
2. Press [ ] twice to select the channel chase function:
3. Press [ENTER] to select start channel: To change the start channel of the chase,press the [ ] [ ] keys or use the keypad.
4. Press [ENTER] to select chase speed: To change the chase speed, use the [ ] [ ] keys .
5. Raise faders 1 - 6 to desired levels: "VR1 =100%" in the LCD signifies fader 1 at 100%.
6. To stop the chase, press [FUNC] [ENTER].
>CH SETTING SUB MASTER
SUB MASTER >CHANNEL CHASE
CH CHASE 1-- 6 MAS.=100% 0.5sec
CH CHASE 1-- 6 MAS.=100% 0.5sec
CH CHASE 1-- 6 VR1 =100% 0.5sec
WE
B V
ER
SIO
N

Page 19
Channel Chase + SceneA channel chase can be executed while a scene is active in the background. Please follow below.
1. Press the [SC] key while the chase is running:
2. Enter [1] or whatever scene # desired:
3. Press [ENTER] to confirm: To change the start channel of the chase,press the [ ] [ ] keys or use the keypad.
If a channel level of a scene is higher then the same channel of the chase, the scene’s channel level will be output (and vice versa). This is because the console operates in an HTP (Highest Takes Precedence) mode.
Sub ChaseThere are two submaster chases available; one will chase through subs 1 - 6, the other will chase through subs 3 - 6.
Procedure: Notes:1. Press the [FUNC] key:
2. Press the [ ] key three times:
3. Press [ENTER]: Use the [ ] [ ] keys to select sub chase.
4. Press [ENTER]: To change the chase speed, use the [ ] [ ] keys .
5. Raise faders to desired levels:
6. To stop the chase, press [FUNC] [ENTER].
LOAD SCENE _ KEYIN SC 1...40
LOAD SCENE 1 ABC
CH CHASE 1-- 6 MAS.=100% 0.5sec
>CH SETTING SUB MASTER
CHANNEL CHASE >SUB CHASE
> CHASE 1 - 6 CHASE 3 - 6
SUB CHASE 1-- 6 MAS=100% 0.5sec
SUB CHASE 1-- 6 SUB1=100% 0.5sec
WE
B V
ER
SIO
N
Chapter 2 Operation
Page 20 N1000-006
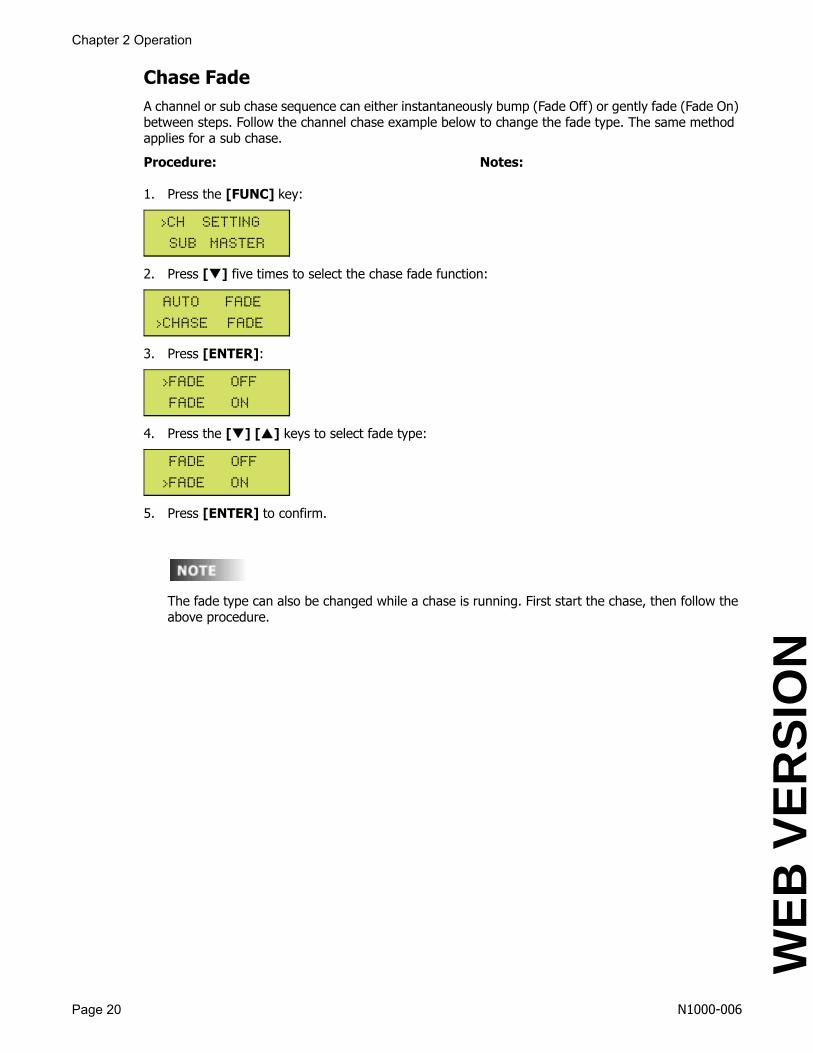
Chase FadeA channel or sub chase sequence can either instantaneously bump (Fade Off) or gently fade (Fade On) between steps. Follow the channel chase example below to change the fade type. The same method applies for a sub chase.
Procedure: Notes:
1. Press the [FUNC] key:
2. Press [ ] five times to select the chase fade function:
3. Press [ENTER]:
4. Press the [ ] [ ] keys to select fade type:
5. Press [ENTER] to confirm.
The fade type can also be changed while a chase is running. First start the chase, then follow the above procedure.
>CH SETTING SUB MASTER
AUTO FADE >CHASE FADE
>FADE OFF FADE ON
FADE OFF >FADE ON
WE
B V
ER
SIO
N

Page 21
Auto Fade
The auto fade function allows a single channel or range of channels to automatically fade from 0 to 100% and back in a continuous fashion. 21 speeds are available, ranging from 0.1 seconds to 1 minute.
Auto Fade a Single ChannelProcedure: Notes:
1. Press the [FUNC] key:
2. Press [ ] four times to select the auto fade function:
3. Press [ENTER] to start the auto fade: Press the [ ] [ ] keys to select CH or usethe keypad.
4. Press [ENTER] to select the speed: To change the speed, use the [ ] [ ] keys .
5. To stop the auto fade, press [FUNC] [ENTER].
Auto Fade a Range of ChannelsProcedure: Notes:
1. Press the [FUNC] key:
2. Press [ ] four times to select the auto fade function:
3. Press [ENTER] to start the auto fade:
(Continued on next page)
>CH SETTING SUB MASTER
SUB CHASE >AUTO FADE
AUTO FADE 3secCH 1 -----> 40%
AUTO FADE 20secCH 1 -----> 40%
>CH SETTING SUB MASTER
SUB CHASE >AUTO FADE
AUTO FADE 3secCH 1 -----> 40%
WE
B V
ER
SIO
N

Chapter 2 Operation
Page 22 N1000-006
Auto Fade a Range of Channels (Con’t)Procedure: Notes:4. Press [CH] [1] [-] [6]:
5. Press [ENTER] to select the speed: To change the speed, use the [ ] [ ] keys .
6. To stop the auto fade, press [FUNC] [ENTER].
DMX IN
Backup ConsoleThe DMX IN feature allows the N1000 to function as a backup console for other DMX consoles.
If the other console fails and its DMX signal becomes lost. the N1000 will automatically output a pre-recorded emergency backup scene (see procedure below on how to record a emergency backup scene).
The N1000 can also capture snapshots of DMX levels being sent from another console for further recording of backup scenes (see procedure on next page on how to record a snapshot scene).
To take full control with the N1000 console after the DMX IN signal becomes lost: Procedure: Notes:1. Raise Fader [1] to 100%, then lower to 0%.
To return to DMX IN control:
Procedure: Notes:1. Re-establish the DMX IN signal.2. Raise Fader [1] to 100%, then lower to 0%.
Recording a Emergency Backup Scene Follow the example below.Procedure: Notes:1. Press the [FUNC] key. The LCD displays:
(Continued on next page)
AUTO FADE 3secCH 1 -- 6-> 40%
AUTO FADE 20secCH 1 -- 6-> 40%
>CH SETTING SUB MASTER
WE
B V
ER
SIO
N
Page 23
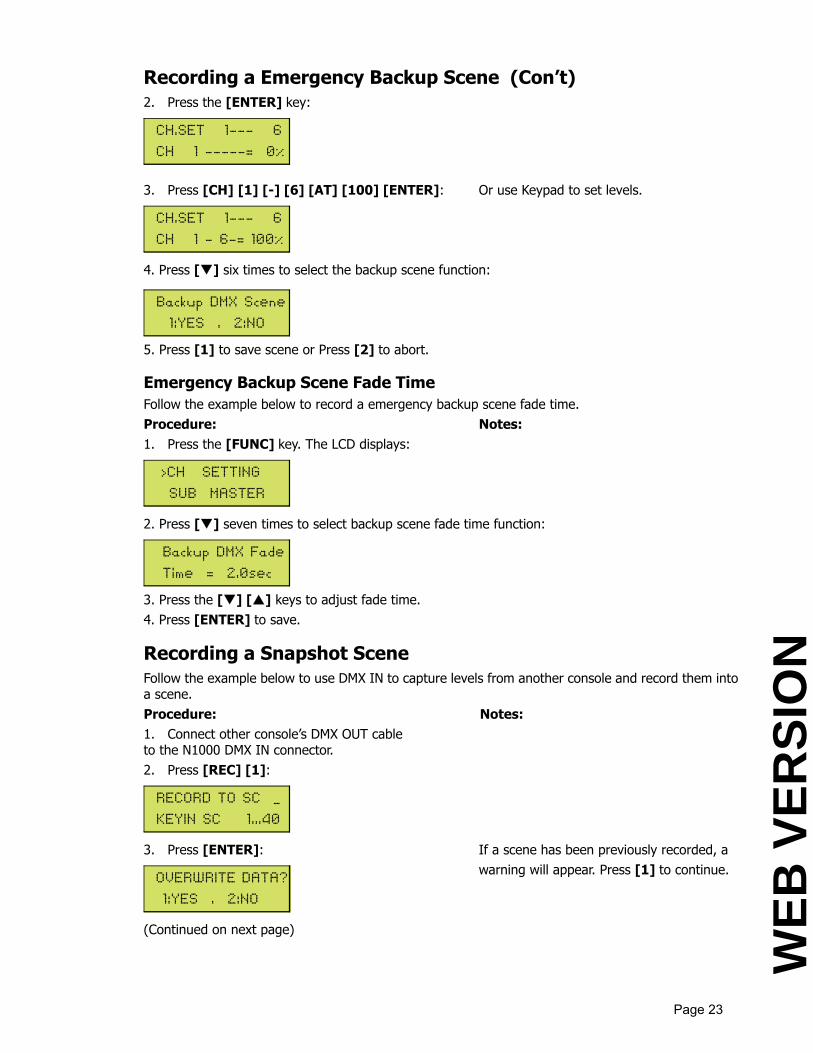
Recording a Emergency Backup Scene (Con’t)2. Press the [ENTER] key:
3. Press [CH] [1] [-] [6] [AT] [100] [ENTER]: Or use Keypad to set levels.
4. Press [ ] six times to select the backup scene function:
5. Press [1] to save scene or Press [2] to abort.
Emergency Backup Scene Fade TimeFollow the example below to record a emergency backup scene fade time.Procedure: Notes:1. Press the [FUNC] key. The LCD displays:
2. Press [ ] seven times to select backup scene fade time function:
3. Press the [ ] [ ] keys to adjust fade time.4. Press [ENTER] to save.
Recording a Snapshot Scene Follow the example below to use DMX IN to capture levels from another console and record them into a scene.Procedure: Notes:1. Connect other console’s DMX OUT cableto the N1000 DMX IN connector.2. Press [REC] [1]:
3. Press [ENTER]: If a scene has been previously recorded, awarning will appear. Press [1] to continue.
(Continued on next page)
CH.SET 1--- 6 CH 1 -----= 0%
CH.SET 1--- 6 CH 1 - 6-= 100%
Backup DMX Scene 1:YES , 2:NO
>CH SETTING SUB MASTER
Backup DMX Fade Time = 2.0sec
RECORD TO SC _ KEYIN SC 1...40
OVERWRITE DATA? 1:YES , 2:NO
WE
B V
ER
SIO
N
Chapter 2 Operation
Page 24 N1000-006
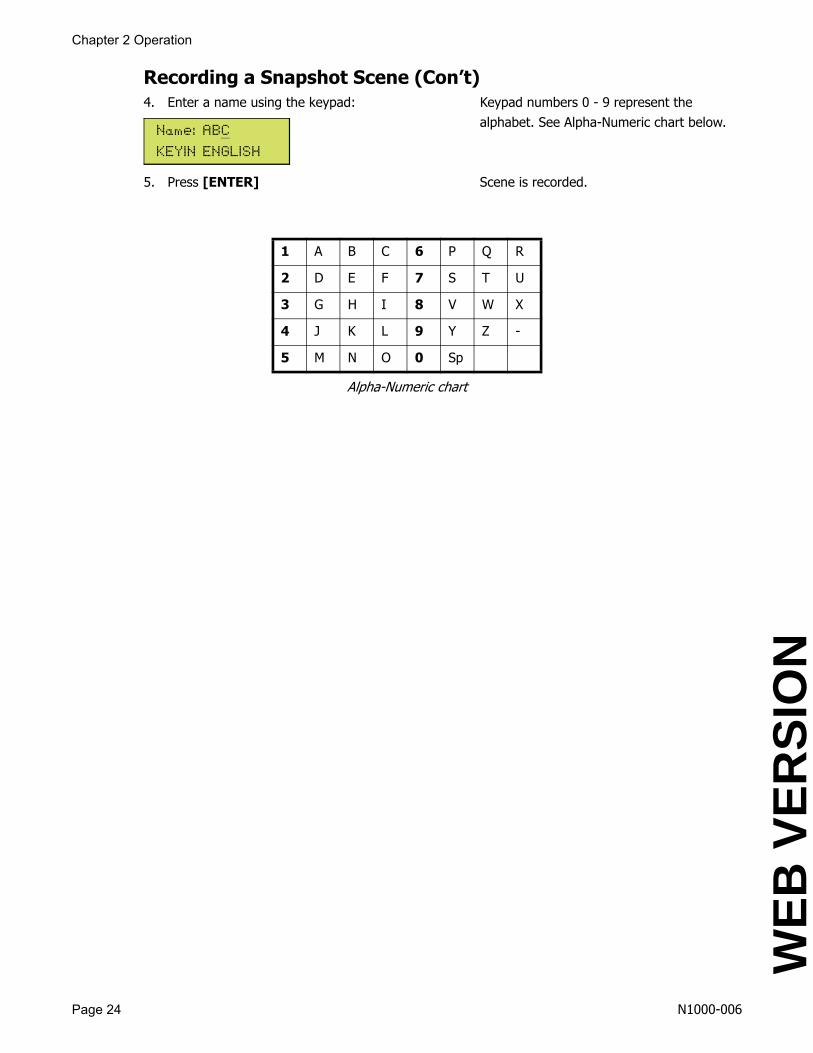
Recording a Snapshot Scene (Con’t)4. Enter a name using the keypad: Keypad numbers 0 - 9 represent the
alphabet. See Alpha-Numeric chart below.
5. Press [ENTER] Scene is recorded.
Alpha-Numeric chart
1 A B C 6 P Q R
2 D E F 7 S T U
3 G H I 8 V W X
4 J K L 9 Y Z -
5 M N O 0 Sp
Name: ABC KEYIN ENGLISH
WE
B V
ER
SIO
N

24
For Technical Assistance Call: 1-800-824-3005 (U.S.A. Only) www.leviton.com
LIMITED 2 YEAR WARRANTY AND EXCLUSIONSLeviton warrants to the original consumer purchaser and not for the benefit of anyone else that this product at the time of its sale by Leviton is free of defects in materials and workmanship under normal and proper use for two years from the purchase date. Leviton’s only obligation is to correct such defects by repair or replacement, at its option. For details visit www.leviton.com or call 1-800-824-3005. This warranty excludes and there is disclaimed liability for labor for removal of this product or reinstallation. This warranty is void if this product is installed improperly or in an improper environment, overloaded, misused, opened, abused, or altered in any manner, or is not used under normal operating conditions or not in accordance with any labels or instructions. There are no other or implied warranties of any kind, including merchantability and fitness for a particular purpose, but if any implied warranty is required by the applicable jurisdiction, the duration of any such implied warranty, including merchantability and fitness for a particular purpose, is limited to two years. Leviton is not liable for incidental, indirect, special, or consequential damages, including without limitation, damage to, or loss of use of, any equipment, lost sales or profits or delay or failure to perform this warranty obligation. The remedies provided herein are the exclusive remedies under this warranty, whether based on contract, tort or otherwise.
FOR CANADA ONLYFor warranty information and/or product returns, residents of Canada should contact Leviton in writing at Leviton Manufacturing of Canada Ltd to the attention of the Quality Assurance Department, 165 Hymus Blvd, Pointe-Claire (Quebec), Canada H9R 1E9 or by telephone at 1 800 405-5320.
WE
B V
ER
SIO
N


![ဦ · u v v / v ] w zd ' e z > x x x x x x x x x x x x x x x x x x x x x x x x x x x x x x x x x x x x x x x x x x x x x x x x x x x x x x x x x x x x x x x x x x x x x x x](https://img.dokumen.tips/doc/110x75/5e436548d273ae1ad25e8202/-u-v-v-v-w-zd-e-z-x-x-x-x-x-x-x-x-x-x-x-x-x-x-x-x-x-x-x-x-x-x-x-x-x.jpg)


![æ ò Y - WKO.at9714]-NEKP... · ï d ] o í x x x x x x x x x x x x x x x x x x x x x x x x x x x x x x x x x x x x x x x x x x x x x x x x x x x x x x x x x x x x x x x x x x x](https://img.dokumen.tips/doc/110x75/5fbaf04dd150160874293c04/-y-wkoat-9714-nekp-d-o-x-x-x-x-x-x-x-x-x-x-x-x-x-x-x-x-x-x.jpg)

