Embed Size (px)
Citation preview

User Guide
GoWorksheet Maker
A printable PDF of this user guide is available from the Attainment Company website:https://www.attainmentcompany.com/goworksheet-maker
Attainment’s

Contents1 GoWorksheet Maker: Getting Started ................................................................... 1
1.1 Quick Start ............................................................................................... 1
2 Start with a PDF Page, Image File, or Printed Worksheet ........................................ 5
2.1 Import a PDF Page from an Email Attachment ............................................. 5
2.2 Import an Image File from an Email Attachment .......................................... 5
2.3 Use the iPad Camera as a Document Scanner .............................................. 6
2.4 Take a Picture with the iPad Camera ........................................................... 6
2.5 Use a Picture from your iPad’s Photo Library ................................................ 7
2.6 Load a PDF or Image from iCloud, DropBox, or Google Drive .......................... 7
2.7 Create Directory Folders to Organize Your Worksheets.................................... 7
3 GoWorksheet Editing Tools .................................................................................. 8
3.1 Object Adjustment Tools .............................................................................. 8
3.1.1 Edit Settings ................................................................................... 9
a. Multiple Choice Options ............................................................... 9
b. Audio Button Options ................................................................ 10
c. Record Answer Button Options ................................................... 10
d. Link Button Options .................................................................. 10
e. Short Answer Options ................................................................ 10
f. Drag and Drop Answer Options .................................................... 11
g. Drag and Drop Question Options ................................................. 11
h. Tap Area Options ....................................................................... 11
3.1.2 Change the Size of a Worksheet Object ............................................ 12
3.1.3 Send Worksheet Object to the Back Layer ........................................ 12
3.1.4 Duplicate a Worksheet Object ......................................................... 12
3.1.5 Remove a Worksheet Object ........................................................... 12
3.2 Worksheet Cropping Tools ......................................................................... 13
4 Filling Out the Worksheets ................................................................................ 14
4.1 Opening a Worksheet ............................................................................... 14
4.2 Drawing and Writing on a Worksheet.......................................................... 14
4.3 Using the Interactive Worksheet Features .................................................. 14
4.3.1 Multiple Choice Answer Selections ................................................ 14
iiGoWorksheet User Guide© 2016 Attainment Company
Contents
iiiGoWorksheet User Guide
4.3.2 Audio Buttons ............................................................................. 15
4.3.3 Voice Recorder Buttons ................................................................ 15
4.3.4 Links ..........................................................................................15
4.3.5 Short Answer Fill-in-the-Blank Spaces ...........................................15
4.3.6 Drag & Drop Questions/Answers ....................................................16
4.3.7 Tap Areas ...................................................................................16
5 Returning and Saving Completed Worksheets ......................................................17
5.1 Closing a Worksheet.................................................................................17
5.2 Saving a Worksheet .................................................................................17
5.3 Resuming a Worksheet .............................................................................17
5.4 Sending a Worksheet ...............................................................................17
5.4.1 Email a Completed Worksheet ......................................................18
5.4.2 Hand-In a Completed Worksheet ...................................................18
5.4.3 Save a Completed Worksheet as a PDF Page ..................................18
5.4.4 Save a Completed Worksheet as an Image ......................................18
6 Sharing and Backing Up Worksheets ..................................................................19
6.1 Share a Worksheet to Other iPads .............................................................19
6.1.1 Sharing a Worksheet with AirDrop .................................................19
6.1.2 Broadcast a Worksheet to Nearby iPads .........................................20
6.1.3 Deliver a Worksheet as an Email Attachment ..................................20
6.2 Backing Up Your Worksheets ....................................................................21
7 Settings...........................................................................................................22
8 Support and Contact Info ..................................................................................24
Appendix: Practice Worksheet Instructions ...............................................................25
© 2016 Attainment Company

A number of complimentary sample worksheets are included with the GoWorksheet Maker app.
Tap Settings and Support at top left of screen, download the Sample Worksheets folder, and find the GoWorksheet Practice worksheet (pictured left). Detailed instructions are in the Appendix, p. 25.

GTN v4.11
TABLE OFCONTENTS © 2016 Attainment Company 1GoWorksheet User Guide
GoWorksheet Maker: Getting StartedUse GoWorksheet Maker® to convert printed worksheets, PDF pages, or image files into interactive worksheets for the iPad. Share the worksheets you have made to any number of other iPads. Use the free GoWorksheet app to fill out worksheets. Students’ completed worksheets can be returned from other iPads for review and results reporting.
GoWorksheet interactive worksheet features include:
• Text-to-Speech message player buttons
• Drag & drop activities
• Short answer fill-in-the-blank fields
• Multiple choice answers
• Message recording buttons
• Drawing tools
The best way to learn about GoWorkSheet Maker is to start creating your own iPad worksheets. To get started, open the Settings and Support display by tapping the gears at top-left of the iPad screen. Tap Install Sample Worksheets to add a folder of sample worksheets to your GoWorksheet directory.
The GoWorksheet Practice worksheet will guide you through the basic features. For step-by-step instructions, see Appendix, page 25.
1.1 QUICK START
1. Open a worksheet document to edit. Open the GoWorksheet Practice worksheet by tapping in the directory. A toolbar will appear at the bottom of the screen. Follow the instructions in the Practice worksheet to use each tool. NOTE: The edits do not all appear in toolbar order.
See pages 5–6 for how to use
an existing image file, PDF page, or to use the iPad camera to start a worksheet.
Fig. 1-1 When editing a worksheet, add activity objects by tapping on the icons in the toolbar.
Section 1
Toolbar

GTN v4.11
GoWorksheet User Guide 2© 2016 Attainment CompanyTABLE OFCONTENTS
a. MULTIPLE CHOICE—Create multiple choice question/answer activities. Tap to open a pop-up menu for adding a tap-to-select dot to the worksheet. A text-to-speech message or recording for the answer selection can be added to the menu or left blank. Tap Create to add the answer dot. The dot will appear in the center of the screen. Drag it to where it should appear on the page. You can make adjustments like preventing incorrect answer selection (page 9) or adjusting the size of the answer selection dot (page 12).
b. AUDIO—Add audio message buttons. Tap to place a message button on the page. After typing a message with the iPad keyboard for text-to-speech, or making a recording, tap Create to add the message icon to the page. Drag the message icon to change its location on the page. The message button size can be adjusted (see page 12).
c. RECORD—Add record answer buttons. Tap to add a worksheet button that lets a user add a voice recording to the worksheet. See page 12 to learn how to adjust the button size.
d. LINK—Add hyperlink to screen. Tap to add a link button that a user may tap to view a video or any webpage that may be accessed via URL, including a page from the GoTalk NOW app.
e. SHORT ANSWER—Create fill-in-the-blank short answers. Tap to add answer fields for typing answers into the worksheet. Finger-drag the borders of the answer field to adjust the height and width of the answer space. In the toolbar, tap to confirm and to cancel. When filling in the worksheet, the answer rule will appear red and change to black when an answer is added.
f. DRAG-AND-DROP—Create answer spaces and objects The drag-and-drop tools turn existing images or words on the page into objects that can be dragged to an answer space that you create.
Section 1Getting Started
with GoWorksheet
Multiple Choice
AudioButton
Record Message Button Link
Short Answer
TapArea
Drag-and-Drop Answer and Drop Space
Fig. 1-2. Activity options on the toolbar
Fig. 1-3. Use the iPad keyboard to add a text-to-speech or audio message for a message button. Tap to preview the message before adding it to the page.
NOTE: When you add an object to
the page it usually appears right in the center of the screen. You then touch and drag it to the location you want.

GTN v4.11
GoWorksheet User Guide 3© 2016 Attainment CompanyTABLE OFCONTENTS
Create a question drop space: Use the tool to place a question space on the worksheet where answer objects can be dragged. The drop space can be adjusted larger or smaller as needed to fit the worksheet page.
Create an answer object: Use the tool to define something on the page (text or image content) as an answer object that can be dragged into a question drop space. An answer object can be larger than the drop space. Use the advanced editing tools (see page 11) to prevent incorrect answer selections or to allow only correct choices.
g. TAP AREA—Make more of the screen tappable Use the tool to pair a button with another area that you create on the screen. For example, if an audio button is next to a line of text, you could make a tap area that surrounds the text itself. Tapping anywhere on the text would cause it to be read aloud.
Section 1Getting Started
with GoWorksheet
Fig. 1-5 Add question drop spaces and define text or images on the worksheet page as drag-and-drop answers. Answer objects are finger dragged into the drop spaces. If an answer object is larger than the drop space, it will reduce to fit the space.
On Toolbar
Question DropSpace
Answer Object
On Page
GTN v4.11
GoWorksheet User Guide 4© 2016 Attainment Company
Section 1Getting Started
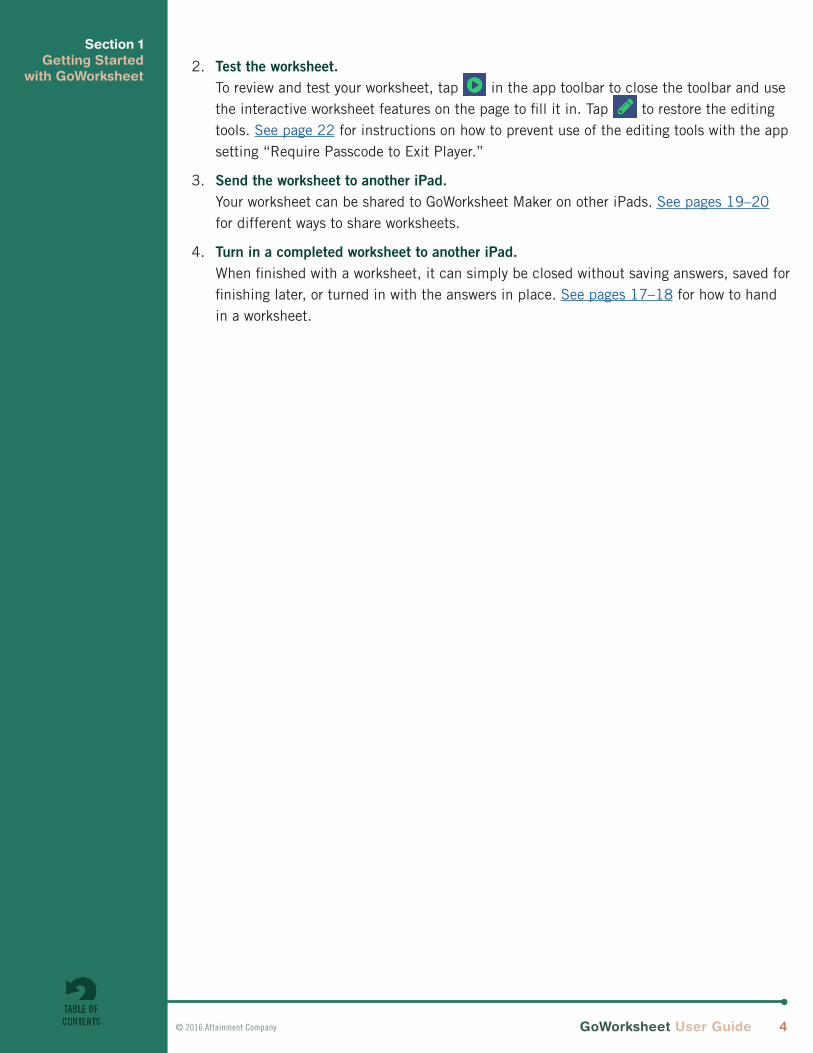
with GoWorksheet2. Test the worksheet.
To review and test your worksheet, tap in the app toolbar to close the toolbar and usethe interactive worksheet features on the page to fill it in. Tap to restore the editingtools. See page 22 for instructions on how to prevent use of the editing tools with the appsetting “Require Passcode to Exit Player.”
3. Send the worksheet to another iPad.Your worksheet can be shared to GoWorksheet Maker on other iPads. See pages 19–20for different ways to share worksheets.
4. Turn in a completed worksheet to another iPad.When finished with a worksheet, it can simply be closed without saving answers, saved forfinishing later, or turned in with the answers in place. See pages 17–18 for how to handin a worksheet.

GTN v4.11
GoWorksheet User Guide 5© 2016 Attainment Company
Start with a PDF Page, Image File, or Printed Worksheet
Section 2
Creating an interactive worksheet starts with a PDF page, an existing image file, or with the iPad camera.
2.1 Import a PDF Page from an Email Attachment
With the email open on your iPad, tap the PDF file attachment to download, tap again to open the file, then tap . Select Import with GoWorksheet to enter a worksheet name and load the PDF as a new worksheet page.
.
Fig. 2-1 To bring a PDF into the app from an email attachment, tap Import with GoWorksheet from the share options after opening the PDF in the email window.
Fig. 2-1 To bring an image file into the app from an email attachment, press and hold the image to open the Import with GoWorksheet from the share options.
2.2 Import an Image File from an Email Attachment
With the email open on your iPad, tap the image file attachment to download, then press-and-hold the image to open the sharing options. Select Import with GoWorksheet to enter a worksheet name and load the image as a new worksheet page.
RESIZING AND CROPPING PAGES:
Tap to change the worksheet page dimensions, zoom to enlarge page content, and position content within the page area. See pp. 12–13.

GTN v4.11
GoWorksheet User Guide 6© 2016 Attainment Company
Section 2Start with a PDF Page,
Image File, or Printed Worksheet
2.3 Use the iPad Camera as a Document Scanner
From the Create New Worksheet options, select From Document Scanner to use the iPad camera as a document scanner. Choose a vertical or horizontal layout by rotating the iPad. The camera will adjust the view for perspective (if not held flat and perpendicular to document) and crop the image to the page borders. When all four sides of the page are determined, the image area is shaded green and the camera automatically captures the image. Fig. 2-3 Use the choices in the Create
New Worksheet menu to use the iPad camera or load an image file from a cloud storage location.
SCANNING TIP:The camera must be able to detect all four page edges. To capture a page from a bound book, use From Camera instead of From Document Scanner.
Fig. 2-4 The document scanner tool uses the iPad camera to detect the page edges, adjusts for border perspective, and automatically captures the image. Enter a name to save it to the worksheet directory.
Scanning settings are available at the bottom of the scanner screen. Make setting adjustments before using the camera to frame the page for scanning.
Image Types: Tap/toggle to choose the setting best for the image:
color image
continuous tone black-and-white image
text only or line drawing black-and-white image
Quality/Scanning Speed: Tap/toggle to choose one of two scan quality settings:
longer scan time for optimum image quality (use for detailed content)
shorter scan time, lower resolution image capture (use for text content)
Lighting: Tap to turn on the iPad light. The light will turn off after the scan completes.
2.4 Take a Picture with the iPad Camera
To capture images other than pages with distinct borders, including pages from a book, tap and select From Camera to use the iPad camera to create a worksheet from a new photo. The worksheet will be created as a vertical or horizontal page depending on how the iPad is rotated.
GTN v4.11
GoWorksheet User Guide 7© 2016 Attainment Company
Section 2Start with a PDF Page,
Image File, or Printed Worksheet
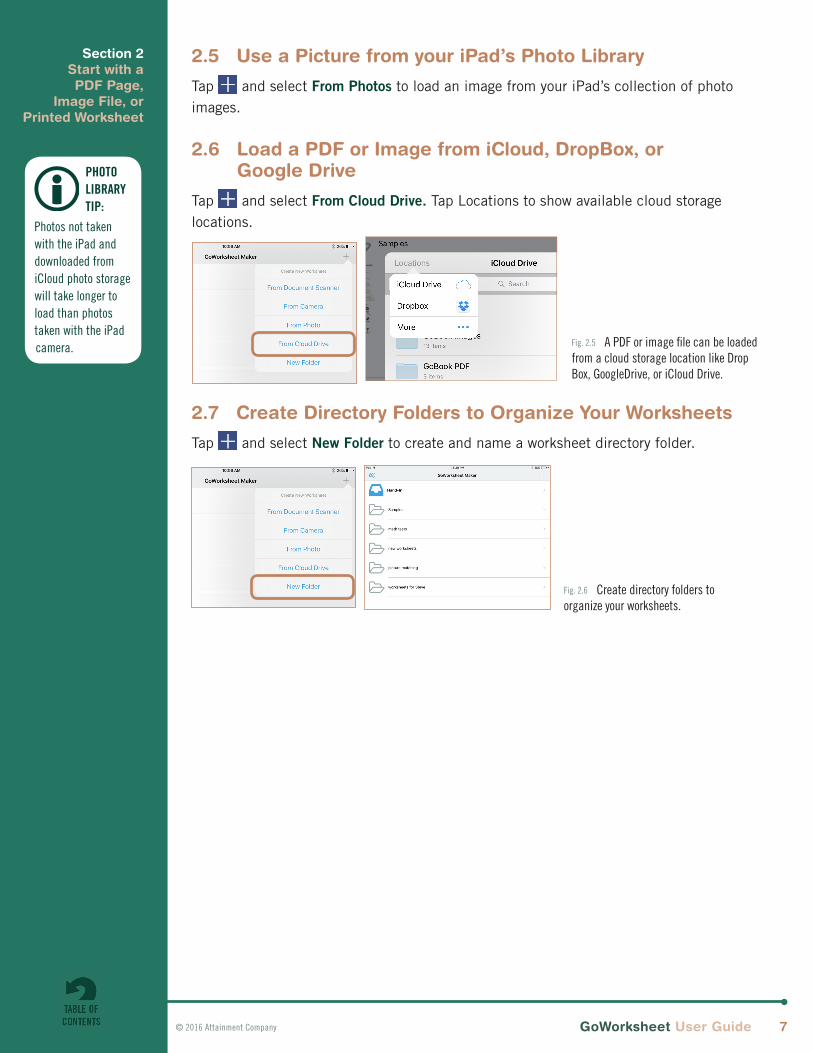
2.5 Use a Picture from your iPad’s Photo Library
Tap and select From Photos to load an image from your iPad’s collection of photo images.
2.6 Load a PDF or Image from iCloud, DropBox, or Google Drive
Tap and select From Cloud Drive. Tap Locations to show available cloud storage locations.
2.7 Create Directory Folders to Organize Your Worksheets
Tap and select New Folder to create and name a worksheet directory folder.
PHOTO LIBRARY TIP:
Photos not taken with the iPad and downloaded from iCloud photo storage will take longer to load than photos taken with the iPad camera. Fig. 2.5 A PDF or image file can be loaded
from a cloud storage location like Drop Box, GoogleDrive, or iCloud Drive.
Fig. 2.6 Create directory folders to organize your worksheets.

GTN v4.11
GoWorksheet User Guide 8© 2016 Attainment CompanyTABLE OFCONTENTS
3.1 Object Adjustment ToolsPress and hold a worksheet page object, such as a microphone, to open a radial menu of tools. Drag your finger to one of the available tools, then remove your finger to select that tool and make adjustments to the object. Choices are: Edit (change settings); Resize; Send to Back (display behind other objects); Duplicate (copy); or Remove (delete).
GoWorksheet Editing ToolsSection 3
RemoveDelete an object from the worksheet.
Duplicate Create a new object with the same appearance and settings.
Send to Back Make an object display behind other objects.
Resize Adjust the size of an object.
EditAdjust settings for each object type.
The GoWorksheet Maker app enables you to create worksheets from scratch, or add to and edit activities on existing ones. Tap on the pencil by worksheet’s name to edit.
GoWorksheet Object Editing Tools
To open a worksheet for editing, tap pencil. To fill out a worksheet, tap icon or name.
To test your worksheet, tap Play icon at top left. Icon will toggle to pencil; tap to return to editing.
If it is difficult to bring up the radial menu of
an object or to select a tool, try making the screen bigger by spreading your thumb and finger apart.
Edit worksheet
Fill out worksheet
For teachers and students using the
same iPad, the edit function can be disabled or passcode protected. See page 22.
When editing, adding an activity from the toolbar will put an object, e.g., a microphone or a multiple choice button, on the page. GoWorksheet Maker will prompt you to make editorial decisions for the object when you place it. They are described on pages 9–12.
To check your worksheet, toggle away from the Editor mode by tapping . Tap to return to editing.

GTN v4.11
GoWorksheet User Guide 9© 2016 Attainment Company
Section 3GoWorksheet Editing Tools
3.1.1 Edit Settings
Menus are available to customize each of the GoWorksheet object types. Use the Edit tool from the radial menu to open a pop-up menu with settings options for the selected
worksheet object. Most of the settings are optional, not required.
a. Multiple Choice Options
• Multiple Choice Text: To play the text next to a multiple-choice button aloud as a text-to-speech message, tap the blank and type, or tap the magic wand at top left of keyboard to select a text item.
• Recording: Alternative to text-to-speech. Tap microphone to start/end recording.
• Group: Assign answer to a group to prevent two or more correct answers. If answers are assigned to a group, the first answer will be deselected when a different choice is made. To make a group assignment, tap Group and type a name for the group, or use the generic name. All subsequent new multiple choice buttons will have the same group name, until it is changed.
• Possible Points : Assign points to award for a correct answer. Award points are sent to the results report when the worksheet is turned in.
• Designate as Correct Answer: Turn this setting ON to make that item the correct answer for the group. If points are assigned, they will be awarded.
• Prevent Incorrect Answers: When turned OFF, an incorrect answer choice may be selected. When turned ON, the button will not allow incorrect selection. This setting controls only one multiple choice item, not the entire group.
Fig. 3-1 Tapping the blank will bring up a keyboard to type text-to-speech message. The alternative method is to tap the magic wand, then select text from the items highlighted on the page.
Magic Wand

GTN v4.11
GoWorksheet User Guide 10© 2016 Attainment Company
b. Audio Button Options
• Text to Speak or Recording: Add or edit the message to be played. If text-to-speech, type on keyboard or choose magic wand at top left corner of keyboard. If recording, tap “Clear” to remove existing recording, then tap microphone to start/end recording.
• Possible Points: Choose the number of points to award for tapping the button. Points are sent to the results report.
c. Record Answer Button Options
• Recording Name: Assign a filename to the recorded answer’s audio file. This name will be listed in the worksheet results report. If nothing is entered, a generic name will be assigned.
• Possible Points: Choose the number of points to award if the button is used.
d. Link Button Options
• URL: Add or change the web page. Link is often used for viewing videos, but can take you to any URL, including a GoTalk NOW page or other app.
• Open Directly: When switched on, the link will take you into the associated app: For example, a YouTube URL will open in the Youtube app. If the app is not installed or if option is switched off, the link will open in a web browser.
• Possible Points: Choose the number of points to award if the link is tapped.
e. Short Answer Options
• Field Name : Used to show a hint or prompt in the answer blank. If nothing is entered here, space will remain blank.
• Is Name: Switch ON to use the space for student name. This name will be used to identify the saved worksheet in the results report. “Name” is automatically used as shaded prompt text. To display a different prompt word or phrase type new text into the Field Name setting. To have a blank name line, replace the default “Field Name” text with a word space.
Section 3GoWorksheet Editing Tools
GTN v4.11
GoWorksheet User Guide 11© 2016 Attainment CompanyTABLE OFCONTENTS
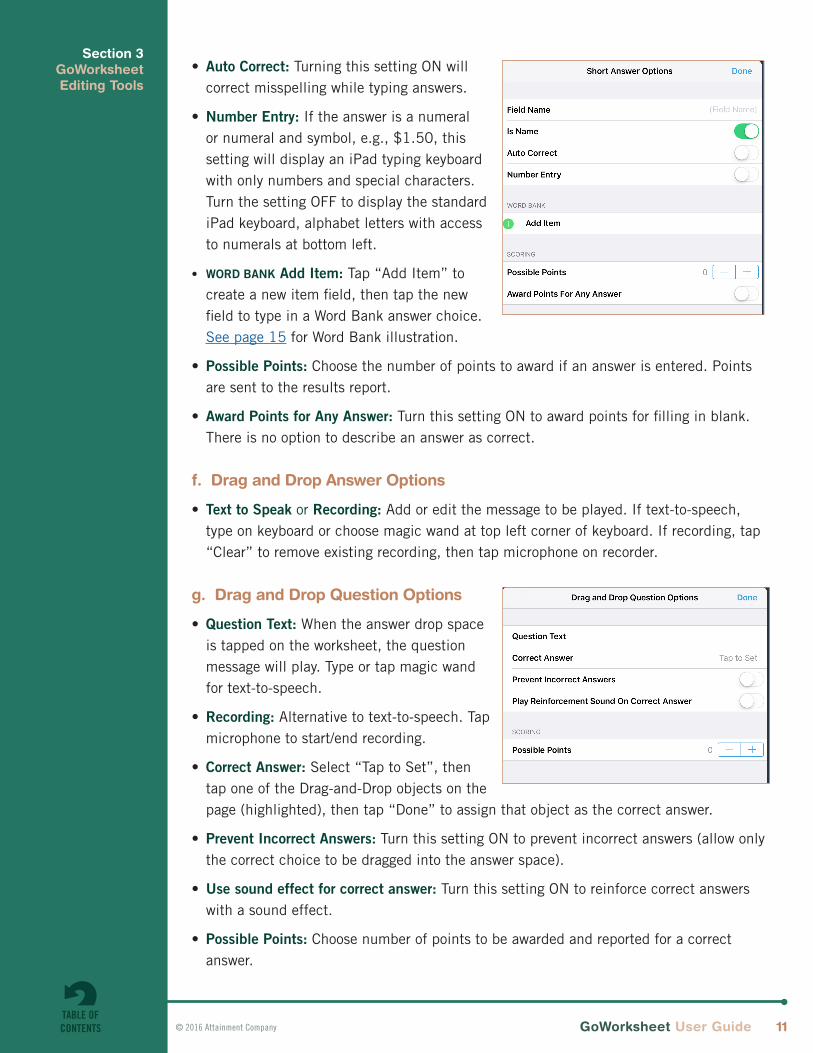
• Auto Correct: Turning this setting ON will correct misspelling while typing answers.
• Number Entry: If the answer is a numeral or numeral and symbol, e.g., $1.50, this setting will display an iPad typing keyboard with only numbers and special characters. Turn the setting OFF to display the standard iPad keyboard, alphabet letters with access to numerals at bottom left.
• WORD BANK Add Item: Tap “Add Item” to create a new item field, then tap the new field to type in a Word Bank answer choice. See page 15 for Word Bank illustration.
• Possible Points: Choose the number of points to award if an answer is entered. Points are sent to the results report.
• Award Points for Any Answer: Turn this setting ON to award points for filling in blank. There is no option to describe an answer as correct.
f. Drag and Drop Answer Options
• Text to Speak or Recording: Add or edit the message to be played. If text-to-speech, type on keyboard or choose magic wand at top left corner of keyboard. If recording, tap “Clear” to remove existing recording, then tap microphone on recorder.
g. Drag and Drop Question Options
• Question Text: When the answer drop space is tapped on the worksheet, the question message will play. Type or tap magic wand for text-to-speech.
• Recording: Alternative to text-to-speech. Tap microphone to start/end recording.
• Correct Answer: Select “Tap to Set”, then tap one of the Drag-and-Drop objects on the page (highlighted), then tap “Done” to assign that object as the correct answer.
• Prevent Incorrect Answers: Turn this setting ON to prevent incorrect answers (allow only the correct choice to be dragged into the answer space).
• Use sound effect for correct answer: Turn this setting ON to reinforce correct answers with a sound effect.
• Possible Points: Choose number of points to be awarded and reported for a correct answer.
Section 3GoWorksheet Editing Tools
GTN v4.11
GoWorksheet User Guide 12© 2016 Attainment Company
Section 3GoWorksheet Editing Tools
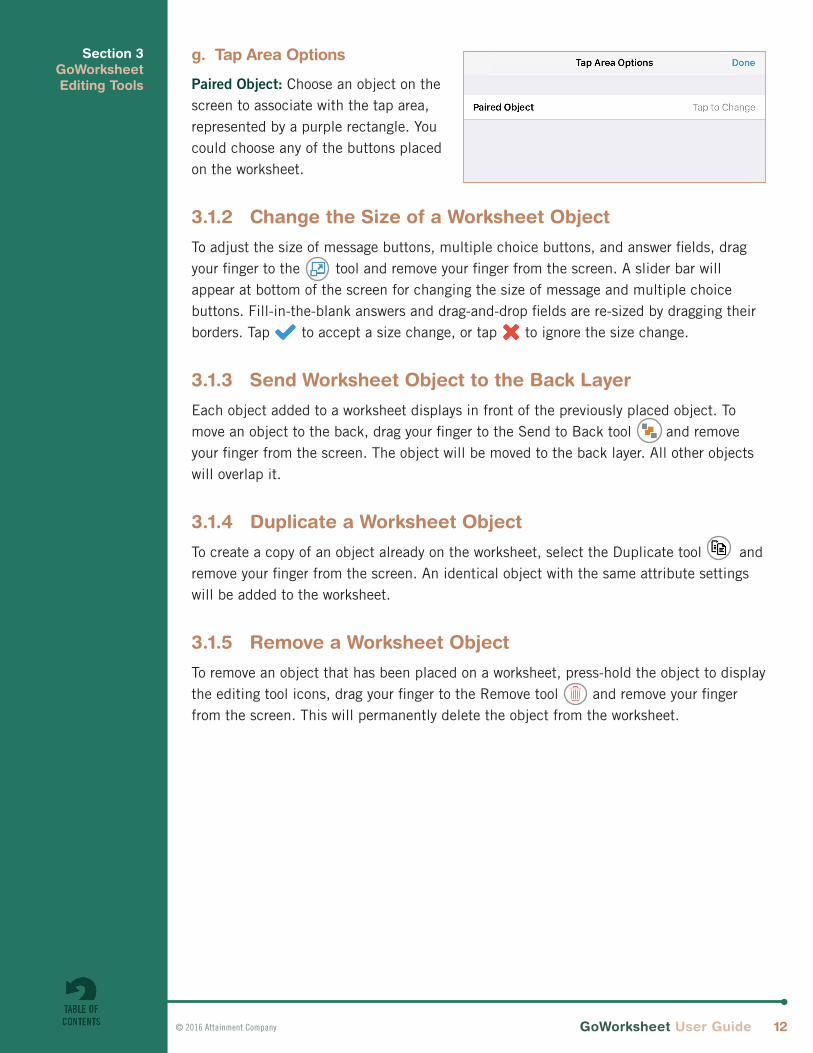
g. Tap Area Options
Paired Object: Choose an object on the screen to associate with the tap area, represented by a purple rectangle. You could choose any of the buttons placed on the worksheet.
3.1.2 Change the Size of a Worksheet Object
To adjust the size of message buttons, multiple choice buttons, and answer fields, drag your finger to the tool and remove your finger from the screen. A slider bar will appear at bottom of the screen for changing the size of message and multiple choice buttons. Fill-in-the-blank answers and drag-and-drop fields are re-sized by dragging their borders. Tap to accept a size change, or tap to ignore the size change.
3.1.3 Send Worksheet Object to the Back Layer
Each object added to a worksheet displays in front of the previously placed object. To move an object to the back, drag your finger to the Send to Back tool and remove your finger from the screen. The object will be moved to the back layer. All other objects will overlap it.
3.1.4 Duplicate a Worksheet Object
To create a copy of an object already on the worksheet, select the Duplicate tool and remove your finger from the screen. An identical object with the same attribute settings will be added to the worksheet.
3.1.5 Remove a Worksheet Object
To remove an object that has been placed on a worksheet, press-hold the object to display the editing tool icons, drag your finger to the Remove tool and remove your finger from the screen. This will permanently delete the object from the worksheet.
GTN v4.11
GoWorksheet User Guide 13© 2016 Attainment Company
Section 3GoWorksheet Editing Tools
Accept Changes
Rotate Worksheet 90º
Undo Change
Change Aspect Ratio
Exit Without Changing
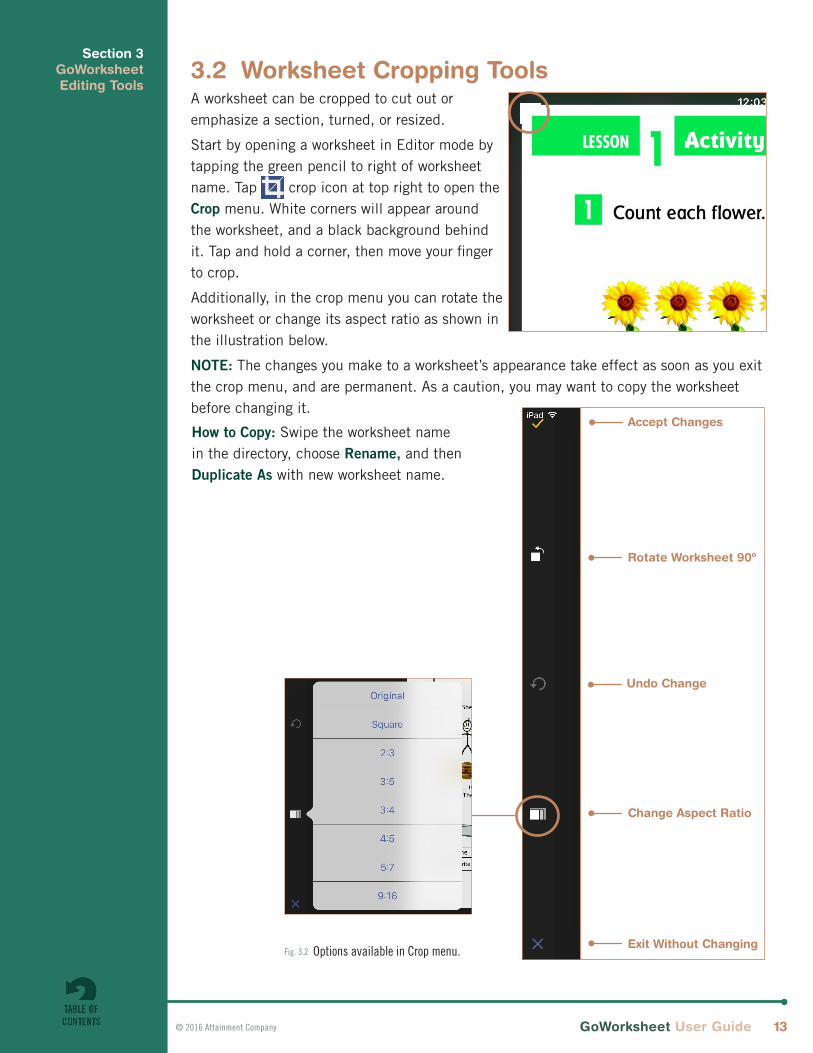
3.2 Worksheet Cropping ToolsA worksheet can be cropped to cut out or emphasize a section, turned, or resized.
Start by opening a worksheet in Editor mode by tapping the green pencil to right of worksheet name. Tap crop icon at top right to open the Crop menu. White corners will appear around the worksheet, and a black background behind it. Tap and hold a corner, then move your finger to crop.
Additionally, in the crop menu you can rotate the worksheet or change its aspect ratio as shown in the illustration below.
NOTE: The changes you make to a worksheet’s appearance take effect as soon as you exit the crop menu, and are permanent. As a caution, you may want to copy the worksheet before changing it.
How to Copy: Swipe the worksheet name in the directory, choose Rename, and then Duplicate As with new worksheet name.
Fig. 3.2 Options available in Crop menu.

GTN v4.11
GoWorksheet User Guide 14© 2016 Attainment CompanyTABLE OFCONTENTS
When using the same iPad to create and fill out worksheets, a passcode can be required to prevent use of the worksheet editing tools. The passcode can also be used to prevent leaving an opened worksheet, deleting a worksheet, or to prevent access to the app settings area (see page 22).
When users have their own iPads, worksheets can be delivered to networked iPads that have the GoWorksheet app installed (see pages 17–18).
4.1 Opening a Worksheet
Worksheets available are listed in a directory on the opening screen. Some worksheets may be organized into folders. Tap on a worksheet’s name to open it.
4.2 Drawing and Writing on a Worksheet
After opening a worksheet, tap the drawing tool to use the drawing tool features. With the drawing tool selected, you can use your finger to draw anywhere on the worksheet page.
Tap the pen picker to adjust line width and color. Tap undo to undo the most recent drawing action.
Drawings and writing added to a worksheet remain on a worksheet when it is emailed or turned in.
4.3 Using the Interactive Worksheet Features
A GoWorksheet page can provide message buttons for listening to Text-to-Speech audio and buttons that let you record your own messages with the iPad microphone.
Question/answer activities on a page include multiple choice selections, fill-in-the-blank answers, and drag-and-drop screen actions.
4.3.1 Multiple Choice Answer Selections
Tap to select a multiple choice answer. If a recorded or Text-to-Speech audio message was assigned to a multiple choice answer, the message will play when the selection is tapped.
Filling Out the WorksheetsSection 4
To hide the selection icon for opening worksheets in edit mode, turn off the Making & Editing Enabled app setting. This puts GoWorksheet Maker into a user-only status.
Fig. 4-1 The home page of GoWorksheet shows the worksheet directory. From here, worksheets can be opened, shared, or deleted.
Fig. 4-2 Drawing tools let you write and draw on a worksheet with your finger.
Multiple choice activities
can be set up to allow only the correct answer, any answer, or multiple answers.

GTN v4.11
GoWorksheet User Guide 15© 2016 Attainment CompanyTABLE OFCONTENTS
Section 4Filling Out the
Worksheets4.3.2 Audio Buttons
Tap to hear an audio message created for the worksheet.
4.3.3 Voice Recorder Buttons
Tap to record a message that will be stored on the page. After recording the message, the microphone icon color changes to green . Recorded messages can be played as long as the worksheet page stays open.
Fig. 4.4 Use the iPad microphone to record an answer and save it on the worksheet.
Fig. 4.5 Use the iPad keyboard (left) to type a Fill-in-the-Blank answer. Tap the blue icon above the keyboard to open the Word Bank (right). The Word Bank provides a list of answer choices for a Fill-in-the-Blank answer.
4.3.4 Links
Tap to see a video, or a page on the Internet. To get back to GoWorksheet, tap message at top left corner of screen (either Done or GoWorksheet).
4.3.5 Short Answer Fill-in-the-Blank Spaces / Word Bank
Tap on a Fill-in-the-Blank answer line to enter an answer. Use the iPad keyboard to type or dictate an answer. If a Word Bank was created for the worksheet (see word bank–Add Item, page 11), tap the blue icon on the keyboard. Tap one of the Word Bank selections to insert it into the Fill-in-the-Blank answer space.

GTN v4.11
GoWorksheet User Guide 16© 2016 Attainment CompanyTABLE OFCONTENTS
Section 4Filling Out the
Worksheets
Fig. 4-7 Pictures and words on a worksheet page can be used for Drag-and-Drop answers.
4.3.6 Drag & Drop Questions/Answers
Orange spaces marked with a are question drop spaces. Drag-and-Drop answers are pictures and/or words on the worksheet that can be dragged into the drop spaces. Rules for requiring correct answers or preventing incorrect answers can be adjusted with the Object Editor settings.
4.3.7 Additional Tap Areas
Adding tap areas to a worksheet allows a button to be paired with another, or bigger, area. For example, the text in a multiple choice could become a tap area, paired with the dot next to it. Tapping the text would select the choice.

GTN v4.11
GoWorksheet User Guide 17© 2016 Attainment Company
5.1 Closing a WorksheetTap the go-back arrow at top left of the screen to return to the worksheet folders. When you do, you will be provided with four choices.
1. Leave. The worksheet will close, but none of the work already done will be retained.
2. Save to Finish Later. The worksheet will close and the work will be retained in the saved worksheet.
3. Send. Hand in the worksheet. This is equivalent to tapping the Share tool at top right. See 5.4 below for methods.
4. Stay. To change your mind and continue working on the worksheet.
5.2 Saving a WorksheetYou may tap the Save tool on top right of screen at any time while the worksheet is open, or select “Save to Finish Later” when closing it. Type a name for the worksheet in “Autosave” blank, then tap “Save for Later.” If you don’t provide a name, the worksheet will be automatically named with the date and time.
5.3 Resuming a WorksheetOpen a worksheet from the directory, then tap the tool. If you have previously saved the worksheet, you may tap on its name to open it.
NOTE: GoWorksheet only saves the most recent version of the worksheet. Once you re-open a worksheet, it is considered new and must be re-saved if you want to close and keep the work.
5.4 Sending a Worksheet
You may tap the tool on top right of screen at any time while the worksheet is open, or select “Send” when closing it.
A worksheet can be sent in four ways. They are detailed below.
Returning and Saving Completed Worksheets
Section 5
Sending or saving a worksheet
does not close it, but does enable it to be closed.
Fig. 5.1 Save a worksheet while it is open by tapping the Save tool at top right. Type a name or autosave.

GTN v4.11
GoWorksheet User Guide 18© 2016 Attainment Company
Section 5Returning and
Saving Completed Worksheets
5.4.1 Email a Completed Worksheet
If your iPad is connected to the internet, a worksheet can be sent as an image attachment to an email message. The image shows the worksheet activities as they appeared when completed. Also included with the email is a text file with results information. Audio messages recorded with the Record Message worksheet tool will be included as audio file attachments to the email.
5.4.2 Hand-In a Completed Worksheet
When using the full-featured GoWorksheet Maker app, turning on the Allow Hand-In app setting adds the Hand-In folder to the directory of worksheets. When that setting is turned on, Hand-In becomes available as a new Send option. Nearby iPads with Bluetooth turned on will also recognize the networked sharing feature and allow a worksheet to be delivered. Once in the Hand-In folder, the completed worksheet can be reviewed, shared, or deleted.
5.4.3 Save a Completed Worksheet as a PDF Page
Choose Save PDF to iBooks to save the worksheet as a PDF file. The file will appear in the directory of that iPad’s iBooks app. Worksheets saved in PDF form do not include recorded audio files.
5.4.4 Save a Completed Worksheet as an Image
Choose Save Image to save a worksheet as an image file. The file can then be found in that iPad’s Photos directory. Worksheets saved as an image do not include recorded audio files.
Fig. 5.4 The Hand-In tool for turning in completed worksheets sends a worksheet to the Hand-In folder on the same iPad or a different iPad connected by WiFi.
NOTE: The Hand-In icon will appear
at the end of the Share menu; scroll to the right in order to see it.

GTN v4.11
GoWorksheet User Guide 19© 2016 Attainment Company
Once you have created a worksheet with GoWorksheet Maker, you can share it with other teachers, special education professionals, or parents.
6.1 Share a Worksheet to Other iPads
From the directory, swipe left on a worksheet and tap Share to select one of the three iPad-to-iPad sharing methods: AirDrop; Broadcast; or Email.
NOTE: This Share method is for sharing blank worksheets with educators or parents, not for turning in completed worksheets.
6.1.1 Sharing a Worksheet with AirDrop
Other iPads within about 30 feet from each other can use AirDrop for sharing. The AirDrop feature must be turned on for both the sending and receiving iPads, and a WiFi connection must be available. A worksheet sent by AirDrop will automatically appear in the receiving iPad’s GoWorksheet directory.
Sharing and Backing Up WorksheetsSection 6
Fig. 6.1 Swipe left on a worksheet in the directory to rename, move, share, or delete it.
To copy a worksheet, select
Rename, type a new name in the blank and select Duplicate As.
Fig. 6.2 Find the recipient’s iPad to share with AirDrop. AirDrop is turned on by swiping up from the bottom of the iPad.
AirDrop is a good option for sharing
a worksheet you’ve made, but will only work with filled-out worksheets if they contain no scored points, drawing or recorded answers.
GTN v4.11
GoWorksheet User Guide 20© 2016 Attainment Company
Section 6Sharing and Backing Up Worksheets
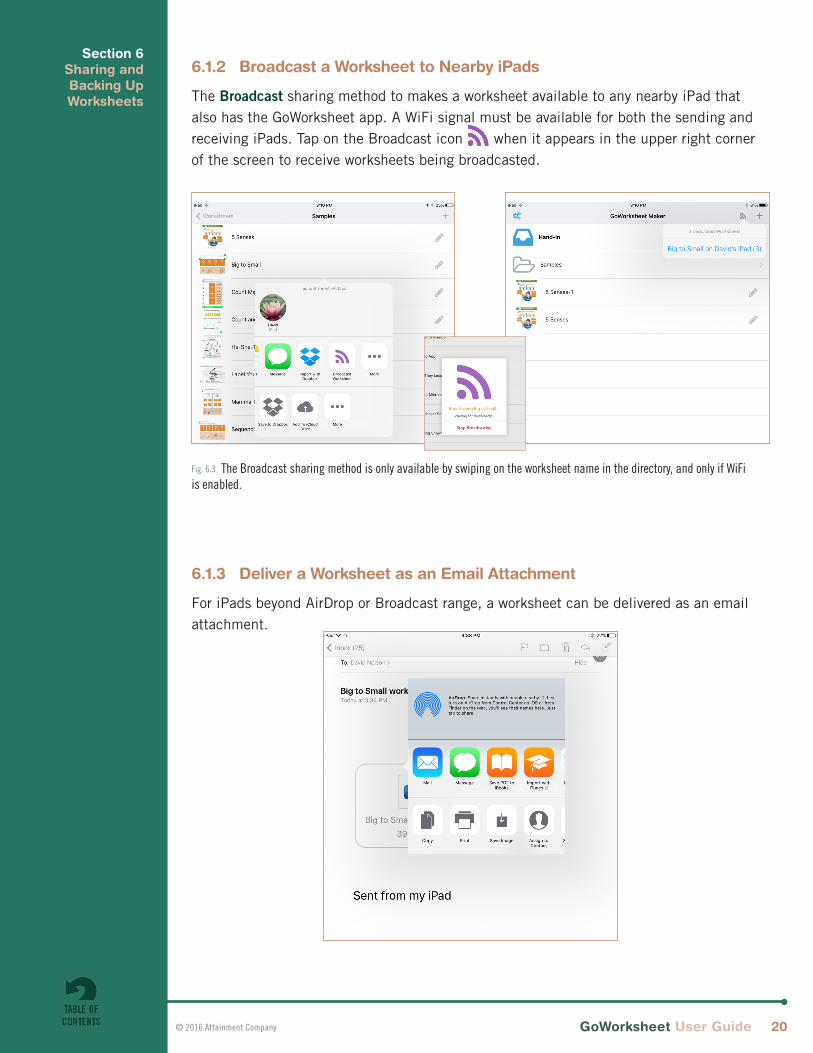
6.1.2 Broadcast a Worksheet to Nearby iPads
The Broadcast sharing method to makes a worksheet available to any nearby iPad that also has the GoWorksheet app. A WiFi signal must be available for both the sending and receiving iPads. Tap on the Broadcast icon when it appears in the upper right corner of the screen to receive worksheets being broadcasted.
6.1.3 Deliver a Worksheet as an Email Attachment
For iPads beyond AirDrop or Broadcast range, a worksheet can be delivered as an email attachment.
Fig. 6.3 The Broadcast sharing method is only available by swiping on the worksheet name in the directory, and only if WiFi is enabled.
GTN v4.11
GoWorksheet User Guide 21© 2016 Attainment Company
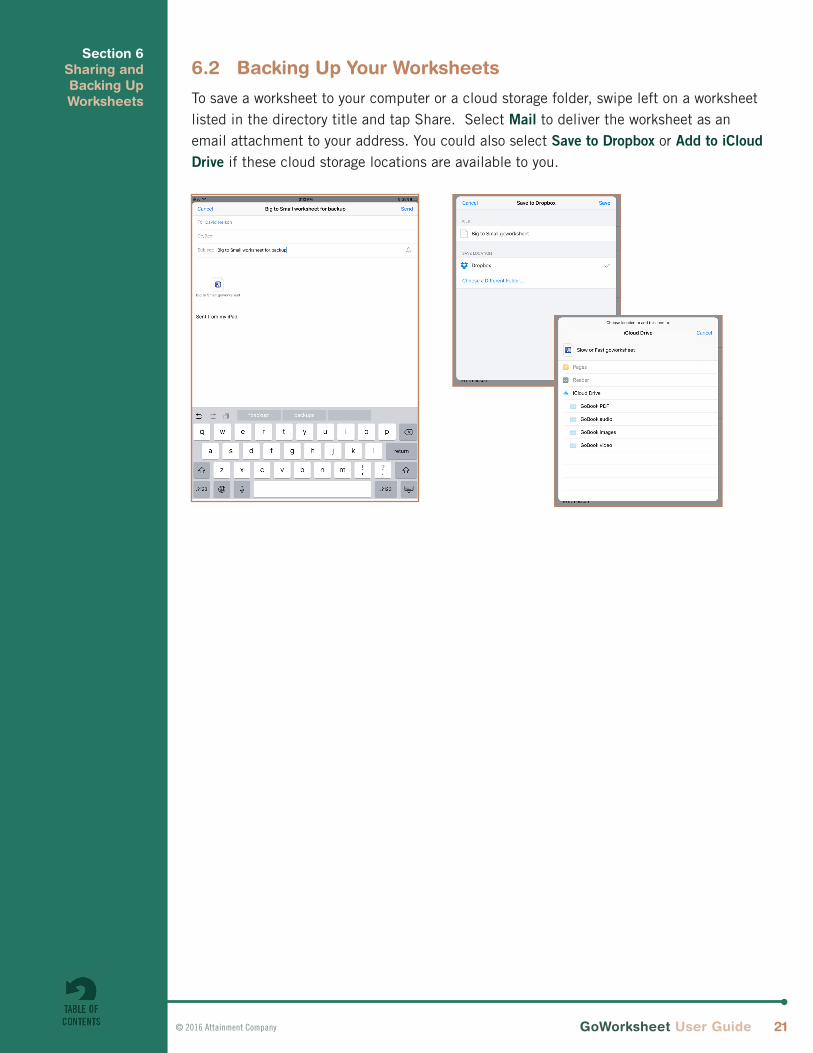
6.2 Backing Up Your Worksheets
To save a worksheet to your computer or a cloud storage folder, swipe left on a worksheet listed in the directory title and tap Share. Select Mail to deliver the worksheet as an email attachment to your address. You could also select Save to Dropbox or Add to iCloud Drive if these cloud storage locations are available to you.
Section 6Sharing and Backing Up Worksheets

GTN v4.11
GoWorksheet User Guide 22© 2016 Attainment Company
Section 7 Settings
Tap from the directory screen to reach the app settings.
MAKING & EDITING
Making & Editing Enabled: On / Off
When turned OFF, worksheets can only be viewed and filled out, not edited.
Default to Edit Mode: On / Off
When turned ON, tapping the worksheet name will open it in Editor mode, unless the “Play” icon is tapped.
Allow Hand In: On / Off
When turned ON, the Hand-In folder appears in the worksheet directory.
Hide Help Menu: On / Off
When turned ON, the “Help” icon will not be available while editing worksheets.
Show Tutorial: On / Off
When turned ON, screen pop-ups will appear to explain editing tool features.
SHARING OPTIONS
Ask To Send When Leaving Player: On / Off
When turned ON, a warning is issued that worksheet will not be saved if not shared.
Always Send as Zip: On / Off
When turned ON, completed and delivered worksheets will be attached as a zip folder archived. When turned OFF, files will be attached as separate image and text files.
Student Names
Create a list of student names. These become a Word Bank list for the “name” fill-in the-blank line.
OPTIONS
Text-to-Speech Speed: Slowest / Slower / Normal / Faster / Fastest
All worksheets will speak in the selected speed until the setting is changed.
Keep Device Awake: On / Off
When turned ON and the GoWorksheet app is active, the iPad will not be allowed to enter sleep mode.
Highlight Drag & Drop Answers: On / Off

GTN v4.11
GoWorksheet User Guide 23© 2016 Attainment Company
Section 7Settings When turned ON, any answer objects on the page will be identified with a border highlight
color.
AUTHENTICATION
Passcode: 4-digit code
A single passcode is used for all of the passcode options below. Touch ID is only available on iPad Air2 and later.
Allow TouchID to Authenticate: On / Off.
Require Passcode To Enter ‘Settings and Support’: On / Off
Require Passcode to Exit Player: On / Off
Require Passcode to Edit Worksheets: On / Off
Require Passcode to Delete Worksheets: On / Off
ADVANCED
Advanced settings are for use during technical support assistance.
Leave these settings turned OFF unless instructed by Attainment Support.
Show Debug Options: On / Off
Disable Sharing And Replace With Text Preview: On / Off
Disable Forced In Progress Actions: On / Off
Additional Logging: On / Off

GTN v4.11
GoWorksheet User Guide 24© 2016 Attainment CompanyTABLE OFCONTENTS
Support and Contact InfoSection 8
IN-APP HELP
1. The Quick Start worksheet in the sample worksheets folder includes step-by-step directions on basic worksheet editing. See page 1 for instructions on downloading the folder.
Tap at top left of screen to give you access to: • This user guide as a searchable PDF file • Quick Start Videos for overview and specific topics • Tutorial which steps through all the icons on the screen with explanations.
TECHNICAL SUPPORT
If you have a problem running the GoWorksheet Maker app, please call or email Attainment Technical Support. If possible, have your iPad nearby while we discuss solutions.
You can speed the process if you collect some basic information ahead of time:• What model of iPad do you have, and what version of GoWorksheet Maker?• What was the error and type of error message, if any?• What triggered the problem?• Can you duplicate the problem?
Tech Support is available weekdays from 9 am - 5 pm (CST)
Phone: 1-800-327-4269 or 1-608-845-7880
Email: [email protected]
Website: www.AttainmentCompany.com
COMMENTS OR QUESTIONS
For comments and questions about GoWorksheet Maker, or for information about other educational materials produced by Attainment Company:
Email: [email protected]
Mailing Address: P.O. Box 930160 504 Commerce Parkway Verona, WI 53593-0160

GTN v4.11
GoWorksheet User Guide 25© 2016 Attainment CompanyTABLE OFCONTENTS
Open practice worksheet to edit1. Launch the GoWorksheet app
2. Tap the Samples folder. (To download, see p. 1.)
3. Tap green pencil next to worksheet titled
GoWorksheet Practice. Toolbar is at bottom of the screen.Add audio button with text-
Practice Worksheet InstructionsAppendix
to-speech1. Tap audio button in toolbar
2. Tap blank under “Text To Speak.” The iPad keyboard will display.
3. Type the words: “My brother and I love”.
4. Tap “Done” at top right of Audio Button Options menu. NOTE: The audio button will appear in the center of the worksheet.
5. Touch and drag the audio button to box next to the words. NOTE: When moving or resizing objects, enlarging the screen can make it easier.
The Samples folder also contains a
completed worksheet for your reference.

GTN v4.11
GoWorksheet User Guide 26© 2016 Attainment CompanyTABLE OFCONTENTS
AppendixPractice Worksheet
Instructions
Add audio button with magic wand(Result is the same.)
1. Tap audio button in toolbar
2. Tap blank under “Text To Speak” to bring up Audio Button Options menu
3. Tap the magic wand at top left of the iPad
keyboard to highlight the text phrases.4. Tap the highlighted phrase “My brother and
I love” 5. Tap green check mark at bottom of menu. You
will return to Audio Button Options menu with
the highlighted phrase entered as text. 6. If okay, tap “Done” at top right of Audio Button
Options screen.
7. Touch and drag the audio button to box next to the words.

GTN v4.11
GoWorksheet User Guide 27© 2016 Attainment CompanyTABLE OFCONTENTS
AppendixPractice Worksheet
Instructions
Add multiple choice buttons1. Tap multiple choice button in toolbar.
2. Tap “Recording.” 3. Tap microphone to start recording. Say “deer.”
Tap microphone to stop recording.
4. Tap Play icon to listen; re-record if necessary.
5. Tap “Done” at top right of recording menu.
6. Tap “Group”. Type “G1” as name, or accept generic name.
7. Tap “Done” at top right of Multiple Choice
Options menu. 8. Touch and drag the multiple choice dot from
center of worksheet to dot under “deer.”
9. Repeat steps 1 through 8 for dot under “fish” and dot under “treasure.” NOTE: Group name will be automatic.
BEYOND THE BASICS – EDIT
10. Touch and hold dot under “treasure.” Keeping
finger on screen, move to edit (green pencil). 11. Move slider on “Designate as Correct Answer”
to the right. If student selects “treasure” it will be recorded as a correct answer in results.
Add record-your-answer button1. Tap record-your-answer button in toolbar 2. Move the button to blank after “Do you like dogs or cats?”
Add link button1. Tap link button in toolbar. 2. Type in URL name: https://www.attainmentcompany.com (or any URL you want)
3. Tap “Done” at top right of Link Button Options menu
4. Touch and drag the link button into box.
BEYOND THE BASICS – RESIZE
5. Touch and hold link button and move finger to “resize” (second from left)
6. Move slider at bottom to make link icon bigger, then tap green check mark next to slider.

GTN v4.11
GoWorksheet User Guide 28© 2016 Attainment CompanyTABLE OFCONTENTS
AppendixPractice Worksheet
Instructions
Add fill-in-the-blank button1. Tap fill-in-the-blank button on toolbar
2. Drag button to blank between “we found”
and “treasure chest.” Resize using dots.
3. Tap green check mark to finish placing.
BEYOND THE BASICS - FIELD NAME
4. Touch and hold dot and move finger to edit, to open Short Answer Options menu.
5. Tap blank by “Field Name” and type
“(word bank).”
6. Tap “Done” at top right corner.
BEYOND THE BASICS - WORD BANK
7. Under WORD BANK, tap “Add Item.” 8. Type in line above “Add Item”, in space
with red circle: “an empty” 9. Repeat steps 7 and 8 for “a full” and “a
broken,” then tap “Done.”
Add drag-and-drop answer objectsAdd answers before adding question drop space, even though the drop space blank is higher on the worksheet.
1. Tap answer object button in toolbar.
2. Drag light orange rectangle to space with puppy. 3. Resize by touching and dragging the dots. (This can be
easier if you enlarge the screen.) Cover both word and
picture. Then tap green check mark. Green check must be tapped both for placing and for resizing, but you can do both in one step.
4. Repeat steps 1 through 3 for “garage” and “treehouse” spaces.

GTN v4.11
GoWorksheet User Guide 29© 2016 Attainment CompanyTABLE OFCONTENTS
AppendixPractice Worksheet
Instructions
Add a question drop space1. Tap question drop space button in toolbar. 2. Move orange rectangle to space after “gold by the.” 3. Resize by touching and dragging the handles.
Then tap green check mark at bottom. 4. Touch and hold on drop space to bring up radial menu.
Move finger to “edit.”
5. Tap “Correct Answer.” 6. Tap one of the highlighted answers to designate it as
the correct answer. 7. Tap “Done” at top right of Drag and Drop Question
Options menu
Add tap areas1. Tap the tap area button in toolbar.
2. All the objects will be highlighted on the screen. Choose the multiple choice button below “deer.”
3. A lavender rectangle will appear in the center of the
screen. Move it to cover the picture of the deer.
4. Tap green check to finish placing the lavender box.
5. Repeat steps 1 through 4 for “fish” and “treasure.”
Now tap the Play button and test everything out.