Embed Size (px)
Citation preview

.
User Guide
19. January 2020
1 / 103
Table of ContentsIntroduction..........................................................................................................................................3Requirements and Terms of Use...........................................................................................................3How to Access UCPH ERDA...............................................................................................................3
Sign-up.............................................................................................................................................3Login................................................................................................................................................7Overview..........................................................................................................................................7Home................................................................................................................................................8Files..................................................................................................................................................9File Sharing and Data Exchange....................................................................................................15
Share Links...............................................................................................................................15Workgroup Shared Folders.......................................................................................................19
Workgroups (VGrids)....................................................................................................................20Archives.........................................................................................................................................21Jupyter............................................................................................................................................27Settings + Setup.............................................................................................................................39
Advanced Data Access.......................................................................................................................41WebDAVS......................................................................................................................................41
Windows File Manager.............................................................................................................42Adjust Windows WebDAVS Transfer Limit.............................................................................47Mac OSX File Manager............................................................................................................51Linux File Manager...................................................................................................................53
SFTP..............................................................................................................................................55FileZilla.....................................................................................................................................56WinSCP.....................................................................................................................................59PuTTY SFTP.............................................................................................................................59Linux File Manager...................................................................................................................60SSHFS.......................................................................................................................................60
FTPS..............................................................................................................................................60FileZilla.....................................................................................................................................61WinSCP.....................................................................................................................................63
Seafile............................................................................................................................................63Automatic Backup to ERDA.........................................................................................................69Scripted Server Backup to ERDA.................................................................................................89Schedule Tasks...............................................................................................................................91WebDAVS/SFTP/FTPS Access to Share Links.............................................................................94Data Import/Export........................................................................................................................95
Advanced Jupyter.............................................................................................................................102JupyterHub Navigation Menu......................................................................................................102
Support, Questions and Comments..................................................................................................103
2 / 103
IntroductionUniversity of Copenhagen – Electronic Research Data Archive (UCPH ERDA or just ERDA) is the storage and archiving facility provided by University of Copenhagen to employees and students. It delivers centralized storage space for personal and shared files in addition to archiving of e.g. PhD theses and research data for publishing.
The latest version of this guide is always available from http://www.erda.dk/ in different languages.
Requirements and Terms of UseYou only need a web browser to use the fundamental features of the ERDA system. In case you want to use the advanced features, you may have to install additional client software.
ERDA comes with few restrictions and rules, and you can always find them on
http://www.erda.dk/terms.html
In short the terms should follow common sense, e.g. it is your responsibility to only store data that you actually have the right to store, and to keep your login safe and secret to prevent others from access to your account.
IMPORTANT: Please note that transfer and storage of so-called personal data typically are under strict regulation set out in The Act on Processing of Personal Data as described on Personal data in research projects on KUnet and the information from the Danish Data Protection Agency. Thus you are not generally permitted to just store them on your PC or on remote storage solutions like ERDA. Please contact us about rules and requirements prior to storing any such data on ERDA.
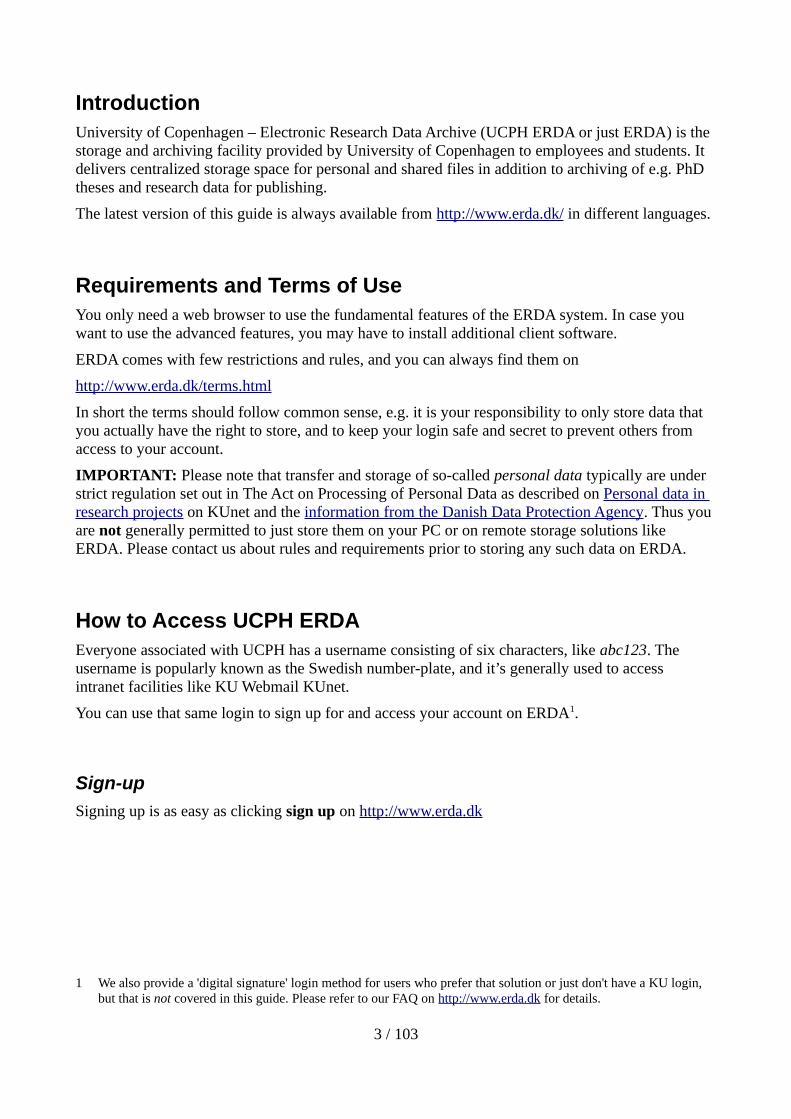
How to Access UCPH ERDAEveryone associated with UCPH has a username consisting of six characters, like abc123. The username is popularly known as the Swedish number-plate, and it’s generally used to access intranet facilities like KU Webmail KUnet.
You can use that same login to sign up for and access your account on ERDA1.
Sign-up
Signing up is as easy as clicking sign up on http://www.erda.dk
1 We also provide a 'digital signature' login method for users who prefer that solution or just don't have a KU login, but that is not covered in this guide. Please refer to our FAQ on http://www.erda.dk for details.
3 / 103

and entering your KU login when prompted.
As an example we show it for the user with KU username brs278 below, but please use your own KU login.
4 / 103
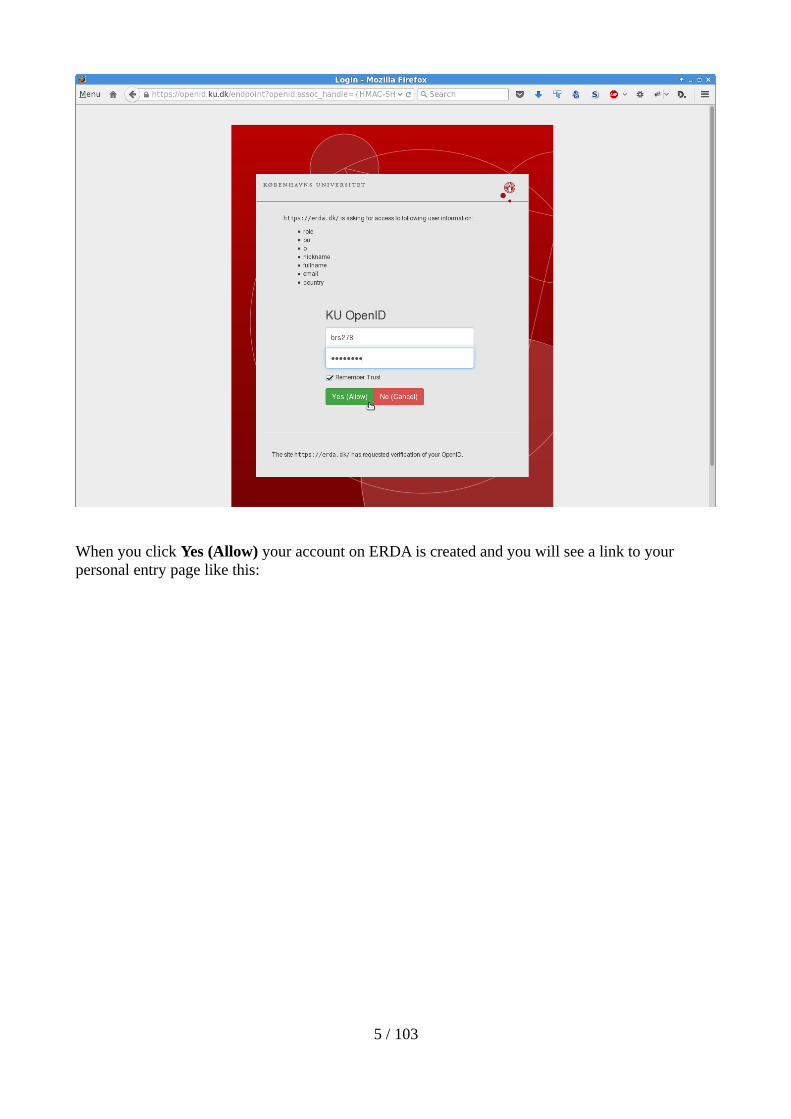
When you click Yes (Allow) your account on ERDA is created and you will see a link to your personal entry page like this:
5 / 103
Just click the your personal page link to go start using your account.
6 / 103
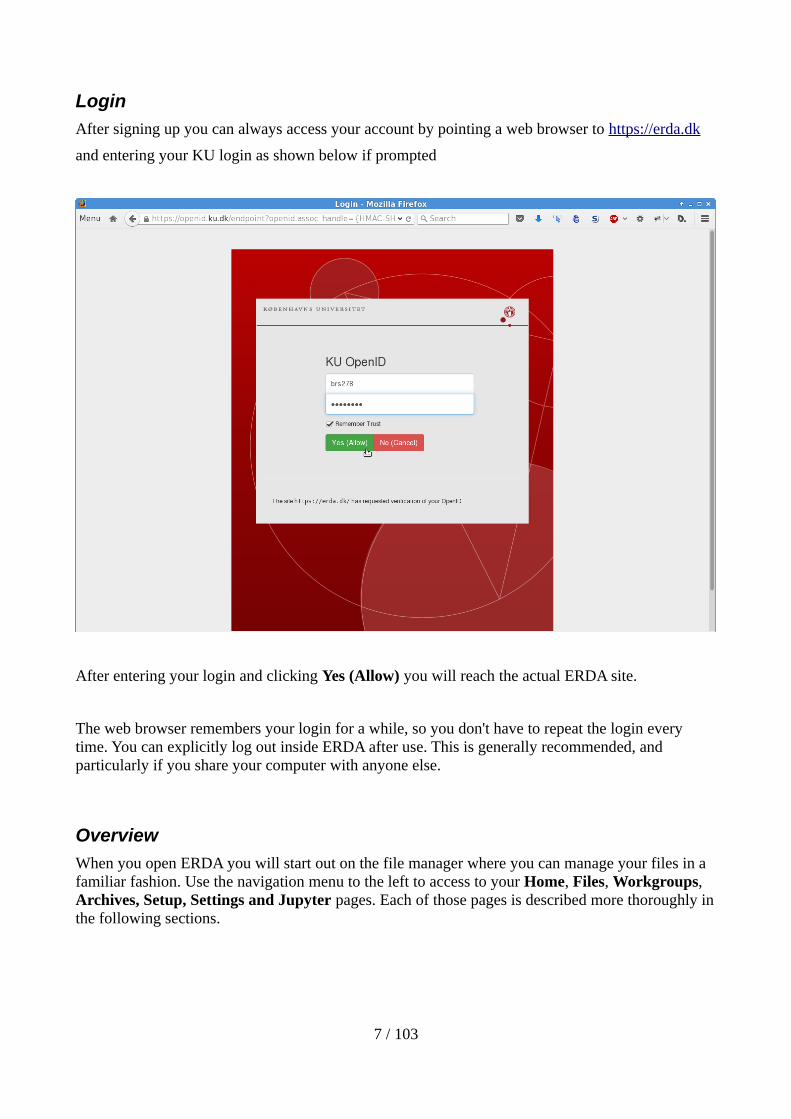
Login
After signing up you can always access your account by pointing a web browser to https://erda.dk
and entering your KU login as shown below if prompted
After entering your login and clicking Yes (Allow) you will reach the actual ERDA site.
The web browser remembers your login for a while, so you don't have to repeat the login every time. You can explicitly log out inside ERDA after use. This is generally recommended, and particularly if you share your computer with anyone else.
Overview
When you open ERDA you will start out on the file manager where you can manage your files in a familiar fashion. Use the navigation menu to the left to access to your Home, Files, Workgroups, Archives, Setup, Settings and Jupyter pages. Each of those pages is described more thoroughly inthe following sections.
7 / 103
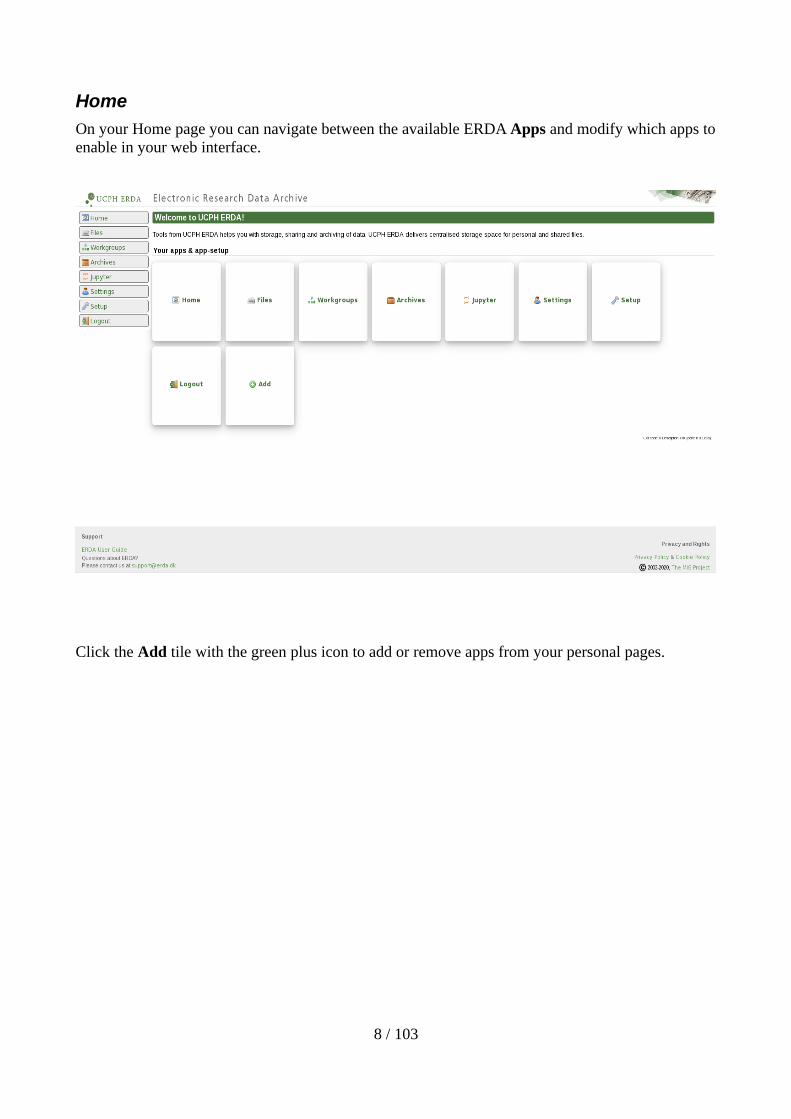
Home
On your Home page you can navigate between the available ERDA Apps and modify which apps toenable in your web interface.
Click the Add tile with the green plus icon to add or remove apps from your personal pages.
8 / 103
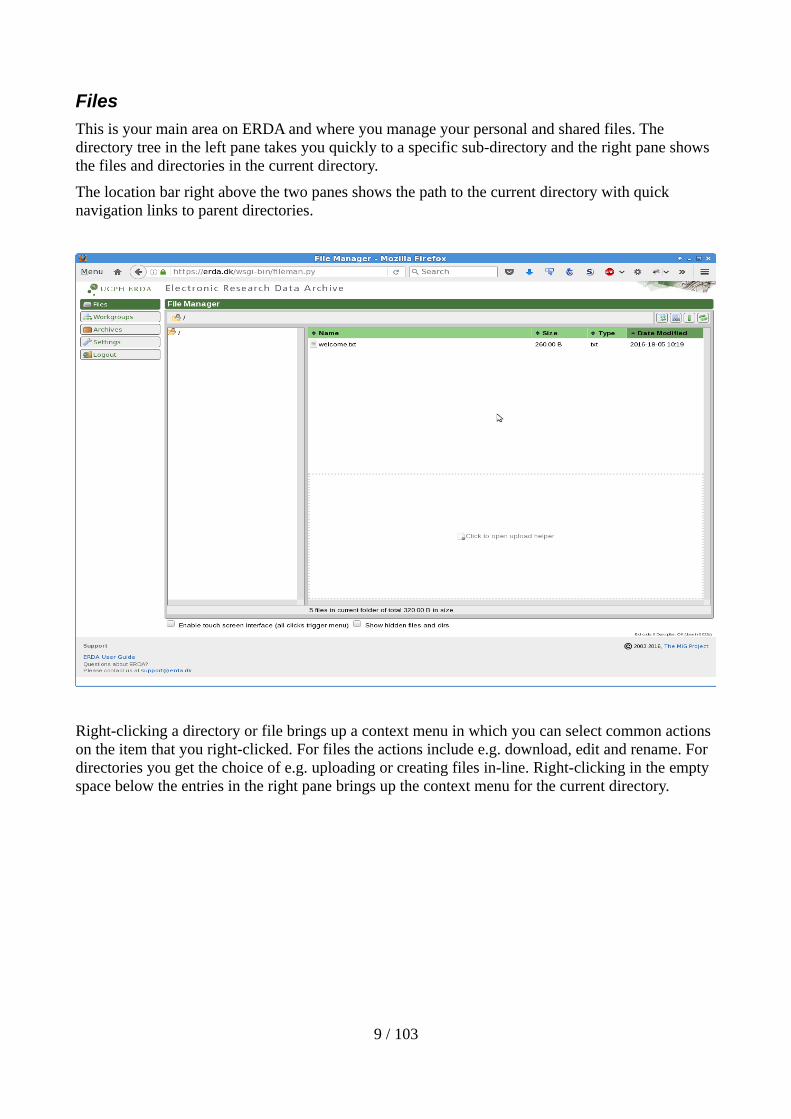
Files
This is your main area on ERDA and where you manage your personal and shared files. The directory tree in the left pane takes you quickly to a specific sub-directory and the right pane shows the files and directories in the current directory.
The location bar right above the two panes shows the path to the current directory with quick navigation links to parent directories.
Right-clicking a directory or file brings up a context menu in which you can select common actions on the item that you right-clicked. For files the actions include e.g. download, edit and rename. For directories you get the choice of e.g. uploading or creating files in-line. Right-clicking in the empty space below the entries in the right pane brings up the context menu for the current directory.
9 / 103
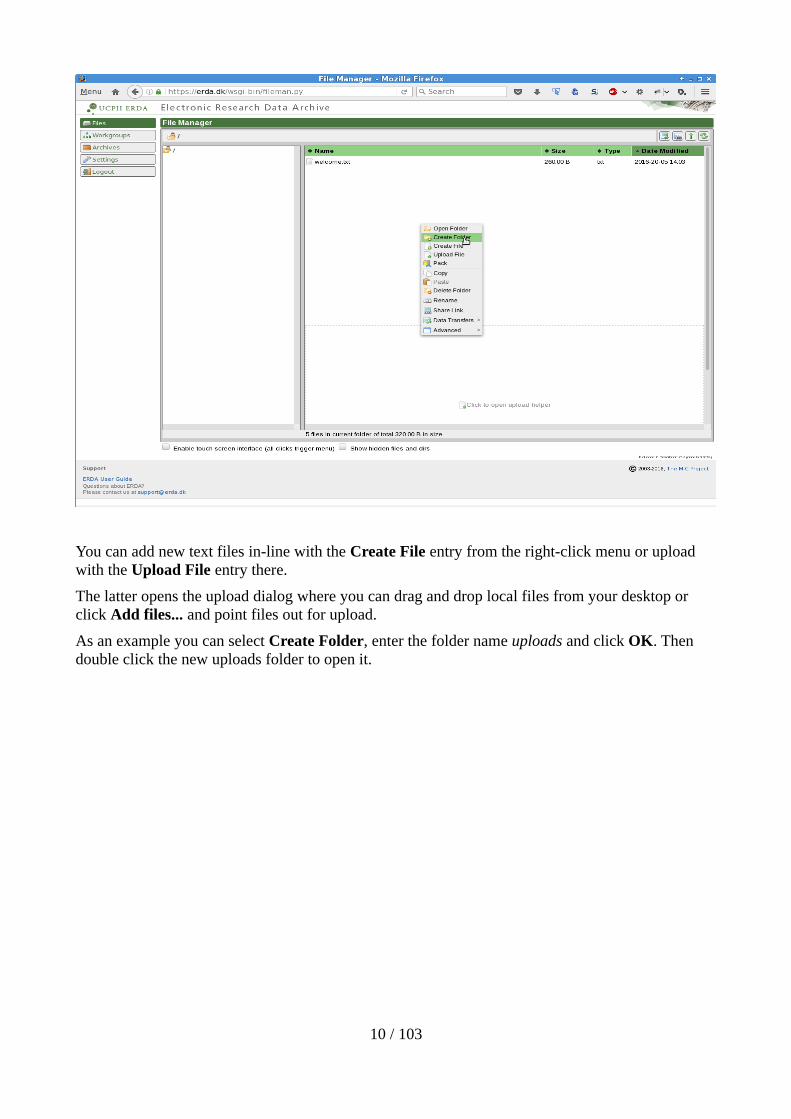
You can add new text files in-line with the Create File entry from the right-click menu or upload with the Upload File entry there.
The latter opens the upload dialog where you can drag and drop local files from your desktop or click Add files... and point files out for upload.
As an example you can select Create Folder, enter the folder name uploads and click OK. Then double click the new uploads folder to open it.
10 / 103
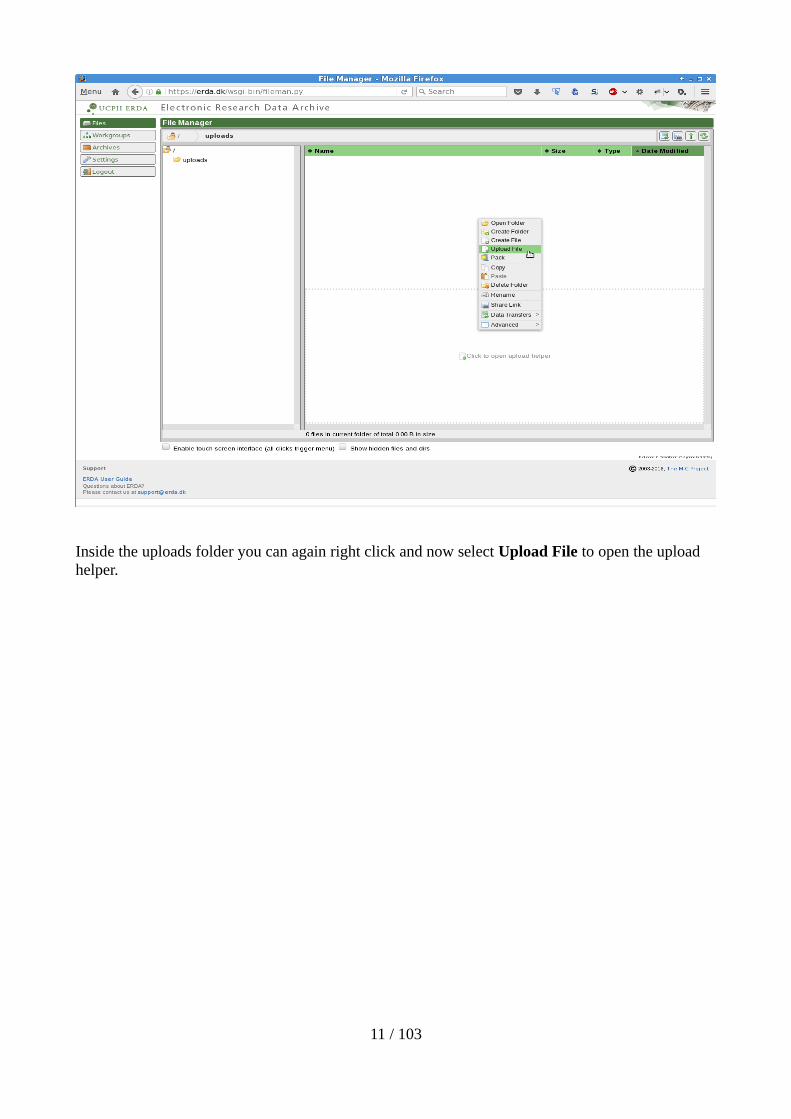
Inside the uploads folder you can again right click and now select Upload File to open the upload helper.
11 / 103
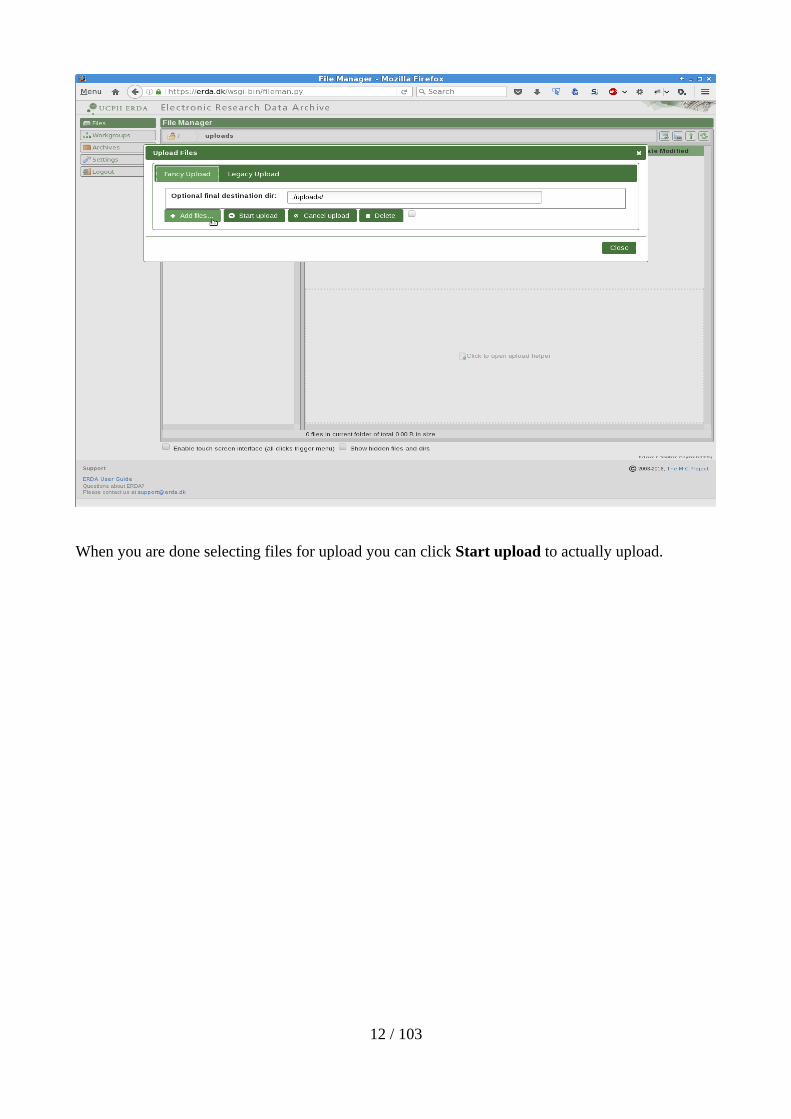
When you are done selecting files for upload you can click Start upload to actually upload.
12 / 103

wait for them to complete or click Cancel if you change your mind.
13 / 103
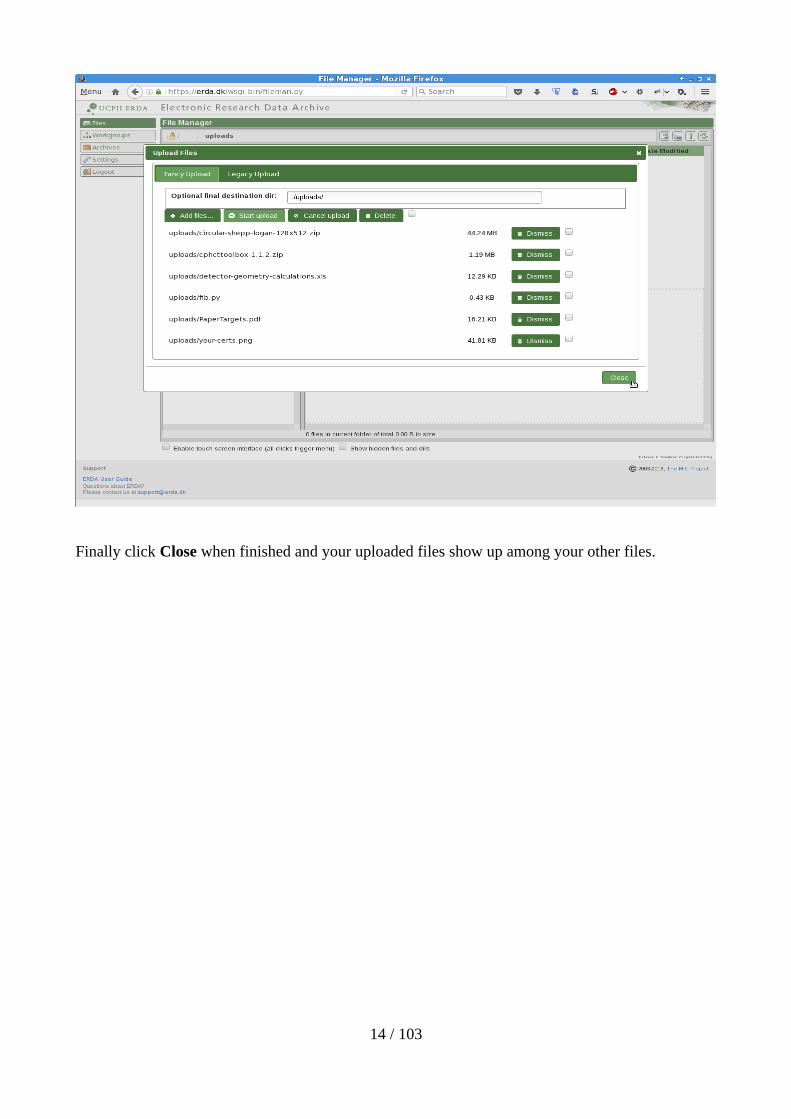
Finally click Close when finished and your uploaded files show up among your other files.
14 / 103
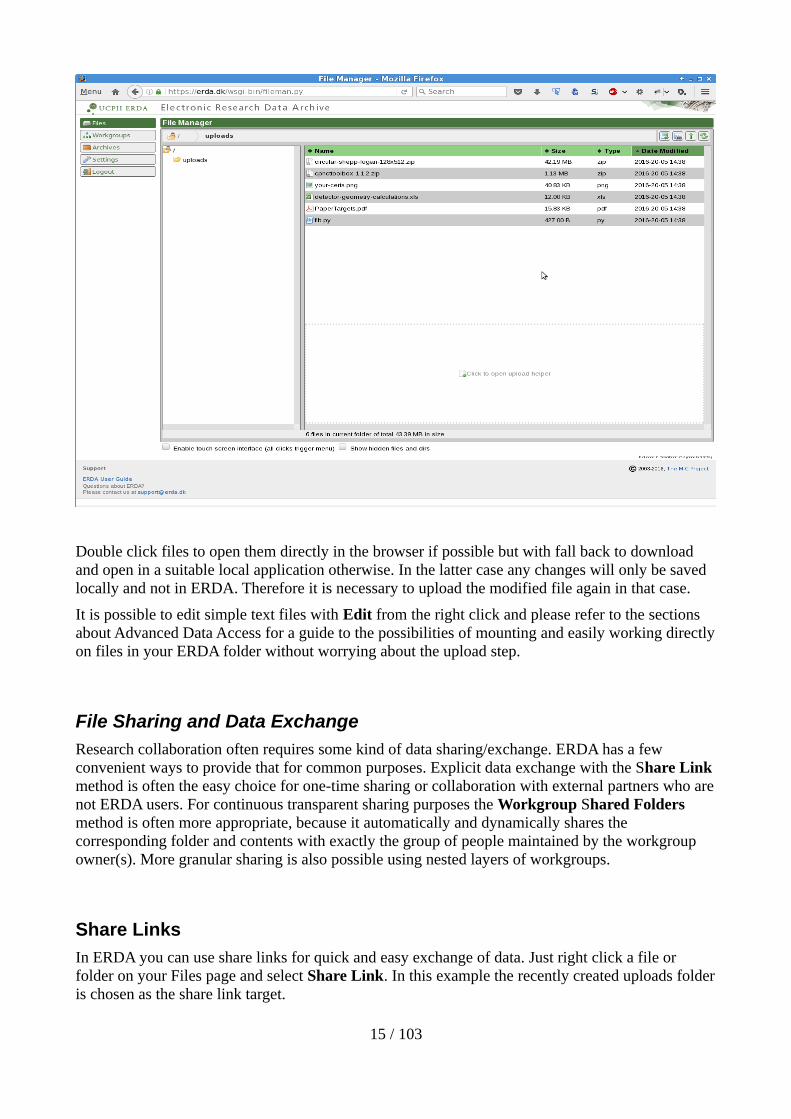
Double click files to open them directly in the browser if possible but with fall back to download and open in a suitable local application otherwise. In the latter case any changes will only be saved locally and not in ERDA. Therefore it is necessary to upload the modified file again in that case.
It is possible to edit simple text files with Edit from the right click and please refer to the sections about Advanced Data Access for a guide to the possibilities of mounting and easily working directlyon files in your ERDA folder without worrying about the upload step.
File Sharing and Data Exchange
Research collaboration often requires some kind of data sharing/exchange. ERDA has a few convenient ways to provide that for common purposes. Explicit data exchange with the Share Link method is often the easy choice for one-time sharing or collaboration with external partners who arenot ERDA users. For continuous transparent sharing purposes the Workgroup Shared Folders method is often more appropriate, because it automatically and dynamically shares the corresponding folder and contents with exactly the group of people maintained by the workgroup owner(s). More granular sharing is also possible using nested layers of workgroups.
Share Links
In ERDA you can use share links for quick and easy exchange of data. Just right click a file or folder on your Files page and select Share Link. In this example the recently created uploads folderis chosen as the share link target.
15 / 103
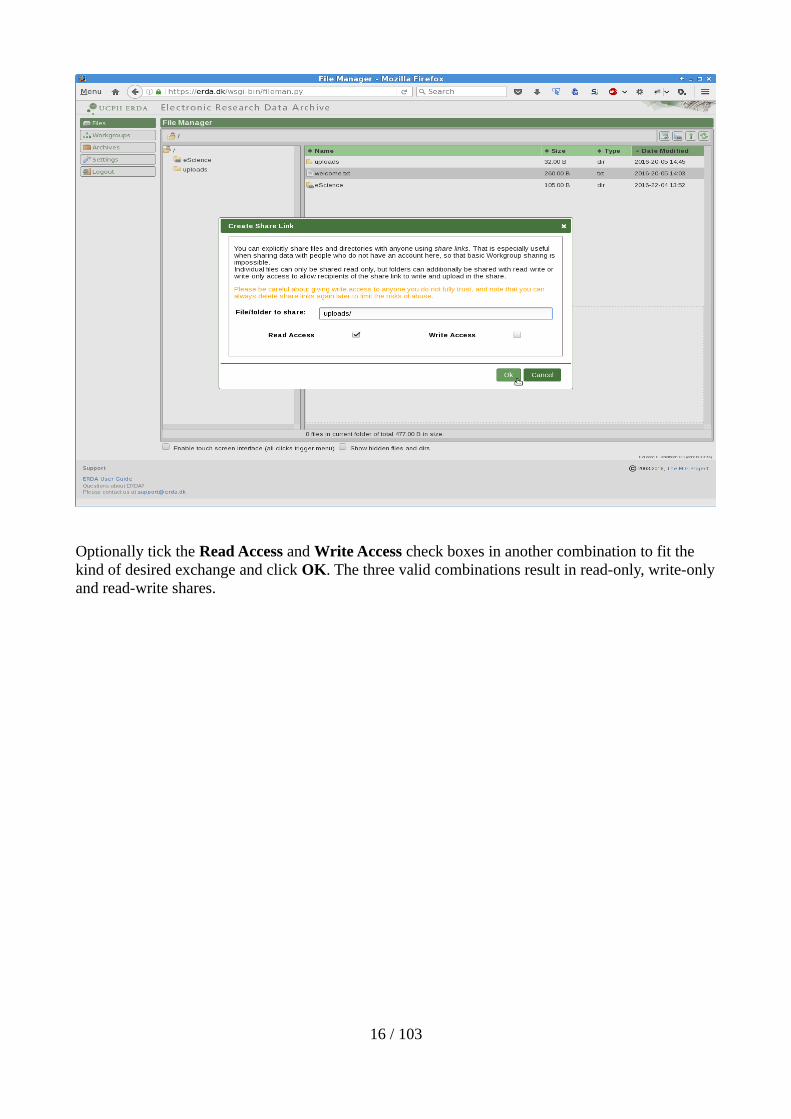
Optionally tick the Read Access and Write Access check boxes in another combination to fit the kind of desired exchange and click OK. The three valid combinations result in read-only, write-onlyand read-write shares.
16 / 103
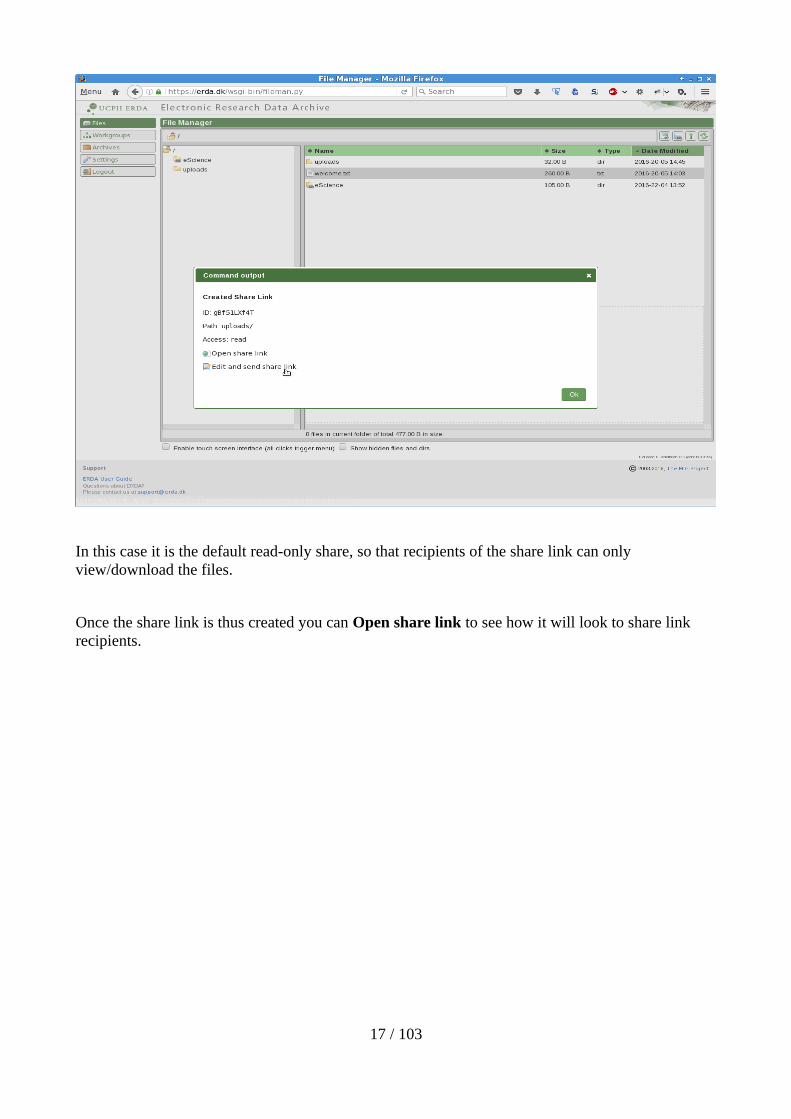
In this case it is the default read-only share, so that recipients of the share link can only view/download the files.
Once the share link is thus created you can Open share link to see how it will look to share link recipients.
17 / 103
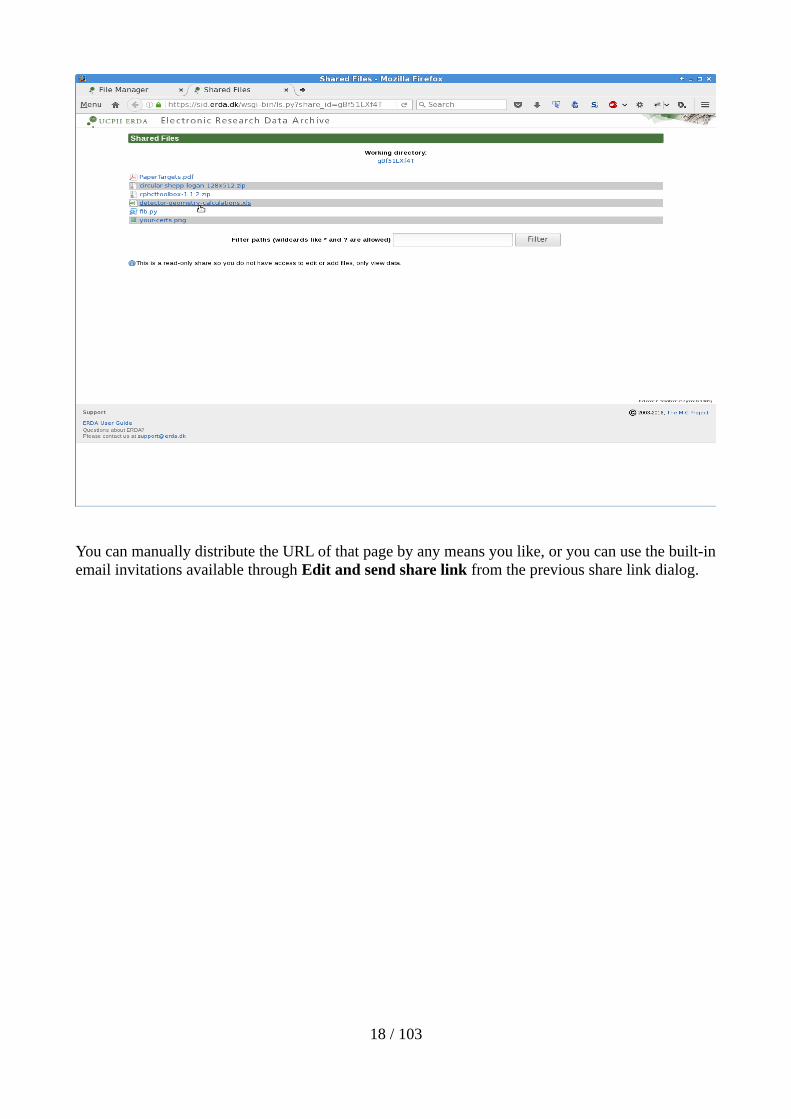
You can manually distribute the URL of that page by any means you like, or you can use the built-inemail invitations available through Edit and send share link from the previous share link dialog.
18 / 103
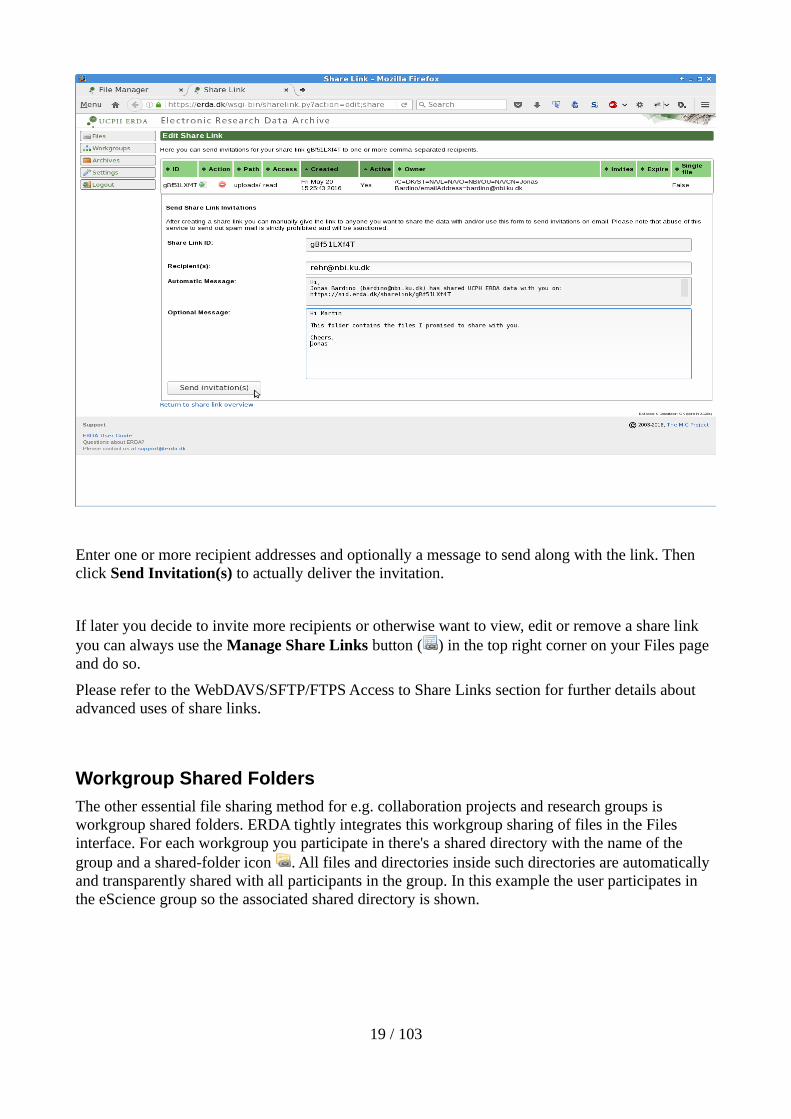
Enter one or more recipient addresses and optionally a message to send along with the link. Then click Send Invitation(s) to actually deliver the invitation.
If later you decide to invite more recipients or otherwise want to view, edit or remove a share link you can always use the Manage Share Links button ( ) in the top right corner on your Files page and do so.
Please refer to the WebDAVS/SFTP/FTPS Access to Share Links section for further details about advanced uses of share links.
Workgroup Shared Folders
The other essential file sharing method for e.g. collaboration projects and research groups is workgroup shared folders. ERDA tightly integrates this workgroup sharing of files in the Files interface. For each workgroup you participate in there's a shared directory with the name of the group and a shared-folder icon . All files and directories inside such directories are automatically and transparently shared with all participants in the group. In this example the user participates in the eScience group so the associated shared directory is shown.
19 / 103
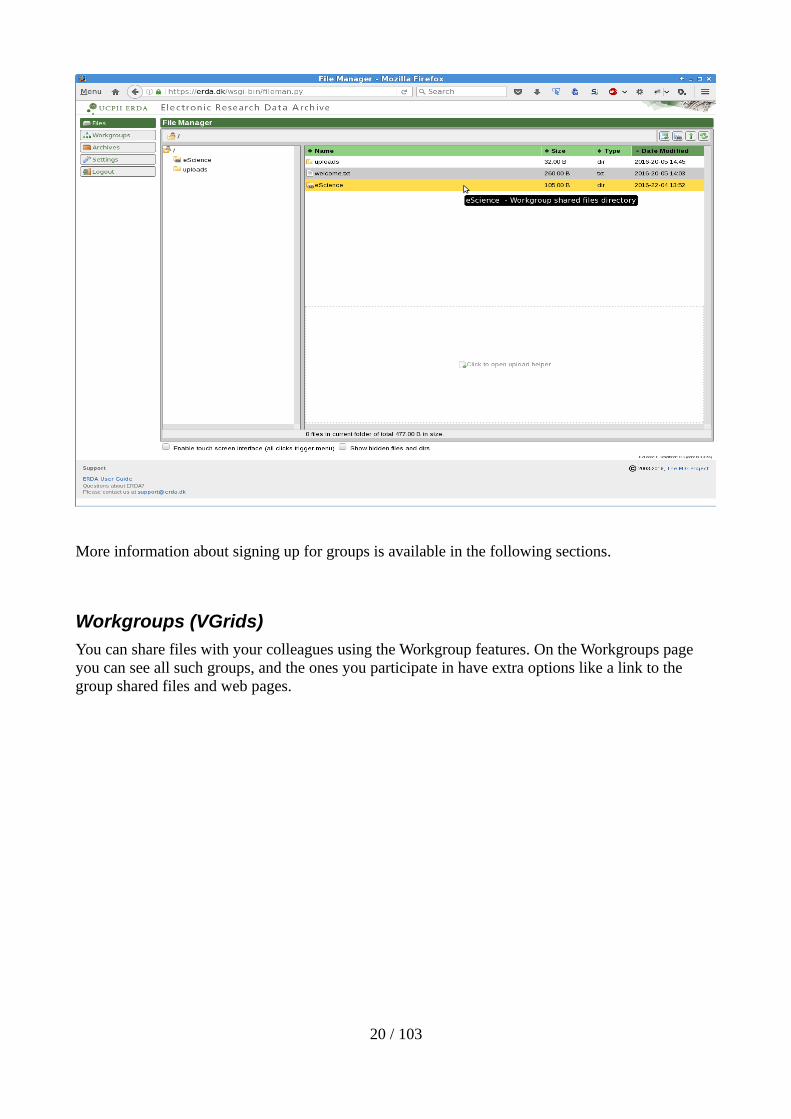
More information about signing up for groups is available in the following sections.
Workgroups (VGrids)
You can share files with your colleagues using the Workgroup features. On the Workgroups page you can see all such groups, and the ones you participate in have extra options like a link to the group shared files and web pages.
20 / 103
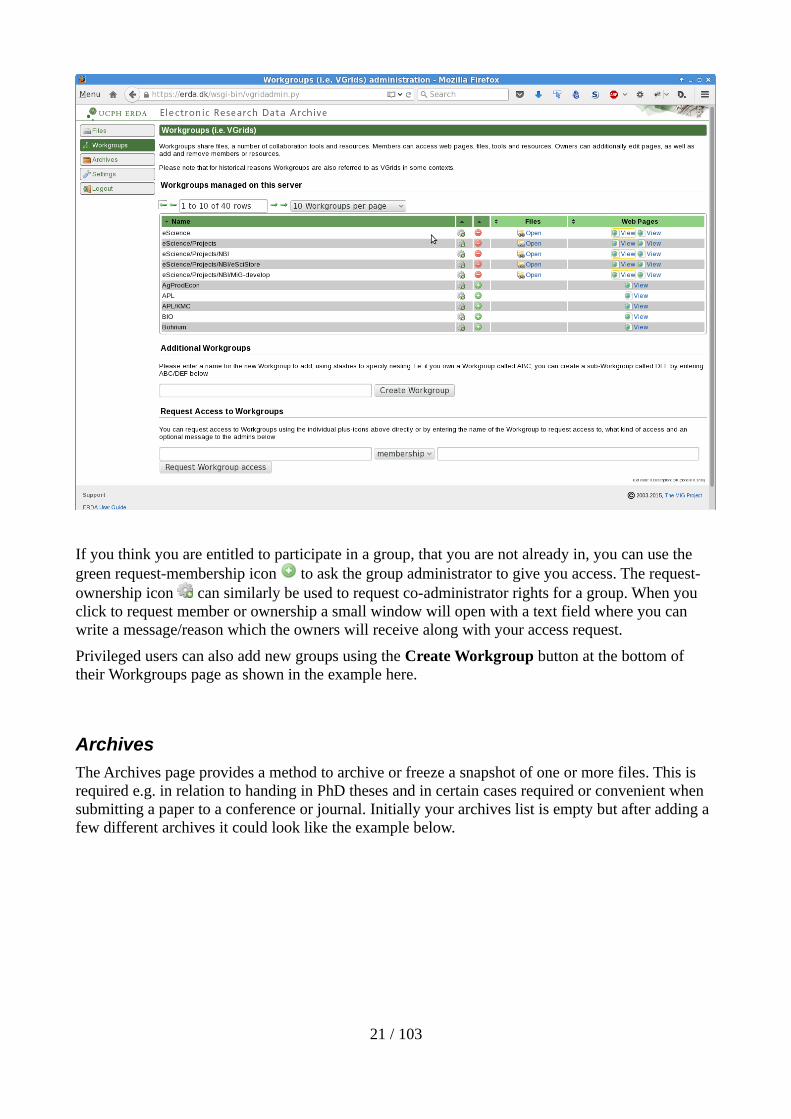
If you think you are entitled to participate in a group, that you are not already in, you can use the green request-membership icon to ask the group administrator to give you access. The request-ownership icon can similarly be used to request co-administrator rights for a group. When you click to request member or ownership a small window will open with a text field where you can write a message/reason which the owners will receive along with your access request.
Privileged users can also add new groups using the Create Workgroup button at the bottom of their Workgroups page as shown in the example here.
Archives
The Archives page provides a method to archive or freeze a snapshot of one or more files. This is required e.g. in relation to handing in PhD theses and in certain cases required or convenient when submitting a paper to a conference or journal. Initially your archives list is empty but after adding a few different archives it could look like the example below.
21 / 103
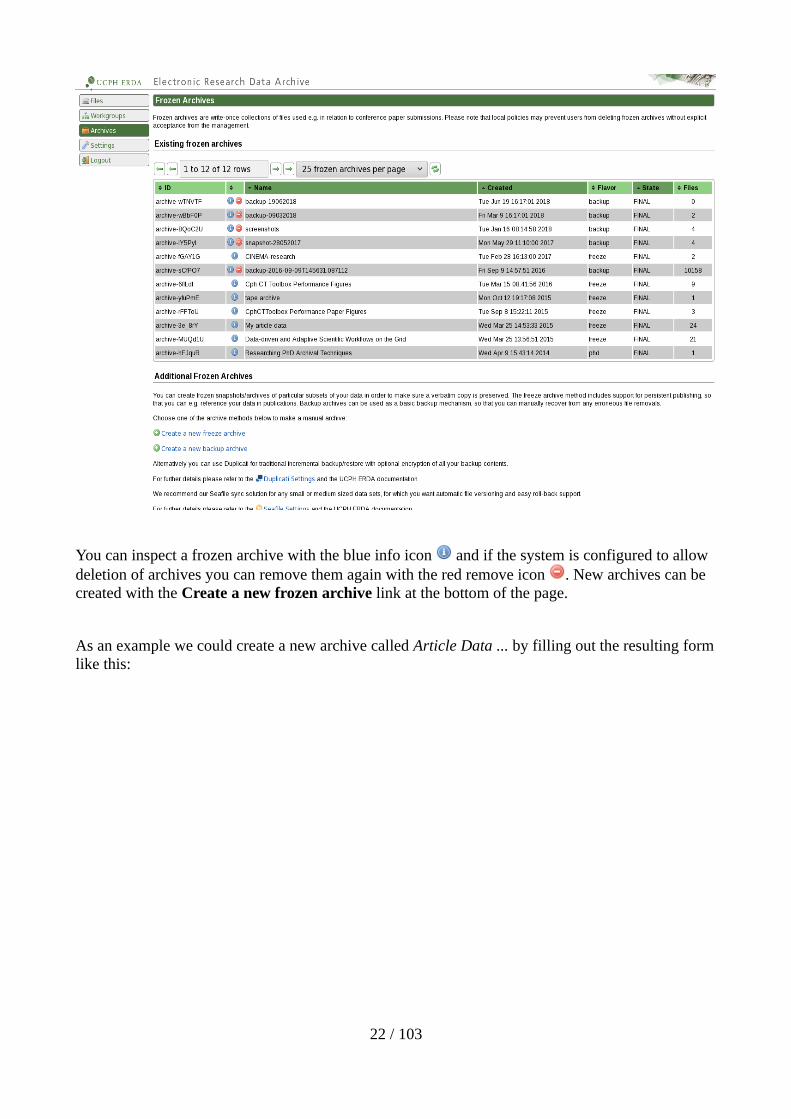
You can inspect a frozen archive with the blue info icon and if the system is configured to allow deletion of archives you can remove them again with the red remove icon . New archives can be created with the Create a new frozen archive link at the bottom of the page.
As an example we could create a new archive called Article Data ... by filling out the resulting formlike this:
22 / 103
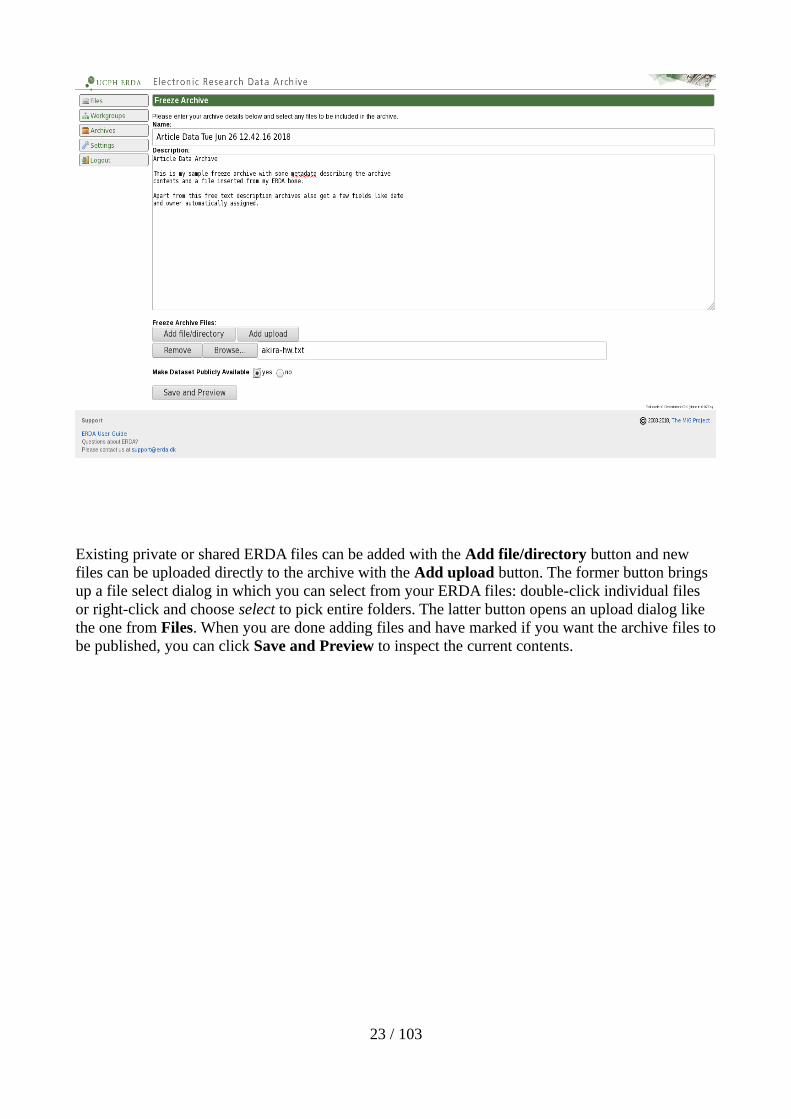
Existing private or shared ERDA files can be added with the Add file/directory button and new files can be uploaded directly to the archive with the Add upload button. The former button brings up a file select dialog in which you can select from your ERDA files: double-click individual files or right-click and choose select to pick entire folders. The latter button opens an upload dialog like the one from Files. When you are done adding files and have marked if you want the archive files tobe published, you can click Save and Preview to inspect the current contents.
23 / 103
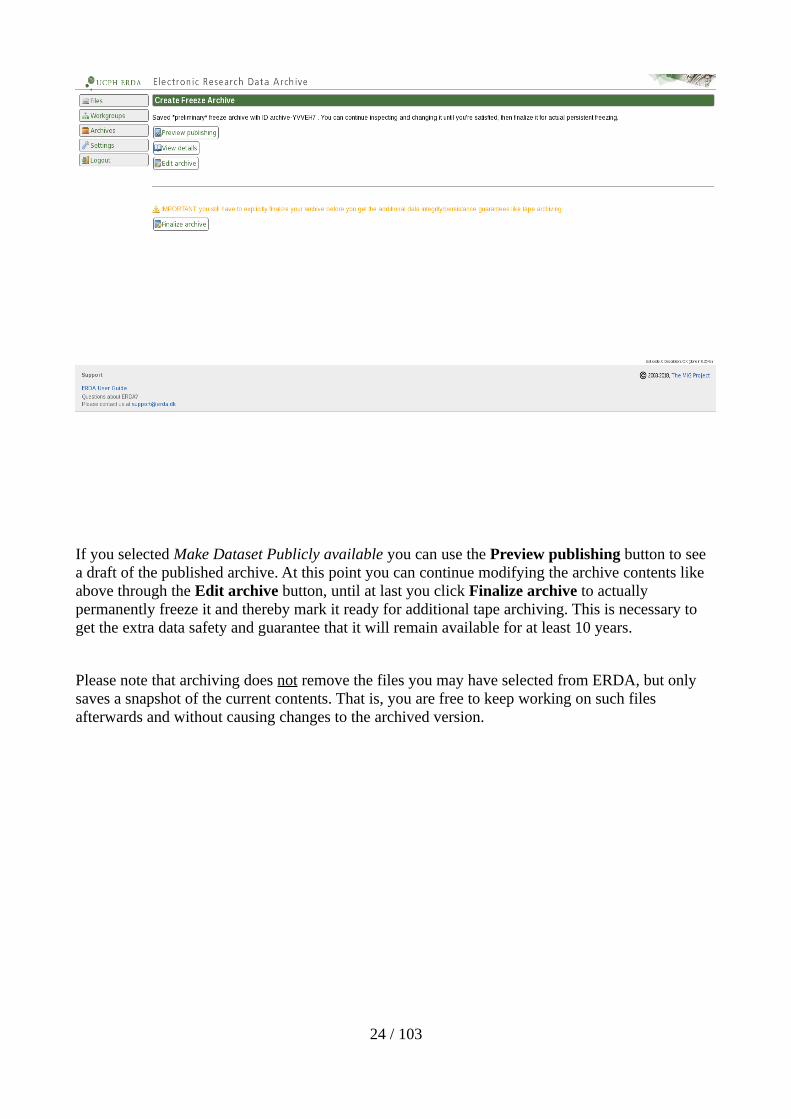
If you selected Make Dataset Publicly available you can use the Preview publishing button to see a draft of the published archive. At this point you can continue modifying the archive contents like above through the Edit archive button, until at last you click Finalize archive to actually permanently freeze it and thereby mark it ready for additional tape archiving. This is necessary to get the extra data safety and guarantee that it will remain available for at least 10 years.
Please note that archiving does not remove the files you may have selected from ERDA, but only saves a snapshot of the current contents. That is, you are free to keep working on such files afterwards and without causing changes to the archived version.
24 / 103

After finalizing you can use the View details button to see all the details registered about it on the view archive page and use the links to access the associated files.
25 / 103
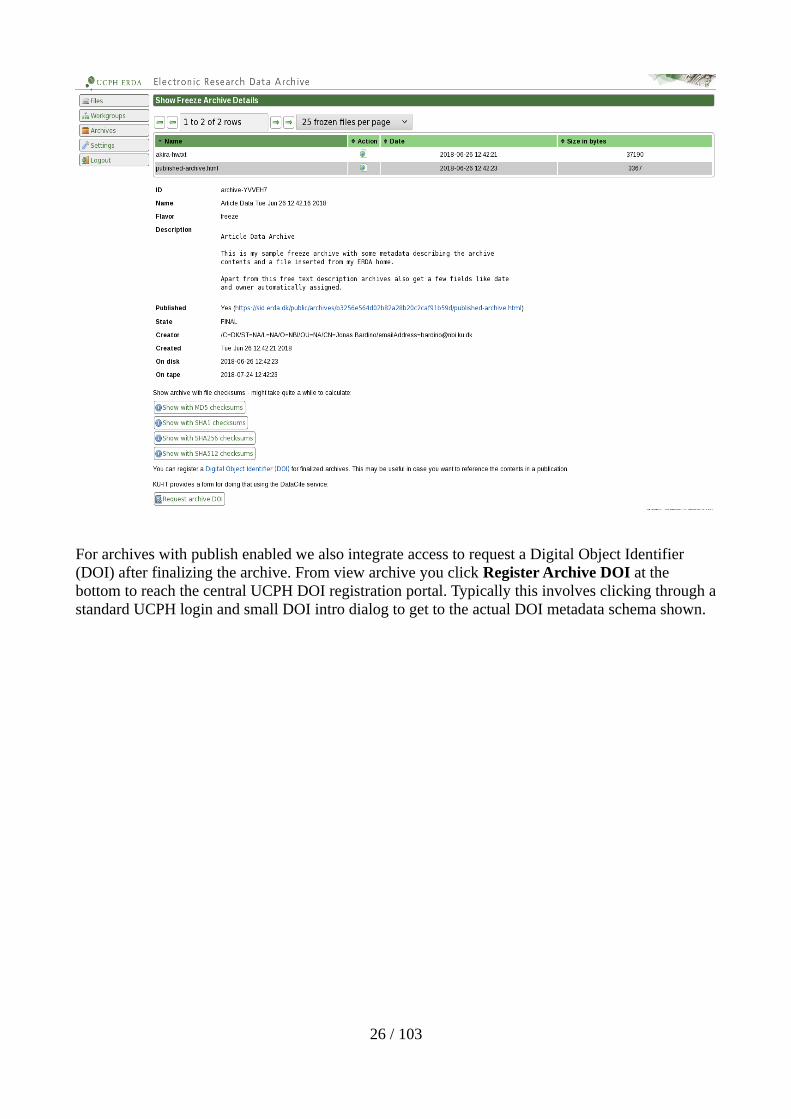
For archives with publish enabled we also integrate access to request a Digital Object Identifier (DOI) after finalizing the archive. From view archive you click Register Archive DOI at the bottom to reach the central UCPH DOI registration portal. Typically this involves clicking through astandard UCPH login and small DOI intro dialog to get to the actual DOI metadata schema shown.
26 / 103
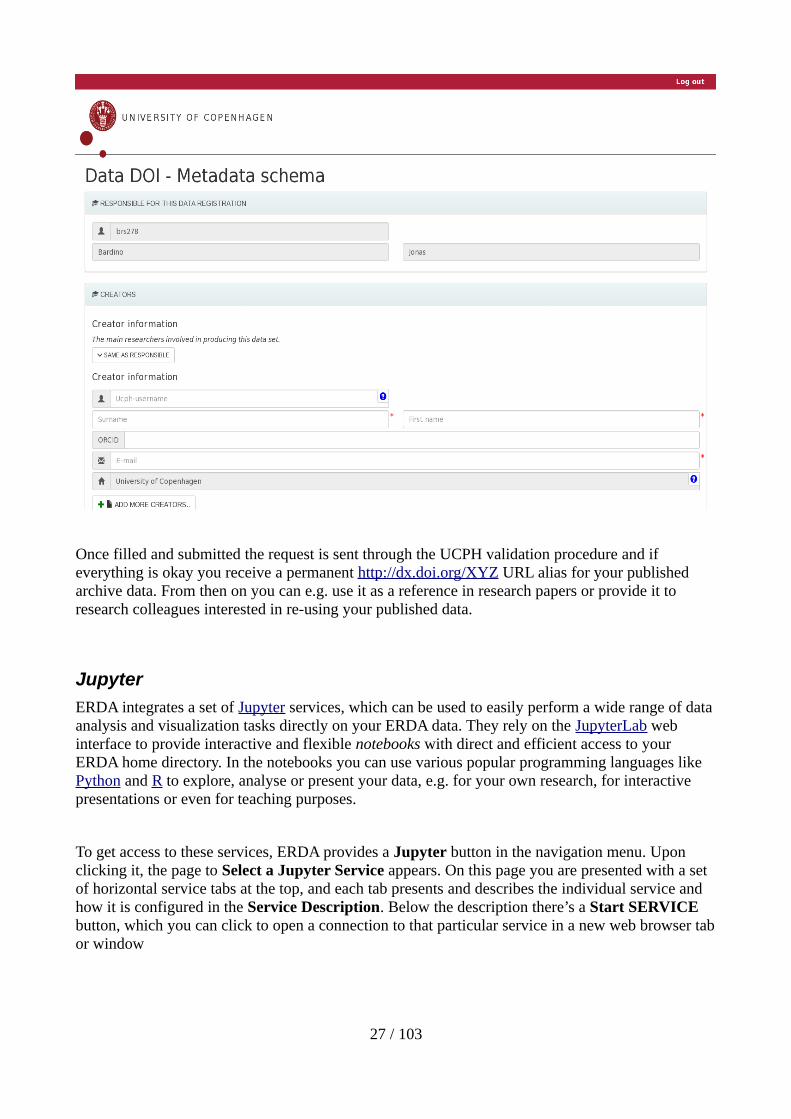
Once filled and submitted the request is sent through the UCPH validation procedure and if everything is okay you receive a permanent http://dx.doi.org/XYZ URL alias for your published archive data. From then on you can e.g. use it as a reference in research papers or provide it to research colleagues interested in re-using your published data.
Jupyter
ERDA integrates a set of Jupyter services, which can be used to easily perform a wide range of data analysis and visualization tasks directly on your ERDA data. They rely on the JupyterLab web interface to provide interactive and flexible notebooks with direct and efficient access to your ERDA home directory. In the notebooks you can use various popular programming languages like Python and R to explore, analyse or present your data, e.g. for your own research, for interactive presentations or even for teaching purposes.
To get access to these services, ERDA provides a Jupyter button in the navigation menu. Upon clicking it, the page to Select a Jupyter Service appears. On this page you are presented with a set of horizontal service tabs at the top, and each tab presents and describes the individual service and how it is configured in the Service Description. Below the description there’s a Start SERVICE button, which you can click to open a connection to that particular service in a new web browser tabor window
27 / 103
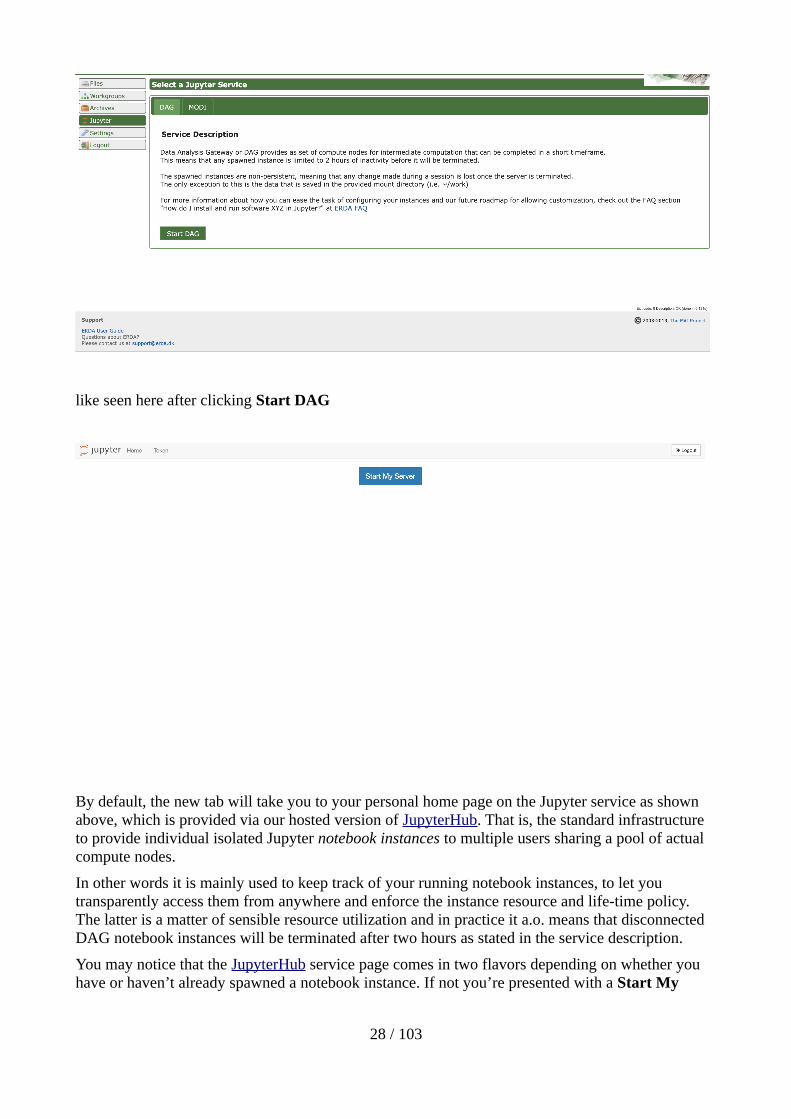
like seen here after clicking Start DAG
By default, the new tab will take you to your personal home page on the Jupyter service as shown above, which is provided via our hosted version of JupyterHub. That is, the standard infrastructure to provide individual isolated Jupyter notebook instances to multiple users sharing a pool of actual compute nodes.
In other words it is mainly used to keep track of your running notebook instances, to let you transparently access them from anywhere and enforce the instance resource and life-time policy. The latter is a matter of sensible resource utilization and in practice it a.o. means that disconnected DAG notebook instances will be terminated after two hours as stated in the service description.
You may notice that the JupyterHub service page comes in two flavors depending on whether you have or haven’t already spawned a notebook instance. If not you’re presented with a Start My
28 / 103

Server button, that takes you to a menu where you can pick a notebook flavor and spawn it.
If you already started a notebook instance the resulting page will instead represent your home page, which gives you the option to either be redirected to your current active notebook instance via the My Server button, or to shut it down via the Stop My Server button.
Upon clicking the “Start My Server”, the site will give you an option to chose which Notebook image you wan't to spawn.
29 / 103
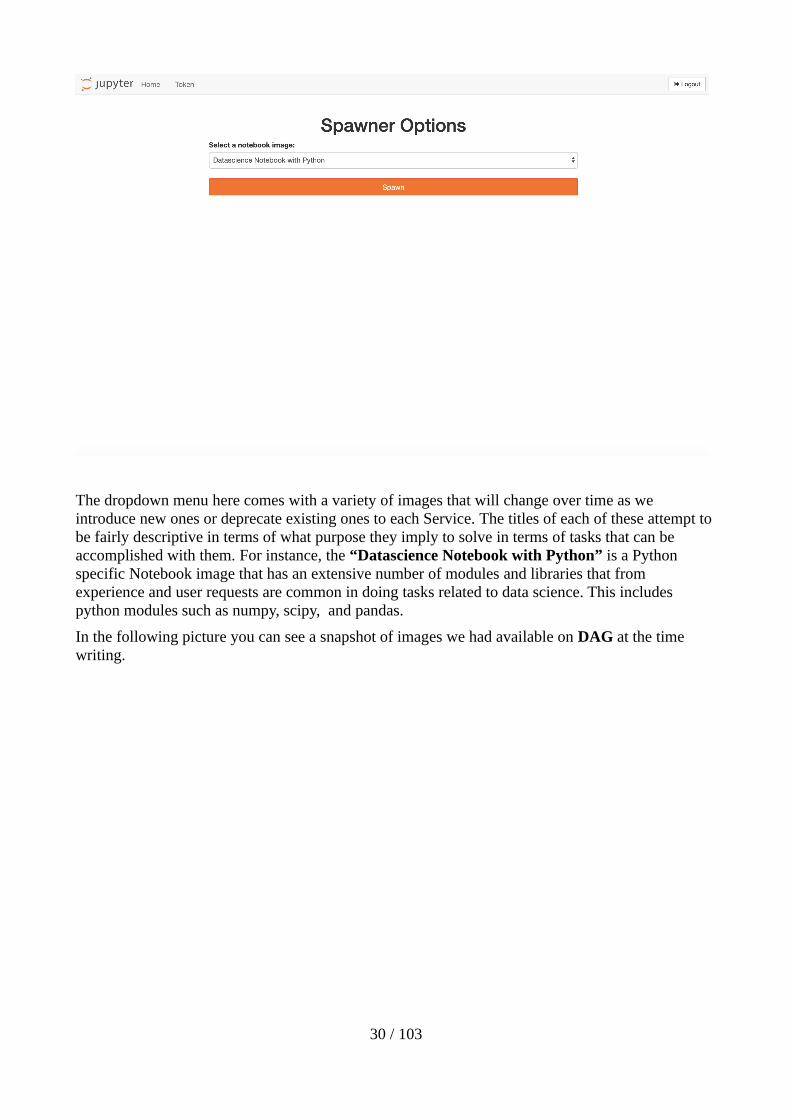
The dropdown menu here comes with a variety of images that will change over time as we introduce new ones or deprecate existing ones to each Service. The titles of each of these attempt to be fairly descriptive in terms of what purpose they imply to solve in terms of tasks that can be accomplished with them. For instance, the “Datascience Notebook with Python” is a Python specific Notebook image that has an extensive number of modules and libraries that from experience and user requests are common in doing tasks related to data science. This includes python modules such as numpy, scipy, and pandas.
In the following picture you can see a snapshot of images we had available on DAG at the time writing.
30 / 103

Currently, every user has the ability to spawn each of these. The only exception to this is the
DGX-1 Notebook image, unless so granted an attempt to spawn this notebook image will fail and present you with the following message “You don't have permission to launch that image”. This is by design, since that notebook image gives access to a special purpose DGX-1 machine, dedicated to GPU intensive tasks by the Machine Learning group at DIKU. Therefore access permission must be explicitly granted by Erik Bjørnager Dam.
Upon spawning an available notebook image, you will be redirected straight to the JupyterLab interface as shown below.
31 / 103
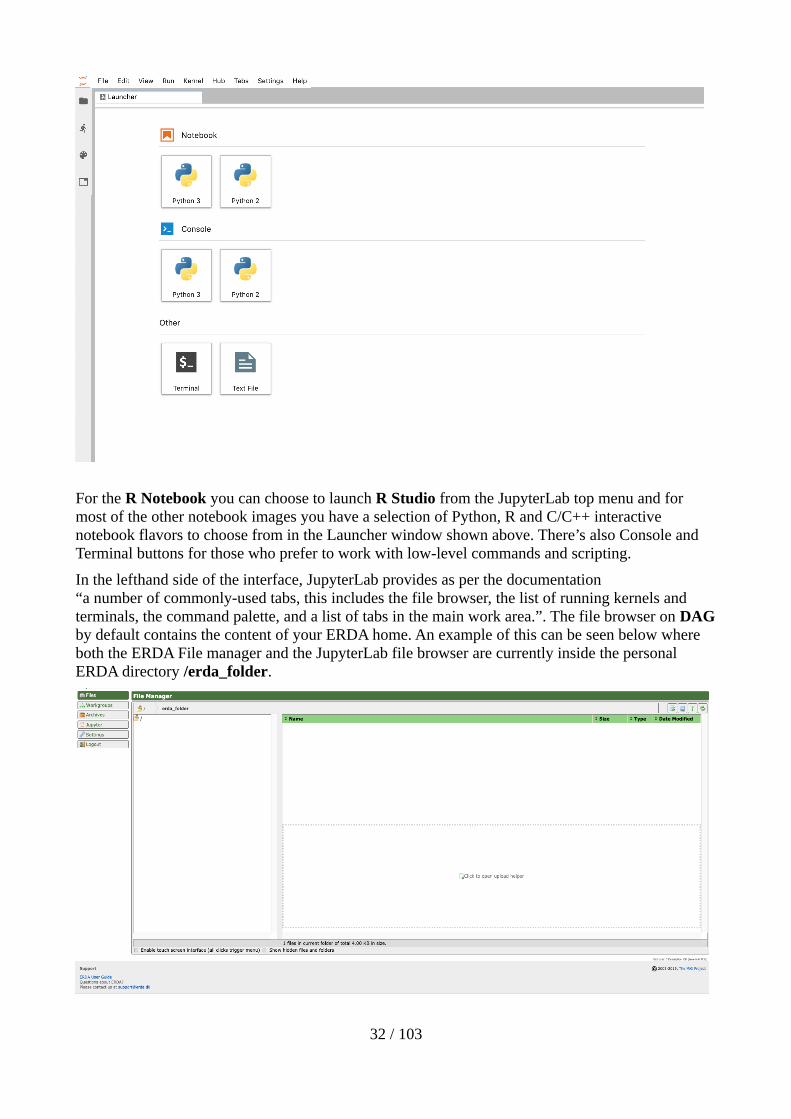
For the R Notebook you can choose to launch R Studio from the JupyterLab top menu and for most of the other notebook images you have a selection of Python, R and C/C++ interactive notebook flavors to choose from in the Launcher window shown above. There’s also Console and Terminal buttons for those who prefer to work with low-level commands and scripting.
In the lefthand side of the interface, JupyterLab provides as per the documentation “a number of commonly-used tabs, this includes the file browser, the list of running kernels and terminals, the command palette, and a list of tabs in the main work area.”. The file browser on DAGby default contains the content of your ERDA home. An example of this can be seen below where both the ERDA File manager and the JupyterLab file browser are currently inside the personal ERDA directory /erda_folder.
32 / 103
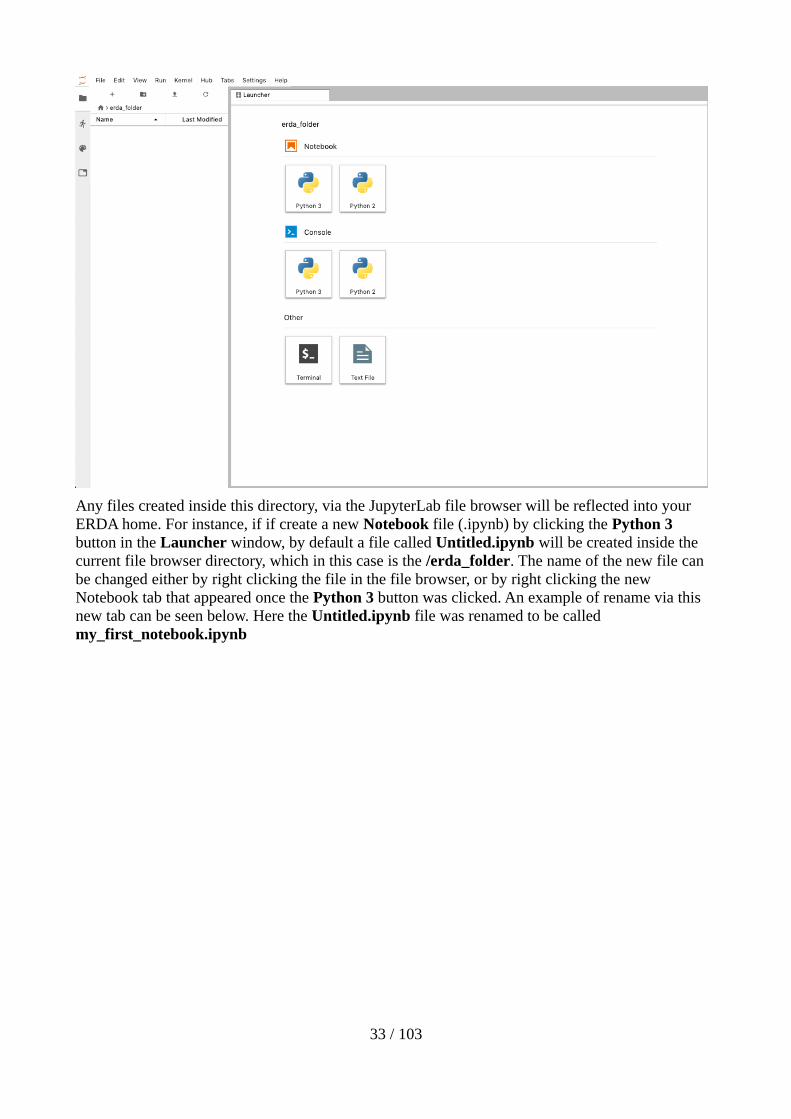
Any files created inside this directory, via the JupyterLab file browser will be reflected into your ERDA home. For instance, if if create a new Notebook file (.ipynb) by clicking the Python 3 button in the Launcher window, by default a file called Untitled.ipynb will be created inside the current file browser directory, which in this case is the /erda_folder. The name of the new file can be changed either by right clicking the file in the file browser, or by right clicking the new Notebook tab that appeared once the Python 3 button was clicked. An example of rename via this new tab can be seen below. Here the Untitled.ipynb file was renamed to be called my_first_notebook.ipynb
33 / 103
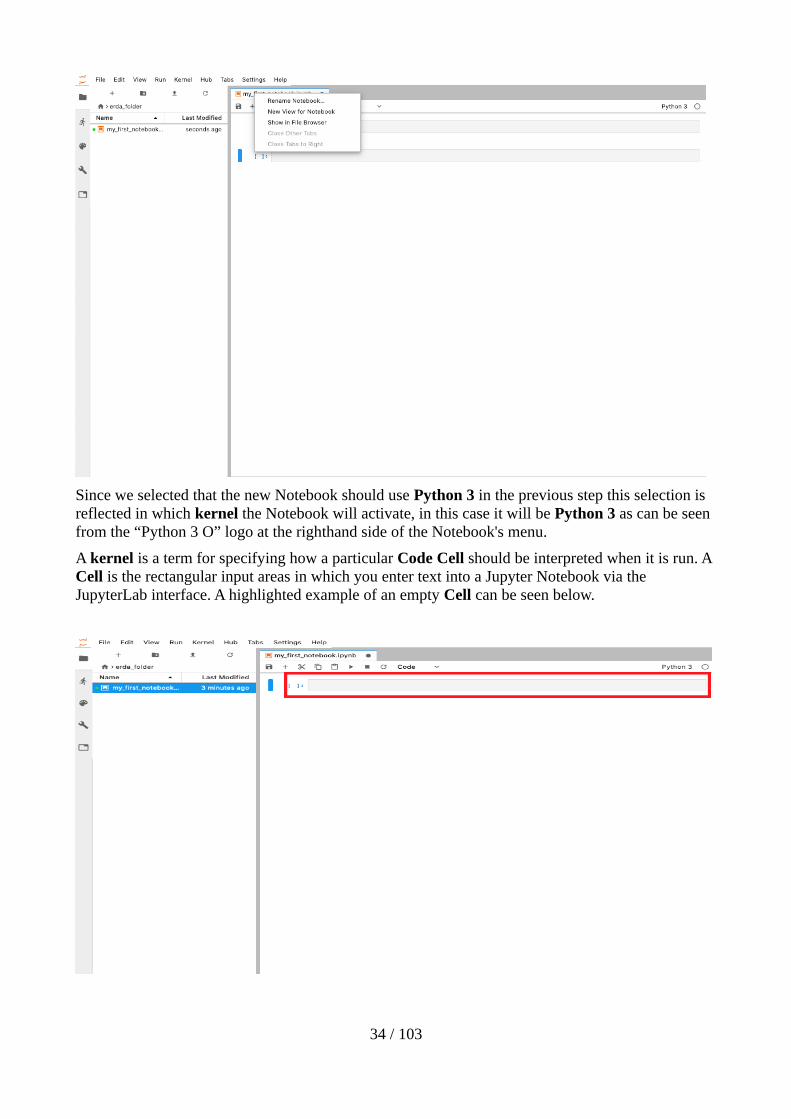
Since we selected that the new Notebook should use Python 3 in the previous step this selection is reflected in which kernel the Notebook will activate, in this case it will be Python 3 as can be seen from the “Python 3 O” logo at the righthand side of the Notebook's menu.
A kernel is a term for specifying how a particular Code Cell should be interpreted when it is run. A Cell is the rectangular input areas in which you enter text into a Jupyter Notebook via the JupyterLab interface. A highlighted example of an empty Cell can be seen below.
34 / 103

A Cell can contain any text that you input into it, however when a Cell is “Run”, either viathe button or by the keyboard shortcut Shift-Enter, the Cell type decides how the contents should beinterpreted. This is selected through the dropdown menu in the menu bar of the Notebook. By default it is set to Code, so that upon running the Cell the input will be interpreted by the active kernel which in this case means as Python 3 code.
As seen the print call gave the expected result by outputting the “Hello World” message. The active kernel and thus how the Code Cell should be interpreted can be changed via the mentioned “Python 3 O” logo. By clicking the “Python 3” part, a menu will appear as shown below, that allow you to select which kernel this active Notebook should use.
35 / 103
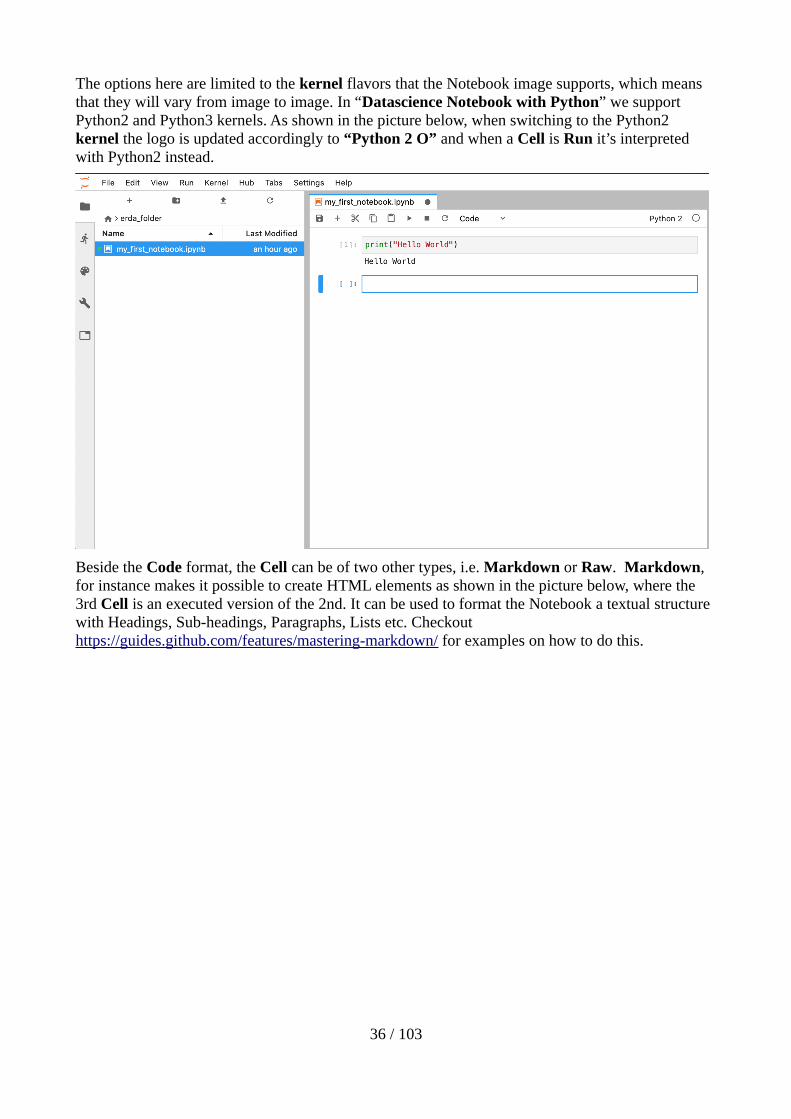
The options here are limited to the kernel flavors that the Notebook image supports, which means that they will vary from image to image. In “Datascience Notebook with Python” we support Python2 and Python3 kernels. As shown in the picture below, when switching to the Python2 kernel the logo is updated accordingly to “Python 2 O” and when a Cell is Run it’s interpreted with Python2 instead.
Beside the Code format, the Cell can be of two other types, i.e. Markdown or Raw. Markdown, for instance makes it possible to create HTML elements as shown in the picture below, where the 3rd Cell is an executed version of the 2nd. It can be used to format the Notebook a textual structure with Headings, Sub-headings, Paragraphs, Lists etc. Checkout https://guides.github.com/features/mastering-markdown/ for examples on how to do this.
36 / 103

Finally RAW does what it says, it doesn't try to interpret the text but simply outputs it as is.
When a Cell is being run by the kernel, the JupyterLab interface will indicate this by updating the empty “[ ]” next to the Cell to a “[ * ]” as shown in the picture below. This means that the kernel isnot finished running the Cell, which could either be because it is waiting for previous Cell's to finish first or that the tasks just takes a long time to finish. If for some reason the Cell's indicator changes state from “[ * ]” with no further activity “[ ]”, it is likely that a Cell has failed to run and the task was killed mid run.
37 / 103
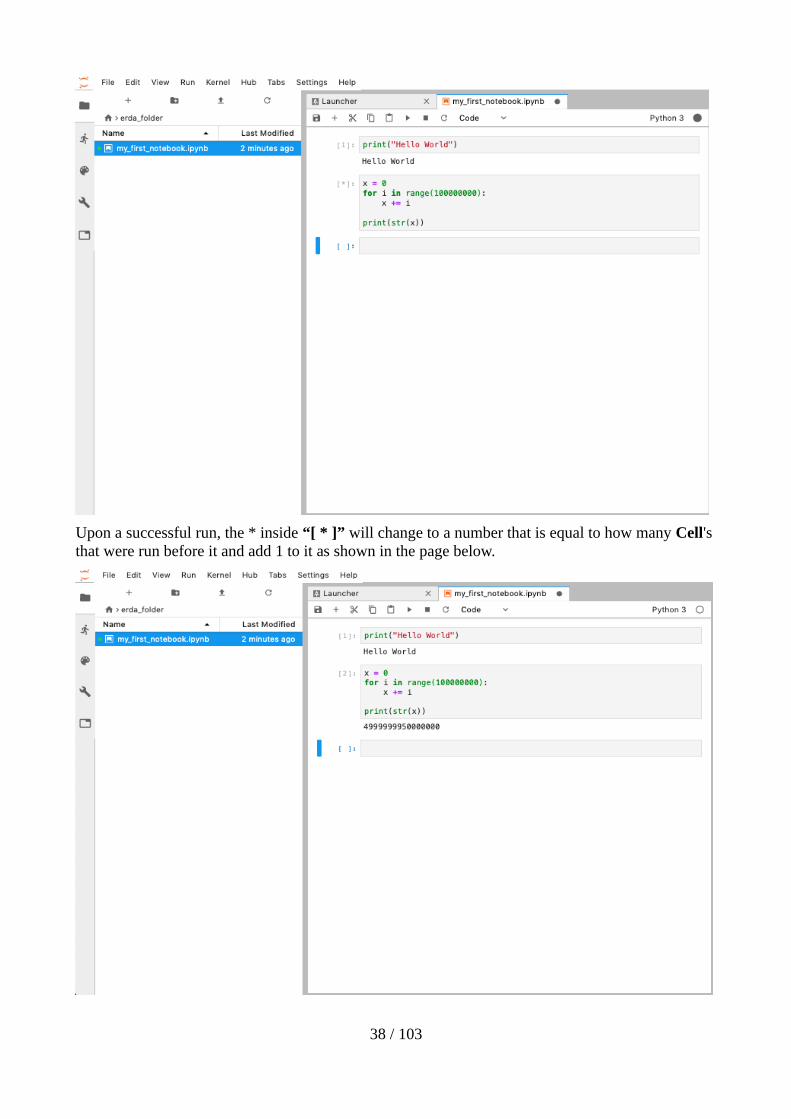
Upon a successful run, the * inside “[ * ]” will change to a number that is equal to how many Cell's that were run before it and add 1 to it as shown in the page below.
38 / 103
For additional up-to-date information on the JupyterLab interface itself please see the official documentation site.
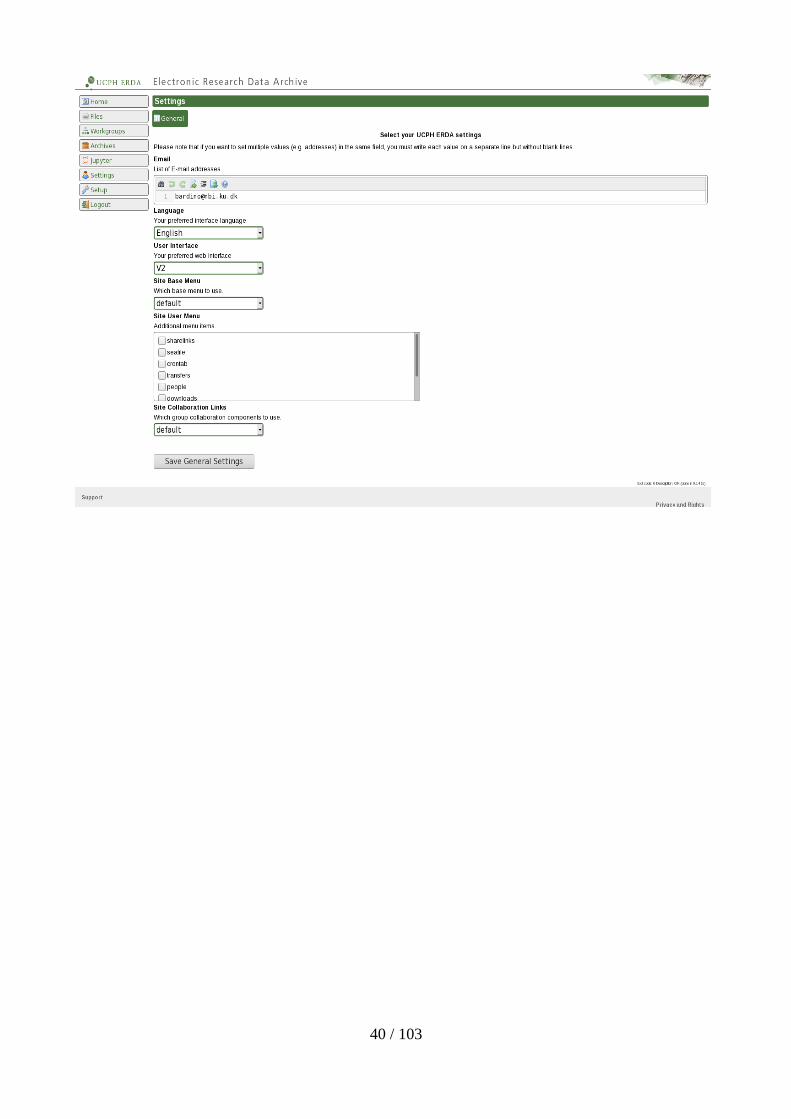
Settings + Setup
On the Settings and Setup pages you can tweak your personal ERDA settings to your liking. This includes configuring the look-and-feel of the web interface and setting up advanced access methods like e.g. access with a SFTP/WebDAVS/FTPS/Seafile client or mapping of your user home as a network drive on your local PC or workstation.
ERDA also includes a file synchronization service like Dropbox, but one which KU employees are permitted to use – unlike Dropbox.
Further description of the SFTP/WebDAVS/FTPS/Seafile tabs and their use is available in the Advanced Access sections.
You don't need to edit the settings to just use the fundamental functionalities. So you can safely leave them alone if in doubt.
39 / 103
40 / 103
Advanced Data AccessIn addition to the web interface ERDA also provides some advanced access interfaces for efficient and transparently integrated file access. These interfaces e.g. allow you to transfer many or big files more efficiently and to map your ERDA files and folders on your local PC or workstation. In that way you can work with them as if they were local files. All the interfaces use a secure connection toERDA, so they are accessible from anywhere where you have an Internet connection. Thus, you do not need VPN or anything like that to access them from outside UCPH.
ERDA comes with a file synchronization service resembling Dropbox, but one that employees at KU are permitted to use in contrast to Dropbox.
WebDAVS
WebDAV is a popular protocol to access remote storage using extensions to the HTTP protocol, andit can be secured with TLS/SSL in the same way. In the following sections we refer to this secured version as WebDAVS. Recent versions of Microsoft Windows, Mac OSX and Linux support this protocol out-pf-the-box, so with those it's possible to access such remote content like if it was in a local folder. That is, without the need to install additional software and still in a secure fashion.
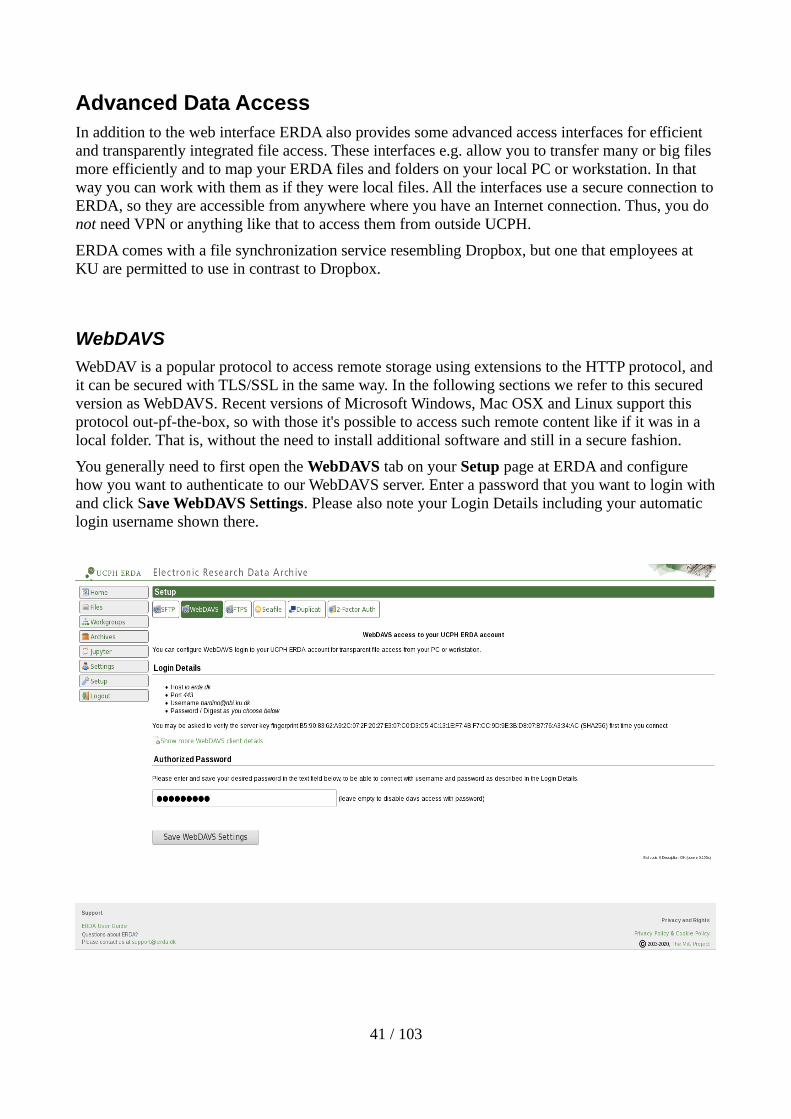
You generally need to first open the WebDAVS tab on your Setup page at ERDA and configure how you want to authenticate to our WebDAVS server. Enter a password that you want to login withand click Save WebDAVS Settings. Please also note your Login Details including your automatic login username shown there.
41 / 103
You can also find the required server URL by clicking the Show more WebDAVS client details... link there. In this example the server URL is https://io.erda.dk and the automatic username is [email protected], but please look up your own.
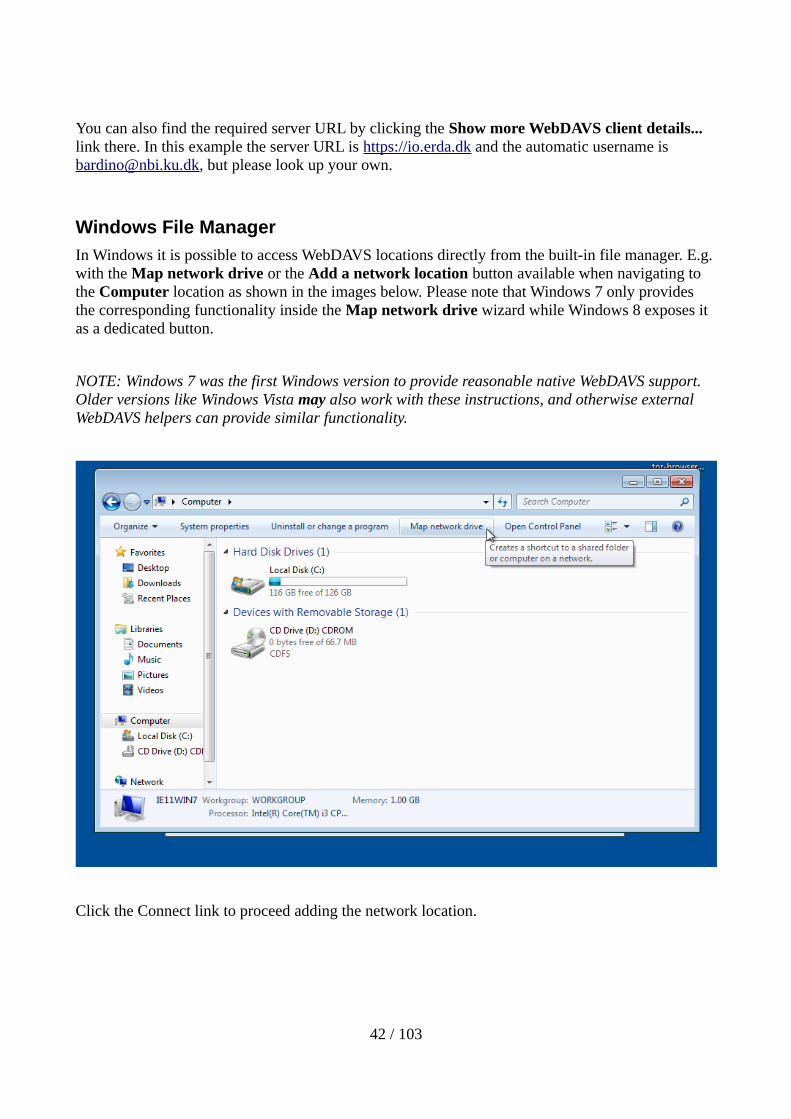
Windows File Manager
In Windows it is possible to access WebDAVS locations directly from the built-in file manager. E.g.with the Map network drive or the Add a network location button available when navigating to the Computer location as shown in the images below. Please note that Windows 7 only provides the corresponding functionality inside the Map network drive wizard while Windows 8 exposes it as a dedicated button.
NOTE: Windows 7 was the first Windows version to provide reasonable native WebDAVS support. Older versions like Windows Vista may also work with these instructions, and otherwise external WebDAVS helpers can provide similar functionality.
Click the Connect link to proceed adding the network location.
42 / 103
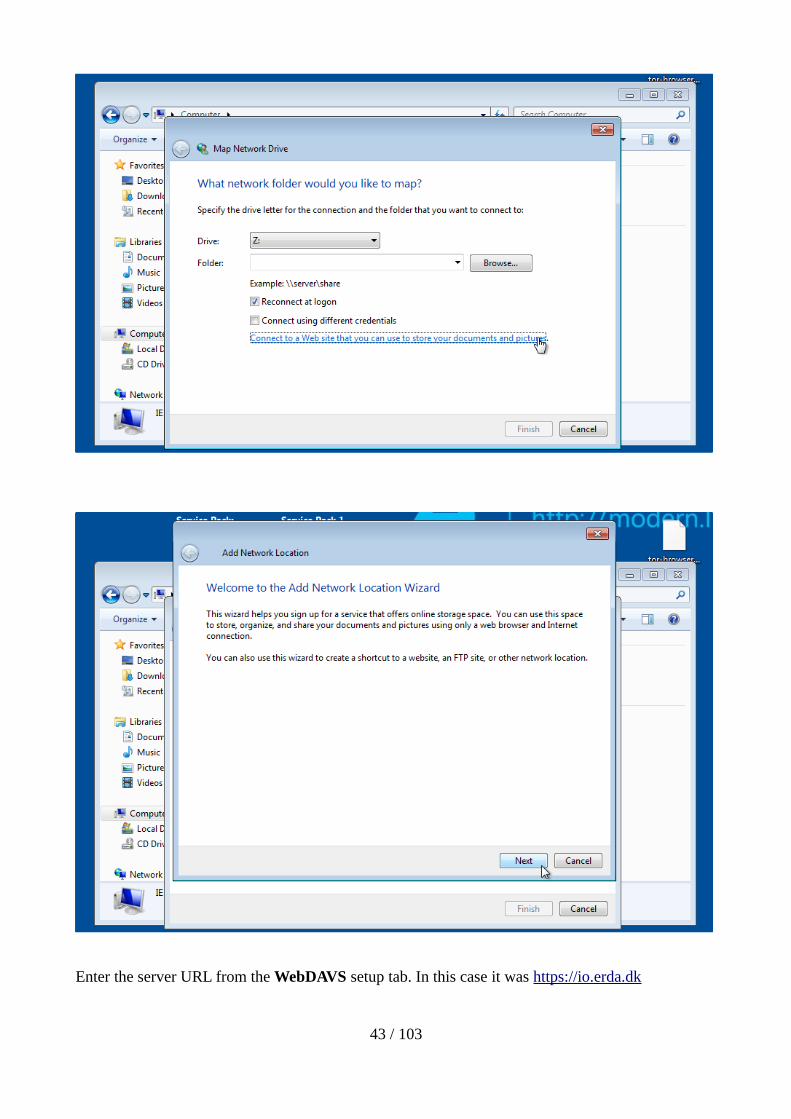
Enter the server URL from the WebDAVS setup tab. In this case it was https://io.erda.dk
43 / 103
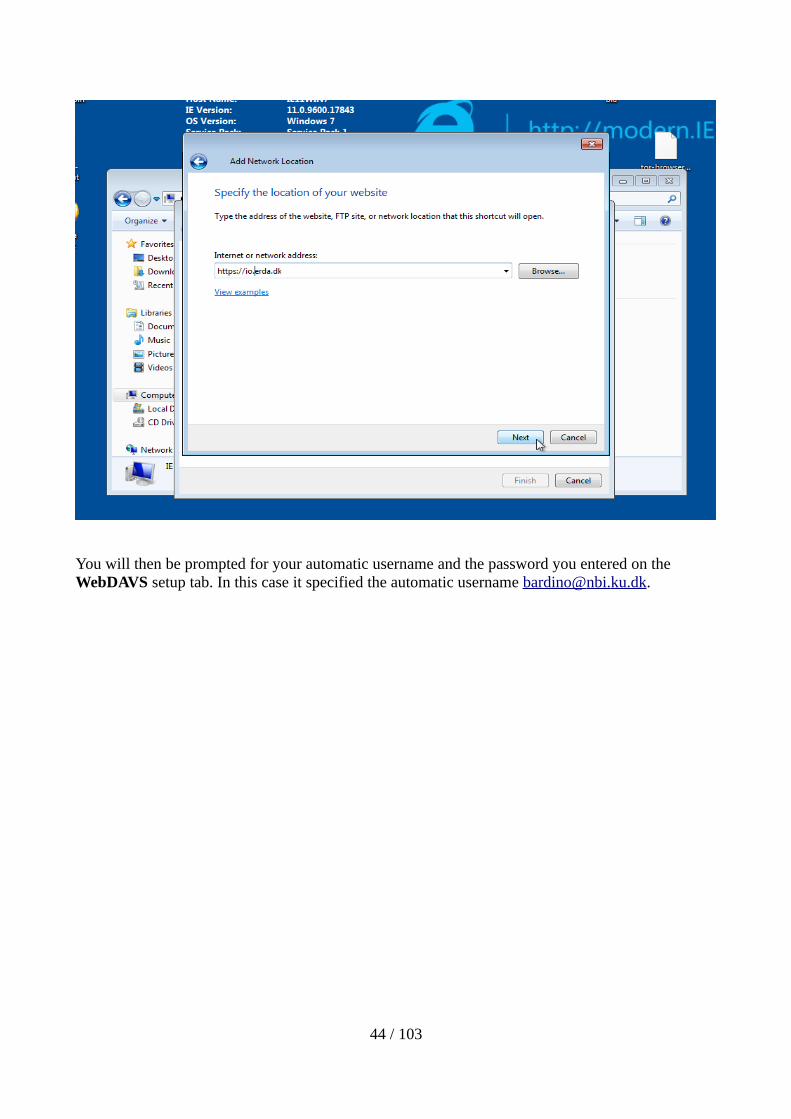
You will then be prompted for your automatic username and the password you entered on the WebDAVS setup tab. In this case it specified the automatic username bardino@ nbi. ku.dk .
44 / 103
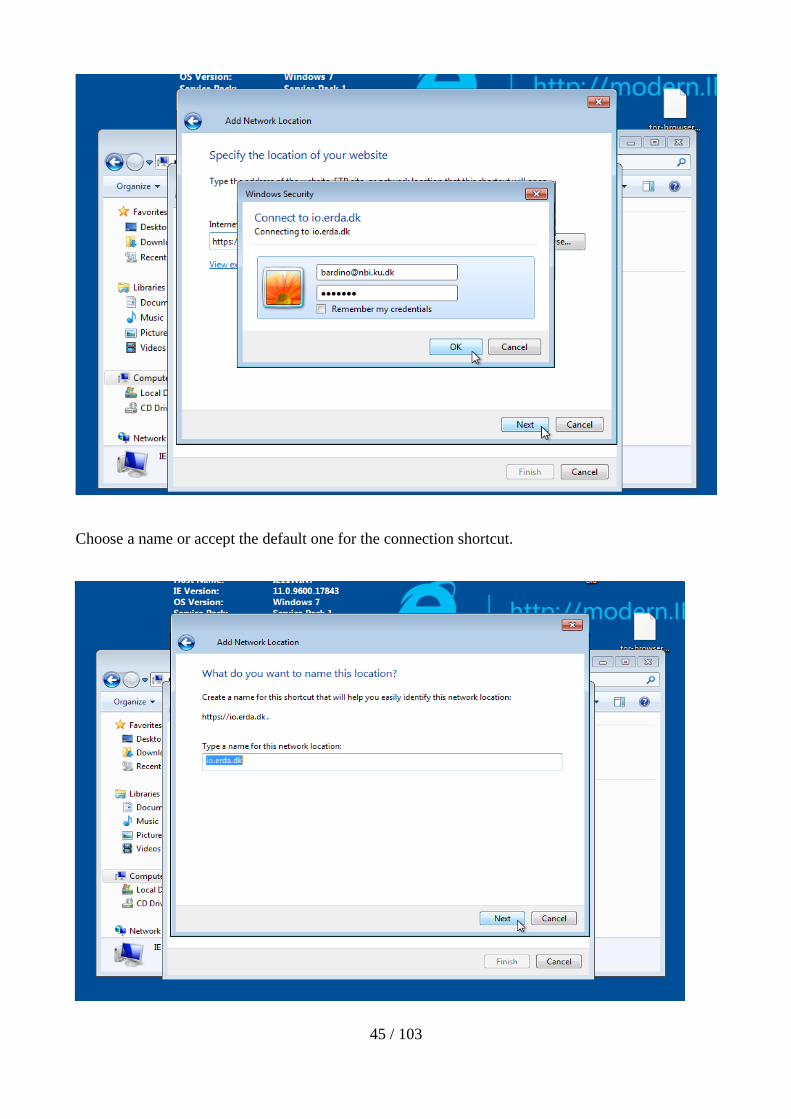
Choose a name or accept the default one for the connection shortcut.
45 / 103
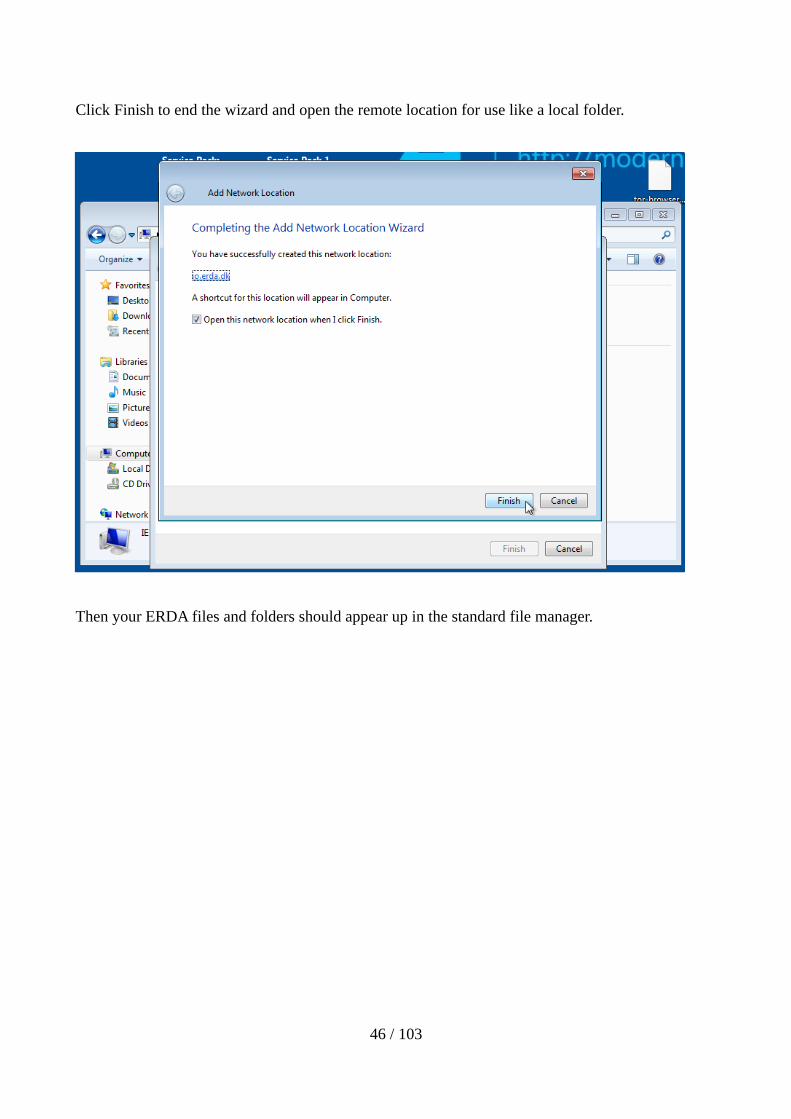
Click Finish to end the wizard and open the remote location for use like a local folder.
Then your ERDA files and folders should appear up in the standard file manager.
46 / 103
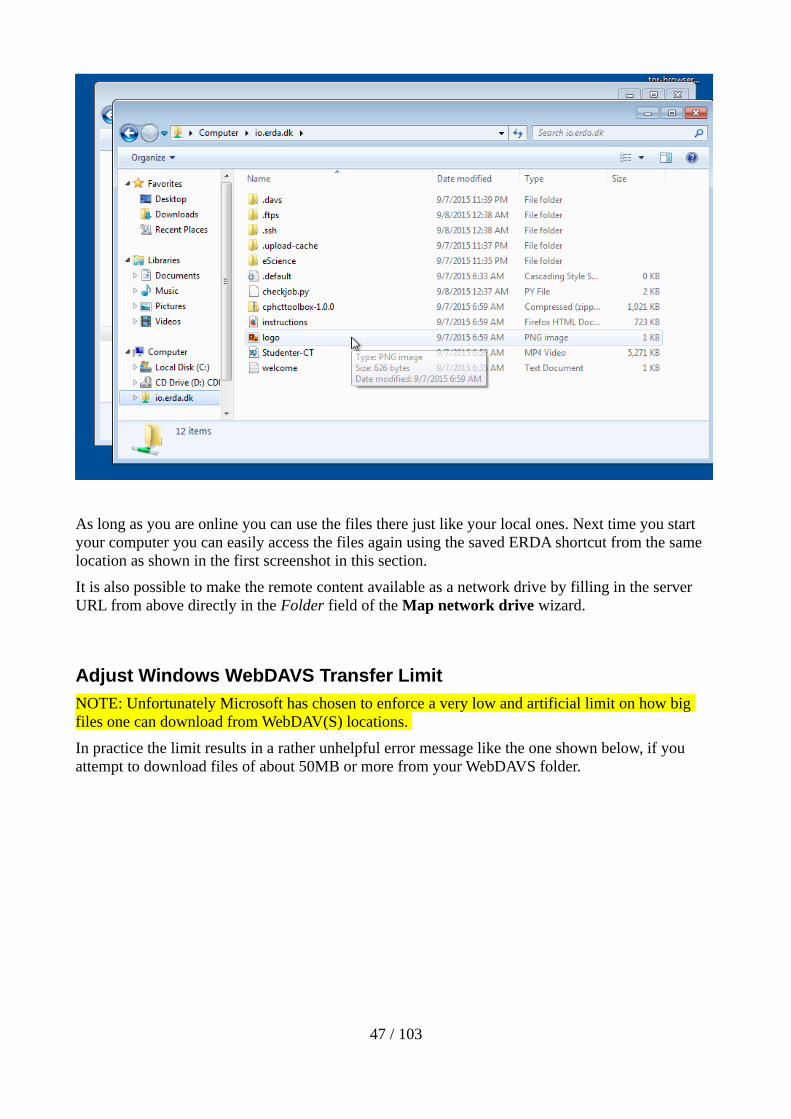
As long as you are online you can use the files there just like your local ones. Next time you start your computer you can easily access the files again using the saved ERDA shortcut from the same location as shown in the first screenshot in this section.
It is also possible to make the remote content available as a network drive by filling in the server URL from above directly in the Folder field of the Map network drive wizard.
Adjust Windows WebDAVS Transfer Limit
NOTE: Unfortunately Microsoft has chosen to enforce a very low and artificial limit on how big files one can download from WebDAV(S) locations.
In practice the limit results in a rather unhelpful error message like the one shown below, if you attempt to download files of about 50MB or more from your WebDAVS folder.
47 / 103

It is treated in more detail on their support pages where they also provide a small tool to edit the limit. The following paragraphs summarize the steps to increase this excessively small limit on download file sizes for Windows 7. At least the 'Fix it yourself' solution should also work for later versions of Windows.
Open the associated support page at Microsoft
https://support.microsoft.com/en-us/kb/2668751
and scroll down to the blue and white Download button. Click it and select Run as shown below
48 / 103

to proceed with installing the Fix it application from Microsoft. First step is to tick the I Agree box and click Next
49 / 103
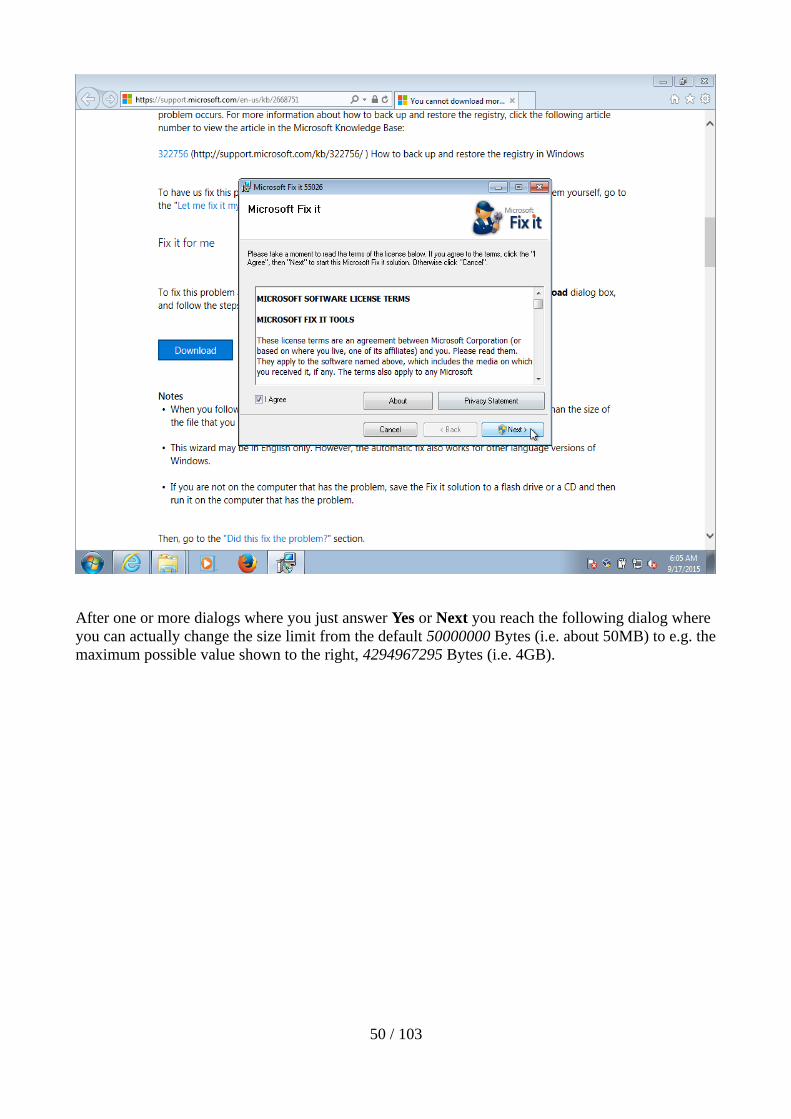
After one or more dialogs where you just answer Yes or Next you reach the following dialog where you can actually change the size limit from the default 50000000 Bytes (i.e. about 50MB) to e.g. themaximum possible value shown to the right, 4294967295 Bytes (i.e. 4GB).
50 / 103
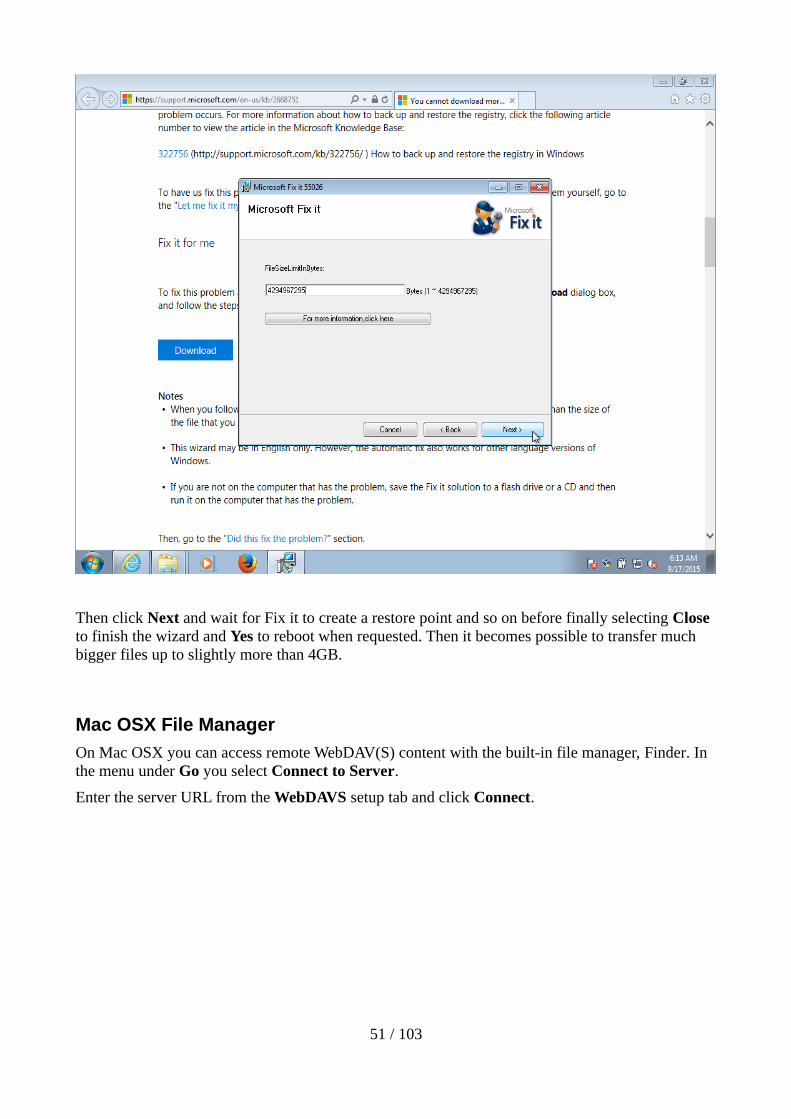
Then click Next and wait for Fix it to create a restore point and so on before finally selecting Close to finish the wizard and Yes to reboot when requested. Then it becomes possible to transfer much bigger files up to slightly more than 4GB.
Mac OSX File Manager
On Mac OSX you can access remote WebDAV(S) content with the built-in file manager, Finder. In the menu under Go you select Connect to Server.
Enter the server URL from the WebDAVS setup tab and click Connect.
51 / 103

You will then be prompted for your automatic username and the password you entered there. In this case it specified the automatic username bardino@ nbi. ku.dk .
On success you will see the remote contents which could look like this
52 / 103
Linux File Manager
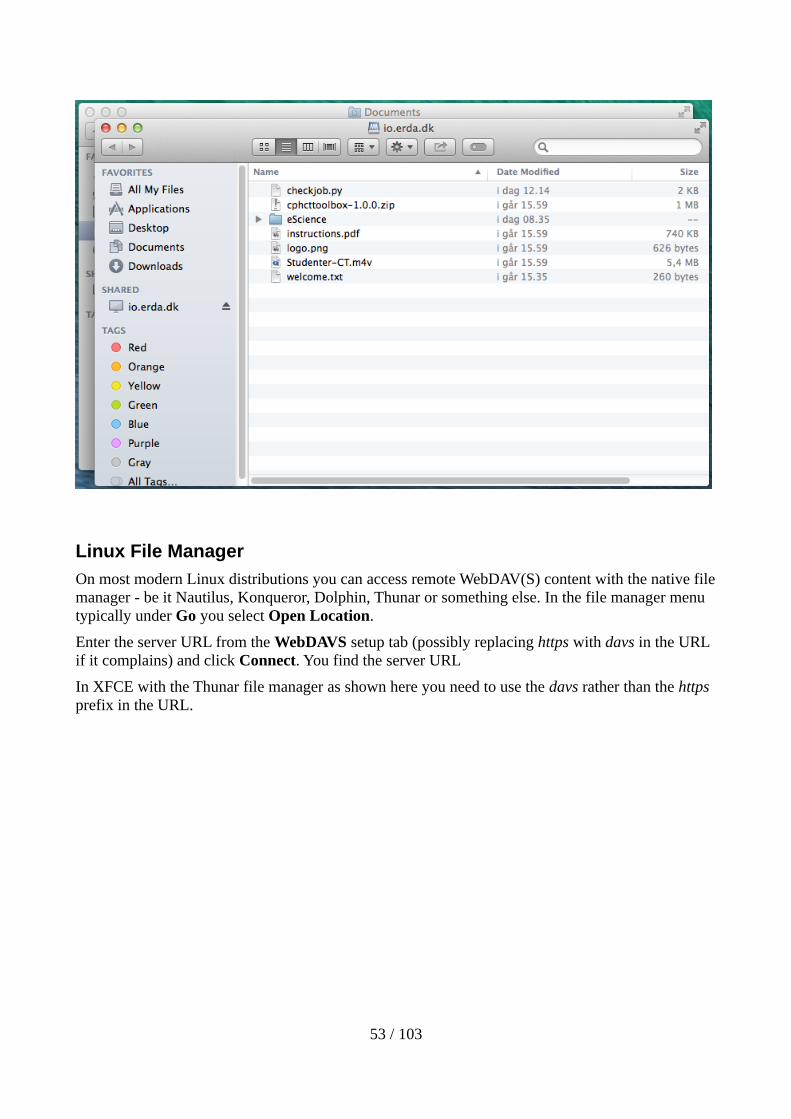
On most modern Linux distributions you can access remote WebDAV(S) content with the native filemanager - be it Nautilus, Konqueror, Dolphin, Thunar or something else. In the file manager menu typically under Go you select Open Location.
Enter the server URL from the WebDAVS setup tab (possibly replacing https with davs in the URL if it complains) and click Connect. You find the server URL
In XFCE with the Thunar file manager as shown here you need to use the davs rather than the https prefix in the URL.
53 / 103
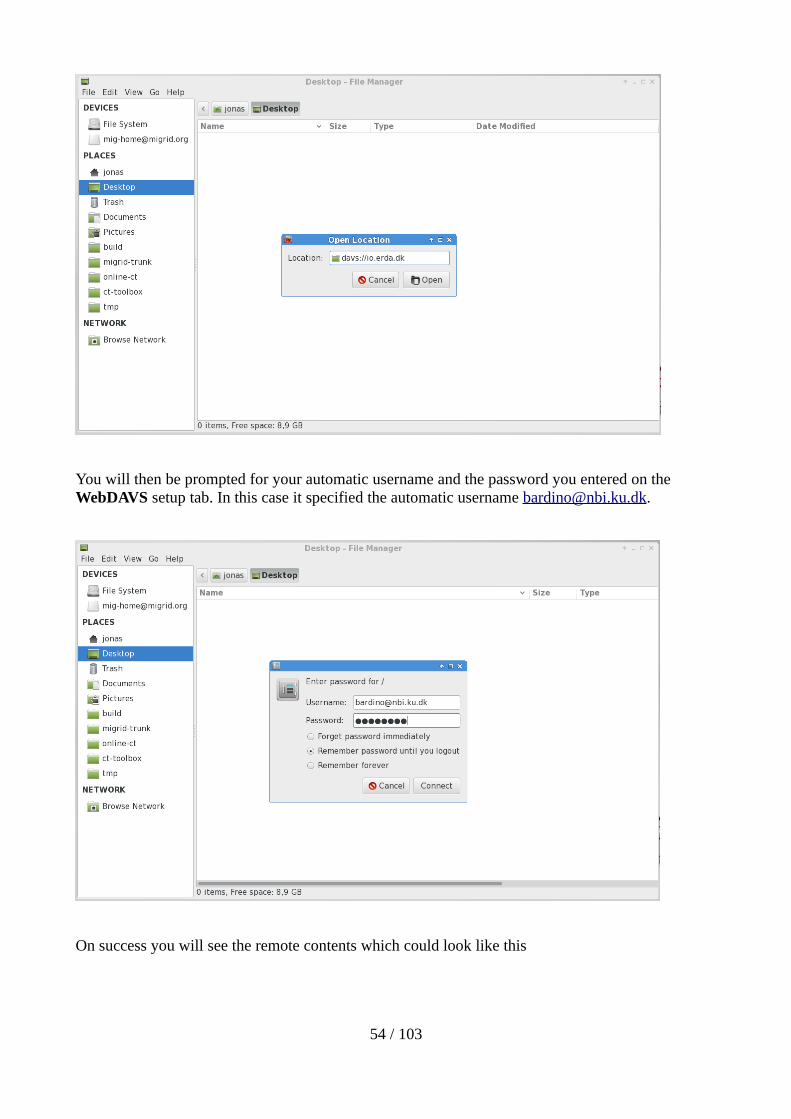
You will then be prompted for your automatic username and the password you entered on the WebDAVS setup tab. In this case it specified the automatic username [email protected].
On success you will see the remote contents which could look like this
54 / 103
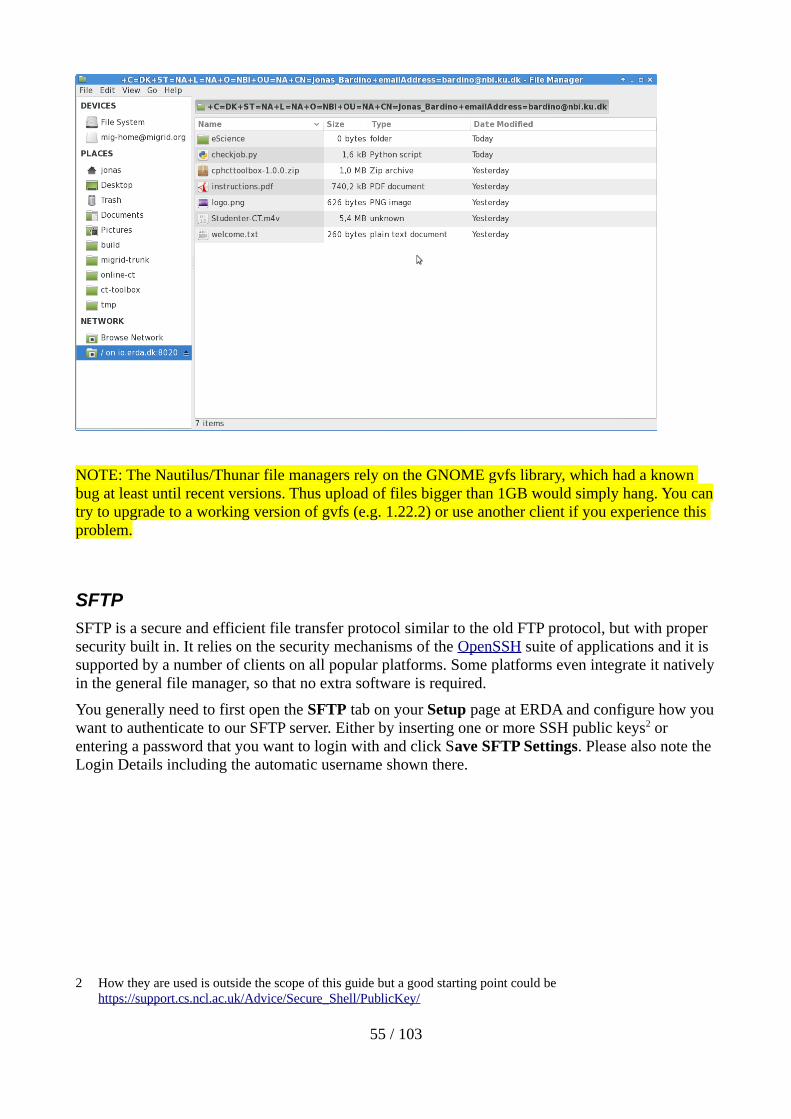
NOTE: The Nautilus/Thunar file managers rely on the GNOME gvfs library, which had a known bug at least until recent versions. Thus upload of files bigger than 1GB would simply hang. You cantry to upgrade to a working version of gvfs (e.g. 1.22.2) or use another client if you experience this problem.
SFTP
SFTP is a secure and efficient file transfer protocol similar to the old FTP protocol, but with proper security built in. It relies on the security mechanisms of the OpenSSH suite of applications and it is supported by a number of clients on all popular platforms. Some platforms even integrate it nativelyin the general file manager, so that no extra software is required.
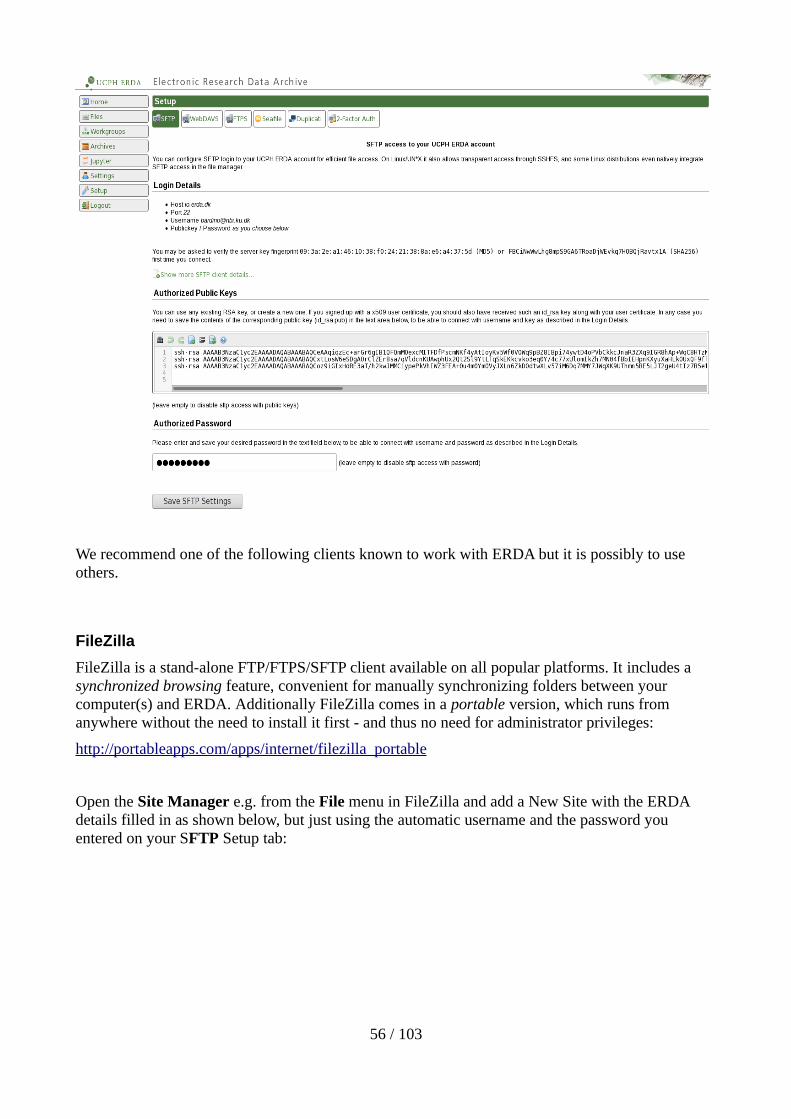
You generally need to first open the SFTP tab on your Setup page at ERDA and configure how youwant to authenticate to our SFTP server. Either by inserting one or more SSH public keys2 or entering a password that you want to login with and click Save SFTP Settings. Please also note the Login Details including the automatic username shown there.
2 How they are used is outside the scope of this guide but a good starting point could be https://support.cs.ncl.ac.uk/Advice/Secure_Shell/PublicKey/
55 / 103
We recommend one of the following clients known to work with ERDA but it is possibly to use others.
FileZilla
FileZilla is a stand-alone FTP/FTPS/SFTP client available on all popular platforms. It includes a synchronized browsing feature, convenient for manually synchronizing folders between your computer(s) and ERDA. Additionally FileZilla comes in a portable version, which runs from anywhere without the need to install it first - and thus no need for administrator privileges:
http://portableapps.com/apps/internet/filezilla_portable
Open the Site Manager e.g. from the File menu in FileZilla and add a New Site with the ERDA details filled in as shown below, but just using the automatic username and the password you entered on your SFTP Setup tab:
56 / 103
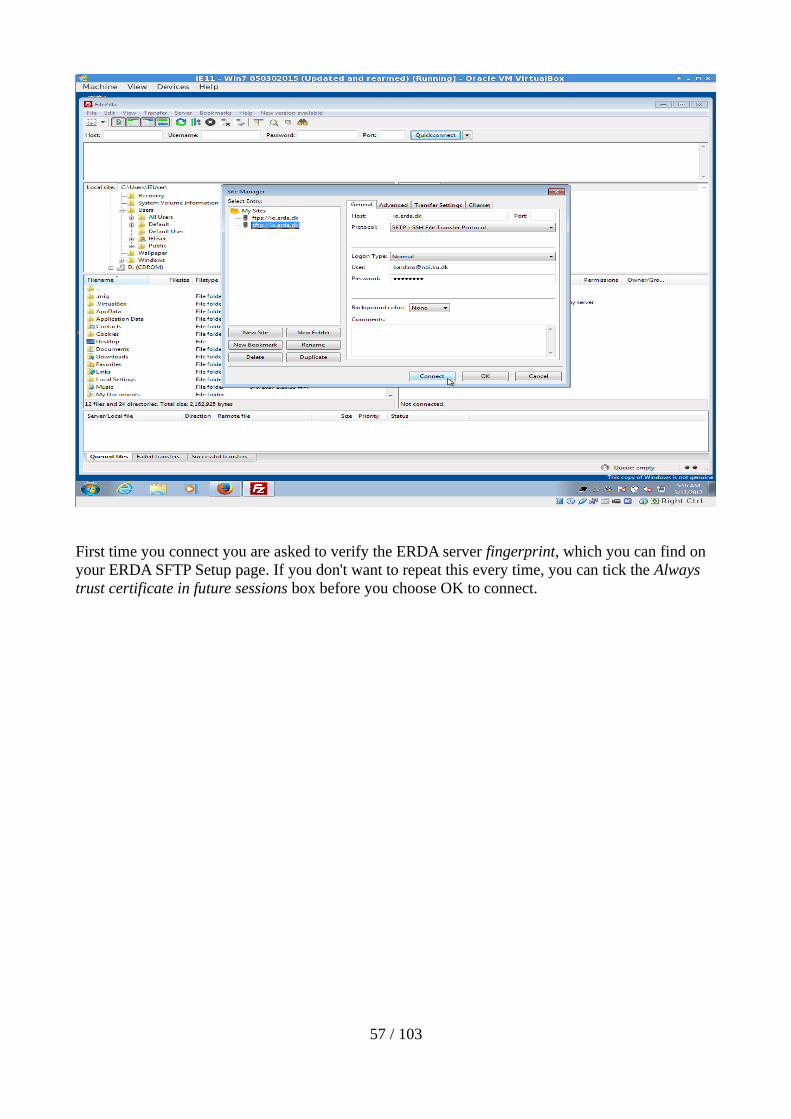
First time you connect you are asked to verify the ERDA server fingerprint, which you can find on your ERDA SFTP Setup page. If you don't want to repeat this every time, you can tick the Always trust certificate in future sessions box before you choose OK to connect.
57 / 103
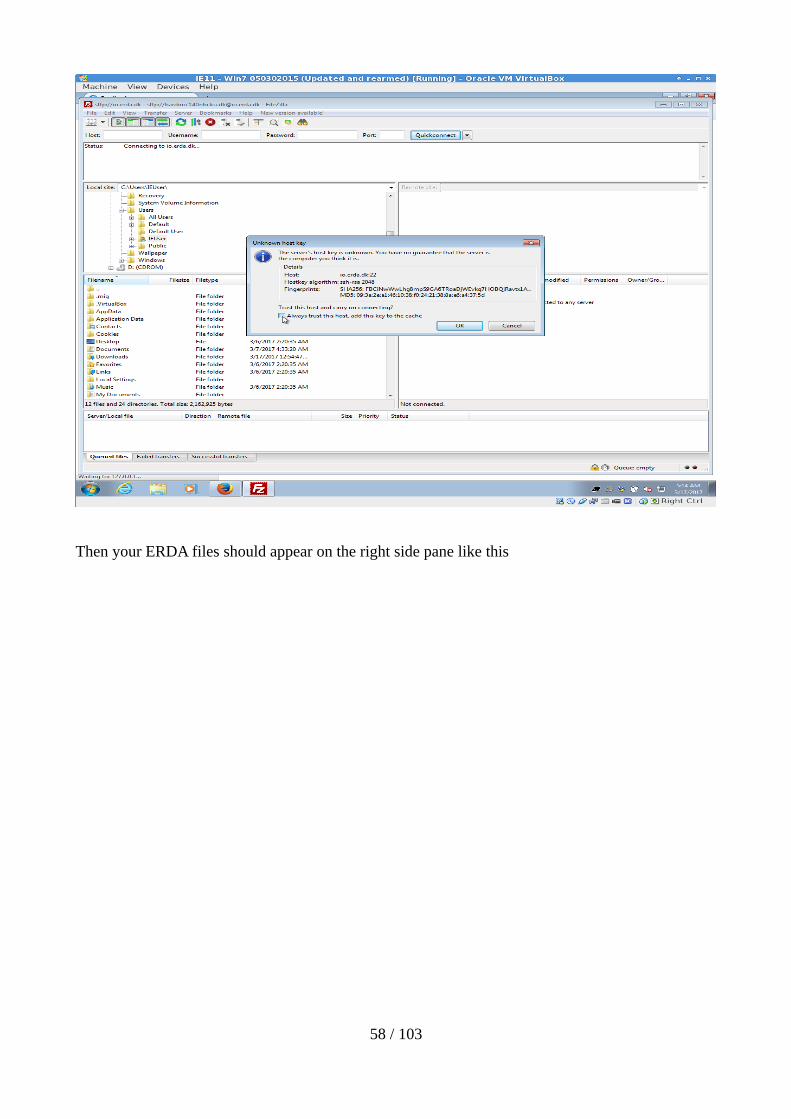
Then your ERDA files should appear on the right side pane like this
58 / 103

Please refer to the project page for further information:
https://filezilla-project.org
WinSCP
WinSCP is another popular stand-alone FTP/FTPS/SFTP client available only for Windows. The ERDA configuration is not that different from the FileZilla one, and likewise it comes in a portable version which doesn't require installation and administrator rights. Additionally it has a semi-automatic sync feature which eases synchronization of files and folders between your computer(s) and ERDA.
Please refer to the project page for more information:
https://winscp.net/
PuTTY SFTP
PuTTY is a popular stand-alone SSH client originally developed for Windows, but now also available on other platforms. It is used under the hood for a number of other clients and comes with a SFTP command line client that can be used to interact with ERDA.
IMPORTANT: due to security concerns you need a recent version to connect to our SFTP service. Version 0.67 and later are known to work, whereas older versions at least up to 0.64 fail to connect with the error “Couldn't agree a key exchange algorithm: available ...”. If you look at the PuTTY
59 / 103
Changes page you'll see that there are a number of recent security fixes, which motivate upgrading to version 0.68 or later anyway.Please refer to the project page for more information:
www.chiark.greenend.org.uk/~sgtatham/putty/
Linux File Manager
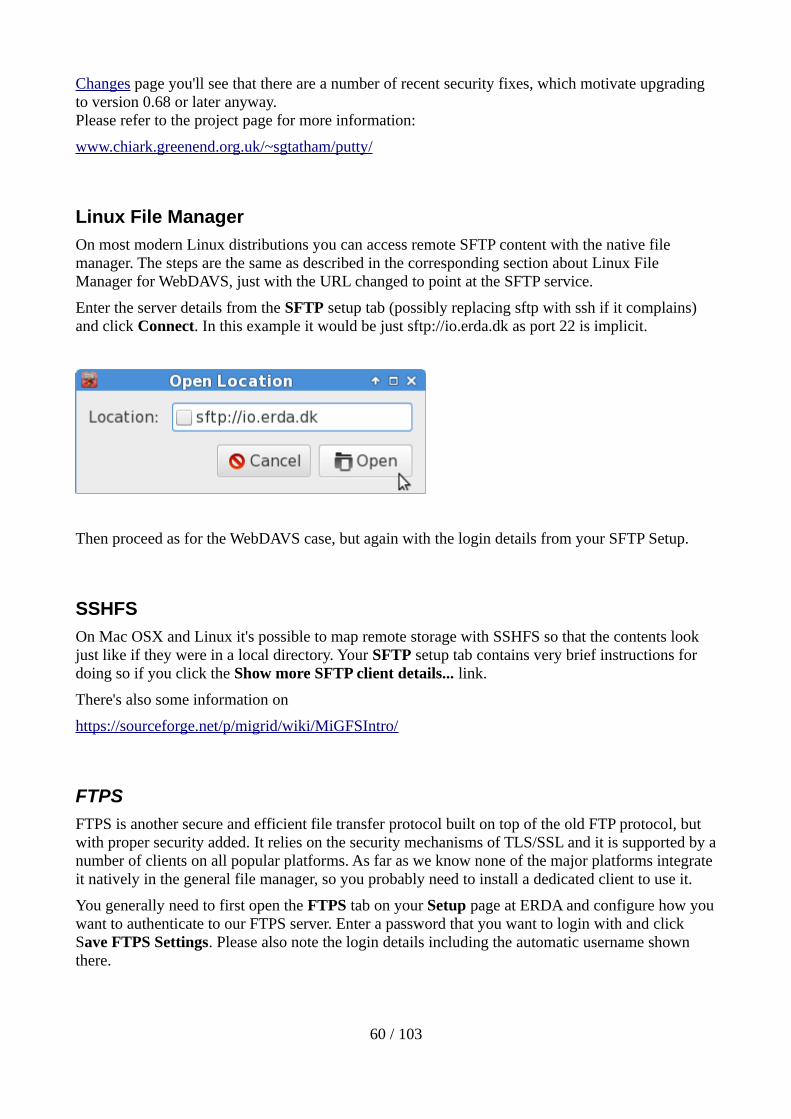
On most modern Linux distributions you can access remote SFTP content with the native file manager. The steps are the same as described in the corresponding section about Linux File Manager for WebDAVS, just with the URL changed to point at the SFTP service.
Enter the server details from the SFTP setup tab (possibly replacing sftp with ssh if it complains) and click Connect. In this example it would be just sftp://io.erda.dk as port 22 is implicit.
Then proceed as for the WebDAVS case, but again with the login details from your SFTP Setup.
SSHFS
On Mac OSX and Linux it's possible to map remote storage with SSHFS so that the contents look just like if they were in a local directory. Your SFTP setup tab contains very brief instructions for doing so if you click the Show more SFTP client details... link.
There's also some information on
https://sourceforge.net/p/migrid/wiki/MiGFSIntro/
FTPS
FTPS is another secure and efficient file transfer protocol built on top of the old FTP protocol, but with proper security added. It relies on the security mechanisms of TLS/SSL and it is supported by anumber of clients on all popular platforms. As far as we know none of the major platforms integrateit natively in the general file manager, so you probably need to install a dedicated client to use it.
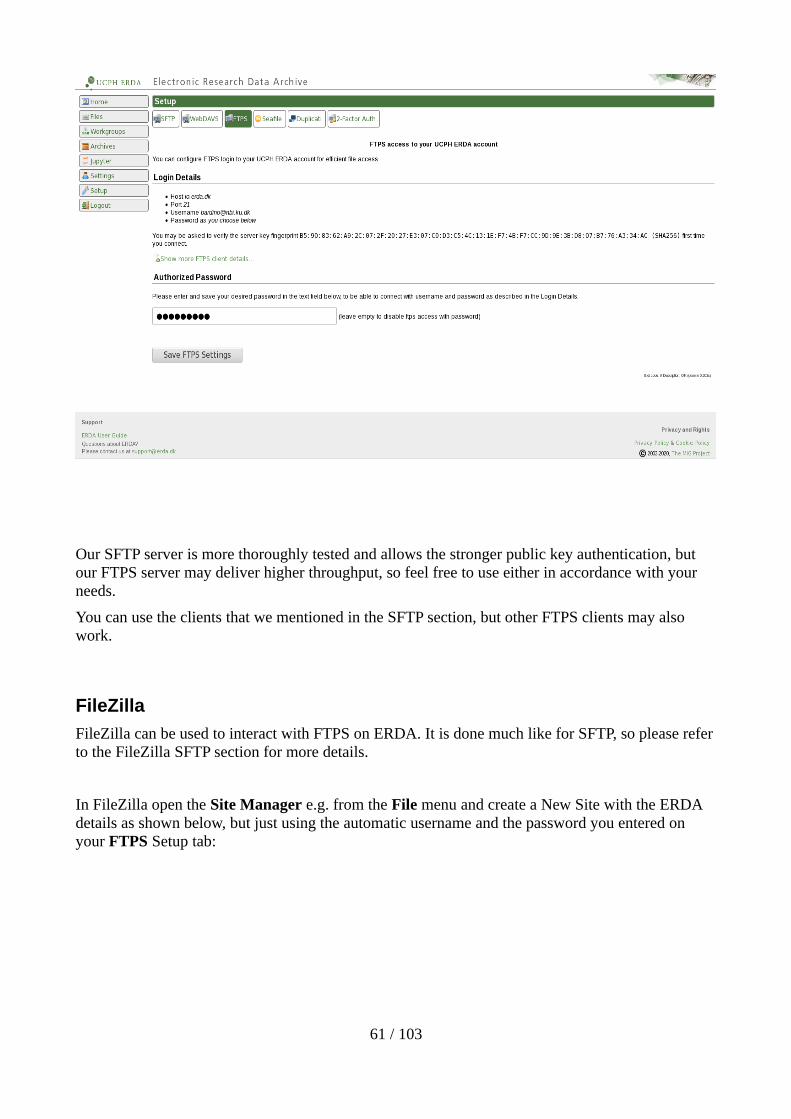
You generally need to first open the FTPS tab on your Setup page at ERDA and configure how youwant to authenticate to our FTPS server. Enter a password that you want to login with and click Save FTPS Settings. Please also note the login details including the automatic username shown there.
60 / 103
Our SFTP server is more thoroughly tested and allows the stronger public key authentication, but our FTPS server may deliver higher throughput, so feel free to use either in accordance with your needs.
You can use the clients that we mentioned in the SFTP section, but other FTPS clients may also work.
FileZilla
FileZilla can be used to interact with FTPS on ERDA. It is done much like for SFTP, so please referto the FileZilla SFTP section for more details.
In FileZilla open the Site Manager e.g. from the File menu and create a New Site with the ERDA details as shown below, but just using the automatic username and the password you entered on your FTPS Setup tab:
61 / 103
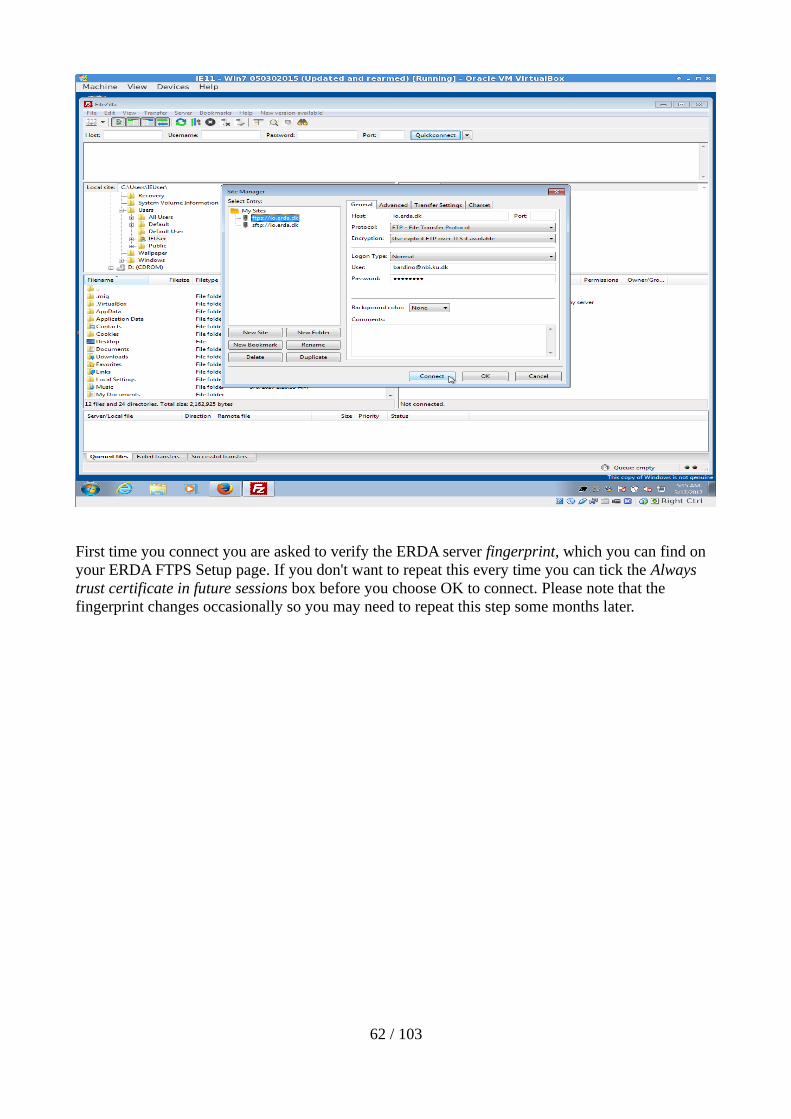
First time you connect you are asked to verify the ERDA server fingerprint, which you can find on your ERDA FTPS Setup page. If you don't want to repeat this every time you can tick the Always trust certificate in future sessions box before you choose OK to connect. Please note that the fingerprint changes occasionally so you may need to repeat this step some months later.
62 / 103
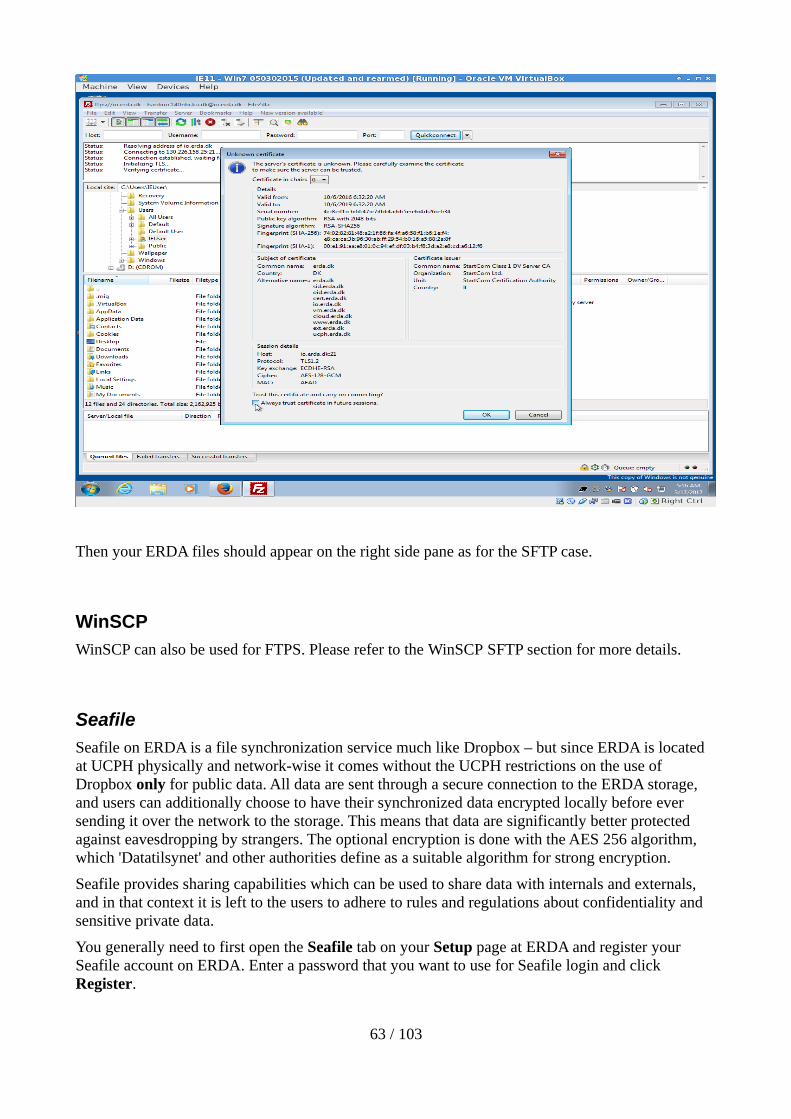
Then your ERDA files should appear on the right side pane as for the SFTP case.
WinSCP
WinSCP can also be used for FTPS. Please refer to the WinSCP SFTP section for more details.
Seafile
Seafile on ERDA is a file synchronization service much like Dropbox – but since ERDA is located at UCPH physically and network-wise it comes without the UCPH restrictions on the use of Dropbox only for public data. All data are sent through a secure connection to the ERDA storage, and users can additionally choose to have their synchronized data encrypted locally before ever sending it over the network to the storage. This means that data are significantly better protected against eavesdropping by strangers. The optional encryption is done with the AES 256 algorithm, which 'Datatilsynet' and other authorities define as a suitable algorithm for strong encryption.
Seafile provides sharing capabilities which can be used to share data with internals and externals, and in that context it is left to the users to adhere to rules and regulations about confidentiality and sensitive private data.
You generally need to first open the Seafile tab on your Setup page at ERDA and register your Seafile account on ERDA. Enter a password that you want to use for Seafile login and click Register.
63 / 103
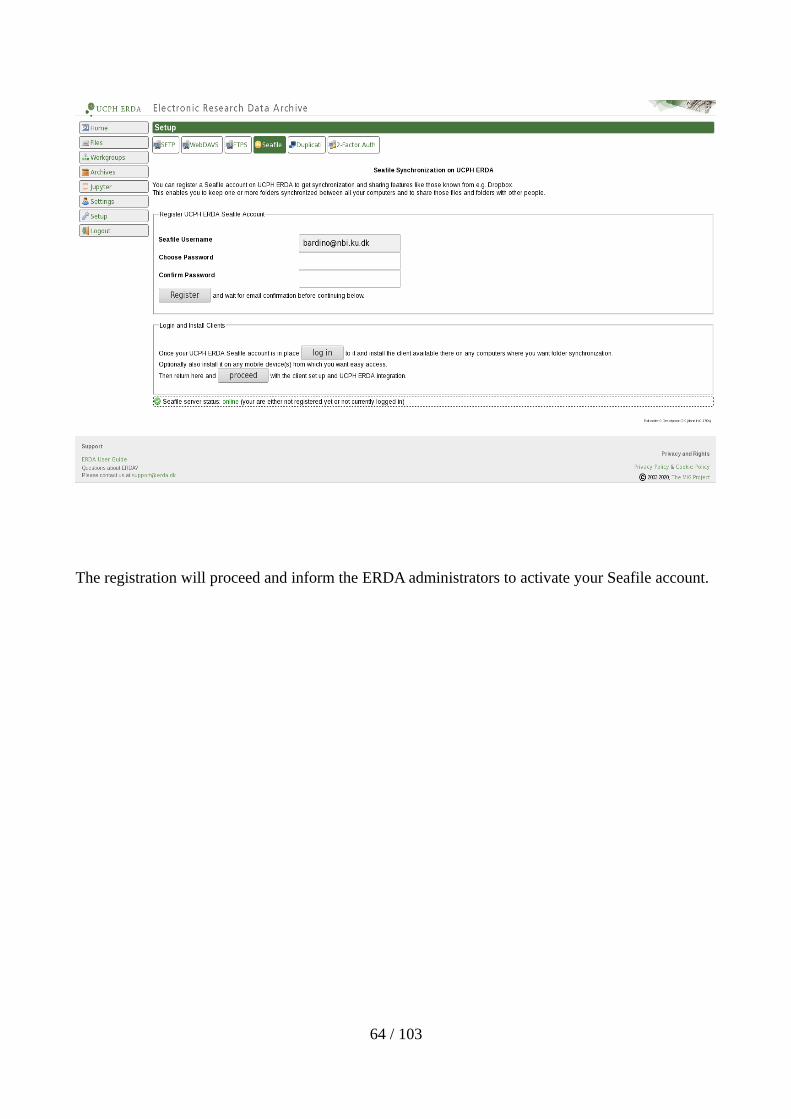
The registration will proceed and inform the ERDA administrators to activate your Seafile account.
64 / 103
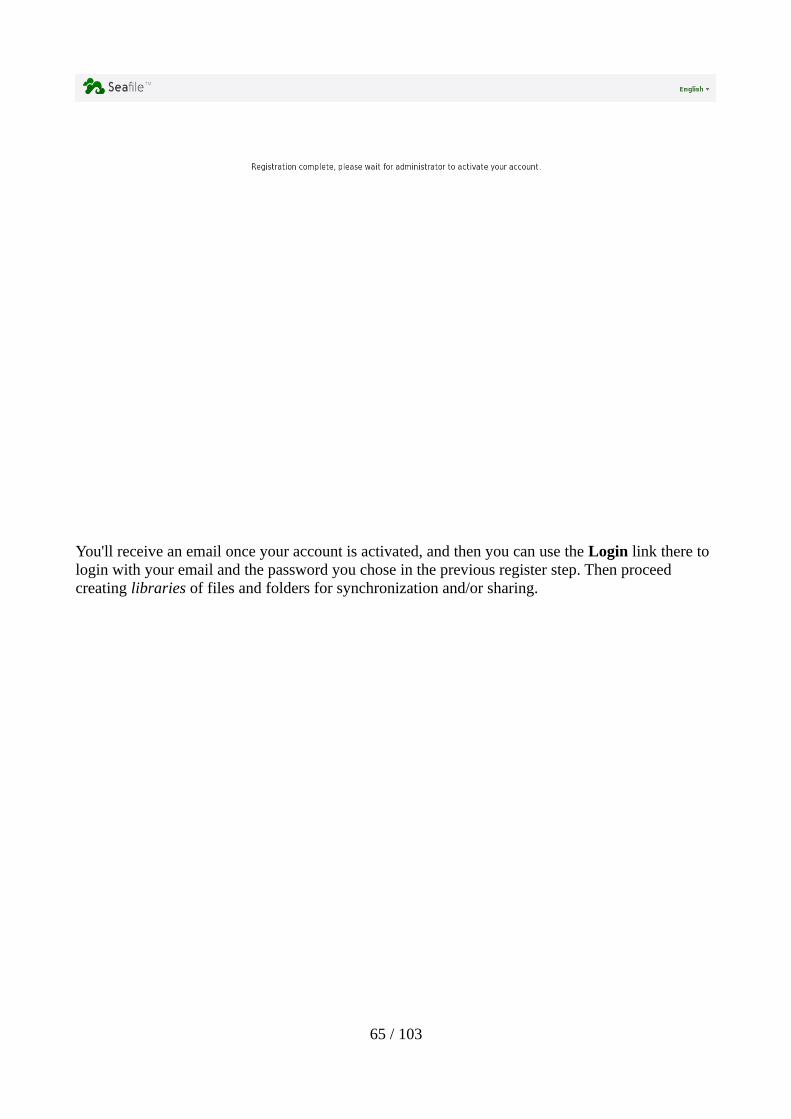
You'll receive an email once your account is activated, and then you can use the Login link there to login with your email and the password you chose in the previous register step. Then proceed creating libraries of files and folders for synchronization and/or sharing.
65 / 103
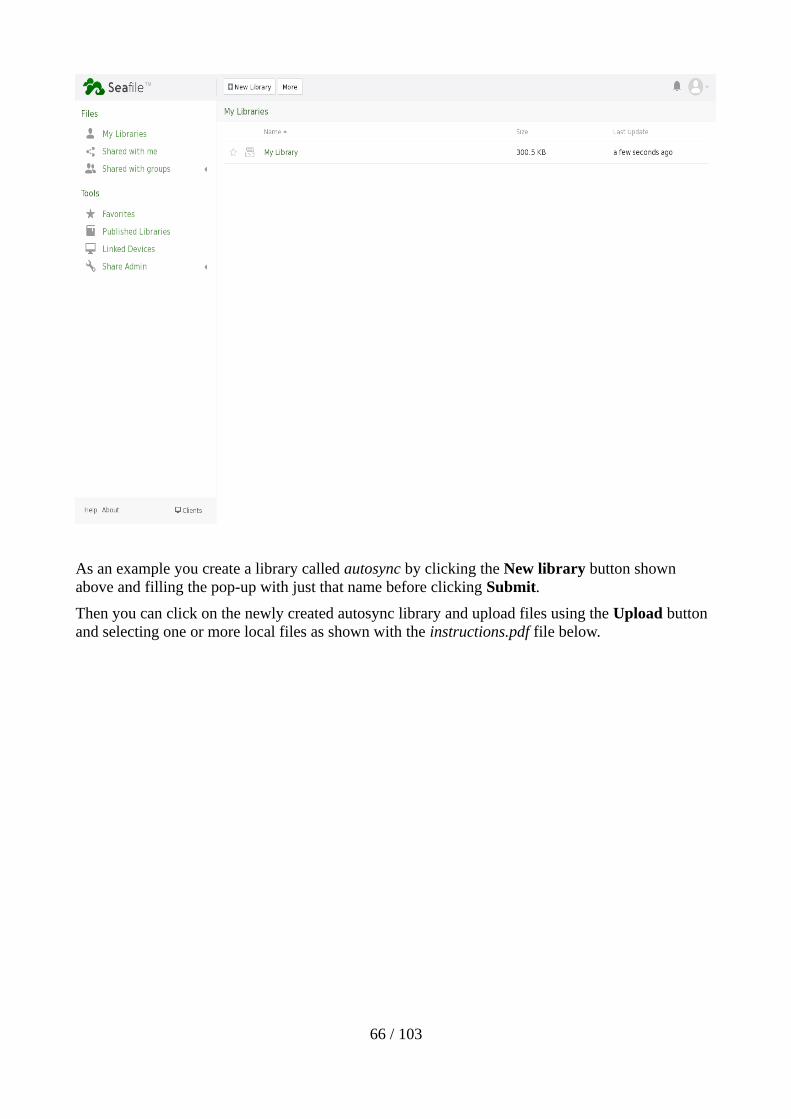
As an example you create a library called autosync by clicking the New library button shown above and filling the pop-up with just that name before clicking Submit.
Then you can click on the newly created autosync library and upload files using the Upload button and selecting one or more local files as shown with the instructions.pdf file below.
66 / 103
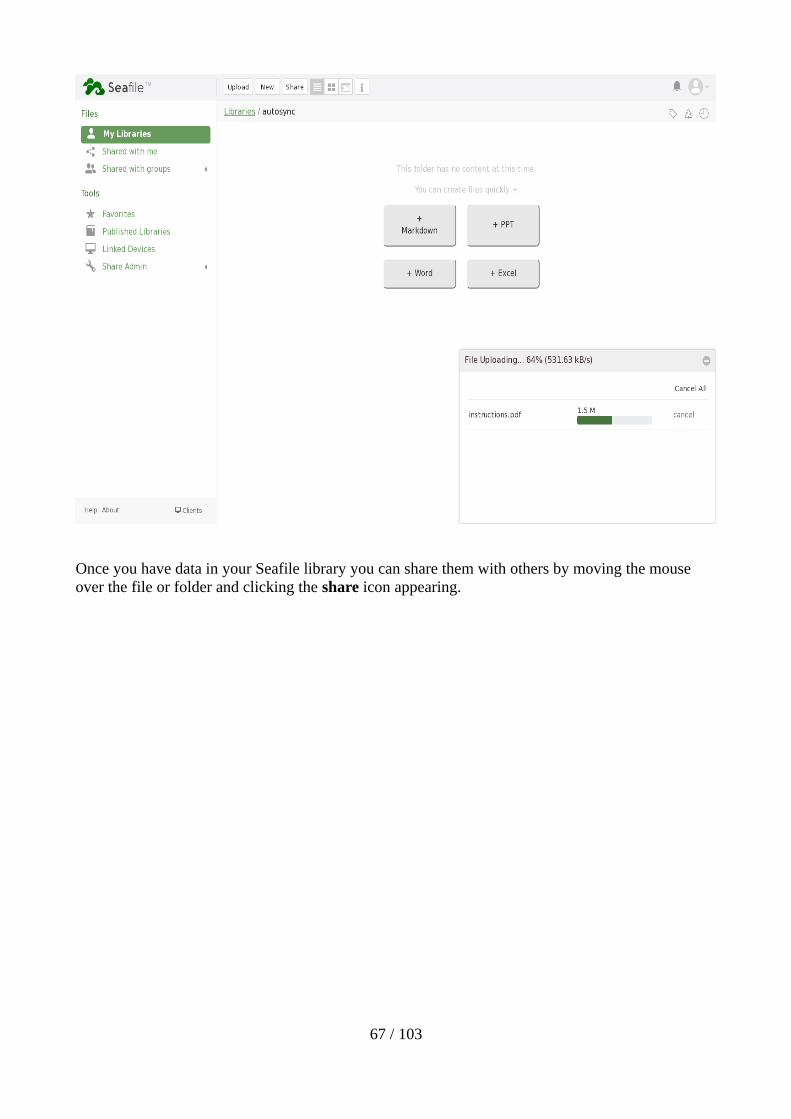
Once you have data in your Seafile library you can share them with others by moving the mouse over the file or folder and clicking the share icon appearing.
67 / 103
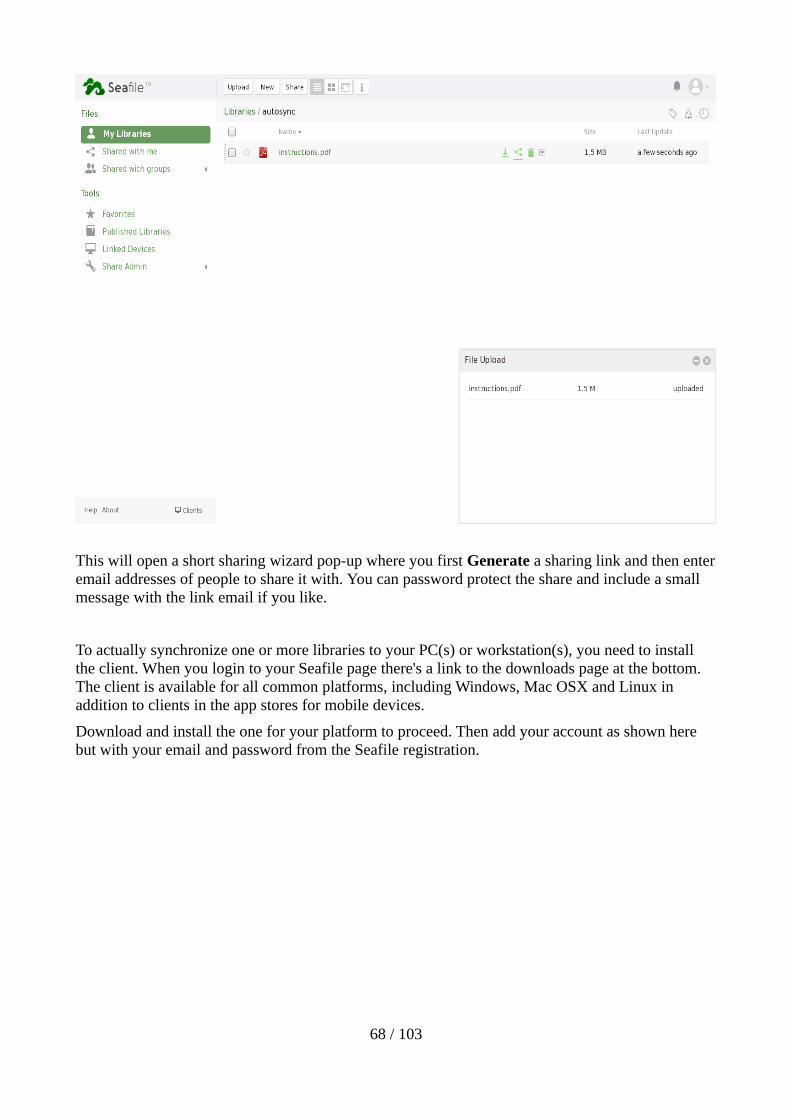
This will open a short sharing wizard pop-up where you first Generate a sharing link and then enteremail addresses of people to share it with. You can password protect the share and include a small message with the link email if you like.
To actually synchronize one or more libraries to your PC(s) or workstation(s), you need to install the client. When you login to your Seafile page there's a link to the downloads page at the bottom. The client is available for all common platforms, including Windows, Mac OSX and Linux in addition to clients in the app stores for mobile devices.
Download and install the one for your platform to proceed. Then add your account as shown here but with your email and password from the Seafile registration.
68 / 103
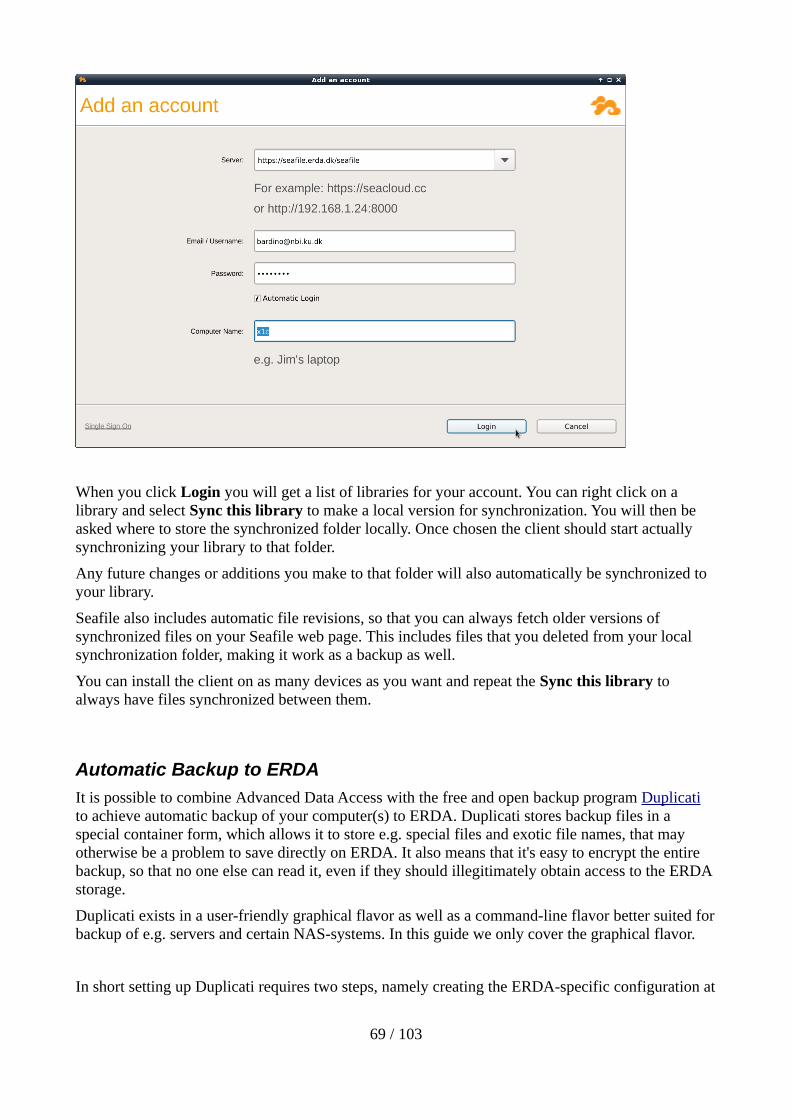
When you click Login you will get a list of libraries for your account. You can right click on a library and select Sync this library to make a local version for synchronization. You will then be asked where to store the synchronized folder locally. Once chosen the client should start actually synchronizing your library to that folder.
Any future changes or additions you make to that folder will also automatically be synchronized to your library.
Seafile also includes automatic file revisions, so that you can always fetch older versions of synchronized files on your Seafile web page. This includes files that you deleted from your local synchronization folder, making it work as a backup as well.
You can install the client on as many devices as you want and repeat the Sync this library to always have files synchronized between them.
Automatic Backup to ERDA
It is possible to combine Advanced Data Access with the free and open backup program Duplicati to achieve automatic backup of your computer(s) to ERDA. Duplicati stores backup files in a special container form, which allows it to store e.g. special files and exotic file names, that may otherwise be a problem to save directly on ERDA. It also means that it's easy to encrypt the entire backup, so that no one else can read it, even if they should illegitimately obtain access to the ERDA storage.
Duplicati exists in a user-friendly graphical flavor as well as a command-line flavor better suited forbackup of e.g. servers and certain NAS-systems. In this guide we only cover the graphical flavor.
In short setting up Duplicati requires two steps, namely creating the ERDA-specific configuration at
69 / 103
your ERDA Duplicati Settings followed by import of the resulting configuration(s) in the Duplicati client on your computer.
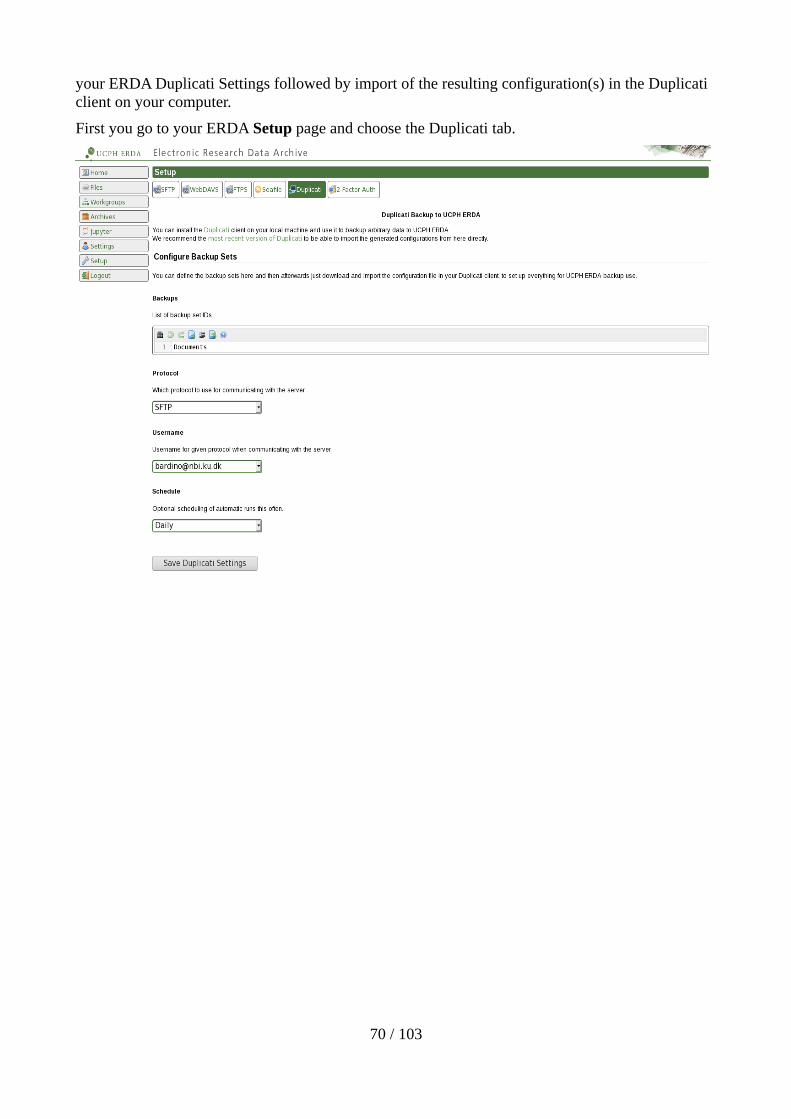
First you go to your ERDA Setup page and choose the Duplicati tab.
70 / 103
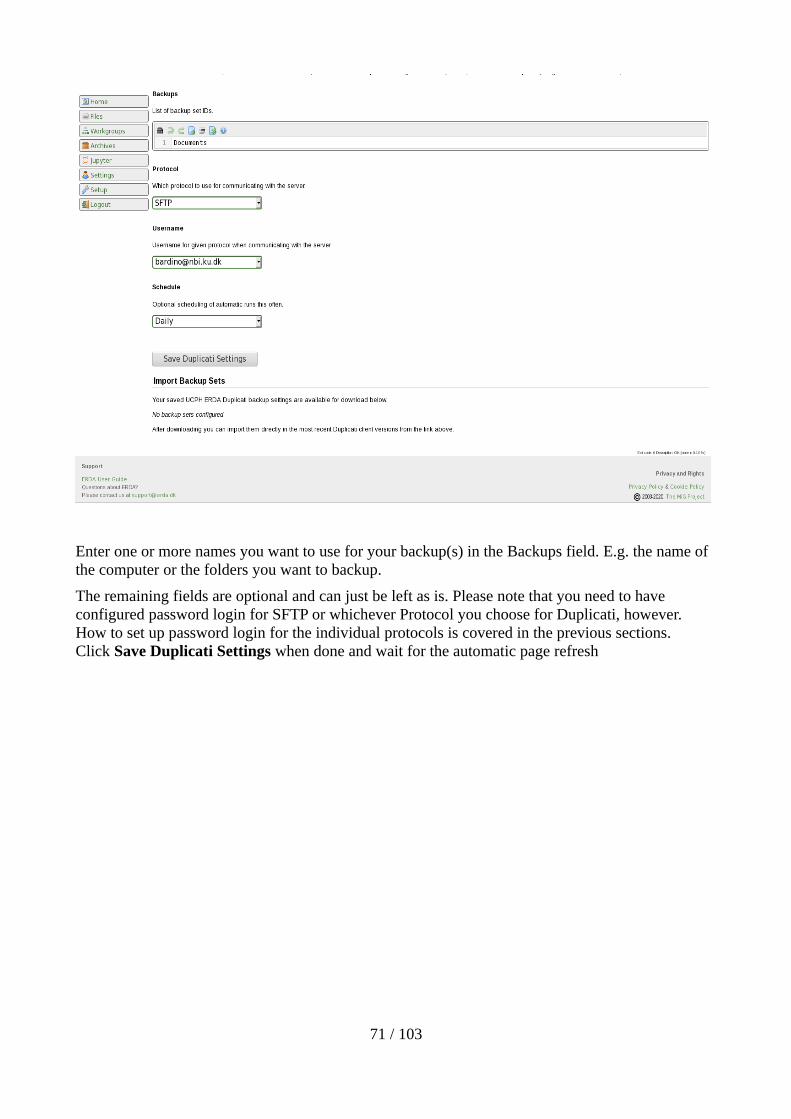
Enter one or more names you want to use for your backup(s) in the Backups field. E.g. the name of the computer or the folders you want to backup.
The remaining fields are optional and can just be left as is. Please note that you need to have configured password login for SFTP or whichever Protocol you choose for Duplicati, however.How to set up password login for the individual protocols is covered in the previous sections.Click Save Duplicati Settings when done and wait for the automatic page refresh
71 / 103
where links to a .json file now appear for each backup name you entered in the Backups field. In this case we just entered Documents and got Documents.json as a result. You can download the json file(s) by right clicking on the link(s) and then something like Save link as or Save target as depending on which web browser and language you use.
The second half of the setup is to import the resulting json file(s) directly in Duplicati.
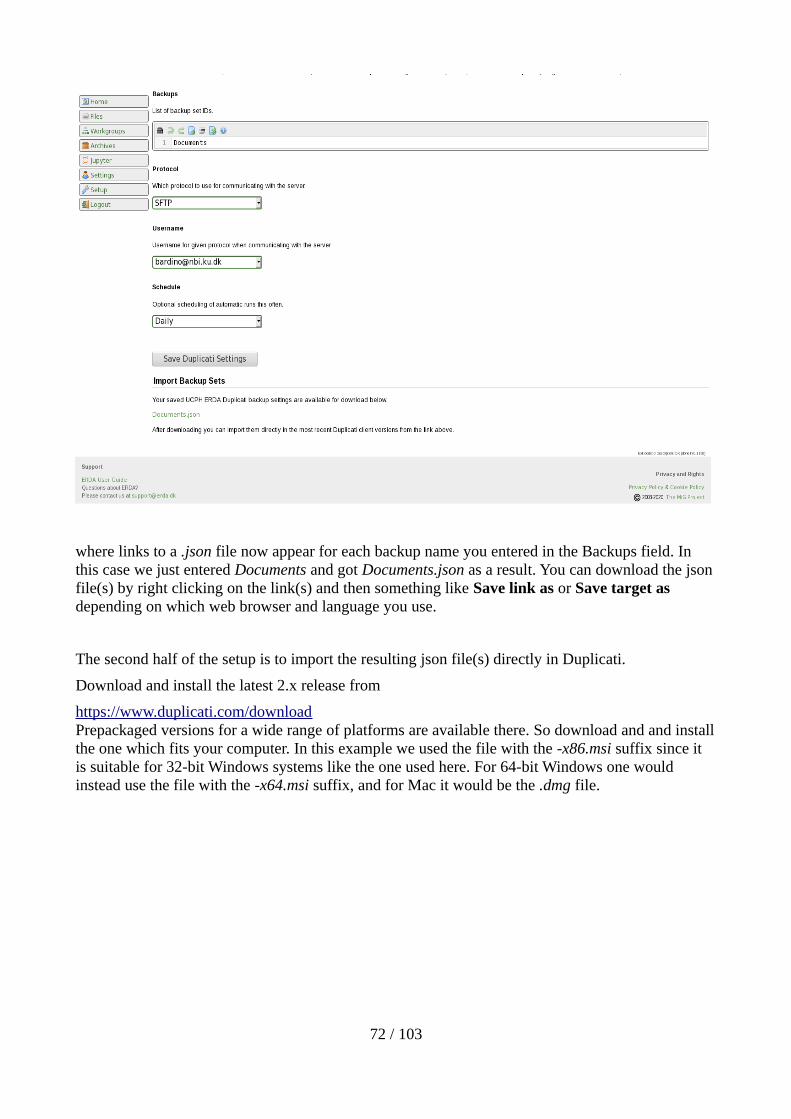
Download and install the latest 2.x release from
https://www.duplicati.com/downloadPrepackaged versions for a wide range of platforms are available there. So download and and installthe one which fits your computer. In this example we used the file with the -x86.msi suffix since it is suitable for 32-bit Windows systems like the one used here. For 64-bit Windows one would instead use the file with the -x64.msi suffix, and for Mac it would be the .dmg file.
72 / 103

On most platforms installing is a matter of double clicking the downloaded file and clicking throughthe install wizard. For Windows platforms the Windows Update utility should already have installedthe required .Net 4.5+ libraries. On other platforms it may be necessary to install the corresponding Mono 3.0+ libraries before the installation will proceed3.
When installed Duplicati should automatically start and show the status overview. However, you can always open Duplicati by right-clicking the status icon in the system tray next to the clock and choose Open there.Select Add backup from the menu in Duplicati
3 If you run into problems with Mono and security warnings, you may also want to have a look at https://github.com/duplicati/duplicati/wiki/SSL-TLS-support-in-Mono
73 / 103

and choose the Import from a file option before clicking Next.
74 / 103

Here you Browse to the saved .json file in the Configuration file field and click Import.
Optionally set up encryption for the backup before clicking Next. Here we show it without encryption.It is left for you to weigh the need for encryption against the extra load it adds on your computer when encrypting and decrypting backup data. In case you backup confidential data it is definitely a good idea to encrypt it – possibly even a legal requirement in line with the guidelines from the Danish Data Protection Agency.
75 / 103
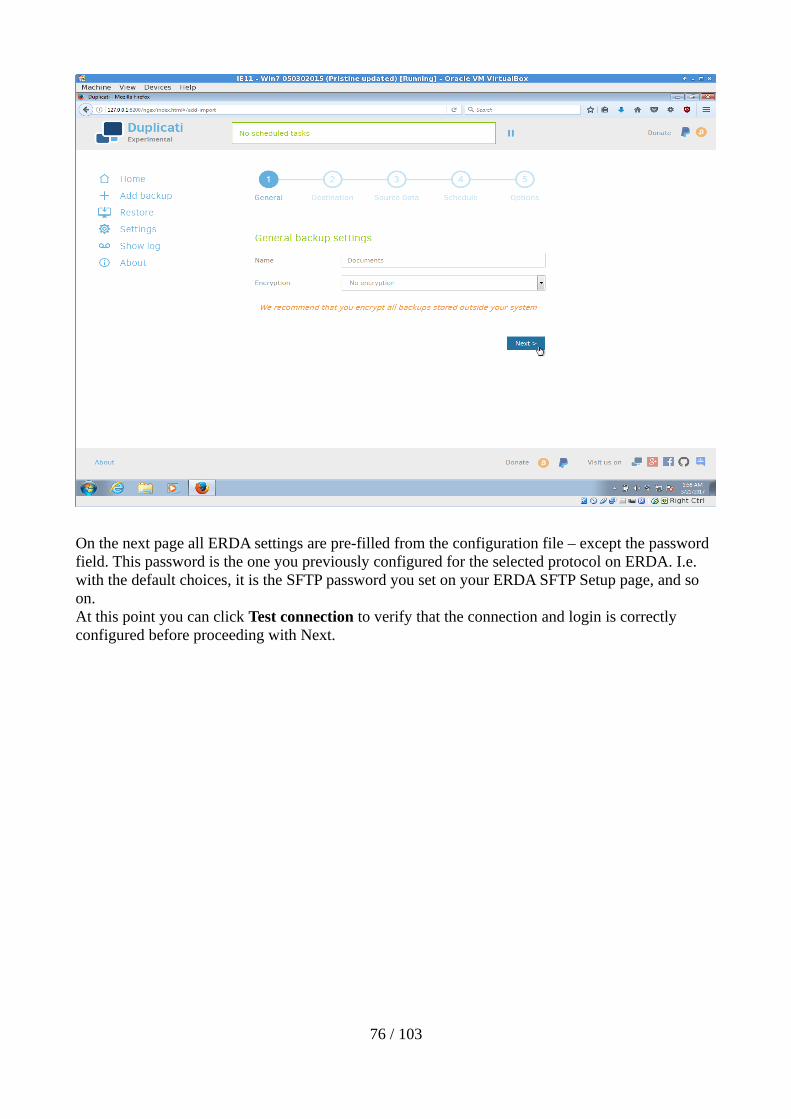
On the next page all ERDA settings are pre-filled from the configuration file – except the password field. This password is the one you previously configured for the selected protocol on ERDA. I.e. with the default choices, it is the SFTP password you set on your ERDA SFTP Setup page, and so on.At this point you can click Test connection to verify that the connection and login is correctly configured before proceeding with Next.
76 / 103
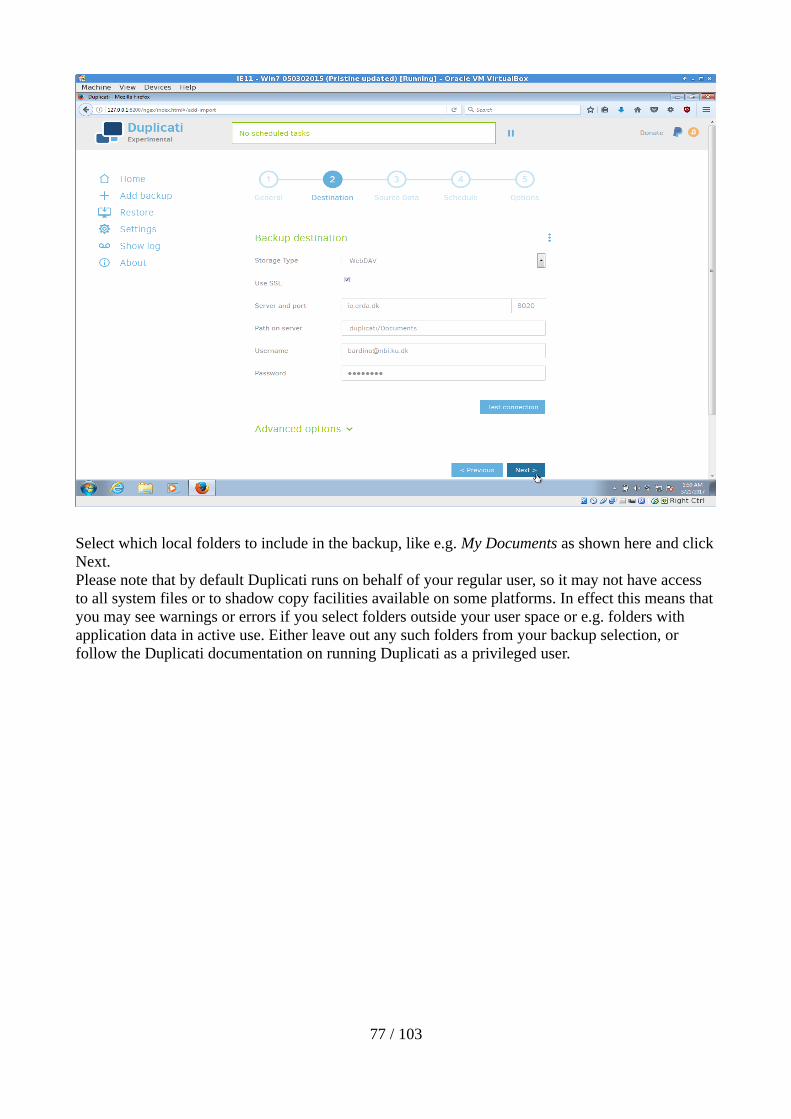
Select which local folders to include in the backup, like e.g. My Documents as shown here and clickNext.Please note that by default Duplicati runs on behalf of your regular user, so it may not have access to all system files or to shadow copy facilities available on some platforms. In effect this means thatyou may see warnings or errors if you select folders outside your user space or e.g. folders with application data in active use. Either leave out any such folders from your backup selection, or follow the Duplicati documentation on running Duplicati as a privileged user.
77 / 103
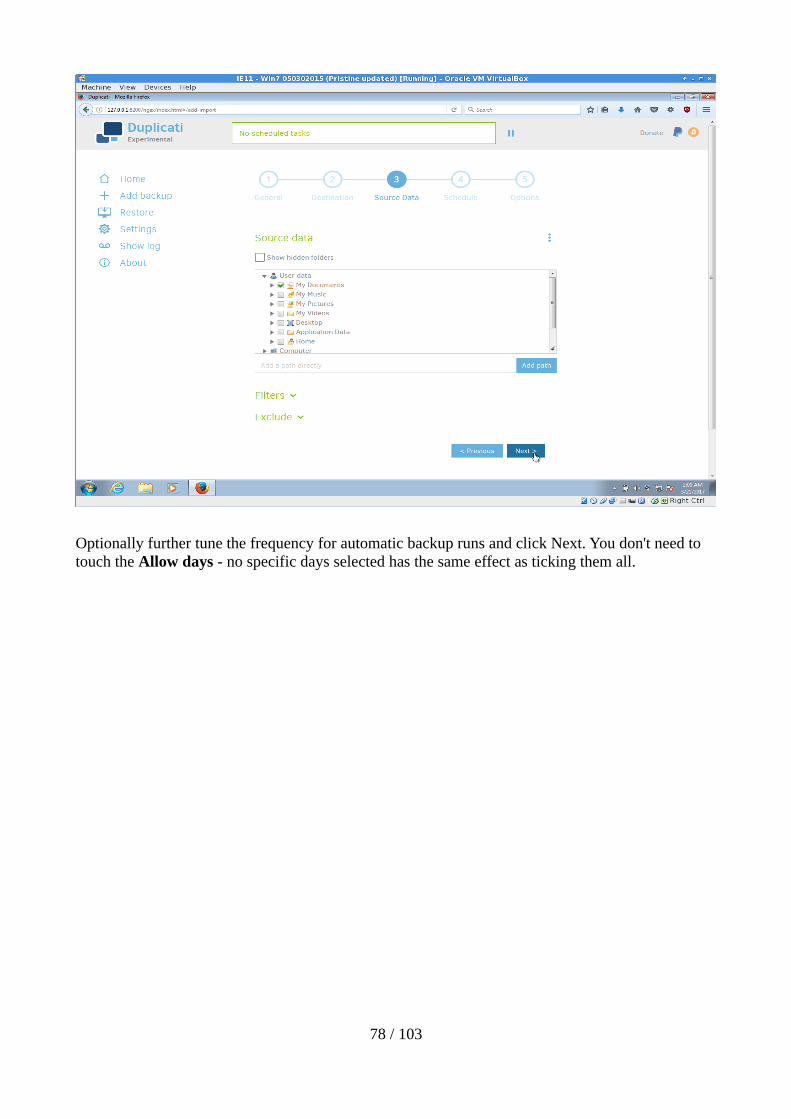
Optionally further tune the frequency for automatic backup runs and click Next. You don't need to touch the Allow days - no specific days selected has the same effect as ticking them all.
78 / 103
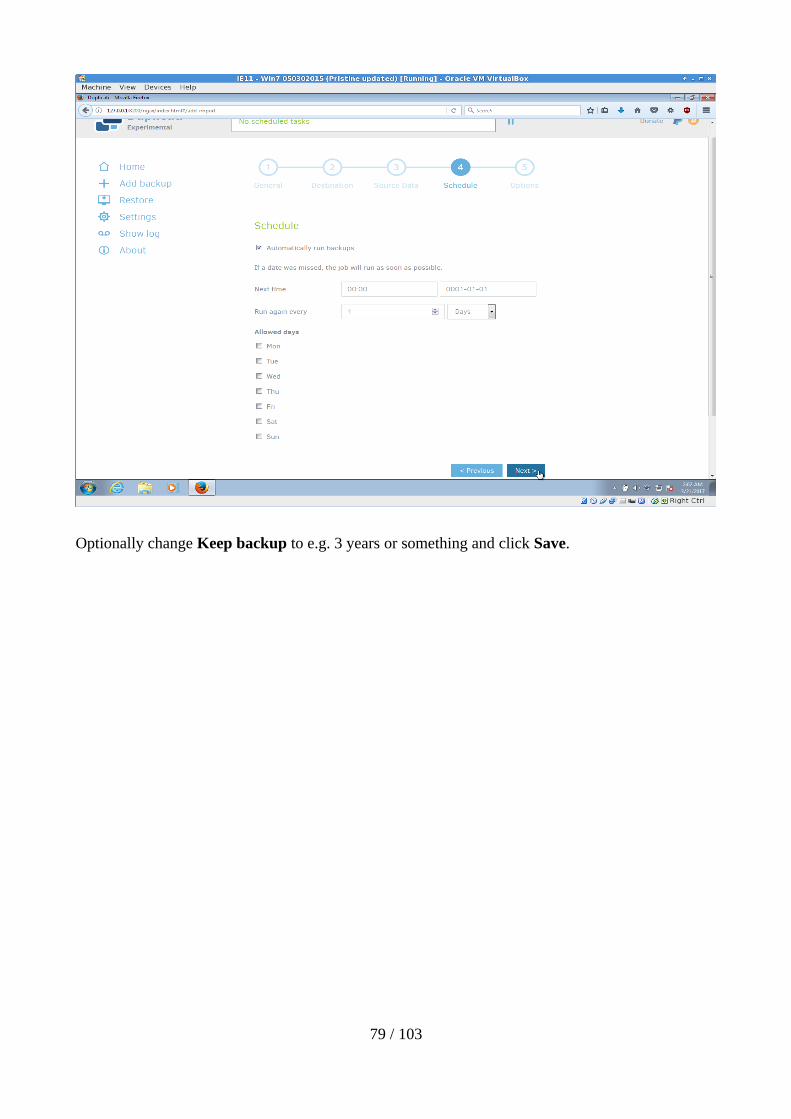
Optionally change Keep backup to e.g. 3 years or something and click Save.
79 / 103
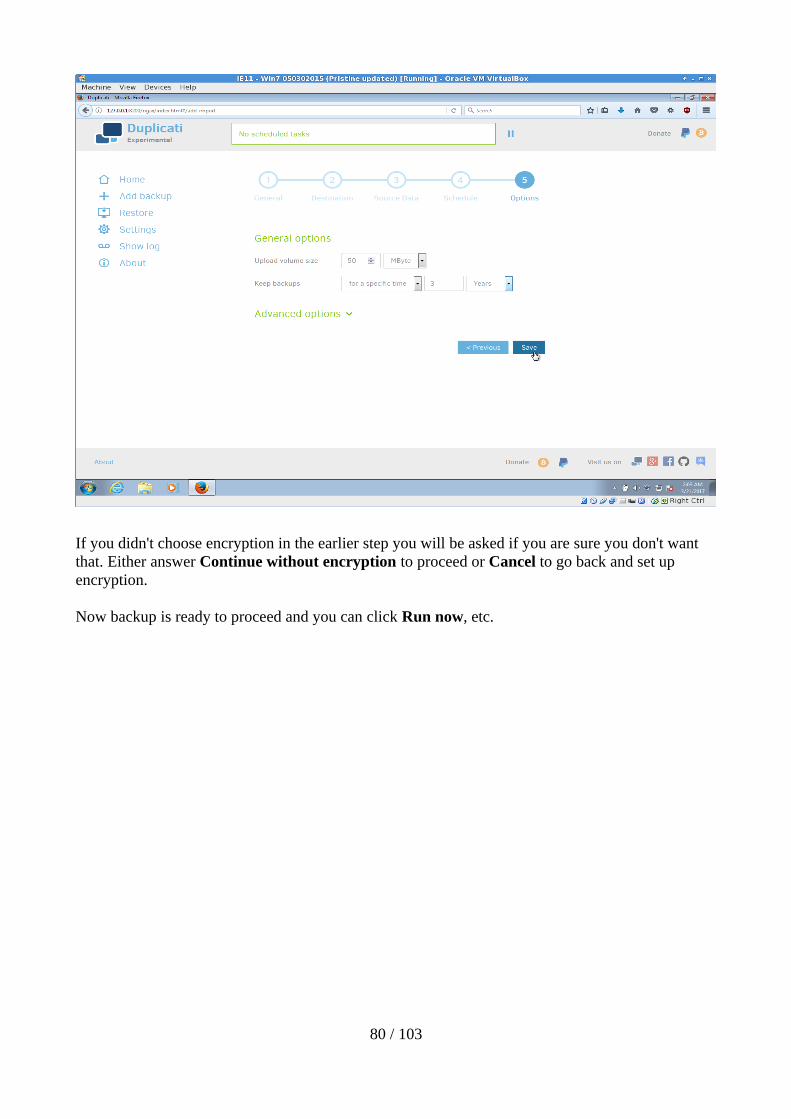
If you didn't choose encryption in the earlier step you will be asked if you are sure you don't want that. Either answer Continue without encryption to proceed or Cancel to go back and set up encryption.
Now backup is ready to proceed and you can click Run now, etc.
80 / 103
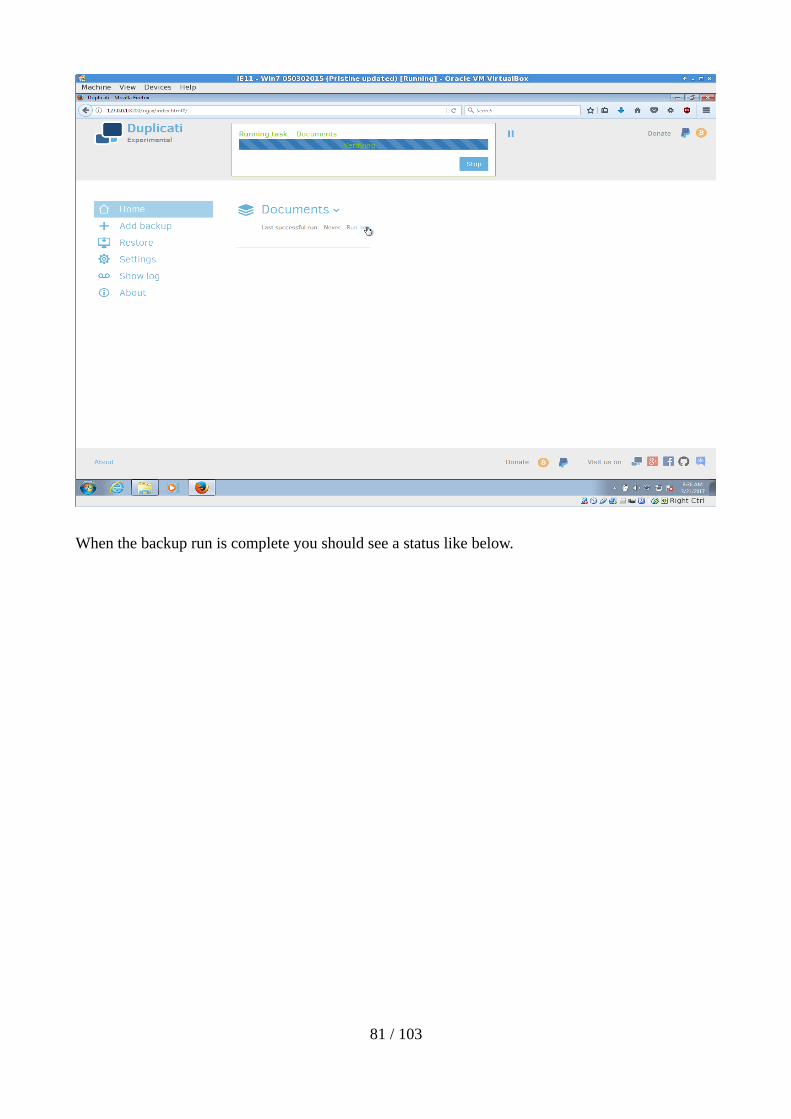
When the backup run is complete you should see a status like below.
81 / 103
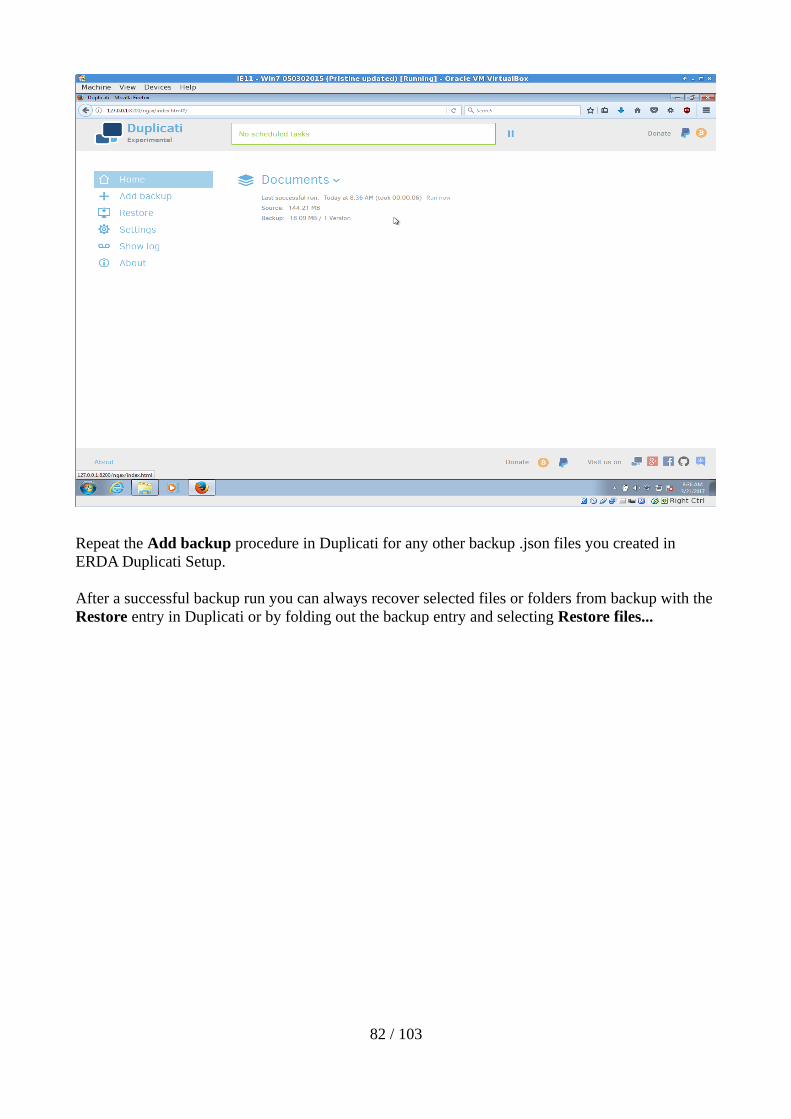
Repeat the Add backup procedure in Duplicati for any other backup .json files you created in ERDA Duplicati Setup.
After a successful backup run you can always recover selected files or folders from backup with theRestore entry in Duplicati or by folding out the backup entry and selecting Restore files...
82 / 103
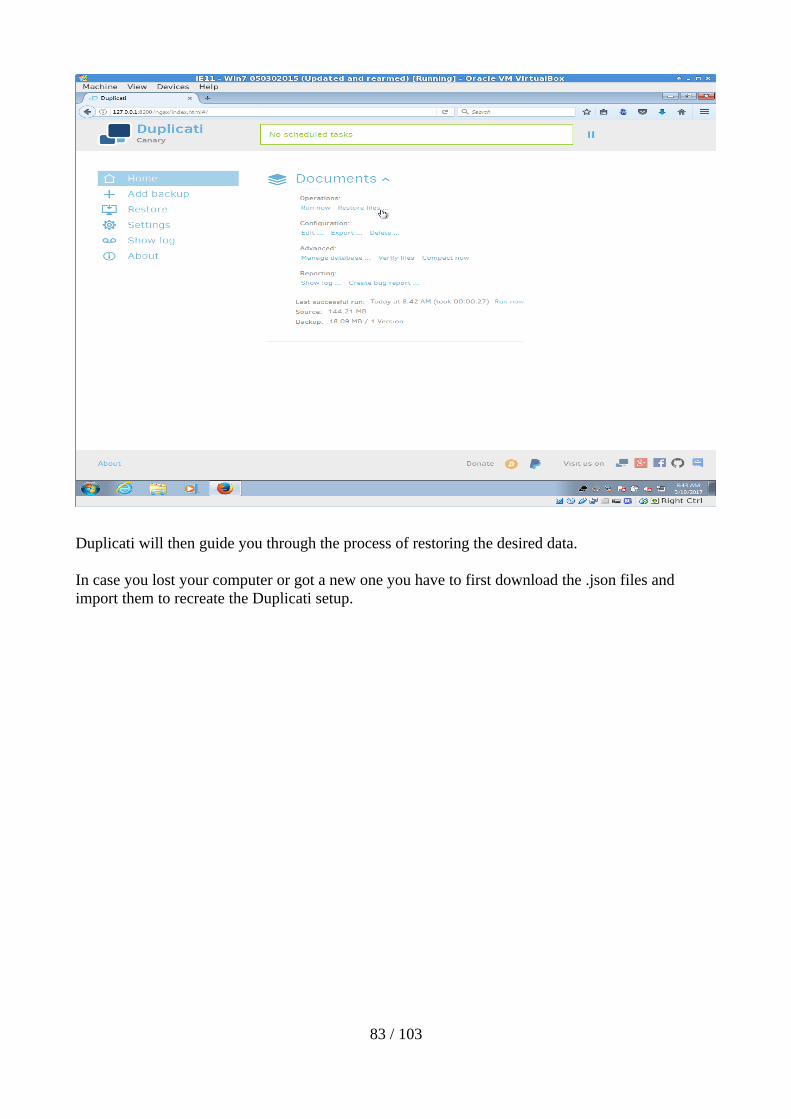
Duplicati will then guide you through the process of restoring the desired data.
In case you lost your computer or got a new one you have to first download the .json files and import them to recreate the Duplicati setup.
83 / 103
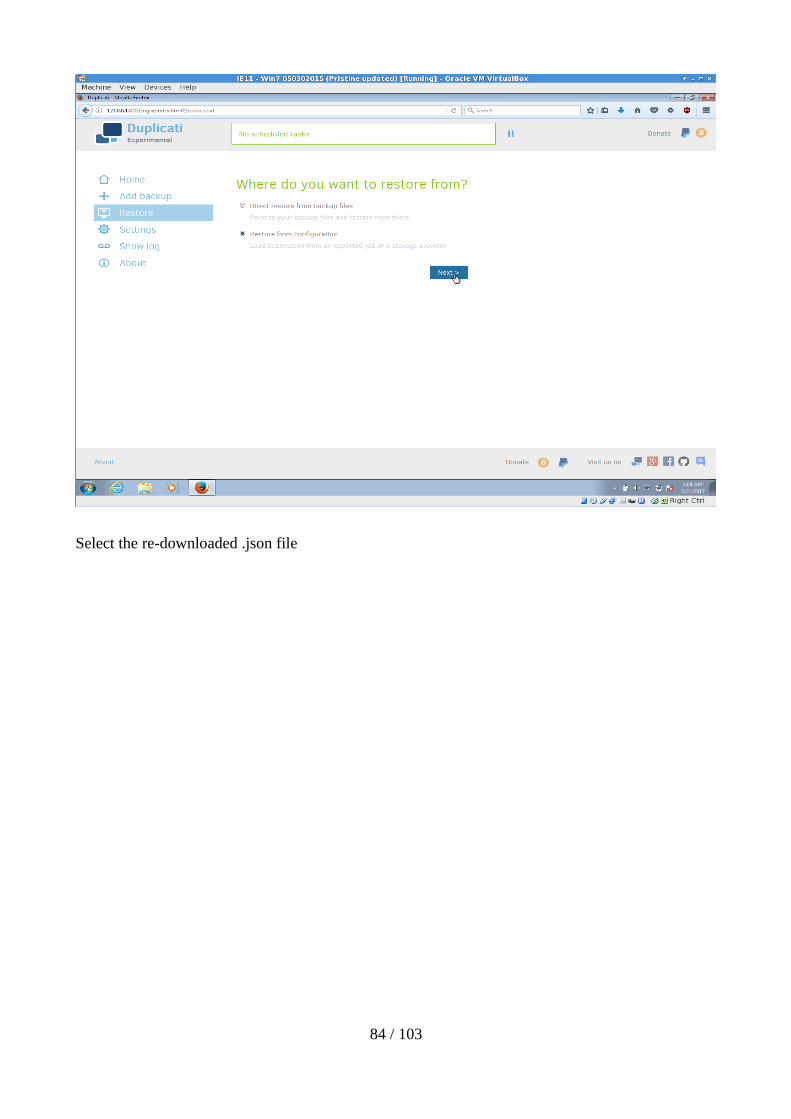
Select the re-downloaded .json file
84 / 103
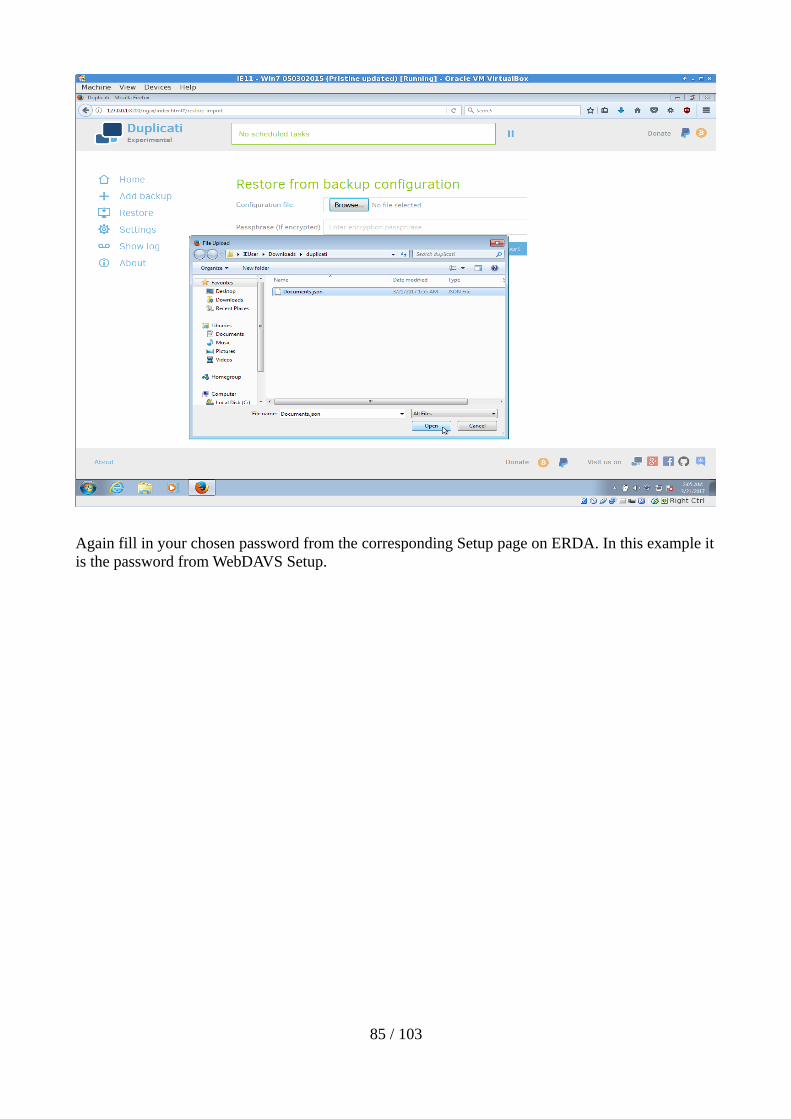
Again fill in your chosen password from the corresponding Setup page on ERDA. In this example itis the password from WebDAVS Setup.
85 / 103
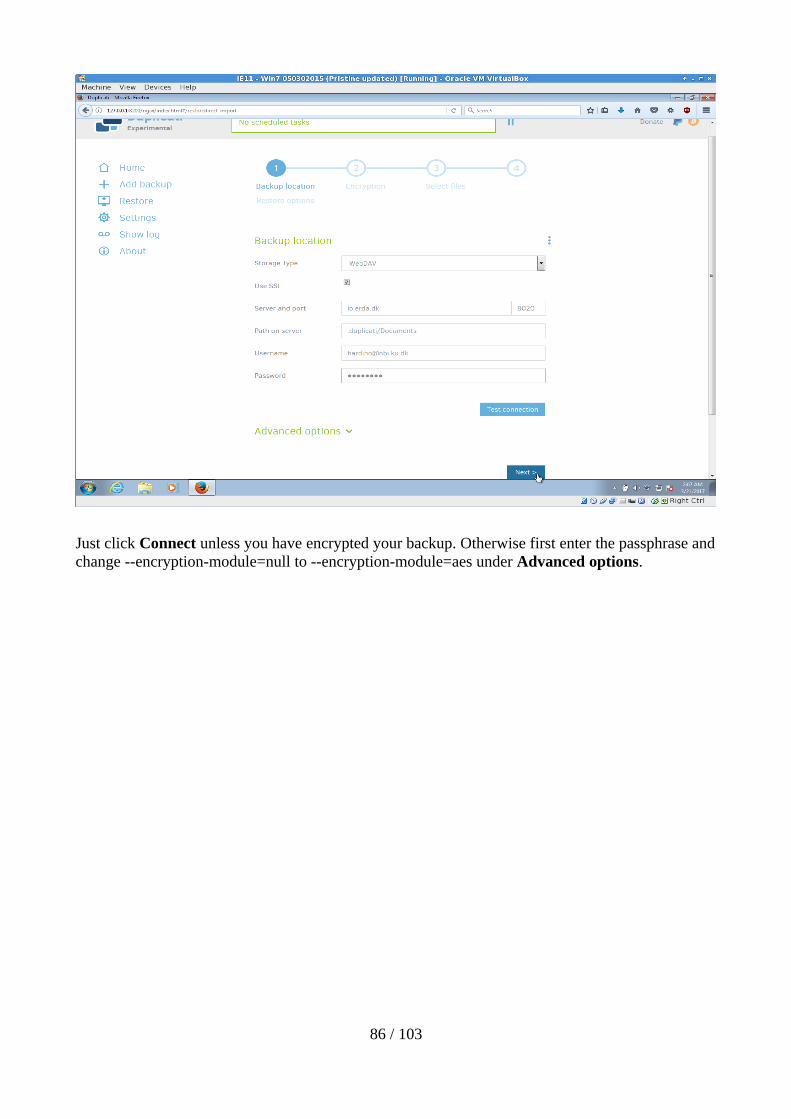
Just click Connect unless you have encrypted your backup. Otherwise first enter the passphrase andchange --encryption-module=null to --encryption-module=aes under Advanced options.
86 / 103
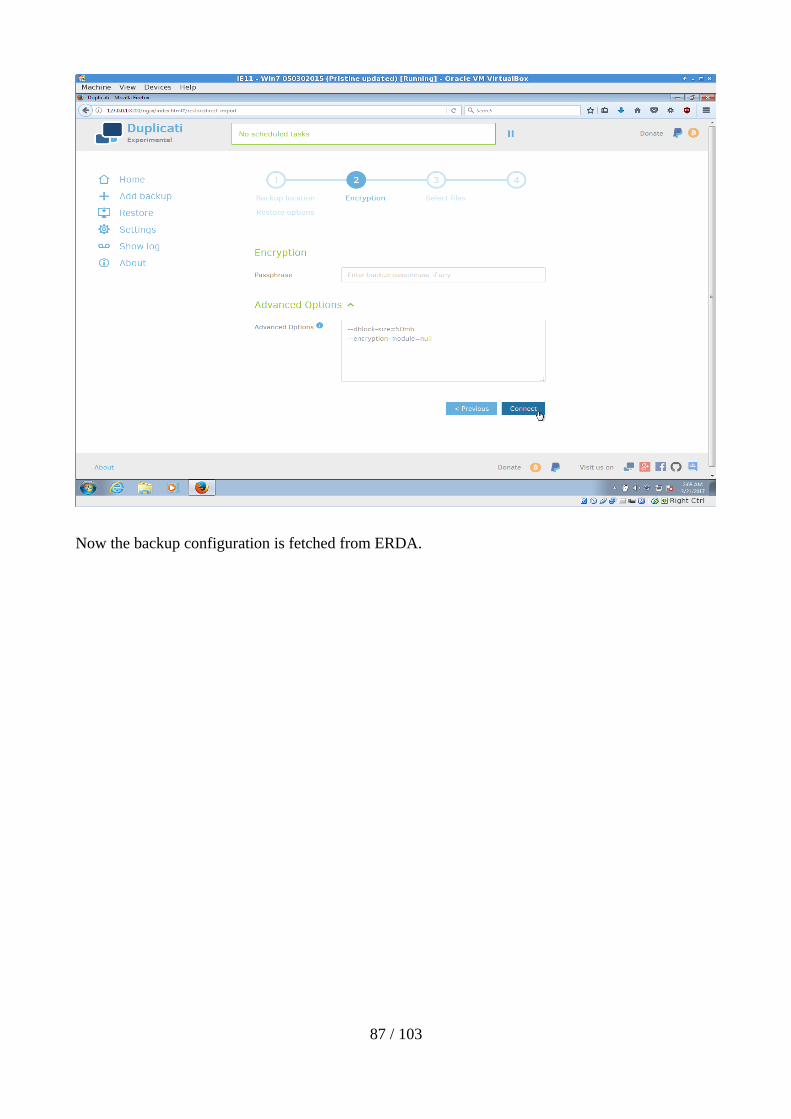
Now the backup configuration is fetched from ERDA.
87 / 103
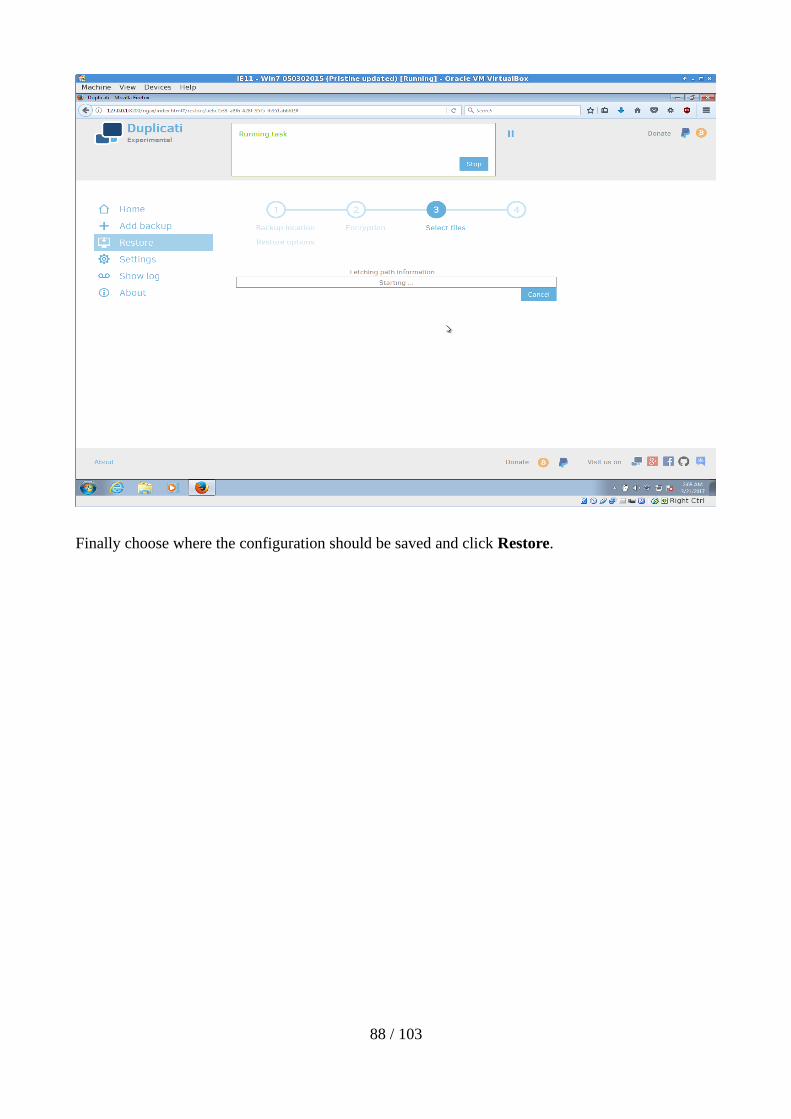
Finally choose where the configuration should be saved and click Restore.
88 / 103
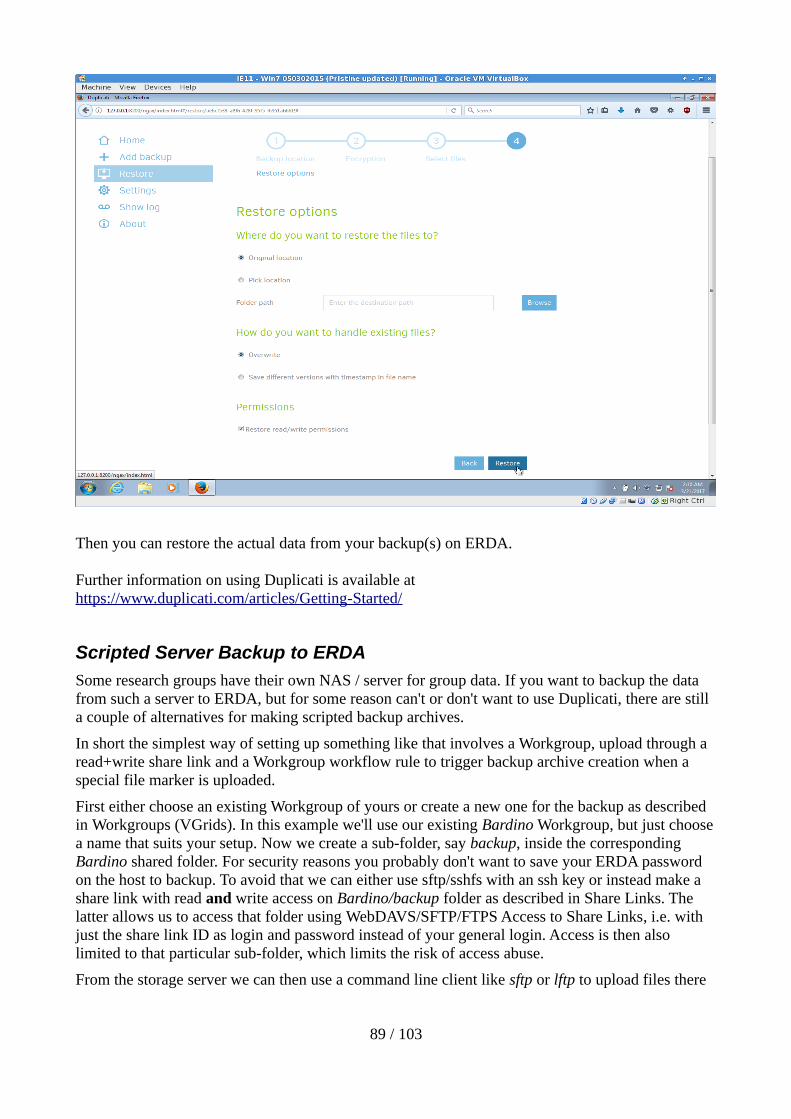
Then you can restore the actual data from your backup(s) on ERDA.
Further information on using Duplicati is available athttps://www.duplicati.com/articles/Getting-Started/
Scripted Server Backup to ERDA
Some research groups have their own NAS / server for group data. If you want to backup the data from such a server to ERDA, but for some reason can't or don't want to use Duplicati, there are still a couple of alternatives for making scripted backup archives.
In short the simplest way of setting up something like that involves a Workgroup, upload through a read+write share link and a Workgroup workflow rule to trigger backup archive creation when a special file marker is uploaded.
First either choose an existing Workgroup of yours or create a new one for the backup as described in Workgroups (VGrids). In this example we'll use our existing Bardino Workgroup, but just choosea name that suits your setup. Now we create a sub-folder, say backup, inside the corresponding Bardino shared folder. For security reasons you probably don't want to save your ERDA password on the host to backup. To avoid that we can either use sftp/sshfs with an ssh key or instead make a share link with read and write access on Bardino/backup folder as described in Share Links. The latter allows us to access that folder using WebDAVS/SFTP/FTPS Access to Share Links, i.e. with just the share link ID as login and password instead of your general login. Access is then also limited to that particular sub-folder, which limits the risk of access abuse.
From the storage server we can then use a command line client like sftp or lftp to upload files there
89 / 103
or even mount it with e.g. sshfs and use something like rsync to only upload file changes.
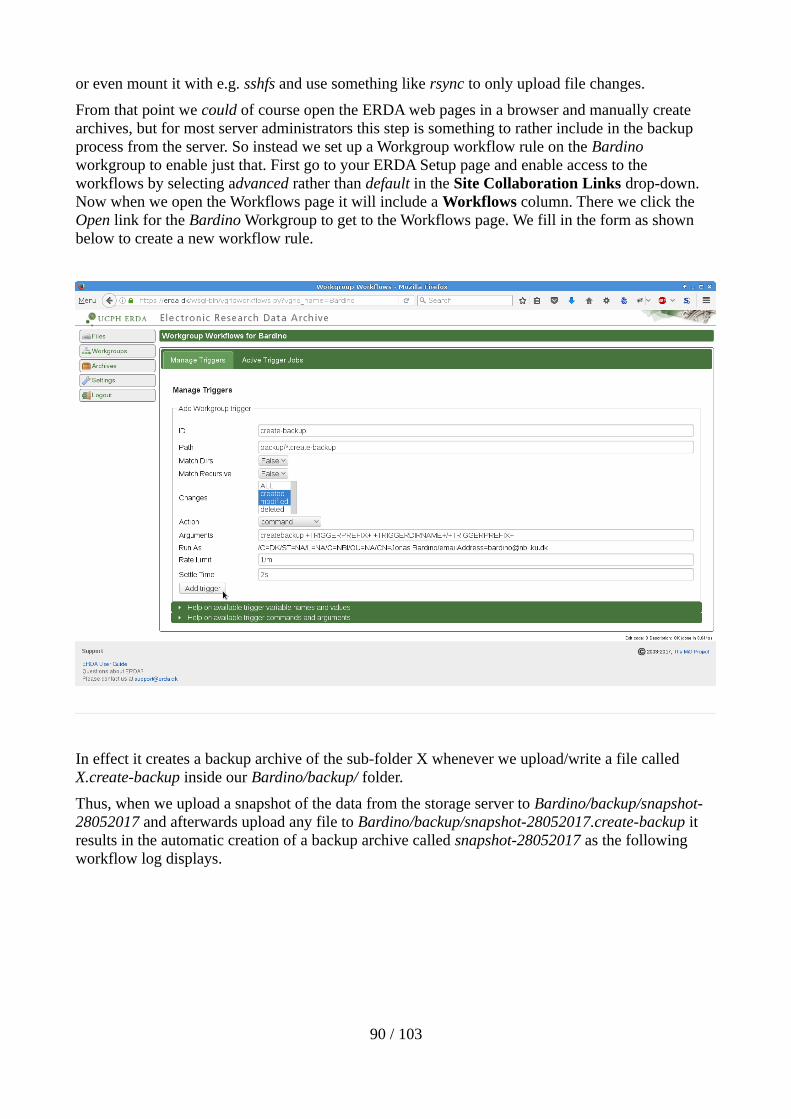
From that point we could of course open the ERDA web pages in a browser and manually create archives, but for most server administrators this step is something to rather include in the backup process from the server. So instead we set up a Workgroup workflow rule on the Bardino workgroup to enable just that. First go to your ERDA Setup page and enable access to the workflows by selecting advanced rather than default in the Site Collaboration Links drop-down. Now when we open the Workflows page it will include a Workflows column. There we click the Open link for the Bardino Workgroup to get to the Workflows page. We fill in the form as shown below to create a new workflow rule.
In effect it creates a backup archive of the sub-folder X whenever we upload/write a file called X.create-backup inside our Bardino/backup/ folder.
Thus, when we upload a snapshot of the data from the storage server to Bardino/backup/snapshot-28052017 and afterwards upload any file to Bardino/backup/snapshot-28052017.create-backup it results in the automatic creation of a backup archive called snapshot-28052017 as the following workflow log displays.
90 / 103
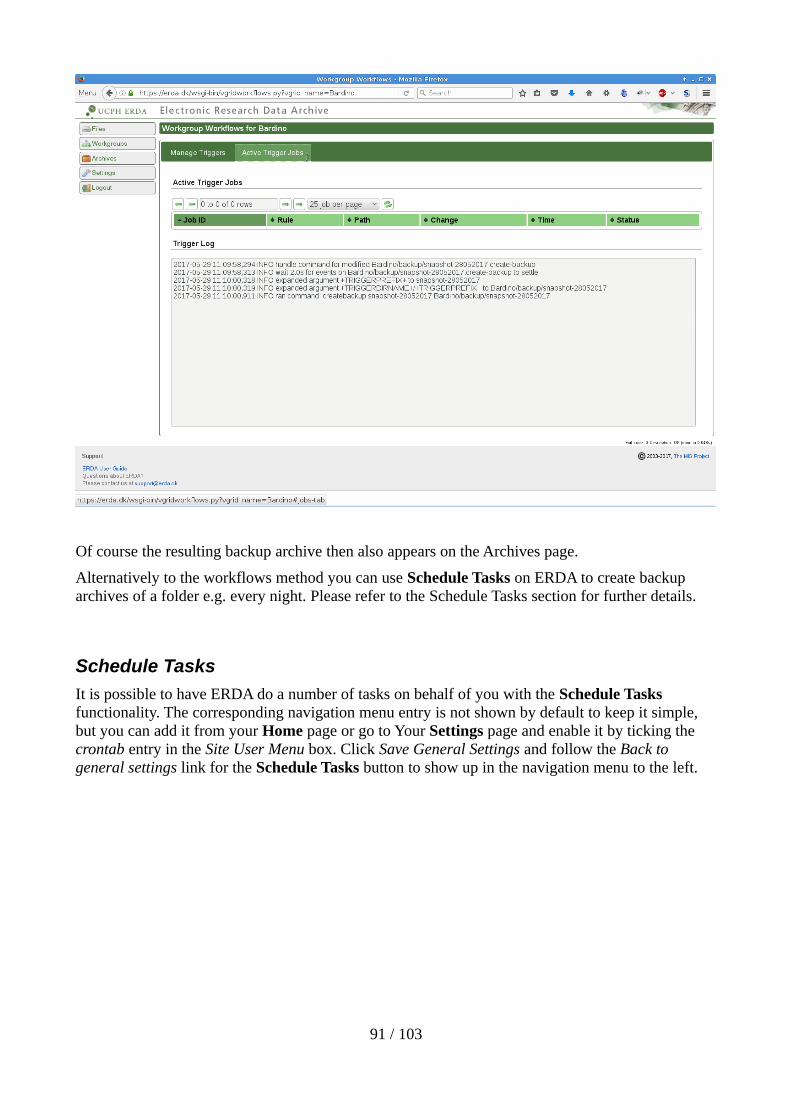
Of course the resulting backup archive then also appears on the Archives page.
Alternatively to the workflows method you can use Schedule Tasks on ERDA to create backup archives of a folder e.g. every night. Please refer to the Schedule Tasks section for further details.
Schedule Tasks
It is possible to have ERDA do a number of tasks on behalf of you with the Schedule Tasks functionality. The corresponding navigation menu entry is not shown by default to keep it simple, but you can add it from your Home page or go to Your Settings page and enable it by ticking the crontab entry in the Site User Menu box. Click Save General Settings and follow the Back to general settings link for the Schedule Tasks button to show up in the navigation menu to the left.
91 / 103

On the Schedule Tasks page you can schedule one-time or regularly repeating tasks
92 / 103
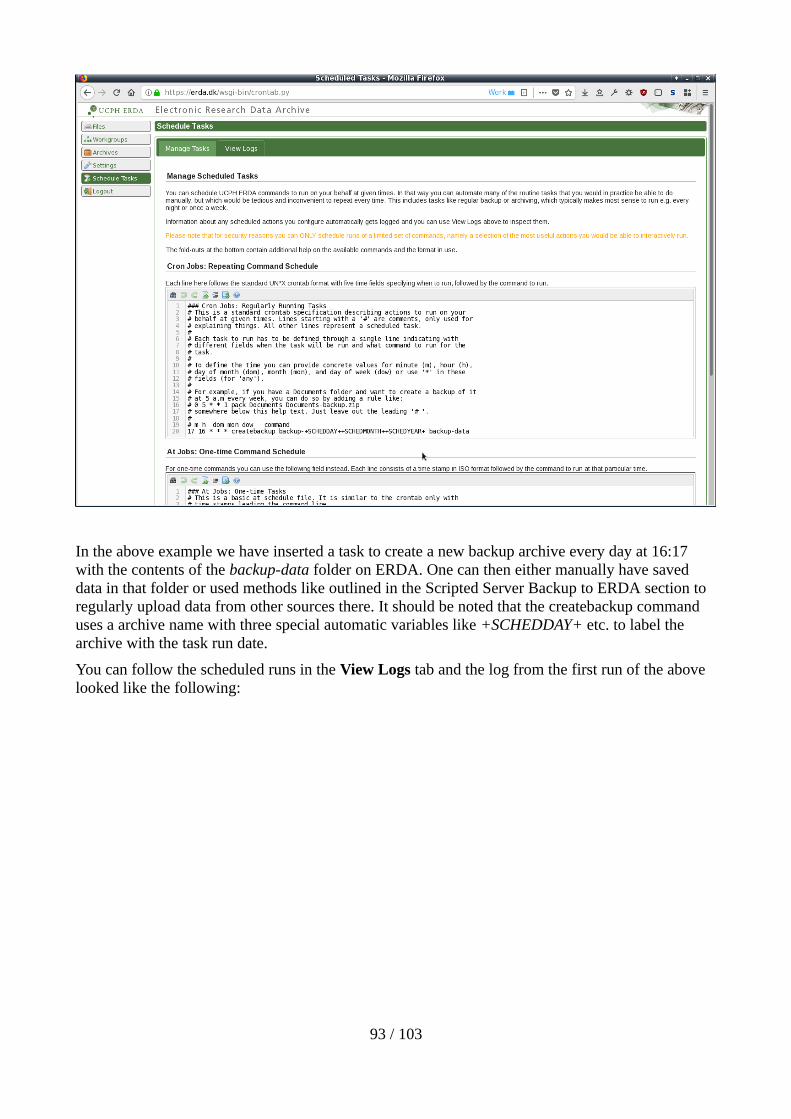
In the above example we have inserted a task to create a new backup archive every day at 16:17 with the contents of the backup-data folder on ERDA. One can then either manually have saved data in that folder or used methods like outlined in the Scripted Server Backup to ERDA section to regularly upload data from other sources there. It should be noted that the createbackup command uses a archive name with three special automatic variables like +SCHEDDAY+ etc. to label the archive with the task run date.
You can follow the scheduled runs in the View Logs tab and the log from the first run of the above looked like the following:
93 / 103
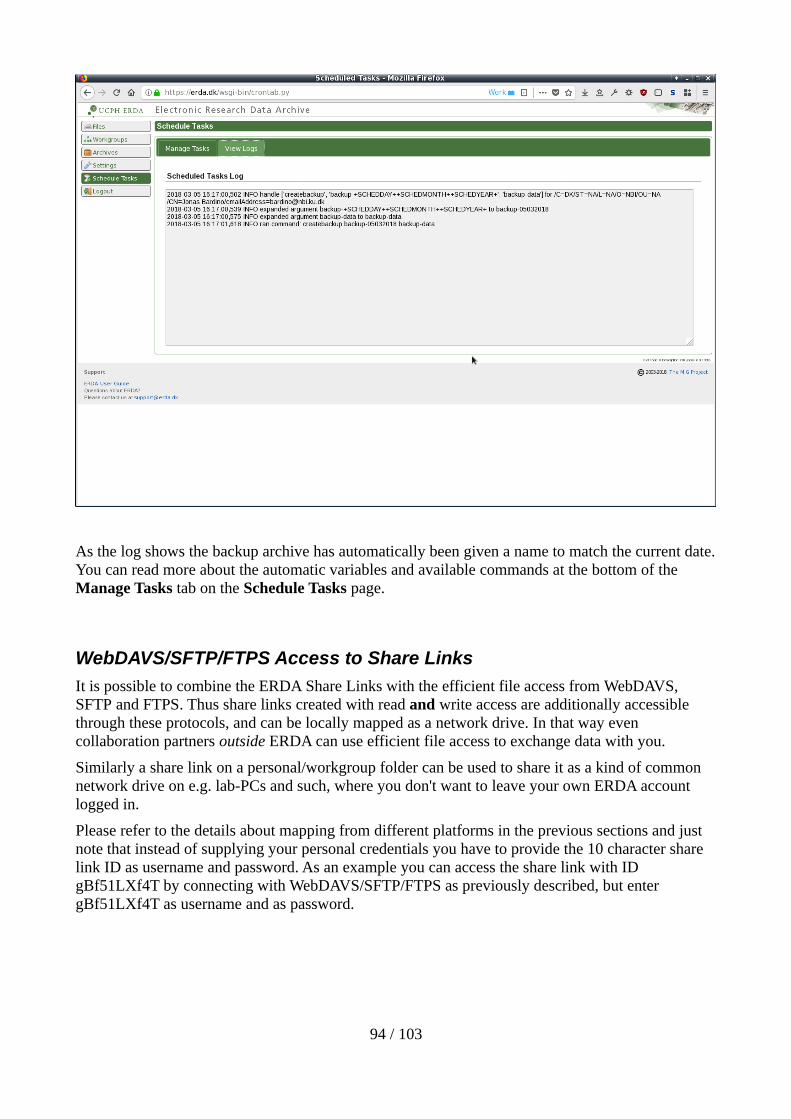
As the log shows the backup archive has automatically been given a name to match the current date.You can read more about the automatic variables and available commands at the bottom of the Manage Tasks tab on the Schedule Tasks page.
WebDAVS/SFTP/FTPS Access to Share Links
It is possible to combine the ERDA Share Links with the efficient file access from WebDAVS,SFTP and FTPS. Thus share links created with read and write access are additionally accessible through these protocols, and can be locally mapped as a network drive. In that way even collaboration partners outside ERDA can use efficient file access to exchange data with you.
Similarly a share link on a personal/workgroup folder can be used to share it as a kind of common network drive on e.g. lab-PCs and such, where you don't want to leave your own ERDA account logged in.
Please refer to the details about mapping from different platforms in the previous sections and just note that instead of supplying your personal credentials you have to provide the 10 character share link ID as username and password. As an example you can access the share link with ID gBf51LXf4T by connecting with WebDAVS/SFTP/FTPS as previously described, but enter gBf51LXf4T as username and as password.
94 / 103
Data Import/Export
In case you have other data storage servers or instruments on the Internet, it may be useful to be able to import data to – or export data from ERDA in an efficient way. Typical scenarios include fetching big data sets from dedicated Linux/UNIX servers or from e.g. imaging sites like ESRF, SLS or similar, where data are recorded on-site with remote access afterwards. This is probably mostly relevant for users with a certain experience in handling big data sets.
ERDA comes with low-level background import and export of data through different efficient transfer protocols like SFTP/FTP(S)/RSYNC/HTTP(S) and WebDAV(S).
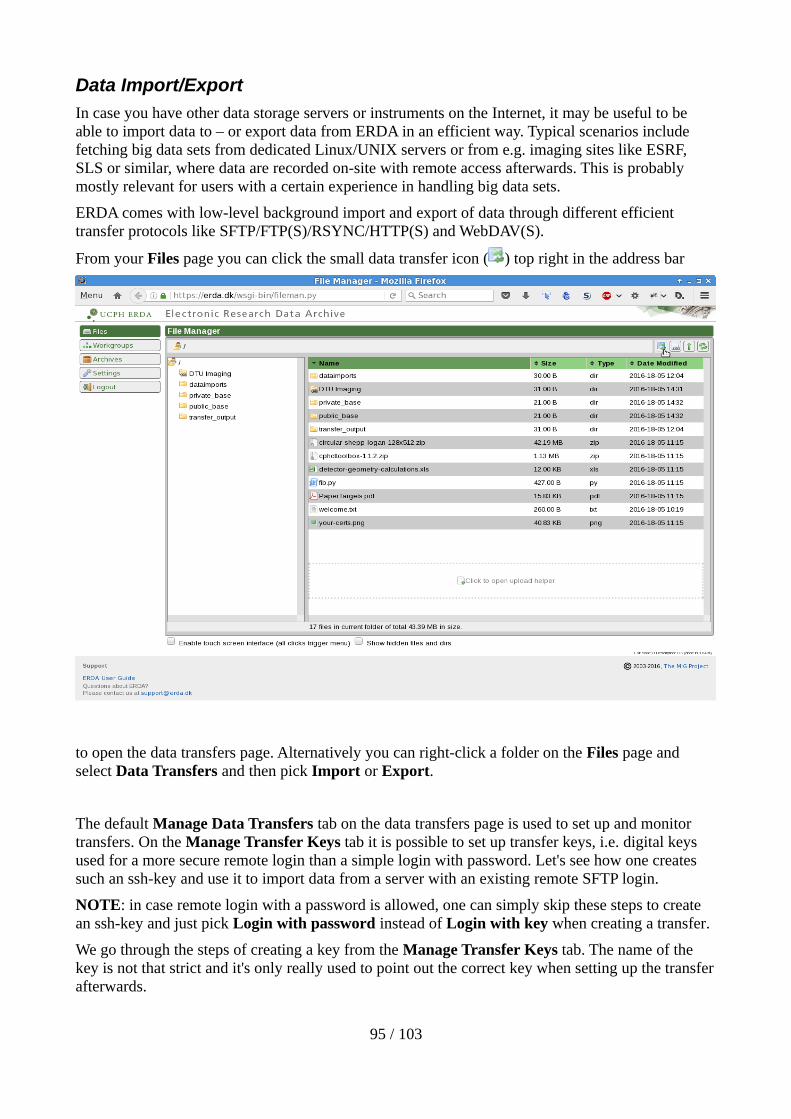
From your Files page you can click the small data transfer icon ( ) top right in the address bar
to open the data transfers page. Alternatively you can right-click a folder on the Files page and select Data Transfers and then pick Import or Export.
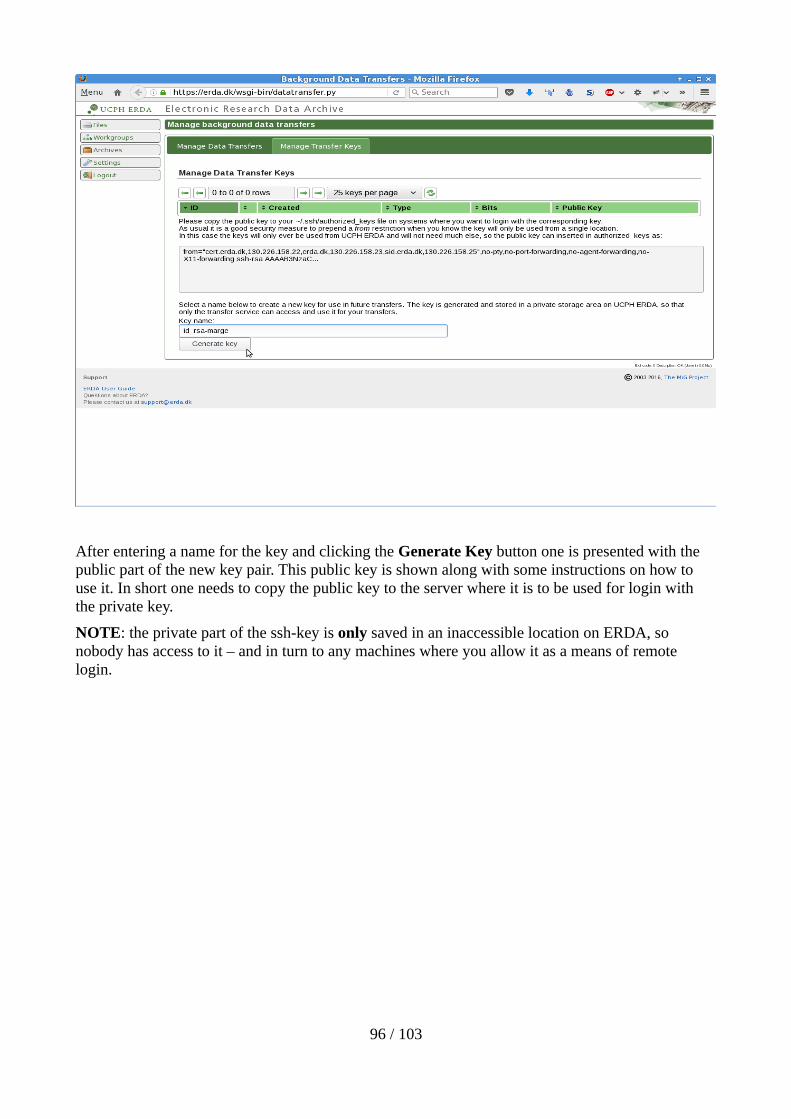
The default Manage Data Transfers tab on the data transfers page is used to set up and monitor transfers. On the Manage Transfer Keys tab it is possible to set up transfer keys, i.e. digital keys used for a more secure remote login than a simple login with password. Let's see how one creates such an ssh-key and use it to import data from a server with an existing remote SFTP login.
NOTE: in case remote login with a password is allowed, one can simply skip these steps to create an ssh-key and just pick Login with password instead of Login with key when creating a transfer.
We go through the steps of creating a key from the Manage Transfer Keys tab. The name of the key is not that strict and it's only really used to point out the correct key when setting up the transferafterwards.
95 / 103
After entering a name for the key and clicking the Generate Key button one is presented with the public part of the new key pair. This public key is shown along with some instructions on how to use it. In short one needs to copy the public key to the server where it is to be used for login with the private key.
NOTE: the private part of the ssh-key is only saved in an inaccessible location on ERDA, so nobody has access to it – and in turn to any machines where you allow it as a means of remote login.
96 / 103
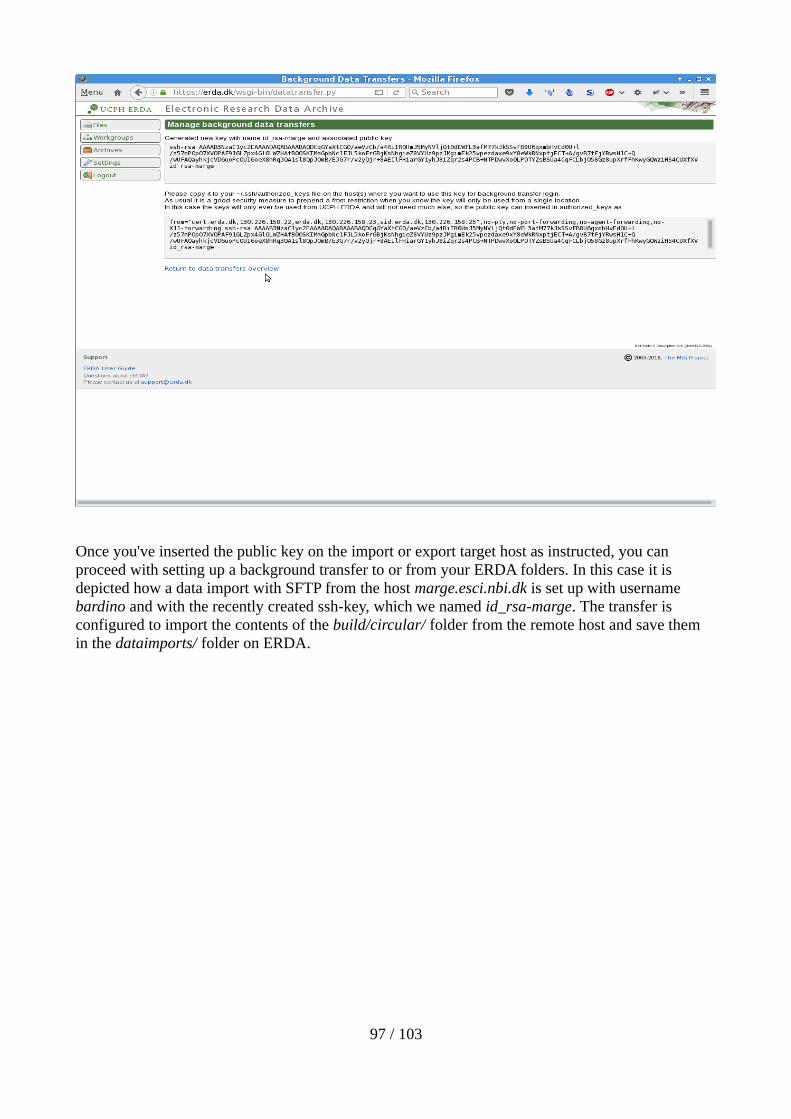
Once you've inserted the public key on the import or export target host as instructed, you can proceed with setting up a background transfer to or from your ERDA folders. In this case it is depicted how a data import with SFTP from the host marge.esci.nbi.dk is set up with username bardino and with the recently created ssh-key, which we named id_rsa-marge. The transfer is configured to import the contents of the build/circular/ folder from the remote host and save them in the dataimports/ folder on ERDA.
97 / 103
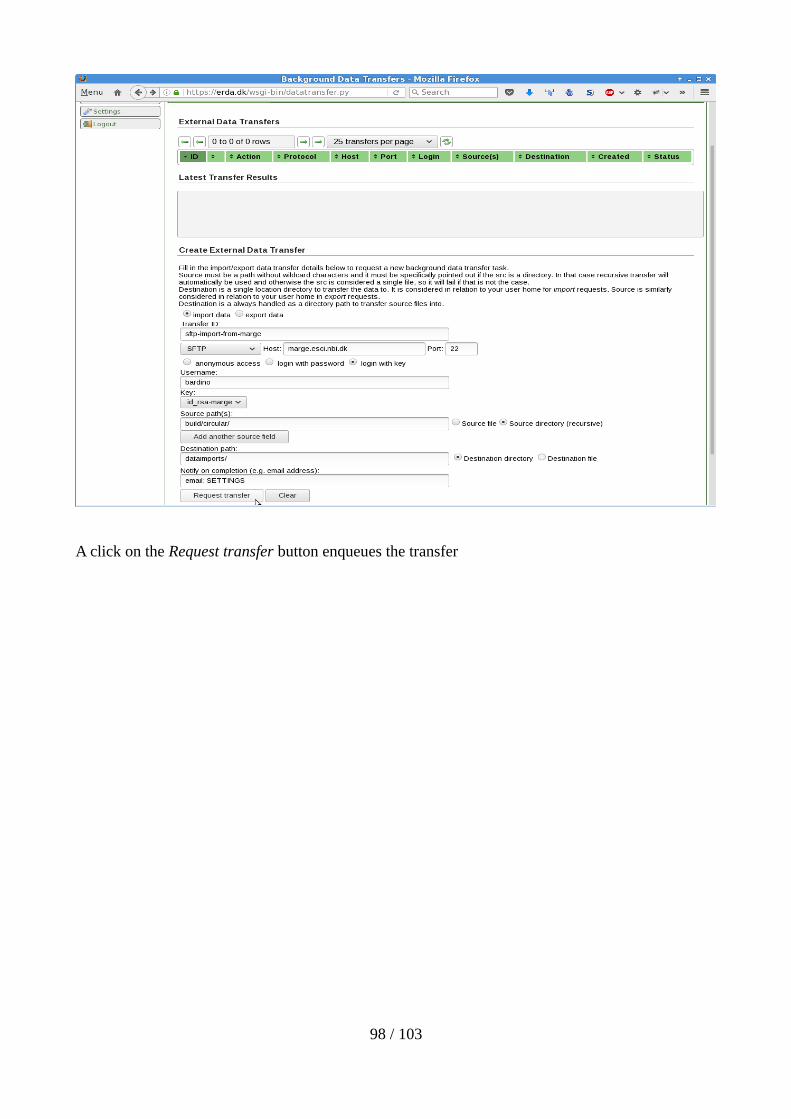
A click on the Request transfer button enqueues the transfer
98 / 103
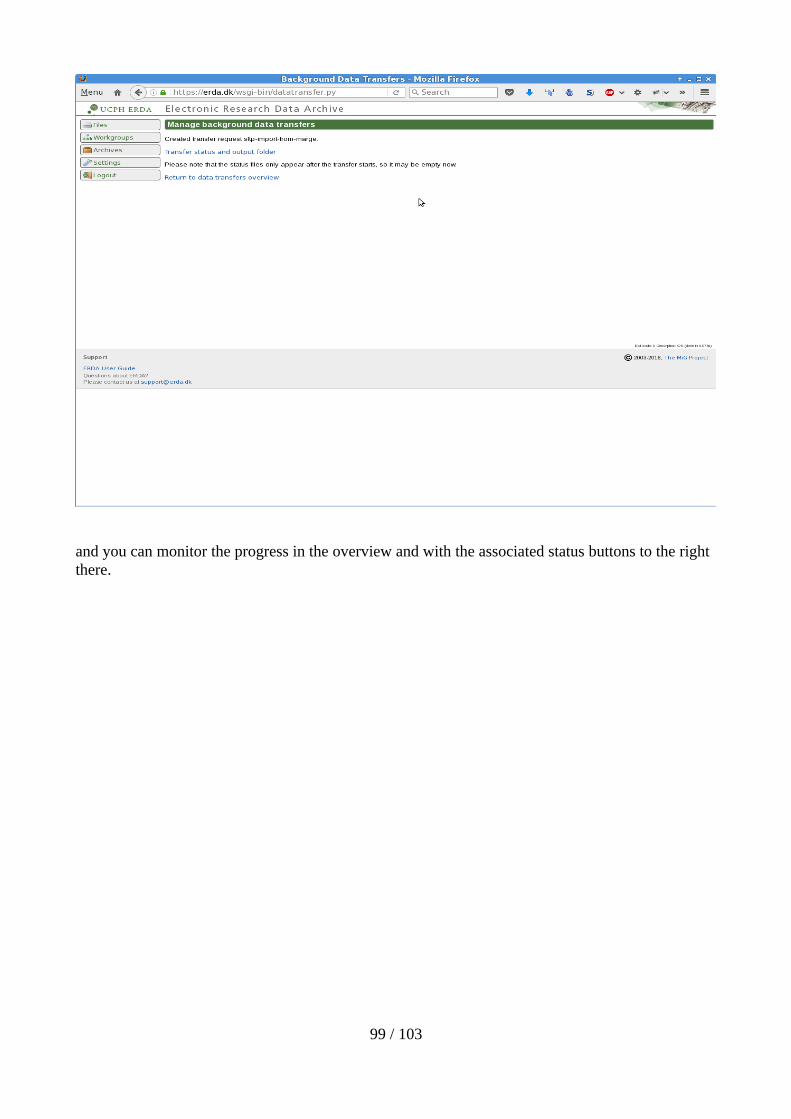
and you can monitor the progress in the overview and with the associated status buttons to the right there.
99 / 103

The transfer can be monitored more closely in the destination folder by clicking the local component-icon ( ) , and in this case the result of the import looked like this, with a few files and folders recursively imported from marge.esci.nbi.dk .
100 / 103
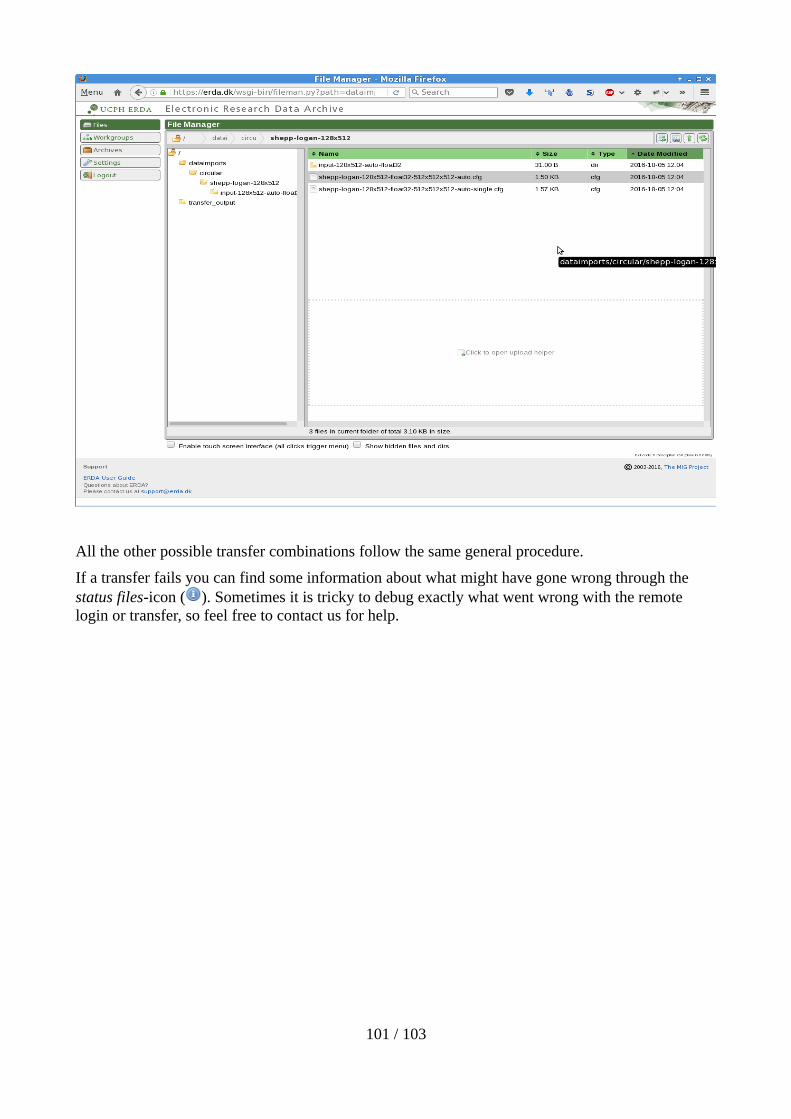
All the other possible transfer combinations follow the same general procedure.
If a transfer fails you can find some information about what might have gone wrong through the status files-icon ( ). Sometimes it is tricky to debug exactly what went wrong with the remote login or transfer, so feel free to contact us for help.
101 / 103
Advanced Jupyter
JupyterHub Navigation Menu
Beyond the variable home page buttons, JupyterHub also provides a top menu bar with the following options. Namely the Jupyter, Home, Token and Logout buttons.
Clicking the Jupyter button/logo will take you to the Spawn page if you haven’t already spawned anotebook and otherwise it will redirect you to your existing notebook. The Home button will take you to one of the two presented versions of the home page on the Jupyter service.
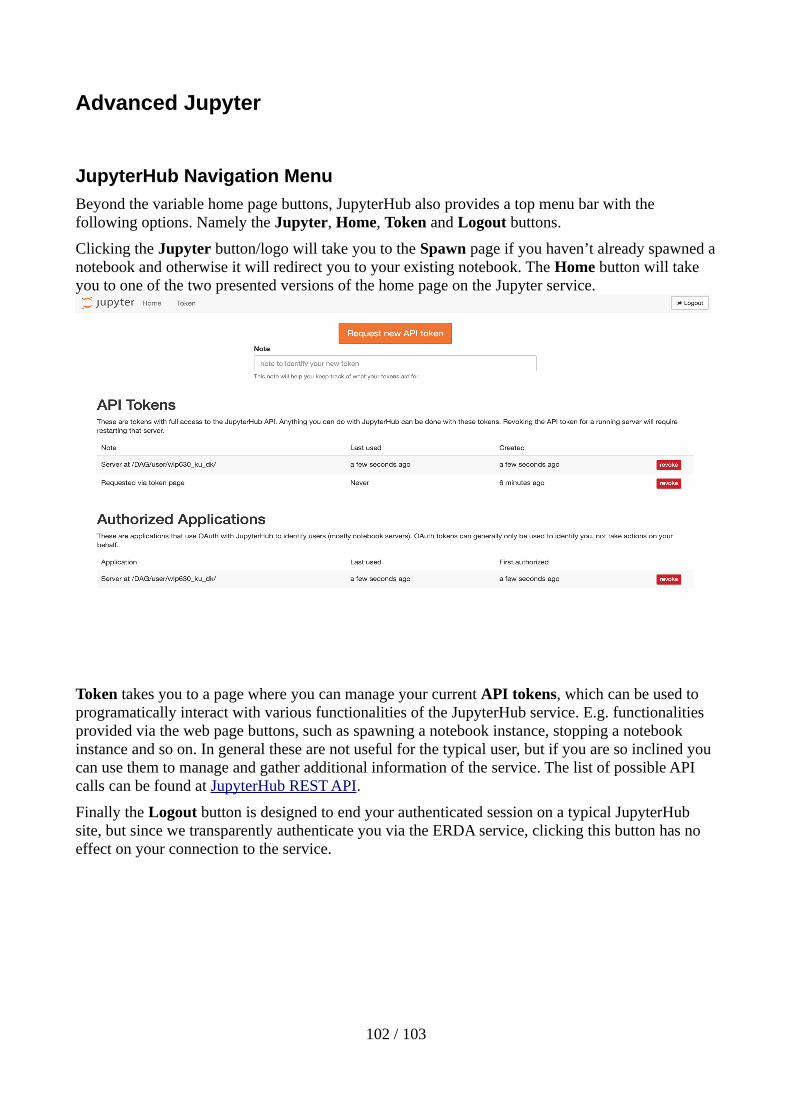
Token takes you to a page where you can manage your current API tokens, which can be used to programatically interact with various functionalities of the JupyterHub service. E.g. functionalities provided via the web page buttons, such as spawning a notebook instance, stopping a notebook instance and so on. In general these are not useful for the typical user, but if you are so inclined you can use them to manage and gather additional information of the service. The list of possible API calls can be found at JupyterHub REST API.
Finally the Logout button is designed to end your authenticated session on a typical JupyterHub site, but since we transparently authenticate you via the ERDA service, clicking this button has no effect on your connection to the service.
102 / 103

Support, Questions and CommentsWe welcome all comments on how we can improve the user experience as well as any questions you may have about the use of ERDA. This includes support in case something doesn't work the way it is intended and described here.
It is very helpful for us if you include information about your operating system and browser with any support requests. If you aren't sure you can open up
https://www.whatismybrowser.com/ or http://detectmybrowser.com/
and send us at least the line below “Your web browser is:” in the blue block at the top or the line starting with “You're using” respectively.
Screenshots of any problems are also very useful.
Feel free to contact us by sending an email to the ERDA Support <[email protected]>.
Kind Regards, the UCPH ERDA team.
103 / 103