Embed Size (px)
Citation preview

User & Help Guide
Employer Providers & Lead Training Provider
V11 June 2020

Contents
Setting up ACE360 – Super Admin Role 1 Logging In & Setting Up ACE360 2 Setting Up User Accounts 4 Linking to End Point Assessment Organisations 5 Standards Management 6 Assigning Standards to Users 8
Setting Up Regional Offices (Super Admin Users ONLY) 9 Regional Administrators 10
Adding a New Apprentice Record 11 Apprentice Live Records View 17
Assigning Apprentice Records to ACE360 Users 18 Viewing, Editing & Updating Apprentice Records 20 Withdrawing an Apprentice 21 Apprentice Live Records View – Filtering Options 22 Apprentice Live Records – Working with Filtered Views 23 Apprentice Assigned & Archived Records – Filtering Options 24 Dashboard 25 Exporting Filtered Data 28
NB: Clicking on the ACE360 logo in the
top right hand corner of each page will
return you to the Contents page

Shared Documents Area 30 EPAO Knowledge Base 31 Apprentice- Uploading Gateway Evidence 32 Summary - Uploading, Downloading, Previewing and Deleting files in an Apprentice Record 33 Apprentice – Submitting for Gateway Approval 34 Apprentice Gateway Rejections 36 Resubmitting for Gateway 37 End Point Assessment Resit Requests 38 Appeals 39 Purchasing ACE360 Tokens – BACS or Credit Card 42 ACE360 Activity Log 44 Apprentice Accounts (Super Admin/Admin ONLY) 45 Reports (Super Admin/Admin ONLY) 47 ACE360 User Permissions Summary 50 Help Guide - ACE360 Apprentice Basic Information Amendments 51
Apprentice Data Fields Included in ACE360 Data Export Function 53
ACE360 System Help & Support Contacts 55
NB: Clicking on the ACE360 logo in the
top right hand corner of each page will
return you to the Contents page

• You will receive an e-mail from ACE360 inviting you to set up an ACE360 account for your organisation.
• Within the e-mail click on the “Complete Account Setup” button.
NB: The person who sets up a new organisation within ACE360 automatically becomes a Super Admin account for the organisation.
• Follow the 3 steps to create a new ACE360 account for your organisation. You will be required to enter your own details and set a password, your
organisation details, including the UKPRN and then read and accept the displayed ACE360 Terms of Use.
• On completing Step 3, a message will be displayed to confirm that your “organisation setup is completed” and that you can now login to ACE360
and start using the system.
NB: If for some reason, your UKPRN is not automatically verified by the system then a warning message will be displayed and you should
contact the ACE360 Support Team for assistance.
Setting up ACE360 – Super Admin Role
1

Logging In & Setting Up ACE360
• After logging in you will be presented with your main Dashboard and the option to upload a profile picture
to your account. This is optional and can be skipped by pressing the “Skip” button.
• Next you will get the option to set up other system users. Once you have set up new Admin accounts then these Admin users will be able to set up other user types such as Training Managers and Training Co-ordinators. Alternatively, Super Admin can set up all of the required accounts.
• You can click the “Invite other users” button to start the process of setting up additional system users. Alternatively, you can skip this option and access it at a later date via the General Settings option on the menu bar on the left hand side of your screen. NB: The menu bar may be presented differently, depending on the size of your screen, larger screens will have icons and a name underneath and smaller screens will display icons only. The menu remains visible on all pages enabling you to navigate through ACE360: -
DASHBOARD – this view gives each user an instant overview of the current status of all the Apprentice records, within ACE360, that they have been assigned access to.
STANDARDS – from here you will be able to add, view, amend and remove Apprenticeship Standards associated with your organisation’s ACE360 profile (NB: ONLY SUPER ADMIN have access to this function).
APPRENTICE RECORDS – your view will be dependent on your user account but will either show all Apprentice records or only records that have been assigned to you.
KNOWLEDGE BASE – this is an area of the system where EPAOs, using ACE360, can upload relevant guidance/support documentation. This can be either Generic or Standard Specific guidance. LTP users will be able to access the Generic resources for all the EPAOs that they are linked to, through ACE360. LTP users will only be able to see the Standard Specific resources for those Standards to which they have been assigned Apprentices that are undertaking these Standards.
ACCOUNTS – here you are able to access financial information relating to each Apprentice record. This option is ONLY available to SUPER ADMIN and ADMIN users.
REPORTS – here you are able to access high level reports to provide you with accurate up-to-date information about the activity within your account. This option is ONLY available to SUPER ADMIN and ADMIN users.
SETTINGS – here you are able to view your organisation and individual settings, although only Super Admin/Admin users will be able to amend organisation/EPAO settings. ONLY Super Admins have the Delete facility.
2
Menu Bar
ACTIVITY LOG – the log tracks all actions carried out within your ACE360 organisation profile, including: User and Apprentice record creation, order and purchase of tokens. Different user types will see different entries in their activity logs. For example, not all users will see financial transactions.
TOKEN MANAGEMENT – NB: this tab will ONLY be visible for those users registered as the organisation’s Finance Manager. Here Finance users will be able to purchase tokens for your organisation.
LMS INTEGRATION FACILTY: - ACE360 has functionality which facilitates the automatic transfer of Apprentice data from
a number of commonly used Learner Management Systems (LMS). This prevents the need for the double entry of
Apprentice data across multiple systems.
We are looking to expand the range of LMS that can integrate with ACE360. If you are interested in finding out more
about this feature and setting up LMS integration then please contact [email protected] or call 0300 303 4444.
3

• Either click the “Invite Other Users” button presented as part of the initial
ACE360 setup process or select General Settings icon on the menu bar, click the Users tab and then the green “Invite a new user” button.
• Complete the Add a new user pop-up. Enter the user’s e-mail address and assign them a “user role” within ACE360. Click the green circle with the plus sign to “add” the user details to your list.
• Continuing adding as many new users, and types, as you require. Remember to click the green circle with the plus sign to “add” each of the new user details to your list.
• When you are ready, click the “Send Invites” button. All of the new users will receive an e-mail inviting them to join ACE360 and create their account profile.
• Unless you are the Super Admin and ALSO the designated Finance Manager user, you should set up a Finance Manager account as soon as possible to enable the purchase of tokens for your organisation. NB: You will need to have available tokens before you can complete your organisation’s ACE360 set-up. You cannot set up any Standards or add any Apprentice records until you have purchased some tokens. See section on Purchasing ACE360 Tokens for more information
• Within General Settings, all system users can view and edit their own Profile. They can also view Organisation Info and EPAO Links. However, ONLY Super Admin/Admin users can edit Organisational or EPAO information and ONLY Super Admins have the DELETE facility.
4
Setting Up User Accounts

Linking to End Point Assessment Organisations (EPAOs) • As part of your initial ACE360 setup, you need to set up the links between
your organisation and the EPAOs with whom you will be working. This is a VERY important step as without even requesting links to EPAOs you will not be able to process an Apprentice record through Gateway to EPA.
• Click the “Link to EPAOs” button.
• Within the General Settings, click the EPAO Links Tab.
• Click the “Request a link to another EPAO” button.
• A drop-down list of all EPAOs registered on ACE360 will be displayed. From the list, select the EPAO/s with whom you want your organisation to be linked. As you select an EPAO name it is added to a list.
• When you have finished selecting EPAOs, click the “Send Link Requests” button.
• Each of the EPAOs will be sent an e-mail invitation and asked to confirm their working relationship with you and this will create an ACE360 system link between your organisation and the selected EPAOs.
• You will receive an e-mail confirming each EPAO’s acceptance of your invitation. In the event that an EPAO denies your request to work with them then you will also receive an e-mail informing you of this decision.
• You can view the status of your EPAO links via General Settings/EPAO links. This shows either all Active or Pending EPAO links.
• Having sent EPAO link requests you will now be able to select Standards to attach to your ACE360 account and then start to add Apprentice records. NB: Until an EPAO has accepted your request you will not be able to link Apprentice records to a specific EPAOs and progress them to Gateway. However, once an EPAO link has been established you can easily update Apprentice records accordingly and attach them to the correct EPAO.
5
NB: If your chosen EPAO doesn’t appear on this list then please let us know. We are continuing to work with EPAOs and will be adding to this list as additional EPAOs use ACE360.

Standards Management
• To set up Standards, click the Standards icon on the menu bar
• A “Standards Select” dialogue box will appear.
• On the left hand side of the screen, select “All Sectors” to see all of the Standards that are available for your selection. Alternatively, click on an individual sector name e.g. Digital or Manufacturing.
• Having selected either all sectors or a specific sector name, on the right hand side of the screen you will see the list of Standards available for delivery.
• Click on the name of the Standard/s you wish to select and link to your organisation’s ACE360 profile. Selected Standards are highlighted in green.
• You can multi-select Standards. If you wish to de-select a Standard then simply click on it again and the green highlight will be removed.
• You can select multiple Standards from multiple different sectors and when you have finished click the “Save” button to add all the selected Standards (from all your chosen sectors) to your ACE360 account.
6
STANDARDS – Course Options NB: Some Standards have course options, if this is the case you will see a Standard for each option (pathway). Please ensure that you add all of the course options so that Apprentices can be allocated to the specific option (pathway) they are on.
This is VERY important as the Gateway /EPA components may differ between “options” and you must ensure that each Apprentice is linked to the correct option (where relevant) within the chosen Standard.

• You will then see a list of all the Standards that are now linked to your organisation’s ACE360 profile.
• They are listed alphabetically by Sector. Each section can be expanded or collapsed to show/hide information.
• Clicking on any Standard name on the left hand side of the screen will display more details relating to selected Standard on the right hand side of the screen: -
STANDARD TITLE
STANDARD LEVEL
EXPECTED TIME TO GATEWAY
LARS CODE
STANDARD’S START DATE
GRADES AVAILABLE
GATEWAY COMPONENTS
EPA COMPONENTS
• To the right of each Gateway or EPA component there is an arrow head. Selecting this, expands the field to provide further details on what each component requires to achieve its completion.
• If you need to add or remove any Standards at a later date then simply select the Standards icon on the menu bar and select the “Update Standards Offering” button.
7

8
Assigning Standards to Users
• Having set up your ACE360 users, you must then individually assign each user the specific Standards that they will be delivering/assessing. If this not done then you will be unable to assign any Apprentices to specific ACE360 users (e.g. Training Managers and Training Co-ordinators)
• To assign Standards to a user account: -
o Select General Settings icon and then the Users Tab
o Select required User from the list
o Click the “Edit Profile” button
o Click the “Assign Standards” button
o From the list of available Standards, click the ones that you want to assign to the user. They will go green in colour. To deselect a Standard simply click on it again. There is a Select All feature within each sector grouping.
o Click “Save” button to save the changes to the user’s record and it is updated accordingly. At any time you can add/remove Standards to a user’s account by clicking the “Assign Standards” button.
NB: Users will only be able to be assigned Apprentices who are on one of the Standards linked to their account. If you are having difficulty assigning an Apprentice to a specific user account, then check that they have been assigned the required Standard.
Training Manager users will be able to see all Apprentices on any Standard that has been assigned to them – even for Apprentices that have not been specifically assigned to them but to another Training Manager or Training Co-ordinator user in their organisation.
Training Co-ordinators will only be able to see Apprentices who are on a Standard that they have been assigned and also had the Apprentice specifically assigned to them.

9
Setting Up Regional Offices – LTP Super Admin Users ONLY
As an LTP Super Admin you can create Regional Offices within your ACE360 organisational account. However, before this functionality is available to you, you must have set up links to your EPAOs and selected the relevant Standards for delivery.
• Within the General Settings, click the Regional Offices Tab.
• Click the “Invite a Regional Office” button.
• Complete the Invite via E-mail field and Send the invite.
NB: The individual user that you have invited will automatically become the Regional Admin User of their Regional Office’s ACE360 account. They are effectively the “Super Admin” of the Regional Office.
• Repeat the process to invite other Regional Offices to set up their ACE360 account (each with their own Regional Administrator)
Any Regional Office that is linked to your ACE360 account will:-
Have its own Regional Admin user (effectively they are the Regional “Super Admin” account holder) who can invite other users in their office to become ACE360 users - either as an Admin, Finance Manager, Training Manager or Training Co-ordinator.
Be responsible for purchasing their own ACE360 tokens, via their assigned Finance Manager.
Be responsible for managing their own ACE360 Apprentice records.
Only have links to the EPAOs and Standards that have already been selected by the “main office” ACE360 Super Admin user. NB: Regional Admin users CANNOT add new Standards to their own regional office account.

10
Regional Administrators
10
The ACE360 Super Admin account holder in your organisation’s main office can set up Regional Offices within their existing ACE360 organisational account. They do this by sending an e-mail invitation to an individual user in each of their Regional offices. These invited users will automatically become the ACE360 Admin User for their specific Regional office.
If you receive an invitation to become a Regional Office Admin user: -
• Click on the link provided in the e-mail and follow the set-up process to create your ACE360 account.
• Once your account is created you can log into ACE360. You are automatically designated as the ACE360 Admin User for your regional office.
• You will then be prompted to invite others in your organisation to become ACE360 users.
• You can do this at any time by selecting General Settings icon on the menu bar, click the Users tab and then the green “Invite a new user” button.
• Users can be designated either as Admin, Finance Manager, Training Manager or Training Co-ordinator.
• Each Regional Office will need to have a Finance Manager user who can purchase ACE360 tokens. Tokens are required before you can start adding any Apprentice records to the system. See section on Purchasing ACE360 Tokens for more information
• Regional Office ACE360 users will only have links to the EPAOs and Standards that have already been selected by the “main office” ACE360 Super Admin user. Regional Admin users CANNOT add new Standards to their Regional office account.
Adding a New Apprentice Record
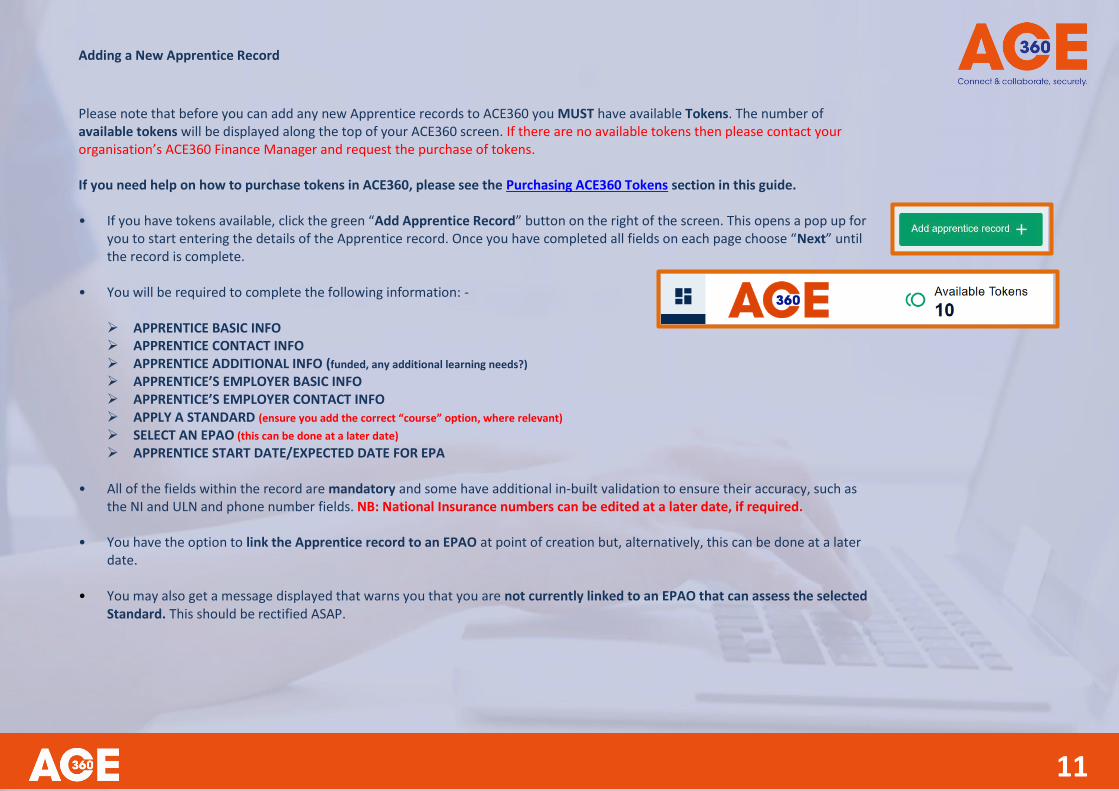
Please note that before you can add any new Apprentice records to ACE360 you MUST have available Tokens. The number of available tokens will be displayed along the top of your ACE360 screen. If there are no available tokens then please contact your organisation’s ACE360 Finance Manager and request the purchase of tokens. If you need help on how to purchase tokens in ACE360, please see the Purchasing ACE360 Tokens section in this guide. • If you have tokens available, click the green “Add Apprentice Record” button on the right of the screen. This opens a pop up for
you to start entering the details of the Apprentice record. Once you have completed all fields on each page choose “Next” until the record is complete.
• You will be required to complete the following information: -
APPRENTICE BASIC INFO APPRENTICE CONTACT INFO APPRENTICE ADDITIONAL INFO (funded, any additional learning needs?)
APPRENTICE’S EMPLOYER BASIC INFO APPRENTICE’S EMPLOYER CONTACT INFO APPLY A STANDARD (ensure you add the correct “course” option, where relevant)
SELECT AN EPAO (this can be done at a later date) APPRENTICE START DATE/EXPECTED DATE FOR EPA
• All of the fields within the record are mandatory and some have additional in-built validation to ensure their accuracy, such as
the NI and ULN and phone number fields. NB: National Insurance numbers can be edited at a later date, if required.
• You have the option to link the Apprentice record to an EPAO at point of creation but, alternatively, this can be done at a later date.
• You may also get a message displayed that warns you that you are not currently linked to an EPAO that can assess the selected Standard. This should be rectified ASAP.
11

12
• To add a new Apprentice record, open the Apprentice Records table by clicking the icon on the left toolbar. • Click the green “Add Apprentice Record” button on the right of the screen.
• A multi-step form opens. Enter the details into each section. • Click the icon on the right of the form to open or close sections. • Some fields have validation to ensure the information entered is correct. • If the information you have entered fails the validation, the form will alert you by turning red.

13
• When entering address details, you can look-up the address by entering a postcode.
• If you need to change the address, you can re-enter the postcode by clicking the yellow magnifying glass.
• Enter funding and learning support. If the Apprentice requires learning support ACE360 will ask you to select from the drop down list.

14
• Enter funding and learning support. If the Apprentice requires learning support ACE360 will ask you to select from the drop down list.
• Enter the employer’s basic information and contact details.

15
Selecting the Standard and End Pint Assessment Organisation (EPAO)
Select the Standard the Apprentice will be working towards.
Make sure you select the exact Standard title, level and option the Apprentice will be on.
If you can’t see the Standard, if may not be included in your profile, see the section regarding Standards Management (ACE360 has a comprehensive database of all Standards that have been approved for delivery).

16
• Click “Create Record” button to save the Apprentice record. If any errors are found an ERROR
message will be displayed and you should go back through the record and correct any errors.
• When you press “Create Record”, one token will be deducted from your account and the new Apprentice record will be created on ACE360.
Please note: we STRONGLY recommend creating Apprentice records at the START of their Apprenticeship to ensure that you have the full benefit of the ACE360 system including:-
Access to Gateway and EPA component information Access to communication and guidance from the EPAOs with whom you work Early notification of forthcoming work for all parties. For example, to ensure future
demand for EPAO services can be planned for and managed effectively.
NB: Only adding Apprentice records to ACE360 as they approach Gateway may result in EPAOs delaying End Point Assessment activities as they will not have had sufficient prior notification that Apprentices would be coming forward for EPA services and therefore have been unable to pre-plan/schedule the required EPA activities for your Apprentices.
• Once a record is created it will be added to your list of Apprentices and can be accessed, and managed, from Apprentices Records - “Live Records” View.
• You will see the following basic information: - ACE360 SYSTEM ID NAME D.O.B EPAO (if not assigned a red
warning triangle is displayed) STANDARD NAME STANDARD LEVEL START DATE EXPECTED GATEWAY DATE STATUS (all new records are set to “IN TRAINING”)

12
Apprentice Live Records View
• Use the Apprentice icon on the menu bar to search, manage, add and track
your Apprentice records.
• The Live Records tab, displays key information relating to each Apprentice: -
ID – a unique automatically generated ACE360 system number NAME – Apprentice name DOB – Apprentice date of birth EPAO – Assigned EPAO or if none assigned this shows a red triangle with
an exclamation mark STANDARD – Title of the Apprenticeship Standard the Apprentice is
registered on LEVEL – Level of the Apprenticeship Standard the Apprentice is
registered on START DATE – Apprentice start date EXPECTED GATEWAY DATE - Date Apprentice is expected to be ready for
Gateway STATUS – Apprentices will start and remain at “In Training” status until
they are ready for Gateway when you will be able to progress their status to “Ready for Gateway” Please note that until you have uploaded all of the required Gateway achievement evidence you will be unable to progress the status to “EPA Ready”
• Once the Apprentice record has been progressed to “Gateway” status the record is locked for any further editing. However, you will still be able to VIEW the content of the record. A locked record is indicated by a padlock icon to the left of the ACE360 ID.
Note: For Super Admin and Admin users, there is an additional tab called
“Record Assignment”. This enables these users to select and assign individual,
or groups of Apprentices, to specific ACE360 users within their organisation.
This function is covered in a separate section on Assigning Apprentice
Records.
17
3
Other Apprentice Statuses are: In Training, Evidence (Gateway) Complete,
Gateway Approved, EPA Ready, EPA Progress, EPA Passed and Grade
Determined.

Assigning Apprentice Records to ACE360 Users (Super Admin/Admin/Training Managers)
• When you have created Apprentice records on ACE360, you can then assign them
to other ACE360 users. For example, assigning Apprentices to their relevant Training Manager/Co-ordinator (i.e. the person who takes responsibility for their day-to-day learning journey whilst in training).
• Before you can assign Apprentices you must have set up the relevant ACE360 user accounts for the individuals to whom you wish to assign Apprentices. If you need to set up any additional user accounts then do this via Settings icon/Users tab and click the “Invite New Users” button.
• Add the new user’s e-mail address and select their user “type” from the drop-down list. Click the green cross to add the new user to your list of new accounts. Continue adding as many new users and types as you require.
• When you are ready, click the “Send Invites” button. The new users will receive an e-mail from ACE360 inviting them to create an account.
• Once their accounts are created, you must then assign them the Standards that they will be working with. ONLY then are you able to assign them Apprentices.
• Click the Apprentice Records icon on the menu bar and select the Record Assignment Tab.
• Use the Training Co-ordinator Controls drop-down to select the ACE360 user to whom you wish to assign Apprentice records.
• Use the checkbox at the far right of each Apprentice record to select the Apprentice/s you wish to assign to the selected user. Click the “Apply” button to assign the Apprentice record/s.
NB: If a user has not been assigned any Standards then you will be unable to assign any Apprentices to them. If you try then this screen will be displayed which means that the user currently has no Standards assigned to their ACE360 account
18
4

• Once an Apprentice record has been assigned to a user, their initials (or profile picture) will be displayed to the right of the Status column. If you hover the mouse over the icon, the full name of the assigned user will pop up.
• In the Live Records view of Apprentice records, Super Admin/Admin users will also be able to see the initials/profile picture of the ACE360 user who has been assigned to each Apprentice in their organisation.
• In the Record Assignment tab, Admin users can also “unassign” Apprentice records from their current ACE360 user.
• To “unassign” an Apprentice record, use the checkbox at the far right of each Apprentice record to select the Apprentice/s you wish to unassign from their current ACE360 user.
• Click the “Remove Applied TCs” button to confirm the unassigning action. IMPORTANT:
Users will only be able to be assigned Apprentices who are on one of the Standards that has been linked to their ACE360 account.
If you are having difficulty assigning an Apprentice to a specific ACE360 user, then check that the user has been assigned the required Standard.
Training Manager users will be able to see all Apprentices on any Standard that has been assigned to them – even for Apprentices that have not been specifically assigned to them (to directly manage) but are assigned to another Training Manager or Training Co-ordinator user in their organisation. They will be able to see the initials/profile picture of the user to whom each Apprentice has been assigned.
Once created, Training Managers will be able to assign Apprentice records to Training Co-ordinators.
Training Co-ordinators will only see Apprentices that have been specifically assigned to them.
19

Viewing, Editing & Updating Apprentice Records
• Each Apprentice record consists of several components:-
Information relating to Standard and the Apprentice progress (Left hand side of screen), including Gateway and EPA Components.
Apprentice Info (Right hand side of screen) Employer Info (Right hand side of screen)
• To edit either Apprentice or Employer information, click the “Edit” button.
On the Apprentice Tab you can edit the Start Date and Expected End Date (i.e. when Apprentice should be ready for EPA)
• Not all fields can be edited. The ULN and ACE360 ID fields are locked and cannot be edited. NI Number can be edited, if required.
• Make sure that you click the “Save” button to save any changes.
• If you require further information relating to any of the Gateway components then click on the appropriate item on the left hand side of the screen and appropriate details will be displayed on the right hand side of the screen.
• This is also how, and where, you can upload documents to evidence the Apprentice’s achievement of each required Gateway component.
• Note that if you have not assigned an EPAO to an Apprentice record then a warning message in a red box will be displayed at the top of the record. You can still upload Gateway component evidence BUT you will be unable to progress the Apprentice record to being “Ready for Gateway” until an EPAO has been assigned to the record.
• Use the “Actions” menu to “Attach an EPAO” NB: As a Training Provider user, you are not able to access/edit anything relating to the EPA components, as this will be the role of the linked EPAO.
20

17
Withdrawing an Apprentice
Once an Apprentice record has been created on ACE360, it is possible for the Training Provider to withdraw the learner from the programme. This can be done at almost any stage of the process however, once the final EPA grade has been awarded the record cannot be withdrawn. It is NOT possible to withdraw an Apprentice once their status has been moved to “Grade Determined”.
NB: An EPAO cannot withdraw an Apprentice. If they are of the opinion that this is required then they need to make a request to the relevant Training Provider. The “Withdrawal” process will remove the Apprentice’s record from the “Live Records” tab and it will be moved to the archive section of the system and viewable from the “Archived Records” tab.
NB: If an Apprentice record is withdrawn on ACE360 within 90 days of their start date then the system will automatically credit one token to your supply available tokens.
• To withdraw an Apprentice record, open the Apprentice’s record and select the “Actions” button. NB: If the Actions button is not visible then the function is not available for this record i.e. they are already at “Grade Determined”
• Select “Withdraw this Apprentice”
• A pop-up asks you to confirm the withdrawal and to add a reason for the withdrawal. You are reminded that following withdrawal the Apprentice record will be locked and any evidence or files attached to the record will not be accessible.
• Click “Withdraw”. An orange banner will appear on the top of the Apprentice’s record indicating the withdrawal, the date and which user carried out the action.
• The Apprentice record is now locked and moves from the “Live Records” list into “Archived Records”
21

Apprentice Live Records View – Filtering Options
Use the Apprentice icon on the main menu bar to view and manage your
Apprentice records.
Click on the “Filter” button to filter your Apprentice records by a large
range of different criteria.
Select the filter options required and then click “Apply” button
APPRENTICE STATUS – can further filter “Apprentice Status” by date range
ATTACHED EPAO – Choose from a drop-down list
APPRENTICE DATE OF BIRTH (From and To Date Picker)
APPRENTICE START DATE (From and To Date Picker)
EXPECTED GATEWAY DATE (From and To Date Picker)
ASSIGNMENTS (of Apprentice records) Manage workloads/ensure all Apprentices are assigned.
Attach to an EPAO early in process.
RESITS – Requested and Rejected
ESFA CERTIFICATION – Issued or Not Issued NB: This feature will only function if the EPAO is using
the ACE360 integration functionality with the ESFA’s certification system
Filtering Options Available:
-
By excluding EPA Passed or Failed records you can view ONLY
Apprentice records that are in “active process” – not
completed.
22

Apprentice Live Records View – Working with Filtered Views
When a filter is applied you will see this visually represented in individual boxes to the right of the “Filter”
Button.
When viewing a filtered list you can add additional filters by selecting the ”Filter” Button and choosing
another filter option. This additional criteria will then be added to the list of filters currently being applied.
To remove individual filters, click the white cross on the far right hand side of the relevant orange box
To remove all filters, click the Grey Cross (Clear All Filters) at the far right hand side of the filter bar
NB: Any filters you set will remain active until you remove them.
Exporting Filtered Data
Any of the filtered lists of Apprentice records can be EXPORTED by clicking the “Export Data” Button.
A dialogue box will appear asking you to confirm that you want to “Export Filtered Records” – records
excluded by the applied filters will not be exported. Click the “Export” Button to confirm the export
process.
NB: If you wanted to export ALL your Apprentice records (i.e. not just those with the applied filter then
remove the tick from the “Export Filtered Records” option.
The records are exported as a CSV file which can then be further sorted, filtered, printed etc.
** FOR DETAILS OF ALL DATA FIELDS EXPORTED SEE PAGE 46
23

Apprentice “Assigned and Archived” Records View - Filtering Options
Filtering options are also available for Apprentice Records on both the ”Record Assignment” and “Archived” Apprentice Tabs
24
SUMMARY OF FILTERING OPTIONS FOR ALL APPRENTICE RECORD VIEWS

25
Dashboard
When any user logs into ACE360, they are presented with their Dashboard view.
The Dashboard gives an instant overview of the current status of your Apprentice records, based on your user permissions and/or Apprentice
assignments. The totals you will see are for all of the Apprentice records directly assigned to you or that you have permission to view.
For example;
Super Admin & Admin - will have an overview of ALL Apprentice records
Training Managers – will see all of the Apprentice records attached to Standards they are assigned to, plus any records they have been
directly assigned.
Training Co-ordinators – will see all of the Apprentice records to which they have been directly assigned.
EXAMPLE DASHBOARD VIEW

IN TRAINING
Apprentice
records added to
ACE360 – no
Gateway evidence
uploaded.
GATEWAY IN
PROGRESS
Apprentice
records with one
or more pieces of
Gateway evidence
uploaded.
GATEWAY EVIDENCE
COMPLETE
Apprentice records
where all required
Gateway
components have
got evidence
uploaded.
DENIED EPA
Apprentice
records that have
had Gateway
evidence
reviewed by
EPAO and it has
been rejected for
a specific reason
– LTP notified.
GATEWAY
APPROVED
Apprentice records
submitted by LTP
to EPAO for
Gateway review.
Awaiting EPAO
review and
approval decision
EPA IN PROGRESS
Apprentice records
with one or more
pieces of EPA
evidence uploaded.
APPROVED FOR EPA
Apprentice records
that EPAO has
reviewed and
accepted Gateway
evidence and
accepted
Apprentices as
being ready for
EPA.
EPA EVIDENCE
COMPLETE
Apprentice records
where all required
EPA components
have got evidence
uploaded.
Dashboard Top Bar Explained
The Left Hand side of the bar has 4 tiles which relate to Apprentice related activities carried out by the LTP.
The Right Hand side of the bar has 4 tiles which relate to Apprentice related activities carried out by the EPAO.
26
LTP RELATED TILES – TRAINING PHASE
EPAO RELATED TILES – ASSESSMENT PHASE

If you click on any of the individual tiles you will be presented with a list of all the Apprentice records that are at that particular status.
The list has the specific “status” filter automatically applied for you.
For example:
Status Filter
automatically applied
Status Filter
automatically applied
27

Any of the filtered lists of Apprentice records can be EXPORTED by clicking the “Export Data” Button.
A dialogue box will appear asking you to confirm that you want to “Export Filtered Records” – records
excluded by the applied filters will not be exported. Click the “Export” Button to confirm the export
process.
NB: If you wanted to export ALL your Apprentice records (i.e. not just those with the applied filter then
remove the tick from the “Export Filtered Records” option.
The records are exported as a CSV file which can then be further sorted, filtered, printed etc.
** FOR DETAILS OF ALL DATA FIELDS EXPORTED SEE PAGE 46
Exporting Filtered Data
Dashboard Bottom Bar Explained
The bottom half of the Dashboard view has 2 sections: -
The Left Hand side shows the number of Apprentices who are expected to reach Gateway within
the next 3 months i.e. their Expected Gateway Date is within 3 months of the current date of
viewing your Dashboard summary. Again if you click on this tile, you will get a list of all the
relevant Apprentice records with this filter automatically applied. The information can be
exported for further analysis and/or printing.
This information can be used for planning purposes for both LTPs and EPAOs. LTPs need to ensure
that they contact the relevant EPAO to arrange EPA activities for the Apprentice and the EPAO
gets advance notice that EPA will be required and they can start discussions and planning with
the LTP.
28

The Right Hand side shows Outcomes for the last 30 days relating to the results of EPA and also
information relating to any Resits (these are not time bound i.e. relates to all re-sit
requests/rejections).
Clicking on any of the Tiles will present an automatically filtered list of all the Apprentice records
meeting the selected criteria. The list can be exported. You can also click on any individual
Apprentice record for further details.
EPA PASSED
All Apprentices who
have successfully
achieved their
Apprenticeship in last
30 days
Status Filters
automatically applied
EPA FAILED
All Apprentices who
have failed EPA in the
last 30 days
RESIT REQUESTED
All Apprentices who have failed EPA
and a RESIT has been requested -
awaiting EPAO decision
RESIT REQUEST REJECTED
An EPAO can decide that a
resit is not possible. The
decision will be based upon
specific EPAO rules and
guidance relating to each
Standard. The EPAO
decision is final.
29

Shared Documents Area
Within each Apprentice record there is an area where documents can be uploaded and shared between Training Providers and the linked EPAO.
To access this facility, click on the Shared Documents Tab within any Apprentice record.
There is an area for both LTP Uploads and EPAO Uploads. o LTP users (except Finance Users) can upload documents to the
LTP upload area. o They can also view documents uploaded by the EPAO in the
EPAO Uploads area. They cannot edit or delete documents in the EPAO Uploads area.
o LTP users can only delete documents that appear within the LTP Uploads area.
o EPAO users can view documents uploaded by LTP users. They cannot edit or delete documents in the LTP Uploads area.
To upload a document, click the Upload Document button. Select the document to upload and click on Open (or double click the document name). Maximum file size is 2GB
Uploaded documents will be displayed as icons.
To preview a document, click the eye icon on the top right of the file. You can preview any document that is under 2MB in size
To download a document, click the blue down arrow head icon.
To delete an uploaded document (if permitted), click the orange dustbin icon. You will be asked to confirm the deletion request.
PLEASE NOTE: The Shared Documents area can be accessed at any point during the Apprentice’s progress. For example, even when an Apprentice record is locked to the LTP (during EPA), the Shared Documents area can still be accessed for the uploading of additional documents or viewing of EPAO documentation.
Note there is no “Delete” option for
documents uploaded by the EPAO
30

EPAO Knowledge Base
This part of the ACE360 system, allows EPAOs to upload guidance and support documentation. These resources will give guidance on specific EPAO processes and procedures and can be either Generic or Standard Specific.
LTP users will be able to access the Generic resources for all of the EPAOs that they are linked to. These could be documents such as the EPAO’s EPA booking process, payment options, Appeals/Complaints process, how to contact them and the use of any of their online testing facilities.
LTP users will only be able to access the Standard Specific resources for those Standards to which they have been specifically assigned Apprentices that are undertaking these Standards. Standard specific guidance may relate to specific assessment plan documentation, EPAO specific requirements relating to uploaded Apprentice evidence and their overall EPA grading criteria.
To access the Knowledge Base: -
Click “Knowledge Base” icon on the main menu bar
Choose an EPAO from the drop-down list of EPAO organisations to whom you are linked.
In the top half of the screen you will see all of the Generic guidance that has been uploaded by the selected EPAO.
To see Standard Specific guidance, go to the bottom half of the screen and select the relevant Standard from the Standard drop-down list.
GENERIC GUIDANCE
All uploaded files can be Previewed or
Downloaded and printed, if required.
THERE IS NO DELETE FUNCTION
STANDARD SPECIFIC GUIDANCE
All uploaded files can be Previewed or
Downloaded and printed, if required.
THERE IS NO DELETE FUNCTION
31

Apprentice – Uploading Gateway Evidence
• All approved Standards have an Assessment Plan which outlines the components that an Apprentice needs to successfully complete, prior to progressing to Apprenticeship Gateway.
• These Gateway requirements are detailed within each Apprentice’s ACE360 record and are determined by the Standard which they are undertaking. During their training period, evidence of Apprentice achievement can easily be uploaded to, and securely stored in, their ACE360 record.
• To upload Gateway component evidence, click on the component details on the left hand side of the screen and then use the “Upload Evidence” button to upload appropriate achievement evidence.
• Once any evidence has been uploaded against a Gateway component, a small blue clipboard icon appears.
• You can upload more than 1 piece of evidence/documentation against each Gateway component. To add additional documents click on the appropriate Gateway component and click the “Upload More Evidence” button.
• To add any additional, supporting notes to any uploaded evidence, click the Pencil icon (to the right of the uploaded file name) and a box appears for you to add your notes.
• There is also a Download or Preview icon if you want to look at the evidence uploaded and a Delete icon if you have uploaded something in error. Note: Delete is only available before Gateway is confirmed. Once Gateway is confirmed, all files are locked and cannot be added to or deleted.
32
GATEWAY EVIDENCE REQUIREMENTS
Please note that any queries relating to
specific evidence requirements for
Gateway should be directed to the
relevant EPAO.

Click the Upload Evidence button to upload a file to Gateway or the Shared Documents area.
Multiple files can be uploaded to each area as required
• Once a file is uploaded, the following options for working with files are available: Edit file notes Download file Preview file Delete file
Summary - Uploading, Downloading, Previewing and Deleting files in an Apprentice Record
33
Working with Files
Select to add or edit notes associated with the file.
Select to download the file to your computer.
Select to preview the file. Note: Preview is only available for files less than 2MB in size. If the preview icon is not visible, the file is greater than 2MB. TIP: In Chrome to make certain file types OPEN automatically instead of downloading, download the file type once, then right after it has downloaded, look at the status bar at the bottom of the browser. Click the arrow next to the file and choose "always open files of this type". In future the files will automatically open.
Select to delete the file. Note: Delete is only available before Gateway is confirmed, once confirmed files are locked and cannot be added or deleted.
Select to download all files associated with Gateway to your computer. This is useful when you are reviewing and confirming Gateway. Note: To allow the Download All feature to work, pop-ups may need to be enabled for https://my.ace360.org/

Apprentice – Submitting for Gateway Approval
REMEMBER: If you have not assigned an EPAO to an Apprentice record you will be unable to progress the Apprentice record to being “EPA Ready” until an EPAO has been assigned.
• When all Gateway components have been achieved and the required evidence uploaded to each of them a pop-up box will appear informing you that it is now time to add the Gateway Notes and the Declaration to the record.
• To do this, you should click the “Actions” button in top right hand corner and select “Add Overall Gateway Notes”. A pop up box appears for you to enter and save any relevant notes.
• To Add Gateway Declaration, click the “Actions” button in top right hand corner and select Add Gateway Declaration. NB: Before an Apprentice can progress to EPA the Employer must sign off the successful completion of the “In training” phase and the achievement of all Gateway requirements and confirm that the Apprentice is ready for EPA.
• A pop up appears for you to upload the appropriate Gateway Readiness Agreement which must be signed by the Apprentice’s Employer. Only ONE document can be uploaded and you can add additional Notes. Click “Save Notes” button to save any notes added.
• You are now ready to confirm Gateway Readiness and submit the Apprentice’s ACE360 record details to the assigned EPAO for review and approval.
• To do this, click “Actions” button and select “Confirm Gateway Readiness”
• A warning box appears reminding you that once you have confirmed the Apprentice as Gateway ready, the EPAO will be notified and the Apprentice’s ACE360 record will be locked for any further editing by you. However, you will still be able to VIEW the Apprentice record.
• Click “Yes, Mark as Ready for EPA”.
NOTE: You can download all Gateway evidence with the click of one button. This is useful for reviewing all evidence before confirming Gateway readiness and submitting to the EPAO for approval.
34
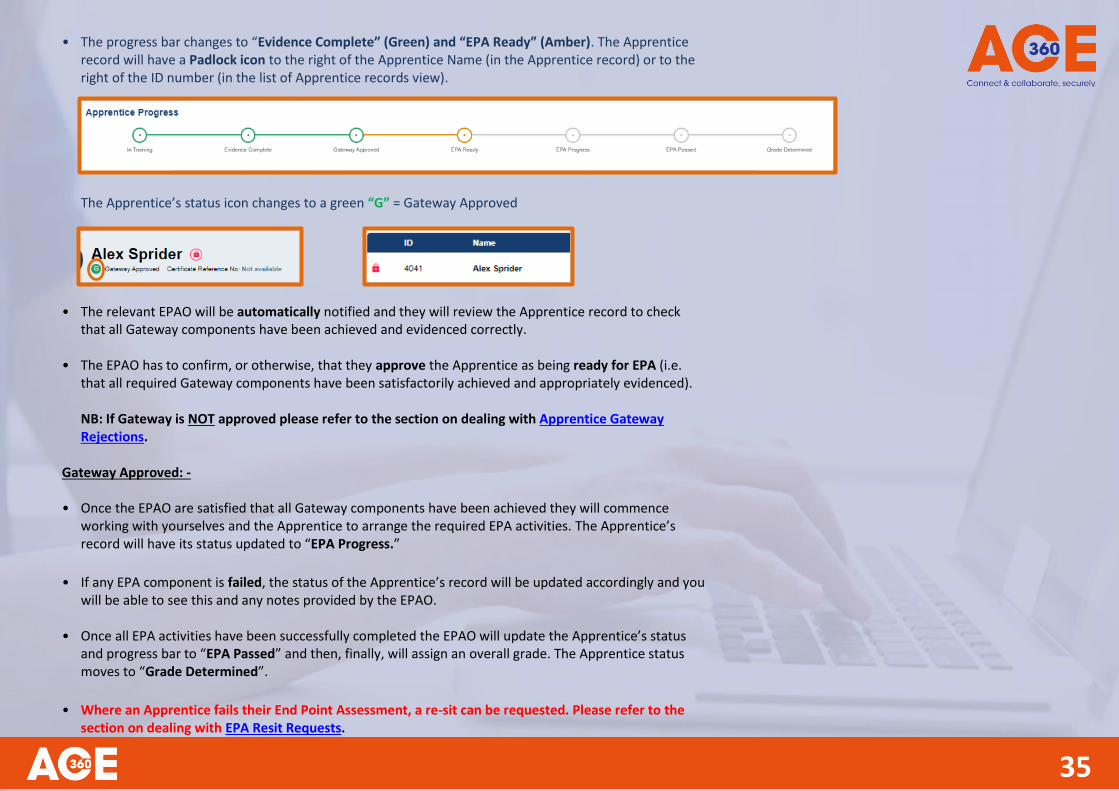
• The progress bar changes to “Evidence Complete” (Green) and “EPA Ready” (Amber). The Apprentice
record will have a Padlock icon to the right of the Apprentice Name (in the Apprentice record) or to the right of the ID number (in the list of Apprentice records view).
The Apprentice’s status icon changes to a green “G” = Gateway Approved
• The relevant EPAO will be automatically notified and they will review the Apprentice record to check
that all Gateway components have been achieved and evidenced correctly.
• The EPAO has to confirm, or otherwise, that they approve the Apprentice as being ready for EPA (i.e. that all required Gateway components have been satisfactorily achieved and appropriately evidenced). NB: If Gateway is NOT approved please refer to the section on dealing with Apprentice Gateway Rejections.
Gateway Approved: -
• Once the EPAO are satisfied that all Gateway components have been achieved they will commence
working with yourselves and the Apprentice to arrange the required EPA activities. The Apprentice’s record will have its status updated to “EPA Progress.”
• If any EPA component is failed, the status of the Apprentice’s record will be updated accordingly and you will be able to see this and any notes provided by the EPAO.
• Once all EPA activities have been successfully completed the EPAO will update the Apprentice’s status
and progress bar to “EPA Passed” and then, finally, will assign an overall grade. The Apprentice status moves to “Grade Determined”.
• Where an Apprentice fails their End Point Assessment, a re-sit can be requested. Please refer to the section on dealing with EPA Resit Requests.
35

Apprentice Gateway Rejections
• An Apprentice record submitted for Gateway can be rejected by the EPAO if
any of the evidence submitted is incorrect or unacceptable, for any reason. ACE360 has a built in flow process to deal with Apprentices rejected for EPA.
• Having reviewed submitted Gateway evidence, the EPAO can accept or reject individual Gateway components. The rejection of just one component will mean that the overall Gateway request will have to be rejected. However, any components that have been accepted will be marked as such and locked to prevent any further changes.
• If an Apprentice has their Gateway approval rejected by an EPAO, then the Apprentice record will appear with the Status as a red circle with an “E“ inside = Gateway Rejected
• Opening the Apprentice’s record will show the progress bar with EPA Ready in red indicating that Gateway has not yet been approved.
• Any Gateway components that have been accepted/approved will be shown in green and have a red, locked padlock icon. These cannot be edited.
• Any Gateway components that have been rejected will be shown in red and have an unlocked padlock icon.
• There will also be an EPAO Gateway Rejection Notes section which when you click on it will open up full details of why the rejection was made.
• Notice also that each Gateway component section will indicate that it is either the “first attempt” or the number of attempts that the Apprentice has had at achieving it e.g. 1 Previous Attempt ACE360 will retain a record of any previous (failed) attempts and the evidence associated with each attempt.
36
32
v
v
v
v

Resubmitting for Gateway Approval
• For failed Gateway components, you will need to resubmit
alternative/additional evidence. ACE360 will not allow you to resubmit for EPA without taking some remedial action. Remember that the Apprentice may require additional training/support prior to them being resubmitted for EPA.
• To upload new or additional evidence, click the component name and upload documentation, as before. Note that this will be uploaded under a separate “Attempt” number. ACE360 will keep a record of all previous attempts and the associated evidence. You can view this by clicking the arrowhead to the right of the attempt number.
• You are now ready to confirm Gateway Readiness and resubmit the Apprentice’s ACE360 record details to the assigned EPAO for review.
• To do this, click “Actions” button and select “Confirm Gateway Readiness”
• A warning box appears reminding you that once you have confirmed the Apprentice as Gateway ready, the EPAO will be notified and the Apprentice’s ACE360 record will be locked for any further editing by you. However, you will still be able to VIEW the Apprentice record.
Similarly, if an Apprentice fails their EPA, their Status and Progress line will be updated for you to view. However, the record remains locked. You will be able to see which EPA component/s were failed as they will show in a red colour. Those passed will be shown in green.
In the future, ACE360 will send system notifications to users to inform them when Apprentice statuses change. For example, Gateway Approved or Gateway Rejected and EPA Approved & Grade Determined or EPA Failed.
37
33

End Point Assessment Resit Requests
• If an Apprentice fails EPA a resit can be requested by the Training Provider.
• EPA Fail is indicated by an E in a red circle alongside the Apprentice name. The record remains locked.
• To request a resit, open the Apprentice record and click the “Request Resit” button.
• Confirm the request for a resit.
• Confirmation of the resit request is indicated beside the Apprentice’s name on their ACE360 record.
• The EPAO will consider the resit request and has the option to “Accept” or “Reject” the request for a resit. NOTE: The EPAO’s resit decision will depend on a number of factors. For example, the Standard, the component/s that were failed and the number of any previous EPA attempts.
• If the EPAO REJECTS the re-sit request then the EPA FAIL grade is confirmed and no further re-sit requests are allowed.
• If the EPAO ACCEPTS the re-sit request then the status next to the Apprentice’s name will change to “Resit Accepted”.
• The EPAO will then arrange to undertake the EPA resit in line with their assessment processes and will confirm the resit result in the usual manner.
• If a resit is accepted the Apprentice’s status will be updated to “Approved for EPA” and an additional EPA Component area is added to the Apprentice’s record. The record remains locked to the Training Provider.
• As with the “attempts” at Gateway, ACE360 will retain a record of the number of EPA attempts and the evidence associated with each attempt.
38
39
35
Appeals
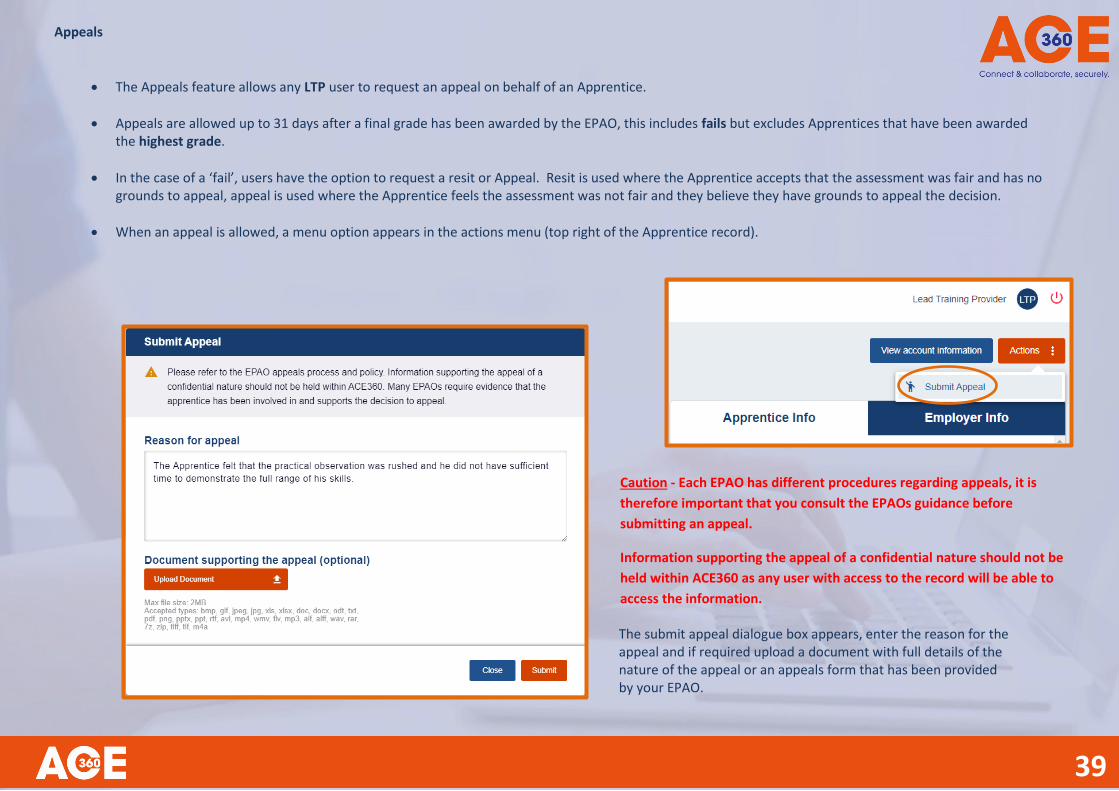
The Appeals feature allows any LTP user to request an appeal on behalf of an Apprentice.
Appeals are allowed up to 31 days after a final grade has been awarded by the EPAO, this includes fails but excludes Apprentices that have been awarded the highest grade.
In the case of a ‘fail’, users have the option to request a resit or Appeal. Resit is used where the Apprentice accepts that the assessment was fair and has no grounds to appeal, appeal is used where the Apprentice feels the assessment was not fair and they believe they have grounds to appeal the decision.
When an appeal is allowed, a menu option appears in the actions menu (top right of the Apprentice record).
The submit appeal dialogue box appears, enter the reason for the appeal and if required upload a document with full details of the nature of the appeal or an appeals form that has been provided by your EPAO.
Caution - Each EPAO has different procedures regarding appeals, it is
therefore important that you consult the EPAOs guidance before
submitting an appeal.
Information supporting the appeal of a confidential nature should not be
held within ACE360 as any user with access to the record will be able to
access the information.

40
Once the Appeal has been submitted a new item appears in the EPA Components area. Selecting this item reveals the full details of the appeal on the right
of the Apprentice record.
All open appeals can be viewed on the dashboard or by using the search and filter function on the Apprentice Record table.

41
37
Once the EPAO has completed their investigation into the appeal, they make an appeal decision and either uphold the grade previously issued or change
the grade.
The appeal process is now complete and the result is sent to the ESFA for certification.
Note. If the appeal was against a fail, you have a further 31 days to request a resit, after this time the fail outcome is confirmed.

Purchasing ACE360 Tokens – Using BACS or Credit Card
• ACE360 uses tokens for the creation of an Apprentice record and
you will need to ensure that you have available tokens BEFORE you can add any Apprentice records or select Standards to be linked to your ACE360 account.
• ACE360 Super Admin, Admin and Finance users all have the ability to purchase tokens.
• To purchase tokens, select the Token Management icon on the menu bar on the left of the screen. If your user assignment doesn’t permit token purchase then you will not see this icon.
• Payment can be made either via BACS or Card payment.
• You need to set up, and save, your organisation’s BACS and/or payment card details. Click the “Add New Payment Card” or “Add BACS Information” button.
• Click the green “Purchase Tokens” button at the top of the screen.
• A pop-up will appear asking you how many ACE360 tokens you would like to order. Enter the amount you would like to order and the total cost, inclusive of VAT at 20%, will be automatically calculated.
• Click “Next” to continue.
• On confirming the number of tokens you would like to order, you will see a new pop-up and you are required to Confirm Order Details.
• You can select your preferred payment method (if you have a number of different options set up!).
37 42
38

• If you select Card Payment, you will need to type in the 3 digit CVV.
• Click the “Confirm Order” button to confirm and submit your token order. A message will appear on screen confirming if the transaction was successful.
• Tokens paid for by Card are credited immediately but those paid for by BACS will show as Pending until payment has been received by the Federation. When the Federation has received payment, within 24 hours (excluding non-working days), they will authorise the tokens to be made available for use.
• If you need to update your BACS payment details, choose the option “Edit BACS Information” which will unlock certain fields. Make required amendments and then save.
• You can delete existing card details (using the red dustbin icon) and/or use the “Add New Payment Card” option.
• For BACS payments, a pro-forma Invoice will be generated once you have placed your order. This will enable you to arrange payment, to the Federation, for your ACE360 tokens.
• To view and/or download your pro-forma invoice, use the Activity Log icon on the left hand menu bar. You will also receive an e-mail confirming receipt of your order and a copy of the pro-forma invoice will be attached.
• All token order/payment transactions will be recorded in the ACE360 Activity Log. These will only be visible to designated ACE360 Finance Manager user accounts and Super Admin.
43
39

ACE360 Activity Log
ACE360 has a built-in, automatically generated Activity Log. This tracks and records all user activity on ACE360, within your organisation. The Activity Log records events such as: -
User account invitations created User accounts created Order of Tokens Crediting of Tokens Creation of Apprentice records Changes/updates to Apprentice records & status
All log entries are automatically “stamped” with the name of the user carrying out the activity and also the date that activity took place. NB: Users will have different views of the Activity Log – their view is dependent on their assigned ACE360 user “type”. For example, only Super Admins and Finance Managers will see transactions relating to Token orders and credits.
44
40

2 45
41
Apprentice Accounts – Super Admin & Admin Users ONLY
Each Apprentice record in ACE360 has “Account” information associated with it. This can be accessed by Super Admin and Admin users ONLY
This can be accessed either:
By clicking the Accounts icon on the main menu bar. All Apprentice records will be displayed with summary information relating to PO and Invoice Numbers. Click on an Apprentice to open their record. OR
Within an Apprentice’s record, click on the View Account Information button in the top right hand corner.
The following screen will be displayed:-

46
2
Accounts Information
EPAO Internal ID – This reference number is provided by the attached EPAO and will be auto-populated using the data they have input.
PO Number – Use this field if the attached EPAO payment process requires the LTP to raise a Purchase Order (PO). Note that if you need to change
the EPAO associated with an Apprentice record then you will need to delete any PO number entered into the Accounts information for the
Apprentice.
Invoice Number – This field will be populated by the attached EPAO.
Paid – This field is managed by the attached EPAO. Red Cross = Not Paid and a Green Tick = Paid. Default is set as “Not Paid”
Funding Type – Choose the correct option from drop-down list.
Prime/Sub Contract? – Choose the correct option to indicate if you are the primary contract holder or a sub-contractor.
ULN Validated? – Some EPAOs will carry out Apprentice ULN validation but it is not a mandatory requirement. This field is managed by the
attached EPAO. Default is a Red Cross i.e. not validated.
Record Information
This information is pre-populated using data input as part of the Apprentice record creation.
ACE360 ID – Unique reference number assigned by ACE360 to each Apprentice record.
ULN – Apprentice’s ULN, added as part of the Apprentice record creation.
Employer ERN – Added as part of the Apprentice record creation. LTP to request information from Apprentice’s employer.
This field can be left blank, if necessary.
Standard – Standard Apprentice is undertaking.
Standard Level – Level of Standard Apprentice is undertaking.
Standard Code – This is the unique code assigned by the IFA to each Standard.
LARS Code – This is the code used by ESFA for funding purposes.
EPAO Name – Displays name of the attached EPAO.
Reasonable Adjustment – This is where an LTP can request that the EPAO grants “reasonable adjustments” for an Apprentice who
has may require additional support whilst undertaking EPA activities. Any supporting documentation can be uploaded to the Shared
Documents area for the EPAO to review. The attached EPAO will accept or reject the request via ACE360.

Reports – Super Admin & Admin Users ONLY (incl Regional Admins)
47
43
ACE360 has a number of built-in reports that can be accessed by SUPER ADMIN and ADMIN users.
Reports are accessed via the “Reports” icon on the main menu bar.
There are currently 2 report types:
Workload Report
Grade Distributions
To access a report type, simply click on the sample chart and you will be presented with a summary chart which you can then customise by using various filter options.

Workload Report
A summary report will be displayed which gives a visual representation of the number of Apprentices at each status in their Apprenticeship journey towards Gateway approval and progression into EPA.
Hovering the mouse over any of the bars or circle segments will display both a % and a numerical value of the Apprentices at each particular status.
Information is also given on the % of all your Apprentices that have been assigned to a specific Training Co-ordinator and any Apprentice records that are without an attached EPAO.
You can customise the report by setting the following filters: -
By All or individual Sector
By All or individual Standard
By All or specific Level
By All or specific EPAO
For All Tng Co-ordinators & Tng Mangers (to whom Apprentice/s are “assigned to”) or by specific user
Date Range
48
44

Grade Distributions Report
A summary report will be displayed which gives a visual representation of the overall grade assignments for your Apprentices that have already undertaken an EPA. By default, this is broken down by month, starting with the current month.
Hovering the mouse over any section of a monthly bar will display both a % and a numerical value of the Apprentices achieving each grade status, in that particular month.
Based on the grades attained by your Apprentices, information is also broken down by sector. The 5 sectors with the BEST overall pass rate % are listed and also the 5 sectors with the WORST performance (i.e. the highest failure % rate)
You can customise the report by setting the following filters: -
By All or individual Sector
By All or individual Standard
By All or specific Level
By All or specific EPAO
For All Tng Co-ordinators & Tng Mangers (to whom Apprentice/s are “assigned to”) or by specific user
Date Range
49
45

Super Admin (SA)
Admin (A) Regional Admin (RA)
Finance Manager (FM)
Training Manager (TM)
Training Coordinator(TC)
Create Users ALL Not SA or FM) ONLY FMs ONLY TCs X
Delete Users ALL Except SA ALL Except SA X X X
Invite Regional Office X X X X X
Edit Own Organisation Profile X X X X
Edit own profile
Edit others profiles X X X
Link to an EPAO X X X X
View links to EPAO & Regional Offices X X X
Remove link to EPAO X X X X
View full list of Standards X X X X X
Search full list of Standards X X X X X
Add Standards to organisation profile X X X X X
View Standards linked to organisation profile
X
Delete Standards from organisation profile X X X X X
Search list of Standards in Organisation profile
X
Create Apprentice records X X X
View Apprentice records X * **
Edit/update Apprentice records pre Gateway
X
Delete Apprentice records X X X
Withdraw Apprentice records X X X
Confirm Gateway Readiness X
Access Token Management Tab X X X
Add/edit BACS information X X X X
Add/edit payment card details X X X X
Purchase tokens X X X X
View/download proformas and invoices X X X
Run Reports X X X
View EPAO Knowledge Base X
Download Knowledge Base Documents X
Upload Documents to Knowledge Base X X X X X X
ACE360 LTP User Permissions Summary
50
6
*Requires Apprentice record assignment
**Requires Standard Assignment

Help Guide - ACE360 Apprentice Basic Information Amendments
Apprentice Basic Information Amendments
During the course of their learning journey, it is possible that, for a variety of reasons, an Apprentice may change (or have changed) their
basic information details.
However, in order to maintain the accuracy and integrity of data held on ACE360, where there are changes/differences relating to
Apprentice names or gender then you are required to load additional evidence to the ACE360 Shared Documents area to confirm and
validate any changes/differences that there are between the Apprentice data entered onto ACE360 and individual pieces of evidence that
are uploaded for the purposes of meeting specified Gateway requirements. It is not possible to produce a fully comprehensive guidance on
the range of acceptable evidence but the list below gives an indication of what is currently acceptable.
Acceptable forms of Name/Gender Change Evidence include:
Marriage Certificate
Civil Partnership Certificate
Gender Recognition Certificate
Enrolled Deed Poll
Act of Parliament
Unenrolled deed poll/Change of name deed
Certificate from the Court of the Lord Lyon of Scotland
Birth Certificate (upon re-registration)
Baptismal/Confirmation certificate (for Christian names only)
Certificate of Naturalisation/Registration
Statutory Declaration/Affidavit
It has also been agreed that we would accept a signed statement from the Apprentice which is countersigned and dated by someone in
authority. This person in authority CANNOT be an employee of the Apprentice’s appointed training provider. The most common
counter signatory used is the Apprentice’s employer contact.
These statements can also be used to confirm discrepancies between Names, Dates of Birth and Gender on achievement
evidence/Gateway documentation and the Apprentice’s Basic Information details held in ACE360. The ACE360 Support Team can advise
you on the format and content of an acceptable Apprentice statement.
51

Apprentice Name Spelling Discrepancies
Should an Apprentice’s record ACE360 contain any spelling differences of forename or surname (i.e. either between the Apprentice Basic
Information details and a piece of evidence, or between two or more pieces of evidence/supporting documentation), then additional
supporting information should be provided to explain the differences. The supporting evidence can be of a similar nature to the above
name/gender statements which should explain a why there are naming differences, why a spelling error exists, and to confirm the correct
spelling. The supporting evidence should be signed and dated by the Apprentice and either their Training Provider or Employer.
National Insurance (NI) Numbers
If there are any discrepancies/errors relating to an Apprentice’s NI Number that is entered into ACE360, then you will be required to provide
evidence of your Apprentice’s correct NI Number before an amendment can be made.
Examples of acceptable evidence for NI Numbers is as follows:
Current P45 or P60
Letter from HM Revenue and customs confirming NI Number or regarding tax or tax credit
Bank statement showing payments by direct debit for class-2 National Insurance contributions, or benefits payment received
showing correct NI Number on the statement. For example, Incapacity Benefit or State Pension.
Payslips, salary statement or works pension statement (as long as it shows NI Number)
Letter from the Pension Service or Jobcentre Plus (not handwritten)
NI Number Card (not handwritten)
NB: Statements signed by an Apprentice CANNOT be used as evidence for a correct NI Number.
Acceptable Evidence for Gateway
Please note that any queries relating to specific evidence requirements and acceptable formats for Gateway requirements should be
directed to the relevant EPAO and not the ACE360 Support Team.
52

Apprentice Data Fields Included in ACE360 Data Export Function
ACE360 FIELDNAME DESCRIPTION COMMENTS
ACE360 ID Unique Apprentice ID automatically assigned at record creation ACEXXX (Numeric)
Status Current Apprentice status In Training, Evidence Complete(Gateway), Gateway Approved, EPA Ready, EPA Progress, EPA Passed, Grade Determined
Apprentice ULN Apprentice ULN XXXXXXXXXX (Numeric)
Apprentice Creation/Registration Date Apprentice Creation/Registration Date (on ACE360) DD/MM/YYYY HH:MM
Forename Apprentice Forename Text
Surname Apprentice Surname Text
Date of Birth Apprentice Date of Birth DD/MM/YYYY
Gender Apprentice Gender Text
Employer Name Apprentice's Employer Name Text
Employer Company Sector Apprentice Employer Sector Text
Employer Street Address Apprentice Employer Street Address Text
Employer Address Town/City Apprentice Employer Address - Town/City Text
Employer Address County Apprentice Employer Address - County Text
Employer Address Country Apprentice Employer Address - Country Text
Employer Address Postcode Apprentice Employer Address - Post Code Standard Post Code Format (Alphanumeric)
Standard Standard that Apprentice is undertaking Text
Level Level of standard being undertaken by Apprentice Numeric
Apprenticeship LARS Code Apprenticeship LARS Code Numeric
Standard Last Update Last Date Standard was Updated DD/MM/YYYY HH:MM
Published Date of Standard Published Date of Standard DD/MM/YYYY HH:MM
Apprenticeship Start Date Start Date of the Apprenticeship DD/MM/YYYY
Apprenticeship Expected End Date Expected End Date of the Apprenticeship DD/MM/YYYY
Funding type How is Apprenticeship Being Funded Employer Levy, Employer Levy & Co Investment, Government Employer Co Investment, Unfunded
53

ACE360 FIELDNAME DESCRIPTION COMMENTS
Training Provider Name Apprentice Training Provider Name Text
Training Provider UKPRN Apprentice Training Provider UKPRN Numeric
Reasonable Adjustment Status Reasonable Adjustment Requested for Apprentice Not Requested, Requested, Approved, Rejected
EPA Ready Confirmation Date Apprentice EPA Ready Confirmation Date DD/MM/YYYY HH:MM
Apprentice Home Address County Apprentice Home Address - County Text
Apprentice Home Address Postcode Apprentice Home Address - Post Code Standard Post Code Format (Alphanumeric)
Apprentice Ethnicity options Apprentice Ethnicity Text
Apprentice Disabilities Apprentice Declared Learning Difficulty/Disability/Health Issue Displays Selected Issue or Leaner not consider self as having any relevant difficulties
ESFA EPA Reference * ESFA EPA Reference * Only populated if linked EPAO is using integration facility with ESFA Certification Process
ESFA EPA Errors * ESFA EPA Errors * Only populated if linked EPAO is using integration facility with ESFA Certification Process
ESFA Certificate Reference * Apprentice ESFA Unique Certificate Reference * Only populated if linked EPAO is using integration facility with ESFA Certification Process
ESFA Certificate Creation Errors * ESFA Certification Creation Errors * Only populated if linked EPAO is using integration facility with ESFA Certification Process
ESFA Certificate Submission Errors * ESFA Certificate Submission Errors * Only populated if linked EPAO is using integration facility with ESFA Certification Process
54
0

31
ACE360 System Help & Support
This user guide is being updated on an ongoing basis and your feedback will be much appreciated. This will help us to improve and enhance this guide to meet the needs of all ACE360 users. For further help and support, and to give feedback on this guide, please contact:-
0300 303 4444
29 55