Embed Size (px)
Citation preview

USDA HSPD-12
Person Model
Sponsor Data Entry Guide
Prepared for
United States Department of Agriculture
Office of Homeland Security and Emergency Coordination (OHSEC)
300 7th Street SW, Washington DC 20024
Version 1.2
June 18, 2012

Revision Information
Version Date Revision Notes
1.0 9/30/2011 Initial Draft
1.1 12/13/2011 Final Draft. Updates include screenshots and comments impacted by development of Person Model leading up to go live on 11/14/11, and post go-live fixes.
1.2 06/18/2012 Update includes new link to Person Model website.

PERSON MODEL SPONSOR
DATA ENTRY GUIDE V1.2
June 18, 2012 Person Model Sponsor Data Entry Guide V 1.2 Page 3 of 56
Contents
Introduction ................................................................................................................................... 7
Separation of Duties ................................................................................................................................ 7
Person Model Sponsor Role .................................................................................................................... 7
Sponsorship .................................................................................................................................. 7
Step 1: Process Start ............................................................................................................................... 7
Step 2: Data Collection ............................................................................................................................ 8
Step 3: Data Entry and Organizational Relationships ........................................................................... 11
Step 4: Sponsorship in Person Model ................................................................................................... 12
Step 5: Enrollment & Activation ............................................................................................................. 12
Step 6: Person Model Data Entry and Sponsorship Functions ............................................................. 13
(a) Login Screen (Required) ..................................................................................................... 13
(b) Start Screen (Required) ...................................................................................................... 14
(c) Company/Organization (Optional) ....................................................................................... 15
(d) Contract, Grant, or Agreement Record (Required) ............................................................. 18
(e) Person Information (Required) ............................................................................................ 24
(f) Add a New Relationship ...................................................................................................... 38
(g) Maintain a Person’s Assignment ......................................................................................... 40
(h) View Person Organizational Summary ............................................................................... 43
(i) Sponsorship ........................................................................................................................ 45
USAccess Sponsorship Functions .............................................................................................. 48
Enrollment & Activation ............................................................................................................... 55

PERSON MODEL SPONSOR
DATA ENTRY GUIDE V1.2
June 18, 2012 Person Model Sponsor Data Entry Guide V 1.2 Page 4 of 56
List of Figures
Figure 1: Login Screen ................................................................................................................................ 13
Figure 2: Start Screen ................................................................................................................................. 14
Figure 3: Search Company/Organization Screen ....................................................................................... 15
Figure 4: Add New Company/Organization Screen .................................................................................... 16
Figure 5: Add/Edit Company/Organization Details Screen ......................................................................... 17
Figure 6: Company/Organization Address Screen ..................................................................................... 18
Figure 7: Search Contract Information Screen ........................................................................................... 19
Figure 8: Add Contract Information Screen ................................................................................................ 20
Figure 9: Edit/View Contract/Grant/Agreement Information Screen ........................................................... 21
Figure 10: Edit/View Contract/Grant/Agreement Information Screen ......................................................... 22
Figure 11: Look Up USDA POC .................................................................................................................. 22
Figure 12: Edit/View Contract/Grant/Agreement Information Screen ......................................................... 23
Figure 13: Contract/Grant/Agreement Information Screen ......................................................................... 23
Figure 14: Finding or Creating a Person Information Screen ..................................................................... 24
Figure 15: Biographical Details Screen ....................................................................................................... 26
Figure 16: Name Screen ............................................................................................................................. 26
Figure 17: Add/Edit Name Screen .............................................................................................................. 27
Figure 18: Biographic Details Screen ......................................................................................................... 29
Figure 19: Contact Details Screen .............................................................................................................. 30
Figure 20: Add/Edit Address Screen ........................................................................................................... 31
Figure 21: Phone Information ..................................................................................................................... 32
Figure 22: Email Addresses ........................................................................................................................ 32
Figure 23: Organizational Relationships Tab .............................................................................................. 33
PERSON MODEL SPONSOR
DATA ENTRY GUIDE V1.2
June 18, 2012 Person Model Sponsor Data Entry Guide V 1.2 Page 5 of 56
Figure 24: Add Person of Interest Screen ................................................................................................... 34
Figure 25: Security Data ............................................................................................................................. 34
Figure 26: Person of Interest History .......................................................................................................... 35
Figure 27: Assignment ................................................................................................................................ 36
Figure 28: Add New POI Type Screen ........................................................................................................ 38
Figure 29: Look Up Person of Interest Type Screen .................................................................................. 39
Figure 30: Add new POI Type Screen ....................................................................................................... 39
Figure 31: Add Person of Interest Screen ................................................................................................... 40
Figure 32: Maintain a Person’s Assignment Screen .................................................................................. 41
Figure 33: Edit POI Relationship Screen .................................................................................................... 42
Figure 34: Assignment Screen .................................................................................................................... 43
Figure 35: Person Org Summary Screen .................................................................................................... 43
Figure 36: Search Screen within the Person Organizational Summary Module ......................................... 44
Figure 37: Search Results with the Person Organizational Summary Module ........................................... 44
Figure 38: Person Org Summary Screen .................................................................................................... 45
Figure 39: Maintain a Person’s Assignment ............................................................................................... 45
Figure 40: Assignment ................................................................................................................................ 46
Figure 41: Card Shipping Information ......................................................................................................... 47
Figure 42: Sponsorship ............................................................................................................................... 47
Figure 43: USAccess Login Screen ................................................................................................................
Figure 44: USAccess Applicant Search Screen.......................................................................................... 49
Figure 45: USAccess Edit Applicant Screen ............................................................................................... 50
Figure 46: USAccess Edit Applicant Screen ............................................................................................... 50
Figure 47: USAccess Sponsor Applicant Screen ...........................................................................................
Figure 48: USAccess Sponsor Applicant Screen ...........................................................................................

PERSON MODEL SPONSOR
DATA ENTRY GUIDE V1.2
June 18, 2012 Person Model Sponsor Data Entry Guide V 1.2 Page 6 of 56
Figure 49: USAccess Sponsor Applicant Screen ....................................................................................... 53
Figure 50: USAccess Applicant Search Screen..............................................................................................
Figure 51: USAccess Sponsor Utilities Screen ........................................................................................... 55

PERSON MODEL SPONSOR
DATA ENTRY GUIDE V1.2
June 18, 2012 Person Model Sponsor Data Entry Guide V 1.2 Page 7 of 56
Introduction
In August 2007, the United States Department of Agriculture (USDA) began a phased transition to the LincPass – USDA’s own Personal Identity Verification (PIV) card. This effort is part of the entire Federal Government’s move toward compliance with the President’s Homeland Security Presidential Directive 12 (the Common Identification Standard for Federal Employees and Contractors), commonly known as HSPD-12.
Separation of Duties
An integral part of HSPD-12 is the separation of duties, which ensures that no individual has the capability to issue a PIV credential without the cooperation of another authorized person. As a result, any person who requires a LincPass must go through several steps to obtain their LincPass. This LincPass process includes Sponsorship, Adjudication, Enrollment and Activation.
Person Model Sponsor Role
As a Sponsor, you will play an integral part in the process for non-employees to enroll for a LincPass so they can access facilities and systems. The Sponsor is the person who initiates the request for a non-employee to enroll for a LincPass and sponsors the non-employee in Person Model. Person Model is USDA’s database for storing and maintaining personnel identity records. Person Model maintains a single identity record for each person, and tracks the history of each relationship the person has with USDA over time. Person Model feeds non-employee information required for LincPass enrollment to USAccess, the General Services Administration (GSA) credentialing system. This document provides an overview of procedures for non-employee sponsorship.
Sponsorship
Step 1: Process Start
To be a Sponsor in Person Model you must:
1. Complete USAccess Sponsor training To complete USAccess training, log on the GoLearn Learning Management System at: https://piv.golearnportal.org/
2. Be designated as a Sponsor in USAccess and obtain a USAccess login Notify your designated supervisor after completing USAccess training. Managers should send requests for Sponsor designation to the agency Role Administrator. Once designated in USAccess, Sponsors will receive a USAccess login.

PERSON MODEL SPONSOR
DATA ENTRY GUIDE V1.2
June 18, 2012 Person Model Sponsor Data Entry Guide V 1.2 Page 8 of 56
Note: Sponsors must be designated in USAccess for records to process successfully from Person Model to USAccess.
3. Complete Person Model Sponsor training and successfully pass the Sponsor test with a score of 80% or better Person Model training is available on the LincPass website at: http://lincpass.usda.gov/training.html. Person Model training materials will also be made available on AgLearn. Contact your AgLearn administrator for more information.
4. Obtain a Person Model Login Submit the non-employee role holder Person Model login request to your supervisor. Supervisors should send completed system login requests to the Agency Security Officer (ASO) for processing. Once approved, you will receive a Person Model User ID and password.
5. Have Person Model Sponsor Materials (including agency-determined data collection materials) Templates for collecting Personally Identifiable Information (PII) and other training materials are provided to Agency HSPD-12 Leads and are posted on the LincPass website. PII may be collected using the PII sheet or PII spreadsheet or other agency-approved method. Be sure to encrypt any files transmitted via email.
6. Determine who will need a LincPass Sponsors should use the USDA Credential Matrix to determine who will need a LincPass. The Credential Matrix can be found at the end of this document and is also available on page D-1 of USDA M 4620-002, available at: http://lincpass.usda.gov/ref_lincpass.html.
Follow your existing Agency process for collecting, transmitting, entering and maintaining non-employee information for LincPass credentialing.
Step 2: Data Collection
Data collection begins after using the USDA Credential Matrix to determine who will need a LincPass. The Sponsor or Data Entry Personnel will need to obtain Company/Organization
Note: Data Entry Personnel may be utilized, but sponsorship must be performed by an official Sponsor. Data Entry Personnel must have a LincPass, complete Person Model Sponsor training and obtain a Person Model login.

PERSON MODEL SPONSOR
DATA ENTRY GUIDE V1.2
June 18, 2012 Person Model Sponsor Data Entry Guide V 1.2 Page 9 of 56
Information (optional), Contract/Grant/Agreement Information, and Person Information prior to performing data entry. Please note that if you do not have this information, you will not be able to save a complete record and may need to re-enter information.
Company/Organization Information (optional)
Note: Company/Organization Information is optional in Person Model. It is encouraged to enter as much information as possible to assist in record keeping and reporting.
If Company/Organization Information is entered, the Sponsor or Data Entry Personnel must have the following information to enter a new Company/Organization in Person Model. Asterisks (*) indicate required fields. Field definitions and formatting requirements are detailed in Step 5.
*DUNS number (required for companies only)
*Company/Organization Name
*Contact Name
*Contact Phone
*Address (Address 1, City, and State required)
Contract, Grant or Agreement Information (required)
The Sponsor or Data Entry Personnel must have the following information to enter a new Contract/Grant/Agreement in Person Model. Asterisks (*) indicate required fields. Field definitions and formatting requirements are detailed in Step 5.
*Number: Procurement Instrument Identifier (PIID), Contract ID or a unique identifier for the contract, grant or agreement (e.g. MOU number)
Description: name of the Contract, Grant or Agreement, or the type of work being performed, e.g. Help Desk
*USDA Sub-Agency that the contract, grant or agreement is supporting
*Period of Performance Start Date
*Period of Performance End Date
*USDA POC for the Contract, Grant or Agreement (First and Last Name or EmplID)
Security Office Identifier (SOI)

PERSON MODEL SPONSOR
DATA ENTRY GUIDE V1.2
June 18, 2012 Person Model Sponsor Data Entry Guide V 1.2 Page 10 of 56
Submitting Office Number (SON)
OPAC/ALC Number
Person Information (required)
The following is a list of the required and optional Person Information fields that must be collected for data entry into Person Model. Asterisks (*) indicate required fields. Field definitions and formatting requirements are detailed in Step 5.
*Full Name
*Date of Birth
Birth Location (City/State for U.S.; if non-U.S., City/Country)
Gender
*Social Security Number (SSN)
*Country of Citizenship
Federal Emergency Response Official (Y/N and designation if yes)
*Home Address
Phone
Non-Employee Type (Affiliates/Contractor/Fellow/Intern/Volunteer)
Data Collection Methods
Data collection begins after using the Sponsor uses the USDA Credential Matrix to determine who will need a LincPass. The preferred method for collection of non-employee information required for LincPass enrollment is an Agency determination. Two options are presented in this process:
A. Encrypted spreadsheet sent via email B. PII sheet hand-carried or sent to locally-secured fax

PERSON MODEL SPONSOR
DATA ENTRY GUIDE V1.2
June 18, 2012 Person Model Sponsor Data Entry Guide V 1.2 Page 11 of 56
Agencies may modify PII collection templates based on their business needs. The Data Entry Personnel role is used in the examples below to show tasks they may perform in support of the Sponsor.
A. Encrypted Spreadsheet Method
1. Sponsor sends list of proposed non-employee applicant names to a designated Point of Contact (POC) for the company/organization providing services on the contract, grant or agreement, and copies Data Entry Personnel to initiate data collection.
2. Data Entry Personnel encrypts blank spreadsheet and sends to the designated POC for data collection with password provided in a separate email:
To encrypt, select File > Save As > Tools > General Options. Enter the password to open and modify, then select OK.
3. The designated POC facilitates completion of the PII spreadsheet for each non-employee applicant.
4. The designated POC sends the completed and encrypted spreadsheet to Data Entry Personnel, and notifies Sponsor of record transmittal.
5. Data Entry Personnel receives the encrypted spreadsheet.
B. PII Sheet Method
1. Sponsor sends list of proposed non-employee applicant names to the designated POC for the company/organization providing services on the contract, grant or agreement, and copies Data Entry Personnel to initiate data collection.
2. Data Entry Personnel provides PII sheet to the designated POC via email or other agency-determined method.
3. The designated POC facilitates completion of PII sheets for each non-employee applicant per the Sponsor’s request.
4. The designated POC sends completed PII sheets to Data Entry Personnel via locally-secured fax (or hand-carries in a sealed envelope) and notifies Sponsor of record transmittal.
5. Data Entry Personnel receives PII sheets.
Step 3: Data Entry and Organizational Relationships
1. Data Entry Personnel obtains the Contract, Grant or Agreement Number, Period of Performance dates and optional Company/Organization Information for the contract, grant or agreement under which the non-employee(s) will perform. This information is provided by the CO/COR/COTR or other USDA POC.
2. Data Entry Personnel logs into Person Model via the following link: https://www.empowhr.gov/HRISP/signon.html.
3. Data Entry Personnel creates a new Company/Organization record (optional) in Person Model or verifies that one already exists in the system.
4. Data Entry Personnel creates a new Contract, Grant or Agreement record in Person Model or verifies that one already exists in the system.

PERSON MODEL SPONSOR
DATA ENTRY GUIDE V1.2
June 18, 2012 Person Model Sponsor Data Entry Guide V 1.2 Page 12 of 56
5. Data Entry Person populates a Person Information record in Person Model for the non-employee or verifies that one already exists in the system.
6. Data Entry Personnel Adds a Person of Interest (POI) Organizational Relationship for the non-employee and assigns a Contract/Grant/Agreement to the non-employee.
7. Data Entry Personnel repeats Steps 5 and 6 for each non-employee applicant per Sponsor’s request.
8. Data Entry Personnel notifies Sponsor that data entry and assignment is complete. 9. Data Entry Personnel permanently deletes spreadsheet from records, email or other
folders, if any or retains them in a locked file cabinet.
Step 4: Sponsorship in Person Model
1. Sponsor logs into Person Model via the following link: https://www.empowhr.gov/HRISP/signon.html.
2. Sponsor verifies that a Person Information record has been entered for the non-employee.
3. Sponsor locates the POI Assignment for the non-employee, checks the LincPass Required box, enters Card Shipping Information, and saves the Sponsorship.
4. Sponsor repeats Steps 2 and 3 for each non-employee applicant. 5. Sponsor or Data Entry Personnel provides the Adjudicator with a list of sponsored non-
employees who are ready for adjudication in Person Model. Adjudicators should follow the process outlined in Person Model Adjudicator Quick Start Guide to enter adjudication results.
Step 5: Enrollment & Activation
1. Upon sponsorship in Person Model, the non-employee will receive an email notification and instructions to schedule their enrollment.
2. The non-employee goes to an HSPD-12 enrollment station and enrolls for a LincPass. a. After enrollment and entry of a favorable fingerprint result in Person Model, the
LincPass is printed and shipped. 3. When the LincPass is printed and arrives at an HSPD-12 activation station, the non-
employee receives email notification and instructions to schedule their card activation. 4. The non-employee goes to an HSPD-12 activation station to activate their LincPass. 5. Process continues according to DM 4620-002.
Defect Problem Report (DPR) references
Throughout this guide, you will see references to Defect Problem Reports (DPRs) that have been submitted to NFC. This indicates that a change request has been submitted for that screen, field or system function and is still in development.
For example, there may be a field name or menu item that will be changed in the future, or a known issue that will be resolved upon system release. These DPRs are marked throughout the presentation.
Any changes due to pending DPRs will be updated in the final version of the training.

PERSON MODEL SPONSOR
DATA ENTRY GUIDE V1.2
June 18, 2012 Person Model Sponsor Data Entry Guide V 1.2 Page 13 of 56
Step 6: Person Model Data Entry and Sponsorship Functions
(a) Login Screen (Required)
Figure 1: Login Screen
Open a web browser to the following address: https://www.empowhr.gov/HRISP/signon.html.
The first time you log in to the system you will use your Person Model User ID and a temporary password. Sign into Person Model with your User ID and temporary password. You will be prompted to change your password.
To change your password, enter your temporary password when prompted, and then your new password twice for verification. You should follow USDA password guidelines when choosing your new password.
When completed, Person Model will say that your password was successfully changed. You will then need to log out of Person Model and then log back in with your new password.

PERSON MODEL SPONSOR
DATA ENTRY GUIDE V1.2
June 18, 2012 Person Model Sponsor Data Entry Guide V 1.2 Page 14 of 56
Forgot your password? Contact your Agency Security Officer (ASO) who facilitated your Person Model login request.
(b) Start Screen (Required)
Figure 2: Start Screen
Once logged in, you will be directed to the main page of Person Model. Select the link for Non-Employee Processing located in the navigational menu on the left to perform required actions. You should have access to all/some of the following Non-Employee Processing functions depending on your role(s):
Person Model Reports (all roles)
Person Information (all roles; Sponsor and Adjudicator have view/search only)
Add a New Relationship (Data Entry only)
Maintain a Person’s Assignment (Data Entry and Sponsor only)
Person Organizational Summary (all roles)
Company/Organization (Data Entry and Sponsor only)
Contract Information (Data Entry and Sponsor only)
PERSON MODEL SPONSOR
DATA ENTRY GUIDE V1.2
June 18, 2012 Person Model Sponsor Data Entry Guide V 1.2 Page 15 of 56
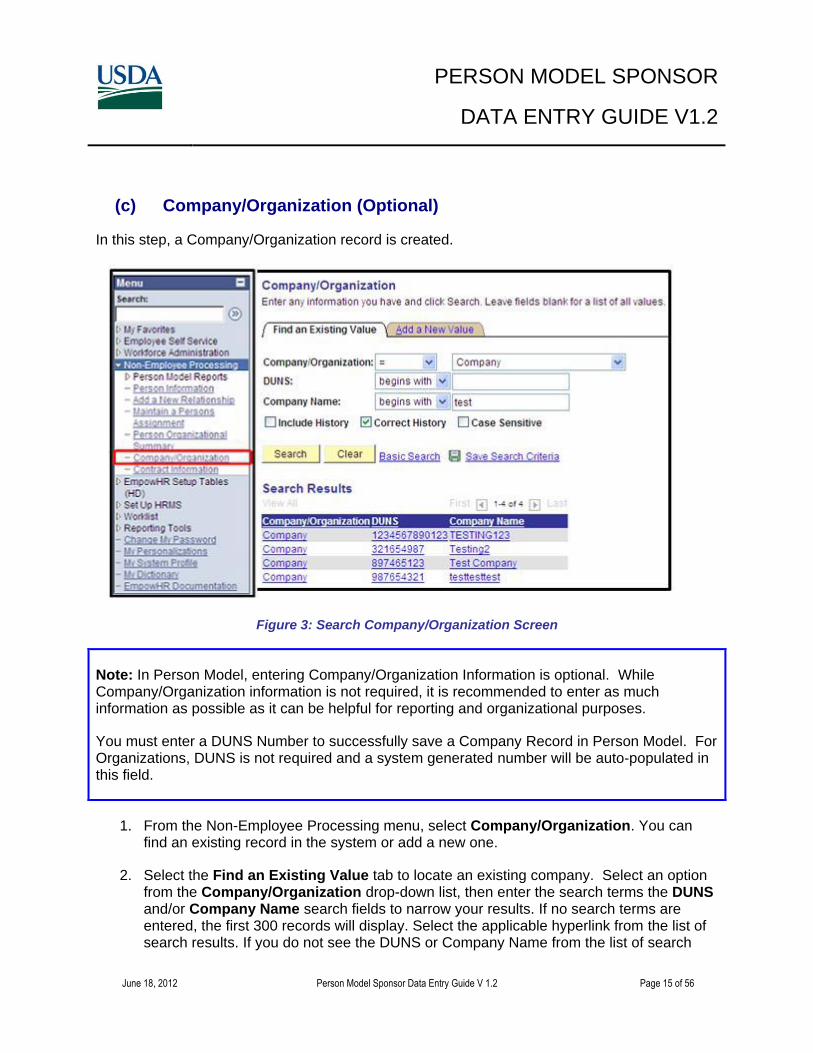
(c) Company/Organization (Optional)
In this step, a Company/Organization record is created.
Figure 3: Search Company/Organization Screen
Note: In Person Model, entering Company/Organization Information is optional. While Company/Organization information is not required, it is recommended to enter as much information as possible as it can be helpful for reporting and organizational purposes.
You must enter a DUNS Number to successfully save a Company Record in Person Model. For Organizations, DUNS is not required and a system generated number will be auto-populated in this field.
1. From the Non-Employee Processing menu, select Company/Organization. You can find an existing record in the system or add a new one.
2. Select the Find an Existing Value tab to locate an existing company. Select an option from the Company/Organization drop-down list, then enter the search terms the DUNS and/or Company Name search fields to narrow your results. If no search terms are entered, the first 300 records will display. Select the applicable hyperlink from the list of search results. If you do not see the DUNS or Company Name from the list of search

PERSON MODEL SPONSOR
DATA ENTRY GUIDE V1.2
June 18, 2012 Person Model Sponsor Data Entry Guide V 1.2 Page 16 of 56
results, you may enter a new record (covered in step 4).
3. Make sure the yellow Correct History button is selected on the bottom right to make any changes to an existing record. Click the Save button to save the information entered.
Figure 4: Add New Company/Organization Screen
4. To add a new Company/Organization, select the Add a New Value tab, then select an option from the Company/Organization drop-down list. You may enter information on this initial screen, or select Add to proceed to the detailed Company/Organization record. Any information entered on this initial screen will be populated in the detailed Company/Organization record in the next step.

PERSON MODEL SPONSOR
DATA ENTRY GUIDE V1.2
June 18, 2012 Person Model Sponsor Data Entry Guide V 1.2 Page 17 of 56
Figure 5: Add/Edit Company/Organization Details Screen
5. Enter the following Company/Organization Details:
Company/Org: (Required) Select an option from the drop-down list. Options are Company or Org.
DUNS: (Required for Companies only) Enter the DUNS for the Contracting Company. DUNS is a 9-digit unique identifier for the Company. You may also enter a 9-digit +4 number used to identify a specific unit within a larger entity. If you selected Org in the previous step, this field will be masked to prevent user data entry, and will be auto-populated with a system-generated number upon saving the record.
Company Name: (Required) Enter the name of the Company/Organization.
Entered By: This field is pre-populated with the User ID of the person logged in.
Contact Name: (Required) Enter the name of the point of contact for the Company/Organization in the following format: [last name] [suffix], [prefix] [first name], [middle name/initial]. Example: Smith,John.
Note: You will only enter a DUNS number if you are entering a Contracting Company. This number does not apply to other Organization types. A DUNS number uniquely identifies a Contracting Company, therefore the system will check to ensure there is no duplication of DUNS numbers within the system.

PERSON MODEL SPONSOR
DATA ENTRY GUIDE V1.2
June 18, 2012 Person Model Sponsor Data Entry Guide V 1.2 Page 18 of 56
Contact Phone #: (Required) Enter the phone number for the Company/Organization. Acceptable formats for the phone number data field are: 9999999 > 999-9999 > 9999999999 > 999/999-9999. If you enter the digits only, e.g. 1234567890, the system will format this field for you.
6. Enter the following Company/Organization Address information:
Figure 6: Company/Organization Address Screen
Address Line 1: (Required)
Address Line 2: (Optional)
City: (Required)
State: (Required) Use the lookup function to enter the State, or key in the two-letter abbreviation
Postal Code: (Optional)
7. Select Save to save the record.
(d) Contract, Grant, or Agreement Record (Required)
In this step, you will create a Contract, Grant, or Agreement record in Person Model (or verify that it is already in the system).
Note: Only a Federal Employee may create or edit Contract, Grant, or Agreement records in Person Model.

PERSON MODEL SPONSOR
DATA ENTRY GUIDE V1.2
June 18, 2012 Person Model Sponsor Data Entry Guide V 1.2 Page 19 of 56
1. From the left navigation menu, select Non-Employee Processing, then select Contract Information. From here, you can search for existing Contract, Grant, or Agreement records or add a new record.
Figure 7: Search Contract Information Screen
2. Before adding a new record, make sure the contract, grant or agreement is not already in the system. Select the Find an Existing Value tab. Select an option from the Contract/Grant Flag drop-down list, then use the available search criteria (Number, Sub-Agency, DUNS, and/or Company/Org Name) to look for the record. You may also select Advanced Search for a Boolean search. If you prefer, select Search without search criteria selected for a complete list of all contracts, grants or agreements already in the system. Please note that this will result in a longer system processing time.
3. To view search results, select the hyperlink under the Number column to verify and/or update an existing Contract/Grant/Agreement record. If you do not see the record, you may enter a new record and proceed to Step 5.
4. Make sure the yellow Correct History icon is selected to make any changes to an existing Contract/Grant/Agreement Information record. You may now begin to update the record with any new information, such as a change in the Period of Performance. Please note, the Type and Number fields are masked and do not permit data entry updates. Click the Save button to save the information entered.

PERSON MODEL SPONSOR
DATA ENTRY GUIDE V1.2
June 18, 2012 Person Model Sponsor Data Entry Guide V 1.2 Page 20 of 56
Figure 8: Add Contract Information Screen
5. To add a new Contract Information record to the system, select the Add a New Value tab on the main Contract Information page. Select an option from the Contract/Grant Flag drop-down list. You may enter information on this initial screen, or select Add to proceed to the detailed Contract Information record. Any information entered on this initial screen will be populated in the detailed Contract Information record in the next step.
6. In the Number field, enter the PIID, Contract ID or other unique identifier for the contract. You can enter up to 35 characters, including letters, numbers, and punctuation characters. Select the Add button.
7. In the Contract Information screen, enter or select information for the fields.

PERSON MODEL SPONSOR
DATA ENTRY GUIDE V1.2
June 18, 2012 Person Model Sponsor Data Entry Guide V 1.2 Page 21 of 56
Figure 9: Edit/View Contract/Grant/Agreement Information Screen
Type: Select an option from the drop-down list. Options include Contract or Grant/Agreement.
Number: Enter the number of the contract, grant, or agreement. This may be the PIID/Contract ID, MOU number, or other unique identifier.
Contract Description: Enter a description of the work being performed on the Contract, Grant, or Agreement (for example “Cafeteria” or “Help Desk”).
Sub-Agency: Enter the Sub-Agency ID, or use the lookup function to select the Sub-Agency ID. This is the Sub-Agency that is sponsoring the non-employee. Once selected, you will see the full name of the Sub-Agency populated on the screen.
Period of Performance Start Date: Enter the Period of Performance Start Date. This date is used to determine if a non-employee is active on a contract, grant or agreement, so it is important that this date is accurate.
Period of Performance End Date: Enter the Period of Performance End Date. This date is used to determine if a non-employee is active on a contract, grant or agreement, so it is important that this date is accurate. If Expiration is reached, all non-employees associated with the contract will be set to “TERMINATED” by the system automatically.

PERSON MODEL SPONSOR
DATA ENTRY GUIDE V1.2
June 18, 2012 Person Model Sponsor Data Entry Guide V 1.2 Page 22 of 56
Figure 10: Edit/View Contract/Grant/Agreement Information Screen
USDA POC: Use the lookup function to select the USDA POC for the Contract, Grant, or Agreement. Select the magnifying glass to be brought to the Look Up USDA POC screen, and enter the EmplID for the non-employee, or the person’s name in the following format: Last Name, First Name. Please note that if you do not enter any search terms under this field, this will result in extended system processing time.
Figure 11: Look Up USDA POC

PERSON MODEL SPONSOR
DATA ENTRY GUIDE V1.2
June 18, 2012 Person Model Sponsor Data Entry Guide V 1.2 Page 23 of 56
Figure 12: Edit/View Contract/Grant/Agreement Information Screen
Security Office Identifier: Enter the Security Office Identifier.
Submitting Office Number: Enter the Submitting Office Number.
OPAC/ALC Number: Enter the OPAC/ALC Number.
Notes: Enter any notes about the Contract, Grant, or Agreement.
The values entered for the above three fields will be populated on the non-employee’s Adjudication record.
Figure 13: Contract/Grant/Agreement Information Screen

PERSON MODEL SPONSOR
DATA ENTRY GUIDE V1.2
June 18, 2012 Person Model Sponsor Data Entry Guide V 1.2 Page 24 of 56
DUNS: Use the lookup function to select a Company/Organization that exists in the system. If a record does not already exist for the appropriate Company/Organization, you can save the Contract, Grant or Agreement without Company/Organization Information and enter it later. Once selected, Company/Organization details will be populated at the bottom of the Contract/Grant/Agreement record.
8. Select the Save button.
(e) Person Information (Required)
In this step, you will create a Person Information record.
1. From the left navigation menu, select Non-Employee Processing, then select Person Information. From here, you can search for existing Person Information records or add a new record.
Figure 14: Finding or Creating a Person Information Screen
2. To search for an existing record, use the available search criteria to look for the record on the Find an Existing Value tab. If you prefer, select Search without search criteria selected for a complete list of all Person Information records already in the system. You may also select Advanced Search for a Boolean search.

PERSON MODEL SPONSOR
DATA ENTRY GUIDE V1.2
June 18, 2012 Person Model Sponsor Data Entry Guide V 1.2 Page 25 of 56
Note: To search by Social Security number you must enter the entire number without hyphens. You can also search by EmplID, Date of Birth, First Name or Last Name.
3. To view search results, select the hyperlink for the record. Once you have selected a record, you may use the navigation menu at the bottom to search through results. If no matching results are found, proceed to adding a new record (covered in step 4). Select the applicable hyperlink from the search of results. Upon selecting the existing record, make sure the yellow Correct History button is selected on the bottom right to make any changes to an existing record. Click the Save button to save information entered.
4. To add a new record, click the Add a New Value tab from the main Person Information menu. You will be directed to a new Person Information record.
5. Click the Biographical Details tab to access the biographical details.
Note: For any SSN or DOB changes or updates, you must contact the USDA HSPD-12 Help Desk. For the HSPD-12 Help Desk contact information, refer to the last page.

PERSON MODEL SPONSOR
DATA ENTRY GUIDE V1.2
June 18, 2012 Person Model Sponsor Data Entry Guide V 1.2 Page 26 of 56
Figure 15: Biographical Details Screen
6. In the Name sub-section, enter the Effective Date. This field defaults to the current date.
Figure 16: Name Screen
7. Click on the Add Name hyperlink (Figure 14). You will be directed to the Edit Name screen.

PERSON MODEL SPONSOR
DATA ENTRY GUIDE V1.2
June 18, 2012 Person Model Sponsor Data Entry Guide V 1.2 Page 27 of 56
Figure 17: Add/Edit Name Screen
8. Enter the Name information as prompted on the screen.
Prefix: (Optional) Enter the Person’s prefix from the drop-down list.
First: (Required) Enter the Person’s first name.
Middle Name: (Optional) Enter the Person’s middle name.
Last Name: (Required) Enter the Person’s last name.
Suffix: (Optional) Enter the Person’s suffix.
Note: You must enter the person’s name as shown on their government-issued ID, such as the driver’s license or passport. If the information does not match, the Applicant will have problems during the enrollment process.
9. Click the OK button. You will be directed back to the Biographical Details screen.
10. Enter the non-employee’s information in the Biographic Information sub-section as prompted on the screen.

PERSON MODEL SPONSOR
DATA ENTRY GUIDE V1.2
June 18, 2012 Person Model Sponsor Data Entry Guide V 1.2 Page 28 of 56
Date of Birth: (Required) Enter the non-employee’s date of birth, or select it from the calendar. Enter the date in the following format: MM/DD/YYYY.
Date of Birth Re-enter: (Required) Re-enter the Date of Birth information you previously entered in the last step, or use the lookup function to select it from the calendar.
Business Email: Enter the non-employee’s business email address. The format for Business Email is [email protected]. Be sure to include the @ symbol in the address. This will be used for notification about the enrollment process, so it must be a valid email address that the non-employee checks regularly. If email is entered incorrectly, the applicant will not receive notifications to enroll. If the non-employee does not have an email address, enter the email address for a Point of Contact who will coordinate enrollment activities, such as a Human Resources Manager or a Security Officer.
Birth Country: (Required) Enter the 3-letter country code or use the lookup feature (magnifying glass) to select the 3-letter code for the non-employee’s Birth Country. The country field defaults to USA but can be changed.
Birth State: If the Birth Country is USA, enter the birth state or use the lookup function (magnifying glass) to select the State.
Birth Location: (Required) Enter the birth city.
11. Enter the non-employee’s information in the Biographical History Details sub-section as prompted on the screen.
Effective Date: (Required) This field defaults to the current date. If you choose you many enter the effective date of the biographical information or the date the record was entered into the system.
Gender: (Required) This field defaults to Unknown. If you choose you may select on the drop-down list to select Female, Male, or Unknown.
12. Enter the non-employee’s information in the National ID sub-section as prompted on the screen.

PERSON MODEL SPONSOR
DATA ENTRY GUIDE V1.2
June 18, 2012 Person Model Sponsor Data Entry Guide V 1.2 Page 29 of 56
Figure 18: Biographic Details Screen
National ID Type: (Required) Use the drop-down to select Social Security Number.
National ID Type: (Required) Use the drop-down to select Social Security Number.
National ID: Enter the non-employee’s 9-digit Social Security Number (SSN). The format for SSN is XXX-XX-XXXX.
National ID Re-enter: Enter the non-employee’s 9-digit Social Security Number (SSN). The format for SSN is XXX-XX-XXXX.
13. Enter additional information in the Biographical Details Tab.
Country of Citizenship: Enter the 3-letter country code or click on the magnifying glass icon to select the 3-letter code for the non-employee’s Person’s Country of Citizenship.
Emergency Response Official (ERO): (Optional): If the non-employee has emergency response duties in the event of a disaster, check this option. This designation will be printed on the non-employee’s USDA LincPass. Caution: This optional field only applies to an Agency-identified non-employee serving in an Emergency Response Official capacity. Contact your Security Officer for more information.
Notes: Enter the non-employee’s ERO title or duties in this field.
14. Click the Contact Details tab.

PERSON MODEL SPONSOR
DATA ENTRY GUIDE V1.2
June 18, 2012 Person Model Sponsor Data Entry Guide V 1.2 Page 30 of 56
Figure 19: Contact Details Screen
15. Next, in the Current Addresses sub-section, click on the Add Address Detail hyperlink. You will be directed to the Address History screen.
16. In the Address History sub-section, enter the following information:
Figure 20: Address History Screen
PERSON MODEL SPONSOR
DATA ENTRY GUIDE V1.2
June 18, 2012 Person Model Sponsor Data Entry Guide V 1.2 Page 31 of 56
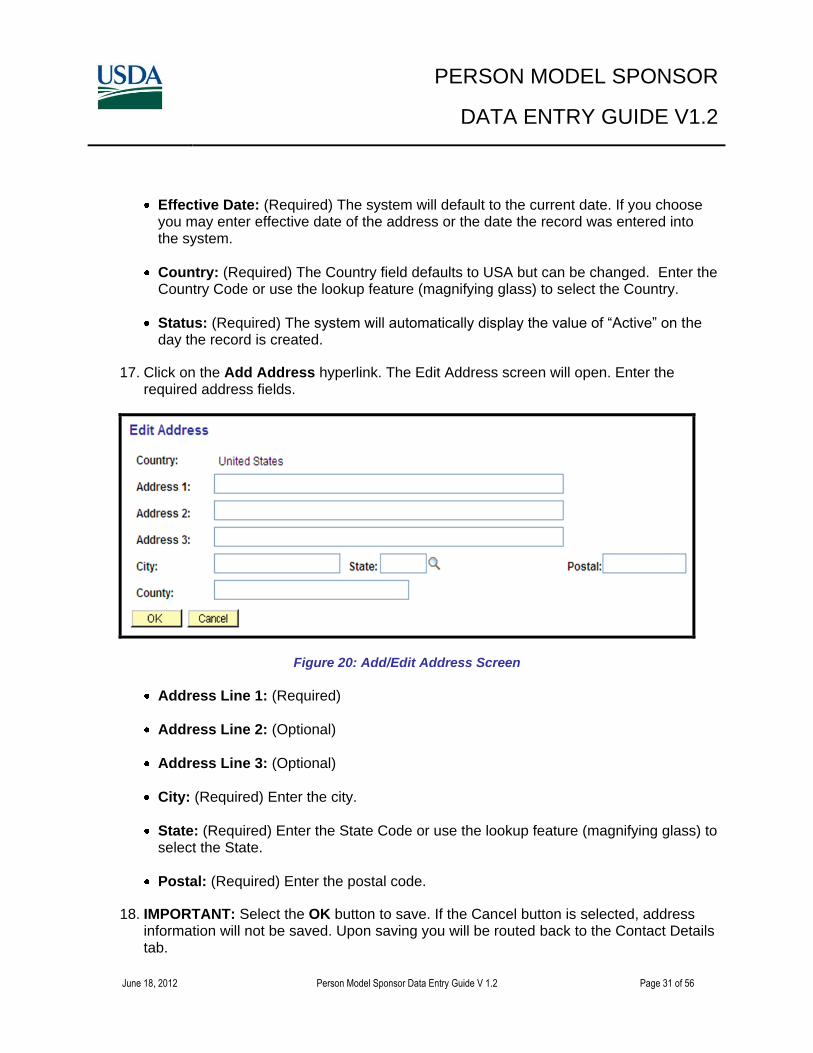
Effective Date: (Required) The system will default to the current date. If you choose you may enter effective date of the address or the date the record was entered into the system.
Country: (Required) The Country field defaults to USA but can be changed. Enter the Country Code or use the lookup feature (magnifying glass) to select the Country.
Status: (Required) The system will automatically display the value of “Active” on the day the record is created.
17. Click on the Add Address hyperlink. The Edit Address screen will open. Enter the required address fields.
Figure 20: Add/Edit Address Screen
Address Line 1: (Required)
Address Line 2: (Optional)
Address Line 3: (Optional)
City: (Required) Enter the city.
State: (Required) Enter the State Code or use the lookup feature (magnifying glass) to select the State.
Postal: (Required) Enter the postal code.
18. IMPORTANT: Select the OK button to save. If the Cancel button is selected, address information will not be saved. Upon saving you will be routed back to the Contact Details tab.

PERSON MODEL SPONSOR
DATA ENTRY GUIDE V1.2
June 18, 2012 Person Model Sponsor Data Entry Guide V 1.2 Page 32 of 56
19. Next, enter information into the Phone Information sub-section.
Figure 21: Phone Information
Phone Type: Select the phone type from the drop-down menu.
Telephone: If you have selected an option from the Phone Type drop-down menu, enter the telephone number in this field.
Extension: If there is an extension number as well, type it in the Extension field.
Preferred: Check the Preferred box next to the phone number that is the employee’s preferred number.
20. Next, enter information into the Email Address sub-section.
Figure 22: Email Addresses
Email Type: (Required) Select the email type from the drop-down menu. Business email will default to preferred.
Email Address: (Required) Enter the email address in this field. The format for Email is [email protected]. Be sure to include the @ symbol in the address.
Note: If you select an option from the Phone Type drop-down menu, you must enter a Telephone number in the next field. If you do not choose an option from the Phone Type drop-down menu, Telephone number is not required.

PERSON MODEL SPONSOR
DATA ENTRY GUIDE V1.2
June 18, 2012 Person Model Sponsor Data Entry Guide V 1.2 Page 33 of 56
Preferred: Business email is preferred. When Business is selected as the type, the Preferred Checkbox will be checked and masked to prevent user data entry.
21. Click the Save button to save information entered.
22. Next, click on the Organizational Relationships Tab.
Figure 23: Organizational Relationships Tab
23. In the Choose Org Relationship to Add sub-section, check the Person of Interest box (all other boxes are masked). A drop-down menu will appear where you can select the Person of Interest type.
24. Person of Interest type: Select an option from the drop-down menu. Options are:
Affiliate
Contractor
Fellow
Intern
Volunteer
25. Click the Add the Relationship button.
26. Click the Save button. You will now be re-directed to the Add Person of Interest screen.

PERSON MODEL SPONSOR
DATA ENTRY GUIDE V1.2
June 18, 2012 Person Model Sponsor Data Entry Guide V 1.2 Page 34 of 56
Figure 24: Add Person of Interest Screen
27. On the Add a Person of Interest tab under Security Data, you will see the following fields already populated: Name; Person ID; and Person of Interest Type. Completion of the following required Security Data fields assign the non-employee as a Person of Interest who supports USDA. There is only one value for each field. Several of the required fields are pre-populated.
28. In the Security Data sub-section, enter the following information.
Figure 25: Security Data
Effective Date: (Required) This field defaults to the current date. You may edit this field by typing in the date or using the lookup function.

PERSON MODEL SPONSOR
DATA ENTRY GUIDE V1.2
June 18, 2012 Person Model Sponsor Data Entry Guide V 1.2 Page 35 of 56
Security Access Type: (Required) Select the Security Access Type using the drop-down menu. The only option available will be “POI Dept”.
Enabled: The Enabled box will be checked when you select POI DEPT and SetID will be populated on the screen.
Value 1 (Required) Use the lookup function to select NOEMP for Value 1.
Value 2: Use the lookup function to select AGNEIS for Value 2.
29. Next, enter information into the Person of Interest History sub-section.
Figure 26: Person of Interest History
Effective Date: (Required) Effective Date: This field defaults to the current date. You may edit this field by typing in the date or using the lookup function.
Organizational Relationship Status: (Required) Organizational Relationship Status: This field defaults to A for Active. Once a Person’s Organizational Relationship has ended, Organizational Relationship Status will be set to I for Inactive.
Planned Exit: (Optional) Use the lookup function to select a Planned Exit date.
More Information: (Optional) Enter any notes about the Person of Interest History in this field. Click OK to save the save the Person Information record and the data entered on this tab.
30. Next, click on the Assignment tab. You will see the following fields already populated: Name; Person ID; and Person of Interest Type.

PERSON MODEL SPONSOR
DATA ENTRY GUIDE V1.2
June 18, 2012 Person Model Sponsor Data Entry Guide V 1.2 Page 36 of 56
Figure 27: Assignment
31. Enter or select information for the following fields on the Assignment tab.
Contract ID or Grant/Agreement: The name of this field will change depending on the non-employee type you selected. If you key in the Contract, Grant or Agreement Number, you will receive an error message. You must use the lookup function (magnifying glass) to locate the number. You will be directed to another screen where you can search for the Contract/Grant/Agreement.
Status: Use the drop-down menu to select the Status. You can choose from Active, Suspended, or Terminated.
Note: The Sub-Agency Code, Sub-Agency Description, and Period of Performance Start and End Dates fields will be automatically populated based on the Contract, Grant, or Agreement selected.
NOTE: If a non-employee is assigned to multiple contracts, grants or agreements, changing status on one assignment will not affect status on other assignments. Non-employee status
will be derived using the following rules:
• Active on at least one assignments = Active non-employee Status • Suspended on ALL assignments = Suspended non-employee Status • Terminated on ALL assignments = Terminated non-employee Status
Selecting “Terminated” has serious repercussions in the HSPD-12 system and will result in card revocation and the non-employee will be immediately escorted from the
facility.

PERSON MODEL SPONSOR
DATA ENTRY GUIDE V1.2
June 18, 2012 Person Model Sponsor Data Entry Guide V 1.2 Page 37 of 56
Effective Date: This field defaults to the current date. Edit the Effective Date as needed in by typing the date in the box or using the calendar lookup function.
Detail: Select Detail to view the detailed record of the Contract/Grant/Agreement. When the icon is selected, you can view the detailed record of the Contract/Grant/Agreement. Click OK to return to the Assignment tab.
Sponsor ID/LincPass Required: Sponsor ID will be blank, and LincPass Required will be masked for Data Entry Personnel who do not hold the Sponsor role as well. If you are a Sponsor, you can complete Sponsorship now. Detailed procedures are covered in Section i: Sponsorship.
Work Address Info (Optional): Click the hyperlink for Work Address Info to enter details of the non-employee’s Work Address. Country, Address 1, City and State are required to save Work Address. Address 2, Address 3, and Postal are optional. County will be populated based on the information entered. Click OK to return to the Edit Address screen. The information entered on the previous screen will be populated here, and the Geographical Location Code will be auto-populated on screen. Here you may enter the Building Number and Room Number. Click OK to return to the Assignment tab.
Click Save. You will see the word Saved in the top right corner of the screen.
This is the end of the data entry process. The record is now ready for sponsorship. The next few screenshots will cover maintaining existing Organizational Relationships and adding new ones. To proceed to Sponsorship, go to Section i: Sponsorship.

PERSON MODEL SPONSOR
DATA ENTRY GUIDE V1.2
June 18, 2012 Person Model Sponsor Data Entry Guide V 1.2 Page 38 of 56
(f) Add a New Relationship
Figure 28: Add New POI Type Screen
1. From the left navigation menu select Add a New Relationship. This will direct you to the Add a New Relationship main menu. From here you can add a new POI type.
EmplID: (Required) Enter the EmplID or use the lookup function (magnifying glass) to select the EmplID.
Person of Interest Type: (Required) Enter the Person of Interest (POI) Type or use the lookup function (magnifying glass) to select the Person of Interest Type.
2. Select the Person of Interest Type to display the type on the Add POI screen.

PERSON MODEL SPONSOR
DATA ENTRY GUIDE V1.2
June 18, 2012 Person Model Sponsor Data Entry Guide V 1.2 Page 39 of 56
Figure 29: Look Up Person of Interest Type Screen
Figure 30: Add new POI Type Screen
3. Click on the Add button to add the new POI Type. You will be directed to the Add Person of Interest screen.

PERSON MODEL SPONSOR
DATA ENTRY GUIDE V1.2
June 18, 2012 Person Model Sponsor Data Entry Guide V 1.2 Page 40 of 56
Figure 31: Add Person of Interest Screen
(g) Maintain a Person’s Assignment
1. From the left navigation menu select Maintain a Person’s Assignment. This will direct you to the Maintain a Person’s Assignment search screen.

PERSON MODEL SPONSOR
DATA ENTRY GUIDE V1.2
June 18, 2012 Person Model Sponsor Data Entry Guide V 1.2 Page 41 of 56
Figure 32: Maintain a Person’s Assignment Screen
2. Find an existing value by entering the criteria into any of the applicable fields.
3. Click the Search button to initiate the search.
4. The search results will display at the bottom of the page. Select the relationship you wish to maintain by clicking on the appropriate hyperlink. You will be directed to the Edit POI Relationship tab.
Note: The Edit POI Relationship screen should default to Correct History mode. Select the yellow Correct History button on the bottom right of the screen if needed.

PERSON MODEL SPONSOR
DATA ENTRY GUIDE V1.2
June 18, 2012 Person Model Sponsor Data Entry Guide V 1.2 Page 42 of 56
Figure 33: Edit POI Relationship Screen
5. Make any desired edits.
6. Click the Save button.
7. Click the Assignment tab. You will be directed to the Assignment tab.

PERSON MODEL SPONSOR
DATA ENTRY GUIDE V1.2
June 18, 2012 Person Model Sponsor Data Entry Guide V 1.2 Page 43 of 56
Figure 34: Assignment Screen
8. Make any desired edits.
9. Click the Save button.
(h) View Person Organizational Summary
1. On the left navigation menu, select Person Organizational Summary.
Figure 35: Person Org Summary Screen
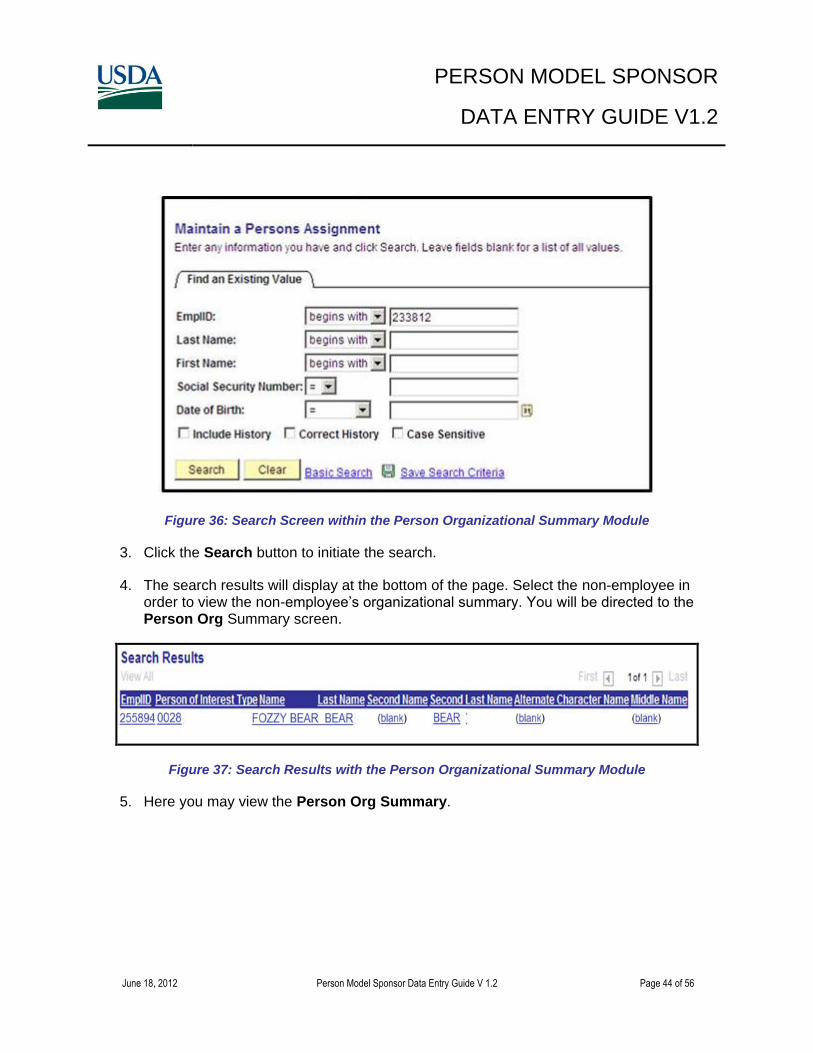
2. Search for the non-employee by entering the criteria into any of the applicable fields.
PERSON MODEL SPONSOR
DATA ENTRY GUIDE V1.2
June 18, 2012 Person Model Sponsor Data Entry Guide V 1.2 Page 44 of 56
Figure 36: Search Screen within the Person Organizational Summary Module
3. Click the Search button to initiate the search.
4. The search results will display at the bottom of the page. Select the non-employee in order to view the non-employee’s organizational summary. You will be directed to the Person Org Summary screen.
Figure 37: Search Results with the Person Organizational Summary Module
5. Here you may view the Person Org Summary.

PERSON MODEL SPONSOR
DATA ENTRY GUIDE V1.2
June 18, 2012 Person Model Sponsor Data Entry Guide V 1.2 Page 45 of 56
Figure 38: Person Org Summary Screen
(i) Sponsorship
1. On the left navigation menu, select Maintain a Person’s Assignment.
Figure 39: Maintain a Person’s Assignment

PERSON MODEL SPONSOR
DATA ENTRY GUIDE V1.2
June 18, 2012 Person Model Sponsor Data Entry Guide V 1.2 Page 46 of 56
2. Find an existing value by entering the criteria into any of the applicable fields, then click Search. The search results will display at the bottom of the page. Select the relationship you wish to maintain by clicking on the appropriate hyperlink. You will be directed to the Edit Relationship tab.
Figure 40: Assignment
3. The assignment will already be completed for you. Click on the yellow Correct History icon located at the bottom of the screen. Verify that the information is correct and check the LincPass Required box.
4. Click on the Card Shipping Information hyperlink. Select the magnifying glass lookup feature to find the location where the card is to be shipped. The system will open a new page that displays five columns of data that can be sorted by street address. The address information for the location you choose will be populated.

PERSON MODEL SPONSOR
DATA ENTRY GUIDE V1.2
June 18, 2012 Person Model Sponsor Data Entry Guide V 1.2 Page 47 of 56
Figure 41: Card Shipping Information
5. Click the Save button to save the information.
Figure 42: Sponsorship

PERSON MODEL SPONSOR DATA ENTRY GUIDE V1.2
HSPD-12 – USDA LincPass Person Model Sponsor Data Entry Guide V 1.2 Page 48 of 56
USAccess Sponsorship Functions
1. On the Log In screen, type in your user name in the User Name field. Type in your password in the Password field and select the Login button.
2. Type in the non-employee’s Last Name or Social Security Number. Type in the non-employee’s Birth Date or select the calendar icon next to the Birth Date field to choose a date from the calendar and select the Search button to begin.
Figure 43: USAccess Login Screen

PERSON MODEL SPONSOR
DATA ENTRY GUIDE V1.2
June 18, 2012 Person Model Sponsor Data Entry Guide V 1.2 Page 49 of 56
Figure 44: USAccess Applicant Search Screen
3. When the search results appear, you will be presented with the option to view the non-employee record or edit the sponsorship. Select View Applicant to view non-employee’s Biographic Data.
4. Verify all required Biographic Data fields have current and correct information. Red asterisks (*) indicate required fields. Select Next to go to the next screen.
Note: If any of the information is incorrect, missing, or needs updating, changes must be made in Person Model and not in USAccess.

PERSON MODEL SPONSOR
DATA ENTRY GUIDE V1.2
June 18, 2012 Person Model Sponsor Data Entry Guide V 1.2 Page 50 of 56
Figure 45: USAccess Edit Applicant Screen
5. Verify all required Address Data have current and correct information. Red asterisks (*) indicate required fields. Select Next to go to the next screen. If any of the information is incorrect, missing, or needs updating, changes must be made in Person Model and not in USAccess.
6. No action is required on the Alias Information screen. The Person Model Alias field is currently masked to prevent data entry, so information on this USAccess screen will not be populated. Select Next to go to the next screen.
Figure 46: USAccess Edit Applicant Screen

PERSON MODEL SPONSOR
DATA ENTRY GUIDE V1.2
June 18, 2012 Person Model Sponsor Data Entry Guide V 1.2 Page 51 of 56
7. Select Finish to save the record. USAccess will direct you to the Sponsorship Search page.
8. Verify the following required Sponsorship Information fields have current and correct information.
Note: If any of the information is incorrect, missing, or needs updating, changes must be made in Person Model and not in USAccess.
Agency
Employee Type: Should read “Contractor” or “Associate or Dignitary”.
Employee Status: Should be set to Active.
Work Email Address
PIV Card Required: Should be set to “Yes”.
Figure 47: USAccess Sponsor Applicant Screen
CONTRACTOR
CONTRACTOR

PERSON MODEL SPONSOR
DATA ENTRY GUIDE V1.2
June 18, 2012 Person Model Sponsor Data Entry Guide V 1.2 Page 52 of 56
Require Digital Signature and Encryption Certificates: Some non-employees who do not have email addresses will provide the email of a supervisor who will coordinate enrollment activities. If you are sponsoring multiple non-employees with the same email address, you must select No for Require Digital Signature and Encryption Certificates to ensure sponsorship is successful.
PIV Card Type: The PIV Card Type should be consistent with the non-employee Type. The PIV Card Type will be printed on the non-employee’s LincPass. If the Non-Employee is a Contractor, the PIV Card Type will state “Contractor”. All other types of non-employees such as Affiliates, Volunteers, or Fellows will have the PIV card Type state “Associate or Dignitary”. Select NEXT to go to the next screen.
FERO: If the applicant is a Federal Emergency Response Official, this option should be set to “Yes”.
9. Verify the Shipping Address fields have current and correct information. Select Next to go to the next screen.
Note: If any of the information is incorrect, missing, or needs updating, changes must be made in Person Model and not in USAccess.

PERSON MODEL SPONSOR
DATA ENTRY GUIDE V1.2
June 18, 2012 Person Model Sponsor Data Entry Guide V 1.2 Page 53 of 56
10. Select Finish to save the record. USAccess will direct you back to the search page.
Figure 49: USAccess Sponsor Applicant Screen
Figure 48: USAccess Sponsor Applicant Screen

PERSON MODEL SPONSOR
DATA ENTRY GUIDE V1.2
June 18, 2012 Person Model Sponsor Data Entry Guide V 1.2 Page 54 of 56
11. Upon completion of USAccess Sponsorship, proceed to Step 6 for Enrollment and Activation details.
12. Optional: To resend a system notification (such as a sponsorship email), select Sponsor Utility in the Applicant Search Screen Results.
13. Select the System Notification tab.
14. Select Resend Email.
a. Sponsorship Complete: to have applicant enroll for LincPass
b. Credential Ready for Pick Up: to have applicant pick up credential and activate card.
Figure 50: USAccess Applicant Search Screen

PERSON MODEL SPONSOR
DATA ENTRY GUIDE V1.2
June 18, 2012 Person Model Sponsor Data Entry Guide V 1.2 Page 55 of 56
Figure 51: USAccess Sponsor Utilities Screen
Enrollment & Activation
1. Upon sponsorship in Person Model, the non-employee will receive email notification and instructions to schedule their enrollment.
a. The Sponsor may perform functions in USAccess as needed, such as resending USAccess sponsorship notifications to the applicant. For detailed instructions on performing functions in USAccess, visit Person Model Sponsor Training (Module G) at; http://lincpass.usda.gov/.
2. The non-employee goes to an HSPD-12 enrollment station and enrolls for a LincPass.
a. After enrollment and entry of a favorable fingerprint result in Person Model, the LincPass is printed and shipped.
3. When the LincPass is printed and arrives at an HSPD-12 activation station, the non-employee receives email notification and instructions to schedule their card activation.
a. The Sponsor may need to perform functions in USAccess as needed, such as resending USAccess card delivery notifications to the applicant (For detailed instructions, refer to Person Model Sponsor Training Module G.
4. The non-employee goes to an HSPD-12 activation station to activate their LincPass. Process continues according to DM 4620-002.
5. Process continues according to DM 4620-002 available at: http://lincpass.usda.gov/ref_lincpass.html.

PERSON MODEL SPONSOR
DATA ENTRY GUIDE V1.2
June 18, 2012 Person Model Sponsor Data Entry Guide V 1.2 Page 56 of 56
For more information on HSPD-12 at USDA, visit http://lincpass.usda.gov/. Contact the USDA HSPD-12 Help Desk: Toll Free: 1-888-212-9309 Local: 703-245-7888 Email: [email protected]