Embed Size (px)
Citation preview
SUBCOURSE EDITION MM3671 5
US Army Ammunition Inspector MOS 55X Skill Level 3 -Course
INSPECTION OF AMMUNITION RAILCARS, MILVANS, AND AIR SHIPMENTS
US ARMY ORDNANCE MISSILE AND MUNITIONS CENTER AND SCHOOL

MM3671
US Army Ammunition Inspector MOS 55X Skill Level 3 Course
INSPECTION OF AMMUNITION RAILCARS, MILVANS, AND AIR SHIPMENTS
*SUBCOURSE MM3671 US Army Ordnance Missile and Munitions Center and School * This publication supersedes MM3671, Inspect Ammunition Transportation (Part II), Edition 1.
i

MM3671 This publication is provided for nonresident instruction only. It reflects the current thought of this school and conforms to published Department of the Army doctrine as closely as possible. Users of this publication are encouraged to recommend changes and submit comments for its improvement. Comments should be keyed to the specific page and line of the text to which the change is recommended. Reasons will be provided for each comment to insure understanding and complete evaluation. ii

MM3671
CONTENTS
INTRODUCTION, v Supplementary Requirements, v Credit Hours, v LESSON 1: INSPECTING A RAILCAR (Task 093-404-3123), 1 Inspecting an Unloaded Railcar, 1 Inspecting a Loaded Railcar, 8 REVIEW EXERCISES, 10 LESSON 2: INSPECTING A MILVAN (Task 093-404-3124), 12 Ammunition MILVAN, 12 Inspecting an Unloaded MILVAN, 13 Container Damage Check List, 15 Container Inspection Report, 25 MILVAN Certificate, 25 Inspecting a Loaded MILVAN, 25 REVIEW EXERCISES, 28 LESSON 3: INSPECTING MUNITIONS FOR AIR SHIPMENT (Task 093-424-3125), 30 Hazardous Material Air Shipment Inspection Report, 30 DD Form 1387-2, 30 Air Shipment Report-Identification Section, 36 Air Shipment Report-Inspection Section, 38 REVIEW EXERCISES, 46
iii

MM3671 EXERCISE SOLUTIONS, 58 iv

MM3671
INTRODUCTION This is the second of two subcourses on the inspection by a military ammunition inspector of vehicles used to haul ammunition. It covers the inspection of railroad cars, MILVANs, and aircraft. The first subcourse, MM3670, covers the inspection of motor vehicles used to haul ammunition. As an ammunition inspector, you must know how to inspect unloaded and loaded railcars. Besides knowing the rejection criteria, you have to be able to fill out the Railcar Inspection Report and the Car Certificate and know where to look up inspection criteria. You must also know how to inspect MILVANs and prepare the necessary paperwork. For air shipments, in addition to inspection criteria, you must know how to prepare such paperwork as the Air Shipment Report and DD Form 1387-2. Supplementary Requirements There are no supplementary requirements in material or personnel for this subcourse. You will need only this book and will work without supervision. Credit Hours Four credit hours will be awarded for the successful completion of this subcourse-a score of at least 75 on the end-of-subcourse examination.
v
MM3671
* * * IMPORTANT NOTICE * * *
THE PASSING SCORE FOR ALL ACCP MATERIAL IS NOW 70%.
PLEASE DISREGARD ALL REFERENCES TO THE 75% REQUIREMENT. vi

MM3671, Lesson 1
Lesson 1
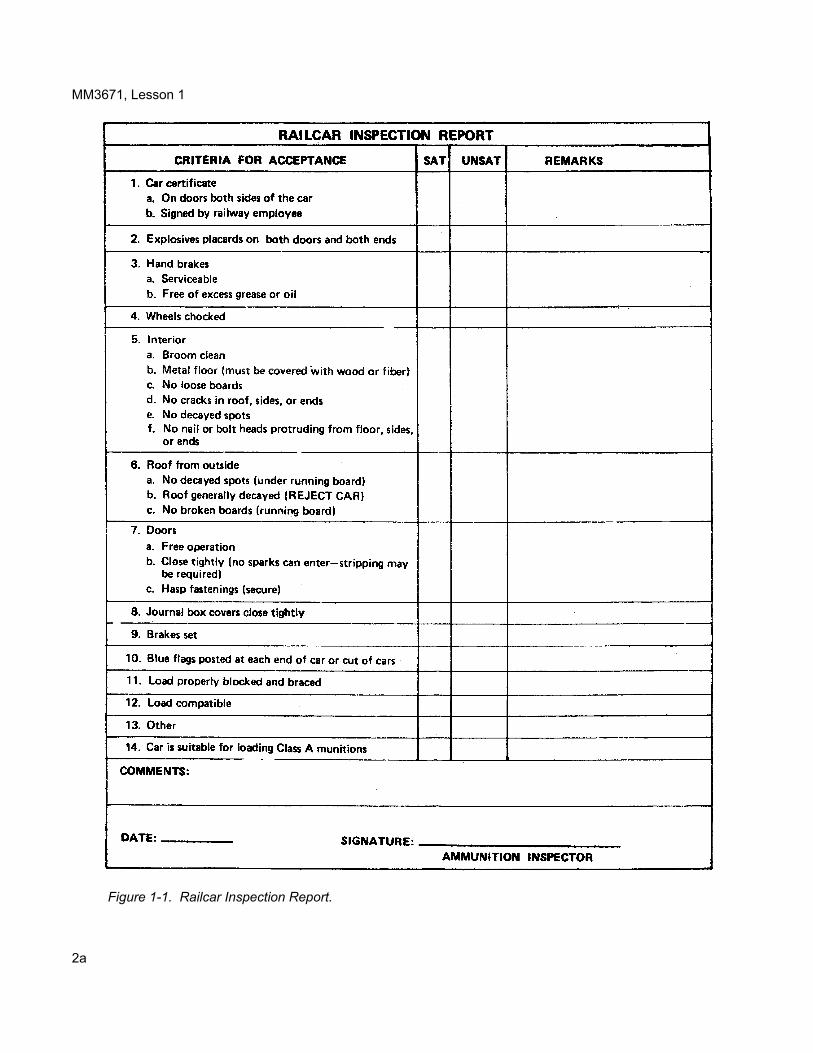
INSPECTING A RAILCAR As an ammunition inspector, you may be responsible for inspecting railcars before and after they are loaded with munitions. To do so, you must know what makes a railcar serviceable or unserviceable. You must also be able to select the right explosives placards, post them, and complete a Car Certificate and a Railcar Inspection Report. Task. This lesson is based on the following task from soldier's manual STP 9-55X34-SM-TG: 093-404-3123, Inspect a Railcar. Objectives. When you have completed this lesson, you should be able to describe the acceptance and rejection criteria for railcars used to transport munitions, to select the proper placards and post them, and to fill out the forms used to verify your inspection. Conditions. You will have this subcourse book and work without supervision. Standards. You must score at least 70 on the end-of-subcourse examination. INSPECTING AN UNLOADED RAILCAR An ammunition inspector must inspect the interior and exterior of any railcar that will be used to transport ammunition. The inspection is made using a locally produced form called the Railcar Inspection Report to record inspection results. An example of such a form is shown in figure 1-1. This example will be used throughout this lesson. Refer to it as you make an item-by-item inspection. Item 1. If the railcar is to carry Class A munitions, it must have a Car Certificate (figure 1-2) attached to each of its doors. The Car Certificate is required by the Tariff No. (Bureau of Explosives) BOE-6000, commonly known as BOE-6000. The carrier prepares three copies and keeps one. The carrier must sign the first part of the certificate. Check the SAT column on the Report if this condition has been met. Check the UNSAT column if it has not been met. If no certificate is required (Class B or C munitions), make a notation to that effect in the Remarks column. Item 2. Do not post placards on empty railcars. If there are no placards on the unloaded railcar, check SAT and print "unloaded railcar" in the Remarks column. Item 3. Inspect the hand brake system to be sure it works properly and that there is no excess oil or grease. If there is too much oil or grease, have it removed before the car is used. Apply the brakes, release them, then apply them again. The brakes should lock the wheels in place. You will check this when you make your outside inspection.
1
MM3671, Lesson 1
Figure 1-1. Railcar Inspection Report. 2a

Figure 1-2. Car Certificate.
Item 4. Verify that the wheels are chocked to keep the car from moving accidentally. Check SAT if the wheels are properly chocked. See figure 1-3. Item 5. Now you are ready to inspect the rest of the railcar safely. The first item you find that causes you to reject the railcar completes your inspection. Begin the inspection with the railcar's interior. Make sure that the interior of the car is "broom clean." This means that the railcar should look as if it has just been swept clean. 2b

MM3671, Lesson 1
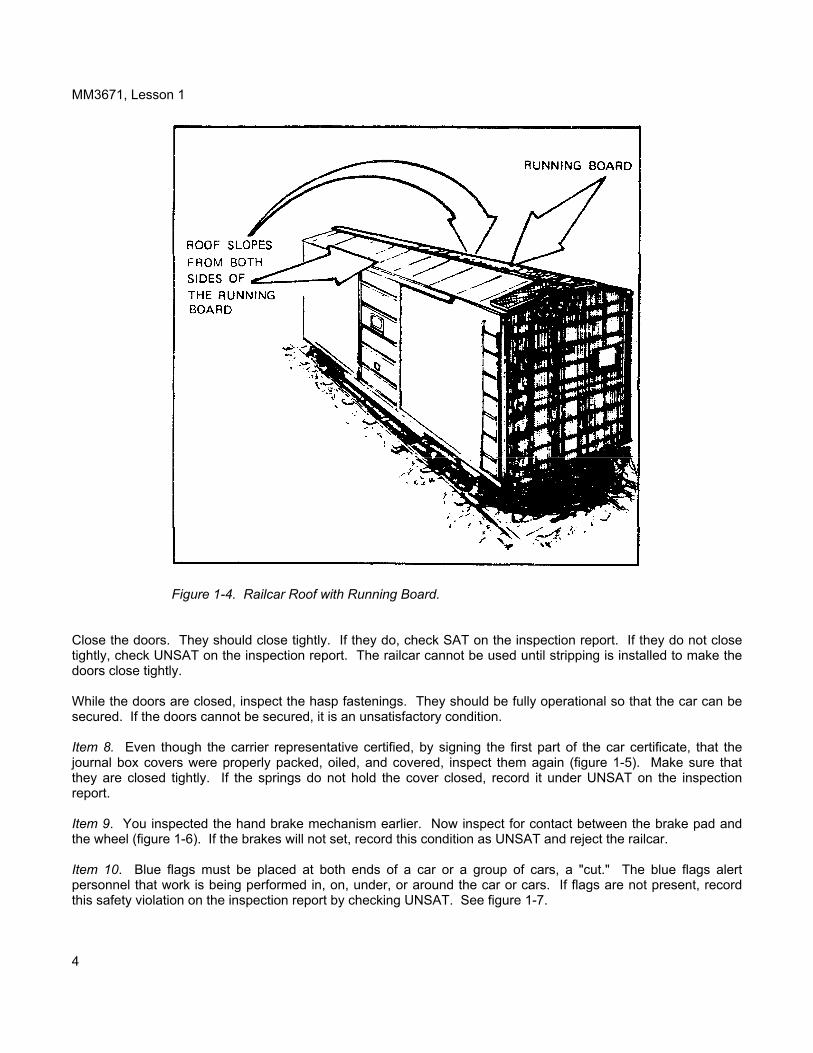
Figure 1-3. Wheels Properly Chocked. If the railcar has metal floor plates, they must be covered with wood or fiber to keep the floor plates and explosives packages from touching. If there is no wood or fiber covering, it is a safety hazard. Check the SAT or UNSAT entry on the inspection report. Another inspection point of the railcar interior is loose boards. Loose boards must be repaired before the car can be used. Report unsafe conditions by checking the UNSAT column. Inspect the car interior for cracks or holes in the roof, sides, or ends. If these conditions exist, record them by checking the UNSAT column. Inspect the railcar floor for decay. Decayed wood will hold sparks that may result in a fire. Decay is recorded as an unsatisfactory condition. Look for nails or bolt heads, or other protruding objects that could damage ammunition containers. If these conditions exist, record them as UNSAT on the Railcar Inspection Report. If satisfactory repairs are made (items are covered or removed) record them in the Remarks section. Item 6. When the interior inspection has been completed, begin your inspection of the railcar's exterior. Inspect the roof and the running board. Any condition that could start a fire, such as decay in spots or overall or broken boards must be reported on the Railcar Inspection Report as an unsatisfactory condition and the defect must be corrected or the car must be rejected. See figure 1-4. Item 7. To inspect the doors of the car, open them. They must operate freely and open all the way. If the doors do not operate properly, it is an unsatisfactory condition. The doors must be repaired or the car must be rejected.
3
MM3671, Lesson 1
Figure 1-4. Railcar Roof with Running Board. Close the doors. They should close tightly. If they do, check SAT on the inspection report. If they do not close tightly, check UNSAT on the inspection report. The railcar cannot be used until stripping is installed to make the doors close tightly. While the doors are closed, inspect the hasp fastenings. They should be fully operational so that the car can be secured. If the doors cannot be secured, it is an unsatisfactory condition. Item 8. Even though the carrier representative certified, by signing the first part of the car certificate, that the journal box covers were properly packed, oiled, and covered, inspect them again (figure 1-5). Make sure that they are closed tightly. If the springs do not hold the cover closed, record it under UNSAT on the inspection report. Item 9. You inspected the hand brake mechanism earlier. Now inspect for contact between the brake pad and the wheel (figure 1-6). If the brakes will not set, record this condition as UNSAT and reject the railcar. Item 10. Blue flags must be placed at both ends of a car or a group of cars, a "cut." The blue flags alert personnel that work is being performed in, on, under, or around the car or cars. If flags are not present, record this safety violation on the inspection report by checking UNSAT. See figure 1-7. 4

MM3671, Lesson 1
Figure 1-5. Location of Journal Box.
Figure 1-7. Blue Flag Warning Signal. Figure 1-6. Brake Pad Properly Against the Railcar
Wheel.
5

MM3671, Lesson 1 Item 11. This item concerns loaded railcars only. Item 12. This item concerns loaded railcars only. Item 13. This item on the inspection report reminds you to note unsafe conditions that are not listed on the report form. In figure 1-8, for example, scrap lumber and used strapping is scattered in the area; this condition is entered and checked UNSAT in Item 13. If the condition is corrected on the spot, note that in the Remarks section.
Figure 1-8. Scrap Lumber Making It Unsafe to Work in and Around Railcars. Item 14. If you pass the railcar, check SAT. If not, check UNSAT and note why in Remarks. Comments. Enter explanations such as, "All unsatisfactory items have been corrected." Date and Signature. Evaluate your inspection results (figure 1-9). Decide from the entries you made on the inspection report, including the remarks and comments, whether or not the car meets the standards for loading munitions. If all unsatisfactory conditions have been corrected, the car may be released for loading. Enter the date that you completed your inspection. Your signature as ammunition inspector on the form will allow the car to be used or will reject it. 6

MM3671, Lesson 1
Figure 1-9. Evaluation of Inspection.
7

MM3671, Lesson 1 INSPECTING A LOADED RAILCAR An ammunition inspector must inspect any railcar that is loaded with ammunition and ready to be moved. The Railcar Inspection Report can also be used for the inspection of a loaded railcar (see figure 1-1). Item 1. Make sure the car certificates are still on the doors (see unloaded railcar inspection). Item 2. Make sure that the proper placards were posted while the railcar was being loaded. You need explosives placards for Classes A and B munitions and placards for Class C. The placards should be on both ends and both sides of each railcar. Items 3 through 8. These items are for unloaded railcars. Item 9. Make sure the brakes are properly set (see unloaded railcar inspection). Item 10. Make sure the wheels are properly chocked (see unloaded railcar inspection). Item 11. Using DARCOM Drawing 4115 5PA 1002 as a reference (figure 1-10), inspect for proper blocking and bracing of the load. DARCOM Drawing 4115 5PA 1002 is used as a guide for blocking and bracing in boxcars of boxed ammunition and ammunition on pallets, unitized with strapping. Improper blocking and bracing may allow the load to shift (figure 1-11). A shifting load may result in an explosion. If the load is not properly blocked or braced, notify the storage officer or NCO of this condition to have the loading deficiency corrected.
Figure 1-11. A Load Improperly Braced. Figure 1-10. DARCOM Drawing 4115 5PA 1002
8
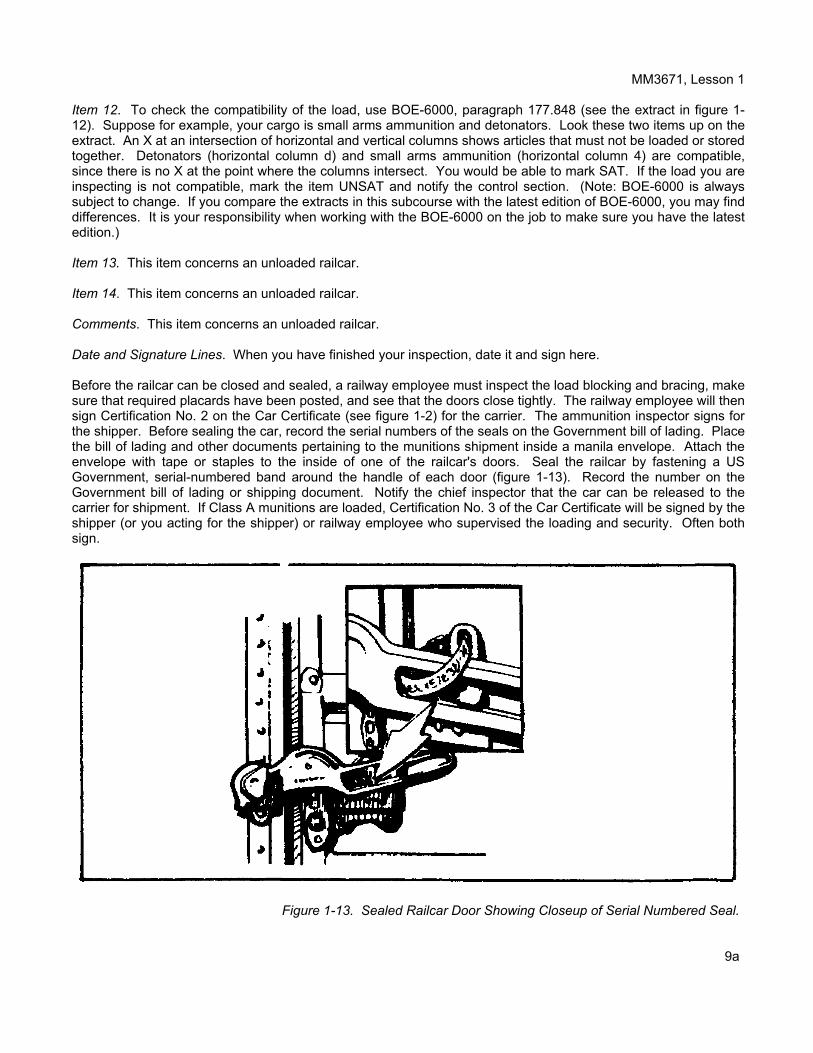
MM3671, Lesson 1 Item 12. To check the compatibility of the load, use BOE-6000, paragraph 177.848 (see the extract in figure 1-12). Suppose for example, your cargo is small arms ammunition and detonators. Look these two items up on the extract. An X at an intersection of horizontal and vertical columns shows articles that must not be loaded or stored together. Detonators (horizontal column d) and small arms ammunition (horizontal column 4) are compatible, since there is no X at the point where the columns intersect. You would be able to mark SAT. If the load you are inspecting is not compatible, mark the item UNSAT and notify the control section. (Note: BOE-6000 is always subject to change. If you compare the extracts in this subcourse with the latest edition of BOE-6000, you may find differences. It is your responsibility when working with the BOE-6000 on the job to make sure you have the latest edition.) Item 13. This item concerns an unloaded railcar. Item 14. This item concerns an unloaded railcar. Comments. This item concerns an unloaded railcar. Date and Signature Lines. When you have finished your inspection, date it and sign here. Before the railcar can be closed and sealed, a railway employee must inspect the load blocking and bracing, make sure that required placards have been posted, and see that the doors close tightly. The railway employee will then sign Certification No. 2 on the Car Certificate (see figure 1-2) for the carrier. The ammunition inspector signs for the shipper. Before sealing the car, record the serial numbers of the seals on the Government bill of lading. Place the bill of lading and other documents pertaining to the munitions shipment inside a manila envelope. Attach the envelope with tape or staples to the inside of one of the railcar's doors. Seal the railcar by fastening a US Government, serial-numbered band around the handle of each door (figure 1-13). Record the number on the Government bill of lading or shipping document. Notify the chief inspector that the car can be released to the carrier for shipment. If Class A munitions are loaded, Certification No. 3 of the Car Certificate will be signed by the shipper (or you acting for the shipper) or railway employee who supervised the loading and security. Often both sign.
Figure 1-13. Sealed Railcar Door Showing Closeup of Serial Numbered Seal.
9a

MM3671, Lesson 1
Figure 1-12. Extract from BOE-6000, Table 12-3 Loading and Storage Chart of Hazardous Materials for Land Transportation.
9b

MM3671, Lesson 1
Figure 1-12. Extract from BOE-6000, Table 12-3 Loading and Storage Chart of Hazardous Materials for Land Transportation. (Cont)
9c

MM3671, Lesson 1
REVIEW EXERCISES Circle the letter of the correct answer to each question. 1. A Car Certificate is required when what class of hazardous materials is being shipped? a. C. b. A. c. D. d. B. 2. When are placards posted on a railcar that will be carrying hazardous material? a. Before it is loaded. b. As it is loaded. c. After it is loaded. 3. Under what condition is a metal floor in a railcar acceptable? a. The car is "broom clean." b. The metal plates are not warped. c. The metal floor is covered with wood or fiber. d. There is no rust on the metal plates. 4. What warning signal is put out when people are working around a railcar loaded with Class A munitions? a. A flashing red light. b. Blue flags. c. Red flags. d. A flashing green light. 5. Who signs Car Certification No. 2 when the inspection has been completed on the loaded railcar? a. The ammunition inspector. b. A railway employee. c. The shipper. d. The receiver. 10

MM3671, Lesson 1
6. What reference is used during inspection for proper blocking and bracing? a. BOE-6000. b. MIL-HDBK 138 (AR). c. DARCOM Drawing 4115 5PA 1002. d. DA Pam 310-3. 7. You are inspecting an unloaded railcar that will be used to carry Class A munitions. On the Car Certificate
on the railcar received from the carrier, Certification No. 1 has not been signed. What should you do? a. Sign Certification No. 1. b. Reject the car. The Car Certificate must be signed and posted before Class A munitions can be
loaded. c. Remove the Car Certificate and okay the use of the car for the next Class B shipment. d. Proceed to have the car loaded and sign Certifications No. 2 and 3. 8. Where is the Segregation and Separation Chart of Hazardous Material located? a. TM 358-1. b. MIL-HDBK 138 (AR). c. DA Pam 310-3. d. BOE-6000. Recheck your answers to the Review Exercises. When you are satisfied that you have answered every question to the best of your ability, check your answers against the Exercise Solutions. If you missed three or more questions, you should retake the entire lesson, paying particular attention to the areas in which your answers were incorrect.
11
MM3671, Lesson 2
Lesson 2 INSPECTING A MILVAN
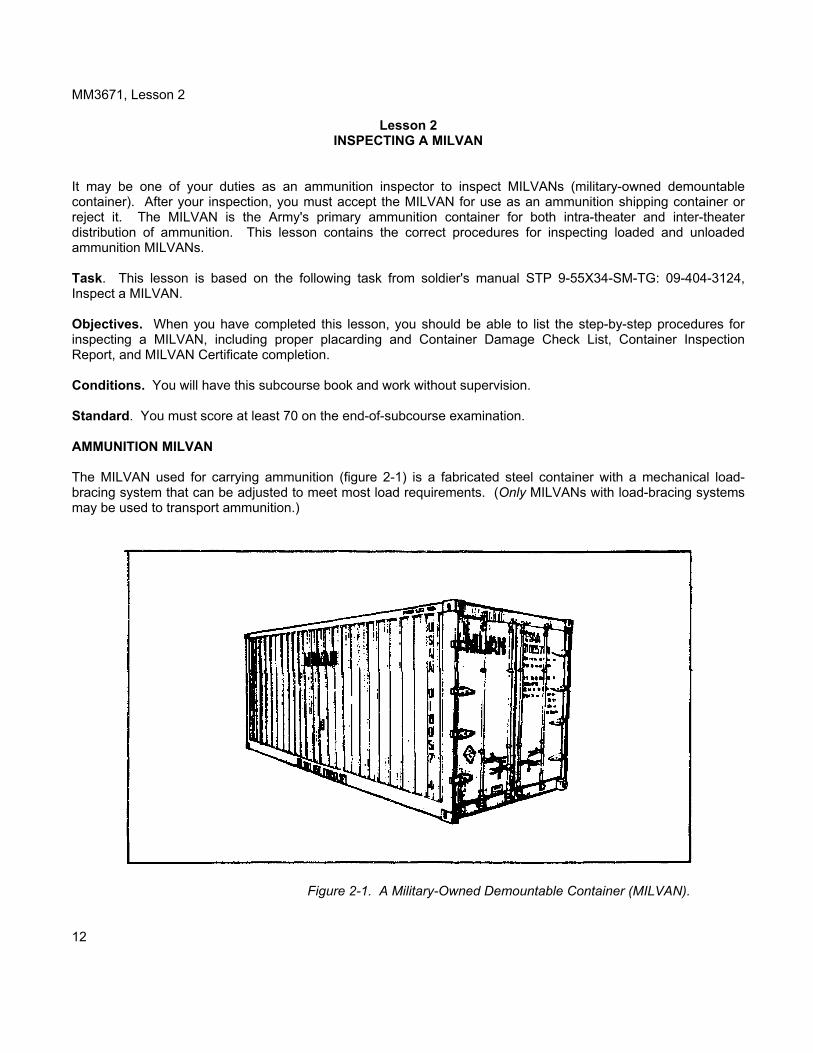
It may be one of your duties as an ammunition inspector to inspect MILVANs (military-owned demountable container). After your inspection, you must accept the MILVAN for use as an ammunition shipping container or reject it. The MILVAN is the Army's primary ammunition container for both intra-theater and inter-theater distribution of ammunition. This lesson contains the correct procedures for inspecting loaded and unloaded ammunition MILVANs. Task. This lesson is based on the following task from soldier's manual STP 9-55X34-SM-TG: 09-404-3124, Inspect a MILVAN. Objectives. When you have completed this lesson, you should be able to list the step-by-step procedures for inspecting a MILVAN, including proper placarding and Container Damage Check List, Container Inspection Report, and MILVAN Certificate completion. Conditions. You will have this subcourse book and work without supervision. Standard. You must score at least 70 on the end-of-subcourse examination. AMMUNITION MILVAN The MILVAN used for carrying ammunition (figure 2-1) is a fabricated steel container with a mechanical load-bracing system that can be adjusted to meet most load requirements. (Only MILVANs with load-bracing systems may be used to transport ammunition.)
Figure 2-1. A Military-Owned Demountable Container (MILVAN). 12
MM3671, Lesson 2
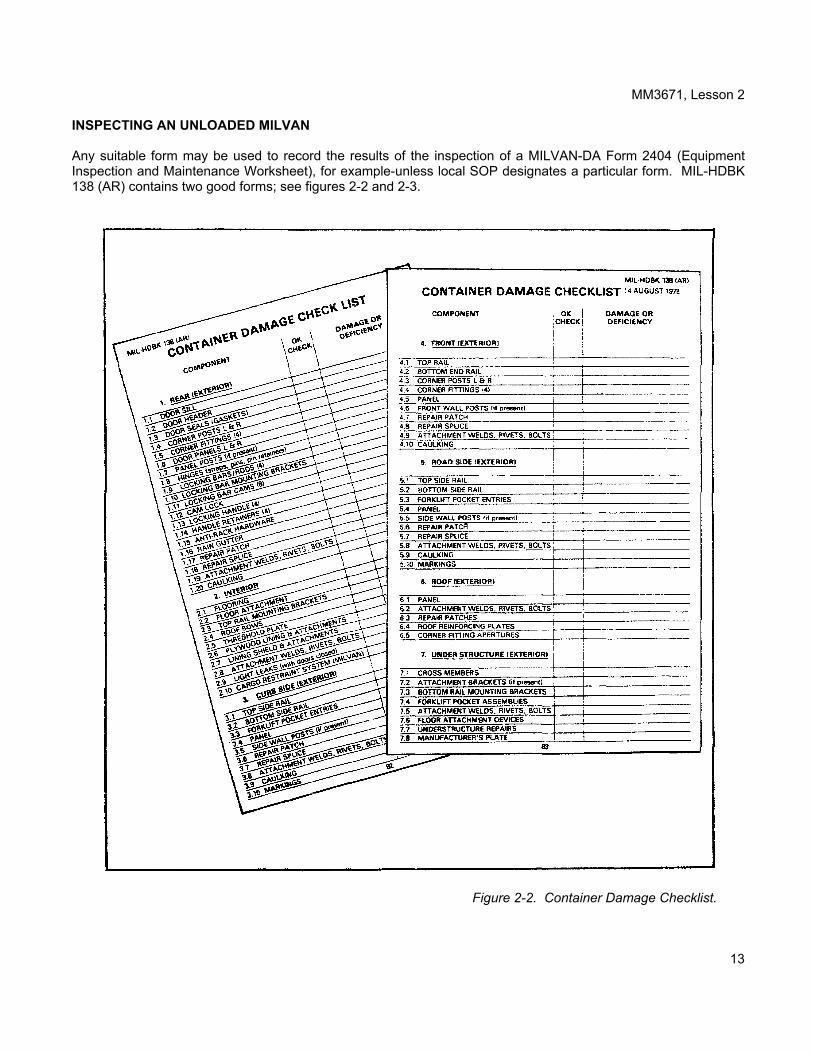
INSPECTING AN UNLOADED MILVAN Any suitable form may be used to record the results of the inspection of a MILVAN-DA Form 2404 (Equipment Inspection and Maintenance Worksheet), for example-unless local SOP designates a particular form. MIL-HDBK 138 (AR) contains two good forms; see figures 2-2 and 2-3.
Figure 2-2. Container Damage Checklist.
13

MM3671, Lesson 2
Figure 2-3. Container Inspection Report. 14

MM3671, Lesson 2
These are the forms used in this lesson. MIL-HDBK 138 (AR) also contains detailed inspection criteria useful when actually inspecting a MILVAN (see extract at the end of the subcourse). You will also need a MILVAN Certificate to complete after you pass a MILVAN (figure 2-4).
Figure 2-4. MILVAN Certificate. When you find a defect that renders the MILVAN unacceptable, reject the MILVAN and stop the inspection immediately. To continue would waste time. Enter the defect on the Container Inspection Report (figure 2-3) and notify maintenance personnel in accordance with local procedure. If the needed repair is made immediately, enter this information on your report form and continue the inspection. If the needed repair is postponed or will take considerable time to complete, file your report with the surveillance section. Container Damage Check List Item 1-Rear (Exterior). Begin your inspection by checking the rear and the exterior of the doors of the MILVAN for any distortion, holes, or tears (figure 2-5). Any damage or improper repair that results in failure of the doors to make the MILVAN watertight-or any other defect that threatens the safety and serviceability of the MILVAN-is a cause for rejection.
1.1 and 1.2. Door headers (above doors) and sills (below doors) must be inspected for any damage that would prevent proper door action or would weaken the structural strength of the MILVAN (figure 2-6). One splice, but not more than one splice, in a door header is acceptable. A splice in a door sill is cause for rejection.
Check the inner side of the doors for any damage that would interfere with their serviceability.
15

MM3671, Lesson 2
Figure 2-6. Where To Inspect for Door Headers and Sills.
Figure 2-5. Examples of Damage Bad Enough To Reject the MILVAN.
Make sure that the document holder is not loose (figure 2-7). If it is loose, this would not be sufficient cause for rejection of the MILVAN. Have the necessary repair made, and continue with the inspection.
1.3. Door seals must be intact to insure that the load is properly protected (figure 2-8). Markings must be legible, and there must be a readable data plate. All information must be accurate. 1.4 - 1.7. Corner posts and fittings and door panels must be structurally sound, including panel posts, if present. 1.8. The hinges must not be damaged or broken, and the doors must open and close freely (figure 2-9). 1.9 - 1.12. The locking bars must be in good condition. 1.13 and 1.14. The handles and the handle retainers must not be distorted or be missing components that would interfere with their function. 1.15. Antirack hardware (keeps doors and panels aligned) should be properly attached to prevent doors from springing and getting out of alignment. 1.16. There must be no major damage to the rain gutter. Minor damage is acceptable (figure 2-6). 1.17 - 1.20. All repairs, attachments, and caulking are properly done.
16

MM3671, Lesson 2
Figure 2-7. Where To Inspect for the Document Holder.
Figure 2-8. Where To Inspect for Door Seals,
Locking Bar Retainers, and Data Plate.
Figure 2-9. Where To Inspect for Hinges,
Handles, and Retainers.
17

MM3671, Lesson 2 Item 2-Interior. Having made sure that the doors are thoroughly serviceable, you are ready to inspect the interior of the MILVAN.
2.1, 2.2, and 2.5, 2.6, and 2.7. Now, turn your attention to the floor of the MILVAN. Examine the floor of the MILVAN for any curvature. This would permit shifting of even well-braced cargo. Inspect for any breaks or holes in the floor. Inspect for any splintering, warping, or rotting of the floor boards (figure 2-10). Check the floor fasteners for any that are corroded, missing, sheared, or loose. Any condition that endangers the cargo, the equipment, or personnel is sufficient cause for rejection. Floor stains and separation of joints also constitute a hazard to the shipment. The floor must be free of any debris, as this, too, could damage the cargo. This is an example of the sort of defect that can be reported to maintenance personnel for on-the-spot correction.
Figure 2-10. Example of Unacceptable Warping of MILVAN Floor.
2.3. Check all visible portions of the corner fittings and top rails for damage and distortion (figure 2-11). Inspect the mounting brackets for breaks and distortion.
Figure 2-11. Where To Inspect for Corner Fittings and Top Rails.
18

MM3671, Lesson 2
2.4. Inspect the roof bows for any that are torn loose from the top side rails. Check them for cuts and breaks. Roof bows that are damaged, missing, or bowed are sufficient cause for rejecting the MILVAN. Inspect the interior of the roof panels for holes or severe dents. If you find that the floor of the MILVAN is acceptable, inspect the interior sides and front wall for any damage, breaks, holes, or punctures. Small dents are acceptable, if the panels are not punctured and if the vertical support is not weakened. Any hole in the side or front wall is cause for rejection. Dents in panels that do not affect support of corrugated ribs are acceptable. 2.8. Check for cracked or missing welds. Any distortion of corner posts and any dent in top rails that exceeds 3/4 in. deep, regardless of length, is cause for rejection. Inspect all previous repairs and welds. They should be properly made and intact. A poor, cracked, or missing weld will seriously weaken the structural strength of the MILVAN. Closely inspect any frame members that are load bearers, both horizontal and vertical (figure 2-12). Check them for distortion, breaks, and separation. Any dent in any support member that exceeds 3/4 in. in depth, regardless of length, is a cause for rejection.
Figure 2-12. Where To Inspect for Load Bearers.
19

MM3671, Lesson 2
2.9. Close the doors from the inside and check for the penetration of light from outside. If light penetrates, look for the source of entry. If it is a hole or a crack, it indicates that the MILVAN is unserviceable. Now, open the doors so that you can continue your inspection of the interior. 2.10. The cargo restraint system consists of eight horizontal slotted rails, intermittently spaced and welded on each side wall, and 25 independent load bracing crossbeams that interlock into the side rail slots. They are shown in figure 2-13, here in position to illustrate their use. Vertical slotted rails must be welded to the sides of the end frame (figure 2-14). This arrangement permits adjustment of the bracing to fit the loading requirements.
Figure 2-13. Crossbeams in Place. Figure 2-14. Vertical Slotted Rail.
Horizontal and vertical rails must not be damaged to the point that their slots would prevent the crossbeams from locking in the slots (figure 2-15). Check the rails for distortion and for possible looseness. Check for faulty or cracked welds. Any of these defects is cause for rejection. Inspect the load bracing crossbeams to make sure that the locking mechanism is operable and that the beams are not bent, crushed, or bowed (figure 2-16). Defective crossbeams must be repaired or replaced before the MILVAN can be accepted.
20

MM3671, Lesson 2
Figure 2-15. Where To Inspect for Slots.
Figure 2-16. Bowed and Bent Crossbeams.
21

MM3671, Lesson 2
Remember, you are determining the safety and the strength of the MILVAN with this inspection. Be sure to inspect every part of the interior for weakness, damage, or any condition that would make the MILVAN unserviceable. If you find no reason to reject the MILVAN from your inspection of the interior, go back outside and inspect the remainder of the exterior.
Item 3-Curb Side (Exterior). Inspect the curb side of the MILVAN for damage or distortion that would weaken the container or threaten its cargo (figure 2-17). Pay particular attention to both the bottom and top rails and the corner fittings as you proceed. Remember that the corner fittings provide the means of handling, stacking, and securing the MILVAN.
Figure 2-17. Curb Side (Exterior) Showing Inspection Points and Showing Unacceptable Damage to the Side. Items 4 and 5-Front and Road Side (Exterior). Examine the road side of the MILVAN and the front, checking in particular the top and bottom rails, corner fittings, and panels for any damage or distortion (figure 2-18). Item 6-Roof. Climb on the roof and inspect it for holes and damage, and for any depression that would allow water to gather (figure 2-19). Check it for any unacceptable repair, such as an insecure weld or other improperly sealed patch. The roof must be firm and watertight. 22

MM3671, Lesson 2
Figure 2-18. Important Inspection Points for the Front and Road Side of the MILVAN.
Figure 2-19. Typical Not Acceptable MILVAN Roofs.
23

MM3671, Lesson 2 Inspect the openings in the four top corner fittings to make sure they are undamaged and unobstructed. Item 7-Understructure (Exterior). Have the MILVAN raised and safely supported so you can inspect the bottom of the container (figure 2-20). Carefully check for any cracked or broken weld, or any weld that has been improperly made. Examine each frame member on the underside of the MILVAN for fractures, cracks, kinks, distortions, and separations. Remember, throughout the inspection, check for bad welds, and for broken, damaged, or improperly used bolts, rivets, and fasteners. Check the openings in the four bottom corner fittings for obstruction and damage. Remember to inspect for rust or corrosion that can weaken the floor assembly or its supporting structure. Carefully check the underside of the floor for any possible damage that was not visible from inside the container. Sum up the information from the check list on the Container Inspection Report.
Figure 2-20. MILVAN Suspended Making Inspection of Its Underside Possible.
24

MM3671, Lesson 2
Container Inspection Report Name of Lesson and Address. Enter the name and address of lesson. Container Number. Get this number off the upper right back door. In figure 2-1, it is USAA 0100574. Inspection Date and Hour. Enter the date and time of the inspection. Container Destination. Enter to where the container is being sent. Type. Enter the type of container. Munitions containers must be steel. Installation or Activity. Enter your installation or activity. Reports Control Symbol. Leave this blank; the Army does not use it. Conditions of Container Major Structures. For each entry under the Major Structures column, refer back to the check list you completed as you inspected the MILVAN. Use your judgment as to whether each entry under the Condition column is SAT. or UNSAT. Use the Remarks column for entries such as reporting repairs made changing UNSAT. to SAT. In the Conclusion section check off if the container has been accepted, conditionally accepted, or, rejected. You, the inspector, sign the lower left block. (Make sure the lower right block (lesson representative signature and title) is filled in.) MILVAN Certificate If your inspection of the MILVAN shows that it is serviceable, fill out the MILVAN Certificate (figure 2-4) and sign it. This certificate will indicate that the MILVAN is ready for loading. INSPECTING A LOADED MILVAN There is no official form to use when inspecting a loaded MILVAN. There may be local forms, however; or you may want to make up your own check list. Your first step is to verify that the items loaded are those listed on the shipping document, DD Form 1348-1 (DOD Single Line Item Release/Receipt Document). If the items are incorrect, notify the shipping section of the ASP of the error. Do not continue with the inspection until the proper items are loaded. If more than one type of ammunition is included in the load, check the compatibility by mode of transportation (water, air, rail, or motor). Use the tables for this compatibility check in BOE-6000 for water, rail, and motor shipments (see lesson 1), and TM 38-250 for air shipments. Inspect the load to insure that it is properly braced to prevent shifting, and check the distribution of the items in the MILVAN to insure load equalization. If the load is improperly braced or distributed in the MILVAN notify the shipping section of the ASP and have the loading defect corrected (figure 2-21). There is no standard for this, so you have to use your own judgment.
25
MM3671, Lesson 2
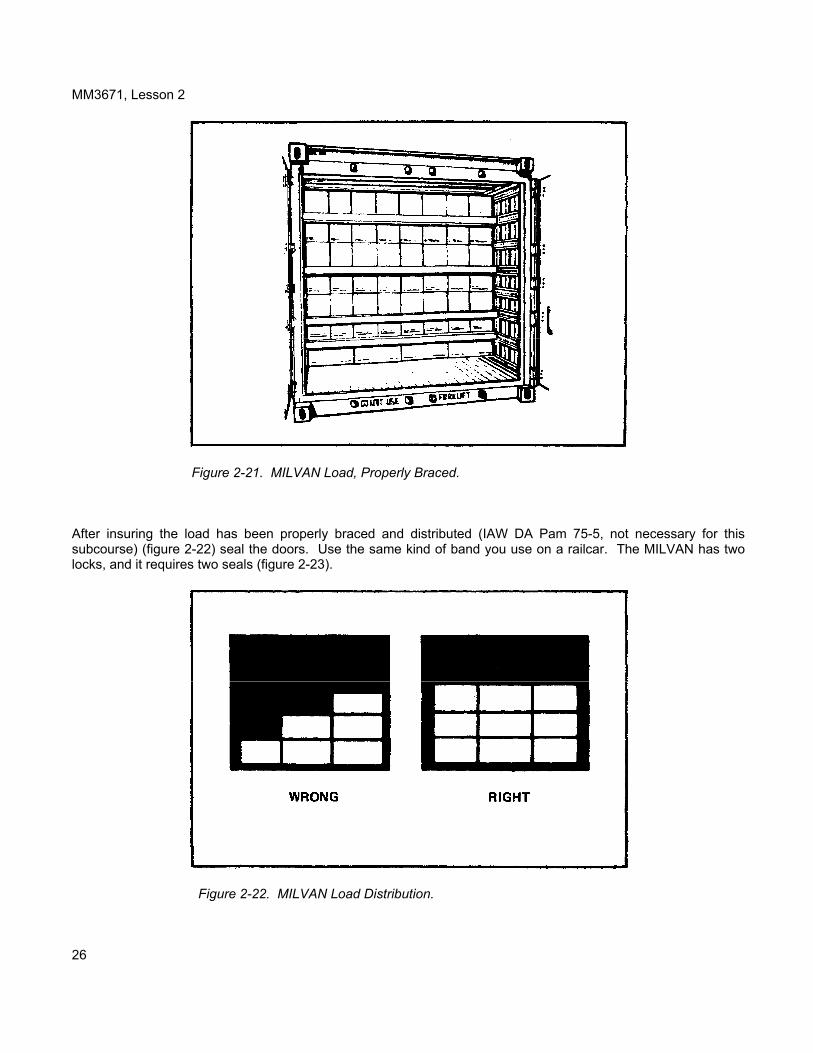
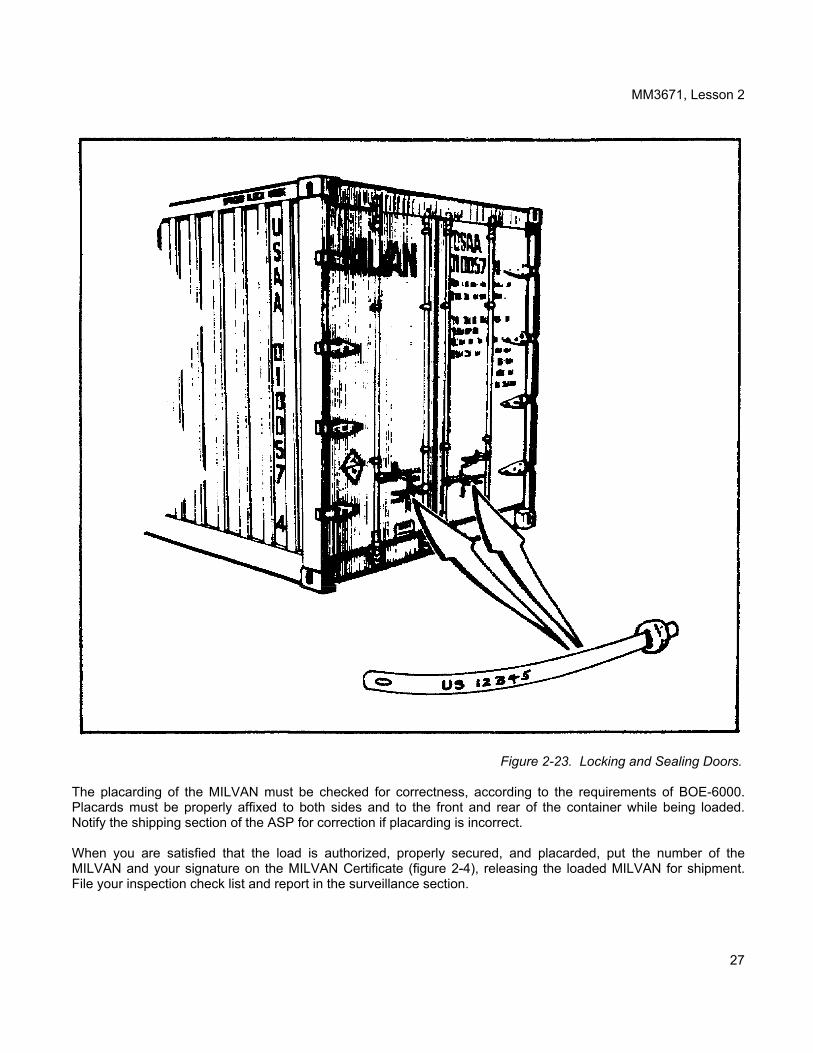
Figure 2-21. MILVAN Load, Properly Braced. After insuring the load has been properly braced and distributed (IAW DA Pam 75-5, not necessary for this subcourse) (figure 2-22) seal the doors. Use the same kind of band you use on a railcar. The MILVAN has two locks, and it requires two seals (figure 2-23).
Figure 2-22. MILVAN Load Distribution. 26
MM3671, Lesson 2
Figure 2-23. Locking and Sealing Doors. The placarding of the MILVAN must be checked for correctness, according to the requirements of BOE-6000. Placards must be properly affixed to both sides and to the front and rear of the container while being loaded. Notify the shipping section of the ASP for correction if placarding is incorrect. When you are satisfied that the load is authorized, properly secured, and placarded, put the number of the MILVAN and your signature on the MILVAN Certificate (figure 2-4), releasing the loaded MILVAN for shipment. File your inspection check list and report in the surveillance section.
27

MM3671, Lesson 2
REVIEW EXERCISES Circle the letter of the correct answer to each question. 1. What reference contains MILVAN container rejection criteria? a. DA Pam 310-3. b. MIL-HDBK 138 (AR). c. BOE-6000. d. TM 385-1. 2. What is done if a MILVAN container defect is not corrected on the spot during an inspection? a. A warning is issued. b. The inspector comes back and inspects only that one defect. c. The container is rejected. d. A conditional acceptance is issued. 3. What part of an unloaded MILVAN is inspected first during an inspection? a. The roof. b. The coupling device. c. The interior. d. The exterior doors. 4. What is being checked when the inspector gets in the MILVAN container and closes the doors? a. The level of light. b. The ventilating system. c. Light penetration. d. The braces. 5. What of the following defects is acceptable for a MILVAN container's interior sides and front wall? a. Small dents. b. Holes on the sides. c. Cracked welds. d. Distorted top rail. 28

MM3671, Lesson 2
6. What side of a MILVAN is inspected first after the interior has been inspected? a. The road side. b. The curb side. c. The rear. d. The front. 7. What is the first thing an inspector must do when inspecting a loaded MILVAN container? a. Check the compatibility tables. b. Determine how the container is to be shipped. c. Reconcile the load and DD Form 1348-1. d. Placard the container. 8. Where is a loaded MILVAN container placarded? a. Sides only. b. Front and rear only. c. Sides, front, and rear. d. Rear only. Recheck your answers to the Review Exercises. When you are satisfied that you have answered every question to the best of your ability, check your answers against the Exercise Solutions. If you missed three or more questions, you should retake the entire lesson, paying particular attention to the areas in which your answers were incorrect.
29

MM3671, Lesson 3
Lesson 3 INSPECTING MUNITIONS FOR AIR SHIPMENTS
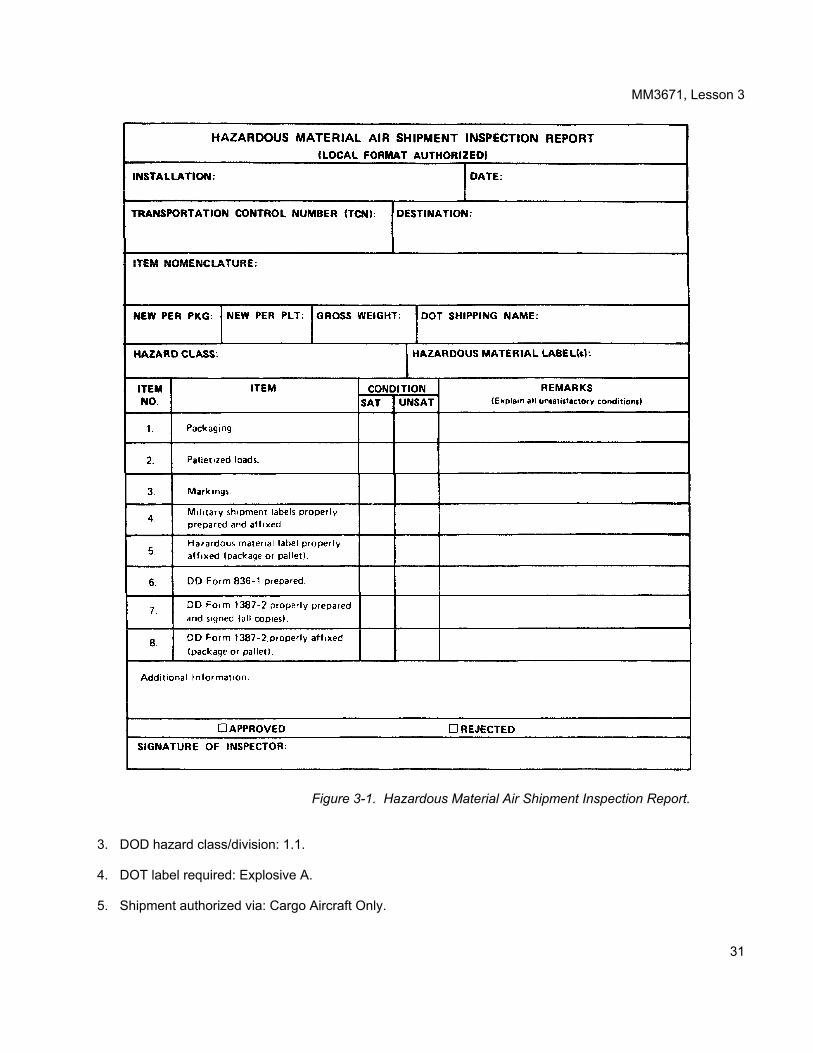
One of the responsibilities of an ammunition inspector is to inspect munitions for air shipment. You may be required to inspect pallets of ammunition at an ammunition supply point before they are transported to a military air base. The areas inspected are critical to the safe transport of ammunition by air. Task. This lesson is based on the following task from soldier's manual STP 9-55X34-SM-TG: 093-424-3125, Inspect Munitions for Air Shipment. Objectives. When you have completed this lesson, you should be able to describe what must be done to inspect ammunition prepared for air shipment, to approve or disapprove the shipment, and to complete the Hazardous Material Air Shipment Inspection Report and the necessary tags and labels (DD Form 1387 and DD Form 1387-1). Conditions. You will have this subcourse book and work without supervision. Standard. You must score at least 70 on the end-of-subcourse examination. HAZARDOUS MATERIAL AIR REPORT SHIPMENT INSPECTION The Hazardous Material Air Shipment Inspection Report, commonly called the air shipment report, is a locally produced form that must be completed by an ammunition inspector when munitions are to be shipped by air. The form shown in figure 3-1, an example of a locally produced form, will be used throughout this lesson. The identification information needed to complete an air shipment report is taken from DD Form 1387-2 (Special Handling Data/Certification) (figure 3-2) and DD Form 1348-1 (figure 3-3). You receive DD Form 1348-1 from the ammunition accountable officer on your installation, as advance notice of the shipment. You receive the original and six copies of DD Form 1387-2, already filled out, from the shipper. It is your responsibility as the ammunition inspector to make certain that DD Form 1387-2 is correctly filled out. DD Form 1387-2 Refer to figure 3-2 as you go through the form item by item. Item Nomenclature Block. Make sure there are five entries for the shipment. 1. Proper shipping name: Detonators, Class A Explosive. 2. Hazard Class: Class A Explosive. 30
MM3671, Lesson 3
Figure 3-1. Hazardous Material Air Shipment Inspection Report. 3. DOD hazard class/division: 1.1. 4. DOT label required: Explosive A. 5. Shipment authorized via: Cargo Aircraft Only.
31

MM3671, Lesson 3
Figure 3-2. DD Form 1387-2 (Special Handling Data/Certification).
Figure 3-3. DOD Form 1348-1 (DOD Single Line Item Release/Receipt Document). 32a

MM3671, Lesson 3 To get the correct information for item nomenclature, use table 4-1, TM 38-250. It has an alphabetical listing of items in which you will find four of the required entries. In figure 3-4, you can find the proper shipping name, the hazard class, the label or labels required, and cargo aircraft only symbol (+) to the left of the first column when it applies. Look down the alphabetical listing in the first column in figure 3-4. In this lesson, a pallet of 180,000 blasting caps is being shipped. Find "Blasting caps with metal clad mild detonating fuze." Note that the table in figure 3-4 states "See Detonators, Class A or Class C Explosives." Continue looking down the alphabetical listing and find "Detonators, Class A Explosives." See figure 3-5. For this shipment, the Department of Transportation (DOT) classification is Class A Explosive, as each package contains over 1,000 blasting caps. The first entry in the Item Nomenclature block on DD Form 1387-2 is "Detonators, Class A Explosives." The second entry is the hazard classification. You can find it in the second column of Table 4-1, TM 38-250, marked Hazard Class (figure 3-5). The entry is "Class A Explosive." The third entry is the DOD Hazard Class/Division. It is placed to the right of the hazard classification. This is extracted from TM 9-1300-206, Table 5-21, Summary of Quantity Distance Classification and Compatibility Groups. The entry, in this case, is "1.1." See figure 3-6. The fourth entry is the label to be placed on the container or pallet shipped. This is found in the fourth column of Table 4-1 in TM 38-250, figure 3-5. The entry is "Explosive A." See figure 3-5. If the fourth column in figure 3-5, marked Labels Required is blank or specifies none, the entry will be "Label None."
Figure 3-4. Extract of Table 4-1, TM 38-250, Blasting Cap Entry. 32b

MM3671, Lesson 3
Figure 3-5. Extract of Table 4-1, TM 38-250, Detonator Entry.
Figure 3-6. Extract of Table 5-21, TM 9-1300-206.
33
MM3671, Lesson -3
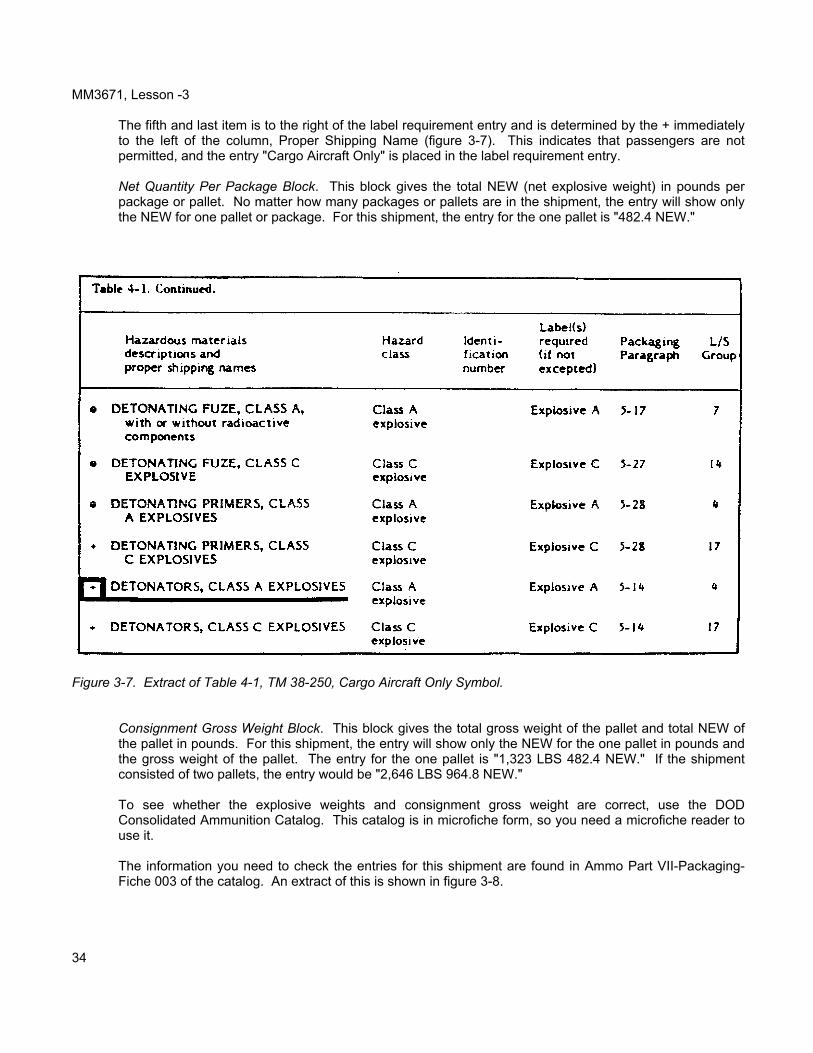
The fifth and last item is to the right of the label requirement entry and is determined by the + immediately to the left of the column, Proper Shipping Name (figure 3-7). This indicates that passengers are not permitted, and the entry "Cargo Aircraft Only" is placed in the label requirement entry. Net Quantity Per Package Block. This block gives the total NEW (net explosive weight) in pounds per package or pallet. No matter how many packages or pallets are in the shipment, the entry will show only the NEW for one pallet or package. For this shipment, the entry for the one pallet is "482.4 NEW."
Figure 3-7. Extract of Table 4-1, TM 38-250, Cargo Aircraft Only Symbol.
Consignment Gross Weight Block. This block gives the total gross weight of the pallet and total NEW of the pallet in pounds. For this shipment, the entry will show only the NEW for the one pallet in pounds and the gross weight of the pallet. The entry for the one pallet is "1,323 LBS 482.4 NEW." If the shipment consisted of two pallets, the entry would be "2,646 LBS 964.8 NEW." To see whether the explosive weights and consignment gross weight are correct, use the DOD Consolidated Ammunition Catalog. This catalog is in microfiche form, so you need a microfiche reader to use it. The information you need to check the entries for this shipment are found in Ammo Part VII-Packaging-Fiche 003 of the catalog. An extract of this is shown in figure 3-8.
34

MM3671, Lesson 3
Figure 3-8. Extract of Fiche 003, Ammo Part VII, Packaging.
35a

MM3671, Lesson 3
Figure 3-8. Extract of Fiche 003, Ammo Part VII, Packaging. (Cont.)
35b
MM3671, Lesson 3 Transportation Control No. You do not need to double check this. It was assigned by the form's originator. Destination. This block was filled in by the form's originator; you do not need to double check it. Load Storage (L/S) Group. This is found in the last column of table 4-1 to the right of Detonators, Class A Explosives. In this case, the entry is 4. See figure 3-5. Flash Point. The entry should be N/A as ammunition does not require this. Certification. You saw earlier in the lesson that this shipment was for cargo aircraft only. This block should be checked and the words Passenger Aircraft should be lined out. Check this block and enter the paragraph 5-15 as shown in Table 4-1 and the subparagraph of TM 38-250 that deals with the items being shipped. Paragraph 5-14, a, (4), (b) describes the packaging and marking for Class A explosive detonators. The rest of the certification block is not filled in, and you do not need to double check it. Address of Shipper. You do not need to double check this. Typed Name, Signature, and Date. You do not need to double check this except to be sure the form has been signed. Air Shipment Report-Identification Section Refer to figures 3-2 and 3-3 as you go through the identification section of the report in figure 3-9 item by item. Installation. Enter the name of the shipper from the block Address of Shipper on DD Form 1387-2. Date. Enter the date you perform the inspection. Transportation Control Number (TCN). Enter the 17-digit Transportation Control Number from DD Form 1387-2. Destination. Enter the Destination from DD Form 1387-2. Item Nomenclature. Enter the item nomenclature (Block X) from DD Form 1387-1. Also enter the NSN from the Stock for Part Number block of DD 1348-1 and to it add the Department of Transportation Identification Code (DODIC) from block W of the same form. NEW Per PKG. Not used. NEW Per PLT. Enter the NEW from the Consignment Gross Weight block on DD Form 1387-2. Gross Weight. Enter the gross weight in pounds from the Consignment Gross Weight block on DD Form 1387-2. DOT Shipping Name. From DD Form 1348-1, enter the Freight Classification Nomenclature (block U). 36

MM3671, Lesson 3
Figure 3-9. Approved Report Showing Defect Corrected. Hazard Class. Enter the hazard class listed in the second line of the Item Nomenclature block on DD Form 1387-2. Hazardous Material Label(s). Enter the label(s) necessary from line three of the Item Nomenclature block on DD Form 1387-2.
37

MM3671, Lesson 3 Air Shipment Report-Inspection Section After you have filled in the identification section of the air shipment report, begin the inspection itself. In an actual inspection, you would need TM 38-250, Preparation of Hazardous Materiels for Military Air Shipment, but it is not needed for this subcourse. Refer to figure 3-9 as you go through the report item by item. Item 1. Inspect the containers on each pallet to make certain they are authorized for the type of ammunition packed inside them. You can find this information in TM 38-250. The authorized packaging for blasting caps is shown in the extract in figure 3-10. Inspect wooden containers for such damage as broken or rotted wood. Be extra careful when you inspect for explosive powder leakage. Even a small amount of leakage is serious. Inspect the containers on each pallet visually for leaking contents. If you are satisfied with this part of your inspection and you have found correctly packed pallets, containers in good condition, no signs of leakage, and authorized containers and packaging, check the condition of the packaging as SAT on the air shipment report. If you find any packaging defects during your inspection, check the condition of the packaging as UNSAT and explain the defect in the Remarks column. You will have automatically disapproved the shipment when you note an UNSAT finding. Report any defect to the control section so the defect can be corrected.
Figure 3-10. Extract from page 5-10, TM 38-250.
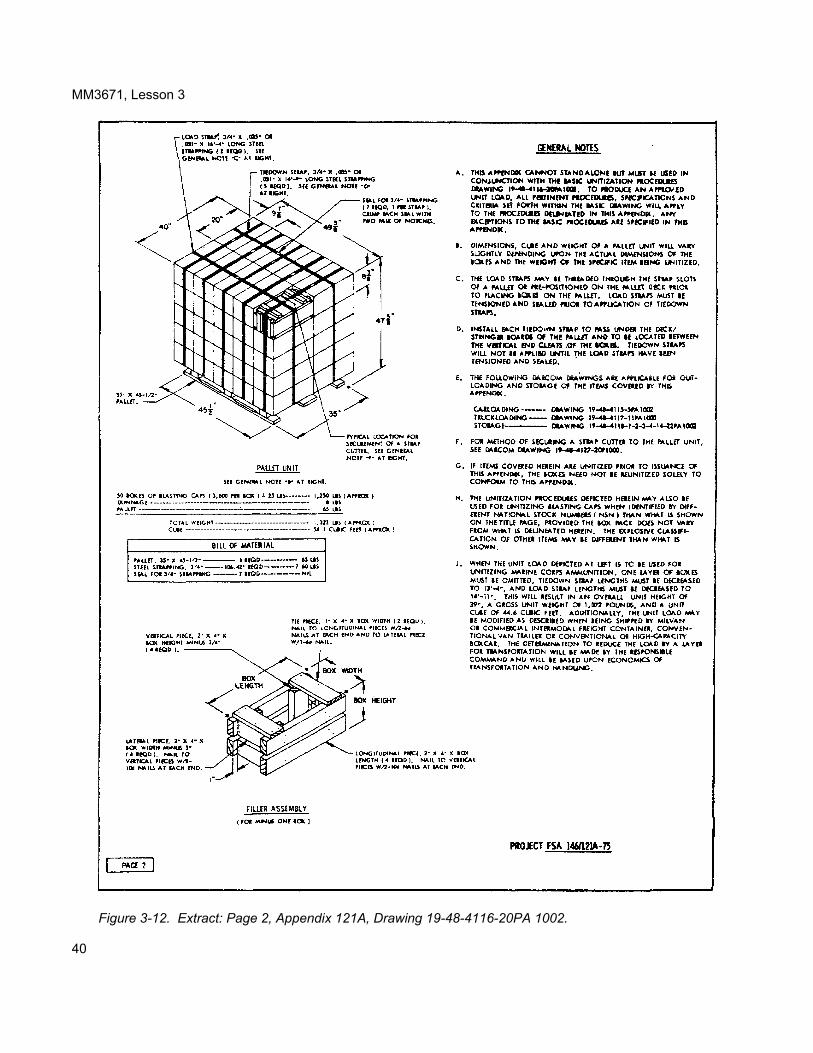
Item 2. Inspect each pallet to determine if it is the correct size for the quantity of items on the pallet. You will find this information in Drawing 19-48-4116-20PA1002, Appendix 121A (see the extract in figure 3-11). You will note that this size pallet calls for 50 boxes containing 3,600 blasting caps per box. The total per pallet is 180,000 blasting caps. Next, turn to page 2 of this appendix. On it is the information you need to determine if the containers of blasting caps have been palletized correctly (see the extract in figure 3-12). 38

MM3671, Lesson 3
Figure 3-11. Extract: Page 1, Appendix 121A, Drawing 19-48-4116-20PA 1002. Follow the General Notes and Pallet Unit for determining pallet size, placement of containers, size of strapping, and placement of strapping. The Bill of Material shows the total quantity of materials by size required to palletize one pallet. Now inspect the pallet for damage. Broken skids and rotted skids are causes for rejection. Broken banding strips are also causes for rejection. If everything passes, check SAT. If not, check UNSAT and explain in Remarks.
39
MM3671, Lesson 3
Figure 3-12. Extract: Page 2, Appendix 121A, Drawing 19-48-4116-20PA 1002. 40

MM3671, Lesson 3
Item 3. Check the Department of Transportation (DOT) markings for the proper shipping name. These markings are found on the top of the box. Be certain that the correct items are being shipped. The markings on the boxes that identify the item should agree with the shipping document pertaining to the shipment. When your inspection shows that the markings are correct, check SAT on the report. If you find that the markings are not correct, check UNSAT and explain the defect in the Remarks column. Item 4. Check the address label or address tag (figure 3-13). The address label is DD Form 1387 (Military Shipment Label). It contains the 17-digit Transportation Control Number, the From and To airports, and other shipping information. No label applied to the pallets can be put over any required identification on the containers.
Figure 3-13. DD Form 1387 (Military Shipment Label).
41

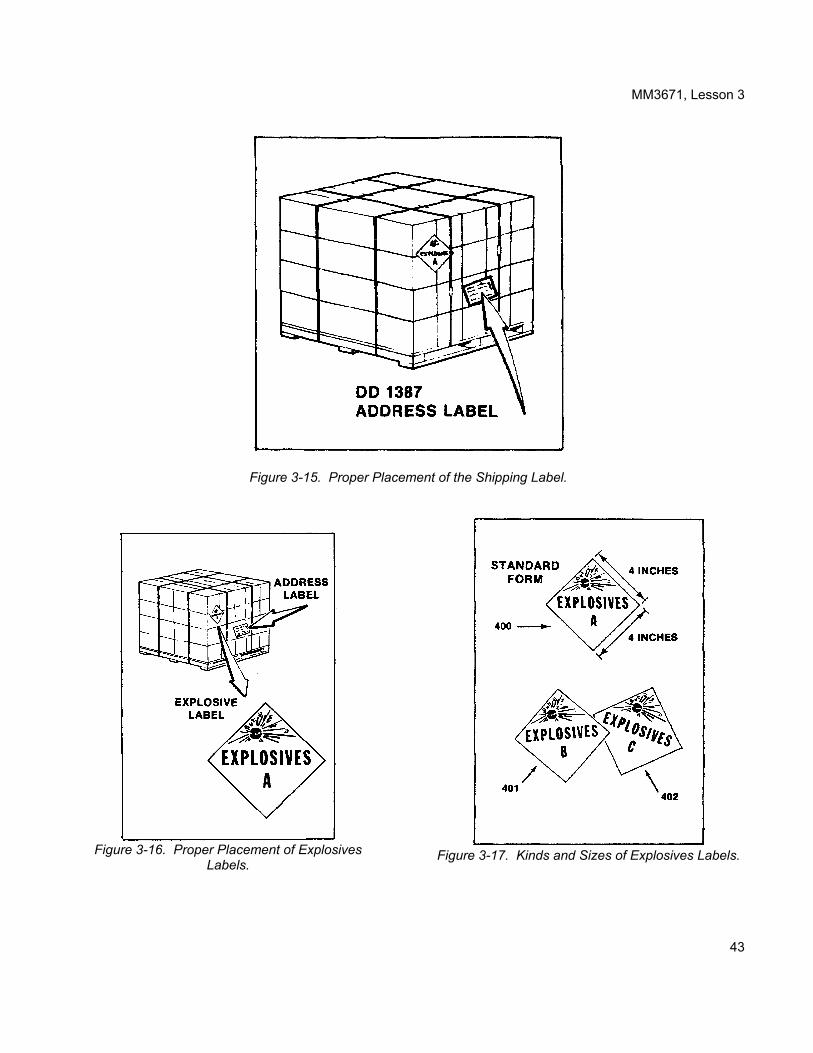
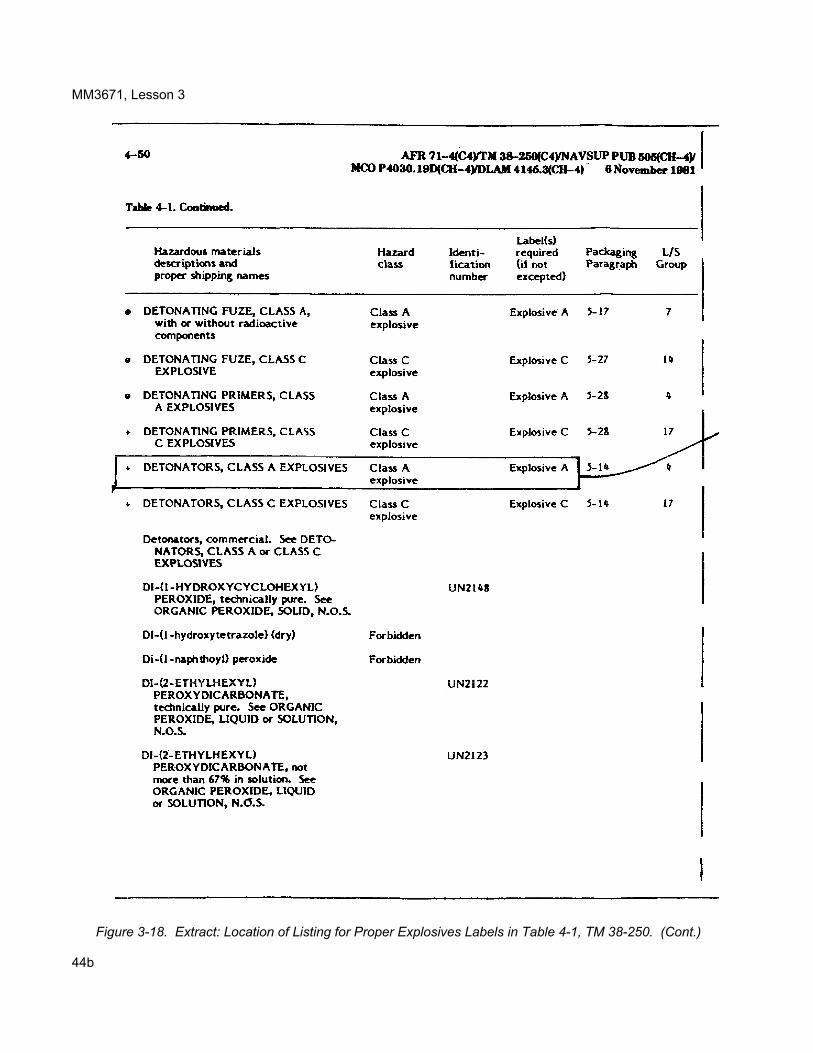
MM3671, Lesson 3 DD Form 1387-1 (Military Shipment Tag) is an address tag (figure 3-14). It is used when a label might crowd out the DOT markings or hazardous label you have just inspected. When the address label is used, it should be applied to the lower two-thirds of the container (figure 3-15). Inspect to make sure that it is correctly applied with waterproof adhesive. Make sure the address label or tag is correctly filled out and complete. If it is, check SAT on the air shipment report. If it is not correct, check UNSAT and state your reason in the Remarks column. Item 5. Inspect the air shipment for correct explosives labels. Each pallet must have an explosives label on the same side as the consignee's name and address (figure 3-16). All are orange, diamond-shaped labels, four inches long on each side. There are three types of explosives labels: Explosive A (Standard Form 400), Explosive B (Standard Form 401), and Explosive C (Standard Form 402). See figure 3-17. Make certain that the label is the correct one for the ammunition being shipped. Find the correct label in Table 4-1, TM 38-250. See figure 3-18. Make sure "Cargo Aircraft Only" label is also on the pallet (see page 169, BOE-6000). If you find that the explosive labeling is correct, check this item as SAT on your air shipment report. If the explosive labels are NOT correct, check UNSAT and explain the defect in the Remarks column.
Figure 3-14. DOD Form 1387-1 (Military Shipment Tag). 42
MM3671, Lesson 3
Figure 3-15. Proper Placement of the Shipping Label.
Figure 3-16. Proper Placement of Explosives
Labels. Figure 3-17. Kinds and Sizes of Explosives Labels.
43

MM3671, Lesson 3
Figure 3-18. Extract: Location of Listing for Proper Explosives Labels in Table 4-1, TM 38-250. 44a
MM3671, Lesson 3
Figure 3-18. Extract: Location of Listing for Proper Explosives Labels in Table 4-1, TM 38-250. (Cont.) 44b

MM3671, Lesson 3
Figure 3-18. Extract: Location of Listing for Proper Explosives Labels in Table 4-1, TM 38-250. (Cont.) 44c

MM3671, Lesson 3
Item 6. Not used. Item 7. The official who certifies that the shipment complies with the requirements of TM 38-250 must sign the form in longhand above the typed name. DOD personnel who are qualified as a result of special training in accordance with paragraph 1-20, TM 38-250, can certify the shipment. Qualified personnel must complete one of the qualifying courses every 24 months. Item 8. The distribution of signed copies of DD Form 1387-2 for a single pallet shipment (which has been the example in this lesson) is as follows: • The original copy is placed next to the address label on the pallet. • One copy is placed in a waterproof envelope marked "DD Form 1387-2," and the envelope is taped to the
pallet. • Two copies are attached to the shipping document to be delivered to the air terminal with the shipment. This will require a total of one original and three copies of DD Form 1387-2 for the one-pallet shipment. For other types of shipments, refer to figure 13-3, TM 38-250, for the required number of DD Forms 1387-2 and their distribution. Additional Information Block. In this space put such data as loading or unloading priority, "deliver by" date, etc. Approved or Rejected Block. In this space check appropriate block as determined by your inspection. Signature of Inspector Block. Sign the air shipment report and give it to the chief ammunition inspector. See figure 3-9. If the shipment has been rejected, you will reinspect the air shipment after the defect or defects have been corrected. Check the SAT column for each defect acceptably corrected, then line out and initial the UNSAT check mark. Make a note that the defect has been corrected.
45

MM3671, Lesson 3
REVIEW EXERCISES Circle the letter of the correct answer to each question. 1. Who provides the filled out copies of DD Form 1387-2? a. Shipper. b. Driver. c. Senior inspector. d. Packer. 2. Where can criteria for the packaging and marking of class A munitions be found? a. TM 38-L69-11-1. b. FM 55-70. c. TM 38-250. 3. On what form does the inspector indicate SAT if approving pallets, containers, and packaging for an air
shipment? a. DD Form 1387-2. b. Air shipment report. c. MILVAN certificate. 4. Where are DOT markings on the box? a. Top. b. Side. c. Top and Sides. d. Bottom. 5. How many kinds of explosives labels are there? a. Four. b. Three. c. Two. d. One. 6. In what publication is information on the correct label for ammunition being shipped? a. Table 121A, FM 55-70. b. Table 121A, TM 38-250. c. Table 4-1, TM 38-250. d. Table 4-1, FM 55-70. 46

MM3671, Lesson 3
7. What is the amount used in the entry for Net Quantity Per Package block on DD Form 1387-2? a. Total NEW per package or pallet. b. Total NEW for the whole shipment. c. Average NEW for the whole shipment. 8. How many copies of DD Form 1387-2 are needed for a single pallet shipment? a. One original, five copies. b. One original, three copies. c. One original, four copies. d. One original, six copies. Recheck your answers to the Review Exercises. When you are satisfied that you have answered every question to the best of your ability, check your answers against the Exercise Solutions. If you missed three or more questions, you should retake the entire lesson, paying particular attention to the areas in which your answers were incorrect.
47

MM3671
EXERCISE SOLUTIONS LESSON 1 1. b (see page 1). 2. b (see page 8). 3. c (see page 3). 4. b (see page 4). 5. b (see page 7). 6. c (see page 8). 7. b (see page 1). 8. d (see page 9). LESSON 2 1. b (see page 13). 2. c (see page 15). 3. d (see page 15). 4. c (see page 20). 5. a (see page 19). 6. b (see page 22). 7. c (see page 25). 8. c (see page 27). LESSON 3 1. a (see page 30). 2. c (see page 32). 3. b (see page 38). 4. a (see page 41). 5. b (see page 42). 6. c (see page 42). 7. a (see page 34). 8. b (see page 30). 58