Embed Size (px)
Citation preview

Department of Veterans Affairs: VistA Blood Bank Maintenance (BBM) Team DocumentVistA Blood Establishment Computer Software (VBECS) – Vision Interface Configuration and Setup Guide Version 3.0
VistA Blood Establishment Computer Software (VBECS) – Vision Interface Configuration and
Setup Guide, Version 3.0
July 2017
Department of Veterans AffairsEnterprise Project Management Office
This document is version controlled via approval signature. Do not assume that a printed, copied, or downloaded document is current. Consult the Electronic Document Control System to verify use of the current version.
Page 1

Department of Veterans Affairs: VistA Blood Bank Maintenance (BBM) Team DocumentVistA Blood Establishment Computer Software (VBECS) – Vision Interface Configuration and Setup Guide Version 3.0
Revision History
Date Revision Description Author01-25-17 1.0 Initial version. (Defect 424731) BBM team
05-05-17 2.0
(Defect 497919)Updated Fig. 6, Fig. 7, Fig. 10, Fig. 22 and Fig. 30 to reflect changed configuration file names and additional rules.Updated Appendices A and B with modified test codes for phenotyping. Updated Appendices C and D with modified rules.Updated section Instrument Manager version with information that the interface requires Specimen Management Module activated in IM.Added Chapters 4 and 5 to the Set Up Automated Instrument section. BBM team
06-30-17 3.0(Defect 546927)Fixed typo in phenotyping codes in Appendix A and Appendix B. BBM team
This document is version controlled via approval signature. Do not assume that a printed, copied, or downloaded document is current. Consult the Electronic Document Control System to verify use of the current version.
Page 2

Department of Veterans Affairs: VistA Blood Bank Maintenance (BBM) Team DocumentVistA Blood Establishment Computer Software (VBECS) – Vision Interface Configuration and Setup Guide Version 3.0
Table of ContentsREVISION HISTORY...................................................................................................................................2
TABLE OF CONTENTS...............................................................................................................................3
INTRODUCTION.........................................................................................................................................5
RELATED MANUALS AND REFERENCE MATERIALS...................................................................................6
SET UP AUTOMATED INSTRUMENT.....................................................................................................7
1 Network Connectivity Setup........................................................................................................72 Testing Profiles Setup..................................................................................................................73 User ID Setup...............................................................................................................................74 Manual versus Automated review................................................................................................75 Limitations of the crossmatch testing...........................................................................................8
SET UP INSTRUMENT MANAGER..........................................................................................................9
1 Instrument Manger Version..........................................................................................................92 Instrument Manager to Automated Instrument Connectivity.......................................................93 Installing Instrument Driver.......................................................................................................104 Set up Instrument Side Configuration........................................................................................10
4.1 Download instrument configuration files..........................................................................104.2 Import Instrument side configuration................................................................................124.3 Verify test code mapping for instrument side configuration.............................................154.4 Verify rules for instrument side configuration..................................................................174.5 Configure rules for instrument side configuration.............................................................184.6 Import VBECS (HL7) side configuration..........................................................................214.7 Verify test code mapping for VBECS side configuration.................................................244.8 Verify rules for VBECS (HL7) side configuration............................................................25
5 Set Up HL7 Connection to VBECS TEST.................................................................................296 Set Up Instrument Connection...................................................................................................317 Test New Connections................................................................................................................338 Validate Instrument connectivity to VBECS TEST...................................................................349 Set up HL7 Connection to VBECS PROD.................................................................................34
GLOSSARY................................................................................................................................................39
APPENDICES.............................................................................................................................................40
APPENDIX A: INSTRUMENT SIDE MAPPING............................................................................................40APPENDIX B: HL7 (VBECS) SIDE MAPPING..........................................................................................44APPENDIX C: INSTRUMENT SIDE RULES..................................................................................................48APPENDIX D: VBECS (HL7) SIDE RULES...............................................................................................53APPENDIX E: VISION TESTING PROFILES.................................................................................................54APPENDIX F: CA SDM SUPPORT TICKET TEMPLATE..............................................................................55APPENDIX G: VALIDATION PLANNING AND EXAMPLE TEST SCENARIOS...............................................56
TEST GROUP ONE: AI INTERFACE DISABLED..................................................................................57
TEST GROUP TWO: VERIFY AI INDIVIDUAL TEST(S).....................................................................58
TEST GROUP 2 SCENARIO 1: VERIFY AI TAS TEST................................................................................59TEST GROUP 2 SCENARIO 2: VERIFY AI SEROLOGIC CROSSMATCH TEST...............................................60TEST GROUP 2 SCENARIO 3: VERIFY AI PATIENT DIAGNOSTIC TESTS...................................................61
This document is version controlled via approval signature. Do not assume that a printed, copied, or downloaded document is current. Consult the Electronic Document Control System to verify use of the current version.
Page 3

Department of Veterans Affairs: VistA Blood Bank Maintenance (BBM) Team DocumentVistA Blood Establishment Computer Software (VBECS) – Vision Interface Configuration and Setup Guide Version 3.0
TEST GROUP 2 SCENARIO 4: VERIFY AI BLOOD UNIT TESTS.................................................................62
This document is version controlled via approval signature. Do not assume that a printed, copied, or downloaded document is current. Consult the Electronic Document Control System to verify use of the current version.
Page 4

Department of Veterans Affairs: VistA Blood Bank Maintenance (BBM) Team DocumentVistA Blood Establishment Computer Software (VBECS) – Vision Interface Configuration and Setup Guide Version 3.0
Introduction
VBECS is a Blood Bank application that facilitates ongoing compliance with Food and Drug Administration (FDA) standards for medical devices and enhances the VA’s ability to produce high-quality blood products and services to veterans. The system follows blood bank standards, standards of national accrediting agencies, FDA regulations and VA policies.
VBECS 2.2.0 introduced a new interface for blood bank testing performed by blood bank instrumentation to VBECS. The implementation of the interface and its associated validation are described in this guide.
Unauthorized access or misuse of this system and/or its data is a federal crime. Use of all data must be in accordance with VA security and privacy policies.
The U.S. FDA classifies this software as a medical device. Unauthorized modifications will render this device an adulterated medical device under Section 501 of the Medical Device Amendments to the Federal Food, Drug, and Cosmetic Act. Acquiring and implementing this software through the Freedom of Information Act requires the implementer to assume total responsibility for the software and become a registered manufacturer of a medical device, subject to FDA regulations. Adding to or updating VBECS software without permission is prohibited.
Instructions in this Setup Guide must be followed for the interface to deliver information to VBECS. Local validation is required to confirm proper operation before use. Validation and verification is required to ensure connectivity to VBECS.
This guide is provided to assist you with the multi-faceted required setup of your local blood bank testing instrument(s), Data Innovations Instrument Manager (DI IM) and VBECS to electronically transmit instrument test results to VBECS for use in the transfusion service.There are specific setup requirements to test and transmit those testing results to VBECS for review using DI IM (Figure 1).
Figure 1: Hardware and Interface Configuration
Your local testing instrument(s) communicates with DI IM via an instrument specific driver provided by DI that must be downloaded from DI and installed, locally.DI IM communicates directly with VBECS via a generic HL7 interface driver that must be downloaded from DI and installed, locally. This driver is then customized for VBECS by downloading and installing the driver configuration file.VBECS has an interface that must be configured in VBECS Administrator to receive messages from DI IM (Figure 2).
This document is version controlled via approval signature. Do not assume that a printed, copied, or downloaded document is current. Consult the Electronic Document Control System to verify use of the current version.
Page 5
Testing instrument
DI IMVBECS

Department of Veterans Affairs: VistA Blood Bank Maintenance (BBM) Team DocumentVistA Blood Establishment Computer Software (VBECS) – Vision Interface Configuration and Setup Guide Version 3.0
Figure 2: Setup Path
Related Manuals and Reference Materials VistA Blood Establishment Computer Software (VBECS) 2.2.0 Technical Manual-Security Guide
Data Innovations Instrument Manager Manual
Blood Bank Analyzer User’s Guide (Instrument Manual)
This document is version controlled via approval signature. Do not assume that a printed, copied, or downloaded document is current. Consult the Electronic Document Control System to verify use of the current version.
Page 6
Department of Veterans Affairs: VistA Blood Bank Maintenance (BBM) Team DocumentVistA Blood Establishment Computer Software (VBECS) – Vision Interface Configuration and Setup Guide Version 3.0
Set Up Automated Instrument1 Network Connectivity Setup
In order to ensure a proper functioning of an interface between an Automated Instrument and Instrument Manager the Instrument needs to be connected to the VA network. The static IP Address and Port number has to be assigned to the Instrument (further referred in this document as <Instrument IP> and <Instrument Port>). Please refer to the Instrument Manual or contact your vendor for the instructions about how to perform this setup. Check with Local IT staff to establish the connection to Instrument Manager.
2 Testing Profiles Setup
Test results sent using profiles that are not supported will not be accepted in VBECS.
Please refer to HIN_VBECS_1 (HL7 side interface)for the list of supported instrument profiles. It is up to each blood bank to choose which test profiles will be used as long as they are selected from the list in Appendix E.
AABB Standards require a serological XM to detect ABO incompatibility (5.16.1) and a local policy must be in place if the site is not performing an IS AHG as part of their serologic crossmatch test, manual or using an instrument.
3 User ID Setup
Failure to set up proper user IDs on an instrument will prevent instrument results from being accepted in VBECS.
In order for VBECS to properly recognize the person who performed testing on an Instrument, all users accessing the instrument must have their user IDs set up to match their network user IDs (e.g., VHAISHBURNSK).
Please refer to the Instrument Manual or contact your vendor for the instructions about how to perform setup of user IDs.
4 Manual versus Automated review
Vision can be configured to automatically review and send test results to LIS. However, in this configuration the test results are not associated with the name of the person who performed testing on the instrument. VBECS requires that all results sent from an instrument are accompanied by the ID of the user who initiated testing, therefore for the interface to function properly Vision MAY NOT be configured for the full automated review of the results.
This document is version controlled via approval signature. Do not assume that a printed, copied, or downloaded document is current. Consult the Electronic Document Control System to verify use of the current version.
Page 7

Department of Veterans Affairs: VistA Blood Bank Maintenance (BBM) Team DocumentVistA Blood Establishment Computer Software (VBECS) – Vision Interface Configuration and Setup Guide Version 3.0
The manufacturer recommends that the following configuration is used to ensure that test results are always accompanied by user ID:
Enforce Manual Review: NoEnforce Manual Review for Cards with Error Grades: YesAll Maintenance Tasks must be completed successfully: YesAll column reactions must be without errors: YesValid Test Result Interpretation (incl. non-discrepant columns): YesAbove/below positive reaction threshold: YesEntire order must be completed: No
Please consult user’s manual for the Vision or contact Ortho Diagnostics support if you need help in changing the manual review settings on the instrument.
5 Limitations of the crossmatch testing
Due to the limitation of the Data Innovation’s driver for Vision it is not possible to successfully send results of the crossmatch test for multiple donor samples from one crossmatch order. In order to perform crossmatch for multiple donor samples users have to create multiple crossmatch orders on the Vision. Each crossmatch order may be associated with only one donor sample. Such results may then be transmitted to VBECS, one crossmatch order/donor sample at a time.
This document is version controlled via approval signature. Do not assume that a printed, copied, or downloaded document is current. Consult the Electronic Document Control System to verify use of the current version.
Page 8

Department of Veterans Affairs: VistA Blood Bank Maintenance (BBM) Team DocumentVistA Blood Establishment Computer Software (VBECS) – Vision Interface Configuration and Setup Guide Version 3.0
Set Up Instrument Manager1 Instrument Manger VersionPlease verify that you are using Instrument Manager Version 8.13 or greater (Figure 3). In Instrument Manager, navigate to Help -> About Instrument Manager.
Figure 3: Instrument Manager Version Screen
If your version of Instrument Manger is older than 8.13 please STOP executing this guide and update the software first. Do not proceed until the issue is resolved.
If your Instrument Manager is greater than 8.13 you may proceed. The user must execute the instructions and validate functionality on newer version. Discrepancies in the instructions must be reported as a CA-SDM ticket. See Appendix F.
Instrument Manager must have the Specimen Management Module licensed and activated. Do not proceed until this issue is resolved.
2 Instrument Manager to Automated Instrument Connectivity
Please contact your local network administrative staff and ensure that your local network allows two-way TCP/IP connectivity between <Instrument Manager IP> address and <Instrument IP> address on <Instrument Port>.
This document is version controlled via approval signature. Do not assume that a printed, copied, or downloaded document is current. Consult the Electronic Document Control System to verify use of the current version.
Page 9

Department of Veterans Affairs: VistA Blood Bank Maintenance (BBM) Team DocumentVistA Blood Establishment Computer Software (VBECS) – Vision Interface Configuration and Setup Guide Version 3.0
3 Installing Instrument Driver
Two drivers are required for the correct operation of the Automated Instrument interface to VBECS (Figure ):
Figure 4: Required Drivers
Driver Name Version DescriptionOrtho Vision ocdvisii 8.00.0003 Instrument to DI IM driverData Innovations LLC, Configurable HL7 diihl7ml 8.00.0049 DI IM to VBECS (HL7)
driver
Please refer to the user’s manual for Instrument Manager or contact Data Innovations for the instructions on how to install drivers for Instrument Manager.
After successful installation of drivers please go to Report -> Available Drivers menu option in Instrument Manager and verify that the drivers listed in Figure 4 are present.
4 Set up Instrument Side Configuration
Execute instructions in this section for each Vision instrument that will be connecting to VBECS.
Modifying rules or test code mappings as imported using this Instrument Manager configuration Setup Guide may lead to malfunction of the Automated Instrument to VBECS interface.
Prerequisites for the Instrument Manager Configuration files download:
You must be an administrator on <Instrument Manager Server>. Once the above prerequisite is met you may proceed.
4.1 Download instrument configuration files
Use local procedures for copying the instrument configuration files to the Instrument Manager server.
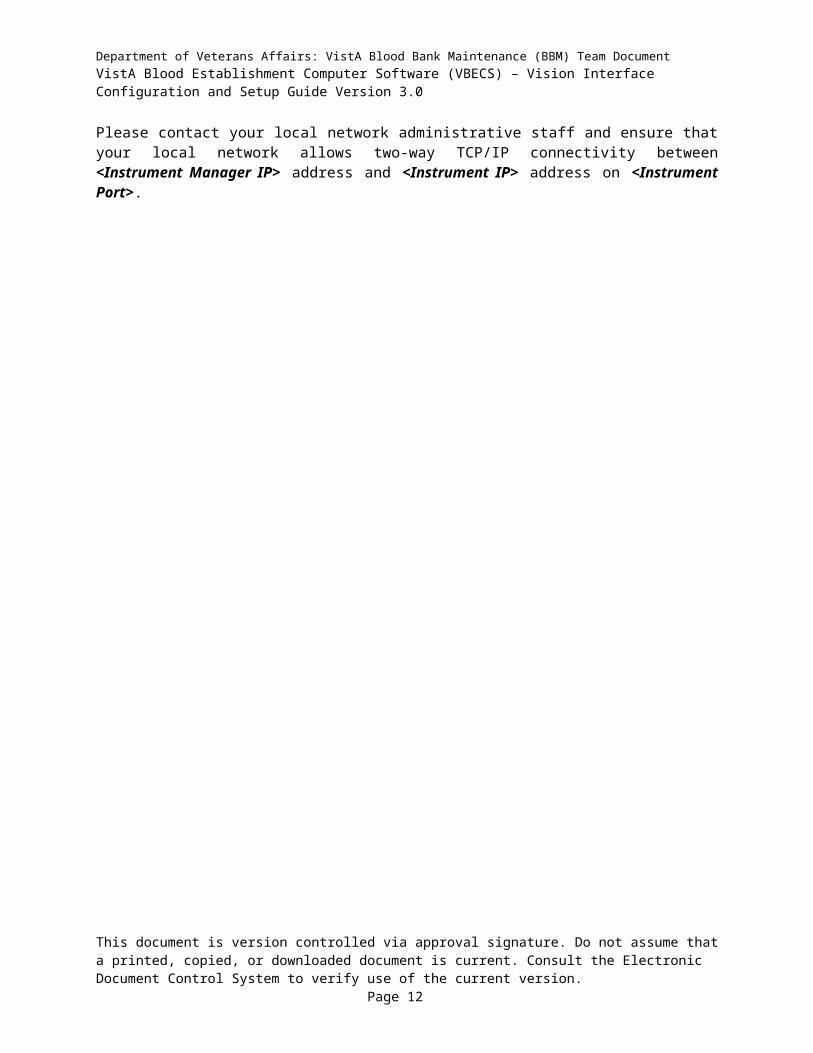
1. Navigate to http://vaww.oed.portal.va.gov/projects/vbecs/Pages/Instrument-Manager-Configuration-Files-Release.aspx (Figure 5).
This document is version controlled via approval signature. Do not assume that a printed, copied, or downloaded document is current. Consult the Electronic Document Control System to verify use of the current version.
Page 10

Department of Veterans Affairs: VistA Blood Bank Maintenance (BBM) Team DocumentVistA Blood Establishment Computer Software (VBECS) – Vision Interface Configuration and Setup Guide Version 3.0
Figure 5: Connecting to the VBECS SharePoint
2. To download a file from the SharePoint, right-click on it and select Save target as (Figure 6).
Figure 6: Example of Save target as…
3. In the next screen, specify the directory to save (Figure 7).
Figure 7: Example of Save As
4. Save both the Vision – HL7 Interface Configuration Template for VBECS 05042017.gsb and the Vision – Instrument Interface Configuration Template for VBECS 05042017.gsb files to the C:\temp directory.
This document is version controlled via approval signature. Do not assume that a printed, copied, or downloaded document is current. Consult the Electronic Document Control System to verify use of the current version.
Page 11
Department of Veterans Affairs: VistA Blood Bank Maintenance (BBM) Team DocumentVistA Blood Establishment Computer Software (VBECS) – Vision Interface Configuration and Setup Guide Version 3.0
5. Per local procedures, copy both files to C:\temp on the Instrument Manager server 6. On the Instrument Manager server; Click Start, and in the “Search programs and files” box type
Run and hit enter. Type powershell and click OK to launch PowerShell7. Copy and paste or type the following commands to generate checksums for configuration files:
certutil –hashfile “C:\Temp\Vision – HL7 Interface Configuration Template for VBECS 05042017.gsb” MD5 <press Enter>certutil –hashfile “C:\Temp\Vision – Instrument Interface Configuration Template for VBECS 05042017.gsb” MD5 <press Enter>
To copy, highlight the lines in grey and enter CTRL-C.
To insert the copied line into a PowerShell window, right click in the PowerShell window and select “Paste”.
8. Verify that checksums for both files match those shown in Figure 8.
Figure 8: Instrument Manager Configuration File checksums
If the checksums do not match, stop and file a national CA SDM ticket to coordinate assistance with installation using the template in Appendix F . Do not proceed until the issue is resolved.
9. Close the PowerShell window.
4.2 Import Instrument side configuration1. After downloading and verifying configuration files, open Instrument Manager and navigate to
Configuration -> Configuration Editor.2. Click on the Import button (Figure 9).
This document is version controlled via approval signature. Do not assume that a printed, copied, or downloaded document is current. Consult the Electronic Document Control System to verify use of the current version.
Page 12

Department of Veterans Affairs: VistA Blood Bank Maintenance (BBM) Team DocumentVistA Blood Establishment Computer Software (VBECS) – Vision Interface Configuration and Setup Guide Version 3.0
Figure 9: Example of Configuration Editor
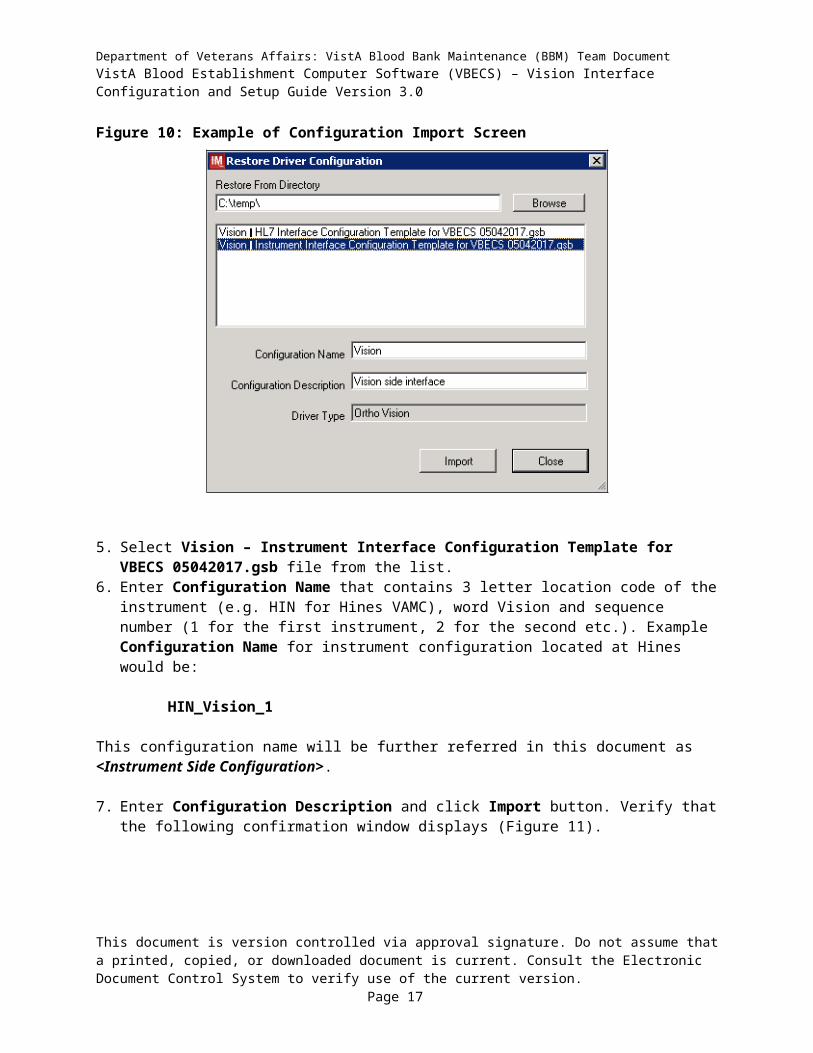
3. Once the import screen opens, click the Browse button and select C:\Temp folder (Figure 10).4. Click OK.
Figure 10: Example of Configuration Import Screen
5. Select Vision – Instrument Interface Configuration Template for VBECS 05042017.gsb file from the list.
6. Enter Configuration Name that contains 3 letter location code of the instrument (e.g. HIN for Hines VAMC), word Vision and sequence number (1 for the first instrument, 2 for the second etc.). Example Configuration Name for instrument configuration located at Hines would be:
This document is version controlled via approval signature. Do not assume that a printed, copied, or downloaded document is current. Consult the Electronic Document Control System to verify use of the current version.
Page 13
Department of Veterans Affairs: VistA Blood Bank Maintenance (BBM) Team DocumentVistA Blood Establishment Computer Software (VBECS) – Vision Interface Configuration and Setup Guide Version 3.0
HIN_Vision_1
This configuration name will be further referred in this document as <Instrument Side Configuration>.
7. Enter Configuration Description and click Import button. Verify that the following confirmation window displays (Figure 11).
Figure 11: Example of Successful Configuration Import
If you are using newer version of the driver than the one mentioned in section 3, the Instrument Manager will warn you about the discrepancy in driver versions. Please acknowledge this warning and continue.
8. Click OK and then close the Restore Driver Configuration window.9. Verify that Configuration Editor shows the new configuration on the list (Figure 12).
This document is version controlled via approval signature. Do not assume that a printed, copied, or downloaded document is current. Consult the Electronic Document Control System to verify use of the current version.
Page 14

Department of Veterans Affairs: VistA Blood Bank Maintenance (BBM) Team DocumentVistA Blood Establishment Computer Software (VBECS) – Vision Interface Configuration and Setup Guide Version 3.0
Figure 12: Example of Configuration Editor Window Showing Newly Imported Configuration
10. Close the Configuration Editor window.
4.3 Verify test code mapping for instrument side configuration1. Navigate to Reports -> Configuration Options and Mappings.2. Select the <Instrument Side Configuration Name> from the pull down menu (Figure 13).3. Select the Results Test Code Mapping Tab (Figure 13).4. Verify the Results Test Code Mapping Report Tab matches the list in- Appendix A: Instrument Side
mapping.
This document is version controlled via approval signature. Do not assume that a printed, copied, or downloaded document is current. Consult the Electronic Document Control System to verify use of the current version.
Page 15

Department of Veterans Affairs: VistA Blood Bank Maintenance (BBM) Team DocumentVistA Blood Establishment Computer Software (VBECS) – Vision Interface Configuration and Setup Guide Version 3.0
Figure 13: Example of Results Test Code Mapping Tab
If mismatches in Test Codes names, missing or extra Test Codes are encountered, file a national CA SDM ticket to coordinate assistance with installation using the template in Appendix F . Do not proceed until the issue is resolved.
This document is version controlled via approval signature. Do not assume that a printed, copied, or downloaded document is current. Consult the Electronic Document Control System to verify use of the current version.
Page 16
Department of Veterans Affairs: VistA Blood Bank Maintenance (BBM) Team DocumentVistA Blood Establishment Computer Software (VBECS) – Vision Interface Configuration and Setup Guide Version 3.0
4.4 Verify rules for instrument side configuration1. Remaining in the Configuration Options and Mapping Window, select the Rules Tab (Figure 14).2. Verify the Rules Tab matches the list in Appendix C: Instrument Side Rules.
Figure 14: Example of Rules Tab
3. Close the Configuration Options and Mappings window.
If problems are encountered, file a national CA SDM ticket to coordinate assistance with installation using the template in Appendix F . Do not proceed until the issue is resolved.
This document is version controlled via approval signature. Do not assume that a printed, copied, or downloaded document is current. Consult the Electronic Document Control System to verify use of the current version.
Page 17

Department of Veterans Affairs: VistA Blood Bank Maintenance (BBM) Team DocumentVistA Blood Establishment Computer Software (VBECS) – Vision Interface Configuration and Setup Guide Version 3.0
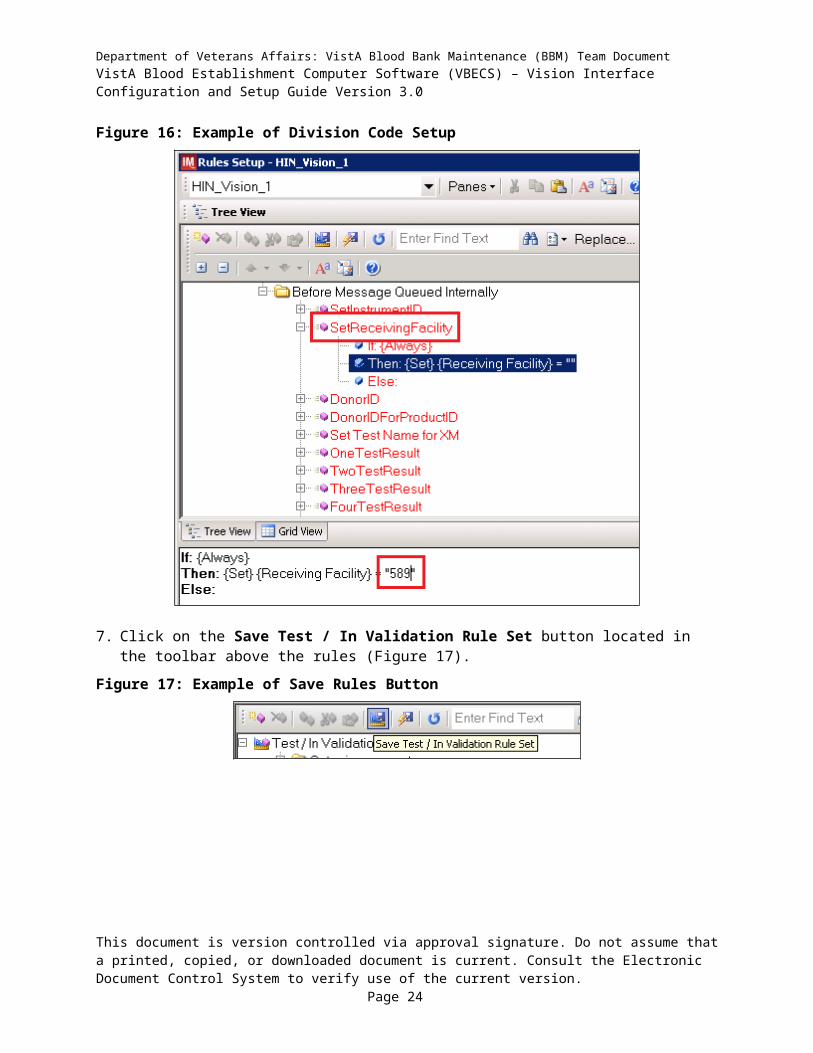
4.5 Configure rules for instrument side configurationIn this section your will establish the name of the instrument associated with test results for VBECS reports. If you are setting up multiple instruments, make sure that each has a unique name.
1. Navigate to Configuration -> Specimen Management Configuration -> Rules Processing.2. Select <Instrument Side Configuration Name> from the pull down menu (Figure 15).3. Locate rule SetInstrumentID. 4. Click on the Then line in the rule. 5. Modify the rule by typing <Instrument Name> between the quotation marks in the lower box in
(Figure 15).
Figure 15: Example of Instrument Name Setup
6. Locate rule SetReceivingFacility. Click on Then line in the rule. Modify the rule by typing <Division Code> between the quotation marks as shown in (Figure 16).
<Division Code> also known as Station Number in VistA is a unique alphanumeric code that is associated with each hospital (e.g., 589 for VA Heartland West VAMC). This code must match the division code configured in VBECS Administrator application for a given site.
This document is version controlled via approval signature. Do not assume that a printed, copied, or downloaded document is current. Consult the Electronic Document Control System to verify use of the current version.
Page 18

Department of Veterans Affairs: VistA Blood Bank Maintenance (BBM) Team DocumentVistA Blood Establishment Computer Software (VBECS) – Vision Interface Configuration and Setup Guide Version 3.0
Figure 16: Example of Division Code Setup
7. Click on the Save Test / In Validation Rule Set button located in the toolbar above the rules (Figure 17).
Figure 17: Example of Save Rules Button
This document is version controlled via approval signature. Do not assume that a printed, copied, or downloaded document is current. Consult the Electronic Document Control System to verify use of the current version.
Page 19

Department of Veterans Affairs: VistA Blood Bank Maintenance (BBM) Team DocumentVistA Blood Establishment Computer Software (VBECS) – Vision Interface Configuration and Setup Guide Version 3.0
8. Verify that the message in Figure 18 is received:
Figure 18: Example of Rule Save
If problems are encountered, file a national CA SDM ticket to coordinate assistance with installation using the template in Appendix F . Do not proceed until the issue is resolved.
9. Click on the Save Live Rule Set button located in the upper toolbar and click Yes to confirm (Figure 19).
Figure 19: Example of Save Rules in Live Set Button
10. Navigate to Reports->Configuration Options and Mappings and select the Rules Tab. Scroll down to Live – Incoming result – Before Message Queued Internally (Figure 20).
11. Verify that the Live Rule Set matches Appendix C: Instrument Side Rules and includes changes made to SetReceivingFacility (Figure 20) and SetInstrumentID.
This document is version controlled via approval signature. Do not assume that a printed, copied, or downloaded document is current. Consult the Electronic Document Control System to verify use of the current version.
Page 20

Department of Veterans Affairs: VistA Blood Bank Maintenance (BBM) Team DocumentVistA Blood Establishment Computer Software (VBECS) – Vision Interface Configuration and Setup Guide Version 3.0
Figure 20: Example of Live Rules Set View
If problems are encountered, file a national CA SDM ticket to coordinate assistance with installation using the template in Appendix F . Do not proceed until the issue is resolved.
12. Close the Configuration Options and Mappings window.
4.6 Import VBECS (HL7) side configuration
Only one HL7 configuration is needed even if you use multiple Vision instruments. All Visions will share the same HL7 configuration.
Modifying rules or test code mappings in the Instrument Manager configuration outside of this Setup Guide is not allowed and may lead to malfunction of the Automated Instrument to VBECS interface.
1. Navigate to Configuration -> Configuration Editor (Figure 21).2. Click on the Import button.
This document is version controlled via approval signature. Do not assume that a printed, copied, or downloaded document is current. Consult the Electronic Document Control System to verify use of the current version.
Page 21

Department of Veterans Affairs: VistA Blood Bank Maintenance (BBM) Team DocumentVistA Blood Establishment Computer Software (VBECS) – Vision Interface Configuration and Setup Guide Version 3.0
Figure 21: Example of Configuration Editor Window
3. Once the Restore Driver Configuration window opens, click Browse the button and select C:\Temp folder (Figure 22).
4. Select Vision – HL7 Interface Configuration Template for VBECS 05042017.gsb file from the list. Enter Configuration Name that contains 3 letter location code of the instrument (e.g. HIN for Hines VAMC), word VBECS and sequence number (1 for the first configuration, 2 for the second etc.). Example Configuration Name for VBECS side configuration located at Hines would be:
HIN_VBECS_1
This configuration name will be further referred in this document as <HL7 Side Configuration>.
This document is version controlled via approval signature. Do not assume that a printed, copied, or downloaded document is current. Consult the Electronic Document Control System to verify use of the current version.
Page 22

Department of Veterans Affairs: VistA Blood Bank Maintenance (BBM) Team DocumentVistA Blood Establishment Computer Software (VBECS) – Vision Interface Configuration and Setup Guide Version 3.0
Figure 22: Example of Configuration Import Window
5. Enter Configuration Description and click Import button. Verify that the confirmation window in Figure 23 displays.
Figure 23: Example of Successful Configuration Import
If you are using newer version of the driver than the one mentioned in section 3, the Instrument Manager will warn you about the discrepancy in driver versions. Please acknowledge this warning and continue.
6. Click OK and close the Restore Driver Configuration window. 7. Verify that Configuration Editor shows the new configuration on the list (Figure 24).
This document is version controlled via approval signature. Do not assume that a printed, copied, or downloaded document is current. Consult the Electronic Document Control System to verify use of the current version.
Page 23
Department of Veterans Affairs: VistA Blood Bank Maintenance (BBM) Team DocumentVistA Blood Establishment Computer Software (VBECS) – Vision Interface Configuration and Setup Guide Version 3.0
Figure 24: Example of Newly Imported HL7 Configuration
4.7 Verify test code mapping for VBECS side configuration
5. Navigate to Reports -> Configuration Options and Mappings.6. Select the <HL7 Side Configuration Name> from the pull down menu (Figure 25).7. Select the Results Test Code Mapping Tab (Figure 25).8. Verify the Results Test Code Mapping Report Tab matches the list in Appendix B: HL7 (VBECS)
Side Mapping.
This document is version controlled via approval signature. Do not assume that a printed, copied, or downloaded document is current. Consult the Electronic Document Control System to verify use of the current version.
Page 24

Department of Veterans Affairs: VistA Blood Bank Maintenance (BBM) Team DocumentVistA Blood Establishment Computer Software (VBECS) – Vision Interface Configuration and Setup Guide Version 3.0
Figure 25: Example of HL7 Configuration Report Window
9. Close Configuration Options and Mappings window.
If mismatches in Test Codes names, missing or extra Test Codes are encountered, file a national CA SDM ticket to coordinate assistance with installation using template in Appendix F . Do not proceed until the issue is resolved.
4.8 Verify rules for VBECS (HL7) side configuration
Modifying rules or test code mappings as imported using this Instrument Manager configuration Setup Guide may lead to malfunction of the Automated Instrument to VBECS interface.
1. Navigate to Configuration -> Specimen Management Configuration -> Rules Processing.
This document is version controlled via approval signature. Do not assume that a printed, copied, or downloaded document is current. Consult the Electronic Document Control System to verify use of the current version.
Page 25

Department of Veterans Affairs: VistA Blood Bank Maintenance (BBM) Team DocumentVistA Blood Establishment Computer Software (VBECS) – Vision Interface Configuration and Setup Guide Version 3.0
2. On the Rule Processing window, select <HL7 Side Configuration> from the drop-down in the upper left corner.
3. Next, click on the Quick Filter icon located on the right side of the Configuration Name (Figure 26)
Figure 26: Example of Rules Processing Toolbar
4. On the Quick Filter window, check the box next to the Outgoing Result and click Close button (Figure 27).
Figure 27: Example of Quick Filter Window
5. Expand Outgoing Result section and Before Message Sent to this Connection sections (Figure 28).
This document is version controlled via approval signature. Do not assume that a printed, copied, or downloaded document is current. Consult the Electronic Document Control System to verify use of the current version.
Page 26

Department of Veterans Affairs: VistA Blood Bank Maintenance (BBM) Team DocumentVistA Blood Establishment Computer Software (VBECS) – Vision Interface Configuration and Setup Guide Version 3.0
Figure 28: Example of Rules Window
6. Expand all rules and verify that they match rules listed in Appendix D: VBECS (HL7) Side Rules.
If mismatches in rules are encountered, file a national CA SDM ticket to coordinate assistance with installation using template in Appendix F . Do not proceed until the issue is resolved.
7. Click on the Save Live Rule Set button located in the upper toolbar and click Yes to confirm (Figure 29).
Figure 29: Example of Save Rules in Live Set Button
8. Expand the Live Rule Set and verify that rule text matches Appendix D: VBECS (HL7) Side Rules. (Figure 30).
This document is version controlled via approval signature. Do not assume that a printed, copied, or downloaded document is current. Consult the Electronic Document Control System to verify use of the current version.
Page 27

Department of Veterans Affairs: VistA Blood Bank Maintenance (BBM) Team DocumentVistA Blood Establishment Computer Software (VBECS) – Vision Interface Configuration and Setup Guide Version 3.0
Figure 30: Example of Live Rules Set View
If problems are encountered, file a national CA SDM ticket to coordinate assistance with installation using the template in Appendix F . Do not proceed until the issue is resolved.
9. Close the Rules Setup window.
This document is version controlled via approval signature. Do not assume that a printed, copied, or downloaded document is current. Consult the Electronic Document Control System to verify use of the current version.
Page 28

Department of Veterans Affairs: VistA Blood Bank Maintenance (BBM) Team DocumentVistA Blood Establishment Computer Software (VBECS) – Vision Interface Configuration and Setup Guide Version 3.0
5 Set Up HL7 Connection to VBECS TEST
If you are using multiple Vision instruments they can all share one connection to VBECS.
Modifying connection settings in the Instrument Manager outside of this Setup Guide is not allowed and may lead to malfunction of the Automated Instrument to VBECS interface.
1. Navigate to Configuration -> Connection Assignment. 2. On the Connection Assignment window, click the Add button. 3. On the Connection Properties window, enter the Connection Name. Enter a name that contains
<HL7 Side Configuration> and word Connection. For example:
HIN_VBECS_1_Connection
4. Select <HL7 Side Configuration> as Configuration Name. 5. Check Include in Specimen Management check box.6. Select TCP/IP connection in Device. (Figure 31).
Figure 31: Example of Connection Properties Window
7. Click on Device Parameters button.
This document is version controlled via approval signature. Do not assume that a printed, copied, or downloaded document is current. Consult the Electronic Document Control System to verify use of the current version.
Page 29

Department of Veterans Affairs: VistA Blood Bank Maintenance (BBM) Team DocumentVistA Blood Establishment Computer Software (VBECS) – Vision Interface Configuration and Setup Guide Version 3.0
8. Enter TCP/IP Address and TCP/IP Port Number that matches VBECS TEST Application IP Address and IP Port Number configured in VBECS TEST Administrator application for Auto Instrument Interface (Figure 32). Please refer to VistA Blood Establishment Computer Software (VBECS) 2.2.0 Technical Manual Security Guide for instruction on how to configure interfaces for VBECS.
Figure 32: Example of TCP/IP Configuration Window
9. Click close on the TCP/IP Port Configuration window and click Yes to save.10. Click close on the Connection Properties window and click Yes to save.11. Verify the newly created connection shows on Connection Assignment window (Figure 33).
Figure 33: Example of Newly Created Connection Figure
This document is version controlled via approval signature. Do not assume that a printed, copied, or downloaded document is current. Consult the Electronic Document Control System to verify use of the current version.
Page 30

Department of Veterans Affairs: VistA Blood Bank Maintenance (BBM) Team DocumentVistA Blood Establishment Computer Software (VBECS) – Vision Interface Configuration and Setup Guide Version 3.0
6 Set Up Instrument Connection
Execute instructions in this section for each instrument that will be connecting to VBECS.
Modifying connection settings in the Instrument Manager outside of this Setup Guide is not allowed and may lead to malfunction of the Automated Instrument to VBECS interface.
1. On the Connection Assignment window, click the Add button. 2. On the Connection Properties window, enter the Connection Name. Enter a name that contains
<Instrument Side Configuration> and word Connection. For example:
HIN_Vision_1_Connection
3. Select <Instrument Side Configuration> as Configuration Name. 4. Check Include in Specimen Management check box.5. Select TCP/IP connection. 6. On the Destination Lines list check the box next to connection configured in previous section
(Figure 34).
Figure 34: Example of Connection Properties Window
7. Click on Device Parameters button.
This document is version controlled via approval signature. Do not assume that a printed, copied, or downloaded document is current. Consult the Electronic Document Control System to verify use of the current version.
Page 31

Department of Veterans Affairs: VistA Blood Bank Maintenance (BBM) Team DocumentVistA Blood Establishment Computer Software (VBECS) – Vision Interface Configuration and Setup Guide Version 3.0
8. TCP/IP Address remains blank.9. Set TCP/IP Port Number to <Instrument Port> discussed in Section Network Connectivity Setup. 10. Uncheck Send String When Opening Connection check box (Figure 35).
Figure 35: Example of TCP/IP Configuration Window
11. Click close on the TCP/IP Port Configuration window and click Yes to save.12. Click close on the Connection Properties window and click Yes to save.13. Verify the newly created connection shows on Connection Assignment window (Figure 36).14. Close the Connection Assignment window.
Figure 36: Example of Newly Created Connection
This document is version controlled via approval signature. Do not assume that a printed, copied, or downloaded document is current. Consult the Electronic Document Control System to verify use of the current version.
Page 32

Department of Veterans Affairs: VistA Blood Bank Maintenance (BBM) Team DocumentVistA Blood Establishment Computer Software (VBECS) – Vision Interface Configuration and Setup Guide Version 3.0
7 Test New Connections
1. Navigate to System -> Status. 2. Right-click each newly created connection and choose option to Start Selected Connections (Figure
37).
Figure 37: Example of Connection Status Window
3. Verify that all newly created connections are showing Status of On after about a minute or so. (Figure 38).
Figure 38: Example of Successful Connection Test
If one or more connections fail to start, file a national CA SDM ticket to coordinate assistance with installation using template in Appendix F . Do not proceed until the issue is resolved.
4. Close the Status Display.
8 Validate Instrument connectivity to VBECS TEST
This document is version controlled via approval signature. Do not assume that a printed, copied, or downloaded document is current. Consult the Electronic Document Control System to verify use of the current version.
Page 33

Department of Veterans Affairs: VistA Blood Bank Maintenance (BBM) Team DocumentVistA Blood Establishment Computer Software (VBECS) – Vision Interface Configuration and Setup Guide Version 3.0
Execute validation instructions from Appendix G to verify that Instrument is properly interfacing with VBECS.
If one or more validation scenarios fail, file a national CA SDM ticket to coordinate assistance with installation using template in Appendix F . Do not proceed until the issue is resolved.
9 Set up HL7 Connection to VBECS PROD
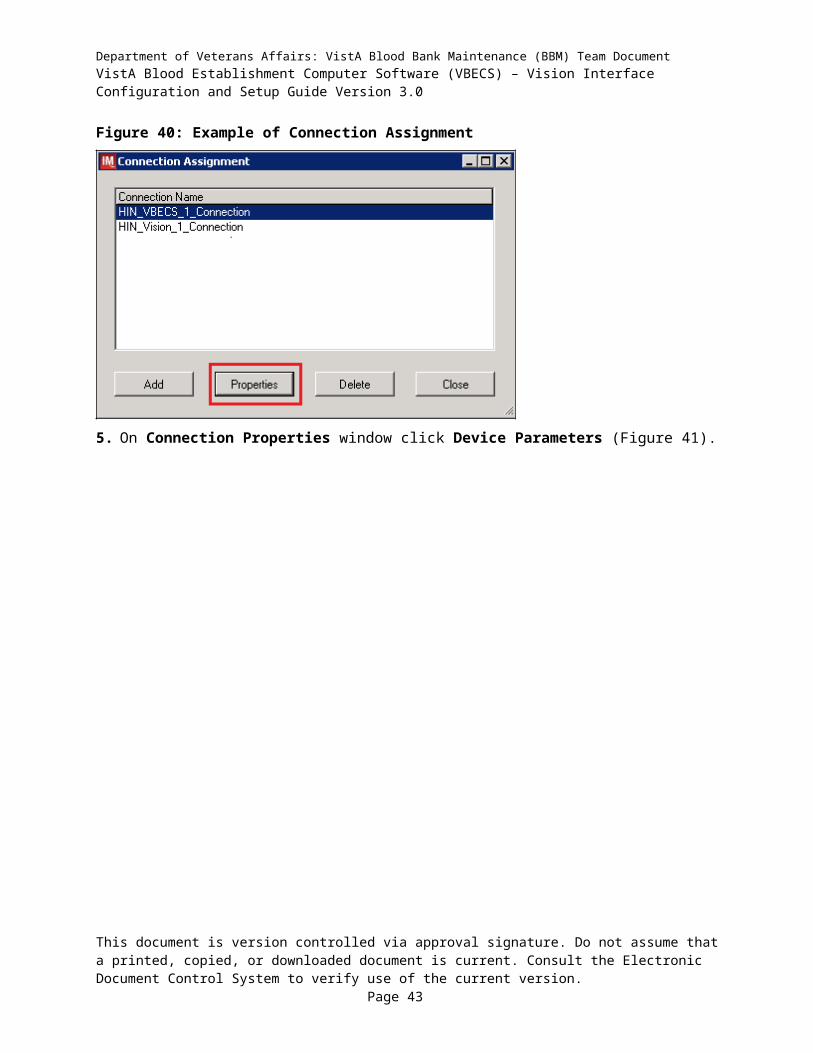
1. Navigate to System -> Status. 2. Right-click <VBECS_Connection> and choose option to Stop Selected Connections (Figure 39).
Figure 39: Example of Stop Selected Connections
3. Wait until connection status changes to Off. Navigate to Configuration -> Connection Assignment. 4. Select <VBECS_Connection> and click Properties (Figure 40).
Figure 40: Example of Connection Assignment
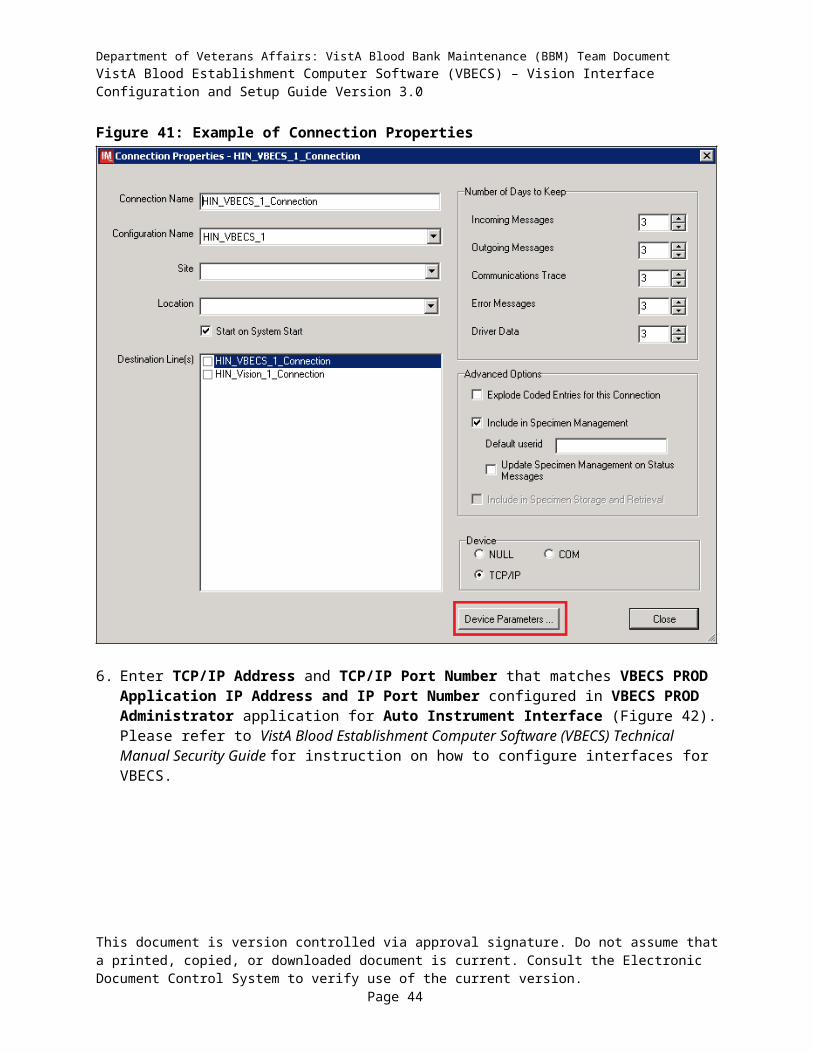
5. On Connection Properties window click Device Parameters (Figure 41).
This document is version controlled via approval signature. Do not assume that a printed, copied, or downloaded document is current. Consult the Electronic Document Control System to verify use of the current version.
Page 34

Department of Veterans Affairs: VistA Blood Bank Maintenance (BBM) Team DocumentVistA Blood Establishment Computer Software (VBECS) – Vision Interface Configuration and Setup Guide Version 3.0
Figure 41: Example of Connection Properties
6. Enter TCP/IP Address and TCP/IP Port Number that matches VBECS PROD Application IP Address and IP Port Number configured in VBECS PROD Administrator application for Auto Instrument Interface (Figure 42). Please refer to VistA Blood Establishment Computer Software (VBECS) Technical Manual Security Guide for instruction on how to configure interfaces for VBECS.
This document is version controlled via approval signature. Do not assume that a printed, copied, or downloaded document is current. Consult the Electronic Document Control System to verify use of the current version.
Page 35

Department of Veterans Affairs: VistA Blood Bank Maintenance (BBM) Team DocumentVistA Blood Establishment Computer Software (VBECS) – Vision Interface Configuration and Setup Guide Version 3.0
Figure 42: Example of TCP/IP Configuration Window
7. Close the TCP/IP Port Configuration and click Yes to confirm changes.8. Close the Connection Properties window and click Yes to confirm changes.9. Close the Connection Assignment window.10. Navigate to System -> Status. 11. Right-click <VBECS_Connection> and choose option to Start Selected Connections (Figure 43).
Figure 43: Example of Connection Status Window
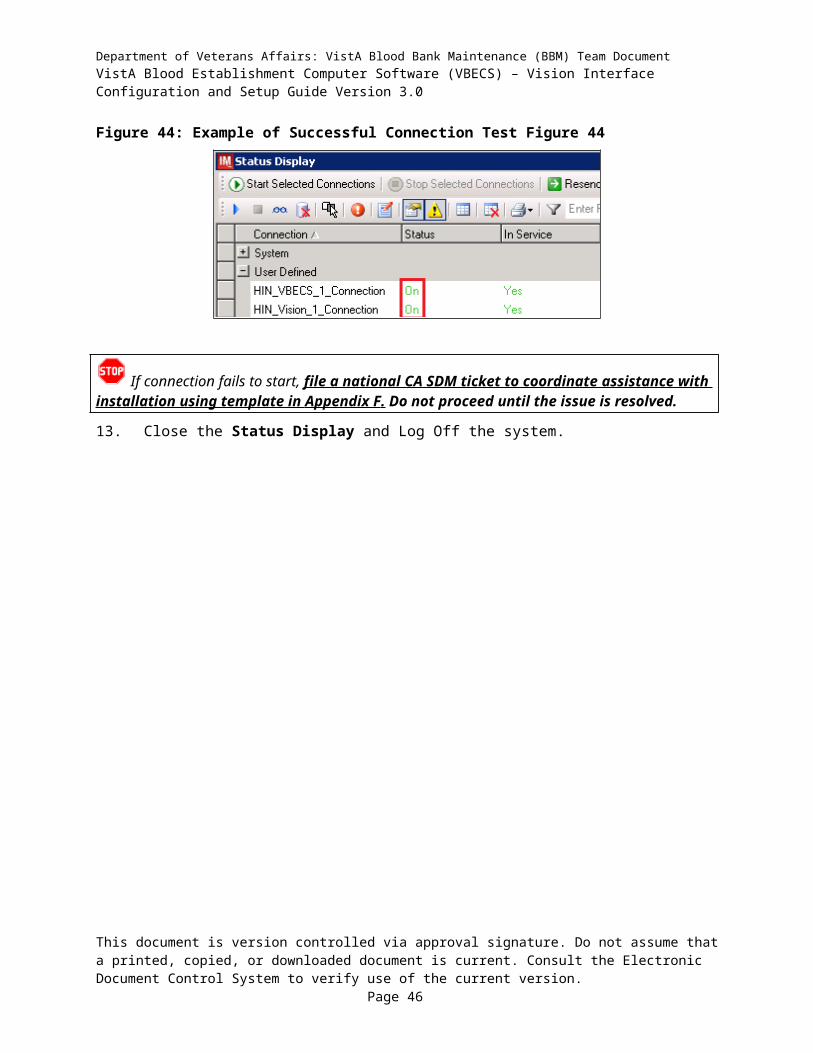
12. Verify that <VBECS_Connection> is showing Status of On after about a minute or so. (Figure 44).
This document is version controlled via approval signature. Do not assume that a printed, copied, or downloaded document is current. Consult the Electronic Document Control System to verify use of the current version.
Page 36

Department of Veterans Affairs: VistA Blood Bank Maintenance (BBM) Team DocumentVistA Blood Establishment Computer Software (VBECS) – Vision Interface Configuration and Setup Guide Version 3.0
Figure 44: Example of Successful Connection Test Figure 44
If connection fails to start, file a national CA SDM ticket to coordinate assistance with installation using template in Appendix F . Do not proceed until the issue is resolved.
13. Close the Status Display and Log Off the system.
This document is version controlled via approval signature. Do not assume that a printed, copied, or downloaded document is current. Consult the Electronic Document Control System to verify use of the current version.
Page 37

Department of Veterans Affairs: VistA Blood Bank Maintenance (BBM) Team DocumentVistA Blood Establishment Computer Software (VBECS) – Vision Interface Configuration and Setup Guide Version 3.0
GlossaryAcronym, Term Definition
Automated Instrument Blood Bank Analyzer that performs blood testing.
Division CodeAlso known as Station Number in Vista is the unique alphanumeric code that is associated with each hospital (e.g. 589 for VA Heartland West).
Instrument Manager (IM)Software created by Data Innovations that serves as a middleware between Automated Instrument and VBECS. It translates messages containing test results sent from an instrument into HL7 messages that are then parsed into VBECS.
VA Department of Veterans Affairs.
VBECS VistA Blood Establishment Computer Software.
VistA
Veterans Health Information Systems and Technology Architecture. VistA software, developed by the VA, is used to support clinical and administrative functions at VA Medical Centers nationwide. VistA is composed of packages that undergo a verification process to ensure conformity with name spacing and other VistA standards and conventions.
This document is version controlled via approval signature. Do not assume that a printed, copied, or downloaded document is current. Consult the Electronic Document Control System to verify use of the current version.
Page 38

Department of Veterans Affairs: VistA Blood Bank Maintenance (BBM) Team DocumentVistA Blood Establishment Computer Software (VBECS) – Vision Interface Configuration and Setup Guide Version 3.0
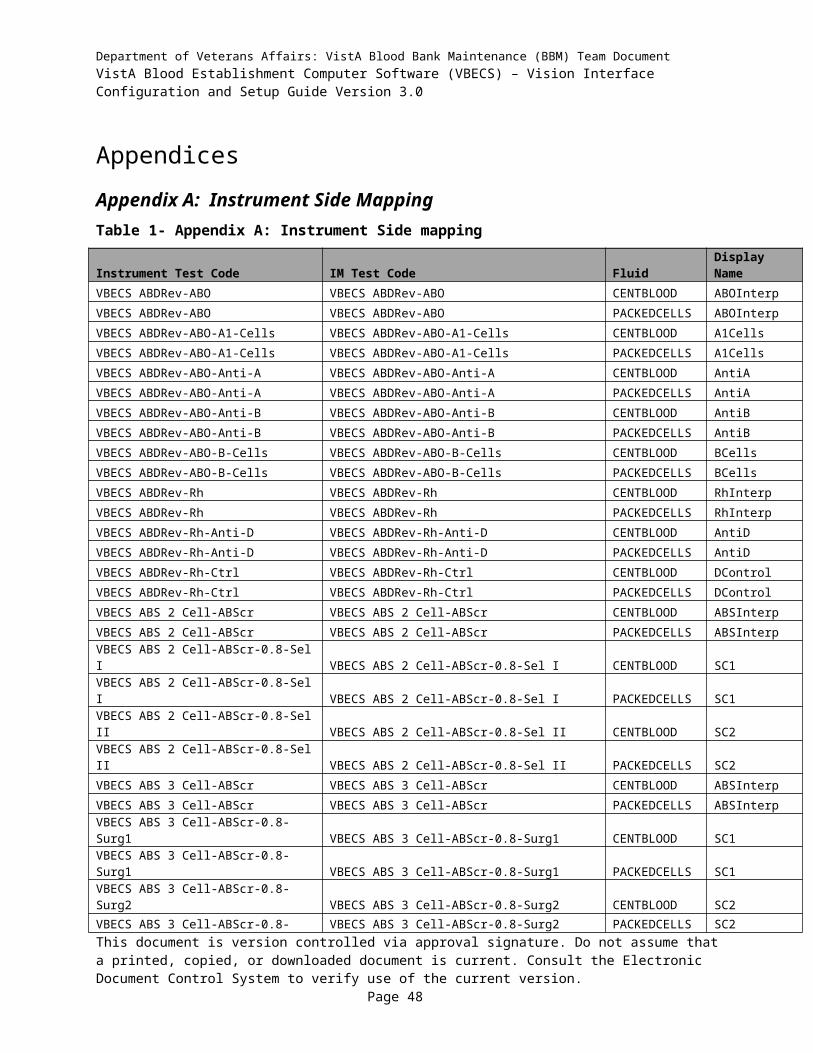
AppendicesAppendix A: Instrument Side MappingTable 1- Appendix A: Instrument Side mapping
Instrument Test Code IM Test Code Fluid Display NameVBECS ABDRev-ABO VBECS ABDRev-ABO CENTBLOOD ABOInterp
VBECS ABDRev-ABO VBECS ABDRev-ABO PACKEDCELLS ABOInterp
VBECS ABDRev-ABO-A1-Cells VBECS ABDRev-ABO-A1-Cells CENTBLOOD A1Cells
VBECS ABDRev-ABO-A1-Cells VBECS ABDRev-ABO-A1-Cells PACKEDCELLS A1Cells
VBECS ABDRev-ABO-Anti-A VBECS ABDRev-ABO-Anti-A CENTBLOOD AntiA
VBECS ABDRev-ABO-Anti-A VBECS ABDRev-ABO-Anti-A PACKEDCELLS AntiA
VBECS ABDRev-ABO-Anti-B VBECS ABDRev-ABO-Anti-B CENTBLOOD AntiB
VBECS ABDRev-ABO-Anti-B VBECS ABDRev-ABO-Anti-B PACKEDCELLS AntiB
VBECS ABDRev-ABO-B-Cells VBECS ABDRev-ABO-B-Cells CENTBLOOD BCells
VBECS ABDRev-ABO-B-Cells VBECS ABDRev-ABO-B-Cells PACKEDCELLS BCells
VBECS ABDRev-Rh VBECS ABDRev-Rh CENTBLOOD RhInterp
VBECS ABDRev-Rh VBECS ABDRev-Rh PACKEDCELLS RhInterp
VBECS ABDRev-Rh-Anti-D VBECS ABDRev-Rh-Anti-D CENTBLOOD AntiD
VBECS ABDRev-Rh-Anti-D VBECS ABDRev-Rh-Anti-D PACKEDCELLS AntiD
VBECS ABDRev-Rh-Ctrl VBECS ABDRev-Rh-Ctrl CENTBLOOD DControl
VBECS ABDRev-Rh-Ctrl VBECS ABDRev-Rh-Ctrl PACKEDCELLS DControl
VBECS ABS 2 Cell-ABScr VBECS ABS 2 Cell-ABScr CENTBLOOD ABSInterp
VBECS ABS 2 Cell-ABScr VBECS ABS 2 Cell-ABScr PACKEDCELLS ABSInterp
VBECS ABS 2 Cell-ABScr-0.8-Sel I VBECS ABS 2 Cell-ABScr-0.8-Sel I CENTBLOOD SC1
VBECS ABS 2 Cell-ABScr-0.8-Sel I VBECS ABS 2 Cell-ABScr-0.8-Sel I PACKEDCELLS SC1
VBECS ABS 2 Cell-ABScr-0.8-Sel II VBECS ABS 2 Cell-ABScr-0.8-Sel II CENTBLOOD SC2
VBECS ABS 2 Cell-ABScr-0.8-Sel II VBECS ABS 2 Cell-ABScr-0.8-Sel II PACKEDCELLS SC2
VBECS ABS 3 Cell-ABScr VBECS ABS 3 Cell-ABScr CENTBLOOD ABSInterp
VBECS ABS 3 Cell-ABScr VBECS ABS 3 Cell-ABScr PACKEDCELLS ABSInterp
VBECS ABS 3 Cell-ABScr-0.8-Surg1 VBECS ABS 3 Cell-ABScr-0.8-Surg1 CENTBLOOD SC1
VBECS ABS 3 Cell-ABScr-0.8-Surg1 VBECS ABS 3 Cell-ABScr-0.8-Surg1 PACKEDCELLS SC1
VBECS ABS 3 Cell-ABScr-0.8-Surg2 VBECS ABS 3 Cell-ABScr-0.8-Surg2 CENTBLOOD SC2
VBECS ABS 3 Cell-ABScr-0.8-Surg2 VBECS ABS 3 Cell-ABScr-0.8-Surg2 PACKEDCELLS SC2
VBECS ABS 3 Cell-ABScr-0.8-Surg3 VBECS ABS 3 Cell-ABScr-0.8-Surg3 CENTBLOOD SC3
VBECS ABS 3 Cell-ABScr-0.8-Surg3 VBECS ABS 3 Cell-ABScr-0.8-Surg3 PACKEDCELLS SC3
VBECS Confirm AB-ABO VBECS Confirm AB-ABO CENTBLOOD ABOInterp
VBECS Confirm AB-ABO VBECS Confirm AB-ABO PACKEDCELLS ABOInterp
VBECS Confirm AB-ABO-Anti-A VBECS Confirm AB-ABO-Anti-A CENTBLOOD AntiA
VBECS Confirm AB-ABO-Anti-A VBECS Confirm AB-ABO-Anti-A PACKEDCELLS AntiA
VBECS Confirm AB-ABO-Anti-B VBECS Confirm AB-ABO-Anti-B CENTBLOOD AntiB
This document is version controlled via approval signature. Do not assume that a printed, copied, or downloaded document is current. Consult the Electronic Document Control System to verify use of the current version.
Page 39

Department of Veterans Affairs: VistA Blood Bank Maintenance (BBM) Team DocumentVistA Blood Establishment Computer Software (VBECS) – Vision Interface Configuration and Setup Guide Version 3.0
Instrument Test Code IM Test Code Fluid Display NameVBECS Confirm AB-ABO-Anti-B VBECS Confirm AB-ABO-Anti-B PACKEDCELLS AntiB
VBECS Confirm ABD-ABO VBECS Confirm ABD-ABO CENTBLOOD ABOInterp
VBECS Confirm ABD-ABO VBECS Confirm ABD-ABO PACKEDCELLS ABOInterp
VBECS Confirm ABD-ABO-Anti-A VBECS Confirm ABD-ABO-Anti-A CENTBLOOD AntiA
VBECS Confirm ABD-ABO-Anti-A VBECS Confirm ABD-ABO-Anti-A PACKEDCELLS AntiA
VBECS Confirm ABD-ABO-Anti-B VBECS Confirm ABD-ABO-Anti-B CENTBLOOD AntiB
VBECS Confirm ABD-ABO-Anti-B VBECS Confirm ABD-ABO-Anti-B PACKEDCELLS AntiB
VBECS Confirm ABD-Rh VBECS Confirm ABD-Rh CENTBLOOD RhInterp
VBECS Confirm ABD-Rh VBECS Confirm ABD-Rh PACKEDCELLS RhInterp
VBECS Confirm ABD-Rh-Anti-D VBECS Confirm ABD-Rh-Anti-D CENTBLOOD AntiD
VBECS Confirm ABD-Rh-Anti-D VBECS Confirm ABD-Rh-Anti-D PACKEDCELLS AntiD
VBECS Confirm O Neg-Anti-AB VBECS Confirm O Neg-Anti-AB CENTBLOOD ABOInterp
VBECS Confirm O Neg-Anti-AB VBECS Confirm O Neg-Anti-AB PACKEDCELLS ABOInterpVBECS Confirm O Neg-Anti-AB-Anti-A+B VBECS Confirm O Neg-Anti-AB-Anti-A+B CENTBLOOD AntiABVBECS Confirm O Neg-Anti-AB-Anti-A+B VBECS Confirm O Neg-Anti-AB-Anti-A+B PACKEDCELLS AntiAB
VBECS Confirm O Neg-Rh VBECS Confirm O Neg-Rh CENTBLOOD RhInterp
VBECS Confirm O Neg-Rh VBECS Confirm O Neg-Rh PACKEDCELLS RhInterp
VBECS Confirm O Neg-Rh-Anti-D VBECS Confirm O Neg-Rh-Anti-D CENTBLOOD AntiD
VBECS Confirm O Neg-Rh-Anti-D VBECS Confirm O Neg-Rh-Anti-D PACKEDCELLS AntiD
VBECS Confirm O Pos-Anti-AB VBECS Confirm O Pos-Anti-AB CENTBLOOD ABOInterp
VBECS Confirm O Pos-Anti-AB VBECS Confirm O Pos-Anti-AB PACKEDCELLS ABOInterp
VBECS Confirm O Pos-Anti-AB-Anti-A+B VBECS Confirm O Pos-Anti-AB-Anti-A+B CENTBLOOD AntiAB
VBECS Confirm O Pos-Anti-AB-Anti-A+B VBECS Confirm O Pos-Anti-AB-Anti-A+B PACKEDCELLS AntiABVBECS Crossmatch IAT-Anti-IgG (Rabbit)-Donor Info
VBECS Crossmatch IAT-Anti-IgG (Rabbit)-Donor Info CENTBLOOD AHG
VBECS Crossmatch IAT-Anti-IgG (Rabbit)-Donor Info
VBECS Crossmatch IAT-Anti-IgG (Rabbit)-Donor Info PACKEDCELLS AHG
VBECS Crossmatch IAT-XM VBECS Crossmatch IAT-XM CENTBLOOD XMInterp
VBECS Crossmatch IAT-XM VBECS Crossmatch IAT-XM PACKEDCELLS XMInterpVBECS Crossmatch-Anti-IgG (Rabbit)-Donor Info VBECS Crossmatch-Anti-IgG (Rabbit)-Donor Info CENTBLOOD AHGVBECS Crossmatch-Anti-IgG (Rabbit)-Donor Info VBECS Crossmatch-Anti-IgG (Rabbit)-Donor Info PACKEDCELLS AHGVBECS Crossmatch-Buffered Gel-Donor Info VBECS Crossmatch-Buffered Gel-Donor Info CENTBLOOD ISVBECS Crossmatch-Buffered Gel-Donor Info VBECS Crossmatch-Buffered Gel-Donor Info PACKEDCELLS IS
VBECS Crossmatch-XM VBECS Crossmatch-XM CENTBLOOD XMInterp
VBECS Crossmatch-XM VBECS Crossmatch-XM PACKEDCELLS XMInterp
VBECS DAT IgG-IgG VBECS DAT IgG-IgG CENTBLOOD IgGInterp
VBECS DAT IgG-IgG VBECS DAT IgG-IgG PACKEDCELLS IgGInterp
VBECS DAT IgG-IgG-IgG VBECS DAT IgG-IgG-IgG CENTBLOOD IgG
VBECS DAT IgG-IgG-IgG VBECS DAT IgG-IgG-IgG PACKEDCELLS IgG
VBECS DAT Poly+IgG-IgG VBECS DAT Poly+IgG-IgG CENTBLOOD IgGInterp
This document is version controlled via approval signature. Do not assume that a printed, copied, or downloaded document is current. Consult the Electronic Document Control System to verify use of the current version.
Page 40

Department of Veterans Affairs: VistA Blood Bank Maintenance (BBM) Team DocumentVistA Blood Establishment Computer Software (VBECS) – Vision Interface Configuration and Setup Guide Version 3.0
Instrument Test Code IM Test Code Fluid Display NameVBECS DAT Poly+IgG-IgG VBECS DAT Poly+IgG-IgG PACKEDCELLS IgGInterp
VBECS DAT Poly+IgG-IgG-IgG VBECS DAT Poly+IgG-IgG-IgG CENTBLOOD IgG
VBECS DAT Poly+IgG-IgG-IgG VBECS DAT Poly+IgG-IgG-IgG PACKEDCELLS IgG
VBECS DAT Poly+IgG-Poly VBECS DAT Poly+IgG-Poly CENTBLOOD DATInterp
VBECS DAT Poly+IgG-Poly VBECS DAT Poly+IgG-Poly PACKEDCELLS DATInterp
VBECS DAT Poly+IgG-Poly-Poly VBECS DAT Poly+IgG-Poly-Poly CENTBLOOD AHG
VBECS DAT Poly+IgG-Poly-Poly VBECS DAT Poly+IgG-Poly-Poly PACKEDCELLS AHG
VBECS DAT-Poly VBECS DAT-Poly CENTBLOOD DATInterp
VBECS DAT-Poly VBECS DAT-Poly PACKEDCELLS DATInterp
VBECS DAT-Poly-Poly VBECS DAT-Poly-Poly CENTBLOOD AHG
VBECS DAT-Poly-Poly VBECS DAT-Poly-Poly PACKEDCELLS AHG
VBECS Phenotyping C-Anti-C (RH2) VBECS Phenotyping C-Anti-C (RH2) CENTBLOOD CInterp
VBECS Phenotyping C-Anti-C (RH2) VBECS Phenotyping C-Anti-C (RH2) PACKEDCELLS CInterpVBECS Phenotyping C-Anti-C (RH2)-Anti-C (RH2)
VBECS Phenotyping C-Anti-C (RH2)-Anti-C (RH2)CENTBLOOD Anti-C
VBECS Phenotyping C-Anti-C (RH2)-Anti-C (RH2)
VBECS Phenotyping C-Anti-C (RH2)-Anti-C (RH2)PACKEDCELLS Anti-C
VBECS Phenotyping E-Anti-E (RH3) VBECS Phenotyping E-Anti-E (RH3) CENTBLOOD EInterp
VBECS Phenotyping E-Anti-E (RH3) VBECS Phenotyping E-Anti-E (RH3) PACKEDCELLS EInterpVBECS Phenotyping E-Anti-E (RH3)-Anti-E (RH3)
VBECS Phenotyping E-Anti-E (RH3)-Anti-E (RH3)CENTBLOOD Anti-E
VBECS Phenotyping E-Anti-E (RH3)-Anti-E (RH3)
VBECS Phenotyping E-Anti-E (RH3)-Anti-E (RH3)PACKEDCELLS Anti-E
VBECS Phenotyping smc-Anti-c (RH4) VBECS Phenotyping smc-Anti-c (RH4) CENTBLOOD cInterp
VBECS Phenotyping smc-Anti-c (RH4) VBECS Phenotyping smc-Anti-c (RH4) PACKEDCELLS cInterpVBECS Phenotyping smc-Anti-c (RH4)-Anti-c (RH4)
VBECS Phenotyping smc-Anti-c (RH4)-Anti-c (RH4) CENTBLOOD Anti-c
VBECS Phenotyping smc-Anti-c (RH4)-Anti-c (RH4)
VBECS Phenotyping smc-Anti-c (RH4)-Anti-c (RH4) PACKEDCELLS Anti-c
VBECS Phenotyping sme-Anti-e (RH5) VBECS Phenotyping sme-Anti-e (RH5) CENTBLOOD eInterp
VBECS Phenotyping sme-Anti-e (RH5) VBECS Phenotyping sme-Anti-e (RH5) PACKEDCELLS eInterpVBECS Phenotyping sme-Anti-e (RH5)-Anti-e (RH5)
VBECS Phenotyping sme-Anti-e (RH5)-Anti-e (RH5) CENTBLOOD Anti-e
VBECS Phenotyping sme-Anti-e (RH5)-Anti-e (RH5)
VBECS Phenotyping sme-Anti-e (RH5)-Anti-e (RH5) PACKEDCELLS Anti-e
VBECS TAS 2 Cell-ABO VBECS TAS 2 Cell-ABO CENTBLOOD ABOInterp
VBECS TAS 2 Cell-ABO VBECS TAS 2 Cell-ABO PACKEDCELLS ABOInterp
VBECS TAS 2 Cell-ABO-A1-Cells VBECS TAS 2 Cell-ABO-A1-Cells CENTBLOOD A1Cells
VBECS TAS 2 Cell-ABO-A1-Cells VBECS TAS 2 Cell-ABO-A1-Cells PACKEDCELLS A1Cells
VBECS TAS 2 Cell-ABO-Anti-A VBECS TAS 2 Cell-ABO-Anti-A CENTBLOOD AntiA
VBECS TAS 2 Cell-ABO-Anti-A VBECS TAS 2 Cell-ABO-Anti-A PACKEDCELLS AntiA
VBECS TAS 2 Cell-ABO-Anti-B VBECS TAS 2 Cell-ABO-Anti-B CENTBLOOD AntiB
VBECS TAS 2 Cell-ABO-Anti-B VBECS TAS 2 Cell-ABO-Anti-B PACKEDCELLS AntiB
VBECS TAS 2 Cell-ABO-B-Cells VBECS TAS 2 Cell-ABO-B-Cells CENTBLOOD BCells
VBECS TAS 2 Cell-ABO-B-Cells VBECS TAS 2 Cell-ABO-B-Cells PACKEDCELLS BCells
VBECS TAS 2 Cell-ABScr VBECS TAS 2 Cell-ABScr CENTBLOOD ABSInterp
This document is version controlled via approval signature. Do not assume that a printed, copied, or downloaded document is current. Consult the Electronic Document Control System to verify use of the current version.
Page 41

Department of Veterans Affairs: VistA Blood Bank Maintenance (BBM) Team DocumentVistA Blood Establishment Computer Software (VBECS) – Vision Interface Configuration and Setup Guide Version 3.0
Instrument Test Code IM Test Code Fluid Display NameVBECS TAS 2 Cell-ABScr VBECS TAS 2 Cell-ABScr PACKEDCELLS ABSInterp
VBECS TAS 2 Cell-ABScr-0.8-Sel I VBECS TAS 2 Cell-ABScr-0.8-Sel I CENTBLOOD SC1
VBECS TAS 2 Cell-ABScr-0.8-Sel I VBECS TAS 2 Cell-ABScr-0.8-Sel I PACKEDCELLS SC1
VBECS TAS 2 Cell-ABScr-0.8-Sel II VBECS TAS 2 Cell-ABScr-0.8-Sel II CENTBLOOD SC2
VBECS TAS 2 Cell-ABScr-0.8-Sel II VBECS TAS 2 Cell-ABScr-0.8-Sel II PACKEDCELLS SC2
VBECS TAS 2 Cell-Rh VBECS TAS 2 Cell-Rh CENTBLOOD RhInterp
VBECS TAS 2 Cell-Rh VBECS TAS 2 Cell-Rh PACKEDCELLS RhInterp
VBECS TAS 2 Cell-Rh-Anti-D VBECS TAS 2 Cell-Rh-Anti-D CENTBLOOD AntiD
VBECS TAS 2 Cell-Rh-Anti-D VBECS TAS 2 Cell-Rh-Anti-D PACKEDCELLS AntiD
VBECS TAS 2 Cell-Rh-Ctrl VBECS TAS 2 Cell-Rh-Ctrl CENTBLOOD DControl
VBECS TAS 2 Cell-Rh-Ctrl VBECS TAS 2 Cell-Rh-Ctrl PACKEDCELLS DControl
VBECS TAS 3 Cell-ABO VBECS TAS 3 Cell-ABO CENTBLOOD ABOInterp
VBECS TAS 3 Cell-ABO VBECS TAS 3 Cell-ABO PACKEDCELLS ABOInterp
VBECS TAS 3 Cell-ABO-A1-Cells VBECS TAS 3 Cell-ABO-A1-Cells CENTBLOOD A1Cells
VBECS TAS 3 Cell-ABO-A1-Cells VBECS TAS 3 Cell-ABO-A1-Cells PACKEDCELLS A1Cells
VBECS TAS 3 Cell-ABO-Anti-A VBECS TAS 3 Cell-ABO-Anti-A CENTBLOOD AntiA
VBECS TAS 3 Cell-ABO-Anti-A VBECS TAS 3 Cell-ABO-Anti-A PACKEDCELLS AntiA
VBECS TAS 3 Cell-ABO-Anti-B VBECS TAS 3 Cell-ABO-Anti-B CENTBLOOD AntiB
VBECS TAS 3 Cell-ABO-Anti-B VBECS TAS 3 Cell-ABO-Anti-B PACKEDCELLS AntiB
VBECS TAS 3 Cell-ABO-B-Cells VBECS TAS 3 Cell-ABO-B-Cells CENTBLOOD BCells
VBECS TAS 3 Cell-ABO-B-Cells VBECS TAS 3 Cell-ABO-B-Cells PACKEDCELLS BCells
VBECS TAS 3 Cell-ABScr VBECS TAS 3 Cell-ABScr CENTBLOOD ABSInterp
VBECS TAS 3 Cell-ABScr VBECS TAS 3 Cell-ABScr PACKEDCELLS ABSInterp
VBECS TAS 3 Cell-ABScr-0.8-Surg1 VBECS TAS 3 Cell-ABScr-0.8-Surg1 CENTBLOOD SC1
VBECS TAS 3 Cell-ABScr-0.8-Surg1 VBECS TAS 3 Cell-ABScr-0.8-Surg1 PACKEDCELLS SC1
VBECS TAS 3 Cell-ABScr-0.8-Surg2 VBECS TAS 3 Cell-ABScr-0.8-Surg2 CENTBLOOD SC2
VBECS TAS 3 Cell-ABScr-0.8-Surg2 VBECS TAS 3 Cell-ABScr-0.8-Surg2 PACKEDCELLS SC2
VBECS TAS 3 Cell-ABScr-0.8-Surg3 VBECS TAS 3 Cell-ABScr-0.8-Surg3 CENTBLOOD SC3
VBECS TAS 3 Cell-ABScr-0.8-Surg3 VBECS TAS 3 Cell-ABScr-0.8-Surg3 PACKEDCELLS SC3
VBECS TAS 3 Cell-Rh VBECS TAS 3 Cell-Rh CENTBLOOD RhInterp
VBECS TAS 3 Cell-Rh VBECS TAS 3 Cell-Rh PACKEDCELLS RhInterp
VBECS TAS 3 Cell-Rh-Anti-D VBECS TAS 3 Cell-Rh-Anti-D CENTBLOOD AntiD
VBECS TAS 3 Cell-Rh-Anti-D VBECS TAS 3 Cell-Rh-Anti-D PACKEDCELLS AntiD
VBECS TAS 3 Cell-Rh-Ctrl VBECS TAS 3 Cell-Rh-Ctrl CENTBLOOD DControl
VBECS TAS 3 Cell-Rh-Ctrl VBECS TAS 3 Cell-Rh-Ctrl PACKEDCELLS DControl
This document is version controlled via approval signature. Do not assume that a printed, copied, or downloaded document is current. Consult the Electronic Document Control System to verify use of the current version.
Page 42
Department of Veterans Affairs: VistA Blood Bank Maintenance (BBM) Team DocumentVistA Blood Establishment Computer Software (VBECS) – Vision Interface Configuration and Setup Guide Version 3.0
Appendix B: HL7 (VBECS) Side MappingTable 2- Appendix B: HL7 (VBECS) Side Mapping
Instrument Test Code IM Test Code FluidAHGInterp AHGInterp CENTBLOOD
AHGInterp AHGInterp PACKEDCELLS
ISInterp ISInterp CENTBLOOD
ISInterp ISInterp PACKEDCELLS
VBECS ABDRev-ABO ABOInterp CENTBLOOD
VBECS ABDRev-ABO ABOInterp PACKEDCELLS
VBECS ABDRev-ABO-A1-Cells A1Cells CENTBLOOD
VBECS ABDRev-ABO-A1-Cells A1Cells PACKEDCELLS
VBECS ABDRev-ABO-Anti-A AntiA CENTBLOOD
VBECS ABDRev-ABO-Anti-A AntiA PACKEDCELLS
VBECS ABDRev-ABO-Anti-B AntiB CENTBLOOD
VBECS ABDRev-ABO-Anti-B AntiB PACKEDCELLS
VBECS ABDRev-ABO-B-Cells BCells CENTBLOOD
VBECS ABDRev-ABO-B-Cells BCells PACKEDCELLS
VBECS ABDRev-Rh RhInterp CENTBLOOD
VBECS ABDRev-Rh RhInterp PACKEDCELLS
VBECS ABDRev-Rh-Anti-D AntiD CENTBLOOD
VBECS ABDRev-Rh-Anti-D AntiD PACKEDCELLS
VBECS ABDRev-Rh-Ctrl DControl CENTBLOOD
VBECS ABDRev-Rh-Ctrl DControl PACKEDCELLS
VBECS ABS 2 Cell-ABScr ABSInterp CENTBLOOD
VBECS ABS 2 Cell-ABScr ABSInterp PACKEDCELLS
VBECS ABS 2 Cell-ABScr-0.8-Sel I SC1 CENTBLOOD
VBECS ABS 2 Cell-ABScr-0.8-Sel I SC1 PACKEDCELLS
VBECS ABS 2 Cell-ABScr-0.8-Sel II SC2 CENTBLOOD
VBECS ABS 2 Cell-ABScr-0.8-Sel II SC2 PACKEDCELLS
VBECS ABS 3 Cell-ABScr ABSInterp CENTBLOOD
VBECS ABS 3 Cell-ABScr ABSInterp PACKEDCELLS
VBECS ABS 3 Cell-ABScr-0.8-Surg1 SC1 CENTBLOOD
VBECS ABS 3 Cell-ABScr-0.8-Surg1 SC1 PACKEDCELLS
VBECS ABS 3 Cell-ABScr-0.8-Surg2 SC2 CENTBLOOD
VBECS ABS 3 Cell-ABScr-0.8-Surg2 SC2 PACKEDCELLS
VBECS ABS 3 Cell-ABScr-0.8-Surg3 SC3 CENTBLOOD
VBECS ABS 3 Cell-ABScr-0.8-Surg3 SC3 PACKEDCELLS
VBECS Confirm AB-ABO ABOInterp CENTBLOOD
VBECS Confirm AB-ABO ABOInterp PACKEDCELLS
VBECS Confirm AB-ABO-Anti-A AntiA CENTBLOOD
This document is version controlled via approval signature. Do not assume that a printed, copied, or downloaded document is current. Consult the Electronic Document Control System to verify use of the current version.
Page 43
Department of Veterans Affairs: VistA Blood Bank Maintenance (BBM) Team DocumentVistA Blood Establishment Computer Software (VBECS) – Vision Interface Configuration and Setup Guide Version 3.0
Instrument Test Code IM Test Code FluidVBECS Confirm AB-ABO-Anti-A AntiA PACKEDCELLS
VBECS Confirm AB-ABO-Anti-B AntiB CENTBLOOD
VBECS Confirm AB-ABO-Anti-B AntiB PACKEDCELLS
VBECS Confirm ABD-ABO ABOInterp CENTBLOOD
VBECS Confirm ABD-ABO ABOInterp PACKEDCELLS
VBECS Confirm ABD-ABO-Anti-A AntiA CENTBLOOD
VBECS Confirm ABD-ABO-Anti-A AntiA PACKEDCELLS
VBECS Confirm ABD-ABO-Anti-B AntiB CENTBLOOD
VBECS Confirm ABD-ABO-Anti-B AntiB PACKEDCELLS
VBECS Confirm ABD-Rh RhInterp CENTBLOOD
VBECS Confirm ABD-Rh RhInterp PACKEDCELLS
VBECS Confirm ABD-Rh-Anti-D AntiD CENTBLOOD
VBECS Confirm ABD-Rh-Anti-D AntiD PACKEDCELLS
VBECS Confirm O Neg-Anti-AB ABOInterp CENTBLOOD
VBECS Confirm O Neg-Anti-AB ABOInterp PACKEDCELLS
VBECS Confirm O Neg-Anti-AB-Anti-A+B AntiAB CENTBLOOD
VBECS Confirm O Neg-Anti-AB-Anti-A+B AntiAB PACKEDCELLS
VBECS Confirm O Neg-Rh RhInterp CENTBLOOD
VBECS Confirm O Neg-Rh RhInterp PACKEDCELLS
VBECS Confirm O Neg-Rh-Anti-D AntiD CENTBLOOD
VBECS Confirm O Neg-Rh-Anti-D AntiD PACKEDCELLS
VBECS Confirm O Pos-Anti-AB ABOInterp CENTBLOOD
VBECS Confirm O Pos-Anti-AB ABOInterp PACKEDCELLS
VBECS Confirm O Pos-Anti-AB-Anti-A+B AntiAB CENTBLOOD
VBECS Confirm O Pos-Anti-AB-Anti-A+B AntiAB PACKEDCELLS
VBECS Crossmatch IAT-Anti-IgG (Rabbit)-Donor Info AHG CENTBLOOD
VBECS Crossmatch IAT-Anti-IgG (Rabbit)-Donor Info AHG PACKEDCELLS
VBECS Crossmatch IAT-XM XMInterp CENTBLOOD
VBECS Crossmatch IAT-XM XMInterp PACKEDCELLS
VBECS Crossmatch-Anti-IgG (Rabbit)-Donor Info AHG CENTBLOOD
VBECS Crossmatch-Anti-IgG (Rabbit)-Donor Info AHG PACKEDCELLS
VBECS Crossmatch-Buffered Gel-Donor Info IS CENTBLOOD
VBECS Crossmatch-Buffered Gel-Donor Info IS PACKEDCELLS
VBECS DAT IgG-IgG IgGInterp CENTBLOOD
VBECS DAT IgG-IgG IgGInterp PACKEDCELLS
VBECS DAT IgG-IgG-IgG IgG CENTBLOOD
VBECS DAT IgG-IgG-IgG IgG PACKEDCELLS
VBECS DAT Poly+IgG-IgG IgGInterp CENTBLOOD
VBECS DAT Poly+IgG-IgG IgGInterp PACKEDCELLS
VBECS DAT Poly+IgG-IgG-IgG IgG CENTBLOOD
VBECS DAT Poly+IgG-IgG-IgG IgG PACKEDCELLS
This document is version controlled via approval signature. Do not assume that a printed, copied, or downloaded document is current. Consult the Electronic Document Control System to verify use of the current version.
Page 44

Department of Veterans Affairs: VistA Blood Bank Maintenance (BBM) Team DocumentVistA Blood Establishment Computer Software (VBECS) – Vision Interface Configuration and Setup Guide Version 3.0
Instrument Test Code IM Test Code FluidVBECS DAT Poly+IgG-Poly DATInterp CENTBLOOD
VBECS DAT Poly+IgG-Poly DATInterp PACKEDCELLS
VBECS DAT Poly+IgG-Poly-Poly AHG CENTBLOOD
VBECS DAT Poly+IgG-Poly-Poly AHG PACKEDCELLS
VBECS DAT-Poly DATInterp CENTBLOOD
VBECS DAT-Poly DATInterp PACKEDCELLS
VBECS DAT-Poly-Poly AHG CENTBLOOD
VBECS DAT-Poly-Poly AHG PACKEDCELLS
VBECS Phenotyping C-Anti-C (RH2)-Anti-C (RH2) AntiC CENTBLOOD
VBECS Phenotyping C-Anti-C (RH2)-Anti-C (RH2) AntiC PACKEDCELLS
VBECS Phenotyping E-Anti-E (RH3)-Anti-E (RH3) AntiE CENTBLOOD
VBECS Phenotyping E-Anti-E (RH3)-Anti-E (RH3) AntiE PACKEDCELLS
VBECS Phenotyping smc-Anti-c (RH4)-Anti-c (RH4) Antic CENTBLOOD
VBECS Phenotyping smc-Anti-c (RH4)-Anti-c (RH4) Antic PACKEDCELLS
VBECS Phenotyping sme-Anti-e (RH5)-Anti-e (RH5) Antie CENTBLOOD
VBECS Phenotyping sme-Anti-e (RH5)-Anti-e (RH5) Antie PACKEDCELLS
VBECS TAS 2 Cell-ABO ABOInterp CENTBLOOD
VBECS TAS 2 Cell-ABO ABOInterp PACKEDCELLS
VBECS TAS 2 Cell-ABO-A1-Cells A1Cells CENTBLOOD
VBECS TAS 2 Cell-ABO-A1-Cells A1Cells PACKEDCELLS
VBECS TAS 2 Cell-ABO-Anti-A AntiA CENTBLOOD
VBECS TAS 2 Cell-ABO-Anti-A AntiA PACKEDCELLS
VBECS TAS 2 Cell-ABO-Anti-B AntiB CENTBLOOD
VBECS TAS 2 Cell-ABO-Anti-B AntiB PACKEDCELLS
VBECS TAS 2 Cell-ABO-B-Cells BCells CENTBLOOD
VBECS TAS 2 Cell-ABO-B-Cells BCells PACKEDCELLS
VBECS TAS 2 Cell-ABScr ABSInterp CENTBLOOD
VBECS TAS 2 Cell-ABScr ABSInterp PACKEDCELLS
VBECS TAS 2 Cell-ABScr-0.8-Sel I SC1 CENTBLOOD
VBECS TAS 2 Cell-ABScr-0.8-Sel I SC1 PACKEDCELLS
VBECS TAS 2 Cell-ABScr-0.8-Sel II SC2 CENTBLOOD
VBECS TAS 2 Cell-ABScr-0.8-Sel II SC2 PACKEDCELLS
VBECS TAS 2 Cell-Rh RhInterp CENTBLOOD
VBECS TAS 2 Cell-Rh RhInterp PACKEDCELLS
VBECS TAS 2 Cell-Rh-Anti-D AntiD CENTBLOOD
VBECS TAS 2 Cell-Rh-Anti-D AntiD PACKEDCELLS
VBECS TAS 2 Cell-Rh-Ctrl DControl CENTBLOOD
VBECS TAS 2 Cell-Rh-Ctrl DControl PACKEDCELLS
VBECS TAS 3 Cell-ABO ABOInterp CENTBLOOD
VBECS TAS 3 Cell-ABO ABOInterp PACKEDCELLS
VBECS TAS 3 Cell-ABO-A1-Cells A1Cells CENTBLOOD
This document is version controlled via approval signature. Do not assume that a printed, copied, or downloaded document is current. Consult the Electronic Document Control System to verify use of the current version.
Page 45
Department of Veterans Affairs: VistA Blood Bank Maintenance (BBM) Team DocumentVistA Blood Establishment Computer Software (VBECS) – Vision Interface Configuration and Setup Guide Version 3.0
Instrument Test Code IM Test Code FluidVBECS TAS 3 Cell-ABO-A1-Cells A1Cells PACKEDCELLS
VBECS TAS 3 Cell-ABO-Anti-A AntiA CENTBLOOD
VBECS TAS 3 Cell-ABO-Anti-A AntiA PACKEDCELLS
VBECS TAS 3 Cell-ABO-Anti-B AntiB CENTBLOOD
VBECS TAS 3 Cell-ABO-Anti-B AntiB PACKEDCELLS
VBECS TAS 3 Cell-ABO-B-Cells BCells CENTBLOOD
VBECS TAS 3 Cell-ABO-B-Cells BCells PACKEDCELLS
VBECS TAS 3 Cell-ABScr ABSInterp CENTBLOOD
VBECS TAS 3 Cell-ABScr ABSInterp PACKEDCELLS
VBECS TAS 3 Cell-ABScr-0.8-Surg1 SC1 CENTBLOOD
VBECS TAS 3 Cell-ABScr-0.8-Surg1 SC1 PACKEDCELLS
VBECS TAS 3 Cell-ABScr-0.8-Surg2 SC2 CENTBLOOD
VBECS TAS 3 Cell-ABScr-0.8-Surg2 SC2 PACKEDCELLS
VBECS TAS 3 Cell-ABScr-0.8-Surg3 SC3 CENTBLOOD
VBECS TAS 3 Cell-ABScr-0.8-Surg3 SC3 PACKEDCELLS
VBECS TAS 3 Cell-Rh RhInterp CENTBLOOD
VBECS TAS 3 Cell-Rh RhInterp PACKEDCELLS
VBECS TAS 3 Cell-Rh-Anti-D AntiD CENTBLOOD
VBECS TAS 3 Cell-Rh-Anti-D AntiD PACKEDCELLS
VBECS TAS 3 Cell-Rh-Ctrl DControl CENTBLOOD
VBECS TAS 3 Cell-Rh-Ctrl DControl PACKEDCELLS
This document is version controlled via approval signature. Do not assume that a printed, copied, or downloaded document is current. Consult the Electronic Document Control System to verify use of the current version.
Page 46

Department of Veterans Affairs: VistA Blood Bank Maintenance (BBM) Team DocumentVistA Blood Establishment Computer Software (VBECS) – Vision Interface Configuration and Setup Guide Version 3.0
Appendix C: Instrument Side Rules
Vision (Vision side interface)ocdvisii / Ortho Vision / v8.00.0002
--- Test / In Validation - Incoming result - Before Message Queued Internally ---
Rule # 1 Desc - SetInstrumentID If - {Always} Then - {Set} {Instrument ID} = ""
Rule # 2 Desc - SetReceivingFacility If - {Always} Then - {Set} {Receiving Facility} = ""
Rule # 3 Desc - DonorID If - ( ( {Length of} {Specimen ID} = "16" ) {AND} ( {Specimen ID} {Contains} "=" ) ) Then - {Set} {Specimen ID} = {Extract Section of} {Specimen ID} {From} "2" {To} "14"
Rule # 4 Desc - DonorIDForProductID If - ( ( {Length of} {Product ID} {On Test} {Value List:crossmatch} = "16" ) {AND} ( {Product ID} {On Test} {Value List:crossmatch} {Contains} "=" ) ) Then - {Set} {Product ID} {On Test} {Value List:crossmatch} = {Extract Section of} {Product ID} {On Test} {Value List:crossmatch} {From} "2" {To} "14"
Value List"Row Enabled","crossmatch""1","VBECS Crossmatch IAT-XM""1","VBECS Crossmatch IAT-Anti-IgG (Rabbit)-Donor Info""1","VBECS Crossmatch-XM""1","VBECS Crossmatch-Anti-IgG (Rabbit)-Donor Info""1","VBECS Crossmatch-Buffered Gel-Donor Info""0",
Rule # 5 Desc - Set Test Name for XM If - {Test Code} {On Any Test} {Contains} "Crossmatch" Then - {Set} {Test Code Sub ID} {On That Test} = "XM"
Rule # 6 Desc - Set Test Name for TAS Child of Rule # 5 - Else If - {Test Code} {On Any Test} {Contains} "TAS" Then - {Set} {Test Code Sub ID} {On That Test} = "TAS"
Rule # 7 Desc - Set Test Name for DAT Child of Rule # 6 - Else If - {Test Code} {On Any Test} {Contains} "DAT" Then - {Set} {Test Code Sub ID} {On That Test} = "DAT"
Rule # 8 Desc - Set Test Name for Patient ABORh Child of Rule # 7 - Else If - {Test Code} {On Any Test} {Contains} "ABDRev" Then - {Set} {Test Code Sub ID} {On That Test} = "Patient ABORh"This document is version controlled via approval signature. Do not assume that a printed, copied, or downloaded document is current. Consult the Electronic Document Control System to verify use of the current version.
Page 47
Department of Veterans Affairs: VistA Blood Bank Maintenance (BBM) Team DocumentVistA Blood Establishment Computer Software (VBECS) – Vision Interface Configuration and Setup Guide Version 3.0
Rule # 9 Desc - Set Test Name for ABS Child of Rule # 8 - Else If - {Test Code} {On Any Test} {Contains} "ABS" Then - {Set} {Test Code Sub ID} {On That Test} = "ABS"
Rule # 10 Desc - Set Test Name for Unit ABORh Child of Rule # 9 - Else If - {Test Code} {On Any Test} {Contains} "Confirm" Then - {Set} {Test Code Sub ID} {On That Test} = "Unit ABORh"
Rule # 11 Desc - Set Test Name for Antigen Typing Child of Rule # 10 - Else If - {Test Code} {On Any Test} {Contains} "Phenotyp" Then - {Set} {Test Code Sub ID} {On That Test} = "Antigen Typing"
Rule # 12 Desc - OneTestResult If - {Result} {On Any Test} = "10" Then - {Set} {Result} {On That Test} = "1+"
Rule # 13 Desc - TwoTestResult If - {Result} {On Any Test} = "20" Then - {Set} {Result} {On That Test} = "2+"
Rule # 14 Desc - ThreeTestResult If - {Result} {On Any Test} = "30" Then - {Set} {Result} {On That Test} = "3+"
Rule # 15 Desc - FourTestResult If - {Result} {On Any Test} = "40" Then - {Set} {Result} {On That Test} = "4+"
Rule # 16 Desc - CMPXMResult If - {Result} {On Any Test} = "CMP" Then - {Set} {Result} {On That Test} = "Compatible"
Rule # 17 Desc - INCMPXMResult If - {Result} {On Any Test} = "INCMP" Then - {Set} {Result} {On That Test} = "Incompatible"
Rule # 18 Desc - POSResult If - {Result} {On Any Test} = "POS" Then - {Set} {Result} {On That Test} = "Pos"
Rule # 19 Desc - NEGResult If - {Result} {On Any Test} = "NEG" Then - {Set} {Result} {On That Test} = "Neg"
Rule # 20 Desc - Set Result Status R If - {Result Status} {On Any Test} = "R" Then - {Set} {Result Status} {On That Test} = "F"
This document is version controlled via approval signature. Do not assume that a printed, copied, or downloaded document is current. Consult the Electronic Document Control System to verify use of the current version.
Page 48

Department of Veterans Affairs: VistA Blood Bank Maintenance (BBM) Team DocumentVistA Blood Establishment Computer Software (VBECS) – Vision Interface Configuration and Setup Guide Version 3.0
Rule # 21 Desc - Set Result Status Empty If - {Result Status} {On Any Test} = "" Then - {Set} {Result Status} {On That Test} = "F"
Rule # 22 Desc - Set Result DateTime for TAS-ABO 3 Cell If - {Result Date/Time} {On Any Test} = "" {AND} {Test Code} {On That Test} {Contains} "VBECS TAS 3 Cell-ABO" Then - {Set} {Result Date/Time} {On That Test} = {Result Date/Time} {On Test} "VBECS TAS 3 Cell-ABO"
Rule # 23 Desc - Set Result DateTime for TAS-Rh 3 Cell If - {Result Date/Time} {On Any Test} = "" {AND} {Test Code} {On That Test} {Contains} "VBECS TAS 3 Cell-Rh" Then - {Set} {Result Date/Time} {On That Test} = {Result Date/Time} {On Test} "VBECS TAS 3 Cell-Rh"
Rule # 24 Desc - Set Result DateTime for TAS-ABS 3 Cell If - {Result Date/Time} {On Any Test} = "" {AND} {Test Code} {On That Test} {Contains} "VBECS TAS 3 Cell-ABScr" Then - {Set} {Result Date/Time} {On That Test} = {Result Date/Time} {On Test} "VBECS TAS 3 Cell-ABScr"
Rule # 25 Desc - Set Result DateTime for TAS-ABO 2 Cell If - {Result Date/Time} {On Any Test} = "" {AND} {Test Code} {On That Test} {Contains} "VBECS TAS 2 Cell-ABO" Then - {Set} {Result Date/Time} {On That Test} = {Result Date/Time} {On Test} "VBECS TAS 2 Cell-ABO"
Rule # 26 Desc - Set Result DateTime for TAS-Rh 2 Cell If - {Result Date/Time} {On Any Test} = "" {AND} {Test Code} {On That Test} {Contains} "VBECS TAS 2 Cell-Rh" Then - {Set} {Result Date/Time} {On That Test} = {Result Date/Time} {On Test} "VBECS TAS 2 Cell-Rh"
Rule # 27 Desc - Set Result DateTime for TAS-ABS 2 Cell If - {Result Date/Time} {On Any Test} = "" {AND} {Test Code} {On That Test} {Contains} "VBECS TAS 2 Cell-ABScr" Then - {Set} {Result Date/Time} {On That Test} = {Result Date/Time} {On Test} "VBECS TAS 2 Cell-ABScr"
Rule # 28 Desc - Set Result DateTime for Patient ABORh - ABO If - {Result Date/Time} {On Any Test} = "" {AND} {Test Code} {On That Test} {Contains} "VBECS ABDRev-ABO" Then - {Set} {Result Date/Time} {On That Test} = {Result Date/Time} {On Test} "VBECS ABDRev-ABO"
Rule # 29 Desc - Set Result DateTime for Patient ABORh - Rh If - {Result Date/Time} {On Any Test} = "" {AND} {Test Code} {On That Test} {Contains} "VBECS ABDRev-Rh" Then - {Set} {Result Date/Time} {On That Test} = {Result Date/Time} {On Test} "VBECS ABDRev-Rh"
Rule # 30 Desc - Set Result DateTime for ABS 3 Cell If - {Result Date/Time} {On Any Test} = "" {AND} {Test Code} {On That Test} {Contains} "VBECS ABS 3 Cell-ABScr" Then - {Set} {Result Date/Time} {On That Test} = {Result Date/Time} {On Test} "VBECS ABS 3 Cell-ABScr"
This document is version controlled via approval signature. Do not assume that a printed, copied, or downloaded document is current. Consult the Electronic Document Control System to verify use of the current version.
Page 49

Department of Veterans Affairs: VistA Blood Bank Maintenance (BBM) Team DocumentVistA Blood Establishment Computer Software (VBECS) – Vision Interface Configuration and Setup Guide Version 3.0
Rule # 31 Desc - Set Result DateTime for ABS 2 Cell If - {Result Date/Time} {On Any Test} = "" {AND} {Test Code} {On That Test} {Contains} "VBECS ABS 2 Cell-ABScr" Then - {Set} {Result Date/Time} {On That Test} = {Result Date/Time} {On Test} "VBECS ABS 2 Cell-ABScr"
Rule # 32 Desc - Set Result DateTime for AGC If - {Result Date/Time} {On Any Test} = "" {AND} {Test Code} {On That Test} {Contains} "VBECS Phenotyping C-Anti-C (RH2)" Then - {Set} {Result Date/Time} {On That Test} = {Result Date/Time} {On Test} "VBECS Phenotyping C-Anti-C (RH2)"
Rule # 33 Desc - Set Result DateTime for AGE If - {Result Date/Time} {On Any Test} = "" {AND} {Test Code} {On That Test} {Contains} "VBECS Phenotyping E-Anti-E (RH3)" Then - {Set} {Result Date/Time} {On That Test} = {Result Date/Time} {On Test} "VBECS Phenotyping E-Anti-E (RH3)"
Rule # 34 Desc - Set Result DateTime for AGc If - {Result Date/Time} {On Any Test} = "" {AND} {Test Code} {On That Test} {Contains} "VBECS Phenotyping smc-Anti-c (RH4)" Then - {Set} {Result Date/Time} {On That Test} = {Result Date/Time} {On Test} "VBECS Phenotyping smc-Anti-c (RH4)"
Rule # 35 Desc - Set Result DateTime for AGe If - {Result Date/Time} {On Any Test} = "" {AND} {Test Code} {On That Test} {Contains} "VBECS Phenotyping sme-Anti-e (RH5)" Then - {Set} {Result Date/Time} {On That Test} = {Result Date/Time} {On Test} "VBECS Phenotyping sme-Anti-e (RH5)"
Rule # 36 Desc - Set Result DateTime for Crossmatch IAT If - {Result Date/Time} {On Any Test} = "" {AND} {Test Code} {On That Test} {Contains} "VBECS Crossmatch IAT" Then - {Set} {Result Date/Time} {On That Test} = {Result Date/Time} {On Test} "VBECS Crossmatch IAT-XM"
Rule # 37 Desc - Set Result DateTime for Crossmatch If - {Result Date/Time} {On Any Test} = "" {AND} {Test Code} {On That Test} {Contains} "VBECS Crossmatch" {AND} {Test Code} {On That Test} {NOT} {Contains} "IAT" Then - {Set} {Result Date/Time} {On That Test} = {Result Date/Time} {On Test} "VBECS Crossmatch-XM"
Rule # 38 Desc - Set Result DateTime for DAT IgG If - {Result Date/Time} {On Any Test} = "" {AND} {Test Code} {On That Test} {Contains} "VBECS DAT IgG-IgG" Then - {Set} {Result Date/Time} {On That Test} = {Result Date/Time} {On Test} "VBECS DAT IgG-IgG"
Rule # 39 Desc - Set Result DateTime for DAT If - {Result Date/Time} {On Any Test} = "" {AND} {Test Code} {On That Test} {Contains} "VBECS DAT-Poly" Then - {Set} {Result Date/Time} {On That Test} = {Result Date/Time} {On Test} "VBECS DAT-Poly"This document is version controlled via approval signature. Do not assume that a printed, copied, or downloaded document is current. Consult the Electronic Document Control System to verify use of the current version.
Page 50

Department of Veterans Affairs: VistA Blood Bank Maintenance (BBM) Team DocumentVistA Blood Establishment Computer Software (VBECS) – Vision Interface Configuration and Setup Guide Version 3.0
Rule # 40 Desc - Set Result DateTime for Unit ABO If - {Result Date/Time} {On Any Test} = "" {AND} {Test Code} {On That Test} {Contains} "VBECS Confirm AB-ABO" Then - {Set} {Result Date/Time} {On That Test} = {Result Date/Time} {On Test} "VBECS Confirm AB-ABO"
Rule # 41 Desc - Set Result DateTime for Unit ABORh - ABO If - {Result Date/Time} {On Any Test} = "" {AND} {Test Code} {On That Test} {Contains} "VBECS Confirm ABD-ABO" Then - {Set} {Result Date/Time} {On That Test} = {Result Date/Time} {On Test} "VBECS Confirm ABD-ABO"
Rule # 42 Desc - Set Result DateTime for Unit ABORh - Rh If - {Result Date/Time} {On Any Test} = "" {AND} {Test Code} {On That Test} {Contains} "VBECS Confirm ABD-Rh" Then - {Set} {Result Date/Time} {On That Test} = {Result Date/Time} {On Test} "VBECS Confirm ABD-Rh"
Rule # 43 Desc - Set Result DateTime for Unit ABORh - O Pos If - {Result Date/Time} {On Any Test} = "" {AND} {Test Code} {On That Test} {Contains} "VBECS Confirm O Pos-Anti-AB" Then - {Set} {Result Date/Time} {On That Test} = {Result Date/Time} {On Test} "VBECS Confirm O Pos-Anti-AB"
Rule # 44 Desc - Set Result DateTime for Unit ABORh - O Neg - ABO If - {Result Date/Time} {On Any Test} = "" {AND} {Test Code} {On That Test} {Contains} "VBECS Confirm O Neg-Anti-AB" Then - {Set} {Result Date/Time} {On That Test} = {Result Date/Time} {On Test} "VBECS Confirm O Neg-Anti-AB"
Rule # 45 Desc - Set Result DateTime for Unit ABORh - O Neg - Rh If - {Result Date/Time} {On Any Test} = "" {AND} {Test Code} {On That Test} {Contains} "VBECS Confirm O Neg-Rh" Then - {Set} {Result Date/Time} {On That Test} = {Result Date/Time} {On Test} "VBECS Confirm O Neg-Rh"
Rule # 46 Desc - Set Result DateTime for DAT+IgG IgG If - {Result Date/Time} {On Any Test} = "" {AND} {Test Code} {On That Test} {Contains} "VBECS DAT Poly+IgG-IgG" Then - {Set} {Result Date/Time} {On That Test} = {Result Date/Time} {On Test} "VBECS DAT Poly+IgG-IgG"
Rule # 47 Desc - Set Result DateTime for DAT+IgG Poly If - {Result Date/Time} {On Any Test} = "" {AND} {Test Code} {On That Test} {Contains} "VBECS DAT Poly+IgG-Poly" Then - {Set} {Result Date/Time} {On That Test} = {Result Date/Time} {On Test} "VBECS DAT Poly+IgG-Poly"
Rule # 48 Desc - SetISInterp If - {Test Code} {On Any Test} = "VBECS Crossmatch-Buffered Gel-Donor Info" Then - {Add Test} "ISInterp" {AND} {Set} {Product ID} {On Test} "ISInterp" = {Product ID} {On That Test} {AND} {Set} {Test Code Sub ID} {On Test} "ISInterp" = {Test Code Sub ID} {On That Test}
This document is version controlled via approval signature. Do not assume that a printed, copied, or downloaded document is current. Consult the Electronic Document Control System to verify use of the current version.
Page 51

Department of Veterans Affairs: VistA Blood Bank Maintenance (BBM) Team DocumentVistA Blood Establishment Computer Software (VBECS) – Vision Interface Configuration and Setup Guide Version 3.0
Rule # 49 Desc - SetAHGInterp If - {Test Code} {On Any Test} = "VBECS Crossmatch-Anti-IgG (Rabbit)-Donor Info" Then - {Add Test} "AHGInterp" {AND} {Set} {Product ID} {On Test} "AHGInterp" = {Product ID} {On That Test} {AND} {Set} {Test Code Sub ID} {On Test} "AHGInterp" = {Test Code Sub ID} {On That Test}
This document is version controlled via approval signature. Do not assume that a printed, copied, or downloaded document is current. Consult the Electronic Document Control System to verify use of the current version.
Page 52

Department of Veterans Affairs: VistA Blood Bank Maintenance (BBM) Team DocumentVistA Blood Establishment Computer Software (VBECS) – Vision Interface Configuration and Setup Guide Version 3.0
Appendix D: VBECS (HL7) Side RulesHIN_VBECS_1 (HL7 side interface)diihl7ml / Data Innovations LLC, Configurable HL7 / v8.00.0049
--- Test / In Validation - Outgoing result - Before Message Sent to this Connection ---
Rule # 1 Desc - SetISInterp - Comp If - {Test Code} {On Any Test} = "VBECS Crossmatch-Buffered Gel-Donor Info" {AND} {Result} {On That Test} = "0" Then - {Set} {Result} {On Test} "ISInterp" = "Compatible" {AND} {Set} {Result Status} {On Test} "ISInterp" = {Result Status} {On That Test} {AND} {Set} {Result Date/Time} {On Test} "ISInterp" = {Result Date/Time} {On That Test}
Rule # 2 Desc - SetISInterp - Incomp If - {Test Code} {On Any Test} = "VBECS Crossmatch-Buffered Gel-Donor Info" {AND} {Result} {On That Test} {Contains} "+" Then - {Set} {Result} {On Test} "ISInterp" = "Incompatible" {AND} {Set} {Result Status} {On Test} "ISInterp" = {Result Status} {On That Test} {AND} {Set} {Result Date/Time} {On Test} "ISInterp" = {Result Date/Time} {On That Test}
Rule # 3 Desc - SetAHGInterp - Comp If - {Test Code} {On Any Test} = "VBECS Crossmatch-Anti-IgG (Rabbit)-Donor Info" {AND} {Result} {On That Test} = "0" Then - {Set} {Result} {On Test} "AHGInterp" = "Compatible" {AND} {Set} {Result Status} {On Test} "AHGInterp" = {Result Status} {On That Test} {AND} {Set} {Result Date/Time} {On Test} "AHGInterp" = {Result Date/Time} {On That Test}
Rule # 4 Desc - SetAHGInterp - Incomp If - {Test Code} {On Any Test} = "VBECS Crossmatch-Anti-IgG (Rabbit)-Donor Info" {AND} {Result} {On That Test} {Contains} "+" Then - {Set} {Result} {On Test} "AHGInterp" = "Incompatible" {AND} {Set} {Result Status} {On Test} "AHGInterp" = {Result Status} {On That Test} {AND} {Set} {Result Date/Time} {On Test} "AHGInterp" = {Result Date/Time} {On That Test}
Rule # 5 Desc - Set POS Result for AB If - {Result} {On Any Test} = "Pos" {AND} {Test Code} {On That Test} {Contains} "Anti-AB" Then - {Set} {Result} {On That Test} = "AB"
Rule # 6 Desc - Set NEG Result for AB If - {Result} {On Any Test} = "Neg" {AND} {Test Code} {On That Test} {Contains} "Anti-AB" Then - {Set} {Result} {On That Test} = "O"
Rule # 7 Desc - Equalize Result DateTime for TAS 3 Cell If - {Test Code} {On Any Test} {Contains} "VBECS TAS 3 Cell" Then - {Set} {Result Date/Time} {On That Test} = {Result Date/Time} {On Test} "VBECS TAS 3 Cell-ABScr"
Rule # 8 Desc - Equalize Result DateTime for TAS 2 Cell If - {Test Code} {On Any Test} {Contains} "VBECS TAS 2 Cell" Then - {Set} {Result Date/Time} {On That Test} = {Result Date/Time} {On Test} "VBECS TAS 2 Cell-ABScr"
This document is version controlled via approval signature. Do not assume that a printed, copied, or downloaded document is current. Consult the Electronic Document Control System to verify use of the current version.
Page 53

Department of Veterans Affairs: VistA Blood Bank Maintenance (BBM) Team DocumentVistA Blood Establishment Computer Software (VBECS) – Vision Interface Configuration and Setup Guide Version 3.0
Appendix E: Vision Testing ProfilesTable 3: Vision Testing Profiles
Profile Name Card Type(s) Test Name VBECS TestVBECS TAS 3 Cell A/B/D Mono and Reverse
Anti-IgGA/B/D and Reverse Group3 Cell Screen
TAS
VBECS TAS 2 Cell A/B/D Mono and ReverseAnti-IgG
A/B/D and Reverse Group2 Cell Screen
TAS
VBECS ABDRev A/B/D Mono and Reverse A/B/D and Reverse Group Patient ABO/RhVBECS ABS 3 Cell Anti-IgG 3 Cell Screen Antibody ScreenVBECS ABS 2 Cell Anti-IgG 2 Cell Screen Antibody Screen
VBECS DATAnti-IgG, -C3d; Polyspecific (Rabbit) DAT (IgG C3d) DAT (Polyspecific)
VBECS DAT IgG Anti-IgG DAT (IgG) DAT IgG
VBECS DAT Poly+IgGAnti-IgG, -C3d; Polyspecific (Rabbit) DAT Specificity
DAT (Polyspecific) and DAT IgG
VBECS Phenotyping C Anti-C Anti-C Patient and Unit AGCVBECS Phenotyping smc Anti-c Anti-c Patient and Unit AGcVBECS Phenotyping E Anti-E Anti-E Patient and Unit AGEVBECS Phenotyping sme Anti-e Anti-e Patient and Unit AGeVBECS Crossmatch Anti-IgG
Buffered GelCrossmatch-IATCrossmatch-IS
Full Crossmatch (IS + IAT)
VBECS Crossmatch IAT Anti-IgG Crossmatch-IAT IAT only CrossmatchVBECS Confirm ABD A/B/D Mono Grouping A/B/D Grouping Unit ABO/Rh ConfirmationVBECS Confirm AB A/B Mono Grouping A/B Group Unit ABO Confirmation
VBECS Confirm O Pos Anti-A,B Anti-A,BUnit ABO Confirmation for O Pos
VBECS Confirm O Neg Anti-A,B Anti-A,B and Anti-DUnit ABO Confirmation for O Neg
This document is version controlled via approval signature. Do not assume that a printed, copied, or downloaded document is current. Consult the Electronic Document Control System to verify use of the current version.
Page 54

Department of Veterans Affairs: VistA Blood Bank Maintenance (BBM) Team DocumentVistA Blood Establishment Computer Software (VBECS) – Vision Interface Configuration and Setup Guide Version 3.0
Appendix F: CA SDM Support Ticket Template
Please use the following to complete your ticket: Incident area: NTL.APP.HealtheVet VistA.VBECS 2_0 Summary: VBECS 2.2.0 Automated Instrument configuration assistance request Description:
o Enter contact information for the main blood bank and the name of the responsible individual(s) for all communications.
o Enter preferred date and time. Property Questions: Respond NO to the required questions. Group : automatically fills in correctly do not change it from. NTL Alert Blood Bank &
VBECS Add additional information as required.
This document is version controlled via approval signature. Do not assume that a printed, copied, or downloaded document is current. Consult the Electronic Document Control System to verify use of the current version.
Page 55
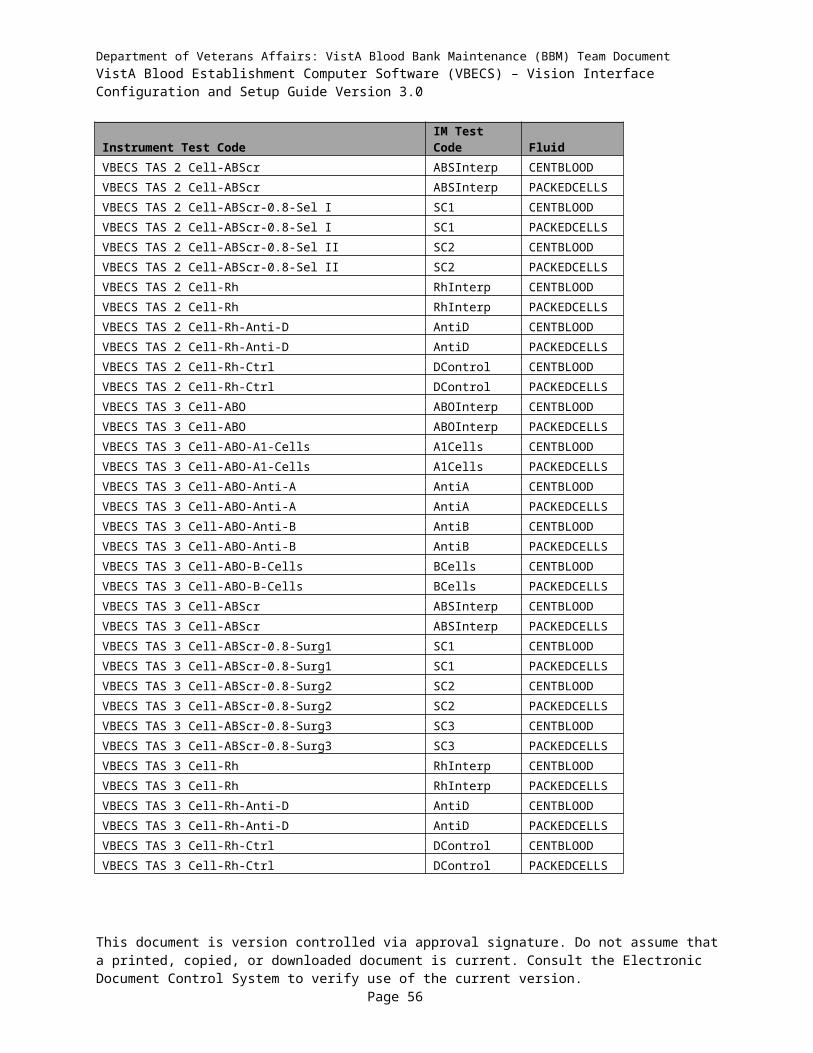
Department of Veterans Affairs: VistA Blood Bank Maintenance (BBM) Team DocumentVistA Blood Establishment Computer Software (VBECS) – Vision Interface Configuration and Setup Guide Version 3.0
Appendix G: Validation Planning and Example Test Scenarios
The following is a flowchart to help assess any one change and plan accordingly.
This document is version controlled via approval signature. Do not assume that a printed, copied, or downloaded document is current. Consult the Electronic Document Control System to verify use of the current version.
Page 56

Department of Veterans Affairs: VistA Blood Bank Maintenance (BBM) Team DocumentVistA Blood Establishment Computer Software (VBECS) – Vision Interface Configuration and Setup Guide Version 3.0
These are examples of test scenarios. Each site is responsible for evaluating changes for their intended use, assess risk, and for establishing additional validation test scenarios.
All test scenarios have a suggested user role, this may require adjustment to align with the patient or unit data selected to execute the scenario. Process any overrides as well, based on patient or unit selection.
*The Expected Outcome numbering corresponds to the Step number where the change verification appears.
Test Group One: AI interface disabledTest Objective: Demonstrate that the system will reject test results sent from automated instrument if the Automated Instrument interface is disabled.Option: VBECS Administrator, Automated Instrument Interface
At least one instrument available in any division and configured for connection with VBECS via Instrument Manager.Note: This may be executed at only one division if VBECS is used in a multidivisional configuration as the interface is enabled/disabled for all or none.
Data
Before beginning, verify current configuration, activity, and status of the existing interfaces, VistALink, and CPRS in your test account.Make sure that the VBECS-OERR HL7 link in VistA is NOT shutdown.
1. Create RBC and TAS orders in CPRS and accept them in VBECS.
User VBECS Administrator access is required to configure the AUTOMATED TESTING interface.No specific user role is required to process TAS and RBC orders in VBECS.
Steps
1. Log into VBECS Administrator:2. Disable the AUTOMATED TESTING interface using Configure Interfaces option.3. A message appears (You are about to disable Auto Instrument Interface. It will cause
VBECS to stop sending and receiving messages via that interface. Continue?), Click Yes.4. Close the window as all fields are disabled.5. Perform TAS test on the instrument and send results of testing to VBECS
Expected Outcome
5. Verify that after sending test results from an instrument fails it is possible to complete TAS test using manual testing grids and subsequently issue and transfuse blood unit to a patient.
Reports: 6. Review the Audit Trail report for changes to the interface.
This document is version controlled via approval signature. Do not assume that a printed, copied, or downloaded document is current. Consult the Electronic Document Control System to verify use of the current version.
Page 57

Department of Veterans Affairs: VistA Blood Bank Maintenance (BBM) Team DocumentVistA Blood Establishment Computer Software (VBECS) – Vision Interface Configuration and Setup Guide Version 3.0
Test Group Two: Verify AI individual test(s)Test Objective: Demonstrate that the system will allow the selected user role to perform normal workflow activities using your local blood bank testing instrument.
Note: Validate all tests that are performed at your site using an automated instrument.
Prior to initiating any testing of the automated instrument interface, see the VistA Blood Establishment Computer Software (VBECS) 2.2.0 Technical Manual-Security Guide for instructions for configuring your local instrument and Data Innovations Instrument Manager.
Configure your Test UID to clearly differentiate from a Production UID during your validation, for example, production is 1234567890, with 123 being your consistent prefix, change 123 or 12 to TS or TST or 999. Please change the Numeric Identifier for the Blood Bank Accession Area in your site Test Account.
Enable Automated Instrument Interface in VBECS Admin if it was disabled while performing testing in Test Group One.
Verify your VBECS processes with the Automated Instrument interface.Your local test plan will demonstrate that the system will perform normal daily work per your local policies, procedures and local validation plan that may include:
Blood Units: Automated Instrument or via the short cut key
ABO-Rh confirmation Unit Antigen Typing or Repeat
Patients: Automated Instrument or via the short cut key Perform a Type and Screen test (ABS and ABS with Auto-control only) Perform crossmatch tests: Serologic (Selected in Blood Units: Select Units before testing.*) Patient Tests:
ABO/Rh or RepeatAntibody Screen or RepeatDirect Antiglobulin Test or RepeatAntigen Typing or Repeat
Overrides, (ABO/Rh Discrepancy, Crossmatch incompatible: Give with Medical Director Approval) Report data from these actions is available for retrieval.
Testing Worklist ReportPatient History ReportUnit History ReportException Report (ABO/Rh Discrepancy, Give with Medical Director Approval)
*Remember to click NO to proceeding to the serologic crossmatch when selecting units for automated instrument testing.
This document is version controlled via approval signature. Do not assume that a printed, copied, or downloaded document is current. Consult the Electronic Document Control System to verify use of the current version.
Page 58

Department of Veterans Affairs: VistA Blood Bank Maintenance (BBM) Team DocumentVistA Blood Establishment Computer Software (VBECS) – Vision Interface Configuration and Setup Guide Version 3.0
Test Group 2 Scenario 1: Verify AI TAS test
Note: the Type and Screen (TAS) is a combination of two tests and may be saved as individual tests without completing the TAS as a whole.
DataVBECS: Select a patient.CPRS: Place a Type and Screen (TAS) order for the patientLAB: Accession the orderVBECS: Accept the order. (Orders, Accept Orders)
User No specific user role is required to process TAS order in VBECS.
Steps
1. User checks the Patient testing list to make sure the order is accepted in VBECS and appears on the Pending Task List (PTL). (Patient, Patient Testing, Diagnostic Tests).
2. Close the PTL.3. Process the specimen on the instrument using the recommended TAS profile for that
instrument. Complete all work needed to transmit the information to VBECS.4. Select Patients, Automated Instrument to review TAS results.5. Select the specimen UID, scanning the UID is preferred.6. Review TAS test results.7. Accept only the ABS or ABO/Rh test. Close the window.8. Open the PTL.9. Try to select TAS on PTL and complete testing on it manually.10. Open the Automated instrument window and accept the second part of TAS.11. Close the automated instrument window.12. Check Reports
Expected Outcome
5. Verify that the specimen UID is selectable by scanning, entry or patient selection6. Verify that the correct test results appear on the Automated Instrument review list.8. Verify that the TAS appears on the PTL with a status of “Instrument Results Pending Review”.9. Verify that system prevents user from completing TAS since they are still pending results from
an instrument for it.12. Verify that the results and comments appear as expected on the reports:
Testing Worklist Report Patient History Report Exception Report
This document is version controlled via approval signature. Do not assume that a printed, copied, or downloaded document is current. Consult the Electronic Document Control System to verify use of the current version.
Page 59

Department of Veterans Affairs: VistA Blood Bank Maintenance (BBM) Team DocumentVistA Blood Establishment Computer Software (VBECS) – Vision Interface Configuration and Setup Guide Version 3.0
Test Group 2 Scenario 2: Verify AI serologic crossmatch test
Data
VBECS: Select a patient.CPRS: Place a Type and Screen (TAS) order and Red Blood Cell order for the patientLAB: Accession the ordersVBECS: Accept the order. (Orders, Accept Orders)Process the TAS to completion.Select a blood unit for a selected patient*:
Previously entered into the division’s inventory (Blood Units, Incoming Shipment) ABO compatible May be available or selected for another patient (available, selected, crossmatched)
status. May or may not trigger selection overrides
*Remember to click NO to proceeding to the serologic crossmatch when selecting units for automated instrument testing.
User No specific user role is required to process crossmatch test in VBECS.
Steps
1. Process the component unit’s specimen on the instrument using the recommended profile for that instrument. Complete all work needed to transmit the information to VBECS.
2. Select Patients, Automated Instrument to review crossmatch results.3. Select the specimen UID, scanning the UID is preferred.4. Review results, select compatibility and accept crossmatch result.5. Print or do not print tag as desired.6. Accept the test and close the automated instrument window.7. Check Reports.
Expected Outcome
4. Verify that crossmatch results sent from an instrument show correctly on the screen.7. Verify that the results and comments appear as expected on the reports:
Testing Worklist Report Patient History Report (interpretations only). Exception Report
This document is version controlled via approval signature. Do not assume that a printed, copied, or downloaded document is current. Consult the Electronic Document Control System to verify use of the current version.
Page 60
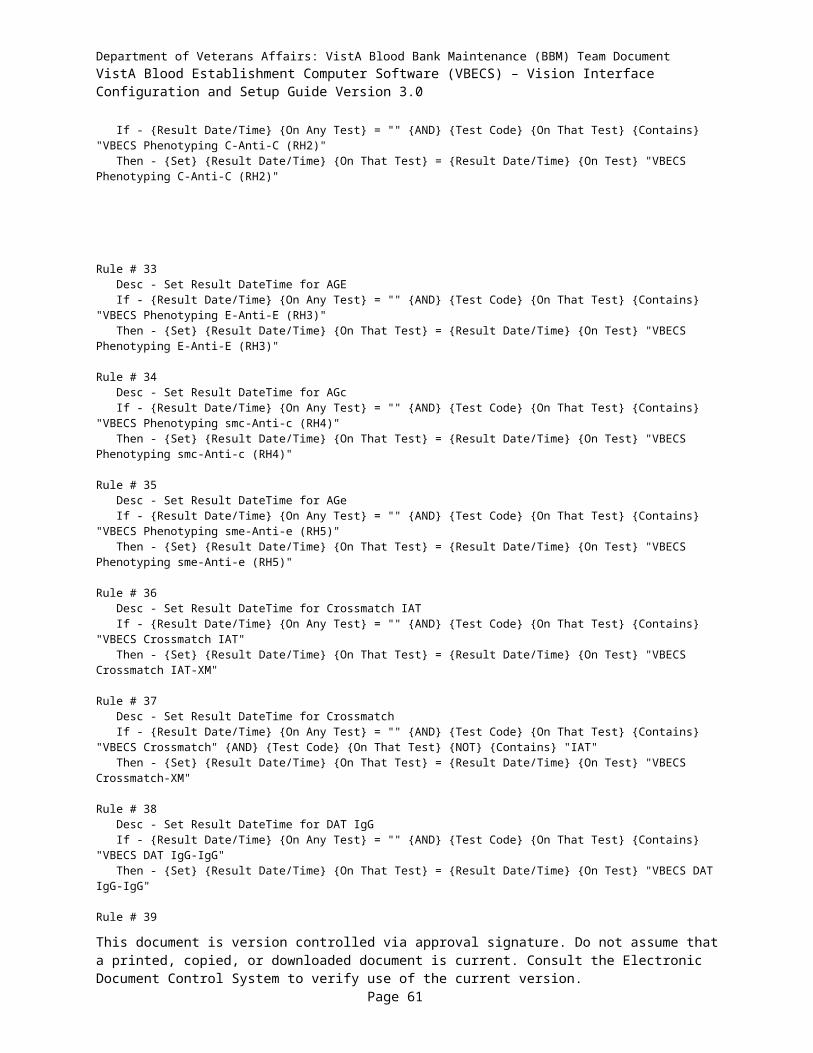
Department of Veterans Affairs: VistA Blood Bank Maintenance (BBM) Team DocumentVistA Blood Establishment Computer Software (VBECS) – Vision Interface Configuration and Setup Guide Version 3.0
Test Group 2 Scenario 3: Verify AI patient diagnostic tests(ABO/Rh, Antibody Screen, Direct Antiglobulin Test, Patient Antigen Typing, and the reflex test)
DataVBECS: Select a patient.CPRS: Place a diagnostic test order for the patientLAB: Accession the orderVBECS: Accept the order. (Orders, Accept Orders)
User No specific user role is required to process diagnostic tests in VBECS.
Steps
1. User checks the Patient testing list to make sure the order is accepted in VBECS and appears on the Pending Task List (PTL). (Patients, Patient Testing, Diagnostic Tests).
2. Close the PTL.3. Process the specimen on the instrument using the recommended testing profile for that
instrument. Complete all work needed to transmit the information to VBECS.4. Select Patients, Automated Instrument to review test results.5. Select the specimen UID, scanning the UID is preferred.6. Review and accept test results7. Close the automated instrument window.8. Check reports.
Expected Outcome
5. Verify that the specimen UID is selectable by scanning, entry or patient selection.6. Verify that patient test results sent from an instrument show correctly on the screen.8. Verify that the results and comments appear as expected on the reports:
Testing Worklist Report Patient History Report Exception Report
This document is version controlled via approval signature. Do not assume that a printed, copied, or downloaded document is current. Consult the Electronic Document Control System to verify use of the current version.
Page 61

Department of Veterans Affairs: VistA Blood Bank Maintenance (BBM) Team DocumentVistA Blood Establishment Computer Software (VBECS) – Vision Interface Configuration and Setup Guide Version 3.0
Test Group 2 Scenario 4: Verify AI blood unit tests
Data
VBECS: Select a blood unit previously entered into the division’s inventory (Blood Units, Incoming Shipment).For ABO/Rh Confirmation testing on the instrument, unit should be in a Limited status.For Unit Antigen Typing, the unit may or may not have been confirmed.
User No specific user role is required to process blood unit tests in VBECS.
Steps
1. Process the component unit’s specimen on the instrument using the recommended profile for that instrument. Complete all work needed to transmit the information to VBECS.
2. Select Blood Units, Automated Instrument to review test results.3. Select the blood component unit’s Donor Identification Number (DIN), scanning the DIN is
preferred.4. Select the product code (if there are multiple blood units with the same product code)5. Review the transmitted blood unit test.6. Accept the test and close the automated instrument window.7. Check Reports
Expected Outcome
5. Verify that blood unit test results show correctly on the screen.7. Verify that the results and comments appear as expected on the reports:
Testing Worklist Report Unit History Report (interpretations only). Exception Report
This document is version controlled via approval signature. Do not assume that a printed, copied, or downloaded document is current. Consult the Electronic Document Control System to verify use of the current version.
Page 62