Embed Size (px)
Citation preview
thebusinessobjectspeople.com
Universe JDBC Connections
This guide is used to show you how to setup jdbc connections to various databases. The
databases in this article are SQL Server 2012, Oracle 11g R2 and SAP IQ 16.
If you plan to develop a multi-source universe using the Information Design Tool it is
recommended to use JDBC for best performance.
If you are developing Lumira Designer dashboards using a universe as a source, it is also
recommended to use JDBC connectivity for best performance.
The examples below all use the Information Design Tool to create a universe connection for a
universe in .unx format.
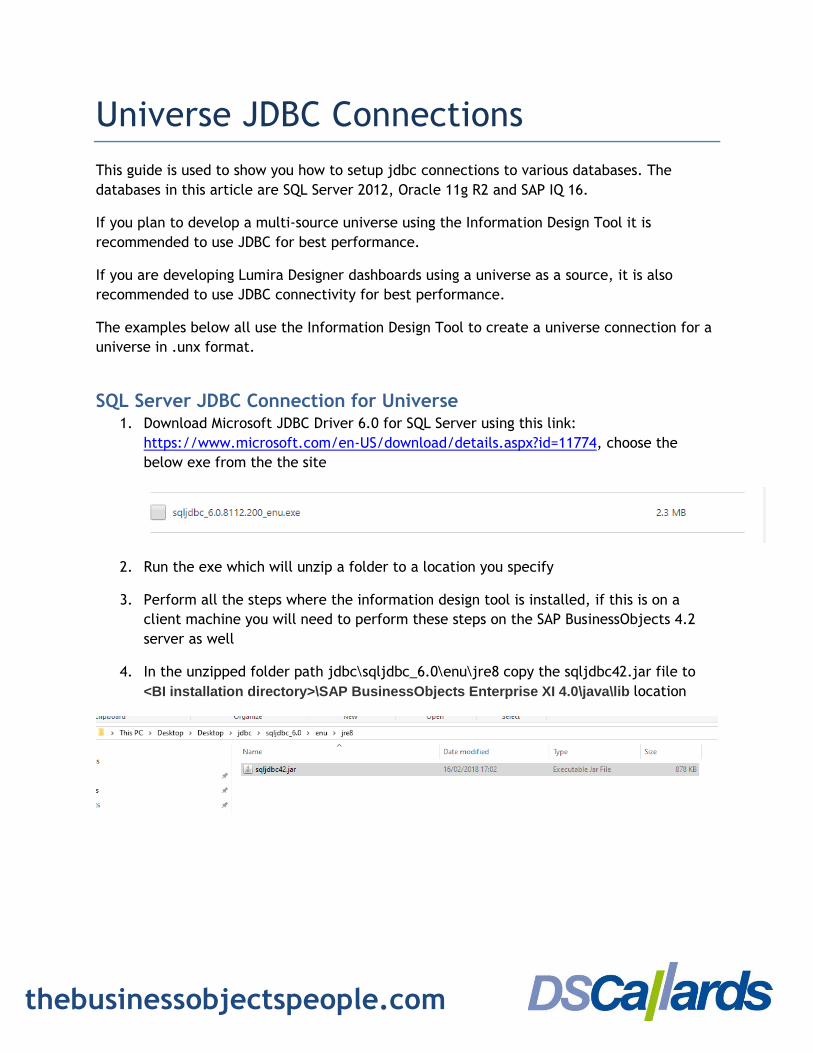
SQL Server JDBC Connection for Universe 1. Download Microsoft JDBC Driver 6.0 for SQL Server using this link:
https://www.microsoft.com/en-US/download/details.aspx?id=11774, choose the
below exe from the the site
2. Run the exe which will unzip a folder to a location you specify
3. Perform all the steps where the information design tool is installed, if this is on a
client machine you will need to perform these steps on the SAP BusinessObjects 4.2
server as well
4. In the unzipped folder path jdbc\sqljdbc_6.0\enu\jre8 copy the sqljdbc42.jar file to
<BI installation directory>\SAP BusinessObjects Enterprise XI 4.0\java\lib location

thebusinessobjectspeople.com
5. Copy the path the .jar file was copied to, this example uses this location C:\Program
Files (x86)\SAP BusinessObjects\SAP BusinessObjects Enterprise XI 4.0\java\lib
6. Take a backup of sqlserv.sbo file from <installation directory>\SAP BusinessObjects
Enterprise XI 4.0\dataAccess\connectionServer\jdbc
7. Once you have backed up sqlsrv.sbo file edit the file in the original location using
notepad, this example uses this location C:\Program Files (x86)\SAP
BusinessObjects\SAP BusinessObjects Enterprise XI
4.0\dataAccess\connectionServer\jdbc\
thebusinessobjectspeople.com
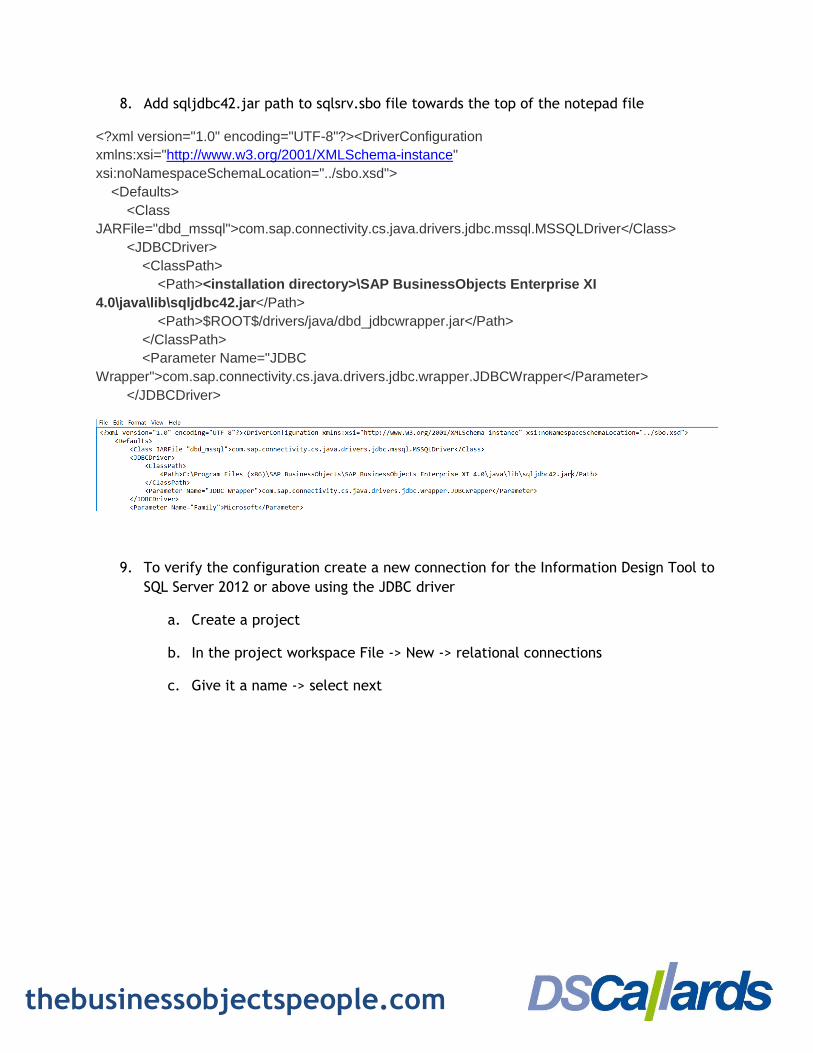
8. Add sqljdbc42.jar path to sqlsrv.sbo file towards the top of the notepad file
<?xml version="1.0" encoding="UTF-8"?><DriverConfiguration
xmlns:xsi="http://www.w3.org/2001/XMLSchema-instance"
xsi:noNamespaceSchemaLocation="../sbo.xsd">
<Defaults>
<Class
JARFile="dbd_mssql">com.sap.connectivity.cs.java.drivers.jdbc.mssql.MSSQLDriver</Class>
<JDBCDriver>
<ClassPath>
<Path><installation directory>\SAP BusinessObjects Enterprise XI
4.0\java\lib\sqljdbc42.jar</Path>
<Path>$ROOT$/drivers/java/dbd_jdbcwrapper.jar</Path>
</ClassPath>
<Parameter Name="JDBC
Wrapper">com.sap.connectivity.cs.java.drivers.jdbc.wrapper.JDBCWrapper</Parameter>
</JDBCDriver>
9. To verify the configuration create a new connection for the Information Design Tool to
SQL Server 2012 or above using the JDBC driver
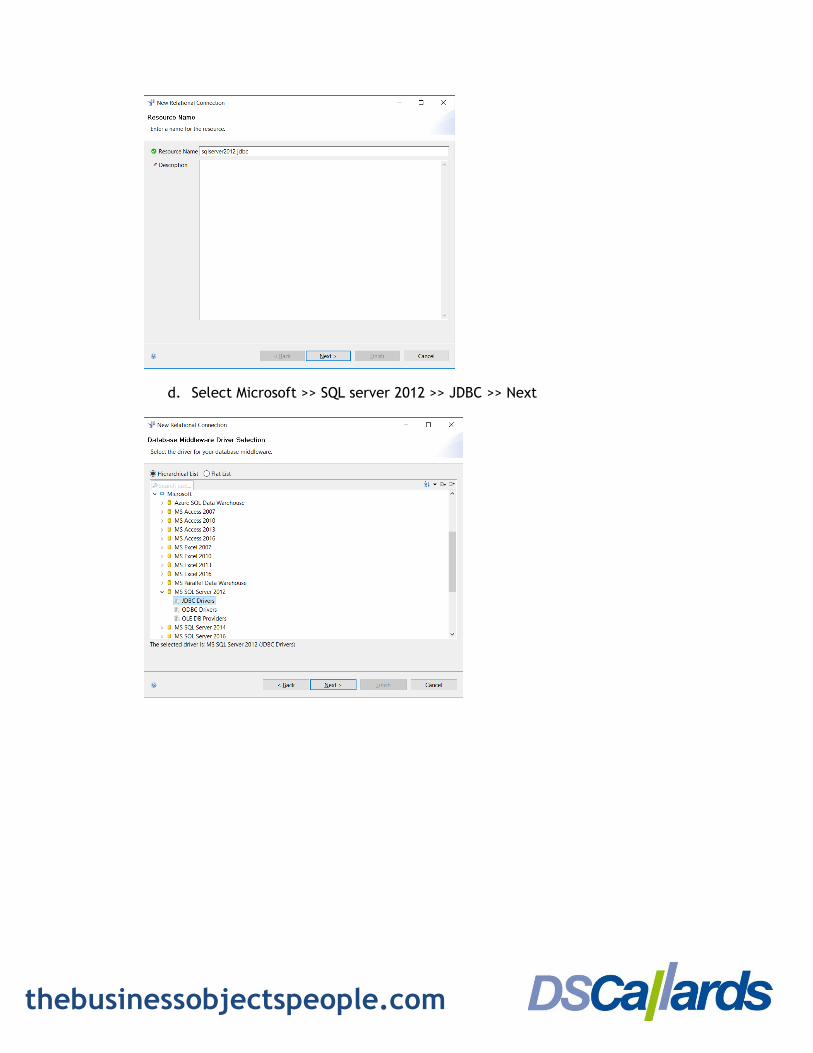
a. Create a project
b. In the project workspace File -> New -> relational connections
c. Give it a name -> select next
thebusinessobjectspeople.com
d. Select Microsoft >> SQL server 2012 >> JDBC >> Next
thebusinessobjectspeople.com
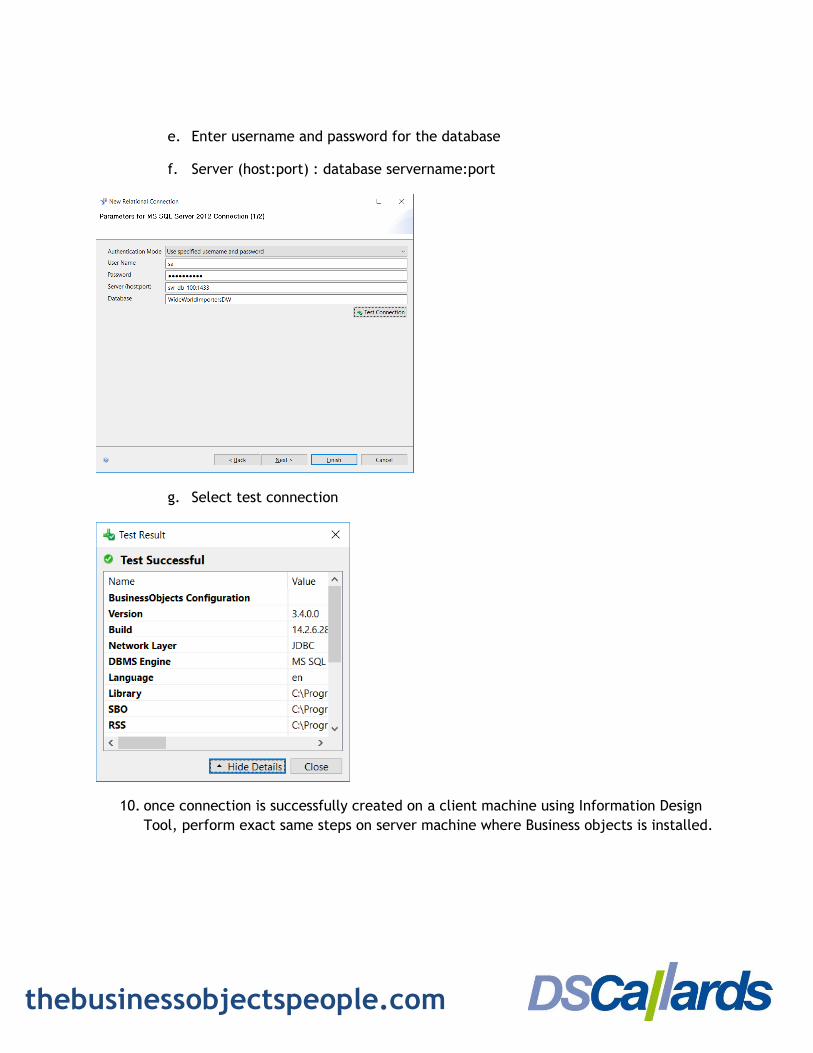
e. Enter username and password for the database
f. Server (host:port) : database servername:port
g. Select test connection
10. once connection is successfully created on a client machine using Information Design
Tool, perform exact same steps on server machine where Business objects is installed.

thebusinessobjectspeople.com
Oracle JDBC Connection for Universe 1. Download the Oracle Client for the version of Oracle you need to report from. This
URL downloads 11g2 client:
64-bit client https://www.oracle.com/technetwork/database/enterprise-
edition/downloads/112010-win64soft-094461.html
2. Install the Oracle 64-bit client and select administrator and a root folder on a drive to
install the client in our example installs it here: C:\Oracle64
3. Take note of the location of the ojdbc6.jar file that the Oracle.sbo need to reference
C:\Oracle64\product\11.2.0\client_1\jdbc\lib\ojdbc6.jar
4. Take a backup of Oracle.sbo file from <installation directory>\SAP BusinessObjects
Enterprise XI 4.0\dataAccess\connectionServer\jdbc
5. Once you have backed up Oracle.sbo file edit the file in the original location using
notepad, this example uses this location C:\Program Files (x86)\SAP
BusinessObjects\SAP BusinessObjects Enterprise XI
4.0\dataAccess\connectionServer\jdbc\
thebusinessobjectspeople.com
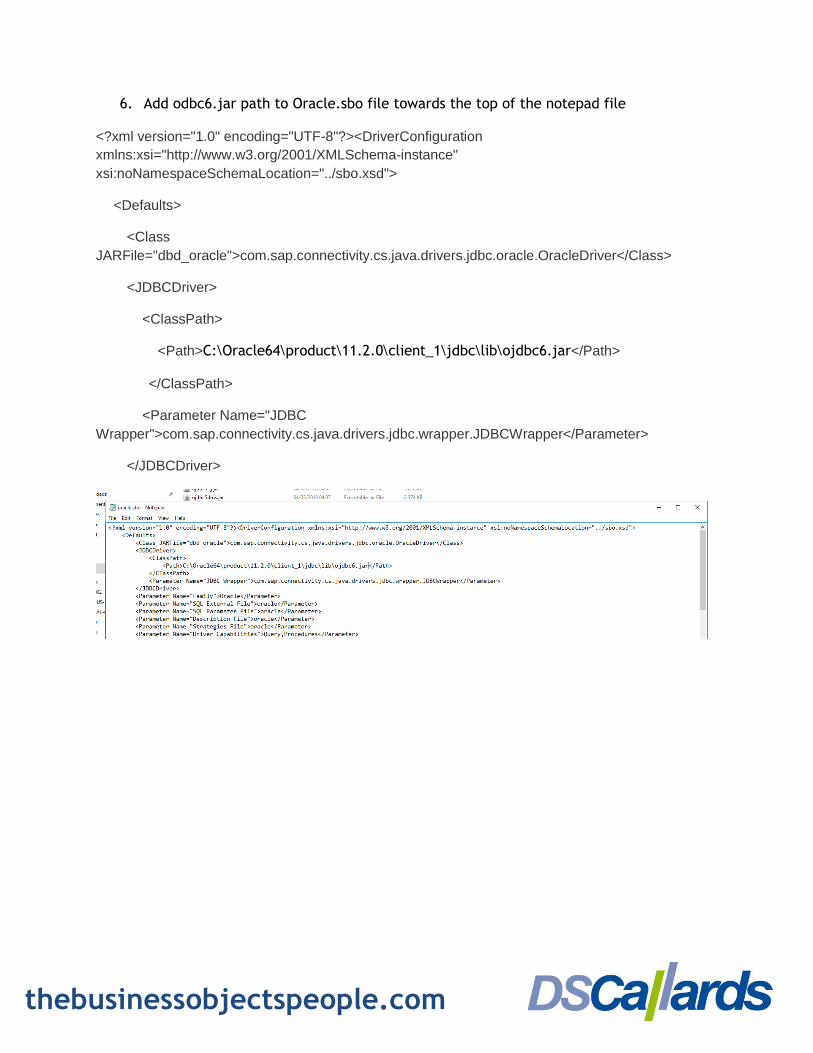
6. Add odbc6.jar path to Oracle.sbo file towards the top of the notepad file
<?xml version="1.0" encoding="UTF-8"?><DriverConfiguration
xmlns:xsi="http://www.w3.org/2001/XMLSchema-instance"
xsi:noNamespaceSchemaLocation="../sbo.xsd">
<Defaults>
<Class
JARFile="dbd_oracle">com.sap.connectivity.cs.java.drivers.jdbc.oracle.OracleDriver</Class>
<JDBCDriver>
<ClassPath>
<Path>C:\Oracle64\product\11.2.0\client_1\jdbc\lib\ojdbc6.jar</Path>
</ClassPath>
<Parameter Name="JDBC
Wrapper">com.sap.connectivity.cs.java.drivers.jdbc.wrapper.JDBCWrapper</Parameter>
</JDBCDriver>
thebusinessobjectspeople.com
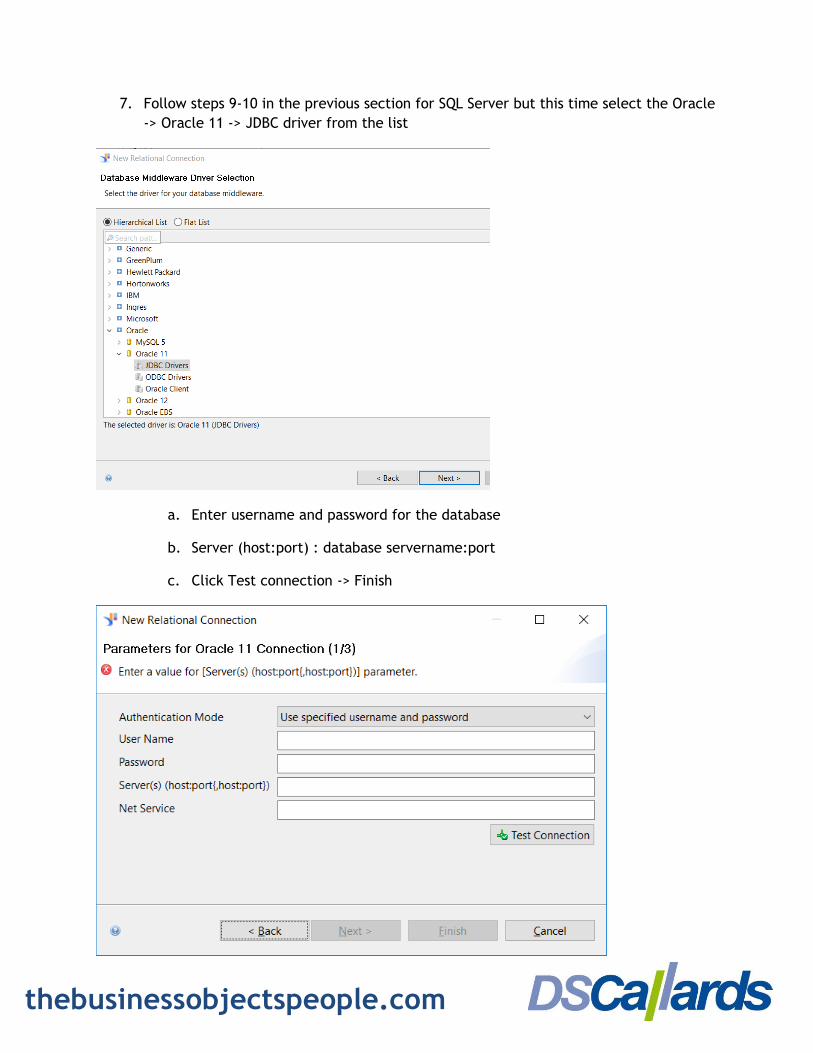
7. Follow steps 9-10 in the previous section for SQL Server but this time select the Oracle
-> Oracle 11 -> JDBC driver from the list
a. Enter username and password for the database
b. Server (host:port) : database servername:port
c. Click Test connection -> Finish

thebusinessobjectspeople.com
SAP IQ JDBC Connection for Universe
1. Check the SAP BusinessObjects server to see if you have already installed the connectivity
components go to the environment variables on the server, control panel -> system ->
advanced system settings, environment variables and check the below environment vriable
location
Or if you do not have this setup on your SAP BusinessObjects server you will need to the
following and download and install the components.
1. Download the relevant SAP IQ Server version installation that you have installed from
the SAP Support Portal download center
https://launchpad.support.sap.com/#/softwarecenter - you will require a S-user login to the
portal and permission to download software.
Navigate to Support Packages and Patches -> By Alphabetical Index -> I -> Sybase IQ -> choose
relevant version -> select Sybase IQ Server [version] -> select Windows on x64 64Bit ->
download the relevant version ZIP file that matches your version
2. Extract the ZIP file downloaded this example is for zip file IQSERV160011P_11-
20011184.ZIP
3. Once extracted run the setup.exe from the extracted zip file C:\SAP
Downloads\IQSERV160011P_11-20011184\ebf27569\setup.exe

thebusinessobjectspeople.com
4. Install location chosen for this example is C:\SAPIQ, and choose custom installation
5. =
6. Choose the jconnect for JDBC
thebusinessobjectspeople.com
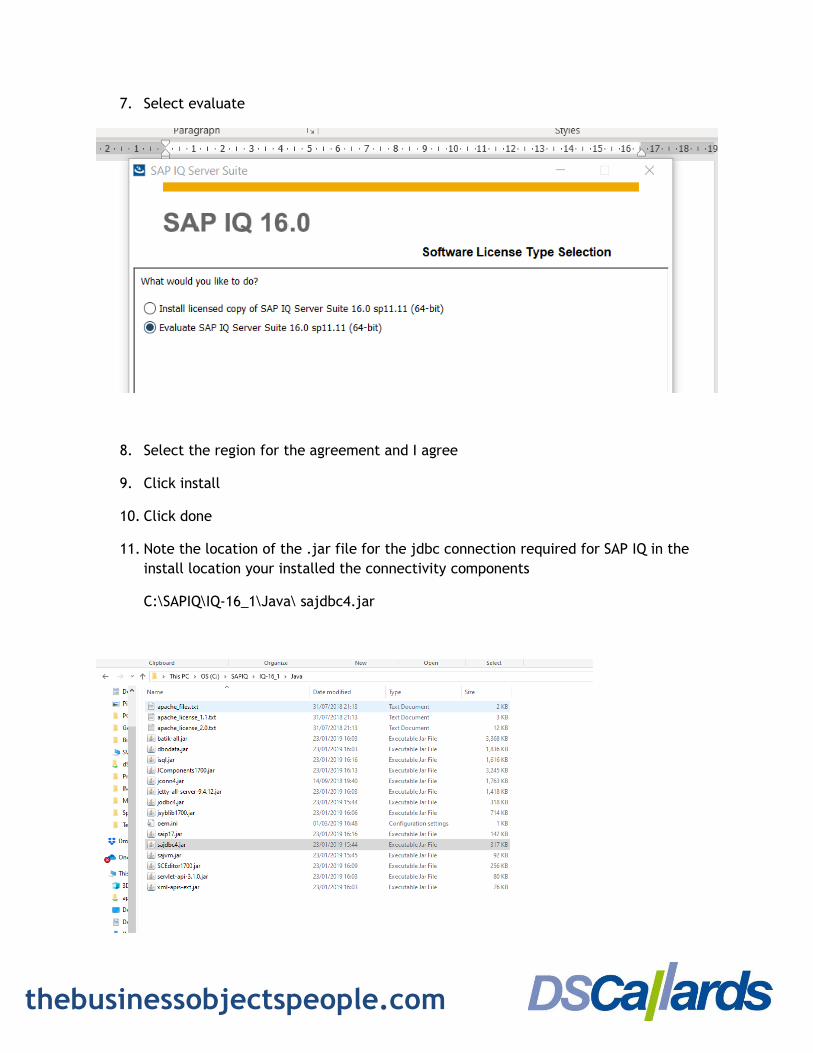
7. Select evaluate
8. Select the region for the agreement and I agree
9. Click install
10. Click done
11. Note the location of the .jar file for the jdbc connection required for SAP IQ in the
install location your installed the connectivity components
C:\SAPIQ\IQ-16_1\Java\ sajdbc4.jar

thebusinessobjectspeople.com
12. Take a backup of Sybase.sbo file from <installation directory>\SAP BusinessObjects
Enterprise XI 4.0\dataAccess\connectionServer\jdbc
13. Once you have backed up Sybase.sbo file edit the file in the original location using
notepad, this example uses this location C:\Program Files (x86)\SAP
BusinessObjects\SAP BusinessObjects Enterprise XI
4.0\dataAccess\connectionServer\jdbc\
14. Add sajdbc4.jar path to Sybase.sbo file towards the top of the notepad file
<?xml version="1.0" encoding="UTF-8"?><DriverConfiguration
xmlns:xsi="http://www.w3.org/2001/XMLSchema-instance"
xsi:noNamespaceSchemaLocation="../sbo.xsd">
<Defaults>
<Class
JARFile="dbd_sybase">com.sap.connectivity.cs.java.drivers.jdbc.sybase.SybaseDriver</Class>
<JDBCDriver>
<ClassPath>
<Path>C:\SAPIQ\IQ-16_1\Java\sajdbc4.jar</Path>
</ClassPath>
<Parameter Name="JDBC
Wrapper">com.sap.connectivity.cs.java.drivers.jdbc.wrapper.JDBCWrapper</Parameter>
</JDBCDriver>

thebusinessobjectspeople.com
8. Follow steps 9-10 in the previous section for SQL Server but this time select the Sybase
-> SAP IQ 16 -> JDBC driver from the list
d. Enter username and password for the database
e. Server (host:port) : database servername:port
f. Click Test connection -> Finish

thebusinessobjectspeople.com
Rebecca Morris, Senior BI Consultant, DSCallards
© DSCallards Ltd

thebusinessobjectspeople.com