Embed Size (px)
Citation preview

SCHOOL OF COMPUTING
DEPARTMENT OF COMPUTER SCIENCE & ENGINEERING
UNIT – I - SIT1402 - Mobile Application Development

Introduction and UI interface
• 1. Introduction to mobile technologies
• 2. Mobile operating systems
• 3. Mobile devices – pros and cons
• 4. Introduction to Android, Versions,Features
• 5. Android architecture
• 6. UI Layouts
• 7. UI Controls / Widgets
• 8. Event handling
• 9. Required Tools- Eclipse, ADT, AVD
• 10. Application structure
• 11. Android manifest file
• 12. Android design philosophy
• 13. Creating andriod applications 2

Mobile Networks / Technologies
GSM
GPRS
EDGE
1G, 2G, 3G, 4G, 5G
IEEE 802.11
Infrared
Bluetooth
Cellular Network
• Base stations transmit to and receive from mobiles at the assigned spectrum
– Multiple base stations use the same spectrum (spectral reuse)
• The service area of each base station is called a cell
• Each mobile terminal is typically served by the ‘closest’
base stations
– Handoff when terminals move

frequency
Cellular Network Generations
• It is useful to think of cellular Network/telephony in terms of generations:
– 0G: Briefcase-size mobile radio telephones
– 1G: Analog cellular telephony
– 2G: Digital cellular telephony
– 3G: High-speed digital cellular telephony (including
video telephony)
– 4G: IP-based “anytime, anywhere” voice, data, and
multimedia telephony at faster data rates than 3G (to be deployed
in 2012–2015)
Frequency Division Multiple Access
• Each mobile is assigned a separate frequency channel for the duration of the call
• Sufficient guard band is required to prevent adjacent channel interference
• Usually, mobile terminals will have one downlink frequency
band and one uplink frequency band
• Different cellular network protocols use different frequencies
• Frequency is a precious and scare resource. We are running
out of it.

Time Division Multiple Access
Guard time – signal transmitted by mobile terminals at different locations do
no arrive at the base station at the same time
• Time is divided into slots and only one mobile terminal
transmits during each slot
– Like during the lecture, only one can talk, but others may take the floor in turn
• Each user is given a specific slot. No competition in cellular
network
– Unlike Carrier Sensing Multiple Access (CSMA) in WiFi

Code Division Multiple Access
• Use of orthogonal codes to separate different
transmissions
• Each symbol of bit is transmitted as a larger number of bits using the user
specific code – Spreading
– Bandwidth occupied by the signal is much larger than the
information transmission rate
– But all users use the same frequency band together

1 GENERATION
• First generation cellular networks
• Radio signals = analog
• Technologies - AMPS (Advanced Mobile Phone System)
• First Blackberry (850)
2G (GSM and GPRS Networks)
• 2G carriers continued to improve transmission quality and coverage paging,
faxes, text messages and voicemail.
• 2.5G uses GPRS(General Packet Radio Services), which delivers packet-
switched capabilities to existing GSM networks.

GSM Architecture
15

GSM
9.6kbps (one timeslot)
GSM Data
Also called CSD
GPRS GSM
HSCSD
GSM Evolution to 3G
High Speed Circuit Switched Data
Dedicate up to 4 timeslots for data
connection ~ 50 kbps Good for
real-time applications c.w. GPRS
Inefficient -> ties up resources, even when nothing sent
Not as popular as GPRS (many skipping HSCSD)
Enhanced
Data Rates for
Global
Evolution
Uses 8PSK
modulation
3x improvement in
data rate on short
distances Can fall
back to GMSK for
greater distances
Combine with GPRS
(EGPRS) ~ 384 kbps
Can also be combined with
HSCSD
• W-CDMA (Wide Band Code Division Multiple Access) technology.
• It also used for services like Wireless Application Protocol (WAP) access,
Multimedia Messaging Service (MMS) or Short Message Service (SMS)
• Internet communication through the excess to World Wide Web and E-mail.
EDGE General Packet Radio Services Data rates
up to ~ 115 kbps
Max: 8 timeslots used as any one time
Packet switched; resources not tied up all the time Contention based.
Efficient, but variable delays GSM / GPRS core network re-used by WCDMA
(3G)
WCDMA

1. Mobile Operating Systems

What is Mobile OS?
• A Mobile OS is a very basic and essential software to operate a Mobile
System.
• A Mobile OS is a software platform which is designed specially for mobile
to handle the devices like Smart phone, Tablet, PDA with lot of features and
facilities.
Android
- Android is a mobile operating system (OS) currently developed by Google,
based on the Linux kernel and designed primarily for touchscreen mobile
devices such as smartphones and tablets.
- It was developed by Google, Open Handset Alliance, Android Open Source
Project, Android Inc.
- Source model, open source
- Written in C (core), C++, and Java (UI)
- OS family, Unix
OHA (Open Handset Alliance)
• A business alliance consisting of 47+ companies to develop
open standards for mobile devices

Apple iOS
iOS
- iOS (originally iPhone OS) is a mobile operating system created and
developed by Apple Inc. and distributed exclusively for Apple hardware. It is
the operating system that presently powers many of the company's mobile
devices, including the iPhone, iPad, and iPod touch.
- It was developed by Apple Inc. June 29, 2007
-Source model, closed source
- Written in, C,C++, Objective-C, and Swift
- OS family, Unix
Windows Mobile
- Windows Mobile is a mobile operating system developed by
Microsoft for smart phones and Pocket PC’s
- It was first launched in October 2010 with Windows Phone 7
- Currently maintained with Micosoft Corporation
- Written in C, C++
- OS Family, Microsoft Windows
Blackberry
- BlackBerry OS is a proprietary mobile operating system developed by
BlackBerry Ltd for its BlackBerry line of smartphone handheld devices.
- It was developed by BlackBerry Ltd on January 19, 1999
- Source model is closed source
- Written in, C++ and Java
- OS family, Mobile Operating Systems

Symbian
- Symbian is a mobile operating system (OS) and computing platform
designed for smart phones
- Symbian was originally developed as a closed- source OS for PDAs in 1998
by Symbian Ltd.
- Currently maintained by Accenture on behalf of Nokia (historically Symbian
Ltd. and Symbian Foundation)
- Written in C++
- OS Family RTOS
Why Mobile App Development?
• Mobile platform is the platform of the future world
• Job market is hot
– Market for mobile software surges from $4.1 billion in 2009 to
$17.5 billion by 2012
– In 2010, www.dice.com survey: 72% of recruiters looking for
iPhone app developers, 60% for Android
– Dice.com: mobile app developers made $85,000 in 2010 and
salaries expected to rise
– According to 2016, 79% of the organizations surveyed plan to
increase spending on mobile development by 36%
• Students (and faculty!) are naturally interested!
Types of Mobile Appications
• What are they?
– Any application that runs on a mobile device
• Types
– Web Apps
– Native Apps
– Hybrid Apps
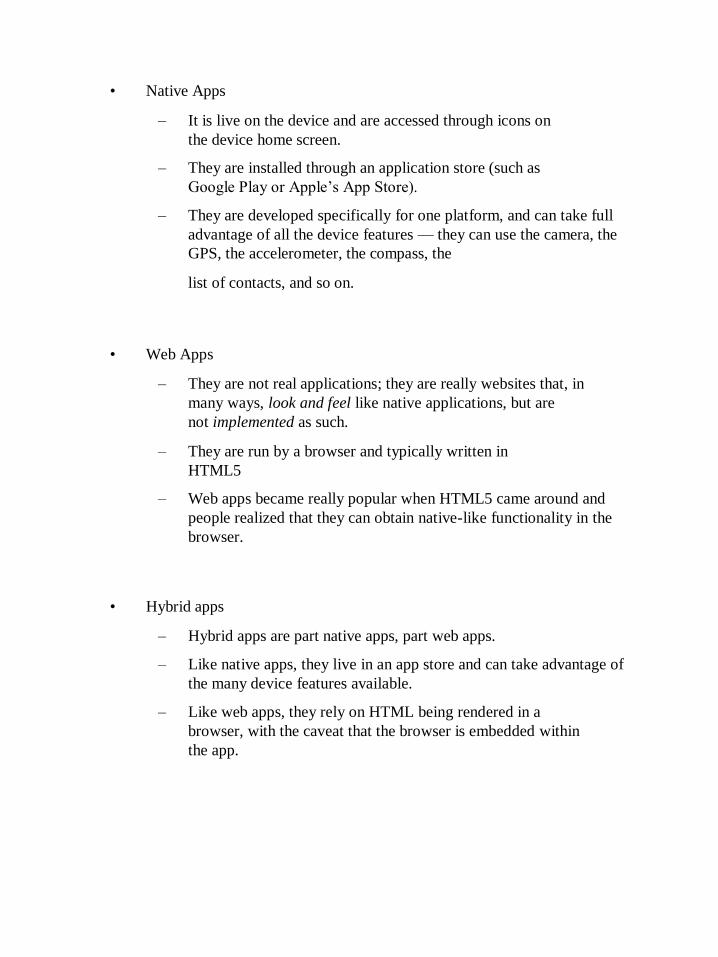
• Native Apps
– It is live on the device and are accessed through icons on
the device home screen.
– They are installed through an application store (such as
Google Play or Apple’s App Store).
– They are developed specifically for one platform, and can take full
advantage of all the device features — they can use the camera, the
GPS, the accelerometer, the compass, the
list of contacts, and so on.
• Web Apps
– They are not real applications; they are really websites that, in
many ways, look and feel like native applications, but are
not implemented as such.
– They are run by a browser and typically written in
HTML5
– Web apps became really popular when HTML5 came around and
people realized that they can obtain native-like functionality in the
browser.
• Hybrid apps
– Hybrid apps are part native apps, part web apps.
– Like native apps, they live in an app store and can take advantage of
the many device features available.
– Like web apps, they rely on HTML being rendered in a
browser, with the caveat that the browser is embedded within
the app.

2. Mobile Devices: Advantages compared to fixed
devices)
• Always with the user
• Typically have Internet access
• Typically GPS enabled
• Typically have accelerometer & compass
• Mostly have cameras & microphones
• Many apps are free or low-cost and etc...
Mobile Devices: Limitations
• Limited memory
• Limited processing power
• Different technologies and standards
• Limited or awkward input: soft keyboard, phone keypad, touch screen, or
stylus
• Small screens
• Limited and slow network access
• Slow hardware
• Limited battery life
• Limited web browser functionality
• Often inconsistent platforms across devices and etc...

Android Mobile Application Development
Prerequisite
• Good knowledge of JAVA language
• Familiarity with Eclipse IDE
* All the above is not mandatory

3. Introduction to Android
• Open software platform for mobile development
• A complete stack – OS, Middleware,
Applications
• An Open Handset Alliance (OHA) project
• Powered by Linux operating system
• Fast application development in Java
• Open source under the Apache 2 license
What is Android?
• Android is a software stack
for mobile devices that
includes an operating
system, middleware and
key applications.

Developed by
• Andy Rubin (co-founder of Danger),
• Rich Miner (co-founder of Wildfire Communications, Inc.),
• Nick Sears (once VP at T-Mobile)
History of Android
• 1) Initially, Andy Rubin founded Android Incorporation in Palo
Alto, California, United States in October, 2003.
• 2) In 17th August 2005, Google acquired Android Incorporation.
Since then, it is in the subsidiary of Google Incorporation.
• 3) The key employees of Android Incorporation are Andy Rubin, Rich
Miner, Chris White and Nick Sears.
• 4) Originally intended for camera but shifted to smart phones later
because of low market for camera only.
• 5) Android is the nick name of Andy Rubin given by coworkers because of
his love to robots.
• 6) In 2007, Google announces the development of Android OS.
• 7) In 2008, HTC launched the first android mobile.

History of Android (con...)
• The code names of android ranges from A to N currently, such as
– 1.0 Astro (some times says no code name)
– 1.1 Bender (Some times say “Petit four”)
– 1.5 Cupcake
– 1.6 Donut
– 2.x Eclair
– 2.2 Froyo
– 2.3.x Gingerbread
– 3.x.x Honeycomb
– 4.0.x Ice Cream Sandwitch
– 4.1.x, 4.2.x and 4.3.x Jelly Bean
– 4.4.x KitKat and
– 5.x.x Lollipop
– 6.0 MarshMallow
– N (“A Few Weeks”)
• Let's understand the android history in a sequence.


Why Android?
• A lot of students have them
– 2010 survey by University of Colorado : 22% of college
students have Android phone (26% Blackberry, 40%
iPhone)
– Gartner survey: Android used on 22.7% of smart phones sold
world-wide in 2010 (37.6% Symbian, 15.7% iOS)
• Students already know Java and Eclipse
– Low learning curve
– CS students can use App Inventor for Android

Android Applications
• Android applications are usually developed in the Java language using the
Android Software Development Kit
• Once developed, Android applications can be packaged easily and sold out
either through a store such as Google Play, SlideME, Opera Mobile Store,
Mobango, F-droid and the Amazon Appstore.
• Android powers hundreds of millions of mobile devices in more than 190
countries around the world. It's the largest installed base of any mobile
platform and growing fast.
• Every day more than 1 million new Android devices are activated worldwide.
Categories of Android applications
• There are many android applications in the market

Features of Android
• Android is a powerful operating system competing with Apple 4GS
and supports great features.
Features Description
Beautiful UI Android OS basic screen provides a
beautiful and intuitive user interface.
Connectivity GSM/EDGE, IDEN, CDMA, EV-DO, UMTS,
Bluetooth, Wi-Fi, LTE, NFC and WiMAX.
Storage SQLite, a lightweight relational database, is used for
data storage purposes.
Features Description
Media support H.263, H.264, MPEG-4 SP, AMR, AMR-WB, AAC,
HE-AAC, AAC 5.1, MP3, MIDI, Ogg Vorbis, WAV,
JPEG, PNG, GIF, and BMP
Messaging SMS and MMS
Web browser Based on the open-source WebKit layout engine,
coupled with Chrome's V8 JavaScript engine
supporting HTML5 and CSS3.
Multi-touch Android has native support for multi-touch which was
initially made available in handsets such as the HTC
Hero.
Multi-tasking User can jump from one task to another and same
time various application can run simultaneously.

Features Description
Resizable widgets Widgets are resizable, so users can expand them
to show more content or shrink them to save
space
Multi- Language Supports single direction and bi-directional text.
GCM Google Cloud Messaging (GCM) is a service that
lets developers send short message data to their
users on Android devices.
Wi-Fi Direct A technology that lets apps discover and pair directly,
over a high-bandwidth peer-to-peer connection.
Android Beam A popular NFC-based technology that lets
users instantly share, just by touching two
NFC-enabled phones together.
• Application framework enabling reuse and replacement of components
• Dalvik virtual machine optimized for mobile devices
• Integrated browser based on the open source webkit engine
• Optimized graphics powered by a custom 2D graphics library; 3D graphics
based on the OpenGL ES 1.0 specification (hardware acceleration optional)
• SQLite for structured data storage
• Media support for common audio, video, and still image formats (MPEG4,
H.264, MP3, AAC, AMR, JPG, PNG, GIF)
67

What does it have that other’s don’t?
• Google Map Applications
• Background Services and Applications
• Shared Data and Inter-process communication
• All Applications are created Equal
• P2P Inter-device Application Messaging
• MVC2 Architecture
VC2
• The goal of the MVC design pattern is to separate the application
object (model) from the way it is represented to the user (view) from
the way in which the user controls it (controller).
69

Manufacturer and carrier support
• Almost all carriers have Android
• HTC
• LG
• Sony-Ericsson
• Geeksphone
• Dell
• Motorola
• Acer
• Samsung
• Archos
• Lenovo
• Huawei
70

4. Architecture

Android S/W Stack - Applications
• Android provides a set of core applications:
Email Client
SMS Program
Calendar
Maps
Browser
Contacts
Etc
• All applications are written using the Java language.
Android S/W Stack Application Framework
• Enabling and simplifying the reuse of components
Developers have full access to the same framework APIs used by the
core applications.
Users are allowed to replace components.

Android S/W Stack App Framework (Cont)
• Features
Feature Role
View System Used to build an application, including lists,
grids, text boxes, buttons, and embedded web browser
Content Provider Enabling applications to access
data from other applications or to
share their own data
Resource Manager Providing access to non-code resources (localized
strings, graphics, and layout files)
Notification Manager Enabling all applications to display customer
alerts in the status bar
Activity
Manager
Managing the lifecycle of applications and providing
a common navigation back-stack

Android S/W Stack - Libraries
• Including a set of C/C++ libraries used by components of the Android
system
• Interface through Java
• Surface manager – Handling UI Windows
• 2D and 3D graphics
• Media codes, SQLite, Browser engine
.
Android S/W Stack - Runtime
• Core Libraries
Providing most of the functionality available in the core libraries of
the Java language
APIs
Data Structures
Utilities
File Access
Network Access
Graphics

Android S/W Stack – Runtime (Cont)
• Dalvik Virtual Machine
Providing environment on which every Android
application runs
Each Android application runs in its own process, with its
own instance of the Dalvik VM.
Dalvik has been written such that a device can run multiple
VMs efficiently.
Register-based virtual machine
Android S/W Stack – Runtime (Cont)
• Dalvik Virtual Machine (Cont)
• Executing the Dalvik Executable (.dex) format
.dex format is optimized for minimal memory
footprint.
Compilation
Relying on the Linux Kernel for:
Threading
Low-level memory management

Android S/W Stack – Linux Kernel
Relying on Linux Kernel 2.6 for core system services
Memory and Process Management
Network Stack
Driver Model
Security
Providing an abstraction layer between the H/W and the rest of the
S/W stack

Android development setup
Follow the instructions ...
Download the software from the URL:
http://developer.android.com/sdk/index.html
Install the following Softwares:
• Android SDK
• Eclipse IDE (3.4 or newer)
• Android Development Tools (ADT) Eclipse plug-in
Bring with you (optional):
• Android OS enabled Mobile device
• USB cable so you can test your app on your phone

Application Fundamentals
• Apps are written in Java
• Bundled by Android Asset Packaging Tool
• Every App runs its own Linux process
• Each process has it’s own Java Virtual Machine
• Each App is assigned a unique Linux user ID
• Apps can share the same user ID to see
each other’s files
Applications
• Lifestyle applications for senior citizens
• Environmental applications that give data about pollution levels.
• Emergency services ( Hospitals, Police station etc.,)
• Bus services
• Games
• E-governance
• Google map 82
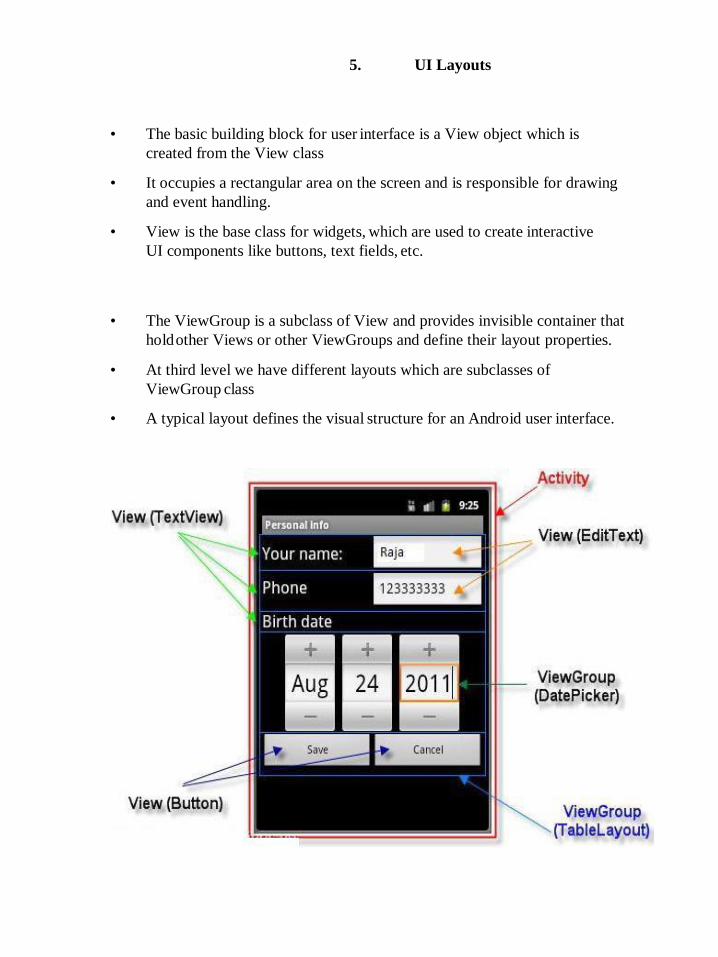
5. UI Layouts
• The basic building block for user interface is a View object which is
created from the View class
• It occupies a rectangular area on the screen and is responsible for drawing
and event handling.
• View is the base class for widgets, which are used to create interactive
UI components like buttons, text fields, etc.
• The ViewGroup is a subclass of View and provides invisible container that
hold other Views or other ViewGroups and define their layout properties.
• At third level we have different layouts which are subclasses of
ViewGroup class
• A typical layout defines the visual structure for an Android user interface.

• To declare the layout using simple XML file main_layout.xml which is
located in the res/layout folder of your project.
• A layout may contain any type of widgets such as buttons, labels,
textboxes, and so on.

A simple XML file having LinearLayout
<?xml version="1.0" encoding="utf-8"?>
<LinearLayout xmlns:android="http://schemas.android.com/apk/res/android"
android:layout_width="fill_p
arent"
android:layout_height="fill_p
arent"
android:orientation="vertical"
>
<TextView android:id="@+id/text"
android:layout_width="wrap_content" android:layout_height="wrap_content"
android:text="This is a TextView" />
<Button android:id="@+id/button"
android:layout_width="wrap_content" android:layout_height="wrap_content"
android:text="This is a Button" />
<!-- More GUI components go here -->
</LinearLayout>
..LinearLayout (con…)
• Once the layout has created, it can loaded by the help of application code
• Sample Code
public void onCreate(Bundle savedInstanceState)
{
super.onCreate(savedInstanceState); setContentView(R.layout.activity_main);
}

Layout Types
• Linear Layout
• Relative Layout
• Table Layout
• Absolute Layout
• Frame Layout
• List View
• Grid View

Linear Layout
• Linear Layout is a view group that aligns all children in either vertically or
horizontally.
Attributes
Attribute Description
android:id This is the ID which uniquely identifies
the layout.
android:gravity This specifies how an object should
position its content, on both the X and Y
axes. Possible values are top, bottom,
left, right, center, center_vertical,
center_horizontal etc.
android:orientation This specifies the direction of arrangement
and you will use "horizontal" for a row,
"vertical" for a column. The default is
horizontal.

Example
<?xml version="1.0" encoding="utf-8"?>
<LinearLayout xmlns:android="http://schemas.android.com/apk/ res/android"
android:layout_width="fill_parent"
android:layout_height="fill_parent"
android:orientation="vertical" >
<!-- More GUI components go here -->
</LinearLayout>
Output

Relative Layout
• Relative Layout enables you to specify how child views are positioned
relative to each other.
• The position of each view can be specified as relative to sibling elements
or relative to the parent.
Attributes
By default, all child views are drawn at the top-left of the layout, so you must
define the position of each view using the various layout properties.
Attribute Description
android:id This is the ID which uniquely
identifies the layout.
android:gravit y This specifies how an object should position its content,
on both the X and Y axes. Possible values are top,
bottom, left, right, center, center_vertical,
center_horizontal etc.

Example
<RelativeLayout xmlns:android="http://schemas.android.co m/apk/res/android"
android:layout_width="fill_parent" android:layout_height="fill_parent"
android:paddingLeft="16dp" android:paddingRight="16dp" >
<!-- More GUI components go here -->
</RelativeLayout>
Output

Table Layout
• TableLayout going to be arranged groups of views into rows and columns.
• Use the <TableRow> element to build a row in the table.
• Each row has zero or more cells; each cell can hold one View object
• It don’t display border lines for their rows, columns, or cells.
Attributes
Attribute Description
android:id This is the ID which uniquely identifies the
layout.
android:collapseColum ns This specifies the zero- based index of the
columns to collapse.
android:shrinkColumns The zero-based index of the columns to shrink.
android:stretchColumns The zero-based index of the columns to stretch.

Example
<TableLayout xmlns:android="http://schemas.android.com/apk/res/and roid"
android:layout_width="fill_parent" android:layout_height="fill_parent">
<TableRow
android:layout_width="fill_p
arent"
android:layout_height="fill_p
arent">
<!-- More GUI components go here -->
</TableRow>
<!-- More Table rows go here -->
</TableLayout>

6. UI Controls / Widgets
• Input controls are the interactive components in your app's user interface.
• Android provides a wide variety of controls you can use in your UI, such as
buttons, text fields, seek bars, check box, zoom buttons, toggle buttons, and
many more
•
• RadioButton
• RadioGroup
• ProgressBar
• Spinner
• TimePicker

TextView Control
• A TextView displays text to the user and optionally
allows them to edit it.
• A TextView is a complete text editor, however the basic class is configured
to not allow editing.

Attributes
Attribute Description
android:id This is the ID which uniquely identifies the
control.
android:fontFamily Font family (named by string) for the text.
android:inputType The type of data being placed in a
text field. Phone, Date, Time,
Number, Password etc.
android:text Text to display.
android:textAllCaps Present the text in ALL CAPS.
Possible value either "true" or "false".
android:textColor Text color. May be a color value.
android:textSize Size of the text. Recommended dimension type
for text is "sp" for scaled-pixels.

Example
In XML:
<TextView
android:id="@+id/text_id" android:layout_width="300dp"
android:layout_height="200dp" android:capitalize="characters"
android:text="hello_world" android:textColor="@android:color/holo_blue_dark"
android:textColorHighlight="@android:color/primary_text_d ark"
android:layout_centerVertical="true" android:layout_alignParentEnd="true"
android:textSize="50dp"/>
In JAVA:
TextView txtView = (TextView) findViewById(R.id.text_id);

Button Control
• A Button is a Push-button which can be pressed, or clicked, by the user to
perform an action.
Attribute Description
android:autoText If set, specifies that this TextView has a textual
input method and automatically corrects some
common spelling errors.
android:drawableBotto m This is the drawable to be drawn below the
text.
android:drawableRight This is the drawable to be drawn to the right
of the text.
android:editable If set, specifies that this TextView has an input
method.
android:text This is the Text to display.

Example
In XML:
<Button android:layout_width="wrap_content" android:layout_height="wrap_content"
android:text="Button" android:id="@+id/button"
android:layout_alignTop="@+id/editText"
android:layout_alignLeft="@+id/textView1"
android:layout_alignStart="@+id/textView1"
android:layout_alignRight="@+id/editText"
android:layout_alignEnd="@+id/editText" />
In JAVA:
Button b1=(Button)findViewById(R.id.button);
b1.setOnClickListener(new View.OnClickListener()
{
@Override
public void onClick(View v)
{
Toast.makeText(MainActivity.this,"YOUR
MESSAGE",Toast.LENGTH_LONG).show();
}
});

ImageButton Control
• A ImageButton is a AbsoluteLayout which enables you to specify the
exact location of its children.
• This shows a button with an image (instead of text) that can be
pressed or clicked by the user.
Attributes
Attribute Description
android:adjustViewBounds Set this to true if you want the ImageView
to adjust its bounds to preserve the aspect
ratio of its drawable.
android:baseline This is the offset of the baseline within
this view.
android:baselineAlignBottom If true, the image view will be baseline
aligned with based on its bottom edge.
android:cropToPadding If true, the image will be cropped to fit within
its padding.
android:src This sets a drawable as the content of this
ImageView.

Example
In XML:
<ImageButton android:layout_width="wrap_content" android:layout_height="wrap_content"
android:id="@+id/imageButton" android:layout_centerVertical="true"
android:layout_centerHorizontal="true" android:src="@drawable/abc"/>
In JAVA:
ImageButton imgButton =(ImageButton)
findViewById(R.id.imageButton);
imgButton.setOnClickListener(new
View.OnClickListener()
{
@Override public void onClick(View v)
{
Toast.makeText(getApplicationContext(),“Test
Image Button",Toast.LENGTH_LONG).show();
}
});

ToggleButton Control
• A ToggleButton displays checked/unchecked states as a button.
• It is basically an on/off button with a light indicator.
Attributes
Attribute Description
android:disabledAlpha This is the alpha to apply to the indicator when
disabled.
android:textOff This is the text for the button when it is
not checked.
android:textOn This is the text for the button when it is checked.

Example
In XML:
<ToggleButton
android:layout_width="wrap_content"
android:layout_height="wrap_content"
android:text="On" android:id="@+id/toggleButton1“
android:checked="true" />
<ToggleButton android:layout_width="wrap_content"
android:layout_height="wrap_content"
android:text="Off" android:id="@+id/toggleButton2" android:checked="true“ />
tton
android:layout_width="wrap_content" android:layout_height="wrap_content "
android:id="@+id/button2" android:text="ClickMe“ />
In JAVA:
ToggleButton tg1,tg2;
Button b1;
tg1=(ToggleButton)findViewById(R.id.toggleBu
tton1);
tg2=(ToggleButton)findViewById(R.id.toggleBu
tton2); b1=(Button)findViewById(R.id.button2);
b1.setOnClickListener(new
View.OnClickListener() { @Override public
void onClick(View v) { StringBuffer result =
new StringBuffer();
result.append("You have clicked first ON Button").append(tg1.getText());
result.append("\You have clicked Second ON Button
").append(tg2.getText());
Toast.makeText(MainActivity.this,result.toString(),Toast.LENGTH_SHORT)
.show(); } });

AutoCompleteTextView Control
• A AutoCompleteTextView is a view that is similar to EditText, except that it
shows a list of completion suggestions automatically while the user is typing.
• The list of suggestions is displayed in drop down menu.
• The user can choose an item from there to replace the
content of edit box with.
Attributes
Attribute Description
android:completionHintVie
w
This defines the hint view displayed in the
drop down menu.
android:completionThresho ld This defines the number of characters that the user
must type before completion suggestions are
displayed in a drop down menu.
android:dropDownAnchor This is the View to anchor the auto- complete
dropdown to.
android:dropDownHeight This specifies the basic height of the dropdown.
android:dropDownSelector This is the selector in a drop down list.
android:dropDownWidth This specifies the basic width of the dropdown.
android:popupBackground This sets the background.

Example
In XML:
<AutoCompleteTextView android:id="@+id/autoCompleteTextView1 "
android:layout_width="wrap_content"
android:layout_height="wrap_content"
android:layout_alignLeft="@+id/textView2"
android:layout_below="@+id/textView2"
android:layout_marginTop="54dp" android:ems="10" />
In JAVA:
AutoCompleteTextView autocompletetextview; String[] arr = { "Paries,France",
"PA,United States","Parana,Brazil", "Padua,Italy", "Pasadena,CA,United
States"};
autocomplete = (AutoCompleteTextView) findViewById(R.id.autoCompleteTextView1);
ArrayAdapter<String> adapter = new ArrayAdapter<String>
(this,android.R.layout.select_dialog_item, arr);
autocomplete.setThreshold(2); autocomplete.setAdapter(adapter);
Output

CheckBox Control
• A CheckBox is an on/off switch that can be toggled by the user.
• To use check-boxes when presenting users with a group of
selectable options that are not mutually exclusive.

Attributes
Attribute Description
android:autoText If set, specifies that this TextView has a
textual input method and automatically
corrects some common spelling errors.
android:drawableBot tom This is the drawable to be drawn below the
text.
android:drawableRig ht This is the drawable to be drawn to the right of
the text.
android:editable If set, specifies that this TextView has an
input method.
android:text This is the Text to display.
In XML:
Example
<CheckBox android:id="@+id/checkBox1"
android:layout_width="wrap_content"
android:layout_height="wrap_content"
android:text="Do you like
android“
android:checked="false“
/>
<CheckBox android:id="@+id/checkBox2"
android:layout_width="wrap_content"
android:layout_height="wrap_content"
android:text="Do you like android "
android:checked="false“ />
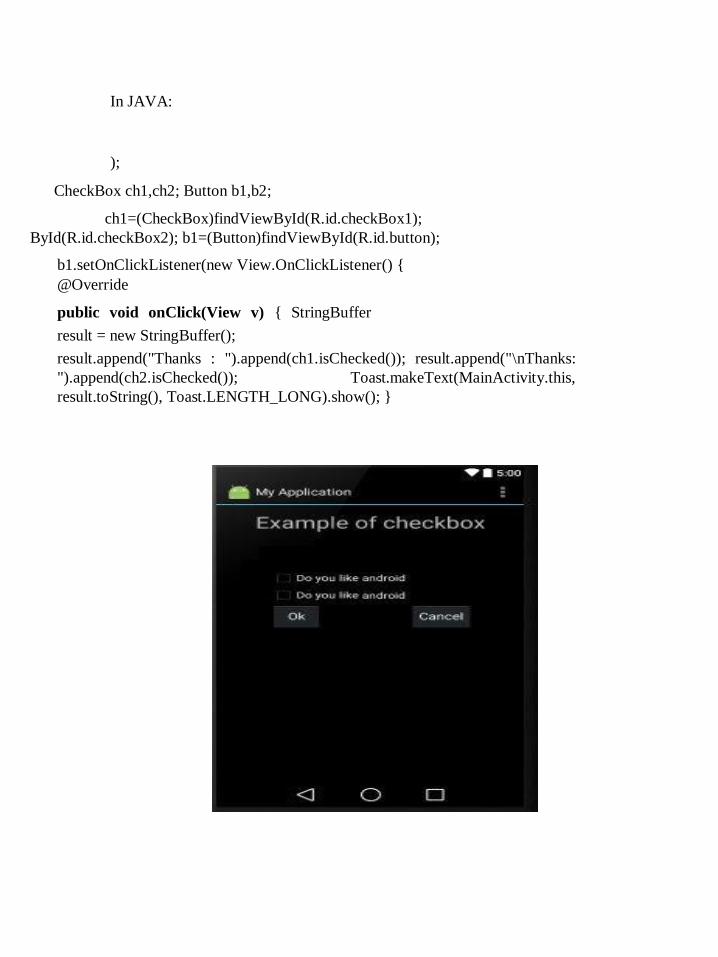
In JAVA:
Example (con…)
);
CheckBox ch1,ch2; Button b1,b2;
ch1=(CheckBox)findViewById(R.id.checkBox1);
ch2=(CheckBox)findView ById(R.id.checkBox2); b1=(Button)findViewById(R.id.button);
b1.setOnClickListener(new View.OnClickListener() {
@Override
public void onClick(View v) { StringBuffer
result = new StringBuffer();
result.append("Thanks : ").append(ch1.isChecked()); result.append("\nThanks:
").append(ch2.isChecked()); Toast.makeText(MainActivity.this,
result.toString(), Toast.LENGTH_LONG).show(); }

RadioButton Control
A RadioButton has two states: either checked or unchecked.
This allows the user to select one option from a set.
In XML:
<RadioGroup
<RadioButton
Example
<RadioButton android:text="HTML" android:id="@+id/radioButton
3“
android:checked="false“ />
android:text="JAVA" </RadioGroup>
android:id="@+id/radioButton1"
android:checked="false“ />
<RadioButton
android:text="ANDROID" android:id="@+id/radioButton2“
android:checked="false“ />

Example (con…)
In JAVA:
RadioButton rb1; RadioGroup rg1; Button
b1;
addListenerRadioButton();
private void addListenerRadioButton() {
rg1 = (RadioGroup) findViewById(R.id.radioGroup);
b1 = (Button) findViewById(R.id.button1);
b1.setOnClickListener(new View.OnClickListener() { @Override
public void onClick(View v) {
int selected=rg1.getCheckedRadioButtonId();
rb1=(RadioButton)findViewById(selected);
Toast.makeText(MainActivity.this,rb1.getText(),Toast.LE NGTH_LONG).show(); }
}); }
RadioGroup Control
• A RadioGroup class is used for set of radio buttons.
• If we check one radio button that belongs to a radio group, it automatically
unchecks any previously checked radio button within the same group.
(Refer RadioButton)
Progress Bar Control
• Progress bars are used to show progress of a task.
• A class called ProgressDialog that allows you to create progress bar.
• Syntax:
ProgressDialog progress = new
ProgressDialog(this);
• For example, when you are uploading or downloading something from
the internet, it is better to show the progress of download/upload to the
user.
Spinner Control
• Spinner allows you to select an item from a drop down menu.
TimePicker Control
• Time Picker allows you to select the time of day in either 24 hour or
AM/PM mode.
• The time consists of hours, minutes and clock format.
• Android provides this functionality through TimePicker
class.


7. Event Handling
• Events are a useful way to collect data about a user's interaction with interactive
components of Applications.
• Like button presses or screen touch etc.
• The Android framework maintains an event queue as first-in, first-out (FIFO)
basis.
• Capture these events in program and take appropriate action as per
requirements.
• Event Management
– Event Listeners
• An event listener is an interface in the View class that contains a single
callback method.
• These methods will be called by the Android framework when the View to
which the listener has been registered is triggered by user interaction with
the item in the UI.
– Event Handlers
• When an event happens and we have registered in the event listener for the
event, the event listener calls the Event Handlers, which is the method that
actually handles the event.
– Event Listeners Registration
• Event Registration is the process by which an Event Handler gets registered
with an Event Listener so that the handler is called when the Event Listener
fires the event

Event Listeners & Event Handlers
Event Handler Event Listener Description
onClick() OnClickListener() This is called when the user
either clicks or touches or
focuses upon any widget like
button, text, image etc.
onLongClick() OnLongClickListener() This is called when the user
either clicks or touches or
focuses upon any widget like
button, text, image etc. for
one or more seconds.
onFocusChange () OnFocusChangeListene
r()
This is called when the
widget looses its focus.
onKey() OnFocusChangeListener
()
This is called when the
user is focused on the
item and presses or
releases a hardware key
on the device.
onTouch() OnTouchListener() This is called when the
user presses the key,
releases the key, or any
movement gesture on
the screen.
onMenuItemClick() OnMenuItemClickListene
r()
This is called when the
user selects a menu
item.
onCreateContextMenu () onCreateContextMenuIte
mListener()
This is called when the
context menu is being
built(as the result of a
sustained "long click”).
Event Listeners Registration
• Event Registration is the process by which an Event Handler gets
registered with an Event Listener so that the handler is called when
the Event Listener fires the event.
• Top 3 ways are,
– Using an Anonymous Inner Class
– Activity class implements the Listener interface.
– Using Layout file activity_main.xml to specify event handler
directly.
Example
• Using an Anonymous Inner Class Button
b1; b1=(Button)findViewById(R.id.button);
b1.setOnClickListener(new View.OnClickListener()
{ @Override
public void onClick(View v) {
TextView txtView =
(TextView)
findViewById(R.id.textView)
;
txtView.setTextSize(25); } });

Example (con…)
• Activity class implements the Listener interface BtnListener listener =
new BtnListener();
((Button) findViewById(R.id.btnNum0Id)).setOnClickListen er(listener);
private class BtnListener implements OnClickListener { // On-click event handler
for all the buttons @Override public void onClick(View view) {
//ToDo the code here….
} }
• Using Layout file activity_main.xml to specify event handler
directly
• In XML
<Button
android:layout_width="wrap_content"
android:layout_height="wrap_content"
android:text="Small font"
android:id="@+id/button“
android:onClick=“Font_Change”/>
• In JAVA
public void Font_Change(View v) { TextView txtView = (TextView)
findViewById(R.id.textView);
txtView.setTextSize(25);
}

8. Tools - Eclipse IDE

Eclipse IDE (con…)

DDMS Configuration

New Android Project Creation

Project Giving Name Application /

Con…

Icon Customization

Customized Icon

Activity type selection

Customize the activity name

Default code appear in Eclipse IDE

Creating AVD Manager

AVD Configuration

Launching the AVD

Launching the AVD (con…)

AVD – Emulator

Configure the Logcat

Application running status displayed in Logcat

Output

9. Application Structure

src
– This contains the .java source files for your project.
– By default, it includes an MainActivity.java source file having an
activity class that runs when your app is launched using the app
icon.
gen
– This contains the .R file, a compiler-generated file that references all
the resources found in your project.
– User should not modify this file.
• bin
– This folder contains the Android package
files .apk built by the ADT during the build process and
everything else needed to run an Android application.
• res/drawable-hdpi
– This is a directory for drawable objects that are designed for high-
density screens.
• res/layout
– This is a directory for files that define your app's user interface.

• res/values
– This is a directory for other various XML files that contain a collection
of resources, such as strings and colours definitions.
• AndroidManifest.xml
– This is the manifest file which describes the fundamental
characteristics of the app and defines each of its components.
AndroidManifest
• The component you develop as a part of your application, you must
declare all its components in a manifest.xml which resides at the root
of the application project directory.
• This file works as an interface between Android OS and your application,
so if you do not declare your component in this file, then it will not be
considered by the OS.
• Default manifest file will look like as following file
<manifest xmlns:android="http://schemas.android.com/apk/res/and roid"
package="com.example.helloworld"
android:versionCode="1"
android:versionName="1.0" >
<uses-sdk
android:minSdkVersion="8"
android:targetSdkVersion="22" />

AndroidManifest (con…)
<application
android:icon="@drawable/ic_launch
er"
android:label="@string/app_name"
android:theme="@style/AppTheme"
>
<activity
android:name=".Main
Activity"
android:label="@string/title_activity_main" >
<intent-filter>
<action android:name="android.intent.action.MAIN"
/>
<category
android:name="android.intent.category.LAUNCHER"/>
</intent-filter> </activity> </application> </manifest>
<application>...</application> tags enclosed the components related to the
application.
Attribute android:icon will point to the application icon available
underres/drawable-hdpi.
The @string/app_name refers to the app_name string defined in the strings.xml
file, which is "HelloWorld"
The <activity> tag is used to specify an activity and android:name attribute
specifies the fully qualified class name of the Activity subclass.
The android:label attributes specifies a string to use as the label for the
activity / application.
The action for the intent filter is named android.intent.action.MAIN to
indicate that this activity serves as the entry point for the application.
The category for the intent-filter is named
android.intent.category.LAUNCHER to indicate that the application can be
launched from the device's launcher icon.

• Following is the list of tags which you will use in your manifest file to
specify different Android application components.
– <activity> elements for activities
– <service> elements for services
– <receiver> elements for broadcast receivers
– <provider> elements for content providers
Practices
• To know about the history, features and various versions of Android
• Draw the Android architecture
• To study various tools used in Android
development
• To study about Eclipse IDE
• To develop first Android App “Hello World”
• To implement the various Android layouts
• To implement the various Android UI controls
• To study the importance of Android application
structure and Android manifest file
218

SCHOOL OF COMPUTING
DEPARTMENT OF COMPUTER SCIENCE AND ENGINEERING
UNIT 2
Introduction to Activity and Intents- Understanding Activity Life Cycle - Linking Activities -
Passing Data – Toast - Displaying Dialog Window – Notifications – Services - Broadcast
Receiver- Content Provider - SQLite Database - Publish App in Play store- Sample
Applications
UNIT- II Mobile Application Development – SIT1402

Android Application Components
Application components are the basic building blocks of an application and these components
will act as an entry point to allow system or user to access our app. Basic core application
components that can be used in Android application.
❖ Activities
❖ Intents
❖ Content Providers
❖ Broadcast Receivers
❖ Services.
Android Components.
Basic core application components that can be used in Android application.
❖ Activities
❖ Intents
❖ Content Providers
❖ Broadcast Receivers
❖ Services
1. Activity
An activity is implemented as a subclass of activity class
public class MainActivity extends Activity{
}
2. Services
A Services is implemented as a subclass of Service class
Public class Myservice extends Service{
}
A Broadcast Receiver is implemented as a subclass of Broadcast Receiver class and
each message is broadcasted as an Intent object
Public class MyReceiver extends BroadcastReceiver{
}

3. A Content provider is implemented as a subclass of ComtentProvider class and must
implement a standard set of APIs that enable other applications to perform
transactions.
Public class MyContentProvider extends ContentProvider{ }
Introduction to Activity:
1. An Activity is an application component that provides a screen with which users
can interact in order to do something, such as dial the phone, take a photo, send
an email, or view a map.
2. Each activity is given a window in which to draw its user interface.
3. The window typically fills the screen, but may be smaller than the screen and
float on top of other windows.
Subclass of Activity class.
An activity is implemented as a subclass of class Activity.
public class MainActivity extends Activity {
}
Manifest XML FILE
<?xml version="1.0" encoding="utf-8"?>
<manifest …..>
<application …..>
<activity android:name=".MainActivity" >
…….
…….
</activity>
…….
</application>
</manifest>
Android Activity Lifecycle:
Android system initiates its program with in an Activity starting with a call
on onCreate() callback method. There is a sequence of callback methods that start up an
activity and a sequence of callback methods that tear down an activity.

Figure 2.1 Activity Sequence
Activity State
1.Doesn’t exist State
2. Foreground State
3. Background State
4.Pause State
Figure 2.2 Activity Lifecycle
1. Running State
An activity is in the running state if it’s shown in the foreground of the users’ screen. Activity
is in the running state when the user is interacting with it.
2. Paused State
When an activity is not in the focus but is still alive for the user, it’s in a paused state. The
activity comes in this state when some other activity comes in with a higher position in the
window.

3. Resumed State
It is when an activity goes from the paused state to the foreground that is an active state.
4. Stopped State
When an activity is no longer in the activity stack and not visible to the users.
Android Activity. Methods. Android activities go through four states during their entire
lifecycle. These activities have callback methods() to describe each activity in each of the
four stages. These methods need to be overridden by the implementing subclass. In Android,
we have the following 7 callback methods that activity uses to go through the four states:
1. onCreate()
2. onStart()
3. onPause()
4. onRestart()
5. onResume()
6. onStop()
7. onDestroy()
1. onCreate()
The Android oncreate() method is called at the very start when an activity is created. An
activity is created as soon as an application is opened. This method is used in order to create
an Activity.
@Override protected void onCreate(Bundle savedInstanceState)
{
super.onCreate(savedInstanceState);
...
}
2. onStart()
The Android onstart() method is invoked as soon as the activity becomes visible to the users.
This method is to start an activity. The activity comes on the forescreen of the users when this
method is invoked.
Syntax:
@Override protected void onStart()
{
super.onStart();
...
}
3. onPause()
The Android onPause() method is invoked when the activity doesn’t receive any user input
and goes on hold. In the pause state, the activity is partially visible to the user. This is done
when the user presses the back or home buttons. Once an activity is in the pause state, it can
be followed by either onResume() or onStopped() callback method.
Syntax:

@Override protected void onPause()
{
super.onPause();
...
}
4. onRestart()
The Android onRestart() method is invoked when activity is about to start from the stop state.
This method is to restart an activity that had been active some time back. When an activity
restarts, it starts working from where it was paused.
Syntax:
@Override protected void onRestart()
{
super.onRestart();
...
}
5. onResume()
The Android onResume() method is invoked when the user starts interacting with the user.
This callback method is followed by onPause(). Most of the functionalities of an application
are implemented using onResume().
Syntax:
@Override protected void onResume()
{
super.onResume();
...
}
6. onStop()
The Android onStop() method is invoked when the activity is no longer visible to the user.
The reason for this state is either activity is getting destroyed or another existing activity
comes back to resume state.
Syntax:
@Override protected void onStop()
{
super.onStop();
...
}
7. onDestroy()
The Android onDestroy() is the method that is called when an activity finishes and the user
stops using it. It is the final callback method received by activity, as after this it is destroyed.

Syntax:
@Override protected void onDestroy()
{
super.onDestroy();
...
}
Figure 2.3 Android Activity Lifecycle
Android Activity Lifecycle Example
MainActivity.java
package example.javatpoint.com.activitylifecycle;
import android.app.Activity;
import android.os.Bundle;
import android.util.Log;

public class MainActivity extends Activity {
@Override
protected void onCreate(Bundle savedInstanceState) {
super.onCreate(savedInstanceState);
setContentView(R.layout.activity_main);
Log.d("lifecycle","onCreate invoked");
}
@Override
protected void onStart() {
super.onStart();
Log.d("lifecycle","onStart invoked");
}
@Override
protected void onResume() {
super.onResume();
Log.d("lifecycle","onResume invoked");
}
@Override
protected void onPause() {
super.onPause();
Log.d("lifecycle","onPause invoked");
}
@Override
protected void onStop() {
super.onStop();
Log.d("lifecycle","onStop invoked");
}
@Override
protected void onRestart() {
super.onRestart();
Log.d("lifecycle","onRestart invoked");
}
@Override
protected void onDestroy() {
super.onDestroy();
Log.d("lifecycle","onDestroy invoked");
}
}
activity_main.xml
<?xml version="1.0" encoding="utf-8"?>
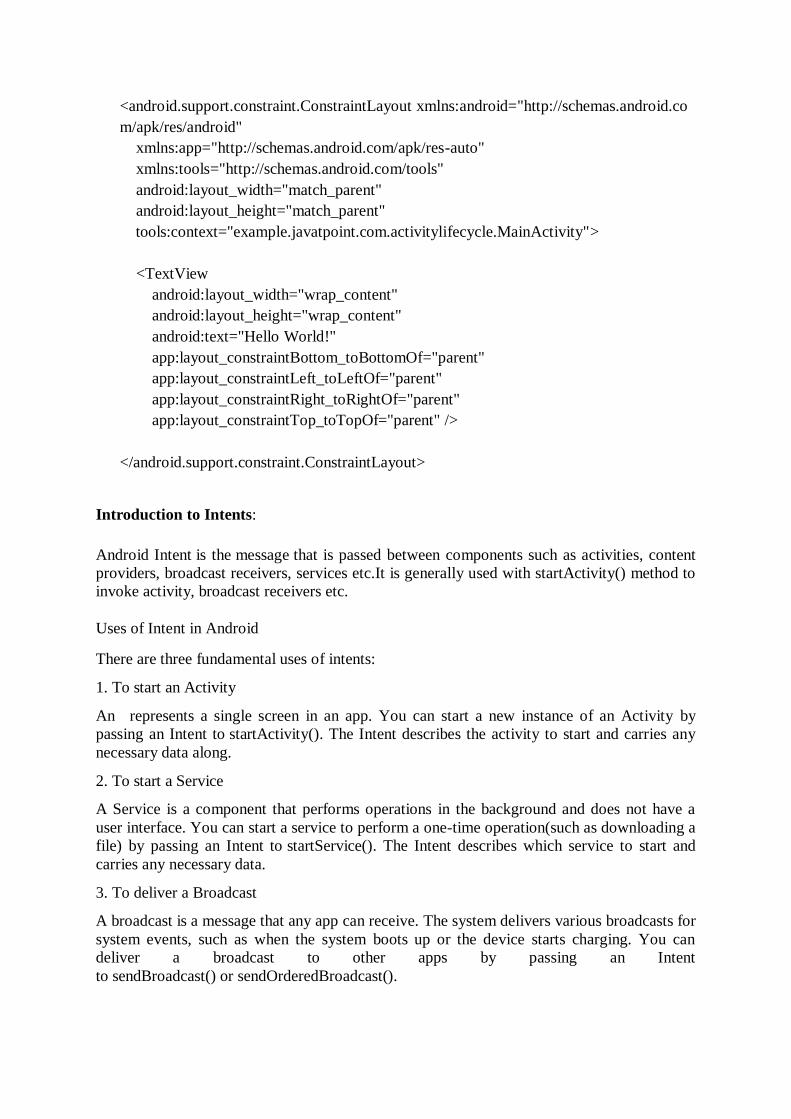
<android.support.constraint.ConstraintLayout xmlns:android="http://schemas.android.co
m/apk/res/android"
xmlns:app="http://schemas.android.com/apk/res-auto"
xmlns:tools="http://schemas.android.com/tools"
android:layout_width="match_parent"
android:layout_height="match_parent"
tools:context="example.javatpoint.com.activitylifecycle.MainActivity">
<TextView
android:layout_width="wrap_content"
android:layout_height="wrap_content"
android:text="Hello World!"
app:layout_constraintBottom_toBottomOf="parent"
app:layout_constraintLeft_toLeftOf="parent"
app:layout_constraintRight_toRightOf="parent"
app:layout_constraintTop_toTopOf="parent" />
</android.support.constraint.ConstraintLayout>
Introduction to Intents:
Android Intent is the message that is passed between components such as activities, content
providers, broadcast receivers, services etc.It is generally used with startActivity() method to
invoke activity, broadcast receivers etc.
Uses of Intent in Android
There are three fundamental uses of intents:
1. To start an Activity
An represents a single screen in an app. You can start a new instance of an Activity by
passing an Intent to startActivity(). The Intent describes the activity to start and carries any
necessary data along.
2. To start a Service
A Service is a component that performs operations in the background and does not have a
user interface. You can start a service to perform a one-time operation(such as downloading a
file) by passing an Intent to startService(). The Intent describes which service to start and
carries any necessary data.
3. To deliver a Broadcast
A broadcast is a message that any app can receive. The system delivers various broadcasts for
system events, such as when the system boots up or the device starts charging. You can
deliver a broadcast to other apps by passing an Intent
to sendBroadcast() or sendOrderedBroadcast().

Types of Intents
In Android, there are two types of Intents:
1. Explicit Intents
2. Implicit Intents
1) Implicit Intent
Implicit Intent doesn't specifiy the component. In such case, intent provides information of
available components provided by the system that is to be invoked
Example:
Intent intent=new Intent(Intent.ACTION_VIEW);
intent.setData(Uri.parse("http://www.javatpoint.com"));
startActivity(intent);
2) Explicit Intent
Explicit Intent specifies the component. In such case, intent provides the external class to
be invoked.
Intent i = new Intent(getApplicationContext(), ActivityTwo.class);
startActivity(i);
Android Implicit Intent Example:
activity_main.xml
<?xml version="1.0" encoding="utf-8"?>
<android.support.constraint.ConstraintLayout xmlns:android="http://schemas.android.co
m/apk/res/android"
xmlns:app="http://schemas.android.com/apk/res-auto"
xmlns:tools="http://schemas.android.com/tools"
android:layout_width="match_parent"
android:layout_height="match_parent"
tools:context="example.javatpoint.com.implicitintent.MainActivity">
<EditText
android:id="@+id/editText"
android:layout_width="wrap_content"
android:layout_height="wrap_content"
android:layout_marginEnd="8dp"
android:layout_marginStart="8dp"
android:layout_marginTop="60dp"
android:ems="10"
app:layout_constraintEnd_toEndOf="parent"
app:layout_constraintHorizontal_bias="0.575"

app:layout_constraintStart_toStartOf="parent"
app:layout_constraintTop_toTopOf="parent" />
<Button
android:id="@+id/button"
android:layout_width="wrap_content"
android:layout_height="wrap_content"
android:layout_marginRight="8dp"
android:layout_marginLeft="156dp"
android:layout_marginTop="172dp"
android:text="Visit"
app:layout_constraintEnd_toEndOf="parent"
app:layout_constraintHorizontal_bias="0.0"
app:layout_constraintStart_toStartOf="parent"
app:layout_constraintTop_toBottomOf="@+id/editText" />
</android.support.constraint.ConstraintLayout>
MainActivity.java
package example.javatpoint.com.implicitintent;
import android.content.Intent;
import android.net.Uri;
import android.support.v7.app.AppCompatActivity;
import android.os.Bundle;
import android.view.View;
import android.widget.Button;
import android.widget.EditText;
public class MainActivity extends AppCompatActivity {
Button button;
EditText editText;
@Override
protected void onCreate(Bundle savedInstanceState) {
super.onCreate(savedInstanceState);
setContentView(R.layout.activity_main);
button = findViewById(R.id.button);
editText = findViewById(R.id.editText);
button.setOnClickListener(new View.OnClickListener() {
@Override
public void onClick(View view) {
String url=editText.getText().toString();

Intent intent=new Intent(Intent.ACTION_VIEW, Uri.parse(url));
startActivity(intent);
}
});
}
}
Linking Activity:
⮚ To start an Activity
An Activity represents a single screen in an app.start a new instance of an Activity by
passing an Intent to startActivity()
⮚ To start a Service
A Service is a component that performs operations in the background and does not
have a user interface. You can start a service to perform a one-time operation(such as
downloading a file) by passing an Intent to startService()
⮚ To deliver a Broadcast
A broadcast is a message that any app can receive. The system delivers various
broadcasts for system events, such as when the system boots up or the device starts
charging. You can deliver a broadcast to other apps by passing an Intent to
sendBroadcast() or sendOrderedBroadcast().
Launchable Android Provided Activities:
Open a browser window
public static void invokeWebBrowser(Activity activity)
{ Intent intent = new Intent(Intent.ACTION_VIEW);
intent.setData(Uri.parse("http://www.google.com"));
activity.startActivity(intent); }
Call a telephone number
public static void call(Activity activity)
{ Intent intent = new Intent(Intent.ACTION_CALL);
intent.setData(Uri.parse("tel:555-555-5555"));
activity.startActivity(intent); }
Present a phone dialer
public static void dial(Activity activity)
{ Intent intent = new Intent(Intent.ACTION_DIAL);
activity.startActivity(intent);
Building an intent:
⮚ Component name
⮚ Action
⮚ Data
⮚ Category
⮚ Extras
⮚ Flags

Bundling an Intent:
• Code to add bundleable objects
Bundle more = new Bundle(); // a bundle contains key/value pairs
more.putString("someKey", "someString");
intent.putExtra("bundleKey", more); // A bundle of extra items
intent.putExtra("anotherKey", 3.5); // A single extra item
• Updating the bundle
– If a bundle exists, Android adds additional key/data pairs
– If a bundle doesn't exist, create one and copy key/data pairs to it
• Overloaded putExtra() methods for adding
– booleans, ints, doubles, floats, strings, arrays, serializable objects, parcelable
objects, bundles, additional intents
Passing Data:
• Activity is used to represent the data to user and allows user interaction.
• In an android application, we can have multiple activities and that can interact with
each other.
• During activity interaction we might required to pass data from one activity to other.
• Data is passed as extras and are key/value pairs.
The key is always a String and the value you can use the primitive data types int, float, chars,
etc.
Syntax for sending and Retriving data:
• Sending data
Intent intent = new Intent(context, Your Activity Class . class);
intent.putExtra(KEY, <your value here>); startActivity(intent);
• Retrieving data Intent intent = getIntent();
String stringData= intent.getStringExtra(KEY);
int numberData = intent . getIntExtra(KEY , default Value) ;
boolean booleanData = intent.getBooleanExtra(KEY, defaultValue);
char charData = intent.getCharExtra(KEY, defaultValue);
Example:
public class MainActivity extends Activity implements OnClickListener {
Button btn;
@Override
protected void onCreate(Bundle savedInstanceState) {
super.onCreate(savedInstanceState); setContentView(R.layout.activity_main);
btn = (Button) findViewById(R.id.btnPassData);
btn.setOnClickListener(this);
}
@Override
public void onClick(View view) { Intent intent = new
Intent(getApplicationContext(), SecondActivity.class);
intent.putExtra("message", "Hello From Main Activity” );
startActivity(intent);}}

public class SecondActivity extends Activity { @Override
protected void onCreate(Bundle savedInstanceState) {
super.onCreate(savedInstanceState);
setContentView(R.layout.activity_another);
Intent intent = getIntent();
String msg = intent.getStringExtra("message"); Toast toast = Toast.makeText(this,
msg,Toast . LENGTH_ LONG);
toast.show();
}
}
Toasts:
• A toast provides simple feedback about an operation in a small popup. It only fills the
amount of space required for the message and the current activity remains visible and
interactive,Toasts automatically disappear after a timeout.
• First, instantiate a Toast object with one of the makeText() methods.
• This method takes three parameters: the application Context, the text message, and
the duration for the toast. It returns a properly initialized Toast object.
• You can display the toast notification with show()
• Context context = getApplicationContext(); CharSequence text = "Hello toast!";
int duration = Toast.LENGTH_SHORT;
Toast toast = Toast.makeText(context, text, duration); toast.show();
(or)
Toast.makeText(context, text, duration).show();
(or)
Toast.makeText(getApplicationContext(),”Hello toast!”,
Toast.LENGTH_“SHORT).show();
Positioning your Toast:
• A standard toast notification appears near the bottom of the
screen, centered horizontally.
• You can change this position with the setGravity(int, int, int) method.
• This accepts three parameters: a Gravity constant, an x-position offset, and a y-
position offset.
• Exmaple toast.setGravity(Gravity.TOP|Gravity.LEFT, 0, 0);
Custom Toast:
• To create a customized layout for your toast notification.
• To create a custom layout, define a View layout, in XML or in your application
code, and pass the root View object to the setView(View) method.
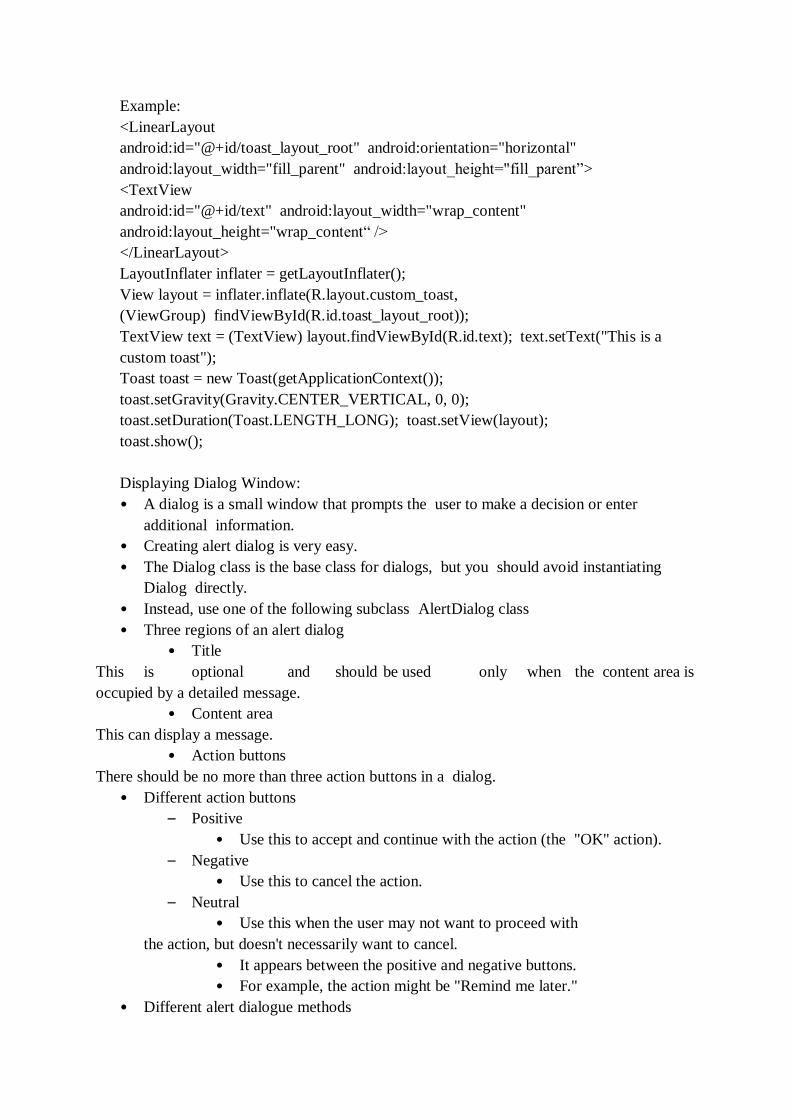
Example:
<LinearLayout
android:id="@+id/toast_layout_root" android:orientation="horizontal"
android:layout_width="fill_parent" android:layout_height="fill_parent”>
<TextView
android:id="@+id/text" android:layout_width="wrap_content"
android:layout_height="wrap_content“ />
</LinearLayout>
LayoutInflater inflater = getLayoutInflater();
View layout = inflater.inflate(R.layout.custom_toast,
(ViewGroup) findViewById(R.id.toast_layout_root));
TextView text = (TextView) layout.findViewById(R.id.text); text.setText("This is a
custom toast");
Toast toast = new Toast(getApplicationContext());
toast.setGravity(Gravity.CENTER_VERTICAL, 0, 0);
toast.setDuration(Toast.LENGTH_LONG); toast.setView(layout);
toast.show();
Displaying Dialog Window:
• A dialog is a small window that prompts the user to make a decision or enter
additional information.
• Creating alert dialog is very easy.
• The Dialog class is the base class for dialogs, but you should avoid instantiating
Dialog directly.
• Instead, use one of the following subclass AlertDialog class
• Three regions of an alert dialog
• Title
This is optional and should be used only when the content area is
occupied by a detailed message.
• Content area
This can display a message.
• Action buttons
There should be no more than three action buttons in a dialog.
• Different action buttons
– Positive
• Use this to accept and continue with the action (the "OK" action).
– Negative
• Use this to cancel the action.
– Neutral
• Use this when the user may not want to proceed with
the action, but doesn't necessarily want to cancel.
• It appears between the positive and negative buttons.
• For example, the action might be "Remind me later."
• Different alert dialogue methods

• one button(ok button) - setPositiveButton()
• two buttons(yes or no buttons) - setNegativeButton()
• three buttons(yes, no and cancel buttons) -
setNeutralButton()
Example:
AlertDialog.Builder alertDialog = new AlertDialog .Builder (AlertDialog Activity.this) ;
// Setting Dialog Title
alertDialog.setTitle("Confirm Delete...");
// Setting Dialog Message
alertDialog.setMessage ("you want delete this” );
// Setting Icon to Dialog
alertDialog.setIcon(R.drawable.delete);
// Setting Positive "Yes" Button
alertDialog.setPositiveButton("YES", new Dialog Interface . OnClick Listener() {
public void onClick(DialogInterface dialog,int which) {
// Write your code here to invoke YES event Toast.makeText(getApplicationContext(), "You
clicked on YES", Toast.LENGTH_SHORT).show();
}});
// Setting Negative "NO" Button alertDialog.setNegativeButton("NO", new
DialogInterface.OnClickListener() {
public void onClick(DialogInterface dialog, int which) {
// Write your code here to invoke NO event Toast.makeText(getApplicationContext(), "You
clicked
on NO", Toast.LENGTH_SHORT).show();
dialog.cancel();
}});
// Showing Alert Message
alertDialog.show();
Notification
• A notification is a message you can display to the user outside of your application's
normal UI.
• When you tell the system to issue a notification, itfirst
appears as an icon in the notification area.
• To see the details of the notification, the user opens
the notification drawer.
• Both the notification area and the notification drawer are system-controlled areas that
the user can view at any time.
Android Toast class provides a handy way to show users alerts but problem is that these
alerts are not persistent which means alert flashes on the screen for a few seconds and then
disappears.

Step 1 - Create Notification Builder
• A first step is to create a notification builder using
NotificationCompat.Builder.build().
• Use Notification Builder to set various Notification properties like its small and large
icons, title, priority etc.
• Syntax
NotificationCompat.Builder mBuilder = new NotificationCompat.Builder(this);
Step 2 - Setting Notification Properties:
• To set its Notification properties using Builder object as per your requirement.
– A small icon, set by setSmallIcon()
– A title, set by setContentTitle()
– Detail text, set by setContentText()
• Example mBuilder.setSmallIcon(R.drawable.notification_icon);
mBuilder.setContentTitle("Notification Alert, Click Me!");
mBuilder.setContentText("Hi, This is Android Notification Detail!");
Step 3 - Attach Actions:
• The action is defined by a PendingIntent containing an Intent that starts an Activity in
your application.
• A PendingIntent object helps you to perform an action on your applications behalf,
often at a later time, without caring of whether or not your application is running.
• We take help of stack builder object which will contain an artificial back stack for
the started Activity.
This ensures that navigating backward from the Activity leads out of your application to
the Home scrren.
Intent resultIntent = new Intent(this, ResultActivity.class);
TaskStackBuilder stackBuilder = TaskStackBuilder.create(this);
stackBuilder.addParentStack(MainActivity.this);
stackBuilder.addNextIntent(resultIntent); PendingIntent resultPendingIntent =
stackBuilder.getPendingIntent(0,PendingIntent.FLAG
_UPDATE_CURRENT);
mBuilder.setContentIntent(resultPendingIntent);
Step 4 - Issue the notification:
• Finally, you pass the Notification object to the system by calling
NotificationManager.notify() to send your notification.
• Make sure you call
NotificationCompat.Builder.build() method on builder object before notifying it.
• Example
NotificationManager mNotificationManager = (NotificationManager)
getSystemService(Context.NOTIFICATION_SERVICE)
mNotificationManager.notify(notificationID, mBuilder.build());

Example:
Button b; b=(Button)findViewById(R.id.notify_btn);
b.setOnClickListener(new View.OnClickListener() {
@Override
public void onClick(View v) {
// TODO Auto-generated method stub Notify_method("Test notify message");
}
private void Notify_method(String string) {
NotificationManager notificationManager = (NotificationManager)
getSystemService(NOTIFICATION_SERVICE);
Notification notification = new Notification(R.drawable.abc,"New Message",
System.currentTimeMillis());
Intent notificationIntent = new
Intent(MainActivity.this,NotifyDisplay.class);
PendingIntent pendingIntent = PendingIntent.getActivity(MainActivity.this,
0,notificationIntent, 0);
notification.setLatestEventInfo(MainActivity.this, "Notification",string,
pendingIntent);
notificationManager.notify(9999, notification);
}
});
Services:
• A service is a component that runs in the background to perform long-running
operations without needing to interact with the user and it works even if application
is destroyed.
• A service can essentially take two states
– Started
• A service is started when an application component, such as an
activity, starts it by calling startService().
• Once started, a service can run in the background indefinitely, even if
the component that started it is destroyed.
• Android Services are the application components that run in the background. Service
is process that doesn’t need any direct user interaction.
• As they perform long-running processes without user intervention, they have no User
Interface.
• They can be connected to other components and do inter-process communication
(IPC).

Figure 2.4 Android Services
1. Foreground Services
Foreground services are those services that are visible to the users. The users can interact
with them at ease and track what’s happening. These services continue to run even when
users are using other applications.
2. Background Services
These services run in the background, such that the user can’t see or access them. These are
the tasks that don’t need the user to know them
3. Bound Services
Bound service runs as long as some other application component is bound to it. Many
components can bind to one service at a time, but once they all unbind, the service will
destroy.
To bind an application component to the service, bindService() is used.
Bound
• A bound service is the server in a client-server interface. It allows components (such
as activities) to bind to the service, send requests, receive responses, and perform
interprocess communication (IPC).
• A bound service typically lives only while it serves another application component
and does not run in the background indefinitely.
• A bound service is an implementation of the Service class that allows other
applications to bind to it and interact with it.
• To provide binding for a service, you must implement the onBind() callback method.
This method returns an IBinder object that defines the programming interface that
clients can use to interact with the service.

Binding Methods
1.onBind()
2. bindService()
3. serviceConnection()
4. onstartCommand()
5. onService Connected()
Lifecycle of Android Services
Android services life-cycle can have two forms of services and they follow two paths, that
are:
• Started Service
• Bounded Service
1. Started Service
• A service becomes started only when an application component calls startService(). It
performs a single operation and doesn’t return any result to the caller. Once this
service starts, it runs in the background even if the component that created it destroys.
This service can be stopped only in one of the two cases:
By using the stopService() method.
By stopping itself using the stopSelf() method.
2. Bound Service
• A service is bound only if an application component binds to it using bindService(). It
gives a client-server relation that lets the components interact with the service. The
components can send requests to services and get results.
• This service runs in the background as long as another application is bound to it. Or it
can be unbound according to our requirement by using the unbindService() method.
IntentService()
• There’s an additional service class, that extends Service class, IntentService Class. It
is a base class for services to handle asynchronous requests.
• It enables running an operation on a single background. It executes long-running
programs without affecting any user’s interface interaction.
• Intent services run and execute in the background and terminate themself as soon as
they are executed completely.
Certain important features of Intent are :
• It queues up the upcoming request and executes them one by one.

• Once the queue is empty it stops itself, without the user’s intervention in its lifecycle.
• It does proper thread management by handling the requests on a separate thread.
Methods of Android Services
• The service base class defines certain callback methods to perform operations on
applications. When we talk about Android services it becomes quite obvious that
these services will do some operations and they’ll be used. The following are a few
important methods of Android services :
1. onStartCommand()
2. onBind()
3. onCreate()
4. onUnbind()
5. onDestroy()
6. onRebind()
1. onStartCommand()
The system calls this method whenever a component, say an activity requests ‘start’ to a
service, using startService().Once we use this method it’s our duty to stop the service
using stopService() or stopSelf().
2. onBind()
This is invoked when a component wants to bind with the service by
calling bindService(). In this, we must provide an interface for clients to communicate
with the service. For interprocess communication, we use the IBinder object.
It is a must to implement this method. If in case binding is not required, we should
return null as implementation is mandatory.
3. onUnbind()
The system invokes this when all the clients disconnect from the interface published by
the service.
4. onRebind()
The system calls this method when new clients connect to the service. The system calls it
after the onBind() method.
5. onCreate()
This is the first callback method that the system calls when a new component starts the
service. We need this method for a one-time set-up.
6. onDestroy()

This method is the final clean up call for the system. The system invokes it just before the
service destroys. It cleans up resources like threads, receivers, registered listeners, etc.
Figure 2.5 Service Life Cycle
Example of Service Life cycle:
package com.tutorialspoint;
import android.app.Service;
import android.os.IBinder;
import android.content.Intent;
import android.os.Bundle;
public class HelloService extends Service {
/** indicates how to behave if the service is killed */
int mStartMode;
/** interface for clients that bind */

IBinder mBinder;
/** indicates whether onRebind should be used */
boolean mAllowRebind;
/** Called when the service is being created. */
@Override
public void onCreate() {
}
/** The service is starting, due to a call to startService() */
@Override
public int onStartCommand(Intent intent, int flags, int startId) {
return mStartMode;
}
/** A client is binding to the service with bindService() */
@Override
public IBinder onBind(Intent intent) {
return mBinder;
}
/** Called when all clients have unbound with unbindService() */
@Override
public boolean onUnbind(Intent intent) {
return mAllowRebind;
}
/** Called when a client is binding to the service with bindService()*/
@Override
public void onRebind(Intent intent) {
}
/** Called when The service is no longer used and is being destroyed */
@Override
public void onDestroy() {
}
}
Broadcast Receivers
Broadcast Receivers simply respond to broadcast messages from other applications or from
the system itself. These messages are sometime called events or intents. For example,
applications can also initiate broadcasts to let other applications know that some data has

been downloaded to the device and is available for them to use, so this is broadcast receiver
who will intercept this communication and will initiate appropriate action.
Here are following two important steps to make BroadcastReceiver works for the system
broadcasted intents −
Creating the Broadcast Receiver.
Registering Broadcast Receiver
There is one additional steps in case you are going to implement your custom intents then
you will have to create and broadcast those intents.
Creating the Broadcast Receiver
A broadcast receiver is implemented as a subclass of BroadcastReceiver class and
overriding the onReceive() method where each message is received as a Intent object
parameter.
public class MyReceiver extends BroadcastReceiver {
@Override
public void onReceive(Context context, Intent intent) {
Toast.makeText(context, "Intent Detected.", Toast.LENGTH_LONG).show();
}
}
Registering Broadcast Receiver
An application listens for specific broadcast intents by registering a broadcast receiver
in AndroidManifest.xml file. Consider we are going to register MyReceiver for system
generated event ACTION_BOOT_COMPLETED which is fired by the system once the
Android system has completed the boot process.
Figure 2.6 Broadcast-Receiver
Broadcast-Receiver
<application
android:icon="@drawable/ic_launcher"
android:label="@string/app_name"
android:theme="@style/AppTheme" >
<receiver android:name="MyReceiver">

<intent-filter>
<action android:name="android.intent.action.BOOT_COMPLETED">
</action>
</intent-filter>
</receiver>
</application>
Now whenever your Android device gets booted, it will be intercepted by
BroadcastReceiver MyReceiver and implemented logic inside onReceive() will be executed.
There are several system generated events defined as final static fields in the Intent class.
The following table lists a few important system events.
Sr.No Event Constant & Description
1 android.intent.action.BATTERY_CHANGED
Sticky broadcast containing the charging state, level, and other information about the
battery.
2 android.intent.action.BATTERY_LOW
Indicates low battery condition on the device.
3 android.intent.action.BATTERY_OKAY
Indicates the battery is now okay after being low.
4 android.intent.action.BOOT_COMPLETED
This is broadcast once, after the system has finished booting.
5 android.intent.action.BUG_REPORT
Show activity for reporting a bug.
6 android.intent.action.CALL
Perform a call to someone specified by the data.
7
android.intent.action.CALL_BUTTON
The user pressed the "call" button to go to the dialer or other appropriate UI for
placing a call.

8 android.intent.action.DATE_CHANGED
The date has changed.
9 android.intent.action.REBOOT
Have the device reboot.
Broadcasting Custom Intents
If you want your application itself should generate and send custom intents then you will
have to create and send those intents by using the sendBroadcast() method inside your
activity class. If you use the sendStickyBroadcast(Intent) method, the Intent is sticky,
meaning the Intent you are sending stays around after the broadcast is complete.
public void broadcastIntent(View view) {
Intent intent = new Intent();
intent.setAction("com.tutorialspoint.CUSTOM_INTENT");
sendBroadcast(intent);
}
This intent com.tutorialspoint.CUSTOM_INTENT can also be registered in similar way as
we have regsitered system generated intent.
<application
android:icon="@drawable/ic_launcher"
android:label="@string/app_name"
android:theme="@style/AppTheme" >
<receiver android:name="MyReceiver">
<intent-filter>
<action android:name="com.tutorialspoint.CUSTOM_INTENT">
</action>
</intent-filter>
</receiver>
</application>
Example: mainactivity.java
package com.example.tutorialspoint7.myapplication;
import android.app.Activity;
import android.content.Intent;
import android.os.Bundle;
import android.view.View;
public class MainActivity extends Activity {
/** Called when the activity is first created. */

@Override
public void onCreate(Bundle savedInstanceState) {
super.onCreate(savedInstanceState);
setContentView(R.layout.activity_main);
}
// broadcast a custom intent.
public void broadcastIntent(View view){
Intent intent = new Intent();
intent.setAction("com.tutorialspoint.CUSTOM_INTENT"); sendBroadcast(intent);
}
}
Myreceiver.java
package com.example.tutorialspoint7.myapplication;
import android.content.BroadcastReceiver;
import android.content.Context;
import android.content.Intent;
import android.widget.Toast;
/**
* Created by TutorialsPoint7 on 8/23/2016.
*/
public class MyReceiver extends BroadcastReceiver{
@Override
public void onReceive(Context context, Intent intent) {
Toast.makeText(context, "Intent Detected.", Toast.LENGTH_LONG).show();
}
}
AndroidManifest.xml
<?xml version="1.0" encoding="utf-8"?>
<manifest xmlns:android="http://schemas.android.com/apk/res/android"
package="com.example.tutorialspoint7.myapplication">
<application
android:allowBackup="true"
android:icon="@mipmap/ic_launcher"
android:label="@string/app_name"
android:supportsRtl="true"
android:theme="@style/AppTheme">

<activity android:name=".MainActivity">
<intent-filter>
<action android:name="android.intent.action.MAIN" />
<category android:name="android.intent.category.LAUNCHER" />
</intent-filter>
</activity>
<receiver android:name="MyReceiver">
<intent-filter>
<action android:name="com.tutorialspoint.CUSTOM_INTENT">
</action>
</intent-filter>
</receiver>
</application>
</manifest>
res/layout/activity_main.xml
<RelativeLayout
xmlns:android="http://schemas.android.com/apk/res/android"
xmlns:tools="http://schemas.android.com/tools"
android:layout_width="match_parent"
android:layout_height="match_parent"
android:paddingLeft="@dimen/activity_horizontal_margin"
android:paddingRight="@dimen/activity_horizontal_margin"
android:paddingTop="@dimen/activity_vertical_margin"
android:paddingBottom="@dimen/activity_vertical_margin"
tools:context=".MainActivity">
<TextView
android:id="@+id/textView1"
android:layout_width="wrap_content"
android:layout_height="wrap_content"
android:text="Example of Broadcast"
android:layout_alignParentTop="true"
android:layout_centerHorizontal="true"
android:textSize="30dp" />
<TextView
android:id="@+id/textView2"
android:layout_width="wrap_content"
android:layout_height="wrap_content"
android:text="Tutorials point "
android:textColor="#ff87ff09"
android:textSize="30dp"
android:layout_above="@+id/imageButton"

android:layout_centerHorizontal="true"
android:layout_marginBottom="40dp" />
<ImageButton
android:layout_width="wrap_content"
android:layout_height="wrap_content"
android:id="@+id/imageButton"
android:src="@drawable/abc"
android:layout_centerVertical="true"
android:layout_centerHorizontal="true" />
<Button
android:layout_width="wrap_content"
android:layout_height="wrap_content"
android:id="@+id/button2"
android:text="Broadcast Intent"
android:onClick="broadcastIntent"
android:layout_below="@+id/imageButton"
android:layout_centerHorizontal="true" />
</RelativeLayout>
Content Provider:
A content provider component supplies data from one application to others on request. Such
requests are handled by the methods of the ContentResolver class. A content provider can use
different ways to store its data and the data can be stored in a database, in files, or even over a
network.
Figure 2. 7 Content Provider

Content URI
Content URI(Uniform Resource Identifier) is the key concept of Content providers. To access
the data from a content provider, URI is used as a query string.
Structure of a Content URI: content://authority/optionalPath/optionalID
Details of different parts of Content URI:
content:// – Mandatory part of the URI as it represents that the given URI is a Content
URI.
authority – Signifies the name of the content provider like contacts, browser, etc. This
part must be unique for every content provider.
optionalPath – Specifies the type of data provided by the content provider. It is essential
as this part helps content providers to support different types of data that are not related
to each other like audio and video files.
optionalID – It is a numeric value that is used when there is a need to access a particular
record.
Operations in Content Provider
Four fundamental operations are possible in Content Provider namely Create, Read, Update,
and Delete. These operations are often termed as CRUD operations.
Create: Operation to create data in a content provider.
Read: Used to fetch data from a content provider.
Update: To modify existing data.
Delete: To remove existing data from the storage.
Working of the Content Provider
UI components of android applications like Activity and Fragments use an
object CursorLoader to send query requests to ContentResolver. The ContentResolver object
sends requests (like create, read, update, and delete) to the ContentProvider as a client. After
receiving a request, ContentProvider process it and returns the desired result.
Figure 2. 8 Operations in Content Provider

Creating a Content Provider
Following are the steps which are essential to follow in order to create a Content Provider:
Create a class in the same directory where the that MainActivity file resides and this
class must extend the ContentProvider base class.
To access the content, define a content provider URI address.
Create a database to store the application data.
Implement the six abstract methods of ContentProvider class.
Register the content provider in AndroidManifest.xml file using <provider> tag.
Following are the six abstract methods and their description which are essential to override as
the part of ContenProvider class:
Figure 2.9 Content Provider Methods
Creating a Content Provider:
Step 1: Create a new project
1. Click on File, then New => New Project.
2. Select language as Java/Kotlin.
3. Choose empty activity as a template

4. Select the minimum SDK as per your need.
Step 2: Modify the strings.xml file
All the strings used in the activity are stored here.
<resources>
<string name="app_name">Content_Provider_In_Android</string>
<string name="hintText">Enter User Name</string>
<string name="heading">Content Provider In Android</string>
<string name="insertButtontext">Insert Data</string>
<string name="loadButtonText">Load Data</string>
</resources>.
Step 3: Creating the Content Provider class
1. Click on File, then New => Other => ContentProvider.
2. Name the ContentProvider
3. Define authority (it can be anything for example “com.demo.user.provider”)
4. Select Exported and Enabled option
5. Choose the language as Java/Kotlin
package com.example.contentprovidersinandroid;
import android.content.ContentProvider;
import android.content.ContentUris;
import android.content.ContentValues;
import android.content.Context;
import android.content.UriMatcher;
import android.database.Cursor;
import android.database.sqlite.SQLiteDatabase;
import android.database.sqlite.SQLiteException;
import android.database.sqlite.SQLiteOpenHelper;
import android.database.sqlite.SQLiteQueryBuilder;
import android.net.Uri;
import java.util.HashMap;
public class MyContentProvider extends ContentProvider {
public MyContentProvider() {
}
// defining authority so that other application can access it
static final String PROVIDER_NAME = "com.demo.user.provider";
// defining content URI
static final String URL = "content://" + PROVIDER_NAME + "/users";
// parsing the content URI
static final Uri CONTENT_URI = Uri.parse(URL);

static final String id = "id";
static final String name = "name";
static final int uriCode = 1;
static final UriMatcher uriMatcher;
private static HashMap<String, String> values;
static {
// to match the content URI
// every time user access table under content provider
uriMatcher = new UriMatcher(UriMatcher.NO_MATCH);
// to access whole table
uriMatcher.addURI(PROVIDER_NAME, "users", uriCode);
// to access a particular row
// of the table
uriMatcher.addURI(PROVIDER_NAME, "users/*", uriCode);
}
@Override
public String getType(Uri uri) {
switch (uriMatcher.match(uri)) {
case uriCode:
return "vnd.android.cursor.dir/users";
default:
throw new IllegalArgumentException("Unsupported URI: " +
uri);
}
}
// creating the database
@Override
public boolean onCreate() {
Context context = getContext();
DatabaseHelper dbHelper = new DatabaseHelper(context);
db = dbHelper.getWritableDatabase();
if (db != null) {
return true;
}
return false;
}
@Override
public Cursor query(Uri uri, String[] projection, String selection,
String[] selectionArgs, String sortOrder) {
SQLiteQueryBuilder qb = new SQLiteQueryBuilder();
qb.setTables(TABLE_NAME);
switch (uriMatcher.match(uri)) {
case uriCode:
qb.setProjectionMap(values);
break;

default:
throw new IllegalArgumentException("Unknown URI " + uri);
}
if (sortOrder == null || sortOrder == "") {
sortOrder = id;
}
Cursor c = qb.query(db, projection, selection, selectionArgs, null,
null, sortOrder);
c.setNotificationUri(getContext().getContentResolver(), uri);
return c;
}
// adding data to the database
@Override
public Uri insert(Uri uri, ContentValues values) {
long rowID = db.insert(TABLE_NAME, "", values);
if (rowID > 0) {
Uri _uri = ContentUris.withAppendedId(CONTENT_URI, rowID);
getContext().getContentResolver().notifyChange(_uri, null);
return _uri;
}
throw new SQLiteException("Failed to add a record into " + uri);
}
@Override
public int update(Uri uri, ContentValues values, String selection,
String[] selectionArgs) {
int count = 0;
switch (uriMatcher.match(uri)) {
case uriCode:
count = db.update(TABLE_NAME, values, selection,
selectionArgs);
break;
default:
throw new IllegalArgumentException("Unknown URI " + uri);
}
getContext().getContentResolver().notifyChange(uri, null);
return count;
}
@Override
public int delete(Uri uri, String selection, String[] selectionArgs) {
int count = 0;
switch (uriMatcher.match(uri)) {
case uriCode:
count = db.delete(TABLE_NAME, selection, selectionArgs);
break;
default:
throw new IllegalArgumentException("Unknown URI " + uri);
}

getContext().getContentResolver().notifyChange(uri, null);
return count;
}
// creating object of database
// to perform query
private SQLiteDatabase db;
// declaring name of the database
static final String DATABASE_NAME = "UserDB";
// declaring table name of the database
static final String TABLE_NAME = "Users";
// declaring version of the database
static final int DATABASE_VERSION = 1;
// sql query to create the table
static final String CREATE_DB_TABLE = " CREATE TABLE " + TABLE_NAME
+ " (id INTEGER PRIMARY KEY AUTOINCREMENT, "
+ " name TEXT NOT NULL);";
// creating a database
private static class DatabaseHelper extends SQLiteOpenHelper {
// defining a constructor
DatabaseHelper(Context context) {
super(context, DATABASE_NAME, null, DATABASE_VERSION);
}
// creating a table in the database
@Override
public void onCreate(SQLiteDatabase db) {
db.execSQL(CREATE_DB_TABLE);
}
@Override
public void onUpgrade(SQLiteDatabase db, int oldVersion, int newVersion) {
// sql query to drop a table
// having similar name
db.execSQL("DROP TABLE IF EXISTS " + TABLE_NAME);
onCreate(db);
}
}
}
Step 4: Design the activity_main.xml layout
<?xml version="1.0" encoding="utf-8"?>
<androidx.constraintlayout.widget.ConstraintLayout

xmlns:android="http://schemas.android.com/apk/res/android"
xmlns:app="http://schemas.android.com/apk/res-auto"
xmlns:tools="http://schemas.android.com/tools"
android:layout_width="match_parent"
android:layout_height="match_parent"
android:background="#168BC34A"
tools:context=".MainActivity">
<LinearLayout
android:id="@+id/linearLayout"
android:layout_width="match_parent"
android:layout_height="wrap_content"
android:layout_centerVertical="true"
android:orientation="vertical"
app:layout_constraintBottom_toTopOf="@+id/imageView"
app:layout_constraintEnd_toEndOf="parent"
app:layout_constraintStart_toStartOf="parent"
app:layout_constraintTop_toTopOf="parent"
app:layout_constraintVertical_bias="0.13"
tools:ignore="MissingConstraints">
<TextView
android:id="@+id/textView1"
android:layout_width="match_parent"
android:layout_height="wrap_content"
android:layout_marginTop="40dp"
android:layout_marginBottom="70dp"
android:fontFamily="@font/roboto"
android:text="@string/heading"
android:textAlignment="center"
android:textAppearance="@style/TextAppearance.AppCompat.Large"
android:textColor="@android:color/holo_green_dark"
android:textSize="36sp"
android:textStyle="bold" />
<EditText
android:id="@+id/textName"
android:layout_width="match_parent"
android:layout_height="wrap_content"
android:layout_marginStart="20dp"
android:layout_marginEnd="20dp"
android:layout_marginBottom="40dp"
android:fontFamily="@font/roboto"
android:hint="@string/hintText" />
<Button
android:id="@+id/insertButton"
android:layout_width="match_parent"
android:layout_height="match_parent"
android:layout_marginStart="20dp"

android:layout_marginTop="10dp"
android:layout_marginEnd="20dp"
android:layout_marginBottom="20dp"
android:background="#4CAF50"
android:fontFamily="@font/roboto"
android:onClick="onClickAddDetails"
android:text="@string/insertButtontext"
android:textAlignment="center"
android:textAppearance="@style/TextAppearance.AppCompat.Display1"
android:textColor="#FFFFFF"
android:textStyle="bold" />
<Button
android:id="@+id/loadButton"
android:layout_width="match_parent"
android:layout_height="match_parent"
android:layout_marginStart="20dp"
android:layout_marginTop="10dp"
android:layout_marginEnd="20dp"
android:layout_marginBottom="20dp"
android:background="#4CAF50"
android:fontFamily="@font/roboto"
android:onClick="onClickShowDetails"
android:text="@string/loadButtonText"
android:textAlignment="center"
android:textAppearance="@style/TextAppearance.AppCompat.Display1"
android:textColor="#FFFFFF"
android:textStyle="bold" />
<TextView
android:id="@+id/res"
android:layout_width="match_parent"
android:layout_height="wrap_content"
android:layout_marginStart="20dp"
android:layout_marginEnd="20dp"
android:clickable="false"
android:ems="10"
android:fontFamily="@font/roboto"
android:textColor="@android:color/holo_green_dark"
android:textSize="18sp"
android:textStyle="bold" />
</LinearLayout>
<ImageView
android:id="@+id/imageView"
android:layout_width="wrap_content"
android:layout_height="wrap_content"

app:layout_constraintBottom_toBottomOf="parent"
app:layout_constraintEnd_toEndOf="parent"
app:layout_constraintStart_toStartOf="parent"
app:srcCompat="@drawable/banner" />
</androidx.constraintlayout.widget.ConstraintLayout>
Step 5: Modify the MainActivity file
package com.example.contentprovidersinandroid;
import androidx.appcompat.app.AppCompatActivity;
import android.content.ContentValues;
import android.content.Context;
import android.database.Cursor;
import android.net.Uri;
import android.os.Bundle;
import android.view.MotionEvent;
import android.view.View;
import android.view.inputmethod.InputMethodManager;
import android.widget.EditText;
import android.widget.TextView;
import android.widget.Toast;
public class MainActivity extends AppCompatActivity {
@Override
protected void onCreate(Bundle savedInstanceState) {
super.onCreate(savedInstanceState);
setContentView(R.layout.activity_main);

}
@Override
public boolean onTouchEvent(MotionEvent event) {
InputMethodManager imm =
(InputMethodManager)getSystemService(Context.INPUT_METHOD_SERVICE);
imm.hideSoftInputFromWindow(getCurrentFocus().getWindowToken(),
0);
return true;
}
public void onClickAddDetails(View view) {
// class to add values in the database
ContentValues values = new ContentValues();
// fetching text from user
values.put(MyContentProvider.name, ((EditText)
findViewById(R.id.textName)).getText().toString());
// inserting into database through content URI
getContentResolver().insert(MyContentProvider.CONTENT_URI,
values);
// displaying a toast message
Toast.makeText(getBaseContext(), "New Record Inserted",
Toast.LENGTH_LONG).show();
}

public void onClickShowDetails(View view) {
// inserting complete table details in this text field
TextView resultView= (TextView) findViewById(R.id.res);
// creating a cursor object of the
// content URI
Cursor cursor =
getContentResolver().query(Uri.parse("content://com.demo.user.provider/users"), null, null,
null, null);
// iteration of the cursor
// to print whole table
if(cursor.moveToFirst()) {
StringBuilder strBuild=new StringBuilder();
while (!cursor.isAfterLast()) {
strBuild.append("\n"+cursor.getString(cursor.getColumnIndex("id"))+ "-"+
cursor.getString(cursor.getColumnIndex("name")));
cursor.moveToNext();
}
resultView.setText(strBuild);
}
else {
resultView.setText("No Records Found");
}
}
}
Step 6: Modify the AndroidManifest file

<?xml version="1.0" encoding="utf-8"?>
<manifest xmlns:android="http://schemas.android.com/apk/res/android"
package="com.example.content_provider_in_android">
<application
android:allowBackup="true"
android:icon="@mipmap/ic_launcher"
android:label="@string/app_name"
android:roundIcon="@mipmap/ic_launcher_round"
android:supportsRtl="true"
android:theme="@style/AppTheme">
<provider
android:name="com.example.contentprovidersinandroid.MyContentProvide
r"
android:authorities="com.demo.user.provider"
android:enabled="true"
android:exported="true"></provider>
<activity android:name=".MainActivity">
<intent-filter>
<action android:name="android.intent.action.MAIN" />
<category
android:name="android.intent.category.LAUNCHER" />
</intent-filter>
</activity>
<meta-data

android:name="preloaded_fonts"
android:resource="@array/preloaded_fonts" />
</application>
</manifest>
SQLite Database:
What is SQLite?
SQLite is an in-process library that implements a self-contained, serverless, zero-
configuration, transactional SQL database engine. It is a database, which is zero-configured,
which means like other databases you do not need to configure it in your system.
SQLite engine is not a standalone process like other databases, you can link it statically or
dynamically as per your requirement with your application. SQLite accesses its storage files
directly.
Why SQLite?
SQLite does not require a separate server process or system to operate (serverless).
SQLite comes with zero-configuration, which means no setup or administration
needed.
A complete SQLite database is stored in a single cross-platform disk file.
SQLite is very small and light weight, less than 400KiB fully configured or less than
250KiB with optional features omitted.
SQLite is self-contained, which means no external dependencies.
SQLite transactions are fully ACID-compliant, allowing safe access from multiple
processes or threads.
SQLite supports most of the query language features found in SQL92 (SQL2)
standard.
SQLite is written in ANSI-C and provides simple and easy-to-use API.
SQLite is available on UNIX (Linux, Mac OS-X, Android, iOS) and Windows
(Win32, WinCE, WinRT).
SQLite Commands
The standard SQLite commands to interact with relational databases are similar to SQL.
They are CREATE, SELECT, INSERT, UPDATE, DELETE and DROP. These commands
can be classified into groups based on their operational nature

SQLiteOpenHelper class
The android.database.sqlite.SQLiteOpenHelper class is used for database creation and
version management. For performing any database operation, you have to provide the
implementation of onCreate() and onUpgrade() methods of SQLiteOpenHelper class.
Constructors of SQLiteOpenHelper class
There are two constructors of SQLiteOpenHelper class.

Methods of SQLiteOpenHelper class
There are many methods in SQLiteOpenHelper class. Some of them are as follows:
SQLiteDatabase class
It contains methods to be performed on sqlite database such as create, update, delete, select
etc.
Methods of SQLiteDatabase class
There are many methods in SQLiteDatabase class. Some of them are as follows:

Example:
Content.java
package example.javatpoint.com.sqlitetutorial;
public class Contact {
int _id;
String _name;
String _phone_number;
public Contact(){ }
public Contact(int id, String name, String _phone_number){
this._id = id;
this._name = name;
this._phone_number = _phone_number;
}
public Contact(String name, String _phone_number){
this._name = name;
this._phone_number = _phone_number;
}
public int getID(){
return this._id;
}
public void setID(int id){
this._id = id;
}
public String getName(){
return this._name;
}
public void setName(String name){
this._name = name;
}
public String getPhoneNumber(){
return this._phone_number;
}
public void setPhoneNumber(String phone_number){
this._phone_number = phone_number;

}
}
DatabaseHandler.java
package example.javatpoint.com.sqlitetutorial;
import android.content.ContentValues;
import android.content.Context;
import android.database.Cursor;
import android.database.sqlite.SQLiteDatabase;
import android.database.sqlite.SQLiteOpenHelper;
import java.util.ArrayList;
import java.util.List;
public class DatabaseHandler extends SQLiteOpenHelper {
private static final int DATABASE_VERSION = 1;
private static final String DATABASE_NAME = "contactsManager";
private static final String TABLE_CONTACTS = "contacts";
private static final String KEY_ID = "id";
private static final String KEY_NAME = "name";
private static final String KEY_PH_NO = "phone_number";
public DatabaseHandler(Context context) {
super(context, DATABASE_NAME, null, DATABASE_VERSION);
//3rd argument to be passed is CursorFactory instance
}
// Creating Tables
@Override
public void onCreate(SQLiteDatabase db) {
String CREATE_CONTACTS_TABLE = "CREATE TABLE " + TABLE_CONTACS
+ "("
+ KEY_ID + " INTEGER PRIMARY KEY," + KEY_NAME + " TEXT,"
+ KEY_PH_NO + " TEXT" + ")";
db.execSQL(CREATE_CONTACTS_TABLE);
}
// Upgrading database
@Override
public void onUpgrade(SQLiteDatabase db, int oldVersion, int newVersion) {
// Drop older table if existed
db.execSQL("DROP TABLE IF EXISTS " + TABLE_CONTACTS);

// Create tables again
onCreate(db);
}
// code to add the new contact
void addContact(Contact contact) {
SQLiteDatabase db = this.getWritableDatabase();
ContentValues values = new ContentValues();
values.put(KEY_NAME, contact.getName()); // Contact Name
values.put(KEY_PH_NO, contact.getPhoneNumber()); // Contact Phone
// Inserting Row
db.insert(TABLE_CONTACTS, null, values);
//2nd argument is String containing nullColumnHack
db.close(); // Closing database connection
}
// code to get the single contact
Contact getContact(int id) {
SQLiteDatabase db = this.getReadableDatabase();
Cursor cursor = db.query(TABLE_CONTACTS, new String[] { KEY_ID,
KEY_NAME, KEY_PH_NO }, KEY_ID + "=?",
new String[] { String.valueOf(id) }, null, null, null, null);
if (cursor != null)
cursor.moveToFirst();
Contact contact = new Contact(Integer.parseInt(cursor.getString(0)),
cursor.getString(1), cursor.getString(2));
// return contact
return contact;
}
// code to get all contacts in a list view
public List<Contact> getAllContacts() {
List<Contact> contactList = new ArrayList<Contact>();
// Select All Query
String selectQuery = "SELECT * FROM " + TABLE_CONTACTS;
SQLiteDatabase db = this.getWritableDatabase();
Cursor cursor = db.rawQuery(selectQuery, null);

// looping through all rows and adding to list
if (cursor.moveToFirst()) {
do {
Contact contact = new Contact();
contact.setID(Integer.parseInt(cursor.getString(0)));
contact.setName(cursor.getString(1));
contact.setPhoneNumber(cursor.getString(2));
// Adding contact to list
contactList.add(contact);
} while (cursor.moveToNext());
}
// return contact list
return contactList;
}
// code to update the single contact
public int updateContact(Contact contact) {
SQLiteDatabase db = this.getWritableDatabase();
ContentValues values = new ContentValues();
values.put(KEY_NAME, contact.getName());
values.put(KEY_PH_NO, contact.getPhoneNumber());
// updating row
return db.update(TABLE_CONTACTS, values, KEY_ID + " = ?",
new String[] { String.valueOf(contact.getID()) });
}
// Deleting single contact
public void deleteContact(Contact contact) {
SQLiteDatabase db = this.getWritableDatabase();
db.delete(TABLE_CONTACTS, KEY_ID + " = ?",
new String[] { String.valueOf(contact.getID()) });
db.close();
}
// Getting contacts Count
public int getContactsCount() {
String countQuery = "SELECT * FROM " + TABLE_CONTACTS;
SQLiteDatabase db = this.getReadableDatabase();
Cursor cursor = db.rawQuery(countQuery, null);
cursor.close();

// return count
return cursor.getCount();
}
}
MainActivity.java
package example.javatpoint.com.sqlitetutorial;
import android.support.v7.app.AppCompatActivity;
import android.os.Bundle;
import android.util.Log;
import java.util.List;
public class MainActivity extends AppCompatActivity {
@Override
protected void onCreate(Bundle savedInstanceState) {
super.onCreate(savedInstanceState);
setContentView(R.layout.activity_main);
DatabaseHandler db = new DatabaseHandler(this);
// Inserting Contacts
Log.d("Insert: ", "Inserting ..");
db.addContact(new Contact("Ravi", "9100000000"));
db.addContact(new Contact("Srinivas", "9199999999"));
db.addContact(new Contact("Tommy", "9522222222"));
db.addContact(new Contact("Karthik", "9533333333"));
// Reading all contacts
Log.d("Reading: ", "Reading all contacts..");
List<Contact> contacts = db.getAllContacts();
for (Contact cn : contacts) {
String log = "Id: " + cn.getID() + " ,Name: " + cn.getName() + " ,Phone: " +
cn.getPhoneNumber();
// Writing Contacts to log
Log.d("Name: ", log);
}
}
}

1
SCHOOL OF COMPUTING
DEPARTMENT OF COMPUTER SCIENCE AND ENGINEERING
Unit – III
Introduction to Objective-C - Data Types and Expressions - Decision Making and Looping -
Objects and Classes – Property – Messaging – Category - Extensions - Fast Enumeration - NSArray
and NSDictionary - Methods and Selectors - Static and Dynamic Objects - Exception Handling -
Memory Management - Required Tools – Xcode, iOS Simulator, Instruments, ARC and Frameworks
UNIT – III – Mobile Application Development – SIT1402

2
Introduction
• Objective-C is a general-purpose, object-oriented programming language that adds
Smalltalk-style messaging to the C programming language.
• This is the main programming language used by Apple for the OS X and iOS operating
systems and their respective APIs, Cocoa and Cocoa Touch.
• Initially, Objective-C was developed by NeXT for its NeXTSTEP OS from whom it was
taken over by Apple for its iOS and Mac OS X.
Objective-C Program Structure
• Preprocessor Commands
• Interface
• Implementation
• Method
• Variables
• Statements & Expressions
• Comments
Example
#import <Foundation/Foundation.h> @interface SampleClass:NSObject
- (void)sampleMethod; @end
@implementation SampleClass
- (void)sampleMethod
{
NSLog(@"Hello, World! \n");
}
@end
int main() {
/* my first program in Objective-C */
SampleClass *sampleClass = [[SampleClass alloc]init];
[sampleClass sampleMethod];
return 0;

3
}
Various parts of the program
• The first line of the program #import
<Foundation/Foundation.h> is a preprocessor command, which tells an Objective-C compiler
to include Foundation.h file before going to actual compilation.
• The next line @interface SampleClass:NSObject shows how to create an interface. It inherits
NSObject, which is the base class of all objects.
• The next line - (void)sampleMethod; shows how to declare a method.
• The next line @end marks the end of an interface.
• The next line @implementation SampleClass shows how to implement the interface
SampleClass.
• The next line - (void)sampleMethod{} shows the implementation of the sampleMethod.
• The next line @end marks the end of an implementation.
• The next line int main() is the main function where program execution begins.
• The next line /*...*/ will be ignored by the compiler and it has been put to add additional
comments in the program. So such lines are called comments in the program.
• The next line NSLog(...) is another function available in Objective-C which causes the
message "Hello, World!" to be displayed on the screen.
• The next line return 0; terminates main() function and returns the value 0.
Token
An Objective-C program consists of various tokens and a token is either,
– a keyword
– an identifier
– a constant
– a string literal, or a symbol.
The semicolon is a statement terminator.
NSLog(@"Hello, World! \n");
(or)
NSLog (
@

4
"Hello, World! \n"
)
;
Data types classified
• Basic Types
– They are arithmetic types and consist of the two types: (a)
integer types and (b) floating-point types.
• Enumerated types
– They are again arithmetic types and they are used to define variables that can only be
assigned certain discrete integer values throughout the program.
• The void type
– The type specifier void indicates that no value is available.
• Derived types
– They include (a) Pointer types, (b) Array types, (c) Structure types, (d) Union types
and (e) Function types.
Data types
• Integer types
– char - 1 byte
– unsigned char - 1 byte
– signed char - 1 byte
– int - 2 or 4 bytes
– unsigned int - 2 or 4 bytes
– short - 2 bytes
– unsigned short - 2 bytes
– long - 4 bytes
– unsigned long - 4 bytes
• Floating-Point Types

5
– float - 4 byte
– double - 8 byte
– long double - 10 byte
• The void Type
– Function returns as void
– Function arguments as void
Variables
• A variable is nothing but a name given to a storage area that our programs can
manipulate.
• Each variable in Objective-C has a specific type, which determines the size and layout
of the variable's memory,
– the range of values that can be stored within that memory
– the set of operations that can be applied to the variable.
•
Basic variable types
• char
– Typically a single octet (one byte). This is an integer type.
• int
– The most natural size of integer for the machine.
• float
– A single-precision floating point value.
• double
– A double-precision floating point value.
• void
– Represents the absence of type.
Example
#import <Foundation/Foundation.h>
// variable declaration
extern int a, b;

6
extern int c;
extern float f;
int main () {
/*
variable
definitio
n: */ int a,
b; int c;
float f;
/* actual
initializat
ion */ a =
10; b = 20;
c = a + b;
NSLog(@"value of c : %d \n",
c); f = 70.0/3.0;
NSLog(@"value of f : %f
\n", f); return 0;
}
Constants
• The constants refer to fixed values that the program may not alter during its execution.
• Constants can be of any of the basic data types like
– integer constant
– floating constant
– character constant
– string literal
– enumeration constant
Operators
• Arithmetic Operators
• Relational Operators
• Logical Operators

7
• Bitwise Operators
• Assignment Operators
• Misc Operators
– sizeof()
– & operator
– * operator
– ?: operator
Decision Making - Branching
Decision making structures require that the programmer specify one or more conditions
to be evaluated or tested by the program, along with a statement or statements to be executed if
the condition is determined to be true, and optionally, other statements to be executed if the
condition is determined to be false as shown in figure 3.1.
Figure 3.1 Decision making flowchart
Types of decision-making statements
• If statement
if(boolean_expression) {
/* statement(s) will execute if the boolean expression is true */ }
• If else statement
if(boolean_expression) {
/* statement(s) will execute if the boolean expression is true */ }
else {

8
/* statement(s) will execute if the boolean expression is false */
}
• Nested if statement
if( boolean_expression 1) {
/* Executes when the boolean expression 1 is true */
if(boolean_expression 2) {
/* Executes when the boolean expression 2 is true */
}}
• Switch statement
switch(expression)
{
case constant-expression:
statement; break;
/* you can have any number of case statements */ default :
/* optional */
statement(s); break;
}
Decision making - Looping
A looping statement allows us to execute a statement or group of statements multiple
times. It’s flowchart is shown in figure 3.2.

9
Figure 3.2 Decision making – Looping flowchart
Looping statement
• While loop
while(condition) {
statement(s); }
• Do while loop
do {
statement(s);
}while( condition );
• For loop
for (init; condition; increment/decrement) {
statement(s); }
Classes & Objects
• The main purpose of Objective-C programming language is to add object orientation
to the C programming language.
• Classes are the central feature of Objective-C that support object-oriented programming
and are often called user-defined types.
• A class is used to specify the form of an object and it combines data representation and
methods for manipulating that data into one neat package.
• The data and methods within a class are called members of the class.
Objective-C characteristics
• The class is defined in two different sections namely @interface and @implementation.
• Almost everything is in form of objects.
• Objects receive messages and objects are often referred as receivers.
• Objects contain instance variables.
• Objects and instance variables have scope.
• Classes hide an object's implementation.
• Properties are used to provide access to class instance variables in other classes.
Class Definitions
• Define a blueprint for a data type.

10
– Define what the class name means?
– What an object of the class will consist?
– What operations can be performed on such an object?
• A class definition starts with the keyword @interface followed by the
interface(class) name;
and the class body, enclosed by a pair of curly braces.
• In Objective-C, all classes are derived from the base class called NSObject.
It is the super class of all Objective-C classes. It provides basic methods like
memory allocation and initialization.
Example
@interface Box:NSObject {
//Instance variables
double length; // Length of a box
double breadth; // Breadth of a box
}
// Property
@property(nonatomic, readwrite) double height;
@end
Allocating and initializing Objects
• A class provides the blueprints for objects, so basically an object is created from a
class.
• We declare objects of a class with exactly the same sort of declaration that we declare
variables of basic types.
Example
Box box1 = [[Box alloc]init]; // Create box1 object of type Box
Box box2 = [[Box alloc]init]; // Create box2 object of type Box
Accessing the Data Members

11
• The properties of objects of a class can be accessed using the direct member
access operator (.)
Example
#import<Foundation/Foundation.h>
@interface Box:NSObject {
double length;
double breadth;
double height;
}
@property(nonatomic, readwrite) double height;
-(double) volume;
@end
@implementation Box
@synthesize height;
-(id)init
{
self = [super init];
length = 1.0;
breadth = 1.0;
return self;
}
-(double) volume
{ return length*breadth*height;
}
@end
int main( )
{
Box *box1 = [[Box alloc]init];
Box *box2 = [[Box alloc]init];
double volume = 0.0;
box1.height = 5.0;

12
box2.height = 10.0;
volume = [box1 volume];
NSLog(@"Volume of Box1 : %f", volume);
volume = [box2 volume];
NSLog(@"Volume of Box2 : %f", volume); return 0; }
Function
• A function is a group of statements that together perform a task.
• A function declaration tells the compiler about a function's name, return type, and
parameters.
• A function definition provides the actual body of the function.
• Call the function as method
Defining a Method
Syntax:
- (return_type) method_name:( argumentType1
)argumentName1 joiningArgument2:(argumentType2)argumentName2
joiningArgumentN:( argumentTypeN )argumentNameN
{
body of the function
}
Example
/* function returning the max between two numbers */
- (int) max:(int) num1 Num2:(int) num2
{
int result;
if (num1 > num2)
{
result = num1;
}else{
result=num2;
}

13
return result;}
Method Declaration
Syntax:
- (return_type) function_name:( argumentType1)argumentName1 joiningArgument2:
( argumentType2 )argumentName2 ... joiningArgumentN:( argumentTypeN
)argumentNameN;
Example
-(int) max:(int)num1 andNum2:(int)num2;
Example
#import<Foundation/Foundation.h>
@interface SampleClass:NSObject
/* method declaration */
- (int)max:(int)num1 andNum2:(int)num2;
@end
@implementation SampleClass
/* method returning the max between two numbers */
- (int)max:(int)num1 andNum2:(int)num2{
/* local variable declaration
*/ int result;
if (num1 > num2)
result = num1;
else
result = num2;
return result;
}
@end
int main ()
{
/* local variable definition */
int a = 100;

14
int b = 200;
int ret;
SampleClass *sampleClass = [[SampleClass alloc]init];
/* calling a method to get max value */
ret = [sampleClass max:a andNum2:b];
NSLog(@"Max value is : %d\n", ret );
return 0;
}
Log Handling
NSLog method
– To print logs, we use the NSLog method
– Syntax:
N“Log(@”“tring”);
– Example
#import<Foundation/Foundation.h>
int main() {
NSLog(@"Hello,
World! \n");
return 0;
}
Example
• DebugLog Method
– To print logs in a live build.
#import <Foundation/Foundation.h>
#if DEBUG == 0
#define DebugLog(...)
#elif DEBUG== 1
#define DebugLog(...) NSLog(VA_ARGS)
#endif
int main() {

15
DebugLog(@"Debug log, our custom addition gets \ printed during debug
only" );
NSLog(@"NSLog gets printed always" );
return 0;
}
Output
• We compile and run the program in debug mode, the output is,
– Debug log, our custom addition gets printed during debug
only
– NSLog gets printed always
• We compile and run the program in release mode, the output is,
– NSLog gets printed always
Property
• To ensure that the instance variable of the class can be accessed outside the class.
• The various parts are the property declaration are as follows
– Properties begin with @property, which is a keyword
– Access specifiers (atomic, nonatomic, readwrite, readonly, strong, weak )
– This is followed by the data-type of the variable.
– Finally, we have the property name terminated by a semicolon.
– We can add synthesize statement in the implementation class.
• Properties let other objects inspect or change its state
• A well-designed object-oriented program, it’s not possible to directly access the
internal state of an object as shown in figure 3.3
• Accessor methods are used
– Setters
– Getters

16
Figure 3.3 Setter and Getter methods
Messaging
• In Objective-C, messages aren’t bound to method implementations until runtime.
• The compiler converts a message expression,
[receiver message] into a call on a messaging function, objc_msgSend.
• This function takes the receiver and the name of the method mentioned in the
message—that is, the method selector—as its two principal parameters:
objc_msgSend(receiver, selector)
• Any arguments passed in the message are also handed to objc_msgSend:
objc_msgSend(receiver, selector, arg1, arg2, ...)
• The messaging function does everything necessary for dynamic binding:
– It first finds the procedure (method implementation) that the selector refers to.
Since the same method can be implemented differently by separate classes, the
precise procedure that it finds depends on the class of the receiver.
– It then calls the procedure, passing it the receiving object (a pointer to its data),
along with any arguments that were specified for the method.
– Finally, it passes on the return value of the procedure as its own return value.
Messaging Framework

17
Figure 3.4 Messaging framework
• When a message is sent to an object, the messaging function follows the object’s is a
pointer to the class structure where it looks up the method selector in the dispatch table.
• If it can’t find the selector here, objc_msgSend follows the pointer to the superclass
and tries to find the selector in its dispatch table.
• Successive failures cause objc_msgSend to climb the class hierarchy until it reaches
the NSObject class as indicated in figure 3.4.
• Once it locates the selector, the function calls the method entered in the table and passes
it the receiving object’s data structure.
• To speed the messaging process, the runtime system caches the selectors and addresses
of methods as they are used.
• There’s a separate cache for each class, and it can contain selectors for inherited
methods as well as for methods defined in the class.
• Before searching the dispatch tables, the messaging routine first checks the cache of
the receiving object’s class.
• If the method selector is in the cache, messaging is only slightly slower than a function
call.
• Caches grow dynamically to accommodate new messages as the program runs.
Categories

18
• To extend an existing class by adding behavior that is useful only in certain situations.
• If you need to add a method to an existing class, the easiest way is to use a category.
• To declare a category uses the @interface keyword.
Syntax
@interface ClassName (CategoryName)
@end
Characteristics of category
• A category can be declared for any class, even if you don't have the original
implementation source code.
• Any methods that you declare in a category will be available to all instances of the
original class, as well as any subclasses of the original class.
• At runtime, there's no difference between a method added by a category and one that
is implemented by the original class.
Person.h
@interface Person : NSObject
@property (readonly) NSMutableArray* friends;
@property (copy) NSString* name;
- (void)sayHello;
- (void)sayGoodbye;
@end
Person.m
#import "Person.h"
@implementation Person
@synthesize name = _name;
@synthesize friends = _friends;
-(id)init
{
self = [super init];
if(self)

19
{
_friends = [[NSMutableArray alloc] init];
}
return self;
}
- (void)sayHello
{
NSLog(@"Hello, says %@.", _name);
}
- (void)sayGoodbye
{
NSLog(@"Goodbye, says %@.", _name);
}
@end
Person+Relations.h
#import<Foundation/Foundation.h>
#import "Person.h"
@interface Person (Relations)
- (void)addFriend:(Person *)aFriend;
- (void)removeFriend:(Person *)aFriend;
- (void)sayHelloToFriends;
@end
Person+Relations.m
#import"Person+Relations.h"
@implementation Person (Relations)
- (void)addFriend:(Person *)aFriend
{
[[self friends] addObject:aFriend];
}

20
- (void)removeFriend:(Person *)aFriend
{
[[self friends] removeObject:aFriend];
}
- (void)sayHelloToFriends
{
for(Person *friend in [self friends])
{
NSLog(@"Hello there, %@!", [friend name]);
}}
@end
Main.m
#import <Foundation/Foundation.h>
#import "Person.h"
#import "Person+Relations.h"
int main(int argc, const char * argv[])
{
@autoreleasepool
{
Person *joe = [[Person alloc] init];
joe.name = @"Joe";
Person *bill = [[Person alloc] init];
bill.name = @"Bill";
Person *mary = [[Person alloc] init];
mary.name = @"Mary";
[joe sayHello];
[joe addFriend:bill];
[joe addFriend:mary];
[joe sayHelloToFriends];
}

21
}
Extensions
• A class extension is similar to a category, but it can only be added to a class for which
you have the source code at compile time.
• The methods declared by a class extension are implemented in the implementation
block for the original class.
• Extensions are actually categories without the category name.
It's often referred as anonymous categories.
• The syntax to declare a extension uses the @interface keyword.
• Syntax
@interface ClassName ()
@end
Characteristics of extensions
• An extension cannot be declared for any class, only for the classes that we have
original implementation of source code.
• An extension is adding private methods and private variables that are only
specific to the class.
• Any method or variable declared inside the extensions is not accessible
even to the inherited classes.
Example
@interface SampleClass : NSObject
{
NSString *name;
}
- (void)setInternalID;
- (NSString *)getExternalID;

22
@end
@interface SampleClass()
{
NSString *internalID;
}
@end
@implementation SampleClass
- (void)setInternalID
{
internalID=[NSStringstringWithFormat:
@"UNIQUEINTERNALKEY%dUNIQUEINTERNALKEY",arc4r
andom()%100];
}
- (NSString *)getExternalID
{
return[internalIDstringByReplacingOccurrencesOfString:
@"UNIQUEINTERNALKEY" withString:@""];
}
@end
The following table 3.1 shows the Difference between Category & Extension.
Table 3.1 Difference between Category & Extension
Category Extension
Categories to define additional
methods of an existing class—even
one whose source code is
unavailable to you
A class extension is similar to a category,
but it can only be added to a class for
which you have the source code
Category have category name Extension don’t have name

23
It helps to add some more
functionality to existing class,
but only functions
It helps to add some more functionality to
existing class, but only properties and
instance variables
It come with its own .h and .m file It comes with .m file only
@interface MyClass (Category Name)
// method declarations
@end
@interface MyClass ()
// method declarations
@end
Fast Enumeration-NSArray
• NSArray is general-purpose array type.
• It represents an ordered collection of objects.
• Like NSSet, NSArray is immutable, so you cannot dynamically add
or remove items.
• Immutable arrays can be defined as literals using the @[] syntax.
Figure 3.5 NSArray - Fast Enumeration
Eg.
NSArray *germanMakes = @[@"Mercedes-Benz", @"BMW", @"Porsche", @"Opel",
@"Volkswagen", @"Audi"];
NSArray *ukMakes = [NSArray arrayWithObjects:@"Aston Martin", @"Lotus", @"Jaguar",
@"Bentley", nil];
NSLog(@"First german make: %@", germanMakes[0]);
NSLog(@"First U.K. make: %@", [ukMakes objectAtIndex:0]);
• Fast-enumeration is the most efficient way to iterate over an NSArray, and its contents

24
are guaranteed to appear in the correct order.
Eg.
NSArray *germanMakes = @[@"Mercedes- Benz", @"BMW", @"Porsche", @"Opel",
@"Volkswagen", @"Audi"];
// With fast-enumeration
for (NSString *item in germanMakes)
{
NSLog(@"%@", item);
}
// With a traditional for loop
for (int i=0; i<[germanMakes count]; i++)
{
NSLog(@"%d: %@", i, germanMakes[i]);
}
There are several advantages to using fast enumeration:
– The enumeration is considerably more efficient than, for The
syntax is concise
– Enumeration is “safe”—the enumerator has a mutation guard so that if
you attempt to modify the collection during enumeration, an exception is
raised
• The NSDictionary class represents an unordered collection of objects
• They associate each value with a key, which acts like a label for the value.
This is useful for modeling relationships between pairs of objects
• NSDictionary is immutable, but the NSMutableDictionary data structure lets you
dynamically add and remove entries as necessary.
• Immutable dictionaries can be defined using the
literal @{} syntax.
• Factory methods
– dictionaryWithObjectsAndKeys:
– dictionaryWithObjects:forKeys:
Eg.

25
// Literal syntax
NSDictionary *inventory = @{ @"Mercedes-Benz SLK250" : [NSNumber
numberWithInt:13],
@"Mercedes-Benz E350" : [NSNumber numberWithInt:22],
@"BMW M3 Coupe" : [NSNumber numberWithInt:19], @"BMW X6" : [NSNumber
numberWithInt:16], };
Eg.
// Values and keys as arguments
inventory = [NSDictionary dictionaryWithObjectsAndKeys:
[NSNumber numberWithInt:13], @"Mercedes-Benz SLK250",
[NSNumber numberWithInt:22], @"Mercedes-Benz E350",
[NSNumber numberWithInt:19], @"BMW M3 Coupe", [NSNumber numberWithInt:16],
@"BMW X6", nil];
Eg.
// Values and keys as arrays
NSArray *models = @[@"Mercedes-Benz SLK250", @"Mercedes-Benz E350", @"BMW
M3 Coupe", @"BMW X6"];
NSArray *stock = @[[NSNumber numberWithInt:13], [NSNumber numberWithInt:22],
[NSNumber numberWithInt:19], [NSNumber numberWithInt:16]];
inventory = [NSDictionary dictionaryWithObjects:stock forKeys:models];
NSLog(@"%@", inventory);
• Fast-enumeration is the most efficient way to enumerate a dictionary, and it loops
through the keys (not the values).
• NSDictionary also defines a count method, which returns the number of entries in the
collection.
Eg.
NSLog(@"We currently have %ld models available", [inventory count]);
for (id key in inventory) {
NSLog(@"There are %@ %@'s in stock", inventory[key], key); }
Methods and Selectors

26
• A selector refers to the name used to select a method to execute for an object
• It is used to identify a method
– Compiler writes each method name into a table
– Pairs the name with a unique identifier that represents the method at runtime
– The runtime system makes sure each identifier is unique
– No two selectors are the same, and all methods with the
same name have the same selector
Static Class
• A class is a blue print for the members like, static variable and static methods.
• A static variable are declared using the modifier static.
• Syntax
• static <data_type> <variable_name>;
Eg.
static int number;
For static method which is also known as class method, you can use the + sign instead of
the – sign when declaring the method.
• Syntax
+ (data_type)method_name;
Eg. +(int) getNumber;
Dynamic Objects
• Dynamic binding is determining the method to invoke at runtime instead of at compile
time. Dynamic binding is also referred to as late binding.
• In Objective-C, all methods are resolved dynamically at runtime.
• The exact code executed is determined by both the method name (the selector) and
the receiving object.
• Dynamic binding enables polymorphism.
Eg.
– Consider a collection of objects including Rectangle and Square.
– Each object has its own implementation of a printArea method.

27
– The actual code that should be executed by the expression [anObject
printArea] is determined at runtime.
– In this, printArea method is dynamically selected in runtime.
Example
#import <Foundation/Foundation.h>
@interface Square:NSObject
{
float area;
}
- (void)calculateAreaOfSide:(CGFloat)side;
- void)printArea;
@end
@implementation Square
- (void)calculateAreaOfSide:(CGFloat)side
{
area = side * side;
}
-(void)printArea
{
NSLog(@"The area of square is %f",area);
}
@end
@interface Rectangle:NSObject
{
float area;
}
- (void)calculateAreaOfLength:(CGFloat)length andBreadth:(CGFloat)breadth;
- (void)printArea;
@end
@implementation Rectangle
- (void)calculateAreaOfLength:(CGFloat)length andBreadth:(CGFloat)breadth

28
{
area = length * breadth;
}
- (void)printArea
{
NSLog(@"The area of Rectangle is %f",area); }
@end
int main()
{
Square *square = [[Square alloc]init];
[square calculateAreaOfSide:10.0];
Rectangle *rectangle = [[Rectangle alloc]init];
[rectangle calculateAreaOfLength:10.0 andBreadth:5.0];
NSArray *shapes = [[NSArray alloc]initWithObjects: square, rectangle,nil];
id object1 = [shapes objectAtIndex:0];
[object1 printArea];
id object2 = [shapes objectAtIndex:1];
[object2 printArea];
return 0;}
Exception Handling
• An exception is a special condition that interrupts the normal flow of program
execution
• There are a variety of reasons why an exception may be generated, by hardware as
well as software
• Exception handling is made available in Objective- C with foundation class
NSException
• Objective-C exception support four compiler directives:
– @try - This block tries to execute a set of statements
– @catch - This block tries to catch the exception in try block
– @throw - throw exceptions if you find yourself in a situation that indicates
a programming error, and want to stop the application from running

29
– @finally - This block contains set of statements that always execute
Eg. division by zero, underflow or overflow, calling undefined instructions
#import <Foundation/Foundation.h>
int main()
{
NSAutoreleasePool * pool = [[NSAutoreleasePool alloc] init];
NSMutableArray *array = [[NSMutableArray alloc]init];
@try
{
NSString *string = [array objectAtIndex:10];
}
@catch (NSException *exception)
{
NSLog(@"%@ ",exception.name);
NSLog(@"Reason: %@ ",exception.reason);
}
@finally
{
NSLog(@"@finaly Always Executes");
}
[pool drain];
return 0;}
Memory Management
• Objects reside in memory, and especially on mobile devices this is a scarce resource
• To make sure that programs don’t take up any more space than they need
• The goal of any memory management system is to reduce the memory footprint of
a program by controlling the lifetime of all its objects. iOS and OS X applications
accomplish this through object ownership, which makes sure objects exist as long
as they have to, but no longer
• Many languages accomplish this through garbage collection, but Objective-C uses
object ownership

30
Figure 3.6 Memory management in Objective C
Manual Retain Release environment
• alloc - Create an object and claim ownership of it.
• retain - Claim ownership of an existing object.
• copy - Copy an object and claim ownership of it.
• release - Relinquish ownership of an object and destroy it immediately.
• autorelease - Relinquish ownership of an object but defer its destruction.
• Manually controlling object ownership might seem like a daunting task, but it’s
actually very easy.
• All you have to do is claim ownership of any object you need and remember to
relinquish ownership when you’re done with it.
• When you forget to balance these calls, one of two things can happen.
– If you forget to release an object, its underlying memory is never freed,
resulting in a memory leak.
– “mall leaks won’t have a visible effect on your program, but if you eat up
enough memory, your program will eventually crash.
– On the other hand, if you try to release an object too many times, you’ll have what’s
called a dangling pointer.
– When you try to access the dangling pointer, you’ll be requesting an invalid
memory address, and your program will most likely crash.

31
Figure 3.7 Balance between memory leak and dangling pointer
The alloc Method
• Using the alloc method to create objects. But, it’s not just allocating memory for
the object, it’s also setting its reference count to 1.
• Eg.
#importFoundation/Foundation.h>
int main(int argc, const char * argv[])
{
@autoreleasepool
{
NSMutableArray *inventory = [[NSMutableArray alloc] init];
[inventory addObject:@"Honda Civic"];
NSLog(@"%@", inventory);
}
return 0;
}
The release Method
• The release method relinquishes ownership of an object by decrementing its
reference count.
• So, we can get rid of our memory leak by adding the following line after the
NSLog()
• Eg.
[inventory release];

32
The Retain Method
• The retain method claims ownership of an existing object.
• It’s like telling the operating system, “Hey! I
need that object too, so don’t get rid of it!”.
Figure 3.8 Reference count of objects during retain and release
Eg.
// CarStore.h
#import<Foundation/Foundation.h>
@interface CarStore : NSObject
-(NSMutableArray *)inventory;
-(void)setInventory:(NSMutableArray *)newInventory;
@end
// CarStore.m
-(void)setInventory:(NSMutableArray *)newInventory
{
_inventory = [newInventory retain]; }
The autorelease method
• The autorelease method relinquishes ownership of an object, but instead of
destroying the object immediately, it defers the actual freeing of memory until
later on in the program.
• This allows you to release objects when you are “supposed”
to, while still keeping them around for others to use.
Eg.
// CarStore.h

33
+ (CarStore *)carStore;
// CarStore.m
+ (CarStore *)carStore
{
CarStore *newStore = [[CarStore alloc] init];
return [newStore autorelease];
}
The dealloc Method
• An object’s dealloc method is the opposite of its init method.
• It’s called right before the object is destroyed, giving you a
chance to clean up any internal objects.
• This method is called automatically by the runtime—you should
never try to call dealloc yourself.
• Eg.
// CarStore.m
(void)dealloc
{
[_inventory release];
[super dealloc];
}
• Automatic Reference Counting works the exact same way as MRR, but it
automatically inserts the appropriate memory- management methods for
you.
• This is a big deal for Objective-C developers, as it lets them focus entirely
on what their application needs to do rather than how it does it.
• ARC takes the human error out of memory management with virtually no
downside, so the only reason not to use it is when you’re interfacing with a
legacy code base.
• The rest of this module explains the major changes between MRR and ARC
• Enabling ARC
– First, let’s go ahead and turn ARC back on in the project’s Build Settings tab as
shown in figure 3.9.

34
– Change the Automatic Reference Counting compiler option to Yes.
– Again, this is the default for all Xcode templates, and it’s what you should be
using for all of your projects
• Automatic Reference Counting, the compiler manages all of
your object ownership automatically
• We never to worry about how the memory management system actually works
• To understand the various attributes of @property, since they tell the compiler
what kind of relationship objects should have
– Strong attribute
– Weak attribute
– Copy attribute
• The strong Attribute
– It creates an owning relationship to whatever object is assigned to the
property
Figure 3.9 Enabling ARC in project’s Build Setting tab

35
– It makes sure the value exists as long as it’s assigned to the property
Figure 3.10 Retain cycle between Car and Person classes
The weak Attribute
• The weak attribute creates a non-owning relationship
• Possible to maintain a cyclical relationship without creating a retain cycle
• Two objects should never have strong references to each other
Figure 3.11 Weak reference
The copy Attribute
– The copy attribute is an alternative to strong
– Instead of taking ownership of the existing object, it creates a copy of
whatever you assign to the property, then takes ownership of that
– Properties that represent values are good candidates
for copying
– Eg.
@property (nonatomic, copy)
NSString *model;

36
Required Tools
• Objective-C is the native programming language for Apple’s iO“ and O“ X
operating systems.
• It’s a compiled, general-purpose language capable of building everything from
command line utilities to animated GUIs to domain- specific libraries.
• It also provides many tools for maintaining large, scalable frameworks.
Figure 3.12 Types of programs written in Objective-C
Xcode
• Xcode is the Integrated Development Environment (IDE) designed for
developing iOS and Mac OS apps
• The Xcode IDE includes editors used to design and implement your apps
• Xcode can show you mistakes in both syntax and logic, and even suggests fixes as
you type.

37
• Finally, Build and run your apps
Figure 3.13 XCode IDE
Components of Xcode
• Xcode IDE : IDE that enables you to manage, edit, and debug your projects
• Dashcode : IDE that enables you to develop web- based iPhone and iPad applications
and Dashboard widgets
• iOS Simulator : Provides a software simulator to simulate an iPhone or an iPad on
your Mac
• Interface Builder : Visual editor for designing user interfaces for your iPhone and
iPad applications
• Instruments : Analysis tool to help you both optimize your application and monitor
for memory leaks in real time
Creating an Application
• Xcode provides several templates for various types of iOS and OS X applications. All
of them can be found by navigating to File > New > Project... or using the
Cmd+Shift+N shortcut.

38
• This will open a dialog window asking you to select a
template:
Figure 3.14 Creating a command line application
• This opens another dialog asking you to configure the project:
Figure 3.15 Configuring a command line application
• You can use whatever you like for the Product Name and Organization Name fields.
• Finally, the Use Automatic Reference Counting checkbox should always be selected
for new projects.
• Clicking Next prompts you for a file path to store the project (save it anywhere you
like), and you should now have a brand new Xcode project to play with.
• In the left-hand column of the Xcode IDE, you’ll find a file called main.m (along
with some other files and folders). At the moment, this file contains the entirety of
your application.
• Note that the .m extension is used for Objective-C source files.

39
• To compile the project, click the Run button in the upper-left corner of the IDE or use
the Cmd+R shortcut.
• This should display Hello, World!in the Output Panel located at the bottom of the
IDE as shown in figure 3.17
The main() Function
#import<Foundation/Foundation.h>
int main(int argc, const char * argv[])
{
@autoreleasepool
{
// insert code here...
NSLog(@"Hello, World!");
}
return 0;
}
Figure 3.16 main.m in the Project Navigator
Figure 3.17 Output console

40
iOS Simulator
• The iOS Simulator app, available within Xcode, presents the iPhone, iPad, or Apple
Watch user interface in a window on your Mac computer.
• You interact with iOS Simulator by using the keyboard and the mouse to emulate
taps, device rotation, and other user actions.
• There are two different ways to access iOS Simulator through Xcode.
– The first way is to run your app in iOS Simulator.
– The second way is to launch iOS Simulator without running an app.
Running Your App in iOS Simulator
• When testing an app in iOS Simulator, it is easiest to launch and run your app in iOS
Simulator directly from your Xcode project.
• To run your app in iOS Simulator, choose an iOS simulator—for example, iPhone 6
or iPad Air—from the Xcode scheme pop-up menu and click Run.
• Xcode builds your project and then launches the most recent version of your app
running in iOS Simulator on your Mac screen as shown in figure 3.18
Instruments
• Instruments is a powerful and flexible performance- analysis and testing tool that’s
part of the Xcode tool set.
• It’s designed to help you profile your OS X and iOS apps, processes, and devices in
order to better understand and optimize their behavior and performance.
Figure 3.18 Running App in iOS
Simulator

41
• Incorporating Instruments into your workflow from the beginning of the app
development process can save you time later by helping you find issues early in the
development cycle.
• In Instruments, you use specialized tools, known as instruments, to trace different
aspects of your apps, processes, and devices over time.
• Instruments collects data as it profiles, and presents the results to you in detail for
analysis.
• By using Instruments effectively, you can:
– Examine the behavior of one or more apps or processes
– Examine device-specific features, such as Wi-Fi and Bluetooth
– Perform profiling in a simulator or on a physical device
– Create custom DTrace instruments to analyze aspects of system and app
behavior
– Track down problems in your source code
– Conduct performance analysis on your app
– Find memory problems in your app, such as leaks, abandoned memory, and
zombies
– Identify ways to optimize your app for greater power efficiency
– Perform general system-level troubleshooting
– Automate testing of your iOS app by running custom scripts to perform a
sequence of user actions and replaying them to reliably reproduce those events
and collect data over multiple runs
– Save instrument configurations as templates
The Instruments Workflow
Figure 3.19 Instruments Workflow
42
• It can be used to gather all kinds of useful information about your app, and
help you diagnose and resolve problems.
• At a high level, it consists of the following main phases:
– Set up a trace document containing the desired
instruments and settings.
– Target a device and an app to profile.
– Profile the app.
– Analyze the data captured during profiling.
– Fix any problems in your source code.
Know When to Use Instruments
• While testing your app with Xcode, consult the debug navigator gauges
(see Figure) before diving into Instruments.
• These gauges provide high-level information about
your app’s CPU, memory, energy usage, and more.
• Often, they provide all the information you need to improve performance and
resolve common problems quickly.
• Use Instruments when you need to perform more detailed analysis
The CPU debugging gauge in XCode
Figure 3.20 CPU debugging gauge in XCode

43
ARC
• Automatic Reference Counting (ARC) to track and manage your app’s memory usage.
• Every time you create a new instance of a class, ARC allocates a chunk of memory to
store information about that instance.
• This memory holds information about the type of the instance, together with the values
of any stored properties associated with that instance.
• Additionally, when an instance is no longer needed, ARC frees up the memory used by
that instance so that the memory can be used for other purposes instead.
• This ensures that class instances do not take up space in memory when they are no longer
needed.
• ARC were to deallocate an instance that was still in use, it would no longer be possible
to access that instance’s properties, or call that instance’s methods.
• Indeed, if you tried to access the instance, your app would most likely crash.
• ARC tracks how many properties, constants, and variables are currently referring to each
class instance.
• ARC will not deallocate an instance as long as at least one active reference to that
instance still exists.
• To make this possible, whenever you assign a class instance to a property, constant, or
variable, that property, constant, or variable makes a strong reference to the instance.
• The reference is called a “strong“ reference because it keeps a firm hold on that instance,
and does not allow it to be deallocated for as long as that strong reference remains.
Framework
• A framework is a collection of resources; it collects a static library and its header files
into a single structure that Xcode can easily incorporate into your projects.
• The Foundation framework defines a base layer of Objective-C classes.
• In addition to providing a set of useful primitive object classes, it introduces several
paradigms that define functionality not covered by the Objective-C language.
• The Foundation framework is designed with these goals in mind:
– Provide a small set of basic utility classes
– Make software development easier by introducing consistent conventions
for things such as deallocation
– Support Unicode strings, object persistence, and object distribution

44
• Provide a level of OS independence to enhance portability The framework was
developed by NeXTStep, which was acquired by Apple and these foundation classes
became part of Mac OS X and iOS.
• Since it was developed by NeXTStep, it has class prefix of “NS”.
• We have used Foundation Framework in all our sample programs. It is almost a must
to use Foundation Framework.
• Generally, we use something like
#import<Foundation/NSString.h> to import an Objective-C class, but in order avoid
importing too many classes, it's all imported in
#import<Foundation/Foundation.h>.
• NSObject is the base class of all objects including the foundation kit classes. It
provides the methods for memory management.
• It also provides basic interface to the runtime system and ability to behave as
Objective-C objects. It doesn't have any base class and is the root for all classes.
Table 3.3 Foundation Classes based on functionality
Loop Type Description
Data storage NSArray, NSDictionary, and NSSet provide storage for
Objective-C objects of any class.
Text and strings NSCharacterSet represents various groupings of characters
that are used by the NSString and NSScanner classes.
The NSString classes represent text strings and provide
methods for searching, combining, and comparing strings.
An NSScanner object is used to scan numbers and words
from an NSString object.
Dates and times The NSDate, NSTimeZone, and NSCalendar classes store
times and dates and represent calendrical information. They
offer methods for calculating date and time differences.
Together with NSLocale, they provide methods for
displaying dates and times in many formats and for adjusting
times and dates based on location in the world.

45
Exception handling Exception handling is used to handle unexpected situations
and it's offered in Objective-C with NSException.
File handling File handling is done with the help of class NSFileManager.
URL loading system A set of classes and protocols that provide access to
common Internet protocols.
• To study various tools involved to develop an iOS app.
• Write a structure Objective-C program.
• Write a Objective-C program for finding given number is prime or not.
• Write a Objective-C program to reverse a given number.
• Explain various conditional branching and looping statements in
Objective-C.
• Mention the exception handling mechanism in Objective-C
• Explain about memory management in Objective-C

1
SCHOOL OF COMPUTING
DEPARTMENT OF COMPUTER SCIENCE AND ENGINEERING
Unit – IV
Introduction to iOS – History, Versions and Features - MVC Architecture - View
Controller - Building the UI - Event handling - Application life cycle - Tab Bars - Story
Boards - Navigation Controllers - Push Notification - Database handling - Debugging and
Deployment - Publishing app in Appstore.
UNIT – IV – Mobile Application Development – SIT1402

2
Introduction to IOS
Operating system is a set of programs that manage computer hardware resources and
provide common services for application software important system software in computer
system. User cannot run an application program on computer without OS. i.e. Android,
Mac OS X, Microsoft Windows. Apples mobile operating system considered the
foundation of the iPhone Originally designed for the iPhone but now supports iPod touch,
iPad, and Apple TV It is updated just like Itune for iPods As of Oct 2011 Apple contains
over 500,000 iOS applications.
History, Version and Features
History
iPhone OS was first unveiled in Jan 2007 at the Macworld Conference and Expo Released
June 2007.In June 2010 licensed the trademark iOS (From Cisco IOS). Now goes all the
way up to iOS 5. Originally did not allow third party applications but after Feb 2008 this
changed. With either 30% profit to apple, or free with membership fee. The following
figure 4.1 shows the features of IOS.
Features
The power of iOS can be felt with some of the following features provided as a part of the
device.
➢ Maps
➢ Siri
Figure 4.1 Features of IOS

3
➢ Facebook and Twitter
➢ Multi-Touch
➢ Accelerometer
➢ GPS
➢ High end processor
➢ Camera
➢ Safari
➢ Powerful APIs
➢ Game center
➢ In-App Purchase
➢ Reminders
The primary applications consist of
➢ Safari
➢ Music
➢ Phone, Face Time
The secondary applications consist of
➢ Camera, Camcorder
➢ Photos
➢ Calendar
➢ Messaging
➢ WeTube
➢ Stocks
➢ Map
➢ Clock
Environmental Setup
iOS - Xcode Installation
Step1−Download the latest version of Xcode
from(https://developer.apple.com/downloads/)
Step 2 − Double click the Xcode dmg file.
Step 3 − We will find a device mounted and opened.
Step 4 − There will be two items in the window that's displayed namely, Xcode application
and the Application folder's shortcut.

4
Step 5 − Drag the Xcode to application and it will be copied to our applications.
Step 6 − Now Xcode will be available as a part of other applications from which we can
select and run.
We also have another option of downloading Xcode from the Mac App store and then
install following the step-by-step procedure given on the screen.
Interface Builder
Interface builder is the tool that enables easy creation of UI interface. We have a
rich set of UI elements that is developed for use. We just have to drag and drop into our
UI view. We'll learn about adding UI elements, creating outlets and actions for the UI
elements in the upcoming pages.
Step 1 : First, launch Xcode. If we’ve installed Xcode via Mac App Store, we should be
able to locate Xcode in the LaunchPad. Just click on the
Step 2: Once launched, Xcode displays a welcome dialog. From here, choose “Create a
new
Xcode project” to start a new project:

5

6
We can simply fill in the options as follows:
• Product Name: HelloWorld – This is the name of our app.
• Company Identifier: com. appcoda – It’s actually the domain name written the other way
round. If we have a domain, we can use our own domain name. Otherwise, we may use
mine or just fill in “edu.self”.
• Class Prefix: HelloWorld – Xcode uses the class prefix to name the class automatically. In
future, we may choose our own prefix or even leave it blank. But for this tutorial, let’s
keep it simple and use “HelloWorld”.
• Device Family: iPhone – Just use “iPhone” for this project.
• Use Storyboards: [unchecked] – Do not select this option. We do not need Storyboards for
this simple project.
• Use Automatic Reference Counting: [checked] – By default, this should be enabled. Just
leave it as it is.
• Include Unit Tests: [unchecked] – Leave this box unchecked. For now, we do not need the
unit test class.
Step 4: Click “Next” to continue. Xcode then asks us where to save the “Hello.

7

8
The rightmost pane is the utility area. This area displays the properties of the file and
allows we to access Quick Help. If Xcode doesn’t show this area, we can select the
rightmost view button in the toolbar to enable it.
Step 7: Add the Hello World button to our app. Go back to the Project Navigator and
select “HelloWorldViewController.xib”.
The editor changes to an Interface Builder and displays an empty view of our app like
below.

9
Step 8: In the lower part of the utility area, it shows the Object library. From here, we can
choose any of the UI Controls, drag-and-drop it into the view. For the Hello World app,
let’s pick the “Round Rect Button” and drag it into the view. Try to place the button at the
center of the view. To edit the label of the button, double-click it and name it “Hello
World”.
Step 9: Coding the Hello World Button
In the Project Navigator, select the “HelloWorldViewController.h”. The editor area now
displays the source code of the selected file. Add the following line of code before the
“@endline.

10
Step 10: Next, select the “HelloWordViewController.m” and insert the following code
before the “@endline”.
- (IBAction)showMessage
{
UIAlertView *helloWorldAlert = [[UIAlertView alloc]
initWithTitle:@"My First App" message:@"Hello, World!" delegate:nil
cancelButtonTitle:@"OK" otherButtonTitles:nil];
// Display the Hello World Message
[helloWorldAlert show];
}
Step 11: Connecting Hello World Button with the Action
we’ll need to establish a connection between the “Hello World” button and the
“showMessage” action we’ve just added. Select the “HelloWorldViewController.xib” file
to go back to the Interface Builder. Press and hold the Control key on our keyboard, click
the “Hello World” button and drag to the “File’s Owner”. Our screen should look like this:

11
Step 12: Test Our App
Just hit the “Run” button. If everything is correct, our app should run properly in the
Simulator. An iOS simulator actually consists of two types of devices, namely iPhone and
iPad with their different versions. iPhone versions include iPhone (normal), iPhone Retina,
iPhone 5. iPad has iPad and iPad Retina. We can simulate location in an iOS simulator for
playing around with latitude and longitude effects of the app. We can also simulate
memory warning and in-call status in the simulator. We can use the simulator for most
purposes, however we cannot test
device features like accelerometer.
Model-View-Controller
The Model-View-Controller design pattern (MVC) is quite old. Variations of it have
been around at least since the early days of Smalltalk. It is a high-level pattern in that it
concerns itself with the global architecture of an application and classifies objects
according to the general roles they play in an application. It is also a compound pattern in
that it comprises several, more elemental patterns. The MVC design pattern considers there
to be three types of objects: model objects, view objects, and controller objects. The MVC
pattern defines the roles that these types of objects play in the application and their lines
of communication.
Model Object
Model objects represent special knowledge and expertise. They hold an application’s
data and define the logic that manipulates that data. A well-designed MVC application has

12
all its important data encapsulated in model objects. Any data that is part of the persistent
state of the application (whether that persistent state is stored in files or databases) should
reside in the model objects once the data is loaded into the application. Because they
represent knowledge and expertise related to a specific problem domain, they tend to be
reusable.
View Objects
A view object knows how to display, and might allow users to edit, the data from the
application’s model. The view should not be responsible for storing the data it is
displaying. A view object can be in charge of displaying just one part of a model object,
or a whole model object, or even many different model objects. Views come in many
different varieties.View objects tend to be reusable and configurable, and they provide
consistency between applications. A view should ensure it is displaying the model
correctly.
Controller Objects
A controller object acts as the intermediary between the application's view objects
and its model objects. Controllers are often in charge of making sure the views have access
to the model objects they need to display and act as the conduit through which views learn
about changes to the model. Controller objects can also perform set-up and coordinating
tasks for an application and manage the life cycles of other objects. Model-View-
Controller is a design pattern that is composed of several more basic design patterns. These
basic patterns work together to define the functional separation and paths of
communication that are characteristic of an MVC application. MVC is made up of the
Composite, Strategy, and Observer patterns.
• Composite—The view objects in an application are actually a composite of nested
views that work together in a coordinated fashion (that is, the view hierarchy). These
display components range from a window to compound views, such as a table view, to
individual views, such as buttons. User input and display can take place at any level of the
composite structure.
• Strategy—A controller object implements the strategy for one or more view
objects. The view object confines itself to maintaining its visual aspects, and it delegates
to the controller all decisions about the application-specific meaning of the interface
behavior.
• Observer—A model object keeps interested objects in an application—usually

13
view objects—advised of changes in its state.
A controller object receives the event and interprets it in an application-specific
way— that is, it applies a strategy. This strategy can be to request (via message) a model
object to change its state or to request a view object (at some level of the composite
structure) to change its behavior or appearance. The model object, in turn, notifies all
objects who have registered as observers when its state changes; if the observer is a view
object, it may update its appearance accordingly. The following figure 4.2 shows the MVC
design patterns.
Figure 4.2 MVC Design Patterns
A user needs to interact with an app interface in the simplest way possible. Design
the interface with the user in mind, and make it efficient, clear, and straightforward.
Storyboards let we design and implement our interface in a graphical environment. We see
exactly what we're building while we’re building it, get immediate feedback about what’s
working and what’s not, and make instantly visible changes to our interface. They are the
building blocks for constructing our user interface and presenting our content in a clear,
elegant, and useful way. As we develop more complex apps, we'll create interfaces with
more scenes and more views. The following figure 4.3 shows the MVC architecture.

14
Figure 4.3 MVC Architecture
One can merge the MVC roles played by an object, making an object, for example,
fulfill both the controller and view roles—in which case, it would be called a view
controller.
A model controller is a controller that concerns itself mostly with the model layer.
It “owns” the model; its primary responsibilities are to manage the model and
communicate with view objects. Action methods that apply to the model as a whole are
typically implemented in a model controller. The document architecture provides a number
of these methods for we; for example, an NSDocument object (which is a central part of
the document architecture) automatically handles action methods related to saving files.
A view controller is a controller that concerns itself mostly with the view layer. It
“owns” the interface (the views); its primary responsibilities are to manage the interface
and communicate with the model. Action methods concerned with data displayed in a view
are typically implemented in a view controller. An NSWindowControllerobject (also part
of the document architecture) is an example of a view controller.
A coordinating controller is typically an NSWindowController or
NSDocumentControllerobject (available only in AppKit), or an instance of a custom
subclass of NSObject. Its role in an application is to oversee—or coordinate—the
functioning of the entire application or of part of the application, such as the objects
unarchived from a nib file. A coordinating controller provides services such as:
• Responding to delegation messages and observing notifications
• Responding to action messages
• Managing the life cycle of owned objects (for example, releasing them at the proper time)
• Establishing connections between objects and performing other set-up tasks

15
View Controller
A view controller is a controller that concerns itself mostly with the view layer. It “owns”
the interface (the views); its primary responsibilities are to manage the interface and
communicate with the model. Action methods concerned with data displayed in a view are
typically implemented in a view controller. An NSWindowControllerobject (also part of
the document architecture) is an example of a view controller.
Views not only display themselves onscreen and react to user input, they can serve
as containers for other views. As a result, views in an app are arranged in a hierarchical
structure called the view hierarchy. The view hierarchy defines the lawet of views relative
to other views. Within that hierarchy, views enclosed within a view are called sub views,
and the parent view that encloses a view is referred to as its super view. Even though a
view can have multiple sub views, it can have only one super view.
At the top of the view hierarchy is the window object. Represented by an instance
of the UIWindow class, a window object is the basic container into which we add our view
objects for display onscreen. By itself, a window doesn’t display any content.
To display content, we add a content view object (with its hierarchy of sub views)
to the window. For a content view and its sub views to be visible to the user, the content
view must be inserted into a window’s view hierarchy. When we use a storyboard, this
placement is configured automatically for we. When an app launches, the application
object loads the storyboard, creates instances of the relevant view controller classes, un
archives the content view hierarchies for each view controller, and then adds the content
view of the initial view controller into the window.
Types of Views
A UIKit view object is an instance of the UIView class or one of its subclasses.
The UIKit framework provides many types of views to help present and organize data as
shown in figure 4.4. Although each view has its own specific function, UIKit views can
be grouped into these general categories.

16
Figure 4.4 Type of view objects
Use Storyboards to Lay Out Views
Storyboards provide a direct, visual way to work with views and build our interface
and composed of scenes, and each scene has an associated view hierarchy. We drag a view
out of the object library and place it in a storyboard scene to add it automatically to that
scene’s view hierarchy. The view’s location within that hierarchy is determined by where
we place it. After we add a view to our scene, we can resize, manipulate, configure, and
move it on the canvas. The canvas also shows an outline view of the objects in our
interface. The outline view which appears on the left side of the canvas—lets we see a
hierarchical representation of the objects in our storyboard. The following figure 4.5 shows
the view controller.
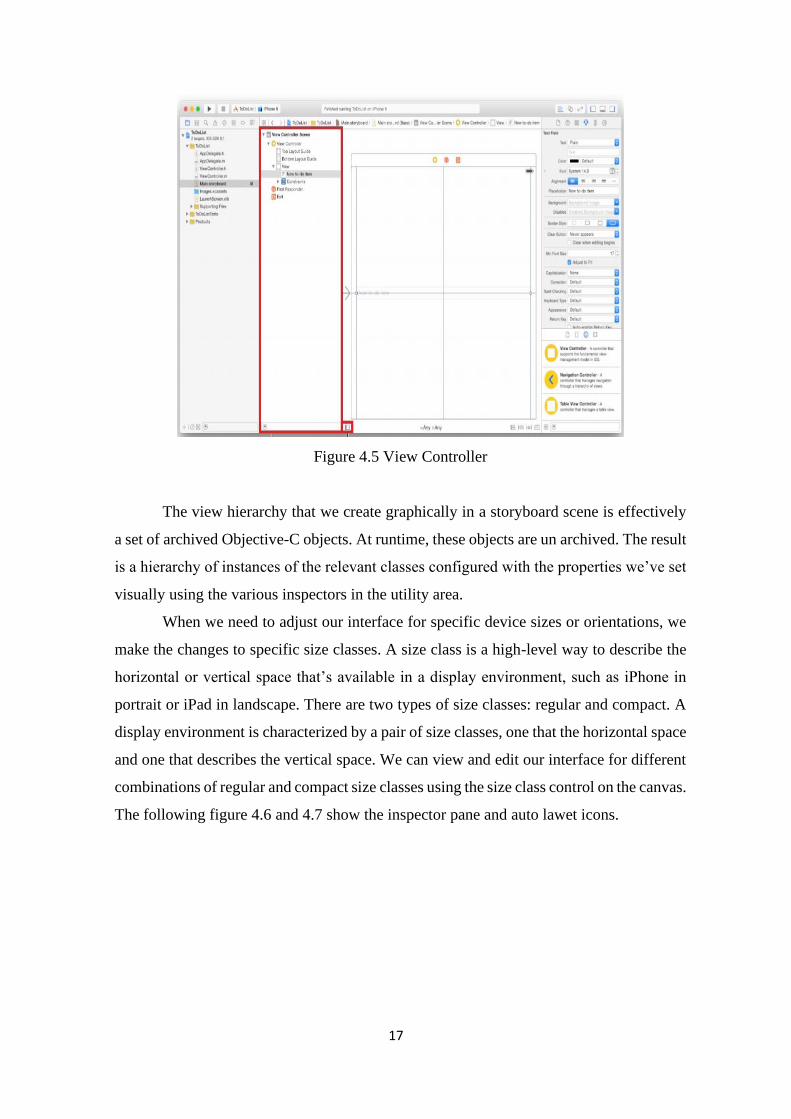
17
Figure 4.5 View Controller
The view hierarchy that we create graphically in a storyboard scene is effectively
a set of archived Objective-C objects. At runtime, these objects are un archived. The result
is a hierarchy of instances of the relevant classes configured with the properties we’ve set
visually using the various inspectors in the utility area.
When we need to adjust our interface for specific device sizes or orientations, we
make the changes to specific size classes. A size class is a high-level way to describe the
horizontal or vertical space that’s available in a display environment, such as iPhone in
portrait or iPad in landscape. There are two types of size classes: regular and compact. A
display environment is characterized by a pair of size classes, one that the horizontal space
and one that describes the vertical space. We can view and edit our interface for different
combinations of regular and compact size classes using the size class control on the canvas.
The following figure 4.6 and 4.7 show the inspector pane and auto lawet icons.

18
Figure 4.6 Inspection Pane
Use the Auto Lawet icons in the bottom-right area of our canvas to add various
types of constraints to views on our canvas, resolve lawet issues, and determine constraint
resizing behavior.
• Align. Create alignment constraints, such as centering a view in its container, or
aligning the left edges of two views.
• Pin. Create spacing constraints, such as defining the height of a view, or
specifying its horizontal distance from another view.
• Resolve Auto Lawet Issues. Resolve lawet issues by adding or resetting
constraints based on suggestions.
• Resizing Behavior. Specify how resizing affects constraints.

19
Figure 4.7 Auto Lawet Icons
Building UI
UI elements are the visual elements that we can see in our applications. Some of
these elements respond to user interactions such as buttons, text fields and others are
informative such as images, labels.
Use of Text Field
A text field is a UI element that enables the app to get user input. A UITextfield is
shown in figure 4.8. The table 4.1 shows the different UI input types along with its
descriptions.
Figure 4.8 UI element - Text Field
Important Properties of Text Field
• Placeholder text which is shown when there is no user input
• Normal text
• Auto correction type

20
• Key board type
• Return key type
• Clear button mode
• Alignment
• Delegate
Table 4.1 UI Input Types
Buttons
Buttons are used for handling user actions. It intercepts the touch events and sends message
to the target object.
Buttons Types
• UIButtonTypeCustom
• UIButtonTypeRoundedRect
• UIButtonTypeDetailDisclosure
• UIButtonTypeInfoLight
• UIButtonTypeInfoDark
• UIButtonTypeContactAdd
Code
-(void)addDifferentTypesOfButton
{ // A rounded Rect button created by using class method
UIButton *roundRectButton = [UIButton buttonWithType: UIButtonTypeRoundedRect];
[roundRectButton setFrame:CGRectMake(60, 50, 200, 40)]; // sets title for the button

21
[roundRectButton setTitle:@"Rounded Rect Button" forState: UIControlStateNormal];
[self.view addSubview:roundRectButton];
Labels
Labels are used for displaying static content, which consists of a single line or multiple
lines as shown in figure 4.9.
Important Properties
• textAlignment
• textColor
• text
• numberOflines
• lineBreakMode
- (void)addLabel
{ UILabel *aLabel = [[UILabel alloc]initWithFrame: CGRectMake(20, 200, 280, 80)];
aLabel.numberOfLines = 0;
aLabel.textColor = [UIColor blueColor];
aLabel.backgroundColor = [UIColor clearColor];
aLabel.textAlignment = UITextAlignmentCenter;
aLabel.text = @"This is a sample text\n of multiple lines. here number of lines is
not limited.";
[self.view addSubview:aLabel];
}
- (void)viewDidLoad
{
[super viewDidLoad];
[self addLabel]; }
Figure 4.9 iOS application with a Label

22
Toolbar
If we want to manipulate something based on our current view we can use toolbar.
Example would be the email app with an inbox item having options to delete, make favorite,
reply and so on. It is shown in figure 4.10.
Figure 4.10 UI Element – Toolbar
Status Bar
Status bar displays the key information of device like −
• Device model or network provider
• Network strength
• Battery information
• Time
Status bar is shown in figure 4.11.
Figure 4.11 UI Element – Status Bar
Add a Custom Method hide Statusbar to our Class
It hides the status bar animated and also resize our view to occupy the statusbar space.
-(void)hideStatusbar
{
[[UIApplication sharedApplication]
setStatusBarHidden:YES
withAnimation:UIStatusBarAnimationFade];
[UIView beginAnimations:@"Statusbar hide" context:nil]; [UIView
setAnimationDuration:0.5];

23
[self.view setFrame:CGRectMake(0, 0, 320, 480)];
[UIView commitAnimations];
}
Tab Bar
It's generally used to switch between various subtasks, views or models within the same
view.
Important Properties
• backgroundImage
• items
• selectedItem
Image View
Image view is used for displaying a single image or animated sequence of images.
Important Properties
• image
• highlightedImage
• userInteractionEnabled
• animationImages
• animationRepeatCount
Important Methods
- (id)initWithImage:(UIImage*)image
- (id)initWithImage:(UIImage *)image highlightedImage: (UIImage
*)highlightedImage
- (void)startAnimating
- (void)stopAnimating
Add a Custom Method addImageView
-(void)addImageView
{
UIImageView *imgview = [[UIImageView alloc] initWithFrame:CGRectMake(10, 10,
300, 400)];
[imgview setImage:[UIImage imageNamed:@"AppleUSA1.jpg"]]; [imgview

24
setContentMode:UIViewContentModeScaleAspectFit];
[self.view addSubview:imgview];
}
Scroll View
Scroll View is used for displaying content more than the size of the screen. It can
contain all of the other UI elements like image views, labels, text views and even another
scroll view itself as shown in figure 4.12.
Important Properties
• contentSize
• contentInset
• contentOffset
• delegate
Code
-(void)addScrollView
{
myScrollView = [[UIScrollView alloc]initWithFrame: CGRectMake(20, 20, 280, 420)];
myScrollView.accessibilityActivationPoint = CGPointMake(100, 100);
imgView = [[UIImageView alloc]initWithImage: [UIImage
imageNamed:@"AppleUSA.jpg"]];
[myScrollView addSubview:imgView];
myScrollView.minimumZoomScale = 0.5; myScrollView.maximumZoomScale = 3;
myScrollView.contentSize = CGSizeMake(imgView.frame.size.width,
imgView.frame.size.height);
myScrollView.delegate = self; [self.view addSubview:myScrollView];
}

25
Figure 4.12 UI Element – Scroll View
Table View
It is used for displaying a vertically scrollable view which consists of a number of
cells (generally reusable cells). It has special features like headers, footers, rows, and section.
Important Properties
• Delegate
• Data source
• Row height
• Section footer height
• Section header height
• Separator color
• Table header view
• Table footer view
Code
- @interface ViewController ()
- @end
- @implementation ViewController
- (void)viewDidLoad
- {

26
- [super viewDidLoad]; // table view data is being set here
- myData = [[NSMutableArray alloc]initWithObjects:
- @"Data 1 in array",
- @"Data 2 in array",
- @"Data 3 in array",
- @"Data 4 in array",
- @"Data 5 in array",
- @"Data 5 in array",
- @"Data 6 in array",
- @"Data 7 in array",
- @"Data 8 in array",
- @"Data 9 in array", nil];
View Transitions
View Transitions are effective ways of adding one view on another view with a proper
transition animation effect as shown in figure 4.13.
Figure 4.13 View Transitions
Pickers
Pickers consist of a rotating scrollable view, which is used for picking a value from
the list of items. It is shown in figure 4.14.
Important Properties

27
• delegate
• dataSource
Figure 4.14 UI Element – Pickers
Switches
Switches are used to toggle between on and off states.
Important Properties
• onImage
• offImage
• on
Important Method
- (void)setOn:(BOOL)on animated:(BOOL)animated
-(IBAction)switched:(id)sender
{
NSLog(@"Switch current state %@", mySwitch.on ? @"On": @"Off");
}
-(void)addSwitch
{
mySwitch = [[UISwitch alloc] init]; [self.view addSubview:mySwitch]; mySwitch.center
= CGPointMake(150, 200);

28
[mySwitch addTarget:self action:@selector(switched:)
forControlEvents:UIControlEventValueChanged];
}
Sliders
Sliders are used to choose a single value from a range of values as shown in figure
4.15.
Important Properties
• Continuous
• Maximum Value
• Minimum Value
• Value
Important Method
- (void)setValue:(float)value animated:(BOOL)animated
Code
-(IBAction)sliderChanged:
(id)sender
{
NSLog(@"SliderValue %f",mySlider.value);
}
-(void)addSlider
{
mySlider = [[UISlider alloc] initWithFrame:CGRectMake(50, 200, 200, 23)]; [self.view
addSubview:mySlider];
mySlider.minimumValue = 10.0;
mySlider.maximumValue = 99.0; mySlider.continuous = NO;
[mySlider addTarget:self action:@selector(sliderChanged:)
forControlEvents:UIControlEventValueChanged]; }

29
Figure 4.15 UI Element – Sliders
Alerts
Alerts are used to give important information to user. Only after selecting the
option in the alert view, we can proceed further using the app. It is shown in figure 4.16.
Important Properties
• Alert View Style
• Cancel Button Index
• Delegate message
• Number of Buttons
• Title
Code
(NSInteger)addButtonWithTitle:(NSString *)title
- (NSString *)buttonTitleAtIndex:(NSInteger)buttonIndex
- (void)dismissWithClickedButtonIndex: (NSInteger)buttonIndex animated:
(BOOL)animated
- (id)initWithTitle:(NSString *)title message: (NSString *)message delegate:(id)delegate
cancelButtonTitle:(NSString *)cancelButtonTitle otherButtonTitles:
(NSString*)otherButtonTitles,
- - (void)show

30
Figure 4.16 UI Element – Alerts
Event Handling
Users manipulate their iOS devices in a number of ways, such as touching the
screen or shaking the device. iOS interprets when and how a user is manipulating the
hardware and passes this information to our app. The more our app responds to actions in
natural and intuitive ways, the more compelling the experience is for the user.
Events are objects sent to an app to inform it of user actions. In iOS, events can
take many forms: Multi-Touch events, motion events, and events for controlling
multimedia. This last type of event is known as a remote-control event because it can
originate from an external accessory.
iOS apps recognize combinations of touches and respond to them in ways that are
intuitive to users, such as zooming in on content in response to a pinching gesture and
scrolling through content in response to a flicking gesture. In fact, some gestures are so
common that they are built in to UIKit. For example, UIControl subclasses, such as
UIButton and UISlider, respond to specific gestures—a tap for a button and a drag for a
slider. When we configure these controls, they send an action message to a target object
when that touch occurs. We can also employ the target-action mechanism on views by
using gesture recognizers. When we attach a gesture recognizer to a view, the entire view
acts like a control—responding to whatever gesture we specify.
Gesture recognizers provide a higher-level abstraction for complex event handling

31
logic. Gesture recognizers are the preferred way to implement touch-event handling in our
app because gesture recognizers are powerful, reusable, and adaptable. We can use one of
the built-in gesture recognizers and customize its behavior. Or we can create our own
gesture recognizer to recognize a new gesture.
Gesture Recognizers
When iOS recognizes an event, it passes the event to the initial object that seems
most relevant for handling that event, such as the view where a touch occurred. If the initial
object cannot handle the event, iOS continues to pass the event to objects with greater
scope until it finds an object with enough context to handle the event. This sequence of
objects is known as a responder chain, and as iOS passes events along the chain, it also
transfers the responsibility of responding to the event. This design pattern makes event
handling cooperative and dynamic.
Multitouch Events
Depending on our app, UIKit controls and gesture recognizers might be sufficient
for all of our app’s touch event handling. Even if our app has custom views, we can use
gesture recognizers. As a rule of thumb, we write our own custom touch-event handling
when our app’s response to touch is tightly coupled with the view itself, such as drawing
under a touch. In these cases, we are responsible for the low-level event handling. We
implement the touch methods, and within these methods, we analyze raw touch events and
respond appropriately.
Motion Events
Motion events provide information about the device’s location, orientation, and
movement. By reacting to motion events, we can add subtle, yet powerful features to our
app. Accelerometer and gyroscope data allow us to detect tilting, rotating, and shaking.
Motion events come in different forms, and we can handle them using different
frameworks. When users shake the device, UIKit delivers a UIEvent object to an app. If
we want our app to receive high-rate, continuous accelerometer and gyroscope data, use
the Core Motion framework.

32
Remote Control Events
IOS controls and external accessories send remote control events to an app. These
events allow users to control audio and video, such as adjusting the volume through a
headset. Handle multimedia remote control events to make our app responsive to these
types of commands.
The figure 4.17 shows the architecture of the main run loop and how user events result in
actions taken by our app. As the user interacts with a device, events related to those
interactions are generated by the system and delivered to the app via a special port set up
by UIKit. Events are queued internally by the app and dispatched one-by-one to the main
run loop for execution. The UIApplication object is the first object to receive the event and
make the decision about what needs to be done. A touch event is usually dispatched to the
main window object, which in turn dispatches it to the view in which the touch occurred.
Other events might take slightly different paths through various app objects. The table 4.2
shows the various types of Events.
Figure 4.17 Event Handling

33
Table 4.2 Events and its types
Event Delivered to Description
Touch The view object in
which the event
occurred
Views are responder objects. Any touch
events not handled by the view are
forwarded down the responder chain for
processing.
Remote control
Shake motion
events
First responder
object
Remote control events are for controlling
media playback and are generated by
headphones and other accessories.
Accelerometer
Magnetometer
Gyroscope
The object we
designate
Events related to the accelerometer,
magnetometer, and gyroscope hardware
are delivered to the object
We designate.
Location The object we
designate
We register to receive location events
using the Core Location
framework.
Redraw The view that
needs the
update
Redraw events do not involve
an event object but are simply calls to the
view to draw itself.
Touch The view object in
which the event
occurred
Views are responder objects. Any touch
events not handled by the view are
forwarded down the responder chain for
processing.
Some events, such as touch and remote-control events, are handled by our app’s
responder objects. Responder objects are everywhere in our app. Most events target a
specific responder object but can be passed to other responder objects (via the responder
chain) if needed to handle an event. For example, a view that does not handle an event can
pass the event to its super view or to a view controller.
Touch events occurring in controls (such as buttons) are handled differently than
touch events occurring in many other types of views. There are typically only a limited
number of interactions possible with a control, and so those interactions are repackaged into

34
action messages and delivered to an appropriate target object. This target-action design
pattern makes it easy to use controls to trigger the execution of custom code in our app.
App Life Cycle
Apps are a sophisticated interplay between our custom code and the system
frameworks. The system frameworks provide the basic infrastructure that all apps need to
run, and we provide the code required to customize that infrastructure and give the app the
look and feel we want. To do that effectively, it helps to understand a little bit about the iOS
infrastructure and how it works. The lifecycle of an iOS app is given in figure 4.18.
The system moves our app from state to state in response to actions happening
throughout the system. For example, when the user presses the Home button, a phone call
comes in, or any of several other interruptions occurs, the currently running apps change state
in response. The table 4.3 describes the different states of an application.
Table 4.3 Different states of App
State Description
Not running The app has not been launched or was running but was terminated
by the system.
Inactive
The app is running in the foreground but is currently not receiving
events. (It may be executing other code though.) An app usually
stays in this state only briefly as it transitions to a different state.
Active The app is running in the foreground and is receiving events. This
is the normal mode for foreground apps.
Background
The app is in the background and executing code. Most apps enter
this state briefly on their way to being suspended. However, an app
that requests extra execution time may remain in this state for a
period of time. In addition, an app being launched directly into the
background enters this state instead of the inactive state.
Suspended
The app is in the background but is not executing code. The system
moves apps to this state automatically and does not notify them
before doing so. While suspended, an app remains in memory but
does not execute any code. When a low-memory condition occurs,

35
the system may purge suspended apps without notice to make more
space for the foreground app.
Figure 4.18 App Life Cycle
Tab bar Controllers
A tab bar controller is a container view controller that we use to divide our app into
two or more distinct modes of operation. A tab bar controller is an instance of the
UITabBarController class. The tab bar has multiple tabs, each represented by a child view
controller. Selecting a tab causes the tab bar controller to display the associated view
controller’s view on the screen. The figure 4.19 shows several modes of the Clock app along
with the relationships between the corresponding view controllers. Each mode has a content
view controller to manage the main content area. In the case of the Clock app, the Clock and
Alarm view controllers both display a navigation-style interface to accommodate some
additional controls along the top of the screen. The other modes use content view controllers
to present a single screen.

36
Figure 4.19 Tab bar Controller
Navigation Controllers
A navigation controller presents data that is organized hierarchically and is an
instance of the UINavigationController class. The methods of this class provide support
for managing a
stack-based collection of content view controllers. This stack represents the path taken by
the user through the hierarchical data, with the bottom of the stack reflecting the starting
point and the top of the stack reflecting the user’s current position in the data.
The figure 4.20 shows screens from the Contacts app, which uses a navigation
controller to present contact information to the user. The navigation bar at the top of each
page is owned by the navigation controller. The rest of each screen displayed to the user
is managed by a content view controller that presents the information at that specific level
of the data hierarchy. As the user interacts with controls in the interface, those controls tell
the navigation controller to display the next view controller in the sequence or dismiss the

37
current view controller.
Figure 4.20 Navigation Controllers
Story Board
A Storyboard is a visual representation of the appearance and flow of our application.
When we implement our app using storyboards, we use Interface Builder to organize our
app’s view controllers and any associated views. The following figure shows an example
interface lawet from Interface Builder. The visual lawet of Interface Builder allows us to
understand the flow through app at a glance. The resulting storyboard is stored as a file in
project. When we build our project, the storyboards in our project are processed and copied
into the app bundle, where they are loaded by our app at runtime. The figure 4.21 shows
the details of story board.

38
Figure 4.21 Story Board
Often, iOS can automatically instantiate the view controllers in our storyboard at
the moment they are needed. Similarly, the view hierarchy associated with each controller
is automatically loaded when it needs to be displayed. Both view controllers and views are
instantiated with the same attributes we configured in Interface Builder. Because most of
this behavior is automated for, we, it greatly simplifies the work required to use view
controllers in our app.
A scene represents an onscreen content area that is managed by a view controller.
We can think of a scene as a view controller and its associated view
hierarchy. We create relationships between scenes in the same storyboard. Relationships
are expressed visually in a storyboard as a connection arrow from one scene to another.
Interface Builder usually infers the details of a new relationship automatically when we
make a connection between two objects. Two important kinds of relationships exist:
• Containment represents a parent-child relationship between two scenes. View
controllers contained in other view controllers are instantiated when their parent controller
39
is instantiated. For example, the first connection from a navigation controller to another
scene defines the first view controller pushed onto the navigation stack. This controller is
automatically instantiated when the navigation controller is instantiated.
An advantage to using containment relationships in a storyboard is that Interface Builder
can adjust the appearance of the child view controller to reflect the presence of its
ancestors. This allows Interface Builder to display the content view controller as it appears
in our final app.
• A segue represents a visual transition from one scene to another. At runtime, segues
can be triggered by various actions. When a segue is triggered, it causes a new view
controller to be instantiated and transitioned onscreen.
Although a segue is always from one view controller to another, sometimes a third object
can be involved in the process. This object actually triggers the segue. For example, if we
make a connection from a button in the source view controller’s view hierarchy to the
destination view controller, when the user taps the button, the segue is triggered. When a
segue is made directly from the source view controller to the destination view controller,
it usually represents a segue that we intend to trigger programmatically.
Different kinds of segues provide the common transitions needed between two different
view controllers:
• A push segue pushes the destination view controller onto a navigation controller’s
stack.
• A modal segue presents the destination view controller.
• A popover segue displays the destination view controller in a popover.
• A custom segue allows weto design our own transition to display the destination
view controller.
Push Notification
Apple Push Notification service (APNs) is the centerpiece of the remote notifications
feature. It is a robust and highly efficient service for propagating information to iOS (and,
indirectly, watchOS), tvOS, and OS X devices. Each device establishes an accredited and
encrypted IP connection with APNs and receives notifications over this persistent
connection. If a notification for an app arrives when that app is not running, the device
alerts the user that the app has data waiting for it.
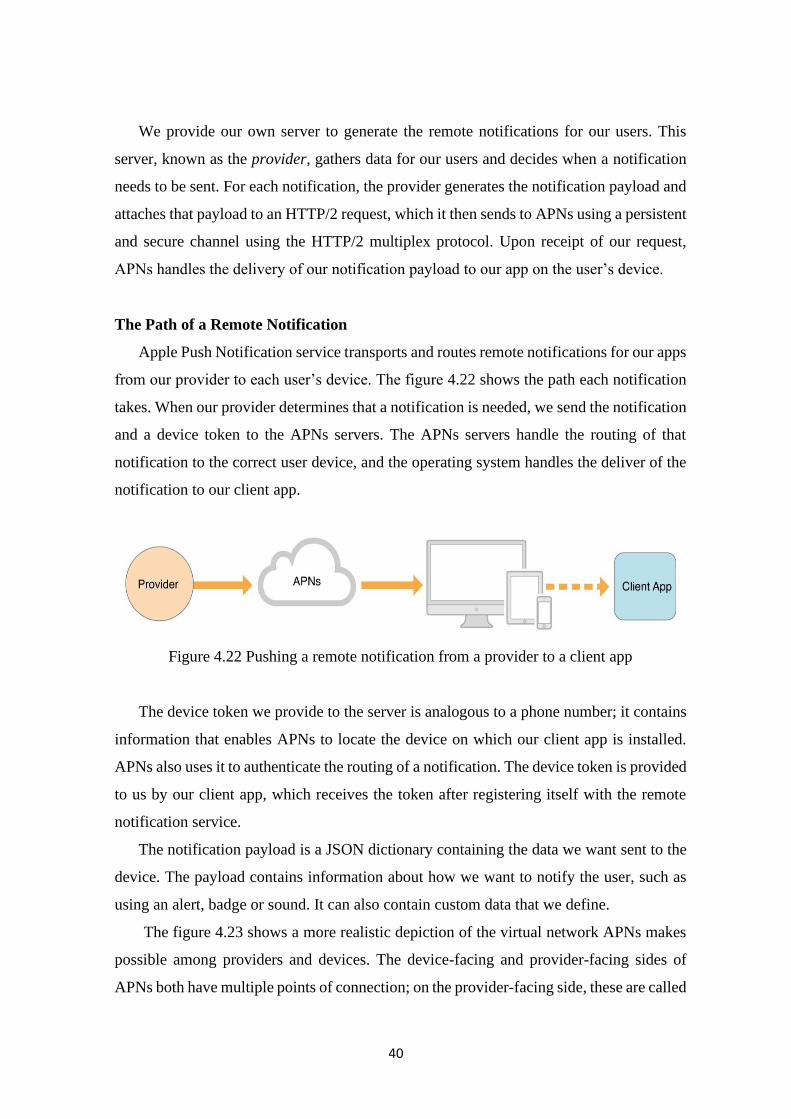
40
We provide our own server to generate the remote notifications for our users. This
server, known as the provider, gathers data for our users and decides when a notification
needs to be sent. For each notification, the provider generates the notification payload and
attaches that payload to an HTTP/2 request, which it then sends to APNs using a persistent
and secure channel using the HTTP/2 multiplex protocol. Upon receipt of our request,
APNs handles the delivery of our notification payload to our app on the user’s device.
The Path of a Remote Notification
Apple Push Notification service transports and routes remote notifications for our apps
from our provider to each user’s device. The figure 4.22 shows the path each notification
takes. When our provider determines that a notification is needed, we send the notification
and a device token to the APNs servers. The APNs servers handle the routing of that
notification to the correct user device, and the operating system handles the deliver of the
notification to our client app.
Figure 4.22 Pushing a remote notification from a provider to a client app
The device token we provide to the server is analogous to a phone number; it contains
information that enables APNs to locate the device on which our client app is installed.
APNs also uses it to authenticate the routing of a notification. The device token is provided
to us by our client app, which receives the token after registering itself with the remote
notification service.
The notification payload is a JSON dictionary containing the data we want sent to the
device. The payload contains information about how we want to notify the user, such as
using an alert, badge or sound. It can also contain custom data that we define.
The figure 4.23 shows a more realistic depiction of the virtual network APNs makes
possible among providers and devices. The device-facing and provider-facing sides of
APNs both have multiple points of connection; on the provider-facing side, these are called

41
gateways. There are typically multiple providers, each making one or more persistent and
secure connections with APNs through these gateways. And these providers are sending
notifications through APNs to many devices on which their client apps are installed.
Figure 4.23 Pushing remote notifications from multiple providers to multiple devices
Quality of Service
Apple Push Notification service includes a default Quality of Service (QoS)
component that performs a store-and-forward function. If APNs attempts to deliver a
notification but the device is offline, the notification is stored for a limited period of time,
and delivered to the device when it becomes available. Only one recent notification for a
particular app is stored. If multiple notifications are sent while the device is offline, the
new notification causes the prior notification to be discarded. This behavior of keeping
only the newest notification is referred to as coalescing notifications. If the device remains
offline for a long time, any notifications that were being stored for it are discarded.
Security Architecture
To ensure secure communication, APNs regulates the entry points between providers
and devices using two different levels of trust: connection trust and token trust. Connection
trust establishes certainty that APNs is connected to an authorized provider for whom
Apple has agreed to deliver notifications. APNs also uses connection trust with the device

42
to ensure the legitimacy of that device. Connection trust with the device is handled
automatically by APNs but we must take steps to ensure connection trust exists between
our provider and APNs.
Token trust ensures that notifications are routed only between legitimate start and end
points. Token trust involves the use of a device token, which is an opaque identifier
assigned to a specific app on a specific device. Each app instance receives its unique token
when it registers with APNs and must share this token with its provider. Thereafter, the
token must accompany each notification sent by our provider. Providing the token ensures
that the notification is delivered only to the app/device combination for which it is
intended.
Provider-to-APNs Connection Trust
Each provider must have a unique provider certificate and private cryptographic
key, which are used to validate the provider’s connection with APNs. The provider
certificate (which is provisioned by Apple) identifies the topics supported by the provider.
(A topic is the bundle ID associated with one of our apps.)
Our provider establishes connection trust with APNs through TLS peer-to-peer
authentication. After the TLS connection is initiated, we get the server certificate from
APNs and validate that certificate on our end. Then we send our provider certificate to
APNs, which validates that certificate on its end. After this procedure is complete, a secure
TLS connection is established; APNs is now satisfied that the connection has been made
by a legitimate provider.
Data Base
The database that can be used by apps in iOS (and also used by iOS) is called
SQLite, and it’s a relational database. It is contained in a C-library that is embedded to
the app that is about to use it. Note that it does not consist of a separate service or daemon
running on the background and attached to the app. On the contrary, the app runs it as an
integral part of it. Nowadays, SQLite lives its third version, so it’s also commonly referred
as SQLite 3. SQLite is not as powerful as other DMBSs, such as MySQL or SQL Server,
as it does not include all of their features. However, its greatness lies mostly to these
factors:
• It’s lightweight.

43
• It contains an embedded SQL engine, so almost all of our SQL knowledge can
be applied.
• It works as part of the app itself, and it doesn’t require extra active services.
• It’s very reliable.
• It’s fast.
• It’s fully supported by Apple, as it’s used in both iOS and Mac OS.
• It has continuous support by developers in the whole world and new features are
always added to it.
SQLite is an embedded implementation of SQL. SQL stands for Structured Query
Language and is a standard language to work with relational databases. SQLite can be
embedded inside any application, so there is no need for a separate process running the
database instance. It follows the principals of a Relational Database Management System
(RDBMS). Inside a RDBMS data is stored inside tables and the relationship between this data
is also stored inside tables.
A good example for this is the relationship between a person and his address as shown
in figure 4.24. A person has typically some properties like first name, last name, birthdate and
much more. An address has properties like street name, street number, etc. But there is also a
relationship between them, a person can have several addresses. In the database this is
achieved by adding a foreign key to the address object. This foreign key points to the primary
key of the person it belongs to. This has also as advantage that when a person is deleted a
warning is given about an associated address. So it becomes possible to also delete the address
if needed.
Figure 4.24 Relationship between person and address class
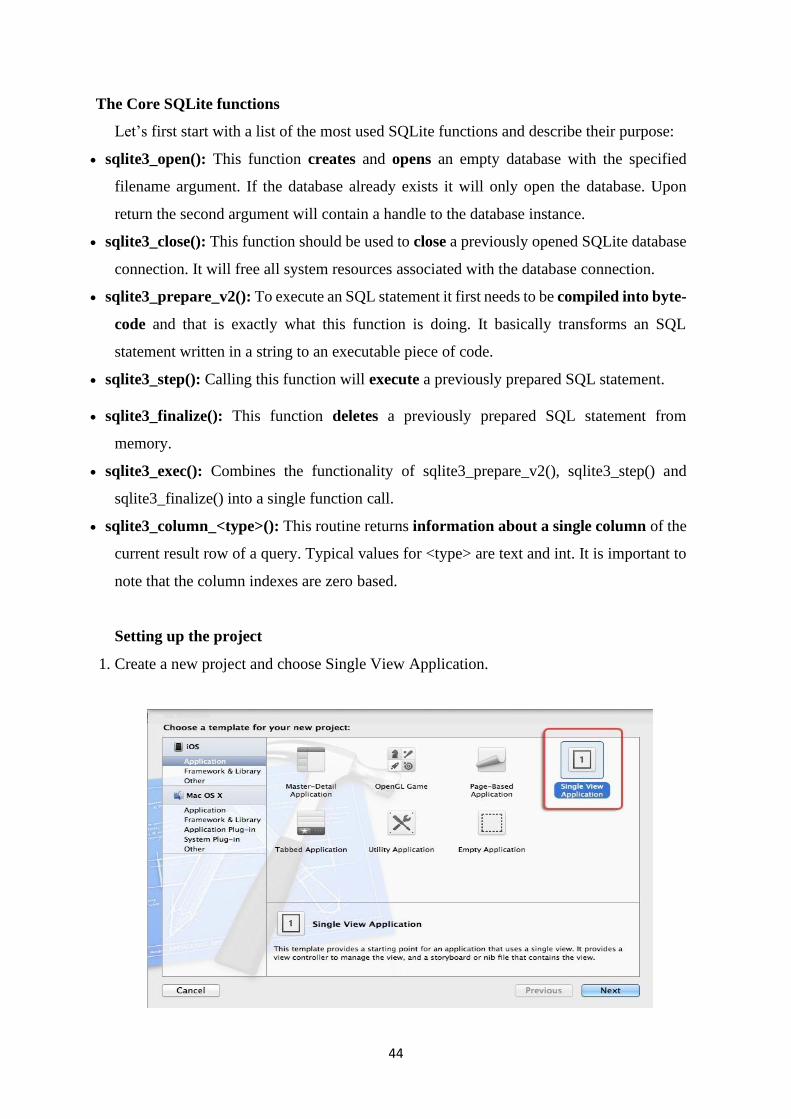
44
The Core SQLite functions
Let’s first start with a list of the most used SQLite functions and describe their purpose:
• sqlite3_open(): This function creates and opens an empty database with the specified
filename argument. If the database already exists it will only open the database. Upon
return the second argument will contain a handle to the database instance.
• sqlite3_close(): This function should be used to close a previously opened SQLite database
connection. It will free all system resources associated with the database connection.
• sqlite3_prepare_v2(): To execute an SQL statement it first needs to be compiled into byte-
code and that is exactly what this function is doing. It basically transforms an SQL
statement written in a string to an executable piece of code.
• sqlite3_step(): Calling this function will execute a previously prepared SQL statement.
• sqlite3_finalize(): This function deletes a previously prepared SQL statement from
memory.
• sqlite3_exec(): Combines the functionality of sqlite3_prepare_v2(), sqlite3_step() and
sqlite3_finalize() into a single function call.
• sqlite3_column_<type>(): This routine returns information about a single column of the
current result row of a query. Typical values for <type> are text and int. It is important to
note that the column indexes are zero based.
Setting up the project
1. Create a new project and choose Single View Application.

45
2. Name the application "SQLiteTutorial" and make sure to uncheck all options.
3. Now add the SQLite framework called "libsqlite3.dylib". To do so select the
SQLiteTutorial project inside the navigation area and then select the SQLiteTutorial target
inside the editor area. Scroll to the section called "Linked Frameworks and Libraries"
and click the add button. Filter the frameworks by typing "sqlite". Select "libsqlite3.dylib"
and press add. We will also notice a framework called "ibsqlite3.0.dylib" this is the
physical library, "ibsqlite3.dylib" is just a symbolic link to the latest version.

46
4. Add a new file to the project. Choose the Cocoa Touch Objective-C template and call
this new file "DataController".
5. Open the header file "DataController.h" and add an import for "sqlite3.h" and a data
member to store a handle to the database:
#import <Foundation/Foundation.h>
#import <sqlite3.h>
@interface DataController : NSObject
{
sqlite3 *databaseHandle;
}
-(void)initDatabase;
@end
6. Now it is time to start adding some entities. Again, choose for the Cocoa Touch
Objective-C template and call the first entity Address. The Address entity will be holding
a street name and a street number.
#import <Foundation/Foundation.h>
@interface Address : NSObject
{
NSString *streetName;
NSNumber *streetNumber;
}
@property (nonatomic,retain) NSString* streetName;
@property (nonatomic,retain) NSNumber* streetNumber;
-(id)initWithStreetName:(NSString*)aStreetName
andStreetNumber:(NSNumber*)streetNumber;
@end
#import "Address.h"
@implementation Address
@synthesize streetName;
@synthesize streetNumber;

47
/ Custom initializer
-(id)initWithStreetName:(NSString*)aStreetName
andStreetNumber:(NSNumber*)aStreetNumber
{
self = [super init];
if(self) {
self.streetName = aStreetName;
self.streetNumber = aStreetNumber;
}
return self;
}
// Cleanup all contained properties
- (void)dealloc
{
[self.streetName release];
[self.streetNumber release];
[super dealloc];
}
7. The next entity to add will be the Person entity. It will contain a first name, last name and
birthday. The Person class will also contain an Address object, this will be reflected in the
SQLite database by using a foreign key inside the address table, but that will become more
clear when creating the database. Again, a custom initializer was added for convenience
and a dealloc method will clean up the object:
#import <Foundation/Foundation.h>
#import "Address.h"
@interface Person : NSObject
{
NSString *firstName;
NSString *lastName;
NSDate *birthday;
Address *address;
}
@property (nonatomic, retain) NSString* firstName;

48
@property (nonatomic, retain) NSString* lastName;
@property (nonatomic, retain) NSDate* birthday;
@property (nonatomic, retain) Address* address;
-(id)initWithFirstName:(NSString*)aFirstName andLastName:(NSString*)aLastName
andBirthday:(NSDate*)aBirthday andAddress:(Address*)anAddress;
@end
#import "Person.h"
@implementation Person
@synthesize firstName;
@synthesize lastName;
@synthesize birthday;
@synthesize address;
// Custom initializer
-(id)initWithFirstName:(NSString*)aFirstName andLastName:(NSString*)aLastName
andBirthday:(NSDate*)aBirthday andAddress:(Address*)anAddress
{
self = [super init];
if(self) {
self.firstName = aFirstName;
self.lastName = aLastName; self.birthday = aBirthday; self.address = anAddress;
}
return self;
}
// Cleanup all contained objects
- (void)dealloc {
[self.firstName release];
[self.lastName release];
[self.birthday release];
[self.address release];
[super dealloc];
}
@end

49
Now that are basic building blocks are in-place it is time to start working with the SQLite
database.
Creating an SQLite database
The SQLite database for this sample application will be stored inside the Documents folder
of the application sandbox and will be called "sqlite.db". To do this add the method
"initDatabase" to the DataController.
// Method to open a database, the database will be created if it doesn't exist
-(void)initDatabase
{
// Create a string containing the full path to the sqlite.db inside the documents folder
NSArray *paths = NSSearchPathForDirectoriesInDomains(NSDocumentDirectory,
NSUserDomainMask,YES);
// To get the application documents directory in app
NSString *documentsDirectory = [paths objectAtIndex:0];
NSString *databasePath = [documentsDirectory
stringByAppendingPathComponent:@"sqlite.db"];
// Check to see if the database file already exists
Bool
databaseAlreadyExists = [[NSFileManager defaultManager] fileExistsAtPath:databasePat
h];
// Open the database and store the handle as a data member
if (sqlite3_open([databasePath UTF8String], &databaseHandle) == SQLITE_OK)
{
// Create the database if it doesn't yet exists in the file system
if (!databaseAlreadyExists)
{
// Create the PERSON table
const char *sqlStatement = "CREATE TABLE IF NOT EXISTS PERSON (ID INTEGER
PRIMARY KEY AUTOINCREMENT, FIRSTNAME TEXT, LASTNAME TEXT,
BIRTHDAY DATE)";

50
char *error;
if (sqlite3_exec(databaseHandle,
sqlStatement, NULL, NULL, &error) == SQLITE_OK)
{
// Create the ADDRESS table with foreign key to the PERSON table
sqlStatement = "CREATE TABLE IF NOT EXISTS ADDRESS (ID INTEGER
PRIMARY KEY AUTOINCREMENT, STREETNAME TEXT, STREETNUMBER
INT, PERSONID INT, FOREIGN KEY(PERSONID) REFERENCES PERSON(ID))";
if (sqlite3_exec(databaseHandle,
sqlStatement, NULL, NULL, &error) == SQLITE_OK)
{
NSLog(@"Database and tables created.");
}
Else
{
NSLog(@"Error: %s", error);
}}
else
{
NSLog(@"Error: %s", error);
}}}}
Let’s highlight some points inside this method:
1. A full path is created that points to sqlite.db inside the documents folder of the
application. In case when running inside the simulator this will be inside the folder
~Library/Application Support/iPhone Simulator
2. Check if the database file already exists inside the file system.
3. Open a connection to the database and store the databaseHandle for later use.
4. If the database did not exist inside the file system then the tables will be created.
5. The table PERSON is created with a auto-incrementing primary key.

51
6. The table ADDRESS is also created with an auto-incrementing primary key and a
foreign key constraint set to the ID of the PERSON table and will be called
PERSONID.
It is also important to close the database connection once the DataController gets released.
To do this simply override the "dealloc" method of the class DataController:
// Close the database connection when the DataController is disposed
- (void)dealloc {
sqlite3_close(databaseHandle);
}
To verify this piece of code update the method "viewDidLoad" from the file
"ViewController.m" so that it looks like:
- (void)viewDidLoad
{
[super viewDidLoad];
// Create datacontroller and initialize database
DataController *dataController = [[DataController alloc]init];
[dataController initDatabase];
[dataController release];
}
Storing values inside the SQLite database
Next part to implement is a method to insert a Person and his associated Address inside
the database. To do so a new method called "insertPerson" needs to be created inside the
DataController:
// Method to store a person and his associated address
-(void)insertPerson:(Person*)person
{

52
// Create insert statement for the person
NSString *insertStatement = [NSString stringWithFormat:@"INSERT INTO PERSON
(FIRSTNAME, LASTNAME, BIRTHDAY) VALUES
(\"%@\", \"%@\", \"%@\")", person.firstName, person.lastName, person.birthday];
char *error;
if ( sqlite3_exec(databaseHandle, [insertStatement UTF8String], NULL, NULL, &error)
==SQLITE_OK)
{
int personID = sqlite3_last_insert_rowid(databaseHandle);
// Create insert statement for the address
insertStatement = [NSString stringWithFormat:@"INSERT INTO ADDRESS
(STREETNAME, STREETNUMBER, PERSONID) VALUES
(\"%@\", \"%@\", \"%d\")", person.address.streetName, person.address.streetNumber,
personID];
if ( sqlite3_exec(databaseHandle, [insertStatement
UTF8String], NULL, NULL, &error) ==SQLITE_OK)
{
NSLog(@"Person inserted.");
}
else{
NSLog(@"Error: %s", error);
}}
Else
{
NSLog(@"Error: %s", error);
}}
Lets discuss the previous code snippet:
1. Create an insert statement for the person object.
2. Execute the insert statement for the person by calling "sqlite3_exec".
3. Get the ID of the last inserted row by calling "sqlite3_last_insert_rowid". This ID
needs to be pasted as the foreign key for the address object.
4. Create the insert statement for the address object. Note that the foreign key is also
passed in.

53
5. Execute the insert statement for the address by calling "sqlite3_exec".
Again it is possible to test the new code by updating the method "viewDidLoad":
// Create address and person objects
Address *address = [[Address alloc]initWithStreetName:@"Infinite Loop"
andStreetNumber:[NSNumbernumberWithInt:1]]; NSDateFormatter *dateFormatter =
[[NSDateFormatter alloc] init];
[dateFormatter setDateFormat:@"yyyy-MM-dd"];
NSDate *birthday = [dateFormatter dateFromString: @"1955-02-24"];
Person *person = [[Person
alloc]initWithFirstName:@"Steve"andLastName:@"Jobs"andBirthday:birthday
andAddress:address];
[dataController insertPerson:person]; //Insert the person
// Cleanup
[dateFormatter release];
[address release];
[person release];
[DataController release];
Testing the result of this action can be done again from the command line with sqlite3
Terminal command:
Enter SQL statements terminated with a ";"
sqlite> SELECT * FROM ADDRESS;
1|Infinite Loop|1|
sqlite> SELECT * FROM PERSON;
1|Steve|Jobs|1955-02-23 23:00:00 +0000

54
Retrieving values from the SQLite database
Now it is time to programmatically retrieve values from the database. This can be done by
using the "sqlite3_step" function. The DataController implementation file needs to be
updated with a method called "getAddressByPersonID" and "getPersons". The method
"getAddressByPersonID" is a helper method to get an address associated with a person.
The method "getPersons" returns an array of all persons inside the database.
// Get an array of all persons stored inside the database
-(NSArray*)getPersons
// Allocate a persons array
NSMutableArray *persons = [[NSMutableArray alloc]init];
// Create the query statement to get all persons
NSString *queryStatement = [NSString stringWithFormat:@"SELECT ID,
FIRSTNAME, LASTNAME, BIRTHDAY FROM PERSON"];
//Prepare the query for execution
sqlite3_stmt *statement;
if (sqlite3_prepare_v2(databaseHandle, [queryStatement UTF8String], -
1, &statement, NULL) ==SQLITE_OK)
{
// Iterate over all returned rows
while (sqlite3_step(statement) == SQLITE_ROW) {
// Get associated address of the current person row
int personID = sqlite3_column_int(statement, 0);
Address *address = [self getAddressByPersonID:personID];
// Convert the birthday column to an NSDate
NSDateFormatter *dateFormatter = [[NSDateFormatter alloc]init];

55
dateFormatter.dateFormat = @"yyyy-MM-dd HH:mm:ss Z";
NSString *birthdayAsString = [NSString stringWithUTF8String:
(char*)sqlite3_column_text(statement, 3)];
NSDate *birthday = [dateFormatter dateFromString: birthdayAsString];
[dateFormatter release];
// Create a new person and add it to the array
Person *person = [[Person alloc]initWithFirstName:
[NSString stringWithUTF8String:(char*)sqlite3_column_text(statement, 1)]
andLastName:[NSString stringWithUTF8String:
(char*)sqlite3_column_text(statement, 2)]
andBirthday:birthday andAddress:address];
[persons addObject:person];
// Release the person because the array takes ownership
[person release];
}
sqlite3_finalize(statement);
}
// Return the persons array an mark for autorelease
return [persons autorelease];
}
Debug and deploy application
1. Join the Apple iOS Developer Program.
We can log in using our existing Apple ID or create an Apple ID. The Apple Developer
Registration guides us through the necessary steps.

56
2. Register the Unique Device Identifier (UDID) of the device.
This step is applicable only if we are deploying our application to an iOS device and not
the Apple App Store. If we want to deploy our application on several iOS devices, register
the UDID of each device.
3. Obtain the UDID of our iOS device
• Connect the iOS device to our development computer and launch iTunes. The connected
iOS device appears under the Devices section in iTunes.
• Click the device name to display a summary of the iOS device.
• In the Summary tab, click Serial Number to display the 40-character UDID of the iOS
device.
4. Register the UDID of our device
• Log in to the iOS Provisioning Portal using our Apple ID and register the device’s UDID.
• Generate a Certificate Signing Request (CSR) file (*.certSigningRequest).We generate a
CSR to obtain a iOS developer/distribution certificate. We can generate a CSR by using
Keychain Access on Mac or Open SSL on Windows. When we generate a CSR we only
provide our user name and email address; we don’t provide any information about our
application or device.
• Generating a CSR creates a public key and a private key as well as a *.cert Signing Request
file. The public key is included in the CSR, and the private key is used to sign the request.
For more information on generating a CSR, see Generating a certificate signing request.
Generate an iOS developer certificate or an iOS distribution certificate (*.cer), as required.
5. Generate an iOS developer certificate
• Log in to the iOS Provisioning Portal using our Apple ID, and select the Development tab
• Click Request Certificate and browse to the CSR file that we generated and saved on our
computer (step 3).
• Select the CSR file and click Submit.
• On the Certificates page, click Download.
• Save the downloaded file (*.developer_identity.cer).
6. Generate an iOS distribution certificate
• Log in to the iOS Provisioning Portal using our Apple ID, and select the Distribution
tab

57
• Click Request Certificate and browse to the CSR file that we generated and saved on
our computer (step 3).
• Select the CSR file and click Submit.
• On the Certificates page, click Download.
• Save the downloaded file (*.distribution_identity.cer).
• 1 Convert the iOS developer certificate or the iOS distribution certificate to a P12 file
format (*.p12).
7. Generate the Application ID by following these steps:
• Log in to the iOS Provisioning Portal using our Apple ID.
• Go to the App IDs page, and click New App ID.
• In the Manage tab, enter a description for our application, generate a new Bundle Seed
ID, and enter a Bundle Identifier.
• Every application has a unique Application ID, which wespecify in the application
descriptor XML file. An Application ID consists of a ten-character "Bundle Seed ID"
that Apple provides and a "Bundle Identifier" suffix that wespecify. The Bundle
Identifier we specify must match the application ID in the application descriptor file.
For example, if our Application ID is com.myDomain.*, the ID in the application
descriptor file must start with com.myDomain.
• Generate a Developer Provisioning Profile file or a Distribution Provisioning Profile
File (*.mobileprovision).
8. Generate a Developer Provisioning Profile
• Log in to the iOS Provisioning Portal using our Apple ID.
• Go to Certificate > Provisioning, and click New Profile.
• Enter a profile name, select the iOS developer certificate, the App ID, and the UDIDs
on which wewant to install the application.
• Click Submit.
• Download the generated Developer Provisioning Profile file (*.mobileprovision)and
save it on our computer.
9. Generate a Distribution Provisioning Profile
• Log in to the iOS Provisioning Portal using our Apple ID. Go to Certificate > Provisioning,
and click New Profile.

58
• Enter a profile name, select the iOS distribution certificate and the App ID. If we want to
test the application before deployment, specify the UDIDs of the devices on which we
want to test.
• Click Submit.
• Download the generated Provisioning Profile file (*.mobileprovision)and save it on our
computer.
Files to select when we test, debug, or install an iOS application
• To run, debug, or install an application for testing on an iOS device, we select the following
files in the Run/Debug Configurations dialog box:
• iOS developer certificate in P12 format (step 5)
• Application descriptor XML file that contains the Application ID (step 6)
• Developer Provisioning Profile (step 7)
For more information, see Debug an application on an Apple iOS deviceand Install an
application on an Apple iOS device.
Files to select when we deploy an application to the Apple App Store
To deploy an application to the Apple App Store, select the Package Type in the
Export Release Build dialog box as Final Release Package For Apple App Store, and
select the following files:
iOS distribution certificate in P12 format (step 5)
Application descriptor XML file that contains the Application ID (step 6).
Note: We can’t use a wildcard Application ID while submitting an application to the
Apple App Store.
Distribution Provisioning Profile
Publishing App in App Store
The App Store review process is a black box for the most part, that doesn't mean that
we can't prepare ourself and our application for Apple's review process. Apple provides

59
guidelines to help we stay within the sometimes-invisible boundaries of what is and isn't
allowed in the App Store.
Testing
An application isn't necessarily ready when we've written the last line of code or
implemented the final feature of the application's specification. The family of iOS devices
has grown substantially over the past years and it is important to test our application on as
many iOS devices as we can lay our hands on. The iOS Simulator is a great tool, but it runs
on our Mac, which has more memory and processing power than the phone in our pocket.
Apple's Review Process isn't airtight, but it is very capable of identifying problems that might
affect our application's user experience. If our application crashes from time to time or it
becomes slow after ten minutes of use, then we have some work to do before submitting it to
the App Store. Even if Apple's review team doesn't spot the problem, our users will. If the
people using our application are not pleased, they will leave bad reviews on the App Store,
which may harm sales or inhibit downloads.
Rules and Guidelines
Our application ...
• doesn't crash.
• shouldn't use private API's.
• shouldn't replicate the functionality of native applications.
• should use In App Purchase for in-app (financial) transactions.
• shouldn't use the camera or microphone without the user's knowledge.
• only uses artwork that we have the copyright of or we have permission to use.
1. App ID
Every application needs an App ID or application identifier. There are two types of
application identifiers, (1) an explicit App ID and (2) a wildcard App ID. A wildcard
App ID can be used for building and installing multiple applications. Despite the
convenience of a wildcard App ID, an explicit App ID is required if our application uses

60
iCloud or makes use of other iOS features, such as Game Center, Apple Push
Notifications, or In App Purchase.
2. Distribution Certificate
To submit an application to the App Store, we need to create an iOS provisioning profile
for distribution. To create such a provisioning profile, we first need to create a distribution
certificate. The process for creating a distribution certificate is very similar to creating a
development certificate. If we have tested our application on a physical device, then we
are probably already familiar with the creation of a development certificate.
3. Provisioning Profile
Once we've created an App ID and a distribution certificate, we can create an iOS
provisioning profile for distributing our application through the App Store. Keep in mind
that we cannot use the same provisioning profile that we use for ad hoc distribution. We
need to create a separate provisioning profile for App Store distribution. If we use a
wildcard App ID for our project, then we can use the same provisioning profile for multiple
applications.
4. Build Settings
With the App ID, distribution certificate, and provisioning profile in place, it is time to
configure our target's build settings in Xcode. This means selecting the target from the list
of targets in Xcode's Project Navigator, opening the Build Settings tab at the top, and
updating the settings in the Code Signing section to match the distribution provisioning
profile we created earlier. Newly added provisioning profiles are sometimes not
immediately visible in the Code Signing section of the build settings. Quitting and
relaunching Xcode remedies this issue.
5. Deployment Target
Each target in an Xcode project, has a deployment target, which indicates the minimum
version of the operating system that the application can run on. It is up to we to set the
deployment target, but keep in mind that modifying the deployment target is not something
we can do without consequences once our application is in the App Store. If we increase
the deployment target for an update of our application, then users who already purchased
our application but don't meet the new deployment target, cannot run the update.

61
Assets
1. Icons
We need to make sure that our application ships with the correct sizes of the artwork.
• iTunes Artwork: 1024px x 1024px (required)
• iPad/iPad Mini: 72px x 72px and 114px x 114px (required)
• iPhone/iPod Touch: 57px x 57px and 114px x 114px (required)
• Search Icon: 29px x 29px and 58px x 58px (optional)
• Settings Application: 50px x 50px and 100px x 100px (optional)
2. Screenshots
Each application can have up to five screenshots and we must provide at least one. If we
are developing a universal application, then we need to provide separate screenshots for
iPhone/iPod Touch and iPad/iPad Mini. In addition, we can optionally include separate
screenshots for the 3.5" and the 4" screen sizes of the iPhone/iPod Touch. This is quite a
bit of work and we want to make sure that the screenshots show our application from its
best side.
3. Metadata
Before we submit our application, it is a good idea to have our application's metadata at
hand. This includes (1) our application's name, (2) the version number, (3) the primary
(and an optional secondary) category, (4) a concise description, (5) keywords, and (6) a
support URL.
4. Submission Preparation
1. The submission process has become much easier since the release of Xcode 4. We can
now validate and submit an application using Xcode, for example. First, however, we
need to create our application in iTunes Connect.
2. The App Name, which needs to be unique, is the name of our application as it will
appear in the App Store. This can be different than the name that is displayed below our
application icon on the home screen, but it is recommended to choose the same name.

62
3. The SKU Number is a unique string that identifies our application. I usually use the
application's bundle identifier. The last piece of information is the Bundle ID of our
application. This means selecting the (wildcard or explicit) App ID that we created earlier
from the drop-down menu.
4. Specifying Price and Availability
5. Once our application's metadata is submitted, we will be presented with a summary of our
application. Under Versions, we should see the version that we submitted a moment ago.
6. To submit our application, we need to create an archive of our application. We can only
create an archive by building our application on a physical device. Select the archive from
the list and click the Distribute button on the right. From the options we are presented
with, select Submit to the iOS App Store. After entering our iOS developer account
credentials and selecting the Application and Code Signing Identity, the application
binary is uploaded to Apple's servers. During this process, our application is also validated.
If an error occurs during the validation, the submission process will fail. The validation
process is very useful as it will tell we if there is something wrong with our application
binary that would otherwise result in a rejection by the App Store review team.

1
SCHOOL OF COMPUTING
DEPARTMENT OF COMPUTER SCIENCE AND ENGINEERING
Unit 5
Introduction to Windows Phone 8, Application Life cycle, UI Designing and events, Building,
Files and Storage, Network Communication, Push Notification, Background Agents, Maps and
Locations, Data Access and storage, Introduction to Silverlight and XAML, Running and
Debugging the App, Deploying and Publishing
Unit V- SIT1402-Mobile App Development

2
Update 1 (or GDR1), which added some improvements in Internet Explorer, Wi-Fi
connectivity, and messaging experience
Introduction to windows phone 8
Microsoft was developing Windows Mobile 7 when it realized that
the phone wouldn’t be an appealing product for consumers who were starting
to get used to iPhone or Android devices. So its developers dropped the
project and started from scratch to build a totally new platform: Windows
Phone 7. The result was really different from the other competitors: a new
user interface, based on a flat design style called Microsoft Design style
(once known as Metro); and deep integration with social networks and all the
Microsoft services, like Office, SkyDrive, and Xbox.
The current version of the platform (which will be covered in this
series) is Windows Phone 8; in the middle, Microsoft released an update
called Windows Phone 7.5 that added many new consumer features but, most
of all, improved the developer experience by adding many new APIs.
Windows Phone 8 is a fresh start for the platform: Microsoft has
abandoned the old stack of technologies used in Windows Phone 7 (the
Windows Mobile kernel, Silverlight, XNA) to embrace the new features
introduced in Windows 8, like the new kernel, the Windows Runtime, and
the native code (C++) support.
1.1 Microsoft has released three updates:

3
1.2 The Hardware
Windows Phone can run on a wide range of devices, with different form factors and
hardware capabilities. However, Microsoft has defined a set of hardware guidelines that all
manufacturers need to follow to build a Windows Phone device. In addition, vendors can’t
customize the user interface or the operating system; all the phones, regardless of the producer,
offer the same familiar user experience.
This way, Windows Phone can take the best from both worlds: a wide range of devices
means more opportunities, because Windows Phone can run well on cheap and small devices in
the same way it works well on high-resolution, powerful phones. A more controlled hardware,
instead, makes the lives of developers much easier, because they can always count on features
like sensors or GPS.
Here are the key features of a Windows Phone 8 device:
multi-core processor support (dual core and quad core processors)
at least 512 MB of RAM (usually 1 GB or 2 GB on high-end devices)
at least 4 GB of storage (that can be expanded with a Micro SD)
camera
motion sensors (accelerometer, gyroscope, compass), optional
proximity sensor, optional
Wi-Fi and 3G connection
GPS
Update 2 (or GDR2), which improved support for Google accounts, Xbox Music, and
Skype, added FM radio support, and expanded the availability of the Data Sense
application to keep track of the data traffic
Update 3 (or GDR3), which added support for a new resolution (1080p), driving mode,
screen lock orientation, and better storage management, and improved the Bluetooth and
Wi-Fi stack

4
The XAML stack has been ported directly from Windows Phone 7 instead of from
Windows 8. This means that the XAML is still managed and not native, but it's
completely aligned with the previous one so that, for example, features like behaviors, for
which support has been added only in Windows 8.1, are still available). This way, you’ll
be able to reuse all the XAML written for Windows Phone 7 applications without having
to change it or fix it.
Thanks to a feature called quirks mode, applications written for Windows Phone 7 are
able to run on Windows Phone 8 devices without having to apply any change in most
cases. This mode is able to translate Windows Phone 7 API calls to the related Windows
Runtime ones.
1.3 The Windows Runtime
The Windows Runtime is the new API layer that Microsoft introduced in Windows 8,
and it’s the foundation of a new and more modern approach to developing applications. In fact,
unlike the .NET framework, it’s a native layer, which means better performance. Plus, it supports
a wide range of APIs that cover many of the new scenarios that have been introduced in recent
years: geolocation, movement sensors, NFC, and much more. In the end, it’s well suited for
asynchronous and multi-threading scenarios that are one of the key requirements of mobile
applications; the user interface needs to be always responsive, no matter which operation the
application is performing.
Under the hood of the operating system, Microsoft has introduced the Windows Phone
Runtime. Compared to the original Windows Runtime, it lacks some features (specifically, all
the APIs that don’t make much sense on a phone, like printing APIs), but it adds several new
ones specific to the platform (like hub integration, contacts and appointments access, etc.).
1.4 Microsoft introduced three features:
four supported resolutions: WVGA (480 × 800), WXGA (768 × 1280), 720p(720 ×
1280), and 1080p (1080 × 1920)
three hardware buttons: Back, Start, and Search

5
Like the full Windows Runtime, Windows Phone 8 has added support for C++ as a
programming language, while the WinJS layer, which is a library that allows developers to
create Windows Store apps using HTML and JavaScript, is missing. If you want to develop
Windows Phone applications using web technologies, you’ll have to rely on
the WebBrowser control (which embeds a web view in the application) and make use of
features provided by frameworks like PhoneGap.
1.5 The Development Tools
The official platform to develop Windows Phone applications is Visual Studio 2012,
although support has also been added to the Visual Studio 2013 commercial versions. The major
difference is that while Visual Studio 2012 still allows you to open and create Windows Phone 7
projects, Visual Studio 2013 can only be used to develop Windows Phone 8 applications.
There are no differences between the two versions when we talk about Windows Phone
development: since the SDK is the same, you’ll get the same features in both environments, so
we’ll use Visual Studio 2012 as a reference for this series.
To start, you’ll need to download the Windows Phone 8 SDK from the official developer
portal. This download is suitable for both new developers and Microsoft developers who already
have a commercial version of Visual Studio 2012. If you don’t already have Visual Studio
installed, the setup will install the free Express version; otherwise, it will simply install the SDK
and the emulator and add them to your existing Visual Studio installation.
The setup will also install Blend for Windows Phone, a tool made by Microsoft
specifically for designers. It’s a XAML visual editor that makes it easier to create a user interface
for a Windows Phone application. If you’re a developer, you’ll probably spend most of the time
The Windows Phone Runtime includes a layer called .NET for Windows Phone, which
is the subset of APIs that were available in Windows Phone 7. Thanks to this layer, you’ll
be able to use the old APIs in a Windows Phone 8 application, even if they’ve been
replaced by new APIs in the Windows Runtime. This way, you’ll be able to migrate your
old applications to the new platform without having to rewrite all the code.

6
manually writing XAML in the Visual Studio editor, but it can be a valid companion when it
comes to more complex things like creating animations or managing the visual states of a
control.
To install the Windows Phone 8 SDK you’ll need a computer with Windows 8
Pro orWindows 8 Enterprise 64-bit. This is required since the emulator is based on Hyper-V,
which is the Microsoft virtualization technology that is available only in professional versions of
Windows. In addition, there’s a hardware requirement: your CPU needs to support the Second
Level Address Translation (SLAT), which is a CPU feature needed for Hyper-V to properly run.
If you have a newer computer, you don’t have to worry; basically all architectures from Intel i5
and further support it. Otherwise, you’ll still be able to install and the use the SDK, but you’ll
need a real device for testing and debugging.
1.6 The Emulator
Testing and debugging a Windows Phone app on a device before submitting it to the
Windows Phone Store is a requirement; only on a real phone will you be able to test the true
performance of the application. During daily development, using the device can slow you down.
This is when the emulator is useful, especially because you’ll easily be able to test different
conditions (like different resolutions, the loss of connectivity, etc.).
The emulator is a virtual machine powered by Hyper-V that is able to interact with the
hardware of your computer. If you have a touch monitor, you can simulate the phone touch
screen; if you have a microphone, you can simulate the phone microphone, etc. In addition, the
emulator comes with a set of additional tools that are helpful for testing some scenarios that
would require a physical device, like using the accelerometer or the GPS sensor.

7
1. Windows application life cycle
The following image illustrates the lifecycle of a Windows Phone application. In this
diagram, the circles are application states. The rectangles show either application- or page-level
events where applications should manage their state.
2.1 The Launching Event
A user can launch a new instance of your app by selecting it from the installed
applications list or from a Tile on Start in addition to other means, such as tapping on a toast
8
notification associated with the app or selecting the app from the Photos Extras menu. When
your app is launched this way, it should present a user interface that makes it clear to the user
that a new instance the app was launched. It’s ok to provide context about the user’s previous
experience with the app, such as a list of recent documents the user viewed, but it shouldn’t
appear as though the user is returning to a previously running instance of the app.
When a new instance of your app is launched, the Launching event is raised. To help
ensure that your app loads quickly, you should execute as little code as possible in the handler
for this event. In particular, avoid resource-intensive tasks like file and network operations. You
should perform these tasks on a background thread after your app has loaded for the best user
experience.
2.2 Running
After being launched, an app is Running. It continues to run until the user navigates
forward, away from the app, or backwards past the app’s first page. Windows Phone apps
shouldn’t provide a mechanism for the user to quit or exit. Apps also leave the Running state
when the phone’s lock screen engages unless you have disabled application idle detection. For
more information, see Idle detection for Windows Phone 8.
2.3 The OnNavigatedFrom Method
The OnNavigatedFrom(NavigationEventArgs) method is called whenever the user
navigates away from one of the pages in your app. This can happen as the result of normal page
navigation within your application, but it is also called if the user navigates away from your app.
Whenever this method is called, your application should store the page state so that it can be
restored if the user returns to the page and the page is no longer in memory. The exception to this
is backward navigation. The NavigationMode property can be used to determine if the navigation
is a backward navigation, in which case there is no need to save state because the page will be re-
created the next time it is visited.
2.4 The Deactivated Event
The Deactivated event is raised when the user navigates forward, away from your app, by
pressing the Start button or by launching another application. The Deactivated event is also
raised if your application launches a Chooser. This event is also raised if the device’s lock screen
is engaged, unless application idle detection is disabled.
In the handler for the Deactivated event, your application should save any unsaved
application data so that it can be restored at a later time, if necessary. Windows Phone
applications are provided with the State object, which is a dictionary you can use to store
application state. If the operating system tombstones your app, as discussed below, it will save
this dictionary and return it to you if your app is reactivated..
It is possible for an application to be completely terminated after Deactivated is called.
When an application is terminated, its state dictionary is not preserved. So you should also store
any unsaved state that should be persisted across application instances to isolated storage during
the Deactivated event.

9
2.5 Dormant
When the user navigates forward, away from an app, after the Deactivated event is
raised, the operating system will attempt to put the app into a dormant state. In this state, all of
the application’s threads are stopped and no processing takes place, but the application remains
intact in memory. If the app is reactivated from the dormant, it doesn’t need to do anything to re-
establish state, because it has been preserved.
If new apps are launched after an app has been made dormant, and these applications
requires more memory than is available to provide a good user experience, the operating system
will begin to tombstone dormant applications to free up memory.
2.6 Tombstoned
A tombstoned app has been terminated, but the operating system preserves information
about its navigation state and also preserves the state dictionaries the app populated
during Deactivated. The device will maintain tombstoning information for up to five apps at a
time. If an app is tombstoned and the user navigates back to the application, it will be relaunched
and the application can use the preserved data to restore state.
2.7 The Activated Event
The Activated event is called when the user returns to a dormant or tombstoned app.
Your app should check the IsApplicationInstancePreserved property of the event args to
determine whether it is returning from being dormant or tombstoned.
If IsApplicationInstancePreserved is true, then your app was dormant and state was
automatically preserved by the operating system. If it is false, then your app was tombstoned and
should use the state dictionary to restore application state
2.8 The OnNavigatedTo Method
The OnNavigatedTo(NavigationEventArgs) method is called when the user navigates to a
page. This includes when the app is first launched, when the user navigates between the pages of
the app, and when the app is relaunched after being made dormant or tombstoned. In this
method, your app should check to see whether the page is a new instance. If it is not, then page
state does not need to be restored. If the page is a new instance, and there is data in the state
dictionary for the page, then you should use this data to restore the state of the page’s UI.
2.9 The Closing Event
The Closing event is raised when the user navigates backwards past the first page of an
app. In this case, the app is terminated and no state is saved. In the Closing event handler, your
app can save data that should persist across instances. There is a limit of 10 seconds for an app to
complete all application and page navigation events. If this limit is exceeded, the application is
terminated. For this reason, it is a good idea to save persistent state throughout the lifetime of the
application and avoid having to do large amounts of file I/O in the Closing event handle

10
2. UI Design Guidelines for Windows Phone 8
3.1 App bar and command bar
Command bars (also called "app bars") provide users with easy access to your app's most
common tasks, and can be used to show commands or options that are specific to the user's
context, such as a photo selection or drawing mode. They can also be used for navigation among
app pages or between app sections. Command bars can be used with any navigation pattern.
Command Bar
The command bar is divided into 4 main areas:
The "see more" [•••] button is shown on the right of the bar. Pressing the "see more" [•••]
button has 2 effects: it reveals the labels on the primary command buttons, and it opens
the overflow menu if any secondary commands are present. In the newest SDK, the
button will not be visible when no secondary commands and no hidden labels are
present. OverflowButtonVisibility property allows apps to change this default auto-hide
behavior.
The content area is aligned to the left side of the bar. It is shown if the Content property is
populated.
The primary command area is aligned to the right side of the bar, next to the "see more"
[•••] button. It is shown if the PrimaryCommands property is populated.
The overflow menu is shown only when the command bar is open and
the SecondaryCommands property is populated. The new dynamic overflow behavior
will automatically move primary commands into the SecondaryCommands area when
space is limited.

11
3.2 Buttons
A button gives the user a way to trigger an immediate action.
Create the button in XAML.
<Button Content="Submit" Click="SubmitButton_Click"/>
Or create the button in code.
Button submitButton = new Button();
submitButton.Content = "Submit";
submitButton.Click += SubmitButton_Click;
// Add the button to a parent container in the visual tree.
stackPanel1.Children.Add(submitButton);
Handle the Click event.
private async void SubmitButton_Click(object sender, RoutedEventArgs e)
{
// Call app specific code to submit form. For example:
// form.Submit();

12
Windows.UI.Popups.MessageDialog messageDialog = new
Windows.UI.Popups.MessageDialog("Thank you for your submission.");
await messageDialog.ShowAsync();
}
Button
3.3 Check boxes
A check box is used to select or deselect action items. It can be used for a single item or for a
list of multiple items that a user can choose from. The control has three selection states:
unselected, selected, and indeterminate. Use the indeterminate state when a collection of sub-
choices have both unselected and selected states.
This XAML creates a single check box that is used to agree to terms of service before a form
can be submitted.
<CheckBox x:Name="termsOfServiceCheckBox" Content="I agree to the terms of
service."/>
the same check box created in code.
CheckBox checkBox1 = new CheckBox();
checkBox1.Content = "I agree to the terms of service.";
Check Box
3.4 Calendar view
A calendar view lets a user view and interact with a calendar that they can navigate by month,
year, or decade. A user can select a single date or a range of dates. It doesn't have a picker
surface and the calendar is always visible.

13
The calendar view is made up of 3 separate views: the month view, year view, and decade
view. By default, it starts with the month view open.
This example shows how to create a simple calendar view.
<CalendarView/>
The resulting calendar view looks like this:
Calender View
calendarView1.SelectedDates.Add(DateTimeOffset.Now);
calendarView1.SelectedDates.Add(new DateTime(1977, 1, 5));
Customizing the calendar view's appearance

14
Properties of Calender View
3.5 Date picker
The date picker gives you a standardized way to let users pick a localized date value using
touch, mouse, or keyboard input.
to create a simple date picker with a header.
<DatePicker x:Name=birthDatePicker Header="Date of birth"/> or
DatePicker birthDatePicker = new DatePicker(); birthDatePicker.Header = "Date of birth";
The resulting date picker looks like this:
Date Picker
3.6 Time picker
The time picker gives you a standardized way to let users pick a time value using touch, mouse,
or keyboard input.
to create a simple time picker with a header.
<TimePicker x:Name=arrivalTimePicker Header="Arrival time"/>
Or
TimePicker arrivalTimePicker = new TimePicker();
arrivalTimePicker.Header = "Arrival time";
The resulting time picker looks like this:

15
Time Picker
3.7 Dialogs
Dialogs is transient UI elements that appear when something happens that requires
notification, approval, or additional information from the user.
Dialog Control
private async void displayDeleteFileDialog()
{
ContentDialog deleteFileDialog = new ContentDialog()
{
Title = "Delete file permanently?",
Content = "If you delete this file, you won't be able to recover it. Do you want to
delete it?",
PrimaryButtonText = "Cancel",
SecondaryButtonText = "Delete file permanently"
};
ContentDialogResult result = await deleteFileDialog.ShowAsync();
// Delete the file if the user clicked the second button.
// Otherwise, do nothing.
if (result == ContentDialogResult.Secondary)
{
// Delete the file.
}
}
3.8 Hyperlinks
Hyperlinks navigate the user to another part of the app, to another app, or launch a specific
uniform resource identifier (URI) using a separate browser app. There are two ways that you
can add a hyperlink to a XAML app: the Hyperlink text element
and HyperlinkButton control.
This example shows how to use a Hyperlink text element inside of a TextBlock.

16
Sample Code
The hyperlink appears inline and flows with the surrounding text:
Hyperlink
3.9 Images
To display an image, you can use either the Image object. An Image object renders an
image.
to create an image by using the Image object.
<Image Width="200" Source="licorice.jpg" />
Here's the rendered Image object.

17
image
3.10 Radio buttons
Radio buttons let users select one option from two or more choices. Each option is represented
by one radio button; a user can select only one radio button in a radio button group.
Sample Code
private void BGRadioButton_Checked(object sender, RoutedEventArgs e)
{
RadioButton rb = sender as RadioButton;
if (rb != null && BorderExample1 != null)
{
string colorName = rb.Tag.ToString(); switch
(colorName)
{
case "Yellow":
BorderExample1.Background = new SolidColorBrush(Colors.Yellow); break;
case "Green":
BorderExample1.Background = new SolidColorBrush(Colors.Green);

18
break; case
"Blue":
BorderExample1.Background = new SolidColorBrush(Colors.Blue); break;
case "White":
BorderExample1.Background = new SolidColorBrush(Colors.White);
break;
}
}
}
private void BorderRadioButton_Checked(object sender, RoutedEventArgs e)
{
RadioButton rb = sender as RadioButton;
if (rb != null && BorderExample1 != null)
{
string colorName = rb.Tag.ToString(); switch
(colorName)
{
case "Yellow":
BorderExample1.BorderBrush = new SolidColorBrush(Colors.Gold);
break;
case "Green":
BorderExample1.BorderBrush = new SolidColorBrush(Colors.DarkGreen);
break;
case "Blue":
BorderExample1.BorderBrush = new SolidColorBrush(Colors.DarkBlue);
break;
case "White":
BorderExample1.BorderBrush = new SolidColorBrush(Colors.White); break;
}
}
}
The radio button groups look like this.

19
Text Box
Radio Buttons
3.11 Text box
The TextBox control lets a user type text into an app. It's typically used to capture a single line
of text, but can be configured to capture multiple lines of text. The text displays on the screen
in a simple, uniform, plaintext format.
Here's the XAML for a simple text box with a header and placeholder text.
<TextBox Width="500" Header="Notes" PlaceholderText="Type your notes here"/>
or
TextBox textBox = new TextBox();
textBox.Width = 500;
textBox.Header = "Notes";
textBox.PlaceholderText = "Type your notes here";
// Add the TextBox to the visual tree.
rootGrid.Children.Add(textBox);
Here's the text box that results from this XAML.
3.12 Password box
A password box is a text input box that conceals the characters typed into it for the purpose of
privacy. A password box looks like a text box, except that it renders placeholder characters in
place of the text that has been entered. You can configure the placeholder character.
Here's the XAML for a password box control that demonstrates the default look of the
PasswordBox.
<StackPanel>

20
<PasswordBox x:Name="passwordBox" Width="200" MaxLength="16"
PasswordChanged="passwordBox_PasswordChanged"/>
<TextBlock x:Name="statusText" Margin="10" HorizontalAlignment="Center" />
</StackPanel>
private void passwordBox_PasswordChanged(object sender, RoutedEventArgs e)
{
if (passwordBox.Password == "Password")
{
statusText.Text = "'Password' is not allowed as a password.";
}
else
{
statusText.Text = string.Empty;
}
}
Here's the result when this code runs and the user enters "Password".
You can change the character used to mask the password by setting
the PasswordChar property. Here, the default bullet is replaced with an asterisk.
<PasswordBox x:Name="passwordBox" Width="200" PasswordChar="*"/>
The result looks like this.
Password Character
Headers and placeholder text
<PasswordBox x:Name="passwordBox" Width="200"
Header="Password" PlaceholderText="Enter your password"/>

21
Password help text
3.13 Auto-suggest box
Use an AutoSuggestBox to provide a list of suggestions for a user to select from as they
type.
to make the AutoSuggestBox look like a typical search box, add a ‘find’ icon, like this.
<AutoSuggestBox QueryIcon="Find"/>
Here's an AutoSuggestBox with a 'find' icon.
AutoSuggest Box
3.14 Labels
A label is the name or title of a control or a group of related controls.

22
3.15 Toggle switches Label

23
The toggle switch represents a physical switch that allows users to turn things on or off. Use
ToggleSwitch controls to present users with exactly two mutually exclusive options (like
on/off), where choosing an option results in an immediate action.
This XAML creates the WiFi toggle switch shown previously.
<ToggleSwitch x:Name="wiFiToggle" Header="Wifi"/>
Here's how to create the same toggle switch in code.
ToggleSwitch wiFiToggle = new ToggleSwitch();
wiFiToggle.Header = "WiFi";
// Add the toggle switch to a parent container in the visual tree.
stackPanel1.Children.Add(wiFiToggle);
Toggle switch
3.16 Tooltips
A tooltip is a short description that is linked to another control or object. Tooltips help users
understand unfamiliar objects that aren't described directly in the UI. They display automatically
when the user moves focus to, presses and holds, or hovers the mouse pointer over a control.
The tooltip disappears after a few seconds, or when the user moves the finger, pointer or
keyboard/gamepad focus.
Tooltips
24
3. Events
An event is a message sent by an object to signal the occurrence of an action. The action
could be caused by user interaction, such as touching the screen, or it could be triggered by the
internal logic of a class. The object that raises the event is called the event sender. The object that
captures the event and responds to it is called the event receiver. Basically the purpose of events
is to communicate time-specific, relatively lightweight information from an object at run time,
and potentially to deliver that information to other objects in the app.
4.1 Windows Phone events
Generally speaking, Windows Phone events are CLR events, and therefore are events that
you can handle with managed code. If you know how to work with basic CLR events already,
you have a head start on some of the concepts involved. But you do not necessarily need to know
that much about the CLR event model in order to perform some basic tasks, such as attaching
handlers.
Because the UI for a typical Windows Phone-based app is defined in markup (XAML),
some of the principles of connecting UI events from markup elements to a runtime code entity
are similar to other Web technologies, such as ASP.NET, or working with an HTML DOM. In
Windows Phone the code that provides the runtime logic for a XAML-defined UI is often
referred to as code-behind or the code-behind file. In the Visual Studio solution views, this
relationship is shown graphically, with the code-behind file being a dependent and nested file
versus the XAML page it refers to.
4.2 Button.Click: an introduction to using Windows Phone events
Generally, you define the UI for your Windows Phone-based app by generating XAML.
This XAML can be the output from a designer such as Blend for Visual Studio or from a design
surface in a larger IDE such as Windows Phone. The XAML can also be written out in a
plaintext editor or a third-party XAML editor. As part of generating that XAML, you can wire
event handlers for individual UI elements at the same time that you define all the other attributes
that describe that UI element.
If you are using Windows Phone, you can use design features that make it very simple to wire
event handlers from XAML and then define them in code-behind. This includes providing an
automatic naming scheme for the handlers.
4.3 Defining an event handler
Event handlers in the partial class are written as methods, based on the CLR delegates
that are used by that particular event. Your event handler methods can be public, or they can
have a private access level. Private access works because the handler and instance created by the
XAML are ultimately joined by code generation. The general recommendation is to not make
your event handler methods public in the class.

25
4.4 The sender parameter and event data
Any handler you write for a managed Windows Phone event can access two values that
are available as input for each case where your handler is invoked. The first such value is sender,
which is a reference to the object where the handler is attached. The sender parameter is typed as
the base Object type. A common technique in Windows Phone event handling is to cast sender to
a more precise type. This technique is useful if you expect to check or change state on
thesender object itself. Based on your own app design, you expect a type that is safe to
cast sender to, based on where the handler is attached or other design specifics.
The second value is event data, which generally appears in signatures as the e parameter.
Per the CLR event model, all events send some kind of event data, with that data captured as an
instance of a class that inherits EventArgs (or isEventArgs itself). You can discover which
properties for event data are available by looking at the e parameter of the delegate that is
assigned for the specific event you are handling, and then using Intellisense in Visual Studio or
the .NET Framework Class Library for Windows Phone. Some Windows Phone events use
the EventHandler<TEventArgs>delegate or other generic handler types. In most cases, the event
definitions constrains the generic with a specific EventArgs derived event data class. You should
then write the handler method as if it took that EventArgs derived event data class directly as the
second parameter.
For some events, the event data in the EventArgs derived class is as important as
knowing that the event was raised. This is especially true of the input events. For keyboard
events, key presses on the keyboard raise the same KeyUp andKeyDown events. In order to

26
determine which key was pressed, you must access the KeyEventArgs that is available to the
event handler.
4.5 Adding event handlers in managed code
XAML is not the only way to assign an event handler to an object. To add event handlers
to any given object in managed code, including to objects that are not even usable in XAML, you
can use the CLR language-specific syntax for adding event handlers.In C#, the syntax is to use
the += operator. You instantiate the handler by declaring a new delegate that uses the event
handler method name.
If you are using code to add event handlers to objects that appear in the run-time UI, a
common practice for Windows Phone is to add such handlers in response to an object lifetime
event or callback, such as Loaded orOnApplyTemplate, so that the event handlers on the relevant
object are ready for user-initiated events at run time.
The other option for Visual Basic syntax is to use the Handles keyword on event
handlers. This technique is appropriate for cases where handlers are expected to exist on objects
at load time and persist throughout the object lifetime. Using Handles on an object that is
defined in XAML requires that you provide a Name / x:Name. This name becomes the instance
qualifier that is needed for the Instance.Event part of the Handles syntax. In this case you do not
need an object lifetime-based event handler to initiate attaching the other event handlers;
the Handles connections are created when you compile your XAML page.
VB
Sub textBlock1_MouseEnter(ByVal sender As Object, ByVal e As MouseEventArgs) Handles
textBlock1.MouseEnter
'....
End Sub
Sub textBlock1_MouseLeave(ByVal sender As Object, ByVal e As MouseEventArgs) Handles
textBlock1.MouseLeave
'....
End Sub
4.6 Routed events
Windows Phone supports the concept of a routed event for several input events that are
defined in base classes and are present on most UI elements that support user interaction and
input. The following is a list of input events that are routed events:
KeyDown
KeyUp
GotFocus
LostFocus

27
MouseLeftButtonDown
MouseLeftButtonUp
MouseMove
BindingValidationError
A routed event is an event that is potentially passed on (routed) from a child object to
each of its successive parent objects in the object tree. The object tree in question is
approximated by the XAML structure of your UI, with the root of that tree being the root
element in XAML. The true object tree might vary somewhat from the XAML because the
object tree does not include XAML language features such as property element tags.
4.7 The OriginalSource property of RoutedEventArgs
When an event bubbles up an event route, sender is no longer the same object as the
event-raising object. Instead,sender is the object where the handler that is being invoked is
attached. In many cases, sender is not the object of interest, and you are instead interested in
knowing information such as object held focus when a keyboard key was pressed. In such a case,
the value of the OriginalSource property is the object of interest.
At all points on the route, OriginalSource reports the original object that raised the event,
instead of where the handler is attached. For an example scenario where this is useful, consider
an app where you want certain key combinations to be "hot keys" or accelerators, regardless of
which control currently holds keyboard focus and initiated the event. In terms of the object tree,
the focused object might be nested within some items list in a list box, or could be one of
hundreds of objects in the overall UI.
4.8 The Handled property
Several event data classes for specific routed events contain a property named Handled.
For examples, seeMouseButtonEventArgs.Handled, KeyEventArgs.Handled,
, DragEventArgs.Handled, andValidationErrorEventArgs.Handled. Handled is a settable
Boolean property.
Setting the Handled property to true influences the event system in Windows Phone.
When you set the value to truein event data, the routing stops for most event handlers; the event
does not continue along the route to notify other attached handlers of that particular event case.
What "handled" as an action means in the context of the event and how your app responds is up
to you. However, you should keep in mind the behavior of the Windows Phone event system if
you set Handled in your event handlers.
4.8 Input event handlers in controls
Specific existing Windows Phone controls sometimes use this Handled concept for input
events internally. This can give the appearance from user code that an input event never occurs.

28
For example, the Button class includes logic that deliberately handles the general input
event MouseLeftButtonDown. Reference topics for specific control classes in the .NET
Framework Library often note the event handling behavior implemented by the class. In some
cases, the behavior can be changed or appended in subclasses by overriding OnEvent methods.
For example, you can change how your TextBox derived class reacts to key input by
overriding TextBox.OnKeyDown.
4.9 Registering handlers for already-handled routed events
Earlier it was stated that setting Handled to true prevented most handlers from acting.
The API AddHandler provides a technique where you can attach a handler that will always be
invoked for the route, even if some other handler earlier in the route has set Handled to true.
This technique is useful if a control you are using has handled the event in its internal
compositing or for control-specific logic but you still want to respond to it on a control instance,
or higher in the route. However, this technique should be used with caution because it can
contradict the purpose of Handled and possibly violate a control's intended usage or object
model.
4.10 User-initiated events
Windows Phone enforces that certain operations are only permitted in the context of a
handler that handles a user-initiated event. The following is a list of such operations:
Navigating from a HyperlinkButton.
Accessing the primary Clipboard API.
Windows Phone user-initiated events include the mouse events (such
as MouseLeftButtonDown), and the keyboard events (such as KeyDown). Events of controls that
are based on such events are also considered user-initiated.
API calls that require user initiation should be called as soon as possible in an event handler.
This is because the Windows Phone user initiation concept also requires that the calls occur
within a certain time window after the event occurrence. In Windows Phone, this time window is
approximately one second.
4.11 Removing event handlers
In some circumstances, you might want to remove event handlers during the app lifetime.
To remove event handlers, you use the CLR-language-specific syntax. In C#, you use the -
= operator. In Visual Basic, you use the RemoveHandlerfunction. In either case, you reference
the event handler method name

29
DATA ACCESS AND STORAGE
Local Storage
The Internet plays an important role in mobile applications. Most Windows Phone
applications available in the Store make use of the network connection offered by every device.
However, relying only on the network connection can be a mistake; users can find themselves in
situations where no connection is available. In addition, data plans are often limited, so the fewer
network operations we do, the better the user experience is.
Windows Phone offers a special way to store local data called isolated storage. It works
like a regular file system, so you can create folders and files as on a computer hard drive. The
difference is that the storage is isolated—only your applications can use it. No other applications
can access your storage, and users are not able to see it when they connect their phone to the
computer. Moreover, as a security measure, the isolated storage is the only storage that the
application can use. You’re not allowed to access the operating system folders or write data in
the application’s folder.
Local storage is one of the features which offers duplicated APIs—the old Silverlight
ones based on the IsolatedStorageFile class and the new Windows Runtime ones based on the
LocalFolder class. As mentioned in the beginning of the series, we’re going to focus on the
Windows Runtime APIs.
Working With Folders
The base class that identifies a folder in the local storage is called StorageFolder. Even
the root of the storage (which can be accessed using theApplicationData.Current.LocalStorage
class that is part of the Windows.Storagenamespace) is a StorageFolder object.
This class exposes different asynchronous methods to interact with the current folder, such as:
• CreateFolderAsync() to create a new folder in the current path.
• GetFolderAsync() to get a reference to a subfolder of the current path.
• GetFoldersAsync() to get the list of folders available in the current path.
• DeleteAsync() to delete the current folder.
• RenameAsync() to rename a folder.
In the following sample, you can see how to create a

30
StorageFile
folder in the local storage’s root:
private async void
OnCreateFolderClicked(object
sender, RoutedEventArgs e)
{
await
ApplicationData.Current.LocalF
older.CreateFolderAsync(“myF
older”);
}
Working With File
Files, instead, are identified by the
interact with files:
class, which similarly offers methods to
DeleteAsync() to delete a file.
RenameAsync() to rename a file.
CopyAsync() to copy a file from one location to another.
MoveAsync() to move a file from one location to another.
The starting point to manipulate a file is the StorageFolder class we’ve previously discussed,
since it offers methods to open an existing file ( GetFileAsync() ) or to create a new one in the
current folder ( CreateFileAsync() ).
Let’s examine the two most common operations: writing content to a file and reading content
from a file.
How to Create a File
As already mentioned, the first step to create a file is to use the CreateFile() method on
a StorageFolder object. The following sample shows how to create a new file called file.txt in
the local storage’s root:

31
private async void OnCreateFileClicked(object sender, RoutedEventArgs e)
{
StorageFile file = await
ApplicationData.Current.LocalFolder.CreateFileAsync(“file.txt”, CreationCollisi
}
You can also pass the optional parameter CreationCollisionOption to the method to define the
behavior to use in case a file with the same name already exists. In the previous sample,
the ReplaceExisting value is used to overwrite the existing file.
Now that you have a file reference thanks to the StorageFile object, you are able to
work with it using the OpenAsync() method. This method returns the file stream, which you
can use to write and read content.
The following sample shows how to write text inside the file:
private async void OnCreateFileClicked(object sender, RoutedEventArgs e)
{
StorageFile file = await
ApplicationData.Current.LocalFolder.CreateFileAsync(“file.txt”,
CreationColli IRandomAccessStream randomAccessStream = await
file.OpenAsync(FileAccessMode.ReadWrite);
using (DataWriter writer = new
DataWriter(randomAccessStream.GetOutputStreamAt(0)))
{
writer.WriteS
tring(“Sampl

32
e text”);
await
writer.StoreA
sync(); }
}
The key is the DataWriter class, which is a Windows Runtime class that can be used to
easily write data to a file. We simply have to create a new DataWriter object, passing as a
parameter the output stream of the file we get using the GetOuputStreamAt() method on the
stream returned by the OpenAsync() method.
The DataWriter class offers many methods to write different data types,
like WriteDouble() for decimal numbers, WriteDateTime() for dates, and WriteBytes() for
binary data. In the sample we write text using the WriteString() method, and then we call
the StoreAsync() and FlushAsync() methods to finalize the writing operation.
How to Read a File
The operation to read a file is not very different from the writing one. In this case, we
also need to get the file stream using the OpenFile() method. The difference is that, instead of
using the DataWriter class, we’re going to use the DataReader class, which does the opposite
operation. Look at the following sample code:
private async void OnReadFileClicked(object sender, RoutedEventArgs e)
{
StorageFile file = await
ApplicationData.Current.LocalFolder.GetFileAsync("file.txt");
IRandomAccessStream randomAccessStream = await
file.OpenAsync(FileAccessMode.Read);
using (DataReader reader = new
DataReader(randomAccessStream.GetInputStreamAt(0)))

33
ApplicationSettings
IsolatedStorageSettings
{
uint bytesLoaded = await reader.LoadAsync((uint)
randomAccessStream.Size); string readString =
reader.ReadString(bytesLoaded);
MessageBox.Show(readString);
}
}
Manage Settings
One common scenario in mobile development is the need to store
settings. Many applications offer a Settings page where users can
customize different options.
To allow developers to quickly accomplish this task, the
SDK includes a class called IsolatedStorageSettings , which
offers a dictionary called ApplicationSettings that you can use to store
settings.
Note: The class is part of the old storage APIs; the Windows
Runtime
offers a new API to manage settings but, unfortunately, it isn’t available in Windows
Phone.
Using the property is very simple: its type is
Dictionary<string,
object> and it can be used to store any object.
In the following sample, you can see two event handlers: the first one
saves an object in the settings, while the second one retrieves it.
private void OnSaveSettingsClicked(object sender, RoutedEventArgs e)
{

34
IsolatedStorageSettings settings =
IsolatedStorageSettings.ApplicationSettings;
settings.Add("name", "Matteo");
settings.Save();
}
private void OnReadSettingsClicked(object sender, RoutedEventArgs e)
{
IsolatedStorageSettings settings =
IsolatedStorageSettings.ApplicationSettings; if
(settings.Contains("name"))
{
MessageBox.Show(settings["name"].ToString());
}
}
The only thing to highlight is the Save() method, which you need to call every time you want to

35
persist the changes you’ve made. Except for this, it works like a regular Dictionary collection.
Debugging the Local Storage
A common requirement for a developer working with local storage is the ability to see
which files and folders are actually stored. Since the storage is isolated, developers can’t simply
connect the phone to a computer and explore it.
The best way to view an application’s local storage is by using a third-party tool available
on CodePlex called Windows Phone Power Tools, which offers a visual interface for exploring
an application’s local storage.
The tool is easy to use. After you’ve installed it, you’ll be able to connect to a device or
to one of the available emulators. Then, in the Isolated Storage section, you’ll see a list of all
the applications that have been side-loaded from Visual Studio. Each one will be identified by its
application ID (which is a GUID). Like a regular file explorer, you can expand the tree structure
and analyze the storage’s content. You’ll be able to save files from the device to your PC, copy
files from your PC to the application storage, and even delete items.
Storing Techniques
Serialization and Deserialization
Serialization is the simplest way to store an application’s data in the local
storage. It’s the process that converts complex objects into plain text so that
they can be stored in a text file, using XML or JSON as output.
Deserialization is the opposite process; the plain text is converted back into

36
objects so that they can be used by the application.
In a Windows Phone application that uses these techniques, serialization is
typically applied every time the application’s data is changed (when a new
item is added, edited, or removed) to minimize the risk of losing data if
something happens, like an unexpected crash or a suspension.
Deserialization, instead, is usually applied when the application starts for
the first time.Serialization is very simple to use, but its usage should be
limited to applications that work with small amounts of data, since
everything is kept in memory during the execution.
public class Person
{
public string
Name { get;
set; } public
string
Surname {
get; set; }
}
We assume that you will have a collection of Person objects, which represents your local data:
List<Person> people = new List<Person>
{
new Person
{
Name = "Matteo", Surname =
"Pagani"
},

37
CreateFile()
new Person
{
Name = "John", Surname = "Doe"
}
};
private async void OnSerializeClicked(object sender, RoutedEventArgs e)
{
DataContractSerializer serializer = new
DataContractSerializer(typeof(List<Person>));
StorageFile file = await
ApplicationData.Current.LocalFolder.CreateFileAsync("people.xml");
IRandomAccessStream randomAccessStream = await
file.OpenAsync(FileAccessMode.ReadWrite);
using (Stream stream = randomAccessStream.AsStreamForWrite())
{
serializer.WriteO
bject(stream,
people); await
stream.FlushAsy
nc();
Serialization
To serialize our application’s data we’re going to use the local storage APIs we learned about in
the previous section. We’ll use the method again, as shown in the
following sample:

38
The class (which is part of
the namespace) takes care of managing the serialization process.
When we create a new instance, we need to specify which data type we’re going to serialize (in
the previous sample, it’s List<Person> ). Next, we create a new file in the local storage and get
the stream needed to write the data. The serialization operation is made by calling
the WriteObject() method of the DataContractSerializer class, which requires as parameters
the stream location in which to write the data and the object to serialize. In this example, it’s the
collection of objects we’ve previously defined. Person
System.Runtime.Serialization
DataContractSerializer
}
}
<ArrayOfPerson xmlns:i="http://www.w3.org/2001/XMLSchema-instance"
xmlns="http://schemas.dataco
<Person>
<Name>Matteo</Name>
<Surname>Pagani</Surname>
</Person>
<Person>
<Name>John</Name>
<Surname>Doe</Surname>
</Person>
</ArrayOfPerson>

39
Deserialization
The deserialization process is very similar and involves, again, the storage APIs to read
the file’s content and the DataContractSerializer class. The following sample shows how to
deserialize the data we serialized in the previous section:
We get a stream to read by using the
We use the method of the
method.
class to deserialize the
file’s content, which takes the file stream as its input parameter. It’s important to note
that the method always returns a generic object, so you’ll always have to cast it to your
real data type (in the sample, we cast it as ). List<Person>
DataContractSerializer
AsStreamForRead()
ReadObject()
private async void OnDeserializeClicked(object sender, RoutedEventArgs e)
{
StorageFile file = await
ApplicationData.Current.LocalFolder.GetFileAsync("people.xml");
DataContractSerializer serializer = new
DataContractSerializer(typeof(List<Person>));
IRandomAccessStream randomAccessStream = await
file.OpenAsync(FileAccessMode.Read);
using (Stream stream = randomAccessStream.AsStreamForRead())
{
List<Person> people = serializer.ReadObject(stream) as List<Person>;
}
}
The only differences are:

40
Using Databases: SQL CE
SQL CE is the database solution that was introduced in Windows Phone 7.5. It’s
a stand- alone database, which means that data is stored in a single file in the storage
without needing a DBMS to manage all the operations.
Windows Phone uses SQL CE 3.5 (the latest release at this time is 4.0, but it is
not supported) and doesn’t support SQL query execution. Every operation is made using
LINQ to SQL, which is one of the first of Microsoft’s ORM solutions.
The approach used by SQL CE on Windows Phone is called code first. The
database is created the first time the data is needed, according to the entities definition
that you’re going to store in tables. Another solution is to include an already existing
SQL CE file in your Visual Studio project. In this case, you’ll only be able to work with
it in read-only mode.
How to Define the Database
The first step is to create the entities that you’ll need to store in your database.
Each entity will be mapped to a specific table.entity definition is made using attributes,
which are part
of the System.Data.Linq.Mapping namespace. Each property is decorated with an
attribute,
which will be used to translate it into a column. In the following sample we adapt the
familiar Person class to be stored in a table:
[Table]
public class Person
{
[Column(IsPrimaryKey = true, CanBeNull = false,
IsDbGenerated = true)] public string Id { get; set; }
[Column]
public string Name { get; set; }

41
[Column]
public string Surname { get; set; }
}
The entire entity is marked with the Table attribute, while every property is marked with
the Column attribute. Attributes can be customized with some properties, like:
IsPrimaryKey to apply to columns that are part of the primary key.
IsDbGenerated in case the column’s value needs to be automatically generated
every
time a new row is inserted (for example, an automatically incremented number).
Name if you want to assign to the column a different name than the property.
DbType to customize the column’s type. By default, the column’s type is
automatically set by the property’s type.
Working With the Database: The DataContext
DataContext is a special class that acts as an intermediary between the
database and
your application. It exposes all the methods needed to perform the most common
operations, like insert, update, and delete.
The DataContext class contains the connection string’s definition (which is the path
where the database is stored) and all the tables that are included in the database. In the
following sample,
you can see a DataContext definition that includes the Person table we’ve
previously defined:
public class DatabaseContext: DataContext
{
public static string ConnectionString = "Data source=isostore:/Persons.sdf";
public DatabaseContext(string connectionString):base(connectionString)

42
CreateDatabase()
returns whether the database already exists.
effectively creates the database in the storage.
DatabaseExists()
In the following sample, you can see a typical database initialization that is executed every time
the application starts:
{
}
public Table<Person> Persons;
}
A separate class of your project inherits from the DataContext class. It
will force
you to
implement a public constructor that supports a connection string as its input
parameter. There are two connection string types, based on the following
prefixes:
isostore:/ means that the file is stored in the local storage. In the previous
sample, the
database’s file name is Persons.sdf and it’s stored in the storage’s root.
appdata:/ means that the file is stored in the Visual Studio project
instead. In this case,
you’re forced to set the File Mode attribute to Read Only .
Creating the Database
As soon as the data is needed, you’ll need to create the database if it doesn’t exist yet. For
this purpose, the DataContext class exposes two methods:
private void OnCreateDatabaseClicked(object sender, RoutedEventArgs e)

43
objects in the table whose In the following sample, you can see how we retrieve all the
name is Matteo:
the definition. It supports standard LINQ operations, so you can query the data
using methods like , , , and .
object that we’ve declared in
Working With the Data
All the operations are made using the
Person
OrderBy() Select() FirstOrDefault() Where()
DataContext
Table<T>
{
using (DatabaseContext db = new
DatabaseContext(DatabaseContext.ConnectionString))
{
if (!db.DatabaseExists())
{
db.CreateDatabase();
}
}
}
private void OnShowClicked(object sender, RoutedEventArgs e)
{
using (DatabaseContext db = new
DatabaseContext(DatabaseContext.ConnectionString))
{
List<Person> persons = db.Persons.Where(x => x.Name ==
"Matteo").ToList();
}

44
single object, while the second one adds multiple items in one operation (in fact, it accepts a
collection as a parameter).
. The first method can be used to insert a methods:
two offers class table, the the items to
and
new add To
The returned result can be used not only for display purposes, but also for editing. To update the
item in the database, you can change the values of the returned object by calling
the SubmitChanges() method exposed by the DataContext class.
InsertAllOnSubmit() InsertOnSubmit()
Table<T>
}
private void OnAddClicked(object sender, RoutedEventArgs e)
{
using (DatabaseContext db = new
DatabaseContext(DatabaseContext.ConnectionString))
{
Person person = new Person
{
Name = "Matteo",
Surname = "Pagani" };
db.Persons.InsertOnSubmit(person);
db.SubmitChanges();
}
}
Please note again the SubmitChanges() method: it’s important to call it every
time you modify

45
is , which is used to track the current schema’s version. It’s important
to properly set it every time we apply an update because we’re going to use it when the database
is created or updated to recognize whether we’re using the latest version.
class the by offered property key The
Updating the Schema
SQL CE in Windows Phone offers a specific class to satisfy this requirement,
called DatabaseSchemaUpdater , which offers some methods to update an already existing
database’s schema.
DatabaseSchemaVersion
DatabaseSchemaUpdater
if you’ve added a new table (of type ).
AddColumn<T>() if you’ve added a new column to a table (of type ).
AddAssociation<T>() if you’ve added a new relationship to a table (of type ). T
T AddTable<T>()
T
The following sample code is executed when the application starts and needs to take care of the
schema update process:
the table (by adding a new item or editing or deleting an already existing one),
otherwise changes won’t be saved.
In a similar way, you can delete items by using the DeleteOnSubmit() and DeleteAllOnSubmit() methods. In the following sample, we delete
all persons with the name Matteo:
private void OnDeleteClicked(object sender, RoutedEventArgs e)
{
using (DatabaseContext db = new
DatabaseContext(DatabaseContext.ConnectionString))
{
List<Person> persons = db.Persons.Where(x => x.Name == "Matteo").ToList();
db.Persons.DeleteAllOnSubmit(persons);db.SubmitChanges();
}
}
After you’ve modified your entities or the DataContext definition in your project, you can use
the following methods:

46
private void OnUpdateDatabaseClicked(object sender, RoutedEventArgs e)
{
using (DatabaseContext db = new
DatabaseContext(DatabaseContext.ConnectionString))
{
if (!db.DatabaseExists())
{
db.CreateDatabase();
DatabaseSchemaUpdater updater = db.CreateDatabaseSchemaUpdater();
updater.DatabaseSchemaVersion = 2;
updater.Execute();
}
else
{
DatabaseSchemaUpdater updater =
db.CreateDatabaseSchemaUpdater(); if
(updater.DatabaseSchemaVersion < 2)
{
updater.AddColumn<Person>("BirthDate");
updater.Databas
eSchemaVersio
n = 2;
updater.Execute
();

47
SQL Server Compact Toolbox: An Easier Way to Work With SQL CE
Two versions of the tool are available:
method. In both cases, we need to apply the described changes by calling the
Instead, if the database already exists, we check the version number. If it’s an older
version, we update the current schema. In the previous sample, we’ve added a new column to
the Person table, called (which is the parameter requested by
the AddColumn<T>() method). Also in this case we need to remember to properly set
the DatabaseSchemaVersion property to avoid further executions of the update operation.
update operation won’t be executed since we’re already working with the latest version.
property. This way, the next time the data will be needed, the the
We’re assuming that the current database’s schema version is 2. In case the database
doesn’t exist, we simply create it and, using the class, we update
Execute()
BirthDate
DatabaseSchemaVersion
DatabaseSchemaUpdater
As an extension that’s integrated into commercial versions of Visual Studio.
As a stand-alone tool for Visual Studio Express since it does not support extensions.
}
}
}
}
The following are some of the features supported by the tool:
Automatically create entities and a DataContext class starting from an already existing
SQL CE database.
The generated DataContext is able to copy a database from your Visual Studio project

48
Advertisement
Using Databases: SQLite
SQLite, from a conceptual point of view, is a similar solution to SQL CE: it’s a stand-
alone database solution, where data is stored in a single file without a DBMS requirement.
The pros of using SQLite are:
It offers better performance than SQL CE, especially with large amounts of data.
It is open source and cross-platform; you’ll find a SQLite implementation for Windows 8,
Android, iOS, web apps, etc.
SQLite support has been introduced only in Windows Phone 8 due to the new native code
support feature (since the SQLite engine is written in native code), and it’s available as a Visual
Studio extension that you can download from the Visual Studio website.
After you’ve installed it, you’ll find the SQLite for Windows Phone runtime available in
the Add reference window, in the Windows Phone Extension section. Be careful; this runtime
is just the SQLite engine, which is written in native code. If you need to use a SQLite database in
a C# application, you’ll need a third-party library that is able to execute the appropriate native
calls for you.
In actuality, there are two available SQLite libraries: sqlite-net and SQLite Wrapper for
Windows Phone. Unfortunately, neither of them is as powerful and flexible as the LINQ to SQL
library that is available for SQL CE.
to your application’s local storage. This way, you can start with a prepopulated database
and, at the same time, have write access.
The generated DataContext supports logging in the Visual Studio Output Window so
you can see the SQL queries generated by LINQ to SQL.

49
public class Person
{
[Primary
Key,
AutoIncr
ement]
public
int Id {
get; set;
}
[MaxLength(50)]
public string Name { get; set; }
Sqlite-net
Sqlite-net is a third-party library. The original version for Windows Store apps is
developed by Frank A. Krueger, while the Windows Phone 8 port is developed byPeter Huene.
The Windows Phone version is available on GitHub. Its configuration procedure is a bit tricky
and changes from time to time, so be sure to follow the directions provided by the developer on
the project’s home page.
Sqlite-net offers a LINQ approach to use the database that is similar to the code-first one offered
by LINQ to SQL with SQL CE.
For example, in sqlite-net, tables are mapped with your project’s entities. The difference is that,
this time, attributes are not required since every property will be automatically translated into a
column. Attributes are needed only if you need to customize the conversion process, as in the
following sample:

50
public string Surname { get; set; }
}
Surname doesn’t have any attribute, so it will be automatically converted into
column. Instead, we set Id as a primary key with an auto increment value, while we a varchar
specify that Name can have a maximum length of 50 characters.
All the basic operations with the database are accomplished using
the SQLiteAsyncConnection class, which exposes asynchronous methods to create tables, query
the data, delete items, etc. It requires as an input parameter the local storage path where the
database will be saved.
As with SQL CE and LINQ to SQL, we need to create the database before using it. This
is done by calling the CreateTableAsync<T>() method for every table we need to create,
where T is the table’s type. In the following sample, we create a table to store
the Person entity:
private async Task CreateDatabase()
{
SQLiteAsyncConnection conn = new
SQLiteAsyncConnection(Path.Combine(ApplicationData.Current.L await
conn.CreateTableAsync<Person>();
}
In a similar way to LINQ to SQL, queries are performed using the Table<T> object. The only
difference is that all the LINQ methods are asynchronous.
private async void OnReadDataClicked(object sender, RoutedEventArgs e)
{
SQLiteAsyncConnection conn = new

51
In the previous sample, we retrieve all the objects whose name is Matteo.
Insert, update, and delete operations are instead directly executed using
the
and
object, which offers the InsertAsync() , UpdateAsync() ,
methods. It is not required to specify the object’s type; sqlite-net will DeleteAsync()
SQLiteAsyncConnection
Person
SQLiteAsyncConnection(Path.Combine(ApplicationData.Current.L List<Person>
person = await conn.Table<Person>().Where(x => x.Name ==
"Matteo").ToListAsync();
}
private async void OnAddDataClicked(object sender, RoutedEventArgs e)
{
SQLiteAsyncConnection conn = new
SQLiteAsyncConnection(Path.Combine(ApplicationData.Current
Person person = new Person
{
N
a
m
e
=
automatically detect it and execute the operation on the proper table. In the following sample,
you can see how a new record is added to a table:

52
"
M
a
t
t
e
o
"
,
S
u
r
n
a
m
e
=
"
P
a
g
a
n
53
all the methods needed to perform the queries. As a parameter, you need to set the local storage
, which takes care of initializing the database and offers The key class is called
The advantage is that you have total control and freedom, since every SQL feature is
supported: indexes, relationships, etc. The downside is that writing SQL queries for every
operation takes more time, and it’s not as easy and intuitive as using LINQ.
SQLite Wrapper for Windows Phone
SQLite Wrapper for Windows Phone has been developed directly by Microsoft team
members (notably Peter Torr and Andy Wigley) and offers a totally different approach than
sqlite-net. It doesn’t support LINQ, just plain SQL query statements.
Sqlite-net is the SQLite library that offers the easiest approach, but it has many limitations. For
example, foreign keys are not supported, so it’s not possible to easily manage relationships.
Database
i
"
};
await conn.InsertAsync(person);
}

54
path to save the database. If the path doesn’t exist, it will be automatically created. Then, you
need to open the connection using the OpenAsync() method. Now you are ready to perform
operations.
There are two ways to execute a query based on the value it returns.
If the query doesn’t return a value—for example, a table creation—you can use
the ExecuteStatementAsync() method as shown in the following sample:
private async void OnCreateDatabaseClicked(object sender, RoutedEventArgs e)
{
Database database = new Database(ApplicationData.Current.LocalFolder, “people.db”);
await database.OpenAsync();
string query = “CREATE TABLE PEOPLE “ +
“(Id INTEGER PRIMARY KEY AUTOINCREMENT NOT NULL,” +
“Name varchar(100), “ +
“Surname varchar(100))”;
await database.ExecuteStatementAsync(query);
}
The previous method simply executes the query against the opened database. In the sample, we
create a People table with two fields, Name and Surname .
The query, instead, can contain some dynamic parameters or return some values. In this case, we
need to introduce a new class called Statement as demonstrated in the following sample:

55
The
with
the
class identifies a query, but it allows additional customization to be performed
it. In
and
the sample, we use it to assign
the placeholder
a dynamic value to
parameters. We set
and then we assign them
using
a
the @ prefix
( @name and ), value using
the BindTextParameterWithName() method, passing the parameter’s name and the value.
isn’t the only available method, but it’s specifically for string
parameters. There are other methods based on the parameter’s type, such
as BindIntParameterWithName() for numbers.
To execute the query, we use the
query, but also to iterate the resulting rows.
method. Its purpose isn’t just to execute the
In the following sample, we can see how this method can be used to manage the results of
a query: SELECT
BindTextParameterWithName()
Statement
@surname
Surname Name
StepAsync()
private async void OnAddDataClicked(object sender, RoutedEventArgs e)
{
Database database = new Database(ApplicationData.Current.LocalFolder,
“people.db”);
await database.OpenAsync();
string query = “INSERT INTO PEOPLE (Name, Surname) VALUES
(@name, @surname)”; Statement statement = await
database.PrepareStatementAsync(query);
statement.BindTextParameterWithName(“@name”,“Matteo”);
statement.BindTextParameterWithName(“@surname”, “Pagani”);
await statement.StepAsync();
}

56
private async void OnGetDataClicked(object sender, RoutedEventArgs e)
{
Database database = new Database(ApplicationData.Current.LocalFolder, “people.db”);
await database.OpenAsync();
string query = “SELECT * FROM PEOPLE”;
Statement statement = await database.PrepareStatementAsync(query);
while (await statement.StepAsync())
{
MessageBox.Show(statement.GetTextAt(0) + “ “ + statement.GetTextAt(1));
}
}
NETWORK COMMUNICATION
The Windows Runtime API, Windows.Networking.Sockets, has been adopted for
Windows Phone 8. It has been implemented as a Windows Phone Runtime API, making it easy
to use in whatever supported programming language you choose. Although we've enhanced the
.NET API, System.Net.Sockets, to support more features such as IPv6 and listener sockets, you
should consider using the new API for sockets programming because it is more portable than the
.NET API. Windows.Networking.Sockets has been built from the ground up to be clean, secure,
and easy-to-use APIs that enforce best practices
New Features in Windows Phone 8
•Two different Networking APIs
•System.Net – Windows Phone 7.1 API, upgraded with new features
•Windows.Networking.Sockets – WinRT API adapted for Windows Phone
•Support for IPV6
•Support for the 128-bit addressing system added to System.Net.Sockets and also is supported in
Windows.Networking.Sockets
•NTLM and Kerberos authentication support

57
• Incoming Sockets
• Listener sockets supported in both System.Net and in Windows.Networking
•Winsock support
•Winsock supported for
native development
Windows Phone 8
Emulator and local host
• In Windows Phone 7.x, the emulator shared the networking of the Host PC
•You could host services on your PC and access them from your code using http://localhost...
• In Windows Phone 8, the emulator is a Virtual machine running under Hyper-V
•You cannot access services on your PC using http://localhost...
• You must use the correct host name or raw IP address of your host PC in URIs
Sockets for Windows Phone 8
Windows Phone provides a programming interface to enable developers
to create applications that can communicate with internet services and other
remote applications using sockets. Examples of applications and services that
use sockets to communicate include FTP, email, chat systems, and streaming
multimedia. Using sockets in your Windows Phone application enables you to
create rich client applications that can communicate with services over
Transmission Control Protocol (TCP) or User Datagram Protocol (UDP)
sockets.
Sockets Support on Windows Phone
Windows Phone provides the programming interface needed to create
and use TCP and UDP sockets. You can select which type of socket to use
based on your application’s needs. The following diagram shows a view of the
operations that take place during a communication session between a client
application and a service.

58
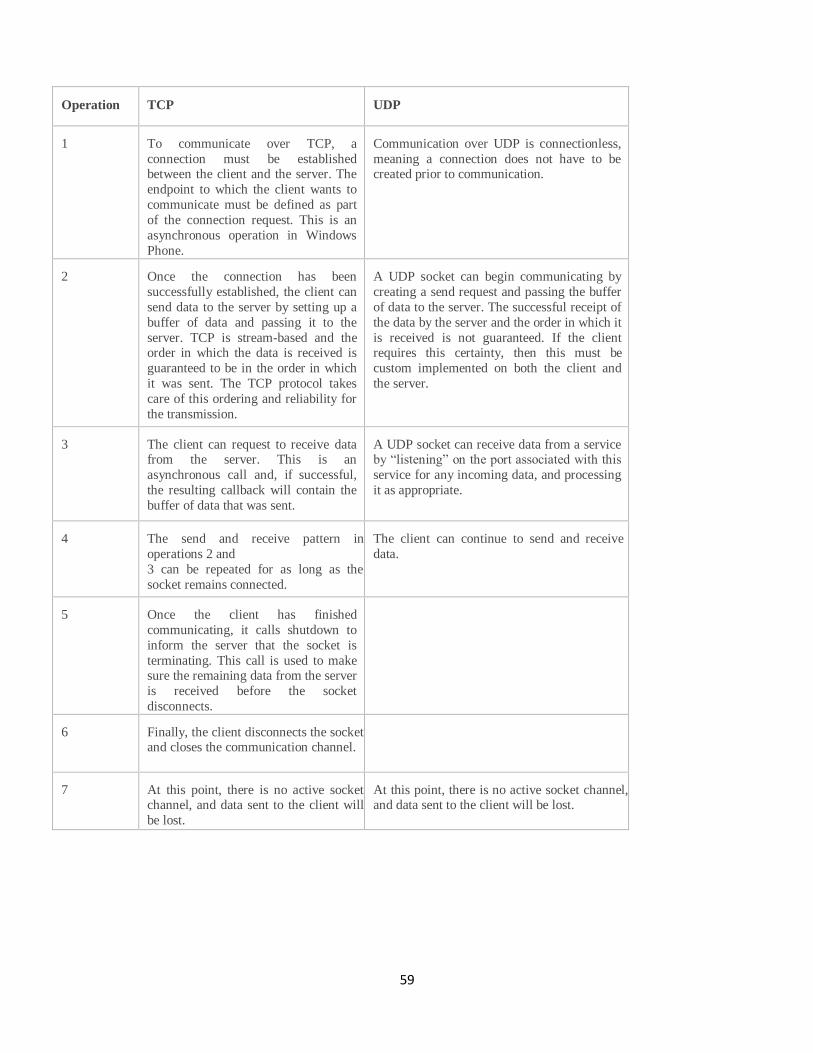
59
Operation TCP UDP
1 To communicate over TCP, a
connection must be established between the client and the server. The
endpoint to which the client wants to
communicate must be defined as part
of the connection request. This is an
asynchronous operation in Windows
Phone.
Communication over UDP is connectionless,
meaning a connection does not have to be created prior to communication.
2 Once the connection has been
successfully established, the client can
send data to the server by setting up a
buffer of data and passing it to the
server. TCP is stream-based and the order in which the data is received is
guaranteed to be in the order in which
it was sent. The TCP protocol takes
care of this ordering and reliability for
the transmission.
A UDP socket can begin communicating by
creating a send request and passing the buffer
of data to the server. The successful receipt of
the data by the server and the order in which it
is received is not guaranteed. If the client requires this certainty, then this must be
custom implemented on both the client and
the server.
3 The client can request to receive data from the server. This is an
asynchronous call and, if successful,
the resulting callback will contain the
buffer of data that was sent.
A UDP socket can receive data from a service by “listening” on the port associated with this
service for any incoming data, and processing
it as appropriate.
4 The send and receive pattern in
operations 2 and
3 can be repeated for as long as the
socket remains connected.
The client can continue to send and receive
data.
5 Once the client has finished
communicating, it calls shutdown to
inform the server that the socket is
terminating. This call is used to make sure the remaining data from the server
is received before the socket
disconnects.
6 Finally, the client disconnects the socket and closes the communication channel.
7 At this point, there is no active socket channel, and data sent to the client will
be lost.
At this point, there is no active socket channel, and data sent to the client will be lost.

60
The following is a comparison of the characteristics of TCP and
UDP sockets on Windows Phone.
Terminology
A socket is a mechanism for delivering data packets or
messages between applications or processes. In programming terms, a
socket is a programming interface against the TCP/IP protocol stack.
Sockets are identified on a network through a socket address, which is
a combination of Internet protocol (IP) address and port number. The
following table lists some common terminology that you should
become familiar with as you work with sockets in your Windows
Phone applications.
Term Description
Broadcast To send data to all devices on a network.
Client In socket communication, the consumer of a service provided by a server. For
example, a chat client is a consumer of a chat service and can use that service to
establish a chat session with other clients. An application running on a Windows
Phone device is a client
TCP UDP
Transmission Type Stream-based Datagram
Example Uses Email, Remote
Administration, File
Transfer, Web
Streaming Multimedia,
Online Games, Internet
Telephony
Unicast Yes Yes
Any Source Multicast (ASM) No Yes
Source-specific Multicast (SSM) No Yes
Broadcast No No
Connectionless or
Connected
Connection-oriented Connectionless
Reliable Communication Yes No

61
application that can consume a service over sockets.
Connectionless Communication in which a connection does not need to be
set up between the sending socket and the receiving socket
prior to the communication starting. In this mode, there is no
guarantee that the recipient is ready to receive the data and
there is also no acknowledgement that the data was ever
received, or received with no errors. A UDP socket provides
a connectionless communication interface.
Connection-
oriented
Communication in which a socket must first set up a
connection to a destination socket prior to sending or
receiving data. Once a connection is established, a stream of
data can be sent and it will be received in the same order. A
TCP socket provides a connection- oriented communication
interface.
Endpoint A communication port on either side of the communication.
It is typically defined by an IP address, supported transport
protocol type, and port number.
IP Address The industry-standard naming convention for devices on a
network. It is a binary number, usually stored in a human
readable format such as 172.36.254.14.
IPv4 The older 32-bit addressing system for devices on the
Internet. An example of an IPv4 address in human-readable
form is 172.36.254.14.
IPv6 The latest 128-bit addressing system for devices on a
network. It was developed to accommodate the ever-
increasing growth of the number of devices on the Internet.
An example of an IPv6 address in human-readable form is
fe80::e42b:2e74:6ddb:e30.
Important Note:
IPv6 is not supported in sockets for Windows Phone OS 7.1.
Multicast Sending data to devices on a network that have registered
interest in that data by joining a multicast group.
Port Number A number that, combined with an IP address and the
transport protocol it supports for communication, identifies
a port or endpoint on a network. A well-known list of ports
has been reserved for use by specific services such as Telnet
(23) and HTTP (80). Other numbers are available for use by
other services and applications.

62
Server A device on a network that provides a service, or multiple
services, for consumption by clients. As an example, a chat
server provides a chat service that can be used by chat
clients to establish chat sessions with other clients. Although
applications on a Windows Phone device can send and
receive data over a socket, they are not considered servers.
Socket A programming interface to communicate with other
applications or services on a network.
Transmission
Control Protocol
(TCP)
An Internet standard that guarantees reliable, in order,
delivery of messages on a network.
TCP/IP The suite of communication protocols used on the Internet
and other networks. It was named after the first two
protocols that were added to this standard, namely, TCP
and IP, but it consists of four layers of protocols, with the
TCP and UDP protocols being parts of the Transport
Layer.
User Datagram
Protocol (UDP)
A Transport Layer protocol used to transmit datagrams in a
connectionless manner, meaning that no prior connection
needs to be established before sending and receiving
messages. This characteristic makes UDP a fast transport
protocol, but it can have disadvantages over TCP in terms
of reliability since receipt of these datagrams by the
destination is not guaranteed and no acknowledgement is
sent by default.
Unicast Sending data to a specific destination with a uniquely
identifiable address in a network.
Simple Http Operations – WebClient
using System.Net; ... WebClient client; // Constructor
public MainPage()
{ ...
client = new WebClient();
client.DownloadStringCompleted += client_DownloadStringCompleted;
}
void client_DownloadStringCompleted(object sender, DownloadStringCompletedEventArgs e)
{ this.downloadedText = e.Result;
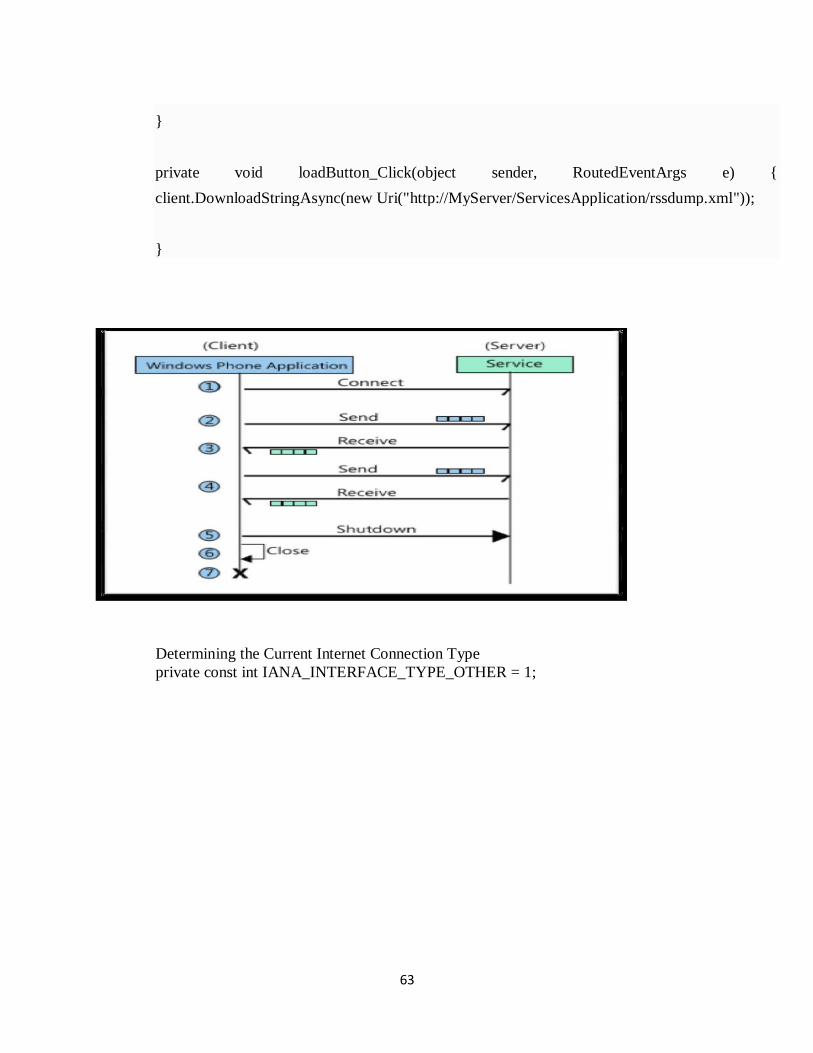
63
Determining the Current Internet Connection Type
private const int IANA_INTERFACE_TYPE_OTHER = 1;
}
client.DownloadStringAsync(new Uri("http://MyServer/ServicesApplication/rssdump.xml"));
{ e) RoutedEventArgs sender, loadButton_Click(object void private
}

64
// Get current Internet Connection Profile. ConnectionProfile internetConnectionProfile =
Windows.Networking.Connectivity.NetworkInformation.GetInternetConnectionProfile();
switch (internetConnectionProfile.NetworkAdapter.IanaInterfaceType)
{
case IANA_INTERFACE_TYPE_OTHER: cost += "Network: Other";
break;
case IANA_INTERFACE_TYPE_ETHERNET: cost += "Network: Ethernet";
break;
case IANA_INTERFACE_TYPE_WIFI: cost += "Network: Wifi\r\n";
break;
default:
cost += "Network: Unknown\r\n"; break;
}
private const int IANA_INTERFACE_TYPE_ETHERNET = 6;
private const int IANA_INTERFACE_TYPE_PPP = 23;
private const int IANA_INTERFACE_TYPE_WIFI = 71; ... string network = string.Empty;

65
PUSH NOTIFICATION
Microsoft Push Notification Service in Windows Phone is an asynchronous, best-effort
service that offers third-party developers a channel to send data to a Windows Phone app from a
cloud service in a power-efficient manner.
The following diagram shows how a push notification is sent.
1. Your app requests a push notification URI from the Push client service.
2. The Push client service negotiates with the Microsoft Push Notification Service (MPNS),
and MPNS returns a notification URI to the Push client service.
3. The Push client service returns the notification URI to your app.
4. Your app can then send the notification URI to your cloud service.
5. When your cloud service has info to send to your app, it uses the notification URI to send
a push notification to MPNS.
6. MPNS routes the push notification to your app.
To send push notifications, your web service or app must:
Create a POST message for each Windows Phone device to which you want to send a
notification.
Form the message for the appropriate notification type. The following sections describe
the message formats for toast, Tile, and raw notification messages. You can post only one
notification type (toast, Tile, or raw) to the server at a time. If you want to send multiple
notification types to the same client device at the same time, you must create separate POST
messages for each notification type.
Post the messages to the push notification service.
Get the response from the push notification service and respond accordingly.
Custom HTTP headers

66
Custom HTTP headers can include a notification message ID, batching interval, the type
of push notification being sent, and the notification channel URI.The MessageID is the
notification message ID associated with the response. If this header is not added to the POST
request, the push notification service omits this header in the response.
The header specification is "X-MessageID"":"1*MessageIDValue MessageIDValue =
STRING (uuid).
For example: X-MessageID: UUID
The NotificationClass is the batching interval that indicates when the push notification will be
sent to the app from the push notification service. See the tables in the toast, Tile, and raw
notification sections for possible values for this header. If this header is not present, the message
will be delivered by the push notification service immediately.
The header specification is ”X-NotificationClass””:”1*NotificationClassValue
NotificationClassValue = DIGIT.
For example: X-NotificationClass:1
The Notification Type is the type of push notification being sent. Possible options are
Tile, toast, and raw. If this header is not present, the push notification will be treated as a raw
notification. For more info, see Push notifications for Windows Phone 8. The header
specification is “X-WindowsPhone-Target””:”1*NotificationTypeValue NotificationTypeValue
= STRING.
For example: X-WindowsPhone-Target:toast.
Special characters
The following characters should be encoded as shown in the table when used in a Tile or toast
payload.
Tile and toast notification payloads
Character XML encoding
< <
> >
& &
‘ '
“ "

67
The following sections describe payload info needed for sending a push notification to a
toast or Tile.
Toast notification payloads
For general info about how to structure the toast notification payload using code or XML,
as well as for info about how to structure the payload to deep link into your app, see Toasts for
Windows Phone 8.
Toast notification payload HTTP headers
Use the following HTTP headers when creating a toast notification:
C#
sendNotificationRequest.ContentType = "text/xml";
sendNotificationRequest.Headers.Add("X-WindowsPhone-Target", "toast");
sendNotificationRequest.Headers.Add("X-NotificationClass", "[batching interval]");
Toast notification batching intervals
The following table describes the values that the batching interval can have.
Tile notification batching intervals
The following table describes the values that the batching interval can have.
Sending push notifications to secondary Tiles
If your app has secondary Tiles, the Id attribute designates which Tile to update. You can
omit the Id attribute of theTile element if updating your app's default Tile.
Value Delivery interval
2 Immediate delivery.
12 Delivered within 450 seconds.
22 Delivered within 900 seconds.
Value Delivery interval
1 Immediate delivery.
11 Delivered within 450 seconds.
21 Delivered within 900 seconds.

68
The following code shows an example of the Id attribute of the Tile element, which should
contain the exact navigation URI of the secondary Tile.
string tileMessage = "<?xml version=\"1.0\" encoding=\"utf-8\"?>" +
"<wp:Notification xmlns:wp=\"WPNotification\">" +
"<wp:Tile Id=\"/SecondaryTile.xaml?DefaultTitle=FromTile\">" +
…
"</wp:Tile> " +
"</wp:Notification>";
Raw Tile notification payload
Use the following HTTP headers when sending a raw Tile notification.
C#
sendNotificationRequest.ContentType = "text/xml";
sendNotificationRequest.Headers.Add("X-NotificationClass", "[batching interval]");
The following table describes the values that the batching interval can have.
The structure of the payload is defined by the app. The following code shows an example.
string tileMessage = "<?xml version=\"1.0\" encoding=\"utf-8\"?>" +
"<root>" +
"<Value1>[UserValue1]<Value1>" +
"<Value2>[UserValue2]<Value2>" +
"</root>"
You can also pass a byte stream. The following code shows an example.
new byte[] {0x01, 0x02, 0x03, 0x04, 0x05, 0x06, 0x07, 0x08};
Background agents for Windows Phone 8
Scheduled Tasks and background agents allow an application to execute code in the
background, even when the application is not running in the foreground. The different types of
Scheduled Tasks are designed for different types of background processing scenarios and
Value Delivery interval
3 Immediate delivery.
13 Delivered within 450 seconds.
23 Delivered within 900 seconds.

69
The following are the types of Scheduled Tasks. Note that
ScheduledTask derives from ScheduledAction. The code that runs in the
background is placed in a class that derives from ScheduledTaskAgent, which
derives fromBackgroundAgent.
Scheduled Task
Type
Description
PeriodicTask Periodic agents run for a small amount of time on a regular recurring
interval. Typical scenarios for this type of task include uploading the
device’s location and performing small amounts of data synchronization.
ResourceIntensiv
eTask
Resource-intensive agents run for a relatively long period of time when the
phone meets a set of requirements relating to processor activity, power
source, and network connection. A typical scenario for this type of task is
synchronizing large amounts of data to the phone while it is not being
actively used by the user.
Background Agent Lifecycle
An application may have only one background agent. This agent can
be registered as a PeriodicTask, aResourceIntensiveTask, or both. The
schedule on which the agent runs depends on which type of task it is registered
as. The details of the schedules are described later in this topic. Only one
instance of the agent runs at a time.
The code for the agent is implemented by the application in a class
that inherits from BackgroundAgent. When the agent is launched,
the operating system calls OnInvoke(ScheduledTask). In this method,
the application can determine which type of ScheduledTask it is being run
as, and perform the appropriate actions.
When the agent has completed its task, it should call NotifyComplete()
or Abort() to let the operating system know that it has
completed.NotifyComplete should be used if the task was successful. If the
agent is unable to perform its task – such as a needed server being unavailable
- the agent should call Abort, which causes the IsScheduled property to be set
to false.
The following constraints apply to all Scheduled Tasks.
therefore have different behaviors and constraints. This topic describes the scheduling, duration,
and limitations of scheduled tasks.

70
Unsupported APIs There is a set of APIs that cannot be used by any Scheduled Task. Using these
APIs either will cause an exception to be thrown at run time or will cause the
application to fail certification during submission to Store. For the list
of restricted APIs, see Unsupported APIs for background agents for
Windows Phone 8.
Memory usage
cap
Periodic agents and resource-intensive agents can use no more than 20 MB of
memory at any time on devices with 1 GB of memory or more.
Reschedule
required every two
weeks
Use the ExpirationTime property of the ScheduledTask object to set the time
after which the task no longer runs. This value must be set to a time within two
weeks of the time when the action is scheduled with the Add(ScheduledAction)
method.
Agents unscheduled
after two
consecuti
ve crashes
Both periodic and resource-intensive agents are unscheduled if they exit two consecutive times due to exceeding the memory quota or any other unhandled
exception. The agents must be rescheduled by the foreground application.
The following are the schedule, duration, and general constraints for Resource-intensive agents.
Constraint Description
Duration:
10 minutes
Resource-intensive agents typically run for 10 minutes. There are other constraints that may cause
an agent to be terminated early.
External power required
Resource-intensive agents do not run unless the device is connected to an external power source.
Non-cellular
connection
required
Resource-intensive agents do not run unless the device has a network connection over Wi-Fi or
through a connection to a PC.
Minimum
battery power
Resource-intensive agents do not run unless the device’s battery power is greater than 90%.
Device
scree
n lock required
Resource-intensive agents do not run unless the device screen is locked.
No active phone
call
Resource-intensive agents do not run while a phone call is active.

71
Introduction to Silverlight
Microsoft Silverlight is a deprecated application framework for writing and
running rich Internet applications, similar to Adobe Flash. A plug-in for Silverlight
is available for some browsers.
Microsoft Silverlight is a cross-browser, cross-platform implementation of .NET for
building and delivering the next generation of media experiences & rich interactive
applications for the Web.

72

73

74

75

76
B
a
c
k
g
r
ound Agents
With the release of Windows Phone 7 Mango, you now
have the ability to multitask (scheduled multitask) by using
background agents. Background agents allow you to do things
when your application is not running.
It is important to understand that the OS is responsible for
determining when your background agent can run and is
determined by a number of factors. It is also dependent on the
type of Background Agent you use.
For both types of Agents you are constrained by the following:
- Unsupported APIs
- Memory Cap Usage

77
- A
g
e
n
t
C
r
a
s
h
e
s
(
u
n
s
c
h
e
d
u
l
e
d
A
g
e
n
t
s
a
f
t
e
r
t
w
o
c
r
a
s
hes)
- Rescheduling ( You have to reschedule every two weeks)
Periodic Agents (PeriodicTask) are used when you want a
“semi” predictable action to fire. But they are constrained to the
following. For example, you can use Periodic Agents for
collecting quick GPS coordinates or updating an RSS feed.
- 30 Minute Intervals (this time may drift)
- Run for 25 seconds
- Might not run on Battery Saver mode
- Agents per device (The number of apps using agents) can be as low as 6 on
some devices
Resource-intensive Agents (resourceIntensiveTask) can be used
for more intensive items like downloading larger files or coping
database entries to a replication server. But you must keep in
mind that they have some specific constraints as well.
- Duration 10 Minutes
- External Power Required (You need to plug it in)
- Connection through WiFi or PC
- Battery 90% or better
- Screen Lock on
- No active phone call
- Add a ScheduledAgentTasks project to your solution
- Add a reference to the agent project in your phone application project
- Add your code to the Invoke Method in the
ScheduledAgentTasks project as shown below protected
override void OnInvoke(ScheduledTask task)
{
//TODO: Add code to
perform your task in
background string
toastMessage = "";
// If your application uses both PeriodicTask and ResourceIntensiveTask
// you can branch your application code

78
h
e
r
e
.
O
t
h
e
r
w
i
s
e
,
y
o
u
d
o
n
'
t
need to. if (task is PeriodicTask)
{
// Execute
periodic task
actions here.
toastMessag
e =
"Periodic
task
running.";
}
else
{
// Execute resource-
intensive task actions
here. toastMessage =
"Resource-intensive
task running.";
}
// Launch a toast to show that the agent is running.
// The toast will not be shown if the
foreground application is running.
ShellToast toast = new ShellToast();
toast.Title

79
=
"
B
a
c
k
g
r
o
u
n
d
A
g
e
n
t
S
a
m
p
l
e
";
toast.Conte
nt =
toastMessa
ge;
toast.Show
();
// If debugging is enabled,
launch the agent again in one minute.
#if DEBUG_AGENT
ScheduledActionService.LaunchForTest(task.Name,
TimeSpan.FromSeconds(60));
#endif
}
// Call NotifyComplete to let the system know the agent is done working.
NotifyComplete();

80
The one caveat is that it can sometimes be difficult to debug in an emulator. If you have a
developer phone you will have a much easier time debugging it on the device.
Background Agents

81

82
Applications of Background Agents

83

84
Using maps and Locations The Maps app in Windows Phone can show you where you are,

85
where you want to go, and provide directions to get you there. It can also show you nearby shops
or restaurants you might be interested in and what other people are saying about them.
Displaying a Map
To display a map in your Windows Phone 8 app, use the Map control. For
more info, see How to add a Map control to a page in Windows Phone 8.
Important Note:
To use the control, you have to select the ID_CAP_MAP capability in the
app manifest file. For more info, see How to modify the app manifest file
for Windows Phone 8.
Displaying a Map with XAML
The following code example shows how you can use XAML to display a
Map control in your Windows Phone 8 app.
<!--ContentPanel - place additional content here-->
<Grid x:Name="ContentPanel" Grid.Row="1" Margin="12,0,12,0">
<maps:Map />
</Grid>
If you add the control by writing XAML, you also have to add the
following xmlns declaration to the phone:PhoneApplicationPage element.
If you drag and drop the Map control from the Toolbox, this declaration is
added automatically.
xmlns:maps="clr-
namespace:Microsoft.Phone.Maps.Controls;assembly=Microsoft.Phone.Maps"
Displaying a Map with code (C#)
The following code example shows how you can use code to display a
Map control in your Windows Phone 8 app.
using Microsoft.Phone.Maps.Controls;
Map MyMap = new Map();
ContentPanel.Children.Add(MyMap);

86
Displaying a Map by using a built-in launcher
This topic describes how to write code that displays a map inside your
app. If you simply want to display a map, you can also use the Maps task,
which launches the built-in Maps app. For more info, see How to use the
Maps task for Windows Phone 8.
The following table lists all the built-in launchers that display or manage
maps. For more info about launchers, see Launchers and Choosers for
Windows Phone 8.
Launcher More info
Maps task Launches the built-in Maps app and optionally marks a
location.
Maps directions task Launches the built-in Maps app and displays directions.
MapDownloader task Downloads maps for offline use.

87
Specifying the center of a map (XAML)
You can set the center of the Map control by using its Center property. To set the property using
XAML, assign a (latitude, longitude) pair to the Center property.
The following code example shows how you can set the center of Map by using XAML.
<!--ContentPanel - place additional content here-->
<Grid x:Name="ContentPanel" Grid.Row="1" Margin="12,0,12,0">
<maps:Map x:Name="MyMap" Center="47.6097, -122.3331" />
</Grid>
The following code example shows how can set the center of Map using code. (C#)
using Microsoft.Phone.Maps.Controls;
using System.Device.Location;
...
Map MyMap = new Map();
MyMap.Center = new GeoCoordinate(47.6097, -122.3331);
ContentPanel.Children.Add(MyMap);
}
Specifying the zoom level of a map (XAML)
Use the ZoomLevel property to set the initial resolution at which you want to display the
map. ZoomLevel property takes values from 1 to 20, where 1 corresponds to a fully zoomed out
map, and higher zoom levels zoom in at a higher resolution. The following code examples show
how you can set the zoom level of the map by using the ZoomLevel property in XAML and
code.
The following code example shows how you can set the zoom level of the map by using the
ZoomLevel property in XAML.

88
<!--ContentPanel - place additional content here-->
<Grid x:Name="ContentPanel" Grid.Row="1" Margin="12,0,12,0">
<maps:Map x:Name="MyMap" Center="47.6097, -122.3331" ZoomLevel="10"/>
</Grid>
The following code example shows how you can set the zoom level of the map by using the
ZoomLevel property in code. (C#)
using Microsoft.Phone.Maps.Controls;
using System.Device.Location;
...
Map MyMap = new Map();
MyMap.Center = new GeoCoordinate(47.6097, -122.3331);
MyMap.ZoomLevel = 10;
ContentPanel.Children.Add(MyMap);
}
Converting a Geocoordinate to a GeoCoordinate
The Center property of the Map control requires a value of type GeoCoordinate from the
System.Device.Location namespace. If you are using location services from the
Windows.Devices.Geolocation namespace, you have to convert a
Windows.Devices.Geolocation.Geocoordinate value to a
System.Device.Location.GeoCoordinate value for use with the Map control.
You can get an extension method to do this conversion, along with other useful
extensions to the Maps API, by downloading the Windows Phone Toolkit. If you want to write
your own code, here is an example of a method that you can use to convert a Geocoordinate to a
GeoCoordinate:
using System;
using System.Device.Location; // Contains the GeoCoordinate class.
using Windows.Devices.Geolocation; // Contains the Geocoordinate class.
namespace CoordinateConverter

89
{
public static class CoordinateConverter
{
public static GeoCoordinate ConvertGeocoordinate(Geocoordinate geocoordinate)
{
return new GeoCoordinate
(
geocoordinate.Latitude,
geocoordinate.Longitude,
geocoordinate.Altitude ?? Double.NaN,
geocoordinate.Accuracy,
geocoordinate.AltitudeAccuracy ?? Double.NaN,
geocoordinate.Speed ?? Double.NaN,
geocoordinate.Heading ?? Double.NaN
);
}
}
}
Displaying landmarks and pedestrian features
Landmarks. Set the LandmarksEnabled property to true to display landmarks on a Map
control. Landmarks are visible on the map only when the ZoomLevel property is set to a value of
16 or higher.
Pedestrian features. Set PedestrianFeaturesEnabled to true on a Map control to display
pedestrian features such as public stairs. Pedestrian features are visible on the map only when the
ZoomLevel property is set to a value of 16 or higher.

90
The following illustration displays a map with landmarks and pedestrian features.
The following example shows how you can set the PedestrianFeaturesEnabled property and the
LandmarksEnabled property in XAML.
<!--ContentPanel - place additional content here-->
<Grid x:Name="ContentPanel" Grid.Row="1" Margin="12,0,12,0">
<maps:Map Center="47.6097, -122.3331" ZoomLevel="16" LandmarksEnabled="true"
PedestrianFeaturesEnabled="true"/>
</Grid>
The following example shows how to set these properties in code.
using Microsoft.Phone.Maps.Controls;
using System.Device.Location;
...
Map MyMap = new Map();
MyMap.Center = new GeoCoordinate(47.6097, -122.3331);

91
MyMap.ZoomLevel = 16;
MyMap.LandmarksEnabled = true;
MyMap.PedestrianFeaturesEnabled = true;
ContentPanel.Children.Add(MyMap);
}
Setting the cartographic mode
Once you set the center and zoom level of a map, you You might may also want to set the
cartographic mode of the map. The cartographic mode defines the display and the translation of
coordinate systems from screen coordinates to world coordinates on the Map control. You can
use the CartographicMode property of the Map control to set the cartographic mode of the map.
This property takes accepts values from the MapCartographicMode enumeration. The following
types of cartographic modes are supported in the MapCartographicMode enumeration:
Road: displays the normal, default 2-D map.
Aerial: displays an aerial photographic map.
Hybrid: displays an aerial view of the map overlaid with roads and labels.
Terrain: displays physical relief images for displaying elevation and water features such as
mountains and rivers.
The following illustration displays the four cartographic modes.

92
The following example displays a map in the default Road mode. The buttons in the app
bar can be used to view the map in Aerial, Hybrid, and Terrain modes.
XAML
<!--LayoutRoot is the root grid where all page content is placed-->
<Grid x:Name="LayoutRoot" Background="Transparent">
<Grid.RowDefinitions>
<RowDefinition Height="Auto"/>
<RowDefinition Height="*"/>
</Grid.RowDefinitions>
<!--TitlePanel contains the name of the application and page title-->
<StackPanel x:Name="TitlePanel" Grid.Row="0" Margin="12,17,0,28">
<TextBlock x:Name="ApplicationTitle" Text="Maps" Style="{StaticResource
PhoneTextNormalStyle}"/>
<TextBlock x:Name="PageTitle" Text="map modes" Margin="9,-7,0,0"
Style="{StaticResource PhoneTextTitle1Style}"/>
</StackPanel>
<!--ContentPanel - place additional content here-->
<Grid x:Name="ContentPanel" Grid.Row="1" Margin="12,0,12,0">
<maps:Map x:Name="MyMap" Center="13.0810, 80.2740" ZoomLevel="10"/>
</Grid>
</Grid>
<!--Sample code showing usage of ApplicationBar-->
<phone:PhoneApplicationPage.ApplicationBar>
<shell:ApplicationBar IsVisible="True" IsMenuEnabled="True">
<shell:ApplicationBarIconButton IconUri="/Images/appbar_button1.png" Text="Road"
Click="Road_Click"/>

93
<shell:ApplicationBarIconButton IconUri="/Images/appbar_button2.png" Text="Aerial"
Click="Aerial_Click"/>
<shell:ApplicationBarIconButton IconUri="/Images/appbar_button3.png" Text="Hybrid"
Click="Hybrid_Click"/>
<shell:ApplicationBarIconButton IconUri="/Images/appbar_button4.png" Text="Terrain"
Click="Terrain_Click"/>
</shell:ApplicationBar>
</phone:PhoneApplicationPage.ApplicationBar>
C#
void Road_Click(object sender, EventArgs args)
{
MyMap.CartographicMode = MapCartographicMode.Road;
}
void Aerial_Click(object sender, EventArgs args)
{
MyMap.CartographicMode = MapCartographicMode.Aerial;
}
void Hybrid_Click(object sender, EventArgs args)
{
MyMap.CartographicMode = MapCartographicMode.Hybrid;
}
void Terrain_Click(object sender, EventArgs args)
{

94
MyMap.CartographicMode = MapCartographicMode.Terrain;
}
Setting the color mode
You can display the map in a light color mode or a dark mode by using the ColorMode
property. The values that this property can take—Light or Dark—is accepts are specified
contained in the MapColorMode enumeration. The default is Light.
In the following illustration, the first map is in the Light color mode and the second map is in the
Dark color mode.
The following code example displays a map in the default Light mode. The buttons in the app
bar can be used to view the map in Light or Dark modes.
XAML
<!--LayoutRoot is the root grid where all page content is placed-->
<Grid x:Name="LayoutRoot" Background="Transparent">
<Grid.RowDefinitions>
<RowDefinition Height="Auto"/>

95
<RowDefinition Height="*"/>
</Grid.RowDefinitions>
<!--TitlePanel contains the name of the application and page title-->
<StackPanel x:Name="TitlePanel" Grid.Row="0" Margin="12,17,0,28">
<TextBlock x:Name="ApplicationTitle" Text="Maps" Style="{StaticResource
PhoneTextNormalStyle}"/>
<TextBlock x:Name="PageTitle" Text="color modes" Margin="9,-7,0,0"
Style="{StaticResource PhoneTextTitle1Style}"/>
</StackPanel>
<!--ContentPanel - place additional content here-->
<Grid x:Name="ContentPanel" Grid.Row="1" Margin="12,0,12,0">
<maps:Map x:Name="MyMap" />
</Grid>
</Grid>
<!--Sample code showing usage of ApplicationBar-->
<phone:PhoneApplicationPage.ApplicationBar>
<shell:ApplicationBar IsVisible="True" IsMenuEnabled="True">
<shell:ApplicationBarIconButton IconUri="/Images/appbar_button1.png" Text="Light"
Click="Light_Click"/>
<shell:ApplicationBarIconButton IconUri="/Images/appbar_button2.png" Text="Dark"
Click="Dark_Click"/>
</shell:ApplicationBar>
</phone:PhoneApplicationPage.ApplicationBar>
C#
void Light_Click(object sender, EventArgs args)
{

96
MyMap.ColorMode = MapColorMode.Light;
}
void Dark_Click(object sender, EventArgs args)
{
MyMap.ColorMode = MapColorMode.Dark;
}
XAML
XAML --> Extensible Markup Language. XAML is very easy in use and it is tag based
language. There are different tags that do their work. It is tag based and when we open a tag
mostly it is necessary to close the same tag as same in HTML.
The Extensible Application Markup Language (XAML) with C# to create a simple
"Hello, world" app that targets the Universal Windows Platform (UWP) on Windows 10. With a
single project in Microsoft Visual Studio, you can build an app that runs on any Windows 10
device. Here we focus on creating an app that runs equally well on desktop and mobile devices.
Step 1: Create a new project in Visual Studio
1. Launch Visual Studio 2015.
The Visual Studio 2015 Start page appears. (From now on, we'll refer to Visual Studio 2015
simply as Visual Studio .)
2. On the File menu, select New > Project.
The New Project dialog appears. The left pane of the dialog lets you select the type of templates
to display.
3. In the left pane, expand Installed > Templates > Visual C# > Windows, then pick
the Universal template group. The dialog's center pane displays a list of project templates for
Universal Windows Platform (UWP) apps.

97
4. In the center pane, select the Blank App (Universal Windows) template.
The Blank App template creates a minimal UWP app that compiles and runs, but contains no
user-interface controls or data. You add controls to the app over the course of this tutorial.
5. In the Name text box, type "HelloWorld".
6. Click OK to create the project.
Visual Studio creates your project and displays it in the Solution Explorer.

98
Although the Blank App is a minimal template, it still contains a lot of files:
A manifest file (Package.appxmanifest) that describes your app (its name, description,
tile, start page, and so on) and lists the files that your app contains.
A set of logo images (Assets/Square150x150Logo.scale-200.png,
Assets/Square44x44Logo.scale-200.png, and Assets/Wide310x150Logo.scale-200.png)to
display in the start menu.
An image (Assets/StoreLogo.png) to represent your app in the Windows Store.
A splash screen (Assets/SplashScreen.scale-200.png) to display when your app starts.
XAML and code files for the app (App.xaml and App.xaml.cs).
A start page (MainPage.xaml) and an accompanying code file (MainPage.xaml.cs) that
run when your app starts.
These files are essential to all UWP apps using C#. Every project that you create in Visual Studio
contains them.
Step 2: Modify your start page
What's in the files?
To view and edit a file in your project, double-click the file in the Solution Explorer. By
default, you can expand a XAML file just like a folder to see its associated code file. XAML
files open in a split view that shows both the design surface and the XAML editor.
In this tutorial, you work with just a few of the files listed previously: App.xaml,
MainPage.xaml, and MainPage.xaml.cs.
App.xaml and App.xaml.cs
App.xaml is where you declare resources that are used across the app. App.xaml.cs is the
code-behind file for App.xaml. Code-behind is the code that is joined with the XAML page's
partial class. Together, the XAML and code-behind make a complete class. App.xaml.cs is the
entry point for your app. Like all code-behind pages, it contains a constructor that calls
the InitializeComponent method. You don't write the InitializeComponent method. It's generated
by Visual Studio, and its main purpose is to initialize the elements declared in the XAML file.
App.xaml.cs also contains methods to handle activation and suspension of the app.
MainPage.xaml
In MainPage.xaml you define the UI for your app. You can add elements directly using
XAML markup, or you can use the design tools provided by Visual Studio. MainPage.xaml.cs is
the code-behind page for MainPage.xaml. It's where you add your app logic and event handlers.
Together these two files define a new class called MainPage, which inherits from Page, in
the HelloWorld namespace.
MainPage.xaml
<Page
x:Class="HelloWorld.MainPage"

99
xmlns="http://schemas.microsoft.com/winfx/2006/xaml/presentation"
xmlns:x="http://schemas.microsoft.com/winfx/2006/xaml"
xmlns:local="using:HelloWorld"
xmlns:d="http://schemas.microsoft.com/expression/blend/2008"
xmlns:mc="http://schemas.openxmlformats.org/markup-compatibility/2006"
mc:Ignorable="d">
<Grid Background="{ThemeResource ApplicationPageBackgroundThemeBrush}">
</Grid>
</Page>
MainPage.xaml.cs
using Windows.UI.Xaml;
using Windows.UI.Xaml.Controls;
namespace HelloWorld
{
/// <summary>
/// An empty page that can be used on its own or navigated to within a Frame.
/// </summary>
public sealed partial class MainPage : Page
{
public MainPage()
{
this.InitializeComponent();
}
}
}
Modify the start page
Now, let's add some content to the app. To modify the start page
1. Double-click MainPage.xaml in Solution Explorer to open it.
2. In the XAML editor, add the controls for the UI.
In the root Grid, add this XAML. It contains a StackPanel with a title TextBlock,
a TextBlock that asks the user's name, a TextBox element to accept the user's name, a Button,
and another TextBlock to show a greeting. Some of these controls have names so that you can
refer to them later in your code.
<StackPanel x:Name="contentPanel" Margin="8,32,0,0">
<TextBlock Text="Hello, world!" Margin="0,0,0,40"/>
<TextBlock Text="What's your name?"/>

100
<StackPanel x:Name="inputPanel" Orientation="Horizontal" Margin="0,20,0,20">
<TextBox x:Name="nameInput" Width="280" HorizontalAlignment="Left"/>
<Button x:Name="inputButton" Content="Say "Hello""/>
</StackPanel>
<TextBlock x:Name="greetingOutput"/>
</StackPanel>
The controls that you added in the XAML editor show up in the design view. Step 3: Start the app
At this point, you've created a very simple app. This is a good time to build, deploy, and launch
your app and see what it looks like. You can debug your app on the local machine, in a simulator
or emulator, or on a remote device. Here's the target device menu in Visual Studio.
Start the app on a Desktop device
By default, the app runs on the local machine. The target device menu provides several options
for debugging your app on devices from the desktop device family.
Simulator
Local Machine
Remote Machine
To start debugging on the local machine
1. In the target device menu ( ) on the Standard toolbar, make sure
that Local Machine is selected. (It's the default selection.)
2. Click the Start Debugging button ( ) on the toolbar.
–or–
From the Debug menu, click Start Debugging. The app opens in a window, and a default splash screen appears first. The splash screen is

101
defined by an image (SplashScreen.png) and a background color (specified in your app's
manifest file).
The splash screen disappears, and then your app appears. It looks like this.
Press the Windows key to open the Start menu, then show all apps. Notice that deploying the
app locally adds its tile to the Start menu. To run the app again (not in debugging mode), tap or
click its tile in the Start menu.
It doesn't do much—yet—but congratulations, you've built your first UWP app!
To stop debugging
Click the Stop Debugging button ( ) in the toolbar.
–or–
From the Debug menu, click Stop debugging.
–or–
Close the app window.
Start the app on a mobile device emulator
Your app runs on any Windows 10 device, so let’s see how it looks on a Windows Phone.
In addition to the options to debug on a desktop device, Visual Studio provides options for
deploying and debugging your app on a physical mobile device connected to the computer, or on
a mobile device emulator. You can choose among emulators for devices with different memory
and display configurations.
Device
Emulator <SDK version> WVGA 4 inch 512MB
Emulator <SDK version> WVGA 4 inch 1GB
etc... (Various emulators in other configurations)
It's a good idea to test your app on a device with a small screen and limited memory, so use
the Emulator 10.0.10240.0 WVGA 4 inch 512MB option.
To start debugging on a mobile device emulator
1. In the target device menu ( ) on the Standard toolbar, pick Emulator
10.0.10240.0 WVGA 4 inch 512MB.
2. Click the Start Debugging button ( ) in the toolbar.

102
–or–
From the Debug menu, click Start Debugging.
–or–
Press F5.
Visual Studio starts the selected emulator and then deploys and starts your app. On the mobile device emulator, the app looks like this.
The first thing you'll notice is the button is pushed off the smaller screen of a mobile device.
Later in this tutorial, you'll learn how to adapt the UI to different screen sizes so your app always
looks good.
You might also notice that you can type in the TextBox, but right now, clicking or tapping
the Button doesn't do anything. In the next steps, you create an event handler for the
button's Click event to display a personalized greeting. You add the event handler code to your
MainPage.xaml.cs file.
Step 4: Create an event handler
XAML elements can send messages when certain events occur. These event messages give you
the opportunity to take some action in response to the event. You put your code to respond to the
event in an event handler method. One of the most common events in many apps is a user
clicking a Button.
Let's create an event handler for your button's Click event. The event handler will get the user's
name from the nameInputTextBox control and use it to output a greeting to
the greetingOutput TextBlock.
Using events that work for touch, mouse, and pen input
What events should you handle? Because they can run on a variety of devices, design
your Windows Store apps with touch input in mind. Your app must also be able to handle input
from a mouse or a stylus. Fortunately, events such asClick and DoubleTapped are device-
independent. If you're familiar with Microsoft .NET programming, you might have seen separate
events for mouse, touch, and stylus input, like MouseMove, TouchMove, and StylusMove. In
Windows Store apps, these separate events are replaced with a single PointerMoved event that
works equally well for touch, mouse, and stylus input.
To add an event handler

103
1. In XAML or design view, select the "Say Hello" Button that you added to
MainPage.xaml.
2. In the Properties Window, click the Events button ( ).
3. Find the Click event at the top of the event list. In the text box for the event, type the
name of the function that handles the Click event. For this example, type "Button_Click".
4. Press Enter. The event handler method is created and opened in the code editor so you
can add code to be executed when the event occurs.
In the XAML editor, the XAML for the Button is updated to declare the Click event handler like
this.
<Button x:Name="inputButton" Content="Say "Hello"" Click="Button_Click"/>
5. Add code to the event handler that you created in the code-behind page. In the event
handler, retrieve the user's name from the nameInput TextBox control and use it to create a
greeting. Use the greetingOutput TextBlock to display the result.
private void Button_Click(object sender, RoutedEventArgs e)
{
greetingOutput.Text = "Hello, " + nameInput.Text + "!";
}
6. Debug the app on the local machine. When you enter your name in the text box and click
the button, the app displays a personalized greeting.

104
Step 5: Adapt the UI to different window sizes
Now we'll make the UI adapt to different screen sizes so it looks good on mobile devices. To do
this, you add aVisualStateManager and set properties that are applied for different visual states.
To adjust the UI layout
1. In the XAML editor, add this block of XAML after the opening tag of the
root Grid element.
<VisualStateManager.VisualStateGroups>
<VisualStateGroup>
<VisualState x:Name="wideState">
<VisualState.StateTriggers>
<AdaptiveTrigger MinWindowWidth="641" />
</VisualState.StateTriggers>
</VisualState>
<VisualState x:Name="narrowState">
<VisualState.StateTriggers>
<AdaptiveTrigger MinWindowWidth="0" />
</VisualState.StateTriggers>
<VisualState.Setters>
<Setter Target="inputPanel.Orientation" Value="Vertical"/>
<Setter Target="inputButton.Margin" Value="0,4,0,0"/>
</VisualState.Setters>
</VisualState>
</VisualStateGroup>
</VisualStateManager.VisualStateGroups>
2. Debug the app on the local machine. Notice that the UI looks the same as before unless
the window gets narrower than 641 pixels.
3. Debug the app on the mobile device emulator. Notice that the UI uses the properties you
defined in the narrowStateand appears correctly on the small screen.
If you've used a VisualStateManager in previous versions of XAML, you might notice that the
XAML here uses a simplified syntax.
The VisualState named wideState has an AdaptiveTrigger with
its MinWindowWidth property set to 641. This means that the state is to be applied only when

105
the window width is not less than the minimum of 641 pixels. You don't define anySetter objects
for this state, so it uses the layout properties you defined in the XAML for the page content.
The second VisualState, narrowState, has an AdaptiveTrigger with
its MinWindowWidth property set to 0. This state is applied when the window width is greater
than 0, but less than 641 pixels. (At 641 pixels, the wideState is applied.) In this state, you do
define some Setter objects to change the layout properties of controls in the UI:
You change the Orientation of the inputPanel element from Horizontal to Vertical.
You add a top margin of 4 to the inputButton element.
Summary
Congratulations, you've created your first app for Windows 10 and the UWP!
Adding controls and handling events (XAML)
You create the UI for your app by using controls such as buttons, text boxes, and combo boxes.
Here we show you how to add controls to your app. You typically use this pattern when working
with controls:
You add a control to your app UI.
You set properties on the control, such as width, height, or foreground color.
You hook up some code to the control so that it does something.
Adding a control
You can add a control to an app in several ways:
Use a design tool like Blend for Visual Studio or the Microsoft Visual Studio XAML
designer.
Add the control to the XAML markup in the Visual Studio XAML editor.
Add the control in code. Controls that you add in code are visible when the app runs, but
are not visible in the Visual Studio XAML designer.
Documentation for each control includes a "How to" topic that describes how to add the control
in XAML, code, or using a design tool. For example, to add a Button control, see How to add a
button.
Here, we use Visual Studio as our design tool, but you can do the same tasks and more in Blend
for Visual Studio.
In Visual Studio, when you add and manipulate controls in your app, you can use many of the
program's features, including the Toolbox, XAML designer, XAML editor, and
the Properties window.
The Visual Studio Toolbox displays many of the controls that you can use in your app. To add a
control to your app, double-click it in the Toolbox. For example, when you double-click
the TextBox control, this XAML is added to the XAMLview.
<TextBox HorizontalAlignment="Left" Text="TextBox" VerticalAlignment="Top"/>

106
You can also drag the control from the Toolbox to the XAML designer.
Setting the name of a control
To work with a control in code, you set its x:Name attribute and reference it by name in your
code. You can set the name in the Visual Studio Properties window or in XAML. Here's how to
change the name of the currently selected control by using the Name text box at the top of
the Properties window.
To name a control
1. Select the element to name.
2. In the Properties panel, type a name into the Name text box.
3. Press Enter to commit the name.
Here's how you can change the name of a control in the XAML editor by changing
the x:Name attribute.
<Button x:Name="Button1" Content="Button"/>
Setting control properties
You use properties to specify the appearance, content, and other attributes of controls. When you
add a control using a design tool, some properties that control size, position, and content might
be set for you by Visual Studio. You can change some properties, such
as Width, Height or Margin, by selecting and manipulating the control in the Design view. This
illustration shows some of the resizing tools available in Design view.
You might want to let the control be sized and positioned automatically. In this case, you can
reset the size and position properties that Visual Studio set for you.
To reset a property
1. In the Properties panel, click the property marker next to the property value. The
property menu opens.

107
2. In the property menu, click Reset.
You can set control properties in the Properties window, in XAML, or in code. For example, to
change the foreground color for a Button, you set the control's Foreground property. This
illustration shows how to set the Foregroundproperty by using the color picker in
the Properties window.

108
Here's how to set the Foreground property in the XAML editor. Notice the Visual Studio
IntelliSense window that opens to help you with the syntax.

110
Here's the resulting XAML after you set the Foreground property.
XAML
<Button x:Name="Button1" Content="Button"
HorizontalAlignment="Left" VerticalAlignment="Top"
Foreground="Beige"/>
Here's how to set the Foreground property in code. C#, C++, VB
Button1.Foreground = new SolidColorBrush(Windows.UI.Colors.Beige);
Creating an event handler
Each control has events that enable you to respond to actions from your user or other changes in
your app. For example, a Button control has a Click event that is raised when a user clicks
the Button. You create a method, called an event handler, to handle the event. You can associate
a control's event with an event handler method in the Propertieswindow, in XAML, or in code.
For more info about events, see Events and routed events overview.
To create an event handler, select the control and then click the Events tab at the top of
the Properties window. TheProperties window lists all of the events available for that control.
Here are some of the events for a Button.

111
To create an event handler with the default name, double-click the text box next to the
event name in the Propertieswindow. To create an event handler with a custom name, type the
name of your choice into the text box and press enter. The event handler is created and the code-
behind file is opened in the code editor. The event handler method has 2 parameters. The first
is sender, which is a reference to the object where the handler is attached. The sender parameter
is anObject type. You typically cast sender to a more precise type if you expect to check or
change state on the sender object itself. Based on your own app design, you expect a type that is
safe to cast sender to, based on where the handler is attached. The second value is event data,
which generally appears in signatures as the e parameter.
Here's code that handles the Click event of a Button named Button1. When you click the button,
the Foreground property of the Button you clicked is set to blue. C#, C++, VB
private void Button_Click(object sender, RoutedEventArgs e)
{
Button b = (Button)sender;
b.Foreground = new SolidColorBrush(Windows.UI.Colors.Blue);
}
You can also associate an event handler in XAML. In the XAML editor, you type in the event
name that you want to handle. Visual Studio shows an IntelliSense window when you begin
typing. After you specify the event, you can double-click <New Event Handler> in the
IntelliSense window to create a new event handler with the default name, or select an existing

112
event handler from the list. Here's the IntelliSense window that appears to
help you create a new event handler.
This example shows how to associate a Click event with
an event handler named Button_Click in XAML.
<Button Name="Button1" Content="Button" Click="Button_Click"/>
You can also associate an event with its event handler in the code-behind.
Here's how to associate an event handler in code. C#, C++, VB
Button1.Click += new RoutedEventHandler(Button_Click);
New controls
If you use other XAML platforms, you might be interested in these controls
that are new for Windows 8.
AppBar
CaptureElement
FlipView
GridView
SemanticZoom
ProgressRing
ToggleSwitch
VariableSizedWrapGrid
Displaying text (XAML)
The XAML framework provides several controls for rendering text, and a set
of properties for formatting the text. The controls for
displaying read-only text areTextBlock and RichTextBlock. This
quickstart shows you how to use TextBlockcontrols to display text.
TextBlock
TextBlock is the primary control for displaying read-only text in Windows
Runtime apps using C++, C#, or Visual Basic. You can display text in a
TextBlock control using its Text property. This XAML shows how to define
a TextBlock control and set its Text property to a string.

113
XAML
<TextBlock Text="Hello, world!" />
You can also display a series of strings in a TextBlock, where each
string has different formatting. You can do this by using a Run element to
display each string with its formatting and by separating each Run element
with a LineBreakelement.
Here's how to define several differently formatted text strings in a
TextBlock by using Run objects separated with aLineBreak.
XAML
<TextBlock FontFamily="Arial" Width="400" Text="Sample text formatting runs">
<LineBreak/>
<Run Foreground="LightGray" FontFamily="Courier
New" FontSize="24"> Courier New 24
</Run>
<LineBreak/>
<Run Foreground="Teal" FontFamily="Times New
Roman" FontSize="18" FontStyle="Italic">
Times New Roman Italic 18
</Run>
<LineBreak/>
<Run Foreground="SteelBlue" FontFamily="Verdana" FontSize="14"
FontWeight="Bold"> Verdana Bold 14
</Run>
</TextBlock>
Here's the result.
Summary and next steps
You learned how to create TextBlock controls to display text in your app.

114
Adding text input and editing controls (XAML)
The XAML framework includes several controls for entering and editing text, and a set
of properties for formatting the text. The text-entry controls areTextBox,PasswordBox,
and RichEditBox. This quickstart shows you how you can use these text controls to display,
enter, and edit text.
Choosing a text control
The XAML framework includes 3 core text-entry controls: TextBox, PasswordBox,
and RichEditBox. The text control that you use depends on your scenario. Here are some
scenarios and the recommended control.
TextBox
You can use a TextBox control to enter and edit unformatted text. You can use the Text property
to get and set the text in a TextBox. Here's the XAML for a simple TextBox with
it's Text property set.
<TextBox Height="35" Width="200" Text="Hello World!" Margin="20"/>
Here's the TextBox that results from this XAML.
You can make a TextBox read-only by setting the IsReadOnly property to true. To make the
text in a multi-line TextBoxwrap, set the TextWrapping property to Wrap and
the AcceptsReturn property to true.
You can get or set the selected text in a TextBox using the SelectedText property. Use
the SelectionChanged event to do something when the user selects or de-selects text.
Scenario
Recommended Control
Enter or edit plain text, such as in a form. TextBox
Enter a password. PasswordBox
Edit a document, article, or blog that requires formatting,
paragraphs, hyperlinks, or inline images. RichEditBox

115
Here, we have an example of these properties and methods in use. When you select text in the
first TextBox, the selected text is displayed in the second TextBox, which is read-only. The
values of the SelectionLength and SelectionStartproperties are shown in two TextBlocks. This
is done using the SelectionChanged event.
<TextBox x:Name="textBox1" Height="75" Width="300" Margin="10"
Text="The text that is selected in this TextBox will show up in the read only TextBox
below."
TextWrapping="Wrap" AcceptsReturn="True"
SelectionChanged="TextBox1_SelectionChanged" />
<TextBox x:Name="textBox2" Height="75" Width="300" Margin="5"
TextWrapping="Wrap" AcceptsReturn="True" IsReadOnly="True"/>
<TextBlock x:Name="label1" HorizontalAlignment="Center"/>
<TextBlock x:Name="label2" HorizontalAlignment="Center"/>
private void TextBox1_SelectionChanged(object sender, RoutedEventArgs e)
{
textBox2.Text = textBox1.SelectedText;
label1.Text = "Selection length is " + textBox1.SelectionLength.ToString();
label2.Text = "Selection starts at " + textBox1.SelectionStart.ToString();
}
Here's the result of this code.
PasswordBox
You can enter a single line of non-wrapping content in a PasswordBox control. The user
cannot view the entered text; only password characters that represents the text are displayed. You
can specify this password character by using thePasswordChar property, and you can specify
the maximum number of characters that the user can enter by setting theMaxLength property.
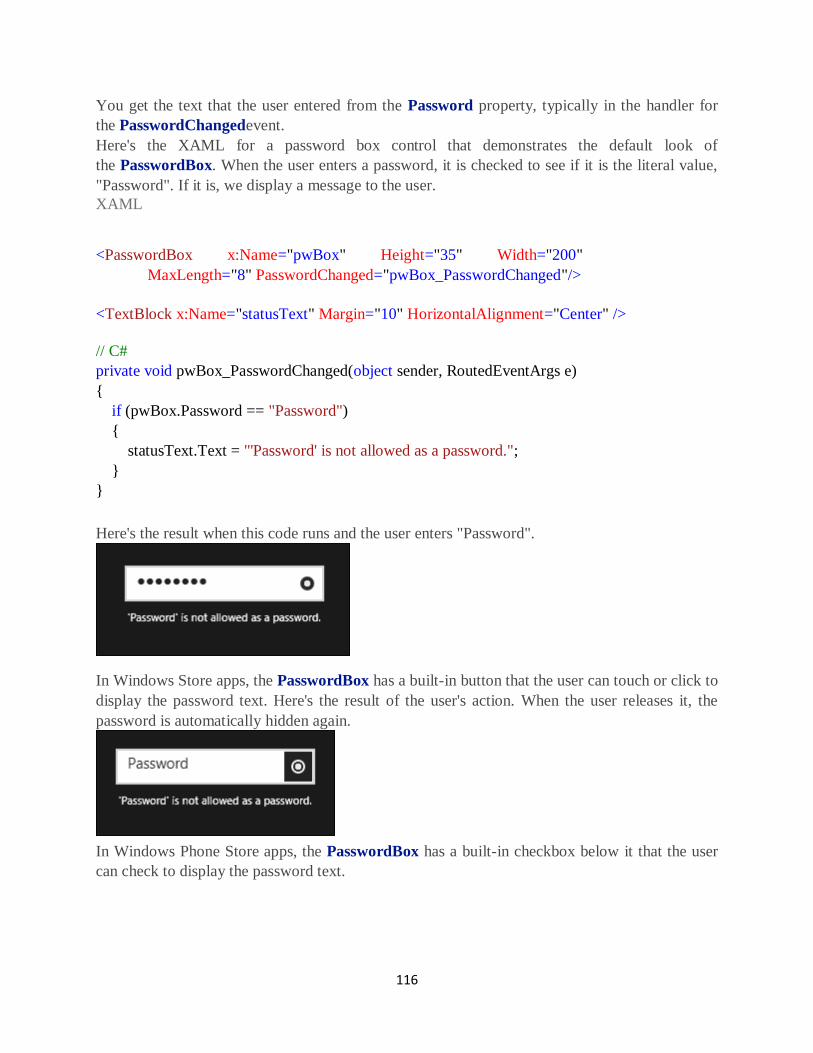
116
You get the text that the user entered from the Password property, typically in the handler for
the PasswordChangedevent.
Here's the XAML for a password box control that demonstrates the default look of
the PasswordBox. When the user enters a password, it is checked to see if it is the literal value,
"Password". If it is, we display a message to the user.
XAML
<PasswordBox x:Name="pwBox" Height="35" Width="200"
MaxLength="8" PasswordChanged="pwBox_PasswordChanged"/>
<TextBlock x:Name="statusText" Margin="10" HorizontalAlignment="Center" />
// C#
private void pwBox_PasswordChanged(object sender, RoutedEventArgs e)
{
if (pwBox.Password == "Password")
{
statusText.Text = "'Password' is not allowed as a password.";
}
}
Here's the result when this code runs and the user enters "Password".
In Windows Store apps, the PasswordBox has a built-in button that the user can touch or click to
display the password text. Here's the result of the user's action. When the user releases it, the
password is automatically hidden again.
In Windows Phone Store apps, the PasswordBox has a built-in checkbox below it that the user
can check to display the password text.

117
RichEditBox
You can use a RichEditBox control to enter and edit rich text documents that contain
formatted text, hyperlinks, and images. You can make a RichEditBox read-only by setting
its IsReadOnly property to true.
By default, the RichEditBox supports spell checking. To disable the spell checker, set
the IsSpellCheckEnabled property to false. For more info, see Guidelines and checklist for spell
checking.
You use the Document property of the RichEditBox to get its content. The content of
a RichEditBox is aWindows.UI.Text.ITextDocument object, unlike
the RichTextBlock control, which usesWindows.UI.Xaml.Documents.Block objects as its
content. The ITextDocument interface provides a way to load and save the document to a
stream, retrieve text ranges, get the active selection, undo and redo changes, set default
formatting attributes, and so on.
This example shows how to load and save a Rich Text Format (rtf) file in a RichEditBox.
<Grid Margin="120">
<Grid.RowDefinitions>
<RowDefinition Height="50"/>
<RowDefinition/>
</Grid.RowDefinitions>
<StackPanel Orientation="Horizontal">
<Button Content="Open file" Click="OpenButton_Click"/>
<Button Content="Save file" Click="SaveButton_Click"/>
</StackPanel>
<RichEditBox x:Name="editor" Grid.Row="1"/>
</Grid>
private async void OpenButton_Click(object sender, RoutedEventArgs e)
{
// Open a text file.
Windows.Storage.Pickers.FileOpenPicker open =
new Windows.Storage.Pickers.FileOpenPicker();
open.SuggestedStartLocation =
Windows.Storage.Pickers.PickerLocationId.DocumentsLibrary;

118
open.FileTypeFilter.Add(".rtf");
Windows.Storage.StorageFile file = await open.PickSingleFileAsync(); if (file != null)
{
Windows.Storage.Streams.IRandomAccessStream randAccStream =
await file.OpenAsync(Windows.Storage.FileAccessMode.Read);
// Load the file into the Document property of the RichEditBox.
editor.Document.LoadFromStream(Windows.UI.Text.TextSetOptions.FormatRtf,
randAccStream);
}
}
private async void SaveButton_Click(object sender, RoutedEventArgs e)
{
if (((ApplicationView.Value != ApplicationViewState.Snapped) ||
ApplicationView.TryUnsnap()))
{
FileSavePicker savePicker = new FileSavePicker();
savePicker.SuggestedStartLocation = PickerLocationId.DocumentsLibrary;
// Dropdown of file types the user can save the file as
savePicker.FileTypeChoices.Add("Rich Text", new List<string>() { ".rtf" });
// Default file name if the user does not type one in or select a file to replace
savePicker.SuggestedFileName = "New Document";
StorageFile file = await savePicker.PickSaveFileAsync();
if (file != null)
{
// Prevent updates to the remote version of the file until we
// finish making changes and call CompleteUpdatesAsync.
CachedFileManager.DeferUpdates(file);
// write to file
Windows.Storage.Streams.IRandomAccessStream randAccStream =
await file.OpenAsync(Windows.Storage.FileAccessMode.ReadWrite);
editor.Document.SaveToStream(Windows.UI.Text.TextGetOptions.FormatRtf,
randAccStream);
// Let Windows know that we're finished changing the file so the

119
// other app can update the remote version of the file.
FileUpdateStatus status = await
CachedFileManager.CompleteUpdatesAsync(file); if (status !=
FileUpdateStatus.Complete)
saved.");
}
}
}
}
Using the touch keyboard
The touch keyboard can be used for text entry when your app runs on a
device with a touch screen. The touch keyboard is invoked when the user taps
on an editable input field, such as a TextBox or PasswordBox, and is dismissed
when the input field loses focus. The touch keyboard uses accessibility info to
determine when it is invoked and dismissed. The text controls provided in the
XAML framework have the automation properties built in. If you create your
own custom text controls, you must implement TextPattern to use the touch
keyboard.
Packaging Universal Windows apps
To sell your Universal Windows app or distribute it to other users, you
need to create an appxupload package for it. When you create the appxupload,
another appx package will be generated to use for testing and sideloading. You
can distribute your app directly by sideloading the appx package to a device.
For Windows 10, you generate one package (.appxupload) that can be uploaded
to the Windows Store. Your app is then available to be installed and run on any
Windows 10 device.
Here are the steps:
1. Before packaging your app: Follow these steps to make sure your
application is ready to be packaged for store submission.
2. Configure an app package: Use the manifest designer to configure the
package. For example, add tile images and choose the orientations that your app
supports.
3. Create an app package: Use the wizard in Visual Studio and then certify
your package with the Windows App Certification Kit.
4. Sideload your app package: After sideloading your app to a device, you
can test it works correctly.
Once you’ve done this, you are ready to sell your app in the Store. If you have a
line-of-business (LOB) app, that you don’t plan to sell because it is for internal

120
users only, you can sideload this app to install it on any Windows 10 device.
Before packaging your app
1. Test your app: Before you package your app for store submission, make
sure it works as expected on all device families that you plan to support. These
device families may include desktop, mobile, Surface Hub, XBOX, IoT devices,
or others.
2. Optimize your app: You can use Visual Studio’s profiling and
debugging tools to optimize the performance of your Universal Windows app.
For example, the Timeline tool for UI responsiveness, the memory Usage tool,
the CPU Usage tool, and more.
3. Check .NET Native compatibility (for VB and C# apps): With the
Universal Windows Platform, there is now a new native compiler that will
improve the runtime performance of your app. With this change, it is highly
recommended that you test your app in this compilation environment. By
default, the Release build configuration enables the .NET native toolchain, so it
is important to test your app with this Release configuration and check that your
app behaves as expected.
Configure an app package
The app manifest file (package.appxmanifest.xml) has the properties and
settings that are required to create your app package. For example, properties in
the manifest file describe the image to use as the tile of your app and the
orientations that your app supports when a user rotates the device.
Visual Studio has a manifest designer that makes it easy for you to update the
manifest file without editing the raw XML of the file.
Visual Studio can associate your package with the Store. When you do this,
some of the fields in the Packaging tab of the manifest designer are
automatically updated.
Configure a package with the manifest designer
1. In Solution Explorer, expand the project node of your Universal Windows app.
2. Double-click the Package.appxmanifest file.
If the manifest file is already open in XML code view, Visual Studio prompts
you to close the file.
3. Now you can decide how to configure your app. Each tab contains information that
you can configure about your app and links to more information if necessary.

121
Check that you have all the images that are required for a Universal Windows
app on the Visual Assets tab.
From the Packaging tab, you can enter publishing data. This is where you can
choose which certificate to use to sign your app. All Universal Windows Apps
must be signed with a certificate. In order to sideload an app package, you need
to trust the package. The certificate must be installed on that device to trust the
package.
4. Save your file after you have made the necessary
edits for your app. Create an app package
To distribute an app through the Store you must create an appxupload package.
You can do that by using the Create App Packages wizard. Follow these steps
to create a package suitable for store submission with Visual Studio 2015:
To create your app package
1. In Solution Explorer, open the solution for your Universal Windows app project.
2. Right-click the project and choose Store->Create App Packages. If this
option is disabled or does not appear at all, check that the project is a Universal
Windows project.
The Create App Packages wizard appears.
3. Select Yes in the first dialog asking if you want to build packages to
upload to the Windows Store, then click Next.

122
If you choose No here, Visual Studio will not generate the required .appxupload
package you need for store submission. If you only want to sideload your app to
run it on internal devices, then you can select this option.
4. Sign in with your developer account to the Windows Dev Center. (If you
don’t have a developer account yet, the wizard will help you create one.)
5. Select the app name for your package, or reserve a new one if you have
not already reserved one with the Windows Dev Center portal.
6. Make sure you select all three architecture configurations (x86, x64,
and ARM) in the Select and Configure Packages dialog. That way your app
can be deployed to the widest range of devices. In the Generate app
bundlelistbox, select Always. This makes the store submission process much
simpler because you will only have one file to upload (.appxupload). The single
bundle will contain all the necessary packages to deploy to devices with each
processor architecture.

123
7. It is a good idea to include full PDB symbol files for the best crash analytics experience
from the Windows Dev Center.
8. Now you can configure the details to create your package. When you’re ready to publish
your app, you’ll upload the packages from the output location.
9. Click Create to generate your appxupload package.
10. Now you will see this dialog:

124
Validate your app before you submit it to the Store for certification on a local or remote machine.
(You can only validate release builds for your app package and not debug builds.)
11. To validate locally, leave the Local machine option selected and click Launch
Windows App Certification Kit.
The Windows App Certification Kit performs tests and shows you the results.
If you have a remote Windows 10 device, that you want to use for testing, you will need to
install the Windows App Certification Kit manually on that device. The next section will walk
you through these steps. Once you’ve done that, then you can select Remote machine and
click Launch Windows App Certification Kit to connect to the remote device and run the
validation tests.
12. After WACK has finished and your app has passed, you are ready to upload to the store.
Make sure you upload the correct file. It can be found in the root folder of your solution
\[AppName]\AppPackages and it will end with .appxupload file extension. The name will be of
the form [AppName]_[AppVersion]_x86_x64_arm_bundle.appxupload.
Validate your app package on a remote Windows 10 device
1. Enable your Windows 10 device for development using these instructions.
2. Download and install the remote tools for Visual Studio. These tools are used to run the
Windows App Certification Kit remotely.

125
3. On the Package Creation Completed page of the wizard, choose the Remote
Machine option button, and then choose the ellipsis button next to the Test Connection button.
4. Specify a device from inside your subnet, or provide the Domain Name Server (DNS)
name or IP address of a device that's outside of your subnet.
5. In the Authentication Mode list, choose None if your device doesn't require you to log
onto it by using your Windows credentials.
6. Choose the Select button, and then choose the Launch Windows App Certification
Kit button.
If the remote tools are running on that device, Visual Studio connects to it and then performs the
validation tests.
Sideload your app package
With Universal Windows app packages, you cannot simply install an app to your device like
Desktop apps for example. Typically, you download these apps from the Store and that is how
they are installed on your device. But you can sideload apps to your device without submitting
them to the Store. This lets you install them and test them out using the app package (.appx) that
you have created. If you have an app that you don’t want to sell in the Store, like a line-of-
business (LOB) app, you can sideload that app so that other users in your company can use it.
To sideload your app package to a Windows 10 device, follow these steps:
Enable your device
To install your app to a desktop, laptop, or tablet, follow the steps in the section below.
To install an app to a Windows 10 Mobile device, use the WinAppDeployCmd.exe.
After you have sideloaded your app to test it, you can upload your package to sell your app in the
Store, or you can sideload your app to any Windows 10 device.
Install an app to a desktop, laptop, or tablet
1. Copy the folders for the version that you want to install to the target device.
If you’ve created an app bundle, then you will have a folder based on the version number and an
_test folder. For example these two folders (where the version to install is 1.0.2):
o C:\Projects\MyApp\MyApp\AppPackages\MyApp_1.0.2.0
o C:\Projects\MyApp\MyApp\AppPackages\MyApp_1.0.2.0_Test
If you don’t have an app bundle, then you can just copy the folder for the correct architecture and
the corresponding test folder. For example these two folders:
o C:\Projects\MyApp\MyApp\AppPackages\MyApp_1.0.2.0_x64
o C:\Projects\MyApp\MyApp\AppPackages\MyApp_1.0.2.0_x64_Test
2. On the target device, open the test folder. For
example:C:\Projects\MyApp\MyApp\AppPackages\MyApp_1.0.2.0_Test.
3. Right-click the Add-AppDevPackage.ps1 file, then choose Run with PowerShell and
follow the prompts.

126
When the app package has been installed, you will see this message in
your PowerShell window: Your app was successfully installed.
4. Click the Start button and then type the name of your app to
launch it.