Embed Size (px)
DESCRIPTION
Manual for the Unison Light Manager Software produced by ETC.
Citation preview

E T C A R C H I T E C T U R A L
Light Manager 1.65U n i s o n™ L i g h t i n g C o n t r o l S y s t e m
User Guide


Unison Light Manager User Manual - version 1.65 1
Unison Light Manager Manual version 1.65
Software License Agreement
Software Copyright © 2000, Electronic Theatre Controls, Inc. All Rights Reserved.
Before using the equipment, please carefully read the software license provisions below. If you do not agree with the provisions, promptly return the equipment to ETC, Inc. and your money will be refunded.
(a) Purchaser is granted a personal, non-exclusive license to use the software soley to operate the equipment for its intended purpose in a single, permanent installation at the Purchaser’s place of use. the Software License continues until Purchaser ceases to use the equipment or transfers the equipment to another party, at which point the license shall be automatically transferred to the new owner, subject to the terms of this license.
(b) Purchaser is authorized to execute the code embodied in the software to enable the equipment to perform according to specifications.
(c) Purchaser agrees that it will not use or copy the software, copies of the software, or any code in the software except as expressly authorized in this License and will not modify, merge, disassemble or decompile the software copies thereof, or any code in the software, nor remove any notices or license terms from the equipment or documentation. Information necessary to achieve interoperability of the equipment with other programs is available from ETC, Inc. on request.
(d) Upon the resale of the equipment, the Software License is automatically transferred to the subsequent purchaser, provided the subsequent purchaser agrees to accept the terms of the Software License. Purchaser agrees that it will not sublicense, rent, or assign the software.
(e) All additional software supplied in the form of updates or incorporated in replacement IRIDEON® hardware shall be subject to the terms of the Software License.

Contents
Chapter 1Introduction
What is Light Manager? . . . . . . . . . . . . . . . . . . . . . . . . . . . . . . . . 5
Computer requirements . . . . . . . . . . . . . . . . . . . . . . . . . . . . . . . . 5
Manual conventions . . . . . . . . . . . . . . . . . . . . . . . . . . . . . . . . . . . 5
Chapter 2 Installing Light Manager Software
. . . . . . . . . . . . . . . . . . . . . . . . . . . . . . 7
Chapter 3Basic Programming
Understanding the display . . . . . . . . . . . . . . . . . . . . . . . . . . 10
Configuring a system . . . . . . . . . . . . . . . . . . . . . . . . . . . . . . 16
Changing system properties. . . . . . . . . . . . . . . . . . . . . . . . . 17
To modify room properties . . . . . . . . . . . . . . . . . . . . 18
To modify station properties. . . . . . . . . . . . . . . . . . . 19
To modify preset properties . . . . . . . . . . . . . . . . . . . 20
To modify zone properties . . . . . . . . . . . . . . . . . . . . 22
To modify section properties . . . . . . . . . . . . . . . . . . 24
To modify wall properties . . . . . . . . . . . . . . . . . . . . . 25
Programming control stations . . . . . . . . . . . . . . . . . . . . . . . 26
To customize Fader and Preset recall stations . . . . . 26
To record a Preset . . . . . . . . . . . . . . . . . . . . . . . . . . 31
LCD stations . . . . . . . . . . . . . . . . . . . . . . . . . . . . . . . 32
Connector stations . . . . . . . . . . . . . . . . . . . . . . . . . . 45
Contact/Fader Interface stations. . . . . . . . . . . . . . . . 47
IR stations. . . . . . . . . . . . . . . . . . . . . . . . . . . . . . . . . 48
Programming Rooms with Moving Partitions. . . . . . . . . . . . 49
Programming Macro sequences . . . . . . . . . . . . . . . . . . . . . 55
Programming Astronomical time clock events. . . . . . . . . . . 63
Saving, loading and transferring configurations . . . . . . . . . . 71
Printing configurations . . . . . . . . . . . . . . . . . . . . . . . . . . . . . 73

4 Electronic Theatre Controls, Inc.
Chapter 4Advanced System Programming
Lockout values . . . . . . . . . . . . . . . . . . . . . . . . . . . . . . . . . . . 75
Visibility levels . . . . . . . . . . . . . . . . . . . . . . . . . . . . . . . . . . . 75
Preset priorities . . . . . . . . . . . . . . . . . . . . . . . . . . . . . . . . . . 76
Zone properties . . . . . . . . . . . . . . . . . . . . . . . . . . . . . . . . . . 77
Station Templates. . . . . . . . . . . . . . . . . . . . . . . . . . . . . . . . . 78
Cross-station control. . . . . . . . . . . . . . . . . . . . . . . . . . . . . . . 80
Advanced LCD features . . . . . . . . . . . . . . . . . . . . . . . . . . . . 82
DMX input macros . . . . . . . . . . . . . . . . . . . . . . . . . . . . . . . . 87
Access - Securing Light Manager configurations . . . . . . . . . 88
Chapter 5Understanding Network Systems
Setting up a Networked Unison configuration. . . . . . . . . . . 91
To set processor network addresses . . . . . . . . . . . . . . . . . 93
Advanced network settings . . . . . . . . . . . . . . . . . . . . . . . . . 97
To set PC network addresses . . . . . . . . . . . . . . . . . . . . . . . 98
Writing network configurations . . . . . . . . . . . . . . . . . . . . . 100
Transferring configurations . . . . . . . . . . . . . . . . . . . . . . . . 103
Working with network configurations . . . . . . . . . . . . . . . . 103
Setting and recording zone levels in Live Control . . . . . . . 104
Chapter 6Glossary
. . . . . . . . . . . . . . . . . . . . . . . . . . . . . . . . . . . . . . . . . . . . 105
Index
. . . . . . . . . . . . . . . . . . . . . . . . . . . . . . . . . . . . . . . . . . . . . . 109

Unison Light Manager User Manual - version 1.65 5
Chapter 1Introduction
What is Light Manager?
Unison Light Manager is a unique software program designed to simplify the setup and operation of Unison lighting control systems. Light Manager is used to configure simple, one-room control systems as well as large networked, multi-processor systems. Light Manager uses standard Microsoft Windows
®
point and click conventions for easy programming. Configuration and Room Wizards lead you through initial programming while sophisticated electronic security protects the system from unauthorized use. Light Manager helps you manage your lighting needs.
Note
: Only authorized personnel should be permitted access to the lighting system configuration.
Computer requirements
Light Manager requires a minimum of a Pentium 90 PC computer with a minimum of 16MB of RAM, 5MB of free hard drive space, and a VGA monitor. Light Manager requires the Windows
®
95 or Windows
®
98 operating system.
Note
: Your screen resolution should be set to 800X600 or greater.
To successfully operate the Unison Light Manager program you should know how to use Windows. This manual assumes that you have a basic knowledge of Windows operation.
Manual conventions
When referencing keys and/or buttons on a control station, the text will be in square brackets, such as [Record]. Messages or text that appears on displays is printed in boldface, such as
Add Custom Page
.
References to other sections of the manual are printed in italics, such as
Chapter 1, Installation
.
Note
: Indicates special applications or points of interest.

6 Electronic Theatre Controls, Inc.

Unison Light Manager User Manual - version 1.65 7
Chapter 2 Installing Light Manager software
To use Light Manager, you must install Light Manager software on your computer.
To install Light Manager
1. Insert the Unison Light Manager 3.5-inch diskette into your disk drive.
2. From the Windows Explorer, find the
Setupex.exe
file on the A: drive. Double click on the
Setupex.exe
file. Light Manager verifies that you wish to install the program.
3. Click [Yes]. Light Manager begins the Install Wizard which will guide you through the setup process. When you finish, the
Welcome
screen will appear.
4. Click [Next]. Light Manager displays the
Choose Destination
screen. Click [Back] to return to the previous screen. Click [Cancel] to stop the installation process.
5. To install Light Manager in the default directory, click [Next]. Light Manager
displays the
Select Folder
screen.
or...
To install Light Manager in an alternate directory, click [Browse] and enter the desired directory path. This is recommended if you have more than one version of Light Manager installed on your computer.
6. Click [Next]. Light Manager
displays the
Select Folder
screen. Unison Light Manager is the default folder option. You may also enter a new folder name or select one from the existing folder list.
7. Installation takes about a minute. Once setup is complete, you will need to restart your computer.
8. Select either [Yes, I want to restart my computer now] or [No, I will restart my computer later] and click [Finish].
9. Light Manager will ask if you wish to launch the program. Click the [Launch] field and click [Finish]
Note
: If you are using Light Manager and Sensor ETCLink Utilities (EELoad), you will need to edit the config.sys file on your computer. These programs will not operate at the same time.
If you are using Light Manager, “rem” the “linkutil” line in the file.
If you are using ETCLink Utilities, “rem” the Light Manager line.

8 Electronic Theatre Controls, Inc.

Unison Light Manager User Manual - version 1.65 9
Chapter 3Basic Programming
Unison Light Manager is designed to help a consultant, technician or user set up the lighting control system quickly and easily. Because of the range of system sizes, the software provides Basic and Advanced levels of programming complexity. To effectively use the program it is very important to understand the display features.
Configuration file name
Pull down menus
Tool bar
Shortcut buttons

10 Electronic Theatre Controls, Inc.
Understanding the display
Pull-down menus
The pull down menus allow you to create and edit items in your configuration.
With the exception of a few
File Menu
items, most functions can be performed using the tool bar (See
"Tool bar functions"
on page 13) or communication buttons (See
"Shortcut buttons"
on page 12).
Note
: In each menu function, one letter is underlined. By pressing the [Alt] key and the underlined letter, you can directly access that function.

Unison Light Manager User Manual - version 1.65 11
The following list describes the functions in the
File Menu
only.
▼
New Opens the Wizard to create a new configuration.
▼
Open Opens a previously created and saved configuration.
▼
Merge Combines functions of multiple configurations to make one configuration. You must hold down the [Ctrl] key to use this function.
▼
Save Saves configuration.
▼
Save As Saves current configuration to specified drive/disk.
▼
Save For Processor Saves configuration on disk for a specified processor.
▼
Network Settings Setup for multiple PC or architectural processors linked together via Ethernet.
▼
Save to Networked Unison Processor
Saves configuration directly to specified processor connected to the network.
▼
Save to Online Networked Unison processors
Saves configuration to all online processors, one at a time.
▼
Setup Serial PC Interface
Opens
Setup PC Interface Connection
window.
▼
Send disk file, Serial
Used to update LCD background images. This function requires a PC Interface station.
▼
Receive disk file, Serial
Used to access LCD background images. This function requires a PC Interface station.
▼
Load from Serial Unison processor
Uploads and displays the configuration currently in the Unison processor. Requires a PC interface.
▼
Save to Serial Unison processor
Downloads current configuration to the Unison Processor. Requires a PC interface.
▼
Live Control Gives you direct viewable control over active and recorded presets, walls and zone levels.
▼
Access Allows you to limit functions of your configuration using a password.
▼
Job Information Allows you to view and edit the information you entered when creating a configuration. This is also where you can add detailed job information.
▼
Keypad Opens and mimics the Unison processor interface keypad. Disabled for multi-processor Ethernet configurations.
▼
Exit Closes Light Manager.

12 Electronic Theatre Controls, Inc.
Shortcut buttons
Shortcut buttons allow point and click access to commonly used functions.
The shortcut buttons are located below the pull-down menus.
The following list describes the function of each shortcut button.
Open
The [Open] a configuration file button accesses previously saved Unison configurations (.cfg).
Save
The [Save] to disk button saves the current configurations to specified drive/disk.
Load from Serial
Unison Processor
This button uploads a configuration from the external processor to Light Manager, via a serial connection. This is used in conjunction with PC interface stations.
Save to Serial
Unison Processor
This button downloads displayed configurations to the Unison Processor. This is used in conjunction with PC interface stations.
Live Control
This button gives you direct viewable control over recorded or manual presets, walls and zone levels.
Live Control
indicator
The [Live Control] indicator button turns green when you have online control.

Unison Light Manager User Manual - version 1.65 13
Tool bar functions
Tool bar button functions allow you to edit and modify configurations.
The tool bar is located below the room label of the screen display.
The following list describes the function of each button on the tool bar.
Pointer
The [Pointer] button cancels the selected function and returns the cursor to pointer action. The Pointer button also selects and expands screen objects.
New Preset
The [New Preset] button changes the cursor to a crosshair. Place the crosshair along top of screen and click to place a new preset. Presets are not tied to specific sections.
New Zone
The [New Zone] button changes the cursor to a crosshair. Place the crosshair in desired room or section and click to place a new zone.
New Station
The [New Station] button opens the station options list. Select, drag and drop new stations in the desired room or section.
New Wall
The [New Wall] button changes the cursor to a crosshair. Place crosshair in desired room and click and drag to place a new wall.
New Section
The [New Section] button changes the cursor to a crosshair. Place crosshair in desired room and click and drag to place a new section.
Record
The [Record] button saves zone levels to the selected preset. To use [Record], set zone levels, select the desired preset and click [Record]. Recall a recorded preset by clicking [Preset] on a control station.
Live Control
indicator
The [Live Control] indicator button turns green when at least one of the processors that controls the room is on line.

14 Electronic Theatre Controls, Inc.
Configuration Icons
Station, Preset and Zone icons in Rooms and Sections are used to display system status and provide access to system properties.
Rooms
are depicted in Light Manager as a moveable, sizable window. A room represents a specific area of control. Each room in a Light Manager configuration has its own graphic display. Rooms may be divided into multiple sections with moving partitions. Room size may be modified by clicking and dragging a corner point of selected room border.
Sections
are depicted in Light Manager as a broad field of color with gray or black borders. Sections are portions of a room. Like a room, a section represents a specific area of control. Sections are joined or linked to other sections through walls. When walls are open, lighting of sections operate together. When walls are closed, lighting of sections operate independently. Left clicking a section will select the section for editing. Gray borders turn black when selected. Section size may be modified by clicking and dragging a corner point of selected section border. Right clicking on the section field will bring up the Section Properties menu choice.
Stations
are depicted in Light Manager as a small station icon. The graphic icon represents the real station in the actual space and is used in Light Manager to assign station functionality. The station icon is typically located in the room or section it will control. Left clicking a station icon will select the station for editing. Double clicking the station icon will display an exploded view of the station for button and fader assignment. Right clicking on the station icon will bring up the Station Properties menu.
Preset icon
Zone icon
Section
Status bar
Wall
Room
Station icon

Unison Light Manager User Manual - version 1.65 15
Presets
are depicted in Light Manager as an icon of an index finger pushing a button. This icon is typically located at the top of the display. Presets represent a programmed set of levels for room zones. Presets are associated with rooms, not sections. A restaurant might have
breakfast
,
lunch
,
dinner
and
late-night
presets. Left clicking a preset icon will select the preset for editing. Right clicking on the preset icon will bring up the Preset Properties menu.
▼
Solid green and light green Preset icon descriptions:
Zones
are depicted in Light Manager as a small light bulb or sconce with an adjacent graphic scale. A zone represents single or groups of DMX512 values that are controlled together. Zone icons are located in the sections of rooms. A Zone‘s level is displayed in the adjacent graphic scale. Levels may be adjusted by clicking and dragging the scale lever, or by selecting the zone and entering a percentage on your keyboard. The light bulb icon will reflect relative lighting intensity. Left clicking a zone icon will select the zone for editing. Right clicking on the zone icon will bring up the Zone Properties menu choice.
▼
Zone icon descriptions:
Note
: Select a Preset then right click on a specific Zone, and select
Include
in Preset
or
Exclude from Preset
Walls
are depicted in Light Manager as gray or black lines between colored
sections. The
wall icon graphically represents the actual moving partition in a large room divided into sections. Lighting control of sections is combined (joined or separated) through walls. When walls are open, lighting of sections operate together. When walls are closed, lighting of sections operate independently. Left clicking a wall will select the wall for editing. When you select the wall, the wall turns black and Light Manager displays chains to indicate sections combined by that wall. Wall size may be modified by pointing and dragging end points of selected wall. Right clicking on the wall will bring up the Wall Properties menu choice.
Status bar
The status bar displays programmed features in the system such as button, tool bar and communication button functions. The status bar is located on the bottom left of the display screen.
Solid Green
A solid-green Preset icon indicates that the Preset is active and associated zones have moved to their pre-recorded levels.
Light Green
A light-green Preset icon indicates that although another Preset has been activated, zones that are associated with this Preset are still active.
X Icon
A small red X by a Zone icon indicates that this zone is excluded from (not recorded in or affected by) the highlighted (selected) preset.
Check Icon
A small black check mark by a Zone icon indicates that this zone is included in the highlighted (selected) preset. Click once on any preset to see which zones are included.

16 Electronic Theatre Controls, Inc.
Configuring a system
The first step in programming a new lighting control system is understanding the parameters of the system. It is recommended that dimmer and control schedules be completed prior to system configuration.A configuration is the specific set of room, station, preset, zone, section and wall requirements for an individual project. You can establish new configurations using the configuration and room wizards, or by manually entering the information with the tool bars.
To begin a new configuration
1. Click [Begin a New configuration]. Light Manager opens the Configuration Wizard and begins to create a new room.
2. Click [Next].3. Enter job name, number, location, and engineer into the fields provided.4. Click [Next].5. Click [Next]. Light Manager opens the Room Wizard.6. Enter the room name. 7. Click [Next].8. Select single or divisible room configuration. If the room is divisible, you will
need to answer several questions about its sections. See page 49.9. Click [Next]. 10. Select a control station(s) for this room from the list of stations.11. To add more than one of this type of station to the room, click [Quantity].12. Enter how many of that station you want per room or section.13. Click [OK]. Repeat steps 10 through 12 for each type of station.14. Click [Next].15. Enter the number of zones for each room or section. If you do not enter the
number of zones, Light Manager will automatically give you the default number of zones on the largest fader station in the room.Enter the starting DMX address for the zones in this room. The Wizard will automatically enter an address based on which room number this is. The pull-down menu also lists common DMX start address.
16. Click [Finish]. Light Manager
builds a graphic representation of the room showing presets, zones, control stations, and movable partitions.

Unison Light Manager User Manual - version 1.65 17
Changing system propertiesSystem properties consist of the defining elements of rooms, stations, zones, presets, sections and walls.
▼ Room properties Define room name,“Mimic LCD page changes” option and designating processor control.
▼ Station properties Define station name, whether station is portable, enable off toggle, station Neuron ID number, station lockout level and active station template. Advanced station properties also define zone select functionality and preset priority level.
▼ Zone properties Define zone name, DMX input mode, link enabling, DMX patch, input patch, maximum zone level, minimum zone level, maximum fade rate and load name.
▼ Preset properties Define preset name, fade time and flicker effect status.
▼ Section properties Define section name.
▼ Wall properties Define wall name.
18 Electronic Theatre Controls, Inc.
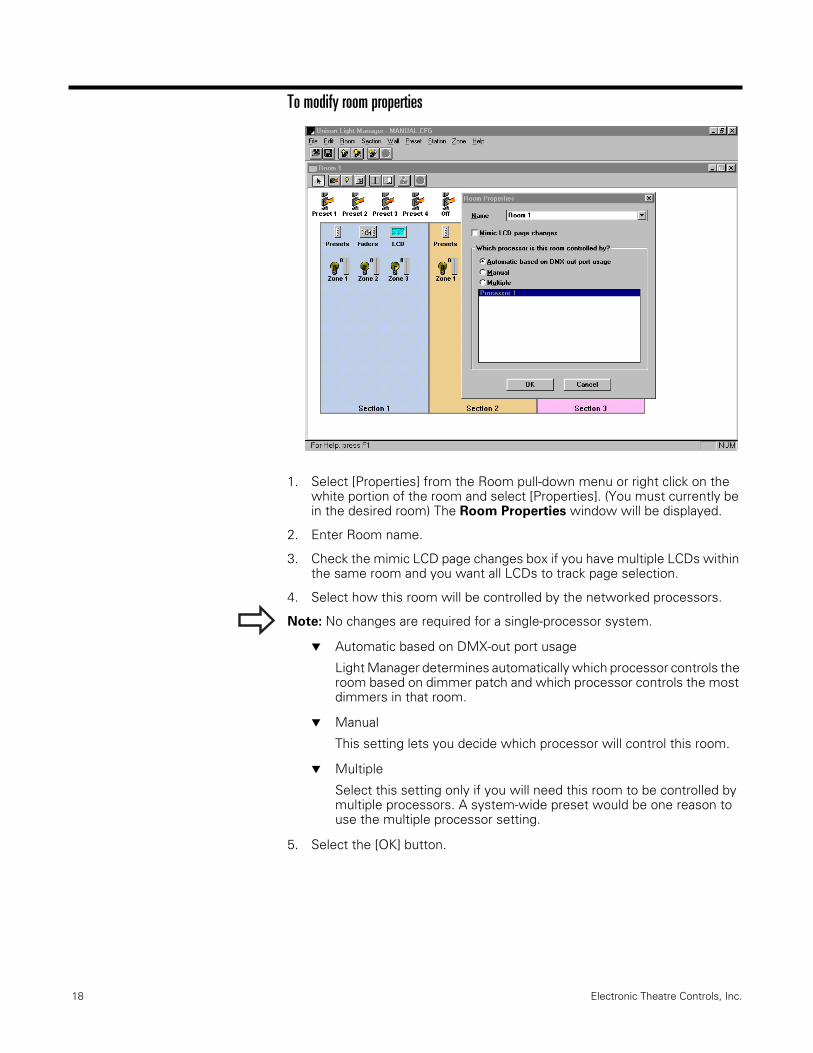
To modify room properties
1. Select [Properties] from the Room pull-down menu or right click on the white portion of the room and select [Properties]. (You must currently be in the desired room) The Room Properties window will be displayed.
2. Enter Room name.
3. Check the mimic LCD page changes box if you have multiple LCDs within the same room and you want all LCDs to track page selection.
4. Select how this room will be controlled by the networked processors.
Note: No changes are required for a single-processor system.
▼ Automatic based on DMX-out port usage
Light Manager determines automatically which processor controls the room based on dimmer patch and which processor controls the most dimmers in that room.
▼ Manual
This setting lets you decide which processor will control this room.
▼ Multiple
Select this setting only if you will need this room to be controlled by multiple processors. A system-wide preset would be one reason to use the multiple processor setting.
5. Select the [OK] button.

Unison Light Manager User Manual - version 1.65 19
To modify station properties 1. Right click the desired station.2. Select Properties... from the displayed menu. The Station Properties
screen appears.
3. Enter the station’s name.4. Check the Portable Station box if the station is portable. A portable
station connector must be in the same Room or Section.5. Check the Enable Off Toggle box to make active presets toggle to Off
when their buttons are pressed a second time. Pressing the Off button toggles back and forth between Off and the last active preset. By default this box is checked.
6. The Zone Select Direct shows Level is an advanced function. If a zone is set with this functionality, the button LED will light whenever that zone is above a level of zero.
7. Enter a station ID number in the ID box. You must include the dashes.You are not required to enter a station ID number. You can display and select station IDs at the Unison processor after the configuration is loaded. If you do enter the correct ID number (including the dashes), the Unison processor will automatically bind to new stations the first time the system is energized.
8. Enter the station Lockout level. The default level is 0.You can use lockout levels to control user access to controls. Light Manager assigns lockout levels to stations. When a station lockout level is higher than one of its component’s lockout value, the component will not operate. Station lockout levels are initially set by Light Manager, and can be changed by macros during system operation. The lockout level will be displayed in the station window title bar if above zero.For information on setting component lockout levels, see "Lockout values" on page 75.
9. Click [Add] to enter additional station template names. Templates are different sets of component functions that can be assigned to control stations. You can switch templates with Light Manager or through macros. The Active Template (other than the default template) will be displayed in the station window title bar on the graphic display. See "Station templates" on page 78.
10. Click [OK] or [Cancel].
20 Electronic Theatre Controls, Inc.
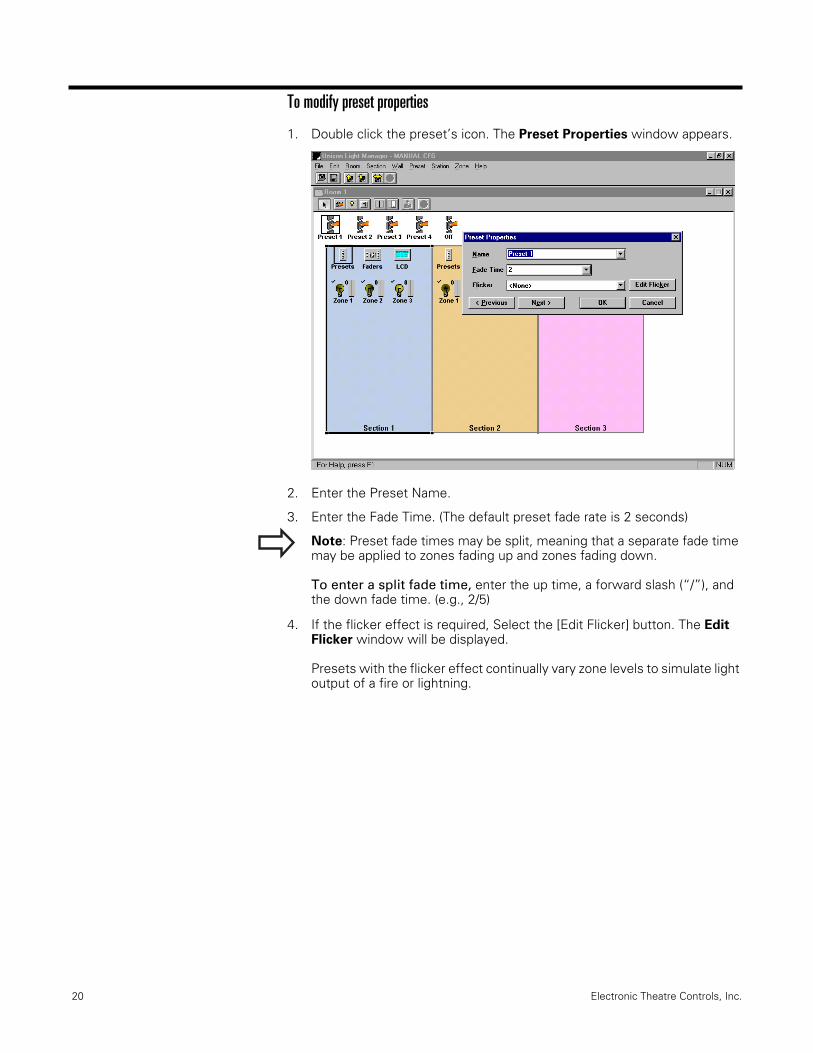
To modify preset properties
1. Double click the preset’s icon. The Preset Properties window appears.
2. Enter the Preset Name.
3. Enter the Fade Time. (The default preset fade rate is 2 seconds)
Note: Preset fade times may be split, meaning that a separate fade time may be applied to zones fading up and zones fading down.
To enter a split fade time, enter the up time, a forward slash (“/”), and the down fade time. (e.g., 2/5)
4. If the flicker effect is required, Select the [Edit Flicker] button. The Edit Flicker window will be displayed.
Presets with the flicker effect continually vary zone levels to simulate light output of a fire or lightning.

Unison Light Manager User Manual - version 1.65 21
To add a flicker effect,
5. Click the [Add] button. The Edit Name window will be displayed.
6. Enter the flicker effect name, then click [OK].
7. To edit flicker effect, select and highlight flicker name in list.
8. Adjust speed and intensity of flicker effect by moving graphic sliders up or down.
Note: The display in the upper-right corner of the window shows a representation of flicker settings.
9. Click the [OK] button to return to the Preset Properties window.
10. Select the flicker from the “Flicker” pop-up list.
11. Select the [OK] button to return to the Light Manager desktop.
Or...[Previous] opens the Properties box for the preset preceding the one you are working on.
Or...[Next] opens the Properties box for the preset next in succession.

22 Electronic Theatre Controls, Inc.
To modify zone properties
If you are writing a configuration that is intended for use on a network, see "Chapter 5 Understanding Network Systems" on page 89 for more information on routing DMX512 and EDMX through your network.
1. Double click the zone’s icon. The Zone/Dimmer Load Properties screen appears.
2. Enter the Zone Name.
3. Select the DMX Input Mode for the dimmer numbers in this zone.
▼ Replace Unison overrides DMX512 input levels, records and outputs active Unison levels. This is the default Input Mode.
▼ Snapshot Unison records incoming DMX512 levels. Dimmers must be patched 1-to-1. Used for UPSAC systems only.
▼ Pile-On Unison and DMX512 console signals combine, highest level takes precedence. This is used best for Snapshotting looks from a console.
▼ Pass-thru DMX512 or EDMX input level passes through Unison system.
▼ Master Unison levels “master” DMX512 passing through the Unison system. (e.g., A Unison fader could be used to fade up and down a chase being run on a console.)
▼ Replace if on DMX512 input levels are output if Unison levels are at 0. If Unison goes above 0, the Unison level is output.
▼ Pass through if on Unison levels are output and recorded unless DMX or EDMX levels are above 0%.
▼ Pass through if active Unison levels are output and recorded unless a DMX or EDMX console is plugged in and turned on.

Unison Light Manager User Manual - version 1.65 23
4. Check the Link when Sections combined box if control of the zone should be combined with zones that have the same name in adjacent sections when the sections are combined. Uncheck the box if the zone will operate independently of the movable partition’s position. By default this box is checked.
5. Enter DMX512 or EDMX output patch dimmer numbers to be controlled together.
EDMX allows you to use more than just 512 DMX values in a configuration. In fact, you can have several “universes” of DMX for multiple rooms and multiple processors all linked on a network by Ethernet. See “Chapter 5 Understanding Network Systems” on page 89.
List dimmer numbers individually, separated with a space or comma, or list dimmer number ranges, separated with a dash. Unison will sequence them automatically.
Note: When recording from a console, Zone and dimmer numbers should be patched 1-to-1 with the Zone set to the “Pile-on” mode. If they are not, only the lowest DMX512 value is recorded for a given zone.
Note: If you would like to see on screen which dimmers your zones are patched to, select Show Dimmer Numbers from the Room pull down menu.
6. Enter the Input Patch DMX dimmer number.
The Input Patch will redirect the dimmer to the Output Patch dimmer number (above). If no Input Patch number is given, the Output Patch is used.
Example: There are several dimmer racks throughout the building that all have a “dimmer 1” in them. In this case, the input patch would be “dimmer 1”, but the output patch may be EDMX value 2000. Since there can only be one sender of information (dimmer 1), redirection to EDMX 2000 eliminates the chance of multiple “dimmer 1” senders of trying to all send out information to a specific zone.
Note: Although the output patch can have multiple dimmers, the input patch is just one dimmer number.
7. Enter the Maximum light level for the zone. Although you may set different parameters, the graphical display of a zone will still show the full range for the zone.
8. Enter the minimum light level for the zone. Although you may set different parameters, the graphical display of a zone will still show the full range for the zone.This is useful for setting egress lighting levels. Low-end cutoff levels for limited range sources, such as fluorescent, should be programmed at the dimming rack.
9. Check the Use 0 for off box when the minimum light levels are low end cutoff levels for limited range sources. When activated, lights will turn off when level is at zero.
10. Enter a Max Fade Rate. This feature establishes a maximum fade rate for individual zone faders for zone bump applications. Select the Except for presets box to override max fade rate in Presets.
11. Enter Load Name (optional).
12. Click [Icon...] and select either the light bulb or sconce icon for the zone.
13. Click [OK].
Or...[Previous] opens the Properties box for the zone preceding the one you are working on.
Or...[Next] opens the Properties box for the zone next in succession.

24 Electronic Theatre Controls, Inc.
To modify section properties
1. Double click in the desired section. The Section Properties screen appears.
2. Enter the Section Name.
3. Click [OK].
Or...[Previous] opens the Properties box for the section preceding the one you are working on.
Or...[Next] opens the Properties box for the section next in succession.

Unison Light Manager User Manual - version 1.65 25
To modify wall properties
1. Right click the wall’s icon.
2. Select Properties... from the displayed menu. The Wall Properties screen appears.
3. Enter the wall’s name.
4. Click [Close].
Or...[Previous] opens the Properties box for the wall proceeding the one you are working on.
Or...[Next] opens the Properties box for the wall next in succession.

26 Electronic Theatre Controls, Inc.
Programming control stations The Unison control product line consists of preset recall, fader, LCD, connector, contact interface, fader interface, IR, keyswitch and PC interface stations. All station components may be factory or field customized to perform a wide variety of functions.
To customize Fader and Preset recall stationsFader and preset recall stations use buttons and faders to select, edit and record presets. Stations can use default or custom component programming to control area/room lighting.
1. Double click the desired station icon. The station is displayed.
2. Right click the station component you want to customize. Light Manager
displays a list of function options. To also see advanced control features, hold down the [Ctrl] key while right clicking the station component. See next page for option descriptions for buttons and faders.
3. Select the desired component function.
Button assignments
Note: For options that include either Toggle or Direct; Toggle is equal to momentary switch closure. Direct is equal to maintained switch closure.
▼ Preset Recall Activates the selected preset in a “Last Action” manner.When activated, Last Action presets turn off all other active presets except Pile-on types.When an active Preset Recall button is pressed again, it activates the Off preset in “Last Action” mode, turning off other active presets except Pile-on types.
Note: Enable Off Toggle must be active.

Unison Light Manager User Manual - version 1.65 27
▼ Preset Recall Activates selected preset in a “Last Action” manner (hard off) identical to “Preset Recall.”
When an active Preset Recall (hard off) button is pressed again, it activates the Off preset in “Last Action Override” mode, turning off other active presets including Pile-on types.
Note: Enable Off Toggle must be active.▼ Preset Toggle Activates selected preset in a “Pile-On” manner.
When activated, Pile-On presets do not turn off other presets. Zone levels are set by the highest level of all active presets.When an active Preset toggle button is pressed again, it turns off only its own preset.
▼ Off Activates the Off preset in a “Last Action Override” manner.Last Action Override activates the selected preset, turning off other active presets including Pile-on.When an active Off button is pressed again, it activates the previously active preset.
Note: If there is no Preset named “Off”, this function will fade all Zones to zero.
Note: If the Enable Off Toggle box in the Station properties dialog box is not checked, pressing active preset or Off buttons twice has no effect – the buttons remain active. See "To modify station properties" on page 19.
▼ Manual Activates zone and master faders. This will deactivate all Presets.
Note: Faders may also be activated individually by moving them. When they meet or exceed current zone level, they activate without affecting other faders or levels.
▼ Record Selects “record” mode.
▼ Raise Proportionally raises levels of the last active preset or zones in the section if no Preset is active.
▼ Lower Proportionally lowers levels of the last active preset or zones in the section if no Preset is active.
▼ Wall Open Indicates the open position of movable partitions, and joins control of lighting in adjacent room.
▼ Wall Closed Indicates the closed position of movable partitions, and separates control of lighting in adjacent rooms.
▼ Wall Toggle Toggles the state of movable walls within the Unison processor. Used when a large room is divided into sections with movable partitions.
▼ Wall Direct When a designated button is connected to a wall sensor or maintained key switch, the maintained closure opens the wall.
▼ Lockout Toggle Alternates lockout state of all stations in a room with a lockout level between 0 and 99.
▼ Lockout Direct Alternates lockout state of stations in the room based on maintained input signal. When a keyswitch is placed in the disable position, the associated stations will not operate. When a keyswitch is placed in the enable position, stations will operate as programmed.

28 Electronic Theatre Controls, Inc.
▼ Zone Bump Alternates designated zone status from full on to fulloff. The LED will illuminate when the zone is on. Enter maximum fade rate in Zone Properties to adjust rate of fade. Default rate is instant.
▼ Zone Bump Direct Alternates designated zone status from full on to full off based on maintained input signal. Typically used with Contact Interface stations, which receive maintained contact closures from secondary devices.
▼ Zone Select Toggle Alternates designated zone status from selected to unselected.
▼ Zone Select Direct Alternates designated zone selection status based on maintained input signal. If a zone is set with this functionality and Zone Select Direct Shows Level box is check in the station’s properties, the button LED will light whenever that zone is above a level of zero.
▼ Selection Bump Bumps selected zone(s) to full. A secondToggle button hit sets zones to zero but does not clear
selection.▼ Selection Bump Bumps selected zone(s) to full. A second
Toggle w/clear button hit sets zones to zero and clears selection.▼ Selection Bump Bumps selected zone(s) to full while button is
Direct depressed.▼ Zone Group Toggle Bumps all zones in a preset to designated preset
levels.▼ No Action Button has no action assigned.▼ Macro Assigns Macro activation.▼ Macro Toggle Alternates activation of selected macro(s). LED
status designates which macro is active.▼ Macro Direct Alternates activation of selected macros based on a
maintained input signal.▼ Lockout Level Edits the numeric value at which the button is
“locked out.” Enter a number between 1 and 100. For more information, see "Lockout values" on page 75.
▼ Legend Edits the button name displayed on the station within Light Manager. Maximum of 20 characters.
▼ Host this control Allows you to designate a button to run a specific function on another station. Useful for custom stations.
▼ Host all controls Designates another station to host all controls on a specified station.
▼ Hold down button Keeps button selected. Used when testing direct-style functions.

Unison Light Manager User Manual - version 1.65 29
Fader assignments
▼ Zone Controls dimmers assigned to specific zone.
▼ Preset Controls assigned preset.
▼ Master Proportionally controls system zones on this station.
▼ Fade time Overrides presets’ recorded fade time with a new time based on the fader’s position. New fade times range from instant at a fader level of 10 percent to two minutes at the 100 percent level. If a zone is set with this functionality and the Zone Select Direct Shows Level box is checked in the station’s properties, the button LED will light whenever that zone is above a level of zero.
When the fader is at the bottom of its slot, presets use their recorded fade times.
▼ Manual Activates zone and master faders. Deactivates all Presets.
▼ Record Selects “record” mode.
▼ Dimmer Minimum Sets the minimum light level of an associated zone. If level a zone is set with this functionality and Zone Select
Direct Shows Level box is checked in the station’sproperties, the fader LED will light whenever that zone is above a level of zero.
▼ Dimmer Maximum Sets the maximum light level of an associated zone. level If a zone is set with this functionality and Zone Select
Direct Shows Level box is checked in the station’sproperties, the fader LED will light whenever thatzone is above a level of zero.
30 Electronic Theatre Controls, Inc.
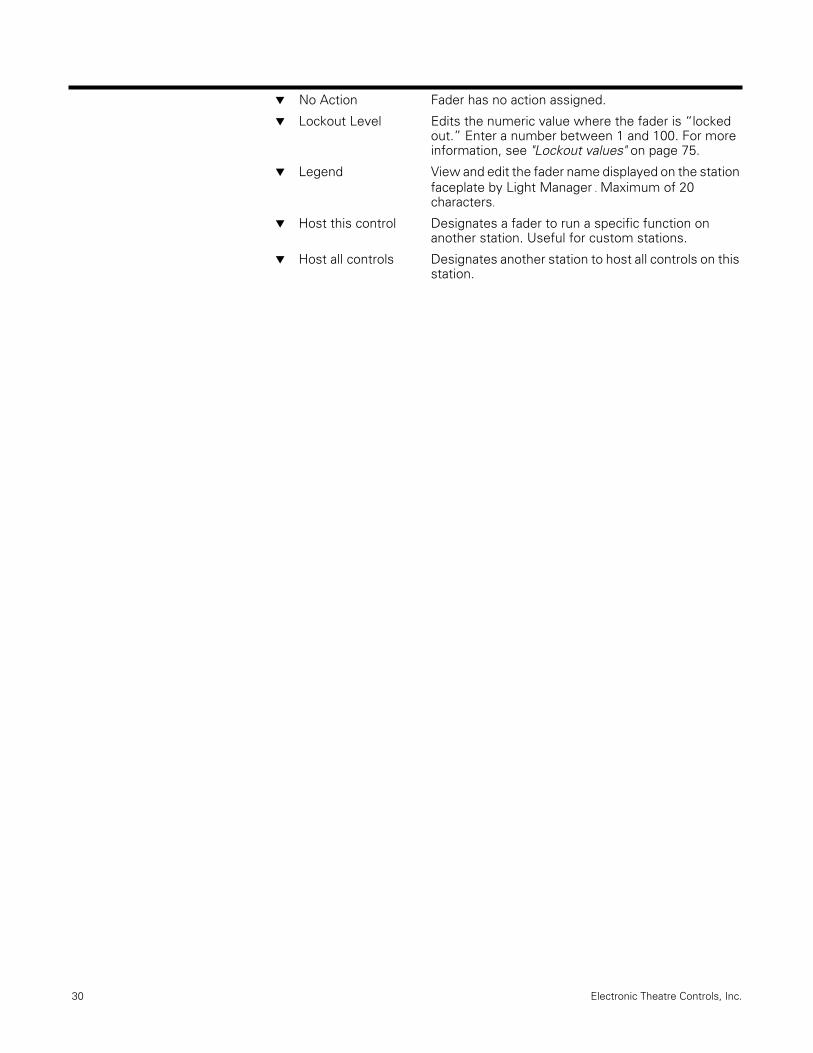
▼ No Action Fader has no action assigned.
▼ Lockout Level Edits the numeric value where the fader is “locked out.” Enter a number between 1 and 100. For more information, see "Lockout values" on page 75.
▼ Legend View and edit the fader name displayed on the station faceplate by Light Manager . Maximum of 20 characters.
▼ Host this control Designates a fader to run a specific function on another station. Useful for custom stations.
▼ Host all controls Designates another station to host all controls on this station.

Unison Light Manager User Manual - version 1.65 31
To record a preset
Using individual zones
1. Create a simple one-room configuration.
2. Set the zone levels as you would like to record them. You can do this in one of the following ways.
▼ Select a zone and click anywhere in its slider bar.
▼ Select a zone. Left click and hold on the slider. Move slider to new level.
▼ Select a zone and on the numerical keypad, enter the new level.
▼ Select a zone, and on the numerical keypad, use the + or - keys to adjust the level one percent at a time. Use * for Full.
3. Right click on the Preset you would like to record to, (e.g., Preset 1) and select Record from the pull-down menu.
Using stations within Light Manager
1. Double click to open a fader station.
2. Set the zone levels using the faders.
3. Change the functionality of one of the buttons to [Record]. See "Fader assignments" on page 29.
4. Press the [Record] button.
5. Press the Preset button you want to record to.
When you recall the new preset within that section or room, you will see only that section or room’s zones move to their new level.
If you activate a system-wide preset, notice that the other section or room’s zones move to their own recorded levels.
32 Electronic Theatre Controls, Inc.
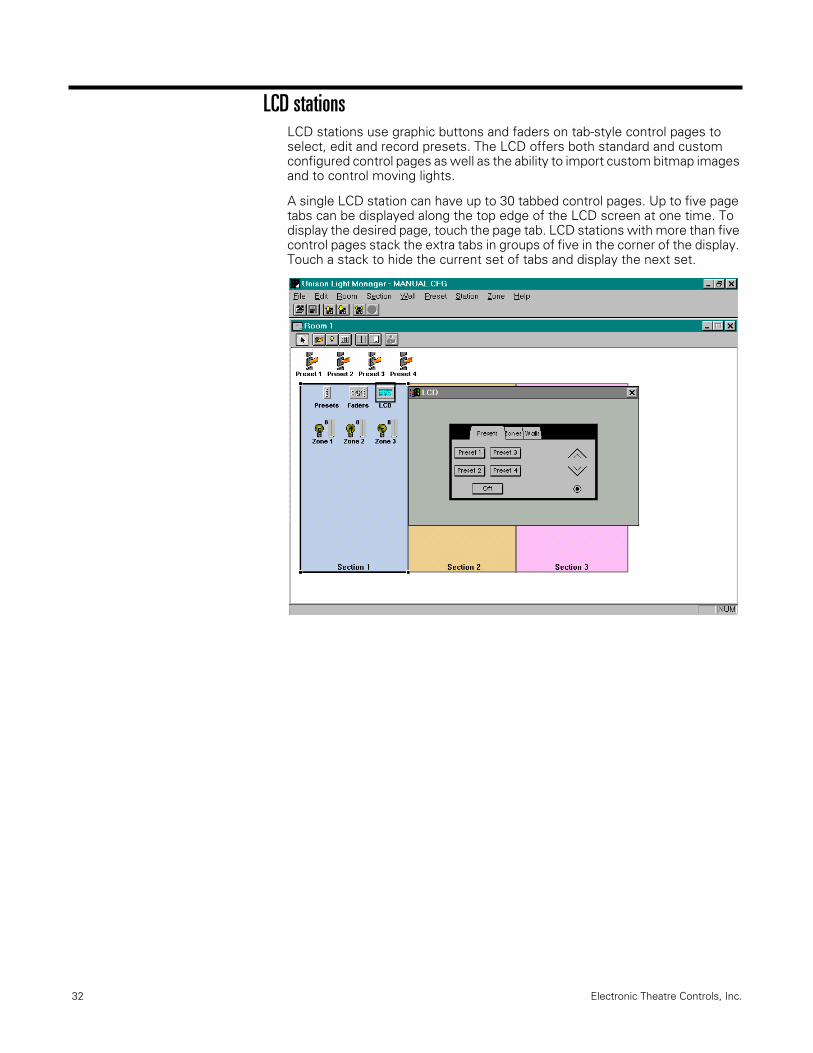
LCD stationsLCD stations use graphic buttons and faders on tab-style control pages to select, edit and record presets. The LCD offers both standard and custom configured control pages as well as the ability to import custom bitmap images and to control moving lights.
A single LCD station can have up to 30 tabbed control pages. Up to five page tabs can be displayed along the top edge of the LCD screen at one time. To display the desired page, touch the page tab. LCD stations with more than five control pages stack the extra tabs in groups of five in the corner of the display. Touch a stack to hide the current set of tabs and display the next set.

Unison Light Manager User Manual - version 1.65 33
Standard control pages
Standard control pages have preprogrammed component layouts. There are four types of standard pages: zone, preset, wall and menu. Standard control pages cannot be modified.
▼ Zones Page (with normal or narrow faders)Zone pages provide individual control of lighting zones through graphic faders. You may have up to four faders per page using normal (default) faders…
or up to eight faders by checking use narrow zones in the page properties dialog box.
Note: Light Manager will add all pages needed to display all presets, walls or zones in the configuration.

34 Electronic Theatre Controls, Inc.
▼ Presets Page Preset pages provide button control of preset recall, raise, lower, and record functions.
Check Show Time and Date in the Page Properties dialog box to add the time and date to your presets page.

Unison Light Manager User Manual - version 1.65 35
▼ Walls page Wall pages use horizontal lines to represent movable partitions. A solid line indicates that a wall is closed and in place, with lighting operating independently. A broken dashed line indicates that a wall is open and not in place, with lighting for the adjacent rooms operating together.
▼ Menu Page Menu pages use graphic buttons and arrows to lead you through basic control module version 1.6 setup functions. See "Advanced LCD features" on page 82 for additional Menu screen details.
Note: Menu page control access should be limited to qualified personnel only. It is not recommended that LCD stations with a menu page be accessible to the general public.
36 Electronic Theatre Controls, Inc.
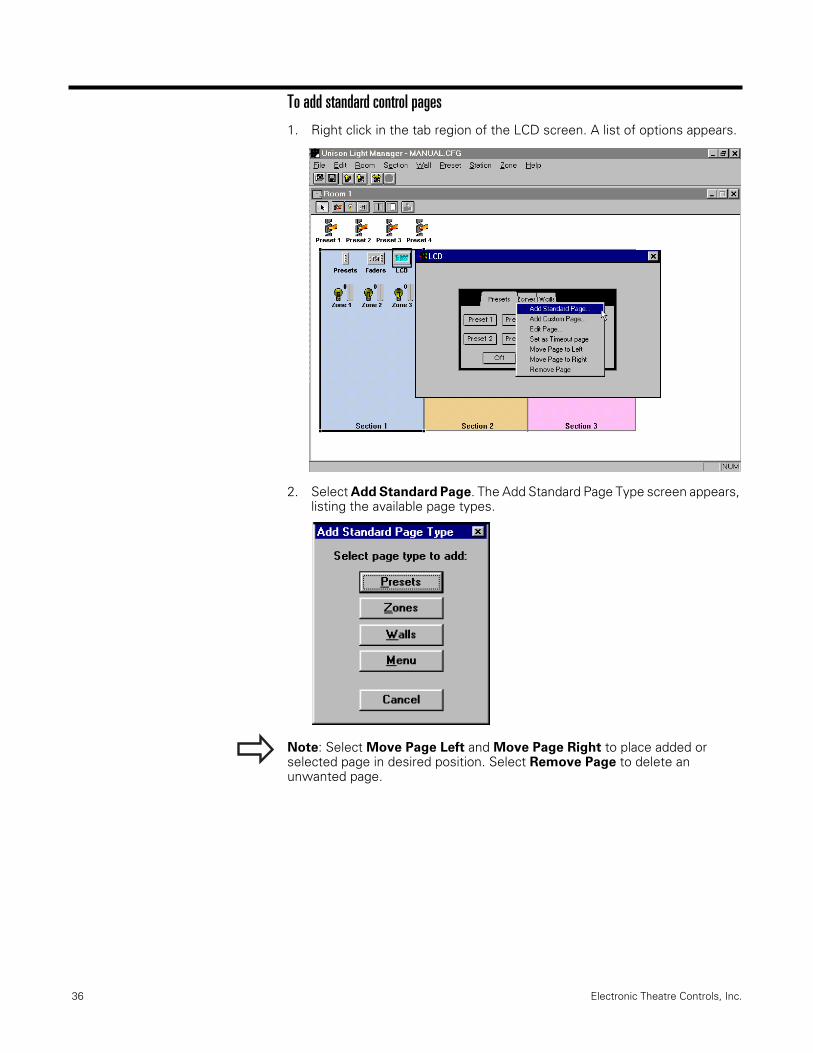
To add standard control pages
1. Right click in the tab region of the LCD screen. A list of options appears.
2. Select Add Standard Page. The Add Standard Page Type screen appears, listing the available page types.
Note: Select Move Page Left and Move Page Right to place added or selected page in desired position. Select Remove Page to delete an unwanted page.

Unison Light Manager User Manual - version 1.65 37
Custom control pages
Custom pages allow you to create an LCD page using button, faders, walls, moving lights and bit-mapped elements.
To add a custom control page
1. Click in the tab region of the LCD screen. An options list appears.
2. Select Add Custom Page. The Page Properties screen appears.

38 Electronic Theatre Controls, Inc.
3. Enter or edit the page name.
4. Enter or edit the Page Lockout value.
Page lockout value is a number between 0 and 100 you assign to the page to control user access for security purposes. Light Manager assigns custom pages a default lockout value of 40.
When a page lockout value is less than the station’s lockout level, the page is replaced by a security keypad.
5. Enter the Unlock Code.
The Unlock Code allows authorized personnel to bypass lockout levels by entering the unlock code with the keypad. See "Lockout values" on page 75.
6. Enter the Visibility value.
Visibility value is a number between 1 and 100 you assign to the page to control its visibility. When a station lockout level is the same or higher than the visibility value, the page is hidden. Light Manager assigns a default visibility value of 60. See "Visibility levels" on page 75.
7. To use a background image, enter the name of the image file in the Background Image box.
A background image file can be any black and white 256 x 128 pixel Windows bitmap (.bmp) file. The file must be placed in the same directory as Light Manager before the configuration is transferred to the Unison processor. The default location for Light Manager’s directory is C:\Program Files\ETC\LightManager. The bitmap file must also be saved to the diskette you use to load the configuration.
8. Click [OK]. The bitmap will be visible if installed.
9. Enter or select the amount of time for the Page Timeout.
10. Select which LCD page will be displayed after the timeout.
Note: Another way to set the Timeout Page is to right click on an LCD page and select Set as Timeout Page.

Unison Light Manager User Manual - version 1.65 39
To configure a custom page
You may add any of the four available components to a custom page. The four options are:
▼ Button Buttons may select presets or macros; activate special functions such as record, raise, lower, wall toggle, lock out toggle; or provide information such as date, day, time, and label.
▼ Zone Zone faders control individual lighting zones. Four standard width faders fit on an LCD page.
▼ Zone (narrow) Narrow zone faders work like normal zone faders but take up less screen space. Eight narrow width faders fit on an LCD page.
▼ X/Y X/Y input controls moving light applications. The X and Y axis control two sequential zones.
1. Right click on the blank custom page at the spot where you want to place the component. A list of components appears.
2. Select the component you want. The button, zone fader or X/Y control appears on the page.
3. To move a component on the page, put the cursor arrow over it and press and hold the right mouse button. As long as you are holding down the mouse button, you can drag the component around the page. Release the button to place the component.
Note: Do not overlap graphics. Doing so will cause problems with your custom page functions and a graphic overlap indicator will be displayed.

40 Electronic Theatre Controls, Inc.
To edit custom page button functions 1. Right click on a button. A button function list appears. To add the advanced
functions to the list, hold down the [Ctrl] key while right clicking.
2. Select the function you want the button to provide. Light Manager labels the button appropriately.
Button assignments
Note: For options that include either Toggle or Direct; Toggle is equal to momentary switch closure. Direct is equal to maintained switch closure.▼ Preset Recall Activates selected preset in a “Last Action” manner.
When activated, Last Action presets turn off all other active presets except Pile-on types.When an active Preset Recall button is pressed again, it activates the Off preset in “Last Action” mode, turning off other active presets except Pile-on types.
▼ Preset Recall Activates selected preset in a “Last Action” (hard off) manner identical to “Preset Recall.”
When an active Preset Recall (hard off) button is pressed again, it activates the Off preset in “Last Action Override” mode, turning off other active presets including Pile-on types.
▼ Preset Toggle Activates selected preset in a “Pile-On” manner.When activated, Pile-On presets do not turn off other presets. Zone levels are set by the highest level of all active presets.When an active Preset toggle button is pressed again, it turns off only its own preset.
▼ Off Activates the Off preset in a “Last Action Override” manner.Last Action Override activates the selected preset, turning off other active presets including Pile-on.When an active Off button is pressed again, it activates the previously active preset.

Unison Light Manager User Manual - version 1.65 41
Note: If the Enable Off Toggle box in the Station properties dialog box is not checked, pressing active preset or Off buttons has no effect — the buttons remain active. See "To modify station properties" on page 19.▼ Record Selects “record” mode.▼ Raise Proportionally raises levels of the last active preset or
zones in the section if no Preset is active.
▼ Lower Proportionally lowers levels of the last active preset or zones in the section if no Preset is active.
▼ Wall Open Indicates the open position of movable partitions, and joins control of lighting in adjacent room.
▼ Wall Close Indicates the closed position of movable partitions, and separates control of lighting in adjacent rooms.
▼ Wall Toggle Toggles the state of movable walls within the Unison processor. Used when a large room is divided into sections with movable partitions.
▼ Lockout Toggle Alternates lockout state of station.▼ Zone Bump Toggle Alternates designated zone status from full on to full
off. The button will highlight when the zone is on. Enter maximum fade rate in Zone Properties to adjust rate of fade. Default rate is instant.
▼ Zone Bump Direct Alternates designated zone status from full on to full off based on maintained input signal.
▼ Zone Select Toggle Turns zone on full while button is held down.▼ Selection Bump Bumps selected zone(s) to full. A second
Toggle button hit fades to zero but does not clear selection.▼ Selection Bump Bumps selected zone(s) to full. A second
Toggle w/clear button hit fades to zero and clears selected zone.▼ Selection Bump Bumps selected zone(s) to full while button is
Direct held down.▼ Zone Group Toggle Bumps all zones in a preset to designated preset
levels (maintained input signal).▼ No Action Button has no action assigned.▼ Macro Assigns Macro activation to component.▼ Macro Toggle Alternates activation of selected macro(s). LED
status designates which macro is active.
▼ Macro Direct Runs one Macro when button is pressed and another when button is released.
▼ Date The button displays the date.▼ Day The button displays the day of the week.▼ Time The button displays the time.▼ Label Displays a word you enter on the page.▼ Lockout/Visibility Edits the numeric value at which the button is
“locked out”. Enter a number between 1 and 100. For more information, see "Lockout values" on page 75.
▼ Legend View and edit the button name displayed on the station faceplate by Light Manager. Maximum of 10 characters.
▼ Delete Deletes selection.

42 Electronic Theatre Controls, Inc.
To edit custom page fader functions
1. Right click on a fader. A Fader Properties list appears.
2. Modify the fader’s legend, lockout level or visibility level.
Fader function options
▼ Lockout/Visibility Edits one numeric value at which the fader is “locked out” and another to make it invisible. Enter a number between 1 and 100 for each value, or click [OK] to use the default values. For more information, see "Lockout values" on page 75.
▼ Legend Edits the fader name displayed on the LCD control page. Maximum of eight characters
▼ Delete Deletes selected fader.

Unison Light Manager User Manual - version 1.65 43
To edit LCD page properties
1. Click in the tab region of the LCD screen. An options list appears.
2. Select Edit Page. The Page Properties screen appears.
3. Enter the page Name. Maximum of 16 characters.
4. Enter the Page Lockout value. (See "Lockout values" on page 75.)
Page lockout values are numbers between 1 and 100 assigned to pages to control user access. Light Manager assigns the following default lockout values to pages.
Zone Page 50 Preset Page 80Wall Page 40 Custom Page 40
When a station lockout level exceeds a page lockout value, the page displays a security keypad and will not operate. Authorized users can use a one to four-digit unlock code on the keypad to make the page usable.
5. Enter the Unlock Code.
The Unlock Code is series of up to four numbers that unlock control pages. Light Manager sets the Unlock code to “0” by default.
6. Enter the Visibility value.
Visibility values are numbers between 1 and 100 assigned to pages to control user access. Light Manager assigns the following default visibility values to pages if you don’t enter a level.
Zone Page 70 Preset Page 90Wall Page 60 Custom Page 60
Visibility values operate similar to lockout values (see step 4 above). A visibility value lower than the station lockout level hides the page.

44 Electronic Theatre Controls, Inc.
7. Enter Background Image if desired
Background images must be created and saved as Windows bitmap (.bmp) files to the same directory that Light Manager is located. If Light Manager is in the default directory, bitmap files would be saved to C:\Program files\ETC\Lightmanager. Images must be 256 W x 128 H pixels and in a black and white format.
HINT: Do not use the top 1/5” (25 pixels) of the bitmap image. This portion is displayed in the tab section of the LCD.
8. Enter the Page Timeout
The Page Timeout is the length of time before the page changes to an indicated page or lockout.
9. Specify the Page to display after the timeout.
10. Click [OK].
Modifying LCD screen featuresFollow the steps below to access the LCD screen editor.
1. Hold down the left mouse button at ➀.
2. Click the right mouse button.
3. Release the left mouse button.
4. Click the left mouse button at ②.
5. Adjust LCD contrast, brightness, dim level and dim delay as desired.
Note: Once you have completed steps 1-5 the above screen will be displayed.
This feature allows you to set the contrast and brightness of the LCD for general use. You can also set the amount of time (Dim Delay) before the LCD will change to a low-light level (Dim Level).
12
Unison Light Manager User Manual - version 1.65 45
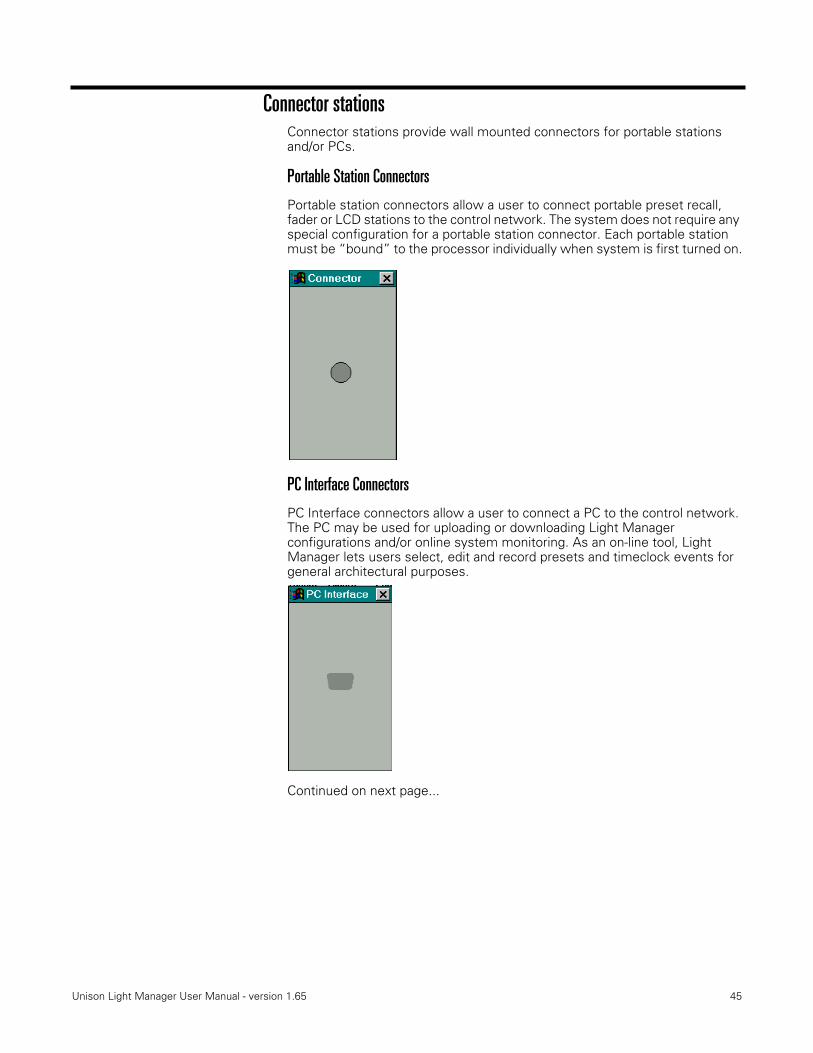
Connector stationsConnector stations provide wall mounted connectors for portable stations and/or PCs.
Portable Station Connectors
Portable station connectors allow a user to connect portable preset recall, fader or LCD stations to the control network. The system does not require any special configuration for a portable station connector. Each portable station must be “bound” to the processor individually when system is first turned on.
PC Interface Connectors
PC Interface connectors allow a user to connect a PC to the control network. The PC may be used for uploading or downloading Light Manager configurations and/or online system monitoring. As an on-line tool, Light Manager lets users select, edit and record presets and timeclock events for general architectural purposes.
Continued on next page...
46 Electronic Theatre Controls, Inc.
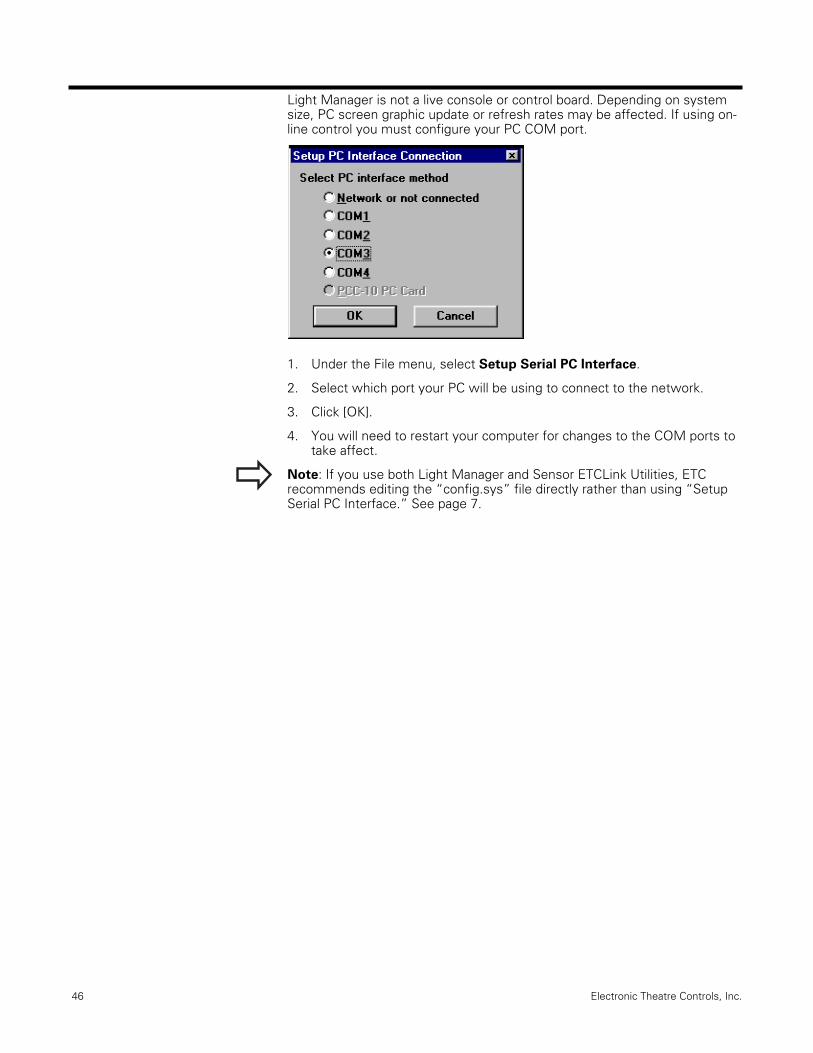
Light Manager is not a live console or control board. Depending on system size, PC screen graphic update or refresh rates may be affected. If using on-line control you must configure your PC COM port.
1. Under the File menu, select Setup Serial PC Interface.
2. Select which port your PC will be using to connect to the network.
3. Click [OK].
4. You will need to restart your computer for changes to the COM ports to take affect.
Note: If you use both Light Manager and Sensor ETCLink Utilities, ETC recommends editing the “config.sys” file directly rather than using “Setup Serial PC Interface.” See page 7.

Unison Light Manager User Manual - version 1.65 47
Contact/Fader Interface StationsContact/Fader Interface stations control lighting based on maintained or momentary contact closure inputs or 0-5Vdc analog from secondary devices, such as building automation controls or security systems. Each station supports the termination of either eight switches or pots and eights lamps of LEDs to be connected to the Link Power network. Stations are assigned to rooms in the initial configuration of the system from the station list. Stations may also be added from the New Station toolbar button.
To customize Contact/Fader Interface stations
1. Double click the Switches/Faders icon. The station is displayed.
2. Press and hold the [Ctrl] button while right clicking the button or fader you want to customize. Light Manager displays a list of function options. See page 29 for a description of options.
3. Select the desired component function for each used position.
48 Electronic Theatre Controls, Inc.
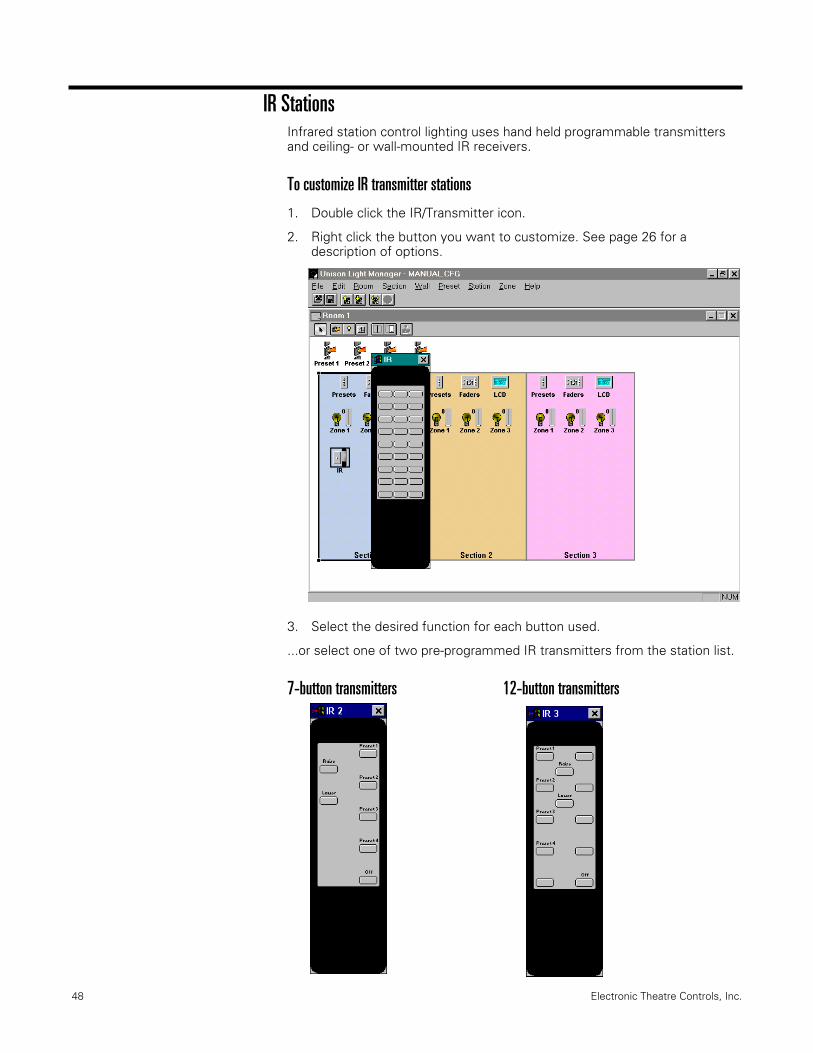
IR StationsInfrared station control lighting uses hand held programmable transmitters and ceiling- or wall-mounted IR receivers.
To customize IR transmitter stations
1. Double click the IR/Transmitter icon.
2. Right click the button you want to customize. See page 26 for a description of options.
3. Select the desired function for each button used.
...or select one of two pre-programmed IR transmitters from the station list.
7-button transmitters 12-button transmitters

Unison Light Manager User Manual - version 1.65 49
Programming Rooms with Moving PartitionsRooms with moving partitions have special lighting control requirements that must be programmed using Light Manager. The small spaces created by the division of a large room are called sections. When the partitions are closed, each section needs individual or separate lighting control. When some or all of the partitions are open, the larger spaces need grouped or joined lighting control. Light Manager supports setup of nine of the most common divisible room configurations through the Room Wizard. You can create alternate layouts in Light Manager using the tool bars.
To program a divisible room using the Room Wizard
1. Create a new room using the Room Wizard. See "Configuring a system" on page 16 for Wizard details.
2. Select [Yes] when asked if the space is divisible.
3. Select [Next]. The Combine Type screen is displayed.
4. Select the layout that resembles your combinable room.
5. Select [Next]. In layouts with a large wall spanning multiple sections, the Combine Walls screen is displayed. In smaller layouts, the wall station screen is displayed.

50 Electronic Theatre Controls, Inc.
Select whether the large wall opens incrementally or all at once.
Or...
Select [Next]. The Wall Stations screen will be displayed.
6. Select type and quantity of stations to be used in each section.
Unison Light Manager User Manual - version 1.65 51
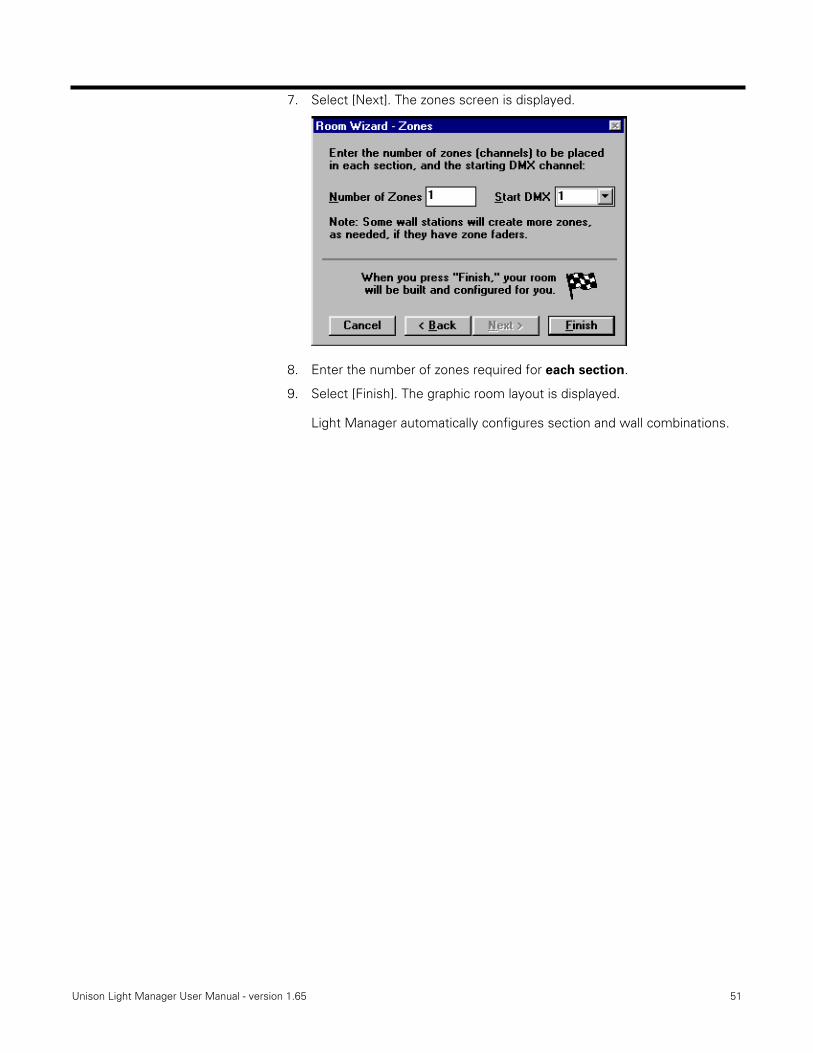
7. Select [Next]. The zones screen is displayed.
8. Enter the number of zones required for each section.
9. Select [Finish]. The graphic room layout is displayed.
Light Manager automatically configures section and wall combinations.

52 Electronic Theatre Controls, Inc.
To modify a divisible room using the tool bars
Complete the Room Wizard, selecting the layout that most closely resembles your divisible space.
To add a section
1. Select the New Section tool.
2. Place the tool cross-hair on the upper left corner of desired new section.
3. Left click and drag the cross-hair to the lower right corner of the desired new section. A new section is displayed. Section size may be modified by selecting the pointer tool and using standard Windows conventions.
With new section added...

Unison Light Manager User Manual - version 1.65 53
To add a wall
1. Select the New Wall tool.
2. Place tool cross-hair on one end of the border between two sections where there is a movable partition.
3. Left click and drag cross-hair to the other end of the border. A new wall is displayed. Wall size may be modified by selecting the pointer tool and using standard Windows conventions.

54 Electronic Theatre Controls, Inc.
To program wall logicWall logic establishes which sections combine when a partition is open.
1. Select the desired section. The border will turn black.
2. Select the wall. The wall turns black.
3. Select Combine through selected wall from the Section pull down menu (or right click on the wall). A chain will appear in combined section.
4. Select the adjacent section. (The wall should still be selected)
5. Select combine through selected wall from the Section pull down menu or by right clicking on the section. A chain will appear in sections that have been combined. Double clicking the wall will join or separate lighting control of assigned sections. The join/separate function may be assigned to a button or part of a macro sequence.
To program control logic
There are two prevailing philosophies regarding the control of rooms with moving partitions.
In the first method, identical presets are programmed for each section. When the sections are combined, presets are selected in parallel. If presets are not identical, lighting levels of the zones will be different in combined spaces. This method is the easiest to program and is recommended for sections with similar zone layouts.
In the second method, presets are programmed for each section and combination of sections. When sections are combined, a macro is activated that changes the control templates of the stations within the combined sections to an alternate set of presets. This method is harder to program yet provides greater system flexibility in applications where lighting configuration changes dramatically based on the position of the moving partitions. See "Station templates" on page 78 for additional details on programming station templates.

Unison Light Manager User Manual - version 1.65 55
Programming Macro sequencesA macro is a programmed sequence of events activated manually by a button or automatically by the integrated time clock. Sequence steps may include preset recall, wall state change, station property change, zone property change, timed delay in sequence, macro recall and stop macro.
To program a Macro
1. Select the Show Room List option from the Room menu. The Area screen appears.
2. Click [Add] below the list of macros. The Edit Macro screen appears.
3. Enter the new macro’s name.

56 Electronic Theatre Controls, Inc.
4. Click [Add Step]. The New Macro Step screen appears.
5. Select the desired macro step type from the list (shown above) and click [OK]. Then follow the lettered steps indicated below for the step type you have chosen.
▼ Recall Preset Selects a preset. When selected as a macro step the Recall Preset Screen appears.
a. Enter the room name the macro will affect from the pull down options.• In the same room (as the station)• In all rooms• Specific room name from the room list
b. Enter the section name from the pull down options.• In all sections• Specific section name from the section list
c. Select preset to recall.d. Enter desired intensity level.

Unison Light Manager User Manual - version 1.65 57
e. Enter desired preset activation mode. The four preset activation modes are:• Last Action – the selected preset will be
activated, de-activating all previously selected presets except Pile-on.
• Pile-On – the selected preset is activated and levels reflect the highest level of any activated preset. Previously selected presets are not de-activated.
• Last Action Override – the last selected preset is activated, de-activating all previously selected presets including Pile-on.
• Deactivate- Clears selected preset.f. Enter preset priority level. This assigns
relative “priority” or importance of a control selection based on levels from 1-10 (10 is the default priority, 1 is highest priority). See "Preset priorities" on page 76.
g. Enter a Fade Time from 0.001 to 1,000 hours.h. Click [Wait for Fade] to hold macro step
progression until fade is complete.i. Click [OK].
▼ Wall Re-defines wall state. When selected as a macro step, the Set Wall State screen is displayed.
a. Enter the name of room in which to change the wall state.
b. Enter the wall name to change.c. Enter the desired action; open, close or
toggle. • Open – opens the wall. Sections set to
combine through the wall will operate jointly.
• Close– closes the wall. Sections set to combine through the wall will operate independently.
• Toggle – changes an open wall to a closed wall or a closed wall to an open wall.
d. Click [OK].

58 Electronic Theatre Controls, Inc.
▼ Station Property Changes station properties. (See Changing Properties section.) When selected as a macro step, the Set Station Property screen appears.
a. Enter the room name the macro will affect from the pull down options.• In all rooms• One room name from the room list
b. Enter the section name from the pull down options:• In all sections• One section name from the section list
c. Enter station type to modify or use the default All Stations.
d. Select station property to change. The station properties a macro can modify are:• Lockout level – See To modify station
properties on page 19.• Template – changes the station template.• LCD Page – allows selection of LCD page.
e. Enter Value. Value will change depending on station property selected.• Lockout level – 0-100• Template – Template name.• LCD page – LCD page name.
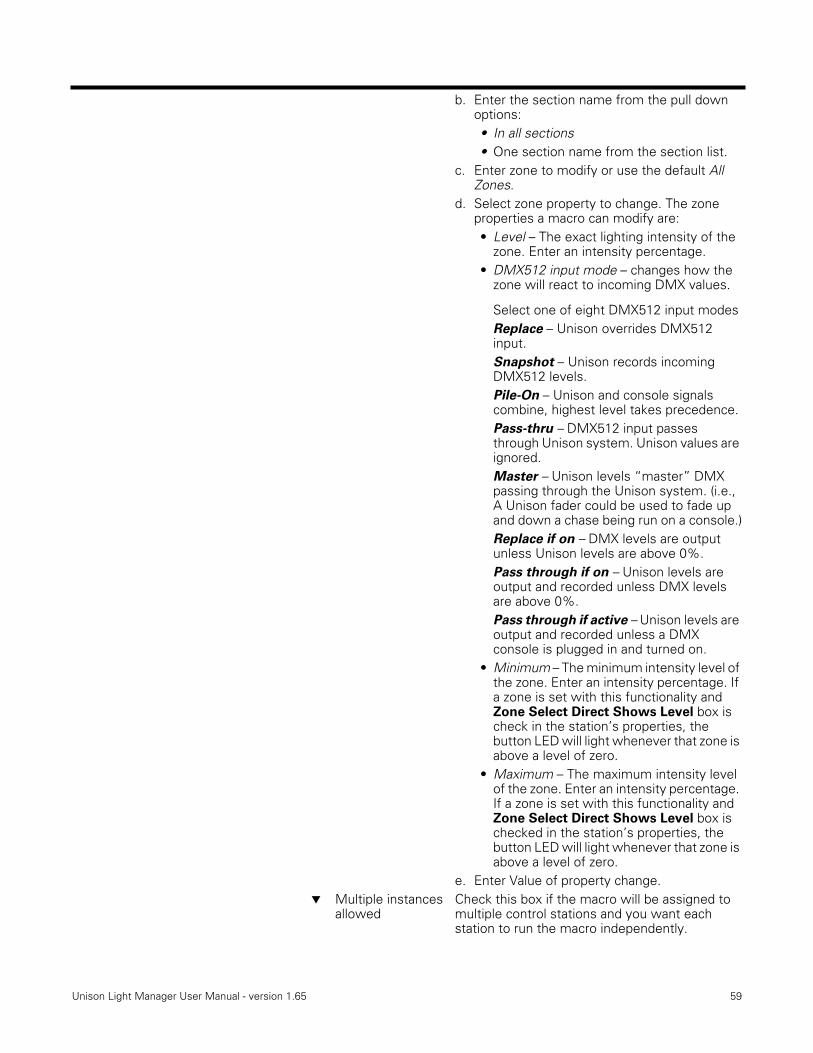
▼ Zone Property Re-defines zone properties. (See Changing Properties section.) When selected as a macro step the Set Zone Property screen appears.
a. Enter the room name the macro will affect from the pull down options:• In all rooms• One room name from the room list.
Unison Light Manager User Manual - version 1.65 59
b. Enter the section name from the pull down options:• In all sections• One section name from the section list.
c. Enter zone to modify or use the default All Zones.
d. Select zone property to change. The zone properties a macro can modify are:• Level – The exact lighting intensity of the
zone. Enter an intensity percentage.• DMX512 input mode – changes how the
zone will react to incoming DMX values.
Select one of eight DMX512 input modesReplace – Unison overrides DMX512 input.Snapshot – Unison records incoming DMX512 levels.Pile-On – Unison and console signals combine, highest level takes precedence.Pass-thru – DMX512 input passes through Unison system. Unison values are ignored.Master – Unison levels “master” DMX passing through the Unison system. (i.e., A Unison fader could be used to fade up and down a chase being run on a console.)Replace if on – DMX levels are output unless Unison levels are above 0%.Pass through if on – Unison levels are output and recorded unless DMX levels are above 0%.Pass through if active – Unison levels are output and recorded unless a DMX console is plugged in and turned on.
• Minimum – The minimum intensity level of the zone. Enter an intensity percentage. If a zone is set with this functionality and Zone Select Direct Shows Level box is check in the station’s properties, the button LED will light whenever that zone is above a level of zero.
• Maximum – The maximum intensity level of the zone. Enter an intensity percentage. If a zone is set with this functionality and Zone Select Direct Shows Level box is checked in the station’s properties, the button LED will light whenever that zone is above a level of zero.
e. Enter Value of property change. ▼ Multiple instances Check this box if the macro will be assigned to
allowed multiple control stations and you want eachstation to run the macro independently.

60 Electronic Theatre Controls, Inc.
▼ Wait Provides a programmable delay in sequence progression. When selected as a macro step a Wait screen appears.
a. Select or enter the desired delay time in hours, minutes and seconds. (e.g., H:M:S)
b. Click [OK].▼ Call Macro Selects a programmed macro. When selected as
a macro step a Macro list appears.
a. Highlight the Macro to select or click [loop macro] to create a “loop” function.
b. Click [OK].Note: When a Macro is ”Called”, the next step does not run until the Called macro is complete.
▼ Stop Macro Stops a macro’s progression. When selected as a macro step a Macro list is displayed.
a. Highlight the Macro to be stopped.b. Click [OK].
6. Add additional steps as required.
7. Click [OK] to record macro.
Note: Use the [Move Up] and [Move Down] buttons to change the order of highlighted macro steps. Use the [Remove Step] button to delete a macro step. [Copy Step] will duplicate selected step and [Run Step] will run highlighted step in the Macro.
8. Enter the Number of Iterations. This number will determine the number of times the macro will loop.
This function will only work if Loops are added to steps. See Call Macro.
9. Click [OK].

Unison Light Manager User Manual - version 1.65 61
To edit macro steps
1. Select the Show Room List option from the Room menu.
2. Highlight the macro to edit.
3. Click [Edit]. The Edit Macro screen appears.
4. Highlight the step to edit.

62 Electronic Theatre Controls, Inc.
5. Click [Edit Step]. The associated step screen appears.
6. Make any necessary changes.
7. Click [OK] to save the edited macro.

Unison Light Manager User Manual - version 1.65 63
Programming Astronomical time clock eventsUnison Light Manager provides a powerful integrated astronomical time clock for automating your lighting control. Timeclock events schedules are programmed for each default and custom day type. Default day types include anyday, weekday, weekend, Monday, Tuesday, Wednesday, Thursday, Friday, Saturday, and Sunday.
The time clock activates events based on their relation to sunrise, sunset, a specific time of day or periodic schedule. The Unison Processor automatically calculates astronomical time based on latitude and longitude. To manually set the altitude, longitude and latitude, see the Unison Installation Guide. Depending on the day, default day type schedules are activated. On a Monday, the anyday, weekday and Monday schedules are activated. On a Sunday, the anyday, weekend and Sunday schedules are activated. Each and every calendar day may be programmed through Light Manager to operate an alternate default or custom day type schedule.
64 Electronic Theatre Controls, Inc.
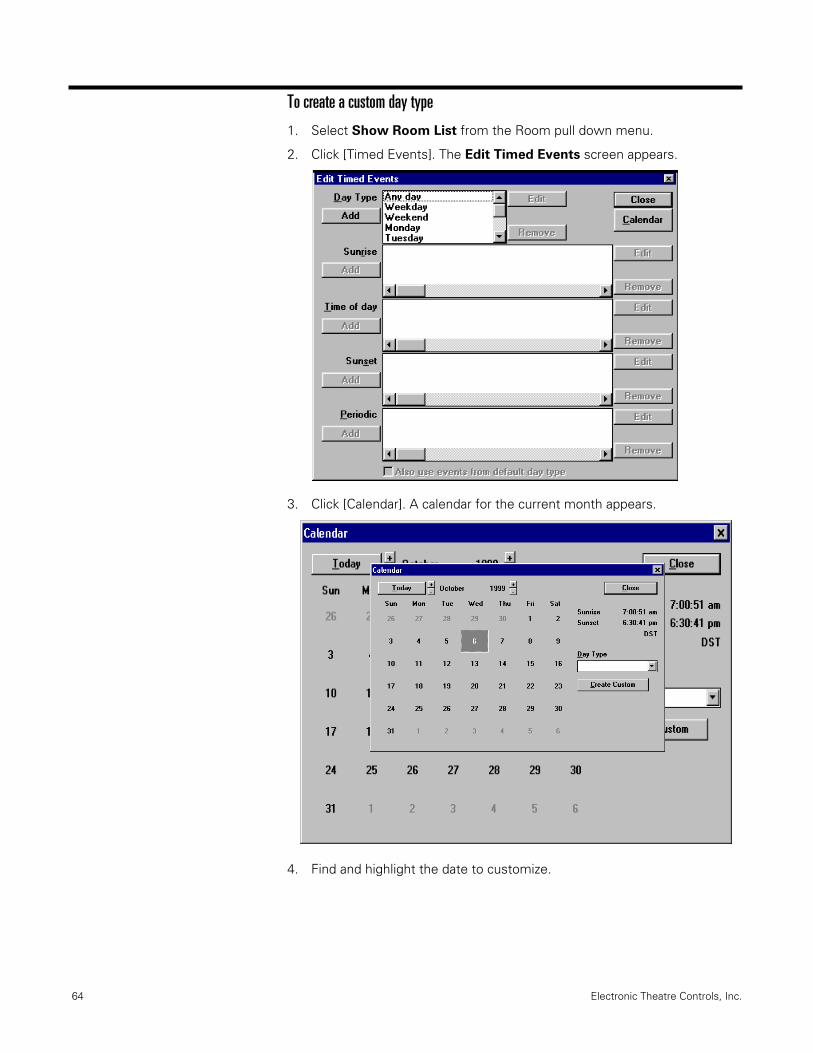
To create a custom day type
1. Select Show Room List from the Room pull down menu.
2. Click [Timed Events]. The Edit Timed Events screen appears.
3. Click [Calendar]. A calendar for the current month appears.
4. Find and highlight the date to customize.

Unison Light Manager User Manual - version 1.65 65
5. Click [Create Custom]. The Day Type screen appears.
6. Enter the Name of the custom day type
7. Click [OK].
8. Click [Close] to return to the Edit Timed Events screen.
66 Electronic Theatre Controls, Inc.
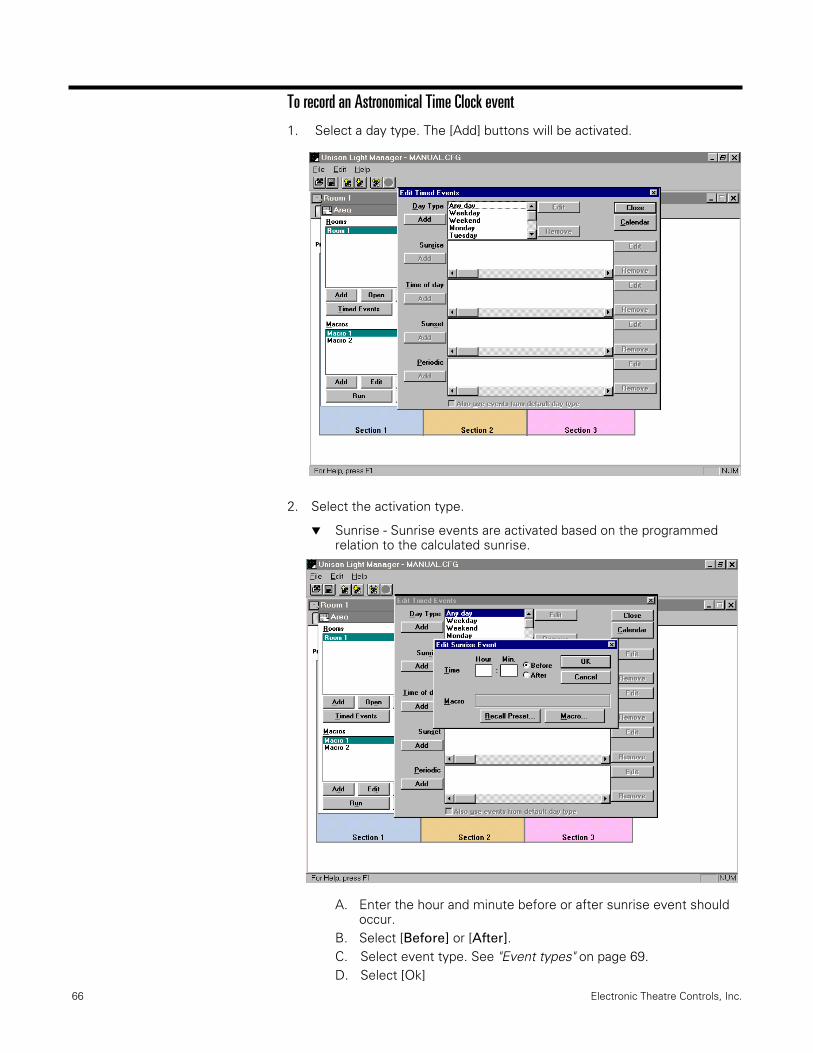
To record an Astronomical Time Clock event
1. Select a day type. The [Add] buttons will be activated.
2. Select the activation type.
▼ Sunrise - Sunrise events are activated based on the programmed relation to the calculated sunrise.
A. Enter the hour and minute before or after sunrise event should occur.
B. Select [Before] or [After].C. Select event type. See "Event types" on page 69.D. Select [Ok]

Unison Light Manager User Manual - version 1.65 67
▼ Time of day - Time of day events are activated at the programmed time of day.
A. Enter the hour and minute event should occur.B. Select am or pm.C. Select event type. See "Event types" on page 69.D. Select [Ok].
▼ Sunset - Sunset events are activated based on the programmed relation to the calculated sunset.
A. Enter the hour and minute, before or after sunset event should occur.
B. Select [Before] or [After].C. Select event type. See "Event types" on page 69.D. Select [Ok].

68 Electronic Theatre Controls, Inc.
▼ Periodic - Periodic events are activated on a programmed interval.
A. Enter the hour and minute interval between events.B. Select event type.C. Select [OK].
3. Repeat steps one and two for each event in all used day types.
▼ Also use events from default day types - check this box if you have programmed a special event, yet also want typical or standard events to occur.

Unison Light Manager User Manual - version 1.65 69
Event types
▼ Recall Preset Activates a pre-recorded preset. When selected as an event the Recall Preset Screen appears.
a. Enter the room name the event will affect from the pull down options:• In the same room in all rooms• One room name from the room list.
b. Enter the section name from the pull down menu options:• In all sections• One section name from the section
list.c. Select preset to recall.d. Enter desired intensity level.e. Enter desired preset activation mode.
The four preset activation modes are:• Last Action – Activates the last selected preset. All previously selected presets are de-activated except Pile-on.• Pile-On – Activates a selected preset. The levels reflect the highest level of any activated preset. Previously selected presets are not de-activated.• Last Action Override – Activates the last selected preset. De-activates all other selected presets including Pile-on.• Deactivate – Unselects the selected preset.
70 Electronic Theatre Controls, Inc.
f. Enter the priority level. This assigns relative priority or importance to control selection based on levels 1-10 (10 is the default priority, 1 is the highest level priority).
g. Enter Fade Time from 0.00 to 1,000 hours.
h. Click [OK].▼ Macro Activates pre-recorded macro. When
selected as a event the Macro List is displayed.
a. Highlight the desired Macro.b. Click [OK].
Unison Light Manager User Manual - version 1.65 71
Saving, loading and transferring configurationsOnce you have written your system configuration, it is important that it be saved and then loaded or transferred to the Unison processor.
Type 2 systems are supported by software versions 1.4 and higher. Version1.6 is the latest release of this software. Type 2 systems use CME or CME(d) processors. These systems use 3.5” diskettes for data transfer.
Type 3 is supported only by versions 1.5 and higher. This type uses a Serial (PC connector) or 3.5” diskettes to transfer configuration information to and from control processors.
Type 4 systems are supported only by version 1.6 software. This type allows you to transfer configuration information through an Ethernet connection, PC interface or 3.5” diskettes.
To save Type 2 Light Manager configurations
From PC to 3.5” disk
1. Insert a 3.5” disk into your A: drive.
2. From the [File] menu, select Save As...
3. Enter the file name and select the A: drive.
4. Click [OK].
From 3.5” diskette to Unison Processor
1. Insert a 3.5” diskette into the control module disk drive.
2. From the control module keypad, scroll to [Load from Disk]. Press [Enter].
3. Select the configuration you wish to load into the control module and press [Enter].
Note: Two bitmap files are automatically created and saved as well: lcdfont0.bmp and lcdgrafx.bmp.
To transfer Type 2 Light Manager configurations using 3.5” diskette
From Unison Processor to 3.5” diskette
1. Insert a 3.5” disk into the control module disk drive.
2. From the control module keypad, use the up and down keys to scroll to [Save to Disk]. Press [Enter].
3. Press [Enter] and choose your configuration file name that you wish to save on a disk and press [Enter].
From 3.5” diskette to your PC
1. Insert 3.5” diskette into A: drive.
2. Select Open from the [File] menu.
3. Select drive A: and the file name.
4. Click [OK].
72 Electronic Theatre Controls, Inc.
To transfer Type2 - Type 4 Light Manager configurations using PC connector station
From your PC to the Unison processor
1. Insert PC serial cable into PC Connector station
Note: Light Manager cannot be running when you make the serial connection.
2. Open Light Manager, then select Save to Serial Unison Processor from the File menu.
3. Light Manager displays a progress dialog box.
From the Unison processor to your PC
1. Insert PC serial cable into PC connector station.
2. In Light Manager, select Load from Serial Unison Processor from the File menu.
3. Light Manager displays progress dialog boxes. Configuration will be opened as an untitled configuration.
To transfer Type 4 Light Manager configurations using an Ethernet connection
1. To send configuration data to a specific processor, from the File menu select Save to Networked Unison Processor...
...or
2. To send configuration data to all processors connected to the network, form the File menu select Save to Online Networked Unison Processors...
3. Light Manager displays a progress dialog box.

Unison Light Manager User Manual - version 1.65 73
Printing configurationsTo print the information in your configuration, press F12. This will create a file called “Config.txt” in the same folder that has the Lightman.exe file. This file contains the number of Presets, Rooms, Zones, Stations and Station ID numbers. Once the file has been created, you can double click on the Config.txt file to open it. If you need to print information on more than one configuration, save each “.txt” file with a different name. Otherwise you will replace the file each time you save.

74 Electronic Theatre Controls, Inc.

Unison Light Manager User Manual - version 1.65 75
Chapter 4Advanced System Programming
In larger or more complex systems, Light Manager can be used to program a variety of elements designed to customize system operation. Advanced elements include lockout/visibility levels, preset priorities, templates, and networked system operation.
Lockout valuesLockout values are used to provide electronic security for your lighting control system. A numeric value between 0-100 may be assigned to each station and each component on a station. The default station lockout level is 0. This value may be re-programmed in the station property screen or via a macro sequence step. Component lockout values are programmed in Light Manager by right clicking on the desired component and entering the lockout value. Default component lockout values are:
Fader/Preset Recall Station LCD Station
Off button 90 Preset page 80
Preset recall 80 Zone Page 50
Manual button 60 Fader/button 40
Master fader 60 Wall page 40
Zone fader 40 Custom page 40
Record button 20 Record 20
Single components or complete stations may be locked out based on station lockout levels and component lockout values. When the station lockout level is higher than one of its component lockout values, that component will be “locked out” and will not work. If a button is locked out, you will see the LED flash quickly. The station lockout level will be displayed in the station window title bar.
When an LCD page is “locked out” the system displays a security key pad. The page may be unlocked with the entry of the unlock code. Unlock codes are programmed in the LCD page property screen. The unlock code is a one to four digit number. The default unlock code is 0. The page will re-lock when a different LCD page is selected.
Visibility levelsVisibility levels are used to provide additional security for your LCD touch screen. A numeric value between 0-100 may be assigned to each LCD page or component. This level may be re-programmed in the page property screen or by right clicking on any component. When the station lockout level is higher than a page or component visibility level, that LCD page or component will no longer be displayed.
The default visibility levels are:
LCD Station
Preset page 80 Wall page 40
Zone Page 50 Custom page 40
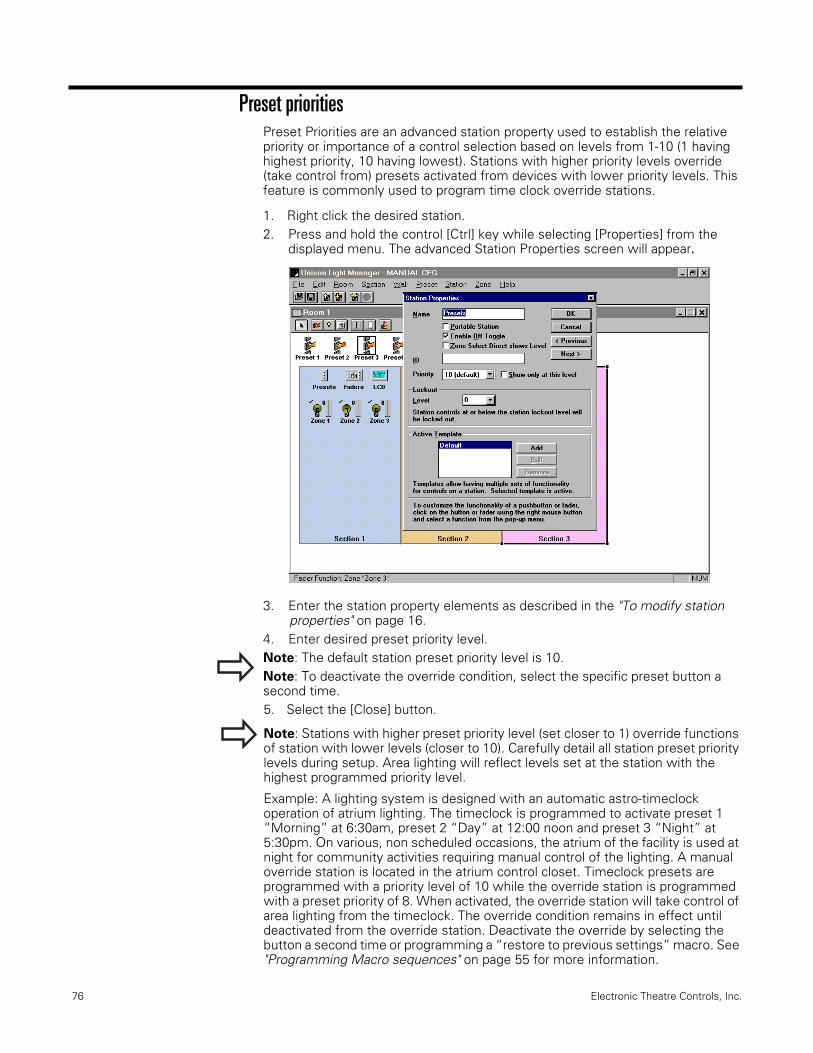
76 Electronic Theatre Controls, Inc.
Preset prioritiesPreset Priorities are an advanced station property used to establish the relative priority or importance of a control selection based on levels from 1-10 (1 having highest priority, 10 having lowest). Stations with higher priority levels override (take control from) presets activated from devices with lower priority levels. This feature is commonly used to program time clock override stations.
1. Right click the desired station.2. Press and hold the control [Ctrl] key while selecting [Properties] from the
displayed menu. The advanced Station Properties screen will appear.
3. Enter the station property elements as described in the "To modify station properties" on page 16.
4. Enter desired preset priority level.Note: The default station preset priority level is 10.Note: To deactivate the override condition, select the specific preset button a second time.5. Select the [Close] button.
Note: Stations with higher preset priority level (set closer to 1) override functions of station with lower levels (closer to 10). Carefully detail all station preset priority levels during setup. Area lighting will reflect levels set at the station with the highest programmed priority level.
Example: A lighting system is designed with an automatic astro-timeclock operation of atrium lighting. The timeclock is programmed to activate preset 1 “Morning” at 6:30am, preset 2 “Day” at 12:00 noon and preset 3 “Night” at 5:30pm. On various, non scheduled occasions, the atrium of the facility is used at night for community activities requiring manual control of the lighting. A manual override station is located in the atrium control closet. Timeclock presets are programmed with a priority level of 10 while the override station is programmed with a preset priority of 8. When activated, the override station will take control of area lighting from the timeclock. The override condition remains in effect until deactivated from the override station. Deactivate the override by selecting the button a second time or programming a “restore to previous settings” macro. See "Programming Macro sequences" on page 55 for more information.

Unison Light Manager User Manual - version 1.65 77
Zone propertiesThe Link Code is an advanced feature of Zone/Dimmer Properties which allows you to specify a master/slave configuration. Master numbers are always 10, 20, 30, up to 120 and so on. A zone master always masters the next 9 zones.
To use this function, hold down the [Ctrl] button while selecting Zone/Dimmer
Load Properties.
Example: A zone with a Link Code of 10 will master any zones with a Link Code between 11-19. Zones with a property of 21-29... will be mastered by a zone with a Link Code of 20 and so forth.
Note: Using Link Codes to provide master/slave zones is the preferred method of controlling multiple zones on a fader.

78 Electronic Theatre Controls, Inc.
Station templatesTemplates are station properties that refer to a specific set of programmed component functions. Light Manager supports the programming of multiple “templates” for each control station. For example, a five button station is programmed to select the default presets 1-4 and off. Via a macro, the station programming or template may be changed to select presets 5-8 and off. It is important to note that the large station graphic always displays the default template legending. The active template name is indicated in the title bar on the graphic station.
To add a station template
1. Right click on station and select [properties].
2. Select Add from the Active Template Section.
3. Enter the new template name.
4. Select the [OK] button.

Unison Light Manager User Manual - version 1.65 79
To activate alternate template1. Right click on station and select [Properties].
2. Highlight desired template.
3. Select [OK]. The graphic station title bar displays the name of the alternate template.
Station templates may also be activated either by a Macro or Time Clock event.
To program alternate templates
1. Activate desired template using the steps above.
2. Program the station as detailed in "Programming control stations" on page 26.

80 Electronic Theatre Controls, Inc.
Cross-station controlCross-station control allows you to assign host or master functionality of components from one station to another station. This is useful when programming large custom stations.
For example, if you use two 10-fader stations to control a 20-zone room, you could have the Record or Master fader functions hosted or mastered at one station to control both.
To program cross station control
1. Double click the “slave” (or controlled) station.
2. Select the “host” (or mastering) station. Do not open this station.
3. Press [Ctrl] and right click on the desired component. The function list is displayed.

Unison Light Manager User Manual - version 1.65 81
4. Select Host this control. Possible host stations will be displayed.
Note: For full station mastering, change Step 4 to select Host all controls.
5. Select host (or mastering) station.
6. Repeat for all slave stations.
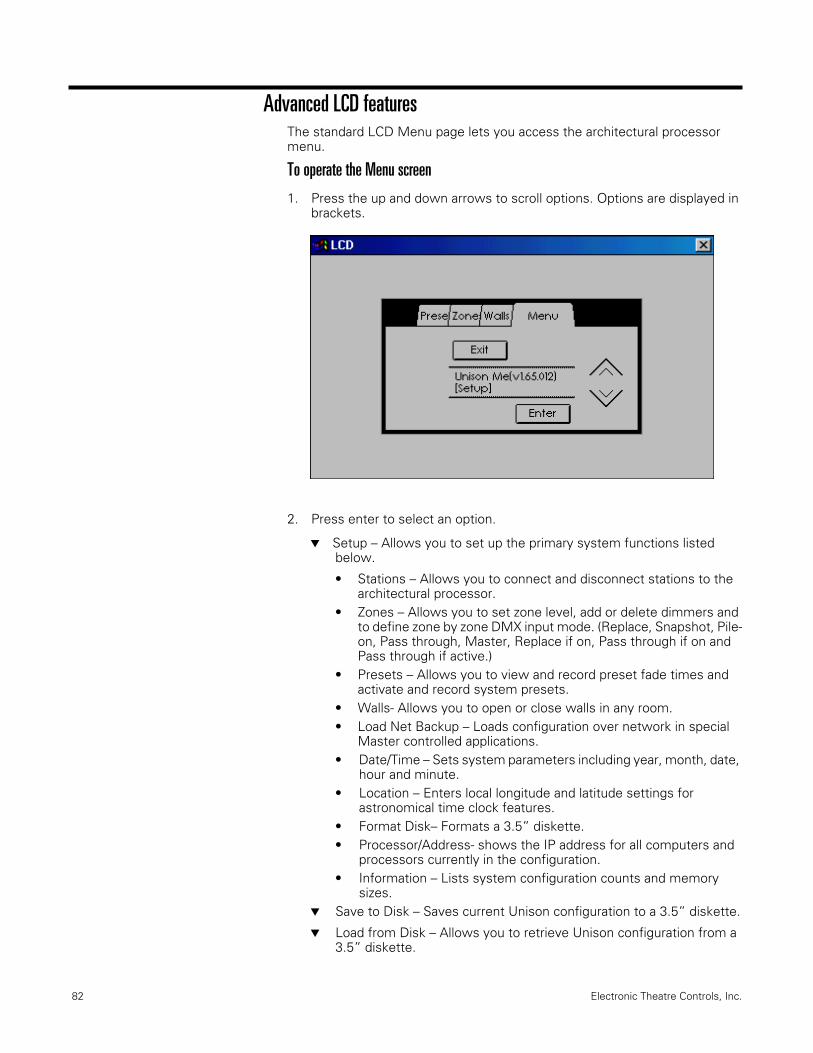
82 Electronic Theatre Controls, Inc.
Advanced LCD featuresThe standard LCD Menu page lets you access the architectural processor menu.
To operate the Menu screen
1. Press the up and down arrows to scroll options. Options are displayed in brackets.
2. Press enter to select an option.
▼ Setup – Allows you to set up the primary system functions listed below.
• Stations – Allows you to connect and disconnect stations to the architectural processor.
• Zones – Allows you to set zone level, add or delete dimmers and to define zone by zone DMX input mode. (Replace, Snapshot, Pile-on, Pass through, Master, Replace if on, Pass through if on and Pass through if active.)
• Presets – Allows you to view and record preset fade times and activate and record system presets.
• Walls- Allows you to open or close walls in any room.• Load Net Backup – Loads configuration over network in special
Master controlled applications.• Date/Time – Sets system parameters including year, month, date,
hour and minute.• Location – Enters local longitude and latitude settings for
astronomical time clock features.• Format Disk– Formats a 3.5” diskette.• Processor/Address- shows the IP address for all computers and
processors currently in the configuration.• Information – Lists system configuration counts and memory
sizes.▼ Save to Disk – Saves current Unison configuration to a 3.5” diskette.
▼ Load from Disk – Allows you to retrieve Unison configuration from a 3.5” diskette.

Unison Light Manager User Manual - version 1.65 83
▼ Diagnostics – Performs a variety of system diagnostics.
Note: Listed below are advanced diagnostic procedures. Only a trained Light Manager operator should attempt to run these.
• Run Macro - Runs selected Macro.• Stop Macro - Stops selected Macro.• Dimmers - Shows levels of input and output DMX512 and EDMX
levels.• Stations - Shows which stations are in use.• All zones off - Turns all active zones off.• Initialize flash - Erase flash memory of processor.• Update software - Uploads currents version of software from a
PCMCIA card. (UPSAC systems only)• Send object model - Sends configuration over network in special
Master controlled applications.3. Press [exit] to back up one step in the menu structure
Note: For more details or flowcharts of control module menus, see the Unison ER and DR Installation Guide.

84 Electronic Theatre Controls, Inc.
Limiting LCD Access
By creating station templates, you can restrict access to certain LCD screens and functions. For more information about creating station template see "Station templates" on page 78.
When a lockout code is entered on an LCD keypad page, if it matches the code of an alternate template, that template becomes active,
Follow these steps to create a sample LCD template with limited access. If you need more information to perform any of the following, see "LCD stations" on page 32.
1. Double click an LCD station.
2. Add a custom page to this station and name it “Login”.
3. Under Edit Page, set the new page’s lockout value to 0.
4. Delete all other pages.
5. In Station Properties, create a new template with a four digit or less numerical name. (e.g., 1234)
6. Keep that template highlighted, close that window and open the LCD station. Notice the LCD’s name has changed, reflecting the templates name.

Unison Light Manager User Manual - version 1.65 85
7. Add a standard page to the station.
8. Create another station template with another numerical name.
9. Add a different standard page to that station.
10. Set the station template back to Default.
11. Open the LCD station, right click on “Login” and select Set as Timeout Page”.
Now, if you enter the code (name) for one of the templates, the screen will change to that template. If you wait for the timeout, it will return to “Login”.
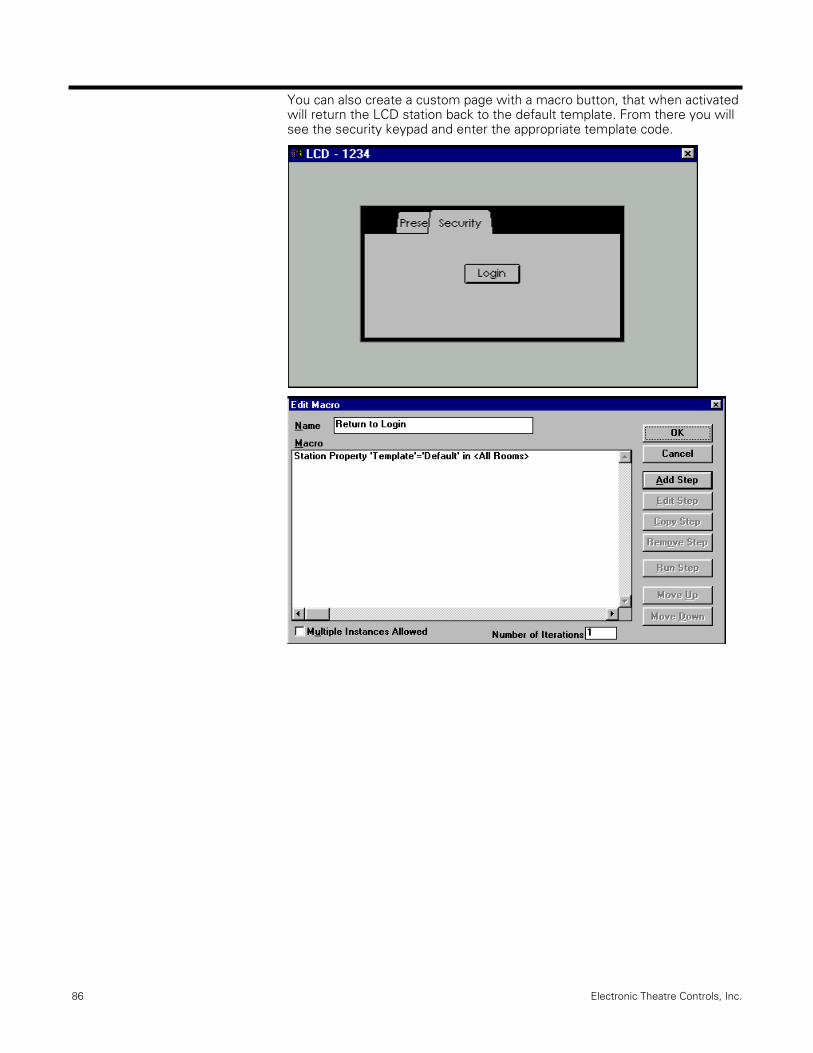
86 Electronic Theatre Controls, Inc.
You can also create a custom page with a macro button, that when activated will return the LCD station back to the default template. From there you will see the security keypad and enter the appropriate template code.

Unison Light Manager User Manual - version 1.65 87
DMX512 Input MacrosBy holding down the [Ctrl] key while pressing F12, you can open a dialog box that allows DMX input macros to be programmed.
There are two types of input macros; acquisition or loss of DMX512 and by a single DMX512 channel activation.
The first type works on Acquire/Loss of DMX512. This would entail creating two different macros for either situation. When a valid DMX512 input signal is sensed the first macro is run. When the DMX512 signal is no longer sensed, the second macro is run. This is very useful for functions that are tied into activation of a console, like changing DMX input modes or locking out all but the specific stations.
The second type of DMX input macro is activated by a single DMX512 value. When that value goes above 0, the first macro will run. When it goes back to 0, the second macro will run. The DMX512 value that this trigger is set on the dialog box above.
Note: Some consoles do not output a true DMX “0”, and will not be able to use this feature.

88 Electronic Theatre Controls, Inc.
Access - Securing Light Manager configurationsIn systems with direct serial input stations, it may be desirable to limit system functions available through Light Manager.
1. Select Access from the File pull down menu. The password screen will appear. Enter only pre-programmed passwords in displayed field. If a password has never been programmed select the [OK] button. The Access window will be displayed.
2. Select Full Access if no user limitations are required.
OR
2. Select Reduced Access if user limitations are required.
▼ Select the [Settings] button to detail system limitations. The System Access window will be displayed.
▼ Check the functions required in reduced access mode. Those functions not checked will be unavailable.
▼ Select the [OK] button to return to the Access window.
3. Select the [change password] button to program or change Access password. Password must be 1-20 alpha numeric characters. The system will require verification entry of password.
Note: It is important to document programmed passwords for future reference to prevent accidental lockout. The Job Information notes under the File menu may be a good place to store these.
4. Select the [OK] button.

Unison Light Manager User Manual - version 1.65 89
Chapter 5Understanding Network Systems
Unison utilizes the ETCNet2 Ethernet protocol (EDMX), which allows several different types of DMX512 devices to negotiate dimmer control. In most cases there are more than 512 dimmers to control and Unison is “sharing” the network with an ETC Obsession control console. Since there are more than 512 dimmers and 512 DMX values, a second (or more) architectural processor (CMEi) is added to the network. The CMEi(s) can send and receive both DMX512 and EDMX. Between these two facets of a network, DMX512 and EDMX levels can be received, sent and redirected throughout all devices connected to the network.
Unison networked systems are comprised of multiple architectural processors linked together on an Ethernet network. The CMEi architectural processor supports termination of UTP (10Base-T) or ST style Fiber Optic 10Base-FL wiring. Linked in this manner, system nodes share commands and information including preset activate, preset record, preset fade time, zone levels, macro activate, stop macro, stop all macros, wall state and time.
Additionally, any CMEi processor may have control of any DMX512 value on a DMX-out port of another CMEi via the EDMX protocol. This DMX512 value corresponds to a specific dimmer which in turn controls the light(s). You have the option of taking control of any dimmer in the system, regardless of “who” had control of it previously. Obsession and Unison work together to assign and reassign dimmer control through the CMEi processors, nodes, consoles and any other device with the ability to send DMX512 levels.
In networked systems, just one configuration is built that will be split up for control by each architectural processor (CMEi) on the network.

90 Electronic Theatre Controls, Inc.
Networking example
ENTER
LIGHTING CONTROL SYSTEM
EXIT
UNISON
ENTER
LIGHTING CONTROL SYSTEM
EXIT
UNISONENTER
LIGHTING CONTROL SYSTEM
EXIT
UNISON
ENTER
LIGHTING CONTROL SYSTEM
EXIT
UNISON
7x
1x
12
6x
MDIX
MDI
12
6
7
1
Status
8
2
9
3
1110
4 5TCVR Packet Collision Power
Entry HubSUPER STACK I
ER4
ER4ER4
ER4
Network Hub
IP address10.10.1.33
IP address10.10.1.XX
IP address10.10.1.35
IP address10.10.1.34
IP address10.10.1.32
Room 3DMX start 1025
Room 4DMX start 1537
Room 2DMX start 513
Room 1DMX start 1
EthernetUnison Link Power

Unison Light Manager User Manual - version 1.65 91
Setting up a networked Unison configurationUsing the example on the facing page, the configuration has been planned and laid out to include four different rooms, each having it’s own ER4 processor (CMEi) and Unison stations for zone control. The processors and computer are connected the network via Ethernet. The processors will each have their own “universe” of DMX or EDMX. The stations are connected to the ER4 processors via the Unison Link Power protocol.
Follow these steps to create a four-room network Unison Configuration.
1. Begin a new configuration and use the Room Wizard to create four rooms.
Note: In the Room Wizard-Zones dialog, change the Start DMX for Rooms 2-4 to the following:
Room 2 = 513Room 3 = 1025Room 4 = 1537

92 Electronic Theatre Controls, Inc.
2. In each Room, you will need to select which processor(s) will be controlling that Room. The default setting is Automatic based on DMX-out port usage.
If you want to select a different processor, select Manual. If more than one processor will be controlling that Room, select Multiple and highlight the appropriate processors.
3. Under the File Menu, open the Network Settings dialog and do the following:
▼ Highlight Computer and ensure that the Enabled and Computer (PC) boxes are checked.
▼ Other processors may not be enabled. To enable, highlight those processor names, and check the Enabled box. Their information can now be viewed.
▼ You may need to change the IP addresses for the computer and processors. Highlight each component and manually type in the correct address in the IP address box.

Unison Light Manager User Manual - version 1.65 93
To set processor network addressesThe following section outlines the network settings for a single or multiple processor system. Many of the options default to a setting that will enable you to set up your system quickly and easily.If you require a more extensive networked configuration, such as customized IP addresses, or connecting your Unison network to an external network, you will need to contact ETC.Note: When 1.6 External Architectural Control (EAC) Code is installed into a processor, the processor defaults to being a computer in the Network Settings. Each networked processor must be manually set at it’s face panel to a unique processor address (e.g. Processor 3).▼ In the Light Manager configuration, go to the [File] pull down menu and
select Network settings. The Network Settings dialog will be displayed.
The following Multicast Addresses are used to send a single message to many on-line devices. In Unison network systems, these messages are used to determine which processors are on line, who is in control of an EDMX channel and to broadcast commands to networked processors. Changing these addresses will cause multicast messages to be lost and processors to respond randomly at best▼ Node status multicast IP address: The IP multicast address is used to
determine which processors and PCs are online. This address should remain at its default setting.
▼ EDMX administration multicast IP address: The IP multicast address is used for EDMX administration. This address should remain at its default setting.
▼ Mimic multicast IP address: The IP multicast address is used for Unison Mimic protocol. This address should remain at its default setting.
▼ Unison Serial Access Protocol Baud Rate (USAP): Allows setting the speed of the USAP interface.USAP is a communication protocol that allows a device capable of outputting RS-232 protocol to interface with a Unison Lighting Control System. USAP is a “polled” system, meaning that it accepts commands from a transmitter and provides status when queried.

94 Electronic Theatre Controls, Inc.
▼ Enable ETCLink: Check this box if you want the capability to send and receive Sensor ETCLink information through the control processors. If you are using this function, please contact ETC.
▼ Reboot: Allows you to reboot a processor from within Light Manager. You must select the processor then [Reboot].
▼ Processors: Lists the processors and PCs used in the configuration. Select a processor to see its properties in the fields below.
▼ Name: The name of the processor or PC. If the processor is currently online, a “>” symbol will appear in front of the name. You can change the name of the processor by clicking in that field and typing the new name.
▼ Enabled: Only enabled processors are considered part of the configuration. By default, only one processor is enabled in the configuration besides the PC.
To enable more than one processor, highlight that processor and check the Enabled box.
▼ Computer (PC): Check this box if the network address is used for a PC and not a Unison processor.
▼ The [Get Stn ID’s] button will cause all of the wallstations connected to the processor to re-connect and update the station ID properties in Light Manager.
Note: Once the configuration is saved, wallstations will automatically bind on subsequent downloads.
▼ Status indicators:
Version: Shows the operating code version in the processor (only shown if the processor is online.)
Online: Shows the last time the processor came online.
Offline: Shows the last time the processor went offline.

Unison Light Manager User Manual - version 1.65 95
▼ IP address: The IP address of the PC or processor. If you are using a private or closed network, you may use the default settings for each processor you will be using.
▼ IP mask: The IP mask of the processor. The chart below shows the different mask classes. The default ETC IP address will always use Class A.
Class A IP addresses: 255.0.0.0
Class B IP addresses: 255.255.0.0
Class C IP addresses: 255.255.255.0
▼ IP mask [Set All]: This sets all the processors to the indicated IP mask. If all the processors are on the same subnet, select [Set All] to assign them all the same IP mask.
▼ IP gateway: The IP address of the gateway or router to other subnetworks. The ETCNet2 protocols, and the Unison mimic protocol can be routed between IP subnetworks, providing the routers support multicast IP (IGMP).
Note: If you are using the default settings, leave the default IP gateway field blank.
Note: If you are routing Unison data through a Hub in your network, the IP gateway should be the same as the processor’s IP address.
▼ IP gateway [Set All]:This sets all of the processors to the indicated IP gateway. If all the processors are on the same subnet, select [Set All] to assign them all the same IP gateway setting.
▼ EDMX data IP: The multicast IP address used for EDMX data distribution from the selected processor. This must be unique for each processor and not used by other EDMX sources or other protocols on the network. You may use the default settings.

96 Electronic Theatre Controls, Inc.
▼ DMX-out start: The starting EDMX value for the processor’s DMX-out port. Notice that if you pull down the menu, the numbers are in increments of 512; however, any number from 1 to 32,256 may be used.
The DMX-out port may also be “split” between two ranges of EDMX values. To do this, enter two numbers separated by a slash (“/”). The first number is used for the first 256 DMX channels, and second for the remaining 256 DMX512 channels. e.g., 1/513.
Note: The second digit must be at least 512 above the first digit.
▼ DMX-out Local Priority: If you check this option, the DMX-out port gives priority to the Unison level over the EDMX level. This is useful for DMX Input modes such as Pile-on.
By not setting this option, you are letting the EDMX source control the level.
▼ Include in EDMX: When checked, this features only enables Unison to accept individual dimmer levels from an ETC Obsession control console. Unison processors do not respond to EDMX from each other. For most networked systems, this option should be checked.
Note: Either Local Priority or Include in EDMX must be checked in order for the Unison processor to output DMX.
▼ DMX-in start: The starting EDMX value for the processor’s DMX-in port. The levels on the DMX-in port are used for Unison zone input patches and are not automatically output as EDMX.
▼ DMX-in Local Priority: If a level is available at both the DMX-in port and from EDMX, this setting determines which has priority. If this is checked, the local DMX-in port will be used. If not checked, the EDMX level will be used.

Unison Light Manager User Manual - version 1.65 97
Advanced Network SettingsThe Advanced Network Settings dialog is used to override settings or change objects that are visible through the OMM protocol interface.
To open the Advanced Network Settings screen, hold down the Control [Ctrl] key while selecting Network Settings under the File menu.
OMM visibility
The Object Model visibility interface is used for ETCLink messages from Sensor racks connected via ETCLink. The OMM visibility gives you the option of which objects you want the CMEi(s) to make available to an OMM client (Master Controller or CUDI).
OMM CID override The default CID is the last number of a processor’s IP address. You would want to override this number only if your network requires it, and then only if you are loading configurations one by one into the networked processors. No two processors on the network should have the same CID.
Once you have changed your CID, save that configuration to a floppy disk and load it into the appropriate processor.
MAC Address overrideAs with the CID, override this address only if your network requires it, and then only if you are loading configurations one by one into the networked processors. No two processors should have the same MAC address.
Once you have changed your MAC address, save your configuration to a floppy disk and download it to the appropriate processor. The processor will automatically translate the number to Hexadecimal.
Warning: CID and MAC overrides will affect all processors in a configuration.

98 Electronic Theatre Controls, Inc.
To set PC network addressesa. Select Settings/Control Panels from the Windows Start menu. The
Control Panel Screen appears.
b. Select the Network Icon. The Network screen appears.
c. Select the TCP/IP. The TCP/IP Properties screen appears.

Unison Light Manager User Manual - version 1.65 99
d. Select the IP Address page tab.
e. Select the Specify an IP address radio button.
f. Enter IP address. The IP address must be unique to the specific node and no other processors or PC’s can have the same address.
IP ADDRESS: 10.10.13.155
g. Enter Subnet Mask. This number must be entered as detailed below.
SUBNET MASK: 255.255.255.0
4. Load Configurations into Individual Processors. See "Saving, loading and transferring configurations" on page 71 for details in loading configurations from disk. If Network Settings have been modified, reset processor by selecting the [Reset] button on the control module.
Note: If a processor’s network address is outside the default range (10.10.20.1 - 10.10.20.64), a floppy disk with a configuration containing the processor’s network address setting must be loaded into that processor. The processor’s address must be set using the [Processor Address] command. From then on, the configuration may be transferred over the network.
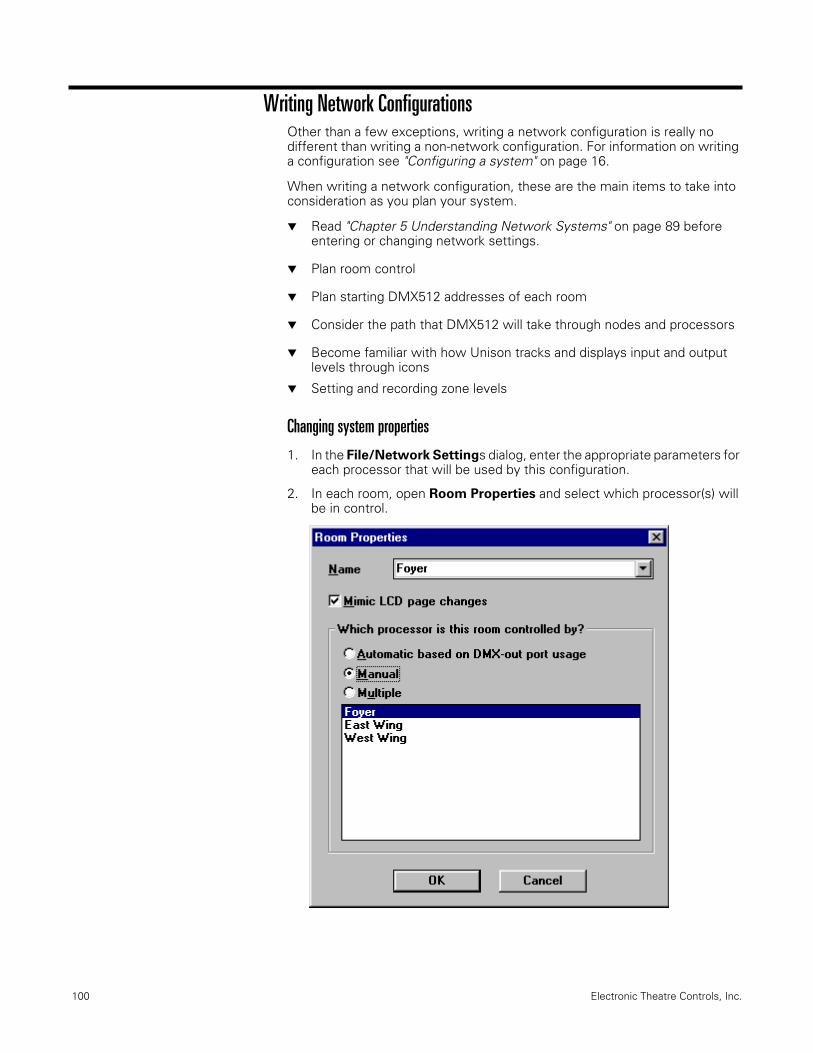
100 Electronic Theatre Controls, Inc.
Writing Network ConfigurationsOther than a few exceptions, writing a network configuration is really no different than writing a non-network configuration. For information on writing a configuration see "Configuring a system" on page 16.
When writing a network configuration, these are the main items to take into consideration as you plan your system.
▼ Read "Chapter 5 Understanding Network Systems" on page 89 before entering or changing network settings.
▼ Plan room control
▼ Plan starting DMX512 addresses of each room
▼ Consider the path that DMX512 will take through nodes and processors
▼ Become familiar with how Unison tracks and displays input and output levels through icons
▼ Setting and recording zone levels
Changing system properties
1. In the File/Network Settings dialog, enter the appropriate parameters for each processor that will be used by this configuration.
2. In each room, open Room Properties and select which processor(s) will be in control.
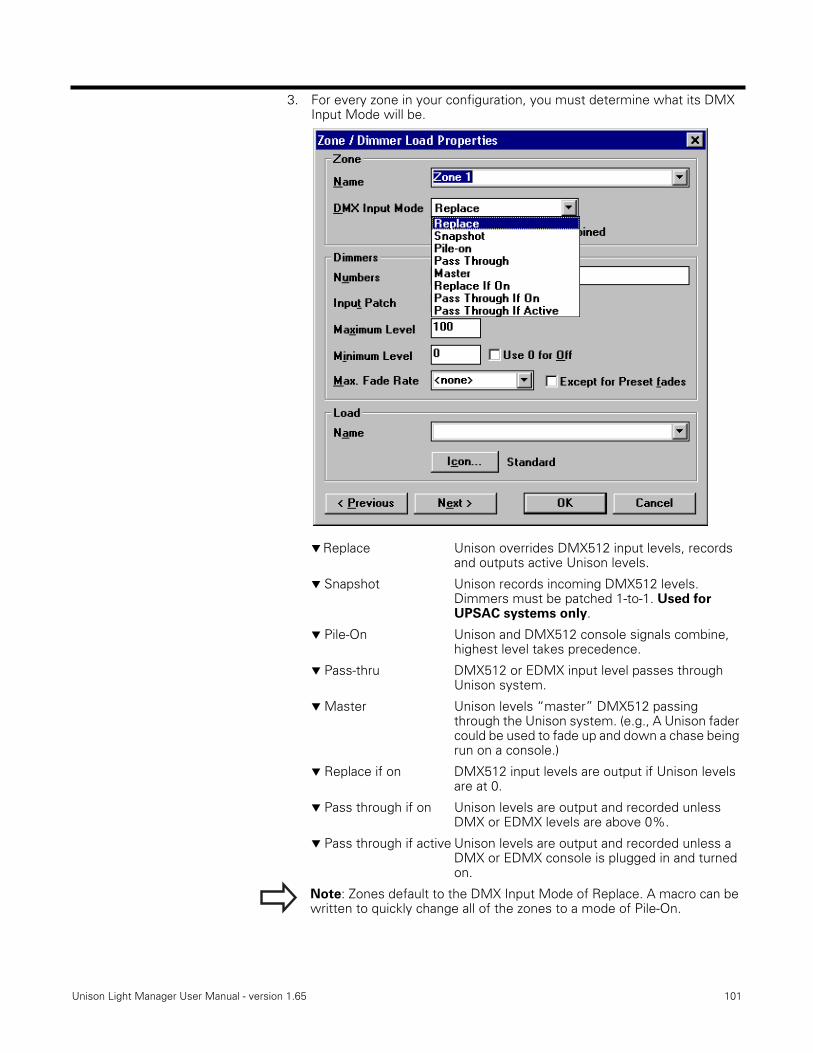
Unison Light Manager User Manual - version 1.65 101
3. For every zone in your configuration, you must determine what its DMX Input Mode will be.
▼ Replace Unison overrides DMX512 input levels, records and outputs active Unison levels.
▼ Snapshot Unison records incoming DMX512 levels. Dimmers must be patched 1-to-1. Used for UPSAC systems only.
▼ Pile-On Unison and DMX512 console signals combine, highest level takes precedence.
▼ Pass-thru DMX512 or EDMX input level passes through Unison system.
▼ Master Unison levels “master” DMX512 passing through the Unison system. (e.g., A Unison fader could be used to fade up and down a chase being run on a console.)
▼ Replace if on DMX512 input levels are output if Unison levels are at 0.
▼ Pass through if on Unison levels are output and recorded unless DMX or EDMX levels are above 0%.
▼ Pass through if active Unison levels are output and recorded unless a DMX or EDMX console is plugged in and turned on.
Note: Zones default to the DMX Input Mode of Replace. A macro can be written to quickly change all of the zones to a mode of Pile-On.

102 Electronic Theatre Controls, Inc.
4. Also in the Zone/Dimmer Load Properties dialog, you need to set the zone’s dimmer number(s) and Input Patch.
▼ Dimmer numbers
Enter DMX512 or EDMX output patch dimmer numbers to be controlled together.
List dimmer numbers individually, separated with a space or comma, or list dimmer number ranges, separated with a dash.
▼ Enter the Input Patch
▼ DMX dimmer number.
The Input Patch will redirect the dimmer to the Output Patch dimmer number (above). If no Input Patch number is given, the Output Patch is used.
Example: There are several dimmer racks throughout the building that all have a “dimmer 1” in them. In this case, the input patch would be “dimmer 1”, but the output patch may be EDMX value 2000. Since there can only be one sender of information (dimmer 1), redirection to EDMX 2000 eliminates the chance of multiple “dimmer 1” senders of trying to all send out information to a specific zone.
Note: Although the output patch can have multiple dimmers, the input patch is just one dimmer number.

Unison Light Manager User Manual - version 1.65 103
Transferring configurationsAs you change of your configuration, you must update the processor(s) in one of the following ways. For more information, see "Saving, loading and transferring configurations" on page 71.
▼ File | Save for Processor...
This allows you to select a processor to write a configuration file for. The file may then be loaded into the processor via a floppy disk.
▼ File | Save to Networked Unison Processor...
Allows you to select a processor to have the configuration sent to.
▼ File | Save to Online Networked Unison processors
Sends configuration updates to all online processors, one at a time.
Note: If a processor’s network address is outside the default range (10.10.20.1 - 10.10.20.64), a floppy disk with a configuration containing the processor’s network address setting must be loaded into that processor. The processor’s address must be set using the [Processor Address] command. From then on, the configuration may be transferred over the network.
▼ Save to Serial Unison processor
Sends configuration data through a PC interface station to the local processor in which that PC interface is connected.
Working with Networked ConfigurationsOnce you have your system configured, saved and downloaded to the processors you will notice that the zone icons change to indicate whether or not you are in Live Control.
The zone level is not being controlled in Live Control
The zone level is being controlled in Live Control.

104 Electronic Theatre Controls, Inc.
Setting and recording zone levels in Live Control
To set and record levels in Live Control you must have the “master” Online indicator selected. You will notice that each room in your configuration also has its own online button that turns green when the “master” indicator is selected. This indicates that at least one of the processors that controls that room is online.
Adjusting levels online is helpful when you want to see what affect your changes will have. In a networked system, even though you are in live control, you may not be able to see your changes. This depends in what the source of control is coming into the zone (e.g., DMX512 or EDMX).
If the zone icon does not have a small Unison logo in it, you will not see your changes as you make them. You may still make changes and record a new preset, but you will not be able to view this new preset until Unison has regained control of those zones. For help with network zone icons, see "Working with Networked Configurations" on page 103.
Setting and recording zone levels in Non-Live Control
Non-live control of zones stays the same regardless of whether your system is networked or not. You can still set and record levels in one of the following ways. See "To record a preset" on page 31 for more information.
▼ Adjusting individual levels and recording to a system wide preset
▼ Using the stations within Light Manager to set and record individual section presets.
Master Online Indicator
Room Online Indicator

Unison Light Manager User Manual - version 1.65 105
Chapter 6Glossary
Activate - Initiates fade of preset or starts macro sequence.
Astronomical Time Clock - Time clock that activates events (presets or macros) based on sunrise and sunset.
Background Image - A 256x128 black and white monochromatic Windows bitmap (.bmp) file created for use in the LCD.
Cancel - Deactivates a selection.
CEM - The Control Electronics Module used in SR series racks.
CME(d) - The dimming and extended architectural control module used in Unison dimming racks.
CMEi - The extended architectural control module with Networking functions.
Combining through selected walls - Function that allows programming of “wall logic” in a room with moving partitions or walls.
Configuration Wizard - A series of questions and dialog boxes regarding the space you would like to configure.
Connector - Device that adjoins peripheral equipment to control network.
Control Page - Tabbed pages on an LCD.
CPU - Central Processing Unit.
Custom Control Page - Non-standard control page on an LCD.
Default - The factory set configuration.
Direct - Refers to input from maintained dry contact closure.
DMX - Acronym for Digital Multiplex, a communication standard developed for theatrical lighting.
DMX Routing Mode - Process of routing DMX input into the CEM or Unison processor.
EDMX - DMX distributed over Ethernet.
Enable off toggle - Activates the alternate action of preset select switches and off.
Events - Presets and/or macros, either manually or automatically activated.
Fade time - Programmed interval of time from the activation to the completion of an event.
Fader - A graphic or mechanical slide potentiometer which is used to vary individual or multiple zone lighting levels. Usually calibrated on a 0-100 scale.
106 Electronic Theatre Controls, Inc.
Icon - Graphic element of Light Manager software.
Last action - A preset activation mode that activates a preset and cancels previous presets except Pile-on types.
Last action override - A preset activation mode that activates a preset and cancels previous presets including Pile-on types.
LCD - A Unison touchscreen control station using liquid crystal display technology.
LED - Light emitting diode used to indicate button and fader status.
Link when sections combined - A Zone property. When selected, joins control of like zones of adjacent sections when the partition separating them is opened.
Lockout - Programmable electronic security for buttons, faders and LCD pages.
Lockout direct - Electronic security controlled by an input from a maintained dry contact closure.
Lower - Control function that incrementally reduces light output.
Macro - A recorded sequence of events. Macros may be activated manually or via the astronomical time clock.
Manual - Individual zone control of lighting through slide or graphic faders.
Master fader - A slide fader assigned to proportionately control area lighting zones.
Maximum level - Zone property that allows you to program the highest level that the controls may drive a zone.
Mimic - Station property which allows changes in the programming of one station to take affect in others.
Minimum level - Zone property which allows programming of the lowest level that the controls may drive a zone. Often used for programming low light levels for limited range light sources,
Page Lockout - Electronic security for LCD pages.
PCMCIA Card - An SRAM data card used for storing and transferring configuration and bitmap images. Used for SR Series systems with an integrated UP-SAC processor.
Pile-On - Preset activation mode where multiple presets can be activated. Zone levels are set by the highest level of active presets.
Preset - A recorded set of lighting zone intensities, including a programmed fade time.
Preset recall - Activates the selected preset in a last action manner.
Preset toggle - Activates the selected preset in a pile-on manner.

Unison Light Manager User Manual - version 1.65 107
Properties - Specific parameters associated with rooms, stations, presets, zones, sections and walls.
Raise - Control function that incrementally increases light output.
Record - Control function that saves zone, sequence or time clock information.
Room - Area of control.
Room combine - Control function designed for joining and separating the lighting controls of adjacent sections based on the position of moving walls.
Room list - Display window detailing all rooms of a single configuration.
Section - Divided area of a room separated by moving partitions.
Source or Zone Source - Used in a networked configuration to keep track of which “object” is controlling or outputting levels. (e.g., Unison, DMX or EDMX)
Station - User control device.
Station ID - A 12-digit identification number that is unique for each station.
Template - Station properties that refer to a specific set of programmed component functions.
Toggle - Alternate action of two functions.
Visibility level - Programmable electronic security LCD pages.
Wait for fade - Function that delays progression of a macro until the previous fade is completed.
Wall - Partition used for dividing a large area or room.
Zone - Control channel.


Unison Light Manager User Manual - version 1.65 109
IndexAAccess, 11, 88Access-Full, 88Access-LCD, 84Access-Reduced, 88Activate, 105Add Standard Page, 36All zones off, 83Astronomical Time Clock 63– 67, 105
Create a custom day, 64– 65Periodic events, 68Record an event, 66Sunrise event, 66Sunset events, 67Time of day events, 67
BBackground Image, 11, 38, 44, 105
CCall Macro, 60CEM, 105CME(d), 71, 105CMEi, 89, 91, 97, 105Combine Sections, 23, 54Combine through selected wall, 54, 105Combine Type, 49Combine Walls screen. 49Configuration Wizard, 105Configurations
Beginning, 16Description, 14Icons
Preset Icon, 14Room Icon, 14Section Icon, 14Station Icon 14Wall Icon, 14Zone Icon, 14
Connector, 105Control stations
Connector stationsPC Interface 45Portable 45
Fader and Preset Recall, 26, 75Fader/Switch contact satellite sta-
tions, 47IR transmitter stations, 48Programming 26
Button assignments, 26Fader assignments, 29
CPU, 105
Custom Day, 64Custom Page, 39
DDate, 41, 82Day, 41Deactivate, 57, 69Delete, 41, 42DMX Input Macros, 87DMX Input Patch, 23, 102DMX512 16, 105
DMX output patch, 23DMX start address 16Input modes
Master, 22, 59Pass through if active, 22, 59Pass through if on, 22, 59Pass-thru, 22, 59Pile-On, 22, 59Replace if on, 22, 59Replace, 22, 59Snapshot, 22, 59
Routing, 22DMX-in Local Priority, 96DMX-in Start, 96DMX-Out, 18, 96
EEdit Macro, 55, 61Edit Timed Events, 64, 65EDMX Data IP, 95EDMX Input Patch, 22, 101EDMX Output Patch, 23, 102EDMX, 22, 83, 89, 91, 93, 95– 96, 101– 102, 104– 105Enable ETCLink, 94Enable Off Toggle, 17, 19, 26, 27, 105Enabled, 92, 94ER4 Processor, 91ETCLink, 97Ethernet, 72, 89, 91Except for Presets, 23Exclude from Preset 15
FFade time, 20, 29, 57, 70, 105Flicker, 20, 21Format Disk, 82Full Access, 88
GGraphic Indicator, 39
HHold down button, 28Host all controls, 28, 30, 81
Host this control, 28, 30, 81
IIcon, 106Icons
Light bulb, 23Presets, 14Sconce, 23See ConfigurationsStations, 14Zones 15Zones, 103
Include in EDMX, 96Include in Preset 15Indicator, 104Information
Configuration, 82Job information 11, 88
Initialize flash, 83IP Address, 92– 93, 95, 97, 99IP Gateway (Set All), 95IP Gateway, 95IP Mask (Set All), 95IP Mask, 95IR transmitter stations, 48
KKeypad
LCD 84Numerical, 31Security, 38, 43Unison Processor, 11, 71
LLabel, 41Last Action Override, 57, 69, 106Last Action, 57, 69, 106LCD
Access, 84Add Standard Page, 36Background Image, 38Custom control pages, 37Custom Page, 39– 42Edit Page, 43Menu Page, 35, 82Page Properties, 43Page Timeout, 38Preset page, 34Screen Features, 44Set as Timeout Page, 38Standard control pages, 33Templates, 84– 86Timeout page 44Walls page, 35Zones Page, 33, 39
LCD stations, 32Legend, 28, 30, 41, 42Light Manager

110 Electronic Theatre Controls, Inc.
Computer requirements 5Display 9Install software 7Programming, 9Saving configurations, 71Securing configurations, 88Transferring configurations, 72Using Stations, 31
Link Code, 77Link Power, 47Link When sections combined, 23, 106Live Control 11– 12, 103, 104
Indicator, 12, 13, 104Load
See also Serial
Load from Serial Unison Processor 12Load from Serial Unison Processor, 72Load Net Backup, 82Location, 82Lockout Direct, 27, 106Lockout Level, 19, 28, 30, 38, 42, 75Lockout Toggle, 27, 41Lockout Value, 19, 38, 43, 75, 84Lockout, 19, 27, 28, 38, 41– 44, 58, 75, 84, 106Lower, 27, 41, 106
MMAC Address, 97Macro 28, 41, 55– 62, 70, 106
Call, 60DMX Input, 87Edit, 61New Macro, 55, 56Number of iterations, 60Run, 83Stop, 83Wait, 60
Macro Direct, 28, 41Macro Toggle, 28, 41Manual
Processor control 18Manual, 27, 29, 75, 92, 106Master Fader, 75, 106Master indicator, 104Master, 22, 29, 59, 77, 80, 101, 106Maximum dimmer level, 29Maximum fade rate, 23, 28, 41Maximum light level, 23, 59, 106Menus
File Menu 10, 11LCD, 35, 82
Pull down 9, 10Windows Start Menu, 98
Merge 11Mimic LCD, 18Mimic multicast IP address, 93Mimic, 106Minimum dimmer level, 29Minimum light level, 23, 59, 106Movable Partitions
See WallsMulticast Addresses, 93Multiple instances allowed, 59Multiple, 92
NNetwork, 11, 103Networking, 89– 101New 11New configuration, 16New Macro, 55, 56New Preset, 13New Section, 13, 52New Station, 13, 47New Wall, 13, 53New Zones, 13No Action, 28, 30, 41Node status multicast IP address, 93Number of Iterations, 60
OOff, 19, 27, 40OMM CID, 97OMM Visibility, 97Open, 11, 12, 57
PPass through if active, 22, 59, 101Pass through if on, 22, 59, 101Pass-thru, 22, 59, 101PC Interface Station, 45– 46, 72PCMCIA Card, 83, 106Periodic Events, 68Pile-On, 22, 57, 59, 69, 101, 106Pointer, 13Portable station connector, 45Portable stations, 19, 45Preset priorities, 76Preset Recall (hard off), 27, 40Preset Recall station, 75Preset Recall, 26, 40, 69, 75, 106Preset Toggle, 27, 40, 106Preset, 29, 31, 82, 106Presets
Description, 15Except for Presets, 23
Icon, 14, 15New Preset, 13Properties, 17, 20Recall, 56Recording, 13, 31System wide, 18
Printing Configurations, 73Processor 18, 71– 72, 82, 91, 94– 97, 99– 100, 103
Manual, 18Multiple, 18Network addresses, 93
ProgrammingBasic 9
Properties 107Fader, 42LCD Page, 34, 43Presets, 17, 20Room, 100Rooms, 17, 18, 20Sections, 17, 24Stations, 17, 19TCP/IP, 98Walls, 17, 25Zones, 17, 22, 77
RRaise, 27, 41, 107Receive
Disk file 11See also Serial
Record 107Record a Preset, 31Record, 13, 27, 29, 31, 41, 66, 75, 104, 107Reduced Access, 88Replace if on, 22, 59, 101Replace, 22, 59, 101Rooms
Description, 14Icon 14Modify divisible room, 52Modifying properties, 18Properties, 17Pull down menu, 18Room Wizard, 16
Run Macro, 83
SSatellite boards, 47Save
Save as, 11Save for processor 11Save for Processor, 103Save to networked Unison proces-
sor 11Save to Networked Unison Proces-
sor, 72, 103Save to Online Networked Unison

Unison Light Manager User Manual - version 1.65 111
processor 11Save to Online Networked Unison
Processor, 72Save to Online Networked Unison
Processors, 103Save to Serial Unison Processor
11, 12Save to Serial Unison Processor,
72, 103Save, 11, 12Sections
Description, 14Icon, 14New Sections, 13Properties, 17, 24
Securing configurations, 88Selection Bump Direct, 28, 41Selection Bump Toggle w/clear, 28, 41Selection Bump Toggle, 28, 41Send
Disk file 11See also Serial
Send object model, 83Serial
Load from Unison Processor 11, 12
PC Interface station 11Receive disk file 11Save to Unison Processor 11, 12Send disk file 11
Set as Timeout Page, 38Set Zone Property, 58Setup
Setup Serial PC Interface 11Setup Serial PC Interface, 46Shortcut Buttons, 9, 12Show Time and Date, 34Sliders, 21, 31Snapshot, 22, 59, 101Station ID, 107Stations
Description, 14
Icon, 14IDs, 19New Stations, 13Properties, 17, 19, 58
Status bar, 14, 15Status Indicator, 94Stop Macro 83Stop Macro, 60Sunrise Events, 66Sunset Events, 67System files
Config.sys file 7, 46System wide Preset, 18
TTemplates
Activating, 79Adding new 78
Templates, 19, 58, 78, 84, 107Time of day Events, 67Time, 41, 82Timeout, 44Timeout. 38Toggle, 57, 107Toolbar
Functions, 13
UUnison Serial Access Protocol Baud Rate (USAP), 93Unlock Code, 38, 43
Vvisibility level, 42Visibility value, 38, 43Visibility, 38, 41, 42, 43, 75, 107Visibility-OMM, 97Visibilty level, 107Visiblity levels, 75
WWait, 60
Wall Close, 41Wall Closed, 27Wall Direct, 27Wall Logic, 54, 105Wall Open, 27, 41Wall Toggle, 27, 41Walls
Description, 15New Walls, 13, 49Properties, 17, 25
WizardCombine Walls screen, 49Divisible Rooms, 49New Configuration, 16See also Configuration, Beginning.Wall Station screen, 49Wall Stations screen, 50Welcome screen 7Zones screen, 91Zones screen. 51
XX/Y Control, 39
ZZone
Narrow, 39Properties, 58
Zone Bump Direct, 28, 41Zone Bump Toggle, 41Zone Bump, 28Zone Group Toggle, 28, 41Zone Select Direct Shows Level, 19, 29, 59Zone Select Direct, 28Zone Select Toggle, 28, 41Zone Source, 107Zones
Description, 15Icon, 14, 15New Zones, 13, 16Properties, 17, 22
Zones, 29, 39

112 Electronic Theatre Controls, Inc.

Americas • 3030 Laura Lane Middleton, WI 53562 • Tel: (+1) 608.831.4116 • Fax: (+1) 608.836.1736 • Toll free: 800.688.4116 • Toll free fax: 800.555.8912Europe • 5 Victoria Industrial Estate, Victoria Road, London W3 6UU • Tel: +44 (0)20 8896 1000 • Fax: +44 (0)20 8896 2000 Asia • Room 605-606, Tower III Enterprise Square • 9 Sheung Yuet Road, Kowloon Bay • Kowloon, Hong Kong • Tel: (+852) 2799 1220 • Fax: (+852) 2799 9325International • 3030 Laura Lane Middleton, WI 53562 • Tel: (+1) 608.831.4116 • Fax: (+1) 608.836.1736 • Toll free: 800.688.4116 • Toll free fax: 800.555.8912Web: www.etcconnect.com • Email: [email protected] © 2000 Electronic Theatre Controls, Inc., All Rights Reserved. All product information and specifications subject to change. 7081M1012 Printed in USA 04 /00


![CHAIN Number [1][0][0][0][1][ ][ ][ ] · 2018. 11. 16. · CHAIN Number [1][0][0][0][1][ ][ ][ ] Enrolment CRF V1.65 CHAIN ENROLLMENT CRF V1.65 2ND October 2018 1 Part 1 *if DOB is](https://img.dokumen.tips/doc/110x75/5ff5d6f902de195a6f583bb0/chain-number-10001-2018-11-16-chain-number-10001.jpg)

![Unison metals-limited[1]](https://img.dokumen.tips/doc/110x75/54646cc9af795974338b4940/unison-metals-limited1.jpg)