Embed Size (px)
Citation preview

Unique Identifier for Staff (UID Staff) Training for Charter Schools that Use ISIS

UID Staff
• Overview
• Key Terms
• Accessing and Navigating UID Staff
• UID Staff Process
• Best Practices
• Other Menu Items
• Resources
Agenda

• The Unique Identifier for Staff System (UID Staff) will assign a
unique identifier to Staff who participate in the North Carolina
public school system.
• Unique IDs follow staff between school districts and remain valid
even if they move out of state and then return to a NC public
school.
• Assigning unique identifiers is the first step in DPI’s multi-stage
effort to create the NC Common Education Data Analysis and
Reporting System (CEDARS).
• UID Staff is built on the eScholar Uniq-ID® for Staff product.
UID Staff Overview

Match Probability
• The newly submitted staff record is compared against all existing staff records to
determine the probability that two staff records are the same individual.
A numerical value (1 to 100) is assigned by UID Staff to represent the matching
probability of a pair of staff records.
1-87 = No Match
If the system finds no matching staff record, it will create a new Staff ID.
88-93 = Near Match
If the system encounters a Near Match, multiple Matches, or any
combination of both, it will mark the record as ‘Resolve Near Matches’.
These records need to be reviewed and resolved by Charter Schools.
94-100 = Match
If the system finds an exact matching staff record, it will assign a new Staff
ID.
UID Staff – Key Terms

Field Weight
First Name High
Middle Name High
Last Name
(Includes suffix if specified) High
Date of Birth Medium
Gender Low
Social Security Number Medium
Ethnicity Code Low
Previous Last Name
High if initial match is not found on last name;
Not Evaluated if initial match is found on last name.
Match Rules for Staff ID
Fields Used by the UID Matching Engine

Exact Match Rules for Staff ID
• A new staff record loaded into UID Staff will be considered an exact
match if the following data is the same:
– Staff ID
– Last Name
– First Name
– Date of Birth
• Importing the staff IDs into the payroll source system will result in more
exact matches and few near matches.
Batch
• A single staff record or group of staff records submitted together for the
purpose of assigning new identifiers or updating pre-existing identifiers.
Exact Match Rule

• UID Staff uses role-based security.
– The system will determine what system features are available for each user role.
• Charter Schools users will be assigned to the “District” User Role. District Users can upload and validate staff files, resolve pending near matches, assign IDs, and download files.
• Registration information can be found at: http://www.ncpublicschools.org/cedars/uniqueid/staff/registration/
• UID Staff will be accessed through the following websites:
– Training
– Production
https://cedarstrain.schools.nc.gov/staffid/customerLogin.jsp
https://cedars.ncpublicschools.gov/staffid/customerLogin.jsp
Accessing UID Staff

• The Home Page will be displayed after a successful login.
• The Home Page consists of a side menu bar and 4 different sections that allow
you to quickly access various information.
If you are in the UID Training
environment, you will see
“TRAINING SITE” in the upper right
corner in purple.
UID Staff Home Page

• The left hand side of each
screen will contain a menu
bar that allows access to the
various UID Staff system
components.
Navigating UID Staff – Menu

• UID Staff utilizes several graphical buttons for navigation
purposes.
• The UID Staff system contains many pages that display lists of
items. All lists may not show all rows on one page. To
navigate to other pages in a list, use the FIRST, PREV, NEXT,
and LAST buttons on the bottom of each page.
• Most lists in the UID Staff system can be sorted by their
columns by clicking on the column’s header.
Clicking this image starts a process based upon status / next step.
Clicking this image allows the user to view the details of the process.
Clicking this image starts a download of an application related file.
Navigating UID Staff
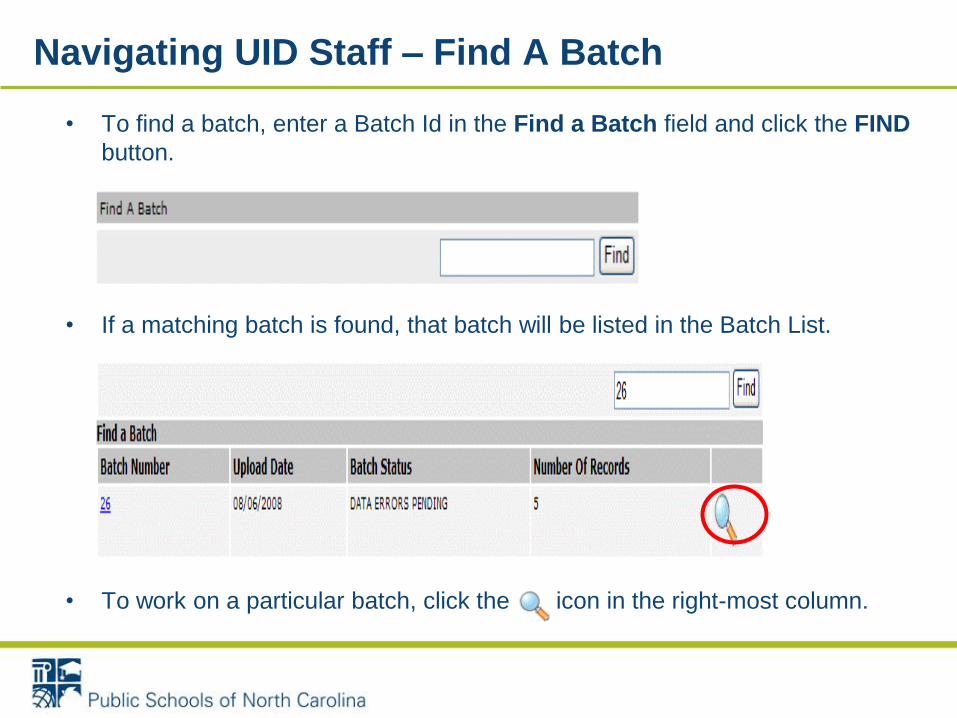
• To find a batch, enter a Batch Id in the Find a Batch field and click the FIND
button.
• If a matching batch is found, that batch will be listed in the Batch List.
• To work on a particular batch, click the icon in the right-most column.
Navigating UID Staff – Find A Batch

Page 1
1.
LEA/Charter
Generates CEDARS
Staff File
From Payroll
System 2.
LEA/Charter
Uploads CEDARS
Staff File
into UID Staff &
Initiates Data
Validation
8.
LEA/Charter
Imports File of
Assigned Staff ID
into Payroll
System
3.
LEA/Charter
Downloads Fix
Errors Report (if data
errors are found by
UID Staff System)
7.
LEA/Charter
Downloads File
of Assigned
Staff IDS
4.
LEA/Charter Fixes
All Errors in UID
Staff and in Payroll
Source System
6.
LEA/Charter
Resolves All
Pending Near
Matches5.
LEA/Charter
Initiates Assign ID
Process in
UID Staff
UID Staff Process

1. LEA/Charter generates the CEDARS Staff File from their payroll system.
2. LEA/Charter logs in to UID Staff and uploads the CEDARS Staff file
generated from their payroll system (UID Staff Process Step 1) through a
web browser. UID Staff assigns a batch number to the CEDARS Staff file
and validates the data in the file that was uploaded successfully.
3. If data errors are found, LEA/Charter downloads the Errors To Fix report.
4. If data errors are found, LEA/Charter fixes all data errors in both their
payroll system (using the Errors to Fix report) and in UID Staff.
5. After all data errors have been fixed in UID Staff, the LEA/Charter initiates
the Assign ID Process in UID Staff. The UID Staff application will process
the staff file and assign IDs through the UID Matching Engine.
6. LEA/Charter resolves all pending Near Matches.
7. After all near matches have been resolved, the LEA/Charter downloads the
file of Assigned Staff IDs from UID Staff.
8. The LEAs/Charter imports the file of Assigned Staff IDs into their payroll
system.
UID Staff Process Overview

• Charter generates the CEDARS Staff file from their
payroll system.
• To create the CEDARS staff file and copy it to a PC,
perform the following steps:
– Sign onto GL, enter the current fiscal year
– Select the State Reporting Option, then select Staff
UID Staff Process Step 1 – Generate CEDARS Staff File
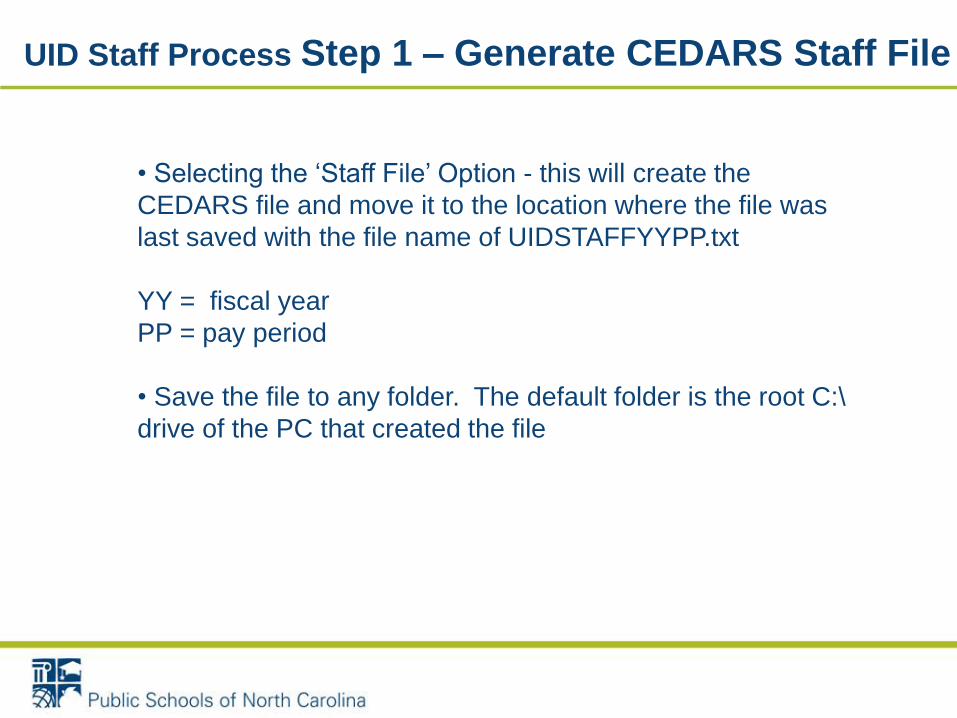
• Selecting the ‘Staff File’ Option - this will create the
CEDARS file and move it to the location where the file was
last saved with the file name of UIDSTAFFYYPP.txt
YY = fiscal year
PP = pay period
• Save the file to any folder. The default folder is the root C:\
drive of the PC that created the file
UID Staff Process Step 1 – Generate CEDARS Staff File
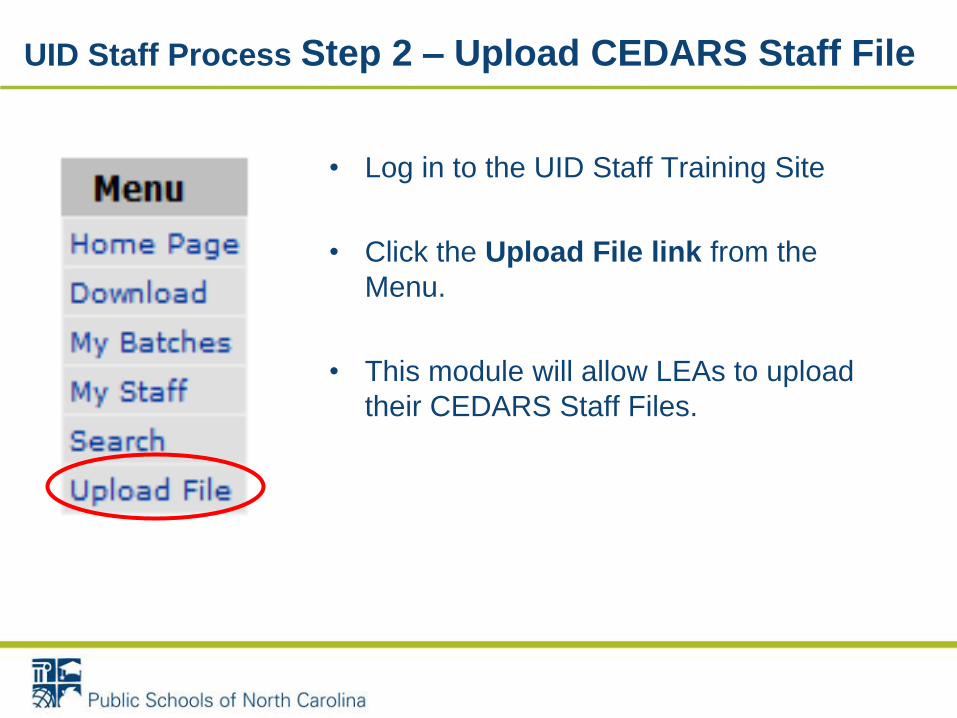
• Log in to the UID Staff Training Site
• Click the Upload File link from the
Menu.
• This module will allow LEAs to upload
their CEDARS Staff Files.
UID Staff Process Step 2 – Upload CEDARS Staff File

• To upload a file, perform the following steps:
1. Click on the Upload File link on the Menu.
2. The system will display the Upload Batch page.
3. Fill in the options as they are displayed on this screen shot
then click the Upload Button.
UID Staff Process Step 2 – Upload CEDARS Staff File
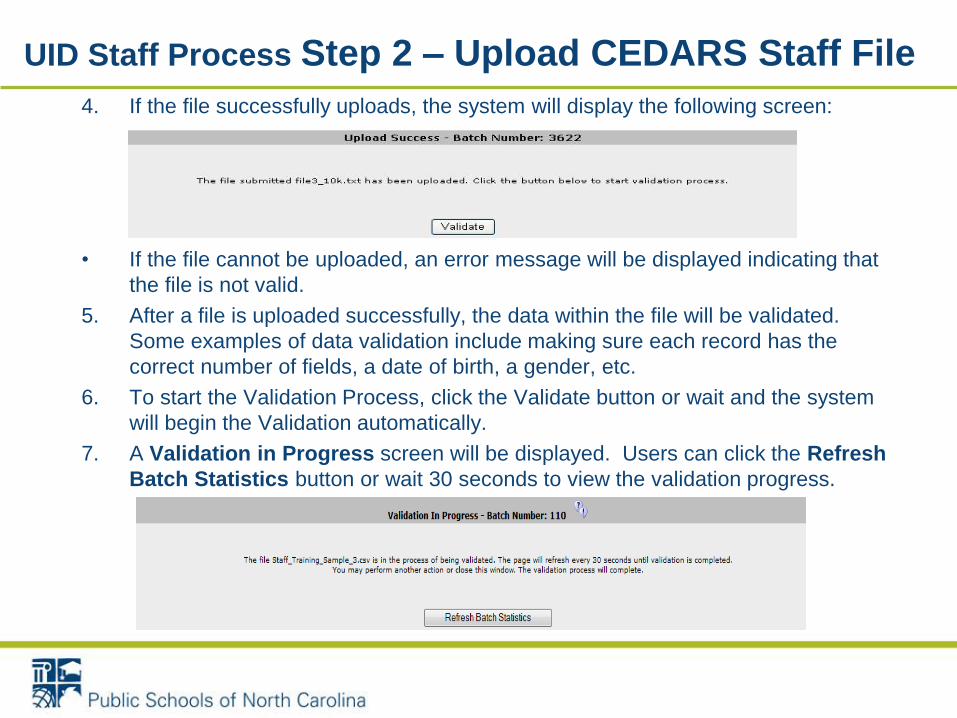
4. If the file successfully uploads, the system will display the following screen:
• If the file cannot be uploaded, an error message will be displayed indicating that
the file is not valid.
5. After a file is uploaded successfully, the data within the file will be validated.
Some examples of data validation include making sure each record has the
correct number of fields, a date of birth, a gender, etc.
6. To start the Validation Process, click the Validate button or wait and the system
will begin the Validation automatically.
7. A Validation in Progress screen will be displayed. Users can click the Refresh
Batch Statistics button or wait 30 seconds to view the validation progress.
UID Staff Process Step 2 – Upload CEDARS Staff File

3 Possible Validation Outcomes
After data validation is complete, the system will identify if any errors
exist:
1. Fatal File Errors:
– The file contained one or more fatal file errors and could not be
processed.
2. Invalid Data Errors:
– The file contained one or more data errors.
3. No Data Errors:
– The file contained no data errors and the user can start ID
assignment.
UID Staff Process Step 2 – Validate Staff Data

Fatal File Errors: – The file will be rejected if a fatal error is found. Causes of a fatal errors include:
• One or more fields have been omitted from a record.
• The maximum allowable number of data errors has been exceeded.
• One of the Upload options was not selected
– If the system finds a fatal file error, it will display the following screen:
If the file contains a fatal error, then the batch will not be loaded into the UID Staff system.
UID Staff Process Step 2 – Validate Staff Data
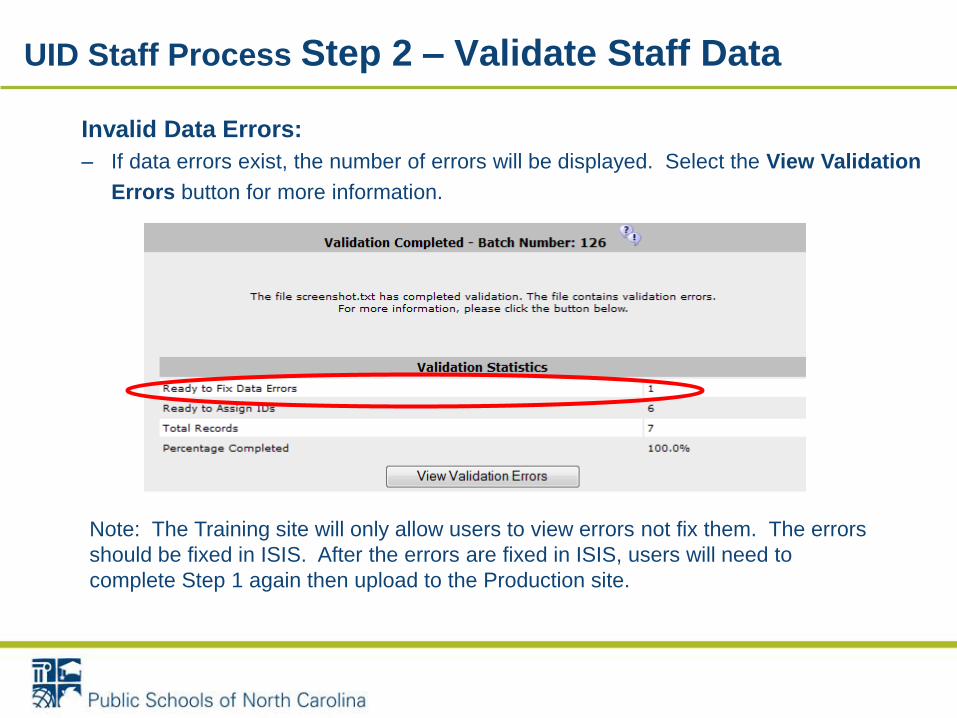
Note: The Training site will only allow users to view errors not fix them. The errors
should be fixed in ISIS. After the errors are fixed in ISIS, users will need to
complete Step 1 again then upload to the Production site.
Invalid Data Errors:
– If data errors exist, the number of errors will be displayed. Select the View Validation
Errors button for more information.
UID Staff Process Step 2 – Validate Staff Data

No Data Errors:
– If no data errors are found, the following screen will be displayed and the user
can then upload the UIDSTAFFYYPP.txt file into the Production site.
Note: The Training site will not allow you to start the ID Assignment process. You
should now load your file into the Production site.
UID Staff Process Step 2 – Validate Staff Data

1. Select the Download link from the Main Menu.
2. The system will display 3 different tabs that provide access to download files.
Select the Other Downloads tab.
3. Select “Errors to Fix” as the Extract Type.
4. Click the Download icon in the far right column.
5. The system will display an Extract Options screen where details of the extract can
be specified.
To create an “Errors to Fix” report of records that need to be corrected in your
payroll system, perform the following steps:
UID Staff Process Step 3 – Download Error Report

6. Complete the Extract Options Page as necessary.
Note: Always select ‘eScholar Uniq-ID for Staff 2.0’ in the Template field.
7. Click the Download button to extract the error file.
8. You will then see a File Extraction Complete message. Click the Download
button to download the file.
UID Staff Process Step 3 – Download Error Report
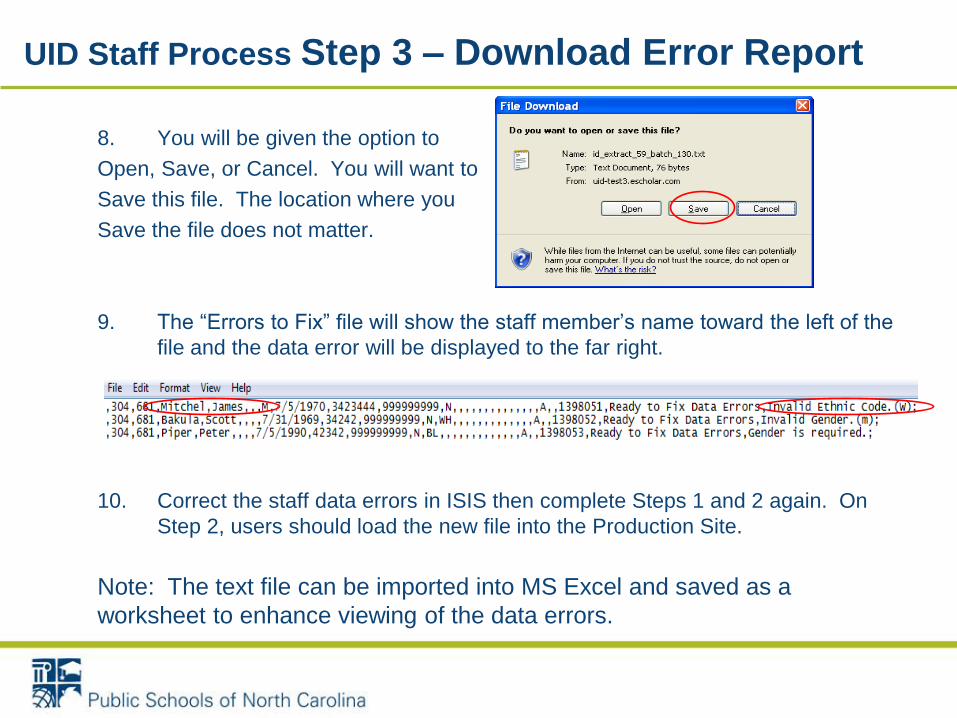
8. You will be given the option to
Open, Save, or Cancel. You will want to
Save this file. The location where you
Save the file does not matter.
9. The “Errors to Fix” file will show the staff member’s name toward the left of the
file and the data error will be displayed to the far right.
10. Correct the staff data errors in ISIS then complete Steps 1 and 2 again. On
Step 2, users should load the new file into the Production Site.
Note: The text file can be imported into MS Excel and saved as a
worksheet to enhance viewing of the data errors.
UID Staff Process Step 3 – Download Error Report

If data errors still exist after loading into Production, the errors can be fixed by
performing the following steps:
1. From the Home Page, click the details icon for the batch with the Data Errors
Pending status.
2. The system will display all records that have data errors:
3. Click to the right of the record you wish to fix.
UID Staff Process Step 4 – Fix Data Errors

5. Correct all data errors on the page.
4. The system will display the staff information in a Fix Error Record form with
an invalid message in red under each data issue.
UID Staff Process Step 4 – Fix Data Errors

6. After all data errors are corrected, select the Update Staff Record button.
*If the Annual Salary field is 0, delete the 0 then click the Update Staff Record button.
7. The system will display a confirmation message after the record is fixed:
8. Click Back To List to select the next record from the list of data errors or move to
the next record in the list by clicking Next Error Record.
UID Staff Process Step 4 – Fix Data Errors

Once all data errors have been fixed, it is time to assign ID numbers:
1. Click the Start ID Assignment button.
UID Staff Process Step 5 – Staff ID Assignment

2. The system will display an Assignment in Progress page.
• Batch statistics are refreshed every 30 seconds or when the
REFRESH BATCH STATISTICS button is selected.
3. An Assignment Completed page will be displayed after the assignment
process has completed.
UID Staff Process Step 5 – Staff ID Assignment

To resolve near matches, perform the following steps:
1. From the Home Page, click the icon to the right of the batch with the
Near Matches Pending status.
2. The system will display all near match records within the batch.
3. Click the icon to the right of the near match you want to review.
UID Staff Process Step 6 - Resolve Near Matches

4. The system will display a Resolve Near Matches Summary page which
includes submission record and potential match record details.
- The Submission record (top) is the record that was just loaded into the
system.
- The Potential Match record (bottom) is the record that is currently in the
UID Staff System.
5. Select the Compare button to view additional details about the 2 records.
UID Staff Process Step 6 - Resolve Near Matches

6. Determine if the Submission record (left) is the same staff member as the
Potential Match record (right).
The fields highlighted in yellow indicate differences between the 2 records.
The SSNs are still being compared even though they are masked by #s.
UID Staff Process Step 6 - Resolve Near Matches

• To view more information about the Potential Match record, click the View Staff
Profile Link
• A pop-up window will display more information about the record. The Vocational
and Historical Information tabs will display previous employment information
about the staff member which might be useful when conducting research.
UID Staff Process Step 6 - Resolve Near Matches

A. Assign ID: If the Submission record is the same as the staff
Potential Match record, “assign” the Staff ID of that matching
staff member to the submitted staff member.
• The Staff ID of the Potential Match record is added to
the Submission record. The other information in the
Submission record will update the Potential Match
record and the previous Potential Match record
information is stored in the staff history.
• A new Staff ID is not created, since both the records
were identified as belonging to the same staff.
B. Create New: If no staff matches the submission staff record,
create a new Staff ID.
When reviewing near matches, one of the following actions can
be taken:
UID Staff Process Step 6 - Resolve Near Matches

7. If the potential match staff record listed is the same as the input staff
whose record is being resolved, click the ASSIGN ID button on the Near
Match Comparison page to assign the staff ID from the existing record
to the submission record. (If the potential match staff record listed is not
the same, go to the next step)
UID Staff Process Step 6 - Resolve Near Matches

8. If the staff listed is different from the input staff whose record is being resolved,
a new Staff ID will be created. To create a new Staff ID:
I. Click the BACK button on the bottom of the Near Match Comparison page.
II. The system will display the Resolve Near Match Summary page.
III. Click the CREATE NEW button. The system will display a confirmation page
displaying the newly created ID.
UID Staff Process Step 6 - Resolve Near Matches

1. Click the ‘Download IDs’ button.
After the all data errors have been fixed, all near matches have been
resolved and the ID assignment process has completed, Staff IDs can be
downloaded. To download Staff IDs, perform the following steps:
UID Staff Process Step 7 - Download Staff IDs

2. The system will display the Download module.
3. Complete the download form as pictured below.
4. Click the Download button.
UID Staff Process Step 7 - Download Staff IDs
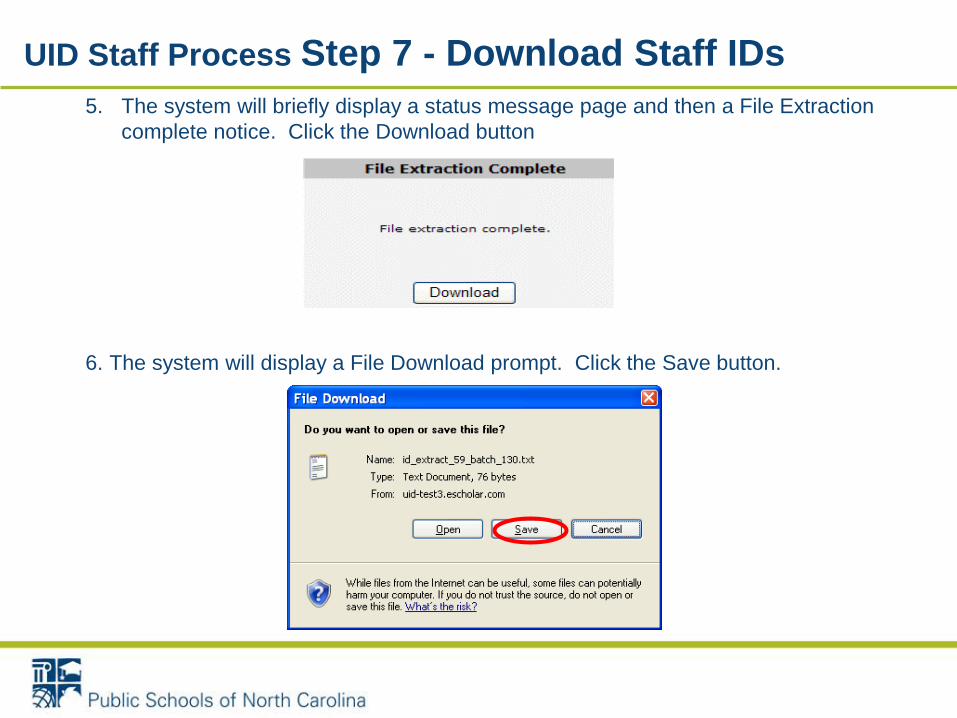
5. The system will briefly display a status message page and then a File Extraction
complete notice. Click the Download button
6. The system will display a File Download prompt. Click the Save button.
UID Staff Process Step 7 - Download Staff IDs

• Save the downloaded CEDARS file of assigned Staff IDs anywhere on the PC it is accessible via the Windows “Browse for File” dialog.
The file
MUST be
saved in
the PC root
C:/drive
The file MUST be named to less
than or equal to 10 characters,
excluding .txt extension. May not
contain special characters ($, #,
_, @, etc.)
UID Staff Process Step 7 - Download Staff IDs

• Click the Close button.
• Return to the application home page by clicking the Home Page
link in the Menu.
You can verify
the name and
location of the
saved file.
UID Staff Process Step 7 - Download Staff IDs
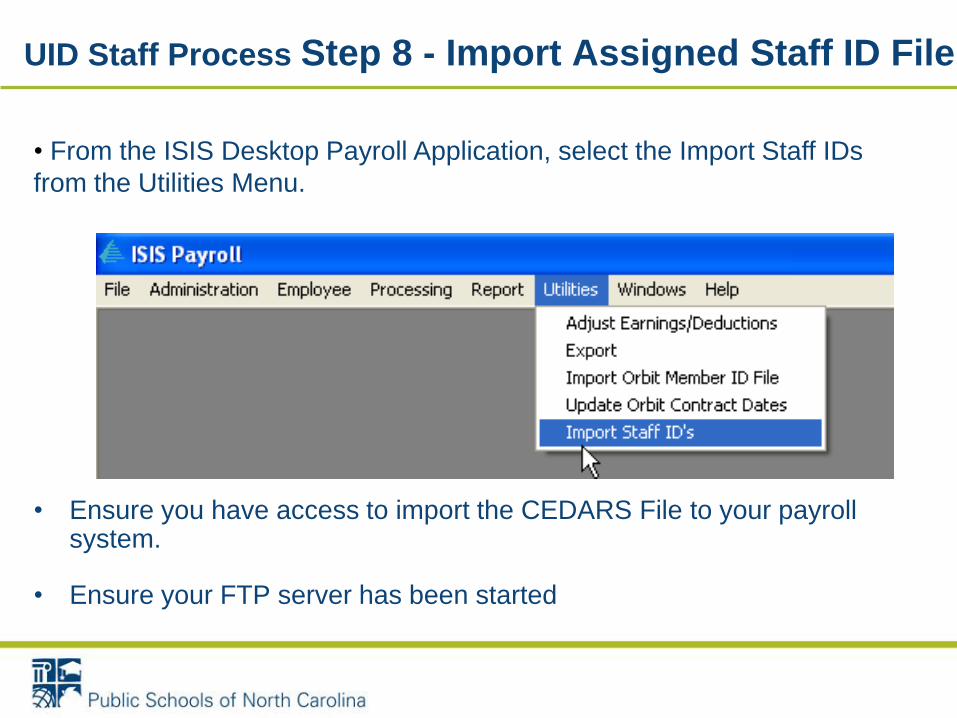
• Ensure you have access to import the CEDARS File to your payroll system.
• Ensure your FTP server has been started
• From the ISIS Desktop Payroll Application, select the Import Staff IDs
from the Utilities Menu.
UID Staff Process Step 8 - Import Assigned Staff ID File

• Select the downloaded file of assigned Staff IDs and click Open.
UID12345.txt
UID Staff Process Step 8 - Import Assigned Staff ID File

• When the file is selected, the program updates the file with
the UID. The above message displays: – Note: This message was updated on the latest release to read
“DPI Staff Member ID” instead of ORBIT.
UID Staff Process Step 8 - Import Assigned Staff ID File

The imported
CEDARS Staff ID
can be viewed on
the EMPLOYEE /
Notes page: Click
on NOTES to
display the
NOTES page.
Importing Staff IDs into ISIS – Viewing Staff IDs

Importing Staff IDs into ISIS – Viewing Staff IDs

• If you received an error while importing your Staff ID file into your payroll system, check the following:
– Verify that the Staff ID file was named correctly during the download.
• Do not use any special characters or spaces in the file name.
• File name length not to exceed 10 characters
– Verify that the Staff ID file path and file name you are attempting to upload matches the path and file name used in the download process.
– Recreate the file from the UID Staff System and attempt to import again
– Error Message: Index 0 is not non-negative and below total rows count.
• One or more of the SSNs in the UID Staff ID file may not match a SSN in your payroll file. This could be due to SSN modifications made within the payroll system after the CEDARS Staff file was generated after month end.
– If your call is regarding errors received during the importing process into the ISIS payroll system, please call EMS for assistance.
Importing Staff IDs into ISIS – Error Correction

• Do not use the REFRESH, BACK, or FORWARD browser buttons. Always use the
system links and buttons to navigate through UID Staff. Using the browser buttons
will cause you to log back in to the system.
• During the Upload, Validation, or ID Assignment Processes, you do not have to
remain on the page or keep your browser open. Once these processes have
started, the system will continue to process the batch and you can check on the
progress later.
• When determining if a record is a “Match” or “No Match”:
– Review the “Near Match Details” page to view fields on the two staff members.
• If fields are different between the two staff members, the background color will be
yellow and the values within the fields are italicized.
– Analyze the records offline if necessary by collecting and comparing more
information.
– If the matching staff is in a different school or school district, consider contacting
the corresponding agency.
• Take note of the specific Batch ID you are working with so you can easily locate it in
the future.
Best Practices

• To access the My Batches Module,
click the My Batches link from the
Menu.
• This feature allows users to:
– Review and all batches the user has
loaded.
– Users cannot see batches that have
been loaded by other users within
the same Charter School.
Other Menu Items - My Batches Module
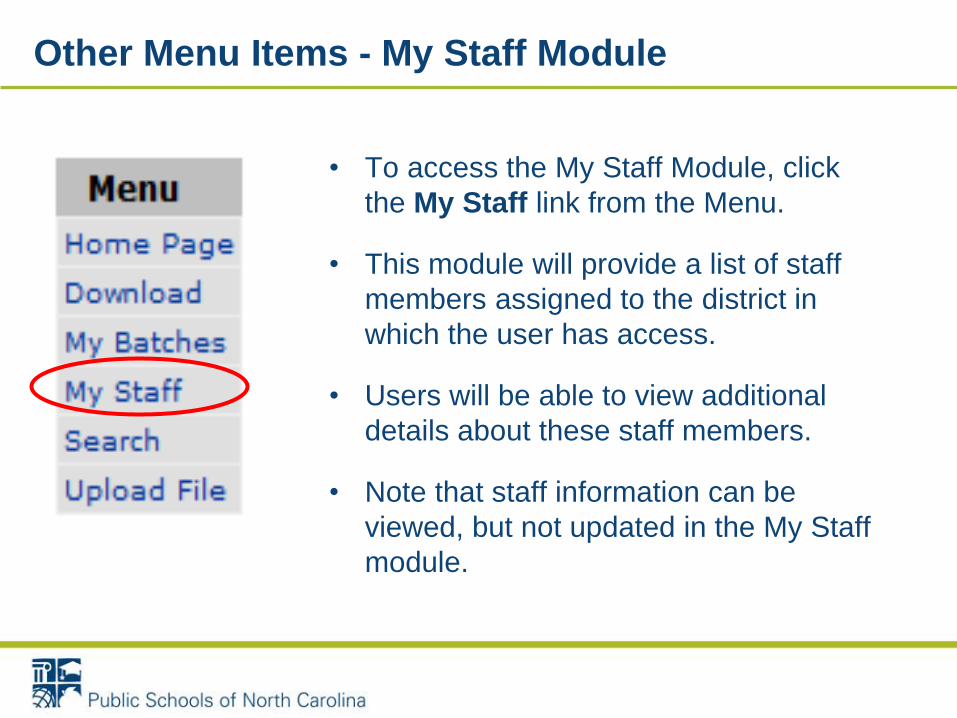
• To access the My Staff Module, click
the My Staff link from the Menu.
• This module will provide a list of staff
members assigned to the district in
which the user has access.
• Users will be able to view additional
details about these staff members.
• Note that staff information can be
viewed, but not updated in the My Staff
module.
Other Menu Items - My Staff Module

• To access the Search Module, click the
Search link from the Menu.
• The Search feature can be used to
verify the details about staff already in
the UID Staff system.
• Note that staff information can be
viewed, but not updated in the Search
Module.
Other Menu Items - Search Module

• UID Staff Training Materials:
http://www.ncpublicschools.org/cedars/uniqueid/staff/training/
– UID system information, FAQs, user contact list
• UID Staff Training site: https://cedarstrain.schools.nc.gov/staffid/
– Use this site to practice working in UID Staff
• UID Staff Production site: https://cedars.ncpublicschools.gov/staffid/
– This is the live data site where you will be working on your Staff data.
• UID Staff Quick Reference Documents:
http://www.ncpublicschools.org/docs/cedars/uniqueid/staff/training/staff-
reference.pdf
– This is the direct link to the UID Staff Quick Reference Documents.
• If you need assistance with the UID Staff process, please contact the
DPI Help Desk at 919-807-4357 or [email protected]
UID Staff Resources