Embed Size (px)
Citation preview

Unified CommunicationsInstallation & Configuration Guide

Table of contents Page
Applications License 1
Mitel 5110 Softphone 5
Click to Dial Application 22

Applications License Obtaining and Configuration
1
2. Take note of the PBX Serial Number. To find the PBX serial number connect to the system via MPS Mitel 3000 Maintenance and Program-ming Software. Click Diagnostics.
Step 1: Obtaining your Licence Activation Key
1. Take note of the Licence number printed on your installation CD.
Both Softphone and Click to Dial users are enabled by the Activation Key.Example;A 4 user key enables 4 softphone users and 4 Click to Dial users.

Applications License Obtaining and Configuration
2
3. Click View CPE Configuration
4. The CCU number is the serial number required to obtain your Licence Key. This always starts with OL and will be between 8 & 9 characters long.
Applications License Obtaining and Configuration
3
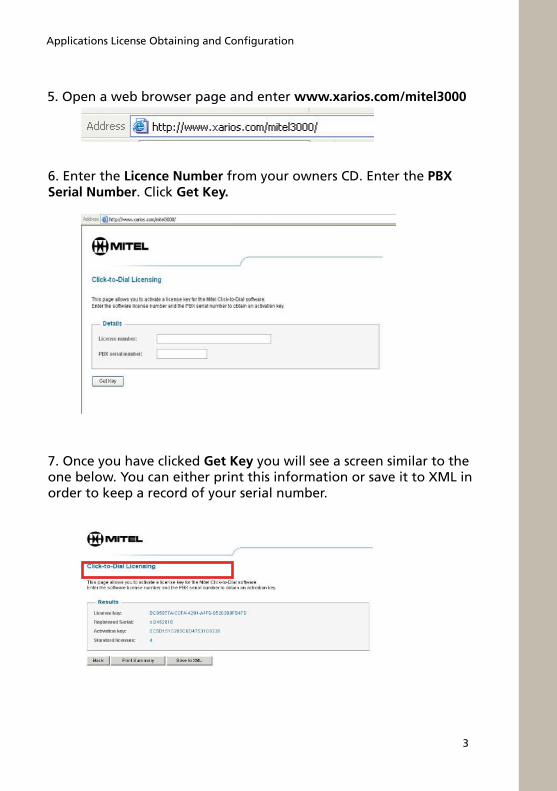
5. Open a web browser page and enter www.xarios.com/mitel3000
6. Enter the Licence Number from your owners CD. Enter the PBX Serial Number. Click Get Key.
7. Once you have clicked Get Key you will see a screen similar to the one below. You can either print this information or save it to XML in order to keep a record of your serial number.

Applications License Obtaining and Configuration
�
Step 2. Configuring the Mitel 3000
Start the MPS and connect to the Mitel 3000.From the main menu click System, Select Systemwide Settings.
Enter the Activation Key provided in the Applications Licenses field and click on Send Changes.
Both Softphone and Click to Dial users are enabled by sending the Activation Key.

Mitel 5110 Softphone Installation & Configuration
5
There are three installation steps:
Step 1: Programming the Broadband Module Step 2: Installing your Mitel 5110 SoftphoneStep 3: Check your Mitel 5110 Softphone audio settings
2. Click the link Change your VoIP endpoint types here ...
1. Connect to the Broadband Module programming Interface. Using the Wizard or Browser Click VoIP from the Setup panel in the main Broadband Module screen.
Note: Previous knowledge on programming the Broadband module is necessary before complet-ing this section: See Broadband module manual for instructions.
Step 1: Programming the Broadband Module
Introduction to programming the Mitel 5110 Softphone

Mitel 5110 Softphone Installation & Configuration
�
3. Choose a free endpoint and select IP Extension from its down menu. Note that the extension number associated with the endpoint will be assigned to the Mitel 5110 Softphone.
Click Next >.
If the Endpoint screen is not shown it is because an IP address is not available to the WAN Interface. Ensure the broadband connection is available and working on the Broadband Module.Note

Mitel 5110 Softphone Installation & Configuration
�
5. In the following page you will observe that a default password is set, this password should be kept as it is and should not be changed. This pass-word matches the password of the Mitel 5110 softphone. If changed the softphone will not register. (Default password: “iptpassw”).
Enter the MAC address (this must match the MAC address programmed into the Mitel 5110 Softphone .You can use the MAC address of the com-puter you are installing the softphone on as long as it matches the MAC address you are using for your softphone.
�. Click Confirm Changes.
Click Next >.

Mitel 5110 Softphone Installation & Configuration
8
�. Click Confirm Changes.
�. Click Restart.Restart the Broadband Module. Once the Broadband Module has re-started, Step 1 of the programming is now complete. The Mitel 5110 Softphone will now connect to the Mitel 3000 system.
The softphone will work as a remote extension only if the Broadband module VoIP interface is programmed as IPWAN. This option is found under VoIP Advanced Settings.
Note

Mitel 5110 Softphone Installation & Configuration
9
Your Mitel 5110 Softphone application may be used with an audio or USB Headset. If you are using a USB headset it is important that you install the USB headset before installing the application. Connect the headset to a USB port on your PC before installing the Mitel 5110 Softphone application software.
Step 2: Installing the 5110 Softphone application
Insert the Unified Communications Installer CD to your PC CD drive. Browse to the CD drive open the “5110 Softphone” folder and Double click on the Setup.bat file.
1. Double Click Setup.bat from “5110 Softphone” folder from your CD.
Installing & configuring your Mitel 5110 Softphone
Mitel 5110 Softphone Installation & Configuration
10
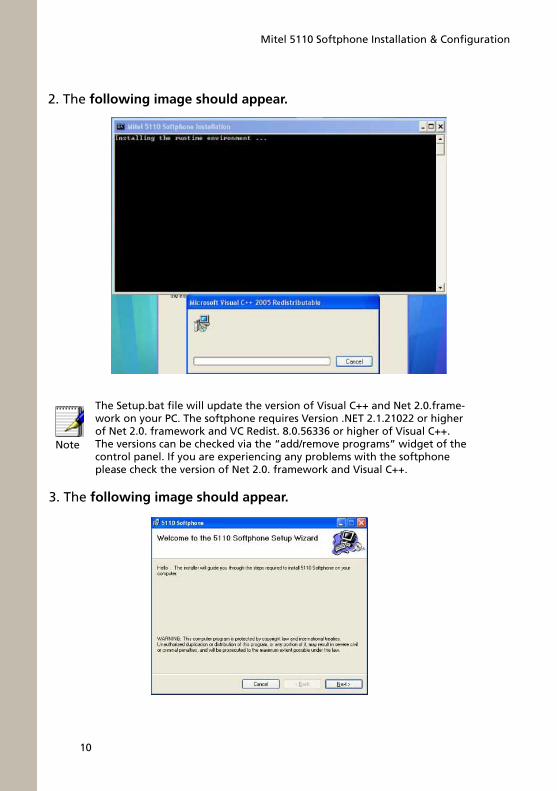
2. The following image should appear.
3. The following image should appear.
Note
The Setup.bat file will update the version of Visual C++ and Net 2.0.frame-work on your PC. The softphone requires Version .NET 2.1.21022 or higher of Net 2.0. framework and VC Redist. 8.0.56336 or higher of Visual C++. The versions can be checked via the “add/remove programs” widget of the control panel. If you are experiencing any problems with the softphone please check the version of Net 2.0. framework and Visual C++.

Mitel 5110 Softphone Installation & Configuration
11
5. Click Next >.
6. Select “I Agree”
Click Next >.
�. Click Next >.

Mitel 5110 Softphone Installation & Configuration
12
8. Click “Everyone” if you wish to allow anyone logged into the PC to use Mitel 5110 Softphone, otherwise select “Just Me”
Click Next >.
9. Click Next >.
10. Confirm the installation Click Next >.

Mitel 5110 Softphone Installation & Configuration
13
11. The following screen will appear while the installation is taking place.
12. Click Close.
13. Close this window.

Mitel 5110 Softphone Installation & Configuration
1�
1�. Click Close.
15. Select Next >.

Mitel 5110 Softphone Installation & Configuration
15
16. Enter the following:
Device ID: Enter the MAC address entered previously to the Broadband Module (this MAC address should match the one programmed in the Broadband Module by the system administrator, if they do not match the softphone will not register).
Internal (native) remote server IP address: The system administrator will provide you with this IP address.
External (NAT) remote server IP address: Leave this at it’s default setting of 0.0.0.0
Password: Enter the password (this must match the password programmed into the Broadband Module Extension , in default this is “iptpassw”)
Confirm the password
Click Next >.
1�. Click Next >.

Mitel 5110 Softphone Installation & Configuration
1�
18. Follow the vocal instructions and those on the screen, to adjust your volume. Make sure your headset is connected.
Click Next >.
19. Follow the instructions displayed on the screen to adjust your microphone volume
Click Next >.

Mitel 5110 Softphone Installation & Configuration
1�
20. Click Finish.
The Mitel 5110 Softphone has now been installed and the icon will now appear on your screen
Double click on it to start the Mitel 5110 Softphone
Step 3: Check your Mitel 5110 Softphone audio settings
1. Click Settings in the top right hand corner. Click Mitel 5110 Phone Options.

Mitel 5110 Softphone Installation & Configuration
18
2. Click the Audio and Other Settings tab.
3. Click the Advanced button.
�. On the Audio-in device interface, select USB headset from the drop-down menu.
On the Audio-out device interface, select USB headset from the drop-down menu.
On the Ring-out device interface, select the sound card that your PC will use. If your PC has only one sound card, only this will be dis-played. Click OK.
5. On the Endpoint audio interface, select USB headset from the drop-down menu.
Click OK.
Your Mitel 5110 Softphone is now set up to use with your USB head-set.

Mitel 5110 Softphone Installation & Configuration
19
Please Note
Some PC applications can override Audio settings on your PC from time to time. If you notice that your Audio devices are not operating as expected on your Mitel 5110 Softphone, then perform the following:
(a) Check that your USB Headset** is correctly plugged in to a USB port on your PC.
(b) Unplug and reconnect your USB Headset.
(c) Check that your audio settings are correct. (Go through the procedure described in “Check your Mitel 5110 Softphone Audio Settings” on page 12).
** We recommend the use of wired USB headsets.
System Requirements
Hardware Requirements
Intel Pentium 300 MHz or faster processor (800 MHz is recommended)100 MB of available hard disk drive128 MB RAM (256 MB is recommended)Ethernet or Wi-Fi network card with TCP/IP configured800 x 600 or higher video resolutionInternet-capable network connection (a broadband connection of 256 kb/s or faster Headset with microphone that uses the speaker and microphone ports is required
Software Requirements
Microsoft ® Windows XP, Home or Professional operating system (recommended that all service packs be installed) and Vista SP1.The latest version of Microsoft ® .NET Framework 1.x
Click to Dial Installation & Configuration
20
PC Requirements
Windows ® 2000 professional, Windows ® XP professional, or Windows 2003 server, Intel Pentium 4 or equivalent processor, 256 MB RAM, network interface card and a spare USB port (Type A) Windows Vista ® SP1.
Introduction to Click to Dial on the Mitel 3000Click to Dial enables complete call management from your PC. Users can integrate all directories into one easy-to-use system and manage this from one place. Users can also see a complete list of missed calls, dialed calls and received calls with the option of adding call notes.
Installation steps: Step 1: Configure the Mitel 3000 Step 2: Installing the Click to Dial application
IMPORTANT:Before you begin configuring the Mitel 3000 you will need to get your licence key (This key is the same as for the Softphone previously configured).
If you have already obtained your license key and have configured the Mitel 3000 with it. You DO NOT need to do it again.
1. Start MPS application and connect to the Mitel 3000. Click Exten-sions. 2. Click More Extension Features.
Step 1. Configuring the Mitel 3000

Applications License Obtaining and Configuration
21
�. Click Send Changes.The Click-to-Dial setup is now complete on the Mitel 3000 system.
3. On the Click to Dial Service, click the Standard option from the drop-down menu for each extension that you wish to enable for Click-to-Dial. (Number of users allowed is limited by the number of licenses provided purchased).
5. Next install the Click-to-Dial application on the users desktop.
Click to Dial Installation & Configuration
22
Step 2: Installing and configuring the Click-to-Dial Application
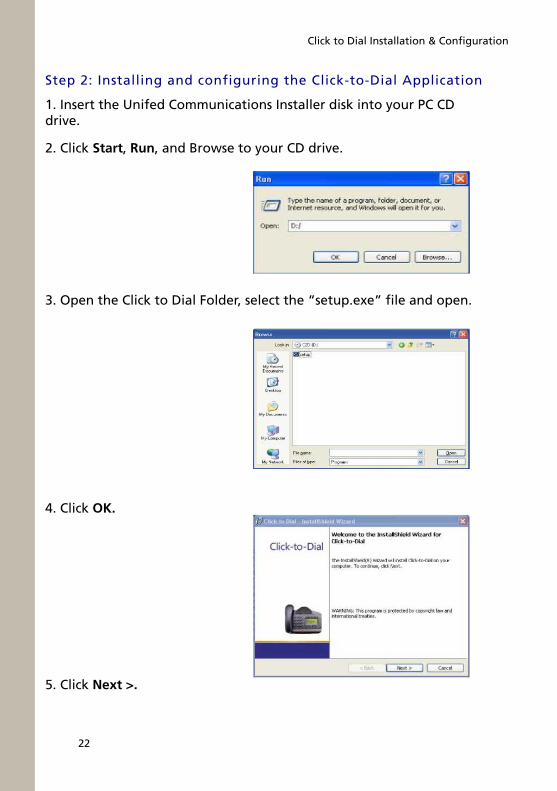
1. Insert the Unifed Communications Installer disk into your PC CD drive.
2. Click Start, Run, and Browse to your CD drive.
3. Open the Click to Dial Folder, select the “setup.exe” file and open.
�. Click OK.
5. Click Next >.

Click to Dial Installation & Configuration
23
�. Click “I accept the terms in the licence agreement”.
�. Click Next>.
Enter the following information:
Hostname/IP Address: This IP address will be provided by the system administrator
Port: Leave this at the default setting of �000
Extension Number: Enter your extension number
Password: Enter the password (this is the same as the extension lock password which is 123 in default) Click Next >.

Click to Dial Installation & Configuration
2�
8. Enter your Name and OrganizationClick Next >.
9. Click Next >.
10. Click Install >.

Click to Dial Installation & Configuration
25
11. Check the box “Launch Click-to-Dial 1.0.1”Click Finish.
12. Click-to-Dial has now been installed on your PC.
13. This icon will now appear in the bottom right lower toolbar.
1�. Right click on the icon and select Phone Manager to display the application.
Help Files
A detailed help file is included in the application for further user instructions.

Click to Dial Installation & Configuration
2�
System Requirements
Hardware Requirements
Intel Pentium 300 MHz or faster processor (800 MHz is recommended)100 MB of available hard disk drive128 MB RAM (256 MB is recommended)Ethernet or Wi-Fi network card with TCP/IP configured800 x 600 or higher video resolutionInternet-capable network connection (a broadband connection of 256 kb/s or faster Headset with microphone that uses the speaker and microphone ports is required
Software Requirements
Microsoft ® Windows XP Home or Professional operating system (recommended that all service packs be installed), Vista SP1. The latest version of Microsoft ®.NET Framework 1.x
IMPORTANT NOTES BEFORE USING CLICK TO DIAL:
Automatic Line Selection should be turned OFF.All Outgoing lines used for Click to dial should be programmed in Outgoing group 1. Alternatively program Flexible Numbering and set Line Access to only use a single digit. Use this digit as the Outside Line code in the Click to dial application.A Firewall port 4000 needs to be opened if Click to dial is on the WAN port.
••
•

Unified Communications Instillation & Configuration GuidePN LR2727.06200 Rev 3

Global Headquarters
Tel: +1(613) 592-2122Fax: +1(613) 592-4784
U.S.
Tel: +1(480) 961-9000Fax: +1(480) 961-1370
EMEA
Tel: +44(0)1291-430000Fax: +44(0)1291-430400
CALA
Tel: +1(613) 592-2122Fax: +1(613) 592-7825
Asia Pacific
Tel: +852 2508 9780Fax: +852 2508 9232
For more information on our worldwide office locations, visit our website at www.mitel.com/offices
THIS DOCUMENT IS PROVIDED TO YOU FOR INFORMATIONAL PURPOSES ONLY. The information furnished in this document, believed by Mitel to be accurate as of the date of its publication, is subject to change without notice. Mitel assumes no responsibility for any errors or omissions in this document and shall have no obligation to you as a result of having made this document available to you or based upon the information it contains.
M MITEL (design) is a registered trademark of Mitel Networks Corporation. All other products and services are the registered trademarks of their respective holders.
© Copyright 2008, Mitel Networks Corporation. All Rights Reserved.
www.mitel.com