Embed Size (px)
Citation preview

USER MANUAL Version 1.6
Corporate Headquarters:
Via ai Prati
6930 Bedano-Lugano
Switzerland
Phone: +41 91 935 73 80
Fax: +41 91 945 03 30
[email protected] © 2013 DATAMARS
www.datamars.com
RUMISOFT
LIVESTOCK ID

RumiSoft User Manual – v. 1.6 May 2014 2
Contents:
1 PURPOSE........................................................................................................................................ 3
2 FILE TYPES ..................................................................................................................................... 4
3 BASIC MODE................................................................................................................................... 5
4 ADVANCED MODE ....................................................................................................................... 11

RumiSoft User Manual – v. 1.6 May 2014 3
1 Purpose
RumiSoft is a software application designed for Datamars Livestock readers. It allows you to manage, share, hold, upload and download all kinds of working file (messages, configuration, procedures, reading sessions and equivalences), with a friendly graphical user interface. Rumisoft has two main working modes:
� Basic: designed for a final user typically using only one reader for day by day activities on the field.
� Advanced: designed for organization needing to manage several reader units and that must
be backward compatible with the old readers. The Advanced mode enables the reader firmware update procedure and other special features.

RumiSoft User Manual – v. 1.6 May 2014 4
2 File types
Rumisoft operates on the following file types:
.rdf: definition file. It is the main GES3S input file that specifies the list of data that users collect during the working session on the field. This software allows to: open, edit, save, read and write procedures from/to GES3S and it is backward compatible with old GES2S.
.gdf: old definitions file coming from GES2S. This can be opened and converted into newer .rdf type.
.req: equivalences data file. It is the second GES3S input file that creates a link between the EIC (Electronic Identification Code) with a Visual Tag. Once a new EIC is found on the field, the user can add the Visual Tag and save the new line in the reader. If the user read again the same animal, he gets both EIC and Visual Tag on the GES3S LCD. The Visual Tag is a 16 characters label that can connect univocally to an EIC to simplify animal identification on the field. User can: open, edit Visual Tag, save, read from and write to GES3S. The user can get these files either from GES3S or importing a text equivalence downloaded from GES2S.
.rsc: search data file. It is the main Bluestick input file. It stores a list of EID, animal, the user must found on the field. Rumisoft allows creating and loading search files into Bluestick readers.
.rct: GES3S control data file. It is the reader output file. It collects all data specified in the definition file. If required it can add also the Visual Tag label stored in the equivalence file. The user can get these files either from the USB readers and old GES2S.
.txt: text control, text equivalence or GES2S messages. The txt control and equivalence files are the exported and readable version of the .rct/.rcb/.rc3/.req files. Text file has been selected as interface with third software tools. The GES2S messages allow loading different language into GES2s reader.
.rcf: GES3S configuration file. These are the configuration files GES3S works with: save, read from and write to GES3S.
.rsb: Bluestick configuration file. These are the configuration files Bluestick works with: save, read from and write to Bluestick.
.zip: USB reader update file. It the firmware update file provided by Datamars support to update the USB reader. Rumisoft allows starting the updating procedure.
.rlg: USB reader language file. It is a new language support for USB readers. Rumisoft allows charging new language into USB readers.
.rs3: F310 configuration file. These are the configuration files F310 works with: save and read from and write to F310.
.rcb: Bluestick control file. It is the reader output file. All detected EICs are stored in the control file along with a time stamp (date and time), when the ‘EIC Store’ option is selected on the Bluestick reader. EIC duplication is not allowed.
.rc3: F310 control file. It is the reader output file. All detected EICs are stored in the control file along with a time stamp (date and time), when the ‘REC’ option is enabled on the F310 reader. EIC duplication is allowed.
.rsg: GES3S session file. It’s the reader output file. All detected EIC are stored in the session file along with a time stamp (date and time).
RumiSoft User Manual – v. 1.6 May 2014 5
3 Basic mode
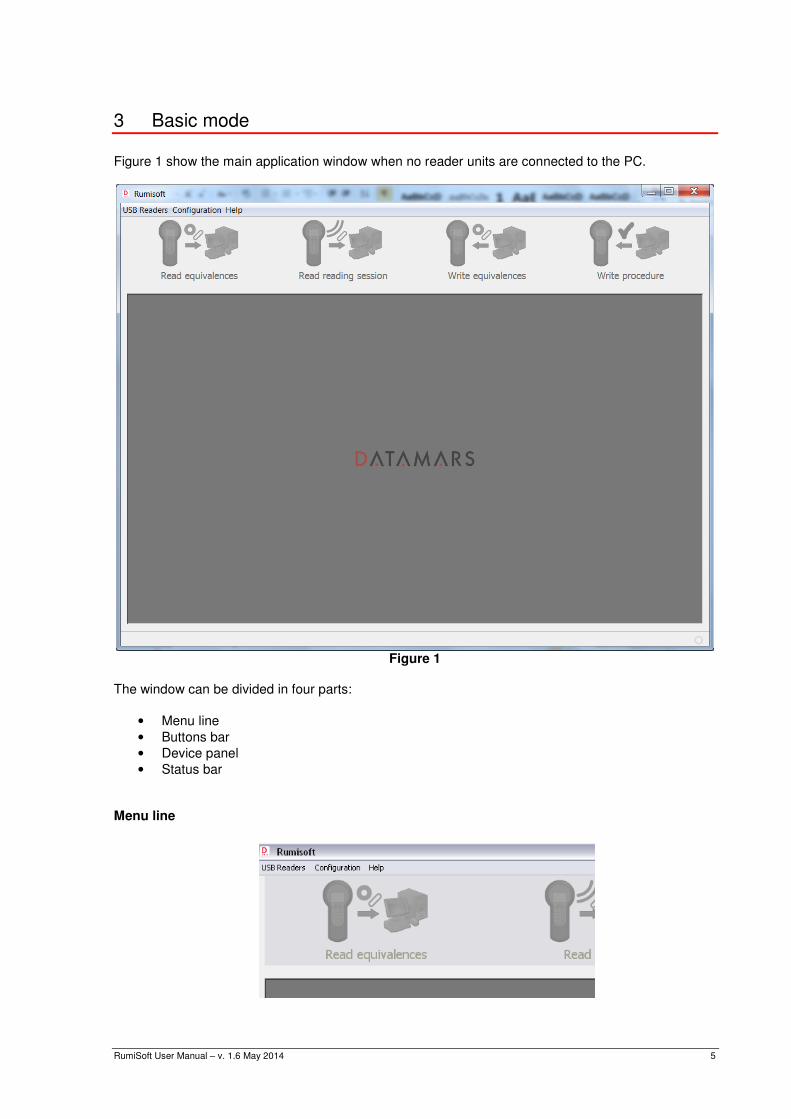
Figure 1 show the main application window when no reader units are connected to the PC.
Figure 1
The window can be divided in four parts:
• Menu line
• Buttons bar
• Device panel
• Status bar
Menu line

RumiSoft User Manual – v. 1.6 May 2014 6
USB Readers: this menu allows to:
• Export to Txt, CSV or XML: select export control file format. Default is text format; but csv or xml are also supported. This option is valid only for USB readers. It is not applicable to GES2 reader.
• EIC format: selects the EIC output format among ISO Long, ISO Short, ISO Tiris, ISO F-210, ISO BND Ita and ISO South America.
• Backup: starts a reader system and data backup.
• Restore: starts a reader’s restore of last available backup. NOTE: the first time a reader is connected to the PC, the Rumisoft automatically suggests the user to start a Backup procedure. It is highly recommended to ensure that a Restore operation can be performed in case that data corruption occurs. Configuration: this menu allows to:
• Show GES2S: enables the GES2S reader support. If selected, the application shows the GES2S device in the devices panel and the GES2S menu.
• Input folder: shows a folder selector to choose where files picked from uploading actions have to be saved. (Figure 2).
Figure 2
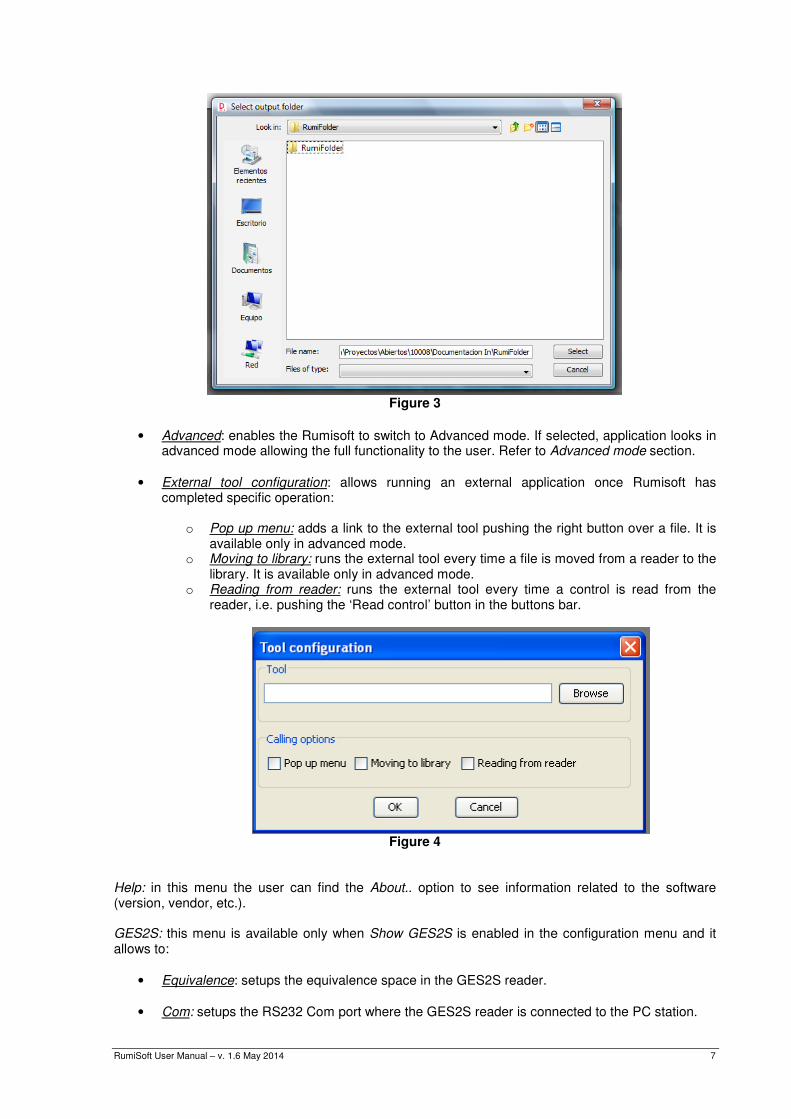
• Output folder: shows a folder selector to choose where files picked from downloading actions have to be saved. (Figure 3).
RumiSoft User Manual – v. 1.6 May 2014 7
Figure 3
• Advanced: enables the Rumisoft to switch to Advanced mode. If selected, application looks in advanced mode allowing the full functionality to the user. Refer to Advanced mode section.
• External tool configuration: allows running an external application once Rumisoft has completed specific operation:
o Pop up menu: adds a link to the external tool pushing the right button over a file. It is
available only in advanced mode. o Moving to library: runs the external tool every time a file is moved from a reader to the
library. It is available only in advanced mode. o Reading from reader: runs the external tool every time a control is read from the
reader, i.e. pushing the ‘Read control’ button in the buttons bar.
Figure 4
Help: in this menu the user can find the About.. option to see information related to the software (version, vendor, etc.). GES2S: this menu is available only when Show GES2S is enabled in the configuration menu and it allows to:
• Equivalence: setups the equivalence space in the GES2S reader.
• Com: setups the RS232 Com port where the GES2S reader is connected to the PC station.
RumiSoft User Manual – v. 1.6 May 2014 8
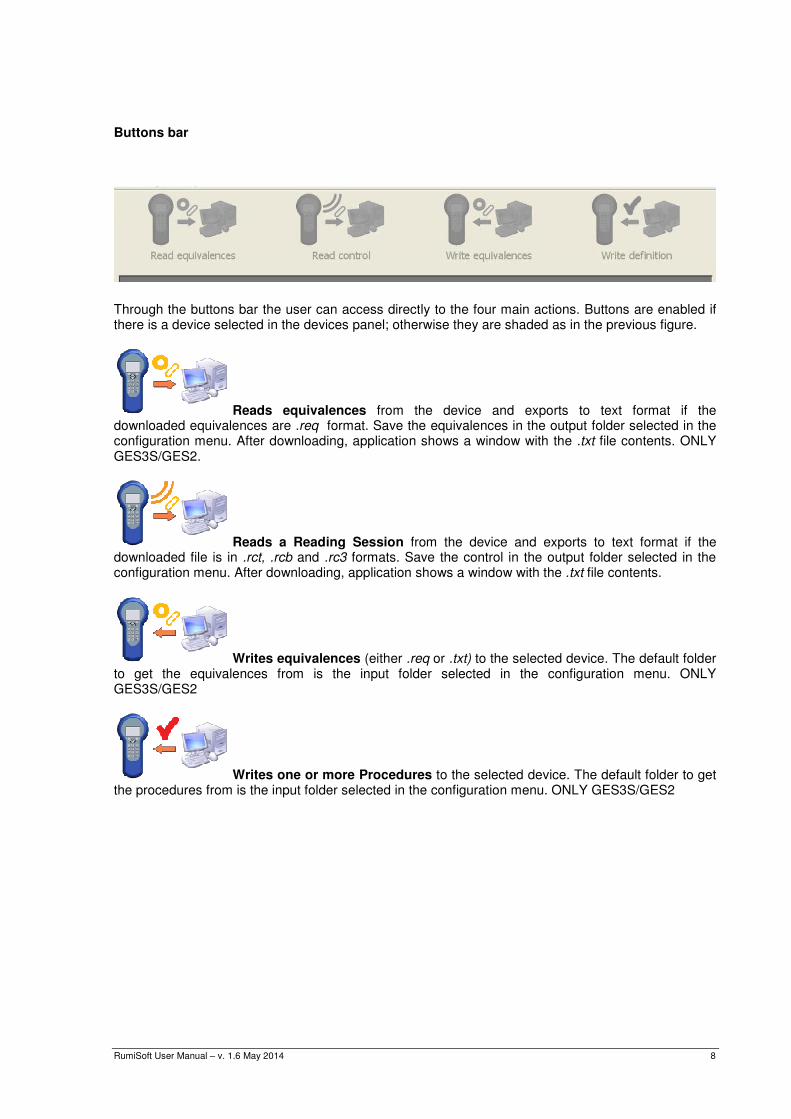
Buttons bar
Through the buttons bar the user can access directly to the four main actions. Buttons are enabled if there is a device selected in the devices panel; otherwise they are shaded as in the previous figure.
Reads equivalences from the device and exports to text format if the downloaded equivalences are .req format. Save the equivalences in the output folder selected in the configuration menu. After downloading, application shows a window with the .txt file contents. ONLY GES3S/GES2.
Reads a Reading Session from the device and exports to text format if the downloaded file is in .rct, .rcb and .rc3 formats. Save the control in the output folder selected in the configuration menu. After downloading, application shows a window with the .txt file contents.
Writes equivalences (either .req or .txt) to the selected device. The default folder to get the equivalences from is the input folder selected in the configuration menu. ONLY GES3S/GES2
Writes one or more Procedures to the selected device. The default folder to get the procedures from is the input folder selected in the configuration menu. ONLY GES3S/GES2

RumiSoft User Manual – v. 1.6 May 2014 9
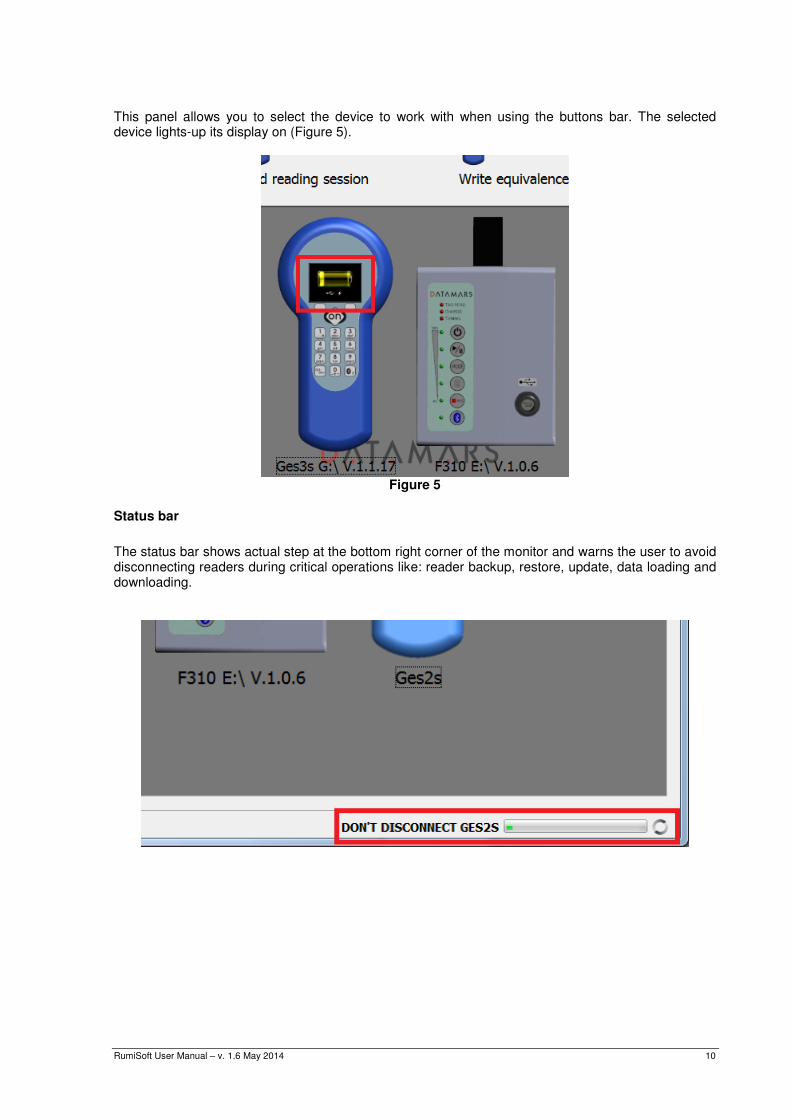
Device panel
The device panel shows the reader devices connected to the PC and the relative version.
When Show GES2S is enabled in the configuration menu, the device panel shows also a GES2S device.
RumiSoft User Manual – v. 1.6 May 2014 10
This panel allows you to select the device to work with when using the buttons bar. The selected device lights-up its display on (Figure 5).
Figure 5
Status bar
The status bar shows actual step at the bottom right corner of the monitor and warns the user to avoid disconnecting readers during critical operations like: reader backup, restore, update, data loading and downloading.

RumiSoft User Manual – v. 1.6 May 2014 11
4 Advanced Mode
Following figure shows the advanced mode main window:
Figure 6
The window can be divided in five parts:
• Menu line
• Buttons bar
• Navigation tree
• Document area
• Status bar (as described in basic mode session, see chapter 3.4)

RumiSoft User Manual – v. 1.6 May 2014 12
Menu line
The user can find all actions in the menu. Options of the main menu are:
File
New Procedure: starts a wizard that helps step by step to create a new procedure (Figure 7).
Figure 7

RumiSoft User Manual – v. 1.6 May 2014 13
Open: shows a file selector pointing to the PC Library to open a file in the document area. The user can import an old procedure file by selecting the GesDef version type file in the Files of type box (Figure 8).
Figure 8
Save: saves the selected file in the document area without asking a new file name. Save As: shows a file selector to save the selected file in the document area with a new file name. Delete: deletes the selected file in the tree. Exit: closes the application. NOTE: Rumisoft is still running in background mode. The user can open the application from the Windows task bar.
GES2S
Actions related to GES2S device. This menu is only visible if Show GES2S is selected in the Configuration menu. Read equivalences: when GES2S is selected, it downloads via Serial Com Port the equivalences from the GES2S and saves them in a text equivalences file in the library folder. Software shows a file selector to select the file name (Figure 9).

RumiSoft User Manual – v. 1.6 May 2014 14
Figure 9
Read Reading Session: when GES2S is selected in the tree, it downloads via Serial Com Port the positions of the control from the GES2S and saves them in a text control file in the library folder. Software shows a file selector to select the file name and asks the user to delete control in the reader (Figure 10).
RumiSoft User Manual – v. 1.6 May 2014 15
Figure 10
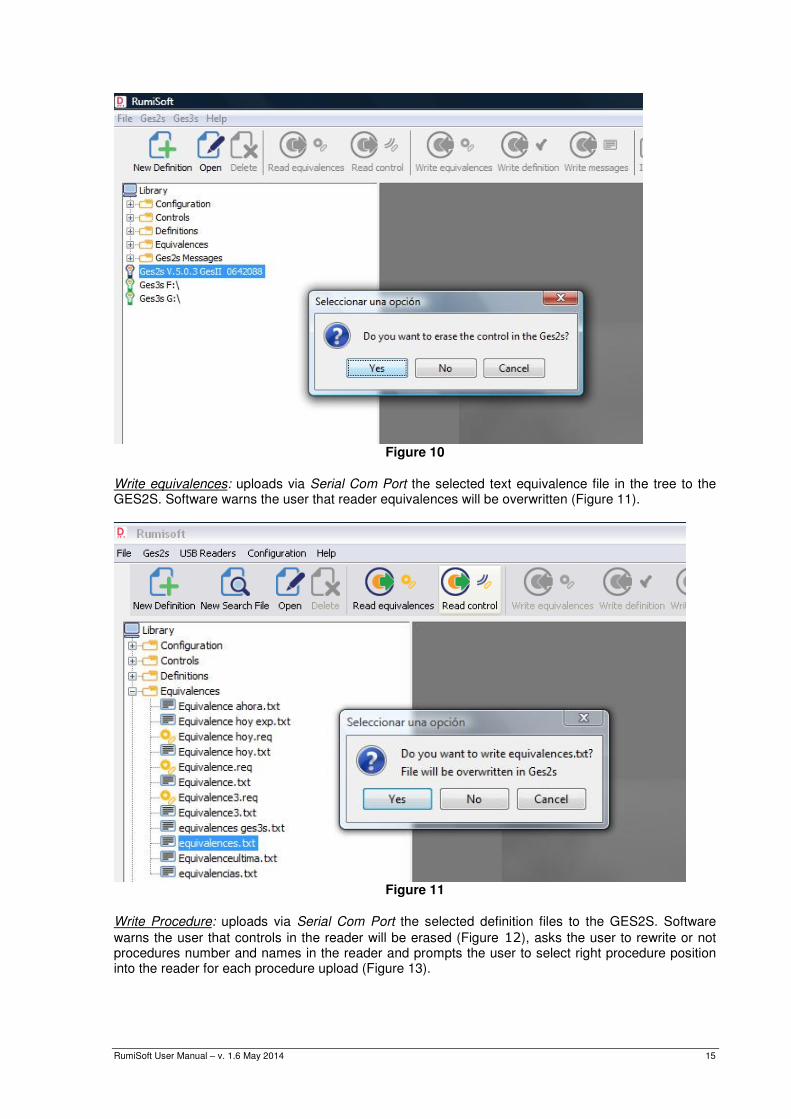
Write equivalences: uploads via Serial Com Port the selected text equivalence file in the tree to the GES2S. Software warns the user that reader equivalences will be overwritten (Figure 11).
Figure 11
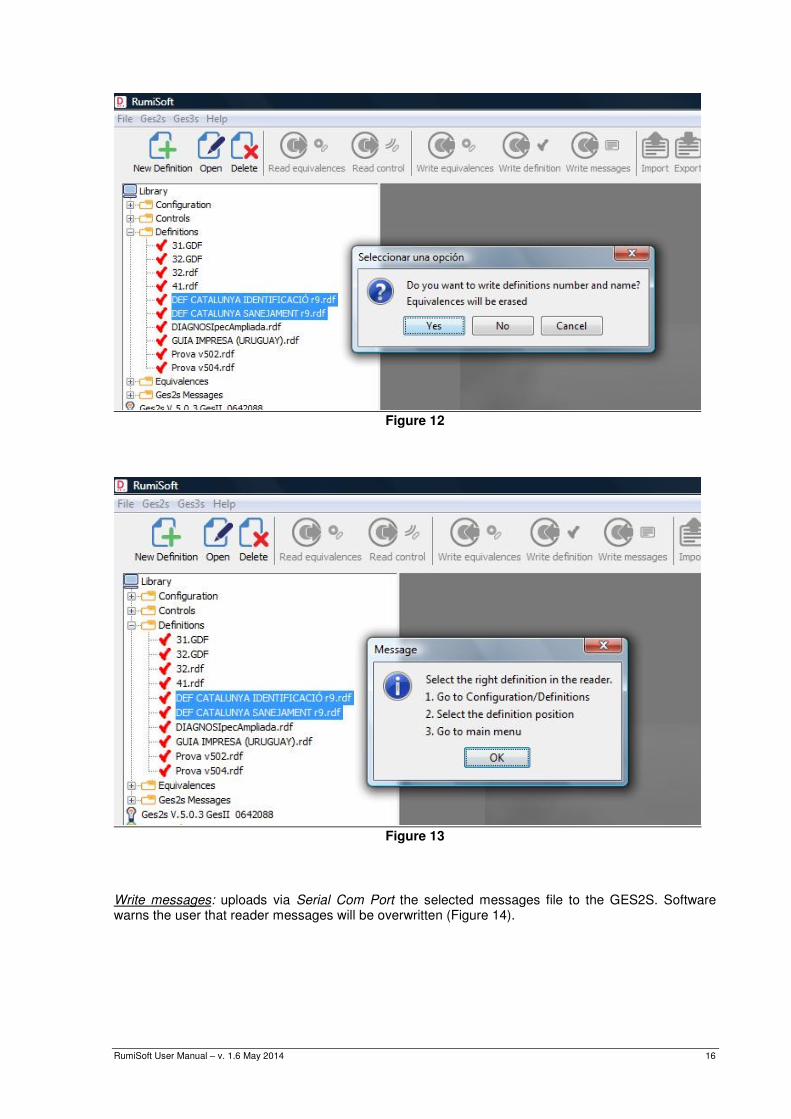
Write Procedure: uploads via Serial Com Port the selected definition files to the GES2S. Software
warns the user that controls in the reader will be erased (Figure 12), asks the user to rewrite or not procedures number and names in the reader and prompts the user to select right procedure position into the reader for each procedure upload (Figure 13).
RumiSoft User Manual – v. 1.6 May 2014 16
Figure 12
Figure 13
Write messages: uploads via Serial Com Port the selected messages file to the GES2S. Software warns the user that reader messages will be overwritten (Figure 14).

RumiSoft User Manual – v. 1.6 May 2014 17
Figure 14
Previous to write definitions operation, the user must read GES2S version by double clicking the GES2S icon. Otherwise, software shows an error message (Figure 15):
Figure 15
Equivalences: allows the user to change the maximum equivalences number the GES2S must keep in memory (Figure 16).

RumiSoft User Manual – v. 1.6 May 2014 18
Figure 16
Com: shows all available com ports in the PC to select the com port used to upload to and download from the GES2S (Figure 17).
Figure 17
USB Readers
Actions related to USB READERS device. Import: converts the text or CSV equivalences file selected to an equivalence file. Software shows a file selector to select the file name. This action allows you to use an old GES2S downloaded equivalence file with a GES3S by converting the old file format to the new one. This option is only visible in advanced mode. Export: if there is an equivalence file selected in the tree software, it converts it to a text, CSV or XML equivalence file with the EIC format selected. This action allows you to use a new GES3S created equivalence file with an old GES2S by converting the new file format into the old one. If there is a Reading Session file selected, it converts it to a text or CSV control file. Software shows a file selector to select the file name. This action allows old software using old text control format to work with GES3S created Reading Sessions by converting the new file format into the old one. This option is only available in advanced mode.

RumiSoft User Manual – v. 1.6 May 2014 19
Export to Txt, CSV or XML: select export control file format. Text format is given by default but CSV and XML are also supported. This option is valid only for USB readers. It is not applicable to GES2 reader. EIC Format: allows the user to change the EIC format used to show and export equivalences files and Reading Session files (Figure 18).
Figure 18
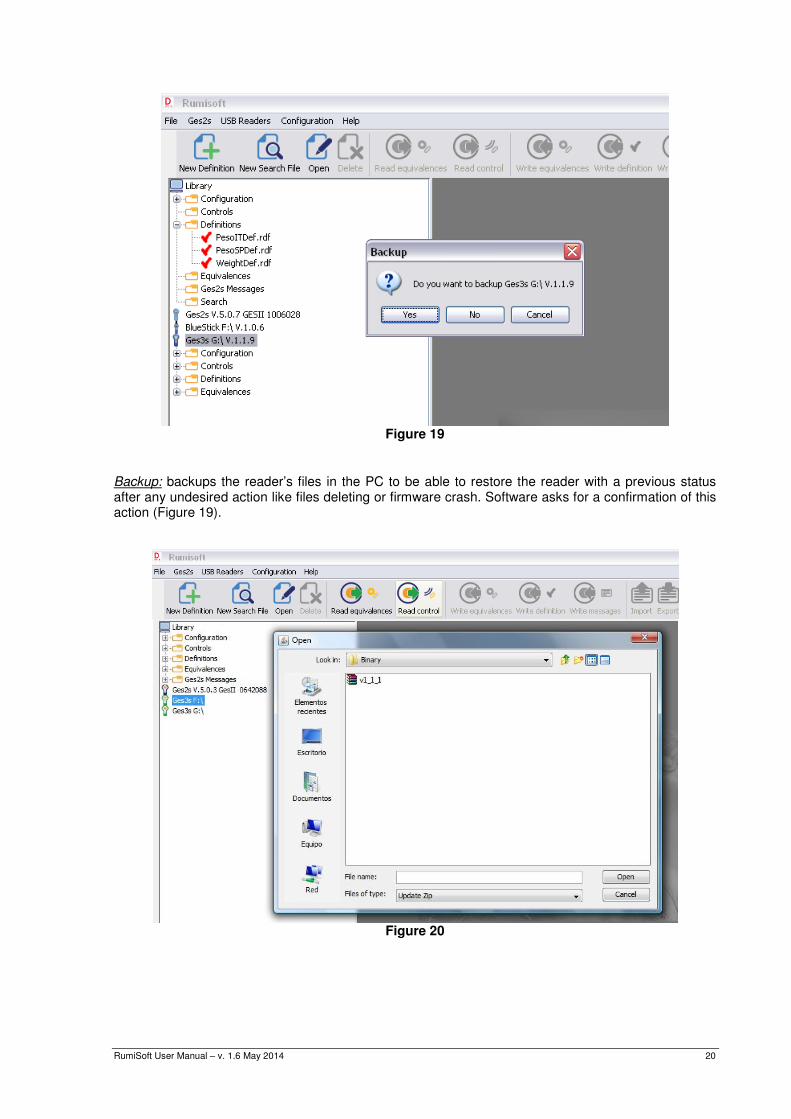
Update: updates the USB READERS firmware from a ZIP file. Before updating, software asks the user for a backup of the reader (Figure 19) and shows a file selector to select the new firmware zip file (Figure 20). It is recommended to backup to be able to restore the reader if new firmware doesn’t work. This option is only available in advanced mode.
RumiSoft User Manual – v. 1.6 May 2014 20
Figure 19
Backup: backups the reader’s files in the PC to be able to restore the reader with a previous status after any undesired action like files deleting or firmware crash. Software asks for a confirmation of this action (Figure 19).
Figure 20

RumiSoft User Manual – v. 1.6 May 2014 21
Restore: restores the reader with the previous backup status. Software asks for a confirmation of this action (Figure 21).
Figure 21
Add language: allows the user to load in the GES3S/Bluestick reader a new language.
Figure 22
The *.rlg file shall be provided by Datamars support. Select the file and click on open to start the reader update.

RumiSoft User Manual – v. 1.6 May 2014 22
Buttons bar
With the buttons bar the user can access directly to the most used actions. Buttons are enabled if their action is allowed for the selected items in the tree. All buttons have their equivalent menu action and some of them have a shortcut key:
New Procedure (CTRL+N). Create a new procedure file *.rdf for Ges3s reader.
New Search File (CTRL+F). Create e new search file *.rsb for Bluestick reader.
Open (CTRL+O). Open a file. The file browser starts from the Library folder.
File/Delete (CTRL+D).
GES2S/Read equivalences. Visible only if Show GES2S is selected in the configuration menu.
GES2S/Read Reading Session. Visible only if Show GES2S is selected in the configuration menu.
GES2S/Write equivalences. Visible only if Show GES2S is selected in the configuration menu.
GES2S/Write Procedure. Visible only if Show GES2S is selected in the configuration menu.
GES2S/Write messages. Visible only if Show GES2S is selected in the configuration menu.
GES3S/Import (CTRL+I). Convert the text or CSV equivalence file in the Rumisoft format *.req
GES3S/Export (CTRL+E). Convert control file (*.rct/*.rcb/*.rc3) into a text, CSV or XML file. Dashboard. Start Dashboard application
RumiSoft User Manual – v. 1.6 May 2014 23
Navigation Tree
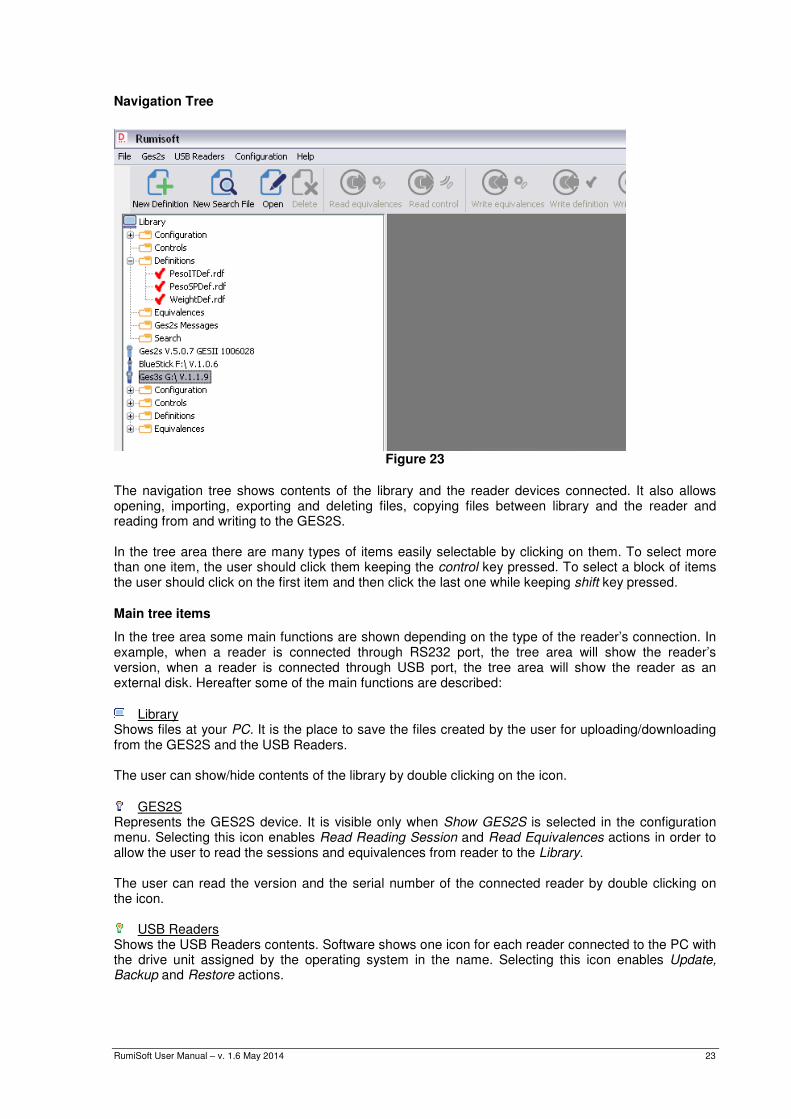
Figure 23
The navigation tree shows contents of the library and the reader devices connected. It also allows opening, importing, exporting and deleting files, copying files between library and the reader and reading from and writing to the GES2S. In the tree area there are many types of items easily selectable by clicking on them. To select more than one item, the user should click them keeping the control key pressed. To select a block of items the user should click on the first item and then click the last one while keeping shift key pressed.
Main tree items
In the tree area some main functions are shown depending on the type of the reader’s connection. In example, when a reader is connected through RS232 port, the tree area will show the reader’s version, when a reader is connected through USB port, the tree area will show the reader as an external disk. Hereafter some of the main functions are described:
Library
Shows files at your PC. It is the place to save the files created by the user for uploading/downloading from the GES2S and the USB Readers. The user can show/hide contents of the library by double clicking on the icon.
GES2S
Represents the GES2S device. It is visible only when Show GES2S is selected in the configuration menu. Selecting this icon enables Read Reading Session and Read Equivalences actions in order to allow the user to read the sessions and equivalences from reader to the Library. The user can read the version and the serial number of the connected reader by double clicking on the icon.
USB Readers Shows the USB Readers contents. Software shows one icon for each reader connected to the PC with the drive unit assigned by the operating system in the name. Selecting this icon enables Update, Backup and Restore actions.

RumiSoft User Manual – v. 1.6 May 2014 24
Bluestick reader, F310 Reader The user can show/hide contents of the reader by double clicking on the icon.
Folders
Library and USB Readers items organize files inside folders. There is a folder for each type of file: Configuration: for configuration files. Reading Sessions: for reading session files and, in the Library, also for text control files. Procedure: for current procedure files and, in the Library, also for old procedure files. Equivalences: for equivalences files and, in the Library, also for text equivalences files. Note that in the USB Readers the user can only have one equivalence file. GES2S messages: for GES2S messages. Search: for search files. The user can show/hide contents of the folder by double clicking on the icon. The user can copy one or more files from one folder of the Library to the same folder in the readers and vice versa by drag and drop the files.
Files
The icons to identify file types are:
Configuration
Procedure. selecting up to five of these files enables Write procedure action to allow the user to
write procedure to the reader.
Reading Session
Equivalences
Text equivalences, text control, GES3S configuration and GES2S messages. Selecting one text equivalences file enables Write equivalences action to allow the user to write equivalences to the reader. Selecting one GES2S messages file enables Write messages action to allow the user to write messages to the reader.
Comma Separated Values (CSV) file format
XML file format
Search The user can open the file in the document area by double clicking on the icon.

RumiSoft User Manual – v. 1.6 May 2014 25
Pop up menu
By clicking the right button of the mouse, a pop up menu shows the common actions open, delete, import and export allowed for the selected file as well as the Copy to action that shows a file selector to copy the selected files to a different folder (Figure 24).
Figure 24

RumiSoft User Manual – v. 1.6 May 2014 26
Document area
Figure 25
Files opened to show/edit are showed in the document area. Each file is opened in a window that the user can move, resize, hide and show, like other operating system windows. There are two types of file the user can edit: equivalences and procedures. Once a file has been modified, the user can “save” or “save as” the file selecting the desired function in the file menu.
Procedure
Procedure is the main input file required by Ges3s reader to collect data on the field. Rumisoft has a Wizard support to help users creating procedure. A procedure is a list of field. Each field is a basic input data. Following example aims to collect weight and Breed of user animal, saving the EIC, the Visual Tag and Reading Time and Date: Field 1: EIC, read the animal EIC Field 2: VISUAL TAG, get the VISUAL TAG from the equivalence table Field 3: Weight, ask the animal weight Field 4: Breed Field 5: Date Field 6: Time NOTE: A procedure can have a maximum of 20 fields Push the New Procedure button to start the Wizard.

RumiSoft User Manual – v. 1.6 May 2014 27
New Procedure
First insert the Field1 name:
Figure 26
Push next and select one of the types of action available, in example Read EIC:
Figure 27

RumiSoft User Manual – v. 1.6 May 2014 28
Select how many EIC must be read before move to next field. Default and typical value is 1 NOTE:1 It may be convenient to read several EIC in order to group animals with common characterictics. NOTE 2: The sum ‘number of fields + nb of EIC read’ can’t exceed 50. For example, if the procedure is made of 4 fields (Date, Time, Farm Name and EIC), Rumisoft will limit the size of the group to 47 EIC (Read EIC how many times is =< 47)
Figure 28
Now is possible to add a condition in order to ask this field only when the condition is true. Since it is the first field it must be asked every time:
Figure 29

RumiSoft User Manual – v. 1.6 May 2014 29
Now it is possible to select if the field can be modified or not:
Figure 30
Now it is possible to define the Duplicity rules of this field. In this example there is not proposed value and it is not allowed to add two EIC field with same value:
Figure 31

RumiSoft User Manual – v. 1.6 May 2014 30
The duplicity is applied also across different fields. Since this is the first, the field list is empty:
Figure 32
Then start the Export field properties. Select yes if this field must be exported in the txt file:
Figure 33

RumiSoft User Manual – v. 1.6 May 2014 31
Then start the Print field properties. Print means sent by Bluetooth. Select yes if this field must be sent through Bluetooth:
Figure 34
First field is completed. Let’s start Field 2 definition:
Figure 35
RumiSoft User Manual – v. 1.6 May 2014 32
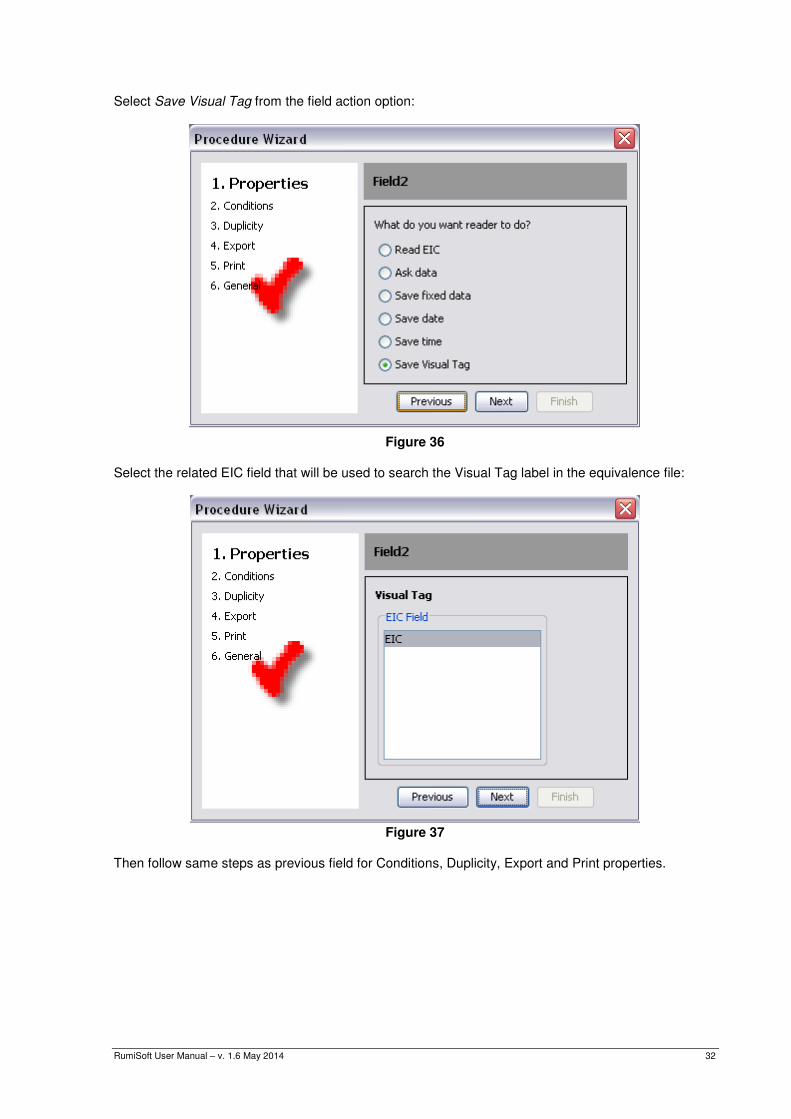
Select Save Visual Tag from the field action option:
Figure 36
Select the related EIC field that will be used to search the Visual Tag label in the equivalence file:
Figure 37
Then follow same steps as previous field for Conditions, Duplicity, Export and Print properties.

RumiSoft User Manual – v. 1.6 May 2014 33
Start field 3:
Figure 38
Select Ask data as field action:
Figure 39

RumiSoft User Manual – v. 1.6 May 2014 34
Select Number as data type:
Figure 40
A number can be defined as Alphanumeric, Integer and Decimal. As shown in the following example, we select three integer digit and 2 decimal digits:
Figure 41
Then follow same steps as previous field for Conditions, Duplicity, Export and Print properties.
RumiSoft User Manual – v. 1.6 May 2014 35
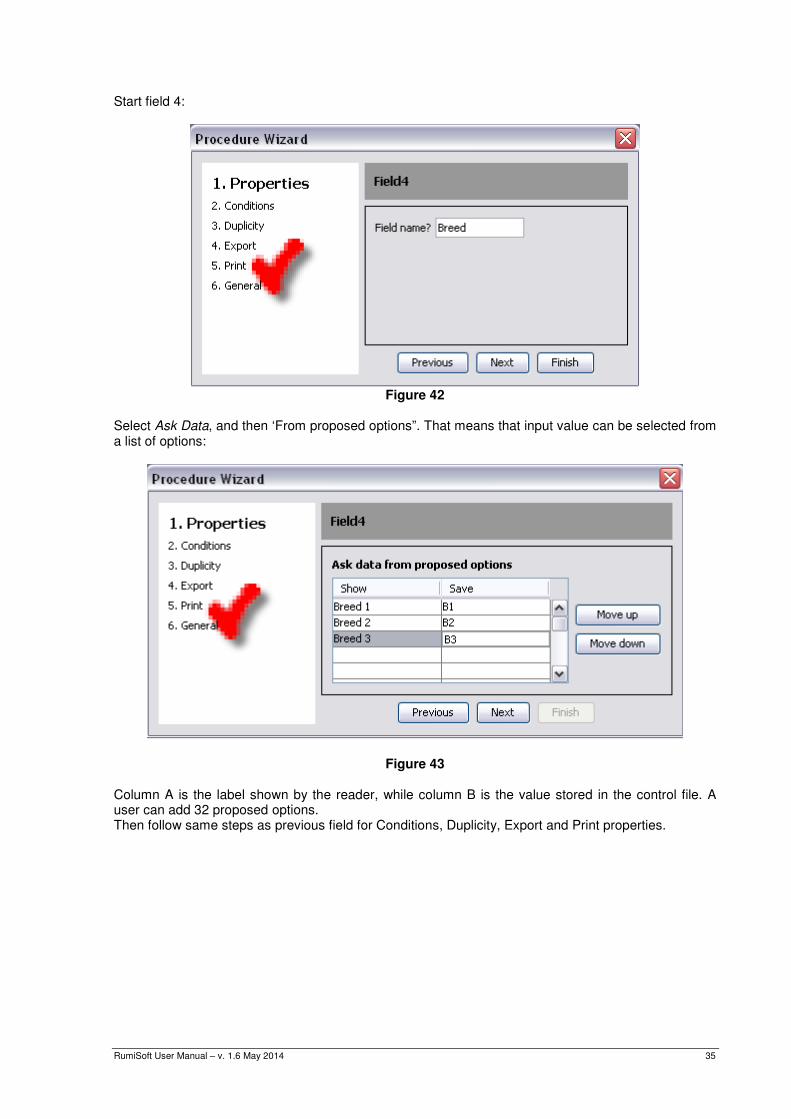
Start field 4:
Figure 42
Select Ask Data, and then ‘From proposed options”. That means that input value can be selected from a list of options:
Figure 43
Column A is the label shown by the reader, while column B is the value stored in the control file. A user can add 32 proposed options. Then follow same steps as previous field for Conditions, Duplicity, Export and Print properties.
RumiSoft User Manual – v. 1.6 May 2014 36
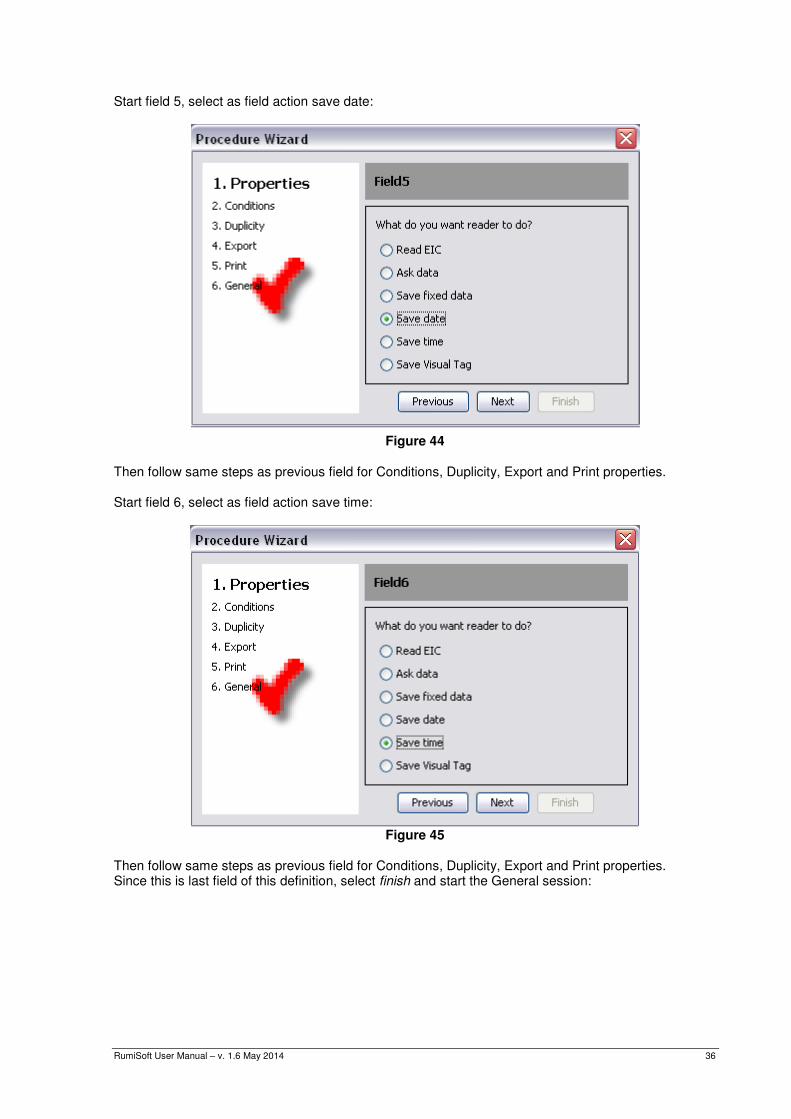
Start field 5, select as field action save date:
Figure 44
Then follow same steps as previous field for Conditions, Duplicity, Export and Print properties. Start field 6, select as field action save time:
Figure 45
Then follow same steps as previous field for Conditions, Duplicity, Export and Print properties. Since this is last field of this definition, select finish and start the General session:

RumiSoft User Manual – v. 1.6 May 2014 37
Figure 46
The user can add a CRC at the end of each control line. Add a Prefix and a Suffix at the begging and at the end of the control file. Compare field number is the last step of duplicity rule: 1 means that first field must always be unique with the control file, 2 means that first 2 fields must be unique, 3 first three field and so on. Finally Identity field is the field used by the reader as identification of a control line when it is shown on the LCD. In this example the EIC has been selected. The new procedure is ready. Select the procedure folder and the definition name and select save.
Procedure edit
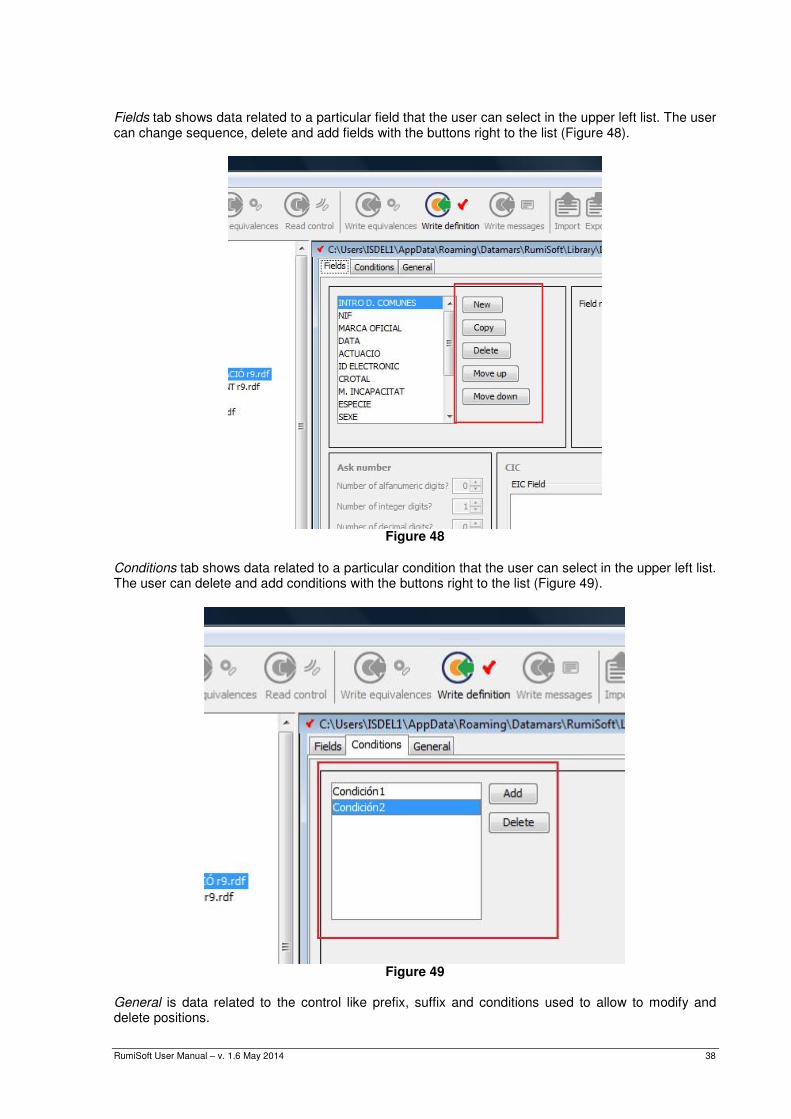
When the user opens a procedure, data is organized in three tabs: Fields, conditions and general (Figure 47).
Figure 47
RumiSoft User Manual – v. 1.6 May 2014 38
Fields tab shows data related to a particular field that the user can select in the upper left list. The user can change sequence, delete and add fields with the buttons right to the list (Figure 48).
Figure 48
Conditions tab shows data related to a particular condition that the user can select in the upper left list. The user can delete and add conditions with the buttons right to the list (Figure 49).
Figure 49
General is data related to the control like prefix, suffix and conditions used to allow to modify and delete positions.
RumiSoft User Manual – v. 1.6 May 2014 39
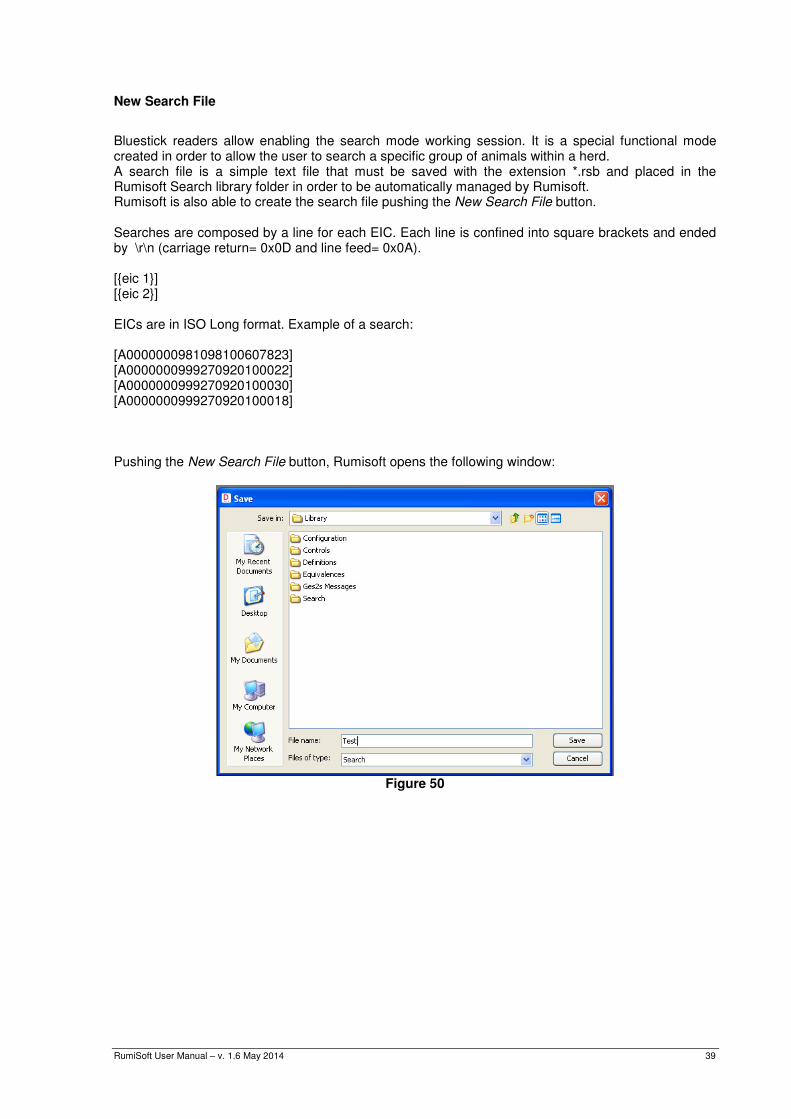
New Search File
Bluestick readers allow enabling the search mode working session. It is a special functional mode created in order to allow the user to search a specific group of animals within a herd. A search file is a simple text file that must be saved with the extension *.rsb and placed in the Rumisoft Search library folder in order to be automatically managed by Rumisoft. Rumisoft is also able to create the search file pushing the New Search File button. Searches are composed by a line for each EIC. Each line is confined into square brackets and ended by \r\n (carriage return= 0x0D and line feed= 0x0A). [{eic 1}] [{eic 2}] EICs are in ISO Long format. Example of a search: [A0000000981098100607823] [A0000000999270920100022] [A0000000999270920100030] [A0000000999270920100018] Pushing the New Search File button, Rumisoft opens the following window:
Figure 50

RumiSoft User Manual – v. 1.6 May 2014 40
Select Search folder and file name, then push save; a new file Test.rsc is be added under the Search folder. Open the new file from the Navigation window:
Figure 51
It is an empty file with a single column that can store the ISO Long EIC (23 digits). Rumisoft allows populating the Search file in two ways:
• Using a Reading Session file: open a reading session file in the Library. Select the EIC that must be searched and drop it in the Test.rsc file.
Figure 52

RumiSoft User Manual – v. 1.6 May 2014 41
EIC will be added to the search file:
Figure 53
• Using another search file: open search file from the Library and select the EIC that must be added to the search file. Drag and drop selected lines in the Test.rsc window:
Figure 54

RumiSoft User Manual – v. 1.6 May 2014 42
New EIC will be added to the search file. If an EIC is already present it is discharged:
Figure 55
Save the file. New Test.src file is competed and can be loaded in the Bluestick reader in the search folder.
Equivalence
Equivalence is a link between an EIC and a label. A label, named Visual Tag, is a generic string that the user can select to identify/remember easily the EIC on the field. It is used to simplify the day by day work on the field since when a user read a tag already stored in the equivalence file gets on the LCD both the EIC number and Visual Tag label. Rumisoft supports three types of Equivalence file: Datamars property format (*.req), text format (*.txt) and CSV format. Rumisoft automatically convert text or CSV format to Datamars format (Note that XML format can be exported but not imported). Only Datamars format file can be loaded on a Ges3s reader.
Equivalence edit
When the user opens a Datamars equivalence file, it shows two columns in the file window: left column for EIC and right column to Visual Tag. The user can edit a Visual Tag value by double clicking on the cell Figure 56).
Figure 56

RumiSoft User Manual – v. 1.6 May 2014 43
When the user opens a text equivalence file, it shows a read only file as in the following image:
Figure 57
The import button is now enabled to convert text format in Datamars format.
Equivalence text format specification
To allow Rumisoft to import a text equivalence file few rules must be satisfied. Each line is confined into square brackets. First field is the EIC, then the | (0x7C) as separator and then the Visual Tag label. Each line is ended by \r\n (carriage return= 0x0D and line feed= 0x0A). [{eic 1}|{Visual Tag 1}] [{eic n}|{Visual Tag n}] EICs may be in ISO Long format (23 digits); Visual Tag’s length may be up to 16 characters. Example of text equivalence: [A0000000999270920100025|VISUAL TAG1] [A0000000999270920100013|VISUAL TAG2] [A0000000999270920100014|VISUAL TAG3] [A0000000999270920100003|VISUAL TAG4]
Configuration
How to change the configuration values
Rumisoft allows showing and modifying reader parameters. A user can create a library of configuration file with a specific setting for specific operation in the field. The following picture shows an example of configuration for the reader F310:
Figure 58

RumiSoft User Manual – v. 1.6 May 2014 44
Following picture shows the GES3S configuration file. To modify a parameter, just select it (for example the Auto shutdown parameter in the below figure) and edit its value.
Figure 59
Following picture shows the Bluestick configuration file, when ‘EIC format’ parameter is under modification, the parameter can be changed selecting the setting from the drop-down menu.
Figure 60

RumiSoft User Manual – v. 1.6 May 2014 45
Features table and Configuration setting description
The following table indicates the configuration setting of each Datamars livestock reader:
GES3S Bluestick F310
Major version • • •
Minor version • • •
Auto Shutdown • • •
Reading timeout [sec] • • •
Decimal separator •
EIC format • • •
Send version • •
Send reading • •
Send reading session •
Send field name •
Ask Visual Tag •
Buzzer duplicate Visual Tag •
Duplicate Visual Tag allowed •
Blank EIC allowed •
Use retagging counter •
Duplicate EIC allowed •
Blank repetition •
Auto start new •
Timeout backlight • •
Keyboard sound • •
Start-up sound •
Start-up image •
Format • •
Reading sound • • •
Shut-down sound •
Bluetooth • • •
Audio level •
Display brightness • •
Show EIC/Visual Tag •
ISO 24631-2 • • *
Reading Vibro •
LCD Contrast •
Store EIC data •

RumiSoft User Manual – v. 1.6 May 2014 46
Continuous reading •
FDX double check • • •
HDX double check • • •
EIC Prefix (Bluetooth) •
EIC Postfix (Bluetooth) •
Cyclic delay •
RS232 Baudrate • •
Power Save Mode •
TI Front End •
Major Version: Shows the first digit of the Configuration file.
Minor Version: Shows the second digit of the Configuration file.
Auto Shutdown: Configure the period of time, while the reader is inactive, after which the device automatically switch off.
GES3S: 1 to 5 minutes Bluestick: 10 to 60 seconds F310: 10 to 240 seconds
Reading Timeout [sec]: Configure the period of time after which the device stops searching for a tag.
GES3S: 1 to 100 seconds Bluestick: 1 to 240 seconds F310: 1 to 120 seconds
Decimal Separator: Configure the type of separator for the decimal digits. (dot or comma)
EIC format: Configure the EIC format between the followings:
Long Short Tiris F-210 Bdn_Ita ShortSA Hex Bi-Hex
Send Version: Enable/disable the sending of the reader version on a serial interface. Send reading: Enable/disable the sending of the read tags on a serial interface. Send reading session: Enable/disable the sending of the session file on a serial interface. Send field name: Enable/disable the sending of the field name on a serial interface. Ask Visual Tag: Enable/disable the request of the Visual Tag when a tag is read. Buzzer duplicate Visual Tag: Enable/disable a sound if a Visual Tag code is inserted twice. Duplicate Visual Tag allowed: Enable/disable the possibility to insert a Visual Tag more than once. Blank EIC allowed: Enable/disable the opportunity to insert a blank EIC. Use retagging counter: Enable/disable the retagging counter.

RumiSoft User Manual – v. 1.6 May 2014 47
Duplicate EIC allowed: Enable/disable the possibility to insert an EIC more than once. Blank repetition: Enable/disable the opportunity to insert a blank repetition in a control. Auto start new: Enable/disable the auto-start of a new control. Timeout backlight: Configure the period of time while the backlight is on.
GES3S: 1 to 40 seconds Bluestick: 1 to 40 seconds.
Keyboard sound: Enable/disable the sound of the keyboard. Start-up sound: Enable/disable the sound of the Start-up. Start-up image: Enable/disable the image of the Start-up. Format: Configure the format of the data and time. (EU, USA and TIMESTAMP) Reading sound: Enable/disable the sound during the reading of a tag. Shut-down sound: Enable/disable the sound of the Shut-down. Bluetooth: Enable/disable the Bluetooth. Audio level: Configure the volume of the device (NO, LOW, MID, HIGH) Display brightness: Configure the brightness of the display (LOW, MID, HIGH) Show EIC/Visual Tag: Configure the default type of tag searching when browsing in the device (EIC, VISUAL TAG) ISO 24631-2: Enable/disable the ISO standard mode. Reading vibration: Enable/disable the vibro while the device is reading a tag. LCD Contrast: Configure the contrast of the display ( 0 up to 100%) Store EIC data: Enable/disable the possibility of recording EIC codes in the control file. Continuous reading: Enable/disable the continuous reading mode. FDX double check: Runs check algorithm during FDX tag decoding. Should be set when reading in noisy environments. HDX double check: Runs check algorithm during HDX tag decoding. Should be set when reading in noisy environments. EIC Prefix (Bluetooth): Each time an EIC or a CIC is sent by the reader via Bluetooth, the reader will first send this Prefix. The prefix is user-defined and can be up to 8 characters. Carriage return is \r New line is \n Default value for this variable is an empty line (no character) EIC Postfix (Bluetooth): Each time an EIC or a CIC is sent by the reader via Bluetooth, the reader will then send this Postfix. The postfix is user-defined and can be up to 8 characters. Carriage return is \r New line is \n Default value for this variable is \r\n Cyclic delay: Configure the delay of a reading cycle.

RumiSoft User Manual – v. 1.6 May 2014 48
RS232 baudrate: Configure the default RS232 baudrate (9600,14400,38400,57600,115200) Power save mode: Enable/disable the Power save mode, which can increase the battery duration up to 10 hours. It can be enabled only in ISO mode, when enabled in Synchro mode will be ignored. TI front end: Configure the decoding of HDX Tag with TI or DATAMARS decoder.
RumiSoft User Manual – v. 1.6 May 2014 49
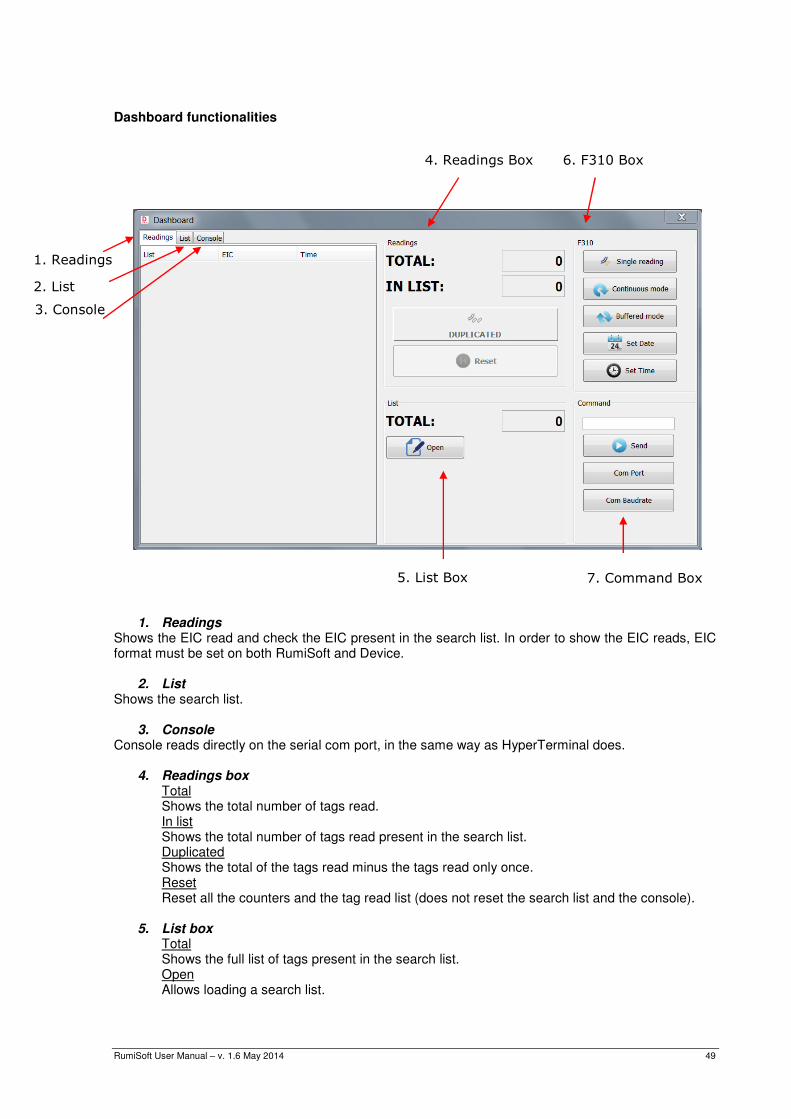
Dashboard functionalities
1. Readings
Shows the EIC read and check the EIC present in the search list. In order to show the EIC reads, EIC format must be set on both RumiSoft and Device.
2. List Shows the search list.
3. Console Console reads directly on the serial com port, in the same way as HyperTerminal does.
4. Readings box Total Shows the total number of tags read. In list Shows the total number of tags read present in the search list. Duplicated Shows the total of the tags read minus the tags read only once. Reset Reset all the counters and the tag read list (does not reset the search list and the console).
5. List box
Total Shows the full list of tags present in the search list. Open Allows loading a search list.
2. List
3. Console
1. Readings
4. Readings Box
6. F310 Box
5. List Box
7. Command Box

RumiSoft User Manual – v. 1.6 May 2014 50
6. F310 box Gives quick access to some standard F310 commands:
Single reading: reads for a limited duration (defined by the ‘reading timeout’ variable) Continuous mode: reads continuously and displays the tag number as many times as it’s read Buffered mode: reads continuously but a single tag is displayed only once Set date: send SET DATE command to F310. The date is taken from the computer clock. Set time: send SET TIME command to F310. The time is taken from the computer clock.
7. Command box (full command set for F310, reduced command set for F210) Proprietary commands (see F310 and F210 manuals) can be typed in the text box. They are sent to the reader (connected through serial port) by pressing the SEND button or ENTER (carriage return) on the computer keyboard.
ComPort: select the ComPort (usually it’s COM 1 if the reader is connected via cable) ComBaudrate: select the Baudrate on the PC side (it shall be the same number as the ‘RS232 baudrate’ config variable)