Embed Size (px)
Citation preview

Ultimate Swinging Screen Installation InstructionThese installation instructions are applicable for the following door products: Ultimate Inswing French Door Ultimate Arch Top French Door
2018-01-1819970256

Table of Contents
Before You Begin.......................................................2Ultimate Swinging Screen Parts Shipped.................2Install Jamb Adapter..................................................4Install Hinge Jamb Z-bar............................................4Install Head Jamb Z-bar.............................................4Hinge Jamb Z-Bar Wood Doors-6 9/16" Jambs.......5Align the Panels.........................................................6Sill Sweep Weather Strip...........................................6Sill Sweep Adjustment...............................................6Screen Door Closer Installation................................6Adjust Closing Tension.............................................7Adjust Closing Speed................................................8Mesh Screen or Storm Insert Installation.................8Mesh Screen or Storm Insert Removal.....................8Optional Top Screen Door Closer Installation.........8
Before You BeginRead these instructions thoroughly before beginning toassemble and install your Ultimate Swinging ScreenDoor. Inspect parts shipped with unit for damage andthat all assembly parts have been received.Instructions for installing the handle are with the handleset.
NOTE: Numbers listed in parentheses () are metricequivalents in millimeters rounded to the nearest wholenumber.
WARNINGWARNING
Practice safety! Wear safety glasses or goggles.
Tip
For ease of installation remove screen inserts from thepanels (refer to page 5) 6 9/16" wood Inswing Frenchdoor installations will require the help of an assistant orremoval of screen door panels (remove hinge screws)from z-bar prior to installation.
NOTE: For 3 and 4 wide units you will need to replacethe mull post. See the parts manual for the correct mullpost for your unit.
Ultimate Swinging Screen Parts Shipped X = One Wide Unit
XX = Two Wide Unit
You Will Need to SupplyRubber mallet Safety glasses1/8" and 1/16" drill bit Screw gun#1 and #2 Phillips bit Utility knifeStraight slot screwdriver Flat pry barPower miter saw with carbide blade for cutting aluminum
Glass CartonX XX1 2 Optional glass insert
Closer Kit1 Closer Assembly1 Closer hold open bracket1 Door bracket2 Door bracket screws #10 x 5/8”1 Jamb bracket4 Jamb bracket screws #10 x1”1 Head jamb bracket (optional usage)
1 Short connecting pin-closer rod to jamb bracket
1 Split connecting pin-closer rod to head jamb bracket (optional usage)
1 Long grooved connecting pin-closer cylinder to door bracket
22018-01-1819970256
Ultimate Swinging Screen for Inswing Rectangleand Arch Top French Doors Installation Instruction

IMPORTANTScrew and hardware kit includes parts for 4 9/16" and 6 9/16" Marvin Wood and Clad Inswing French Doorconfigurations. Please use chart to determine which screws are required for your door.
NOTE: *Use for 4 9/16" Clad OXX or XXO mulled units; longer screws may penetrate through exterior side of thedoor frame or mull post.
Main Shipping CartonX XX
1 2 Ultimate panel w/ screen insert, attached hinge z-bar, sill sweep
0 1 Astragal Assembly (attached to passive panel of double)
2 2 Jamb adapter (a)1 0 Latch stile z-bar (b)1 1 Head jamb z-bar (c)1 1 Instruction Manual1 1 Premium handle kit (see handle kit breakdown)1 1 Active panel closer kit (see closer kit breakdown)
1 1 Installation screws and hardware kit (see following page)
Screw and Hardware Kit Qty Jamb Mounting Mull Post Mounting
Identification and Application X XX Clad 4 9/16"
Clad 6 9/16"
Wood 4 9/16"
Wood 6 9/16" Clad Wood
#4 x 3/4" Self tapping pan head screw(Jamb adapter attachment)
14 14 Y Y Y N Y Y
#8 X 1" Standard pan head screw(Hinge z-bar attachment)*
8 16 Y Y N N Y Y
#8 x 1 1/2" Self tapping pan head screw(Hinge z-bar attachment)
8 16 N N Y Y N N
#8 X 1 1/2" Countersink flat head screw(Latch stile z-bar attachment)*
9 6 Y N N N Y Y
#8 x 1 1/2" Self tapping flat head screw(Latch stile z-bar attachment)
9 6 N Y Y Y N N
0.24" Panel hinge shims(Panel alignment adjustment)
16 16 Y Y Y Y Y Y
(a) A2022 (c) A2023(b) A2024
(a) A1958 (b) A1964 (c) A1948
For 1 3/4" panel UIFD manufactured prior to 02/28/2011
For 1 3/4" panel UIFD manufactured on or after 02/28/2011and all other Inswing doors
32018-01-1819970256
Ultimate Swinging Screen for Inswing Rectangleand Arch Top French Doors Installation Instruction

Unpack unit and separate jamb adapters and head jamb z-bar from panels. See above to determine which screwsare required for assembling your unit. For ease of handling remove screen/storm panel(s) and reinstall after unithas been installed.
Install Jamb AdapterFor jamb adapter placement on your French door seejamb and mull post details above. Do not pre-drill orinstall screws in the top hole of the jamb adapter. Thiswill help in aligning the mitered corners when fasteningthe z-bars.
NOTE: For 6 9/16" jamb wood units, the jamb adapteris assembled to z-bar and not screwed to jamb. Seenext page.
1. Place and center the jamb adapter against jamb sothere is an even space between the jamb adapterand sill and jamb adapter and head jamb. Seefigure 1.
Figure 1
2. Make sure the jamb adapter is seated and tightagainst the jamb and part stop. Using the pre-drilled holes in the adapter as a guide, drill 1/16" (2)pilot holes. Use the #4 x 3/4" self tapping pan headscrews to fasten the jamb adapter to the part stopthrough the pre-drilled holes in the jamb adapter.See figure 2.
Figure 2
3. Repeat above process for the other jamb adapter.
4 9/16" Clad UltimateInswing Door Sill Detail
Wood Ultimate Inswing French Door Mull Post Detail
Mull post
Z-bar adapter
Side jamb z-bar
Clad Ultimate Inswing FrenchDoor Mull Post Detail
Mull post
6 9/16" Clad Ultimate Inswing Door Sill Detail
Jamb, Sill and Mull Post Details6 9/16" Wood Ultimate Inswing
6 9/16" Clad Ultimate InswingFrench Door Jamb Detail
French Door Jamb Detail
4 9/16" Clad Ultimate InswingFrench Door Jamb Detail
4 9/16" Wood Ultimate InswingFrench Door Jamb Detail
Jamb adapterPart stop
NOTE: Evenly space the jambadapter between the top and bottomof door jamb.
42018-01-1819970256
Ultimate Swinging Screen for Inswing Rectangleand Arch Top French Doors Installation Instruction

Install Hinge Jamb Z-barNOTE: Arch Top door sills shown for illustrativepurposes unless otherwise noted. For wood 6 9/16"jamb z-bar, see next page.
1. Unpack a screen door panel and orient correctly infront of the door by using the z-bar top miter jointas a guide. Lift and align the bottom of the hinge z-bar (attached to panel) to the sill contour. Seefigure 3. Guide the leg of the z-bar between thejamb adapter and the jamb.
Figure 3
2. With the screen panel in the closed position,engage the hinge z-bar to the jamb adapter byfirmly tapping along the full length of the stop onthe z-bar with a soft rubber mallet and wood block.A “snap” will be heard when the z-bar is properlyseated into the jamb adapter. See figure 4.
Figure 4
Install Head Jamb Z-bar1. Once the side z-bar is properly engaged to the
jamb adapter, the screen panel can be carefullyopened. If the hinge z-bar disengages the jambadapter when the panel is opened, the z-bar wasnot properly seated; repeat above steps.
2. At the head jamb of the unit, measure the spacebetween the side jamb z-bars and cut a 45° miteron the head jamb z-bar with the miter saw. Seefigure 5. Place and center the head jamb z-bar atthe unit head jamb between the side jambs. Usingthe head z-bar existing holes as a template drill a1/8" (3) pilot holes into the head jamb. Secure thehead z-bar to the head jamb with the followingscrews:
#8x1 1/2" flat head screws for wood units. #8x1 1/2" flat head self tapping screws for clad
units.
Figure 5
3. Insert a flat pry bar between the sill and hinge z-barto carefully slide the hinge z-bar upward until themiters of the head z-bar and hinge z-bar align. Seefigure 6.
Figure 6
Cut a 45° miter at this end
Head jamb z-bar 45° cut
ScrewHead jamb z-bar
NOTE: Side jamb z-bar left off for illustrative purposes
Align 45° mitered edges
52018-01-1819970256
Ultimate Swinging Screen for Inswing Rectangleand Arch Top French Doors Installation Instruction
4. Prior to pre-drilling the holes in the hinges, alignthe side jamb and head jamb miter by moving theside jamb z-bar up and down and in and out. Whileholding the side jamb z-bar in place pre-drillthrough the holes in the hinge z-bar with a 1/8" (3)drill bit through the jamb adapter and first wall ofthe unit cladding. Install and tighten the appropriatesheet metal screws: See figure 7.
#8 x 1" pan head screws for clad and mulled units. #8 x 1 1/2" pan head self tapping screws for wood
units.
Figure 7
Hinge Jamb Z-Bar Installation for Wood Doors with 6 9/16" Jambs
Seek Assistance
This step will require an assistant.
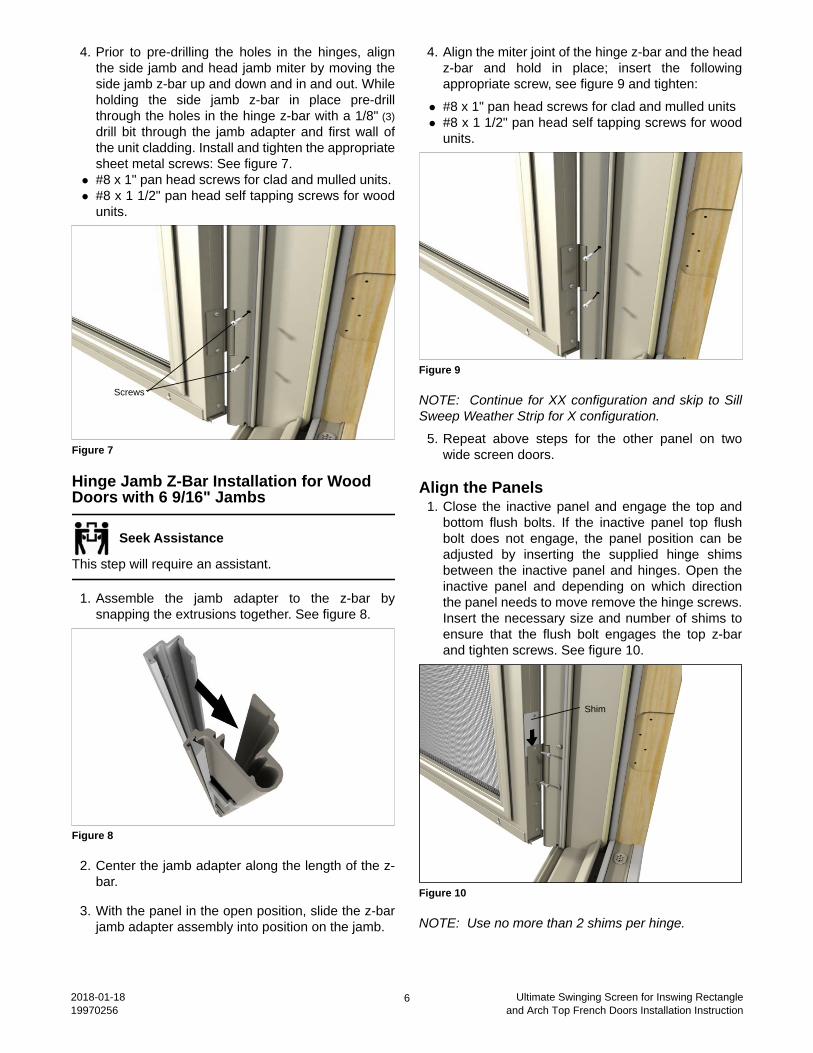
1. Assemble the jamb adapter to the z-bar bysnapping the extrusions together. See figure 8.
Figure 8
2. Center the jamb adapter along the length of the z-bar.
3. With the panel in the open position, slide the z-barjamb adapter assembly into position on the jamb.
4. Align the miter joint of the hinge z-bar and the headz-bar and hold in place; insert the followingappropriate screw, see figure 9 and tighten:
#8 x 1" pan head screws for clad and mulled units #8 x 1 1/2" pan head self tapping screws for wood
units.
Figure 9
NOTE: Continue for XX configuration and skip to SillSweep Weather Strip for X configuration.
5. Repeat above steps for the other panel on twowide screen doors.
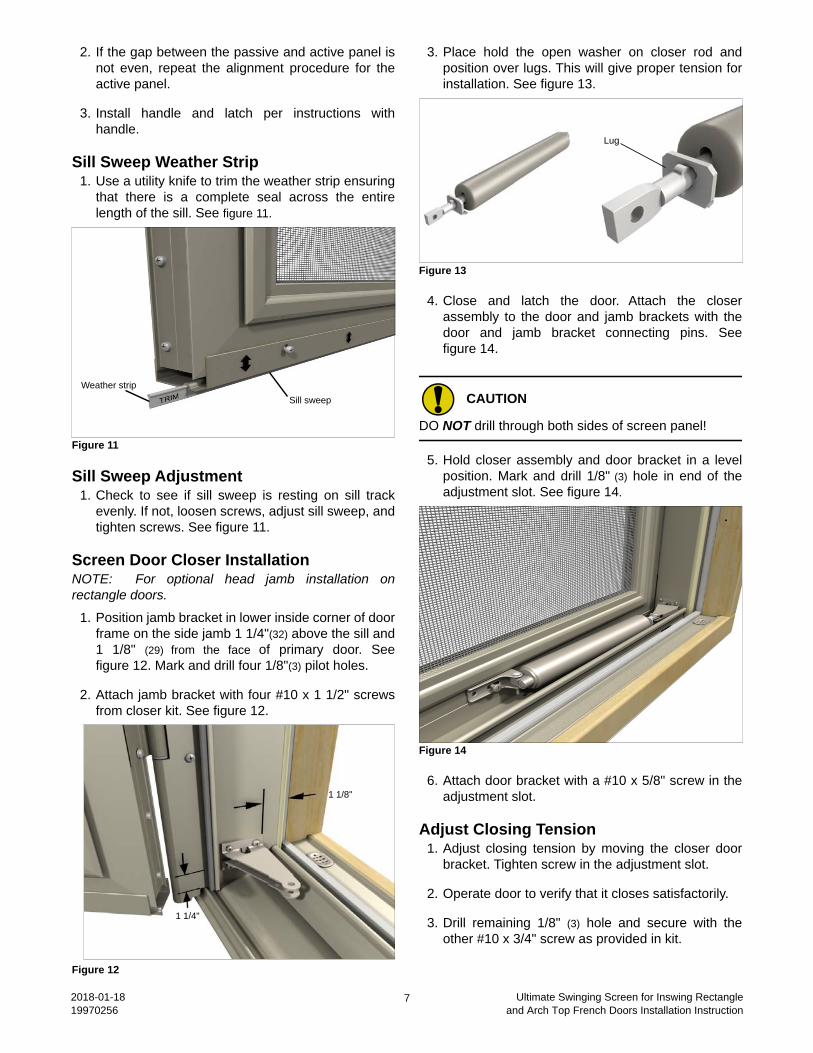
Align the Panels1. Close the inactive panel and engage the top and
bottom flush bolts. If the inactive panel top flushbolt does not engage, the panel position can beadjusted by inserting the supplied hinge shimsbetween the inactive panel and hinges. Open theinactive panel and depending on which directionthe panel needs to move remove the hinge screws.Insert the necessary size and number of shims toensure that the flush bolt engages the top z-barand tighten screws. See figure 10.
Figure 10
NOTE: Use no more than 2 shims per hinge.
Screws
Shim
62018-01-1819970256
Ultimate Swinging Screen for Inswing Rectangleand Arch Top French Doors Installation Instruction
2. If the gap between the passive and active panel isnot even, repeat the alignment procedure for theactive panel.
3. Install handle and latch per instructions withhandle.
Sill Sweep Weather Strip1. Use a utility knife to trim the weather strip ensuring
that there is a complete seal across the entirelength of the sill. See figure 11.
Figure 11
Sill Sweep Adjustment1. Check to see if sill sweep is resting on sill track
evenly. If not, loosen screws, adjust sill sweep, andtighten screws. See figure 11.
Screen Door Closer InstallationNOTE: For optional head jamb installation onrectangle doors.
1. Position jamb bracket in lower inside corner of doorframe on the side jamb 1 1/4"(32) above the sill and1 1/8" (29) from the face of primary door. Seefigure 12. Mark and drill four 1/8"(3) pilot holes.
2. Attach jamb bracket with four #10 x 1 1/2" screwsfrom closer kit. See figure 12.
Figure 12
3. Place hold the open washer on closer rod andposition over lugs. This will give proper tension forinstallation. See figure 13.
Figure 13
4. Close and latch the door. Attach the closerassembly to the door and jamb brackets with thedoor and jamb bracket connecting pins. Seefigure 14.
CAUTION
DO NOT drill through both sides of screen panel!
5. Hold closer assembly and door bracket in a levelposition. Mark and drill 1/8" (3) hole in end of theadjustment slot. See figure 14.
Figure 14
6. Attach door bracket with a #10 x 5/8" screw in theadjustment slot.
Adjust Closing Tension1. Adjust closing tension by moving the closer door
bracket. Tighten screw in the adjustment slot.
2. Operate door to verify that it closes satisfactorily.
3. Drill remaining 1/8" (3) hole and secure with theother #10 x 3/4" screw as provided in kit.
Weather stripSill sweep
1 1/8"
1 1/4"
Lug
72018-01-1819970256
Ultimate Swinging Screen for Inswing Rectangleand Arch Top French Doors Installation Instruction

Adjust Closing Speed1. To vary the closing speed of the screen door, use a
screwdriver to rotate the closing speed adjustmentscrew located at the door bracket end of cylinderassembly. See figure 15.
Figure 15
Mesh Screen or Storm Insert Installation1. Place insert into the panel opening and push firmly
at the perimeter to snap insert into place. Seefigure 16.
Figure 16
Mesh Screen or Storm Insert Removal1. Slide insert to the left or right to disengage locking
mechanism on the opposite side. Rotatedisengaged side of insert from panel and lift insertfrom panel. See figure 17.
Figure 17
Optional Top Screen Door Closer Installation
1. Position head jamb bracket in upper inside cornerof door frame against side jamb and 3/8" (10) fromface of door. Mark and drill three 1/8" (3) pilot holes.
2. Attach a head jamb bracket with #10 x 7/8" screws.See figure 18.
Figure 18
3. Place hold open washer on closer rod and positionover lugs. This will give proper tension forinstallation. See figure 19.
Figure 19
4. Close and latch the door. Attach closer assembly tothe door and jamb brackets with the door and jambbracket connecting pins. See figure 20.
Figure 20
CAUTION
DO NOT drill through both sides of screen panel.
5. Hold closer assembly and door bracket in a levelposition. Mark and drill 1/8"(3) hole in end of slotopposite cylinder.
6. Attach door bracket with a #10 x 5/8" screw in theadjustment slot.
3/8" (10)
Lug
Closer speed adjustment screw
After pre-drillingholes, attach thedoor bracket withtwo- #10 x 1/2" screws
Connect panelbracket to closerwith the door bracket connecting pin
Attach closer to head jamb bracket with spilt connecting pin
*Note the closer is to be installed to bottom of the head jamb bracket.
82018-01-1819970256
Ultimate Swinging Screen for Inswing Rectangleand Arch Top French Doors Installation Instruction