Embed Size (px)
Citation preview

UCS User Guide - 1 -
-------------------------------------------------------------------------------------------------------
www.corbatool.com
UCS User Guide V1.2.6
1 Introduction................................................................................................................. 4 1.1 Project history ....................................................................................................... 4 1.2 Assumptions.......................................................................................................... 5 1.3 Contact Info& Resources...................................................................................... 5 1.3.1 Project web site: ............................................................................................. 5 1.3.2 Email address: ................................................................................................ 5 1.3.3 Download web site......................................................................................... 5
2 Software Installation ................................................................................................... 5 2.1 Installation............................................................................................................. 5 2.2 Directory structure ................................................................................................ 5 2.3 Configuration ........................................................................................................ 7 2.4 Running............................................................................................................... 10
3 Usage......................................................................................................................... 12 3.1 Project management............................................................................................ 12 3.1.1 Create a project ............................................................................................ 12 3.1.2 Open or reload existing project.................................................................... 15
3.2 CORBA Client Simulation ................................................................................. 16 3.2.1 Start the server of factory demo................................................................... 16 3.2.2 Attach a IOR to client .................................................................................. 17 3.2.3 Invoke operation .......................................................................................... 19 3.2.4 Fill request parameter .................................................................................. 20 3.2.5 Return an interface type ............................................................................... 21 3.2.6 Save test case ............................................................................................... 22 3.2.7 Load test case ............................................................................................... 23 3.2.8 Search test case ............................................................................................ 23 3.2.9 Auto save all test case .................................................................................. 23 3.2.10 Auto load all test case............................................................................... 24 3.2.11 Auto load one test case ............................................................................. 24 3.2.12 One note for Operation Tree Display ....................................................... 25
3.3 CORBA Server Simulation................................................................................. 25 3.3.1 Fill reply parameter or exception................................................................. 25 3.3.2 Create servant............................................................................................... 26
3.4 CORBA Server extending................................................................................... 28 3.4.1 Prerequisite .................................................................................................. 28 3.4.2 Steps............................................................................................................. 28 3.4.3 Q&A............................................................................................................. 28 3.4.4 Appendix: Mapping Table ........................................................................... 30
3.5 IDL Browser ....................................................................................................... 31 3.6 CORBA Client Operation Flow.......................................................................... 31

UCS User Guide - 2 -
-------------------------------------------------------------------------------------------------------
www.corbatool.com
3.6.1 OpenOperationFlow..................................................................................... 32 3.6.2 AddOperation............................................................................................... 32 3.6.3 InsertOperation ............................................................................................ 33 3.6.4 MoveUp ....................................................................................................... 33 3.6.5 MoveDown .................................................................................................. 33 3.6.6 RemoveAllOperation ................................................................................... 33 3.6.7 SaveOperationFlow & ExecuteOperationFlow ........................................... 33 3.6.8 How to set parameter replacement............................................................... 34 3.6.9 How to set match condition ......................................................................... 35 3.6.10 How to set AutomaticAddMatchCondition.............................................. 36 3.6.11 How to enable iterator function................................................................ 36 3.6.12 How to set execution number for every operation? ................................. 37 3.6.13 How to set repetition number for the whole operation flow?................... 37 3.6.14 How to set comments for every operation?.............................................. 37 3.6.15 Others ....................................................................................................... 38
3.7 Test Spec Generating .......................................................................................... 38 3.7.1 Use it as test case document......................................................................... 39 3.7.2 Use it as test report document ...................................................................... 39
3.8 Notification Service ............................................................................................ 40 3.8.1 Notification service management ................................................................ 40 3.8.2 Notification sending and receiving .............................................................. 41
3.9 Naming Service................................................................................................... 42 3.9.1 Naming server.............................................................................................. 42 3.9.2 Naming service management ....................................................................... 42
3.10 GIOP Message Interceptor .............................................................................. 43 3.10.1 GIOP Filter Model.................................................................................... 43 3.10.2 GIOP filter tools ....................................................................................... 44 3.10.3 Fix IOR:.................................................................................................... 44 3.10.4 Quick start Interceptor.............................................................................. 46 3.10.5 Start Interceptor ........................................................................................ 49 3.10.6 Stop Interceptor ........................................................................................ 49
3.11 Utility............................................................................................................... 50 3.11.1 Ping IOR................................................................................................... 50 3.11.2 Parse IOR ................................................................................................. 51
3.12 Console mode .................................................................................................. 51 3.12.1 Client Operation Flow.............................................................................. 51 3.12.2 Notification Tools..................................................................................... 52
3.13 UCS plugin ...................................................................................................... 55 3.13.1 IOpFlowNodePlugin.java......................................................................... 55 3.13.2 IStructureEventActionPlugin.java............................................................ 57
3.14 How to enable SSL function ........................................................................... 59 3.14.1 Key stores ................................................................................................. 59 3.14.2 Configuring SSL properties...................................................................... 60
3.15 Description of “Notifications” Menu .............................................................. 63 3.16 How to use “CMTreeBrowser” tool ................................................................ 63
4 Appendix................................................................................................................... 65

UCS User Guide - 3 -
-------------------------------------------------------------------------------------------------------
www.corbatool.com
4.1 FAQ..................................................................................................................... 65 4.1.1 How to start multi UCS instances on same machine? ................................. 65 4.1.2 Why my UCS Plugin can not be executed? ................................................. 65
4.2 Regular Expression ............................................................................................. 65 4.2.1 Some Simple patterns .................................................................................. 65 4.2.2 Sequences and alternatives .......................................................................... 66 4.2.3 Some predefined character classes............................................................... 66 4.2.4 Boundary matchers ...................................................................................... 66 4.2.5 Greedy quantifiers........................................................................................ 66 4.2.6 Types of quantifiers ..................................................................................... 67 4.2.7 Quantifier examples ..................................................................................... 67 4.2.8 Escaping metacharacters.............................................................................. 67 4.2.9 Spaces .......................................................................................................... 67
4.3 Tips for UCS Tool Usage ................................................................................... 68 4.3.1 Double-click on “Notification Output”table, it will display the detailed info in one Text-window. ................................................................................................. 68 4.3.2 Double-click one table column title on the “NsManager”table, it will autmatically sort accordlingly................................................................................... 69 4.3.3 Right-click on the “NsManager”table, it will save the table contents. ........ 69

UCS User Guide - 4 -
-------------------------------------------------------------------------------------------------------
www.corbatool.com
1 Introduction
1.1 Project history
As CORBA user, we have used many test tools to improve our software developing and testing. However, so far no one can fully satisfy us. So we made a decision to make a super CORBA test tool, which is Ultra CORBA Simulator. UCS owns extraordinary performance and equips a lot of excellent features. The following description will give you a basic impression.
� Powerful IDL parser UCS implemented owned IDL parser. So it doesn’t depend on CORBA Interface Repository Service from any vendor. This is the reason why UCS can load project with a lot of IDL files very quickly, while other tools have to take a lot of time to import IDL files into IR Service.
� Friendly User Interface UCS represents all IDL operations and parameters as tree view. It is rather easy for user to fill parameters even without any training.
� Reused Test Case The IDL operation with parameters can be saved as XML file. So your test case can be distributed to your team member and reloaded with UCS.
� Automatic Operation Flow To support automatic test, UCS provides a way to create operation flow. An operation flow contains a set of operations. The operation may have dependency relationship. And also UCS support result match function. So that user can only pay attention to the result. Only if result is not passed you should check the error. The operation flow could be executed in both GUI mode and console mode.
� Easy Test Script To extend CORBA Server simulation, if the parameters filled in GUI tree view can not meet your test requirement, you can write script, which follow Java grammar. E.g. you can read some files to give the client reply, or you may give different reply according to different incoming parameter.
� Useful Utilities To support fault diagnosing during software developing and testing phase UCS provides many useful utilities such as Notification/Naming Service management, GIOP diagnosing, and so on.
For the detail usage, refer to chapter 3.

UCS User Guide - 5 -
-------------------------------------------------------------------------------------------------------
www.corbatool.com
1.2 Assumptions
Here we assume that you are software developer or tester with basic CORBA knowledge.
1.3 Contact Info& Resources
1.3.1 Project web site:
http://ucs.sourceforge.net
1.3.2 Email address:
1.3.3 Download web site
http://sourceforge.net/projects/ucs/
2 Software Installation
2.1 Installation
Installation is simple; just unzip the zip file (UCS_V1.2.6.zip) to one folder. The prerequisite to run this application, is that you have the JDK1.4.0.2 or above version in your machine.
2.2 Directory structure
UCSV1.2.6\ +---bin +---demo +---doc +---etc +---lib +---oemlib +---plugin +---projects | +---CallBackDemo | | +---classes | | | +---Generated Source | | | +---Money | | | \---package cache | | +---dsi | | | \---src | | +---etc | | +---idl | | +---log

UCS User Guide - 6 -
-------------------------------------------------------------------------------------------------------
www.corbatool.com
| | +---scripts | | \---src | | \---Money | +---FactoryDemo | | +---classes | | | +---Money | | | \---package cache | | +---dsi | | | \---src | | +---etc | | +---idl | | +---log | | +---scripts | | \---src | | \---Money | +---NotificationDemo | | +---dsi | | | \---src | | +---etc | | +---idl | | | \---include | | +---ior | | | \---ucs | | +---log | | \---scripts | | +---AttachSequencePushConsumer | | \---SendOutOneNotification | +---test | | +---dsi | | | \---src | | +---etc | | +---idl | | +---ior | | | \---ucs | | +---log | | \---scripts | \---TMF | +---dsi | | \---src | +---etc | +---idl | | +---omgidl | | \---tnmsidl | +---ior | | \---ucs | +---log

UCS User Guide - 7 -
-------------------------------------------------------------------------------------------------------
www.corbatool.com
| \---scripts +---src +---template \---trace
2.3 Configuration
The UCS properties file “CorbaMNQ.properties “is located in etc subfolder, and the project properties file “CorbaMNQ.properties” is located in every project’s etc subfolder. When UCS opens a project, if it doesn’t find the project properties file, it will use the UCS properties file. The meaning of each item in the properties file is listed as below: #################################################################################################################################### # CorbaMNQ configuration# CorbaMNQ configuration# CorbaMNQ configuration# CorbaMNQ configuration #################################################################################################################################### # The display time for show dynamic Gif welcome picture# The display time for show dynamic Gif welcome picture# The display time for show dynamic Gif welcome picture# The display time for show dynamic Gif welcome picture # value (less than 0) means no welcome picture show.# value (less than 0) means no welcome picture show.# value (less than 0) means no welcome picture show.# value (less than 0) means no welcome picture show. # Unit: seconds# Unit: seconds# Unit: seconds# Unit: seconds # Def# Def# Def# Default value: 3 secondsault value: 3 secondsault value: 3 secondsault value: 3 seconds # This property is obsolete.# This property is obsolete.# This property is obsolete.# This property is obsolete. CorbaMNQ.gif.showtime=CorbaMNQ.gif.showtime=CorbaMNQ.gif.showtime=CorbaMNQ.gif.showtime=----1111 # The maximum file length for Separate notification log file, if the maximum file # The maximum file length for Separate notification log file, if the maximum file # The maximum file length for Separate notification log file, if the maximum file # The maximum file length for Separate notification log file, if the maximum file length is reached, then a new separate notificationlength is reached, then a new separate notificationlength is reached, then a new separate notificationlength is reached, then a new separate notification # log file will be created automatically.# log file will be created automatically.# log file will be created automatically.# log file will be created automatically. # U# U# U# Unit: KBytesnit: KBytesnit: KBytesnit: KBytes # Normally, if suppose one trap with 1.8 KBytes, then 20MBytes could store # Normally, if suppose one trap with 1.8 KBytes, then 20MBytes could store # Normally, if suppose one trap with 1.8 KBytes, then 20MBytes could store # Normally, if suppose one trap with 1.8 KBytes, then 20MBytes could store more than 10,000 traps.more than 10,000 traps.more than 10,000 traps.more than 10,000 traps. # Default value: 20000 KBytes (20MBytes)# Default value: 20000 KBytes (20MBytes)# Default value: 20000 KBytes (20MBytes)# Default value: 20000 KBytes (20MBytes) # Minimum value: 1000 KBytes (1MBtyes)# Minimum value: 1000 KBytes (1MBtyes)# Minimum value: 1000 KBytes (1MBtyes)# Minimum value: 1000 KBytes (1MBtyes) CorbaMNQ.notification.logfile.maxlength=20000CorbaMNQ.notification.logfile.maxlength=20000CorbaMNQ.notification.logfile.maxlength=20000CorbaMNQ.notification.logfile.maxlength=20000 # Whether to sto# Whether to sto# Whether to sto# Whether to store notifications in file or notre notifications in file or notre notifications in file or notre notifications in file or not # 1 # 1 # 1 # 1 -------- enable, 0 enable, 0 enable, 0 enable, 0 -------- disable disable disable disable # Default value: 1 (enable)# Default value: 1 (enable)# Default value: 1 (enable)# Default value: 1 (enable) CorbaMNQ.notification.logfile.status=0CorbaMNQ.notification.logfile.status=0CorbaMNQ.notification.logfile.status=0CorbaMNQ.notification.logfile.status=0 # # # # Set the maximum row values for the table which storing the notificationsSet the maximum row values for the table which storing the notificationsSet the maximum row values for the table which storing the notificationsSet the maximum row values for the table which storing the notifications

UCS User Guide - 8 -
-------------------------------------------------------------------------------------------------------
www.corbatool.com
# Default value: # Default value: # Default value: # Default value: 5000500050005000 # Minimum value: # Minimum value: # Minimum value: # Minimum value: 0000 CorbaMNQ.nCorbaMNQ.nCorbaMNQ.nCorbaMNQ.notification.logtable.maxrowotification.logtable.maxrowotification.logtable.maxrowotification.logtable.maxrow=5000=5000=5000=5000 # Whether to display the test case output in Client Output window# Whether to display the test case output in Client Output window# Whether to display the test case output in Client Output window# Whether to display the test case output in Client Output window # True or False# True or False# True or False# True or False # Default value: True# Default value: True# Default value: True# Default value: True CorbaMNQ.testcase.outputInClientWindow=TrueCorbaMNQ.testcase.outputInClientWindow=TrueCorbaMNQ.testcase.outputInClientWindow=TrueCorbaMNQ.testcase.outputInClientWindow=True # Whether to provide the default valid interface value in client input or# Whether to provide the default valid interface value in client input or# Whether to provide the default valid interface value in client input or# Whether to provide the default valid interface value in client input or servant servant servant servant outputoutputoutputoutput # True or False# True or False# True or False# True or False # Default value: False# Default value: False# Default value: False# Default value: False CorbaMNQ.idl.defaultInterface=TrueCorbaMNQ.idl.defaultInterface=TrueCorbaMNQ.idl.defaultInterface=TrueCorbaMNQ.idl.defaultInterface=True # Whether to parse idl quickly, and make the idl browser in "no comments" # Whether to parse idl quickly, and make the idl browser in "no comments" # Whether to parse idl quickly, and make the idl browser in "no comments" # Whether to parse idl quickly, and make the idl browser in "no comments" mode for sub nodemode for sub nodemode for sub nodemode for sub node # True or False# True or False# True or False# True or False # Default value: False# Default value: False# Default value: False# Default value: False CoCoCoCorbaMNQ.idl.deletecomments=FalserbaMNQ.idl.deletecomments=FalserbaMNQ.idl.deletecomments=FalserbaMNQ.idl.deletecomments=False # Whether to load the customized servant method# Whether to load the customized servant method# Whether to load the customized servant method# Whether to load the customized servant method # True or False# True or False# True or False# True or False # Default value: False# Default value: False# Default value: False# Default value: False CorbaMNQ.dsi.customized=FalseCorbaMNQ.dsi.customized=FalseCorbaMNQ.dsi.customized=FalseCorbaMNQ.dsi.customized=False # Whether to display the client results in "OperationEntry" view# Whether to display the client results in "OperationEntry" view# Whether to display the client results in "OperationEntry" view# Whether to display the client results in "OperationEntry" view # True or False# True or False# True or False# True or False # Default value: True# Default value: True# Default value: True# Default value: True CorbaMNQ.dii.resultInTree=FalseCorbaMNQ.dii.resultInTree=FalseCorbaMNQ.dii.resultInTree=FalseCorbaMNQ.dii.resultInTree=False #### Whether to display the test case output in "OperationFlow" view Whether to display the test case output in "OperationFlow" view Whether to display the test case output in "OperationFlow" view Whether to display the test case output in "OperationFlow" view # True or False# True or False# True or False# True or False # Default value: True# Default value: True# Default value: True# Default value: True CorbaMNQ.dii.testcaseInTree=TrueCorbaMNQ.dii.testcaseInTree=TrueCorbaMNQ.dii.testcaseInTree=TrueCorbaMNQ.dii.testcaseInTree=True # Whether to # Whether to # Whether to # Whether to put the output of SequencePushConsumer to "Notification put the output of SequencePushConsumer to "Notification put the output of SequencePushConsumer to "Notification put the output of SequencePushConsumer to "Notification output" tableoutput" tableoutput" tableoutput" table # True or False# True or False# True or False# True or False
UCS User Guide - 9 -
-------------------------------------------------------------------------------------------------------
www.corbatool.com
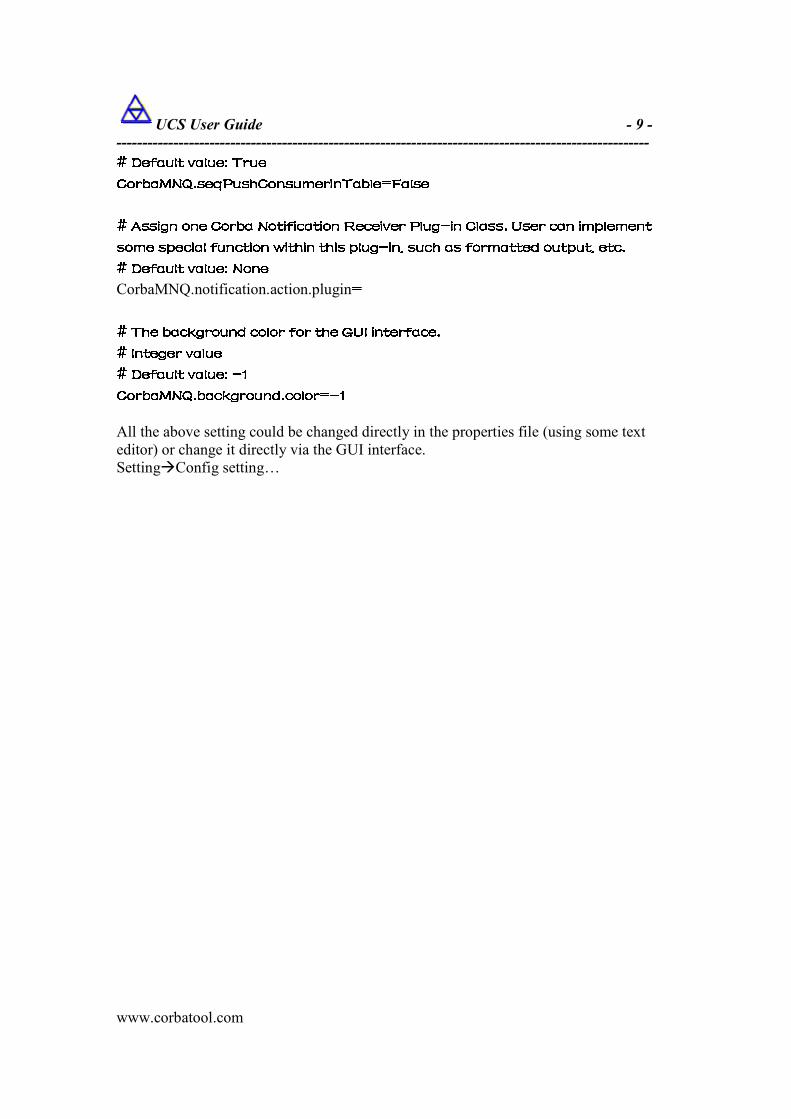
# Default value: Tru# Default value: Tru# Default value: Tru# Default value: Trueeee CorbaMNQ.seqPushConsumerInTable=CorbaMNQ.seqPushConsumerInTable=CorbaMNQ.seqPushConsumerInTable=CorbaMNQ.seqPushConsumerInTable=FalseFalseFalseFalse # # # # Assign one Corba Notification Receiver PlugAssign one Corba Notification Receiver PlugAssign one Corba Notification Receiver PlugAssign one Corba Notification Receiver Plug----in Class. User can implement in Class. User can implement in Class. User can implement in Class. User can implement some special function within this plugsome special function within this plugsome special function within this plugsome special function within this plug----in, such as formatted output, etc.in, such as formatted output, etc.in, such as formatted output, etc.in, such as formatted output, etc. # Default value: # Default value: # Default value: # Default value: NoneNoneNoneNone CorbaMNQ.notification.action.plugin==== # # # # The The The The background color for the GUI interface.background color for the GUI interface.background color for the GUI interface.background color for the GUI interface. # Integer value# Integer value# Integer value# Integer value # Default value: # Default value: # Default value: # Default value: ----1111 CorbaMNQ.background.color=CorbaMNQ.background.color=CorbaMNQ.background.color=CorbaMNQ.background.color=----1111
All the above setting could be changed directly in the properties file (using some text editor) or change it directly via the GUI interface. Setting�Config setting…

UCS User Guide - 10 -
-------------------------------------------------------------------------------------------------------
www.corbatool.com
2.4 Running
After your installation, pls. modify the JAVA_HOME property value in the startup scripts, (Windows -- ucs.bat, Unix -- ucs.sh). To make sure that this variable is consistent with your machine setting. If not set it in the scripts, then UCS will automatically find one available java virtual machine to run it.
The above is the welcome screen that you could choose to open an existing project or create a new project. All newly created projects will be stored in the subfolder “projects”.

UCS User Guide - 11 -
-------------------------------------------------------------------------------------------------------
www.corbatool.com
Note:
• When you create a new project, pls. make sure the project name is not an existing one.
• When you open an existing project, pls. make sure that you have chosen
the project file “corba.project”.
Then, you’ll get the following windows:

UCS User Guide - 12 -
-------------------------------------------------------------------------------------------------------
www.corbatool.com
3 Usage
3.1 Project management
You could create, open or reload one project. All those operation could be found in the “Project” menu.
3.1.1 Create a project
After you create one new project, the application will create all necessary folders & files for this project (which is stored in ‘projects’ subfolder). You could find one subfolder with the same name as the project name. And then, you could copy all the necessary idl files in the “./projects/ProjectName/idl” folder. (All files with *.idl format under this folder, including subfolders, will be parsed by UCS.) Then you just reload the project, and then you refresh your project data. Step1: Project�New …

UCS User Guide - 13 -
-------------------------------------------------------------------------------------------------------
www.corbatool.com
Step2: After creation, you will see

UCS User Guide - 14 -
-------------------------------------------------------------------------------------------------------
www.corbatool.com
Step 3: copy all the necessary idl files to project’s idl subfolder Step 4: After reload the project: Project�Reload, you will see

UCS User Guide - 15 -
-------------------------------------------------------------------------------------------------------
www.corbatool.com
3.1.2 Open or reload existing project
When you open an existing project, pls. make sure that you have chosen the project file “corba.project”. See below:

UCS User Guide - 16 -
-------------------------------------------------------------------------------------------------------
www.corbatool.com
In any case that IDL files are changed (e.g. IDL files added, deleted, modified, etc.), you need to reload the project to make it effective immediately. (Project�Reload)
3.2 CORBA Client Simulation
Simulating client means that generating a CORBA client without coding, and you can use this client to test servers. Make sure that you have opened a project, and which includes IDL files. For example, we open factory demo project.
3.2.1 Start the server of factory demo
You have to set JAVA_HOME before launch this server, after that what you need to do is double click “Server.bat” which exists in the directory of FactoryDemo.

UCS User Guide - 17 -
-------------------------------------------------------------------------------------------------------
www.corbatool.com
3.2.2 Attach a IOR to client
Choose Invoice interface, and then client “associate an IOR to selected interface” button. If you don’t choose an interface named Accounting, and this button will be disabled.

UCS User Guide - 18 -
-------------------------------------------------------------------------------------------------------
www.corbatool.com
.
. The following dialog will show.
Click yes button, and choose “MyAccounet.ior”

UCS User Guide - 19 -
-------------------------------------------------------------------------------------------------------
www.corbatool.com
Press enter. Choose another interface, and click Accounting interface again. You can see the changes in common output pane.
3.2.3 Invoke operation
You can call get_outstanding_balance operation by right click it.

UCS User Guide - 20 -
-------------------------------------------------------------------------------------------------------
www.corbatool.com
Following results will be showed in client output pane.
3.2.4 Fill request parameter
By clicking “create_invoice” operation, the right pane can switch to operation entry pane automatically.

UCS User Guide - 21 -
-------------------------------------------------------------------------------------------------------
www.corbatool.com
You can input data that you want to these text fields. If you don’t know their data types, just see the status bar.
3.2.5 Return an interface type
When you call “create invoice” operation, there would return an interface. Click return value, you will get an object reference.
You can attach IOR to “Invoice” interface, call its operations.

UCS User Guide - 22 -
-------------------------------------------------------------------------------------------------------
www.corbatool.com
3.2.6 Save test case
You can also save you test case.

UCS User Guide - 23 -
-------------------------------------------------------------------------------------------------------
www.corbatool.com
The stored file is xml format with “.op” suffix, and can be opened by any text editor (e.g. notepad). <Operation opname="get_name" cname="::Money::Invoice::get_name" ior="IOR:000000000000001649444C3A4D6F6E65792F496E766F6963653A312E30000000000000010000000000000068000102000000000A3132372E302E302E3100303900000015313238323138323636362F001541171E4B42412A42000000000000020000000000000008000000004A414300000000010000001C00000000000100010000000105010001000101090000000105010001" > <Parameter id="0" value="" ></Parameter> <Parameter id="1" value="None" ></Parameter> </Operation >
3.2.7 Load test case
You can also load your previously saved test case. Click one operation node, and right-click, and then select “LoadOperation”.
3.2.8 Search test case
Click one operation node, and right-click, and then select “SearchScripts”. UCS could help you search the test case under one folder/and its subfolder. This function is helpful, if you forget your previous saved test case name.
3.2.9 Auto save all test case
Some time, it’s very useful to save all the test cases within the project. UCS could help you save all opened operation nodes (i.e. the operation node has been clicked). In the “Interface” panel, right-click the empty area, you will see the below pop-up menu:
UCS User Guide - 24 -
-------------------------------------------------------------------------------------------------------
www.corbatool.com
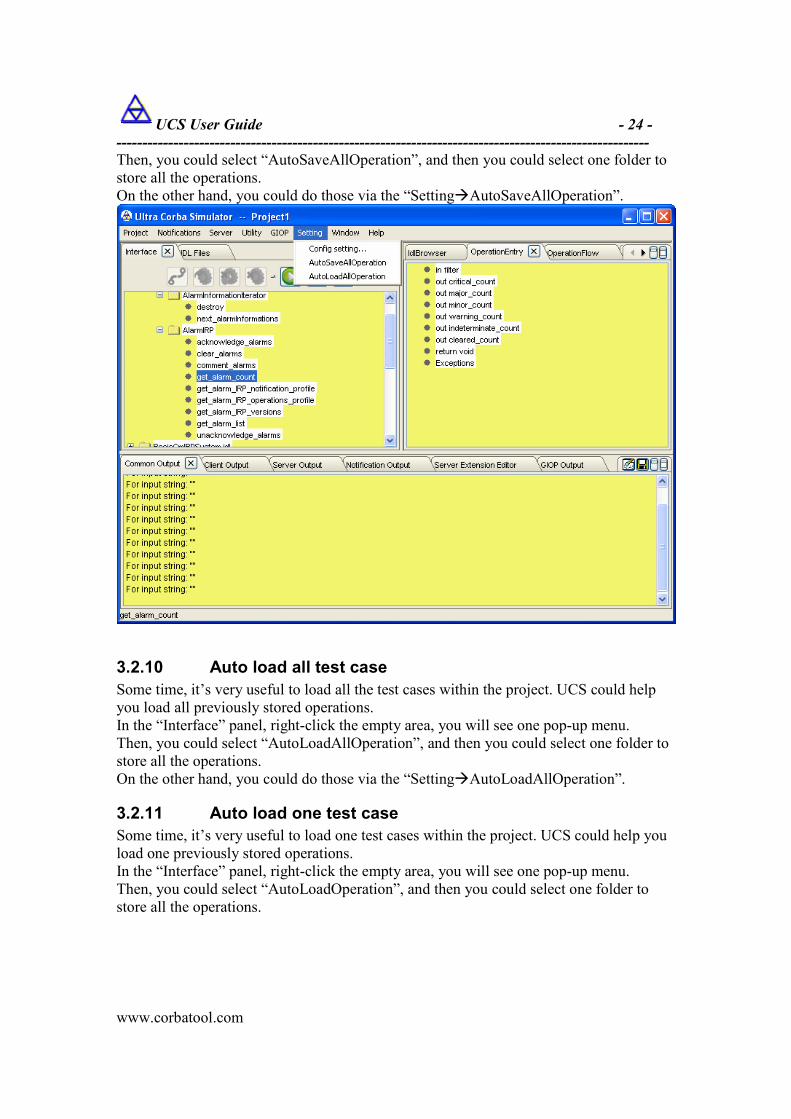
Then, you could select “AutoSaveAllOperation”, and then you could select one folder to store all the operations. On the other hand, you could do those via the “Setting�AutoSaveAllOperation”.
3.2.10 Auto load all test case
Some time, it’s very useful to load all the test cases within the project. UCS could help you load all previously stored operations. In the “Interface” panel, right-click the empty area, you will see one pop-up menu. Then, you could select “AutoLoadAllOperation”, and then you could select one folder to store all the operations. On the other hand, you could do those via the “Setting�AutoLoadAllOperation”.
3.2.11 Auto load one test case
Some time, it’s very useful to load one test cases within the project. UCS could help you load one previously stored operations. In the “Interface” panel, right-click the empty area, you will see one pop-up menu. Then, you could select “AutoLoadOperation”, and then you could select one folder to store all the operations.

UCS User Guide - 25 -
-------------------------------------------------------------------------------------------------------
www.corbatool.com
3.2.12 One note for Operation Tree Display
One improvement for operation tree display (located in “OperationEntry” panel): if the node is a table, then, it will display its name & value directly. (separated by ‘=’)
3.3 CORBA Server Simulation
We will use UCS to simulate a server for Factroydemo, so first, open the Factroydemo project.
3.3.1 Fill reply parameter or exception
You can enter 2222.22 for the return of “get_total()” operation

UCS User Guide - 26 -
-------------------------------------------------------------------------------------------------------
www.corbatool.com
3.3.2 Create servant
Right click Invoice interface, you will see
After that, a servant instance of invoice will be created, and its IOR will be put to common pane.

UCS User Guide - 27 -
-------------------------------------------------------------------------------------------------------
www.corbatool.com
Copy this IOR, and paste it to the return value of “create_invoice” operation.
right click “Accounting” interface, and create an IOR for this interface. Copying accounting’s IOR to a file named “MyAccount.ior” in root of FactoryDemo project, and then run “client.bat” in the same directory. You can see the following result.

UCS User Guide - 28 -
-------------------------------------------------------------------------------------------------------
www.corbatool.com
3.4 CORBA Server extending
3.4.1 Prerequisite
� Check whether the sun's tools.jar is located in %JAVA_HOME%\lib. (since dynamic compile need this jars)
� Enable the following property in CorbaMNQ.properties (located in project’s etc folder)
# Whether to load the customized servant method # True or False # Default value: False CorbaMNQ.dsi.customized=True you could modify it via GUI or modify the properties file directly.
3.4.2 Steps
1. Select one operation node in the "interface" window, which you want to control the servant output. e.g. ::emsSession::EmsSession_I::getManager then, right click, select the "ServerExtension" in the pop-up menu
2. You'll see that default java source code is displayed in the "Server Extension Editor" If this is a new one, then UCS will create one default input. If this is an existing one, then UCS will load it from the fiel. "e.g. Ucs__emsSession_EmsSession_I_getManager.java"
3. Insert or modify your input between the following block. (Syntax is java syntax) // TODO Below is the customized coding for servant extension // Begin of customization of servant extension // ------------------Begin---------------------- ... // ------------------End---------------------- // End of customization of servant extension
4. click the save button, then this file will be saved and compiled, the compiled class is put in the folder "project_folder/dsi", source code is put in the folder "project_folder/dsi/src". The file name is UCS_+_emsSession_EmsSession_I_getManager+.java = Ucs__emsSession_EmsSession_I_getManager.java
5. Then it's ok, next time, the servant will load this class to determine the output value.
3.4.3 Q&A
Q1: How to reload class?
Sometime, when UCS is running, you'll modify your server extension code for many times, in order to make it effective, not to restart UCS, you could select the Menu: "Server-->reLoadClass" to make UCS reload the newly compiled class.

UCS User Guide - 29 -
-------------------------------------------------------------------------------------------------------
www.corbatool.com
Q2: How to recompile all the server extension codes?
select the Menu: "Server-->reCompileAll"
Q3: How to retrieve the input value & set the output value using java coding?
Firstly, all the input value (corba type) is mapped to java objects. (Detailed mapping, pls. see the mapping table in the end. exmple1: void getManager( in string managerName, out common::Common_I managerInterface) raises(globaldefs::ProcessingFailureException); Therefore, managerName is mapped to java.lang.String, managerInterface is mapped to java.lang.String , and ProcessingFailureException is mapped to java.lang.List Then, coding could be like this: if(managerName.equals("Unknown")) {
// send the ProcessingFailureException exception except = new java.util.Vector(); // insert the first member of exception output, it will be always java.lang.Integer type. // Its value is the position of this exception in the "raises" sentense. // ProcessingFailureException is the first one, therefore, the position value is 0 except.add(new Integer(0)); // ProcessingFailureException is one corba exception(CTExcept), it will contain the following // two member: // exception ProcessingFailureException // { // ExceptionType_T exceptionType; // string errorReason; // }; // one is corba enum (CTEnum), will be mapped to java.lang.Integer // value is the position value for enum value. // here we select the EXCPT_INVALID_INPUT value, (the third one, position value is 2) except.add(new Integer(2)); // the other is corba stirng, will be mapped to java.lang.String except.add(new String("haha")); } else if(managerName.equals("EMS")) { // it will output EMS ior string managerInterface="ior string for ems"; } else if(managerName.equals("ME")) { // it will output ME ior string managerInterface="ior string for me"; }

UCS User Guide - 30 -
-------------------------------------------------------------------------------------------------------
www.corbatool.com
Remark: Any missing output in your coding, UCS will get the default value in the GUI interface. i.e. if you don't care of some output, you could keep it as "null" value, then UCS will get the input value from GUI.
3.4.4 Appendix: Mapping Table
1: CTBasic "float" java.lang.Float "double" java.lang.Double "long double" java.lang.Double "short" java.lang.Short "long" java.lang.Integer "long long" java.lang.Long "unsigned short" java.lang.Short "unsigned long" java.lang.Integer "unsigned long long" java.lang.Long "char" java.lang.Character "wchar" java.lang.Character "boolean" java.lang.Boolean "octet" java.lang.Byte "string" java.lang.String "wstring" java.lang.String 2: CTArray "array" java.lang.Object[] 3: CTDeclaration 4: CTEnum "enum" java.lang.Integer 5: CTStruct "struct" java.util.Vector(List) -- list of member object value 6: CTUnion "union" java.util.Vector(List) -- two member, -- first one -------- identifier object value -- second one ------- switch body object value 7: CTSequence "sequence" java.lang.Object[] 8: CTInterface "interface" java.lang.String -- IOR String 9: CTExcept "exception" java.util.Vector(List) -- list of member object value

UCS User Guide - 31 -
-------------------------------------------------------------------------------------------------------
www.corbatool.com
3.5 IDL Browser
IDL files could be browsed easily in UCS, the IDL file content will be displayed in Tree Mode in the left windows “IDL Files” and the original IDL file content will be highlighted in the right windows “IdlBrowser”. When you click any node of the IDL file in the let, the original info will be located in the right windows. One example, pls. see below:
3.6 CORBA Client Operation Flow
In the “OperationFlow” Tab, right-click you’ll find the following pop-up menu:

UCS User Guide - 32 -
-------------------------------------------------------------------------------------------------------
www.corbatool.com
3.6.1 OpenOperationFlow
“OpenOperationFlow”: It could open one previously existing operation-flow file (file extention is *.opf).
3.6.2 AddOperation
“AddOperation”: Add one existing operation to the current operation flow (file extension for operation is *.op) If no node is selected, then the loaded operation will be put to the end of the operation flow. If one node is selected, then, the loaded operation will be inserted after the selected node.

UCS User Guide - 33 -
-------------------------------------------------------------------------------------------------------
www.corbatool.com
3.6.3 InsertOperation
“InsertOperation”: Add one existing operation to the current operation flow (file extension for operation is *.op). The loaded operation will be inserted before the selected node.
3.6.4 MoveUp
“MoveUp”:Move up the selected node in the current operation flow.
3.6.5 MoveDown
“MoveDown”:Move down the selected node in the current operation flow.
3.6.6 RemoveAllOperation
“RemoveAllOperation”: Remove all the test-case in the current operation flow.
3.6.7 SaveOperationFlow & ExecuteOperationFlow
After some operations are added in the operation flow, the “SaveOperationFlow” & “ExecuteOperationFlow” could be found in the pop-up menu. (See below picture)
• SaveOperationFlow: save the current operation flow in one file, also it will save all the related operations in one subfolder.
• ExecuteOperationFlow: execute the operation flow, the output will be displayed in the “Common Output”

UCS User Guide - 34 -
-------------------------------------------------------------------------------------------------------
www.corbatool.com
3.6.8 How to set parameter replacement
� Firstly, right click the replaced-node (which you want to replace the value using previous node value), then you will see that cursor will be changed to Hand-cursor.
� Secondly, select the replacing-node value (its type is same as the replaced-node). � Then double-click, you will see that the dependency is setting successfully.
UCS User Guide - 35 -
-------------------------------------------------------------------------------------------------------
www.corbatool.com
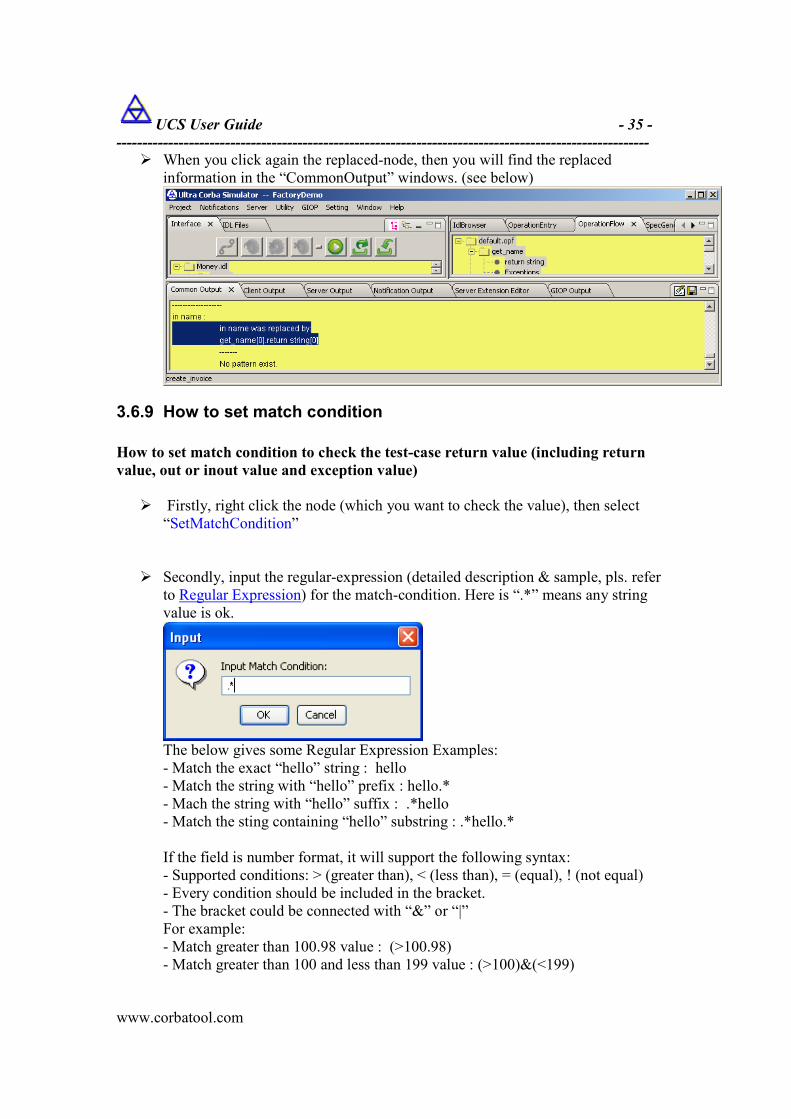
� When you click again the replaced-node, then you will find the replaced information in the “CommonOutput” windows. (see below)
3.6.9 How to set match condition
How to set match condition to check the test-case return value (including return
value, out or inout value and exception value)
� Firstly, right click the node (which you want to check the value), then select “SetMatchCondition”
� Secondly, input the regular-expression (detailed description & sample, pls. refer to Regular Expression) for the match-condition. Here is “.*” means any string value is ok.
The below gives some Regular Expression Examples: - Match the exact “hello” string : hello - Match the string with “hello” prefix : hello.* - Mach the string with “hello” suffix : .*hello - Match the sting containing “hello” substring : .*hello.* If the field is number format, it will support the following syntax:
- Supported conditions: > (greater than), < (less than), = (equal), ! (not equal) - Every condition should be included in the bracket. - The bracket could be connected with “&” or “|” For example: - Match greater than 100.98 value : (>100.98) - Match greater than 100 and less than 199 value : (>100)&(<199)

UCS User Guide - 36 -
-------------------------------------------------------------------------------------------------------
www.corbatool.com
- Match the value, which is greater than 100 and less than 199 and not equal to 150, or equal to 888 : ((>100)&(<199)&(!150))|(=888)
� And then execute the operation flow, you’ll find the results in the “Common Output”
3.6.10 How to set AutomaticAddMatchCondition
In some case, it’s a tedious work to set the match condition one by one manually. In this case, you could let UCS automatically set all the match condition value according to your current value in the tree. Just right-click the node, which you want to set match condition for this node & its sub nodes, then select “AutomaticAddMatchCondition”
3.6.11 How to enable iterator function
� Firstly, selected the operation node in “OperationFlow” window, which you want to enable the iterator function. I.e. you want to iterate to execute this operation based on the return value. Right-click on it, then choose the “EnableIterator”
� Secondly, input the check value. For example, if return value is true, then you want to continue to execute this operation, otherwise, go to the next operation. Then you just input string “true”.

UCS User Guide - 37 -
-------------------------------------------------------------------------------------------------------
www.corbatool.com
After you enable this function, you still can disable this function via pop-up menu “CancelIterator”.
3.6.12 How to set execution number for every operation?
� Firstly, selected the operation node in “OperationFlow” window, which you want to set the execution number for this operation. And then right-click on it to choose the “SetExecutionNumber”.
Secondly, input the execution number. For example, input 100.
3.6.13 How to set repetition number for the whole operation flow?
� Firstly, selected the roo node in “OperationFlow” window, which you want to set the repetition number for the whole operation flow. And then right-click on it to choose the “SetRepetitionNumber”.
Secondly, input the repetition number. For example, input 3
.
3.6.14 How to set comments for every operation?
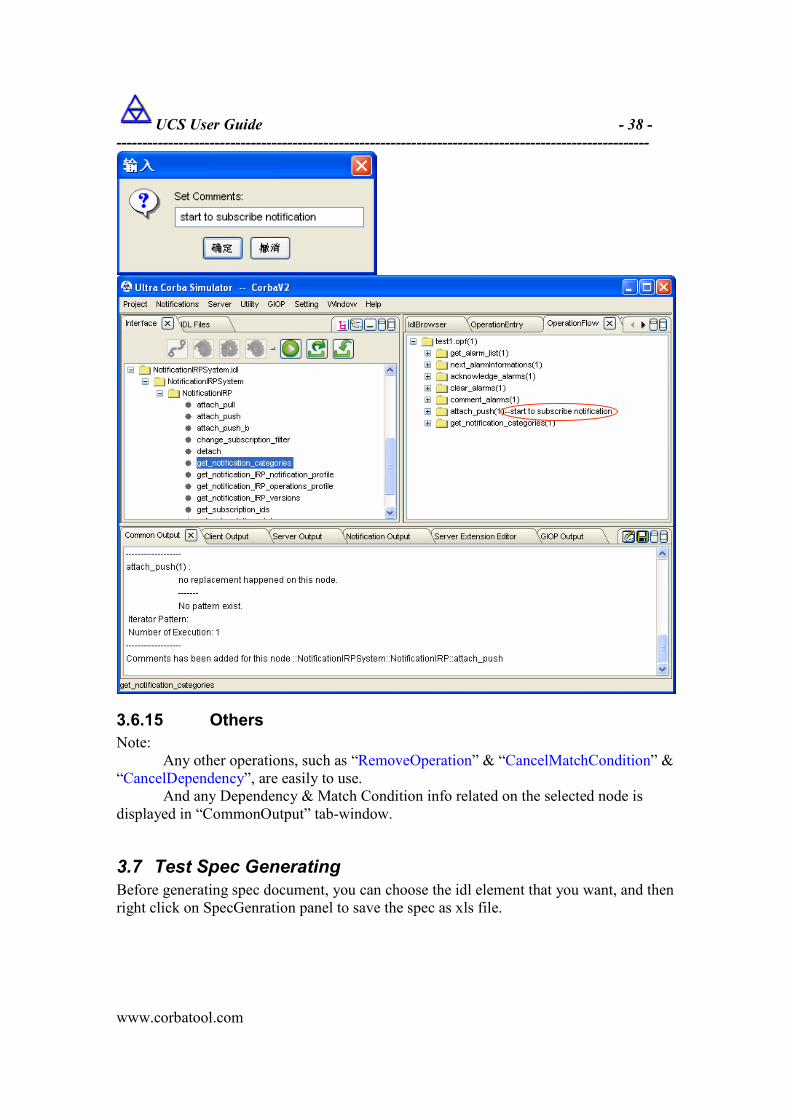
� Firstly, selected the operation node in “OperationFlow” window, which you want to set the comments for this operation. And then right-click on it to choose the “SetComments”.
Secondly, input the comments for this operation. For example, input comments “start to subscribe notification”.
UCS User Guide - 38 -
-------------------------------------------------------------------------------------------------------
www.corbatool.com
3.6.15 Others
Note: Any other operations, such as “RemoveOperation” & “CancelMatchCondition” & “CancelDependency”, are easily to use. And any Dependency & Match Condition info related on the selected node is displayed in “CommonOutput” tab-window.
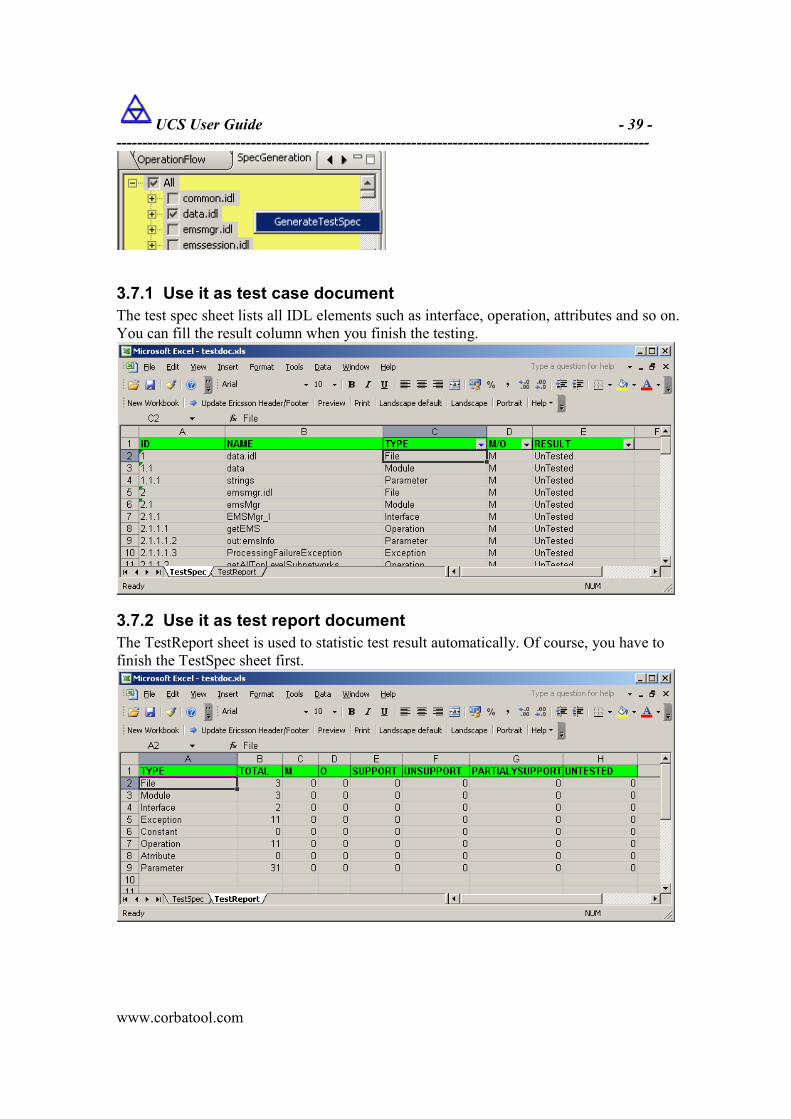
3.7 Test Spec Generating
Before generating spec document, you can choose the idl element that you want, and then right click on SpecGenration panel to save the spec as xls file.
UCS User Guide - 39 -
-------------------------------------------------------------------------------------------------------
www.corbatool.com
3.7.1 Use it as test case document
The test spec sheet lists all IDL elements such as interface, operation, attributes and so on. You can fill the result column when you finish the testing.
3.7.2 Use it as test report document
The TestReport sheet is used to statistic test result automatically. Of course, you have to finish the TestSpec sheet first.
UCS User Guide - 40 -
-------------------------------------------------------------------------------------------------------
www.corbatool.com
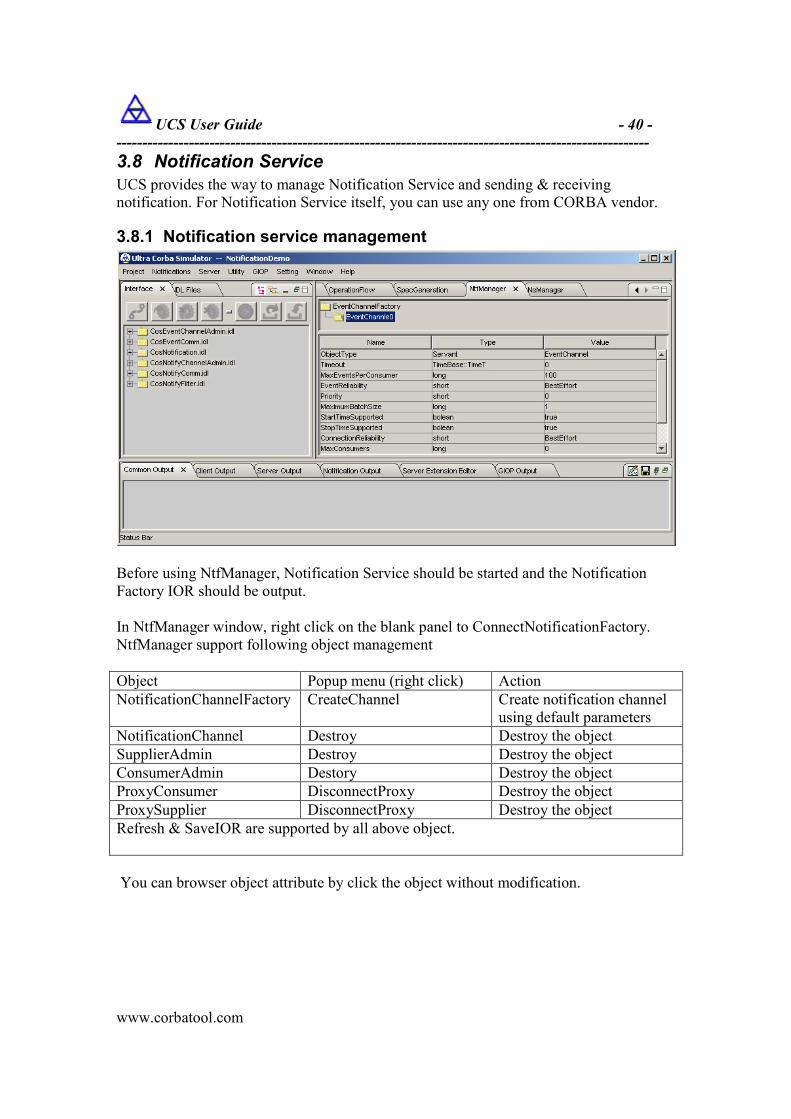
3.8 Notification Service
UCS provides the way to manage Notification Service and sending & receiving notification. For Notification Service itself, you can use any one from CORBA vendor.
3.8.1 Notification service management
Before using NtfManager, Notification Service should be started and the Notification Factory IOR should be output. In NtfManager window, right click on the blank panel to ConnectNotificationFactory. NtfManager support following object management
Object Popup menu (right click) Action
NotificationChannelFactory CreateChannel Create notification channel using default parameters
NotificationChannel Destroy Destroy the object
SupplierAdmin Destroy Destroy the object
ConsumerAdmin Destory Destroy the object
ProxyConsumer DisconnectProxy Destroy the object
ProxySupplier DisconnectProxy Destroy the object
Refresh & SaveIOR are supported by all above object.
You can browser object attribute by click the object without modification.

UCS User Guide - 41 -
-------------------------------------------------------------------------------------------------------
www.corbatool.com
3.8.2 Notification sending and receiving
UCS implements Notification sending and receiving by operation flow with IDL files related to CosNotification. In “NotificationDemo” project, you can see two operation flows (for the detail to create operation flow, refer to clause 3.6):
� SendOutOneNotification.opf This operation flow is used to attach a supplier to event channel and send out a notification, after that the supplier detached from the channel in order to release the resource in event channel.
� AttachSequencePushConsumer.opf This operation flow is used to attach a event consumer to a event channel and wait for the incoming event. Once event comes in, the consumer will display event info in “Server output” panel (or “notification output” panel if you set CorbaMNQ.seqPushConsumerInTable as true ) It is better to demonstrate the Notification sending and receiving together with above operation flows. Here we use JacORB to do the demo. See detail steps below:
Step#1
Start JacORB notification service by command
C: \program\JacORB\bin>ntfy.bat -writeIOR c:\ntf.ior
After that, the Notification Factory IOR file will be output to file c:\ntf.ior Step#2
Connect Notification factory from UCS NtfManager by right clicking “ConnectNotificationFactory”, select the c:\ntf.ior.
Step#3
Create event channel with default parameters by right clicking on NtfManager object EventChannelFactory. And then right clicking on EventChannel object to save IOR to a file c:\ch.ior
Step#4
Load operation flow AttachSequencePushConsumer.opf. And execute it Make sure it is executed successfully according to following log
Step#5

UCS User Guide - 42 -
-------------------------------------------------------------------------------------------------------
www.corbatool.com
Load Operation flow SendOutOneNotification.opf and execute it, then you will find the notification has been received and displayed in “Notiification Output”.
Notes #1 if you already got the event channel ior, you can skip step#2 and step#3. but the ior should be saved to c:\ch.ior #2 if you want to change ior file directory or file name, you have to modify the operation AttachSequencePushConsumer\1_get_default_consumer_admin.op &
SendOutOneNotification\1_get_default_supplier_admin.op since both refer to
c:\ch.ior. E.g. 1_get_default_supplier_admin.op
<Operation opname="_get_default_supplier_admin" cname="::CosNotifyChannelAdmin::EventChannel::_get_default_supplier_admin" ior="file:/c:\\ch.ior" > <Parameter id="1" value="None" ></Parameter> </Operation> #3 you can create much more complex operation flow to implement event filter and other functionality of notification.
3.9 Naming Service
UCS only provides naming service management. However current jacorb.jar has been integrated in UCS package, so we can also use jacorb naming service from UCS command line mode.
3.9.1 Naming server
Check file ns.bat to make sure that the environment variables JAVA_HOME points to jre installation directory, and the UCS_HOME points to UCS installation directory. Run ns.bat from command line. The ior file will be generated according to following attributes in %UCS_HOME%/etc/jacorb.properties. e.g.: jacorb.naming.ior_filename=C:/ns.ior
3.9.2 Naming service management
After naming service started, connect naming service from UCS NsManager. By right clicking popup menus you can create context, bind object with Servant IOR.

UCS User Guide - 43 -
-------------------------------------------------------------------------------------------------------
www.corbatool.com
In following demo, we create new context “testA”, and then create a servant from left tree view. Finally we bind the object (servant ior) to naming service using name “MyServer”.
3.10 GIOP Message Interceptor
3.10.1 GIOP Filter Model
Common CORBA client-server model.
GIOP filter model
Client Server
IIOP/GIOP

UCS User Guide - 44 -
-------------------------------------------------------------------------------------------------------
www.corbatool.com
The GIOP filter can record the message between clients and servers, so it’s a very useful tools when you meet some calling problems.
3.10.2 GIOP filter tools
There are 4 tools: � Fix IOR � Quick start Interceptor � Start Interceptor � Stop Interceptor
3.10.3 Fix IOR:
When you click this menu, you can see
Client Server GIOP
Filter

UCS User Guide - 45 -
-------------------------------------------------------------------------------------------------------
www.corbatool.com
This dialogue box let you input an IOR file, and the hostname and port that you want to change to. For instance, you may input following, and press enter.
Then you can see Use IOR parse tools you can see the host and port of IOR file you input has been changed.

UCS User Guide - 46 -
-------------------------------------------------------------------------------------------------------
www.corbatool.com
3.10.4 Quick start Interceptor
This tools only support IOR file and IOR string by now, and it will support corbaloc and corbaname in future. Let’s use following IOR to do a demo. IOR:000000000000001E49444C3A4355534D2F636F7262615F494355534D53746F72653A312E30000000000000010000000000000084000102000000000D31302E3134312E332E31343800001A0A0000002D5374616E64617264496D706C4E616D652F4D6E7124242F5F4355534D5F636F7262615F494355534D53746F7265000000000000020000000000000008000000004A414300000000010000001C00000000000100010000000105010001000101090000000105010001 Parse this IOR

UCS User Guide - 47 -
-------------------------------------------------------------------------------------------------------
www.corbatool.com
Next step:

UCS User Guide - 48 -
-------------------------------------------------------------------------------------------------------
www.corbatool.com
After above steps, there is an IOR be generated. IOR:000000000000001E49444C3A4355534D2F636F7262615F494355534D53746F72653A312E30000000000000010000000000000084000102000000000D31302E3134312E332E313438000008AE0000002D5374616E64617264496D706C4E616D652F4D6E7124242F5F4355534D5F636F7262615F494355534D53746F7265000000000000020000000000000008000000004A414300000000010000001C00000000000100010000000105010001000101090000000105010001

UCS User Guide - 49 -
-------------------------------------------------------------------------------------------------------
www.corbatool.com
This means GIOP filter is listening on 2222, and its IP is 10.141.3.148. It will dispatch all the packets to the destination of 10.141.3.148:6666. So offer client the generated IOR, and the GIOP tools and record the message between client and server.
3.10.5 Start Interceptor
This is a way to start interceptor manually, so it may complement with the Fix IOR tools. Because Quick Start Interceptor always use the first IP as the generated IOR ip, so it’s quick way, but not a perfect way. Use Fix IOR and Start Interceptor together, you may finish anything.
The GIOP filter will listen on 1234, and dispatch message to tonyzhang:2345.
3.10.6 Stop Interceptor
No need to say. It just stops the interceptor, and make it restarted possible.

UCS User Guide - 50 -
-------------------------------------------------------------------------------------------------------
www.corbatool.com
3.11 Utility
3.11.1 Ping IOR
This chapter will use FactoryDemo as an example. Run server.bat, make sure you setup JAVA_HOME already, you will see following, and there will be a file named MyAccount.ior was generated.
Click the ping IOR menu item. Open “MyAccount.ior”, and copy its content, and paste it to following dialog. Press enter. The object is alive will be showed.
UCS User Guide - 51 -
-------------------------------------------------------------------------------------------------------
www.corbatool.com
Close the server that we started a moment ago, and repeat the “Ping IOR” step again. Following box will show.
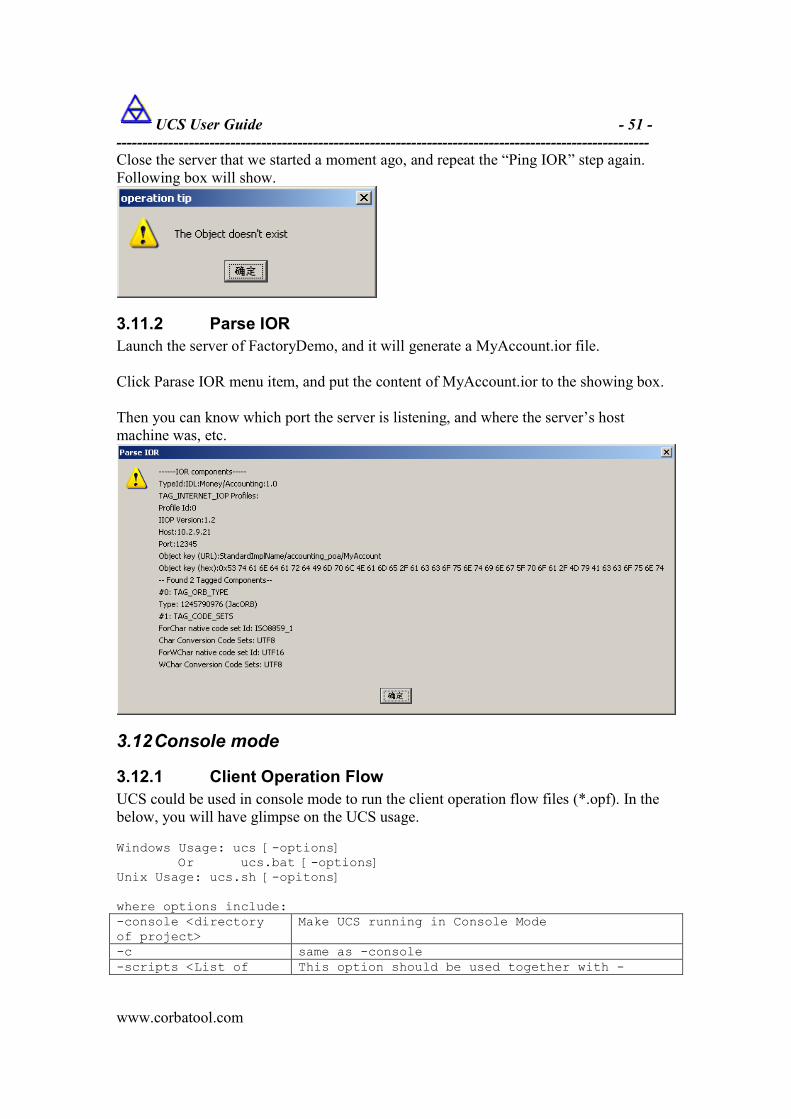
3.11.2 Parse IOR
Launch the server of FactoryDemo, and it will generate a MyAccount.ior file. Click Parase IOR menu item, and put the content of MyAccount.ior to the showing box. Then you can know which port the server is listening, and where the server’s host machine was, etc.
3.12 Console mode
3.12.1 Client Operation Flow
UCS could be used in console mode to run the client operation flow files (*.opf). In the below, you will have glimpse on the UCS usage.
Windows Usage: ucs [-options]
Or ucs.bat [-options]
Unix Usage: ucs.sh [-opitons]
where options include:
-console <directory
of project>
Make UCS running in Console Mode
-c same as -console
-scripts <List of This option should be used together with -

UCS User Guide - 52 -
-------------------------------------------------------------------------------------------------------
www.corbatool.com
absolute path of
OperationFlow file>
console, File lsit is seprated by ';',
e.g.: -scripts
D:\ucs\projects\test\scripts\flow1.opf;D:\ucs\pr
ojects\test\scripts\flow2.opf
-scripts
D:\ucs\projects\test\scripts\flow1.opf;D:\ucs\pr
ojects\test\scripts\flow2.opf
-scripts
/tmp/ucs/projects/test/scripts/flow1.opf;/tmp/uc
s/projects/test/scripts/flow2.opf
-s same as -scripts
-op <absolute path of
Operation file>
This option should be used together with -
console
e.g.: -op
D:\ucs\projects\test\scripts\op1.op
-port <integer> servant listening port, if not set, then 8888 is
used
-p as -port
-seqPushConsumer Make UCS in notification receiving mode. This
option should be used together with -console
-spc same as -seqPushConsumer
-help or -h or -? Print the usage message
3.12.2 Notification Tools
All above tools exist in UCS_HOME/bin.
3.12.2.1 Prerequisite
Setup JAVA_HOME, and you can set it in system properties or the script files.
3.12.2.2 Notification receiver
You can use this tool to quickly check if you can receiver an event from notify services.
How to start a notification receiver?
You need to open a console window, and input the commands as following. .D:\myjava\ucs\bin>Notify_Push_Consumer_tester. IOR:01feffff3a00000049444c3a6f6d672e6f72672f436f734e6f746966794368616e6e656c41646d696e2f4576656e744368616e6e656c466163746f72793a312e30000000010000000000000084000000010102000e0000003139322e3136382e312e31303900881339000000abacab305f526f6f74504f41004e6f7469667953657276696365504f41000044656661756c744576656e744368616e6e656c466163746f727900000001000000010000002000000001f1130001000100020000002000010001000105090101000100000000010100 The IOR string is the notify service’s. If your notify service support corbaloc, you can also the command such as following. .D:\myjava\ucs\bin>Notify_Push_Consumer_tester corbaloc:iiop:localhost:5000/Defau ltEventChannelFactory Press enter, and you will see:

UCS User Guide - 53 -
-------------------------------------------------------------------------------------------------------
www.corbatool.com
In that situation we press “C”, and then press enter. One channel will be created. .
We input “0” to choose one channel admin. .
The receiver is waiting for the new events coming.
3.12.2.3 Notification sender
You can use this tool to simulate some events, and send them to notify services. If you don’t know how to start this tool, please reference 4.3.4. D:\myjava\ucs\bin>Notify_Push_Supplier_tester corbaloc:iiop:localhost:5000/Defau ltEventChannelFactory After the tool start, you can see
Input 14, and that means you are choosing channel 14.
Choose admin 0.

UCS User Guide - 54 -
-------------------------------------------------------------------------------------------------------
www.corbatool.com
You can input any string to notify now.
If the receiver of UCS is also running, you can see following:
3.12.2.4 Notification Destroyer
You use this tool to delete a channel, admin, or proxy. If you don’t know how to start this tool, please reference 4.3.4.
Enter DP0

UCS User Guide - 55 -
-------------------------------------------------------------------------------------------------------
www.corbatool.com
Press any key.
Enter 14
Enter d
3.13 UCS plugin
To customize UCS features for advanced user, UCS provides some plugin interface. Which could be implemented using Java.The interface file location is $(UCS_HOME)\ plugin\com\corba\mnq\plugin. The implementation java file location is $(UCS_HOME)\plugin. Here you will find out the build.bat for compiling java file. So far following plug-in interfaces are available.
3.13.1 IOpFlowNodePlugin.java
In OpFlow, you may want to do some special task such as sleep some times or to check some condition. With IOpFlowNodePlugin you can implement such kind of request. Here we give a example about how to implement sleep plugin.(OpSleepPlugin.java)
import com.corba.mnq.plugin.*; public class OpSleepPlugin implements IOpFlowNodePlugin { public String[] action(String[] names, String[] values, ILog log){ log.output("--------- Enter OpSleepPlugin----------"); String[] r=new String[1]; r[0]="false"; for( int i=0;i<names.length;i++){ log.output("Input parameter "+names[i]+"="+values[i]);
UCS User Guide - 56 -
-------------------------------------------------------------------------------------------------------
www.corbatool.com
} if( values.length <1 ){ log.output("please input sleep ms!"); }else { log.output("sleep "+values[0]+" ms"); try{ Long x=new java.lang.Long(values[0]); Thread.sleep( x.longValue() ); r[0]="true"; log.output("sleep finished"); }catch( Exception ex){ ex.printStackTrace(); log.output(ex.getMessage()); } } log.output("--------- Exit OpSleepPlugin----------"); return r; } }
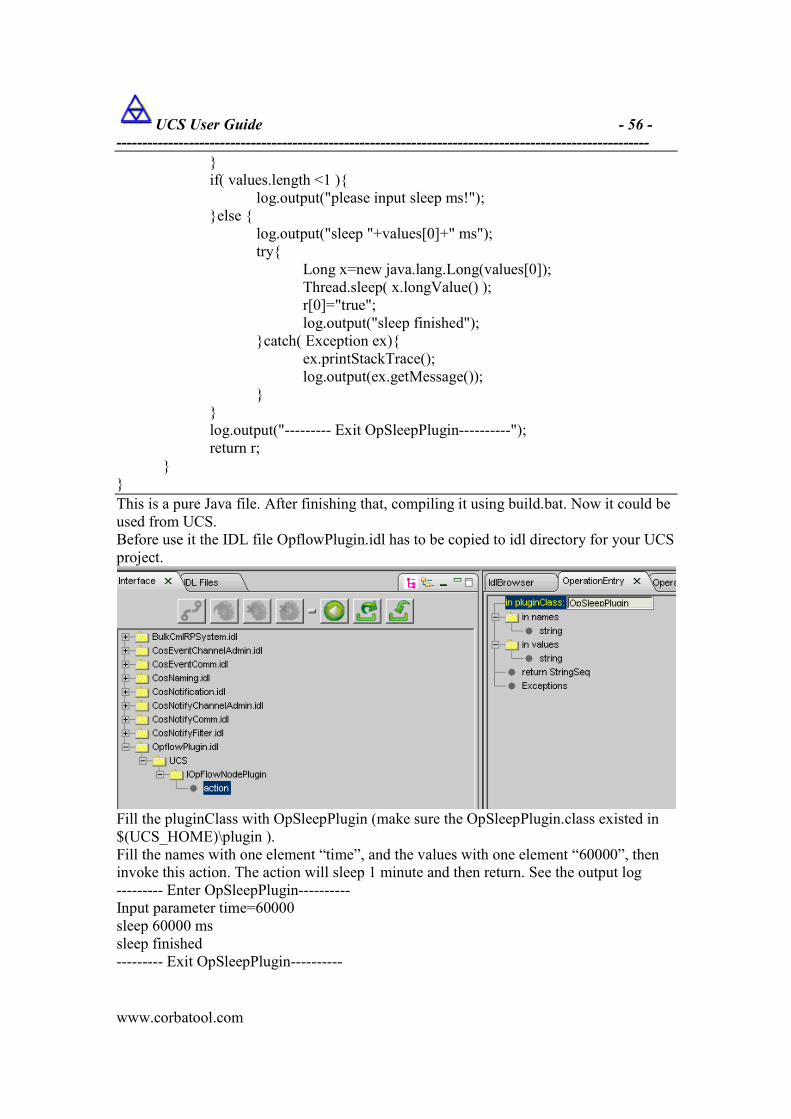
This is a pure Java file. After finishing that, compiling it using build.bat. Now it could be used from UCS. Before use it the IDL file OpflowPlugin.idl has to be copied to idl directory for your UCS project.
Fill the pluginClass with OpSleepPlugin (make sure the OpSleepPlugin.class existed in $(UCS_HOME)\plugin ). Fill the names with one element “time”, and the values with one element “60000”, then invoke this action. The action will sleep 1 minute and then return. See the output log --------- Enter OpSleepPlugin---------- Input parameter time=60000 sleep 60000 ms sleep finished --------- Exit OpSleepPlugin----------

UCS User Guide - 57 -
-------------------------------------------------------------------------------------------------------
www.corbatool.com
Of course, you can save this operation so that it could be added to OpFlow, just like other generic IDL operations.
3.13.2 IStructureEventActionPlugin.java
When receiving a StructureEvent, UCS give a change to do something by IStructureEventActionPlugin. Following demo show how to use it ( DefaultEventActionPlugin.java)
import org.omg.CosNotification.StructuredEvent; import com.corba.mnq.plugin.ILog; import com.corba.mnq.plugin.IStructureEventActionPlugin; public class DefaultEventActionPlugin implements IStructureEventActionPlugin { public boolean action(StructuredEvent event, ILog log) { log.output("event has been received!!!!"); return true; }
Same as last clause to compile the java file. Then we have to config it by UCS menu->Setting->Config Setting->CorbaMNQ.notification.action.plugin.

UCS User Guide - 58 -
-------------------------------------------------------------------------------------------------------
www.corbatool.com
Here we specify the name is DefaultEventActionPlugin. First of all, run a opflow AttachSequencePushConsumer.opf to attach consumer to event channel. Then send event to this channel. Finally following log will be printed in CommonOutput window. event has been received!!!!

UCS User Guide - 59 -
-------------------------------------------------------------------------------------------------------
www.corbatool.com
3.14 How to enable SSL function
UCS could be running in SSL mode or non-SSL mode. It depends on the configuration file setting (jacorb.properties). The default setting is no-SSL mode. To enable SSL mode, pls. following the below steps: 1. Edit the jacorb.properties (located in UCSV1.2.0/etc) * make sure that below value is enabled (on), not disabled (off) jacorb.security.support_ssl=on * make sure that below value is corresponding to the real value for SSL jacorb.security.keystore=D:\\Users\\cn1wc0k0\\Desktop\\ucs.key jacorb.security.keystore_password=ucsucs
2. Normally, above modification is ok, For further detailed refined configuration for SSL, pls. see below sub chapters.
3.14.1 Key stores
SSL relies on public key certificates in the standard X.509 format. These certificates are presented in the authentication phase of the SSL handshake and used to compute and exchange session keys. The Java 2 security API provides interfaces that access a persistent data structure called KeyStore. A key store is simply a file that contains public key certificates and the corresponding private keys. It also contains other certificates that can be used to verify public key certificates. All cryptographic data is protected using passwords and accessed using names called aliases. The following section explains how to create key stores for Sun JSSE.
3.14.1.1 Setting up a JSSE key store
To set up key stores with JSSE you can use Java’s keytool. In order to generate a simple public key infrastructure you can perform the following steps: 1. Create a new key store containing a new public/private key pair with keytool. The public key will be wrapped into a self-signed certificate.
2. Export the self-signed certificate from the key store into a file. 3. Import the self-signed certificate into a trust store (or configure that trustees shall be read from key store, see below).

UCS User Guide - 60 -
-------------------------------------------------------------------------------------------------------
www.corbatool.com
To create a new key store containing a new public/private key pair type: keytool -genkey -alias <alias> -keystore <keystore>
If you don’t give a key store name keytool will create a key store with the name .keystore in the user’s home directory. The command given above will ask for the following input:
Enter keystore password: ucsucs What is your first and last name?
[Unknown]: Developer What is the name of your organizational unit?
[Unknown]: ucs What is the name of your organization?
[Unknown]: ucs What is the name of your City or Locality?
[Unknown]: Beijing What is the name of your State or Province?
[Unknown]: Beijing What is the two-letter country code for this unit?
[Unknown]: China Is CN=Developer, OU=ucs, O=ucs, L= Beijing, ST= Beijing, C= China correct?
[no]: yes Enter key password for <testkey> (RETURN if same as keystore password): ucsucs
You can view the entries of the newly created keystore by typing: keytool -keystore <keystore> -list -storepass <password>
Now you have a public key certificate that you can present for authentication. The public key contained in the key store is wrapped into a self-signed certificate. This self-signed certificate has to be added to the Java trust store. To do this export the certificate from the key store and import it into the Java trust store located in <java_home>/jre/lib/security/cacerts. To export the self-signed certificate into a file type:
keytool -export -keystore <keystore> -alias <alias> -file <filename>
3.14.2 Configuring SSL properties
When the ORB is initialized by the application, a couple of properties are read from files and the command line. To turn on SSL support, you have to set the following property to “on”:
jacorb.security.support_ssl=on
This will just load the SSL classes on startup. The configuration of the various aspects of SSL is done via additional properties. Configure which SSL socket factory and SSL server socket factory shall be used with the properties:
jacorb.ssl.socket_factory=qualified classname jacorb.ssl.server_socket_factory=qualified classname

UCS User Guide - 61 -
-------------------------------------------------------------------------------------------------------
www.corbatool.com
If you want to use JSSE, then configure the following as qualified classname of SSL Socket Factory and SSL server socket factory:
org.jacorb.security.ssl.sun_jsse.SSLSocketFactory org.jacorb.security.ssl.sun_jsse.SSLServerSocketFactory
As explained in the previous section, cryptographic data (key pairs and certificates) is stored in a key store file. To configure the file name of the key store file, you need to define the following property:
jacorb.security.keystore=AKeystoreFileName The key store file name can either be an absolute path or relative to the home directory. Key stores are searched in this order, and the first one found is taken. If this property is not set, the user will be prompted to enter a key store location on ORB startup. To avoid typing in lots of aliases and passwords (one for the key store, and one for each entry that is used), you can define default aliases and passwords like this:
# the name of the default key alias to look up in the key store jacorb.security.default_user=brose jacorb.security.default_password=ucsucs
Note that when using Sun JSSE: The javax.net.ssl.trustStore[Password] properties doesn’t seem to take effect, so you may want to add trusted certificates to ”normal” key stores. In this case configure JacORB to read certificates from the key store rather than from a dedicated trust store, please set the property
jacorb.security.jsse.trustees_from_ks=on SSL settings can be further refined using security options as in the following property definitions:
jacorb.security.ssl.client.supported_options=0 jacorb.security.ssl.client.required_options=0 jacorb.security.ssl.server.supported_options=0 jacorb.security.ssl.server.required_options=0
The value of these security options is a bit mask coded as a hexadecimal integer. The meanings of the individual bits is defined in the CORBA Security Service Specification and reproduced here from the Security.idl file:
Table 5.1: Client side supported options
Property with value Description jacorb.security.ssl.client.supported_options=20 // EstablishTrustInTarget
This value indicates that the client can use SSL. Actually, this is default SSL behaviors and must always be supported by the client.
jacorb.security.ssl.client.supported_options=40 // EstablishTrustInClient
This makes the client load it’s own key/certificate from it’s key store, to enable it to authenticate to the server.
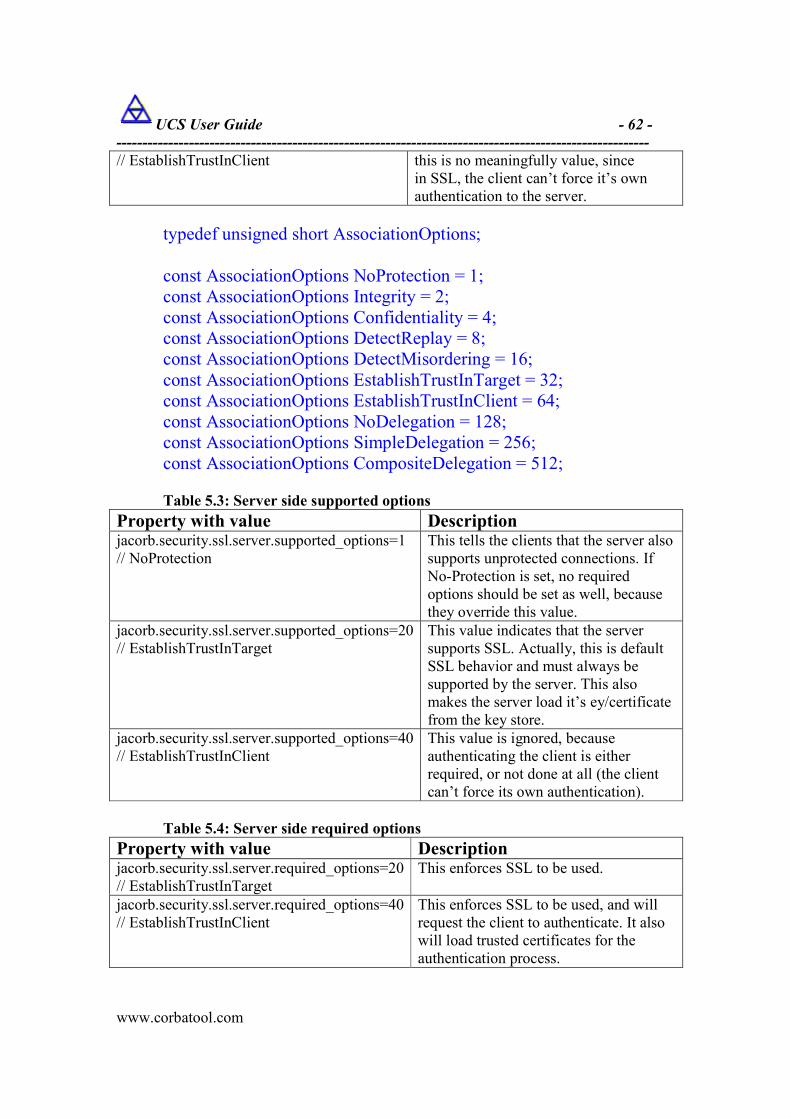
Table 5.2: Client side required options
Property with value Description jacorb.security.ssl.client.required_options=20 // EstablishTrustInTarget
This enforces SSL to be used.
jacorb.security.ssl.client.required_options=40 This enforces SSL to be used. Actually,
UCS User Guide - 62 -
-------------------------------------------------------------------------------------------------------
www.corbatool.com
// EstablishTrustInClient
this is no meaningfully value, since in SSL, the client can’t force it’s own authentication to the server.
typedef unsigned short AssociationOptions; const AssociationOptions NoProtection = 1; const AssociationOptions Integrity = 2; const AssociationOptions Confidentiality = 4; const AssociationOptions DetectReplay = 8; const AssociationOptions DetectMisordering = 16; const AssociationOptions EstablishTrustInTarget = 32; const AssociationOptions EstablishTrustInClient = 64; const AssociationOptions NoDelegation = 128; const AssociationOptions SimpleDelegation = 256; const AssociationOptions CompositeDelegation = 512;
Table 5.3: Server side supported options
Property with value Description jacorb.security.ssl.server.supported_options=1 // NoProtection
This tells the clients that the server also supports unprotected connections. If No-Protection is set, no required options should be set as well, because they override this value.
jacorb.security.ssl.server.supported_options=20 // EstablishTrustInTarget
This value indicates that the server supports SSL. Actually, this is default SSL behavior and must always be supported by the server. This also makes the server load it’s ey/certificate from the key store.
jacorb.security.ssl.server.supported_options=40 // EstablishTrustInClient
This value is ignored, because authenticating the client is either required, or not done at all (the client can’t force its own authentication).
Table 5.4: Server side required options
Property with value Description jacorb.security.ssl.server.required_options=20 // EstablishTrustInTarget
This enforces SSL to be used.
jacorb.security.ssl.server.required_options=40 // EstablishTrustInClient
This enforces SSL to be used, and will request the client to authenticate. It also will load trusted certificates for the authentication process.

UCS User Guide - 63 -
-------------------------------------------------------------------------------------------------------
www.corbatool.com
3.15 Description of “Notifications” Menu
� "Obtain ior for Sequence PushConsumer": Return one SequencePushConsumer’s
IOR. Meanwhile, activate it(if this object is not activated). And its output will be displayed in the “Notification output" Table.If “CorbaMNQ.notification.logfile .status" is chosen in the setting, then its output also will be recorded in one separate Log files. (e.g. seqPushConsumerLog.0.xml located in ‘log’ subfolder)
� “Active Sequence PushConsumer”: Activate SequencePushConsumer Object � “Deactive Sequence PushConsumer”: De-activate SequencePushConsumer Object,
it could be used to simulate that SequencePushConsumer Object is in “NotActive” status.
� “Start test mode”: Let the SequencePushConsumer Object enter into “test Mode” status. In this case, it won’t output anything (including Log output & Table output). The purpose is to test the performance of notification service, it reduce the influence of SequencPushconsumer Object due to its receiving speed.
� “Stop test mode”: Let Sequence PushConsumer exit “test Mode” status, i.e. currently, its output will be normally displayed in Table or Logs. Meanwhile, it will print out the statics message (e.g. total received notifications, receiving rate, etc.) during the test period.
� “Start sleep mode”: In this mode, when SequencePushConsumer Object receives the notification, it won’t do any handling, and don’t return, just in sleep mode. This is to simulate the case that Consumer don’t return for a long time.
� “Leave sleep mode”: Let SequencePushConsumer exit “sleep” Mode, and normally handle the received notifications.
3.16 How to use “CMTreeBrowser” tool
UCS could display the configuraiton data in the tree view. It can cache all kinds of configuration data, only if the configuration data is reported in the Struct type or Regular Value type. And then display those configuratino data in the tree view. The description of the Menu “CMTreeBrowser”:
� "StartCacheCmData": Start to cache the configuration data. All the received configuration data (whatever it comes from operation or operation flows) will be cached. � "StopCacheCmData": Stop to cache the configuration data. � "ClearCMTree": Clear the cached configuration data. � "ViewCMTree": Display the configuration data in the tree view. The setting description for CMTreeBrowser: (see below picture)

UCS User Guide - 64 -
-------------------------------------------------------------------------------------------------------
www.corbatool.com
� CorbaMNQ.CMTree.StructResult.id:
It could be the Id value of the Struct type, which store the CM data:
e.g.: “IDL:3gppsa5.org/BasicCmIRPSystem/Result:1.0 “ or “IDL:mtnm.tmforum.org/managedElement/ManagedElement_T:1.0” or “IDL:mtnm.tmforum.org/equipment/Equipment_T:1.0” Or it could be the scopenanme of the Regular Value type, which store the CM data: e.g.: ::itut_x780::ManagedObjectValueType In this case, all this RegularValue and its subtype (e.g. ::q834_4::ProfileManager::DS1ProfileValueType) will be stored in the cache.
� CorbaMNQ.CMTree.StructResult.memberName:
It could the member name of the Sturct or Regular Value, which contains the DN value. E.g. "mo" or "name"
� CorbaMNQ.CMTree.DN_separator: the separator between RDN, eg. ","
one DN example: subnetwork=1,managmentElement=1,sgsnFunction=1 � CorbaMNQ.CMTree.Value_separator: the separator in RDN, e.g. "="
One Sample picture for CMTreeBrowser view:

UCS User Guide - 65 -
-------------------------------------------------------------------------------------------------------
www.corbatool.com
4 Appendix
4.1 FAQ
4.1.1 How to start multi UCS instances on same machine?
To start multi UCS on same machine, the service port number should be provided. Otherwise, UCS will complain of port conflict. E.g “ucs.bat –port 9000” or “ucs.bat –p 9000”
4.1.2 Why my UCS Plugin can not be executed?
If you run your plugin, which is compiled by newer JRE, under older JRE environment, then the plugin may not be executed. So please keep same version between them.
4.2 Regular Expression
4.2.1 Some Simple patterns
abc exactly this sequence of three letters [abc] any one of the letters a, b, or c [^abc] any character except one of the letters a, b, or c (immediately within an open bracket, ^ means “not,” but anywhere else it just means the character ^) [a-z] any one character from a through z, inclusive [a-zA-Z0-9] any one letter or digit

UCS User Guide - 66 -
-------------------------------------------------------------------------------------------------------
www.corbatool.com
[a-z]+ a sequence of one or more lowercase letters
4.2.2 Sequences and alternatives
� If one pattern is followed by another, the two patterns must match consecutively - For example, [A-Za-z]+[0-9] will match one or more letters immediately followed by one digit
� The vertical bar, |, is used to separate alternatives - For example, the pattern abc|xyz will match either abc or xyz
4.2.3 Some predefined character classes
. any one character except a line terminator \d a digit: [0-9] \D a non-digit: [^0-9] \s a whitespace character: [ \t\n\x0B\f\r] \S a non-whitespace character: [^\s] \w a word character: [a-zA-Z_0-9] \W a non-word character: [^\w]
4.2.4 Boundary matchers
These patterns match the empty string if at the specified position: ^ the beginning of a line $ the end of a line \b a word boundary \B not a word boundary \A the beginning of the input (can be multiple lines) \Z the end of the input except for the final terminator, if any \z the end of the input \G the end of the previous match
4.2.5 Greedy quantifiers
(The term “greedy” will be explained later) Assume X represents some pattern X? optional, X occurs once or not at all X* X occurs zero or more times X+ X occurs one or more times X{n} X occurs exactly n times X{n,} X occurs n or more times X{n,m} X occurs at least n but not more than m times Note that these are all postfix operators, that is, they come after the operand

UCS User Guide - 67 -
-------------------------------------------------------------------------------------------------------
www.corbatool.com
4.2.6 Types of quantifiers
� A greedy quantifier will match as much as it can, and back off if it needs to - We’ll do examples later
� A reluctant quantifier will match as little as possible, then take more if it needs to - You make a quantifier reluctant by appending a ?: X?? X*? X+? X{n}? X{n,}? X{n,m}?
� A possessive quantifier will match as much as it can, and never let go - You make a quantifier possessive by appending a +: X?+ X*+ X++ X{n}+ X{n,}+ X{n,m}+
4.2.7 Quantifier examples
Suppose your text is aardvark � Using the pattern a*ardvark (a* is greedy): - The a* will first match aa, but then ardvark won’t match - The a* then “backs off” and matches only a single a, allowing the rest of the pattern (ardvark) to succeed
� Using the pattern a*?ardvark (a*? is reluctant): - The a*? will first match zero characters (the null string), but then ardvark won’t match - The a*? then extends and matches the first a, allowing the rest of the pattern (ardvark) to succeed
� Using the pattern a*+ardvark (a*+ is possessive): - The a*+ will match the aa, and will not back off, so ardvark never matches and the pattern match fails
4.2.8 Escaping metacharacters
� A lot of special characters--parentheses, brackets, braces, stars, plus signs, etc.--are used in defining regular expressions; these are called metacharacters
� Suppose you want to search for the character sequence a* (an a followed by a star) - "a*"; doesn’t work; that means “zero or more as” - "a\*"; doesn’t work; since a star doesn’t need to be escaped (in Java String constants), Java just ignores the \ - "a\\*" does work; it’s the three-character string a, \, *
� Just to make things even more difficult, it’s illegal to escape a non-metacharacter in a regular expression
4.2.9 Spaces
� There is only one thing to be said about spaces (blanks) in regular expressions, but it’s important: - Spaces are significant!
� A space stands for a space--when you put a space in a pattern, that means to match a space in the text string
� It’s a really bad idea to put spaces in a regular expression just to make it look better
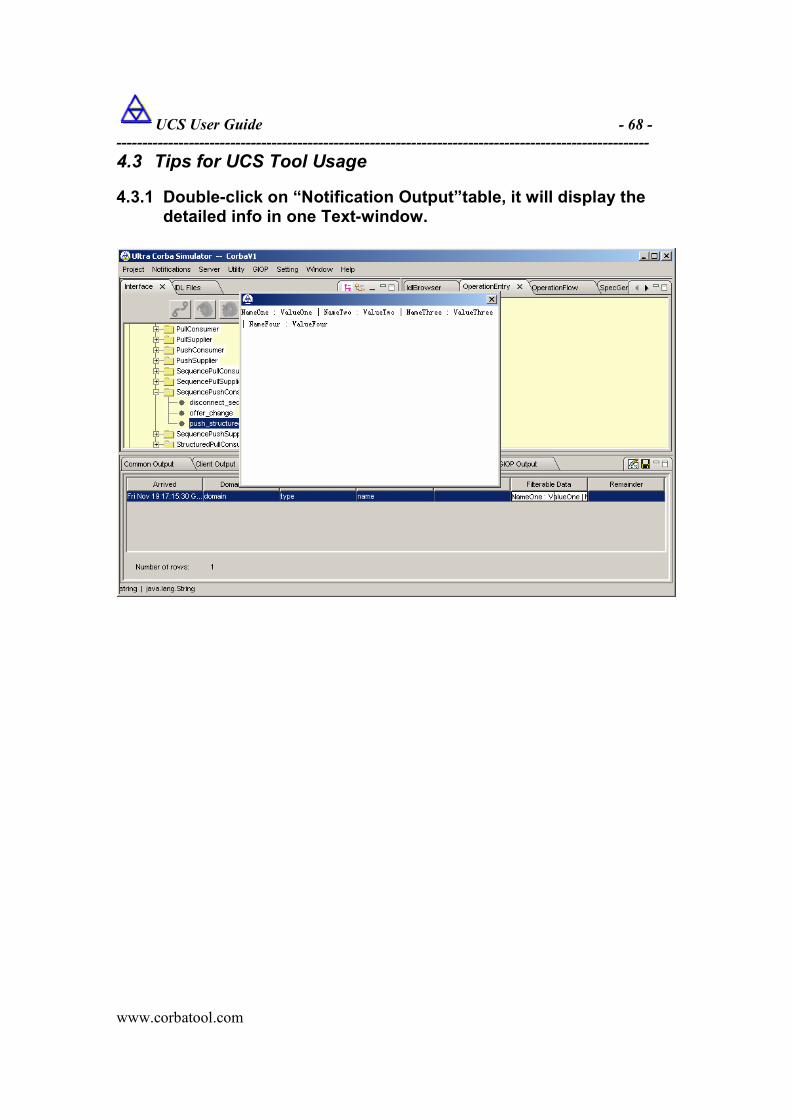
UCS User Guide - 68 -
-------------------------------------------------------------------------------------------------------
www.corbatool.com
4.3 Tips for UCS Tool Usage
4.3.1 Double-click on “Notification Output”table, it will display the detailed info in one Text-window.

UCS User Guide - 69 -
-------------------------------------------------------------------------------------------------------
www.corbatool.com
4.3.2 Double-click one table column title on the “NsManager”table, it will autmatically sort accordlingly.
4.3.3 Right-click on the “NsManager”table, it will save the table contents.