Embed Size (px)
Citation preview

U11 Coaches Manual
The goals of the M.Y.S.A. is to provide a program of safe, enjoyable, and fair competition, promote good sportsmanship, and encourage participation in the playing of soccer. It is expected that the
M.Y.S.A., through favorable actions of its members, would provide leadership and create a positive influence on each participant, particularly by exercising reasonableness and restraint, and would perpetually
demonstrate a respectable image.

The Official Marysville Youth Soccer U-11 Coaches Manual
Table of Contents
Page
Chapter 1 MYSA General Rules and Regulations U11 3
Chapter 2 Foundations of Coaching 8
Chapter 3 Describing Characteristics of the U11 10
Chapter 4 Off the Field 13
Chapter 5 On the Field 15
Chapter 6 How to Kick/Head, Juggle a Soccer Ball, & Offsides Rule 22
Chapter 7 Field Lay Out and Training Activities 32
Chapter 8 Preventing Soccer Injuries 39
2

Chapter 1
M.Y.S.A General Rules and Regulations U11
3

MYSA General Rules and Regulations U11 Equipment: (provided by player)
1. Soccer cleats or tennis shoe, no toe cleat and no metal cleats. 2. Shin Guards must be worn and covered by socks at all games and practices. 3. Soccer Ball – Size 4
Uniforms:
1. Uniforms are provided as part of your Registration fees. Uniforms must be worn to all games. 2. Each child is responsible for their own shin guards and ball. Shin guards must be worn and covered by
socks at all practices and games. Bring your ball to all practices unless otherwise instructed by coach. 3. Soccer cleats are not required, but if you purchase cleats they must be soccer cleats. Soccer cleats do not
have a toe cleat. If you are not sure ask the store clerk. Children will not be allowed to play if they are not wearing tennis shoes or soccer cleats.
4. A goalkeeper jersey and gloves will be provided to Jr. High teams by the league. During games, the goalkeeper must wear a goalkeeper jersey or some other jersey/shirt that is not in similar color to either team involved. Gloves are recommended, but not required.
5. The supplied uniform must be worn over any other clothing. No exposed hoods and no jean pants. Hats, knit gloves and athletic type apparel may be worn during cold weather.
6. NO jewelry or hard items are to be worn. Weather:
1. Games will be cancelled for thunder and/or lightning, severe cold or poor field conditions at the discretion of the Board. It is the intent of the league to only cancel games if absolutely necessary.
2. Games will be cancelled for inclement weather in a reasonable amount of time prior to the game starting in order that teams and referees can be notified.
3. Once a game has started, if lightning strikes or thunder is heard everyone will retreat to their vehicles and there will be a half hour hold on the games. Games may also be called off by a Board member if necessary.
4. Any make up/cancelled games will be played the following Saturday afternoon. Divisional Directors will notify the coaches by Tuesday of the make-up game times. If other arrangements are needed, coaches must get Board approval.
Playing time:
1. All players must play or be encouraged to play half of each game, it may be at one time or scattered throughout the game.
2. Jr. High teams play (2) 35 minute halves with a 10 minute break at half time. Team:
1. Field players may use any part of their bodies except their hands. ("Hands" defined as the shoulder, from armpit, down to fingertips)
2. The goalkeeper may use their hands only while in the 18 yard box (penalty box). 3. Jr. High
a. Off sides will be called. b. May head the ball (with Coach instructions)
4. NO slide tackles for any age group. Slide tackle defined as a player sliding onto the ground, into another player with the intent to gain possession of the ball.
5. U-11 teams play (2) 25 minute halves with a 5 minute half. Timing and Substitution:
4

1. Time starts when the referee blows the whistle. 2. The clock is running at all times, it should be stopped during an injury or time will be added at the end. 3. U11 substitutions may enter during a teams own throw-in, if they do choose to make a substitution at this
time then the opposing team may also substitute, any goal kick and after a goal. 4. Substitutions must enter from the centerline. 5. Goalkeeper may substitute only when the ball is dead.
Kickoff:
1. The home team starts the game with a kick off, alternating between the teams for each half. Teams will switch defending ends at halftime.
2. The kickoff will be at midfield with two offensive players. The ball must travel forward and fully cross the centerline before it can be played in any direction.
3. The first player to touch the ball may NOT play the ball again until touched by another player. 4. A goal cannot be scored directly from the kickoff unless it is touched by another player.
Goalkeeper
1. Use of the hands can only be done inside the 18 yard box (penalty box). 2. The goalkeeper may punt the ball. 3. The goalkeeper may not be charged. They are to be left alone in their own 18 yard box or while in possession of the ball. ("Possession" defined as having both hands on the ball and having it in control.) Kicking at the ball must be stopped immediately following the goalkeeper acquiring possession.
Restarting Play: 1. Throw-in is awarded if the ball is unplayable by fully crossing the sideline. The throw must be made with
both feet on the ground behind the line, two hands on the ball, and from behind the head. 2. Corner Kick is awarded if a defensive player kicks it out of the end line. 3. Goal Kick is awarded if an offensive player kicks it out the end line.
Fouls:
Ball is put into play from point of infraction. Opponents must be at least 10 yards away from the ball in all directions. Results of fouls are: Direct Free Kick (only awarded to U11 and Jr. High, all fouls in all other divisions will result an indirect free kick): Can be identified by the signal given by the referee. The referee will only point in the direction of the infraction (toward the offending team's goal). A goal can be scored by a single player kicking the ball directly into the defending team's goal. Infractions that will result in a direct free kick are:
• Kicking, striking, tripping or the attempt of any of these infractions on another player • Handball • Handball by goalie outside of 18 yard box • Pushing or holding another player • Violent charge
Indirect Free Kick: Can also be identified by the signal given by the referee. The referee will raise one hand straight above their head and will only lower it once the ball is in play and is
5
touched by a second player. A goal cannot be scored by a single player kicking the ball into the defending team's goal. The ball must touch another player before entering the goal. Infractions that will result in an indirect free kick are:
• Off-sides (U11 and Jr. High) • Illegal obstruction • Unsportsmanlike behavior • Dangerous play
Forfeit Rule: 1. There is no automatic forfeit rule. Teams will play with the number of players present. The coach with the
least number of players may choose to forfeit. There will be no reschedule of that game unless it is under extreme circumstances and done so by the Executive Board.
2. In the case of a coach deciding to forfeit a game that counts towards the standings, to apply this forfeit to the standings goals will be awarded per the following; forfeit team = 0goals, non-forfeit team = 4 goals.
Standings:
1. Teams will be ranked in standings based on their record from games that count determined by the following point system; win =3points, tie =1point, lose= 0points.
2. Teams ranked in 1st,2nd or 3rd will be recognized as such. The number of ranked teams will not exceed half of the number of teams in the division.
3. Standings will appear each week on the league board at the field and the website. Tie-breaker Formula:
1. Ties in the standings will be broken based on the following formula. The formula will be implemented from the top down on the games that counted. a. Head to head games b. Goal differential c. Total goals allowed d. Total goals
2. A team will be awarded a maximum of 4 goals more than their opponents
3. A team’s goals against will be increased by a maximum of 4 goals less then their opponents score for each game played to be used as the basis of the Tie breaker formula.
4. If after the 4th step of the Tie breaker formula a tie is not broken, the teams will be both awarded the same ranking in the standing.
Score Sheets:
1. Score sheets will be given to the referees to track items including, score and misconducts. 2. Score sheets will be provided for each game by the Board of Directors. 3. Score sheet must be signed by both coaches. 4. Referee/s will sign the score sheet and return it to the league representative assigned to disburse referee
payments. Disciplinary Sanctions U-11
• The yellow card is used to communicate that a player, coach or parent has been cautioned (the coach will be shown the caution for any of their players parent violations).
6

• The red card is used to communicate that a player, coach or parent has been sent off (the coach will be shown the red card for any of their players parent violations).
• Any player, coach or parent that receives a direct red card will be required to meet and discuss the sanction with the Head Coach, Head Referee, game Referee/s and parents at the earliest day following the date of the sanction.
• The referee/s have the authority to take disciplinary sanctions from the moment they enter the field of play until they leave the field of play after the final whistle.
Cautionable Offences (Yellow)
A player, coach or parent is cautioned and shown the yellow card if they commit any of the following seven offences: • Unsporting behavior • Dissent by word or action • Persistent infringement of the Laws of the Game • Delaying the restart of play • Failure to respect the required distance when play is restarted with a corner kick or free kick • Entering or re-entering the field of play without the referee’s permission • Deliberately leaving the field of play without the referee’s permission
Sending-Off Offences (Red)
A player, coach or parent is shown the red card and is sent off if they commit any of the following seven offences: • Serious foul play • Violent conduct • Spitting at an opponent or any other person • Denying the opposing team a goal or an obvious goal scoring opportunity by
deliberately handling the ball (this does not apply to the goalkeeper within their own penalty area) • Denying an obvious goal scoring opportunity to an opponent moving towards the
player’s goal by an offence punishable by a free kick or a penalty kick • Using offensive, insulting or abusive language and/or gestures • Receiving a second caution in the same game
A player, coach or parent who has been sent off must leave the vicinity of the field of play. A substitute player can be put in play for a sent off player.
Chapter 2
7

Foundations of Coaching Children Foundations of Coaching Children
Is coaching an art or a science? With the rapid advances in sports technology, it could be a science. However, since it deals with children, youth coaching could be an art that only improves with experience.
All involved with coaching–whether volunteer or paid–and the administration of youth organizations should address player development from an educational training perspective. If we are truly concerned with the
8

positive development of children to become productive, compassionate and moral citizens through sports, then all should be adequately prepared to be a youth coach.
Whether paid or a volunteer, coaches are still involved with the same aged child. Children do not make any distinction between a “professional coach” and a “volunteer coach.” Both coaches can have a profound influence on how a child views sport, physical activity, themselves and others.
Children who specialize in one sport too early are more prone to overuse injuries and burnout. “Military” style coaching is no longer appropriate for youth soccer. Unfortunately, this information is not common knowledge within youth organizations. Many coaches still deny children water, many have them run laps as punishment, and many run a practice like a drill sergeant, ignoring the creativity and energy that children bring to the sport. It is important that coaches seek out current information on child development by attending clinics, going to the library, and/or searching the internet.
The Role and Importance of the Art of Coaching
A good coach who is actively practicing the craft of coaching is easily identified. The players will be active, coaches are teaching, players are learning and everyone is having fun.
The quality of player/coach interaction, the development of player self-esteem and self-confidence, and introducing children to sport as a lifelong pursuit with strong moral values are the primary objectives of youth soccer in America. Developing winning teams or pursuing sport for future economic gains creates very few winners and countless losers.
We can develop youth soccer players, by presenting a wide range of movement activities and challenges during practices.
The three learning domains described below provide a conceptual framework to guide us in the design of developmentally appropriate games and practices.
Psychomotor (Physical)
Children grow at different rates. Balance, center of gravity, length of limbs, body mass, and gross and fine motor control all play a part in a child’s ability to move effectively. Within the same age group, some are shorter or taller than others, some have better balance, and others fall down quite often. As a result, we cannot pass false judgment on a child whose development is a little slower than the rest of the team.
Activities should be designed in which players are provided the opportunity to practice a wide range of locomotor movements (running, skipping, hoping, galloping, leaping, etc.), nonlocomotor movements (bending, pulling, twisting, pushing, etc.) and other movement components such as balance, change of direction, strength, and cardiovascular endurance.
Cognitive (Thinking & Learning)
Knowledge gained from studying early learning theories can be used to help plan effective experiences for youth sport beginners. It is equally important to understand how a child thinks; how they perceive and understand their surroundings and the world. Experience and challenging the mind become the two most important characteristics of learning and future performance.
Chapter 3
9

Describing/Characteristics of the – U11 player
Describing/Characteristics of the – U11 player Anyone involved in coaching youth sports must understand the fact that children grow at varying degrees
with regard to development of their minds and bodies. Though we have a tendency to lump children together in our educational and sport activities, we must understand that the best way to characterize them is by their individual differences.
10

Children at this age are typically enrolled in grades 3 - 5 and may have been playing soccer for half of their lifetime. Some children, however, choose to begin play in soccer at this age. Both boys and girls are beginning to demonstrate an improved ability and a mastery of some aspects of basic locomotor, nonlocomotor, and manipulative skills (the ability to control objects, either directly through hands and feet, or indirectly with an implement such as a tennis racket).
They have also begun to develop basic technical abilities to play soccer and their cognitive understanding of tactics and strategies is evolving. They are beginning to demonstrate an ability to think in advance of the ball (anticipation). Formal schooling plays an increasingly important role in the development of children’s thinking. They will demonstrate a very basic form of self-awareness; of realizing what they know and what they don’t know
Psychomotor
During this period, children gain a tremendous amount of physical strength, endurance, and power. Strength is related to body size and muscle mass. During childhood and adolescence, boys tend to have greater strength, especially in the trunk and upper body when compared to girls; however, leg strength differences are minimal.
Motor performance is most often measured by a variety of motor tasks that require speed, balance, flexibility, explosive strength and muscular endurance. Children are in a linear growth mode (from head to toe) that peaks with a growth spurt at adolescence. Some children will grow faster than others. Height can approach 5 feet and weight can reach 80 pounds or more.
Significant physical differences appear between genders from 10 to 11 years of age and onward. Young soccer players must be observed and assessed in authentic game related activities that all three identified domains–psychomotor, cognitive and psychosocial.
Cognitive There are significant changes in a child’s memory ability in nine and 10 year olds, particularly in deliberate
recall memory. They have the ability to remember and follow more complex instructions, which enables them to solve higher-level problems. Improvements in memory reflect a child’s increasing fund of knowledge and experience. Children in this age group develop an ability to focus longer and stay “on task.” They begin to sequence thought and actions and they begin to think in advance of, or anticipate, the ball. They will start recognizing when and where to move with and without the ball and they begin to develop a sense of pace.
Psychosocial
Players begin to initiate play on their own and are likely to want to play rather than to be reminded that it is time to go to soccer practice. Many players are becoming more serious about their play and with whom they play. Peer group attachment and the pressure generated by peers become significant. There is a need to belong and the association with a team becomes increasingly more important. They will develop a group of friends; there is great social need to interact. Adults outside of the immediate family (most notably the coach) begin to take on added significance. Gender differences become more apparent.
Let’s now turn our attention to some more specific notions of the characteristics of this young person known as the “developmental player”.
• Boys and girls begin to develop separately • Greater diversity in playing ability and physical maturity, physically mature individuals
demonstrate stronger motor skills • More prone than adults to heat injury
11

• Lengthened attention span, ability to sequence thought and actions. • Pace factor becoming developed(starting to think ahead). • Starting to recognize fundamental tactical concepts, such as changing direction of ball, but not
always sure why • Repetitive technique very important, but it must be dynamic not static • Continued positive reinforcement • Explanations must still be brief, concise and indicate purpose. • Peer pressure starting to be a factor • Adult/s outside of family may take on added significance • The average age for the beginning of pubescence in girls is 10 with the range of 7-14, for boys is
the age 12 with a range of 9-16 • Flexibility training is key to prevention of injury • Some may begin to develop abilities to sustain complex coordination sequences • Some may begin to think abstract terms and can address hypothetical situations
Crying Wolf When they fall or cry, don't panic. Most injuries are not serious at this age. We have found that most of
the “injuries” in this age group are for getting attention or embarrassment from a mistake. You may find that some players seem to have frequent injuries or that over react to situations. If you have a player/players frequently doing this and once they are removed from the field almost immediately request to be put back in the game in coach on a regular basis. We have found you can help prevent this by telling the player you are concerned and sit them out a few extra shifts this will deter them from “crying wolf” . If needed you will have icepacks and bandages in your coaching bag for injuries requiring treatment. If you do have an injury needing attention you will have icepacks and first aid supplies in your coaches manual.
Chapter 4
12

Off the Field Information on what to do now that you are a coach
Off the Field At the coaches meeting we will give you your roster you will sign up for practice and photo times for your
team. You will be expected to contact your team with-in a week of receiving this information. Initial phone contact with your players’ parents let them know your name, contact information, and that you will be coaching their child for the upcoming season. Also, inform them of what your practice schedule is, where your practice will be held, what their child should bring to practice (water bottle, size 3 soccer ball, shin guards and tennis shoes or cleats, appropriate dress attire based on weather conditions.
Your team photo times that were selected at the coaches meeting. This information needs to be included on your team schedule. In our experience you will generally have a few players that will show up late for photos, come unprepared or without their order forms completed. To try and prevent this situation, we suggest telling
13

your parents and players that your photo time is 15 minutes prior to the actual photo time. That extra 15 minutes will allow you time to get your team together and for parents to fill out the proper photo forms and provide a cushion for late arrivals. Your team will need to dress in their uniforms for photo day and you will want to wear your coach’s jersey. We leave it up to the coaches as to if they will still choose to have an actual practice or partial practice this day. If you do intend on still holding a practice we suggest having photo’s prior to your scheduled practice time to avoid dirty uniforms and red faces for photo’s it will also allow you to know how much actual time you will have left to hold your practice if you normally have practice scheduled on that day. You will pick up your team photo’s at the field towards the end of the season and will get information emailed to you regarding pick up.
At your first practice you should have a meet n greet. For any new players they will need to have their concussion paperwork done prior to any practice taking place. Concussion forms for these players will be in your coaching packets and labeled so you will know who needs to have these forms still filled out(You will need to get these to our Registrar Nicole Fletcher, once they have been filled out). At this meeting we suggest introducing yourself to the families and players. Cover the basic rules with the parents such as no smoking on the fields, no dogs permitted at the fields, pass out uniforms if you have them. Cancellation of game/practice guidelines rules and regulations. Have a snack schedule for your players have that ready to pass out. We suggest no snacks with peanuts since so many kids these days have peanut allergies. Find out if there are any allergies or medical conditions that you may need to be aware of. Let the parents know what to expect from you and what you expect from them and the player. Once you have covered the information with the parents then take the players out on the field. Talk to the players have them together all go around and introduce themselves by name this will help you and them learn each other’s names (you may even want to start with this the first few practices to help everybody get to know each other better.) You could also ask the kids for a few ideas on a team name you could either decide that day or ask them to go home and think about it and discuss at the next practice.
On the last day of the soccer season you will pick up your team awards at the field. You will get information emailed to you prior to the last day of where to pick these up from. It is up to you as to how you would like to pass these out to your team. Generally coaches choose to have a small awards ceremony off to the side of the field it generally works out calling each player up and giving them the award and then forming a line next to you with parents/family all gathered around for photo opportunities.
After your last game you will also need to turn in your coach’s bag, pugg nets, completed player evaluations, and any other league items. You will get an email also telling you who to turn these items in to.If at any time during the season you have any questions or concerns please feel free to contact your divisional director or a league representative. You will be given their contact information at the coaches meeting and can also find the information on our website at www.mysami.org.
Chapter 5
14

On the Field Game and Practice Preparation
On the Field Most importantly, keep it fun. U11 soccer is a time for our 9 and 10 year olds to have fun get exercise and
they love to socialize. U11 soccer is where some children start to discover the game of soccer with guidance from their coach and parents while others may have been playing half of their lives. “If a coach/parent is constantly talking or yelling at players during the practice/game, it prevents your players from thinking for themselves.” At this age, you will still be covering the basics (creating building blocks) while some players will be more advanced technically. You will need to continue their skills as they advance to higher divisions. You also need to know a few drills and a few fun games.
You need to know proper technique for kicking, dribbling and throw ins, off sides and heading .
• Kicking with the inside of the foot • Outside of the foot • Kicking with the top of foot • Throw ins
15

• Heading • Dribbling • Off sides
Avoid kicking with the point of the foot (toe punch) because to small surface space and it does not give consistency or accuracy. At this age, things will get more technical.
Practices at this age group should be approximately 60-90 minutes long one to two times a week. They should include water breaks at least every 15-20 minutes. In hot weather, they should be more frequent. Have a plan so you won't be stumbling for ideas with 24 eyes looking at you. You will look more professional. Fold it in half and tuck it in on the side of your waistband for quick access to it. After practice, use it to write what worked well and what you would change. Keep them as records so you know what and when you practiced. Arrive early have all your cones laid out for practice activities. No down time in between drills unless for a water break.
Equipment check
• Soccer cleats (no toe cleats)/tennis shoes are securely tied. • Shin guards are secured with socks over (socks folded over shin guard is acceptable) • Size 4 ball • Water bottle
Warm-ups (5 to 10 minutes)
• Jogging/running • Leg stretches • Arm stretches • Neck rotations • Wrist and ankles stretches and rotations
Training Activities (30-40 minutes)
• 4-5 drills • Dribbling drill • Throw in • Shooting drill • Passing drill • Goal kick drill • Corner kicks • Goal keeping training • Ball control/stopping drill • Offensive and defensive drills • Strategical drills • Off sides • Heading
16

Further down in this manual you will find drills that can be rotated through your practices that are mandatory to be done with your team for they will teach the necessary skills being taught at this age level. You can also add additional drills into your practice. We suggest that you Google U10/U11drills or look on YouTube. See if you think it is a drill that can be easily taught and the kids can have fun with.
Play scrimmage (10-15 minutes)
• Separate team as evenly as possible, one team wears pinnies (usually yellow or orange) which should be provided in the coaching bag.
• This will help give an indication of each player’s performance. • Stop the game when necessary for instruction but keep it SIMPLE.
Snack time at this age some coaches will only offer snack time after games.
• During snack time talk with player, ask questions and recap
Game day come prepared arrive at least five minutes prior to the time you ask your players to arrive. Player in the U11 division should show up 30 minutes prior to the game. If you coach more than one team and may be at the field just before game time let your families know this so they are not wondering where you are.
• Bring a game line up that shows you were players will play each quarter, who are your substitute
players(see sample page 19). • Bring your coaches bag and line up. • MYSA’s has competitive soccer in this age group which means score is kept and playoff’s are played • .You need to know the guidelines for play listed at the beginning of this manual under general rules
and regulations in order to properly instruct your players.
Pre-Game Warm up and Discussions
• Have players stretch for the first 5 to 10 minutes. • Have the kids warm up by passing the ball back and forth to each other. • Once the field is available (prior to game start time) take the field with your players have them
take some shots on goal and warm up your starting goalie. • Five minutes before game time have them check in with the referees. • Speak in a calm and relaxed manner. • Be brief. Conduct the talk away from any distractions. • Stress the importance of having fun and displaying good sportsmanship at all times during the game. • Avoid pressure phrases like “Let’s score five goals today.” Kids can give you their best effort, but they can’t control the outcome of games. • Be enthusiastic with your tone of voice and body language. The kids will be more responsive. • Ensure players’ cleats/tennis shoes are securely tied. • Have kids take a small water break during pre- game discussions
17
Post- Game
• At the end of the game gather all players together off of the field to recap highlights of game what went right what needs work.
• Along with passing out snacks.
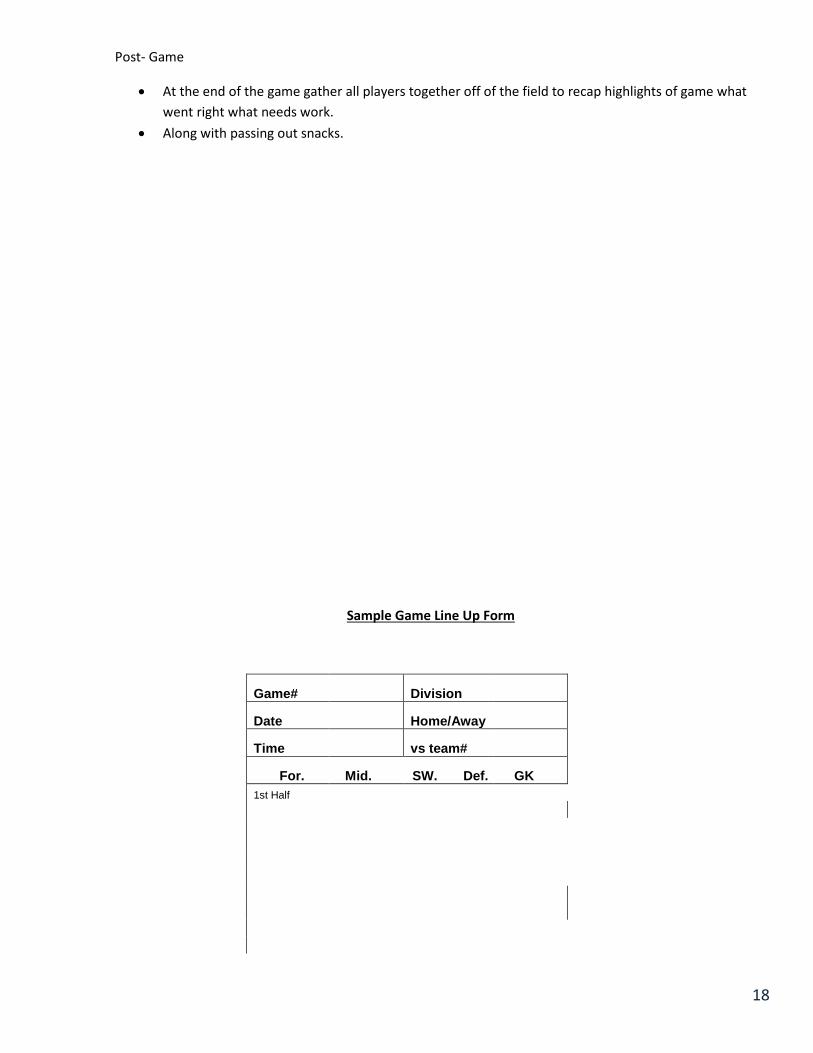
Sample Game Line Up Form
Game# Division
Date Home/Away
Time vs team#
For. Mid. SW. Def. GK 1st Half
18

2nd Half
Subs 1st Half
2nd Half
Sample Snack, Practice, and Photo Schedule
19

20

Rate each player's skills from 5-1 using the scale above. In the "score (average)" space add up their total score and divide by 16 (14 for U9) to find their average. Force rank each player against each other, from 1 (best) to N (entire team). No half values (i.e. 1.5) and no players with the
same value (make a choice, you must select one over another).
MYSA Player Evaluation Form
Scoring = 5-Advanced 4-Above Average 3-Proficient 2-Needs Improvement 1-Minimal
Season/Year: Team #: Coach Name:
Player Name Ball Contro
l
Passing
Dribblin
g
Heading
Finish
ing
Attacki
ng Aware
ness
Defensiv
e Aware
ness
Enduran
ce
Speed
Agility
Strength
Attitude
Practic
e Effort
Commitmen
t
Goalkeeping
Off-Sid
es
Score
(Averag
e)
Force
Rank
Comments
21

Chapter 6
How to Kick/ Head ,Juggle a Soccer Ball & Offsides How to Kick a Soccer Ball
22

How to Kick a Soccer Ball Do you want to kick a soccer ball without embarrassing yourself? Better yet, do you want to get to the point where you can start kicking the ball with the best of them, like Messi, Pele, or Roberto Carlos? There are a lot of different ways to kick a soccer ball and each technique involves its own set of rules. If you want to learn a few of them, read the following tips and trick for kicking a soccer ball.
Method 1 of 5: Getting The Hang Of It Practice your kick sitting down. In order to get a good feel for kicking the ball, try practicing in simple situations. Start off sitting down.
• Take off your shoes and socks and sit down on the ground with your knees pointed to the sky.
• Hold the ball in your hands over your feet, so that your arms are wrapped around your knees.
• Kick the ball out of your hands with the top of one foot. Lock your ankles. When your foot connects with the ball, the ball should connect with the “laces” part of your foot, or where the laces would be if you were wearing cleats.
• Kick the ball lightly. The ball should only go up a couple feet, with little or no spin. Try connecting with your dominant foot first, and then alternate to your non-dominant foot. Skilled soccer players can kick the ball just as well with their non-dominant foot as they can with their dominant one.
Practice your kick standing up. Now that you have practiced kicking while sitting down, it’s time to practice while standing up. Again, try to kick the ball up only a couple of feet, with little spin.
• Stand up and do the same thing. Drop the ball over your foot and kick up gently. Practice
your coordination here. • Again, look for no spin in the ball when you kick it up.
23

Method 2 of 5: The Basics
Only take a few steps back. Do you ever watch soccer players take a corner kick or a penalty kick? Soccer players line up only a few steps behind the ball. You do not need to get a running start from 15ft. away in order to strike the ball well. In fact, getting a 15ft. running start will probably keep you from hitting the ball well. Pay attention to your planter foot. Your planter foot is the only foot you’re not kicking with, the foot that you plant next to the ball. There a couple of things that you should remember when placing your planter foot: • The planter foot and the ball should be on the same horizontal plane. Imagine that there’s a line
going through the side of the soccer ball on each side. You want to place your planter foot right on that line.
• Place your planter foot before the line and you’re going to the ground and knock up a divot more than you will hit the ball.
• Place your planter foot ahead of the line and you will hit the ball before your foot has gotten enough momentum and its proper position.
• Point your planter foot in the direction you want the ball to go. If you want the ball to travel to the left, point your planter foot slightly to the left. If you want the ball to travel to the right, point your planter foot slightly to the right. If you want the ball to travel straight ahead, point your planter foot forward.
Bring your leg back to generate force. You want some speed and power to your kick, right? You get that by bringing your leg back and moving your hips. If you want to pass the ball, you only need to bring your leg back a little bit and you don’t have to bend your leg. If you want to shoot the ball, you should bring your leg back much more and you want to bend your leg. Use your arms for position and balance. Many soccer players bring one arm out before they shoot. You never see soccer players playing with both arms on their sides. Play around with what feels good to you, and what helps give you balance. If you’re shooting with your right foot, try bringing your left arm out in front of you and then moving it up over your head in an arc-like movement as you shoot.
Follow through on the ball like a ballerina landing from a leap. You want the core of your body to stay upright, for the most part. If you lean to far back, the ball will go flying up. If you lean to far forward, you won’t get that much power out of your kick.
24
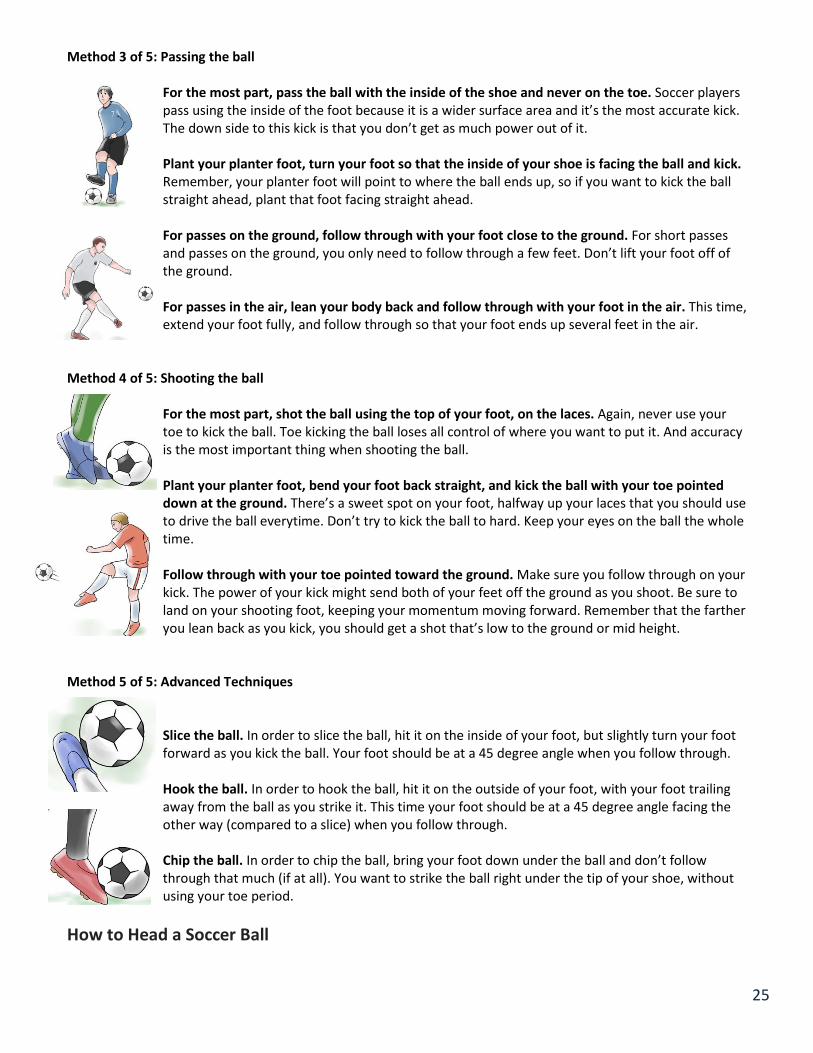
Method 3 of 5: Passing the ball
For the most part, pass the ball with the inside of the shoe and never on the toe. Soccer players pass using the inside of the foot because it is a wider surface area and it’s the most accurate kick. The down side to this kick is that you don’t get as much power out of it. Plant your planter foot, turn your foot so that the inside of your shoe is facing the ball and kick. Remember, your planter foot will point to where the ball ends up, so if you want to kick the ball straight ahead, plant that foot facing straight ahead.
For passes on the ground, follow through with your foot close to the ground. For short passes and passes on the ground, you only need to follow through a few feet. Don’t lift your foot off of the ground. For passes in the air, lean your body back and follow through with your foot in the air. This time, extend your foot fully, and follow through so that your foot ends up several feet in the air.
Method 4 of 5: Shooting the ball
For the most part, shot the ball using the top of your foot, on the laces. Again, never use your toe to kick the ball. Toe kicking the ball loses all control of where you want to put it. And accuracy is the most important thing when shooting the ball. Plant your planter foot, bend your foot back straight, and kick the ball with your toe pointed down at the ground. There’s a sweet spot on your foot, halfway up your laces that you should use to drive the ball everytime. Don’t try to kick the ball to hard. Keep your eyes on the ball the whole time. Follow through with your toe pointed toward the ground. Make sure you follow through on your kick. The power of your kick might send both of your feet off the ground as you shoot. Be sure to land on your shooting foot, keeping your momentum moving forward. Remember that the farther you lean back as you kick, you should get a shot that’s low to the ground or mid height.
Method 5 of 5: Advanced Techniques
Slice the ball. In order to slice the ball, hit it on the inside of your foot, but slightly turn your foot forward as you kick the ball. Your foot should be at a 45 degree angle when you follow through.
Hook the ball. In order to hook the ball, hit it on the outside of your foot, with your foot trailing away from the ball as you strike it. This time your foot should be at a 45 degree angle facing the other way (compared to a slice) when you follow through. Chip the ball. In order to chip the ball, bring your foot down under the ball and don’t follow through that much (if at all). You want to strike the ball right under the tip of your shoe, without using your toe period.
How to Head a Soccer Ball
25

Heading in soccer is vital if you want to win the air war. Good heading ability will also help you dominate in the
front of your and opponents six yard box. Beside winning the air war you will also score often at corner and free
kicks.
Throw the ball in the air or have someone throw it to you. You may want to keep it at
head level if you're beginning.
Position your head to where you think it will hit the ball.
Step forward and hit the ball with your forehead. Aim for making contact on your hairline. That's where you will get the most power. You shouldn't do it with your scalp but it hurts and does not go that far.
Open your eyes when you head the ball. This way you can avoid crashing into other players.
Keep your mouth shut and keep your upper and lower teeth together (or you might get hurt).
26

While practicing this way, observe which angle of the head gives what kind of result. Use this observation to learn to head the ball in the desired direction with the desired speed.
Tips Remember that heading has different purposes in soccer. If you are heading at goal then you should
head it down hard into the corner of the goal away from the keeper. But if you are making a headed
clearance you should head the ball up in the air and try to get distance.
• Keep your eyes open at all times
• Keep your mouth closed
• Practice.
• This is useful for corner kicks,indirect free kicks,direct free kicks,and throw-ins in games because you can
direct it to the ground where a teammate can kick it in the goal or you can head it in the goal yourself.
How to Juggle a Soccer Ball
Got Football World Cup fever? Decided it’s time to step up to the mark and improve your game? You need to learn to juggle a soccer ball.
Why Juggle?
Juggling a soccer ball is a training exercise that has a number of benefits that translate directly into improved performance on the field.
• Improved eye/limb coordination.
• Improved mental focus.
• Greater ball control.
• Reinforced muscle-memory benefiting first touch on the ball and your ability to receive the ball.
• Motor skill fine tuning.
• Better feel for ball response.
Learning the Technique
27

Learning to juggle a soccer ball is a matter of progressing through a series of stages, each more advanced than the one before. The secret is to take it a step at a time and to be patient. It can be a little frustrating at first when the ball goes flying out of your reach or you miss a kick, but a little regular practice will enable you to master the technique in a week or two.
Preparation
Deflate your soccer ball just a little. This will slow its bounce and make it easier to control in the early stages of juggling. Once you’ve mastered the technique, though, you should practice with a fully inflated ball.
Practice your juggling on a hard, flat surface to keep bounce and direction consistent.
Take a moment to visualize your lower body. Are your knees slightly bent? Do your hips feel strong and aligned? Are you centered? Relax…
Juggling can look flashy and impressive, but its aim is control. Throughout your practice remember what it is you are really trying to achieve.
Your First Juggles
1. Hold the ball straight out in front of you, level with the center of your chest.
2. Drop the ball and let it bounce once.
3. As the ball begins to descend after this bounce kick it up into the air with your dominant foot so that it rises to chest height. Point your toes up slightly as you kick and aim to hit the ball with your boot laces.
4. Catch the ball.
5. Repeat this procedure until you can consistently get the ball back to chest height and catch it without having to lunge or lean for it.
6. Do the same with your other foot.
Improving Your Juggling
When you’ve mastered the stage above, improve your juggling skills by dropping the ball, letting it bounce, kicking it up to chest height, letting it fall (but not bounce) and kicking it up again. You’re doing a two-kick juggle and by the time you’ve mastered this you’ll be feeling pretty good about your ball control skills.
Keep pushing yourself to greater skill levels by steadily increasing the number of kicks you make before catching the ball. When you can do two, move on to three. When you can do three, move on to four etc.
Alternate Feet
When you have a reasonable measure of control you can progress still further by kicking with alternate feet before catching. Drop the ball, let it bounce, kick it up with your right foot, let it fall, kick it up with your left foot, catch the ball. This technique really tests and improves your balance, eye tracking, coordination and peripheral awareness.
More than Feet?
28

You can involve more than your feet in soccer ball juggling. As the ball falls from one of your kicks knock it up with your thigh. Use the meaty, mid-part on the top of your thigh. If you use your knee the ball will bounce more violently and may move out of range of your next kick. Discipline Brings Rewards The whole idea of soccer ball juggling is to improve your ball skills. Practicing anything requires a measure of strictness and discipline – juggling is no different. You should aim to juggle the ball without moving backwards or forwards, or side to side more than a meter or two. If you find you are chasing the ball along the length of the pitch, you haven’t mastered the technique. It’s better to do a few kicks in one spot than to do multiple kicks over a stretch of ground. You’ll get a whole lot more out of your practice if you set yourself patterns of kicks, alternating feet combinations, thigh/foot combinations etc. before you start your practice. By doing this you’re giving yourself a sequence to follow and the demands on your mind and body will be correspondingly greater. But so will your progress. Happy soccer ball juggling!
Offside
29

Offside (sometimes known as offsides) - Which states; that if a player is in an offside position when the ball is touched or played by a team-mate, the player may not become actively involved in the play. A player is in an offside position when closer to the opponent’s goal line than both the ball and the second-to-last defender (which is usually the last outfield player), and also in the opponent's half of the field. "Offside position" is a matter of fact, whereas committing an "offside offence" occurs when a player is "actively involved" and is subject to the interpretation of the referee. Goals scored after committing an offside offence are nullified if caught by the referee. Application - The application of the offside rule may be considered in three steps: offside position, offside offence and offside sanction.
Offside position - The blue forward on the left of the diagram is in an offside position as he is in front of both the second-to-last defender (marked by the dotted line) and the ball. Note that this does not necessarily mean he is committing an offside offence; it only becomes an offence if the ball were to be played to him at this moment, whether or not he is in an offside position when he receives the ball, as he could receive the ball in an onside position but he'd still have committed an offside offence.
The blue forward in the penalty box of the diagram is not in an offside position, as he is behind the ball, despite the fact that he is in front of all but one of his opponents.
A player is in an offside position if three conditions are met: first, the player must be in the opposing team's half of the field. Second, the player must be in front of the ball. And third, there must be fewer than two opposing players between him and the opposing goal line, with the goalkeeper counting as an opposing player for these purposes. It is not necessary that the goalkeeper be one of the last two opponents. Any attacker that is level with or behind the ball is not in an offside position and may never be sanctioned for an offside offence.
Regardless of position, there is no offside offence if a player receives the ball directly from a corner kick, goal kick or throw in. However, an offside offence may occur if a player receives the ball directly from either a direct free kick or an indirect free kick.
Offside offence
30

A player in an offside position at the moment the ball is touched or played by a teammate is only committing an offside offence if, in the opinion of the referee, he becomes actively involved in play by:
• Interfering with play - Playing or touching the ball passed or touched by a team-mate • Interfering with an opponent - Preventing an opponent from playing or being able to play the ball
by clearly obstructing the opponent’s line of vision or movements or making a gesture or movement which, in the opinion of the referee, deceives or distracts an opponent.
• Gaining an advantage by being in an offside position - Playing a ball that rebounds to him off a goalpost or the crossbar having been in an offside position or playing a ball that rebounds to him off an opponent having been in an offside position.
Offside sanction
The restart for an offside sanction is an indirect free kick for the opponent at the place where the off-sided player was at the time the teammate passed or touched the ball. This is defined as where the infringement took place.
Offficiating
In enforcing this rule, the referee depends greatly on an assistant referee, who generally keeps in line with the second-to-last defender, the ball, or the halfway line, whichever is closer to the goal line of their relevant end. An assistant referee signals that an offside offence has occurred by first raising their flag upright without movement and then, when acknowledged by the referee, by raising their flag in a manner that signifies the location of the offence:
• Flag pointed at a 45-degree angle downwards: offence has occurred in the third of the pitch nearest to the assistant referee;
• Flag parallel to the ground: offence has occurred in the middle third of the pitch;
• Flag pointed at a 45-degree angle upwards: offence has occurred in the third of the pitch furthest from the assistant referee.
The assistant referees' task with regard to offside can be difficult, as they need to keep up with attacks and counter-attacks, consider which players are in an offside position when the ball is played, and then determine whether and when the offside-positioned players become involved in active play. The risk of false judgment is further increased by the foreshortening effect, which occurs when the distance between the attacking player and the assistant referee is significantly different from the distance to the defending player, and the assistant referee is not directly in line with the defender. The difficulty of offside officiating is often underestimated by spectators. Trying to judge if a player is level with an opponent at the moment the ball is kicked is not easy: if an attacker and a defender are running in opposite directions, they can be two meters apart in a tenth of a second.
31

Chapter 7
Field Lay Out & Training Activities
32

Field Lay Out
Training Activities Objectives (goals, what should be expected of a U11 soccer player)
33
• Introduction of basic game laws • Corner kicks • Kick-off • Following the ball during play • Trying to shoot on opposing teams net • Defending (protecting) their net. • Good throw in technique • Dribbling the ball with both right and left foot keeping it within 2-3 strides. • Be able to demonstrate how to stop the ball • Player should have practiced kicking the ball with different parts of foot • What to do if there is an injury on the field • Toe taps • Punting the ball • Passing • Juggling • Heading • Offsides
U11 Training Activities These training activities can be rotated through your practices. They are mandatory to be done with your team for
they will teach the necessary skills being taught at this age level.
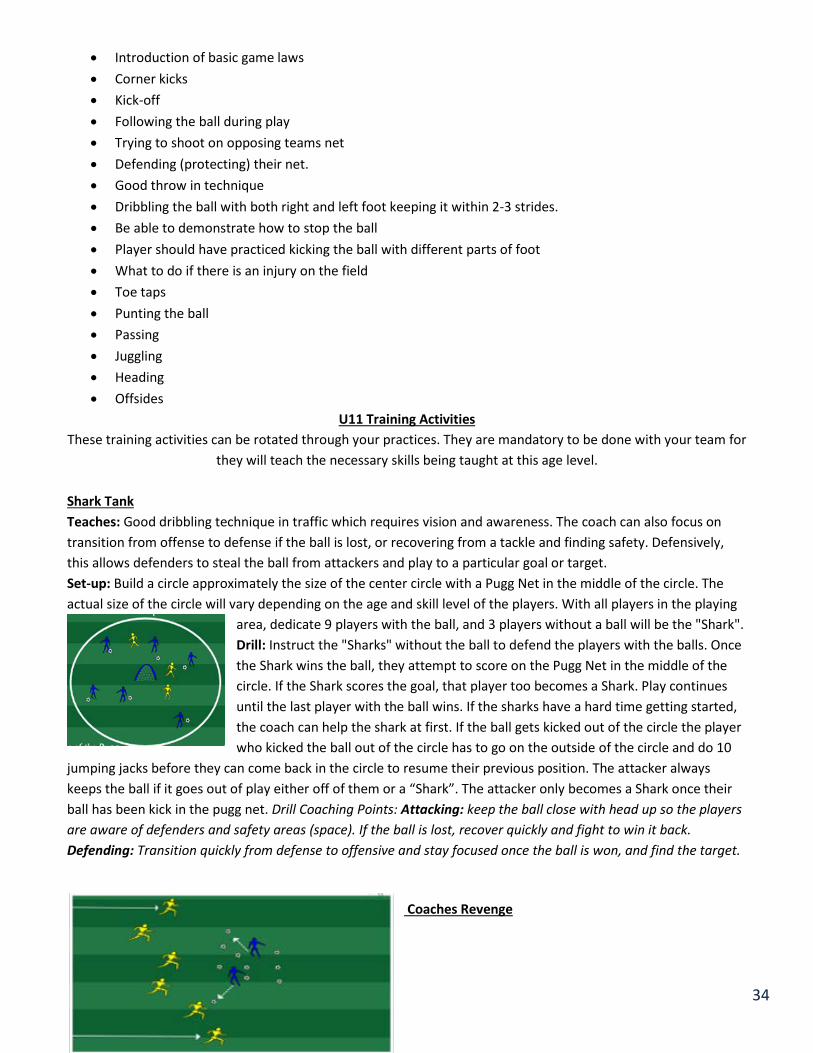
Shark Tank Teaches: Good dribbling technique in traffic which requires vision and awareness. The coach can also focus on transition from offense to defense if the ball is lost, or recovering from a tackle and finding safety. Defensively, this allows defenders to steal the ball from attackers and play to a particular goal or target. Set-up: Build a circle approximately the size of the center circle with a Pugg Net in the middle of the circle. The actual size of the circle will vary depending on the age and skill level of the players. With all players in the playing
area, dedicate 9 players with the ball, and 3 players without a ball will be the "Shark". Drill: Instruct the "Sharks" without the ball to defend the players with the balls. Once the Shark wins the ball, they attempt to score on the Pugg Net in the middle of the circle. If the Shark scores the goal, that player too becomes a Shark. Play continues until the last player with the ball wins. If the sharks have a hard time getting started, the coach can help the shark at first. If the ball gets kicked out of the circle the player who kicked the ball out of the circle has to go on the outside of the circle and do 10
jumping jacks before they can come back in the circle to resume their previous position. The attacker always keeps the ball if it goes out of play either off of them or a “Shark”. The attacker only becomes a Shark once their ball has been kick in the pugg net. Drill Coaching Points: Attacking: keep the ball close with head up so the players are aware of defenders and safety areas (space). If the ball is lost, recover quickly and fight to win it back. Defending: Transition quickly from defense to offensive and stay focused once the ball is won, and find the target.
Coaches Revenge
34
Teaches: Young player’s agility while dodging balls kicked at them, and is a great ice breaker or a fun warm-up
game at the beginning of practice.
Set up: Create a grid approximately 25X30 yard grid (the size of the grid can be adjusted depending on the age
and number of players). Have all of the teammates spread out on one of the end lines without a ball. The coach
or coaches should be in the middle of the grid with every ball. Drill: On the coach’s command, every player must sprint from one side of the grid to the other while avoiding balls being kicked at them by the coaches in the middle. The Coach attempts to hit the players as they pass from the knee down. If a player is struck by the coach’s pass, those players collect the balls and join the coach’s in the middle of the grid attempting to hit the remaining players. The last player standing wins! Who's Open Teaches: Passing Four or Five players in circle formation about 15 yards in diameter (adjust for age). All players except one have a ball at feet. Two players inside circle with one designated as attacker and the other defender. To start, attacking player moves and calls name of player he wants to serve him a ball. He must control ball and return to the open player who did not have a ball at start of exercise (you can't give it back to the player who served it). Attacker then asks for another ball (calling name and making appropriate run) and repeats the exchange. Defender tries to dispossess attacker.
Punts and Drop Kicks Into a Net
The easiest way to get lots of repetition on punts and drop kicks without having to chase balls is to kick into a goal
with a net. Review basic technique and carefully watch -- and listen! -- to the keepers' form. Not only can you see
good technique or mistakes, but you can hear them. A good kick has a definite "solid" sound. Make sure they've
got the basics: starting with two hands, dropping (not tossing) the ball, keeping everything in a straight line, and
following through. This activity can be shortened or lengthened depending on the amount of technical correction
the players need.
To view training video on this drill go to
http://www.youtube.com/watch?v=AM8tuRo_y-U
World Cup Soccer Drill
Teaches: The World Cup Soccer Drill is a great game to work on game like situations with number down situations.
35

Setup: Inside the penalty box, set up 4 groups of 3 players in alternate jersys with a goalkeeper in a full size goal.
The coach should have the full supply of soccer balls nearby.
Instructions: The coach should serve a ball into the grid. Each team plays at the same time against the other
teams. The team to score sits out for the remainder of that round and advances to the next round. The last team
to score in each round is out of the tournament.
Round 1:
3v9
3v6
3v3
last team to score is out.
Round 3:
3v3
team to score first 2 goals wins the world cup.
Coaching Points
• Good team work • quick passes • take shots/chances
The Numbers Game Teaches: Individual dynamics of this game such as dribbling, shooting, shielding, turning and beating an opponent.
Setup: Create a small 1v1 field approximately 15X20 with two small goals on each endline. Split the group into two even teams and assign a number to each player in each group. For instance if you have 5 players in each group, number off 1-5 in each group. One group should wear alternate jerseys.
Instructions: The coach will play a ball into the area and call out a number. Those players must then sprint onto the field and play a 1v1. The game should continue until a goal is scored or the ball goes out of bounds.
Variations
• Call out two or more numbers to create a 2v2 or 3v3.
Coaching Points: Encourage players to take on their opponent. Encourage players to shoot when they have a Chance of a goal. Instruct the players to protect the ball when necessary.
Throw in Drill
Teaches: How to do a throw-in.
36

When the ball is kicked out of bounds on either side, it necessitates a throw-in. The simplest way to teach this is have the kids put their toes on the line, Grab the ball with both hands, Pull it back over their head, Touch the back of their neck with the ball. Both arms come over together - Both feet stay on the ground on the line. Make it a game by asking them who can throw the ball the farthest. Or by placing balls on cones and have them aim for the ball and knock the ball off the cone. To view training video on this drill go to
http://www.youtube.com/watch?v=Oxpmr1s90dI
Pass Possession Game
Teaches: This is a great passing drill that focuses on holding possession and completing a series of passes. This possession passing drill will work on awareness, speed of play, support, and movement to maintain possession.
Set up: Create a grid approximately 40 yards x 30 yards. Split players into 2 even teams with two other players as neutral players. The neutral players are positioned at the end line on each end of the field.
Instructions:The two teams attempt to hold possession from each other within the grid. To score a goal, a team must make 5 or more consecutive passes to their teammates and then must make the 6th pass to either of the neutral players. If the ball is touched or won by the opposition, the pass count is reset.
Once the neutral player receives a scoring pass they must pass the ball in one touch to the team that scored and their pass count is reset.
Play to 10 and make the losing team do pushups or situps.
Variations
• Restrict players touch to 2-touches or 1-touch. If a player exceeds the max number of touches they lose possession.
4v3 Attack vs. Defense
Teaches: Offense, Defense, Passing
37

Setup: Set up a 30 X 30 grid with one side playing to goal. Coach assigns 3 defenders who wear an alternate jersey. The attackers begin with the ball. A keeper should be defending the goal
Instructions Instruct the players to exploit their numerical advantage and finish with a shot on goal. Attackers should move the ball looking for the open player and holes in the defense. Defenders should attempt to break-down the attack and will gain experience in how to cover a one-down situation. Defensive players should complete a pass to the coach to end the attack. The coach should then give the ball back to the attackers to build the attack again.
Variations
• Increase the number of attackers (or decrease the number of defenders) if scoring chances are infrequent.
• Increase the number of defenders (or decrease the number of attackers) if scoring chances are too frequent
Coaching Points Offensive:
• Quickly switch the point of attack to off-balance the defense. • Play quick both physically (1 and 2 touch) and mentally (think ahead). • Make sure the players are attacking at the appropriate times
Defensive:
• Contain the play and keep the ball in front of the defense.
Early pressure and do not allow space behind the defenders
Chapter 8
38

Preventing Soccer Injuries PREVENTING SOCCER INJURIES Soccer is one of the most popular sports in the world and the fastest growing team sport in the United States. Although soccer provides an enjoyable form of aerobic exercise and helps develop balance, agility, coordination, and a sense of teamwork, soccer players must be aware of the risks for injury. Injury prevention, early detection, and treatment can keep kids and adults on the field long-term.
WHAT ARE SOME COMMON SOCCER INJURIES?
39

Lower Extremity Injuries Sprains and strains are the most common lower extremity injuries. The severity of these injuries varies. Cartilage tears and anterior cruciate ligament (ACL) sprains in the knee are some of the more common injuries that may require surgery. Other injuries include fractures and contusions from direct blows to the body.
Overuse Lower Extremity Injuries
Shin splints (soreness in the calf), patellar tendinitis (pain in the knee), and Achilles tendinitis (pain in the back of
the ankle) are some of the more common soccer overuse conditions. Soccer players are also prone to groin pulls
and thigh and calf muscle strains.
Stress fractures occur when the bone becomes weak from overuse. It is often difficult to distinguish stress
fractures from soft tissue injury.
If pain develops in any part of your lower extremity and does not clearly improve after a few days of rest, a
physician should be consulted to determine whether a stress fracture is present.
Upper Extremity Injuries
Injuries to the upper extremities usually occur from falling on an outstretched arm or from player-to-player
contact. These conditions include wrist sprains, wrist fractures, and shoulder dislocations.
Head, Neck, and Face Injuries
Injuries to the head, neck, and face include cuts and bruises, fractures, neck sprains, and concussions. A
concussion is any alteration in an athlete's mental state due to head trauma and should always be evaluated by a
physician. Not all those who experience a concussion lose consciousness
HOW ARE SOCCER INJURIES TREATED? Participation should be stopped immediately until any injury is evaluated and treated properly. Most injuries are minor and can be treated by a short period of rest, ice, and elevation. If a trained health care professional such as a sports medicine physician or athletic trainer is available to evaluate an injury, often a decision can be made to allow an athlete to continue playing immediately. The athlete should return to play only when clearance is granted by a health care professional.
Overuse injuries can be treated with a short period of rest, which means that the athlete can continue to perform or practice some activities with modifications. In many cases, pushing through pain can be harmful, especially for stress fractures, knee ligament injuries, and any injury to the head or neck. Contact your doctor for proper diagnosis and treatment of any injury that does not improve after a few days of rest.
40


![INDEX [sa1c9dbbba90cec02.jimcontent.com]...BASEBALL - ROLES . 8. BASEBALL - RULES . 9. HANDBALL •The dimensions of a handball court are 40m x 20m, with a goal at each end. •There](https://img.dokumen.tips/doc/110x75/5ff0afa6d69bd26cfe170991/index-baseball-roles-8-baseball-rules-9-handball-athe-dimensions.jpg)


![Let’s Play Mini-Handball Steen Hjorth, International ...1].pdf · Let’s Play Mini-Handball Steen Hjorth, International Handball Federation What is Mini-Handball? Mini handball](https://img.dokumen.tips/doc/110x75/5aaad7e17f8b9a9a188ebe6b/lets-play-mini-handball-steen-hjorth-international-1pdflets-play-mini-handball.jpg)