Embed Size (px)
Citation preview

© 2012 Alamo Group Inc.
TX1500/1700
Published 01/12 Part No. 50069174
OPERATOR’S MANUAL
RHINO® 1020 S. Sangamon Ave.Gibson City, IL 60936800-446-5158Email: [email protected]
TRI-DECK FLEXFINISHING MOWER
This Operator's Manual is an integral part of the safe operation of this machine and must be maintained with the unit at all times. READ, UNDERSTAND, and FOLLOW the Safety and Operation Instructions contained in this manual before operating the equipment. C01-Cover
$0.00

To the Owner/Operator/Dealer
All implements with moving parts are potentially hazardous. There is no substitute for a cautious, safe-minded operator who recognizes the potential hazards and follows reasonable safety practices. The manufacturer has designed this implement to be used with all its safety equipment properly attached to minimize the chance of acci-dents.
BEFORE YOU START! Read the safety messages on the implement and shown in your manual. Observe the rules of safety and common sense!
WARRANTY INFORMATION:
Read and understand the complete Warranty Statement found in this Manual. Fill out the Warranty Registration Form in full and return it to within 30 Days. Make certain the Serial Number of the Machine is recorded on the War-ranty Card and on the Warranty Form that you retain

In order to reduce accidents and enhance the safe operation of mowers, Alamo Group Ag Division, in cooperationwith other industry manufacturers has developed the AEM/FEMA Industrial and Agricultural Mower Safety Prac-tices video and guide book. The video will familiarize and instruct mower-tractor operators in safe practices when using industrial and agricul-tural mowing equipment. It is important that Every Mower Operator be educated in the operation of their mowingequipment and be able to recognize the potential hazards that can occur while operating a mower. This video,along with the mower operator’s manual and the warning messages on the mower, will significantly assist in thisimportant education.Your Authorized Rhino Dealer may have shown this video and presented you a DVD Video when you purchasedyour mower. If you or any mower operator have not seen this video, Watch the Video, Read this Operator’s Man-ual, and Complete the Video Guidebook before operating your new mower. If you do not understand any of theinstructions included in the video or operator’s manual or if you have any questions concerning safety of operation,contact your supervisor, dealer or Alamo Group Ag.If you would like a VHS video tape of the video, please e-mail [email protected] or Fax AEM VHSVideo at (830) 372-9529 or mail in a completed copy of the form on the back of this page to AEM VHS Video 1502E Walnut Street, Seguin, TX 78155. and request the VHS video version. Please include your name, mailingaddress, mower model and serial number. Every operator should be trained for each piece of equipment (Tractor and Mower), understand the intended use,and the potential hazards before operating the equipment.The information and material listed above along with this Operator’s Manual can assist you in meeting the OSHArequirement for Operator annual training.OSHA TRAINING REQUIREMENTS
The following training requirements have been taken from Title 29, Code of Federal Regulations Part1928.57 (a)(6). www.osha.gov
Operator Instructions. At the time of initial assignment and at least annually thereafter, the employer shall instructevery employee who operates an agricultural tractor or implement in the safe operating practices and servicing ofequipment with which they are or will be involved, and of any other practices dictated by the work environment.

Alamo Group Ag. Division is willing to provideone (1) AEM Mower Safety Practices Video
Please Send Me: VHS Format – AEM/FEMA Mower Operator Safety Video
DVD Format – AEM/FEMA Mower Operator Safety Video
Mower Operator’s Manual
AEM Mower Operator’s Safety Manual
Requester Name:_________________________________Phone: _____________________________
Requester Address:_________________________________
City:_______________________________
State: ______________________________
Zip Code:___________________________
Mower Model:__________________________________Serial Number:___________________
Date Purchased:_________________________________Dealer Salesperson:________________
Dealership Name:_______________________________ Dealership Location:_______________
Mail to:
AEM Video Services
1502 E. Walnut Street
Seguin, TX 78155
Or Fax to:
(830) 372-9529
Or Email to:

TABLE OF CONTENTS
SAFETY SECTION .............................................................................................................. 1-1
General Safety Instructions and Practices ......................................................................................................... 1-2Operator Safety Instructions and Practices ....................................................................................................... 1-3Equipment Operation Safety Instructions and Practices ................................................................................... 1-6Connecting or Disconnecting Implement Safety Instructions and Practices .................................................... 1-12Transporting Safety Instructions and Practices ............................................................................................... 1-13Maintenance and Service Safety Instructions and Practices ........................................................................... 1-15Decal Location ................................................................................................................................................. 1-18Decal Description ............................................................................................................................................. 1-20Federal Laws and Regulations ........................................................................................................................ 1-25
INTRODUCTION SECTION ................................................................................................. 2-1
ASSEMBLY SECTION ........................................................................................................ 3-1
OPERATION SECTION ....................................................................................................... 4-1
Standard Equipment and Specifications ............................................................................................................ 4-3OPERATOR REQUIREMENTS ......................................................................................................................... 4-4TRACTOR REQUIREMENTS ........................................................................................................................... 4-5ROPS and Seat Belt .......................................................................................................................................... 4-5Tractor Safety Devices ...................................................................................................................................... 4-5Tractor Horsepower ........................................................................................................................................... 4-5Drawbar ............................................................................................................................................................. 4-6Tractor Hydraulics .............................................................................................................................................. 4-6Front End Weight ............................................................................................................................................... 4-6Power Take Off (PTO) ....................................................................................................................................... 4-6GETTING ON AND OFF THE TRACTOR ......................................................................................................... 4-7Boarding the Tractor .......................................................................................................................................... 4-7Dismounting the Tractor .................................................................................................................................... 4-8STARTING THE TRACTOR .............................................................................................................................. 4-9CONNECTING THE MOWER TO THE TRACTOR ........................................................................................... 4-9Connecting the Mower Tongue to the Tractor ................................................................................................. 4-10Safety Tow Chain ............................................................................................................................................ 4-10Connecting Mower Hydraulics ......................................................................................................................... 4-11SETTING THE MOWER .................................................................................................................................. 4-11Cutting Height Adjustment ............................................................................................................................... 4-12DRIVELINE ATTACHMENT ............................................................................................................................ 4-12Driveline Length Check .................................................................................................................................... 4-13Constant Velocity (CV) Driveline ..................................................................................................................... 4-15PRE-OPERATION INSPECTION AND SERVICE ........................................................................................... 4-16Tractor Pre-Operation Inspection/Service ....................................................................................................... 4-17Mower Pre-Operation Inspection/Service ........................................................................................................ 4-17DRIVING THE TRACTOR AND IMPLEMENT ................................................................................................. 4-23Starting the Tractor .......................................................................................................................................... 4-24Brake and Differential Lock Setting ................................................................................................................. 4-24Raising the Mower ........................................................................................................................................... 4-25Before Releasing Transport Latch ................................................................................................................... 4-25Raising Wings to Full Height ............................................................................................................................ 4-26Operating Position ........................................................................................................................................... 4-26Driving the Tractor and Mower ........................................................................................................................ 4-26

Crossing Ditches and Steep Inclines ............................................................................................................... 4-27OPERATING THE TRACTOR AND IMPLEMENT .......................................................................................... 4-29Foreign Debris Hazards ................................................................................................................................... 4-30Bystander/Passerby Precautions ..................................................................................................................... 4-31Engaging the Power Take Off (PTO) ............................................................................................................... 4-31PTO RPM and Ground Speed ......................................................................................................................... 4-32Operating the Mower ....................................................................................................................................... 4-32Shutting Down the Implement .......................................................................................................................... 4-35DISCONNECTING THE MOWER FROM THE TRACTOR ............................................................................. 4-36MOWER STORAGE ........................................................................................................................................ 4-37TRANSPORTING THE TRACTOR AND IMPLEMENT ................................................................................... 4-38Transporting on Public Roadways ................................................................................................................... 4-40Hauling the Tractor and Implement ................................................................................................................. 4-42TROUBLESHOOTING GUIDE ........................................................................................................................ 4-44
MAINTENANCE SECTION .................................................................................................. 5-1
PARTS INFORMATION ..................................................................................................................................... 5-2LUBRICATION INFORMATION ........................................................................................................................ 5-2GEARBOX ......................................................................................................................................................... 5-4CENTER 4-WAY GEAR BOX ............................................................................................................................ 5-5GAUGE WHEEL ASSEMBLIES ........................................................................................................................ 5-5BLADE SPINDLE LUBRICATION ..................................................................................................................... 5-6DRIVELINE LUBRICATION ............................................................................................................................... 5-6CV DRIVELINE PROFILE LUBRICATION ........................................................................................................ 5-7WING DRIVELINE PROFILE LUBRICATION ................................................................................................... 5-7BLADE SERVICING .......................................................................................................................................... 5-8BLADE SHARPENING ...................................................................................................................................... 5-8BLADE INSTALLATION .................................................................................................................................... 5-8SPINDLE BELT ADJUSTMENT ........................................................................................................................ 5-9SPINDLE BELT REPLACEMENT ................................................................................................................... 5-10STORAGE ....................................................................................................................................................... 5-10

Safety Section 1-1
© 2012 Alamo Group Inc.
SAFETY SECTION

SAFETY
TX1500/1700 01/12 Safety Section 1-2
© 2012 Alamo Group Inc.
SAFE
TY
General Safety Instructions and PracticesA careful operator is the best operator. Safety is of primary importance to the manufacturer and should be tothe owner/operator. Most accidents can be avoided by being aware of your equipment, your surroundings, andobserving certain precautions. The first section of this manual includes a list of Safety Messages that, iffollowed, will help protect the operator and bystanders from injury or death. Read and understand these SafetyMessages before assembling, operating or servicing this Implement. This equipment should only be operatedby those persons who have read the manual, who are responsible and trained, and who know how to do soresponsibly.
The Safety Alert Symbol combined with a Signal Word, as seen below, is used throughout thismanual and on decals which are attached to the equipment. The Safety Alert Symbol means:“ATTENTION! BECOME ALERT! YOUR SAFETY IS INVOLVED!” The Symbol and Signal Wordare intended to warn the owner/operator of impending hazards and the degree of possible injuryfaced when operating this equipment.
Indicates an imminently hazardous situation that, if not avoided, WILL result in DEATH ORVERY SERIOUS INJURY.
Indicates an imminently hazardous situation that, if not avoided, COULD result in DEATHOR SERIOUS INJURY.
Indicates an imminently hazardous situation that, if not avoided, MAY result in MINORINJURY.
Identifies special instructions or procedures that, if not strictly observed, could result indamage to, or destruction of the machine, attachments or the environment.
NOTE: Identifies points of particular interest for more efficient and convenient operation or repair.(SG-1)
Practice all usual and customary safe working precautions and above all---remember safety isup to YOU. Only YOU can prevent serious injury or death from unsafe practices.
READ, UNDERSTAND, and FOLLOW the following Safety Messages. Serious injury ordeath may occur unless care is taken to follow the warnings and instructions stated in theSafety Messages. Always use good common sense to avoid hazards. (SG-2)
Si no lee ingles, pida ayuda a alguien que si lo lea para que le traduzca lasmedidas de seguridad. (SG-3)

SAFETY
TX1500/1700 01/12 Safety Section 1-3
© 2012 Alamo Group Inc.
SAFETY
Operator Safety Instructions and Practices
Engine Exhaust, some of its constituents, and certain vehicle components contain or emitchemicals known to the state of California to cause cancer and birth defects or otherreproductive harm. (SG-30)
Battery posts, terminals and related accessories contain lead and lead compounds,chemicals known to the state of California to cause cancer, birth defects or otherreproductive harm. (SG-31)
The rotating parts of this machine continue to rotate even after the PTO has been turned off.The operator should remain in the operator’s seat for 60 seconds after the brake has beenset, the PTO disengaged, the tractor turned off, and all evidence of rotation has ceased.(S3PT-10)
“Wait a minute...Save a life!”
Never crawl under a raised Implement supported solely by the Tractor 3-Point hitch.Release of the control lever or mechanical failure will result in the Implement falling andpossible injury or death. Always securely block up the Implement before crawlingunderneath to perform repairs and service. (S3PT-19)
Never operate the Tractor or Implement until you have read andcompletely understand this Manual, the Tractor Operator’s Manual, andeach of the Safety Messages found in the Manual or on the Tractor andImplement. Learn how to stop the tractor engine suddenly in anemergency. Never allow inexperienced or untrained personnel tooperate the Tractor or Implement without supervision. Make sure theoperator has fully read and understood the manuals prior to operation.(SG-4)
The operator and all support personnel should wear hard hats, safetyshoes, safety glasses, and proper hearing protection at all times forprotection from injury including injury from items that may be thrown bythe equipment. (SG-16)

SAFETY
TX1500/1700 01/12 Safety Section 1-4
© 2012 Alamo Group Inc.
SAFE
TY
PROLONGED EXPOSURE TO LOUD NOISE MAY CAUSEPERMANENT HEARING LOSS! Tractors with or without an Implementattached can often be noisy enough to cause permanent hearing loss.We recommend that you always wear hearing protection if the noise inthe Operator’s position exceeds 80db. Noise over 85db over anextended period of time will cause severe hearing loss. Noise over 90dbadjacent to the Operator over an extended period of time will causepermanent or total hearing loss. NOTE: Hearing loss from loud noise[from tractors, chain saws, radios, and other such sources close to theear] is cumulative over a lifetime without hope of natural recovery. (SG-I7)
Always read carefully and comply fully with the manufacturer’sinstructions when handling oil, solvents, cleansers, and any otherchemical agent. (SG-22)
KEEP AWAY FROM ROTATING ELEMENTS to prevent entanglementand possible serious injury or death. (SG-24)
Never allow children to play on or around Tractor or Implement. Children can slip or fall offthe Equipment and be injured or killed. Inadvertent contact with controls can cause theImplement to shift or fall crushing themselves or others. (SG-25)
DO NOT use drugs or alcohol immediately before or while operating theTractor and Implement. Drugs and alcohol will affect an operator’salertness and coordination and therefore affect the operator’s ability tooperate the equipment safely. Before operating the Tractor or Implement,an operator on prescription or over-the-counter medication must consulta medical professional regarding any side effects of the medication thatwould hinder their ability to operate the Equipment safely. NEVERknowingly allow anyone to operate this equipment when their alertness orcoordination is impaired. Serious injury or death to the operator or otherscould result if the operator is under the influence of drugs or alcohol. (SG-27)
Prolonged operation may cause operator boredom and fatigue affecting safe operation.Take scheduled work breaks to help prevent these potentially impaired operatingconditions. Never operate the Implement and Tractor in a fatigued or bored mental statewhich impairs proper and safe operation. (SG-32)

SAFETY
TX1500/1700 01/12 Safety Section 1-5
© 2012 Alamo Group Inc.
SAFETY
Use extreme caution when getting onto the Implement to perform repairs, maintenance andwhen removing accumulated material. Only stand on solid flat surfaces to ensure goodfooting. Use a ladder or raised stand to access high spots which cannot be reached fromground level. Slipping and falling can cause serious injury or death. (SG-33)
DO NOT operate this Implement on a Tractor that is not properly maintained. Should amechanical or Tractor control failure occur while operating, immediately shut down theTractor and perform repairs before resuming operation. Serious injury and possible deathcould occur from not maintaining this Implement and Tractor in good operating condition.(SG-36)
Avoid contact with hot surfaces of the engine or muffler. Use gloves and eye protectionwhen servicing hot components. Contact with a hot surface or fluid can cause serious injuryfrom burns or scalding. (SG-38)
Repeated or substantial breathing of hazardous dusts, includingcrystalline silica, could cause fatal or serious respiratory disease includingsilicosis. Concrete, masonry, many types of rock, and various othermaterials contain silica sand. California lists respirable crystalline silica asa substance known to cause cancer. Operation of this equipment undercertain conditions may generate airborne dust particles that could containcrystalline silica. In those conditions, personal protective equipmentincluding an appropriate respirator must be used. If excessive dust isgenerated, a dust collection or suppression system should also be usedduring operation. (SG-41)
For your protection while operating or servicing equipment, wear relatively tight and beltedclothing to avoid entanglement in moving parts. Tie up and protect long hair that couldbecome entangled in machinery. Remove all jewelry including necklaces, rings andwatches which can get caught in machinery or on corners or edges of the equipment.Serious injury can result from entanglement with the machinery. (SG-42)
Do not put hands or feet under mower decks. Blade Contact can resultin serious injury or even death. Stay away until all motion has stoppedand the decks are securely blocked up. (SGM-09)

SAFETY
TX1500/1700 01/12 Safety Section 1-6
© 2012 Alamo Group Inc.
SAFE
TY Equipment Operation Safety Instructions and Practices
Always keep a careful lookout and use extreme care when working around utility andmunicipal obstructions. Never allow the Mower to contact any utility, municipal, or othertype structure. Clearly mark all mowing obstructions and consult local utility providers fora safe code of operation. (SPU-5)
Do not operate the implement while wearing loose fitting clothing. Entanglement of theclothing with the rotating elements can result in serious injury or even death. Stay clear ofall rotating elements at all times. (SSP-03)
Never leave the Tractor and Implement unattended while the Implement is in the liftedposition. Accidental operation of lifting lever or a hydraulic failure may cause sudden dropof unit with injury or death by crushing. To properly park the implement when disconnectingit from the tractor, lower the stand and put the retaining pin securely in place, or put a securesupport under the A-Frame. Lower the implement carefully to the ground. Do not put handsor feet under lifted components. (S3PT-1)
This Implement may be wider than the Tractor. Be careful when operating or transportingthis equipment to prevent the Implement from running into or striking sign posts, guard rails,concrete abutments or other solid objects. Such an impact could cause the Implement andTractor to pivot violently resulting in loss of steering control, serious injury, or even death.Never allow the Implement to contact obstacles. (S3PT-12)
Be sure you have adequate knowledge of the property you will be working on. Take time tomake yourself aware of any area underground lines or cables. Contact with buried lines orcable could result in serious injury or death. If in doubt about buried utility lines call 811before digging or 1-800-258-0808. (SBH-6)
Do not operate Mower if excessive vibration exists. Shut down PTO and the Tractorengine. Inspect the Mower to determine the source of the vibration. If Mower blades aremissing or damaged replace them immediately. Do not operate the mower until theblades have been replaced and the Mower operates smoothly. Operating the Mower withexcessive vibration can result in component failure and broken objects to be thrownoutward at very high velocities. To reduce the possibility of property damage, serious injury,or even death, never allow the Mower to be operated with blades missing. (SFL-4)

SAFETY
TX1500/1700 01/12 Safety Section 1-7
© 2012 Alamo Group Inc.
SAFETY
There are obvious and hidden potential hazards in the operation of thisMower. REMEMBER! This machine is often operated in weeds andin heavy grass. The Blades of this Mower can throw objects if shieldsare not properly installed and maintained. Serious injury or evendeath may occur unless care is taken to insure the safety of theoperator, bystanders, or passersby in the area. Do not operate thismachine with anyone in the immediate area. Stop mowing if anyone iswithin 100 yards of mower. (SFM-1)
Rotary Mowers are capable under adverse conditions of throwingobjects for great distances (300 feet or more) and causing serious injuryor death. Follow safety messages carefully
STOP MOWING IF PASSERSBY ARE WITHIN 300 FEET UNLESS:
-Mower Deck Shielding, and Discharge Deflector are installed and in good, workingcondition;
-Mower section is running close to and parallel with the ground without exposed Blades;
-Passersby are outside the existing thrown-object zone;
-All areas have been thoroughly inspected and all foreign material such as rocks, cans,glass, and general debris has been removed.
NOTE: Where there are grass and weeds high enough to hide debris that could be struckby the blades, the area should be: inspected and large debris removed, mowed at anintermediate height, inspected closely with any remaining debris being removed, andmowed again at desired final height. (This will also reduce power required to mow,reduce wear and tear on the Mower drivetrain, spread cut material better, reducestreaking, and make the final cut more uniform). (SFM-3)
Operate this Equipment only with a Tractor equipped with an approved roll-over-protective system (ROPS). Always wear seat belts. Serious injury oreven death could result from falling off the tractor--particularly during a turnoverwhen the operator could be pinned under the ROPS. (SG-7)
BEFORE leaving the tractor seat lower the implement, set the parkingbrake and/or set the tractor transmission in parking gear, disengage thePTO, stop the engine, remove the key, and wait for all moving parts tostop. Place the tractor shift lever into a low range or parking gear toprevent the tractor from rolling. Never dismount a Tractor that is movingor while the engine is running. Operate the Tractor controls from thetractor seat only. (SG-9)

SAFETY
TX1500/1700 01/12 Safety Section 1-8
© 2012 Alamo Group Inc.
SAFE
TY
Never allow children or other persons to ride on the Tractor or Implement.Falling off can result in serious injury or death. (SG-10)
Do not mow with two machines in the same area except with Cab tractors with the windowsclosed. (SGM-11)
Do not mount or dismount the Tractor while the tractor is moving. Mountthe Tractor only when the Tractor and all moving parts are completelystopped. (SG-12)
Start tractor only when properly seated in the Tractor seat. Starting atractor in gear can result in injury or death. Read the Tractor operatorsmanual for proper starting instructions. (SG-13)
Do not operate this Equipment with hydraulic oil or fuel leaking. Oiland fuel are explosive and their presence could present a hazard. Donot check for leaks with your hand! High-pressure oil streams frombreaks in the line could penetrate the skin and cause tissue damageincluding gangrene. To check for a hose leak, SHUT the unit ENGINEOFF and remove all hydraulic pressure. Wear oil impenetrable gloves,safety glasses and use Cardboard to check for evidence of oil leaks. Ifyou suspect a leak, REMOVE the HOSE and have it tested at a Dealer.If oil does penetrate the skin, have the injury treated immediately by aphysician knowledgeable and skilled in this procedure. (SG-15)
Never run the Tractor engine in a closed building or without adequate ventilation. Theexhaust fumes can be hazardous to your health. (SG-23)
Do not exceed the rated PTO speed for the Implement. Excessive PTO speeds can causeImplement driveline or blade failures resulting in serious injury or death. (SG-26)

SAFETY
TX1500/1700 01/12 Safety Section 1-9
© 2012 Alamo Group Inc.
SAFETY
Operate the Tractor and/or Implement controls only while properly seated in the Tractor seatwith the seat belt securely fastened around you. Inadvertent movement of the Tractor orImplement may cause serious injury or death. (SG-29)
In case of mechanical difficulty during operation, place the transmission in the parkposition, set the parking brake, shut down all power, including the PTO and the engine andremove the key. Wait until all rotating motion has stopped before dismounting. (SG-39)
Do Not operate this equipment in areas where insects such as bees may attack you and/orcause you to lose control of the equipment. If you must enter in such areas, use a tractorwith an enclosed Cab and close the windows to prevent insects from entering. If a tractorcab is not available, wear suitable clothing including head, face, and hand protection toshield you from the insects. Attacking insects can cause you to lose control of the tractor,which can result in serious injury or death to you or bystanders. Never dismount a movingtractor. (SG-40)
Mow only in conditions where you have clear visibility in daylight or with adequate artificiallighting. Never mow in darkness or foggy conditions where you cannot clearly see at least300 feet (90 m) in front and to the sides of the tractor and mower. Make sure that you canclearly see and identify passersby, steep slopes, ditches, drop-offs, overhead obstructions,power lines, debris and foreign objects. If you are unable to clearly see these type of itemsdiscontinue mowing. (SGM-1)
There are obvious and hidden potential hazards in the operation of thisMower. REMEMBER! This machine is often operated in heavy brushand in heavy weeds. The Blades of this Mower can throw objects ifshields are not properly installed and maintained. Serious injury or evendeath may occur unless care is taken to insure the safety of the operator,bystanders, or passersby in the area. Do not operate this machine withanyone in the immediate area. Stop mowing if anyone is within 300 feetof mower. (SGM-02)
The rotating parts of this machine have been designed and tested for rugged use.However, the blades could fail upon impact with heavy, solid objects such as metal guardrails and concrete structures. Such impact could cause the broken objects to be thrownoutward at very high velocities. To reduce the possibility of property damage, seriousinjury, or even death, never allow the cutting blades to contact such obstacles. (SGM-4)

SAFETY
TX1500/1700 01/12 Safety Section 1-10
© 2012 Alamo Group Inc.
SAFE
TY
Extreme care should be taken when operating near loose objects suchas gravel, rocks, wire, and other debris. Inspect the area beforemowing. Foreign objects should be removed from the site to preventmachine damage and/or bodily injury or even death. Any objects thatcannot be removed must be clearly marked and carefully avoided by theoperator. Stop mowing immediately if blades strike a foreign object.Repair all damage and make certain rotor or blade carrier is balancedbefore resuming mowing. (SGM-05)
Many varied objects, such as wire, cable, rope, or chains, can become entangled in theoperating parts of the mower head. These items could then swing outside the housing atgreater velocities than the blades. Such a situation is extremely hazardous and could resultin serious injury or even death. Inspect the cutting area for such objects before mowing.Remove any like object from the site. Never allow the cutting blades to contact such items.(SGM-06)
Mow at the speed that you can safely operate and control the tractor and mower. Thecorrect mowing speed depends on terrain condition and grass type, density, and height ofcut. Normal ground speed range is from 2 to 5 mph(3-8 kph). Use slow mowing speedswhen operating on or near steep slopes, ditches, drop-offs, overhead obstructions, powerlines, or when debris and foreign objects are to be avoided. (SGM-07)
Avoid mowing in reverse direction when possible. Check to make sure there are nopersons behind the mower and use extreme care when maneuvering in reverse. Mow onlyat a slow ground speed where you can safely operate and control the tractor and mower.Never mow an area that you have not inspected and removed debris or foreign material.(SGM-08)
Do not mow with two machines in the same area except with Cab tractors with the windowsclosed. (SGM-11)
SAFETY
TX1500/1700 01/12 Safety Section 1-11
© 2012 Alamo Group Inc.
SAFETY
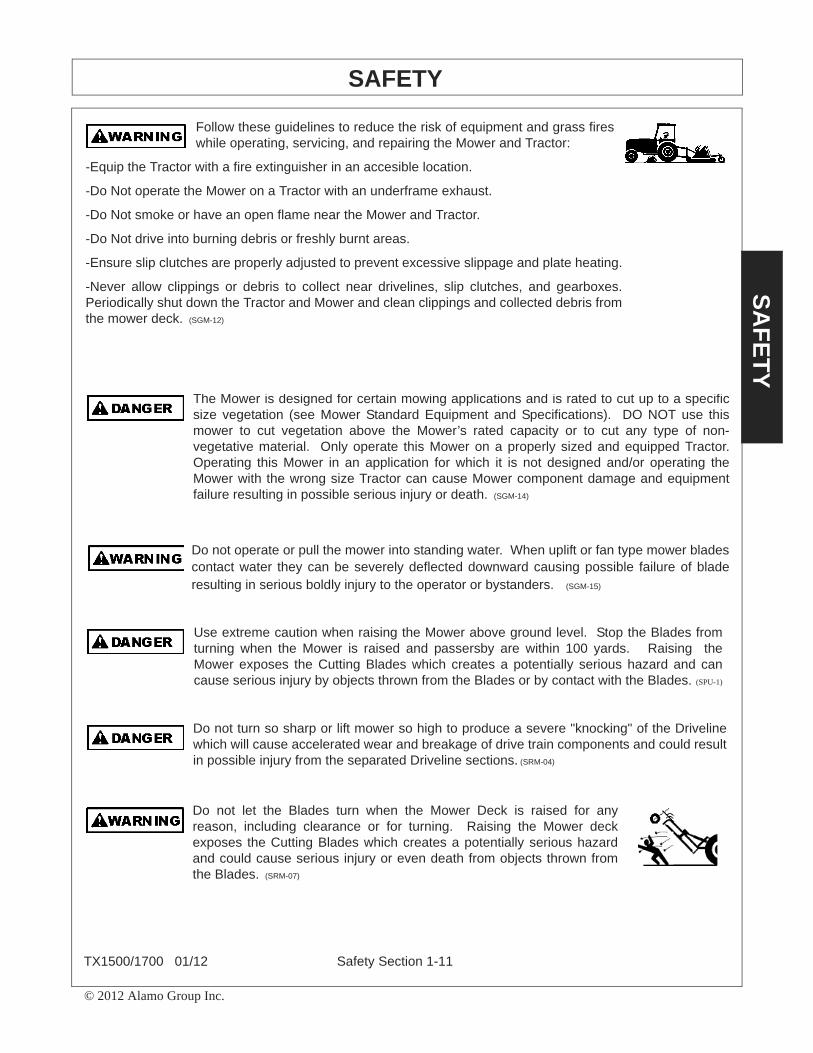
Follow these guidelines to reduce the risk of equipment and grass fireswhile operating, servicing, and repairing the Mower and Tractor:
-Equip the Tractor with a fire extinguisher in an accesible location.
-Do Not operate the Mower on a Tractor with an underframe exhaust.
-Do Not smoke or have an open flame near the Mower and Tractor.
-Do Not drive into burning debris or freshly burnt areas.
-Ensure slip clutches are properly adjusted to prevent excessive slippage and plate heating.
-Never allow clippings or debris to collect near drivelines, slip clutches, and gearboxes.Periodically shut down the Tractor and Mower and clean clippings and collected debris fromthe mower deck. (SGM-12)
The Mower is designed for certain mowing applications and is rated to cut up to a specificsize vegetation (see Mower Standard Equipment and Specifications). DO NOT use thismower to cut vegetation above the Mower’s rated capacity or to cut any type of non-vegetative material. Only operate this Mower on a properly sized and equipped Tractor.Operating this Mower in an application for which it is not designed and/or operating theMower with the wrong size Tractor can cause Mower component damage and equipmentfailure resulting in possible serious injury or death. (SGM-14)
Do not operate or pull the mower into standing water. When uplift or fan type mower bladescontact water they can be severely deflected downward causing possible failure of bladeresulting in serious boldly injury to the operator or bystanders. (SGM-15)
Use extreme caution when raising the Mower above ground level. Stop the Blades fromturning when the Mower is raised and passersby are within 100 yards. Raising theMower exposes the Cutting Blades which creates a potentially serious hazard and cancause serious injury by objects thrown from the Blades or by contact with the Blades. (SPU-1)
Do not turn so sharp or lift mower so high to produce a severe "knocking" of the Drivelinewhich will cause accelerated wear and breakage of drive train components and could resultin possible injury from the separated Driveline sections. (SRM-04)
Do not let the Blades turn when the Mower Deck is raised for anyreason, including clearance or for turning. Raising the Mower deckexposes the Cutting Blades which creates a potentially serious hazardand could cause serious injury or even death from objects thrown fromthe Blades. (SRM-07)

SAFETY
TX1500/1700 01/12 Safety Section 1-12
© 2012 Alamo Group Inc.
SAFE
TY
Connecting or Disconnecting Implement Safety Instructions and Practices
DO NOT use a PTO adapter to attach a non-matching Implement driveline to a TractorPTO. Use of an adapter can double the operating speed of the Implement resulting inexcessive vibration, thrown objects, and blade and implement failure. Adapter use will alsochange the working length of the driveline exposing unshielded driveline areas. Seriousbodily injury and/or equipment failure can result from using a PTO adapter. Consult anauthorized dealer for assistance if the Implement driveline does not match the Tractor PTO.(S3PT-14)
Always shut the Tractor completely down, place the transmission in park, and set theparking brake before you or anyone else attempts to connect or disconnect the Implementand Tractor hitches. (S3PT-15)
Never operate the Tractor and Mower if the Implement input driveline is directly connectedto the Tractor transmission. Tractor braking distances can be substantially increased bythe momentum of the rotating Mower blades driving the Tractor transmission even thoughthe Tractor clutch has been disengaged. Install an over running clutch between the TractorPTO and the Mower driveline to prevent this potentially dangerous situation. (S3PT-16)
When attaching the Implement input driveline to the Tractor PTO, it is important that theconnecting yoke spring activated locking collar slides freely and the locking balls are seatedsecurely in the groove on the Tractor PTO shaft. Push and pull the driveline back and forthseveral times to ensure it is securely attached. A driveline not attached correctly to theTractor PTO shaft could come loose and result in personal injury and damage to theImplement. (S3PT-17)
Before operating the Implement, check to make sure the Implement input driveline will notbottom out or become disengaged. Bottoming out occurs when the inner shaft penetratesthe outer housing until the assembly becomes solid-it can shorten no more. Bottoming outcan cause serious damage to the Tractor PTO by pushing the PTO into the Tractor andthrough the support bearings or downward onto the PTO shaft, breaking it off. A brokendriveline can cause personal injury. (S3PT-18)

SAFETY
TX1500/1700 01/12 Safety Section 1-13
© 2012 Alamo Group Inc.
SAFETY
Transporting Safety Instructions and PracticesBe particularly careful when transporting the Implement with the Tractor. Turn curves or goup hills only at a low speed and using a gradual steering angle. Rear mounted implementsmove the center of gravity to the rear and remove weight from the front wheels. Makecertain, by adding front ballast, that at least 20% of the tractor’s weight is on the front wheelsto prevent rearing up, loss of steering control or Tractor tip-over. Slow down on rough oruneven surfaces to prevent loss of steering control which could result in property damageor possible injury. Do not transport unless 3-Point lift lever is fully raised and in the latchedtransport position. Dropping implement in transport can cause serious damage to thetractor and/or Implement and possibly cause the operator or others to be injured or killed.(S3PT-02)
Allow sufficient clearance for the Implement to swing outward while turning. Implementscarried behind the Tractor will swing outside the tire path when making turns. Contacting asolid object while turning will cause equipment damage and possible injury. (S3PT-20)
Make certain that the “Slow Moving Vehicle” (SMV) sign is installed insuch a way as to be clearly visible and legible. When transporting theEquipment use the Tractor flashing warning lights and follow all localtraffic regulations. (SG-6)

SAFETY
TX1500/1700 01/12 Safety Section 1-14
© 2012 Alamo Group Inc.
SAFE
TY
Transport only at speeds where you can maintain control of theequipment. Serious accidents and injuries can result from operating thisequipment at high speeds. Understand the Tractor and Implement and
how it handles before transporting on streets and highways. Make sure the Tractor steeringand brakes are in good condition and operate properly.
Before transporting the Tractor and Implement, determine the proper transport speeds foryou and the equipment. Make sure you abide by the following rules:
Test the tractor at a slow speed and increase the speed slowly. Apply the Brakes smoothlyto determine the stopping characteristics of the Tractor and Implement. As you increasethe speed of the Tractor the stopping distance increases. Determine the maximumtransport speed not to exceed 20 mph (30 kph) for transporting this equipment.
Test the equipment at a slow speed in turns. Increase the speed through the turn only afteryou determine that the equipment can be operated at a higher speed. Use extreme careand reduce your speed when turning sharply to prevent the tractor and implement fromturning over. Determine the maximum turning speed for you and this equipment beforeoperating on roads or uneven ground.
Only transport the Tractor and Implement at the speeds which allow you to properly controlthe equipment.
Be aware of the operating conditions. Do not operate the Tractor with weak or faulty brakesor worn tires. When operating down a hill or on wet or rain slick roads, the braking distanceincreases: use extreme care and reduce your speed. When operating in traffic always usethe Tractor’s flashing warning lights and reduce your speed. Be aware of traffic around youand watch out for the other guy. (SG-19)
Be particularly careful when transporting the Implement using the tractor. Turn curves orgo up or down hills only at a low speed and at a gradual steering angle. Make certain thatat least 20% of the tractor’s weight is on the front wheels to maintain safe steerage. Slowdown on rough or uneven surfaces. (STI-01)
Only tow the Implement behind a properly sized and equipped Tractorwhich exceeds the weight of the Implement by at least 20%. DO NOTtow the Implement behind a truck or other type of vehicle. Never tow theImplement and another Implement connected in tandem. Never tow theImplement at speeds over 20 MPH. (STI-06)

SAFETY
TX1500/1700 01/12 Safety Section 1-15
© 2012 Alamo Group Inc.
SAFETY
Maintenance and Service Safety Instructions and PracticesMake sure the PTO shield, integral driveline shields, and input shieldsare installed when using PTO-driven equipment. Always replace anyshield if it is damaged or missing. (S3PT-8)
Relieve hydraulic pressure prior to doing any maintenance or repair workon the Implement. Place the Implement on the ground or securelyblocked up, disengage the PTO, and turn off the tractor engine. Pushand pull the Remote Cylinder lever in and out several times prior tostarting any maintenance or repair work. (S3PT-09)
Always disconnect the main PTO Driveline from the Tractor before performing service onthe Implement. Never work on the Implement with the tractor PTO driveline connected andrunning. Rotating Parts, Blades or Drivelines could turn without warning and causeimmediate entanglement, injury or death. (S3PT-11)
All Safety Shields, Guards and Safety devices including (but not limitedto) - the Discharge Deflectors, Steel Guards, Gearbox Shields, BeltShileds, and PTO Shields should be used and maintained in goodworking condition. All safety devices should be inspected carefully atleast daily for missing or broken components. Missing, broken, orworn items must be replaced at once to reduce the possibility of injuryor death from thrown objects, entanglement, or blade contact. (SFM-2)
Always maintain the safety signs in good readable condition. If the safety signs are missing,damaged, or unreadable, obtain and install replacement safety signs immediately. (SG-5)
Do not modify or alter this Implement. Do not permit anyone to modify or alter thisImplement, any of its components or any Implement function. (SG-8)
Never work under the Implement, the framework, or any liftedcomponent unless the Implement is securely supported or blocked upto prevent sudden or inadvertent falling which could cause seriousinjury or even death. (SG-14)
Never attempt to lubricate, adjust, or remove material from the Implement while it is inmotion or while tractor engine is running. (SG-20)

SAFETY
TX1500/1700 01/12 Safety Section 1-16
© 2012 Alamo Group Inc.
SAFE
TY
Periodically inspect all moving parts for wear and replace whennecessary with authorized service parts. Look for loose fasteners, wornor broken parts, and leaky or loose fittings. Make sure all pins havecotter pins and washers. Serious injury may occur from not maintainingthis machine in good working order. (SG-21)
Do Not fill fuel tank while engine is running. Refuel only after engine has cooled down. Iffuel is spilled, move machine away from the area of the spill and avoid creating any sourceof ignition until the gasoline has evaporated. (SG-28)
Perform service, repairs and lubrication according to the maintenance section. Ensure theunit is properly lubricated as specified in the lubrication schedule and all bolts and nuts areproperly torqued. Failure to properly service, repair and maintain this Implement in goodoperating condition could cause component failure and possible serious injury or evendeath. (SG-35)
Use caution and wear protective gloves when handling sharp objects such as blades,knives, and other cutting edges. Be alert to worn component surfaces which have sharpedges. Sharp surfaces can inflict severe laceration injuries if proper hand protection is notworn. (SG-37)
All Safety Shields, Guards and Safety devices including (but notlimited to) - the Deflectors, Chain Guards, Steel Guards, GearboxShields, PTO integral shields, and Retractable Door Shields shouldbe used and maintained in good working condition. All safetydevices should be inspected carefully at least daily for missing orbroken components. Missing, broken, or worn items must bereplaced at once to reduce the possibility of injury or death fromthrown objects, entanglement, or blade contact. (SGM-3)
Replace bent or broken blades with new blades. NEVER ATTEMPT TO STRAIGHTEN,WELD, OR WELD HARDFACING ON BLADES SINCE THIS WILL LIKELY CRACK OROTHERWISE DAMAGE THE BLADE WITH SUBSEQUENT FAILURE AND POSSIBLYCAUSE SERIOUS INJURY FROM THROWN BLADES. (SGM-10)

SAFETY
TX1500/1700 01/12 Safety Section 1-17
© 2012 Alamo Group Inc.
SAFETY
DO NOT weld or repair rotating mower components. Welds and other repairs may causesevere vibration and/or component failure resulting in part being thrown from the mowercausing serious bodily injury. See your Authorized Dealer for proper repairs. (SGM-13)
PARTS INFORMATIONRhino mowers use balanced and matched system components for blade carriers, blades, cuttershafts, knives,knife hangers, rollers, drivetrain components, and bearings. These parts are made and tested to Rhinospecifications. Non-genuine "will fit" parts do not consistently meet these specifications. The use of “will fit”parts may reduce mower performance, void warranties, and present a safety hazard. Use genuine Rhinomower parts for economy and safety. (SPRM-1)
SEE YOUR RHINO DEALER
Be sure you have adequate knowledge of the property you will be working on. Take time tomake yourself aware of any area underwater or underground lines or cables. Contact withburied lines or cable could result in serious injury or death. (STL-1)
In wet conditions where there is a likelihood of material collecting on the Implement, makecertain that this material is removed before traveling on public roadways. (STL-7)
In addition to the design and configuration of this Implement, including Safety Signs and Safety Equipment,hazard control and accident prevention are dependent upon the awareness, concern, prudence, and propertraining of personnel involved in the operation, transport, maintenance, and storage of the machine. Referalso to Safety Messages and operation instruction in each of the appropriate sections of the Tractor andEquipment Manuals. Pay close attention to the Safety Signs affixed to the Tractor and Equipment. (SG-18)

SAFETY
TX1500/1700 01/12 Safety Section 1-18
© 2012 Alamo Group Inc.
SAFE
TY
Decal Location
NOTE: Rhino supplies safety decals on this product to promote safe operation. Damage to the decals mayoccur while in shipping, use, or reconditioning. Rhino cares about the safety of its customers, operators, andbystanders, and will replace the safety decals on this product in the field, free of charge (Some shipping andhandling charges may apply). Contact your Rhino dealer to order replacement decals.

SAFETY
TX1500/1700 01/12 Safety Section 1-19
© 2012 Alamo Group Inc.
SAFETY
ITEM PART NO. QTY. TYPE DESCRIPTION
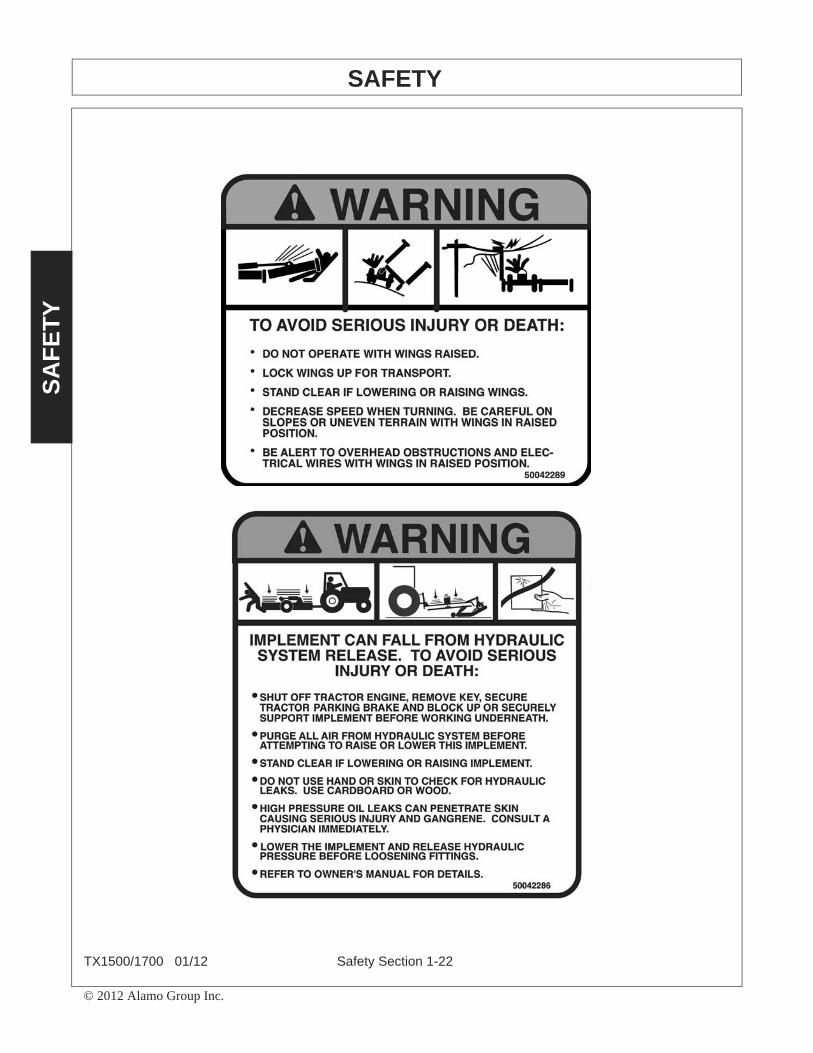
1. 83056 3 WARNING Missing Discharge Shield2. 50012616 6 DANGER Missing Belt Shield 3. 50012615 9 WARNING Missing Shields4. 00771283 3 INSTRUCT 5 Yr. Gearbox Warranty5. 50042286 4 WARNING Hydraulic System Hazard6. 50042285 4 WARNING Notice to Owner7. 50042284 3 WARNING Folding Wings8. 50042283 5 WARNING Thrown Objects9. 88655 3 INSTRUCT Belt Installation (Underside of Shield)10. 50042281 4 CAUTION 540 RPM PTO11. D302 4 LOGO Rhino Logo12. 83343 2 WARNING Lock Wings for Transport13. 50042289 2 WARNING Multi Hazard - Wing14. NFS 1 SERIAL PLT Serial Number Plate 15. 87340 1 INSTRUCT Lubrication Requirements16. 87317 1 IMPORTANT Drawbar-to-PTO Distance17. 94359 1 REFLECT SMV18. 53316BH 2 REFLECT Red Reflector19. 53315 2 REFECT Amber Reflector20. 50069185 3 LOGO TX1500 Name
50069186 3 LOGO TX1700 Name21. 99101 3 LOGO Rhino Logo22. 94878 1 CAUTION Hydraulic System23. 50035829 1 _________ Canister (Operator’s Manual Inside)24. 46503.01 1 _________ Seal25. 15918BH 3 _________ Flatwasher26. 1160807 3 _________ Bolt27. 15531BH 3 _________ Hexnut28. 15905 3 _________ Lockwasher29. 50069174 1 _________ Operator’s Manual

SAFETY
TX1500/1700 01/12 Safety Section 1-20
© 2012 Alamo Group Inc.
SAFE
TY
Decal Description

SAFETY
TX1500/1700 01/12 Safety Section 1-21
© 2012 Alamo Group Inc.
SAFETY
SAFETY
TX1500/1700 01/12 Safety Section 1-22
© 2012 Alamo Group Inc.
SAFE
TY

SAFETY
TX1500/1700 01/12 Safety Section 1-23
© 2012 Alamo Group Inc.
SAFETY

SAFETY
TX1500/1700 01/12 Safety Section 1-24
© 2012 Alamo Group Inc.
SAFE
TY

SAFETY
TX1500/1700 01/12 Safety Section 1-25
© 2012 Alamo Group Inc.
SAFETY
Federal Laws and RegulationsThis section is intended to explain in broad terms the concept and effect of federal laws and regulations concerningemployer and employee equipment operators. This section is not intended as a legal interpretation of the law andshould not be considered as such.Employer-Employee Operator RegulationsU.S. Public Law 91-596 (The Williams-Steiger Occupational and Health Act of 1970) OSHA
This Act Seeks:“...to assure so far as possible every working man and woman in the nation safe and healthful workingconditions and to preserve our human resources...”
DUTIESSec. 5 (a) Each employer-(1) shall furnish to each of his employees employment and a place of employment which are free fromrecognized hazards that are causing or are likely to cause death or serious physical harm to his employees;(2) shall comply with occupational safety and health standards promulgated under this Act.(b) Each employee shall comply with occupational safety and health standards and all rules, regulations andorders issued pursuant to this Act which are applicable to his own actions and conduct.
OSHA Training RequirementsTitle 29, Code of Federal Regulations Part 1928.57(a)(6). www.osha.govOperator instructions. At the time of initial assignment and at least annually thereafter, the employer shallinstruct every employee who operates an agricultural tractor and implements in the safe operating practicesand servicing of equipment with which they are or will be involved, and of any other practices dictated by thework environment.Keep all guards in place when the machine is in operation;Permit no riders on equipmentStop engine, disconnect the power source, and wait for all machine movement to stop before servicing,adjusting, cleaning or unclogging the equipment, except where the machine must be running to be properlyserviced or maintained, in which case the employer shall instruct employees as to all steps and procedureswhich are necessary to safely service or maintain the equipment. Make sure everyone is clear of machinery before starting the engine, engaging power, or operating themachine.
Employer Responsibilities:To ensure employee safety during Tractor and Implement operation, it is the employer’s responsibility to:1. Train the employee in the proper and safe operation of the Tractor and Implement.2. Require that the employee read and fully understand the Tractor and Implement Operator’s manual.3. Permit only qualified and properly trained employees to operate the Tractor and Implement.4. Maintain the Tractor and Implement in a safe operational condition and maintain all shields and guards on the
equipment.5. Ensure the Tractor is equipped with a functional ROPS and seat belt and require that the employee operator
securely fasten the safety belt and operate with the ROPS in the raised position at all times.6. Forbid the employee operator to carry additional riders on the Tractor or Implement.7. Provide the required tools to maintain the Tractor and Implement in a good safe working condition and provide the
necessary support devices to secure the equipment safely while performing repairs and service.8. Require that the employee operator stop operation if bystanders or passersby come within 300 feet.Child Labor Under 16 Years of AgeSome regulations specify that no one under the age of 16 may operate power machinery. It is your responsibility toknow what these regulations are in your own area or situation. (Refer to U.S. Dept. of Labor, Employment StandardAdministration, Wage & Home Division, Child Labor Bulletin #102.)


2
Contents Acknowledgment . . . . . . . . . . . . . . . . . . . . . . . . . . . . . . 2
Foreword . . . . . . . . . . . . . . . . . . . . . . . . . . . . . . . . . . . . . 2
Safety Alerts. . . . . . . . . . . . . . . . . . . . . . . . . . . . . . . . . . . 3
A Word To The User/Operator . . . . . . . . . . . . . . . . . . . . 3
The Industrial/Agricultural Mower. . . . . . . . . . . . . . . . . 4
Follow A Safety Program . . . . . . . . . . . . . . . . . . . . . . . . 5
Prepare For Safe Operation . . . . . . . . . . . . . . . . . . . . . . 9
Start Safely. . . . . . . . . . . . . . . . . . . . . . . . . . . . . . . . . . . 13
Operate Safely . . . . . . . . . . . . . . . . . . . . . . . . . . . . . . . . 13
Park Safely . . . . . . . . . . . . . . . . . . . . . . . . . . . . . . . . . . . 18
Shut Down Safely . . . . . . . . . . . . . . . . . . . . . . . . . . . . . 18
Perform Maintenance Safely . . . . . . . . . . . . . . . . . . . . 19
Final Word To The User. . . . . . . . . . . . . . . . . . . . . . . . . 26
AcknowledgmentWe wish to acknowledge the contributions of the members of AEM’s Industrial/Agricultural Mower Manufacturers Council
to the preparation of this Safety Manual.
NOTICE OF COPYRIGHT PROTECTIONCopyright, 2010, by the Association of Equipment Manufacturers. All rights reserved. This work may not be reproduced or disseminated in whole or in part by any means
without the prior written permission of the Association of Equipment Manufacturers.
Copyright 2010© AEM (Association of Equipment Manufacturers)
Revised 01/03, 09/10
This safety manual is intended to point out some of the basic safety situations that may be encountered during the normal operation and maintenance of your machine and to instruct you in safety practices for dealing with these conditions. This manual is NOT a substitute for the mower manufacturer’s operator’s manual(s).
Additional precautions may be necessary, or some instructions may not apply, depending on equipment, attachments and conditions at the worksite or in the service area. The manufacturer has no direct control over equipment application, operation, inspection or maintenance. Therefore, it is YOUR responsibility to use good safety practices in these areas.
The information provided in this manual supplements the specifi c information about your machine that is contained in the manufacturer’s operator’s manual(s). Other information that may affect the safe operation of your machine may be contained on safety signs or in insurance requirements, employer’s safety and training programs, safety codes, local, state/provincial and federal laws, rules and regulations.
IMPORTANT! Before you operate the mower, make sure you have the manufacturer’s operator’s manual(s) for this machine and all attachments. If the manufacturer’s manuals are missing, obtain replacement manuals from your employer, equipment dealer or directly from the manufacturer. Keep this safety manual and the manufacturer’s manuals with the machine at all times. Read and understand all manuals.
The AEM Mower Safety Practices video is available to train and reinforce good safety practices. Operators are encouraged to periodically view the safety video.
Foreword
Read and Understand
Manuals Before Operating

3
Safety AlertsSymbol
This Safety Alert Symbol means: “ATTENTION!
STAY ALERT! YOUR SAFETY IS INVOLVED!”
The Safety Alert Symbol identifi es important safety messages on equipment, safety signs, in manuals or elsewhere. When you see this symbol, be alert to the possibility of death or personal injury. Follow instructions in the safety message.
Reasons Safety is Important:
— Accidents disable and kill.
— Accidents cost.
— Accidents can be avoided.
Signal Words
Signal words are distinctive words that will typically be found on safety signs on the mower and other worksite equipment. These words may also be found in this manual and the manufacturer’s manuals. These words are intended to alert the operator to a hazard and the degree of severity of the hazard.
DANGER indicates a hazardous situation which, if not avoided, will result in death or serious injury.
WARNING indicates a hazardous situation which, if not avoided, could result in death or serious injury.
CAUTION indicates a hazardous situation which, if not avoided, could result in minor or moderate injury.
NOTICE indicates a property damage message.
DANGER
WARNING
CAUTION
NOTICE
A Word To The User/OperatorIt is YOUR responsibility to read and understand the safety manual and the manufacturer’s manuals before operating this machine. This safety manual takes you step by step through your working day.
Hazard Recognition and Accident Prevention depend upon you being alert, careful and properly trained in the operation, transport, maintenance and storage of this equipment.
Graphics have been provided to help you understand the text.
Remember that YOU are the key to safety. Good safety practices not only protect you but also protect the people around you. Study and understand this manual and the manufacturer’s manuals for your specifi c machine. Make them a working part of your safety program. Keep in mind that this safety manual is written for industrial/agricultural mowers.
Contact the manufacturer of your equipment to answer any questions about safe operation that remain after studying the manufacturer’s operator’s manual(s) and this safety manual.
Practice all other usual and customary safe
working precautions and above all:
REMEMBER — SAFETY IS UP TO YOU!
YOU CAN PREVENT SERIOUS INJURY OR
DEATH CAUSED BY UNSAFE WORK PRACTICES!
Read andUnderstand AllSafety Signs

4
Industrial/Agricultural Mower Types
Mowers are used for pasture clipping, crop residue shredding, heavy brush cutting, waterways, right-of-ways, roadside or highway mowing. Also, these mowers are used for cutting grass and other growth in public areas such as parks and cemeteries.
The Industrial/Agricultural Mower
Sickle Bar
Flail
Rotary
Boom
Folding Wing Rotary
Agricultural Disc Mower Types
Disc mowers are designed and equipped to cut hay crops at higher fi eld speed.
Disc mower/conditioners mow and condition crops.
Self-propelled windrowers mow and form conditioned hay into windrows.
The Industrial/Agricultural Mower
Disc Mower
Disc Mower Conditioner
Self-propelled Windrower

5
Follow A Safety ProgramProtect Yourself
Wear personal protective clothing and Personal Protective Equipment (PPE) issued to you or called for by job conditions. You must ALWAYS wear safety glasses with side shields.
You may also need:— Hard hat— Safety shoes— Safety goggles or face shield— Heavy gloves— Hearing protection— Refl ective clothing— Wet weather gear— Respirator or fi lter mask
Wear whatever is needed—don’t take chances.
WARNING! Prevent death or serious injury from entanglement. Do not wear loose clothing or
accessories. Tie up long hair. Stay away from all
rotating components when the engine is running. Contact, wrapping or entanglement with rotating or moving parts could result in death or serious injury.
Avoid Entanglement
Follow A Safety Program— Read, understand and follow the manufacturer’s
written instructions found in the operator’s manual(s) and safety signs on mower and tractor.
— Have operational training with mower and tractor.— Take advantage of training programs offered in
your area.— Ask your equipment dealer or supervisor to explain
things you do not understand.— Explain the written instructions in the operator’s
manual(s) and safety signs to those users or operators who cannot read.
— Inspect the mower and tractor daily before operating. Ensure all guards are in place and the equipment is operating properly.
— Never smoke while operating. Never fi ll the fuel tank with the engine running or near an open fl ame.
— Make sure you have adequate visibility and suffi cient lighting.
— Know the pinch points and rotating parts. Awareness on your part can prevent accidents.
— Never attempt to operate the controls except from the operator’s seat. Improperly controlled functions could produce unexpected machine movement and result in serious injury or death.
— Shut down the mower and tractor before dismounting. (See page 18, Proper Equipment Shut Down
Practices.)
Read, Understand and Follow Manuals
and Safety Signs
Avoid Rotating Parts
Know and Avoid Pinch
Points

6
Follow A Safety ProgramAvoid Injury From Raised Equipment
Avoid possible crushing injury from falling mower or other raised equipment.
Before working near or under raised mower or equipment parts:— Securely support or block up raised mower or
equipment parts according to the operator’s manual.— Securely support, block up or lock up wings with
approved locking devices or lower mower or equipment parts to the ground.
— Use transport locks when transporting mower on public roads.
Avoid Injury From High Pressure Fluid
Avoid fl uid injection injury due to high pressure fl uid leaks.
If any fl uid is injected into the skin, it must be
removed within a few hours by a doctor familiar with
this type of injury.
Fluid leaks under pressure may not be visible. When checking for leaks or working around pressurized systems:— Read manufacturer’s operator’s manual(s) for
recommended safety practices.— Wear a face shield or safety goggles for eye protection.— Use a piece of cardboard or wood to check for leaks;
DO NOT use your hands.
— Relieve system pressure before disconnecting lines.— Check for and repair damaged or leaking lines, pipes
and hoses.— Check for and tighten loose connections.— Purge air from system before operating.
High Pressure Fluid Can Inject into the BodyAvoid Crushing –
Block Up or Securely Support
Mower
Follow A Safety ProgramAvoid Injury From Fire And Explosion
Set the parking brake, shut the mower and tractor engine down and remove the key while fi lling the fuel tank. Use extra caution when fueling a hot engine. Never smoke while fueling. Avoid sparks by grounding the fuel nozzle against the fi ller neck.
The fumes in an empty fuel tank are explosive. Never weld or cut on fuel lines, tanks or containers.
Remove all trash or mowing debris from the machine daily or as needed. Keep debris away from engine, exhaust, slip clutches and other heat sources. Use spark arrestors, as appropriate, on the engine exhaust system. Make sure oily rags or other fl ammable material are not stored on the machine.
Check for fuel, oil or hydraulic fl uid leaks. Repair the leaks and clean the machine before you operate it.
Ether/cold start fl uid is fl ammable. Do not smoke when using ether/cold start fl uid. Always follow the instructions on the can and in the manufacturer’s operator’s manual(s) for your mower. Do not use ether/cold start fl uid if the engine is equipped with a glow plug or other type of preheater.
Always use a nonfl ammable solvent when you clean parts. Do not use gasoline, diesel fuel or other fl ammable fl uids.
Store all fl ammable fl uids and materials away from your machine and work area.
Know where fi re extinguishers are kept—how they operate—and what type of fi re they are for. Check readiness of fi re extinguishers according to manufacturer’s instructions. Make sure each tractor is equipped with a fi re extinguisher.
Remove Debris Daily or
As Needed
No Smokingand No Open
Flames

7
Follow A Safety ProgramBe Alert!
Know where to get assistance. Know how to use a fi rst aid kit and fi re extinguisher/fi re suppression system.
Be Aware!
Take advantage of training programs offered.
Be Careful!
Human error is caused by many factors: carelessness, fatigue, overload, preoccupation, unfamiliarity of operator with the machine, drugs, and alcohol to name a few. Damage to the tractor or mower can be fi xed in a short period of time, but injury, or death, has a lasting effect.
For your safety and the safety of others, encourage your fellow workers to act safely.
For Safe Operation
You must be a qualifi ed and authorized operator for proper operation of your machine. You must clearly understand the written instructions supplied by the manufacturer, be trained—including actual operation of the mower—and know the safety rules and regulations for the worksite. It is a good safety practice to point out and explain safety signs and practices and ensure others understand the importance of following these instructions.
WARNING! Drugs and alcohol affect an operator’s alertness and coordination and the operator’s ability to safely operate the equipment. Never use drugs or
alcohol while operating the mowing equipment.
Never knowingly allow anyone to operate this
machine when their alertness or coordination is
impaired. An operator taking prescription or over-the-counter medication must consult a medical professional regarding any side effects of the medication that would hinder their ability to safely operate this equipment. Never Use Drugs
or Alcohol While Operating
Follow A Safety ProgramKnow The Rules
Most employers have rules governing operation and maintenance of equipment. Before you start work at a new location, check with your supervisor or the safety coordinator. Ask about the rules you will be expected to obey.
The Occupational Safety and Health Administration (OSHA) enforces federal laws within the United States that apply to safe operation, application and maintenance of equipment on a worksite. It is the employer’s responsibility to comply with these laws. An OSHA representative may periodically inspect a worksite to see that these laws are being followed.
There may also be local or state/provincial laws or international regulations that apply to this equipment and its use, along with specifi c worksite or employer rules. It is important that you know and comply with all applicable laws and rules, including those requiring operator training and certifi cation.
These are some of the rules you must work by:
— A ROPS and seat belt-equipped tractor is a federal government (OSHA) requirement for operator protection during mowing operations. An enclosed cab provides additional operator protection from thrown objects. Check your mower operator's manual to see if a tractor cab is also required.
— Wear and check that others are wearing proper clothing and personal protective equipment.
— Inspect your machine and attachments before each use as specifi ed by the manufacturer and your employer.
— Know the limitations and operating characteristics of your mowing equipment. Do not misuse it.
— Have all provided shields and guards properly installed before operating the machine.
— Never modify or remove any part of the machine (except for service—then make sure it is replaced).
Safety Rules•••••
•••••
Know and Understand
Rules of Operation

8
Follow A Safety ProgramSome Rules You Must Work By (continued)
— Only qualifi ed and authorized individuals may operate this equipment.
— Never allow children to play on, ride on or operate the equipment. Children are not qualifi ed to operate this equipment.
— Do not allow any riders.— Use three-point contact (handholds and steps) and
face the equipment when mounting or dismounting. — Keep bystanders 300 ft (92 m) from the mowing
operation.— Know the worksite before you use the mower. Be
aware of possible terrain hazards that you may encounter. Remove or mark obstacles and debris that could damage or be thrown by the mower.
— Only use attachments and parts that are approved by the mower manufacturer.
— Make sure all attachments are lowered, set the parking brake, shut off the engine and cycle the control levers. Remove the key before leaving the tractor. (See page 18, Proper Equipment Shut Down Practices.)
— When transporting the mower on a trailer, follow the manufacturer’s detailed instructions for loading, tying down and unloading the mower.
Keep Children
Away from Equipment
No Riders
Shut Down Unattended Equipment
Keep Bystanders
Away
Follow A Safety ProgramKnow The Equipment
Read and understand the DANGER, WARNING, CAUTION and NOTICE safety signs and other informational signs on the tractor and mower and in the manufacturer’s operator’s manual. Ask your supervisor or mower dealer to explain any information you do not understand. Failure to obey safety instructions could result in death or serious injury.
Make sure all the manufacturer’s protective structures, guards, shields, screens and panels are in good repair, in place and securely fastened. Damaged, missing or weakened safety components can create a hazardous situation for you as the operator. Never remove or modify any safety components including thrown object shielding on a mower.
Know the following about your tractor and mower:
— Function, purpose and use of all controls.— Correct operation speeds.— Slope and uneven terrain capabilities and proper
operation.— Braking and steering characteristics.— Turning radius and clearances.— How to quickly stop equipment in an emergency.
Read andUnderstand AllSafety Signs
Read and Understand
Manuals Before Operating

9
Prepare For Safe OperationCheck The Mower And Tractor Equipment
Before beginning your work day inspect the machine and have all systems in good operational condition.
WARNING! Prevent possible crushing injury from falling equipment. Hydraulic system or part failure could cause unsupported equipment to fall. Do not go under raised
equipment unless it is properly supported according
to the operator’s manual.
— Perform daily and periodic service procedures as instructed by the equipment manufacturer.
— Check for loose, broken, missing or damaged tractor and mower parts. Repair or replace these parts.
— Check for proper tractor and mower attachments.— Check for proper tractor and mower PTO rpm rating
match.— Check mower blade(s) condition. Replace severely
worn, bent, gouged or nicked blades including the blade bolts and fasteners. Never straighten or weld on blades.
— Ensure thrown object shielding is properly installed and in good condition. Repair or replace if damaged or missing.
Read Manual –Block Up or
Securely Support Mower
MaintainMachine
Walk-Around Inspection
Prepare For Safe Operation— Check that all guards and shields are in place and
that all equipment is in good operating condition. This includes PTO driveline, gearbox and implement guards and shields that are used for operator protection.
— Check for properly latched driveline yoke-end locking devices.
— Check for damaged or leaky tractor and mower hydraulic systems. Repair or adjust as needed.
WARNING! Hydraulic fl uid under pressure can penetrate the skin or eyes and cause serious injury, blindness or death. Fluid leaks under pressure may not be visible. Use a piece of cardboard or wood to fi nd leaks, not
your hand. Wear eye protection. If fl uid is injected into the skin, it must be removed within a few hours by medical personnel familiar with this type of injury.
— Keep the operator platform surface clean and free of grease, oil, dirt, snow or ice. Steps and handholds must be clean and functional.
— Ensure work lights are kept clean (if equipped). Check that all lights work properly.
— Ensure the slow moving vehicle (SMV) sign, refl ectors and warning lights are in good condition and can be clearly seen.
— Ensure all tools or loose objects are removed or securely fastened while operating the machine.
— Check all safety signs for clarity. Replace damaged signs.
Check forLeaks and Inspect
Hoses
Check for Missing/Damaged Guards
and Shields
Put AwayTools

10
Prepare For Safe OperationKnow The Work Area
Before you operate the mower thoroughly inspect the work area. Walk around the area and inspect the surfaces you will travel on when using the mower.
Locate and avoid:— Holes — Drop-offs — Obstacles
(stumps) — Excavations— Standing water
Look for debris and obstacles by walking the area before you mow. Objects like wire, cable, rocks, tires, and metal objects that could damage or be thrown by the mower must be removed or marked clearly and avoided.
Correct unsafe conditions. Do not operate in problem areas where debris and obstacles cannot be removed or marked.
Analyze mowing area to determine:— The most effi cient mowing procedure.— The height of the material to be mowed.— Operating terrain conditions.— How to best use forward mowing pattern.— The potential for bystanders or passers-by to be
exposed to thrown objects.
Look Out For Others
Before starting equipment:— Walk around the equipment.— Check for anyone under, on or near the equipment.— Clear everyone from these areas.— Sound a warning.
Remove or Mark Debris and
Obstacles
WalkAround theWorksite
— Deep mud — Wet spots — Soft soil— Rough spots — Power lines
and apparatus
— Other utilities— Any conditions
which could cause collision, loss of control or tipover
— Steep slopes
Prepare For Safe OperationMount And Dismount Tractor Properly
Always use three-point contact when mounting or dismounting the tractor or mower. Face the machine when you enter or leave the machine. Three-point contact means that three out of four arms and legs are in contact with the machine at all times during mount and dismount.
Before mounting:— Clean shoes and wipe hands. Clean steps and
handholds of snow, ice, mud or oil.
During mounting and dismounting:— Use handholds and step plates.— Never grab steering wheels or controls for handholds.— Never mount or dismount from a moving tractor.— Never mount or dismount while carrying tools or
objects that prevent three-point contact. Put parts or tools down. Maintaining proper contact, climb and then pick up the object.
Use Three-Point
Contact
Clean Up Slippery Areas

11
Prepare For Safe OperationTractor And Mower Controls Safety Test
Start the tractor following the specifi c procedures in the manufacturer’s operator’s manual. These procedures normally include:— Fasten and adjust seat belt on your ROPS-equipped
tractor.— Check parking brake for engagement.— Check PTO disengagement.— Check all controls for Park position.— Warn others in area before starting tractor.— Start tractor following tractor manufacturer’s
recommended starting procedures.
WARNING! Avoid serious injury or death from unexpected machine movement. Start the engine only
from the operator’s position. Never attempt to start
the engine by shorting across starter terminals or
reaching the key from the ground or outside the cab.
After starting:— Check all instruments, gauges and indicator lights for
normal operation.— Check all tractor controls, steering and brakes for
proper function.
— Raise and lower mower to check for driveline bottoming out or engagement problems.
— Check the equipment for excessive vibration and unusual noises.
Check Instruments and Controls
Start Only from Operator’s
Seat
Use ROPS and Seat Belt
Use a “Do Not Operate”
Tag
Do Not Dismount Until
Equipment Motion Has Stopped
Prepare For Safe Operation— Use proper equipment shut down practices before
inspecting equipment. Wait until all equipment motion has stopped before dismounting the tractor or mower.
— Do not operate mower unless tractor and mower are running properly. Place a “Do Not Operate” tag on the machine, remove the key and do not operate the mower until the problem is corrected.
Power Takeoff System
Be sure to operate the tractor at the mower’s rated PTO rpm speed.
When operating tractors with transmission-driven PTO systems, a rotary mower will have a signifi cant fl ywheel effect. The mower may continue to propel a tractor with a transmission-driven PTO system.
The tractor should be equipped and operated as follows:— Install a driveline equipped with an over-running
clutch.— Give yourself suffi cient maneuvering room and time
by anticipating turns, stops and speed reductions.
Use Proper PTO Speed

12
Prepare For Safe OperationHitching Mower To Tractor
Three-point hitch-mounted mowers:
— Refer to mower and tractor manufacturers’ manuals.— Place tractor’s hydraulic power lift (rockshaft)
selector lever in down position to avoid unexpected movement.
— Explain the hitching procedures to those operators who cannot read.
— Front-end weights may be needed to maintain steering control and front-end stability. Refer to the manufacturers' operator's manual(s).
— When backing the tractor up to the mower, NEVER allow anyone between the tractor and the mower.
— Attach the mower to the tractor three-point links and securely pin in position.
— Securely attach the driveline to the tractor PTO. Lower the master shield into place if it is movable. Push and pull on the driveline to ensure it is locked onto the PTO shaft.
Read and Understand
Manuals Before Operating
Maintain Proper Weight
Distribution
No OneAllowed Between
Tractor and Mower
Avoid Entanglement,
Use Guards and Shields
Pull-type hitch-mounted mowers:
— Refer to mower and tractor manufacturers’ manuals.— Remove three-point hitch quick coupler if equipped.— Attach only to drawbar hitch.— Adjust tractor drawbar length for 540 or 1000 rpm
PTO operation.— When backing the tractor up to the mower, NEVER
allow anyone between the tractor and the mower.— Properly attach the mower safety tow chain to the
tractor. — Securely attach the driveline to the tractor PTO. Push
and pull on the driveline to ensure it is locked onto the PTO. Lower the master shield into place.
— Hook up the mower hydraulic hoses to the tractor.— Make sure the wings, or raised mower decks, are
supported by the cylinders before removing the transport locks. Never use force to release the transport or wing locks. The wings or deck could fall and crush you.
Confi rm Wings Are Supported Before Releasing Locks
Avoid Entanglement,
Use Guards and Shields
Prepare For Safe Operation
Tractor Drawbar
Adjustment
14IN
540 RPO PTO1-3/8" 6 SPLINE
1000 RPO PTO1-3/8" 21 SPLINE
16IN
1000 RPO PTO1-3/4" 20 SPLINE
20IN
540 RPM PTO1-3/8" 6 SPLINE
1000 RPM PTO1-3/8" 21 SPLINE
1000 RPM PTO1-3/4" 20 SPLINE

13
Start SafelyMake The Right Start
Mow only in daylight or good artifi cial light conditions.
Avoid serious injury or death from mower-thrown objects or blade contact:— Keep chain shields, fl exible or solid defl ector shields
or discharge chutes in place and in good repair.— Keep bystanders at least 300 ft (92 m) from mowing
operation.— Never direct mower discharge toward anyone.— Keep hands, feet and other body parts away from
rotating parts, blades and discharge openings.— Do not operate mower in transport position.
Do not approach a mower until all motion has stopped.
Mower PTO drive engagement:— Raise mower to maximum cutting height.— Engage PTO at low engine rpm.— Increase engine rpm to mower’s rated rpm PTO speed.— Lower mower to desired cutting height.— Stop and shut down immediately if the mower strikes
an obstruction.— Inspect and repair any mower damage before
resuming mowing.— Do not operate mower with severe vibrations or with
unusual noise.
Mower-Thrown Objects
Depending on the designed purpose, mowers are designed to cut grass, weeds, brush and crops. The mower blades have been designed and tested for rugged use. The mower blades, however, are not intended to contact solid objects like rocks, concrete or metal. Such impact can cause broken objects to be thrown up to 300 ft (92 m). Bystanders should never be within 300 ft (92 m) of an operating rotary mower or within 100 ft (30 M) of a properly equipped disc mower.
Rotating Blades – Keep Away
Do Not Operate a Damaged Mower
Operate SafelyMower shielding is designed to reduce the risk of thrown objects and must be properly maintained and in place during mowing operations.
The risk of serious injury or death from thrown objects can be signifi cantly reduced by following three rules. If all of these safety rules are not followed, the
mowing operation must be stopped if anyone comes
within the safety limit for the mower type.
First — Inspect the area prior to mowing and remove stones, branches, wire, cable, metal, glass and other solid objects before operating. Any objects that cannot be removed must be clearly marked and carefully avoided by the operator.
In non-crop areas with grass and weeds high enough to hide objects that could be struck by the blades, inspect the area and remove or mark large debris or obstacles.
Mow the area at an intermediate height. Inspect the area closely and remove or mark any remaining debris or obstacles. Mow again at desired fi nal height.
Second — Mower-thrown object shielding must be used when operating near roads, parks, populated areas or other areas where thrown objects could injure bystanders or damage property. Follow the manufacturer's operator's manual.
Third — Cross diagonally when mowing through ditches, sharp dips, and drops. Raise the mower to prevent the mower blades from hitting the ground.
Follow All Mower
Safety Rules

14
Operate SafelyMower-Thrown Objects (continued)
Disc Mowers — When using a disc mower it is important to know the area to be mowed. If the operator has mowed the fi eld before and is familiar with all obstacles that may be present, it is suffi cient to watch ahead of the mower path for any additional objects that may have entered the fi eld. Be ready to stop or avoid any objects that could be hazardous if thrown by the mower. If you plan to mow an unfamiliar fi eld and it is next to a traveled road or people may be within 100 ft (30 m) of the mower you must inspect, and clean or mark the fi eld.
Mowing In Reverse
Do not mow while traveling in reverse. Objects are more likely to be thrown and can travel further.
Shut off the PTO, wait for the blades to stop turning, raise the mower, and then back up.
Mow traveling in the forward direction.
Mowing Ground Speed
Proper ground speed depends on terrain conditions and grass type, density and height to be cut:— Normal ground speed range is 2 to 5 mph.— Use slower ground speed for mowing tall, dense grass.— Use faster ground speed for mowing medium height,
thin grass and under smooth terrain conditions.— Use slower ground speed for mowing in rough,
sloping or unfamiliar terrain.
Disc mowers are designed to use faster ground speeds for operating in fi elds clear of debris and surface hazards.
Use Proper Ground Speed
Do Not Mowin Reverse
Operate SafelyExtremely Tall Grass Mowing
You may need to mow extremely tall, non-crop grass twice. (See page 13, Mower-Thrown Objects.)
First mowing pass:— Shut the mower and tractor down using proper
equipment shut down practice before dismounting tractor. (See page 18, Proper Equipment Shut Down
Practices.)— Inspect the area and remove or mark debris and
obstacles.— Cut grass higher (10-15 inches) to avoid hidden objects.
Second mowing pass:— Shut the mower and tractor down using proper
equipment shut down practice before dismounting tractor.
— Inspect the area and remove or mark debris and obstacles.
— Cut grass at desired height and, when possible, 90 degrees to the fi rst mowing pass.
Watch Equipment Clearances
Three-point hitch and side-mounted mowers have a larger turning arc than pull-type mowers. Allow suffi cient clearance for mower swing while turning.
Do not allow bystanders near the tractor and mower when moving or transporting the tractor and mower.
Provide Adequate Clearance for Mower Swing
Stop Blade Before
Unclogging

15
Operate SafelyUnder Mount Mower Safety Practices
When mowing with an under mount mower:— Keep removable discharge chute in place and over
discharge opening.— Never stand on a mower housing when the tractor
engine is operating.— Distribute grass clippings with discharge chute facing
mowed area.— Before clearing a clogged mower or discharge
chute, shut down your machine using proper equipment shut down practice. (See page 18, Proper
Equipment Shut Down Practices.)
Stop Blade Before
Unclogging
Never Stand on Mower – Keep Away
Keep Chute in Place
Operate SafelyWing Or Boom Mower
Overhead Obstruction Hazards And Risks
Check for overhead obstructions with raised wing or boom mowers to avoid serious injury or death by contact with:— Electrical power lines and apparatus.— Low tree limbs.— Other overhead obstructions.— Maintain specifi ed distance from power lines and
apparatus. Never approach energized power lines or apparatus with any part of your machine unless all local, state/provincial and federal (OSHA) required safety precautions have been taken. Use extreme caution.
DANGER! Avoid electrocution or serious injury from contact with or inadequate clearance to energized power lines or apparatus. Do not allow the machine or
attachment to approach or contact any power line.
Do not approach or touch any machine in contact
with a power line.
Do Not Approach Energized
Power Lines
Stay Clear of Energized Equipment

16
Operate SafelyWing And Side Mount Mowers Safety Practices
Raised wing positions reduce shielding protection and increases the thrown object and blade contact hazard risks.
Avoid possible serious injury or death by thrown
objects or blade contact from raising and lowering
wings during mowing operations:
— Do not mow with bystanders within 300 ft (92 m) of the mower.
— Be sure no one is near mower while raising or lowering wings.
— Shut off the PTO and wait for all rotating elements to stop before raising the mower deck or wing section.
— Only raise wing to clear objects in the mowing path or to match ground slope.
— Lower raised wing to ground after clearing object or ground slope conditions.
— Stop mowing if anyone approaches within 300 ft (92 m) of mowing area.
Ditch Bank Mowing Safety Practices
Use extreme care when mowing ditch banks. Watch for washouts, eroded areas and mowing obstructions along the ditch banks. Hitting obstructions with side-mount or boom mowers may swerve the tractor’s front end toward the ditch.
Avoid Hitting Obstructions
Keep Bystanders Away from
Mowing Area
300 ft (92 m)
Operate SafelyRaised wing and boom mower ditch bank operations may reduce the mower’s thrown object shielding effectiveness for the mower operator’s protection.— Use enclosed ROPS cabs, special protective
enclosures and other operator shielding available from the manufacturer when performing these operations.
— Inspect mowing area and remove or mark all foreign objects and debris to be avoided by mower.
Uneven Terrain Mowing Safety Practices
Tractor and mower stability is reduced on slopes and uneven terrain.
As in all conditions when mowing, use tractors equipped with ROPS and seat belt. Make sure the
ROPS are raised and locked in place and always
wear your seat belt.
Prevent tractor and mower overturns and maintain equipment stability control:— Review tractor and mower operator’s manuals for
operating safety practices on slopes and uneven terrain conditions. Explain the practices to those users and operators who cannot read.
— Avoid extremely steep slope operations.
Read and Understand
Manuals Before Operating
Use Enclosed ROPS
Cabs or Protective Enclosures
Use ROPS and Seat Belt

17
Uneven Terrain Mowing Safety Practices (continued)
— Use extreme care to maintain control over the equipment when operating in these conditions.
— Increase tractor stability by adding wheel weights, ballast and increasing wheel spacing to maximum. Refer to operator’s manual for recommendations.
— Maintain minimum ground speed.— Make wide and gradual turns.— Avoid sudden starts, stops, and turns when operating
up, down, or across slopes.— Do not raise rear-mount or side-mount mowers or
mower wings from the ground during these operations. — Keep alert for holes, bumps, ruts, rocks, stumps or
other obstructions that could overturn the machine.— Avoid slippery ground conditions that could cause
loss of control and overturn of tractor and mower.— Avoid bottoming and striking the ground by diagonal
crossing of sharp dips and drops.
Use extreme care in maintaining equipment stability during all uneven terrain and slope mowing operations. You are the fi nal judge as to any slope that can be safely negotiated.
Maintain Control, Use Low
Speeds
Add Ballast, Widen Wheel
Spacing
Avoid Ruts, Bumps, Holes
Operate Safely
Operate SafelyRoad Transport Safety Practices
Before operating on public roads:— Refer to tractor and mower manufacturers’ operator’s
manuals for instructions.— Explain the instructions to those users or operators
who cannot read.— Check local regulations for required equipment
markings, lights, fl ashers, etc., while traveling on public roads. Lights are required on mowers that obscure tractor taillights and/or warning lights.
— When transporting the mower on a trailer, follow the manufacturer’s detailed instructions for loading, tying down and unloading the mower.
Before transporting on public roads:— Disengage PTO power to mower.— Raise mower into transport position and engage
transport lock.— Lock mower wings in the transport position with
approved locking devices.— Attach towing safety chain between pull-type mower
and tractor.— Make sure lights, warning lights and refl ectors are in
place and visible.
— Check SMV (Slow-Moving Vehicle) emblem for visibility to any rear-approaching vehicle.
While transporting on public roads:— Obey all local traffi c regulations.— Approach intersections with caution.— Observe speed and traffi c control signs.— Avoid panic stops and sharp turns.
Be a courteous operator and pull over periodically and allow traffi c to pass.
Read and Understand
Manuals Before Operating
STOP YIELD
Obey Traffi c Regulations

18
Parking Safety Practices
— Use designated or out-of-traffi c areas.— Use fi rm level ground locations.— Set parking brake.— Lower raised equipment to ground.
Shut down the mower and tractor using proper equipment shut down practice before dismounting tractor. (See page 18, Proper Equipment Shut Down
Practices.)
Sloping ground parking locations:— Position equipment across slope.— Set parking brakes.— Lower raised equipment to ground.— Block tractor wheels.
Before temporarily parking and leaving disabled equipment near traffi c areas:— Remove equipment from public roads.— Set out warning fl ags.— Use tractor fl ashing warning lights.
Park Safely
Set Parking Brake
Lower Raised Equipment to
Ground
P
Shut Down SafelyProper Equipment Shut Down Practices
Make proper equipment shut down an important habit.
Properly shutting down a tractor and mower can prevent accidents from occurring when the mower is left unattended. Shut down the mower following the specifi c procedures in the manufacturer’s operator’s manual. These procedures will normally include:— Reduce engine speed.— Disengage PTO clutch and transmission drive.— Idle engine for gradual cooling.— Place all controls in PARK position.— Set the parking brake.— Lower mower to ground.— Lower wings of wing mowers to ground.— Shut off engine, lock ignition and remove key from
the machine and take it with you.— Wait for all moving parts to stop before dismounting.— Relieve hydraulic pressure by moving hydraulic
controls several times in all directions.— Lock anti-vandalism covers and closures, if
equipped, when equipment is unattended.— Dismount carefully maintaining three-point contact.
Disengage PTO,Set Brake
Wait for Rotating Parts
to Stop
Lower Raised Equipment to
Ground
Remove Key,Lock Ignition, Take
Key With You
PTO
STOP
P

19
Shut Down SafelyDismounting Properly
— Never dismount from moving equipment.— Never jump from any machines.— Dismount carefully.— Check for slippery steps.— Keep feet and hands away from controls.— Use handholds and steps during dismount.— Face machine and use three-point contact
(2 hands and 1 foot or 2 feet and 1 hand).
Wait for Moving Parts
to Stop
Use Three-Point Contact,
Face Machine
Perform Maintenance SafelyMaintain Your Equipment
Be sure to maintain the equipment according to manufacturer’s instructions. Regularly check the operation of the protective and safety devices.
Do not perform any work on a tractor or mower unless you are authorized and qualifi ed to do so.
If you have been authorized to do maintenance, read
the operator’s and service manuals. Study the instructions; check the lubrication charts; examine all the instruction messages on the machine. Maintenance can be hazardous unless performed properly. Be sure you have the necessary skill, information, correct tools and equipment to do the job.
WARNING! Do not modify equipment or add
components not approved by the manufacturer. Use parts, lubricants and service techniques recommended by the manufacturer.
Mower Parts And Your Safety
Mower manufacturers use specifi c fasteners and specially designed parts to meet mowing operations requirements. Critical parts (self-locking blade bolts, blades, pins, shields and other special items) have specifi c strength, design and fi t requirements for the make and model mower you are using.
Avoid possible death or serious injury from unapproved parts or modifi cations:— Do not substitute common hardware for original
manufacturer’s blade bolts or other special part items.— Do not substitute for blades, pins, shields or other
critical parts.— Do not use higher strength bolts to replace original
manufacturer’s shear bolts.
MaintainEquipment

20
Perform Maintenance SafelyPrepare Yourself
Wear personal protective clothing and Personal Protective Equipment (PPE) issued to you or called for by job conditions. You must ALWAYS wear safety glasses with side shields.
You may also need:— Hard hat— Safety shoes— Safety glasses, goggles or face shield— Apron and gloves— Hearing protection— Welding helmet or goggles— Respirator or fi lter mask
Wear whatever is needed—don’t take chances.
Keep hands—and clothing—away from all moving
parts. Don’t wear dangling ties, loose sleeves, rings, watches, or long hair.
WARNING! Prevent death or serious injury from entangle -ment. Do not wear loose clothing or accessories. Stay
away from all rotating components when the engine is
running. Contact, wrapping or entanglement with rotating or moving parts could result in death or serious injury.
Avoid Rotating Parts
AvoidPinch Points
Perform Maintenance SafelyWear a rubber apron and rubber gloves when working with corrosives. Wear gloves and safety shoes when handling wooden blocks or sharp-edged metal.
Always use safety glasses, goggles or a face shield. They provide eye protection from fl uids under pressure, during grinding and while servicing batteries. Protection is also needed from fl ying debris, liquids and loose material produced by equipment, tools and pressurized air/water.
Wear a face shield and follow manufacturer's instuctions when you disassemble spring-loaded components or work with battery acids. Wear a welding helmet or goggles with a shaded fi lter when you weld or cut with a torch.
Do not sand, grind, fl ame-cut, braze or weld without a NIOSH-approved respirator or appropriate ventilation. If welding is required on this machine, refer to the manufacturer’s operator's or service manuals or consult your equipment dealer for proper procedures.
Keep pockets free of all objects that could fall out—and drop into machinery.
Handle tools and heavy parts sensibly—with regard for yourself and other persons. Lower items—don’t drop them.
Prepare The Work Area
— Position the mower in a level area out of the way of other working equipment.
— Make sure there is adequate light, ventilation and clearance.
— Remove oil, grease or water to eliminate any slippery surfaces.
— Clean around the area to be serviced to minimize contamination.
CleanSlippery Surfaces
VentilateWork Area

21
Perform Maintenance SafelyPrepare The Machine
Stored energy sources (electrical, mechanical, hydraulic, pneumatic, chemical, thermal, etc.) must be controlled or reduced to a practical minimum before performing any maintenance, repair or service procedures.
Safety practices to prevent potential injuries from
energy-releasing sources:
— Disengage PTO before shutting off engine.— Place controls in PARK or NEUTRAL before shutting
off engine.— Set parking brake or block wheels.— Allow all moving parts to stop.— Lower mower to ground.— Lower wings to ground on wing mowers.— Shut off tractor engine.— Relieve hydraulic system pressure by moving controls
several times in all directions.— Lock ignition, remove key and take it with you.— Look and listen for evidence of moving parts before
dismounting.— Securely support or block up mower before working
underneath mower or other lifted components.
— Securely support, block up, or lock up mower wings with approved locking devices before working near or underneath a wing mower.
— Relieve pressure before disconnecting or disassembling any pressurized system.
— Block or relieve spring pressure before disassembling any spring-loaded mechanism.
— Securely support or block up any raised machine component before working on it.
— Avoid fl ames, sparks, or smoking near any fuel, hydraulic fl uid or other fl ammable material such as mowing debris.
Prepare Machine Systems
for Service
Attach a “DO NOT OPERATE” warning tag to the control levers and remove the ignition key if the mower should not be operated. Take the key with you.
Install approved support device(s) when working under or near raised equipment.
WARNING! Unsupported raised mowers or other equipment may drop unexpectedly. Never go under
equipment when raised unless supported by an
approved support device(s). Death or serious crushing injury could result from falling equipment.
Remove only guards or covers that provide access to the area being serviced. Replace all guards and covers when work is complete.
ReplaceAll Guards
Perform Maintenance Safely
Use Approved
Support Device
Use a “Do Not Operate”
Tag

22
Perform Maintenance SafelyPerform Maintenance SafelyUse Proper Ventilation
If it is necessary to run an engine in an enclosed area, remove the exhaust fumes from the area with an exhaust pipe extension. If you do not have an exhaust pipe extension, make sure you open the doors and get outside air into the area.
WARNING! Prevent possible injury. Never work on
machinery with the engine running unless instructed
by the manufacturer’s manuals for specifi c service.
WARNING! Never operate any type of engine without
proper ventilation—EXHAUST FUMES CAN KILL.
Use Jacks And Hoists Carefully
Safety stands or blocks must be located on a rigid part of the mower. Do not position stands under axles or wheel supports that may rotate.
If you must work beneath raised equipment, always use wood—not concrete—blocks, jack-stands or other rigid and stable supports. When using jacks or hoists always be sure they are adequately supported.
WARNING! Prevent possible crushing injury. Never
use concrete blocks for supports. They can collapse under even light loads.
Make sure the hoists or jacks you use are in good repair. Never use jacks with cracked, bent, or twisted parts. Never use frayed, twisted or pinched cables. Never use bent or distorted hooks.
VentilateWork Area
Use Proper Support for Raised
Equipment
RemoveKey and ReadMaintenance
Manual
Common Maintenance Safety Practices
Fuel Hazards
WARNING! Always use approved fuel containers
and/or dispensing equipment.
Fuels are fl ammable, so observe these practices to reduce the possibility of a serious accident.— Shut off engine and ignition during refueling.— Always ground the fuel nozzle against the fi ller neck
to avoid sparks.— Keep sparks and open fl ames away from fuel.— Do not smoke while refueling or when handling fuel
containers.— Do not cut or weld on or near fuel lines, tanks or
containers.— Do not overfi ll the tank or spill fuel. Clean up spilled
fuel immediately.
Engine Coolant Hazards
Liquid cooling systems build up pressure as the engine gets hot, so use extreme caution before removing the radiator cap.
Be sure to:— Stop the engine and wait for the system to cool.— Wear protective clothing and safety glasses.— Turn the radiator cap slowly to the fi rst stop to allow
the pressure to escape before removing the cap completely.
Remove Radiator Cap
Slowly
No Smokingand No Open
Flames
Perform Maintenance Safely

23
Hydraulic System Hazards
The hydraulic system is under pressure whenever the engine is operating and may hold pressure even after the engine is shut off. Cycle all hydraulic controls including the auxiliary hydraulic control after the engine is shut down. Relieve trapped pressure in the lines after the attachments are shut down and resting on the ground.
During inspection of the hydraulic system:— Wait for fl uid to cool before disconnecting the lines.
Hot hydraulic fl uid can cause SEVERE BURNS.— Do not use your hand to check for leaks. Instead,
use a piece of cardboard or paper to search for leaks.— Wear appropriate eye protection. Hydraulic fl uid can
cause permanent eye injury.
WARNING! Hydraulic fl uid under pressure can penetrate the skin or eyes and cause serious injury, blindness or death. Fluid leaks under pressure may not be visible. Use a piece of cardboard or wood to fi nd leaks, not
your hand. Wear a face shield or safety goggles for
eye protection. If fl uid is injected into the skin, it must be removed within a few hours by medical personnel familiar with this type of injury.
When venting or fi lling the hydraulic system, loosen the fi ller cap slowly and remove it gradually.
Never reset any relief valve in the hydraulic system to a pressure higher than recommended by the manufacturer.
WearEye Protection
High Pressure Fluid Can Inject Into the Body
Perform Maintenance Safely
Electrical System Hazards
Before working on the electrical system, disconnect the battery cable(s).— Remove the battery negative (-) cable(s) fi rst.— When reconnecting the battery, connect the battery
negative (-) cable(s) last.
The liquid in batteries contains acid, which is a POISON and can cause SEVERE CHEMICAL BURNS.
Avoid Injury
— Wear a face shield to prevent contact with your eyes.— Wear chemical-resistant gloves and clothing to keep
electrolyte off your skin and regular clothing.
WARNING! Electrolyte will damage eyes or skin on contact. Always wear a face shield to avoid
electrolyte in eyes. If electrolyte contacts eyes, fl ush immediately with clean water and get medical attention. Wear chemical-resistant gloves and protective
clothing to keep electrolyte off skin. If electrolyte contacts exposed skin or clothing, wash off immediately
with clean water. If electrolyte is ingested, seek medical attention immediately. NEVER give fl uids that would induce vomiting.
Wear Protective Clothing
Wear Face Protection
Perform Maintenance Safely

24
Avoid Explosion
WARNING! Avoid possible serious injury from explosion. Lead-acid batteries produce extremely explosive gases especially when being charged. Keep
arcs, sparks, fl ames and lighted tobacco away.
— Do not smoke near batteries.— Keep arcs, sparks and open fl ames away from
batteries.— Provide adequate ventilation.
Never check the battery by placing a metal object across the battery posts — the resulting spark could cause an explosion.
WARNING! Avoid possible serious injury from battery explosion. Do not charge a battery or boost start the
engine if the battery is frozen. Warm to 60°F (15.5°C) or the battery may explode and could cause serious injury.
Safety rules during battery boost starting:— Follow the instructions for proper “battery boost
starting” as specifi ed in the manufacturer’s manual.— Be sure the machines are not touching.
— Observe the polarity of the batteries and connections.— Make the fi nal cable connection to the engine or the
furthest ground point away from the battery. Never make the fi nal connection at the starter or dead battery—sparks may ignite the explosive gases present at the battery.
— When disconnecting cables after jump starting, remove the cables in reverse order of connection (e.g., fi nal connection fi rst).
Avoid Sparks and Open Flames
Near Batteries
For Boost Starting
Observe Polarity and Make Final Connection at Ground Point
Perform Maintenance Safely
Tire And Wheel Maintenance
Check your tires and wheels daily because the stability of the tractor and mower can be dramatically affected by tire pressure or damage to tires or wheels.
Check tires for:— Correct pressure.— Cuts and bulges.— Nails or other punctures.— Uneven or excessive wear.— Condition of valve stems and caps.
Check wheels for:— Damage to the rims.— Missing or loose lug nuts or bolts.— Misalignment.
All tire service should be performed by a qualifi ed tire service center or by an authorized service person who has been properly trained in the procedures and use of safety equipment designed for tire servicing.
Check Tires and Wheels for
Damage
Maintain Proper Tire Pressure
Perform Maintenance Safely

25
Tire And Wheel Maintenance (continued)
WARNING! The types of wheels and tires usually
found on this equipment require special care when
servicing to prevent death or serious injury.
Do not infl ate the tires above the recommended pressure. Be sure to replace tire ballast if equipped. See manufacturer’s specifi cations for ballast requirements.
Keep wheel lug nuts tightened to manufacturer’s recommendations.
A rise in tire pressure during operation is normal, and should NOT be reduced.
Never reinfl ate a tire that has been run fl at or seriously underinfl ated without removing the tire from the wheel. Have the tire and wheel closely inspected for damage before remounting.
When adding air to a tire, do so from a distance. Use a long hose with self-attaching chuck. Always stand behind tread when adjusting tire pressure.
Do not infl ate tires with fl ammable gases or from systems using an alcohol injector.
Never cut or weld on a wheel with an infl ated tire mounted on it. This could cause explosive decompression.
Check that the tire size and wheel are correctly matched.
When replacing the tires, ensure the tires are of the appropriate rating specifi ed by the manufacturer.
Tires should not be operated at speeds higher than their rated speed. Most agricultural tires are rated for 20mph maximum speed.
Avoid Tire Explosion
Perform Maintenance Safely
Complete Service And Repairs Before Machine
Is Released
Tighten all bolts, fi ttings, and connections to torques specifi ed by the manufacturer.
Install all guards, covers, and shields after servicing. Replace or repair any damaged parts. Refi ll and recharge pressure systems only with manufacturer approved or recommended fl uids.
Start the engine and check for leaks. (See page 23, Hydraulic System Hazards.) Operate all controls to make sure the tractor and mower are functioning properly. Test the machine if necessary. After testing, shut down and check the work you performed. Are there any missing cotter pins, washers, locknuts, etc.? Recheck all fl uid levels before releasing the equipment for operation.
All parts should be inspected during repair and replaced if worn, cracked or damaged. Excessively worn or damaged parts can fail and cause injury or death.
Replace any damaged or illegible safety signs.
Mower Blade Maintenance
Do not take chances using damaged or bent blades. The mower manufacturers from the Association of Equipment Manufacturers (AEM) and the Farm Equipment Manufacturers Association (FEMA) advocate that you DO NOT reuse, straighten, hard face or weld mower blades. Death or serious injury could result if a broken blade is thrown from a mower.
Verify Service Work
When Completed
Perform Maintenance Safely

26
Perform Maintenance SafelyMower Blade Maintenance (continued)
— How are mower blades made? Mower blades are made of high strength alloy spring steel. They are hot-forged and shaped to meet the manufacturer’s individual specifi cations, then heat treated and tempered to a high strength, ductile state to reduce the possibility of breaking while mowing. Blades are tested to ensure they meet strength, hardness, and ductility standards. If a blade fails to meet any of these specifi cations, it will not be used on the mower.
— What happens when a mower blade bends? It takes a great amount of impact force to bend the blade. This impact force often results in the blades being gouged or chipped. After a blade is damaged by a gouge or chip a blade failure is much more likely to occur. When a blade is severely bent, a microscopic crack may be created in the blade. Straightening the blade does not remove or repair this crack, but may cause additional cracks. Additional stresses during mowing operations can result in an unexpected blade failure.
— Avoid bending blades. Help prevent mower blades from bending or cracking by avoiding contact with solid objects. Mower blades are intended to cut grass, shrubs, woody vegetation, and small trees and limbs. They are not intended to contact solid objects such as rocks, concrete, or steel posts. Inspect the area prior to mowing. Remove or clearly mark any solid objects and mow around them.
— Replace damaged blades! Inspect the mower blade(s) daily or after hitting any solid object. If a mower blade becomes damaged (bent, gouged, cracked) or worn more than 25 percent of the original size, it should be removed and replaced with a new blade. Always use the original manufacturer’s blades. Aftermarket brand blades may not meet the mower manufacturer’s strength, hardness and ductility requirements.
— Do not take chances mowing with damaged or
bent blades. Using a damaged or straightened mower blade can result in the blade breaking and being thrown into the operator or a bystander causing death or serious injury. The price of a new blade is small compared to the potential for the serious injury that could result from a bent or broken blade being thrown from the mower.
Final Word To The UserYou have just fi nished reading the AEM Industrial and Agricultural Mower Manual. It is impossible for this manual to cover every safety situation that you may encounter on a daily basis. Your knowledge of these safety precautions and your application to the
basic rules of safety will help to build good judgment in all situations. Our objective is to help you develop, establish and maintain good safety habits to make operating an Industrial and Agricultural Mower easier and safer for you.
This manual is another in a series on the safe operation of machinery published by AEM.Many pictorials in this safety manual can be found and downloaded at http://pictorials.aem.org.
For additional publications visit our website at www.safetymaterials.org.
ASSOCIATION OFEQUIPMENT MANUFACTURERS
e-mail [email protected]


2
Este manual de seguridad está destinado a señalar algunas de las situaciones de seguridad básicas que pueden surgir durante la operación y el mantenimiento normales de la máquina y a instruirlo en prácticas de seguridad para manejar estas condiciones. Este manual NO sustituye los manuales del operador del fabricante de la cortadora de césped.
Puede ser necesario tomar precauciones adicionales o algunas de las instrucciones pueden no ser pertinentes, dependiendo del equipo, los accesorios y las condiciones del sitio de trabajo o del área de servicio. El fabricante no tiene control directo sobre la aplicación, la operación, la inspección o el mantenimiento del equipo. Por lo tanto, es SU responsabilidad utilizar prácticas de seguridad correctas en estas áreas.
La información que se proporciona en este manual complementa la información específi ca sobre la máquina que contienen los manuales del operador del fabricante. Puede haber otra información que afecte la operación segura de la máquina en los letreros de seguridad o en los requisitos del seguro, programas de seguridad y capacitación del empleador, códigos de seguridad, leyes federales, locales, estatales o provinciales, reglas y ordenanzas.
¡IMPORTANTE! Antes de hacer funcionar la cortadora de césped, asegúrese de contar con los manuales del operador del fabricante para esta máquina y todos los accesorios. Si faltan los manuales del fabricante, solicite manuales de repuesto a su empleador, al concesionario de los equipos o directamente al fabricante. Guarde este manual de seguridad y los manuales del fabricante con la máquina en todo momento. Lea y asegúrese de comprender todos los manuales.
Se encuentra disponible el video AEM Mower Safety Practices (Prácticas de seguridad para la cortadora de césped de AEM) para capacitar y reforzar prácticas de seguridad correctas. Se alienta a los operadores a ver periódicamente el video de seguridad.
Introducción
Lea y asegúrese de comprender los
manuales antes de comenzar la
operación
Contenido Reconocimiento . . . . . . . . . . . . . . . . . . . . . . . . . . . . . . . 2
Introducción . . . . . . . . . . . . . . . . . . . . . . . . . . . . . . . . . . 2
Alertas de seguridad . . . . . . . . . . . . . . . . . . . . . . . . . . . 3
Palabras para el usuario/operador . . . . . . . . . . . . . . . . 3
Cortadora de césped industrial/para agricultura . . . . 4
Cumplimiento del programa de seguridad . . . . . . . . . 5
Preparación para una operación segura . . . . . . . . . . . 9
Arranque con seguridad . . . . . . . . . . . . . . . . . . . . . . . 13
Operación con seguridad . . . . . . . . . . . . . . . . . . . . . . 13
Estacionamiento seguro . . . . . . . . . . . . . . . . . . . . . . . 18
Apagado con seguridad . . . . . . . . . . . . . . . . . . . . . . . 18
Realización de mantenimiento con seguridad . . . . . 19
Palabras fi nales para el usuario . . . . . . . . . . . . . . . . . 26
ReconocimientoDeseamos reconocer las contribuciones de los miembros del Consejo de Fabricantes de Cortadoras de Césped
Industriales/para Agricultura para la preparación de este Manual de seguridad.
AVISO DE PROTECCIÓN DE COPYRIGHTCopyright, 2010, por la Asociación de Fabricantes de Equipos (Association of Equipment Manufacturers). Todos los derechos reservados. Queda prohibida la reproducción o
difusión parcial o total de este trabajo por cualquier medio sin consentimiento previo por escrito de la Asociación de Fabricantes de Equipos.
Copyright 2010© AEM (Asociación de Fabricantes de Equipos)
Revisado el 01/03, 09/10

3
Alertas de seguridadSímbolo
Este símbolo de alerta de seguridad signifi ca: “¡ATENCIÓN! ¡MANTÉNGASE ALERTA! ¡SU
SEGURIDAD ESTÁ EN RIESGO!”
El símbolo de alerta de seguridad identifi ca mensajes de seguridad importantes sobre el equipo, sobre letreros de seguridad, en manuales u otros lugares. Cuando vea este símbolo, manténgase alerta ante la posibilidad de muerte o lesiones personales. Siga las instrucciones del mensaje de seguridad.
Motivos por los cuales la seguridad es importante:— Los accidentes provocan discapacidad y muerte.— Los accidentes cuestan.— Los accidentes pueden evitarse.
Palabras indicativas
Las palabras indicativas son palabras distintivas que típicamente se encontrarán en letreros de seguridad de la cortadora de césped y otros equipos del sitio de trabajo. Estas palabras también se pueden encontrar en este manual y en los manuales del fabricante. Están destinadas a alertar al operador sobre un riesgo y el grado de gravedad del riesgo.
DANGER (PELIGRO) indica una situación riesgosa que, si no se evita, resultará en una lesión grave o la muerte.
WARNING (ADVERTENCIA) indica una situación riesgosa que, si no se evita, podría resultar en una lesión grave o la muerte.
CAUTION (PRECAUCIÓN) indica una situación que, si no se evita, podría resultar en lesiones leves o moderadas.
NOTICE (AVISO) indica un mensaje de daños a la propiedad.
NOTICE
PELIGRO
ADVERTENCIA
PRECAUCIÓN
AVISO
DANGER
WARNING
CAUTION
Palabras para el usuario/operadorEs SU responsabilidad leer y asegurarse de comprender el manual de seguridad y los manuales del fabricante antes de hacer funcionar esta máquina. Este manual de seguridad lo lleva paso a paso a través de su día de trabajo.
El reconocimiento de los riesgos y la prevención de
accidentes dependen de que usted esté alerta, sea cuidadoso y se capacite correctamente para la operación, el transporte, el mantenimiento y el almacenamiento de este equipo.
Se han suministrado gráfi cos útiles para comprender el texto.
Recuerde que USTED es la clave de la seguridad. Las prácticas de seguridad correctas lo protegen no sólo a usted sino también a las personas que lo rodean. Estudie este manual y los manuales del fabricante para su máquina en particular. Transfórmelos en una parte activa de su programa de seguridad. Tenga presente que este manual de seguridad está escrito para cortadoras de césped industriales/para agricultura.
Contáctese con el fabricante del equipo si le queda alguna pregunta sobre la operación segura después de estudiar los manuales del operador del fabricante y este manual de seguridad.
Tome todas las demás precauciones habituales y
acostumbradas para un trabajo seguro y, sobre todo:
RECUERDE:
¡LA SEGURIDAD DEPENDE DE USTED!
¡PUEDE EVITAR LESIONES GRAVES O MUERTE
CAUSADAS POR PRÁCTICAS LABORALES
NO SEGURAS!
Lea y asegúrese de comprender
todos los letreros de seguridad

4
Tipos de cortadora de césped industrial/para
agricultura
Las cortadoras de césped se usan para recortar pasturas, desmenuzar residuos de cultivos, cortar arbustos, realizar desbroce pesado, cortar la hierba en vías de agua, derechos de paso, costados de caminos o autopistas. Además, estas cortadoras se usan para cortar la hierba y otras plantas en zonas públicas como parques y cementerios.
Cortadora de césped industrial/para agricultura
Barra en forma de hoz
Triturador
Giratorio
Aguilón
Giratorio con lateral plegable
Tipos de cortadora de césped de disco para
agricultura
Las cortadoras de césped de disco están diseñadas y equipadas para cortar cultivos de heno a mayor velocidad de desplazamiento.
Las cortadoras/acondicionadoras de disco cortan y acondicionan los cultivos.
Las formadoras de hileras autopropulsadas cortan el heno y lo acondicionan en hileras.
Cortadora de césped industrial/para agricultura
Cortadora de césped de disco
Cortadora/acondicionadora de
disco
Formadora de hileras autopropulsada
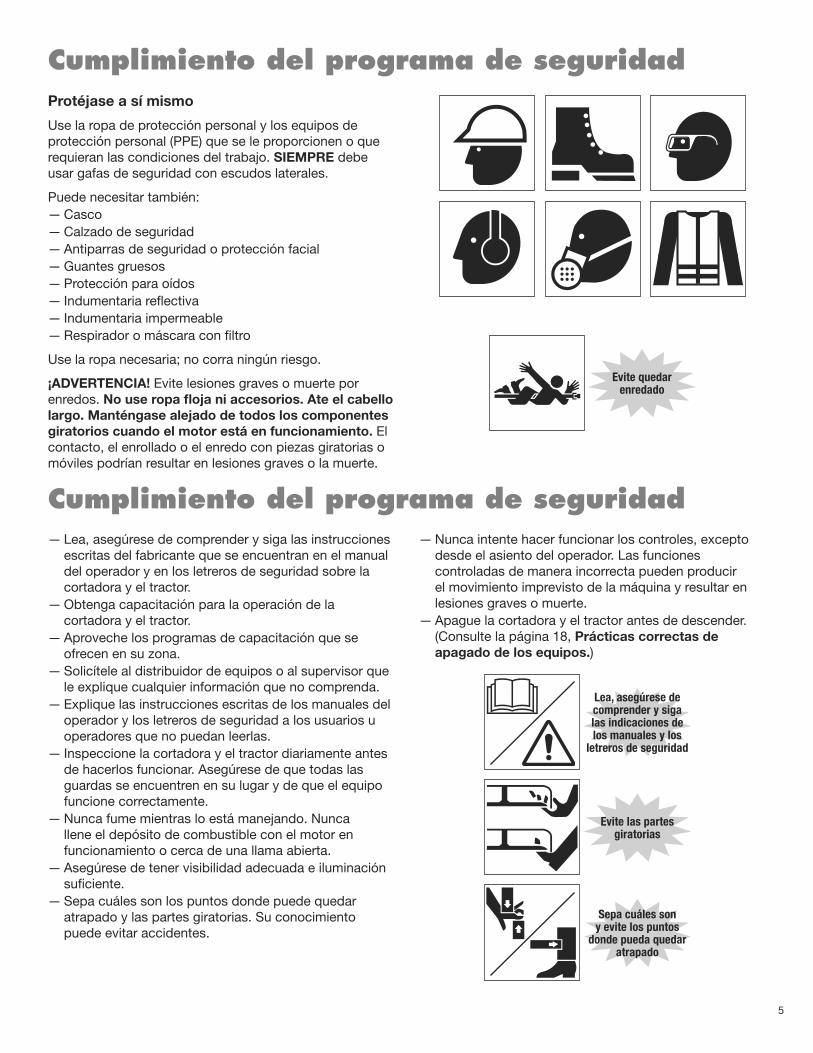
5
Cumplimiento del programa de seguridadProtéjase a sí mismo
Use la ropa de protección personal y los equipos de protección personal (PPE) que se le proporcionen o que requieran las condiciones del trabajo. SIEMPRE debe usar gafas de seguridad con escudos laterales.
Puede necesitar también:— Casco— Calzado de seguridad— Antiparras de seguridad o protección facial— Guantes gruesos— Protección para oídos— Indumentaria refl ectiva— Indumentaria impermeable— Respirador o máscara con fi ltro
Use la ropa necesaria; no corra ningún riesgo.
¡ADVERTENCIA! Evite lesiones graves o muerte por enredos. No use ropa fl oja ni accesorios. Ate el cabello
largo. Manténgase alejado de todos los componentes
giratorios cuando el motor está en funcionamiento. El contacto, el enrollado o el enredo con piezas giratorias o móviles podrían resultar en lesiones graves o la muerte.
Evite quedar enredado
Cumplimiento del programa de seguridad— Lea, asegúrese de comprender y siga las instrucciones
escritas del fabricante que se encuentran en el manual del operador y en los letreros de seguridad sobre la cortadora y el tractor.
— Obtenga capacitación para la operación de la cortadora y el tractor.
— Aproveche los programas de capacitación que se ofrecen en su zona.
— Solicítele al distribuidor de equipos o al supervisor que le explique cualquier información que no comprenda.
— Explique las instrucciones escritas de los manuales del operador y los letreros de seguridad a los usuarios u operadores que no puedan leerlas.
— Inspeccione la cortadora y el tractor diariamente antes de hacerlos funcionar. Asegúrese de que todas las guardas se encuentren en su lugar y de que el equipo funcione correctamente.
— Nunca fume mientras lo está manejando. Nunca llene el depósito de combustible con el motor en funcionamiento o cerca de una llama abierta.
— Asegúrese de tener visibilidad adecuada e iluminación sufi ciente.
— Sepa cuáles son los puntos donde puede quedar atrapado y las partes giratorias. Su conocimiento puede evitar accidentes.
— Nunca intente hacer funcionar los controles, excepto desde el asiento del operador. Las funciones controladas de manera incorrecta pueden producir el movimiento imprevisto de la máquina y resultar en lesiones graves o muerte.
— Apague la cortadora y el tractor antes de descender. (Consulte la página 18, Prácticas correctas de
apagado de los equipos.)
Lea, asegúrese de comprender y siga las indicaciones de los manuales y los
letreros de seguridad
Evite las partes giratorias
Sepa cuáles son y evite los puntos
donde pueda quedar atrapado

6
Cumplimiento del programa de seguridadEvite las lesiones provocadas por equipos elevados
Evite posibles lesiones de aplastamiento por caídas de la cortadora u otros equipos elevados.
Antes de trabajar cerca o debajo de partes levadas de la cortadora o de los equipos:— Apoye o bloquee con seguridad las partes elevadas de
la cortadora o los equipos de acuerdo con el manual del operador.
— Apoye, bloquee o trabe con seguridad los laterales con dispositivos de bloqueo aprobados o descienda las partes de la cortadora o de los equipos hasta el suelo.
— Use trabas de transporte cuando transporte la cortadora por la vía pública.
Evite lesiones producidas por líquidos a alta presión
Evite las lesiones por inyección de fl uidos debidas a fugas de líquidos a alta presión.
Si un fl uido se inyecta en la piel, debe ser extraído
dentro de pocas horas por personal médico
familiarizado con este tipo de lesión.
Las fugas de fl uido bajo presión pueden no ser visibles. Al verifi car en busca de fugas o cuando trabaja cerca de sistemas presurizados:— Lea las prácticas de seguridad recomendadas en los
manuales del operador del fabricante.— Use una protección facial o antiparras de seguridad
para proteger los ojos.— Use un cartón o una madera para buscar fugas; NO
use las manos.
— Alivie la presión del sistema antes de desconectar líneas.— Busque y repare las líneas, los tubos y las mangueras
dañados o con fugas.— Busque y apriete las conexiones fl ojas.— Purgue el aire del sistema antes de hacerlo funcionar.
El fl uido a alta presión puede
inyectarse en elcuerpo
Evite ser aplastado – Bloquee o apoye con seguridad la
cortadora
Cumplimiento del programa de seguridadEvite lesiones por incendios y explosiones
Aplique el freno de estacionamiento, apague el motor de la cortadora y del tractor y retire la llave mientras llena el depósito de combustible. Tenga precaución adicional cuando carga combustible en un motor caliente. Nunca fume mientras carga combustible. Evite las chispas conectando a tierra la boquilla de combustible contra el cuello de llenado del depósito.
Los vapores de un depósito de combustible vacío son explosivos. Nunca suelde o realice cortes en líneas, depósitos o contenedores de combustible.
Retire toda la basura o los residuos de corte de la máquina todos los días o según sea necesario. Mantenga los residuos alejados del motor, el escape, los embragues y otras fuentes de calor. Use supresores de chispas, según corresponda, en el sistema de escape del motor. Asegúrese de que no haya trapos con aceite u otro material infl amable almacenado en la máquina.
Revise en busca de fugas de combustible, aceite o fl uido hidráulico. Repare las fugas y limpie la máquina antes de hacerla funcionar.
El éter/fl uido para arranque en frío es infl amable. No fume cuando usa éter/fl uido para arranque en frío. Siempre siga las instrucciones del recipiente y de los manuales del
operador del fabricante correspondientes a la cortadora de césped. No use éter/fl uido para arranque en frío si el motor está equipado con bujías de precalentamiento u otro dispositivo de precalentamiento.
Siempre use solvente no infl amable para limpiar las partes. No use gasolina, combustible diesel u otros fl uidos infl amables. Almacene todos los fl uidos y materiales infl amables lejos de la máquina y de la zona de trabajo.
Sepa dónde se guardan los extintores de incendios, cómo funcionan y para qué tipo de incendio están destinados. Verifi que la disponibilidad de los extintores de incendios de acuerdo con las instrucciones del fabricante. Asegúrese de que cada tractor esté equipado con un extintor de incendios.
Retire los residuos a diario
o según sea necesario
No fumar; evitar las llamas
abiertas

7
Cumplimiento del programa de seguridad¡Manténgase alerta!
Sepa dónde obtener asistencia. Sepa cómo usar un equipo de primeros auxilios y un extintor de incendios/sistema de supresión de fuego.
¡Manténgase informado!
Aproveche los programas de capacitación que se ofrecen.
¡Tenga cuidado!
El error humano es causado por muchos factores: descuido, fatiga, sobrecarga, preocupación, desconocimiento de la máquina por parte del operador, fármacos y alcohol, entre muchos otros. Los daños al tractor o la cortadora de césped se pueden arreglar en un tiempo breve, pero las lesiones o la muerte tienen un efecto perdurable.
Por su seguridad y la de los demás, aliente a sus compañeros de trabajo a actuar con seguridad.
Para una operación segura
Usted debe ser un operador cualifi cado y autorizado para operar la máquina correctamente. Debe comprender claramente las instrucciones por escrito que proporciona el fabricante, recibir capacitación (que incluya la operación real de la cortadora de césped) y conocer las reglas y ordenanzas de seguridad correspondientes al sitio de trabajo. Una buena práctica de seguridad consiste en señalar y explicar los letreros y las prácticas de seguridad y asegurarse de que otras personas comprendan la importancia de seguir estas instrucciones.
¡ADVERTENCIA! Los fármacos y el alcohol afectan la capacidad de alerta y de coordinación del operador, así como su capacidad para operar los equipos con seguridad. Nunca use fármacos o alcohol mientras
opera el equipo de la cortadora. Nunca permita a
sabiendas que otra persona opere esta máquina con
la capacidad de alerta o coordinación deteriorada. Un operador que toma un medicamento recetado o de venta libre debe consultar a un profesional médico con respecto a los efectos colaterales del medicamento que podrían reducir su capacidad de operar este equipo con seguridad.
Nunca use fármacos o alcohol
mientras está operando la máquina
Cumplimiento del programa de seguridadConozca las reglas
La mayoría de los empleadores tienen reglas que rigen la operación y el mantenimiento de los equipos. Antes de comenzar a trabajar en una ubicación nueva, verifi que con el supervisor o con el coordinador de seguridad. Averigüe sobre las reglas que tendrá que obedecer.
La Administración de Seguridad y Salud Ocupacional (Occupational Safety and Health Administration, OSHA) hace cumplir leyes federales dentro de los EE.UU. que se aplican a la operación, la aplicación y el mantenimiento seguros de equipos en un sitio de trabajo. Es responsabilidad del empleador cumplir estas leyes. Un representante de OSHA puede visitar periódicamente un sitio de trabajo para ver si estas leyes se cumplen.
También puede haber leyes estatales/provinciales o locales u ordenanzas internacionales que se apliquen a este equipo y a su uso, junto con reglas específi cas del sitio de trabajo o del empleador. Es importante que conozca y cumpla todas las leyes y reglas aplicables, incluso las que requieren capacitación y certifi cación del operador.
Las siguientes son algunas de las reglas que debe
cumplir al trabajar:
— Un ROPS (sistema de protección antivuelco) y un tractor equipado con cinturón de seguridad es exigencia del
gobierno federal (OSHA) par ala protección de los operadores durante el funcionamiento de la cortadora. Una cabina cerrada proporciona protección adicional para el operador con respecto a objetos arrojados. Verifi que el manual del operador de la cortadora de césped para ver si también se requiere una cabina de tractor.
— Use y verifi que que otras personas usen la indumentaria y los equipos de protección personal correctos.
— Inspeccione la máquina y los accesorios antes de cada uso según lo especifi cado por el fabricante y por su empleador.
— Conozca las limitaciones y las características operativas del equipo de corte de césped. No haga un uso indebido.
— Verifi que que todos los escudos y las guardas estén correctamente instalados antes de hacer funcionar la máquina.
— Nunca modifi que o retire partes de la máquina (excepto para realizar servicios; después, asegúrese de que se vuelvan a colocar en su lugar).
Reglas de seguridad
•••••
•••••
Sepa cuáles son y asegúrese de
comprender las reglas de funcionamiento

8
Cumplimiento del programa de seguridadAlgunas reglas que debe cumplir al trabajar
(continuación)
— Únicamente personas cualifi cadas y autorizadas pueden manejar estos equipos.
— Nunca permita que los niños jueguen en los equipos, viajen en ellos o los hagan funcionar. Los niños no
están cualifi cados para manejar estos equipos.— No transporte pasajeros.— Use contacto en tres puntos (asideros y peldaños) y
enfrente el equipo al ascender o descender de él.— Mantenga a las personas ajenas a 300 pies (92 m) de la
operación de corte.— Familiarícese con el sitio de trabajo antes de usar la
cortadora de césped. Tenga en cuenta posibles riesgos que puede encontrar en el terreno. Retire o marque los obstáculos y residuos que podrían dañar la cortadora o ser arrojados por ella.
— Utilice sólo accesorios y partes aprobados por el fabricante de la cortadora de césped.
— Asegúrese de que todos accesorios estén descendidos, aplique el freno de estacionamiento, apague el motor y haga funcionar todas las palancas de control. Retire la llave antes de salir del tractor. (Consulte la página 18, Prácticas correctas de apagado de los equipos.)
— Cuando transporte la cortadora de césped en un remolque, siga las instrucciones detalladas del fabricante para la carga, el amarre y la descarga de la cortadora.
Mantenga a los niños alejados
de los equipos
No lleve pasajeros
Apague los equipos cuando están sin
vigilancia
Mantenga a las personas ajenas
alejadas
Cumplimiento del programa de seguridadConozca los equipos
Lea y asegúrese de comprender los letreros de seguridad que indican PELIGRO, ADVERTENCIA, PRECAUCIÓN y AVISO y otros letreros informativos que hay sobre el tractor y la cortadora de césped y en el manual del operador del fabricante. Solicítele al supervisor o al distribuidor de la cortadora que le explique cualquier información que no comprenda. El incumplimiento de las instrucciones de seguridad podría resultar en lesiones graves o muerte.
Asegúrese de que todas las estructuras de protección, guardas, escudos, pantallas y paneles del fabricante están bien reparados, en su lugar y bien ajustados. Los componentes de seguridad dañados, faltantes o debilitados pueden crear una situación de riesgo para usted como operador. Nunca retire o modifi que ningún componente de seguridad (incluso escudos para objetos arrojados) que haya en la cortadora.
Conozca lo siguiente sobre el tractor y la cortadora de
césped:
— Funcionamiento, propósito y uso de todos los controles.— Velocidades de funcionamiento correctas.— Capacidades y funcionamiento correcto en pendientes
y terrenos desparejos.— Características del frenado y la dirección.— Radio de giro y separaciones.— Cómo detener los equipos rápidamente en una
emergencia.
Lea y asegúrese de comprender
todos los letreros de seguridad
Lea y asegúrese de comprender los
manuales antes de comenzar la
operación

9
Preparación para una operación seguraRevise los equipos de la cortadora de césped y el
tractor
Antes de comenzar la jornada de trabajo, inspeccione la máquina y asegúrese de que todos los sistemas estén en buenas condiciones operacionales.
¡ADVERTENCIA! Evite posibles lesiones por aplastamiento producidas por equipos que caen. La falla del sistema hidráulico o de una parte podría causar la caída de equipos que no están apoyados. No permanezca debajo
de equipos elevados excepto que estén correctamente
apoyados de acuerdo con el manual del operador.
— Realice procedimientos de servicio diarios y periódicos según lo indicado por el fabricante del equipo.
— Verifi que para detectar piezas faltantes, dañadas, rotas o fl ojas en el tractor y en la cortadora de césped. Repare o sustituya esas piezas.
— Verifi que que los accesorios del tractor y la cortadora sean los correctos.
— Verifi que que la clasifi cación nominal de velocidad de TDF del tractor y la cortadora sea la correcta.
— Verifi que el estado de las hojas de la cortadora de césped. Sustituya las hojas que se encuentren gravemente gastadas, dobladas, agujereadas o
marcadas; incluya los pernos y sujetadores de las hojas. Nunca enderece o suelde en las hojas.
— Asegúrese de que el escudo para objetos que son arrojados se encuentre correctamente instalado y en buen estado. Repárelo o sustitúyalo si está dañado o falta.
Lea el manual –Bloquee o apoye con seguridad la
cortadora
Realice el mantenimiento de
la máquina
Recorrida de inspección
Preparación para una operación segura— Verifi que que todos los escudos y guardas estén en su
lugar y que todos los equipos se encuentren en buenas condiciones de funcionamiento. Esto incluye la línea motriz de la TDF, la caja de engranajes y las guardas y escudos de los implementos que se usan para proteger al operador.
— Verifi que que los dispositivos de bloqueo del extremo en horquilla de la línea motriz estén correctamente enclavados.
— Verifi que en busca de sistemas hidráulicos dañados o con fugas en el tractor o la cortadora. Repare o ajuste según sea necesario.
¡ADVERTENCIA! El fl uido hidráulico bajo presión puede penetrar la piel o los ojos y causar lesiones graves, ceguera o la muerte. Las fugas de fl uido bajo presión pueden no ser visibles. Utilice un cartón o una madera
para buscar fugas, no la mano. Use protección ocular. Si el fl uido se inyecta en la piel, debe ser extraído dentro de las próximas pocas horas por personal médico familiarizado con este tipo de lesión.
— Mantenga la superfi cie de la plataforma del operador limpia y libre de grasa, aceite, suciedad, nieve o hielo. Los peldaños y asideros deben estar limpios y funcionar correctamente.
— Asegúrese de que las luces de trabajo se mantengan limpias (si están instaladas). Verifi que que todas las luces funcionen correctamente.
— Asegúrese de que el letrero de vehículo de movimiento lento, los y las luces de advertencia estén en buenas condiciones y puedan verse claramente.
— Asegúrese de que todas las herramientas y objetos sueltos se retiren o se sujeten con seguridad mientras se opera la máquina.
— Verifi que que todos los letreros de seguridad se vean con claridad. Sustituya los letreros dañados.
Verifi que en busca de fugas e inspeccione las
mangueras
Revise para detectar/guardas y escudos dañados
Aparte las refl ectores
herramientas

10
Preparación para una operación seguraFamiliarícese con la zona de trabajo
Antes de hacer funcionar la cortadora de césped, inspeccione cuidadosamente la zona de trabajo. Recorra a pie alrededor de la zona e inspeccione las superfi cies sobre las cuales se desplazará cuando utilice la cortadora.
Busque residuos y obstáculos recorriendo a pie la zona antes de cortar. Los objetos como alambre, cable, rocas, neumáticos y metales que podrían dañar o ser arrojados por la cortadora de césped deben retirarse o marcarse claramente y evitarse.
Corrija las condiciones no seguras. No opere en áreas con problemas donde no se puedan retirar o marcar los residuos y los obstáculos.
Analice la zona de corte para determinar:— El procedimiento de corte más efi ciente.— La altura del material que debe cortarse.— Las condiciones operativas del terreno.— Cómo usar mejor el patrón de corte en sentido de
avance.— Las posibilidades de que personas ajenas o que pasan
circunstancialmente queden expuestas a objetos que se arrojan.
Tenga cuidado con otras personas
Antes de poner en marcha los equipos:— Recorra a pie alrededor de los equipos.— Verifi que en busca de personas debajo o cerca de los
equipos.— Retire a todas las personas de esas zonas.— Haga sonar una advertencia.
Retire o marque los residuos y
obstáculos
Recorra a pie alrededor del lugar
de trabajo
Localice y evite:— Agujeros— Desmoronamientos— Obstáculos (tocones)— Excavaciones— Agua estancada— Lodo profundo— Puntos mojados— Suelo blando
— Puntos irregulares— Líneas y aparatos
eléctricos— Otros servicios públicos— Cualquier condición que
podría causar una colisión, pérdida de control o vuelco
— Pendientes empinadas
Preparación para una operación seguraAscienda y descienda del tractor correctamente
Siempre use contacto de tres puntos al ascender o descender del tractor o de la cortadora de césped. Enfrente la máquina al ingresar o salir de ella. Un contacto de tres puntos signifi ca que tres de los cuatro miembros (brazos y piernas) están en contacto con la máquina en todo momento durante el ascenso y descenso.
Antes de ascender:— Límpiese el calzado y las manos. Limpie la nieve, el
hielo, el lodo o el aceite de los peldaños y asideros.
Durante el ascenso y el descenso:— Use los asideros y los estribos.— Nunca se aferre al volante o a los controles como
asideros.— Nunca ascienda o descienda de un tractor en
movimiento.— Nunca ascienda o descienda transportando
herramientas u objetos que impidan el contacto de tres puntos. Deje en el piso las piezas o las herramientas. Manteniendo el contacto correcto, suba y, después, recoja el objeto.
Utilice contacto de tres puntos
Limpie las superfi cies
resbaladizas

11
Preparación para una operación seguraPrueba de seguridad de los controles del tractor
y de la cortadora de césped
Arranque el tractor siguiendo los procedimientos específi cos del manual del operador del fabricante. Estos procedimientos normalmente incluyen:— Colóquese y ajústese el cinturón de seguridad en el
tractor equipado con ROPS.— Verifi que que el freno de estacionamiento esté aplicado.— Verifi que que la TDF esté desenganchada.— Verifi que que todos los controles estén en la posición
de estacionamiento.— Advierta a otras personas en la zona antes de arrancar
el tractor.— Arranque el tractor siguiendo los procedimientos de
arranque que recomienda el fabricante del tractor.
¡ADVERTENCIA! Evite lesiones graves o muertes producidas por el movimiento inesperado de la máquina. Arranque el motor únicamente desde el puesto del
operador. Nunca intente arrancar el motor haciendo
un corto entre los bornes del arranque o tomando la
llave desde el suelo o desde afuera de la cabina.
Después del arranque:— Verifi que que todos los instrumentos, indicadores y
luces indicadoras funcionen normalmente.— Verifi que que todos los controles, la dirección y los
frenos del tractor funcionen correctamente.
— Eleve y descienda la cortadora de césped en busca de problemas en el descenso total o el enganche de la línea motriz.
— Verifi que los equipos en busca de vibraciones excesivas y ruidos anormales.
Revise los instrumentos y
controles
Arranque únicamente desde
el asiento del operador
Use el ROPS y el cinturón de
seguridad
Preparación para una operación segura— Use las prácticas correctas de apagado de los equipos
antes de inspeccionar equipos. Espere hasta que todo movimiento de los equipos se haya detenido antes de descender del tractor o la cortadora de césped.
— No haga funcionar la cortadora si el tractor y la cortadora de césped no funcionan correctamente. Coloque una etiqueta que indique “No poner en funcionamiento” en la máquina, retire la llave y no haga funcionar la cortadora hasta que el problema se haya corregido.
Sistema de toma de fuerza (TDF)
Asegúrese de hacer funcionar el tractor a la velocidad de TDF indicada para la cortadora.
Al hacer funcionar tractores con sistemas de TDF impulsados por transmisión, una cortadora giratoria tiene un signifi cativo efecto de rueda volante. La cortadora puede seguir propulsando un tractor con un sistema de TDF impulsado por transmisión.
El tractor debe estar equipado y funcionar como sigue:— Instale una línea motriz equipada con un embrague de
sobrecarga.— Prevea sufi ciente espacio y tiempo para maniobrar
anticipando los giros, las paradas y las reducciones de velocidad.
Use la velocidad de la TDF
No descienda hasta que el movimiento de los equipos se haya
detenido
Use una etiqueta que indique
“No poner en funcionamiento”

12
Preparación para una operación seguraEnganche de la cortadora de césped al tractor
Cortadoras montadas en enganche de tres puntos:
— Consulte los manuales de los fabricantes de la cortadora y del tractor.
— Coloque la palanca selectora de elevación de potencia hidráulica del tractor en la posición descendida para evitar movimientos imprevistos.
— Explique los procedimientos de enganche a los operadores que no puedan leerlos.
— Pueden requerirse pesos en el extremo delantero para mantener el control de la dirección y la estabilidad del extremo delantero. Consulte los manuales del operador de los fabricantes.
— Al hacer retroceder el tractor hasta la cortadora de césped, NUNCA permita que haya personas entre tractor y la cortadora.
— Instale la cortadora en los eslabones de tres puntos del tractor y asegúrela en su lugar con pasadores.
— Instale con seguridad la línea motriz a la TDF del tractor. Descienda el escudo principal hasta su lugar si es móvil. Empuje y tire de la línea motriz para asegurarse de que esté trabada en el vástago de la TDF.
Lea y asegúrese de comprender los
manuales antes de comenzar la
operación
Mantenga una distribución
correcta del peso
No permita que haya nadie entre el
tractor y la cortadora de césped
Evite quedar enredado, use
guardas y escudos
Cortadoras montadas en enganche tipo de tiro:
— Consulte los manuales de los fabricantes de la cortadora y del tractor.
— Retire el acople rápido del enganche de tres puntos si está instalado.
— Instálelo únicamente al enganche de la barra de tiro.— Ajuste la longitud de la barra de tiro del tractor para el
funcionamiento de la TDF a 540 ó 1000 rpm.— Al hacer retroceder el tractor hasta la cortadora de
césped, NUNCA permita que haya personas entre tractor y la cortadora.
— Instale correctamente la cadena de remolque de seguridad de la cortadora en el tractor.
— Instale con seguridad la línea motriz a la TDF del tractor. Empuje y tire de la línea motriz para asegurarse de que esté trabada en la TDF. Descienda el escudo principal a su lugar.
— Conecte las mangueras hidráulicas de la cortadora de césped en el tractor.
— Asegúrese de que los laterales o las plataformas elevadas de la cortadora estén sostenidas por los cilindros antes de retirar las trabas de transporte. Nunca haga fuerza para soltar las trabas de transporte o de los laterales. Los laterales o la plataforma podrían caerse y aplastarlo.
Confi rme que los laterales estén
apoyados antes de soltar las trabas
Evite quedar enredado, use
guardas y escudos
Preparación para una operación segura
Ajuste de la barra de tiro del
tractor
14IN
540 RPO PTO1-3/8" 6 SPLINE
1000 RPO PTO1-3/8" 21 SPLINE
16IN
1000 RPO PTO1-3/4" 20 SPLINE
20IN
TDF A 540 RPM ESTRÍA 6 A 1 3/8"
TDF A 1000 RPM ESTRÍA 21 A 1 3/8"
TDF A 1000 RPM 1 ESTRÍA 20 A 1 ¾ "
14 PULG.
16 PULG.
20 PULG.

13
Arranque con seguridadCómo realizar un arranque correcto
Corte la hierba únicamente con luz diurna o en condiciones de buena luz artifi cial.
Evite lesiones graves o muerte producidas por objetos arrojados por la cortadora o por el contacto con las hojas:— Mantenga los escudos de las cadenas, los escudos
defl ectores fl exibles o sólidos y las rampas de descarga en su lugar y en buen estado de reparación.
— Mantenga a las personas ajenas a 300 pies (92 m) de la operación de corte.
— Nunca dirija la descarga de la cortadora hacia una persona.
— Mantenga las manos, los pies y otras partes del cuerpo alejadas de las piezas giratorias, las hojas y las aberturas de descarga.
— No haga funcionar la cortadora de césped en la posición de transporte.
No se acerque a una cortadora hasta que todo movimiento se haya detenido.
Enganche de la transmisión de RDF de la cortadora de césped:— Eleve la cortadora hasta la altura de corte máxima.— Enganche la TDF a baja velocidad del motor.— Aumente la velocidad del motor hasta llegar a la
velocidad nominal de la TDF.— Descienda la cortadora hasta la altura de corte deseada.— Detenga y apague de inmediato si la cortadora golpea
contra una obstrucción.— Inspeccione y repare cualquier daño de la cortadora
antes de reanudar el corte.— No haga funcionar una cortadora que vibra en exceso o
produce ruidos anormales.
Objetos arrojados por la cortadora de césped
Dependiendo del propósito previsto, las cortadoras están diseñadas para cortar hierba, maleza, broza y cultivos. Las hojas de la cortadora están diseñadas y probadas para uso intensivo. Las hojas de la cortadora, sin embargo, no están diseñadas para entrar en contacto con objetos sólidos como rocas, cemento o metales. Un impacto de este tipo puede arrojar objetos rotos hasta 300 pies (92 m) de distancia. Nunca debe haber personas ajenas a menos de 300 pies (92 m) de una cortadora giratoria en funcionamiento o a menos de 100 pies (30 m) de una cortadora de disco correctamente equipada.
Hojas giratorias – Manténgase
No ponga en funcionamiento una cortadora de césped
dañada
Operación con seguridadLos escudos de la cortadora están diseñados para reducir el riesgo de objetos arrojados y se deben mantener correctamente y en su lugar durante las operaciones de corte.
El riesgo de lesiones graves o muerte puede reducirse signifi cativamente si se siguen estas reglas. Si no se
siguen todas estas reglas de seguridad, la operación
de corte debe detenerse en caso de que alguna
persona ingrese dentro del límite de seguridad
correspondiente a cada tipo de cortadora.
Primero — Inspeccione la zona antes de cortar y retire las piedras, ramas, alambres, cables, metales, vidrios y otros objetos sólidos antes de hacer funcionar la máquina. Los objetos que no puedan retirarse deben marcarse con claridad y ser evitados con cuidado por el operador.
En áreas sin cultivos con hierba y maleza de altura sufi ciente como para ocultar objetos que podrían ser golpeados por las hojas, inspeccione la zona y retire o marque los residuos u obstáculos grandes.
Realice el corte de la zona a una altura intermedia. Inspeccione la zona atentamente y retire o marque cualquier residuo u obstáculo restante. Corte nuevamente a la altura fi nal deseada.
Segundo — Los escudos para objetos arrojados por la cortadora deben usarse cuando se opera cerca de caminos, parques, zonas pobladas u otras zonas donde objetos arrojados podrían lesionar a personas ajenas o dañar la propiedad. Siga el manual del operador del fabricante.
Tercero — Cruce en sentido diagonal cuando realiza el corte a través de zanjas, depresiones marcadas y hundimientos. Eleve la cortadora para evitar que las hojas de la cortadora golpeen el suelo.
Siga todas las reglas de
seguridad

14
Operación con seguridadObjetos arrojados por la cortadora de césped
(continuación)
Cortadoras de disco — Cuando se usa una cortadora de disco, es importante conocer la zona donde se va a cortar. Si el operador ha realizado cortes en el terreno antes y está familiarizado con todos los obstáculos que puede haber, es sufi ciente observar delante de la trayectoria de la cortadora para detectar cualquier objeto adicional que pueda haber ingresado en el terreno. Esté preparado para detenerse o evitar objetos que podrían ser peligrosos si son arrojados por la cortadora. Si piensa cortar en un terreno que no conoce bien y se encuentra junto a un camino transitado o puede haber personas a menos de 100 pies (30 m) de la cortadora de césped, debe inspeccionar y limpiar o marcar el terreno.
Cómo cortar en retroceso
No corte mientras se desplaza en retroceso. Es más probable que se arrojen objetos y que éstos puedan llegar más lejos.
Apague la TDF, espere que las hojas dejen de girar, eleve la cortadora y, después, retroceda.
Corte desplazándose en sentido de avance.
Velocidad de desplazamiento durante el corte
La velocidad de desplazamiento correcta depende de las condiciones del terreno y del tipo de hierba, la densidad y la altura que debe cortarse:— El rango normal de velocidad de desplazamiento es de
2 a 5 mph (3.2 a 8 km/h).— Use una velocidad de desplazamiento menor para
cortar hierbas altas y densas.— Use una velocidad de desplazamiento mayor para
cortar hierba delgada a altura media y con condiciones de terreno sin difi cultades.
— Use una velocidad de desplazamiento menor par acortar en terreno irregular, con pendientes o no muy conocido.
Las cortadoras de disco están diseñadas para usar velocidades de desplazamiento mayores cuando funcionan en terrenos despejados de residuos y peligros superfi ciales.
Use la velocidad de desplazamiento
correcta
Operación con seguridadCorte de hierba extremadamente alta
Puede ser necesario cortar dos veces la hierba extremadamente alta que no sea cultivo. (Consulte la página 13, Objetos arrojados por la cortadora de césped.)
Primera pasada de corte:— Apague la cortadora y el tractor usando la práctica
correcta de apagado de equipos antes de descender del tractor. (Consulte la página 18, Prácticas correctas de
apagado de los equipos.)— Inspeccione la zona y retire o marque cualquier residuo u
obstáculo.— Corte la hierba a mayor altura (10 a 15 pulg. [25 a 38 cm])
para evitar los objetos ocultos.
Segunda pasada de corte:— Apague la cortadora y el tractor usando la práctica
correcta de apagado de equipos antes de descender del tractor.
— Inspeccione la zona y retire o marque cualquier residuo u obstáculo.
— Corte la hierba a la altura deseada y, de ser posible, a 90 grados con respecto a la primera pasada de corte.
Preste atención a los espacios libres de los
equipos
Las cortadoras con enganche de tres puntos y montaje lateral tienen un arco de giro mayor que las tipo de tiro. Deje el espacio libre sufi ciente para la oscilación de la cortadora cuando gira.
No permita que haya personas ajenas cerca del tractor y la cortadora de césped cuando mueve o transporta el tractor y la cortadora.
Proporcione el espacio libre
adecuado para la oscilación de la
cortadora de césped
Detenga la hoja antes de
desatascar
No corte en retroceso

15
Operación con seguridadPrácticas de seguridad para la cortadora de
césped de montaje inferior
Cuando se traslada con una cortadora de césped de montaje inferior:— Mantenga la rampa de descarga extraíble en su lugar y
por encima de la abertura de descarga.— Nunca se pare sobre la carcasa de una cortadora
de césped cuando el motor del tractor está en funcionamiento.
— Distribuya los recortes de hierba con la rampa de descarga orientada hacia la zona donde se cortó.
— Antes de limpiar una cortadora o una rampa de descarga atascada, apague la máquina usando la práctica correcta para apagado del equipo. (Consulte la página 18, Prácticas correctas de apagado de los
equipos.)Detenga
la hoja antes de desatascar
Nunca se pare sobre la cortadora
de césped – Manténgase alejado
Mantenga la rampa en
su lugar
Operación con seguridadCortadora de césped con lateral o aguilón
Peligros y riesgos de obstrucciones elevadas
Verifi que en busca de obstrucciones elevadas con las cortadoras que tienen el lateral o el aguilón elevado, para evitar lesiones graves o la muerte por contacto con:— Líneas y aparatos eléctricos.— Ramas bajas de los árboles.— Otras obstrucciones elevadas.— Mantenga las distancias especifi cadas con respecto a
los cables y los aparatos eléctricos. Nunca se acerque a cables o aparatos eléctricos energizados con ninguna parte de la máquina, salvo que se hayan tomado todas las precauciones de seguridad locales, estatales/provinciales y federales (OSHA) necesarias. Use extrema precaución.
¡PELIGRO! Evite la electrocución o lesiones graves por contacto o un espacio libre inadecuado con respecto a líneas o aparatos eléctricos energizados. No permita
que la máquina o el accesorio se acerque o entre en
contacto con una línea de electricidad. No se acerque
ni toque una máquina que esté en contacto con una
línea de electricidad.
No se acerque a líneas de electricidad
energizadas
Manténgase alejado de los equipos energizados

16
Operación con seguridadPrácticas de seguridad para cortadoras de
césped con laterales y montaje lateral
Las posiciones elevadas de los laterales reducen la protección de los escudos y aumentan los riesgos de objetos arrojados y contacto con las hojas.
Evite la posibilidad de lesiones graves o muerte por
objetos arrojados o contacto con las hojas causados
por la elevación y el descenso de los laterales durante
las operaciones de corte:
— No realice cortes con personas ajenas presentes a menos de 300 pies (92 m) de la cortadora de césped.
— Asegúrese de que no haya personas cerca de la cortadora mientras se elevan o descienden los laterales.
— Apague la TDF y espere hasta que todos los elementos giratorios se hayan detenido antes de elevar la plataforma o la sección lateral de la cortadora.
— Únicamente eleve el lateral para quitar objetos de la trayectoria de corte o para acompañar una pendiente del terreno.
— Descienda hasta el suelo el lateral elevado una vez que se eliminó el objeto o se superó la pendiente.
— Detenga el trabajo de corte si alguna persona se acerca a menos de 300 pies (92 m) de la zona de corte.
Prácticas de seguridad para trabajos de corte en
orillas de zanjas
Use extremo cuidado al realizar cortes en orillas de zanjas. Preste atención a escurrimientos, zonas erosionadas y obstrucciones para el corte a lo largo de las orillas de zanjas. Si se golpean obstrucciones con cortadoras de montaje lateral o con aguilón, el extremo delantero del tractor puede desviarse hacia la zanja.
Operación con seguridadLos trabajos en orillas de zanjas con aguilón y lateral elevado pueden reducir la efi cacia de la protección del operador de la cortadora que proporcionan los escudos para objetos arrojados.
— Cuando realice estas operaciones, use cabinas cerradas con ROPS, cerramientos protectores especiales y otros escudos para el operador que ofrece el fabricante.
— Inspeccione la zona de corte y retire o marque todos los objetos extraños y los residuos que deberá esquivar la cortadora.
Prácticas de seguridad para trabajos de corte en
terrenos desparejos
Las pendientes y los terrenos desparejos reducen la estabilidad del tractor y de la cortadora.
Como en todas las condiciones de corte, use tractores equipados con ROPS y cinturón de seguridad. Asegúrese
de que el ROPS está elevado y trabado en su lugar y
use siempre el cinturón de seguridad.
Prevenga los vuelcos del tractor y de la cortadora de césped y mantenga controlada la estabilidad de los equipos:— Repase los manuales del operador del tractor y de la
cortadora para ver las prácticas de seguridad para operaciones en pendientes y terrenos desparejos. Explique las prácticas a los operadores que no puedan leerlas.
— Evite trabajar en pendientes extremadamente empinadas.
Evite golpear obstrucciones
Lea y asegúrese de comprender los
manuales antes de comenzar la
operación
Utilice cabinas cerradas con ROPS o cerramientos de
protección
Mantenga a las personas ajenas
alejadas de la zona de corte
300 ft (92 m)
Use el ROPS y el cinturón de seguridad

17
Prácticas de seguridad para trabajos de corte en terrenos desparejos (continuación)
— Use extremo cuidado para mantener el control de los equipos cuando trabaja en estas condiciones.
— Aumente la estabilidad del tractor agregando pesos o lastre en las ruedas y aumentando al máximo la separación entre las ruedas. Consulte las recomendaciones en el manual del operador.
— Mantenga la velocidad de desplazamiento en el mínimo.— Realice giros amplios y graduales.— Evite los arranques, las paradas y los giros bruscos
cuando trabaje en subidas o bajadas de pendientes o sobre ellas.
— No levante del suelo las cortadoras de montaje trasero o de montaje lateral ni los laterales de la cortadora durante estas operaciones.
— Manténganse alerta en busca de agujeros, baches, pozos, tocones u otras obstrucciones que podrían hacer volcar la máquina.
— Evite las condiciones de suelo resbaladizo que podrían causar la pérdida de control y el vuelco del tractor y la cortadora.
— Evite bajar completamente y golpear el suelo cuando cruza en sentido diagonal depresiones marcadas y hundimientos.
Use extremo cuidado al mantener la estabilidad de los equipos durante todos los trabajos de corte en terrenos desparejos y pendientes. Usted es quien juzga en última instancia si en cualquier pendiente se puede trabajar con seguridad.
Mantenga el control,
desplácese
Agregue lastre, ensanche la
separación entre las ruedas
Evite los pozos, baches y agujeros
Operación con seguridad
Operación con seguridadPrácticas de seguridad para el transporte en caminos
Antes de operar en la vía pública:— Consulte los manuales del operador de los fabricantes
de la cortadora y del tractor para ver instrucciones.— Explique las instrucciones a los usuarios u operadores
que no puedan leerlas.— Verifi que las ordenanzas locales sobre marcas, luces,
balizas, etc. requeridas en los equipos durante el desplazamiento por la vía pública. Se requieren luces en las cortadoras que obstaculizan la visibilidad de las luces traseras y/o las luces de advertencia del tractor.
— Cuando transporte la cortadora de césped en un remolque, siga las instrucciones detalladas del fabricante para la carga, el amarre y la descarga de la cortadora.
Antes de transportar en la vía pública:— Desconecte la alimentación de la TDF a la cortadora.— Eleve la cortadora a la posición de transporte y aplique
la traba para transporte.— Trabe los laterales de la cortadora de césped en la
posición de transporte con dispositivos de bloqueo aprobados.
— Instale una cadena de seguridad para remolque entre la cortadora tipo de tiro y el tractor.
— Asegúrese de que las luces, las luces de advertencia y los refl ectores están en su lugar y son visibles.
— Verifi que que el emblema de vehículo de movimiento le resulte visible a cualquier vehículo que se aproxime por atrás.
Durante el transporte en la vía pública:— Obedezca todas las ordenanzas de tránsito locales.— Acérquese a las intersecciones con precaución.— Observe los letreros de velocidad y control del tránsito.— Evite las paradas de emergencia y los giros cerrados.
Sea un operador amable y apártese periódicamente para dejar pasar el tránsito.
Lea y asegúrese de comprender los
manuales antes de comenzar la
operación
STOP YIELD
Obedezca las ordenanzas de
tránsito

18
Prácticas de seguridad para el estacionamiento
— Use las zonas designadas o alejadas del tránsito.— Use lugares con suelo fi rme y nivelado.— Aplique el freno de estacionamiento.— Descienda el equipo de la cortadora de césped hasta
el suelo.
Apague la cortadora y el tractor usando la práctica correcta de apagado de equipos antes de descender del tractor. (Consulte la página 18, Prácticas correctas de
apagado de los equipos.)
Lugares de estacionamiento con suelo en pendiente:— Ubique los equipos transversalmente con respecto a la
pendiente.— Aplique los frenos de estacionamiento.— Descienda el equipo de la cortadora de césped hasta
el suelo.— Bloquee las ruedas del tractor.
Antes de estacionar temporalmente y dejar equipos deshabilitados cerca de zonas con tránsito:— Retire los equipos de la vía pública.— Instale banderas de advertencia.— Use las balizas de advertencia del tractor.
Estacionamiento seguro
Aplique el freno de estacionamiento
Descienda los equipos elevados
hasta el suelo
P
Apagado con seguridadPrácticas correctas de apagado de los equipos
Transforme el apagado correcto de los equipos en un hábito.
El apagado correcto de un tractor y una cortadora de césped puede ayudar a evitar accidentes cuando la cortadora está sin vigilancia. Apague la cortadora siguiendo los procedimientos específi cos del manual del operador del fabricante. Estos procedimientos normalmente incluirán: — Reduzca la velocidad del motor.— Desenganche el embrague de la TDF y la transmisión.— Haga funcionar el motor en ralentí para que se enfríe
gradualmente.— Coloque todos los controles en la posición de
estacionamiento.— Aplique el freno de estacionamiento.— Descienda la cortadora de césped hasta el suelo.— Descienda los laterales de las cortadoras con laterales
hasta el suelo.— Apague el motor, trabe la ignición y retire la llave de la
máquina; llévela con usted.— Espere hasta que todas las piezas móviles se hayan
detenido antes de descender.— Libere la presión hidráulica moviendo los controles
hidráulicos varias veces en todas las direcciones.— Trabe las cubiertas y los cerramientos antivandalismo, si
están instalados, cuando los equipos están sin vigilancia.— Descienda con cuidado manteniendo contacto de tres
puntos.
Desenganche la TDF, aplique el freno
Espere hasta que las piezas giratorias se
detengan
Descienda los equipos elevados
hasta el suelo
Retire la llave, trabe la ignición, llévese
la llave
PTO
STOP
P

19
Apagado con seguridadDescenso correcto
— Nunca descienda de equipos en movimiento.— Nunca baje de una máquina saltando.— Descienda con cuidado.— Verifi que que no haya peldaños resbaladizos.— Mantenga los pies y las manos lejos de los controles.— Use los asideros y los peldaños durante el descenso.— Enfrente la máquina y use contacto de tres puntos (2
manos y 1 pie o 2 pies y 1 mano).
Espere hasta que las piezas móviles se
detengan
Use contacto de tres puntos; enfrente a
la máquina
Realización de mantenimiento con seguridadMantenimiento de los equipos
Asegúrese de mantener los equipos de acuerdo con las instrucciones del fabricante. Verifi que con regularidad el funcionamiento de los dispositivos de protección y de seguridad.
No realice ningún trabajo en un tractor o en una cortadora de césped si no está autorizado y cualifi cado para hacerlo.
Si ha sido autorizado para realizar mantenimiento, lea
los manuales del operador y de servicios. Estudie las instrucciones; verifi que las tablas de lubricación; examine todos los mensajes de instrucciones que haya sobre la máquina. El mantenimiento puede ser peligroso si no se realiza correctamente. Asegúrese de tener las habilidades necesarias, la información y las herramientas y equipos correctos para realizar el trabajo.
¡ADVERTENCIA! No modifi que equipos ni agregue
componentes no aprobados por el fabricante. Use piezas, lubricantes y técnicas de servicio recomendadas por el fabricante.
Piezas de la cortadora de césped y seguridad
personal
Los fabricantes de cortadoras de césped usan sujetadores y específi cos y piezas especialmente diseñadas para cumplir con los requisitos de las operaciones de las cortadoras. Las piezas críticas (pernos autobloqueantes de las hojas, hojas, pasadores, escudos y otros componentes especiales) tienen requisitos específi cos de resistencia, diseño y ajuste para la marca y el modelo de cortadora que usted está usando.
Evite posibles lesiones graves o la muerte por el uso de piezas o modifi caciones no aprobadas:— No sustituya con tornillería común los pernos de las
hojas u otros componentes de piezas especiales originales del fabricante.
— No sustituya hojas, pasadores, escudos u otras piezas críticas.
— No use pernos de mayor resistencia para reemplazar los pernos de seguridad originales del fabricante.
Realice el mantenimiento de
los equipos

20
Realización de mantenimiento con seguridadPreparación personal
Use la ropa de protección personal y los equipos de protección personal (PPE) que se le proporcionen o que requieran las condiciones del trabajo. SIEMPRE debe usar gafas de seguridad con escudos laterales.
Puede necesitar también:— Casco— Calzado de seguridad— Anteojos de seguridad, antiparras o protección facial— Delantal y guantes— Protección para oídos— Casco o antiparras para soldar— Respirador o máscara con fi ltro
Use la ropa necesaria; no corra ningún riesgo.
Mantenga las manos (y la ropa)alejadas de todas las
piezas móviles. No use cordones sueltos, mangas fl ojas, anillos, relojes o cabello largo.
¡ADVERTENCIA! Evite lesiones graves o muerte por enredos. No use ropa fl oja ni accesorios. Manténgase
alejado de todos los componentes giratorios cuando
el motor está en funcionamiento. El contacto, el enrollado o el enredo con piezas giratorias o móviles podrían resultar en lesiones graves o la muerte.
Evite las piezas giratorias
Evite puntos donde pueda quedar
atrapado
Realización de mantenimiento con seguridadUse un delantal de caucho y guantes de caucho cuando trabaja con sustancias corrosivas. Use guantes y calzado de seguridad cuando manipula bloques de madera o metales con bordes agudos.
Use siempre anteojos de seguridad, antiparras o protección facial. Proporcionan protección ocular para fl uidos bajo presión, mientras se esmerila y se realizan servicios a las baterías. También es necesaria protección contra residuos, líquidos y material suelto producido por el equipo, las herramientas y el aire/agua presurizada.
Use protección facial y siga las instrucciones del fabricante cuando desarma componentes cargados a resorte o cuando trabaja con ácidos de batería. Use un casco o antiparras para soldar con fi ltro esfumado cuando suelda o corta con soplete.
No arene, esmerile, corte con soplete o suelde sin un respirador aprobado por NIOSH o una ventilación adecuada. Si se requiere soldar en esta máquina, consulte los manuales del operador o de servicios del fabricante o consulte al concesionario de los equipos para obtener los procedimientos correctos.
Mantenga los bolsillos sin objetos que podrían salirse y caer dentro de la maquinaria.
Maneje las herramientas y las piezas pesadas con sensatez con respecto a usted mismo y a otras personas. Deposite los elementos, no los deje caer.
Preparación de la zona de trabajo
— Ubique la cortadora de césped en una zona nivelada fuera del paso de otros equipos en funcionamiento.
— Asegúrese de que haya luz, ventilación y espacio libre adecuados.
— Quite el aceite, la grasa o el agua para eliminar toda superfi cie resbaladiza.
— Limpie alrededor de la zona donde se realizarán servicios para minimizar la contaminación.
Limpie las superfi cies
resbaladizas
Ventile la zona de trabajo

21
Realización de mantenimiento con seguridadPreparación de la máquina
Deben controlarse o reducirse las fuentes de energía almacenada (eléctricas, mecánicas, hidráulicas, neumáticas, químicas, térmicas, etc.) al mínimo practicable antes de realizar cualquier procedimiento de mantenimiento, reparación o servicio.
Prácticas de seguridad para prevenir posibles lesiones
por fuentes que liberan energía:
— Desenganche la TDF antes de apagar el motor.— Coloque los controles en la posición de estacionamiento
o punto muerto antes de apagar el motor.— Aplique el freno de estacionamiento o bloquee las
ruedas.— Espere hasta que todas las piezas móviles se
detengan.— Descienda la cortadora de césped hasta el suelo.— Descienda los laterales de las cortadoras con laterales
hasta el suelo.— Apague el motor del tractor.— Libere la presión del sistema hidráulico moviendo los
controles varias veces en todas las direcciones.— Trabe la ignición, retire la llave y llévesela.
— Escuche y observe en busca de evidencias que indiquen piezas en movimiento antes de descender.
— Apoye o bloquee con seguridad la cortadora de césped antes de trabajar debajo de ella o de otros componentes elevados.
— Apoye, bloquee o trabe con seguridad los laterales de la cortadora con dispositivos de traba aprobados antes de trabajar cerca o debajo de una cortadora con laterales.
— Alivie la presión antes de desconectar o desarmar un sistema presurizado.
— Bloquee o alivie la presión de los resortes antes de desarmar un mecanismo cargado a resorte.
— Apoye o bloquee con seguridad cualquier componente elevado de la máquina antes de trabajar en él.
— Evite las llamas, las chispas y no fume cerca de combustibles, fl uido hidráulico u otro material infl amable como los residuos de los cortes.
Prepare los sistemas de la máquina para
realizarles servicios
Fije una etiqueta con la advertencia “NO PONER EN FUNCIONAMIENTO” en todas las palancas de control y retire la llave de contacto si la cortadora de césped no debe ser utilizada. Llévese la llave.
Instale dispositivos de apoyo aprobados cuando trabaja debajo o cerca de equipos elevados.
¡ADVERTENCIA! Las cortadoras de césped u otros equipos elevados no apoyados pueden caerse de manera imprevista. Nunca se introduzca debajo de equipos
elevados si no están apoyados en dispositivos de
apoyo aprobados. La caída de equipos podría resultar en una lesión grave o la muerte por aplastamiento.
Retire sólo las guardas o cubiertas que permiten acceder a la zona donde se realizarán servicios. Vuelva a colocar todas las guardas y cubiertas cuando el trabajo esté terminado.
Vuelva a colocar todas las guardas
Realización de mantenimiento con seguridad
Utilice dispositivos de apoyo
aprobados
Use una “etiqueta que indique No poner en
funcionamiento”

22
Realización de mantenimiento con seguridadUse ventilación adecuada
Si es necesario hacer funcionar un motor en una zona cerrada, elimine del área las emanaciones de escape con una extensión del caño de escape. Si no tiene esa extensión, asegúrese de abrir las puertas y dejar entrar aire del exterior.
¡ADVERTENCIA! Evite posibles lesiones. Nunca trabaje
en la maquinaria con el motor en funcionamiento salvo
que así lo indiquen los manuales del fabricante para
un servicio en particular.
¡ADVERTENCIA! Nunca haga funcionar ningún tipo de
motor sin la ventilación adecuada: LAS EMANACIONES DEL ESCAPE PUEDEN SER MORTALES.
Use gatos y malacates con cuidado
Los soportes o bloques de seguridad deben ubicarse en una parte rígida de la cortadora. No ubique soportes debajo de ejes o apoyos de ruedas que puedan girar.
Si debe trabajar debajo de equipos elevados, siempre use bloques de madera (no de concreto), soportes de gato u otros soportes rígidos y estables. Cuando use gatos o malacates, siempre asegúrese de que están correctamente apoyados.
¡ADVERTENCIA! Evite posibles lesiones por aplastamiento. Nunca use bloques de concreto para
apoyo. Pueden colapsar bajo cargas incluso livianas.
Asegúrese de que los malacates o gatos que usa estén en buenas condiciones. Nunca use gatos con piezas rajadas, dobladas o retorcidas. Nunca use cables pelados, retorcidos o pellizcados. Nunca use ganchos doblados o deformados.
Ventile la zona de trabajo
Use un apoyo adecuado para los equipos elevados
Retire la llave y lea el manual de mantenimiento
Prácticas de seguridad para tareas de
mantenimiento comunes
Riesgos del combustible
¡ADVERTENCIA! Siempre use recipientes y/o equipos
de distribución de combustible aprobados.
Los combustibles son infl amables; por eso, debe cumplir estas prácticas con el fi n de reducir la posibilidad de un accidente grave.— Apague el motor y la ignición mientras carga combustible.— Siempre conecte a tierra la boquilla de combustible
contra el cuello de llenado del depósito para evitar chispas.
— Mantenga las chispas y llamas abiertas alejadas del combustible.
— No fume mientras carga combustible o manipula recipientes con combustible.
— No corte ni suelde en líneas, tanques o recipientes de combustible ni cerca de ellos.
— No llene el depósito en exceso o derrame combustible. Limpie el combustible derramado de inmediato.
Riesgos del refrigerante de motor
Los sistemas de refrigeración con líquidos acumulan presión a medida que el motor se calienta; tenga suma
precaución antes de retirar la tapa del radiador.Asegúrese de:— Detener el motor y esperar que el sistema se enfríe.— Usar ropa de protección y anteojos de seguridad.— Girar la tapa del radiador lentamente hasta el primer
tope para permitir que la presión escape antes de retirar la tapa por completo.
Retire la tapa del radiador lentamente
No fumar; evitar las llamas
abiertas
Realización de mantenimiento con seguridad

23
Riesgos del sistema hidráulico
El sistema hidráulico se encuentra bajo presión siempre que el motor está funcionando; puede conservar presión incluso después de apagar el motor. Haga funcionar todos los controles hidráulicos incluyendo el control hidráulico auxiliar después de que el motor esté apagado. Alivie la presión atrapada en las líneas después de que los accesorios están apagados y apoyados en el suelo.
Durante la inspección del sistema hidráulico:— Espere que el fl uido se enfríe antes de desconectar
las líneas. El fl uido hidráulico caliente puede causar QUEMADURAS GRAVES.
— No use las manos para verifi car la presencia de fugas. En cambio, use un cartón o papel para buscar fugas.
— Use protección ocular adecuada. El fl uido hidráulico puede causar lesiones oculares permanentes.
¡ADVERTENCIA! El fl uido hidráulico bajo presión pueden penetrar la piel o los ojos y causar lesiones graves, ceguera o la muerte. Las fugas de fl uido bajo presión pueden no ser visibles. Utilice un cartón o una madera
para buscar fugas, no la mano. Use una protección
facial o antiparras de seguridad para proteger los
ojos. Si el fl uido se inyecta en la piel, debe ser extraído dentro de las próximas pocas horas por personal médico familiarizado con este tipo de lesión.
Cuando ventila o llena el sistema hidráulico, afl oje la tapa de llenado con lentitud y retírela gradualmente.
Nunca restablezca una válvula de alivio del sistema hidráulico a una presión mayor que la recomendada por el fabricante.
Use protección ocular
El fl uido a alta presión puede
inyectarse en el cuerpo
Realización de mantenimiento con seguridad
Riesgos del sistema eléctrico
Antes de trabajar en el sistema eléctrico, desconecte los cables de la batería.— Retire primero los cables negativos (-) de la batería.— Al reconectar la batería, conecte los cables negativos
(-) de la batería al fi nal.
El líquido del interior de las baterías contiene ácido, que es un VENENO y puede causar QUEMADURAS QUÍMICAS GRAVES.
Evite lesiones
— Use una protección facial para evitar el contacto con los ojos.
— Use guantes y ropa resistentes a los productos químicos para mantener al electrolito alejado de la piel y la ropa común.
¡ADVERTENCIA! El contacto con el electrolito daña los ojos y la piel. Siempre use una protección facial
para evitar que el electrolito penetre en los ojos. Si el electrolito entra en contacto con los ojos, enjuague de inmediato con agua limpia y busque atención médica.
Use guantes de caucho y ropa de protección para
mantener el electrolito lejos de la piel. Si el electrolito entra en contacto con la piel o la ropa, lave de inmediato con agua limpia.
Si se ingiere, busque atención médica de inmediato. NUNCA proporcione líquidos que induzcan el vómito.
Use indumentaria de protección
Use protección facial
Realización de mantenimiento con seguridad

24
Evite explosiones
¡ADVERTENCIA! Evite posibles lesiones graves por explosiones. Las baterías de plomo-ácido producen gases sumamente explosivos, especialmente durante la carga. Mantenga alejados los arcos, las chispas, las
llamas y el tabaco encendido.
— No fume cerca de las baterías.— Mantenga los arcos, las chispas y llamas abiertas
alejadas de las baterías.— Proporcione ventilación adecuada.
Nunca revise la batería colocando un objeto metálico entre los bornes: la chispa resultante podría causar una explosión.
¡ADVERTENCIA! Evite posibles lesiones graves por explosiones de baterías. No cargue baterías ni arranque
con refuerzo el motor si la batería está congelada.
Caliente a 60 °F (15,5 °C) o la batería puede explotar y causar lesiones graves.
Reglas de seguridad durante el arranque con refuerzo de batería:— Siga las instrucciones para el “arranque con refuerzo
de batería” correcto como se especifi ca en el manual del fabricante.
— Asegúrese de que las máquinas no se estén tocando.— Observe la polaridad de las baterías y conexiones.— Realice la conexión fi nal de cable al motor o al punto
de tierra más alejado de la batería. Nunca realice la conexión fi nal en el arrancador o la batería muerta: las chispas pueden encender gases explosivos presentes en la batería.
— Cuando desconecta cables después de un arranque con puente, retire los cables en el orden inverso al de la conexión (es decir, la conexión fi nal primero).
Evite las chispas y las llamas abiertas
cerca de las baterías
Para el arranque con refuerzo, observe la polaridad y realice la conexión fi nal en
el punto de descarga a tierra
Realización de mantenimiento con seguridad
Mantenimiento de neumáticos y ruedas
Revise los neumáticos y las ruedas a diario porque la estabilidad del tractor y la cortadora de césped puede verse signifi cativamente afectada por la presión de los neumáticos o daños en los neumáticos o en las ruedas.
Revise los neumáticos para verifi car:— La presión correcta.— Cortes y protuberancias.— Clavos u otras pinchaduras.— Desgaste desparejo o excesivo.— Estado de los vástagos y tapas de las válvulas.
Revise las ruedas para verifi car:— Daños en las llantas.— Tuercas o pernos faltantes o fl ojos.— Desalineación.
Todos los servicios de neumáticos deben ser realizados por un centro de servicios para neumáticos cualifi cado o por una persona de servicio autorizada debidamente capacitada en los procedimientos y el uso del equipo de seguridad destinado a los servicios de neumáticos.
Revise los neumáticos y las ruedas en busca
de daños
Mantenga la presión correcta en
los neumáticos
Realización de mantenimiento con seguridad

25
Mantenimiento de neumáticos y ruedas
(continuación)
¡ADVERTENCIA! Los tipos de ruedas y neumáticos
que generalmente se encuentran en estos equipos
requieren cuidados especiales al realizar servicios
para evitar lesiones graves o la muerte.
No infl e los neumáticos por encima de la presión recomendada. Asegúrese de volver a colocar el lastre de los neumáticos si está instalado. Consulte las especifi caciones del fabricante para ver los requisitos de lastre.
Mantenga las tuercas de las ruedas apretadas según las recomendaciones del fabricante.
Es normal que la presión de los neumáticos aumente durante el funcionamiento; NO se debe reducir.
Nunca vuelva a infl ar un neumático que se ha desinfl ado mucho o por completo sin retirar el neumático de la rueda. Haga inspeccionar atentamente el neumático y la rueda para detectar daños antes de volverlos a armar.
Al agregar aire a un neumático, hágalo desde cierta distancia. Use una manguera larga con mandril de autofi jación. Siempre párese detrás de la trocha cuando ajusta la presión de un neumático.
No infl e neumáticos con gases infl amables o con sistemas que usan un inyector de alcohol.
Nunca corte o suelde una rueda con un neumático infl ado instalado en ella. Esto podría causar descompresión explosiva.
Verifi que que el tamaño del neumático y la rueda coincidan correctamente.
Cuando reemplaza neumáticos, asegúrese de que sean de la clasifi cación adecuada especifi cada por el fabricante.
Los neumáticos no deben funcionar a velocidades más altas que las nominales. La mayoría de los neumáticos para agricultura están clasifi cados para una velocidad máxima de 20 mph (32 km/h).
Evite la explosión de los neumáticos
Realización de mantenimiento con seguridad
Servicio y reparaciones completas antes de
liberar la máquina
Apriete todos los pernos, accesorios y conexiones con las torsiones especifi cadas por el fabricante.
Instale todas las guardas, cubiertas y escudos después de realizar los servicios. Reemplace o repare los que estén dañados. Llene y recargue los sistemas a presión sólo con los fl uidos aprobados o recomendados por el fabricante.
Arranque el motor y revise para detectar fugas. (Consulte la página 23, Riesgos del sistema hidráulico.) Haga funcionar todos los controles para asegurarse de que el tractor y la cortadora de césped funcionan correctamente. Pruebe la máquina si es necesario. Después de las pruebas, apague y verifi que el trabajo realizado. ¿Falta algún pasador, arandela, tuerca de seguridad, etc.? Vuelva a revisar todos los niveles de fl uidos antes de liberar la máquina para el funcionamiento.
Todas las piezas deben ser inspeccionadas durante la reparación y deben reemplazarse si están gastadas, rajadas o dañadas. Las piezas excesivamente gastadas o dañadas pueden fallar y causar lesiones o la muerte.
Reemplace cualquier letrero dañado o ilegible.
Mantenimiento de las hojas de la cortadora
No corra riesgos usando hojas dañadas o dobladas. Los fabricantes de cortadoras de césped de la Asociación de Fabricantes de Equipos (Association of Equipment Manufacturers, AEM) y la Asociación de Fabricantes de Equipos para Agricultura (Farm Equipment Manufacturers Association, FEMA) piden que las hojas de cortadoras NO se reutilicen, enderecen, refuercen en su superfi cie o suelden. Si una hoja rota es arrojada por una cortadora, podrían producirse lesiones graves o la muerte.
Verifi que el trabajo de servicio cuando
está completo
Realización de mantenimiento con seguridad

26
Realización de mantenimiento con seguridadMantenimiento de las hojas de la cortadora
(continuación)
— ¿Cómo están hechas las hojas de la cortadora
de césped? Están hechas acero para resortes de aleación de alta resistencia. Se forjan en caliente y se les da forma para cumplir con las especifi caciones individuales del fabricante; luego, se tratan y templan a un estado dúctil, de alta resistencia para reducir la posibilidad de rupturas durante el corte. Las hojas se prueban para garantizar que cumplan con las normas de resistencia, dureza y ductilidad. Si una hoja no cumple con alguna de estas especifi caciones, no se utilizará en la cortadora de césped.
— ¿Qué sucede cuando se dobla una hoja de la
cortadora? Se necesita una gran fuerza de impacto para doblar la hoja. Esta fuerza de impacto a menudo resulta en que las hojas se agujerean o marcan. Una vez que una hoja está dañada por un agujero o una marca, es mucho más probable que ocurra una falla de la hoja. Cuando una hoja está gravemente doblada, puede crearse una rajadura microscópica en ella. Enderezar la hoja no quita o repara esta rajadura, sino que puede causar rajaduras adicionales.Tensiones adicionales durante los trabajos de corte pueden resultar en una falla imprevista de la hoja.
— Evite doblar las hojas. Contribuya a prevenir que las hojas de la cortadora se doblen o rajen evitando el contacto con objetos sólidos. Las hojas de la cortadora de césped están destinadas a cortar hierba, arbustos, vegetación leñosa y árboles y ramas pequeños. No están diseñadas para entrar en contacto con objetos sólidos como roca, cemento o postes de acero. Inspeccione la zona antes de usar la cortadora. Retire o marque claramente los objetos sólidos y corte alrededor de ellos.
— Sustituya las hojas dañadas! Inspeccione las hojas de la cortadora diariamente o después de golpear algún objeto sólido. Si una hoja de la cortadora de césped se daña (está doblada, agujereada, rajada) o desgasta más del 25 por ciento del tamaño original, debe retirarse y sustituirse con una nueva. Siempre use las hojas originales del fabricante. Las hojas de marcas no originales pueden no cumplir con los requisitos de resistencia, dureza y ductilidad del fabricante de la cortadora.
— No corra riesgos usando hojas dañadas o dobladas. El uso de una hoja de cortadora dañada o enderezada puede resultar en la ruptura de la hoja y que la hoja sea arrojada hacia el operador o una persona ajena causando una lesión grave o la muerte. El precio de una nueva hoja es bajo en comparación con la posibilidad de una lesión grave que podría resultar de una hoja doblada o rota arrojada por la cortadora
Palabras fi nales para el usuarioAcaba de terminar de leer el Manual de la cortadora de césped industrial y para agricultura AEM. Es imposible que este manual abarque todas las situaciones de seguridad que se podría encontrar a diario. Su conocimiento de estas precauciones de seguridad y de su cumplimiento de las reglas básicas de seguridad
contribuirán a formar un buen juicio en todas las situaciones. Nuestro objetivo es ayudarlo a desarrollar, establecer y mantener buenos hábitos de seguridad para que la operación de una cortadora de césped industrial y para agricultura le resulte más fácil y más segura.
Éste es otro manual de una serie publicada por AEM sobre la operación de maquinaria en condiciones de seguridad.Muchas de las ilustraciones de este manual de seguridad se pueden encontrar y descargar en http://pictorials.aem.org.
Para obtener publicaciones adicionales, visite nuestro sitio web en www.safetymaterials.org.
ASOCIACIÓN DE FABRICANTES DE EQUIPOS
Correo electrónico: [email protected]

Introduction Section 2-1
© 2012 Alamo Group Inc.
INTRODUCTION SECTION

INTRODUCTION
TX1500/1700 01/12 Introduction Section 2-2
© 2012 Alamo Group Inc.
INTR
OD
UC
TIO
N
We are pleased to have you as a Rhino customer. Your Rotary Cutter has been carefully designed with careand built with quality materials by skilled workers to give maximum service with minimum down time. Thismanual is provided to give you the necessary operating and maintenance instructions for keeping your rotarycutter in top operating condition. Careful use and timely service saves extensive repairs and costly downtimelosses. Please read this manual thoroughly. Understand what each control is for and how to use it.
No shielding is 100% effective in preventing thrown objects. The possibility of injury and property damage fromthis hazard can be substantially reduce by selecting proper shielding, maintaining the mower and shielding ingood operational condition, inspecting the area for foreign debris before mowing, operating the mower at aminimum cutting height of 1-1/2", and keep unprotected persons at a minimum distance of 300 feet from themower at all times during operation.
Safety is of primary importance to the owner/operator and to the manufacturer. Observe all safety precautionsdecaled on the machine and noted throughout the manual for safe operation of implement. If any assistance oradditional information is needed, contact your authorized Rhino dealer. The owner/operator/dealer shouldknow and understand the Safety Messages before assembly and be aware of the hazards of operating thiscutter during assembly, use, and maintenance. The Safety Alert Symbol combined with a Signal Word, as seenbelow, is intended to warn the owner/operator of impending hazards and the degree of possible injury facedwhen operating this machine.
Indicates an imminently hazardous situation that, if not avoided, WILL result in DEATH ORVERY SERIOUS INJURY.
Indicates an imminently hazardous situation that, if not avoided, COULD result in DEATHOR SERIOUS INJURY.
Indicates an imminently hazardous situation that, if not avoided, MAY result in MINORINJURY.
Identifies special instructions or procedures that, if not strictly observed, could result indamage to, or destruction of the machine, attachments or the environment.

INTRODUCTION
TX1500/1700 01/12 Introduction Section 2-3
© 2012 Alamo Group Inc.
INTR
OD
UC
TION
The Rhino Model TX1500 and TX1700 are designed for sod growers, golf courses, land owners,municipalities, and recreational areas where a high quality of cut on turf grasses is required. Uplifted bladesform a suction during operation to lift the grass before cutting it. The caster wheel arrangement along with theflexible, floating deck attachment and the standard front mounted rollers, all work together to give an even cutand minimize scalping.
NOTE: The rear wheels on the two wing mower decks and the front wheels on the rear mower deck are rigidlymounted and are not designed to caster.
Power from the tractor is transmitted through a telescoping driveline to a divider gearbox, then to 90ºgearboxes on each mower deck. Power is passed to the spindle housings by single, a B-Section, Kevlarreinforced belts. Drivetrain protection is provided by belt slippage.
NEVER ALLOW CHILDREN TO OPERATE, RIDE ON, OR COME CLOSE TO MOWER ORTRACTOR. Usually 16-18 year-old children who are mature and responsible can operatethe mower with reasonable safety if they have read Operator’s Manual, been trained in safeoperation of the machine, and are physically large and strong enough to reach and operatecontrols easily.
For Non-Agricultural use, OSHA, ASABE, SAE, and ANSI standards require the use ofChain Guards, Deflectors, or Solid Skirts at all times. The Mower manufacturer stronglyrecommends the use of Chain Guards or Rubber Deflectors for Agricultural purposes aswell, to reduce the risk of property damage, serious bodily injury, or even death from objectsthrown out by or from contact with the Cutting Blades.
Front and rear and left and right are determined by the normal direction of travel, the same as driving anautomobile.

INTRODUCTION
TX1500/1700 01/12 Introduction Section 2-4
© 2012 Alamo Group Inc.
INTR
OD
UC
TIO
N
Attention Owner/Operator
BEFORE OPERATING THIS MACHINE:
1. Carefully read the Operator’s Manual, completely understand the Safety Messages and instructions, andknow how to operate correctly both the tractor and implement.
2. Fill out the Warranty Card in full. Be sure to answer all questions, including the Serial Number of theimplement. Mail within 30 days of delivery date of this implement.
NOTE: Warranties are honored only if completed “Owner Registration and Warranty” forms are received byAlamo Group within thirty days of delivery of the implement.
3. Record the Mower Model and Serial Numbers on the Warranty page at the front of the Operator’s Manual.Keep this as part of the permanent maintenance file for the implement.

Assembly Section 3-1
© 2012 Alamo Group Inc.
ASSEMBLY SECTION

ASSEMBLY
TX1500/1700 01/12 Assembly Section 3-2
© 2012 Alamo Group Inc.
ASS
EMB
LY
Operating with PTO speed over 540 RPM can cause excessive vibration with subsequentmachine failure which can cause serious injury or even death. Never exceed 600 RPM.
DEALER SET-UP INSTRUCTIONS
This mower is shipped completely assembled from the factory.
Always use personal protection devices such as eye and ear protectors during assembly.

Operation Section 4-1
© 2012 Alamo Group Inc.
OPERATION SECTION

OPERATION
TX1500/1700 01/12 Operation Section 4-2
© 2012 Alamo Group Inc.
OPE
RAT
ION
RHINO TX1500/1700FINISHING MOWER OPERATION INSTRUCTIONS
Rhino TX1500 and TX1700 finishing mowers are manufactured with quality material by skilled workers. Thesemowers are designed for cutting grass and small weeds. The mower is equipped with protective deflectorsand/or chain guards to prevent objects being thrown from the mower by the blades, however, no shielding is100% effective. All shields, guards, deflectors, and chains equipped on the unit must be maintained on themower in good operational condition.
It is the operator’s responsibility to be knowledgeable of all potential operating hazards and to take everyreasonable precaution to ensure oneself, others, animals, and property are not injured or damaged by themower, tractor, or a thrown object. Do not operate the mower if passersby, pets, livestock, or property aredirectly in front or to the rear of the unit.
This section of the Operator’s Manual is designed to familiarize, instruct, and educate safe and proper moweruse to the operator. Pictures contained in this section are intended to be used as a visual aid to assist inexplaining the operation of a rotary mower and are not of a finishing mower. Some pictures may show shieldsremoved for purposes of clarity. NEVER OPERATE this implement without all shields in place and in goodoperational condition. The operator must be familiar with the mower and tractor operation and all associatedsafety practices before operating the mower and tractor. Proper operation of the mower, as detailed in thismanual, will help ensure years of safe and satisfactory use of the mower.
IMPORTANT: To avoid mower damage, check bolt torque after the first 10 hours of operation. Retightenblade bolt to proper torque of 76 ft. lbs.
READ AND UNDERSTAND THE ENTIRE OPERATING INSTRUCTIONS AND SAFETY SECTION OF THISMANUAL AND THE TRACTOR MANUAL BEFORE ATTEMPTING TO USE THE TRACTOR ANDIMPLEMENT. If you do not understand any of the instructions, contact your nearest authorized dealer for afull explanation. Pay close attention to all safety signs and safety messages contained in this manual andthose affixed to the implement and tractor. OPS-U- 0001
READ, UNDERSTAND, and FOLLOW the following Safety Messages. Serious injury ordeath may occur unless care is taken to follow the warnings and instructions stated in theSafety Messages. Always use good common sense to avoid hazards. (SG-2)
Si no lee ingles, pida ayuda a alguien que si lo lea para que le traduzca lasmedidas de seguridad. (SG-3)

OPERATION
TX1500/1700 01/12 Operation Section 4-3
© 2012 Alamo Group Inc.
OPER
ATION
1. Standard Equipment and SpecificationsTX1500 TX1700
Cutting Width 15’ 17’Cutting Height 1-1/2 to 4-1/2” 1-1/2 to 4-1/2”Transport Height 8’ 9’Transport Width 8’ 8’Transport Length 14’ 14’Horsepower Required (min) 40 HP 40 HPHitch ---Pull Type, Clevis Hitch, Three-Position Adjustment---Gearbox Rating Transfer Box 80 HP 80 HP Center & Wings 45 HP 45 HPTractor PTO Speed 540 RPM 540 RPMDriveline Size ----------- Cat 4 80º (Main), Cat 3 (Decks) --------Wing Section Lift Arms ------------- 4 x 4 inch Boxed Section ----------Wing Flex --------------- 30° Up and 10° Down ------------Wing Deck Flex ------10° Side to Side, 10° Front to Rear ----Tire Size 23 x 8.5 (2) 23 x 8.5 (2)Deck Widths 5 ft Deck 2 N/A 6 ft Deck 1 3Deck Plate 7 Gauge 7 GaugeBlade Tip Speed 18271 FPM (18,231 Wings) 18271 FPMGauge Wheels 13” x 5” 13” x 5”Belt --------- (1) per Deck “B” size Kevlar --------Belt Adjustment --------------- Sprint Loader Idler --------------Deck Overlap 6” 6”Blade Overlap 1-1/2” 1-1/2”Front Roller Size (Std) 3” x 5” 3” x 5”Weight (Approximate) 2752 lbs. 2855 lbs.Jack Stand Std. Std.Safety Tow Chain Std. Std..
NOTE: Before operation, service all locations outlined in Maintenance Section - “Lubrication” and removetransport lock pins from mower decks as shown. Unpin inside wing tires and reposition into a trailing positionand repin in place. Run the mower in a static condition at half throttle for 30 minutes. Inspect all belts for propertension; check gearboxes for proper oil level; and check to make sure blade spindles are not overheating.
The Mower is designed for certain mowing applications and is rated to cut up to a specificsize vegetation (see Mower Standard Equipment and Specifications). DO NOT use thismower to cut vegetation above the Mower’s rated capacity or to cut any type of non-vegetative material. Only operate this Mower on a properly sized and equipped Tractor.Operating this Mower in an application for which it is not designed and/or operating theMower with the wrong size Tractor can cause Mower component damage and equipmentfailure resulting in possible serious injury or death. (SGM-14)

OPERATION
TX1500/1700 01/12 Operation Section 4-4
© 2012 Alamo Group Inc.
OPE
RAT
ION
2. OPERATOR REQUIREMENTSSafe operation of the unit is the responsibility of a qualified operator. A qualified operator has read andunderstands the implement and tractor Operator’s Manuals and is experienced in implement and tractoroperation and all associated safety practices. In addition to the safety messages contained in this manual,safety signs are affixed to the implement and tractor. If any part of the operation and safe use of thisequipment is not completely understood, consult an authorized dealer for a complete explanation.
If the operator cannot read the manuals for themselves or does not completely understand the operation of theequipment, it is the responsibility of the supervisor to read and explain the manuals, safety practices, andoperating instructions to the operator.
Safe operation of equipment requires that the operator wear approved Personal Protective Equipment (PPE)for the job conditions when attaching, operating, servicing, and repairing the equipment. PPE is designed toprovide operator protection and includes the following safety wear:
PERSONAL PROTECTIVE EQUIPMENT (PPE)
• Always Wear Safety Glasses• Hard Hat• Steel Toe Safety Footwear• Gloves• Hearing Protection• Close Fitting Clothing• Respirator or Filter Mask (depends on
operating conditions) OPS-U- 0002
DO NOT use drugs or alcohol immediately before or while operating theTractor and Implement. Drugs and alcohol will affect an operator’salertness and coordination and therefore affect the operator’s ability tooperate the equipment safely. Before operating the Tractor or Implement,an operator on prescription or over-the-counter medication must consulta medical professional regarding any side effects of the medication thatwould hinder their ability to operate the Equipment safely. NEVERknowingly allow anyone to operate this equipment when their alertness orcoordination is impaired. Serious injury or death to the operator or otherscould result if the operator is under the influence of drugs or alcohol. (SG-27)

OPERATION
TX1500/1700 01/12 Operation Section 4-5
© 2012 Alamo Group Inc.
OPER
ATION
3. TRACTOR REQUIREMENTSThe tractor used to operate the mower must have the power capacity to lift, pull, and operate the Power TakeOff (PTO) at the mower’s rated speed while traveling at a ground speed between 2 and 5 MPH. Operating themower with a tractor that does not meet the following requirements may cause tractor or mower damage andbe a potential danger to the operator and passersby.
Tractor Requirements and Capabilities• Certified approved Roll-Over Protective Structure (ROPS) or ROPS cab and seat belt.• Tractor Safety Devices .....................Slow Moving Vehicle (SMV) emblem, lighting, PTO master shield• Tractor Horsepower- Minimum.........TX1500 - 40 HP, TX1700 -40 HP• Drawbar............................................14” Length - measured from end of PTO shaft to hitch pin hole, rated
to carry mower tongue weight, safety chain attachment point• Hydraulics.........................................Single acting hydraulic selective control valve with float detent• Power Take Off ................................. 540 RPM
3.3 Tractor HorsepowerThe horsepower required to operate the mower depends on many factors including the vegetation to be cut,terrain condition, operator experience, and condition of the mower and tractor. For most mowing condition, theTX1500/1700 mower requires tractor with at least 40 HP. Operating the mower with a tractor that does nothave adequate power may damage the tractor engine.
3.1 ROPS and Seat BeltThe tractor must be equipped with a Roll-Over-Protective-Structure (ROPS) (tractor cab or roll-bar) and seatbelt to protect the operator from falling off the tractor, especially during a roll over where the driver could becrushed and killed. Only operate the tractor with the ROPS in the raised position and seat belt fastened.Tractor models not equipped with a ROPS and seat belt should have these life saving features installed by anauthorized dealer. OPS-U- 0003
Operate this Equipment only with a Tractor equipped with an approved roll-over-protective system (ROPS). Always wear seat belts. Serious injury oreven death could result from falling off the tractor--particularly during a turnoverwhen the operator could be pinned under the ROPS. (SG-7)
3.2 Tractor Safety DevicesIf transporting or operating the tractor and implement near a public roadway, the tractor must be equipped withproper warning lighting and a Slow Moving Vehicle (SMV) emblem which are clearly visible from the rear ofthe unit. Lights and a SMV emblem must be equipped directly on implements if the visibility of the tractorwarning signals are obscured.
Maintain all manufacturer equipped safety shields and guards. Always replace shields and guards that wereremoved for access to connect, service, or repair the tractor or implement. Never operate the tractor PTOwith the PTO master shield missing or in the raised position. OPS-U- 0004

OPERATION
TX1500/1700 01/12 Operation Section 4-6
© 2012 Alamo Group Inc.
OPE
RAT
ION
3.4 DrawbarThe tractor drawbar must be positioned at a certainlength based on the operating speed of the mowerto ensure proper driveline operation. 540 RPMmowers require the drawbar length measured fromshaft end to hitch pin hole to be positioned at 14”.
Ensure the drawbar is rated to carry the tongueweight of the mower.
3.5 Tractor HydraulicsThe mower is raised and lowered with three hydraulic cylinders, one for each section. Hydraulic lines areplumbed together and controlled by a single tractor hydraulic selective control valve. The tractor must beequipped with one single acting selective control valve with float detent to enable the mower sections to followthe contour of the terrain.
3.6 Front End WeightA minimum of 20% total tractor weight must be maintained on the tractor front end at all times. Front endweight is critical to maintain steering control and to prevent the tractor from rearing up while driving. If thefront end is too light, add weight until a minimum of 20% total weight is reached on the front tires. Frontweights and weight carriers can be purchased through an authorized tractor dealership. OPS-U- 0005
3.7 Power Take Off (PTO)Depending on the unit, the mower is designed to operate at a PTO speed of 540 RPM. Most tractors operateat either 540, or a combination of 540 and 1000 RPM PTO speeds. The operating speed of the mower andtractor can be determined by the number of splines on the driveline yoke and PTO output shaft. Thoseoperating at 540 RPM will have a 6-spline shaft and those operating at 1000 RPM will have a 21-spline shaft.Note: Refer to the tractor owner’s manual for instructions to change PTO speeds on models that operate atmore than one speed.
If operating an older model tractor where the tractor’s transmission and PTO utilize one master clutch, anover-running clutch must be used between the PTO output shaft and the driveline of the mower. Anauthorized tractor dealer can provide the over-running clutch and its installation if needed. OPS-U- 0006_B

OPERATION
TX1500/1700 01/12 Operation Section 4-7
© 2012 Alamo Group Inc.
OPER
ATION
DO NOT use a PTO adapter to attach a non-matching Implement driveline to a TractorPTO. Use of an adapter can double the operating speed of the Implement resulting inexcessive vibration, thrown objects, and blade and implement failure. Adapter use will alsochange the working length of the driveline exposing unshielded driveline areas. Seriousbodily injury and/or equipment failure can result from using a PTO adapter. Consult anauthorized dealer for assistance if the Implement driveline does not match the Tractor PTO.(S3PT-14)
Never operate the Tractor and Mower if the Implement input driveline is directly connectedto the Tractor transmission. Tractor braking distances can be substantially increased bythe momentum of the rotating Mower blades driving the Tractor transmission even thoughthe Tractor clutch has been disengaged. Install an over running clutch between the TractorPTO and the Mower driveline to prevent this potentially dangerous situation. (S3PT-16)
4. GETTING ON AND OFF THE TRACTORBefore getting onto the tractor, the operator must read and completely understand the implement and tractoroperator manuals. If any part of either manual is not completely understood, consult an authorized dealer fora complete explanation. OPS-U- 0007
Do not mount or dismount the Tractor while the tractor is moving. Mountthe Tractor only when the Tractor and all moving parts are completelystopped. (SG-12)
4.1 Boarding the TractorUse both hands and equipped handrails and steps for support when boarding the tractor. Never use controllevers for support when mounting the tractor. Seat yourself in the operator’s seat and secure the seat beltaround you.
Never allow passengers to ride on the tractor or attached equipment. Riders can easily fall off and beseriously injured or killed from falling off and being ran over. It is the operator’s responsibility to forbid all extrariders at all times. OPS-U- 0008
Never allow children to operate, ride on, or come close to the Tractor orImplement. Usually, 16-17 year-old children who are mature andresponsible can operate the implement with adult supervision, if theyhave read and understand the Operator’s Manuals, been trained inproper operation of the tractor and Implement, and are physically largeenough to reach and operate the controls easily. (SG-11)

OPERATION
TX1500/1700 01/12 Operation Section 4-8
© 2012 Alamo Group Inc.
OPE
RAT
ION
Never allow children or other persons to ride on the Tractor or Implement.Falling off can result in serious injury or death. (SG-10)
4.2 Dismounting the TractorBefore dismounting, park the tractor and implement on a reasonably level surface, apply the parking brake,idle the engine down, disengage the PTO, and lower the implement to the ground. Shut down the tractorengine according to the operator’s manual, remove the key, and wait for all motion to completely stop. Neverleave the seat until the tractor, its engine and all moving parts have come to a complete stop.
Use hand rails and steps when exiting the tractor. Be careful of your step and use extra caution when mud,ice, snow or other matter has accumulated on the steps or hand rails. Use all handrails and steps for supportand never rush or jump off the tractor. OPS-U- 0009
BEFORE leaving the tractor seat lower the implement, set the parkingbrake and/or set the tractor transmission in parking gear, disengage thePTO, stop the engine, remove the key, and wait for all moving parts tostop. Place the tractor shift lever into a low range or parking gear toprevent the tractor from rolling. Never dismount a Tractor that is movingor while the engine is running. Operate the Tractor controls from thetractor seat only. (SG-9)

OPERATION
TX1500/1700 01/12 Operation Section 4-9
© 2012 Alamo Group Inc.
OPER
ATION
5. STARTING THE TRACTORThe operator must have a complete understanding of the placement, function, and operational use of alltractor controls before starting the tractor. Review the tractor operator’s manual and consult an authorizeddealer for tractor operation instructions if needed.
Essential Tractor Controls:• Locate the light control switch. • Locate the engine shut off control. • Locate the brake pedals and the clutch. • Locate the PTO control. • Locate the 3-point hitch control lever.• Locate the hydraulic remote control levers.
Before starting the tractor ensure the following: • Conduct all pre-start operation inspection and service according to the tractor operator’s manual. • Make sure all guards, shields, and other safety devices are securely in place.• The parking brake is on. • The PTO control lever is disengaged. • The 3-point hitch control lever is in the lowered position.• The hydraulic remote control levers are in the neutral position.• The tractor transmission levers are in park or neutral. Refer to the tractor owner’s manual for tractor starting procedures. Only start the tractor while seated andbelted in the tractor operator’s seat. Never bypass the ignition switch by short circuiting the starter solenoid.
After the tractor engine is running, avoid accidental contact with the tractor transmission to prevent suddenand unexpected tractor movement. OPS-U-0028
Never run the Tractor engine in a closed building or without adequate ventilation. Theexhaust fumes can be hazardous to your health. (SG-23)
Start tractor only when properly seated in the Tractor seat. Starting atractor in gear can result in injury or death. Read the Tractor operatorsmanual for proper starting instructions. (SG-13)
6. CONNECTING THE MOWER TO THE TRACTORUse extreme caution when connecting the mower to the tractor. The mower should be securely resting atground level or setting on blocks. Keep hands and feet from under the mower deck and clear of pinch pointsbetween the tractor hitch arms and mower pins. OPS-R-0001
Always shut the Tractor completely down, place the transmission in park, and set theparking brake before you or anyone else attempts to connect or disconnect the Implementand Tractor hitches. (S3PT-15)

OPERATION
TX1500/1700 01/12 Operation Section 4-10
© 2012 Alamo Group Inc.
OPE
RAT
ION
6.1 Connecting the Mower Tongue to the Tractor1. Adjust tractor drawbar length to dimension
shown in Figure Ops-1166. Incorrect drawbarlength will change angle of driveline causingpossible damage to constant velocity joint. Seetractor operator’s manual for drawbaradjustment procedure.
2. Attach jackstand to tongue of cutter. Extendjackstand to support weight of tongue.
3. Connect clevis hitch to tractor drawbar using a1-inch (25 mm) diameter approved pin withlynch pin retainer or equivalent.
4. Adjust clevis height as necessary to leveltongue. (Figure Ops-1538)
5. Route hydraulic hose and transport lock chainthrough hose holder rod. Connect hydraulichose to tractor remote quick couplers. Makesure hydraulic line is not twisted or kinked.
6. Route control chains to convenient location andfasten to tractor. Be sure excess slack isremoved from the chain to avoid entanglementwith tractor tires or other moving parts. Makesure latch locking pins are in the storedpositions so that latches can be released bypulling the chain.
7. Attach driveline to tractor. Pull on each drivelinesection to be sure that yoke locks into place.
8. Securely attach tow chain to tractor.
6.2 Safety Tow ChainIf the mower is towed on a public roadway, a safety chain with tensile strength equal to or greater than thegross weight of the mower must be connected between the tractor and mower. This will help control theimplement in the event the tongue becomes disconnected from the drawbar. Make sure the chain is attachedto a secure location on the tractor and not to an intermediate support.
After connecting both ends of the safety chain, drive the tractor to the right and left to check for proper chainlength. Adjust length as necessary and allow only enough slack in the chain to make a maximum turn in bothdirections. When not in use, store the safety chain to protect it from mud or standing water by wrapping thechain around the tongue. Replace the safety chain if one or more links or end fittings are broken, stretched orotherwise damaged or deformed. OPS-U-0039

OPERATION
TX1500/1700 01/12 Operation Section 4-11
© 2012 Alamo Group Inc.
OPER
ATION
6.3 Connecting Mower Hydraulics1. With the tractor shut down and secured in
position, move the hydraulic remote valve leverback and for the several times or place thehydraulic lever in the float position to relieve allhydraulic pressure. When connecting themower hydraulic lines to the tractor, keep thehose, quick couplers, and swivels free of dirtand other contaminants. Wipe all dirt and othercontaminants from the tractor hydraulic remoteports and mower hydraulic hose coupler with aclean rag before connecting.
2. Connect mower hydraulic hose to the tractorremote port. Ensure the coupler locks in placemaking a good connection. Different tractormodels receive hydraulic lines differently. Referto the tractor Operator’s Manual for connectingand operating hydraulics for your particularmodel tractor.
3. Ensure hydraulic hoses will not contact orbecome entangled with mower drivelines, donot bind when turning, or become pinched orkinked when operating, raising and lowering themower.
7. SETTING THE MOWER Properly setting the cutting height is essential for efficient and safe operation. A properly set mower will makea more uniform cut, distribute clippings more evenly, require minimal tractor work, and follow the contour ofuneven terrain. NOTE: Avoid very low cutting heights, striking the ground with the blades gives the mostdamaging shock loads and will cause damage to the mower and drive. Blades contacting the ground maycause objects to be thrown out from under the mower deck. Always avoid operating the mower at a heightwhich causes the blades to contact the ground. OPS-U- 0010
Never work under the Implement, the framework, or any liftedcomponent unless the Implement is securely supported or blocked upto prevent sudden or inadvertent falling which could cause seriousinjury or even death. (SG-14)

OPERATION
TX1500/1700 01/12 Operation Section 4-12
© 2012 Alamo Group Inc.
OPE
RAT
ION
7.1 Cutting Height AdjustmentThe mower should be operated at the highest position that will give desired cutting results. This will helpprevent blades from striking the ground, reducing blade wear and undue strain on the machine.
1. Raise mower off ground enough to removecaster. SECURELY BLOCK MOWER INPOSITION before working underneath.
2. Holding wheel and yoke assembly up, removequick-lock pin from top of gauge wheel spindle.Position spacers to obtain desired cuttingheight. All spacers on top of spindle tube allowsfor approximately 1-1/2" cutting height.Adjustments range from 1-1/2" to a maximumof 4-1/" in 1/4" increments.
8. DRIVELINE ATTACHMENTThe driveline yoke and tractor PTO shaft must bedirt free and greased for attachment.
To connect the mower driveline to the tractor PTOoutput shaft, pull the driveline yoke collar back andalign the grooves and splines of the yoke withthose of the PTO shaft. Push the driveline yokeonto the PTO shaft, release the locking collar, andposition the yoke until the locking collar balls areseated onto the PTO shaft. Push and pull thedriveline back and forth several times to ensure asecure attachment. OPS-R-0003_D
When attaching the Implement input driveline to the Tractor PTO, it is important that theconnecting yoke spring activated locking collar slides freely and the locking balls are seatedsecurely in the groove on the Tractor PTO shaft. Push and pull the driveline back and forthseveral times to ensure it is securely attached. A driveline not attached correctly to theTractor PTO shaft could come loose and result in personal injury and damage to theImplement. (S3PT-17)

OPERATION
TX1500/1700 01/12 Operation Section 4-13
© 2012 Alamo Group Inc.
OPER
ATION
8.1 Driveline Length Check
When fitting the mower to the tractor, the telescoping driveline must be inspected to ensure that at its mostcompressed position, the profiles do not “bottom out”, and when at its farthest extended position, there issufficient engagement between the profiles to operate safely. At its shortest length, there must be at least a 1”clearance between each profile end and opposite profile universal joint. At its farthest operating extension, aminimum profile engagement of 12” must be maintained.
Before operating the Implement, check to make sure the Implement input driveline will notbottom out or become disengaged. Bottoming out occurs when the inner shaft penetratesthe outer housing until the assembly becomes solid-it can shorten no more. Bottoming outcan cause serious damage to the Tractor PTO by pushing the PTO into the Tractor andthrough the support bearings or downward onto the PTO shaft, breaking it off. A brokendriveline can cause personal injury. (S3PT-18)
“Bottoming Out” Check Procedure• Disconnect driveline from the tractor and slide
the profiles together until fully compressed. • Place a mark on the inner shield 1/8” from the
end of the outer shield and reattach thedriveline to the PTO shaft.
• With the PTO NOT TURNING, slowly drive thetractor with mower attached through thesharpest turn possible and watch shaftmovement. With the PTO NOT TURNING,slowly drive the tractor with the mower attachedthrough the most severe terrain conditionsexpected and watch shaft movement.
• If the distance between the mark and the outershield becomes less than 2” at any point thereis a potential problem bottoming out thedriveline and the driveline should be shortened. OPS-R-0004_E

OPERATION
TX1500/1700 01/12 Operation Section 4-14
© 2012 Alamo Group Inc.
OPE
RAT
ION
Shorten the driveline profiles as follows:
• Remove the driveline from the tractor.• Position the mower to the point with the shortest dis-
tance between the tractor PTO shaft and cutter gear-box. Shut down the tractor and securely block the mower in this position.
• Pull driveline apart and reattach yoke to PTO shaft.• Hold driveline sections parallel to one another and
measure back 1” from yoke of each shaft and place mark on opposite section. Cut this length off with a saw.
• Round off all sharp edges and debur.• Thoroughly grease then reinstall the driveline.• Recheck for proper operation.
Engagement Check Procedure
• With the driveline attached, position the mower to the point where the telescoping driveline is at its maximum extension. Completely shut down the tractor and secure in position.
• Mark the inner driveline shield 1/8” from the end of the outer shield.• Disconnect the driveline from the tractor and separate the two driveline halves. • Measure the distance from the mark to the end of the inner profile. This length is the amount the driveline profiles
were engaged.• If the engaged length is less than 12” for a CV driveline and less than 6” for a non-CV driveline, the shaft is considered
too short and should be replaced with a longer shaft. Consult an authorized dealer to purchase the required driveline length.
NOTE: If the driveline cannot be shortened and still maintain the required profile engagement, the operator must be madeaware of terrain conditions and avoid situations which pose a potential problem to avoid damaging the driveline. OPS-R-0005

OPERATION
TX1500/1700 01/12 Operation Section 4-15
© 2012 Alamo Group Inc.
OPER
ATION
8.2 Constant Velocity (CV) DrivelineFor mowers equipped with a Constant Velocity (CV) driveline, the maximum turning angle between the tractorand mower must be determined to ensure the joint angle does not over-extend which can cause CV jointdamage. Constant Velocity joints enable the driveline to operate smoothly with no vibrations and clattering atangles up to 70°. Angles greater than 80° can result in mechanical damage to the CV joint and mowerdriveline.
The Constant Velocity joint must be lubricated every 8 hours of operation as specified in the MaintenanceSection. Failure to properly lubricate the joint will result in accelerated wear and joint component failure.
CV Driveline Maximum Angle Check Procedure
With the mower attached to the tractor and the driveline disconnected from the tractor PTO stub make ahard left turn until there is approximately a 1" clearance between the left rear tractor tire and mower frame ortongue.
Stop and completely shut down the tractor. Place the tractor in Park and apply the Parking Brake beforedismounting.
Check the CV joint at this maximum turning radius by holding the driveline yoke above the PTO shaft and thenangle the CV joint to its maximum angle. A minimum difference of 10 degrees between the center line of theyoke and the PTO shaft must be maintained to ensure the joint will not be over angled. If the joint cannot beangled at least 10°, there is a potential problem of over-angling the joint while making sharp turns.
Solutions: To ensure the joint is not damaged, check the following:
Check the drawbar length to ensure that it is at the proper length for the RPM speed of the mower.
Move the tractor rear tires wider apart to limit the tractor turning radius.
Position the mower at multiple angles and perform the above procedure. Determine the sharpest turningradius that maintains a safe operating angle and note this position to the operator. OPS-R-0006

OPERATION
TX1500/1700 01/12 Operation Section 4-16
© 2012 Alamo Group Inc.
OPE
RAT
ION
Do not turn so sharp or lift mower so high to produce a severe "knocking" of the Drivelinewhich will cause accelerated wear and breakage of drive train components and could resultin possible injury from the separated Driveline sections. (SRM-04)
9. PRE-OPERATION INSPECTION AND SERVICEBefore each use, a pre-operation inspection and service of the implement and tractor must be performed.This includes routine maintenance and scheduled lubrication, inspecting that all safety devices are equippedand functional, and performing needed repairs. DO NOT operate the unit if the pre-operation inspectionreveals any condition affecting safe operation. Perform repairs and replacement of damaged and missingparts as soon as noticed. By performing a thorough pre-operation inspection and service, valuable down timeand repair cost can be avoided. OPS-U-0029
Always disconnect the main PTO Driveline from the Tractor before performing service onthe Implement. Never work on the Implement with the tractor PTO driveline connected andrunning. Rotating Parts, Blades or Drivelines could turn without warning and causeimmediate entanglement, injury or death. (S3PT-11)
Never work under the Implement, the framework, or any liftedcomponent unless the Implement is securely supported or blocked upto prevent sudden or inadvertent falling which could cause seriousinjury or even death. (SG-14)
Periodically inspect all moving parts for wear and replace whennecessary with authorized service parts. Look for loose fasteners, wornor broken parts, and leaky or loose fittings. Make sure all pins havecotter pins and washers. Serious injury may occur from not maintainingthis machine in good working order. (SG-21)

OPERATION
TX1500/1700 01/12 Operation Section 4-17
© 2012 Alamo Group Inc.
OPER
ATION
9.1 Tractor Pre-Operation Inspection/ServiceRefer to the tractor operator’s manual to ensure acomplete pre-operation inspection and scheduledservice is performed according to themanufacturers recommendations. The followingare some of the items that require daily service andinspection:
• Tire condition/air pressure• Wheel lug bolts • Steering linkage• PTO shield • SMV sign is clean and visible• Tractor’s lights are clean and functional• Tractor Seat belt is in good condition • Tractor ROPS is in good condition• ROPS is in the raised position• No tractor oil leaks • Radiator free of debris • Engine oil level and condition• Engine coolant level and condition • Power brake fluid level • Power steering fluid level • Fuel condition and level • Sufficient lubrication at all lube points• Air filter condition OPS-U-0030
9.2 Mower Pre-Operation Inspection/ServiceBefore each mower use, a complete inspection and service is required to ensure the mower is in a good andsafe working condition. Damaged and/or broken parts should be repaired and/or replaced immediately. Toensure the mower is ready for operation, conduct the following. OPS-R-0007
The operator’s manual and safety signs affixed onthe unit contain important instructions on the safeand proper use of the equipment. Maintain theseimportant safety features on the implement in goodcondition to ensure the information is available tothe operator at all times.
• Ensure the manual canister is secured to theequipment with the operator’s manual inside.
• Ensure all safety signs are in place and legible.Replace missing, damaged, and illegibledecals. OPS-U- 0011

OPERATION
TX1500/1700 01/12 Operation Section 4-18
© 2012 Alamo Group Inc.
OPE
RAT
ION
• Check that the main driveline securelyattached to the tractor and the locking collar isseated in the groove of the PTO Shaft.
• Ensure wing drivelines are secure at bothends.
• Ensure the mower hitch is securely attachedto the tractor drawbar with a proper size boltand secured nut.
• Ensure that a properly rated safety tow chainis equipped securing the mower to the tractor.OPS-R-0073
• Ensure the driveline integral shields are ingood condition and rotate freely.
• Inspect that all bolts and screws are inposition and are properly torqued. OPS-R-0049
• Inspect the condition of the drive belts.• Ensure driveline shield and drive belt shields
are in place and in good repair.• Ensure the tractor PTO master shield is in
place, lowered and in good condition. OPS-R-0064_F

OPERATION
TX1500/1700 01/12 Operation Section 4-19
© 2012 Alamo Group Inc.
OPER
ATION
• Inspect oil level in all gearboxes andreplenish if needed. A low oil level is awarning sign that the gearbox may becracked or its seal damaged and needs to bereplaced.
• Perform scheduled lubrication as specified inthe maintenance section. OPS-R-0076_C
• Inspect cutter knives and knife pins forlooseness and excessive wear. Make surethe mower is securely blocked up beforecrawling beneath. Replace damaged, worn,and missing knives as complete sets tomaintain cuttershaft balance.
• Remove any grass or other debris which maybe wrapped around the cuttershafts.
• Inspect the condition of deck skid shoes andhardware. OPS-R-0050
• Ensure each hydraulic cylinder is installedand retained correctly. Ensure the proper sizepins are used to retain the cylinders in placeand are secured with pins.
• Check for hydraulic oil leaks on the cylinders,along the hydraulic lines, and at tractorhydraulic ports. IMPORTANT: DO NOT useyour hands to check for oil leaks. Use a pieceof heavy paper or cardboard to check forhydraulic oil leaks. OPS-R-0013_D

OPERATION
TX1500/1700 01/12 Operation Section 4-20
© 2012 Alamo Group Inc.
OPE
RAT
ION
• Inspect mower tire condition, wheel bearings,and lug nut torque.
• Check the condition of the wing hinge pins.• Check all the overall condition of the mower
main frame. OPS-R-0051
All Safety Shields, Guards and Safety devices including (but notlimited to) - the Deflectors, Chain Guards, Steel Guards, GearboxShields, PTO integral shields, and Retractable Door Shields shouldbe used and maintained in good working condition. All safetydevices should be inspected carefully at least daily for missing orbroken components. Missing, broken, or worn items must bereplaced at once to reduce the possibility of injury or death fromthrown objects, entanglement, or blade contact. (SGM-3)
Replace bent or broken blades with new blades. NEVER ATTEMPT TO STRAIGHTEN,WELD, OR WELD HARDFACING ON BLADES SINCE THIS WILL LIKELY CRACK OROTHERWISE DAMAGE THE BLADE WITH SUBSEQUENT FAILURE AND POSSIBLYCAUSE SERIOUS INJURY FROM THROWN BLADES. (SGM-10)
Inspect the Blades daily for abnormal wear. REPLACE BLADES IMMEDIATELY if anyblade has:
• Become bent or deformed from it’s original shape or• Any cracks are visible, or • Deep gouges in the blade’s surface are present, or• Gouges or chipped areas in the cutting edge are larger than 1/2”, or • The material on the leading edge has been worn away by more than 1/2”Failure to replace abnormally worn blades may lead to catastrophic failure of the blades and ejection of thebroken part with tremendous force which may cause serious bodily injury or death. OPS-U-0032_A

OPERATION
TX1500/1700 01/12 Operation Section 4-21
© 2012 Alamo Group Inc.
OPER
ATION
Finish Mower PRE-OPERATION Inspection
Mower ID#________________________Make____________________
Date:_____________________________Shift____________________
Before conducting the inspection, make sure the tractor engine is off, allrotation has stopped and the tractor is in park with the parking brakeengaged. Make sure the mower is resting on the ground or securely blockedup and all hydraulic pressure has been relieved.
Operator’s Signature:
Item Condition at Start of Shift
Specific Comments if not O.K.
The Operator’s Manual is in the canister on the mowerAll safety decals are in place and legibleThe tongue/hitch connection bolts & pins are tightThere are no cracks on hitchThe tow chain is secured to the tractor & mowerThe hydraulic cylinders pins are tightThere are no leaking or damaged hosesThe mower deck is clear of cut grass and debrisChain guards/deflectors are in place & in good conditionDriveline/gearbox shields are in good conditionDriveline clutches are in good condition; not frozenDriveline telescoping members & U-joints are lubricatedDriveline yokes are securely attached to PTO & mowerGearbox mounting bolts are tightGearbox oil is at the proper levelBlade carrier retaining nut is tightBlades are not chipped, cracked or bentBlade bolts are tightWheel lug nuts are tightTransport locks are in good condition
DO NOT OPERATE an UNSAFE TRACTOR or MOWER

OPERATION
TX1500/1700 01/12 Operation Section 4-22
© 2012 Alamo Group Inc.
OPE
RAT
ION
Tractor PRE-OPERATION Inspection
Tractor ID#________________ Make ____________________
Date: ________________ Shift ____________________
Before conducting the inspection, make sure the tractor engine is off, allrotation has stopped and the tractor is in park with the parking brakeengaged. Make sure the mower is resting on the ground or securely blockedup and all hydraulic pressure has been relieved.
Operator’s Signature:
Item Condition at Start of Shift
Specific Comments if not O.K.
The flashing lights function properlyThe SMV Sign is clean and visibleThe tires are in good condition with proper pressureThe wheel lug bolts are tightThe tractor brakes are in good conditionThe steering linkage is in good conditionThere are no visible oil leaksThe hydraulic controls function properlyThe ROPS or ROBS Cab is in good conditionThe seatbelt is in place and in good conditionThe 3-point hitch is in good conditionThe drawbar pins are securely in placeThe PTO master shield is in placeThe engine oil level is fullThe brake fluid level is fullThe power steering fluid level is fullThe fuel level is adequateThe engine coolant fluid level is fullThe radiator is free of debrisThe air filter is in good condition
DO NOT OPERATE an UNSAFE TRACTOR or MOWER

OPERATION
TX1500/1700 01/12 Operation Section 4-23
© 2012 Alamo Group Inc.
OPER
ATION
10. DRIVING THE TRACTOR AND IMPLEMENTSafe tractor transport requires the operator possess a thorough knowledge of the model being operated andprecautions to take while driving with an attached implement. Ensure the tractor has the capacity to handle theweight of the implement and the tractor operating controls are set for safe transport. To ensure safety whiledriving the tractor with an attached implement, review the following. OPS-U- 0012
This Implement may be wider than the Tractor. Be careful when operating or transportingthis equipment to prevent the Implement from running into or striking sign posts, guard rails,concrete abutments or other solid objects. Such an impact could cause the Implement andTractor to pivot violently resulting in loss of steering control, serious injury, or even death.Never allow the Implement to contact obstacles. (S3PT-12)
Transport only at speeds where you can maintain control of theequipment. Serious accidents and injuries can result from operating thisequipment at high speeds. Understand the Tractor and Implement and
how it handles before transporting on streets and highways. Make sure the Tractor steeringand brakes are in good condition and operate properly.
Before transporting the Tractor and Implement, determine the proper transport speeds foryou and the equipment. Make sure you abide by the following rules:
Test the tractor at a slow speed and increase the speed slowly. Apply the Brakes smoothlyto determine the stopping characteristics of the Tractor and Implement. As you increasethe speed of the Tractor the stopping distance increases. Determine the maximumtransport speed not to exceed 20 mph (30 kph) for transporting this equipment.
Test the equipment at a slow speed in turns. Increase the speed through the turn only afteryou determine that the equipment can be operated at a higher speed. Use extreme careand reduce your speed when turning sharply to prevent the tractor and implement fromturning over. Determine the maximum turning speed for you and this equipment beforeoperating on roads or uneven ground.
Only transport the Tractor and Implement at the speeds which allow you to properly controlthe equipment.
Be aware of the operating conditions. Do not operate the Tractor with weak or faulty brakesor worn tires. When operating down a hill or on wet or rain slick roads, the braking distanceincreases: use extreme care and reduce your speed. When operating in traffic always usethe Tractor’s flashing warning lights and reduce your speed. Be aware of traffic around youand watch out for the other guy. (SG-19)

OPERATION
TX1500/1700 01/12 Operation Section 4-24
© 2012 Alamo Group Inc.
OPE
RAT
ION
10.1 Starting the TractorThe procedure to start the tractor is model specific.Refer to the tractor operator’s manual for startingprocedures for your particular tractor. Consult anauthorized dealer if the starting procedure isunclear. Ensure the 3-point control lever is in thelowered position and the PTO is disengaged beforestarting the tractor. OPS-U-0033
10.2 Brake and Differential Lock SettingMake sure the tractor brakes are in good operatingcondition. Tractor brakes can be set to operateindependently allowing single rear wheel brakingaction or locked together to provide simultaneousrear wheel braking. FOR MOST DRIVING ANDOPERATING CONDITIONS, THE BRAKE PEDALSSHOULD BE LOCKED TOGETHER TO PROVIDETHE MOST EFFECTIVE BRAKING ACTION.
Always disengage the tractor differential lock whenturning. When engaged the differential lock willprevent or limit the tractor from turning. Duringnormal cutting conditions, locking the differentialprovides no benefit and should not be used. OPS-U- 0013
Be aware of the operating conditions. Do not operate the Tractor with weak or faulty brakes.When operating down a hill or on wet or rain slick roads, the braking distance increases; useextreme care and reduce your speed in these conditions. When operating in traffic, alwaysuse the Tractor’s flashing warning lights and reduce your speed. Be aware of traffic aroundyou and watch out for the other guy.

OPERATION
TX1500/1700 01/12 Operation Section 4-25
© 2012 Alamo Group Inc.
OPER
ATION
.Do not stand outside of the wing to remove the transport latch. If the wing fell it could killyou. Make sure no bystanders are under the wing or in the area where the wing could fall.
10.4 Before Releasing Transport Latch• Fill cylinders with oil before attempting to lower
implement wings.• Clear area of bystanders before lowering
implement wings.• Implement can fall from hydraulic failure or
accidental operation of controls.• Stand clear when releasing transport latch,
lowering or raising wings.• Securely engage transport latch before
transportation or working under wing.• Do Not Operate in transport position or with
wings off the ground.• Block up and securely support equipment
before putting hands, feet, or body under raisedequipment or lifted components.
10.3 Raising the MowerTo raise mower for transport, drive the unit to alevel area, pull the chain to open the transportlocks and retract the hydraulic cylinders. DO NOTraise wings with the mower positioned on anembankment or other inclined position to preventoverturning the mower. DO NOT raise the moweruntil all blade movement has come to a completestop. After each section is fully raised, release thechain to engage the transport wing & centerlocks. Ensure transport locks have engaged oneach section to prevent unexpected falling.
The mower’s center of gravity is raised and themower more prone to tipping when the wings arein the raised position. Use extreme caution whentowing the mower in the transport position andavoid uneven terrain which could upset themower. OPS-R-0016_J

OPERATION
TX1500/1700 01/12 Operation Section 4-26
© 2012 Alamo Group Inc.
OPE
RAT
ION
10.5 Raising Wings to Full Height1. Pull the chain and hold to open the transport
latch so the locking lugs can pass behind thetransport latch.
NOTE: Failure to open the latch before folding thewings will cause damage to the Transport Latchand Locking Lugs.2. Raise the wings and center section.3. When the lugs align with the holes on the
transport latch, release the chain allowing theholes in the latch to slide over the lugs andcenter unit to latch.
4. Place the hairpins in the locking lugs and thetransport pin in the center unit latch transportposition using a hairpin to secure.
10.7 Driving the Tractor and MowerStart off by operating at a slow speed and gradually increase your speed while maintaining complete control ofthe tractor and mower. Moving slowly at first will also prevent the tractor from rearing up and loss of steeringcontrol. The tractor should never be operated at speeds that cannot be safely handled or which will preventthe operator from stopping quickly during an emergency. If the power steering or engine ceases operating,stop the tractor immediately as the tractor will be difficult to control.
Drive the tractor with the 3-Point lift arms in the raised position and lock the control lever in the transport detentposition to prevent damage to the mower driveline and tongue while turning.
10.6 Operating PositionTo lower the mower, retract the hydrauliccylinders to remove tension from the transportlocks. Then pull the release chain and place thehydraulic control lever in the float detent to lowerthe mower.
The mower must be operated with the cuttersections fully lowered and the hydraulic controllever in the float detent to ensure the mowerfollows the contour of the ground and to preventsections from creeping up. NEVER attempt toraise the mower while the mower is operating.OPS-R-0017_H

OPERATION
TX1500/1700 01/12 Operation Section 4-27
© 2012 Alamo Group Inc.
OPER
ATION
Perform turns with the tractor and mower at slowspeeds to determine how the tractor with anattached mower handles a turn. Determine thespeed to maintain proper control of the tractorwhen making turns. When turning with a towedimplement, the overall working length of the unit isincreased. Allow additional clearance for themower when turning.
To avoid overturns, drive the tractor with care andat safe speeds, especially when operating overrough ground, crossing ditches or slopes, andturning corners. Tractor wheel tread spacingshould be increased when working on inclines orrough ground to reduce the possibility of tipping.
Use extreme caution when operating on steepslopes. Keep the tractor in a low gear when goingdownhill. DO NOT coast or free-wheel downhill.OPS-R-0019_C
10.8 Crossing Ditches and Steep InclinesWhen crossing ditches with steep banks or going upsharp inclines, it is possible that the main drivelineinner profile will penetrate into the outer housing to itsmaximum depth until the assembly becomes solid(driveline is at its extreme shortest length). This typeof abusive operation can cause serious damage tothe tractor and mower drive by pushing the PTO intothe tractor and through the support bearings ordownward onto the PTO shaft, breaking it off.
Damage resulting from over-collapse of the driveline’s inner profile and its outer housingmay allow the driveline to come loose from the Tractor which could cause bodily injury to theoperator or bystanders and/or extensive damage to the Tractor or Implement. OPS-R-0020

OPERATION
TX1500/1700 01/12 Operation Section 4-28
© 2012 Alamo Group Inc.
OPE
RAT
ION
When confronted with an incline or ditch, do notapproach from an angle which is perpendicular orstraight on as damage to or over-collapse of thedriveline may occur. OPS-R-0021_A
Inclines and ditches should be approached along aline which is at an angle as shown. This type ofpath will reduce the possibility of over-collapse ofthe driveline and resulting damage. If the gradientis so steep that such an approach increases thepossibility of a tractor roll-over, select an alternatecrossing path.
When operating the tractor and mower acrossslopes and inclines, through ditches, and otheruneven terrain conditions, it is important to maintainsufficient deck to ground clearance. Blade contactwith the ground may cause soil, rocks and otherdebris to be thrown out from under the mowerresulting in possible injury and/or property damage.Ground contact also produces a severe shock loadon the mower drive and to the mower bladesresulting in possible damage and premature wear.OPS-R-0022

OPERATION
TX1500/1700 01/12 Operation Section 4-29
© 2012 Alamo Group Inc.
OPER
ATION
11. OPERATING THE TRACTOR AND IMPLEMENTTHE OPERATOR MUST COMPLETELY UNDERSTAND HOW TO OPERATE THE TRACTOR ANDIMPLEMENT AND ALL CONTROLS BEFORE ATTEMPTING TO OPERATE. The operator must read andunderstand the Safety and Operation Sections of the implement and tractor operator’s manuals. Thesemanuals must be read and explained to any operator who cannot read. Never allow someone to operate theimplement and tractor without complete operating instructions.
Before starting any operation, the operator must become familiar with the area to be worked in and anyobstacles and hazards contained within to ensure safety to the operator, bystanders, and equipment. Specialattention should be paid to foreign debris, rough terrain, steep slopes, and passersby and animals in the area.OPS-U- 0015
Extreme care should be taken when operating near loose objects suchas gravel, rocks, wire, and other debris. Inspect the area beforemowing. Foreign objects should be removed from the site to preventmachine damage and/or bodily injury or even death. Any objects thatcannot be removed must be clearly marked and carefully avoided by theoperator. Stop mowing immediately if blades strike a foreign object.Repair all damage and make certain rotor or blade carrier is balancedbefore resuming mowing. (SGM-05)
Many varied objects, such as wire, cable, rope, or chains, can become entangled in theoperating parts of the mower head. These items could then swing outside the housing atgreater velocities than the blades. Such a situation is extremely hazardous and could resultin serious injury or even death. Inspect the cutting area for such objects before mowing.Remove any like object from the site. Never allow the cutting blades to contact such items.(SGM-06)

OPERATION
TX1500/1700 01/12 Operation Section 4-30
© 2012 Alamo Group Inc.
OPE
RAT
ION
11.1 Foreign Debris HazardsBefore mowing, inspect the area to make surethere are no foreign objects that the mower bladescould hit or become entangled with. Remove allforeign objects and debris. If objects are too big toremove, mark them clearly and be sure to preventthe mower blades from contacting them.
If you hit a solid object or foreign debris, stop themower and tractor at once. Immediately idle theengine speed and disengage the PTO. Wait for allmower rotating motion to stop, then raise themower and move the tractor and implement off theobject. Inspect the area and remove, or mark thelocation of the debris. Inspect the condition of themower and make any needed repairs immediately.Make sure the blades are not damaged and thecarrier is balanced before resuming operation.
Always wear your seat belt securely fastened andonly operate the tractor and mower with the ROPSin the raised position. If the tractor or mower hits atree stump, rock, or bump, a sudden movementcould throw you off of the seat and under thetractor and/or mower. The seat belt is your bestprotection from falling off the tractor and the ROPSprovides protection from being crushed during atractor roll-over. OPS-R-0023_B

OPERATION
TX1500/1700 01/12 Operation Section 4-31
© 2012 Alamo Group Inc.
OPER
ATION
11.2 Bystander/Passerby PrecautionsIf a bystander comes within 100 yards of the tractor while the mower is being operated, stop the tractor at once,idle the engine and disengage the PTO. Do not engage the PTO again until all bystanders are well past the100 yard distance.
Rotary Mowers are capable under adverse conditions of throwingobjects for great distances (300 feet or more) and causing serious injuryor death. Follow safety messages carefully.
STOP MOWING IF PASSERSBY ARE WITHIN 300 Feet UNLESS:
-Front and Rear Deflectors, Chain Guards, or Bands are installed and in good, workablecondition;
-Mower sections or Wings are running close to and parallel to the ground without exposedBlades;
-Passersby are outside the existing thrown-object zone;
-All areas have been thoroughly inspected and all foreign material such as rocks, cans,glass, and general debris has been removed.
NOTE: Where there are grass and weeds high enough to hide debris that could be struckby the blades, the area should be: inspected and large debris removed, mowed at anintermediate height, inspected, closely with any remaining debris being removed, andmowed again at desired final height. (This will also reduce power required to mow, reducewear and tear on the Mower drivetrain, spread cut material better, reduce streaking, andmake the final cut more uniform). (SRM-01)
11.3 Engaging the Power Take Off (PTO)Before engaging the PTO, make certain that the area is clear of bystanders and passersby. The implementmust be completely lowered and the deck positioned at a safe operating height. NEVER engage the PTO withthe implement in the raised position.
Set the tractor engine speed at approximately 1,000 RPM before engaging the PTO. Shift the PTO control tothe on position, and slowly increase the engine speed until the PTO is operating at the rated speed. If youhear unusual noises or see or feel abnormal vibrations, disengage the PTO immediately. Inspect theimplement to determine the cause of the noise or vibration and repair the abnormality. OPS-U- 0027
Do not let the Blades turn when the Mower Deck is raised for anyreason, including clearance or for turning. Raising the Mower deckexposes the Cutting Blades which creates a potentially serious hazardand could cause serious injury or even death from objects thrown fromthe Blades. (SRM-07)

OPERATION
TX1500/1700 01/12 Operation Section 4-32
© 2012 Alamo Group Inc.
OPE
RAT
ION
11.5 Operating the MowerOnly operate the mower from the tractor operator’s seat with the seatbelt securely fastened on a ROPS or cabequipped tractor. The mower is designed for cutting grass and small weeds. Sharp blades will produce acleaner cut and require less power. Travel at a speed that allows the mower sufficient time to cut through thevegetation and maintain the PTO operating speed to prevent overloading the mower and tractor. Choose adriving pattern that provides the maximum pass length and minimizes turning. Stay alert and watch for trees,low hanging limbs, power lines, and other overhead obstacles and solid ground objects while you areoperating.
Under some conditions, tractor tires may roll vegetation down preventing a cut at the same height as thesurrounding area. To minimize this problem, reduce the tractor ground speed while maintaining the operatingspeed of the mower. A slower ground speed allows grasses to partially rebound and be cut. Reversing thedirection of travel may also help produce a cleaner cut in these conditions.
If tractor engine or cutter stalls, do not slip tractor clutch to allow engine to retain speed as this will exert unduestrain on the implement drivetrain. When stalling occurs, disengage PTO drive, move to a cut area, set tractorthrottle to idle, then re-engage PTO drive.
Avoid mowing in the reverse direction. If the mower must be backed to access an area to cut, make sure thereare no persons or other foreign debris behind the mower before mowing in reverse. When mowing in reverse,operate the tractor and mower at a reduced ground speed to ensure control of the tractor and mower ismaintained.
Do not put hands or feet under mower decks. Blade Contact can resultin serious injury or even death. Stay away until all motion has stoppedand the decks are securely blocked up. (SGM-09)
11.4 PTO RPM and Ground SpeedGround speed for mowing will depend upon the height, type, and density of vegetation to be cut.Recommended speed for efficient mower performance is between 2 and 5 mph(3-8 kph). Operate the mowerat its full rated PTO speed to maintain blade speed for a clean cut. Refer to the tractor operator’s manual orthe tractor instrument panel for the engine speed and gear to provide the required PTO and desired groundspeed. Make sure that the mower is operating at its full rated speed before entering the vegetation to be cut.If it becomes necessary to temporarily regulate engine speed, increase or decrease the throttle gradually.
Ground speed is achieved by transmission gear selection and not by the engine operating speed. Theoperator may be required to experiment with several gear range combinations to determine the best gear andrange which provides the most ideal performance from the mower and most efficient tractor operation. As theseverity of cutting conditions increase, the ground speed should be decreased by selecting a lower gear tomaintain the proper operating PTO speed. OPS-R-0025
Do not exceed the rated PTO speed for the Implement. Excessive PTO speeds can causeImplement driveline or blade failures resulting in serious injury or death. (SG-26)

OPERATION
TX1500/1700 01/12 Operation Section 4-33
© 2012 Alamo Group Inc.
OPER
ATION
Do not mow with two machines in the same area except with Cab tractors with the windowsclosed. (SGM-11)
Mow only in conditions where you have clear visibility in daylight or with adequate artificiallighting. Never mow in darkness or foggy conditions where you cannot clearly see at least300 feet (90 m) in front and to the sides of the tractor and mower. Make sure that you canclearly see and identify passersby, steep slopes, ditches, drop-offs, overhead obstructions,power lines, debris and foreign objects. If you are unable to clearly see these type of itemsdiscontinue mowing. (SGM-1)
Avoid mowing in reverse direction when possible. Check to make sure there are nopersons behind the mower and use extreme care when maneuvering in reverse. Mow onlyat a slow ground speed where you can safely operate and control the tractor and mower.Never mow an area that you have not inspected and removed debris or foreign material.(SGM-08)
Follow these guidelines to reduce the risk of equipment and grass fireswhile operating, servicing, and repairing the Mower and Tractor:
-Equip the Tractor with a fire extinguisher in an accesible location.
-Do Not operate the Mower on a Tractor with an underframe exhaust.
-Do Not smoke or have an open flame near the Mower and Tractor.
-Do Not drive into burning debris or freshly burnt areas.
-Ensure slip clutches are properly adjusted to prevent excessive slippage and plate heating.
-Never allow clippings or debris to collect near drivelines, slip clutches, and gearboxes.Periodically shut down the Tractor and Mower and clean clippings and collected debris fromthe mower deck. (SGM-12)
Do not let the Blades turn when the Mower Deck is raised for anyreason, including clearance or for turning. Raising the Mower deckexposes the Cutting Blades which creates a potentially serious hazardand could cause serious injury or even death from objects thrown fromthe Blades. (SRM-07)

OPERATION
TX1500/1700 01/12 Operation Section 4-34
© 2012 Alamo Group Inc.
OPE
RAT
ION
Large, dense, or wet vegetation may need to bemowed in two or more passes to achieve a uniformcut. In such conditions, raise the cutting height to12” or more on the first pass. OPS-R-0043
Then lower the mower to the desired height andmow the vegetation a second time. If possible,select a mowing pattern that is at a 90 degree angleto the first pass to reduce streaking for a moreuniform cut. OPS-R-0044_A
When mowing across slopes, weaving or skewingmay occur as the implement slips sideways. Thiscondition may cause streaking if there is insufficientoverlap between the cutting swaths. To correct thissituation, the outer mower decks may be moved inan additional 6” to increase overlap.
NOTE: Initial distance from the end of the tubeframe to edge of the U-bolt should be 8-1/8” on the15’ Model and 2-1/8” on the 17’ Model.OPS-R-0108

OPERATION
TX1500/1700 01/12 Operation Section 4-35
© 2012 Alamo Group Inc.
OPER
ATION
11.6 Shutting Down the ImplementTo shut down attached mower head, first bring thetractor to a complete stop. Decrease engine RPMto idle then disengage cutterhead. The mower headwill come to a complete stop within a suitableamount of time. Do not engage or disengage thecutterheads at a high RPM unless there is anemergency situation.
Park the tractor on a level surface, place thetransmission in park or neutral and apply theparking brake, lower the attached implement to theground, shut down the engine, remove the key, andwait for all motion to come to a complete stopbefore exiting the tractor. OPS-U- 0016

OPERATION
TX1500/1700 01/12 Operation Section 4-36
© 2012 Alamo Group Inc.
OPE
RAT
ION
12. DISCONNECTING THE MOWER FROM THE TRACTOR
Before disconnecting the mower, the PTO must be disengaged and all motion at a complete stop. Move themower to a level storage location and lower the center section and both wings to the ground. If the mower willbe stored with the sections in the raised position, be sure that the locks are engaged. If the mower is notresting securely on the ground, block the mower up securely before attempting to disconnect it from the tractor.Use extreme care to keep feet and hands from under the mower and clear of any pinch points.
When disconnecting the mower, the tractor should be completely shut down and secured in position. Relievehydraulic pressure by moving the control levers back and forth several times. Lower the parking jack and raisethe mower until the tongue clevis is no longer resting on the tractor drawbar and is supported solely by thejack. Also, make sure that the jack foot is securely resting at ground level or securely supported by a blockbefore raising the mower. Once the mower tongue is being supported entirely by the jack, remove the hitchbolt, locknut and washers. Disconnect the hydraulic hose from the tractor and secure to the mower to preventcontact with the ground. Disconnect the mower wiring harness from the tractor and store it safely on the unit soit does not contact the ground.
After disconnecting the mower hitch, remove the mower driveline from the tractor PTO shaft. Place thedriveline in its storage bracket to prevent it from contacting mud or dirt which can contaminate the universaljoint bearings and shorten the life of the driveline. After the driveline has been disconnected from the tractorplace the PTO master shield back in the operating position.
Always shut the Tractor completely down, place the transmission in park, and set theparking brake before you or anyone else attempts to connect or disconnect the Implementand Tractor hitches. (S3PT-15)
Never unhitch without using the Tongue Jack. The Tongue is very heavy. Attempting to liftthe Tongue without using the Tongue Jack could cause strains or other injury. Allowing thetongue to fall suddenly and unexpectedly could result in crushing injury. Use the TongueJack for lifting the Implement only. Overloading the Tongue Jack can cause failure withpossible serious bodily injury or even death. (STI-04)

OPERATION
TX1500/1700 01/12 Operation Section 4-37
© 2012 Alamo Group Inc.
OPER
ATION
13. MOWER STORAGEIt is recommended that the mower be stored with the center section and both wings fully lowered to groundlevel. If the mower is stored with the wings in the raised position, select a level area and install wing transportbraces to prevent the wings from falling BEFORE disconnecting the mower hitch from the tractor.
Properly preparing and storing the mower at the end of the season is critical to maintaining its appearanceand to help ensure years of dependable service. The following are suggested storage procedures:
• Thoroughly clean all debris off the mower toprevent damage from rotting grass andstanding water.
• Lubricate all mower grease points and fillgearbox oil levels as detailed in themaintenance section.
• Tighten all bolts and pins to the recommendedtorque.
• Check the mower for worn and damagedparts. Perform repairs and makereplacements immediately so that the mowerwill be ready for use at the start of the nextseason.
• Store the mower in a clean, dry place with themower housing resting securely on blocks orat ground level.
• Keep the driveline yoke from sitting in water,dirt and other contaminants.
• Use spray touch-up enamel where necessaryto prevent rust and maintain the appearance ofthe mower.
It is critical that driveline clutches slip when an obstacle or heavy load is encountered to avoid mower and/ortractor damage. If the mower sits outside for an extended period of time or is exposed to rain and/or humidair, the clutch lining plates must be inspected to ensure they are not frozen together from rust or corrosion. Ifthe mower has been exposed to such conditions, at the start of each mowing season, and any time it issuspected that the slip clutch plates may be frozen together, readjust the slip clutch as detailed in SeasonalClutch Maintenance of the maintenance section in this manual. OPS-R-0032
Never allow children to play on or around Tractor or Implement. Children can slip or fall offthe Equipment and be injured or killed. Inadvertent contact with controls can cause theImplement to shift or fall crushing themselves or others. (SG-25)

OPERATION
TX1500/1700 01/12 Operation Section 4-38
© 2012 Alamo Group Inc.
OPE
RAT
ION
14. TRANSPORTING THE TRACTOR AND IMPLEMENTInherent hazards of operating the tractor and implement and the possibility of accidents are not left behindwhen you finish working in an area. Therefore, the operator must employ good judgement and safe operationpractices when transporting the tractor and implement between locations. By using good judgement andfollowing safe transport procedures, the possibility of accidents while moving between locations can besubstantially minimized. OPS-U- 0017
Never allow children or other persons to ride on the Tractor or Implement.Falling off can result in serious injury or death. (SG-10)
Before transporting the tractor and mower, idle thetractor engine, disengage the PTO and wait for allmower moving parts to come to a complete stop.Raise the mower sections and ensure transportlocks engage. OPS-R-0083_A

OPERATION
TX1500/1700 01/12 Operation Section 4-39
© 2012 Alamo Group Inc.
OPER
ATION
To raise mower for transport, drive the unit to alevel area, pull the chain to open the transportlocks and retract the hydraulic cylinders. DO NOTraise wings with the mower positioned on anembankment or other inclined position to preventoverturning the mower. DO NOT raise the moweruntil all blade movement has come to a completestop. After each section is fully raised, release thechain to engage the transport wing & centerlocks. Ensure transport locks have engaged oneach section to prevent unexpected falling.
Install pins into the transport lock positions.
NOTE: The mower deck transport hair pinsprovided on the wing sections MUST be removedBEFORE operation. Failure to remove these hairpins will result in front caster wheel damage, turfdamage, and unacceptable mowing performance.
The mower’s center of gravity is raised and themower more prone to tipping when the wings arein the raised position. Use extreme caution whentowing the mower in the transport position andavoid uneven terrain which could upset themower. OPS-R-0016_K

OPERATION
TX1500/1700 01/12 Operation Section 4-40
© 2012 Alamo Group Inc.
OPE
RAT
ION
If the tractor’s hydraulic pump is not independent of the tractor PTO, or if the tractor PTO has to be run to havehydraulic power, disconnect the mower driveline from the tractor PTO output shaft. Secure the driveline to themower deck to prevent driveline damage or loss during transport.
Before transporting the tractor on a public roadwayor boarding a trailer for transport, the tractor brakepedals should be locked together. Locking thepedals ensures that both wheels brakesimultaneously while stopping, especially whenmaking an emergency stop.
Use extreme caution and avoid hard applications ofthe tractor brakes when towing heavy loads at roadspeeds. Never tow the implement at speedsgreater than 20 MPH (32 kph). OPS-U- 0018
14.1 Transporting on Public RoadwaysExtreme caution should be used when transporting the tractor and implement on public roadways. The tractormust be equipped with all required safety warning features including a SMV emblem and flashing warninglights to alert drivers of the tractor’s presence. Remember that roadways are primarily designed forautomotive drivers and most drivers will not be looking out for you, therefore, you must look out for them.Check your side view mirrors frequently and remember that vehicles will approach quickly because of thetractor’s slower speed. Be extremely cautious when the piece of equipment that you are towing is wider thanthe tractor tire width and/or extends beyond your lane of the road.
Make sure that a proper size safety tow chain is secured between the tractor and implement before entering apublic road. OPS-U- 0019
Only tow the Implement behind a properly sized and equipped Tractorwhich exceeds the weight of the Implement by at least 20%. DO NOTtow the Implement behind a truck or other type of vehicle. Never tow theImplement and another Implement connected in tandem. Never tow theImplement at speeds over 20 MPH. (STI-06)
Never allow children or other persons to ride on the Tractor or Implement.Falling off can result in serious injury or death. (SG-10)

OPERATION
TX1500/1700 01/12 Operation Section 4-41
© 2012 Alamo Group Inc.
OPER
ATION
Make certain that the “Slow Moving Vehicle” (SMV) sign is installed insuch a way as to be clearly visible and legible. When transporting theEquipment use the Tractor flashing warning lights and follow all localtraffic regulations. (SG-6)
The SMV (Slow-Moving Vehicle) emblem isuniversal symbol used to alert drivers of thepresence of equipment traveling on roadways at aslow speed. SMV signs are a triangular brightorange with reflective red trim for both easy dayand night visibility. Make sure the SMV sign isclean and visible from the rear of the unit beforetransporting the tractor and implement on a publicroadway. Replace the SMV emblem if faded,damaged, or no longer reflective. OPS-U- 0020
Make sure that all tractor flashing warning lights,headlights, and brake/tail lights are functioningproperly before proceeding onto public roads. Whilenewer model tractors have plenty of lighting toprovide warning signals and operating lighting, mostolder models are only equipped with operating lights.Consult an authorized tractor dealer for lighting kitsand modifications available to upgrade the lighting onolder tractor models. OPS-U- 0021
When operating on public roads, haveconsideration for other road users. Pull to the sideof the road occasionally to allow all following trafficto pass. Do not exceed the legal speed limit set inyour country for agricultural tractors. Always stayalert when transporting the tractor and implementon public roads. Use caution and reduce speed ifother vehicles or pedestrians are in the area. OPS-U- 0022

OPERATION
TX1500/1700 01/12 Operation Section 4-42
© 2012 Alamo Group Inc.
OPE
RAT
ION
Reduce speed before turning or applying the brakes.Ensure that both brake pedals are locked togetherwhen operating on public roads. OPS-U- 0023
14.2 Hauling the Tractor and ImplementBefore transporting a loaded tractor and implement,measure the height and width dimensions and grossweight of the complete loaded unit. Ensure that theload will be in compliance with the legal limits set forthe areas that will be traveled through. OPS-U- 0024
Use adequately sized and rated trailers andequipment to transport the tractor and implement.Consult an authorized dealer to determine the properequipment required. Using adequately sized chains,heavy duty straps, cables and/or binders, securely tiedown both the front and rear of the tractor utilizing theproper tie down locations as specified by the tractormanufacturer. OPS-U- 0025

OPERATION
TX1500/1700 01/12 Operation Section 4-43
© 2012 Alamo Group Inc.
OPER
ATION
Arrange the chains so that when tightened, thechains are pulling downward and againstthemselves. Carefully tighten the securing chains orother fasteners using boomers or binders to applymaximum tension. Use extreme care whenattaching and removing the securing devices as theextreme tension involved when released has thepotential to inflict serious injury.
While hauling the tractor and implement, makeoccasional stops to check that the tractor andimplement have not moved or shifted and that thesecuring chains have maintained tension. If duringtransport a hard braking, sharp turning, or swervingaction was performed, stop at the next safe locationto inspect the security of the load. OPS-U- 0026

OPERATION
TX1500/1700 01/12 Operation Section 4-44
© 2012 Alamo Group Inc.
OPE
RAT
ION
15. TROUBLESHOOTING GUIDE
PROBLEM POSSIBLE CAUSE POSSIBLE REMEDY
Streaking or Windrowing Slow Blade Speed Operate PTO at 540 RPM.Worn Blade Tips Replace with Genuine RHINO blades.
See your Rhino dealer.Dull Blades Sharpen blades uniformly.Blades unable to cut that part Slow ground speed of tractor but keep of grass pressed down by engine running at full PTO RPM. path of tractor tires or casters Cutting slower will help.Mowing too fast Slow down until cured.Drive belt loose Tighten per Instructions.Belt glazed/slipping Apply belt dressing or replace with
special RHINO belt.Blade loose on Spindle. Tighten blade bolt securely.
(Note: Torque to 76 ft./lbs.)Conditions too wet for mowing Allow grass to dry before mowing.
Material Discharges Material too high and too much Reduce ground speed but maintainfrom Mower Unevenly material 540 RPM at tractor PTO, or make twoBunches Material passes over material. Raise thealong Swath mower for the first pass and lower to
desired height for the second and cut at 90 degrees to first pass. Raise rear of mower high enough to permit material to discharge, but no so high that conditions listed above occur.
Belt Slipping Tighten or replace with specialRHINO belt.
Grass Wet Allow grass to dry before mowing.Slow ground speed of tractor but keep engine running at full PTO rpm.Cutting lower will help.
Uneven Cut Cutter not level side to side Adjust cutting height.or front to rear.
Belt slipping Adjust belt
Worn or bent blades(s). Replace blade(s).

OPERATION
TX1500/1700 01/12 Operation Section 4-45
© 2012 Alamo Group Inc.
OPER
ATION
PROBLEM POSSIBLE CAUSE POSSIBLE REMEDY
Heavy Vibration Too high blade speed Do not exceed 540 PTO RPM.Broken/bent Blade Replace with genuine RHINO blades.
See your RHINO dealer.Worn/Unbalanced Blade Grind uniformly, rebalance and replaceBent/broken Sheave Replace parts.Trash Hung on Blade Clean off Blade.
Belt Slipping Belt loose Tighten or replace with SpecialRHINO belt.
Belt Glazed Use belt dressing or replace.Oil on Belt Clean or replace.Mower overloading, material Reduce tractor ground speed buttoo tall or heavy maintain full PTO rpm. Cut material
twice, one high pass and then mow at desired height. Cut a partial swath.
Oil on belt from over-lubrication Be careful not to overlubricate.Clean lubricant from belt and pulleys with a clean rag. Replace oil soaked belt.
Belt hung up or rubbing Check belt for free travel in pulleysand belt guides. Check under mower and around blade spindle shafts for wire, rags or other foreign material. Clean all material from under mower.
Frayed Edges on Belt misaligned or belt Re-align belt or guide. Be sure beltBelt Cover rubbing guide doesn’t rub any other part while
running.Pulley misalignment Inspect to ensure belt is running in
center of backside idler. Shim idler as necessary to align.

OPERATION
TX1500/1700 01/12 Operation Section 4-46
© 2012 Alamo Group Inc.
OPE
RAT
ION
PROBLEM POSSIBLE CAUSE POSSIBLE REMEDY
Belt Rollover Pulley misalignment Re-alignDamaged belt Replace beltForeign object in pulley grooves Inspect all pulley grooves for rust,
paint or weld spots and remove.Worn pulley groove Replace pulley
Damaged Belt Rollover, high shock loads or Replace belt.installation damage
Belt Breakage High shock loads Avoid abusive mowing. Avoid hittingthe ground or large obstructions.
Belt came off drive Check drive alignment for foreignmaterial in grooves. Ensure proper tension. Avoid hitting solid objects or ground.
*Check belt for damage by laying it flat on floor. If belt does not lie flat (has lumps or twists), which indicatesbroken or stretched cords, it must be replaced. Each mower head belt must be replace as set of two belts.

Maintenance Section 5-1
© 2012 Alamo Group Inc.
MAINTENANCE SECTION

MAINTENANCE
TX1500/1700 07/11 Maintenance Section 5-2
© 2012 Alamo Group Inc.
MA
INTE
NA
NC
E
PARTS INFORMATION
Before operating your Cutter, make sure it is properly lubricated and thoroughly inspected. Only a minimum oftime and effort is required to regularly lubricate and maintain this machine to provide long life and trouble freeoperation.
Always disengage the PTO before raising the Rotary Cutter for transporting or makingadjustments.
NOTE: Some guards and shields have been removed from the illustrations and pictures for instructional clarity.DO NOT operate implement without all shields and guards in place and in good condition.
LUBRICATION INFORMATIONDo not let excess grease collect on or around parts, particularly when operating in sandy areas. Theillustrations below shows lubrication points. The chart gives the frequency of lubrication in hours, based onnormal operating conditions. Severe or unusual conditions may require more frequent lubrication. See Mnt-R-0534.Use Multi-Purpose Gear Oil P/N 00786250 when required in Gearbox. Use N.L.G.I. #2 grease for all locationsdesigned with grease gun. Be sure to clean the fitting thoroughly before using grease gun. Daily lubrication ofthe main driveline slip joint is necessary. Failure to maintain proper lubrication will result in damage to U-joints,gearbox, and/or driveshaft.
PARTS INFORMATIONRhino mowers use balanced and matched system components for blade carriers, blades, cuttershafts, knives,knife hangers, rollers, drivetrain components, and bearings. These parts are made and tested to Rhino speci-fications. Non-genuine "will fit" parts do not consistently meet these specifications. The use of “will fit” partsmay reduce mower performance, void warranties, and present a safety hazard. Use genuine Rhino mowerparts for economy and safety. (SPRM-1)
SEE YOUR RHINO DEALER

MAINTENANCE
TX1500/1700 07/11 Maintenance Section 5-3
© 2012 Alamo Group Inc.
MA
INTEN
AN
CE

MAINTENANCE
TX1500/1700 07/11 Maintenance Section 5-4
© 2012 Alamo Group Inc.
MA
INTE
NA
NC
E
GEARBOXThe Gearbox has been filled with lubricant to the Test Plug Level prior to shipment. However, you should checkthe oil level at Test Plug before operating, and frequently thereafter.The gearbox should not require additional lubricant unless the box is cracked or a seal is leaking. It isrecommended that the oil level plug be removed after every 8 to 10 hours of operation and oil added until itcomes to proper level at oil level plug opening. MntP-R-0268.
Required lubricant is Multi-Purpose Gear Oil (P/N 00786250). Gearbox capacity is 1 Quart.NOTE: Overfilling the Gearbox will cause pressure to build up and cause Oil Seals to leak.
ATTENTION: If the Gearbox suddenly starts making an unusual noise, stop at once, check for leaks, and refillGearbox as required.

MAINTENANCE
TX1500/1700 07/11 Maintenance Section 5-5
© 2012 Alamo Group Inc.
MA
INTEN
AN
CE
CENTER 4-WAY GEAR BOXGearbox is filled from factory with proper lube level. To check oil level, remove dipstick plug located on the topof the gearbox. It is recommended that the oil level be checked every 100 hours of operation. Add oil asneeded, until it reaches the top mark on the dipstick.
Recommended lubricant is Multi-Purpose Gear Oil (P/N 00786250). Gearbox capacity is 1-1/2 quarts.
GAUGE WHEEL ASSEMBLIESGauge wheels are equipped with bushings which require grease daily. Grease fittings are provided in theWheel Hub and Gauge Wheel Pivot. Grease after 8 hours of use.

MAINTENANCE
TX1500/1700 07/11 Maintenance Section 5-6
© 2012 Alamo Group Inc.
MA
INTE
NA
NC
E
BLADE SPINDLE LUBRICATIONBlade spindles must be lubricated daily (every 8 hrs). Access lubrication fitting through hole in outer shieldsand in center gearbox mounting. Each spindle must be lubricated enough each time to force small amount ofgrease out through top seal. NOTE: Do not overlube as excess grease may get on belt drive.
DRIVELINE LUBRICATIONThe Drivelines and U-Joints should be inspected each morning before the mower is started. Mnt-R-0537.The U-Joint and CV Joint on the Driveline undergo extreme forces when the unit is turning or when the Wingsare being raised. It is important that the U-Joints and CV Joint be greased each day before the unit is started,and after each 8 hours of use. The U-Joints are located at each end of the Center and Wing Drivelines. The CVJoint assemblies are accessible by rotating the Driveline Safety Shield until the hole in the Shield matches upwith the Grease Fitting. Use #2 Bearing Grease for lubrication. Do not force grease through the Needle CupAssemblies. Inspect the U-Joint for wear by holding the shaft on one side of the U-Joint while trying to rotatethe shaft on the other side of the U-Joint. If there is noticeable movement in the Driveline replace the U-Jointbefore it causes severe damage to the Driveline.
Grease all Points Every 8 Hours

MAINTENANCE
TX1500/1700 07/11 Maintenance Section 5-7
© 2012 Alamo Group Inc.
MA
INTEN
AN
CE
The Driveline Integral Shields should not become dented or otherwise damaged. The Integral Shield Assemblyhas a Nylon Bearing at each end and should turn freely. This nylon bearing should require lubrication every 8hours. To remove the Integral Shields for replacement or repair, turn the three Nylon Nuts 1/4 turn in the ShieldSlots of the Cone and Tube and remove them. Slip the Shield Cone Assembly off inner section of the Driveline.Install the new or repaired Shield on the Driveline. Place the split Nylon Bearing over the Driveline Housing ofShaft against the Yoke and in the Bearing groove. Install shield over the Housing so the Nylon Bearing fits intothe Shield Bearing Retainer. Align a slot in the Shield Cone with one of the slots in the Shield.
CV DRIVELINE PROFILE LUBRICATIONGrease telescoping profile tube through slots in shield tubes. NOTE: Constant Velocity (CV) Joint - Position CV joint as straight as possible to be sure grease will penetrateto ball joint. Lubricate the central body with a minimum of 30 shots of grease every 8 hours. Lubricatetelescoping members with 10 shots every 8 hours and every 40 hours pull the two sections apart, apply thincoat of multi-purpose grease to outside of inner (male) section and reassemble.
WING DRIVELINE PROFILE LUBRICATIONDisconnect PTO driveline, pull the two sections apart, apply thin coat of multi-purpose grease to outside ofinner (male) section. Reassemble sections and install. Pull each section to be sure driveline and shields aresecurely connected. Make certain PTO shielding is in good condition.
Make certain that the Driveline Integral Shields are free to telescope and rotate around theDriveline without binding.
When attaching PTO yoke to tractor PTO shaft, it is important that spring-activated lockingcollar slides freely and locking balls are seated in groove on PTO shaft. A loose shaft couldslip off and result in personal injury or damage to cutter.

MAINTENANCE
TX1500/1700 07/11 Maintenance Section 5-8
© 2012 Alamo Group Inc.
MA
INTE
NA
NC
E
BLADE SERVICINGInspect blades before each use to determine that they are properly installed and in good condition. Replaceany blade that is bent, excessively nicked, worn, or has any other damage. Small nicks can be ground outwhen sharpening.Use only original equipment blades on this cutter. They are made of special heat-treated alloy steel. Substituteblades may not meet specifications and may fail in a hazardous manner that could cause injury.
BLADE SHARPENINGAlways sharpen both blades at same time to maintain balance. Follow original sharpening pattern as shown inFigure Mnt-R-0008 Always sharpen blades by grinding. DO NOT heat and pound out edge. Do not sharpenblade to a razor edge, but leave a 1/16" blunt edge. Do not sharpen back side of blade. Mnt-R-0273.
Avoid personal injury. Always block the cutter up to prevent if from falling when the bladesand/or carrier are being serviced.
When sharpening blades, grind each end the same amount to maintain balance.Unbalanced blades will cause excessive vibration which can damage blade spindlebearings. Vibration may also cause structural cracks in mower housing.
BLADE INSTALLATION1. Raise cutter using tractor hydraylics and SECURELY BLOCK INTO POSITION.2. Set parking brake, turn off tractor and remove key.3. Remove bolt and cup washer securing blade to spindle. Remove blade.4. Install washer on blade bolt, insert bolt into blade, thread bolt into spindle shaft.NOTE: Tighten blade bolt to 76 ft./lbs. torque. Use heavy leather gloves during tightening process to holdblade and wrench.

MAINTENANCE
TX1500/1700 07/11 Maintenance Section 5-9
© 2012 Alamo Group Inc.
MA
INTEN
AN
CE
SPINDLE BELT ADJUSTMENTBelt tensions should be checked every 40 hours to get maximum life from drive belts and best performancefrom the cutter. Belt tension is adjusted by increasing or decreasing the length of the spring on the moveableidler. For proper belt tension on the 60” mowers, the spring length should be set at 6-5/8”. For proper belttension on the 72” mowers, the spring length should be set at 7-7/8”. To adjust the spring length, loosen ortighten the 3/8” hex nuts on the spring adjustment rod until the correct spring length is reached. Use onlyGenuine Rhino replacement parts.

MAINTENANCE
TX1500/1700 07/11 Maintenance Section 5-10
© 2012 Alamo Group Inc.
MA
INTE
NA
NC
E
SPINDLE BELT REPLACEMENT1. Remove right and left side shields.2. Relieve spring tension by loosening the two 3/8” hex nuts on the spring adjustment rod.3. Remove old belt.4. Install new belt per diagram. Be sure that the belt is properly positioned in all sheave grooves.5. Adjust tension on the belt by adjusting the length of the spring on the moveable idler. The correct spring
lengths are 6-5/8” (60”) and 7-7/8” (72”) mowers.6. Replace right and left side shields.
STORAGEYour rotary mower represents an investment from which you should get the greatest possible benefit.Therefore, when the season is over, the cutter should be thoroughly checked and prepared for storage so thata minimum amount of work will be required to put it back into operation for the next season. The following aresuggested storage procedures:1. Thoroughly clean the cutter.2. Lubricate the cutter as covered in Maintenance Section.3. Tighten all bolts and pins to the recommended torque.4. Check the cutter for worn or damaged parts. Make replacements immediately.5. Store the cutter in a clean, dry place with the cutter housing resting on blocks.6. Use spray touch-up enamel where necessary to prevent rust and maintain the appearance of the cutter.

MAINTENANCE
TX1500/1700 07/11 Maintenance Section 5-11
© 2012 Alamo Group Inc.
MA
INTEN
AN
CE
PROPER TORQUE FOR FASTENERSThe chart lists the correct tightening torque for fasteners. When bolts are to be tightened or replaced, refer tothis chart to determine the grade of bolts and the proper torque except when specific torque values areassigned in manual text.
RECOMMENDED TORQUE IN FOOT POUNDS UNLESS OTHERWISE STATED IN THE MANUAL*
NOTE: These values apply to fasteners as received from supplier, dry or when lubricated with normal engineoil. They do not apply if special graphited or molydisulphide greases or other extreme pressure lubricants areused. This applies to both UNF fine and UNC coarse threads.
RHINO LIMITED WARRANTY
1. LIMITED WARRANTIES1.01. Rhino warrants for one year from the purchase date to the original non-commercial, governmental, or municipal purchaser
(“Purchaser”) and warrants for six months to the original commercial or industrial purchaser (“Purchaser”) that the goodspurchased are free from defects in material or workmanship.
1.02. Manufacturer will replace for the Purchaser any part or parts found, upon examination at one of its factories, to be defectiveunder normal use and service due to defects in material or workmanship.
1.03. This limited warranty does not apply to any part of the goods which has been subjected to improper or abnormal use,negligence, alteration, modification, or accident, damaged due to lack of maintenance or use of wrong fuel, oil, or lubricants,or which has served its normal life. This limited warranty does not apply to any part of any internal combustion engine, orexpendable items such as blades, shields, guards, or pneumatic tires except as specifically found in your Operator’s Manual.
1.04. Except as provided herein, no employee, agent, Dealer, or other person is authorized to give any warranties of any nature onbehalf of Manufacturer.
2. REMEDIES AND PROCEDURES.2.01. This limited warranty is not effective unless the Purchaser returns the Registration and Warranty Form to Manufacturer within
30 days of purchase. 2.02. Purchaser claims must be made in writing to the Authorized Dealer (“Dealer”) from whom Purchaser purchased the goods or
an approved Authorized Dealer (“Dealer”) within 30 days after Purchaser learns of the facts on which the claim is based.2.03. Purchaser is responsible for returning the goods in question to the Dealer.2.04. If after examining the goods and/or parts in question, Manufacturer finds them to be defective under normal use and service
due to defects in material or workmanship, Manufacturer will:(a)Repair or replace the defective goods or part(s) or(b)Reimburse Purchaser for the cost of the part(s) and reasonable labor charges (as determined by Manufacturer) if
Purchaser paid for the repair and/or replacement prior to the final determination of applicability of the warranty byManufacturer.
The choice of remedy shall belong to Manufacturer.2.05. Purchaser is responsible for any labor charges exceeding a reasonable amount as determined by Manufacturer and for
returning the goods to the Dealer, whether or not the claim is approved. Purchaser is responsible for the transportation costfor the goods or part(s) from the Dealer to the designated factory.
3. LIMITATION OF LIABILITY.3.01. MANUFACTURER DISCLAIMS ANY EXPRESS (EXCEPT AS SET FORTH HEREIN) AND IMPLIED WARRANTIES WITH
RESPECT TO THE GOODS INCLUDING, BUT NOT LIMITED TO, MERCHANTABILITY AND FITNESS FOR APARTICULAR PURPOSE.
3.02. MANUFACTURER MAKES NO WARRANTY AS TO THE DESIGN, CAPABILITY, CAPACITY, OR SUITABILITY FOR USE OFTHE GOODS.
3.03. EXCEPT AS PROVIDED HEREIN, MANUFACTURER SHALL HAVE NO LIABILITY OR RESPONSIBILITY TO PURCHASEROR ANY OTHER PERSON OR ENTITY WITH RESPECT TO ANY LIABILITY, LOSS, OR DAMAGE CAUSED OR ALLEGEDTO BE CAUSED DIRECTLY OR INDIRECTLY BY THE GOODS INCLUDING, BUT NOT LIMITED TO, ANY INDIRECT,SPECIAL, CONSEQUENTIAL, OR INCIDENTAL DAMAGES RESULTING FROM THE USE OR OPERATION OF THEGOODS OR ANY BREACH OF THIS WARRANTY. NOT WITHSTANDING THE ABOVE LIMITATIONS AND WARRANTIES,MANUFACTURER’S LIABILITY HEREUNDER FOR DAMAGES INCURRED BY PURCHASER OR OTHERS SHALL NOTEXCEED THE PRICE OF THE GOODS.
3.04. NO ACTION ARISING OUT OF ANY CLAIMED BREACH OF THIS WARRANTY OR TRANSACTIONS UNDER THISWARRANTY MAY BE BROUGHT MORE THAN TWO (2) YEARS AFTER THE CAUSE OF ACTION HAS OCCURRED.
4. MISCELLANEOUS.4.01. Proper Venue for any lawsuits arising from or related to this limited warranty shall be only in Guadalupe County, Texas.4.02. Manufacturer may waive compliance with any of the terms of this limited warranty, but no waiver of any terms shall be deemed
to be a waiver of any other term.4.03. If any provision of this limited warranty shall violate any applicable law and is held to be unenforceable, then the invalidity of
such provision shall not invalidate any other provisions herein.4.04. Applicable law may provide rights and benefits to purchaser in addition to those provided herein.
KEEP FOR YOUR RECORDSATTENTION: Purchaser should fill in the blanks below for his reference when buying repair parts and/or for proper machine identificationwhen applying for warranty.Rhino Implement Model Serial NumberDate Purchased DealerATTENTION: READ YOUR OPERATOR'S MANUAL RHINO®
1020 S Sangamon Ave. Gibson City, IL 60936800-446-5158Email: [email protected]

TO THE OWNER/OPERATOR/DEALER
In addition to the standard Limited Warranty shown on the facing page, Rhino also provides:
A FIVE-YEAR (60 months) LIMITED WARRANTY* on GEARBOX components provided they have beenproperly maintained† and have not been subjected to abuse or mis-use except as limited below.
* WARRANTY LIMITATIONS - GEARBOXA) Warranty is ONE-YEAR (12 MONTHS) for Seals (After one year, seals are considered to be WEARINGPARTS and replacement is the users' responsibility.)B) Users' Gearboxes may be rebuilt by Rhino or replaced by new or rebuilt Gearboxes at the option of Rhino.
† NOTE - "properly maintained" specifically includes, but is not limited to:A) Running Gearboxes with the proper amount of the correct lubricant.B) Adjusting Slip Clutches correctly to provide proper protection for Driveline and Gearbox Components. C) Properly lubricate all driveline components as specified.D) Maintaining proper bearing preload on all gearbox shaft.
To keep your implement running efficiently and safely, read your manual thoroughly and follow these directionsand the Safety Messages in this Manual. The Table of Contents clearly identifies each section where you caneasily find the information you need.
The OCCUPATIONAL SAFETY AND HEALTH ACT (1928.51 Subpart C) makes these minimum safetyrequirements of tractor operators:
REQUIRED OF THE OWNER:1. Provide a Roll-Over-Protective Structure that meets the requirements of this Standard; and2. Provide Seat belts that meet the requirements of this paragraph of this Standard and SAE J4C; and3. Ensure that each employee uses such Seat belt while the tractor is moving; and4. Ensure that each employee tightens the Seat belt sufficiently to confine the employee to the protected area provided by the ROPS
REQUIRED OF THE OPERATOR:1. Securely fasten seat belt if the tractor has a ROPS.2. Where possible, avoid operating the tractor near ditches, embankments, and holes.3. Reduce speed when turning, crossing slopes, and on rough, slick, or muddy surfaces.4. Stay off slopes too steep for safe operation.5. Watch where you are going - especially at row ends, on roads, and around trees.6. Do not permit others to ride.7. Operate the tractor smoothly - no jerky turns, starts, or stops.8. Hitch only to the drawbar and hitch points recommended by the tractor manufacturer.9. When the tractor is stopped, set brakes securely and use park lock, if available.

TX1500/1700-SOM-01/12 P/N 50069174Printed U.S.A
TX-1500/1700Finishing Mower