Embed Size (px)
Citation preview

TwinSAFE tutorial 12 | EN
SafeMotion WizardAX8000 projects with partially different functionality
9/21/2021 | Version: 1.0.0

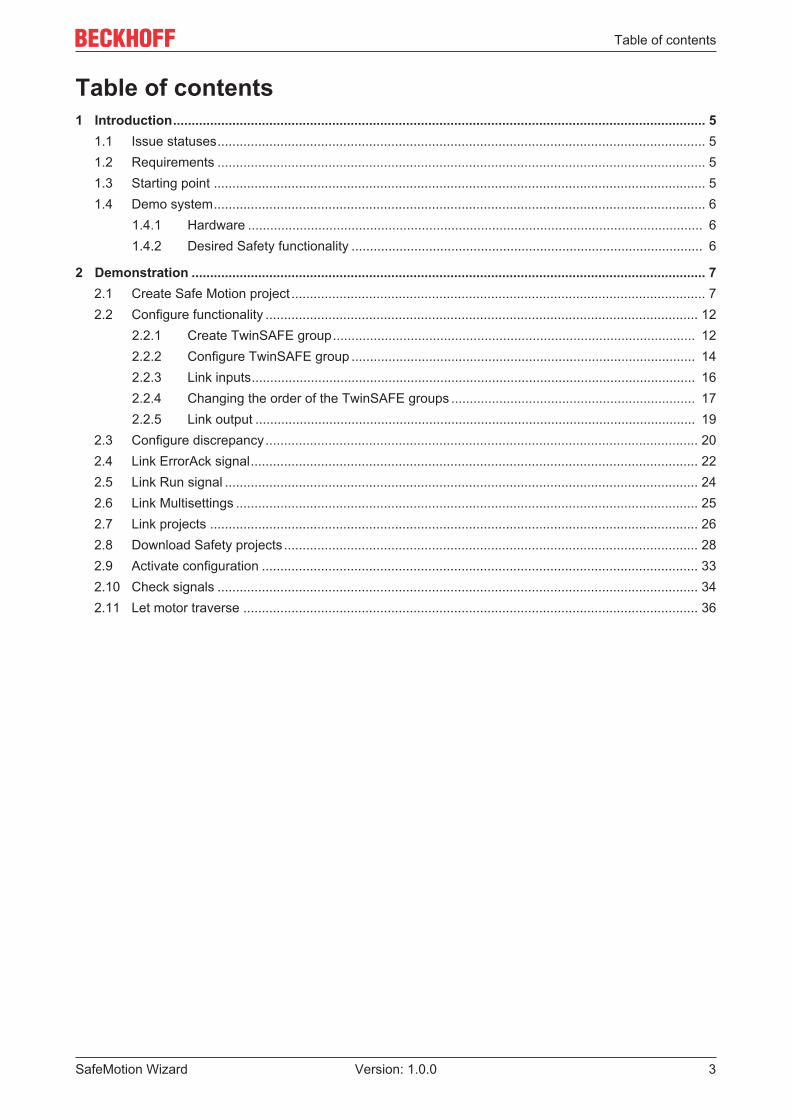
Table of contents
SafeMotion Wizard 3Version: 1.0.0
Table of contents1 Introduction................................................................................................................................................ 5
1.1 Issue statuses.................................................................................................................................... 51.2 Requirements .................................................................................................................................... 51.3 Starting point ..................................................................................................................................... 51.4 Demo system..................................................................................................................................... 6
1.4.1 Hardware ........................................................................................................................... 61.4.2 Desired Safety functionality ............................................................................................... 6
2 Demonstration ........................................................................................................................................... 72.1 Create Safe Motion project ................................................................................................................ 72.2 Configure functionality ..................................................................................................................... 12
2.2.1 Create TwinSAFE group.................................................................................................. 122.2.2 Configure TwinSAFE group ............................................................................................. 142.2.3 Link inputs........................................................................................................................ 162.2.4 Changing the order of the TwinSAFE groups .................................................................. 172.2.5 Link output ....................................................................................................................... 19
2.3 Configure discrepancy..................................................................................................................... 202.4 Link ErrorAck signal......................................................................................................................... 222.5 Link Run signal ................................................................................................................................ 242.6 Link Multisettings ............................................................................................................................. 252.7 Link projects .................................................................................................................................... 262.8 Download Safety projects ................................................................................................................ 282.9 Activate configuration ...................................................................................................................... 332.10 Check signals .................................................................................................................................. 342.11 Let motor traverse ........................................................................................................................... 36

Table of contents
SafeMotion Wizard4 Version: 1.0.0
Introduction
SafeMotion Wizard 5Version: 1.0.0
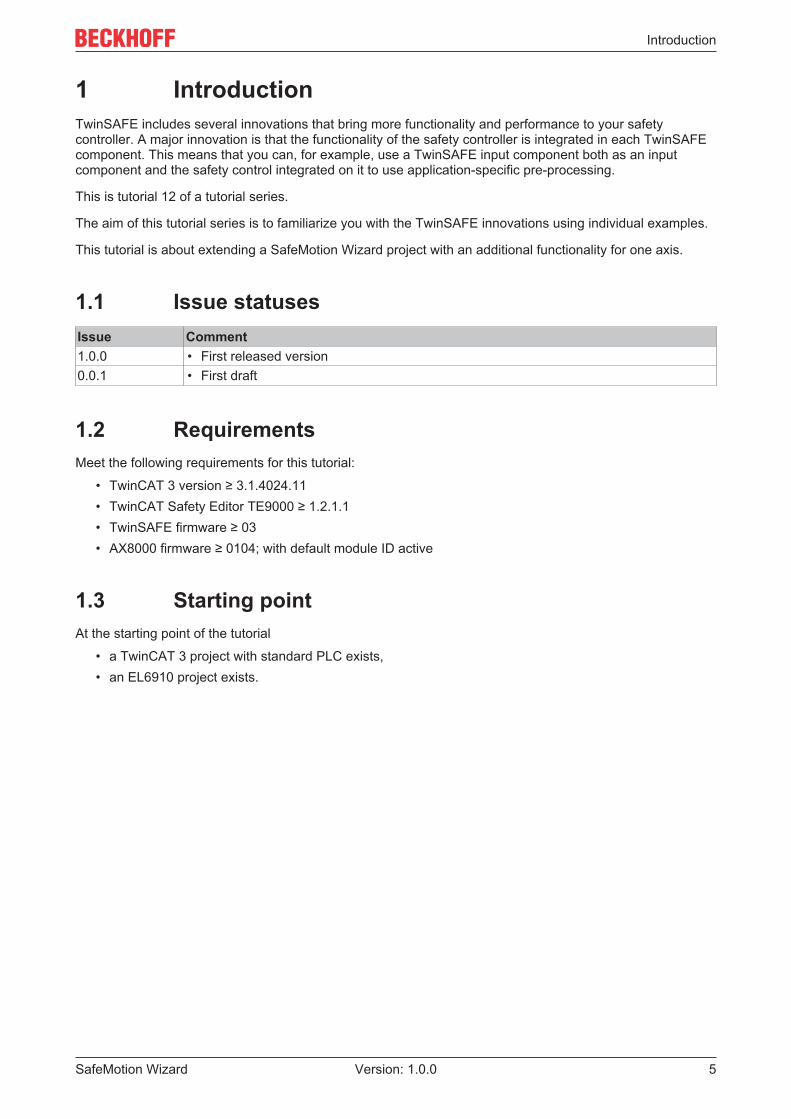
1 IntroductionTwinSAFE includes several innovations that bring more functionality and performance to your safetycontroller. A major innovation is that the functionality of the safety controller is integrated in each TwinSAFEcomponent. This means that you can, for example, use a TwinSAFE input component both as an inputcomponent and the safety control integrated on it to use application-specific pre-processing.
This is tutorial 12 of a tutorial series.
The aim of this tutorial series is to familiarize you with the TwinSAFE innovations using individual examples.
This tutorial is about extending a SafeMotion Wizard project with an additional functionality for one axis.
1.1 Issue statusesIssue Comment1.0.0 • First released version0.0.1 • First draft
1.2 RequirementsMeet the following requirements for this tutorial:
• TwinCAT 3 version ≥ 3.1.4024.11• TwinCAT Safety Editor TE9000 ≥ 1.2.1.1• TwinSAFE firmware ≥ 03• AX8000 firmware ≥ 0104; with default module ID active
1.3 Starting pointAt the starting point of the tutorial
• a TwinCAT 3 project with standard PLC exists,• an EL6910 project exists.

Introduction
SafeMotion Wizard6 Version: 1.0.0
1.4 Demo system
1.4.1 HardwareThe demo system of this tutorial consists of the following hardware:
• CX for EtherCAT communication and the standard PLC controller• EL6910 as master TwinSAFE Logic• EL1918 with safe inputs for reading light barrier signals• Light barrier• AX8000-x2xx
1.4.2 Desired Safety functionalityThis tutorial describes the realization of the following safety functionality:
• Realization of an identical project for all axes with additional function on one axis using the SafeMotionWizard.

Demonstration
SafeMotion Wizard 7Version: 1.0.0
2 Demonstration
2.1 Create Safe Motion projectStarting point of the tutorial is an existing TwinCAT3 project with an existing I/O configuration and thecorresponding Safe Motion entries.
Proceed as follows to create a Safe Motion project with the SafeMotion Wizard:
1. Select project
2. Select “TwinSAFE” tab
3. Select “Start SafeMotion Wizard...” via the wizard field
The “Select Project Targets” window opens and shows you an overview of all existing and virtual axes.
4. Select Safe-Motion components5. Confirm selection with “Next”
Demonstration
SafeMotion Wizard8 Version: 1.0.0
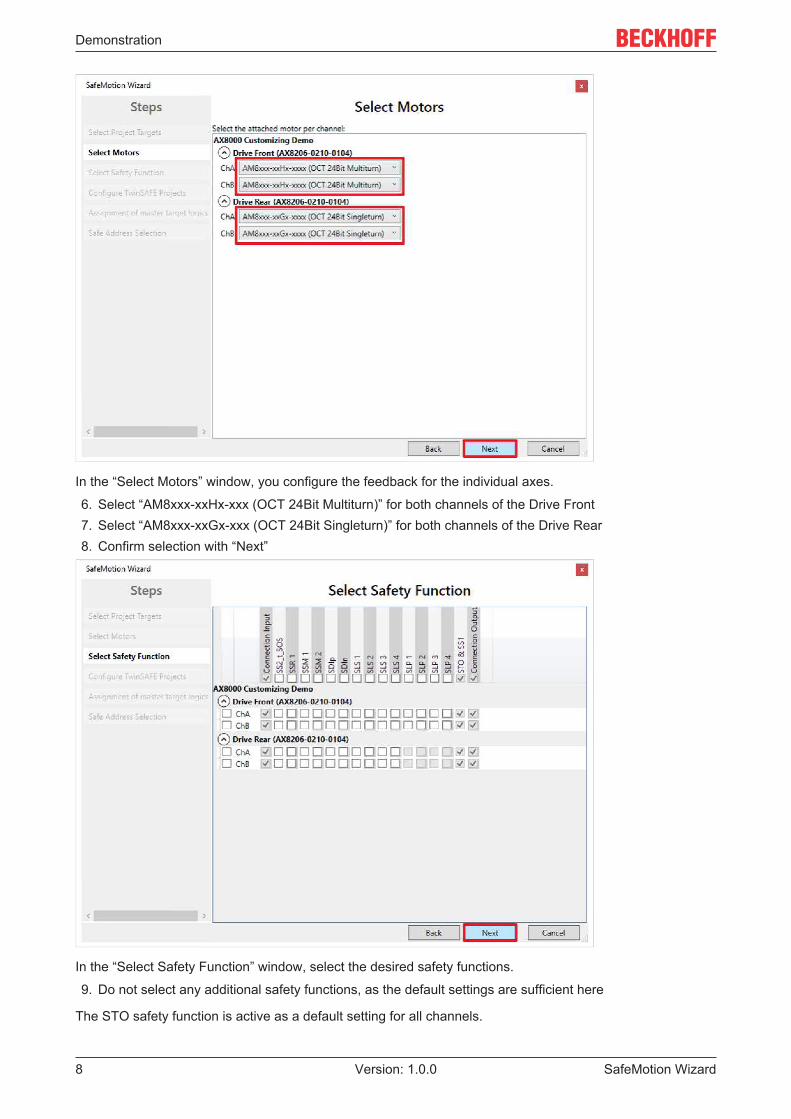
In the “Select Motors” window, you configure the feedback for the individual axes.
6. Select “AM8xxx-xxHx-xxx (OCT 24Bit Multiturn)” for both channels of the Drive Front7. Select “AM8xxx-xxGx-xxx (OCT 24Bit Singleturn)” for both channels of the Drive Rear8. Confirm selection with “Next”
In the “Select Safety Function” window, select the desired safety functions.
9. Do not select any additional safety functions, as the default settings are sufficient here
The STO safety function is active as a default setting for all channels.
Demonstration
SafeMotion Wizard 9Version: 1.0.0
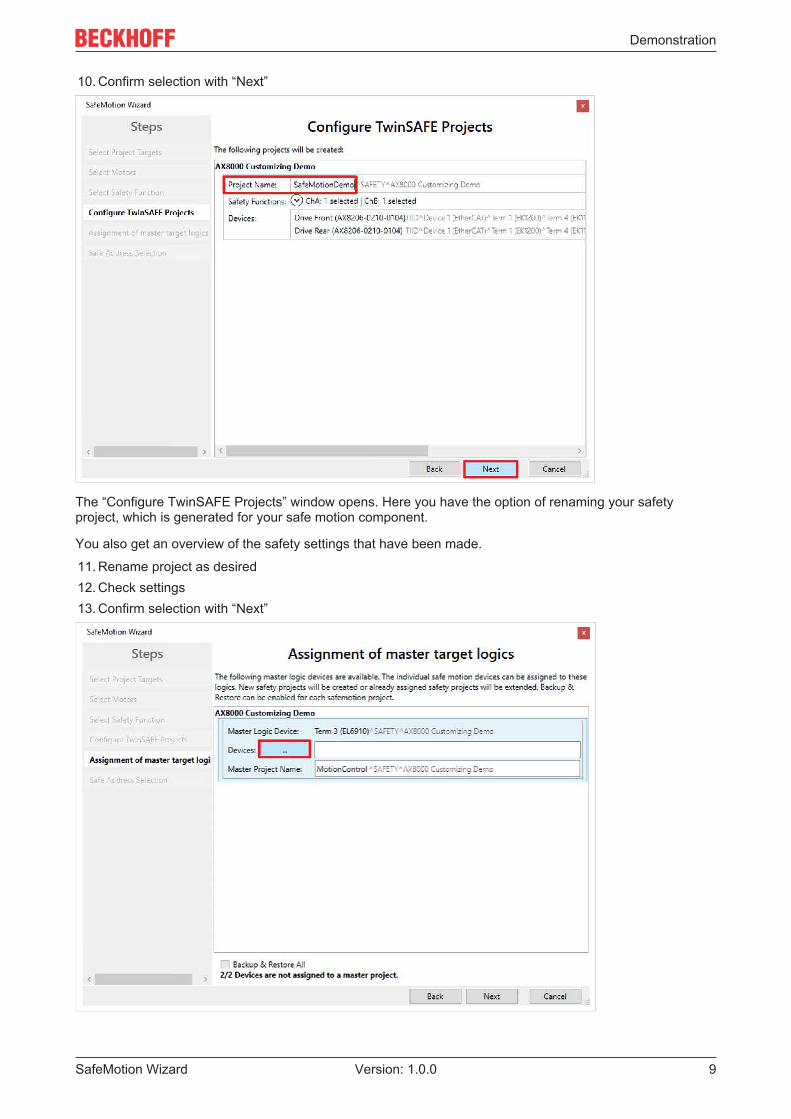
10. Confirm selection with “Next”
The “Configure TwinSAFE Projects” window opens. Here you have the option of renaming your safetyproject, which is generated for your safe motion component.
You also get an overview of the safety settings that have been made.
11. Rename project as desired12. Check settings13. Confirm selection with “Next”

Demonstration
SafeMotion Wizard10 Version: 1.0.0
In the next window “Assignment of master target logics” the connection to the EL6910 project is closed sothat your Safe Motion component can communicate with the EL6910 project. The EL6910 project isautomatically found and displayed.
14. Click the button “ ... “
15. Select safe motion components that you want to connect to the EL6910 project16. Confirm selection with “OK”
17. Confirm window with “Next”
Demonstration
SafeMotion Wizard 11Version: 1.0.0
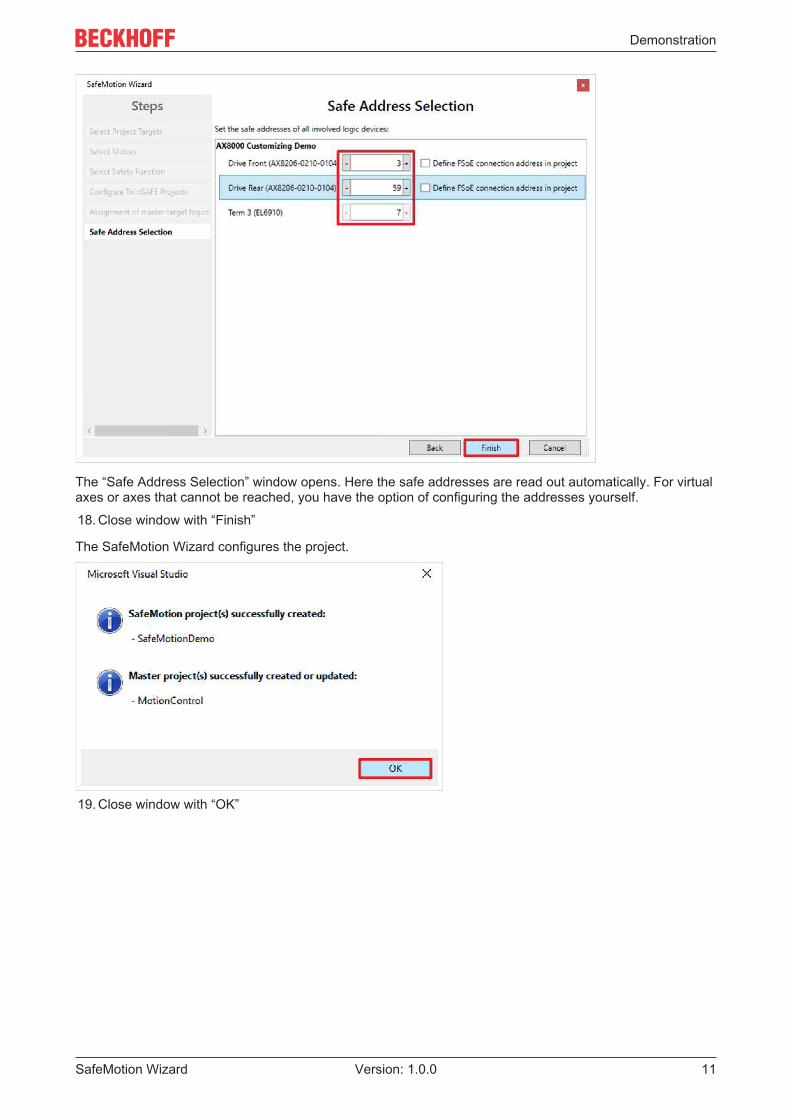
The “Safe Address Selection” window opens. Here the safe addresses are read out automatically. For virtualaxes or axes that cannot be reached, you have the option of configuring the addresses yourself.
18. Close window with “Finish”
The SafeMotion Wizard configures the project.
19. Close window with “OK”

Demonstration
SafeMotion Wizard12 Version: 1.0.0
2.2 Configure functionality
2.2.1 Create TwinSAFE group
1. Right click on the newly created Safe Motion project2. Select “New Item” via the “Add” field
3. Select “TwinSAFEGroup Preconfigured ErrAck”4. Rename TwinSAFE group5. Confirm selection with “Add”

Demonstration
SafeMotion Wizard 13Version: 1.0.0
6. Right click on file “ErrorAcknowledgement.sds”7. Click on “Delete”
8. Close window with “OK” to confirm deletion

Demonstration
SafeMotion Wizard14 Version: 1.0.0
2.2.2 Configure TwinSAFE group
1. Open sal file of the new TwinSAFE group
2. Open tab “Variable Mapping”3. Click on “ ... “ at parameter “GroupPort_ErrAck”
4. Select “ChA_DriveReq_ErrAck”5. Confirm selection with “OK”
Demonstration
SafeMotion Wizard 15Version: 1.0.0
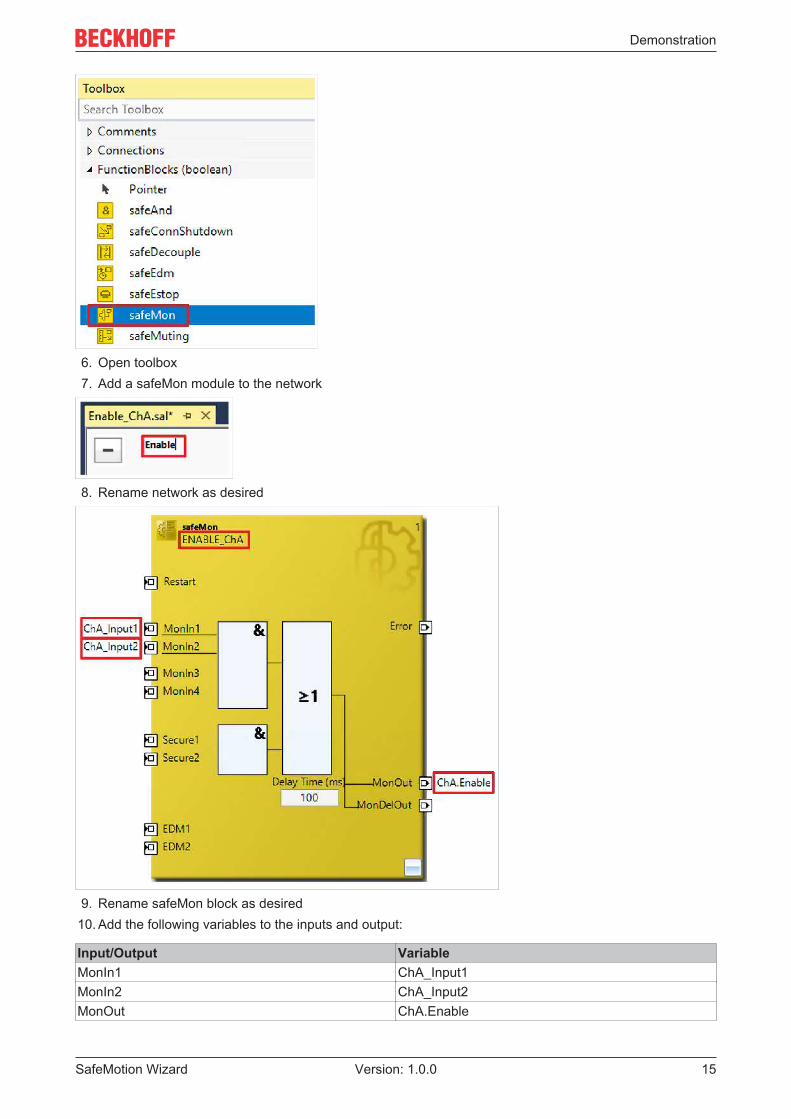
6. Open toolbox7. Add a safeMon module to the network
8. Rename network as desired
9. Rename safeMon block as desired10. Add the following variables to the inputs and output:
Input/Output VariableMonIn1 ChA_Input1MonIn2 ChA_Input2MonOut ChA.Enable

Demonstration
SafeMotion Wizard16 Version: 1.0.0
2.2.3 Link inputsIn the following, you must link the individual signals and variables in the "Variable Mapping" tab. Theprocedure is identical for all variables and is shown here as an example for one variable using thescreenshots.
1. Click the button “ ... “ at the desired variable
2. Select the signal for your Safe Motion component3. Confirm selection with “OK”
The following links result for the variables:
Variable SignalChA_Input1 ChA_SafeInput_1ChA_Input2 ChA_SafeInput_2
4. Click on “Save all” in the menu bar to save the settings

Demonstration
SafeMotion Wizard 17Version: 1.0.0
2.2.4 Changing the order of the TwinSAFE groups
1. Right click on Safe Motion project2. Click on “Edit TwinSAFE Group Order”
In the “Edit TwinSAFE Group Order” window you can see a comparison of the current order values of theTwinSAFE groups with the new order values.
Change the order of the TwinSAFE groups as follows:
3. Click the TwinSAFE group “Enable_ChA”

Demonstration
SafeMotion Wizard18 Version: 1.0.0
4. Drag with pressed mouse button to the position above “ChA_STO_SS1_ErrorHandling” to correspond tothe Safe Motion project
5. Confirm selection with “OK”

Demonstration
SafeMotion Wizard 19Version: 1.0.0
2.2.5 Link output
1. Open file “ChA_STO_SS1_ErrorHandling.sal”
2. Add variable “ChA.Enable” at FB3 at input MonIn3

Demonstration
SafeMotion Wizard20 Version: 1.0.0
2.3 Configure discrepancyProceed as follows to permanently deactivate the TwinSAFE group:
1. Open file “Enable_ChA.sal”2. Open “Properties”
3. Select “True” in the drop-down menu of “Permanent Deactivation Allowed”, so that the TwinSAFE groupcan be permanently deactivated
Next, configure an appropriate substitute value for the enable signal.

Demonstration
SafeMotion Wizard 21Version: 1.0.0
4. Click on enable output
5. Select “True” in the drop-down menu of “Replacement Value”6. Click “Save all” in the menu bar to save the settings
When the group is deactivated, this enable signal is “True” so that the rest of the safety functionalitycontinues to work.

Demonstration
SafeMotion Wizard22 Version: 1.0.0
2.4 Link ErrorAck signal
1. Open file “ERR_ACK FSoE Connection.sds”
2. Click the link icon in the linking tab
Demonstration
SafeMotion Wizard 23Version: 1.0.0
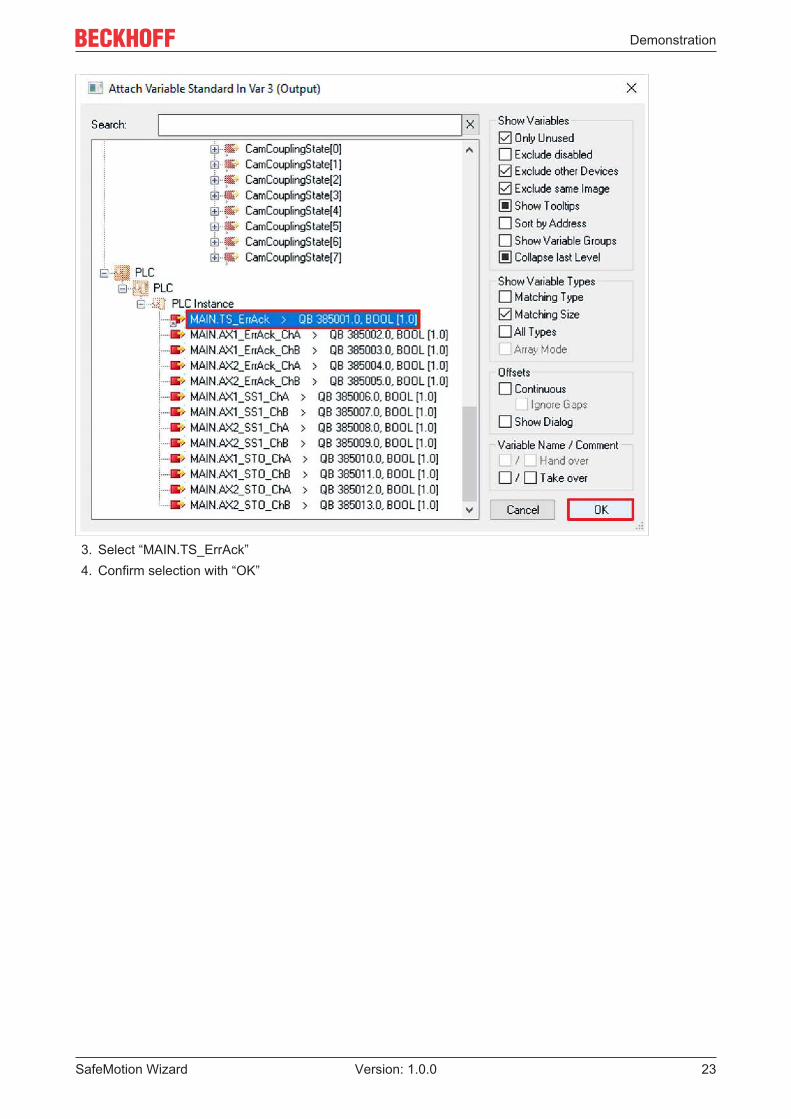
3. Select “MAIN.TS_ErrAck”4. Confirm selection with “OK”

Demonstration
SafeMotion Wizard24 Version: 1.0.0
2.5 Link Run signal
1. Open file “RUN FSoE Connection.sds”2. Click link icon
3. Select “MAIN.TS_Run”4. Confirm selection with “OK”

Demonstration
SafeMotion Wizard 25Version: 1.0.0
2.6 Link Multisettings
1. Open file “Multi Settings.sms”2. Scroll to Run-FSoE-Connection
3. Click on “ ... “
4. Select signals for Run and ErrorAck5. Confirm selection with “OK”6. Click “Save all” in menu bar to save the settings

Demonstration
SafeMotion Wizard26 Version: 1.0.0
2.7 Link projectsThis chapter describes the linking of the SafeMotion project with the EL6910 Safety project via the EL6910parameters.
The SafeMotion Wizard has already created the connections via the Alias Devices.
Proceed as follows:
1. Open the “TwinSafeGroup1.sal” file in your EL6910 project2. Open the “Variable Mapping” tab
In the following, you must link the individual signals and variables in the "Variable Mapping" tab. Theprocedure is identical for all variables and is shown here as an example using the screenshots for onevariable.
3. Click the button “ ... “ at the desired variable
Demonstration
SafeMotion Wizard 27Version: 1.0.0
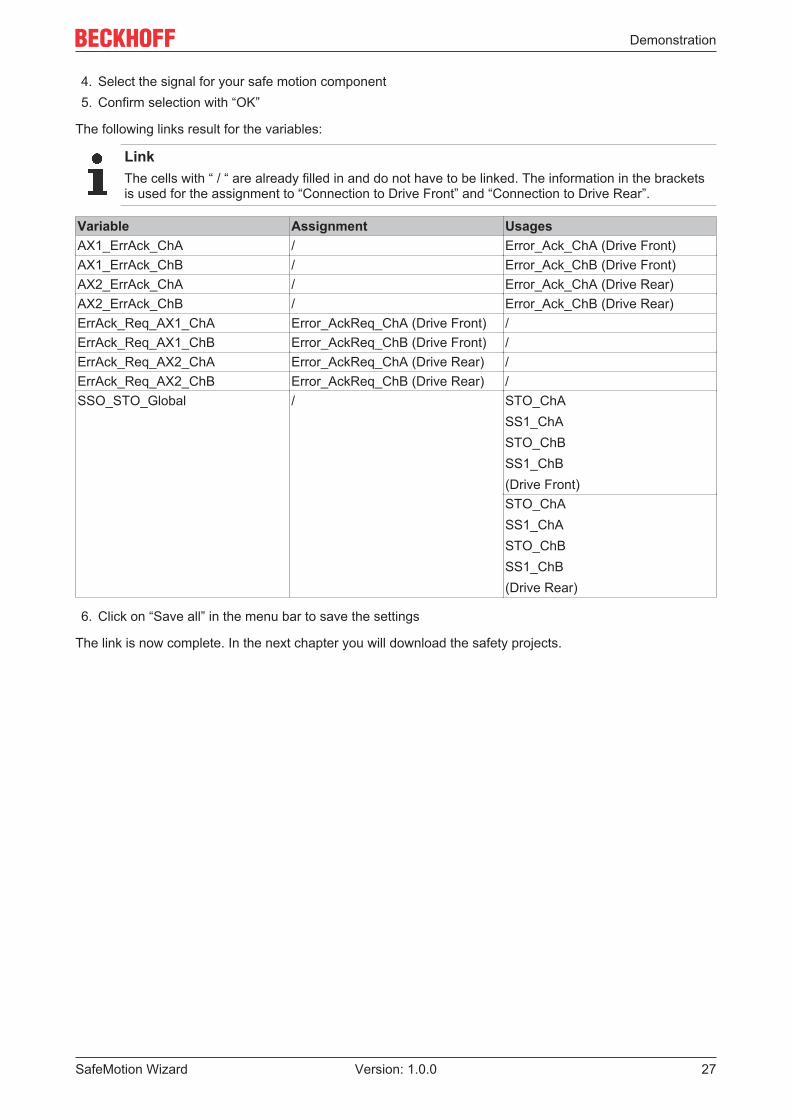
4. Select the signal for your safe motion component5. Confirm selection with “OK”
The following links result for the variables:
LinkThe cells with “ / “ are already filled in and do not have to be linked. The information in the bracketsis used for the assignment to “Connection to Drive Front” and “Connection to Drive Rear”.
Variable Assignment UsagesAX1_ErrAck_ChA / Error_Ack_ChA (Drive Front)AX1_ErrAck_ChB / Error_Ack_ChB (Drive Front)AX2_ErrAck_ChA / Error_Ack_ChA (Drive Rear)AX2_ErrAck_ChB / Error_Ack_ChB (Drive Rear)ErrAck_Req_AX1_ChA Error_AckReq_ChA (Drive Front) /ErrAck_Req_AX1_ChB Error_AckReq_ChB (Drive Front) /ErrAck_Req_AX2_ChA Error_AckReq_ChA (Drive Rear) /ErrAck_Req_AX2_ChB Error_AckReq_ChB (Drive Rear) /SSO_STO_Global / STO_ChA
SS1_ChASTO_ChBSS1_ChB(Drive Front)STO_ChASS1_ChASTO_ChBSS1_ChB(Drive Rear)
6. Click on “Save all” in the menu bar to save the settings
The link is now complete. In the next chapter you will download the safety projects.
Demonstration
SafeMotion Wizard28 Version: 1.0.0
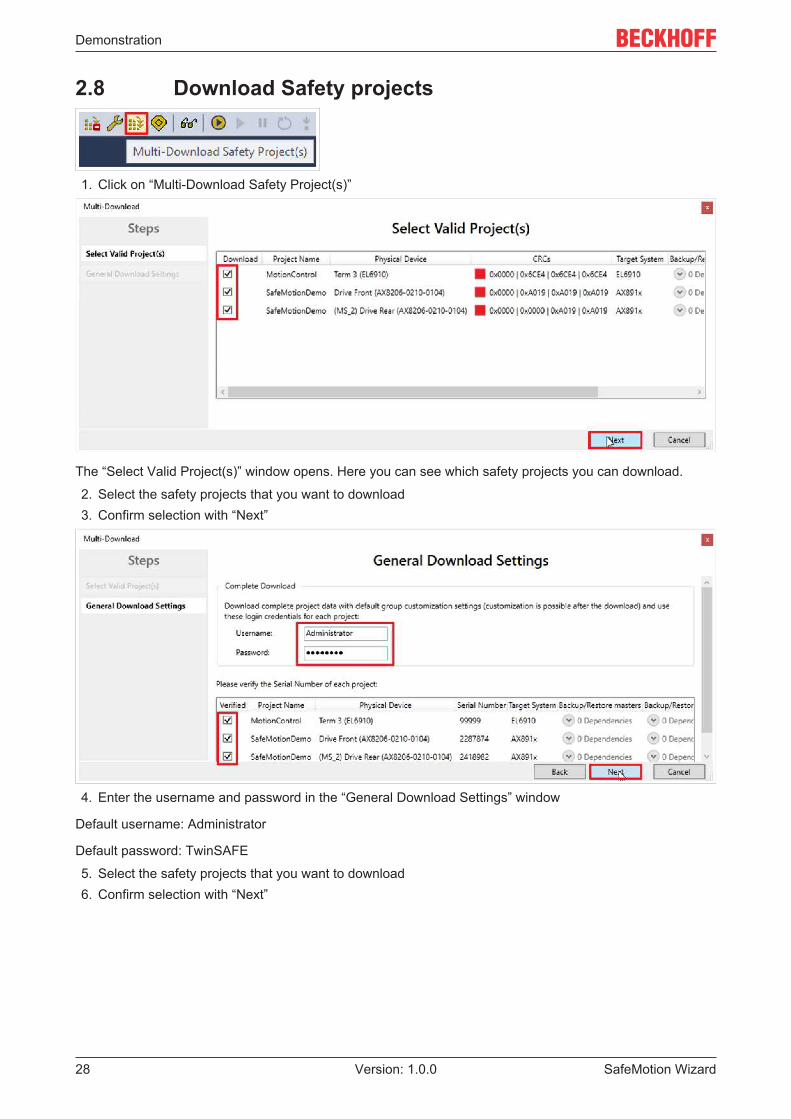
2.8 Download Safety projects
1. Click on “Multi-Download Safety Project(s)”
The “Select Valid Project(s)” window opens. Here you can see which safety projects you can download.
2. Select the safety projects that you want to download3. Confirm selection with “Next”
4. Enter the username and password in the “General Download Settings” window
Default username: Administrator
Default password: TwinSAFE
5. Select the safety projects that you want to download6. Confirm selection with “Next”

Demonstration
SafeMotion Wizard 29Version: 1.0.0
7. Check the CRCs in the “Final Verification” window8. If the CRCs match, click on the box to confirm the verification9. Confirm window with “Next”
The “Activation” window opens, in which you activate the safety projects.
10. Enter the default password11. Check if the safety projects are selected12. Confirm selection with “Next”

Demonstration
SafeMotion Wizard30 Version: 1.0.0
13. Close the window “Multi-Download Result” with “Next”
If customizing is configured in one of your projects, the additional "Customize Projects" window appears.Here you get an overview of the projects for which customizing is possible.
In this use case, the additional functionality should be active on the Drive Front and not on the Drive Rear.Therefore, deactivate the additional functionality in Customizing for the Drive Rear as follows:
14. Click on the wrench icon of the Drive Rear to open customizing

Demonstration
SafeMotion Wizard 31Version: 1.0.0
15. Select “Deactivate Permanently”16. Confirm selection with “Next”
The “Info” window informs you about the settings made
17. Close window with “Finish”

Demonstration
SafeMotion Wizard32 Version: 1.0.0
18. Close “Customize Projects” window with “Finish”19. Click “Save all” in the menu bar to save the settings
Your safety projects are now downloaded and active.

Demonstration
SafeMotion Wizard 33Version: 1.0.0
2.9 Activate configurationSince the process images of the Safe Motion components and the EL6910 have been changed, it isnecessary to reactivate the configuration. To do this, proceed as follows:
Click on “Activate Configuration” in the menu bar
1. Confirm the “Activate Configuration” window with “OK”

Demonstration
SafeMotion Wizard34 Version: 1.0.0
2.10 Check signalsIn the following, check the configuration as follows:
1. Open file “Enable_ChA.sal”
2. Click in the menu bar “Show Online Data” to enable the online view
You can see for the Drive Rear that the TwinSAFE group is disabled.
Since a substitute value is configured for the Enable output, the output is still True.

Demonstration
SafeMotion Wizard 35Version: 1.0.0
3. Open file “ChA_STO_SS1_ErrorHandling.sal”
In the ErrorHandling you see now also that the Enable-Input is True.
Demonstration
SafeMotion Wizard36 Version: 1.0.0
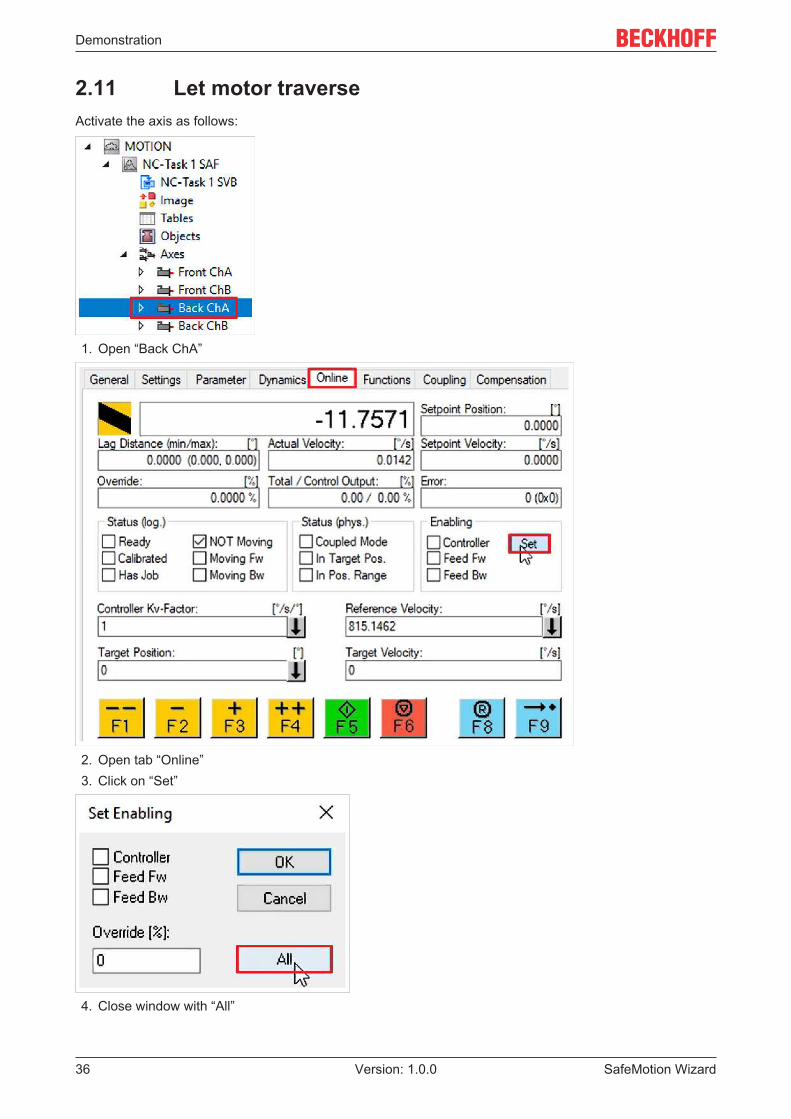
2.11 Let motor traverseActivate the axis as follows:
1. Open “Back ChA”
2. Open tab “Online”3. Click on “Set”
4. Close window with “All”

Demonstration
SafeMotion Wizard 37Version: 1.0.0
5. Click on “F3”
6. Click on “F2”


Beckhoff Automation GmbH & Co. KGHülshorstweg 2033415 VerlGermanyPhone: +49 5246 [email protected]
More Information: www.beckhoff.com/twinsafe/


![Design-Guide zu EJ-Backplane für TwinSAFE-Moduleftp.beckhoff.com/download/document/automation/twinsafe/...[R8]IPC-2221B Generic Standard on Printed Board Design Hinweis EN 60664-5](https://img.dokumen.tips/doc/110x75/60d62127f8063367d278b7d3/design-guide-zu-ej-backplane-fr-twinsafe-r8ipc-2221b-generic-standard-on.jpg)