Embed Size (px)
Citation preview
Tutorial: Tools for mobile Linux (TmL) Exercises
Setting Up the Environment for the Hands-on Sessions
You can get all the software you need for the TmL tutorial from http://wiki.eclipse.org/DSDP/TML/EclipseCon2009_Tutorial. Alternatively, you can copy it from the pen drives that are going to be passed around at the beginning of the tutorial at EclipseCon.
This is a check list of the components you need:
� Eclipse 3.5 Galileo Classic (with JDT and PDE) with the TmL plug-ins;
� The puppy Linux emulator with the echo server;
� A pre-configured workspace with the tutorial projects (optional).
Run Eclipse and select the pre-configured workspace.
Hands-on Session #1: Using the Device Framework to integrate an emulator into Eclipse
In this session, we are going to use the Device Framework component from TmL to integrate the puppy Linux emulator into the Eclipse platform. This will allow you to start and stop the emulator from Eclipse, as well as to visualize the state of the emulator, i.e. whether it has been started or stopped.
In order to do this, we are going to create extensions using the following extension points:
•••• org.eclipse.tml.deviceTypes, to define a type for the emulator;
•••• org.eclipse.tml.serviceDefinition, to define operations or services for the emulator;
•••• org.eclipse.tml.device.ui.newDeviceWizardPages, to define a wizard to create instances of the emulator.
You will also learn how to use the following extension points:
•••• org.eclipse.tml.status, to define states for a state machine;
•••• org.eclipse.tml.service, to define operations or services to transition from a state to another state.
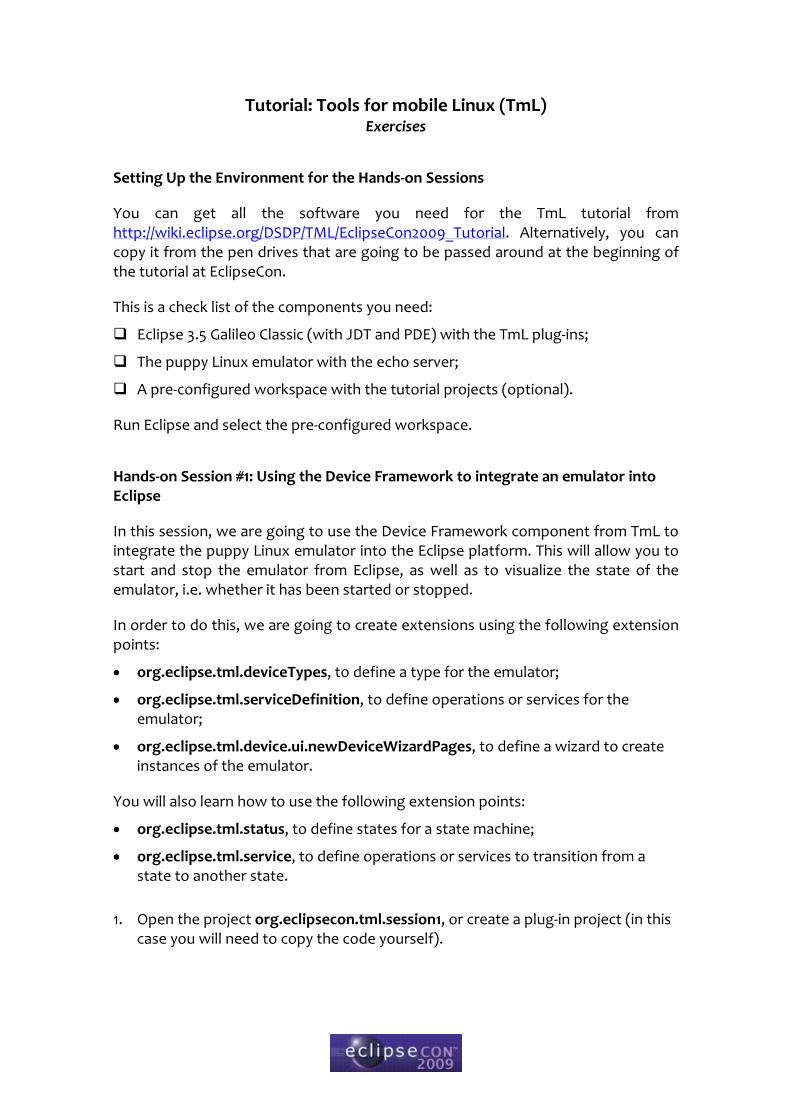
1. Open the project org.eclipsecon.tml.session1, or create a plug-in project (in this case you will need to copy the code yourself).
2. Switch to the Plug-in Development perspective.
3. Open the META-INF/MANIFEST.MF file.
4. Select the Overview tab, check the option This plug-in is a singleton and save the file.
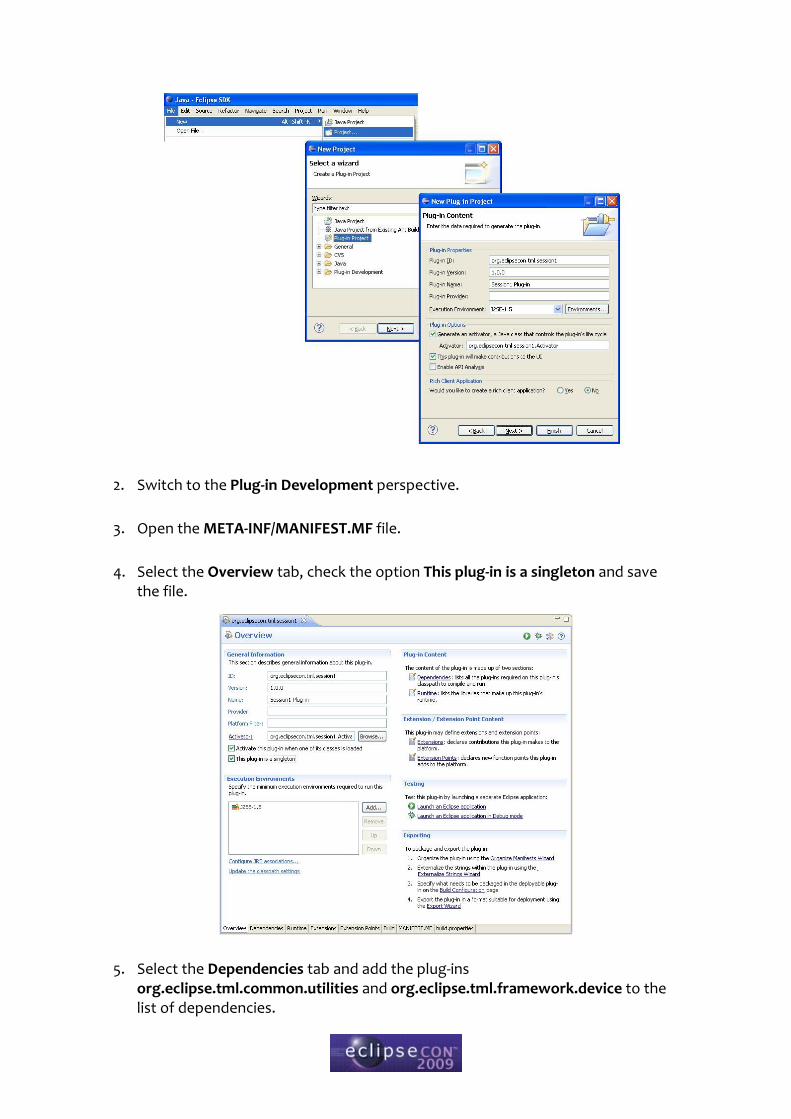
5. Select the Dependencies tab and add the plug-ins org.eclipse.tml.common.utilities and org.eclipse.tml.framework.device to the list of dependencies.
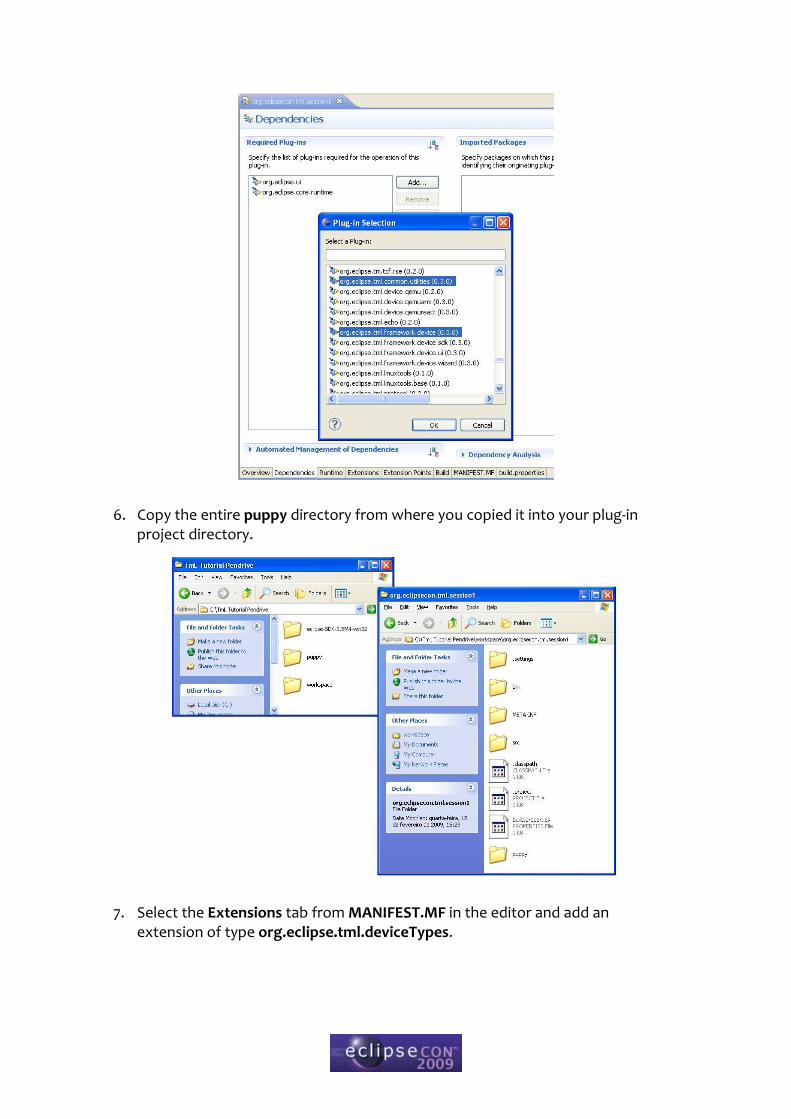
6. Copy the entire puppy directory from where you copied it into your plug-in project directory.
7. Select the Extensions tab from MANIFEST.MF in the editor and add an extension of type org.eclipse.tml.deviceTypes.
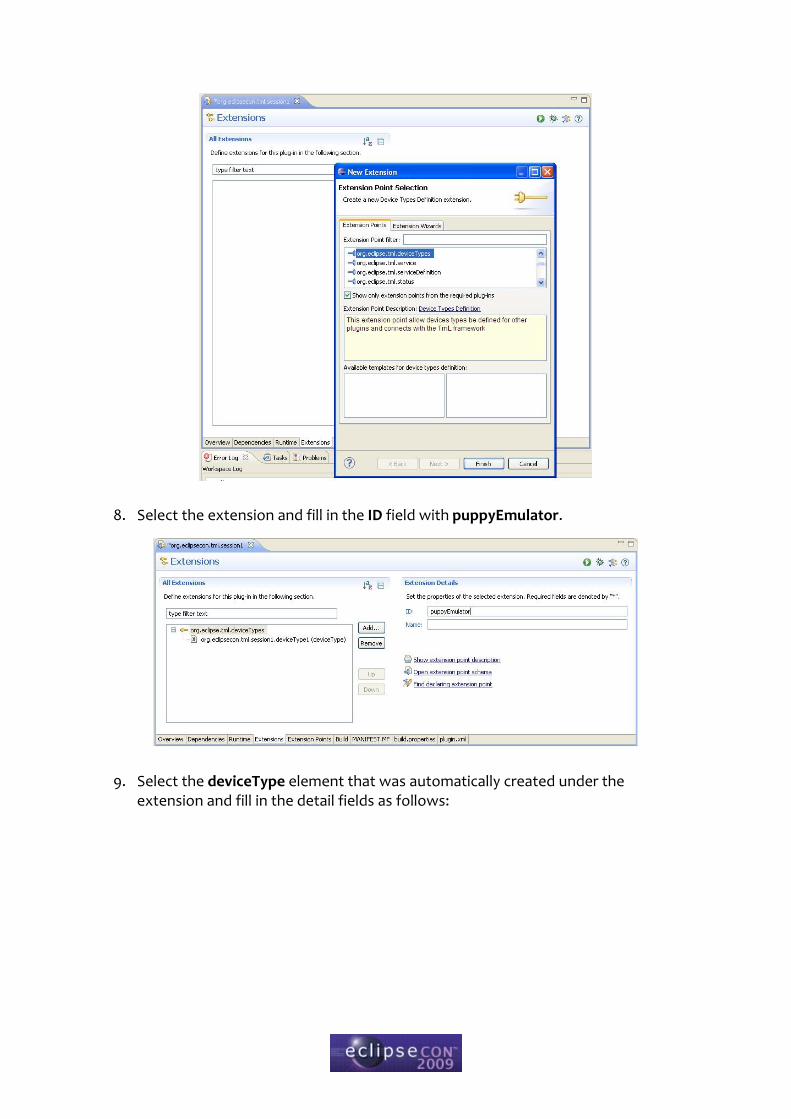
8. Select the extension and fill in the ID field with puppyEmulator.
9. Select the deviceType element that was automatically created under the extension and fill in the detail fields as follows:
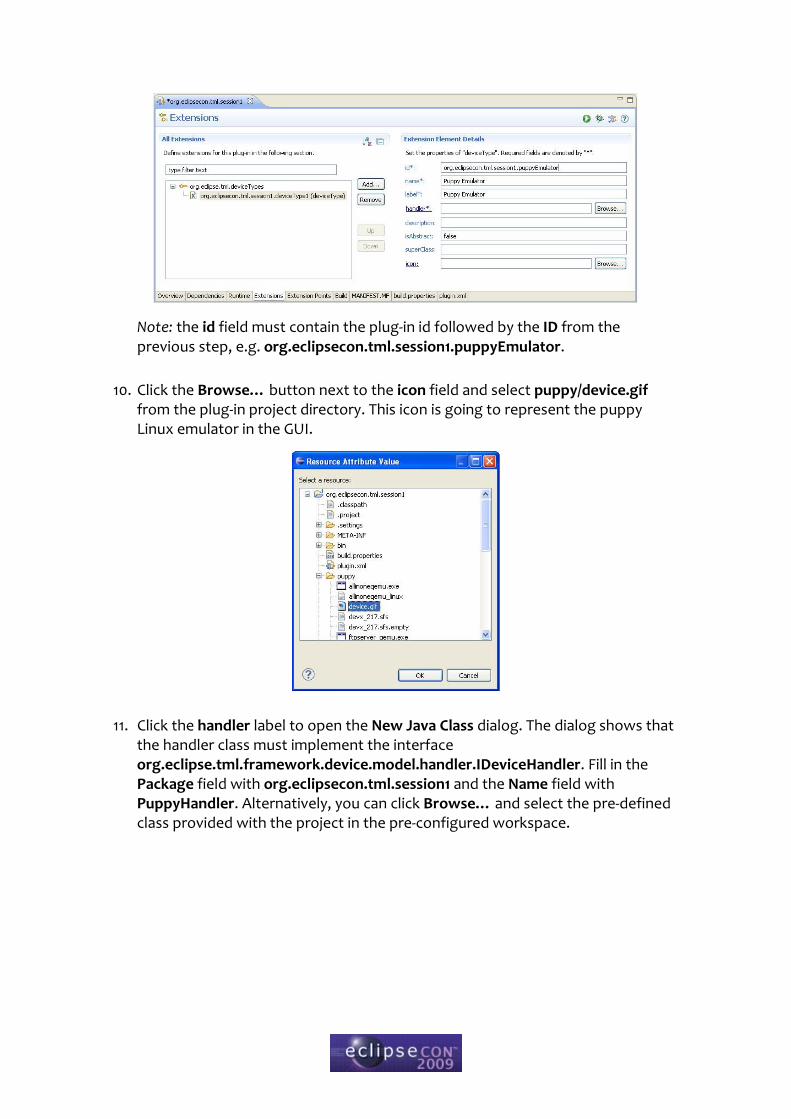
Note: the id field must contain the plug-in id followed by the ID from the previous step, e.g. org.eclipsecon.tml.session1.puppyEmulator.
10. Click the Browse… button next to the icon field and select puppy/device.gif from the plug-in project directory. This icon is going to represent the puppy Linux emulator in the GUI.
11. Click the handler label to open the New Java Class dialog. The dialog shows that the handler class must implement the interface org.eclipse.tml.framework.device.model.handler.IDeviceHandler. Fill in the Package field with org.eclipsecon.tml.session1 and the Name field with PuppyHandler. Alternatively, you can click Browse… and select the pre-defined class provided with the project in the pre-configured workspace.
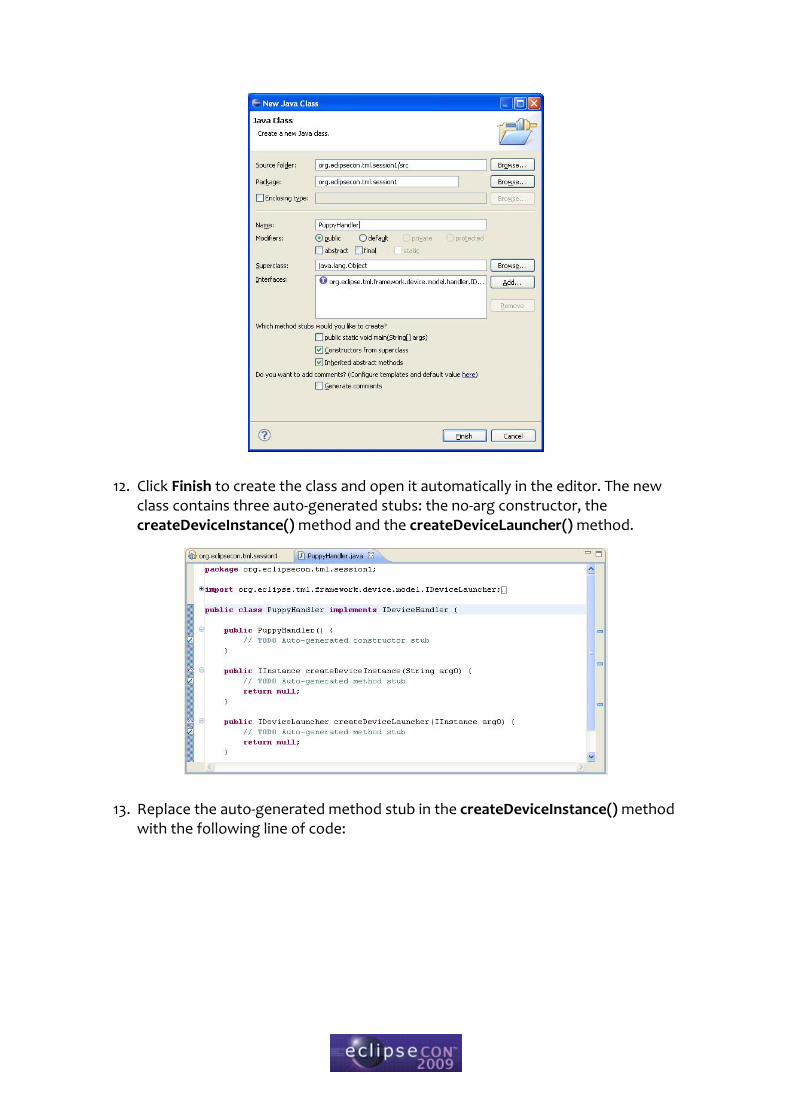
12. Click Finish to create the class and open it automatically in the editor. The new class contains three auto-generated stubs: the no-arg constructor, the createDeviceInstance() method and the createDeviceLauncher() method.
13. Replace the auto-generated method stub in the createDeviceInstance() method with the following line of code:
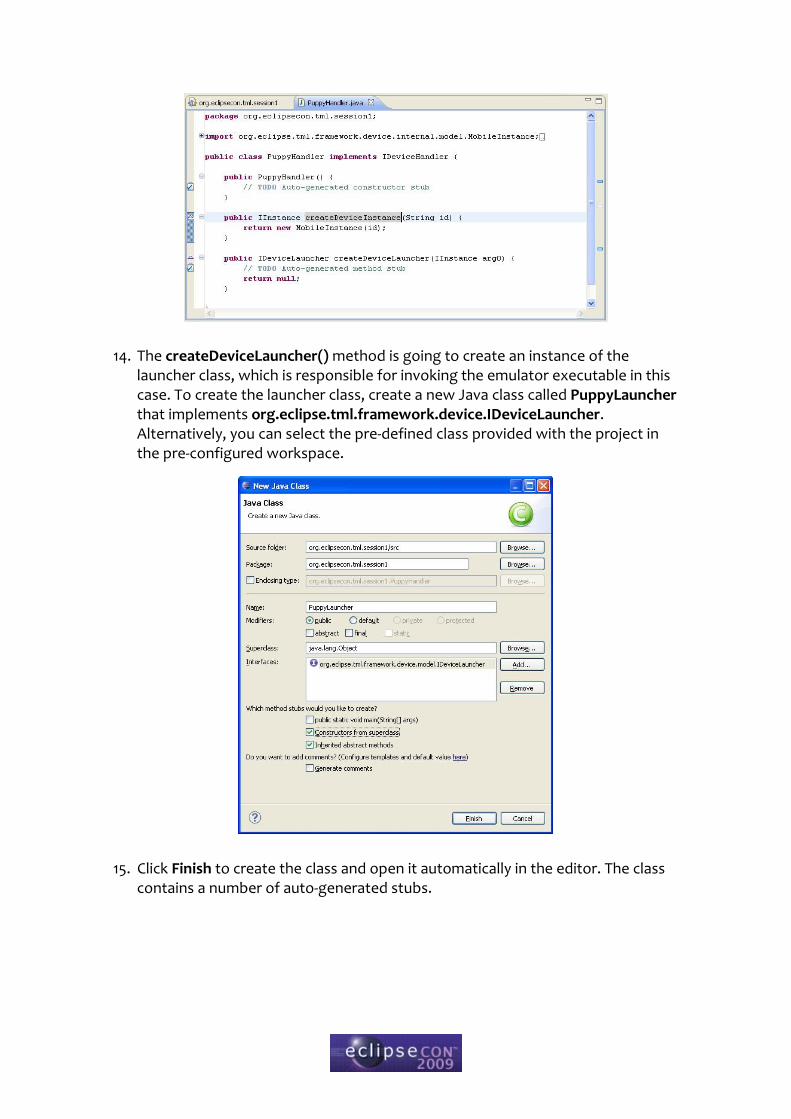
14. The createDeviceLauncher() method is going to create an instance of the launcher class, which is responsible for invoking the emulator executable in this case. To create the launcher class, create a new Java class called PuppyLauncher that implements org.eclipse.tml.framework.device.IDeviceLauncher. Alternatively, you can select the pre-defined class provided with the project in the pre-configured workspace.
15. Click Finish to create the class and open it automatically in the editor. The class contains a number of auto-generated stubs.

16. First, add the following code to handle the process id (pid) of the emulator instance:
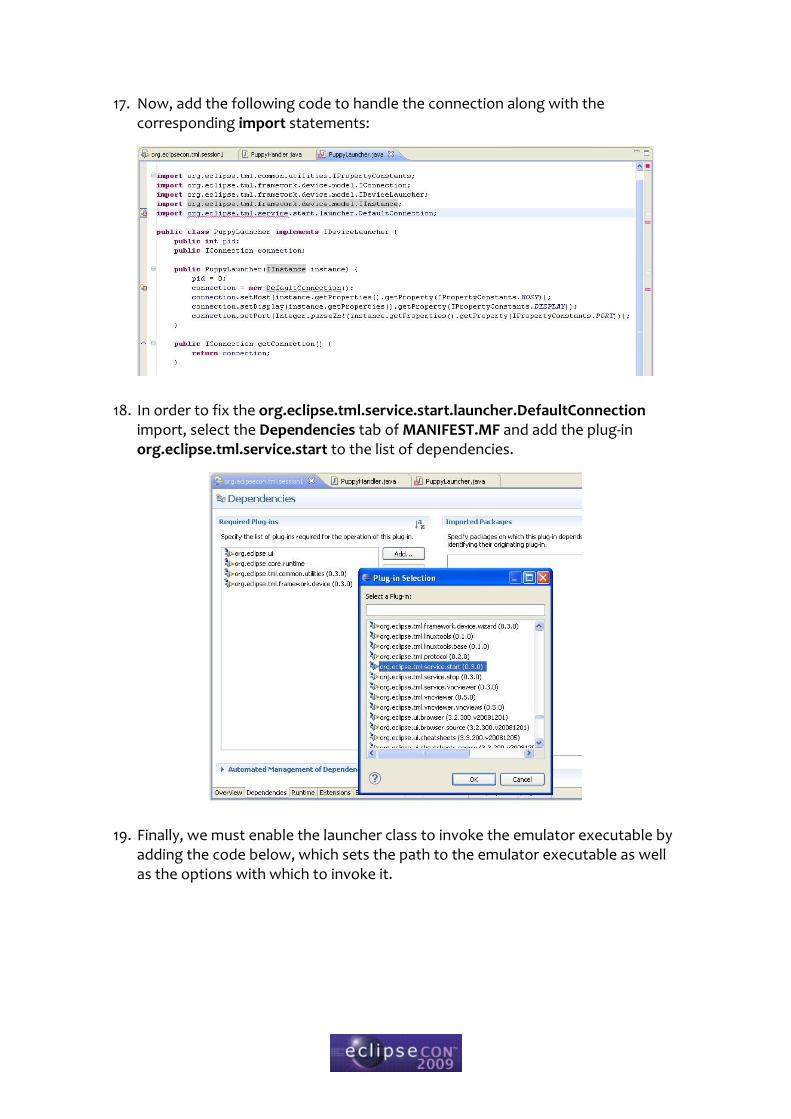
17. Now, add the following code to handle the connection along with the corresponding import statements:
18. In order to fix the org.eclipse.tml.service.start.launcher.DefaultConnection import, select the Dependencies tab of MANIFEST.MF and add the plug-in org.eclipse.tml.service.start to the list of dependencies.
19. Finally, we must enable the launcher class to invoke the emulator executable by adding the code below, which sets the path to the emulator executable as well as the options with which to invoke it.
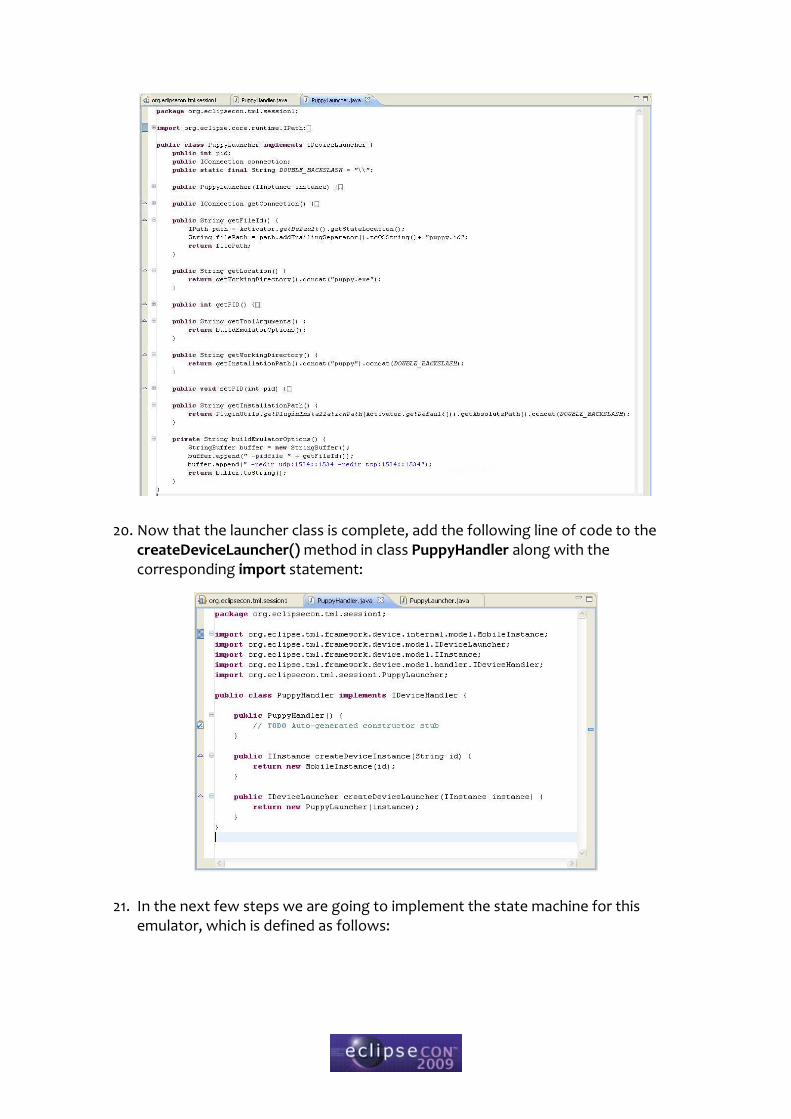
20. Now that the launcher class is complete, add the following line of code to the createDeviceLauncher() method in class PuppyHandler along with the corresponding import statement:
21. In the next few steps we are going to implement the state machine for this emulator, which is defined as follows:
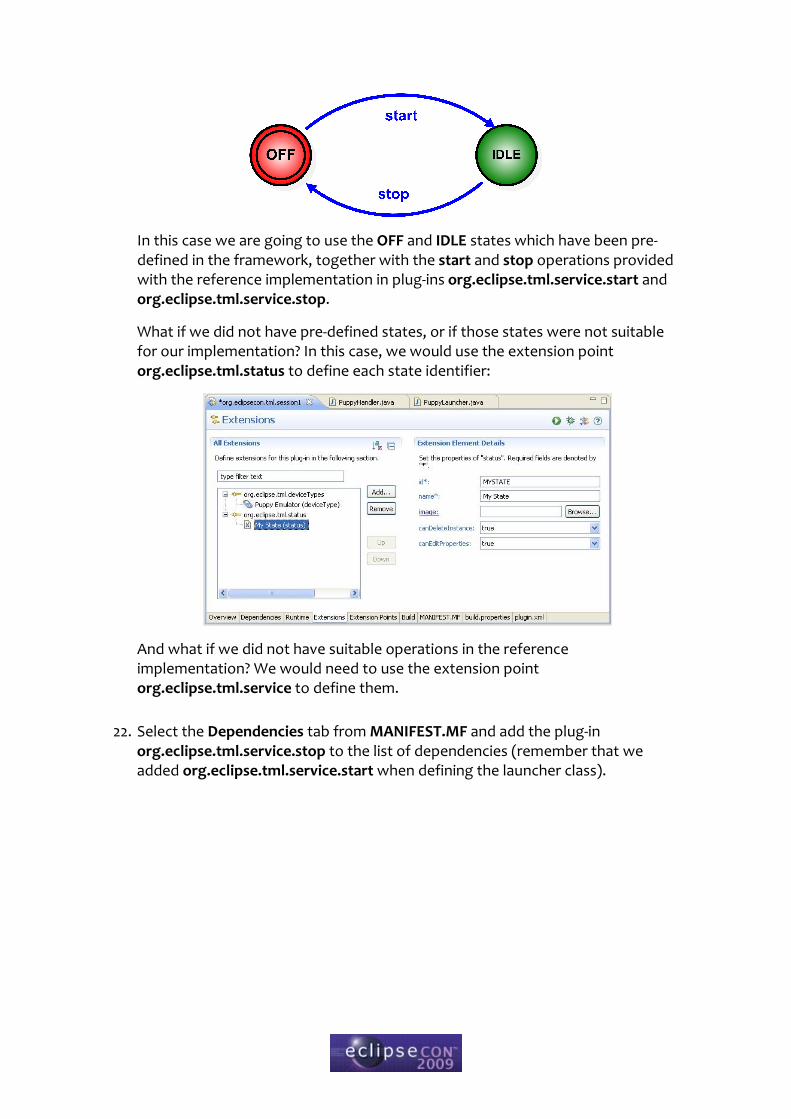
In this case we are going to use the OFF and IDLE states which have been pre-defined in the framework, together with the start and stop operations provided with the reference implementation in plug-ins org.eclipse.tml.service.start and org.eclipse.tml.service.stop.
What if we did not have pre-defined states, or if those states were not suitable for our implementation? In this case, we would use the extension point org.eclipse.tml.status to define each state identifier:
And what if we did not have suitable operations in the reference implementation? We would need to use the extension point org.eclipse.tml.service to define them.
22. Select the Dependencies tab from MANIFEST.MF and add the plug-in org.eclipse.tml.service.stop to the list of dependencies (remember that we added org.eclipse.tml.service.start when defining the launcher class).
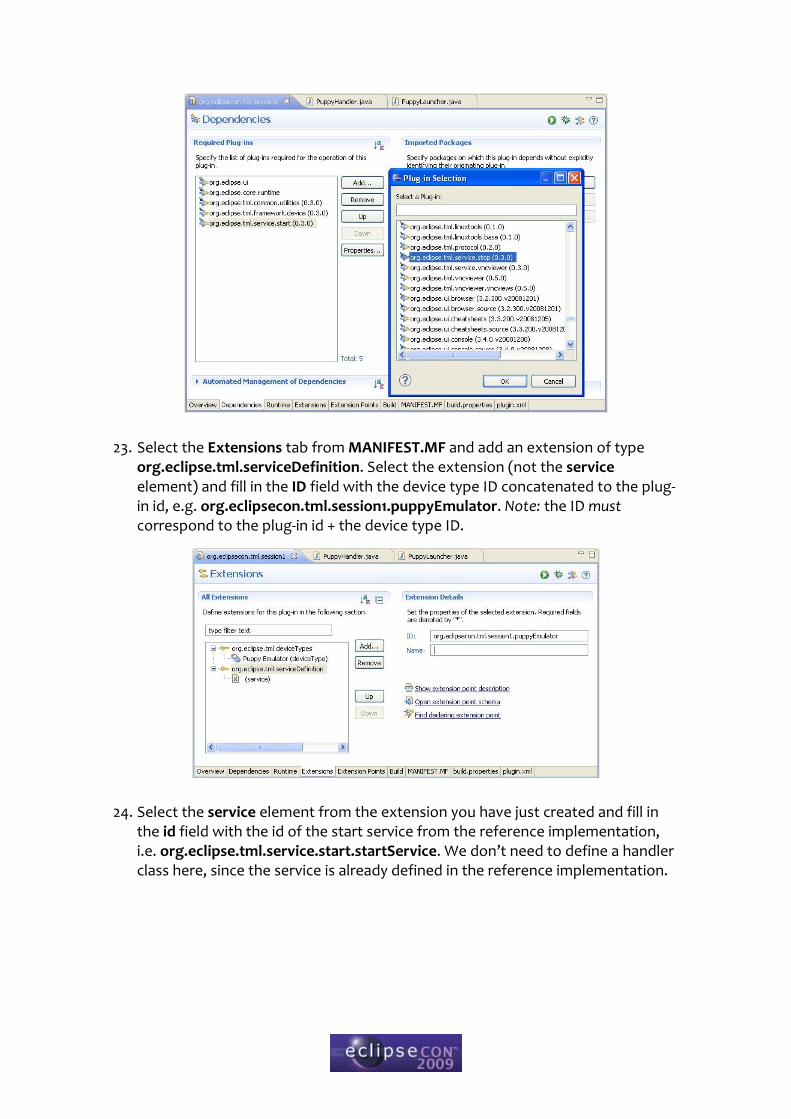
23. Select the Extensions tab from MANIFEST.MF and add an extension of type org.eclipse.tml.serviceDefinition. Select the extension (not the service element) and fill in the ID field with the device type ID concatenated to the plug-in id, e.g. org.eclipsecon.tml.session1.puppyEmulator. Note: the ID must correspond to the plug-in id + the device type ID.
24. Select the service element from the extension you have just created and fill in the id field with the id of the start service from the reference implementation, i.e. org.eclipse.tml.service.start.startService. We don’t need to define a handler class here, since the service is already defined in the reference implementation.
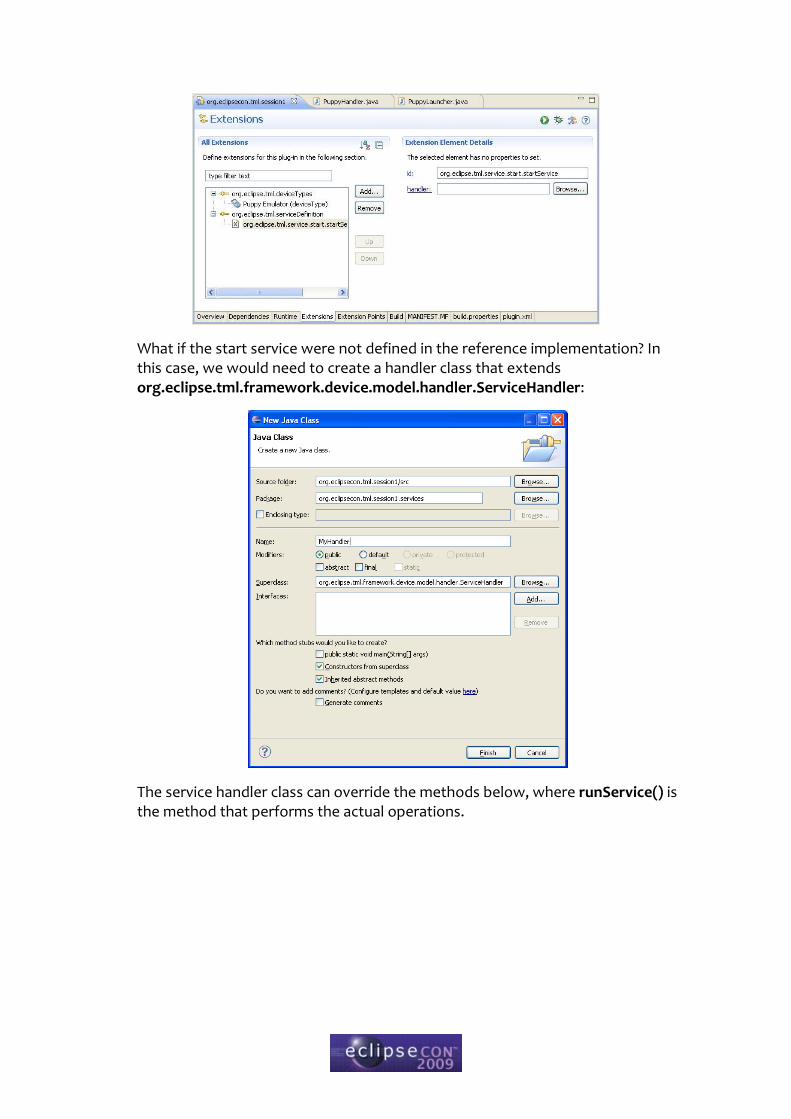
What if the start service were not defined in the reference implementation? In this case, we would need to create a handler class that extends org.eclipse.tml.framework.device.model.handler.ServiceHandler:
The service handler class can override the methods below, where runService() is the method that performs the actual operations.
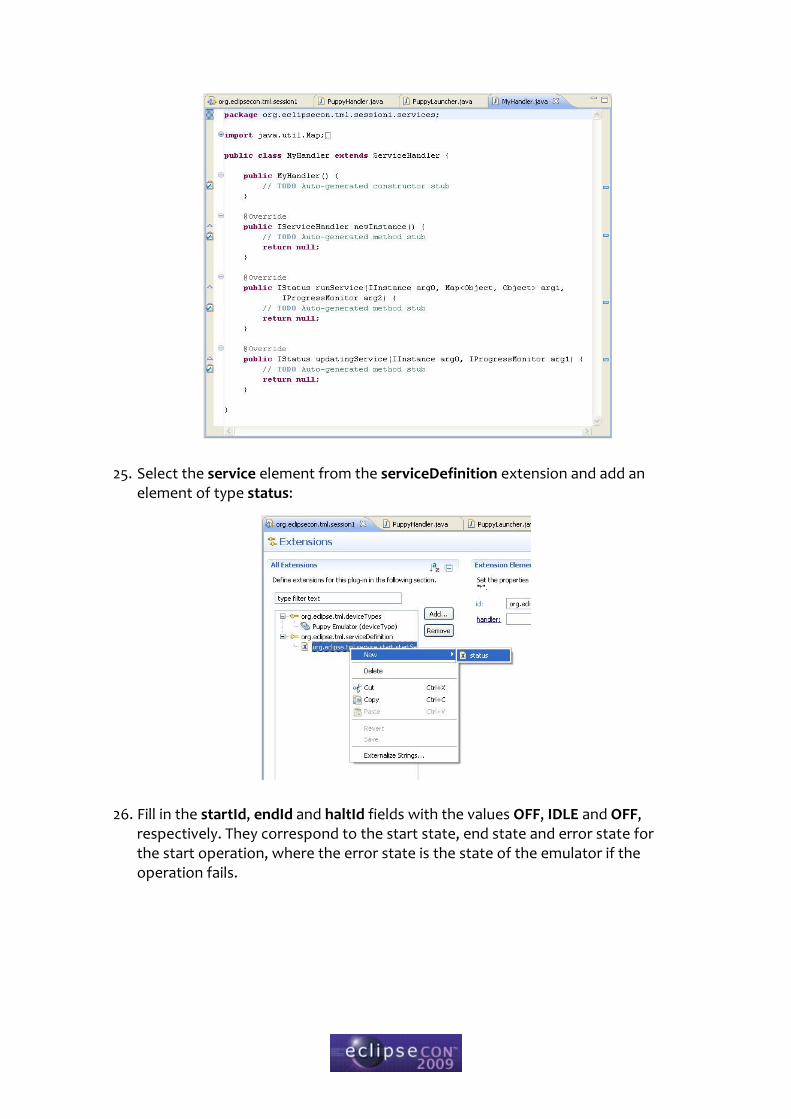
25. Select the service element from the serviceDefinition extension and add an element of type status:
26. Fill in the startId, endId and haltId fields with the values OFF, IDLE and OFF, respectively. They correspond to the start state, end state and error state for the start operation, where the error state is the state of the emulator if the operation fails.
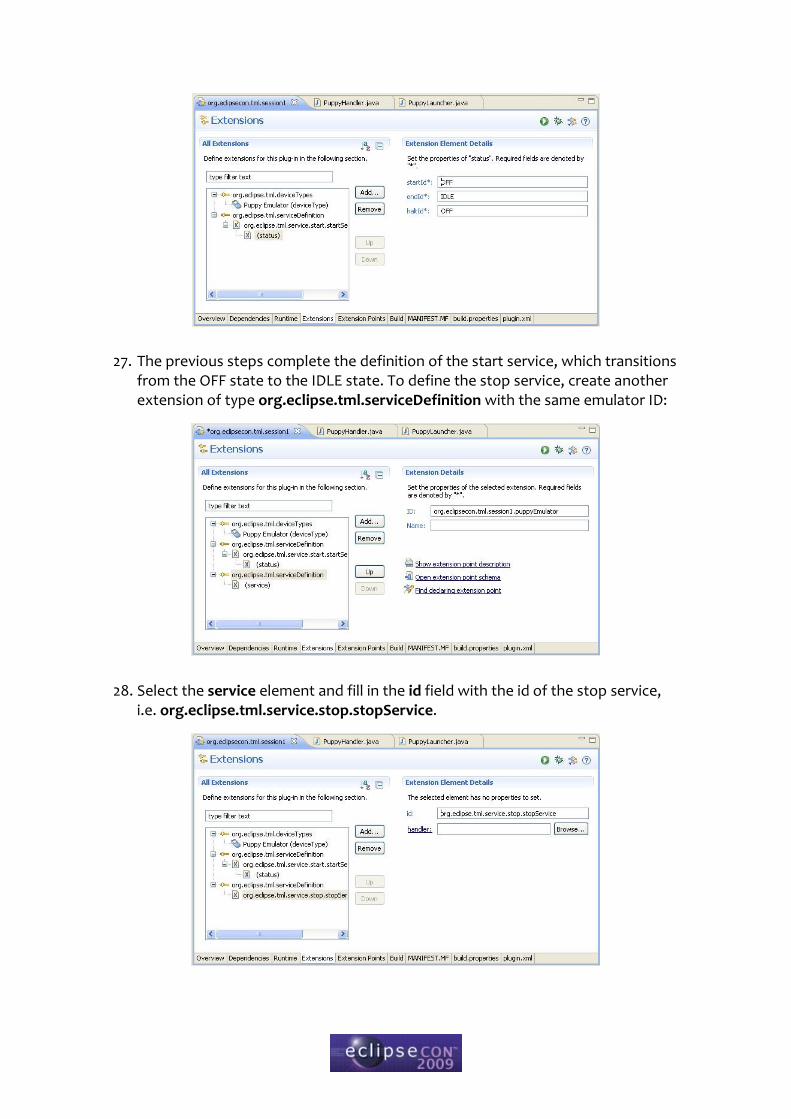
27. The previous steps complete the definition of the start service, which transitions from the OFF state to the IDLE state. To define the stop service, create another extension of type org.eclipse.tml.serviceDefinition with the same emulator ID:
28. Select the service element and fill in the id field with the id of the stop service, i.e. org.eclipse.tml.service.stop.stopService.
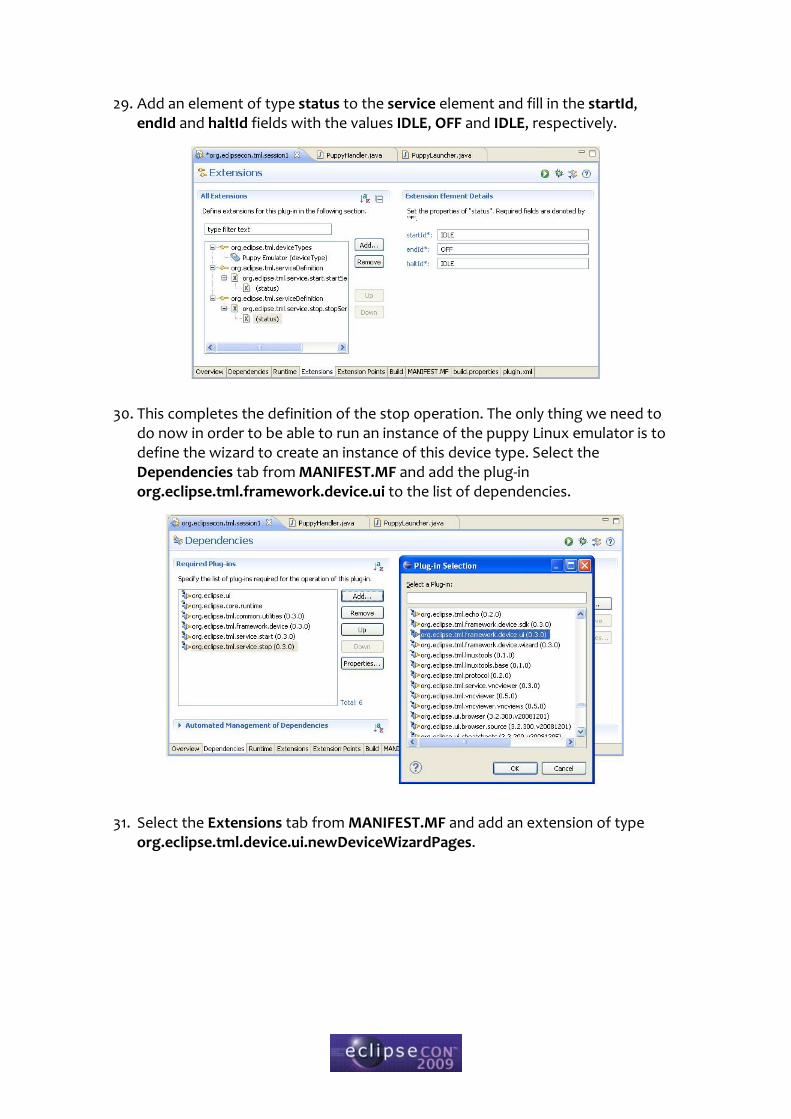
29. Add an element of type status to the service element and fill in the startId, endId and haltId fields with the values IDLE, OFF and IDLE, respectively.
30. This completes the definition of the stop operation. The only thing we need to do now in order to be able to run an instance of the puppy Linux emulator is to define the wizard to create an instance of this device type. Select the Dependencies tab from MANIFEST.MF and add the plug-in org.eclipse.tml.framework.device.ui to the list of dependencies.
31. Select the Extensions tab from MANIFEST.MF and add an extension of type org.eclipse.tml.device.ui.newDeviceWizardPages.
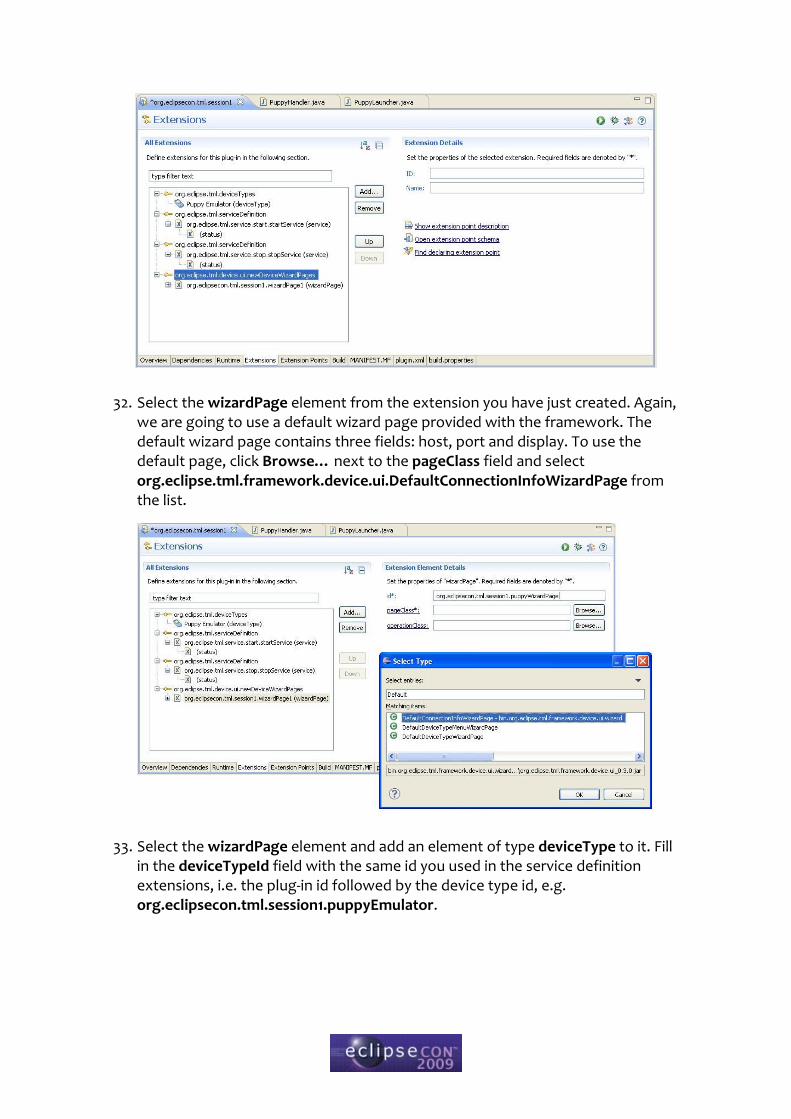
32. Select the wizardPage element from the extension you have just created. Again, we are going to use a default wizard page provided with the framework. The default wizard page contains three fields: host, port and display. To use the default page, click Browse… next to the pageClass field and select org.eclipse.tml.framework.device.ui.DefaultConnectionInfoWizardPage from the list.
33. Select the wizardPage element and add an element of type deviceType to it. Fill in the deviceTypeId field with the same id you used in the service definition extensions, i.e. the plug-in id followed by the device type id, e.g. org.eclipsecon.tml.session1.puppyEmulator.
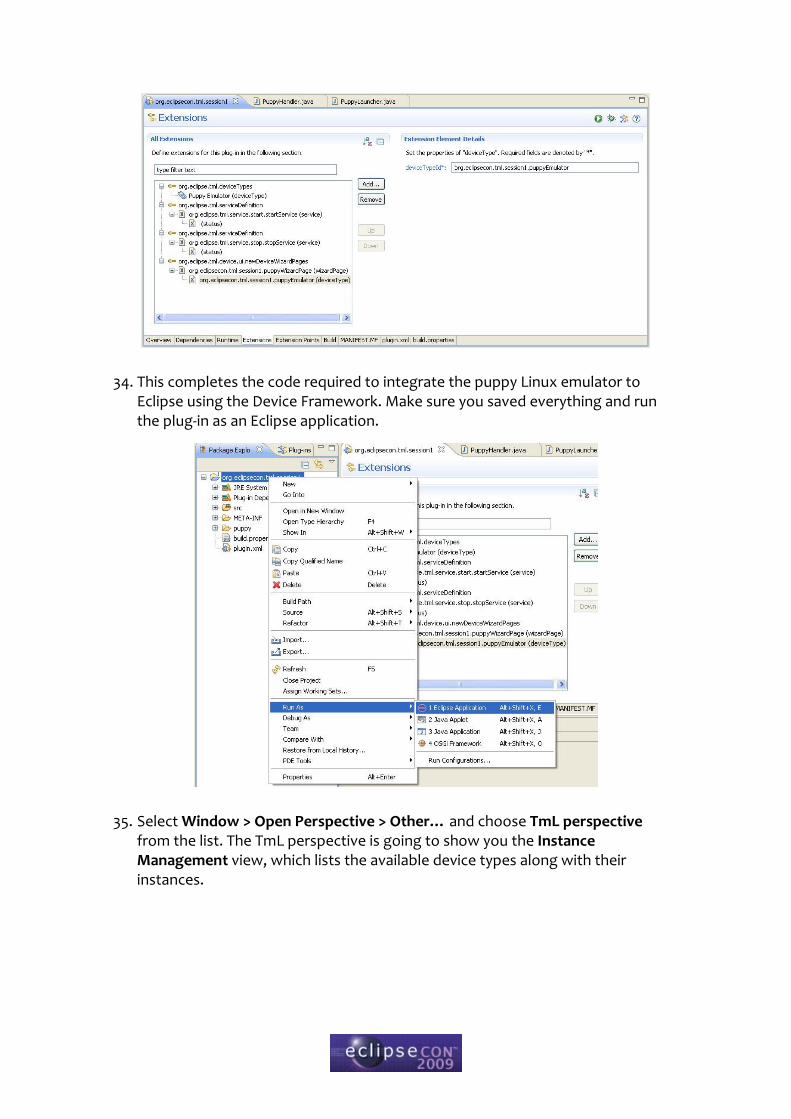
34. This completes the code required to integrate the puppy Linux emulator to Eclipse using the Device Framework. Make sure you saved everything and run the plug-in as an Eclipse application.
35. Select Window > Open Perspective > Other… and choose TmL perspective from the list. The TmL perspective is going to show you the Instance Management view, which lists the available device types along with their instances.
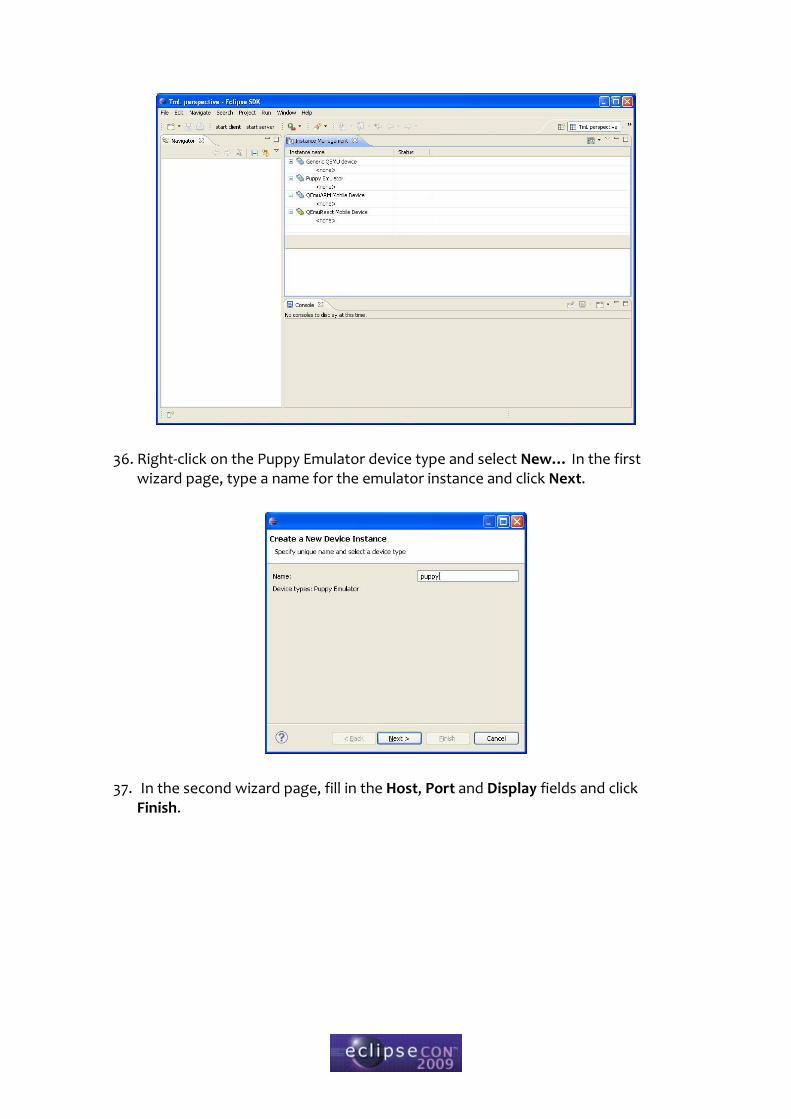
36. Right-click on the Puppy Emulator device type and select New… In the first wizard page, type a name for the emulator instance and click Next.
37. In the second wizard page, fill in the Host, Port and Display fields and click Finish.
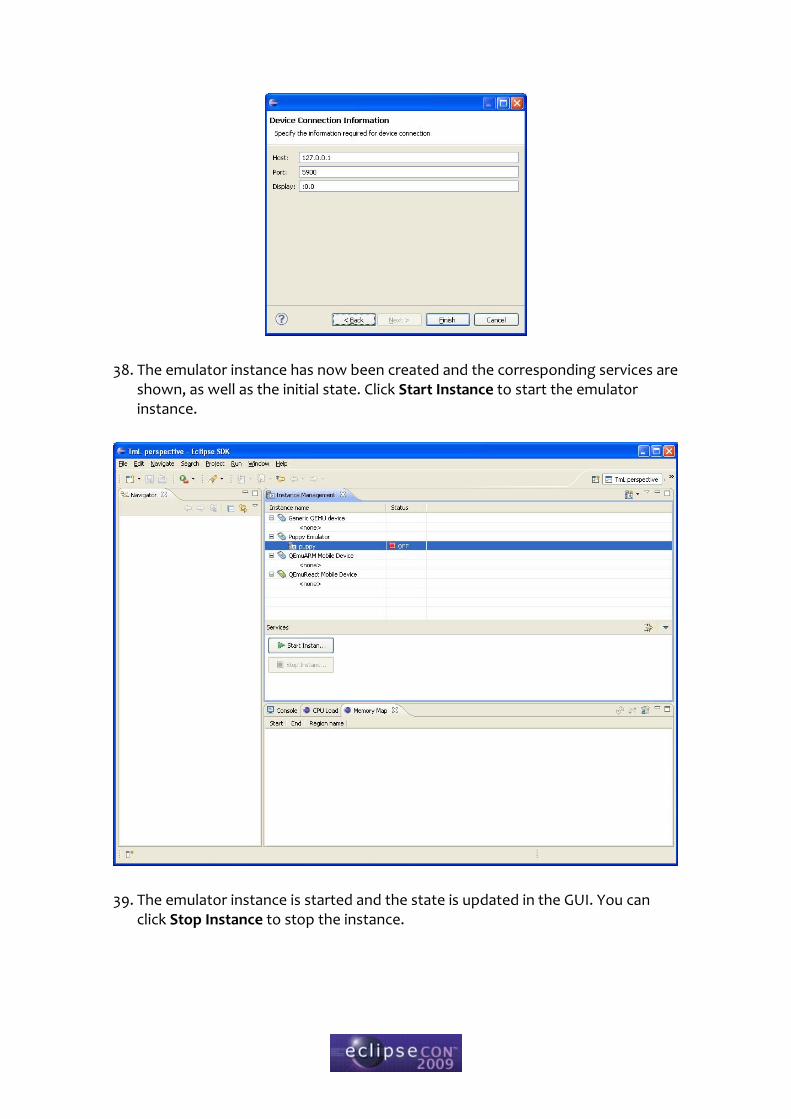
38. The emulator instance has now been created and the corresponding services are shown, as well as the initial state. Click Start Instance to start the emulator instance.
39. The emulator instance is started and the state is updated in the GUI. You can click Stop Instance to stop the instance.
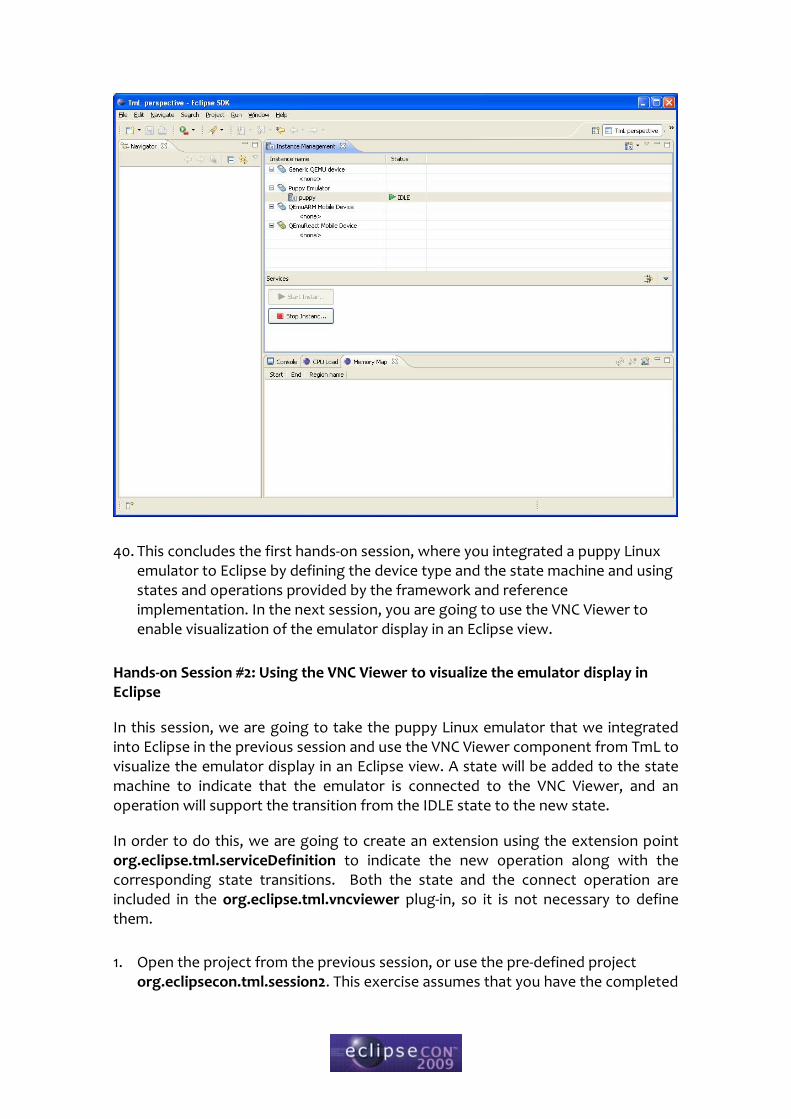
40. This concludes the first hands-on session, where you integrated a puppy Linux emulator to Eclipse by defining the device type and the state machine and using states and operations provided by the framework and reference implementation. In the next session, you are going to use the VNC Viewer to enable visualization of the emulator display in an Eclipse view.
Hands-on Session #2: Using the VNC Viewer to visualize the emulator display in Eclipse
In this session, we are going to take the puppy Linux emulator that we integrated into Eclipse in the previous session and use the VNC Viewer component from TmL to visualize the emulator display in an Eclipse view. A state will be added to the state machine to indicate that the emulator is connected to the VNC Viewer, and an operation will support the transition from the IDLE state to the new state.
In order to do this, we are going to create an extension using the extension point org.eclipse.tml.serviceDefinition to indicate the new operation along with the corresponding state transitions. Both the state and the connect operation are included in the org.eclipse.tml.vncviewer plug-in, so it is not necessary to define them.
1. Open the project from the previous session, or use the pre-defined project org.eclipsecon.tml.session2. This exercise assumes that you have the completed
project from the previous session as a starting point, and the pre-defined project is provided in case you haven’t completed it.
2. Switch to the Plug-in Development perspective.
3. Open the META-INF/MANIFEST.MF file.
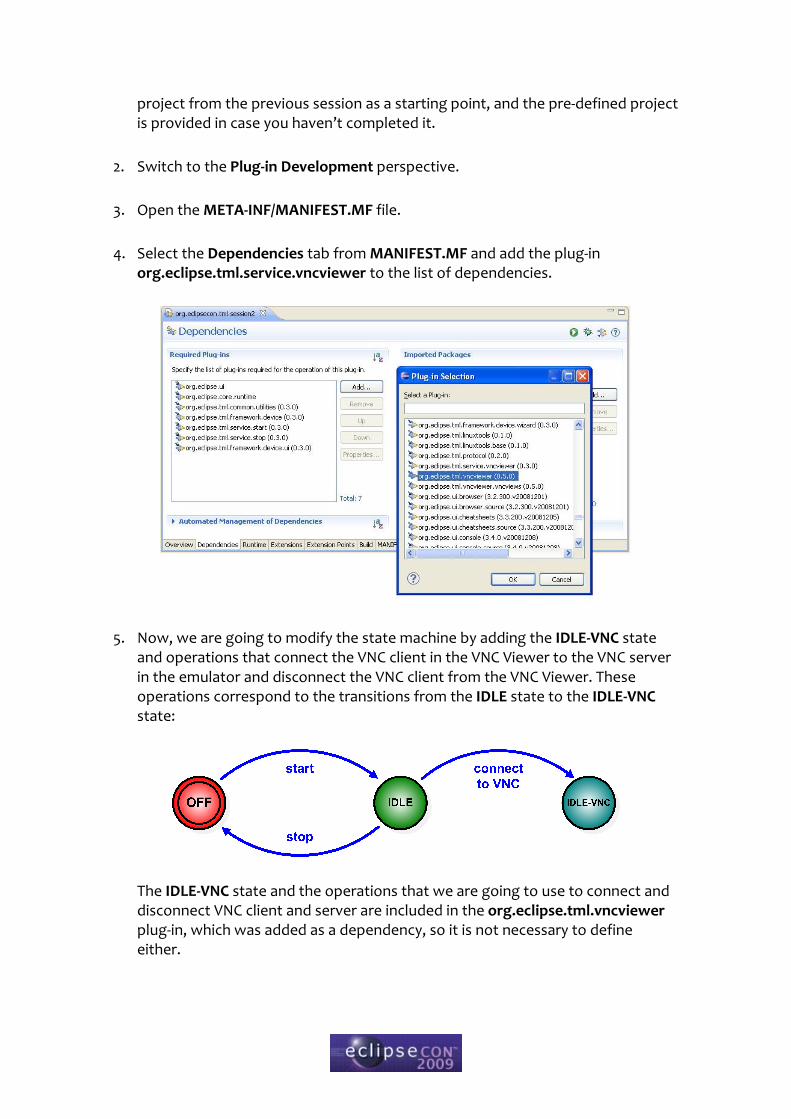
4. Select the Dependencies tab from MANIFEST.MF and add the plug-in org.eclipse.tml.service.vncviewer to the list of dependencies.
5. Now, we are going to modify the state machine by adding the IDLE-VNC state and operations that connect the VNC client in the VNC Viewer to the VNC server in the emulator and disconnect the VNC client from the VNC Viewer. These operations correspond to the transitions from the IDLE state to the IDLE-VNC state:
The IDLE-VNC state and the operations that we are going to use to connect and disconnect VNC client and server are included in the org.eclipse.tml.vncviewer plug-in, which was added as a dependency, so it is not necessary to define either.
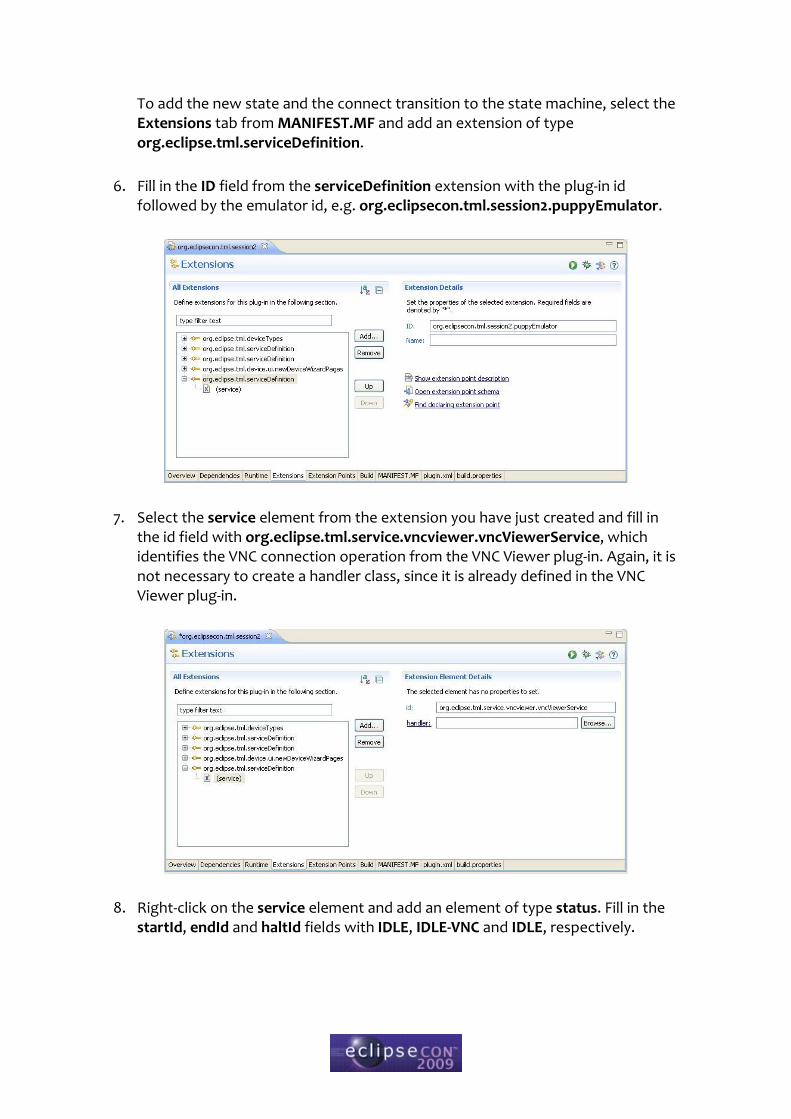
To add the new state and the connect transition to the state machine, select the Extensions tab from MANIFEST.MF and add an extension of type org.eclipse.tml.serviceDefinition.
6. Fill in the ID field from the serviceDefinition extension with the plug-in id followed by the emulator id, e.g. org.eclipsecon.tml.session2.puppyEmulator.
7. Select the service element from the extension you have just created and fill in the id field with org.eclipse.tml.service.vncviewer.vncViewerService, which identifies the VNC connection operation from the VNC Viewer plug-in. Again, it is not necessary to create a handler class, since it is already defined in the VNC Viewer plug-in.
8. Right-click on the service element and add an element of type status. Fill in the startId, endId and haltId fields with IDLE, IDLE-VNC and IDLE, respectively.
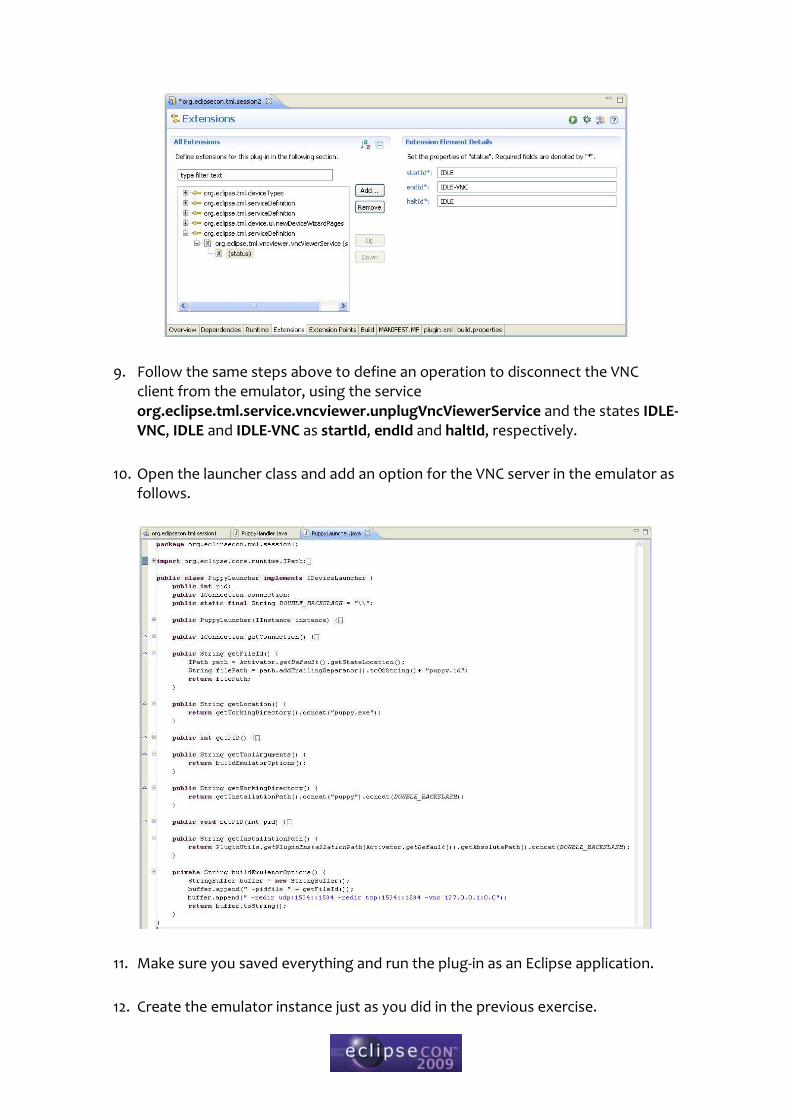
9. Follow the same steps above to define an operation to disconnect the VNC client from the emulator, using the service org.eclipse.tml.service.vncviewer.unplugVncViewerService and the states IDLE-VNC, IDLE and IDLE-VNC as startId, endId and haltId, respectively.
10. Open the launcher class and add an option for the VNC server in the emulator as follows.
11. Make sure you saved everything and run the plug-in as an Eclipse application.
12. Create the emulator instance just as you did in the previous exercise.
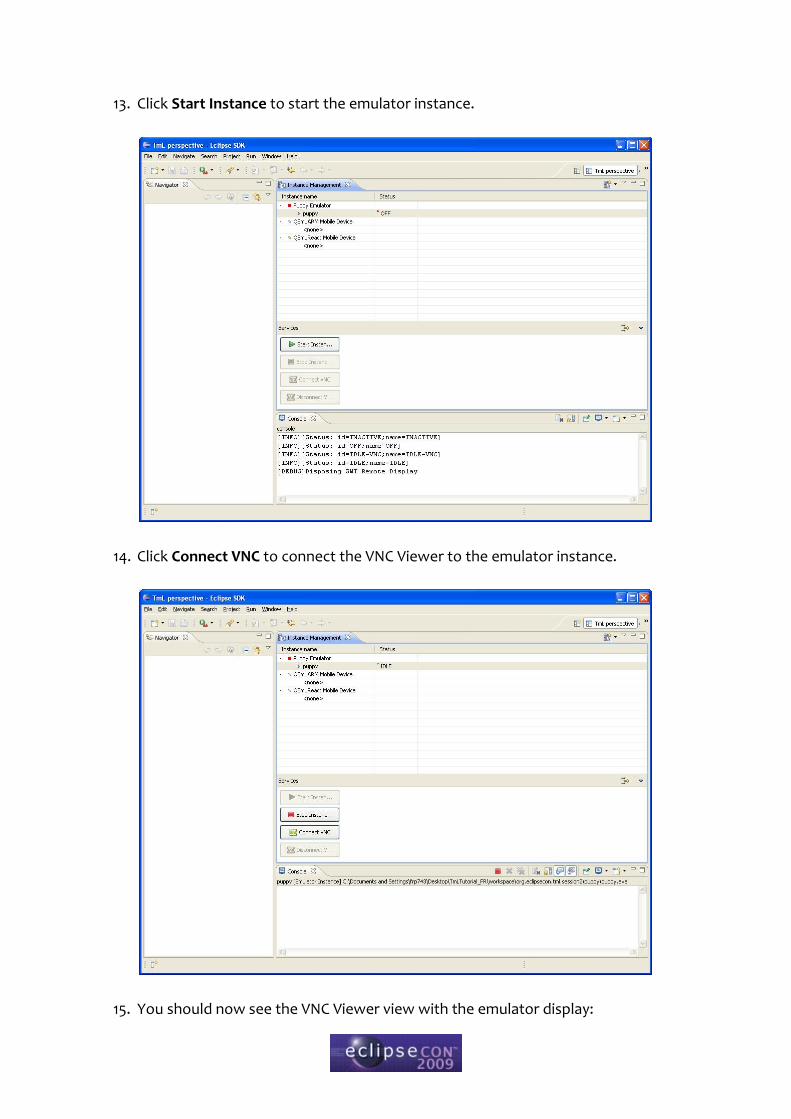
13. Click Start Instance to start the emulator instance.
14. Click Connect VNC to connect the VNC Viewer to the emulator instance.
15. You should now see the VNC Viewer view with the emulator display:
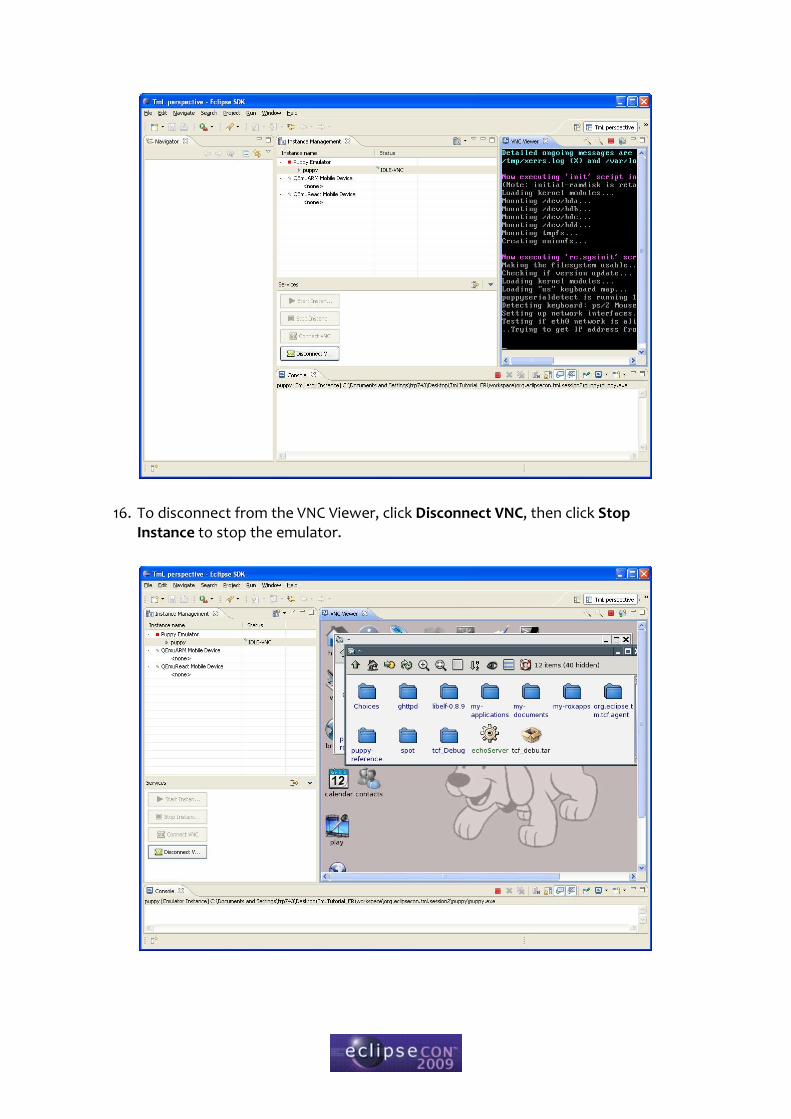
16. To disconnect from the VNC Viewer, click Disconnect VNC, then click Stop Instance to stop the emulator.
17. You can also create an instance of the QEMU ARM Linux emulator and/or the QEMU ReactOS emulator provided, start them and connect each one to the VNC Viewer.
Hands-on Session #3: Using the Protocol Framework to implement an echo protocol
In this session, we are going to use the Protocol Framework to implement an echo client that communicates with the echo server included in the puppy Linux emulator that we integrated into Eclipse in the previous sessions.
1. Open the project org.eclipsecon.tml.session3, or create a plug-in project (in this case you will need to copy the code yourself).
2. Switch to the Plug-in Development perspective.
3. Open the META-INF/MANIFEST.MF file. Select the Overview tab and check the option This plug-in is a singleton.
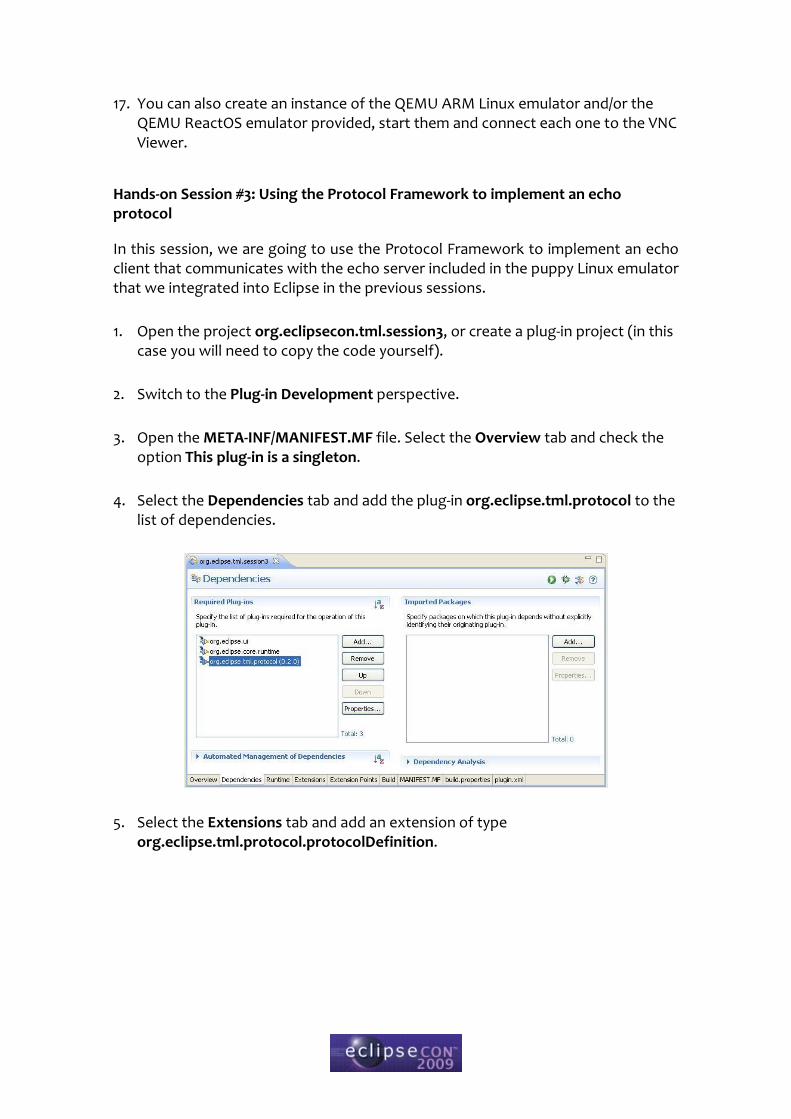
4. Select the Dependencies tab and add the plug-in org.eclipse.tml.protocol to the list of dependencies.
5. Select the Extensions tab and add an extension of type org.eclipse.tml.protocol.protocolDefinition.
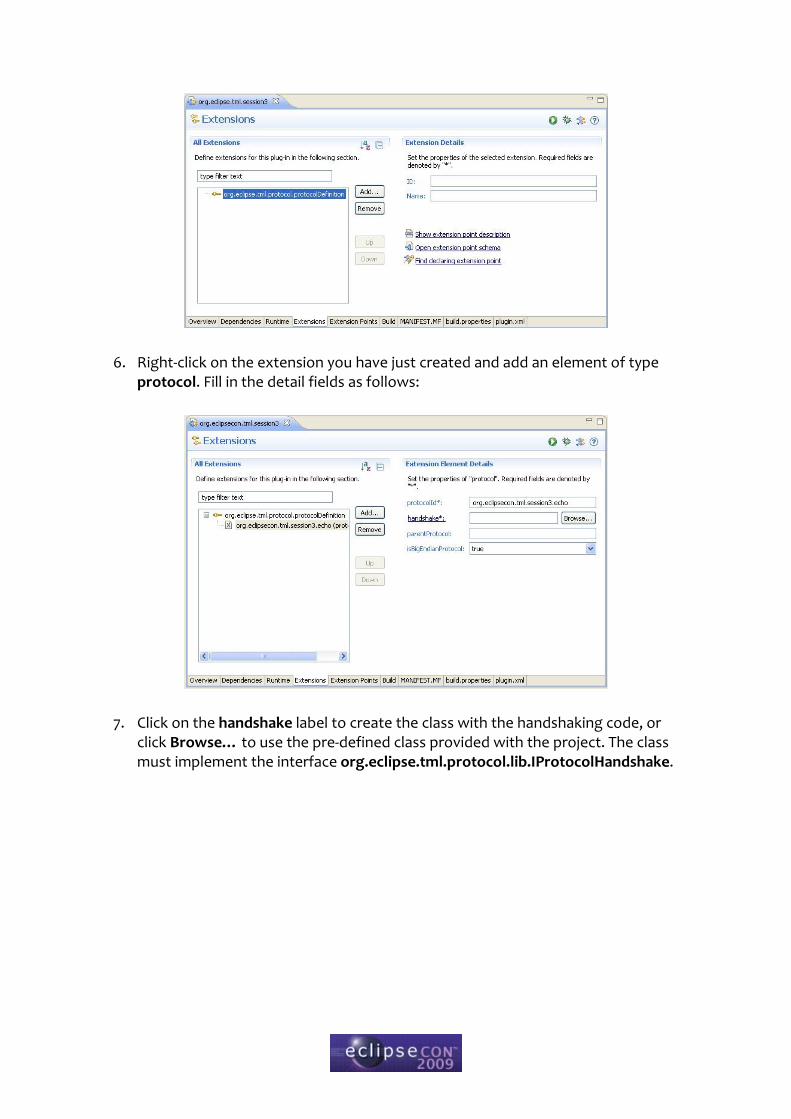
6. Right-click on the extension you have just created and add an element of type protocol. Fill in the detail fields as follows:
7. Click on the handshake label to create the class with the handshaking code, or click Browse… to use the pre-defined class provided with the project. The class must implement the interface org.eclipse.tml.protocol.lib.IProtocolHandshake.
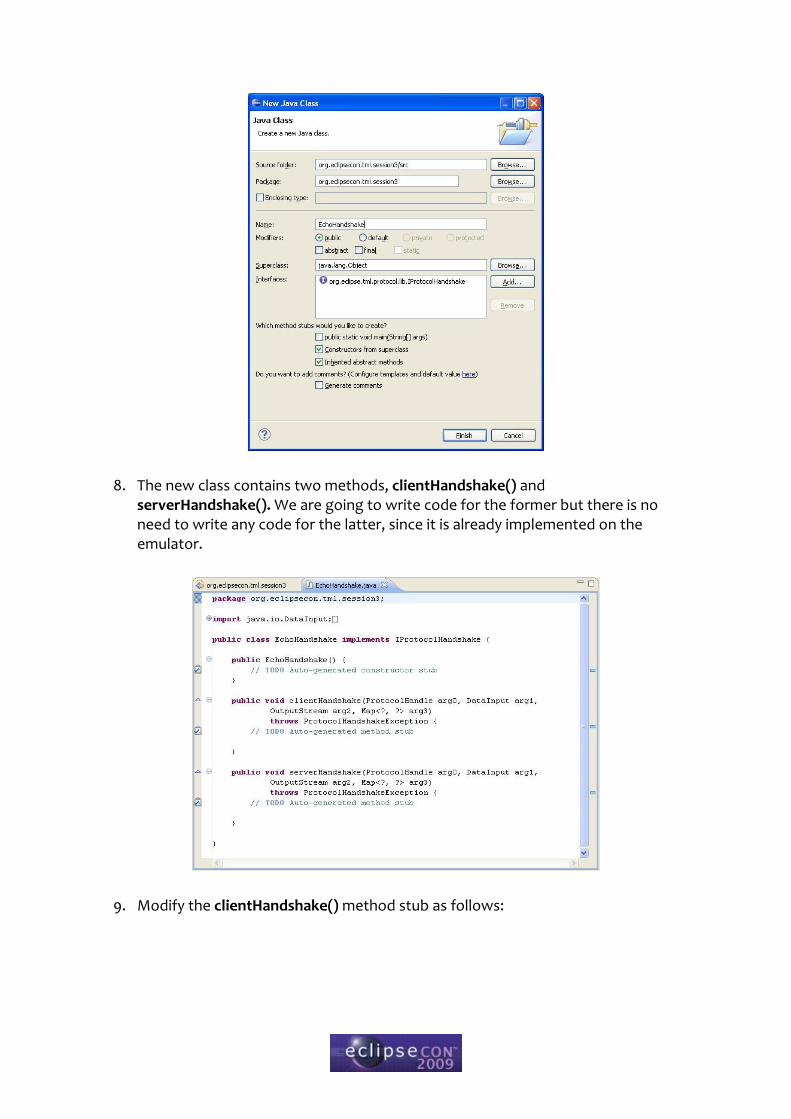
8. The new class contains two methods, clientHandshake() and serverHandshake(). We are going to write code for the former but there is no need to write any code for the latter, since it is already implemented on the emulator.
9. Modify the clientHandshake() method stub as follows:
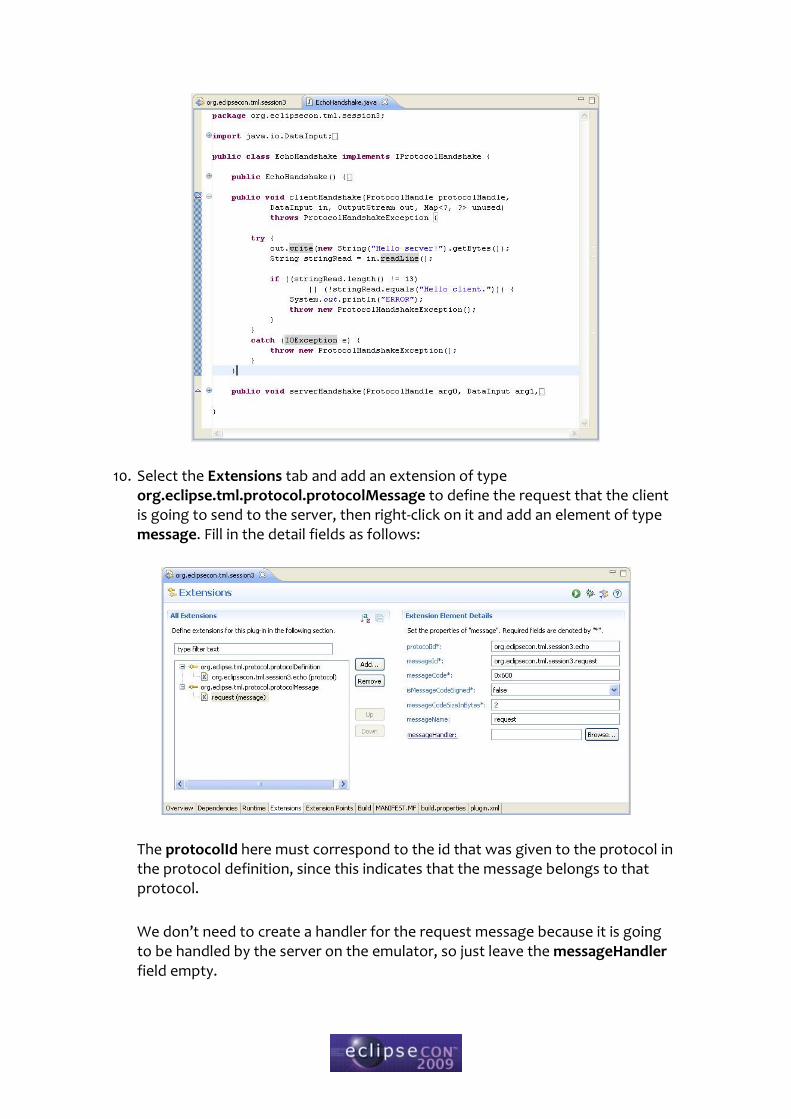
10. Select the Extensions tab and add an extension of type org.eclipse.tml.protocol.protocolMessage to define the request that the client is going to send to the server, then right-click on it and add an element of type message. Fill in the detail fields as follows:
The protocolId here must correspond to the id that was given to the protocol in the protocol definition, since this indicates that the message belongs to that protocol.
We don’t need to create a handler for the request message because it is going to be handled by the server on the emulator, so just leave the messageHandler field empty.
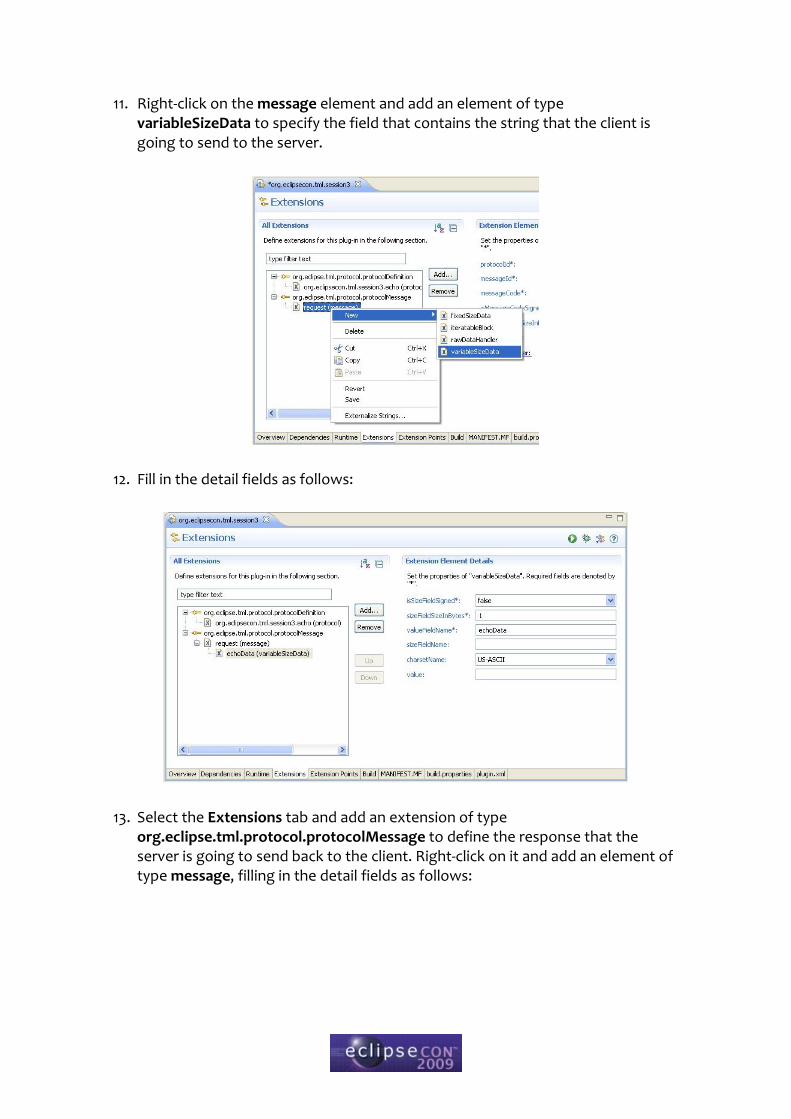
11. Right-click on the message element and add an element of type variableSizeData to specify the field that contains the string that the client is going to send to the server.
12. Fill in the detail fields as follows:
13. Select the Extensions tab and add an extension of type org.eclipse.tml.protocol.protocolMessage to define the response that the server is going to send back to the client. Right-click on it and add an element of type message, filling in the detail fields as follows:
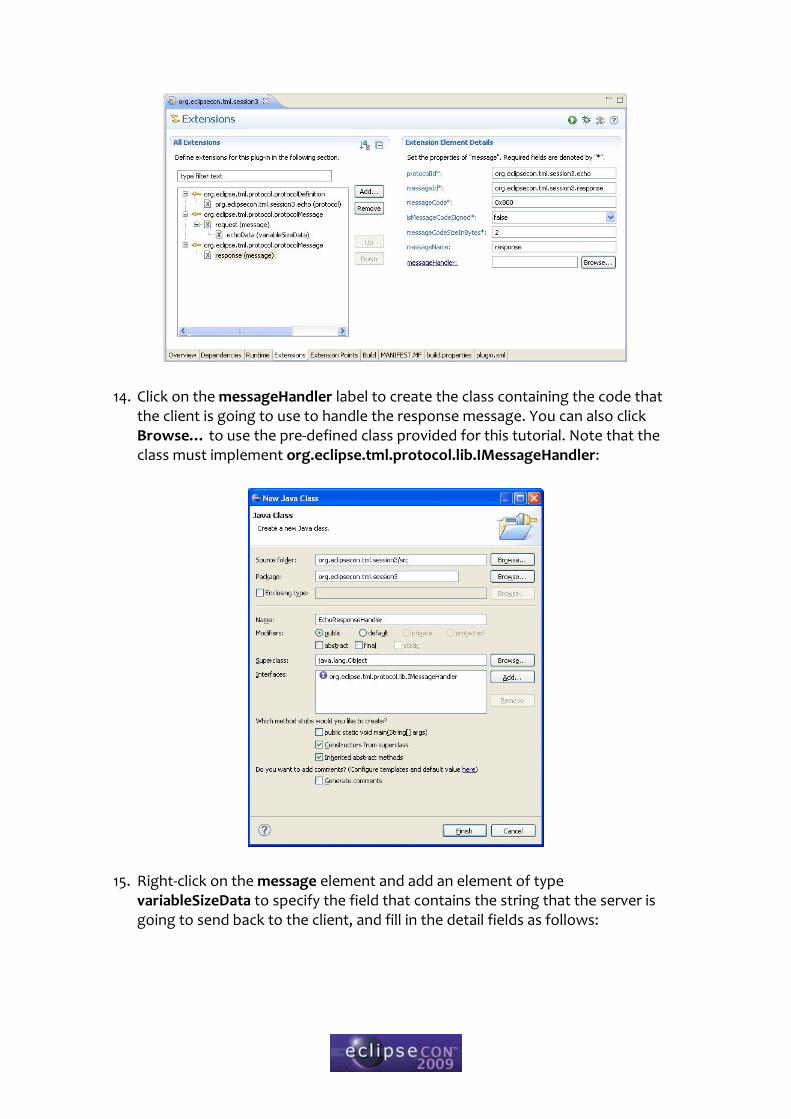
14. Click on the messageHandler label to create the class containing the code that the client is going to use to handle the response message. You can also click Browse… to use the pre-defined class provided for this tutorial. Note that the class must implement org.eclipse.tml.protocol.lib.IMessageHandler:
15. Right-click on the message element and add an element of type variableSizeData to specify the field that contains the string that the server is going to send back to the client, and fill in the detail fields as follows:
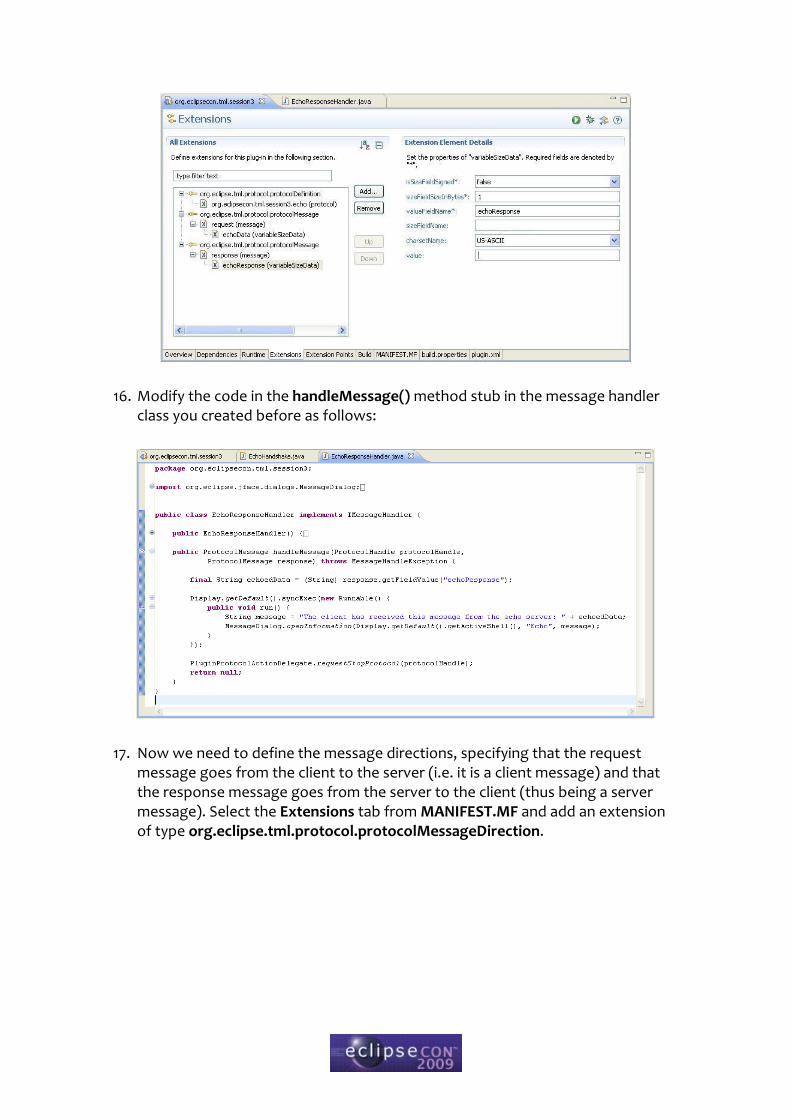
16. Modify the code in the handleMessage() method stub in the message handler class you created before as follows:
17. Now we need to define the message directions, specifying that the request message goes from the client to the server (i.e. it is a client message) and that the response message goes from the server to the client (thus being a server message). Select the Extensions tab from MANIFEST.MF and add an extension of type org.eclipse.tml.protocol.protocolMessageDirection.
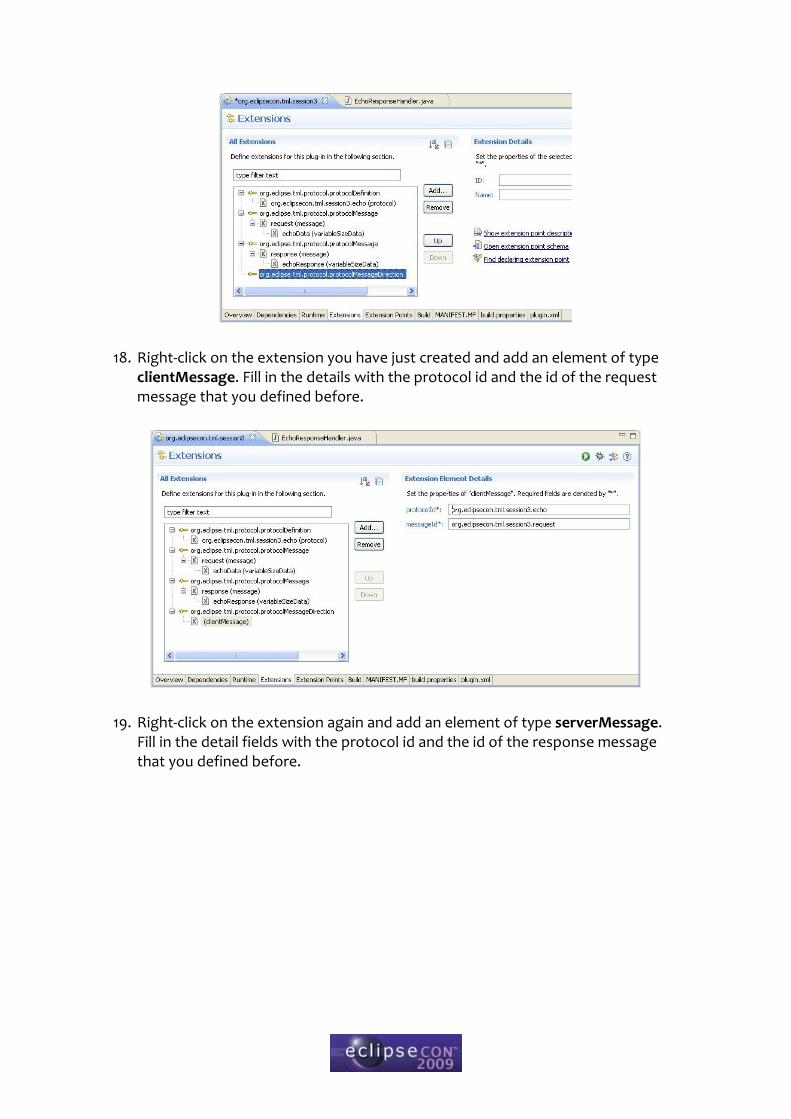
18. Right-click on the extension you have just created and add an element of type clientMessage. Fill in the details with the protocol id and the id of the request message that you defined before.
19. Right-click on the extension again and add an element of type serverMessage. Fill in the detail fields with the protocol id and the id of the response message that you defined before.
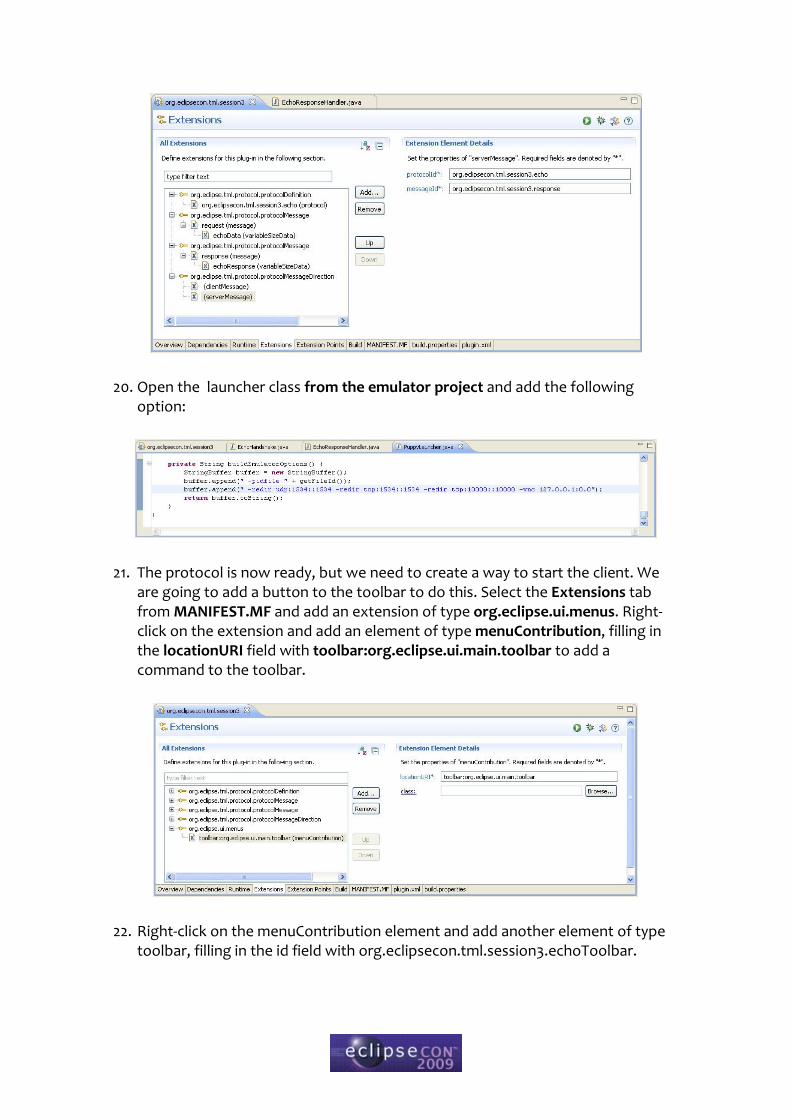
20. Open the launcher class from the emulator project and add the following option:
21. The protocol is now ready, but we need to create a way to start the client. We are going to add a button to the toolbar to do this. Select the Extensions tab from MANIFEST.MF and add an extension of type org.eclipse.ui.menus. Right-click on the extension and add an element of type menuContribution, filling in the locationURI field with toolbar:org.eclipse.ui.main.toolbar to add a command to the toolbar.
22. Right-click on the menuContribution element and add another element of type toolbar, filling in the id field with org.eclipsecon.tml.session3.echoToolbar.
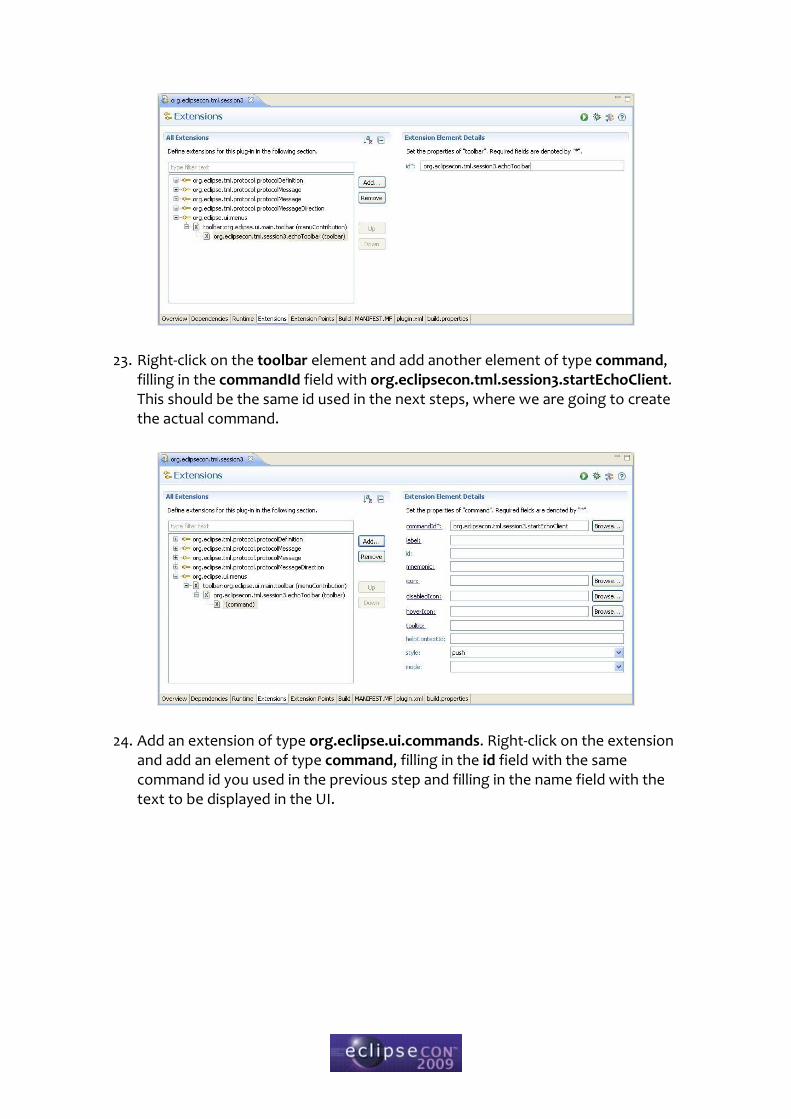
23. Right-click on the toolbar element and add another element of type command, filling in the commandId field with org.eclipsecon.tml.session3.startEchoClient. This should be the same id used in the next steps, where we are going to create the actual command.
24. Add an extension of type org.eclipse.ui.commands. Right-click on the extension and add an element of type command, filling in the id field with the same command id you used in the previous step and filling in the name field with the text to be displayed in the UI.
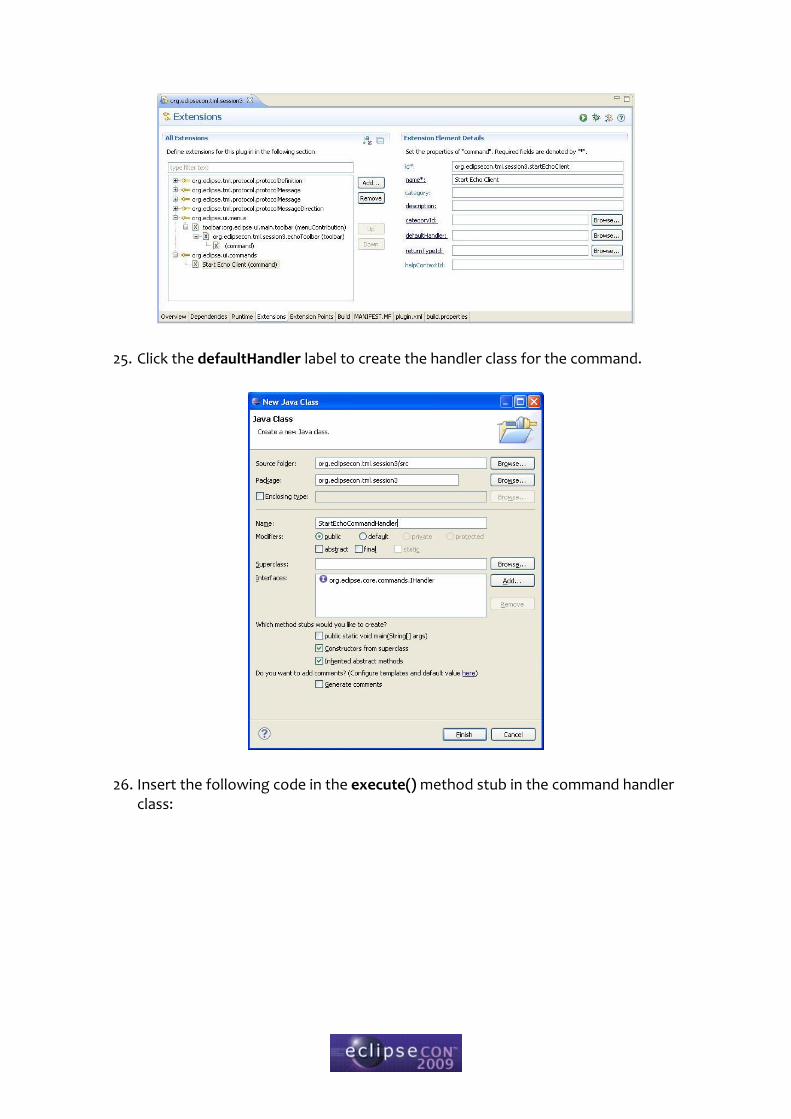
25. Click the defaultHandler label to create the handler class for the command.
26. Insert the following code in the execute() method stub in the command handler class:

27. Make sure you saved everything and run the plug-in as an Eclipse application.
28. Start the emulator instance and connect it to the VNC Viewer.
29. Start the echo server on the emulator by typing in the command line:
cd /root
./echoServer 10000
30. Start the echo client in Eclipse by clicking on the toolbar button.
31. You can see the string that the client sends to the server and that the server sends back to the client.
Hands-on Session #4: Using the /proc tools to display system information in Eclipse views
In this session, we are going to take the puppy Linux emulator that we integrated into Eclipse in the first and second sessions, and use the /proc tools to get system information.
1. Open the project you created in the second hands-on session, or use the pre-defined project org.eclipsecon.tml.session4.
2. Run the plug-in as an Eclipse application and start the emulator.
3. Start the /proc tools server on the emulator by typing in the command line:
cd /root/tcf_Debug
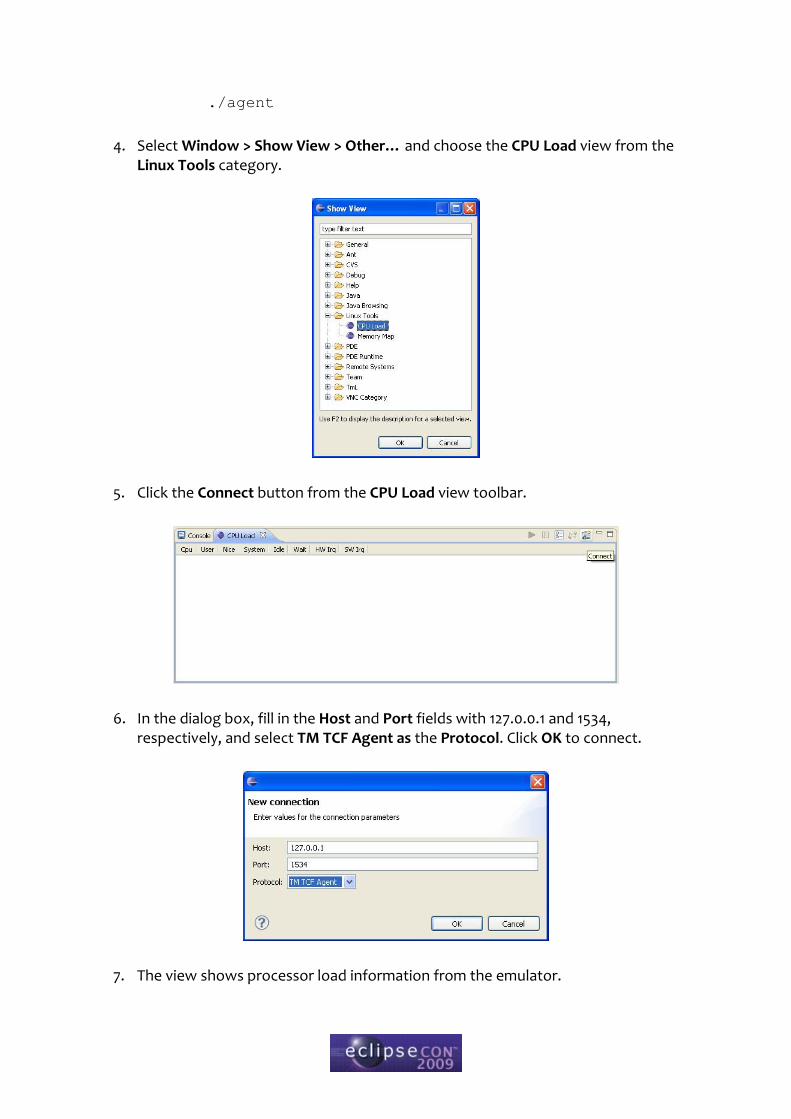
./agent
4. Select Window > Show View > Other… and choose the CPU Load view from the Linux Tools category.
5. Click the Connect button from the CPU Load view toolbar.
6. In the dialog box, fill in the Host and Port fields with 127.0.0.1 and 1534, respectively, and select TM TCF Agent as the Protocol. Click OK to connect.
7. The view shows processor load information from the emulator.
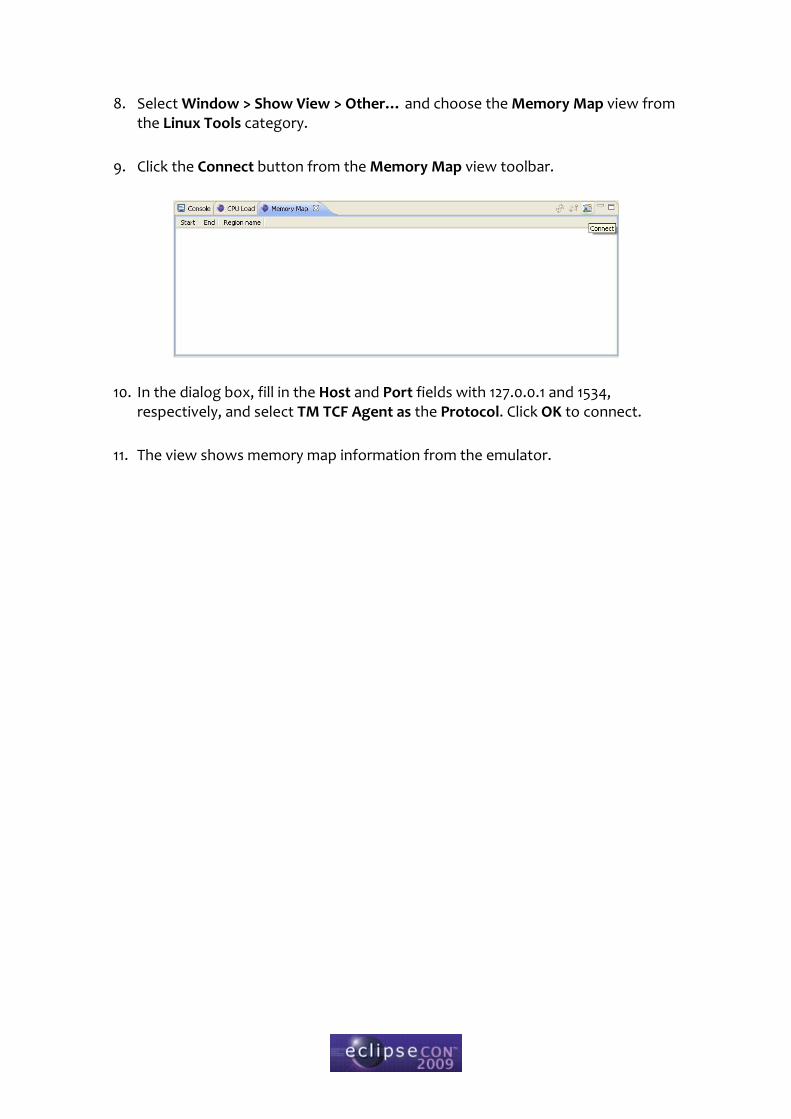
8. Select Window > Show View > Other… and choose the Memory Map view from the Linux Tools category.
9. Click the Connect button from the Memory Map view toolbar.
10. In the dialog box, fill in the Host and Port fields with 127.0.0.1 and 1534, respectively, and select TM TCF Agent as the Protocol. Click OK to connect.
11. The view shows memory map information from the emulator.