Embed Size (px)
Citation preview
Tutorial: Importing/Modifying/Exporting Torchlight mesh in Blender (for newbies)
(Created by Dusho)

Index: Importing existing TL model as a reference..................................................................3 Modifying existing TL mesh .......................................................................................10
Optional: Adjusting the texture................................................................................18 Exporting Ogre mesh ...................................................................................................23 Optional: Exporting image of mesh (for item icon).....................................................25
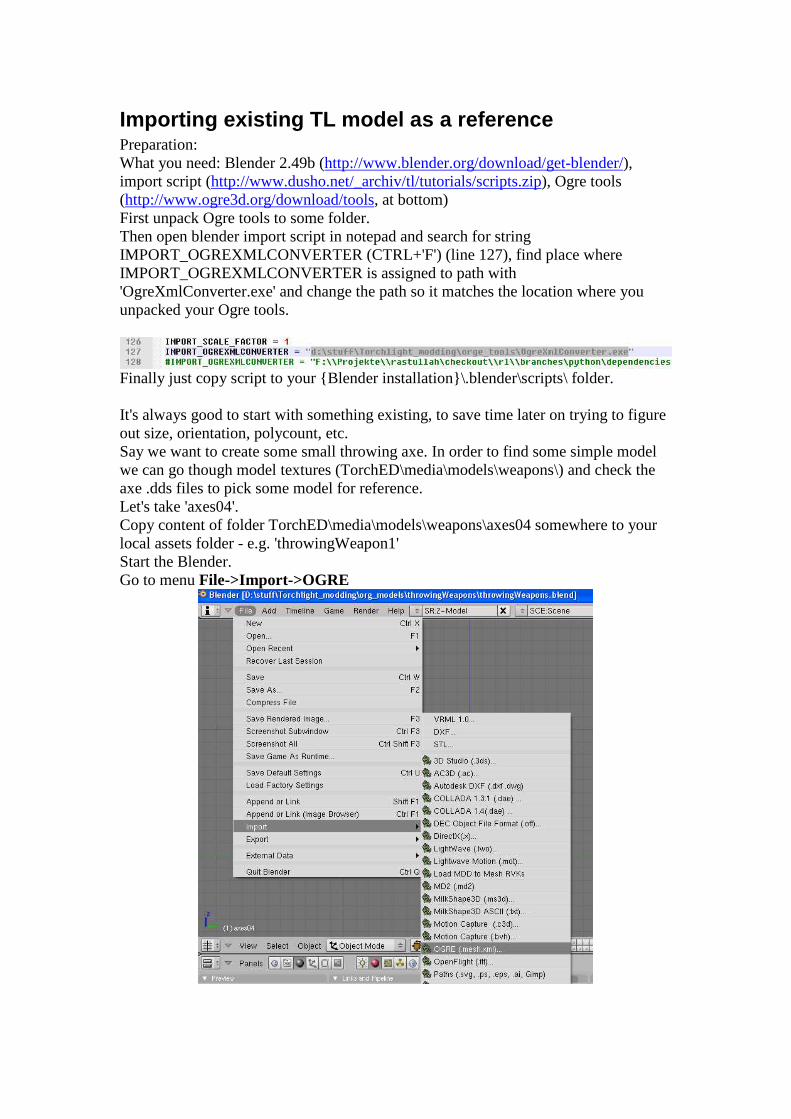
Importing existing TL model as a reference Preparation: What you need: Blender 2.49b (http://www.blender.org/download/get-blender/), import script (http://www.dusho.net/_archiv/tl/tutorials/scripts.zip), Ogre tools (http://www.ogre3d.org/download/tools, at bottom) First unpack Ogre tools to some folder. Then open blender import script in notepad and search for string IMPORT_OGREXMLCONVERTER (CTRL+'F') (line 127), find place where IMPORT_OGREXMLCONVERTER is assigned to path with 'OgreXmlConverter.exe' and change the path so it matches the location where you unpacked your Ogre tools.
Finally just copy script to your {Blender installation}\.blender\scripts\ folder. It's always good to start with something existing, to save time later on trying to figure out size, orientation, polycount, etc. Say we want to create some small throwing axe. In order to find some simple model we can go though model textures (TorchED\media\models\weapons\) and check the axe .dds files to pick some model for reference. Let's take 'axes04'. Copy content of folder TorchED\media\models\weapons\axes04 somewhere to your local assets folder - e.g. 'throwingWeapon1' Start the Blender. Go to menu File->Import->OGRE
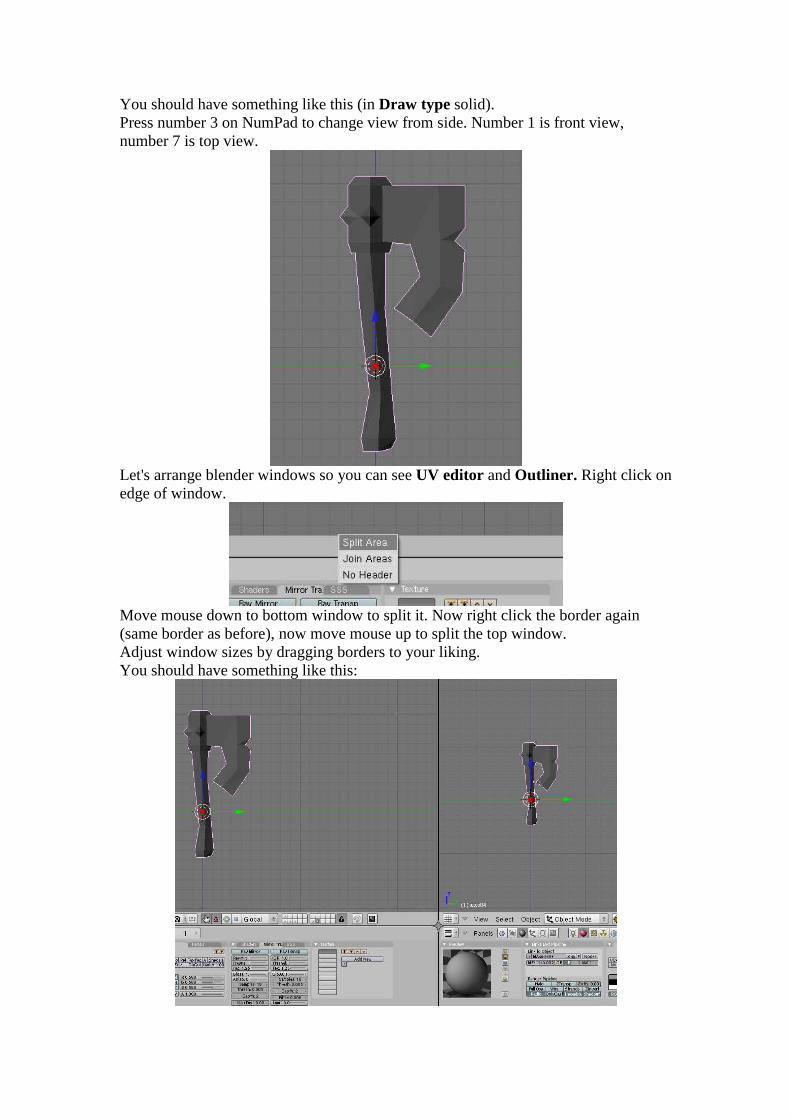
You should have something like this (in Draw type solid). Press number 3 on NumPad to change view from side. Number 1 is front view, number 7 is top view.
Let's arrange blender windows so you can see UV editor and Outliner. Right click on edge of window.
Move mouse down to bottom window to split it. Now right click the border again (same border as before), now move mouse up to split the top window. Adjust window sizes by dragging borders to your liking. You should have something like this:
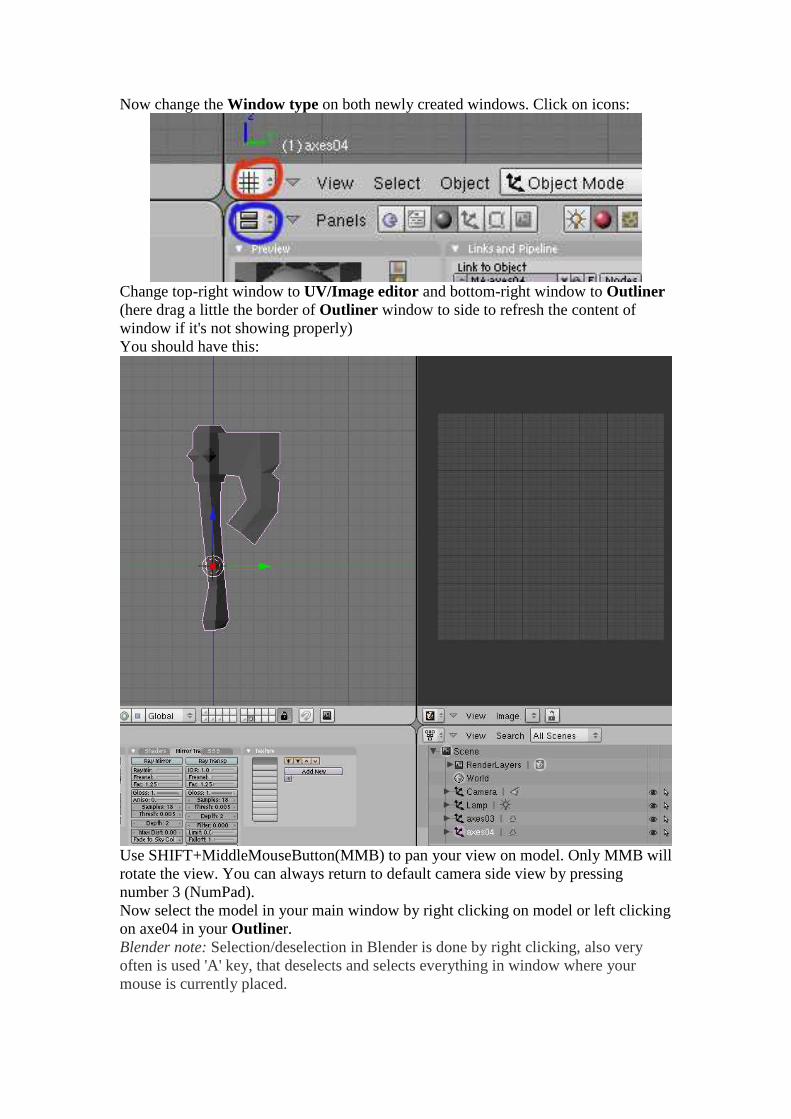
Now change the Window type on both newly created windows. Click on icons:
Change top-right window to UV/Image editor and bottom-right window to Outliner (here drag a little the border of Outliner window to side to refresh the content of window if it's not showing properly) You should have this:
Use SHIFT+MiddleMouseButton(MMB) to pan your view on model. Only MMB will rotate the view. You can always return to default camera side view by pressing number 3 (NumPad). Now select the model in your main window by right clicking on model or left clicking on axe04 in your Outliner. Blender note: Selection/deselection in Blender is done by right clicking, also very often is used 'A' key, that deselects and selects everything in window where your mouse is currently placed.
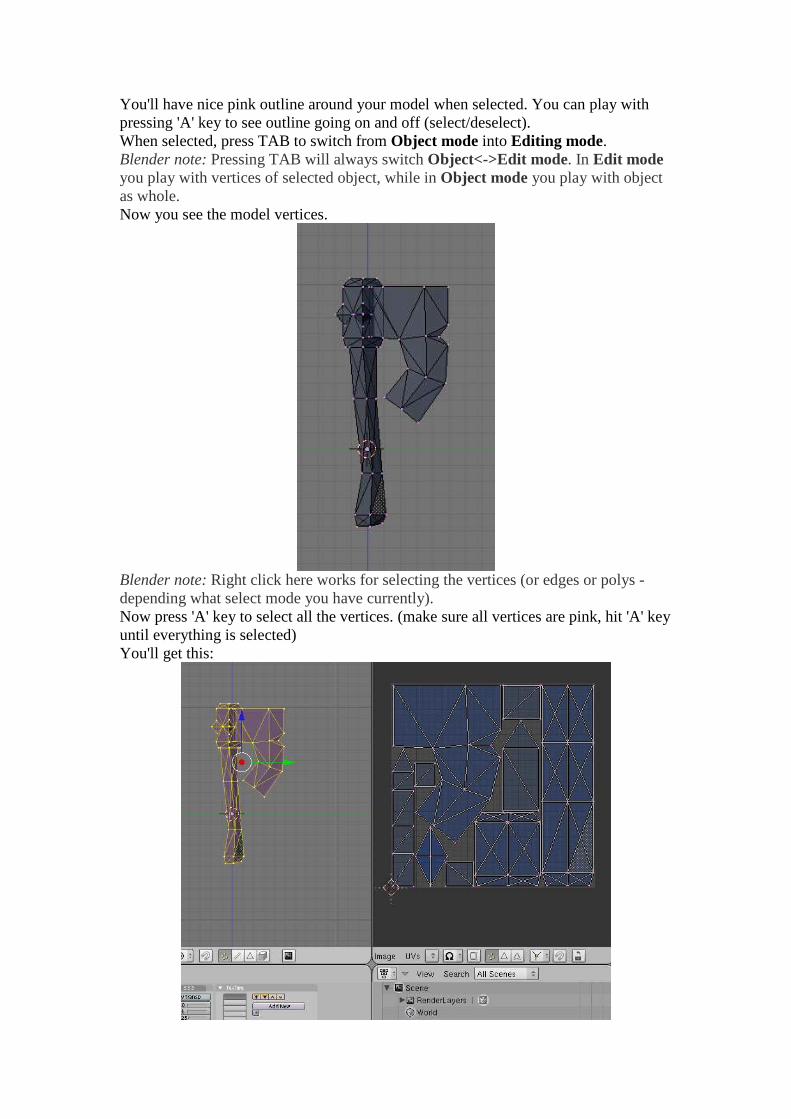
You'll have nice pink outline around your model when selected. You can play with pressing 'A' key to see outline going on and off (select/deselect). When selected, press TAB to switch from Object mode into Editing mode. Blender note: Pressing TAB will always switch Object<->Edit mode. In Edit mode you play with vertices of selected object, while in Object mode you play with object as whole. Now you see the model vertices.
Blender note: Right click here works for selecting the vertices (or edges or polys - depending what select mode you have currently). Now press 'A' key to select all the vertices. (make sure all vertices are pink, hit 'A' key until everything is selected) You'll get this:
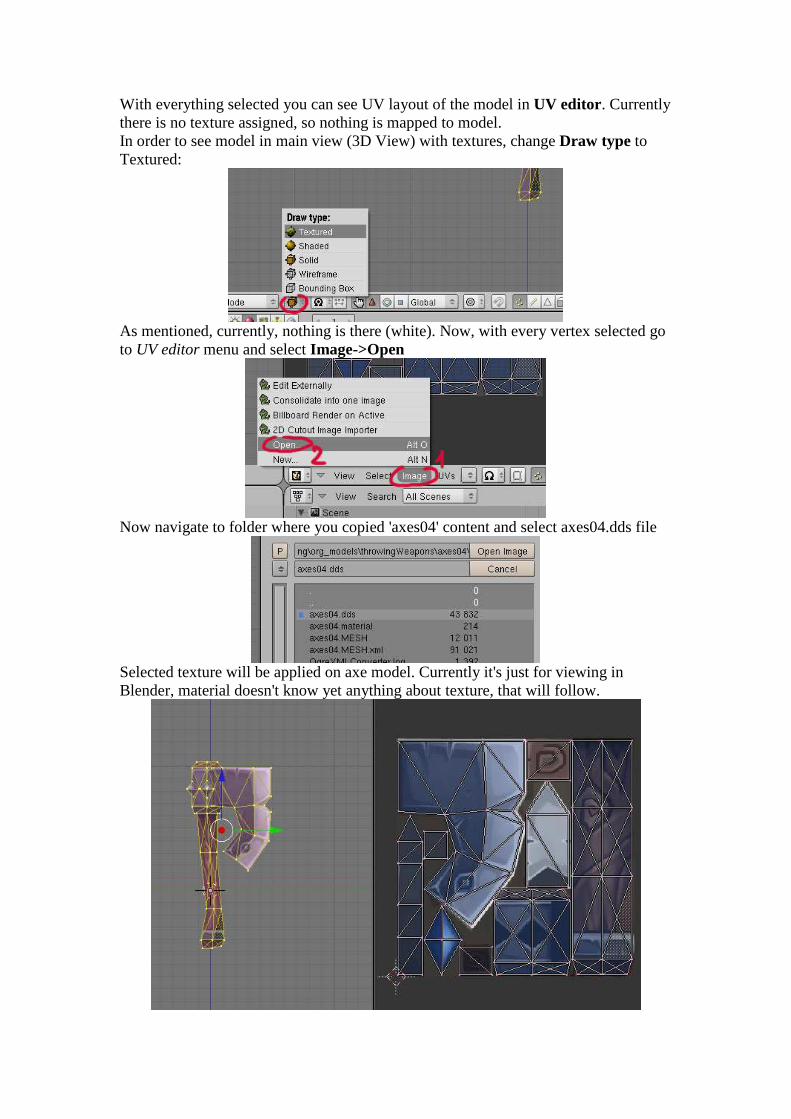
With everything selected you can see UV layout of the model in UV editor . Currently there is no texture assigned, so nothing is mapped to model. In order to see model in main view (3D View) with textures, change Draw type to Textured:
As mentioned, currently, nothing is there (white). Now, with every vertex selected go to UV editor menu and select Image->Open
Now navigate to folder where you copied 'axes04' content and select axes04.dds file
Selected texture will be applied on axe model. Currently it's just for viewing in Blender, material doesn't know yet anything about texture, that will follow.
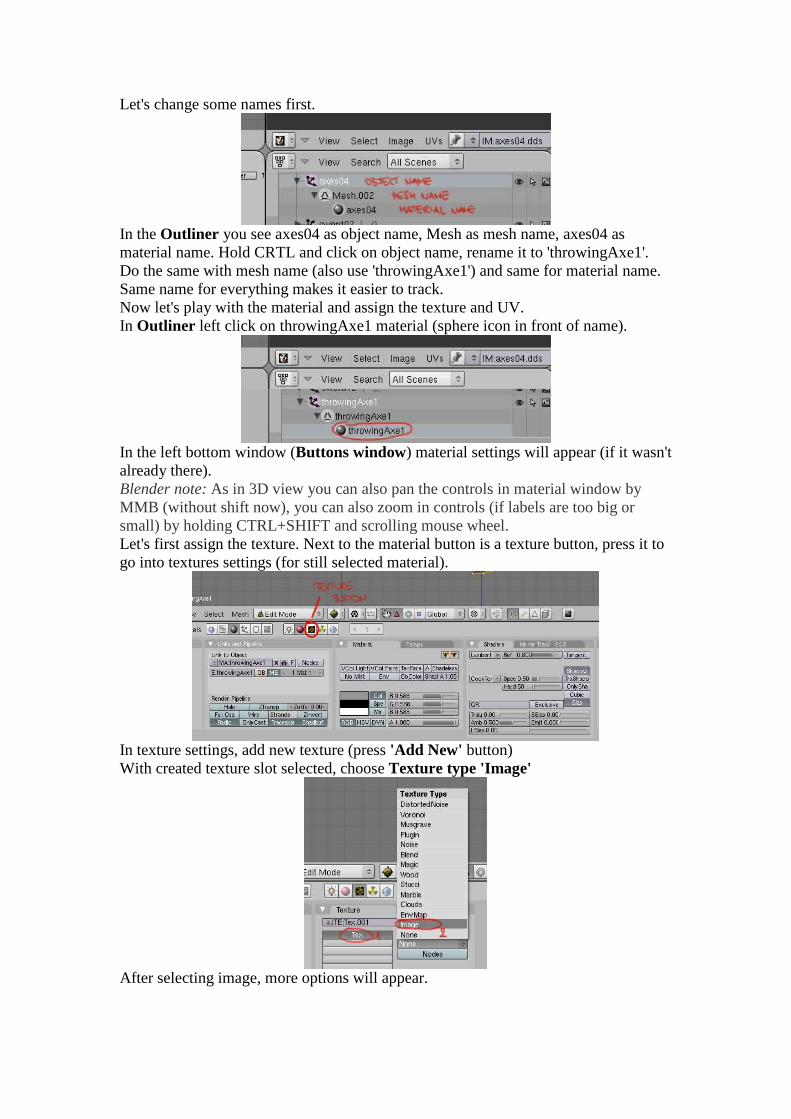
Let's change some names first.
In the Outliner you see axes04 as object name, Mesh as mesh name, axes04 as material name. Hold CRTL and click on object name, rename it to 'throwingAxe1'. Do the same with mesh name (also use 'throwingAxe1') and same for material name. Same name for everything makes it easier to track. Now let's play with the material and assign the texture and UV. In Outliner left click on throwingAxe1 material (sphere icon in front of name).
In the left bottom window (Buttons window) material settings will appear (if it wasn't already there). Blender note: As in 3D view you can also pan the controls in material window by MMB (without shift now), you can also zoom in controls (if labels are too big or small) by holding CTRL+SHIFT and scrolling mouse wheel. Let's first assign the texture. Next to the material button is a texture button, press it to go into textures settings (for still selected material).
In texture settings, add new texture (press 'Add New' button) With created texture slot selected, choose Texture type 'Image'
After selecting image, more options will appear.
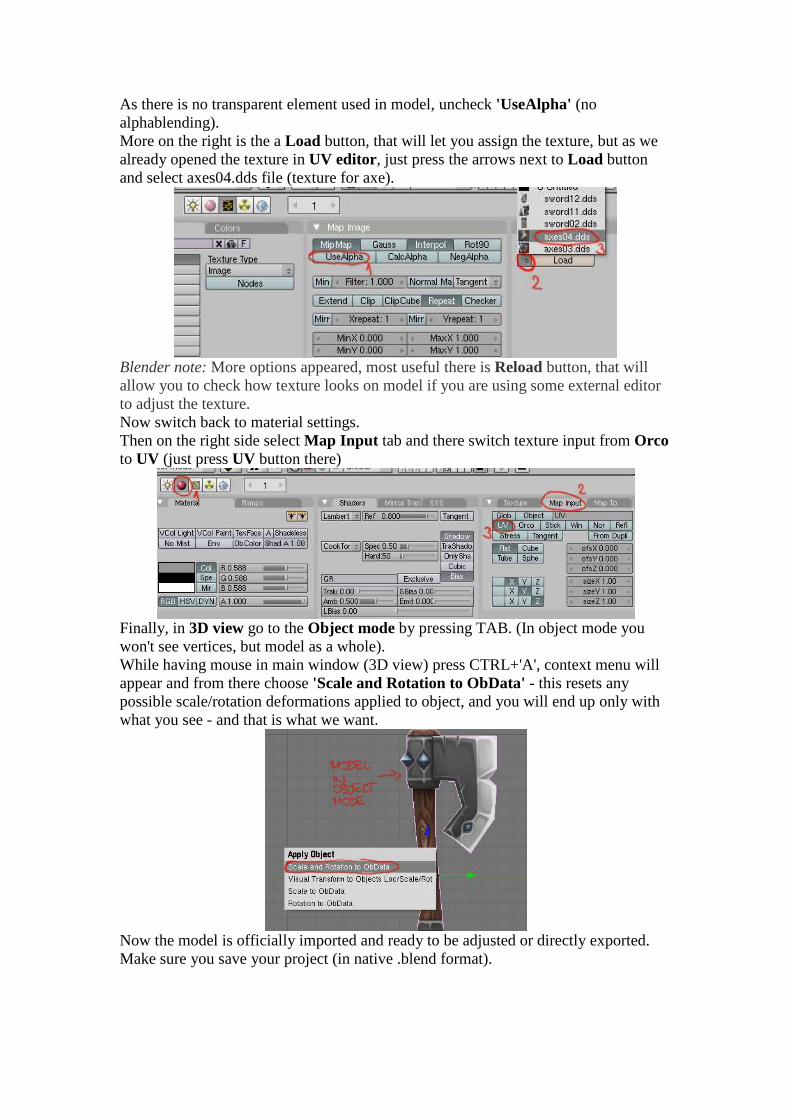
As there is no transparent element used in model, uncheck 'UseAlpha' (no alphablending). More on the right is the a Load button, that will let you assign the texture, but as we already opened the texture in UV editor, just press the arrows next to Load button and select axes04.dds file (texture for axe).
Blender note: More options appeared, most useful there is Reload button, that will allow you to check how texture looks on model if you are using some external editor to adjust the texture. Now switch back to material settings. Then on the right side select Map Input tab and there switch texture input from Orco to UV (just press UV button there)
Finally, in 3D view go to the Object mode by pressing TAB. (In object mode you won't see vertices, but model as a whole). While having mouse in main window (3D view) press CTRL+'A', context menu will appear and from there choose 'Scale and Rotation to ObData' - this resets any possible scale/rotation deformations applied to object, and you will end up only with what you see - and that is what we want.
Now the model is officially imported and ready to be adjusted or directly exported. Make sure you save your project (in native .blend format).
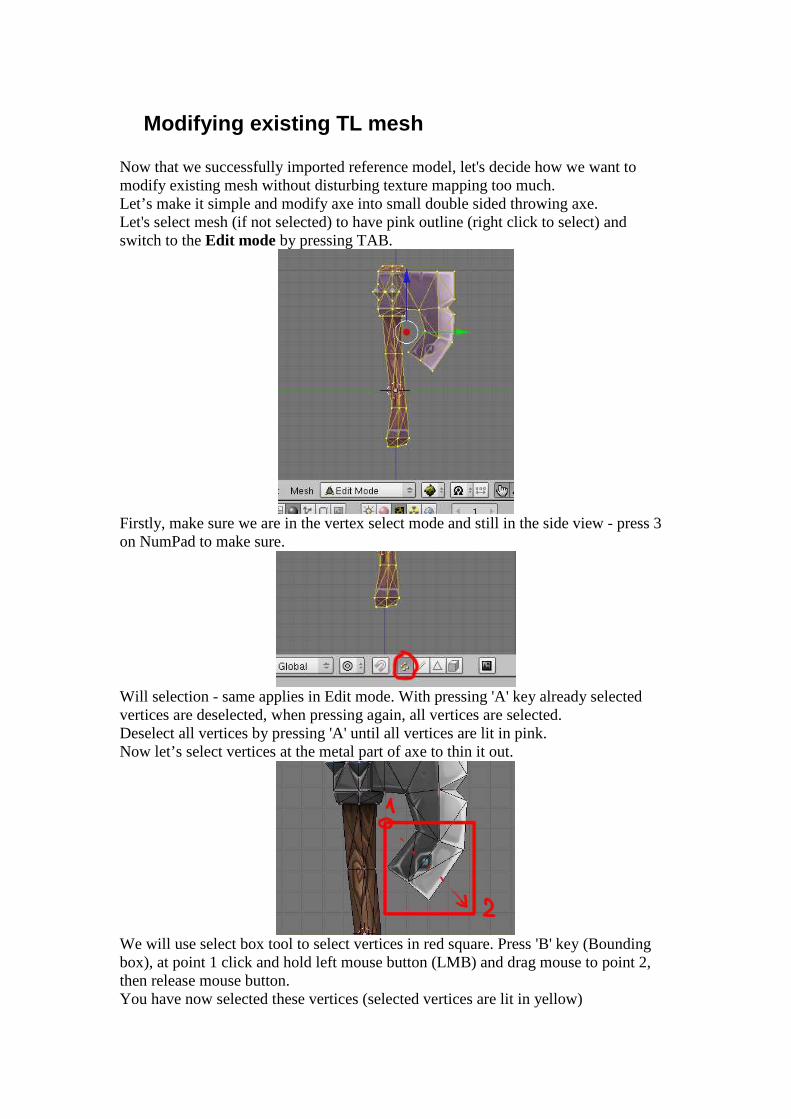
Modifying existing TL mesh Now that we successfully imported reference model, let's decide how we want to modify existing mesh without disturbing texture mapping too much. Let’s make it simple and modify axe into small double sided throwing axe. Let's select mesh (if not selected) to have pink outline (right click to select) and switch to the Edit mode by pressing TAB.
Firstly, make sure we are in the vertex select mode and still in the side view - press 3 on NumPad to make sure.
Will selection - same applies in Edit mode. With pressing 'A' key already selected vertices are deselected, when pressing again, all vertices are selected. Deselect all vertices by pressing 'A' until all vertices are lit in pink. Now let’s select vertices at the metal part of axe to thin it out.
We will use select box tool to select vertices in red square. Press 'B' key (Bounding box), at point 1 click and hold left mouse button (LMB) and drag mouse to point 2, then release mouse button. You have now selected these vertices (selected vertices are lit in yellow)
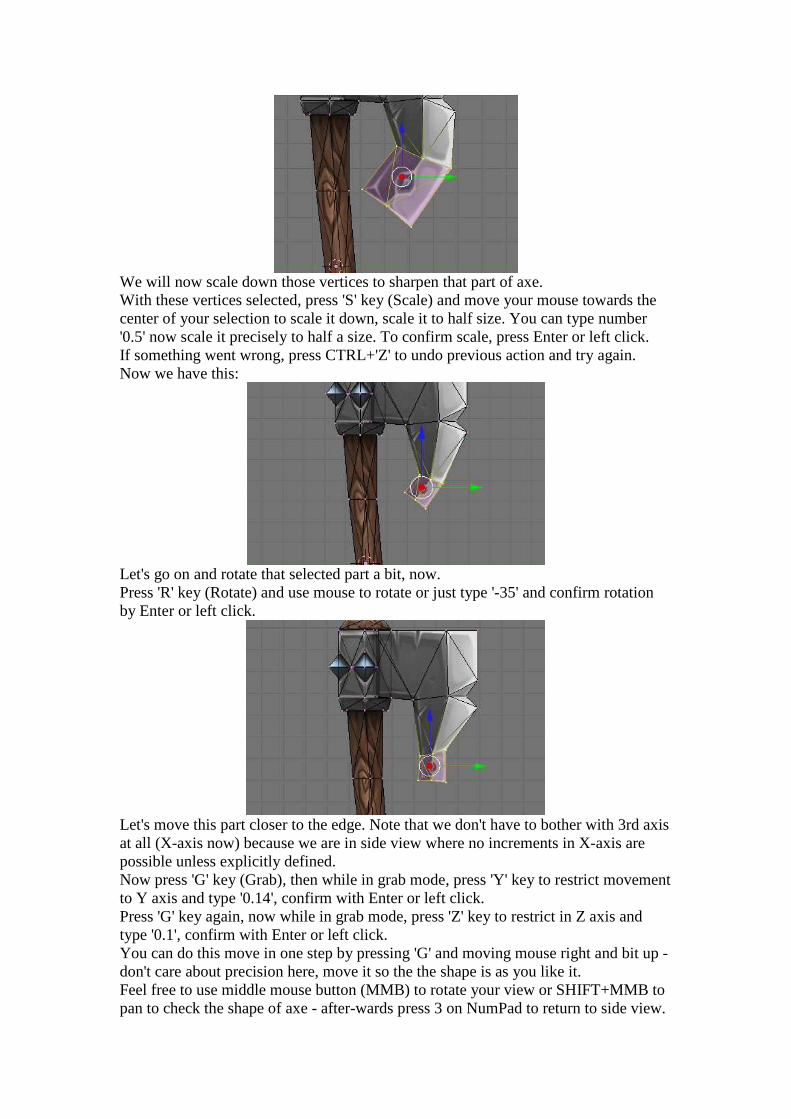
We will now scale down those vertices to sharpen that part of axe. With these vertices selected, press 'S' key (Scale) and move your mouse towards the center of your selection to scale it down, scale it to half size. You can type number '0.5' now scale it precisely to half a size. To confirm scale, press Enter or left click. If something went wrong, press CTRL+'Z' to undo previous action and try again. Now we have this:
Let's go on and rotate that selected part a bit, now. Press 'R' key (Rotate) and use mouse to rotate or just type '-35' and confirm rotation by Enter or left click.
Let's move this part closer to the edge. Note that we don't have to bother with 3rd axis at all (X-axis now) because we are in side view where no increments in X-axis are possible unless explicitly defined. Now press 'G' key (Grab), then while in grab mode, press 'Y' key to restrict movement to Y axis and type '0.14', confirm with Enter or left click. Press 'G' key again, now while in grab mode, press 'Z' key to restrict in Z axis and type '0.1', confirm with Enter or left click. You can do this move in one step by pressing 'G' and moving mouse right and bit up - don't care about precision here, move it so the the shape is as you like it. Feel free to use middle mouse button (MMB) to rotate your view or SHIFT+MMB to pan to check the shape of axe - after-wards press 3 on NumPad to return to side view.
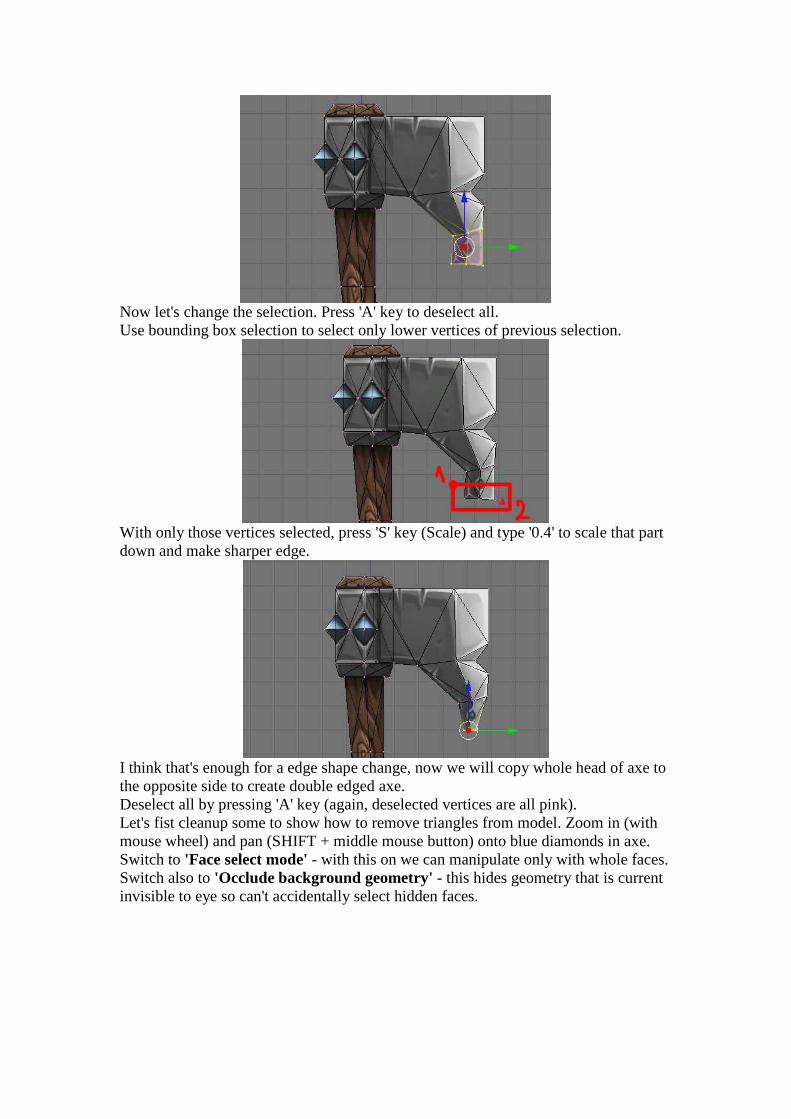
Now let's change the selection. Press 'A' key to deselect all. Use bounding box selection to select only lower vertices of previous selection.
With only those vertices selected, press 'S' key (Scale) and type '0.4' to scale that part down and make sharper edge.
I think that's enough for a edge shape change, now we will copy whole head of axe to the opposite side to create double edged axe. Deselect all by pressing 'A' key (again, deselected vertices are all pink). Let's fist cleanup some to show how to remove triangles from model. Zoom in (with mouse wheel) and pan (SHIFT + middle mouse button) onto blue diamonds in axe. Switch to 'Face select mode' - with this on we can manipulate only with whole faces. Switch also to 'Occlude background geometry' - this hides geometry that is current invisible to eye so can't accidentally select hidden faces.
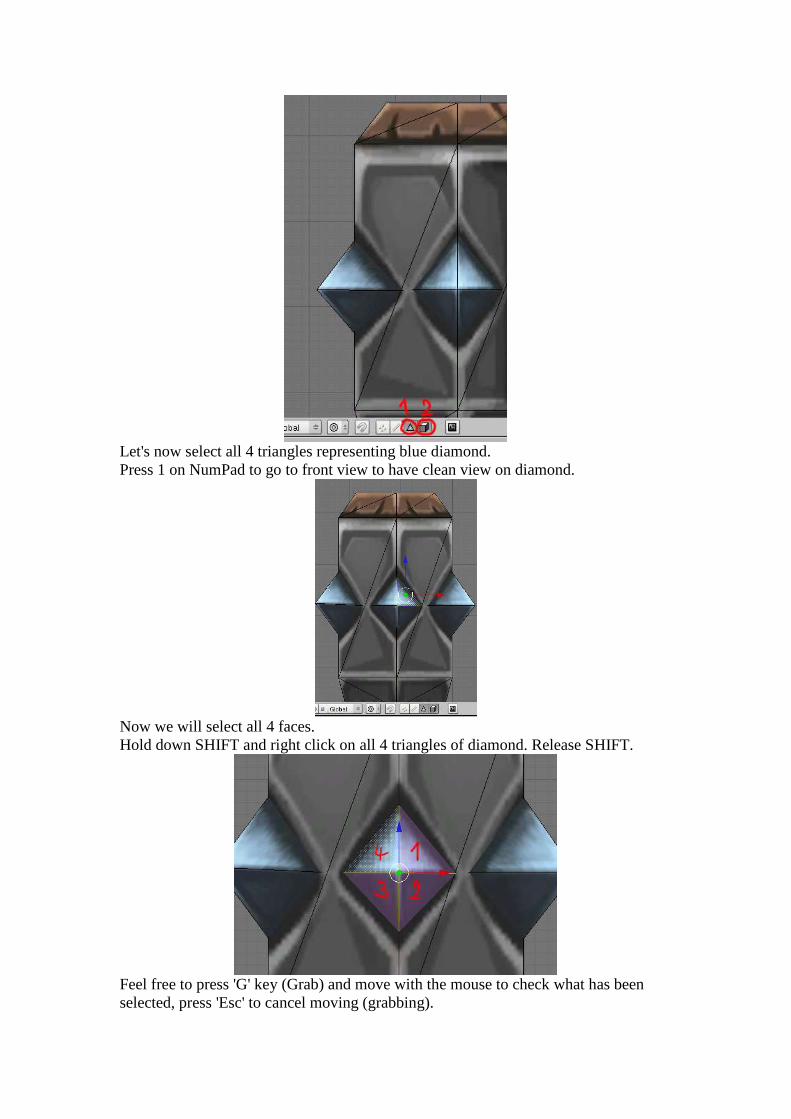
Let's now select all 4 triangles representing blue diamond. Press 1 on NumPad to go to front view to have clean view on diamond.
Now we will select all 4 faces. Hold down SHIFT and right click on all 4 triangles of diamond. Release SHIFT.
Feel free to press 'G' key (Grab) and move with the mouse to check what has been selected, press 'Esc' to cancel moving (grabbing).
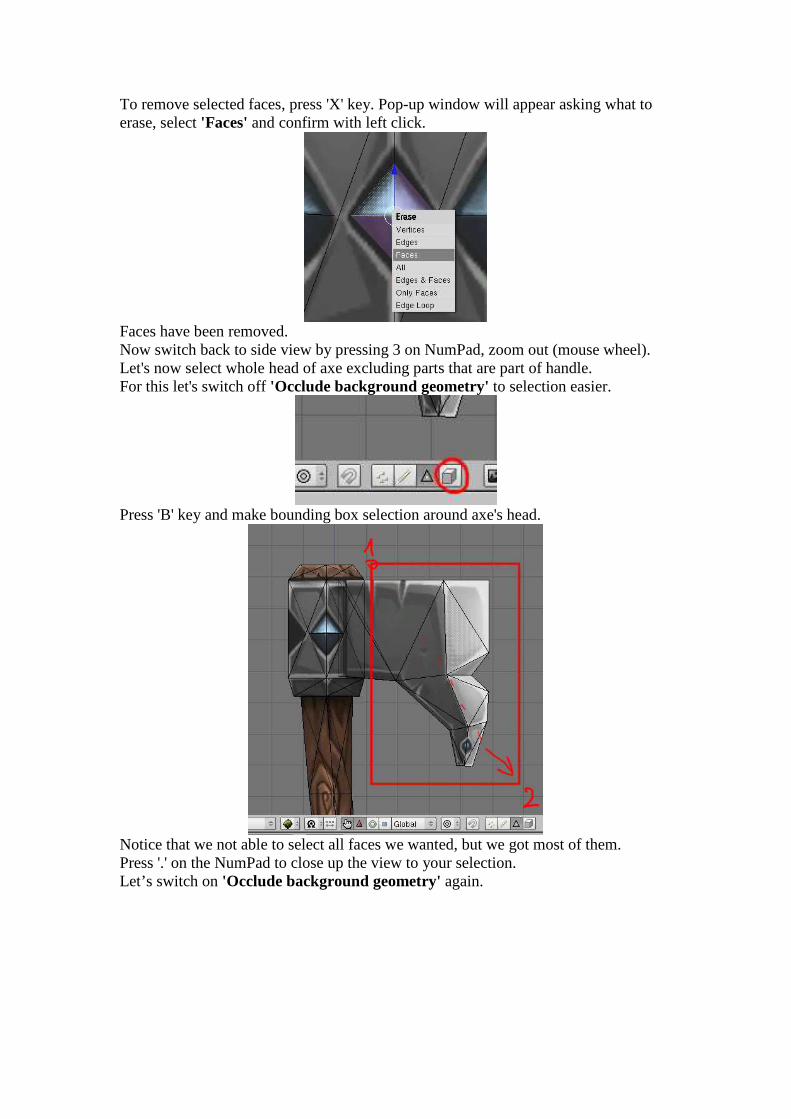
To remove selected faces, press 'X' key. Pop-up window will appear asking what to erase, select 'Faces' and confirm with left click.
Faces have been removed. Now switch back to side view by pressing 3 on NumPad, zoom out (mouse wheel). Let's now select whole head of axe excluding parts that are part of handle. For this let's switch off 'Occlude background geometry' to selection easier.
Press 'B' key and make bounding box selection around axe's head.
Notice that we not able to select all faces we wanted, but we got most of them. Press '.' on the NumPad to close up the view to your selection. Let’s switch on 'Occlude background geometry' again.
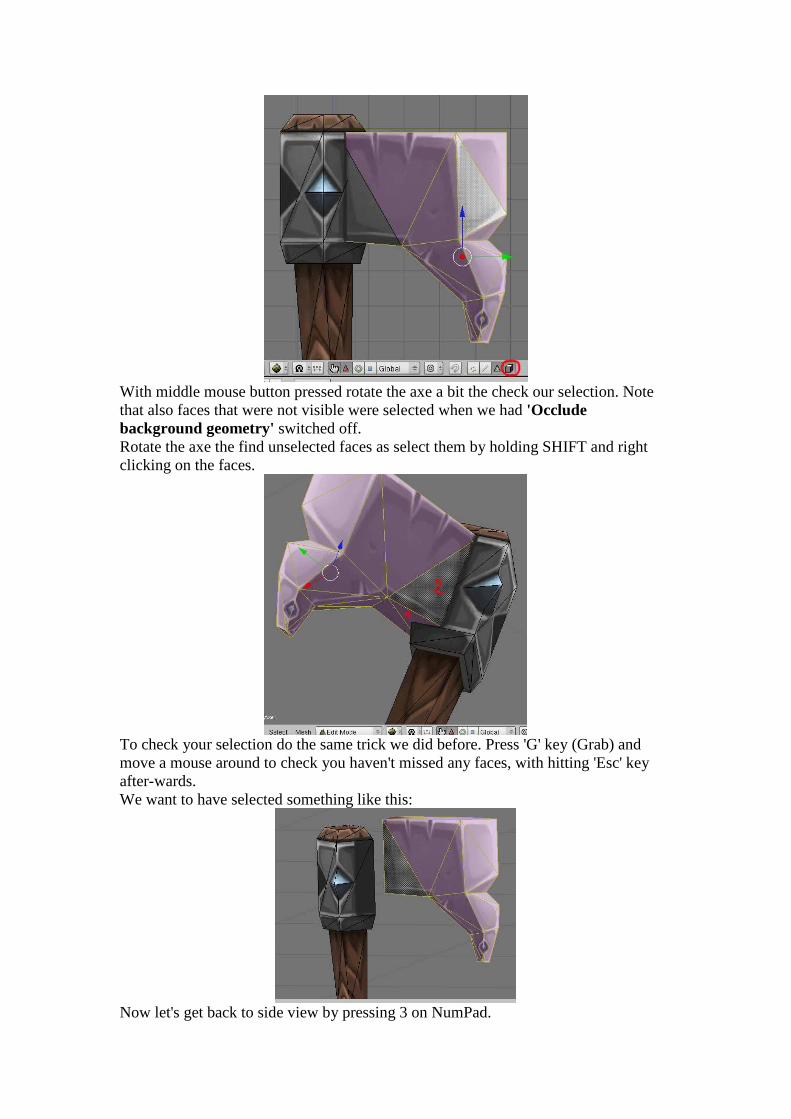
With middle mouse button pressed rotate the axe a bit the check our selection. Note that also faces that were not visible were selected when we had 'Occlude background geometry' switched off. Rotate the axe the find unselected faces as select them by holding SHIFT and right clicking on the faces.
To check your selection do the same trick we did before. Press 'G' key (Grab) and move a mouse around to check you haven't missed any faces, with hitting 'Esc' key after-wards. We want to have selected something like this:
Now let's get back to side view by pressing 3 on NumPad.
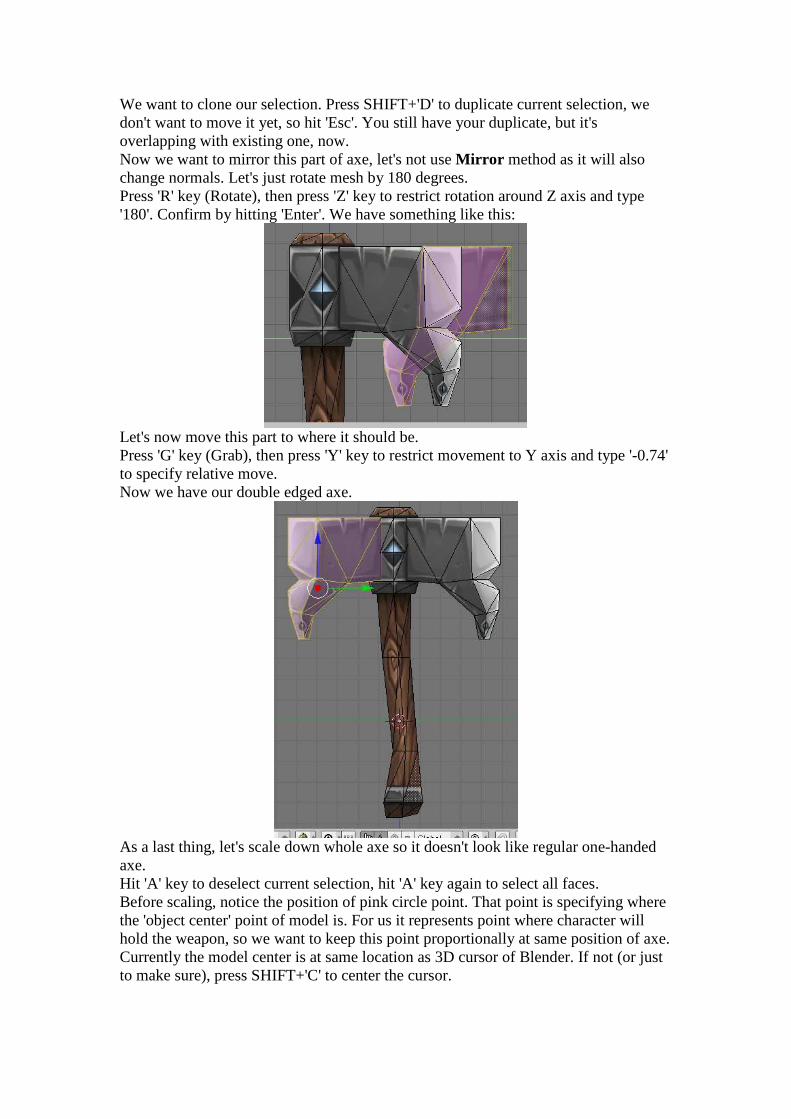
We want to clone our selection. Press SHIFT+'D' to duplicate current selection, we don't want to move it yet, so hit 'Esc'. You still have your duplicate, but it's overlapping with existing one, now. Now we want to mirror this part of axe, let's not use Mirror method as it will also change normals. Let's just rotate mesh by 180 degrees. Press 'R' key (Rotate), then press 'Z' key to restrict rotation around Z axis and type '180'. Confirm by hitting 'Enter'. We have something like this:
Let's now move this part to where it should be. Press 'G' key (Grab), then press 'Y' key to restrict movement to Y axis and type '-0.74' to specify relative move. Now we have our double edged axe.
As a last thing, let's scale down whole axe so it doesn't look like regular one-handed axe. Hit 'A' key to deselect current selection, hit 'A' key again to select all faces. Before scaling, notice the position of pink circle point. That point is specifying where the 'object center' point of model is. For us it represents point where character will hold the weapon, so we want to keep this point proportionally at same position of axe. Currently the model center is at same location as 3D cursor of Blender. If not (or just to make sure), press SHIFT+'C' to center the cursor.
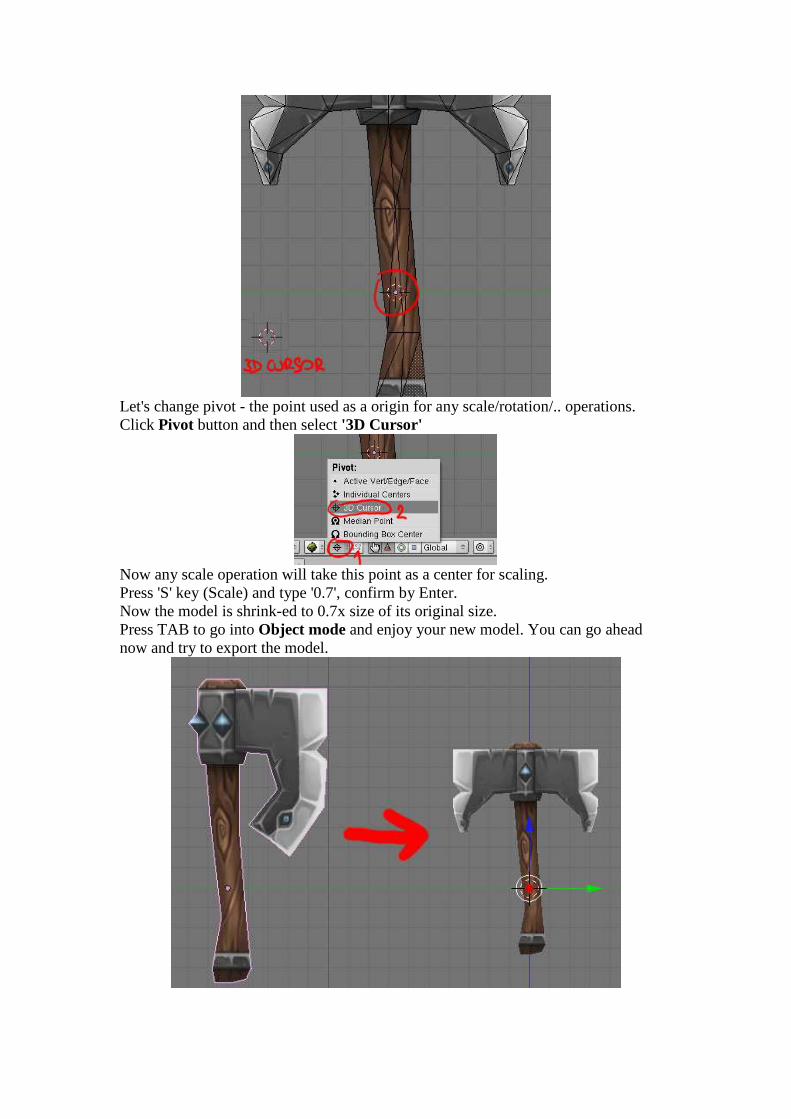
Let's change pivot - the point used as a origin for any scale/rotation/.. operations. Click Pivot button and then select '3D Cursor'
Now any scale operation will take this point as a center for scaling. Press 'S' key (Scale) and type '0.7', confirm by Enter. Now the model is shrink-ed to 0.7x size of its original size. Press TAB to go into Object mode and enjoy your new model. You can go ahead now and try to export the model.
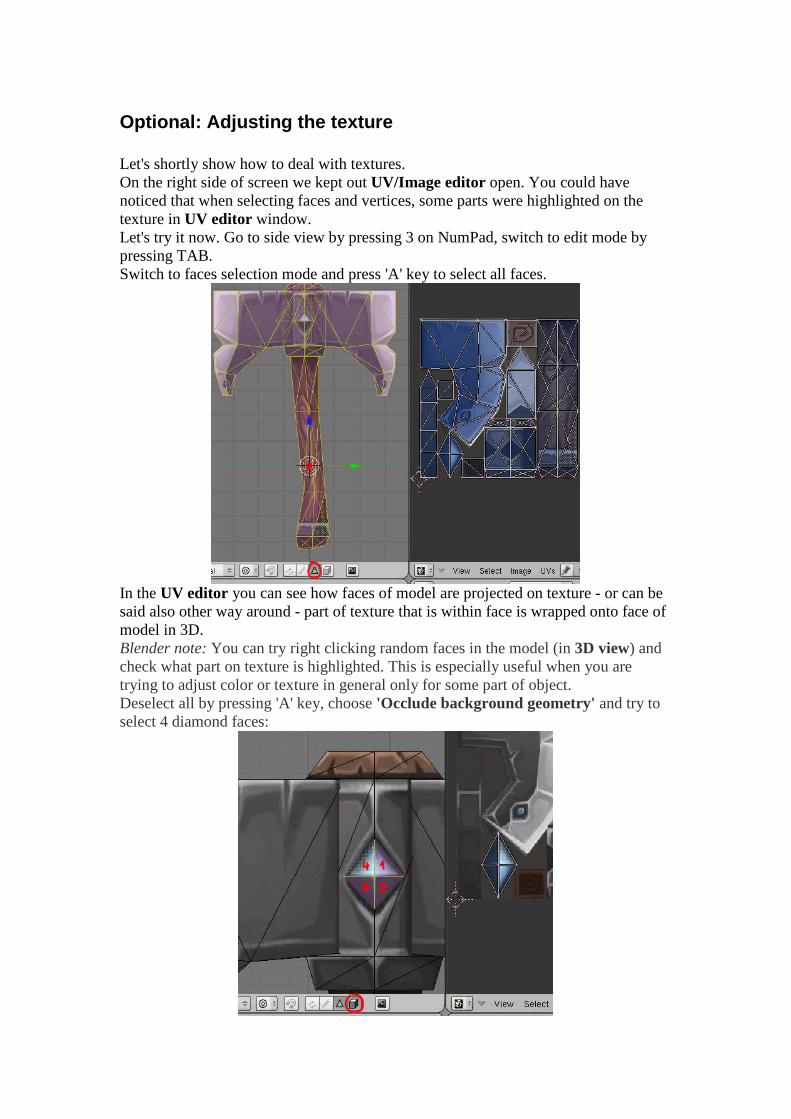
Optional: Adjusting the texture Let's shortly show how to deal with textures. On the right side of screen we kept out UV/Image editor open. You could have noticed that when selecting faces and vertices, some parts were highlighted on the texture in UV editor window. Let's try it now. Go to side view by pressing 3 on NumPad, switch to edit mode by pressing TAB. Switch to faces selection mode and press 'A' key to select all faces.
In the UV editor you can see how faces of model are projected on texture - or can be said also other way around - part of texture that is within face is wrapped onto face of model in 3D. Blender note: You can try right clicking random faces in the model (in 3D view) and check what part on texture is highlighted. This is especially useful when you are trying to adjust color or texture in general only for some part of object. Deselect all by pressing 'A' key, choose 'Occlude background geometry' and try to select 4 diamond faces:
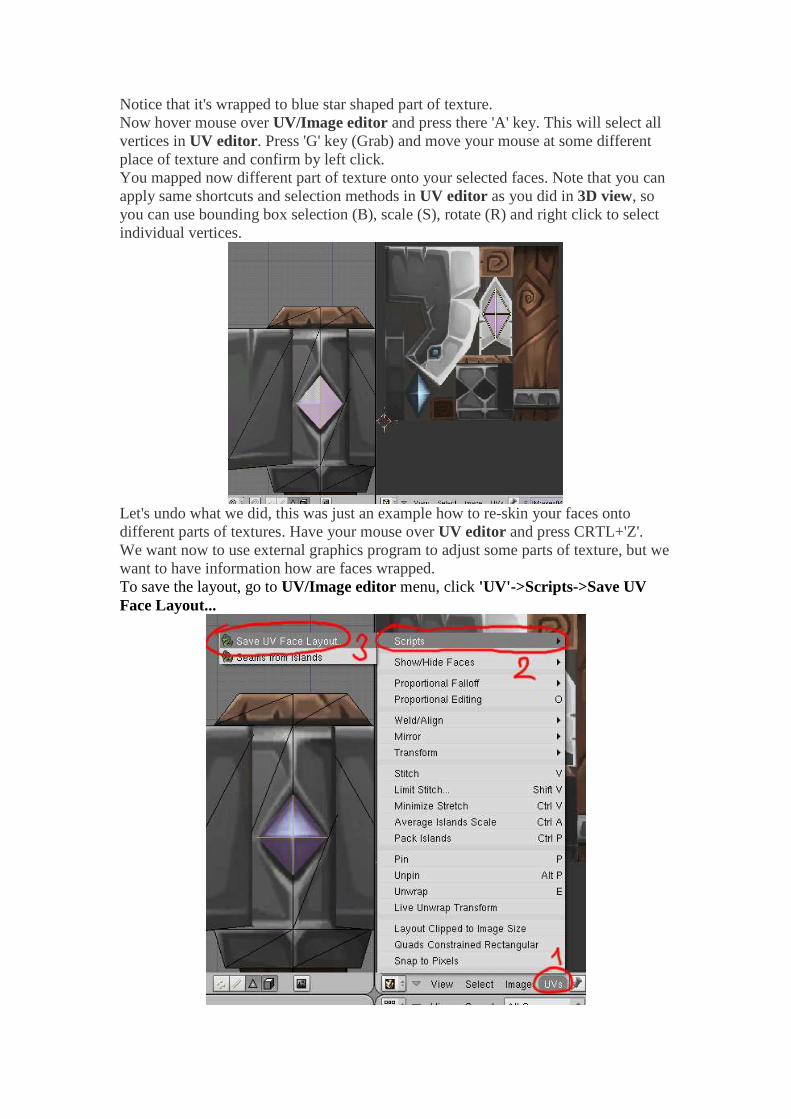
Notice that it's wrapped to blue star shaped part of texture. Now hover mouse over UV/Image editor and press there 'A' key. This will select all vertices in UV editor. Press 'G' key (Grab) and move your mouse at some different place of texture and confirm by left click. You mapped now different part of texture onto your selected faces. Note that you can apply same shortcuts and selection methods in UV editor as you did in 3D view, so you can use bounding box selection (B), scale (S), rotate (R) and right click to select individual vertices.
Let's undo what we did, this was just an example how to re-skin your faces onto different parts of textures. Have your mouse over UV editor and press CRTL+'Z'. We want now to use external graphics program to adjust some parts of texture, but we want to have information how are faces wrapped. To save the layout, go to UV/Image editor menu, click 'UV'->Scripts->Save UV Face Layout...

Another window with more options appeared:
'Size' means size of texture to be stored in pixels - default is 256x256. 'Wire' means thickness of wire used to draw UV layout other choices are self explanatory or not important enough for us now Let's press OK. Another window appeared asking where to save the image. Choose your asset directory, you can change the file name also and hit 'Save UV(tga)'
Now let's go to your graphical program (Photoshop, Paint.NET, Gimp, ... ). Open .tga layout file you saved (in my case 'throwingWeapons1_throwingAxe1.tga', yes, it will append name of mesh to filename).
Open also original texture file 'axe04.dds' from your assets directory. Copy your texture (axe04.dds) as a new layer into your image with layout (in Photoshop - in axes04.dds press CTRL+'A', CTRL+'C' and then in .tga press CTRL+'V'). Change layer style of axes04.dds layer to multiply:
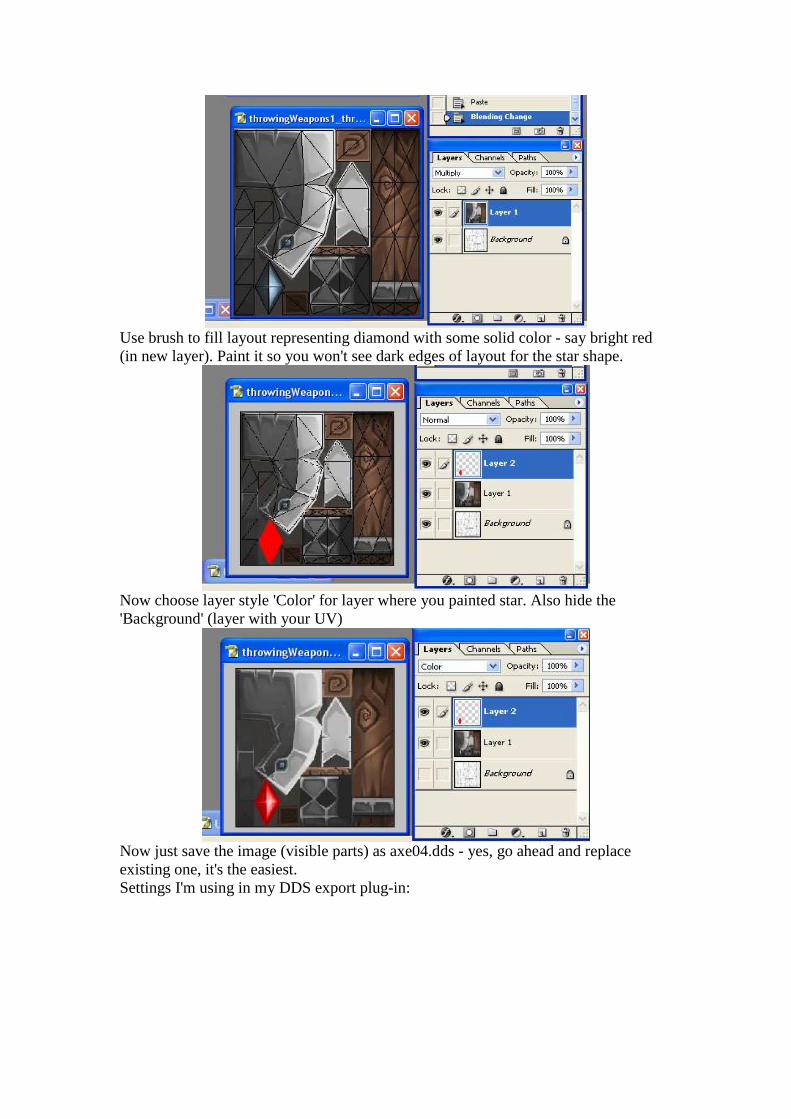
Use brush to fill layout representing diamond with some solid color - say bright red (in new layer). Paint it so you won't see dark edges of layout for the star shape.
Now choose layer style 'Color' for layer where you painted star. Also hide the 'Background' (layer with your UV)
Now just save the image (visible parts) as axe04.dds - yes, go ahead and replace existing one, it's the easiest. Settings I'm using in my DDS export plug-in:
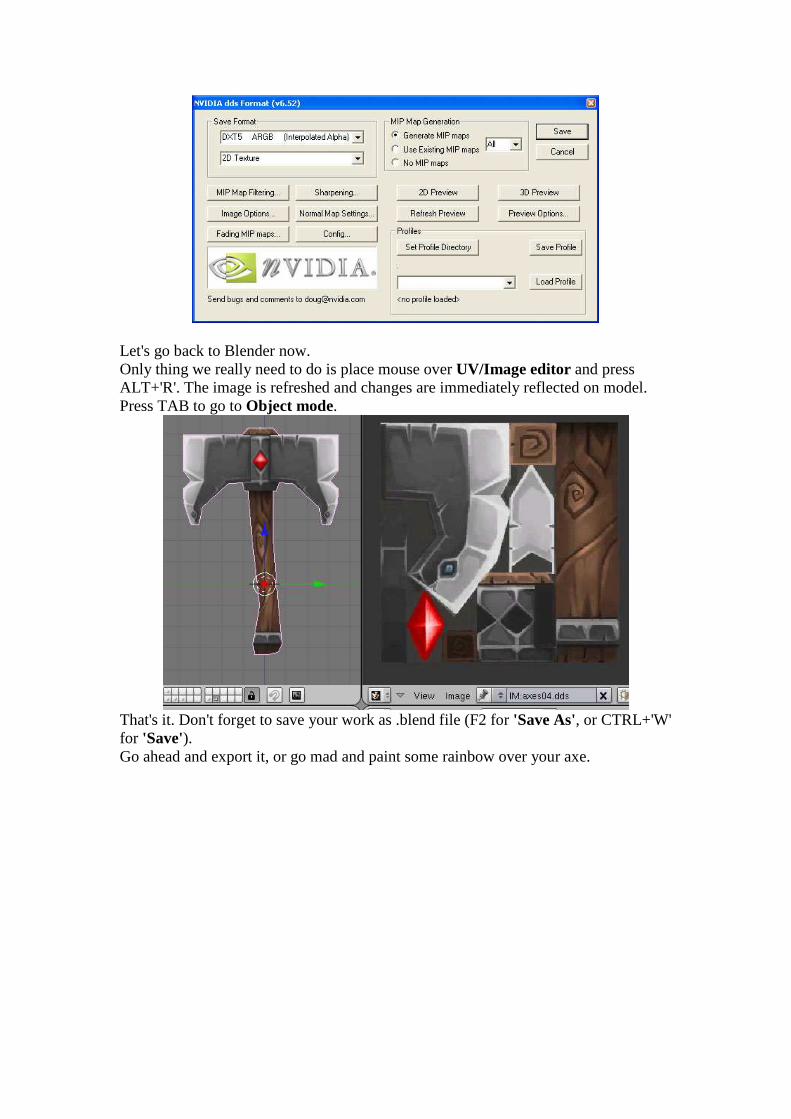
Let's go back to Blender now. Only thing we really need to do is place mouse over UV/Image editor and press ALT+'R'. The image is refreshed and changes are immediately reflected on model. Press TAB to go to Object mode.
That's it. Don't forget to save your work as .blend file (F2 for 'Save As', or CTRL+'W' for 'Save'). Go ahead and export it, or go mad and paint some rainbow over your axe.
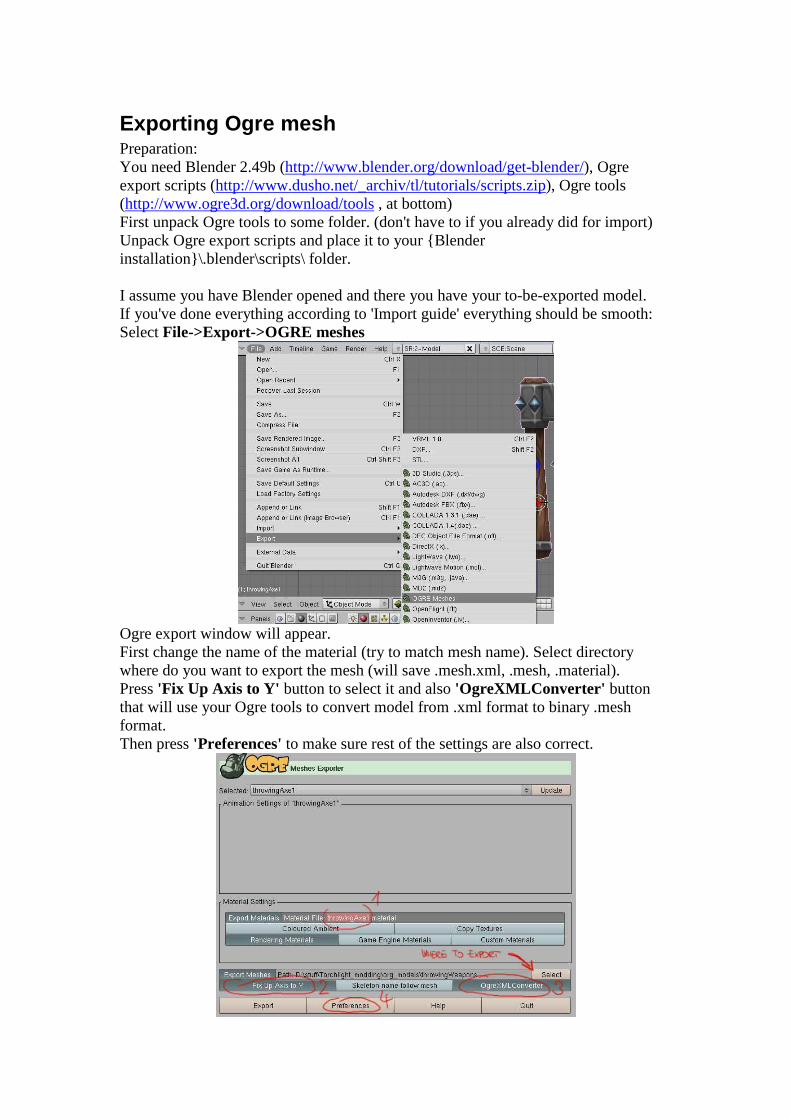
Exporting Ogre mesh Preparation: You need Blender 2.49b (http://www.blender.org/download/get-blender/), Ogre export scripts (http://www.dusho.net/_archiv/tl/tutorials/scripts.zip), Ogre tools (http://www.ogre3d.org/download/tools , at bottom) First unpack Ogre tools to some folder. (don't have to if you already did for import) Unpack Ogre export scripts and place it to your {Blender installation}\.blender\scripts\ folder. I assume you have Blender opened and there you have your to-be-exported model. If you've done everything according to 'Import guide' everything should be smooth: Select File->Export->OGRE meshes
Ogre export window will appear. First change the name of the material (try to match mesh name). Select directory where do you want to export the mesh (will save .mesh.xml, .mesh, .material). Press 'Fix Up Axis to Y' button to select it and also 'OgreXMLConverter' button that will use your Ogre tools to convert model from .xml format to binary .mesh format. Then press 'Preferences' to make sure rest of the settings are also correct.
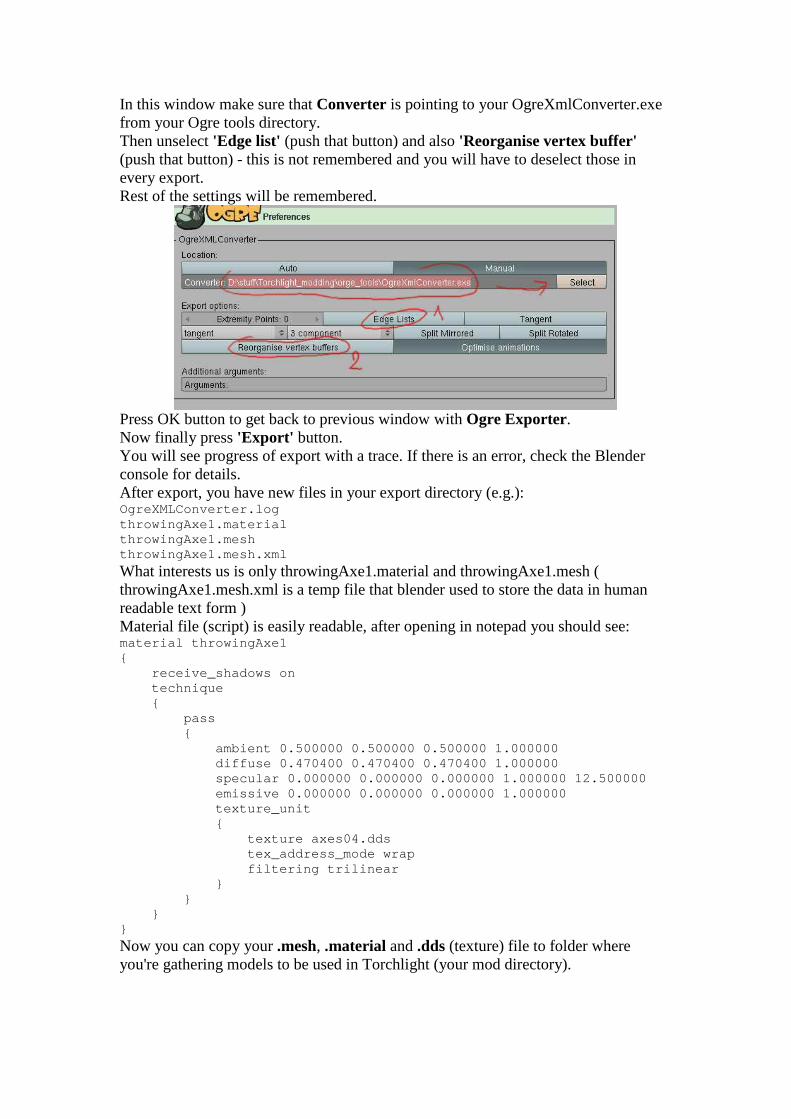
In this window make sure that Converter is pointing to your OgreXmlConverter.exe from your Ogre tools directory. Then unselect 'Edge list' (push that button) and also 'Reorganise vertex buffer' (push that button) - this is not remembered and you will have to deselect those in every export. Rest of the settings will be remembered.
Press OK button to get back to previous window with Ogre Exporter. Now finally press 'Export' button. You will see progress of export with a trace. If there is an error, check the Blender console for details. After export, you have new files in your export directory (e.g.): OgreXMLConverter.log throwingAxe1.material throwingAxe1.mesh throwingAxe1.mesh.xml
What interests us is only throwingAxe1.material and throwingAxe1.mesh ( throwingAxe1.mesh.xml is a temp file that blender used to store the data in human readable text form ) Material file (script) is easily readable, after opening in notepad you should see: material throwingAxe1 { receive_shadows on technique { pass { ambient 0.500000 0.500000 0.500000 1.000000 diffuse 0.470400 0.470400 0.470400 1.000000 specular 0.000000 0.000000 0.000000 1.000000 12.500000 emissive 0.000000 0.000000 0.000000 1.000000 texture_unit { texture axes04.dds tex_address_mode wrap filtering trilinear } } } }
Now you can copy your .mesh, .material and .dds (texture) file to folder where you're gathering models to be used in Torchlight (your mod directory).
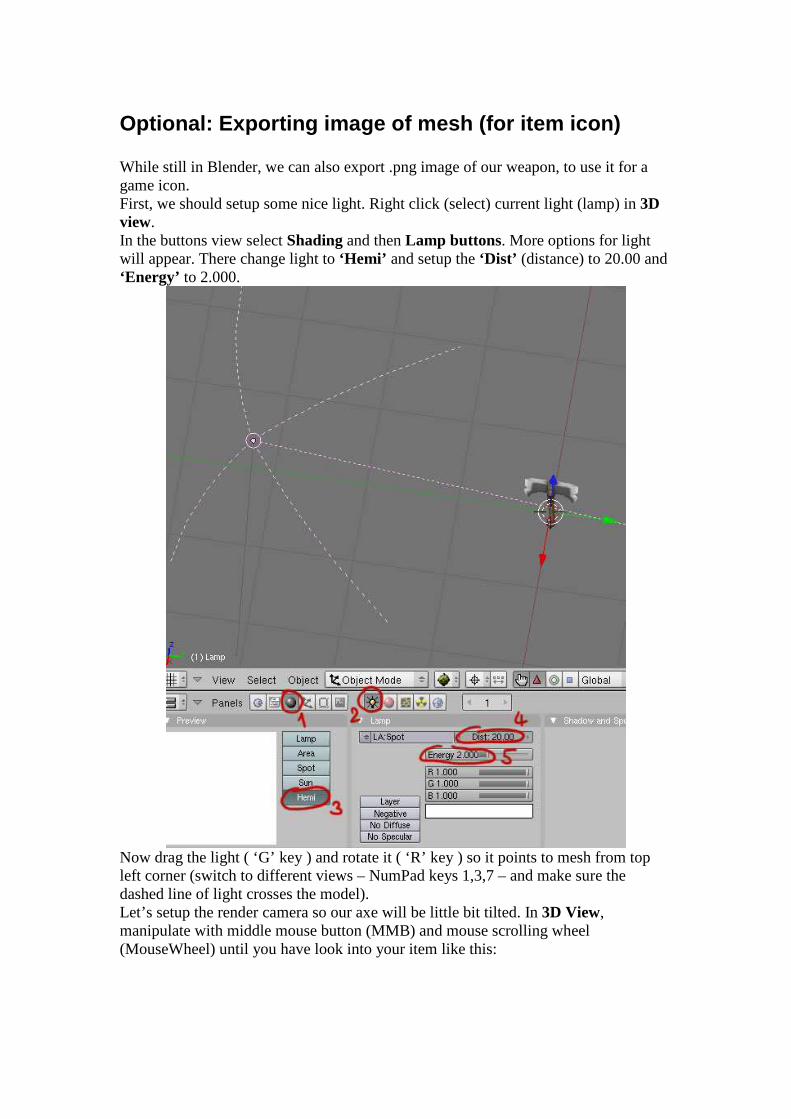
Optional: Exporting image of mesh (for item icon) While still in Blender, we can also export .png image of our weapon, to use it for a game icon. First, we should setup some nice light. Right click (select) current light (lamp) in 3D view. In the buttons view select Shading and then Lamp buttons. More options for light will appear. There change light to ‘Hemi’ and setup the ‘Dist’ (distance) to 20.00 and ‘Energy’ to 2.000.
Now drag the light ( ‘G’ key ) and rotate it ( ‘R’ key ) so it points to mesh from top left corner (switch to different views – NumPad keys 1,3,7 – and make sure the dashed line of light crosses the model). Let’s setup the render camera so our axe will be little bit tilted. In 3D View, manipulate with middle mouse button (MMB) and mouse scrolling wheel (MouseWheel) until you have look into your item like this:
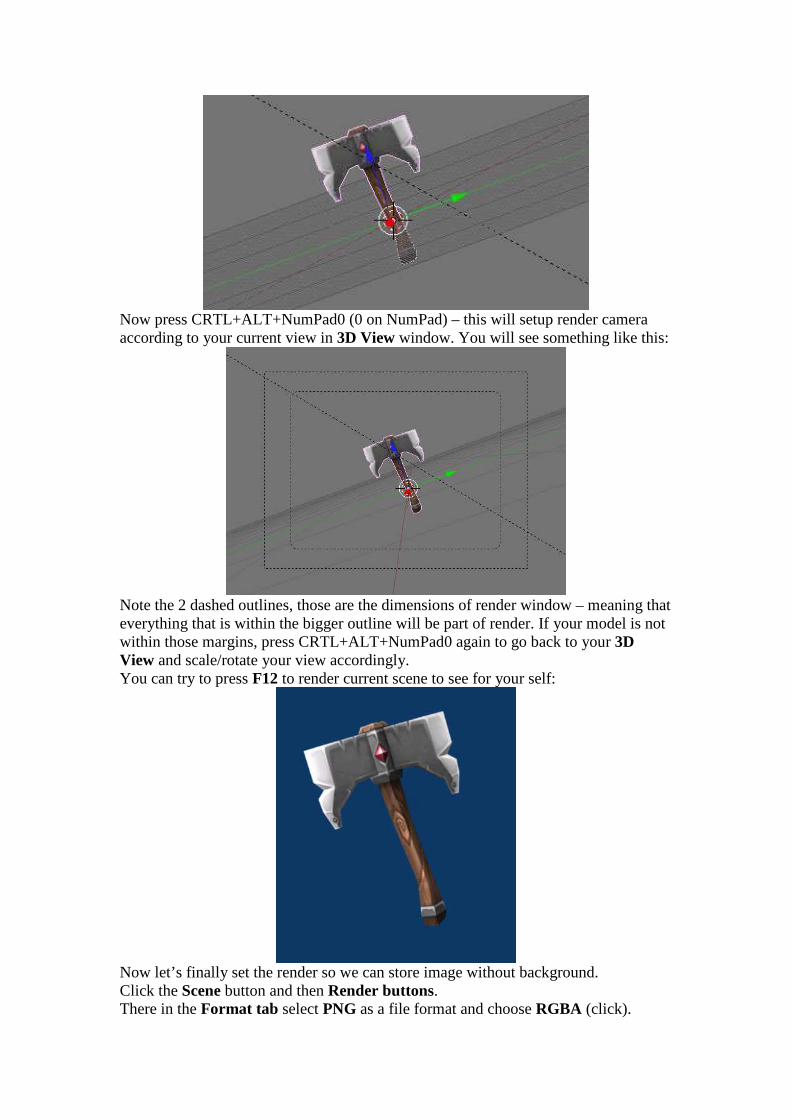
Now press CRTL+ALT+NumPad0 (0 on NumPad) – this will setup render camera according to your current view in 3D View window. You will see something like this:
Note the 2 dashed outlines, those are the dimensions of render window – meaning that everything that is within the bigger outline will be part of render. If your model is not within those margins, press CRTL+ALT+NumPad0 again to go back to your 3D View and scale/rotate your view accordingly. You can try to press F12 to render current scene to see for your self:
Now let’s finally set the render so we can store image without background. Click the Scene button and then Render buttons. There in the Format tab select PNG as a file format and choose RGBA (click).
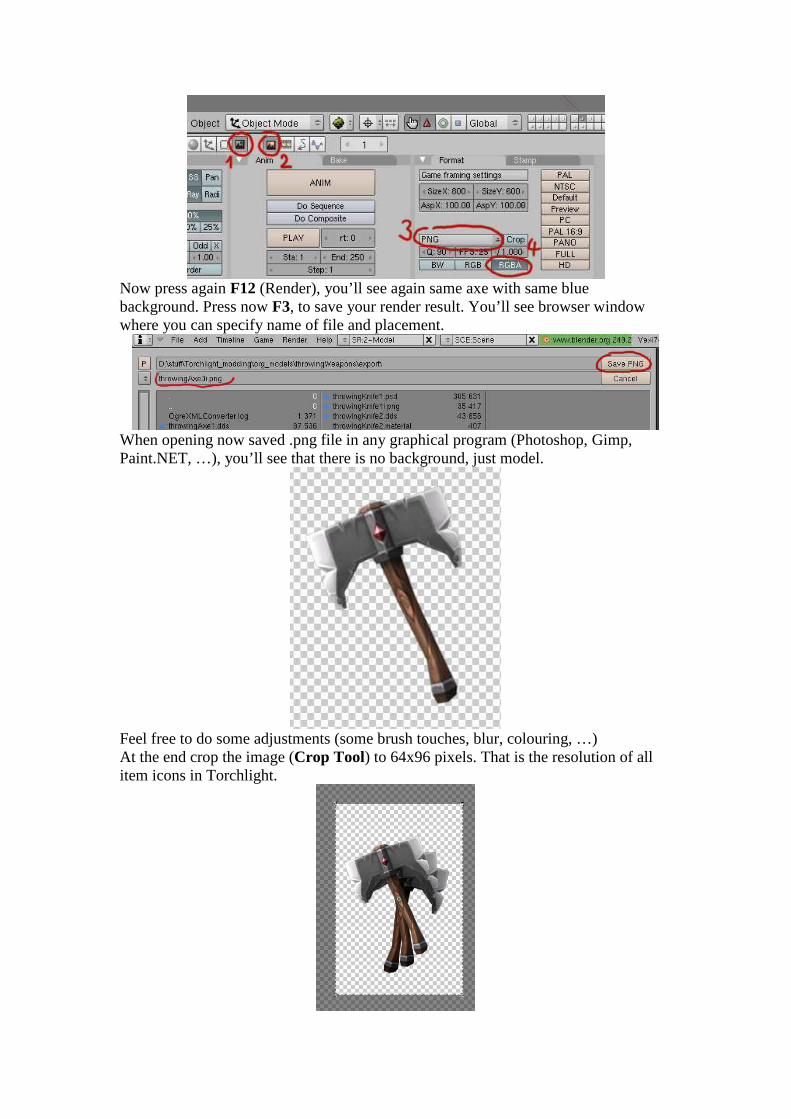
Now press again F12 (Render), you’ll see again same axe with same blue background. Press now F3, to save your render result. You’ll see browser window where you can specify name of file and placement.
When opening now saved .png file in any graphical program (Photoshop, Gimp, Paint.NET, …), you’ll see that there is no background, just model.
Feel free to do some adjustments (some brush touches, blur, colouring, …) At the end crop the image (Crop Tool) to 64x96 pixels. That is the resolution of all item icons in Torchlight.

![[Guide] Armored Emberquaker - Torchlight 2 Forum _ inTorchlight.de - Die deutsche Torchlight 2 Community by ingame™.pdf](https://img.dokumen.tips/doc/110x75/55cf943e550346f57ba09ad2/guide-armored-emberquaker-torchlight-2-forum-intorchlightde-die-deutsche.jpg)