Embed Size (px)
DESCRIPTION
Tutorial Foxta
Citation preview

FOXTA - Tutorial
2006 Page 1
FOUNDATIONS DESIGN
APPLICATION WITH PROGRAM FOXTA V2.X
TTUUTTOORRIIAALL:: SSEETTTTLLEEMMEENNTT CCAALLCCUULLAATTIIOONNSS
1 INTRODUCTION
This example is aimed at demonstrating the various available methods in Foxta to calculate settlements.
First, we will consider the pressumetric settlement of an isolated footing 3 m x 3 m size, loaded with a vertical distributed load of 100 kPa. The footing thickness is 0.8 m, and it is placed at one meter depth.
Secondly, we will calculate the elastic settlement below this single footing (left configuration), and then below the footing but taking into account another close footing (right configuration), in order to show the influence of this close foundation.
This example will enable to highlight:
• The correspondance between pressumeter and elastic moduli (as far as settlements are concerned).
• How we can take into account the interaction between several close foundations.
The figure below presents the geometry of the project, as well as the soil properties.
For this example, we will use modules: FONDSUP, TASSELDO et TASPOUTRE.
Note: explanations are provided in english but the program itself is in french only.

FOXTA - Tutorial
2006 Page 2
2 STEP 1: FONDSUP CALCULATION (SHALLOW FOUNDATIONS)
• Run FOXTA with Start menu;
• In menu [Fichier] (= File), select item [Nouveau projet complet] (= New project);
• Fill in the dialogue box « Titres – n° affaire – Commentaires » (= General settings): figure below.
• The project database is then displayed.
• Click on the radio button « FondSup ». Only the columns corresponding to data required for Fondsup calculations will be displayed: layer name, pressumeter modulus, limit pressure. Fill in the data as displayed below, and validate ([Valider …]).
• Select item [Afficher FONDSUP] (= display Fondsup) in menu [Modules], or click on the "Fondsup" button in the toolbar. The dialogue box below is then displayed (empty to start with).

FOXTA - Tutorial
2006 Page 3
• Fill in the data: square footing (3 m x 3 m), initial and final groundlevel at 0 level, and foundation level at -1 m.
• Then, click either on tab [Données pressiométriques] (= pressumeter data) or on button [Suivant] (=next).

FOXTA - Tutorial
2006 Page 4
• To input the pressumeter data, we will use the data we already defined in the project database: double-click on the first cell (first line / first column) in the table. The window shown below is displayed. Select "fill", (and later "clay" and "chalk" for the second and third lines in the table). The pressuremeter data are then automatically copied into the table (figure above).
• Complete each line with the bottom level of each layer (they should be given as levels and not as depths, so values are negative).
• Activate the checkbox « Discrétisation » (discretised layers, refer to manual). A warning is displayed about using this checkbox.
• Click on button [Evaluer] (= evaluate) to display the calculated values for equivalent limit pressure ple
* and for equivalent embedement depth De.

FOXTA - Tutorial
2006 Page 5
• Then, click either on tab [Classes de sols] (= soil types) or on button [Suivant] (=next).
• Select soil type "Argiles, limons" (= clay, loam) and click on button [Proposition]. Depending on ple* value, class A, B or C will be automatically proposed.
• Then click on wizard button [Choix de Alpha] (= alpha choice). Next window then opens.
• Sélectionner « Argile » (= clay) in and « Normalement consolidé » (= normally consolidated). The value of α = 0.67 is then updated. Click on button [>>] to transfer this value in Fondsup main window.
• To display the bearing capacity factor, click on button [Evaluer]: kp = 0.87.
• Click either on tab [Chargement] (= loads) or on button [Suivant] (=next).

FOXTA - Tutorial
2006 Page 6
• First click on the first vertical tab on the left, to ensure you define the first loading case.
• We have to define a vertical load of 900 kN (= 100 kPa): you can either define Qv and Qh, or Q and delta (load inclination).
• No excentricity was defined. Thus ple* value is still the same.
• Click either on tab [Tassements et calculs] (= settlements and calculations) or on button [Suivant] (=next).
• There's no slope close to the foundation in this example. So select No for "Proximité d'un talus".
• Tassements (= settlements): Keep the default value for the number of increments (10)
• Click on button [Calcul pour Zd] (= calculate for given foundation depth).
• You are then requested to save the file: save it and ask for calculation again.

FOXTA - Tutorial
2006 Page 7
• The total pressumeter settlement is equal to 0.92 cm.
• The ULS allowable stress is 265 kPa and the SLS allowable stress is 183 kPa. The applied stress (100 kPa) is smaller than these values.
• Click on button [Calcul du profil complet] (= calculate for all depths): the calculation will then automatically be repeated for all depths (until depth is not compatible anymore with shallow foundation criterion).

FOXTA - Tutorial
2006 Page 8
• The button [Résultats] allows for output display. Several options are availble: table, result file, graphs, etc.

FOXTA - Tutorial
2006 Page 9

FOXTA - Tutorial
2006 Page 10
3 STEP 2: TASSELDO CALCULATION WITHOUT CLOSE FOUND.
We will deal this time with the elastic settlement calculated with module TASSELDO.
The purpose of this second calculation is to determine the equivalence betweenYoung modulus EYoung and pressuremeter modulus EM.
We will use the project database again.
• Select [Base des données] (= Database) in the menu [Données générales] (=General Data). The database is displayed. Choose "Tasseldo sans calcul oedométrique" (= Tasseldo without oedometric calculation i.e. with elastic parameters). Fill in the data.
Note: we chose E ≅ 2.(EM/α). We will check after the calculation if this guess is correct:
• Select [Afficher TASSELDO] in menu [Modules] (or select button [Tasseldo] in the toolbar). Fill in the dialog box.

FOXTA - Tutorial
2006 Page 11
• Click either on tab [Caractéristiques des couches de sol] (= soil properties) or on button [Suivant] (=next).
• Proceed the same way as before: double-click on each line to fill in the soil properties
with the database information. Complete each line with the bottom level of each layer.
• We also have to define a discretisation for each layer: n. We chose n values so that each layer is discretised with 1 m thick intervals.
• Click either on tab [Charges sur le sol] (= Load definition) or on button [Suivant] (=next).
• Define at level –1 the same load as in the Fondsup calculation: 100 kPa on a square area 3 x 3 m. The origin point is (0, 0, 0): it's arbitrary. The coordinates are important only if you want to define several loads.

FOXTA - Tutorial
2006 Page 12
• Click either on tab [Points de calcul] (= Calculation points) or on button [Suivant] (=next).
• We will define a grid for calculation points, that will cover the foundation area.
• Click on the button [Points sur un quadrilatère] (points on a quadrilater). Next window opens.
• Fill the coordinates of points A, B, C andt D (foundation corners) and define
discretisation in each direction N = 5 and M = 5.
• Click on button [Générer les points] (= create points). The table on the left is then filled with the coordinates of the calculation points. Click on button [>>] to transfer the points to TASSELDO main window.

FOXTA - Tutorial
2006 Page 13
• The figures below can be viewed after a click on the validation button.
Note: points 5 (corner), 13 (centre) and 15 (side) will be used when interpreting results.
• Click either on tab [Calcul des tassements] (= Calculation) or on button [Suivant] (=next).
• Select "Calcul de plan moyen t3D" (= calculation of average settlement plane for 3D elastic settlement) in the list.

FOXTA - Tutorial
2006 Page 14
• Click on button [Calculer] and then on button [Résultats].
• Again, results can be displayed as graphs, tables, etc.
FOXTA - Tutorial
2006 Page 15
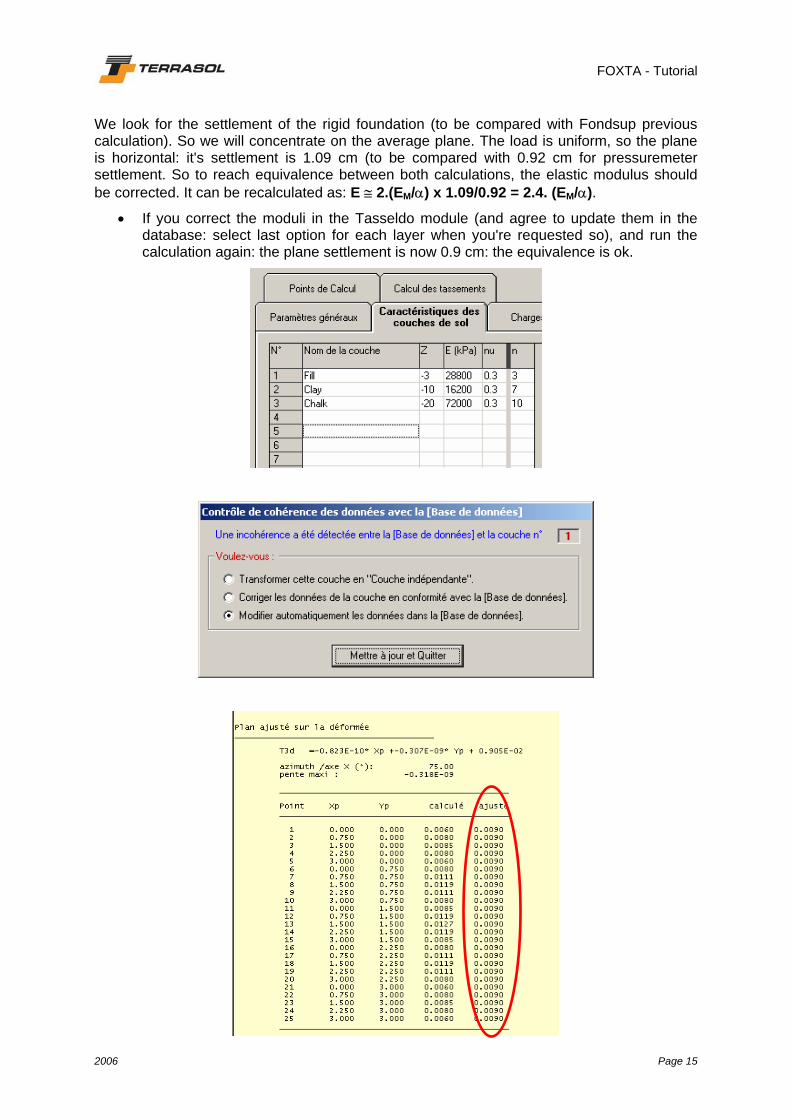
We look for the settlement of the rigid foundation (to be compared with Fondsup previous calculation). So we will concentrate on the average plane. The load is uniform, so the plane is horizontal: it's settlement is 1.09 cm (to be compared with 0.92 cm for pressuremeter settlement. So to reach equivalence between both calculations, the elastic modulus should be corrected. It can be recalculated as: E ≅ 2.(EM/α) x 1.09/0.92 = 2.4. (EM/α).
• If you correct the moduli in the Tasseldo module (and agree to update them in the database: select last option for each layer when you're requested so), and run the calculation again: the plane settlement is now 0.9 cm: the equivalence is ok.
FOXTA - Tutorial
2006 Page 16
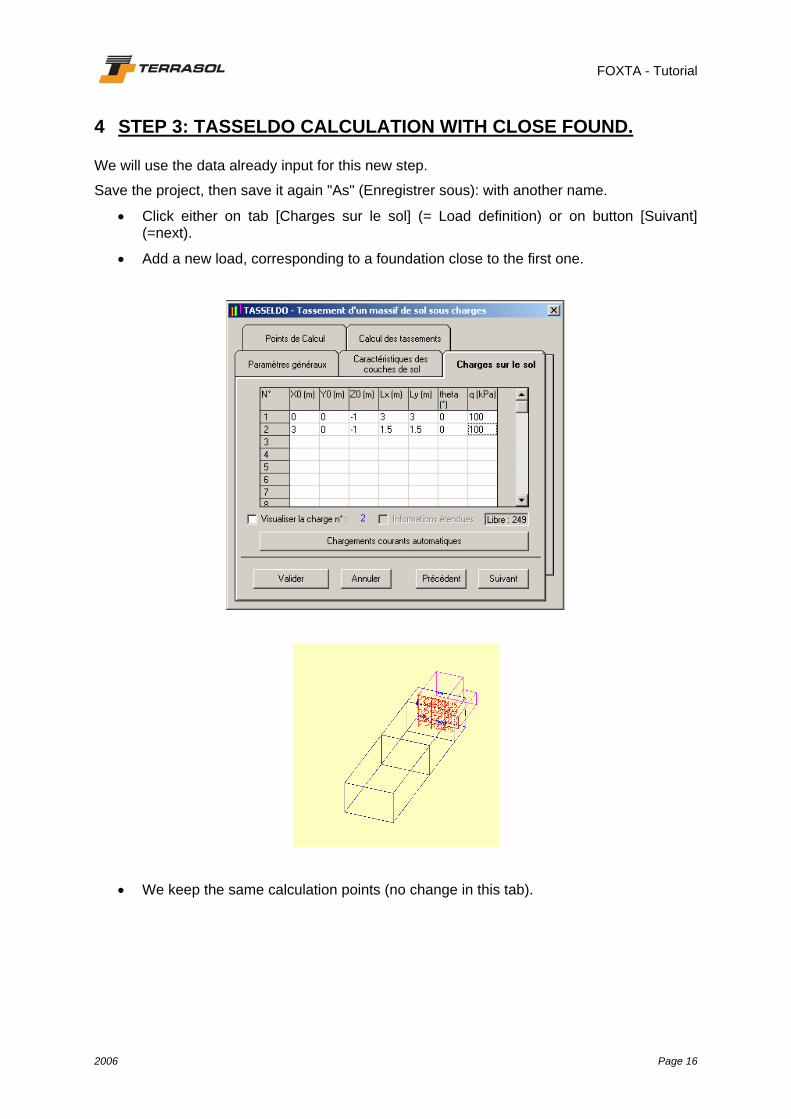
4 STEP 3: TASSELDO CALCULATION WITH CLOSE FOUND.
We will use the data already input for this new step.
Save the project, then save it again "As" (Enregistrer sous): with another name.
• Click either on tab [Charges sur le sol] (= Load definition) or on button [Suivant] (=next).
• Add a new load, corresponding to a foundation close to the first one.
• We keep the same calculation points (no change in this tab).

FOXTA - Tutorial
2006 Page 17
• Click either on tab [Calcul des tassements] (= Calculation) or on button [Suivant] (=next).
Flexible foundation:
• Settlement in the center (point 13) = 1.4 cm
• Settlement in the corner (pont 5) = 0.9 cm
Rigid foundation:
• Settlement in the center (point 13) = 1.0 cm
• Settlement in the corner (pont 5) = 1.2 cm

FOXTA - Tutorial
2006 Page 18
5 STEP 4: TASPOUTRE CALCULATION WITHOUT CLOSE FOUND.
As a last step for this example, we will calculate the settlement with TASPOUTRE module without and with the close foundation.
The difference between TASPOUTRE and TASSELDO lays in the fact the TASPOUTRE takes into account the foundation as a beam.
We will use the database again.
• Open the database and select [TASPOUTRE]. The required data are the same as for Tasseldo. So you just have to validate.
• Select [Afficher TASPOUTRE] in menu [Modules] (or select button [Taspoutre] in the toolbar). Fill in the dialog box.
• In the tab [Paramètres généraux] (= General settings), fill in a title and the subdivisions number (= 1: the beam will be composed of one single element).

FOXTA - Tutorial
2006 Page 19
• Click either on tab [Caractéristiques des couches de sols] (= Soil properties) or on button [Suivant] (=next).
• Fill in the soil properties using the database as before. Add bottom levels.
• Click either on tab [Charges sur le sol] (= Loads on the soil outside the foundation) or on button [Suivant] (=next). No close foundation will be defined at first. So nothing should be defined in this tab.
• Click either on tab [Définition de la poutre] (= Beam properties) or on button [Suivant] (=next).
• Fill in the coordinates for the beam reference point P(XP,YP,ZP), the beam orientation Thêta and the beam width DLY.

FOXTA - Tutorial
2006 Page 20
• In the table below, input the values for length XL, product of inertia EI and beam subdivision number. The beam here is composed of one single element, so only one column is filled.
• Click either on tab [Chargement au nœuds] (= Load conditions on the nodes) or on button [Suivant] (=next).
• No load will be applied on loads here.
• Click either on tab [Chargement sur les segments] (= Load conditions on segments i.e. beam elements) or on button [Suivant] (=next).
EI = E.b.h3/12 = 2.107 . 1 . 0.83 / 12 kPa

FOXTA - Tutorial
2006 Page 21
• The beam is composed of 6 subdivisions (segments). So the load of 100 kPa should be defined for each segment.
• Click on the button [Calculate].

FOXTA - Tutorial
2006 Page 22
• Click on the button [Résultats].
• Settlement is uniform (load is uniform): 1.04 cm.

FOXTA - Tutorial
2006 Page 23
6 STEP 5: TASPOUTRE CALCULATION WITH CLOSE FOUND.
We will now add the load applied on the close foundation into the TASPOUTRE calculation.
• Select the tab [Charges sur le sol] and add the additional load.
• Run the calculation again.

FOXTA - Tutorial
2006 Page 24
The settlement is not uniform anymore.
In the center of the foundation, it is equal to 1.2 cm.
In the corner near the close foundation, it is equal to 1.3 cm.