Embed Size (px)
Citation preview

ESPAÑOL
CONEXIÓN A LA RED ELÉCTRICAAntes de conectar la tostadora, compruebe que la tensión es la misma que la indicada en la placa de características. Se recomienda un enchufe conectado a tierra.
INSTRUCCIONES DE SEGURIDAD•Lea atentamente las ins-
trucciones. Guárdelas en un lugar seguro para con-sultas posteriores.
•Cuando está en funciona-miento, la tostadora genera altas temperaturas alrede-dor de las ranuras para el pan. No toque las super-ficies calientes. Utilice las palancas y los botones.
•El pan puede quemar.No deben utilizarse tosta-doras cerca o debajo de cortinas u otros materiales inflamables. Hay que vigi-lar la tostadora.
•Esteaparatopuedenutilizarloniños con edad de 8 años y superior, y personas con capacidades físicas, senso-riales o mentales reducidas o falta de experiencia y cono-cimiento, si se les ha dado la supervisión o instrucción apropiadas respecto al uso del aparato de una manera
segura y comprenden los peligros que implica.
•Losniñosnodebenjugarconelaparato.Lalimpiezay el mantenimiento a reali-zar por el usuario no deben ser realizados por niños sal-vo que sean mayores de 8 años y bajo supervisión.
•Mantener el aparato y sucable fuera del alcance de niños menores de 8 años.
•Esteaparatonoestápensadopara que lo utilicen personas (incluidos niños) con dismi-nuciones físicas, sensoriales o mentales o con falta de ex-periencia y conocimiento, a menos que estén vigila-das o reciban instrucciones sobre el uso del aparato por parte de una persona res-ponsable de su seguridad.
•Sedebevigilaralosniñospara asegurarse de que no jueguen con el aparato.
•Noutiliceelaparatoenelexterior.
•Nointroduzcaobjetosme-tálicosenlatostadora.Estopuede provocar fuego o una descarga eléctrica. No utilice cuchillos, tenedores o cualquier otro objeto metálico para extraer una tostada o las migas.
•Nosumerjael aparatoenagua o cualquier otro lí-quido.
•Nocoloquenadaencimade la tostadora mientras esté en funcionamiento.
•Mantengalatostadoraale-jada de otras fuentes de calor. No deje el cable colgando ni deje que to-que superficies calientes.
•No coloque la tostadoraen posición horizontal por cualquier de sus lados.
•No introduzca pan quesea demasiado grande para la tostadora.
•No intente extraer el panmientras la tostadora esté en funcionamiento.
•Desenchufe el aparatocuando no esté en funcio-namiento y antes de lim-piarlo.Déjeloenfriarantesde limpiarlo.
•Este aparato está diseña-do exclusivamente para su uso doméstico. Utilíce-lo sólo para este fin.
•Noutiliceelaparatosielcable o el enchufe están dañados, si se da cuenta de que no funciona co-rrectamente o si ha su-frido cualquier tipo de daño. Las reparaciones o
el cambio de cable sólo deberán realizarse por parte del servicio técnico autorizado.
•ADVERTENCIA: La posi-ción del selector de tosta-do variará en función del grado de humedad del pan que utilice.
PIEZAS Y ELEMENTOS DE MANEJO1. Palanca de funcionamiento2.Controldetostado3.Botón Descongelar con indicador
luminoso4. Botón Recalentar con indicador lu-
minoso5. Botón de paro con indicador lumi-
noso6.Carcasadetactofrío7. Palanca de elevación del calentador
de panecillos8. Portacables (utilizar el más largo)9. Bandeja recogemigas10. Indicador luminoso de calentamiento
INSTRUCCIONES DE FUN-CIONAMIENTOCuandoenchufelatostadoraporprimeravez, deje que funcione cuatro veces en la posición máxima sin introducir pan, para eliminar el olor residual.Control de tostadoAjuste el control de tostado a la posición deseada (1-5) para hacer la tostada a su gusto.1 - Tiempo de tostado más corto.5 - Tiempo de tostado más largo.Al pulsar la palanca de funcionamiento, la rebanada de pan entra en la ranura y se activa la tostadora.Función RecalentarPara recalentar una tostada fría, pulse la palanca de funcionamiento (1) y pulse el botón Recalentar (4). La tostadora
08-1
3
100% recycled paper
INSTRUCCIONES DE USO ES
OPERATING INSTRUCTIONS GB
MODE D'EMPLOI FR
INSTRUÇõES DE USO PT
HASZN LATI UTAS T S HU
إرشادات التشغيل AR
TT7973TT7974
funcionará durante 20 segundos, independientemente de la posición en que esté el control de tostado (2). El indicador luminoso azul (4) de latostadora estará encendido durante todo este proceso.Posición DescongelarCuandoutilicepancongeladopulselapalanca de funcionamiento y a conti-nuación pulse el botón Descongelar(3).El indicador luminosoazul (3)dela tostadora estará encendido durante todo este proceso.Calentador de panecillos (Figura 1)¡Nunca ponga papel de aluminio sobre la rejilla de calentamiento!Se puede usar para mantener calientes panecillos o bollos, listos para comer.Apriete la palanca de elevación del calentador de panecillos (7). Lasrejillas se elevarán automáticamente para poner los panecillos. Ajuste el control (2) a la posición deseada, de 1a3máximo.Coloque lospanecilloso bollos en la rejilla de calentamiento y baje la palanca de funcionamiento (1). Lapalancade funcionamiento (1)saltará a su posición inicial cuando el calentamiento haya terminado. Para bajar las rejillas del calentador de panecillos, suba la palanca de elevación (7).Deje que el aparato se enfríe ydesconéctelo.ParoAl poner el control de tostado en la posición de paro, el ciclo se detiene de forma automática y el pan sale inmediatamente. El procesode tostado se puede interrumpir en cualquier momento ajustándolo en esta posición.Tipo de panLa tostadora acepta la mayoría detiposdepancortado. Elpande tipobizcocho y productos similares no son adecuados para tostar y no se deben utilizar con esta tostadora.
LIMPIEZARIESGO de descarga eléctricaNo sumerja nunca el aparato en agua ni lo ponga en el lavavajillas.Antes de limpiar la tostadora, compruebe que está desenchufada de la corriente y que está totalmente fría.Limpieelexteriorconunpañohúmedo.Nointroduzcaningúnutensiliometálicoen la ranura para extraer el pan. No utilice productos de limpieza abrasivos.Extraer las migasAbra la bandeja recogemigas y extraiga los restos.IMPORTANTE:Desenchufelatostadorade la corriente antes de realizar esta operación.
ALMACENAJE DEL CABLEElcablesepuedeguardarenrollándoloalrededor del soporte en la base de la tostadora.
REPARACIONESSi el aparato no funciona bien, no dude en llevarlo a un servicio técnico autorizado.
CONSEJOS PARA SU ELI-MINACIÓN:
Nuestros productos se presentan con un embalaje optimizado.
Consiste básicamente en utilizarmateriales no contaminantes que deberían darse al servicio local de eliminación de residuos como materia prima secundaria.Antes de tirar un aparato usado, hágalo visiblemente inoperativo y elimínelo según las leyes nacionales vigentes.Su tienda, ayuntamiento o autoridad municipal le pueden dar información detallada sobre este tema.
Este aparato está etiquetadosegún la directiva europea2002/96/CE sobre el uso deaparatos eléctricos y electróni-
cos (residuos de equipamiento eléctri-coyelectrónico-WEEE).Estaspautasestablecenelmarcoparaelretorno y el reciclado de aparatos usados
queseaplicanentodalaUE.Pregunte a su tienda sobre las formas vigentes de eliminación.
ENGLISH
CONNECTION TO THE MAINSBefore connecting the appliance, check that the voltage is the same as that indicated on the characteristics plate. An earthed plug is recommended.
SAFETY INSTRUCTIONS•Read the instructions
carefully. Keep them in a safe place for future reference.
•When in use, the toastergenerates high temperatures aroundthebreadslot.Donot touch hot surfaces. Use the levers and buttons.
•Bread can burn. Toastersshould not be used near or under curtains or other flammable materials. They must be watched.
•Thisappliancecanbeusedby children aged from 8 years and above and persons with reduced physical, sensory or mental capabilities or lack of experience and knowledge if they have been given supervision or instruction concerning use of the appliance in a safe way and understand the
hazards involved.•Childrenshallnotplaywiththe appliance. Cleaningand user maintenance shall not be made by children unless they are older than 8 and supervised.
•Keep the appliance andits cord out of reach of children less than 8 years.
•This appliance is notintended for use by persons (including children) with reduced physical, sensory or mental capabilities, or lack of experience and knowledge, unless they have been given supervision or instruction concerning use of the appliance by a person responsible for their safety.
•Childrenmustbesupervisedto ensure that they do not play with the appliance.
•Donotuse theapplianceoutdoors.
•Donotinsertmetalobjectsinto the toaster as this may lead to fire or an electric shock.Donotuseknives,forksor any other metal object to extract toast or crumbs.
•Do not submerge theappliance in water or any other liquid.
•Donotplaceanythingontop of the toaster while it is in use.
•Keepthetoasterawayfromheatsources.Donotleavethe cord hanging or allow it to touch hot surfaces.
•Do not lay the toaster oneither of its sides.
•Donot insert food that istoo large for the toaster.
•Donottrytoextractfoodwhile the toaster is in use.
•Disconnect the appliancewhen it is not in use and before cleaning it. Allow it to cool before cleaning.
•Thisapplianceisdesignedexclusively for use in the home. Use it only in this way.
•Donotuse theapplianceif the cord or plug is damaged, if you notice that it is not working properly or if it has suffered any kind of damage. Repairs or cord replacement must only be carried out by the Authorised Technical Service.
•WARNING: The position of the browning selector will vary depending on the degree of humidity of the bread you are using.
PARTS AND OPERATING CONTROLS1. Operating lever2. Browning control3.Defrostbuttonwithpilotlamp4. Reheat button with pilot lamp5. Stop button with pilot lamp6.Cool-touchbody7. Bun warmer lifting lever8.Cableholder(uselargerone)9.Crumbtray10. Heating pilot lamp
OPERATING INSTRUCTIONSWhen you connect the toaster for the first time, allow it to work four times at the maximum position without bread in order to eliminate residual odour.Browning controlSet the browning control to the desired position (1-5) to obtain toast to your taste.1 - Shortest toasting time.5-Longesttoastingtime.On pressing the operating lever, the slice of bread enters the slot and the toaster is activated.Re-heat functionTo re-heat cold toast, use the operating lever (1) and press the re-heat button (4). The toaster will come on for 20 seconds, regardless of the position that the toasting setting (2) is set to. The blue pilot lamp (4) on the toaster will light up throughout this process.Defrost positionWhen you use frozen bread, press down the operating lever and press the defrost button (3). The blue pilot lamp (3) on the toaster will light up throughout this process.Bread warmer (Figure 1)Never place aluminium foil on the warming rack!Can be used to keep small rolls orpastries warm, ready for eating.Press the bread warmer lifting lever (7). The rods will lift automatically to accommodate the bread.
Adjust the setting (2) to the desired position, 1 to 3 maximum. Place the rolls or pastries on top of the warming rack and lower the operating lever (1). The operating lever (1) will spring back up when warming has finished. To drop the bread warmer rods, lift the lifting lever (7).Let the appliance cool down andunplug it.Stop settingBy setting the browning control to the “STOP” position, the cycle is automatically stopped and the bread is immediately ejected. The toasting process may be interrupted at any time by setting it to this position.Type of breadThe toaster accepts most kinds of regular sliced bread. Caketype breadand similar products are unsuitable for toasting and must not be used with this toaster.
CLEANINGRISK of electric shockNever immerse the device in water or place it in the dishwasher! Before cleaning the toaster, check that it is disconnected from the mains and completely cold.Clean the outsidewith a damp cloth.Donotinsertanymetalutensilintotheslot to extract the bread. Do not useabrasive cleaning agents.Removing crumbsOpen the crumb tray and remove the particles.IMPORTANT: Disconnect the toasterfrom the mains before performing this operation.
CORD STORAGEThe cord may be stored by rolling it around the support at the base of the toaster.
REPAIRSIf your appliance is defective, do not hesitate to take it to an Authorised Technical Service.
ADVICE ON DISPOSAL:Our goods come in optimised packaging. This basically consists
of using non- contaminating materials that should be handed over to the local waste disposal service as secondary raw materials.Before throwing a used appliance away, first make it noticeably inoperable and be certain to dispose of it in accordance with current national laws. YourRetailer,TownHallorLocalCouncilcan give you detailed information about this.
This appliance is labelled in accordance with EuropeanDirective2002/96/EC–concerningused electrical and electronic
appliances (waste electrical and electronicequipment–WEEE).The guidelines determine the framework for the return and recycling of used appliances as applicable throughout the EU.Please ask your dealer about current means of disposal.
FRANÇAIS
BRANCHEMENT AU SEC-TEURAvant de brancher votre appareil, vérifiez que la tension est identiqueà celle indiquée sur la plaquette de caractéristiques. Une prise reliée à la terre est recommandée.
CONSIGNES DE SÉCURITÉ•Lisez lesconsignesatten-
tivement. Rangez-les dans un endroit sûr pour vous y reporter ultérieurement.
•En cours de fonctionne-ment, le grille-pain pro-duit de hautes températu-res autour de la fente. Ne touchez pas les surfaces
chaudes. Utilisez les leviers et les boutons.
•Lepainpeutêtrebrûlant.Lesgrille-painsnedoiventpas être utilisés près ousous des rideaux ou autres matièresinflammables.Ilfauttoujours les surveiller.
•Cetappareilpeutêtreutilisépar des enfants de plus de 8 ans et des personnes ayant un handicap physique, sensoriel ou mental, ou bien un manque d'expérience et de connaissances, s'ils ont reçu des explications ou des instructions sur la façon d'utiliser l'appareil de manière sécurisée etqu'ils en comprennent les risques encourus.
•Lesenfantsnedoiventpasjouer avec l'appareil. Lenettoyage et l'entretien ne doiventpasêtreeffectuéspar des enfants à moins qu'ils soient âgés de plus 8 ans et surveillés.
•Tenir l'appareil et soncordon hors de portée des enfants de moins de 8 ans.
•Cet appareil n'est pasconçupourêtreutilisépardes personnes (enfants in-clus) présentant des capa-cités mentales, sensorielles ou physiques réduites, ou
un manque d'expérience et de connaissance, sauf si elles sont surveillées ou si elles ont reçu des instructions concernant l'utilisation de l'appareil de la part d'une personne responsable de leur sécurité.
•Les enfants doivent êtresurveillés afin de s'assurer qu'ils ne jouent pas avec l'appareil.
•N'utilisez pas l'appareil àl'extérieur.
•N' insérez pas d'objetsmétalliques dans le grille-pain car cela pourrait pro-voquer un incendie ou un choc électrique. N'utilisez pas de couteaux, de four-chettes ou tout autre objet métallique pour retirer du pain grillé ou des miettes.
•Neplongezpasl'appareildans l'eau ou tout autre li-quide.
•Neplacezriensurledes-sus du grille-pain pendant qu'il fonctionne.
•Maintenez le grille-painéloigné des sources de chaleur. Ne laissez pas pendre le fil électrique ni entrer en contact avec des surfaces chaudes.
•Neposezpaslegrille-pain
BSH Electrodomésticos España, S.A.
CIF A-28-893550C/ Itaroa, n° 1, 31.620 HUARTE (Navarra)España
1
543
2
7
6
8
9
1
543
2
7
6
8
10
9
sur l'un de ses côtés.•N'insérez pas de nourri-
ture trop épaisse pour le grillepain.
•N'essayez pas de retirerde la nourriture pendant que le grille-pain fonc-tionne.
•Débranchez l'appareillorsqu'il n'est pas utilisé et avantdelenettoyer.Lais-sez-le refroidir avant de le nettoyer.
•Cet appareil est exclusi-vement conçu pour une utilisation domestique. Utilisez-le uniquement de cettemanière.
•N'utilisezpasl'appareilsile fil électrique ou la prise sont endommagés, si vous remarquez qu'il ne fonc-tionne pas correctement ou s'il a subi un quelcon-quedommage. Les répa-rations ou le remplace-ment du fil électrique ne doivent être réalisés quepar le Service Technique autorisé.
•AVERTISSEMENT :Lapo-sition du sélecteur de bru-nissement variera en fonction du niveau d'humidité du pain que vous utilisez.
ELÉMENTS ET COMMANDES1.Levierdecommande
2.Commandedebrunissement3. Bouton de décongélation avec vo-
yant lumineux4. Bouton de réchauffage avec voyant
lumineux5.Boutond'arrêtavecvoyantlumineux6.Revêtementavecisolationthermique7.Levierdecommande8. Range-cordon (en utiliser un plus
grand)9. Ramasse-miettes10. Voyant lumineux de fonctionnement
CONSIGNES D'UTILISATIONLorsquevousallumezlegrille-painpourla première fois, laissez-le fonctionnerquatre fois à la position maximale sans pain afin d'éliminer les odeurs résiduelles.Commande de brunissementPlacez la commande de brunissement sur la position souhaitée (1-5) pour obtenir du pain grillé à votre goût.1 - Temps de grillage le plus court.5 - Temps de grillage le plus long.Lorsque vous appuyez sur le levierde commande, la tranche de pain entre dans la fente et le grille-pain se déclenche.Fonction de réchauffagePour réchauffer du pain grillé froid, utilisez le levier de commande (1) et appuyez sur le bouton de réchauffage (4). Le grille-pain se déclencherapendant 20 secondes, quelle que soit la position du niveau de grillage (2).Levoyant lumineuxbleu(4)sur legrille-pain s'allumera au cours de ce processus.Position de décongélationLorsquevousutilisezdupaincongelé,abaissez le levier de commande et appuyez sur le bouton de décongélation (3).Levoyant lumineuxbleu(3)sur legrille-pain s'allumera au cours de ce processus.Réchauffage de-pain (figure 1)Ne placez jamais de papier d'aluminium sur la grille chauffante !Peutêtreutilisépourgarderchaudsdes
8
7
Figure 1
8
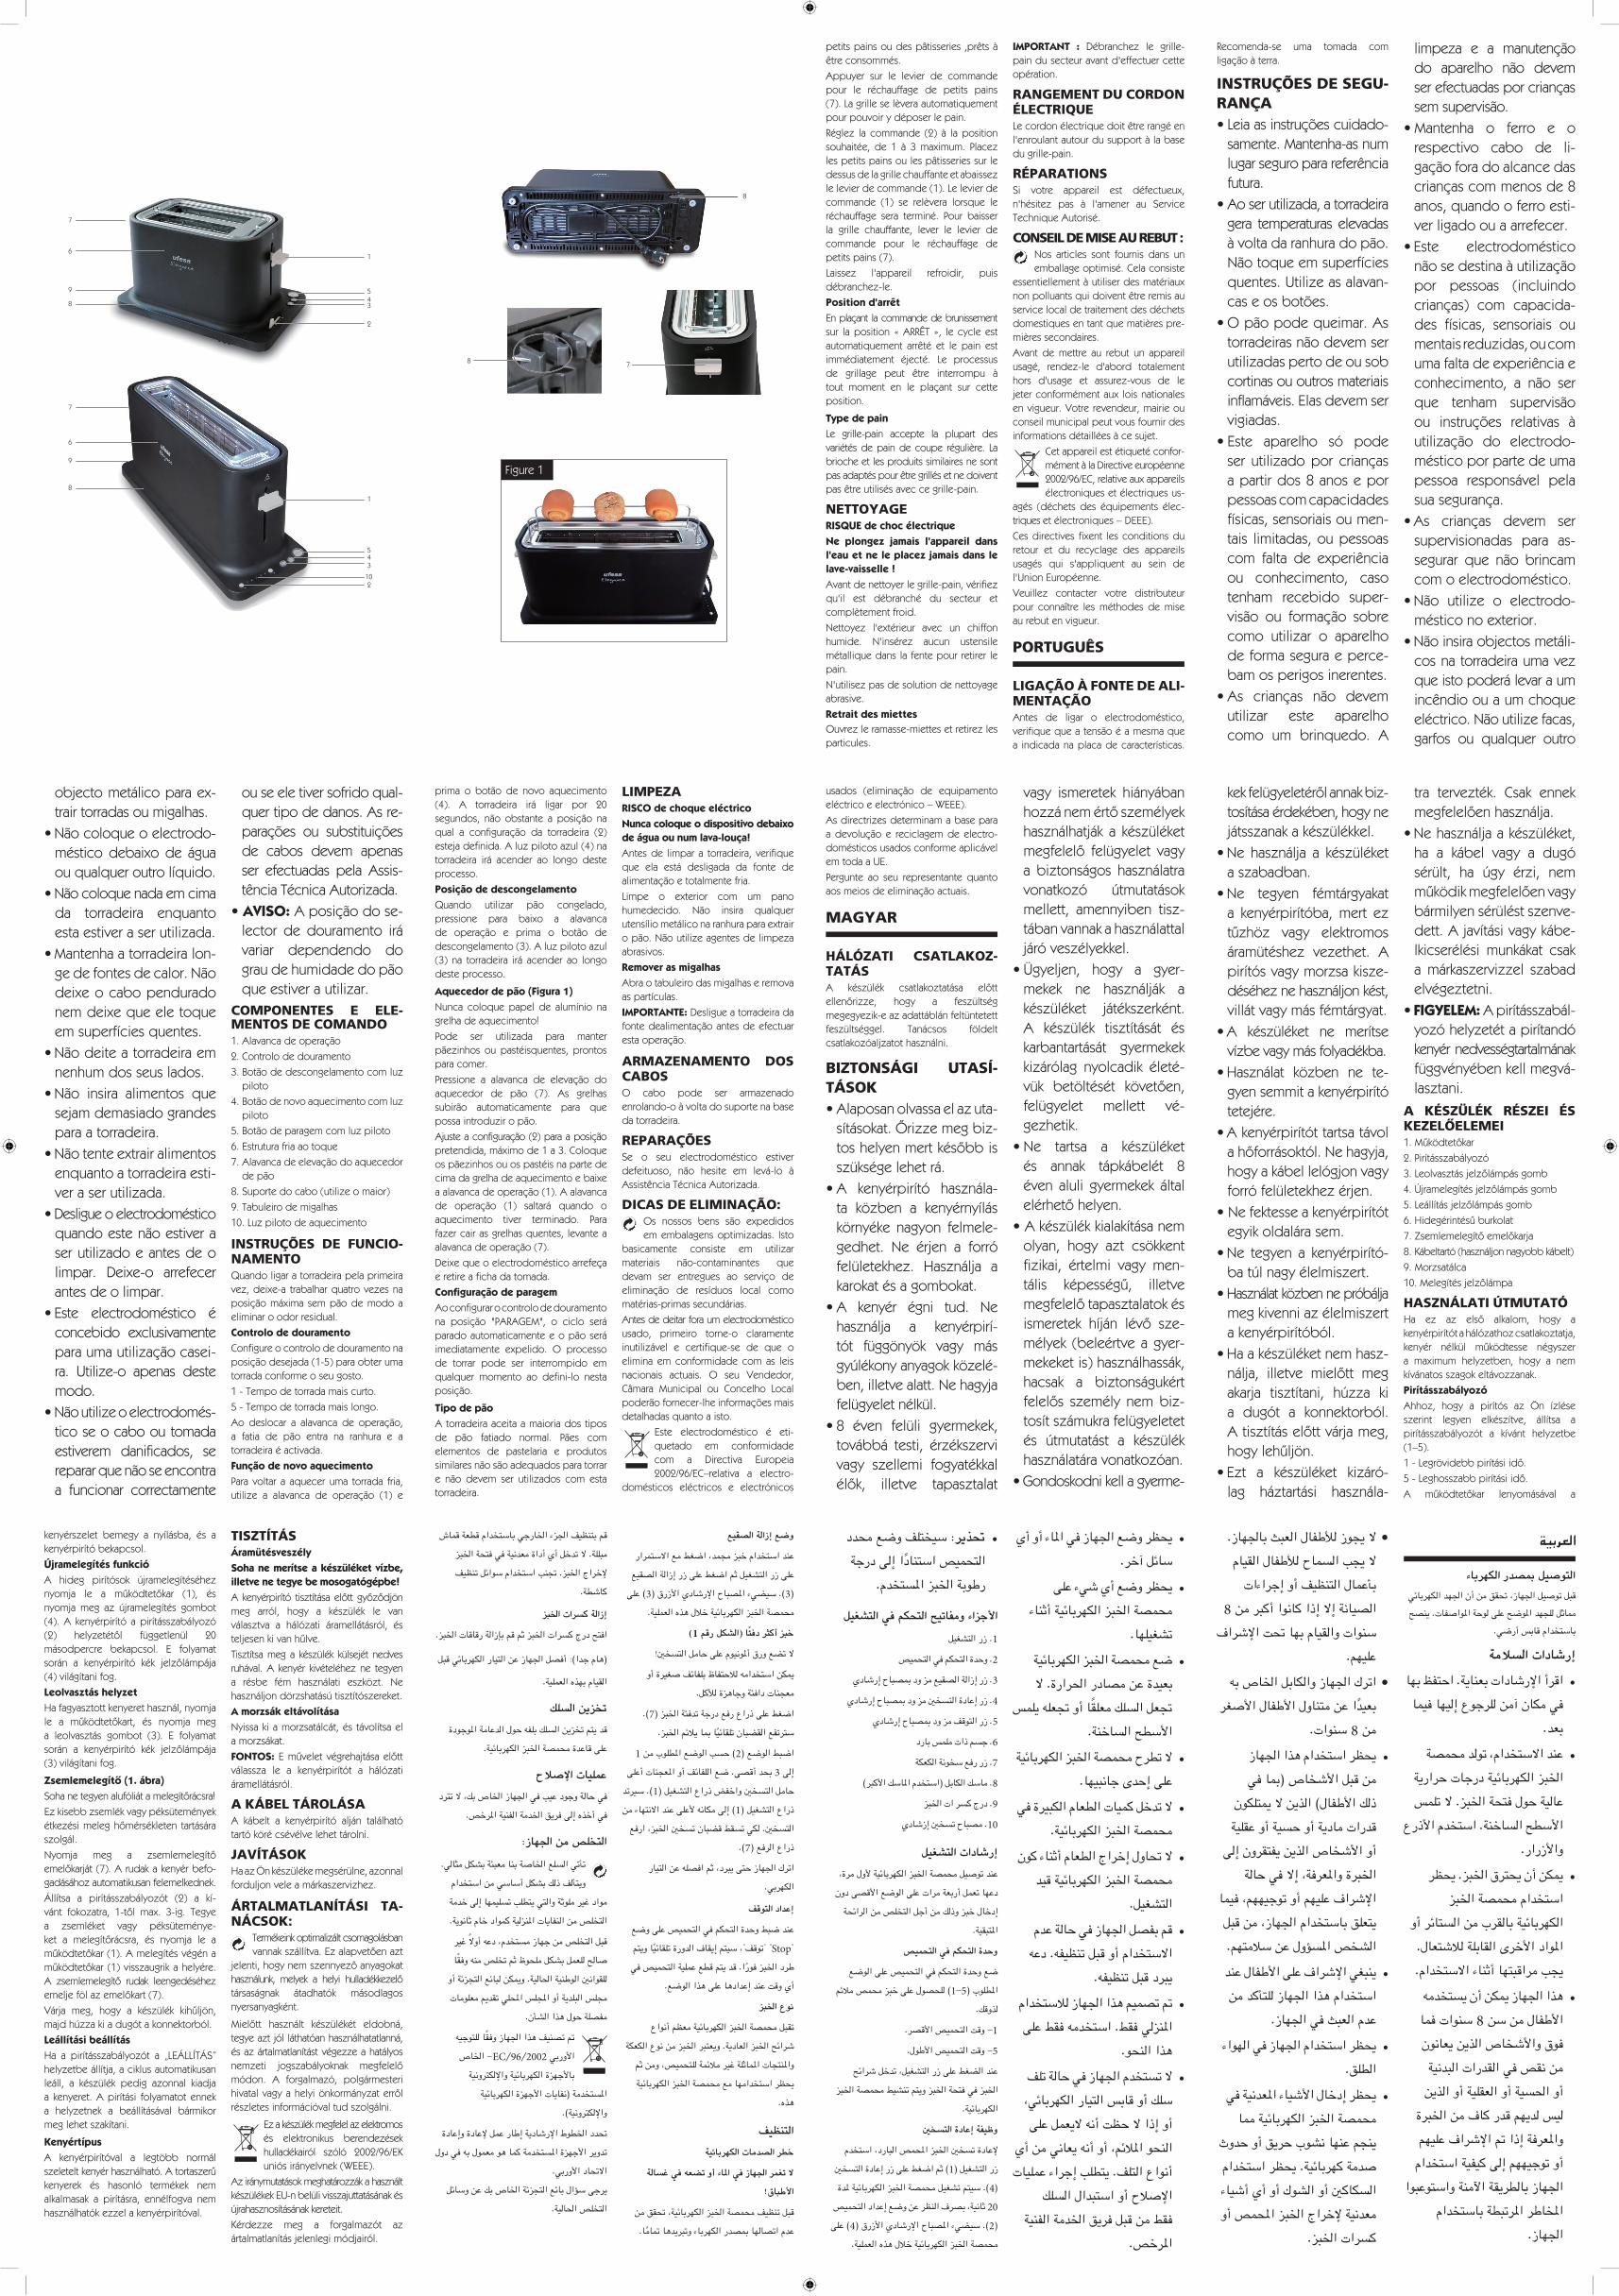
petitspainsoudespâtisseries,prêtsàêtreconsommés.Appuyer sur le levier de commande pour le réchauffage de petits pains (7).Lagrilleselèveraautomatiquementpour pouvoir y déposer le pain.Réglez la commande (2) à la position souhaitée, de 1 à 3 maximum. Placez les petits pains ou les pâtisseries sur le dessus de la grille chauffante et abaissez lelevierdecommande(1).Lelevierdecommande (1) se relèvera lorsque leréchauffage sera terminé. Pour baisser la grille chauffante, lever le levier de commande pour le réchauffage de petits pains (7).Laissez l'appareil refroidir, puisdébranchez-le.Position d'arrêtEnplaçant lacommandedebrunissementsur la position « ARRÊT », le cycle est automatiquement arrêté et le pain estimmédiatement éjecté. Le processusde grillage peut être interrompu àtout moment en le plaçant sur cette position.Type de painLe grille-pain accepte la plupart desvariétésdepaindecoupe régulière. Labrioche et les produits similaires ne sont pasadaptéspourêtregrillésetnedoiventpasêtreutilisésaveccegrille-pain.
NETTOYAGERISQUE de choc électriqueNe plongez jamais l'appareil dans l'eau et ne le placez jamais dans le lave-vaisselle !Avant de nettoyer le grille-pain, vérifiez qu'il est débranché du secteur et complètementfroid.Nettoyez l'extérieur avec un chiffon humide. N'insérez aucun ustensile métallique dans la fente pour retirer le pain.N'utilisez pas de solution de nettoyage abrasive.Retrait des miettesOuvrez le ramasse-miettes et retirez les particules.
IMPORTANT : Débranchez le grille-pain du secteur avant d'effectuer cette opération.
RANGEMENT DU CORDON ÉLECTRIQUELecordonélectriquedoitêtrerangéenl'enroulant autour du support à la base du grille-pain.
RÉPARATIONSSi votre appareil est défectueux, n'hésitez pas à l'amener au Service Technique Autorisé.
CONSEIL DE MISE AU REBUT :Nos articles sont fournis dans un emballageoptimisé.Celaconsiste
essentiellement à utiliser des matériaux nonpolluantsquidoiventêtreremisauservice local de traitement des déchets domestiquesentantquematièrespre-mièressecondaires.Avant de mettre au rebut un appareil usagé, rendez-le d'abord totalement hors d'usage et assurez-vous de le jeter conformément aux lois nationales en vigueur. Votre revendeur, mairie ou conseil municipal peut vous fournir des informations détaillées à ce sujet.
Cetappareilestétiquetéconfor-mémentàlaDirectiveeuropéenne2002/96/EC,relativeauxappareilsélectroniques et électriques us-
agés (déchets des équipements élec-triquesetélectroniques–DEEE).Cesdirectivesfixent lesconditionsduretour et du recyclage des appareils usagés qui s'appliquent au sein de l'UnionEuropéenne.Veuillez contacter votre distributeur pour connaître les méthodes de mise au rebut en vigueur.
PORTUGUÊS
LIGAÇÃO À FONTE DE ALI-MENTAÇÃOAntes de ligar o electrodoméstico, verifiquequeatensãoéamesmaquea indicada na placa de características.
Recomenda-se uma tomada com ligaçãoàterra.
INSTRUÇÕES DE SEGU-RANÇA•Leiaasinstruçõescuidado-samente.Mantenha-asnumlugarseguroparareferênciafutura.
•Aoserutilizada,atorradeiragera temperaturas elevadas àvoltadaranhuradopão.Nãotoqueemsuperfíciesquentes. Utilize as alavan-caseosbotões.
•Opãopodequeimar.Astorradeirasnãodevemserutilizadas perto de ou sob cortinas ou outros materiais inflamáveis.Elasdevemservigiadas.
•Este aparelho só podeser utilizado por crianças a partir dos 8 anos e por pessoas com capacidades físicas, sensoriais ou men-tais limitadas, ou pessoas com falta de experiênciaou conhecimento, caso tenham recebido super-visão ou formação sobrecomo utilizar o aparelho de forma segura e perce-bam os perigos inerentes.
•As crianças não devemutilizar este aparelho como um brinquedo. A
limpeza e a manutençãodo aparelho não devemser efectuadas por crianças semsupervisão.
•Mantenha o ferro e orespectivo cabo de li-gaçãoforadoalcancedascrianças com menos de 8 anos, quando o ferro esti-ver ligado ou a arrefecer.
•Este electrodomésticonãosedestinaàutilizaçãopor pessoas (incluindo crianças) com capacida-des físicas, sensoriais ou mentais reduzidas, ou com umafaltadeexperiênciaeconhecimento, a não serque tenham supervisãoou instruções relativas àutilização do electrodo-méstico por parte de uma pessoa responsável pela sua segurança.
•As crianças devem sersupervisionadas para as-segurar que não brincamcom o electrodoméstico.
•Não utilize o electrodo-méstico no exterior.
•Nãoinsiraobjectosmetáli-cos na torradeira uma vez que isto poderá levar a um incêndioouaumchoqueeléctrico.Nãoutilizefacas,garfos ou qualquer outro
objecto metálico para ex-trair torradas ou migalhas.
•Nãocoloqueoelectrodo-méstico debaixo de água ou qualquer outro líquido.
•Nãocoloquenadaemcimada torradeira enquanto esta estiver a ser utilizada.
•Mantenhaatorradeiralon-gedefontesdecalor.Nãodeixe o cabo pendurado nem deixe que ele toque em superfícies quentes.
•Nãodeiteatorradeiraemnenhum dos seus lados.
•Não insira alimentos quesejam demasiado grandes para a torradeira.
•Nãotenteextrairalimentosenquanto a torradeira esti-ver a ser utilizada.
•Desligueoelectrodomésticoquandoestenãoestiveraser utilizado e antes de o limpar. Deixe-o arrefecerantes de o limpar.
•Este electrodoméstico éconcebido exclusivamente paraumautilizaçãocasei-ra. Utilize-o apenas deste modo.
•Nãoutilizeoelectrodomés-tico se o cabo ou tomada estiverem danificados, se repararquenãoseencontraa funcionar correctamente
ou se ele tiver sofrido qual-quer tipo de danos. As re-parações ou substituiçõesde cabos devem apenas ser efectuadas pela Assis-tênciaTécnicaAutorizada.
•AVISO:Aposiçãodose-lector de douramento irá variar dependendo do graudehumidadedopãoque estiver a utilizar.
COMPONENTES E ELE-MENTOS DE COMANDO1.Alavancadeoperação2.Controlodedouramento3.Botãodedescongelamentocomluz
piloto4.Botãodenovoaquecimentocomluz
piloto5.Botãodeparagemcomluzpiloto6.Estruturafriaaotoque7.Alavancadeelevaçãodoaquecedordepão
8. Suporte do cabo (utilize o maior)9. Tabuleiro de migalhas10.Luzpilotodeaquecimento
INSTRUÇÕES DE FUNCIO-NAMENTOQuando ligar a torradeira pela primeira vez, deixe-a trabalhar quatro vezes na posiçãomáximasempãodemodoaeliminar o odor residual.Controlo de douramentoConfigureocontrolodedouramentonaposiçãodesejada(1-5)paraobterumatorrada conforme o seu gosto.1 - Tempo de torrada mais curto.5 - Tempo de torrada mais longo.Ao deslocar a alavanca de operação,a fatia de pão entra na ranhura e atorradeira é activada.Função de novo aquecimentoPara voltar a aquecer uma torrada fria, utilize a alavanca de operação (1) e
prima o botão de novo aquecimento(4). A torradeira irá ligar por 20 segundos, não obstante a posição naqual a configuração da torradeira (2)esteja definida. A luz piloto azul (4) na torradeira irá acender ao longo deste processo.Posição de descongelamentoQuando utilizar pão congelado,pressione para baixo a alavanca de operação e prima o botão dedescongelamento (3). A luz piloto azul (3) na torradeira irá acender ao longo deste processo.Aquecedor de pão (Figura 1)Nunca coloque papel de alumínio na grelha de aquecimento!Pode ser utilizada para manter pãezinhos ou pastéisquentes, prontospara comer.Pressione a alavanca de elevação doaquecedor de pão (7). As grelhassubirão automaticamente para quepossaintroduziropão.Ajusteaconfiguração(2)paraaposiçãopretendida,máximode1a3.Coloqueospãezinhosouospastéisnapartedecima da grelha de aquecimento e baixe aalavancadeoperação(1).Aalavancade operação (1) saltará quando oaquecimento tiver terminado. Para fazer cair as grelhas quentes, levante a alavancadeoperação(7).Deixequeoelectrodomésticoarrefeçae retire a ficha da tomada.Configuração de paragemAo configurar o controlo de douramento na posição "PARAGEM", o ciclo seráparadoautomaticamenteeopãoseráimediatamente expelido. O processo de torrar pode ser interrompido em qualquer momento ao defini-lo nesta posição.Tipo de pãoA torradeira aceita a maioria dos tipos de pão fatiado normal. Pães comelementos de pastelaria e produtos similaresnãosãoadequadosparatorrare não devem ser utilizados com estatorradeira.
LIMPEZARISCO de choque eléctricoNunca coloque o dispositivo debaixo de água ou num lava-louça!Antes de limpar a torradeira, verifique que ela está desligada da fonte de alimentaçãoetotalmentefria.Limpe o exterior com um panohumedecido. Não insira qualquerutensílio metálico na ranhura para extrair opão.Nãoutilizeagentesdelimpezaabrasivos.Remover as migalhasAbra o tabuleiro das migalhas e remova as partículas.IMPORTANTE:Desligueatorradeiradafontedealimentaçãoantesdeefectuarestaoperação.
ARMAZENAMENTO DOS CABOSO cabo pode ser armazenado enrolando-o à volta do suporte na base da torradeira.
REPARAÇÕESSe o seu electrodoméstico estiver defeituoso, não hesite em levá-lo àAssistênciaTécnicaAutorizada.
DICAS DE ELIMINAÇÃO:Os nossos bens são expedidosem embalagens optimizadas. Isto
basicamente consiste em utilizar materiais não-contaminantes quedevam ser entregues ao serviço de eliminação de resíduos local comomatérias-primas secundárias.Antes de deitar fora um electrodoméstico usado, primeiro torne-o claramente inutilizável e certifique-se de que oelimina em conformidade com as leis nacionais actuais. O seu Vendedor, Câmara Municipal ou Concelho Localpoderãofornecer-lheinformaçõesmaisdetalhadas quanto a isto.
Este electrodoméstico é eti-quetado em conformidade com a Directiva Europeia2002/96/EC–relativa a electro-
domésticos eléctricos e electrónicos
usados (eliminação de equipamentoeléctricoeelectrónico–WEEE).As directrizes determinam a base para adevolução e reciclagemde electro-domésticos usados conforme aplicável emtodaaUE.Pergunte ao seu representante quanto aosmeiosdeeliminaçãoactuais.
MAGYAR
HÁLÓZATI CSATLAKOZ-TATÁSA készülék csatlakoztatása előttellenőrizze, hogy a feszültségmegegyezik-e az adattáblán feltüntetett feszültséggel. Tanácsos földelt csatlakozóaljzatot használni.
BIZTONSÁGI UTASÍ-TÁSOK•Alaposanolvassaelazuta-sításokat.Őrizzemegbiz-toshelyenmertkésőbbisszüksége lehet rá.
•A kenyérpirító használa-ta közben a kenyérnyílás környéke nagyon felmele-gedhet. Ne érjen a forró felületekhez. Használja a karokat és a gombokat.
•A kenyér égni tud. Nehasználja a kenyérpirí-tót függönyök vagy más gyúlékonyanyagokközelé-ben, illetve alatt. Ne hagyja felügyelet nélkül.
•8 éven felüli gyermekek,továbbá testi, érzékszervi vagy szellemi fogyatékkal élők, illetve tapasztalat
vagy ismeretek hiányában hozzánemértőszemélyekhasználhatják a készüléket megfelelő felügyelet vagya biztonságos használatra vonatkozó útmutatásokmellett, amennyiben tisz-tában vannak a használattal járó veszélyekkel.
•Ügyeljen, hogy a gyer-mekek ne használják a készüléket játékszerként. A készülék tisztítását és karbantartását gyermekek kizárólag nyolcadik életé-vük betöltését követően,felügyelet mellett vé-gezhetik.
•Ne tartsa a készüléketés annak tápkábelét 8 éven aluli gyermekek által elérhetőhelyen.
•Akészülékkialakításanemolyan, hogy azt csökkent fizikai, értelmi vagy men-tális képességű, illetvemegfelelőtapasztalatokésismeretek híján lévő sze-mélyek (beleértve a gyer-mekeket is) használhassák, hacsak a biztonságukért felelős személy nembiz-tosít számukra felügyeletet és útmutatást a készülékhasználatára vonatkozóan.
•Gondoskodnikellagyerme-
العربية
التوصيل مبصدر الكهرباءقبل توصيل اجلهاز، حتقق من أن اجلهد الكهربائي مماثل للجهد املوضح على لوحة املواصفات. ينصح
باستخدام قابس أرضي.
إرشادات السالمةاقرأ اإلرشادات بعناية. احتفظ بها •في مكان آمن للرجوع إليها فيما
بعد.عند االستخدام، تولد محمصة •
اخلبز الكهربائية درجات حرارية عالية حول فتحة اخلبز. ال تلمس
األسطح الساخنة. استخدم األذرع واألزرار.
ميكن أن يحترق اخلبز. يحظر •استخدام محمصة اخلبز
الكهربائية بالقرب من الستائر أو املواد األخرى القابلة لالشتعال. يجب مراقبتها أثناء االستخدام.هذا اجلهاز ميكن أن يستخدمه •األطفال من سن 8 سنوات فما فوق واألشخاص الذين يعانون من نقص في القدرات البدنية أو احلسية أو العقلية أو الذين
من اخلبرة ٍ
ليس لديهم قدر كافواملعرفة إذا مت اإلشراف عليهم أو توجيههم إلى كيفية استخدام
اجلهاز بالطريقة اآلمنة واستوعبوا املخاطر املرتبطة باستخدام
اجلهاز.
ال يجوز لألطفال العبث باجلهاز. •ال يجب السماح لألطفال القيام
بأعمال التنظيف أو إجراءات الصيانة إال إذا كانوا أكبر من 8
سنوات والقيام بها حتت اإلشراف عليهم.
اترك اجلهاز والكابل اخلاص به •بعيًدا عن متناول األطفال األصغر
من 8 سنوات.يحظر استخدام هذا اجلهاز •من قبل األشخاص )مبا في
ذلك األطفال( الذين ال ميتلكون قدرات مادية أو حسية أو عقلية
أو األشخاص الذين يفتقرون إلى اخلبرة واملعرفة، إال في حالة
اإلشراف عليهم أو توجيههم، فيما يتعلق باستخدام اجلهاز، من قبل الشخص املسؤول عن سالمتهم.
ينبغي اإلشراف على األطفال عند •استخدام هذا اجلهاز للتأكد من
عدم العبث في اجلهاز.يحظر استخدام اجلهاز في الهواء •
الطلق.يحظر إدخال األشياء املعدنية في •
محمصة اخلبز الكهربائية مما ينجم عنها نشوب حريق أو حدوث صدمة كهربائية. يحظر استخدام السكاكني أو الشوك أو أي أشياء معدنية إلخراج اخلبز احملمص أو
كسرات اخلبز.
يحظر وضع اجلهاز في املاء أو أي •سائل آخر.
يحظر وضع أي شيء على •محمصة اخلبز الكهربائية أثناء
تشغيلها.ضع محمصة اخلبز الكهربائية •بعيدة عن مصادر احلرارة. ال
جتعل السلك معلًقا أو جتعله يلمس األسطح الساخنة.
ال تطرح محمصة اخلبز الكهربائية •على إحدى جانبيها.
ال تدخل كميات الطعام الكبيرة في •محمصة اخلبز الكهربائية.
ال حتاول إخراج الطعام أثناء كون •محمصة اخلبز الكهربائية قيد
التشغيل.قم بفصل اجلهاز في حالة عدم •
االستخدام أو قبل تنظيفه. دعه يبرد قبل تنظيفه.
مت تصميم هذا اجلهاز لالستخدام •املنزلي فقط. استخدمه فقط على
هذا النحو.ال تستخدم اجلهاز في حالة تلف •سلك أو قابس التيار الكهربائي، أو إذا ال حظت أنه اليعمل على
النحو املالئم، أو أنه يعاني من أي أنواع التلف. يتطلب إجراء عمليات
اإلصالح أو استبدال السلك فقط من قبل فريق اخلدمة الفنية
املرخص.
حتذير: سيختلف وضع محدد •التحميص استناًدا إلى درجة
رطوبة اخلبز املستخدم.
األجزاء ومفاتيح التحكم في التشغيل1. زر التشغيل
2. وحدة التحكم في التحميص
3. زر إزالة الصقيع مز ود مبصباح إرشادي
4. زر إعادة التسخني مز ود مبصباح إرشادي
5. زر التوقف مز ود مبصباح إرشادي
6. جسم ذات ملمس بارد
7. زر رفع سخونة الكعكة
8. ماسك الكابل )استخدم املاسك األكبر(
9. درج كسر ات اخلبز
10. مصباح تسخني إزشادي
إرشادات التشغيلعند توصيل محمصة اخلبز الكهربائية ألول مرة،
دعها تعمل أربعة مرات على الوضع األقصى دون
إدخال خبز وذلك من أجل التخلص من الرائحة
املتبقية.
وحدة التحكم في التحميص
ضع وحدة التحكم في التحميص على الوضع
املطلوب )5-1( للحصول على خبز محمص مالئم
لذوقك.
1- وقت التحميص األقصر.
5- وقت التحميص األطول.
عند الضغط على زر التشغيل، تدخل شرائح
اخلبز في فتحة اخلبز ويتم تنشيط محمصة اخلبز
الكهربائية.
وظيفة إعادة التسخني
إلعادة تسخني اخلبز احملمص البارد، استخدم
زر التشغيل )1( ثم اضغط على زر إعادة التسخني
)4(. سيتم تشغيل محمصة اخلبز الكهربائية ملدة
20 ثانية، بصرف النظر عن وضع إعداد التحميص
)2(. سيضيء املصباح اإلرشادي األزرق )4( على
محمصة اخلبز الكهربائية خالل هذه العملية.
kekfelügyeletérőlannakbiz-tosítása érdekében, hogy ne játsszanak a készülékkel.
•Ne használja a készüléketa szabadban.
•Ne tegyen fémtárgyakata kenyérpirítóba, mert ez tűzhöz vagy elektromosáramütéshez vezethet. A pirítós vagy morzsa kisze-déséhez ne használjon kést, villát vagy más fémtárgyat.
•A készüléket ne merítse vízbe vagy más folyadékba.
•Használat közben ne te-gyen semmit a kenyérpirító tetejére.
•Akenyérpirítóttartsatávolahőforrásoktól.Nehagyja,hogy a kábel lelógjon vagy forró felületekhez érjen.
•Nefektesseakenyérpirítótegyik oldalára sem.
•Ne tegyen a kenyérpirító-batúlnagyélelmiszert.
•Használat közben ne próbálja meg kivenni az élelmiszert a kenyérpirítóból.
•Haakészüléketnemhasz-nálja, illetve mielőtt megakarja tisztítani, húzza kia dugót a konnektorból. Atisztításelőttvárjameg,hogylehűljön.
•Ezt a készüléket kizáró-lag háztartási használa-
tra tervezték. Csak ennekmegfelelőenhasználja.
•Nehasználjaakészüléket,ha a kábel vagy a dugó sérült, ha úgy érzi, nemműködikmegfelelőenvagybármilyen sérülést szenve-dett. A javítási vagy kábe-lkicserélési munkákat csak a márkaszervizzel szabad elvégeztetni.
•FIGYELEM: A pirításszabál-yozó helyzetét a pirítandó kenyér nedvességtartalmának függvényében kell megvá-lasztani.
A KÉSZÜLÉK RÉSZEI ÉS KEZELŐELEMEI1.Működtetőkar2. Pirításszabályozó3.Leolvasztásjelzőlámpásgomb4.Újramelegítésjelzőlámpásgomb5.Leállításjelzőlámpásgomb6.Hidegérintésűburkolat7.Zsemlemelegítőemelőkarja8. Kábeltartó (használjon nagyobb kábelt)9.Morzsatálca10.Melegítésjelzőlámpa
HASZNÁLATI ÚTMUTATÓHa ez az első alkalom, hogy akenyérpirítót a hálózathoz csatlakoztatja, kenyér nélkül működtesse négyszera maximum helyzetben, hogy a nem kívánatos szagok eltávozzanak.PirításszabályozóAhhoz, hogy a pirítós az Ön ízlése szerint legyen elkészítve, állítsa a pirításszabályozót a kívánt helyzetbe (1–5).1-Legrövidebbpirításiidő.5-Leghosszabbpirításiidő.A működtetőkar lenyomásával a
kenyérszelet bemegy a nyílásba, és a kenyérpirító bekapcsol.Újramelegítés funkcióA hideg pirítósok újramelegítéséheznyomja le a működtetőkar (1), ésnyomja meg az újramelegítés gombot(4). A kenyérpirító a pirításszabályozó (2) helyzetétől függetlenül 20másodpercre bekapcsol. E folyamatsorán a kenyérpirító kék jelzőlámpája(4) világítani fog.Leolvasztás helyzetHa fagyasztott kenyeret használ, nyomja le a működtetőkart, és nyomja mega leolvasztás gombot (3). E folyamatsorán a kenyérpirító kék jelzőlámpája(3) világítani fog.Zsemlemelegítő (1. ábra)Sohanetegyenalufóliátamelegítőrácsra!Ezkisebbzsemlékvagypéksüteményekétkezésimeleghőmérsékleten tartásáraszolgál.Nyomja meg a zsemlemelegítőemelőkarját(7).Arudakakenyérbefo-gadásához automatikusan felemelkednek.Állítsa a pirításszabályozót (2) a kí-vánt fokozatra, 1-től max. 3-ig. Tegye a zsemléket vagy péksüteménye-ket a melegítőrácsra, és nyomja le aműködtetőkar(1).Amelegítésvégénaműködtetőkar(1)visszaugrikahelyére.A zsemlemelegítő rudak leengedéséhezemeljefölazemelőkart(7).Várja meg, hogy a készülék kihűljön,majdhúzzakiadugótakonnektorból.Leállítási beállításHa a pirításszabályozót a „LEÁLLÍTÁS”helyzetbe állítja, a ciklus automatikusan leáll, a készülék pedig azonnal kiadja a kenyeret. A pirítási folyamatot ennek a helyzetnek a beállításával bármikor meg lehet szakítani.KenyértípusA kenyérpirítóval a legtöbb normál szeleteltkenyérhasználható.Atortaszerűkenyerek és hasonló termékek nem alkalmasak a pirításra, ennélfogva nem használhatók ezzel a kenyérpirítóval.
TISZTÍTÁSÁramütésveszélySoha ne merítse a készüléket vízbe, illetve ne tegye be mosogatógépbe!A kenyérpirító tisztítása előtt győződjönmeg arról, hogy a készülék le van választva a hálózati áramellátásról, és teljesenkivanhűlve.Tisztítsa meg a készülék külsejét nedves ruhával. A kenyér kivételéhez ne tegyen a résbe fém használati eszközt. Ne használjondörzshatásútisztítószereket.A morzsák eltávolításaNyissa ki a morzsatálcát, és távolítsa el a morzsákat.FONTOS:Eműveletvégrehajtásaelőttválassza le a kenyérpirítót a hálózati áramellátásról.
A KÁBEL TÁROLÁSAA kábelt a kenyérpirító alján található tartó köré csévélve lehet tárolni.
JAVÍTÁSOKHa az Ön készüléke megsérülne, azonnal forduljon vele a márkaszervizhez.
ÁRTALMATLANÍTÁSI TA-NÁCSOK:
Termékeink optimalizált csomagolásban vannakszállítva.Ezalapvetőenazt
jelenti,hogynemszennyezőanyagokathasználunk, melyek a helyi hulladékkezelőtársaságnak átadhatók másodlagos nyersanyagként.Mielőtt használt készülékét eldobná,tegye azt jól láthatóan használhatatlanná, és az ártalmatlanítást végezze a hatályos nemzeti jogszabályoknak megfelelőmódon. A forgalmazó, polgármesteri hivatalvagyahelyiönkormányzaterrőlrészletes információval tud szolgálni.
Ezakészülékmegfelelazelektromosés elektronikus berendezések hulladékairól szóló 2002/96/EKuniósirányelvnek(WEEE).
Az iránymutatások meghatározzák a használt készülékekEU-nbelülivisszajuttatásánakésújrahasznosításánakkereteit.Kérdezze meg a forgalmazót az ártalmatlanítás jelenlegi módjairól.
وضع إزالة الصقيع
عند استخدام خبز مجمد، اضغط مع االستمرار
على زر التشغيل ثم اضغط على زر إزالة الصقيع
)3(. سيضيء املصباح اإلرشادي األزرق )3( على
محمصة اخلبز الكهربائية خالل هذه العملية.
خبز أكثر دفًئا )الشكل رقم 1(
ال تضع ورق أملونيوم على حامل التسخني!
ميكن استخدامه لالحتفاظ بلفائف صغيرة أو
معجنات دافئة وجاهزة لألكل.
اضغط على ذراع رفع درجة تدفئة اخلبز )7(.
سترتفع القضبان تلقائًيا مبا يالئم اخلبز.
اضبط الوضع )2( حسب الوضع املطلوب من 1
إلى 3 بحد أقصى. ضع اللفائف أو املعجنات أعلى
حامل التسخني واخفض ذراع التشغيل )1(. سيرتد
ذراع التشغيل )1( إلى مكانه ألعلى عند االنتهاء من
التسخني. لكي تسقط قضبان تسخني اخلبز، ارفع
ذراع الرفع )7(.
اترك اجلهاز حتى يبرد، ثم افصله عن التيار
الكهربي.
إعداد التوقف
عند ضبط وحدة التحكم في التحميص على وضع
"Stop" "توقف"، سيتم إيقاف الدورة تلقائًيا ويتم
طرد اخلبز فوًرا. قد يتم قطع عملية التحميص في
أي وقت عند إعدادها على هذا الوضع.
نوع اخلبز
تقبل محمصة اخلبز الكهربائية معظم أنواع
شرائح اخلبز العادية. ويعتبر اخلبز من نوع الكعكة
واملنتجات املماثلة غير مالئمة للتحميص، ومن ثم
يحظر استخدامها مع محمصة اخلبز الكهربائية
هذه.
التنظيفخطر الصدمات الكهربائية
ال تغمر اجلهاز في املاء أو تضعه في غسالة
األطباق!
قبل تنظيف محمصة اخلبز الكهربائية، حتقق من
عدم اتصالها مبصدر الكهرباء وتبريدها متاًما.
قم بتنظيف اجلزء اخلارجي باستخدام قطعة قماش
مبللة. ال تدخل أي أداة معدنية في فتحة اخلبز
إلخراج اخلبز. جتنب استخدام سوائل تنظيف
كاشطة.
إزالة كسرات اخلبز
افتح درج كسرات اخلبز ثم قم بإزالة رقاقات اخلبز.
)هام جدا(: أفصل اجلهاز عن التيار الكهربائي قبل
القيام بهذه العملية.
تخزين السلكقد يتم تخزين السلك بلفه حول الدعامة املوجودة
على قاعدة محمصة اخلبز الكهربائية.
عمليات اإلصالحفي حالة وجود عيب في اجلهاز اخلاص بك، ال تترد
في أخذه إلى فريق اخلدمة الفنية املرخص.
التخلص من اجلهاز:تأتي السلع اخلاصة بنا معبئة بشكل مثالي.
ويتألف ذلك بشكل أساسي من استخدام
مواد غير ملوثة والتي يتطلب تسليمها إلى خدمة
التخلص من النفايات املنزلية كمواد خام ثانوية.
قبل التخلص من جهاز مستخدم، دعه أواًل غير
صالح للعمل بشكل ملحوظ ثم تخلص منه وفًقا
للقوانني الوطنية احلالية. وميكن لبائع التجزئة أو
مجلس البلدية أو املجلس احمللي تقدمي معلومات
مفصلة حول هذا الشأن.
مت تصنيف هذا اجلهاز وفًقا للتوجيه
األوربي EC/96/2002 - اخلاص
باألجهزة الكهربائية واإللكترونية
املستخدمة )نفايات األجهزة الكهربائية
واإللكترونية(.
حتدد اخلطوط اإلرشادية إطار عمل إلعادة وإعادة
تدوير األجهزة املستخدمة كما هو معمول به في دول
االحتاد األوربي.
يرجى سؤال بائع التجزئة اخلاص بك عن وسائل
التخلص احلالية.
1
543
2
7
6
8
9
1
543
2
7
6
8
10
9
8
7
Figure 1
8