Embed Size (px)
Citation preview

Thank you for purchasing your Triple Trunking Handheld Radio Scanner from RadioShack. Your scanner scans conventional frequencies and trunked systems. Please read this user’s guide before installing, setting up and using
your new scanner.
20-164Triple Trunking Handheld Radio Scanner
www.radioshack.com
What’s Included
Scanner
Antenna
BeltClip
Non-rechargeableBatteryHolder
RechargeableBatteryHolder
PreprogrammedFrequencyAddendum
User’sGuide

�
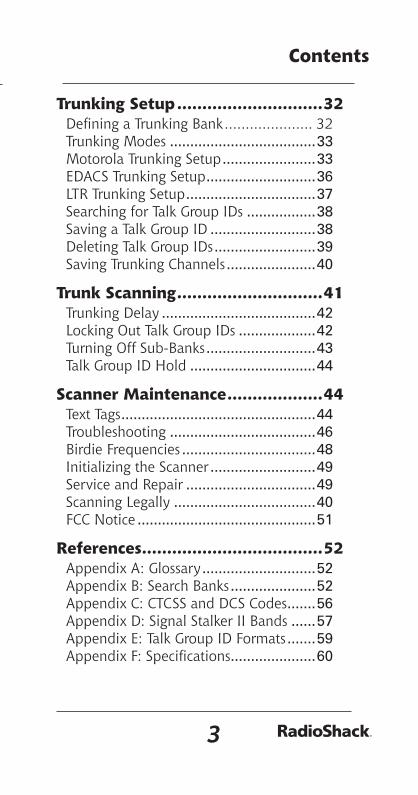
Contents
�
Contents
Your Scanner ..................................4ConnectingtheAntenna...........................5AttachingtheBeltClip.............................5PoweringYourScanner.............................6HeadphonesandSpeakers.......................9KeytonesandKeylock............................10BacklightandContrast...........................10SquelchandAttenuator..........................11Delay.....................................................13
Scanner Setup ..............................13Defining a Channel.................................14CopyingaFrequency..............................15DeletingSavedFrequencies....................16CTCSSANDDCS....................................16ScannerCloning.....................................17
Searching .....................................18SeekSearch............................................18SearchBanks..........................................19Zeromatic...............................................20ProgrammingaSearchRange.................21SignalStalkerII......................................21LockingOutFrequencies.........................23SavingFoundFrequencies......................24
Scanning .......................................25LockingOutChannels.............................25PriorityScanning....................................26WeatherAlerts.......................................27SAMEStandbyMode................................28Skywarn.................................................30
Monitoring ...................................31
Trunking Setup .............................32Defining a Trunking Bank..................... 32TrunkingModes.....................................33MotorolaTrunkingSetup........................33EDACSTrunkingSetup............................36LTRTrunkingSetup.................................37SearchingforTalkGroupIDs..................38SavingaTalkGroupID...........................38DeletingTalkGroupIDs..........................39SavingTrunkingChannels.......................40
Trunk Scanning .............................41TrunkingDelay.......................................42LockingOutTalkGroupIDs....................42TurningOffSub-Banks............................43TalkGroupIDHold................................44
Scanner Maintenance ...................44TextTags.................................................44Troubleshooting.....................................46BirdieFrequencies..................................48InitializingtheScanner...........................49ServiceandRepair.................................49ScanningLegally....................................40FCCNotice.............................................51
References ....................................52AppendixA:Glossary.............................52AppendixB:SearchBanks......................52AppendixC:CTCSSandDCSCodes........56AppendixD:SignalStalkerIIBands.......57AppendixE:TalkGroupIDFormats........59Appendix F: Specifications......................60
�
Contents
�
Contents
Your Scanner ..................................4ConnectingtheAntenna...........................5AttachingtheBeltClip.............................5PoweringYourScanner.............................6HeadphonesandSpeakers.......................9KeytonesandKeylock............................10BacklightandContrast...........................10SquelchandAttenuator..........................11Delay.....................................................13
Scanner Setup ..............................13Defining a Channel.................................14CopyingaFrequency..............................15DeletingSavedFrequencies....................16CTCSSANDDCS....................................16ScannerCloning.....................................17
Searching .....................................18SeekSearch............................................18SearchBanks..........................................19Zeromatic...............................................20ProgrammingaSearchRange.................21SignalStalkerII......................................21LockingOutFrequencies.........................23SavingFoundFrequencies......................24
Scanning .......................................25LockingOutChannels.............................25PriorityScanning....................................26WeatherAlerts.......................................27SAMEStandbyMode................................28Skywarn.................................................30
Monitoring ...................................31
Trunking Setup .............................32Defining a Trunking Bank..................... 32TrunkingModes.....................................33MotorolaTrunkingSetup........................33EDACSTrunkingSetup............................36LTRTrunkingSetup.................................37SearchingforTalkGroupIDs..................38SavingaTalkGroupID...........................38DeletingTalkGroupIDs..........................39SavingTrunkingChannels.......................40
Trunk Scanning .............................41TrunkingDelay.......................................42LockingOutTalkGroupIDs....................42TurningOffSub-Banks............................43TalkGroupIDHold................................44
Scanner Maintenance ...................44TextTags.................................................44Troubleshooting.....................................46BirdieFrequencies..................................48InitializingtheScanner...........................49ServiceandRepair.................................49ScanningLegally....................................40FCCNotice.............................................51
References ....................................52AppendixA:Glossary.............................52AppendixB:SearchBanks......................52AppendixC:CTCSSandDCSCodes........56AppendixD:SignalStalkerIIBands.......57AppendixE:TalkGroupIDFormats........59Appendix F: Specifications......................60

� �
Your Scanner
Squelch
VOLUME / OFF
PRI.–.Priority
TEXT.–.Activates.text.buttons.
PSE.–.Pause
MODE.–.Changes.receive.mode.
KEY/LIGHT.–.Keypad.lock.and.backlight.
TUNE –.Enters.Tune.mode.
ATT –.Attenuator.
–.Navigates.functions.
SRCH.–.Search.
Headphones
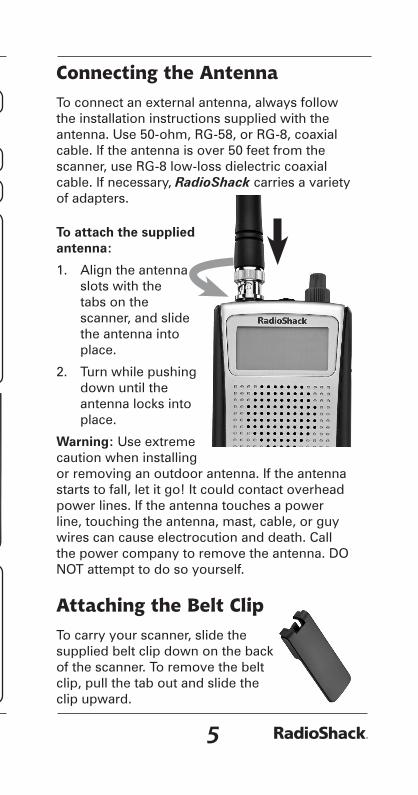
Connecting the Antenna
To.connect.an.external.antenna,.always.follow.the.installation.instructions.supplied.with.the.antenna..Use.50-ohm,.RG-58,.or.RG-8,.coaxial.cable..If.the.antenna.is.over.50.feet.from.the.scanner,.use.RG-8.low-loss.dielectric.coaxial.cable..If.necessary,.RadioShack.carries.a.variety.of.adapters..
To attach the supplied antenna:
1.. Align.the.antenna.slots.with.the.tabs.on.the.scanner,.and.slide.the.antenna.into.place.
2.. Turn.while.pushing.down.until.the.antenna.locks.into.place.
Warning:.Use.extreme.caution.when.installing.or.removing.an.outdoor.antenna..If.the.antenna.starts.to.fall,.let.it.go!.It.could.contact.overhead.power.lines..If.the.antenna.touches.a.power.line,.touching.the.antenna,.mast,.cable,.or.guy.wires.can.cause.electrocution.and.death..Call.the.power.company.to.remove.the.antenna..DO.NOT.attempt.to.do.so.yourself.
Attaching the Belt Clip
To.carry.your.scanner,.slide.the.supplied.belt.clip.down.on.the.back.of.the.scanner..To.remove.the.belt.clip,.pull.the.tab.out.and.slide.the.clip.upward.
1-9 / A-Z– Numbers.and.letters..Zero.enters.special.characters.
./DELAY – Decimal.point,.space,.delay.functions.
CL –.Clear.
L/OUT.–.Locks.out.channels,.frequencies,.or.Talk.Group.IDs.
PGM.–.Program.
ENT.–.Enter.
.—.Signal.Stalker.
SCAN.—.Starts.a.scan.
FUNC.—.Function
MAN.—.Manually.select.a.channel.or.enter.a.channel.number.
TRUNK —.Accesses.trunking.functions.
WX/ .—.Weather.search.and.Skywarn.
� �
Your Scanner
Squelch
VOLUME / OFF
Headphones
Connecting the Antenna
To.connect.an.external.antenna,.always.follow.the.installation.instructions.supplied.with.the.antenna..Use.50-ohm,.RG-58,.or.RG-8,.coaxial.cable..If.the.antenna.is.over.50.feet.from.the.scanner,.use.RG-8.low-loss.dielectric.coaxial.cable..If.necessary,.RadioShack.carries.a.variety.of.adapters..
To attach the supplied antenna:
1.. Align.the.antenna.slots.with.the.tabs.on.the.scanner,.and.slide.the.antenna.into.place.
2.. Turn.while.pushing.down.until.the.antenna.locks.into.place.
Warning:.Use.extreme.caution.when.installing.or.removing.an.outdoor.antenna..If.the.antenna.starts.to.fall,.let.it.go!.It.could.contact.overhead.power.lines..If.the.antenna.touches.a.power.line,.touching.the.antenna,.mast,.cable,.or.guy.wires.can.cause.electrocution.and.death..Call.the.power.company.to.remove.the.antenna..DO.NOT.attempt.to.do.so.yourself.
Attaching the Belt Clip
To.carry.your.scanner,.slide.the.supplied.belt.clip.down.on.the.back.of.the.scanner..To.remove.the.belt.clip,.pull.the.tab.out.and.slide.the.clip.upward.
1-9 / A-Z– Numbers.and.letters..Zero.enters.special.characters.
./DELAY – Decimal.point,.space,.delay.functions.
CL –.Clear.
L/OUT.–.Locks.out.channels,.frequencies,.or.Talk.Group.IDs.
PGM.–.Program.
ENT.–.Enter.
.—.Signal.Stalker.
SCAN.—.Starts.a.scan.
FUNC.—.Function
MAN.—.Manually.select.a.channel.or.enter.a.channel.number.
TRUNK —.Accesses.trunking.functions.
WX/ .—.Weather.search.and.Skywarn.
� �
Powering Your Scanner
You.can.power.your.scanner.with.four AAfour.AA.batteries.(not.supplied), or an external power,.or.an.external.power.source..
Batteries
When.battery.power.is.low,.battery.symbol.flashes and the scanner beeps every 30 seconds..When.battery.power.is.depleted,.the.scanner.turns.itself.off..
For.the.longest.operation.and.best.performance,.use.alkaline.batteries,.available.at.your.local.RadioShack.store,.or.use.RadioShack.1600.mAh.nickel-metal.hydride.(Ni-MH).rechargeable.batteries.
Rechargeable.batteries.last.longer.and.deliver.more.power.if.you.let.them.fully.discharge.once.a.month..To.do.this,.use.the.scanner.until.battery symbol flashes.
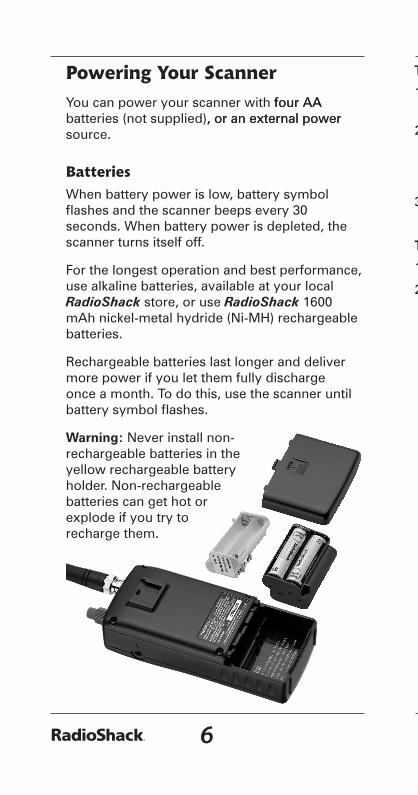
Warning: Never.install.non-rechargeable.batteries.in.the.yellow.rechargeable.battery.holder..Non-rechargeable.batteries.can.get.hot.or.explode.if.you.try.to.recharge.them.
To install batteries:
1.. Slide.open.the.battery.compartment.cover.on.the.back.of.the.scanner.
2.. Place.4.AA.batteries.into.the.correct.battery.holder.matching.polarity.symbols.(+./.-):•. Black.–.Alkaline.(non-rechargeable)•. Yellow.–.Rechargeable..
3.. Place.the.battery.holder.into.the.battery.compartment.and.replace.the.cover.
To charge batteries:
1.. Install.rechargeable.batteries.
2.. Connect.an.external.power.source.to.the.PWR DC 9V.jack..Using.the.scanner.while.charging.will.increase.charge.time.
Battery Current Charge.Time
Ni-MH 1600.mAh 16.hours
Ni-Cd 600.mAh 6.hours
Ni-Cd 850.mAh 8.hours
. Do.not.overcharge.batteries..Overcharging.shortens.battery.life..
• Each battery holder fits only one way. Do not.force.it.
•. Use.only.fresh.batteries.of.the.required.size.and.recommended.type..Do.not.mix.old.and.new.batteries,.different.types.(alkaline.or.rechargeable),.or.rechargeable.batteries.of.different.capacities.
•. Remove.old.or.weak.batteries..If.you.will.not.use.the.scanner.with.batteries.for.a.month,.remove.the.batteries..Batteries.can.leak.chemicals.that.destroy.electronic.circuits.
•. Always.dispose.of.old.batteries.promptly.and.properly..Do.not.bury.or.burn.them.

� �
Powering Your Scanner
You.can.power.your.scanner.with.four AAfour.AA.batteries.(not.supplied), or an external power,.or.an.external.power.source..
Batteries
When.battery.power.is.low,.battery.symbol.flashes and the scanner beeps every 30 seconds..When.battery.power.is.depleted,.the.scanner.turns.itself.off..
For.the.longest.operation.and.best.performance,.use.alkaline.batteries,.available.at.your.local.RadioShack.store,.or.use.RadioShack.1600.mAh.nickel-metal.hydride.(Ni-MH).rechargeable.batteries.
Rechargeable.batteries.last.longer.and.deliver.more.power.if.you.let.them.fully.discharge.once.a.month..To.do.this,.use.the.scanner.until.battery symbol flashes.
Warning: Never.install.non-rechargeable.batteries.in.the.yellow.rechargeable.battery.holder..Non-rechargeable.batteries.can.get.hot.or.explode.if.you.try.to.recharge.them.
To install batteries:
1.. Slide.open.the.battery.compartment.cover.on.the.back.of.the.scanner.
2.. Place.4.AA.batteries.into.the.correct.battery.holder.matching.polarity.symbols.(+./.-):•. Black.–.Alkaline.(non-rechargeable)•. Yellow.–.Rechargeable..
3.. Place.the.battery.holder.into.the.battery.compartment.and.replace.the.cover.
To charge batteries:
1.. Install.rechargeable.batteries.
2.. Connect.an.external.power.source.to.the.PWR DC 9V.jack..Using.the.scanner.while.charging.will.increase.charge.time.
Battery Current Charge.Time
Ni-MH 1600.mAh 16.hours
Ni-Cd 600.mAh 6.hours
Ni-Cd 850.mAh 8.hours
. Do.not.overcharge.batteries..Overcharging.shortens.battery.life..
• Each battery holder fits only one way. Do not.force.it.
•. Use.only.fresh.batteries.of.the.required.size.and.recommended.type..Do.not.mix.old.and.new.batteries,.different.types.(alkaline.or.rechargeable),.or.rechargeable.batteries.of.different.capacities.
•. Remove.old.or.weak.batteries..If.you.will.not.use.the.scanner.with.batteries.for.a.month,.remove.the.batteries..Batteries.can.leak.chemicals.that.destroy.electronic.circuits.
•. Always.dispose.of.old.batteries.promptly.and.properly..Do.not.bury.or.burn.them.
� �
The EPA certified RBRC© Battery Recycling.Seal.on.the.nickel-cadmium.(Ni-Cd).battery.indicates.RadioShack.voluntarily.participates.in.an.industry.
program.to.collect.and.recycle.these.batteries.at.the.end.of.their.useful.life,.when.taken.out.of.service.in.the.United.States.or.Canada..The.RBRC.program.provides.a.convenient.alternative.to.placing.used.Ni-Cd.batteries.into.the.trash.or.the.municipal.waste.stream,.which.may.be.illegal.in.your.area..Please.call.1-800-THE-SHACK.(1-800-843-7422).for.information.on.Ni-Cd.battery.recycling.and.disposal.band/restrictions.in.your.area..RadioShack’s.involvement.in.this.program.is.part.of.the.company’s.commitment.to.preserving.our.environment.and.conserving.our.natural.resources.
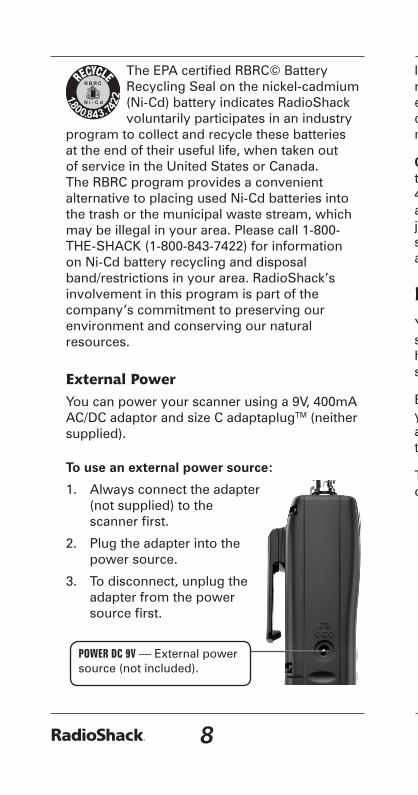
External Power
You.can.power.your.scanner.using.a.9V,.400mA.AC/DC.adaptor.and.size.C.adaptaplugTM.(neither.supplied).
To use an external power source:
1.. Always.connect.the.adapter.(not.supplied).to.the.scanner first.
2.. Plug.the.adapter.into.the.power.source.
3.. To.disconnect,.unplug.the.adapter.from.the.power.source first.
If.you.use.an.external.power.source.for.regular.operation,.install.alkaline.batteries.for.emergencies..Rechargeable.batteries.will.self-discharge,.even.when.not.used,.and.could.have.no.usable.power..
Caution: You.must.use.a.Class.2.power.source.that.supplies.9V.DC.and.delivers.at.least..400.mA..Its.center.tip.must.be.set.to.positive.and its plug must fit the scanner’s PWR DC 9V.jack..Using.an.adaptor.that.does.not.meet.these.specifications could damage the scanner or the adaptor.
Headphones and Speakers
You can plug headphones or an amplified speaker.(neither.included).into.your.scanner’s.headphone.jack..This.automatically.mutes.the.scanner’s.speaker..
Even.though.some.earphones/headphones.let.you.hear.some.outside.sounds.when.listening.at.normal.volume.levels,.they.still.can.present.a.traffic hazard.
To.protect.your.hearing,.follow.these.earphone.or.headphones.guidelines:
•. Do.not.listen.at.extremely.high.volume.levels..Extended.high-volume.listening.can.lead.to.permanent.hearing.loss.
•. Set.the.volume.to.the.lowest.setting.before.listening..Turn.on.the.scanner,.and.adjust.the.volume.to.a.comfortable.level.
•. After.you.set.the.volume,.do.not.increase.it..Over.time,.your.ears.adapt.to.the.volume.level,.so.a.volume.level.that.does.not.cause.discomfort.might.still.damage.your.hearing.
POWER DC 9V.—.External.power.source.(not.included).

� �
The EPA certified RBRC© Battery Recycling.Seal.on.the.nickel-cadmium.(Ni-Cd).battery.indicates.RadioShack.voluntarily.participates.in.an.industry.
program.to.collect.and.recycle.these.batteries.at.the.end.of.their.useful.life,.when.taken.out.of.service.in.the.United.States.or.Canada..The.RBRC.program.provides.a.convenient.alternative.to.placing.used.Ni-Cd.batteries.into.the.trash.or.the.municipal.waste.stream,.which.may.be.illegal.in.your.area..Please.call.1-800-THE-SHACK.(1-800-843-7422).for.information.on.Ni-Cd.battery.recycling.and.disposal.band/restrictions.in.your.area..RadioShack’s.involvement.in.this.program.is.part.of.the.company’s.commitment.to.preserving.our.environment.and.conserving.our.natural.resources.
External Power
You.can.power.your.scanner.using.a.9V,.400mA.AC/DC.adaptor.and.size.C.adaptaplugTM.(neither.supplied).
To use an external power source:
1.. Always.connect.the.adapter.(not.supplied).to.the.scanner first.
2.. Plug.the.adapter.into.the.power.source.
3.. To.disconnect,.unplug.the.adapter.from.the.power.source first.
If.you.use.an.external.power.source.for.regular.operation,.install.alkaline.batteries.for.emergencies..Rechargeable.batteries.will.self-discharge,.even.when.not.used,.and.could.have.no.usable.power..
Caution: You.must.use.a.Class.2.power.source.that.supplies.9V.DC.and.delivers.at.least..400.mA..Its.center.tip.must.be.set.to.positive.and its plug must fit the scanner’s PWR DC 9V.jack..Using.an.adaptor.that.does.not.meet.these.specifications could damage the scanner or the adaptor.
Headphones and Speakers
You can plug headphones or an amplified speaker.(neither.included).into.your.scanner’s.headphone.jack..This.automatically.mutes.the.scanner’s.speaker..
Even.though.some.earphones/headphones.let.you.hear.some.outside.sounds.when.listening.at.normal.volume.levels,.they.still.can.present.a.traffic hazard.
To.protect.your.hearing,.follow.these.earphone.or.headphones.guidelines:
•. Do.not.listen.at.extremely.high.volume.levels..Extended.high-volume.listening.can.lead.to.permanent.hearing.loss.
•. Set.the.volume.to.the.lowest.setting.before.listening..Turn.on.the.scanner,.and.adjust.the.volume.to.a.comfortable.level.
•. After.you.set.the.volume,.do.not.increase.it..Over.time,.your.ears.adapt.to.the.volume.level,.so.a.volume.level.that.does.not.cause.discomfort.might.still.damage.your.hearing.
10 11
Keytones and Keylock
The.scanner.sounds.a.tone.each.time.you.press.a.key..To.prevent.accidental.changes,.you.can.lock.the.keypad..
To set the keytone:
1.. Turn.on.the.scanner..“Multi-system.Trunking.Scanner”.appears.
2.. While.“Multi-system.Trunking.Scanner”.appears,.press.1.to.turn.on.the.keytone.or.2.to.turn.it.off.
To lock the keypad:
1.. Press.FUNC.then.KEY/LIGHT..“Key.locked”.appears briefly and the keypad is locked. When.locked,.the.only.controls.that.operate.are.FUNC,.LIGHT/KEY,.SQ,.and.VOL.
2.. To.unlock.the.keypad,.press.FUNC.then.KEY/LIGHT.again..“Key.unlocked”.appears.
Backlight and Contrast
Your.scanner.features.a.backlit.keypad.and.display.for.easy.viewing..You.can.select.from.three.backlight.modes:
Normal.–.Press.LIGHT.to.activate.the.backlight..
Keypress.–.Press.any.key.on.the.keypad.to.activate.the.backlight.
Ignore.–.Keypress.mode,.but.the.scanner.ignores the function of the first key pressed to activate.the.backlight.
The light remains on for a set time after the last button is pressed.
To turn on the backlight:
1.. Hold.down.LIGHT.until.the.light.turns.on..
2.. To.turn.off.the.backlight,.press.LIGHT.
To change the backlight mode:
1.. Turn.on.the.scanner..“Multi-system.Trunking.Scanner”.appears.
2.. While.“Multi-system.Trunking.Scanner”.appears,.press.LIGHT.
3.. Press..or..to.select.a.backlight.mode.and.duration.(seconds)..
Normal Keypress Ignore
3 K3 I3
5 K5 I5
10 K10 I10
20 K20 I20
4.. Press.ENT.
To change the display contrast:
1.. Press.MAN.
2.. Press.FUNC.then.9..
3.. Press..or..to.select.the.contrast.
4.. Press.ENT.
Squelch and Attenuator
The.squelch.and.attenuator.help.you.control.your.scanner’s.sensitivity..If.you.hear.a.hissing.sound,.the.scanner.will.remain.on.an.active.channel,.even.after.a.disconnect.tone.or.a.stopped.transmission.

1� 1�
If.you.set.the.squelch.precisely.at.the.threshold.where.the.hissing.sound.stops,.the.scanner.may.pick.up.unwanted,.partial,.or.very.weak.transmissions..To.prevent.this,.most.users.prefer.a.position.a.bit.past.the.threshold.
With.the.attenuator.on,.the.scanner.might.not.receive.weak.signals..You.can.reduce.interference.using.two.attenuator.modes:.
•. Global.–.(Default).The.attenuator.setting.is.applied.to.all.channels,.bands,.or.groups..
•. Normal.–.Lets.you.set.the.attenuator.in.each.channel,.band,.or.group..
To set squelch:
1.. Turn.off.the.scanner.and.turn.SQUELCH.fully.counterclockwise.
2.. Turn.on.the.scanner..You.should.hear.a.hissing.sound.
3.. Turn.the.SQUELCH.clockwise.to.decrease.the.scanner’s.sensitivity,.turn.counterclockwise.to.increase.its.sensitivity.
To set the attenuator mode:
1.. To.set.Global.mode,.press.FUNC.and.then.ATT..On.the.display.“G”.appears.”.
2.. To.set.the.attenuator.for.each.channel,.press.FUNC.and.then.ATT..On.the.display.“G”.disappears..To.turn.the.attenuator.on.or.off.for.each.channel:•. On.–.Press.ATT..“A”.appears..•. Off.–.Press.ATT.again..“A”.disappears.”
You cannot set the attenuator while scanning.
Delay
Some.conversations.might.take.several.seconds.between.transmissions..To.avoid.missing.a.reply,.a.delay.is.automatically.set.for.each.channel..The.scanner.stops.for.2.seconds.after.a.transmission.stops.before.it.resumes.scanning.or.searching..
To turn the delay on / off:
1.. Press../DELAY..DLY.appears.if.the.delay.is.on..
2.. To.turn.on.the.delay,.press../DELAY.again..“dly”.appears.if.the.delay.is.off.
Scanner SetupA.frequency,.expressed.in.kHz.or.MHz,.is.the.tuning.location.of.a.station..
Your.scanner.saves.frequencies.to.channels.and.groups.the.channels.into.banks..The.scanner’s.10.banks.each.hold.100.channels.(1,000.channels.total).
The.scanner.is.preset.to.the.most.common.AM.or.FM.receive.modes.for.each.frequency.range..However,.some.amateur.transmissions.may.operate.in.a.different.mode..If.the.transmission.sounds.weak.or.distorted,.you.may.have.the.channel.set.to.the.wrong.receive mode:
AM – Amplitude.Modulation,.primarily.used.for.aircraft,.military,.some.amateur.and.government.transmissions.
FM – Frequency.Modulation,.used.for.most.public.safety.transmissions,.broadcast,.business,.and.amateur.radio.transmissions.
1� 1�
CT – FM.transmissions.with.Continuous.Tone.Coded.Squelch.System.(CTCSS)
DC – FM.transmissions.with.Digital.Coded.Squelch.(DCS)
MO – Motorola.Trunking.System
ED – EDACS.Trunking.System
LT – LTR.Trunking.System
If you change the receive mode using MODE key, the scanner shows the receive mode for small caps (ex. fm, am, ct, or dc). If you want to change the default setting, press FUNC then press MODE.
Defining a Channel
Go.to.www.radioreference.com.for.the.latest.frequency.references.
To define a channel:
1.. Press.MAN.
2.. Enter.the.bank.(0-9).and.channel.number.(00-99).where.you.want.to.store.the.frequency.(Example:.101.for.Bank.1,.Channel.1).
3.. Press.MAN.again..M.and.the.bank.and.channel.number.appear.
4.. Press.PGM..M.changes.to.P.
5.. Use.the.number.keys.to.enter.the.frequency.(including.the.decimal.point)..If.you.make.a.mistake,.press.CL.to.delete.a.single.digit.or.hold.CL.about.2.seconds.to.start.over.
Your scanner automatically rounds to the nearest valid frequency. For example, if you enter 151.553, your scanner rounds to 151.550.
6.. If.necessary,.press.MODE.to.change.the.receiving.mode.
7.. Press.ENT..
. If.the.frequency.is.already.stored.in.the.bank,.“Dupl.Freq..ChXXX”.appears..To.copy.the.duplicate.frequency.anyway,.press.ENT.or.press.CL.to.cancel.
. If.you.made.a.mistake.in.Step.5,.“Invalid.Freq.” briefly appears and the scanner beeps.when.you.press.ENT..Go.back.to.step.5.again.
8.. Press.MAN.again..M.and.the.bank.and.channel.number.appear.
For information about adding text tags to a channel or bank, see “Text Tags” on Page 44.
Copying a Frequency
When.you.copy.a.frequency,.all.the.channel.conditions,.including.mode,.are.also.copied.
To copy a frequency:
1.. Press.TUNE.
2.. Tune.the.frequency.you.want.to.copy..
3.. If.necessary,.press.MODE.to.change.the.receiving.mode.
4.. Press.FUNC.then.ENT..“Bank.9.Store?”.appears.
5.. To.select.a.new.bank,.press.the.bank.number.
6.. Press.ENT..“Channel.Stored!”.appears.briefly.
1� 1�
Notes
. If.the.frequency.is.already.stored.in.the.bank,.“Dupl.Freq..ChXXX”.appears..To.copy.the.duplicate.frequency.anyway,.press.ENT.or.press.CL.to.cancel.
7.. Press.MAN.
Deleting Saved Frequencies
To delete a saved frequency:
1.. Press.MAN.
2.. Use.the.number.keys.to.enter.the.frequency’s.channel.number.
3.. Press.MAN.
4.. Press.PGM..M.changes.to.P.
5.. Press.FUNC.
6.. Press.CL..“0.0000”.appears.
To delete all saved frequencies in a bank:
1.. Press.PGM..M.changes.to.P.
2.. Press.FUNC.
3.. Use.the.number.keys.to.enter.the.bank.number..
4.. Press.FUNC.then.CL..“Clear.entire.bank?”.appears.
5.. Press.1.to.clear.all..Any.other.key.aborts.
CTCSS AND DCS
CTCSS.and.DCS.allow.multiple.users.to.share.a.single.radio.frequency.without.hearing.each.other’s.transmissions..Your.scanner.features.an.advanced,.DSP-based.CTCSS.and.DCS.decoder.that.displays.CTCSS.or.DCS.codes.when.available.
CTCSS, DCS, and digital voice
transmissions operate independently of each other. Your scanner will not decode digital voice transmissions for CTCSS or DCS channels. Use FM mode for mixed analog and digital voice transmissions.
To define a channel’s CTCSS or DCS code:
1.. Press.PGM..M.changes.to.P.
2.. Navigate.to.the.channel.
3.. Enter.a.conventional.frequency.
4.. Press.MODE.until.the.desired.mode.(CT.or.DC).appears.with.the.default.search.code.value..
5.. Press.FUNC,.then.MODE..
6.. Use.the..or..to.select.the.desired.CTCSS.or.DCS.code..
You can enter the code manually. The scanner automatically fills in the code. See Appendix B for a list of codes.
6.. Press.ENT.
To save a CTCSS or DCS code:
Press.ENT.while.the.code.appears.
Scanner Cloning
You.can.transfer.the.programmed.data.to.and.from.another.PRO-164.(or.PRO-163).scanner.using.a.connecting.cable.which.has.1/8-inch.stereo.(TRS).phone.plugs.on.both.ends.(not.supplied)..
You.can.also.upload.or.download.the.programmed.data.to.or.from.a.PC.using.an.optional.USB.cable.and.application.software.available.through.your.local.RadioShack.store.
1� 1�
. If.the.frequency.is.already.stored.in.the.bank,.“Dupl.Freq..ChXXX”.appears..To.copy.the.duplicate.frequency.anyway,.press.ENT.or.press.CL.to.cancel.
7.. Press.MAN.
Deleting Saved Frequencies
To delete a saved frequency:
1.. Press.MAN.
2.. Use.the.number.keys.to.enter.the.frequency’s.channel.number.
3.. Press.MAN.
4.. Press.PGM..M.changes.to.P.
5.. Press.FUNC.
6.. Press.CL..“0.0000”.appears.
To delete all saved frequencies in a bank:
1.. Press.PGM..M.changes.to.P.
2.. Press.FUNC.
3.. Use.the.number.keys.to.enter.the.bank.number..
4.. Press.FUNC.then.CL..“Clear.entire.bank?”.appears.
5.. Press.1.to.clear.all..Any.other.key.aborts.
CTCSS AND DCS
CTCSS.and.DCS.allow.multiple.users.to.share.a.single.radio.frequency.without.hearing.each.other’s.transmissions..Your.scanner.features.an.advanced,.DSP-based.CTCSS.and.DCS.decoder.that.displays.CTCSS.or.DCS.codes.when.available.
CTCSS, DCS, and digital voice
transmissions operate independently of each other. Your scanner will not decode digital voice transmissions for CTCSS or DCS channels. Use FM mode for mixed analog and digital voice transmissions.
To define a channel’s CTCSS or DCS code:
1.. Press.PGM..M.changes.to.P.
2.. Navigate.to.the.channel.
3.. Enter.a.conventional.frequency.
4.. Press.MODE.until.the.desired.mode.(CT.or.DC).appears.with.the.default.search.code.value..
5.. Press.FUNC,.then.MODE..
6.. Use.the..or..to.select.the.desired.CTCSS.or.DCS.code..
You can enter the code manually. The scanner automatically fills in the code. See Appendix B for a list of codes.
6.. Press.ENT.
To save a CTCSS or DCS code:
Press.ENT.while.the.code.appears.
Scanner Cloning
You.can.transfer.the.programmed.data.to.and.from.another.PRO-164.(or.PRO-163).scanner.using.a.connecting.cable.which.has.1/8-inch.stereo.(TRS).phone.plugs.on.both.ends.(not.supplied)..
You.can.also.upload.or.download.the.programmed.data.to.or.from.a.PC.using.an.optional.USB.cable.and.application.software.available.through.your.local.RadioShack.store.

1� 1�
The.application.software.is.also.available.online.at.www.starrsoft.com.and.www.scancat.com.
To clone the scanner data:
1.. Turn.on.both.scanners.
2.. Connect.the.connecting.cable.to.each.scanner’s.PC/IF.jack..**.CLONE.MODE.**.appears.
3.. Press.. “Confirm to send data?” appears.
4.. Press.1.to.send.the.data.to.the.other.unit.or.press.any.other.key.to.cancel..
5.. To.exit.the.clone.mode,.remove.the.cable.
“CLONE MODE Incorrect Model” appears if you connect a scanner other than a PRO-164 (or PRO-163).
SearchingYou.can.search.for.transmissions.using.the.preprogrammed.search.bank,.which.is.divided.into.eight.search.bands..
Seek Search
When.Seek.Search.is.active,.the.scanner.stops.on active frequencies for five seconds and then resumes.searching.automatically..
To activate Seek Search:
1.. Press.FUNC.then.7..“Seek.Search.ON”.appears briefly and “S” appears on the
display.
2.. To.turn.off.Seek.Search,.press.FUNC.then.7.again. “Seek Search OFF” appears briefly.
Search Banks
To search preprogrammed search banks:
1.. Press.SRCH.repeatedly.to.select.a.bank..
Bank BandSR0 Marine
SR1 CB
SR2 FRS/GMRS/MURS
SR3 Public.Safety
SR4 Aircraft
SR5 Amateur.Bands
SR6 Railroad
SR7 Limit.search.(User.changeable)
. For.SR0-SR2,.you.can.directly.select.a.channel.or.search.through.the.band.
. SR3.to.SR5.banks.contain.several.groups..To.turn.off.a.group,.press.the.group.number;.the.group.number.disappears..To.turn.the.group.back.on,.press.the.group.number.again.
2.. Adjust.the.Squelch..After.the.set.delay,.the.scanner.starts.searching..When.the.scanner.finds an active frequency, it stops searching.
3.. To.pause.while.searching,.press.PSE..The.scanner.stops.searching.and.***.PAUSED.***.appears..To.resume,.press.PSE.again.
4.. If.the.scanner.stops.on.an.unwanted.frequency,.you.can.press.L/OUT.to.lock.out.the.frequency.
PC/IF.—.PC.interface.cable.for.use.with.your.computer.

�0 �1
To search banks SR0-SR2:
1.. Press.SRCH.repeatedly.to.select.SR0,.SR1,.or.SR2..
2.. To.search.the.entire.band,.press.FUNC.then.SRCH..“MAN”.(Manual.select).or.“SRCH”.(searches.through.the.band).appears..The.scanner.starts.searching.while.“SRCH”.appears.on.the.display..When.the.scanner.finds an active frequency, it stops searching.
. Press.FUNC.then.SRCH.again.to.return.to.the.previous.mode.
3.. To.select.a.channel.while.“MAN”.appears.on.the.display,.press.a.channel.number.or.use..or..
4.. Adjust.the.Squelch..
5.. If.the.scanner.stops.on.an.unwanted.frequency,.you.can.press.L/OUT.to.lock.out.the.frequency..For.more.information,.see.Locking.Out.Frequencies....
6.. To.pause.while.searching,.press.PSE..The.scanner.stops.searching.and.***.PAUSED.***.appears..To.resume,.press.PSE.again.
Zeromatic
While.searching,.the.scanner.stops.if.a.transmission.triggers.the.squelch.setting...A.narrow-band.FM.transmission.can.have.a.deviation.of.+/-.5.Khz,.and.the.actual.total.bandwidth,.including.the.tails.of.the.sidebands,.can.be.even.greater..However,.search.intervals.smaller.than.that.can.stop.your.scanner.short.of.the.correct.(center).frequency..
The.Zeromatic.function.allows.the.scanner.to.find the correct center frequency for search banks.SR3,.SR4,.SR5,.SR6.and.SR7..When.active,.Zeromatic.automatically.tunes.to.the.
frequency.that.is.the.closest.step.increment.to.the.correct.center.frequency.
To activate Zeromatic:
1.. Press.FUNC.then.0..“Zeromatic.ON.”.appears briefly, then ZM appears.
2.. To.turn.Zeromatic.off,.press.FUNC.then.0.again..“ZM”.changes.to.“zm.”
Programming a Search Range
To program the search range of Bank SR7:
1.. Repeatedly.press.SRCH.to.select.SR7.
2.. Press.PGM.then.SRCH..“Enter.SR7.Search.Range.Limits”.appears..L.blinks.for.the.lower-limit.of.the.range.
3.. Use.the.number.keys.to.enter.the.lower-limit.frequency.(including.the.decimal.point)..
4.. Press.ENT..U.appears.
5.. Use.the.number.keys.to.enter.the.upper-limit.frequency.(including.the.decimal.point),.then.press.ENT.
If either entered frequency is incorrect, “Invalid Freq” appears briefly.
6.. Press.SRCH.to.start.searching.
7.. Adjust.the.Squelch..After.the.set.delay,.the.scanner.starts.searching..When.the.scanner.finds an active frequency, it stops searching.
Signal Stalker II
Signal.Stalker.II.provides.a.powerful.tool.to.rapidly.detect,.monitor.and.save.frequencies.of.nearby.or.high-power.transmissions..Signal.Stalker.II.resembles.more.expensive.portable.frequency.counters,.but.provides.many.
�� ��
Notes
advantages.over.typical.portable.frequency.counters..
Signal.Stalker.II.is.more.sensitive.than.portable.frequency.counters.and.will.detect.transmissions.at.a.greater.distance..Signal.Stalker.II.rapidly.searches.the.RF.spectrum.in.1.MHz.segments..If.it.detects.a.signal,.Signal.Stalker II searches in finer steps until the signal source.is.found.
Signal.Stalker.II.can.search.all.frequencies,.or you can define frequency ranges, to avoid ranges.with.constant.activity,.such.as.paging.or.broadcast.transmitters..
To use Signal Stalker II:
1.. Hold.the.Signal.Stalker.button.( ).for.approximately.1.second..
2.. To.change.the.scanned.band.(All.Band.or.Police/Fire),.press.FUNC.then.Signal.Stalker.
( )..For.a.list.of.Signal.Stalker.Bands,.see..Appendix.D.
3.. To.turn.off.a.bank,.press.the.bank.or.group.number.while.Signal.Stalker.II.is.active.
4.. To.turn.off.Signal.Stalker,.hold.the.Signal.
Stalker.button.( ).again.
Priority mode is not available while using the Signal Stalker II.
Special Signal Stalker
Special.Signal.Stalker.II.divides.the.frequency.range.by.1.MHz.segments..If.you.lock.out.5.frequencies.within.1.MHz.segment,.the.scanner.will.skip.that.segment.in.subsequent.sweeps.
To use Special Signal Stalker II:
1.. Press.FUNC.
2.. Use..or..to.select.“Sp..Stalker”.appears.for.Special.Signal.Stalker.II.
3.. To.turn.off.Special.Signal.Stalker.II,.press.FUNC.and.then..or..again.
Locking Out Frequencies
When.you.lock.out.frequencies.during.a.search,.the.scanner.continues.searching,.but.ignores.the.locked.out.frequencies..You.can.lock.out.up.to.50.frequencies.in.each.bank..If.you.try.to.lock.out.more,.“L/O.Memory.Full!”.appears.
While.using.Signal.Stalker.II,.you.can.lock.out.150.frequencies.if.searching.all.bands.and.50.frequencies.while.searching.PubSafety.frequencies..If.you.lock.out.5.frequencies.within.a.1.MHz.segment,.the.scanner.will.skip.that.segment.in.subsequent.sweeps.
If you lock out all the frequencies in a search bank and only that search bank is activated, “All ranges Locked out!” appears and the scanner does not search.
Signal Stalker II still performs a fine step search for locked out signals. Signal Stalker II will not stop on the signal, but scan may take longer.
To lock out a frequency:
When.the.scanner.stops.on.a.frequency,.press.L/OUT..
To review and unlock frequencies:
1.. Press.SRCH.to.enter.search.mode.
�� ��
2.. Press.FUNC.then.L/OUT. The first locked-out.frequency.and.lockout.list.appear..If.the.search.bank.has.no.locked-out.frequencies,.“No.Lockout”.appears.
3.. Press..or..to.review.the.list..The.current.position.and.the.total.locked-out.number.also.appear.as.“Lockout.XX.of.YY.”.(Example:.Lockout.10.of.30.)..
4.. (Optional).To.unlock.a.frequency,.select.the.frequency.then.press.CL.
5.. Press.FUNC.then.L/OUT.again.to.exit.
To unlock all frequencies in a search bank:
1.. Press.SRCH.
2.. Select.the.search.bank.
3.. Press.FUNC.then.press.L/OUT..The.Lockout.list.appears.
4.. Press.FUNC.then.6..“Clear.entire.list?”.appears..
5.. Press.1..“List.cleared”.appears..Pressing.any.other.key.cancels.the.clearing.
Saving Found Frequencies
To save a frequency found during a search:
1.. When.the.scanner.stops.on.a.frequency,.press.FUNC.then.PGM..“Store.in.ChXXX?”.appears and the frequency flashes.
2.. To.change.the.target.channel,.enter.the.bank.and.channel.number..
3.. Press.ENT..“Channel.Stored!”.appears.briefly, then the search resumes.
ScanningScanning.sequentially.checks.all.saved.channels.for.activity..You.must.save.frequencies.into.channels.to.scan..The.scanner.does.not.scan.empty.channels.or.unsaved.frequencies.
You.can.increase.the.scanning.speed.by.locking.out.channels.with.continuous.transmissions,.such.as.a.weather.channel.or.turning.off.entire.banks..Turning.off.a.bank.prevents.the.scanner.from.scanning.any.channels.within.the.bank..You.cannot.turn.off.all.banks..There.must.be.at.least.one.active.bank.to.scan.
To scan:
1.. Press.SCAN..The.scanner.checks.all.unlocked.channels.in.the.active.banks.
2.. To.change.the.scan.direction,.press..or..
3.. To.lock.out.a.channel,.when.the.scanner.stops.on.the.channel,.press.L/OUT..The.scan.resumes.
4.. To.turn.off.a.bank,.press.the.bank’s.number.so.the.bank’s.number.disappears..To.turn.on.a.bank,.press.the.number.key.so.the.bank’s.number.appears.
5.. To.stop.on.a.channel,.press.PSE.
Locking Out Channels
You.can.increase.the.scanning.speed.by.locking.out.channels.with.continuous.transmissions..
To locked out a channel:
1.. Press.MAN..
2.. Enter.the.bank.and.channel.number.or.use..or..to.select.the.channel..

�� ��
3.. Press.L/OUT..On.the.display,.“lo”.changes.to.“LO.”.
4.. To.unlock.a.locked-out.channel,.press.L/OUT.again.
To review all locked out channels:
1.. Press.MAN..
2.. Repeatedly.pressing.FUNC.and.then.L/OUT.to.view.each.locked-out.channel..
3.. To.unlock.a.channel,.press.L/OUT..“LO”.changes.to.“lo.”
4. When you finish reviewing locked-out channels,.press.MAN.
You can manually select any channel in a bank, even in turned-off banks.
Priority Scanning
In.addition.to.the.1,000.programmable.memory.channels,.your.scanner.has.one.Priority.channel..When.Priority.is.turned.on,.the.scanner.checks.the.Priority.channel.every.2.seconds..This.lets.you.scan.without.missing.a.transmission.on.the.Priority.channel..
Priority scanning does not operate if the scanner stops on a trunking transmission. Priority check seems random during peak hours.
To turn on the priority feature:
1.. Press.PRI.so.“pri”.changes.“PRI”.on.the.display.during.scanning..
2.. To.turn.off.the.priority.feature,.press.PRI.again.
To make an existing channel a Priority channel:
1.. Press.MAN.
2.. Use.the.number.keys.to.enter.the.bank.and.channel.number..
The Priority channel cannot be a trunking channel (MOT, ED, or LTR).
3.. Press.MAN.
4.. Press.FUNC,.then.hold.PRI.until.the.display.blinks.
To modify the Priority channel:
1.. Press.PGM.
2.. Press.PRI.
3.. Use.the.number.keys.to.enter.the.frequency.
4.. Press.ENT.
. If.the.frequency.is.incorrect,.“Invalid.Freq”.appears briefly.
Weather Alerts
The.Federal.Communications.Commission.(FCC).has.allocated.channels.for.use.by.the.National.Oceanic.and.Atmospheric.Administration.(NOAA). NOAA broadcasts Specific Area Message.Encoding.(SAME).alerts.that.include.digitally.encoded.data.about.the.severity.of.the.alert.
Regulatory agencies in other countries have also allocated channels for use by their weather reporting authorities.
If.you.program.a.weather.channel.as.the.Priority.channel,.your.scanner.can.detect.the.1050.Hz.weather.alert.tone..All.alerts.are.received.(FIPS.settings.are.ignored),.and.the.scanner.stays.on.

�� ��
Notes
the.Priority.channel.only.if.the.scanner.detects.a.weather.alert.
To perform a weather scan:
Press.WX..Your.scanner.scans.through.the.weather.bands.then.stops.on.the.next.available.weather.broadcast.
To program a weather channel into priority channel:
1.. Press.WX.
2.. Select.the.weather.channel.
3.. Press.FUNC.and.then.PRI.
SAME Standby Mode
SAME.alerts.include.FIPS.codes.to.identify.areas,.established.by.the.US.Census.bureau..You.can.set.your.scanner.to.alert.for.all.areas.or.limit weather alerts to up to 10 specific areas by FIPS.code..
The National Weather Service maintains a current list of FIPS codes at www.nws.noaa.gov/nwr/.
To program a FIPS code:
1.. Press.WX.and.listen.to.identify.the.weather.station.with.the.strongest.signal.
2.. Press.FUNC,.and.then.PGM.to.access.the.FIPS.code.entry.table.
3.. Use..or..to.select.the.desired.FIPS.code.positions.(0-9).
4.. Use.the.number.keys.to.enter.the.FIPS.code..The.format.of.a.FIPS.code.is:
Subdivisions State.Code County.Code
0-9
(0=entire.area)
01-50
(00=all.states)
XXX
(000=all.counties)
Example:.048439
(0=All;.48=Texas;.439=Tarrant.County)
5.. (Optional).To.label.the.code,.press.TEXT.and.use.the.letter.buttons.to.enter.text..
6.. Press.ENT.to.store.the.code..Repeat.this.process.to.program.additional.FIPS.codes..
7.. Press.L/OUT to lock out or enable specific FIPS.entries.
8.. Press.WX.to.exit.the.FIPS.code.entry.table.
To review stored FIPS codes:
1.. Press.WX.then.a.number.key..
2.. Press.L/OUT.to.change.the.lockout.status.
The scanner sounds an alert or beep when it receives the SAME code. If you do not stop the alert (or beep) for five minutes, the alert stops and the scanner beeps every ten seconds. If the scanner receives a new message after five minutes, it sounds the alert or beep. Press any key except LIGHT to stop the alert and allow the scanner to receive a new alert signal before the five minute time out.
For information about adding text tags to a FIPS code, see “Text Tags” on Page 44.
�� ��
the.Priority.channel.only.if.the.scanner.detects.a.weather.alert.
To perform a weather scan:
Press.WX..Your.scanner.scans.through.the.weather.bands.then.stops.on.the.next.available.weather.broadcast.
To program a weather channel into priority channel:
1.. Press.WX.
2.. Select.the.weather.channel.
3.. Press.FUNC.and.then.PRI.
SAME Standby Mode
SAME.alerts.include.FIPS.codes.to.identify.areas,.established.by.the.US.Census.bureau..You.can.set.your.scanner.to.alert.for.all.areas.or.limit weather alerts to up to 10 specific areas by FIPS.code..
The National Weather Service maintains a current list of FIPS codes at www.nws.noaa.gov/nwr/.
To program a FIPS code:
1.. Press.WX.and.listen.to.identify.the.weather.station.with.the.strongest.signal.
2.. Press.FUNC,.and.then.PGM.to.access.the.FIPS.code.entry.table.
3.. Use..or..to.select.the.desired.FIPS.code.positions.(0-9).
4.. Use.the.number.keys.to.enter.the.FIPS.code..The.format.of.a.FIPS.code.is:
Subdivisions State.Code County.Code
0-9
(0=entire.area)
01-50
(00=all.states)
XXX
(000=all.counties)
Example:.048439
(0=All;.48=Texas;.439=Tarrant.County)
5.. (Optional).To.label.the.code,.press.TEXT.and.use.the.letter.buttons.to.enter.text..
6.. Press.ENT.to.store.the.code..Repeat.this.process.to.program.additional.FIPS.codes..
7.. Press.L/OUT to lock out or enable specific FIPS.entries.
8.. Press.WX.to.exit.the.FIPS.code.entry.table.
To review stored FIPS codes:
1.. Press.WX.then.a.number.key..
2.. Press.L/OUT.to.change.the.lockout.status.
The scanner sounds an alert or beep when it receives the SAME code. If you do not stop the alert (or beep) for five minutes, the alert stops and the scanner beeps every ten seconds. If the scanner receives a new message after five minutes, it sounds the alert or beep. Press any key except LIGHT to stop the alert and allow the scanner to receive a new alert signal before the five minute time out.
For information about adding text tags to a FIPS code, see “Text Tags” on Page 44.
�0 �1
Notes
To enter SAME standby:
1.. Press.FUNC,.and.then.WX..The.scanner.will.monitor.the.selected.weather.radio.station.for.alerts.with.FIPS.codes.that.match.the.codes.you.entered.in.the.FIPS.entry.table..
2.. To.exit.SAME.standby,.press.FUNC,.and.then.WX.
The scanner searches the weather frequencies while SAME standby mode when squelch is off.
To test the weather alert:
1.. Press.WX..Your.scanner.scans.through.the.weather.bands.
2.. Set.the.Squelch.to.the.lowest.setting.so.that.you.hear.static.
3.. Press.FUNC.and.then.WX..“SAME.Standby”.appears.
4.. Hold.ENT.for.about.2.seconds..The.display.indicates.the.type.of.message,.and.the.scanner.sounds.an.alert.or.series.of.beeps.
5.. Press.any.key.except.LIGHT.to.stop.testing.
Skywarn
Skywarn.is.an.organized.group.of.trained.weather.observers..Using.Skywarn,.you.can.hear.trained.observers.in.your.area.call.in.official reports to a control station that relays those.reports.to.NOAA.and.other.emergency.agencies.
Before.using.this.feature,.save.local.Skywarn.frequencies.for.your.area.into.Channel.999..
To use Skywarn:
Hold.the.Skywarn.button.( )..“SKY”.appears.
If.the.skywarn.channel.is.empty,.“Not.programmed”.appears.
MonitoringWhen.monitoring,.the.scanner.remains.on.a.single.channel..
Your scanner features a power save circuit that allows the scanner to “sleep” briefly while waiting for a call on a monitored channel.
To monitor a channel:
1.. Press.MAN..
2.. Use.the.number.keys.to.enter.the.channel.number.and.press.MAN.
To find a frequency to monitor:
1.. Press.TUNE..The.currently-tuned.frequency.and.***.PAUSED.***.appear.
2.. (Optional).Use.the.number.keys.to.change.the.frequency.and.press.ENT.
3.. Press.PSE..The.scanner.searches.for.a.frequency..To.change.the.tune.direction,.press..or.. When the scanner finds an active.frequency,.it.stops..
4.. Press.PSE.to.monitor.the.frequency..
The transmission signal level is indicated by the 5 dots.
�0 �1
To enter SAME standby:
1.. Press.FUNC,.and.then.WX..The.scanner.will.monitor.the.selected.weather.radio.station.for.alerts.with.FIPS.codes.that.match.the.codes.you.entered.in.the.FIPS.entry.table..
2.. To.exit.SAME.standby,.press.FUNC,.and.then.WX.
The scanner searches the weather frequencies while SAME standby mode when squelch is off.
To test the weather alert:
1.. Press.WX..Your.scanner.scans.through.the.weather.bands.
2.. Set.the.Squelch.to.the.lowest.setting.so.that.you.hear.static.
3.. Press.FUNC.and.then.WX..“SAME.Standby”.appears.
4.. Hold.ENT.for.about.2.seconds..The.display.indicates.the.type.of.message,.and.the.scanner.sounds.an.alert.or.series.of.beeps.
5.. Press.any.key.except.LIGHT.to.stop.testing.
Skywarn
Skywarn.is.an.organized.group.of.trained.weather.observers..Using.Skywarn,.you.can.hear.trained.observers.in.your.area.call.in.official reports to a control station that relays those.reports.to.NOAA.and.other.emergency.agencies.
Before.using.this.feature,.save.local.Skywarn.frequencies.for.your.area.into.Channel.999..
To use Skywarn:
Hold.the.Skywarn.button.( )..“SKY”.appears.
If.the.skywarn.channel.is.empty,.“Not.programmed”.appears.
MonitoringWhen.monitoring,.the.scanner.remains.on.a.single.channel..
Your scanner features a power save circuit that allows the scanner to “sleep” briefly while waiting for a call on a monitored channel.
To monitor a channel:
1.. Press.MAN..
2.. Use.the.number.keys.to.enter.the.channel.number.and.press.MAN.
To find a frequency to monitor:
1.. Press.TUNE..The.currently-tuned.frequency.and.***.PAUSED.***.appear.
2.. (Optional).Use.the.number.keys.to.change.the.frequency.and.press.ENT.
3.. Press.PSE..The.scanner.searches.for.a.frequency..To.change.the.tune.direction,.press..or.. When the scanner finds an active.frequency,.it.stops..
4.. Press.PSE.to.monitor.the.frequency..
The transmission signal level is indicated by the 5 dots.

�� ��
To set a default tuning frequency:
1.. Press.MAN..
2.. (Optional).Use.the.number.keys.to.enter.the.frequency.number.
3.. Press.FUNC,.then.TUNE..The.scanner.saves.the.frequency..For.example,.if.you.save.145.31000.MHz,.when.you.press.TUNE,.the.scanner.starts.tuning.at.145.31000.MHz.
Trunking SetupInstead of transmitting on a specific frequency, trunking.systems.choose.one.of.several.frequencies.during.a.2-way.radio.transmission.and.simultaneously.transmit.a.Talk.Group.ID.that identifies the 2-way radio user. This allows trunking.systems.to.allocate.fewer.frequencies.to.multiple.2-way.radio.users..
Defining a Trunking BankYou can define any of the 10 banks as a trunking bank,.but.each.bank.can.only.scan.for.one.system:.Motorola,.EDACS.(GE/Ericsson),.or.LTR.(EF.Johnson)..
Trunking banks can contain both trunking and non-trunking channels.
To define a Trunking Bank:
1.. Press.PGM,.then.press.TRUNK.to.enter.the.ID.program.mode.
2.. Press.FUNC,.then.use..or..to.select.a.bank..
3.. Repeatedly.press.MODE.to.select.a.trunking.mode.(Motorola,.EDACS,.or.LTR).
4.. Press.PGM.
Trunking Modes
In.Closed.mode,.the.scanner.stops.only.on.transmissions.with.saved.and.unlocked.Talk.Group.IDs..This.lets.you.focus.a.scan.on.the.frequencies you have identified, ignoring other transmissions..
In.Open.mode,.the.scanner.stops.for.transmissions.on.any.unlocked.channel..This.lets.you.search.for.Talk.Group.IDs.that.you.can.then.save..
While.scanning,.“–”.appears.for.Closed.mode.and.“+”.appears.for.Open.mode.under.the.channel.storage.bank’s.number..When.the.scanner.stops.on.a.channel,”OPEN”.or.“CLOSED”.appears.
To set Open or Closed mode for a bank:
1.. Press.MAN.
2.. Use..or..to.select.a.bank.
3.. Press.FUNC.then.DELAY..“Bank.OPEN”.or.“Bank.CLOSED”.appears.
Motorola Trunking Setup
Motorola systems can allocate as few as five frequencies.to.up.to.several.thousand.groups.of.users.in.three.categories:.
• Type I – User groups are assigned to fleets. To scan, you must program a fleet map into the.scanner.
•. Type.II.–.The.Talk.Group.ID.contains.4.or.5.digit.numbers.
•. Hybrid.–.Combines.Type.I.and.Type.II.formats.

�� ��
Fleet Maps
For.Motorola.Type.I.and.hybrid.systems,.you.must program a fleet map before saving Talk Group.IDs.
To program a fleet map:
1.. Press.PGM.then.TRUNK.
2.. Press.FUNC,.then.press..or..to.select.the.bank.
3.. If.necessary,.repeatedly.press.MODE.to.select.“Motorola.”
4.. Press.FUNC,.then.press.8..“Size.Code.Setting”.appears,.with.Block.0.selected.
5.. Enter.the.size.code.for.Block.0,.supplied.with.the.Type.I.system.information,.or.try.one of the following common fleet maps.
Size.Codes
BLOCKS
0 1 2 3 4 5 6 7
1 S11 S11 S11 S11 S11 S11 S11 S11
2 S4 S4 S4 S4 S4 S4 S4 S4
3 S4 S4 S4 S4 S4 S4 S12 ––
4 S12 –– S4 S4 S4 S4 S4 S4
5 S4 S4 S12 –– S4 S4 S4 S4
6 S3 S10 S4 S4 S12 –– S12 ––
7 S10 S10 S11 S4 S4 S4 S4 S4
8 S1 S1 S2 S2 S3 S3 S4 S4
9 S4 S4 SO SO SO SO SO SO
10 SO SO SO SO SO SO S4 S4
11 S4 SO SO SO SO SO SO SO
12 SO SO SO SO SO SO SO S4
13 S3 S3 S11 S4 S4 SO SO SO
14 S4 S3 S10 S4 S4 S4 S12 ––
15 S4 S4 S4 S11 S11 SO S12 ––
16 S3 S10 S10 S11 SO SO S12 ––
For Motorola Type II, enter 15.
6.. Press.ENT..The.next.block.appears.
7.. Repeat.steps.5-6.for.each.block..If.you.make.a.mistake,.press.CL.and.enter.the.correct.size.code.
Base and Offset Frequencies
To.receive.Motorola.VHF.and.UHF.system.transmissions,.you.must.program.applicable.base.and.offset.frequencies..In.the.800.MHz.trunking.band,.you.can.select.a.base.frequency.(normal.or.offset),.but.in.the.900.MHz.trunking.band,.you.do.not.need.to.set.the.base.frequency.
You.can.get.information.about.base.and.offset.frequencies.from.www.trunkscanner.com.
UHF-Lo (406-512 MHz) To program Motorola base and offset frequencies:
1.. Press.PGM.then.TRUNK.to.enter.the.ID.program.mode.
2.. Press.FUNC,.then.press..or...The.bank.number.increases.or.decreases.by.one..If.you.hold.down..or.,.the.bank.number.increases.or.decreases.continuously.
3.. If.necessary,.repeatedly.press.MODE.to.select.“Motorola.”
4.. Press.FUNC.then.2..The.screen.displays.the.Base,.Offset,.and.Step.with.the.B.in.Base.blinking.
5.. If.necessary,.use.the.number.keys.to.enter.a.new.Base.frequency.and.press.ENT..The.O.in.Offset.blinks.
�� ��
6.. If.necessary,.use.the.number.keys.to.enter.a.new.Offset.frequency.and.press.ENT..The.S.in.Step.blinks.
If you try to program an offset frequency in the UHF-Hi bands (806-960 MHz), the scanner ignores the entry.
7.. While.the.S.in.Step.blinks,.repeatedly.press..or..to.select.the.step.number:.5.0,.6.25,.10.0,.12.5,.15.0,.18.75,.20.0,.25.0,.30.0,.31.25,.35.0,.37.5,.40.0,.43.75,.or.50.0.kHz,.then.press.ENT.
8.. Press.PGM.
UHF-Hi (806-960 MHz) To program 800 MHz Motorola trunking:
1.. Press.PGM.then.TRUNK.to.enter.the.ID.program.mode.
2.. Press.FUNC,.then.press..or...The.bank.number.increases.or.decreases.by.one..If.you.hold.down..or.,.the.bank.number.increases.or.decreases.continuously.
3.. If.necessary,.repeatedly.press.MODE.to.select.“Motorola.”
4.. Press.FUNC.then.3..NORMAL.appears.
5.. Press..or..to.select.NORMAL.or.SPLINTER.and.press.ENT..If.you.are.uncertain.about.the.base.frequency,.use.NORMAL..
. The.base.frequency.in.NORMAL.is.851.0125.MHz..The.base.frequency.in.SPLINTER.is.851.0000.MHz....If.you.cannot.receive.with.the.NORMAL.setting,.change.to.SPLINTER..
EDACS Trunking Setup
EDACS.(GE/Ericsson).systems.transmit.Talk.
Group.ID.data.on.a.dedicated.control.channel..Scanning.requires.clear.reception.of.the.control.channel.at.all.times,.so.EDACS.systems.generally.have.a.smaller.usable.area..You.can.manually.select.the.data.channel,.but.an.external.antenna.can.greatly.improve.EDACS.scanning..If.you.are.programming.frequencies.for.an.EDACS.sysstem,.you.must.store.them.in.the.Logical.Channel.Number.order.(usually.listed.as.LCN#).
LTR Trunking Setup
LTR.systems,.assign.each.frequency.a.Home.Repeater.(HR).number,.and.are.frequently.programmed.with.unique.ID.codes.for.each.radio..LTR.Talk.Group.IDs.are.organized.in.a.specific order, and to scan, you must program the.frequencies.in.HR.order..LTR.systems.are.used.primarily.by.businesses,.such.as.taxicabs,.delivery.trucks,.and.repair.services.
LTR.systems.use.a.Home.Repeater.as.part.of.their.Talk.Group.ID.
To save a correct Home Repeater:
1.. Save.the.LTR.channels.in.any.order..
2.. Set.the.bank.to.Open.mode..
3.. Manually.select.LT.channels.and.watch.the.LTR.data.on.the.display..
. Your.scanner.displays.the.LTR.Talk.Group.ID.and.a.number.preceded.by.“R.”.The.“R”.number.is.the.Home.Repeater.number.for.the.transmission..
4.. The.assigned.Home.Repeater.channel.must.equal.the.Home.Repeater.number..For.example,.R12.must.be.programmed.into.Channel.12.

�� ��
Searching for Talk Group IDs
If.you.tune.the.scanner.to.an.active.Motorola.control.channel,.the.Motorola.System.ID.and.the.approximate.control.channel.message.decode.success.rate.appears..This.helps.you.identify.the.system.and.the.reception.quality..When.the.scanner.decodes.control.channel.data.from.a.Motorola.system,.COTRL.appears.on.the.display..
To search for Talk Group IDs:
1.. Set.the.bank.to.Open.mode.
2.. Press.SCAN..The.scanner.scans.through.all.unlocked.channels.in.the.active.banks.
3.. When.the.scanner.stops.on.a.transmission,.press.TRUNK..The.scanner.displays.the.ID.location:
Sub-bank. ID.Location
0-4 00-29
Example:.2-01
If the ID has already been saved, “ID was saved” appears.
If you try to store more than 150 talk group IDs in a bank, “Memory Full!” appears.
Saving a Talk Group ID
Each.of.the.10.banks.contains.5.sub-banks.that.each.hold.30.Talk.Group.IDs..(You.can.save.up.to.1,500.Talk.Group.IDs.).When.the.scanner.receives.a.trunked.transmission,.it.searches.the.associated.sub-bank.for.the.Talk.Group.ID.to.decode.data.for.Motorola,.EDACS.(GE/Ericsson),.and.LTR.(EF.Johnson).systems..
To define a Talk Group ID:
1.. Press.PGM,.then.press.TRUNK.to.enter.the.ID.program.mode.
2.. Press.FUNC,.then.use..or..to.select.a.bank..
3.. Repeatedly.press.MODE.to.select.a.trunking.mode.(Motorola,.EDACS,.or.LTR).
4.. Repeatedly.press.TRUNK.to.select.the.sub-bank.
5.. Press..or..to.select.the.location.where.to.store.the.Talk.Group.ID.
6.. Use.the.number.and.decimal.point.keys.to.enter.the.Talk.Group.ID:
. For.ED.Talk.Group.IDs,.you.can.enter.either.a.decimal.or.AFS.code..The.default.setting.is.decimal.ID.entry..
. To.use.the.AFS.code,.press.FUNC.then.2,.“AFS.Format”.appears.for.about.2.seconds..You.can.then.enter.the.AFS.code.
. If.you.make.a.mistake,.“Invalid.ID.value”.appears.when.you.press.ENT..Go.back.to.Step.3.
. If.you.entered.an.ID.that.is.already.stored.in.same.bank,.“Dupl..ID.of.X-XX.appears.”.To.store.the.ID.code,.press.ENT..To.cancel,.press.CL.
7.. Press.ENT..
For information about adding text tags to a Talk Group ID, see “Text Tags” on Page 44.
Deleting Talk Group IDs
You.can.delete.an.individual.Talk.Group.ID.or.all.Talk.Group.IDs.in.a.bank.

�0 �1
To delete a Talk Group ID:
1.. Press.PGM.then.TRUNK.
2.. Press.FUNC,..or..to.select.ID.memory.
3.. Press.FUNC.then.CL.
To delete ALL talk group IDs in a bank:
1.. Press.PGM.
2.. Press.TRUNK.to.enter.a.Talk.Group.ID.memory.mode.
3.. Select.a.Talk.Group.ID.bank.using.FUNC,..or..
4.. Press.FUNC.then.6..“Clear.entire.list?.Press.1.to.clear.all,.any.other.key.aborts”.appears.
5.. To.clear.the.Talk.Group.IDs,.Press.1..To.cancel.the.deletion,.press.any.key.except.1.
Saving Trunking Channels
Trunking channels are defined using the same.procedure.for.non-trunking.channels..In.each.bank,.you.can.mix.channel.modes,.including.conventional,.but.you.can.scan.only.one.trunking.mode.at.a.time,.either.EDACS,.Motorola,.or.LTR.
Because.Motorola.control.frequencies.change.daily,.you.should.save.all.the.control.frequencies.in.the.same.bank..If.you.do.not.know.the.control.frequency,.save.all.the.Motorola.frequencies.in.the.same.bank.
EDACS.frequencies.are.assigned.Logical.Channel.Numbers.(LCN).and.organized.in.a.specific order. To scan correctly, you must program.the.frequencies.in.LCN.order,.starting.with.Memory.01.
Trunked modes (MO, ED, and LT) can only be selected for frequencies above 137 MHz that use trunking operations.
For information about adding text tags to a channel, see “Text Tags” on Page 44.
Trunk ScanningIn.each.bank,.you.can.mix.conventional.channels.and.frequencies.in.a.bank..However,.you.can.scan.only.one.trunking.mode.at.a.time,.either.EDACS,.Motorola,.or.LTR.
To.focus.on.trunk.scanning,.during.a.normal.scan,.you.turn.off.banks.that.contain.only.conventional.channels.
For.Motorola.channels,.your.scanner.displays.the.Talk.Group.ID.memory.location,.received.frequency,.voice.channel.(VC),.and.the.Motorola.ID.number.
To.change.the.scanning.direction,.press..or..
Your scanner automatically mutes the audio while it decodes control channel data. However, we recommend you turn SQ clockwise and leave it set to a point just after the hiss stops. This lets the scanner quickly acquire the data channel.
For Motorola trunking systems, more than one talk group can transmit at a time. If you manually tune the scanner, you will hear the talk group on that channel, but the display will alternate between all active Talk Group IDs.
�� ��
For EDACS and Motorola (above 406 MHz range), the scanner monitors the control channel between each transmission to identify talk groups. For some Motorola (under 512 MHz range) and LTR systems, the scanner uses the subaudible data sent with each transmission to identify talk groups.
Trunking Delay
You.can.set.a.Talk.Group.ID.delay.separately.from.the.channel.delay..When.active,.the.scanner.checks.the.Talk.Group.ID.for.the.delay.time.when.a.transmission.ends.
To set a Talk Group ID delay:
1.. Press.FUNC.then../DELAY.while.you.are.programming.the.Trunk.Group.ID..“ENTER.key.saves..2.0.seconds”.appears.
2.. Use..or..to.set.ID.Delay:.None,.0.5,.1.0,.1.5,.2.0,.2.5,.3.0,.3.5,.or.4.0.seconds.
3.. Press.ENT.
Locking Out Talk Group IDs
You.can.only.lock.out.Talk.Group.IDs.when.the.scanner.is.in.the.Closed.mode.
To lock out Talk Group IDs:
1.. Press.PGM.then.TRUNK.
2.. Press.FUNC,..or..to.move.to.the.desired.bank.
3.. Press..or..to.select.the.ID.
4.. Press.L/OUT.to.lock.out.the.ID..“lo”.changes.to.“LO.”
5.. To.remove.the.lockout.from.a.trunking.ID,.
manually.select.the.ID.memory,.and.press.L/OUT..LO.changes.to.lo.
You cannot clear all lockouts from a talk group at the same time.
To review locked-out Talk Group IDs:
1.. Press.PGM.then.TRUNK.
2.. Press.FUNC..Then L/OUT. The first locked out.ID.appears..If.the.ID.memory.bank.has.no.locked-out.ID,.you.hear.the.low.beep.tone.
3.. Press..or..to.scroll.through.the.list.
4.. Press.PGM.to.exit.
Turning Off Sub-Banks
To turn off a sub-bank:
1.. Press.TRUNK.repeatedly.to.select.the.desired.sub-bank.
2.. Press.FUNC.then.1.to.turn.the.sub-bank.on.if.it.is.off.or.off.if.it.is.on.
To turn off a sub-bank while scanning:
1.. When.the.scanner.stops.on.a.transmission,.press.FUNC.
2.. Press.TRUNK..The.display.indicates.which.sub-bank.is.turned.on.or.off..The.active.sub-bank.number.appears.
3.. Press.FUNC.and.the.number.of.the.sub-bank.you.desire.to.turn.on.or.off..For.example.to.turn.sub-bank.4.on.or.off,.press.FUNC..Then.press.4.
This function activates when the receiving channel bank is Closed mode.
�� ��
Talk Group ID Hold
You.can.set.your.scanner.to.follow.a.trunking.signal.that.you.want.to.track.during.scanning..
To set Talk Group ID Hold:
1.. While.the.scanner.is.stopped.on.a.voice.channel.(VC.appears),.hold.down.TRUNK.until.“ID.hold.ON”.appears.
. When.the.scanner.receives.a.transmission,.the.“S”.on.the.display.changes.to.“H.”
2.. To.release.ID.hold,.press.SCAN.or.TRUNK.
Scanner Maintenance•. Handle.the.scanner.carefully;.do.not.drop.
it..
•. Use.and.store.the.scanner.only.in.normal.temperature.environments..
•. Keep.the.scanner.dry;.if.it.gets.wet,.wipe.it.dry.immediately..
•. Keep.the.scanner.away.from.dust.and.dirt,.and.wipe.it.with.a.damp.cloth.occasionally.to.keep.it.looking.new.
Text Tags
While.scanning,.if.the.scanner.stops.on.a.channel.with.a.saved.text.tag,.the.text.appears.on.the.display..Otherwise,.the.Talk.Group.ID.appears.on.the.display.
You can define text tags to identify channels, Talk.Group.IDs,.banks.or.FIPS.Codes.
To define a Text Tag:
1. To define a text tag for a channel:
•. Press.MAN.•. Enter.the.bank.and.channel.number.•. Press.PGM..M.changes.to.P.
2. To define a text tag for a Talk Group ID:•. Press.PGM.•. Press.TRUNK.•. Press.FUNC.then..or..to.select.the.
desired.bank.•. Press.TRUNK.to.select.the.desired.sub-
bank.•. Press.or.hold.down..or..to.select.the.
desired.group.ID.
3. To define a text tag for a bank:•. Press.PGM.•. Press.FUNC.then.press.bank.number..
“Bank.X.(0.through.9).selected”.appears.
4. To define a text tag for a FIPS code, first access the FIPS code definition. See ”SAME Standby.Mode”.on.Page.28.
5.. Press.TEXT..
6.. Enter.the.text.using.the.text.keys.(up.to.16.characters).
. When.you.press.a.key,.the.associated.letters.appear.on.the.screen..Press.the.corresponding.number..For.example,.when.you.press.ABC,.A,.B,.and.C.appear.on.the.display..To.select.A,.press.1..To.select.B,.press.2..To.select.C,.press.3.
. To.enter.a.number,.press.1,.then.press.the.number.key.
. To.enter.lowercase.character.or.second-set.character.for.the.0.key,.press.the.number.key.and.then.press.FUNC.
7.. If.you.make.a.mistake,.press..or..to.move.to.the.character.you.want.to.change.
8.. Press.ENT.to.save.the.text.

�� ��
To display the Talk Group ID:
1.. If.the.scanner.displays.the.text.tag.for.a.transmission,.press.TEXT..The.ID.code.appears.
2.. Press.TEXT.again.to.cancel.
Troubleshooting
Problem Solution
The scanner is not working at all.
Cause:
The.AC.or.DC.adaptor.might.not.be.connected.
The.batteries.might.be.dead.or.need.to.be.recharged.
If.the.scanner.does.not.operate.when.you.connect.a.DC.adaptor,.the.DC.adaptor.socket.might.be.dirty.
Be.sure.the.adaptor’s.barrel.plug.is.fully.inserted.into.the.PWR.DC.9V.jack..The.center.tip.of.the.adaptor’s.barrel.plug.must.be.set.to.positive..
Recharge.the.rechargeable.batteries.or.replace.the.standard.batteries.
Unplug.the.DC.adaptor.from.the.power.source.and.clean.the.socket,.or.check.the.adaptor’s.internal.fuse.
Problem Solution
The scanner does not receive any stations or reception is poor.
Cause:
Antenna.might.not.be.connected.correctly.
Squelch.setting.might.be.too.sensitive.causing.it.to.pick.up.unwanted,.partial.or.weak.transmissions.
Antenuator.might.be.on.so.your.scanner.might.not.receive.weak.signals.
The.scanner.might.need.to.be.initialized.
Check.the.antenna.
.Check.the.squelch...Check.the.Attenuator...Turn.the.scanner.off.then.on.again,.or.initialize.the.scanner.
The scanner is on but does not scan.
Cause:
The.squelch.might.not.be.adjusted.correctly..
There.might.only.be.one.channel.or.no.channels.stored.in.the.scanner..
The.keylock.might.be.turned.on..
Turn.SQ.clockwise..
Save.more.frequencies.into.channels..
Turn.off.keylock.
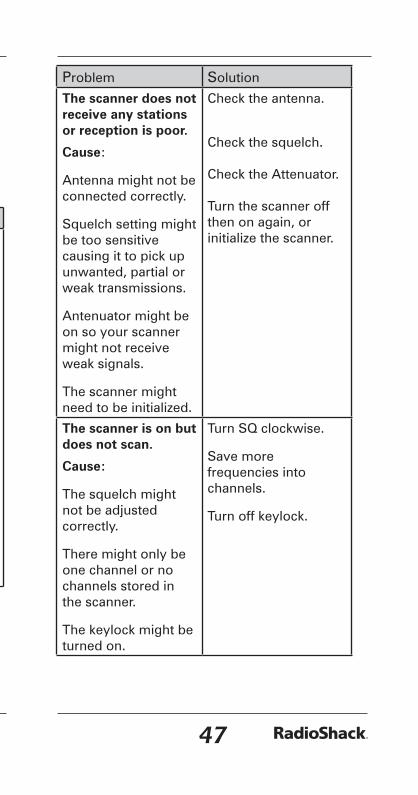

�� ��
Problem Solution
Error message appears when trying to upload or download from a computer.
Cause:
Your.computer.is.using.Windows.XP.and.does.not.have.the.necessary.USB.cable.driver.
Download.and.install.the.“Windows.XP.Driver.to.resolve.PC.connection error” file from.your.scanner’s..Product.Support.page.or.the.Software.Download.page.on..www.RadioShack.com.
Then.make.your.connection.and.try.again..Be.sure.the.correct.COM.port.is.selected.in.device.manager.
Birdie Frequencies
All.scanners.have.signals.created.inside.the.scanner’s.receiver..These.birdie.frequencies.can.interfere.with.transmissions.on.the.same.frequencies..If.the.interference.is.not.severe,.you.might.be.able.to.turn.SQ.clockwise.to.omit.the.birdie.
To find the birdies:
1.. Disconnect.the.antenna.and.moving.it.away.from.the.scanner..Make.sure.that.no.other.nearby.radio.or.TV.sets.are.turned.on.near.the.scanner..
2.. Start.a.search.of.every.frequency.range.from.its.lowest.frequency.to.the.highest..When.the.search.stops,.often.without.any.sound,.this.is.a.birdie..
3.. Make.a.list.of.all.the.birdies.in.your.scanner.for.future.reference.
Initializing the Scanner
If.the.scanner’s.display.locks.up.or.does.not.work.properly.after.you.connect.a.power.source.or.install.batteries,.you.might.need.to.initialize.it.
Caution: This procedure clears the scanner’s memory. Initialize the scanner only after trying all other methods to correct issues.
To initialize the scanner:
1.. Turn.off.the.scanner,.then.turn.it.on.again..“Multi-system.Trunking.Scanner”.appears.
2.. While.“Multi-system.Trunking.Scanner”.appears,.press.0.
3.. Press.1.
4.. Press.ENT..“Initializing.please.stand.by”.appears.for.about.5.seconds..When.the.initialization.is.complete,.M000.appears.on.the.second.line.of.the.display..Bank.0.Ch.00.appears.
Do not turn off the scanner until the initialization is complete.
Service and Repair
If.your.scanner.is.not.performing.as.it.should,.take.it.to.your.local.RadioShack.store.for.assistance..To.locate.your.nearest.RadioShack,.use.the.store.locator.feature.on.RadioShack’s.web.site.(www.radioshack.com),.or.call.1-800-The.Shack.(800-843-7422).and.follow.the.menu.options..Modifying.or.tampering.with.the.scanner’s.internal.components.can.cause.a.malfunction.and.might.invalidate.its.warranty.and.void.your.FCC.authorization.to.operate.it.
�0 �1
Scanning LegallyYour.scanner.covers.frequencies.used.by.many different groups including police and fire departments,.ambulance.services,.government.agencies,.private.companies,.amateur.radio.services,.military.operations,.pager.services,.and.wireline.(telephone.and.telegraph).service.providers..It.is.legal.to.listen.to.almost.every.transmission.your.scanner.can.receive..However,.there.are.some.transmissions.you.should.never.intentionally.listen.to..These.include:
•. telephone.conversations.(cellular,.cordless,.or.other.private.means.of.telephone.signal.transmission)
•. pager.transmissions•. any.scrambled.or.encrypted.transmissions
According.to.the.Electronic.Communications.Privacy.Act.(ECPA),.as.amended,.you.are.subject to fines and possible imprisonment for.intentionally.listening.to,.using,.or.divulging.the.contents.of.such.a.transmission.unless.you.have.the.consent.of.a.party.to.the.communication.(unless.such.activity.is.otherwise.illegal).This.scanner.is.designed.to.prevent.reception.of.illegal.transmissions,.in.compliance.with.the.law.which.requires.that.scanners.be.manufactured.in such a way as to not be easily modifiable to pick.up.those.transmissions..Do.not.open.your.scanner’s case to make any modifications that could.allow.it.to.pick.up.transmissions.that.it.is.not.legal.to.listen.to..Doing.so.could.subject.you.to.legal.penalties..In.some.areas,.mobile.use.of.this.scanner.is.unlawful.or.requires.a.permit..Check.the.laws.in.your.area..It.is.also.illegal.in.many.areas.to.interfere with the duties of public safety officials
by.traveling.to.the.scene.of.an.incident.without.authorization.We.encourage.responsible,.legal.scanner.use.
FCC Notice
This.equipment.has.been.tested.and.found.to.comply.with.the.limits.for.a.scanning.receiver,.pursuant.to.Part.15.of.the.FCC.Rules..These.limits.are.designed.to.provide.reasonable.protection.against.harmful.interference.in.a.residential.installation..This.equipment.generates,.uses.and.can.radiate.radio.frequency.energy.and,.if.not.installed.and.used.in.accordance.with.the.instructions,.may.cause.harmful.interference.to.radio.communications.However,.there.is.no.guarantee.that.interference.will.not.occur.in.a.particular.installation..If.this.equipment.does.cause.harmful.interference.to.radio.or.television.reception,.which.can.be.determined.by.turning.the.equipment.off.and.on,.the.user.is.encouraged.to.try.to.correct.the.interference.by.one.or.more.of.the.following.measures:.•...Reorient.or.relocate.the.receiving.antenna..•...Increase.the.separation.between.the.equipment.and.receiver..•...Connect.the.equipment.into.an.outlet.on.a.circuit.different.from.that.to.which.the.receiver.is.connected.
This.device.complies.with.Part.15.of.the.FCC.Rules..Operation.is.subject.to.the.following.two.conditions:.1....This.device.may.not.cause.harmful.interference..2....This.device.must.accept.any.interference.received,.including.interference.that.may.cause.undesired.operation.
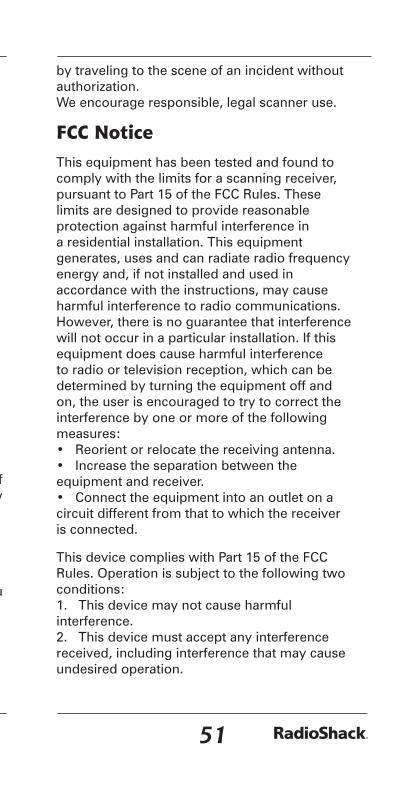

�� ��
ReferencesAppendix A: GlossaryFrequency.–.The.signal.(expressed.in.MHz).used by broadcasting radios. To find active frequencies,.you.can.use.frequency.guides.available.from.your.local.RadioShack.store,.frequency.lists.posted.on.the.Internet,.or.your.scanner’s.search.function.
Bank.–.A.storage.unit.for.a.group.of.channels..A.channel.contains.one.frequency,.and.a.bank.can.hold.up.to.100.channels.
Channel.–.A.programmable.memory.locations.for.a.single.frequency.
Talk Group ID.–.A.simultaneous.trunking.transmission that identifies 2-way radio users. This.allows.trunking.systems.to.allocate.a.few.frequencies.to.multiple.2-way.radio.users..
Sub-bank.–.Each.bank.has.an.associated.Talk.Group.ID.sub-bank..In.Closed.mode,.the.scanner.only.stops.if.a.transmission.has.a.Talk.Group.ID.saved.in.the.associated.Talk.Group.ID.sub-bank..In.Open.Mode,.the.scanner.stops.on.all.transmissions,.except.those.you.lock.out.
Appendix B: Search BanksNote:.All.scanners.tune.by.steps..Your.RadioShack.scanner.uses.steps.consistent.with.the.latest.US.or.worldwide.standards..If.you.enter.a.non-valid.step.frequency,.any.scanner.will.tune.to.the.next.step..Some.scanner.designs.do.this.without.showing.the.correct.step.in.the.display..This.scanner.will.show.the.actual.tuned.frequency.in.the.display..Because.steps.are.so.close.together,.the.audio.quality.will.not.be.affected.by.the.offset.
Search.bank:.SR0.Marine.bandReceive.mode:.FM
Ch. Freq..(MHz)
Ch. Freq..(MHz)
Ch. Freq..(MHz)
01 156.0500 21 157.0500 72 156.6250
05 156.2500 22 157.1000 73 156.6750
06 156.3000 23 157.1500 74 156.7250
07 156.3500 24 157.2000.161.8000
77 156.8750
08 156.4000 25 157.2500.161.8500
78 156.9250
09 156.4500 26 157.3000.161.9000
79 156.9750
10 156.5000 27 157.3500.161.9500
80 157.0250
11 156.5500 28 157.4000.162.0000
81 157.0750
12 156.6000 63 156.1750 82 157.1250
13 156.6500 64 156.2250.160.8250
83 157.1750
14 156.7000 65 156.2750 84 157.2250.161.8250
15 156.7500 66 156.3250 85 157.2750.161.8750
16 156.8000 67 156.3750 86 157.3250.161.9250
17 156.8500 68 156.4250 87 157.3750.161.9750
18 156.9000 69 156.4750 88 157.4250
19 156.9500 70 156.5250
20 157.0000.161.6000
71 156.5750
Note:.Some.Marine.frequencies.assing.two.frequencies.to.one.channel..For.example,.157.000.and.161.600.are.assigned.in.Channel.20.Search.bank:.SR1.CB.bandReceive.mode:.AM
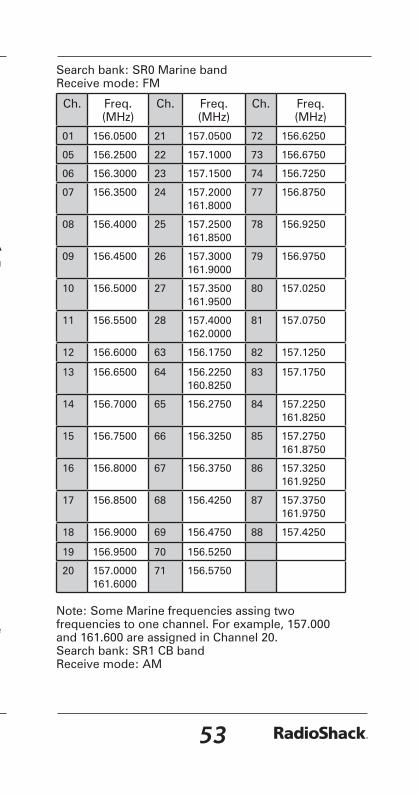
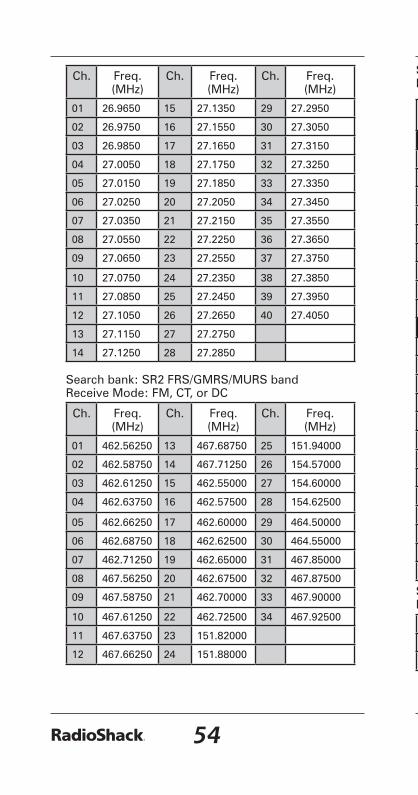
�� ��
Ch. Freq..(MHz)
Ch. Freq..(MHz)
Ch. Freq..(MHz)
01 26.9650 15 27.1350 29 27.2950
02 26.9750 16 27.1550 30 27.3050
03 26.9850 17 27.1650 31 27.3150
04 27.0050 18 27.1750 32 27.3250
05 27.0150 19 27.1850 33 27.3350
06 27.0250 20 27.2050 34 27.3450
07 27.0350 21 27.2150 35 27.3550
08 27.0550 22 27.2250 36 27.3650
09 27.0650 23 27.2550 37 27.3750
10 27.0750 24 27.2350 38 27.3850
11 27.0850 25 27.2450 39 27.3950
12 27.1050 26 27.2650 40 27.4050
13 27.1150 27 27.2750
14 27.1250 28 27.2850
Search.bank:.SR2.FRS/GMRS/MURS.bandReceive.Mode:.FM,.CT,.or.DC
Ch. Freq..(MHz)
Ch. Freq..(MHz)
Ch. Freq..(MHz)
01 462.56250 13 467.68750 25 151.94000
02 462.58750 14 467.71250 26 154.57000
03 462.61250 15 462.55000 27 154.60000
04 462.63750 16 462.57500 28 154.62500
05 462.66250 17 462.60000 29 464.50000
06 462.68750 18 462.62500 30 464.55000
07 462.71250 19 462.65000 31 467.85000
08 467.56250 20 462.67500 32 467.87500
09 467.58750 21 462.70000 33 467.90000
10 467.61250 22 462.72500 34 467.92500
11 467.63750 23 151.82000
12 467.66250 24 151.88000
Search.bank:.SR3.Public.Safety.bandReceive.Mode:.FM,.CT,.or.DC
Freq..(MHz) Step.(kHz)
Freq..(MHz) Step.(kHz)
Group.0 Group.2
33.420-33.980 10 453.0375-453.9625 6.25
37.020-37.420 10 458.0375-458.9625 6.25
39.020-39.980 10 460.0125-460.6375 6.25
42.020-42.940 10 462.5500-462.7250 6.25
44.620-45.860 10 465.0125-465.6375 6.25
45.880 467.5625-467.7125 6.25
45.900 Group.3
45.940-46.060 10 764.003125-766.996875 3.125
46.080-46.500 10 773.003125-775.996875 3.125
Group.1 794.003125-796.996875 3.125
151.820-151.940 7.5 803.003125-805.996875 3.125
153.770-154.130 7.5 Group.4
154.145-154.445 7.5 851.0125-852.0125 12.5
154.570 852.0375-853.0375 12.5
154.600 853.0625-854.0625 12.5
154.650-154.770 7.5 854.0875-855.0875 12.5
154.785-154.950 7.5 855.1125-856.1125 12.5
155.010-155.370 7.5 856.1375-857.1375 12.5
155.415-155.700 7.5 857.1625-858.1625 12.5
155.730-156.210 7.5 858.1875-859.1875 12.5
158.730-159.210 7.5 859.2125-860.2125 12.5
166.250 860.2375-860.9875 12.5
170.150 866.0125-868.9875 12.5
Search.bank:.SR4.AircraftReceive.mode:.AM,.FM
Group Frequency.(MHz) Step.(kHz)
0 108.000-117.99166 8.33
1 118.000-136.99166 8.33
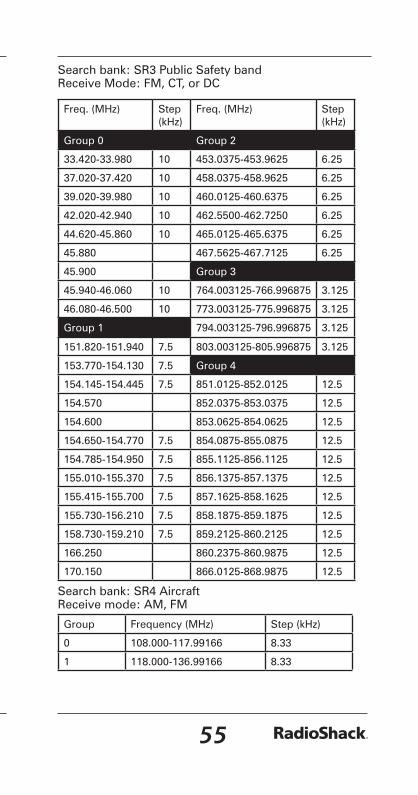

�� ��
Group Frequency.(MHz) Step.(kHz)
2 138.000-143.9875 12.5
148.000-150.7875 12.5
3 225.000-379.975 25
380.000-400.000 12.5
Search.bank:.SR5.Amateur.bandReceive.mode:.FM,.CT,.or.DC
Group Frequency.(MHz) Step.(kHz)
0 28.0000-29.7000 5
1 50.0000-54.0000 5
2 144.0000-148.0000 5
3 222.0000-224.9950 5
4 420.0000-450.0000 5
5 902.000-927.9875 12.5
6 1240.0000-1300.0000 6.25
Search.bank:.SR6.RailroadReceive.mode:.FM,.CT,.or.DC
Frequency.(MHz) Step.(kHz)
159.810-161.5650 7.5
Search.bank:.SR7.Programmable.limit.searchReceive.mode:.FM,.AM,.CT,.or.DC
Appendix C: CTCSS / DCS Codes
You.can.program.any.of.the.following.codes:
CTCSS Codes:
67.0.Hz 94.8.Hz 131.8.Hz 171.3.Hz 203.5.Hz
69.3.Hz 97.4.Hz 136.5.Hz 173.8.Hz 206.5.Hz
71.9.Hz 100.0.Hz 141.3.Hz 177.3.Hz 210.7.Hz
74.4.Hz 103.5.Hz 146.2.Hz 179.9.Hz 218.1.Hz
77.0.Hz 107.2.Hz 151.4.Hz 183.5.Hz 225.7.Hz
79.7.Hz 110.9.Hz 156.7.Hz 186.2.Hz 229.1.Hz
82.5.Hz 114.8.Hz 159.8.Hz 189.9.Hz 233.6.Hz
85.4.Hz 118.8.Hz 162.2.Hz 192.8.Hz 241.8.Hz
88.5.Hz 123.0.Hz 165.5.Hz 196.6.Hz 250.3.Hz
91.5.Hz 127.3.Hz 167.9.Hz 199.5.Hz 254.1.Hz
DCS Codes:
006 050 125 174 255 343 445 526 703
007 051 131 205 261 346 446 532 712
015 053 132 212 263 351 452 546 723
017 054 134 214 265 356 454 565 731
021 065 141 223 266 364 455 606 732
023 071 143 225 271 365 462 612 734
025 072 145 226 274 371 464 624 743
026 073 152 243 306 411 465 627 754
031 074 155 244 311 412 466 631
032 114 156 245 315 413 503 632
036 115 162 246 325 423 506 654
043 116 165 251 331 431 516 662
047 122 172 252 332 432 523 664
Appendix D: Signal Stalker BandsSignal.Stalker.can.search.the.following.bands:
All BandBnk. Freq..(MHz) Bnk. Freq..(MHz)
0 25.000-54.000 5 406.000-470.000
1 108.000-136.99166 6 470.0125-512.000
2 137.000-174.000 7 764.000-805.996875
3 216.0025-299.975 8 806.000-868.9875
4 300.000-405.9875 9 894.000-960,.1240-1300.000

�� ��
PubSafety Band
Freq..(MHz) Step.(kHz)
Freq..(MHz) Step.(kHz)
Group.0 Group.2
33.420-33.980 10 453.0375-453.9625 6.25
37.020-37.420 10 458.0375-458.9625 6.25
39.020-39.980 10 460.0125-460.6375 6.25
42.020-42.940 10 462.5500-462.7250 6.25
44.620-45.860 10 465.0125-465.6375 6.25
45.880 467.5625-467.7125 6.25
45.900 Group.3
45.940-46.060 10 764.003125-766.996875 3.125
46.080-46.500 10 773.003125-775.996875 3.125
Group.1 794.003125-796.996875 3.125
151.820-151.940 7.5 803.003125-805.996875 3.125
153.770-154.130 7.5 Group.4
154.145-154.445 7.5 851.0125-852.0125 12.5
154.570 852.0375-853.0375 12.5
154.600 853.0625-854.0625 12.5
154.650-154.770 7.5 854.0875-855.0875 12.5
154.785-154.950 7.5 855.1125-856.1125 12.5
155.010-155.370 7.5 856.1375-857.1375 12.5
155.415-155.700 7.5 857.1625-858.1625 12.5
155.730-156.210 7.5 858.1875-859.1875 12.5
158.730-159.210 7.5 859.2125-860.2125 12.5
166.250 860.2375-860.9875 12.5
170.150 866.0125-868.9875 12.5
Appendix E: Talk Group Format
Motorola
For.Motorola Type I,.enter.the.block.number,.fleet number and subfleet number.
Fleet.No. Subfleet No.
XXX XX
Example:.XXX-XX
Motorola Type II.talk.group.IDs.are.4-.or.5-digit.numbers,.divisible.by.16..
EDACS
Enter.either.a.four-digit.decimal.number.from.0001.to.2047.
Agency Fleet Subfleet (AFS).numbers.range.from.00-001.to.15-157..The.default.EDACS.setting.is.decimal..
To use AFS format:
1.. Press.FUNC.then.2..“AFS.Format”.appears.briefly.
2.. Enter.the.AFS.number:
Agency.No. Fleet.No. Subfleet No.
XX XXXX XXXX
Example:.XXXXXX-XXXX
LTR
Enter.the.area.code,.home.repeater.and.user.ID.
Area.Code Home.Repeater User.ID
0-1 01-20 000-254
Example:.010123
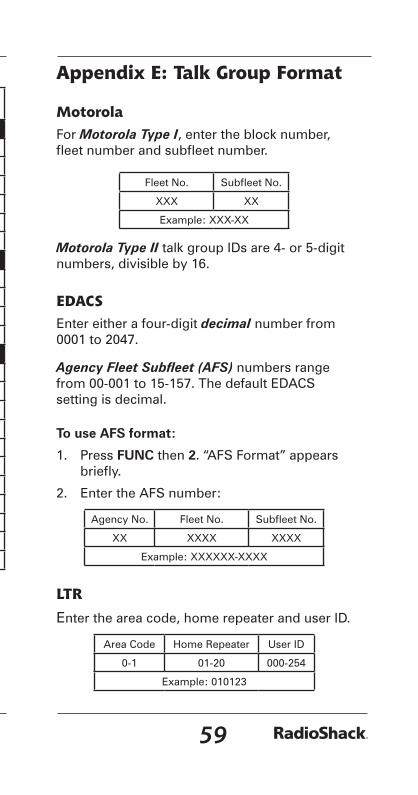
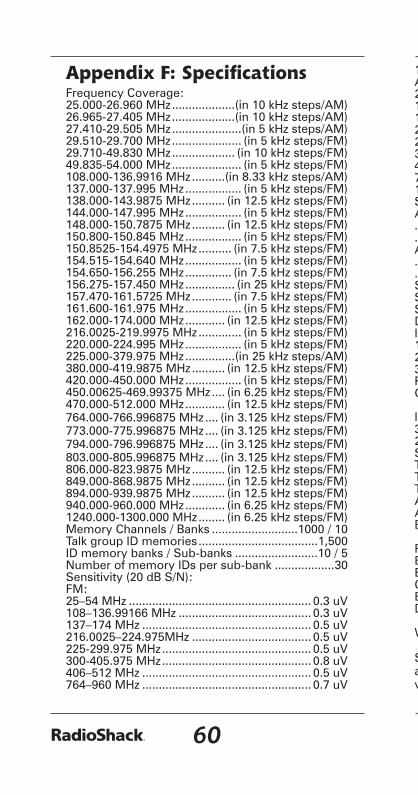
�0 �1
Appendix F: SpecificationsFrequency.Coverage:25.000-26.960.MHz....................(in.10.kHz.steps/AM)26.965-27.405.MHz....................(in.10.kHz.steps/AM)27.410-29.505.MHz......................(in.5.kHz.steps/AM)29.510-29.700.MHz...................... (in.5.kHz.steps/FM)29.710-49.830.MHz.................... (in.10.kHz.steps/FM)49.835-54.000.MHz...................... (in.5.kHz.steps/FM)108.000-136.9916.MHz...........(in.8.33.kHz.steps/AM)137.000-137.995.MHz.................. (in.5.kHz.steps/FM)138.000-143.9875.MHz........... (in.12.5.kHz.steps/FM)144.000-147.995.MHz.................. (in.5.kHz.steps/FM)148.000-150.7875.MHz........... (in.12.5.kHz.steps/FM)150.800-150.845.MHz.................. (in.5.kHz.steps/FM)150.8525-154.4975.MHz........... (in.7.5.kHz.steps/FM)154.515-154.640.MHz.................. (in.5.kHz.steps/FM)154.650-156.255.MHz............... (in.7.5.kHz.steps/FM)156.275-157.450.MHz................ (in.25.kHz.steps/FM)157.470-161.5725.MHz............. (in.7.5.kHz.steps/FM)161.600-161.975.MHz.................. (in.5.kHz.steps/FM)162.000-174.000.MHz............. (in.12.5.kHz.steps/FM)216.0025-219.9975.MHz.............. (in.5.kHz.steps/FM)220.000-224.995.MHz.................. (in.5.kHz.steps/FM)225.000-379.975.MHz................(in.25.kHz.steps/AM)380.000-419.9875.MHz........... (in.12.5.kHz.steps/FM)420.000-450.000.MHz.................. (in.5.kHz.steps/FM)450.00625-469.99375.MHz..... (in.6.25.kHz.steps/FM)470.000-512.000.MHz............. (in.12.5.kHz.steps/FM)764.000-766.996875.MHz..... (in.3.125.kHz.steps/FM)773.000-775.996875.MHz..... (in.3.125.kHz.steps/FM)794.000-796.996875.MHz..... (in.3.125.kHz.steps/FM)803.000-805.996875.MHz..... (in.3.125.kHz.steps/FM)806.000-823.9875.MHz........... (in.12.5.kHz.steps/FM)849.000-868.9875.MHz........... (in.12.5.kHz.steps/FM)894.000-939.9875.MHz........... (in.12.5.kHz.steps/FM)940.000-960.000.MHz............. (in.6.25.kHz.steps/FM)1240.000-1300.000.MHz......... (in.6.25.kHz.steps/FM)Memory.Channels./.Banks...........................1000./.10Talk.group.ID.memories.....................................1,500ID.memory.banks./.Sub-banks..........................10./.5Number.of.memory.IDs.per.sub-bank...................30Sensitivity.(20.dB.S/N):FM:25–54.MHz........................................................ 0.3.uV108–136.99166.MHz......................................... 0.3.uV137–174.MHz.................................................... 0.5.uV216.0025–224.975MHz..................................... 0.5.uV225-299.975.MHz.............................................. 0.5.uV300-405.975.MHz.............................................. 0.8.uV406–512.MHz.................................................... 0.5.uV764–960.MHz.................................................... 0.7.uV
1240–1300.MHz................................................ 0.7.uVAM:25–54.MHz........................................................... 1.uV108–136.99166.MHz............................................ 1.uV137–174.MHz.................................................... 1.5.uV216.0025–224.975MHz..................................... 1.5.uV225-299.975.MHz................................................. 2.uV300-405.975.MHz................................................. 3.uV406–512.MHz....................................................... 2.uV764–960.MHz....................................................... 2.uV1240–1300.MHz................................................... 3.uVSelectivity:All.AM.and.FM.(except.AM.25.–.27.995.MHz)..............................................................6.dB.+/-7.kHz.........................................................-50.dB.+/-13.kHzAM.25.–.27.995.MHz.............................................................-6.dB.+/-4.kHz...........................................................-50.dB.+/-6.kHzSpurious.Rejection.(at.154.1.MHz.FM)............. 40.dBScanning.Rate...........Up.to.60.Channels.per.SecondSearch.Rate.....................Up.to.78.Steps.per.SecondDelay.Time..................................................2.secondsIntermediate.Frequencies.(IF):1st............................................................... 380.8.MHz2nd............................................................... 21.4.MHz3rd...................................................................455.kHzPriority.Sampling........................................2.secondsOperating.Temperature........................... 14.to.140°.F. (-10.to.60°.C)IF.Rejection380.8.MHz.at.154.1.MHz.................................... 60.dB21.4.MHz.at.154.1.MHz.................................... 100.dBSquelch.Sensitivity:Threshold.(FM.and.AM)................................... 0.5.uVTight.(FM).......................................................... 25.dBTight.(AM).......................................................... 20.dBAntenna.Impedance.....................................50.OhmsAudio.Output.Power.(10%.THD)..................170.mWBuilt-in.Speaker........................1.3/8.Inches.(36.mm). (8-ohm,.Dynamic.Type)Power.Requirements:Batteries.............................................................. 4.AAExternal.Power.................................................. 9V.DCCurrent.Drain.(Squelched)...............................90.mABattery.Charge.Current..................................150.mADimensions.(HWD).....5.3./4.x.2.9./16.x.1.5./8.Inches. (145.x.65.x.42.mm)Weight.(without.antenna.and.batteries)..........8.5.oz.. (240.g)Specifications and depictions are subject to change and.improvement.without.notice..Actual.product.may.vary.from.the.images.found.in.this.document.
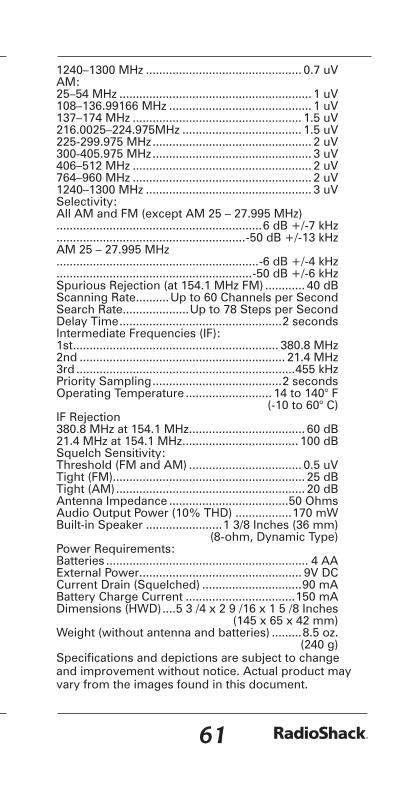

©2007. RadioShack.Corporation...All.rights.reserved..RadioShack.and.RadioShack.com.are.trademarks.used.by.RadioShack.Corporation.
20-164Printed.in.China
GE-07D-091111A07
Motorola,.Smartnet,.ASTRO.and.Privacy.Plus.are.registered.trademarks.of.Motorola.Inc.EDACS.is.a.registered.trademark.of.M/A-COM.Inc.LTR.is.a.registered.trademark.of.EF.Johnson.
Limited One-year WarrantyThis product is warranted by RadioShack against manufacturing defects in material and workmanship under normal use for one (1) year from the date of purchase from RadioShack company-owned stores and authorized RadioShack franchisees and dealers. For complete warranty details and exclusions, check with your local RadioShack store.
RadioShack Customer Relations300 RadioShack Circle, Fort Worth, TX 76102 04/04