Embed Size (px)
Citation preview

TREND TECHTREND USA Ltd2700 Biscayne Blvd. · Miami, FL 33137 · USAphone +1 305 593 6072 · fax +1 305 593 6075toll free +1 866 508 7363 · [email protected]
TREND AUSTRALASIA Pty Ltd7/5 Talavera Road, North Ryde · 2113 Sydney · NSW Australiaphone +612 8817 5500 · fax +612 8817 5556 · [email protected]
TREND TECH
This catalogue has been printed on ecologically safe recycled paper.Este catálogo se ha impreso en papel ecológico reciclado.
TREND
TECH
editorfederica bisazza
giorgia girardello
concepttrend art dpt
graphic designgabriel sabbaghfederico sanson
printed in italygrafiche antiga
7500 copiesfebruary 2008
copyrightTrend USA Ltd
All rights reserved.Reproduction of any part of this book
and publication on the Internet or on any other medium is not permitted without
Trend USA Ltd written permission.
Contents will be revised as necessary.Check with Trend USA for the most current information.
Please, contact Giorgia Girardello ph. 786 200 4645
El contenido será revisado cuando sea necesario.Verificar con Trend USA para la más reciente información.

TREND TECH �

TREND TECH �

TREND TECH �
a cure for ordinaryYour needs are not ordinary.Your expectations for the spaces you live and work in should not be ordinary either. The extraordinary TREND Collections will stir your senses: handcrafted glass mosaic tiles in a startling array of colors, shapes, sizes and finishes; dynamic wallpaper designs executed in glass; our extensive palette of sophisticated engineered surfaces which deliver style and beauty without sacrificing your personal desire to support the earth’s environment. Count on TREND USA to consistently exceed your expectations.
Una cura para lo ordinario.Sus necesidades no son comunes. Las expectativas para los espacios donde usted vive y trabaja tampoco deberían ser comunes. Las extraordinarias colecciones de TREND conmoverán sus sentidos: productos artesanales de mosaicos de vidrio en una brillante gama de colores, formas, tamaños y terminaciones; dinámicos diseños ejecutados en vidrio; nuestra extensa paleta de sofisticadas superficies producen estilo y belleza sin sacrificar su deseo personal de proteger el ambiente natural. Cuente usted con TREND USA para lograr consistentemente sus expectativas.

index6 SAFETY FIRST LA SEGURIDAD PRIMERO
7 GENERAL CONDITIONS FOR INSTALLING MOSAICS CONDICIONES GENERALES PARA LA COLOCACIÓN DE MOSAICOS
13 SURFACE PREPARATION PREPARACIÓN DE LOS FONDOS
19 INSTALLING SHEETS OF MOSAIC COLOCACIÓN DE HOJAS DE MOSAICOS
37 INSTALLING KARMA, LIBERTY AND GLAMOUR COLOCACIÓN DE KARMA, LIBERTY Y GLAMOUR
55 INSTALLING TREND Q FLOOR TILES COLOCACIÓN DE LOSAS TREND Q PARA PISOS
73 TECHNICAL CHARACTERISTICS CARACTERÍSTICAS TÉCNICAS
83 GROUT JUNTA
TREND TECH 4

TREND TECH 5

TREND TECH �
Welcome to the Trend USA Installation Manual. This manual will provide step by step instructions for installing mosaics and agglomerate floor tiles. The manual is organized by sections to enable you to select installation procedures and step by step instructions for the products you are going to install. Some of the content in each section is similar to others; for example tools and adhesives will be covered in the basic tools and adhesive sections, and referenced in other sections.One of the most important areas of concern is the use of proper safety equipment specified for the various grouts and adhesives. Therefore, we want to highlight this first for all users of Trend USA products and recommended grouts, adhesives, and tools.
SAFETY FIRSTRegardless of the installation, proper safety practices must be observed when working with the grouts, adhesives and tools. It is important that each employee read and comply with the safety instructions on all products and tools.Make sure all employees understand that proper protective equipment must be worn and appropriate safety techniques must be applied.
This may include:· Safety glasses or goggles· Face mask or respirator· Protective gloves as recommended· Weight belts or back braces as needed
Finally, each person should understand and demonstrate proper lifting techniques. From time to time, they may be involved in lifting heavy equipment and/or products.
Bienvenido al Manual de Instalación de Trend USA. Este manual está dotado de instrucciones paso a paso para facilitar la colocación de mosaicos y losas Trend Q para pisos. Está organizado por secciones para permitirle a usted seleccionar los procedimientos para la colocación e instrucciones detalladas para los productos que debe emplear. Algunos de los contenidos de las secciones son similares a otros; tal es el caso de los instrumentos y adhesivos, los mismos estarán incluídos en las secciones básicas para instrumentos y adhesivos así como se hará referencia a ellos en otras secciones.Una de las áreas de mayor importancia es la referida al uso de equipamiento de seguridad apropiado específico para los diferentes rejuntados y adhesivos. Es por ello que decidimos hacer énfasis en la seguridad primero para todos los usuarios de productos, rejuntado, adhesivos y herramientas de Trend USA.
LA SEGURIDAD PRIMEROConjuntamente con la colocación existen medidas de seguridad que deben ser observadas al trabajar con rejuntados, adhesivos y herramientas durante el proceso de aplicación de los productos. Asegúrese de que todos los empleados comprendan la importancia del uso de equipamiento protectivo adecuado y del cumplimiento de las medidas de seguridad.
El equipamiento incluye:· Gafas protectoras· Máscara facial o respirador· Guantes protectores según el caso· Faja protectora o sostenedor de ser necesario
Finalmente, cada persona debe entender y dominar las técnicas apropiadas para levantar pesos ya que en ocasiones se enfrentarán a levantamiento de equipos y productos pesados.
SAFETY FIRSTLA SEGURIDAD PRIMERO

TREND TECH �
Every tile installation begins with verifying the site conditions. For outdoor installations, it is a good practice to assess substrate conditions as well as the weather conditions.
· The substrate must be properly aged. Normalpractices recommended by adhesive manufacturers are to: · Wait twenty eight days for the underlay and cement based plasters; · Wait ninety days for concrete/cement; · Allow a maximum of five percent residual humidity with an hydrate-based substrates.
· Temperatures can have an effect on adhesives and materials: · If the temperature is lower than fifty-five degrees Fahrenheit, the drying of the adhesive is slower and can create problems for the bonding. · If the temperature is over ninety-five degrees Fahrenheit, it is advisable to do the installation when there is less sun, i.e., in the morning or late afternoon. · It is also recommended to cover the site from excessive sunlight during the hottest parts of the day or on windy days to prevent possible dehydration of the adhesive.
· Swimming Pools, Showers, and Jacuzzi: · For swimming pools, a waterproof test may be necessary before installing. · Shower floors and jacuzzi tubs must be waterproofed with special products.
· Dirt and Loose Pieces: · All traces of dir t, oil, and loose pieces and/or powder from the surface must be carefully removed.
Antes de iniciar cualquier instalación se deben tener en cuenta las condiciones del local. Para realizar instalaciones al exterior, es importante evaluar las condiciones de la superficie así como las condiciones atmosféricas.
· Los fondos deben estar perfectamente sec-os. Según sugieren los fabricantes de adhe-sivos luego de culminar cada obra se debe: · Esperar veintiocho días para los revoques y los enducidos de cemento; · Esperar noventa días para el hormigón; · La humedad máxima permitida es de 0.5%.
· La temperatura es un elemento importante a tener en cuenta, por el efecto que ésta puede provocar en los adhesivos y materiales: · Con temperaturas inferiores a cincuenta y cinco grados Fahrenheit el secado de los adhesivos es más lento y puede provocar problemas en la duración a largo plazo. · Con temperaturas superiores a noventa y cinco grados es recomendable realizar la colocación en los horarios más frescos del día, es decir por la mañana o al caer la tarde. · También se recomienda mantener la obra protegida del calor excesivo y del viento para evitar la posible deshidratación de los adhesivos.
· Piscinas, Duchas e Hidromasajes: · En el caso específico de las piscinas es necesario comprobar que no haya pérdida de agua antes de proceder a la colocación. · Los pisos de duchas , bañeras e hidromasajes deben ser impermeabilizados con productos específicos.
· Suciedad y partes incoherentes: · Se deben eliminar cuidadosamente todos los restos de suciedad, aceite y partes incoherentes así como el polvo superficial.
GENERAL CONDITIONS FOR INSTALLING MOSAICSCONDICIONES GENERALES PARA LA COLOCACIÓN DE MOSAICOS

TREND TECH �
The tools used for the installation of glass mosaic must be clean and free from rust. These tools are:
Las herramientas para la colocación de mosaicos vítreos tienen que estar limpias y libres de óxido. Estas herramientas son:
TOOLS FOR INSTALLING MOSAICSHERRAMIENTAS PARA LA COLOCACIÓN DE MOSAICOS
Angle grinder with a continuous crown diamond blade for cutting mosaics.Esmeriladora con disco diamantado de corte de corona continua para el corte del mosaico.
A measuring set, tape measure and pencil, for marking the main reference grid and a string for marking the main reference grid.Instrumentos de medición, metros y lápiz para realizar el diseño de referencia principal y hilo para trazado de la línea de referencia principal.
Rubber float for patting mosaics to the adhesives and adjusting alignments and a felt backed float.Espátula de goma para rejuntado y espátula con filtro.
Mosaic pliers and cutters.Tenazas para alicatado y cutter.
A set of various sizes of trowels. Serie de paletas y espátulas.
A level.Nivel.

TREND TECH �
Mosaic Adhesive. · Mix all adhesives according to the instructions on the package.· The adhesive must not be too liquid.· In areas prone to high traffic, mix this adhesive with latex according to the manufacturer’s instructions.· Use a maximum of �/4“ thickness· Use an auto-leveling material· Let it set-up at least �4 hours· This adhesive cannot be used for doubling up.· It cannot be used for waterproofing.
Adhesivos para la colocación de mosaicos.· Mezcle todos los adhesivos de acuerdo a las instrucciones del paquete.· El adhesivo no debe quedar demasiado líquido.· En áreas propensas a un tráfico continuo, mezcle este adhesivo con latex siguiendo las instrucciones de los fabricantes.· Emplee un espesor máximo de 1/4“ · Emplee un material auto nivelador si es necesario· Déjelo reposar al menos por un período de 24 horas· Este adhesivo no puede ser utilizado en dos tiempos.· No es aconsejable que éste sea utilizado como impermeabilizante.
TOOLS FOR INSTALLING MOSAICSHERRAMIENTAS PARA LA COLOCACIÓN DE MOSAICOS
�/�”x �/�” Square-Notched Trowel.Espátula de dientes cuadrados de 1/8”x 1/8”.
A water bucket with a roller and sponge for cleaning. Note: Always use clean water.Cubeta con rodillos y esponjas para la limpieza. Nota: Se recomienda usar siempre agua limpia.
A low speed mixing drill with spiral mixer. Taladro mezclador de baja velocidad para mantener la uniformidad de las mezclas con batidor elicoidal.

TREND TECH �0
Adhesive and grout used for karma installationsFor Karma, Liberty, Glamour or for installations in wet areas or spas, saunas, and showers, Trend recommends the use of epoxy adhesive and epoxy grout.
Adhesivos y rejuntados utilizados para la colocación de KarmaPara la colocación de Karma, Liberty, Glamour u otros productos en áreas húmedas, spas, saunas o duchas, Trend recomienda el uso de rejuntados y adhesivos epoxídicos.
KERAKOLL
· Kerakoll Adhesive Superflex Adhesivo
· Kerakoll Grout Fugabella Epoxy Rejuntado
· Kerakoll Cement Adhesive Tenax H40 White Adhesivo cementoso
· Kerakoll Latex Top Latex Latex
· Kerakoll Cement Grouting Fugabella Rejuntado cementoso
· Kerakoll Latex Fugaflex Latex
LATICRETE
· Laticrete Cement Adhesive Laticrete ��0 Adhesivo cementoso
· Laticrete Cement Grout Laticrete ���� Rejuntado cementoso
· Laticrete Acid Clear Laticrete TC 50 Acido para limpieza
· Laticrete Adhesive Latopoxy �00 Adhesivo
· Laticrete Adhesive �54 Platinum White Adhesivo
MAPEI
· Mapei Cement Adhesive with Latex Kerabond / Keralastie Adhesivo cementoso con latex
· Mapei Grout Keracolor Rejuntado
· Mapei Grout Kerapoxy Rejuntado
ADHESIVES FOR MOSAIC INSTALLATIONSADHESIVOS PARA LA COLOCACIÓN DE MOSAICOS
Trend USA recommends a variety of adhesives and grouts for product installations. Trend USA uses and distributes Kerakoll products.
Trend USA recomienda una variedad de adhesivos y rejuntados para la instalación de productos. Trend USA usa y distribuye los productos Kerakoll.

TREND TECH ��
Depending on the installation, specific adhesives are recommended. In each case, the surface and product must be taken into consideration to select the correct adhesive. Be sure to follow the specific instructions on the packaging in preparing the adhesive.
En dependencia del tipo de instalación, se recomiendan adhesivos específicos para cada una de ellas. En cada caso, tanto la superficie como los productos deben ser tomados en cuenta para seleccionar el tipo de adhesivo adecuado. Asegúrese de seguir las instrucciones específicas que aparecen en el paquete con respecto a la preparación del adhesivo.
MIXING ADHESIVESMEZCLA DEL ADHESIVO
Mosaic adhesives must be diluted in water in the proportions indicated by the manufacturer.Mix with a low speed drill with a spiral mixer to avoid modifying the adhesive characteristics.• The adhesive should be like a creamy, easy to spread paste. • Re-mixing after the initial preparation of the mixture with the addition of water or other products to prolong its useful life or workability should be avoided.
El adhesivo debe diluirse en agua según las proporciones indicadas por los fabricantes. La mezcla debe efectuarse con un taladro de baja velocidad con batidor elicoidal para mantener las características del producto. · El resultado obtenido debe presentarse como una pasta cremosa fácil de aplicar. · Se desaconseja absolutamente una vez realizada la mezcla inicial, remover de nuevo la misma con agua u otros productos para prolongar su vida útil.

TREND TECH ��TREND TECH ��

TREND TECH ��
surfacepreparation
su
rf
ac
e p
re
pa
ra
tio
n
TREND TECH ��
preparación de los fondos

TREND TECH �4
Rendering is necessary where the base is not perfectly flat or the surface is flakey. Rendering must be completed �4 hours before installing mosaics.
La raspadura debe ser realizada en las superficies donde la base no esté perfectamente llana o esté agrietada. Esta operación debe ser completada 24 horas antes de la colocación del mosaico.
Rendering a sub-base for glass mosaic must be carried out using the smooth edge of the trowel.
La raspadura de la superficie donde será colocado el mosaico debe realizarse con la parte lisa de la espátula.
The surface should be compact and free of cracks. If the surface flakes or if it is warped from shrinking, it must be rendered correctly. This is always a good practice where capillary absorption may present a significant problem.
El fondo debe presentarse compacto y libre de grietas. Si éste tiende a pulverizarse o está ondulado por haberse contraído debe procederse a una raspadura adecuada. Esta operación es recomendable en casos en que la absorsión capilar pueda representar un problema significativo.
SURFACE PREPARATIONPREPARACIÓN DE LOS FONDOS

TREND TECH �5
Select the best starting point and mark out a square grid on the sub-base corresponding to the number of sheets of mosaics being laid.
· This can easily be determined by laying a row of mosaic sheets on the floor, next to the wall to be covered, and measuring the distance the sheets will cover in a row of mosaics.
Seleccione el punto de comienzo más adecuado y trace una línea cuadrada en la superficie de acuerdo con el número de hojas de mosaico que se deberán colocar.
· Esta se puede determinar fácilmente colocando de manera superpuesta una hilera de hojas en el piso partiendo de la pared a enlosar y midiendo la distancia que las mismas cubrirán.
· Make sure the distance between sheets accurately reflects the distance of the joints between the individual sheets.
· Es importante asegurarse de que la distancia entre las hojas coincida de manera precisa con el espacio para las juntas o uniones que deberá existir entre ellas.
Select the best starting point and mark your reference line on the wall. This reference line should be at eye level. This first reference line can be established with a level or other tool you may select.
Realice la operación similar de trazado de línea de referencia en la pared. Esta primera línea de referencia se realizará con el nivel o cualquier otro instrumento seleccionado por usted para este fin.
Various methods can be used in marking this grid, from a simple level to a sophisticated electronic and laser measuring system. Nevertheless, the reference grid should be marked with great care since the installation of the mosaics will depend on the accuracy of this system.
Para efectuar el trazado de las líneas de referencia se pueden utilizar varios métodos que van desde un simple nivel hasta un sofisticado sistema de medición laser. En todos los casos las líneas de referencia deben ser trazadas con gran precisión ya que la ulterior colocación del mosaico dependerá de un correcto trazado.
MARKING THE REFERENCE GRIDTRAZADO DE LAS LÍNEAS DE REFERENCIA
su
rf
ac
e p
re
pa
ra
tio
n

TREND TECH ��
The most important concern is that this reference is level and crosses the entire wall of the installation.
En este caso lo fundamental es que la línea de referencia quede nivelada y abarque toda la pared donde serán colocadas las hojas.
Make sure the distance from this reference line to the floor will accommodate full sheets of mosaics.
La distancia entre la línea de referencia y el piso contendrá hojas enteras de mosaico verticalmente.
Marking guidelines at right angles to the grid line should begin to provide reference lines for laying each sheet of mosaic.
El trazado de líneas guías en los ángulos derechos de la línea principal comenzará a proporcionar líneas de referencia para la colocación de cada hoja de mosaico.
MARKING THE REFERENCE GRIDTRAZADO DE LAS LÍNEAS DE REFERENCIA

TREND TECH ��
Spread the adhesive over the base using the smooth edge of the notch trowel to ensure the entire surface is covered.
Aplique el adhesivo a lo largo de la base usando la parte lisa de la espátula dentada para asegurar que el material cubra toda la superficie.
Excessive adhesive is then removed with the notched part of the trowel. Be careful to keep a steady inclination of the notched trowel and exert sufficient pressure so no more adhesive than necessary remains. The adhesive must not run over the joints. If it does, it means that the notches on the trowel are too large.
Luego retire el material en exceso con la parte dentada de la espátula. Asegúrese de mantener una inclinación uniforme de la espátula y ejerza presión suficiente como para que permanezca solo el material necesario. El adhesivo no debe derramarse por fuera de las juntas, si esto sucede significa que los dientes de la paleta son demasiado grandes.
Once the reference grid has been marked, the adhesive is spread over the base.Una vez trazadas las líneas de referencia, se aplica el adhesivo a lo largo de la base.
PREPARATION, MARKING AND SPREADING ADHESIVEPREPARACIÓN, TRAZADO Y APLICACIÓN DEL ADHESIVO
su
rf
ac
e p
re
pa
ra
tio
n

TREND TECH ��TREND TECH ��

TREND TECH ��
installingsheets of mosaic
mo
sa
ic
TREND TECH ��
colocación dehojas de mosaics

TREND TECH �0
INSTALLING 3/4” x 3/4” AND 5/8” x 5/8”SHEETS OF MOSAIC, FACE MOUNTED ON FILMCOLOCACIÓN DE HOJAS DE MOSAICOS 3/4” x 3/4” Y 5/8” X 5/8” CON SOPORTE DE LÁMINA PLÁSTICA
Once the reference grid has been marked and the adhesive spread over the base, install the first sheet on the reference grid without exerting too much pressure, with the plastic film towards the installer. Always maintain the lines of the previously marked grid as a reference.
Toda vez que las líneas de referencia han sido trazadas y el adhesivo aplicado a lo largo de la superficie, coloque la primera hoja siguiendo la línea de referencia sin ejercer demasiada presión, con la lámina plástica de cara al instalador. Mantenga siempre las líneas de referencia previamente trazadas.
A well prepared adhesive will hold the mosaic sheets in position without any problem.
Si la preparación del adhesivo fue la adecuada las hojas deben sostenerse en su posición sin problema alguno.
Tap the mosaic with a rubber float to ensure perfect adhesion to the surface.
Golpee el mosaico con la espátula de goma para asegurar una perfecta adherencia a la superficie.
TREND TECH ��
mo
sa
ic
INSTALLING 3/4” x 3/4” AND 5/8” x 5/8”SHEETS OF MOSAIC, FACE MOUNTED ON FILMCOLOCACIÓN DE HOJAS DE MOSAICOS 3/4” x 3/4” Y 5/8” X 5/8” CON SOPORTE DE LÁMINA PLÁSTICA
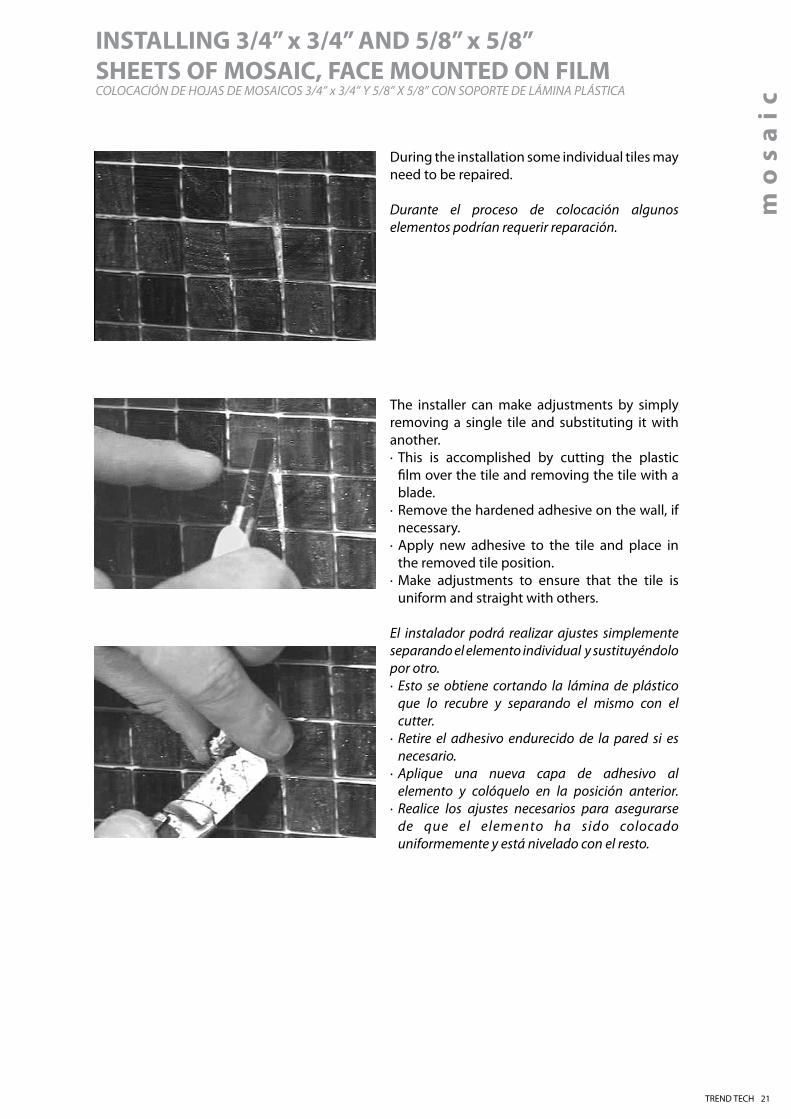
During the installation some individual tiles may need to be repaired.
Durante el proceso de colocación algunos elementos podrían requerir reparación.
The installer can make adjustments by simply removing a single tile and substituting it with another.· This is accomplished by cutting the plastic film over the tile and removing the tile with a blade.· Remove the hardened adhesive on the wall, if necessary.· Apply new adhesive to the tile and place in the removed tile position.· Make adjustments to ensure that the tile is uniform and straight with others.
El instalador podrá realizar ajustes simplemente separando el elemento individual y sustituyéndolo por otro.· Esto se obtiene cortando la lámina de plástico que lo recubre y separando el mismo con el cutter.· Retire el adhesivo endurecido de la pared si es necesario.· Aplique una nueva capa de adhesivo al elemento y colóquelo en la posición anterior.· Realice los ajustes necesarios para asegurarse de que el elemento ha sido colocado uniformemente y está nivelado con el resto.

TREND TECH ��
Lay out the number of sheets needed to cover this opening and mark your measurements and draw a line for cutting.
Coloque las hojas necesarias para cubrir esta abertura , realice las medidas necesarias y trace una línea para realizar el corte.
In some cases, walls may not be perfect right angles to each other. To make the tiles fit, you will need to adjust the width of the sheets of tiles by measuring the opening.
En algunas ocasiones las paredes no forman ángulos perfectos. Para lograr que las hojas encajen usted deberá realizar ajustes en el ancho de las mismas midiendo la abertura.
Continue installing sheets of mosaics across the wall based on the reference grid.
Continúe colocando hojas de mosaico a lo largo de la pared siguiendo las líneas de referencia.
INSTALLING 3/4” x 3/4” AND 5/8” x 5/8”SHEETS OF MOSAIC, FACE MOUNTED ON FILMCOLOCACIÓN DE HOJAS DE MOSAICOS 3/4” x 3/4” Y 5/8” X 5/8” CON SOPORTE DE LÁMINA PLÁSTICA

TREND TECH ��
mo
sa
ic
Cut the tiles with your angle grinder.
Realice el corte de la hoja con la esmeriladora.
Apply the adhesive on the wall and install the individual sheets and tap into place.
Aplique el adhesivo en la pared y coloque las hojas golpeando sobre ellas con la espátula para llevarlas a su lugar.
Cut the plastic film between the rows of tiles and, with a trowel, adjust the space between rows to fill all spaces equally.
Corte la lámina plástica que une las hojas y con una paleta, ajuste los espacios que quedan entre las hileras para que se cubran uniformemente.
INSTALLING 3/4” x 3/4” AND 5/8” x 5/8”SHEETS OF MOSAIC, FACE MOUNTED ON FILMCOLOCACIÓN DE HOJAS DE MOSAICOS 3/4” x 3/4” Y 5/8” X 5/8” CON SOPORTE DE LÁMINA PLÁSTICA

TREND TECH �4
Follow the manufacturer’s instructions for adhesive hardening time. Depending on the conditions when installing this, this could be from � hours to �4 hours.
Siga las instrucciones de los fabricantes para el tiempo de endurecimiento del adhesivo.En dependencia de las condiciones que existieron durante la colocación, el tiempo de endurecimiento puede oscilar entre las 3 y las 24 horas. .
Once sufficiently dried, the plastic film isremoved from the mosaic.· The plastic film should be removed in a diagonal direction keeping the film parallel to the tiles.
Cuando el adhesivo esté lo suficientemente seco se retira la lámina de plástico que recubre el mosaico.· Esta lámina debe retirarse en dirección diagonal manteniéndola paralela a las hojas colocadas.
INSTALLING 3/4” x 3/4” AND 5/8” x 5/8”SHEETS OF MOSAIC, FACE MOUNTED ON FILMCOLOCACIÓN DE HOJAS DE MOSAICOS 3/4” x 3/4” Y 5/8” X 5/8” CON SOPORTE DE LÁMINA PLÁSTICA

TREND TECH �5
Using a rubber float, spread the grouting cement with vertical and horizontal strokes, with slight pressure to make sure the joints are well filled.
Utilizando una espátula de goma, extienda el rejuntado con movimientos horizontales y verticales ejerciendo ligera presión para asegurarse de que las juntas queden bien selladas.
From time to time, rinse and roll your sponge to remove excess water and continue cleaning the tiles with clean water. Any final lingering residue can be removed with a slightly acid solution.
De vez en cuando, enjuague y escurra la esponja para eliminar el exceso de agua y continúe la limpieza con agua limpia. Cualquier suciedad remanente puede eliminarse con una solución ligeramente ácida.
The cleaning of the mosaic surface can begin once the grouting cement starts to harden. (The time may vary according to the temperature of the surroundings – from approximately thirty to sixty minutes).· Move your float diagonally across the mosaics to remove most of the excess grout with a special felt and lightly dampened sponge. Remember to always use clean water.· Be careful, at all times, not to remove the grout from between the joints.
La limpieza de la superficie del mosaico puede iniciarse una vez comenzado el endurecimiento del rejuntado. (El tiempo puede variar en relación con la temperatura del ambiente circundante- oscilando desde treinta hasta sesenta minutos)· Mueva la espátula de goma dotada de una esponja ligeramente humedecida con movimientos diagonales a lo largo de la superficie para eliminar la mayor parte del rejuntado en exceso. Recuerde usar siempre agua limpia. · Asegúrese de no eliminar el material que debe permanecer entre las juntas, sólo el sobrante.
GROUTING AND FINAL CLEANINGREJUNTADO Y LIMPIEZA FINAL
mo
sa
ic
Depending on the time required for the adhesive to set, you will begin filling the joints.En dependencia del tiempo requerido para la fijación del adhesivo usted podrá comenzar a rellenar las juntas.

TREND TECH ��
INSTALLING 3/4” x 3/4” AND 5/8” x 5/8” PAPER-FACED MOSAICS WITH BORDERS*INSTALACIÓN DE MOSAICOS 3/4” x 3/4” Y 5/8” x 5/8” Y CENEFAS CON SOPORTE DE PAPEL*
Follow all preceding steps used for installing �/4” x �/4” mosaics for the following items:· Tools· Surface Preparation· Mixing Adhesives· Marking Reference Grid· Laying Mosaics – Preparation, Marking, and Spreading Adhesives· In this sequence, once the grid lines are marked at eye level, you will need to mark another grid line for the border. This grid line must compensate for the sheets of mosaics that must be installed from the eye level grid line to border grid line.
Note*: Use the same procedures for installing �/�” x �/�” and �/�” x �/4” Tessellatum and Goldmosaics.
Nota*: Siga el mismo procedimiento para instalar Tessellatum y mosaicos vítreos de 3/8” x 3/8”y 3/8” x 3/4”
Siga las instrucciones anteriores necesarias para la colocación de mosaicos 3/4” x 3/4”.Tenga en cuenta los siguientes aspectos.· Instrumentos· Preparación de fondos· Mezcla de los adhesivos· Trazado de las líneas de referencia· Colocación de mosaicos- preparación, trazado y aplicación de los adhesivos· Para este tipo de instalación, una vez trazadas las líneas de referencia principal se necesitará trazar una nueva línea para colocar la cenefa. Es importante el correcto trazado de esta línea pues a partir de ella se colocarán el resto de las hojas.
When installing borders, it is important to install the border modules first.· To accomplish this, measure the distance from the reference grid to the location of the border. This distance must accommodate full rows of mosaics from the border to the initial grid line.· Make any adjustments to the reference grid to place the height of the mosaic sheets to fit directly under the border.
Para comenzar la instalación es necesario colocar las cenefas primero.· Para lograr esto mida la distancia partiendo de la línea de referencia para ubicar la cenefa. Esta distancia debe servir de guía para la ulterior colcación del resto de las hojas. · Realice los ajustes necesarios para garantizar que las hojas encajen perfectamente debajo de la cenefa.

TREND TECH ��
INSTALLING 3/4” x 3/4” AND 5/8” x 5/8” PAPER-FACED MOSAICS WITH BORDERSINSTALACIÓN DE MOSAICOS 3/4” x 3/4” Y 5/8” x 5/8” Y CENEFAS CON SOPORTE DE PAPEL*
mo
sa
ic
Install the sheets of mosaics between the border and eye level grid line.
Coloque las hojas de mosaicos por debajo de la línea de referencia trazada para la colocación de la cenefa.
Following the grid line for the top border, install the sheets of mosaics.
Siguiendo la línea de referencia coloque las hojas de mosaico a partir del borde inferior de las cenefas.
Tap the sheets of mosaic tiles with the rubber float to adjust alignment and to ensure a perfect adhesion to the surface.
Con la espátula de goma, golpee suavemente sobre cada hoja para garantizar su perfecta adherencia y realizar cualquier ajuste de alineamiento.

TREND TECH ��
Once the adhesive has dried sufficiently, prepare to remove the paper from the tiles. The time may vary according to the temperature of the surroundings. Always follow manufacturer’s instructions. With a wet sponge and clean water, wipe down the tiles to loosen the paper from the tiles.
Una vez que el adhesivo se haya secado suficientemente se procede a retirar la lámina de papel que recubre el mosaico. El tiempo de endurecimiento varía en dependencia de la temperatura del local. Siga siempre las instrucciones de los fabricantes. Con una esponja húmeda usando agua limpia, humedezca la zona donde se han colocado las hojas para que se comience a separar el papel adherido a ellas.
Cut accordingly.
Realice el corte de la franja sobrante.
Measure the space between the bottom tile and mark the sheet of mosaic.
En caso de que la lámina sea más grande que la superficie a cubrir marque la franja sobrante de la hoja por el borde inferior.
INSTALLING 3/4” x 3/4” AND 5/8” x 5/8” PAPER-FACED MOSAICS WITH BORDERS*INSTALACIÓN DE MOSAICOS 3/4” x 3/4” Y 5/8” x 5/8” Y CENEFAS CON SOPORTE DE PAPEL*

TREND TECH ��
mo
sa
ic
Peel the paper from the tiles once it is moist and ready to be removed. Remove the paper by pulling diagonally across the tiles.
Retire el papel de las hojas una vez humedecido tirando del mismo en forma diagonal.
Wipe down the tiles with a wet sponge to remove the paper adhesive. Always use clean water. Using a rubber float, spread the grouting cement with vertical and horizontal strokes with slight pressure to make sure the joints are well filled. Use a slightly acid solution to remove any residual grout.
Una vez retirado el papel, limpie el área con una esponja para eliminar los restos de adhesivo que haya dejado el papel. Use siempre agua limpia. Con la espátula de goma aplique el rejuntado con movimientos verticales y horizontales ejerciendo ligera presión para asegurarse de que el material llene todos los espacios vacíos. Emplee una solución ligeramente ácida para retirar cualquier residuo del rejuntado aplicado.
INSTALLING 3/4” x 3/4” AND 5/8” x 5/8” PAPER-FACED MOSAICS WITH BORDERSINSTALACIÓN DE MOSAICOS 3/4” x 3/4” Y 5/8” x 5/8” Y CENEFAS CON SOPORTE DE PAPEL*

TREND TECH �0
INSTALLING SHEETS OF ARTISTIC MOSAICSCOLOCACIÓN DE MOSAICO ARTÍSTICO
When you receive your boxes of mosaics, locate the box containing the first set of sheets and the word “MAP” written on top (the number of boxes with the word MAP will vary according to the size of the mosaic). This one will serve as a guide for your installation.Remove the contents from the boxes.
Cuando reciba las cajas, localice la que contiene las primeras hojas, con la palabra “MAP” escrita sobre ella (según el tamaño del mosaico, varía la cantidad de cajas con la palabra “MAP”). Esta le servirá de guía para la colocación.Retire el contenido de las cajas.
Follow all preceding steps used for installing �/4” x �/4” mosaics for the following items:· Tools· Surface Preparation· Mixing Adhesives· Marking Reference Grid· Laying Mosaics – Preparation, Marking, and Spreading Adhesives· In this installation, the marking of the grid lines will be dependent on the design layout map that comes in the box of mosaic sheets. Using the map helps determine how many sheets should go above and below the eye level grid line. This grid line must compensate for the sheets of mosaics that must be installed above and below the grid line to get the design to fit the prescribed wall.
Siga las instrucciones anteriores para la colocación del mosaico de 3/4” x 3/4” teniendo en cuenta los siguientes aspectos:· Instrumentos.· Preparación de fondos· Mezcla de los adhesivos· Trazado de las líneas de referencia· Colocación del mosaico - Preparación, trazado y aplicación de los adhesivos.· En el caso de esta instalación, el trazado de las líneas de referencia dependerá del mapa de colocación que viene dentro del paquete que contiene las hojas de mosaico. El uso del mapa le ayudará a determinar el número de hojas que deberán ser colocadas por encima y por debajo de la línea de referencia y esta última le permitirá garantizar que todas las hojas encajen adecuadamente en la pared a enlosar.

TREND TECH ��
INSTALLING SHEETS OF ARTISTIC MOSAICSCOLOCACIÓN DE MOSAICO ARTÍSTICO
mo
sa
ic
The computer design created was made especially for your installation. Review the picture of the total design and familiarize yourself with the design and wall or space where it is to be installed.Review the map provided to show exactly how the design should be installed. Keep the following points in mind:
· Lay out the design on the floor next to the wall or space where it is to be installed.· Measure the height of the wall and count the number of rows of sheets that should be above your grid line.· REMEMBER your grid line should be at eye level.· Measure the distance below the grid line to determine how many rows of sheets are below your grid line.· Plot your perpendicular grid lines and measure the number of columns of sheets going to the right and left of the perpendicular grid line.
Begin your installation following the map provided.
El diseño artístico creado con ordenador fue concebido especialmente para su instalación. Repase las imágenes y familiarícese con el mismo, así como con la pared o el espacio donde será colocado.Repase el mapa que muestra como se debe colocar el diseño. Tenga en cuenta los siguientes puntos:
· Extienda el diseño en el piso cerca de la pared o el espacio donde será colocado.· Mida la altura de la pared y cuente el número de hileras de hojas que deberán ser colocadas por encima de la línea de referencia.· RECUERDE que su línea de referencia debe estar correctamente nivelada.· Mida la distancia por debajo de la línea de referencia para determinar el número de hileras de hojas que deberán ser colocadas por debajo de la línea de referencia.· Trace su línea de referencia perpendicular y determine el número de columnas que deberán ser colocadas a la derecha y a la izquierda de dicha línea de referencia perpendicular.
Comience la colocación siguiendo el mapa provisto incluído en el paquete.

TREND TECH ��
Once the design is installed, allow the tiles to adhere to the wall and remove the plastic film on the mosaics.
Follow all the remaining procedures for cleaning, grouting, and final cleaning procedures aspresented in installing �/4” x �/4” mosaics.· Wiping down the mosaics with a clean damp sponge. (Remember to use clean water.)· Grout the mosaic tiles using a vertical and horizontal application.· Wipe down the mosaics tiles once the grout has set up.· Use a slightly acid solution for cleaning any residual grout.Enjoy your installation.
Una vez colocadas las hojas, permita que las mismas se adhieran a la pared y luego retire la lámina de plástico que las recubre.
Prosiga con las instrucciones anteriores referentes a los procesos de limpieza, rejuntado y limpieza final como se presentan en la instalación de mosaicos de 3/4” x 3/4”.· Limpie los mosaicos con una esponja húmeda. (Recuerde usar agua limpia.)· Proceda a aplicar el rejuntado con movimientos verticales y horizontales.· Una vez fijado este último elimine los restos del mismo con la esponja húmeda.· Emplee una solución ligeramente ácida para eliminar el rejuntado en exceso.Disfrute de su instalación.
INSTALLING SHEETS OF ARTISTIC MOSAICSCOLOCACIÓN DE MOSAICO ARTÍSTICO

TREND TECH ��
The installation of Wallpaper designs is exactly the same as the procedures used for installing �/4” x �/4” mosaic with a computer design. All the preliminary steps for initiating the installation are the same for:· Tools· Surface Preparation· Mixing Adhesives· Marking Reference Grid· Laying Mosaics – Preparation, Marking, and Spreading Adhesives· In this installation, the marking of the grid lines will be dependent on the design layout map. Using the map helps determine how many sheets should go above and below the eye level grid line. This grid line must compensate for the sheets of mosaics that must be installed above and below the grid line to get the design to fit the prescribed wall or positions.
Para proceder a la colocación de Wallpaper se siguen exactamente los mismos procedimientos que anteriormente se aplicaron para la colocación de mosaico de 3/4” x 3/4” con diseño artístico. Todos los pasos preliminares para iniciar la colocación se mantienen en los siguientes aspectos: · Instrumentos.· Preparación de fondos· Mezcla de los adhesivos· Trazado de las líneas de referencia· Colocación del mosaico- Preparación, trazado y aplicación de los adhesivos.· En esta instalación , el trazado de las líneas de referencia dependerá del mapa de colocación del diseño. El uso del mapa le ayudará a determinar el número de hojas que deberán ser colocadas por encima y por debajo de la línea de referencia y esta última le permitirá garantizar que todas encajen adecuadamente en la pared a enlosar.
INSTALLING WALLPAPERCOLOCACIÓN DE WALLPAPER
mo
sa
ic
When you receive your boxes of mosaics, locate the box containing the first set of sheets and the word “MAP” written on top (the number of boxes with the word MAP will vary according to the size of the mosaic). This one will serve as a guide for your installation.Remove the contents from the boxes.
Cuando reciba las cajas, localice la que contiene las primeras hojas, con la palabra “MAP” escrita sobre ella (según el tamaño del mosaico, varía la cantidad de cajas con la palabra “MAP”). Esta le servirá de guía para la colocación. Retire el contenido de las cajas.

TREND TECH �4
The design created was made especially for your installation. Review the picture of the total design and familiarize yourself with the design and wall or space where it is to be installed. Begin your installation following the map provided. Once the design is installed, allow the tiles to adhere to the wall and remove the plastic film on the mosaics.
Follow all the remaining procedures for cleaning, grouting, and final cleaning procedures as presented in installing �/4” x �/4” mosaics.· Wiping down the mosaics with a clean damp sponge. (Remember to use clean water.)· Grout the mosaic tiles using a vertical and horizontal application.· Wipe down the mosaic tiles once the grout has set up.· Use a slightly acid solution for cleaning any residual grout. Enjoy your installation.
El diseño creado fue concebido especialmente para su instalación. Repase las imágenes y familiarícese con el diseño así como con la pared o el espacio donde será colocado. Comience la colocación siguiendo el mapa provisto. Una vez colocado el diseño, permita que las hojas se adhieran a la pared y retire la lámina de plástico que las recubre.
Prosiga con las instrucciones anteriores referentes a los procesos de limpieza, rejuntado y limpieza final como se presentan en la instalación de mosaicos de 3/4” x 3/4”.· Limpie el área enlosada con una esponja húmeda. (Recuerde usar agua limpia.)· Proceda a aplicar el rejuntado con movimientos verticales y horizontales.· Una vez fijado elimine los restos del mismo con la esponja húmeda.· Emplee una solución ligeramente ácida para eliminar el rejuntado en exceso.Disfrute de su instalación.
INSTALLING WALLPAPERCOLOCACIÓN DE WALLPAPER

TREND TECH �5
mo
sa
ic
TREND TECH �5
TREND Q ��� (�4” x �4” · 60 x 60 cm)wall: wallpaper futurist E
“atmosphere room” by simonetta bussandri · casadecor ‘0� miami, florida, usa

TREND TECH ��TREND TECH ��

TREND TECH ��
installingkarma, liberty and glamour
ka
rm
a,
lib
er
ty
an
d g
lam
ou
r
TREND TECH ��
colocación dekarma, liberty y glamour

TREND TECH ��
INSTALLING KARMACOLOCACIÓN DE KARMA
Plot the grid line using the sheet of Karma to get the appropriate height for the initial grid line.
Trace la línea de referencia utilizando la hoja de Karma para obtener la altura apropiada de la línea inicial.
Use a level or other device to draw a straight line to finish plotting the grid line.
Se recomienda el uso de un nivel u otro instrumento afín para trazar una línea recta y finalizar la ubicación de la línea de referencia.
Follow the same steps used for installing mosaics when installing Karma. See previous sections on:· Tools · Surface Preparation · Mixing Adhesives · Marking the Reference Grid· Laying Mosaics – Preparation, Marking and Spreading AdhesivesThese following instructions are provided for installing Karma. These sheets and individual tiles will be installed starting at the bottom of wall to set the grid line.Note: In this installation, the wall tiles are installed before the floor tiles. In this demonstration, different sizes of Karma are installed on the walls and floors to provide an understanding in these installation procedures.
Para colocar Karma siga los mismos pasos que aparecen en secciones anteriores para la colocación de mosaicos. Consulte las secciones anteriores con respecto a:• Instrumentos • Preparación de fondos• Mezcla de los adhesivos• Trazado de las líneas de referencia• Colocación del mosaico- Preparación, trazado y aplicación de los adhesivos.A continuación ofrecemos instrucciones para la colocación de karma. Estas hojas o losas individuales deberán ser colocadas comenzando por el borde inferior de la pared para establecer la línea de referencia.Nota: En esta instalación se colocan primero las losas de la pared y luego las del piso. Durante la demostración observe como se colocan piezas Karma de diferente dimensión para proveer una mejor comprensión de los procedimientos para su colocación.

TREND TECH ��
INSTALLING KARMACOLOCACIÓN DE KARMA
ka
rm
a,
lib
er
ty
an
d g
lam
ou
r
Apply the adhesive over the area with the flat part of the notch trowel and then the notched side. After spreading the adhesive with the notched trowel, install the mosaics using the grid lines with the plastic film facing theinstaller.
Aplique el adhesivo a lo largo del área de colocación primero con la parte lisa y luego con la dentada de la espátula. Después de aplicado el adhesivo con la espátula dentada, coloque los mosaicos siguiendo las líneas de referencia con la lámina de plástico de cara al instalador.
Tap each sheet of tiles lightly with a rubber float to ensure perfect adhesion to the surface.
Golpee suavemente sobre cada hoja con la espátula de goma para garantizar una perfecta adherencia a la superficie.
On the adjacent wall, plot your grid line and apply the adhesive first with the flat side of the trowel and then the notched side. Then, using the grid line, install the Karma mosaic and tap lightly with the rubber float to ensure perfect adhesion to the surface.
En la pared adyacente, trace la línea de referencia y aplique el adhesivo primero con la parte lisa y luego con la dentada de la espátula, luego siguiendo dicha línea coloque las hojas de Karma batiendo suavemente sobre cada una de ellas para garantizar una perfecta adherencia a la superficie.

TREND TECH 40
Plot your grid lines on the floor. Apply the adhesive over the area with the flat part of the notch trowel and then the notched side. After spreading the adhesive with the notched trowel, install the mosaics using the grid lines with the plastic film facing the installer.
Terminada la colocación en las paredes proceda a trazar las líneas de referencia en el piso.Aplique el adhesivo en toda el área primero con la parte lisa y luego con la dentada de la espátula. Luego comience a colocar las hojas siguiendo la línea de referencia con la lámina de plástico de cara al instalador.
Tap each sheet of tiles lightly with a rubber float to ensure perfect adhesion to the surface.
Golpee suavemente sobre cada hoja con la espátula de goma para garantizar una perfecta adherencia a la superficie.
Continue the installation process by removing the plastic film, grouting, and cleaning the tiles according to previously demonstrated instructions. Always use slightly acid solution for final cleaning.
Concluya el proceso de instalación retirando la lámina de plástico, aplicando el rejuntado y realizando la limpieza de acuerdo con las instrucciones mostradas anteriormente. Recuerde siempre usar una solución ligeramente ácida para la limpieza final.
INSTALLING KARMACOLOCACIÓN DE KARMA

TREND TECH 4�
INSTALLING DIAMOND SHAPED KARMACOLOCACIÓN DE DIAMOND SHAPED KARMA
Plot the reference grid at eye level and calculate the distance between the points of the diamond and mark on the grid.
Trace las líneas de referencia teniendo en cuenta la nivelación y calculando la distancia entre las puntas del diamante.
Spread the adhesive on the wall with the flat side of the trowel and then the notched side.
Aplique el adhesivo sobre la pared primero con la parte lisa y luego con la dentada de la espátula.
ka
rm
a,
lib
er
ty
an
d g
lam
ou
r
When you install Diamond Shaped Karma, follow all the preceding steps used for installing mosaics for the following items:· Tools · Surface Preparation · Mixing Adhesives · Marking the Reference Grid· Laying Mosaics – Preparation, Marking and Spreading AdhesivesThese instructions are provided for installing Diamond Shaped Karma. These individual tiles will be installed on the grid line using the following procedures:
Para instalar Diamond Shaped Karma siga las instrucciones anteriores para la colocación de mosaicos teniendo en cuenta los siguientes aspectos:· Instrumentos.· Preparación de fondos· Mezcla de los adhesivos· Trazado de las líneas de referencia· Colocación del mosaico- Preparación, trazado y aplicación de los adhesivos.Estos son los pasos a seguir para la colocación de Diamond Shaped Karma. Estas losas individuales se colocarán siguiendo los procedimientos que explicamos a continuación:

TREND TECH 4�
Begin laying the individual diamond tiles next to each other so the points are in alignment and on the reference grid line.When the first row is complete, insert the diamonds keeping the joints equal distance and aligning the points.
Comience a colocar las losas individuales una a continuación de la otra de manera que las puntas queden alineadas y siguiendo la línea de referencia.Cuando esté terminada la primera hilera, inserte el diamante manteniendo las juntas a igual distancia y alineando las puntas.
To lay the diamond in contact with the adjacent wall, cut it in half and insert it in the position. Wetsaw Grinder for cutting.
Para colocar los diamantes que pegan a la pared adyacente córtelos a la mitad e insértelos en la posición adecuada. Cortador eléctrico con agua.
Once the adhesive is set, grout the tiles according to the grouting procedures. Clean the surface with recommended cleaning procedures (use a slightly acid solution) demonstrated in the preceding sections.
Una vez endurecido el adhesivo prosiga con los pasos para aplicar el rejuntado anteriormente explicados. Limpie la superficie con una solución ligeramente ácida según lo indicado en secciones anteriores.
INSTALLING DIAMOND SHAPED KARMACOLOCACIÓN DE DIAMOND SHAPED KARMA

TREND TECH 4�
INSTALLING LIBERTYCOLOCACIÓN DE LIBERTY
ka
rm
a,
lib
er
ty
an
d g
lam
ou
r
Mark your eye level grid line.Spread the adhesive first with the flat side of the trowel and then the notched side.
Trace las líneas de referencia.Aplique el adhesivo primero con la parte lisa y luego con la dentada de la espátula.
Position your first tile and tap the mosaic with a rubber float to ensure perfect adhesion to the surface.
Coloque la primera hoja batiendo suavemente con la espátula de goma para asegurar una perfecta adherencia a la superficie.
The installation of Liberty designs is exactly the same as the procedures used for installing mosaics with a computer design. All the preliminary steps for initiating the installation are the same for:· Tools· Surface Preparation· Mixing Adhesives· Marking Reference Grid· Laying Mosaics – Preparation, Marking, and Spreading Adhesives· In this installation, the marking of the grid lines should be at eye level. This grid line must compensate for the sheets of mosaics that must be installed above and below the grid line to get the design to fit the prescribed wall or positions.
Para la colocación de los diseños Liberty se siguen exactamente los mismos procedimientos de colocación de mosaicos con diseño artístico, también en esta ocasión se repiten los pasos preliminares en los siguientes aspectos:· Instrumentos.· Preparación de fondos· Mezcla de los adhesivos· Trazado de las líneas de referencia· Colocación del mosaico- Preparación, trazado y aplicación de los adhesivos.· En esta instalación el trazado de las líneas de referencia se efectuará con ayuda del nivel, teniendo en cuenta la cantidad de hojas de mosaico que deben ser colocadas encima y debajo de la línea y asegurando que las mismas encajen en la pared a enlosar.

TREND TECH 44
When you install the remaining tiles with Liberty, some tiles will be cut from the sheet to fill a row.
Durante la colocación de las hojas algunas deberán ser cortadas para completar una hilera.
Small individual glass mosaics may also need to be cut to finish a row.
Eventualmente puede ser necesario cortar algunos mosaicos vítreos para completar una hilera.
From time to time, you may need to cut the plastic film around individual tiles to adjust them.Follow the manufacturer’s instructions for adhesive hardening time. Depending on the conditions when installing, this could be from � hours to �4 hours.
En ocasiones será necesario realizar cortes de la película plástica que recubre el mosaico para ajustarlo. Siga las orientaciones de los fabricantes con respecto al tiempo de endurecimiento, en dependencia de las condiciones durante la colocación, éste puede oscilar entre 3 y 24 horas.
INSTALLING LIBERTYCOLOCACIÓN DE LIBERTY

TREND TECH 45
ka
rm
a,
lib
er
ty
an
d g
lam
ou
r
Once sufficiently dried, the plastic film is removed from the mosaic.· The plastic film should be removed in a diagonal direction keeping the film parallel to the tiles.
Una vez que esté suficientemente seco, la película de plástico que recubre el mosaico puede ser retirada.· Esta película debe ser retirada en dirección diagonal manteniéndola paralela a las hojas.
In this installation, we have chosen the use of a dark grout. To protect the wall surface adjacent to the Liberty wall, apply painter’s tape to protect the surface.
En este tipo de instalación hemos elegido la aplicación de un rejuntado oscuro. Utilice una cinta protectora para evitar manchas en la superficie de la pared adyacente.
Apply the grout in a vertical and diagonal motion to fill all grout lines.
Aplique el rejuntado con movimientos verticales y diagonales para garantizar que éste llene todas las juntas.
INSTALLING LIBERTYCOLOCACIÓN DE LIBERTY

TREND TECH 4�
Once the grout has dried (approximately thirty to sixty minutes), move your sponge across the mosaics to remove most of the excess grout.Remember to always use clean water.
Cuando el rejuntado haya secado lo suficiente (aproximadamente de treinta a sesenta minutos), limpie el área con la esponja para eliminar la mayor parte del rejuntado en exceso.Recuerde usar siempre agua limpia.
When you use dark grout, the cleaning of the tiles may take several passes with a clean sponge.
Cuando se emplea rejuntado oscuro la operación de limpieza con la esponja deberá repetirse tantas veces como sea necesario.
Remember to use a slightly acid solution in your final cleaning.
Recuerde emplear una solución ligeramente ácida para la limpieza final.
INSTALLING LIBERTYCOLOCACIÓN DE LIBERTY

TREND TECH 4�
INSTALLING GLAMOURCOLOCACIÓN DE GLAMOUR
Where greater thickness is needed for the wall tiles, place them on the floor to allow for additional space in setting up the floor guidelines for the Glamour floor tiles.
En las zonas donde las losas de la pared necesiten mayor grosor colóquelas sobre el piso para tener noción del espacio adicional en el momento de efectuar el trazado de las líneas guías para la colocación de las losas Glamour en el piso.
Also placing the Glamour tiles in position, you can mark the floor for the floor grid lines for the floor tiles.
El superponer las losas en la posición en que serán colocadas posteriormente, le facilitará el trazado de las líneas de referencia para la colocación de las losas del piso.
ka
rm
a,
lib
er
ty
an
d g
lam
ou
r
When you install Glamour, follow the preceding steps used for installing mosaics for the following items:· Tools· Surface Preparation · Mixing Adhesives · Marking the Reference Grid· Laying Mosaics – preparation, marking and spreading adhesivesThese instructions are provided for installing Glamour mosaic tiles. Due to the weight of Glamour tiles, the installation begins at the bottom and moves up the wall.Note: In this installation, the wall tiles are positioned to provide the distance from the wall in which to start plotting the grid lines. In this demonstration, different sizes of Glamour are installed on the walls and floors to provide an understanding of this installation procedure.
Para colocar Glamour, siga los procedimeintos anteriores para la colocación de mosaicos en lossiguientes aspectos:· Instrumentos· Preparación de fondos · Mezcla de los adhesivos · Trazado de las líneas de referencia· Colocación del mosaico- preparación, trazado y aplicación de los adhesivosA continuación ofrecemos las instrucciones a seguir para la colocación de Glamour. Debido al peso de estas losas, la instalación comienza desde abajo hacia arriba hasta llenar toda la pared.Nota: En esta instalación las losas de la pared se deben superponer en la posición que ocuparán posteriormente para determinar la distancia que debe quedar desde la pared y trazar las líneas de referencia. Durante la demostración se colocarán losas de Glamour de diferentes dimensiones en paredes y pisos para facilitar la comprensión del proceso de colocación.

TREND TECH 4�
Using your preferred tool to draw the grid line, mark it on the floor.
Utilizando el instrumento escogido por usted, trace la línea sobre el piso.
Reposition the wall and floor tiles to complete marking the grid lines and then apply the adhesive to the floor.
Superponga una vez más las piezas tanto de la pared como del piso para completer el trazado de las líneas guías y comience a aplicar el adhesivo sobre el piso.
After applying the adhesive, position the floor tiles using the designated grid lines. A well prepared adhesive will hold the tiles in place without any problems.
Luego de la aplicación del adhesivo, coloque las losas siguiendo las líneas de referencia. Un adhesivo bien preparado, las mantendrá en su lugar sin problemas.
Note: When installing Glamour, a transparent mosaic, you can put a layer of adhesive on the back of the tiles so the floor imperfections do not show through, or apply sufficient pressure to the tiles to flatten the adhesive evenly on the bottom of the mosaic.
Nota: Al colocar el Glamour, un mosaico transparente, aplique una capa de adhesivo por la parte trasera de cada losa para que no asomen las imperfecciones del piso o de lo contrario, ejerza suficiente presión sobre cada pieza colocada para que el adhesivo se distribuya uniformente por debajo delmosaico.
INSTALLING GLAMOURCOLOCACIÓN DE GLAMOUR

TREND TECH 4�
Continue installing the tiles according to grid lines and tap vigorously with a rubber float to adjust positions and adhere to the adhesive (if additional adhesive has not been applied to the back of the mosaics, it is necessary to tap the tiles down with a more firm pressure to seal the tiles tightly into the adhesive).
Continúe colocando las losas siguiendo la línea de referencia y golpee consistentemente sobre ellas con una espátula de goma para ajustar sus posiciones y que las mismas se adhieran adecuadamente a la superficie (si no se ha aplicado adhesivo adicional en la parte trasera de cada losa, es necesario batir ejerciendo una presión más firme para una perfecta adherencia.
Position larger Glamour tiles on the floor with spacers and measure the height of the tiles.
Posicione las losas más grandes de Glamour sobre el piso con separadores y mida la altura de las mismas.
Based on the height of the tiles, plot your wall grid line.
Basado en la altura de las piezas, trace la línea de referencia.
ka
rm
a,
lib
er
ty
an
d g
lam
ou
r
INSTALLING GLAMOURCOLOCACIÓN DE GLAMOUR

TREND TECH 50
Apply adhesive to the wall and go over the surface with the notched trowel.
Aplique el adhesivo en la pared a lo largo de toda la superficie utilizando la parte dentada de la espátula.
Glamour is a clear glass mosaic and needs to have a layer of adhesive placed on the back of each tile to keep any blemishes on the wall from showing through the tiles.
El Glamour es un material vítreo claro y necesita una capa de adhesivo aplicada por la parte posterior de cada losa para evitar que ulteriores manchas asomen en la pared a través de la losa.
Position the bottom row of Glamour tiles with the spacers to maintain the appropriate distance for grouting.
Coloque la hilera inferior de losas Glamour con los separadores para dejar el espacio apropiado para el posterior proceso de rejuntado.
INSTALLING GLAMOURCOLOCACIÓN DE GLAMOUR

TREND TECH 5�
Continue installing tiles up to the grid line.
Continúe colocando las losas restantes siguiendo las líneas de referencia.
The installation of the Glamour tiles begins by inserting the sheet of tiles on the wall to set up the grid line.
La colocación de las losas Glamour comienza con la superposición de las hojas de mosaico sobre la pared para trazar la línea de referencia.
Mark a line at the top of this sheet to draw the grid line.
Trace la línea de referencia por encima del borde superior de la hoja.
ka
rm
a,
lib
er
ty
an
d g
lam
ou
r
INSTALLING GLAMOURCOLOCACIÓN DE GLAMOUR

TREND TECH 5�
Apply the adhesive and position the Glamour tiles with the grid line, and pat gently with the rubber float if you put adhesive on the back of the tiles. If no adhesive is applied on the back, press more vigorously to seal the tiles.
Aplique una capa de adhesivo y coloque la losa siguiendo la línea de referencia y golpee suvemente con la espátula de goma si ya colocó el adhesivo en la parte trasera de cada una. De no aplicarse adhesivo individualmente detrás de cada losa, la presión a ejercer sobre las mismas debe ser mayor para un correcto sellado.
The film can be cut to lessen the overall weight of mosaic sheets. Once cut, the individual rows can be pushed up to the grid line. Once the adhesive has set, remove the film sheets diagonally across the sheet of mosaics.
Para aligerar el sobrepeso de las hojas de mosaico se puede cortar la película que las recubre y luego llevar las hileras a la posición en que se ajusten a la línea de referencia. Cuando esté completamente seco el adhesivo retire diagonalmente la película que recubre las hojas.
Continue the installation process by grouting and cleaning the tiles, according to previously demonstrated instructions. Always use a slightly acid solution in the final tile cleaning.
Continue el proceso de colocación y al finalizar siga los procedimientos para el rejuntado y la limpieza final según se explica en secciones anteriores. Emplee siempre una solución ligeramente ácida para la limpieza final.
INSTALLING GLAMOURCOLOCACIÓN DE GLAMOUR

TREND TECH 5�
ka
rm
a,
lib
er
ty
an
d g
lam
ou
r
TREND TECH 5�
glamour 0��· 050 (��” x ��” · 30 x 30 cm)villa alle scalette · vicenza, italy

TREND TECH 54TREND TECH 54

TREND TECH 55
installingtrend Q floor tiles
tr
en
d Q
TREND TECH 55
colocación de losastrend Q para pisos

TREND TECH 5�
INSTALLING OVER EXISTING SURFACES OFSTONE, TILE AND WOODCOLOCACIÓN SOBRE SUPERFICIES EXISTENTES DE PIEDRA NATURAL, CERÁMICA Y MADERA
Trend Q floor tiles can be applied over existing surfaces. The application process may vary with local areas. Be sure to check these specifications in your area.Trend Q can be installed over existing surfaces of stone, tile and wood. There may be issues in each situation so thorough tests must be completed to verify proper adhesive for various surfaces.When applying Trend tiles to existing stone or tiles, you need to use a polyurethane adhesive that is flexible. Before applying the adhesive, make sure the surface is free of any topical application (wax, silicone, or any sealer). Next, thoroughly clean the tiles and remove any grease, grime, or build-up that could interfere with the installation. Follow the normal preparation noted especially including the repair of cracks by removing or patching the crack. (Remove any loose tiles or stones).When applying Trend tiles to a new concrete surface where you have removed the old floor, you should follow the normal floor preparation. You can use a fast setting thin set on new surfaces (not on existing overlay projects). The thin set should be modified polymers and is available from a variety of suppliers.If you are using larger tiles, like 4�”x 4�” or larger, use polyurethane adhesives.When applying to wood surfaces, it is best to remove the wood surface due to the potential flexing of the wood floor. Wood can move.If you cannot remove the wood, it is recommended that you sand the wood to rough it up and then thoroughly clean the surface before applying. The polyurethane adhesive should be applied both on the surface and on the back side of the Trend Q tile. The company does not guarantee floor installations and limits warranty issues to defects in the product so it is extremely important that you use a qualified installer or verify that the adhesive matches the project and adheres to the material you are covering.
Las losas Trend Q pueden ser colocadas sobre superficies ya existentes. El proceso de colocación puede variar en dependencia del local en cuestión. Asegúrese de adaptarse a las especificidades del área.Las losas Trend Q pueden ser instaladas sobre superficies existentes de piedra natural, cerámica y madera. Cada situación presenta sus especificidades por tanto se requerirán pruebas para verificar cuales adhesivos son los adecuados para cada tipo de superficie.Al colocar las losas Trend Q sobre superficies existentes de piedra natural o cerámica se recomienda usar un adhesivo poliuretánico que sea flexible. Antes de su aplicación deberá verificarse que la superficie esté libre de cualquier tipo de tratamiento aplicado anteriormente (ceras, silicona o cualquier otro sellador). El próximo paso será limpiar toda la superficie para eliminar restos de grasas, suciedad o restos de materiales de construcción que pudieran estropear la instalación. Siga la preparación normal sugerida, incluyendo especialmente la reparación de fisuras eliminándolas o resanándolas. (Retire cualquier losa o piedra suelta)En caso de que las losas Trend Q se deban colocar sobre una nueva superficie de hormigón en las zonas donde se haya retirado parcial o totalmente el pavimento anterior, siga el procedimiento normal para la preparación de los pisos. Se puede aplicar un adhesivo cementoso de rápido secado sobre la nueva superficie (no sobre superficies existentes). Este adhesivo debe ser de polímeros modificados y lo poseen la mayoría de los suministradores.Si usted va a colocar losas de grandes dimensiones como por ejemplo de 47”x47” o más, utilice un adhesivo poliuretánico.En caso de que la aplicación sea sobre pisos de madera, es más aconsejable retirar completamente la superficie debido a su potencial flexibilidad. La madera se puede mover.Si es imposible retirar la madera, se recomienda enarenarla para que se torne más rugosa y luego limpiar la superficie antes de la colocación.El adhesivo poliuretánico debe aplicarse no solo a la parte trasera de la losa sino también a la superficie. La compañia no se responsabiliza con la colocación de los pisos, la garantía ofrecida se limita a los aspectos relacionados con defectos del producto, por lo tanto es extremadamente importante contratar a un instalador calificado o asegurarse de emplear el adhesivo adecuado para cada proyecto.

TREND TECH 5�
tr
en
d Q
GENERAL CONDITIONS FOR LAYING FLOOR TILESCONDICIONES GENERALES PARA LA COLOCACIÓN DE LOSAS DE PISO
The first and most important step of any installation begins with the thorough evaluation of the surface to be covered.
El primer y más importante paso de toda instalación es la evaluación general de la superficie a cubrir.
Each existing surface is unique.If necessary, the surface to be covered needs to be leveled with the appropriate adhesive and other specific products where the surface may have a considerable incidence of absorption through capillary action.
Cada superficie existente es única.De ser necesario, la superficie a cubrir debe ser nivelada con el adhesivo apropiado o cualquier otro producto específico en los casos en que la misma pueda representar una incidencia considerable de absorción a través de la acción capilar.
Repair any cracks before installing tiles. If the surface crumbles or is undulated through shrinkage, it is not suitable as a laying surface.
Resane las fisuras antes de la colocación de las losas. Si la superficie se pulveriza o por efecto del secado presenta ondulaciones, no es recomendable la colocación de las losas.
It is very important that there is not salt efflorescence or rising damp/pots.
Es muy importante que la superficie esté completamente seca y libre de formaciones salinas.
Note: The surface must be perfectly planar smooth and dry.
Nota: La superficie debe estar perfectamente nivelada, lisa y seca.

TREND TECH 5�
Ambient temperature must be considered. If the temperature is lower than 50 degrees Fahrenheit, the drying of the adhesive will be slower and could present a problem for bonding. If the temperature is above �5 degrees Fahrenheit, the adhesive will dry too quickly.
Surfaces to be covered must also be properly seasoned. Adhesive manufacturers recommend:· Twenty- eight days to dry screened and cement plaster· Ninety days for concrete· Anhydrate-based substrates tolerate a maximum residual humidity of 0.5%
Debe considerarse la temperatura ambiental. Si la temperatura es inferior a 50 grados Fahrenheit, el tiempo de secado se prolongará y pueden presentarse problemas en el proceso de encolado. Con temperaturas superiores a los 95 grados, el adhesivo se secará demasiado rápido.
Las superficies a cubrir deben estar perfectamente secas. El tiempo recomendado por los fabricantes de adhesivos es de:· Veintiocho días para los revoques e inducidos de cemento· Noventa días para el hormigon.· La humedad máxima permitida es de 0.5%
GENERAL CONDITIONS FOR LAYING FLOOR TILESCONDICIONES GENERALES PARA LA COLOCACIÓN DE LOSAS DE PISO

TREND TECH 5�
tr
en
d Q
SLAB STORAGE BEFORE INSTALLINGALMACENAMIENTO DE LAS LOSAS ANTES DE LA INSTALACIÓN
All floor slabs must be stored horizontally on a flat surface.· If the slabs are stored vertically, they could become slightly warped.· If warping occurs, place 5 to � slabs on top of one another on a flat surface. After a few hours, they will become flat. Depending on the temperature and humidity of the storage area, they will flatten after a few hours.
Las losas deben ser almacenadas en posición hori-zontal sobre una superficie plana. · Si se almacenan verticalmente, las losas pueden curvarse.· Si se curvan, coloque de 5 a 7 losas una encima de la otra sobre una superficie plana. Después de unas horas, tornarán a su posición original. El tiempo para que este proceso tenga lugar dependenderá de las condiciones de temperatura y humedad del área de almacenaje.

TREND TECH �0
TOOLS FOR INSTALLING Q FLOOR TILESINSTRUMENTOS PARA LA COLOCACIÓN DE LOSAS TREND Q PARA PISOS
An angle grinder with a continuous crown diamond blade. Esmeriladora con disco diamantado de corte de corona continua para el corte del mosaico.
A set of various sizes of trowels. Juego de paletas.
A level. Nivel.
The tools used for the installation of agglomerate tiles must be clean and free from rust. These tools are:
Los instrumentos para la colocación de losas Trend Q deben estar limpios y libres de óxido. Estos instrumentos son:
A measuring set, tape measure and pencil.Instrumentos de medición, metros y lápiz.

TREND TECH ��
tr
en
d Q
TOOLS FOR INSTALLING Q FLOOR TILESINSTRUMENTOS PARA LA COLOCACIÓN DE LOSAS TREND Q PARA PISOS
A low speed mixing drill with spiral mixer. Taladro mezclador de baja velocidad con batidor elicoidal.
Floats, rubber float for grouting and a felt backed float. Espátula de goma para rejuntado y espátula con filtro.
�/4” x �/4” Square Notched Trowel. Espátula de dientes cuadrados de 1/4” x 1/4” .
A water bucket with a roller and sponge for cleaning. Remember to always use a slightly acid solution in final cleaning steps.Cubeta con rodillos y esponjas para la limpieza. Recuerde emplear siempre una solución ligeramente ácida para la limpieza final.

TREND TECH ��
ADHESIVES FOR INSTALLING TREND SLABSON CONCRETE BASES & DRY WALLSADHESIVOS PARA LA COLOCACIÓN DE LOSAS TREND Q SOBRE BASES DE HORMIGÓN Y DRY WALL
Trend recommends installing Trend Q using cement-based adhesives. Trend USA uses and distributes Kerakoll products.
Trend recomienda adhesivos cementosos para la colocación de las losas Trend Q. Trend USA utiliza y distribuye productos Kerakoll.
To bond on metal (except aluminum in which a primer – adhesion promoter must be applied before using any type of adhesive) glass fiber, wood, gypsum, or, plaster, Trend recommends:
Para la colocación de losas Trend Q sobre superficies de metal (con excepción del aluminio el cual requiere la aplicación de un primer antes de cualquier otro tipo de adhesivo), fibra de vidrio, madera, cartón yeso o yeso, Trend recomienda:
CompanyCompañia
CompanyCompañia
Kerakoll
Mapei
Laticrete
Kerakoll
Kerakoll
Laticrete
Laticrete
Laticrete
Laticrete
Mapei
Mapei
Mapei
Product nameNombre del producto
Product nameNombre del producto
H 40 Marmorex
Granirapid
4��� Rapid + ��� (latex)
Superflex
Fugabella epoxy
Latapoxy �00 pav.
Latapoxy �00 vert.
Latapoxy SP �00 pav.
Latapoxy SP �00 vert.
UP ��
Keralastic
Kerapoxy
CharacteristicCaracterística
CharacteristicCaracterística
Quick - hardening adhesiveAdhesivo de rápido endurecimiento
Quick - hardening adhesiveAdhesivo de rápido endurecimiento
Quick - hardening adhesiveAdhesivo de rápido endurecimiento
� parts adhesive (polyurethane)Adhesivo bicomponente (poliuretánico)
� parts grouting (epoxy)Rejuntado bicomponente(epoxídico)
� parts adhesive (polyurethane)Adhesivo bicomponente (poliuretánico)
� parts adhesive (polyurethane)Adhesivo bicomponente (poliuretánico)
� parts grouting (epoxy)Rejuntado tricomponente (epoxídico)
� parts grouting (epoxy)Rejuntado tricomponente (epoxídico)
� parts adhesive (polyurethane)Adhesivo bicomponente (poliuretánico)
� parts adhesive (polyurethane)Adhesivo bicomponente (poliuretánico)
� parts grouting (epoxy)Rejuntado bicomponente (epoxídica)
NoteNota
NoteNota
Adhesive and groutingAdhesivo y rejuntado
Adhesive and groutingAdhesivo y rejuntado
Adhesive and groutingAdhesivo y rejuntado
AdhesiveAdhesivo
GroutingRejuntado
Floor adhesiveAdhesivo para pisos
Wall adhesiveAdhesivo para paredes
Floor groutingRejuntado para pisos
Wall groutingRejuntado para paredes
AdhesiveAdhesivos
AdhesiveAdhesivos
GroutingRejuntados

TREND TECH ��
tr
en
d Q
ADHESIVES FOR INSTALLING TREND SLABSON CONCRETE BASES & DRY WALLSADHESIVOS PARA LA COLOCACIÓN DE LOSAS TREND Q SOBRE BASES DE HORMIGÓN Y DRY WALL
A slow-speed mixing drill with a spiral mixer should be used. · The adhesive must be mixed according to the manufacturer’s specifications on the adhesive package.· Mixing and blending the adhesive should be accomplished by using the low speed drill to prevent altering the characteristics of the adhesive.· The recommended texture and appearance should be a creamy paste which is easy to spread.
Para realizar la mezcla utilizaremos el taladro mezclador de baja velocidad con batidor elicoidal.· La mezcla se debe realizar siguiendo las instrucciones de los fabricantes que aparecen el paquete.· La mezcla debe efectuarse con un taladro de baja velocidad con batidor elicoidal para no alterar las características del producto. · El resultado debe presentarse como una pasta cremosa fácil de aplicar.
It is recommended that a polyurethane adhesive be used when applying Trend tiles to existing stone or tiles.Follow the instructions on the label of these two products to make the best adhesive for your job.
Es recommendable utilizar adhesivo poliuretánico para la colocación de las losas Trend Q sobre superficies ya existentes de piedra natural o cerámica. Para obtener una buena mezcla siga las instrucciones que aparecen en la etiqueta.
Be sure to mix the correct proportions / weights of the product specified by the manufacturer.Using the slow speed mixer, mix the product until you achieve the desired smooth adhesive.
Sea preciso al mezclar los productos utilizando las correctas proporciones y los pesos especificados por el fabricante. Proceda a realizar la mezcla utilizando un taladro mezclador de baja velocidad hasta lograr la textura deseada.

TREND TECH �4
CUTTING FLOOR SLAB TILESPROCEDIMIENTO PARA REALIZAR LOS CORTES
Slabs can be cut with the angle grinder using a continuous crown diamond blade.· Measure and mark the slab.· Cut along marked line with the angle grinder.
Los cortes necesarios se podrán realizar con laesmeriladora de disco diamantado de corte.· Mida y trace una línea sobre la losa. · Proceda a cortar siguiendo la línea marcada empleando la esmeriladora.

TREND TECH �5
tr
en
d Q
LAYING FLOOR TILE PROCEDURESPROCEDIMIENTO PARA LA COLOCACIÓN DE LOSAS DE PISO
Dry fit the area to be tiled with the largest full slabs first.
Para garantizar una instalación adecuada superponga primero las losas enteras en la zona donde serán colocadas.
Measure additional cut outs to be dry fit.
Determine los cortes que se deben realizar.
Dry fit additional cut outs.
Ahora compruebe si los cortes encajan correctamente antes de aplicar el adhesivo.

TREND TECH ��
Dry fit all slabs for a perfect installation.
Superponga todas las losas y cortes a lo largo del área donde serán colocados para garantizar una perfecta instalación.
Apply adhesive on the floor and use the �/4” x �/4” square notch trowel for proper application.
Aplique la capa de adhesivo sobre el piso utilizando la espátula dentada de 1/4” x 1/4” para una adecuada colocación.
Apply adhesive to the back of each slab before placing into positions.
Aplique el adhesivo al dorso de cada losa antes de colocarlo en su posición final.
LAYING FLOOR TILE PROCEDURESPROCEDIMIENTO PARA LA COLOCACIÓN DE LOSAS DE PISO

TREND TECH ��
tr
en
d Q
Place slabs on the floor and apply pressure to get an even distribution of adhesive and position of slab. Press down with both hands to ensure there is no difference in the thickness.
Coloque las losas sobre la superficie ejerciendo presión para lograr una distribución uniforme del adhesivo y la correcta ubicación de las mismas. Presione con ambas manos para asegurarse de que no hayan diferencias en el grosor.
The surface of the slab must be kept clean by removing any residual adhesive immediately from the surface of the tile before it hardens.
La superficie de la losa debe quedar limpia, eliminando los restos de adhesivo inmediatamente después de aplicado y antes de que endurezca.
Checking adhesive contact.It is a good practice to periodically check the contact between the adhesive and the slab by raising one or more of the slabs after it has been laid and set in place.
Chequeo de la correcta aplicación del adhesivo.Es recomendable chequear periódicamente la correcta aplicación del adhesivo. Levante con ayuda de la paleta una o más losas después de que hayan sido colocadas en su lugar.
LAYING FLOOR TILE PROCEDURESPROCEDIMIENTO PARA LA COLOCACIÓN DE LOSAS DE PISO

TREND TECH ��
Once all slabs are installed, wipe down the slabs with clean warm water as prescribed in earlier tile cleaning processes. Use the bucket with rollers.
Una vez que las losas hayan sido colocadas y con la ayuda de la cubeta con rodillos y esponjas, proceda a efectuar la limpieza siguiendo las mismas indicaciones de las secciones anteriores.
With a trowel, clean any excess adhesive out of the seams. Wipe down slabs with clean, warm water to remove all adhesive.
Con una espátula, limpie el adhesivo que haya quedado entre las juntas. Lave el área con agua caliente para eliminar todo el adhesivo en exceso.
Once slabs are dry, grout the seams between the slabs following the instructions on previous sections.
Cuando el adhesivo se haya endurecido, proceda a aplicar el rejuntado siguiendo las indicaciones relacionadas con este proceso que aparecen en secciones anteriores.
LAYING FLOOR TILE PROCEDURESPROCEDIMIENTO PARA LA COLOCACIÓN DE LOSAS DE PISO

TREND TECH ��
tr
en
d Q
GROUTING SLABSPROCESO DE REJUNTADO
The grouting process is not difficult:· Grouting should not begin until the adhesive has hardened; usually after �4 hours.· To obtain the best results, it is essential to have a supply of clean water, and a new sponge for washing.· Remember- excess grout can only be removed during the surface cleaning process.· The grout grain size used must be compatible with the dimensions of the joint.· Both cement and epoxy grout are applied in the same manner.· The differences between the two grouts are: CEMENT GROUT EPOXY GROUT IS: · Easy to use · Easy to use · Inexpensive · Long lasting · Readily available · Quick hardened · Anti - acid· Be sure to follow the instructions on the grout mix package.· Epoxy grout is used when it is required by health and hygiene regulations and when high physical and mechanical specifications are required.
El proceso de rejuntado no es difícil:· El rejuntado debe comenzar cuando el adhesivo se haya endurecido, generalmente después de 24 horas.· Para obtener un mejor resultado, es esencial tener un abasto continuo de agua limpia y una esponja nueva.· Recuerde que el exceso de adhesivo se elimina durante el proceso de limpieza de la superficie.· El rejuntado a utilizar dependerá del grosor de los juntas.· Tanto el rejuntado cementoso como el epoxídico se aplican de la misma manera.· Las diferencias entre ambos son: REJUNTADO REJUNTADO CEMENTOSO ES: EPOXÍDICO ES: · Fácil de usar · Fácil de usar · Económico · Duradero · Disponible · Rápido endurecimiento · Anti-ácido· Siga las instrucciones que aparecen en el paquete para aplicar el rejuntado.· El rejuntado epoxídico se recomienda cuando existen problemas de salud, por regulaciones de higiene, físicas y mecánicas.

TREND TECH �0
EXPANSION AND STRUCTURAL JOINTSJUNTAS ESTRUCTURALES Y DE EXPANSIÓN
When laying small (�4”x �4”) or large (���”x 4�”) tiles, the structural or expansion joints must be used.
Cuando colocamos losas pequeñas (24”x 24”) o grandes(118”x 48”), se deben usar juntas estructurales y de expansión.
For indoor installations, the expansion joints must be positioned roughly every �� feet.· It should be noted that structural and expansion joints must only be covered with specific products such as sealants, fillers, etc.· Under no circumstances should structural and expansion joints be covered with flooring or covering materials.
Para instalaciones interiores, las juntas de expansión se deben colocar aproximadamente cada 23 pies.· Nótese que las juntas estructurales y de expansión deben ser rellenadas con productos específicos como son los selladores.· Bajo ninguna circunstancia se deben utilizar materiales de pavimentación para su sellado.
For outside installations, the expansion joints must be positioned roughly every �� feet.
Para instalaciones exteriores, las juntas de expansión se deben colocar aproximadamente cada 16 pies.
Expansion or structural joints must be filled with an elastic material capable of absorbing the relative movement of the structure and/or covering.· Elastomer profiles, normally available, may be used as fillers.· Or, the joint may be filled with silicone or polyurethane material suitable for the environment.
Las juntas estructurales y de expansión deben ser selladas con un material elástico capaz de absorber el movimiento relativo de la estructura y/o pavimentacion.· Normalmente en la junta se colocan perfiles elastoméricos.· O las juntas se pueden sellar con silicona o material poliuretánico según el tipo de local.

TREND TECH ��
tr
en
d Q
TREND TECH ��
TREND Q 4�� · �4�“lexus lifestyle living room” by arcila-duque furniture interiors · casadecor ‘0� miami, florida, usa

TREND TECH ��TREND TECH ��
karma ��0 (� �/�” x �” · 4 x 8 cm)“liquid mist” by pfuner busso design · casadecor ‘0� miami, florida, usa

TREND TECH ��
technicalcharacteristicscaracterísticas técnicas
te
ch
nic
al
ch
ar
ac
te
ris
tic
s
TREND TECH ��

TREND TECH �4
ASTM TESTSTEST PERFORMED AND REQUIREMENTS
Facial dimensions (ASTM C4��)
Range of thickness (ASTM C4��)
Wedging (ASTM C50�)
Thermal shock (ASTM C4�4)
Bond strength (ASTM C4��)
Frost resistance (ASTM �0��)
Chemical resistance (ASTM 54�)
Color resistance to fading (DIN 5�0�4)
Coefficient of linear thermal expansion (ASTM D���)
Wedging of flat, rectangular, ceramic wall and floor tile (ASTM C50�-��A)
Resistance to fire
Crazing (ASTM C4�4)
Friction coefficient (ASTM C�0��-��)
Water absorption (ASTM C���)
Apparent porosity (ASTM C���)
Apparent specific gravity (ASTM C���)
Bulk density (ASTM C���)
RESULTS
��.�� mm
Resistant
Resistant
Resistant
Resistant
passes
passes
Dry condition 0.��Wet condition 0.��
Negligible (dilation is absorbed by grout)
Non-combustible -Class O (emits no
toxic gas at melting)
�.�� mm
0.0%
0.0�%
0.�0%
0.0%
g/cm �:�.��
g/cm �:�.��
WEIGHT AND DIMENSIONS TABLA DE MEDIDAS Y PESO
WEIGHT PER BOXPESO POR CAJA
WEIGHTPESO
VITREO · BRILLANTE · SHINING ~ �4.45 Ibs · 15.66 kg
AUREO~ ��.�0 Ibs · 16.64 kg
VITREO · BRILLANTE · SHINING~ �.� Ib/SQF · 7 kg/m2
AUREO~ �.� Ib/SQF · 8.3 kg/m2
JOINTJUNTA
SHEET SIZEMEDIDAS HOJAS
~ �/4�” · 1 mm
�� �/��” x �� �/��”31.6 x 31.6 cm
QUANTITY PER BOXCANTIDAD POR CAJA
SIZE OF THE BOXTAMAÑO DE CAJA
��.5�� SQF · 2 m2
��” x ��” x 4” · 33 x 33 x 10.16 cm
THICKNESSESPESOR ~ 5/��” · 4 mm
SIZETAMAÑO
VITREO · BRILLANTE · SHINING�/4” x �/4” · 2 x 2 cm
AUREO*�/4” x �/4” · 2 x 2 cm
*Hand cut · Cortado a mano
SHEETS PER BOXHOJAS POR CAJA �0
· Colors may vary somewhat by production lot.· Los colores pueden presentar variaciones según el lote.
TECHNICAL CHARACTERISTICS VITREO BRILLANTE SHINING (�/4” x �/4” · 2 x 2 cm)CARACTERÍSTICAS TÉCNICAS

TREND TECH �5
te
ch
nic
al
ch
ar
ac
te
ris
tic
s
ASTM TESTSTEST PERFORMED AND REQUIREMENTS
Facial dimensions (ASTM C4��)
Range of thickness (ASTM C4��)
Wedging (ASTM C50�)
Thermal shock (ASTM C4�4)
Bond strength (ASTM C4��)
Frost resistance (ASTM �0��)
Chemical resistance (ASTM 54�)
Color resistance to fading (DIN 5�0�4)
Coefficient of linear thermal expansion (ASTM D���)
Wedging of flat, rectangular, ceramic wall and floor tile (ASTM C50�-��A)
Resistance to fire
Crazing (ASTM C4�4)
Friction coefficient (ASTM C�0��-��)
Water absorption (ASTM C���)
Apparent porosity (ASTM C���)
Apparent specific gravity (ASTM C���)
Bulk density (ASTM C���)
RESULTS
��.�� mm
Resistant
Resistant
Resistant
Resistant
passes
passes
Dry condition 0.��Wet condition 0.��
Negligible (dilation is absorbed by grout)
Non-combustible -Class O (emits no
toxic gas at melting)
�.�� mm
0.0%
0.0�%
0.�0%
0.0%
g/cm �:�.��
g/cm �:�.��
WEIGHT AND DIMENSIONS TABLA DE MEDIDAS Y PESO
WEIGHTPESO
WEIGHT PER BOXPESO POR CAJA
~ ��.5�� Ibs10 kg
~ � Ib/SQF · 5 kg/m2
JOINTJUNTA
SHEET SIZEMEDIDAS HOJAS
~ 4/4�” · 2 mm
�� �/��” x �� �/��” (�/�” x �/�”)31.6 x 31.6 cm (1 x 1 cm)
�� �/�� x �� �/��” (�/4” x �/�”)30.9 x 31.6 cm (2 x 1 cm)
QUANTITY PER BOXCANTIDAD POR CAJA
SIZE OF THE BOXTAMAÑO DE CAJA
SHEETS PER BOXHOJAS POR CAJA
��.5�� SQF2 m2
��” x ��” x 4” · 33 x 33 x 10.16 cm
�0
THICKNESSESPESOR ~ 5/��” · 4 mm
SIZE TAMAÑO
TESSELLATUM*�/�” x �/�” · 1 x 1 cm*�/4” x �/�” · 2 x 1 cm
Measurements may vary slightly due to the hand cut character of the product.Las medidas pueden presentar minimas variaciones debido a la caracteristica del producto cortado a mano.
*Hand cut · Cortado a mano
· Colors may vary somewhat by production lot.· Los colores pueden presentar variaciones según el lote.
TECHNICAL CHARACTERISTICS TESSELLATUM (�/�” x �/�” · 1 x 1 cm) (�/4” x �/�” · 2 x 1 cm)CARACTERÍSTICAS TÉCNICAS

TREND TECH ��
ASTM TESTSTEST PERFORMED AND REQUIREMENTS
Facial dimensions (ASTM C4��)
Range of thickness (ASTM C4��)
Wedging (ASTM C50�)
Thermal shock (ASTM C4�4)
Bond strength (ASTM C4��)
Frost resistance (ASTM �0��)
Chemical resistance (ASTM 54�)
Color resistance to fading (DIN 5�0�4)
Coefficient of linear thermal expansion (ASTM D���)
Wedging of flat, rectangular, ceramic wall and floor tile (ASTM C50�-��A)
Resistance to fire
Crazing (ASTM C4�4)
Friction coefficient (ASTM C�0��-��)
Water absorption (ASTM C���)
Apparent porosity (ASTM C���)
Apparent specific gravity (ASTM C���)
Bulk density (ASTM C���)
RESULTS
��.�� mm
Resistant
Resistant
Resistant
Resistant
passes
passes
Dry condition 0.��Wet condition 0.��
Negligible (dilation is absorbed by grout)
Non-combustible -Class O (emits no
toxic gas at melting)
�.�� mm
0.0%
0.0�%
0.�0%
0.0%
g/cm �:�.��
g/cm �:�.��
WEIGHT AND DIMENSIONS TABLA DE MEDIDAS Y PESO
WEIGHT PER BOXPESO POR CAJA
WEIGHTPESO
~ �4.45 Ibs · 15.66 kg
LUX · SUNSHINE~ �.� Ib/ SQF · 7 kg/ m2
AUREO~ �.� Ib/ SQF · 8.3 kg/ m2
JOINTJUNTA
SHEET SIZEMEDIDAS HOJAS
~ �/4�” · 1 mm
�� �/��” x �� �/��”31.6 x 31.6 cm
QUANTITY PER BOXCANTIDAD POR CAJA
SIZE OF THE BOXTAMAÑO DE CAJA
��.5�� SQF · 2 m2
��” x ��” x 4” · �� x �� x �0.�� cm
SHEETS PER BOXHOJAS POR CAJA �0
THICKNESSESPESOR ~ 5/��” · 4 mm
SIZETAMAÑO
LUX · SUNSHINE5/�” x 5/�” · 1.5 x 1.5 cm
AUREO*5/�” x 5/�” · 1.5 x 1.5 cm
* Hand cut · Cortado a mano
· Colors may vary somewhat by production lot.· Los colores pueden presentar variaciones según el lote.
TECHNICAL CHARACTERISTICS LUX SUNSHINE (5/�” x 5/�” · 1.5 x 1.5 cm)CARACTERÍSTICAS TÉCNICAS

TREND TECH ��
te
ch
nic
al
ch
ar
ac
te
ris
tic
s
TECHNICAL CHARACTERISTICS GLAMOURCARACTERÍSTICAS TÉCNICAS
WEIGHT AND DIMENSIONS TABLA DE MEDIDAS Y PESO
WEIGHT PER BOXPESO POR CAJA
WEIGHTPESO
~ �� Ibs · 11.80 kg
~ 4.�0 Ib/SQF · 20.22 kg/m2
JOINTJUNTA
SHEET SIZEMEDIDAS HOJAS
~ �/�” · 3.5 mm
�� �/��” x �� �/��”31.6 x 31.6 cm
QUANTITY PER BOXCANTIDAD POR CAJA
SIZE OF THE BOXTAMAÑO DE CAJA
SHEETS PER BOXHOJAS POR CAJA
~ 5.��� SQF · 0.498 m2
��” x ��” x 4” · 33 x 33 x 10.16 cm
5
THICKNESSESPESOR ~ �/�” · 10 mm
SIZETAMAÑO
Nominal DimensionsDimensiones Nominales
Various sizesVarios tamaños
Measurements may vary slightly due to the hand cut character of the product.Las medidas pueden presentar minimas variaciones debido a la caracteristica del producto cortado a mano.
Mounted on film.Aplicado sobre pelicula transparente.
· Colors may vary somewhat by production lot.· Los colores pueden presentar variaciones según el lote.
ASTM TESTSTEST PERFORMED AND REQUIREMENTS
Facial dimensions (ASTM C4��)
Range of thickness (ASTM C4��)
Wedging (ASTM C50�)
Thermal shock (ASTM C4�4)
Bond strength (ASTM C4��)
Frost resistance (ASTM �0��)
Chemical resistance (ASTM 54�)
Color resistance to fading (DIN 5�0�4)
Coefficient of linear thermal expansion (ASTM D���)
Wedging of flat, rectangular, ceramic wall and floor tile (ASTM C50�-��A)
Resistance to fire
Crazing (ASTM C4�4)
Friction coefficient (ASTM C�0��-��)in sizes � �/�” x �” (4 x � cm) or larger
Water absorption (ASTM C���)
Apparent porosity (ASTM C���)
Apparent specific gravity (ASTM C���)
Bulk density (ASTM C���)
RESULTS
��.�� mm
Resistant
Resistant
Resistant
Resistant
passes
passes
Wer /Dry 0.�� /0.��0.�� /0.55
Negligible (dilation is absorbed by grout)
Non-combustible -Class O (emits no
toxic gas at melting)
�.�� mm
0.0%
0.0�%
0.�0%
0.0%
g/cm �:�.��
g/cm �:�.��
Special Installation ProceduresPieces are hand made and hand cut, so desired effect highlights irregular thickness and slight variations in cutting angles. Larger sizes require back battering and use of adhesive to level pieces during installation.
Procedimiento Especial Para la InstalaciónLas piezas son hechas y cortadas a mano, por lo tanto las mismas pueden contener irregularidades en color y espesor, así como variaciones en los ángulos cortados. Piezas grandes requieren aplicación de adhesivo en la parte posterior de la pieza y el uso del adhesivo para nivelar las piezas durante la instalación.

TREND TECH ��
TECHNICAL CHARACTERISTICS KARMACARACTERÍSTICAS TÉCNICAS
ASTM TESTSTEST PERFORMED AND REQUIREMENTS
Facial dimensions (ASTM C4��)
Range of thickness (ASTM C4��)
Wedging (ASTM C50�)
Thermal shock (ASTM C4�4)
Bond strength (ASTM C4��)
Frost resistance (ASTM �0��)
Chemical resistance (ASTM 54�)
Color resistance to fading (DIN 5�0�4)
Coefficient of linear thermal expansion (ASTM D���)
Wedging of flat, rectangular, ceramic wall and floor tile (ASTM C50�-��A)
Resistance to fire
Crazing (ASTM C4�4)
Friction coefficient (ASTM C�0��-��)in sizes � �/�” x �” (4 x � cm) or larger
Water absorption (ASTM C���)
Apparent porosity (ASTM C���)
Apparent specific gravity (ASTM C���)
Bulk density (ASTM C���)
RESULTS
��.�� mm
Resistant
Resistant
Resistant
Resistant
passes
passes
Wer /Dry 0.�� /0.��0.�� /0.55
Negligible (dilation is absorbed by grout)
Non-combustible -Class O (emits no
toxic gas at melting)
�.�� mm
0.0%
0.0�%
0.�0%
0.0%
g/cm �:�.��
g/cm �:�.��
Special Installation ProceduresPieces are hand made and hand cut, so desired effect highlights irregular thickness and slight variations in cutting angles. Larger sizes require back battering and use of adhesive to level pieces during installation.
Procedimiento Especial Para la InstalaciónLas piezas son hechas y cortadas a mano, por lo tanto las mismas pueden contener irregularidades en color y espesor, así como variaciones en los ángulos cortados. Piezas grandes requieren aplicación de adhesivo en la parte posterior de la pieza y el uso del adhesivo para nivelar las piezas durante la instalación.
WEIGHT AND DIMENSIONS TABLA DE MEDIDAS Y PESO
WEIGHTPESO
WEIGHT PER BOXPESO POR CAJA ~ ��.5 Ibs · 10.20 kg
~ � Ib/SQF · 10 kg/m2
JOINTJUNTA
SHEET SIZEMEDIDAS HOJAS
~ �/��” · 2 mm
�� �/��” x �� �/��”31.6 x 31.6 cm
QUANTITY PER BOXCANTIDAD POR CAJA
SIZE OF THE BOXTAMAÑO DE CAJA
SHEETS PER BOXHOJAS POR CAJA
~ �0.�� SQF · 1 m2
��” x ��” x 4” · 33 x 33 x 10.16 cm
�0
THICKNESSESPESOR ~ 5/��” · 4 mm
SIZETAMAÑO
Nominal DimensionsDimensiones Nominales
�/4” x �/4” · 2 x 2 cm�/4” x � �/�” · 2 x 4 cm · staggered joint� �/�” x �”· 4 x 8 cm · aligned joint
OTHER SIZESOTROS TAMAÑOS
Special sizes upon requestMedidas especiales sobre demanda
SETTING MATERIALMATERIAL DE INSTALACIÓN
Must use epoxy adhesiveDebe usar adhesivo epoxy
Measurements may vary slightly due to the hand cut character of the product.Las medidas pueden presentar minimas variaciones debido a la caracteristicadel producto cortado a mano.
Mounted on film.Aplicado sobre pelicula transparente.
· Colors may vary somewhat by production lot.· Los colores pueden presentar variaciones según el lote.

TREND TECH ��
te
ch
nic
al
ch
ar
ac
te
ris
tic
s
TECHNICAL CHARACTERISTICS LIBERTYCARACTERÍSTICAS TÉCNICAS
WEIGHT AND DIMENSIONS TABLA DE MEDIDAS Y PESO
WEIGHT PER BOXPESO POR CAJA
WEIGHTPESO
~ ��.� Ibs · 8 kg
~ � Ib/SQF · 10 kg/m2
JOINTJUNTA ~ �/��” · 2 mm
QUANTITY PER BOXCANTIDAD POR CAJA
SIZE OF THE BOXTAMAÑO DE CAJA
SHEETS PER BOXHOJAS POR CAJA
~ �.��� SQF · 0.82 m2
��” x ��” x 4” · 33 x 33 x 10.16 cm
�0
THICKNESSESPESOR ~ 5/��” · 4 mm
SHEET SIZEMEDIDAS HOJAS
Nominal DimensionsDimensiones Nominales
�� �/5” x �0 �/�0” · 31.03 x 26.2 cm
Measurements may vary slightly due to the hand cut character of the product.Las medidas pueden presentar minimas variaciones debido a la caracteristica del producto cortado a mano.
Mounted on film.Aplicado sobre pelicula transparente.
ASTM TESTSTEST PERFORMED AND REQUIREMENTS
Facial dimensions (ASTM C4��)
Range of thickness (ASTM C4��)
Wedging (ASTM C50�)
Thermal shock (ASTM C4�4)
Bond strength (ASTM C4��)
Frost resistance (ASTM �0��)
Chemical resistance (ASTM 54�)
Color resistance to fading (DIN 5�0�4)
Coefficient of linear thermal expansion (ASTM D���)
Wedging of flat, rectangular, ceramic wall and floor tile (ASTM C50�-��A)
Resistance to fire
Crazing (ASTM C4�4)
Friction coefficient (ASTM C�0��-��)
Water absorption (ASTM C���)
Apparent porosity (ASTM C���)
Apparent specific gravity (ASTM C���)
Bulk density (ASTM C���)
RESULTS
��.�� mm
Resistant
Resistant
Resistant
Resistant
passes
passes
Wet /Dry 0.�� /0.��
Negligible (dilation is absorbed by grout)
Non-combustible -Class O (emits no
toxic gas at melting)
�.�� mm
0.0%
0.0�%
0.�0%
0.0%
g/cm �:�.��
g/cm �:�.��
Special Installation ProceduresPieces are hand made and hand cut, so desired effect highlights irregular thickness and slight variations in cutting angles. Larger sizes require back battering and use of adhesive to level pieces during installation.
Procedimiento Especial Para la InstalaciónLas piezas son hechas y cortadas a mano, por lo tanto las mismas pueden contener irregularidades en color y espesor, así como variaciones en los ángulos cortados. Piezas grandes requieren aplicación de adhesivo en la parte posterior de la pieza y el uso del adhesivo para nivelar las piezas durante la instalación.
· Colors may vary somewhat by production lot.· Los colores pueden presentar variaciones según el lote.

TREND TECH �0
TECHNICAL CHARACTERISTICS WALLPAPERCARACTERÍSTICAS TÉCNICAS
ASTM TESTS
TEST PERFORMED AND REQUIREMENTS
Facial dimensions (ASTM C4��)
Range of thickness (ASTM C4��)
Wedging (ASTM C50�)
Thermal shock (ASTM C4�4)
Bond strength (ASTM C4��)
Frost resistance (ASTM �0��)
Chemical resistance (ASTM 54�)
Color resistance to fading (DIN 5�0�4)
Coefficient of linear thermal expansion (ASTM D���)
Wedging of flat, rectangular, ceramic wall and floor tile (ASTM C50�-��A)
Resistance to fire
Crazing (ASTM C4�4)
Friction coefficient (ASTM C�0��-��)
Water absorption (ASTM C���)
Apparent porosity (ASTM C���)
Apparent specific gravity (ASTM C���)
Bulk density (ASTM C���)
RESULTS
��.�� mm
Resistant
Resistant
Resistant
Resistant
passes
passes
Dry condition 0.��Wet condition 0.��
Negligible (dilation is absorbed by grout)
Non-combustible -Class O (emits no
toxic gas at melting)
�.�� mm
0.0%
0.0�%
0.�0%
0.0%
g/cm �:�.��
g/cm �:�.��
WEIGHT AND DIMENSIONS TABLA DE MEDIDAS Y PESO
WEIGHT PER BOXPESO POR CAJA
WEIGHTPESO
~ �4.45 Ibs· ~ 15.66 kg
~ �.� Ib/ SQF · ~ 7 kg/ m2
JOINTJUNTA �/4�” · ~ 1 mm
QUANTITY PER BOXCANTIDAD POR CAJA
SIZE OF THE BOXTAMAÑO DE CAJA
SHEETS PER BOXHOJAS POR CAJA
��.5�� SQF · 2 m2
��” x ��” x 4” · �� x �� x �0.�� cm
�0
THICKNESSESPESOR 5/��” · ~ 4 mm
SIZETAMAÑO
VITREO · BRILLANTE SHINING · AUREO�/4” x �/4” · 2 x 2 cm
LUX · SUNSHINE · AUREO5/�” x 5/�” · 1.5 x 1.5 cm
· Colors may vary somewhat by production lot.· Los colores pueden presentar variaciones según el lote.
SHEET SIZEMEDIDAS HOJAS
�� �/��” x �� �/��”31.6 x 31.6 cm

TREND TECH ��
TECHNICAL CHARACTERISTICS TREND QCARACTERÍSTICAS TÉCNICAS
RECOMMENDED ADHESIVESPEGAMENTOS RECOMENDADOS
KERAKOLLLATICRETEMAPEI
MANUFACTURERFABRICANTE
NAMENOMBRE
TYPE TIPO
H40 MARMOREX4��� + ��� (LATEX)GRANIRAPID
SINGLE COMPONENTBI - COMPONENTBI - COMPONENT
ASTM TESTS
TEST PERFORMED AND REQUIREMENTS
Thermal shock resistance 4�4-�� (��)
Water absorption ���-�� (�4)
Pendulum impact (J/M) �5�-��A
Breaking strength (MOR/MPA) �4�-�4 (�4)
Flexural strength ��0M-��
Abrasive wear ��4�-��
Friction coefficient �0��-�� (Wet /Dry)
High temperature resistance �4�-��
Stain resistance ����-��
Light exposure DIN 5�0�4-��
RESULTS
No Damage
4�.4/�.5
(MPA) ��.�
�0�.�/�.�
00.��/00.��
< 0.�%
�.4/0.5
�4
No Staining
No Alteration
TREND Q RECYCLED CONTENTCONTENIDO RECICLADO TREND Q
THE FOLLOWING TREND Q COLORS CONTAIN POST-CONSUMER RECYCLED MATERIAL IN THE INDICATED PERCENTAGES.
LOS SIGUIENTES COLORES DE TREND Q, CONTIENEN MATERIAL RECICLADO POST-CONSUMIDOR EN LOS PORCENTAJES INDICADOS.
All TREND Q products are manufactured in the United States.Todos los productos TREND Q son fabricados en USA.
WEIGHT AND DIMENSIONS TABLA DE MEDIDAS Y PESO
WEIGHTPESO �.�� lbs/SQF · 14 kg/m2
THICKNESSESPESOR �/4” · ~ 6.6 mm
STANDARD SIZETAMAÑO ESTÁNDAR
OTHER SIZESOTROS TAMAÑOS
Special sizes upon requestMedidas especiales sobre demanda
ACTUAL
��.���” x ��.���” · 30 x 30 cm
��.���” x ��.���” · 30 x 60 cm
�5.�5�” x �5.�4�” · 40 x 40 cm
�5.�4�” x 4�.�44” · 40 x 120 cm
��.���” x ��.���” · 60 x 60 cm
��.���” x 4�.�44” · 60 x 120 cm
4�.�44” x 4�.�44” · 120 x 120 cm
5�.055” x ��.���” · 150 x 60 cm
���.��” x ��.���” · 300 x 60 cm
NOMINAL
��” x ��”
��” x �4”
��” x ��”
��” x 4�”
�4” x �4”
�4” x 4�”
4�” x 4�”
5�” x �4”
���” x �4”
462 - ��%464 - ��%480 - ��%481 - ��%537 - ��%
485 - ��%431 - �0%439 - �0%484 - �0%486 - �0%
487 - �0%666 - ��%664 - �5%453 - �0%451 - 5�%
461 - 5�%460 - 5�%646 - 5�%681 - 55%456 - 54%
665 - 5�%536 - 45%667 - 45%659 - 4�%655 - ��%
538 - ��%657 - ��%663 - ��%668 - ��%669 - ��%
407 - ��%422 - ��%465 - ��%482 - ��%483 - ��%
· Colors may vary somewhat by production lot.· Los colores pueden presentar variaciones según el lote.

TREND TECH ��
COVERAGE OF THE ADHESIVECONSUMO DEL ADHESIVO
COVERAGE OF THE GROUTCONSUMO DEL REJUNTADO
AdhesiveAdhesivo
Superflex
Elastik
H 40 Flex
H 40 Flotex
H 40 Ideal
H 40 Marmorex
H 40 Maxi
H 40 Rapid
H 40 Tenax
Relax
Special
0.�� lb/ SQF3.00 kg/m2
0.�� - 0.�� lb/ SQF3.00 - 4.02 kg/m2
0.�� - 0.�� lb/ SQF3.00 - 4.02 kg/m2
0.�� - 0.�� lb/ SQF3.00 - 4.02 kg/m2
0.�� - 0.�� lb/ SQF3.00 - 4.02 kg/m2
0.�� - 0.�� lb/ SQF3.00 - 4.02 kg/m2
0.�� - 0.�� lb/ SQF3.00 - 4.02 kg/m2
0.�� - 0.�� lb/ SQF3.00 - 4.02 kg/m2
0.�� - 0.�� lb/ SQF3.00 - 4.02 kg/m2
0.�� - 0.�� lb/ SQF3.00 - 4.02 kg/m2
0.�� - 0.�� lb/ SQF3.00 - 4.02 kg/m2
�.�0 - �.50 lb/ SQF5.33 - 7.27 kg/m2
�.�0 - �.50 lb/ SQF5.33 - 7.27 kg/m2
�.�0 - �.50 lb/ SQF5.33 - 7.27 kg/m2
�.�0 - �.50 lb/ SQF5.33 - 7.27 kg/m2
�.�0 - �.50 lb/ SQF5.33 - 7.27 kg/m2
�.�0 - �.50 lb/ SQF5.33 - 7.27 kg/m2
�.�0 - �.50 lb/ SQF5.33 - 7.27 kg/m2
�.�0 - �.50 lb/ SQF5.33 - 7.27 kg/m2
�.�0 - �.50 lb/ SQF5.33 - 7.27 kg/m2
�.�0 - �.50 lb/ SQF5.33 - 7.27 kg/m2
CoverageConsumo
For large formatPara formato grande
Material
Mosaic �/4” x �/4”
Mosaic 5/�” x 5/�”
Karma �/4” x � �/�”
Karma � �/�” x � �/�”
Karma � �/�” x �”
Karma �” x �”
Agglomerates ��” x ��”
Agglomerates �4” x �4”
Agglomerates �4” x 4�”
Agglomerates 4�” x 4�”
Agglomerates 4�” x ���”
0.�4 lb/ SQF1.164 kg/m2
0.�� lb/ SQF1.504 kg/m2
0.�5 lb/ SQF0.727 kg/m2
0.0� lb/ SQF0.339 kg/m2
0.0� lb/ SQF0.145 kg/m2
0.04 lb/ SQF0.194 kg/m2
0.04 lb/ SQF0.194 kg/m2
0.0� lb/ SQF0.097 kg/m2
0.0�� lb/ SQF0.087 kg/m2
0.0�5 lb/ SQF0.072 kg/m2
0.0� lb/ SQF0.048 kg/m2
Fugabella Epoxy(B1 - Component A+B)
0.�� lb/ SQF1.116 kg/m2
0.� lb/ SQF1.455 kg/m2
0.�5 lb/ SQF0.727 kg/m2
0.0� lb/ SQF0.339 kg/m2
0.0� lb/ SQF0.145 kg/m2
0.04 lb/ SQF0.194 kg/m2
0.04 lb/ SQF0.194 kg/m2
0.0� lb/ SQF0.097 kg/m2
0.0�� lb/ SQF0.087 kg/m2
0.0�5 lb/ SQF0.072 kg/m2
0.0� lb/ SQF0.048 kg/m2
FugabellaPorcelana 0-5
0.� lb/ SQF0.��0 kg/m2
0.�� lb/ SQF�.��� kg/m2
0.�5 lb/ SQF0.727 kg/m2
0.0� lb/ SQF0.339 kg/m2
0.0� lb/ SQF0.145 kg/m2
0.04 lb/ SQF0.194 kg/m2
0.0�5 lb/ SQF0.��� kg/m2
0.0� lb/ SQF0.097 kg/m2
0.0�� lb/ SQF0.082 kg/m2
0.0�4 lb/ SQF0.0�� kg/m2
0.0� lb/ SQF0.048 kg/m2
FugabellaScuba
0.�4 lb/ SQF1.164 kg/m2
0.�� lb/ SQF1.504 kg/m2
0.�5 lb/ SQF0.727 kg/m2
0.0� lb/ SQF0.339 kg/m2
0.0� lb/ SQF0.145 kg/m2
0.04 lb/ SQF0.194 kg/m2
0.04 lb/ SQF0.194 kg/m2
0.0� lb/ SQF0.097 kg/m2
0.0�� lb/ SQF0.087 kg/m2
0.0�5 lb/ SQF0.072 kg/m2
0.0� lb/ SQF 0.048 kg/m2
Fugabella2-12
MATERIAL COVERAGE Consumo del material
· These Kerakoll products are available from Trend USA Ltd.· Estos productos Kerakoll, están disponibles en Trend USA Ltd.
· These coverage estimates are provided by Kerakoll. Your results may vary.· Estos estimados del consumo, son proporcionados por Kerakoll. Sus resultados pueden variar.
Grout of �/�4” x �/��”Junta de 1 x 8 mm

TREND TECH ��
gr
ou
t
MaterialDescriptionDescripción
Fugabella Epoxy(B1 - Component A+B)
FugabellaPorcelana 0-5
FugabellaScuba*
Fugabella2-12
COLORS OF THE GROUT Colores de la junta
MintMenta
Emerald greenVerde esmeralda
Olive greenVerde oliva
RubyRubí
SunsetPuesta del sol
MagnoliaMagnolia
CaramelCaramelo
WalnutNuez
BrownMarrón
TerracottaTerracotta
Bahama beigeBahama beige
Anthracite Antracita
Iron greyGris
Pearl greyGris perla
Light greyGris claro
WhiteBlanco
BlackNegro
JasminJasmin
BlueAzul
RedRojo
YellowAmarillo
Bermuda blueAzul bermuda
LilacLila
OceanOcéano
CrocusCrocus
GreenVerde
Los colores sugeridos fabricados por Kerakoll, están disponibles en Trend USA Ltd. Scuba*: Al final del 2008, Scuba estará disponible en todos los colores.El color epoxídico camel - el cual es similar al caramel - esta disponible exclusivamente en Trend USA.
Suggested colors produced by Kerakoll are available from Trend USA Ltd.Scuba*: By the end of �00�, Scuba will be available in all colors.The epoxy color camel - which is similar to caramel - is available exclusively from Trend USA.

TREND TECH �4

TREND TECHTREND USA Ltd2700 Biscayne Blvd. · Miami, FL 33137 · USAphone +1 305 593 6072 · fax +1 305 593 6075toll free +1 866 508 7363 · [email protected]
TREND AUSTRALASIA Pty Ltd7/5 Talavera Road, North Ryde · 2113 Sydney · NSW Australiaphone +612 8817 5500 · fax +612 8817 5556 · [email protected]
TREND TECH
This catalogue has been printed on ecologically safe recycled paper.Este catálogo se ha impreso en papel ecológico reciclado.
TREND
TECH
editorfederica bisazza
giorgia girardello
concepttrend art dpt
graphic designgabriel sabbaghfederico sanson
printed in italygrafiche antiga
7500 copiesfebruary 2008
copyrightTrend USA Ltd
All rights reserved.Reproduction of any part of this book
and publication on the Internet or on any other medium is not permitted without
Trend USA Ltd written permission.
Contents will be revised as necessary.Check with Trend USA for the most current information.
Please, contact Giorgia Girardello ph. 786 200 4645
El contenido será revisado cuando sea necesario.Verificar con Trend USA para la más reciente información.


![Linha Pintura [fechado] - Ferrate · 2018. 6. 7. · M A T E R I A I S D E C O N S T R U Ç Ã O PINTURA 300050 300051 300052 Espátula 6 cm Espátula 8 cm Espátula 10 cm 012 012](https://img.dokumen.tips/doc/110x75/613c464f4c23507cb63546f4/linha-pintura-fechado-ferrate-2018-6-7-m-a-t-e-r-i-a-i-s-d-e-c-o-n-s-t.jpg)