Embed Size (px)
Citation preview
HORT 1003MASTER GARDENER CORE COURSE Horticulture for the Home & Garden
Item # 086042011 Edition
& shrubsTrees
and Other Woody Plants

Item #08604 HORT 1003 Master Gardener Core Course Textbook series
Copyright © 2008, Regents of the University of Minnesota. All rights reserved. Send copyright permission inquiries to: Copyright Coordinator, University of Minnesota Extension, 405 Coffey Hall, 1420 Eckles Avenue, St. Paul, MN 55108-6068. E-mail to [email protected] or fax to: (612) 625-3967.
CreditsEditor / graphic design: Julie WeisenhornProduction coordinator: Linda WasemMaster Gardener Volunteer Manual: David Moen, Julie Weisenhorn, Mary MeyerBotany: Gary Johnson, Cindy TongSoils: Carl Rosen, Peter Bierman, Harlan FinneyHerbaceous Plants: David Zlesak, Mary MeyerWoody Plants: Nancy Rose, Kathy ZuzekTurf: Robert Mugaas, Karyn VidmarWeeds: Robert Mugaas, Karyn Vidmar, Randy NelsonEntomology: Jeffery HahnPlant Pathology: Michelle GrabowskiDiagnostics: Jeffrey Hahn, Michelle GrabowskiFruits: Emily Hoover, Terry Nennich, Doug Foulk, Karl FoordVegetables: Vince Fritz, Beth JarvisIndoor Plants: Carl Hoffman, Deborah BrownLiving with Wildlife: James Kitts, John Loegering
Thanks to Washington and Virginia Master Gardener Programs for allowing use of information and illustra-tions from their Master Gardener Core Course outlines.
Find more University of Minnesota Extension educational information at http://www.extension.umn.edu/gardeninfo
The information given in this publication is for educational purposes only. Reference to commercial products or trade names is made with the understanding that no discrimination is intended and no endorsement by University of Minnesota Extension is implied.
University of Minnesota Extension is committed to the policy that all persons shall have equal access to its programs, facilities, and employment without regard to race, color, creed, religion, national origin, sex, age, marital status, disability, public assistance status, veteran status, or sexual orientation.
Additional copies of this item can be ordered from the Extension Store at http://shop.extension.umn.edu/; or place credit card orders at (800) 876-8636; or e-mail questions to: [email protected].
In accordance with the Americans with Disabilities Act, this material is available in alternative formats upon request. Please contact your University of Minnesota Extension office or the Distribution Center at (800) 876-8636.
INTRODUCTIONA woody plant can be defined as a perennial plant that has a woody structure that persists throughout all seasons of the year. Trees, shrubs, and some vines are classified as woody plants. Woody plants, especially trees and shrubs, are the main components of most planned landscapes. Because of their structural importance and longevity in the landscape it’s essential to select these plants carefully, basing decisions primarily on site and environmental factors. The many species and cultivars of woody plants available provide a myriad of ornamental features to select from as well.
LEARNING OBJECTIVES1. Understand the classification of woody plants and their nomenclature.2. Understand the landscape function and value of various types of woody plants.3. Understand the process of plant selection based on site and environmental factors.4. Understand the basic process of identifying a woody plant.5. Understand how to care for woody plants.6. Become familiar with a number of woody plants that are appropriate for use
in Minnesota landscapes. 7. Know where to find valid information on woody plants.
TYPES OF WOODY PLANTSWoody plants can be classified as trees, shrubs, or vines.
Tree• : grows with one or a few main trunks, usually over 15 feet tall.Shrub• : grows with numerous branching stems, usually under 15 feet tall.Vine• : grows with numerous long, thin, flexible stems that require support to grow upright.
There are certainly some exceptions to these broad definitions. For example, some large multi-stemmed shrubs such as nannyberry viburnum (Viburnum lentago) may grow taller than 15 feet in some sites. There are also single-trunked trees that grow less than 15 feet tall, such as Sargent crabapple (Malus sargentii) which matures at about 10 feet tall. Pruning or grafting can also blur the line between trees and shrubs. For example, gray dogwood (Cornus racemosa) typically grows as a 6 to 10 feet tall multi-stemmed shrub, but with early pruning and removal of sucker growth it can be trained as a single-trunked small tree. Small trees can also be formed by grafting shrubs at a 3 to 6 feet height onto compatible standards (understock trunks). An example of this is tree-form dwarf Korean lilac, in which the small, rounded shrub, dwarf Korean lilac (Syringa meyeri ‘Palibin’), is grafted onto a Japanese tree lilac (Syringa reticulata) standard.
TREES & SHRUBS and Other Woody Plantsby Kathy Zuzek, Regional Extension Educator - Horticulture and Nancy Rose

NOMENCLATURE Successful selection and use of woody plants first requires an understanding of
plant nomenclature. It is essential to know the structure of plant names so that you can find the plant you are looking for in reference material, on websites, or at nurseries or garden centers. In order to search for or communicate about any given plant you should know both its botanical name and its common name (if it has one).
Common names make it relatively easy to communicate about a plant with people who may not be familiar with botanical names. Common names may be broad (oak, maple, juniper) or more specific (Northern pin oak, red maple, dwarf Japgarden juniper). However, the pitfalls of only using common names quickly become apparent. For example, the name “red maple” may mean the species Acer rubrum to some, while others use the name “red maple” to indicate red-leafed cultivars of Norway maple (Acer platanoides). And one of our most common native juniper species, Juniperus virginiana, goes by the common name “Eastern red cedar”, doubly confusing because the common name makes no mention of “juniper”, and the plant is not in the true cedar genus, Cedrus. As a final example of the potential for confusion with common names, consider this list of plants which are all associated with the common name ironwood:
• Ironwood Ostrya virginiana • Ironwood Carpinus caroliniana • Ironwood Parrotia persica • Ironwood Backhousia sciadophora • Ironwood Cliftonia monophylla • Ironwood Eugenia confusa • Ironwood Mesua ferrea
Botanical names, on the other hand, are very specific to each plant. Botanical names (also referred to as Latin names or scientific names) follow a binomial system developed by Swedish botanist Carl Linnaeus (also known as Carl von Linné or Carolus Linnaeus) in the 1700s. Latin and Greek provide the language bases for most botanical names.
In the binomial system plants are identified by their two-part species name. The two parts of the species name are the genus and the specific epithet. The genus name is capitalized while the specific epithet is in lower case. The entire species names is italicized. The plural of genus is genera; species is both singular and plural.
Example: The species name for common honeylocust is Gleditsia triacanthos.
SPECIESGENUS SPECIES EPITHET
Gleditsia tricanthos
Some plants may be further identified to the level of botanical variety
(usually abbreviated as var. or v. when writing out the plant name). A variety is a naturally occurring variation of a species which will generally breed true from seed. For example, thornless individuals of the typically thorny common honeylocust occur naturally in the wild. Seeds collected and grown out from these thornless individuals produce a high percentage (over 70 percent) of

thornless seedlings. A thornless common honeylocust is identified in this way: Gleditsia triacanthos var. inermis (In Latin the word inermis means unarmed, which in this case indicates “without
thorns”.) For ornamental woody plants an even more common designation is the
cultivar (a contraction of “cultivated variety”) name. A cultivar is a plant that has been selected for a specific trait that varies from the species (e.g. different leaf size or form, different flower color) and has been designated with a cultivar name. Woody plant cultivars are almost always vegetatively propagated in order to maintain the desired trait. For example, ‘Autumn Spire’ red maple (Acer rubrum ‘Autumn Spire’) is propagated by rooting stem cuttings. Therefore each resulting plant is genetically identical to the original plant. Cultivar names are capitalized, not italicized, and set off in single quotation marks.
In recent years the process of patenting plants and using trademark names
has added confusion to plant nomenclature. When a plant is patented, the patent holder controls the propagation and distribution rights for that plant for 20 years. In the patent application, the plant is identified by species and cultivar names; the patent protects that specific plant. After 20 years anyone can propagate and sell the plant using that cultivar name.
Some plant breeders and growers have sought to extend the period in which they have market control over their introductions by using trademark names. A trademark (indicated as ™, or, if a registered trademark, as ®) never expires as long as the holder renews it as required. A trademark protects only the use of that name and is not tied to any particular plant. This has led to introducers assigning odd, codelike cultivar names to plants, then using a pleasant trademark name in association with that plant. For example, the shrub rose cultivar ‘MEIpitac’ is marketed with the trademark name Carefree Wonder™. This rose cultivar was also patented, using the cultivar name ‘MEIpitac’. After 20 years, anyone may propagate and sell this rose under its cultivar name ‘MEIpitac’, but of course most of the rose-buying public would not recognize that name and would continue to buy only the plants sold by the holder of the trademark name Carefree Wonder™.
It is also possible for growers to take an existing, non-patent-protected cultivar and sell the plant in association with a trademark name that they own. An actual example of this is the attractive spring-flowering ‘Grefsheim’ spirea (Spiraea x cinerea ‘Grefsheim’), which was selected and named more than 100 years ago. A major U.S. wholesale nursery offers this plant for sale with the trademark name First Snow™, perhaps assuming that consumers will find that a more desirable name than its actual cultivar name.
Recently updated nursery standards require plant labels that use trademark names to also show the true cultivar name, though this is often in much smaller print.
All in the Family Gardeners and plant professionals are primarily interested in identifying
plants at the species level (genus + specific epithet). However, there are some interesting aspects to learning about plant families. Family is the next broadest plant classification above genus. Families may encompass anywhere from one to hundreds of genera. Knowing family relations can help with plant identification;
for example, all of the genera in the Betulaceae (birch family) bear male flowers in pendant, cylindrical catkins that are present through the winter. Genera within the Betulaceae that are commonly grown in Minnesota include Betula (birch), Alnus (alder), Carpinus (hornbeam, et al.), Corylus (hazelnut), and Ostrya (hophornbeam, et al.).
A few plant family fun facts: • Family names are capitalized but not italicized. • Most family names end with –aceae. • The Ginkgoaceae has only one genus which contains only one species
(Ginkgo; Ginkgo biloba). • The Orchidaceae is one of the largest families with about 800 genera and
over 17,000 species.
TREES, SHRUBS AND VINESFunction and value in the landscape Different types of woody plants serve different functions within the planned
landscape. Careful study of the site will help you determine which plant types are needed in each area within the site. There are many choices of plant species and cultivars within all of these plant groups.
Most planned landscapes use a combination of deciduous and evergreen woody plants. Deciduous plants lose their leaves in autumn and grow new leaves in spring. Evergreen plants retain their green (living) leaves throughout the year, though each leaf will eventually be shed (evergreen leaf retention typically ranges from 2 to 4 years but may be longer in some species). Evergreen woody plants are designated as broad-leafed evergreens or narrow-leafed evergreens. Broad-leafed evergreens have leaves that resemble typical deciduous plants. Examples of broad-leafed evergreens include boxwood and many species of rhododendron and holly. Narrow-leafed evergreens have needle- or scale-like leaves. Examples of narrow-leafed evergreens include pine, spruce, fir, arborvitae, and juniper.
Deciduous woody plants Deciduous trees, shrubs, and vines provide much landscape interest from spring
through autumn with foliage, flowers, fruit, and autumn color. In Minnesota, deciduous plants are leafless for 5 to 6 months of the year. During this time they can still provide interest through features such as bark, fruit, and branching structure, but they do not serve some of their summer functions such as shading and screening.
Deciduous trees Dividing deciduous trees by approximate mature heights, here are some of the
functions and values of large, medium, and small trees in the landscape:
Large trees (mature height 50 feet or more): • Provide a sense of scale. While trees can certainly be the tallest element in
a landscape, be aware that very large trees growing close to small houses can throw off scale and feel overwhelming.
• Provide visual canopy and sense of enclosure in outdoor living areas. • Provide shade. Large deciduous trees placed east or southeast and west or
southwest of houses can reduce summer cooling costs.
• Ornamental features. Large deciduous trees are generally not notable for flower interest or showy fruit, but many provide excellent autumn foliage color and striking winter silhouettes.
• Wildlife food and habitat. Large trees provide nesting and sheltering sites for birds and some mammals. Acorns and other seeds and fruits provide wildlife food.
Medium trees (mature height 25 to 50 feet): • Provide sense of scale. Many medium sized trees make excellent substitutes
for large trees on small sites or near small houses where they are more in scale.
• Provide visual canopy and sense of enclosure in outdoor living areas. • Provide transition from large trees to lower elements in the landscape. • Provide shade. Even a 30 foot tall tree can provide significant shade to a
one or two story house. • Ornamental features. Many trees in this size range provide flower, foliage,
and fruit interest. • Wildlife food and habitat. Medium-sized trees provide nesting and sheltering
sites for birds and some mammals as well as fruit and seeds for food.
Small trees (mature height to 25 feet): • Provide sense of scale. Small trees are in scale with most houses and can be
used in close proximity. • Provide sense of enclosure in smaller outdoor areas such as patios or entry
ways. • Provide transition between smaller and larger landscape elements. • Ornamental features. Many small trees provide multiple seasons of interest
from foliage, flowers, fruit, autumn foliage color, bark, and branching habit. • Wildlife food and habitat. Many small trees provide nesting and sheltering
sites and food for birds.
Deciduous shrubs Deciduous shrubs offer an amazing range of sizes (less than 1 foot to over 15 feet tall), growth habits, foliage textures and colors, flowers, fruits, and other ornamental features. Shrubs are a major component of many planned landscapes. They can be plant-ed singly, in small groups, or in mass plantings. Important landscape functions of shrubs include:
• Connect houses and other structures with their surroundings. • Connect landscape elements. Shrubs of various sizes provide pleasing transi-
tions between tall elements such as shade trees or buildings and lower ele- ments such as groundcovers, turf, and paving.
• Fill vertical and horizontal spaces, including hedges and screening. • Ornamental features. Deciduous shrubs provide multiple seasons of interest
from foliage, flowers, fruit, autumn foliage color, bark, and branching habit. • Wildlife food and habitat. Many shrubs provide nesting and sheltering sites
and food for birds.
Evergreen woody plants In long-winter regions like ours, evergreens are an especially valuable
component in the landscape. In warmer areas (Zone 6 and warmer) many broad-leafed evergreen trees and shrubs are used in landscaping, but in Minnesota’s Zone 3 - 4 climate the narrow-leafed evergreens (pine, spruce, fir, hemlock, arborvitae, juniper, yew, etc.) represent the majority of landscape evergreens. Evergreen trees and shrubs serve the following functions in the landscape.

Evergreen trees • Provide mass and substance in landscape. • Provide winter color. • Provide visual screening • Block wind and some noise. • Wildlife habitat. Evergreens provide important shelter for birds and other
wildlife.
Evergreen shrubs • Connect landscape elements. • Fill vertical and horizontal spaces, including hedges and screening. • Provide winter color. • Block wind and some noise. • Ornamental features. Dwarf conifers in particular provide a unique range of
plant sizes, forms, foliage textures and colors.
Vines Vines comprise a unique and often underused plant group. They are a good
choice for sites with limited horizontal space. In addition to a number of woody perennial vines, there are also many attractive and useful vines that are herbaceous perennials or annuals. The vines commonly grown in Zones 3 and 4 are deciduous. Vines do need support in order to grow upright, so you may need to supply a specialized structure such as a trellis or arbor when planting some vines.
There are several methods by which vines may climb. When selecting a vine for planting, it’s important to know its climbing method so it can be placed in an appropriate site and be given a suitable structure to climb on if needed. Common methods of climbing for vines are:
• Twining. Stem twining is probably the most common adaptation for climbing . As the stem tips grow they actually move in a circular pattern, seeking out a support such as a branch or wire. The vine will then twine around the support, allowing the plant to grow upward. Vigorously twining vines like honeysuckle or bittersweet can wrap around large supports such as posts, but smaller twiners need more slender supports like string or wire. Twining vines require a support structure or they will grow prostrate on the ground. Overly vigorous twining vines can girdle or shade out small plants.
• Adhering. Some vines are adapted to climbing straight up flat surfaces with the aid of either sticky holdfasts or aerial rootlets. For example, Virginia creeper and Boston ivy bear clusters of sticky disks that act like suction cups, cementing themselves to vertical surfaces so the vine can climb farther up. Other vines such as trumpet creeper use large clusters of hairy aerial rootlets to plaster itself to the support. These vines do not require a separate support but should be planted close to the surface on which they will adhere. They are great for covering masonry walls, but they can be a problem on painted wood since the holdfasts or rootlets are tough to scrape off should the surface need repainting.• Twining petioles. Clematis have a rather unique adaptation for climbing:
twining petioles. The petioles are the stalks that hold the leaves, and they will twine around supports to help the vine continue to grow upward. The petioles are fairly short and can only twine around fairly thin supports, so give clematis a fine textured support structure such as wire fencing or nylon netting.
• Tendrils. Tendrils are actually modified leaves and may look like branched threads or small coiled springs, seen on vines such as grapes. These tendrils
wind tightly onto nearby supports and, like the twining petioles of clematis, attach best to fairly thin supports. Some vines combine tendrils with twining stems or adhering holdfasts.
Vines serve these functions in the landscape: • Screening (on vertical structures). • Ground cover, if allowed to spread. • Soften or mask structural features such as fences or buildings. • Ornamental features: flowers, foliage, fruit, fall color. • Food for humans, birds, and wildlife.
Conifer or Evergreen? The botanical terms “evergreen” and “conifer” are NOT synonymous, but
unfortunately they are often used that way in common parlance. As previously mentioned, an evergreen is a plant that retains green leaves throughout all seasons of the year for several years. A conifer is a plant in the order Coniferales that bears seeds in specialized structures called cones. The confusion perhaps stems from the fact that most of the commonly grown conifers in Minnesota are indeed evergreen: think pines (Pinus), spruce (Picea), fir (Abies), and arborvitae (Thuja). Even junipers (Juniperus) bear cones, though the fleshy, tightly closed scales make these cones look more like berries. These plants can all be described as “evergreen conifers”. But there are also some conifers that are not evergreen. A prime example is American larch, also known as tamarack (Larix laricina), a Minnesota native. Larch is one of the small group of trees known as “deciduous conifers”; they bear cones, but they also lose their leaves annually. Other deciduous conifers include bald cypress (Taxodium distichum) and dawn redwood (Metasequoia glyptostroboides); unfortunately neither of these unique trees is fully hardy in Zone 4.
SELECTING THE RIGHT PLANT FOR THE RIGHT PLACE Walk into a large nursery or garden center and you may feel overwhelmed by
the number of woody plants that are available. Adding woody plants to your landscape has many advantages, but it also requires significant investments in money, time, and effort. In order to develop healthy, long-lasting plantings it’s important to do some research before selecting trees, shrubs, and vines. Careful selection, proper planting, and follow-up maintenance will go a long ways toward ensuring that your plant purchases add value and enjoyment to your home.
When selecting woody plants, select plants based on their characteristics or elements of design. Here are some of the primary characterisitcs you should consider:
• Plant purpose (function) • Plant size/Site space • Hardiness • Sun/wind exposure • Soil type/Soil moisture • Soil pH • Disease/Insect/Maintenance issues
For more information about plant selection and a database of plants suitable for Minnesota landscapes, visit the Sustainable Urban Landscape Information
Series (SULIS): http://www.sustland.umn.edu
Purpose Why do you want to add a tree, shrub, or vine to your landscape? Determining
the purpose of the addition is the first step in making a thoughtful plant selection. Some purposes include:• Shade. Shade from trees can make outdoor living areas more inviting in
hot weather and, when strategically placed, can reduce energy needed to cool homes. Large shade trees will provide large areas of shade, but medium or small trees may provide enough shade for a spot such as a patio or deck. Also consider whether too much shade could be a detriment; for example, vegetable gardens, fruit trees, and sun-loving annual and perennial flowers will not thrive in shade.
• Screening / Hedge. Do you want to screen a view year ‘round? If so, dense evergreens may be your choice. Do you just want a little more backyard privacy in the summer? Then deciduous trees or shrubs may be enough. Limited space along a property line? Perhaps a sturdy trellis planted with vines is the answer.
• Accent plant. Accent plants serve to move the viewer’s eye through the landscape and to highlight features such as an entryway to the home or a pathway. Planted singly or in small groups.
• Specimen plant. Specimen plants are often planted singly and are selected for having an outstanding ornamental feature in at least one season. For example, a star magnolia (Magnolia stellata) in the front yard would look spectacular in spring bloom. Some plants have specimen features in several seasons; for example ‘Autumn Brilliance’ serviceberry (Amelanchier x grandiflora ‘Autumn Brilliance’) has showy spring bloom and outstanding autumn color.
• Group or mass planting. Trees and shrubs of all sizes may be planted in groups. For example, 5 or more birches could be planted to form a grove; 3 American cranberry bush viburnums could be planted at the corner of a house; or a hundred Japanese spireas could be mass planted near a commercial parking lot.
• Ornamental features. Simply having attractive features can be a legitimate reason to select a plant. However, if you do not also consider environmental factors and cultural needs you may find that the plant requires lots of maintenance or may turn out to be short-lived. This is acceptable if you understand the risks. For example, if you love hybrid tea roses you can certainly plant them, as long as you are aware that for peak performance these roses will require high maintenance in the form of pesticide sprays, fertilizing, pruning, and winter protection.
Plant size/Site space The most common mistake made in landscaping is planting trees and shrubs
too close to other plants and to structures. This often results in plants intruding on pedestrian walkways, interfering with power lines, blocking window views, and/or inhibiting the normal growth of nearby plants. Take these steps to help prevent the problem:• Assess the site space. Take a tape measure and measure out how much
space you have for plants. Keep plants far enough away from buildings so that there will be several feet of open space between mature plants and the building. Don’t forget to look up; plants that grow too close to power lines may end up being radically pruned or removed.
• Know the plant’s mature height and width before planting. That cute little shrub in a 2-gallon pot will grow much bigger within a few years. Research the potential size of the species or cultivar you want to plant by checking reliable references. You may find slightly different size ranges listed in different references, but it should at least give you a good idea of mature

size. • Know the plant’s growth rate. A shrub with a mature height of 10
feet might reach that height in 5 years if it has a rapid growth rate, or it might take 20 years if it is very slow growing (a dwarf conifer, for example). Slow-growing plants may be spaced more closely if desired, since it will take them longer to reach mature size.
• Know the plant’s growth habit. This is important especially for shrub species that sucker extensively. Suckers are new plant sections that arise from the roots or rhizomes of the parent plant. Some species such as staghorn and smooth sumacs (Rhus typhina, R. glabra) form large colonies through sucker growth. This may be a desirable or undesirable landscape trait, depending on the particular site.
Hardiness Cold hardiness is an essential concern when selecting woody plants in
Minnesota. Winter survival of woody plants is a complex issue. It is affected by a plant’s genetic makeup and by specific environmental and climatic conditions which may vary from year to year. Woody plant species with a wide geographical distribution may show an equally wide range of cold hardiness. In these cases it’s important to select individual plants from a provenance (original seed source) with a climate similar to that of the planting location. For example, red maple (Acer rubrum) grows natively in the United States from Maine to Florida. A red maple originating in Maine would be better adapted to growing in Minnesota than one from Florida because of greater similarities in latitude and climate between Minnesota and Maine.
In order to have some kind of rating system for woody plants several organizations have developed cold hardiness zone maps over the years. The most widely used and accepted map is the USDA Plant Hardiness Zone Map. The current USDA map was introduced in 1990 and uses temperature data from 1974 to 1986. The USDA map divides North America (Canada, the United States, Mexico) into eleven zones, with Zone 1 being the coldest. The zones are based on the average annual minimum temperature and are divided by 10 degree F increments. The zones are further divided into sections “a” and “b” by 5 degree F increments, with “a” being the colder section.
Minnesota falls within USDA Zones 3 and 4, with several small sections of Zone 2b in the far northern part of the state. Here are the average annual minimum temperatures for these zones:


While this zone map is useful for giving an idea about a tree or shrub species’ hardiness range, there are many factors that should be considered beyond a zone rating. Some important aspects of cold hardiness include:• Cold hardiness is not determined only by the lowest annual winter
temperature. Woody plants have different levels of cold hardiness through the year (see next point). This is why it’s really not possible to say that a certain plant is hardy to exactly -27 degrees, for example.
• Acclimation and deacclimation. Every year, woody plants go through a process of acclimation (progressively developing greater cold tolerance) and deacclimation (progressively losing cold tolerance). Acclimation occurs starting in late summer and into autumn as daylength shrinks and temperatures become colder. Woody plants usually reach their greatest degree of cold hardiness in mid-winter. Then, as days lengthen and temperatures warm towards spring, woody plants start to deacclimate. Winter injury often occurs not from mid-winter low temperatures but from sudden temperature changes during the acclimation and deacclimation periods.
• Plant health. A number of factors can alter a plant’s ability to tolerate cold temperatures. Plants that are stressed by factors such as insect or disease damage, drought, or nutrient deficiency are often more susceptible to cold injury. Factors that delay normal acclimation in autumn (e.g. excessive fertilizing or heavy pruning in late summer or early fall; presence of bright lights at night which can mimic long daylength) make plants more susceptible to winter injury.
• Microclimates. Environmental factors such as sun, shade, wind protection, city heat sink effects, water bodies, and topography can affect temperatures on a very localized level. You may find that a friend who lives a few miles away can successfully grow a shrub species that has repeatedly suffered winter dieback at your house, simply because she has a more favorable microclimate. Adventurous gardeners enjoy experimenting with marginally hardy plants by carefully siting the plants in protected microclimates.
• Snow cover/ Mulch. The insulation provided by snow cover or applied mulch such as straw can aid winter survival for some marginally hardy woody plants. Even hardy plants may suffer more damage in winters that lack snow cover because of greater depth of soil freezing and loss of soil moisture which can damage fine feeder roots.
A common frustration for gardeners is finding several different zone ratings for one plant listed in different catalogs or reference books. From the list above, you can see why it is difficult to assign a precise zone rating for any plant. There is no formal testing process for woody plant hardiness; for new cultivars, hardiness ratings usually are provided by the introducer. The introducer may or may not have tested the plant in different hardiness zones. Commercial references (catalogs, websites) often seem to list wider zone ranges than other references, perhaps to include more potential customers. If you find conflicting zone ratings for a plant you’re interested in growing it’s worth checking with gardening friends, public gardens, or other local resources to see how the plant has performed in your area.
Sun exposure Woody plant species have specific preferences for sun exposure and may not
thrive under other light conditions. When selecting plants for a specific site in your landscape consider what that site’s sun/shade conditions will be in all seasons of the year; remember the dramatic change in light levels once large deciduous trees leaf out.
Typical descriptions of sun exposure levels include:• Full sun. At least eight hours of direct sunlight each day during the growing
season. The majority of woody plants grow best in full sun or at least part-day sun.
• Part-day sun. Distinct periods of sun and shade during the day. A pattern of morning sun and afternoon shade is ideal for some plants including clematis and certain gold-foliaged plants that may suffer sunburned leaves in full sun.
• Filtered shade. The amount of shade cast by large trees varies depending on the density of their leaf canopy. Tree species with fairly open canopies such as honeylocust cast dappled or filtered shade which allows moderately shade tolerant species to be grown near them.
• Full shade. Dense canopied trees such as sugar maples and Norway maples create dense shade which can make it difficult to grow other woody plants near them. Dense shade from buildings, especially on the north sides of buildings, also makes it difficult for most plants to grow.
Winter sun can cause damage to leaves and bark of some evergreen and deciduous woody plants. A number of broadleaf and needled evergreens are susceptible to winter burn on their foliage. Winter burn occurs when sunlight heats the leaves enough to cause stomata (leaf pores) to open, resulting in loss of water from the leaves. Strong wind can exacerbate the water loss. In warmer seasons the plant would respond by drawing water into the roots then transporting the water to the leaf to replace lost water. When the ground is frozen, though, water cannot be replaced. This can lead to desiccation (drying) of leaf cells and possibly browning and death of the entire leaf. The dead foliage often becomes very noticeable in late winter to early spring. Buds and stems are less susceptible to winter burn than leaf tissue, so new growth may cover old winter burned foliage by midsummer. In severe cases of winter burn pruning or complete plant removal may be required. To help reduce the chance of winter burn, water all evergreens thoroughly in autumn before the soil freezes and apply several inches of mulch around the plants. Shading or wrapping evergreens may also help prevent winter burn. When planting winter burn-susceptible evergreens such as yews and rhododendrons, site them on north or east sides of buildings or other locations where they will be shaded in winter.
Winter sun can also cause sun scald on the trunks of thin-barked deciduous trees. Sun scald occurs when winter sun, including reflection off snow, heat tissue on the south to southwest side of tree trunks. This tissue can be warmed enough to become active, but when the sun is no longer heating the trunk the ambient below-freezing air temperatures can cause sudden chilling and damage to the tissue. This can result in sections of dead tissue on the trunk. Kraft paper trunk wrapping was previously recommended but studies have not shown it to be effective. Current recommendations to reduce the chance of sun scald on thin-barked trees are shading the trunk with sections of loose-fitting white PVC tubing or with a board loosely tied to the south side of the trunk. Protection should be removed in the spring.
Soil type / Soil moisture Many woody plants will grow well in a fairly broad range of soil types. Other
plants are fairly particular about soil type and especially about soil moisture levels. Soil type and soil moisture/drainage can vary from spot to spot even on a fairly small property. Before selecting any tree, shrub, or vine it’s important to know the site conditions and soil preferences of that plant.
Sandy soils tend to drain quickly, which is often a good trait, but they can also hold too little water and lose nutrients quickly. Clay soils hold moisture and

nutrients well but may also drain too slowly and be difficult to work if too dry. Adding organic matter to any type of soil is usually beneficial, but it is not really possible to completely change the soil type by doing so. It’s better to select plants that are adaptable to your site’s soil conditions rather than try to drastically change the soil.
Soil pH Soil pH is measured on a scale of 0 to 14. A pH of 7 is neutral; above 7 is
alkaline, below 7 is acidic. The best pH range for most plants is from 5.5 to 7.0, since most nutrients are most available at this pH level. Many woody plants will tolerate somewhat alkaline soils, above pH 7.0. Some woody plants definitely require acid soils (usually in a pH range of 4.5 to 5.5, possibly up to 6.0 for some). Some particularly desirable ornamentals are in this acid-loving categories, including azaleas and rhododendrons (Rhododendron spp.), blueberries (Vaccinium spp.), winterberry (Ilex verticillata), and summersweet (Clethra alnifolia).
The only way to determine soil pH on a site is to have soil samples tested. For the most accurate testing for soil pH as well as soil nutrients and texture soil, samples should be analyzed by a soil lab like the University of Minnesota’s. It is possible to raise or lower soil pH in at least a limited area but it may require ongoing treatments to maintain a particular soil pH. This may be worthwhile for limited planting sites, but not for an entire property. For example, if you have a soil pH of 6.8 and you’d like to grow some azaleas, you can use sulfur to lower the soil pH to 5.5 in a limited planting area for the azaleas. Building a raised bed or berm with soil amended specifically for acid-loving plants may be the best option on higher pH soils.
Disease/Insect/Maintenance Issues No woody plant is completely unaffected by diseases or insects. But when
selecting plants, choosing those that are known to be relatively problem free can go a long ways toward reducing pesticide use, reducing maintenance time, and providing a healthy, long-lived landscape. This doesn’t mean you can’t select a few plants that you know will require some extra care in the form of disease or insect control, or greater maintenance needs such as extensive pruning or winter protection, as long as you are aware of the issues before planting.
A general strategy for selecting low pest problem, low maintenance woody plants follows:• Select pest resistant cultivars. Let’s say you want to plant a flowering
crabapple in your yard. There are dozens of crabapple cultivars available from nurseries and garden centers. These cultivars vary widely in their susceptibility to common disease problems such as apple scab. Cultivars such as ‘Hopa’ and ‘Radiant’ are extremely susceptible to apple scab, often resulting in moderate to severe defoliation of the tree by late summer. On the other hand, cultivars such as ‘Prairifire’ and ‘Donald Wyman’ have good resistance to apple scab, resulting in lower maintenance needs and greater landscape value.
• Select alternative species or hybrid within a genus. Some tree and shrub species have few or no cultivars available, or all cultivars that are available may be equally susceptible to a pest problem. In this case, you may want to look for a different species but within the same genus. For example, you might want to plant a red oak (Quercus rubra) but you are concerned about the issue of oak wilt, a serious disease problem. There are no oak wilt resistant cultivars of red oak (in fact, there are few cultivars of red oak at all). But other species of oak (including white oak [Q. alba] and bur oak [Q. macrocarpa]) are less susceptible to oak wilt and would certainly serve landscape functions similar to red oak.
• Select a completely different plant. Perhaps you were thinking about planting a green ash (Fraxinus pennsylvanica), a large tree that’s been widely used for commercial and residential landscaping in Minnesota. While it has many good traits, there have been increasing disease and insect problems with this species, including the threat of emerald ash borer, a devastating insect problem that has not yet been found in Minnesota. All ash species are susceptible to emerald ash borer, so simply selecting an alternative species within a genus is not a good option in this case. Your best course of action is to consider all trees that have the qualities you were looking for (specific size, soil tolerances, etc.) and narrow down your selection from those. In many cases, it’s best to begin the plant selection process by looking at a number of different species within a broad category (e.g. large shade tree, small flowering shrub), rather than having one specific plant in mind first.
INVASIVE WOODY PLANTS We’ve looked at a number of reasons NOT to select a particular woody plant,
such as high susceptibility to pest problems, high maintenance needs, and having cultural requirements that do not match with existing planting site conditions. A plant’s potential to be invasive is another cause for concern.
Invasiveness can be defined in a number of ways. At the broadest level, an invasive woody plant can be defined as any plant growing where it is not desired. More narrowly defined, an invasive woody plant is one that can increase its population in an area to the point that it crowds out the existing plants in that area. This is of special concern when non-native plants invade and displace native plant communities.
There are both non-native and native (indigenous to North America) plants that have the potential to be invasive. Invasiveness can also vary from region to region. For example, English ivy (Hedera helix), native to Eurasia, is extremely invasive in the mild climate of the Pacific Nothwest states, where it climbs high into trees and can overwhelm small plants on the ground. In Minnesota, however, English ivy is marginally hardy, at most surviving only as a ground cover in warmer parts of Zone 4.
Minnesota does have a number of invasive woody plant species distributed throughout the state. Here are some of the non-native invasive woody plants commonly encountered in the state:
• Common buckthorn (Rhamnus cathartica) • Glossy buckthorn (Rhamnus frangula) including cultivar ‘Columnaris’ • Shrub honeysuckles (Lonicera tatarica, L. maackii, L. x bella) • Russian olive (Elaeagnus angustifolia) • Siberian elm (Ulmus pumila) • Siberian pea shrub (Caragana arborescens) • White mulberry (Morus alba)
The following non-native woody plants may be invasive in some areas. They are still widely used in landscaping.
• Japanese barberry (Berberis thunbergii) • Burning bush (Euonymus alatus) • Norway maple (Acer platanoides) • Amur maple (Acer ginnala)
Several North American native plants are also invasive in at least parts of the state. The following two species are fairly common:

• Black locust (Robinia pseudoacacia) • Prickly ash (Zanthoxylum americanum)
Other native plants that may be aggressive or invasive on some sites include: • Boxelder (Acer negundo) • Poison ivy (Rhus toxicodendron) • Sumac (Rhus typhina, R. glabra) • Wild grape (Vitis riparia) • Virginia creeper (Parthenocissus quinquefolia) • Silver Maple (Acer saccharinum) • Green ash (Fraxinus pennsylvanica)
Government agencies, the nursery industry, and the gardening public will continue to have to wrestle with the problem of invasive plants in the future. While gardeners enjoy the diverse ornamental qualities that plants from different parts of the world bring us, we certainly need to be aware of the potential for environmental damage from those plants that do turn out to be invasive. The example of common buckthorn, a Eurasian species once widely planted here as a hedge plant but now a damaging invader, makes us aware of the seriousness of the issue.
IDENTIFYING WOODY PLANTS Identifying woody plants in the field or from samples (e.g. leaves, branches)
requires observation skills and attention to details. As with identifying birds, frequent practice and good reference materials will help you improve your plant identification skills.
Dichotomous keys are one type of reference that may help with plant identification. These keys offer a series of choices that allows you to narrow down the possibilities for the plant you are keying out. Keys require at least some familiarity with taxonomic terms since the choices offered describe some part of the plant. This may start as broadly as a choice between alternate or opposite leaf arrangement and may narrow to details about something like the degree of serration on leaf margins. Many reference books have glossaries that define the taxonomic terms used in keys.
References (books, websites) that provide detailed photographs or drawings of plants are also useful for plant identification and can often be used in conjunction with written keys. You may find it useful to take photographs of correctly identified plants and refer to them when attempting to key out an unknown plant.
Features such as flower and fruiting structures can often lead to the “Aha!” moment when trying to identify a plant, so look carefully for things like cones, catkins, and seed pods. Sometimes even the presence of certain disease or insect problems can help with plant identification; for example, the presence of witches’-brooms (abnormal clusters of fine, twiggy growth on branches) could help in identifying a hackberry tree in winter, since witches’-brooms are a fairly common problem with this species.

There are obviously many questions you could ask when trying to identify a plant. Whether identifying a plant on site or from a client’s descriptions, here are some questions you can begin to consider in order to help determine the plant’s identity:
What is the growth habit? (e.g. tree, shrub, single or multiple trunks, upright, spreading)
What is the approximate size of the plant (height and width)?
Is the plant deciduous or evergreen? This may seem obvious, but in summer some broadleaf evergreens could be
mistaken for deciduous, and deciduous conifers may look evergreen.
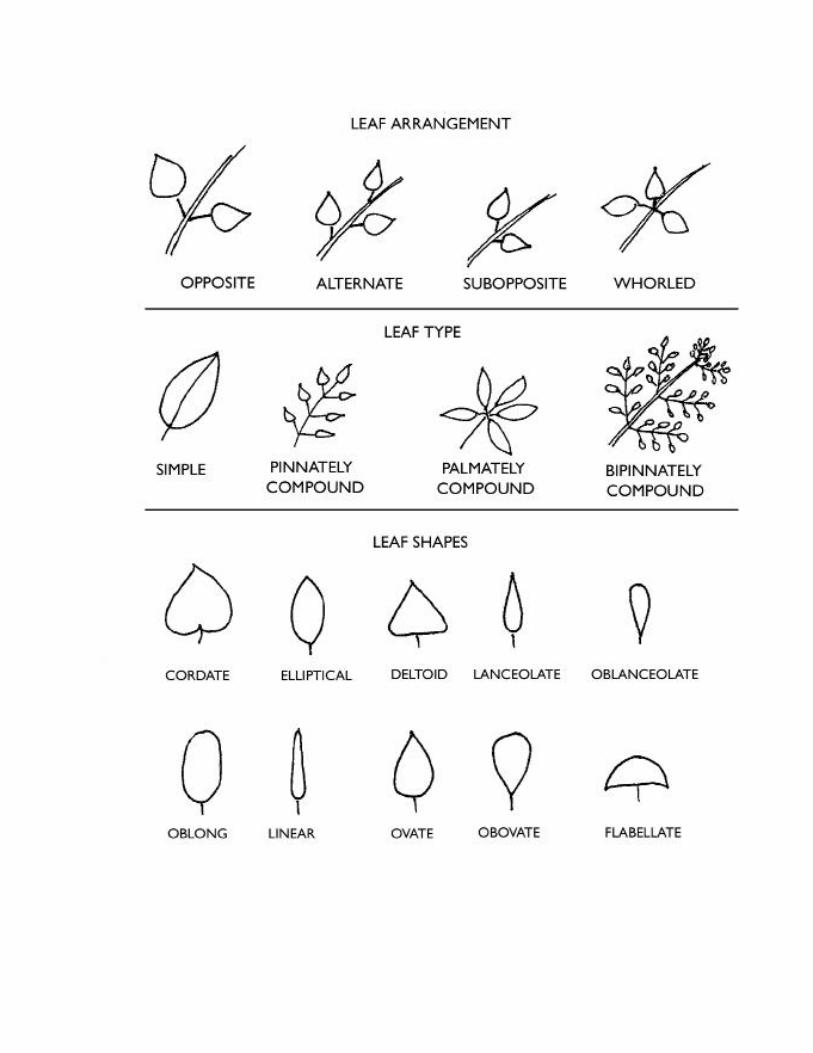
How are the leaves arranged? • Opposite • Alternate • Whorled • Sub-opposite
Are leaves simple or compound?
What is the shape of the leaf (including leaf tips and bases) and size? What kind of leaf margins does the plant have? Leaf surfaces? Leaf venation?Leaf
color, summer and autumn? What does the bark look like in color and texture? (This may vary between younger and older stems)
If present, what is the structure of the flowers? Are they borne singly or in clusters? What is the form of clusters?
What are the colors and size of the flowers?
Does the tree or shrub have fruit? Is it borne singly or in clusters? What is the arrangement of clusters?
• Dry seedpod or capsule • Fleshy (berry, pome, drupe, etc.) • Nut • Cone
How are the buds shaped? What is the size, color of winter buds?
Does the plant have a unique branching pattern? Do the branches have any interesting or unique feature such as spotting,
streaking, wings, flaking, corkiness, etc.? Are there thorns?

PLANTING TREES AND SHRUBS
Planting Success and Root SystemsPlanting and successful establishment of newly planted woody plants is really all about roots. Before discussing planting and care of newly planted trees and shrubs, let’s look at root systems, their growth, and the effect of nursery pro-duction on root growth.
Roots serve three functions: structural support, fluid transport, and nutrient and moisture absorption. In return, tree canopies deliver energy back to the roots for use and for storage.
Large diameter roots anchor the tree in the ground. These are typically oblique or sinker roots. Oblique roots originate from a tree’s primary root or from a lateral root near the base of the trunk, and grow down at a steep angle for many feet. Within the drip line of older trees, sinker roots may originate from the lower sides of lateral roots and grow straight down for 3-6 feet. Some species also produce and rely on tap roots. As trees age, tap and oblique roots become a smaller portion of the total root system; lateral and fine roots become more important.
Lateral roots originate near the base of a tree trunk and provide structural sup-port and anchoring, transport nutrients, water, and oxygen to the canopy, and store energy reserves. These roots grow horizontally at a depth of 1-12 inches, radiate away from the tree, and grow far out beyond the tree’s canopy.
Fine roots originate all along the root framework, but are generally located in the top 12 inches of soil where they originate from the horizontal lateral roots. They grow outward, sometimes downward, but more often up towards the soil suface. They branch to form fans of roots that end in thousands of very fine tips. Most absorption or water and minerals takes occurs through fine roots. Fine roots represent a large portion of the total root surface area and biomass.
What affects root health and where and when roots grow? Root growth is a direct response to the localized nutrient and water content of soils. Roots don’t grow to water. Instead they grow where the water is. Roots in dry soil show very little growth. In spring when the soils are moist and warm near the surface, roots near the surface show the most growth. As the soil dries out, roots near the surface die and new roots are produced deeper in the soil where moisture levels are higher. The depth of active root growth moves pro-gressively deeper in the soil as the season progresses, With each rain or irriga-tion new roots appear near the surface, absorb water and nutrients, and then die if soil moisture becomes too low.
Good root growth also requires a soil atmosphere of 15% oxygen. At 5% soil oxygen root growth stops and when levels fall below 2% roots decline and die. As roots go deeper into soil, soil oxygen levels decrease.
Soil density also impacts where soils grow. Compacted soils have reduced pore spaces for holding air between soil particles so their low oxygen levels can decrease or stop root growth. Compacted roots also impact root growth when their density prevents root penetration. Compacted clay soils often have bulk densities greater than 1.5 and tree roots have trouble penetrating soils greater than this. As soil moisture decreases at the soil surface in summer and
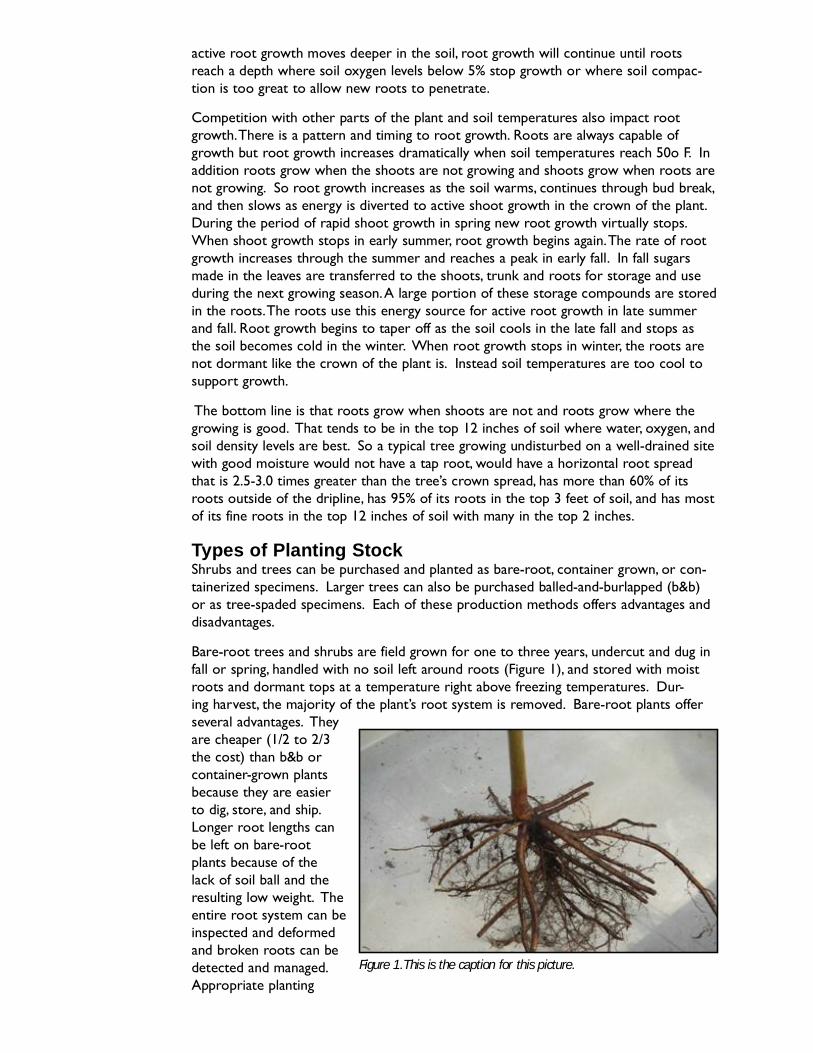
Figure 1. This is the caption for this picture.
active root growth moves deeper in the soil, root growth will continue until roots reach a depth where soil oxygen levels below 5% stop growth or where soil compac-tion is too great to allow new roots to penetrate.
Competition with other parts of the plant and soil temperatures also impact root growth. There is a pattern and timing to root growth. Roots are always capable of growth but root growth increases dramatically when soil temperatures reach 50o F. In addition roots grow when the shoots are not growing and shoots grow when roots are not growing. So root growth increases as the soil warms, continues through bud break, and then slows as energy is diverted to active shoot growth in the crown of the plant. During the period of rapid shoot growth in spring new root growth virtually stops. When shoot growth stops in early summer, root growth begins again. The rate of root growth increases through the summer and reaches a peak in early fall. In fall sugars made in the leaves are transferred to the shoots, trunk and roots for storage and use during the next growing season. A large portion of these storage compounds are stored in the roots. The roots use this energy source for active root growth in late summer and fall. Root growth begins to taper off as the soil cools in the late fall and stops as the soil becomes cold in the winter. When root growth stops in winter, the roots are not dormant like the crown of the plant is. Instead soil temperatures are too cool to support growth.
The bottom line is that roots grow when shoots are not and roots grow where the growing is good. That tends to be in the top 12 inches of soil where water, oxygen, and soil density levels are best. So a typical tree growing undisturbed on a well-drained site with good moisture would not have a tap root, would have a horizontal root spread that is 2.5-3.0 times greater than the tree’s crown spread, has more than 60% of its roots outside of the dripline, has 95% of its roots in the top 3 feet of soil, and has most of its fine roots in the top 12 inches of soil with many in the top 2 inches.
Types of Planting StockShrubs and trees can be purchased and planted as bare-root, container grown, or con-tainerized specimens. Larger trees can also be purchased balled-and-burlapped (b&b) or as tree-spaded specimens. Each of these production methods offers advantages and disadvantages.
Bare-root trees and shrubs are field grown for one to three years, undercut and dug in fall or spring, handled with no soil left around roots (Figure 1), and stored with moist roots and dormant tops at a temperature right above freezing temperatures. Dur-ing harvest, the majority of the plant’s root system is removed. Bare-root plants offer several advantages. They are cheaper (1/2 to 2/3 the cost) than b&b or container-grown plants because they are easier to dig, store, and ship. Longer root lengths can be left on bare-root plants because of the lack of soil ball and the resulting low weight. The entire root system can be inspected and deformed and broken roots can be detected and managed. Appropriate planting

depth is easy to gauge because the root system is visible. Because there is no soil around the root zone, there is none of the dramatic change in soil interface between the rootball and native soil that can hinder plant establishment. There are also disadvantages to bare root plants. Because bare root plants have no soil ball around roots, there is a high risk of post-planting stress or mortality if root desiccation during post-harvest handling and planting occurs. When han-dling or transporting bare root stock, keep the roots moist and protected from sun and wind at all times. If you can’t plant bare root stock immediately upon delivery, place it in a cool, shaded, sheltered location and cover the roots with moist straw, hay, damp burlap, or loose moist soil.
In Minnesota, bare root stock is most often planted in early spring after the ground thaws but before growth starts in the canopy.
Container grown trees and shrubs have been grown their entire lives in con-tainers. Because these plants have their entire root system intact, they suffer little transplant shock if they are given enough irrigation planting. These plants are easier to move and plant than b&b plants because of the light soilless grow-ing media used in containers. Root growth is contained by the pot size so root ball size if often smaller than it would be in the ground. In addition, container-ized growing media are developed to drain quickly and thoroughly. For these reasons, these plants require daily watering before and after planting until plants establish. Containerized plants held too long in pots may become root bound or have kinked or circling roots that can reduce plant vigor and or result in girdling roots. Container grown plants may be planted at any time during the growing season.
Containerized stock are field-grown plants that were either harvested as bare-root plants or are field-potted with a ball of field soil around them.
Bare root shrubs and trees transplanted into containers in early spring should have root systems established enough to hold the planting media together when transplanted in late spring, summer, or fall. With the exception of not having their entire root system intact, these plants have all of the advantages and dis-advantages of container grown plants and can be planted anytime during late spring, summer, or fall.
Field-potted nursery stock should be sold and planted during spring because the field soil will not allow long term good plant growth in a container.
Balled-and-burlapped trees are hand-dug or tree-spaded with a ball of field soil around the roots. The soil ball is then wrapped in burlap that is secured with twine and then sometimes enclosed in a wire basket. This is the production method used for moving and transplanting larger trees. Planting a large b&b tree gives an instant landscape effect. B&b plants can be planted throughout the growing season. Because of the larger tree size and the weight of the soil ball, these plants are heavy and require equipment to move and plant. Establish-ment of large b&b plants is often slow compared to smaller planting stock. B&b trees can be planted in spring, summer, or fall.
Tree spaded trees are dug with machines that dig larger trees and a mass of soil and roots in the shape of an inverted cone. The plant and root ball may stay in the machine until it is planted into a pre-dug matching hole, or it may be placed in a wire basket lined with burlap for transport to the planting site. Plants can be moved in spring, summer, or fall with a spade.
Research has shown that the method of plant production (bare root, container-ized, container grown, b&b, tree spaded) will have little effect on post-transplant
growth as long as plants are planted properly and receive regular and timely irrigation until root systems are reestablished.
Transplant Shock and Plant Establishment after PlantingTransplant shock and failure is caused by water stress when most of the roots are removed during transplanting. Established trees and shrubs with their extensive root systems are in contact with great volumes of soil and soil moisture. On the other hand, a tree that has been dug or spaded from a nursery as a bare root or b&b plant has a very small portion of its root system moved with it. 91-98% of the roots are left at the nursery and only 2-9% of the root system moves with the tree. Although the demands for water by the unaltered plant crown are as big as ever, bare-root and b&b woodies are absorbing water with a greatly diminished root system surface area. If irrigation rate and frequency are too low, the reduced root system cannot replace water lost through crown transpiration. This water stress triggers root damage and/or death followed by top growth reduction and/or death.
Container grown plants have their entire root system intact but the size of the root system is smaller than that of an in-ground tree or shrub because the pot size limits growth. In addition these plants are planted in light, soilless, fast-draining growing media designed for daily watering. Until the root system grows into the surrounding soil, the transplant depends on the one- or two-day supply of water in the container media. These container growing media are very different from the native soils at a planting site and after planting, water will move from the coarser container media out into the finer-textured native soil. Research has shown that a typical container soil can lose up to 85% of available water to the surrounding soil in just a few hours time. For both of these reasons even container grown plants can experience transplant shock from water stress without daily irrigation. Water never moves from the native soil back into the container media around a new transplant, so it is important to remember to water directly over the root ball until roots have grown and extended into the native soil.
So all newly planted trees and shrubs will be subjected to water stress until a complete root system has grown and reestablished. How long does it take for a tree or shrub to replace lost roots? A newly planted tree or shrub often sits in its new landscape for a year or more, looking as if it is not growing. There is actually a lot of growth occur-ring, but it is happening underground where the plant is busy replacing missing roots. The first order of business for a newly planted tree or shrub is to replace the root system that was left behind during harvest in the production nursery. There is a saying that a newly transplanted tree will “sleep” the first year, “creep” the second year, and “leap” the third year. This is because woody species have a characteristic shoot:root ratio. When the ratio is altered, plants respond by redirecting most of its resources to replace the removed parts. Remove roots and shoot growth in the canopy will be reduced while the plant directs its resources into replacing the missing roots. During year one after planting, there are few roots to absorb soil-supplied resources so leaves are usually small and there is little shoot growth in the canopy. What photosynthate is produced is sent to developing roots. In spring of year two, there is a little canopy growth because of increased nutrient and water supply by the now larger root system. The larger canopy produces increased photosynthate for the root system that is still being replaced. Eventually, when the root system that was lost is replaced and the bal-ance between roots and shoots is restored, the tree canopy “leaps” into active shoot growth.
The time it takes to restore the root:shoot ratio varies with climate and length of
growing season. In warm, humid North Florida it takes 3 months for each inch of trunk caliper. In Chicago it takes 1 year for each inch of trunk caliper, and in Minneapolis it takes 1 1/2 years. Caliper is the diameter of the tree 6” above the ground if the diameter is 4” or less. If the diameter is greater than 4”, move to a point on the trunk 12” above the ground and measure the diameter there. In North Florida restoring the root:shoot ratio of a 3” caliper tree would take 9 months. In Chicago and Minneapolis it would take a tree 3 years and 4 ½ years respectively to restore the tree to its normal root:shoot ratio.
Root growth rate after planting is similar for small or large trees (about 18”/year in Minneapolis). But a newly planted small tree will “leap” into top growth much more quickly than a newly planted large tree. Why is this? Restoring the root:shoot ratio takes much less time for a smaller tree, because it left less of its root system back in the nursery than the larger tree did. Plant a 4” caliper tree in Minneapolis and it will take 6 years (4”x 1 ½ years per caliper inch) for the root system to be replaced and for active canopy growth to resume. Plant a 2” caliper tree and it will take only 3 years (2x1 ½ years per caliper inch). The small tree will resume active top growth 3 years before the large tree and will often catch up to the larger tree in size by the time the larger tree resumes top growth.
When to PlantPlanting of bare root trees and shrubs is limited to when plants are dormant in early spring or in fall at the end of the growing season. Balled and burlapped, containerized and container grown plants, and tree spaded plants can be planted throughout the growing season, but with caution during the summer months. Periods of heat and drought during summer are hard on newly planted trees and shrubs that are already under water stress.
The best time of year to plant is when soil temperatures and moisture levels encourage active root growth and when trees and shrubs are dormant. Early spring between ground thaw and leaf emergence is one of those time and early- to mid-autumn is a second good planting season. The transpiration demands on leaves and shoots is low in autumn because of cooler air temperatures, shorter days, and cessation of shoot growth so water stress for the new transplant is less. Try to plant in fall when there are at least 4 weeks remaining where soil temperatures will be above 40o F.
Planting HolesAs you prepare to plant a tree or shrub, remember that wherever you live the gas, electric, cable TV, water and sewer lines that serve you or your neighbor may be underground. If you are doing any digging, state law requires you to notify Gopher State One Call of your intent to work at least 2 working days before digging. To notify Gopher State One Call of your intent to dig, call 811 or 800-252-1166 or 651-454-0002 or contact them at www.gopherstateonecall.org
Planting and establishing trees and shrubs is all about managing oxygen and moisture in the soil to promote rapid root development and root spread beyond the planting hole. The width and depth of the planting hole is an
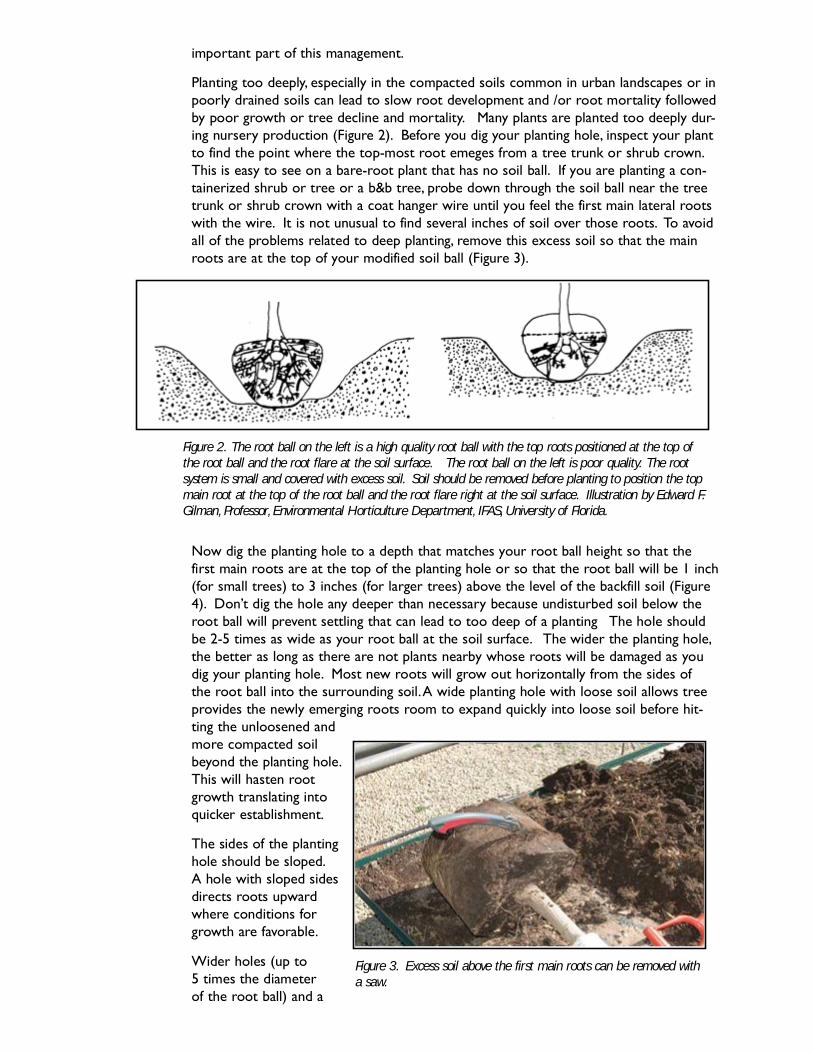
Figure 2. The root ball on the left is a high quality root ball with the top roots positioned at the top of the root ball and the root flare at the soil surface. The root ball on the left is poor quality. The root system is small and covered with excess soil. Soil should be removed before planting to position the top main root at the top of the root ball and the root flare right at the soil surface. Illustration by Edward F. Gilman, Professor, Environmental Horticulture Department, IFAS, University of Florida.
Figure 3. Excess soil above the first main roots can be removed with a saw.
important part of this management.
Planting too deeply, especially in the compacted soils common in urban landscapes or in poorly drained soils can lead to slow root development and /or root mortality followed by poor growth or tree decline and mortality. Many plants are planted too deeply dur-ing nursery production (Figure 2). Before you dig your planting hole, inspect your plant to find the point where the top-most root emeges from a tree trunk or shrub crown. This is easy to see on a bare-root plant that has no soil ball. If you are planting a con-tainerized shrub or tree or a b&b tree, probe down through the soil ball near the tree trunk or shrub crown with a coat hanger wire until you feel the first main lateral roots with the wire. It is not unusual to find several inches of soil over those roots. To avoid all of the problems related to deep planting, remove this excess soil so that the main roots are at the top of your modified soil ball (Figure 3).
Now dig the planting hole to a depth that matches your root ball height so that the first main roots are at the top of the planting hole or so that the root ball will be 1 inch (for small trees) to 3 inches (for larger trees) above the level of the backfill soil (Figure 4). Don’t dig the hole any deeper than necessary because undisturbed soil below the root ball will prevent settling that can lead to too deep of a planting The hole should be 2-5 times as wide as your root ball at the soil surface. The wider the planting hole, the better as long as there are not plants nearby whose roots will be damaged as you dig your planting hole. Most new roots will grow out horizontally from the sides of the root ball into the surrounding soil. A wide planting hole with loose soil allows tree provides the newly emerging roots room to expand quickly into loose soil before hit-ting the unloosened and more compacted soil beyond the planting hole. This will hasten root growth translating into quicker establishment.
The sides of the planting hole should be sloped. A hole with sloped sides directs roots upward where conditions for growth are favorable.
Wider holes (up to 5 times the diameter of the root ball) and a
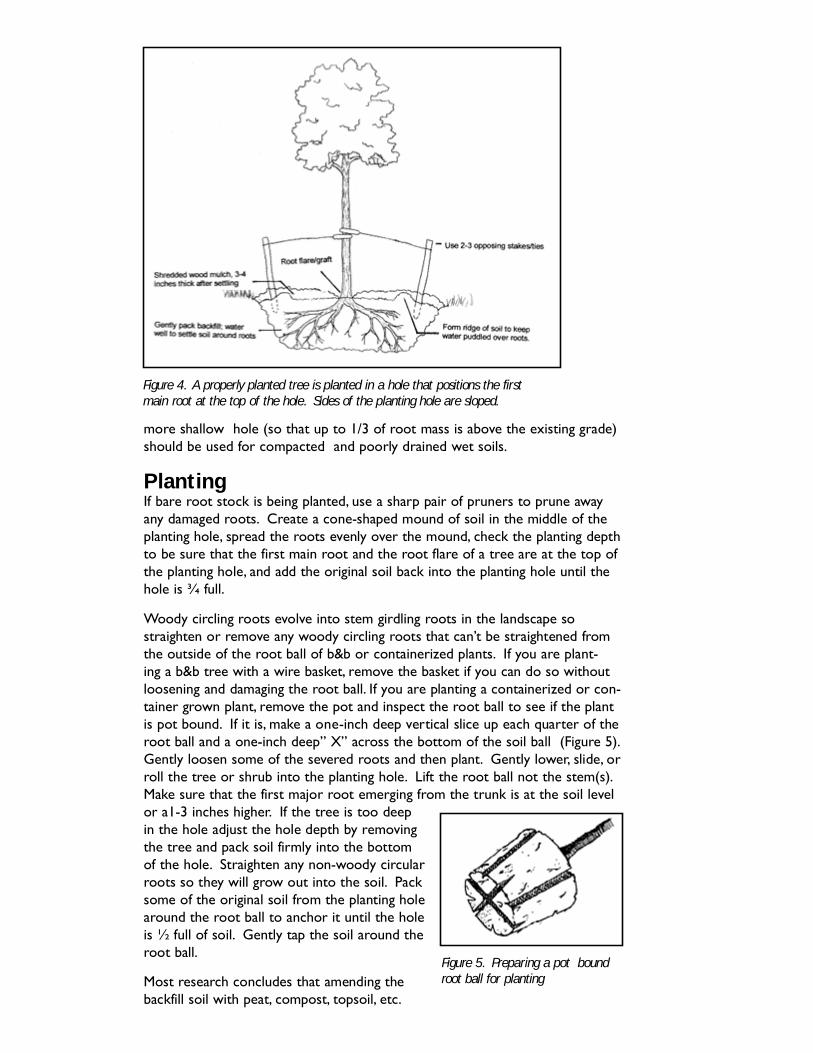
Figure 4. A properly planted tree is planted in a hole that positions the first main root at the top of the hole. Sides of the planting hole are sloped.
Figure 5. Preparing a pot bound root ball for planting
more shallow hole (so that up to 1/3 of root mass is above the existing grade) should be used for compacted and poorly drained wet soils.
PlantingIf bare root stock is being planted, use a sharp pair of pruners to prune away any damaged roots. Create a cone-shaped mound of soil in the middle of the planting hole, spread the roots evenly over the mound, check the planting depth to be sure that the first main root and the root flare of a tree are at the top of the planting hole, and add the original soil back into the planting hole until the hole is ¾ full.
Woody circling roots evolve into stem girdling roots in the landscape so straighten or remove any woody circling roots that can’t be straightened from the outside of the root ball of b&b or containerized plants. If you are plant-ing a b&b tree with a wire basket, remove the basket if you can do so without loosening and damaging the root ball. If you are planting a containerized or con-tainer grown plant, remove the pot and inspect the root ball to see if the plant is pot bound. If it is, make a one-inch deep vertical slice up each quarter of the root ball and a one-inch deep” X” across the bottom of the soil ball (Figure 5). Gently loosen some of the severed roots and then plant. Gently lower, slide, or roll the tree or shrub into the planting hole. Lift the root ball not the stem(s). Make sure that the first major root emerging from the trunk is at the soil level or a1-3 inches higher. If the tree is too deep in the hole adjust the hole depth by removing the tree and pack soil firmly into the bottom of the hole. Straighten any non-woody circular roots so they will grow out into the soil. Pack some of the original soil from the planting hole around the root ball to anchor it until the hole is ½ full of soil. Gently tap the soil around the root ball.
Most research concludes that amending the backfill soil with peat, compost, topsoil, etc.
offers no advantage and is sometimes detrimental. The soil that was removed from planting hole should be used for backfill. Organic matter additions have been shown to be beneficial if an entire bed is being created at once and all of the soil in the bed can be amended. Check to make sure that the tree is straight by viewing the tree from two directions perpendicular to each other. Straighten if necessary. Remove all string and strapping and as much burlap and wire basket as possible from a b&b tree. Finish backfilling until the backfill matches the existing grade and the top edge of the root ball. When you have filled in the planting hole the top of the root ball should be at the soil surface. Water the planting hole well with a slow application of several gallons of water and then fill in any depressions with backfill soil.
Apply 3-4 inches of organic mulch out to a diameter that at least matches the diameter of the tree crown. Pull the mulch back from the trunk or crown a few inches.. Organic mulches (wood chips, shredded bark, pine needles, etc.) will decompose and will have to be replaced every year or two but they also have many benefits. They buffer soil temperatures, help retain soil moisture, prevent growth of weeds and turf that compete with the shrub or tree for water and minerals, prevent damage from mowing equip-ment, and increase organic matter in soil as it decomposes.
AFTER-CARE OF NEWLY PLANTED TREES AND SHRUBS
WateringWatering is the most important consideration for a newly planted tree or shrub because of diminished water absorption by reduced or small root systems. Trees and shrubs can be killed by overwatering as easily as they can be killed by underwatering. Unfortunately water recommendations are very difficult to give because they are so dependent on site exposure, air temperature and humidity, wind, rainfall, d a soil’s mois-ture-holding capacity and drainage characteristics.
Research has shown that root balls of newly planted trees and shrubs can dry to lev-els that block new root growth within 2-3 days so we know now that more frequent watering is necessary than the 1 to 1 ½ inches of water/week recommended in the past. As a general rule of thumb in the Midwest, water daily for the first 1-2 weeks, applying approximately 1-1 ½ gallons for each inch of stem caliper. Then water every 2-3 days for the next 2-3months and then weekly until established. Remember to water where the roots are; apply water directly over the root ball you just planted and apply water in a very slow, soil-saturating trickle.
As an example, you measure the diameter of your newly planted tree at 6 inches above the ground. The diameter is 5 inches. Because this diameter is greater than 4” move up the trunk and measure the diameter at 12 inches above ground. When you do this measurement, your diameter is 4 inches. 4 inches multiplied by 1-1 ½ gallons for each inch of stem caliper means that 4-6 gallons of water should be applied at each watering.
Since it takes 1 to 1 ½ years of establishement time for each inch of stem caliper it will take your 4” tree 4-6 years of time to replace its lost roots and reestablish again. Four to six years is a long time to remember to water your tree on a weekly basis. Remember that smaller trees establish more quickly than larger trees, will not have to be watered regularly for as long of a time, and will start active growth more quickly. A shorter period of frequent watering and quicker restoration of growth is a strong endorsement for planting smaller trees.
FertilizingBecause most newly planted or transplanted trees or shrubs lose the majority of their roots during the transplanting process, high rates of quick release nitro-gen will not be used efficiently during the first year. High rates of nitrogen may also push canopy growth instead of allowing the root growth needed to restore the root system. Application of quick-release nitrogen levels should not exceed 0.1 lb. N/100 sq. ft. per year for the first year after planting. Quick-release fertil-izers should be broadcast after planting and then watered in. Do not mix quick-release forms with the soil used to backfill the planting hole, because direct contact with fertilizer will burn the roots.
As an alternative, a higher rate of a slow-release fertilizer, up to 0.2 lb. nitrogen/100 sq. ft. per year, can be used. Slow-release and natural organic fertil-izers can be incorporated into the backfill soil.
If you have created a new bed for multiple plants, improving overall soil condi-tions by adding organic matter may be the most worthwile investment to speed establishment and long-term growth of woody ornamental plants.
PruningIn the past, 14-40% of a newly planted tree’s crown was removed by pruning. The thought was that top pruning would reduce transpiration and water deficits in the tree. Subsequent research has shown that pruning can reduce transpira-tion but has no effect on survival. If trees are watered frequently enough, they establish more quickly without pruning. Without frequent watering, growth will be no different between pruned and non-pruned plants. Leaving as much of the crown intact maximizes photosynthate production that can be used to promote root and trunk diameter growth. Pruning a tree or shrub crown at planting time is only recommended to eliminate problems and to ensure good branch structure. Remove diseased, dead, broken, crowded, and crossing or rubbing branches. You can also prune to encourage a central leader, to eliminate narrow branch crotches with included bark, or to remove basal sprouts on trees. Prun-ing only to compensate for root loss is not a reason to prune.
StakingStaking newly planted trees that are large and bare-root, or those with lots of wind resistance (evergreens and densely-crowned deciduous trees) can improve the survival of newly planted trees, especially on sites with a lot of wind expo-sure. Attach stakes with flexible web belting or any other strips of wide, soft, but strong materials low on the tree trunk. This will prevent movement of the lower trunk and the root system, but allow for movement and resulting strengthening in the top of the tree. Staking may be necessary for 1-3 years while roots are growing and beginning to stabilize the tree. Check the attach-ment points of the webbing or strips on the stem every 3 to 6 months and loosen if necessary. For more information see: http://www.forestry.umn.edu/extension/urban_com/StakeandGuyBestMaterialsandTechniques.html.
Trunk ProtectionTrunk protection for smooth-barked species such as crabapples, lindens, and maple will prevent injury from sunscald. Apply paper tree wraps or white wraps made from synthetic material from the bottom up in an overlapping pattern until the first major branch is reached. The wrap can be secured with duct tape or expandable plastic tape. Apply tree wraps in late October or early Novem-ber and remove in March or early April.
Trunk protection may also be needed to prevent damage from rabbits and rodents dur-ing winter. Wire mesh and hardware cloth are good for this purpose.
Maintenance of Established Trees and Shrubs
WateringIn a typical lawn situation, an established tree’s roots grow and spread radially out from the trunk and can be 2-3 times the diameter of the tree canopy. On the other hand, if a tree is growing in a restricted site such as in a tree apron between a sidewalk and boulevard, the root structure will spread through the ground between the paved sur-faces and will have a long narrow rectangular shape similar to the tree apron. Estab-lished trees with their extensive root systems need significantly less water than a newly planted tree. But when they do need irrigation, it is important to water the entire area above the extensive root system. A good rule of thumb to use in estimating how far a tree’s roots extend is to estimate a 1.5 foot radius of roots for every inch of stem caliper. So if your tree has a 10 inch caliper, apply water in a circle with a 15 foot radius around your tree.
Watering recommendations are as difficult to give for established trees as for newly planted trees because they are dependent on the same factors: exposure, air tempera-ture and humidity, wind, rainfall, a soil’s moisture-holding capacity and drainage charac-teristics. Sandy soils will drain more quickly than clay or compacted soils. More water-ing will be required with high temperatures, high winds, low humidity, and low rainfall, and on sites with southern and western exposures.
The amount of water woody plants need also differs by species. Bur most trees and shrubs prefer moist soil. Remember that most woody plant roots, especially the absorbing roots, are found in the top 12” of ground so this is where you should focus on creating moist soils. A good general rule is to keep the top 6-8 inches of your soil moist. Dig a hole 6-8 inches down into your soil and adjust your watering schedule based on what you find. If the soil is extremely dry, water for longer periods of time or more frequently. If the soil is saturated, reduce the amount of water you are applying or reduce the frequency of your watering. Less frequent watering with higher rates of water applied are better than more frequent watering with less water applied.
FertilizingPlease see Tree Fertilization: A Guide for Fertilizing New and Established Trees in the Landscape printed at the end of this chapter.
Pruning
How Pruning WorksAlong a tree or shrub branch are points called nodes. Nodes are where leaves attach. In the axils where the leaf stalks (petioles) attach to the branch are lateral buds. The length of branch between two nodes in called an internode. At the tip of a branch is an apical or terminal bud. When this bud expands, it produces additional nodes and inter-nodes to add length to the tip of the branch.
In many plants, the apical bud expands and creates new shoot growth while the lateral buds don’t germinate. This phenomenon is called apical dominance. It is caused by the production in the apical bud of a plant hormone called auxin. Auxin causes the apical bud to grow while causing lateral buds to stay dormant.
When the apical bud is removed, the ability to produce auxin is also removed. This
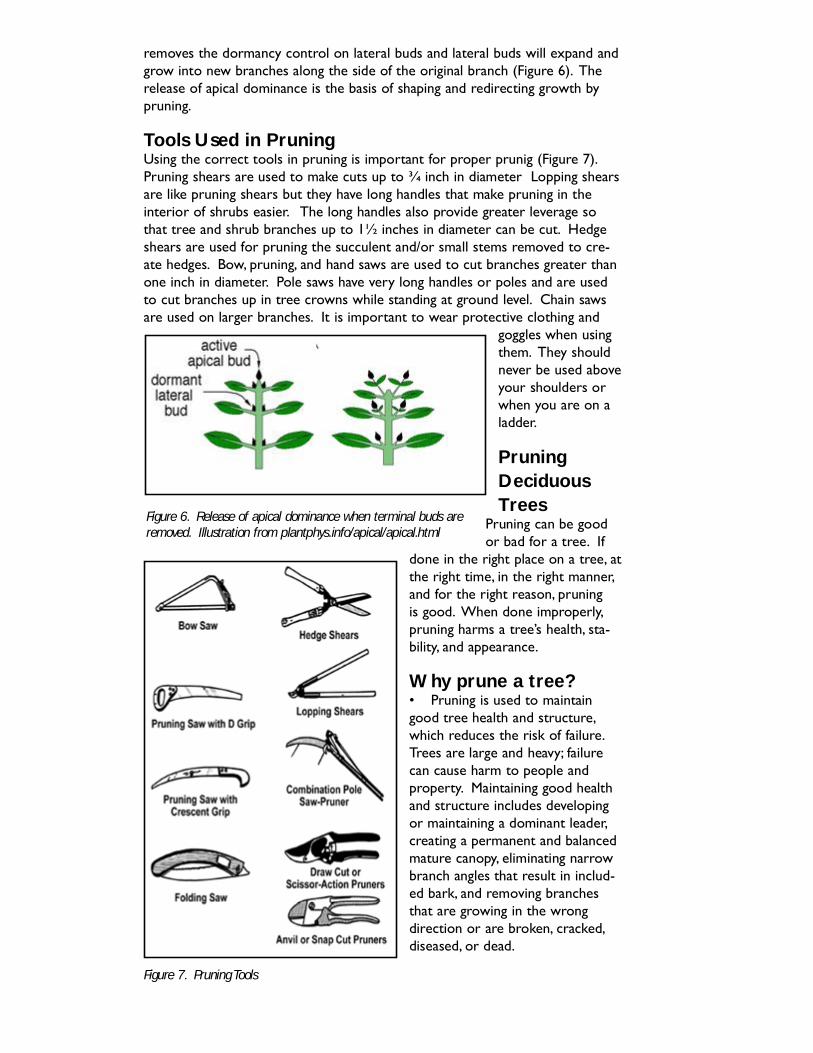
Figure 6. Release of apical dominance when terminal buds are removed. Illustration from plantphys.info/apical/apical.html
Figure 7. Pruning Tools
removes the dormancy control on lateral buds and lateral buds will expand and grow into new branches along the side of the original branch (Figure 6). The release of apical dominance is the basis of shaping and redirecting growth by pruning.
Tools Used in PruningUsing the correct tools in pruning is important for proper prunig (Figure 7). Pruning shears are used to make cuts up to ¾ inch in diameter Lopping shears are like pruning shears but they have long handles that make pruning in the interior of shrubs easier. The long handles also provide greater leverage so that tree and shrub branches up to 1½ inches in diameter can be cut. Hedge shears are used for pruning the succulent and/or small stems removed to cre-ate hedges. Bow, pruning, and hand saws are used to cut branches greater than one inch in diameter. Pole saws have very long handles or poles and are used to cut branches up in tree crowns while standing at ground level. Chain saws are used on larger branches. It is important to wear protective clothing and
goggles when using them. They should never be used above your shoulders or when you are on a ladder.
Pruning Deciduous Trees
Pruning can be good or bad for a tree. If
done in the right place on a tree, at the right time, in the right manner, and for the right reason, pruning is good. When done improperly, pruning harms a tree’s health, sta-bility, and appearance.
Why prune a tree? • Pruning is used to maintain good tree health and structure, which reduces the risk of failure. Trees are large and heavy; failure can cause harm to people and property. Maintaining good health and structure includes developing or maintaining a dominant leader, creating a permanent and balanced mature canopy, eliminating narrow branch angles that result in includ-ed bark, and removing branches that are growing in the wrong direction or are broken, cracked, diseased, or dead.

• Pruning provides clearance or a view for people, structures, and/or vehicles.
• Pruning can improve or maintain the appearance, shape, and landscape function of a tree.
When to PruneDead and diseased wood can be removed at anytime during the year.
Live branches are best pruned in late winter just before buds swell and growth starts. Callus formation and wound closure will be rapid as spring growth start. Diseases and insects are dormant in winter which minimizes infection risk. Pruning decisions are easier to make in winter when leaves are gone and plant architecture and branching structure are easy to see.
The next best time to prune is after spring growth has stopped and leaves are turning dark green and are hardening. Don’t remove more than 10% of the foliage during sum-mer pruning and remember that there is a higher risk of pest invasion during summer pruning.
Pruning during spring and fall is not recommended. Pruning in spring can easily damage cambium and bark and can trigger heavy sprouting near pruning wounds. Pruning in fall often promotes flushes of growth instead of allowing a plant to go dormant in prepara-tion for winter.
Pruning at the proper time can prevent disease infection in some tree species. For instance, oaks should never be pruned during April, May, or June when the beetles that carry oak wilt spores are active and attracted to fresh wounds on oaks. Honeylocust should never be pruned during rainy and humid summer weather when spores of Thy-ronectria are abundant and can infect and cause stem cankers. Crabapples, mountain ash, hawthorns and other members of the Rosaceae family should not be pruned in spring or summer when the backterial disease fireblight can spread and infect trees.
Oftentimes, sap can be seen running or “bleeding” from pruning wounds created in late winter and early spring. Species prone to this bleeding include birches, black locust, dogwoods, elms, European hornbeam, hackberry, honeylocust, Kentucky cof-fee tree, magnolias, maples, mulberry, poplars, sumacs, walnuts, and willows. Bleeding is not harmful to the plant. Pruning in mid- or late summer or pruning smaller diameter branches when trees are younger will help avoid bleeding.
If you are growing a tree for flowering quality, prune plants that flower on previous years’ wood (Table 1.) immediately after they bloom so that new stems with flower buds will have time to grow before next year’s flowering period. Prune plants that flow-
er on current year’s wood in late winter or early spring.

Table 1. Woody ornamental plants that bloomon previous year’s woodScientific Name Common NameAesculus horsechestnutAmelanchier serviceberryAronia ChokeberryBerberis barberryCalycanthus sweet shrubCaragana peashrubCercis redbud
Chaenomeles quince
Chionanthus fringetreeCornus dogwoodDeutzia deutziaExochorda pearlbushForsythia forsythiaHamamelis witchhazelHydrangea macrophyllum bigleaf hydrangeaItea sweetspireLonicera honeysuckleMagnolia magnoliaMalus crabapplePhiladelphus mockorangePieris AndromedaPrunus cherry, almond, plumPyrus pearlbushRhododendron azaleas & rhododendronsSyringa lilacViburnum viburnumWeigela weigela
Branch Anatomy and PruningA branch bark ridge is a ridge of rough raised bark formed in the angle of a branch trunk union. It extends down both sides of the branch/trunk juncture (Figure 8) and serves as a guideline for pruning.
A branch collar is a swollen area at the base of a branch where it joins the trunk (Figure 8). It is formed by overlapping layers of trunk and branch wood. A collar is a very strong juncture that resists breakage. Inside the collar is the branch protection zone, rich in energy reserves and chemicals that prevent the spread of decay.
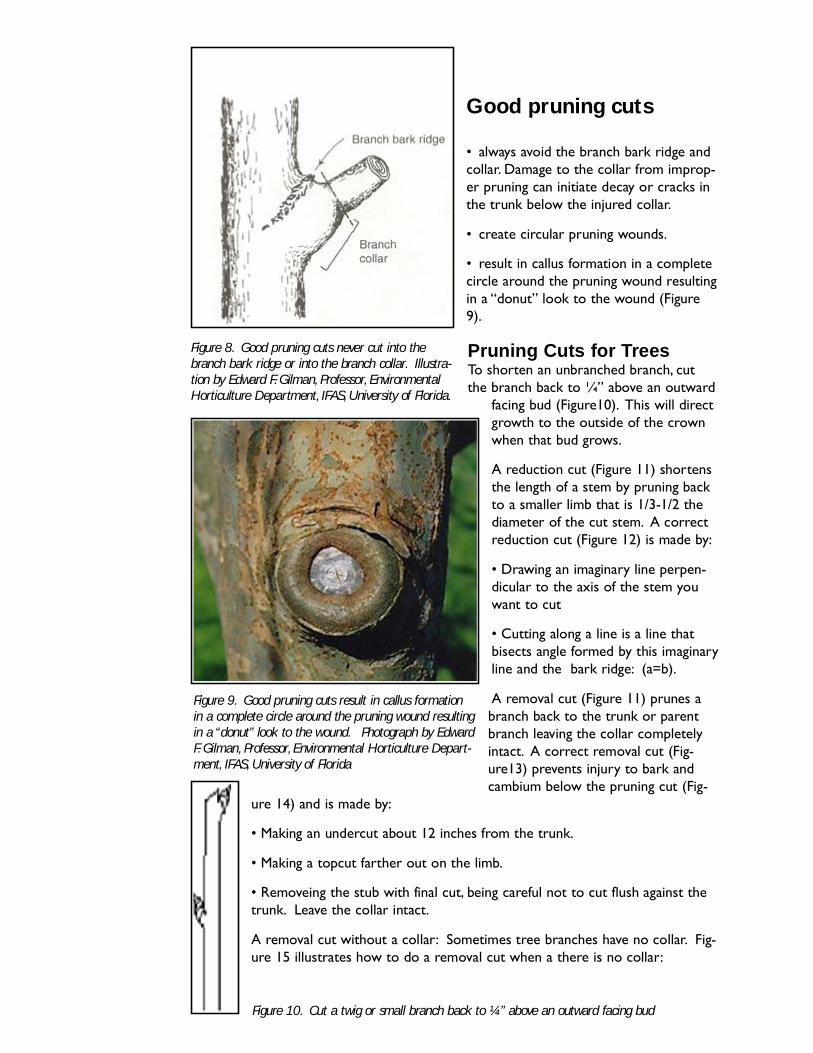
Figure 8. Good pruning cuts never cut into the branch bark ridge or into the branch collar. Illustra-tion by Edward F. Gilman, Professor, Environmental Horticulture Department, IFAS, University of Florida.
Figure 9. Good pruning cuts result in callus formation in a complete circle around the pruning wound resulting in a “donut” look to the wound. Photograph by Edward F. Gilman, Professor, Environmental Horticulture Depart-ment, IFAS, University of Florida
Figure 10. Cut a twig or small branch back to ¼” above an outward facing bud
Good pruning cuts
• always avoid the branch bark ridge and collar. Damage to the collar from improp-er pruning can initiate decay or cracks in the trunk below the injured collar.
• create circular pruning wounds.
• result in callus formation in a complete circle around the pruning wound resulting in a “donut” look to the wound (Figure 9).
Pruning Cuts for TreesTo shorten an unbranched branch, cut the branch back to ¼” above an outward
facing bud (Figure10). This will direct growth to the outside of the crown when that bud grows.
A reduction cut (Figure 11) shortens the length of a stem by pruning back to a smaller limb that is 1/3-1/2 the diameter of the cut stem. A correct reduction cut (Figure 12) is made by:
• Drawing an imaginary line perpen-dicular to the axis of the stem you want to cut
• Cutting along a line is a line that bisects angle formed by this imaginary line and the bark ridge: (a=b).
A removal cut (Figure 11) prunes a branch back to the trunk or parent branch leaving the collar completely intact. A correct removal cut (Fig-ure13) prevents injury to bark and cambium below the pruning cut (Fig-
ure 14) and is made by:
• Making an undercut about 12 inches from the trunk.
• Making a topcut farther out on the limb.
• Removeing the stub with final cut, being careful not to cut flush against the trunk. Leave the collar intact.
A removal cut without a collar: Sometimes tree branches have no collar. Fig-ure 15 illustrates how to do a removal cut when a there is no collar:
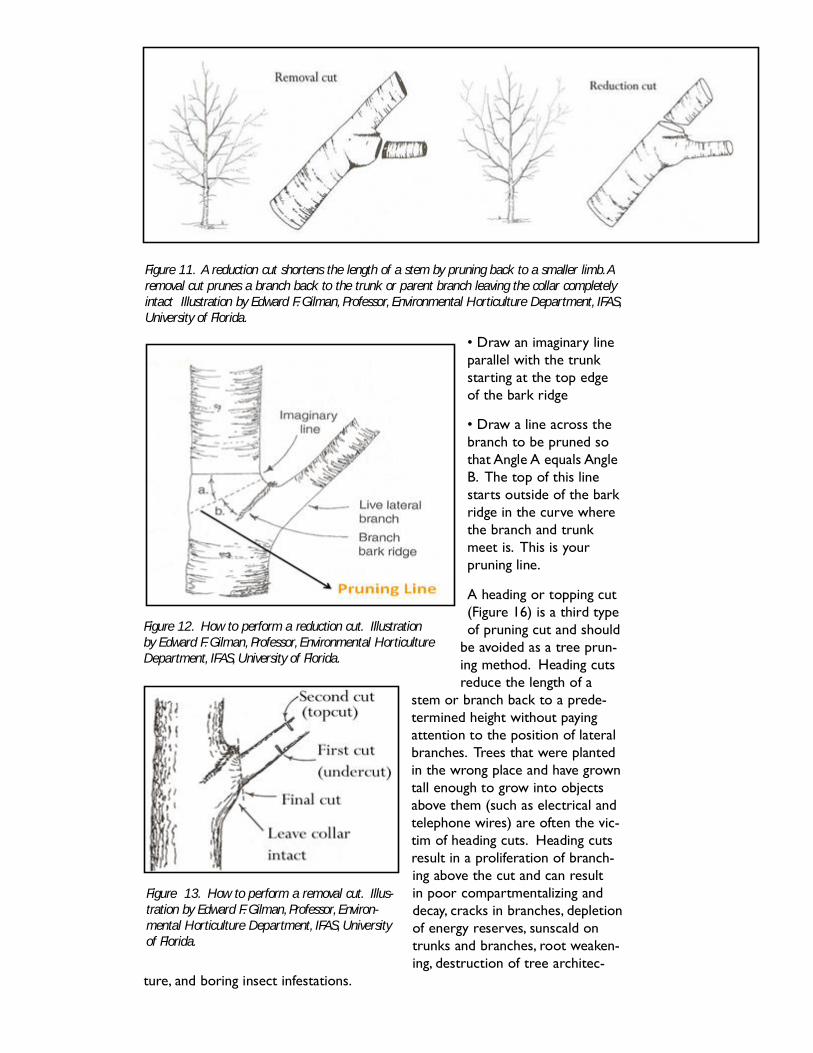
Figure 11. A reduction cut shortens the length of a stem by pruning back to a smaller limb. A removal cut prunes a branch back to the trunk or parent branch leaving the collar completely intact Illustration by Edward F. Gilman, Professor, Environmental Horticulture Department, IFAS, University of Florida.
Figure 12. How to perform a reduction cut. Illustration by Edward F. Gilman, Professor, Environmental Horticulture Department, IFAS, University of Florida.
Figure 13. How to perform a removal cut. Illus-tration by Edward F. Gilman, Professor, Environ-mental Horticulture Department, IFAS, University of Florida.
• Draw an imaginary line parallel with the trunk starting at the top edge of the bark ridge
• Draw a line across the branch to be pruned so that Angle A equals Angle B. The top of this line starts outside of the bark ridge in the curve where the branch and trunk meet is. This is your pruning line.
A heading or topping cut (Figure 16) is a third type of pruning cut and should
be avoided as a tree prun-ing method. Heading cuts reduce the length of a
stem or branch back to a prede-termined height without paying attention to the position of lateral branches. Trees that were planted in the wrong place and have grown tall enough to grow into objects above them (such as electrical and telephone wires) are often the vic-tim of heading cuts. Heading cuts result in a proliferation of branch-ing above the cut and can result in poor compartmentalizing and decay, cracks in branches, depletion of energy reserves, sunscald on trunks and branches, root weaken-ing, destruction of tree architec-
ture, and boring insect infestations.

Figure 14. A good (left) and bad (right) removal cut.
Figure 15. How do perform a removal cut when there is no collar present. Illustration by Edward F. Gilman, Professor, Environmental Horticulture Department, IFAS, University of Florida.
Figure 16. A heading or topping cut as shown on the right is not recommended for trees. A better way to prune around an object that a tree has grown into is a reduction cut as shown on the left. Illustration by Edward F. Gilman, Professor, Environmental Horticulture Department, IFAS, University of Florida.
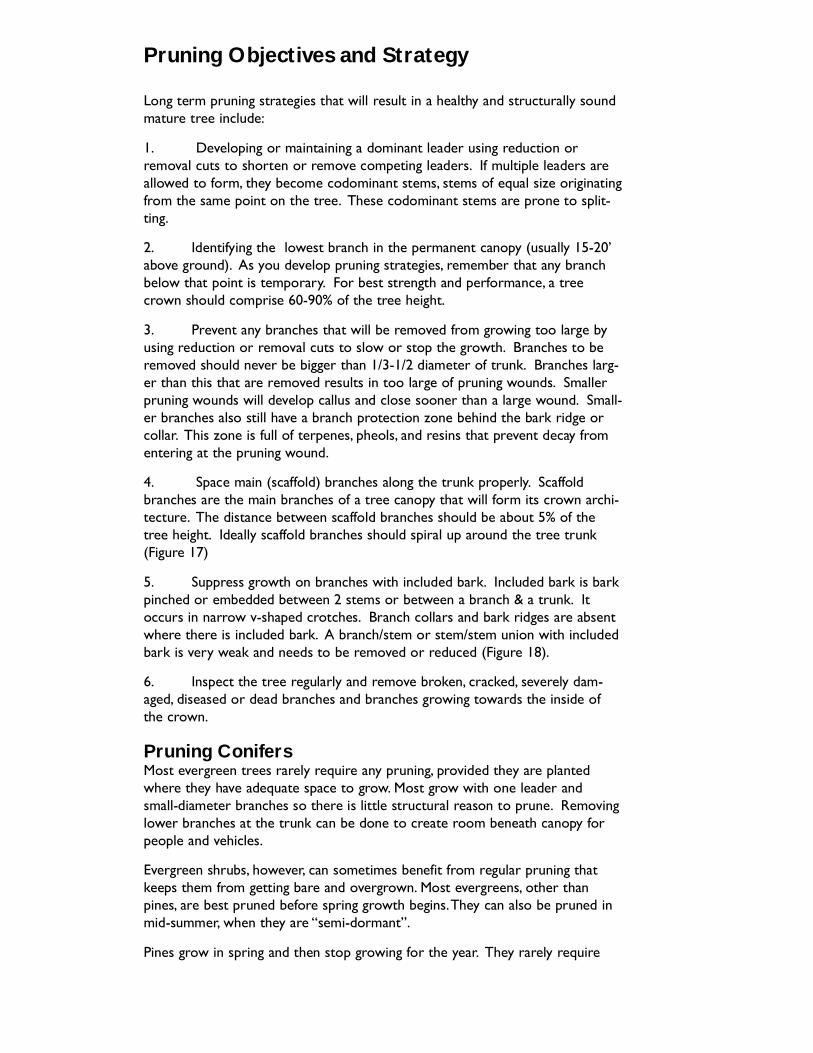
Pruning Objectives and Strategy
Long term pruning strategies that will result in a healthy and structurally sound mature tree include:
1. Developing or maintaining a dominant leader using reduction or removal cuts to shorten or remove competing leaders. If multiple leaders are allowed to form, they become codominant stems, stems of equal size originating from the same point on the tree. These codominant stems are prone to split-ting.
2. Identifying the lowest branch in the permanent canopy (usually 15-20’ above ground). As you develop pruning strategies, remember that any branch below that point is temporary. For best strength and performance, a tree crown should comprise 60-90% of the tree height.
3. Prevent any branches that will be removed from growing too large by using reduction or removal cuts to slow or stop the growth. Branches to be removed should never be bigger than 1/3-1/2 diameter of trunk. Branches larg-er than this that are removed results in too large of pruning wounds. Smaller pruning wounds will develop callus and close sooner than a large wound. Small-er branches also still have a branch protection zone behind the bark ridge or collar. This zone is full of terpenes, pheols, and resins that prevent decay from entering at the pruning wound.
4. Space main (scaffold) branches along the trunk properly. Scaffold branches are the main branches of a tree canopy that will form its crown archi-tecture. The distance between scaffold branches should be about 5% of the tree height. Ideally scaffold branches should spiral up around the tree trunk (Figure 17)
5. Suppress growth on branches with included bark. Included bark is bark pinched or embedded between 2 stems or between a branch & a trunk. It occurs in narrow v-shaped crotches. Branch collars and bark ridges are absent where there is included bark. A branch/stem or stem/stem union with included bark is very weak and needs to be removed or reduced (Figure 18).
6. Inspect the tree regularly and remove broken, cracked, severely dam-aged, diseased or dead branches and branches growing towards the inside of the crown.
Pruning ConifersMost evergreen trees rarely require any pruning, provided they are planted where they have adequate space to grow. Most grow with one leader and small-diameter branches so there is little structural reason to prune. Removing lower branches at the trunk can be done to create room beneath canopy for people and vehicles.
Evergreen shrubs, however, can sometimes benefit from regular pruning that keeps them from getting bare and overgrown. Most evergreens, other than pines, are best pruned before spring growth begins. They can also be pruned in mid-summer, when they are “semi-dormant”.
Pines grow in spring and then stop growing for the year. They rarely require
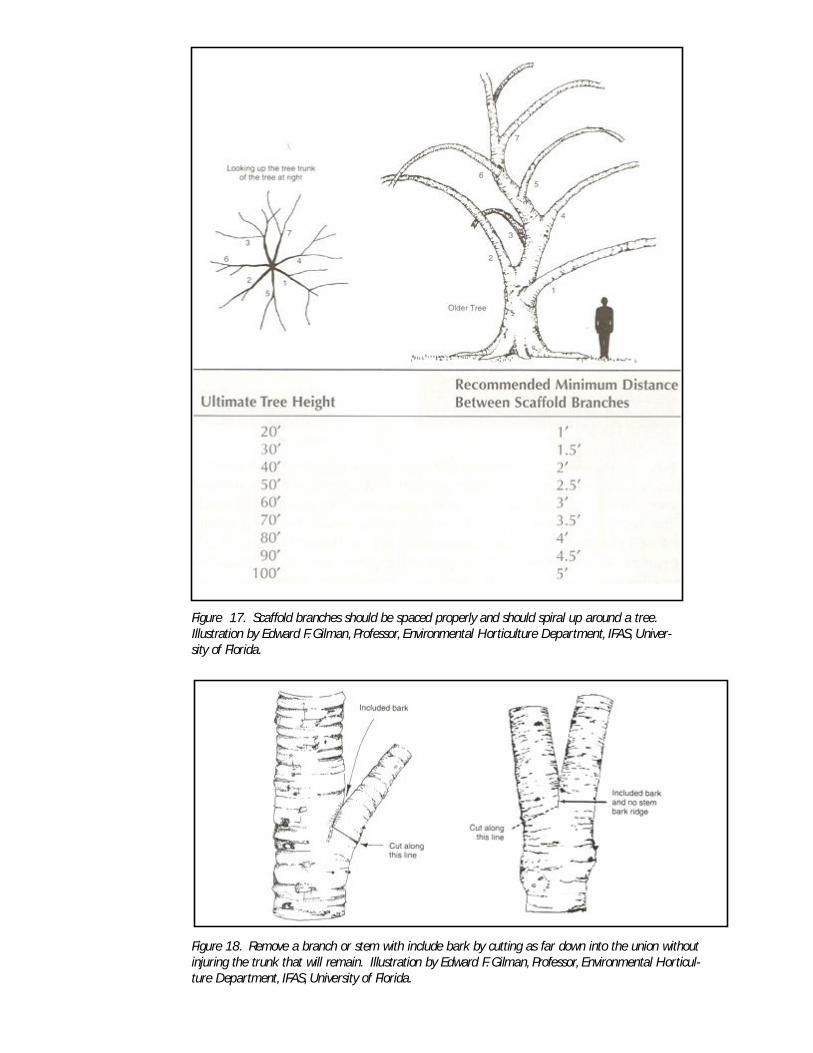
Figure 17. Scaffold branches should be spaced properly and should spiral up around a tree. Illustration by Edward F. Gilman, Professor, Environmental Horticulture Department, IFAS, Univer-sity of Florida.
Figure 18. Remove a branch or stem with include bark by cutting as far down into the union without injuring the trunk that will remain. Illustration by Edward F. Gilman, Professor, Environmental Horticul-ture Department, IFAS, University of Florida.
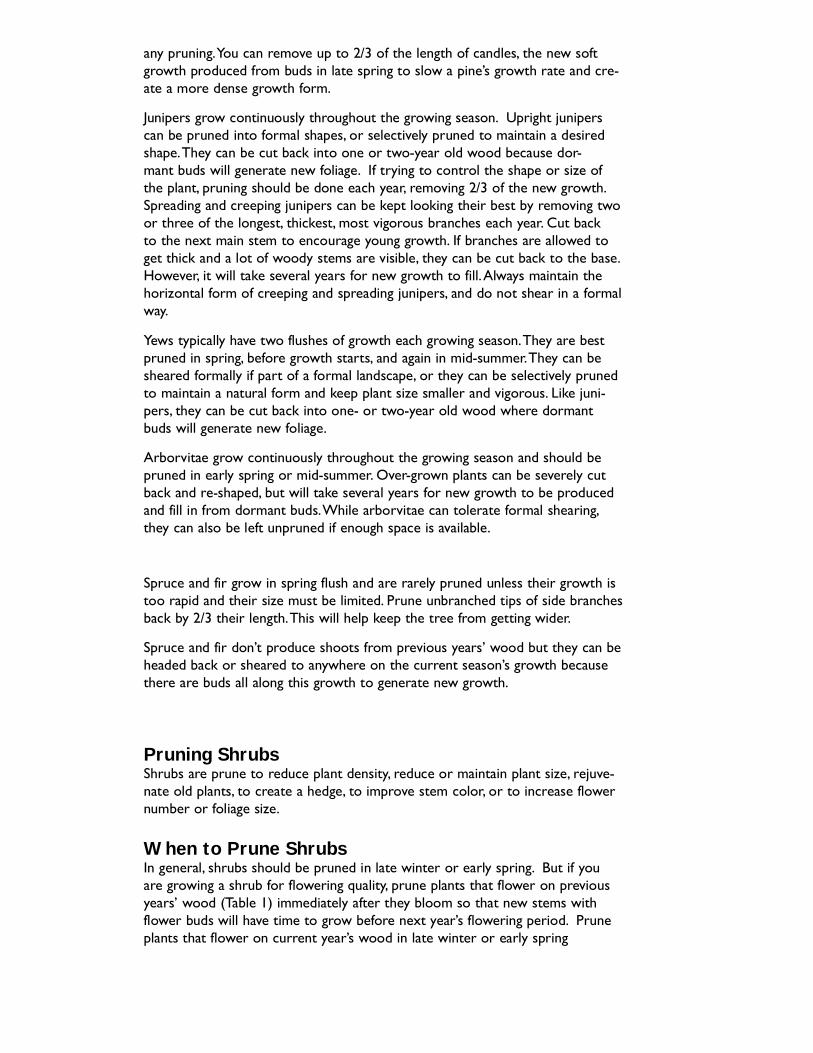
any pruning. You can remove up to 2/3 of the length of candles, the new soft growth produced from buds in late spring to slow a pine’s growth rate and cre-ate a more dense growth form.
Junipers grow continuously throughout the growing season. Upright junipers can be pruned into formal shapes, or selectively pruned to maintain a desired shape. They can be cut back into one or two-year old wood because dor-mant buds will generate new foliage. If trying to control the shape or size of the plant, pruning should be done each year, removing 2/3 of the new growth. Spreading and creeping junipers can be kept looking their best by removing two or three of the longest, thickest, most vigorous branches each year. Cut back to the next main stem to encourage young growth. If branches are allowed to get thick and a lot of woody stems are visible, they can be cut back to the base. However, it will take several years for new growth to fill. Always maintain the horizontal form of creeping and spreading junipers, and do not shear in a formal way.
Yews typically have two flushes of growth each growing season. They are best pruned in spring, before growth starts, and again in mid-summer. They can be sheared formally if part of a formal landscape, or they can be selectively pruned to maintain a natural form and keep plant size smaller and vigorous. Like juni-pers, they can be cut back into one- or two-year old wood where dormant buds will generate new foliage.
Arborvitae grow continuously throughout the growing season and should be pruned in early spring or mid-summer. Over-grown plants can be severely cut back and re-shaped, but will take several years for new growth to be produced and fill in from dormant buds. While arborvitae can tolerate formal shearing, they can also be left unpruned if enough space is available.
Spruce and fir grow in spring flush and are rarely pruned unless their growth is too rapid and their size must be limited. Prune unbranched tips of side branches back by 2/3 their length. This will help keep the tree from getting wider.
Spruce and fir don’t produce shoots from previous years’ wood but they can be headed back or sheared to anywhere on the current season’s growth because there are buds all along this growth to generate new growth.
Pruning ShrubsShrubs are prune to reduce plant density, reduce or maintain plant size, rejuve-nate old plants, to create a hedge, to improve stem color, or to increase flower number or foliage size.
When to Prune ShrubsIn general, shrubs should be pruned in late winter or early spring. But if you are growing a shrub for flowering quality, prune plants that flower on previous years’ wood (Table 1) immediately after they bloom so that new stems with flower buds will have time to grow before next year’s flowering period. Prune plants that flower on current year’s wood in late winter or early spring
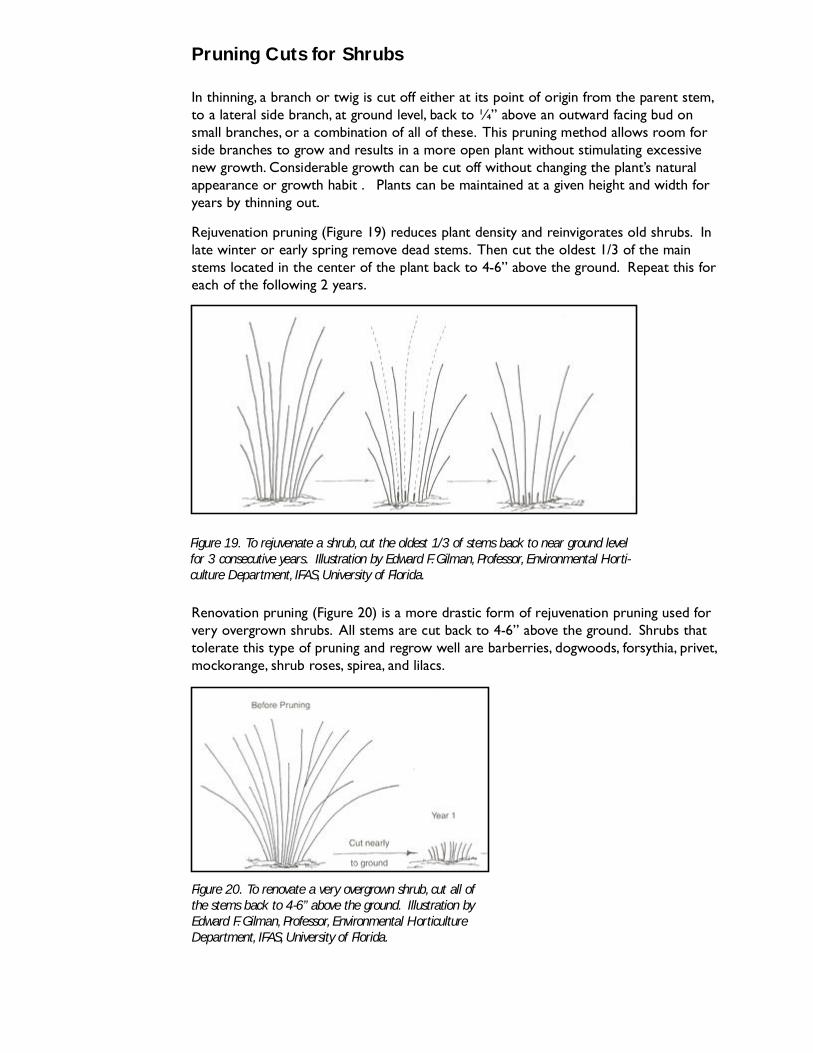
Figure 19. To rejuvenate a shrub, cut the oldest 1/3 of stems back to near ground level for 3 consecutive years. Illustration by Edward F. Gilman, Professor, Environmental Horti-culture Department, IFAS, University of Florida.
Figure 20. To renovate a very overgrown shrub, cut all of the stems back to 4-6” above the ground. Illustration by Edward F. Gilman, Professor, Environmental Horticulture Department, IFAS, University of Florida.
Pruning Cuts for Shrubs
In thinning, a branch or twig is cut off either at its point of origin from the parent stem, to a lateral side branch, at ground level, back to ¼” above an outward facing bud on small branches, or a combination of all of these. This pruning method allows room for side branches to grow and results in a more open plant without stimulating excessive new growth. Considerable growth can be cut off without changing the plant’s natural appearance or growth habit . Plants can be maintained at a given height and width for years by thinning out.
Rejuvenation pruning (Figure 19) reduces plant density and reinvigorates old shrubs. In late winter or early spring remove dead stems. Then cut the oldest 1/3 of the main stems located in the center of the plant back to 4-6” above the ground. Repeat this for each of the following 2 years.
Renovation pruning (Figure 20) is a more drastic form of rejuvenation pruning used for very overgrown shrubs. All stems are cut back to 4-6” above the ground. Shrubs that tolerate this type of pruning and regrow well are barberries, dogwoods, forsythia, privet, mockorange, shrub roses, spirea, and lilacs.
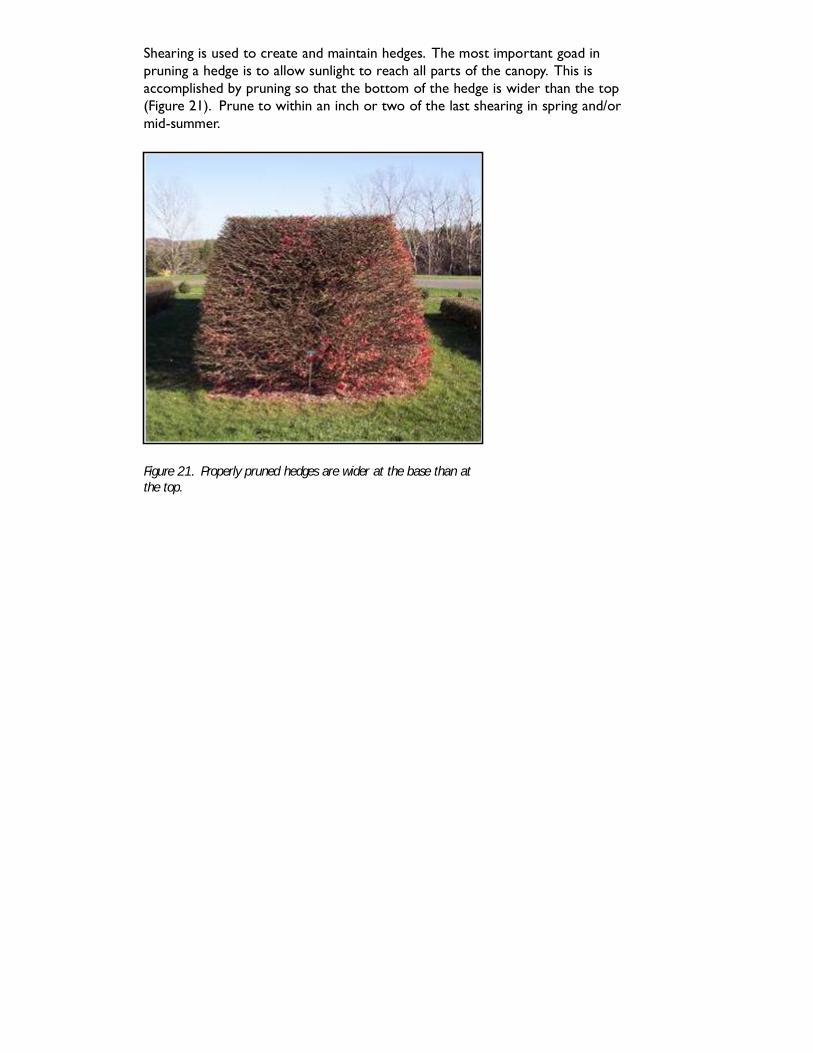
Figure 21. Properly pruned hedges are wider at the base than at the top.
Shearing is used to create and maintain hedges. The most important goad in pruning a hedge is to allow sunlight to reach all parts of the canopy. This is accomplished by pruning so that the bottom of the hedge is wider than the top (Figure 21). Prune to within an inch or two of the last shearing in spring and/or mid-summer.

RESOURCES Websites:
University of Minnesota Extension Publications Publications are available on Garden Information website: http://www.extension.umn.edu./gardeninfo.
Sustainable Urban Landscape Information Series (SULIS): Herbaceous Plant Maintenance: http://www.sustland.umn.edu
Landscape Plants of the Upper Midwest – U Wisconsin: http://www.midwestlandscapeplants.org/
USDA Plants Database: http://plants.usda.gov/index.html
The Right Tree Handbook: http://www.mnpower.com/treebook/
Forest and Shade Tree Health: http://www.cnr.umn.edu/FR/extension/forestandshadetreehealth.html
Midwest Plant Selection – Morton Arboretum: http://www.mortonarb.org/plantinfo/plantclinic/planttrees/plantclinic_planttrees.htm
U Connecticut Plants Database: http://www.hort.uconn.edu:591/search.html Landscape Plants – University of Florida: http://hort.ifas.ufl.edu/woody/
MN Tree Care Advisors plant information: http://www.mntca.org/Reference_manual/Tree_info/Minnesota_Tree_Index.htm
Yard and Garden Briefs: http://www.extension.umn.edu/projects/yardandgarden/
Yard and Garden Line Newsletter: http://www.extension.umn.edu/projects/yardandgarden/ygline-news.html
U of MN Soil Testing Laboratory: http://soiltest.coafes.umn.edu/
Plant nomenclature: http://herbarium.usu.edu/treatments/accepted_names_and_synonyms.htm
http://www.ishs.org/icra/
http://fp.bio.utk.edu/mycology/Nomenclature/nom-index.htm
http://www.winternet.com/%7Echuckg/dictionary.html specific epithets
http://garden-gate.prairienet.org/botrts.htm root words

International Code of Botanical Nomenclature:http://www.bgbm.fu-berlin.de/iapt/nomenclature/code/SaintLouis/0000St.Luistitle.htm
Plant identification and ID keys:http://www.hort.uconn.edu/plants/keys/trees/treekey01.html
http://www.extension.iastate.edu/pages/tree/
http://forestry.msu.edu/uptreeid/default.htm
http://dnr.wi.gov/org/land/forestry/treeid/keys.htm
http://www.dnr.state.wi.us/org/caer/ce/eek/veg/treekey/ (tree key for kids)
http://www.cnr.vt.edu/dendro/dendrology/idit.htm
http://www.extension.umn.edu/distribution/naturalresources/DD6593.html (A Beginner’s Guide to MN Trees)
Invasive plants: http://www.dnr.state.mn.us/invasives/terrestrialplants/index.html
http://www.dnr.state.wi.us/invasives/plants.htm
http://tncweeds.ucdavis.edu/index.html
http://www.invasive.org/
Books:
Brickell, Christopher and Judith Zuk eds. 2004. The American Horticultural Society A to Z Encyclopedia of Garden Plants, 2nd edition
Dirr, Michael A. 1998. Manual of Woody Landscape Plants: Their Identification, Ornamental Characteristics, Culture, Propagation and Uses
Dirr, Michael A. 1998. Hardy Trees and Shrubs
Farrar, John Laird. 1995. Trees of the Northern United States and Canada.
Gilman, Edward F. 2002. An Illustrated Guide to Pruning. Griffiths, Mark. 1994. The Royal Horticultural Society Index of Garden Plants
Harris, Richard W., James R. Cark, Nelda P. Matheny. 2004. Arboriculture: Integrated Management of Landscape Trees, Shrubs and Vines.
Huxley, Anthony ed. 1992. The Royal Horticultural Society Dictionary of Gardening
Rehder, Alfred. 1987. Manual of Cultivated Trees and Shrubs, 2nd edition
Smith, Welby R. 2008. Trees and Shrubs of Minnesota.
Sternberg, Guy with Jim Wilson. 2004. Native Trees for North American Landscapes

Steiner, Lynn M. 2004. Landscaping with Native Plants of Minnesota
Rose, Nancy, Don Selinger, John Whitman. 2001. Growing Shrubs and Small Trees in Cold Climates
Harris, Richard W. 1991. Arboriculture: Care of Trees, Shrubs, and Vines in the Landscape
Fiala, Fr. John L. 1994. Flowering Crabapples: The Genus Malus
Stearn, William T. 1996. Stearn’s Dictionary of Plant Names for Gardeners
Coombes, Alan. 1994. Dictionary of Plant Names