Embed Size (px)
Citation preview

Transmitter


Contacts: Africa: Medtronic Africa (Pty) Ltd.Tel: +27 (0) 11 677 4800
Argentina: Corpomedica S.A.Tel: +(11) 4 814 1333 Medtronic Directo 24/7: +0800 333 0752
Australia: Medtronic Australasia Pty. Ltd.Tel: 1800 668 670
Azerbaijan: IsomedTel: +994 (12) 464 11 30
Bangladesh: Sonargaon Healthcare Pvt Ltd.Mobile: (+91)-9903995417 or (+880)-1714217131
Belarus: ОДО “Баджин”Tel: +375 17 313 0990
België/Belgique: N.V. Medtronic Belgium S.A.Tel: 0800-90805
Bosnia and Herzegovina: Medimpex d.o.o.Tel: +387 33 476 444 or +387 33 476 400 Fax: +387 33 476 401 or +387 33 432 241
Brasil: Medtronic Comercial Ltda.Tel: +(11) 2182-9200 Medtronic Directo 24/7: +0800 773 9200
Bulgaria: RSR Ltd.Tel: +359 885 428 900
Canada: Medtronic of Canada Ltd.Tel: 1-800-284-4416 (toll free/sans-frais)
Chile: Medtronic ChileTel: +(9) 66 29 7126 Medtronic Directo 24/7: +1 230 020 9750 Medtronic Directo 24/7 (From Santiago): +(2)595 2942
China: Medtronic (Shanghai) Ltd.24 Hour Help (Cell): +86 400-820-1981 24 Hour Help (Landline): +86 800-820-1981
Colombia: Medtronic Latin America Inc. SucursalColombiaTel: +(1) 742 7300 Medtronic Directo 24/7 (Landline): +01 800 7102170 Medtronic Directo 24/7 (Cellular): +1 381 4902
Croatia: Medtronic Adriatic d.o.o.Tel: +385 1 488 11 20 Fax: +385 1 484 40 60
Danmark: Medtronic Danmark A/STel: +45 32 48 18 00
Deutschland: Medtronic GmbH Geschäftsbereich DiabetesTelefon: +49 2159 8149-370 Telefax: +49 2159 8149-110 24-Stdn-Hotline: 0800 6464633
Eire: Accu-Science LTD.Tel: +353 45 433000
España: Medtronic Ibérica S.A.Tel: +34 91 625 05 42 Fax: +34 91 625 03 90 24 horas: +34 900 120 330
Europe: Medtronic Europe S.A. Europe, MiddleEast and Africa HeadquartersTel: +41 (0) 21-802-7000
France: Medtronic France S.A.S.Tel: +33 (0) 1 55 38 17 00
Hellas: Medtronic Hellas S.A.Tel: +30 210677-9099
Hong Kong: Medtronic International Ltd.Tel: +852 2919-1300 To order supplies: +852 2919-1322 24-hour helpline: +852 2919-6441
India: India Medtronic Pvt. LtdTel: (+91)-80-22112245 / 32972359 Mobile: (+91)-9611633007 Patient Care Helpline: 1800 209 6777
Indonesia: Medtronic International Ltd.Tel: +65 6436 5090 or +65 6436 5000

Israel: Medtronic World Trade CorporationTel: +972 9972 4400
Italia: Medtronic Italia S.p.A.Tel: +39 02 24137 261 Fax: +39 02 24138 210 Servizio assistenza tecnica: Nº verde: 800 60 11 22
Japan: Medtronic Japan Co. Ltd.Tel: +81-3-6776-0019 24 Hr. Support Line: 0120-56-32-56
Kazakhstan: Medtronic BV in KazakhstanTel: +7 727 311 05 80 (Almaty) Tel: +7 717 224 48 11 (Astana) Круглосуточная линия поддержки: 8 800 0805001
Latin America: Medtronic, Inc.Tel: 1(305) 500-9328 Fax: 1(786) 709-4244
Latvija: Ravemma Ltd.Tel: +371 7273780
Macedonia: Alkaloid Kons DooelTel: +389 2 3204 430
Magyarország: Medtronic Hungária Kft.Tel: +36 1 889 0688
Malaysia: Medtronic International Ltd.Tel: +603 7946 9000
Middle East and North Africa: Regional OfficeTel: +961-1-370 670
Montenegro: GlosarijTel: +382 20 642 495 Fax: +382 20 642 540
México: Medtronic Servicios S. de R. L. de C.V.Tel (México DF): +(11) 029 058 Tel (Interior): +01 800 000 7867 Medtronic Directo 24/7 (from México DF): +(55) 36 869 787 Medtronic Directo 24/7: +01 800 681 1845
Nederland, Luxembourg: Medtronic B.V.Tel: +31 (0) 45-566-8291 Gratis: 0800-3422338
New Zealand: Medica PacificaPhone: 64 9 414 0318 Free Phone: 0800 106 100
Norge: Medtronic Norge A/STel: +47 67 10 32 00 Fax: +47 67 10 32 10
Philippines: Medtronic International Ltd.Tel: +65 6436 5090 or +65 6436 5000
Poccия: ООО «Медтроник»Tel: +7 495 580 73 77 Круглосуточная линия поддержки: 8 800 200 7636
Polska: Medtronic Poland Sp. z o.o.Tel: +48 22 465 6934
Portugal: Medtronic Portugal LdaTel: +351 21 7245100 Fax: +351 21 7245199
Puerto Rico: Medtronic Puerto RicoTel: 787-753-5270
Republic of Korea: Medtronic Korea, Co., Ltd.Tel: +82.2.3404.3600
Romania: Medtronic BV ReprezentantaTel: +40 372 188 000
Schweiz: Medtronic (Schweiz) AGTel: +41 (0)31 868 0160 24-Stunden-Hotline: 0800 633333 Fax Allgemein: +41 (0)318680199
Serbia: Medtronic B.V. SerbiaTel: +381 11 2095 900
Singapore: Medtronic International Ltd.Tel: +65 6436 5090 or +65 6436 5000
Slovenija: Zaloker & Zaloker d.o.o.brezplačna številka: 080 1880 Tel: +386 1 542 51 11
Slovenská republika: Medtronic Slovakia, s.r.o.Tel: +421 26820 6942 HelpLine: +421 26820 6986

Sri Lanka: Swiss Biogenics Ltd.Mobile: (+91)-9003077499 or (+94)-777256760
Suomi: Medtronic Finland OyTel: +358 20 7281 200 Help line: +358 400 100 313
Sverige: Medtronic ABTel: +46 8 568 585 20 Fax: +46 8 568 585 11
Taiwan: Medtronic (Taiwan) Ltd.Tel: 02-21836000 Toll free: +886-800-005285
Thailand: Medtronic (Thailand) Ltd.Tel: +662 232 7400
Türkiye: Medtronic Medikal Teknoloji Ticaret Ltd. Sirketi.Tel: +90 216 4694330
USA: Medtronic Diabetes Global Headquarters24 Hour HelpLine: +1-800-646-4633 To order supplies: +1-800-843-6687
Ukraine: Medtronic B.V. Representative office inUkraineTel: +38 044 392 04 01 Лінія цілодобової підтримки: 0 800 508 300
United Kingdom: Medtronic Ltd.Tel: +44 1923-205167
Österreich: Medtronic Österreich GmbHTel: +43 (0) 1 240 44-0 24 – Stunden – Hotline: 0820 820 190
Česká republika: Medtronic Czechia s.r.o.Tel: +420 233 059 111 Non-stop helpLine (24/7): +420 233 059 059 Zákaznický servis (8:00 - 17:00): +420 233 059 950


The Guardian™ Link (3) transmitter is a component of the continuous glucosemonitoring (CGM) system for the MiniMed® 670G insulin pump. The transmitter iscompatible only with the Guardian™ Sensor (3) glucose sensor. The transmittercollects data from the sensor. The transmitter then wirelessly sends the data to theinsulin pump.
serter
transmitter
tester
charger
Guardian Link (3) transmitter kit componentsA complete transmitter kit includes the following components:
• Guardian Link (3) transmitter (MMT-7811)
• Two testers (MMT-7736L)
• Charger (MMT-7715)
• One-press serter (MMT-7512)
Indications for useThe Guardian Link (3) transmitter is intended for use with MiniMed 670G System.The transmitter powers the glucose sensor, collects and calculates sensor data, andwirelessly sends the data to the MiniMed 670G pump. The transmitter is intended forsingle-patient, multi-use.
ContraindicationsNone known.
Warnings• Do not use the transmitter adjacent to other electrical equipment which may
cause interference with the normal system operation. This includes mobilecommunication devices such as cell phones, GPS navigation systems, and otherdevices that have an output transmitter power greater than 1W. Other electrical
-1-
En
glish

equipment that may compromise normal system operation has been contraindicated.For more information, see Exposure to magnetic fields and radiation, on page 2.
• Always refer to the sensor user guide for all precautions, warnings, and instructionsrelating to the sensor. Not referring to the sensor user guide can result in seriousinjury or damage to the sensor.
• Do not allow children to put small parts in their mouth. This product poses a chokinghazard for young children.
• Do not change or modify the device unless expressly approved by MedtronicDiabetes. Modifying the device can cause serious injury, interfere with your ability tooperate the device, and void your warranty.
• Do not use the tester if it comes in contact with blood. Touching blood can causeinfection. Dispose of the tester according to the local regulations for medical wastedisposal, or contact your healthcare professional for disposal information.
• Bleeding may occur after inserting the sensor. Always make sure that the site is notbleeding before connecting the transmitter to the sensor. Blood can get into thetransmitter connector and damage the device. Discard the device if damaged. Ifbleeding occurs, apply steady pressure with a sterile gauze or clean cloth at theinsertion site until bleeding stops. After bleeding stops, connect the transmitter to thesensor.
• Contact the 24 Hour HelpLine if you experience any adverse reactions associatedwith the transmitter or sensor. Adverse reactions can cause serious injury.
Exposure to magnetic fields and radiation• Do not expose your transmitter to Magnetic Resonance Imaging (MRI) equipment,
diathermy devices, or other devices that generate strong magnetic fields (forexample, x-ray, CT scan, or other types of radiation). Exposure to a strong magneticfield has not been evaluated and can cause the device to malfunction, result inserious injury or be unsafe. If your transmitter is exposed to a strong magnetic field,discontinue use and contact the 24 Hour HelpLine for further assistance.
• Always remove your sensor and transmitter before entering a room that has x-ray,MRI, diathermy, or CT scan equipment. Exposure to a strong magnetic field has notbeen evaluated and can cause the device to malfunction, result in serious injury or beunsafe. If your sensor or transmitter is exposed to a strong magnetic field,discontinue use and contact the 24 Hour HelpLine for further assistance.
• Always carry the Medical emergency card provided with your device when you aretraveling. The Medical emergency card provides critical information about airportsecurity systems, and using your transmitter on an airplane that can help you andothers. Not following the guidance on the Medical emergency card could result inserious injury.
-2-
Precautions• Only use the Guardian Sensor (3) (MMT-7020) glucose sensor with the
transmitter. Do not use any other sensor. Other sensors are not intended for usewith the transmitter, and will damage the transmitter and the sensor.
• Only use the green colored tester (MMT-7736L) with the transmitter. Pockets onthe transmitter are visible when connected to the tester. Do not use any othertest plug. Other test plugs are not intended for use with the transmitter, and willdamage the transmitter and the tester.
• Always use the tester when cleaning the transmitter. Do not use any other testplug with the transmitter. Use of another test plug can allow water to get into thetransmitter or can prevent proper cleaning. Water can damage the transmitter.
• Do not twist the tester or sensor while attached to the transmitter. Twisting thetester or sensor will damage the transmitter.
• Do not allow the tester to come in contact with any liquid when not connected tothe transmitter. A wet tester can damage the transmitter.
• Do not allow the transmitter to come in contact with any liquid when notconnected to a sensor or to the tester. Moisture will damage the transmitter and awet transmitter can damage the sensor.
• Do not clean the o-rings on the tester with any substances. Cleaning the o-ringscan damage the tester.
Radio Frequency (RF) communicationThis device complies with the United States Federal Communications Commission(FCC) and international standards for electromagnetic compatibility. This devicecomplies with Part 15 of the FCC Rules. Operation is subject to two conditions: (1)This device may not cause harmful interference, and (2) this device must accept anyinterference received, including interference that may cause undesired operation.
This device has been tested and found to comply with the limits for a Class B digitaldevice, pursuant to Part 15 of the FCC rules. These limits are designed to providereasonable protection against harmful interference in a residential installation. Thisdevice generates, uses, and can radiate radio frequency energy and, if not installedand used in accordance with the instructions, may cause harmful interference toradio communications. However, there is no guarantee that interference will not occurin a particular installation. If this device does cause harmful interference to radio ortelevision reception, which can be determined by turning the device off and on, theuser is encouraged to try to correct the interference by one or more of the followingmeasures:
• Reorient or relocate the receiving antenna.
-3-
En
glish

• Increase the separation between the device and the receiver.• Decrease the distance between the transmitter and the insulin pump to 6 feet (1.8
meters) or less.• Increase the separation between the transmitter and the equipment that is receiving
or emitting interference.
Note: Harmful interference is defined by the FCC as follows. Any emission, radiationor induction that endangers the functioning of a radio navigation service or ofother safety services or seriously degrades, obstructs or repeatedly interruptsa radio communications service operating in accordance with FCC rules.
Changes or modifications made to this equipment not expressly approved by MedtronicDiabetes could void the user's authority to operate the equipment.
Directive 1999/5/ECMedtronic declares that this product is in conformity with the essential requirements ofDirective 1999/5/EC on Radio and Telecommunications Terminal Equipment.
For additional information, contact Medtronic MiniMed at the address or phone numberprovided on the back cover.
IEC60601-1-2:2007; Special EMC Precautions for Medical Electrical Equipment1 Special Precautions regarding Electromagnetic Compatibility (EMC): This body worn
device is intended to be operated within a reasonable residential, domestic, public orwork environment, where common levels of radiated “E” (V/m) or “H” fields (A/m)exist; such as cellular phones, WiFi, Bluetooth, electric can openers, microwave andinduction ovens. This device generates, uses, and can radiate radio frequencyenergy and, if not installed and used in accordance with the provided instructions,may cause harmful interference to radio communications.
2 Portable and mobile RF communications equipment can affect Medical ElectricalEquipment as well. If you encounter RF interference from a mobile or stationary RFtransmitter, move away from the RF transmitter that is causing the interference.
AssistanceMedtronic MiniMed provides a 24 Hour HelpLine for assistance. When calling theHelpLine, please have the serial number of your device available. The serial number andthe 24 Hour HelpLine phone number are listed on the back of your device.
Department Telephone number
24 Hour HelpLine (calls within the United States) 800 646 4633
24 Hour HelpLine (calls outside the United States) +1 818 576 5555
Website www.medtronicdiabetes.com
-4-

ChargerThe transmitter contains a non-replaceable, rechargeable battery that you canrecharge as needed with the charger. The charger has a green light that shows thecharging status and a red light that communicates any problems during charging. Ifyou see a red light, see the Troubleshooting section. The charger needs one AAAalkaline battery.
Note: If the battery is installed incorrectly or is low, the charger will not work. Repeatthe battery installation steps using a new battery.
Installing a battery in the charger To install a battery in the charger:
1 Push the battery cover in and slide it off (as shown in the image in step 3).
2 Insert a new AAA alkaline battery. Make sure the + and - symbols on the batteryalign with these same symbols shown on the charger.
3 Slide the cover back on the charger until it clicks into place.
Charging the transmitterCaution: Always charge the transmitter before inserting your sensor. A
depleted transmitter does not function. A fully charged transmitterworks at least seven days without recharging. A depletedtransmitter can take up to two hours to recharge.
-5-
En
glish

Caution: Do not store the transmitter on the charger for more than 60 days.Disconnect and reconnect to the charger to re-charge again before use.If the transmitter is left on the charger for more than 60 days, thebattery will be permanently damaged.
To charge the transmitter:
1 Push the two components together to connect the transmitter tothe charger.
2 Within 10 seconds after the transmitter is connected, a greenlight on the charger will flash for one to two seconds as thecharger powers on. For the rest of the charging time, the greenlight on the charger will continue to flash in a pattern of fourflashes with a pause between the four flashes.
3 When charging is complete, the greenlight on the charger will stay on, withoutflashing, for 15 to 20 seconds and thenturn off.
4 After the green charger light turns off,disconnect the transmitter from thecharger. The green light on thetransmitter will flash 10 times and thenturn off.
Pairing your transmitterAlways refer to the system user guide for instructions on how to pair your transmitter toyour pump.
Inserting the sensorAlways refer to your sensor user guide for instructions on how to insert the sensor.
Connecting the transmitter to the sensorBefore proceeding, have your system user guide available. To connect the transmitter to the sensor:
1 After the sensor is inserted, consult your sensor user guide for details on applying therequired tape before connecting the transmitter.
2 Hold the rounded end of the inserted sensor to prevent it from moving duringconnection.
-6-

3 Hold the transmitter as shown. Line up the two notches onthe transmitter with the side arms of the sensor. The flatside of the transmitter should face the skin.
4 Slide the transmitter onto the sensor connector until thesensor arms snap into the notches on the transmitter. If thetransmitter is properly connected, and if the sensor has hadenough time to become hydrated, the green light on thetransmitter will flash 6 times.
Note: If the transmitter does not flash, see Troubleshooting, on page 14.
5 When the transmitter light flashes green after connecting to the sensor, use yourpump to start the sensor. For more instructions, see your system user guide.
6 Attach the adhesive tab of the sensor to thetransmitter.
7 Refer to the sensor user guide for instructions on howto apply a second tape.
8 Follow the instructions that appear on the pumpscreen or in your system user guide.
Disconnecting the transmitter from thesensorBefore proceeding, have your system user guide available. To disconnect the transmitter from the sensor:
1 Carefully remove any tape from the transmitter and sensor.
2 Remove the adhesive tab from the top of the transmitter.
3 Hold the transmitter as shown, and pinch the flexible sidearms of the sensor between your thumb and forefinger.
4 Gently pull the transmitter away from the sensor.
5 Follow the instructions that appear on the pump or in yoursystem user guide.
Removing the sensorAlways refer to the sensor user guide for instructions on how to remove the sensor.
-7-
En
glish

Bathing and swimmingAfter the transmitter and sensor are connected, they form a waterproof seal to a depth of8 feet (2.4 meters) for up to 30 minutes. You can shower and swim without removingthem.
TesterThe tester is used to test the transmitter to make sure it is working. It is also used as arequired component for cleaning the transmitter. Properly connecting the tester to thetransmitter ensures that fluids do not come in contact with the connector pins inside thetransmitter. Fluids can cause connector pins to corrode and affect the performance of thetransmitter.
Do not twist the tester while attached to the transmitter. This will damage the transmitter.
The tester can be used for one year. If you continue to use the tester for more than oneyear, the connector pins inside the transmitter could be damaged, because the testercannot continue to provide a waterproof seal. For instructions on how to check theconnector pins, see Inspecting the transmitter connector pins, on page 9.
Caution: Only use the green colored tester (MMT-7736L) with the transmitter.Pockets on the transmitter are visible when connected to the tester. Donot use any other test plug. Other test plugs are not intended for usewith the transmitter, and will damage the transmitter and the tester.
greentester
pockets
-8-

Inspecting the transmitter connector pinsThis image is an example of how the connector pins should look.
connector opening
connector pins
housing
Look inside the connector opening of the transmitter to make sure that the connectorpins are not damaged or corroded. If the connector pins are damaged or corroded,the transmitter cannot communicate with the charger or pump. Contact the 24 HourHelpLine. It may be time to replace your transmitter.
Also look for moisture inside the connector opening. If you see any moisture, allowthe transmitter to dry for at least one hour. Moisture inside the connector openingcould cause the transmitter to not work properly, and could cause corrosion anddamage over time.
Connecting the tester for testing or cleaningBefore proceeding, have your system user guide available. To connect the tester:
1 Hold the transmitter and the tester as shown. Line up theflat side of the tester with the flat side of the transmitter.
2 Push the tester into the transmitter until the flexible sidearms of the tester click into the notches on both sides of thetransmitter.When properly connected, the green light on the transmitterflashes 6 times.
3 To test the transmitter, check the sensor icon on the pumpto ensure that the transmitter is sending a signal (see your system user guide).
4 To clean the transmitter, see Cleaning the transmitter, on page 10.
5 After testing or cleaning, disconnect the tester from the transmitter.
-9-
En
glish

Disconnecting the tester To disconnect the tester:
1 Hold the transmitter body as shown and pinch the side arms ofthe tester.
2 With the tester arms pinched, gently pull the transmitter awayfrom the tester.
Note: To save transmitter battery life, do NOT leave the testerconnected after cleaning or testing.
Cleaning the transmitterThe transmitter is a single-patient use device and not intended for multi-patient use.
Warning: Do not discard the transmitter in a medical waste container or expose itto extreme heat. The transmitter contains a battery that may ignite, andresult in serious injury.
Note: The tester is a required component for cleaning the transmitter. For details, seeTester, on page 8.
Always clean the transmitter after each use.
To clean the transmitter, you need the following materials:
• mild liquid soap (for example, Ivory® liquid soap)• soft-bristled toddler toothbrush• container• clean, lint-free dry cloths
You can find these supplies at Walmart, Target, or http://www.amazon.com/.
Use life
The transmitter can be cleaned up to 122 times or one year, whichever comes first.Discard the transmitter at this point. If you continue to use the transmitter beyond 122times or one year, the cleaning process may damage the device. Contact Medtronic toorder a new transmitter.
-10-

Warning: Do not use the device if you see any cracking, flaking, or damage tothe housing. Cracking, flaking, or damage to the housing are signsof deterioration. Deterioration of the housing can affect the ability toproperly clean the transmitter, and result in serious injury. Call the24 Hour HelpLine and discard the device according to localregulations for battery disposal (nonincineration), or contact yourhealthcare professional for disposal information.
To clean the transmitter:
1 Wash your hands thoroughly.
2 Attach the tester to the transmitter.
3 If there is adhesive residue on the transmitter, see Removing adhesive residue,on page 13.
4 Rinse the transmitter under room temperature tap water for at least one minute,and until visibly clean. Make sure all hard-to-reach areas are rinsed completely.
5 Prepare a mild liquid soap solution using 1 teaspoon (5 milliliters) of mild liquidsoap per 1 gallon (3.8 liters) of room temperature tap water.
-11-
En
glish

6 With the tester still attached, submerge the transmitter in the mild liquid soap solutionand soak for one minute.
7 Holding the tester, brush the entire surface of the transmitter using a soft-bristledtoddler toothbrush. Make sure to brush all hard-to-reach areas until visibly clean.
8 Rinse the transmitter under running room temperature tap water for at least oneminute, and until all visible liquid soap is gone.
-12-

9 Dry the transmitter and tester with a clean, dry cloth.
10 Place the transmitter and tester on a clean, dry cloth and air dry them completely.
11 Disconnect the tester from the transmitter by gently squeezing the arms of thetester.
Removing adhesive residueYou may need to perform this procedure if there is adhesive residue present on thetransmitter. If you visually inspect the transmitter and see adhesive residue on it,follow the instructions below.
To remove adhesive residue, you need Detachol® medical adhesive remover, andcotton swabs. You can buy Detachol at http://www.amazon.com/, http://www.medtronicdiabetes.com, or by calling 800 646 4633.
Note: During testing, Medtronic MiniMed used Detachol to remove the adhesiveresidue from the transmitter.
To remove adhesive residue:
1 Make sure the tester is attached to the transmitter.
-13-
En
glish

2 Holding the tester, saturate a cotton swab in the Detachol solution and gently rub theadhesive residue on the transmitter until it is fully removed.
3 Continue with the cleaning procedure. See Cleaning the transmitter, on page 10 fordetails.
Cleaning the chargerThis procedure is for general cleaning as required, based on physical appearance.
Caution: Do not immerse the charger in water or any other cleaning agent. Thecharger is not waterproof. Water can damage the charger, and causethe device to malfunction.
Warning: Dispose the charger according to the local regulations for batterydisposal, or contact your healthcare professional for disposalinformation. The charger may ignite upon incineration.
To clean the charger:
1 Wash your hands thoroughly.
2 Use a damp cloth with mild cleaning solution, such as a dishwashing detergent, toclean any dirt or foreign material from the outside of the charger. Never use organicsolvents, such as paint thinner or acetone, to clean the charger.
3 Place the charger on a clean, dry cloth and air dry for two to three minutes.
TroubleshootingThe following table contains troubleshooting information for the transmitter, charger, andtester. For more information about troubleshooting, see your system user guide.
-14-

Problem Likely Cause(s) Resolution
You connected thetransmitter to thecharger and no lightscame on.
The transmitter connec-tor pins are damaged orcorroded.
Your charger battery hasno power or no battery isinserted.
1 Check the transmitter connector pins fordamage or corrosion. For more informa-tion about your connector pins, see In-specting the transmitter connector pins,on page 9. If the pins are damaged or cor-roded, contact the 24 Hour HelpLine. Itmay be time to replace your transmitter.
2 If there is no damage to the connectorpins, replace the battery in the charger.For instructions on replacing your chargerbattery, see Installing a battery in thecharger, on page 5.
During charging, theflashing green light onthe charger turns offand you see a longerflashing red light on thecharger.
Your charger battery islow on power.
Replace the battery in the charger. For instruc-tions on replacing your charger battery, see In-stalling a battery in the charger, on page 5.
During charging, theflashing green light onthe charger turns offand you see a series ofquick flashing red lightson the charger for twoseconds at a time.
Your transmitter is lowon power.
1 Charge the transmitter continuously forone hour. If flashing does not stop, pro-ceed to step 2.
2 Charge the transmitter continuously foreight hours. If flashing does not stop, callthe 24 Hour HelpLine. It may be time toreplace your transmitter.
During charging, a mixof quick and long flash-ing red lights appearon the charger.
Your charger and yourtransmitter are low onpower.
1 Replace the battery in the charger. For in-structions on replacing your charger bat-tery, see Installing a battery in thecharger, on page 5.
2 Charge the transmitter continuously forone hour. If the quick flashing red lightsdo not stop, proceed to step 3.
3 Charge the transmitter continuously foreight hours. If flashing does not stop, callthe 24 Hour HelpLine. It may be time toreplace your transmitter.
-15-
En
glish

Problem Likely Cause(s) Resolution
The green light on thetransmitter does notflash when you con-nect it to the sensor.
Your transmitter is notfully connected.
Your transmitter is lowon power.
Your sensor is not prop-erly inserted into yourbody.
1 Disconnect the transmitter from the sen-sor.
2 Wait for five seconds and reconnect them.If the green light still does not flash, pro-ceed to step 3.
3 Fully charge the transmitter and connect itto the tester. If the green light still doesnot flash, see troubleshooting on “Thegreen light on the transmitter does notflash when you connect it to the tester”. Ifthe green light flashes, proceed to step 4.
4 Disconnect the transmitter from the tester,wait at least five seconds, and connectthe transmitter to the sensor. If the greenlight still does not flash, proceed to step 5.
5 The sensor may not be properly insertedinto your body. Remove the sensor fromyour body and insert a new sensor.
The green light on thetransmitter does notflash when you con-nect it to the tester.
Your transmitter is notfully connected.
Your transmitter is lowon power.
1 Check the connection between the trans-mitter and the tester. If the green light stilldoes not flash, proceed to step 2.
2 Fully charge the transmitter.
3 Test the transmitter with the tester again.If you still do not see the green light flash,call the 24 Hour HelpLine. It may be timeto replace your transmitter.
Your transmitter bat-tery does not last forseven days.
Your transmitter is notfully charged when youconnect it to the sensor.
The transmitter andpump frequently losewireless connection.
1 Fully charge the transmitter before con-necting it to the sensor. If the transmitterbattery still does not last for seven days,proceed to step 2.
2 Move away from any equipment that cancause RF interference. For more informa-tion on RF interference, see Radio Fre-quency (RF) communication, on page 3.
3 Make sure your pump and your transmitterare located on the same side of your bodyto minimize any RF interference. If yourfully charged transmitter battery continuesto lose power before a full seven days,call the 24 Hour HelpLine. It may be timeto replace your transmitter.
-16-
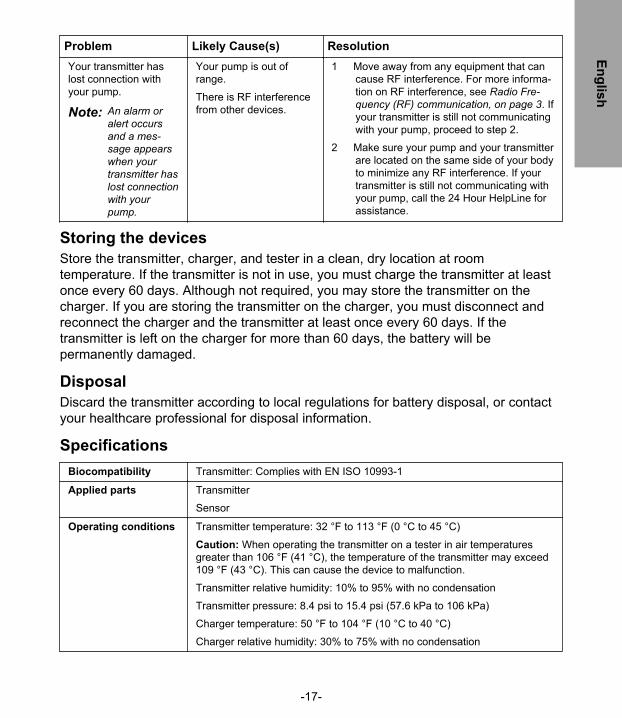
Problem Likely Cause(s) Resolution
Your transmitter haslost connection withyour pump.
Note: An alarm oralert occursand a mes-sage appearswhen yourtransmitter haslost connectionwith yourpump.
Your pump is out ofrange.
There is RF interferencefrom other devices.
1 Move away from any equipment that cancause RF interference. For more informa-tion on RF interference, see Radio Fre-quency (RF) communication, on page 3. Ifyour transmitter is still not communicatingwith your pump, proceed to step 2.
2 Make sure your pump and your transmitterare located on the same side of your bodyto minimize any RF interference. If yourtransmitter is still not communicating withyour pump, call the 24 Hour HelpLine forassistance.
Storing the devicesStore the transmitter, charger, and tester in a clean, dry location at roomtemperature. If the transmitter is not in use, you must charge the transmitter at leastonce every 60 days. Although not required, you may store the transmitter on thecharger. If you are storing the transmitter on the charger, you must disconnect andreconnect the charger and the transmitter at least once every 60 days. If thetransmitter is left on the charger for more than 60 days, the battery will bepermanently damaged.
DisposalDiscard the transmitter according to local regulations for battery disposal, or contactyour healthcare professional for disposal information.
Specifications
Biocompatibility Transmitter: Complies with EN ISO 10993-1
Applied parts Transmitter
Sensor
Operating conditions Transmitter temperature: 32 °F to 113 °F (0 °C to 45 °C)
Caution: When operating the transmitter on a tester in air temperaturesgreater than 106 °F (41 °C), the temperature of the transmitter may exceed109 °F (43 °C). This can cause the device to malfunction.
Transmitter relative humidity: 10% to 95% with no condensation
Transmitter pressure: 8.4 psi to 15.4 psi (57.6 kPa to 106 kPa)
Charger temperature: 50 °F to 104 °F (10 °C to 40 °C)
Charger relative humidity: 30% to 75% with no condensation
-17-
En
glish

Storage conditions Transmitter temperature: -4 °F to 131 °F (-20 °C to 55 °C)
Transmitter relative humidity: up to 95% with no condensation
Transmitter pressure: 8.4 psi to 15.4 psi (57.6 kPa to 106 kPa)
Charger temperature: 14 °F to 122 °F (-10 °C to 50 °C)
Charger relative humidity: 10% to 95% with no condensation
Battery life Transmitter: Seven days of continuous glucose monitoring immediately fol-lowing a full charge.
Charger: The charger uses one new AAA battery to charge the transmitter.
Transmitter
frequency
2.4 GHz, 2M65G1D modulation, less than 1 mW ERP
Maximum outputpower (EIRP)
0.1 mW (-9.9 dBm)
Radio Frequency (RF)communications
Pump to transmitter frequency: 2.4 Ghz; proprietary Medtronic protocol;range up to 6 feet (1.8 meters)
Utilizes the IEEE 802.15.4 protocol with proprietary data format.
Transmitter expectedservice life
The transmitter expected service life is one year depending on patient us-age.
Transmitter wireless communication
Quality of serviceThe transmitter and the MiniMed 670G insulin pump are associated as part of an802.15.4 network for which the pump functions as the coordinator and the transmitter asan end node. In an adverse RF environment the pump will assess channel changingneeds based on "noise" levels detected during an energy scan. The pump will performthe energy scan if after 10 minutes no CGM transmitter signal has been received. If thechannel change occurs the pump will send beacons on the new channel.
The transmitter will initiate a channel search when beacon detection fails on theassociated channel. The search will be conducted across all five channels. When thebeacon is located the transmitter will rejoin on the identified channel. Upon re-associationany missed packets (up to 10 hours) will be transmitted from the transmitter to the pump.
In normal operation the transmitter will transmit a packet every 5 minutes and retransmitthe packet if the data is corrupted or missed.
Data securityThe MiniMed 670G insulin pump is designed to only accept radio frequency (RF)communications from recognized and linked devices (you must program your pump toaccept information from a specific device).
-18-

The MiniMed 670G insulin pump and system components (meters and transmitters)ensure data security via proprietary means and data integrity using error checkingprocesses, such as cyclic redundancy checks.
Traveling by airYour transmitter is safe for use on commercial airlines. If questioned by airlinepersonnel about the use of your device, please show them your Medical emergencycard. If they request that you turn off your system, you must comply.
Guidance and manufacturer's declaration
Guidance and Manufacturer's Declaration - Electromagnetic Emissions
The transmitter is intended for use in the electromagnetic environment specified be-low. The customer or the user of the transmitter should make sure that it is used insuch an environment.
Emissions Test Compliance Electromagnetic Environment - Guidance
RF emissions CISPR 11
Group 1 The transmitter must emit electromagnetic energy in order to per-form its intended function. Nearby electronic equipment may beaffected.
RF emissions CISPR 11
Class B The transmitter is suitable for use in all establishments, includingdomestic and those directly connected to the public low-voltagepower supply network that supplies buildings used for domesticpurposes.
Guidance and Manufacturer's Declaration - Electromagnetic Immunity
The transmitter is intended for use in the electromagnetic environment specified be-low. The customer or the user of the transmitter should assure that it is used in suchan environment.
Immunity Test IEC 60601 Test Level ComplianceLevel
Electromagnetic Envi-ronment - Guidance
Electrostatic discharge(ESD)
IEC 61000-4-2
±2 kV, ±4 kV, ±8 kV, ±15 kVAir
±2 kV, ±4 kV, ±6 kV, ±8 kVContact
±2 kV, ±4 kV,±8 kV, ±15 kVAir
±2 kV, ±4 kV,±6 kV, ±8 kVContact
For use in a typical do-mestic, commercial, orhospital environment.
Electrical fast transi-ent/burst
±2 kV for power supplylines
Not applicable Requirement does notapply to this battery pow-ered device.
-19-
En
glish

Guidance and Manufacturer's Declaration - Electromagnetic Immunity
The transmitter is intended for use in the electromagnetic environment specified be-low. The customer or the user of the transmitter should assure that it is used in suchan environment.
Immunity Test IEC 60601 Test Level ComplianceLevel
Electromagnetic Envi-ronment - Guidance
IEC 61000-4-4 ±1 kV for input/output lines
Surge
IEC 61000-4-5
±1 kV line(s) to line(s)
±2 kV line(s) to earth
Not applicable Requirement does notapply to this battery pow-ered device.
Voltage dips, short in-terruptions and voltagevariations on powersupply lines
IEC 61000-4-11
<5% UT (>95% dip in UT)for 0.5 cycle
Not applicable Requirement does notapply to this battery pow-ered device.
Power frequency (50/60 Hz) magneticfield
IEC 61000-4-8
3 A/m 400 A/m Power frequency mag-netic fields should be atlevels characteristic of atypical location in a typi-cal domestic, commer-cial, or hospitalenvironment.
Note: UT is the a.c. mains voltage prior to application of the test level.
Guidance and Manufacturer's Declaration - Electromagnetic Immunity
The transmitter is intended for use in the electromagnetic environment specified be-low. The customer or user of the transmitter should assure that it is used in such anelectromagnetic environment.
Immunity Test IEC 60601 Level Compliance Lev-el
Electromagnetic Environ-ment Guidance
Conducted RF IEC 61000-4-6
3 V/m 150 kHz to80 MHz
Not applicable Not applicable
-20-

Guidance and Manufacturer's Declaration - Electromagnetic Immunity
The transmitter is intended for use in the electromagnetic environment specified be-low. The customer or user of the transmitter should assure that it is used in such anelectromagnetic environment.
Immunity Test IEC 60601 Level Compliance Lev-el
Electromagnetic Environ-ment Guidance
Radiated RF IEC 61000-4-3
3 V/m 80 MHz to2.5 GHz
10 V/m 80 MHz to6 GHz
Portable and mobile RF com-munications equipment shouldbe used no closer to any part ofthe transmitter, including ca-bles, than the recommendedseparation distance calculatedfrom the equation applicable tothe frequency of the transmit-ter.
Refer to the recommendedseparation distance table formore information.
d = 0.35 P 80 MHz to 800 MHz
d = 0.70 P 800 MHz to 6 GHz
Where P is the maximum out-put power rating of the trans-mitter in watts (W) according tothe transmitter manufacturerand d is the recommendedseparation distance in meters(m).
Field strengths from fixed RFtransmitters, as determined byan electromagnetic site sur-veya, should be less than thecompliance level in each fre-quency rangeb.
Interference may occur in thevicinity of equipment markedwith the following symbol:
-21-
En
glish

Guidance and Manufacturer's Declaration - Electromagnetic Immunity
The transmitter is intended for use in the electromagnetic environment specified be-low. The customer or user of the transmitter should assure that it is used in such anelectromagnetic environment.
Immunity Test IEC 60601 Level Compliance Lev-el
Electromagnetic Environ-ment Guidance
Note: At 80 MHz and 800 MHz, the higher frequency range applies.
Note: These guidelines may not apply in all situations. Electromagnetic propagation is affected byabsorption, and reflection from structures, objects and people.
aField strengths from fixed transmitters, such as base stations for radio (cellular/cordless) telephonesand land mobile radios, amateur radio, AM and FM radio broadcasts and TV broadcast cannot be pre-dicted theoretically with accuracy. To assess the electromagnetic environment due to fixed RF trans-mitters, an electromagnetic site survey should be considered. If the measured field strength in thelocation in which the transmitter is used exceeds the applicable RF compliance level above, the trans-mitter should be observed to verify normal operation. If abnormal performance is observed, additionalmeasures may be necessary, such as re-orienting or relocating the transmitter.
bOver the frequency range 150 kHz to 80 MHz, field strengths should be less than 3 V/m.
Recommended separation distances between portable and mobile RFcommunications equipment and the transmitter
The transmitter is intended for use in an electromagnetic environment in which radi-ated RF disturbances are controlled. The customer or the transmitter users can helpprevent electromagnetic interference by maintaining a minimum distance betweenportable and mobile RF communications equipment and the transmitter as recommen-ded below, according to the maximum output power of the communications equip-ment.
Rated maximumoutput power oftransmitter (W)
Separation distance according to the frequency of transmitter (m)
150 kHz to 80MHzNot applicable
80MHz to 800MHz
d = 0.35 P800MHz to 6.0GHz
d = 0.70 P
0.01 Not applicable 0.035 0.07
0.1 Not applicable 0.11 0.22
1 Not applicable 0.35 0.7
10 Not applicable 1.1 2.2
100 Not applicable 3.5 7
For transmitters rated at a maximum output power not listed above, the recommended separation dis-tance d in meters (m) can be estimated using the equation applicable to the frequency of the transmit-ter, where p is the maximum output power rating of the transmitter in watts (W) according to thetransmitter manufacturer.
-22-

Recommended separation distances between portable and mobile RFcommunications equipment and the transmitter
The transmitter is intended for use in an electromagnetic environment in which radi-ated RF disturbances are controlled. The customer or the transmitter users can helpprevent electromagnetic interference by maintaining a minimum distance betweenportable and mobile RF communications equipment and the transmitter as recommen-ded below, according to the maximum output power of the communications equip-ment.
Rated maximumoutput power oftransmitter (W)
Separation distance according to the frequency of transmitter (m)
150 kHz to 80MHzNot applicable
80MHz to 800MHz
d = 0.35 P800MHz to 6.0GHz
d = 0.70 P
Note: At 80 MHz and 800 MHz, the separation distance for the higher frequency range applies.
Note: These guidelines may not apply in all situations. Electromagnetic propagation is affected byabsorption and reflection from structures, objects, and people.
WarrantyMedtronic MiniMed, Inc. (or such other legal entity as may be referred to asmanufacturer on the labeling of this device "Medtronic Minimed") warrants theMedtronic transmitter to the purchaser of the product against defects in material andworkmanship for a period of one (1) year and the charger for up to one (1) year fromthe date of purchase.
During the warranty period, Medtronic MiniMed will replace or repair, at its discretion,any defective transmitter or charger, subject to the conditions and exclusions statedherein. This warranty applies only to new devices. In the event a transmitter orcharger is replaced, the warranty period will not be extended past its originalexpiration date.
This warranty is valid only if the Medtronic transmitter or charger is used inaccordance with the manufacturer’s instructions. Without limitation, this warranty willnot apply:
• If damage results from changes or modifications made to the transmitter orcharger by the user, or third persons, after the date of purchase;
• If damage results from service or repairs performed by any person or entity otherthan the manufacturer;
• If damage results from a Force Majeure or other event beyond the control of themanufacturer;
• If damage results from negligence or improper use, including but not limited to:improper storage, submersion in water, physical abuse, (such as dropping);
-23-
En
glish

• If damage results from use of the device in a manner other than according to themanufacturer’s product labeling, instructions for use, or regulatory notifications.
This warranty shall be personal to the original purchaser. Any sale, rental or othertransfer or use of the product covered by this warranty to or by a user other than theoriginal purchaser shall cause this warranty to immediately terminate. This warranty doesnot apply to Glucose Sensors and other accessories.
The remedies provided for in this warranty are the exclusive remedies available for anybreach hereof. Neither Medtronic MiniMed nor its suppliers or distributors shall be liablefor any incidental, consequential, or special damage of any nature or kind caused by orarising out of a defect in the product.
All other conditions and warranties, other than mandatory statutory warranties, expressedor implied, are excluded, including the warranties of merchantability and fitness for aparticular purpose.
This warranty gives the purchaser specific legal rights, and the purchaser may also haveother rights that vary under local law. This warranty does not affect the purchaser’sstatutory rights.
Icon Table
Serial number
Catalogue or model number
One transmitter, charger, and serter per container/package
Two testers per container/package
Date of manufacture (YYYY-MM-DD)
Manufacturer
Must refer to instruction manual before every use (appears blue on label).
Temperature limit
Non-ionizing electromagnetic radiation (RF communication).
Configuration or unique version identifier
Degree of protection against electric shock: Type BF applied part
-24-

IP48 Transmitter: 4 is the level of protection against solid objects with a diameterabove 1mm. 8 is the level of protection against the effects of continuousimmersion in water [8 feet (2.4 meters) immersion for 30 minutes].
Humidity limitation
Prescription only
Fragile, handle with care
Keep dry
Recycle cardboard, paper, plastic packaging supplies and unwanted writtenmaterial.
WEEE Initiative: DO NOT THROW IN TRASH. Recycle device according tolocal disposal requirements.
Magnetic Resonance (MR) unsafe: keep away from magnetic resonanceimaging (MRI) equipment.
©2016 Medtronic MiniMed, Inc. All rights reserved.
MiniMed® and Guardian™ are trademarks of Medtronic MiniMed, Inc.
Bluetooth® is a registered trademark of Bluetooth SIG, Inc.
Ivory® is a registered trademark of The Procter & Gamble Company.
Detachol® is a registered trademark of Ferndale Laboratories Inc.
-25-
En
glish

-26-


6025977-013_a
MMT-7811MMT-7736LMMT-7715MMT-7512