Embed Size (px)
Citation preview

1
Translational Training Tools
TM
The 3 Ts Serving the 3 Rs
VOLUME 1
Recipes for Crafting Your Own Purpose-Specific
Training Tools for Non-Surgical Procedures
Wendy O. Williams, DVM, DACLAM David E. Mooneyhan, BS, RLATG Christine M. Peterson, BS, RLATG
https://ras.research.cornell.edu/care/3T.html
©CornellCARE 2015

2
Translational Training Tools™ The 3 Ts Serving the 3 Rs
Center for Animal Resources and Education (CARE)
Cornell University, Ithaca, New York, 14853
The CARE Training Team has put a significant amount of time and
effort into the creation of the 3 Ts methods and tools. We are pleased to be able to share the information in this manual with you. We
welcome your comments and feedback and trust that you will respect that the information in this manual is the intellectual property of
Wendy O. Williams, David E. Mooneyhan and Christine M. Peterson of the Cornell Center for Animal Resources and Education (CARE).
We ask that you please not copy, reproduce or present the material in this manual without permission from the authors.
Thank you from Wendy, Dave and Christine.
https://ras.research.cornell.edu/care/3T.html
©CornellCARE 2015

3
Translational Training Tools™ The 3 Ts Serving the 3 Rs
The Cornell University Center for Animal Resources and Education (CARE)
Training Team Mission:
Be role models for the responsible use of animals.
Emphasize the importance of minimizing pain and distress in the animals used for teaching and research; make animal comfort a priority during
training classes.
Accommodate the needs of our trainees and guide them towards competency on the procedures required to accomplish their research goals.
Promote the 3 Rs (Replace, Reduce and Refine) through the use of inanimate models for hands-on training.

4
Volume 1
Table of Contents
PART I
1. General Concept for Training with Translations Training Tools™ 2. Basic Properties and Uses of Translational Training Tools™
3. Introduction to the 3 Ts Methods and Tools for Training and Practice of
Non-surgical Techniques and Procedures
a. Mouse handling and restraint tools b. Needle and syringe handling
c. Rodent intra-peritoneal and sub-cutaneous injection tools i. Intra-peritoneal injection
ii. Sub-cutaneous injection d. Rabbit Intra Muscular Injection Tool e. Venipuncture Tools
i. General information about 3 Ts venipuncture training
ii. Rat and mouse venipuncture of the lateral tail vein
iii. Rabbit venipuncture of the marginal ear vein iv. Pig venipuncture of the marginal ear vein v. Canine and feline venipuncture of the cephalic vein
f. Cardiac puncture blood collection in rodents g. Cervical dislocation in mice h. Neonatal rodent decapitation
PART II
1. Recipes for crafting each of the 3 Ts Training Tools
a. FP Balloon™ for demonstration, teaching and practice of mouse handling and restraint, and rodent intra-peritoneal and sub-cutaneous injection
i. IM Foosbun™ for demonstration, teaching and practice of rabbit intra muscular injection
b. Venipuncture Tools

5
i. Tube Tail™ for demonstration, teaching and practice of
venipuncture of the lateral tail vein
ii. Spongy Bunear™ for demonstration, teaching and practice of venipuncture of the rabbit marginal ear vein
iii. Ear Piggy Piggy™ for demonstration, teaching and practice of venipuncture of the marginal ear vein of pigs
iv. Cephalic Tube™ for demonstration, teaching and practice of venipuncture of the canine or feline cephalic vein
c. Cardiac Balloon™ for demonstration, teaching and practice of cardiac-puncture blood collection in rodents
d. CD Mouse™ for demonstration, teaching, practice and validation of competency of cervical dislocation euthanasia in rodents
e. Pink E. D. Cap™ for demonstration, teaching , practice and validation of competency of decapitation euthanasia of neonatal mice
See also Translational Training Tools™
Joy of Training - Volume 2
Recipes for Crafting Your Own Purpose-Specific Training Tools for Surgical
Practice
https://ras.research.cornell.edu/care/3T.html

6
PART I
1. General Concept for Training with Translations Training
Tools™
Translational Training Tools™ (The 3 Ts) is a method used to provide training to individuals working with animals in research, testing and teaching settings. The 3 Ts incorporates simple, inexpensive, and effective hand-crafted tools to teach and encourage practice of non-surgical and surgical procedures, prior to conducting similar training and practice on live animals. We believe that when hands-on training is performed on a live animal too early in the trainee’s learning process; the teaching exercise is potentially compromised in multiple ways. The 3 Ts tools and training methods were developed to address several of the gaps that exist in the current methods of hands-on training for individuals learning to perform techniques on live animals. Using the 3 Ts teaching methods, trainees translate the skills they have learned on the 3 Ts inanimate training tools to successful practice on a live animal.
Enhancing the learning experience while minimizing distress for the animals, trainees and trainers
A. Using the 3 Ts to address the essential steps required to perform a procedure
We structure our procedural training into steps, using the 3 Ts to address several key learning issues that we have identified as the most difficult concepts for trainees to grasp. The steps allow the trainee to appreciate and practice the skills required to properly execute the procedure, without having to experience the complexities of practicing on a live animal. The goal is to maximize the chances that the trainee will understand and master a skill, in preparation for practice on a live animal. The following steps are typical of how 3 Ts training proceeds:
1. The trainer describes the procedure including relevant anatomy and conceptual information such as the biomechanics required to perform the procedure. Descriptions may include analogies, images and diagrams, and direct visualization of comparative anatomy on the
Translational Training Tools™. 2. The trainer demonstrates the procedure on the appropriate Translational Training
Tools™, while reemphasizing the relevant anatomy, hand positions and motions.

7
3. The trainee performs supervised practice of the procedure on a Translational Training
Tool™, while the trainer offers guidance and support to help the trainee refine the skills. Trainers will identify learning issues and offer constructive feedback to correct any errors, before advancing the trainee to the next step of training.
4. The trainer confirms competency of the trainee’s performance on the Translational
Training Tool™; prior to moving to a more advanced tool or to training with a live animal.
B. Using the 3 Ts to as a visual aid to address key learning issues in procedural training The tools used for the 3 Ts teaching methods are relatively simple, with overtly visible or palpable anatomical features. While more realistic tools may be useful during later stages of training, using tools that have more obvious anatomical features can be useful to address some of the conceptually challenging steps of learning a new procedure. The visible and palpable features of our Translational Training Tools™ aid in the visualization of similar anatomy in the live animal. As the procedural steps are demonstrated on our inanimate tools, trainees have better visibility of these steps, while they occur. Subsequently as the trainees practice the procedure on these tools, their own successes or errors are visible and can be corrected more readily. Trainees often grasp the key learning issues at different paces. We also have students that require more time to build their confidence as they progress through the training exercises. For many of our tools, we provide various options for tool modification to accommodate the varied needs and pace of the individual trainee. Because the tools are easy to make and of limited expense, it is feasible for us to offer many of the tools for ‘take-home” practice. When the trainee feels comfortable after additional practice, he or she can return to the trainers for a competency assessment before moving to supervised practice with a more advanced tool or a live animal. The 3 Ts can also be used for verification of competency and refresher training, to ensure that an individual has mastered the key learning issues.
C. Minimizing distress by using the 3 Ts training method of hands-on training Our intention is to ensure that our trainees feel comfortable learning at their own pace. We make every attempt to avoid taking large training leaps that can hinder the learning process. An example of such a training leap would be to conduct procedural demonstration immediately followed with live animal practice. Too large a training leap can leave trainees feeling anxious, can put the training-animals at risk, and can leave the trainers on edge. The steps and options we have described as part of the 3 Ts method, allow us to pace the training for individual trainees. By using the translational training tools, we minimize the distress to the animals by limiting practice on animals, until proficiency is achieve with the inanimate tools. The trainee can practice new skills without concerns that they will cause injury or undue stress to the animals. In addition, trainees can concentrate on the key learning issues without feeling at risk of the animal biting or harming them. Trainers feel more at ease to take the time required to adequately explain and demonstrate various aspects of the training exercise when using the Translational Training Tools™; thus, trainers can avoid prolonged handling of training animals during demonstrations. Overall, stress is minimized for animal, trainee and trainer when teaching with the 3 Ts methods and tools.
8
2. Basic Properties and Uses of Translational Training Tools™ The tools used for the 3 Ts methods have the following basic properties:
1. They are not necessarily realistic but have visible or palpable anatomy to help address the key learning issues
2. They effectively translate the necessary movements required to perform the procedure being taught and practiced
3. They address the key learning issues that arise when teaching a given procedure 4. They are versatile i.e. easily modified to accommodate different learning paces and address
different steps or key learning issues 5. They are simple to make from inexpensive and readily available materials
The tools used for the 3 Ts methods can be utilized in a variety of ways. Examples of ways to use these tools are described below:
1. Demonstration of a procedure to trainees 2. Teaching the relevant anatomy and specific mechanics of a procedure to trainees 3. Demonstration of key learning issues and common errors that trainees encounter when
practicing a new procedure 4. Demonstration of different options for various approaches, hand positions and restraint
techniques for accomplishing each of the procedures 5. Trainee practice of a procedure under the supervision of a trainer 6. Trainee take-home practice of a procedure 7. Refresher training for trainees 8. Refresher practice of trainers on procedures that are not performed routinely 9. Demonstration and confirmation of competency
Remember:
A training tool does not have to look real to be effective at
teaching a skill.
Translational Training Tools™ The 3 Ts Serving the 3 Rs

9
3. Introduction to the 3 Ts Methods and Tools for Training and Practice of Non-surgical Techniques and Procedures
For each of the procedures in this section, we will address the main skills, steps and key learning issues we have identified during our training sessions.
a. Mouse handling and restraint Key learning issues that we address for mouse handling and restraint practice:
1. Picking the mouse up and out of the cage 2. Maneuvering the mouse by the tail to help position the animal in preparation for
restraint 3. Using the bars of the cage top to help position the mouse for restraint 4. Placing some hand pressure on the mouse’s back, to immobilize the animal while
gathering the scruff into the fingers 5. Picking up only the skin of the scruff; determining how much skin one must handle to
properly scruff the mouse 6. Finishing the scruff before lifting the mouse i.e. avoid scruff and lift at the same time
a. Appreciating this step as a 2-step process 7. Positioning the tail between the fingers and the palm of the hand
Translational training tools™ for teaching and practicing mouse restraint
Step 1: We have a variety of pictures and images available to aid in introducing students to the concept of mouse handling and restraint.

10
Step 2: For our first hands-on step in training, we use a small stuffed mouse to demonstrate, teach and practice how to pick up and maneuver the mouse in preparation for restraint, and practice of the basic hand position and motions required for restraining a mouse as per key learning issues 1 to 3 and key learning issues 6 and 7.
Step 3: Once the trainee is comfortable with these first steps of mouse restraint, we introduce the trainee to a translational training tool called the FP Balloon™, which we use to teach and practice key learning issues 4 and 5, and for further emphasis on key learning issues 1 to 3, 6 and 7. The FP Balloon™ consists of two layers of balloon filled with a spongy substance. The

11
outside layer of the balloon mimics the skin and the inside layer of the balloon represents the tissues surrounding the body cavity.
Step 4: After confirming competency of the handling and restraint on the FP Balloon™ using
the dominant hand, we encourage practice of these skills on the FP Balloon™ with non-
dominant hand, in preparation for performing manipulations such as injections, which will
occupy the dominant hand. This practice may be done first without gloves so that dexterity is
not compromised to any degree. When comfortable with the procedure without glove, the
trainee then practices the procedure while wearing gloves. After confirming that the trainee is
competent at handling and restraining the FP Balloon™ in the gloved, non-dominant hand, we
advance to handling live mice.
For other uses of the FP Balloon™, please refer to the sections on Rodent Injection Tools and the 3 Ts Joy of Training Volume 2, Aseptic Technique Training, Practice and Assessment.
FP Balloon™ FP Balloon™
12
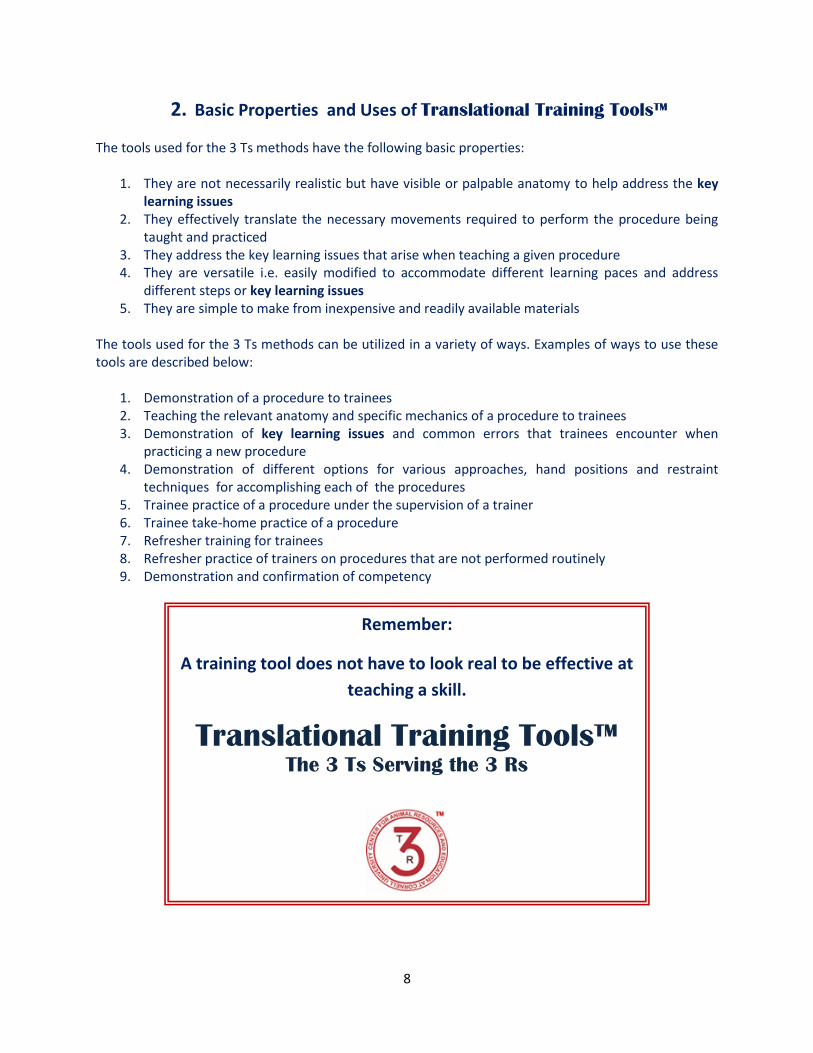
b. Basic information about needle and syringe handling
Prior to injection and venipuncture practice, trainees must be competent at handling live rodents. We then introduce our trainees to basic needle and syringe anatomy, followed by tips on safe handling and manipulations of needles and syringes. We use various images and analogies to teach many of the key concepts for safely performing procedures using needles and syringes.

13
c. Rodent intraperitoneal (IP) and subcutaneous (SC) injection tools
Key learning issues identified for practicing for both IP and SC injections in rodents
1. Restraining the mouse with the non-dominant hand while preparing to administer an injection with the dominant hand
2. Proper needle placement with respect to anatomical landmarks on the animal 3. Understanding the amount of pressure required to move the needle through the tissue
layers and developing the confidence to commit to moving the needle through the tissue
4. Appreciating the amount of pressure required to put on the needle for it to penetrate into the skin.
5. Appreciating the depth in which to advance the needle through the tissue layers 6. Learning to apply some back pressure on the syringe plunger, prior to depressing the
plunger 7. Understanding the dexterity and hand movements required to depress the plunger on
the syringe while keeping the syringe and animal steady 8. Appreciating the speed at which to deliver the injectable solution into the animal 9. Appreciating the appropriate timing for removing the needle from the animal 10. Learning to safely place the animal back in the cage and properly disposing of the
needle and syringe
i. Translational Training Tools™ used for teaching and practicing IP injections in rodents
Step 1: We use visual material and analogies to help trainees understand the anatomical landmarks and general approach for injecting a substance into the peritoneal cavity or a rodent.

14
Step 2: We use the FP Balloon™ to demonstrate, teach and practice key learning issues 1 through 10 described above. Note that practice may be done first without gloves. Once comfortable with the procedure, the trainee practices while wearing gloves.
Step 3: After confirming that the trainee has grasped all learning issues and achieved competency of
each of the steps for practicing IP injections using the FP Balloon™ with gloved hands, we advance to practicing with live rodents.
FP Balloon™

15
Translational Training Tools™ used for teaching and practicing SC injections in rodents ii.
Step 1: We use visual material and analogies to help trainees understand the concept of simultaneously restraining the animal while “tenting” the skin to access the subcutaneous space.
Step 2: As for rodent handling and restraint, we use the 3 Ts FP BalloonTM to demonstrate, teach and practice the skill such as skin tenting, and to reinforce the steps and key learning issues 1 to 10. Note that practice may be done first without gloves. Once comfortable with the SC injection procedure, the trainee practices while wearing gloves.

16
Step 3: After confirming that the trainee has grasped all learning issues and achieved competency of each of the steps for practicing IP injections using the FP Balloon™ with gloved hands, we advance to practicing with live rodents.
www.procedureswithcare.org.uk

17
d. Intramuscular (IM) injections in the lumbar muscles of rabbits
Key learning issues identified for practicing for IM injections in the lumbar muscles of rabbits
1. Restraining the rabbit in a safe manner to prevent injury to the rabbit and the handler 2. Familiarity with the anatomy 3. Proper needle placement with respect to anatomical landmarks on the animal 4. Understanding the amount of pressure required to move the needle through the tissue
layers and developing the confidence to commit to moving the needle through the tissue
5. Appreciating the amount of pressure required to put on the needle for it to penetrate into the skin and into the muscle layers
6. Appreciating the depth in which to advance the needle through the tissue layers 7. Learning to apply some back pressure on the syringe plunger, prior to depressing the
plunger 8. Understanding the dexterity and hand movements required to depress the plunger on
the syringe while keeping the syringe and animal steady 9. Appreciating the speed at which to deliver the injectable solution into the animal 10. Appreciating the appropriate timing for removing the needle from the animal 11. Learning to safely place the animal back in the cage and properly disposing of the
needle and syringe
i. Translational Training Tools™ used for teaching and practicing IM injections in the lumbar muscles of rabbits
Step 1: We use visual material and analogies to help trainees understand the anatomical landmarks and general approach for injecting a substance into the lumbar muscles of a rabbit.
Step 2: We use the 3 Ts IM Foosbun™ to demonstrate, teach and practice the skills such as palpation of the vertebrae and the muscles, to reinforce the steps and key learning issues 1 to 11. We start using a
Rabbit skeleton; arrows point to the spinous processes of the lumbar spine. The lumbar muscles lay on either side of the spine are particularly large in the rabbit. The curved red line shows roughly where the lumbar muscles are positioned.

18
simplified version of the tool with the anatomy visible, to allow the trainee to conceptualize all of the steps and potential errors in needle placement (e.g. inappropriate needle angle or depth). Note that you can opt to spend some time just using a basic football to teach proper handling and restraint of the rabbit.
Note that practice may be done first without gloves. Once comfortable with the IM injection procedure, the trainee practices while wearing gloves.
The most basic version of the IM
Foosbun™ is shown in this
picture.
A larger sponge football or a regular football is useful for practice and teaching of basic handling and restraint of
rabbits. Note that the football should not be fully
inflated. Alternatively, use a large sponge football for
the handling practice.

19
Step 3: When the trainee is competent and comfort with the injection procedure on the basic version of the IM Foosbun™, we will advance the student to training on a version of the tool in which the musculature and spine are covered by a thin layered balloon. This version of the tool has less visibility of the anatomical features, while allowing for easy palpation of the spine and muscles.
This picture demonstrates palpation of
the spinous processes of the spine and
of the muscles on either side of the
spine. The arrows point to the spinous
processes. The thumb and middle
finger are used to palpate the muscles.
The index finger is used to locate the
spinous processes of the vertebral
column to help determine the injection
site.
With this tool, we can demonstrate insertion of the needle lateral to the midline. Trainees can then practice the proper needle placement. The basic version of the tool makes it easy for the trainee to understand the anatomy and the proper needle placement required to access the muscle and avoid the spine.

20
Step 4: Once the trainee is comfortable advancing to the next step of training and also demonstrates competency in performing IM injections in the lumbar muscles of the balloon covered IM Foosbun™, a fur covered version of the tool is introduced. When using the furred version of the IM Foosbun™, the muscles are more challenging for the trainee to palpate. The trainee will learn to perform a clean injection into through the fur layer and into the lumbar muscles.
This picture shows the intermediate version of the tool. The visibility of the lumbar muscles is reduced in this version of the tool; therefore, the trainee must begin to rely more on palpation to locate the spine and lumbar muscles.
The layer of balloon in the intermediate tool requires additional pressure with the needle to penetrate the layers.
Using the advanced version of the IM
Foosbun™ the trainee must palpate
the spine and lumbar muscles
through fake fur that has been placed
over the intermediate version of the
tool. The visibility of the anatomy is
further reduced and palpation is
slightly more challenging.

21
Step 5: After confirming that the trainee has grasped all learning issues and achieved competency of each of the steps for practicing lumbar IM injections using the IM Foosbun™ with gloved hands, and the trainee feels comfortable to proceed, we advance to practicing the procedure with live rabbits.
The layer of balloon and fake fur in the advanced version requires the trainee to apply additional pressure with the needle to penetrate through the layers

22
e. Translational Training Tools™ used for teaching and practicing venipuncture in
various species
i. General information about 3 Ts venipuncture training
Before attempting to train an individual on venipuncture techniques in various species using the 3 Ts
methods and tools, the trainee must be confident and competent at handling and restraint of the
relevant species. We also ensure adequate training has been achieved on sharps safety and on needle
and syringe manipulation, as described in previous sections of this manual.
Note that many of the key learning issues that we address for each of the venipuncture methods will be
similar to each other, as the dexterity and hand motions used to stabilized needles and syringes or
catheters are similar in nature. The differences relate mostly to the different anatomical locations for
the vessels used for venipuncture in the different species e.g. rodents, rabbits, pigs, dogs and cats.
Key learning issues that can be addressed for a variety of venipuncture procedures. Note that key
learning issues will vary a bit based on the species and procedure (blood collection, IV injection or IV
catheter placement.
1. Proper needle placement with respect to anatomical landmarks on the animal 2. Understanding the amount of pressure required to move the needle through the tissue layers
and developing the confidence to commit to moving the needle into the tissue 3. Appreciating the amount of pressure to exert on the needle to guide it through the skin. 4. Appreciating the depth in which to advance the needle through the tissue layers 5. Learning to apply some back pressure on the syringe plunger, prior to depressing the plunger 6. Understanding the dexterity and hand movements required to depress the plunger on the
syringe while keeping the syringe and animal steady 7. Appreciating the speed at which to deliver the injectable solution into the animal 8. Appropriate timing for removing the needle from the blood vessel 9. Safely releasing the animal from restraint and properly disposing of the needle and syringe in
the sharps container
We have designed many of our tools for venipuncture practice, with externally placed blood vessels.
This placement allows the trainee to clearly see the needle position relative to the blood vessel, and aids
in understanding errors in needle positioning, depth and angle.
We address the first venipuncture procedure i.e. venipuncture of the rodent lateral tail vein, in the
greatest depth. The venipuncture techniques in other species will follow many of the same principles as
those used for teaching the lateral tail vein procedure.

23
ii. Rodent lateral tail vein
Before attempting to train an individual on venipuncture of the lateral tail veins, the trainee must be confident and competent at handling and restraint of the relevant rodent species, and must be proficient at proper also needle and syringe or catheter manipulation.
Key learning issues that we address for venipuncture practice of the rodent lateral tail veins
1. Positioning hands to properly hold the tail for each of the procedures
2. Placing the needle at an appropriate angle to the vein
3. Stabilizing the tail and the syringe throughout the procedure
4. Manipulating the plunger while stabilizing the needle and syringe within the vein
5. Guiding the needle into the vessel and directly observing what happens if the angle is
placed too deep or too superficially in the lateral vein of the rodent tail
6. Observing the blood enter the hub of needle, then the syringe and gauging the amount
of back pressure to apply on the plunger of the syringe (during blood collection)
Observing the vein ‘clear’ as the solution is injected into it7.
Translational Training Tools™ used for teaching and practicing tail venipuncture in rodents
Step 1: We use a diagram to show a simplified view of the venous and arterial anatomy of the tail. Because many of our trainees are not familiar with the terms: dorsal, ventral and lateral, the directions of the compass are used to help convey the positioning of blood vessels in the natural position when the animal is ventral side down. We can then indicate positional changes of the vessels as we manipulate the tail during venipuncture. In place of compass positions, referring to positions on a clock is another option to help convey the concept of blood vessel positioning during tail venipuncture.
This picture shows the position of the
blood vessels of the rodent tail when the
animal’s body is ventral side down, with
the tail is in a natural position.
This picture shows the position of the blood
vessels of the rodent tail when the animal’s
body is ventral side down, but the tail has
been rotated 90 degrees
Vertebra

24
Proper placement of the needle in the bevel-up is demonstrated using diagrams and images.
Common errors of needle placement are also addressed with diagrams and images.
Note that in this picture,
the tail has been rotated
90 degrees, altering the
position of the lateral tail
veins from east and west
position to the north and
south positions on the tail.
Note that in this picture,
the tail has been rotated
90 degrees, altering the
position of the lateral tail
veins from east and west
position to the north and
south positions on the tail.
In the picture, venipuncture is unsuccessful because
the needle is placed superficial to the lateral tail
vein.
In this picture, the bevel of the needle is incorrectly
facing down instead of the correct orientation of bevel
up. Approaching the blood vessel from this position,
may cause damage to the vessel.
In this picture, the needle is placed in the lateral tail vein in the
proper orientation, with the bevel facing up.
Note that in this picture,
the tail has been rotated
90 degrees, altering the
position of the lateral tail
veins from east and west
position to the north and
south positions on the tail.

25
Images and diagrams may also be used to show the position of the mouse during blood collection.
Step 2: For our first steps of hands-on training, we use a simple string or shoelace to demonstrate hand position on the tail during the procedure.
This picture shows the hand
position one might use for
tail venipuncture of an
anesthetized mouse. Similar
images may be used to
show venipuncture of a
mouse in a restraining
device.
Note that in this picture,
the tail has been rotated
90 degrees, altering the
position of the lateral tail
veins from east and west
position to the north and
south positions on the tail.
In this picture, venipuncture is unsuccessful because
the approach to the vessel is too steep, causing the
needle to penetrate through the vessel in contrast to
the correct placement of the needle, bevel up, in the
lumen of the vessel.

26
Step 3: We introduce the trainee to a 3 Ts tool called the Tube TailTM to demonstrate and practice venipuncture of the lateral tail veins. Clear hollow tubing is representative of lateral tail veins, purposefully placed on the outside of the string tail. The tubes are proportionally larger than are the corresponding blood vessels in an actual rodent tail. The design of the tool is intended to address many of the key learning issues for venipuncture of the lateral tail veins. The large transparent tubing allows the trainee to see the placement of the needle in the vessel to achieve correct needle placement in the blood vessel. References are made back to the diagrams that illustrated proper needle orientation within the blood vessels. The trainer can also use the Tube TailTM to demonstrate some of the common errors such as the placing the needle too superficial or too deeply. When training with this tool, we do our best to ensure the trainee understands the corresponding live animal anatomy that is represented by the various parts of the Tube TailTM. We compare what we see in a live rodent to the Tube TailTM structures that serve as a visual aid to facilitate training.
In this picture, the string is
permanently attached to an
examination table in our training
room. You can attach the string in
a similar manner in your own
training space.
Tube Tail TM basic version made with transparent tubing

27
Note the needle placement in the
lumen of the tubing, oriented with
the bevel up.

28
Note that the Tube Tail TM can also be used for tail vein blood collection methods such as tail nick with blood collection into a micro-capillary tube.
Step 4 (optional): Depending on the trainee’s competency and comfort with the procedure on the Tube
Tail TM, various options exist for adding complexity to the tools and training exercise. It is not necessary for all of the trainees to go through every option. The options are available for those trainees that require more steps to become comfortable and gain proficiency with the tail venipuncture procedure.

29
Option 1 – Replace the transparent tubing on the Tube Tail TM with black tubing to represent the lateral tail veins. The black tubing increases the complexity of the exercise, because the trainee can no longer see the needle within the lumen of the tubing.
Option 2 – Replace the white string with black string to use for the main structure of the Tube
Tail TM and use black tubing for the lateral vessels. The overall visibility of the black tubing is decreased when attached to the black tubing; thus, the tool and training exercise are a bit more difficult.
Step 5: We recommend covering the string and tubes to mimic skin over top of the tail veins. We use a long twisty balloon to cover the tails. Trainees can use this version of the Tube Tail TM to locate the vessels without seeing them as readily as with previous versions of the tool. Trainees also experience the amount of pressure required to push the needle through additional layers of tissue.
Tube Tail TM advanced version, with a balloon to hide the blood vessels.
Tube Tail TM made with black tubing
Tube Tail TM made with black string and tubing

30
The tails can be prepared such that half of the tail is covered by the balloon, leaving the other half available to access the tubing for the earlier stages of training. Once the trainee is ready to advance to Step 5, practice can be performed on the covered part of the tail.

31
Note that practice may occur first without gloves. Once the trainee demonstrates proficiency doing the procedure on the inanimate tools with non-gloved hands, practice will continue to gain proficiency while wearing gloves, and prior to working with live animals. Step 6: Practice with live animals.
In this picture, the animal is anesthetized.
Practice will also include using rodent
restraint devices during venipuncture.

32
iii. Rabbit Marginal Ear Vein Before attempting to train an individual on venipuncture in rabbits, the trainee must be confident and competent at handling and restraint of rabbits. We also ensure adequate training has been achieved on needle and syringe or catheter manipulation, and sharps safety.
Key learning issues we address for teaching and practicing venipuncture of the marginal ear vein of the rabbit. Note that these learning issues are similar to those identified for
venipuncture of the lateral tail veins in rodents. Also key learning issues will differ slightly depending on the procedure being taught i.e. IV blood collection, injections or catheter
placement.
1. Positioning hands to properly hold the rabbit’s ear for each of the procedures
2. Placing the needle at an appropriate angle to the vein
3. Stabilizing the ear and the syringe throughout the procedure
4. Manipulating the plunger while stabilizing the needle and syringe (or catheter)
5. Applying appropriate back pressure on the plunger of the syringe during blood collection
6. Guiding the needle into the vessel and directly observing what happens if the angle is
too deep or superficial
7. Observing the blood enter the hub of needle
8. Observing the vessel ‘clear’ as the substance is injected into it
Translational Training Tools™ used for teaching and practicing venipuncture of the marginal
ear vein in rabbits
Step 1: We review the position and anatomy of the blood vessels in the rabbit ear, and discuss the approach to holding the ear during the venipuncture procedure.
oacu.od.nih.gov

33
Step 2: We use a 3 Ts tool called Spongy BunearTM for our first step in hands on training. Similar to the Tube TailTM, we use clear, hollow tubing to represent veins on an inanimate rabbit ear model. Also similar to our methods for training on venipuncture of tail veins, the vessels of the Spongy BunearTM are external, easy to access and very visible. We believe the placement of the tube veins is helpful to facilitate mastering the key learning issues that we have addressed for venipuncture of the marginal ear vein.
Step 3: Further training is performed with a modified version the Spongy BunearTM. For this version of the tool, we cover the tube vein with a commercially-available, plastic cling-wrap to make the vessels less apparent yet still visible.
Note that the Spongy BunearTM can be modified for central auricular artery blood collection training and practice.
Spongy BunearTM advanced version
Spongy BunearTM basic version
Spongy BunearTM advanced version
Spongy BunearTM basic version
Note the needle in the lumen of the tube
with the upward orientation of the bevel.
34
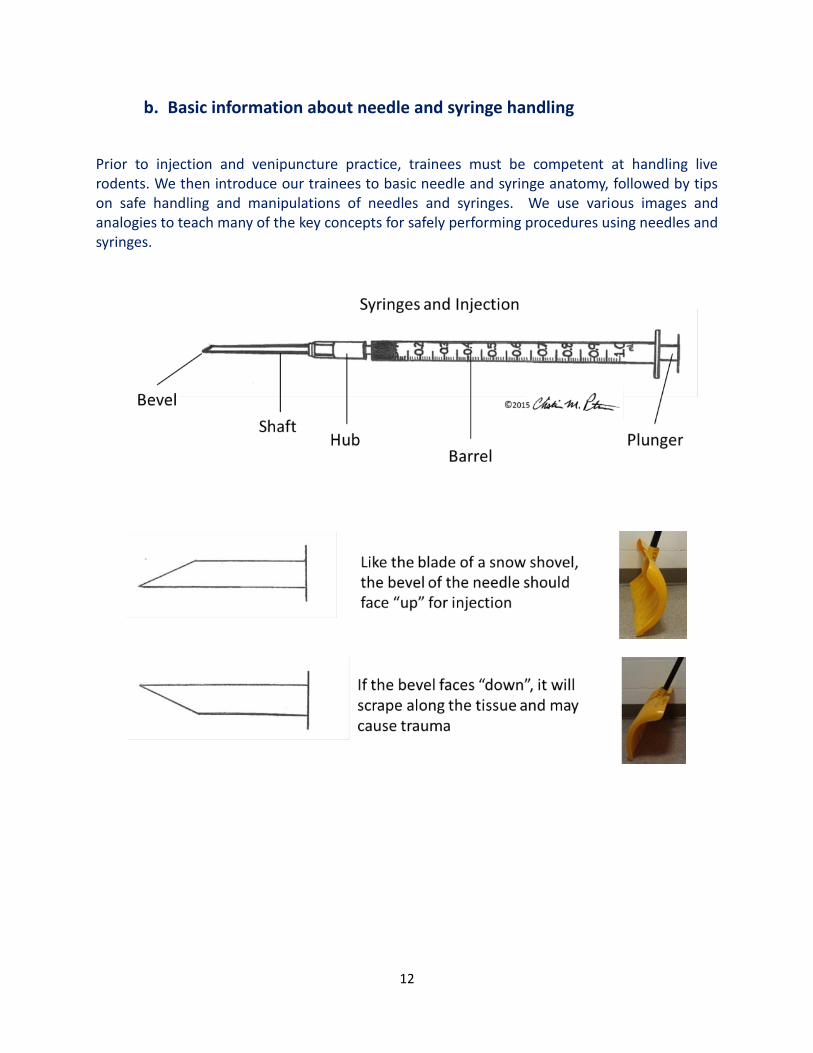
We may also mount the ear on an object such as this sponge football, to better simulate practice of handling of the ear on the rabbits head.
Step 4: After the trainee has been deemed proficient at handling the ear and performing venipuncture on the marginal ear vein of the Spongy BunearTM with gloved hands, we proceed with training on live animals.

35
iv. Pig venipuncture of the Marginal Ear Vein
Before attempting to train an individual on venipuncture of the marginal veins of the pig, the trainee must be confident and competent at handling and restraint of swine, and must be proficient at proper needle and syringe (or catheter) manipulation.
Key learning issues we address for teaching and practicing venipuncture of the marginal ear vein of the pig. The key learning issues for this procedure are fairly similar to those used for
training on the rabbit marginal ear vein.
1. Proper handling of the ear and positioning the hand to place some pressure to hold off
the vein
2. Palpation of the vein
3. Placing the needle at an appropriate angle to the vein
4. Stabilizing the ear and the syringe throughout the procedure
5. Managing potential movement of the ear during the venipuncture procedure
6. Manipulating the plunger while stabilizing the needle and syringe (or catheter)
7. Applying appropriate back pressure on the plunger of the syringe during blood collection
8. Guiding the needle into the vessel and directly observing what happens if the angle is
too deep or superficial
9. Observing the blood enter the hub of needle (or catheter)
10. Holding off the vein to control bleeding once the needle has been removed from the
vein
Translational Training Tools™ used for teaching and practicing venipuncture of the marginal
ear vein in pigs
Step 1: We review the position and anatomy of the blood vessels in the pig ear, and we discuss the approach to holding the ear during the venipuncture procedure. Step 2: We use a 3 Ts tool called Ear Piggy PiggyTM for our first step in hands on training. Similar to the Spongy BunearTM we use a spongy material to create the structure of the ear. Similar to another 3 Ts tool known as the Cephalic TubeTM, we use a long, skinny balloon to serve as the vein. The vein may be
commercially-left uncovered for better visibility, though we prefer to cover the ear and the vein with a available, plastic cling-wrap.

36
Ear Piggy PiggyTMNote that training with the may begin using non-gloved hands to allow for unimpeded dexterity during the early stages of learning. As the skills progress, we encourage trainees to practice while wearing gloves. Step 3: After the trainee has been deemed proficient at handling the ear and performing venipuncture on the marginal ear vein on the Ear Piggy PiggyTM with gloved hands, we may proceed with training on live animals.
Ear Piggy PiggyTM
http://oslovet.norecopa.no
37
v. Canine and Feline Venipuncture of the Cephalic Vein Before attempting to train an individual on venipuncture of the cephalic veins of the dog or cat, the trainee must be confident and competent at handling and restraint of the relevant species, and must be proficient at proper needle and syringe (or catheter) manipulation.
Key learning issues we address for teaching and practicing venipuncture of the cephalic vein Note that the key learning issues are addressed for both the trainee learning to restrain the
animal for cephalic venipuncture and for the trainee that is performing the venipuncture procedure. Key learning issues will differ slightly depending on whether training is for IV
blood collection, injection or catheter placement.
1. Learning to restrain the forelimb while holding off the blood vessel
2. Appreciating the importance of communication between restrainer and the
individual performing the venipuncture procedure
3. Appreciating what the cephalic vein feels like when palpated
4. Stabilizing the cephalic vein with the thumb alongside the vessel during the
venipuncture procedure
5. Placing the needle at an appropriate angle to the blood vessel
6. Dealing with potential movement of the dog limb during the venipuncture procedure
7. Manipulating the plunger while stabilizing the needle and syringe (or catheter)
8. Applying appropriate back pressure on the plunger of the syringe during blood
collection
9. Guiding the needle into the vessel and directly observing what happens if the angle
is too deep or superficial
10. Observing the blood enter the hub of needle (or catheter)
11. Holding off the blood vessel once the needle has been removed from the vein
Translational Training Tools™ used for teaching and practicing cephalic venipuncture in
canines and felines
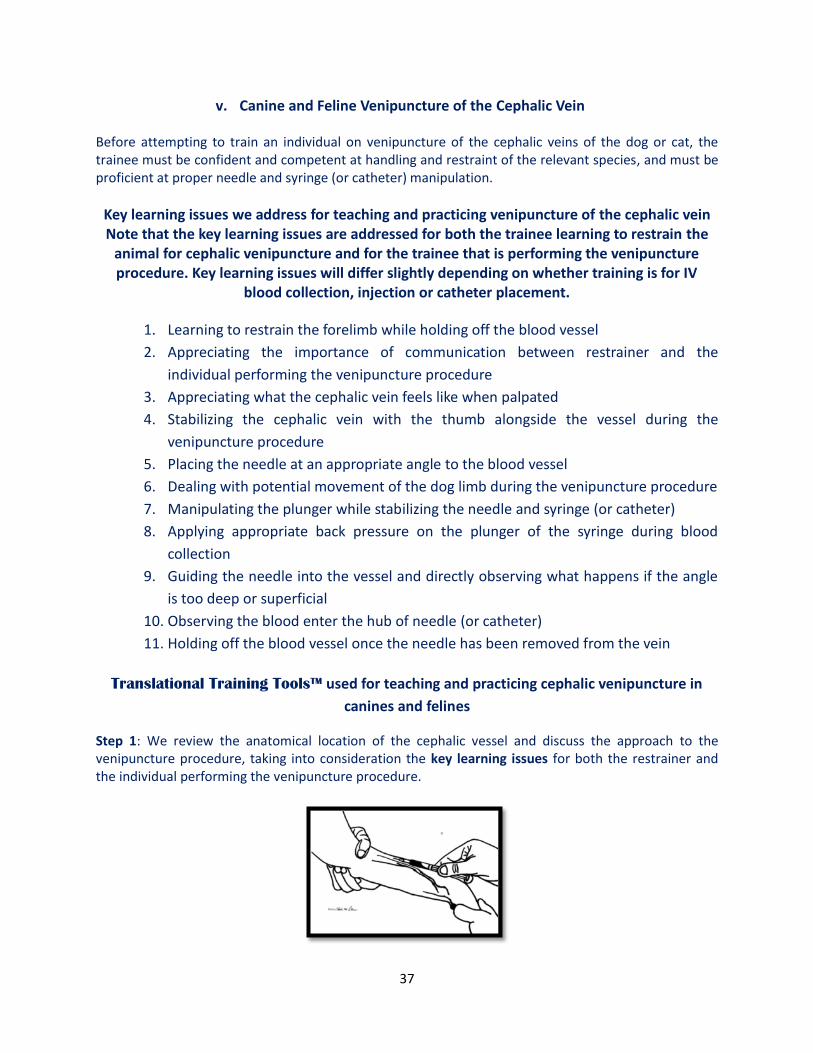
Step 1: We review the anatomical location of the cephalic vessel and discuss the approach to the venipuncture procedure, taking into consideration the key learning issues for both the restrainer and the individual performing the venipuncture procedure.

38
Step 2: The first hands-on step of cephalic venipuncture training is achieve through demonstration and practice of the technique using a 3 Ts tool called the Cephalic TubeTM. This tool consists of a cardboard tube such as paper towel roll, with a long, skinny balloon serving as the cephalic vein. Note that training with this tool may begin using non-gloved hands to allow for unimpeded dexterity during the early stages of learning. As the skills progress, we encourage trainees to practice while wearing gloves.
Note that the balloon blood vessel is placed loosely enough to allow for the vessel to roll a bit. The laxity of the vessel is ideal for teaching the restraining-trainee to properly hold off the vein and keep it taut, to help facilitate the venipuncture process. For the individual learning to perform the venipuncture, the looseness of the vessel helps the trainee understand how mobile the vessel can be and learning to stabilize the vein during the venipuncture procedure.
Cephalic TubeTM basic version
Cephalic TubeTM basic version

39
The venipuncture-trainee can become familiar with how the vein feels and behaves when palpated. Training with the Cephalic TubeTM also provides ample opportunity for practicing communication between the venipuncture-trainee and the restraining-trainee then learning to make any necessary adjustments in restraint of the vessel.
Cephalic TubeTM
basic version
Note that the restraining-trainee is
giving a slight twist to the vein while
holding it off; thus, keeping the vein
taut during the venipuncture process
Cephalic TubeTM basic version

40
The trainees also learn to adapt to and manage any potential blood leakage from the vein during the venipuncture procedure.
Training on communication and interactions between the two trainees will continue as the needle is removed from the vein.
Note that the venipuncture-trainee is
stabilizing the vein with the thumb.
Note that the trainee who is
performing the restraint is applying
pressure to the vein as the needle is
withdrawn from the vessel.
Cephalic TubeTM basic version
Cephalic TubeTM basic version
Cephalic TubeTM basic version

41
Step 3: Further training is performed with a modified version the Cephalic TubeTM. For this version of the tool, we cover the cardboard tube and vein with a piece of textured fabric to mimic the animal’s skin and hair. The fabric covering makes the vein less apparent but readily palpable.
Note that both the basic and the advanced version of the Cephalic TubeTM are useful to demonstrate, teach and practice blood collection, IV injections and catheter placement procedures. All of these procedures will require the two trainees to learn to work as a team to understand the essential hand positions and motions and the interaction between the restraining-trainee and the venipuncture-trainee.
Cephalic TubeTM advanced version
Cephalic TubeTM advanced version
Blood collection
placement
IV catheter placement

42
Step 4: After the trainees are deemed proficient at practicing both restraint for cephalic venipuncture and venipuncture procedure on the Cephalic TubeTM with gloved hands, we proceed with training on live animals.
www.atdove.org
Cephalic TubeTM advanced version
Cephalic TubeTM advanced version
Catheter cap placement
Taping the catheter in place

43
f. Cardiac puncture blood collection in rodents
Note that in addition to the information outlined in this manual, al trainees performing cardiac puncture, will discuss the relevant regulations and guidelines that apply to this procedure. The terminal nature of the procedure is also addressed as is the necessity for appropriate anesthetic depth.
Key learning issues that we address for demonstration, teaching and practice of rodent blood
collection by cardiac puncture
1. Correctly positioning the animal for either a ventral or lateral approach to the heart 2. Appreciating the anatomical landmarks and correctly orientating the needle relative to the
landmarks 3. Understanding the need to stabilize the mouse’s body; thus, minimizing the degree to which the
heart shifts as the needle advances towards it. 4. Learning to reposition the needle, without removing it entirely from the thoracic cavity, should
the initial attempt at puncturing the heart be unsuccessful 5. Appreciating the sensation of the needle penetrating the heart 6. Appreciating the depth at which the needle should be placed 7. Understanding the amount of back pressure to apply to the plunger of the syringe to facilitate
blood collection without collapsing the heart 8. Learning to stabilize the needle and syringe while drawing back on the plunger as the blood is
collected into the syringe
Translational Training Tools™ used for teaching and practicing rodent blood collection by
cardiac puncture
Step 1: We use a variety of pictures and images to introduce the trainees to the concept of blood collection by cardiac puncture. The anatomical landmarks and different approaches to the procedure are addressed. We have provided some examples of images used to address the ventral approach to cardiac puncture.

44
Step 2: Hands-on demonstration and practice of the cardiac puncture procedure is achieved using a 3 Ts tool called the Cardiac BalloonTM.
Note that we have created a simple version of the tool that can be used prior to training with the advanced version of the Cardiac Balloon™. The simple version of the tool provides an optional step for individuals that find it helpful to have a more overt view of the anatomy to potentially provide a better opportunity to conceptualize of the steps of the procedure. We use this tool to further enhance the understanding of the movement of the heart when inserting the needle into it. A small , 4’’ balloon is filled slightly with air and representative of the heart, is affixed to an empty 9’’ balloon that is representative of the thoracic cavity.
Cardiac BalloonTM
When the needle is placed against the
small balloon, the balloon may swivel
or move away from the needle. We
use this diagram to depict what the
trainee might expect when practicing
this procedure in a real rodent.

45
Lateral approach from the left side: the solid arrow indicates the placement of the needle. The dotted arrow indicates the direction of the movement of the heart away from the needle as it is inserted laterally into the heart.
We demonstrate the proper hand position to stabilize the body, and the heart during needle insertion from the lateral approach. If the body is not properly stabilized at the chest level, the heart may move laterally to the opposite side of the body from the needle insertion sight. Note that we are using a syringe without the needle attached for this demonstration.
Ventral approach: the solid arrow indicates the placement of the needle. The dotted arrow indicates the direction of the movement of the heart away from the needle. The heart may shift cranial slightly as it is inserted ventrally into the heart.

46
After the visualization exercise using the basic version of the Cardiac Balloon™, we advance to using a
tool has a small balloon filled with more advanced version of the tool. In the advanced version of the fake blood which represents the heart. The small blood filled balloon is placed inside a larger balloon which is then filled with a gel substance which represents the rodent body surround the heart.
It is important to note that there are some major differences between this 3 Ts tool and the corresponding anatomy of the rodent. The Cardiac BalloonTM does not include the bony structure of the thoracic cavity such as the ribs and sternum. Another difference is that the heart of the Cardiac
BalloonTM does not have a heartbeat. In addition, the Cardiac BalloonTM heart can be palpated as a small bladder-like structure in the center of the balloon body. Palpation of the heart in this manner would not be possible in a real animal due to the presence of the ribs and sternum. We find that these deviations from the actual rodent anatomy do not preclude the Cardiac BalloonTM from being an effective tool to address the majority of the key learning issues that we aim to tackle in this step of training. Similar to the other procedures discussed in this manual, the trainee may first practice the procedure without gloves so that dexterity is not compromised. Once comfortable with practice of the procedure on the Cardiac BalloonTM with the non-gloved hands, we encourage similar practice while wearing gloves.
We demonstrate the proper hand position to stabilize the body, and the heart during needle insertion fusing the lateral approach. If the body is not properly stabilized at the chest level, the heart may move laterally to the opposite side of the body from the needle insertion sight.
The dotted circular outline refers to
the small, fake-blood filled balloon
that represents the heart.

47
Step 4: After the trainees are deemed proficient at performing the cardiac puncture procedure on the Cardiac BalloonTM with gloved hands, we proceed with training on cadavers and eventually proceed to practice on anesthetized animals.
Cardiac BalloonTM Cardiac BalloonTM
Ventral approach Lateral approach

48
g. Cervical dislocation in mice
Before teaching this procedure, we discuss the regulations and guidelines for mouse euthanasia and discuss the appropriate conditions under which to perform this procedure. Trainees must be comfortable and confident in performing mouse handling and restraint, before proceeding with training on cervical dislocation.
Key learning issues that we address for demonstration, teaching and practice of cervical dislocation in
mice
1. Understanding the relevant anatomical landmarks 2. Understanding the point at which the disarticulation of the vertebrae should occur 3. Appreciation of the hand position and direction of motion of the hands, as well as the pressure
required to disarticulate the vertebrae 4. Processing the physical and emotional experience of disarticulating the joint 5. Palpating after the cervical dislocation procedure, to determine that the appropriate vertebral
joint was indeed disarticulated
Translational Training Tools™ used for teaching, demonstration and practice of cervical
dislocation in mice
Step 1: We discuss the anatomical landmarks and different approaches to the procedure. Step 2: Hands-on demonstration and practice of the cervical dislocation procedure is achieved using a tool called the CD MouseTM. This tool is made from a series of interlocking beads that serve as the head and vertebrae of the mouse. With enough pressure placed between the first and second beads, the first bead will separate from the rest of the chain. We begin the hands-on training with just the string of beads used to address the concept of the tool, and how it mimics the cervical dislocation procedure. Trainees can practice the hand position and gain an appreciation for the amount of pressure required to disarticulate the beads.
Step 3: Once the trainee understands the basic concept of performing a cervical dislocation procedure on the ‘naked’ CD MouseTM and the trainee is aware of the appropriate landmarks, we advance to using an intermediate version of the CD MouseTM. For this version, the series of interlocking beads is placed inside a small balloon so that the trainee can no longer see the separation of each of the beads. The end of the balloon can serve as a tail of the mouse.
‘Naked’ CD MouseTM Naked CD MouseTM disarticulated

49
Step 4: When the trainee can demonstrate proficiency on the intermediate CD MouseTM , we proceed to the advanced version of the CD MouseTM which has a finger puppet mouse placed over balloon-covered strand of interlocking beads. The finger puppet adds more layers which can mimic the tissue layers that lay overtop of the cervical spine of the mouse. Additional force is required to accomplish the disarticulation with this version of the CD MouseTM.
Different approaches to the procedure can be taught with each level of the tool from the basic to advanced CD MouseTM.
Intermediate balloon covered CD
MouseTM
Advanced CD MouseTM

50
Step 5: After the trainees are deemed proficient at performing the cervical dislocation procedure on the CD MouseTM with gloved hands, we proceed with training on cadavers and eventually proceed to practice on anesthetized animals.

51
h. Decapitation of neonatal rodents Before teaching this procedure, we discuss the regulations and guidelines for mouse euthanasia and discuss the rationale for using this procedure in neonatal mice and the appropriate conditions under which to perform this procedure.
Key learning issues that we address for demonstration, teaching, practice and validation of
competency of decapitation of neonatal rodents
1. Overcoming the challenges some trainees face with the esthetics of the procedure 2. Appreciation of how to handle and position the neonatal mouse to prepare for the procedure 3. Identifying the correct position and motion of the scissors used to perform the procedure 4. Processing the physical and emotional experience of performing the procedure
Translational Training Tools™ used for teaching, demonstration, practice and validation of
competency of decapitation of neonatal rodents
Step 1: We discuss the anatomical landmarks and different approaches to the procedure. Step 2: Hands-on demonstration and practice of the decapitation procedure is achieved using a tool called the Pink E. D. Cap™. It is a simple tool made with a soft clay-like substance representing the body of the neonatal or pinkie rodents. The substance is inserted into two layers of either a small balloon or a finger cot. This outer layer represents the subcutaneous and skin. The two layers tend to slide against each other making the balloon layers more mobile similar to skin. We begin the hands-on training by addressing the concept of the tool, and discussing how the tool mimics the decapitation procedure. Because many individuals are challenged by the idea of performing the neonatal decapitation procedure, this tool can help individuals become comfortable with the concept and the esthetics of performing this procedure. Trainees can practice the hand position and gain an appreciation for the swift and accurate motion applied to the scissors during the procedure. They also have an opportunity to appreciate the importance of having sharp blades on the scissors used for the procedure.

52
In this picture, the decapitation procedure is
demonstrated on the 3 Ts - Pink E. D. CapTM
training tool.

53
PART II – The Recipes
Table of Contents
1. Instructions for making the 3 Ts Training Tools
a. FP Balloon™ for demonstration, teaching and practice of mouse
handling and restraint, and rodent intra-peritoneal and sub-
cutaneous injection; and rodent surgery practice (refer to The Joy of
Training Volume 2)
b. IM Foosbun™ for demonstration, teaching and practice of rabbit
intra- muscular injection
c. Venipuncture Tools
i. Tube Tail™ for demonstration, teaching and practice of
venipuncture of the lateral tail vein
ii. Spongy Bunear™ for demonstration, teaching and practice of
venipuncture of the rabbit marginal ear vein
iii. Ear Piggy Piggy™ for demonstration, teaching and practice of
venipuncture of the marginal ear vein of pigs
iv. Cephalic Tube™ for demonstration, teaching and practice of
venipuncture of the canine or feline cephalic vein
d. Cardiac Balloon™ for cardiac puncture blood collection in rodents
e. CD Mouse™ for demonstration, teaching, practice and validation of
competency of cervical dislocation in rodents
f. Pink E. D. Cap™ for demonstration, teaching, practice and
validation of competency of neonatal rodent decapitation euthanasia

54
a. FP BalloonTM
For demonstration, teaching and practice of mouse handling and restraint; and rodent intra-peritoneal and sub-cutaneous injection; and rodent surgery
practice (refer to The Joy of Training Volume 2)
Ingredients:
2 - 12” balloons *
1 - Container of 3“ Fart Putty® (FP) or a similar product **
1 - 5 cm piece of 6 mm width pipe cleaner
Instructions:
1. Fill one balloon with the FP or a similar substance
2. Tie off the FP-filled balloon leaving a moderate degree of laxity to the balloon
3. Insert the FP-filled balloon into the second balloon
4. Tie off the outer balloon leaving a moderate degree of laxity to the balloon
*Use 2 contrasting colored balloons if using the FP BalloonTM for surgery practice
** Recipes are available online to make a similar product to Fart Putty®
http://www.stevespanglerscience.com/lab/experiments/glue-borax-gak
Images to help guide the process of making an FP BalloonTM
OPTIONAL STEP: After completing step 3, insert the pipe cleaner piece between the two layers of balloon. Orient the pipe cleaner piece longitudinally. The pipe cleaner is intended to mimic the spinal vertebrae.

55

56
Some people find it challenging to hold the mouth of the balloon open with the fingers. Note
that the use of an elastrator can assist in holding open the balloon.
We acknowledge Sarah Valyou, Abbie Hutchinson, Katie Parini and Liz Borrie from Ithaca College,
Department of Occuaptional Therapy for their creativity in finding a simple method to access the inside
of a balloon.
The elastrator shown in the pictures above is typically used as a castration or tail docking device used for livestock. It is a useful tool for opening the mouth of balloons for insertion of FP, slime or
gak. It is also useful for insertion of foam into long balloons when making the IM FoosbunTM
).
A wooden block or similar object can be placed near the top of the elastrator to hold the instrument open; thus easing the pressure on the hand. Note that the elastrator can also be clamped to a table, to free up both hands. Clamp method is not shown in the picture.

57
b. IM FoosbunTM
For demonstration, teaching and practice of rabbit intra muscular injection into
the lumbar muscles
Ingredients for making the basic version of the IM Foosbun™:
1 – Medium to large sized spongy football (e.g. Nerf® football)
2 – Long balloons i.e. Qualatex 350Q Medium Sized Twisting Balloons
5 or 6 Rubber bands
Several sewing pins (optional)
15 x 17 x 1 inch piece of sponge (will supply enough for several IM Foosbuns™ (instead
of the sponge; home-made ‘gak” or slime may be used)
1 x jumbo size pipe cleaner
1 – 36 inch latex balloon (for intermediate version)
12 x 8 inch piece of fake fur (for the advanced version)
2 to 3 binder clips to hold the fur in place
Supplies:
1 pair of scissors to cut the sponge and the long balloons
Instructions for making the basic version of the IM Foosbun™:
1. Cut 350Q balloons to fit about ¾ of the length of the football
2. Cut a two pieces of foam – generally about 1.5 inches wide by 17 inches long
3. Stuff the 350Q balloon pieces with the foam to create the muscle (or if using Gak or Slime; place
the material into the balloon and seal off the balloon.
4. Bend the pipe cleaner so that there are multiple ‘ridges’ to represent the spinous processes
5. Lay the shaped pipe cleaner between the two foam stuffed balloons
6. Use the rubber bands to affix both the foam filled balloons and pipe cleaner to the football
7. Optional: secure the ends of the balloon to the football using the pins

58
Stuff the 350Q balloon pieces with the foam inserted; into the balloon. An elastrator can be useful to help hold the balloon open during the process of inserting the foam into the balloon.

59
The elastrator shown in the pictures above is typically used to perform ruminant castrations. It is a useful tool for opening the mouth of balloons for insertion of foam as well as homemade or
commercially available slime, gak or FP (See FP BalloonTM
).
Bend the pipe cleaner so that there are multiple ‘ridges’ to represent the spinous processes.

60
The basic version of the IM Foosbun™ is now ready for use.
Lay the shaped pipe cleaner between the two foam stuffed balloons and use the rubber bands to affix both the foam filled balloons and pipe cleaner to the football.
Optional step: secure the ends of the balloon to the football using the sewing pins

61
Instructions for making the intermediate version of the IM Foosbun™: 1. Cut the end of the 36 inch balloon to widen the mouth of the balloon, while ensure that enough balloon remains to cover the football, pipe-cleaner and sponge-filled balloons. 2. Insert the football with the pipe cleaner and sponge-filled balloons attached, into the 36 inch balloon
The intermediate version of the IM Foosbun™ is now ready for use.
Instructions for making the advance version of the IM Foosbun™:
1. Cover the intermediate version of the IM Foosbun™ with the fake fur

62
2. Clip the fur in place with the binder clips The advanced version of the IM Foosbun™ is now ready for use.

63
c. Venipuncture Tools
i. Tube TailTM
For demonstration, teaching and practice of venipuncture of the lateral tail vein
Ingredients for making the basic version of the Tube TailTM:
1 - Piece of white string or shoe lace; approximately 5mm in diameter
2 - Pieces of hollow tubing; approximately 2mm in diameter; transparent or frosted (our
preference is Pony Bead LacingTM)
1 – Piece of polyester sewing thread; approximately 30 cm long
1 ml of fake-blood (our preference is Vampire Blood®)
Supplies:
1 pair of scissors
1 sewing needle
1 – 21 gauge catheter tip
1 – syringe (3cc to 12 cc)
A fray stop solution found in most craft stores– our choice is Dritz Fray Check™
Instructions for making the basic version of the Tube Tail™:
8. Cut string to a length of approximately 4 to 6 inches
9. Apply Fray Check™ to each cut end of the string and allow time for it to dry
ADDITONAL INGREDIENTS and SUPPLIES FOR INTERMEDIATE and ADVANCED VERSIONS OF THE Tube Tail™:
Hollow, black tubing
Black string
Long, skinny balloon (260 Q)
1 cm diameter metal dowel rod about 7 cm long

64
10. Cut hollow tubing to a length that is about 1 to 1.5 cm longer than the string on each end
11. Thread the sewing needle with the polyester thread and tie at knot at the end of the thread
12. Insert the sewing needle into the center of one end of the string
13. Begin sewing the pieces of tubing onto either side of the string; leaving a space of about 2 cm
between the stiches (see photos for details)
14. When both tubes have been sewn to either side of the string, tie the thread off at the end of the
string and cut the thread distal to the knot
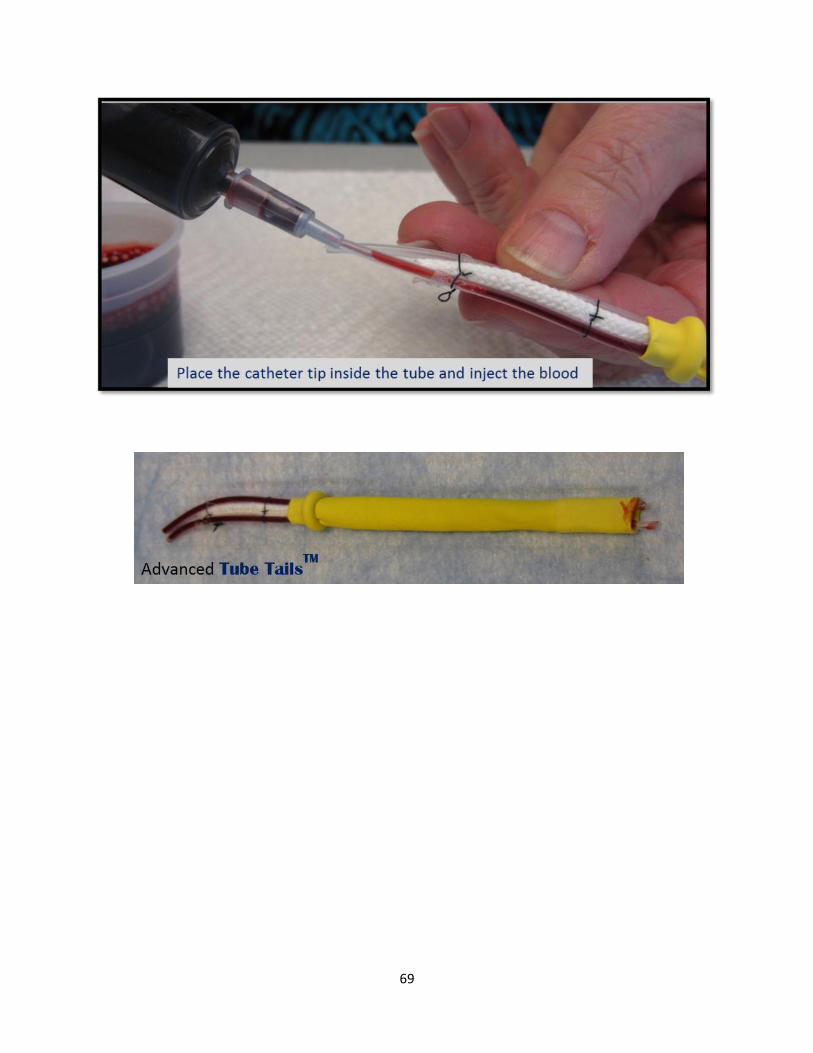
Shortly before using any version of the Tube TailTM :
15. Prepare a syringe filled with fake-blood and place the catheter tip on the syringe
16. Insert the catheter tip into the tubing and inject the fake-blood down the length of the tubing
The Tube TailTM is now ready for use. Depending on the venipuncture procedure for which it is being
used, it may be helpful to clamp or tie off one or both ends of the blood filled tubes.
OPTION 1 FOR INTERMEDIATE VERSION 1 OF THE Tube TailTM:
In place of the transparent or frosted tubing, sew black hollow tubing onto white string
OPTION 2 FOR INTETMEDIATE VERSION 1 OF THE Tube TailTM:
In place of the white string and frosted tubing, use black tubing sewn onto black string
OPTION FOR ADVANCED VERSION OF THE Tube TailTM:
1. Cut off the end of the balloon
2. Place the rolled edge of the balloon over one end of the metal dowel rod
3. OPTIONAL STEP: Place some clear tape over the ends of the tubing and tail tip to facilitate
smoother passage through the balloon
4. Thread a needle with about 20 cm of thread
5. Attach thread to one end of the Tube TailTM (at the taped end if step 3 was performed)
6. Feed the needle through the open end of the dowel and into balloon until you are able to grasp
the thread at the far end of the balloon
7. Pull gently on the thread to feed Tube TailTM through the dowel and into the balloon until the
tail tip is visible at the opposite end of the balloon
8. Remove the balloon encased Tube TailTM from the dowel
9. Trim the end of the balloon to a length that allow both ends of the tubes to be access for
infusing fake-blood into the tubes

65
Images to help guide the process of making a Tube TailTM

66

67

68
Various versions of Tube Tails ready for blood infusion into the tubes
69

70
ii. Spongy BunearTM
For demonstration, teaching and practice of venipuncture of the rabbit marginal ear vein
Ingredients:
2 - Sheets of thin craft-foam (our preference is Foamies with Sticky Back, 6” x 9” x 2
mm) If sticky back is not available; a glue gun is recommended
1 – Piece of hollow, tubing; approximately 2 mm diameter; transparent or frosted (our
preference is Pony Bead Lacing – frosted)
1 - Piece of polyester sewing thread; approximately 30 cm long
1 – Pipe cleaner (6 mm x 12 “)
1 ml of fake-blood (our preference is Vampire Blood®)
Supplies:
• Crafting scissors
• Sewing needle
• Syringe
• Soft-tip catheter
• Glue gun (if not sticky back foam is available)
Instructions:
1. Place 2 pieces of foam together (if using sticky back, place non-sticky side together)
2. Draw the shape of a rabbit ear onto the side of the foam that is facing up
3. With both pieces of foam held with non-sticky side together, cut the ear shape from the
2 pieces of foam
4. Lay both pieces of foam on the work surface, sticky-back side up
5. Peel the sticky back away from both pieces of cut foam
6. Mold the pipe-cleaner into the shape of the foam ear, such that the pipe-cleaner will sits
approximately ½ cm short of the border of the foam ear.

71
7. Either cut and remove any excess pipe-cleaner, or simply tuck the excess pipe-cleaner
around the part of the pipe-cleaner structure
8. Sandwich the molded pipe-cleaner between the sticky sides of both pieces of the foam
ear and press the opposing pieces of foam together
9. Cut the hollow tubing to a length that is slightly longer than the length of the ear
10. Sew the tubing onto the external border of the foam ear; placement should be about
2mm from the edge of the ear and on the side of the ear that represents the lateral
orientation of the marginal ear vein in a rabbit
Shortly before using any version of the Spongy BunearTM:
11. Prepare a syringe filled with fake-blood and place the catheter tip on the syringe
12. Insert the catheter tip into the tubing and inject the fake-blood down the length of the tubing
13. Bend the base of the ear and tape or pin the base of the ear to a surface or to an object such as
a sponge football (see photos)
The Spongy BunearTM is now ready for use. Depending on the venipuncture procedure for which it
is being used, it may be helpful to clamp or tie off one or both ends of the blood filled tubes.
FOR CREATING THE ADVANCED VERSION OF THE Spongy BunearTM: Cover the ear and the tubing with transparent cling wrap to make the simulated blood vessel less apparent.

72
Images to help guide the process of making a Spongy BunearTM

73

74

75
iii. Ear Piggy PiggyTM
For demonstration, teaching and practice of venipuncture of the marginal ear vein
of pigs
Ingredients:
2 - Sheets of thin craft-foam (our preference is Foamies with Sticky Back, 9” x 12” x 2
mm)
1 – Long balloon (160 Q)
2 – Pipe cleaners (6 mm x 12”)
1 – Piece of transparent cling wrap (our preference is Press’n Seal®)
2-3 ml of fake-blood (our preference is Vampire Blood®)
Supplies:
• Crafting scissors
• Sewing needle
• Syringe
• Soft-tip catheter
• Glue gun if unable to obtain sticky-back foam
Instructions:
1. Place 2 pieces of foam together (if using sticky back, place non-sticky side together)
2. Draw the shape of a pig ear onto the side of the foam that is facing up
3. With both pieces of foam held with non-sticky side together, cut the ear shape from the 2
pieces of foam
4. Lay both pieces of foam on the work surface, sticky-back side up

76
5. Peel the sticky back away from both pieces of cut foam (if unable to find sticky back foam,
use a glue gun to seal the pipe cleaner to the foam pieces)
6. Mold the pipe-cleaner into the shape of the foam ear, such that the pipe-cleaner will sit
approximately ½ cm short of the border of the foam ear.
7. Either cut and remove any excess pipe-cleaner, or simply tuck the excess pipe-cleaner
around the part of the pipe-cleaner structure
8. Sandwich the molded pipe-cleaner between the sticky sides of both pieces of the foam
ear and press the opposing pieces of foam together foam (If unable to find sticky back
foam, use a glue gun to seal the pipe cleaner to the foam pieces)
9. Cut a short groove (about 3 mm) at both the base and the tip of the ear
10. Mold the pipe-cleaner at the base of the ear so that it forms a slight fold in the ear
11. When ready to use, fill the balloon with fake-blood and tie a small knot into both ends of
the blood-filled balloon
12. Orient the blood-filled balloon from the center of the base of the ear, securing the
knotted ends of the balloon into the grooves at the base and tip of the ear
13. Cover the ear with cling wrap
The Ear Piggy PiggyTM is now ready for use.
Images to help guide the process of making an Ear Piggy PiggyTM

77
iv. Cephalic TubeTM
For demonstration, teaching and practice of venipuncture of the canine or feline
cephalic vein Ingredients:
12” hollow tube; 1 to 2 “diameter (our preference is a paper- towel roll)
Long Skinny Balloon (160 Q to 260 Q)
Simulated Blood
For the advanced version of the Cephalic TubeTM
Fabric cut to a size that can easily wrap around the tube ; about 12” x 9” (our
preference is velvet or crushed velvet)
Supplies:
Scissors
Tape
6cc Syringe
Lab tape
Instructions:
1. Cut a groove into either end of the hollow tube (preferably cardboard) at each end,
directly opposite each other about 0.5” deep
2. Fill a 6cc Syringe with simulated blood (Vampire BloodR)
3. Guide the syringe tip into the open end of the balloon and fill the balloon with blood,
while agitating the balloon slightly to expel some of the air that may be in the
balloon
4. Fill the balloon until it is moderately turgid
5. Tie off the open end of the balloon and it may be helpful to also tied a small knot in
the opposite end of the balloon

78
6. Place the knotted ends of the balloon into the grooves made on the paper towel so
that the blood-filled balloon has a minimal degree of movement but is still able to
roll slightly.
7. Tape the knotted ends of the balloon to the inside of tube for added security
Images to help guide the process of making a Cephalic TubeTM
FOR CREATING THE ADVANCED VERSION OF THE Cephalic TubeTM: cover both the balloon and the tube with the fabric to make the simulated blood vessel less apparent. Tape the fabric in place.

79
f. Cardiac BalloonTM
For cardiac puncture blood collection in rodents
Ingredients:
9” Latex balloon
2-4” Latex balloon (water balloon)
Simulated blood
Hair gel
Supplies:
3 cc syringe
35 cc syringe or larger
Hemostat
Instructions:
1. Fill the 3 cc syringe with simulated blood (Vampire BloodR)
2. Fill the 3” balloon with the blood from the syringe, until the balloon is plump and is
about 1.5 cm in diameter
3. Tie off the balloon while attempting to release excess air from the balloon as you tie.
Note that a small amount of air in the balloon may actually be beneficial for the training
exercise. When tying off, try to leave as much tail on the balloon as possible.
4. Fill the 35 cc syringe with hair gel and set aside.
5. Using the hemostat, clamp the rolled edge of the balloon, and then pass the small
balloon into the 9” balloon and fill the 9” balloon with the hair gel until the 9” balloon is
plump (trying not to lose any gel in the process)
6. Line up the rolled edge of the small blood-filled balloon to about 1.5 cm below the
mouth of the 9” balloon

80
7. Tie off the neck of the 9” balloon while incorporating the neck of the small balloon into
the tie. This step will secure the small balloon heart in place.
Images to help guide the process of making a Cardiac BalloonTM
Options for other uses of the Cardiac BalloonTM: This tool could be used for various types of
palpation practice, which may in some cases require that the small balloon remain free
floating; rather than secured to the neck of the larger balloon as for the cardiac puncture
practice.

81

82

83
g. CD MouseTM
For teaching and practice of cervical dislocation in rodents
Ingredients:
4 - Round, connecting plastic beads (our preference is Pop-Arty! beads, 10mm
diameter) for the basic, intermediate and advanced version of the tool
1 – Water balloon; 2 “ diameter for the intermediate version of the tool
1 – mouse shaped finger puppet or cat toy, with stuffing removed, it is preferable if the
toy has a tail
Instructions:
1. Attach 4-5 plastic beads together to create the basic version of the CD MouseTM and for
the skeletal portion of the intermediate and advanced versions of the CD MouseTM
2. Insert beads into empty water balloon and tie off the end to create the intermediate
version of the CD MouseTM and the center part of the advanced version
3. Insert the bead-filled balloon into the finger puppet or cat toy
Images to help guide the process of making a CD MouseTM

84

85
h. Pink E. D. Cap™
For teaching, practice, and validation of competency of neonatal decapitation
euthanasia in rodents
Ingredients:
2 – Finger cots
Soft dough or clay - our preference is. Amaco super dough white
(www.amaco.com/t/mixed-media/modeling-and-mold-making/super-dough )
1 small rubber band
Instructions:
1. Roll the dough into a tube shape that is about the size of a rat or mouse neonate
2. Insert the dough into one of the finger cots
3. Insert the dough filled finger cot into a second finger cot
4. Use a small rubber band to secure the open end of the finger cots. This step will
prevent drying out the clay or dough prior to using the tool. Alternatively, the ends of
the finger cots may be tied; though we find this method can create too much bulk in the
tool.
See below for images to help guide the process of making a Pink E. D. Cap™

86

87
We hope that you enjoy making and training with these
Translational Training ToolsTM
We look forward to your comments and feedback.
Our website is currently under construction; however, please
check for updates on the 3 Ts at:
https://ras.research.cornell.edu/care/3T.html
Thank you for taking the time to explore our training tools
and methods.
Translational Training Tools™ The 3 Ts Serving the 3 Rs