Embed Size (px)
DESCRIPTION
Â
Citation preview

2 3
©2012 UIG ENTERTAINMENT GMBH. All rights reserved. All changes, errors and printing omissions and errors reserved. All rights reserved. Images © Bruder, © mipan, © arquiplay77, © Scanrail - Fotolia.com
Software, Graphics, Music, Texts, Names and Manual are copyrighted. Software and Manual may not be copied, reproduced or translated, and neither reproduced on any electronic medium or in machine-readable form without the prior written permission of UIG Entertainment GmbH. Most hardware and software brands in this Manual are registered trademarks and must be treated as such.
Epilepsy warning
Some persons may suffer from loss of consciousness or epileptic seizures when they are exposed to certain light effects or fl ashes of light. Certain graphics and effects in computer games can cause an epi-leptic seizure or trigger loss of consciousness. And previously unknown epileptic tendencies may surface when exposed to the above effects. If you have epilepsy, or someone in your family has epilepsy, please consult your physician before playing this game. If you experience symptoms such as dizziness, sensory disturbances, eye or muscle twitching, unconsciousness, disorientation, or any involuntary movements or convulsions, turn the device off IMMEDIATELY and consult a doctor before playing again.
Technical Information/Hotline
Do you have technical problems while installing the software or are you in the middle of the game and have no idea what to do next?
support @uieg.de
Content1. Foreword. . . . . . . . . . . . . . . . . . . . . . . . . . . . . . . . . . . . . . . . . . . . . . . . . . .4
Welcome to Train Giant!. . . . . . . . . . . . . . . . . . . . . . . . . . . . . . . . . . . . . . . . . . . . . . . . . . . . 4
2. Overview. . . . . . . . . . . . . . . . . . . . . . . . . . . . . . . . . . . . . . . . . . . . . . . . . . .5About the game. . . . . . . . . . . . . . . . . . . . . . . . . . . . . . . . . . . . . . . . . . . . . . . . . . . . . . . . . . 5Winning and Losing a Game . . . . . . . . . . . . . . . . . . . . . . . . . . . . . . . . . . . . . . . . . . . . . . . . 5
3. Tips on developing cities . . . . . . . . . . . . . . . . . . . . . . . . . . . . . . . . . . . . . .63.1. Getting an Overview of the City. . . . . . . . . . . . . . . . . . . . . . . . . . . . . . . . . . . . . . . . . . . 63.2. Generating Flows of People, Material and Power. . . . . . . . . . . . . . . . . . . . . . . . . . . . . . 73.3. Earning of Profi t . . . . . . . . . . . . . . . . . . . . . . . . . . . . . . . . . . . . . . . . . . . . . . . . . . . . . . 8
4. Train Giant - the Basics. . . . . . . . . . . . . . . . . . . . . . . . . . . . . . . . . . . . . . .104.1 Starting the Game . . . . . . . . . . . . . . . . . . . . . . . . . . . . . . . . . . . . . . . . . . . . . . . . . . . . 104.2. Confi guration . . . . . . . . . . . . . . . . . . . . . . . . . . . . . . . . . . . . . . . . . . . . . . . . . . . . . . . 104.3 Camera controls . . . . . . . . . . . . . . . . . . . . . . . . . . . . . . . . . . . . . . . . . . . . . . . . . . . . . 144.4. Changing game speed . . . . . . . . . . . . . . . . . . . . . . . . . . . . . . . . . . . . . . . . . . . . . . . . 164.5. The Side Menu . . . . . . . . . . . . . . . . . . . . . . . . . . . . . . . . . . . . . . . . . . . . . . . . . . . . . . 164.6. Using hot keys . . . . . . . . . . . . . . . . . . . . . . . . . . . . . . . . . . . . . . . . . . . . . . . . . . . . . . 19
5. Infrastructure - The Basics. . . . . . . . . . . . . . . . . . . . . . . . . . . . . . . . . . . .215.1. Supplying Materials . . . . . . . . . . . . . . . . . . . . . . . . . . . . . . . . . . . . . . . . . . . . . . . . . . 215.2. Power supply . . . . . . . . . . . . . . . . . . . . . . . . . . . . . . . . . . . . . . . . . . . . . . . . . . . . . . . 22
6. Infrastructure – The Trains . . . . . . . . . . . . . . . . . . . . . . . . . . . . . . . . . . . .246.1. Stations . . . . . . . . . . . . . . . . . . . . . . . . . . . . . . . . . . . . . . . . . . . . . . . . . . . . . . . . . . . 246.2. Track & platform layout. . . . . . . . . . . . . . . . . . . . . . . . . . . . . . . . . . . . . . . . . . . . . . . . 266.3. The Trains. . . . . . . . . . . . . . . . . . . . . . . . . . . . . . . . . . . . . . . . . . . . . . . . . . . . . . . . . . 296.4. Creating a timetable from a station or track switch. . . . . . . . . . . . . . . . . . . . . . . . . . . 326.5. Timetable assistant. . . . . . . . . . . . . . . . . . . . . . . . . . . . . . . . . . . . . . . . . . . . . . . . . . . 356.6. Detailed timetables. . . . . . . . . . . . . . . . . . . . . . . . . . . . . . . . . . . . . . . . . . . . . . . . . . . 36
7. Buses, trucks, lay-byes and loading bays . . . . . . . . . . . . . . . . . . . . . .388. Finances . . . . . . . . . . . . . . . . . . . . . . . . . . . . . . . . . . . . . . . . . . . . . . . . . .39
8.1. Subsidiaries . . . . . . . . . . . . . . . . . . . . . . . . . . . . . . . . . . . . . . . . . . . . . . . . . . . . . . . . 398.2. Large projects . . . . . . . . . . . . . . . . . . . . . . . . . . . . . . . . . . . . . . . . . . . . . . . . . . . . . . 438.4. Shares . . . . . . . . . . . . . . . . . . . . . . . . . . . . . . . . . . . . . . . . . . . . . . . . . . . . . . . . . . . . 448.5. Credit . . . . . . . . . . . . . . . . . . . . . . . . . . . . . . . . . . . . . . . . . . . . . . . . . . . . . . . . . . . . . 45
9. The fi rst steps to success. . . . . . . . . . . . . . . . . . . . . . . . . . . . . . . . . . . . .46Introduction. . . . . . . . . . . . . . . . . . . . . . . . . . . . . . . . . . . . . . . . . . . . . . . . . . . . . . . . . . . . 46Starting the game . . . . . . . . . . . . . . . . . . . . . . . . . . . . . . . . . . . . . . . . . . . . . . . . . . . . . . . 46The fi rst railway route . . . . . . . . . . . . . . . . . . . . . . . . . . . . . . . . . . . . . . . . . . . . . . . . . . . . 47
10. The special missions . . . . . . . . . . . . . . . . . . . . . . . . . . . . . . . . . . . . . . .5210.1. Greece is bankrupt! . . . . . . . . . . . . . . . . . . . . . . . . . . . . . . . . . . . . . . . . . . . . . . . . . 5310.2. Tyrol - the Sacred Land . . . . . . . . . . . . . . . . . . . . . . . . . . . . . . . . . . . . . . . . . . . . . . 54
11. The Editor . . . . . . . . . . . . . . . . . . . . . . . . . . . . . . . . . . . . . . . . . . . . . . . .5511.1. Starting the Editor. . . . . . . . . . . . . . . . . . . . . . . . . . . . . . . . . . . . . . . . . . . . . . . . . . . 5511.2. Working with the Editor. . . . . . . . . . . . . . . . . . . . . . . . . . . . . . . . . . . . . . . . . . . . . . . 5611.3. Saving a map . . . . . . . . . . . . . . . . . . . . . . . . . . . . . . . . . . . . . . . . . . . . . . . . . . . . . . 5711.4. Import custom game . . . . . . . . . . . . . . . . . . . . . . . . . . . . . . . . . . . . . . . . . . . . . . . . 57

4 5
2. OverviewAbout the game
Train Giant is a simulation that derives its charm from the fun of running your own train company and developing cities.
You are the owner of a train company, and your goal is to amass a fortune of 10 trillion yen.
Winning and Losing a Game
Once you have accumulated capital in the amount of 100 trillion yen, you will have completed the map you are playing. If you want, you can also keep playing the map you just fi nished. This way you can keep building the city of your dreams.
Should you ever lose all your capital (i.e. go into the red), you will have lost the game. So always keep an eye on your funds.
1. ForewordWelcome to Train Giant!
Train Giant is the European version of “A-Train 9”, one of the most successful infrastructure/city building simulation games ever. Japan‘s A-Train series has been one of the best of its genre since the 90s and is one of the most successful game series ever published in Japan.
The “Train Giant” gives you an English version of this masterpiece of Far Eastern programming and game design. We at UIG hope you have lots of enjoyment with the game. We‘ve prepared this manual for you to ease your introduction into the material, which can be complex at times.
Important information:
The enclosed HTML Manual also contains the points explained in this User Manual, but it goes into still more detail and gives you lots of additional information. If the User Manual is no help at some point, please consult the HTML manual.
Enjoy!

6 7
3.2. Generating Flows of People, Material and Power
Once you know the city‘s features, you can start developing it.
There are three points which require special attention when developing city districts: “Flows of people”, “Material” and “Power”. Neglecting just one of these will stop the city from developing. If supply is defi cient in any one of these areas, take steps immediately to remedy the situation.
Generating Flows of PeopleBy laying tracks to connect stations, and then operating trains, you can generate “fl ows of people”.
A station with developed surroundings attracts people, so you should connect it to other stations. This way the other stations will also attract people, and you will be able to develop them effectively.
By building roads and bus stops, you can also generate fl ows of people with buses.
3. Tips on developing citiesIf you are playing Train Giant for the fi rst time, you may be wondering where to start and how best to develop the cities in the game.
To fi nd out, just take a look at the steps shown below and then continue to develop your city.
•・First, you should get an overview of the city•・Then you should generate fl ows of people, material and power•・Now make an effort to make a profi tAnd once you have enough capital, press ahead with developing the areas along your tracks.
3.1. Getting an Overview of the City
First, move the camera to get an overview of the whole city.
Points to watch out for•・Station sites•・Locations for facilities that produce materials, such as factories and harbours•・Locations with lots of buildings where people gather
Right at the start you should also take a look at the following: “Capital”, “Subsidiaries owned” and “All power plants in the city”.
You can fi nd out more about “All power plants in the city” from the Reports Menu, and “Subsidiaries owned” from the Market Menu. It is also a good idea to always keep an eye on your capital, which is displayed at the bottom of the screen.
You should never go into the red - if you do, the game is lost!
3.2. Generating Flows of People, Material and Power

8 9
- Have you scheduled your hours of operation to avoid wasteful hours?When you take a look at the number of passengers using a train or bus from morning until evening, you’ll notice that passenger numbers fl uctuate depending on the time of day. As very few passengers use your services late at night compared to other times of the day, you can already reduce costs by simply stopping train and bus services at certain times.
- Are you generating a surplus in material or power?Factories and power plants make a profi t by selling material and power. If they produce too much, creating a surplus, they incur additional production costs. So you must carefully consider just how many factories and power plants are needed in a city.
- Are your subsidiaries generating turnover?Unlike factories and power plants, subsidiaries cannot sell anything. If your subsidiary is continuously in the red, you can sell it to get out of the red.
Roads are cheaper than railways to build and operate, but they also carry far less people. So it’s best to consider them a helpful addition to your railway network for developing the area around stations and alongside railway lines.
Generating MaterialMaterial is needed for constructing all buildings except stations, tracks and material factories.
Material is produced automatically by material factories. However, you cannot use the material while it is on the premises of material factories. First, you need goods trains or trucks to transport it to material warehouses or other locations.
You can also buy material from nearby cities by building harbours, or by laying tracks to the edges of the map and sending goods trains to those neighbouring cities.
Generating PowerPower is an element that must not go ignored when developing your city. If a city district is not supplied with power, it will not be lit at night and people will not be attracted to it.
To generate power you need power plants, which automatically supply power to the households on the entire map. You can fi nd out how much power the city requires and how much is currently being supplied in the Reports Menu under “Energy information“. You should build power plants if the power supply is insuffi cient.
3.3. Earning of Profi t
Now take a break from developing the city districts and turn your attention towards generating a profi t.
To generate a profi t, you MUST cut any waste. Let‘s take a look at the situation of your transportation facilities and subsidiaries and think about cutting waste in certain sectors.
Go through the following checklist briefl y:
- Have you selected trains and buses according to the number of passengers?As a rule, operating costs increase the bigger a set of coaches is. If a train‘s actual number of passengers is lower than its maximum number of passengers, and the fares are less than the operating costs, you will go into the red. In this case you should try changing the number of coaches and the train type to reduce costs.
Try changing buses as well, if they are running in the red.
10 11
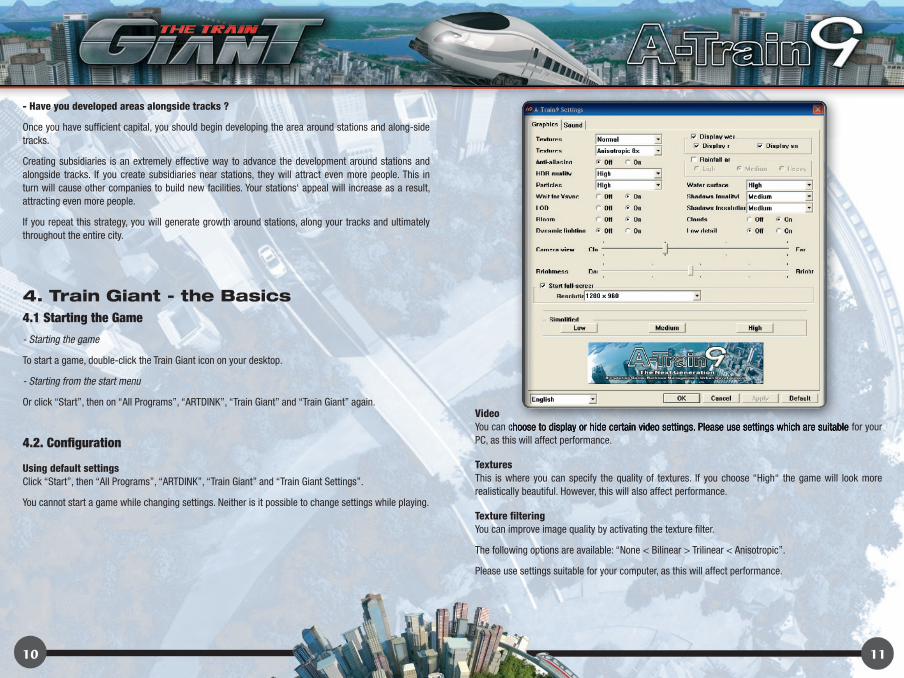
VideoYou can choose to display or hide certain video settings. Please use settings which are suitable for your PC, as this will affect performance.
TexturesThis is where you can specify the quality of textures. If you choose “High“ the game will look more realistically beautiful. However, this will also affect performance.
Texture fi lteringYou can improve image quality by activating the texture fi lter.
The following options are available: “None < Bilinear > Trilinear < Anisotropic”.
Please use settings suitable for your computer, as this will affect performance.
- Have you developed areas alongside tracks ?
Once you have suffi cient capital, you should begin developing the area around stations and along-side tracks.
Creating subsidiaries is an extremely effective way to advance the development around stations and alongside tracks. If you create subsidiaries near stations, they will attract even more people. This in turn will cause other companies to build new facilities. Your stations‘ appeal will increase as a result, attracting even more people.
If you repeat this strategy, you will generate growth around stations, along your tracks and ultimately throughout the entire city.
4. Train Giant - the Basics4.1 Starting the Game
- Starting the game
To start a game, double-click the Train Giant icon on your desktop.
- Starting from the start menu
Or click “Start”, then on “All Programs”, “ARTDINK”, “Train Giant” and “Train Giant” again.
4.2. Confi guration
Using default settingsClick “Start”, then “All Programs”, “ARTDINK”, “Train Giant” and “Train Giant Settings”.
You cannot start a game while changing settings. Neither is it possible to change settings while playing.
You can choose to display or hide certain video settings. Please use settings which are suitable for your

12 13
Start full-screen modeIf you check this box you can play the game using the whole screen. This is also where you can change your screen resolution.
Display weatherHere you can choose whether or not to display rain and snow.
If you prefer, you can also display only rain or only snow.
Rainfall and snowfallYou can choose whether or not to display rainfall and snowfall.
WaterThis is where you can specify how water is to be displayed.
Shadow qualityHere you can specify how shadows are to be displayed. Select “High“ to display softer shadows. If you select “Off”, shadows will not be displayed, but doing so may considerably improve image perform-ance.
Quality of shadowsThis is where you can specify the quality of shadows. Selecting “High” causes shadows to be displayed more accurately, and will reduce screen flickering caused by shadows.
CloudsYou can choose whether or not to display clouds.
Low detailIf you select “On” here, buildings will only be displayed in low detail. Turn this function on or off as you wish. When “On”, the entire screen content is displayed in a rather sketchy manner.
Basic settingsThe settings that affect performance can be specified as “Low”, “Medium” and “High” by default.
SoundChange your sound settings here.
SoundYou can turn music, sound effects and menu sounds on and off.
Anti-aliasingActivating anti-aliasing smoothes building contours.
However, selecting this option will smooth the entire screen. Activate or deactivate this function to suit your preference.
HDR qualitySelect “High“ to reproduce shadows in high quality.
This also creates an effective difference between light and dark, when exiting a dark tunnel into day-light, for instance.
ParticlesSelect “High” to display fireworks, snow, rain and exhaust from trains in high quality.
Wait for VsyncIf you select “Off“, the frame rate may increase. However, this may also cause the screen to start flicker-ing. Please select the settings which suit your PC and monitor.
LODIf you select “On”, buildings in the background will also be displayed in detail. However, doing so will affect performance considerably.
BloomIf you select “On”, lights at night, etc., will appear brighter.
Dynamic lightingIf you select “On”, the headlights of trains, buses and trucks will light up the road and nearby buildings.
Camera viewYou can change the section of the map visible at one time from 2km to 5km. However, if the visible area is too large, it will affect performance.
BrightnessThis is where you can specify screen brightness. If the image displayed on your screen is too bright or too dark, you can change it with the slider.

14 15
Using the satelliteYou can also control the camera with the satellite in the top right corner of the screen.
Double-click 1 to move the camera to this point on the map.
Change the satellite‘s position by left-clicking 1 and dragging the mouse.
Enlarge or reduce the satellite image by left-clicking 1 and turning the mouse wheel.
Move the camera by left-clicking 2 and dragging the mouse.
Rotate the camera by left-clicking 3 and dragging the mouse.
Click 4 to realign the camera to the north.
Increase the size of the area displayed by the satellite by left-clicking 5 and dragging the mouse.
Using the camera control panelYou can also control the camera with the camera control panel in the top right corner of the screen.
Rotate the camera by left-clicking 1 and dragging the mouse.
Click 2 to realign the camera to the north.
Change the camera angle by left-clicking 3 and dragging the mouse.
Zoom in and out with the camera by left-clicking 4 and dragging the mouse.
When the mouse cursor is at the above-mentioned positions, you can also use the mouse wheel to make fi ne adjustments.
If you check the box next to “Sound”, you can also turn sound effects on or off individually.
Music volumeYou can adjust the music volume here.
Sound effects volumeYou can adjust the sound effects volume here.
Menu sounds volumeYou can adjust the menu sounds volume here.
4.3 Camera controls
Camera controlsTo move the camera, left-click the game screen and drag the mouse while holding down the left mouse button.
To rotate the camera, right-click the game screen and drag the mouse while holding down the right mouse button.
Use the mouse wheel to zoom in and out of the screen.
Using the keyboardYou can also control the camera using the keyboard.
Scroll map upwards <8> (number pad) and “E”
Scroll map downwards <2> (number pad) and “X”
Scroll map to the left <4> (number pad) and “S”
Scroll map to the right <6> (number pad) and “D”
Scroll map to the top left <7> (number pad) and “W”
Scroll map to the top right <9> (number pad) and “R”
Scroll map to the bottom left <1> (number pad) and “Z”
Scroll map to the bottom right <3> (number pad) and “C”
Zoom in Home
Zoom out End

16 17
SatelliteThe satellite lets you view all objects on the map, rotate the camera and change camera location.
Double-click 1 to move the camera to this point on the map.
Change the satellite‘s position by left-clicking 1 and dragging the mouse.
Enlarge or reduce the satellite image by left-clicking 1 and turning the mouse wheel.
Move the camera by left-clicking 2 and dragging the mouse.
Rotate the camera by left-clicking 3 and dragging the mouse.
Click 4 to realign the camera to the north.
Increase the size of the area displayed by the satellite by left-clicking 5 and dragging the mouse.
Camera controls panelYou can use the camera control panel to rotate the camera and zoom in and out.
Rotate the camera by left-clicking 1 and dragging the mouse.
Click 2 to realign the camera to the north.
Change the camera angle by left-clicking 3 and dragging the mouse.
Zoom in and out with the camera by left-clicking 4 and dragging the mouse.
When the mouse pointer is at the above-mentioned positions, you can also use the mouse wheel to make fi ne adjustments.
GridA grid with a side length of 10m on each side is laid over the map.
Deleting menusNo menus are displayed on the game screen.
If you wish to display the menus, press “0” or move the mouse to the top edge of the screen.
4.4. Changing game speed
Use the slider at the bottom of the screen to change the game speed.
Please note, however, that game speed relies heavily on the PC which is running the game - the actual game speed may be slower than the speed displayed (in this case, it will only be increased to the speed marked on the slider).
To change the game speed, click slider 1, or left-click the slider and drag the mouse.
To fi x the game speed at “x 1.0”, click 2.
To pause the game, click 3 or 4.
To continue a paused game, click 3, 4 or 5.
4.5. The Side Menu
Using the side menuYou can click on the side menu icons in the top right of the screen to activate and deactivate various useful functions.
Go to the Options menu and then Side menu to activate or deactivate the side menu itself.
Satellite Initial Confi guration: “On”
Camera controls panel Initial Confi guration: “On”
Grid
Deleting menus
Viewpoint
Target information
Elevation bar
Timer

18 19
In the Side menu, Viewpoint, Target information, Elevation bar and Timer each offer only one option.
4.6. Using hot keys
You can also control Train Giant using only the keyboard. (・” “ indicates normal keys,< > the number pad keys)
Basics for controls
Pause/continue game “:” or <*> (number pad)
Display/hide all menus “0” or <0> (number pad)
Switch Elevation bar function “h”
Raise using the Elevation bar “Page Up”
Lower using the Elevation bar “Page Down“
Align camera to the North “n” or <5> (number pad)
Music/Sound “m”
Rotate buildings/projects to the left “Left” and “Tab”
Rotate buildings/projects to the right “Right”
Scroll up “Up”
Scroll down “Down”
Cancel follow trains “:” or <.> (number pad)
Confi rm yes/no [y]/[n]
Scroll map
Scroll map upwards <8> (number pad)
Scroll map downwards <2> (number pad)
Scroll map to the left <4> (number pad)
Scroll map to the right <6> (number pad)
Scroll map to the top-left <7> (number pad)
Scroll map to the top-right <9> (number pad)
Scroll map to the bottom-left <1> (number pad)
Scroll map to the bottom-right <3> (number pad)
ViewpointYou can save the camera‘s current location.
•� Enter: Save the camera‘s current location in the list under the specifi ed number.
• Name: Generate a name automatically based on the stations or junctions in the vicinity.
• Delete: Delete the location saved under this number.
•� Manually: Move the camera by hand using the button displayed below it.
• Track objects automatically: Track objects near the camera (trains, buses and trucks) automati-cally.
•� Switch cameras: Display the images from the saved cameras one after the other (moving the camera manually cancels the settings for switching cameras).
In the Side menu, Viewpoint, Target information, Elevation bar and Timer each offer only one option.
Target informationThe buildings, trains, information on property and the wind speed are displayed when hovering the mouse over any particular location.
This will also show the city‘s entire power consumption.
In the Side menu, Viewpoint, Target information, Elevation bar and Timer each offer only one option.
Elevation barThis is where you can hide buildings and properties which exceed a specifi ed height.
Build subways, elevated railways and roads, or tunnels by adjusting the height.
In the Side menu, Viewpoint, Target information, Elevation bar and Timer each offer only one option.
TimerSelect “On” to pause the game at midnight on the specifi ed day.
Move the camera by hand using the button displayed below it.

20 21
5. Infrastructure - The Basics
5.1. Supplying Materials
Building material factoriesOnce you build material factories, they produce material automatically.
However, you cannot use the material they produce yet - it has to be transported to material warehouses by goods train or truck fi rst.
Building container portsWhen you build a container port, container ships will purchase material from nearby cities and bring it back to the port‘s material warehouse.
They also take unneeded material from the container ports and sell it in nearby cities.
Separate departures
Drag 24h bar to the left [Left・・・]
Drag 24h bar to the right [Right・・・]
Drag 24h bar to the current time [t]
Traffi c light settings
Apply current traffi c light settings to all traffi c lights
[j]
Go to the Options menu, then “Controls” and “Fly mode hot keys” to activate or deactivate the fl y mode.
Activate Fly mode
forwards [w]
backwards [s]
left [a]
right [d]
Direction Mouse location
Change viewpoint Home
Remove viewpoint End
Deactivate Fly mode
Scroll map upwards [e]
Scroll map downwards [x]
Scroll map to the left [s]
Scroll map to the right [d]
Scroll map to the top-left [w]
Scroll map to the top-right [r]
Scroll map to the bottom-left [z]
Scroll map to the bottom-right [c]
Change viewpoint Home
Remove viewpoint End

22 23
Conventional power plants cost a lot to remove. Particularly nuclear power plants and fusion reactors – they cost ten times as much to remove as they do to build.
As wind power stations, swift wind turbines and solar power plants all depend on environmental condi-tions (weather and wind speed) and so do not generate energy consistently, when building them you will need to pay special attention to the difference between power used and power generated.
Conventional power plants Heat power plants Power generation 100,000 kWh
Nuclear power plants Power generation 180,000 kWh
Fusion reactors Power generation 270,000 kWh
Green power plants Wind power plants Max. power gen. 1,000 kWh
Swift wind turbines Max. power gen. 3,000 kWh
Solar power plants Max. power gen. 10,000 kWh
Tidal power plants Power gen. 120,000 kWh
Geothermal power stations Power gen. 250,000 kWh
Building power plantsOpen the Construction menu and click “Power plants”.
Getting material from nearby cities by goods train As soon as you lay tracks to nearby cities, you can send goods trains there to purchase material.
You can also have them take unneeded material to sell it in other cities.
Getting material from nearby cities by truckAs soon as you build roads to nearby cities, you can send trucks there to purchase material.
You can also have them take unneeded material to sell it in other cities.
Getting the material to the construction siteIMPORTANT: You cannot use material while it is on the premises of material factories. You can only use it after you have transported it to material warehouses by goods train or truck. However, material that you purchased from nearby cities and stored in material warehouses is available right away.
The material supply areaYou can use stored material for buildings located within a 600m radius of the material warehouse and at an elevation difference of up to 30m.
You can bring material to and remove it from stations, loading bays and material warehouses within a radius of 400m and at an elevation difference of up to 30m.
5.2. Power supply
If you build power plants on the map you can supply power to all households in the city automatically.
Check “Energy information” in the Reports menu to view the city‘s total energy production and consump-tion.
City suburbs will not develop very well if insuffi cient power is being generated. On the other hand, if too much is generated, the city will develop but the power plants will make a loss.
Power plant types:You can use conventional power plants and green power plants to generate power.
Although conventional power plants generate a lot of power, green power plants generate power in an ever-increasing amount.
Green power plants also boost the city‘s economy.

24 25
Elevated stationsThese are elevated stations that can only be built at least
20m above ground level.
• Types of station building: small and large
• Platform length: 3-10 cars
• Number of platforms (tracks): 1-7 platforms
TerminalsTerminals are stations at the end of a railway line. They may only be built above ground.
• Types of station building: small and large
• Platform length: 3-10 cars
• Number of platforms (tracks): 2-7 platforms
Underground stationSubway stations can only be built below ground.
• Types of station building: small and large
• Platform length: 3-10 cars
• Number of platforms (tracks): two, four and six tracks
Marshalling yardsMarshalling yards are stations for loading and unloading goods trains.
They may only be built above ground.
Please note that although passenger trains may stop at marshalling yards, they will make almost no profit by doing so.
• Types of station building: medium-sized
• Platform length: 3-10 cars
• Number of platforms (tracks): 1-7 platforms
The power plant is built automatically.
To build the station click your desired construction site.
Prior to construction you can specify “Power plant type” and “Building orientation”.
Click 1 to specify the type of power plant.
Click 2 to change the building‘s orientation.
You can also change the building‘s orientation by clicking either the left, right or middle mouse button.
You cannot sell power plants to other companies. Keep in mind that redundant power plants cannot sell the power they generate - so they’ll make a loss.
Locations for building tidal power plantsTidal power plants can only be built in the water. Even if only a part of the plant is on land, construction will not be possible.
6. Infrastructure – The TrainsThe game wasn‘t originally called “A-Train” for nothing - and lots of trains and an excellent infra-structure in terms of rail transport are the ultimate key to the success of “Train Giant”. Not just because trains are the most profitable industry (if properly created and financially managed), but they‘re also the “engine” behind the settlement of commercial, industrial and residential areas along the connecting routes.
6.1. Stations
There are different types of stations. Which one you choose will depend on its location and purpose.
Stations at ground level
These are stations that can only be built above ground.
• Types of station building: small, medium-sized and large
• Platform length: 3-10 cars
• Number of platforms (tracks): 1-7 platforms
26 27
Building a tunnelTunnels will be constructed automatically if you lay level tracks across mountains.
However, if inclines are gentle, tunnels may not be built in all cases.
Connecting a nearby cityIf you build tracks which extend beyond the edge of the map, they will connect automatically to the nearest city off the map. Once a nearby city is connected by rail, you can operate trains to and from it.
You can connect nearby cities via level and elevated tracks as tracks that cross bridges. However, you cannot connect them via underground lines.
Removing tracksOpen the Tracks menu and click “Track” and “Remove”. Click the track you wish to remove, and it will be removed.
Using hot keysBy pressing the space bar, you’ll switch to the “Remove All” mode - here you can remove buildings, tracks, roads, trains and buses with just one click (only active while holding down Shift). Click the track in question and it will be removed.
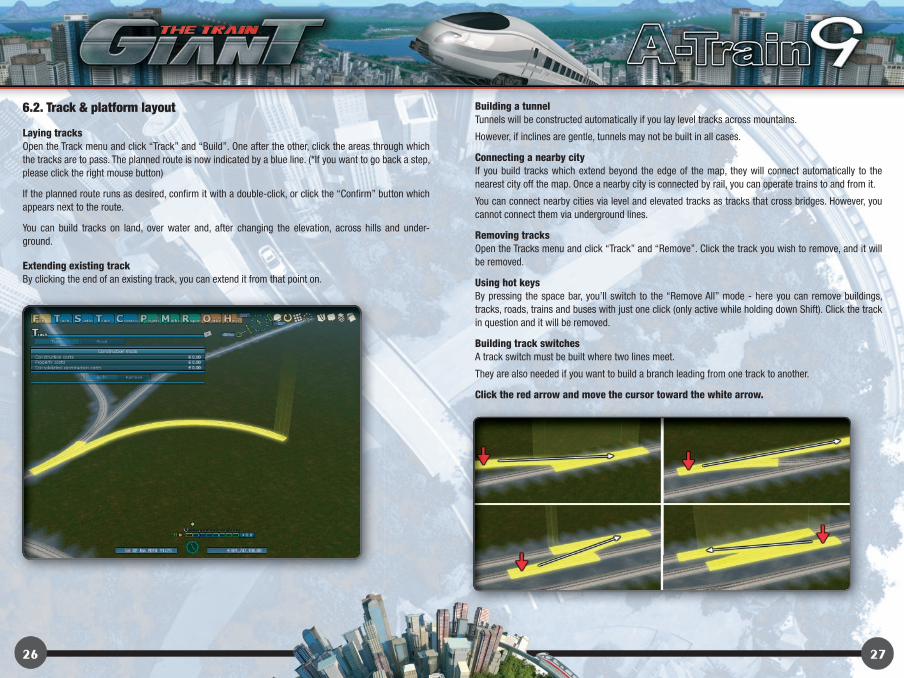
Building track switchesA track switch must be built where two lines meet.
They are also needed if you want to build a branch leading from one track to another.
Click the red arrow and move the cursor toward the white arrow.
6.2. Track & platform layout
Laying tracksOpen the Track menu and click “Track” and “Build”. One after the other, click the areas through which the tracks are to pass. The planned route is now indicated by a blue line. (*If you want to go back a step, please click the right mouse button)
If the planned route runs as desired, confi rm it with a double-click, or click the “Confi rm” button which appears next to the route.
You can build tracks on land, over water and, after changing the elevation, across hills and under-ground.
Extending existing trackBy clicking the end of an existing track, you can extend it from that point on.

28 29
6.3. The Trains
There are basically two types of trains: passenger trains and goods trains.
Passenger trains transport people and goods trains transport material.
Passenger trains differ signifi cantly from one another in the maximum number of people they can trans-port.
Passenger trains Commuter train Max. number of passengers: 200%
High-speed commuter train Max. number of passengers: 180%
Passenger train Max. number of passengers: 160%
High-speed train Max. number of passengers: 140%
Express train Max. number of passengers: 120%
Super express train Max. number of passengers: 110%
Subway Max. number of passengers: 200%
Goods trains Goods train -
Express goods train -
Building an elevated railwayTo build an elevated railway, use the Elevation bar to specify a track‘s elevation, starting at ground level (000).
A ramp will be built automatically if you change the eleva-tion of a track while building it, or if you connect the track to another track at a different elevation.
Using the Elevation barTo open the Elevation bar, access the sub-menu in the top right corner of the screen and click the second icon to the right.
Using hot keysYou can change the elevation of a line by turning the mouse wheel while holding down the CTRL key. If you extend an elevated railway, construction will continue as if you were using the Elevation bar.
Laying track below groundTo build a subway, you can specify the track‘s depth in the Elevation bar, starting at ground level (000).
A ramp will be built automatically if you change the elevation of a track while building it, or if you connect the track to another track at a different elevation.
Using the Elevation barTo open the Elevation bar, access the sub-menu in the top right corner of the screen and click the second icon to the right.
port.

30 31
Removing trainsOpen the Trains menu and click “Trains”. A list of trains will now appear. Choose the train you wish to remove and click “Remove”.
Selling trainsOpen the Trains menu and click “Trains”. A list of trains will now appear. Choose the train you wish to sell and click “Sell”.
A list of trains will now appear. Choose the train you wish to sell and click “Confi rm sale”. The selected train will now be sold. However, you can only sell trains which are not currently in use. If you wish to sell trains which are in use, please take them out of service before doing so.
Pulling and pushing powerSteam engines, goods trains and some of the express trains pulled by a locomotive are a lot slower when pushing than when pulling.
About the number of trains running at one timeThe number of trains that you can run at one time depends on the map. You can only specify the number of trains within the map‘s limits. Your aim is to accumulate 100 billion Euro, at which amount you win the map.
However, when creating a map you can increase the number of trains that you can run at one time by entering the Options menu, going to “Create Map” and then clicking “Increase max. number of vehicles”.
Placing trainsOpen the Trains menu and click “Trains”. A list of trains will now appear. Select the train you wish to place, then click “Place” or double-click the box.
Now place the train by moving the mouse over the track where you want to place it and left-click (*the train will be marked blue if it can be placed).
Changing a train‘s orientationWhen setting up a train, you can change its orientation and direction.
1 Click “Forwards” or “Backwards” to change the train‘s orientation.
2 Click “Reverse” to change the direction in which it travels.
Naming a train that you ownNames for trains you own can be generated automatically, based on their routes.
If you click “Show names”, the display in the vehicle box will switch to display names.
You can now edit a name by clicking it.

32 33
�• Individual departure times: You can defi ne all departure times any way you like (・this option is only available if you checked the “Apply individual departure times” box)
Departure directionThe direction from which a train enters a station determines the direction in which it will leave.
• Straight ahead: The trains will continue in the same direction.
• Reverse: The train will reverse and return the way it came.
The same settings are applied to all trains when they fi rst go into service.
Should you wish to change a train‘s timetable, or create a more detailed one, open the “Options” menu, go to “Timetables” and activate “Set detailed timetables”.
Confi guration of a track switchYou can set the track switches in “Confi gure track switch”.
Confi guring a track switchWhen a train approaches a track switch, you can specify the direction in which it will proceed.
• Straight ahead: The train stays on the line.
• Branch off: The train switches to a different line.
The same settings are applied to all trains when they fi rst go into service.
Should you wish to change a train‘s timetable, or create a more detailed one, open the “Options” menu, go to “Timetables” and activate “Set detailed timetables”.
6.4. Creating a timetable from a station or track switch
Confi guring a stationYou can set up timetables for stations either via the “Direction of departure” or the “Operation mode”.
Operating modeThe train that arrives at a station determines the settings for the next departure.
�• Stop: Use this slider to set the amount of time a train will wait at the station.
�• Time of departure: Use this slider to set the train‘s time of departure. You can also specify the period after which the next train is to leave.
�• Passing through: The train will not stop at the station.
�• Waiting for arrivals: The train will leave after another train has arrived at another platform.
�• Wait for train coming from the opposite direction: The train will leave only after a train coming from the opposite direction has passed through (wait for arrival and departure).
• Wait for the overtaking train: The train will leave only after a train going in the same direction has passed (wait for its arrival and departure).
32

34 35
6.5. Timetable assistant
Using the Timetable assistantOpen the Trains menu and click “Trains”. A list of trains will now appear. Select a train that is en route and click “Timetable assistant”. This opens the timetable assistant.
You can use the timetable assistant to create timetables for stations and track switches that are adjusted to the trains‘ times.
Once a train in the timetable assistant arrives at stations or track switches, the Timetable assistant menu will open for that station or switch. Click “Continue” if you wish to continue working with the timetable assistant after confi guring the settings, otherwise click “Close”.
If you wish to Close the timetable assistant while the train is moving, click “Close timetable assistant”.
Applying train timetables to other trainsIf you activated “Settings for trains, buses and trucks” in “Timetables” in the Options menu, you can apply these timetables to other trains.
Defi ning departure times at stations
When defi ning departure times for stations, you can set “First departure”, “Interval until next departure” and “End of service”.
If the end of service has been set prior to the fi rst departure, intervals will be set to exceed midnight.
Important information on goods trainsLoading and unloading material requires a certain amount of time. If the stopover interval at the station is too short, the train will leave, even though it has not been properly loaded or unloaded.
Defi ning departure times at stations

36 37
Configuring one-minute intervals with the mouse wheel If you activate this function and apply it to stations and track switches, the smallest interval will be set at one minute. You can then use the mouse wheel to specify the intervals one minute at a time. If it is deactivated, then the smallest interval will be 5 minutes.
Configuring departure times at stations using “Individual departure times”If you have activated “Apply individual departure times” in “Timetables” in the Options menu, “Individual departure times” will be added in the Operation mode.
Once you have activated individual departure times, you can define all departure times any way you like.
You will also be able to specify the direction of departure for each individual time of departure (・if (in the Options menu) you also activated “Passenger and cargo settings” in “Timetables”, you can specify individual settings for passengers and cargo).
Detailed track switch settingsActivate the switch at the bottom (indicates “On”) if you want to create more detailed timetables for track switches (*the other switches do not affect the settings for track switch timetables).
Settings for trains, buses and trucksIf you activate this function, you can assign the settings of stations and track switches to each individual train. If it is deactivated and “Branch off” is specified, all trains will branch off at that point.
Configure track switch settingsIf you activate this function, you can specify alternate times for continuing or branching off at track switches. If it is deactivated and branching off has been specified, “Branch off” will usually be configured that way for 24 hours.
Configure one-minute intervals with the mouse wheelIf you activate this function and apply it to stations and track switches, the smallest interval will be set at one minute. You can then use the mouse wheel to specify the intervals one minute at a time. If it is deactivated, then the smallest interval will be 5 minutes.
If you apply these settings to track switches, you must specify the times in the track switch settings.
Go to the Trains menu and click “Copy” to copy all timetables defined for the trains on the list to the clipboard.
If you now click “Insert”, the timetables you copied previously will be taken from the clipboard and applied to the train timetables (・Click “Cancel” if you want to cancel copying).
If you wish to edit existing timetables for trains, click “Edit”.
6.6. Detailed timetables
Creating detailed timetables
You can create detailed timetables by opening the Options menu and activating “Timetables” and “Set detailed timetables”.
Detailed station settingsActivate the switch at the bottom (indicates “On“) if you want to create more detailed timetables for stations (*the other switches do not affect the settings for station timetables)
Settings for trains, buses and trucksIf you activate this function, you can assign the settings of stations and track switches to each individual train. If it is deactivated, the default setting is “5 min. stopover” and all trains arriving at that station will leave after waiting for 5 minutes.
Platform settingsIf you activate this function, you can assign individual settings to each platform of each station.
If you deactivate it, the default setting is “5 min. stopover“ and will apply for all platforms at that station.
Configure daily timetablesIf you activate this function, you can apply the timetable settings of stations and track switches to particular days (*no service other than on the day specified). If this function is deactivated and “5 min. stopover“ is configured, trains will wait at this station for 5 minutes each day.
Passenger and cargo settingsIf you activate this function, you can specify intervals for this station at which passengers can get on or off trains (or cargo is loaded or unloaded). If it is deactivated, intervals for boarding or disembarking from trains, or loading and unloading trains will be determined by default.
38 39
If the function “Confi gure track switch settings” is activated, you can specify times for branching off at track switches.
If the time for branching off ends prior to the time branching off is confi gured, intervals will be set to exceed midnight.
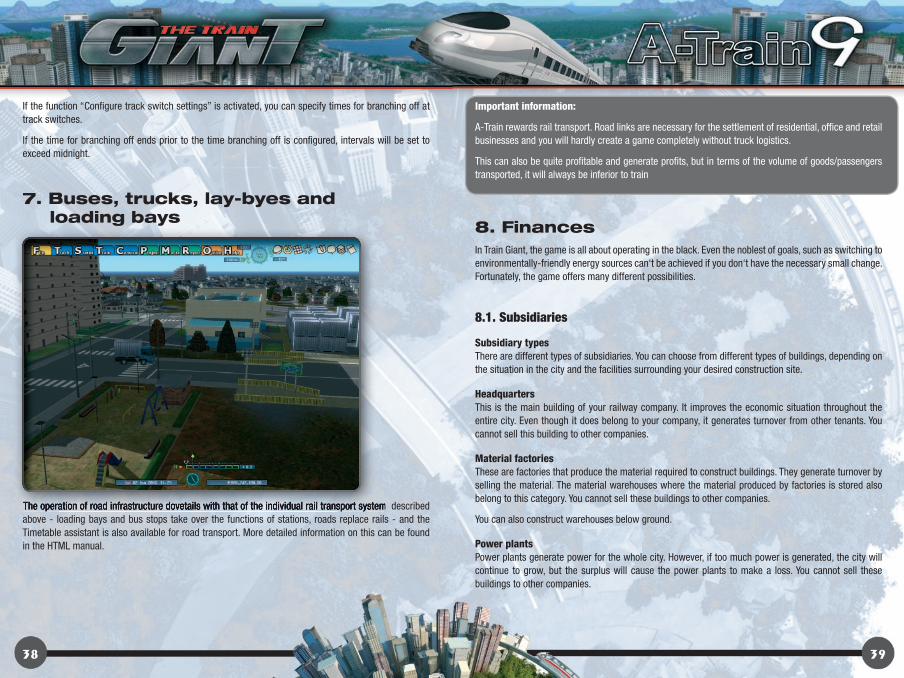
7. Buses, trucks, lay-byes and loading bays
The operation of road infrastructure dovetails with that of the individual rail transport system described above - loading bays and bus stops take over the functions of stations, roads replace rails - and the Timetable assistant is also available for road transport. More detailed information on this can be found in the HTML manual.
The operation of road infrastructure dovetails with that of the individual rail transport system described
Important information:
A-Train rewards rail transport. Road links are necessary for the settlement of residential, offi ce and retail businesses and you will hardly create a game completely without truck logistics.
This can also be quite profi table and generate profi ts, but in terms of the volume of goods/passengers transported, it will always be inferior to train
8. FinancesIn Train Giant, the game is all about operating in the black. Even the noblest of goals, such as switching to environmentally-friendly energy sources can‘t be achieved if you don‘t have the necessary small change. Fortunately, the game offers many different possibilities.
8.1. Subsidiaries
Subsidiary typesThere are different types of subsidiaries. You can choose from different types of buildings, depending on the situation in the city and the facilities surrounding your desired construction site.
HeadquartersThis is the main building of your railway company. It improves the economic situation throughout the entire city. Even though it does belong to your company, it generates turnover from other tenants. You cannot sell this building to other companies.
Material factoriesThese are factories that produce the material required to construct buildings. They generate turnover by selling the material. The material warehouses where the material produced by factories is stored also belong to this category. You cannot sell these buildings to other companies.
You can also construct warehouses below ground.
Power plantsPower plants generate power for the whole city. However, if too much power is generated, the city will continue to grow, but the surplus will cause the power plants to make a loss. You cannot sell these buildings to other companies.

40 41
Leisure facilitiesThese buildings increase the number of leisure activities in the city.
Sports facilitiesThese buildings increase the number of leisure activities in the city.
Cultural centersThese buildings increase the number of cultural activities in the city.
Manufacturing plantsThese buildings increase the number of manufacturing plants in the city.
Historic buildingsThese buildings increase the number of cultural activities in the city. They serve to represent a city, but they require a lot of money and material to build.
HarboursPorts and helicopter pads generate income through transporting people by passenger ships and heli-copters. Container ports generate income through container ships that sail to nearby cities to buy and sell material.
You cannot sell these buildings to other companies.You can build up to 4 ports, container ports and helicopter pads on the map.
Public buildingsThese buildings speed up a city‘s growth. Although your company fi nances their construction, they do not generate turnover and are not considered to be subsidiaries. You cannot sell these buildings to other companies either.
Subsidiary typesOpen the Construction menu and click “Build”. When you click your desired construction site, the sub-sidiary will be built. You can build subsidiaries on level ground, or on gentle slopes by using stilts. Use the arrow keys to rotate.
Material requirementsSubsidiaries require capital and material to construct. If you do not have enough material, you will need to produce it in a factory or get it from a port, then transport it to a warehouse near the construction site by goods train or truck.
Apartment buildingsThese buildings affect how a city‘s population grows and increase the number of apartments in the city.
ShopsThese buildings increase the number of businesses in the city.
HotelsThese buildings increase the number of businesses in the city.
Offi ce buildingsThese buildings increase the number of companies in the city.
SkyscrapersThese buildings increase the number of companies in the city. Multi-storey buildings and skyscrapers require a lot of money and material to build. They also take a long time to complete - and they don’t generate any turnover between the start of construction and completion.

42 43
Tip - “Black Game”:If there are several profi table subsidiaries in an area in which you control the infrastructure, you can cut off the area from the infrastructure (close down railway stations, etc), thereby drastically reducing its value - then buy the buildings back cheaply and restore the infrastructure... nasty, but effective!
Using the Market menuOpen the Market menu and click “Real estate”. Select the subsidiary for sale and click “Sell building”. The subsidiary will now be sold.
8.2. Large projects
Large-scale projects trigger “Achievements”; they are also prestige projects and cost vast sums of money. However - and this is underestimated by many players - they can also make a lot of profi t for you A golf course in a busy residential and business area can be a real gold mine, for instance.
Likewise, a busy railway museum will continuously ring the cash register...
You can fi nd out exactly how much material is required from the lists of subsidiaries in the Construction menu. Really elaborate subsidiaries may well require more material than is stored in a large warehouse. In this case, two or more well-stocked warehouses must be built in the catchment area.
Land priceConstruction costs incurred when building are not “costs for purchasing land”, but rather “costs for using the land”. Careful: By removing a building you also waive any right to use the property (i.e. it is returned without compensation).
Removing subsidiariesOpen the Construction menu and click “Remove”. Click the subsidiary you wish to remove and it will be removed.
If you wish to remove a subsidiary belonging to another company, you can only do so after purchasing that company. This is why doing so costs much more than when removing your own subsidiaries.
Direct removalClick one of your subsidiaries on the map to see how it is performing. If you click “Remove” in this detailed overview, the subsidiary will be removed.
If you want to remove a subsidiary belonging to another company, you will have to buy it fi rst.
To do so, click “Buy and remove”.
Buying subsidiariesClick a subsidiary belonging to another company on the map to see how it is performing.
If you click “Buy“ in this detailed overview, the subsidiary will be purchased.
Selling subsidiariesClick one of your subsidiaries on the map to see how it is performing. If you click “Sell“ in this detailed overview, the subsidiary will be sold.
After several years, you can sell subsidiaries built on sites which you have developed intensively in sparsely populated areas - and sell them at prices many times more than what they cost you. This is one of the most profi table trading opportunities.
Likewise, a busy railway museum will continuously ring the cash register...
44 45
If you own shares in successful companies, they will pay out an annual dividend on June 1 each year.
Economic climateOpen the Market menu and activate the “Economy graph” to view a graph of the economy in your cities.
Selling sharesOpen the Market menu, click “Stock market” and “Sell shares”. Select your desired industry and brand and click “Sell shares” to sell the shares of the company you chose. “Sell shares” does not mean that the shares are actually sold - they will simply be offered on the market. They are only sold when someone buys them.
In addition, the shares are sold at the share price which is current at the time a buyer purchased them (meaning when they are actually sold).
Click “Cancel” if you want to cancel the sale.
8.5. Credit
The last economic crisis showed that loans are a double-edged sword. Nevertheless, it may be necessary to raise capital. However, don‘t do this if you‘re not 100% sure that you can repay the interest and the loan itself.
Borrowing capital from the bankOpen the Market menu and click “Bank” and “Borrow capital”. Select the amount of capital you wish to borrow, and the loan term. Then click “Take loan” to borrow the capital.
Your credit line is up to 50% of your company‘s total capital. Interest increases with the duration of the credit term.
Repaying the bank loanOpen the Market menu, click “Bank” and “Repay”. Select the loan you wish to repay from the list. Then click “Repay loan” to repay the loan.
The repayment amount will also be deducted from your capital automatically when the repayment date (specifi ed when you took out the loan) is reached.
The following large projects are available:Golf courseRailway museumInternational airportAttracting a Shinkansen stationAttracting a maglev station
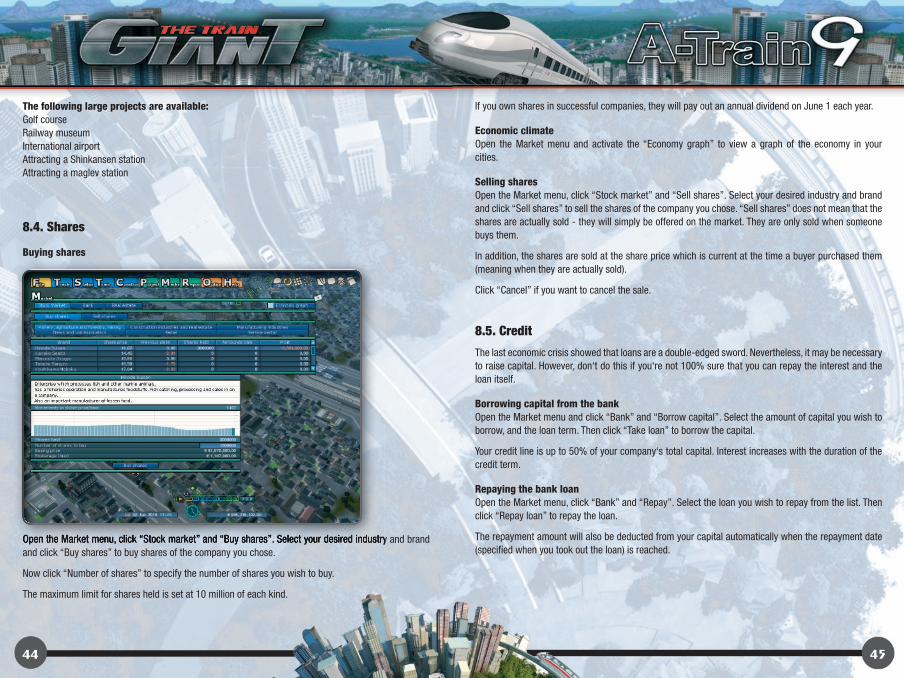
8.4. Shares
Buying shares
Open the Market menu, click “Stock market” and “Buy shares”. Select your desired industry and brand and click “Buy shares” to buy shares of the company you chose.
Now click “Number of shares” to specify the number of shares you wish to buy.
The maximum limit for shares held is set at 10 million of each kind.
Open the Market menu, click “Stock market” and “Buy shares”. Select your desired industry and brand

46 47
Select the fi rst map (above left, it should be already selected by default) and start the game (bottom right button). Now the game will load again.
Read the map information - it basically contains guidelines and useful tips.
You can stick to the proposals (which will accelerate your success) or fi nd more creative ways of doing things!
Use the Time bar to take a break and get an overview of things.
Ah-ha! As you can see, one of the places on the map is NOT connected to the rest of the cities.
This will be our fi rst major task.
The fi rst railway route
We‘ve found a good site for a station at the western end of the suburb.Using Track -> Street -> remove, we can eliminate unwanted stretches of road - and if you wish, the program will automatically remove all objects that interfere with your progress (except for other parties‘ buildings).
9. The fi rst steps to successIntroduction
Welcome to the English version of A-Train 9, which we are publishing as “Train Giant”.
An HTML manual is also included - it tackles the control and operation of the game and contains the very fi rst detailed steps of the fi rst mission map. Two things fi rst:
1. We recommend that you play the game in FULL SCREEN mode in your respective native screen resolu-tion.
2. On some systems clipping errors may occur at the highest levels of detail - in this case, please change the settings to “medium”.
Both can be easily set in the Confi g program.
Starting the game
After double-clicking the -exe fi le, the game will load. At this point, we would ask you to be patient - the program hasn‘t stopped working, the load button has just been taken over by Windows. When loading has fi nished, you‘ll see the Start menu.
1

48 49
Now let‘s select the menu point “Track - build>“ and click the end of the station track in the city - from there take the track in the direction of the suburb.
At the end piece, make the connection and “confi rm”. The route is now fi nished. Only the train’s missing!
In the Station menu, choose the “medium-sized station” (Careful - this can only take small and medium-sized trains - A9 Commuter or similar sets will simply run back and forth, costing a lot of money) and place it in the catchment sector of the residential area.
Now we do the same thing again in the “big city“ on the map. And it‘s time to connect the tracks!
In the Station menu, choose the “medium-sized station” (Careful - this can only take small and medium- Now let‘s select the menu point “Track - build>“ and click the end of the station track in the city - from
2
3
4
5

50 51
Congratulations! With any luck, your fi rst line will soon be earning handsome profi ts!
And we wish you many more exciting and successful experiences in A-Train - The Train Giant!
Use the “Trains” menu and click a blank button to access the “Supermarket for trains”, where we can buy our sets. The A9 Supercommuter would be the perfect commuter train, but our stations are too small - the U set or the AR3 will have to do for starters. As soon as you purchase a train, you must place it.
Here we move it to the desired track and change or confi rm the start direction. As soon as the train has been placed, the fi rst route segment is opened for business! You can either follow the train in the 3rd person perspective or travel with it in the Ego perspective.
Use the “Trains” menu and click a blank button to access the “Supermarket for trains”, where we can buy Congratulations! With any luck, your fi rst line will soon be earning handsome profi ts!
Here we move it to the desired track and change or confi rm the start direction. As soon as the train has
6
7
8

52 53
10. The special missionsAs a special “extra” which isn‘t included in the Japanese version of A-Train 9, “Train Giant” includes several special missions created specifi cally for the worldwide release. These missions possess different degrees of diffi culty and complexity.
Start the special missions by clicking “Import self-created game” in the main menu, then selecting your desired scenario.
Here are two of these scenarios:
10.1. Greece is bankrupt!
Idea: Ivan Ertlov & Robin GibbelsMap & Game Design: Ivan Ertlov
The largest and most complex scenario of the whole “Train Giant” game. As manager of the European Central Bank, you take over all of Greece together with with ALL of its buildings
and tracks. Unfortunately, your budget is limited and almost every operation, transport service and public institution is totally ineffi cient. You could even say it’s a lost cause...
Fortunately, the Chinese are in Europe, looking for projects to buy into for one of their state funds.
Sell specifi c loss-making residential and offi ce buildings, industrial and recreational parks and one or other of your public institutions - this will get you capital to carry out a complete renovation.
And lucrative foreign trade is also possible via the northwest link to Albania and Macedonia.
Start the special missions by clicking “Import self-created game” in the main menu, then selecting your The largest and most complex scenario of the whole “Train Giant” game. As manager of the European

54 55
11. The EditorWhen you‘ve become the economic and logistical champion of all classes and you can master every one of the game’s scenarios, you can start developing your own scenarios!
The Editor is the tool with which the developers worked - so it‘s a very powerful instrument, but one which requires a learning curve - in other words, take your time to learn all its ins and outs!
11.1. Starting the Editor
In the main menu, click “Create map”, select one of the templates and confi rm with “Import template”.
Here we’ve selected an island map.
10.2. Tyrol - the Sacred Land
Idea, Map & Game Design: tomdotio of http://letssim.net
This map - roughly modelled on the Inn Valley and Innsbruck - takes us to the Austrian mountains, where a connection to the neighbouring valleys already exists. However, the topographical conditions have made this a loss-making operation - unless someone comes along who can optimize the timetable!There are enough unused areas to build a thriving industry, but you could also boost tourism - which way will you go?

56 57
11.3. Saving a map
In the “File” menu, click the “Save an unfi nished map” function and save the map. A game description can also be added here - but this function is actually intended for further editing of the map, before the map is integrated into the gameplay scenario.
11.4. Import custom game
This function - also accessible via “File” - fi nally integrates our “map” into “Train Giant” as a playable scenario. So we should defi nitely enter a short description here and make settings for the starting capital, the starting date AND the level of diffi culty. Alternatively, you can have these specifi ed automatically.
Detailed tutorials on this are available at:
www.letssim.net
11.2. Working with the Editor
In principle, you “work” with the game‘s Construction menu, but with two exceptions:
- neither money nor materials are required for the construction of the buildings and route segments- you also have the topographic Editor - just click “Edit“ in the main menu - here you can edit the entire
landscape, creating objects like mountains, lakes and islands.
We recommend that you really take the time to get into this function‘s workings - because in reshap-ing each of these areas of the Earth, you MUST take care not to create areas that are unsuitable for building. The “Specify elevation” function here is vital.
Using “Specify height”, you can create perfect high plateaus and plains in/on which platforms, tracks and complex buildings can be created - something which would surely cause problems in rugged or hilly terrain.

58 59
Notes

©2012 UIG ENTERTAINMENT GMBH. All rights reserved. Subject to modifications and amendments. All rights reserved. Images © Bruder, © mipan, © arquiplay77, © Scanrail - Fotolia.com. A-Train9 (c) 2010,2012 ARTDINK. All Rights Reserved. (※(c)はマルc表記)©2012 UIG ENTERTAINMENT GMBH. All rights reserved. Subject to modifications and amendments. © mipan, © arquiplay77, © Scanrail - Fotolia.com. A-Train9 (c) 2010,2012 ARTDINK. All Rights Reserved.