Embed Size (px)
Citation preview

Technical Report
External NetApp Storage for Azure Stack Solution Deployment
Mark Beaupre, NetApp
November 2019 | TR-4809-DEPLOY
Abstract
This technical report describes how to connect Microsoft Azure Stack to NetApp® storage
through IP-based storage protocols, associated use cases, and deployment guidance.
In partnership with

2 External NetApp Storage for Azure Stack © 2019 NetApp, Inc. All rights reserved.
TABLE OF CONTENTS
1 Solution Overview ................................................................................................................................ 3
1.1 Solution Technology .......................................................................................................................................3
1.2 Use Case Summary ........................................................................................................................................4
2 Increase Azure Stack Block Storage Capacity Through iSCSI ........................................................ 4
2.1 Technology Requirements ..............................................................................................................................4
2.2 Deployment Procedures .................................................................................................................................5
3 Increase Azure Stack File Storage Capacity Through NFS ............................................................ 13
3.1 Technology Requirements ............................................................................................................................ 13
3.2 Deployment Procedures ............................................................................................................................... 14
4 Increase Azure Stack File Storage Capacity Through SMB ........................................................... 17
4.1 Technology Requirements ............................................................................................................................ 17
4.2 Deployment Procedures ............................................................................................................................... 18
5 Conclusion .......................................................................................................................................... 21
Where to Find Additional Information .................................................................................................... 21
Version History ......................................................................................................................................... 22
LIST OF TABLES
Table 1) Hardware requirements for increasing Azure Stack block storage capacity through iSCSI. .............................4
Table 2) Software requirements for increasing Azure Stack block storage capacity through iSCSI. ..............................5
Table 3) Hardware requirements for increasing Azure Stack file storage capacity through NFS. ................................ 13
Table 4) Software requirements for increasing Azure Stack storage capacity through NFS. ....................................... 14
Table 5) Hardware requirements for increasing Azure Stack storage capacity through SMB. ..................................... 17
Table 6) Software requirements for increasing Azure Stack storage capacity through SMB. ....................................... 18
LIST OF FIGURES
Figure 1) External NetApp storage for Azure Stack connectivity. ...................................................................................4

3 External NetApp Storage for Azure Stack © 2019 NetApp, Inc. All rights reserved.
1 Solution Overview
Microsoft Azure Stack allows customers to consume Azure infrastructure-as-a-service (IaaS), platform-as-
a-service (PaaS), identity, and Azure Marketplace content by using purpose-built integrated systems
deployed on customer premises. Because Azure and Azure Stack use the same API, customers have
familiar tools, application patterns, automation capabilities, deployment and configuration, and operations.
Therefore, investments in people, processes, and teams are transferrable between Azure and Azure
Stack.
Azure Stack is a purpose-built integrated system; therefore, customers cannot add internal storage
capacity independent of compute. To add storage capacity to Azure Stack, customers can connect
NetApp® storage to Azure Stack IaaS compute by using NFS, SMB, and iSCSI storage protocols.
After Azure Stack customers connect to external NetApp storage, they benefit from the availability,
security, and data management features provided by NetApp storage. NetApp data management features
include NetApp SnapCenter® technology to support application-integrated data protection, NetApp
FlexClone® technology to support application development and test workflows, and NetApp SnapMirror®
software for disaster recovery.
1.1 Solution Technology
The external NetApp storage for Azure Stack solution consists of one or more Azure Stack integrated
systems and one or more NetApp storage systems connected through the TCP/IP network protocol and
deployed in a customer on-premises data center.
Windows and Linux Virtual machines (VMs) deployed into an Azure Stack Virtual Network (VNet) are
configured with a storage protocol client (such as an iSCSI software initiator, SMB client, or NFS client)
and a public IP address on each VM network interface.
The VM public IP address is configured with an RFC 1918 IP address assigned from the data center
network. Network address translation (NAT) is used to support network connectivity between the Azure
VNet and the data center network where the NetApp storage is deployed.
NetApp AFF and FAS systems support storage resource connectivity through iSCSI, NFSv3, v4.x, and
SMB3 storage protocols. Customers can use NetApp storage management through a GUI, a CLI, or APIs
to create and configure the NetApp storage resources that are connected to the Azure Stack VMs.
Examples are network resources, NetApp FlexVol® volumes, protocols, and data protection resources.
NetApp storage management tools include:
• NetApp PowerShell Toolkit
• NetApp ONTAP® System Manager (formerly NetApp OnCommand® System Manager)
• NetApp ONTAP CLI
• NetApp ONTAP REST API (ONTAP 9.6 or later)
• NetApp management software development kit (SDK)
• Ansible modules for NetApp ONTAP software
Customers can run the NetApp storage management tools from Azure Stack VMs or from other data
center compute resources that have network access to the NetApp storage.
Figure 1 shows the technical components of the solution.

4 External NetApp Storage for Azure Stack © 2019 NetApp, Inc. All rights reserved.
Figure 1) External NetApp storage for Azure Stack connectivity.
1.2 Use Case Summary
The external NetApp storage for Azure Stack solution applies to the following use cases:
• Increase Azure Stack block storage capacity through iSCSI
• Increase Azure Stack file storage capacity through NFS
• Increase Azure Stack file storage capacity through SMB
These use cases are not an exhaustive list. After Azure Stack customers connect to external NetApp
storage, they benefit from the availability, security, and data management features provided by NetApp
storage. NetApp data management features include SnapCenter technology to support application-
integrated data protection, FlexClone technology to support application development and test workflows,
and SnapMirror software for disaster recovery.
2 Increase Azure Stack Block Storage Capacity Through iSCSI
To add storage capacity to Azure Stack, customers can connect NetApp storage to Azure Stack IaaS
compute by using iSCSI storage protocols.
2.1 Technology Requirements
Hardware Requirements
Table 1 lists the hardware components that are required to implement the use case.
Table 1) Hardware requirements for increasing Azure Stack block storage capacity through iSCSI.
Hardware Quantity
Azure Stack system One or more
NetApp AFF or FAS system One or more
Top-of-rack network switch (Azure Stack) One

5 External NetApp Storage for Azure Stack © 2019 NetApp, Inc. All rights reserved.
Hardware Quantity
Border leaf network switch (Azure Stack) One
Top-of-rack network switch (NetApp) One
Border leaf network switch (NetApp) One
Software Requirements
Table 2 lists the software components that are required to implement the use case.
Table 2) Software requirements for increasing Azure Stack block storage capacity through iSCSI.
Software Version
NetApp ONTAP software Version 9.5 or later
NetApp ONTAP iSCSI license Not applicable
Windows Server OS Windows Server 2012R2 or later
Linux OS Distributions available in the Azure Marketplace: Red Hat, SUSE, CentOS, Debian, Canonical Ubuntu, and CoreOS
Microsoft Multipath I/O (MPIO) software (iSCSI) Windows Server MPIO feature Linux Device Mapper Multipathing (DM-Multipath) feature
2.2 Deployment Procedures
The scope of this deployment procedure does not include the installation of the Azure Stack system, the
NetApp storage, or the configuration of the network switches.
This document assumes that you understand Azure Stack administration, network administration, and
NetApp storage administration.
Note: For Linux VMs, refer to the distribution documentation for specific deployment steps.
Deploying the solution involves the following tasks:
• Creating an Azure Stack Windows VM
• Enabling the iSCSI service and installing MPIO on the Azure Stack Windows VM
• Creating and configuring the NetApp storage virtual machine (SVM) for iSCSI
• Creating an iSCSI LUN and mapping the LUN to the Azure Stack Windows VM
• Creating iSCSI sessions and configuring MPIO on the Azure Stack Windows VM
• Mounting an iSCSI LUN and formatting the LUN file system
Note: Unless otherwise noted, this deployment procedure uses the Azure Stack portal and the ONTAP System Manager GUI.
Create an Azure Stack Windows VM
To create an Azure Stack Windows VM, complete the following steps:
1. Make sure that an Azure VNet and subnet have been created in Azure Stack.

6 External NetApp Storage for Azure Stack © 2019 NetApp, Inc. All rights reserved.
Note: The Classless Inter-Domain Routing (CIDR) network address space of the virtual network must not conflict or overlap with the CIDR network address space used by the NetApp storage.
2. On the Azure Stack VM dashboard, click Add to add a VM.
3. Select a Windows Server image from the Azure Marketplace content (for example, Windows Server 2016 Datacenter). Click Create.
4. In the Create Virtual Machine blade, provide the following information:
− Name
− VM Disk Type (Standard HDD or Premium HDD)
− Username
− Password
− Confirm Password
− Subscription
− Resource Group (use the resource group of the virtual network)
− Location
5. In the Size blade, select a VM size. Click Select.
6. In the Settings blade, provide the following information:
− Availability Set (not required, but can be used in the solution).
− Storage: Use the managed disks.
− Network: Specify the virtual network in the resource group.
− Subnet: Specify the subnet in the virtual network.
− Public IP Address: Create a new public IP address and set the assignment to static. Click OK.
− Network Security Group: Use the default setting of Basic and select the inbound port of RDP 3389.
Note: If you use the Advanced setting for Network Security Group, make sure that the network security group you are manually creating has the correct rules to allow outbound and inbound iSCSI protocol ports.
− Monitoring: Use the default setting for Boot Diagnostics and Guest OS Diagnostics. Although it isn’t required, setting diagnostics on Azure Stack VMs is a good practice.
− Diagnostics Storage Account: Select or create a storage account to store diagnostic logs.
7. In the Summary blade, review the settings for the Windows VM. If everything looks okay, click OK to create the VM.
Enable the iSCSI Service and Install the Multipath I/O Feature on the Azure Stack Windows VM
To install the MPIO feature and enable the iSCSI service on the Windows VM, complete the following
steps:
1. Log in to the Windows VM that you created in the previous deployment task.
2. Open the control panel and click the iSCSI Initiator Control Panel icon.
3. When prompted to start the iSCSI service and configure the service to start automatically, click Yes.
4. Click the iSCSI Initiator Control Panel icon and select the Configuration tab.

7 External NetApp Storage for Azure Stack © 2019 NetApp, Inc. All rights reserved.
5. Document the initiator name.
6. Open the System Manager application and go to Roles and Features.
7. In Roles and Features, select Add Roles and Features from the Tasks menu.
8. In the Add Roles and Features wizard, select the MPIO feature.
9. After the MPIO feature is installed, reboot the Windows VM.
Create and Configure the NetApp SVM for iSCSI
To create and configure the NetApp SVM for iSCSI, complete the following steps:
1. Using a web browser, log in to NetApp ONTAP System Manager.
2. In System Manager, select Storage > SVMs and then click Create.
3. In the Basic SVM Details section of the Storage Virtual Machine (Setup) wizard, provide the following information:
− SVM Name: Enter an SVM name.
− IPSpace: Leave this value as the default or specify a specific IPspace as needed.
− Data Protocols: Select iSCSI.
− Default Language: Use the Default value of C.UTF.8.
− Security Style: This value sets the security style of the root volume of the SVM. The default value of UNIX is recommended for most customers. To determine whether to use NTFS or mixed, refer to the product guides in the ONTAP 9 Documentation Center.
− Root Aggregate: This is the value of the root aggregate where the SVM root volume will be created. Each node in the NetApp cluster will have a root aggregate. Select the root aggregate of the node where the NFS volume will be created.
− Search Domains: This is the value of the DNS domain that the SVM will use.
− Name Servers: This is the value of the DNS servers that the SVM will use.
4. Click Submit & Continue.
5. In the Configure iSCSI Protocol section of the Storage Virtual Machine (Setup) wizard, provide the following information:
− Target Alias: This value sets the iSCSI alias. This value is not required.
− LIFs per Node: One logical interface (LIF) per node is required for availability. However, depending on their requirements, customers can provision up to four LIFs per node.
− Assign IP Address: Select Without a Subnet and set the IP address, netmask, and gateway of the iSCSI network interface.

8 External NetApp Storage for Azure Stack © 2019 NetApp, Inc. All rights reserved.
− Broadcast Domain: You can leave the default value or specify the broadcast domain associated with the IPspace of the SVM.
− Adapter Type: The default value of CNA/NIC will work for most customers.
− Click Review or Modify LIF Configuration (Advanced Settings) to review the iSCSI network interface configuration that will be created on the NetApp storage.
− Document the IP addresses of the iSCSI network interfaces.
− Skip Creating an iSCSI LUN.
− Click Submit & Continue.
6. In the Enter SVM Administrator Details section of the Storage Virtual Machine (Setup) wizard, provide the following information:
− Password: Set the password of the SVM administrator account.
− Confirm Password: Reenter the password of the SVM administrator account.
− Create a New LIF for SVM Management: This field is optional if you plan to use the NetApp cluster management network interface to manage the SVM. The SVM management network interface is useful in a multitenant deployment scenario.
7. Click Submit & Continue.
Create an iSCSI LUN and Map the LUN to Azure Stack Windows VM
To create an iSCSI LUN and map it to an Azure Stack Windows VM, complete the following steps:
1. In System Manager, select Storage > LUNs > Create.
2. In the General Properties section of the Create LUN wizard, provide the following information:
− Name: Enter the name of the LUN.
− Description: (Optional) Provide the description of the LUN.
− Type: Specify the operating system type that will use the LUN. For Windows, select Windows 2008 or later.
− Size: Specify the size of the LUN.
− Space Reserve: Select the default value, which applies the ONTAP space reservation settings to the LUN. For information about space reservation, refer to the product guides in the ONTAP 9 Documentation Center.
3. Click Next.
4. In the LUN Container section of the Create LUN wizard, do the following:
− Select the Create a New Flexible Volume In option.
− Aggregate Name: Specify the aggregate hosting the volume.
− Volume Name: Enter the name of the volume.
− Tiering Policy: Select none. For information about other tier policy settings, refer to the product guides in the ONTAP 9 Documentation Center.
5. Click Next.
6. In the Initiators Mapping section of the Create LUN wizard, click Add Initiator Group.
7. On the General tab of the Create Initiator Group wizard, provide the following information:
− Name: Enter the name of the initiator group.
− Operating System: Specify the operating system that will use the initiator group. For Windows, select Windows.
− Type: Select iSCSI.
− Port Sets: (Optional) Specify the port sets if they are being used.

9 External NetApp Storage for Azure Stack © 2019 NetApp, Inc. All rights reserved.
8. On Initiators tab of the Create Initiator Group wizard, add the initiator by entering the iSCSI Qualified Name (IQN) string of the iSCSI initiator from the VM that will be connected to the LUN.
9. Click Create to create the initiator group. Click OK to acknowledge the creation of the initiator group.
10. In the Initiators Mapping section of the Create LUN wizard, provide the following information:
− Select the Map option next to the initiator group that was just created.
− LUN ID Number: Leave this option blank.
11. Click Next.
12. In the Storage Quality of Service Properties section of the Create LUN wizard, leave the Manage Storage Quality of Service option unselected.
Note: If you want to apply a quality-of-service (QoS) policy, refer to the product guides in the ONTAP 9 Documentation Center.
13. Click Next.
14. Review the flexible volume, initiator group, and LUN settings. Click Next to create the flexible volume, initiator group, and LUN.
15. Click Finish.
16. In System Manager, click Storage > Junction Paths > Mount.
17. In the Mount Volume dialog box, provide the following information:
− Volume Name: Enter the name of the volume created to store the LUN.
− Junction Name: Leave this as the default value.
− Junction Path: Leave this as the default value.
18. Click Mount to mount the volume.
Create iSCSI Sessions and Configure MPIO on the Azure Stack Windows VM
To create iSCSI sessions and configure MPIO on the Azure Stack Windows VM, complete the following
steps:
1. Log in to the Windows VM that you created in the previous deployment task.
2. Open the iSCSI Initiator Control Panel icon.
3. On the Discovery tab, click Discover Portal and enter the IP address of the first iSCSI network interface on the NetApp storage system that was created in the previous deployment task. Click OK.

10 External NetApp Storage for Azure Stack © 2019 NetApp, Inc. All rights reserved.
4. On the Targets tab, select the target that you discovered. Click Connect.
5. Select the Enable Multipath option.
6. Click Advanced and provide the following information:
− Local Adapter: Select Microsoft iSCSI Initiator.
− Initiator IP: Select the IP address of the virtual network interface of the VM.
− Target Portal/IP: Select the IP address of the first NetApp iSCSI network interface.
7. Click OK.
11 External NetApp Storage for Azure Stack © 2019 NetApp, Inc. All rights reserved.
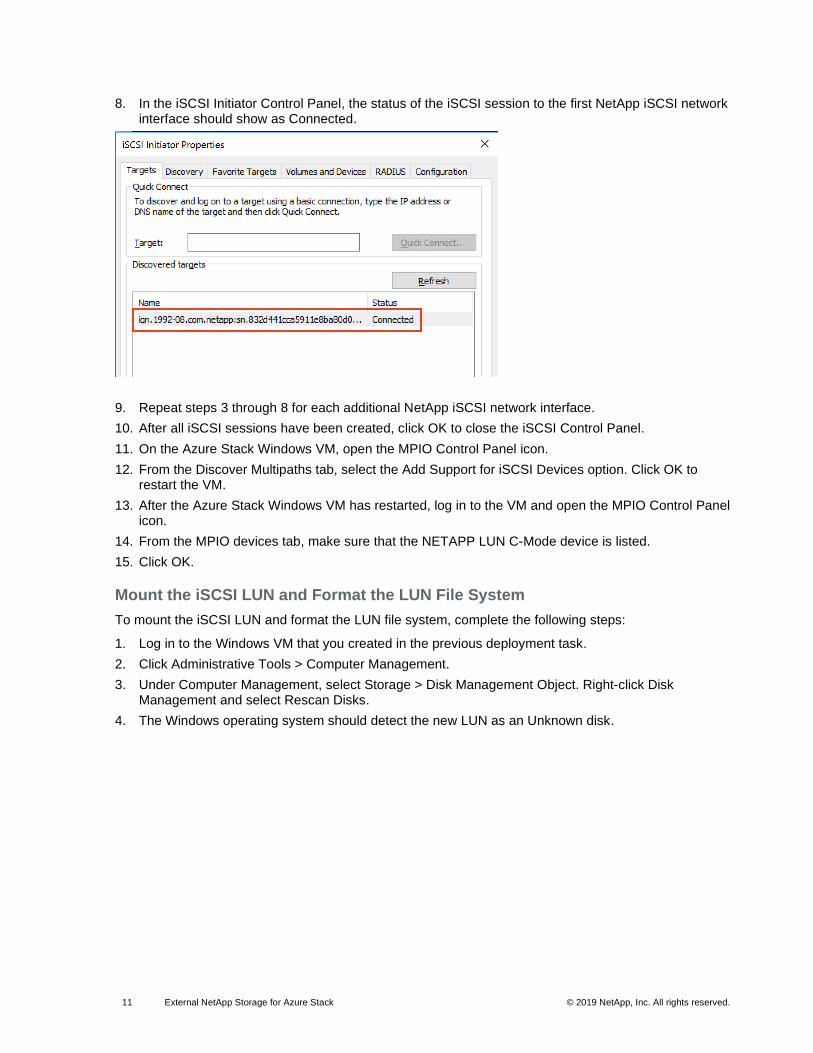
8. In the iSCSI Initiator Control Panel, the status of the iSCSI session to the first NetApp iSCSI network interface should show as Connected.
9. Repeat steps 3 through 8 for each additional NetApp iSCSI network interface.
10. After all iSCSI sessions have been created, click OK to close the iSCSI Control Panel.
11. On the Azure Stack Windows VM, open the MPIO Control Panel icon.
12. From the Discover Multipaths tab, select the Add Support for iSCSI Devices option. Click OK to restart the VM.
13. After the Azure Stack Windows VM has restarted, log in to the VM and open the MPIO Control Panel icon.
14. From the MPIO devices tab, make sure that the NETAPP LUN C-Mode device is listed.
15. Click OK.
Mount the iSCSI LUN and Format the LUN File System
To mount the iSCSI LUN and format the LUN file system, complete the following steps:
1. Log in to the Windows VM that you created in the previous deployment task.
2. Click Administrative Tools > Computer Management.
3. Under Computer Management, select Storage > Disk Management Object. Right-click Disk Management and select Rescan Disks.
4. The Windows operating system should detect the new LUN as an Unknown disk.

12 External NetApp Storage for Azure Stack © 2019 NetApp, Inc. All rights reserved.
5. Right-click the Unknown disk and select Initialize Disk.
6. In the Initialize Disk dialog box, select GPT as the partition type. Click OK.
7. Right-click the Unallocated drive and select New Simple Volume. This action starts the New Simple Volume wizard.

13 External NetApp Storage for Azure Stack © 2019 NetApp, Inc. All rights reserved.
8. In the Specify Volume Size section of the New Simple Volume wizard, accept the default size value. Click Next.
9. In the Assign Drive Letter or Path section of the New Simple Volume wizard, assign a drive letter or mount point. Click Next.
10. In the Format Partition section of the New Simple Volume wizard, do the following:
− Select the Format This Volume with the Following Settings option.
− Volume Label: (Optional) Add a descriptive label for the volume.
− Select the Perform a Quick Format option.
− Leave Enable File and Folder Compression unselected.
11. Click Next.
12. Review the settings for the New Simple Volume wizard. If the settings are correct, click Finish.
13. After the volume format is complete, Windows will mount the file system for use.
3 Increase Azure Stack File Storage Capacity Through NFS
To add storage capacity to Azure Stack, customers can connect NetApp storage to Azure Stack IaaS
compute by using NFS storage protocols.
3.1 Technology Requirements
Hardware Requirements
Table 3 lists the hardware components that are required to implement the use case.
Table 3) Hardware requirements for increasing Azure Stack file storage capacity through NFS.
Hardware Quantity
Azure Stack system One or more
NetApp AFF or FAS system One or more
Top-of-rack network switch (Azure Stack) One
Border leaf network switch (Azure Stack) One
Top-of-rack network switch (NetApp) One
Border leaf network switch (NetApp) One
14 External NetApp Storage for Azure Stack © 2019 NetApp, Inc. All rights reserved.
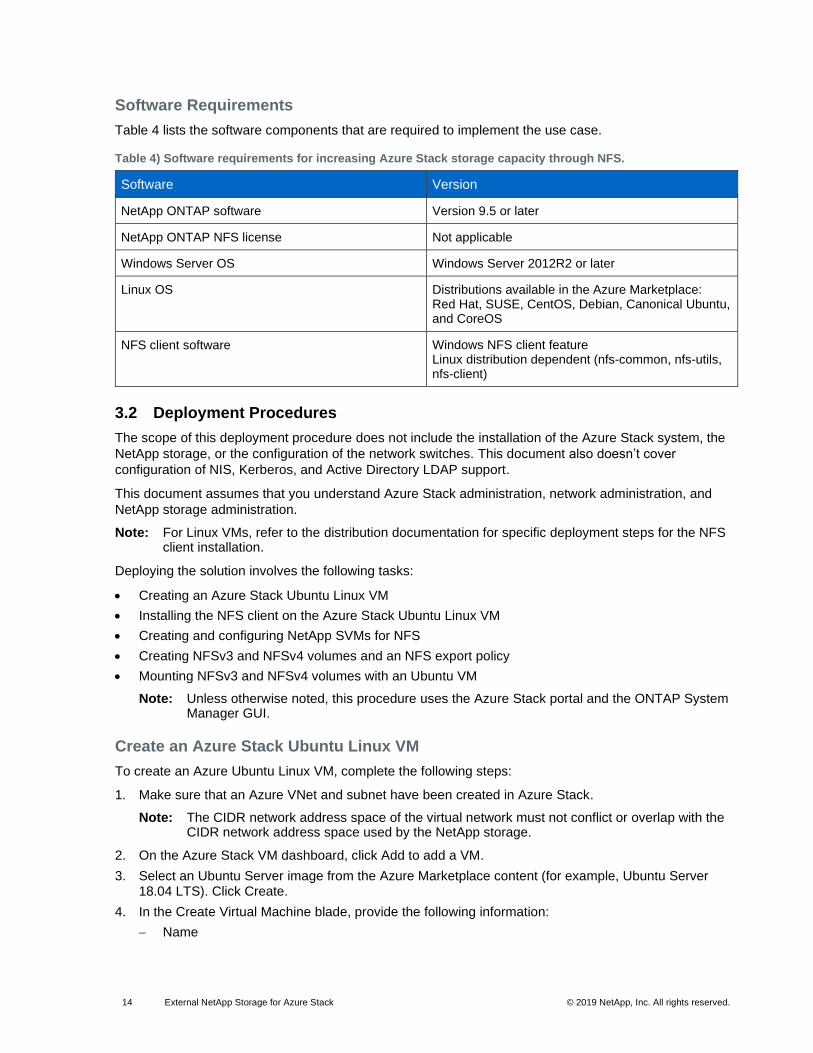
Software Requirements
Table 4 lists the software components that are required to implement the use case.
Table 4) Software requirements for increasing Azure Stack storage capacity through NFS.
Software Version
NetApp ONTAP software Version 9.5 or later
NetApp ONTAP NFS license Not applicable
Windows Server OS Windows Server 2012R2 or later
Linux OS Distributions available in the Azure Marketplace: Red Hat, SUSE, CentOS, Debian, Canonical Ubuntu, and CoreOS
NFS client software Windows NFS client feature Linux distribution dependent (nfs-common, nfs-utils, nfs-client)
3.2 Deployment Procedures
The scope of this deployment procedure does not include the installation of the Azure Stack system, the
NetApp storage, or the configuration of the network switches. This document also doesn’t cover
configuration of NIS, Kerberos, and Active Directory LDAP support.
This document assumes that you understand Azure Stack administration, network administration, and
NetApp storage administration.
Note: For Linux VMs, refer to the distribution documentation for specific deployment steps for the NFS client installation.
Deploying the solution involves the following tasks:
• Creating an Azure Stack Ubuntu Linux VM
• Installing the NFS client on the Azure Stack Ubuntu Linux VM
• Creating and configuring NetApp SVMs for NFS
• Creating NFSv3 and NFSv4 volumes and an NFS export policy
• Mounting NFSv3 and NFSv4 volumes with an Ubuntu VM
Note: Unless otherwise noted, this procedure uses the Azure Stack portal and the ONTAP System Manager GUI.
Create an Azure Stack Ubuntu Linux VM
To create an Azure Ubuntu Linux VM, complete the following steps:
1. Make sure that an Azure VNet and subnet have been created in Azure Stack.
Note: The CIDR network address space of the virtual network must not conflict or overlap with the CIDR network address space used by the NetApp storage.
2. On the Azure Stack VM dashboard, click Add to add a VM.
3. Select an Ubuntu Server image from the Azure Marketplace content (for example, Ubuntu Server 18.04 LTS). Click Create.
4. In the Create Virtual Machine blade, provide the following information:
− Name

15 External NetApp Storage for Azure Stack © 2019 NetApp, Inc. All rights reserved.
− VM Disk Type (Standard HDD or Premium HDD)
− Username
− Password
− Confirm Password
− Subscription
− Resource Group (use the resource group of the virtual network)
− Location
5. In the Size blade, select a VM size. Click Select.
6. In the Settings blade, provide the following information:
− Availability Set (not required, but can be used in the solution).
− Storage: Use managed disks.
− Network: Specify the virtual network in the resource group.
− Subnet: Specify the subnet in the virtual network.
− Public IP Address: Create a new public IP address and set the assignment to static. Click OK.
− Network Security Group: Use the default setting of Basic and select the inbound port of Secure Shell (SSH) 22.
Note: If you use the Advanced setting on Network Security Group, make sure that the network security group you are manually creating has the correct rules to allow outbound and inbound NFS protocol ports.
− Monitoring: Use the default setting for Boot Diagnostics. Although it is not required, setting the diagnostics on a VM is a good practice.
− Diagnostics Storage Account: Select or create a storage account to store diagnostic logs.
7. In the Summary blade, review the settings for the Linux VM. If everything looks okay, click OK to create the VM.
Install an NFS Client on an Azure Stack Ubuntu Linux VM
To install an NFS client on an Ubuntu VM, complete the following steps:
1. Log in to the Ubuntu VM that you created in the previous deployment task.
2. To install the NFS client, run the following command from the SSH session:
sudo apt-get install nfs-common
Create and Configure the NetApp SVM for NFS
To create and configure the NetApp SVM for NFS, complete the following steps:
1. Using a web browser, log in to NetApp ONTAP System Manager.
2. In System Manager, select Storage > SVMs and then click Create.
3. In the Storage Virtual Machine (Setup) wizard, provide the following information:
− SVM Name: Enter an SVM name.
− IPSpace: Leave the default value.
− Data Protocols: Select NFS.
− Default Language: This value sets the default language encoding for the SVM. NetApp recommends the default value of C.UTF.8 for most customers.
− Security Style: This value sets the security style of the root volume of the SVM. NetApp recommends the default value of UNIX for most customers. To determine whether to use NTFS or mixed, refer to the product guides in the ONTAP 9 Documentation Center.

16 External NetApp Storage for Azure Stack © 2019 NetApp, Inc. All rights reserved.
− Root Aggregate: This is the value of the root aggregate where the SVM root volume will be created. Each node in the NetApp cluster will have a root aggregate. Select the root aggregate of the node where the NFS volume will be created.
− Search Domains: This is the value of the DNS domain that the SVM will use.
− Name Servers: This is the value of the DNS servers that the SVM will use.
4. Click Submit & Continue.
5. In the Configure NFS Protocol section of the Storage Virtual Machine (Setup) wizard, provide the following information:
− Assign an IP Address: Select Without a Subnet and set the IP address, netmask, and gateway of the NFS network interface. Click OK.
− Port: Select a network port on the NetApp storage where the NFS network interface will be homed.
− NIS Configuration: This setting is optional.
− Do not provision a volume for NFS storage. This setting is covered in the next deployment task.
− Click Submit & Continue.
6. In the Enter SVM Administrator Details section of the Storage Virtual Machine (Setup) wizard, provide the following information:
− Password: Set the password of the SVM administrator account.
− Confirm Password: Reenter the password of the SVM administrator account.
− Create a New LIF for SVM Management: If you plan to use the NetApp cluster management network interface to manage the SVM, this action is not required. The SVM management network interface is useful in a multitenant deployment scenario.
7. Click Submit & Continue.
Create NFSv3 and NFSv4 Volumes and NFS Export Policies
To create NFSv3 and NFSv4 volumes and export policies, complete the following steps:
1. In System Manager, select Storage > Volumes > Create > Create FlexVol.
2. In the Create Volume dialog box, provide the following information:
− Name: Enter the name of the volume (for example, nfs3_vol).
− Aggregate: Specify the aggregate that will host the volume. Select the aggregate on the node where the SVM is hosted.
− Storage Type: Select NAS.
− Size: Specify the size of the volume.
− Snapshot Reserve: Specify the space reserved in the volume for NetApp Snapshot™ copies. To determine the appropriate value, refer to the product guides in the ONTAP 9 Documentation Center.
− Space Reserve: This value sets the space reservation policy for the volume. NetApp recommends the default value for most customers. For information about the appropriate space reservation setting, refer to the product guides in the ONTAP 9 Documentation Center.
3. Click Create.
4. Repeat steps 1 through 3 to create more NFS volumes (for example, nfs4_vol).
5. In System Manager, select Storage > SVMs. Click the NFS SVM that was created in the previous deployment task.
6. Select SVM Settings > Export Policies. A default export policy named Default is created automatically. The export policy has one export policy rule that allows all access to all clients. To

17 External NetApp Storage for Azure Stack © 2019 NetApp, Inc. All rights reserved.
determine whether you need to create more export policies or export policy rules that are appropriate to your environment, refer to the product guides in the ONTAP 9 Documentation Center.
7. In System Manager, click Junction Paths to view the export policies for the volumes that you created.
8. To change an export policy for a volume, click the volume and then click Change Export Policy.
Mount NFSv3 and NFSv4 Volumes with an Ubuntu VM
To mount NFSv3 and NFSv4 volumes with an Ubuntu VM, complete the following steps:
1. Log in to the Ubuntu VM that you created in the previous deployment task.
2. To create the mount point directories, run the following commands from the SSH session:
sudo mkdir /nfs3_vol
sudo mkdir /nfs4_vol
sudo chmod 777 /nfs3_vol
sudo chmod 777 /nfs4_vol
Note: Use chmod mode bits that are appropriate to your environment.
3. To mount the volumes, run the following commands from the SSH session:
sudo mount -t nfs -o vers=3 <SVM IP address>:/nfs3_vol /nfs3_vol
sudo mount -t nfs -o vers=4 <SVM IP address>:/nfs4_vol /nfs4_vol
Note: Use the mount options that are appropriate to your environment.
4. If you require the NFS volumes to be mounted after the reboot of the Ubuntu VM, modify the file systems table (fstab) on the Ubuntu VM with the appropriate entries. For more information, review
the documentation for the version of Ubuntu you are using.
4 Increase Azure Stack File Storage Capacity Through SMB
To add storage capacity to Azure Stack, customers can connect NetApp storage to Azure Stack IaaS
compute by using SMB storage protocols.
4.1 Technology Requirements
Hardware Requirements
Table 5 lists the hardware components that are required to implement the use case.
Table 5) Hardware requirements for increasing Azure Stack storage capacity through SMB.
Hardware Quantity
Azure Stack system One or more
NetApp AFF or FAS system One or more
Top-of-rack network switch (Azure Stack) One
Border leaf network switch (Azure Stack) One
Top-of-rack network switch (NetApp) One
Border leaf network switch (NetApp) One
Software Requirements
Table 6 lists the software components that are required to implement the use case.

18 External NetApp Storage for Azure Stack © 2019 NetApp, Inc. All rights reserved.
Table 6) Software requirements for increasing Azure Stack storage capacity through SMB.
Software Version
NetApp ONTAP software Version 9.5 or later
NetApp ONTAP CIFS license Not applicable
Windows Server OS Windows Server 2012R2 or later
Linux OS Distributions available in the Azure Marketplace: Red Hat, SUSE, CentOS, Debian, Canonical Ubuntu, and CoreOS
SMB client software Windows Server 2012R2 or later Linux distribution dependent (Samba)
4.2 Deployment Procedures
The scope of this deployment procedure does not include the installation of the Azure Stack system,
NetApp storage, or the configuration of the network switches.
This document assumes that you understand Azure Stack administration, network administration, and
NetApp storage administration.
Note: The NetApp SMB SVM cannot join an Active Directory deployed in an Azure Stack VNet because Active Domain join operations are not supported by Microsoft over a NAT network connection. For more information, review Description of Support Boundaries for Active Directory over NAT. Customers who want to integrate NetApp SMB volumes with Active Directory must set up a federated Active Directory environment. This process is beyond the scope of this document, which covers the process for setting up workgroup access to SMB volumes.
For Linux VMs, refer to the distribution documentation for specific deployment steps for the Samba client installation.
Deploying the solution involves the following tasks:
• Creating an Azure Stack Windows VM
• Creating and configuring NetApp SVMs for SMB
• Creating SMB volumes and SMB shares
• Mounting an SMB volume with a Windows VM
Note: Unless otherwise noted, this procedure uses the Azure Stack portal and the ONTAP System Manager GUI.
Create an Azure Stack Windows VM
To create an Azure Stack Windows VM, complete the following steps:
1. Make sure that an Azure VNet and subnet have been created in Azure Stack. The CIDR network address space of the virtual network must not conflict or overlap with the CIDR network address space used by the NetApp storage. On the Azure Stack VM dashboard, click Add to add a VM.
2. Select a Windows Server image from the Azure Marketplace content (for example, Windows Server 2016 Datacenter). Click Create.
3. In the Create VM blade, provide the following information:
− Name
− VM Disk Type (Standard HDD or Premium HDD)
− Username

19 External NetApp Storage for Azure Stack © 2019 NetApp, Inc. All rights reserved.
− Password
− Confirm Password
− Subscription
− Resource Group (use the resource group of the virtual network)
− Location
4. In the Size blade, select a VM size. Click Select.
5. In the Settings blade, provide the following information:
− Availability Set: This setting is not required, but it can be used in the solution.
− Storage: Use managed disks.
− Network: Specify the virtual network in the resource group.
− Subnet: Specify the subnet in the virtual network.
− Public IP Address: Create a new public IP address and set the assignment to static. Click OK.
− Network Security Group: Use the default setting of Basic and select the inbound port of RDP 3389.
− Monitoring: Use the default setting for Boot Diagnostics and Guest OS Diagnostics. Although it is not required, enabling diagnostics on an Azure VM is a good practice.
− Diagnostics Storage Account: Select or create a storage account to store diagnostic logs.
6. In the Summary blade, review the settings for the Windows VM. If everything looks okay, click OK to create the VM.
Create and Configure a NetApp SVM for SMB
To create and configure a NetApp SVM for SMB, complete the following steps:
1. Using a web browser, log in to NetApp ONTAP System Manager.
2. In System Manager, select Storage > SVMs and then click Create.
3. In the Storage Virtual Machine (Setup) wizard, provide the following information:
− SVM Name: Enter an SVM name.
− IPSpace: Leave the default value.
− Data Protocols: Do not select any protocols.
− Default Language: This value sets the default language encoding for the SVM. NetApp recommends the default value of C.UTF.8 for most customers.
− Security Style: This value sets the security style of the root volume of the SVM. NetApp recommends the default value of NTFS for most customers. To determine whether you need to use UNIX or mixed, refer to the product guides in the ONTAP 9 Documentation Center.
− Root Aggregate: This is the value of the root aggregate where the SVM root volume is created. Each node in the NetApp cluster has a root aggregate. Select the root aggregate of the node where the NFS volume will be created.
− Search Domains: This is the value of the DNS domain that the SVM will use.
− Name Servers: This is the value of the DNS servers that the SVM will use.
4. Click Submit & Continue.
5. In the Enter SVM Administrator Details section of the Storage Virtual Machine (Setup) wizard, provide the following information:
− Password: Set the password of the SVM administrator account.
− Confirm Password: Reenter the password of the SVM administrator account.

20 External NetApp Storage for Azure Stack © 2019 NetApp, Inc. All rights reserved.
− Create a New LIF for SVM Management: If you plan to use the NetApp cluster management network interface to manage the SVM, this action is not required. The SVM management network interface is useful in a multitenant deployment scenario.
6. Click Submit & Continue.
7. To create the SMB server, log in to the NetApp storage cluster by using an SSH client and enter the following command:
vserver modify -vserver <SVM name> -allowed-protocols cifs
vserver cifs create -vserver <SVM name> -cifs-server test -workgroup <workgroup name>
8. In System Manager, select Network > Network Interfaces > Create.
9. In the Create Network Interface wizard, do the following:
− Name: Enter the name of the network interface.
− Interface Role: Select Serves Data.
− SVM: Select the SVM that you created in the previous deployment task.
− Protocol Access: Select CIFS.
− Management Access: (Optional) Enabling management access is useful in multitenant scenarios.
− Assign IP Address: Select Without a Subnet and set the IP address, netmask, and gateway of the SMB network interface. Click OK
− Document the IP address used by the SMB network interface.
− Port: Select the home node and port of the SMB network interface. This value should be the same node hosting the volume.
− Dynamic DNS (DDNS): This setting is optional.
10. Click Create.
11. In System Manager, select SVMs > Edit SVM Settings and then select the SMB SVM that you created in the previous step.
12. Under Host Users and Groups, select Windows > Users.
13. Unlock the local administrators account or create a new local user.
14. In System Manager, select SVMs > Edit SVM Settings > Export Policies. In the Export Policy Rule pane, click Add.
15. In the Add Export Policy Rule dialog box, provide the following information:
− Client Specification: Specify 0.0.0.0/0 (SMB share ACLs restrict access to the share).
− Access Protocols: Select CIFS.
− Access Details: Accept the default values.
16. Click OK.
Create an SMB Volume and SMB Share
To create an SMB volume and SMB share, complete the following steps:
1. In System Manager, select Storage > Volumes > Create > Create FlexVol.
2. In the Create Volume dialog box, provide the following information:
− Name: Enter the name of the volume (for example, smb_vol).
− Aggregate: Specify the aggregate that will host the volume. Select the aggregate on the node where the SVM is hosted.
− Storage Type: Select NAS.
− Size: Specify the size of the volume.

21 External NetApp Storage for Azure Stack © 2019 NetApp, Inc. All rights reserved.
− Snapshot Reserve: Specify the space reserved in the volume for the NetApp Snapshot copies. To determine the appropriate value, refer to the product guides in the ONTAP 9 Documentation Center.
− Space Reserve: This value sets the space reservation policy for the volume. NetApp recommends the default value for most customers. For information about space reservation, refer to the product guides in the ONTAP 9 Documentation Center.
3. Click Create.
4. In System Manager, select Storage > Shares. Select the SMB SVM that was created in a previous deployment task. Click Create Share.
5. In the Create Share dialog box, provide the following volume information:
− Folder to Share: Click Browse to select the SMB volume created in the previous step.
− Share Name: Use the default value or enter a custom share name.
− Comment: (Optional) This is a comment field for the share.
− Enable continuous availability for Hyper-V and SQL: Do not select this option.
− Encrypt data using SMB 3.0: (Optional) Select this option depending on customer security requirements.
6. Click Create.
7. Select the SMB share that you created in the previous step and select Edit > Permissions.
8. Use the Permissions tab to change the default share permissions from Everyone/Full Control.
Note: To create local users and groups in the SMB SVM, refer to the product guides in the ONTAP 9 Documentation Center.
Mount SMB Volumes with a Windows VM
To mount the SMB volume with a Windows VM, complete the following steps:
1. Log in to the Windows VM that you created in the previous deployment task.
2. Open File Explorer and enter \\<SMB network IP address>\<share name>.
3. If prompted for credentials, enter the local Windows username and password that you created in the previous task.
5 Conclusion
When using Azure Stack IaaS VMs with external NetApp storage, customers benefit from the availability,
security, and data management features provided by NetApp storage. The combination of Azure Stack
and NetApp storage can help customers successfully pursue their hybrid cloud strategies.
Where to Find Additional Information
To learn more about the information that is described in this document, review the following documents or
websites:
• Microsoft Azure Stack Documentation https://docs.microsoft.com/en-us/azure-stack/?view=azs-1908
• NetApp Product Documentation https://docs.netapp.com
• NetApp Ansible Modules Documentation https://www.netapp.com/us/getting-started-with-netapp-approved-ansible-modules/index.aspx

22 External NetApp Storage for Azure Stack © 2019 NetApp, Inc. All rights reserved.
Version History
Version Date Document Version History
Version 1.0 November 2019 Initial release.

23 External NetApp Storage for Azure Stack © 2019 NetApp, Inc. All rights reserved.
Refer to the Interoperability Matrix Tool (IMT) on the NetApp Support site to validate that the exact product and feature versions described in this document are supported for your specific environment. The NetApp IMT defines the product components and versions that can be used to construct configurations that are supported by NetApp. Specific results depend on each customer’s installation in accordance with published specifications.
Copyright Information
Copyright © 2019 NetApp, Inc. All Rights Reserved. Printed in the U.S. No part of this document covered by copyright may be reproduced in any form or by any means—graphic, electronic, or mechanical, including photocopying, recording, taping, or storage in an electronic retrieval system—without prior written permission of the copyright owner.
Software derived from copyrighted NetApp material is subject to the following license and disclaimer:
THIS SOFTWARE IS PROVIDED BY NETAPP “AS IS” AND WITHOUT ANY EXPRESS OR IMPLIED WARRANTIES, INCLUDING, BUT NOT LIMITED TO, THE IMPLIED WARRANTIES OF MERCHANTABILITY AND FITNESS FOR A PARTICULAR PURPOSE, WHICH ARE HEREBY DISCLAIMED. IN NO EVENT SHALL NETAPP BE LIABLE FOR ANY DIRECT, INDIRECT, INCIDENTAL, SPECIAL, EXEMPLARY, OR CONSEQUENTIAL DAMAGES (INCLUDING, BUT NOT LIMITED TO, PROCUREMENT OF SUBSTITUTE GOODS OR SERVICES; LOSS OF USE, DATA, OR PROFITS; OR BUSINESS INTERRUPTION) HOWEVER CAUSED AND ON ANY THEORY OF LIABILITY, WHETHER IN CONTRACT, STRICT LIABILITY, OR TORT (INCLUDING NEGLIGENCE OR OTHERWISE) ARISING IN ANY WAY OUT OF THE USE OF THIS SOFTWARE, EVEN IF ADVISED OF THE POSSIBILITY OF SUCH DAMAGE.
NetApp reserves the right to change any products described herein at any time, and without notice. NetApp assumes no responsibility or liability arising from the use of products described herein, except as expressly agreed to in writing by NetApp. The use or purchase of this product does not convey a license under any patent rights, trademark rights, or any other intellectual property rights of NetApp.
The product described in this manual may be protected by one or more U.S. patents, foreign patents, or pending applications.
Data contained herein pertains to a commercial item (as defined in FAR 2.101) and is proprietary to NetApp, Inc. The U.S. Government has a non-exclusive, non-transferrable, non-sublicensable, worldwide, limited irrevocable license to use the Data only in connection with and in support of the U.S. Government contract under which the Data was delivered. Except as provided herein, the Data may not be used, disclosed, reproduced, modified, performed, or displayed without the prior written approval of NetApp, Inc. United States Government license rights for the Department of Defense are limited to those rights identified in DFARS clause 252.227-7015(b).
Trademark Information
NETAPP, the NETAPP logo, and the marks listed at http://www.netapp.com/TM are trademarks of NetApp, Inc. Other company and product names may be trademarks of their respective owners.
TR-4809-DEPLOY-1119