Embed Size (px)
Citation preview

Technical Report
Microsoft Hyper-V over SMB 3.0 with ONTAP: Best Practices Brahmanna Chowdary Kodavali, Shashanka SR, NetApp
February 2017 | TR-4172
Abstract
This technical report provides guidelines and best practices for integrated architecture and
implementation of Microsoft Hyper-V with NetApp® storage solutions utilizing the SMB 3.0
NAS protocol. The NetApp technologies discussed in this technical report provide customers
with an integrated storage solution that is cost effective, operationally efficient, flexible, and
environmentally friendly.
2 Microsoft Hyper-V over SMB 3.0 with ONTAP: Best Practices © 2017 NetApp, Inc. All rights reserved.
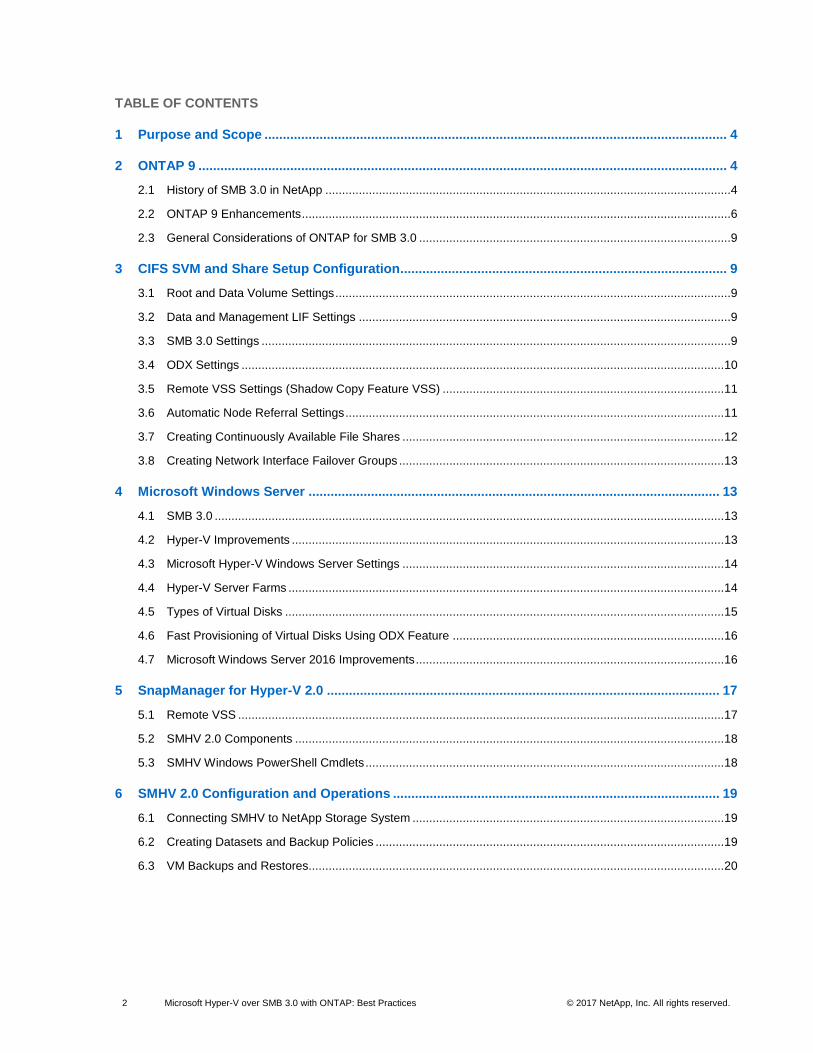
TABLE OF CONTENTS
1 Purpose and Scope .............................................................................................................................. 4
2 ONTAP 9 ................................................................................................................................................ 4
2.1 History of SMB 3.0 in NetApp .........................................................................................................................4
2.2 ONTAP 9 Enhancements ................................................................................................................................6
2.3 General Considerations of ONTAP for SMB 3.0 .............................................................................................9
3 CIFS SVM and Share Setup Configuration......................................................................................... 9
3.1 Root and Data Volume Settings ......................................................................................................................9
3.2 Data and Management LIF Settings ...............................................................................................................9
3.3 SMB 3.0 Settings ............................................................................................................................................9
3.4 ODX Settings ................................................................................................................................................ 10
3.5 Remote VSS Settings (Shadow Copy Feature VSS) .................................................................................... 11
3.6 Automatic Node Referral Settings ................................................................................................................. 11
3.7 Creating Continuously Available File Shares ................................................................................................ 12
3.8 Creating Network Interface Failover Groups ................................................................................................. 13
4 Microsoft Windows Server ................................................................................................................ 13
4.1 SMB 3.0 ........................................................................................................................................................ 13
4.2 Hyper-V Improvements ................................................................................................................................. 13
4.3 Microsoft Hyper-V Windows Server Settings ................................................................................................ 14
4.4 Hyper-V Server Farms .................................................................................................................................. 14
4.5 Types of Virtual Disks ................................................................................................................................... 15
4.6 Fast Provisioning of Virtual Disks Using ODX Feature ................................................................................. 16
4.7 Microsoft Windows Server 2016 Improvements ............................................................................................ 16
5 SnapManager for Hyper-V 2.0 ........................................................................................................... 17
5.1 Remote VSS ................................................................................................................................................. 17
5.2 SMHV 2.0 Components ................................................................................................................................ 18
5.3 SMHV Windows PowerShell Cmdlets ........................................................................................................... 18
6 SMHV 2.0 Configuration and Operations ......................................................................................... 19
6.1 Connecting SMHV to NetApp Storage System ............................................................................................. 19
6.2 Creating Datasets and Backup Policies ........................................................................................................ 19
6.3 VM Backups and Restores............................................................................................................................ 20

3 Microsoft Hyper-V over SMB 3.0 with ONTAP: Best Practices © 2017 NetApp, Inc. All rights reserved.
References ................................................................................................................................................. 21
LIST OF FIGURES
Figure 1) SMB negotiate request. ...................................................................................................................................7
Figure 2) SMB negotiate response. ................................................................................................................................8
Figure 3) Tree connect response. ..................................................................................................................................8
Figure 4) VHDX location settings. ................................................................................................................................ 14
Figure 5) VM location settings. ..................................................................................................................................... 14
Figure 6) Hyper-V VM move options. ........................................................................................................................... 15
Figure 7) NetApp remote VSS components. ................................................................................................................ 18
Figure 8) Storage connection settings. ......................................................................................................................... 19
Figure 9) Manual backup of VMs. ................................................................................................................................. 20
Figure 10) Restoring VMs. ............................................................................................................................................ 20
Figure 11) Restore options. .......................................................................................................................................... 21
4 Microsoft Hyper-V over SMB 3.0 with ONTAP: Best Practices © 2017 NetApp, Inc. All rights reserved.
1 Purpose and Scope
NetApp has been at the forefront of solving complex business problems with its innovative technology
breakthroughs and end-to-end solutions approach. One of NetApp’s strongest areas in solving these
problems is the use of virtualization throughout the data center. Server virtualization is a major
component in this space, and Microsoft is a lead player with its server virtualization and private cloud
solutions. This technical report provides detailed guidance on how to architect and implement Microsoft
server virtualization solutions on NetApp storage using the SMB 3.0 NAS protocol with ONTAP® 9. It
describes the best practices for setting up a Windows Server 2012 R2 Hyper-V environment with
SnapManager® for Hyper-V (SMHV) 2.0 to protect VMs running on SMB 3.0 file share hosting on NetApp
clustered Data ONTAP®. This report also introduces Windows Server 2016.
This technical report is not intended to be a definitive implementation or solutions guide. Expertise might
be required to solve specific deployment issues. Contact your local NetApp sales representative to speak
with one of our Microsoft Hyper-V solutions experts. NetApp is dedicated to helping you transform your
data center.
2 ONTAP 9
ONTAP 9 provides a complete solution for NetApp customers to deploy a virtualized environment and
protect virtual machines (VMs) running on file-level data storage provided by the SMB 3.0 protocol.
2.1 History of SMB 3.0 in NetApp
NetApp started supporting SMB 3.0 from clustered Data ONTAP 8.2.1 onward, enabling NetApp
customers to utilize the SMB 3.0 features introduced with Windows Server 2012. These new features
enabled ONTAP to be used to host VM virtual disks and configuration settings on a CIFS file share.
Clustered Data ONTAP 8.2.1 started supporting the following SMB 3.0 features:
Persistent handles (continuously available file shares)
Witness protocol
Clustered client failover
Scale-out awareness
Offloaded data transfer (ODX)
Remote Volume Shadow Copy Service (VSS)
Persistent Handles (Continuously Available File Shares)
To enable continuous availability on a file share, the SMB client opens a file on behalf of the application,
such as a VM running on a Hyper-V host, and requests persistent handles for the virtual hard disk format
(VHDX) file. When the SMB server receives a request to open a file with a persistent handle, the SMB
server retains sufficient information about the file handle, along with a unique resume key supplied by the
SMB client. Persistent handle information is shared between nodes in a cluster.
In case of a planned move of file share resources from one node to another, or in case of failure of the
node, the SMB client reconnects to an active and available node and reopens the file using persistent
handles. The application running on the SMB client computer does not experience any failures or errors
during this operation. From a VM perspective, it appears the input/output (I/O) operations to virtual disk
are delayed for a small amount of time, similar to brief loss of connectivity to the disk, but no disruption is
noticed.
5 Microsoft Hyper-V over SMB 3.0 with ONTAP: Best Practices © 2017 NetApp, Inc. All rights reserved.
Witness Protocol
When an SMB server node fails, the SMB client usually relies on the TCP timeout to detect a failure of the
file share resource, such as an open file. SMB 3.0 allows variable values for TCP timeouts, and because
the virtual disk is a critical resource, the VM running on a Hyper-V server needs faster detection of
network resources failing over. Witness protocol significantly improves the SMB client reconnect time.
During connection to a shared resource (TREE_CONNECT), the SMB server provides information about
the features enabled on a share, such as if the resource is clustered, scaled out, or continuously
available. Based on this information, the SMB client requests this same data from other nodes. Upon
receiving the information, the SMB client registers itself with the other node.
In the case of a cluster node failure, the SMB client is already connected to another node, which can
detect the failure and then notify the SMB client. This action saves the SMB client from waiting until the
TCP timeout is over and instead initiates a reconnect to the running node immediately, minimizing the
time the client is disconnected from the resource. For VMs with virtual disks stored on such SMB shares,
disk disconnection time is reduced to the point where the VM would not detect such disconnects as
hardware failure.
This feature is enabled on ONTAP by default only if all best practices are followed and there is a logical
interface (LIF) on each node in the cluster in every storage virtual machine (SVM; formerly known as
Vserver). Note also that witness protocol only comes into play for continuously available shares.
Clustered Client Failover
To increase redundancy in a VM environment, Hyper-V servers should be placed into a Microsoft failover
cluster. When the Hyper-V server node running a VM fails, the VM is live-migrated to another node.
Before clustered client failover (CCF) with SMB 3.0, a VM moving to another cluster node was considered
to be a new application instance. New application instances connecting to files already open on file
shares have to wait until the TCP timeout is over and the file handle is closed. CCF gives the VM the
ability to open a virtual disk file on a file share and provide a unique application identifier. When a Hyper-
V server cluster node fails, the VM starts on another Hyper-V server node and supplies the same
application identifier, letting the SMB server close existing file handles. The SMB client can then
reconnect to the previously open file.
Scale-Out Awareness
ONTAP is scale-out by design and provides the ability to serve data from multiple nodes. It brings
additional data redundancy on the network and spreads the load of multiple SMB clients between multiple
nodes in a cluster. Scale-out awareness allows SMB clients to connect to all nodes in the cluster and get
to the same data.
ODX, Copy Offload
Although this feature is not required to run a Hyper-V workload over SMB 3.0, in typical deployments
where the customer needs to provision multiple VMs, this feature can drastically improve VM deployment
time. The main advantage of this feature is that it is transparent to client machines, and no actual data is
put over the network during file copy operations. ONTAP provides different mechanisms on the back end
to copy data blocks. In the case of a single volume serving a file share, NetApp uses cloning functionality,
which eliminates the data copy process by creating only pointers. This process speeds up back-end
operations and improves copy performance with ODX on the NetApp platform when compared to ODX
implementations in other storage arrays. When data is copied within the cluster but outside the volume,
the process remains offloaded, and no traffic goes through the client or the network.

6 Microsoft Hyper-V over SMB 3.0 with ONTAP: Best Practices © 2017 NetApp, Inc. All rights reserved.
Remote VSS
VSS is a framework that provides coordination of application I/O and physical storage on the same server
and allows the creation of application-consistent Snapshot® copies of the storage. Microsoft Windows
Server 2012 extends the functionality of VSS to multiple servers. For instance, an application running on
one server has storage on another server’s file share. Remote VSS coordinates I/O activities during a
backup process between both servers and provides application-consistent backup Snapshot copies of the
storage for applications running remotely on the storage server. ONTAP extends the functionality of
remote VSS by plugging into the VSS framework; a VSS service runs on a NetApp controller, and a VSS
provider runs on a Windows Server machine. From a VSS perspective, the NetApp array acts in the same
way as a Windows File Server.
Autolocation Services (Automatic Node Referral)
Autolocation uses SMB automatic node referrals to increase SMB client performance by referring clients
to the LIF on the node that owns the data volume of an SVM. When an SMB client connects to an SMB
share hosted on an SVM, it might connect using a LIF on a node that does not own the requested data
and uses a cluster interconnect network to retrieve data. The client can experience faster response times
if the SMB connection uses a LIF located on the node containing the requested data.
ONTAP provides this functionality by using Microsoft Distributed File System (DFS) referrals to inform
SMB clients that a requested file or folder in the namespace is hosted somewhere else. A node makes a
referral when it determines that there is an SVM LIF on the node containing the data. Referrals are made
based on the location of the root of the share through which the client is connected.
The referral occurs during SMB negotiation. The referral is made before the connection is established.
After ONTAP refers the SMB client to the target node, the connection is made, and the client accesses
data through the referred LIF path from that point on. This allows the clients faster access to the data and
avoids extra cluster communication.
2.2 ONTAP 9 Enhancements
Enhanced Support for SMB 3.0
Beginning with ONTAP 9, SMB 3.1.1 and enhanced features for SMB 2.0 and later are supported. The
following enhancements are supported in SMB 2.0 and later:
Workgroup authentication. You can now configure a CIFS server in a workgroup with CIFS clients that authenticate to the server by using locally defined users and groups.
Large MTU. Increased efficiency and throughput are now enabled by packet sizes up to 1MB; previously, the maximum size was 64KB.
Note: Large MTU values must be enabled through the CIFS server. Small packet sizes might result in performance degradation.
Support for CIFS server in workgroup mode. Beginning with ONTAP 9, you can configure a CIFS server in a workgroup with CIFS clients that authenticate to the server by using locally defined users and groups. You can configure a CIFS server in a workgroup when the Microsoft Active Directory domain infrastructure is not available. A CIFS server in workgroup mode supports only NTLM authentication and does not support Kerberos authentication. Certain CIFS features are not supported by a CIFS server in workgroup mode. For more information about CIFS management, see the ONTAP 9 CIFS Reference.
ONTAP 9 Setup
There are no special requirements for setting up ONTAP 9 to utilize SMB 3.0 features. By default, ONTAP
9 supports all versions of SMB, including 1.0, 2.0, 2.1, 3.0, and 3.1. Most of the usual applications of SMB

7 Microsoft Hyper-V over SMB 3.0 with ONTAP: Best Practices © 2017 NetApp, Inc. All rights reserved.
protocol, such as user file sharing, can work on pre-3.0 SMB protocols and might not benefit from the
additional features of the SMB 3.0 protocol. The Hyper-V workload requires the SMB 3.0 protocol and
some of its additional features, such as continuously available shares. Taking into consideration the
additional overhead of storing and replicating persistent handle information between nodes in an HA pair
to support features such as continuously available shares, NetApp strongly recommends utilizing only
continuously available shares for Hyper-V over SMB workloads.
There are several different options to provide reliable and high-performing network connectivity from
Hyper-V hosts to SMB 3.0 continuously available file shares providing storage for virtual disks. For
detailed information about these options and best practices, see TR-4349: Windows Server 2012 with
Hyper-V over SMB Network Configuration.
ONTAP Cloud
ONTAP Cloud is a software-only storage appliance that runs ONTAP software. It provides secure, proven
NFS, CIFS, and iSCSI data management for the cloud. For more information about ONTAP Cloud, see
the ONTAP Cloud Resources page.
SMB 3.0 Protocol Negotiation Feature
SMB feature negotiation between client and server starts when a client machine initiates a connection to
a CIFS/SMB file share. During the SMB negotiation request, as shown in Figure 1, the client tells the
server which dialects (versions) of SMB it supports. This section shows the negotiation process (using
packet trace pictures) and how dialect and features are confirmed. If troubleshooting is required,
customers can use packet traces to confirm that the correct dialect and features are being used.
Figure 1) SMB negotiate request.
The server responds with the highest common version of the SMB protocol, as shown in Figure 2.
8 Microsoft Hyper-V over SMB 3.0 with ONTAP: Best Practices © 2017 NetApp, Inc. All rights reserved.
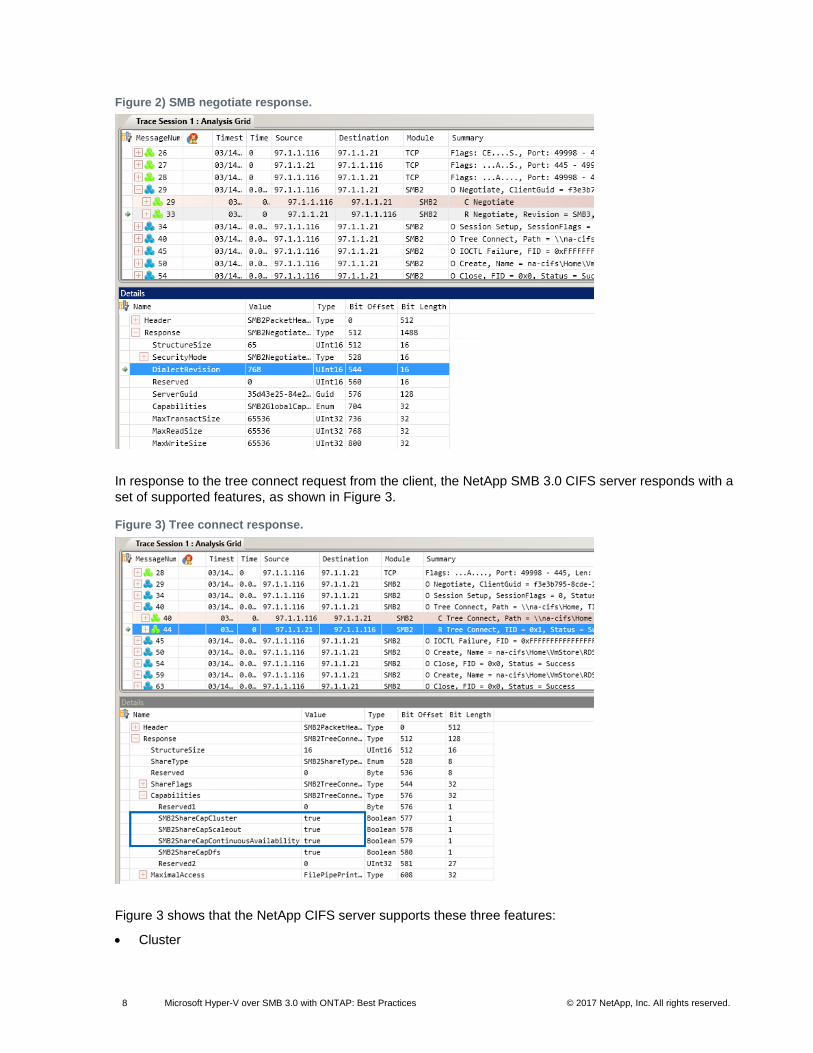
Figure 2) SMB negotiate response.
In response to the tree connect request from the client, the NetApp SMB 3.0 CIFS server responds with a
set of supported features, as shown in Figure 3.
Figure 3) Tree connect response.
Figure 3 shows that the NetApp CIFS server supports these three features:
Cluster
9 Microsoft Hyper-V over SMB 3.0 with ONTAP: Best Practices © 2017 NetApp, Inc. All rights reserved.
Scale-out
Continuous availability
Based on the set of features supported by the CIFS server, the client uses features such as persistent
handles and witness protocol.
2.3 General Considerations of ONTAP for SMB 3.0
When setting up ONTAP 9 for using continuously available file shares to host VHDX disk images of VMs,
consider the following:
Persistent handles work only between nodes in an HA pair.
Witness protocol works only between nodes in an HA pair.
Continuously available file shares are only supported for Hyper-V workloads.
ODX is supported and works across protocols. Copying data between a file share and iSCSI or an FCP-attached LUN utilizes ODX.
Connectivity between Hyper-V hosts and the NetApp array is recommended on a 10GB network if one is available. In case of 1GB network connectivity, NetApp recommends creating an interface group consisting of multiple 1GB ports.
CIFS and FlexClone® (required by remote VSS of SMHV) licenses should be installed.
Time settings on nodes in the cluster should be set up accordingly. Network Time Protocol (NTP) should be used if the NetApp CIFS server has to participate in the Windows Active Directory (AD) domain.
3 CIFS SVM and Share Setup Configuration
There are several considerations when setting up an SMB 3.0 CIFS SVM for use as storage with
Windows Server 2012 Hyper-V. Some of these limitations come from the Windows AD domain–joined
CIFS file server, and some are defined by SnapManager for Hyper-V. The minimum Microsoft OS
versions supporting SMB 3.0 are Windows Server 2012 and Windows 8.
3.1 Root and Data Volume Settings
NetApp CIFS SVM root and data volumes should be FlexVol® volumes and have a security style of New
Technology File System (NTFS). Symlinks, hardlinks, or widelinks are not supported with SnapManager
for Hyper-V. Also, junctions inside of data volumes are not supported.
3.2 Data and Management LIF Settings
At least one data LIF should be created per node for every SVM in the cluster. The data LIF should not be
configured to “autorevert.” Each LIF’s IP address should have an entry in DNS, and no NetBIOS aliases
are allowed for DNS entries. Network interface failover groups can be configured to specify network ports
to which the LIF can be moved. Also, SMHV requires one additional management LIF for the SVM.
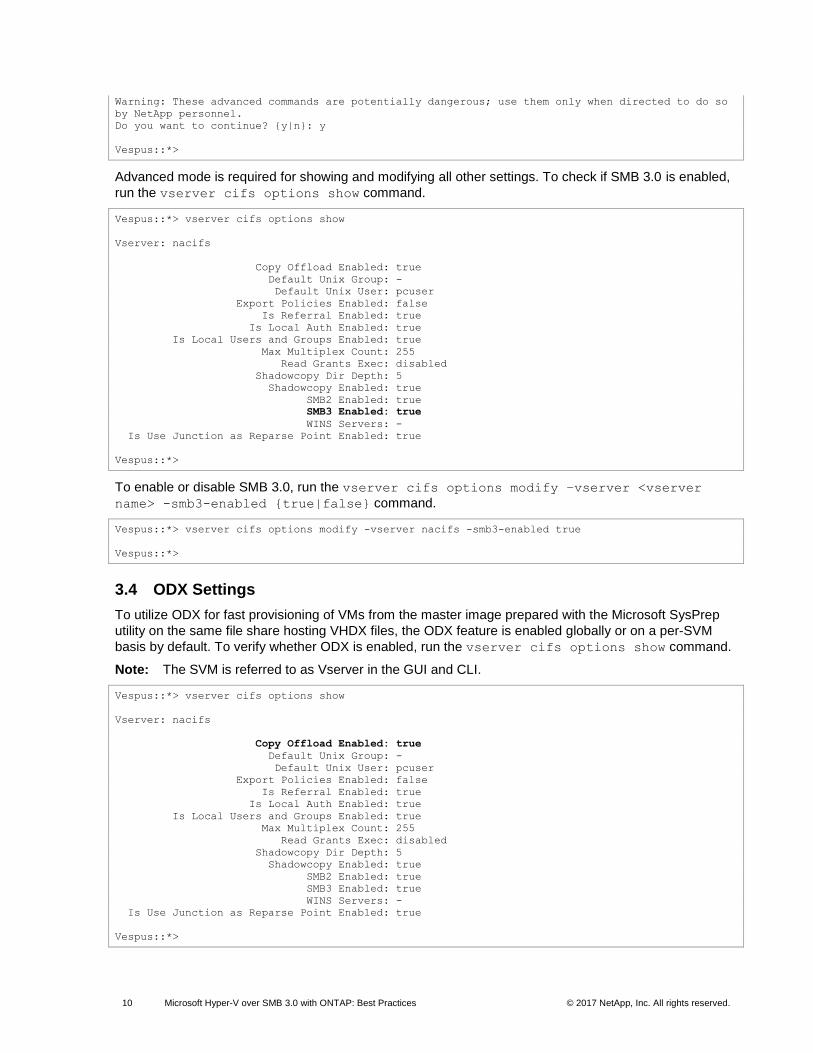
3.3 SMB 3.0 Settings
Though SMB 3.0 protocol is enabled by default, it can be checked, enabled, or disabled by running the
vserver cifs options command in the advanced mode. To set up the advanced mode, run the set
advanced command.
Note: The SVM is referred to as Vserver in the GUI and CLI.
Vespus::> set advanced
10 Microsoft Hyper-V over SMB 3.0 with ONTAP: Best Practices © 2017 NetApp, Inc. All rights reserved.
Warning: These advanced commands are potentially dangerous; use them only when directed to do so
by NetApp personnel.
Do you want to continue? {y|n}: y
Vespus::*>
Advanced mode is required for showing and modifying all other settings. To check if SMB 3.0 is enabled,
run the vserver cifs options show command.
Vespus::*> vserver cifs options show
Vserver: nacifs
Copy Offload Enabled: true
Default Unix Group: -
Default Unix User: pcuser
Export Policies Enabled: false
Is Referral Enabled: true
Is Local Auth Enabled: true
Is Local Users and Groups Enabled: true
Max Multiplex Count: 255
Read Grants Exec: disabled
Shadowcopy Dir Depth: 5
Shadowcopy Enabled: true
SMB2 Enabled: true
SMB3 Enabled: true
WINS Servers: -
Is Use Junction as Reparse Point Enabled: true
Vespus::*>
To enable or disable SMB 3.0, run the vserver cifs options modify –vserver <vserver
name> -smb3-enabled {true|false} command.
Vespus::*> vserver cifs options modify -vserver nacifs -smb3-enabled true
Vespus::*>
3.4 ODX Settings
To utilize ODX for fast provisioning of VMs from the master image prepared with the Microsoft SysPrep
utility on the same file share hosting VHDX files, the ODX feature is enabled globally or on a per-SVM
basis by default. To verify whether ODX is enabled, run the vserver cifs options show command.
Note: The SVM is referred to as Vserver in the GUI and CLI.
Vespus::*> vserver cifs options show
Vserver: nacifs
Copy Offload Enabled: true
Default Unix Group: -
Default Unix User: pcuser
Export Policies Enabled: false
Is Referral Enabled: true
Is Local Auth Enabled: true
Is Local Users and Groups Enabled: true
Max Multiplex Count: 255
Read Grants Exec: disabled
Shadowcopy Dir Depth: 5
Shadowcopy Enabled: true
SMB2 Enabled: true
SMB3 Enabled: true
WINS Servers: -
Is Use Junction as Reparse Point Enabled: true
Vespus::*>
11 Microsoft Hyper-V over SMB 3.0 with ONTAP: Best Practices © 2017 NetApp, Inc. All rights reserved.
To enable or disable the ODX feature, run the vserver cifs options modify –vserver
<vserver name> -copy-offload-enabled {true|false} command.
Vespus::*> vserver cifs options modify -vserver nacifs -copy-offload-enabled true
Vespus::*>
Note: ODX is supported for intervolume and inter-SVM transfers and not intercluster for SMB.
3.5 Remote VSS Settings (Shadow Copy Feature VSS)
This feature should be enabled if SMHV is deployed on Hyper-V servers to protect VMs. To verify
whether remote VSS is enabled, run the vserver cifs options show command.
Note: The SVM is referred to as Vserver in the GUI and CLI.
Vespus::*> vserver cifs options show
Vserver: nacifs
Copy Offload Enabled: true
Default Unix Group: -
Default Unix User: pcuser
Export Policies Enabled: false
Is Referral Enabled: true
Is Local Auth Enabled: true
Is Local Users and Groups Enabled: true
Max Multiplex Count: 255
Read Grants Exec: disabled
Shadowcopy Dir Depth: 5
Shadowcopy Enabled: true
SMB2 Enabled: true
SMB3 Enabled: true
WINS Servers: -
Is Use Junction as Reparse Point Enabled: true
Vespus::*>
To enable or disable the remote VSS feature, run the vserver cifs options modify –vserver
<vserver name> -shadowcopy-enabled {true|false} command.
Vespus::*> vserver cifs options modify -vserver nacifs -shadowcopy-enabled true
Vespus::*>
3.6 Automatic Node Referral Settings
The Microsoft Hyper-V host relies heavily on Kerberos authentication, which cannot be utilized with
NetApp IP-based automatic node referral. By default, node referrals are disabled, but when deploying
Hyper-V over SMB, be sure to verify this by running the vserver cifs options show command.
Note: The SVM is referred to as Vserver in the GUI and CLI.
Vespus::*> vserver cifs options show
Vserver: nacifs
Copy Offload Enabled: true
Default Unix Group: -
Default Unix User: pcuser
Export Policies Enabled: false
Is Referral Enabled: false
Is Local Auth Enabled: true
Is Local Users and Groups Enabled: true
Max Multiplex Count: 255
Read Grants Exec: disabled
12 Microsoft Hyper-V over SMB 3.0 with ONTAP: Best Practices © 2017 NetApp, Inc. All rights reserved.
Shadowcopy Dir Depth: 5
Shadowcopy Enabled: true
SMB2 Enabled: true
SMB3 Enabled: true
WINS Servers: -
Is Use Junction as Reparse Point Enabled: true
Vespus::*>
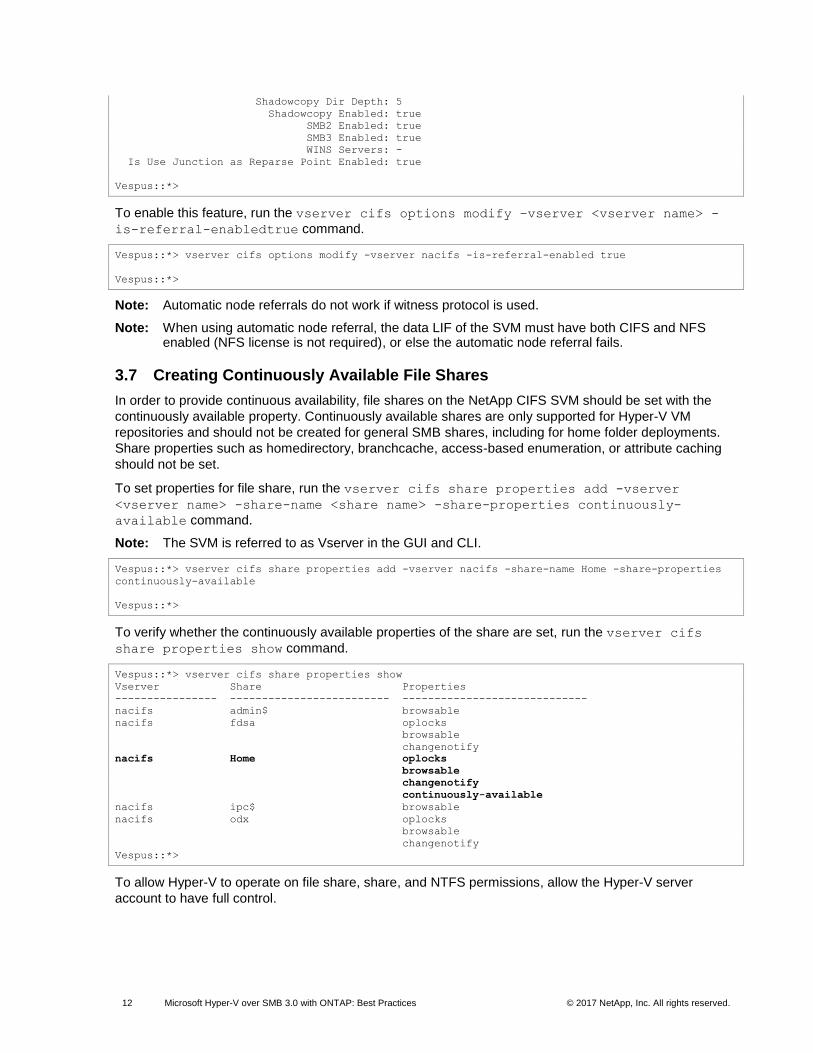
To enable this feature, run the vserver cifs options modify –vserver <vserver name> -
is-referral-enabledtrue command.
Vespus::*> vserver cifs options modify -vserver nacifs -is-referral-enabled true
Vespus::*>
Note: Automatic node referrals do not work if witness protocol is used.
Note: When using automatic node referral, the data LIF of the SVM must have both CIFS and NFS enabled (NFS license is not required), or else the automatic node referral fails.
3.7 Creating Continuously Available File Shares
In order to provide continuous availability, file shares on the NetApp CIFS SVM should be set with the
continuously available property. Continuously available shares are only supported for Hyper-V VM
repositories and should not be created for general SMB shares, including for home folder deployments.
Share properties such as homedirectory, branchcache, access-based enumeration, or attribute caching
should not be set.
To set properties for file share, run the vserver cifs share properties add -vserver
<vserver name> -share-name <share name> -share-properties continuously-
available command.
Note: The SVM is referred to as Vserver in the GUI and CLI.
Vespus::*> vserver cifs share properties add -vserver nacifs -share-name Home -share-properties
continuously-available
Vespus::*>
To verify whether the continuously available properties of the share are set, run the vserver cifs
share properties show command.
Vespus::*> vserver cifs share properties show
Vserver Share Properties
---------------- ------------------------- -----------------------------
nacifs admin$ browsable
nacifs fdsa oplocks
browsable
changenotify
nacifs Home oplocks
browsable
changenotify
continuously-available
nacifs ipc$ browsable
nacifs odx oplocks
browsable
changenotify
Vespus::*>
To allow Hyper-V to operate on file share, share, and NTFS permissions, allow the Hyper-V server
account to have full control.
13 Microsoft Hyper-V over SMB 3.0 with ONTAP: Best Practices © 2017 NetApp, Inc. All rights reserved.
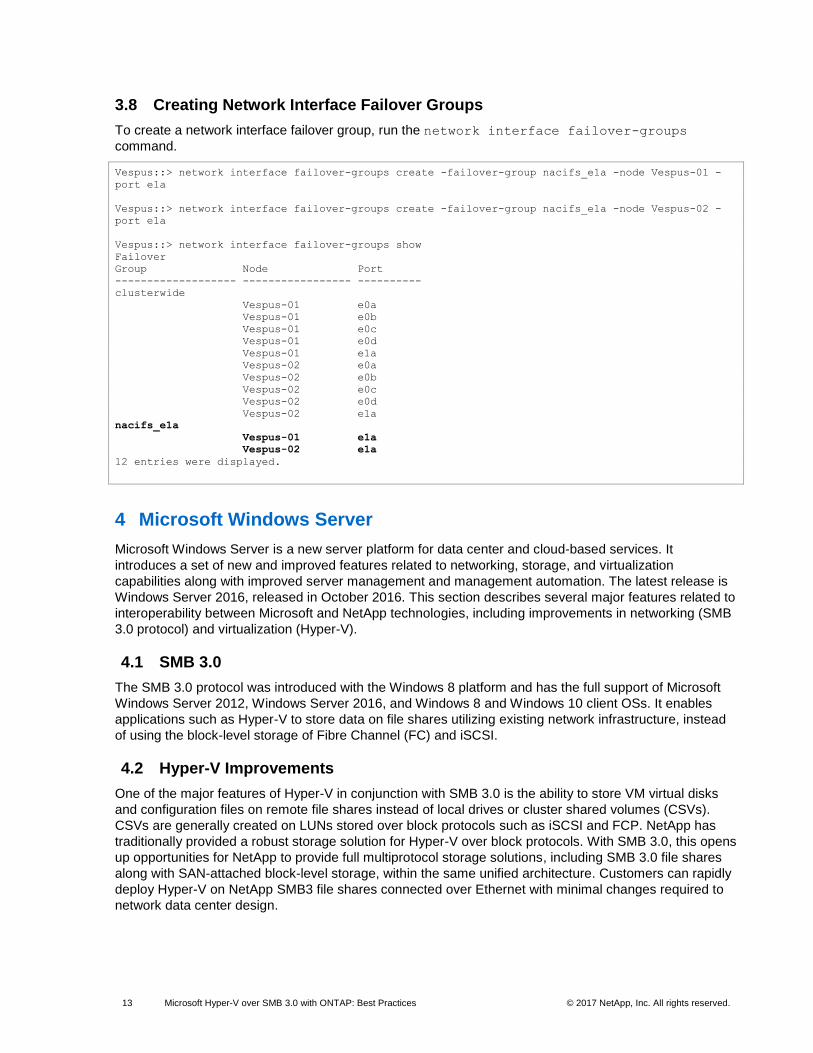
3.8 Creating Network Interface Failover Groups
To create a network interface failover group, run the network interface failover-groups
command.
Vespus::> network interface failover-groups create -failover-group nacifs_e1a -node Vespus-01 -
port e1a
Vespus::> network interface failover-groups create -failover-group nacifs_e1a -node Vespus-02 -
port e1a
Vespus::> network interface failover-groups show
Failover
Group Node Port
------------------- ----------------- ----------
clusterwide
Vespus-01 e0a
Vespus-01 e0b
Vespus-01 e0c
Vespus-01 e0d
Vespus-01 e1a
Vespus-02 e0a
Vespus-02 e0b
Vespus-02 e0c
Vespus-02 e0d
Vespus-02 e1a
nacifs_e1a
Vespus-01 e1a
Vespus-02 e1a
12 entries were displayed.
4 Microsoft Windows Server
Microsoft Windows Server is a new server platform for data center and cloud-based services. It
introduces a set of new and improved features related to networking, storage, and virtualization
capabilities along with improved server management and management automation. The latest release is
Windows Server 2016, released in October 2016. This section describes several major features related to
interoperability between Microsoft and NetApp technologies, including improvements in networking (SMB
3.0 protocol) and virtualization (Hyper-V).
4.1 SMB 3.0
The SMB 3.0 protocol was introduced with the Windows 8 platform and has the full support of Microsoft
Windows Server 2012, Windows Server 2016, and Windows 8 and Windows 10 client OSs. It enables
applications such as Hyper-V to store data on file shares utilizing existing network infrastructure, instead
of using the block-level storage of Fibre Channel (FC) and iSCSI.
4.2 Hyper-V Improvements
One of the major features of Hyper-V in conjunction with SMB 3.0 is the ability to store VM virtual disks
and configuration files on remote file shares instead of local drives or cluster shared volumes (CSVs).
CSVs are generally created on LUNs stored over block protocols such as iSCSI and FCP. NetApp has
traditionally provided a robust storage solution for Hyper-V over block protocols. With SMB 3.0, this opens
up opportunities for NetApp to provide full multiprotocol storage solutions, including SMB 3.0 file shares
along with SAN-attached block-level storage, within the same unified architecture. Customers can rapidly
deploy Hyper-V on NetApp SMB3 file shares connected over Ethernet with minimal changes required to
network data center design.
14 Microsoft Hyper-V over SMB 3.0 with ONTAP: Best Practices © 2017 NetApp, Inc. All rights reserved.
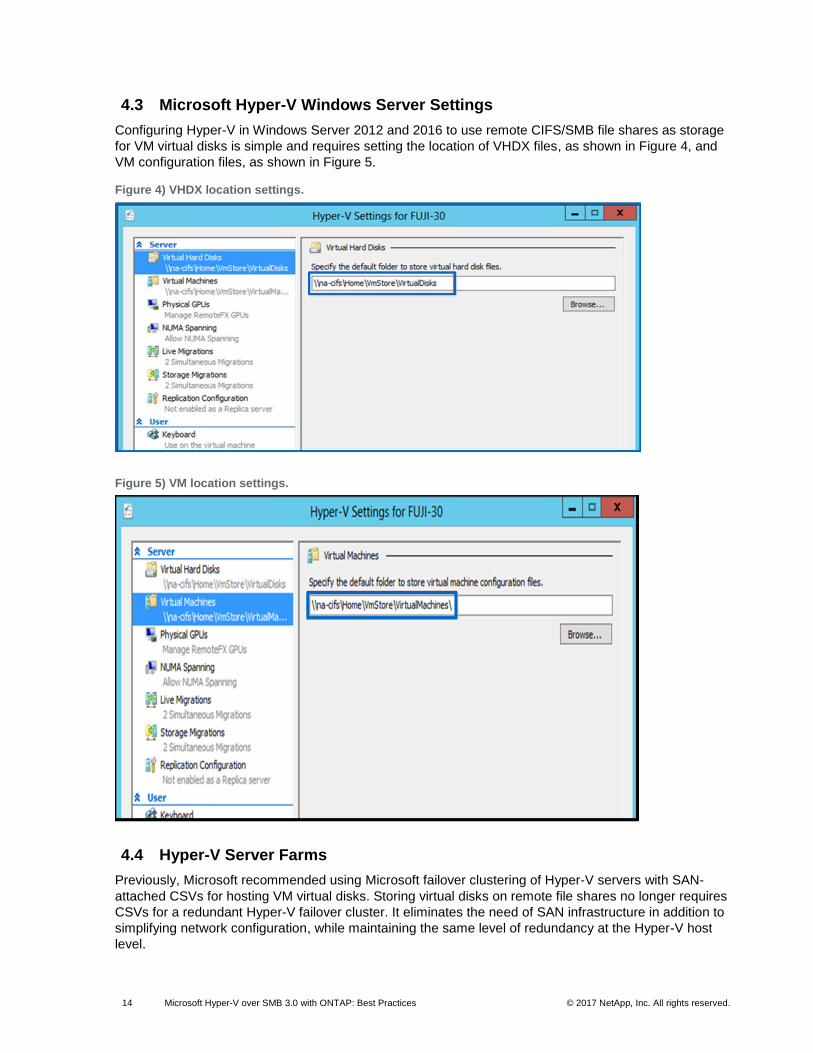
4.3 Microsoft Hyper-V Windows Server Settings
Configuring Hyper-V in Windows Server 2012 and 2016 to use remote CIFS/SMB file shares as storage
for VM virtual disks is simple and requires setting the location of VHDX files, as shown in Figure 4, and
VM configuration files, as shown in Figure 5.
Figure 4) VHDX location settings.
Figure 5) VM location settings.
4.4 Hyper-V Server Farms
Previously, Microsoft recommended using Microsoft failover clustering of Hyper-V servers with SAN-
attached CSVs for hosting VM virtual disks. Storing virtual disks on remote file shares no longer requires
CSVs for a redundant Hyper-V failover cluster. It eliminates the need of SAN infrastructure in addition to
simplifying network configuration, while maintaining the same level of redundancy at the Hyper-V host
level.
15 Microsoft Hyper-V over SMB 3.0 with ONTAP: Best Practices © 2017 NetApp, Inc. All rights reserved.
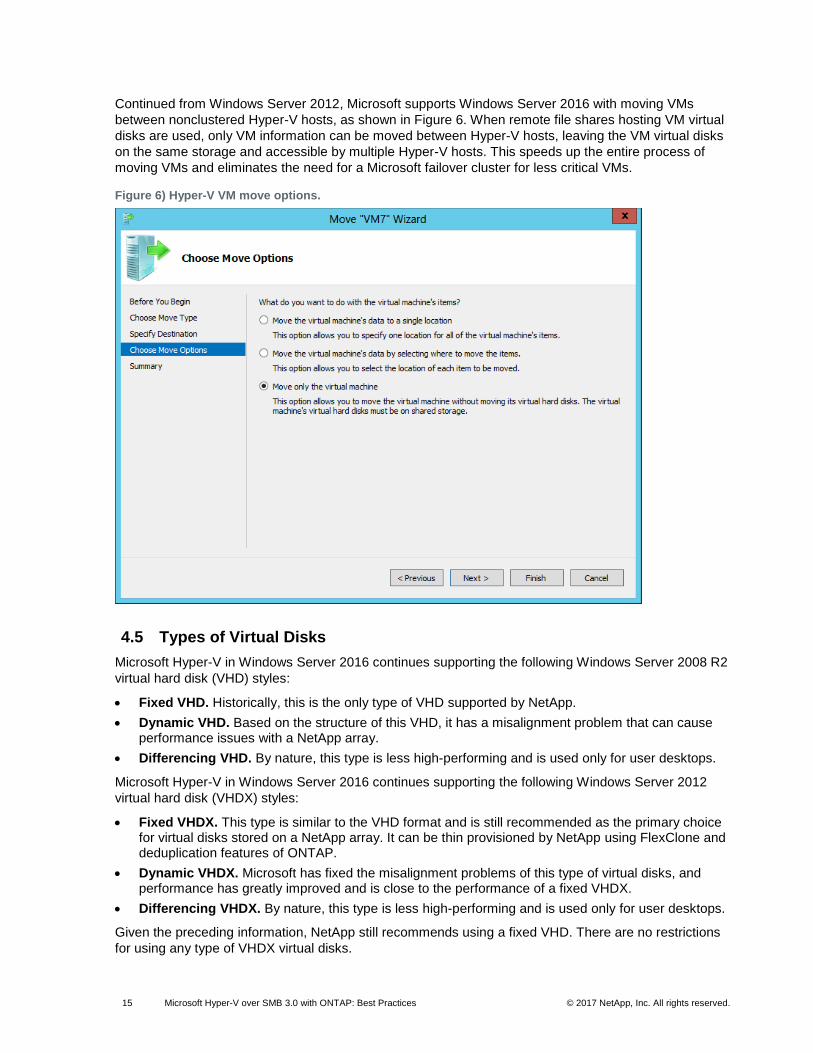
Continued from Windows Server 2012, Microsoft supports Windows Server 2016 with moving VMs
between nonclustered Hyper-V hosts, as shown in Figure 6. When remote file shares hosting VM virtual
disks are used, only VM information can be moved between Hyper-V hosts, leaving the VM virtual disks
on the same storage and accessible by multiple Hyper-V hosts. This speeds up the entire process of
moving VMs and eliminates the need for a Microsoft failover cluster for less critical VMs.
Figure 6) Hyper-V VM move options.
4.5 Types of Virtual Disks
Microsoft Hyper-V in Windows Server 2016 continues supporting the following Windows Server 2008 R2
virtual hard disk (VHD) styles:
Fixed VHD. Historically, this is the only type of VHD supported by NetApp.
Dynamic VHD. Based on the structure of this VHD, it has a misalignment problem that can cause performance issues with a NetApp array.
Differencing VHD. By nature, this type is less high-performing and is used only for user desktops.
Microsoft Hyper-V in Windows Server 2016 continues supporting the following Windows Server 2012
virtual hard disk (VHDX) styles:
Fixed VHDX. This type is similar to the VHD format and is still recommended as the primary choice for virtual disks stored on a NetApp array. It can be thin provisioned by NetApp using FlexClone and deduplication features of ONTAP.
Dynamic VHDX. Microsoft has fixed the misalignment problems of this type of virtual disks, and performance has greatly improved and is close to the performance of a fixed VHDX.
Differencing VHDX. By nature, this type is less high-performing and is used only for user desktops.
Given the preceding information, NetApp still recommends using a fixed VHD. There are no restrictions
for using any type of VHDX virtual disks.

16 Microsoft Hyper-V over SMB 3.0 with ONTAP: Best Practices © 2017 NetApp, Inc. All rights reserved.
4.6 Fast Provisioning of Virtual Disks Using ODX Feature
The ODX feature in ONTAP allows making copies of master VHDXs by simply copying a master VHDX
file hosted by a NetApp array. Because an ODX-enabled copy does not put any data on the network wire,
the copy process happens on the NetApp array and as a result can be up to six to eight times faster on a
10GB network. General considerations for fast provisioning include master SysPreped images stored on
file shares and regular copy processes initiated by the Hyper-V host machine.
4.7 Microsoft Windows Server 2016 Improvements
Windows Server 2016 provides various new computing, identity, management and automation,
networking, security, and storage features. This document discusses the improvements made to
computing features.
Windows Server 2016 offers a new installation option called Nano Server for Standard and Datacenter
editions. A Nano Server has the following characteristics:
Is a remotely administered server operating system
Provides optimization for private clouds and data centers
Supports only 64-bit applications, tools, and agents
Takes far less disk space and requires fewer updates
Provides significantly faster setup and restart
A Nano Server is ideal for the following scenarios:
As a compute host for Hyper-V virtual machines
As a storage host for scale-out file servers
As a DNS server
As a web server running Internet Information Services (IIS)
As a host for containers
This document is limited to discussing the Nano Server as a Hyper-V host. To know more about Nano
Server and its deployment, refer to Getting Started with Nano Server.
Hyper-V on Nano Server
Hyper-V on Nano Server works the same as Hyper-V on Windows Server in Server Core mode, except
for the following differences:
Managing the Hyper-V on Nano Server is always through remote management.
The remotely managed computer must be running the same build of Windows Server as the Nano Server.
RemoteFX is not available.
Nano Server Management
A Nano Server can be managed through the following methods:
Direct connection through Recovery Console, a full-screen text-mode logon prompt. Log on credentials are the ones provided in step 3 of deployment. This approach provides fewer options such as firewall rules, network adapters, and TCP/IP settings.
Remote connection from other Windows 2016 Servers using Windows PowerShell, Windows Management Instrumentation (WMI), Windows Remote Management (WinRM), and Emergency Management Services (EMS). This approach requires the IP address of the Nano Server.
Remote connection from another Windows 2016 Server using GUI management tools such as Server Manager, Services, Hyper-V Manager, and Failover Cluster Manager.
17 Microsoft Hyper-V over SMB 3.0 with ONTAP: Best Practices © 2017 NetApp, Inc. All rights reserved.
Provisioning SMB Share on Nano Server Nano Server does not require any additional client software to access data on the CIFS share on NetApp storage controllers.
To copy files from Nano Server to a CIFS share, run the following cmdlets on the remote server.
$ip = “<input IP Address of the Nano Server>”
# Create a New PS Session to the Nano Server
$session = New-PSSession -ComputerName $ip -Credential ~\Administrator
Copy-Item -FromSession $s -Path C:\Windows\Logs\DISM\dism.log -Destination \\cifsshareWhen
cifsshare is the CIFS share on a NetApp Storage Controller, copy the files to the Nano Server by
running the following cmdlet.Copy-Item -ToSession $s -Path \\cifsshare\<file> -Destination C:\
To copy the entire contents of a folder, specify the folder name and use the -Recurse parameter at the
end of the cmdlet.
5 SnapManager for Hyper-V 2.0
This section describes remote VSS capabilities of SnapManager for Hyper-V 2.0 (SMHV 2.0). Detailed
information about SMHV settings, configuration, and use cases is provided in separate technical reports
such as:
TR-4226: NetApp SnapManager 2.0 for Hyper-V on Clustered Data ONTAP 8.2 Best Practices Guide
TR-4234: NetApp SnapManager 2.0 for Hyper-V on Data ONTAP Operating in 7-Mode Best Practices Guide
TR-4355: NetApp SnapManager 2.1 for Hyper-V on Clustered Data ONTAP 8.3 Best Practices Guide
For more information, refer to the References section of this document.
The new version of SMHV is remote VSS enabled, meaning that SMHV can detect that a VM’s
configuration and virtual disk are stored on remote file shares hosted by a NetApp array. During a backup
process, SnapManager coordinates I/O activity on local Hyper-V hosts utilizing local VSS and Snapshot
captures of the NetApp volume hosting the remote file share. It does this while making sure that all virtual
disks are in an application-consistent state. SMHV v2.0 is aware of clustered Hyper-V hosts and
coordinates backup activities between all Hyper-V hosts in a Microsoft failover cluster. Currently, SMHV
v2 supports 16 Hyper-V nodes and 2,000 VMs.
Note: SnapManager for Hyper-V 2.0 currently does not support Windows Server 2016. It will be supported in future versions.
5.1 Remote VSS
Remote VSS features allow coordination of I/O operations between the host generating the I/O and the
remote host/appliance controlling the storage. The NetApp remote VSS components are described in
Figure 7.
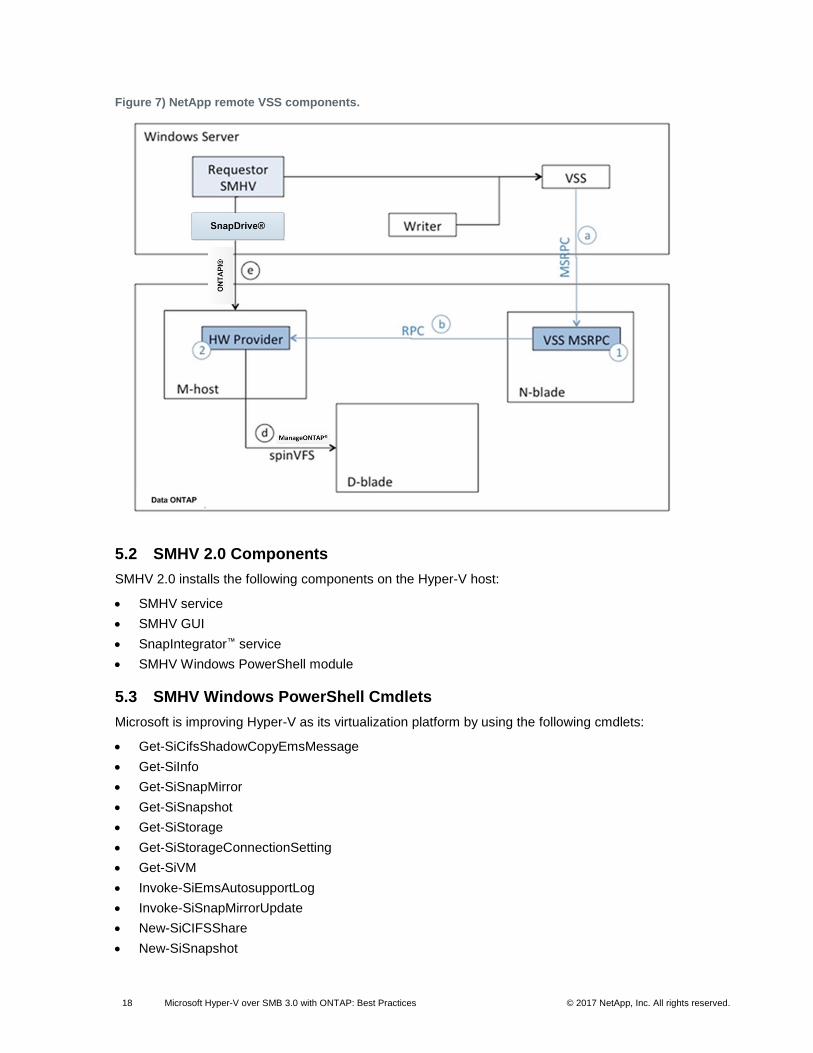
18 Microsoft Hyper-V over SMB 3.0 with ONTAP: Best Practices © 2017 NetApp, Inc. All rights reserved.
Figure 7) NetApp remote VSS components.
5.2 SMHV 2.0 Components
SMHV 2.0 installs the following components on the Hyper-V host:
SMHV service
SMHV GUI
SnapIntegrator™ service
SMHV Windows PowerShell module
5.3 SMHV Windows PowerShell Cmdlets
Microsoft is improving Hyper-V as its virtualization platform by using the following cmdlets:
Get-SiCifsShadowCopyEmsMessage
Get-SiInfo
Get-SiSnapMirror
Get-SiSnapshot
Get-SiStorage
Get-SiStorageConnectionSetting
Get-SiVM
Invoke-SiEmsAutosupportLog
Invoke-SiSnapMirrorUpdate
New-SiCIFSShare
New-SiSnapshot
19 Microsoft Hyper-V over SMB 3.0 with ONTAP: Best Practices © 2017 NetApp, Inc. All rights reserved.
New-SiVolume
Remove-SiSnapshot
Remove-SiStorageConnectionSetting
Rename-SiSnapshot
Restore-SiSnapshot
Set-SiStorageConnectionSetting
6 SMHV 2.0 Configuration and Operations
After SMHV is installed, the following settings must be configured:
Report settings
Notification settings
SnapInfo settings
Storage connection settings
These settings can be configured by running the configuration wizard.
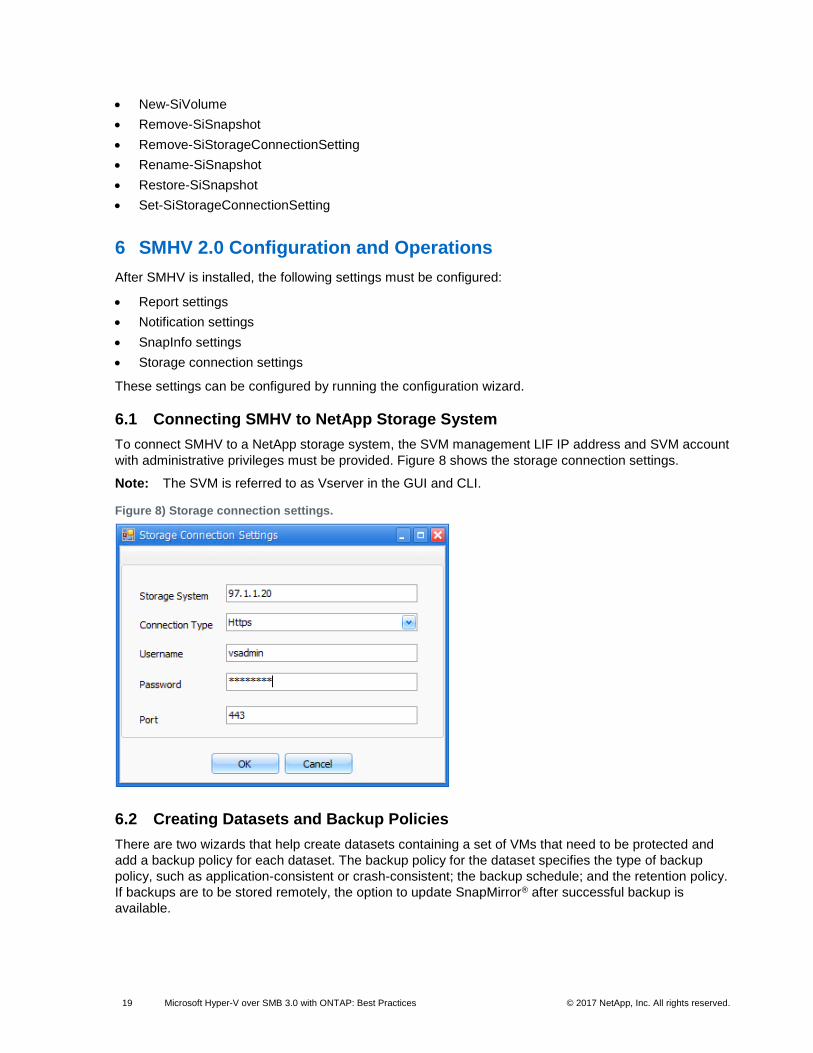
6.1 Connecting SMHV to NetApp Storage System
To connect SMHV to a NetApp storage system, the SVM management LIF IP address and SVM account
with administrative privileges must be provided. Figure 8 shows the storage connection settings.
Note: The SVM is referred to as Vserver in the GUI and CLI.
Figure 8) Storage connection settings.
6.2 Creating Datasets and Backup Policies
There are two wizards that help create datasets containing a set of VMs that need to be protected and
add a backup policy for each dataset. The backup policy for the dataset specifies the type of backup
policy, such as application-consistent or crash-consistent; the backup schedule; and the retention policy.
If backups are to be stored remotely, the option to update SnapMirror® after successful backup is
available.
20 Microsoft Hyper-V over SMB 3.0 with ONTAP: Best Practices © 2017 NetApp, Inc. All rights reserved.
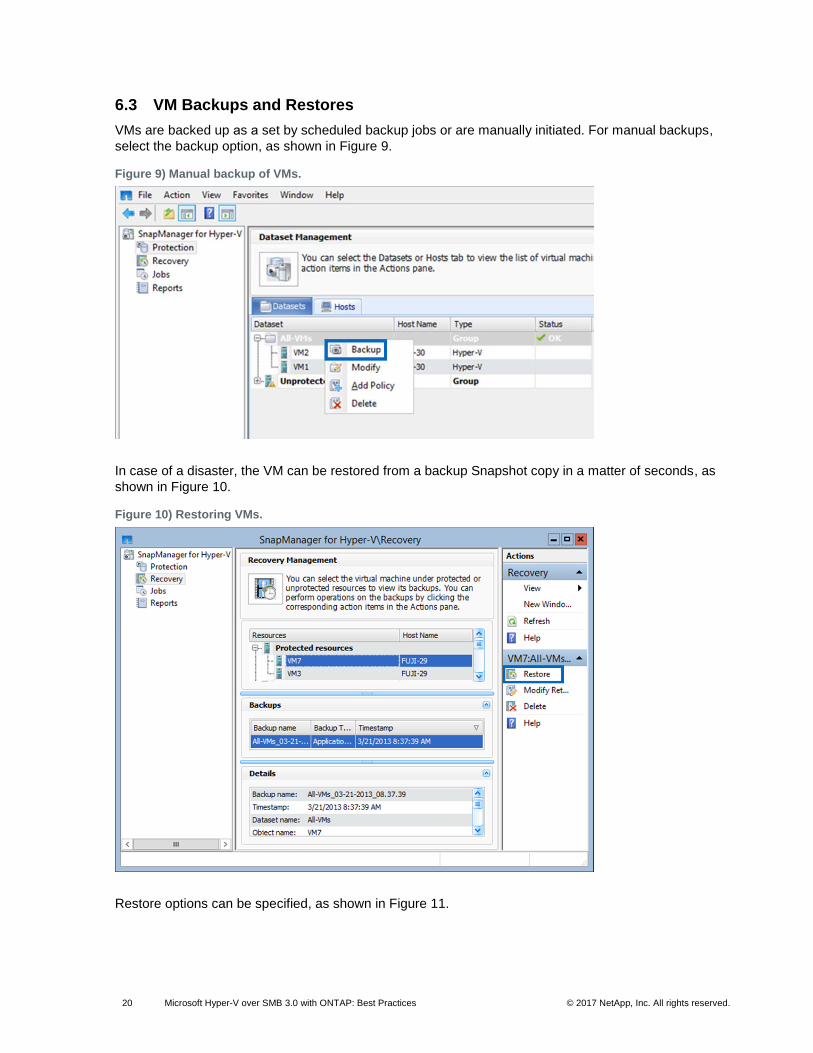
6.3 VM Backups and Restores
VMs are backed up аs а set by scheduled backup jobs or are manually initiated. For manual backups,
select the backup option, as shown in Figure 9.
Figure 9) Manual backup of VMs.
In case of a disaster, the VM can be restored from a backup Snapshot copy in a matter of seconds, as
shown in Figure 10.
Figure 10) Restoring VMs.
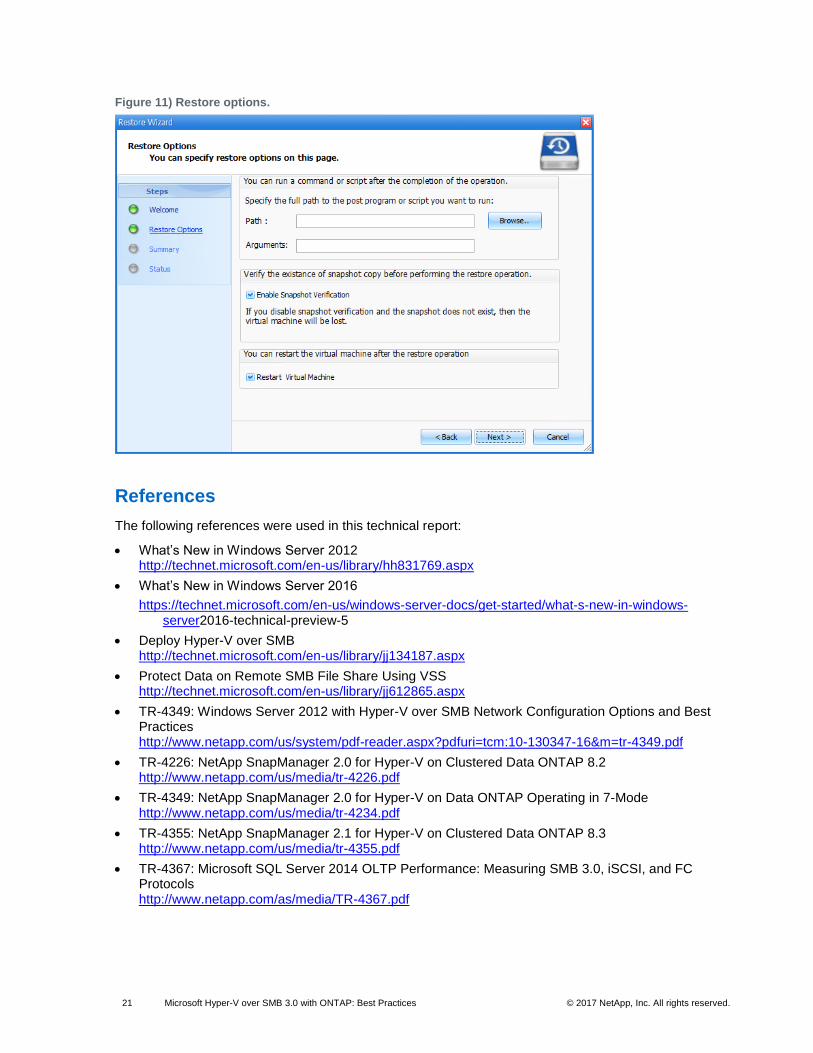
Restore options can be specified, as shown in Figure 11.
21 Microsoft Hyper-V over SMB 3.0 with ONTAP: Best Practices © 2017 NetApp, Inc. All rights reserved.
Figure 11) Restore options.
References
The following references were used in this technical report:
What’s New in Windows Server 2012 http://technet.microsoft.com/en-us/library/hh831769.aspx
What’s New in Windows Server 2016
https://technet.microsoft.com/en-us/windows-server-docs/get-started/what-s-new-in-windows-server2016-technical-preview-5
Deploy Hyper-V over SMB http://technet.microsoft.com/en-us/library/jj134187.aspx
Protect Data on Remote SMB File Share Using VSS http://technet.microsoft.com/en-us/library/jj612865.aspx
TR-4349: Windows Server 2012 with Hyper-V over SMB Network Configuration Options and Best Practices http://www.netapp.com/us/system/pdf-reader.aspx?pdfuri=tcm:10-130347-16&m=tr-4349.pdf
TR-4226: NetApp SnapManager 2.0 for Hyper-V on Clustered Data ONTAP 8.2 http://www.netapp.com/us/media/tr-4226.pdf
TR-4349: NetApp SnapManager 2.0 for Hyper-V on Data ONTAP Operating in 7-Mode http://www.netapp.com/us/media/tr-4234.pdf
TR-4355: NetApp SnapManager 2.1 for Hyper-V on Clustered Data ONTAP 8.3 http://www.netapp.com/us/media/tr-4355.pdf
TR-4367: Microsoft SQL Server 2014 OLTP Performance: Measuring SMB 3.0, iSCSI, and FC Protocols http://www.netapp.com/as/media/TR-4367.pdf
22 Microsoft Hyper-V over SMB 3.0 with ONTAP: Best Practices © 2017 NetApp, Inc. All rights reserved.
Version History
Version Date Author Document Version History
Version 1.0 January 2015 Pavel Lobanov, John Reed
Initial release
Version 1.1 February 2017 Brahmanna Chowdary Kodavalli, Shashanka S R
ONTAP 9 and Windows Server 2016 update
23 Microsoft Hyper-V over SMB 3.0 with ONTAP: Best Practices © 2017 NetApp, Inc. All rights reserved.
Refer to the Interoperability Matrix Tool (IMT) on the NetApp Support site to validate that the exact product and feature versions described in this document are supported for your specific environment. The NetApp IMT defines the product components and versions that can be used to construct configurations that are supported by NetApp. Specific results depend on each customer’s installation in accordance with published specifications.
Copyright Information
Copyright © 1994–2017 NetApp, Inc. All rights reserved. Printed in the U.S. No part of this document covered by copyright may be reproduced in any form or by any means—graphic, electronic, or mechanical, including photocopying, recording, taping, or storage in an electronic retrieval system—without prior written permission of the copyright owner.
Software derived from copyrighted NetApp material is subject to the following license and disclaimer:
THIS SOFTWARE IS PROVIDED BY NETAPP “AS IS” AND WITHOUT ANY EXPRESS OR IMPLIED WARRANTIES, INCLUDING, BUT NOT LIMITED TO, THE IMPLIED WARRANTIES OF MERCHANTABILITY AND FITNESS FOR A PARTICULAR PURPOSE, WHICH ARE HEREBY DISCLAIMED. IN NO EVENT SHALL NETAPP BE LIABLE FOR ANY DIRECT, INDIRECT, INCIDENTAL, SPECIAL, EXEMPLARY, OR CONSEQUENTIAL DAMAGES (INCLUDING, BUT NOT LIMITED TO, PROCUREMENT OF SUBSTITUTE GOODS OR SERVICES; LOSS OF USE, DATA, OR PROFITS; OR BUSINESS INTERRUPTION) HOWEVER CAUSED AND ON ANY THEORY OF LIABILITY, WHETHER IN CONTRACT, STRICT LIABILITY, OR TORT (INCLUDING NEGLIGENCE OR OTHERWISE) ARISING IN ANY WAY OUT OF THE USE OF THIS SOFTWARE, EVEN IF ADVISED OF THE POSSIBILITY OF SUCH DAMAGE.
NetApp reserves the right to change any products described herein at any time, and without notice. NetApp assumes no responsibility or liability arising from the use of products described herein, except as expressly agreed to in writing by NetApp. The use or purchase of this product does not convey a license under any patent rights, trademark rights, or any other intellectual property rights of NetApp.
The product described in this manual may be protected by one or more U.S. patents, foreign patents, or pending applications.
RESTRICTED RIGHTS LEGEND: Use, duplication, or disclosure by the government is subject to restrictions as set forth in subparagraph (c)(1)(ii) of the Rights in Technical Data and Computer Software clause at DFARS 252.277-7103 (October 1988) and FAR 52-227-19 (June 1987).
Trademark Information
NETAPP, the NETAPP logo, and the marks listed at http://www.netapp.com/TM are trademarks of NetApp, Inc. Other company and product names may be trademarks of their respective owners.