Embed Size (px)
Citation preview
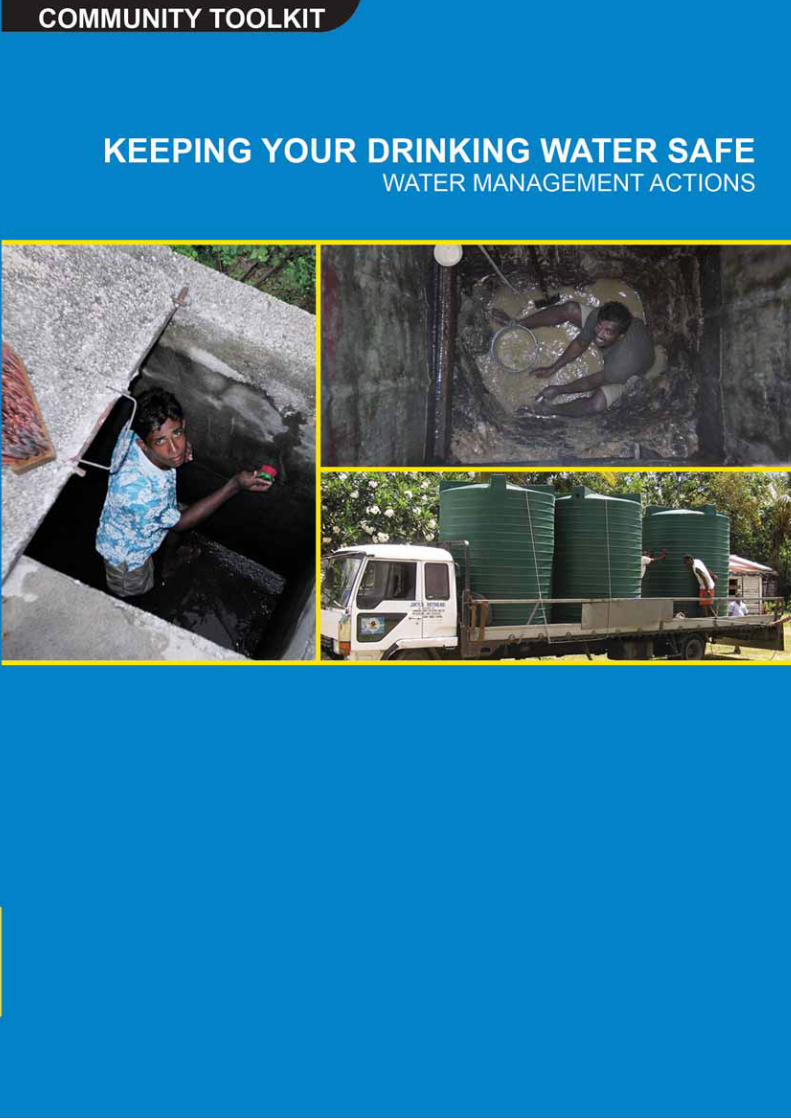
Tool for Water Management Actions
The Tool for Water Management Actions is part of the Keeping Your Drinking Water Safe Community Toolkit developed by Live & Learn Environmental Education. The toolkit is designed to be used by Community Trainers, Health Officers, Community Workers, and Facilitators, to raise awareness about the need to keep water clean and promote responsible attitudes, behaviour and actions to ensure safe and lasting drinking water supplies.
Live & Learn Environmental Education is thankful to those who have contributed to the development of the ‘Keeping Your Drinking Water Safe Community Toolkit’. They include:
� The Australian Agency for International Development (AusAID), for funding the 2-year Pacific Drinking Water Safety Plan Programme, which provided financial support for production of this valuable resource. � The World Health Organization (WHO) and the Pacific Islands Applied Geoscience Commission (SOPAC) for support, guidance and advice during the development of the toolkit. � The Institute of Applied Science University of the South Pacific, for reviewing the scientific and technical information presented in this toolkit.� The Government agencies, in-country partners and people of Fiji, Vanuatu, Cook Islands, Tonga, Palau, Samoa, who provided valuable lessons learned.� The Water & Sewerage Department, Curriculum Development Unit, National Water Quality Monitoring Laboratory and Ministry of Health, Fiji� Helti Pasifik Komuniti Program, The Foundation of the Peoples of the South Pacific International (FSPI) and affiliates.
The Keeping Your Drinking Water Safe Community Toolkit contains:� An Introductory Booklet containing background information and annexes� Tool for Conducting a Water Audit � Tool for Conducting Sanitary Surveys� Tool on Snapshots to Monitoring Water Sources � Tool For Water Quality Monitoring Using The Hydrogen-Sulphide (H2S) Paper-Strip Test � Tool on Water Awareness and Education � Tool for Water Management Actions� H2S Comic and Paper-strip test Instruction Flipchart
This document is an output of a regional programme funded by AusAID, for effective management of drinking water supplies in Pacific Island Countries. The views expressed are not necessarily that of AusAID, World Health Organization and/or the Pacific Islands Applied Geoscience Commisssion.
Developed by:Live & Learn Environmental Education87 Gordon Street, SuvaPrivate Mail Bag, Suva, FIJIPh: +679 331 5868; Fax: +679 330 5868Email: [email protected]
Any part of this publication, including the illustrations (except items taken from other publications) may be copied, reproduced or adapted to address local needs and situations provided the parts are used for non-commercial purposes such as training.

CONTENTS
WATER MANAGEMENT ACTIONS
Introduction 2
Treating Your Drinking Water SupplyFact Sheet: Emergency Disinfection of Community Water Sources using Chlorine 6
Fact Sheet: Some Water Treatment Tips 8
Caring For Your Wells and Rainwater TanksFact Sheet: Maintaining Freshwater in Wells 10
Fact Sheet: Preventing Well Contamination 12
Fact Sheet: Securing Rainwater Drinking Supplies 16
Fact Sheet: Taking Care of your Rainwater Tank 21
Rainwater Harvesting ToolsFact Sheet: Parts of a Rainwater Harvesting System 22
Fact Sheet: Rainwater and Health 23
Fact Sheet: Contaminants Found in Rainwater Collecting Systems 24
Fact Sheet: Maintenance and Repair of Rainwater Harvesting Systems 25
Fact Sheet: Advantages and Disadvantages of the Rainwater Harvesting Systems
for Domestic Water Supply 27
Fact Sheet: Checklist for Assessing the Appropriateness and Viability of
Rainwater Harvesting 28
Fact Sheet: Guide to Sizing of Gutters and Down Pipes for Rainwater
Harvesting Systems in Tropical Regions and Lessons Learnt 29
Fact Sheet: Comparison of Different Storage Tank Types 30
Wastewater Management and Water Conservation ActionsFact Sheet: Managing Wastewater 32
Fact Sheet: Banana Circles – A Practical Wastewater Management Activity 33
Case Study on Wastewater Management 34
Fact Sheet: Snapshots From HOPE 35
1
Making a Difference!
Community water-quality monitoring builds the capacity of communities and individuals to: � Describe water resources and identify problems faced in relation to water quality, use and management, � Develop plans and set goals to improve water quality, � Develop and implement actions to improve water quality and water management, and � Evaluate the effectiveness of actions.
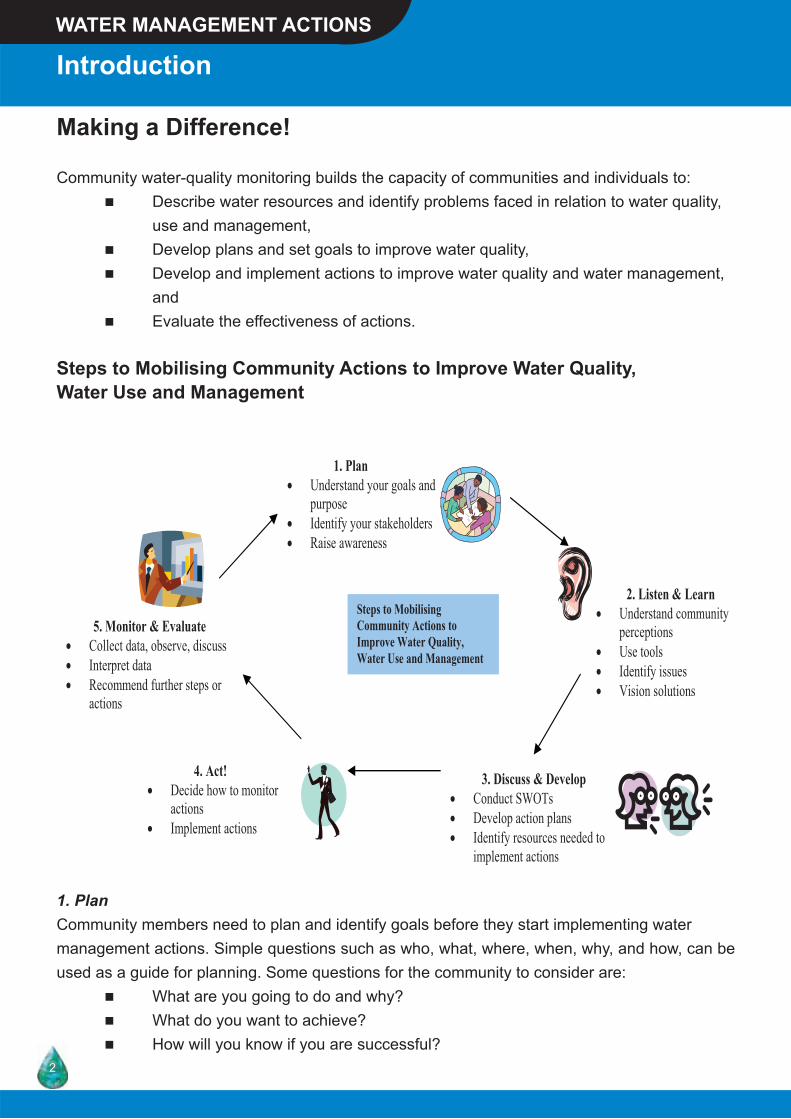
Steps to Mobilising Community Actions to Improve Water Quality,Water Use and Management
1. PlanCommunity members need to plan and identify goals before they start implementing water management actions. Simple questions such as who, what, where, when, why, and how, can be used as a guide for planning. Some questions for the community to consider are: � What are you going to do and why? � What do you want to achieve? � How will you know if you are successful?
1. Plan • Understand your goals and
purpose • Identify your stakeholders • Raise awareness
5. Monitor & Evaluate • Collect data, observe, discuss • Interpret data • Recommend further steps or
actions
4. Act! • Decide how to monitor
actions • Implement actions
3. Discuss & Develop • Conduct SWOTs • Develop action plans • Identify resources needed to
implement actions
2. Listen & Learn • Understand community
perceptions • Use tools • Identify issues • Vision solutions
Steps to Mobilising Community Actions to Improve Water Quality, Water Use and Management
Introduction
2
WATER MANAGEMENT ACTIONS

It is important to identify stakeholders to support the implementation of community water management actions. Things to think about include: � Who will the community work with and why? � Are the different groups in the community represented as stakeholders? Plan for ways to get the most effective support from the community and stakeholders for water management actions and to reduce any barriers that may affect the actions.
Raising awareness in the community about water issues is important in order to get community support and promote informed decision- making. If conducting awareness raising sessions or workshops, consider: � How long the activities will take, � Whether the timing is suitable for all groups within the community, � The location, skills and resources needed.
2. Listen & LearnTo effectively mobilize community action, it is important to listen and learn about different viewpoints or perceptions in the community. Keep notes on what is said by the different groups in the community, and facilitate discussions in order to get a common understanding and agreement about community needs, goals, priorities and proposed actions.
Various tools for community water- quality monitoring can be used to find out more about the water situation in the community. These and other tools such as focus group discussions, mapping and ranking, help communities to participate in identifying their problems, visioning or setting goals to improve their situation, and developing practical solutions to their problems.
3. Discuss, Develop & Act!It is important to discuss and develop strategies to mobilize the community to take ownership for water management actions. There are often several solutions to the problems, or several actions that are proposed to address community problems. Some factors to consider when discussing and developing water management actions include: � Is the action simple and practical? � Does the action improve the situation? � Does everyone benefit from it and does it help bring people together? � What resources and skills are needed? � Is it sustainable? Is external support needed to continue?A good way to begin would be to list possible actions and conduct a SWOT analysis.
•
d to
INTRODUCTION
3
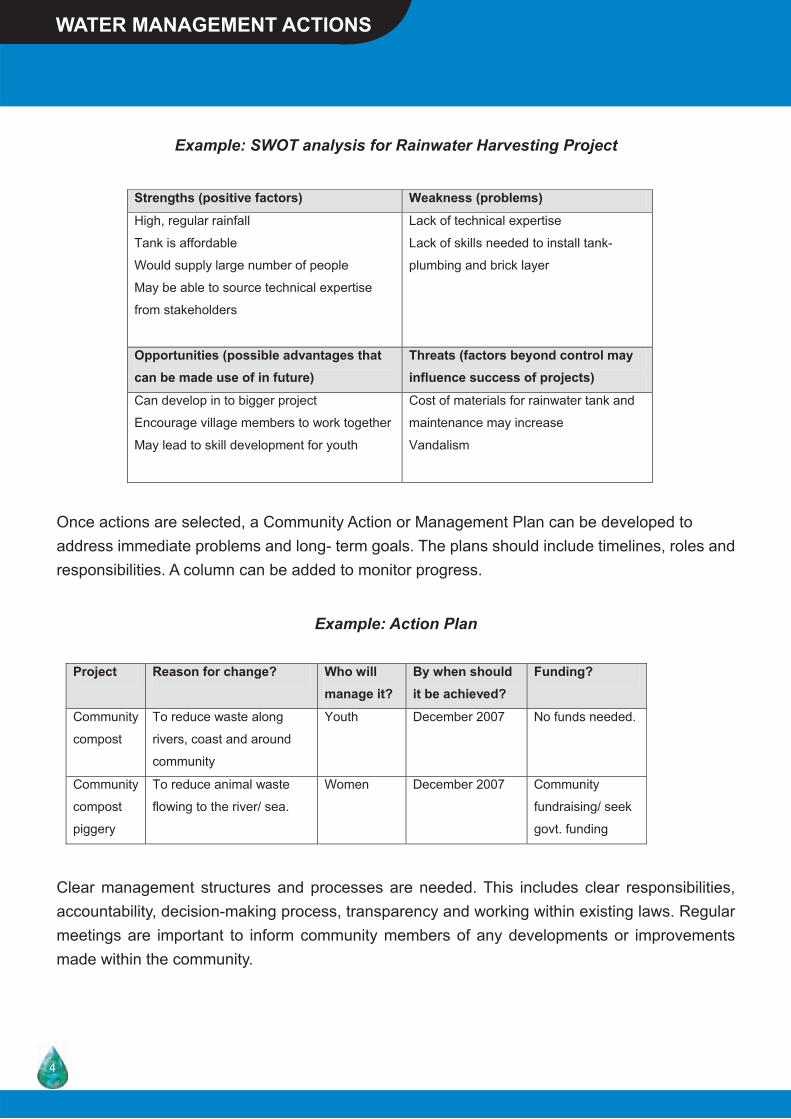
Once actions are selected, a Community Action or Management Plan can be developed to address immediate problems and long- term goals. The plans should include timelines, roles and responsibilities. A column can be added to monitor progress.
Clear management structures and processes are needed. This includes clear responsibilities, accountability, decision-making process, transparency and working within existing laws. Regular meetings are important to inform community members of any developments or improvements made within the community.
Strengths (positive factors) Weakness (problems)
High, regular rainfall
Tank is affordable
Would supply large number of people
May be able to source technical expertise
from stakeholders
Lack of technical expertise
Lack of skills needed to install tank-
plumbing and brick layer
Opportunities (possible advantages that can be made use of in future)
Threats (factors beyond control may influence success of projects)
Can develop in to bigger project
Encourage village members to work together
May lead to skill development for youth
Cost of materials for rainwater tank and
maintenance may increase
Vandalism
Example: SWOT analysis for Rainwater Harvesting Project
Example: Action Plan
Project Reason for change? Who will manage it?
By when should it be achieved?
Funding?
Community
compost
To reduce waste along
rivers, coast and around
community
Youth December 2007 No funds needed.
Community
compost
piggery
To reduce animal waste
flowing to the river/ sea.
Women December 2007 Community
fundraising/ seek
govt. funding
WATER MANAGEMENT ACTIONS
4

4. Monitoring And Evaluating Your ProgressConsistently monitor the changes and actions that are taking place to improve water use and management. Monitoring and evaluation is important: � It provides an opportunity for community members to reflect on their plans and their actions, and get feedback about what worked well and any changes that need to be made, � Evaluation should be a time for group or community members to look back at what they have achieved and celebrate achievements, � It should also be used to critically look at what didn’t work, the reasons why and what the group wants to do about it.
Methods Of Monitoring And Evaluation
� General verbal feedback during meetings asking people to share their feelings and thoughts on plans and actions.� Go through the list of expectations and ask if these have all been met.� Distribute evaluation forms.� Use a monitoring and evaluation checklist.
INTRODUCTION
5

Instructions for the temporary disinfection of contaminated wells and rainwater tanks in the occurrence of a waterborne disease outbreak.
Step 1: CALCULATE HOW MUCH CHLORINE IS REQUIRED FOR DISINFECTION
To obtain the recommended safe chlorine residual of 0.3 mg/l, if using bleaching powder that is 30% chlorine, use the quantities given below.
Rainwater Tanks
Capacity of Rainwater Tank Quality of Chlorine Full rainwater tank of 250 litres 1 level teaspoon
Full rainwater tank of 500 litres 2 level teaspoon Full rainwater tank of 1000 litres 4 level teaspoon
NB: Make sure that the teaspoons are level and not heaped. If the tanks are half full then use half the quantity of bleaching powder. If they are a quarter full use a quarter of the quantity and so on.
Step 2: CHLORINATING THE RAINWATER TANK OR GROUNDWATER WELL
The bleaching powder should be thoroughly mixed with 5 liters of clean water. Add the powder to the water, never the other way around.Once mixed, the white calcium carbonate deposit should be removed by filtering the solution though a fine muslin filter. The clear solution can then be slowly added to the well and the well water and stirred.
Ground Water Wells
For A One Meter Diameter Well Depth of water from the bottom of well to water surface is 1 meter
ONE THIRD of a level teaspoon
Depth of water from the bottom of well to water surface is 2 meters
TWO THIRDS of a level teaspoon
Depth of water from the bottom of well to water surface is 3 meters
ONE level teaspoon
Emergency Disinfection of Community Water Sources using Chlorine
6
TREATING DRINKING WATER SUPPLY

FACT SHEET
SAFETY PRECAUTIONS!
• Take care when handling bleaching powder and the solution. Do not inhale the powder. • Wear rubber gloves, goggles and a mask when handling the powder and the solution. • Wash any spilt solution or powder with excess amounts of water. • Any contamination to the eyes should be immediately and thoroughly washed with fresh water and a doctor consulted as soon as possible. • DO NOT store bleaching powder near any oil or diesel fuel - if it mixes it will explode! • Keep all bleaching powder containers tightly closed and in a dry cool place. Store off the floor. • Always store the chlorine solution out of sunlight and keep container covered.
These instructions are for temporary disinfection of community wells and rainwater tanks. Once the rainwater tanks fill with further rain they can no longer be considered disinfected and the procedure would have to be repeated. Groundwater wells will become contaminated within several days as the water circulates if the contamination source is not identified and removed.
7

Water is treated to kill and remove dangerous bacteria in the water; and improve the colour, odour and taste of water. Types of water treatment include:
USING FILTERS or FILTERING � This is placed over the tap and is made up of carbon. � They are a very good way of removing dirt and chlorine from the water, but they do not remove bacteria or viruses. � These filters should be changed regularly or bacteria will grow in them and contaminate the water. � Do not place a cloth/fabric over the tap because it can introduce bacteria into the water.
USING BLEACH or BLEACHING � Using laundry bleach is an inexpensive way to kill bacteria and algae in the water tank. � Bleach your tank on a monthly basis, or if it is during rainy periods, at least once a week. � Given below is a table showing the amount of bleach to use for the different volumes of water:
Water Volume Regular Bleach 4.5 litres 3 Drops
23 litres 10 Drops or ¼ teaspoon 250 litres 2 teaspoons 450 litres 1 tablespoon 900 litres 2 tablespoons
2300 litres 5 tablespoons or 1/3 cup 3900 litres 10 tablespoons or 2/3 cup 4500 litres 12 tablespoon or ¾ cup
� The above table is based on the assumption that the water tank is full, clean and has a cover. � If your tank is not clean, you must clean it out in order for the bleach to be effective; otherwise your tank will remain contaminated. � To add bleach to your tank, measure it with a measuring cup and pour it into a bucket of clean water, then pour the bucket into the tank. This will result in an even distribution of the bleach. � The tank must be covered and not used for at least 2 hours for the bleach to be effective.
SOME WATER TREATMENT TIPS
8
TREATING DRINKING WATER SUPPLY
� To get rid off the smell of bleach before drinking the water, pour the water into a clean container, filling it to the top. Put a lid on it (or cover it), leaving a small amount of air in the container and let the container sit at room temperature or leave it in the fridge overnight. By the next day, the smell of chlorine will have left the water.
BOILING WATER � Boiling is the best way to kill bacteria, viruses and parasites.
Proper Boiling Water Procedures:1. Choose a clean pot that is big enough to hold water and a lid
that fits
2. Don’t fill the pot all the way up as you need more room for water
to bubble
3. Place the pot on the stove and turn the heat to high. If you want to speed the process
cover the pot with the lid
4. Keep checking the pot to see how the water is doing
5. Check to see if the water is boiling and leave it to boil for another 1 minute until you see big air bubbles. Wait for bubbles that rise to the top of the pot
6. After boiling let it stand to cool down before pouring into a jug ready to be used.
ADVANTAGES OF BOILING WATER
• Pathogens that might be lurking in your water will be killed if the water is boiled at least 1 minute at full boil.• Boiling will also drive out some of the Volatile Organic Compounds (VOCs), bacteria and pathogens that cause water borne disease.
9
FACT SHEET

Why Is There Freshwater In The Ground?All small islands are surrounded by the sea that is salty. The rain, which falls on the island, is fresh. About a third of this rainfall will soak into the ground and infiltrate into the coral sand. This water collects in the sand and forms a body of freshwater. The freshwater is not very thick however (typically 2-7m on smaller islands) and floats on salt water that is underneath it, that has entered the sand below the sea level. The infiltrated freshwater eventually flows out to the sea.
Why Does The Groundwater Salinity Vary?The freshwater body or lens is surrounded by the sea. The seawater also tries to get into the islands coral sand, but is pushed out by the freshwater entering from the rainfall. However the nearer you get to the coast the closer you are to the sea, and the easier it is for seawater to come into the land. At the coast there is a thinner freshwater lens so the groundwater becomes brakish. In general, the further inland a well is located, the greater the thickness of the freshwater lens and the fresher the water.
Why Does My Well Water Get More Salty During The Dry Season?During the dry season the amount of rainfall is reduced and the amount of freshwater entering the freshwater lens becomes less. This means the freshwater flows within the groundwater are reduced and that more seawater can enter the island. The freshwater lens then gets thinner. If you live towards the edge of your island, you will notice your well water getting saltier during the dry season.
Maintaining Freshwater in Wells
10
CARING FOR WELLS & RAINWATER TANKS
Source: Live & Learn Environmental Education

A pumped well abstracts more groundwater than a well with a bucket. This reduces the amount fresh groundwater available to push out the seawater, and so pumped wells tend to be more prone to salt water intrusion. There is a relationship between the height of the freshwater level above the sea level and the amount of freshwater in the lens below sea level. Generally for every 1cm of freshwater above mean sea level there is 20 cm of freshwater below it. So when a pumped well lowers the water level in the well by too much, the freshwater lens thickness below the well reduces and saline water comes up and into the well. This is known as saline up-coming. The more water you take from your well, the more likely it will become saltier.
How Can I Make My Well Water Less Salty?There are several simple things you can do to make your well water as fresh as possible. These are listed below: � Direct your rainwater tank overflow either directly into your well or into the ground next to your well. If you are not collecting all the water off your roof for rainwater harvesting then catch the rest and route it into the well. � Construct your well with small holes in the side of your well wall lining below the water level. This allows very shallow fresh water to enter the well. This will be fresher than water entering the well through its base alone. � Make sure your pump is of as low an abstraction rate as possible. Large pumps will provide your water more quickly but reduce the water level in the well by a greater amount too. � Ideally get your pump to feed a water storage tank next to your roof, and pump to it at a constant and low rate day and night. The storage tank can then provide your daily supply under gravity. This will minimize water the lowering of the well water level. � Only take the water you need. Do not waste water. � If you have a flush toilet, use smaller flush tanks (small 6 L tanks) as less water is required for flushing than if you use a 12 L tank.
FACT SHEET
11

Health Risks From Drinking Contaminated Well WaterMany surveys of well water show that well water is generally of worse quality than rainwater. It usually has about 100 times more bacteria in it and is 100 times more salty than rainwater. Some wells also contain contamination from septic tanks.
If you drink well water that contains too much bacteria then it will make you sick, and give you diarrhoea and vomiting. This can lead to dehydration and for vulnerable people (children and the elderly) even death.
When people get infected with diseases such as diarrhoea, typhoid and hepatitis A, their excreta will contain large amounts of the germs, which cause the disease. When people defecate in the open, flies will feed on the excreta and can carry excreta on their bodies. When they touch food excreta and germs are passed on the food. Where there are germs there is always a risk of disease.
During the rainy season, excreta may be washed away by rainwater and can run into wells contaminating the wells.
In many cultures it is believed that children’s faeces are harmless and do not cause disease. This is not true. A child’s faeces contain as many germs as an adult’s, and it is very important to collect and dispose of children’s faeces quickly and safely.
Many common diseases that can give diarrhoea can spread from one person to another. Disposing of excreta safely, preventing faecal contamination of water supplies and improving personal hygiene particularly hand washing with soap (at critical times such as after going to the toilet, before eating and food preparation) would greatly reduce the spread of diseases.
Risk Of Contamination At The WellThere are a number of factors that affect the vulnerability of your well and therefore the likelihood of your well becoming contaminated. These are:
Condition Of The WellThe well consists of a circular wall, rising above ground level, and penetrating usually 1.5-2.0m into the ground. The well is usually open at the base. Any cracks in the wall will enable water to enter the well without first passing through the ground. This means water contaminated at the ground surface from household activities can get rapidly into the well.
Water often gets spilt around the well, when pouring it into jugs and bowls. Water spilling onto the ground will infiltrate back into the well and may carry contaminants from household activities with it. The concrete floor around the well must be free from cracks to avoid contamination of the well from used water.
Water used after washing may cause ponding around the well if there is no proper drainage channel to direct water away from the well.
PREVENTING WELL CONTAMINATION
12
CARING FOR WELLS & RAINWATER TANKS

Many wells do not have a cover on them. This means insects (especially mosquitoes), small animals and debris can fall into the well.
As some people believe that children’s faeces are safe and do not contain germs, proper attention is not given in disposing of children’s faeces safely. Disposing of faeces or cleaning soiled clothes must not be done near the well.
Septic Tank DischargeSurveys show that the main source of contamination of well water is septic tanks. Septic tanks discharge toilet effluent into the ground after some treatment, but the effluent that leaves the tank is still very rich in bacteria, nitrate and ammonia. These compounds contaminate groundwater.
The condition, size and maintenance of the household septic tank are contributing factors to affecting the water quality in your well. If the septic tank is cracked or broken, untreated effluent will leak from the tank into the ground. If the tank is too small for your household then the effluent will not stay in the tank long enough for it to be treated. If you don’t clean out the sludge from your tank then it won’t treat the effluent so effectively.
13
FACT SHEET
Source: SOPAC
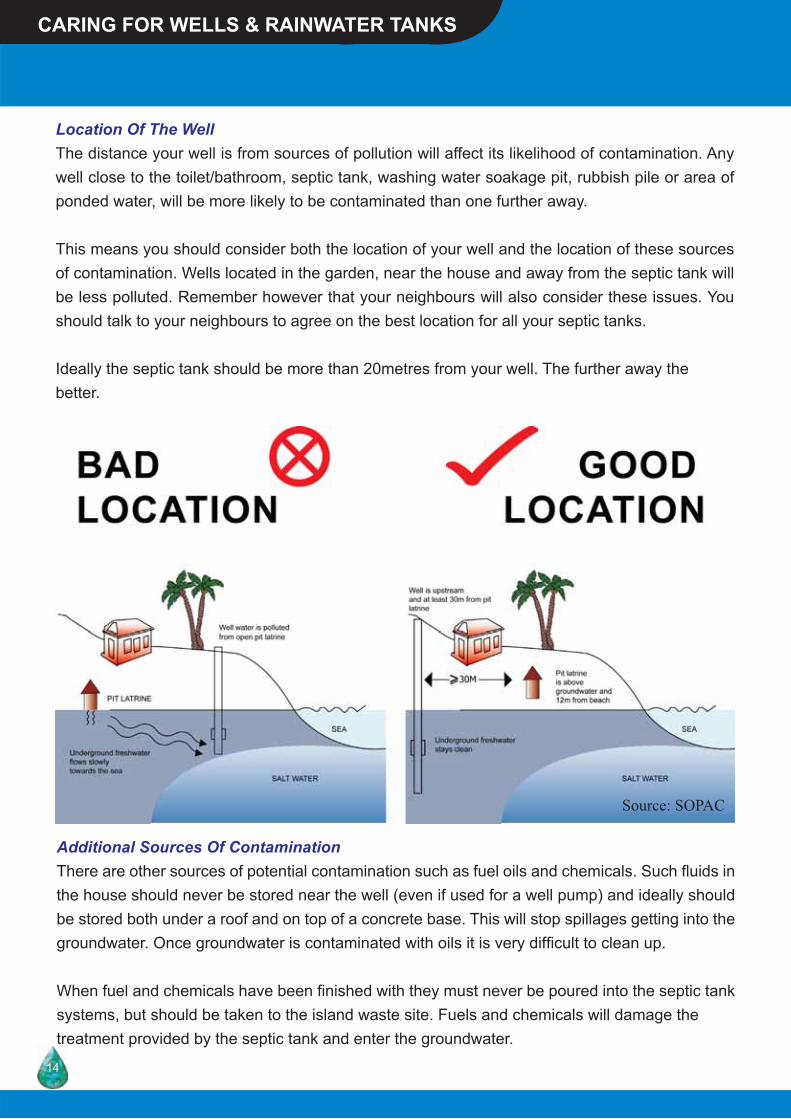
Location Of The WellThe distance your well is from sources of pollution will affect its likelihood of contamination. Any well close to the toilet/bathroom, septic tank, washing water soakage pit, rubbish pile or area of ponded water, will be more likely to be contaminated than one further away.
This means you should consider both the location of your well and the location of these sources of contamination. Wells located in the garden, near the house and away from the septic tank will be less polluted. Remember however that your neighbours will also consider these issues. You should talk to your neighbours to agree on the best location for all your septic tanks.
Ideally the septic tank should be more than 20metres from your well. The further away the better.
Additional Sources Of ContaminationThere are other sources of potential contamination such as fuel oils and chemicals. Such fluids in the house should never be stored near the well (even if used for a well pump) and ideally should be stored both under a roof and on top of a concrete base. This will stop spillages getting into the groundwater. Once groundwater is contaminated with oils it is very difficult to clean up.
When fuel and chemicals have been finished with they must never be poured into the septic tank systems, but should be taken to the island waste site. Fuels and chemicals will damage the treatment provided by the septic tank and enter the groundwater.
14
CARING FOR WELLS & RAINWATER TANKS
Source: SOPAC
Significant fuel stores should be stored under roofing, and on a concrete slab covered by theroofing. The slab should have a bounded edge that would enable all the fuel to be held within it should the fuel store leak. Any leak can then be cleared up and removed to the island waste site for incineration. Washing water will contain detergents. The washing water catch pit can also contaminate your groundwater but to a much lesser extent than the septic tank.
Actions To Reduce Well Contamination And Improve Well Water QualityThere are some easy steps you can take to improve the protection of your well and therefore improve its water quality. These are listed below:
� Repair all cracks to the well walls regularly and make sure it is adequately sealed. � Remove all debris from around the well. � Put a metal well cover with a hinged lid on the top of the well. � Build a concrete apron around the well, which will direct spills and rainwater away from the well. These can be channeled into pipe and flow further away from the wellhead. � Make sure the water bucket does not stand on the floor and has a hanger to keep it in the air. � Clean the water bucket, ideally with bleach, once a week. � Repair any cracks seen on the septic tank. � Empty the septic tank at least once a year of its sludge and dispose correctly. � If you build a new septic tank make sure it is big enough for your household. Get advice from health offices on the design of your septic tank. � If you build a new septic tank locate it as far away from your well as possible. Check with your neighbours on the locations of their wells as these might be close to where you intend to put your septic tank. � Move the washing water catch pit away from the well area. � Store fuel oils and chemicals away from the well area. � If you dig a new well make sure it is near to the house and far away from the septic tank. � Put the rainwater tank overflow pipe into the well. Rainwater has less salt and bacteria than groundwater and contains no nitrate and ammonia. The rainwater will dilute the groundwater and improve the well water quality. It will also help keep the septic tank effluent in the groundwater away from the well. � Do not dispose garbage or excreta near the well (at least 15m). � Repair any cracks in the concrete floor around the well.
15
FACT SHEET

Many surveys confirm rainwater is 100 times fresher than groundwater, and 100 times cleaner than groundwater from bacteria. This is because sea water and pollution from septic tanks, fuel cans, and household chemicals cannot get into your tank, but they can and do get into your water well. Drinking rainwater from a clean protected rainwater tank will keep you healthy. Drinking well water may make you sick.
It is important therefore to make sure your rainwater harvesting is correctly sized to provide water throughout the dry season, and that you keep the roof and rainwater tanks clean. This fact sheet tells you how to improve the amount and the quality of the rainwater you collect off your roof. Maintaining this water supply is the responsibility of the household and community.
Health Risks From Drinking Contaminated RainwaterWhen rain falls it is very clean and contains no bacteria and very little salt. But when it lands on your house it flows over the roof into the gutters, down the down-pipe and into the tank, and can pick up dirt and bacteria.
SECURING RAINWATER DRINKING SUPPLIES
16
CARING FOR WELLS & RAINWATER TANKS
Source: Live & Learn

WHAT SHOULD BE CONSIDERED WHEN HARVESTING RAIN WATER?Clean The Roof And Gutters � If you keep your roof and gutters clean you will reduce the amount of dirt and bacteria going into your tank. � You should clean your roof once a month, and your gutters once a week. � Make sure the first flush valve is open before you wash the roof – as you don’t want wash water in the tank. � It is easier to stop the roof from getting dirty than cleaning it. Make sure no branches overhang the roof as these will attract birds, bats and insects, and allow rats to jump onto the roof. All these creatures may defecate on the roof, which will make the rainwater dirty.
Put On A Down pipe Filter � Where your gutters empty into the down pipe, pests can also crawl. Put a small grill over the entrance to the down pipe. If you can afford some wire mesh, this will work well and also stop larger pieces of debris being washed into the tank. � A filter that allows water to run through (but no mosquitoes) will be even better. � Clean the filter each time you clean the gutter.
Source: Live & Learn
FACT SHEET
17

Use A ‘First Flush’ Valve � Use a first flush valve- this is a valve which when open prevents the water from entering the tank. You should leave this valve open, when it is not raining. When it starts to rain, let the water flow off the roof and past the open-valve for 5 minutes. This prevents the dust and dirt that may be on the roof entering your tank. � After 5 minutes close the valve and the water will flow into the tank. This water will be much cleaner than if you hadn’t used the First Flush technique. � You may also like to put another filter (or cloth gauze) on the pipe just before it enters the rainwater tank. This will stop mosquitoes and other insects getting into the tank through the open end of the first flush down-pipe.
Using a first flush device can help to maintain the quality of your drinking water.
CARING FOR WELLS & RAINWATER TANKS
18
Put the Tank On A Concrete Base � It is a good idea to raise the tank off the ground by 20-30cm. This not only provides a good solid base for the tank to sit on but also raises the tank up, making it easier to use the tap and put jugs under it. � Raising the tap level also tends to keep the tap cleaner, preventing domestic animals and children from touching it. � Do not have the tap at the very base of the tank, but 10-20cm above it. This prevents the tap providing water from the very base of the tank, where debris might sink and collect. � A draining tap can be put at the base of the tank to drain off any sediment collecting at the base of the tank. The draining tap also makes it easier to remove water after cleaning the tank.
Use A Spill Collector � It is very likely that water will get spilt when filling jugs from the tank. Water falling onto the ground next to the tank can either start to erode the sand around the base of the tank or pond and attract mosquitoes. � Also taps can leak. Always fix a leaking tap to save water. � It is a good idea to construct a small concrete trough under the tap, which collects the spilt water and channels it away from the tank. This will keep the area around the tank dry and clean.
Clean The Tank � A small amount of bacteria will still get into your tank. It is necessary to clean the tank once a year. You will need to get inside the tank and scrub the walls. If you can afford bleach, then you can mix this with water to clean the tank. You should add half a bottle (about 125 ml) of 4% active chlorine bleach for every 1000 litres of water in the tank, and let the disinfected water remain in the tank for 24 hours. If the bleach is 8% you need add half the volume above. Once you have cleaned the tank you will need to drain out the dirty water before allowing the tank to refill. � Also keep the top of your tank clear from debris, especially around the hatch area.
Put A Filter On The Overflow Pipe � You should make sure your tank has an overflow pipe, so that when it is full it can fill a second tank or divert water to freshen your well. If the overflow pipe is open to the air (that is if it is not in the next tank) it should be fitted with a filter to prevent insects and small animals getting back into the tank.
FACT SHEET
19

Whilst it is important to ensure the water quality in you rainwater tank is of as good a quality as possible, if your tank goes dry you won’t have any water at all. Given the importance of the rain-water to many Pacific Island communities, and the poor quality of most groundwater, it is impor-tant that rainwater collection is maximised. This can be done by:
Guttering The Entire Roof Area � Adding gutter to the rest of the roof area is very simple and costs about 10% of the value of a new tank. � Increasing the rainfall collection area reduces the time it takes for your tank to refill. It is particularly helpful therefore at capturing occasional rain showers in the dry season to replenish the tank. � If you double the roof area collecting rainwater from your house you can more than half the number of days the tank will be empty. � This does mean you will have to clean more roof area, but you’ll have more rainwater.
Adding A Second Tank � Adding a second rainwater tank can increase water storage from 2500 litres to 5000 litres per household. � Having a second tank means you will have more water when the dry season starts, and are therefore likely to have water for longer into the dry season. � However if you do not increase your guttering and roof catchment area as well, then the two tanks will only be replenished by the same amount as one tank being fed by the same roof area.
Establishing Community Rainwater TanksCommunity tanks can be used to harvest rainwater from communal buildings such as schools and government offices. Communal tanks can be large single structures (made of ferro-cement) or a row of smaller tanks (HDPE) linked by overflow pipes. This water is very valuable as it can help the community if the household tanks become dry.
Community rainwater tanks need to be looked after the same as household tanks. In fact because the water is used less, sometimes the water quality can be poorer. This means the roof and gut-ters need to be kept cleaner than households. The building staff should sweep the roof every week if possible, and try to clean the roof once a month.
Because the rainwater ‘sits’ in the tank for much longer than a household tank the condition of the tank is very important. Some communal tanks are sheltered from the weather under their own roofs, which keeps the tanks cooler, and helps reduce contamination in the tank.
Ferro-cement tanks can be difficult to clean adequately, especially old tanks. These tanks can be lined with special plastic paints, which re-seal the tank and effectively turn them into plastic tanks, which generally ensure better water quality.
Making Sure Your Tank Won’t Be Empty During The Dry Season
CARING FOR WELLS & RAINWATER TANKS
20
� If the tap leaks, fix it up so you do not lose water � Use water sparingly, particularly during the dry season or when there is a drought � Your Rainwater Tank will only give clean, safe water if you LOOK AFTER IT! � Don’t let trees grow over your roof as you want to try and keep leaves and bird droppings from fall onto your roof and washing into your rainwater tanks. � Plant shady bushes near your tank to help keep the water cool in the tank � Build a fence around your tank to keep pigs and other animals away � Regularly clean away the leaves from the top of your tank � Make sure that you buy some extra guttering to that the whole roof will give rainwater to your tank � If a cyclone is coming, disconnect your down pipe from the roof to the tank to stop salt water getting into your tank.
How to Clean Your Water TankYou will need: • Liquid chlorine (such as Dash or Janola) or chlorine tablets • Bucket • Brush • Eye and hand protection (glasses, rubber gloves)
1. Drain any water in the tank to level at the tap. Transfer water to clean contaminant free storage or temporary vessel.
2. Add 1 bottle of bleach or chlorine tablets (according to the instructions) to the remaining water in the tank.
3. Climb inside the tank. Using a brush thoroughly scrub the bottom and sides of the tank.
4. Remove the water and bleach solution with a bucket.
5. Refill the tank with water.
6. Leave the water to settle overnight before use.
7. Wear proper hand and eye protection when preparing and handling chlorine solutions to avoid burning skin and damaging eyes.
Remember to Clean Your Water Tank at Least Once a Year
Taking Care of Your Rainwater TankFACT SHEET
21
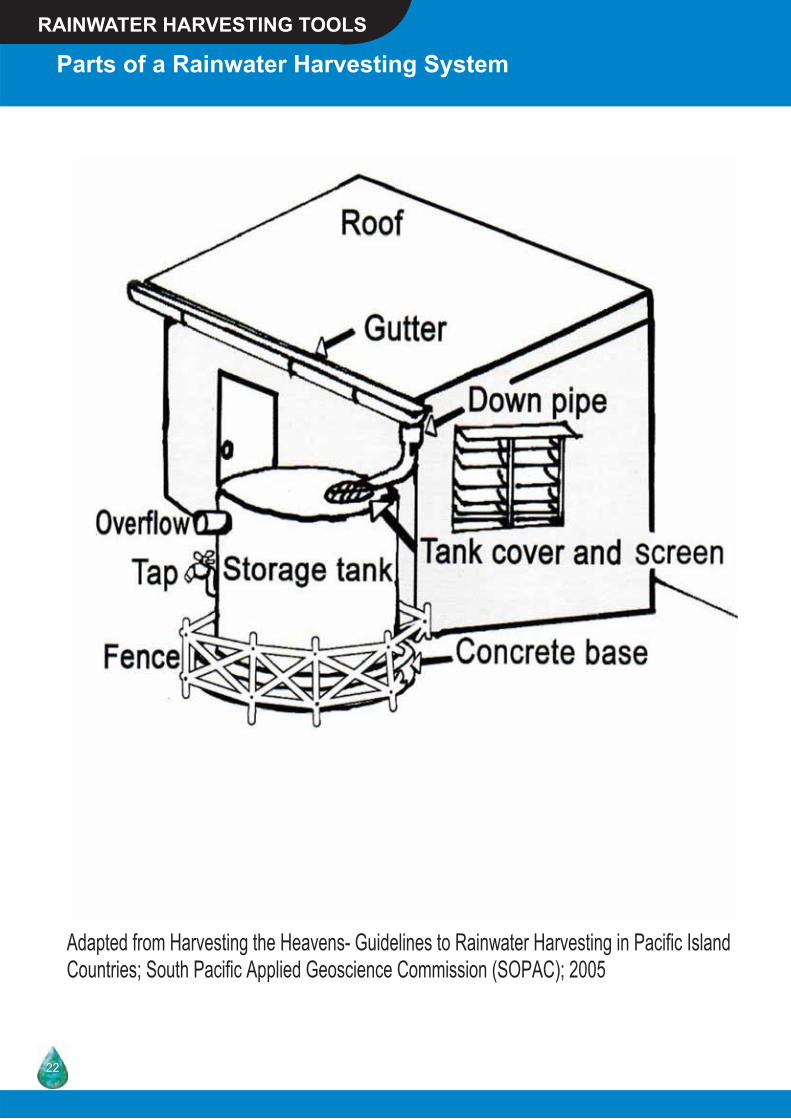
Parts of a Rainwater Harvesting SystemRAINWATER HARVESTING TOOLS
Adapted from Harvesting the Heavens- Guidelines to Rainwater Harvesting in Pacific Island Countries; South Pacific Applied Geoscience Commission (SOPAC); 2005
22

Adapted from Harvesting the Heavens- Guidelines to Rainwater Harvesting in Pacific Island Countries; South Pacific Applied Geosciences Commission (SOPAC); 2005
FAECAL-ORAL DISEASES Organisms from human or animal faeces can reach the mouth and make a person ill and cause diarrhoea. These organisms can be spread by hands, clothes, food, as well as cups, glasses, plates
and utensils used for eating and drinking.
Taps on rainwater tanks and containers used to collect and store rainwater can become contaminated and spread disease.
HOW RAINWATER AFFECTS YOUR
HEALTH
DISEASES SPREAD BY INSECTS
Diseases such as dengue and malaria
are spread by insects.
Mosquitoes can breed inside
rainwater tanks or in pools of water in
gutters or beneath leaking tanks or taps
and then spread disease.
WATER-BORNE DISEASES Disease-causing organisms can be present in drinking water
and can cause diseases such as diarrhoea, cholera and typhoid.
Rainwater collected in the tank can become contaminated
when leaves, bird or rat droppings get into the tank.
DISEASES RELATED TO
WATER SCARCITY Proper bathing is necessary to stop skin diseases like
scabies. During droughts,
infrequent bathing due to a lack of
available water in rainwater tanks can make diseases get
worse.
Rainwater and HealthFACT SHEET
23

Contaminants Found In Rainwater Collection Systems
Contaminant Source Risk of entering
rainwater Dust and ash Surrounding dirt and
vegetation, volcanic activity
Moderate: can be minimized by regular roof and gutter maintenance and use of a first-flush device.
Pathogenic bacteria Bird and other animal droppings on roof attached to dust
Moderate: bacteria may be attached to dust or in animal droppings falling on the roof. Can be minimized by use of a first-flush device and good roof and tank maintenance.
Heavy metals Dust, particularly in urban and industrial areas, roof materials
Low: unless downwind of industrial activity such as a metal smelter and/or rainfall is very acidic (this may occur in volcanic island)
Other inorganic contaminants ( e.g. salt from sea spray)
Sea spray, certain industrial discharges to air, use of unsuitable tank and/or roof materials
Low: Unless very close to the ocean or downwind of large-scale industrial activity.
Mosquito Larvae Mosquitoes laying eggs in guttering and/or tank
Moderate: if tank inlet is screened and there are no gaps, risk can be minimized.
Adapted from Harvesting the Heavens- Guidelines to Rainwater Harvesting in Pacific Island Countries; South Pacific Applied Geoscience Commission (SOPAC); 2005
RAINWATER HARVESTING TOOLS
24
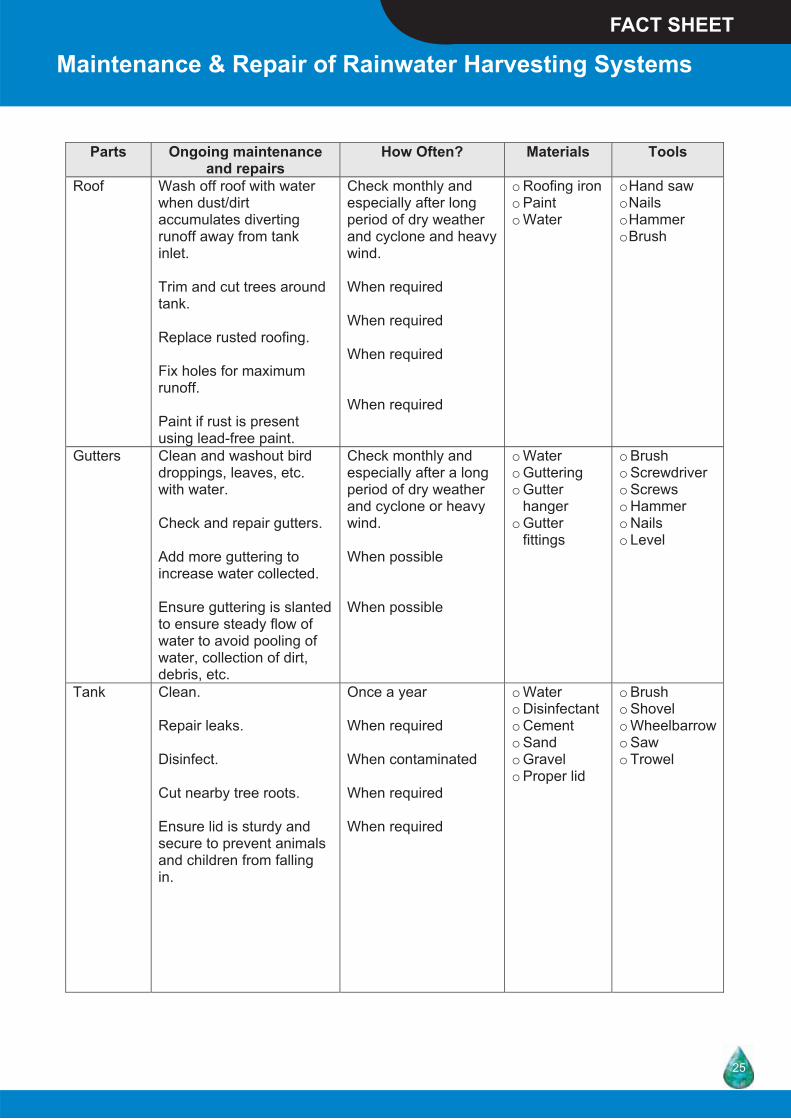
Parts Ongoing maintenance
and repairs How Often? Materials Tools
Roof Wash off roof with water when dust/dirt accumulates diverting runoff away from tank inlet. Trim and cut trees around tank. Replace rusted roofing. Fix holes for maximum runoff. Paint if rust is present using lead-free paint.
Check monthly and especially after long period of dry weather and cyclone and heavy wind. When required When required When required When required
o Roofing iron o Paint o Water
o Hand saw o Nails o Hammer o Brush
Gutters Clean and washout bird droppings, leaves, etc. with water. Check and repair gutters. Add more guttering to increase water collected. Ensure guttering is slanted to ensure steady flow of water to avoid pooling of water, collection of dirt, debris, etc.
Check monthly and especially after a long period of dry weather and cyclone or heavy wind. When possible When possible
o Water o Guttering o Gutter
hanger o Gutter
fittings
o Brush o Screwdriver o Screws o Hammer o Nails o Level
Tank Clean. Repair leaks. Disinfect. Cut nearby tree roots. Ensure lid is sturdy and secure to prevent animals and children from falling in.
Once a year When required When contaminated When required When required
o Water o Disinfectant o Cement o Sand o Gravel o Proper lid
o Brush o Shovel o Wheelbarrowo Saw o Trowel
Maintenance & Repair of Rainwater Harvesting SystemsFACT SHEET
25
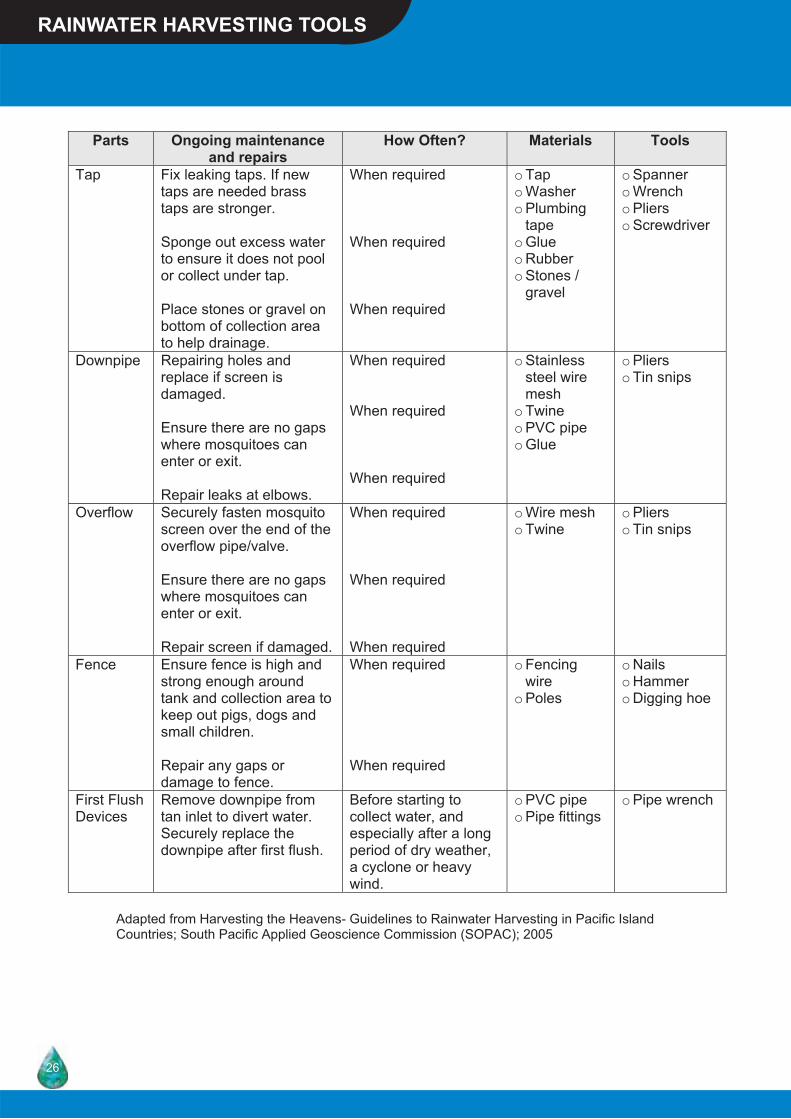
Parts Ongoing maintenance and repairs
How Often? Materials Tools
Tap Fix leaking taps. If new taps are needed brass taps are stronger. Sponge out excess water to ensure it does not pool or collect under tap. Place stones or gravel on bottom of collection area to help drainage.
When required When required When required
o Tap o Washer o Plumbing
tape o Glue o Rubber o Stones /
gravel
o Spanner o Wrench o Pliers o Screwdriver
Downpipe Repairing holes and replace if screen is damaged. Ensure there are no gaps where mosquitoes can enter or exit. Repair leaks at elbows.
When required When required When required
o Stainless steel wire mesh
o Twine o PVC pipe o Glue
o Pliers o Tin snips
Overflow Securely fasten mosquito screen over the end of the overflow pipe/valve. Ensure there are no gaps where mosquitoes can enter or exit. Repair screen if damaged.
When required When required When required
o Wire mesh o Twine
o Pliers o Tin snips
Fence Ensure fence is high and strong enough around tank and collection area to keep out pigs, dogs and small children. Repair any gaps or damage to fence.
When required When required
o Fencing wire
o Poles
o Nails o Hammer o Digging hoe
First Flush Devices
Remove downpipe from tan inlet to divert water. Securely replace the downpipe after first flush.
Before starting to collect water, and especially after a long period of dry weather, a cyclone or heavy wind.
o PVC pipe o Pipe fittings
o Pipe wrench
Adapted from Harvesting the Heavens- Guidelines to Rainwater Harvesting in Pacific Island Countries; South Pacific Applied Geoscience Commission (SOPAC); 2005
RAINWATER HARVESTING TOOLS
26

Advantages: Disadvantages:1. Convenience – Provides a supply at the point of consumption. 2. Good Maintenance – The operation and maintenance of household catchments systems are under the sole control of the tank owner’s family. 3. Low Running Cost – These are almost negligible. 4. Relatively Good Water Impact – Better than traditional sources, especially for roof catchment. 5. Low Environment Impact – Rainwater is a renewable resource and no damage is done either to the environment or to future supplies through its introduction. 6. Reliable Supply – Rainwater is readily available, depending on how often it rains. 7. Simple Construction - The construction of rainwater catchments systems is simple and local people can easily be trained to build these by themselves. This reduces costs and encourages community participation. 8. Flexible Technology – Systems can be built to almost any requirement. Poor households can start with a single small tank and add more when they can afford it.
1. Expensive – When compared with alternative water sources, where these are available, the cost per litre for rainwater is frequently higher. 2. Supply is Limited – Both by the amount of rainfall and size of catchment area. 3. High Initial Costs – The main cost of rainwater catchment systems is always wholly incurred during the initial construction, when a considerable capital outlay is required. 4. Unattractive to Policy Makers – Rainwater projects are always far more bulky to administer than single large projects, e.g. dam. 5. Supply is Easily Affected by Droughts – Occurrence of long dry spells and droughts will adversely affect the performance of rainwater harvesting systems. 6. Water Quality Vulnerable – The quality of rainwater may be affected by air pollution in the surrounding areas of certain industries. Contamination from animals or bird droppings, insects, dirt and organic matter can also be a problem.
Adapted from Harvesting the Heavens- Guidelines to Rainwater Harvesting in Pacific Island Countries; South Pacific Applied Geoscience Commission (SOPAC); 2005
Advantages And Disadvantages Of The Rainwater Harvesting Systems For Domestic Water Supply.
FACT SHEET
27

Checklist For Assessing The Appropriateness And Viability Of Rainwater Harvesting
RAINWATER HARVESTING TOOLS
Desirable pre-conditions for rainwater harvesting projects.
Check Remarks
Technical Feasibility � Is the rainwater and catchment area
sufficient to meet demand? � Is the design appropriate? � Are skills or training potential available
locally?
Social and Economic Feasibility � Is there a real need in the community for
better water provision? � Is the design affordable and cost –
effective? � Is the community excited and fully
involved? � Has the community experiences with
previous projects been positive? � Is the community united in supporting
rainwater harvesting?
Environmental Feasibility and Health � Will the project have an acceptable level of
environmental impact? � Is the project designed to enhance the
environment? � Will the project improve both the quantity
and quality of water available? � Will the project have a positive impact on
the health of the community?
Alternatives Considered � Have all reasonable alternatives means of
water provision been investigated? � Has consideration been given to using
more than one alternative in combination?
Institutional Arrangement � Does the community have the capacity to
manage the development and operation of the system? (structure, system, knowledge, skills, etc)
� Are there adequate local humans resources to ensure the project continues to function effectively once any external agency assistance is withdrawn?
Traditional and Current Practices � Has traditional rainwater harvesting
practices been considered? � Have existing approaches to rainwater
utilization and possible upgrading been investigated?
28
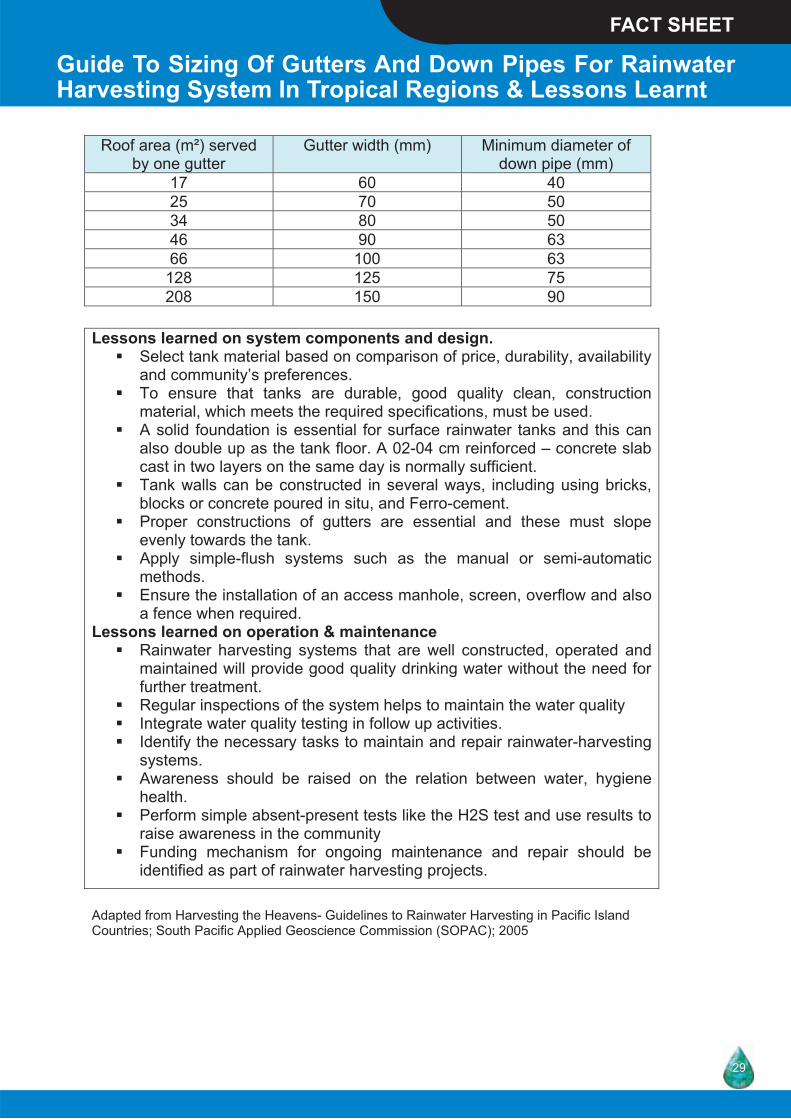
Roof area (m²) served by one gutter
Gutter width (mm) Minimum diameter of down pipe (mm)
17 60 40 25 70 50 34 80 50 46 90 63 66 100 63
128 125 75 208 150 90
Adapted from Harvesting the Heavens- Guidelines to Rainwater Harvesting in Pacific Island Countries; South Pacific Applied Geoscience Commission (SOPAC); 2005
Lessons learned on system components and design. � Select tank material based on comparison of price, durability, availability
and community’s preferences. � To ensure that tanks are durable, good quality clean, construction
material, which meets the required specifications, must be used. � A solid foundation is essential for surface rainwater tanks and this can
also double up as the tank floor. A 02-04 cm reinforced – concrete slab cast in two layers on the same day is normally sufficient.
� Tank walls can be constructed in several ways, including using bricks, blocks or concrete poured in situ, and Ferro-cement.
� Proper constructions of gutters are essential and these must slope evenly towards the tank.
� Apply simple-flush systems such as the manual or semi-automatic methods.
� Ensure the installation of an access manhole, screen, overflow and also a fence when required.
Lessons learned on operation & maintenance � Rainwater harvesting systems that are well constructed, operated and
maintained will provide good quality drinking water without the need for further treatment.
� Regular inspections of the system helps to maintain the water quality � Integrate water quality testing in follow up activities. � Identify the necessary tasks to maintain and repair rainwater-harvesting
systems. � Awareness should be raised on the relation between water, hygiene
health. � Perform simple absent-present tests like the H2S test and use results to
raise awareness in the community � Funding mechanism for ongoing maintenance and repair should be
identified as part of rainwater harvesting projects.
Guide To Sizing Of Gutters And Down Pipes For Rainwater Harvesting System In Tropical Regions & Lessons Learnt
FACT SHEET
29

Tank type Indicative
price Capacity Life Expectancy Notes
Ferro-cement (Demonstration project Tonga) Ferro-cement (Contractor Fiji)
$2,500 FJD for 11m³ $2,000 FJD for 11m³
Up to 150m³ but typically less than 12m³
If well built with good quality materials and maintained, can be 50+ years.
Tank built on site Larger sizes needs welded mesh or bars and roof supports Minimum 8 days for installation.
Concrete $5,000 FJD for 10m³
If well built with good quality materials and maintained can be 50+ years
Can be pre-fabricated or cast on site
Corrugated galvanized steel
$900 FJD for 10m³
Up to 25m³ Can be less than 2 years in corrosive environments but typically 5-8 years. Well maintained painted tanks can reach 20 years but this is not typical
Corrosion can be a problem galvanized tanks should be painted inside and out to prolong life and are not suitable for coastal areas.
Polymer – coated steel
$1,300 FJD for 10m³
Up to 10m³ Tanks designed for rainwater storage have 10 – 20 year manufacturers warranties depending on location
Plastic/HDPE $2,500 FJD for 10m³
Up to 25m³ 15 – 25 years Limited experience past 15 years but some manufacturers now provide 25 years warranty
No joints, lightweight, non – toxic food grade PE
Comparison Of Different Storage Tank TypesRAINWATER HARVESTING TOOLS
30

Fibreglass $2,700 FJD for 10m³
Typically less than 20m³
Minimum 25 years claimed by manufacturers
Complete with inlet, outlet and overflow connections
Brick and Blockwork
$2,000 FJD for 10m³
Up to 6m³, if reinforced up to 175m³
Variable depending on design and local conditions and materials. Some designs have failed within 2 years while others have lasted more than 20 years
Constructions on site usually utilizing local skills and materials. Uses more cement than equivalent sized Ferro-cement tanks
Wood $4,400 FJD for 11m³ (excluding freight ex-NZ)
Up to 100m³ Manufacturer claims 80 years for the tank and 25 years for the liner.
Constructed on site, can use local labour under supervision. Concrete ring – beam foundation required.
* These prices are estimates for Fiji in 2004. 1 FJD = USD 0.60. Costs for pre-fabricated tanks do not include transport to site or cost of any foundation requirements. Prices will vary greatly with time and location and cost estimates for individual projects should always be calculated based on local conditions. Adapted from Harvesting the Heavens- Guidelines to Rainwater Harvesting in Pacific Island Countries; South Pacific Applied Geoscience Commission (SOPAC); 2005
FACT SHEET
31

Wastewater can be used to flush toilets, water gardens and even wash clothes. To reuse wastewater helps reduces water bills, uses less water resources, and cuts down the amount of pollution going into our waterway.
There are two types of wastewater � Blackwater – is the term for sewage from toilets. It is best treated in septic tanks and directed to sewers. � Greywater – is wastewater from showers, basins and taps. Greywater can require less treatment than blackwater. Greywater can be reused indoors for toilet flushing and outdoor for garden watering.
GreywaterThe quality of your recycled water depends on your treatment system, the water’s “first use” and which chemicals are used in the home. To reduce your treatments you need to:
1. Minimize use of cleaning chemicals and use natural cleaning products such as vinegar, salt or lemon. 2. Do not dispose of household chemicals down the sink. 3. Use a sink strainer in the kitchen to help prevent food scrap and other solid materials from entering your wastewater. 4. Use a lint filter on the outlet from your washing machines. 5. Use phosphate –free liquid or environmentally friendly detergents. 6. Pre-filter to remove solids by using plumbing features such as sinks or strainers.
Re-using wastewater for flushing of toilet will save approximately 65 liters of potable water in an average household a day.
PrecautionsGreywater must be treated first and disinfected before storage and general reuse because: � It contains significant amount of pathogens which spread disease; � It can not be stored for longer than a few hours untreated as it begins to turn septic and smell.
Treated wastewater can be reused to water gardens. Avoid watering fruits and vegetables with re-cycled water if they will be eaten raw.
Managing WastewaterWASTEWATER & WATER CONSERVATION
32

A Banana Circle is a simple composting method where several banana trees are planted around a hole filled with any plant or organic waste, for example weeds, cut grass, pieces of sticks, etc. Sometimes grey water from the kitchen and laundry is piped into the hole to feed the banana roots. This circle can result in the growth of a healthy supply of bananas.
Steps to Setting Up the Banana CircleStep 1Decide on the best place for your banana circle. The circle will be about 2 meters in diameter and will require a lot of water. It can be located at anyplace where there is an overflow of water (from rainwater tanks, washing machines, or any other waste grey-water that doesn’t contain harsh chemicals.)
Step 2Dig a large hole 2 meters in diameter and approximately 80cm deep.
Step 3Find some bananas! Or more specifically, find some banana suckers. You can easily get these off from people who already have banana plants. You are looking for the small ones about 50cm in height. You will need 7. Don’t be worried about pulling them out without soil around them. They are very hardy and will take to their new surroundings easily.
Step 4Evenly distribute your banana suckers around the perimeter of the hole (and not inside of the hole) and plant them into the mound of soil you have created. Water them in well.
Step 5Fill the hole with mulch, kitchen scraps, and any vegetation you can find. Spread these materials well around the bananas too, so that in the end you can’t see a difference between where the bananas are planted, and the hole. Keep plenty of mulch in the hole always.
Step 6Fill the hole with as much water as you can. The bananas will suck it up and grow according to how much they get! Put all your kitchen scraps, garden vegetation etc into the banana circle. It’ll be used as fertiliser.
Step 7Each banana plant will give you one bunch of bananas. It will never fruit again, so cut it down at the base, mulch all of it up, and feed it back into the hole. Each banana will throw suckers as it is growing. Cut them all off until it has fruited.
Once it has fruited, allow one sucker per plant to grow. Decide which direction around the perimeter you want your bananas to grow (it doesn’t matter which way you go, but be consistent with all the plants) and allow one sucker per tree to grow.
Banana Circles- A Practical Wastewater Management Activity
FACT SHEET
33

These are images of how the Wastewater (Banana Circle) and Waste Pit would look like.
Rubbish Pits and Wastewater Pits
The community of Nailega in the District of Namalata, Tailevu was concerned with the growing number of people throwing bags of rubbish into the nearby river. Litter has been a major issue in the community. This was discussed in the monthly village meeting and the community decided to look into the matter and develop plans to minimize the problem.
It was realized in the meeting that some households do not have proper waste pits. The community developed a waste collection plan. Rubbish pits and wastewater pits were built for each household. They also built a rubbish pit for the community centre. The community centre rubbish pit has a lid and is only used when functions are held at the community center.
Construction of a Waste Pit:When constructing a waste pit, communities used the model that was introduced to them by the Health Inspectors responsible for their communities. They used rejected drums and dug a two meter hole to install the drum. A lid made out of flat iron sheets was welded to the drums to protect flies from flying in and out of the pit. The drum was painted and a Waste Committee was formed to be responsible for the maintenance and care for the waste pits. The waste pit installed for the community hall had a lock to stop people from dumping their rubbish in it.
Construction of a Wastewater Pit:Construction of the wastewater pit is similar to the waste pits except that the wastewater pits have pebbles and rocks placed at the bottom of the pit. This pit is designed for wastewater only that is discarded from kitchens. This includes wastewater from the sinks, water from cooked food like cassava and taro. Often, people would dispose wastewater into drains or the edge of the homes.
Case Study on Wastewater ManagementWASTEWATER & WATER CONSERVATION
34
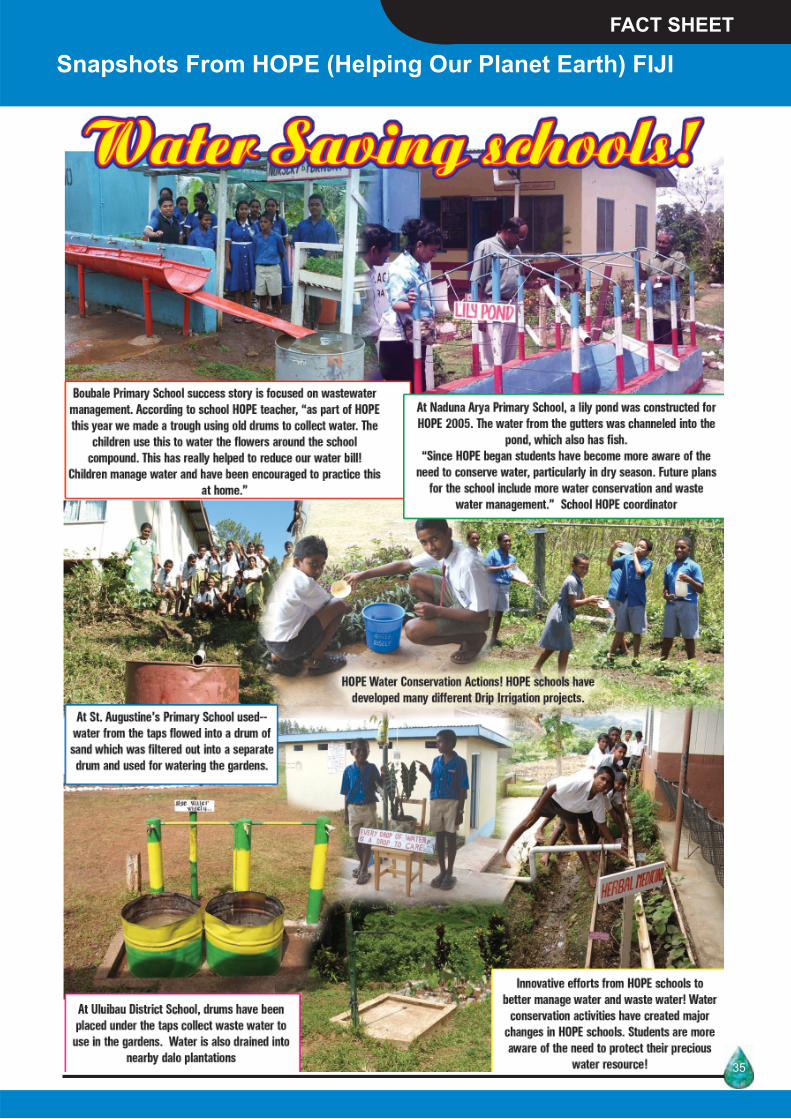
Snapshots From HOPE (Helping Our Planet Earth) FIJIFACT SHEET
35

Snapshots From HOPE (Helping Our Planet Earth)WASTEWATER & WATER CONSERVATION
36

� Stop all leaks! Check community water supply system from reservoir to taps in homes for leaks. � Plant the right plants; use native plants, these are suitable to local climate and will have natural mechanisms to absorbing appropriate amounts of water. � Water only what your plants need - do not water plants just after rain or on windy days � Remove weeds and unhealthy plants so remaining plants can benefit from the water saved. In many cases, older, established plants require only infrequent irrigation. Look for indications of water need, such as wilting, change of color, or dry soils.
� Time watering, when possible, to occur in the early morning or evening when evaporation is lowest. � Turn off unnecessary taps � Repair dripping taps, showers and continuously running or leaking toilets (check washers). � Reduce the water used in toilet flushing by installing toilet tank displacement devices - bottles, or bags. Use the half flush button on the tanks � Recycle rinse water from the kitchen sinks in gardens. � Do not use running water to melt ice or frozen foods. If necessary, use basins filled with water. � Pre-soak utensils and dishes in ponded water instead of using a running water rinse � Wash vegetables in basins of water; do not let water run! � If using a washing machine, only wash full loads of clothes or change the machine settings to suit your load of clothes!