Embed Size (px)
Citation preview

G R O W I N G W I T H YO U - YAT E S 1
SPRING EDITION
tomatogrowing
101
9 WATER SAVING
TIPS
G E T I N S P I R E D
»» Sustainable»Gardening»» Starting»a»vegie»patch»» Indoor»plants
Weekend»Project»Guides,»perfect for the family!
A D O R A B L E FA I RY G A R D E N | O H S O C H I C T E R R A R I U M
1 0 WAYS
TO M A K E YO U R
G A R D E N I N G
L I F E E A S I E R

STARTING A SPRING
VEGIE PATCH
BEEFRIENDLYGARDEN
FRIENDOR FOE
9 TIPS FORSAVING WATERIN THE GARDEN

STARTING A SPRING
VEGIE PATCH
1TOMATO
GROWING101
3COMPANION
PLANTING
5
CARING FORINDOOR PLANTS
11CREATING
TERRANIUMS
9BEE
FRIENDLYGARDEN
7
10 WAYS TO MAKEYOUR GARDENING
LIFE EASIER
15GET
COMPOSTING
14FRIENDOR FOE
13
CREATING AFAIRY
GARDEN
21SUSTAINABLEGARDENING
199 TIPS FOR
SAVING WATERIN THE GARDEN
17
24HELPING
YOU
23ANGIE'SACRES

G R O W I N G W I T H YO U - YAT E S 4
V E G E TA B L E S & H E R B S
S TA R T I N G A»
Spring»vegie»patch

G R O W I N G W I T H YO U - YAT E S 2
Grow your own vegies and herbs at home, the natural way.
S T E P 1 : P R E PA R E Prepare your garden bed by controlling unwanted weeds with Yates® Nature’s Way® Organic Weed Spray. Before you plant, you need to prepare your garden by removing unwanted weeds. Weeds will compete with your new plants for valuable nutrients and water. One of the easiest and quickest ways to control weeds in garden beds is to spray with Yates® Nature’s Way® Organic Weed Spray. This certified organic weed spray is based on two natural ingredients – clove oil and acetic acid – which work together quickly to dehydrate and kill weeds. Simply spray for
visible results within 1 hour on most weeds.
S T E P 2 : P L A N TUse the Yates seed finder to know what you can plant now. To ensure your new vegies & herb seedlings thrive and produce, prepping the soil is an absolute must. For a bumper crop of vegies, enrich the soil before planting by adding Yates® Dynamic Lifter® Organic Soil Improver & Plant Fertiliser. It’s packed with organic matter which encourages earthworms and beneficial soil micro-organisms. It also contains wonderful slow release nutrients from manure, fish meal, blood & bone and seaweed which gently feeds your plants as it grows. Simply dig the pellets in.
If your soil is difficult to work with or perhaps you don’t have any soil to plant up, then consider using a raised garden bed, like the Organic Garden Co. Square Raised Garden Bed. It measures 90cmx90cmx41cm and perfect for any sized garden. Fill with garden soil and mix in Yates® Dynamic Lifter® Organic Soil Improver & Plant Fertiliser before planting.
S T E P 3 : F E E DFeed your new plants with Yates® Thrive® Natural Vegie & Herb Liquid Plant FoodTo encourage lots of leafy vegies & herbs, feed your plants regularly with Yates® Thrive® Natural Vegie & Herb Liquid Plant Food. It is specially formulated with fish blood & bone and seaweed which are natural plant growth promoters PLUS contains additional fast acting nutrients to give your plant a boost. Yates Thrive Natural Vegie & Herb Liquid Plant Food is high in nitrogen for healthy green leaf growth. Simply add two capfuls to your nine litre watering and you can feed and
water at the same time.
S T E P 4 : P R O T E C TProtect your garden from nasty pests with Yates® Nature’s Way® Vegie and Herb Spray.Your new vegie & herb garden will be a feast for unwanted pests including aphids. Aphids are small green, brown or black coloured insects that hide under foliage, and deplete your new plants by sucking the sap from leaves and stems. Aphids can be controlled by spraying with Yates® Nature’s Way® Vegie and Herb Spray. Certified organic, it’s a natural soap based spray that smothers and suffocates aphids on contact. Best of all it has no withholding period so you can simply wash and eat your produce after spraying. Spray every five to seven days and be sure to spray underneath leaves as this is where aphids can hide.

Yates Tomato Heirloom Favourites
Yates Tomato Summerstar
Tomato 'Big Beef' An award-winning variety with good flavour. Large and meaty, perfect in salads and pasta sauces.
Tomato 'Grosse Lisse' Australia’s most popular variety produces a heavy
yield of large, round fruit. Perfect in salads.
Tomato 'Improved Apollo' A popular hybrid that fruits over a long period and is disease resistant.
Tomato 'Roma' Traditional egg-shaped tomato that’s best for paste and cooking.
Tomato 'Small Fry' Trusses of tiny sweet fruit on a tall, rambling plant.
Tomato 'Tiny Tim' A miniature in all ways, Tiny Tim grows cherry-sized fruit on a dwarf plant. Perfect for pots.
VA R I E T I E S I N T H E
V E G E TA B L E S & H E R B S
Once you grow and taste your own tomatoes (or any home grown vegetable for that matter), you
won’t go back. Tomatoes are one of the most popular backyard vegies and for good reason too. They’re easy to grow and if looked after,
yield lots of delicious fruit for months! You don’t need a big backyard either – there are varieties to
suit any space.
tomato
101
R A N G E
growing

7
In cool climates, you can get a start on your tomatoes early
by raising seeds in trays of Yates Seed Raising Mix.
They can be transplanted to the garden or pot when the
weather is warmer.
A layer of mulch will help retain moisture in the soil.
In fruit fly-affected areas, begin applications of Yates Nature’s
Way Fruit Fly Control while fruit are still small and before they
have changed colour.
To help prevent blossom end rot (when the bottom
of the fruit looks sunken and rotten), apply fast acting Yates
Hydrangea Pinking Liquid Lime & Dolomite at planting time, which will help ensure a sufficient supply of calcium. The tomato is still perfectly
fine to eat, simply remove and discard the affected parts.
If you didn’t apply lime at planting time, it’s not too late to do it during the growing season.
Certain tomato diseases are carried in the soil, so choose a different spot each year (avoid planting in the same part of the garden for at least four years).
When buying tomato plants or seeds, look for varieties that
mention disease resistance.
Protect plants from pests and diseases with regular use of
Yates Tomato & Vegetable Dust.
T O M AT O
growing T I P S
H O W » T O » G R O W » I N » A » G A R D E N»Choose a sunny spot in the garden with well drained soil and enrich with Yates Dynamic Lifter Soil Improver & Plant Fertiliser. Add Yates Hydrangea Pinking Liquid Lime & Dolomite to help sweeten the soil and help prevent blossom end rot.
Sow seeds, lightly cover with Yates Seed Raising Mix and water well. If growing from seedlings, they can be planted a little deeper, so that the bottom few centimetres of the tomato stems are covered with soil. Water in well.
Tall growing tomatoes will require stakes for support, so it’s best to put these in now to avoid damaging plant roots later.
As seedlings emerge and grow, feed weekly with Yates Thrive Tomato Liquid Plant Food. Mulch around the base with organic mulch like sugarcane or pea straw, keeping it away from the main stem.
As larger staked tomatoes grow, gently tie the main stems to the stakes with a plant tie or old piece of hosiery.
Harvest tomatoes when the fruit is plump and red (or yellow, depending on the variety).
1
2
3
4
5
6
H O W » T O » G R O W » I N » A » P O T»If you don’t have room in your garden to grow tomatoes, grow them in pots! Choose smaller varieties, such as Yates Tiny Tim, which is compact enough to grow in a pot.
Choose a pot at least 400mm wide and deep and position in full sun. Fill with quality potting mix, such as Yates Potting Mix with Dynamic Lifter.
Sow seeds, lightly cover with Yates Seed Raising Mix and water well. If growing from seedlings, they can be planted a little deeper, so that the bottom few centimetres of the tomato stems are covered with soil. Water in well.
Tall growing tomatoes will require stakes for support, so it’s best to put these in now to avoid damaging plant roots later.
Potted plants dry out quicker than in-ground plants, so it’s important to water potted plants regularly.
As seedlings grow, feed weekly with Yates Thrive Tomato Liquid Plant Food to encourage growth.
As larger staked tomatoes grow, gently tie the main stems to the stakes with a plant tie or old piece of hosiery.
Harvest tomatoes when the fruit is plump and red (or yellow, depending on the variety).
1
2
3
4
5
6
7

G R O W I N G W I T H YO U - YAT E S 8
V E G E TA B L E S & H E R B S
Most gardeners have heard of the benefits of companion planting, but many are confused about just what companion planting means and how its principles can be applied in the garden.
Companion»Planting

G R O W I N G W I T H YO U - YAT E S 6
Planting a mixture of flowers and herbs among vegies and fruit trees will encourage a healthy diversity of living creatures to move into the garden. Insect-attracting plants that grow readily from seed include herbs like thyme, sage, coriander, chives and mint, and flowers such as cosmos, calendula, lavender, echinacea and marigold.
Phacelia, available in Yates seed range, is very successful at attracting useful garden insects such as bees (valuable pollinators) and hoverflies (aphid predators). Phacelia’s appealing lavender-blue flowers produce copious quantities of pollen and nectar that make them irresistible to many insects.
Plants that attract beneficial insects
Working out which plants grow well together is often a matter of individual trial and error, but Yates seed packets have recently been re-vamped with the addition of lots of extra information, including recommendations for herb and vegetable companion planting. Here are some favourites: pumpkin loves corn, beans and radish; cabbages love beans, celery and onions; beetroot loves broccoli, lettuce and onions.
Before sowing, always check out the ‘Hint’ section on the back of Yates vegetable and herb seed packets.
Companion planting involves grouping garden plants together so that they help each other to grow better. They can do this in many different ways, such as:
Choosing companion plants
Masking plants emit an odour that disguises the smell of desirable plants and confuses the insect pests that might otherwise
attack them. A good example is planting chives, onions or garlic near roses to deter thrips, aphids and other pests.
Closely related to the masking plants are the ‘decoy’ plants that attract pests to themselves and away from their neighbours. Nasturtiums are one of the best known decoy plants. Nasturtiums act like magnets, pulling pests away from other plants. Plants like this are sometimes called ‘sacrificial’ or ‘martyr’ plants because they’re prepared to suffer in order to protect their companions.
Masking and decoy plants
Other plants improve conditions for their neighbours. The best-known of these are the peas, beans and other members of the legume family that have the ability to capture nitrogen from the atmosphere. Plants growing in close proximity to peas and beans benefit from the nitrogen the legumes have added to the soil.
Nurturing plants

G R O W I N G W I T H YO U - YAT E S 10
Bees play an essential role as pollinators in the garden and are a lovely sight to watch
when they are foraging around on your favourite flowering plants and vegetables.
AttractingBees»To»The»
Garden
F L O W E R S

G R O W I N G W I T H YO U - YAT E S 8
AttractingBees»To»The»
Garden
» Forget me nots are spring annuals that produce copious quantities of seed, ensuring that the plants re-appear year after year.
» Lavender in all its forms is a wonderful bee attractant and because of long flowering period and its range of varieties, possible to have lavender in flower for most of the year. Dwarf Lavender Munstead can be grown from seed.
» Nasturtiums, too, grow readily from seed. Both the bee-attracting flowers and the leaves are edible.
» Catmint, with its grey foliage and soft mauve blooms, makes a delightful edging for vegie beds.
» Salvia, especially the blue flowering variety, attracts bees.
» Flowering Australian native plants like bottlebrush, banksia and grevillea are adored by bees and winter flowering varieties are particularly important as they provide a food source for bees during the cooler weather.
» Basil is an annual that grows right through the warmer weather, producing sprays of white, pink or mauve flowers in late summer and autumn. Allowing a few flowers to develop will attract bees.
» Thyme is a perennial mini shrub that, like basil, flowers in late summer.
» Sage, the culinary form of the ornamental salvias, does a good job as a bee attractant.
» Rocket can be classed either as a herb or a salad vegetable. Allowing some rocket to flower and go to seed will encourage friendly insects to visit the garden.
» Borage is a great addition to the bee attracting garden. Not only does it provide an abundance of flowers, they are also edible as well. Some for the bees, some for yourself!
One way to encourage more bees into your garden is to plant lots of flowers!
These will help attract bees as well as other pollinators and beneficial insects. For example, mixing flowering plants among the vegies not only adds colour to the vegetable garden, it helps to ensure that there are enough bees around to do the job.
Of course the bees aren’t interested in helping the flowers; they’re simply chasing the pollen and nectar that the flowers produce. Pollination is incidental, and honey bees while important, are not the only pollinators. Many other insects play a part in pollination, as do environmental factors such as wind. Native bees, of which there are more than 1500 species in Australia, are also critically important. Tomatoes, for example, are pollinated by what’s termed ‘buzz pollination’. Buzz pollination is almost impossible for honey bees but can be carried out by certain native bees.
With so many different flower varieties out there, which ones are the best to attract the bees to your garden? Similar to us, bees have their favourite colours and preferences, and are very fond of yellow, blue and purple coloured flowers. Here are some of our favourite easy to grow bee attracting plants that can be grown both in the garden and in pots on balconies or decks.
B E E
F R I E N D LY
H E R B S
Some herbs are also very bee-friendly. They have a natural affinity with vegetables and many are said to deter insect pests in the garden. Try these herbs:
B E E
F R I E N D LY
F L O W E R S

S U C C U L E N T S
Terrariums, open vessels or indoor containers, whatever you choose to call them, one thing is for sure – they’re amazing!And the best thing about them is that anyone can make them. You can create many different themed worlds that can be enjoyed from your kitchen to your couch, in fact, anywhere indoors that takes your fancy.
There are a couple of things that should be considered before getting out the jar and the plants:
creating»a»terraniumS

G R O W I N G W I T H YO U - YAT E S 10
T H E M E Think about the theme of your small world. Are you after a dry arid landscape, a beach paradise or a lush forest that red riding hood can lose herself in? The best inspiration for designing your terrarium comes from nature itself. Look at photos of beach scapes, rainforests or tropical paradises and think about how you can recreate these images using plant choices and other objects.
V E S S E L Once you have your design set, then look at the jar. Do you want it closed or prefer it open? Many understorey ferns, indoor plants or forest-like plants perform well in closed jars and will require minimal care once properly established. These plants can also be grown in open jars as well, but will require slightly more attention to ensure that they get the water that they need.
Succulents, air plants and cacti perform at their best in open jars as they prefer drier conditions and need good air circulation. If you are a sucker for succulents, an open jar is the only way to go.
P L A N T S With so many plants out there what ones do you choose? For basic designs it is best to look at ‘thrillers’ (the main star of the terrarium), ‘spillers’ (these soften the edges) and ‘fillers’ (great for filling the space).
D E C O R AT I O N S This is where you can let your creative side out. Think about what stones or features you want to include in your jar. Try out different designs and really let your imagination take hold.
Once you have sorted out the essentials it’s time to create!
Clean jar and ensure that it is completely dry before placing any objects inside.
Add 1.5-2cm layer of stones to the base of the jar to assist with drainage.
Cut a piece of paper into a circle or use a small amount of slightly moist sphagnum moss to line the top of the stones. This layer will stop the help prevent the soil moving through to the stones.
Place a small amount of activated charcoal on top of the paper. This will assist with the removal of odours and toxins in the potting mix over time.
Using the small pot, scoop potting mix into the jar, covering the paper of layer of paper well. Don’t be tempted to place too much soil in to the jar at this stage. It is easier to add to the jar after the plants have been positioned.
Create a small well in the centre of the soil. Remove plants from their pots, tickle the soil to remove excess dirt and cut away at the rootball, if necessary.
Carefully place a plant into the prepared hole and backfill with potting mix. Repeat for remaining plants, then water in lightly using the sprayer.
Level or create mounds in the soil. Clean the sides of the jar with the paintbrush and paper towel, removing any excess water or soil.
Funnel the sand into the jar, covering all the soil. Clean any sand from the leaves of the plants and sides of the jar using the paintbrush and paper towel.
Position large decorative stones on top of the sand. Give the jar a final clean and light water.
Place terrarium in a sheltered indoor area that receives plenty of indirect light. Water lightly each week using a sprayer filled with water.
You will need: » Glass jar
» Stones for the base of the terrarium
» Activated charcoal
» Paper or sphagnum moss
» Succulent and cacti potting mix
» Plants (we used Crassula ‘Gollum’, Sedum album and Aloe sladeniana)
1
2
3
4
5
6
how to create a terrarium:
7
8
9
» Decorative sand/pebbles (for groundcover)
» Funnel
» Large decorative stones
» Small pot to scoop potting mix
» Spray bottle filled with water
» Paintbrush
» Paper towel
» Gloves
creating»a»terraniumS
10
11

G R O W I N G W I T H YO U - YAT E S 11
I N D O O R P L A N T S
our easy guide»T O C A R I N G F O R
indoor plants
Do you consider yourself a plant lover, but also find that you’re a serial plant killer? Quite the contradiction, but we can help you fix that – without having to resort
to faux foliage (ugh!). Most plants are quite happy indoors, provided you can give them the right conditions
(although, there are a few that will tolerate dimly let rooms and barely any water – here’s looking at you
pothos and sansevieria).
G R O W I N G W I T H YO U - YAT E S 15
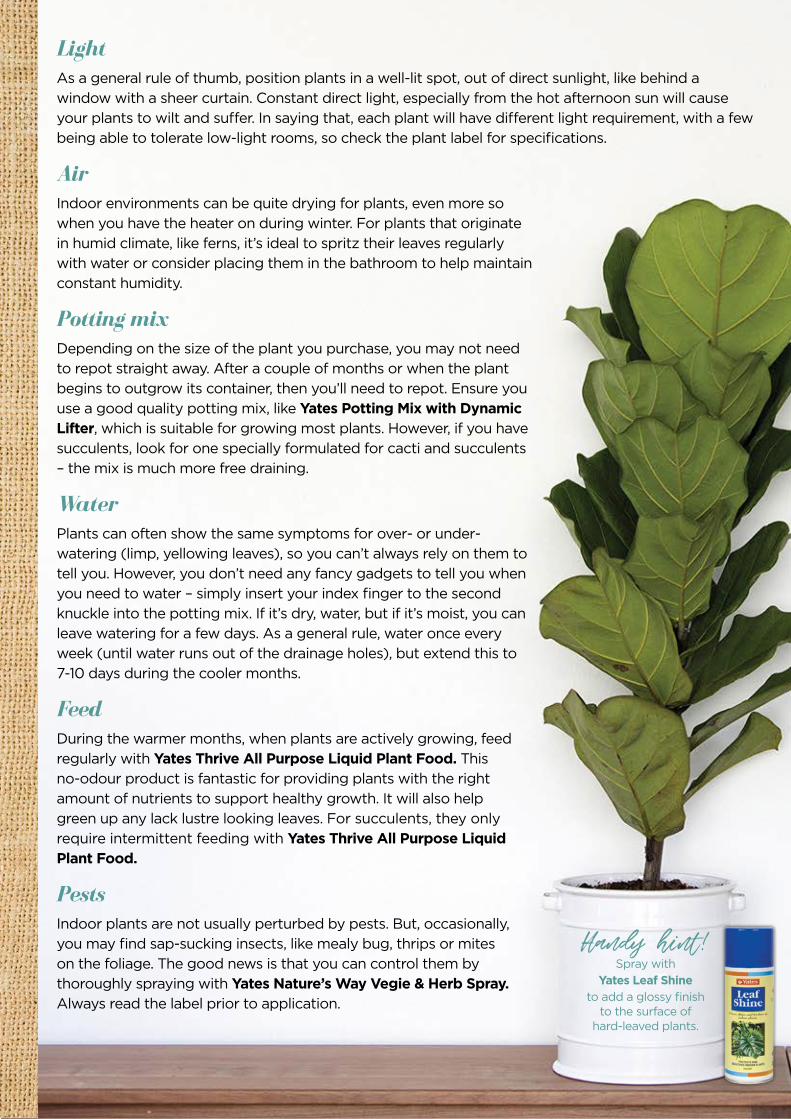
LightAs a general rule of thumb, position plants in a well-lit spot, out of direct sunlight, like behind a window with a sheer curtain. Constant direct light, especially from the hot afternoon sun will cause your plants to wilt and suffer. In saying that, each plant will have different light requirement, with a few being able to tolerate low-light rooms, so check the plant label for specifications.
AirIndoor environments can be quite drying for plants, even more so when you have the heater on during winter. For plants that originate in humid climate, like ferns, it’s ideal to spritz their leaves regularly with water or consider placing them in the bathroom to help maintain constant humidity.
Potting mixDepending on the size of the plant you purchase, you may not need to repot straight away. After a couple of months or when the plant begins to outgrow its container, then you’ll need to repot. Ensure you use a good quality potting mix, like Yates Potting Mix with Dynamic Lifter, which is suitable for growing most plants. However, if you have succulents, look for one specially formulated for cacti and succulents – the mix is much more free draining.
WaterPlants can often show the same symptoms for over- or under-watering (limp, yellowing leaves), so you can’t always rely on them to tell you. However, you don’t need any fancy gadgets to tell you when you need to water – simply insert your index finger to the second knuckle into the potting mix. If it’s dry, water, but if it’s moist, you can leave watering for a few days. As a general rule, water once every week (until water runs out of the drainage holes), but extend this to 7-10 days during the cooler months.
FeedDuring the warmer months, when plants are actively growing, feed regularly with Yates Thrive All Purpose Liquid Plant Food. This no-odour product is fantastic for providing plants with the right amount of nutrients to support healthy growth. It will also help green up any lack lustre looking leaves. For succulents, they only require intermittent feeding with Yates Thrive All Purpose Liquid Plant Food.
PestsIndoor plants are not usually perturbed by pests. But, occasionally, you may find sap-sucking insects, like mealy bug, thrips or mites on the foliage. The good news is that you can control them by thoroughly spraying with Yates Nature’s Way Vegie & Herb Spray. Always read the label prior to application.
Handy hint! Spray with
Yates Leaf Shineto add a glossy finish
to the surface of hard-leaved plants.

G R O W I N G W I T H YO U - YAT E S 16
G A R D E N I N G

Compost bins or bays can tend to attract vermin, but you can help keep them under control by baiting nearby with Ratsak Fast Action Wax Blocks, which can be housed in Ratsak Fast Action Reusable Rodent Bait Station. Ensure you read instructions prior to use.
control vermin
GET
Food scraps, fallen leaves and small tree clippings are wonderful sources of potential organic matter for your garden. Why potential? Well, you need to compost them first! By doing so, you transform them into wonderful, rich sources of organic matter, which can then be used to nourish soils and improve garden beds.
Composting these materials at home is easier than you think. There are several types of composting ‘systems’ available, from a homemade bay in the corner of the backyard to enclosed compost tumblers and kitchen bench units. Whatever method you have room for, not wasting food scraps and making your own compost helps the planet and your soil (and worms) will love you for it.
The key to successful composting is to include a variety of ingredients, including leafy ‘green’ material such as grass clippings and vegie scraps and harder high carbon ‘brown’ ingredients like dried leaves, shredded newspaper and small woody stems.
In compost bays and bins, use the ‘lasagne’ method and add 5 – 10 cm layers of these different ingredients. In enclosed compost tumblers the different ingredients can all go in together and be mixed.
Adding small handfuls of Yates Dynamic Lifter Soil Improver & Plant Fertiliser in amongst the ingredients helps provide a rich source of nitrogen, which helps feed the composting microorganisms as they start to break down the organic material into fabulous compost. Keep the compost moist, but not soaking wet, and if possible, turn and mix the pile every few weeks to improve aeration and help all the ingredients compost effectively.
When ready, mix compost with Yates® Dynamic Lifter Soil Improver & Plant Fertiliser and use to improve to soils prior to planting or apply around the base of established plants. Always mulch over the top to protect the compost from direct sunlight and to help retain soil moisture.
composting
G R O W I N G W I T H YO U - YAT E S 14

G A R D E N I N G
10 ways»to»make»your»gardening»life»easier
If you love your garden but don’t feel you have enough time or energy to spend hours gardening (or just want more time to enjoy your little patch of greenery) then here are 10 easy gardening shortcuts.
Simply applying a layer of mulch such as bark chips over your garden beds has the magical effect of ‘completing’ the look of the garden. It covers bare soil and visually links everything together, with the added benefits of reducing weed growth and helping keep the soil moist.
Mulching
Regular and thorough watering can be time consuming, so installing a watering system with a timer means you can have a weekend sleep in and be watering your garden at the same time. The Pope Raised Garden Bed Irrigation Kit is ideal – it’s easy to use and can be used with automatic timers. The kit simply attaches to a garden hose and the adjustable flow trickler on spikes allows water emitted to be adjusted to meet individual plant needs.
Install a watering system
Some weedkillers can help prevent weeds coming up in paths and hard surfaces for up to 12 months. So, just one application of a product like Yates Pathweeder can control weeds for up to a year. Now that’s smart weeding!
Long term weeding
Self watering pots and hanging baskets have a water reservoir in the base that the plants can draw from. This means that you can increase the time between waterings but still have flourishing, well watered plants. Self watering pots are particularly handy if you’re away from your garden and can’t water for a few days.
Self-watering pots
1 2 3
4

G R O W I N G W I T H YO U - YAT E S 16
Including dwarf varieties of plants in your garden means you’ll spend less time chopping and pruning as they’ve been specially developed to remain dense and compact. Hedging and border plants like murraya, nandina, abelia, and viburnum and Australian natives like westringia, lily pily, bottlebrush, banksia and grevillea are all available in dwarf or compact varieties that require less trimming.
If you have a bare spot in the garden an easy way to fill it with colour is by mixing some Yates Thrive Natural Roses & Flowers into the soil, scattering some flower seed over the area, gently raking it in and keeping the area moist. Yates ‘Festival of Flowers’ and Yates ‘Wild Flowers of the World’ are 2 very pretty seed blends that can quickly fill a garden bed with a rainbow of colour. Nurture, scatter, rake and water. It’s as simple as that!
Succulents are the ultimate low maintenance plants, requiring minimal watering and feeding. They come in a multitude of different shades and interesting shapes and a bowl filled with succulents provides wonderful year round colour. Requiring only intermittent watering and feeding (with a liquid fertiliser like Yates Thrive All Purpose Soluble Plant Food), they’re perfect for time poor gardeners but still help you look like you’re an absolute green thumb!
Grow low maintenance plants
Grow long lived vegies
Grow long lived vegies - if you love the thought of home grown vegies and herbs but are daunted by the need to replant each season then there are some fantastic edibles that will grow for up to 12 months or more. You can repeat harvest silverbeet, kale, spinach, spring onions parsley and chives for many months, keeping your kitchen well stocked with healthy greens.
Easily fill a bed with flowers
Succulents
Feature pots
Feeding plants is a very important part of keeping them healthy and productive. Organic plant foods like Yates Dynamic Lifter Soil Improver & Plant Fertiliser are a rich source of organic matter to promote soil health, but also feed plants like flowers and vegies for up to 6 – 8 weeks with slow release organic nutrients. So you can rest easy knowing that just one application of Yates Dynamic Lifter will feed your plants and nurture the soil for many weeks.
Organic feeding
It’s surprising what a difference just one decorative pot filled with flowers makes. Whether you position the pot at your front door step to welcome you home or feature it on an outdoor table on a balcony or patio, it will bring a happy splash of colour into your world and create a ‘look at me’ focal point. A well fed and watered pot of flowers can last for a season or longer, so you’ll only need to refresh it a few times a year to have a fabulous ongoing display. In the warmer months think of planting pretty petunias, geranium and verbena together and in cooler weather combine gorgeous lobelia, pansies and salvia.
5 6 7
8
9
10

G A R D E N I N G
9 tipsfor»saving»water»
in»the»gardenWater is a precious resource, it’s the life source for all living things, so it’s important to consider
ways in which we conserve it! Here are our top 10 tips to saving water in your garden.

Organise Y O U R P L A N T SGroup plants together according to how much water they need.
Choose hardy plantsGrow plants that have good drought tolerance. Look for plants with small, hard or hairy leaves that have evolved in dry climates. Great choices include grevilleas, bottlebrush and lavender.
Mulch, mulch, mulchMulch around
the base of plants to keep moisture in
the soil. Consider using organic mulches, like sugarcane or pea straw, which break down and help improve the soil.
Check for leaksMake sure all your tap fittings and hoses aren’t leaking. One way to check this is to turn off every tap in your home, check the water meter, wait a few hours and then check again. If there is a different reading you will need to investigate!
H AV E M O R E
C O N T R O L O V E R
Y O U R H A N D
WAT E R I N G
Invest in ‘handy’ watering tools, like Pope’s 2wist 2-in-1 hand spray and sprinkler to reduce the number of devices lying around your garden It’s the smarter way to water.
Don’t lose your water to evaporationIt’s best to give your plants a deep drink early in the morning before the harsh afternoon sun comes around. This gives the roots time to soak up the water before you lose it to evaporation!
Chicken poo is your friendFertilise with organic plant food such as Yates Dynamic Lifter Soil Improver and Plant
Fertiliser. This will help improve soil structure and its ability to
retain water.
Recycle, recycle, recycleFrom a glass of ‘old’ water to the water you use to cook your pasta in – it all counts! Before pouring it down the sink, think about whether your plants might be thirsty.
Install irrigation and tap timersHelp automate watering in your garden and ensure your plants receive the right amount of water at the right time every day. Smart devices such as the Pope Aquazone Tap Timer has up to 4 programmable watering cycles, with an eco-function to help reduce wasteful water run-off, and watering can even be suspended when rain is forecast.
Water lawns efficiently and effectively!When watering large areas such as lawns, use a sprinkler to help get the best coverage and to give your lawn a good deep soak. Look for one that will allow you to water the lawn thoroughly, but also economically, like the Pope Rain-Tech Oscillating Sprinkler, which allows you to adjust the head for flexible watering to suit different lawn shapes and sizes

T O I L E T » R O L L S»PA P E R » T O W E L » R O L L S » (pictured bottom left)
We all have these hanging around at home. Instead of placing them in the recycling bin, why not use them as a great seed starter pot!
They are easy to create and a great project for beginner gardeners and kids. Once you have your rolls, cut them in half to reduce the overall height. Then cut four slits opposite each other, just under half the length of the pre-cut rolls. Fold all four slits inwards one at a time in a circular motion creating a base to the pot. Secure the base by overlapping the slats with each other.
You now have a biodegradable seed starter pot! Fill them with Yates® Seed Raising Mix, your favourite seeds and water well. Once the seedlings are ready to plant out, plant the entire seed starter pot into a well prepared garden bed or larger pot.
G A R D E N I N G
sustainableG A R D E N I N G
There is no better time to look at reducing your impact on our environment and adding some goodness back into your own garden.
From the balcony to the paddock, there are many different ways that you can create a sustainable garden using everyday items in your
home. We have listed below just a couple of ideas that can be easily implemented into your garden.
Home-made, biodegradable seed starter pots
E G G » C A R T O N S
Paper based egg cartons are still a favourite way to get your seeds off to a good start. Just pop some drainage holes at the base of each of the pockets, then fill with seed raising mix and seeds and water well. When they are ready to plant out, break off the individual seed starter pots, and plant out directly into a prepared bed or pot.
Not only can these be used as seed starter pots, they can be used as little succulent gift boxes!

Weed ControlNo matter what garden you have, you are bound to get some weeds popping up from time to time. In larger beds they can be hard to control using hand weeding methods. When the soil is disturbed by the removal of these weeds, more weed seeds are getting the chance to pop up in their place!
An easy way to get some control in these garden beds is to use a combination of an organic weed spray, layers of newspapers and mulch.
Spray the existing weeds in the bed with an organically certified weed killer such as Yates® Nature’s Way® Organic Weed Spray. After 3 days, once the weeds have visible signs of burning and death, layer wet newspaper around the garden beds, at least 8 sheets in thickness, creating a barrier for the light to reach the soil. Keep the sheets clear of the stems of existing plants to avoid rotting or fungal issues. Cover the overlapped layers of newspaper with an organic mulch, such as bark chips, sugar cane or pea straw ensuring to keep it away from plant stems.
Composting and Worm FarmsReduce your impact on the environment and help your garden out at the same time by getting a compost bin or worm farm at your place. Both of these options decrease the amount of organic material that end up in landfill and in the end you get a lovely soil mix or worm juice and castings that your garden will love!
ChickensIf you have space in your yard (and council approval), chickens are your best friends in the garden. They love eating some of those pesky grubs, such as the curl grubs and codling moth larvae, as well as a wide range of your everyday kitchen scraps.
If you don’t like digging up your soil after harvesting is complete, let the chooks give you a hand. Not only do they stir up the soil, they add fertiliser as they go!
Organic Pest ControlSometimes, no matter how healthy your plants are or how many companion plants you have in the garden, pests can still make an appearance when conditions are right. Gardening in a sustainable and organically certified manner is easy with Yates® Nature’s Way®.
Our Nature’s Way® range has a wide range of products to target many of the common pests in your garden, from white cabbage moth caterpillars on your tomatoes to the dreaded bronze orange bug on citrus.
G R O W I N G W I T H YO U - YAT E S 20

G A R D E N I N G
Gardens and magic go hand in hand. Every time you plant a seed, magic seems to happen. While we’ve never seen them, we’re pretty sure that fairies are somehow involved in this! You can imagine that after a long day of weaving their magic through the garden, they’d love to just chill out and relax like we do. Perhaps, a cosy place to rest their wings and play among the flowers? So why not create a home where they can do just that. All you need is a couple of essential fairy items and few teaspoons of imagination and the fairies will be flocking to their new home in no time!
C R E AT I N G A»
FairyGarden

G R O W I N G W I T H YO U - YAT E S 22
You will need: » Garden gloves
» Flexi tub or shallow pot
» Drill (for drainage holes)
» Yates Potting Mix with Dynamic Lifter
» Plants (we used snapdragon, Cineraria ‘Silver Dust’, blue fescue, brass buttons, creeping thyme, alyssum)
» Yates Thrive Naturals Roses and Flowers
» Mica® Mini Starter Pack
how to build a fairy garden:
P O T C H O I C E
To start your garden, choose a nice shallow tub container that has good drainage and is easy for little hands to navigate around.
P L A N T S E L E C T I O N
Think about where the garden will be located. Fairies love sheltered spots so a shady position is always best. However, they can still handle the full or part sun as well. Once you know where your garden will live, then it is all about picking the plants for fairies to frolic around. Here’s a short list of plants that will perform well in different positions in your garden:
FULL SHADE
• Corsican mint
• Rabbit’s foot fern
• Baby’s tears
• Fuchsia
• Fittonia
• Native viola
• Parlour palms
• Club moss
D E S I G N
Now for the fun part! Think about how you want to lay out your fairy garden. Make sure you give them a place that is warm and cosy to rest their wings – a small terracotta pot placed on its side makes a great fairy house. Also, give the fairies a place to let their hair down, like a small pool or pond. Luckily, Mica® Decorations by Northcote Pottery have just the right tools to give your fairies the relaxed atmosphere that they need. Create a small little pond using the Mica® Decorations Mirror Sand and the Grey Marbles as a border, and just like magic the fairies have a place to cool down after a long summer’s day!
D E C O R AT E
Not only do fairies need a place to relax, but they also need tools to help look after our gardens (and their new space, too). Check out the Mica® Decorations Mini Starter Pack, which has all the garden tools they’ll need.
PART SHADE
• Violas
• Pansies
• Creeping thyme
• Mondo grass
• Chamomile
• Lobelia
FULL SUN
• Snapdragon
• Cineraria ‘Silver Dust’
• Lamb’s ears
• Chamomile
• Creeping thyme
• Brass buttons
• Blue fescue
• Alyssum
» Mica® Grey Marbles
» Mica® Mirror Sand
» Mica® Flat Stones in White
» Mica® Miniature Archway
» Washed pebbles (for the pathway)
» Northcote Pottery Terracotta Pot 13cm
» Selleys Aquadhere Exterior
» Paddle Pop Sticks
» Sticks and twigs from the garden
» Waterproof fairy lights
Drill 4 evenly spaced holes into the base of the tub.
Turn over and fill tub with a good quality potting mix such as Yates® Potting Mix with Dynamic Lifter®.
Position plants (still in their pots) around the tub to get a feel for where you would like the plants to sit. Create layers, so tall plants are at the back and ground covers near the front. We planted snapdragons at the back, together with Cineraria ‘Silver Dust’ and blue fescue to add texture to the area. Ensure you leave enough space between plantings to place decorations.
To plant, create a hole large enough for the root ball. Gently remove plant from pot, tease the roots and position in the prepared hole. Backfill with potting mix.
Where you have chosen to place your fairy house or terracotta pot, flatten out the soil so it will sit level in the garden amongst the larger plants. Position pot and slightly bury the front of the pot in the soil to just cover the entrance.
Plant out the front edges of the tub with groundcovers. We used a mix of creeping thyme and alyssum.
Create rows or furrows in the soil for paths – consider little pathways leading to the entrance of the fairy house or base of garden beds. Also create a small hole for the pond.
Carefully line furrows with pebbles to create paths.
Line the pond with Mica Grey Pebbles, then fill with Mica Mirror Sand to give the illusion of water. You can also add a couple of pebbles in the centre of the pond to help fairies can hop from one side to the other.
Decorate the gardens with Mica Decorations and Stones. For an added touch, create a small clothes line with to sticks connected together with twine and a couple of tiny pegs.
Water all plants in well with Thrive Natural Roses and Flowers Liquid Plant Food.
To create a base for inside of the terracotta pot (we don’t want fairies to get cold!), glue twigs and sticks onto paddle pop sticks with Selleys Aquadhere Exterior Glue. Hold the sticks together with pegs and leave overnight to set.
Once set, position inside the pot and decorate with pom poms. Finish by adding in waterproof fairy lights to create a warm glow.
10
11
12
13

Filled raised garden bed with worm tower ready for planting
Angie's AcresT H E A D V E N T U R E S C O N T I N U E
I N A N G I E ’ S G A R D E N !
With no rain to speak of since autumn, some very windy weather and the temperatures warming up, we’re hoping for some decent rain soon. Being on tank water can make gardening a challenge and although we have a large tank (100,000 litres), it won’t last long in our huge vegie patch. Fingers crossed for several hours of the soft pitter patter of rain on our metal roof!
In the raised vegie beds, the carrots, beetroot, radish, onions, snow and dwarf peas are all up and growing. It’s lovely to see long straight rows of tiny seedlings. I will need to carry out some thinning soon, which I find an incredibly difficult thing to do. I feel sorry for all those little discarded carrot seedlings. I know, I’m a softie!
In September I alluded to a lovely big of plants that had just arrived. It was like an early Christmas! Inside were some yacon tubers and rhizomes, 3 different varieties of rhubarb, Purple Phantom and Mary Washington asparagus crowns, Jerusalem artichokes and a
Early days in the vegie beds – leafy greens, tomatoes and
herbs and the very first tiny asparagus sp
ear poking its
head through the mulch. Grow little one grow!
perennial leek. They’ve all been planted in some of the 4 beds that I’ve dedicated to perennial and long lived vegies.
The berry collection has been added to with a thornless gooseberry (my father in law is English and adores gooseberries, but the fruit are hard to find) and some alpine strawberries which I have grown from the Yates seed range. I’m hoping they will spread and form a living (and tasty!) ground cover in the netted berry bed).
We’re also preparing an area along the edge of the citrus orchard (more about that next month) that will become a mixed species edible hedge and will also help to create a bit of a wind break. I have several cherry and Chilean guava and pomegranate tubestock ready to go in and they’ll be combined with anything ‘trimmable’, including Camellia sinensis, bay tree and feijoas. A hedge buffet!
Happy gardening everyone,
Above: Mixed Salad in raised bed Below: Tomato & Basil
Angie

How can we help you on your gardening journey?
Yates® has a LiveChat portal where gardeners can have their queries answered on the spot. Between 8am – 9pm weekdays and 10am – 6pm on weekends (AEST) we have a team of qualified horticulturists (here’s a picture of our team!) standing by to help. You can even upload a photo of your query and be sent a record of the chat via email. It’s easy to access our LiveChat service through the Yates website.
Join the Yates Garden Club - we have more than 138,000 members! The Yates Garden Club is perfect for both first time and experienced gardeners. Whether you’re interested in growing your own fruit and vegies, love roses and flowers or want a beautiful lawn, as a Yates Garden Club member you’ll receive a personalised monthly email that contains fantastic gardening information, advice and inspiration for your garden. It’s comptelely FREE to join the Yates Garden Club – head to www.yates.com.au/garden-club to join.
Join the Yates Facebook community and be inspired with ideas as to what to plant in your garden, share your garden successes (and challenges), hear about gardening hints and tips and see some gorgeous gardens and clever gardeners from around the world.
Yates Raise A Patch™ is a new fundraising program designed to teach kids about healthy eating and where food comes from. Not only does this program get kids out into the garden but it also raises double the amount of profit compared to selling chocolates or sweets. Please visit www.fundraising.yates.com.au for helpful tips for your next school or sporting club fundraiser.
Visit the Yates website at www.yates.com.au for loads of fantastic information about all things gardening, including problem solving, a gardening calendar, organic gardening, how to grow guides on vegies and herbs, fruit and citrus, roses and flowers and lawns and an interactive virtual garden planning tool.
G R O W I N G W I T H YO U - YAT E S 24

G R O W I N G W I T H YO U - YAT E S 28
Ever been stuck with a gardening question that you can’t answer?
We know it can be difficult to know everything about gardening – the right diagnosis, where to plant, what
to grow, how to save and protect your plants….
NOW you have the answer in the palm of your hand. Download the Yates My Garden App or visit www.yates.com.au and talk to one of our
FREE Yates Live Chat service is available 7 days a week 8am – 9pm weekdays and 10am – 6pm weekends (AEST).