Embed Size (px)
Citation preview


TM 31–210
IMPROVISED MUNITIONS
HANDBOOK
TABLE OF CONTENTS
Section Page
I. EXPLOSIVES AND PROPELLANTS 7(Including Igniters)
1 Plastic Explosive Filler 72 Potassium Nitrate 83 Improvised Black Powder 114 Nitric Acid 145 Initiator for Dust Explosions 176 Fertilizer Explosive 197 Carbon TET – Explosive 218 Fertilizer AN – AL Explosive 239 Red or White Powder Propellant 2510 Nitric Acid/Nitrobenzene (Hellhoffite) Explosive 2811 Optimized Process for Cellular/Acid Explosive 3012 Methyl Nitrate Dynamite 3213 Urea Nitrate Explosive 3614 Preparation of Copper Sulfate (Pentahydrate) 4015 Reclamation of RDX from C4 4316 TACC [Tetramminecopper (II) Chlorate] 4517 HMTD 4818 Potassium/Sodium Nitrite and Litharge (Lead Monoxide) 5019 DDNP 5320 Preparation of Lead Picrate 5621 Picric Acid from Aspirin 5822 Double salts 6223 Sodium Chlorate 6524 Mercury Fulminate 6825 Sodium Chlorate and Sugar or Aluminum Explosive 71
II. MINES AND GRENADES 731 Pipe Hand Grenades 732 Nail Grenade 753 Wine Bottle Cone Charge 774 Grenade–Tin Can Land Mine 795 Mortar Scrap Mine 816 Coke Bottle Shaped Charge 847 Cylindrical Cavity Shaped Charge 87
1

TM 31–210
8 N/A9 Funnel Shaped Charge 9010 Linear Shaped Charge 93
III. SMALL ARMS WEAPONS AND AMMUNITION 961 Pipe Pistol for 9mm Ammunition 962 Shotgun (12 Gauge) 1003 Shotshell Dispersion Control 1044 Carbine (7.62mm Standard Rifle Ammunition) 1065 Reusable Primer 1106 Pipe Pistol for .45 Caliber Ammunition 1127 Match Gun 1158 Rifle Cartridge, (Reusable) 1219 Pipe Pistol for .38 Caliber Ammunition 12310 Pipe Pistol for .22 Caliber Ammunition
Long or Short Cartridges 12511 Low Signature System 127
IV. MORTAR AND ROCKETS 1301 Recoilless Launcher 1302 Shotgun Grenade Launcher 1323 Grenade Launcher (57mm Cardboard Container) 1374 Fire Bottle Launcher 1405 Grenade Launcher 1446 60mm Mortar Projectile launcher 148
V. INCENDIARY DEVICES 1511 Chemical Fire Bottle 1512 Igniter From Book Matches 1533 Mechanically Initiated Fire Bottle 1554 Gelled Flame Fuels 1605 Acid Delay Incendiary 1716 Improvised White Flare 1737 Improvised Iron Oxide 1768 Improvised Yellow Flare 1799 Improvised White Smoke Munition 18410 Improvised Black Smoke Munition 189
VI. FUSES, DETONATORS & DELAY MECHANISMS1941 Electric Bulb Initiator 1942 Fuse Igniter from Book Matches 1963 Delay Igniter from Cigarette 1984 Watch Delay Igniter 2005 No-Flash Fuse Igniter 2026 Dried Seed Timer 2047 Fuse Cords 2068 Clothespin Time Delay Switch 2089 Time Delay Grenade 21010 Can Liquid Time Delay 21111 Short Term Time Delay for Grenade 213
2

TM 31–210
12 Long Term Delay for Grenade 21613 Detonator 220
VII. MISCELLANEOUS 2241 Clothespin Switch 2242 Mousetrap Switch 2263 Flexible Plate Switch 2284 Metal Ball Switch 2305 Altimeter Switch 2326 Pull Loop Switch 2347 Knife Switch 2368 Improvised Scale 2379 Rope Grenade Launching Technique 23910 Bicycle Generator Power Source 24111 Automobile Generator Power Source 24312 Improvised Battery (Short Lasting) 14513 Improvised Battery (2 Hour Duration) 24814 Armor Materials 251
XIII PRIMARY HIGH EXPLOSIVES 25213-1 Mercury Fulminate 25213-2 Lead Styphnate 25213-3 Lead Azide 25213-4 DDNP 253
XIV SECONDARY HIGH EXPLOSIVES 25314-1 TNT 25314-2 Nitrostarch 25314-3 Tetryl 25314-4 RDX 25414-5 Nitroglycerin 25414-6 Commercial Dynamite 25414-7 Military Dynamite 25514-8 Amatol 25514-9 PETN 25514-10 Blasting Gelatin 25614-11 Composition B 25614-12 Composition C4 25614-13 Ammonium Nitrate 256
3

TM 31–210
For further information or additional inserts, contact:
Commanding OfficerFrankford ArsenalATTN: SMUFA-U3100, Special Products Division
Small Caliber Engineering DirectoratePhiladelphia, Pa. 19137
Additional inserts will be made available as evaluationtests are completed. Please notify the above agency of anychange of address so that you may receive them.
FRANKFORD ARSENAL
Philadelphia, Pennsylvania
4

TM 31–210
INTRODUCTION
1. Purpose and Scope
In Unconventional Warfare operations it may be impossible or un-wise to use conventional military munitions as tools in the conduct ofcertain missions. It may be necessary instead to fabricate the requiredmunitions from locally available or unassuming materials. The pur-pose of this Manual is to increase the potential of Special Forces andguerrilla troops by describing in detail the manufacture of munitionsfrom seemingly innocuous locally available materials.
Manufactured, precision devices almost always will be more effec-tive, more reliable, and easier to use than improvised ones, but shelfitems will just not be available for certain operations for security orlogistical reasons. Therefore the operator will have to rely on mate-rials he can buy in a drug or paint store, find in a junk pile, or scroungefrom military stocks. Also, many of the ingredients and materials usedin fabricating homemade items are so commonplace or innocuous theycan be carried without arousing suspicion. The completed item itselfoften is more easily concealed or camouflaged. In addition, the fieldexpedient item can be tailored for the intended target, thereby pro-viding an advantage over the standard item in flexibility and versatility.
The Manual contains simple explanations and illustrations to permitconstruction of the items by personnel not normally familiar with makingand handling munitions. These items were conceived in-house or, ob-tained from other publications or personnel engaged in munitions orspecial warfare work. This Manual includes methods for fabricatingexplosives, detonators, propellants, shaped charges, small arms,mortars, incendiaries, delays, switches, and similar items from indige-nous materials.
2. Safety and Reliability
Each item was evaluated both theoretically and experimentally toassure safety and reliability. A large number of items were discardedbecause of inherent hazards or unreliable performance. Safety warningsare prominently inserted in the procedures where they apply but it isemphasized that safety is a matter of attitude. It is a proven fact thatmen who are alert, who think out a situation, and who take correct pre-cautions have fewer accidents than the careless and indifferent. It isimportant that work be planned and that instructions be followed to theletter; all work should be done in a neat and orderly manner. In themanufacture explosives, detonators, propellants and incendiaries,equipment must be kept clean and such energy concentrations as sparks,
5

TM 31–210
friction, impact, hot objects, flame, chemical reactions, and exces-sive pressure should be avoided.
These items were found to be effective in most environments;however, samples should be made and tested remotely prior to actualuse to assure proper performance. Chemical items should be used assoon as possible after preparation and kept free of moisture, dirt, andthe above energy concentrations. Special care should be taken in anyattempt at substitution or use of items for purposes other than that spec-ified or intended.
9. User Comments
It is anticipated that this manual will be revised or changed fromtime to time. In this way it will be possible to update present materialand add new items as they become available. Users are encouraged tosubmit recommended changes or comments to improve this manual.Comments should be keyed to the specific page, paragraph, and line ofthe text in which changes are recommended. Reasons should be pro-vided for each comment to insure understanding and complete evalua-tion. Comments should be forwarded directly to Commandant, UnitedStates Army, Special Warfare School, Fort Bragg, North Carolina28307 and Commanding Officer, United States Army, FrankfordArsenal, SMUFA-J8000, Philadelphia, Pennsylvania 19137.
6

TM 31–210
Section INo. 1
PLASTIC EXPLOSIVE FILLER
A plastic explosive filler can be made from potassium chlorateand petroleum jelly. This explosive can be detonated with commer-cial #8 or any military blasting cap.
MATERIALS REQUIRED HOW USED
Potassium chlorate MedicineManufacture of matches
Petroleum jelly (Vaseline) MedicineLubricant
Piece of round stick
Wide bowl or other container formixing ingredients.
PROCEDURES:
1. Spread potassium chloratecrystals thinly on a hardsurface. Roll the round stickover crystals to crush into avery fine powder until it lookslike face powder or wheat flour.
2. Place 9 parts powdered potas-sium chlorate and 1 part petro-leum jelly in a wide bowl orsimilar container. Mix ingredi-ents with hands (knead) until auniform paste is obtained
NOTE: Store explosive in a waterproof container until ready to use.
7

TM 31–210
Section INo. 2
POTASSIUM NITRATE
Potassium nitrate (saltpeter) can be extracted from natural sources and can be used to make nitric acid, black powder, and many pyrotechnics. The yield ranges from 0.1 to 10% by weight, depending on the fertility of the soil.
MATERIALS REQUIRED: SOURCE
Nitrate bearing earth or othermaterial, about 3-1/2 gallons(13-1/2 liters)
Soil containing old decayedvegetable or animalmatter
Old cellars and/or farmdirt floors
Earth from old burialgrounds
Decayed stone or mortarbuilding foundations
Fine wood ashes, about 1/2 cup(1/8 liter)
Totally burned whitish woodash powder
Totally burned paper (black)
Bucket or similar container, about5 gallons (19 liters) in volume(Plastic, metal, or wood)
2 pieces of finely woven cloth, eachslightly larger than bottom ofbucket
Shallow pan or dish, at least aslarge as bottom of bucket
Shallow heat resistant container(ceramic, metal, etc.)
Water — 1-3/4 gallons (6-3/4 liters)Awl, knife, screwdriver, or other
hole producing instrumentAlcohol about 1 gallon (4 liters)
(whiskey, rubbing alcohol, etc.)Heat source (fire electric heater etc.)PaperTape
NOTE: Only the ratios of the amounts of the ingredients are important.Thus for twice as much potassium nitrate, double the quantities used.
8

TM 31–210
PROCEDURES:
1. Punch holes in bottom of bucket. Spread one piece of cloth over holes inside of bucket.
2. Place wood ashes on cloth andspread to make a layer about thethickness of the cloth. Placesecond piece of cloth on topashes.
3. Place dirt in bucket.
4. Place bucket over shallowcontainer. Bucket may be sup-ported on sticks if necessary.
9

TM 31–210
5. Boil water and pour it over earth in bucket a little at a time. Allow waterto run through holes in bucket into shallow container. Be sure watergoes through all of the earth. Allow drained liquid to cool and settlefor 1 to 2 hours
NOTE: Do not pour all of the water at once, since this may causestoppage.
6. Carefully drain off liquid into heat resistant container. Discard any sludgeremaining in bottom of the shallow container
7. Boil mixture over hotfire for at least 2 hours.Small grains of salt willbegin to appear in the sol-lution. Scoop these out asthey form, using any typeof improvised strainer(paper, etc.)
8. When liquid has boiled down toapproximately half its originalvolume, remove from fire andlet sit. After half an hour add anequal volume of alcohol. Whenmixture is poured throughpaper, small white crystals willcollect on top of it.
9. To purify the potassium nitrate, re-desolve the dry crystals in thesmallest possible amount of boiled water. Remove any salt crystalsthat appear (Step 7); pour through an improvised filter made of severalpieces of paper and evaporate or gently heat the concentrated solutionto dryness.
10 Spread crystals on flat surface and allow to dry. The potassiumnitrate crystals are now ready for use.
10

TM 31–210
Section INo. 3
IMPROVISED BLACK POWDER
Black powder can be prepared in a simple, safe manner. It maybe used as blasting or gun powder.
MATERIALS REQUIRED:
Potassium nitrate, granulated, 3 cups (3/4 liter) (see Sect. I, No. 2)Wood charcoal, powdered, 2 cups (1/2 liter)Sulfur, powdered, 1/2 cup (1/8 liter)Alcohol, 5 pints (2-1/2 liters) (whiskey, rubbing alcohol, etc.)Water, 3 cups (3/4 liter)Heat source2 Buckets - each 2 gallon (7-1/2 liters) capacity, at least one of which is heat
resistant (metal, ceramic, etc. )Flat window screening, at least 1 foot (30 cm) squareLarge wooden stickCloth, at least 2 feet (60 cm) square
NOTE: The above amounts will yield two pounds (900 grams) of blackpowder. However, only the ratios of the amounts of ingredients areimportant. Thus, for twice as much black powder, double all the quan-tities used.
PROCEDURES:
1. Place alcohol in one of the buckets.
2. Place potassium nitrate, charcoal, and sulfur in the heat resistantbucket. Add 1 cup water and mix thoroughly with wooden stick untilall ingredients are dissolved
3. Add remaining water (2 cups) to mixture. Place bucket on heatsource and stir until small bubbles begin to form.
CAUTION: Do not boil mixture. Be sure all of the mixture stays wet. Ifany is dry, as on sides of pan, it may ignite.
11

TM 31–210
4. Remove bucket from heat andpour mixture into alcohol whilestirring vigorously.
5. Let alcohol mixture stand about five minutes. Strain mixture throughcloth to obtain black powder. Discard liquid. Wrap cloth around blackpowder and squeeze to remove all excess liquid.
12

TM 31–210
6. Place screening over drybucket. Place workable amountof damp powder on screen andgranulate by rubbing solidthrough screen .
NOTE: If granulated particles appear to stick together and changeshape, recombine entire batch of powder and repeat steps 5 and 6.
7. Spread granulated black powder on flat dry surface so that a layerabout 1/2 inch (1-1/4 cm) is formed. Allow to dry. Use radiator, ordirect sunlight. This should be dried as soon as possible, preferablyin one hour. The longer the drying period, the less effective the blackpowder.
CAUTION: Remove from heat as soon as granules are dry. Blackpowder is now ready for use.
13

TM 31–210
Section INo. 4
NITRIC ACID
Nitric acid is used in the preparation of many explosives, incendi-ary mixtures, and acid delay timers. It may be prepared by distillinga mixture of potassium nitrate and concentrated sulfuric acid.
MATERIALS REQUIRED: SOURCES:
Potassium nitrate (2 parts byvolume)
Drug StoreImprovised (Section I, No 2)
Concentrated sulfuric acid (1 partby volume)
Motor vehicle batteriesIndustrial plants
2 bottles or ceramic jugs (narrownecks are preferable)
Pot or frying panHeat source (woods coal, or
charcoal)Tape (paper, electrical, masking etc
but riot cellophane)Paper or rags
IMPORTANT: If sulfuric acid is obtained from a motor vehicle battery,concentrate it by boiling it until white fumes appear. DO NOT INHALEFUMES
NOTE The amount of nitric acid produced is the same as the amount ofpotassium nitrate Thus, for 2 tablespoonful of nitric acid, use 2tablespoonful of potassium nitrate and 1 tablespoonful of concentratedsulfuric acid
PROCEDURES:
1. Place dry potassium nitrate inbottle or jug Add sulfuric acid.Do not fill bottle more than l/4full. Mix until paste is formed.
CAUTION: Sulfuric acid will burn skin and destroy clothing. If any isspilled, wash it away with a large quantity of water. Fumes are alsodangerous and should not be inhaled.
14

TM 31–210
2. Wrap paper or rags around necks of bottles. Securely tape necksof bottles together. Be sure bottles are flush against each other andthat there are no air spaces.
3. Support bottles on rocks or cans so that empty bottle is slightly lowerthan bottle containing paste so that nitric acid that is formed in receivingbottle will not run into other bottle.
4. Build fire in pot or frying pan.
5. Gently heat bottle containing mixture by moving fire in and out. As redfumes begin to appear periodically pour cool water over any emptyreceiving bottle. Nitric acid will begin to form in the receiving bottle.
15

TM 31–210
CAUTION: Do not overheat or wet bottle containing mixture or it mayshatter. As an added precaution, place bottle to be heated in heatresistant container filled with sand or gravel. Heat this outer containerto produce nitric acid.
6. Continue the above process until no more red fumes are formed.If the nitric acid formed in the receiving bottle is not clear (cloudy)pour it into cleaned bottle and repeat Steps 2 - 6.
CAUTION: Nitric acid will burn skin and destroy clothing. If any isspilled, wash it away with a large quantity of water. Fumes are alsodangerous and should not be inhaled.
Nitric acid should be kept away from all combustibles and should bekept in a sealed ceramic or glass container.
16

TM 31–210
Section INo, 5
INITIATOR FOR DUST EXPLOSIONS
An initiator which will initiate common material to produce dustexplosions can be rapidly and easily constructed. This type of chargeis ideal for the destruction of enclosed areas such as rooms or buildings.
MATERIALS REQUIRED:
A flat can, 3 in. (8 cm) diameter and 1-1/2 in. (3-3/4 cm) high. A6-1/2 ounce Tuna can serves the purpose quite well.
Blasting capExplosiveAluminum (may be wire, cut sheet, flattened can or powder)Large nail, 4 in. (10 cm) longWooden rod – 1/4 in. (6 mm) diameterFlour, gasoline and powder or chipped aluminum
NOTE: Plastic explosives (Comp. C-4, etc.) produce better explosionsthan cast explosives (Comp. B. etc.).
PROCEDURES:
1. Using the nail, press a holethrough the side of the Tunacan 3/8 to 1/2 inch (1 to 1-1/2cm) from the bottom. Usinga rotating and lever action,enlarge the hole until it willaccommodate the blasting cap.
2. Place the wooden rod in thehole and position the end of therod at the center of the can.
3. Press explosive into the can,being sure to surround therod, until it is 3/4 inch(2 cm) from top of the can.Carefully remove thewooden rod.
17

TM 31–210
4. Place the aluminum metal on topof the explosive.
5. Just before use, insert theblasting cap into the cavity madeby the rod. The initiator is nowready for use.
NOTE: If it is desired to carry the initiator some distance, cardboardmay be pressed on top of aluminum to insure against loss of material.
HOW TO USE:
This particular unit works quite well to initiate charges of five pounds offlour, 1/2 gallon (1-2/3 liters) of gasoline or two pounds of Sake paintersaluminum. The solid materials may merely be contained in sacks orcardboard cartons. The gasoline may be placed in plastic coated paper milkcartons, plastic or glass bottles. The charges are placed directly on top of theinitiator and the blasting cap is actuated electrically or by fuse depending onthe type of cap employed. This will destroy a 2,000 cubic feet enclosure(building 10 x 20 x 10 feet).
NOTE: For larger enclosures, use proportionately larger initiators andcharges.
18

TM 31–210
Section INo. 6
FERTILIZER EXPLOSIVE
An explosive munition can be made from fertilizer grade ammoniumnitrate and either fuel oil or a mixture of equal parts of motor oil andgasoline. When properly prepared, this explosive munition can be deto-nated with a blasting cap.
MATERIALS REQUIRED:
Ammonium nitrate (not less than 32% nitrogen)Fuel oil or gasoline and motor oil (1:1 ratio)Two flat boards. (At least one of these should be comfortably held in the
hand, i.e. 2 x 4 and 36 x 36.)Bucket or other container for mixing ingredientsIron or steel pipe or bottle, tin can or heavy-walled cardboard tubeBlasting capWooden rod - 1/4 in. diameterSpoon or similar measuring container
PROCEDURES:
1. Spread a handful of the ammo-nium nitrate on the large flatboard and rub vigorously withthe other board until the largeparticles are crushed into a veryfine powder that looks like flour(approx. 10 min).
NOTE: Proceed with Step 2 as soon as possible since the powder maytake moisture from the air and become spoiled.
2. Mix one measure (cup, table-spoon, etc. ) of fuel oil with 16measures of the finely groundammonium nitrate in a drybucket or other suitablecontainer and stir with thewooden rod. If fuel oil is notavailable, we one half measureof gasoline and one halfmeasure of motor oil. Store in awaterproof container until readyto use.
19

TM 31–210
3. Spoon this mixture into an iron or steel pipe which has an end capthreaded on one end. If a pipe is not available, you may use a dry tincan, a glass jar or a heavy-walled cardboard tube.
NOTE: Take care not to tamp or shake the mixture in the pipe. Ifmixture becomes tightly packed, one cap will not be sufficient to initiatethe explosive.
4. Insert blasting cap just beneaththe surface of the explosivemix.
NOTE: Confining the open end of the container will add to the effec-tiveness of the explosive.
20

TM 31–210
Section INo. 7
CARBON TET - EXPLOSIVE
A moist explosive mixture can be made from fine aluminum powdercombined with carbon tetrachloride or tetrachloroethylene. This ex-plosive can be detonated with a blasting cap.
MATERIALS REQUIRED: SOURCE:
Fine aluminum bronzing powder Paint StoreCarbon tetrachloride Pharmacy, or fire extin-
guisher fluidortetrachloroethylene Dry cleaners,Stirring rod(wood) PharmacyMixing container (bowl, bucket
etc.)Measuring container (cup, table-
spoon, etc.)Storage container (jar, can, etc.)Blasting capPipe, can or jar
PROCEDURES:
1. Measure out two parts alumi-num powder to one part carbontetrachloride or tetrachloro-ethylene liquid into mixingcontainer, adding liquid topowder while stirring with thewooden rod.
2. Stir until the mixture becomesthe consistency of honey syrup.
CAUTION: Fumes from the liquid are dangerous and should not beinhaled.
21

TM 31–210
3. Store explosive in a jar or sim-ilar water proof container untilready to use. The liquid in themixture evaporates quicklywhen not confined.
NOTE: Mixture will detonate in this manner for a period of 72 hours.
HOW TO USE:
1. Pour this mixture into an ironor steel pipe which has an endcap threaded on one end. If apipe is not available, you mayuse a dry tin can or a glass jar.
2. Insert blasting cap just beneaththe surface of the explosivemix.
NOTE: Confining the open end of the container will add to theeffectiveness of the explosive.
22

TM 31–210
Section INo. 8
FERTILIZER AN-AL EXPLOSIVE
A dry explosive mixture can be made from ammonium nitratefertilizer combined with fine aluminum powder. This explosive can bedetonated with a blasting cap.
MATERIALS REQUIRED: SOURCE
Ammonium nitrate fertilizer Farm or Feed Store(not less than 32% nitrogen)
Fine aluminum bronzing powder Paint StoresMeasuring container (cup, table-
spoon, etc.)Mixing container (wide bowl, can,
etc.)Two flat boards (one should be
comfortably held in hand andone very large, i. e. 2 x 4 and 36 x 36 in.)
Storage container (jar, can, etc.)Blasting capWooden rod – 1/4 inch diameterPipe, can or jar
PROCEDURES:
1. Method I – To obtain a low velocity explosive.
a. Use measuring container to measure four parts fertilizer to onepart aluminum powder and pour into the mixing container. (Example: 4 cups of fertilizer to 1 cup aluminum powder.)
b. Mix ingredients well with the wooden rod.
2. Method II – To obtain a much higher velocity explosive.
a. Spread a handful at a time of thefertilizer on the large flat boardand rub vigorously with theother board until the largeparticles are crushed into a veryfine powder that looks like flour(approx. 10 min per handful)
NOTE: Proceed with step b below as soon as possible since thepowder may take moisture from the air and become spoiled.
23

TM 31–210
b. Follow steps “a” and “b” of Method I.
3. Store the explosive mixture ina waterproof container, such asglass jar, steel pipe, etc., untilready to use.
HOW TO USE:
Follow steps #1 and #2 of “How To Use” in Section I, No. #7.
24

TM 31–210
Section INo. 9
“RED OR WHITE POWDER” PROPELLANT
“Red or White Powder” Propellant may be prepared in a simple,safe manner. The formulation described below will result in approxi-mately 2-1/2 pounds of powder. This is a small arms propellant andshould only be used in weapons with 1/2 in. inside diameter or less,such as the Match Gun or the 7.62 Carbine, but not pistols.
MATERIALS REQUIRED:
Heat source (Kitchen stove or open fire)2 gallon metal bucketMeasuring cup (8 ounces}Wooden spoon or rubber spatulaMetal sheet or aluminum foil (at least 18 in. sq.)Flat window screen (at least 1 ft. sq.)Potassium nitrate (granulated) 2-1/3 cupsWhite auger (granulated) 2 cupsPowdered ferric oxide (rust) 1/8 cup (if available)Clear water, 3-1/2 cups
PROCEDURES:
1. Place the auger, potassiumnitrate, and water in the bucket.Heat with a low flame, stirringoccasionally until the auger andpotassium nitrate dissolve.
2. If available, add the ferric oxide(rust) to the solution. increasethe flame under the mixture untilit boils gently.
NOTE: The mixture will retain the rust coloration.
25

TM 31–210
3. Stir and scrape the bucket sides occasionally until the mixture isreduced to one quarter of its original volume, then stir continuously.
4. As the water evaporates, the mixture will become thicker until itreaches the consistency of cooked breakfast cereal or homemade fudge.At this stage of thickness, remove the bucket from the heat source,and spread the mass on the metal sheet.
5. While the material cools, score it with the spoon or spatula in crisscrossedfurrows about 1 inch apart.
6. Allow the material to air dry, preferably in the sun. As it dries,rescore it occasionally (about every 20 minutes) to aid drying.
26

TM 31–210
7. When the material has dried to a point where it is moist and softbut not sticky to the touch, place a small spoonful on the screen. Rubthe material back and forth against the screen mesh with spoon orother flat object until the material is granulated into small worm-likeparticles.
8. After granulation, return the material to the sun to dry completely.
27

TM 31–210
Section INo. 10
NITRIC ACID/NITROBENZENE (“HELLHOFFITE”) EXPLOSIVE
An explosive munition can be made from mononitrobenezene andnitric acid. It is a simple explosive to prepare. Just pour themononitrobenzene into the acid and stir.
MATERIALS REQUIRED: SOURCE:
Nitric acid Field grade or 90% concentrated(specific gravity of 1.48)
Mononitrobenzene (also known as Drug store (oil of mirbane)nitrobenzene) Chemical supply house
Industries (used as solvent)Acid resistant measuring Glass, clay, etc.
containersAcid resistant mixing rodBlasting capWaxSteel pipe, end cap and tapeBottle or jar
NOTE: Prepare mixture just before use.
PROCEDURES:
1. Add 1 volume (cup, quart, etc.)mononitrobenzene to 2 volumesnitric acid in bottle or jar.
2. Mix ingredients well by stirringwith acid resistant rod.
28

TM 31–210
CAUTION: Nitric acid will burn skin and destroy clothing. If any isspilled, wash off immediately with large amount of water. Nitro-benzene is toxic; do not inhale fumes.
HOW TO USE:
1. Wax blasting cap, pipe and end cap.
2. Thread end cap onto pipe.
3. Pour mixture into pipe.
4. Insert and tape blasting cap justbeneath surface of mixture.
NOTE: Confining the open end of the pipe will add to the effectivenessof the explosive.
29

TM 31–210
Section INo. 11
OPTIMIZED PROCESS FOR CELLULOSE/ACID EXPLOSIVES
An acid type explosive can be made from nitric acid and whitepaper or cotton cloth. This explosive can be detonated with a com-mercial #8 or any military blasting cap.
SOURCE:MATERIALS REQUIRED:
Nitric Acid Industrial metal processors, 90%concentrated (specific gravityof 1.48)
Field grade (See Section I, No. 4White unprinted, unsized paper Paper towels, napkinsClean white cotton cloth Clothing, sheets, etc.Acid resistant container Wax coated pipe or can, ceramic
pipe, glass jar, etc.Heavy-walled glass containers
Aluminum foil or acid resistantmaterial
Food stores
Protective glovesBlasting capWax
PROCEDURES:
1. Put on gloves.
2. Spread out a layer of paper or cloth on aluminum foil and sprinklewith nitric acid until thoroughly soaked. If aluminum foil is unavail-able, use an acid resistant material (glass, ceramic or wood).
30

TM 31–210
CAUTION: Acid will burn skin and destroy clothing. If any is spilled,wash it away with a large quantity of water. Do not inhale fumes.
3. Place another layer of paper or cloth on top of the acid-soaked sheet andrepeat step 2 above. Repeat as often as necessary.
4. Roll up the aluminum foil con-taining the acid-soaked sheetand insert the roll into the acidresistant container.
NOTE: If glass, ceramic or wooden tray is used, pick up sheets withtwo wooden sticks and load into container.
5. Wax blasting cap.
6. Insert the blasting cap in thecenter of the rolled sheets.Allow 5 minutes beforedetonating the explosive.
31

TM 31–210
Section INo. 12
METHYL NITRATE DYNAMITE
A moist explosive mixture can be made from sulfuric acid, nitricacid and methyl alcohol. This explosive can be detonated with a blast-ing cap.
MATERIALS REQUIRED: SOURCES::
Clear battery acid boiled until whitefumes appear
Sulfuric acid
Field grade nitric acid (Section I,No. 4) or 90% conc.
Nitric acid
(sp. gr. of l.48)MethanolMethyl alcoholWood alcohol (not denatured
alcohol)Anti-freeze (non-permanent)
Eyedropper or syringe with glasstube
Large diameter glass (2 qt. ) jarNarrow glass jars (1 qt.)Absorbent (fine sawdust, shredded
paper, shredded cloth)CupPan (3 to 5 gallon)TeaspoonWooden stickSteel pipe with end capBlasting capWaterTray
PROCEDURES:
1. Add 24 teaspoons of sulfuricacid to 16-1/2 teaspoons ofnitric acid in the 2 quart jar.
CAUTION: Acid will burn skin and destroy clothing. If any is spilled,wash it away with a large quantity of water. Do not inhale fumes.
2. Place the jar in the pan (3 to 5 gallon) filled with cold water or a stream andallow acid to cool.
32

TM 31–210
3. Rapidly swirl the jar to create awhirlpool in the liquid (withoutsplashing) while keeping thebottom portion of the jar in thewater.
4. While continually swirling, addto mixture, 1/2 teaspoon at atime, 13-1/2 teaspoons ofmethyl alcohol, allowingmixture to cool at least oneminute between additions.
CAUTION: If there is a sudden increase in the amount of fumes pro-duced or if the solution suddenly turns much darker or begins to froth,dump solution in the water within 10 seconds. This will halt thereaction and prevent an accident.
5. After the final addition of methyl alcohol, swirl for another 30 to45 seconds.
6. Carefully pour the solution into one of the narrow glass jars.Allow jar to stand in water for approximately 5 minutes until twolayers separate.
7. With an eyedropper or syringe,remove top layer and carefullyput into another narrow glassjar. This liquid is the explosive.
CAUTION: Explosive is shock sensitive.
33

TM 31–210
8. Add an equal quantity of waterto the explosive and swirl.Allow mixture to separate againas in step 6. The explosive isnow the bottom layer.
9. Carefully remove the top layer with the eyedropper or syringe anddiscard.
10. Place one firmly packed cup of absorbent in the tray.
11. While stirring with the wooden stick, slowly add explosive until themass is very damp, but not wet enough to drip. Explosive is ready touse.
NOTE: If mixture becomes too wet, add more absorbent.
If storage of explosive is required, store in a sealed container to preventevaporation.
CAUTION: Do not handle liquid explosive or allow to contact skin. Ifthis happens, flush away immediately with large quantity of water.Keep grit, sand or dirt out of mix.
34

TM 31–210
HOW TO USE:
1. Spoon this mixture into an iron or steel pipe which has an end capthreaded on one end. If a pipe is not available, you may use a dry tincan or a glass jar.
2. Insert blasting cap just beneaththe surface of the explosivemix.
NOTE Confining the open end of the container will add to the effective-ness of the explosive.
35

TM 31–210
Section INo. 13
UREA NITRATE EXPLOSIVE
Urea nitrate can be used as an explosive munition. It is easy to preparefrom nitric acid and urine. It can be detonated with a blasting cap.
MATERIAL REQUIRED: SOURCE:
Nitric acid, 90% conc. (1.48sp. gr.)
Field grade (Section I, No. 4)or industrial metal processors
Urine Animals (including humans)2 one gallon heat and acid resistant
containers (glass, clay, etc. )Filtering material Paper towel or finely textured
cotton cloth (shirt, sheet, etc. )
Aluminum powder (optional or ifavailable)
Paint stores
Heat sourceMeasuring containers (cup and
spoon)WaterTapeBlasting capSteel pipe and end cap (s)
NOTE: Prepare mixture just before use.
PROCEDURE:
1. Boil a large quantity of urine(10 cups) to approximately 1/10its volume (1 cup) in one of thecontainers over the heat source.
36

TM 31–210
2. Filter the urine into the other container through the filteringmaterial to remove impurities.
3. Slowly add 1/3 cup of nitricacid to the filtered urine, and letmixture stand for 1 hour.
CAUTION: Acid will burn skin and destroy clothing. If any is spilledwash it away with a large quantity of water. Do not inhale fumes.
37

TM 31–210
4. Filter mixture as in step 2.Urea nitrate crystals will collecton the paper.
5. Wash the urea nitrate by pouring water over it.
6. Remove urea nitrate crystals from the filtering material and allow to drythoroughly (approximately 16 hours).
NOTE: The drying time can be reduced to two hours if a hot (notboiling) water bath is used. See Step 5 of Section I, No. 15.
HOW TO USE:
1. Spoon the urea nitrate crystals into an iron or steel pipe which has an endcap threaded on one end.
2. Insert blasting cap just beneaththe surface of the urea nitratecrystals.
38

TM 31–210
NOTES: This explosive can be made more effective by mixing withaluminum powder (can be obtained in paint stores) in the ratio of 4 to 1.For example mix 1 cup of aluminum powder with 4 cups of urea nitrate.
Confining the open end of the container will add to the effec-tiveness of the explosive.
39

TM 31–210
Section INo. 14
PREPARATION OF COPPER SULFATE (PENTAHYDRATE)
Copper sulfate is a required material for the preparation of TACC(Section I, No. 16).
MATERIALS REQUIRED:
Pieces of copper or copper wireDilute sulfuric acid (battery acid)Potassium Nitrate (Section I, No. 2) or Nitric Acid, 90% conc. (1.48
sp. gr. ) (Section I, No. 4)AlcoholWaterTwo 1 pint jars or glasses, heat resistantPaper towelsPanWooden rod or stickImprovised Scale (Section VII, No. 8)CupContainerHeat sourceTeaspoon
PROCEDURES:
1. Place 10 grams of copper piecesinto one of the pint jars. Add 1cup (240 milliliters) of dilutesulfuric acid to the copper.
2. Add 12 grams of potassiumnitrate or 1-1/2 teaspoons ofnitric acid to the mixture.
40

TM 31–210
NOTE: Nitric acid gives a product of greater purity.
.
3. Heat the mixture in a pan ofsimmering hot water bath untilthe bubbling has ceased(approximately 2 hours). Themixture will turn to a blue color.
CAUTION: The above procedure will cause strong toxic fumes. Per-form Step 3 in an open, well ventilated area.
4. Pour the hot blue solution, but not the copper, into the other pintjar. Allow solution to cool at room temperature. Crystals will format the bottom of the jar. Discard the unreacted copper pieces in thefirst jar.
5. Carefully pour away the liquidfrom the crystals. Crushcrystals into a powder withwooden rod or stick.
6. Add 1/2 cup (120 milliliters) ofalcohol to the powder whilestirring.
41

TM 31–210
7. Filter the solution through apaper towel into a container tocollect the crystals. Wash thecrystals left on the paper towelthree times, using 1/2 cup (120milliliters) portions of alcoholeach time.
8. Air dry the copper sulfate crystals for 2 hours.
NOTE: Drying time can be reduced to 1/2 hour by use of hot, notboiling, water bath (see Step 3).
42

TM 31–210
Section INo. 15
RECLAMATION OF RDX FROM C-4
RDX can be obtained from C-4 explosive with the use of gasoline.It can be used as a booster explosive for detonators (Section VI, No. 13)or as a high explosive charge.
MATERIALS REQUIRED:
GasolineC-4 explosive2 pint glass jars, wide mouthPaper towelsStirring rod (glass or wood)WaterCeramic or glass dishPan Optional (RDX can be air dried instead)Heat SourceTeaspoonCupTape
PROCEDURES:
1. Place 1-1/2 teaspoon (15 grams)of C-4 explosive in one of thepint jars. Add 1 cup (240milliliters) of gasoline.
NOTE: These quantities can be increased to obtain more RDX. Forexample, use 2 gallons of gasoline per 1 cup of C-4.
43

TM 31–210
2. Knead and stir the C-4 with therod until the C-4 has brokendown into small particles.Allow mixture to stand for 1/2hour.
3. Stir the mixture again until a fine white powder remains on the bottom of thejar.
4. Filter the mixture through apaper towel into the other glassjar. Wash the particles collectedon the paper towel with 1/2 cup(120 milliliters) of gasoline.Discard the waste liquid.
5. Place the RDX particles in aglass or ceramic dish. Set thedish in a pan of hot water, notboiling, and dry for a period of1 hour.
NOTE: The RDX particles may be air dried for a period of 2 to 3 hours.
44

TM 31–210
Section INo. 16
TACC (TETRAMMINECOPPER (II) CHLORATE)
Tetramminecopper (n) chlorate is a primarily explosive that can bemade from sodium chlorate, copper sulfate and ammonia. This ex-plosive is to be used with a booster explosive such as picric acid(Section I, No. 21) or RDX (Section I, No. 15) in the fabrication ofdetonators (Section VI, No. 13)
MATERIALS REQUIRED: SOURCES:
Sodium chlorate Section I, No. 23Medicine
Copper sulfate Weed killer, hardware storeSection I, No. 14Insecticide, hardware storeWater purifying agent
Ammonia hydroxide Household ammoniaSmelling salts
Alcohol, 95% pureWax, clay, pitch, etc.WaterBottle, narrow mouth (wine or
coke)Bottles, wide mouth (mason jars)Tubing (rubber, copper, steel) to fit
narrow mouth bottleTeaspoonImprovised scale Section VII, No. 8Heat sourcePaper towelPanTapeCup
PROCEDURES:
1. Measure 1/3 teaspoon (2-1/2grams) of sodium chlorate into awide mouth bottle. Add 10teaspoons of alcohol.
45

TM 31–210
2. Place the wide mouth bottle in apan of hot water. Add 1teaspoon (4 grams) of coppersulfate to the mixture. Heat for aperiod of 30 minutes just underthe boiling point and stiroccasionally.
CAUTION: Keep solution away from flame.
NOTE: Keep volume of solution constant by adding additional alcoholapproximately every 10 minutes.
3. Remove solution from pan andallow to cool. Color of solutionwill change from blue to lightgreen. Filter solution through apaper towel into another widemouth bottle. Store solutionuntil ready for step 6.
4. Add 1 cup (250 milliliters) ofammonia to the narrow mouthbottle.
5. Place tubing into the neck of bottle so that it extends about 1-1/2inches (4 cm) inside bottle. Seal tubing to bottle with wax, clay, pitch etc.
46

TM 31–210
6. Place free end of tubing into the chlorate-alcohol-sulfate solution (Step 3).Heat bottle containing ammonia in a pan of hot water, but not boiling, forapproximately 10 minutes.
7. Bubble ammonia gas through the chlorate-alcohol-sulfate solution,approximately 10 minutes, until the color changes from light green todark blue. Continue bubbling for another 10 minutes.
CAUTION: At this point the solution is a primary explosive. Keepaway from flame. |
8. Remove the solution from the pan and reduce the volume to about1/3 of its original volume by evaporating in the open air or in a streamof air.
NOTE: Pour solution into a flat container for faster evaporation.
9. Filter the solution through apaper towel into a wide mouthbottle to collect crystals. Washcrystals with 1 teaspoon ofalcohol and set aside to dry(approx. 16 hours) .
CAUTION: Explosive is shock and flame sensitive. Store in a cappedcontainer.
NOTE: The drying time can be reduced to 2 hours if a hot (not boiling)water bath is used.
47

TM 31–210
Section INo. 17
HMTD
HMTD is a primary explosive that can be made from hexamethy-lenetetramine, hydrogen peroxide and citric acid. This explosive is tobe used with a booster explosive such as picric acid (Section I, No. 21)or RDX (Section I, No. 15) in the fabrication of detonators (Section VI,No. 13).
MATERIALS REQUIRED: SOURCES:
Hexamethylenetetramine Drugstores under names ofurotropine, hexamin,methenamine, etc.
Army heat tablets.Hydrogen peroxide 6% hair bleach (or stronger if
possible)Citric acid Drug stores or food stores
(“Sour Salt”)Containers, bottles or glassesPaper towelsTeaspoonPanWaterTape
PROCEDURES
1. Measure 9 teaspoons ofhydrogen peroxide into acontainer.
2. In 3 portions, dissolve 2-1/2teaspoons of crushedhexamethylenetetramine in theperoxide.
3. Keep the solution cool for 30minutes by placing container ina pan of cold water.
4. In 5 portions, dissolve 4-1/2 teaspoons of crushed citric acid in thehexamethylenetetramine-peroxide solution,
48

TM 31–210
5. Permit solution to stand at roomtemperature until solid particlesform at the bottom of container.
NOTE: Complete precipitation will take place in 8 to 24 hours.
CAUTION: At this point the mixture is a primary explosive. Keepaway from flame.
6. Filter the mixture through apaper towel into a container tocollect the solid particles.
7. Wash the solid particles collected in the paper towel with 6 tea-spoons of water by pouring the water over them. Discard the liquidin the container.
8. Place these explosive particles in a container and allow to dry.
CAUTION: Handle dry explosive with great care. Do not scrape orhandle it roughly. Keep away from sparks or open flames. Store in cool,dry place.
49

TM 31–210
Section INo. 18
POTASSIUM OR SODIUM NITRITE ANDLITHARGE (LEAD MONOXIDE)
Potassium or sodium nitrite is needed to prepare DDNP (Section I,No. 19), and litharge is required for the preparation of lead picrate (SectionI, No. 20).
MATERIALS REQUIRED: SOURCE:
Lead metal (small pieces or chips) Plumbing supply storePotassium (or sodium) nitrate Field grade (Section I, No. 2)
or Drug StoreMethyl (wood) alcoholIron pipe with end capIron rod or screwdriverPaper towels2 glass jars, wide mouthMetal panHeat source (hot coals or blow
torch)Improvised scale
(Section VII No. 8)CupWaterPan
PROCEDURES:
1. Mix 12 grams of lead and 4grams of potassium or sodiumnitrate in a jar. Place the mixturein the iron pipe.
2. Heat iron pipe in a bed of hotcoals or with blow torch for 30minutes to 1 hour. (Mixture willchange to a yellow color. )
50

TM 31–210
3. Remove the iron pipe from theheat source and allow to cool.Chip out the yellow materialformed in the iron pipe andplace the chips in the glass jar.
4. Add 1/2 cup (120 milliliters) ofmethyl alcohol to the chips.
5. Heat the glass jar containing themixture in a hot water bath forapproximately 2 minutes (heatuntil there is a noticeablereaction between chips andalcohol; solution will turndarker).
51

TM 31–210
6. Filter the mixture through apaper towel into the other glassjar. The material left on thepaper towel is lead monoxide.
7. Remove the lead monoxide and wash it twice through a paper towel using1/2 cup (120 milliliters) of hot water each time. Air dry before using.
8. Place the jar with the liquid (from Step 6) in a hot water bath (as inStep 5) and heat until the alcohol has evaporated. The powder remainingin the jar after evaporation is potassium or sodium nitrite.
NOTE: Nitrite has a strong tendency to absorb water from the atmos-phere and should be stored in a closed container.
52

TM 31–210
Section INo. 19
DDNP
DDNP is a primary explosive used in the fabrication of detonators(Section VI, No. 13). It is to be used with a booster explosive such aspicric acid (Section I, No. 21) or RDX (Section I, No. 15).
MATERIALS REQUIRED: SOURCES:
Picric acid Section I, No. 21Flowers of sulfurLye (sodium hydroxide)Sulfuric acid, diluted Motor vehicle batteriesPotassium or sodium nitrite Section I, No. 18Water2 glass cups, heat resistant,
(Pyrex)Stirring rod (glass or wood)Improvised scale Section VII, No. 8Paper towelsTeaspoonTablespoonEyedropperHeat sourceContainersTape
PROCEDURES:
1. In one of the glass cups, mix1/2 gram of lye with 2 table-spoons (30 milliliters) of warmwater.
2. Dissolve 1 teaspoon (3 grams)of picric acid in the water-lyesolution. Store until ready forstep 5.
53

TM 31–210
3. Place 1/4 teaspoon (1 milliliter) of water in the other glass cup.Add 1/2 teaspoon (2-1/2 grams) of sulfur and 1/3 teaspoon (2-1/2grams) of lye to the water.
4. Boil solution over heat sourceuntil color turns dark red.Remove and allow solution tocool.
5. In three portions, add thissulfur-lye solution to the picricacid-lye solution (Step 2); stirwhile pouring. Allow mixture tocool.
6. Filter the mixture through apaper towel into a container.Small red particles will collecton the paper. Discard the liquidin the container.
7. Dissolve the red particles in 1/4cup (60 milliliters) of boilingwater.
54

TM 31–210
8. Remove and filter the mixture through a paper towel as in step 6.Discard the particles left on the paper.
9. Using an eyedropper, slowlyadd the sulfuric acid to thefiltered solution until it turnsorange-brown.
10. Add 1/2 teaspoon (2-1/2 grams) more of sulfuric acid to the solution.Allow the solution to cool to room temperature.
11. In a separate container, dissolve 1/4 teaspoon (1.8 grams) of potassiumor sodium nitrite in 1/3 cup (80 milliliters) of water.
12. Add this solution in one portion, while stirring, to the orange-brownsolution. Allow the mixture to stand for 10 minutes. The mix-ture will turn light brown.
CAUTION: At this point the mixture is a primary explosive. Keepaway from flame.
13. Filter the mixture through apaper towel. Wash the particlesleft on the paper with 4teaspoons (20 milliliters) ofwater.
14. Allow the particles to dry (approx. 16 hours).
CAUTION: Explosive is shock and flame sensitive. Store explosivein a capped container.
NOTE: The drying time can be reduced to 2 hours if a hot (not boiling)water bath is used. See Section I, No. 16.
55

TM 31–210
Section INo. 20
PREPARATION OF LEAD PICRATE
Lead picrate is used as a primary explosive in the fabrication ofdetonators (Section VI, No. 13). It is to be used with a booster explo-sive such as picric acid (Section I, No. 21) or RDX (Section I, No. 15).
MATERIAL REQUIRED: SOURCE:
Litharge (lead monoxide) Section I, No. 18 or plumbingsupplies
Picric Acid Section I, No. 21Wood alcohol (methanol) Paint removers; some antifreezesWooden or plastic rodDish or saucer (china or glass)TeaspoonImprovised Scale Section VII, No. 8ContainersFlat panHeat source (optional)Water (optional)
PROCEDURE:
1. Weigh 2 grams each of picric acid and lead monoxide. Place eachin a separate container.
2. Place 2 teaspoons (10 milli-liters) of the alcohol in a dish.Add the picric acid to thealcohol and stir with thewooden or plastic rod.
3. Add the lead monoxide to the mixture while stirring.
CAUTION: At this point the solution is a primary explosive. Keepaway from flame.
4. Continue stirring the mixture until the alcohol has evaporated. Themixture will suddenly thicken.
56

TM 31–210
5. Stir mixture occasionally (tostop lumps from forming) untila powder is formed. A fewlumps will remain.
CAUTION: Be very careful of dry material forming on the inside ofthe container.
6. Spread this powdered mixture,the lead picrate, in a flat pan toair dry,
NOTE: If possible, dry the mixture in a hot, (not boiling), water bathfor a period of 2 hours.
57

TM 31–210
Section INo. 21
PREPARATION OF PICRIC ACID FROM ASPIRIN
Picrio acid can be used as a booster explosive in detonators (SectionVI, No. 13), a high explosive charge, or as an intermediate to preparinglead picrate (Section I, No. 20) or DDNP (Section I, No. 19).
MATERIALS REQUIRED:
Aspirin tablets (5 grains per tablet)Alcohol, 95% pureSulfuric acid, concentrated, (battery
acid - boil until white fumesappear)
Potassium Nitrate (Section I, No. 2)WaterPaper towelsCanning jar, 1 pintRod (glass or wood)Glass containersCeramic or glass dishCupTeaspoonTablespoonPanHeat SourceTape
PROCEDURES:
1. Crush 20 aspirin tablets in aglass container. Add 1 teaspoonof water and work into a paste.
58

TM 31–210
2. Add approximately 1/3 to 1/2cup of alcohol (100 milliliters)to the aspirin paste; stir whilepouring.
3. Filter the alcohol-aspirinsolution through a paper towelinto another glass container.Discard the solid left on thepaper towel.
4. Pour the filtered solution into a ceramic or glass dish.
5. Evaporate the alcohol and waterfrom the solution by placing thedish into a pan of hot water.White powder will remain in thedish after evaporation.
NOTE: Water in pan should be at hot bath temperature, not boiling,approximately 160. to 180° F. It should not burn the hands.
59

TM 31–210
6. Pour 1/3 cup (80 milliliters) ofconcentrated sulfuric acid into acanning jar, Add the whitepowder to the sulfuric acid.
7. Heat canning jar of sulfuric acidin a pan of simmering hot waterbath for 15 minutes; thenremove jar from the bath.Solution will turn to a yellow-orange color.
8. Add 3 level teaspoons (15grams) of potassium nitrate inthree portions to the yellow-
orange solution; stir vigorouslyduring additions. Solution will
turn red, and then back to ayellow-orange color.
9. Allow the solution to cool to ambient or room temperature while stirringoccasionally.
60

TM 31–210
10. Slowly pour the solution, whilestirring, into 1-1/4 cup (300milliliters) of cold water andallow to cool.
11. Filter the solution through a paper towel into a glass container. Light yellowparticles will collect on the paper towel.
~
12. Wash the light yellow particleswith 2 tablespoons (25 milli-liters) of water. Discard thewaste liquid in the container.
13. Place particles in ceramic dish and set in a hot water bath, as in step 5, for 2hours.
61

TM 31–210
Section INo. 22
DOUBLE SALTS
Double Salts is used as a primary explosive in the fabrication ofdetonators (Section VI, No. 13). It can be made in the field from silver(coins), nitric acid, calcium carbide, and water.
MATERIALS REQUIRED:
Nitric acid (90% conc.) (Section I, No. 4)Silver metal (silver coin, about 5/8 in diameter)Calcium carbide (acetylene or calcium carbide lamps)Rubber and glass tubing (approx. 1/4 in. inside diameter)Paper towelsHeat-resistant bottles or ceramic jugs, 1 to 2 quart
capacity, and one cork to fit. (Punch hole in corkto fit tubing. )
Teaspoon (aluminum, stainless steel or wax-coated) or equivalentmeasure
Glass containerHeat sourceLong narrow jar (olive jar)TapeWaterAlcohol
PROCEDURES:
1. Dilute 2-1/4 teaspoons of nitricacid with 1-1/2 teaspoons ofwater in a glass container byadding the acid to the water.
2. Dissolve a silver coin (a silver dime) in the diluted nitric acid. Thesolution will turn to a green color.
NOTE: It may be necessary to warm the container to completelydissolve the silver coin.
62

TM 31–210
CAUTION: Acid will burn skin and destroy clothing. If any is spilled,wash it away with a large quantity of water. Do not inhale fumes.
3. Pour solution into a longnarrow (olive) jar and place it ina bottle of hot water. Crystalswill form in the solution; heatuntil crystals dissolve.
4. While still heating and after crystals have dissolved, place 10 tea-spoons of calcium carbide in another glass bottle and add 1 teaspoon ofwater. After the reaction has started add another teaspoon of water.Then set up as shown.
5. Bubble acetylene through the solution for 5 to 8 minutes. A brownvapor will be given off and white flakes will appear in the silver solution.
6. Remove the silver solution fromthe heat source and allow it tocool. Filter the solution througha paper towel into a glasscontainer. Green crystals willcollect on the paper.
63

TM 31–210
7. Wash the solids collected on thepaper towel with 12 teaspoonsof alcohol. The solid materialwill turn white while the solventin the container will have agreen color.
8. Place the white solid material on a clean paper towel to air dry.
CAUTION: Handle dry explosive with great care. Do not scrape orhandle it roughly. Keep away from sparks or open flames. Store incool, dry place.
64

TM 31–210
Section INo. 23
SODIUM CHLORATE
Sodium chlorate is a strong oxidizer used in the manufacture ofexplosives. It can be used in place of potassium chlorate (see Section I,No. 1).
MATERIALS REQUIRED: SOURCES:
2 carbon or lead rode (1 in.diameter x 5 in. long)
Dry cell batteries (2-1/2 in.diameter x 7 in. long) orplumbing supply store
Salt or, ocean water Grocery store or oceanSulfuric acid, diluted Motor vehicle batteriesMotor vehicleWater2 wires, 16 gauge (3/64 in.
diameter approx.). 6 ft. long,insulated
Gasoline1 gallon glass jar, wide mouth
(6 in. diameter x 6 in. highapprox. )
SticksStringTeaspoonTraysCupHeavy clothKnifeLarge flat pan or tray
PROCEDURES
1. Mix 1/2 cup of salt into theone gallon glass jar with 3 liters(3 quarts) of water.
65

TM 31–210
2. Add 2 teaspoons of battery acidto the solution and stirvigorously for 5 minutes.
3. Strip about 4 inches of insula-tion from both ends of the 2wires.
4. With knife and sticks shape 2strips of wood 1 x 1/8 x 1-1/2.Tie the wood strips to the leador carbon rods so that they are1-1/2 inches apart.
5. Connect the rode to the battery in a motor vehicle with the insulatedwire
66

TM 31–210
6. Submerge 4-l/2 in. of the rodsinto the salt water solution.
7. With gear in neutral position, start the vehicle engine. Depress theaccelerator approximately 1/5 of its full travel.
8. Run the engine with the accelerator in this position for 2 hours; then,shut it down 2 hours.
9. Repeat this cycle for a total of 64 hours while maintaining the levelof the acid-salt water solution in the glass jar.
CAUTION: This arrangement employs voltages which may be danger-ous to personnel. Do not touch bare wire leads while engine is running.
10. Shut off the engine. Remove the rods from the glass jar and dis-connect wire leads from the battery.
11. Filter the solution through theheavy cloth into a flat pan ortray, leaving the sediment at thebottom of the glass jar.
12. Allow the water in the filtered solution to evaporate at room tem-perature (approx. 16 hours). The residue is approximately 60% ormore sodium chlorate which is pure enough to be used as an explosiveingredient.
67

TM 31–210
Section INo. 24
MERCURY FULMINATE
Mercury Fulminate is used as a primary explosive in the fabrica-tion of detonators (Section VI, No. 13). It is to be used with a boosterexplosive such as picric acid (Section I, No. 21) or RDX (Section I,No. 15).
MATERIALS REQUIRED: SOURCE:
Nitric Acid, 90% conc. (1.48sp. gr.)
Field grade (Section I, No. 4) orindustrial metal processors
Mercury Thermometers, mercury switches,old radio tubes
Ethyl (grain) alcohol (90%)Filtering material Paper towelsTeaspoon measure (1/4, 1/2, and
1 teaspoon capacity) - aluminumstainless steel or wax-coated
Heat sourceClean wooden stickClean waterGlass containersTapeSyringe
PROCEDURES:
1. Dilute 5 teaspoons of nitric acid with 2-1/2 teaspoons of cleanwater in a glass container by adding the acid to the water.
2. Dissolve 1/8 teaspoon ofmercury in the diluted nitricacid. This will yield dark redfumes.
NOTE: It may be necessary to add water, one drop at a time, to themercury-acid solution in order to start reaction.
68

TM 31–210
CAUTION: Acid will burn skin and destroy clothing. If any is spilled,wash it away with a large quantity of water. Do not inhale fumes.
3. Warm 10 teaspoons of thealcohol in a container until thealcohol feels warm to the insideof the wrist.
4. Pour the metal-acid solution in-to the warm alcohol. Reactionshould start in less than 5minutes. Dense white fumeswill be given off duringreaction. As time lapses, thefumes will become less dense.Allow 10 to 15 minutes tocomplete reaction. Fulminatewill settle to bottom.
CAUTION: This reaction generates large quantities of toxic, flammablefumes. The process must be conducted outdoors or in a well ventilatedarea, away from sparks or open flames. Do not inhale fumes.
5. Filter the solution through apaper towel into a container.Crystals may stick to the side ofthe container. If so, tilt andsquirt water down the sides ofthe container until all thematerial collects on the filterpaper.
69

TM 31–210
6. Wash the crystals with 6teaspoons of ethyl alcohol.
7. Allow these mercury fulminate crystals to air dry.
CAUTION: Handle dry explosive with great care. Do not scrape orhandle it roughly. Keep away from sparks or open flames. Store incool dry place.
70

TM 31–210
Section INo. 25
SODIUM CHLORATE AND SUGAR OR ALUMINUM EXPLOSIVE
An explosive munition can be made from sodium chlorate combinedwith granular sugar, or aluminum powder. This explosive can bedetonated with a No. 8 commercial or a Military J-2 blasting cap.
MATERIALS REQUIRED: SOURCE
Sodium chlorate Section I, No. 23Granular sugar Food storeAluminum powder Paint storeWooden rod or stickBottle or jarBlasting capSteel pipe (threaded at one end),
end cap and tapeWaxMeasuring container
(cup, quart, etc.)
PROCEDURES:
1. Add three volumes (cups,quarts, etc.) sodium chlorate toone volume aluminum, or twogranular sugar, in bottle or jar.
2. Mix ingredients well by stirringwith the wooden rod or stick.
71

TM 31–210
HOW TO USE:
1. Wax blasting cap, pipe and endcap.
2. Thread end cap onto pipe.
3. Pour mixture into pipe.
4. Insert and tape blasting cap justbeneath surface of mixture.
NOTE: Confining the open end of the pipe will add to the effectivenessof the explosive.
72

TM 31–210
Section IINo. 1
PIPE HAND GRENADE
Hand grenades can be made from a piece of iron pipe, Thefiller can be plastic or granular military explosive, improvisedexplosive, or propellant from shotgun or small arms ammunition.
MATERIALS REQUIRED:
Iron pipe, threaded ends, 1-1/2 to3” diam., 3” to 8” long.
Two (2) iron pipe caps.Explosive or propellantNonelectric blasting cap.
(Commercial or military)Fuse cordHand drillPliers
PROCEDURES:
1. Place blasting cap on one end offuse cord and crimp with pliers.
NOTE: To find out how long the fuse cord should be, check the time ittakes a known length to burn. If 12 inches burns in 30 seconds, a 6-inchcord will ignite the grenade in 15 seconds.
2. Screw pipe cap to one end ofpipe. Place fuse cord withblasting cap into the oppositeend so that the blasting cap isnear the center of the pipe.
NOTE: If plastic explosive is to be used, fill pipe before inserting theblasting cap. Push a round stick into the center of the explosive tomake a hole and than insert the blasting cap.
73

TM 31–210
3. Pour explosive or propellantinto pipe a little bit at a time.Tap the base of the pipefrequently to settle the filler.
4. Drill a hole in the center of theunassembled pipe cap largeenough for the fuse cord to passthrough.
5. Wipe pipe threads to removeany filler material.
6. Slide the drilled pipe cap overthe fuse and screw handtightonto the pipe.
74

TM 31–210
Section IINo. 2
NAIL GRENADE
Effective fragmentation grenade can be made from a blockof TNT or other blasting explosive and nails.
MATERIALS REQUIRED:
Block of TNT or other blastingexplosive
NailsNon-Electric Military blasting capFuse CordTape, string, wire or glue
PROCEDURES:
1. If an explosive charge otherthan a standard TNT block isused, make a hole in the centerof the charge for inserting theblasting cap. TNT can be drilledwith relative safety. Withplastic explosives, a hole canbe made by pressing a roundstick into center of the charge.The hole should be deep enoughthat the blasting cap is totallywithin the explosive.
2. Tape, tie or glue one or tworows of closely packed nailsto slides of explosive block.Nails should completely coverthe four surfaces of the block.
3. Place blasting cap on one endof the fuse cord and crimp withpliers.
NOTE: To find out how long the fuse cord should be, check the time ittakes a known length to burn. If 12 inches (30 cm) burns for 30seconds, a 10 second delay will require a 4 inch (10 cm) fuse .
75

TM 31–210
4. Insert the blasting cap inthe hole in the block of ex-plosive. Tape or tie fuse cordsecurely in place so that it willnot fall out when the grenade isthrown.
ALTERNATE USE:
An effective directionalantipersonnel mine can be madeby placing nails on only oneside of the explosive block. Forthis case, an electric blasting capcan be used.
76

TM 31–210
Section IIno. 3
WINE BOTTLE CONE CHARGE
This cone charge will penetrate 3 to 4 inches of armor. Placedon an engine or engine compartment it will disable a tank or other vehicle.
MATERIALS REQUIRED:
Glass wine bottle with false bottom(cone shaped)
Plastic or castable explosiveBlasting capGasoline or Kerosene (small
amount)StringAdhesive tape
PROCEDURES:
1. Soak a piece of string in gaso-line or kerosene. Double wrapthis string around wine bottleapproximately 3 in. (7-1/2 cm)above the top of the cone.
NOTE: A small amount of motor oil added to the gasoline or kerosenewill improve results.
2. Ignite the string and allow toburn for 1 to 2 minutes. Thenplunge the bottle into cold waterto crack the bottle. The top halfcan now be easily removed anddiscarded.
3. If plastic explosive is used:(a) pack explosive into the
bottle a little at a time compressing with a wooden rod. Fill the bottleto the top.
(b) press a 1/4 in. wooden dowel 1/2 in (12mm) intothe middle of the top of the explosive charge to form a hole for the blasting cap.
4. If TNT or other castable explosive is used:(a) break explosive into small pieces with a wooden mallet or
non-sparking metal tools. Place pieces in a tin can.
77

TM 31–210
(b) Suspend this can in a largercontainer which is partly filledwith water. A stiff wire or stickpushed through the smaller canwill accomplish this.
CAUTION: The inner can must not rest on bottom of outer container.
(c) Heat the container on an electric hot plate or other heat source. Stir theexplosive frequently with a wooden stick while it is melting.
CAUTION: Keep area well ventilated while melting explosive. Fumesmay be poisonous.
(d) When all the explosive has melted. remove the inner container and stir themolten explosive until it begins to thicken. During this time the bottom, halfof the wine bottle should be placed in the container of hot water. This willpre-heat the bottle so that it will not crack when the explosive is poured.
(e) Remove the bottle from hot water and dry thoroughly. Pour molten explo-sive into the bottle and allow to cool. The crust which forms on top of thecharge during cooling should be broken with a wooden stick and more ex-plosive added. Do this as often as necessary until bottle is filled to the top.
(f) When the explosive has completely hardened, bore a hole for the blastingcap in the middle of the top of the charge about 1/2 in. (12mm) deep.
HOW TO USE:
1. Place blasting cap in the hole inthe top of charge. If noneletriccap is used be sure cap iscrimped around fuze and fuze islong enough to provide safedelay.
2. Place the charge so that thebottom is 3 to 4 in. (7-1/2 to 10cm) from the target. This can bedone by taping legs to thecharge or any other convenientmeans as long as there isnothing between the base of thecharge and the target.
3. If an electric cap is used,connect the blasting cap wire tothe firing circuit.
NOTE: Effectiveness can be increased by placing it inside a can, box, orsimilar container and pack sand or dirt between charge and container.
78

TM 31–210
Section IIno. 4
GRENADE-TIN CAN LAND MINE
This device can be used as a land mine that will explode when thetrip wire is pulled.
MATERIALS REQUIRED:
Hand grenade having side safety leverSturdy container, open at one end, that is just large enough to fit over
grenade and its safety lever (tin can of proper size is suitable).Strong string or wire
NOTE: The container must be of such a size that, when the grenade isplaced in it and the safety pin removed, its sides will prevent the safetylever from springing open. One end must be completely open.
PROCEDURES:
1. Fasten one piece of string to theclosed end of container, makinga strong connection. This can bedone by punching 2 holes in thecan, looping the string throughthem, and tying a knot.
2. Tie free end of this string to abush, stake, fencepost, etc.
3. Fasten another length of stringto grenade such that it cannotinterfere with the functioning ofthe ignition mechanism of thegrenade.
4. Insert grenade into container.
79

TM 31–210
5. Lay free end of string acrosspath and fasten to a stake, bush,etc. The string should remaintaut.
HOW TO USE:
1. Carefully withdraw safety pin by pulling on ring Be sure safety lever isrestrained during operation. Grenade will function in normal manner whentrip wire is pulled.
NOTE: In areas where concealment is possible, a greater effort may beobtained by suspending the grenade several feet above the groundillustrated below.
80

TM 31–210
Section IINo. 5
MORTAR SCRAP MINE
A directional shrapnel launcher that can be placed in the path ofadvancing troops.
MATERIALS REQUIRED:
Iron pipe approximately 3 ft. (1 meter) long and 2 in. to 4 in. (5 to10 cm) in diameter and threaded on at least one end. Salvagedartillery cartridge case may also be used.
Threaded cap to fit pipe.Black powder or salvaged artillery propellant about 1/2 lb. (200 gms)
total.Electrical igniter (commercial SQUIB or improvised igniter, Section
Vl, No. 1). Safety or improvised fuse may also be used.Small stones about 1 in. (2-1/2 cm) in diameter or small size scrap;
about 1 lb. (400 gms) total.Rags for wadding, each about 20 in. by 20 in. (50 cm x 50 cm)Paper or bagBattery and wireStick (non-metallic)
Note: Be sure pipe has no cracks or flaws.
81

TM 31–210
PROCEDURES:
1. Screw threaded cap onto pipe.
2. Place propellant and igniter inpaper or rag and tie packagewith string so contents will notfall out.
3. Insert packaged propellant and igniter into pipe until package rests againstthreaded cap leaving firing leads extending from open end of pipe.
4. Roll rag till it is about 6 in. (15-1/2 cm) long and the same diameteras pipe. Insert rag wadding against packaged propellant igniter. Withcaution, pack tightly using stick.
5. Insert stones and/or scrap metal into pipe.
6. Insert second piece of rag wadding against stones and/or metal scrap. Packtightly as before.
HOW TO USE:
1. Bury pipe in ground with open end facing the expected path of the enemy.The open end may be covered with cardboard and a thin layer of dirt orleaves as camouflage.
82

TM 31–210
2. Connect firing leads to battery and switch. Mine can be remotelyfired when needed or attached to trip device placed in path of ad-vancing troops.
NOTE: A NON-ELECTRICAL ignition system can be substituted forthe electrical ignition system as follows.
1. Follow above procedure, substituting safety fuse for igniter.
2. Light safety fuse when ready to fire.
83

TM 31–210
Section IINo. 6
COKE BOTTLE SHAPED CHARGE
This shaped charge will penetrate 3 in. (7-1/2 cm) of armor. (It willdisable a vehicle if placed on the engine or engine compartment).
MATERIALS REQUIRED:
Glass Coke bottle, 6-1/2 oz. sizePlastic or castable explosive, about
1 lb. (454 gm)Blasting capMetal cylinder, open at both ends,
about 6 in. (15 cm) long and 2in. (5 cm) inside diameter.Cylinder should be heavywalled for best results.
Plug to fit mouth of coke bottle(rags, metal, wood, paper, etc.)
Non-metal rod about 1/4 in. (6 mm)in diameter and 8 in. (20 cm) ormore in length.
Tape or string2 tin cans if castable explosive is used (See Section II, No. 3)
NOTE: Cylinder may be cardboard, plastic, etc. if castable explosive isused.
PROCEDURES:
1. Place plug in mouth of bottle.
2. Place cylinder over top of bottleuntil bottom of cylinder rests onwidest part of bottle. Tapecylinder to bottle. Containershould be straight on top ofbottle.
84

TM 31–210
3. If plastic explosive is used:
a. Place explosive in cylinder alittle at a time tamping with rod until cylinder is full.
b. Press the rod about 1/2 in. (1 cm) into the middle of the top ofthe explosive charge to form a hole for the blasting cap.
4. If castable explosive is used,follow procedure of Wine BottleCone Charge, Section II, No.3, Step 4, a through f.
HOW TO USE:
Method 1. If electrical blasting cap is used:
1. Place blasting cap in hole in top of explosive.
CAUTION: Do not insert blasting cap until charge is ready to bedetonated.
85

TM 31–210
2. Place bottom of Coke Bottleflush against the target. If targetis not flat and horizontal, fastenbottle to target by any con-venient means, such as byplacing tape or string aroundtarget and top of bottle. Bottomof bottle acts as stand-off.
CAUTION: Be sure that base of bottle is flush against tarps and thatthere is nothing between the target and the base of the bottle.
3. Connect leads from blasting cap to firing circuit.
Method II: If non-electrical blasting cap is used:
1. Crimp cap around fuse.
CAUTION: Be sure fuse is long enough to provide safe delay.
2. Follow steps 1, 2, and CAUTIONS of Method 1.
3. Light fuse when ready to fire.
86

TM 31–210
Section IINo. 7
CYLINDRICAL CAVITY SHAPED CHARGE
A shaped charge can be made from common pipe. It will penetrate1-1/2 in. (3-1/2 cm) of steel, producing a hole 1-1/2 in. (3-1/2 cm) indiameter.
MATERIALS REQUIRED:
Iron or steel pipe, 2 to 2-1/2 in. (3 to 6-1/2 cm) in diameter and 3 to4 in. 7-1/2 to 10 cm) long
Metal pipe, 1/2 to 3/4. in. (1-1/2 to 2 cm) in diameter and 1-1/2 in.(3-1/2 cm) long, open at both ends. (The wall of the pipe shouldbe as thin as possible.)
Blasting capNon-metallic rod, 1/4 in. (6 mm) in diameterPlastic or castable explosive2 metal cans of different sizes (If castable explosive is used)Stick or wire (If castable explosive is used)Heat source (If castable explosive is used)
PROCEDURES:
1. If plastic explosive is used:
a. Place larger pipe on flat surface. Hand pack and tamp explosive into pipe. Leave approximately 1/4 in. (6 mm) space at top.
b. Push rod into center of explosive. Enlarge hole in explosive to diameter and length of small pipe.
c. Insert small pipe into hole.
IMPORTANT: Be sure direct contact is made between explosive andsmall pipe. Tamp explosive around pipe by hand if necessary.
87

TM 31–210
d. Make sure that there is 1/4. (6 mm) empty space above smallpipe. Remove explosive if necessary.
e. Turn pipe upside down and push rod 1/2 in (1-1/4cm) into opposite end of explosive to form a hole for the blasting cap.
CAUTION: Do not insert blasting cap in hole until ready to fire shapedcharge.
3. If TNT or other castable explosive is used:
a Follow procedure, Section II, No 3, Step 4, Para a, b, c, in-duding CAUTIONS.
b. When all the explosive has melted, remove the inner container and stir the molten explosive until it begins to thicken.
c. Place large pipe on flat surface. Pour explosive intopipe until it is 1-3/4 in (4 cm) from the top.
d. Place small pipe in center oflarge pipe so that it rests on top of explosive. Holding small pipe in place, pour explosive around small pipeuntil explosive is 1/4 in. (6 mm) from top of large pipe.
e. Allow explosive to cool. Break crust that forms on top of thecharge during cooling with a wooden stick and add more explo-sive. Do this as often as necessary until explosive is 1/4 in.(6 mm) from top.
88

TM 31–210
f. When explosive has com-pletely hardened, turn pipe upside down and bore a hole for the blasting cap in the middle of the top of the charge about 1/2 in (1-1/4 cm) deep.
HOW TO USE:
Method I – If electrical blasting cap is used.
1. Place blasting cap in hole made for it.
CAUTION: Do not insert blasting cap until charge is ready to fire.
2. Place other end of pipe flushagainst the target. Fasten pipeto target by any convenientmeans, such as by placing tapeor string around target and topof pipe, if target is not flat andhorizontal
CAUTION Be sure that base of pipe is flush against target and thatthere is nothing between the target and the base of the pipe.
3. Connect leads from blasting cap to firing circuit.
Method II – If non-electrical blasting cap is used:
1. Crimp cap around fuse.
CAUTION: Be sure fuse is long enough to provide a safe delay.
2. Follow Steps 1, 2, and CAUTION of Method I.
3. Light fuse when ready to fire
89

TM 31–210
Section IINo. 9
FUNNEL SHAPED CHARGE
An effective shaped charge can be made using various types ofcommercial funnels. See table for penetration capabilities.
MATERIALS REQUIRED:
Container (soda or beer can, etc.), approximately 2-1/2 in. diameterx 5 in. long (6-1/4 cm x 12-l/2 cm)
Funnel(s) (glass, steel, or aluminum) 2-1/2 in. (6-1/2 cm) in diameterWooden rod or stick, 1/4 in. (6 mm) in diameterTapeBlasting cap (electrical or non-electrical)Sharp cutting edgeExplosive
PROCEDURES:
1. Remove the top and bottomfrom can and discard.
2. Cut off and throw away thespout of the funnel(s).
NOTE: When using 3 funnels (see table), place the modified funnelstogether as tight and as straight as possible. Tape the funnels togetherat the outer ridges.
3. Place the funnel(s) in the modi-fied can. Tape on outer ridges tohold funnel(s) to can.
90

TM 31–210
4. If plastic explosive is used, fillthe can with the explosive usingsmall quantities, and tamp withwooden rod or stick.
NOTE: If castable explosive is used, refer to step 4 of Section II, No. 3.
5. Cut wooden rodto lengths 3inches longer than the standofflength. (See table.) Positionthree of these rods around theexplosive filled can and hold inplace with tape.
NOTE: The position of the rods on the container must conform tostandoff dimensions to obtain the penetrations giren in the table.
STANDOFF TABLE
FUNNEL NO. OF STANDOFF PENETRATIONMATERIAL FUNNELS inches metric inches metric
Glass 1 3–1/2 9 cm 4 10 cmSteel 3 1 2–1/2 cm 2–1/2 6 cm
Aluminum 3 3–1/2 9 cm 2–1/2 6 cm *If only one steel or aluminum funnel is available:
Steel 1 1 2–1/2 cm 1–1/2 4 cmAluminum 1 1 2–1/2 cm 1–1/2 4 cm
91

TM 31–210
6. Make a hole for blasting cap inthe center of the explosive withrod or stick.
CAUTION: Do not place blasting cap in place until the Funnel ShapedCharge is ready for use.
HOW TO USE:
1. Place blasting cap in the hole intop of the charge. If non-electriccap is used, be sure cap iscrimped around fuse and fuse islong enough to provide safedelay.
2. Place (tape if necessary) the Funnel Shaped Charge on the target sothat nothing is between the base of charge and target.
3. If electric cap is used, connect blasting cap wires to firing circuit.
92

TM 31–210
Section IINo, 10
LINEAR SHAPED CHARGE
This shaped charge made from construction materials will cutthrough up to nearly 3 inches of armor depending upon the liner used(see table).
MATERIALS REQUIRED:
Standard structural angle or pipe (see table)Wood or cardboard containerHacksaw — If pipe is usedVice — If pipe is usedWooden rodExplosiveBlasting capTape
SHAPE CHARGE TABLE
LINER SIZE STANDOFF PENETRATIONTYPE MATERIAL in – Nom in. metric in. metric
angle steel 3 x 3 legs x 2 5 cm 2–3/4 7 cm1/4 web
angle aluminum 2 x 2 legs x 5–1/2 14 cm 2–1/2 6 cm3/16 web
pipe half aluminum 2 diameter 2 5 cm 2 5 cm sectionpipe half copper 2 diameter 1 2–1/2 cm 1–3/4 4 cm section
NOTE: These were the only linear shaped charges of this type that werefound to be more efficient than the Ribbon Charge.
Ribbon Charge: No standoff is required; just place on target.
93

TM 31–210
PROCEDURES:
1. If pipe is used —
a. Place the pipe in the vise and cut pipe in half length-wise. Remove the pipe half sections from vise.
b. Discard one of the pipe halfsections, or save for anothercharge.
2. Place angle or pipe half section with open end face down on a flatsurface.
3. Make container from any material available. The container mustbe as wide as the angle or pipe half section, twice as high, and aslong as the desired cut to be made with the charge.
4. Place container over the liner (angle or pipe half section) and tapeliner to container.
5. If plastic explosive is used, fillthe container with the explosiveusing small quantities, and tampwith wooden rod or stick.
NOTE: If castable explosive is used, refer to step 4 of Section II, No. 3.
94

TM 31–210
6. Cut wooden rod to lengths 2inches longer than the standofflength (see table). Position therods at the corners of the explo-sive filled container and hold inplace with tape.
NOTE: The position of the rods on the container must conform tostandoff and penetration dimensions given in the table.
7. Make a hole for blasting cap in the side of the container 1/2 in. above theliner and centered with the wooden rod.
CAUTION: Do not place blasting cap in place until the Linear ShapedCharge is ready for use.
NOW TO USE:
1. Place blasting cap into hole onthe side of the container. If non-electric cap is used, be sure capis crimped around fuse and fuseis long enough to provide safedelay.
2. Place (tape if necessary) the Linear Shaped Charge on the target so thatnothing is between base of charge and target.
3. If electric cap is used, connect blasting cap wires to firing circuit.
95

TM 31–210
Section IIINo. I
PIPE PISTOL FOR 9 MM AMMUNITION
A 9 mm pistol can be made from 1/4” steel gas or water pipe and fittings.
MATERIALS REQUIRED:
1/4” nominal else steel pipe 4 to 6inches long with threaded ends.
1/4” Solid pipe plugTwo (2) steel pipe couplingsMetal strap - roughly 1/8” x
1/4” x 5”Two (2) elastic bandsFlat head nail - 6D or 8D (approx
1/16” diameter)Two (2) wood screws #8Wood 8” x 5” x 1"Drill 1/4” wood or metal rod,
(approx 8" long)
PROCEDURES:
1. Carefully inspect pipe and fittings.
a. Make sure that there are NO cracks or other flaws in the pipe or fittings.
b. Check inside diameter of pipe using a 9 mm cartridge as a gauge. The bullet should closely fit into the pipe without forcing, but the cartridge case SHOULD NOT fit into pipe.
c. Outside diameter of pipe MUST NOT BE less than 1-1/2 times bullet diameter (0.536 inches; 1.37 cm)
2. Drill a 9/16” (1.43 cm) diam-eter hole 3/8” (approximately 1cm) into one coupling to removethe threat.
Drilled section should fit tightlyover smooth section of pipe.
3. Drill a 25/64” (1 cm) diameterhole 3/4” (1.9 cm) into pipe.Use cartridge as a gauge; whena cartridge is inserted into thepipe, the base of the case shouldbe even with the end of thepipe. Thread coupling tightlyonto pipe, drilled end first.
96

TM 31–210
4. Drill a hole in the center of thepipe plug just large enough forthe nail to fit through.
HOLE MUST BE CENTEREDIN PLUG.
5. Push nail through plug untilhead of nail is flush with squareend. Cut nail off at other end1/16” (.158 cm) away fromplug. Round off end of nailwith file.
6. Bend metal strap to “U” shape.Drill holes for wood screws.File two small notches at top.
7. Saw or otherwise shape 1”(2.54 cm) thick hard wood intostock.
8. Drill a 9/16” diameter (1.43 cm)hole through the stock. Thecenter of the hole should beapproximately 1/2” (1.Z7 cm)from the top.
9. Slide the pipe through this holeand attach front coupling.Screw drilled plug into rearcoupling.
97

TM 31–210
NOTE: If 9/16” drill is not available cut a groove in the top of the stockand tape pipe securely in place.
10. Position metal strap on stock sothat top will hit the head of thenail. Attach to stock with woodscrew on each site.
11. String elastic bands from frontcoupling to notch on each sideof the strap.
SAFETY CHECK - TEST FIRE PISTOL BEFORE HAND FIRING
1. Locate a barrier such as a stone wall or large tree which youcan stand behind in case the pistol ruptures when fired.
2. Mount pistol solidly to a table or other rigid support at leastten feet in front of the barrier.
3. Attach a cord to the firing strap on the pistol.
4. Holding the other end of the cord, go behind the barrier.
5. Pull the cord so that the firing strap is held back.
6. Replace the cord to fire the pistol. (If pistol does not fire,shorten the elastic bands or increase their number. )
IMPORTANT: Fire at least five rounds from behind the barrier andthen re-inspect the pistol before you attempt to hand fire it.
98

TM 31–210
HOW TO OPERATE PISTOL:
1. To Load
a. Remove plug from rear coupling.
b. Place cartridge into pipe.
c. Replace plug.
2. To Fire
a. Pull strap back and hold with thumb until ready.
b. Release strap.
3. To Remove Shell Case
a. Remove plug from rear coupling.
b. Insert 1/4” diameter steel or wooden rod into front of pistol and push shell case out.
99

TM 31–210
Section IIINo. 2
SHOTGUN (12 GAUGE)
A 12-gauge shotgun can be made from 3/4" water or gas pipe and fittings.
MATERIALS REQUIRED:
Wood 2” x 4” x 32”3/4” nominal size water or gas pipe 20” to 30” long threaded on
one end.3/4” steel couplingSolid 3/4” pipe plugMetal strap (1/4” x 1/16” x 4”)Twine, heavy (100 yards approximately)3 wood screws and screwdriverFlat head nail 6D or 8DHand drillSaw or knifeFileShellac or lacquerElastic bands
PROCEDURES:
1. Carefully inspect pipe and fittings.
a. Make sure that there are no cracks or other flaws.
b. Check inside diameter of pipe. A 12-gauge shot shell should fit into the pipe but the brass rim should not fit.
c. Outside diameter of pipe must be at least 1 in. (2.54 cm).
2. Cut stock from wood using a saw or knife.
3. Cut a 3/8” deep “V” groove in top of the stock.
100

TM 31–210
4. Turn coupling onto pipe until tight.
5. Coat pipe and “V” groove of stock with shellac or lacquer and, while stillwet, place pipe in “V” groove and wrap pipe and stock together using twoheavy layers of twine. Coat twine with shellac or lacquer after each layer.
6. Drill a hole through center ofpipe plug large enough for nailto pass through.
7. File threaded end of plug flat.
8. Push nail through plug and cutoff flat 1/32” past the plug.
9. Screw plug into coupling.
10. Bend 4” metal strap into “L”shape and drill hole for woodscrew. Notch metal strap onthe long side 1/2” from bend.
101

TM 31–210
11. Position metal strap on stock so that top will hit the head of the nail.Attach to stock with wood screw.
12. Place screw in each side of stock about 4” in front of metal strap.Pass elastic bands through notch in metal strap and attach to screwon each side of the stock.
SAFETY CHECK - TEST FIRE SHOTGUN BEFORE HAND FIRING
1. Locate a barrier such as a stone wall or large tree which youcan stand behind in case the weapon explodes when fired.
2. Mount shotgun solidly to a table or other rigid support at leastten feet in front of the barrier.
3. Attach a long cord to the firing strap on the shotgun.
4. Holding the other end of the cord, go behind the barrier.
5. Pull the cord so that the firing strap is held back.
6. Release the cord to fire the shotgun. (If shotgun does not fire,shorten the elastic bands or increase their number. )
IMPORTANT: Fire at least five rounds from behind the barrier andthen re-inspect the shotgun before you attempt to shoulder fire it.
102

TM 31–210
HOW TO OPERATE SHOTGUN:
1. To Load
a. Take plug out of coupling.
b. Put shotgun shell into pipe.
c. Screw plug hand-tight into coupling.
2. To Fire
a. Pull strap back and hold with thumb.
b. Release strap.
3. To Unload Gun
a. Take plug out of coupling.
b. Shake out used cartridge.
103

TM 31–210
Section IIINo. 3
SHOTSHELL DISPERSION CONTROL
When desired, shotshell can be modified to reduce shot dispersion.
MATERIALS REQUIRED:
ShotshellScrewdriver or knifeAny of the following filler materials:
Crushed RiceRice FlourDry Bread CrumbsFine Dry Sawdust
PROCEDURES:
1. Carefully remove crimp fromshotshell using a screwdriver orknife.
NOTE: If cartridge is of rollcrimp type, remove top wad.
2. Pour shot from shell,
3. Replace one layer of shot in thecartridge. Pour in filler materialto fill the spaces between theshot.
104

TM 31–210
4. Repeat Step 3 until all shot has been replaced.
5. Replace top wad (if applicable) and re-fold crimp.
6. Roll shell on flat surface tosmooth out crimp and restoreroundness .
7. Seal end of case with wax.
HOW TO USE:
This round is loaded and fired in the same manner as the standard shotshell. The shot spread will be about 2/3 that of a standard round.
105

TM 31–210
Section IIINo. 4
CARBINE (7. 62 mm Standard Rifle Ammunition)
A rifle can be made from water or gas pipe and fittings. Standardcartridges are used for ammunition.
MATERIALS REQUIRED:
Wood approximately 2 in. x 4 in. Twine, heavy (100 yards approx.)x 30 in. 3 wood screws and screwdriver
1/4 in. nominal size iron water or Flat head nail about 1 in. longgas pipe 20 in. long threaded Hand drillat one end. Saw or knife
3/8 in. to 1/4 in. reducer File3/8 in. to 1-1/2 in. threaded pipe Pipe wrench3/8 in. pipe coupling Shellac or lacquerMetal strap approximately 1/2 in. Elastic bands
x 1/16 in. x 4 in. Solid 3/8 in. pipe plug
PROCEDURES:
1. Inspect pipe and fittings carefully.
a. Be sure that there are no cracks or flaws.
b. Check inside diameter of pipe. A 7.62 mm projectile should fit into 3/8 in. pipe.
2. Cut stock from wood using saw or knife.
106

TM 31–210
3. Cut a 1/4 in. deep “V” groove in top of the stock.
4. Fabricate rifle barrel from pipe.
a. File or drill inside diameter of threaded end of 20 in. pipe for about 1/4 in. so neck of cartridge case will fit in.
b. Screw reducer onto threaded pipe using pipe wrench.
c. Screw short threaded pipe into reducer.
d. Turn 3/8 pipe coupling ontothreaded pipe using pipe wrench. All fittings should be as tight as possible. Do not split fittings.
5. Coat pipe and “V” groove of stock with shellac or lacquer. While still wet,place pipe in “V” groove and wrap pipe and stock together using two layersof twine. Coat twine with shellac or lacquer after each layer.
6. Drill a hole through center ofpipe plug large enough for nailto pass through.
7. File threaded end of plug flat.
107

TM 31–210
8. Push nail through plug and cutoff rounded 1/32 in. (2 mm)past the plug.
9. Screw plug into coupling.
10. Bend 4 in. metal strap into "L"shape and drill hole for woodscrew. Notch metal strap on thelong side 1/2 in. from bend.
11. Position metal strap on stock sothat top will hit the head of thenail. Attach to stock with woodscrew.
12. Place screw in each side of stock about 4 in. in front of metal strap. Passelastic bands through notch in metal strap and attach to screw on each sideof the stock.
SAFETY CHECK - TEST FIRE RIFLE BEFORE HAND FIRING
1. Locate a barrier such as a stone wall or large tree which you can standbehind to test fire weapon.
2. Mount rifle solidly to a table or other rigid support at least ten feet infront of the barrier.
108

TM 31–210
3. Attach a long cord to the firing strap on the rifle.
4. Holding the other end of the cord, go behind the barrier.
5. Pull the cord so that the firing strap is held back.
6. Release the cord to fire the rifle. (If the rifle does not fire, shorten the elasticbands or increase their number.)
IMPORTANT: Fire at least five rounds from behind a barrier andthen re-inspect the rifle before you attempt to shoulder fire it.
HOW TO OPERATE RIFLE:
1. To Load.
a. Remove plug from coupling
b. Put cartridge into pipe.
c. Screw plug hand-tight into coupling.
2. To Fire
a. Pull strap back and hold with thumb.
b. Release strap.
3. To Unload Gun
a. Take plug out of coupling.
b. Drive out used case using a stick or twig.
109

TM 31–210
Section IIINo. 5
REUSABLE PRIMER
A method of making a previously fired primer reusable.
MATERIALS REQUIRED:
Used cartridge case2 long nails having approximately the same diameter as the inside of
the primer pocket“Strike-anywhere” matches - 2 or 3 are needed for each primerViseHammerKnife or other sharp edged instrument
PROCEDURES:
1. File one nail to a needle point sothat it is small enough to fitthrough hole in primer pocket.
2. Place cartridge case and nail between jaws of vise. Force out fired primerwith nail as shown below.
3. Remove anvil from primer cup.
110

TM 31–210
4. File down point of second nailuntil tip is flat.
5. Remove indentations from faceof primer cup with hammer andflattened nail.
6. Cut off tips of the heads of“strike-anywhere” matchesusing knife. Carefully crush thematch tips on dry surface withwooden match stick until themixture is the consistency ofsugar.
CAUTION: Do not crush more than 3 match tips at one time or themixture may explode.
7. Pour mixture into primer cup.Compress mixture with woodenmatch stick until primer cup isfully packed.
8. Place anvil in primer pocketwith legs down.
9. Place cup in pocket withmixture facing downward.
10. Place cartridge case and primer cup between vise jaws, and press slowlyuntil primer is seated into bottom of pocket. The primer is now ready to use.
111

TM 31–210
Section IllNo. 6
PIPE PISTOL FOR .45 CALIBER AMMUNITION
A .45 caliber pistol can be made from 3/8 in. nominal diameter steelgas or water pipe and fittings. Lethal range is about 15 yards (13-l/2meters).
MATERIALS REQUIRED:
Steel pipe, 3/8 in. (1 cm) nominal diameter and 6 in. (15 cm) longwith threaded ends.
2 threaded couplings to fit pipeSolid pipe plug to fit pipe couplingHard wood, 8-1/2 in. x 6-1/2 in. x 1 in. (21 cm x 16-1/2 cm x 2-1/2 cm)Tape or stringFlat head nail, approximately 1/16 in. (1-1/2 mm) in diameter2 wood screws, approximately 1/16 in. (1-1/2 mm) in diameterMetal strap, 5 in. x 1/4 in. x 1/8 in. (12-1/2 cm x 6 mm x 1 mm)Bolt, 4 in. (10 cm) long, with nut (optional).Elastic bandsDrills, one 1/16 in. (1-1/2 mm) in diameter, and one having same
diameter as bolt (optional).Rod, 1/4 in. (6mm) in diameter and 8 in. (20 cm) longSaw or knife
PROCEDURES:
1. Carefully inspect pipe and fittings.
a. Make sure that there are no cracks or other flaws in the pipe and fittings.
b. Check inside diameter of pipe using a .45 caliber cartridge as a gauge. The cartridge case should fit into the pipe snugly but without forcing.
c. Outside diameter of pipe MUST NOT BE less than 1-1/2 times the bulletdiameter.
2. Follow procedure of Section III, No. 1, steps 4, 5, and 6.
112

TM 31–210
3. Cut stock from wood using sawor knife.
Inches Centimeters
1-1/2 4cm8-1/2 26- 1/26 201-1/2 45 12-1/2
4. Cut a 3/8 in. (9-l/2 mm) deepgroove in top of stock.
5. Screw couplings onto pipe.Screw plug into one coupling.
6. Securely attach pipe to stockusing string or tape.
7. Follow procedures of Section III, No. 1, steps 10 and 11.
8. (Optional) Bend bolt for trigger. Drill hole in stock and place bolt in hole sostrap will be anchored by bolt when pulled back. If bolt is not available, usestrap as trigger by pulling back and releasing.
113

TM 31–210
9. Follow SAFETY CHECK, Section III, No, 1
HOW TO USE:
1. To Load:
a. Remove plug from rear coupling.
b. Wrap string or elastic band around extractor groove so case will seat into barrel securely.
c. Place cartridge in pipe.
d. Replace plug.
2. To Fire:
a. Pull metal strap back and anchor in trigger.
b. Pull trigger when ready to fire.
NOTE: If bolt is not used, pull strap back and release.
3. To Remove Cartridge Case:
a. Remove plug from rear coupling.
b. Insert rod into front of pistoland push cartridge case out.
114

TM 31–210
Section IIINo. 7
MATCH GUN
An improvised weapon using safety match heads as thepropellant and a metal object as the projectile. Lethal range is about40 yards (36 meters).
MATERIALS REQUIRED:
Metal pipe 24 in. (61 cm) long and 3/8 in. (1 cm) in diameter (nominalsize) or its equivalent, threaded on one end.
End cap to fit pipeSafety matches - 3 books of 20 matches each.Wood-28 in. x 4 in. x 1 in. (70 cm x 10 cm x 2.54 cm)Toy caps OR safety fuse OR “Strike-anywhere matches” (2)Electrical tape or stringMetal strap, about 4 in. x 1/4 in. x 3/16 in. ( 10 cm x 6 mm x 4.5 mm)2 rags, about 1 in x 12 in. and 1 in. x 3 in. (2-1/2 cm x30 cm and
2-1/2 cm x 8 cm)Wood screwsElastic bandsMetal object (steel rod, bolt with head cut off, etc.), approximately
7/16 in. (11 mm) in diameter, and 7/16 in. (11 mm) long if ironor steel, 1-1/4 in. (31 mm) long if aluminum, 5/16 in. (8mm) longif lead.
Metal disk 1 in. (2-1/2 cm) in diameter and 1/16 in. (1-1/2 mm) thickBolt, 3/32 in. (2-1/2 mm) or smaller in diameter and nut to fitSaw or knife
PROCEDURES:
1. Carefully inspect pipe and fittings. Be sure that there are no cracks orother flaws.
2. Drill small hole in center of endcap. If safety fuse is used, besure it will pass through thishole.
115

TM 31–210
3. Cut stock from wood using asaw or knife.
Metric English
8 cm 2 in10 cm 4 in36 cm 14 in71 cm 28 in
4. Cut 3/8 in. (9-1/2 mm) deep “V” groove in top of stock.
5. Screw end cap onto pipe until finger tight.
6. Attach pipe to stock with string or tape.
7. Bend metal strap into “L” shapeand drill holes for wood screw.Notch metal strap on long side1/2 in. (1 cm) from bend.
8. Position metal strap on stock so that the top will hit the center of hole drilledin end cap.
116

TM 31–210
9. Attach metal disk to strap withnut and bolt. This will deflectblast from hole in end cap whengun is fired. Be sure that headof bolt is centered on hole inend cap.
10. Attach strap to stock with wood screws.
11. Place screw on each side of stock about 4 in. (10 cm) in front of metalstrap. Pass elastic bands through notch in metal strap and attach to screw oneach side of stock.
HOW TO USE:
A. When Toy Caps Are Available:
1. Cut off match heads from 3books of matches with knife. Pour match heads into pipe.
117

TM 31–210
2. Fold one end of l in. x 12 in.rag 3 times so that it becomes aone inch square of 3 thick-nesses. Place rag into pipe tocover match heads, folded endfirst. Tamp firmly WITHCAUTION.
3. Place metal object into pipe. Place I in. x 3 in. rag into pipe to coverprojectile. Tamp firmly WITH CAUTION.
4. Place 2 toy caps over small holein end cap. Be sure metal strapwill hit caps when it is released.
NOTE: It may be necessary to tape toy caps to end cap.
5. When ready to fire, pull metal strap back and release.
B. When “Strike-Anywhere” Matches Are Available:
1. Follow steps 1 through 3 in A.
2. Carefully cut off tips of headsof 2 “strike-anywhere” matcheswith knife.
3. Place one tip in hole in end cap. Push in with wooden end of match stick.
118

TM 31–210
4. Place second match tip on apiece of tape. Place tape somatch tip is directly over hole inend cap.
5. When ready to fire, pull metal strap back and release.
C. When Safety Fuse Is Available: (Recommended for Booby Traps)
1. Remove end cap from pipe.Knot one end of safety fuse.Thread safety fuse through holein end cap so that knot is oninside of end cap.
2. Follow steps 1 through 3 in A.
3. Tie several matches to safetyfuse near outside of end cap.
NOTE: Bare end of safety fuse should be inside match head cluster.
4. Wrap match covers aroundmatches and tie. Striker shouldbe in contact with match bands.
5. Replace end cap on pipe.
6. When ready to fire, pull match cover off with strong, firm, quick motion.
119

TM 31–210
SAFETY CHECK - TEST FIRE GUN BEFORE HAND FIRING
1. Locate a barrier such as a stone wall or large tree which you can standbehind in case the weapon explodes when fired.
2. Mount gun solidly to a table or other rigid support at least ten feet infront of the barrier.
3. Attach a long cord to the firing strap on the gun.
4. Holding the other end of the cord, go behind the barrier.
5. Pull the cord so that the firing strap is held back.
6. Release the cord to fire the gun. (If gun does not fire, shorten the elasticbands or increase their number.)
IMPORTANT: Fire at least five rounds from behind the barrier andthen re-inspect the gun before you attempt to shoulder fire it.
120

TM 31–210
Section IIINo. 8
RIFLE CARTRIDGE
NOTE: See Section III, No. 5 for reusable primer.
A method of making a previously fired rifle cartridge reusable.
MATERIALS REQUIRED:
Empty rifle cartridge, be sure that it still fits inside gun.Threaded bolt that fits into neck of cartridge at least 1-1/4 in. (3 cm)
long.Safety or “strike-anywhere” matches (about 58 matches are needed
for 7.62 mm cartridge)Rag wad (about 3/4 in. (1-1/2 cm) square for 7.62 mm cartridge)KnifeSaw
NOTE: Number of matches and size of rag wad depend on particularcartridge used.
PROCEDURES:
1. Remove coating on heads ofmatches by scraping matchsticks with sharp edge.
CAUTION: If wooden “strike-anywhere” matches are used, cut offtips first. Discard tips or use for Reusable Primer, Section III, No. 5.
121

TM 31–210
2. Fill previously primed cartridgecase with match head coatingsup to its neck. Pack evenly andtightly with match stick.
CAUTION: Remove head of match stick before packing. In all packingoperations, stand off to the side and pack gently. DO NOT HAMMER.
3. Place rag wad in neck of case.Pack with match stick fromwhich head was removed.
4. Saw off head end of bolt soremainder is approximately thelength of the standard bullet.
5. Place bolt in cartridge case so that it sticks out about the same length as theoriginal bullet.
NOTE: If bolt does not fit snugly, force paper or match sticks betweenbolt and case, or wrap tape around bolt before inserting in case.
122

TM 31–210
Section IIINo. 9
PIPE PISTOL FOR . 38 CALIBER AMMUNITION
A .38 caliber pistol can be made from 1/4 in. nominal diametersteel gas or water pipe and fittings. Lethal range is approximately 33yards (30 meters).
MATERIALS REQUIRED:
Steel pipe, 1/4 in. (6 mm) nominaldiameter and 6 in. (15 cm) longwith threaded ends (nipple)
Solid pipe plug, 1/4 in. (6 mm)nominal diameter
2 steel pipe couplings, 1/4 in. (6mm) nominal diameter
Metal strap, approximately 1/8 in. xl/4 in. x 5 in.(3 mm x 6mm x125 mm or 12-1/2 cm)
Elastic bandsFlat head nail - 6D or 8D, approxi-
mately 1/16 in. dia. (1-1/2 mm)2 wood screws, #8Hard wood, 8 in. x 5 in. x 1 in.
(20 cm x 12-1/2 cm x 2-1/2 cm)DrillWood or metal rod, 1/4 in. (6 mm)
diameter and 8 in. (20 cm) longSaw or knife
PROCEDURES:
1. Carefully inspect pipe and fittings.
a. Make sure that there are NO cracks or other flaws in the pipe or fittings
b. Check inside diameter of pipe using a .38 caliber cartridge as a gauge. The bullet should fit closely into the pipe without forcing, but the cartridge case SHOULD NOT fit into the pipe.
c. Outside diameter of pipe MUST NOT BE less than 1-1/2 times the bulletdiameter.
123

TM 31–210
2. Drill a 35/64 in. (14 mm)diameter hole 3/4 in. (2 cm) intoone coupling to remove thethread. Drilled section should fittightly over smooth section ofpipe.
3. Drill a 25/64 in. (1 cm) diameterhole 1-1/8 in. (2.86 cm) intopipe. Use cartridge as a gauge;when a cartridge is inserted intothe pipe, the shoulder of thecase should butt against the endof the pipe. Thread couplingtightly onto pipe, drilled endfirst.
4. Follow procedures of Section III, No. 1, steps 4 through 11.
5. Follow SAFETY CHECK, Section III, No. 1.
HOW TO OPERATE PISTOL:
Follow procedures of HOW TO OPERATE PISTOL, Section III, No. 1, steps1, 2, and 3.
124

TM 31–210
Section IIINo. 10
PIPE PISTOL FOR .22 CALIBER AMMUNITIONLONG OR SHORT CARTRIDGE
A .22 Caliber pistol can be made from 1/8 in. nominal diameterextra heavy, steel gas or water pipe and fittings. Lethal range isapproximately 33 yards (30 meters).
MATERIALS REQUIRED:
Steel pipe, extra heavy, 1/8 in. (3mm) nominal diameter and 6 in.(15 cm) long with threaded ends(nipple)
Solid pipe plug, 1/8 in. (3 mm)nominal diameter
2 steel pipe couplings, 1/8 in. (3mm) nominal diameter
Metal strap, approximately 1/8 in. x1/4 in. x 5 in. (3 mm x 6 mm x125 mm or 12-1/2 cm)
Elastic bandsFlat head nail - 6D or 8D (approxi-
mately 1/16 in. (1-1/2 mm)diameter
2 wood screws, #8Hard wood, 8 in. x 5 in. x 1 in.
(20 cm x 12-1/2 cm x 2-1/2 cm)DrillWood or metal rod, 1/8 in. (3 mm)
diameter and 8 in. (20 cm) longSaw or knife
PROCEDURES:
1. Carefully inspect pipe and fittings.
a. Make sure that there are NO cracks or other flaws in the pipe or fittings.
b. Check inside diameter of pipe using a .22 caliber cartridge, long or short, as a gauge. The bullet should fit closely into the pipe without forcing, but the cartridge case SHOULD NOT fit into the pipe.
c. Outside diameter of pipe MUST NOT BE less than 1-1/2 times the bulletdiameter.
125

TM 31–210
2. Drill a 15/64 in. (1/2 cm)diameter hole 9/16 in. (1-1/2cm) deep in pipe for longcartridge. (If a short cartridge isused, drill hole 1 3/8 in. (1 cm)deep). When a cartridge isinserted into the pipe, theshoulder of the case should buttagainst the end of the pipe.
3. Screw the coupling onto the pipe. Cut coupling length to allow pipe plug tothread in pipe flush against the cartridge case.
4. Drill a hole off center of the pipeplug just large enough for thenail to fit through.
NOTE: Drilled hole MUST BE OFF CENTER in plug.
5. Push nail through pipe pluguntil head of nail is flush withsquare end. Cut nail off at otherend 1/16 in. (1-1/2 mm) awayfrom plug. Round off end withfile.
6. Follow procedures of Section Ill, No. 1, steps 6 through 11.
7. Follow SAFETY CHECK, Section III, No. 1.
HOW TO OPERATE:
Follow procedures of HOW TO OPERATE PISTOL, Section III, No. 1, steps1, 2, and 3.
126

TM 31–210
Section IIINo. 11
LOW SIGNATURE SYSTEM
Low signature systems (silencers) for improvised small armsweapons (Section III) can be made from steel gas or water pipe and fittings.
MATERIALS REQUIRED:
Grenade containerSteel pipe nipple, 6 in. (15 cm) long -
See Table I for diameter2 steel pipe couplings - See Table II
for dimensionsCotton cloth - See Table 1I for
dimensionsDrillAbsorbent cotton
PROCEDURES:
1. Drill hole in grenade container at both ends to fit outside diameter of pipenipple. (See Table 1. )
2. Drill four (4) rows of holes in pipe nipple. Use Table I for diameter andlocation of holes.
127

TM 31–210
Table I. Low Signature System Dimensions
Holes(Coupling) per (4-Rows)
Cal A B C D Row Total
.45 Cal. 3/8 1/4 3/8 3/8 12 48
.38 Cal. 3/8 1/4 1/4 1/4 12 489 mm 3/8 1/4 1/4 1/4 12 487.62 mm 3/8 1/4 1/4 1/4 1Z 48.22 Cal. 1/4 5/32 1/8* 1/8 14 50
*Extra Heavy PipeAll dimensions in inches
3. Thread one of the pipe couplings on the drilled pipe nipple.
4. Cut coupling length to allow barrel of weapon to thread fully into lowsignature system. Barrel should butt against end of the drilled pipe nipple.
5. Separate the top half of thegrenade container from thebottom half.
6. Insert the pipe nipple in thedrilled hole at the base of thebottom half of container. Packthe absorbent cotton inside thecontainer and around the pipenipple.
128

TM 31–210
7. Pack the absorbent cotton in top half of grenade container leaving hole incenter. Assemble container to the bottom half.
8. Thread the other coupling onto the pipe nipple.
NOTE: A longer container and pipe nipple, with same “A” and “B”dimensions as those given, will further reduce the signature of thesystem.
HOW TO USE:
1. Thread the low signature system on the selected weapon securely.
2. Place the proper cotton wad size into the muzzle end of the system.
Table II. Cotton Wadding - Sizes
Weapon Cotton Wad Size
.45 Cal. 1-1/2 x 6 inches
.38 Cal. 1 x 4 inches
9 mm 1 x 4 inches
7.62 mm 1 x 4 inches
.22 Cal. Not needed
3. Load Weapon
4. Weapon is now ready for use.
129

TM 31–210
Section IVNo. 1
RECOILLESS LAUNCHER
A dual directional scrap fragment launcher which can be placed tocover the path of advancing troops.
MATERIAL REQUIRED:
Iron water pipe approximately 4 ft. (1 meter) long and 2 to 4 in. (5 to10 cm) in diameter
Black powder (commercial) or salvaged artillery propellant about 1/2 lb.(200 gms)
Safety or improvised fuse (Section Vl, No. 7) or improvised electrical igniter(Section Vl, No. 2)
Stones and/or metal scrap chunks approximately 1/2 in. (1 cm) in diameter -about 1 lb. (400 gms) total
4 rags for wadding, each about 20 in. by 20 in. (50 cm by 50 cm)WirePaper or rag
NOTE: Be sure that the water pipe has no cracks or flaws.
130

TM 31–210
PROCEDURES:
1. Place propellant and igniter in paper or rag and tie with string so contentscannot fall out.
2. Insert packaged propellant and igniter in center of pipe. Pull firingleads out one end of pipe.
3. Stuff a rag wad into each end of pipe and lightly tamp using a flat end stick.
4. Insert stones and/or scrap metal into each end of pipe. Be sure the sameweight of material is used in each side.
5. Insert a rag wad into each end of the pipe and pack tightly as before.
HOW TO USE:
1. Place scrap mine in a tree or pointed in the path of the enemy. Attach Igniterlead to the firing circuit. The recoilless launcher is now ready to fire.
2. If safety or improvised fuse is used instead of the detonator, place the fuseinto the packaged propellant through a hole drilled in the center of the pipe.Light free end of fuse when ready to fire. Allow for normal delay time.
CAUTION: Scrap will be ejected from both ends of the launcher.
131

TM 31–210
Section IVNo. 2
SHOTGUN GRENADE LAUNCHER
This device can be used to launch a hand grenade to a distance of160 yards (150 meters) or more using a standard 12 gauge shotgun.
MATERIALS REQUIRED:
Grenade (Improvised pipe hand grenade, Section II, No. 1, may be used)12 gauge shotgun12 gauge shotgun cartridgesTwo washers, (brass. steel, iron, etc. ), having outside diameter of
5/8 in. (1-1/2 cm)Rubber disk 3/4 in. (2 cm) in diameter and 1/4 in. (6 mm) thick (leather,
neoprene, etc. can be used)A 30 in. (75 cm) long piece of hard wood (maple, oak. etc. ) approxi-
mately 5/8 in. (1-1/2 cm) in diameter. Be sure that wood will slideinto barrel easily.
Tin can (grenade and its safety lever must fit into can)Two wooden blocks about 2 in. (5 cm) square and 1-1/2 in. (4 cm) thickOne wood screw about 1 in. (2-1/2 cm) longTwo nails about 2 in. (5 cm) long12 gauge wads, tissue paper, or cottonAdhesive tape, string, or wireDrill
PROCEDURES:
1. Punch hole in center of rubber disk large enough for screw to pass through.
2. Make push-rod as shown.
NOTE: Gun barrel is slightly less than 3/4 inch in diameter. If rubberdisk does not fit in barrel, file or trim it very slightly. It should fittightly.
3. Drill a hole through the center ofone wooden block of such sizethat the push-rod will fit tightly.Whittle a depression around thehole on one side approximately1/8 in. (3 mm) and large enoughfor the grenade to rest in.
132

TM 31–210
4. Place the base of the grenade inthe depression in the woodenblock. Securely fasten grenadeto block by wrapping tape (orwire) around entire grenade andblock.
NOTE: Be sure that the tape (or wire) does not cover hole in block orinterfere with the operation of the grenade safety lever.
5. Drill hole through the center of the second wooden block, so that it will justslide over the outside of the gun barrel.
6. Drill a hole in the center of the bottom of the tin can the same size as the holein the block.
7. Attach can to block as shown.
8. Slide the can and block onto the barrel until muzzle passes can open end.Wrap a small piece of tape around the barrel an inch or two from the end.Tightly wrapped string may be used instead of tape. Force the can andwooden block forward against the tape so that they are securely held inplace. Wrap tape around the barrel behind the can.
133

TM 31–210
CAUTION: Be sure that the can is securely fastened to the gun barrel.If the can should become loose and slip down the barrel after thelauncher is assembled, the grenade will arm and explode after itsnormal delay time. (4 – 5 sec.)
9 Remove crimp from a 12 gaugeshotgun cartridge with penknife. Open cartridge. Pour shotfrom shell. Remove wads andplastic liner if present.
10. Empty the propellant onto apiece of paper. Using knife,divide the propellant in half.Replace half of the propellantinto the cartridge caste.
11. Replace the 12 gauge card-board wads into cartridge case.
NOTE: If wads are not available, stuff tissue paper or cotton into thecartridge case. Pack tightly
HOW TO USE:
Method I — When Ordinary Grenade is Used:
1. Load cartridge in gun.
2. Push end of push-rod without the rubber disk into hole in wooden blockfastened to grenade
134

TM 31–210
3. Slowly push rod into barrel until it rests against the cartridge case and thegrenade is in the can. If the grenade is not in the can, remove rod and cut toproper size. Push rod back into barrel.
4. With can holding safety lever of grenade in place, carefully remove safetypin.
CAUTION: Be sure that the sides of the can restrain the grenade safetylever. If the safety lever should be released for any reason, grenade willarm and explode after its normal delay time. (4 – 5 sec.)
5. To fire grenade launcher, rest gun on ground at angle determined by rangedesired. A 45 degree angle should give about 150 meters ( 160 yds.).
Method II — When Improvised Pipe Grenade is Used:
An improvised pipe grenade (Section II. No. 1) may be launched in asimilar manner. No tin can is needed.
1. Fasten the grenade to the block as shown above with the fuse hole at the endopposite the block.
2. Push end of push-rod into hole in wooden block fastened to grenade.
3. Push rod into barrel until it rests against cartridge case.
135

TM 31–210
4. Load cartridge in gun.
5. Follow step 5 of Method I.
6. Using a fuse with at least a 10 second delay, light the fuse before firing.
7. Fire when the fuse burns to 1/2 its original length.
136

TM 31–210
Section IVNo. 3
GRENADE LAUNCHER (57 MM CARDBOARD CONTAINER)
An improvised method of launching a standard grenade 150 yds. (135meters) or an improvised grenade 90 yds. (81 meters) using a discardedcardboard ammunition container.
MATERIAL REQUIRED:
Heavy cardboard container with inside diameter of 2-1/2 to 3 in.(5-1/2 to 8 cm) and at least 12 in. (30 cm) long (ammunitioncontainer is suitable)
Black powder - 8 grams (124 grains) or lessSafety or improvised fuse (Section Vl, No. 7)Grenade (improvised hand grenade, Section II, No. 1 may be used)Rag, approximately 30 in. x 24 in. (75 cm x 60 cm)Paper
CAUTION: 8 grams of black powder yield the maximum ranges. Donot use more than this amount. See Improvised Scale, Section Vll,
PROCEDURES:
METHOD I — If Standard Grenade is Used:
1. Discard top of container. Makesmall hole in bottom.
2. Place black powder in paper.Tie end with string so contentscannot fall out. Place package incontainer.
137

TM 31–210
3. Insert rag wadding intocontainer. Pack tightly withCAUTION.
4. Measure off a length of fuse thatwill give the desired delay.Thread this through hole inbottom of container so that itpenetrates into the black powderpackage.
NOTE: If improvised fuse is used, be sure fuse fits loosely through holein bottom of container.
5. Hold grenade safety lever andcarefully withdraw safety pinfrom grenade. Insert grenadeinto container, lever end first.
CAUTION: If grenade safety lever should be released for any reason,grenade will arm and explode after its normal delay time. (4 – 5 sec.)
6. Bury container about 6 in. (15 cm) in the ground at 30° angle, bringing fuseup alongside container. Pack ground tightly around container.
CAUTION: The tightly packed dirt helps to hold the tube togetherduring the firing. Do not fire unless at least the bottom half of thecontainer is buried in solidly packed dirt.
METHOD II — If Improvised Pipe Hand Grenade is Used:
1. Follow step 1 of above procedure.
138

TM 31–210
2. Measure off a piece of fuse at least as long as the cardboard container. Tapeone end of this to the fuse from the blasting cap in the improvised grenade.Be sure ends of fuse are in contact with each other.
3. Place free end of fuse and black powder on piece of paper. Tie ends withstring so contents will not fall out.
4. Place package in tube. Insert rag wadding. Pack so it fits snugly. Place pipehand grenade into tube. Be sure it fits snugly.
5. Insert fuse through hole in endof cardboard container. Be sureit goes into black powderpackage.
NOTE: Cardboard container may be used for only one firing.
6. Follow step G of Method I.
HOW TO USE:
Light fuse when ready to fire.
139

TM 31–210
Section IVNo. 4
FIRE BOTTLE LAUNCHER
A device using 2 items (shotgun and chemical fire bottle) that can beused to start or place a fire 80 yards (72 meters) from launcher.
MATERIAL REQUIRED:
Standard 12 gage or improvised shotgun (Section III, No. 2)Improvised fire bottle (Section V, No. 1)Tin can, about 4 in. (10 cm) in diameter and 5-1/2 in. (14 cm) highWood, about 3 in. x 3 in. x 2 in. (7-1/2 cm x 7-1/2 cm x 5 cm)Nail, at least 3 in. (7-1/2 cm) longNuts and bolts or nails, at least 2-1/2 in. (6-1/2 cm) longRagPaperDrill
If Standard Shotgun is Used:
Hard wood stick, about the same length as shotgun barrel and about 5/8 in.(1-1/2 cm) in diameter. Stick need not be round.
2 washers (brass, steel, iron, etc.) having outside diameter of 5/8 in,(1-1/2 cm)
One wood screw about 1 in. (2-1/2 cm) longRubber disk, 3/4 in. (2 cm) in diameter and 1/4 in. (6 mm) thick, leather,
cardboard, etc. can be used.12 gauge shotgun ammunition
If Improvised Shotgun is Used:
Fuse, safety or improvised fast burning (Section VI, No. 7)Hard wood stick, about the same length as shotgun barrel and 3/4 in.
(2 cm) in diameterBlack powder - 9 grams (135 grains). See Section VII, No. 8,
140

TM 31–210
PROCEDURES:
METHOD I - If Improvised Shotgun is Used:
1. Drill hole in center of woodblock approximately 1 in. (2-1/2cm) deep. Hole should haveapproximately the samediameter as the wooden stick.
2. Drill 2 small holes on oppositesides of wooden block. Holeshould be large enough for boltto pass through.
3. Fasten can to block with nutsand bolts.
NOTE: Can may also be securely fastened to block by hammeringseveral nails through can and block. Do not drill holes, and be carefulnot to split wood.
4. Place wooden stick into hole inwooden block, Drill small hole(same diameter as that of 3 in.nail) through wooden block andthrough wooden stick. Insertnail in hole.
141

TM 31–210
5. Crumple paper and place in bottom of can. Place another piece of paperaround fire bottle and insert in can. Use enough paper so that bottle will fitsnugly.
6. Place safety fuse and blackpowder on paper. Tie each endwith string.
7. Thread fuse through hole in plug. Place powder package in rear of shotgun.Screw plug finger tight into coupling.
NOTE Hole in plug may have to be enlarged for fuse.
142

TM 31–210
8. Insert rag into front of shotgun. Pack rag against powder package withstick. USE CAUTION.
METHOD II — If Standard Shotgun is Used:
1. Follow Steps 1 and 2, Shotgun Grenade Launcher, Section IV, No. 2.
2. Follow procedure of Method I, Steps 1 - 5.
3. Follow Steps 9, 10, 11, Shotgun Grenade Launcher, Section IV, No. 2,using 1/3 of total propellant instead of 1/2.
4. Load cartridge in gun.
HOW TO USE:
1. Insert stick and holder containing chemical fire bottle.
CAUTION: Do not tilt muzzle downward.
2. Hold bottom of gun against ground at 45° angle and light fuse.
NOTE: Steps 1 and 2, “HOW TO USE:” same for both standard andimprovised shotguns.
CAUTION: Severe burns may result if bottle shatters when fired. Ifpossible, obtain s bottle identical to that being used as the fire bottle. Fillabout 2/3 full of water and fire as above. If bottle shatters when firedinstead of being launched intact, use a different type of bottle.
143

TM 31–210
Section IVNo. 5
GRENADE LAUNCHERS
A variety of grenade launchers can be fabricated from metal pipes andfittings. Ranges up to 600 meters (660 yards) can be obtained depending onlength of tube, charge, number of grenades, and angle of firing.
MATERIAL REQUIRED:
Metal pipe, threaded on one end and approximately 2-1/2 in. (6-1/4 cm)in diameter and 14 in. to 4 ft. (35 cm to 119 cm) long depending onrange desired and number of grenades used.
End cap to fit pipeBlack powder, 15 to 50 cm, approximately 1-1/4 to 4-1/4 tablespoons
(Section I, No. 3)Safety fuse, fast burning improvised fuse (Section Vl, No. 7) or
improvised electric bulb initiator (Section Vl, No. 1 Automobilelight bulb is needed)
Grenade(s) - 1 to 6Rag(s) - about 30 in. x 30 in. (75 cm x 75 cm) and 20 in. x 20 in.
(55 cm x 55 cm)DrillString
NOTE: Examine pipe carefully to be sure there are no cracks or otherflaws.
PROCEDURES:
METHOD I — If Fuse is Used:
1. Drill small hole through centerof end cap.
2. Make small knot near one endof fuse. Place black powder andknotted end of fuse in paper andtie with string.
144

TM 31–210
3. Thread fuse through hole in endcap and place package in endcap. Screw end cap onto pipe,being careful that black powderpackage is not caught betweenthe threads.
4. Roll rag wad so that it is about 6in. (15 cm) long and hasapproximately the samediameter as the pipe. Pushrolled rag into open end of pipeuntil it rests against blackpowder package.
5. Hold grenade safety lever inplace and carefully withdrawsafety pin.
CAUTION: If grenade safety lever is released for any reason, grenadewill arm and explode after its normal delay time. (4 – 5 sec.)
6. Holding safety lever in place, carefully push grenade into pipe, lever endfirst, until it rests against rag wad.
145

TM 31–210
7. The following table lists various types of grenade launchers and theirperformance characteristics.
NO. OFDESIRED GRENADES POWDER PIPE FIRINGRANGE LAUNCHED CHARGE LENGTH ANGLE
250 m 1 15 gm 14" 30500 m 1 50 gm 48" 10600 m a 1 50 gm 48" 30200 m 6 b 25 gm 48" 30
a For this range, an additional delay is required. See Section Vl, No. 11 and12.
b For multiple grenade launcher, load as shown.
NOTE: Since performance of different black powder varies, fireseveral test rounds to determine the exact amount of powder necessaryto achieve the desired range.
HOW TO USE:
1. Bury at least 1/2 of the launcher pipe in the ground at desired angle. (Openend should face the expected path of the enemy.) Muzzle may be coveredwith cardboard and a thin layer of dirt and/or leaves as camouflage. Be surecardboard prevents dirt from entering the pipe.
146

TM 31–210
NOTE: The 14 in. launcher may be hand held against the groundinstead of being buried.
2. Light fuse when ready to fire.
METHOD II — If Electrical Igniter is Used:
NOTE: Be sure that bulb is in good operating condition.
1. Prepare electric bulb initiator as described in Section Vl, No, 1.
2. Place electric initiator and black powder charge in paper. Tie ends of paperwith string.
3. Follow above Procedure, from Step 3 to end.
HOW TO USE:
1. Follow above How to Use:, Step 1.
2. Connect leads to firing circuit. Close circuit when ready to fire.
147

TM 31–210
Section IVNo. 6
60 MM MORTAR PROJECTILE LAUNCHER
A device to launch 60 mm mortar rounds using a metal pipe 2-1/2 in.(6 cm) in diameter and 4 ft. (120 cm) long as the launching tube.
MATERIAL REQUIRED:
Mortar, projectile (60 mm) and charge incrementMetal pipe 2-1/2 in. (6 cm) in diameter and 4 ft. (120 cm) long, threaded
on one endThreaded end cap to fit pipeBolt, 1/8 in. (3 mm) in diameter and at least 1 in. (2-1/2 cm) longTwo (2) nuts to fit boltFileDrill
PROCEDURES:
1. Drill hole 1/8 in. (3 mm) indiameter through center of endcap.
2. Round off end of bolt with file.
3. Place bolt through hole in endcap. Secure in place with nutsas illustrated.
148

TM 31–210
4. Screw end cap onto pipe tightly.Tube is now ready for use.
HOW TO USE:
1. Bury launching tube in groundat desired angle so that bottomof tube is at least 2 ft. (60 cm)underground. adjust the numberof increments in rear finned endof mortar projectile. Seefollowing table for launchingangle and number of incrementsused.
2. When ready to fire, withdrawsafety wire from mortarprojectile. Drop projectile intolaunching tube, FINNED ENDFIRST.
CAUTION: Be sure bore riding pin is in place in fuse when mortarprojectile is dropped into tube. A live mortar round could explode in thetube if the fit is loose enough to permit the bore riding pin to come outpartway.
CAUTION: The round will fire as soon as the projectile is dropped intothe tube. Keep all parts of the body behind the open end of the tube.
149

TM 31–210
DESIRED MAXIMUM REQUIRED CHARGERANGE HEIGHT ANGLE Number of(YARDS) MORTAR ELEVATION Charges -
WILL OF TUBE IncrementsREACH (MEASURED(YARDS) FROM HORI–
ZONTALDEGREES)
150 25 40 0300 50 40 1700 150 40 21000 225 40 31500 300 40 4
125 75 60 0300 125 60 1550 250 60 21000 375 60 31440 600 60 4
75 100 80 0150 200 80 1300 350 80 2400 600 80 3550 750 80 4
150

TM 31–210
Section VNo. 1
CHEMICAL FIRE BOTTLE
This incendiary bottle is self-igniting on target impact.
MATERIALS REQUIRED
Material How Used Common Source
Sulphuric Acid Storage Batteries Motor VehiclesMaterial Processing Industrial Plants
Gasoline Motor Fuel Gas Station orMotor Vehicles
Potassium Chlorate Medicine Drug Store
Sugar Sweetening Foods Food Store
Glass bottle with stopper (roughly 1 quart size).Small Bottle or Jar with lid.Rag or absorbent paper (paper towels, newspaper).String or rubber bands.
PROCEDURES
1. Sulphuric Acid Must be Concentrated. If battery acid or other dilute acid isused, concentrate it by boiling until dense white fumes are given off.Container used should be of enamelware or oven glass.
CAUTION: Sulphuric acid will burn skin and destroy clothing. If anyis spilled, wash it away with a large quantity of water. Fumes are alsodangerous and should not be inhaled.
2. Remove the acid from heat and allow to cool to room temperature.
151

TM 31–210
3. Pour gasoline into the large (1 quart) bottle until it is approximately 2/3 full.
4. Add concentrated sulphuric acid to gasoline slowly until the bottle is filledto within 1” to 2” from the top. Place the stopper in the bottle
5 Wash the outside of the bottle thoroughly with clear water.
CAUTION: If this is not done, the fire bottle may be dangerous tohandle during use.
6 Wrap a clean cloth or severalsheets of absorbent paperaround the outside of the bottleTie with string or fasten withrubber bands.
7 Dissolve 1/2 cup (100 gm) of potassium chlorate and 1/2 cup (100 gm) ofsugar in one cup (250 cc) of boiling water.
8 Allow the solution to cool, pour into the small bottle and cap tightly Thecooled solution should be approx 2/3 crystals and 1/3 liquid. If there ismore liquid than this, pour off excess before using
CAUTION: Store this bottle separately from the other bottle.
HOW TO USE
1. Shake the small bottle to mixcontents and pour onto the clothor paper around the large bottle
Bottle can be used wet or after solution has dried However, when dry, thesugar — Potassium chlorate mixture is very sensitive to spark or flameand should be handled accordingly.
2. Throw or launch the bottle. When the bottle breaks against a hard surface(target) the fuel will ignite.
152

TM 31–210
Section VNo. 2
IGNITER FROM BOOK MATCHES
This is a hot igniter made from paper book matches for use withmolotov cocktail and other incendiaries.
MATERIALS REQUIRED:
Paper book matches. Adhesiveor friction tape.
PROCEDURES:
1. Remove the staple(s) frommatch book and separatematches from cover.
2. Fold and tape one row ofmatches.
3. Shape the cover into a tube withstriking surface on the insideand tape. Make sure the foldedcover will fit tightly around thetaped match heads. Leave coveropen at opposite end forinsertion of the matches.
4. Push the taped matches into thetube until the bottom ends areexposed about 3/4 in. (2 cm).
153

TM 31–210
5. Flatten and fold the open endof the tube so that it laps overabout 1 in. (2-1/2 cm); tapein place.
Use With Molotov Cocktail:
1. Tape the “match end tab” o£the igniter to the neck of themolotov cocktail.
2. Grasp the “cover end tab” andpull sharply or quickly to ignite.
GENERAL USE:
The book match igniter can be used by itself to ignite flammable liquids,fuse cords and similar items requiring hot ignition.
CAUTION: Store matches and completed igniters in moisture proofcontainers such as rubber or plastic bags until ready for use. Damp orwet paper book matches will not ignite.
154

TM 31–210
Section VNo 3
MECHANICALLY INITIATED FIRE BOTTLE
The mechanically initiated Fire Bottle is an incendiary devicewhich ignites when thrown against a hard surface.
MATERIALS REQUIRED:
Glass jar or short neck bottle witha leakproof lid or stopper
“Tin” can or similar container justlarge enough to fit over the lidof the jar
Coil spring (compression) approxi-mately 1/2 the diameter of thecan and 1-1/2 times as long
GasolineFour (4) “blue tip” matchesFlat stick or piece of metal
(roughly 1/2” x 1/16” x 4”)Wire or heavy twineAdhesive tape
PROCEDURES:
1. Draw or scratch two linesaround the can - one 3/4” (19mm) and the other 1-1/4" (30mm) from the open end.
2. Cut 2 slots on opposite sidesof the tin can at the line farthestfrom the open end. Make slotslarge enough for the flat stick orpiece of metal to pass through.
155

TM 31–210
3. Punch 2 small holes just belowthe rim of the open end of thecan.
4. Tape blue tip matches togetherin pairs. The distance betweenthe match heads should equalthe inside diameter of the can.Two pairs are sufficient.
5. Attach paired matches to secondand third coils of the spring,using thin wire.
6. Insert the end of the springopposite the matches into the tincan.
156

TM 31–210
7. Compress the spring ,until theend with the matches passes theslot in the can. Pass the flatstick or piece of metal throughslots in the can to hold springin place This acts as a safetydevice
8. Punch many closely spacedsmall holes between the linesmarked on the can to form astriking surface for the matches.Be careful not to seriouslydeform the can.
9. Fill the jar with gasoline and captightly.
10. Turn can over and place overthe jar so that the safety stickrests on the lid of the jar.
157

TM 31–210
11. Place wire or twine around thebottom of the jar. Thread endsthrough holes in can and bindtightly to jar.
12. Tape wire or cord to jar near thebottom.
HOW TO USE:
1. Carefully withdraw flat safetystick.
2. Throw jar at hard surface.
CAUTION: DO NOT REMOVE SAFETY STICK UNTIL READYTO THROW FIRE BOTTLE.
The safety stick, when in place, prevents ignition of the fire bottle if itshould accidentally be broken.
158

TM 31–210
Section VNo. 4
GELLED FLAME FUELS
Gelled or paste type fuels are often preferable to raw gaso-line for use in incendiary devices such as fire bottles. Thistype of fuel adheres more readily to the target and producesgreater heat concentration.
Several methods are shown for gelling, gasoline usingcommonly available materials. The methods are divided intothe following categories based on the major ingredient:
4.1 Lye Systems
4 2 Lye-Alcohol Systems
4 3 Soap-Alcohol Systems
4.4 Egg White Systems
4 5 Latex systems
4 6 Wax Systems
4 7 Animal Blood Systems
159

TM 31–210
Section VNo. 4.1
GELLED FLAME FUELS
LYE SYSTEM
Lye (also known as caustic soda or Sodium Hydroxide) can be usedin combination with powdered rosin or castor oil to gel gasoline for use as aflame fuel which will adhere to target surfaces.
NOTE: This fuel is not suitable for use in the chemical (SulphuricAcid) type of fire bottle (Section V, No.1). The acid will react withthe lye and break down the gel.
MATERIALS REQUIRED:
Parts by Volume Ingredient How Used Common Source60 Gasoline Motor fuel Gas station or
motor vehicle2 (flake) or Lye Drain cleaner, Food store1 (powder) making of Drug store
soap15 Rosin Manufacturing Naval stores
Paint & Varnish IndustryorCastor Oil Medicine Food and Drug
Stores
CAUTION: Make sure that there are no open flames in the area whenmixing the flame fuel. NO SMOKING!
PROCEDURES:1. Pour gasoline into jar, bottle or other container. (DO NOT USE AN
ALUMINUM CONTAINER.)2. If rosin is in cake form, crush into small pieces.3. Add rosin or castor oil to the gasoline and stir for about five (5) minutes to
mix thoroughly.4. In a second container (NOT ALUMINUM) add lye to an equal volume of
water slowly with stirring.
CAUTION: Lye solution can burn skin and destroy clothing. If anyis spilled, wash away immediately with large quantities of water.
5. Add lye solution to the gasoline mix and stir until mixture thickens (aboutone minute).
NOTE: The sample will eventually thicken to a very firm paste. Thiscan be thinned, if desired, by stirring in additional gasoline.
160

TM 31–210
Section VNo. 4.2
GELLED FLAME FUELS
LYE-ALCOHOL SYSTEMS
Lye (also known as caustic soda or Sodium Hydroxide) can be usedin combination with alcohol and any of several fats to gel gasoline for use asa flame fuel.
NOTE: This fuel is not suitable for use in the chemical (Sulphuric Acid)type of fire bottle (Section V, No. 1). The acid will react with the lye andbreak town the gel.
MATERIALS REQUIRED:
Parts by Volume Ingredient How Used Common Source60 Gasoline Motor fuel Gas station or
motor vehicle2 (flake) or Lye Drain cleaner, Food store1 (powder) making of soap Drug store3 Ethyl Alcohol Whiskey Liquor stores
Medicine Drug Stores
NOTE: Methyl (wood) alcohol or isopropyl (rubbing) alcohol can besubstituted for ethyl alcohol, but their use produces softer gels.
14 Tallow Food Fat rendered byMaking of soap cooking the meat
or suet of animals.
NOTE: The following can be substituted for the tallow:
(a) Wool grease (Lanolin) (very good) — Fat extracted from sheep wool,(b) Castor oil (good).(c) Any vegetable oil (corn, cottonseed, peanut, linseed, etc.)(d) Any fish oil(e) Butter or oleomargarine
It is necessary when using substitutes (c) to (e) to double the given amountof fat and of lye for satisfactory bodying.
PROCEDURES:
CAUTION: Make sure that there are no open flames in the area whenmixing flame fuels. NO SMOKING!
1. Pour gasoline into bottle, jar or other container. (DO NOT USE ANALUMINUM CONTAINER).
2. Add Tallow (or substitute) to the gasoline and stir for about 1/2 minute todissolve the fat.
161

TM 31–210
3. Add alcohol to the gasoline mixture.
4. In a separate container (NOT ALUMINUM) slowly add lye to an equalamount of water. Mixture should be stirred constantly while adding lye.
CAUTION: Lye solution can burn skin and destroy clothing. If any isspilled, wash away immediately with large quantities of water.
5. Add lye solution to the gasoline mixture and stir occasionally until thickened(about 1/2 hour).
NOTE: The mixture will eventually (in 1 to 2 days) thicken to a veryfirm paste. This can be thinned, if desired, by stirring in additionalgasoline.
162

TM 31–210
Section VNo. 4.3
GELLED FLAME FUELS
SOAP-ALCOHOL SYSTEM
Common household soap can be used in combination with alcohol togel gasoline for use as a flame fuel which will adhere to target surfaces.
MATERIAL REQUIRED:
Parts by Volume Ingredient How Used Common Source
36 Gasoline Motor fuel Gas station,Motor vehicles
1 Ethyl Alcohol Whiskey Liquor storeMedicine Drug store
NOTE: Methyl (wood) or isopropyl (rubbing) alcohols can besubstituted for the whiskey.
20 (pow- Laundry soap Washing Storesdered) or clothes 28 (flake )
NOTE: Unless the word “soap” actually appears somewhere on thecontainer or wrapper, a washing compound is probably a detergent.These Can Not Be Used.
PROCEDURES:
CAUTION: Make sure that there are no open flames in the area whenmixing flame fuels. NO SMOKING!
1. If bar soap is used, carve into thin flakes using a knife.
2. Pour alcohol and gasoline into a jar, bottle or other container and mixthoroughly.
3. Add soap powder or flakes to gasoline-alcohol mix and stir occasionallyuntil thickened (about 15 minutes).
163

TM 31–210
Section VNo. 4.4
GELLED FLAME FUELS
EGG SYSTEM
The white of any bird egg can be used to gel gasoline for useas a flame fuel which will adhere to target surfaces.
MATERIALS REQUIRED:
Parts by Volume Ingredient How Used Common Source
85 Gasoline Motor fuel Gas stationStove fuel Motor vehiclesSolvent
14 Egg Whites Food Food storeIndustrial pro- Farms cesses
Any One Of The Following:
1 Table Salt Food Sea waterIndustrial pro- Natural brine cesses Food store
3 Grnd Coffee Food Coffee plantFood store
3 Dried Tea Food Tea plant Leaves Food store
3 Cocoa Food Cacao treeFood store
2 Sugar Sweetening foods Sugar caneIndustrial pro- Food store cesses
1 Saltpeter Pyrotechnics Natural Deposits(Niter) Explosives Drug store(Potassium Matches Nitrate) Medicine
1 Epsom salts Medicine Natural depositsMineral water KieseriteIndustrial pro- Drug store cesses Food store
2 Washing soda Washing cleaner Food store (Sal soda) Medicine Drug store
Photography Photo supply store
164

TM 31–210
Parts by Volume Ingredient How Used Common Source
1-1/2 Baking Soda Baking Food storeBeverages, Drug storeMineral waters and Medicines
1-1/2 Aspirin Medicine Drug storeFood store
PROCEDURES:
CAUTION: Make sure that there are no open flames in the area whenmixing flame fuels. NO SMOKING!
1. Separate egg white from yolk. This can be done by breaking the egg into adish and carefully removing the yolk with a spoon.
NOTE: DO NOT GET THE YELLOW EGG YOLK MIXED INTOTHE EGG WHITE. If egg yolk gets into the egg white, discard the egg.
2. Pour egg white into a jar, bottle, or other container and add gasoline .
3. Add the salt (or other additive) to the mixture and stir occasionally until gelforms (about 5 to 10 minutes).
NOTE: A thicker gelled flame fuel can be obtained by putting thecapped jar in hot (65°C) water for about 1/2 hour and then letting themcool to room temperature. (DO NOT HEAT THE GELLED FUELCONTAINING COFFEE).
165

TM 31–210
Section VNo. 4.5
GELLED FLAME FUELS
LATEX SYSTEM
Any milky white plant fluid is a potential source of latexwhich can be used to gel gasoline.
MATERIALS REQUIRED:
Ingredient How Used Common Source
Gasoline Motor fuel Gas stationSolvent Motor vehicle
Latex, Paints Natural from tree orcommercial or Adhesives plantnatural Rubber cement
One of the Following Acids:
Acetic Acid Salad dressing Food stores(Vinegar) Developing film Fermented apple cider
Photographic supply
Sulfuric Acid Storage batteries Motor vehicles(Oil of Vitriol) Material processing Industrial plants
Hydrochloric Acid Petroleum wells Hardware store(Muriatic Acid) Pickling and metal Industrial plants
cleaning Industrial processes
NOTE: If acids are not available, use acid salt (alum. sulfates andchlorides other than sodium or potassium). The formic acid fromcrushed red ants can also be used.
PROCEDURES:
CAUTION Make sure that there are no open flames in the area whenmixing flame fuels. NO SMOKING!
1. With Commercial Rubber Latex:
a. Place 7 parts by volume of latex and 92 parts by volume of gasoline in bottle. Cap bottle and shake to mix well.
b. Add 1 part by volume vinegar (or other acid) and shake until gel forms.
CAUTION: Concentrated acids will burn skin and destroy clothing,If any is spilled, wash away immediately with large quantities of water.
166

TM 31–210
2. With Natural Latex:
a. Natural latex should form lumps as it comes from the plant. If lumps do not form, add a small amount of acid to the latex.
b. Strain off the latex lumps and allow to dry in air.
c. Place 20 parts by volume of latex in bottle and add 80parts by volume of gasoline. Cover bottle and allow to standuntil a swollen gel mass is obtained (2 to 3 days).
167

TM 31–210
Section VNo. 4.6
GELLED FLAME FUELS
WAX SYSTEM
Any of several common waxes can be used to gel gasoline foruse as a flame fuel which will adhere to target surfaces.
MATERIALS REQUIRED:
Parts by Volume Ingredient How Used Common Source80 Gasoline Motor fuel Gas station
Solvent Motor vehiclesAny one of the following:
20 Ozocerite Leather polish Natural depositsMineral wax Sealing wax General storesFossil wax Candles Department storeCeresin wax Crayons
Waxed paperTextile sizing
Beeswax Furniture and Honeycomb of bee floor waxes General storeArtificial fruit Department store and flowersLithographingWax paperTextile finishCandles
Bayberry wax Candles Natural formMyrtle wax Soaps Myrica berries
Leather polish General storeMedicine Department store
Drug store
PROCEDURES:1. Obtaining wax from Natural Sources: Plants and berries are potential
sources of natural waxes. Place the plants and/or berries in boiling water.The natural waxes will melt. Let the water cool. Natural waxes will form asolid layer on the water surface. Skim off solid wax and let it dry. Naturalwaxes have suspended matter when melted. Screen the wax through a cloth.
2. Melt wax and pour into jar or bottle which has been placed in a hot waterbath.
3. Add gasoline to the bottle.4. When wax has completely dissolved in the gasoline, allow the water bath to
cool slowly to room temperature.
NOTE: If a gel does not form, add additional wax (up to 40% byvolume) and repeat the above steps. If no gel forms with 40% wax,make a Lye solution by dissolving a small amount of Lye (SodiumHydroxide) in an equal amount of water. Add this solution (1/2% byvolume) to the gasoline wax mix and shake bottle until a gel forms
168

TM 31–210
Section VNo. 4.7
GELLED FLAME FUELS
ANIMAL BLOOD SYSTEMS
Animal blood can be used to gel gasoline for use as a flamefuel which will adhere to target surfaces.
MATERIAL REQUIRED:
Parts by Volume Ingredient How Used Common Source
68 Gasoline Motor fuel Gas stationSolvent Motor vehicles
30 Animal blood Food Slaughter HouseSerum Medicine Natural habitat
Any one of the following:2 Salt Food Sea Water
Industrial pro- Natural brine cesses Food store
Grnd Coffee Food Coffee plantCaffeine source Food storeBeverage
Dried Tea Food Tea plantLeaves Beverage Food store
Sugar Sweetening foods Sugar caneIndustrial pro- Food store cesses
Lime Mortar From calcium carbonate
Plaster Hardware storeMedicine Drug storeCeramics Garden supplySteel making storeIndustrial pro- cesses
Baking soda BakingBeverages Food storeMedicine Drug storeIndustrial pro- cesses
Epsom salts Medicine Drug storeMineral water Natural de-
positsIndustrial pro- Food store cesses
169

TM 31–210
PROCEDURES:
1. Preparation of animal blood serum:
a. Slit animal’s throat by jugular vein. Hang up-side down to drain.
b. Place coagulated (lumpy) blood in a cloth or on a screen and catch the red fluid (serum) which drains through.
c. Store in a cool place if possible.
CAUTION: Do not get aged animal blood or the serum into an opencut. They can cause infections.
2. Pour blood serum into jar, bottle, or other container and add gasoline.
3. Add the salt (or other additive) to the mixture and stir until a gel forms.
170

TM 31–210
Section VNo 5
ACID DELAY INCENDIARYThis device will ignite automatically after a given time delay.
MATERIAL REQUIRED:Small jar with capCardboardAdhesive tapePotassium ChlorateSugarSulphuric Acid (Battery Acid)Rubber sheeting (tire inner tube)
PROCEDURES:1. Sulphuric acid must be concentrated. If battery acid or other dilute acid is
used, concentrate it by boiling. Container used should be of enamelware oroven glass. When dense white fumes begin to appear, immediately removethe acid from heat and allow to cool to room temperature.
CAUTION: Sulphuric acid will burn skin and destroy clothing. Ifany is spilled, wash it away with a large quantity of water. Fumes arealso dangerous and should not be inhaled
2. Dissolve one part by volume of Potassium Chlorate and one partby volume of sugar in two parts by volume of boiling water.
3. Allow solution to cool. When crystals settle, pour off and discard liquid.
4. Form a tube from cardboard justlarge enough to fit around theoutside of the jar and 2 to 3times the height of the jar. Tapeone end of the tube closed.
5. Pour wet Potassium Chloratesugar crystals into the tube untilit is about 2/3 full. Stand thetube aside to dry
6. Drill a hole through the cap ofthe jar about 1/2 inch (1-1/4 cm)in diameter.
171

TM 31–210
7. Cut a disc from rubber sheet sothat it just fits snugly inside thelid of the jar.
8. Partly fill jar with water, cover with rubber disc and cap tightly with thedrilled lid. Invert bottle and allow to stand for a few minutes to make surethat there are no leaks, THIS IS EXTREMELY IMPORTANT
9. Pour water from jar and fillabout 1/3 full with concentratedsulphuric acid. Replace therubber disc and cap tightly.
IMPORTANT: Wash outside of jar thoroughly with clear water. Ifthis is not done, the jar may be dangerous to handle during use.
HOW TO USE:
1. Place the tube containing the Sugar Chlorate crystals on anincendiary or flammable material taped end down.
2. Turn the jar of sulphuric acid cap end down and slide it intothe open end of the tube,
After a time delay, the acid will eat through the rubber discand ignite the sugar chlorate mix. The delay time depends uponthe thickness and type of rubber used for the disc. Before usingthis device, tests should be conducted to determine the delay timethat can be expected.
NOTE: A piece of standard automobile inner tube (about 1/32" thick}will provide a delay time of approximately 45 minutes.
172

TM 31–210
Section VNo. 6
IMPROVISED WHITE FLARE
An improvised white flare can be made from potassium nitratealuminum powder and shellac. It has a time duration of approximately2 minutes.
MATERIALS REQUIRED: SOURCE:
Potassium nitrate Field grade (Section I, No. 2)Drug Store
Aluminum powder (bronzing) Hardware or paint storeShellac Hardware or paint storeQuart jar with lidFuse, 15 in. longWooden rod. 1/4 in. diameterTin can, 2-1/2 in. diameter x 5 in. longFlat window screenWooden block
NOTE: All of the above dimensions are approximate.
PROCEDURES:
1. Place the potassium nitratecrystals on the screen. Rub thematerial back and forth againstthe screen mesh with thewooden block until the nitrate isgranulated into a powder.
2. Measure 21 tablespoons of thepowdered nitrate into a quartjar. Add 21 tablespoons of thealuminum powder to the nitrate.
173

TM 31–210
3. Place lid on the jar and shakeingredients vigorously until wellmixed,
4. Add 12 tablespoons of shellacto the mixture and stir with thewooden rod. Store mixture untilready for Step 7.
5. Knot one end of the fuse.
6. Wrap the knotted end of thefuse once around the insidebottom of the can with the knotat the center. Then, run the restof the fuse out the center top ofthe can.
174

TM 31–210
7. Pour the mixture in the can andaround the fuse.
8. Store flare mixture away fromheat and flame until ready foruse, but no longer than 3weeks.
175

TM 31–210
Section VNo. 7
IMPROVISED IRON OXIDE
Iron Oxide can be made from steel wool. It is used in the preparationof Improvised Yellow Flare (Section V, No. 8), Improvised White SmokeMunition (Section V, No. 9) and Improvised Black Smoke Munition(Section V, No. 10).
MATERIAL REQUIRED: SOURCE:
Steel wool (without soap), approx. Hardware or general store16 large pads
Smoke pipe, approximately 4 feet Hardware storelong x 12 inches in diameter,1/16 inches thick
Vacuum cleaner Hardware storeElectrical source (110 v, A C. ) Modern commercial and domestic
buildingsWindow screenNewspaper2 containersWooden blocks, if necessaryFlame source (matches, lighter, etc. )
PROCEDURE:
1. Separate a handful it of steelwool into a fluffy ball,approximately 12inches in diameter and place intoone end of the smoke pipe.
2. Place the pipe on a level, nonflammable surface. Steady the pipe, usingwooden blocks if necessary.
3. Ignite the steel wool with the flame source and, with the vacuum cleaner,force a stream of air through the flame.
176

TM 31–210
NOTE: The forced air provided by the vacuum cleaner aids in theburning of the steel wool. If the steel wool does not completely burn,more separation of the wool is needed.
4. When the steel wool has almost completely burned, add another handful ofthe fluffed steel wool (Step No. 1).
5. Continue adding to the flame a single handful of fluffed wool at a time untilsufficient amount of iron oxide granules have accumulated in the stove pipe.
6. Place a window screen on asheet of newspaper. Pour theburned steel wool granules ontothe window screen and shakescreen until all the fine particleshave passed through..
177

TM 31–210
7. Discard those particles on the newspaper which are fibrous andunburned.
8. Save the particles which were too large to pass through the screen in one of the containers for future burning.
9. Store particles of iron oxide (left on newspaper) in anothercontainer until ready for use.
178

TM 31–210
Section VNo. 8
IMPROVISED YELLOW FLARE
A yellow flare can be made from shellac, sulfur, aluminumpowder, iron oxide and baking soda. It can be used either for signalingor lighting up a dark area.
MATERIALS REQUIRED: SOURCES:
Shellac Hardware or paint storeSulfur Drug or agricultural supply storeAluminum powder (bronzing) Hardware or paint storeBlack iron oxide Section V, No. 7Sodium bicarbonate (baking soda) Food storeImprovised white flare mix Section V, No. 6Window ScreenWooden rod or stickTablespoonQuart jar with lidNewspaperWooden blockFuse, 15 inches longTin can, 2-1/2 inches diameter x 5 inches longAluminum foilFlame source (matches, lighter, etc. )
PROCEDURES:
1. Measure 6 firm leveltablespoons of sulfur into aquart jar.
2. Add 7 firm level tablespoons of sodium bicarbonate to the sulfur.
3. Add 2 heaping tablespoons of black iron oxide.
179

TM 31–210
4. Place the lid on the quart jar andshake ingredients 10 times.
5. Place the mixed ingredients onthe window screen.
6. Mix ingredients thoroughly byforcing material through screenmesh onto the newspaper, usinga wooden rod or stick. Repeatscreening 2 times to insurethorough mixing.
180

TM 31–210
7. Pour mixed ingredients backinto the jar.
8. Add 20 heaping tablespoons ofaluminum powder to theingredients.
9. Add while stirring the leastamount of shellac needed tomoisten the mixture.
181

TM 31–210
10. Force moistened mix through screen mesh onto the newspaper as in Step 6.Store mixture until ready for Step 14.
11. Measure one heaping teaspoon of white flare mix onto a 4 inch square pieceof aluminum foil.
12. Knot one end of the fuse andplace the knot onto the mix.
13. Fold the corners of the foiltightly around the fuse.
14. Now place the yellow flare mixinto the can.
182

TM 31–210
15. Place the fused white flare mixin the foil below the surface ofthe yellow flare mix in the can.
16. Light the fuse with the same source when ready.
183

TM 31–210
Section VNo. 9
IMPROVISED WHITE SMOKE MUNITION
A white smoke munition can be made from sulfur, potassiumnitrate, black powder, aluminum powder, iron oxide and carbon tetra-chloride. It can be used either for signaling or screening.
MATERIALS REQUIRED: SOURCE:
Sulfur Drug or agricultural supply storePotassium nitrate (Saltpeter) Drug store or Section I, No. 2Improvised black powder Section I, No. 3Aluminum powder (bronzing) Hardware or paint storeBlack Iron oxide Section V, No. 7Carbon tetrachloride Hardware or paint storeImprovised white flare mix Section V, No. 6TablespoonWooden rod or stickNewspaperQuart jar with lidWindow screenFuse, 15 inches longTin can, 2-1/2 inches diameter
x 5 inches 1mgFlame source (matches, lighter,
etc.)
PROCEDURES:
1. Measure 3 level tablespoons ofpowdered dry sulfur into thequart jar.
2. Add 4 level tablespoons of powdered dry potassium nitrate to the sulfur.
NOTE: It may be necessary to crush the potassium nitrate crystals andsulfur to obtain an accurate measure in tablespoon.
3. Add 2 heaping tablespoons of black iron oxide.
184

TM 31–210
4. Place all ingredients on thewindow screen.
5. Mix ingredients thoroughly bysieving them onto the news-paper. Repeat screening 3 timesto insure thorough mixing.
6. Pour mixed ingredients backinto the jar.
7. Screw lid onto the quart jar andshake vigorously until theingredients are evenly mixed.
185

TM 31–210
8. Remove lid from quart jar andadd 15 heaping tablespoons ofaluminum powder (bronzing) tothe ingredients. Mix thoroughlywith wooden rod or stick.
NOTE: If the white smoke mixture is not for immediate use, screw thelid back onto the jar tightly and store until ready for use. If mixture isfor immediate use, continue with the following steps.
9. Wet mix the ingredients to apaste consistency with carbontetrachloride.
CAUTION: Fumes of Carbon Tetrachloride are hazardous. PerformStep 10 in a well ventilated area.
10. Add 1/2 cup of black powder tothe ingredients and carefullymix with wooden rod or stick.
186

TM 31–210
HOW TO USE:
1. Measure one heaping teaspoonof white flare mix onto a 4 inchsquare piece of aluminum foil.
2. Knot one end of the fuse andplace the knot into the mix.
3. Fold the corners of the foiltightly around the fuse.
4. Now place the white smoke mixinto the can.
187

TM 31–210
5. Place the fused white flare mixin the foil below the surface ofthe white smoke mix in the can.
6. Light the fuse with the flame source when ready.
188

TM 31–210
Section VNo. 10
IMPROVISED BLACK SMOKE MUNITION
A black smoke munition can be made from sulfur, aluminum powder,iron oxide, moth crystals and carbon tetrachloride. It can be used either forsignaling or screening.
MATERIALS REQUIRED: SOURCES:
Sulfur Drug StoreAluminum powder (bronzing) Paint or hardware storeImprovised black iron oxide Section V, No. 7Moth crystals (paradichlorobenzene) Hardware storeCarbon tetrachloride Paint or hardware storeImprovised white flare mix Section V, No. 6Table salt Food storeTeaspoonTablespoonQuart jar or containerWooden rod or stickWooden blockWindow screenNewspaperFuse, 15 in. longTin can, 2-1/2 in. diameter x 5 in. longAluminum foilFlame source (matches, lighter, etc.)
PROCEDURES:
1. Measure 3 level teaspoons ofsulfur into a quart jar.
2. Add 1 heaping tablespoon of improvised iron oxide to the sulfur.
3. Add 2 level teaspoons of table salt.
189

TM 31–210
4. Crush 5 heaping tablespoons ofmoth crystal into a fine powderusing a wooden block.
5. Add 4 heaping tablespoons of powdered moth crystals to the otheringredients in the jar.
6. Place all ingredients on thewindow screen.
7. Mix ingredients thoroughly bysieving them onto the news-paper. Repeat screening 3 timesto insure thorough mixing.
190

TM 31–210
8. Pour mixed ingredients backinto the far.
9. Add 12 heaping tablespoons ofaluminum powder to theingredients and mix by stirringwith wooden rod or stick.
10 Just before use as a blacksmoke wet mix the above ingre-dients to a paste consistencywith carbon tetrachloride.
CAUTION: Fumes of Carbon Tetrachloride are hazardous. PerformStep 10 in a well ventilated area.
191

TM 31–210
HOW TO USE:
1. Measure one heaping teaspoon of white flare mix onto a 4 inch square pieceof aluminum foil.
2. Knot one end of the fuse andplace the knot into the mix.
3. Fold the corners of the foiltightly around the fuse.
4. Now place the black smoke mixinto the can.
192

TM 31–210
5. Place the fused white flare mixin the foil below the surface ofthe black smoke mix in the can.
6. Light the fuse with the flame source when ready.
193

TM 31–210
Section VINo. 1
ELECTRIC BULB INITIATOR
Mortars, mines and similar weapons often make use of elec-tric initiators. An electric initiator can be made using a flash-light or automobile electric light bulb.
MATERIALS REQUIRED:
Electric light bulb andmating socket
Cardboard or heavy paperBlack PowderAdhesive tape
PROCEDURES:
Method I
1. Break the glass of the electriclight bulb. Take care not todamage the filament. The ini-tiator will NOT work if thefilament is broken. Remove allglass above the base of the bulb
2. Form a tube 3 to 4 inches longfrom cardboard or heavy paperto fit around the base of the bulbJoin the tube with adhesive tape
3. Fit the tube to the bulb base andtape in place.
Make sure that the tube does notcover that portion of the bulbbase that fits into the socket.
194

TM 31–210
4 . If no socket is available forconnecting the initiator to thefiring circuit, solder theconnecting wires to the bulbbase.
CAUTION: DO NOT use a hot soldering iron on the completed ignitersince it may ignite the Black Powder.
5. Fill the tube with BlackPowder and tape the open endof the tube closed
Method II
If the glass bulb (electric light) is large enough to hold the Black Powder, itcan be used as the container
PROCEDURES:
1. File a small hole in thetop of the bulb
2. Fill the bulb with BlackPowder and tape the holeclosed.
195

TM 31–210
Section VINo. 2
FUSE IGNITER FROM BOOK MATCHES
A simple, reliable fuse igniter can be made from paper book matches.
MATERIALS REQUIRED:
Paper book matches.Adhesive or friction tape.Fuse cord (improvised or
commercial).Pin or small nail.
PROCEDURES:
1. Remove the staple(s) frommatch book and separatematches from cover.
2. Cut fuse cord so that innercore is exposed.
3. Tape exposed end of fusecord in center of one rowof matches.
4. Fold matches over fuse andtape.
196

TM 31–210
5. Shape the cover into a tube withthe striking surface on the insideand tape. Make sure the edgesof the cover at the striking endare butted. Leave cover open atopposite end for insertion of thematches.
6. Push the taped matches withfuse cord into the tube until thebottom ends of the matches areexposed about 3/4 inch (2 cm).
7. Flatten and fold the open end ofthe tube so that it laps overabout 1 inch (2-l/2 cm); tape inplace.
8. Push pin or small nail throughmatches and fuse cord. Bendend of pin or nail.
Method of Use:
To light the fuse cord, theigniter is held by both handsand pulled sharply or quickly.
CAUTION: Store matches and completed fuse igniters in moistureproof containers such as plastic or rubber type bags until ready for use.Damp or wet paper book matches WILL NOT ignite. Fuse lengthsshould not exceed 12 in., (30 cm) for easy storage. These can be splicedto main fuses when needed.
197

TM 31–210
Section VINo 3
DELAY IGNITER FROM CIGARETTE
A simple and economical time delay can be made with a common cigarette.
MATERIALS REQUIRED:
CigarettePaper match.String (shoelace or similar cord).Fuse cord (improvised or commercial).
PROCEDURES:
1. Cut end of fuse cord to expose inner core.
2. Light cigarette in normal fashion. Place a paper match so that the head isover exposed end of fuse cord and tie both to the side of the burningcigarette with a string.
198

TM 31–210
3. Position the burning cigarette with fuse so that it burns freely. A suggestedmethod is to hang the delay on a twig.
NOTE:
Common dry cigarettes burn about 1 inch every 7 or 8 minutesin still air. If the fuse cord is placed 1 inch from the burning end of acigarette a time delay of 7 or 8 minutes will result.
Delay time will vary depending upon type of cigarette, wind,moisture, and other atmospheric conditions.
To obtain accurate delay time a test run should be made under“use” conditions.
199

TM 31–210
Section VINo. 4
WATCH DELAY TIMER
A time delay device for use with electrical firing circuits can be made by using a watch with a plastic crystal.
MATERIAL AND EQUIPMENT REQUIRED:
Watch with plastic crystal,Small clean metal screw.Battery.Connecting wires.Drill or nail.
PROCEDURES:
1. If watch has a sweep or large second hand, remove it. If delay time ofmore than one hour is required, also remove the minute hand. If handsare painted, carefully scrape paint from contact edge with knife.
2. Drill a hole through thecrystal of the watch orpierce the crystal with aheated nail. The hole mustbe small enough that thescrew can be tightly threadedinto it.
200

TM 31–210
3. Place the screw in the hole and turn down as far as possible without making contact with theface of the watch. If screw hasa painted tip, It may be neces-sary to drill the tip flat.
If no screw is available, pass a bent stiff wire through the hole andtape to the crystal.
IMPORTANT: Check to make sure hand of watch cannot pass screwor wire without contacting it.
How to Use:
1. Set the watch so that a hand will reach the screw or wire at the time youwant the firing circuit completed.
2. Wind the watch.
3. Attach a wire from the case of the watch to one terminal of the battery.
4. Attach one wire from an electric initiator (blasting cap, squib, or alarmdevice) to the screw or wire on the face of the watch.
5. After a thorough inspection is made to assure that the screw or the wireconnected to it is not touching the face or case of the watch, attach theother wire from the initiator to the second terminal of the battery
CAUTION: Follow Step 5 carefully to prevent premature initiation.
201

TM 31–210
Section VINo. 5
NO-FLASH FUSE IGNITER
A simple no-flash fuse igniter made from common pipe fittings.
.MATERIALS REQUIRED:
1/4 in. (6mm) Pipe CapSolid 1/4 in. (6mm) Pipe PlugFlat head nail about 1/16 in. (1-1/2
mm} in diameterHand DrillCommon “Strike Anywhere”
MatchesAdhesive Tape
PROCEDURES:
1. Screw the pipe plug tightly intothe pipe cap.
2. Drill hole completely throughthe center of the plug and caplarge enough that the nail fitsloosely.
3. Enlarge the hole in the plugexcept for the last 1/8 in. (3mm)so that the fuse cord will just fit.
4. Remove the plug from the capand push the flat head nail thruhole in the cap from the inside.
202

TM 31–210
5. Cut the striking tips from approximately 10 strike-anywhere matches. Placematch tips inside pipe cap and screw plug in finger tight.
HOW TO USE:
1. Slide the fuse cord into the holein the pipe plug.
2. Tape igniter to fuse cord.
3. Tap point of nail on a hardsurface to ignite the fuse.
203

TM 31–210
Section VINo. 6
DRIED SEED TIMER
A time delay device for electrical firing circuits can be made using the principle of expansion of dried seeds.
MATERIALS REQUIRED:
Dried peas, beans or otherdehydrated seeds
Wide mouth glass jar with non-metal cap
Two screws or boltsThin metal plateHand drillScrewdriver
PROCEDURES:
1. Determine the rate of rise of the dried seeds selected. This is necessary todetermine delay time of the timer.
a. Place a sample of the dried seeds in the jar and cover with water.
b. Measure the time it takes for the seeds to rise to a given height. Most dried seeds increase 50% in one to two hours.
2. Cut a disc from thin metal plate.Disc should fit loosely insidethe jar.
NOTE: If metal is painted, rusty or otherwise coated, it must bescraped or sanded to obtain a clean metal surface.
3. Drill two holes in the cap of thejar about 2 inches apart.Diameter of holes should besuch that screws or bolts willthread tightly into them. If thejar has a metal cap or no cap, apiece of wood or plastic (NOTMETAL) cat be used as a cover.
204

TM 31–210
4. Turn the two screws or boltsthrough the holes in the cap.Bolts should extend about onein. (2-1/2 cm) into the jar.
IMPORTANT: Both bolts must extend the same distance below thecontainer cover.
5. Pour dried seeds into the container. The level will depend upon thepreviously measured rise time and the desired delay.
6. Place the metal disc in the jar ontop of the seeds.
HOW TO USE:
1. Add just enough water to completely cover the seeds and place the cap onthe jar.
2. Attach connecting wires fromthe firing circuit to the twoscrews on the cap.
Expansion of the seeds will raise the metal disc until it contacts thescrews and closes the circuit.
205

TM 31–210
Section VlNo. 7
FUSE CORDS
These fuse cords are used for igniting propellants andincendiaries or, with a non-electric blasting cap, to detonate explosives.
FAST BURNING FUSE
The burning rate of this fuse is approximately 40 in. (100 cm) per minute.
MATERIALS REQUIRED:
Soft Cotton String Potassium Nitrate (Saltpeter) 25 partsFine Black powder......or........ Charcoal 3 partsPiece of round stick Sulfur 2 partsTwo pans or dishes
PROCEDURES:
1. Moisten fine Black Powder to form a paste or prepare a substitute asfollows:
a. Dissolve Potassium Nitrate in an equal amount of water
b. Pulverize charcoal by spreading thinly on a hard surface and rolling the round stick over it to crush to a fine powder.
c. Pulverize sulfur in the same manner.
d. Dry mix sulfur and charcoal.
e. Add Potassium Nitrate solution to the dry mix to obtain a thoroughly wet paste.
2. Twist or braid three strands ofcotton string together.
3. Rub paste mixture into twisted string with fingers and allow to
dry.
206

TM 31–210
4. Check actual burning rate of fuse by measuring the time it takes for aknown length to burn. This is used to determine the length needed fora desired delay time. If 5 in (12-1/2 cm) burns for 6 seconds, 50 in.(125 cm) of fuse cord will be needed to obtain a one minute (60second) delay time.
SLOW BURNING FUSE
The burning rate of this fuse is approximately 2 in. (5 cm) per minute.
MATERIALS REQUIRED:
Cotton String or 3 ShoelacesPotassium Nitrate or Potassium ChlorateGranulated Sugar
PROCEDURES:
1. Wash cotton string or shoelaces in hot soapy water; rinse in fresh water.
2. Dissolve 1 part Potassium Nitrate or Potassium Chlorate and 1 partgranulated sugar in 2 parts of hot water.
3. Soak string or shoelaces in solution.
4. Twist or braid three strands of string together and allow to dry.
5. Check actual burning rate of the fuse by measuring the time it takes for aknown length to burn. This is used to determine the length needed for thedesired delay time. If 2 in. (5 cm) burns for 1 minute, 10 in;. (25 cm) willbe needed to obtain a 5 minute delay.
NOTE: The last few inches of this cord (the end inserted in the materialto be ignited) should be coated with the fast burning Black Powderpaste if possible. This must be done when the fuse is used to ignite ablasting cap.
REMEMBER: The burning rate of either of these fuses can varygreatly. Do Not Use for ignition until you have checked their burningrate.
207

TM 31–210
Section VINo. 8
CLOTHESPIN TIME DELAY SWITCH
A 3 to 5 minute time delay switch can be made from the clothespinswitch (Section VII, No. 1) and a cigarette. The system can be used forinitiation of explosive charges, mines, and booby traps.
MATERIALS REQUIRED:
Spring type clothespinSolid or stranded copper wire about 1/16 in. (2 mm) in diameter (field or
ball wire is suitable)Fine string, about 6 inches in lengthCigaretteKnife
PROCEDURES:
1. Strip about 4 inches (10 cm) ofinsulation from the ends of 2copper wires. Scrape copperwires with pocket knife untilmetal is shiny.
2. Wind one scraped wire tightlyon one end of the clothespin,and the other wire on the otherjaw so that the wires will be incontact with each other whenthe jaws are closed.
3. Measuring from tip of cigarette,measure a length of cigarettethat will correspond to desireddelay time. Make a hole incigarette at this point, usingwire or pin.
208

TM 31–210
NOTE: Delay time may be adjusted by varying the burning length ofthe cigarette. Burning rate in still air is approximately 7 minutes perinch (2.5 cm,). Since this rate varies with environment and brand ofcigarette, it should be tested in each case if accurate delay time is desired
4. Thread string through hole incigarette.
5. Tie string around rear ofclothespin, 1/8 inch or less fromend. Clothespin may be notchedto hold the string in place.
NOTE: The string must keep the rear end of the clothespin closed sothat the jaws stay open and no contact is made between the wires.
HOW TO USE:
Suspend the entire system verti-cally with cigarette tip down.Light cigarette tip. Switch willclose and initiation will occurwhen the cigarette burns up toand through its string.
NOTE: Wires to the firing circuit must not be pulled taut when theswitch is mounted. This could prevent the jaws from closing.
209

TM 31–210
Section VlNo. 9
TIME DELAY GRENADE
This delay mechanism makes it possible to use an ordinary grenadeas a time bomb.
MATERIALS REQUIRED:
GrenadeFuse Cord
IMPORTANT: Fuse cord must be the type that burns completely.Slow burning Improvised fuse cord (Section Vl, No. 7) is suitable.Safety fuse is not satisfactory, since its outer covering does not burn.
PROCEDURE:
1. Bend end of safety leverupward to form a hook. Make asingle loop of fuse cord aroundthe center of the grenade bodyand safety lever. Tie a knot ofthe non-slip variety at the safetylever.
NOTE: The loop must be tight enough to hold the safety lever inposition when the pin is removed.
2. Measuring from the knot along the free length of the fuse cord, measure offa length of fuse cord that will give the desired delay time. Cut off the excessfuse cord.
HOW TO USE:
1. Place hand around grenade andsafety lever so safety lever isheld in place. Carefully removepin.
2. Emplace grenade in desiredlocation while holding grenadeand safety lever.
3. Very carefully remove hand from grenade and safety lever, making sure thatthe fuse cord holds the safety lever in place.
CAUTION: If loop and knot of fuse cord do not hold for any reasonand the safety lever is released, the grenade will explode after the regulardelay time.
4. Light free end of fuse cord.
210

TM 31–210
Section VlNo. 10
CAN-LIQUID TIME DELAY
A time delay device for electrical firing circuits can be made usinga can and liquid.
MATERIALS REQUIRED:
CanLiquid (water, gasoline, etc,)Small block of wood or any material that will float on the liquid usedKnife2 pieces of solid wire. each piece 1 foot (30 cm) or longer
PROCEDURES:
1. Make 2 small holes at oppositesides of the can very close to thetop.
2. Remove insulation from a longpiece of wire for a distance alittle greater than the diameter ofthe can.
3. Secure the wire in place acrossthe top of the can by threading itthrough the holes and twistingin place, leaving some slack.Make loop in center of wire. Besure a long piece of wire ex-tends from one end of the can.
211

TM 31–210
4. Wrap a piece of insulated wire around the block of wood. Scrape insulationfrom a small section of this wire and bend as shown so that wire contactsloop before wood touches bottom of container. Thread this wire through theloop of bare wire.
5. Make a very small hole (pinhole) in the side of the container. Fill containerwith a quantity of liquid corresponding to the desired delay time. Since therate at which liquid leaves the can depends upon weather conditions, liquidused, size of hole, amount of liquid in the container, etc., determine thedelay time for each individual case. Delays from a few minutes to manyhours are possible. Vary time by adjusting liquid level, type of liquid(water, oil) and hole size.
HOW TO USE:
1. Fill can with liquid to the same level as during experimental run (step 5above). Be sure that wooden block floats on liquid and that wire is free tomove down as liquid leaves the container.
2. Connect wires to firing circuit.
NOTE: A long term delay can be obtained by placing a volatile liquid(gasoline, ether, etc.) in the can instead of water and relying on evapo-ration to lower the level. Be sure that the wood will float on the liquidused. DO NOT MAKE PINHOLE IN SIDE OF CAN!
212

TM 31–210
Section VlNo. 11
SHORT–TERM TIME DELAY FOR GRENADE
Simple modification can produce delays of approximately 12 secondsfor grenades when fired from Grenade Launchers (Section IV, No. 5).
MATERIALS REQUIRED:
GrenadeNailKnife — may not be neededPliers — may not be neededSafety fuse
NOTE: Any safety or improvised fuse may be used. However, since dif-ferent time delays will result, determine the burning rate of fuse first.
PROCEDURES:
1. Unscrew fuse mechanism frombody of grenade and remove.Pliers may have to be used.
2. Carefully cut with knife orbreak off detonator at crimp andsave for later use.
CAUTION: If detonator is cut or broken below the crimp, detonationmay occur and severe injuries could result.
3. Remove safety pin pull ring andlever, letting striker hit theprimer. Place fuse mechanismaside until delay fuse powdermix in mechanism is completelyburned.
213

TM 31–210
4. Remove pin, spring, andstriker.
5. Remove primer from fusemechanism by pushing nailthrough bottom end of primerhole and tapping with hammer.
6. Insert safety fuse through top ofprimer hole. Enlarge hole ifnecessary. The fuse should gocompletely through the hole.
7. Insert fuse into detonator andtape it securely to modified basemechanism.
NOTE: Be sure that fuse seats firmly against detonator at all times.
8. Screw modified fuse mechanism back into grenade. Grenade is now readyfor use.
214

TM 31–210
NOTE: If time delay is used for Improvised Grenade Launchers(Section IV, No. 5} — use steps 1 through 3 below.
1. Wrap tape around safety fuse.
2. Securely tape fuse to grenade.
3. Load grenade in launcher. Grenade will explode in approximately 12 seconds after safety fuse burns up to bottom of grenade.
215

TM 31–210
Section VlNo. 12
LONG–TERM TIME DELAY FOR GRENADE
Simple modification can produce delays of approximately 20 secondsfor grenades when fired from Grenade Launchers (Section IV, No. 5).
MATERIAL REQUIRED:
GrenadeNail“Strike-anywhere” matches, 6 to 8Pliers — may not be neededKnife or sharp cutting edgePiece of woodSafety fuse
NOTE: Any safety or improvised fuse may be used. However, since dif-ferent time delays will result, determine the burning rate of fuse first.
PROCEDURES:
1. Unscrew fuse mechanism frombody of grenade and remove.— Pliers may have to be used.
2. Insert nail completely throughsafety hole (hole over primer).
3. Carefully remove safety pin pullring and lever, and allow strikerto hit nail.
216

TM 31–210
CAUTION: If for any reason, striker should hit primer instead of nail,detonator will explode in regular delay time (4-5 sec.).
4. Pull pin out and remove springand striker. Remove nail.
5. Carefully remove top section offuse mechanism from bottomsection by unscrewing.— Pliers may have to be used.
CAUTION: Use extreme care — sudden shock may set off detonator.
8. Fire primer by hitting nail placed against top of it. Remove fired primer(same as procedure 5 of Section Vl. No. 11).
CAUTION: Do not hold assembly in your hand during above opera-tion as serious burns may result.
217

TM 31–210
7. Scrape delay fuse powder with a sharpened stick. Loosen about 1/4 in.(6 mm) of powder in cavity.
8. Cut off tips (not whole head) of 6 “strike-anywhere” matches with sharpcutting edge. Drop them into delay fuse hole.
9. Place safety fuse in delay fuse hole so that it is flush against the match tips.
IMPORTANT: Be sure fuse remains flush against the match tips at alltimes.
10. Thread fuse through primerhole. Enlarge hole if necessary.Screw modified fuse mecha-nism back together. Screwcombination back into grenade.Grenade modification is nowready for use. Light fuse whenready to use.
218

TM 31–210
NOTE: If time delay is used for Improvised Grenade Launchers(Section IV, No. 5} — use steps 1 through 3 below.
1. Wrap tape around safety fuse.
2. Securely tape fuse to grenade.
3. Load grenade in launcher. Grenade will explode in approximately 20 seconds after safety fuse burns up to bottom of grenade.
219

TM 31–210
Section VlNo. 13
DETONATOR
Detonators (blasting caps) can be made from a used small armscartridge case and field manufactured explosives. Detonators areused to initiate secondary high explosives (C-4, TNT, etc.).
MATERIALS REQUIRED: SOURCE:
Primary explosive See tableBooster explosive RDX (Section I, No. 15) or Picric
Acid (Section I, No. 21)Improvised scale Section VII, No. 8Used cartridge case .22 caliber or largerFuse, 12 in. longRound wooden stick (small enough just to fit in the neck of the cartridge case)Drill or knifeLong nail with sharpened endViseImprovised loading fixture
PROCEDURES:
1. Remove fired primer from a used cartridge case using a sharpenednail. (See Section III, No. 5.)
2. If necessary, open out flashhole in the primer pocket usinga drill or knife. Make it largeenough to receive fuse.
220

TM 31–210
3. Place one end of fuse in the flash hole and extend it through the case untilit becomes exposed at the open end. Knot this end and then pull fuse incartridge case thus preventing fuse from falling out.
4. Load the primary explosive inthe cartridge case, using thefollowing table for the properamount.
Primary Explosive Primary Explosive Minimum Weight* Source
Lead Picrate** Section I, No. 20 3 grams(3 Hdbk Pgs)
TACC Section I, No. 16 1 gram (Tetrammine copper (l Hdbk Pg) Chlorate)
DDNP Section I, No. 19 0.5 gram (Diazodinitrophenol) (1/2 Hdbk Pg)
Mercury Fulminate Section I, No. 24 0.75 gram(3/4 Hdbk Pg)
HMTD Section I, No. 17 0.75 gram(3/4 Hdbk Pg)
Double Salts Section I, No. 22 0.75 gram(3/4 Hdbk Pg)
* See Section Vll, No. 8 for details on improvised scale.** .22 Cal. cartridge case cannot be used with lead picrate as there is not enough volume to contain the explosive train.
221

TM 31–210
5. Compress the primary explosiveinto the cartridge case with thewooden stick and the followingimprovised loading fixture.
|
CAUTION: The primary explosive is shock and flame sensitive.
NOTE: Tamping is not needed when TACC is used.
222

TM 31–210
6. Add one gram of booster explosive. The booster can be RDX(Section I, No. 15), or Picric Acid (Section I, No. 21).
7. Compress the booster explosive into the cartridge case with wooden stickand the loading fixture.
8. If the case is not full, fill the remainder with the secondary explosive to bedetonated.
CAUTION: Detonator has considerably more power than a militaryblasting cap and should be handled carefully.
223

TM 31–210
Section VIINo. 1
CLOTHESPIN SWITCH
A spring type clothespin is used to make a circuit closing switch to actuate explosive charges, mines, booby traps and alarm systems.
MATERIALS REQUIRED:
Spring type clothespin,Solid copper wire — 1/16 in. (2 mm) in diameter.Strong string or wire.Flat piece of wood (roughly 1/8 x 1” x 2”).Knife.
PROCEDURES:
1. Strip in. (10 cm) of insulationfrom the ends of 2 solid copperwires. Scrape copper wires withpocket knife until metal isshiny.
2. Wind one scraped wire tightlyon one jaw of the clothespin,and the other wire on the otherjaw.
3. Make a hole in one end of theflat piece of wood using a knife,heated nail or drill. Tie strongstring or wire through the hole.
224

TM 31–210
5. Place flat piece of wood be-tween jaws of the clothespinswitch.
Basic Firing Circuit
When the flat piece of wood is removed by pulling the string, the jaws ofthe clothespin will close, completing the circuit.
CAUTION: Do not attach the battery until the switch and trip wirehave been emplaced and examined. Be sure the flat piece of wood isseparating the jaws of the switch.
A Method of Use
225

TM 31–210
Section VIINo. 2
MOUSETRAP SWITCH
A common mousetrap can be used to make a circuit closing switch forelectrically initiated explosives, mines and booby traps.
MATERIALS REQUIRED:
MousetrapHacksaw or FileConnecting wires
PROCEDURES:
1. Remove the trip lever from themousetrap using a hacksaw orfile. Also remove the staple andholding wire.
2. Retract the striker of themousetrap and attach the triplever across the end of the woodbase using the staple with whichthe holding wire was attached
NOTE: If the trip lever is not made of metal, a piece of metal of approx-imately the same size should be used.
3. Strip one in. (2-1/2 cm) of insulation from the ends of 2 connecting wires.
4. Wrap one wire tightly aroundthe spring loaded striker of themousetrap.
226

TM 31–210
5. Wrap the second wire around some part of the trip lever or piece of metal.
HOW TO USE:
This switch can be used in a number of ways — one typical method ispresented here.
The switch is placed inside a box which also contains the explosive andbatteries. The spring loaded striker is held back by the lid of the box andwhen the box is opened the circuit is closed.
227

TM 31–210
Section VIINo. 3
FLEXIBLE PLATE SWITCH
This pressure sensitive switch is used for initiating emplaced minesand explosives.
MATERIALS REQUIRED:
2–flexible metal sheets oneapproximately 10 in. (25 cm)square one approximately 10 in.x 8 in.(20 cm)
Piece of wood 10 in. square by 1in. thick
4–soft wood blocks 1" x 1" x 1/4"8–flat head nails, 1 in. longConnecting wiresAdhesive tape
PROCEDURES:
1. Nail 10 in. x 8 in. metal sheet to10 in. sq. piece of wood so that1 in. of wood shows on eachside of metal. Leave one of thenails sticking up about 1/4 in.
2. Strip insulation fro m the end ofone connecting wire. Wrap thisend around the nail and drivethe nail all the way in.
3. Place the four wood blocks onthe corners of the wood base.
4. Place the 10 in. square flexiblemetal sheet so that it rests on theblocks in line with the woodbase.
228

TM 31–210
5. Drive four nails through themetal sheet and the blocks tofasten to the wood base. Asecond connecting wire isattached to one of the nails as inStep 2.
6. Wrap adhesive tape around theedges of the plate and woodbase. This will assure that nodirt or other foreign matter willget between the plates andprevent the switch fromoperating.
HOW TO USE:
The switch is placed in a hole in the path of expected traffic and coveredwith a thin layer of dirt or other camouflaging material. The mine or otherexplosive device connected to the switch can be buried with the switch oremplaced elsewhere as desired.
When a vehicle passes over the switch, the two metal plates make contactclosing the firing circuit.
229

TM 31–210
Section VIINo. 4
METAL BALL SWITCH
This switch will close an electric circuit when it is tipped in anydirection. It can be used alone for booby traps or in combination withanother switch or timer as an anti-disturbance switch.
MATERIALS REQUIRED:
Metal Ball 1/2" ( 1-1/4 cm)diameter (see Note)
Solid copper wire 1/16” (1/4 cm)diameter
Wood block 1" ( 2 1/2 cm) squareby 1/4" thick
Hand drillConnecting wiresSoldering iron and solder.
NOTE: If other than a 1/2" diameter ball is used, other dimension mustbe changed so that the ball will rest in the center hole of the block with-out touching either of the wires.
PROCEDURES:
1. Drill four 1/16" holes and one1/8" hole through the woodblock as shown.
2. Form two “U” shaped piecesfrom 1/16" copper wire to thedimensions shown.
3. Wrap a connecting wire aroundone leg of each “U” at least 1/4"from the end and solder inplace.
230

TM 31–210
4. Place metal ball on block so itrests in the center hole.
5. Insert the ends of the small“U” into two holes in the block.Insert large “U” into the re-maining two holes.
CAUTION: Make sure that the metal ball does not touch either “U”shaped wire when the switch is standing on its base. If the ball doestouch, bend wires outward slightly.
HOW TO USE:
Mount switch vertically and connect in electrical firing circuit as with anyother switch. When tipped in any direction it will close the circuit.
CAUTION: Switch must be mounted vertically and not disturbedwhile completing connections.
231

TM 31–210
Section VIINo. 5.
ALTIMETER SWITCH
This switch is designed for use with explosives placed on aircraft.It will close an electrical firing circuit when an altitude of approximately5000 ft (1-1/2 KM) is reached.
MATERIALS REQUIRED:
Jar or tin canThin sheet of flexible plastic or
waxed paperThin metal sheet (cut from tin can)Adhesive TapeConnecting Wires
PROCEDURES:1. Place sheet of plastic or waxed paper over the top of the can or jar and tape
tightly to sides of container.
NOTE: Plastic sheet should not be stretched tight. A small depressionshould be left in the top.
2. Cut two contact strips from thin metal and bend to the shapes shown.
3. Strip insulation from the ends oftwo connecting wires. Attachone wire to each contact strip.
NOTE: If a soldering iron is available solder wires in place .
232

TM 31–210
4. Place contact strips over container so that the larger contact is above the smaller with every small clearance between the two.
5. Securely tape contact strips to the sides of the container.
HOW TO USE
1. Connect the altimeter switch in an explosive circuit the same asany switch.
2. Place the explosive package on airplane. As the plane rises theair inside the container will expand. This forces the plastic sheet against the contacts closing the firing circuit
NOTE: The switch will not function in a pressurized cabin. It mustbe placed in some part of the plane which will not be pressurized
233

TM 31–210
Section VIINo. 6
PULL-LOOP SWITCH
This switch will initiate explosive charges, mines, and booby trapswhen the trip wire is pulled.
MATERIALS REQUIRED:
2 lengths of insulated wireKnifeStrong string or cordFine thread that will break easily
PROCEDURES:
1. Remove about 2 inches of in-sulation from one end of eachlength of wire. Scrape bare wirewith knife until metal is shiny.
2. Make a loop out of each pieceof bare wire.
3. Thread each wire through theloop of the other wire so thewires can slide along eachother.
NOTE: The loops should contact each other when the two wires arepulled taut.
234

TM 31–210
HOW TO USE:
1. Separate loops by about 2 in-ches. Tie piece of fine threadaround wires near each loopThread should be taut enough tosupport loops and wire, yet fineenough that it will break under avery slight pull.
2. Fasten one wire to tree or stake and connect end to firing circuit.
3. Tie a piece of cord or string around the other piece of wire a fewinches from the loop. Tie free end of cord around tree, bush, or stake.Connect the free end of the wire to the firing circuit. Initiation willoccur when the tripcord is pulled.
CAUTION: Be sure that the loops do not contact each other when thewires are connected to the firing circuit.
OTHER USES: The switch minus the fine thread may be used to activatea booby trap by such means as attaching it between the lid and a rigidportion of a box, between a door and a door jamb, and in similar manners.
235

TM 31–210
Section VIINo. 7
KNIFE SWITCH
This device will close the firing circuit charges, mines, and boobytraps when the trip wire is pulled or cut.
MATERIALS REQUIRED:
Knife or hack saw blade Sturdy wooden board6 nails WireStrong string or light rope
PROCEDURES:
1. Place knife on board. Drive 2 nails into board on each side of knifehandle so knife is held in place.
2. Drive one nail into board so that it touches blade of knife near thepoint,
3. Attach rope to knife. Place rope across path. Apply tension torope, pulling knife blade away from nail slightly. Tie rope to tree,bush or stake.
4. Drive another nail into board near the tip of the knife blade as shownbelow. Connect the two nails with a piece of conducting wire. Nail shouldbe positioned so that it will contact the second nail when blade is pulledabout 1 inch (2-1/2 cm) to the side.
NOTE: Check position of nails to knife blade. The nails should beplaced so that the knife blade will contact either one when the rope ispulled or released.
HOW TO USE:
Attach one wire from firing circuit to one of the nails and the other tothe knife blade. The circuit will be completed when the tripcord ispulled or released.
236

TM 31–210
Section VIINo. 8
IMPROVISED SCALE
This scale provides a means of weighing propellant and other itemswhen conventional scales or balances are not available.
MATERIAL REQUIRED:
Pages from Improvised Munitions HandbookStraight sticks about 1 foot (30 cm) long and 1/4 in. (5 mm) in diameterThread or fine string
PROCEDURES:
1. Make a notch about 1/2 in. (1 cm) from each end of stick. Be surethat the two notches are the same distance from the end of the stick.
2. Find the exact center of the stickby folding in half a piece ofthread the same length as thestick and placing it alongside thestick as a ruler. Make a smallnotch at the center of the stick.
3. Tie a piece of thread around thenotch. Suspend stick frombranch, another stick wedgedbetween rocks, or by any othermeans. Be sure stick is balancedand free to move.
NOTE: If stick is not balanced, shave or scrape a little off the heavyend until it does balance. Be sure the lengths of the arms are the same.
4. Make a container out of onepiece of paper. This can be doneby rolling the paper into acylinder and folding up thebottom a few times.
5. Punch 2 holes at opposite sidesof paper container. Suspendcontainer from one side of stick
237

TM 31–210
6. Count out the number of hand-book pages equal in weight tothat of the quantity of material tobe weighed. Each sheet of paperweighs about 1.3 grams (20grains or 0.04 ounce). Suspendthese sheets, plus one, tobalance container on the otherside of the scale.
7. Slowly add the material to beweighed to the container. Whenthe stick is balanced, the desiredamount of material is in thecontainer.
8. If it is desired to weigh a quantity of material larger than that which wouldfit in the above container, make a container out of a larger paper or paperbag, and suspend from one side of the stick. Suspend handbook pages fromthe other side until the stick is balanced. Now place a number of sheets ofhandbook pages equal in weight to that of the desired amount of material tobe weighed on one side, and fill the container with the material until thestick is balanced.
9. A similar method may be used to measure parts or percentage by weight.The weight units are unimportant, Suspend equal weight containers fromeach side of the stick. Bags, tin cans, etc. can be used. Place one material inone of the containers. Fill the other container with the other material untilthey balance. Empty and refill the number of times necessary to get therequired parts by weight (e.g., 5 to 1 parts by weight would require 5fillings of one can for one filling of the other) .
238

TM 31–210
Section VIINo. 9
ROPE GRENADE LAUNCHING TECHNIQUE
A method of increasing the distance a grenade may be thrown. safetyfuse is used to increase the delay time.
MATERIALS REQUIRED:
Hand grenade (Improvised pipe hand grenade, Section II, No. 1 may beused)
Safety fuse or fast burning Improvised Fuse, (Section VI, No. 7)Light rope, cord, or string
PROCEDURES:
1. Tie a 4 to 6 foot (1 meter lengthof cord to the grenade. Be surethat the rope will not prevent thegrenade handle from comingoff.
Note: If improvised grenade is used, tie cord around grenade nearthe end cap. Tape in place if necessary.
2. Tie a large knot in the other end of the cord for use as a handle.
3. Carefully remove safety pin from grenade, holding safety lever in place.Enlarge safety pin hole with point of knife, awl, or drill so that safety fusewill pass through hole.
4. Insert safety fuse in hole. Be sure that safety fuse is long enough to providea 10 second or more time delay. Slowly release safety lever to make surefuse holds safety lever in place.
239

TM 31–210
CAUTION: If safety lever should be released for any reason, grenadewill explode after regular delay time (4-5 sec. ).
NOTE: If diameter of safety fuse is too large to fit in hole (Step 4),follow procedure and How to Use of Time Delay Grenade, Section VI,No. 9, instead of Steps 3 and 4 above.
HOW TO USE:
1. Light fuse.
2. Whirl grenade overhead, holding knot at end of rope, until grenade picks upspeed (3 or 4 turns),
3. Release when sighted on target.
CAUTION: Be sure to release grenade within 10 seconds after fuse islit.
NOTE: It is helpful to practice first with a dummy grenade or a rockto improve accuracy. With practice, accurate launching up to 100 meters(300 feet) can be obtained.
240

TM 31–210
Section VIINo. 10
BICYCLE GENERATOR POWER SOURCE
A 6 volt, 3 watt bicycle generator will set off one or two blastingcaps (connected in series) or an igniter.
MATERIALS REQUIRED:
Bicycle generator (6 volts, 3 watt)Copper wireKnife
PROCEDURES:
1. Strip about 4 in. (10 cm) ofcoating from both ends of 2copper wires. Scrape ends withknife until metal is shiny.
2. Connect the end of one wire tothe generator terminal.
3. Attach the end of the secondwire to generator case. Thiswire may be wrapped around aconvenient projection, taped, orsimply held against the casewith the hand.
241

TM 31–210
HOW TO USE:
1. Connect free ends of wires to blasting cap or squib leads.
CAUTION: If drive wheel is rotated, explosive may be set off.
2. Run the drive wheel firmly and rapidly across the palm of the hand toactivate generator.
242

TM 31–210
Section VIINo. 11
AUTOMOBILE GENERATOR POWER SOURCE
An automobile generator can be used as a means of firing one blast-ing cap or igniter (Improvised Igniter, Section V, No. 2, may be used.)
MATERIALS REQUIRED:
Automobile generator (6, 12, or 28 volts). (An alternator will not work.)Copper WireStrong string or wire, about 5 ft. (150 cm) long and 1/16 in. (1-1/2 mm)
in diameterKnifeSmall light bulb requiring same voltage as generator, (for example,
bulb from same vehicle as generator).
PROCEDURES:
1. Strip about 1 in. (2-1/2 cm) ofcoating from both ends of 3copper wires. Scrape ends withknife until metal is shiny.
2. Connect the “A” and “F” ter-minals with one piece of wire.
3. Connect a wire to the “A”terminal.. Connect anotherto the “G” terminal.
.
NOTE: The “F” and “G” or “C” terminals may not be labeled; in thiscase, connect wires as shown. The “F” terminal is usually smaller in sizethan the “C” or “G” terminal.
243

TM 31–210
4. Wrap several turns of string orwire clockwise around the drivepulley.
HOW TO USE:
1. Connect the free ends of thewires to the light bulb.
2. Place one foot on the generatorto secure it in place. Give thestring or wire a very hard pull tolight the bulb.
NOTE: If not successful at first, rewind string and try again severaltimes. After repeating this operation and the bulb still does not light,follow Step 4, “How to Use.”
3. If light bulb lights, follow Steps 1 and 2 of above, “How to Use,” con-necting free ends of wires to blasting cap or igniter instead of to light bulb.
4. If light bulb does not light afterseveral pulls switch leads con-nected to F and G terminals.Repeat above “How to Use, “Steps 1 to 3.
244

TM 31–210
Section VIINo. 12
IMPROVISED BATTERY (SHORT LASTING)
This battery is powerful but must be used within 15 minutes afterfabrication. One cell of this battery will detonate one blasting cap or oneigniter. Two cells, connected in series, will detonate two of these devicesand so on. Larger cells have a longer life as well as greater power.
MATERIALS: COMMON SOURCE
Water
Sodium hydroxide (lye, solid Soap manufacturing or concentrated solution) Disinfectants
Sewer cleaner
Copper or brass plate about 4 in. (10 cm) square and 1/16 in. (2 mm) thick
Aluminum plate or sheet, same size as copper plate
Charcoal powder
Container for mixing
Knife
One of the following:
Potassium permanganate, solid DisinfectantsDeodorants
Calcium hypochlorite, solid DisinfectantsWater treating chemicalsChlorine bleaches
Manganese dioxide (pyrolucite) Dead dry-cell batteries
NOTE: Be sure sodium hydroxide solution is at least a 45% solution byweight, If not, boil off some of the water. If solid sodium hydroxide isavailable, dissolve some sodium hydroxide in about twice as much water(by volume).
245
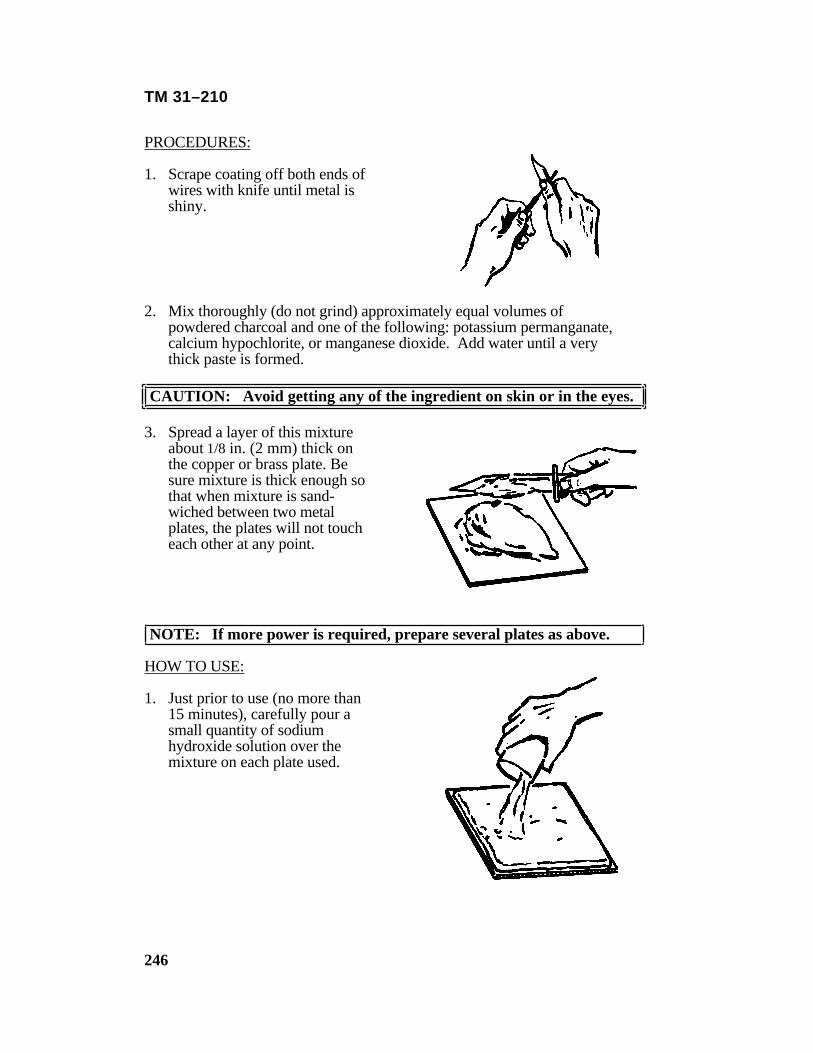
TM 31–210
PROCEDURES:
1. Scrape coating off both ends ofwires with knife until metal isshiny.
2. Mix thoroughly (do not grind) approximately equal volumes ofpowdered charcoal and one of the following: potassium permanganate,calcium hypochlorite, or manganese dioxide. Add water until a verythick paste is formed.
CAUTION: Avoid getting any of the ingredient on skin or in the eyes.
3. Spread a layer of this mixtureabout 1/8 in. (2 mm) thick onthe copper or brass plate. Besure mixture is thick enough sothat when mixture is sand-wiched between two metalplates, the plates will not toucheach other at any point.
NOTE: If more power is required, prepare several plates as above.
HOW TO USE:
1. Just prior to use (no more than15 minutes), carefully pour asmall quantity of sodiumhydroxide solution over themixture on each plate used.
246

TM 31–210
CAUTION: If solution gets on skin, wash off immediately with water.
2. Place an aluminum plate on topof the mixture on each copperplate. Press firmly. Remove anyexcess that oozes out betweenthe plates.
CAUTION: Be sure plates are not touching each other at any point.
3. If more than one cell is used,place the cells on top of eachother so that unlike metal platesare touching.
4. When ready to fire, clean plates with knife where connections are to bemade. Connect one wire to the outer aluminum plate. This may he done byholding the wires against the plates or by hooking them through holespunched through plates. If wires are hooked through plates, be sure they donot touch mixture between plates.
247

TM 31–210
Section VIINo. 13
IMPROVISED BATTERY (2 HOUR DURATION)
This battery should be used within 2 hours and should be securelywrapped. Three cells will detonate one blasting cap or one igniter.Five cells, connected in series will detonate two of these devices andgo on. Larger cells have a longer life and will yield more power.
If depolarizing materials such as potassium permanganate ormanganese dioxide cannot be obtained, ten cells without depolarizer,arranged as described below, (step 4) will detonate one blasting cap.
MATERIALS: COMMON SOURCE:
Water
Ammonium chloride (sal ammoniac) Medicines(solid or concentrated solution Soldering fluxes
FertilizersIce melting chemicals for roads
Charcoal powder
Copper or brass plate about 4 in. (10 cm) square and 1/16 in. (2 mm) thick
Aluminum plate same size as copper or brass plate
Wax and paper (or waxed paper) Candles
Wire, string or tape
Container for mixing
Knife
One of the following:
Potassium permanganate, acid DisinfectantsDeodorants
Manganese dioxide Dead dry batteries
NOTE: If ammonium chloride solution is not concentrated (at least45% by weight) boil off some of the water.
248

TM 31–210
PROCEDURES:
1. Mix thoroughly (do not grind) approximately equal volumes of pow-dered charcoal, ammonium chloride and one of the following: potassiumpermanganate or manganese dioxide. Add water until a very thick pasteis formed. If ammonium chloride is in solution form, it may not benecessary to add water.
2. Spread a layer of this mixture,about 1/8 in. (3 mm) thick, on aclean copper or brass plate. Thelayer must be thick enough toprevent a second plate fromtouching the copper plate whenit is pressed on top.
3. Press an aluminum plate veryfirmly upon the mixture on thecopper plate. Remove com-pletely any of the mixture thatsqueezes out between the plates.The plates must not touch.
4. If more than one coil is desired:
a. Place one cell on top of the other so that it unlike metal plates are touching.
249

TM 31–210
b. Wrap the combined cells in heavy waxed paper. The waxed paper can be made by rubbing candle wax over one side of a piece of paper. Secure thepaper around the battery with string, wire or tape. Expose the top and bottommetal plates at one corner.
HOW TO USE:
1. Scrape a few inches off each end of two wires with knife until metal isshiny.
2. Clean plates with knife until metal is shiny where connections are to bemade.
3. Connect one wire from the explosive to a copper or brass plate andthe other wire to an aluminum plate. The connection can be made byholding the wire against the plate. A permanent connection can be madeby hooking the wire through holes in the exposed corners of the plates.The battery is now ready for use.
NOTE: If battery begins to fail after a few firings, scrape the plates andwires where connections are made until metal is shiny.
250

TM 31–210
Section VIINo. 14
ARMOR MATERIALS
The following table shows the amount of indigenous materials neededto stop ball type projectiles of the 5.56 mm, .30 caliber, and .50 caliberammunition fired from their respective weapons at a distance of 10feet (3 m).
THICKNESS OF MATERIALSInches Centimeters
5.56 0.30 0.50 5.56 0.30 0.50INDIGENOUS mm cal cal mm cal calMATERIALS 7.62 12.70 7.62 12.70
mm mm mm mm
Mild steel (structural) 1/2 1/2 3/4 1–1/4 1–1/4 2
Mild aluminum (structural) 1 1 2 2–1/2 2–1/2 5
Pine wood (soft) 14 22 32 36 56 82
Broken stones/cobble gravel 3 4 11 8 11 28
Dry sand 4 5 14 11 13 36
Wet sand or earth 6 13 21 16 33 54
NOTE: After many projectiles are fired into the armor, the armorwill break down. More material must be added.
251

TM 31–210
13. PRIMARY HIGH EXPLOSIVES
MERCURY FULMINATE 13—1
Description: Mercury fulminate is an initiating explosive, commonlyappearing as white or gray crystals. It is extremely sensitive to initiation byheat, friction, spark or flame, and impact. It detonates when initiated by anyof these means. It is pressed into containers, usually at 3000 psi, for use indetonators and blasting caps. However, when compressed at greater andgreater pressure (up to 30,000 psi), it becomes “dead pressed.” In thiscondition, it can only be exploded by another initial detonating agent.Mercury fulminate gradually becomes inert when stored continuously above100° F. A dark-colored product of deterioration gives evidence of thiseffect. Mercury fulminate is stored underwater except when there is dangerof freezing. Then it is stored under a mixture of water and alcohol.
Comments: This material was tested. It is effective.
References: TM 9 1900, Ammunition, General, page 59.TM 9-1910, Military Explosives, page 98.
LEAD STYPHNATE 13—2
Description: Lead styphnate is an initiating explosive, commonly appearingin the form of orange or brown crystals. It is easily ignited by heat and staticdischarge, but cannot be used to initiate secondary high explosives reliably.Lead styphnate is used as an igniting charge for lead azide and as aningredient in priming mixtures for small arms ammunition. In theseapplications, it is usually mixed with other materials first and then pressedinto a metallic container (detonators and primers). Lead styphnate is storedunder water except when there is danger of freezing. Then it is stored undera mixture of water and alcohol.
Comments: This item was tested. I/ is effective.
References: TM 9-1900, Ammunition, General, page 59.TM 9-1910, Military Explosives, page 107.
LEAD AZIDE 13—3
Description: Lead azide is an initiating explosive and is produced as awhite to buff crystalline substance. It is a more efficient detonating agentthan mercury fulminate and it does not decompose on long continuedstorage at moderately elevated temperatures. It is sensitive to both flame andimpact but requires a layer of lead styphnate priming mixture to producereliable initiation when it is used in detonators that are initiated by a firingpin or electrical energy. It is generally loaded into aluminum detonatorhousings and must not be loaded into housing of copper or brass becauseextremely sensitive copper azide can be formed in the presence of moisture.
252

TM 31–210
Comments: This material was tested. It is effective.
References: TM 9-1900, Ammunition, General, page 60.TM 9-1910, Military Explosives, page 103.
DDNP 13—4Description: DDNP (diazodinitrophenol) is a primary high explosive. It isextensively used in commercial blasting caps that are initiated by blackpowder safety fuse. It is superior to mercury fulminate in stability but is notas stable as lead azide. DDNP is desensitized by immersion in water.
Comments: This material was tested. It is effective.
References: TM 9-1900, Ammunition, General, page 60.TM 9-1910 Military Explosives, page 103.
Section 14. SECONDARY HIGH EXPLOSIVES
TNT 14—1Description: TNT (Trinitrotoluene) is produced from toluene, sulfuric acid,and nitric acid. It is a powerful high explosive. It is well suited for steelcutting, concrete breaching, general demolition, and for underwaterdemolition. It is a stable explosive and is relatively insensitive to shock. Itmay be detonated with a blasting cap or by primacord. TNT is issued in l-pound and 1/2-pound containers and 50-pounds to a wooden box.
Comments: This material was tested. It is effective. TNT is toxic and its dust should not be inhaled or allowed to contact the skin.
References: TM 9-1900, Ammunition, General, page 263.FM 5-25, Explosives and Demolitions, page 3.
NITROSTARCH 14—2Description: Nitrostarch is composed of starch nitrate, barium nitrate, andsodium nitrate. It is more sensitive to flame, friction, and impact than TNTbut is less powerful. It is initiated by detonating cord. Nitrostarch is issuedin 1-pound and l-1/2 pound blocks. The 1-pound packages can be brokeninto 1/4-pound blocks. Fifty 1-pound packages and one hundred 1-1/2pound packages are packed in boxes.
Comments: This material was tested. It is effective.
Reference: TM 9-1900 Ammunition, General, page 263.
TETRYL 14—3Description: Tetryl is a fine, yellow, crystalline material and exhibitsa very high shattering power. It is commonly used as a booster in ex-
253

TM 31–210
plosive trains. It is stable in storage. Tetryl is used in detonators. Itis pressed into the bottom of the detonator housing and covered witha small priming charge of mercury fulminate or lead azide.
Comments: This material was tested. It is effective.
References: TM 9-1900, Ammunition, General, page 52.TM 31-201-1, Unconventional Warfare Devices and Techniques, para 1509.
RDX 14—4Description: RDX (cyclonite) is a white crystalline solid that exhibits veryhigh shattering power. It is commonly used as a booster in explosive trainsor as a main bursting charge. It is stable in storage, and when combinedwith proper additives, may be cast or press loaded. It may be initiated bylead azide or mercury fulminate.
Comments: This material was tested. It is effective.
References. TM 9 1900, Ammunition, General, page 52.TM 31-201-1, Unconventional Warfare Devices andTechniques, para 1501.
NITROGLYCERIN 14—5Description: Nitroglycerin is manufactured by treating glycerin with anitrating mixture of nitric and sulfuric acid. It is a thick, clear toyellow-brownish liquid that is an extremely powerful and shock-sensi-tive high explosive. Nitroglycerin freezes at 56° F., in which state itis less sensitive to shock than in liquid form.
Comments: This material was tested. It is effective.
References: TM 9-1910, Military Explosives, page 123.TM 31-201-1, Unconventional Warfare Devices andTechniques, para 1502.
COMMERCIAL DYNAMITE 14—6Description: There are three principal types of commercial dynamite:straight dynamite, ammonia dynamite, and gelatin dynamite. Eachtype is further subdivided into a series of grades. All dynamites con-tain nitroglycerin in varying amounts and the strength or force of theexplosive is related to the nitroglycerin content. Dynamites range invelocity of detonation from about 4000 to 23,000 feet per second andare sensitive to shock. The types and grades of dynamite are each usedfor specific purposes such as rock blasting or underground explosives.Dynamite is initiated by electric or nonelectric blasting caps. Althoughdynamites are furnished in a wide variety of packages, the most com-mon unit is the 1/2 pound cartridge. Fifty pounds is the maximumweight per case.
254

TM 31–210
Comments: This material was tested. It is effective.
References: TM 9-1900, Ammunition, General, page 265.FM 5-25, Explosives and Demolitions, page 8.
MILITARY DYNAMITE 14—7Description: Military (construction) dynamite, unlike commercialdynamite, does not absorb or retain moisture, contains no nitroglycerine,and is much safer to store, handle, and transport. It comes in standardsticks 1-1/4 inches in diameter by 8 inches long, weighing approximately1/2 pound. It detonates at a velocity of about 20,000 feet per secondand is very satisfactory for military construction, quarrying, and demo-lition work. It may be detonated with an electric or nonelectric militaryblasting cap or detonating cord.
Comments: This material was tested. It is effective.
References: FM 5-25, Explosives and Demolitions, page 7.TM 9-1910, Military Explosives, page 204.
AMATOL 14—8Description: Amatol is a high explosive, white to buff in color. It is amixture of ammonium nitrate and TNT, with a relative effectivenessslightly higher than that of TNT alone. Common compositions varyfrom 80% ammonium nitrate and 20% TNT to 40% ammonium nitrateand 60% TNT. Amatol is used as the main bursting charge in artilleryshells and bombs. Amatol absorbs moisture and can form dangerouscompounds with copper and brass. Therefore it should not be housedin containers of such metals.
Comments: This material was tested. It is effective.
References: FM 5-25, Explosives and Demolitions, page 7.TM 9-1910, Military Explosives, page 182.
PETN 14—9Description: PETN (pentaerythrite tetranitrate), the high explosiveused in detonating cord, is one of the most powerful of military ex-plosives, almost equal in force to nitroglycerine and RDX. When usedin detonating cord, it has a detonation velocity of 21,000 feet per secondand is relatively insensitive to friction and shock from handling andtransportation.
Comments: This material was tested. It is effective.
References: FM 5-25, Explosives and Demolitions, page 7.TM 9-1910, Military Explosives, page 135.TM 31-201-1, Unconventional Warfare Devices andTechniques, para 1508.
255

TM 31–210
BLASTING GELATIN 14—10Description: Blasting gelatin is a translucent material of an elastic, jellyliketexture and is manufactured in a number of different colors. It is consideredto be the most powerful industrial explosive. Its characteristics are similar tothose of gelatin dynamite except that blasting gelatin is more water resistant.
Comments: This-material was tested. It is effective.
Reference: TM 9 1910, Military Explosives, page 204.
COMPOSITION B 14—11Description: Composition B is a high-explosive mixture with a relativeeffectiveness higher than that of TNT. It is also more sensitive than TNT. Itis composed of RDX (59%) TNT (40%) and wax (1%). Because of itsshattering power and high rate of detonation, Composition B is used as themain charge in certain models of bangalore torpedoes and shaped charges.
Comments: This material was tested. It is effective.
References: FM 5 25, Explosives and Demolitions, page 7.TM 9-1900, Ammunition, General, page 57.TM 9-1910, Military Explosives, page 193.
COMPOSITION C4 14—12Description: Composition C4 is a white plastic high explosive morepowerful than TNT. It consists of 91% RDX and 9% plastic binder. Itremains plastic over a wide range of temperatures (–70° F. to +170° F.), andis about as sensitive as TNT. It is eroded less than other plastic explosiveswhen immersed under water for long periods. Because of its highdetonation velocity and its plasticity, C4 is well suited for cutting steel andtimber and for breaching concrete.
Comments: This material was tested. It is effective.
Reference: TM 9-1910, Military Explosives, page 204.
AMMONIUM NITRATE 14—13Description: Ammonium nitrate is a white crystalline substance that isextremely water absorbent and is therefore usually packed in a sealed metalcontainer. It has a low velocity of detonation (3600 fps)) and is usedprimarily as an additive in other explosive compounds. When it is usedalone, it must be initiated by a powerful booster or primer. It is only 55% aspowerful as TNT, hence larger quantities are required to produce similarresults.
CAUTION: Never use copper or brass containers because ammoniumnitrate reacts with these metals.
Comments: This material was tested. It is effective.
References: TM 5 1900, Ammunition, General, page 264.TM 9-1910, Military Explosives, page 119.
256