Embed Size (px)
Citation preview
Tivoli® Security Information and Event ManagerVersion 2.0
Administrators Guide
SC23-9688-02
���


Tivoli® Security Information and Event ManagerVersion 2.0
Administrators Guide
SC23-9688-02
���

NoteBefore using this information and the product it supports, read the information in “Notices” on page 225.
This edition applies to version 2, release 0, modification 0 of IBM Tivoli Security Information and Event Manager(product number 5724-Z13) and to all subsequent releases and modifications until otherwise indicated in neweditions.
© Copyright IBM Corporation 1998, 2011.US Government Users Restricted Rights – Use, duplication or disclosure restricted by GSA ADP Schedule Contractwith IBM Corp.

Contents
Figures . . . . . . . . . . . . . . vii
Tables . . . . . . . . . . . . . . . ix
About this publication . . . . . . . . xiIntended audience . . . . . . . . . . . . xiPublications . . . . . . . . . . . . . . xi
IBM Tivoli Security Information and EventManager library . . . . . . . . . . . . xiPrerequisite publications . . . . . . . . . xiiiRelated publications . . . . . . . . . . xiiiAccessing terminology online . . . . . . . xiiiAccessing publications online . . . . . . . xiiiOrdering publications. . . . . . . . . . xiii
Accessibility . . . . . . . . . . . . . . xivTivoli technical training . . . . . . . . . . xivTivoli user groups . . . . . . . . . . . . xivSupport information . . . . . . . . . . . xivConventions used in this publication . . . . . xiv
Typeface conventions . . . . . . . . . . xvOperating system-dependent variables and paths xv
Chapter 1. Description of a TivoliSecurity Information and Event Managersystems administrator . . . . . . . . 1Primary responsibilities . . . . . . . . . . . 1Recommended skills . . . . . . . . . . . . 3
Chapter 2. Configuring the web browserand system for the Tivoli IntegratedPortal . . . . . . . . . . . . . . . . 5Supported web browsers . . . . . . . . . . 5Screen resolution . . . . . . . . . . . . . 5Enabling JavaScript and ActiveX. . . . . . . . 5
Enabling ActiveX and configuring security settingsin Internet Explorer . . . . . . . . . . . 5Configuring "Trusted sites" in Internet Explorer. . 6
Disabling Enhanced Security Configuration inWindows 2003 Server . . . . . . . . . . . 7Disabling Enhanced Security Configuration inWindows 2008 Server . . . . . . . . . . . 7Configuring encryption for Internet Explorer . . . 8Configuring encryption for Firefox . . . . . . . 8Enabling cookies . . . . . . . . . . . . . 8
Enabling cookies in Internet Explorer . . . . . 9Enabling cookies in Firefox . . . . . . . . 9
Enabling browser caching . . . . . . . . . . 9Configuring browser caching in Internet Explorer 9Configuring browser caching in Firefox . . . . 10
Turning off the "Show friendly HTTP errormessages" parameter in Internet Explorer . . . . 10Installing language files and fonts . . . . . . . 11
Installing TrueType fonts . . . . . . . . . 11
Installing language files for Asian languages onWindows 2003 systems . . . . . . . . . 12
Changing the system locale to support globalizeddomain names . . . . . . . . . . . . . 13Configuring the server locale for localized numberformatting . . . . . . . . . . . . . . . 14Changing the log file size. . . . . . . . . . 15
Chapter 3. Logging on to TivoliSecurity Information and EventManager . . . . . . . . . . . . . . 17Logon credentials . . . . . . . . . . . . 17Logging on to the Tivoli Integrated Portal . . . . 17Logging out . . . . . . . . . . . . . . 18User roles . . . . . . . . . . . . . . . 18Navigating Tivoli Security Information and EventManager . . . . . . . . . . . . . . . 19
Using the Tivoli Security Information and EventManager user interface . . . . . . . . . 19
Common tasks . . . . . . . . . . . . . 19Resources . . . . . . . . . . . . . . . 20
Using online help . . . . . . . . . . . 20Accessing the Information Center . . . . . . 21
Support . . . . . . . . . . . . . . . 22
Chapter 4. Managing remote serverswith the Launchpad . . . . . . . . . 23Viewing the Launchpad . . . . . . . . . . 23Using the Launchpad . . . . . . . . . . . 23
Opening a remote server in a Web browser . . . 24Editing server registry entries . . . . . . . 24Refreshing the server list . . . . . . . . . 25
Chapter 5. Configuring auditedmachines . . . . . . . . . . . . . 27Viewing audited machines . . . . . . . . . 27Working with audited machines . . . . . . . 27
Viewing the properties of an audited machine . . 29Creating an audited machine . . . . . . . 31Deleting an audited machine . . . . . . . 42Reattaching an audited machine . . . . . . 42Identifying an audited machine by its agent ID 44
Organizing audited machines into agent groups . . 44Moving audited machines into agent groups . . 44Creating an agent group . . . . . . . . . 45Deleting an agent group . . . . . . . . . 45Renaming an agent group . . . . . . . . 46
Chapter 6. Configuring event sourcesand user information sources . . . . . 47Viewing event sources and user information sources 47Managing event sources and user informationsources . . . . . . . . . . . . . . . . 48
Viewing event source properties . . . . . . 49
© Copyright IBM Corp. 1998, 2011 iii
||

About event source properties . . . . . . . 49About advanced event source properties. . . . 51Viewing user information source properties . . 52About user information source properties . . . 52Creating an event source . . . . . . . . . 53Creating a user information source . . . . . 60Creating a machine . . . . . . . . . . . 62Deleting an event source and user informationsource . . . . . . . . . . . . . . . 62Creating a collection schedule . . . . . . . 63
Setting the audit profile for an event source . . . 65
Chapter 7. Configuring SIM ReportingDatabases . . . . . . . . . . . . . 67Viewing Reporting Databases . . . . . . . . 67Managing databases . . . . . . . . . . . 68Viewing database properties . . . . . . . . . 70
About database properties . . . . . . . . 70Creating a database. . . . . . . . . . . . 72Deleting a database. . . . . . . . . . . . 73About event sources . . . . . . . . . . . 73
Adding event sources to a database . . . . . 74Removing event sources from a database . . . 74
Loading a database . . . . . . . . . . . . 75Creating a database load schedule . . . . . . 75Using the Load Database Wizard to manuallyload data . . . . . . . . . . . . . . 77
Clearing a database. . . . . . . . . . . . 82Viewing which policy is used to map audit data . . 83
Chapter 8. Managing policies with thePolicy Explorer . . . . . . . . . . . 85Viewing policies in the Policy Explorer . . . . . 86Managing policies with the Policy Explorer. . . . 87
Opening policies. . . . . . . . . . . . 88Creating a policy . . . . . . . . . . . 88Deleting policies . . . . . . . . . . . . 89Duplicating policies . . . . . . . . . . 89Renaming a policy . . . . . . . . . . . 89Committing policies . . . . . . . . . . 90Unlocking policies . . . . . . . . . . . 91Generating automatic policies . . . . . . . 91
Chapter 9. Configuring policies withthe Policy Editor . . . . . . . . . . 93About security policies . . . . . . . . . . 93Managing grouping policies . . . . . . . . . 94
Managing platforms . . . . . . . . . . 94Managing group definition sets. . . . . . . . 96
Creating group definition sets . . . . . . . 97Deleting group definition sets . . . . . . . 97Renaming a group definition set . . . . . . 97Importing a group definition set . . . . . . 98
Managing groups . . . . . . . . . . . . 98Creating a group . . . . . . . . . . . 99Renaming a group . . . . . . . . . . . 99Deleting a group . . . . . . . . . . . 100Changing the group significance . . . . . . 100Managing conditions for groups . . . . . . 101Managing conditions . . . . . . . . . . 101
Defining requirements . . . . . . . . . 102Using the Group Wizard to create a policy group 103Managing policy rules . . . . . . . . . . 104
Creating policy rules . . . . . . . . . . 104Editing policy rules . . . . . . . . . . 105Deleting policy rules . . . . . . . . . . 105Importing policy rules . . . . . . . . . 105
Managing attention rules . . . . . . . . . 106Creating attention rules . . . . . . . . . 106Editing attention rules . . . . . . . . . 106Deleting attention rules . . . . . . . . . 107Importing attention rules . . . . . . . . 107
Testing policies . . . . . . . . . . . . . 108
Chapter 10. Configuring policies usingthe Policy Generator . . . . . . . . 109Opening the Policy Generator . . . . . . . . 109Generating a security policy . . . . . . . . 110Policy Generator users . . . . . . . . . . 112
Chapter 11. Configuring alerts . . . . 113Viewing alerts . . . . . . . . . . . . . 113Managing alerts . . . . . . . . . . . . 113
Creating alerts . . . . . . . . . . . . 114Deleting alerts . . . . . . . . . . . . 115Editing an alert . . . . . . . . . . . . 115
Editing the protocol for an alert . . . . . . . 115Editing the SNMP protocol . . . . . . . . 115Editing the email protocol . . . . . . . . 116Editing the script protocol . . . . . . . . 117Creating an alert handler . . . . . . . . 118
Delaying alerts . . . . . . . . . . . . . 121Reducing time between events and alerts . . . . 121Preventing repeated alerts . . . . . . . . . 122Sending alerts based on special attention ruleseverity . . . . . . . . . . . . . . . 123Sending alerts based on event severity . . . . . 124
Chapter 12. Archiving audit data . . . 125Accessing the archive tools . . . . . . . . . 125Exporting audit data . . . . . . . . . . . 126Importing archive data . . . . . . . . . . 128Using a network drive to import or export auditdata . . . . . . . . . . . . . . . . 129
Chapter 13. Configuring users . . . . 131Viewing users . . . . . . . . . . . . . 131Working with users . . . . . . . . . . . 131
About user name requirements . . . . . . 132Creating users . . . . . . . . . . . . 133Deleting users . . . . . . . . . . . . 134About password requirements . . . . . . . 134Changing user passwords . . . . . . . . 134Changing your own user password . . . . . 135Managing passwords with a password policy 135
Setting user database access . . . . . . . . 136Assigning user roles . . . . . . . . . . . 138
Types of user roles and access rights . . . . 139User roles needed to perform various tasks . . 143
Centrally managing users within a Security Group 145
iv Tivoli Security Information and Event Manager V2.0: Administrators Guide

Security Group components . . . . . . . 146Configuring a Security Group . . . . . . . 148
Chapter 14. Configuring Scoping . . . 149Opening the Scoping application . . . . . . . 149Overview of Scoping . . . . . . . . . . . 149
Understanding how Scoping works . . . . . 149Structure of the Scoping configuration . . . . . 151
Data structure of Scoping configuration . . . 151Asset ownership rules . . . . . . . . . 152Users of Scoping application . . . . . . . 152
Using the Scoping user interface . . . . . . . 153Understanding Scoping terminology. . . . . . 153Using Scoping . . . . . . . . . . . . . 154
Determining the number of unassigned assets 154Enabling and disabling Scoping . . . . . . 154
Viewing scoping information for a dimension . . 155Managing scoping groups . . . . . . . . . 155
Adding a scoping group. . . . . . . . . 155Removing a scoping group . . . . . . . . 156Renaming a scoping group . . . . . . . . 156
Managing scoping members . . . . . . . . 157Adding a member to a scoping group . . . . 157Removing a member from a scoping group . . 157
Managing privileges for a member of a Scopinggroup . . . . . . . . . . . . . . . . 158
Granting administrator privileges to a scopinggroup member . . . . . . . . . . . . 158Revoking administrator privileges from ascoping group member . . . . . . . . . 158Granting auditor privileges to a scoping groupmember . . . . . . . . . . . . . . 159Revoking auditor privileges from a scopinggroup member . . . . . . . . . . . . 159
Moving the assets of a scoping group . . . . . 160Operations done outside of Scoping . . . . . . 160
Chapter 15. Backing up and restoringTivoli Security Information and EventManager . . . . . . . . . . . . . 163Restore scenarios . . . . . . . . . . . . 163
Case: Operating system corruption . . . . . 164Case: Tivoli Security Information and EventManager corruption . . . . . . . . . . 164
Backing up . . . . . . . . . . . . . . 166Backing up a Log Management Server . . . . 166Backing up a Standard Server . . . . . . . 167Backing up an Enterprise Server . . . . . . 168Security Server . . . . . . . . . . . . 169Backing up SIM Reporting Databases . . . . 170Choosing a timeframe to perform a backup . . 170
Performing a partial restore . . . . . . . . 170Partially restoring a Log Management Server 170Partially restoring a Standard Server . . . . 172Partially restoring an Enterprise Server . . . . 173Security Server . . . . . . . . . . . . 174
Performing a full restore . . . . . . . . . 174Fully restoring a Log Management Server . . . 174Fully restoring a Standard Server . . . . . . 176Fully restoring an Enterprise Server . . . . . 177
Security Server . . . . . . . . . . . . 178
Appendix A. Configuration Parameters 179Log Management Server. . . . . . . . . . 179Standard Server . . . . . . . . . . . . 181Enterprise Server . . . . . . . . . . . . 182Security Server . . . . . . . . . . . . . 183Grouped Server . . . . . . . . . . . . 184
Appendix B. Backing up and restoringthe Tivoli Security Information andEvent Manager DB2 database . . . . 187Backing up the DB2 database . . . . . . . . 187Restoring the DB2 database . . . . . . . . 188
Appendix C. Backing up and restoringthe LDAP tree . . . . . . . . . . . 191Backing up the Tivoli Security Information andEvent Manager LDAP tree . . . . . . . . . 191Restoring the Tivoli Security Information andEvent Manager LDAP tree . . . . . . . . . 191
Appendix D. Stopping and startingservices. . . . . . . . . . . . . . 195Syntax for AIX systems . . . . . . . . . . 195Syntax for Linux systems . . . . . . . . . 195Syntax for Windows systems . . . . . . . . 196Stopping Tivoli Security Information and EventManager services . . . . . . . . . . . . 196
Stopping the Tivoli Security Information andEvent Manager Server Service . . . . . . . 197Stopping the Tivoli Security Information andEvent Manager Authorization (Auth) DaemonService . . . . . . . . . . . . . . 197Stopping the Tivoli Integrated Portal Service 197Stopping the Tivoli Security Information andEvent Manager Event Mapper Services(Reporting Databases) . . . . . . . . . 198Stopping the Tivoli Security Information andEvent Manager Indexer Service . . . . . . 198
Starting Tivoli Security Information and EventManager services . . . . . . . . . . . . 199
Starting Tivoli Security Information and EventManager Server Service . . . . . . . . . 199Starting Tivoli Security Information and EventManager Authorization (Auth) Daemon Service . 200Starting Tivoli Security Information and EventManager Event Mapper Services (ReportingDatabases) . . . . . . . . . . . . . 200Starting the Tivoli Security Information andEvent Manager Indexer Service . . . . . . 200Starting the Tivoli Integrated Portal Service . . 201
Appendix E. Backing up and restoringthe Deployment Engine database . . . 203Backing up the Deployment Engine database . . . 203Restoring the Deployment Engine database . . . 203
Contents v
||

Appendix F. Using DR550 with TivoliSecurity Information and EventManager . . . . . . . . . . . . . 205Mounting the DR550 drive on AIX and Linuxsystems using CIFS . . . . . . . . . . . 205Mounting the DR550 drive on Windows systems 206
Using separate user accounts on the DR550 andTivoli Security Information and Event Manager . 206Creating the same user on the DR550 and TivoliSecurity Information and Event Managersystems . . . . . . . . . . . . . . 207
Managing Log Management Depot data with aDR550 drive . . . . . . . . . . . . . . 208
Moving data between the DR550 drive and theLog Management Depot . . . . . . . . . 208Relocating the Log Management Depot to theDR550 shared drive on Windows . . . . . . 210
Relocating the Log Management Depot to theDR550 shared drive on AIX and Linux . . . . 211
Appendix G. Upgrading to DB2version 9.7 . . . . . . . . . . . . 213Upgrading a single system to DB2 version 9.7 . . 213Upgrading a cluster to DB2 version 9.7 . . . . . 214Upgrading an AIX system . . . . . . . . . 215Upgrading a Linux system . . . . . . . . . 218Upgrading a Windows system. . . . . . . . 221
Notices . . . . . . . . . . . . . . 225Trademarks . . . . . . . . . . . . . . 226
Index . . . . . . . . . . . . . . . 229
vi Tivoli Security Information and Event Manager V2.0: Administrators Guide
|||||||||||||

Figures
1. Tivoli Integrated Portal logon window . . . 182. Welcome page . . . . . . . . . . . 193. Online help window . . . . . . . . . 214. Launchpad. . . . . . . . . . . . . 245. Navigation panel showing the Managing
Audited Machines link . . . . . . . . . 276. The Audited Machines page . . . . . . . 287. Choose Audited Machine Type . . . . . . 328. Choose Audited Machines . . . . . . . 339. Choose Audited Machines: Browse Network 34
10. Configure Agent on Audited Machine(s) 3911. Navigation panel showing the Managing Event
Sources link . . . . . . . . . . . . 4712. Event Sources page . . . . . . . . . . 4813. Choose Audited Machine . . . . . . . . 5414. Choose Event Source . . . . . . . . . 5515. Set Collection Schedule . . . . . . . . 5716. Choose Database . . . . . . . . . . . 5817. Set Database Load Schedule showing a daily
schedule . . . . . . . . . . . . . 5918. Summary . . . . . . . . . . . . . 6019. Navigation panel showing the Managing
Reporting Databases link . . . . . . . . 6820. Reporting Databases page. . . . . . . . 69
21. Schedule page showing how to configure aweekly loading schedule . . . . . . . . 76
22. Choose a Database . . . . . . . . . . 7823. Choose a Period . . . . . . . . . . . 7924. Collect Data . . . . . . . . . . . . 8025. Choose a Policy . . . . . . . . . . . 8126. Completing the Load Database Wizard 8227. Navigation bar showing the Policy Explorer 8728. Policy Explorer . . . . . . . . . . . 8829. Policy Explorer window showing a Committed
policy and a Work policy. . . . . . . . . 9030. Policy Explorer window showing a locked
policy . . . . . . . . . . . . . . 9131. Navigation bar showing the Policy Generator 11032. Navigation panel showing the Archive Tools
links . . . . . . . . . . . . . . 12533. Export Audit Data page . . . . . . . . 12734. Import Audit Data page . . . . . . . . 12835. Navigation panel showing the Users and
Roles link . . . . . . . . . . . . . 13136. The Users page . . . . . . . . . . . 13237. Create User page . . . . . . . . . . 13338. Set Database Access page . . . . . . . 13739. Set Roles . . . . . . . . . . . . . 139
© Copyright IBM Corp. 1998, 2011 vii

viii Tivoli Security Information and Event Manager V2.0: Administrators Guide

Tables
1. Description of common tasks . . . . . . 202. Description of Launchpad columns . . . . 243. Audited Machine properties . . . . . . . 284. Audited Machine properties . . . . . . . 305. Properties action controls . . . . . . . . 316. Fields in Reattach page . . . . . . . . 437. Event source table attributes . . . . . . . 488. Description of event source properties . . . 509. Attributes of the Reporting Databases that an
event source loads data into . . . . . . . 5110. Description of Event Source advanced
properties . . . . . . . . . . . . . 5111. Description of user information source
properties . . . . . . . . . . . . . 5212. Event source and user information source
collection schedule parameters . . . . . . 6413. Description of Reporting Database table 6914. Description of Reporting Database properties 7115. Description of user interface controls on the
Reporting Database Properties window . . . 7216. Description of event sources attached to a
database . . . . . . . . . . . . . 7317. Load schedule parameters . . . . . . . 7618. Elements of a security policy . . . . . . . 93
19. Policy Editor user interface controls . . . . 9420. Description of platform attributes . . . . . 9421. Actions available from Select Action menu 9622. Actions available from Select Action menu 9923. Actions available from Select Action menu 10124. Actions available from Select Action menu 10225. Alert properties . . . . . . . . . . . 11326. Fields of the Event File parameter. . . . . 11827. Description of user roles for Event Source and
Log Management . . . . . . . . . . 14028. Description of user roles for Policy
Management . . . . . . . . . . . . 14129. Description of user roles for User
Management . . . . . . . . . . . . 14230. Description of user roles for Reporting 14231. Roles needed to complete various tasks 14432. Scoping terminology . . . . . . . . . 15333. Log Management Server configuration
parameters . . . . . . . . . . . . 17934. Standard Server configuration parameters 18135. Enterprise Server configuration parameters 18236. Security Server configuration parameters 18337. Grouped Server configuration parameters 184
© Copyright IBM Corp. 1998, 2011 ix

x Tivoli Security Information and Event Manager V2.0: Administrators Guide

About this publication
This publication describes system components and processes that IBM® Tivoli®
Security Information and Event Manager uses, and explains how to set up andmaintain event monitoring activity to obtain security data and logs, security andcompliance reports, and alerts. You can learn how to create your enterprise-widesecurity policy and maintain it, manage individual systems and system groups inyour enterprise, define and track users' roles, create and manage alerts, andregulate (scope) access to information that is generated in reports.
Intended audienceThis publication is intended for administrators and system programmers whoseroles include security officer, security manager, electronic data processing auditor,or someone who monitors events in the enterprise IT environment.
Individuals who manage and handle such security standards as the Sarbanes-OxleyAct, the Gramm-Leach-Bliley Financial Services Modernization Act, HealthInsurance Portability and Accountability Act (HIPAA), Control Objectives forInformation and related Technology (COBIT), ISO 27001, and the Payment CardIndustry Data Security Standard (PCI-DSS), among others, can use this publicationto learn the basics of using all pertinent aspects of Tivoli Security Information andEvent Manager.
You should be familiar with operating systems concepts and site system standards,and know how to perform routine security administration tasks. This publication isalso useful for network planners and individuals who must plan, implement, andmaintain security policy and a compliance strategy in their IT environments.
PublicationsThis section lists publications in the IBM Tivoli Security Information and EventManager library, the prerequisite publications, and the related publications. Thesection also describes how to access Tivoli publications online and how to orderTivoli publications.
IBM Tivoli Security Information and Event Manager library
The following documents are available in the IBM Tivoli Security Information andEvent Manager library:v IBM Tivoli Security Information and Event Manager Quick Start Guide, GI11-8777-00
Provides instructions for getting started with Tivoli Security Information andEvent Manager.
v IBM Tivoli Security Information and Event Manager Installation Guide, GI11-8778-02Provides an overview of the installation process and describes installing andconfiguring each of the Tivoli Security Information and Event Managercomponents and their prerequisite software.
v IBM Tivoli Security Information and Event Manager Event Source Guide,SC23-9687-02Provides information about configuring auditing for supported systems anddeploying event and user information sources.
© Copyright IBM Corp. 1998, 2011 xi
v IBM Tivoli Security Information and Event Manager Users Guide, SC23-9689-01Provides an overview of the Tivoli Security Information and Event Managercomponents and processes and describes performing common management,maintenance, and reporting tasks.
v IBM Tivoli Security Information and Event Manager Administrators Guide,SC23-9688-02Provides instructions for completing administration tasks that are required forall deployments.
v IBM Tivoli Security Information and Event Manager User Reference Guide,SC23-9691-01Provides reference information about the General Scanning Language (GSL) andthe GSL Toolkit which is used to develop and analyze unique event sourcesusing Tivoli Security Information and Event Manager.
v IBM Tivoli Security Information and Event Manager Troubleshooting Guide,SC23-9690-02Provides troubleshooting information and instructions for problem solving.
v IBM Tivoli Basel II Management Module Installation Guide, GI11-8779-01Provides an overview and installation information for the IBM Tivoli Basel IIManagement Module.
v IBM Tivoli COBIT Management Module Installation Guide, GI11-8780-01Provides an overview and installation information for the IBM Tivoli COBITManagement Module.
v IBM Tivoli FISMA Management Module Installation Guide, GI11-9301-01Provides an overview and installation information for the IBM Tivoli FISMAManagement Module.
v IBM Tivoli GLBA Management Module Installation Guide, GI11-9302-01Provides an overview and installation information for the IBM Tivoli GLBAManagement Module.
v IBM Tivoli HIPAA Management Module Installation Guide, GI11-9303-01Provides an overview and installation information for the IBM Tivoli HIPAAManagement Module.
v IBM Tivoli ISO27001 Management Module Installation Guide, GI11-9304-01Provides an overview and installation information for the IBM Tivoli ISO27001Management Module.
v IBM Tivoli NERC CIP Management Module Installation Guide, GI11-9306-01Provides an overview and installation information for the IBM Tivoli NERC CIPManagement Module.
v IBM Tivoli PCI-DSS Management Module Installation Guide, GI11-9307-01Provides an overview and installation information for the IBM Tivoli PCI-DSSManagement Module.
v IBM Tivoli Sarbanes-Oxley Management Module Installation Guide, GI11-9308-01Provides an overview and installation information for the IBM TivoliSarbanes-Oxley Management Module.
You can obtain the publications from the IBM Tivoli Security Information andEvent Manager Information Center:
http://publib.boulder.ibm.com/infocenter/tivihelp/v2r1/topic/com.ibm.tsiem.doc/welcome.html
xii Tivoli Security Information and Event Manager V2.0: Administrators Guide

Prerequisite publications
To use the information in this book effectively, you should have some knowledgeof related software products, which you can obtain from the following sources:v IBM WebSphere® Application Server Version 6.1 Information Center:
http://publib.boulder.ibm.com/infocenter/wasinfo/v6r1/index.jspYou can obtain PDF versions of the IBM WebSphere Application Server Version6.1 documentation at:http://ibm.com/software/webservers/appserv/was/library/v61/
Related publications
The Tivoli Software Library provides a variety of Tivoli publications such as whitepapers, datasheets, demonstrations, Redbooks®, and announcement letters. TheTivoli Software Library is available on the web at:
http://publib.boulder.ibm.com/tividd/td/tdprodlist.html
Accessing terminology onlineThe IBM Terminology website consolidates the terminology from IBM productlibraries in one convenient location. You can access the Terminology website at:
http://ibm.com/software/globalization/terminology
Accessing publications online
IBM posts publications for this and all other Tivoli products, as they becomeavailable and whenever they are updated, to the Tivoli Documentation Centralwebsite at:
http://ibm.com/tivoli/documentation
Note: If you print PDF documents on other than letter-sized paper, set the optionin the File > Print window that allows Adobe Reader to print letter-sized pages onyour local paper.
Ordering publications
You can order many Tivoli publications online at
http://ibm.com/e-business/linkweb/publications/servlet/pbi.wss
You can also order by telephone by calling one of these numbers:v In the United States: 800-879-2755v In Canada: 800-426-4968
In other countries, contact your software account representative to order Tivolipublications. To locate the telephone number of your local representative, performthe following steps:1. Go to http://ibm.com/e-business/linkweb/publications/servlet/pbi.wss2. Select your country from the list and click Go.
About this publication xiii

3. Click About this site in the main panel to see an information page thatincludes the telephone number of your local representative.
AccessibilityAccessibility features help users with physical disabilities, such as restrictedmobility or limited vision, to use software products successfully. Tivoli SecurityInformation and Event Manager is not fully accessible.
For additional information, see the Accessibility appendix in the IBM Tivoli SecurityInformation and Event Manager Installation Guide.
Tivoli technical trainingFor Tivoli software training information, refer to the IBM Tivoli Education websiteat http://ibm.com/software/tivoli/education
Tivoli user groupsTivoli user groups are independent, user-run membership organizations thatprovide Tivoli users with information to assist them in the implementation ofTivoli Software solutions. Through these groups, members can share informationand learn from the knowledge and experience of other Tivoli users. Tivoli usergroups include the following members and groups:v 23,000+ membersv 144+ groups
Access the link for the Tivoli Users Group at http://www.tivoli-ug.org.
Support informationIf you have a problem with your IBM software, you want to resolve it quickly.
IBM provides the following ways for you to obtain the support you need:
OnlineAccess the Tivoli Software Support site at http://ibm.com/software/sysmgmt/products/support/index.html?ibmprd=tivman
IBM Support AssistantThe IBM Support Assistant is a free local software serviceability workbenchthat helps you resolve questions and problems with IBM softwareproducts. The Support Assistant provides quick access to support-relatedinformation and serviceability tools for problem determination. To installthe Support Assistant software, go to
http://ibm.com/software/support/isa
Troubleshooting GuideFor more information about resolving problems, see the IBM Tivoli SecurityInformation and Event Manager Troubleshooting Guide.
Conventions used in this publicationThis publication uses several conventions for special terms and actions, operatingsystem-dependent commands and paths.
xiv Tivoli Security Information and Event Manager V2.0: Administrators Guide

Typeface conventionsThe following typeface conventions are used in this guide.
Bold
v Lowercase commands and mixed case commands that are otherwisedifficult to distinguish from surrounding text
v Interface controls (check boxes, push buttons, radio buttons, spinbuttons, fields, folders, icons, list boxes, items inside list boxes,multicolumn lists, containers, menu choices, menu names, tabs, propertysheets), labels (such as Tip:, and Operating system considerations:)
v Keywords and parameters in text
Italic
v Citations (examples: titles of publications, diskettes, and CDs)v Words defined in text (example: a nonswitched line is called a
point-to-point line)v Emphasis of words and letters (words as words example: "Use the word
that to introduce a restrictive clause."; letters as letters example: "TheLUN address must start with the letter L.")
v New terms in text (except in a definition list): a view is a frame in aworkspace that contains data.
v Variables and values you must provide: ... where myname represents....
Monospace
v Examples and code examplesv File names, programming keywords, and other elements that are difficult
to distinguish from surrounding textv Message text and prompts addressed to the userv Text that the user must typev Values for arguments or command options
Operating system-dependent variables and pathsThis publication uses the Windows convention for specifying environmentvariables and for directory notation.
When using the UNIX command line, replace % variable% with $variable forenvironment variables and replace each backslash (\) with a forward slash (/) indirectory paths. The names of environment variables are not always the same inthe Windows and UNIX environments. For example, %TEMP% in Windowsenvironments is equivalent to $TMPDIR in UNIX environments.
Note: If you are using the bash shell on a Windows system, you can use the UNIXconventions.
About this publication xv

xvi Tivoli Security Information and Event Manager V2.0: Administrators Guide
Chapter 1. Description of a Tivoli Security Information andEvent Manager systems administrator
A Tivoli Security Information and Event Manager systems administrator configuresTivoli Security Information and Event Manager, ensures that it runs smoothly, andperforms routine user and systems management tasks.
The Tivoli Security Information and Event Manager end-user and the TivoliSecurity Information and Event Manager systems administrator are often differentpeople with different backgrounds and roles in the organization.
As a security compliance policy monitoring tool, it is necessary that Tivoli SecurityInformation and Event Manager is optimized for your environment and is wellmaintained.
Primary responsibilitiesA Tivoli Security Information and Event Manager systems administrator can beresponsible for installing agents, configuring and maintaining the system,managing users, and defining and running reports.
Install agents
A Tivoli Security Information and Event Manager systems administratorcoordinates and supports the installation of agents on target platforms. An agent isa piece of software that collects audit log data from the targeted platform. Theseadministrative tasks include:v Working with other system administrators to install agents on target platforms.v Providing the other administrators with the appropriate installation instructions
and audit settings.
Note: Baseline audit settings for most supported platforms are available fromIBM.
v Adding event sources to Tivoli Security Information and Event Manager.v Modifying the event source properties to customize the event source properties
to your network environment.v Setting collect schedules for event sources.
Perform daily or weekly maintenance tasks
A Tivoli Security Information and Event Manager systems administrator performsdaily or weekly maintenance tasks. These administrative tasks include:v Checking, verifying, and investigating collects.v Verifying that the agents on the target machines are running.v Checking whether any of the machines are collecting empty chunks (that is, if
auditing was turned off and thus the machines cannot collect audit logs).v Checking loads in Tivoli Integrated Portal.v Checking database status, contents, and load date in the Tivoli Integrated Portal.v In case of a Reporting Database failure, investigating the length of time since the
last Reporting Database load.
© Copyright IBM Corp. 1998, 2011 1
Note: For this, a basic knowledge of the mainmapper is needed to interpret themainmapper logs.
v Confirming that authorized users can log onto Tivoli Integrated Portal and havethe appropriate user roles to perform tasks and view data. For more informationabout user roles, see “Types of user roles and access rights” on page 139.
Configure SIM Reporting Database and event sources
A Tivoli Security Information and Event Manager systems administrator managescomponents of Tivoli Security Information and Event Manager. Theseadministrative tasks include:v Managing Reporting Databases and event sources.v Adding Reporting Databases and event sources.v Adding event sources to Reporting Databases.v Removing event sources from Reporting Databases.v Removing Reporting Databases.v Setting load schedules.v Performing manual loads.v Setting mapping to take place at load-time or at collect-time.
Manage users
A Tivoli Security Information and Event Manager systems administrator managesTivoli Security Information and Event Manager users. These administrative tasksinclude:v Creating users.v Assigning roles to users.v Establishing database access for users.v Confirming that authorized users can log onto Tivoli Integrated Portal and have
the appropriate user roles to perform tasks and view data. For more informationabout user roles, see “Types of user roles and access rights” on page 139.
Configure alerts
A Tivoli Security Information and Event Manager systems administrator configuresand manages Tivoli Security Information and Event Manager alerts. Theseadministrative tasks include:v Configuring email alerts.v Creating and modifying alert rules.
Develop policies and generate reports
A Tivoli Security Information and Event Manager systems administrator createspolicies and rules and generates custom reports. These administrative tasksinclude:v Managing policies.v Creating and modifying W7 groups.v Creating and modifying policy rules.v Creating and modifying special attention rules.v Testing policies.v Committing policies, when needed.
2 Tivoli Security Information and Event Manager V2.0: Administrators Guide

v Creating custom reports in the Compliance Dashboard.
Recommended skillsA Tivoli Security Information and Event Manager administrator should have abackground in systems administration and information security practices.
A Tivoli Security Information and Event Manager systems administrator shouldhave the following information technology skills:v Strong knowledge of the target operating systems, such as Windows, AIX®, or
Linuxv Knowledge of other operating systems, especially the operating systems of
audited systemsv Working knowledge of security auditing.
Chapter 1. Description of a Tivoli Security Information and Event Manager systems administrator 3

4 Tivoli Security Information and Event Manager V2.0: Administrators Guide

Chapter 2. Configuring the web browser and system for theTivoli Integrated Portal
Tivoli Security Information and Event Manager uses the Tivoli Integrated Portal, aweb-based application, for performing administrative, configuration, and reportingfunctions. In order for the features in Tivoli Security Information and EventManager to function properly in the web browser and reports, you must use asupported web browser and configure your web browser and system.
Supported web browsersTivoli Security Information and Event Manager has a single login entrance foraccessing all its installed components. It is implemented as a web applicationcalled the Tivoli Integrated Portal, and it can be opened in a web browser.
The Tivoli Integrated Portal is compatible with the following web browsers:
Microsoft Windows systems
v Microsoft Internet Explorer Version 6.0 Service Pack 2 (SP2)v Microsoft Internet Explorer Version 7.0v Mozilla Firefox versions 2.0, 3.0, and 3.1
Linux systemsMozilla Firefox versions 2.0, 3.0, and 3.1
Other versions of these web browsers are not compatible with the Tivoli IntegratedPortal.
Screen resolutionThe minimum screen resolution is 1024 x 768.
Enabling JavaScript and ActiveXTo view the Tivoli Integrated Portal properly, ensure that JavaScript and ActiveXare enabled for the web browser. If you are using Internet Explorer, ensure that thesystem where Tivoli Security Information and Event Manager is installed is addedto the "Trusted sites" list in Internet Explorer.
If JavaScript is disabled or ActiveX is disabled in Internet Explorer, then the TivoliIntegrated Portal windows do not resize correctly. To ensure that the windowsresize correct, enable JavaScript, enable Active Scripting, and add the system whereTivoli Security Information and Event Manager is installed to the "Trusted sites"list in Internet Explorer.
Enabling ActiveX and configuring security settings in InternetExplorer
Enable ActiveX for Internet Explorer.
© Copyright IBM Corp. 1998, 2011 5

Before you begin
Ensure that Internet Explorer Version 6.0 Service Pack 2 or Internet ExplorerVersion 7.0 is installed.
Procedure1. Open Internet Explorer.2. Click Tools.3. Click Internet Options.4. Click the Security tab.5. Select Custom Level.... The Security Settings window opens.6. In the Security Settings window, ensure that the following settings are
enabled.v Ensure that the radio button for Script ActiveX controls marked safe for
scripting is set to Enable.v Ensure that the radio button for Active scripting is set to Enable.v Ensure that the radio button for Display mixed content is set to Enable.
7. Click OK to exit the Security Settings window.8. Click the General tab.9. In the Browsing history section, click Settings. The Temporary Internet Files
and History Settings page opens.10. In the Temporary Internet Files section, ensure that the radio button for
Check for newer versions of stored pages: is set to Every time I visit thewebpage.
11. Click OK to exit the Temporary Internet Files and History Settings page.12. Click OK to exit the Internet Options window.13. Restart Internet Explorer for the settings to take effect.
Configuring "Trusted sites" in Internet ExplorerAdd the system where Tivoli Security Information and Event Manager is installedand about:blank to the "Trusted sites" list in Internet Explorer.
Before you begin
Ensure that Internet Explorer Version 6.0 Service Pack 2 or Internet ExplorerVersion 7.0 is installed.
About this task
In order for Tivoli Integrated Portal to display correctly, you must add the systemwhere Tivoli Security Information and Event Manager is installed and about:blankto the "Trusted sites" list in Internet Explorer.
Procedure1. Open Internet Explorer.2. Click Tools.3. Click Internet Options.4. Click the Security tab.5. Click Trusted sites.6. Click Sites....
6 Tivoli Security Information and Event Manager V2.0: Administrators Guide

7. In the Add this website to the zone field, add the following sites to theTrusted sites list.v Enter the IP address or the URL for the system where Tivoli Security
Information and Event Manager is installed.v Enter about:blank.
8. Click OK to exit the Trusted sites window.9. In the section, Security Level for this zone, click Custom Level.
10. Ensure that the slider is set to Medium-low.11. Click OK to exit the Internet Options window.
What to do next
If you are running the Tivoli Integrated Portal on Windows 2003 Server orWindows 2008 Server, you must also disable the Internet Explorer EnhancedSecurity Configuration. For more information, see “Disabling Enhanced SecurityConfiguration in Windows 2003 Server” and “Disabling Enhanced SecurityConfiguration in Windows 2008 Server.”
Disabling Enhanced Security Configuration in Windows 2003 ServerIf you are running the Tivoli Integrated Portal on Windows 2003 Server, you mustalso disable the Internet Explorer Enhance Security Configuration.
Before you begin
Ensure that Internet Explorer Version 6.0 Service Pack 2 or Internet ExplorerVersion 7.0 is installed.
About this task
This section explains how to disable the Enhanced Security Configuration inInternet Explorer on a Windows 2003 Server.
Procedure1. Open the Control Panel.2. Click Add or Remove Programs.3. Click Add/Remove Windows Components.4. Select Internet Explorer Enhanced Security Configuration.5. Click Details.6. Unselect the option for the user group running Tivoli Integrated Portal on
Internet Explorer.
Disabling Enhanced Security Configuration in Windows 2008 ServerIf you are running the Tivoli Integrated Portal on Windows 2008 Server, you mustalso disable the Internet Explorer Enhance Security Configuration.
Before you begin
Ensure that Internet Explorer Version 6.0 Service Pack 2 or Internet ExplorerVersion 7.0 is installed.
Chapter 2. Configuring the web browser and system for the Tivoli Integrated Portal 7
About this task
This section explains how to disable the Enhanced Security Configuration inInternet Explorer on a Windows 2008 Server.
Procedure1. Open the Server Manager administrative tool.2. Navigate to the Security Information section.3. Click Configure Internet Explorer Enhanced Security Configuration.4. Disable Internet Explorer Enhanced Security Configuration for the user group
running Tivoli Integrated Portal on Internet Explorer.
Configuring encryption for Internet ExplorerEnable the Transport Layer Security (TLS) protocol for Internet Explorer.
Before you begin
Ensure that Internet Explorer Version 6.0 Service Pack 2 or Internet ExplorerVersion 7.0 is installed.
Procedure1. Open Internet Explorer.2. Click Tools.3. Click Internet Options.4. In the Advanced tab, scroll down to the Security section.5. Select the check box for Use TLS 1.0.6. Click OK.
Configuring encryption for FirefoxEnable the Transport Layer Security (TLS) protocol for Firefox.
Before you begin
Ensure that a supported version of Mozilla Firefox is installed.
Procedure1. In the browser menu, click Tools.2. Click Options. The Options window opens.3. Click the Advanced icon.4. Click the Encryption tab.5. In the Protocols section, select the Use TLS 1.0 check box.6. Click OK to close the Options window.
Enabling cookiesTo access the Tivoli Integrated Portal, cookies must be enabled in the browser.
8 Tivoli Security Information and Event Manager V2.0: Administrators Guide

Enabling cookies in Internet ExplorerEnabling cookies in Internet Explorer allows Tivoli Security Information and EventManager to remember your settings.
Before you begin
Ensure that Internet Explorer Version 6.0 Service Pack 2 or Internet ExplorerVersion 7.0 is installed.
Procedure1. Open Internet Explorer.2. Click Tools.3. Click Internet Options. The Internet Options window opens.4. In the Privacy tab, move the settings slide to Low or Accept All Cookies.5. Click OK.
Enabling cookies in FirefoxEnabling cookies in Firefox allows Tivoli Security Information and Event Managerto remember your settings.
Before you begin
Ensure that a supported version of Mozilla Firefox is installed.
About this task
By default, cookies are enabled in Firefox.
Procedure1. Open Firefox2. Click Tools.3. Click Options. The Options window opens.4. Click the Privacy icon.5. In the Firefox will: field, select Use custom settings for history.6. Ensure that the check box for Accept cookies from sites is selected.7. Ensure that the check box for Accept third-party cookies is selected.8. In the Keep until: field, select they expire.9. Click OK.
Enabling browser cachingTo ensure that the Tivoli Integrated Portal and the Compliance Dashboard alwaysdisplay the most recent audit data, you must adjust caching for the browser. Makethis adjustment before starting the Tivoli Integrated Portal for the first time.
Configuring browser caching in Internet ExplorerThis section explains how to configure browser caching in Internet ExplorerVersion 6.0 SP and Internet Explorer Version 7.0.
Chapter 2. Configuring the web browser and system for the Tivoli Integrated Portal 9

Before you begin
Ensure that Internet Explorer Version 6.0 Service Pack 2 or Internet ExplorerVersion 7.0 is installed.
Procedure1. Open Internet Explorer.2. Click Tools.3. Click Internet Options.4. In the Temporary Internet Files section, click Settings.5. Below Check for new versions of stored pages, click Every visit to the page.6. Click OK twice to save and apply the new settings.
Configuring browser caching in FirefoxThis section explains how to configure browser caching in Mozilla Firefox.
Before you begin
Ensure that a supported version of Mozilla Firefox is installed.
About this task
By default, browser caching is enabled in Firefox.
Procedure1. Open Firefox.2. In the address bar, enter about:config.3. Scroll to the preference network.http.use-cache.
v If the value equals true, then browser caching is enabled.v If the value equals false, then browser caching is disabled. To enable browser
caching, right-click network.http.use-cache and select Toggle. The valueswitches to true.
4. Close the browser tab.
Turning off the "Show friendly HTTP error messages" parameter inInternet Explorer
If you are viewing data or reports in the Compliance Dashboard and you click theBack button, you might see an error message such as "Warning: Page has expired"or "The page cannot be displayed." In order to be redirected to the correct pageand to avoid these error messages, you must turn off the "Show friendly HTTPerror messages" parameter in Internet Explorer.
Before you begin
Ensure that Internet Explorer Version 6.0 Service Pack 2 or Internet ExplorerVersion 7.0 is installed.
Procedure1. Open Internet Explorer.2. Click Tools.
10 Tivoli Security Information and Event Manager V2.0: Administrators Guide

3. Click Internet Options.4. In the Advanced tab, scroll down to the Browsing section.5. Unselect the check box for Show friendly HTTP error messages.6. Click OK.7. Restart Internet Explorer.
Installing language files and fontsYou must install the appropriate language files and fonts on your system for thelanguages in which you want to view reports using the Compliance Dashboardand generate PDF reports.
You might need to collect audit data from systems in different countries that usedifferent languages. For example, an international organization might want tocollect audit data from England, Brazil, and Japan. If the appropriate fonts areinstalled on the Tivoli Security Information and Event Manager Server, then TivoliSecurity Information and Event Manager can generate reports in the ComplianceDashboard that display data in the respective languages.
For information about installing fonts, see:v “Installing TrueType fonts.”v “Installing language files for Asian languages on Windows 2003 systems” on
page 12.
Installing TrueType fontsTrueType fonts must be installed on the Tivoli Security Information and EventManager system in order to properly display localized Compliance Dashboard PDFreports.
Before you begin
The TrueType fonts are typically located on the installation CDs for the operatingsystem.
About this task
Tivoli Security Information and Event Manager can generate ComplianceDashboard reports that contain content in multiple languages. To properly displaymultilingual reports in the Web browser, the appropriate Unicode TrueType fontsfor the desired languages must be installed on the client system. To properlygenerate multilingual PDF reports, the appropriate Unicode TrueType fonts for thedesired languages must be installed on the server where Tivoli SecurityInformation and Event Manager is installed.
For example, if your enterprise is monitoring systems that include both Japaneseand Russian languages, then both Japanese and Russian TrueType fonts must beinstalled on the client system so that you can view the multilingual report in theCompliance Dashboard using your Web browser. If you wanted to generate a PDFof that report, then both Japanese and Russian TrueType fonts must be installed onthe server so that Tivoli Security Information and Event Manager can generate themultilingual PDF report.
Chapter 2. Configuring the web browser and system for the Tivoli Integrated Portal 11

Procedure1. Install the TrueType fonts.
v AIX systems:a. Install the fonts located on the AIX distribution media in package
X11.fnt.ucs.ttf (AIX and Windows Unicode TrueType Fonts).b. Verify that the fonts were installed into the following directories:
– /usr/X11R6/lib/X11/fonts/TrueType, which resolves to the real path/usr/lpp/X11/lib/X11/fonts/TrueType
– /usr/openwin/lib/X11/fonts/TrueType
– /usr/share/fonts/default/TrueType
– /usr/X11R6/lib/X11/fonts/ttf
v Linux systems:a. Install the fonts located on the Linux operating system media.b. Verify that the fonts were installed into the following directories:
– /Library/Fonts
– /System/Library/Fonts
– /usr/X11R6/lib/X11/fonts/TrueType
v Windows systems:a. Install the fonts located on the Windows operating system media.b. Verify that the fonts were installed into the following directories:
– C:/windows/fonts
– C:/winnt/fonts
– D:/windows/fonts
– D:/winnt/fonts
2. Restart the Tivoli Integrated Portal:/etc/rc.d/init.d/tsiem_tip_service.sh restart
What to do next
Tivoli Security Information and Event Manager can now generate multilingual PDFreports, and the Compliance Dashboard can now display multilingual reports.
Installing language files for Asian languages on Windows2003 systems
To generate PDF reports in East Asian languages (Chinese, Japanese, and Korean)on Windows 2003 systems, you must install the batang.ttc font.
About this task
If the batang.ttc font is not installed, then Asian-language text cannot bedisplayed in reports.
The font is installed on Windows 2008 systems by default. To install the font onWindows 2003 systems, follow these instructions.
Procedure1. In Windows 2003, open the Control Panel.2. Click Regional and Language Options.3. Click the Languages tab.
12 Tivoli Security Information and Event Manager V2.0: Administrators Guide
4. Select Install files for East Asian languages. Installing the Chinese, Japanese,and Korean language files requires 230 MB of available disk space.
5. Click Apply.6. Click OK.
Changing the system locale to support globalized domain namesIf your network includes non-Unicode globalized domain names, then you mustensure that the system locale for the Tivoli Security Information and EventManager system is the same as the system locale for the domain controller (DC)system.
Before you begin
Check with your information technology (IT) department or network administratorto find out if the default encoding on the domain controller (DC) system has beenchanged from ASCII to a globalized (that is, non-Unicode) encoding. If the defaultencoding has been changed, find out which encoding is being used.
About this task
If your network includes globalized domain names (that is, domain names in otherlanguages), then the default encoding on the domain controller system must be thesame as the encoding on the target machine (that is, the system on which TivoliSecurity Information and Event Manager is installed). If the encoding is not thesame, then the domain name might not display correctly in the Domain orWorkgroup section of the Choose Audited Machine page in the Create MachineWizard.
Procedure1. In Windows, log in as Administrator.2. Click Start.3. Open the Control Panel.4. Click Regional and Language Options. The Regional and Language Options
window opens.5. Select the Advanced tab.6. In the Language for non-Unicode programs section, select a language to match
the language version of the non-Unicode programs you want to use.7. In the Default user account settings section, select the check box to apply these
settings to all user accounts on the Windows system.8. Click Apply.9. Click the X in the top right corner of the Regional and Language Options
window to exit.
What to do next
After you have changed the system locale on your system, you should updatethese settings for all Tivoli Security Information and Event Manager users in thecifusers and cifadmins groups. To do so, you must log in as each user and manuallyupdate the settings.
Chapter 2. Configuring the web browser and system for the Tivoli Integrated Portal 13

Configuring the server locale for localized number formattingThe server locale controls how Tivoli Security Information and Event Manager webapplications (such as Tivoli Integrated Portal and the Compliance Dashboard)formats numbers according to local custom.
About this task
Different countries use different formats for numbers. For example, the numberone thousand five can be written in several different ways. In European countries,people might write "1.005". In North American countries, people tend to write"1,000" and so on.
The way that Tivoli Security Information and Event Manager displays numbers iscontrolled by the server locale on the system where Tivoli Security Information andEvent Manager is installed. The formatting is not controlled by the browser locale.Thus, if the server locale is set to one format, but the browser locale is set to adifferent format, then the Tivoli Security Information and Event Manager webapplications will display numbers based on the server locale.
Procedure
To configure the server locale:
AIX
1. Log on to the Tivoli Security Information and Event Manager server asthe root user.
2. Start SMIT.3. Click System Management.4. In the lower pane, select Manage language environment.5. Click Change/Show Primary Language Environment > Change/Show
Cultural Convention, Language, or Keyboard.6. Change the Primary CULTURAL convention, Primary LANGUAGE
translation, and Primary KEYBOARD fields to the desired values.7. Specify the location of the AIX installation media in the INPUT
device/directory for software field, such as /mnt/dvd.8. Click OK to apply your changes.9. Restart the system to make your changes effective.
For information about UNIX server locales, see:
http://publib.boulder.ibm.com/infocenter/aix/v6r1/index.jsp?topic=/com.ibm.aix.cmds/doc/aixcmds3/locale.htm
Linux
1. Log on to the Tivoli Security Information and Event Manager server asthe root user.
2. Click System > Administration > Language.3. Select the desired language and click OK.4. Restart the system to make your changes effective.
Windows
1. Click Start.2. Click Control Panel.
14 Tivoli Security Information and Event Manager V2.0: Administrators Guide

3. Click Regional and Language Options.4. In the Regional Options tab, go to the Standards and formats section.
Select your country from the menu.5. Click OK.
Results
Tivoli Security Information and Event Manager uses the updated settings whenformatting numbers in web applications.
Changing the log file sizeConfigure the maximum size of log files generated by the Tivoli Integrated Portal.
About this task
The Tivoli Integrated Portal server generates log files. You can change themaximum size of the log files. You can change the maximum number of historicallog files that are stored.
Procedure1. Log on to the Tivoli Integrated Portal for Tivoli Security Information and Event
Manager as tipadmin.2. Navigate to Troubleshooting → Logs and Trace → server1 → JVM logs.3. To change the Tivoli Integrated Portal System.out log file size, select the File
Size check box and specify the desired size of log files in MB in the MaximumSize field. The default value is 1 MB.
4. To change the number of historical Tivoli Integrated Portal System.out logs thatare retained, specify the desired number in the Maximum Number ofHistorical Logs Files field. The default value is 1.
5. Click OK.6. Restart the Tivoli Integrated Portal for the changes to take effect.
Chapter 2. Configuring the web browser and system for the Tivoli Integrated Portal 15
|
|
|
|||
|
||
|
|||
|||
|
|
|

16 Tivoli Security Information and Event Manager V2.0: Administrators Guide

Chapter 3. Logging on to Tivoli Security Information andEvent Manager
Tivoli Security Information and Event Manager uses a Web-based application forperforming administrative, configuration, and reporting functions. You can log onto Tivoli Security Information and Event Manager using a Web browser.
Logon credentialsBefore you can log on to the Tivoli Integrated Portal, you must obtain a user nameand a password from the Tivoli Security Information and Event Manageradministrator.
For more information about user roles, see "Configuring users" in the IBM TivoliSecurity Information and Event Manager Administrators Guide.
Logging on to the Tivoli Integrated PortalLog on to the Tivoli Integrated Portal by opening a web browser and navigating tothe correct address. You can establish either a secure (HTTPS) or unsecure (HTTP)connection to the Tivoli Integrated Portal.
In the address bar, enter:http://host_name:16315/ibm/console
for an unsecure connection, or enterhttps://host_name:16316/ibm/console
for an SSL (secure) connection, where host_name is the name or IP address of thesystem where the Tivoli Security Information and Event Manager Server isinstalled. To access the console from a web browser on the same system as theTivoli Security Information and Event Manager Server, you can specify localhostor 127.0.0.1 for host_name. For example:https://127.0.0.1:16316/ibm/console
After the web page loads, the Tivoli Integrated Portal logon window displays asshown in Figure 1 on page 18.
© Copyright IBM Corp. 1998, 2011 17

To log on to the Tivoli Integrated Portal:1. In the User ID field, enter your user ID.2. In the Password field, enter your password.3. Click Log in. If logon is successful, then the Tivoli Security Information and
Event Manager Welcome Page displays. If logon is not successful, verify thatyou entered the correct user ID and password.
Logging outWhen you are finished using Tivoli Security Information and Event Manager, logout and close your web browser session to maintain the security of theinformation.
Procedure1. Click Logout in the top right corner of the page.2. Close your web browser session.
User rolesTivoli Security Information and Event Manager components and functions areprotected by user roles, which govern the permissions that a user has. Specific userroles are required in order to view the user interfaces and perform administrativefunctions. If you do not have the appropriate user role, then you cannot viewcertain Tivoli Security Information and Event Manager components or performcertain tasks.
If you cannot see specific pages or perform tasks in Tivoli Security Information andEvent Manager, then you might not have the proper user roles.
Ask the administrator to verify that you have the necessary user roles. For moreinformation about user roles, see the chapter "Configuring users" in the IBM TivoliSecurity Information and Event Manager Administrators Guide.
Figure 1. Tivoli Integrated Portal logon window
18 Tivoli Security Information and Event Manager V2.0: Administrators Guide

Navigating Tivoli Security Information and Event ManagerThe Tivoli Security Information and Event Manager Welcome page provides linksto common tasks you might perform in Tivoli Security Information and EventManager, resources for accessing online help and product documentation, andsupport.
Using the Tivoli Security Information and Event Manager userinterface
The Tivoli Integrated Portal is organized into two sections. The navigation panel ison the left side of the screen. The main part of the screen, on the right side,displays the Welcome page when you first log in to Tivoli Security Informationand Event Manager.
The navigation panel allows you to open different tool and pages in Tivoli SecurityInformation and Event Manager. You can expand topics that have a bold typefaceby clicking the (+) icon. When a topic is expanded, the icon changes to a (-) icon.You can collapse expanded topics by clicking the (-) icon.
You can adjust the relative size of the navigation panel or the main panel bysliding the divider to the left or to the right.
You can close or open the navigation panel by clicking the arrow on the divider.
Common tasksThe Common Tasks section of the Welcome page provides hyperlinks toadministrative, configuration, and reporting tools in Tivoli Security Informationand Event Manager, such as the Compliance Dashboard or Policy Explorer.
Figure 2. Welcome page
Chapter 3. Logging on to Tivoli Security Information and Event Manager 19

From the Common Tasks section, you can access different tools in Tivoli SecurityInformation and Event Manager. You can also access these tools from thenavigation panel.
Table 1. Description of common tasks
Common task Description
Launchpad Allows you to navigate and configure otherTivoli Security Information and EventManager servers.
Event Source Management Allows you to manage event sources,including adding, editing, and deletingevent sources.
Log Manager Dashboard Allows you to view audit data log files,verify that logs are collected as scheduled,and perform forensic analysis on log files.
Compliance Management Modules Allows you to view and run reports aboutcompliance with security regulations.
Compliance Dashboard Allows you to view and run reports aboutcompliance with security policy and to drilldown into security events.
Policy Explorer Allows you to configure W7 groups, policyrules, and special attention rules.
ResourcesThe Resources section of the Welcome page provides hyperlinks to Online Helpand the Information Center.
You can click the Online Help hyperlink to open the Tivoli Security Informationand Event Manager online help in a new window.
You can click the Information Center hyperlink to access product documentationand IBM redbooks on the Internet.
Using online helpOnline help provides short explanations and instructions for completing tasks inTivoli Security Information and Event Manager.
Accessing online help
You can access online help in three ways:1. By clicking the Online Help hyperlink on the Welcome page. A new window
opens that shows information about the help system.2. By clicking the Help hyperlink in the upper-right corner of the Tivoli
Integrated Portal title bar. A new window opens that shows information aboutthe help system.
3. By clicking the question mark icon ( ) on the upper-right corner of the page.A new window opens that shows contextual help about the page from whichyou clicked the Help button.
20 Tivoli Security Information and Event Manager V2.0: Administrators Guide

Navigating online help
The table of contents is in the panel on the left side of the screen. You can expandtopics that are in bold typeface by clicking the topic. The main information panel ison the right side of the screen. You can adjust the relative size of the navigationpanel or the main panel by sliding the divider to the left or to the right.
You can search topics by typing a keyword into the Search field and clicking Go.
Several icons in the top right corner of the screen allow you to:v Navigate forward and backward through topicsv Highlight where a topic appears in the table of contentsv Bookmark a topic for future referencev Print a topicv Maximize the main information panel, thus collapsing the table of contents
panel
Accessing the Information CenterThe Information Center provides product documentation and hyperlinks toproduct support on the Internet.
You can access the Information Center online at
http://publib.boulder.ibm.com/infocenter/tivihelp/v2r1/topic/com.ibm.tsiem.doc/welcome.html
You can also access the Information Center by clicking the Information Centerhyperlink on the Welcome page.
Figure 3. Online help window
Chapter 3. Logging on to Tivoli Security Information and Event Manager 21

At the Information Center, you can read the product manuals as HTML Web pages.Each page allows you to rate the quality of the information and provide comments.
You also can download the product manuals as PDF files.
SupportThe Support section of the Welcome page contains a hyperlink to the IBM SupportWeb site where you can find information about technical resources and productupdates.
22 Tivoli Security Information and Event Manager V2.0: Administrators Guide

Chapter 4. Managing remote servers with the Launchpad
You can manage remote Tivoli Security Information and Event Manager Serversfrom the Launchpad. The Launchpad enables you to open the Tivoli IntegratedPortal for remote Servers. After you open the Tivoli Integrated Portal on theremote Server, you can perform administrative tasks and run reports on it.
Viewing the LaunchpadYou can see all Tivoli Security Information and Event Manager Servers from aSecurity Group by clicking Launchpad in the navigation panel. You can also openthe Launchpad from the Welcome page that first appears when you log into IBMTivoli Security Information and Event Manager by clicking Launchpad in theCommon Tasks section.
About this task
The Launchpad shows all Tivoli Security Information and Event Manager Serversin the same Security Group.
Procedure1. Log on to Tivoli Security Information and Event Manager.2. In the navigation panel, expand the Tivoli Security Information and Event
Manager topic.3. Click Launchpad. The Launchpad page opens where you can view and manage
Tivoli Security Information and Event Manager Servers.
Using the LaunchpadYou can use the Launchpad to view Tivoli Security Information and EventManager Servers that are in the server registry for a single and to start the TivoliIntegrated Portal of the Servers.
When Tivoli Security Information and Event Manager is installed on a server, theserver becomes known as a Tivoli Security Information and Event Manager Server.This server is automatically defined in the server registry.
All Tivoli Security Information and Event Manager Servers are displayed on theLaunchpad page.
© Copyright IBM Corp. 1998, 2011 23

The Launchpad page contains a table that shows all Tivoli Security Informationand Event Manager Servers. Table 2 describes the columns in the Launchpad.
Table 2. Description of Launchpad columns
Column Heading Description
Server The name of the Server represented in thisrow.
To open the Tivoli Integrated Portal for aServer in a new browser tab or window,click the hyperlink.
Capabilities The functions available on the TivoliIntegrated Portal of the Server representedin this row.
Description A description of the Server represented inthis row.
Opening a remote server in a Web browserYou can open the Tivoli Integrated Portal for a Tivoli Security Information andEvent Manager Server that is in the same Security Group by clicking on thehyperlinked server name in the Launchpad page. Clicking the hyperlinked servername opens the Server in a different browser tab or window.
Procedure1. Open the Launchpad page.2. In the Server Name column, click the hyperlinked name of the Server that you
want to open. The Tivoli Integrated Portal for the Server opens in a differentbrowser tab or window.
What to do next
You can perform administrative tasks, view the Compliance Dashboard, and runreports on the Server if you have the appropriate user roles for that Server.
Editing server registry entriesYou can edit the description of Tivoli Security Information and Event ManagerServers in the server registry by clicking Edit on the Launchpad page.
Figure 4. Launchpad
24 Tivoli Security Information and Event Manager V2.0: Administrators Guide
Before you begin
Only the Tivoli Security Information and Event Manager administrator that wasdefined during installation can edit the server registry. For more information, seethe IBM Tivoli Security Information and Event Manager Installation Guide.
About this task
The server registry lists all Tivoli Security Information and Event Manager Serverthat in the same Security Group. The server registry defines the Servers that can bestarted from the Launchpad.
Procedure1. Open the Launchpad page.2. Select the Server that you want to edit.3. Click Edit. The Edit Registry Entry page opens.4. In the Description field, enter a description of the Server.5. Click OK. The description is saved, and the Edit Registry Entry page closes.
What to do next
After you have edited a registry entry, refresh the list of Servers.
Refreshing the server listYou can refresh the list of Tivoli Security Information and Event Manager Serversby clicking Refresh. Refreshing checks the Server Registry for information aboutServers.
Procedure1. Open the Launchpad page.2. Click Refresh. The list of Tivoli Security Information and Event Manager
Servers refreshes.
Chapter 4. Managing remote servers with the Launchpad 25

26 Tivoli Security Information and Event Manager V2.0: Administrators Guide

Chapter 5. Configuring audited machines
IBM Tivoli Security Information and Event Manager collects and analyzes auditdata from systems, which are called audited machines. You can create, edit, anddelete audited machines, and also drill down into the properties of auditedmachines.
Viewing audited machinesYou can see all audited machines that are defined in IBM Tivoli SecurityInformation and Event Manager by expanding the Configuration andManagement topic and clicking Managing Audited Machines.
About this task
You can access the Audited Machines page from the navigation panel.
Procedure1. Log on to Tivoli Security Information and Event Manager.2. In the navigation panel, expand the Tivoli Security Information and Event
Manager topic.3. Expand the Configuration and Management topic.4. Click Managing Audited Machines. The Audited Machines page opens where
you can view and work with audited machines.
Working with audited machinesYou can create, delete, and reattach audited machines, organize audited machinesinto agent groups, identify audited machines using their agent ID.
Figure 5. Navigation panel showing the Managing Audited Machines link
© Copyright IBM Corp. 1998, 2011 27

The Audited Machines page (Figure 6) contains a table that shows the auditedmachines and their properties.
Table 3 describes the audited machine properties that are shown in the AuditedMachine View window.
Table 3. Audited Machine properties
Column Heading Description
Audited Machine The name of an audited machine, generally displayed as ahyperlink.
You can click the hyperlink to open a window showinginformation about this audited machine.
v If the audited machine's type is Server or Agent, then thehyperlink opens the Properties window.
v If the audited machine's type is Agentless, then the hyperlinkopens the Event Source selector window where you can see allof the event sources for the audited machine. You can alsoselect an event source to view its properties.
If the audited machine is inactive, then the name is nothyperlinked.
An icon showing the status of the audited machine. There arethree possible statuses:
v Green means that the audited machine is running.
v Red means failure. An agentless machine inherits the status ofits agent.
v Yellow with an exclamation mark means that the auditedmachine is inactive.
Type The type of audited machine.
An audited machine type can be:
v Server
v Agent
v Agentless
v Inactive
Hostname or IP The host name or IP address of the audited machine. The IPaddress can be either IPv4 or IPv6.
If the audited machine's type is Agentless or Inactive, then thiscolumn is blank.
Figure 6. The Audited Machines page
28 Tivoli Security Information and Event Manager V2.0: Administrators Guide

Table 3. Audited Machine properties (continued)
Column Heading Description
Agent Group The name of the agent group for the audited machine.
Filtering and sorting the audited machine table
You can use the Integrated Solutions Console toolbar to filter and to sort the tabledisplay of audited machines. Filtering the table display shows only auditedmachines that meet the filter criteria. Sorting the table display shows auditedmachines based on the sort order. Filtering and sorting are useful when there are alarge number of audited machines.
Using the Select Action menu
The following actions are available in the Select Action menu:v Createv Deletev Reattachv Organize Agent Groupsv Propertiesv Identify
Viewing the properties of an audited machineYou can view the properties of an audited machine.
About this task
This task explains how to view properties for an audited machine. The propertiesare described in “About the properties of audited machines.”
From the Properties page for an audited machine, you can drill down to see theEvent Source Details page for event sources that are attached to the auditedmachine.
Procedure1. Open the Audited Machines page.2. Select the audited machine that you want to view.3. In the Select Actions menu, click Properties and then click Go. The Properties
window opens.v You can edit the Agent Group in the Properties window.v You can view information about attached event sources by selecting an event
source, selecting View properties in the Select Action menu, and thenclicking Go. The Event Source Details page opens. For more information, see“About event source properties” on page 49.
4. Click OK. The Properties window closes.
About the properties of audited machinesThe Properties window shows information about an audited machine.
Table 4 on page 30 describes the properties of the audited machine displayed in theProperties window.
Chapter 5. Configuring audited machines 29

Table 4. Audited Machine properties
Column Heading Description Editable?
Name The name of the audited machine. No.
Type The type of audited machines.
An audited machine types can be:
v Server
v Agent
No.
Agent Group The name of the agent group for the auditedmachine.
Yes.
Hostname or IP The host name or IP address of the auditedmachine. The IP address can be either IPv4 orIPv6.
No.
Port The port that the audited machine listens on. No.
Version The version of the agent that runs on theaudited machine.
No.
InstallationPassword
The password needed to manually install anagent.
If the machine typeequals server, thenthis field is read-only.
Communicates withthe Server usingFIPS-certifiedencryption
This property has different values dependingon the audited machine type.
v If the audited machine type equals agent,then this property shows whether theagent applies to the Federal InformationProcessing Standard (FIPS) encryptionstandard. Possible values are:
– Yes
– No
v If the audited machine type equals server,then this property shows whether theserver communicates withnon-FIPS-certified encryption. Possiblevalues are:
– This Server allows communication withback-level Agents usingnon-FIPS-certified encryption.
– This Server communicates only withAgents using FIPS-certified encryption.
No.
Properties action controls
The Properties window contains several buttons that allow you to take variousactions. Table 5 on page 31 describes the actions that you can take on theproperties of an audited machine.
30 Tivoli Security Information and Event Manager V2.0: Administrators Guide
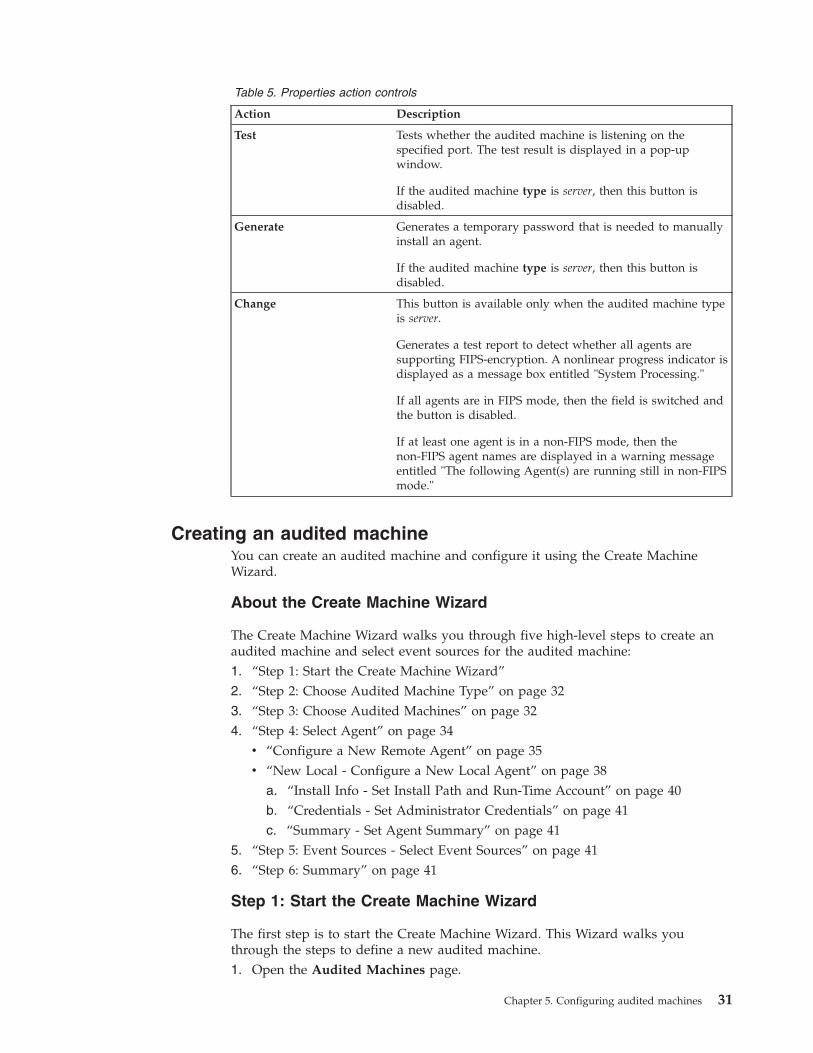
Table 5. Properties action controls
Action Description
Test Tests whether the audited machine is listening on thespecified port. The test result is displayed in a pop-upwindow.
If the audited machine type is server, then this button isdisabled.
Generate Generates a temporary password that is needed to manuallyinstall an agent.
If the audited machine type is server, then this button isdisabled.
Change This button is available only when the audited machine typeis server.
Generates a test report to detect whether all agents aresupporting FIPS-encryption. A nonlinear progress indicator isdisplayed as a message box entitled "System Processing."
If all agents are in FIPS mode, then the field is switched andthe button is disabled.
If at least one agent is in a non-FIPS mode, then thenon-FIPS agent names are displayed in a warning messageentitled "The following Agent(s) are running still in non-FIPSmode."
Creating an audited machineYou can create an audited machine and configure it using the Create MachineWizard.
About the Create Machine Wizard
The Create Machine Wizard walks you through five high-level steps to create anaudited machine and select event sources for the audited machine:1. “Step 1: Start the Create Machine Wizard”2. “Step 2: Choose Audited Machine Type” on page 323. “Step 3: Choose Audited Machines” on page 324. “Step 4: Select Agent” on page 34
v “Configure a New Remote Agent” on page 35v “New Local - Configure a New Local Agent” on page 38
a. “Install Info - Set Install Path and Run-Time Account” on page 40b. “Credentials - Set Administrator Credentials” on page 41c. “Summary - Set Agent Summary” on page 41
5. “Step 5: Event Sources - Select Event Sources” on page 416. “Step 6: Summary” on page 41
Step 1: Start the Create Machine Wizard
The first step is to start the Create Machine Wizard. This Wizard walks youthrough the steps to define a new audited machine.1. Open the Audited Machines page.
Chapter 5. Configuring audited machines 31

2. Click Create. The Create Machine Wizard opens.v Alternatively, you can start the Create Machine Wizard by selecting Create in
the Select Action menu, and then clicking Go.3. Click Next to start using the wizard.
Step 2: Choose Audited Machine Type
The second step is to select the audited machine type. Event sources thatcorrespond to the selected machine type are displayed in the Available EventSource Types menu.
To choose the audited machine type:1. In the Audited Machine Type menu, select the audited machine type.2. Click Next.
Step 3: Choose Audited Machines
The third step is to select the audited machines.
Figure 7. Choose Audited Machine Type
32 Tivoli Security Information and Event Manager V2.0: Administrators Guide

To manually select an audited machine or audited machines:1. In the Hostname or IP field, enter the host name or IP address of the audited
machine.2. Click Add. The machine is added to the list in the Selected Machines table.3. To resolve any highlighted machine names, click Test. The system attempts to
resolve the names. To remove machines, select the machine and click Remove.The machine is removed from the Selected Machines list.
4. Click Next.
You can also browse the network to search for available machines. This feature isonly available for Microsoft Windows audited machine types.
Note: If your network includes globalized domain names (that is, domain namesin other languages), then the default encoding on the domain controller (DC)system must be the same as the encoding on the target machine (that is, the systemon which Tivoli Security Information and Event Manager is installed). If theencoding is not the same, then the domain name might not display correctly in theDomain or Workgroup section of the Choose Audited Machine page. For moreinformation, see “Changing the system locale to support globalized domainnames” on page 13.
To browse the network for available machines (this feature is only available forMicrosoft Windows audited machine types):
Figure 8. Choose Audited Machines
Chapter 5. Configuring audited machines 33
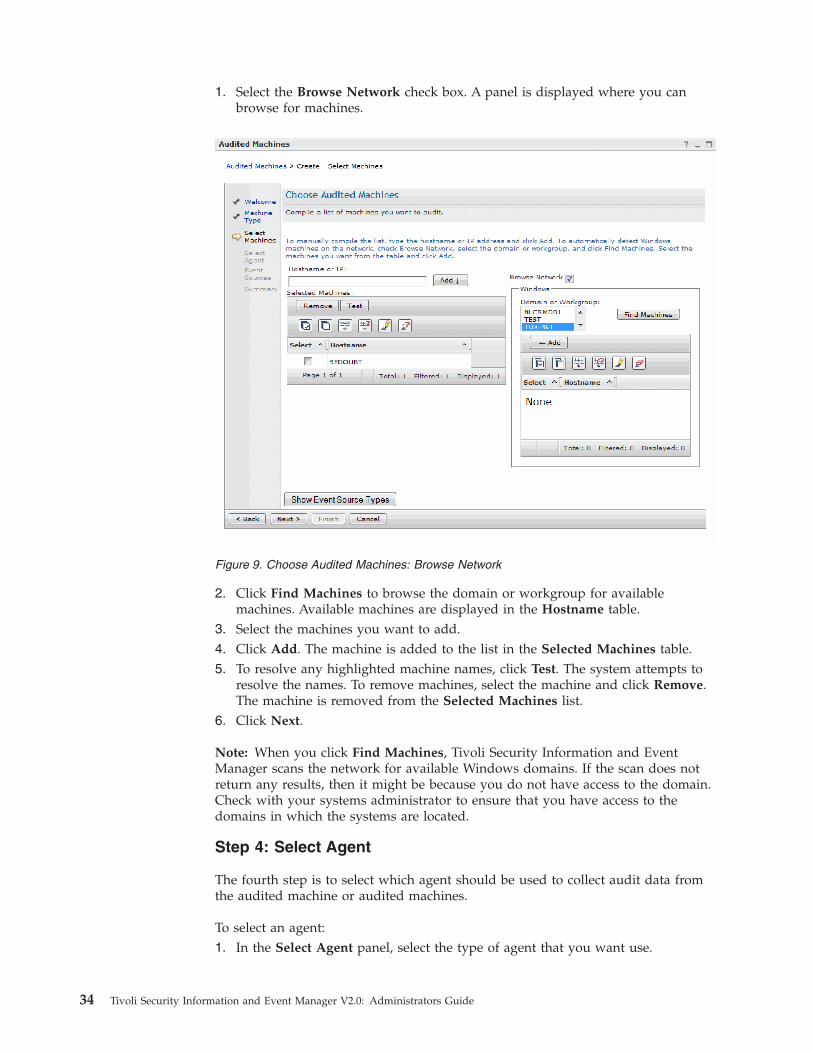
1. Select the Browse Network check box. A panel is displayed where you canbrowse for machines.
2. Click Find Machines to browse the domain or workgroup for availablemachines. Available machines are displayed in the Hostname table.
3. Select the machines you want to add.4. Click Add. The machine is added to the list in the Selected Machines table.5. To resolve any highlighted machine names, click Test. The system attempts to
resolve the names. To remove machines, select the machine and click Remove.The machine is removed from the Selected Machines list.
6. Click Next.
Note: When you click Find Machines, Tivoli Security Information and EventManager scans the network for available Windows domains. If the scan does notreturn any results, then it might be because you do not have access to the domain.Check with your systems administrator to ensure that you have access to thedomains in which the systems are located.
Step 4: Select Agent
The fourth step is to select which agent should be used to collect audit data fromthe audited machine or audited machines.
To select an agent:1. In the Select Agent panel, select the type of agent that you want use.
Figure 9. Choose Audited Machines: Browse Network
34 Tivoli Security Information and Event Manager V2.0: Administrators Guide
2. If you selected Agent installed locally on the audited machine, click Next. Forfurther configuration instructions, go to “New Local - Configure a New LocalAgent” on page 38.
3. If you selected Agent installed remotely from the audited machine, select theagent type and then click Next. For further configuration instructions, see“Configure a New Remote Agent.”There are three types of remote agents:a. Directly from TSIEM Server [name of audited machine] – The agent is
remote from the perspective of the audited machine. The remote agent canbe a Tivoli Security Information and Event Manager server.
b. Existing Agent – The agent already exists. Select an existing agent from theAgent group menu and from the Agent name menu.
c. Install a new remote Agent of type – There may be a list of more than oneagent type that supports the specified audited machine type. Select an agentfrom the menu. The menu lists agent types known to the Tivoli SecurityInformation and Event Manager instance. The default type is MicrosoftWindows.
4. Optionally click Show Event Source Types to see a list of available eventsource types for the selected audited machine type.
Note: If you selected Install a new remote Agent of type [type] in the Select Agentwindow, then go to “Configure a New Remote Agent.” If you selected Agentinstalled locally on the audited machine(s), then go to “New Local - Configure a NewLocal Agent” on page 38.
Configure a New Remote Agent
If you selected Install a new remote Agent of type [type] in the Select Agent window,then you need to configure the new remote agent.
You can configure an agent by selecting either Automatic or Manual. TheAutomatic installation is available only on Windows platforms.
Note: You must enable the guest account on the audited machine to perform aremote installation of the agent on a Windows audited machine. To enable theguest account:1. Log on to the audited machine as an administrator.2. Click Start.3. Right-click My Computer and then click Manage.
v On Windows 2003, expand the System Tools twistie in the ComputerManagement window.
v On Windows 2008 Server, expand the Configuration twistie in the ServerManager window.
4. Expand the Local Users and Groups twistie, and then click Users.5. Ensure that the Guest account is enabled. If it is disabled, right-click Guest and
click Properties.6. In the Properties window, open the General tab. Ensure that the check box for
Account is disabled is not selected. If it is selected, then unselect the checkbox.
7. Click Apply.
Chapter 5. Configuring audited machines 35
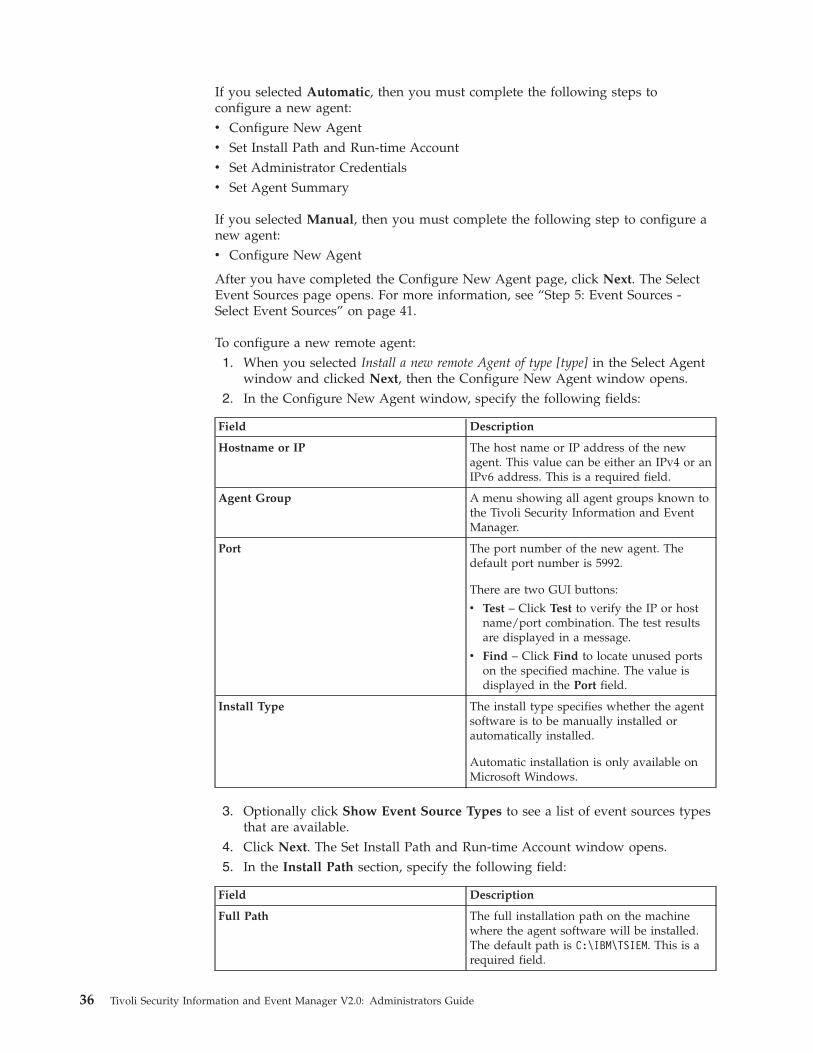
If you selected Automatic, then you must complete the following steps toconfigure a new agent:v Configure New Agentv Set Install Path and Run-time Accountv Set Administrator Credentialsv Set Agent Summary
If you selected Manual, then you must complete the following step to configure anew agent:v Configure New Agent
After you have completed the Configure New Agent page, click Next. The SelectEvent Sources page opens. For more information, see “Step 5: Event Sources -Select Event Sources” on page 41.
To configure a new remote agent:1. When you selected Install a new remote Agent of type [type] in the Select Agent
window and clicked Next, then the Configure New Agent window opens.2. In the Configure New Agent window, specify the following fields:
Field Description
Hostname or IP The host name or IP address of the newagent. This value can be either an IPv4 or anIPv6 address. This is a required field.
Agent Group A menu showing all agent groups known tothe Tivoli Security Information and EventManager.
Port The port number of the new agent. Thedefault port number is 5992.
There are two GUI buttons:
v Test – Click Test to verify the IP or hostname/port combination. The test resultsare displayed in a message.
v Find – Click Find to locate unused portson the specified machine. The value isdisplayed in the Port field.
Install Type The install type specifies whether the agentsoftware is to be manually installed orautomatically installed.
Automatic installation is only available onMicrosoft Windows.
3. Optionally click Show Event Source Types to see a list of event sources typesthat are available.
4. Click Next. The Set Install Path and Run-time Account window opens.5. In the Install Path section, specify the following field:
Field Description
Full Path The full installation path on the machinewhere the agent software will be installed.The default path is C:\IBM\TSIEM. This is arequired field.
36 Tivoli Security Information and Event Manager V2.0: Administrators Guide

6. In the Run-time Account (Existing or New) section, specify the followingfields:
Field Description
Account Type Select the operating system account type byusing the radio buttons.
On Windows systems, possible values are:
v Domain (Recommended) – On Windowssystems, selecting Domain will prefix theUsername field with the domain name ofthe Tivoli Security Information and EventManager server.
v Local – On Windows systems, selectingLocal will prefix the Username field withthe hostname of the Tivoli SecurityInformation and Event Manager server.
On AIX and Linux systems, possible valuesare:
v Domain – Selecting Domain will notprefix the Username field.
v Local – Local is the default account typefor AIX and Linux. Selecting Local willprefix the Username field with thehostname of the Tivoli SecurityInformation and Event Manager server.
Username The username of the run-time account.
On Windows systems, if Domain is selected,then the username is prefixed with the fullyqualified Windows domain name (forexample, mydomainhost.example.com\mycifadmin). If Local is selected, then theusername is prefixed the hostname of theTivoli Security Information and EventManager server.
On AIX and Linux systems, if Domain isselected, then the username is not prefixed,and if Local is selected, then the username isprefixed the hostname of the Tivoli SecurityInformation and Event Manager server.
Password The password of the run-time account.
Confirm Password Confirm the password of the run-timeaccount. This field must be equal to thePassword field.
7. Click Next. The Set Administrator Credentials window opens.8. In the Administrator Account box, specify the following fields:
Chapter 5. Configuring audited machines 37

Field Description
Username The administrator user name on the targetmachine. The default user name isAdministrator. This is a required field.Note: Note: If a domain user name isspecified, make sure that the user namecontains the fully qualified domain name ofwhich the user belongs. For example:mydomainhost.example.com\Administrator.
Password The password of the administrator accounton the target machine. This is a requiredfield.
Show Event Source Types Click Show Event Source Types to see a listof event sources types that are available fora Windows audited machine type agent.
9. Click Next. The Set Agent Summary window opens.10. Verify the configuration. To change any selections, click Back.11. If the summary is satisfactory, click Next.12. In the help panel, scroll down to the section entitled "Select Event Sources."
New Local - Configure a New Local Agent
If you selected Agent installed locally on the audited machine in the Select Agentwindow, then you must configure the local agent.
Note: Clicking the Find Port button scans the audited machine for an open port. Ifthe audited machine is turned off, offline, protected by a firewall, or otherwiseunavailable, then the scan might not return any results. You can manually enter theport number. Ensure that the audited machine is available.
38 Tivoli Security Information and Event Manager V2.0: Administrators Guide
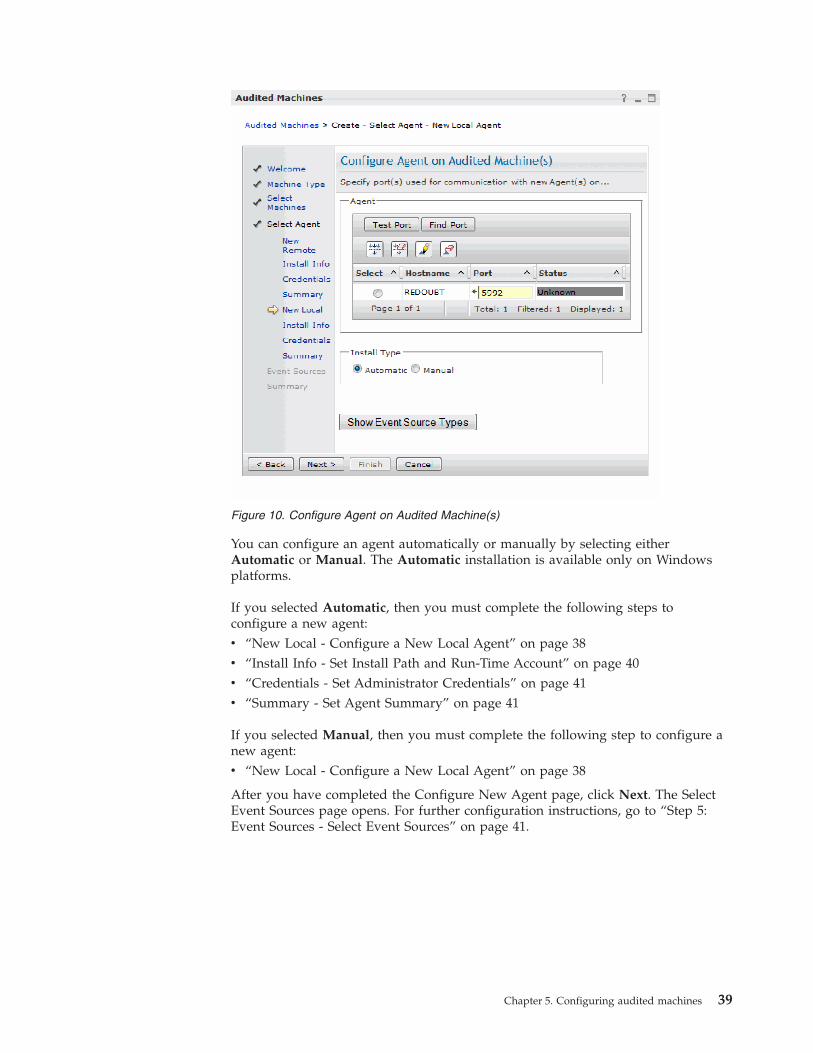
You can configure an agent automatically or manually by selecting eitherAutomatic or Manual. The Automatic installation is available only on Windowsplatforms.
If you selected Automatic, then you must complete the following steps toconfigure a new agent:v “New Local - Configure a New Local Agent” on page 38v “Install Info - Set Install Path and Run-Time Account” on page 40v “Credentials - Set Administrator Credentials” on page 41v “Summary - Set Agent Summary” on page 41
If you selected Manual, then you must complete the following step to configure anew agent:v “New Local - Configure a New Local Agent” on page 38
After you have completed the Configure New Agent page, click Next. The SelectEvent Sources page opens. For further configuration instructions, go to “Step 5:Event Sources - Select Event Sources” on page 41.
Figure 10. Configure Agent on Audited Machine(s)
Chapter 5. Configuring audited machines 39

Install Info - Set Install Path and Run-Time Account1. In the Install Path section, specify the following field:
Field Description
Full Path The full installation path on the machinewhere the agent software will be installed.The default path is C:\IBM\TSIEM. This is arequired field.
2. In the Run-time Account (Existing or New) section, specify the followingfields:
Field Description
Account Type Select the operating system account type byusing the radio buttons.
On Windows systems, possible values are:
v Domain – On Windows systems, selectingDomain will prefix the Username fieldwith the domain name of the TivoliSecurity Information and Event Managerserver.
v Local – On Windows systems, selectingLocal will prefix the Username field withthe hostname of the Tivoli SecurityInformation and Event Manager server.
On AIX and Linux systems, possible valuesare:
v Domain – Selecting Domain will notprefix the Username field.
v Local – Local is the default account typefor AIX and Linux. Selecting Local willprefix the Username field with thehostname of the Tivoli SecurityInformation and Event Manager server.
Username The username of the run-time account.
On Windows systems, if Domain is selected,then the username is prefixed with the fullyqualified Windows domain name (forexample, mydomainhost.example.com\mycifadmin). If Local is selected, then theusername is prefixed the hostname of theTivoli Security Information and EventManager server.
On AIX and Linux systems, if Domain isselected, then the username is not prefixed,and if Local is selected, then the username isprefixed the hostname of the Tivoli SecurityInformation and Event Manager server.
Password The password of the run-time account.
Confirm Password Confirm the password of the run-timeaccount. This field must be equal to thePassword field.
40 Tivoli Security Information and Event Manager V2.0: Administrators Guide

3. Click Next. The Set Administrator Credentials window opens.
Credentials - Set Administrator Credentials1. In the Administrator Account section, specify the following fields:
Field Description
Username The administrator user name on the targetmachine. The default user name isAdministrator. This is a required field.Note: Note: If a domain user name isspecified, make sure that the user namecontains the fully qualified domain name ofwhich the user belongs. For example:mydomainhost.example.com\Administrator.
Password The password of the administrator accounton the target machine. This is a requiredfield.
2. Click Next. The Set Agent Summary window opens.
Summary - Set Agent Summary1. Verify the configuration. To change any selections, click Back.2. If the summary is satisfactory, click Next. The Select Event Sources page opens.
Step 5: Event Sources - Select Event Sources
Next, select whether you want to run the Create Event Source Wizard aftercompleting the Create Machine Wizard.
To run the Create Event Source Wizard immediately after completing the CreateMachine Wizard:1. Click Yes. A list of available event sources is displayed.2. In the Event Source Selector box, select event sources. The selected event
sources will be passed to the Create Event Source Wizard for futureconfiguration.
3. Click Next.
To run the Create Event Source Wizard at a later time:1. Click No. This option is disabled if you are adding an agentless machine.2. Click Next. The Summary page opens.
Step 6: Summary
The final step is to verify the configuration for the audited machine that you havejust created.
To verify the configuration for the audited machine:1. Review the settings in the Summary window. To change any selections, click
Back.2. If the configuration is satisfactory, click Finish. The Create Machine Wizard
closes. If you selected Yes in the previous window, then the Create EventSource Wizard opens.
To save a local copy of the agent connection file:
Chapter 5. Configuring audited machines 41

1. Click Save. A file browser opens where you can select where to save the agentconnection file. This option is available only if the machine is an agent type.
Deleting an audited machineYou can delete an audited machine by selecting the audited machine and clickingDelete. You can also delete the data associated with an audited machine (auditdata and collection schedules) by selecting the Delete Data check box.
About this task
When you delete an audited machine, the audited machine is considered "inactive."The audited machine still appears in the table in the Audited Machines page.Audit data from the audited machine remains in the Log Management Depot.However, after an audited machine is deleted, Tivoli Security Information andEvent Manager no longer collects audit data from it. If you later want to collectaudit data from a deleted audited machine, you can do so by reattaching theaudited machine. For more information, see “Reattaching an audited machine.”
When you delete an audited machine, you can choose whether to delete the auditdata and collection schedules associated with the audited machine. In this case, theaudit data is permanently removed from the Log Management Depot. Check theDelete Data check box to delete the audit data and collection schedules. If youdelete an audited machine and delete its data, it is not possible to reattach theaudited machine.
Note: Only the following types of audited machines can be deleted:v Agentv Agentlessv Inactive
Audited machines with of the "Server" type cannot be deleted.
Procedure1. Open the Audited Machines page.2. Select the audited machine or audited machines that you want to delete.3. Click Delete. The Delete window opens.
v Alternatively, you can click Delete in the Select Action menu, and then clickGo.
4. Optionally select the check box for Delete Data to delete data (such as auditdata and collection schedules) associated with the audited machine. If youdecide to delete the data, then a confirmation window opens. Click Delete toconfirm deletion.
5. Click OK.
Reattaching an audited machineIf you previously deleted an audited machine but did not delete its audit data,then you can reattach the audited machine to a Tivoli Security Information andEvent Manager server by selecting the audited machine and clicking Reattach inthe Selected Actions menu.
42 Tivoli Security Information and Event Manager V2.0: Administrators Guide

About this task
You can resume the collection of audit data from an audited machine byreattaching an inactive audited machine. Only inactive audited machines can bereattached.
There are several fields that you must configure in order to reattach an auditedmachine. Table 6 shows the fields that you must configure.
Table 6. Fields in Reattach page
Column Heading Description Required Field?
Machine Name The name of the inactiveaudited machine.
No
Hostname or IP The host name or IP address ofthe audited machine. The IPaddress can be either IPv4 orIPv6.
Yes
Port The port number.
The result of the Find Portaction is written to this field.The default value is 5992.
Yes
Status The result of a Test Port action.
The status can be:
v Normal (the port is free)
v Warning (the port is in use)
v Unknown (the test isinconclusive)
N/A
Procedure1. Open the Audited Machines page.2. Select an audited machine to reattach. Only inactive machines can be
reattached.3. In the Select Action menu, click Reattach and then click Go.
The Reattach window opens.4. In the Hostname or IP field, enter the host name or IP address of the audited
machine.5. In the Port field, enter the port number to which the audited machine listens.
You can find and test a port to ensure that it is available:v Click Find Port to generate an open port number. The default value is 5992.v Click Test Port to verify the status of the port shown in the Port field. The
results of the test are shown in the Status column.6. Click OK. The fields are validated.
If the fields pass validation, then the audited machine is reattached. TheReattach window closes.
What to do next
In order to resume the collection of audit data after reattaching a machine, youmust re-configure the agent software on the audited machine. When you reattachan audited machine, a new configuration file is created in the <TSIEM_home>\sim\
Chapter 5. Configuring audited machines 43

server\config\machines\ directory. You must copy the configuration file to theagent machine and then configure the agent machine according to thespecifications in the IBM Tivoli Security Information and Event Manager InstallationGuide.
You must also configure collection schedules for each event source associated withthe reattached machine. When an audited machine is deleted, all of the collectionschedules are set to "Never." For more information, see “Creating a collectionschedule” on page 63.
Identifying an audited machine by its agent IDYou can identify an audited machine by entering the agent ID from the server log.This command is used for service purposes.
About this task
This task allows you to find an audited machine when you only know its agent ID.This is useful when checking logs, because the logs typically refer to an agent byits agent ID.
For example, you might investigate an error in the log. But the log messageprovides only the ID of the agent which threw the exception. In this case, youcould use the agent ID to identify which audited machine the exception occurredon.
Procedure1. Open the Audited Machines page.2. In the Select Action menu, select Identify and click Go.
The Identify window opens.3. In the Agent ID field, enter the agent ID from the server log.
The agent ID always starts with 12.1. This is a required field.4. Click OK. The agent ID is validated.
If the agent ID passes validation, then the Details window opens and shows theproperties of the audited machine associated with that agent ID.
Organizing audited machines into agent groupsYou can classify audited machines into agent groups, thus grouping relatedsystems.
Moving audited machines into agent groupsMove audited machines to an agent group by selecting the agent in the Agentstable and clicking Cut. In the Agent Groups table, select the agent group and clickPaste.
About this task
You can classify audited machines into agent groups, thus grouping relatedsystems.
The Organize Agent Group window contains two tables, one for agent groups andthe other for agents. The Agent Groups table contains a list of agent groups. TheAgents table contains a list of agents within the selected agent group.
44 Tivoli Security Information and Event Manager V2.0: Administrators Guide

Procedure1. Open the Audited Machines page.2. In the Select Action menu, click Organize Agent Groups and then click Go.
The Organize Agent Groups window opens.3. In the Agents table, select the agent or agents that you want to move.4. Click Cut.5. Select the agent group to which you want to move the agent.6. Click Paste. The agent is added to the agent group.7. Click Close to close the Organize Agent Group window.
Creating an agent groupYou can create an agent group by clicking Create in the Organize Agent Groupswindow.
Procedure1. Open the Audited Machines page.2. In the Select Action menu, click Organize Agent Groups and then click Go.
The Organize Agent Groups window opens.3. Click Create.
The Create window opens.4. In the Name field, type the name of the agent group. This is a required field.5. Click OK.
The new agent group is created, and the Create window closes.
What to do next
After you have created an agent group, you can organize agent groups by pastingaudited machines into the new agent group. For more information, see “Movingaudited machines into agent groups” on page 44.
Deleting an agent groupYou can delete an empty agent group.
Before you begin
Only empty agent groups can be deleted. If an agent group contains agents, youmust move the agents from one agent group to another agent group.
About this task
This action is disabled for the default IBM Tivoli Security Information and EventManager group.
Procedure1. Open the Audited Machines page.2. In the Select Action menu, click Organize Agent Groups and then click Go.
The Organize Agent Groups window opens.3. Select the agent group that you want to delete.
Chapter 5. Configuring audited machines 45

4. Click Delete. If you delete an agent group but keep the data (that is, you donot delete the data), then the agent group becomes inactive, but the groupchanges to default.
Renaming an agent groupYou can rename an agent group to better describe its contents.
About this task
You can rename all agent groups, except for the default Tivoli Security Informationand Event Manager Server. This group cannot be renamed. The Rename button isdisabled for this group.
Procedure1. Open the Audited Machines page.2. In the Select Action menu, click Organize Agent Groups and then click Go.
The Organize Agent Groups window opens.3. Select the agent group that you want to rename.4. Click Rename. The Rename window opens.5. In the New Name field, enter the name for the agent group.6. Click OK. The selected agent group is renamed.
46 Tivoli Security Information and Event Manager V2.0: Administrators Guide

Chapter 6. Configuring event sources and user informationsources
Tivoli Security Information and Event Manager collects audit data from variousdevices and applications called event sources or user information sources.
Viewing event sources and user information sourcesYou can see all event sources and user information sources that are configured inTivoli Security Information and Event Manager by expanding the Configurationand Management topic and clicking Managing Event Sources. You can also openthe Event Sources page from the Welcome page that first appears when you loginto Tivoli Security Information and Event Manager by clicking Event SourceManagement in the Common Tasks section.
About this task
You can access the Event Sources page from the navigation panel.
Procedure1. Log on to Tivoli Security Information and Event Manager.2. In the navigation panel, expand the Tivoli Security Information and Event
Manager topic.3. Expand the Configuration and Management topic.4. Click Managing Event Sources. The Event Sources page opens where you can
view and work with event sources and user information sources.
Figure 11. Navigation panel showing the Managing Event Sources link
© Copyright IBM Corp. 1998, 2011 47

Managing event sources and user information sourcesYou can view and manage all event sources and user information sources that aredefined in IBM Tivoli Security Information and Event Manager from the EventSource View window.
The Event Sources page contains a table that shows the events sources and theirproperties.
The following attributes for each event source or user information source aredisplayed in the table.
Table 7. Event source table attributes
Column Heading Description
Agent Group The name of the agent group for the audited machine of theevent source or user information source.
Audited Machine A hyperlink showing the name of the audited machine for theevent source or user information source.
Select the hyperlink to open a window showing informationabout this audited machine.
Event Source A hyperlink showing the name of the event source or userinformation source.
Select the hyperlink to open a window showing informationabout the event source or user information source.
Figure 12. Event Sources page
48 Tivoli Security Information and Event Manager V2.0: Administrators Guide
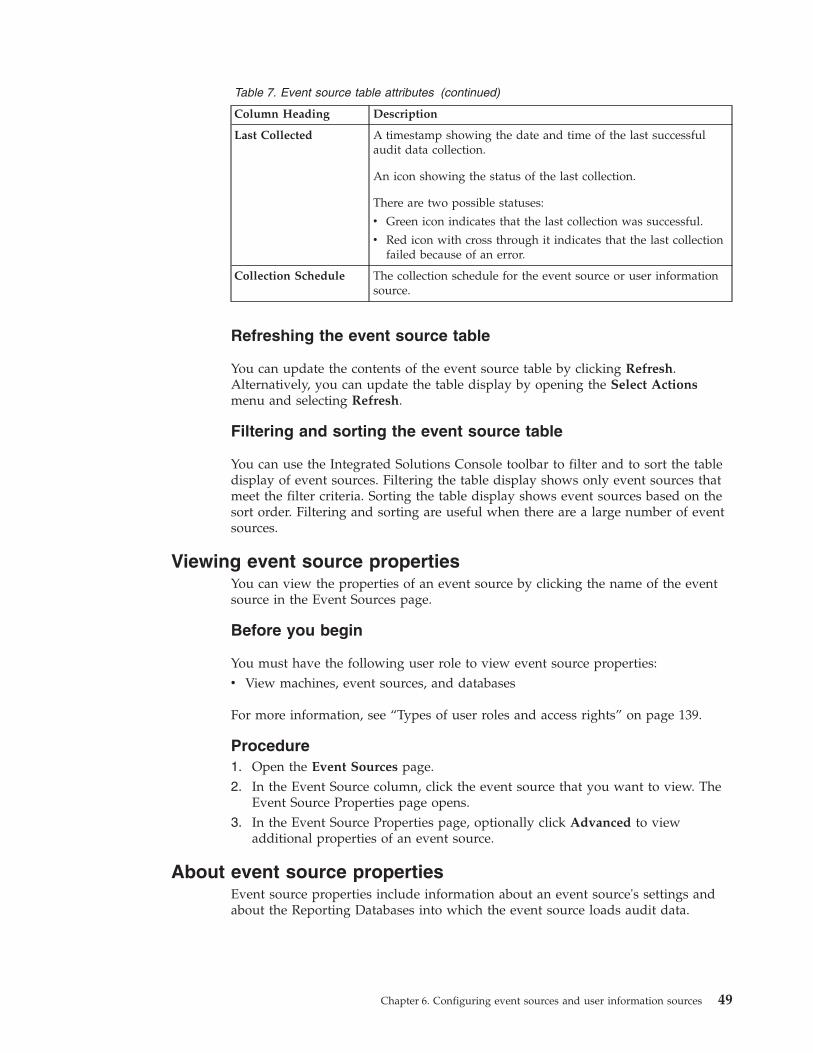
Table 7. Event source table attributes (continued)
Column Heading Description
Last Collected A timestamp showing the date and time of the last successfulaudit data collection.
An icon showing the status of the last collection.
There are two possible statuses:
v Green icon indicates that the last collection was successful.
v Red icon with cross through it indicates that the last collectionfailed because of an error.
Collection Schedule The collection schedule for the event source or user informationsource.
Refreshing the event source table
You can update the contents of the event source table by clicking Refresh.Alternatively, you can update the table display by opening the Select Actionsmenu and selecting Refresh.
Filtering and sorting the event source table
You can use the Integrated Solutions Console toolbar to filter and to sort the tabledisplay of event sources. Filtering the table display shows only event sources thatmeet the filter criteria. Sorting the table display shows event sources based on thesort order. Filtering and sorting are useful when there are a large number of eventsources.
Viewing event source propertiesYou can view the properties of an event source by clicking the name of the eventsource in the Event Sources page.
Before you begin
You must have the following user role to view event source properties:v View machines, event sources, and databases
For more information, see “Types of user roles and access rights” on page 139.
Procedure1. Open the Event Sources page.2. In the Event Source column, click the event source that you want to view. The
Event Source Properties page opens.3. In the Event Source Properties page, optionally click Advanced to view
additional properties of an event source.
About event source propertiesEvent source properties include information about an event source's settings andabout the Reporting Databases into which the event source loads audit data.
Chapter 6. Configuring event sources and user information sources 49

Event Source Properties
The Event Source Properties section in the Event Source Properties window showsinformation about the selected event source.
You can use the buttons at the bottom of the Event Source Properties section to seemore information about the event source and to perform certain actions on theevent source:v Click Advanced to drill down into additional event source properties. You can
also edit the name of the event source in the Advanced page.v Click Schedule to set a collection schedule for the event source. For more
information, see “Creating a collection schedule” on page 63.v Click Audit Profile to view and set the audit profile for the event source. For
more information, see “Setting the audit profile for an event source” on page 65.
The Event Source table shows information about the event source. Table 8 describesthe information shown in the Event Source Properties table in the Event SourceProperties window.
Table 8. Description of event source properties
Property Description
Status An icon and description that indicates the status of the auditdata collection from the event source.
The icon can be either green or red:
v Green means that the collection was successful
v Red means that the collection failed
Type The type of event source.
Agent The name of the system which acts as the agent for thisevent source.
ID The LogPlatformInstance object ID of the event source.
Collected A timestamp showing the data and time of the lastcollection.
Schedule The collection schedule for the event source.
Audit Profile The audit profile for the event source.
If the event source does not support an audit profile, thenthis field will be empty.
Tivoli Security Information and Event Manager supportsautomatic audit configuration on the following event sourcetypes:
v Microsoft Windows NT-2003
v Microsoft Windows 2000-2003 Active Directory
v Oracle 9i 10g 11g (from Microsoft Windows platform only)
v Sybase Adaptive Server Enterprise (from MicrosoftWindows platform only)
For more information, see “Setting the audit profile for anevent source” on page 65.
50 Tivoli Security Information and Event Manager V2.0: Administrators Guide

Reporting Databases
The Reporting Database table in the Event Source Properties window showsinformation about the Reporting Databases into which the event source loads auditdata.
You can use the buttons at the top of the Event Source Properties section toperform certain actions on the databases:v Click Load to open the Load Database Wizard. For more information, see “Using
the Load Database Wizard to manually load data” on page 77.v Click Clear to clear the database. For more information, see “Clearing a
database” on page 82.
Table 9 describes the attributes of these databases.
Table 9. Attributes of the Reporting Databases that an event source loads data into
Attribute Description
Database Name A hyperlink showing the name of Reporting Databases that theevent source is attached to.
Click the hyperlink to open the Database Properties page. Formore information, see “About database properties” on page 70.
Status An icon and description showing the load status of the ReportingDatabase.
A load is the process of putting audit data into a ReportingDatabase where the data can be analyzed.
Load statuses are:
v Loaded
v Not Loaded
v In Error
v Loading
v Clearing
For more information, see “Loading a database” on page 75.
Last Loaded A timestamp showing the date and time of the last load.
About advanced event source propertiesYou can see and edit additional properties of an event source by clickingAdvanced in the Event Source Details page.
The Advanced page shows additional properties about an event source. Table 10describes the basic set of advanced properties shown for every event source. Inaddition to this basic set of advanced properties, each event source has propertiesspecific to the given event source. These unique properties also are shown in thetable. For more information about the specific properties of each event source, seethe IBM Tivoli Security Information and Event Manager Event Source Guide.
Table 10. Description of Event Source advanced properties
Name Value
Name The name of the event source.
Audited Machine The name of the audited machine.
Chapter 6. Configuring event sources and user information sources 51

Table 10. Description of Event Source advanced properties (continued)
Name Value
Type The type of event source.
Agent The agent used by the event source.
Viewing user information source propertiesYou can view the properties of a user information source by clicking the name ofthe user information source in the Event Sources page.
Before you begin
You must have the following user role to view user information sources:v View machines, event sources, and databases
For more information, see “Types of user roles and access rights” on page 139.
Procedure1. Open the Event Sources page.2. In the Event Source column, click the user information source that you want to
view. The User Information Source Properties page opens.3. In the User Information Source Properties page, optionally click Advanced to
view additional properties of a user information source.
About user information source propertiesUser information source properties include information about a user informationsources' settings.
The User Information Source Properties window shows information about theselected user information source.
You can use the buttons at the bottom of the User Information Source Propertiespage to see more information about the user information source and to performcertain actions on the user information source:v Click Advanced to drill down into additional properties of the user information
source. You can also edit the name of the user information source in theAdvanced page.
v Click Schedule to set a collection schedule for the user information source. Formore information, see “Creating a collection schedule” on page 63.
The User Information Source table shows information about the user informationsource. Table 11 describes the properties.
Table 11. Description of user information source properties
Property Description
Type The type of user information source.
Agent The name of the system which acts as the agent for this userinformation source.
ID The LogPlatformInstance object ID of the user informationsource.
52 Tivoli Security Information and Event Manager V2.0: Administrators Guide

Table 11. Description of user information source properties (continued)
Property Description
Collected on A timestamp showing the data and time of the lastcollection.
Schedule The collection schedule for the user information source.
Creating an event sourceYou can use the Create Event Source Wizard to define new event sources. TheCreate Event Source Wizard walks you through the steps to configure a new eventsource.
You must have the following user roles to configure event sources:v View machines, event sources, and databasesv Manage machines, event sources, log reports
For more information, see “Types of user roles and access rights” on page 139.
The Create Event Source Wizard walks you through eight steps to create an eventsource:1. “Step 1: Start the Create Event Source Wizard”2. “Step 2: Choose Audited Machine ”3. “Step 3: Choose Event Source” on page 54
a. “Step 3a: Choose Audit Profile” on page 55b. “Step 3b: Provide Administrator Credentials” on page 56
4. “Step 4: Set Properties” on page 575. “Step 5: Set Collection Schedule” on page 576. “Step 6: Choose Database” on page 587. “Step 7: Set Load Schedule” on page 588. “Step 8: Summary” on page 59
Step 1: Start the Create Event Source Wizard
The first step is to start the Create Event Source Wizard.1. Open the Event Sources page.2. Click Create. The Create Event Source Wizard opens.
v Alternatively, you can start the Create Event Source Wizard by selectingCreate in the Select Action menu, and then clicking Go.
3. Click Next to start using the wizard. The Choose Audited Machine page opens.
Step 2: Choose Audited Machine
The second step is to select the audited machine to use with this event source.Available audited machines are listed in the Audited Machine table.
Chapter 6. Configuring event sources and user information sources 53

1. In the Audited Machine table, select the audited machine to use with thisevent source.
2. Click Next. The Choose Event Source window opens.
Step 3: Choose Event Source
The third step is to specify the event source name and select the type of eventsource that you want to create.
Figure 13. Choose Audited Machine
54 Tivoli Security Information and Event Manager V2.0: Administrators Guide
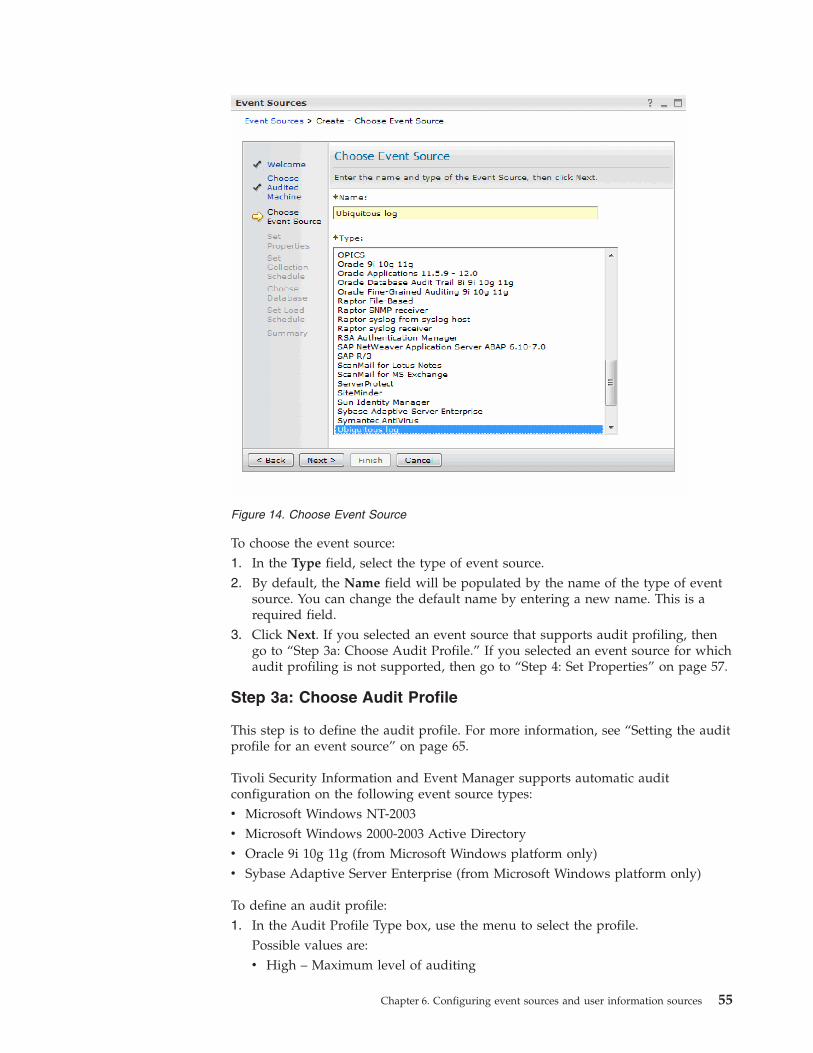
To choose the event source:1. In the Type field, select the type of event source.2. By default, the Name field will be populated by the name of the type of event
source. You can change the default name by entering a new name. This is arequired field.
3. Click Next. If you selected an event source that supports audit profiling, thengo to “Step 3a: Choose Audit Profile.” If you selected an event source for whichaudit profiling is not supported, then go to “Step 4: Set Properties” on page 57.
Step 3a: Choose Audit Profile
This step is to define the audit profile. For more information, see “Setting the auditprofile for an event source” on page 65.
Tivoli Security Information and Event Manager supports automatic auditconfiguration on the following event source types:v Microsoft Windows NT-2003v Microsoft Windows 2000-2003 Active Directoryv Oracle 9i 10g 11g (from Microsoft Windows platform only)v Sybase Adaptive Server Enterprise (from Microsoft Windows platform only)
To define an audit profile:1. In the Audit Profile Type box, use the menu to select the profile.
Possible values are:v High – Maximum level of auditing
Figure 14. Choose Event Source
Chapter 6. Configuring event sources and user information sources 55

v Medium – Medium level of auditingv Low - Only audits critical eventsv Custom – Allows you to apply customized audit settings (the Clear option
disables all auditing)v None – No audit settings are changed
2. If the event source type is Oracle, then the Oracle Properties box is displayed,showing the Oracle system properties for the audited machine. In the OracleProperties box, specify the following fields:
Field Description
System ID The System ID (SID) for the Oracle instance.The default value is empty.
This is a required field.
Username The Oracle administrator account name onthe Oracle instance. The default value isSYS.
This is a required field.
Password The Oracle administrator account passwordon the Oracle instance.
This is a required field.
Log Size (Bytes) The size, in bytes, of the security log that ismaintained when the audit profile is set. Thedefault size is 32 MB.
This is a required field.
3. Click Next. The Provide Administrator Credentials page opens.
Step 3b: Provide Administrator Credentials
This step is to provide the administrator credentials for the audited machine inorder to push the audit profile settings to the audited machine.
Note: If you set the audit profile level to "None" in “Step 3a: Choose AuditProfile” on page 55, then this step is skipped.
To specify the administrator credentials:1. In the Administrator Account box, specify the following fields:
Field Description
Username The administrator username on the auditedmachine. The default value is Administrator.
This is a required field.
Password The password of the administrator accounton the audited machine.
This is a required field.
2. To save the credentials, select Save credentials for future use.
56 Tivoli Security Information and Event Manager V2.0: Administrators Guide

Step 4: Set Properties
The fourth step is to define properties for the event source. Each event source hasdifferent properties. For information about configuring properties for a specificevent source, see the IBM Tivoli Security Information and Event Manager Event SourceGuide.
To define properties for the event source:1. Specify the properties for the event source.2. Click Next. The Collect Schedule page opens.
Step 5: Set Collection Schedule
The fifth step is to define the collection schedule that controls when audit data iscollected from the event source.
The Tivoli Security Information and Event Manager Server can simultaneouslycollect information from a maximum of 3 event sources. Do not configure theServer to collect from more than 3 event sources at the same time.
For more information about collection frequencies and settings, see “Creating acollection schedule” on page 63.
To define the collection schedule:1. In the Frequency menu, select how often the audit data should be collected.
The Frequency parameter determines which other configuation fields are
Figure 15. Set Collection Schedule
Chapter 6. Configuring event sources and user information sources 57
|||

displayed. For more information about collection frequencies and settings, see“Creating a collection schedule” on page 63.
2. Specify the settings for the selected frequency.3. Click Next. The Choose Database page opens.
Step 6: Choose Database
The sixth step is to select one or more Reporting Databases that you want to loadthe event source audit data into.
To select one or more Reporting Databases:1. In the Reporting Databases section is a list of available Reporting Databases.2. Select the Reporting Databases that you want to use.3. Click Next. The Set Load Schedule page opens.
Step 7: Set Load Schedule
The seventh step is to define the schedule that controls when event source auditdata is loaded into the Reporting Database.
Note: If you set the event source collection schedule to "Never" in “Step 5: SetCollection Schedule” on page 57, then this step is skipped.
For more information about configuring a database load schedule, see “Creating adatabase load schedule” on page 75.
You must have the following user role to perform this task:v Add or edit reporting databases
Figure 16. Choose Database
58 Tivoli Security Information and Event Manager V2.0: Administrators Guide

If you do not have the appropriate user role, then this step is not displayed. Formore information about user roles, see “Types of user roles and access rights” onpage 139.
To define a load schedule:1. In the Frequency menu, select how often the audit data should be loaded. The
Frequency parameter determines which other configuation fields are displayed.For more information about loading frequencies and settings, see “Creating adatabase load schedule” on page 75.
2. Specify the settings for the selected frequency.3. Click Next. The Summary page opens.
Step 8: Summary
Finally, verify the settings for the event source that you have just created.
Figure 17. Set Database Load Schedule showing a daily schedule
Chapter 6. Configuring event sources and user information sources 59

To verify the settings for the event source:1. Review the settings in the Summary window. To change any selections, click
Back.2. If the settings are satisfactory, click Finish. The event source is created and is
shown in the Event Source View window. The Create Event Source Wizardcloses.
Creating a user information sourceYou can create a user information source by using the Create User InformationSource Wizard. The Wizard walks you through the steps to configure a new userinformation source.
You must have the following user roles to configure user information sources:v View machines, event sources, and databasesv Manage machines, event sources, log reports
The Create User Information Source Wizard walks you through six steps to createa user information source:1. “Step 1: Start the Create User Information Source Wizard” on page 612. “Step 2: Choose Audited Machine ” on page 613. “Step 3: Choose User Information Source” on page 614. “Step 4: Set Properties” on page 615. “Step 5: Set Collection Schedule” on page 616. “Step 6: Summary” on page 62
Figure 18. Summary
60 Tivoli Security Information and Event Manager V2.0: Administrators Guide
Step 1: Start the Create User Information Source Wizard
The first step is to start the Create User Information Source Wizard.1. Open the Event Sources page.2. In the Select Action menu, click Create user information source, and then click
Go.3. Click Next to start using the wizard. The Choose Audited Machine page opens.
Step 2: Choose Audited Machine
The second step is to select the audited machine to use with this user informationsource. Available audited machines are listed in the Audited Machine table.1. In the Audited Machine table, select the audited machine to use with this user
information source.2. Click Next.
Step 3: Choose User Information Source
The next step is to specify the user information source name and select the type ofuser information source that you want to create.
To choose the user information source:1. In the Type field, select the type of event source.2. By default, the Name field will be populated by the name of the type of event
source. You can change the default name by entering a new name. This is arequired field.
3. Click Next. The Set Properties page opens.
Step 4: Set Properties
The fourth step is to define properties for the user information source. Each userinformation source has different properties. For information about configuring aspecific user information source, see the IBM Tivoli Security Information and EventManager Event Source Guide.
To define properties for the user information source:1. Specify the properties for the user information source.2. Click Next. The Collect Schedule page opens.
Step 5: Set Collection Schedule
The fifth step is to define the collection schedule that controls when audit data iscollected from the user information source.
For more information about collection frequencies and settings, see“Creating acollection schedule” on page 63.
To define the collection schedule:1. In the Frequency menu, select how often the audit data should be collected.
The Frequency parameter determines which other configuation fields aredisplayed. For more information about collection frequencies and settings, see“Creating a collection schedule” on page 63.
2. Specify the settings for the selected frequency.
Chapter 6. Configuring event sources and user information sources 61

3. Click Next. The Summary page opens.
Step 6: Summary
Finally, verify the settings for the user information source that you have justcreated.
To verify the settings for the user information source:1. Review the settings in the Summary window. To change any selections, click
Back.2. If the settings are satisfactory, click Finish. The user information source is
created and is shown in the Event Source View window. The Create UserInformation Source Wizard closes.
Creating a machineYou can create an audited machine by using the Create Audited Machine Wizard.
Before you begin
You must have the following user roles to add an audited machine:v View machines, event sources, and databasesv Manage machines, event sources, log reports
For more information, see “Types of user roles and access rights” on page 139.
About this task
An event source collects audit data from an audited machine. Before the eventsource can collect data, there must be an audited machine from which it can collectdata. The Create Machine Wizard helps you configure an audited machine. Formore information, see “Creating an audited machine” on page 31.
Procedure1. Open the Event Sources page.2. Select the event source that you want to view.3. In the Select Action menu, select Create Machine, and then click Go. The
Create Audited Machine Wizard opens. The Create Audited Machine Wizardwalks you through the process of configuring an audited machine. For moreinformation, see “Creating an audited machine” on page 31.
Deleting an event source and user information sourceYou can delete an event source or a user information source. You can also deletethe audit data and collection schedules associated with an event source or a userinformation source.
Before you begin
You must have the following user roles to delete event sources and userinformation sources:v View machines, event sources, and databasesv Manage machines, event sources, log reportsv Delete event sources with data
62 Tivoli Security Information and Event Manager V2.0: Administrators Guide

For more information, see “Types of user roles and access rights” on page 139.
About this task
The Delete Event Source window shows information about the event source oruser information source selected for deletion, including the name of the auditedmachine that the event source is attached to and the type of event source.
The Delete Data check box enables you to delete data associated with the eventsource or user information source. If you select the check box for Delete Data, thenthe audit data and collection schedules are deleted in addition to the event sourceor user information source.
If you delete an event source or user information source and delete the data, thenthe event source or user information source is permanently deleted.
However, if you delete an event source or user information source but do notdelete the data, then the event source or user information source is considered tobe inactive. It still appears in the Event Sources page. A yellow icon indicates thatthe event source or user information source is inactive.
Procedure1. Open the Event Sources page.2. Select the event source or user information source that you want to delete.3. Click Delete. The Delete Event Source window opens.
v Alternatively, you can open the Delete Event Source window by clickingDelete in the Select Action menu, and then click Go.
4. Optionally select the check box for Delete Data to delete data (such as auditdata and collection schedules) associated with the event source or userinformation source. If you decide to delete the data, then a confirmationwindow opens. Click Delete to confirm deletion.
5. Click OK.
Creating a collection scheduleYou can configure a schedule to automatically collect audit data from an eventsource or user information source.
Before you begin
You must have the following user roles to create a collection schedule for an eventsource:v View machines, event sources, and databasesv Manage machines, event sources, log reports
For more information, see “Types of user roles and access rights” on page 139.
About this task
A collection schedule tells Tivoli Security Information and Event Manager when tocollect audit data from event sources or user information sources.
Chapter 6. Configuring event sources and user information sources 63

If there are conflicting collect schedules (for example, if there are conflictingschedules for a database and an event source), then Tivoli Security Information andEvent Manager collects data according to the event source schedule.
Ensure that the collect schedule is set to complete the data collection before thedatabase load schedule starts.
Depending on the start time and the frequency of the collection schedule, it ispossible for multiple collections to occur in a given time period. For example, if thehourly frequency option is selected, then Tivoli Security Information and EventManager collects data from the event source at the interval (1 or more hours) thatwas set. The first collection occurs at the time (the hour and minute) specified inthe collect schedule. The collection continues until 11:59 P.M. each day. Forexample, a schedule that collects data every hour starting at 1:00 A.M. collects 23times each day. A schedule that collects every hour starting at 1:00 P.M. collects 11times each day. A schedule that collects every 2 hours starting at 1:00 P.M. collects6 times each day.
The Tivoli Security Information and Event Manager Server can simultaneouslycollect information from a maximum of 3 event sources. Do not configure theServer to collect from more than 3 event sources at the same time.
The table describes the parameters used to define how frequently audit data iscollected from event sources and user information source.
Table 12. Event source and user information source collection schedule parameters
Parameter Description
Frequency How often a load occurs.
Frequency settings include:
v Minutes
v Hourly
v Daily
v Weekly
v Monthly
v Annual
v Once (one time only)
v Never
Collect every or Starting at The interval between collections and the start time forthe collection.
The settings shown depend on the Frequency selected.
If the frequency is set to Never, then these fields do notappear.
For example, frequency was set to Hourly, then thefields would be Collect every day at [time] and then every[numeric value] hours. Whereas, if the frequency was setto Annual, then the fields would be Collect Every [nameof month] [day of month] of month and Starting at [time].
Procedure1. Open the Event Sources page.
64 Tivoli Security Information and Event Manager V2.0: Administrators Guide
|||

2. Select the event source or user information source for which you want to createa collection schedule.
3. Click Schedule. The Collection Schedule window opens where you can define anew collection schedule.v Alternatively, you can open the Collection Schedule window by clicking
Schedule in the Select Action menu, and then clicking Go.4. In the Frequency menu, select how often the collection should occur.5. In the Collect every [frequency interval] field, either enter a value manually or
choose a value from the menu. The options presented depend on the selectedFrequency parameter.
6. In the Starting at field, either enter a value manually or choose a value fromthe menu. The options presented depend on the selected Frequency andCollect every settings.
7. Click OK. The collection schedule is saved and the Collection Schedulewindow closes.
Setting the audit profile for an event sourceYou can set the audit profile of an event source. An audit profile manages theamount of log data that is audited from an event source.
Before you begin
You must have the following user roles to configure event sources:v View machines, event sources, and databasesv Manage machines, event sources, log reports
For more information, see “Types of user roles and access rights” on page 139.
About this task
There are several levels of audit profiling, which manages the amount of logs thatare audited from the event source (that is, manage the amount of logs which arelogged from the event source).
There are five profile types:v High – Maximum level of auditingv Medium – Medium level of auditingv Low - Only audits critical eventsv Custom – Allows you to apply customized audit settings (the Clear option
disables all auditing)v None – No audit settings are changed
Tivoli Security Information and Event Manager supports automatic auditconfiguration on the following event source types:v Microsoft Windows NT-2003v Microsoft Windows 2000-2003 Active Directoryv Oracle 9i 10g 11g (from Microsoft Windows platform only)v Sybase Adaptive Server Enterprise (from Microsoft Windows platform only)
There are two ways of accessing the Audit Profile page: from the Event Sourcespage and from the Event Sources Properties page. For more information, see
Chapter 6. Configuring event sources and user information sources 65
“About event source properties” on page 49.
Procedure1. Open the Event Sources page.2. Select the event source that you want to view.3. In the Select Action menu, select Audit Profile and then click Go. The Audit
Profile window opens. You can edit the Profile Type in the Audit Profilewindow.
4. Click OK. The audit profile is saved, and the Audit Profile page closes.
66 Tivoli Security Information and Event Manager V2.0: Administrators Guide
Chapter 7. Configuring SIM Reporting Databases
After Tivoli Security Information and Event Manager collects audit data, it loadsthe data into a Security Information Manager Reporting Database (SIM ReportingDatabase) where the data is normalized using the W7 analysis process. TivoliSecurity Information and Event Manager uses the information in the database togenerate reports and analyze trends.
About the W7 normalization process
W7 normalizes an event record into the following W7 attributes:
Who Name of the user, application, or process that initiated the event.
What Type of action that the event represents.
When Time and date when the event took place.
onWhatName of the object affected by the event. An object could be any type offile, database, application, permission, etc., that was manipulated by theevent.
Where Name of the system on which the event occurred.
WhereFromName of the system where the event originated (that is, the source of theevent).
WhereToName of the system that is the target of the event (the destination or targetof the event).
Maximum number of databases
By default, only one Reporting Database, the SelfAudit database, is created duringinstallation.
If additional room is needed to store and normalize audit data, then you can adddatabases. The maximum recommended number of Reporting Databases is 32.
Viewing Reporting DatabasesYou can see all SIM Reporting Databases that are defined in IBM Tivoli SecurityInformation and Event Manager by expanding the Configuration andManagement topic and clicking Managing Reporting Databases.
Before you begin
You must have the following user roles in order to work with Reporting Databasesand view data in the Compliance Dashboard:v View machines, event sources, and database.v Manage database, alerts, and archiving.v View compliance dashboard and log management reports.
© Copyright IBM Corp. 1998, 2011 67

For more information about user roles, see “Types of user roles and access rights”on page 139.
You must have permission to access the database. For more information, see“Assigning user roles” on page 138.
About this task
You can access the Reporting Databases page from the navigation panel.
Procedure1. Log on to Tivoli Security Information and Event Manager.2. In the navigation panel, expand the Tivoli Security Information and Event
Manager topic.3. Expand the Configuration and Management topic.4. Click Managing Reporting Databases. The Reporting Database page opens
where you can view and work with SIM Reporting Databases.
Managing databasesAll defined SIM Reporting Databases are displayed in the Reporting Databasespage. You can view database load status, load audit data into a selected database,and clear audit data from a selected database.
The Reporting Databases page (Figure 20 on page 69) contains a table that showsthe Reporting Databases and their properties.
Figure 19. Navigation panel showing the Managing Reporting Databases link
68 Tivoli Security Information and Event Manager V2.0: Administrators Guide

The following attributes for each database are displayed in the table.
Table 13. Description of Reporting Database table
Column Heading Description
Database Name A hyperlink showing the name of a SIM reporting database.
Select the hyperlink to open a window showing informationabout this database.
Status An icon and description of the database's load status. A load isthe process of adding security information events to a database.
Load statuses are:
v Loaded
v Not Loaded
v In Error
v Loading
v Clearing
If the database status is Loaded, then you can perform thefollowing actions by clicking the respective button or userinterface control:
v Load
v Clear
v Delete
v View Policy Used
If the database status is Not Loaded, then you can perform thefollowing actions by clicking the respective button or userinterface control:
v Load
v Delete
If the database status is In Error, then you can perform thefollowing actions by clicking the respective button or userinterface control:
v Load
v Delete
If the database status is Loading or Clearing, then you cannotperform any actions until the loading or clearing process hasfinished.
Figure 20. Reporting Databases page
Chapter 7. Configuring SIM Reporting Databases 69

Table 13. Description of Reporting Database table (continued)
Column Heading Description
Audited Machines The names of the audited systems. If a SIM Reporting Databaseincludes audit data from more than one audited system, then thefirst audited machine name is displayed in alphabetical order(A-Z), followed by an ellipsis. The ellipsis indicates that there areadditional audited systems.
Last Load A timestamp showing the date and time of the last successfulload.
Filtering and sorting the database table
You can use the Integrated Solutions Console toolbar to filter and to sort the tabledisplay of databases. Filtering the table display shows only databases that meet thefilter criteria. Sorting the table display shows databases based on the sort order.Filtering and sorting are useful when there are a large number of databases.
Viewing database propertiesYou can drill down into the properties of a Reporting Database to see its loadstatus, when it was last loaded, and its load schedule.
About this task
This task enables you to drill down into the properties of a Reporting Database.From the Reporting Database Properties, you can also load the database, clear thedatabase, and create load schedules, as well as add and remove event sources. Youcan also specify how Tivoli Security Information and Event Manager processes thedata.
Procedure1. Open the Reporting Database page.2. Click the name of the Reporting Database for which you want to view
properties. The Reporting Database Properties window opens.
About database propertiesThe Reporting Database Details window shows information about the ReportingDatabase. You can perform actions on the database, such as loading data into it orclearing data from it. You can also configure a load schedule and select whenTivoli Security Information and Event Manager maps the audit data.
The Reporting Database Details window contains two sections: ReportingDatabase Properties and Event Sources. In the Event Sources section, you can addand remove event sources. For more information about event sources, see “Addingevent sources to a database” on page 74 and “Removing event sources from adatabase” on page 74.
Properties
The Reporting Database Properties section contains a table that shows the loadstatus, when the database was last loaded, and the load schedule.
70 Tivoli Security Information and Event Manager V2.0: Administrators Guide

Table 14. Description of Reporting Database properties
Property Description
Load Status An icon showing the database's load status.A load is the process of adding securityinformation events to a database.
There are 5 possible load statuses:
v Loaded
v Not Loaded
v In Error
v Loading
v Clearing
Loaded on The date and time when the last loadoccurred.
Schedule The load schedule for the database, if one isconfigured.
Data Processing selection Radio buttons that control when TivoliSecurity Information and Event Managermaps the audit data for this database.
Select whether to map data during:
v Collect-time - Data is mapped during thedatabase pre-processing operation.
v Load-time - Data is mapped during thedatabase processing operation.
Click Apply to apply your settings.
Actions
The Reporting Database Properties section contains several user interface controlsthat allow you to configure and manage the database.
Chapter 7. Configuring SIM Reporting Databases 71

Table 15. Description of user interface controls on the Reporting Database Propertieswindow
User interface controls Description
Load... Opens the Load Database Wizard where youcan manually load data into the database.
During the load phase, Tivoli SecurityInformation and Event Manager takes intoaccount the data processing selection thatwas made on the Database Details page.This selection affects when the system mapsthe data. There are two time periods whenthe system maps the data: at Collect-time orat Load-time:
v If Collect-time is selected, then the systemmaps the data when it collects audit datafrom the event source. If Collect-time isselected and the event sources areremoved from the Reporting Database,then the next load will still include datafrom the removed event source. To avoidthis situation, clear the database afterremoving event sources.
v If Load-time is selected, then the systemmaps the data when the data is loadedinto the Reporting Database.
Clear Clears audit data from the database.
Clearing the data does not affect whenmapping occurs.
Schedule... Opens a window where you can configure aload schedule.
Apply Applies your data-processing selection.
Creating a databaseCreate a new Reporting Database by selecting Create in the Select Action menu.
About this task
A valid Reporting Database contains a maximum of 14 alphanumeric andunderscore characters. The first character must be a letter. Only ASCII charactersare allowed.
The default size for a Reporting Database is 100 MB. However, the size neededmight vary depending on the amount of event data to be processed by theReporting Database, which can vary depending on the type of event source.
Procedure1. Open the Reporting Database page.2. Open the Select Action menu.3. Select Create, and then click Go. The Create Reporting Database window
opens.4. In the Name field, enter a name for the new Reporting Database.
72 Tivoli Security Information and Event Manager V2.0: Administrators Guide
5. In the Size (MB) field, enter a value for the physical size of the database inmegabytes (MB). The default size is 100 MB.
6. Click OK. A new Reporting Database is created and displayed at the bottom ofthe table in the Database window.
What to do next
After you create a Reporting Database, you must attach an event source to thedatabase. You cannot load audit data into a database until an event source isattached to the database. For more information, see “Adding event sources to adatabase” on page 74.
Deleting a databaseDelete a Reporting Database.
About this task
When you delete a Reporting Database, Tivoli Security Information and EventManager does three things:v Clears the database of all data.v Removes any event sources attached to the database. These events sources are
not deleted from Tivoli Security Information and Event Manager, but merelydetached from the database.
v Deletes the database.
Procedure1. Open the Reporting Database page.2. Select the database that you want to delete.3. Open the Select Action menu.4. Select Delete, and then click Go. The Delete Reporting Database window
opens.5. Click Yes to confirm deletion. The database is cleared, and any event sources
are removed from the database. The database is deleted, and no longer appearsin the SIM Reporting Database window.
About event sourcesTivoli Security Information and Event Manager collects audit data from the eventsource and loads the audit data into the database. Tivoli Security Information andEvent Manager analyzes the data and uses it to generate reports about securityevents.
The Event Sources section of the Reporting Database Details page contains a tablethat shows all event sources that are attached to the database.
The following attributes for each event source are displayed in the table.
Table 16. Description of event sources attached to a database
Column Heading Description
Agent Group The name of the agent group that belongs to the parent machineof the event source.
Chapter 7. Configuring SIM Reporting Databases 73

Table 16. Description of event sources attached to a database (continued)
Column Heading Description
Audited Machine The name of the audited machine that belongs to the eventsource.
Event Source The type of event source.
Last Collect The time and date of when the last successful event collectionoccurred.
Collection Schedule The collection schedule for the event source.
Adding event sources to a databaseAdd an event source to a database by clicking Add in the Reporting DatabaseDetails window.
About this task
Adding an event source to a Reporting Database enables Tivoli SecurityInformation and Event Manager to collect data from the event source. In order toview audit data and events in the Compliance Dashboard, it is necessary to haveloaded audit data into a Reporting Database. In order to load data into a ReportingDatabase, you must add an event source.
Procedure1. Open the Reporting Database page.2. Click the name of the Reporting Database for which you want to view
properties. The Reporting Database Properties window opens.3. In the Event Sources section, click Add. The Add Event Source window opens
and shows available event sources.4. Select the event sources that you want to add to the database.5. Click OK. The event sources are added to the database.
What to do next
After you have added an event source and collected data from the event source,you can load the audit data into the database. For more information, see “Loadinga database” on page 75.
Removing event sources from a databaseRemove an event source to a database by selecting a database and clickingRemove in the Reporting Database Details window.
Procedure1. Open the Reporting Database page.2. Click the name of the Reporting Database for which you want to view
properties. The Reporting Database Properties window opens.3. In the Event Sources section, select the event source or event sources that you
want to remove from the database.4. Click Remove. A confirmation window opens.5. Click Yes. The event sources are removed from the database.
74 Tivoli Security Information and Event Manager V2.0: Administrators Guide
Loading a databaseLoading a Reporting Database is the process by which audit data is loaded into theReporting Database. After data is loaded, Tivoli Security Information and EventManager can aggregate the data and generate reports on the data.
Creating a database load scheduleA load schedule defines how frequently audit data from each system, auditedmachine, or event source is loaded into the Reporting Database associated withload schedule. Create a load schedule by opening the Reporting DatabaseProperties page and clicking Schedule.
About this task
A load schedule tells Tivoli Security Information and Event Manager when to loadaudit data from each system, audited machine, or event source into the database.
The event source collection schedule affects which audit data is loaded into thedatabase. For example, if the event source collection occurs every 5 minutes at 7:00,7:05, 7:10, 7:20, and so on, but the period of time when data is loaded into thedatabase is set to load from 7:05 to 7:16, then only two chunks of audit data will beloaded into the database, because the database will load only the chunks that werecollected during the loading period (that is, the data that was collected at 7:10 and7:15). Audit data that are collected at the same time as the start time for thedatabase load schedule are not loaded into the database. Thus, under this loadschedule, the chunk of data that was collected at 7:05 would not be loaded.
Ensure that the data loading interval and the start time are set to use all thecollected audit data. To do so, follow these tips:v In general, set load frequency to an interval as long as or longer than the
collection schedule interval. The collection should have completed before theload begins. For example, audit data might be collected hourly and loaded twiceper day. It is unlikely that you would want to collect audit data twice a day andthen load it hourly, because you would be reloading the same data over again.
v Set the load schedule time to start about 15 minutes after each scheduledcollection time. This delay ensures that Tivoli Security Information and EventManager loads the most recently collected data into the database.
v If the hourly frequency option is selected, then Tivoli Security Information andEvent Manager collects data from the event source at the interval (1 or morehours) that was set. The first collection occurs at the time (hour and minute)specified in the collect schedule. The collection continues until 11:59 P.M. eachday. For example, a schedule that collects data every hour starting at 1:00 A.M.collects 23 times each day. A schedule that collects every hour starting at 1:00P.M. collects 11 times each day. A schedule that collects every 2 hours starting at1:00 P.M. collects 6 times each day.
Note: To change a database from loading older data (that is, the last N days ofdata) to loading only new data, first set the schedule to Never and then set theschedule to load the new data.
The Table 17 on page 76 describes the parameters used to define how frequentlyaudit data is loaded into the Reporting Database.
Chapter 7. Configuring SIM Reporting Databases 75

Table 17. Load schedule parameters
Field Description
Frequency How often a load occurs.
Frequency settings include:
v Minutes
v Hourly
v Daily
v Weekly
v Monthly
v Annual
v Once (one time only)
v Never
It is possible to manually load the database only if thefrequency is set to Never. If the load schedule is set toany other frequency, then it is impossible to manuallyload the database.
Load every N [frequency unit] Numeric value for the interval between loads, where the[frequency unit] is the unit selected in the Frequencyfield. For example, if the frequency was set to Hourly,then the field would be Load every N hours.
Procedure1. Open the Reporting Database page.2. Click the name of the Reporting Database for which you want to create a load
schedule. The Reporting Database Properties window opens.3. Click Schedule.
4. In the Frequency menu, select how often a load should occur.5. Specify the settings for the selected frequency.6. Click OK. The load schedule is saved, and data will be loaded into the
Reporting Database as scheduled.
Figure 21. Schedule page showing how to configure a weekly loading schedule
76 Tivoli Security Information and Event Manager V2.0: Administrators Guide

What to do next
The aggregation process does not automatically run after a scheduled load as it didin previous versions. To enable aggregation to run automatically after a scheduledload, you must delete the TSIEM_HOME/sim/server/run/ReportingDatabase_NAME.options file and then restart the mapper services at a time whenthe database is not being loaded. For more information, see Appendix D, “Stoppingand starting services,” on page 195.
Using the Load Database Wizard to manually load dataYou can use the Load Database Wizard to manually load audit data into aReporting Database. Open the Load Database Wizard by clicking Load in theReporting Database page or in the Database Properties page.
About the Load Database Wizard
The Load Database Wizard walks you through the steps to configure the settingsfor a manual load.
There are six steps:1. “Step 1: Open the Load Database Wizard.”2. “Step 2: Choose a Database.”3. “Step 3: Choose a Period” on page 78.4. “Step 4: Collect Data” on page 79.5. “Step 5: Choose a Policy” on page 80.6. “Step 6: Summary” on page 81.
Step 1: Open the Load Database Wizard
The first step is to open the Load Database Wizard.1. Open the Reporting Database page.2. Click Load. The Load Database Wizard opens.
v Alternatively, you can start the Load Database Wizard by selecting Load inthe Select Action menu, and then clicking Go.
3. Click Next to start using the wizard. The Choose a Database page opens.
Step 2: Choose a Database
The second step is to select which database you want to load data into.
Chapter 7. Configuring SIM Reporting Databases 77

Available Reporting Databases are listed in the Database table. The Database tableshows properties for each database. Database properties are described in “Aboutdatabase properties” on page 70.
To choose a SIM Reporting Database to load:1. In the Database table, select the database to load.2. Click Next. The Choose a Period page opens.
Step 3: Choose a Period
The third step is to specify a period of time from which audit data should beloaded into the database.
This setting tells Tivoli Security Information and Event Manager to load audit datafrom a specified time period. For example, you might have a year's worth of auditdata, but you only want to view data from a particular month. You could specifythe dates and times of the period that you were interested in.
For more information about the relationship between event source collections anddatabase load schedules, see “Creating a database load schedule” on page 75.
Figure 22. Choose a Database
78 Tivoli Security Information and Event Manager V2.0: Administrators Guide

To specify a period of time:1. In the From field, use the calendar widget to select a date and use the clock
widget to select a time.2. In the Until field, use the calendar widget to select a date and use the clock
widget to select a time.3. Click Next. The Collect Data page opens.
Step 4: Collect Data
The fourth step is to specify whether Tivoli Security Information and EventManager should collect data before starting the load.
Figure 23. Choose a Period
Chapter 7. Configuring SIM Reporting Databases 79
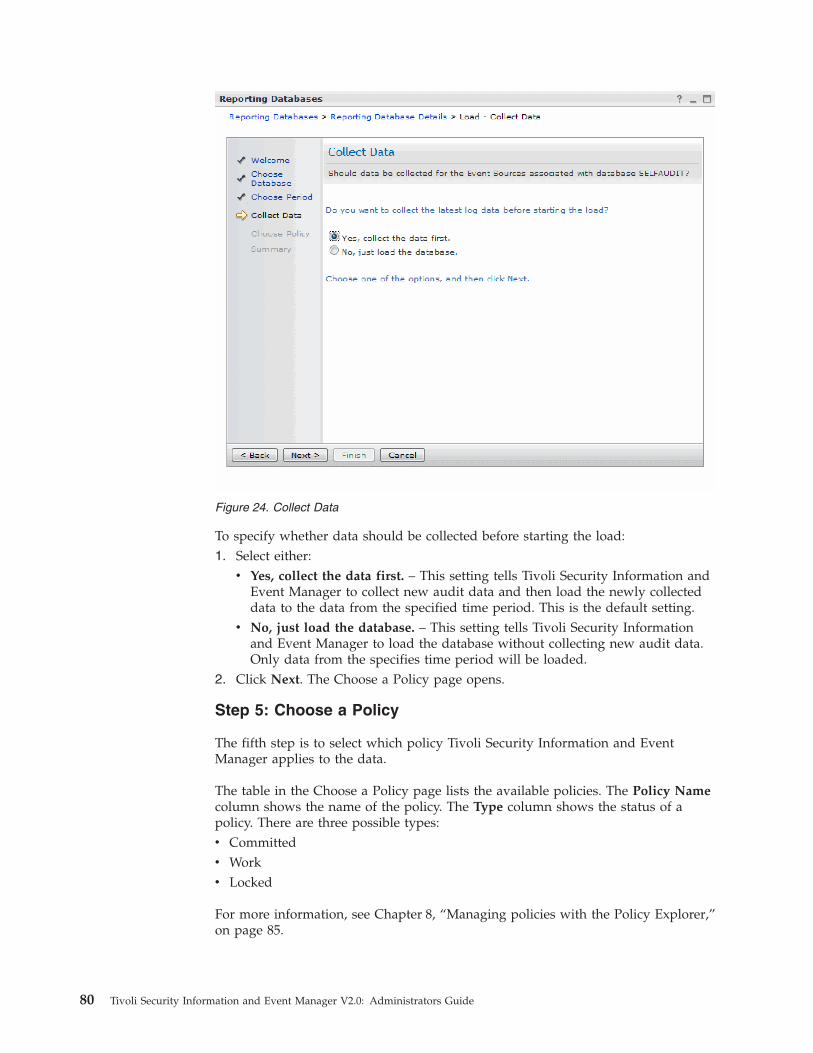
To specify whether data should be collected before starting the load:1. Select either:
v Yes, collect the data first. – This setting tells Tivoli Security Information andEvent Manager to collect new audit data and then load the newly collecteddata to the data from the specified time period. This is the default setting.
v No, just load the database. – This setting tells Tivoli Security Informationand Event Manager to load the database without collecting new audit data.Only data from the specifies time period will be loaded.
2. Click Next. The Choose a Policy page opens.
Step 5: Choose a Policy
The fifth step is to select which policy Tivoli Security Information and EventManager applies to the data.
The table in the Choose a Policy page lists the available policies. The Policy Namecolumn shows the name of the policy. The Type column shows the status of apolicy. There are three possible types:v Committedv Workv Locked
For more information, see Chapter 8, “Managing policies with the Policy Explorer,”on page 85.
Figure 24. Collect Data
80 Tivoli Security Information and Event Manager V2.0: Administrators Guide

To choose a policy:1. Select a policy from the following options:
v Matching – The Load Database Wizard will apply the policy that bestmatches the selected time period.
v Newest – The Load Database Wizard will apply the most recently committedpolicy.
v Fixed – You can select a policy from the policies listed in the table. The LoadDatabase Wizard will apply the selected policy.
2. Click Next. The Completing the Load Database Wizard page opens.
Step 6: Summary
The final step is verify the settings for the Reporting Database that you have justconfigured.
Figure 25. Choose a Policy
Chapter 7. Configuring SIM Reporting Databases 81

To verify the settings for the Reporting Database:1. Review the settings in the Summary window. To change any selections, click
Back.2. If the settings are satisfactory, click Finish. The Load Database Wizard closes.
Tivoli Security Information and Event Manager will collect audit data and loadthe data into the selected Reporting Database as specified.
Clearing a databaseClear a database by selecting the database and clicking Clear.
About this task
Clearing is the processing of removing audit data from a database.
Note: You can also clear a database from the Reporting Database Propertieswindow by clicking Clear.
Procedure1. Open the Reporting Database page.2. Select the database that you want to clear.3. Click Clear. A confirmation window opens.
v Alternatively, you can click Clear in the Select Action menu, and then clickGo.
4. Click OK. The database is cleared, and the database's status changes to NotLoaded.
Figure 26. Completing the Load Database Wizard
82 Tivoli Security Information and Event Manager V2.0: Administrators Guide
Viewing which policy is used to map audit dataView which policy is used to map audit data by selecting the database andselecting View Policy Used.
About this task
This task enables you to quickly see which policy is applied to audit data for adatabase. However, this task is only available if audit data from an event source oruser information source has been collected and loaded into the database.
Procedure1. Open the Reporting Database page.2. Select the database for which you want to view the policy.3. Open the Select Action menu.4. Select View Policy Used, and then click Go. The Policy Editor window opens
showing the automatic policy used for mapping audit data contained in theselected database.
Chapter 7. Configuring SIM Reporting Databases 83

84 Tivoli Security Information and Event Manager V2.0: Administrators Guide

Chapter 8. Managing policies with the Policy Explorer
The Policy Explorer enables you to create and manage enterprise security policies.A security policy consists of group definition sets, policy rules, and attention rulesthat are defined for one or more platforms. When audited machines are registered,Tivoli Security Information and Event Manager applies the policy and attentionrules in your security policy to load audit data from each system into a ReportingDatabase, organizing the data using the groups you defined, and displaying theresults in the Compliance Dashboard.
You can create a security policy either by creating a new policy or by duplicatingand modifying an existing policy. Typically, a security policy is used until it needsto be updated. Thereafter, you must either update it or create a new policy,depending on the level of change that is necessary.
The security policy that Tivoli Security Information and Event Manager uses toturn chunk logs into events that you can view using Compliance Dashboard is thecombination of the last automatic and the last committed policy.
Types of policies
There are three types of policies:v Work policiesv Committed policiesv Automatic policies
A Work policy can be edited and deleted. All newly created policies and duplicatedpolicies are Work policies until they are committed. Work policies are used whenyou are defining and modifying policies. You can manually run compliance checksagainst a Work policy.
A Committed policy cannot be edited or deleted. After you have finished defining aWork policy and want to ensure that no further changes are made to it, you cancommit the policy. You can automatically run compliance checks against aCommitted policy.
An Automatic policy is a read-only policy. Automatic policies are generated basedon the User Information Source (UIS) and contains only a grouping policy.Automatic policies do not contain any policy rules or attention rules.
When Tivoli Security Information and Event Manager collects and loads audit dataaccording to a schedule you set, it uses the most recent policy in the Committedfolder.
A Work policy can be used to collect data if you load data manually and selectanother policy at that time. For example, you might specify another policy to use ifyou updated a policy and wanted to compare audit data from the old policy andthe new policy.
© Copyright IBM Corp. 1998, 2011 85

Defining policies
A policy is a collection of rules that determine what audit data Tivoli SecurityInformation and Event Manager loads and displays for analysis.
You can define a policy, create a new empty policy, duplicate or edit it, or delete orrename it.
To define a policy, you must specify the following information:v Attention rulesv Group definitions for each platformv Platforms to be auditedv Policy rules
Group definition sets are created to organize audit data into standardized groups forefficient analysis. You can create a group definition set for an entire policy or createa set for each platform to be audited.
Policy rules specify which actions can be performed by which people on whichsystems at what times. Actions that do not match a policy rule generate policyexceptions.
Attention rules specify which events should generate audit data even if the eventsare allowed by your policy rules. Actions that match an attention rule generateattentions.
You can create rules for any of the operating systems or application platforms fromwhich Tivoli Security Information and Event Manager can collect data.
Tivoli Security Information and Event Manager filters audit data generated bypolicy exception rule and attention rule matches, normalizes the data into sevenstandardized groups (W7 groups) as defined by the auditing model, and displaysthe results in Tivoli Integrated Portal for analysis.
Storing policies
All policies are stored in the Grouping folder (located in <TSIEM_HOME>\sim\server\config\grouping\), which contains two subfolders:v The Committed folder contains all policies that you have committed for use. You
can view committed policies, but you cannot change them.v The Work folder contains policies that you can change. After you finish changing
a policy, move it to the Committed folder so that you can apply it when loadingaudit data.
Viewing policies in the Policy ExplorerYou can see all policies that are configured in Tivoli Security Information andEvent Manager in the Policy Explorer by expanding the Configuration andManagement topic, expanding the Policies topic, and clicking Policy Explorer. Youcan also open the Policy Explorer from the Welcome page that first appears whenyou log into Tivoli Security Information and Event Manager by clicking PolicyExplorer in the Common Tasks section.
86 Tivoli Security Information and Event Manager V2.0: Administrators Guide

About this task
You can open the Policy Explorer from the navigation panel as shown in Figure 27.
Procedure1. Log on to Tivoli Security Information and Event Manager.2. In the navigation panel, expand the Tivoli Security Information and Event
Manager topic.3. Expand the Configuration and Management topic.4. Expand the Policies topic.5. Click Policy Explorer. The Policy Explorer page opens where you can view and
work with policies.
Managing policies with the Policy ExplorerThe Policy Explorer enables you to view policies, create policies, delete policies,duplicate policies, rename policies, unlock policies, commit policies, showautomatic policies, and test policies.
The Policy Explorer (Figure 28 on page 88) displays a table showing the committedand work policies.
Figure 27. Navigation bar showing the Policy Explorer
Chapter 8. Managing policies with the Policy Explorer 87

Opening policiesYou can open policies to view and edit.
About this task
You can open a policy from the Policy Explorer. This action opens the Policy Editorwhere you can view both Committed policies and Work policies and modify Workpolicies.
Procedure1. Open the Policy Explorer.2. Select the policy that you want to open.
v Click Open. The Policy Editor opens.v Alternatively, you can click the hyperlink showing the policy name. The
Policy Editor opens.v Alternatively, you can click Open in the Select Action menu, and then click
Go. The Policy Editor opens.
What to do next
After you have opened a policy, use the Policy Editor to view or modify it. Formore information, see Chapter 9, “Configuring policies with the Policy Editor,” onpage 93.
Creating a policyYou can create a blank policy and then use the Policy Wizard to define the policy.
Before you begin
Only users with the "Create or edit policy" role can create policies.
Procedure1. Open the Policy Explorer.2. Click Create. The Create Policy window opens.
Figure 28. Policy Explorer
88 Tivoli Security Information and Event Manager V2.0: Administrators Guide
3. In the Policy Name field, enter the name of the policy.4. Click Create. The Create Policy window closes. A new policy is created and
displayed in the Policy Explorer.
What to do next
After you create a policy, use the Policy Editor to define elements of the policy,such as the group definition sets, groups, conditions and requirements, policyrules, attention rules, and to test and commit the policy.
Deleting policiesYou can delete a policy.
Before you begin
Only users with the "Commit or delete policy" role can delete policies.
Procedure1. Open the Policy Explorer.2. Select the policy that you want to delete.3. Click Delete. The Delete Policy confirmation window opens.4. Click Delete to confirm deletion. The policy is deleted. The Delete Policy
confirmation window closes, and you are returned to the Policy Explorer.
Duplicating policiesYou can create a policy by copying an existing policy and using it as a template forthe new policy.
Before you begin
Only users with the "Create or edit policy" role can create or duplicate policies.
Procedure1. Open the Policy Explorer.2. Select the policy that you want to duplicate.3. Click Duplicate. The Duplicate Policy window opens.4. In the Policy Name field, enter a name for the duplicated policy. The default
name is Duplicate of selected policy name.
Note: The maximum length of a policy name is 45 characters. The name caninclude alphanumeric characters (such as "a-z", "A-Z", and "0-9") and hyphens(-), underscores (_), the dollar symbol ($), the pound symbol (#), and spaces.
5. Click Duplicate. The duplicated policy is displayed in the Policy Explorer.
What to do next
After you have duplicated a policy, use the Policy Editor to change the policy'scontents.
Renaming a policyYou can change the name of a policy.
Chapter 8. Managing policies with the Policy Explorer 89
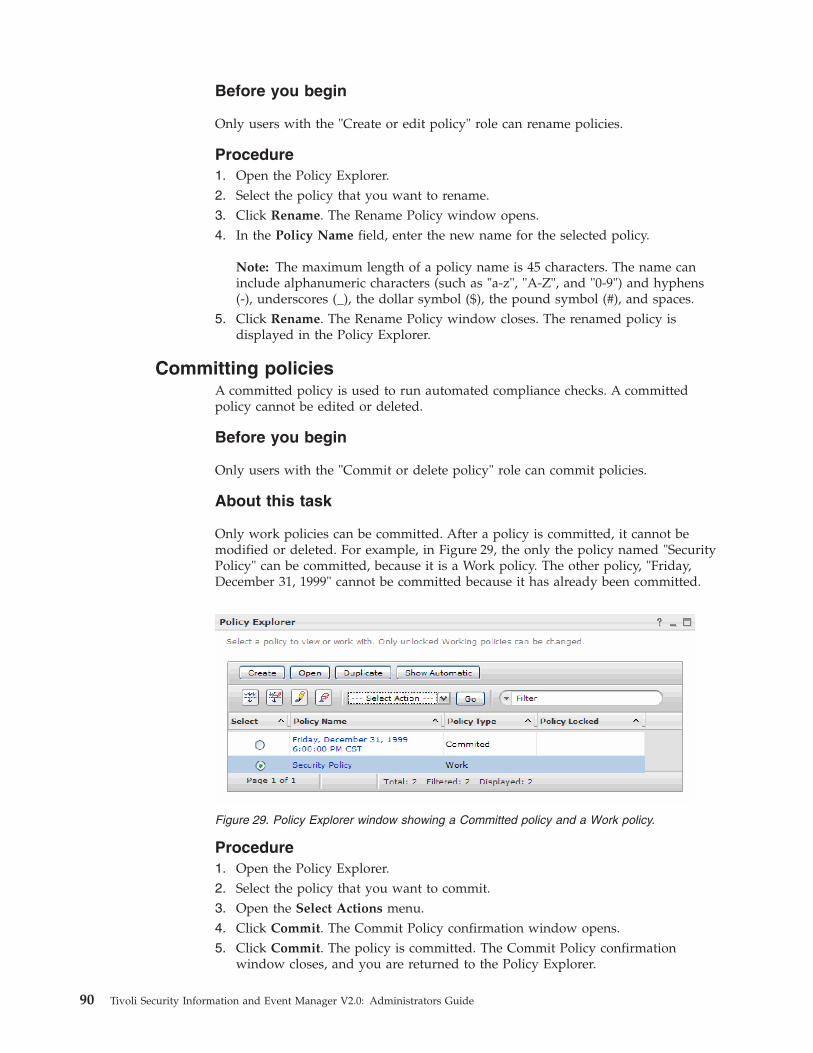
Before you begin
Only users with the "Create or edit policy" role can rename policies.
Procedure1. Open the Policy Explorer.2. Select the policy that you want to rename.3. Click Rename. The Rename Policy window opens.4. In the Policy Name field, enter the new name for the selected policy.
Note: The maximum length of a policy name is 45 characters. The name caninclude alphanumeric characters (such as "a-z", "A-Z", and "0-9") and hyphens(-), underscores (_), the dollar symbol ($), the pound symbol (#), and spaces.
5. Click Rename. The Rename Policy window closes. The renamed policy isdisplayed in the Policy Explorer.
Committing policiesA committed policy is used to run automated compliance checks. A committedpolicy cannot be edited or deleted.
Before you begin
Only users with the "Commit or delete policy" role can commit policies.
About this task
Only work policies can be committed. After a policy is committed, it cannot bemodified or deleted. For example, in Figure 29, the only the policy named "SecurityPolicy" can be committed, because it is a Work policy. The other policy, "Friday,December 31, 1999" cannot be committed because it has already been committed.
Procedure1. Open the Policy Explorer.2. Select the policy that you want to commit.3. Open the Select Actions menu.4. Click Commit. The Commit Policy confirmation window opens.5. Click Commit. The policy is committed. The Commit Policy confirmation
window closes, and you are returned to the Policy Explorer.
Figure 29. Policy Explorer window showing a Committed policy and a Work policy.
90 Tivoli Security Information and Event Manager V2.0: Administrators Guide

Unlocking policiesPolicies that are being used by another user are locked. However, you can unlocklocked policies.
Before you begin
Only administrators and users with the "Unlock policy" role can unlock policies.
About this task
When a policy is locked, the name of the user who is using the policy is displayedin the Policy Explorer in the Policy Locked column. If the Policy Locked column isblank, then the policy is unlocked.
For example, in Figure 30, the policy "tsiem" is locked because it is being used bythe user "cifowner."
Note: All unsaved work is lost when a locked policy is unlocked. You may wantto consult with the user who has locked the policy before unlocking the policy toprevent losing any unsaved work.
Procedure1. Open the Policy Explorer.2. Select the policy that you want to unlock.3. Open the Select Actions menu.4. Click Unlock. The policy is unlocked.
Generating automatic policiesAn automatic policy displays the policy in effect for a specified date and time.Automatic policies are used to generate group definition sets so that the groupdefinition sets can be copied into a Work policy.
Before you begin
Only administrators and users with the "Create or edit policy" role can generateautomatic policies.
Figure 30. Policy Explorer window showing a locked policy
Chapter 8. Managing policies with the Policy Explorer 91

You must set up a user information source (UIS) and collect audit data from theuser information source before you generate an automatic policy.
Procedure1. Open the Policy Explorer.2. Click Show Automatic. The Select Automatic Policy window opens.3. In the Date field, either type the date in M/D/YY format or use the calendar
widget to select a date.4. In the Time field, either type the time in H:MM AM/PM (for 12-hour clock
format locales) or in HH:MM (for 24-hour clock format locales) or use the clockwidget to select a time. The time picker field varies by geographic locale. Usersin locales that typically use a 12-hour clock format with AM and PM will see afield that allows you to specify AM or PM. Users in locales that typically use a24-hour clock format will see a field that allows you to specify time using the24-hour clock format.
5. Click Show Automatic. The automatic policy is generated and is displayed inthe Policy Explorer.
What to do next
After you generate an automatic policy, you can view the policy by opening it withthe Policy Editor.
92 Tivoli Security Information and Event Manager V2.0: Administrators Guide

Chapter 9. Configuring policies with the Policy Editor
The Policy Editor enables you to define and modify the components of a securitypolicy, including the platforms, group definition sets, groups, conditions,requirements, policy rules, and attention rules.
About security policiesA security policy consists of group definition sets, policy rules, and attention rulesdefined for one or more platforms. When systems whose activity is audited areregistered, IBM Tivoli Security Information and Event Manager applies the policyand attention rules in your security policy to load audit data from each system intoa SIM Reporting Database, organizing the data using the groups you defined, anddisplaying the results in the Compliance Dashboard.
Elements of a security policy
When you create a security policy, you must define the following elements:v Platformsv Group definition setsv Groupsv Conditionsv Requirementsv Policy rulesv Attention rules
Table 18 describes the elements that comprise a security policy.
Table 18. Elements of a security policy
Name Description
Platforms The platform defines the type of operatingsystem or application that is audited by thepolicy.
Group definition sets Every platform contains group definitionsets. A group definition set is a collection ofgroups defined using the W7 methodology.
Groups Every group contains conditions andrequirements. An event is classified as amember of a group if it meets at least onecondition. To satisfy the condition, the eventmust meet all requirements defined in thecondition.
Conditions An event is classified as a member of agroup if it satisfies at least one conditiondefined in the group.
Requirements An event meets a condition when it meetsall of the requirements defined in thecondition.
© Copyright IBM Corp. 1998, 2011 93

Table 18. Elements of a security policy (continued)
Name Description
Policy rules A set of rules that define all types ofbehavior that is permitted in your company.These rules are based on the groupdefinitions. All events that are outside theserules are policy exceptions and can beviewed as such in Compliance Dashboard.
Attention rules A set of rules used to identify events thatmight require extra scrutiny. These eventsmight be policy exceptions or legitimateevents.
Managing grouping policiesGrouping policies are used to define groups based on shared characteristics.
Managing platformsYou can use the Policy Editor to create, modify, and delete platforms that are usedin a policy.
The Policy Editor contains a table in which you can view and select platforms towork with. The tables below describe the user interface controls available in thePolicy Editor and the policy attributes shown in the Policy Editor.
Select a platform, and then select an action to perform on the selected platformfrom the toolbar at the top of the window or from the Select Actions menu.
Table 19. Policy Editor user interface controls
Name of button Description
Create Opens the Create Platform window whereyou can select a platform to create in thepolicy. You can only create platforms inWork policies.
Open Opens the Group Definition Sets windowwhere you can view a content summary ofthe platform.
Delete Confirms the deletion of the selectedplatform in the policy and returns to thePlatform View window. You can only deleteplatforms in Work policies.
The following attributes for each platform are displayed in the table.
Table 20. Description of platform attributes
Column heading Description
Select Radio button that you can use to select theplatform that you want to view, copy,modify, or delete. You can select only oneplatform.
Platform Name of the platform.
94 Tivoli Security Information and Event Manager V2.0: Administrators Guide

Filtering and sorting the platforms table
You can use the Integrated Solutions Console toolbar to filter and to sort the tabledisplay of platforms. Filtering the table display shows only platforms that meet thefilter criteria. Sorting the table display shows platforms based on the sort order.Filtering and sorting are useful when there are a large number of platforms.
Creating a platformAfter a policy is created, you must add a platform to be audited to the policy.
About this task
Systems can be audited on any of the platforms supported by Tivoli SecurityInformation and Event Manager. For information about supported platforms, seethe Installation Guide.
Only one platform can be added at a time. It is not possible to add multipleplatforms at the same time.
You can define platforms for any work policy.
You can also define platforms for committed policies by duplicating the committedpolicy, adding the new platform as described in this section, and then committingthe updated policy.
Procedure1. Open the Policy Editor.2. Click Manage Groups. The Platforms window opens.3. Click Create. The Create Platform window opens.4. Select the platform that you want to use from the menu.5. Click OK. The platform is added to the policy. The Create Platform window
closes, and you are returned to the Policy Editor.
Deleting a platformDeleting a platform removes the platform from the policy so that Tivoli SecurityInformation and Event Manager no longer maps audited data to the deletedplatform.
About this task
Deleting a platform from a policy removes the sub-elements of the deletedplatform (such as group definition sets, groups, conditions, and requirements) fromthe policy. Tivoli Security Information and Event Manager stops mapping auditeddata to sub-elements that were defined in the deleted platform.
Procedure1. Open the Policy Editor.2. Click Manage Groups. The Platforms window opens.3. Select the platform that you want to delete.4. Click Delete. The Delete Platform confirmation window opens.5. Click Yes to confirm deletion. The platform is removed from the policy. The
Delete Platform window closes, and you are returned to the Policy Editor.
Chapter 9. Configuring policies with the Policy Editor 95

Managing group definition setsA group definition set is a collection of folders called Who, What, When, Where,and OnWhat. You can use the Policy Editor to create, modify, and delete groupdefinition sets.
Each folder holds groups that fit into one of the auditing categories. After groupdefinition set folders have been created, groups of people, events, times, systems,and platforms should be defined for any or all folders in the group definition set.
You can create a group definition set for each platform to be audited, or create aglobal group definition set whose groups apply to all platforms that you audit.
Viewing and managing group definition sets
Use the table to manage group definition sets for a selected platform.
Select a group definition sets, and then select an action to perform on the selectedgroup definition sets from the toolbar at the top of the window or from the SelectActions menu.
Table 21. Actions available from Select Action menu
Action Description
Create Opens the Create Group Definition Setwindow that enables you to define a groupdefinition set to add to a platform. You canonly create group definition sets in Workpolicies.
Open Opens a window where you can drill downinto the group definition set.
Delete Confirms the deletion of the selected groupdefinition set and returns to the GroupDefinition Sets window. You can only deletegroup definition sets in Work policies.
Rename Enables you to rename a group definitionset.
Copy Enables you to copy a group definition set.
Paste Enables you to paste a group definition setthat you had copied.
Import Group Definition Set Enables you to import the sub-elements of agroup definition set. You can use an importgroup definition set as a template forcreating other definition sets.
The following attributes for each group definition set are displayed in the table.
SelectSelect the group that you want to view, copy, modify, or delete. You can selectonly one group definition set.
Group Definition SetName of group definition set.
96 Tivoli Security Information and Event Manager V2.0: Administrators Guide

Filtering and sorting the group definition sets table
You can use the Integrated Solutions Console toolbar to filter and to sort the tabledisplay of group definition sets. Filtering the table display shows only groupdefinition sets that meet the filter criteria. Sorting the table display shows groupdefinition sets based on the sort order. Filtering and sorting are useful when thereare a large number of group definition sets.
Creating group definition setsYou can create a new group definition set in the selected platform.
Procedure1. Open the Group Definition Sets window. (Policy Editor > Platforms > Group
Definition Sets)2. Click Create. The Create Group Definition Set window opens.3. In the Group Definition Set Name field, enter the name of the new group
definition set.4. Click Create. The group definition set is created. The Create Group Definition
Set window closes, and you are returned to the Group Definition Sets window.The new group definition set is displayed in the Group Definition Sets window.
Deleting group definition setsYou can delete a group definition set from a work policy. Group definition setscannot be deleted from committed policies. Deleting a group definition set deletesall groups, conditions, and requirements defined within the group definition set.
About this task
This action cannot be undone. If you need to redefine a deleted group definitionset, then you can manually redefine it from committed policies or from importedfiles.
Procedure1. Open the Group Definition Sets window. (Policy Editor > Platforms > Group
Definition Sets)2. Select the group definition set that you want to delete. You can select one or
more group definition sets to delete.3. Click Delete. The Delete Group Definition Sets confirmation window opens.4. Click Delete to confirm deletion. The group definition set and all groups,
conditions, and requirements associated with it are deleted. The Delete GroupDefinition Sets window closes, and you are returned to the Group DefinitionSets window.
Renaming a group definition setYou can rename a group definition set.
Procedure1. Open the Group Definition Sets window. (Policy Editor > Platforms > Group
Definition Sets)2. Select the group definition set that you want to rename.3. Open the Select Action menu.
Chapter 9. Configuring policies with the Policy Editor 97

4. Click Rename. The Rename Group Definition Sets window opens.5. In the Group Definition Set Name field, type the new name for the group
definition set.6. Click Rename. The group definition set is renamed and is displayed in the
Group Definition Sets window. The Rename Group Definition Sets windowcloses, and you are returned to the Group Definition Sets window.
Importing a group definition setYou can import a group definition set and use it with any work policy.
About this task
The Grouping Wizard creates and saves group definition sets as a .CFG file. Youcan import these files to use with work policies.
Procedure1. Open the Group Definition Sets window. (Policy Editor > Platforms > Group
Definition Sets)2. Open the Select Action menu.3. Click Import. The Import window opens.4. Click Browse to open a file browser.5. Select the file that you want to import.6. Click Import. The file is imported and is displayed in the Group Definition Sets
window. The Import window closes, and you are returned to the GroupDefinition Sets window.
Managing groupsYou can view, create, edit, and delete groups using the Policy Editor.
Managing groups
Use the table to manage groups in a selected group definition set.
Select a group, and then select an action to perform on the selected group from thetoolbar at the top of the window or from the Select Actions menu.
CreateOpens the Create Group window where you can select a group to create in thepolicy. You can only create groups in work policies.
DeleteConfirms the deletion of the selected group in the group set and returns to theGroups window. You can only delete groups in work policies.
Create Group WizardOpens a wizard that enables you to create a new group based on event data ina Reporting Database.
The following attributes for each group are displayed in the table.
SelectSelect the group that you want to view, copy, modify, or delete. You can selectmore than one check box at a time.
98 Tivoli Security Information and Event Manager V2.0: Administrators Guide

Group NameName of the group.
DimensionName of W7 category that the group belongs to. W7 categories are Who, What,When, Where, On What, Where From, Where To.
SignifianceSignificance level of the group.
The Select Action menu provides actions you can perform on the selected group.Click Select Action and select one of the following actions.
Table 22. Actions available from Select Action menu
Action Description
Create Opens a window enabling you to create anew group.
Open Opens a window enabling you to drill downinto the group.
Delete Confirms the deletion of the selected group.
Rename Enables you to rename a group.
Change Significance Opens a window where you can change thesignificance level associated with the group.
Copy Enables you to copy a group.
Paste Enables you to paste a group definition setthat you had copied.
Filtering and sorting the groups table
You can use the Integrated Solutions Console toolbar to filter and to sort the tabledisplay of groups. Filtering the table display shows only groups that meet the filtercriteria. Sorting the table display shows groups based on the sort order. Filteringand sorting are useful when there are a large number of groups.
Creating a groupYou can define a group to use in a grouping policy.
Procedure1. Open the Groups window. (Policy Editor > Platforms > Group Definition Sets >
Groups)2. Click Create. The Create Group window opens.3. In the Group Name field, enter a name for the new group.4. In the Dimension field, select the W7 category that the group belongs to.5. Click Create. A new group is created and displayed in the Groups window.
Renaming a groupYou can rename a group. For example, if you copied a group and then modifiedthe copy, then you might want to rename the group in order to better describe itscontents.
Chapter 9. Configuring policies with the Policy Editor 99

Procedure1. Open the Groups window. (Policy Editor > Platforms > Group Definition Sets >
Groups)2. Select the group that you want to rename.3. Open the Select Action menu.4. Click Rename. The Rename Group window opens.5. In the Group Name field, type the new name for the group.6. Click Rename. The group is renamed and is displayed in the Groups window.
The Rename Group window closes, and you are returned to the Groupswindow.
Deleting a groupYou can delete a group from a group definition set in a work policy. Groupscannot be deleted from committed policies. Deleting a group deletes all conditionsand requirements defined within the group.
Procedure1. Open the Groups window. (Policy Editor > Platforms > Group Definition Sets >
Groups)2. Select the group that you want to delete.3. Click Delete. The Delete Group confirmation window opens.4. Click Delete to confirm deletion. The group, and all conditions and
requirements associated with it, are deleted. The Delete Group window closes,and you are returned to the Groups window.
Changing the group significanceYou can define a significance percentage for a group to indicate the severity ofevents belonging to the group. Tivoli Security Information and Event Manager usesthe significance percentage and the specified severity threshold to determine whento send alert messages.
About this task
A higher group significance percentage assigns a higher severity level to groupevents. For example, if you were concerned primarily about external firewallbreaches, then you might assign a high group significance percentage to networklogin failures.
Note: By default, a new group is given the default significance of 10.
Procedure1. Open the Groups window. (Policy Editor > Platforms > Group Definition Sets >
Groups)2. Select the group that you want to change.3. Open the Select Action menu.4. Click Change Significance. The Change Significance window opens.5. In the Significance field, type the new significance percentage. The significance
must be a whole integer between 10 and 99. It cannot contain any punctuationor symbols (such as a % sign). A new group is given the default significance of10.
100 Tivoli Security Information and Event Manager V2.0: Administrators Guide

6. Click Change. The changed significance is displayed in parentheses after thegroup name in the Groups window. The Change Significance window closes,and you are returned to the Groups window.
Managing conditions for groupsA condition is a statement that describes a member of a group. You can create anddelete conditions, and you can paste conditions into a group.
Managing conditionsA condition is a statement that describes a member of a group. All definedconditions are displayed in the Conditions window. Using the table, you can createand delete conditions, and you can paste conditions into a group.
About conditions
A condition is a statement that describes a member of a group. For example, if agroup is titled “All Employees,” the condition for group membership is a validemployee ID. If a group is created called “Finance Managers,” then the conditionfor group membership is an employee ID that identifies a group member as amanagement employee in the Finance department. When groups are created, youmust specify the conditions for group membership.
The following attributes for each condition are displayed in the table.
SelectSelect the condition that you want to view, copy, modify, or delete. You canselect more than one check box at a time.
Condition NameName of the condition.
Managing conditions
Use the table in the Conditions window to manage conditions in a selected group.
Select a condition, and then select an action to perform on the selected conditionfrom the toolbar at the top of the window or from the Select Actions menu.
Table 23. Actions available from Select Action menu
Action Description
Create Opens the Requirements window where youcan define requirements for the condition.You can only create conditions andrequirements in work policies.
Open Opens a window where you can drill downinto the conditions
Delete Confirms the deletion of the selectedcondition in the group and returns to theConditions window. You can only deleteconditions in work policies.
Copy Enables you to copy a condition.
Paste Pastes a copied condition into the selectedgroup and returns to the Conditionswindow. You can only copy and pasteconditions in work policies.
Chapter 9. Configuring policies with the Policy Editor 101

Filtering and sorting conditions
You can use the Integrated Solutions Console toolbar to filter and to sort the tabledisplay of conditions. Filtering the table display shows only conditions that meetthe filter criteria. Sorting the table display shows conditions based on the sortorder. Filtering and sorting are useful when there are a large number of conditions.
Defining requirementsYou can define requirements for a selected condition.
Before you begin
You must create a condition before you can define requirements for the condition.
About this task
The following table describes action available form the Select Action menu.
Table 24. Actions available from Select Action menu
Action Description
Create Opens the Requirements window where youcan define requirements for the condition.You can only create requirements in workpolicies.
Open Opens a window where you can drill downinto the requirements.
Delete Confirms the deletion of the selectedrequirement. You can only delete conditionsin work policies.
Copy Enables you to copy a requirement.
Paste Pastes a copied requirement into the selectedcondition. You can only copy and pasterequirements in work policies.
Procedure1. Open the Conditions window. (Policy Editor > Platforms > Group Definition
Sets > Groups > Conditions)2. Select the condition for which you want to define requirements.3. Click Create. The Requirements window opens.4. In the middle field, select the condition that you want to use.5. In the field on the right, enter the parameter that the field name and condition
should match.6. Click Create. The requirement is created. If you are editing a requirement, then
the Update button displays instead of the Create button.7. Repeat steps 3-6 to define additional requirements.8. When you are finished defining requirements, click Close. The Requirements
window closes, and you are returned to the Conditions window.
102 Tivoli Security Information and Event Manager V2.0: Administrators Guide
Using the Group Wizard to create a policy groupYou can use the Group Wizard to create a policy group. The Group Wizard walksyou through the steps to define a group.
You must have the following roles in order to use the Group Wizard:v Create or edit policy rolev View machines, event sources, and databases role
For more information about user roles, see “Types of user roles and access rights”on page 139.
The Group Wizard consists of five steps:1. Choose Reporting Database2. Specify group name and dimension3. Set Reporting Database filters4. Select group elements5. Verify group
Step 1: Choose Reporting Database
The first step is to choose a SIM Reporting Database. The selected databaseprovides the events that can you use to create the group using the Group Wizard.
In the Reporting Database Name menu, select the name of the Reporting Databasethat you want to use. Click Next to continue to the Specify Group Name andDimension window.
Step 2: Specify Group Name and Dimension
After selecting the Reporting Database, define a group name and select a W7dimension.
In the Group Name field, enter a name for the new group. In the Dimension list,use the radio buttons to select the W7 category that the group belongs to. You canonly select one dimension. Click Next to continue to the Set Reporting DatabaseFilters window.
Step 3: Set Reporting Database Filters
After specifying the group name and dimension, use the filter criteria to displaymatching elements.
Click Next to continue to the Select Group Elements window
Step 4: Select Group Elements
After setting the Reporting Database filters, select group elements based on thefilter settings. The conditions and requirements for group membership are definedbased on the selected elements.
The table displays attributes of the elements available in the Reporting Database.Column headings vary depending on which dimension and filters were specified.
Chapter 9. Configuring policies with the Policy Editor 103

Use the check boxes to select the elements that you want to add to the group. Youcan select multiple check boxes. Click Next to continue to the Verify Groupwindow.
Step 5: Verify Group
After completing the configuration windows, review the information that isdefined for the group.
If the information is not correct, click Back to return to previous windows.
If the information is correct, click Finish. The group is created and displayed in theGroup window.
Managing policy rulesPolicy rules specify the events that are permitted and not permitted for a selectedpolicy. In essence, the policy rules define the security policy. You can use the PolicyEditor to view policy rules, create rules, delete rules, edit rules, copy rules, pasterules and import rules.
Creating policy rulesYou can create a new policy rule by specifying the W7 categories that will triggerthe rule.
About this task
You can only create policy rules in Work policies, because committed policiescannot be modified.
Note: When creating policy rules for the When dimension, note that the time isrounded to the nearest quarter-hour. For example, if the When dimension isspecified for 12:03, then the time will be rounded to 12:00 (the closest quarter-hourincrement). If the When dimension is specified for 12:09, then the time will berounded to 12:15.
Procedure1. In the Policy Rules window, click Create. The Create Rule window displays.2. Click Select Group to view a list of available groups for the appropriate W7
category. The Select Groupname window opens showing the groups that havebeen defined for the given W7 category.
3. In the Select a Platform field, select the platform. The table is refreshed withthe group names and definition sets for the selected platform.
4. Select the group that you want by clicking the appropriate radio button.5. Click Select. The group is added to the rule. The window closes and returns to
the Create Rule window.6. Specify additional W7 categories that you want (for example, Who, What, When,
and so on). It is not necessary to specify every category.7. Add an optional description of the rule in the Description field.8. Click OK. The new rule is saved. The Create Rule window closes, and you are
returned to the Policy Rules window.
104 Tivoli Security Information and Event Manager V2.0: Administrators Guide

Editing policy rulesYou can edit a policy rule by modifying the W7 categories that trigger the rule orby modifying the description of the rule.
Procedure1. In the Policy Rules window, select the rule that you want to edit.2. Click Edit. The Edit Rule window displays.3. Click Select Group to view a list of available groups for the appropriate W7
category. The Select Groupname window is displayed showing the groups thathave been defined for the given W7 category.
4. In the Select a Platform field, select the platform. The table is refreshed withthe group names and definition sets for the selected platform.
5. Select the group that you want by clicking the appropriate radio button. Youcan only select one group at a time.
6. Click Select. The group is added to the rule. The window is closed and you arereturned to the Edit Rule window.
7. Specify additional W7 categories that you want. It is not necessary to specifyevery category.
8. Add an optional description of the rule in the Description field.9. Click OK. The modified rule is saved.
Deleting policy rulesYou can delete policy rules from Work policies.
About this task
You also can delete policy rules from a committed policy by duplicating the policy,deleting the policy rule, and committing the modified policy. This process creates anew committed policy while retaining the original policy in case it is needed.
Procedure1. Open the Policy Rules window. (Policy Editor > Policy Rules)2. Select the policy rules that you want to delete. You can select one or more sets
of rules.3. Click Delete. The Delete Policy Rule(s) confirmation window opens.4. Click Delete to confirm deletion. The rules are deleted. The Delete Policy
Rule(s) confirmation window closes, and you are returned to the Policy Ruleswindow.
Importing policy rulesYou can import policy rules and use them with any Work policy.
About this task
The Policy Wizard creates and saves policy rules as a .pcy file. You can importthese files to use with Work policies. Because policy rules are created from recentlycollected audit data, you can respond quickly to changed activities by importingrules.
Note: Importing policy rules overwrites the existing set of policy rules.
Chapter 9. Configuring policies with the Policy Editor 105

Procedure1. Open the Policy Rules window. (Policy Editor > Policy Rules)2. Open the Select Action menu.3. Click Import rules. The Import window opens.4. Click Browse to open a file browser.5. Select the file that you want to import.6. Click Import. The file is imported and is displayed in the Policy Rules window.
The Import window closes, and you are returned to the Policy Rules window.
Managing attention rulesAttention rules determine which events trigger an alert. The trigger criteria isbased on a rule or combination of rules. You can use the Policy Editor to viewattention rules, create rules, delete rules, edit rules, copy rules, paste rules, andimport rules.
Creating attention rulesYou can create a new attention rule by specifying the W7 categories that willtrigger the rule. You can create attention rules for a Work policy.
About this task
You can only create attention rules in Work policies, because committed policiescannot be modified.
Procedure1. In the Attention Rules window, click Create. The Create Rule window
displays.2. Click Select Group to view a list of available groups for the appropriate W7
category. The Select Groupname window opens showing the groups that havebeen defined for the given W7 category.
3. In the Select a Platform field, select the platform. The table is refreshed withthe group names and definition sets for the selected platform.
4. Select the group that you want by clicking the appropriate radio button.5. Click Select. The group is added to the rule. The window closes and returns
to the Create Rule window.6. Specify additional W7 categories that you want (for example, Who, What,
When, and so on). It is not necessary to specify every category.7. Specify the severity level in the Severity field. Attention rules contain a
severity metric, which triggers the rule if an event or combination of eventsgoes above a specified threshold. The severity level can be between 1 and 99.A higher number indicates a greater severity (that is, a more severe incident).
8. Specify a rule ID in the Rule ID field. The Rule ID is the name of the rule.9. Add an optional description of the rule in the Description field.
10. Click OK. The new rule is saved. The Create Rule window closes, and you arereturned to the Attention Rules window.
Editing attention rulesYou can edit an attention rule by modifying the W7 categories that trigger the ruleor by modifying the description of the rule.
106 Tivoli Security Information and Event Manager V2.0: Administrators Guide

Procedure1. In the Attention Rules window, select the rule that you want to edit.2. Click Edit. The Edit Rule window displays.3. Click Select Group to view a list of available groups for the appropriate W7
category. The Select Groupname window is displayed showing the groups thathave been defined for the given W7 category.
4. In the Select a Platform field, select the platform. The table is refreshed withthe group names and definition sets for the selected platform.
5. Select the group that you want by clicking the appropriate radio button. Youcan only select one group at a time.
6. Click Select. The group is added to the rule. The window is closed and you arereturned to the Edit Rule window.
7. Specify additional W7 categories that you want. It is not necessary to specifyevery category.
8. Add an optional description of the rule in the Description field.9. Click OK. The modified rule is saved.
Deleting attention rulesYou can delete attention rules from Work policies.
About this task
You also can delete attention rules from a committed policy by duplicating thepolicy, deleting the attention rule, and committing the modified policy. Thisprocess creates a new committed policy while retaining the original policy in caseit is needed.
Procedure1. Open the Attention Rules window. (Policy Editor > Attention Rules)2. Select the attention rules that you want to delete. You can select one or more
sets of rules.3. Click Delete. The Delete Attention Rule(s) confirmation window opens.4. Click Delete to confirm deletion. The rules are deleted. The Delete Attention
Rule(s) confirmation window closes, and you are returned to the AttentionRules window.
Importing attention rulesYou can import attention rules and use them with any Work policy.
About this task
The Policy Wizard creates and saves attention rules as a .PCY file. You can importthese files to use with Work policies.
Procedure1. Open the Attention Rules window. (Policy Editor > Attention Rules)2. Open the Select Action menu.3. Click Import rules. The Import window opens.4. Click Browse to open a file browser.5. Select the file that you want to import.
Chapter 9. Configuring policies with the Policy Editor 107

6. Click Import. The file is imported and is displayed in the Attention Ruleswindow. The Import window closes, and you are returned to the AttentionRules window.
Testing policiesBefore you commit a Work policy, it can be helpful to test it and see how itanalyzes the audit data.
Before you begin
Only users with the "Manage databases, alerts, and archiving" role can test policies.
About this task
When you test a policy, you load audit data and map the W7 data against thepolicy definitions.
Only Work policies can be tested. The testing functionality is not available forCommitted policies.
Procedure1. Open the Policy Editor.2. Click Test Policy. The Load Database Wizard opens.3. Manually map and load audit data into a Reporting Database and run the
dataset against a Work policy. For information about using the Load DatabaseWizard, see “Using the Load Database Wizard to manually load data” on page77.
108 Tivoli Security Information and Event Manager V2.0: Administrators Guide

Chapter 10. Configuring policies using the Policy Generator
You can use the Policy Generator to quickly create a work policy using collectedaudit data.
The Policy Generator consists of a wizard that walks you through the process ofcreating a policy.
You can use a set of collected audit data in a Reporting Database as a startingpoint to create a security policy. The Policy Generator automatically generates asecurity policy by comparing known acceptable behavior of the platform familiescontained in the database to the audit data. After the Policy Generator creates apolicy, you can view the policy in the Policy Explorer and modify the policy in thePolicy Editor.
Note: The Policy Generator only supports the Windows and firewall platformfamilies. Grouping files for other platforms in the collected audit data cannot becreated by the Policy Generator.
Opening the Policy GeneratorYou can open the Policy Generator by expanding the Configuration andManagement topic, expanding the Policies topic, and clicking Policy Generator.
About this task
You can open the Policy Generator from the navigation panel as shown inFigure 31 on page 110.
© Copyright IBM Corp. 1998, 2011 109

Procedure1. Log on to Tivoli Security Information and Event Manager.2. In the navigation panel, expand the Tivoli Security Information and Event
Manager topic.3. Expand the Configuration and Management topic.4. Expand the Policies topic.5. Click Policy Generator. The Policy Generator page opens where you can
automatically generate a security policy.
Generating a security policyYou can quickly generate a security policy with collected audit data by using thePolicy Generator.
Before you begin
You must have the following user roles in order to use the Policy Generator:v Create or edit policy.v View machines, event sources, and database role.
For more information, see “Types of user roles and access rights” on page 139.
Note: If scoping is enabled, the user must have auditor privileges to use the PolicyGenerator.
In addition to the user roles, you must have access to the Reporting Database thatwill be used for policy generation. If you do not have access to a Reporting
Figure 31. Navigation bar showing the Policy Generator
110 Tivoli Security Information and Event Manager V2.0: Administrators Guide

Database, then that database will not be displayed in the list of available databasesin the Policy Generator and thus you will not be able to select it.
For more information, see “Setting user database access” on page 136.
About this task
The Policy Generator walks you through four steps to automatically generate aWork policy:1. Define the name of the policy.2. Select the audit data that you want to use.3. The Policy Generator analyzes the data and generates the policy.4. Optionally, load the data into a Reporting Database and then check the results
in the Compliance Dashboard.
Procedure1. Open the Policy Generator. The Tivoli Security Information and Event
Manager Policy Generator welcome page opens.2. Click Next. The Enter the Policy Name page opens.3. In the Policy Name field, enter a name for the policy. The name must meet the
following requirements:v It can only contain alphanumeric characters, spaces, and the following
special characters: hyphen (-), underscore (_), dollar sign ($), and hash sign(#).
v It cannot contain more than 45 characters.4. Click Next. The Select the Reporting Database you want to analyze page opens.5. Use the radio button to select a Reporting Database.6. Click Next. The Policy Generator analyzes the audit data contained in the
Reporting Database. Using the data, the Policy Generator creates groups andpolicy rules. When then policy creation process is finished, the Policy Generatorshows the success result in the page header, information about the generatedpolicy, analyzed data, and the name of the Reporting Database used foranalysis.
7. Click Next. The Loading a Reporting Database with the newly created Policypage opens where you can select whether to test the policy against the data ina Reporting Database.
8. Select whether to load the Reporting Database.v If you want to test the policy, use the radio buttons to select the Reporting
Database.v If you do not want to test the policy, select the radio button for I do not want
to load a Reporting Database with the Policy now.9. Click Next. The Summary page opens and describes the status of the Policy
Generator operation.
What to do next
After you have created a policy, you can view the policy in the Policy Explorer andedit the policy in the Policy Editor. For more information, see Chapter 8,“Managing policies with the Policy Explorer,” on page 85 and Chapter 9,“Configuring policies with the Policy Editor,” on page 93.
Chapter 10. Configuring policies using the Policy Generator 111
You can also test the policy by loading it into the Reporting Database, and thenviewing the results of the policy in the Compliance Dashboard. For moreinformation, see “Loading a database” on page 75.
Policy Generator usersThere are two types of Policy Generator users: the Tivoli Security Information andEvent Manager administrator, who is created during installation, and the normaluser.
All users except for the Tivoli Security Information and Event Manageradministrator are normal users of the Policy Generator. If Scoping is enabled, thenthe user must be an auditor who owns at least one of the top-level Scoping groups.
For more information, see Chapter 14, “Configuring Scoping,” on page 149.
112 Tivoli Security Information and Event Manager V2.0: Administrators Guide

Chapter 11. Configuring alerts
Alerts notify specified recipients, such as a system administrator, when a serious orpotentially harmful security event has occurred.
Alerts are messages that Tivoli Security Information and Event Manager sendswhen a serious or potentially harmful security event has occurred. Alerts allow asystems manager or administrator to quickly respond to the security event.
Viewing alertsYou can see all alerts that are configured in IBM Tivoli Security Information andEvent Manager by expanding the Configuration and Management topic,expanding the Policies topic, and clicking Alerts.
About this task
You can open the Alerts page from the navigation panel.
Procedure1. Log on to Tivoli Security Information and Event Manager.2. In the navigation panel, expand the Tivoli Security Information and Event
Manager topic.3. Expand the Configuration and Management topic.4. Expand the Policies topic.5. Click Alerts. The Alerts page opens where you can view and manage alerts.
Managing alertsAll defined alerts are displayed in the Alerts page. You can create, edit, and deletealerts, and you can also configure the protocol settings used to send the alerts.
The purpose of an alert is to raise attention for events that require a follow-up, thatis, special attention events or events that are above a defined severity level, such assecurity policy exceptions. Alerts notify specified recipients, such as a systemadministrator, when a serious or potentially harmful security event has occurred.The relevance (severity) of an event is defined in the security policy.
The following attributes for each alert are displayed in the table on the Alerts page.
Table 25. Alert properties
Field Description
Protocol The protocol used to send the alert. Thedefault protocol is email.
Protocols include:
v SNMP
v email
v Script
© Copyright IBM Corp. 1998, 2011 113

Table 25. Alert properties (continued)
Field Description
Recipient The email address of the person to whomthe alert is sent.
You can specify multiple recipients byseparating the email addresses with either asemicolon (;) or a space ( ).
This field is not valid for SNMP alerts.
Severity The severity threshold that triggers the alert.If an event exceeds the threshold, then TivoliSecurity Information and Event Managersends an alert.
Severity metrics can range from 0–99, wherea higher number indicates a greater severity.
Rule Identifiers A comma-separated list of rules (shown bytheir rule identifiers) that trigger the alert. Ifan event matches the specified rules, thenTivoli Security Information and EventManager sends an alert.
Filtering and sorting the alerts table
You can use the Integrated Solutions Console toolbar to filter and to sort the tabledisplay of alerts. Filtering the table display shows only alerts that meet the filtercriteria. Sorting the table display shows alerts based on the sort order. Filtering andsorting are useful when there are a large number of alerts.
Creating alertsDefine criteria that are used to trigger an alert, and specify who receives the alert.
Before you begin
You must have the "Manage databases, alerts, and archiving" role in order to createalerts.
About this task
Tivoli Security Information and Event Manager sends alerts on the basis of alertsettings. The settings specify the circumstances (that is, the severity level and therule identifiers) under which Tivoli Security Information and Event Manager willsend an alert. The settings also specify to whom the alert will be sent and theprotocol used to send the alert.
To create an alert, you must define the alert properties described in Table 25 onpage 113.
Procedure1. Open the Alerts page.2. Click Create. The Create Alert window opens.
v Alternatively, you can click Create in the Select Action menu, and then clickGo.
114 Tivoli Security Information and Event Manager V2.0: Administrators Guide

3. In the Protocol menu, select the protocol that you want to use. The defaultprotocol is email.
4. In the Severity field, type a number representing the severity threshold thattriggers the alert. This is a required field.
5. In the Rule Identifiers field, type the rules that trigger the alert.6. Click OK. The alert is created, and you are returned to the Alerts window.
Deleting alertsYou can delete alerts.
Before you begin
You must have the "Manage databases, alerts, and archiving" role in order to deletealerts.
Procedure1. Open the Alerts page.2. Select the alert or alerts that you want to delete.3. Click Delete. All selected alerts are deleted.
v Alternatively, you can click Delete in the Select Action menu, and then clickGo.
Editing an alertYou can modify an alert.
Before you begin
You must have the "Manage databases, alerts, and archiving" role in order tomodify alerts.
Procedure1. Open the Alerts page.2. Select the alert that you want to edit.3. Click Edit. The Edit Alert window opens.
v Alternatively, you can click Edit in the Select Action menu, and then clickGo.
4. Modify the fields as needed.5. Click OK. The changes to the alert are saved, and you are returned to the
Alerts window.
Editing the protocol for an alertYou can modify the protocol that is used to send an alert.
After one or more alerts are created, you must configure the protocols that TivoliSecurity Information and Event Manager will use to send the alert. The protocolsettings apply to all alerts that are sent using the same protocol.
Editing the SNMP protocolYou can configure the IP address and the port on which SNMP alerts are sent.
Chapter 11. Configuring alerts 115

Before you begin
You must have the "Manage databases, alerts, and archiving" role in order to editan alert protocol.
Gather the following information:v SNMP address. Both IPv4 and IPv6 addresses are supported.v SNMP port number.
SNMP uses the UDP protocol, and thus you cannot be sure that messages actuallyarrive at the SNMP receiving device. To maximize reliability, the network oftenneeds to be configured for SNMP traffic. Consult your network administratorabout network configuration.
SNMP receivers are configured using a file that defines the SNMP message format.The file for the SNMP alert format used by Tivoli Security Information and EventManager can be found on Windows, AIX, and Linux systems at:../tsiem/sim/server/mib/alert.mib
Procedure1. Open the Alerts page.2. Click Protocol. The Edit Protocol window opens.
v Alternatively, you can click Protocol in the Select Action menu, and thenclick Go.
3. In the Protocol menu, select SNMP.4. In the Address field, type the DNS host name or the IP address of the SNMP
device or application that receives the alerts. This field is required.5. In the Port field, type the port number on which the SNMP receiver listens (the
port number is typically port 161). This field is required.6. Click OK. The protocol is modified. The Edit Protocol window closes, and you
are returned to the Alerts window.
Editing the email protocolYou can configure how email alerts are processed.
Before you begin
You must have the "Manage databases, alerts, and archiving" role in order to editan alert protocol.
Gather the following information:v Host name of the email server.v email address of sender. This is the address from which alerts are sent.v email address that alert recipients can reply to. When alert recipients reply to an
alert by email, their reply is sent to this email address.v Determine whether the alert should be delayed (that is, sent after a specified
time period) if the severity is less than or equal to a specified threshold. This isuseful for less urgent alerts.
Procedure1. Open the Alerts page.2. Open the Alerts window.
116 Tivoli Security Information and Event Manager V2.0: Administrators Guide
|

3. Click Protocol. The Edit Protocol window opens.v Alternatively, you can click Protocol in the Select Action menu, and then
click Go.4. In the Protocol menu, select email.5. In the Host name field, type the host name of the email server. This is a
required field.6. In the From field, type the email address of the sender. This is a required field.7. In the Reply To field, type the email address that alert recipients can reply to.
When alert recipients reply to an alert by email, their reply is sent to this emailaddress. This is a required field.
8. In the Delay Enabled box, you can optionally specify a time delay for sendingthe alert if the severity of the alert is less than or equal to the severity setting.To set a delay, in the Minutes field, type the amount of time to delay inminutes, and in the Severity field, type the severity threshold.
9. Click OK. The protocol is modified. The Edit Protocol window closes, and youare returned to the Alerts window.
Editing the script protocolYou can send alerts through an alert handler, which invokes an alert based on auser-defined program or script. The alert handler allows you to forward alerts toalmost any device or application using any protocol.
Before you begin
You must have the "Manage databases, alerts, and archiving" role in order to editan alert protocol.
Gather the following information:v The file path to the alert handler you want to use to send alerts. This file path
can be an absolute file path or a relative file path to the \Server\run folder.
About this task
To forward alerts to various devices or applications, you must obtain or create aprotocol handler, such as an MS-DOS executable, a Windows 32 executable, aWindows 64 executable, an AIX executable, or a Unix executable.
The protocol handler is started by the mapper whenever a set of script-invokedalerts must be sent. For information about protocol handlers, see “Creating an alerthandler” on page 118.
Procedure1. Open the Alerts page.2. Click Protocol. The Edit Protocol window opens.
v Alternatively, you can click Protocol in the Select Action menu, and thenclick Go.
3. In the Protocol menu, select Script.4. In the Command field, type the command line that invokes the alert handler.
You can use an absolute path to the executable or a path relative to the\Server\run folder. You also can specify any command line parameters that thehandler requires and a maximum of three different place holders. This field isrequired.
Chapter 11. Configuring alerts 117
5. Click OK. The protocol is modified. The Edit Protocol window closes, and youare returned to the Alerts window.
Creating an alert handlerAn alert handler can be created in any programming language or technology, solong as it can be run from the command line and can access the event fileparameters from the original command line. This section describes the purpose ofthe alert handler and provides an example of an alert handler script for Windowssystems.
Purpose
The mapper calls the alert handler when the mapper determines that an alertshould be sent. The DOS session and security context are inherited from the Serverrun (OS) account.
The initial current directory is the \tsiem\sim\Server\run folder.
Event file parameters
The eventfile parameter specifies a path name for a file that contains detailsabout events on which an alert reports. The file is prepared by the mapper. The fileis located in the temporary folder for the user environment that is active for boththe mapper processes and the alert handler: the Server OS run account. After thealert handler returns, the mapper deletes the event file again.
The first line of the file contains field name headers. Each remaining linerepresents one event.
The encoding of the event file is UTF-8. Tabs separate the fields.
Table 26 describes the fields.
Table 26. Fields of the Event File parameter
Header Content Format / Valid values
EventSeverity The event severity aslisted in the ComplianceDashboard.
A decimal integer in the range 1-99.
EventCount The number of sourcerecords represented bythe event.
A positive decimal integer.
When The event time stamp. Non-empty string with format: day ofweek month date hh:mm:ss zzz yyyy.
WhenGroups A list of all Whengroups to which theevent belongs.
Non-empty string. Stringformat:[groupname1:groupsignificance1,
WhatVerb Event main class: thefirst part of the What aslisted in the ComplianceDashboard.
Non-empty string.
WhatNoun Event class: the middlepart of the What aslisted in the ComplianceDashboard.
Non-empty string.
118 Tivoli Security Information and Event Manager V2.0: Administrators Guide

Table 26. Fields of the Event File parameter (continued)
Header Content Format / Valid values
WhatSuccess Success class: the thirdpart of the What aslisted in the ComplianceDashboard.
Non-empty string, typically 'success'or 'failure'.
WhatGroups A list of all What groupsto which the eventbelongs.
The same as WhenGroups.
WhereType The platform type fromthe event 'Where'.
Non-empty string
WhereName The platform name fromthe event 'Where'.
Non-empty string
WhereGroups A list of all Wheregroups to which theevent belongs.
The same as WhenGroups
WhoRealname The person name for theevent 'Who'.
Non-empty string
WhoLogonname The logon ID for theeven 'Who'.
Non-empty string
WhoGroups A list of all Who groupsto which the eventbelongs.
The same as WhenGroups
WherefromType The platform type fromthe event 'Wherefrom'.
Non-empty string
WherefromName The platform name fromthe event 'Wherefrom'.
Non-empty string
WherefromGroups A list of all WhereFromgroups to which theevent belongs.
The same as WhenGroups
OnwhatType The left part of theOnWhat from the eventas listed in theCompliance Dashboard.
Non-empty string
OnwhatPath The middle part of theOnWhat from the eventas listed in theCompliance Dashboard.
Non-empty string
OnwhatName The right part of theOnWhat from the eventas listed in theCompliance Dashboard.
Non-empty string
OnWhatGroups A list of all OnWhatgroups to which theevent belongs.
The same as WhenGroups
WheretoType The platform type fromthe event 'Whereto'.
Non-empty string
WheretoName The platform name fromthe event 'WhereTo'.
Non-empty string
WheretoGroups A list of all WhereTogroups to which theevent belongs.
The same as WhenGroups
Chapter 11. Configuring alerts 119

Table 26. Fields of the Event File parameter (continued)
Header Content Format / Valid values
RuleIDs A list of IDs of allattention rules thatmatch this event.
Non-empty string. String format:[element1, .., elementN], N >= 0
Sample alert handler
The following sample alert handler is implemented as a batch file. The example isonly for Windows systems.@echo offrem sdalert.bat sample alert handler batch scriptremrem this script copies the command line parametersrem passed by the main mapper as well as the temporaryrem file containing event details to the file sdalert.logremrem The alert handler is called directly from java.rem There is no dos box and no output to standard devicesrem should be generated.rem If output is sent to stdout or stderr, the processrem will halt, as well as the main mapper and the databaserem load fails.remc:>nul:cd \>nul:echo.|time>>sdalert.log 2>nul:echo Recipient>>sdalert.log 2>nul:echo %1>>sdalert.log 2>nul:echo Summary>>sdalert.log 2>nul:echo %2>>sdalert.log 2>nul:echo Eventfile>>sdalert.log 2>nul:echo %3>>sdalert.log 2>nul:copy /b sdalert.log+%3 sdalert.log>nul: 2>&1
To run the sample, save the code to a batch file called c:\sdalert.bat and use thefollowing command line in the protocol settings window:c:\sdalert.bat <recipient> <summary> <eventfile>
The sample writes its output to a file called sdalert.log, as shown in thefollowing example:The current time is: 15:08:23.91Enter the new time:[email protected]"Attention occurred. Severity: 80. Broken Attention Rule:sysupsa."EventfileC:\DOCUME~1\CEAROO~1.CRM\LOCALS~1\Temp\cstalert44756.tmp
Severity EventCount When WhatGroups WhatVerbWhatNoun WhatSuccess WhatGroups WhereTypeWhereName WhereGroups WhoRealname WhoLogonnameWhoGroups WherefromType WherefromName WherefromGroupsOnwhatType OnwhatPath OnwhatName OnwhatGroupsWheretoType WheretoName WheretoGroups RuleIDs
80 1 Wed May 07 15:04:44 CEST 2010 [OfficeHours:10] Use Privilege Failure [SystemUpdates:50] Windows SATURN [Workstations:10] John
120 Tivoli Security Information and Event Manager V2.0: Administrators Guide

Emerson SATURN\JOHN [Users:10] [Workstations:10] SATURN[Workstations:10] AUDITPOLICY . Audit Policy[Other Objects:10] Windows SATURN [Other Platforms:10][sysupsa]
The output shows the current time, the recipient, the event summary, and theevent file path name. The output is saved to the temp folder of the Tivoli SecurityInformation and Event Manager run account OS user.
The event file is a temporary file that is deleted after the handler exits. If needed,the contents can be copied by the handler as the sample handler does. The handlercopies and forwards the data to another location. The sample output shows thecontents of the event file commencing with the line that starts with Severity.
Note: The alert handler is called directly from a Java process. It does not run in aDOS window, and no output to standard devices should be generated. If output issent to any of the standard devices, such as stdout or stderr, then the process andthe main mapper stop, which makes the database load fail. Therefore, the sampleredirects all output for both stdout and stderr either to an output file or the nulldevice.
Delaying alertsWhen sending alerts based on event severity, the alert channel might be floodedwith messages. You can reduce the number of alerts by combining multiplemessages into one message.
Delaying alert messages (that is, delaying how quickly an alert is sent) gives themapper time to see if more alerts are raised. If more events occur, then TivoliSecurity Information and Event Manager can combine the alerts.
Consider the following parameters when deciding whether to delay alerts:v It is possible to delay alerts sent by email. Emails can carry large amounts of
data and are typically sent to people. To prevent overwhelming recipients withnumerous emails, it might be useful to delay alerts. In this case, the mapperwould send a combined alert rather than numerous alerts.
v It is not possible to delay SNMP alerts. An SNMP message can carry only alimited amount of data, which is sufficient for one alert message.
v The delay can be switched on or off for script alerts, depending on theparameters and nature of the script alert handler. For more information, see“Creating an alert handler” on page 118.
When the delay feature is enabled, the mapper respects a maximum waiting timewhile processing events. After the maximum time is reached for one event, themapper combines all alerts into a single message and sends the message. Thedefault maximum waiting time is 1 minute.
Reducing time between events and alertsYou can reduce the amount of time between when an event occurs on an auditedsystem and when the mapper sends an alert by scheduling more frequent collects.
Alerts are generated when the events are mapped. You can reduce the amount oftime between when an event occurs on an audited system and when the mappersends an alert. Use a frequent collect schedule and ensure that the collect-time
Chapter 11. Configuring alerts 121
mapping mode is turned on for the SIM Reporting Database that receives thecollected events. For information about collect schedules, see “Reducing timebetween events and alerts” on page 121.
Example collect schedule and collect-time mapping configuration
For example, if the collect schedule is set to every 15 minutes and collect-timemapping is turned on, then events are delivered to Server within 15 minutes.
Mapping time for the collected events varies, depending on the system load. If theload is moderate, then mapping takes about 15 minutes. As a result, alerts, if any,are generated within 30 minutes after the event has occurred.
This time can be reduced further by increasing the collect frequency, at the cost ofadditional overhead. Collect schedules more frequent than every 5 minutes areadvised only in special cases.
Preventing repeated alertsYou can prevent the mapper from sending repeated alerts by enabling or disablingthe alerting functions for specific SIM Reporting Databases by modifying themapper configuration file.
Typically, the mapper sends an alert one time for scheduled loads. The mapperdoes not send alerts for manual loads.
However, it is possible that an event source might be assigned to more than oneReporting Database, which are all loaded on schedule. In this case, the mappermight send repeated alerts. To prevent the mapper from sending repeated alerts,you can disable alerting functionality for specific Reporting Databases.
You can enable or disable the alerting functionality by modifying the mapperconfiguration file on the Server. The mapper configuration file is located onWindows systems in \tsiem\Server\run\gensub.ini and on AIX or Linux systemsin /opt/ibm/tsiem/sim/server/run/gensub.ini. To enable the alerting functionality,ensure that the alerting parameter is set to yes (alerting = yes).
By default, alerting is enabled for all Reporting Databases that are loaded onschedule.
Disabling alerting for a specific Reporting Database
To disable alerting for a specific Reporting Database, add the followingconfiguration parameter to the gensub.ini file:[Mainmapper.<GEMDB>]alerting=no
where <GEMDB> is the name of the Reporting Database.
For example, to disable alerting for Reporting Database GEM1, while leavingalerting enabled for all other Reporting Databases that are loaded on schedule, addthe following configuration parameter to gensub.ini:[Mainmapper.GEM1]alerting=no
122 Tivoli Security Information and Event Manager V2.0: Administrators Guide

Disabling alerting for all Reporting Databases
Alerting can also be disabled for all Reporting Databases. Doing so allows you toenable alerting only for a specific Reporting Databases.
To disable alerting for all Reporting Databases, add the following configurationparameter to the gensub.ini file:[Mainmapper]alerting=no
Enabling alerting for a specific Reporting Database
Alerting can then be enabled for a specific Reporting Database, add the followingconfiguration parameter to the gensub.ini file:[Mainmapper.<GEMDB>]alerting=yes
For example, to disable alerting by default and enable it for Reporting DatabaseGEM2 only, add the following configuration parameter to the gensub.ini file:[Mainmapper]alerting=no
[Mainmapper.GEM2]alerting=yes
Note: Even if the gensub.ini file explicitly specifies that alerting is enabled for aReporting Database, alerting is only available if the Reporting Database is loadedon a schedule.
Sending alerts based on special attention rule severityYou can configure Tivoli Security Information and Event Manager to send alertsbased only the special attention severity property of events.
About this task
You can edit the alert configuration file so that the severity-based alerting systemonly considers the special attention severity property of the overall event severitylevel when it is determining whether to send an alert. This system-wide settingaffects the behavior of all severity-based alerting.
The alert configuration file is located in \tsiem\Server\config\alert.ini.
Procedure1. Open the file \tsiem\Server\config\alert.ini, which can be found on the
server.2. Look for a line starting with attentionalertsonly in the options section. The
default is:[Options]attentionalertsonly=no
3. To receive alerts based only on the special attention rule severity, change No toYes and save the file.
4. Restart the EventMapper services in the Windows Services applet to implementthe change. For more information, see Appendix D, “Stopping and startingservices,” on page 195.
Chapter 11. Configuring alerts 123

Sending alerts based on event severityWhen the severity level of an event reaches a specified threshold, Tivoli SecurityInformation and Event Manager sends an alert.
Tivoli Security Information and Event Manager analyzes events and assigns eachevent a severity level. It compares the event severity to a severity threshold. If theevent severity is equal to or greater than the severity threshold, Tivoli SecurityInformation and Event Manager sends an alert.
The severity threshold is defined in the alert settings.
The event severity is determined by using the highest of the following values:v If the event is a special attention event, then Tivoli Security Information and
Event Manager uses the highest severity of all matching attention rules.v If the event is a policy exception, then Tivoli Security Information and Event
Manager uses the highest significance of all W7 groups of which the event ispart.
v If the event is not a policy exception, then Tivoli Security Information and EventManager uses the highest significance of all W7 groups of which the event ispart, divided by 10.
Reducing the number of alerts sent
When Tivoli Security Information and Event Manager sends alerts based on eventseverity, it is possible that the alert channel might be flooded with large numbersof events. To reduce the number of alerts sent, increase the severity threshold.
For example, you may want to receive an alert whenever an event with a veryhigh severity occurs. Because the severity level ranges from 1 to 99, you mightwant to choose a an alerting threshold at the higher end of that range, for example,at 95. In this case, it is necessary to modify the policy so that events for whichalerts are required receive a severity of 95 or higher.
About policy exceptions and special attentions
Events with a severity of 10 or higher are classified as special attention events oras policy exception events.
Policy exception events with a severity of 95 or higher are events where at leastone W7 dimension is party of a group with significance 95 or higher. If the securitypolicy already effectively identifies nonstandard behavior as policy exceptions,then the only policy change required is to identify groups for which alerts need tobe raised when they are involved in a policy exception. For example, these groupsmight include privileged users or especially sensitive data. The significance forsuch groups should then be set at 95 or higher to elevate the severity of any policyexception involving these groups to the level sufficient to trigger an alert.
Note: Raising the group significance of many groups to high levels might reducethe ability to distinguish severe events from less severe ones.
124 Tivoli Security Information and Event Manager V2.0: Administrators Guide

Chapter 12. Archiving audit data
The Archive tools consist of the Export Audit Data tool, which enables you toexport audit data from the Log Management Depot to the Tivoli SecurityInformation and Event Manager Server, and the Import Audit Data tool, whichenables you to import audit data that has previously been exported.
Accessing the archive toolsYou can access the Export Archive Data and Import Archive Data Tools in IBMTivoli Security Information and Event Manager by expanding the Configurationand Management topic, expanding the Archive Tools topic and clicking ExportAudit Data or Import Audit Data.
Before you begin
You must have the following user roles in order to view the Export Audit Datapage and the Import Audit Data page:v View machines, event sources, and database role.v Manage database, alerts, and archiving role.
For more information, see “User roles needed to perform various tasks” on page143.
About this task
You can access the Export Audit Data page and the Import Audit Data page fromthe navigation panel.
Figure 32. Navigation panel showing the Archive Tools links
© Copyright IBM Corp. 1998, 2011 125

Procedure1. Log on to Tivoli Security Information and Event Manager.2. In the navigation panel, expand the Tivoli Security Information and Event
Manager topic.3. Expand the Configuration and Management topic.4. Expand the Archive Tools topic.5. Click Export Audit Data to open the Export Audit Data page, or click Import
Audit Data to open the Import Audit Data page.
Exporting audit dataYou can export audit logs from the Log Management Depot to a physical path onthe Tivoli Security Information and Event Manager Server. You can use the ExportAudit Data tool to schedule exports to occur automatically.
Before you begin
You must have the following user roles in order to export audit data:v View machines, event sources, and database role.v Manage database, alerts, and archiving role.
For more information, see “User roles needed to perform various tasks” on page143.
Note: If you are using Tivoli Security Information and Event Manager on AIX orLinux, then you must ensure that the cifadmin user (that is, the user name of theadministrator specified during installation) is an owner of the parent directory towhich you want to export the data. For example, if you want to export the data tothe /mnt/data/tsiem/export directory, then cifadmin must be an owner of the/mnt/data/tsiem parent directory.
About this task
Archiving audit data frees space in the Log Management Depot. Exported logs arestored on the Tivoli Security Information and Event Manager Server, where theyare available for future use. If you want to analyze archived audit data, you canimport the data using the Import Audit Data tool.
If you want to export data only one time, then you must schedule the export usingany frequency except for "Never." After the export is completed, modify theschedule by changing the frequency to "Never."
Exported data can be imported only on systems with the same platform. Forexample, you cannot export data from a Windows system and then import the datato an AIX system, and vice versa.
Procedure1. Open the Export Audit Data page.
126 Tivoli Security Information and Event Manager V2.0: Administrators Guide

2. In the Frequency field, select how often you want to export audit data. You canexport data:
Option Description
Daily Exports either every working day(Monday-Friday) or every day.
Use the radio buttons to select when auditdata will be exported.
Weekly Exports every week on a specified day.
Use the list to select the day when the auditdata will be exported.
Monthly Exports one time each month.
Use the list to select the day of the monthwhen the audit data will be exported.
Annual Exports one time each year.
Use the lists to select the month and the daywhen the audit data will be exported.
Never Never exports data.
3. In the Starting at field, enter the time or use the time picker to select a timewhen the export will occur. This is a required field. The time format dependson whether the browser locale is set to 12 hours or to 24 hours. If the frequencyis Never, then this field does not display.
4. In the Export data older than (selected frequency) field, enter an integergreater than 0 (zero) and less than 400. This is a required field.
5. In the Export logs to path on Server field, enter a path to the directory on theServer where you want to export the audit data. This is a required field. Thefull default export directory path is %TSIEM_INSTALL_DIR/sim/server/export.The relative default directory path is ..\export. The maximum export directorypath length is 128 characters. If you want to export logs to a network drive, see“Using a network drive to import or export audit data” on page 129.
6. Click OK. If you have scheduled exports, then Tivoli Security Information andEvent Manager will begin exporting at the schedule time.
Figure 33. Export Audit Data page
Chapter 12. Archiving audit data 127

Importing archive dataYou can import audit logs from a physical path on the Tivoli Security Informationand Event Manager Server to the Log Management Depot.
Before you begin
You must have the following user roles in order to import audit data:v View machines, event sources, and database role.v Manage database, alerts, and archiving role.v Manage machines, event sources, and log reports role.
For more information, see “User roles needed to perform various tasks” on page143.
About this task
You can only import audit logs that were exported with the Export Audit Datatool. The logs must be stored on the Tivoli Security Information and EventManager Server.
Exported data can be imported only on systems with the same platform. Forexample, you cannot export data from a Windows system and then import the datato an AIX system, and vice versa.
Procedure1. Open the Import Audit Data page.
2. In the User ID field, enter your user name for Tivoli Security Information andEvent Manager. This is a required field.
3. In the Password field, enter your password for Tivoli Security Information andEvent Manager. This is a required field.
Figure 34. Import Audit Data page
128 Tivoli Security Information and Event Manager V2.0: Administrators Guide

4. In the Import logs from path on Server field, enter the full file path for theaudit logs that you want to import. This is a required field. If you want toimport logs from a network drive, see “Using a network drive to import orexport audit data.”
5. Click OK. The audit logs are imported into the Log Management Depot.
What to do next
When you click OK, the import audit tool submits a request to the server forimporting the specified log data. The amount of time it takes the server to importthe log data depends on the amount of log data being imported. The server doesnot send any notification when it finishes processing the request. To verify that theimport of the log data was successful, you must check the CImport.log file locatedin the %TSIEM_INSTALL_DIR%/sim/server/log directory. Look for error messages orfor an indication that the import was completed successfully.
After you have imported the audit logs, you can analyze the audit data andretrieve logs for forensic investigation in the Log Manager using the LogManagement Depot Investigation Tool. You can also use the Tivoli CommonReporting report sets to see reports about the audit data. For more information, seethe IBM Tivoli Security Information and Event Manager Users Guide.
Using a network drive to import or export audit dataYou can import data from a network drive and export data to a network drive.
The import/export processes run under the Tivoli Security Information and EventManager operating system user (by default, cifowner), not under the name of theuser who initiates the process. As a result, mapped network drives that are visibleto the user might not be available for the import/export processes.
To import or export data to a network drive, specify the UNC (Universal NamingConvention) path instead of a drive letter. For example, specify \\Source\datainstead of C:\\source\data.
Ensure that the Tivoli Security Information and Event Manager operating systemuser (typically cifowner) has enough permissions to read and write to the networkdrive.
Chapter 12. Archiving audit data 129

130 Tivoli Security Information and Event Manager V2.0: Administrators Guide
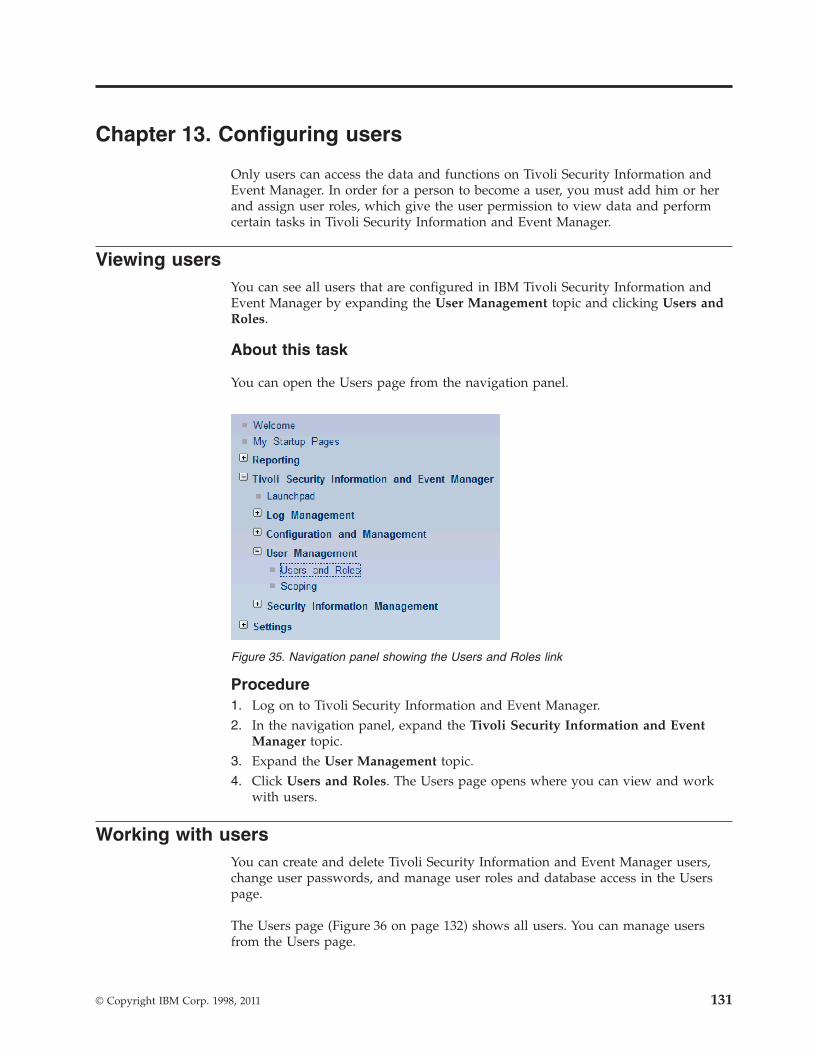
Chapter 13. Configuring users
Only users can access the data and functions on Tivoli Security Information andEvent Manager. In order for a person to become a user, you must add him or herand assign user roles, which give the user permission to view data and performcertain tasks in Tivoli Security Information and Event Manager.
Viewing usersYou can see all users that are configured in IBM Tivoli Security Information andEvent Manager by expanding the User Management topic and clicking Users andRoles.
About this task
You can open the Users page from the navigation panel.
Procedure1. Log on to Tivoli Security Information and Event Manager.2. In the navigation panel, expand the Tivoli Security Information and Event
Manager topic.3. Expand the User Management topic.4. Click Users and Roles. The Users page opens where you can view and work
with users.
Working with usersYou can create and delete Tivoli Security Information and Event Manager users,change user passwords, and manage user roles and database access in the Userspage.
The Users page (Figure 36 on page 132) shows all users. You can manage usersfrom the Users page.
Figure 35. Navigation panel showing the Users and Roles link
© Copyright IBM Corp. 1998, 2011 131

About user name requirementsThis section describes the requirements for creating valid user names.
User names must conform with the following requirements:v User names must be 6-20 characters in length.v The first character must be a letter.v User names cannot contain spaces.v User names can include any of the following characters:
– Letters: A-Z and a-z– Numbers: 0-9– Special character: _ (underscore)
User names cannot start with any of the following prefixes:v IBMv SYSv SQL
User names cannot be equal to the following reserved user names:v TIPADMINv USERSv ADMINSv GUESTS
User names cannot equal the name of any SIM Reporting Database, including:v aggrdb
v beat
v clmdb
v eprisedb
v lmdb
User names cannot be equal to any of the reserved words listed in the DB2®
specification. For information about the DB2 specification, see
Figure 36. The Users page
132 Tivoli Security Information and Event Manager V2.0: Administrators Guide

http://publib.boulder.ibm.com/infocenter/db2luw/v9r7/index.jsp?topic=/com.ibm.db2.luw.sql.ref.doc/doc/r0001095.html.
Creating usersYou can add users to Tivoli Security Information and Event Manager by creating auser in the Users page.
Before you begin
You must have the "Manage users and roles" role in order to create users.
For more information about user roles, see “Types of user roles and access rights”on page 139.
About this task
User name and passwords must conform to particular requirements. For moreinformation, see:v “About user name requirements” on page 132.v “About password requirements” on page 134
Procedure1. Open the Users page.2. Click Create. The Create User page (Figure 37) opens where you can create a
user.
3. In the User field, type the name of the user. To avoid name conflicts, start alluser names with the letters cif.
4. In the Password field and the Confirm Password field, type the password. Thepasswords must be identical. Passwords are obscured for security.
5. Click OK. The user is created and you are returned to the Users window.
What to do next
After creating a user, assign a role or roles to the user. For information about userroles, see “Assigning user roles” on page 138.
Figure 37. Create User page
Chapter 13. Configuring users 133

Deleting usersYou can delete users from Tivoli Security Information and Event Manager byselecting them in the Users page and clicking Delete.
Before you begin
You must have the "Manage users and roles" role in order to delete users.
Procedure1. Open the Users page.2. Select the check box for one or more users.3. Click Delete. A confirmation window opens.4. Click Delete. All selected users are deleted.
About password requirementsUser passwords must conform to certain requirements.
Tivoli Security Information and Event Manager requires that passwords must startwith a letter and cannot start with a number or a special character.
Passwords can include any of the following characters:v Letters A-Z and a-zv Numbers 0-9v Special characters: % {} - + _ @ # $ ' * + = . []
Requirements for passwords, such as password strength, length, or otherrequirements, can differ if you are using IBM Tivoli Directory Server to enforce apassword policy. Ask your Tivoli Security Information and Event Manageradministrator if your company has specific password requirements.
By default, when Tivoli Security Information and Event Manager is installed, itdoes not have a password policy. Thus, there are no limitations on passwordlength or symbols.
You can use IBM Tivoli Directory Server to enforce a password policy. For moreinformation, see “Managing passwords with a password policy” on page 135.
Changing user passwordsYou can change the password of any user.
Before you begin
You must have the "Manage users and roles" role in order to change userpasswords.
For more information about user roles, see “Types of user roles and access rights”on page 139.
About this task
For information about password requirements, see “Creating users” on page 133.
134 Tivoli Security Information and Event Manager V2.0: Administrators Guide

Procedure1. Open the Users page.2. Select the user whose password you want to change.3. Click Change Password. The Change Password window opens.4. In the Password field, type a password.5. In the Confirm Password field, retype the password. The passwords must be
identical.6. Click OK. The password is changed. The Change Password window closes, and
you are returned to the Users window.
Changing your own user passwordYou can change your own user password in the Tivoli Integrated Portal settings.
Before you begin
You do not need a particular user role in order to change your own password.
Procedure1. Open the Tivoli Integrated Portal.2. In the navigation panel, expand Settings.3. Click Change Your Password. The Change Your Password page opens.4. In the Enter a new password field, type a password.5. In the Re-enter new password field, retype the password. The passwords must
be identical.6. Click Set Password. The password is changed.
Managing passwords with a password policyBy default, when Tivoli Security Information and Event Manager is installed, itdoes not have a password policy. However, you can set one in IBM TivoliDirectory Server on the Tivoli Security Information and Event Manager Securityserver to manage passwords.
You can use a password policy in Tivoli Directory Server to place restrictions onpasswords. A password policy specifies rules for syntax, validation, and lockout.The administrator password policy configuration is stored on the Tivoli SecurityInformation and Event Manager Security server and can be modified only by theprimary administrator that is specified as the LDAP Root User during installation.The default value is cn=root. The user password policy configuration is storedwithin the LDAP tree and can be modified by the primary administrator Theattribute values can be changed only when binding as administrator to the server.Tivoli Directory Server provides three types of password policies: individual,group, and global password policies.
Setting up a password policy
To use a Tivoli Directory Server password policy, see http://publib.boulder.ibm.com/infocenter/tivihelp/v2r1/topic/com.ibm.IBMDS.doc/admin_gd17.htm#pwdpolicy.
Tivoli Security Information and Event Manager connects the Tivoli IntegratedPortal to Tivoli Directory Server as a non-root user, for example,cn=ciftdsad,cn=cif,o=ibm. When a user logs in to the Tivoli Integrated Portal, the
Chapter 13. Configuring users 135
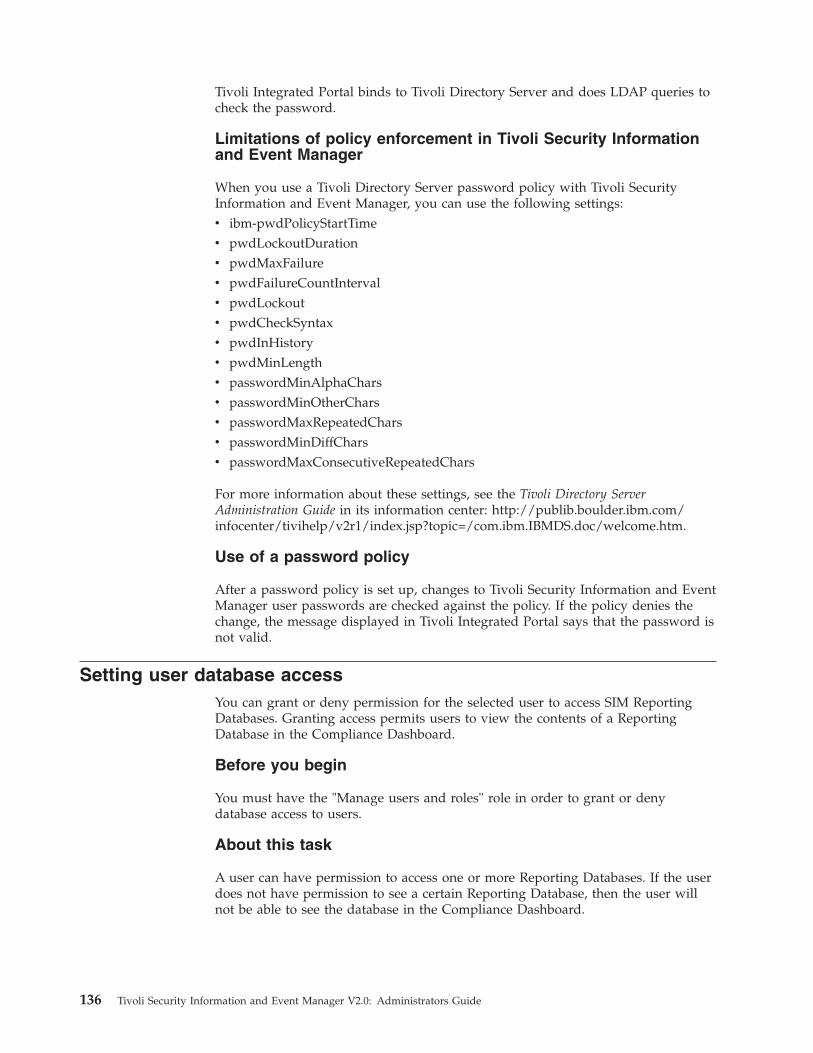
Tivoli Integrated Portal binds to Tivoli Directory Server and does LDAP queries tocheck the password.
Limitations of policy enforcement in Tivoli Security Informationand Event Manager
When you use a Tivoli Directory Server password policy with Tivoli SecurityInformation and Event Manager, you can use the following settings:v ibm-pwdPolicyStartTimev pwdLockoutDurationv pwdMaxFailurev pwdFailureCountIntervalv pwdLockoutv pwdCheckSyntaxv pwdInHistoryv pwdMinLengthv passwordMinAlphaCharsv passwordMinOtherCharsv passwordMaxRepeatedCharsv passwordMinDiffCharsv passwordMaxConsecutiveRepeatedChars
For more information about these settings, see the Tivoli Directory ServerAdministration Guide in its information center: http://publib.boulder.ibm.com/infocenter/tivihelp/v2r1/index.jsp?topic=/com.ibm.IBMDS.doc/welcome.htm.
Use of a password policy
After a password policy is set up, changes to Tivoli Security Information and EventManager user passwords are checked against the policy. If the policy denies thechange, the message displayed in Tivoli Integrated Portal says that the password isnot valid.
Setting user database accessYou can grant or deny permission for the selected user to access SIM ReportingDatabases. Granting access permits users to view the contents of a ReportingDatabase in the Compliance Dashboard.
Before you begin
You must have the "Manage users and roles" role in order to grant or denydatabase access to users.
About this task
A user can have permission to access one or more Reporting Databases. If the userdoes not have permission to see a certain Reporting Database, then the user willnot be able to see the database in the Compliance Dashboard.
136 Tivoli Security Information and Event Manager V2.0: Administrators Guide
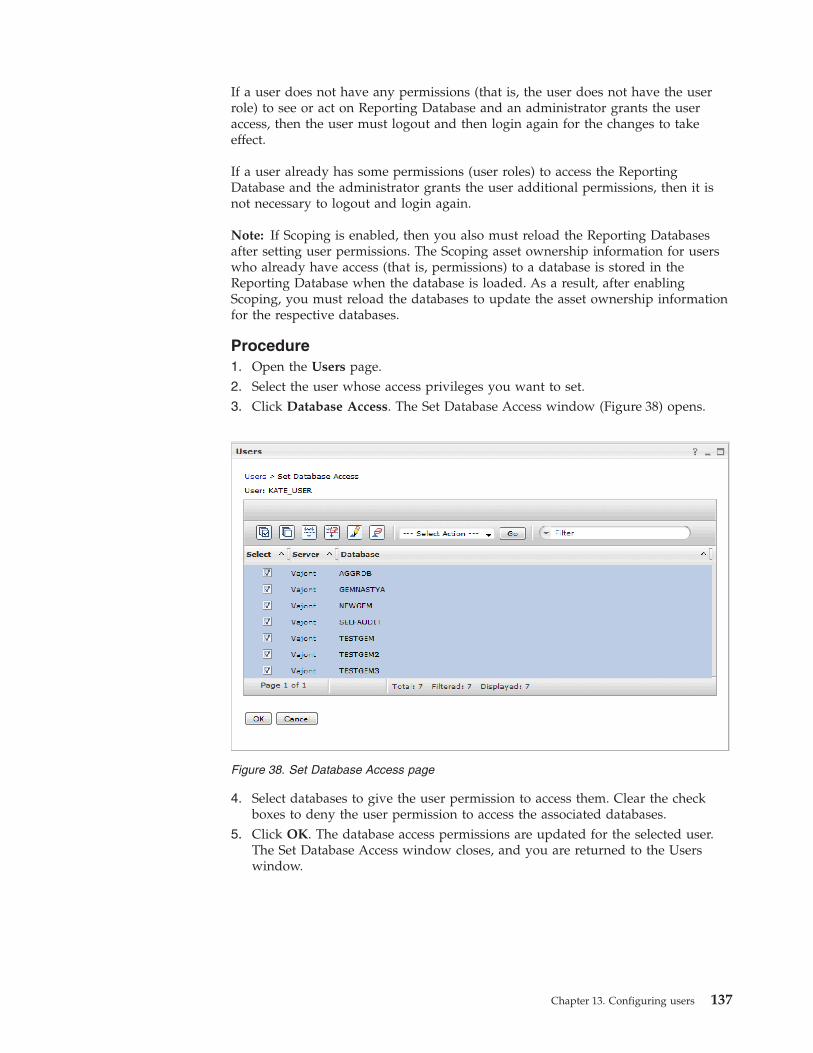
If a user does not have any permissions (that is, the user does not have the userrole) to see or act on Reporting Database and an administrator grants the useraccess, then the user must logout and then login again for the changes to takeeffect.
If a user already has some permissions (user roles) to access the ReportingDatabase and the administrator grants the user additional permissions, then it isnot necessary to logout and login again.
Note: If Scoping is enabled, then you also must reload the Reporting Databasesafter setting user permissions. The Scoping asset ownership information for userswho already have access (that is, permissions) to a database is stored in theReporting Database when the database is loaded. As a result, after enablingScoping, you must reload the databases to update the asset ownership informationfor the respective databases.
Procedure1. Open the Users page.2. Select the user whose access privileges you want to set.3. Click Database Access. The Set Database Access window (Figure 38) opens.
4. Select databases to give the user permission to access them. Clear the checkboxes to deny the user permission to access the associated databases.
5. Click OK. The database access permissions are updated for the selected user.The Set Database Access window closes, and you are returned to the Userswindow.
Figure 38. Set Database Access page
Chapter 13. Configuring users 137

What to do next
If Scoping is enabled, reload the Reporting Databases so that users will be able tosee the contents of the databases. For more information, see “Loading a database”on page 75
Assigning user rolesYou can add user roles for users in order to allow users to view data or performtasks in Tivoli Security Information and Event Manager, and you can remove userroles for users in order to revoke permission to view data or perform tasks.
Before you begin
You must have the "Manage users and roles" role in order to assign user roles tousers.
For information about the user roles, see:v “Types of user roles and access rights” on page 139.v “User roles needed to perform various tasks” on page 143.
Procedure1. Open the Tivoli Integrated Portal.2. In the navigation panel, expand Tivoli Security Information and Event
Manager.3. Expand User Management.4. Click Users and Roles. The Users page opens.5. In the Users window, select the user with whom you want to work.6. Click Roles. The Set Roles window opens.
138 Tivoli Security Information and Event Manager V2.0: Administrators Guide
7. Select roles to give the selected user permission to access the associatedfunctions. Clear check boxes to remove roles from the selected user.
8. Click OK. The roles are updated for the selected user. The Set Roles windowcloses, and you are returned to the Users window.
Types of user roles and access rightsUser roles control the windows that a user can view and the tasks that a user canperform, based on the roles that are assigned to the user.
User roles control which items appear in the navigation panel when you logon.User roles also control which items you can access (that is, open and view), andwhich tasks you can perform (such as, create, edit, and delete items).
The following tables describe the user roles and the access rights granted by eachrole:v Table 27 on page 140v Table 28 on page 141v Table 29 on page 142v Table 30 on page 142
Figure 39. Set Roles
Chapter 13. Configuring users 139

A user can have one or more roles. A user may need more than one role toperform a task. Table 31 on page 144explains which roles are needed to perform agiven task. For more information, see “User roles needed to perform various tasks”on page 143.
Note: User rights apply to Security Groups, with usually consist of 1 SecurityServer and several Grouped Servers (provided that there is a single user repositoryfor all servers in the Security Group). For more information, see “Centrallymanaging users within a Security Group” on page 145.
Table 27. Description of user roles for Event Source and Log Management
This user role: Provides access to these items from the navigation panel:
View machines, eventsources, and databases
Allows you to view information about:
v Audited Machines
v Event Sources
v Reporting Databases
Manage machines, eventsources, and log reports
Allows you to add, edit, and delete:
v Audited Machines
v Event Sources
before Tivoli Security Information and Event Managercollects data for the systems or event sources.
You must also have the "View machines, event sources, anddatabases role" in addition to the "Manage machines, eventsources, and log reports" role to perform these operations.
This role allows you to create schedules for the logcontinuity report.
This role also allows you to view information and runreports in
v Common Reporting
Delete event sources withdata
Allows you to delete:
v Audited Machines
v Event Sources
for which Tivoli Security Information and Event Manager hascollected audit data.
You must also have the "View machines, event sources, anddatabases role" in addition to the "Delete event sources withdata" role to perform these operations.
140 Tivoli Security Information and Event Manager V2.0: Administrators Guide

Table 27. Description of user roles for Event Source and Log Management (continued)
This user role: Provides access to these items from the navigation panel:
Manage databases, alertsand archiving
Allows you to view information, add event sources toReporting Database, set schedules for loading and clearingaudit data in:
v Reporting Database
You must also have the "View machines, event sources, anddatabases role" in addition to the "Manage databases, alerts,and archiving" role to perform these operations.
Allows you to import audit data to the Log ManagementDepot and set schedules for exporting data from the LogManagement Depot in:
v Export Audit Data
v Import Audit Data
You must have the "View machines, event sources, anddatabases role" and the "Manage databases, alerts, andarchiving" role to import audit data.
Allows you to add, edit, and delete alerts in:
v Alerts
Investigate and retrievedepot logs and run logmanagement reports
Allows you to view information about log management andrun reports in:
v Log Manager Dashboard
v Log Manager Reports
This role also allows you to run searches and retrieveoriginal log files from the Log Management Depot.
You must also have the "View compliance dashboard and logmanagement dashboard" role in addition to the "Investigateand retrieve depot logs and run log management reports"role to perform these operations.
Table 28. Description of user roles for Policy Management
This user role: Provides access to these items from the navigation panel:
Create or edit policy Allows you to view information and create and edit policiesin:
v Policy Explorer
v Policy Generator
You must also have the "View machines, event sources, anddatabases" role in addition to the "Create or edit policy" rolein order to use the Create Group Wizard.
Commit or delete policy Allows you to commit a policy (that is, change a policy'sstatus from work to committed) and to delete a policy in:
v Policy Explorer
You must also have the "Create or edit policy" role inaddition to the "Commit or delete policy" role to performthese operations.
Chapter 13. Configuring users 141
|||
||
||

Table 28. Description of user roles for Policy Management (continued)
This user role: Provides access to these items from the navigation panel:
Unlock policy Allows you to unlock locked policies in:
v Policy Explorer
You must also have the "Create or edit policy" role inaddition to the "Unlock policy" role to perform theseoperations.
Table 29. Description of user roles for User Management
This user role: Provides access to these items from the navigation panel:
Manage users and roles Allows you to view information and to create, edit, anddelete users, change user passwords, and to assign user rolesin:
v Users and Roles
Manage scoping Allows you to access the Scoping application and managewhich data users can view in the Compliance Dashboard,provided that you have an entire Scoping role such asAdministrator:
v Scoping
You must also have the "Manage users and roles" role inaddition to the "Manage scoping" role to perform theseoperations.
Table 30. Description of user roles for Reporting
This user role: Provides access to these items from the navigation panel:
Manage machines, eventsources, and log reports
Allows you to add, edit, and delete:
v Audited Machines
v Event Sources
before Tivoli Security Information and Event Managercollects data for the systems or event sources.
You must also have the "View machines, event sources, anddatabases role" in addition to the "Manage machines, eventsources, and log reports" role to perform these operations.
This role allows you to create schedules for the logcontinuity report.
If you have the "Investigate and retrieve depot logs and runlog management reports" role, then this role also allows youto view information, run reports, and manage reportschedules in:
v Common Reporting
View compliance dashboardand log managementdashboard
Allows you to view information in:
v Log Management Dashboard
v Compliance Dashboard
142 Tivoli Security Information and Event Manager V2.0: Administrators Guide
|||
|
|
||
|||
||
||||
|
|

Table 30. Description of user roles for Reporting (continued)
This user role: Provides access to these items from the navigation panel:
Investigate and retrievedepot logs
Allows you to view information about log management andrun reports in:
v Log Management Dashboard
v Log Manager Reports
v Common Reporting
This role also allows you to run searches and retrieveoriginal log files from the Log Management Depot.
Except for "Common Reporting", you must also have the"View compliance dashboard and log management reports"role in addition to the "Investigate and retrieve depot logsand run log management reports" role to perform theseoperations.
Create or edit customreports
Allows you to create and edit custom reports in:
v Compliance Dashboard
v Common Reporting
In addition to the "Create or edit custom reports" role, youmust have the "View compliance dashboard and logmanagement dashboard" role to customize ComplianceDashboard reports or the "Investigate and retrieve depot logsand run log management reports" role to customize CommonReporting reports.
View custom reports Allows you to view information in custom reports in:
v Compliance Dashboard
You must also have the "View compliance dashboard and logmanagement reports" role in addition to the "View customreports" role to perform these operations.
Manage incidents Allows you to manage incident in:
v Compliance Dashboard
You must also have the "View compliance dashboard and logmanagement dashboard" role in addition to the "Manageincidents" role to perform these operations.
Manage excerpts Allows you to configure report distribution (that is, sendingreports through email to groups of people) in:
v Compliance Dashboard
You must also have the "View compliance dashboard and logmanagement dashboard" role in addition to the "Manageexcerpts" role to perform these operations.
User roles needed to perform various tasksIn order to view certain pages or perform certain tasks, you must have theappropriate user role.
You may need one or more roles to complete certain tasks. This table shows whichroles you must have in order to complete certain tasks.
Chapter 13. Configuring users 143
||||
|
|
|
||
|||||
|||
|
|
||||||
|
|
|
If an item does not appear in the navigation panel, then you do not have theappropriate privileges needed to access that item. The Tivoli Security Informationand Event Manager administrator can give you the user roles that you need toview information or to complete a task.
Table 31 explains which roles are needed to perform certain tasks.
Table 31. Roles needed to complete various tasks
Type of task If you want to: Then you must have the following roles:
Audited Machine,Event Source,Reporting Database,and LogManagement
View audited machines v View machines, event sources, and databases
Add, edit and delete audited machines v View machines, event sources, and databases
v Manage machines, event sources, and logreports
View event sources v View machines, event sources, and databases
Add or edit event sources v View machines, event sources, and databases
v Manage machines, event sources, and logreports
View reporting databases v View machines, event sources, and databases
Add or edit reporting databases v View machines, event sources, and databases
v Manage databases, alerts, and archiving
Export audit data from the depot v Manage database, alerts, and archiving role.
Import audit data to the depot v View machines, event sources, and databaserole.
v Manage database, alerts, and archiving role.
v Manage machines, event sources, and logreports role.
Delete event sources and data collectedby an event source
v View machines, event sources, and databases
v Manage machines, event sources, and logreports
v Delete event sources with data
Perform forensic analysis and retrievelogs from the log depot
v View compliance dashboard and logmanagement reports
v Investigate and retrieve depot logs
Policy Management View policies v Create or edit policy
Create or edit policies v Create or edit policy
v View machines, event sources, and databases
Delete policies v Commit or delete policy
v Create or edit policy
Commit policies v Commit or delete policy
v Create or edit policy
Unlock policies v Unlock policies
v Create or edit policy
144 Tivoli Security Information and Event Manager V2.0: Administrators Guide

Table 31. Roles needed to complete various tasks (continued)
Type of task If you want to: Then you must have the following roles:
User Management View users v Manage users and roles
Add, edit, and delete users v Manage users and roles
Assign user roles to users v Manage users and roles
Configure scoping for users and usergroups
v Manage scoping
v Manage users and roles
Reporting View information on the compliancedashboard or view log managementdashboard
v View compliance dashboard and logmanagement dashboard
View custom reports v View custom reports
v View compliance dashboard and logmanagement dashboard
Create or edit custom reports v Create or edit custom reports
v View compliance dashboard and logmanagement dashboard
Manage incidents v Manage incidents
v View compliance dashboard and logmanagement dashboard
Manage excerpts v Manage excerpts
v View compliance dashboard and logmanagement dashboard
Run Log Manager reports from CommonReporting
v Investigate and retrieve depot logs and run logmanagement reports
Create or edit Common Reporting reports v Create or edit custom reports
v Investigate and retrieve depot logs and run logmanagement reports
Manage Common Reporting reports(create and modify report schedules)
v Manage machines, event sources, and logreports role.
v Investigate and retrieve depot logs and run logmanagement reports
Centrally managing users within a Security GroupCentralized user management is enabled by the use of a Tivoli SecurityInformation and Event Manager Security Group. This section explains how aSecurity Group works.
Centralized user management enables Tivoli Security Information and EventManager servers in a Security Group to authenticate users and authorize accessagainst a designated server, called a Security Server. Because all user permissionsfor users of the servers in a Security Group are stored on one Security Server, youcan add, delete, or modify users and permissions and these changes will beapplied globally to all servers in the Security Group.
You can administer users, roles, and Reporting Database access permissions for allmembers of a Security Group from the Users page on any server in the Security
Chapter 13. Configuring users 145
||
|
|
|
|
||
||
||

Group. Adding, deleting, or modifying a Tivoli Security Information and EventManager user or changing a password for an existing user is stored centrally onthe Security Server. For more information about user administration, seeChapter 13, “Configuring users,” on page 131.
For example, if you add a new user, the information for that user is stored on theSecurity Server, and the user becomes available to all servers in the SecurityGroup. Similarly, if you delete a user, then that user is no longer available on anyserver in the Security Group. If you change a password or change a user's role,then that change is applied to all servers in the Security Group. The user has thesame role(s) on each server in the Security Group.
Users can have different Reporting Database access rights for each server in theSecurity Group. A user can be granted access to the database of any GroupedServer or Security Server in the group from any Set Database Access window onany server in the group. The Set Database Access window contains the list ofdatabases on each server, and it allows an administrator to select the databases towhich a user has access rights.
Although you can manage users, roles, and Reporting Database access permissionsfrom any Users page on any server in the Security Group, the changes are notimmediately applied to all servers in the group.
Each server in the group runs a synchronization process in order to synchronizelocal server users, roles, and database access permissions with the Security Server.The servers apply the changes after they have finished synchronization.
Thus, if a user is assigned a role or granted access to database using the Userspage on one server in the group, the other servers will apply these changes afterthey have synchronized with the Security Server. By default, synchronization isperformed every 1 minute.
Security Group componentsA Security Group consists of 1 Security Server and several Grouped Servers.
The components of a Security Group are briefly described in the list below:
Security GroupA Tivoli Security Information and Event Manager Security Group is a setof any number of Tivoli Security Information and Event Manager serversthat use the same Security Server for authentication and authorization. ASecurity Group consists of 1 Security Server. All other servers in theSecurity Group are called Grouped Servers. A Security Group can includemultiple Tivoli Security Information and Event Manager Clusters. AllTivoli Security Information and Event Manager servers in the sameSecurity Group can administer Tivoli Security Information and EventManager users and their permissions for all other servers in that SecurityGroup.
Security ServerA Tivoli Security Information and Event Manager Security Server is thecore of a Tivoli Security Information and Event Manager Security Group.The Security Server contains an LDAP server used by all Tivoli SecurityInformation and Event Manager servers in the Security Group for
146 Tivoli Security Information and Event Manager V2.0: Administrators Guide

authentication and a permission store used by all Tivoli SecurityInformation and Event Manager servers in the Security Group forauthorization.
Grouped ServerA Grouped Server is any Tivoli Security Information and Event Managerserver that is a member of a Security Group but is not the Security Serverof that group. During the installation of a Grouped Server, you can specifywhich Security Server should be used for authentication and authorization.
A Security Group deployment uses the Tivoli Security Information and EventManager Enterprise Server and Standard Server. These servers are referred to asthe Security Server or Grouped Server based on their role in the group.
The Tivoli Security Information and Event Manager servers are described in the listbelow:
Enterprise ServerThe Enterprise Server provides all Log Management Server functions aswell as all SIM functions such as W7 normalization and compliancereporting. In addition, the Enterprise Server provides a consolidated viewof W7 data on the Standard Servers that are attached to it. The EnterpriseServer is the main Tivoli Security Information and Event Manager server ina Tivoli Security Information and Event Manager Cluster. An EnterpriseServer can be either a Grouped Server or the Security Server in a SecurityGroup.
Consolidation ServerA Consolidation Server is a Tivoli Security Information and Event Managerserver where the consolidation database is installed. By definition, aConsolidation Server is an Enterprise Server.
Standard ServerA Standard Server provides log collection, log storage, log retrieval, W7normalization, and compliance reporting, but no forensic search or logmanagement reports.
A Standard Server is any Tivoli Security Information and Event Managerserver that is not an Enterprise Server. A Standard Server contains theTivoli Security Information and Event Manager server and the webapplications. A Standard Server typically is a Grouped Server in a SecurityGroup, but it can also be a Security Server if it is the only server in thegroup.
Log Management ServerA Log Management Server provides all Log Management functions,including log collection, log storage, log retrieval, forensic search, and logmanagement reports. This server type is deployed to manage log data forwhich SIM functions, such as W7 normalization and compliance reporting,are not required.
Tivoli Security Information and Event Manager ClusterA Tivoli Security Information and Event Manager Cluster is a group ofonly one Enterprise Server and a maximum of three Standard Servers. TheEnterprise Server consolidates data from the Standard Servers and reportson audit data from all of the servers in the cluster. All servers in a clustermust authenticate against the same Security Server; thus, all servers in acluster must be included as Grouped Servers in the same Security Group.This should be considered during installation of servers in a cluster.
Chapter 13. Configuring users 147

During the installation of a Grouped Server, you can specify whichSecurity Server should be used for authentication and authorization.
For more detailed information about Tivoli Security Information and EventManager servers and deployment scenarios, see the IBM Tivoli Security Informationand Event Manager Installation Guide.
Configuring a Security GroupYou can configure a Security Group when you install a Tivoli Security Informationand Event Manager server. For more information about installing a Tivoli SecurityInformation and Event Manager server or about configuring a Security Group, seethe IBM Tivoli Security Information and Event Manager: Installation Guide.
148 Tivoli Security Information and Event Manager V2.0: Administrators Guide

Chapter 14. Configuring Scoping
Scoping is a Web-based application that controls access to information in the Portalreports.
Opening the Scoping applicationYou can open the Scoping application by expanding the User Management topicand clicking Scoping.
About this task
You can open the Scoping page from the navigation panel.
Procedure1. Log on to Tivoli Security Information and Event Manager.2. In the navigation panel, expand the Tivoli Security Information and Event
Manager topic.3. Expand the User Management topic.4. Click Scoping. The Scoping page opens where you can manage the viewing
rights of users.
Overview of ScopingScoping is done per Tivoli Security Information and Event Manager instance. Userswithin the Scoping application own Who, onWhat and Where groups. Portal showsonly the user information about events that are associated with groups that youown.
You can use the user interface of the Scoping application to configure Scoping in aServer using a Web browser. You can either manage the Scoping configurationinformation for Scoping items or enable or disable the functionality.
Note: Changes made in the Scoping application might not be visible until after theReporting Database has been loaded. For more information, see “Loading adatabase” on page 75.
Understanding how Scoping worksThe purpose of the Scoping application is to control the amount of visibility usershave into the Compliance Dashboard reports. This section provides informationand use cases that illustrate how Scoping works.
The Scoping application controls user visibility into the event data contained in theSIM Reporting Databases, aggregation database (AGGRDB), and consolidationdatabase (BEAT).
Scoping restricts which W7 dimensions of events are visible to the user.
In the Scoping application, users are assigned as owners of scoping asset. Ascoping asset is an entity that corresponds to W7 Policy group.
© Copyright IBM Corp. 1998, 2011 149

The user's ability to view event information and event details or aspects dependson whether the user is the owner of a scoping asset in all three dimensions (Who,onWhat, and Where):v If a user is the owner of a scoping assets in all three dimensions (Who, onWhat
and Where), then the user can view all event information, including the eventaspects.
v If a user is the owner of a scoping assets in one or two of the dimensions, butnot in all three dimensions, then the user can view only event information ofthose dimensions for which the user is an owner. The user cannot view anyevent details for those events.
v If a user is not the owner of any scoping asset in any dimension, then the usercannot see any events in the Reporting Database.
For information about W7 dimensions, see the IBM Tivoli Security Information andEvent Manager Users Guide.
Use cases
These use cases provide examples of how scoping is used in Tivoli SecurityInformation and Event Manager.
Use Case 1: Preventing a user from seeing the Who dimension of events
For example, you might want to allow a user to see all events in the ReportingDatabases, but you do not want to allow the user to see the Who dimension ofthese events. You can restrict the user's visibility into the Who dimension byadding the user to the root groups for the On What dimension and Wheredimension.
When the user logs in to the Compliance Dashboard and views reports, the userwill be able to see all events and group information, but the fields of the Whodimension will be marked as "XXXX."
Note: After changing the scoping rules for a user, you must reload each ReportingDatabase in order for these rules to be applied. For information, see “Loading adatabase” on page 75.
Use Case 2: Permitting a user to see only events in the "Administrator" group ofthe Who dimension
For example, you might want to allow a user to see all event details about theevents in the "Administrator" group of the Who dimension, but you do not want toallow the user to see in any other group in the Who dimension.
You can restrict the user's visibility of other groups by:1. Creating a new scoping group in the Who dimension.2. Moving the "Administrator" asset into the scoping group.3. Adding the user to the scoping group.4. Granting the user Auditor permissions on this scoping group.
When the user logs in to the Compliance Dashboard and views reports, the userwill be able to see only event and group information for the "Administrator"group.
150 Tivoli Security Information and Event Manager V2.0: Administrators Guide

Use Case 3: Preventing a user from seeing the On What and Where dimensionsof events in the "Administrator" group
For example, you might want to allow a user to see only event details about theevents in the "Administrator" group, but you do not want to allow the user to seethe On What (Where To) and Where (From Where) dimensions of these events.
You can restrict the user's visibility of other groups by:1. Creating a new scoping group in the Who dimension.2. Moving the "Administrator" asset into the scoping group.3. Adding the user to the scoping group, but without granting the user Auditor
permissions.
When the user logs in to the Compliance Dashboard and views reports, the userwill be able to see only events in the "Administrator" group but the event detailsfor the On What, Where, Where From, and Where To dimensions wll be marked as"XXXX."
Structure of the Scoping configurationThe Scoping configuration includes Scoping groups, Scoping group members, andScoping group assets.
Scoping configuration includes the following types of entities:
Scoping groupsHave a name and a dimension and contain zero or more group members,group assets, or child groups. Additionally each Scoping group has oneparent Scoping group, except for the root group.
Scoping group membersServe to associate Tivoli Security Information and Event Manager userswith scoping groups using their user names, and indicate if a user is anadministrator for a scoping group.
Scoping group assetsAssociate Tivoli Security Information and Event Manager groups withScoping asset groups.
Global Scoping enabled or disabled flagIndicates whether the scoping rules are in effect at this time. You can selectthis flag to enable or disable the Scoping.
Data structure of Scoping configurationThis section describes the data structure of Scoping groups.
In the data structure of Scoping configuration, only one global configurationenabled or disabled flag exists. The Scoping functionality is turned on or off for theentire instance of the Server.
Each Scoping group has either a Who, onWhat, or Where Scoping dimension, andalways only one Scoping group per dimension without a parent Scoping group(the root Scoping group for the corresponding dimension).
The root scoping group for the Who dimension is always named HR DefaultOwner. The root scoping groups for the onWhat and Where dimensions are alwaysnamed IT.
Chapter 14. Configuring Scoping 151
All other scoping groups always have one and only one parent scoping group inthe same dimension. A group in a dimension can be an asset only in a scopinggroup in the hierarchy for that dimension. A group might not be assigned as anasset for some scoping group. In that case, the Tivoli Security Information andEvent Manager group is an asset in the root scoping group for the hierarchy of thecorresponding dimension. A user can be a member of multiple scoping groups inany or all of the hierarchies. Any membership of a user in a scoping group can bemarked as an administrator.
Asset ownership rulesCertain rules govern asset ownership.
The following rules govern asset ownership:v If an asset is associated with a specific scoping group, then that scoping group
explicitly owns that asset.v A scoping group implicitly owns all assets that its child scoping groups either
implicitly or explicitly own.v If a user is a member of a scoping group, then that user owns all assets that are
explicitly or implicitly owned by that scoping group (that is, the assets ownedby the scoping group and all its descendants).
These ownership rules show that the root scoping group for a hierarchy owns allassets in that dimension.
Users of Scoping applicationThere are two types of users in the Scoping application: the Tivoli SecurityInformation and Event Manager administrator, who is the user created during theinstallation process and typically is named cifowner, and typical users, who are allusers who are not administrators.
Tivoli Security Information and Event Manager administrator
The administrator is always a member of the root scoping group of each hierarchy,and thus always owns all groups in all hierarchies.
The administrator can view and alter the whole scoping configuration and enableand disable scoping. The administrator knows how many groups are not assignedas assets for each dimension.
Typical users
Typical users can view only scoping configuration information associated withscoping groups they own. For each scoping group, if you are a typical user, thenyou can view information about the scoping group and its assets and members ifyou are a member of that scoping group or a member of a scoping group that is anancestor (parent, grandparent, and so on.) of that scoping group.
Typical users can also be set as administrators for a scoping group of which theyare members. When a typical user is an administrator of a scoping group, that usercan change scoping configuration for that group and all descending scopinggroups.
Typical users can be set as auditors for a scoping group of which they aremembers. When a user is an auditor in a scoping group, that user can see the
152 Tivoli Security Information and Event Manager V2.0: Administrators Guide

content of all event fields of the events from that group and all descending scopinggroups, as long as the user owns at least one dimension.
Note: For more information about the auditor permission, see “Managingprivileges for a member of a Scoping group” on page 158.
Using the Scoping user interfaceThe user interface of the Scoping application consists of two main windows. Theentry window provides general information and links to functions that you canaccess. The scoping group hierarchy window for a dimension helps you view andchange scoping groups, scoping group assets, and scoping group members.
Overview page
The Overview page provides access to the scoping group hierarchy for each of thedimensions (Who, onWhat, and Where) that are covered by Scoping. If you arelogged in as the Tivoli Security Information and Event Manager administrator, youalso can see the number of groups in the Who dimension, onWhat dimension, andWhere dimension that are not assigned as scoping group assets.
The Overview page also allows the Scoping functionality to be enabled or disabled.Only the Tivoli Security Information and Event Manager administrator can enableor disable Scoping.
Who, onWhat, and Where dimension pages
The Who, onWhat, and Where dimension pages show the scoping hierarchy for therespective dimension and enables you to see all scoping groups that you own andall scoping group assets and scoping group members for those groups. Normalusers (that is, users who are not Tivoli Security Information and Event Manageradministrators) can only see the contents of the corresponding scoping group andits descending scoping groups.
If you have the administrator rights for a scoping group, you can also make thefollowing modifications to your corresponding scoping groups:v Add a new scoping group under that group, add a new scoping group member,
or remove or rename the scoping groupv Remove the scoping group member and set or unset the administrator flag for
this member in the corresponding scoping groupv Move the assets to another scoping group
Understanding Scoping terminologyThe Scoping application uses specific terminology to describe scoping groups,types of users, dimensions, and asset groups.
Describes the data scoping terms and description.
Table 32. Scoping terminology
Term Meaning
Scoping groups thatyou can control
All scoping groups in which a Tivoli Security Information andEvent Manager user is a member and all their descendantgroups.
Chapter 14. Configuring Scoping 153

Table 32. Scoping terminology (continued)
Term Meaning
Tivoli SecurityInformation and EventManager Administrator
The administrator user created during installation, typicallyhaving the username cifowner.
Normal user A Tivoli Security Information and Event Manager user other thanthe administrator.
Dimension One of the W7 (Who, What, When, Where, onWhat, from What,Where to) properties defined in Tivoli Security Information andEvent Manager for events.
Asset group A Tivoli Security Information and Event Manager group on theWho, Where or onWhat dimensions.
Using ScopingThis section provides instructions about using features of the Scoping application.
Determining the number of unassigned assetsOn the Overview page there is a count of the number of unassigned assets for eachdimension. This number represents Tivoli Security Information and Event Managergroups in that dimension that do not have a scoping group asset entry.
Note: This functionality is available to the Tivoli Security Information and EventManager administrator user only.
Enabling and disabling ScopingIf Scoping is enabled, then you can see the Disable Scoping button. If Scoping isdisabled, then you can see the Enable Scoping button.
About this task
This functionality is only available to the Tivoli Security Information and EventManager administrator user.
Note: If Scoping is enabled, then you also must reload the Reporting Databases.The Scoping asset ownership information for users who already have access (thatis, permissions) to a database is stored in the Reporting Database when thedatabase is loaded. As a result, after enabling Scoping, you must reload thedatabases to update the asset ownership information for the respective databases.
Procedure1. Open the Overview page.2. Click Enable Scoping to turn on Scoping, or click Disable Scoping to turn off
Scoping. The Scoping status change window opens.3. Click Start to confirm your changes. It might take several minutes for the
change to take effect.
What to do next
If you enabled Scoping, then reload the Reporting Databases so that users will beable to see the contents of the databases. For more information, see “Loading adatabase” on page 75
154 Tivoli Security Information and Event Manager V2.0: Administrators Guide

Viewing scoping information for a dimensionYou can view information about the Who dimension, onWhat dimension, andWhere dimension.
On the entry page, you can select the page where scoping information for a givendimension is displayed by clicking in the appropriate bar. Also, from any pageexcept the login page, if you click one of the dimension icons Who, onWhat andWhere on the top toolbar, the scoping information page for that dimension isdisplayed.
The scoping hierarchy window for a dimension shows information about eachscoping group that you are allowed to see in the form of a tree structure.
You can see only those scoping groups in which you are a member and in all itsdescendants. For each scoping group, this window shows the scoping group name,all scoping group members, all scoping group assets, and all child scoping groups.For each scoping group member, this window shows the username for the userassociated with this scoping group member entry. If the user is an administrator ofthis scoping group, the Admin Rights check box is also selected.
For each scoping group asset, this window displays the name of the Tivoli SecurityInformation and Event Manager group in the dimension for this hierarchy thatcorresponds to this scoping group asset.
Managing scoping groupsYou can add, remove, and rename scoping groups.
Adding a scoping groupYou can create a new scoping group.
Before you begin
Only the following users can add members to a scoping group:v An administrator of any ancestor scoping group.
About this task
The name of the scoping group cannot be empty or only contain spaces; this willcause the operation to fail. The name of the scoping group must contain between 1and 255 characters. Using longer names can result in an error message.
Some languages use Unicode characters that occupy 3-4 bytes. When entering thename of a scoping group in one of these languages, use no more than 64 charactersin the name.
The new scoping group cannot have the same name as any other scoping group inthe same dimension.
Procedure1. Open the Scoping application.2. Click the icon for the dimension. The Scoping hierarchy window for the
selected dimension opens.
Chapter 14. Configuring Scoping 155

3. Click Add new scoping group on the name bar of a scoping group.4. Enter the name of the new scoping group. The scoping group is displayed as a
child of the parent scoping group.
Note: Changes made in the Scoping application might not be visible until afterthe Reporting Database has been loaded. For more information, see “Loading adatabase” on page 75.
Removing a scoping groupYou can remove a scoping group.
Before you begin
Only the following users can remove a scoping group:v An administrator of the scoping group that you want to remove.v An administrator of any ancestor scoping group.
About this task
You cannot remove a scoping group if it contains one or more assets, members, orchild scoping groups.
Procedure1. Open the Scoping application.2. Click the icon for the dimension. The Scoping hierarchy window for the
selected dimension opens.3. Click Delete on the name bar of a scoping group. The scoping group is no
longer displayed in the scoping group hierarchy for the dimension.
Note: Changes made in the Scoping application might not be visible until afterthe Reporting Database has been loaded. For more information, see “Loading adatabase” on page 75.
Renaming a scoping groupYou can rename a scoping group.
Before you begin
Only the following users can add members to a scoping group:v An administrator of any ancestor scoping group.v An administrator of the scoping group whose name is to be changed.
About this task
The new name cannot be the same any other scoping group in the samedimension.
The name of the root scoping group of a dimension cannot be changed.
Procedure1. Open the Scoping application.
156 Tivoli Security Information and Event Manager V2.0: Administrators Guide
2. Click the icon for the dimension. The Scoping hierarchy window for theselected dimension opens.
3. Click Edit on the name bar of the scoping group.4. Enter the new name. The scoping group is renamed.
Note: Changes made in the Scoping application might not be visible until afterthe Reporting Database has been loaded. For more information, see “Loading adatabase” on page 75.
Managing scoping membersYou can add and remove members in a Scoping group.
Adding a member to a scoping groupYou can add a member to a scoping group.
Before you begin
Only the following users can add members to a scoping group:v An administrator of the scoping group to which you want to add a member.v An administrator of any ancestor scoping group.
Procedure1. Open the Scoping application.2. Click the icon for the dimension. The Scoping hierarchy window for the
selected dimension opens.3. Click Add new in the Members section of an existing scoping group.4. On the New Member page, select a user in the list box.5. Optionally, you can select the corresponding check box to make this member an
administrator for the Scoping group.6. Click Submit to add the user to the scoping group or Cancel to end the
operation.
Removing a member from a scoping groupYou can remove a member from a scoping group.
Before you begin
Only the following users can remove members from a scoping group:v An administrator of the scoping group from which you want to remove a
member.v An administrator of any ancestor scoping group.
Procedure1. Open the Scoping application.2. Click the icon for the dimension. The Scoping hierarchy window for the
selected dimension opens.3. Expand the scoping group.4. Click the remove icon in the Members section. The member is removed from
the scoping group.
Chapter 14. Configuring Scoping 157

Managing privileges for a member of a Scoping groupYou can grant and revoke administrator privileges and auditing privileges to amember of a Scoping group in the scoping hierarchy for the selected dimension.
Granting administrator privileges to a scoping group memberYou can grant administrative privileges to a scoping group member.Administrative privileges enable the scoping group member to administer ascoping group.
Before you begin
Only the following users can make a user into an administrator:v An administrator of the scoping group to which the member belongs.v An administrator of any ancestor scoping group.
About this task
This task enables a user to administer a scoping group. The administrator privilegeallows a user to perform the following tasks for the scoping group and any childscoping groups:v Add and remove child scoping groups.v Add, remove, and set permissions for members.v Move scoping group assets.
Procedure1. Open the Scoping application.2. Click the icon for the dimension. The Scoping hierarchy window for the
selected dimension opens.3. To give a user administrative privileges, select the Admin rights check box for
the scoping group member. The selected scoping group member is made anadministrator. The scoping hierarchy for the dimension shows the new status ofthe member.
Revoking administrator privileges from a scoping groupmember
You can revoke administrative privileges from a scoping group member who is anadministrator.
Before you begin
Only the following users can revoke administrative privileges from a scopinggroup member:v An administrator of the scoping group to which the member belongs.v An administrator of any ancestor scoping group
Procedure1. Open the Scoping application.2. Click the icon for the dimension. The Scoping hierarchy window for the
selected dimension opens.
158 Tivoli Security Information and Event Manager V2.0: Administrators Guide

3. Clear the Admin rights check box for the scoping group member. The selectedscoping group member loses administrative privileges. The scoping hierarchyfor the dimension shows the new status of the member.
Granting auditor privileges to a scoping group memberYou can grant auditing privileges to a scoping group member. Auditor privilegesenable a user to see the content of all event fields if the user owns at least onedimension.
Before you begin
Only the following users can make a user into an auditor:v An administrator of the scoping group to which the member belongs.v An administrator of any ancestor scoping group.
About this task
This task enables you to assign auditor privileges to a user.
Users who are auditors can see the content of all event fields provided that theuser owns at least one dimension. If a user has auditor privileges, then an eye iconappears next to the name of the user.
Users who are not auditors can only see the field content of the dimensions thatthey own.
Procedure1. Open the Scoping application.2. Click the icon for the dimension. The Scoping hierarchy window for the
selected dimension opens.3. Click the name of the scoping group member. The User Information window
opens.4. Select the Auditor check box.5. Click Close. The User Information window closes. The selected scoping group
member is made an auditor. The scoping hierarchy for the dimension showsthe new status of the member by displaying an eye icon next to the name ofthe user.
Revoking auditor privileges from a scoping group memberYou can revoke auditing privileges to a scoping group member.
Before you begin
Only the following users can revoke auditor privileges from a scoping groupmember:v An administrator of the scoping group to which the member belongs.v An administrator of any ancestor scoping group
Procedure1. Open the Scoping application.2. Click the icon for the dimension. The Scoping hierarchy window for the
selected dimension opens.
Chapter 14. Configuring Scoping 159

3. Click the name of the scoping group member. The User Information windowopens.
4. Clear the Auditor check box for the scoping group member. The selectedscoping group member is no longer an auditor. The scoping hierarchy for thedimension shows the new status of the member by removing the eye icon thatwas next to the name of the user.
Moving the assets of a scoping groupYou can move assets from one scoping group to another scoping group.
Before you begin
Only the following users can move assets of a scoping group:v An administrator of the scoping group from which the assets are being moved.v An administrator of the scoping group to which the assets are being moved.v An administrator of any ancestor scoping group.
About this task
A scoping asset group is a group of users or systems that is classified into the oneof the following W7 dimensions: Where, Who, or On What dimensions.
The following examples illustrate possible asset groups that might be classified in aspecific dimension. In the Where dimension, asset groups might include "RemoteWorkstation" or "System with non-segregated administration." In the On Whatdimension, asset groups might include "System Objects" or "Financial Data." In theWho dimension, asset groups might include "Managers" or "Administrators."
Procedure1. Open the Scoping application.2. Click the icon for the dimension. The Scoping hierarchy window for the
selected dimension opens.3. Select the check boxes beside the scoping group assets that you want to move.
Note: To move an individual asset, click the arrows widget beside thecorresponding asset.
4. Click Move on the corresponding bar. The Move Assets To page opens.5. On the Move Assets To page, select a destination scoping group from the list
box.6. Click Submit to move the assets to the destination scoping group or Cancel to
end the operation. If the operation is not canceled, the chosen scoping groupassets are moved from the current scoping group to the selected destinationscoping group. You can see the scoping hierarchy for the dimension updatedwith the new position of the assets.
Operations done outside of ScopingThis section outlines operations that influence the Tivoli Security Information andEvent Manager Scoping application but are done outside of it.
160 Tivoli Security Information and Event Manager V2.0: Administrators Guide

Creating and managing Tivoli Security Information and EventManager users
The administrator user for the Tivoli Security Information and Event Managerapplications (including the Scoping application) is created during installation. Allother users are created using the Tivoli Integrated Portal application.
For more information about Tivoli Security Information and Event Manager users,see Chapter 13, “Configuring users,” on page 131.
Creating and managing Tivoli Security Information and EventManager dimension groups
Grouping event properties in the Who, onWhat and Where dimensions is doneoutside the Scoping application.
Any group in any of the Reporting Databases, aggregation database, andconsolidation database for the Tivoli Security Information and Event Managerinstance are available in the Scoping application as scoping group assets.
Chapter 14. Configuring Scoping 161

162 Tivoli Security Information and Event Manager V2.0: Administrators Guide

Chapter 15. Backing up and restoring Tivoli SecurityInformation and Event Manager
This section describes how to back up and to restore Tivoli Security Informationand Event Manager 2.0 on AIX, Linux, and Windows operating systems.
There are three possible configurations of Tivoli Security Information and EventManager:1. Log Management Server.2. Standard Server.3. Enterprise Server. This configuration is a Standard Server with additional
Consolidation feature.
Each of the previous three types of Tivoli Security Information and Event Managerservers can have the role of a Security Server, on which a Directory Server isinstalled for Central User Management. If the Tivoli Security Information andEvent Manager server does not have the role of a Security Server, it is called aGrouped Server.
The Backup and Restore procedure described in this document supports bothStandard Server and Enterprise Server configurations, where each configurationcan take on a Security Server role or Grouped Server role.
Note:
v The Backup or Restore procedure should be executed at moments ofinoperability of the Tivoli Security Information and Event Manager server. Thereis a risk of corrupting the Tivoli Security Information and Event Managerdatabase configuration when performing the Backup or Restore at a momentwhen data is being aggregated.
v When the Tivoli Security Information and Event Manager configuration isrestored, the default Tivoli Security Information and Event Manager Install OSaccounts on the Restore server should have the same passwords they had at thetime when the Backup is made.
In the next section, we describe two scenarios that are supported when performinga Restore of a Tivoli Security Information and Event Manager server. Thesubsequent sections describe the details of Backup and Restore procedures.
Restore scenariosThere are two possible restore paths when you perform a Restore operation of aTivoli Security Information and Event Manager 2.0 server.
Partial Restore
A restore is performed on the currently running system. This implies that TivoliSecurity Information and Event Manager Depot and Indexes will be kept andreused. The Tivoli Security Information and Event Manager database configurationand Tivoli Security Information and Event Manager software is restored.
© Copyright IBM Corp. 1998, 2011 163

Full Restore
The full system will be restored through the restoration of the operating systemand the reinstallation of Tivoli Security Information and Event Manager. All dataon the disk will be lost during the operating system restore. If the operatingsystem is not accessible anymore or if the Partial Restore has failed, a full Restoreis necessary. The system will be brought back to the latest stable configuration byrestoring the latest stable Full Backup.
Case: Operating system corruptionIf the Tivoli Security Information and Event Manager 2.0 server is no longeraccessible, then it is likely that the Operating System is corrupted. In this situation,you must perform a Full Restore of Tivoli Security Information and EventManager.
About this task
This task reinstalls the operating system and fully restores the Tivoli SecurityInformation and Event Manager configuration.
Procedure1. Restore by reinstalling or restoring the operating system on the Server.2. Reinstall Tivoli Security Information and Event Manager 2.0 with the same
configuration (i.e. Enterprise, Standard or Log Management Server withSecurity or Grouped Server Role), as before corruption. See Appendix A,“Configuration Parameters,” on page 179 for the list of Tivoli SecurityInformation and Event Manager configuration parameters that need to bepreserved during reinstallation of Tivoli Security Information and EventManager 2.0.
3. Perform pre-restore actions such as stopping Tivoli Security Information andEvent ManagerServices. See Appendix D, “Stopping and starting services,” onpage 195.
4. Perform a Full Restore of the most recent or desired stable Backup of TivoliSecurity Information and Event Manager server.
5. Perform any post-restore operations.6. Restart the restored Tivoli Security Information and Event Manager Server and
verify if the system is operational after startup. If the system is not restored toan operational state, contact IBM Tivoli Technical Support.
Case: Tivoli Security Information and Event Managercorruption
In this case, the Server is still accessible, but the Tivoli Security Information andEvent Manager Server is corrupted. In this situation, perform a Restore of thesystem in the given sequence to resolve the problem.
Before you begin
Before performing a Restore, try performing the manual corrective actionsproposed by IBM Tivoli Support.
164 Tivoli Security Information and Event Manager V2.0: Administrators Guide
About this task
This task reinstalls the Tivoli Security Information and Event Managerconfiguration, but does not reinstall the operating system.
Procedure1. Restore the System by a Partial Restore of latest stable Backup, without
performing an operating system restore.a. Create a full Backup of current Tivoli Security Information and Event
Manager configuration. Mark this Backup as unstable.b. Perform pre-restore actions such as stopping Tivoli Security Information and
Event Manager Services. See Appendix D, “Stopping and starting services,”on page 195.
c. Perform Partial Restore steps using the latest stable Backup.d. Restart the Tivoli Security Information and Event Manager Server System
and check if the corruption is solved.
If the problem is not solved, continue with Step 2 (because the problem was not relatedto the Tivoli Security Information and Event Manager configuration or software).
2. Restore the System by restoring the full operating system and using currentTivoli Security Information and Event Manager configuration.a. Restore the Tivoli Security Information and Event Manager server by
restoring or reinstalling the operating system.b. Re-install Tivoli Security Information and Event Manager software with the
same configuration as before corruption. See Appendix A, “ConfigurationParameters,” on page 179 for a list of configuration parameters that need tobe preserved during reinstallation of Tivoli Security Information and EventManager.
c. Perform pre-restore actions such as stopping Tivoli Security Information andEvent Manager Services. See Appendix D, “Stopping and starting services,”on page 195..
d. Perform Full Restore actions using the unstable Backup created in Step 1.This will restore the System with latest Depot and Indexes.
e. Restart the Tivoli Security Information and Event Manager Server Systemand check if the corruption is resolved.
If the problem is not resolved, continue with Step 3 (as the problem was not related tooperating system).
3. Restore the System by using the latest stable Backup.
Note: Restoring the system to the latest stable Backup implies that you willlose the changes made to the system after the latest Backup and moment ofinoperability. This includes losing the collected audit logs that are stored in theTivoli Security Information and Event Manager Depot.a. Perform pre-restore actions such as stopping Tivoli Security Information and
Event Manager Services. See Appendix D, “Stopping and starting services,”on page 195.
b. Perform Full Restore actions using the latest stable Backup.c. Restart the Tivoli Security Information and Event Manager Server System
and check if corruption is resolved.
If the problem is not resolved, contact IBM Tivoli Technical Support.
Chapter 15. Backing up and restoring Tivoli Security Information and Event Manager 165

Backing upThis section describes the procedures to back up Tivoli Security Information andEvent Manager 2.0.
Backing up a Log Management ServerThis section describes the procedure to perform a backup of a Tivoli SecurityInformation and Event Manager 2.0 Log Management Server.
Before you begin
Prior to performing a backup, Tivoli Security Information and Event ManagerServices must be stopped and the Tivoli Integrated Portal must be closed. For moreinformation, see Appendix D, “Stopping and starting services,” on page 195.
Procedure1. Backup Tivoli Security Information and Event Manager Software
a. Locate the installation folder. The following are the default locations:v AIX: /opt/IBM/tsiemv Linux: /opt/ibm/tsiemv Windows: IBM\TSIEM
b. Backup the following folders:v _uninst
v registry
v AIX or Linux: sim/serverWindows: sim\server
v AIX or Linux: sim/webappsWindows: sim\webapps
v tip
2. Backup Tivoli Security Information and Event Manager Dataa. Perform Tivoli Security Information and Event Manager DB2 Database
Backup. For more information, see Appendix B, “Backing up and restoringthe Tivoli Security Information and Event Manager DB2 database,” on page187.
b. Backup the contents of the Tivoli Security Information and Event ManagerDepot folderv AIX: /opt/IBM/tsiem/sim/depotv Linux: /opt/ibm/tsiem/sim/depotv Windows: \IBM\TSIEM\sim\depot
c. Backup the contents of the Tivoli Security Information and Event ManagerIndexes folder:v AIX: /opt/IBM/tsiem/sim/Indexesv Linux: /opt/ibm/tsiem/sim/Indexesv Windows: IBM\TSIEM\sim\Indexes
d. If you have SSH Remote Collects configured on this server, take theappropriate action:v AIX or Linux: Backup the .ssh folder located under home directory of
tsiem user. (Default location: /home/cifadmin/.ssh)
166 Tivoli Security Information and Event Manager V2.0: Administrators Guide

v Windows: Export the SSHHostKeys Registry key contents(HKEY_CURRENT_USER\Software\SimonTatham\PuTTY\SshHostKeys)
– Perform the export only if you have SSH Remote Collects configuredon this server.
– Perform the export under the credentials of the Tivoli SecurityInformation and Event Manager Server service OS account.
3. Deployment Engine databasea. Perform Deployment Engine database backup. For more information, see
Appendix E, “Backing up and restoring the Deployment Engine database,”on page 203.
What to do next
After the backup finishes, start the Tivoli Security Information and Event ManagerServices. For more information, see Appendix D, “Stopping and starting services,”on page 195.
Backing up a Standard ServerThis section describes the procedure to perform a backup of a Tivoli SecurityInformation and Event Manager 2.0 Standard Server.
Before you begin
Prior to performing a backup, Tivoli Security Information and Event ManagerServices must be stopped and the Tivoli Integrated Portal must be closed. For moreinformation, see Appendix D, “Stopping and starting services,” on page 195.
Procedure1. Backup Tivoli Security Information and Event Manager Software
a. Locate the installation folder. The following are the default locations:v AIX: /opt/IBM/tsiemv Linux: /opt/ibm/tsiemv Windows: IBM\TSIEM
b. Backup the following folders:v _uninst
v registry
v AIX or Linux: sim/iViewWindows: sim\iView
v AIX or Linux: sim/serverWindows: sim\server
v AIX or Linux: sim/webappsWindows: sim\webapps
v tip
2. Backup Tivoli Security Information and Event Manager Dataa. Perform Tivoli Security Information and Event Manager DB2 Database
Backup. For more information, see Appendix B, “Backing up and restoringthe Tivoli Security Information and Event Manager DB2 database,” on page187.
b. Backup the contents of the Tivoli Security Information and Event ManagerDepot folder.
Chapter 15. Backing up and restoring Tivoli Security Information and Event Manager 167

v AIX: /opt/IBM/tsiem/sim/depotv Linux: /opt/ibm/tsiem/sim/depotv Windows: \IBM\TSIEM\sim\depot
c. If you have SSH Remote Collects configured on this server, take theappropriate action:v AIX or Linux: Backup the .ssh folder located under home directory of
tsiem user. (Default location: /home/cifadmin/.ssh)v Windows: Export the SSHHostKeys Registry key contents
(HKEY_CURRENT_USER\Software\SimonTatham\PuTTY\SshHostKeys)
– Perform the export only if you have SSH Remote Collects configuredon this server.
– Perform the export under the credentials of the Tivoli SecurityInformation and Event Manager Server service OS account.
3. Deployment Engine databasea. Perform Deployment Engine database backup. For more information, see
Appendix E, “Backing up and restoring the Deployment Engine database,”on page 203.
What to do next
After the Backup finishes, start the Tivoli Security Information and Event ManagerServices. For more information, see Appendix D, “Stopping and starting services,”on page 195..
Backing up an Enterprise ServerThis section describes the procedure to perform a backup of a Tivoli SecurityInformation and Event Manager 2.0 Enterprise Server.
Before you begin
Prior to performing a backup, Tivoli Security Information and Event ManagerServices must be stopped and the Tivoli Integrated Portal must be closed. For moreinformation, see Appendix D, “Stopping and starting services,” on page 195.
Procedure1. Backup Tivoli Security Information and Event Manager Software
a. Locate the installation folder. The following are the default locations:v AIX: /opt/IBM/tsiemv Linux: /opt/ibm/tsiemv Windows: IBM\TSIEM
b. Backup the following folders:v _uninst
v registry
v AIX or Linux: sim/iViewWindows: sim\iView
v AIX or Linux: sim/serverWindows: sim\server
v AIX or Linux: sim/webappsWindows: sim\webapps
168 Tivoli Security Information and Event Manager V2.0: Administrators Guide

v AIX or Linux: sim/consolidationWindows: sim\consolidation
v tip
2. Backup Tivoli Security Information and Event Manager Dataa. Perform Tivoli Security Information and Event Manager DB2 Database
Backup. For more information, see Appendix B, “Backing up and restoringthe Tivoli Security Information and Event Manager DB2 database,” on page187.
b. Backup the contents of the Tivoli Security Information and Event ManagerDepot folder.v AIX: /opt/IBM/tsiem/sim/depotv Linux: /opt/ibm/tsiem/sim/depotv Windows: \IBM\TSIEM\sim\depot
c. Backup the contents of the Tivoli Security Information and Event ManagerIndexes folder:v AIX: /opt/IBM/tsiem/sim/Indexesv Linux: /opt/ibm/tsiem/sim/Indexesv Windows: IBM\TSIEM\sim\Indexes
d. If you have SSH Remote Collects configured on this server, take theappropriate action:v AIX or Linux: Backup the .ssh folder located under home directory of
tsiem user. (Default location: /home/cifadmin/.ssh)v Windows: Export the SSHHostKeys Registry key contents
(HKEY_CURRENT_USER\Software\SimonTatham\PuTTY\SshHostKeys)
– Perform the export only if you have SSH Remote Collects configuredon this server.
– Perform the export under the credentials of the Tivoli SecurityInformation and Event Manager Server service OS account.
3. Deployment Engine databasea. Perform Deployment Engine database backup. For more information, see
Appendix E, “Backing up and restoring the Deployment Engine database,”on page 203.
What to do next
After the backup finishes, start the Tivoli Security Information and Event ManagerServices. For more information, see Appendix D, “Stopping and starting services,”on page 195.
Security ServerIn case that the Tivoli Security Information and Event Manager Enterprise Serveror Standard Server has a Security Server role, perform the following additionalstep after running the Backup procedure mentioned in previous sections.v Backup the contents of the following LDAP tree in the IBM Tivoli Directory
Server (LDAP Server):– cn=cif,o=ibm (For more information, see Appendix C, “Backing up and
restoring the LDAP tree,” on page 191.)
Chapter 15. Backing up and restoring Tivoli Security Information and Event Manager 169

Backing up SIM Reporting DatabasesImportant: The SIM Reporting Databases in Tivoli Security Information and EventManager Database Instance (CIFDB) are not exported, although the Tivoli SecurityInformation and Event Manager configuration (maintained in EPRISEDB) of thoseSIM Reporting Databases is kept. In case a Full Restore is performed, re-create alldefined SIM Reporting Database in the Tivoli Integrated Portal before restoring.
Choosing a timeframe to perform a backupWhen the backup procedure runs, all applications connected to the Tivoli SecurityInformation and Event Manager DB2 database must be turned off in order toperform a full database backup.
Parameters
The Tivoli Security Information and Event Manager services and Tivoli IntegratedPortal must be stopped prior to performing a backup. For more information, seeAppendix D, “Stopping and starting services,” on page 195.
It is imperative that the backup procedure be scheduled at a time when the TivoliSecurity Information and Event Manager server has least activity(planned/scheduled or in progress).
The following criteria must be met prior to and during the execution of backupprocedure:v Tivoli Security Information and Event Manager Services mentioned previously
must be stopped. For more information, see Appendix D, “Stopping and startingservices,” on page 195.
v Reporting Database loads must not be in progress.v On the Enterprise Server, the consolidation task must not be in progress.
Choosing the start time of the backup run is crucial to ensure consistency andavailability of data. Consider the following setup options when scheduling thebackup:v When SIM Reporting Databases are configured to perform mapping at collect
time (or continuous mapping), schedule the backup just after all (scheduled) SIMReporting Databases have completed their loads for the day.
v Otherwise, perform the backup when all the collects for a given day havecompleted; it is advisable to embed the backup at the end of scheduled restartprocess.
Performing a partial restoreIn case of a Partial Restore, the Tivoli Security Information and Event Managerservices should be stopped and the database contents are imported into the TivoliSecurity Information and Event Manager DB2 database (CIFDB). The PartialRestore will overwrite the current Tivoli Security Information and Event ManagerDB2 database contents. If this does not fix the problem, a Full Restore is required.
Partially restoring a Log Management ServerThis section describes the procedure to perform a Partial Restore of a TivoliSecurity Information and Event Manager Log Management Server.
170 Tivoli Security Information and Event Manager V2.0: Administrators Guide

Before you begin
Prior to performing a Partial Restore, Tivoli Security Information and EventManager Services must be stopped and the Tivoli Integrated Portal must be closed.For more information, see Appendix D, “Stopping and starting services,” on page195.
Procedure1. Restore Tivoli Security Information and Event Manager Data.
a. Perform Tivoli Security Information and Event Manager DB2 DatabaseRestore. For more information, see Appendix B, “Backing up and restoringthe Tivoli Security Information and Event Manager DB2 database,” on page187.
b. If you have SSH Remote Collects configured on this server, take theappropriate action:v AIX or Linux: Import the .ssh folder located under home directory of
tsiem user. (Default location: /home/cifadmin/.ssh)v Windows: Import the SSHHostKeys Registry key contents
(HKEY_CURRENT_USER\Software\SimonTatham\PuTTY\SshHostKeys)
– Perform the import only if you have SSH Remote Collects configuredon this server.
– Perform the import under the credentials of the Tivoli SecurityInformation and Event Manager Server service OS account.
2. Restore Tivoli Security Information and Event Manager Software. Beforerestoring the folders, rename all folders listed below on the clean system beforecopying the backed up folders.a. Locate the installation folder. The following are the default locations:
v AIX: /opt/IBM/tsiemv Linux: /opt/ibm/tsiemv Windows: IBM\TSIEM
b. Restore the following folders:v _uninst
v registry
v AIX or Linux: sim/serverWindows: sim\server
v AIX or Linux: sim/webappsWindows: sim\webapps
v tip
3. Restore the Deployment Engine database.a. Perform Deployment Engine database restore. For more information, see
Appendix E, “Backing up and restoring the Deployment Engine database,”on page 203.
What to do next
After the Restore finishes, start the Tivoli Security Information and Event ManagerServices. For more information, see Appendix D, “Stopping and starting services,”on page 195.
Chapter 15. Backing up and restoring Tivoli Security Information and Event Manager 171

Partially restoring a Standard ServerThis section describes the procedure to perform a Partial Restore of a TivoliSecurity Information and Event Manager Standard Server.
Before you begin
Prior to performing a Partial Restore, Tivoli Security Information and EventManager Services must be stopped and the Tivoli Integrated Portal must be closed.For more information, see Appendix D, “Stopping and starting services,” on page195.
Procedure1. Restore Tivoli Security Information and Event Manager Data.
a. Perform Tivoli Security Information and Event Manager DB2 DatabaseRestore. For more information, see Appendix B, “Backing up and restoringthe Tivoli Security Information and Event Manager DB2 database,” on page187.
b. If you have SSH Remote Collects configured on this server, take theappropriate action:v AIX or Linux: Import the .ssh folder located under home directory of
tsiem user. (Default location: /home/cifadmin/.ssh)v Windows: Import the SSHHostKeys Registry key contents
(HKEY_CURRENT_USER\Software\SimonTatham\PuTTY\SshHostKeys)
– Perform the import only if you have SSH Remote Collects configuredon this server.
– Perform the import under the credentials of the Tivoli SecurityInformation and Event Manager Server service OS account.
2. Restore Tivoli Security Information and Event Manager Software. Beforerestoring the folders, rename all folders listed below on the clean system beforecopying the backed up folders.a. Locate the installation folder. The following are the default locations:
v AIX: /opt/IBM/tsiemv Linux: /opt/ibm/tsiemv Windows: IBM\TSIEM
b. Restore the following folders:v _uninst
v registry
v AIX or Linux: sim/iViewWindows: sim\iView
v AIX or Linux: sim/serverWindows: sim\server
v AIX or Linux: sim/webappsWindows: sim\webapps
v tip
3. Restore the Deployment Engine database.a. Perform Deployment Engine database restore. For more information, see
Appendix E, “Backing up and restoring the Deployment Engine database,”on page 203.
172 Tivoli Security Information and Event Manager V2.0: Administrators Guide
What to do next
After the Restore finishes, start the Tivoli Security Information and Event ManagerServices. For more information, see Appendix D, “Stopping and starting services,”on page 195.
Partially restoring an Enterprise ServerThis section describes the procedure to perform a Partial Restore of a TivoliSecurity Information and Event Manager Enterprise Server.
Before you begin
Prior to performing a Partial Restore, Tivoli Security Information and EventManager Services must be stopped and the Tivoli Integrated Portal must be closed.For more information, see Appendix D, “Stopping and starting services,” on page195.
Procedure1. Restore Tivoli Security Information and Event Manager Data.
a. Perform Tivoli Security Information and Event Manager DB2 DatabaseRestore. For more information, see Appendix B, “Backing up and restoringthe Tivoli Security Information and Event Manager DB2 database,” on page187.
b. If you have SSH Remote Collects configured on this server, take theappropriate action:v AIX or Linux: Import the .ssh folder located under home directory of
tsiem user. (Default location: /home/cifadmin/.ssh)v Windows: Import the SSHHostKeys Registry key contents
(HKEY_CURRENT_USER\Software\SimonTatham\PuTTY\SshHostKeys)
– Perform the import only if you have SSH Remote Collects configuredon this server.
– Perform the import under the credentials of the Tivoli SecurityInformation and Event Manager Server service OS account.
2. Restore Tivoli Security Information and Event Manager Software. Beforerestoring the folders, rename all folders listed below on the clean system beforecopying the backed up folders.a. Locate the installation folder. The following are the default locations:
v AIX: /opt/IBM/tsiemv Linux: /opt/ibm/tsiemv Windows: IBM\TSIEM
b. Restore the following folders:v _uninst
v registry
v AIX or Linux: sim/iViewWindows: sim\iView
v AIX or Linux: sim/serverWindows: sim\server
v AIX or Linux: sim/webappsWindows: sim\webapps
v AIX or Linux: sim/consolidation
Chapter 15. Backing up and restoring Tivoli Security Information and Event Manager 173

Windows: sim\consolidationv tip
3. Add the Standard Server that were part of the Tivoli Security Information andEvent Manager Cluster.
4. Restore the Deployment Engine database.a. Perform a Deployment Engine database restore. For more information, see
Appendix E, “Backing up and restoring the Deployment Engine database,”on page 203.
What to do next
After the Restore finishes, start the Tivoli Security Information and Event ManagerServices. For more information, see Appendix D, “Stopping and starting services,”on page 195.
Security ServerIn case the Tivoli Security Information and Event Manager 2.0 Enterprise Server orStandard Server has a Security Server role, perform the following additional stepafter running the Restore procedure mentioned in previous sections.v Restore the contents of the following LDAP tree in the IBM Tivoli Directory
Server (that, is the LDAP Server):– cn=cif,o=ibm (For more information, see Appendix C, “Backing up and
restoring the LDAP tree,” on page 191.)
Performing a full restoreIn the case of a Full Restore, the full operating system must be restored orreinstalled.
Subsequently, the Tivoli Security Information and Event Manager 2.0 softwaremust be reinstalled with the same configuration as before corruption. SeeAppendix A, “Configuration Parameters,” on page 179 for a list of configurationparameters that need to be preserved during reinstallation of Tivoli SecurityInformation and Event Manager.
Important: Before performing the Full Restore, all Reporting Databases that existedon the broken Tivoli Security Information and Event Manager server must becreated on the reinstalled Tivoli Security Information and Event Manager server(This will create the Event Mapper services and Reporting Database schemasaccording to the configuration data of the backed-up Tivoli Security Informationand Event Manager data).
The Tivoli Security Information and Event Manager Server services should bestopped before performing the Restore actions. See Appendix D, “Stopping andstarting services,” on page 195.
The next sections describe the additional steps for a Full Restore, to be performedfor each type of Tivoli Security Information and Event Manager serverconfiguration.
Fully restoring a Log Management ServerThis section describes the procedure to perform a Full Restore of a Tivoli SecurityInformation and Event Manager Log Management Server.
174 Tivoli Security Information and Event Manager V2.0: Administrators Guide

Before you begin
Prior to performing a Full Restore, Tivoli Security Information and Event ManagerServices must be stopped and the Tivoli Integrated Portal must be closed. For moreinformation, see Appendix D, “Stopping and starting services,” on page 195.
Procedure1. Restore Tivoli Security Information and Event Manager Data.
a. Perform Tivoli Security Information and Event Manager DB2 DatabaseRestore. For more information, see Appendix B, “Backing up and restoringthe Tivoli Security Information and Event Manager DB2 database,” on page187.
b. If you have SSH Remote Collects configured on this server, take theappropriate action:v AIX or Linux: Import the .ssh folder located under home directory of
tsiem user. (Default location: /home/cifadmin/.ssh)v Windows: Import the SSHHostKeys Registry key contents
(HKEY_CURRENT_USER\Software\SimonTatham\PuTTY\SshHostKeys)
– Perform the import only if you have SSH Remote Collects configuredon this server.
– Perform the import under the credentials of the Tivoli SecurityInformation and Event Manager Server service OS account.
c. Restore the contents of the Tivoli Security Information and Event ManagerDepot folderv AIX: /opt/IBM/tsiem/sim/depotv Linux: /opt/ibm/tsiem/sim/depotv Windows: \IBM\TSIEM\sim\depot
d. Restore the contents of the Tivoli Security Information and Event ManagerIndexes folder:v AIX: /opt/IBM/tsiem/sim/Indexesv Linux: /opt/ibm/tsiem/sim/Indexesv Windows: IBM\TSIEM\sim\Indexes
2. Restore Tivoli Security Information and Event Manager Software. Beforerestoring the folders, rename all folders listed below on the clean system beforecopying the backed up folders.a. Locate the installation folder. The following are the default locations:
v AIX: /opt/IBM/tsiemv Linux: /opt/ibm/tsiemv Windows: IBM\TSIEM
b. Restore the following folders:v _uninst
v registry
v AIX or Linux: sim/serverWindows: sim\server
v AIX or Linux: sim/webappsWindows: sim\webapps
v tip
3. Perform any post-restore operations.
Chapter 15. Backing up and restoring Tivoli Security Information and Event Manager 175

4. Restore the Deployment Engine database.a. Perform Deployment Engine database restore. For more information, see
Appendix E, “Backing up and restoring the Deployment Engine database,”on page 203.
What to do next
After the Restore finishes, start the Tivoli Security Information and Event ManagerServices. For more information, see Appendix D, “Stopping and starting services,”on page 195.
Fully restoring a Standard ServerThis section describes the procedure to perform a Full Restore of a Tivoli SecurityInformation and Event Manager Standard Server.
Before you begin
Prior to performing a Full Restore, Tivoli Security Information and Event ManagerServices must be stopped and the Tivoli Integrated Portal must be closed. For moreinformation, see Appendix D, “Stopping and starting services,” on page 195.
Procedure1. Restore Tivoli Security Information and Event Manager Data.
a. Perform Tivoli Security Information and Event Manager DB2 DatabaseRestore. For more information, see Appendix B, “Backing up and restoringthe Tivoli Security Information and Event Manager DB2 database,” on page187.
b. If you have SSH Remote Collects configured on this server, take theappropriate action:v AIX or Linux: Import the .ssh folder located under home directory of
tsiem user. (Default location: /home/cifadmin/.ssh)v Windows: Import the SSHHostKeys Registry key contents
(HKEY_CURRENT_USER\Software\SimonTatham\PuTTY\SshHostKeys)
– Perform the import only if you have SSH Remote Collects configuredon this server.
– Perform the import under the credentials of the Tivoli SecurityInformation and Event Manager Server service OS account.
c. Restore the contents of the Tivoli Security Information and Event ManagerDepot folderv AIX: /opt/IBM/tsiem/sim/depotv Linux: /opt/ibm/tsiem/sim/depotv Windows: \IBM\TSIEM\sim\depot
2. Restore Tivoli Security Information and Event Manager Software. Beforerestoring the folders, rename all folders listed below on the clean system beforecopying the backed up folders.a. Locate the installation folder. The following are the default locations:
v AIX: /opt/IBM/tsiemv Linux: /opt/ibm/tsiemv Windows: IBM\TSIEM
b. Restore the following folders:v _uninst
176 Tivoli Security Information and Event Manager V2.0: Administrators Guide

v registry
v AIX or Linux: sim/iViewWindows: sim\iView
v AIX or Linux: sim/serverWindows: sim\server
v AIX or Linux: sim/webappsWindows: sim\webapps
v tip
3. Perform any post-restore operations.4. Restore the Deployment Engine database.
a. Perform Deployment Engine database restore. See Appendix E, “Backing upand restoring the Deployment Engine database,” on page 203.
What to do next
After the Restore finishes, start the Tivoli Security Information and Event ManagerServices. For more information, see Appendix D, “Stopping and starting services,”on page 195.
Fully restoring an Enterprise ServerThis section describes the procedure to perform a Full Restore of a Tivoli SecurityInformation and Event Manager Enterprise Server.
Before you begin
Prior to performing a Full Restore, Tivoli Security Information and Event ManagerServices must be stopped and the Tivoli Integrated Portal must be closed. For moreinformation, see Appendix D, “Stopping and starting services,” on page 195.
Procedure1. Re-add all Standard Servers and Log Management Servers that were registered
to this Enterprise Server. This action will create an Indexer service on theEnterprise Server for each Standard Server and each Log Management Server.
2. Restore Tivoli Security Information and Event Manager Data:a. Perform Tivoli Security Information and Event Manager DB2 Database
Restore. For more information, see Appendix B, “Backing up and restoringthe Tivoli Security Information and Event Manager DB2 database,” on page187.
b. If you have SSH Remote Collects configured on this server, take theappropriate action:v AIX or Linux: Import the .ssh folder located under home directory of
tsiem user. (Default location: /home/cifadmin/.ssh)v Windows: Import the SSHHostKeys Registry key contents
(HKEY_CURRENT_USER\Software\SimonTatham\PuTTY\SshHostKeys)
– Perform the import only if you have SSH Remote Collects configuredon this server.
– Perform the import under the credentials of the Tivoli SecurityInformation and Event Manager Server service OS account.
c. Restore the contents of the Tivoli Security Information and Event ManagerDepot folder
Chapter 15. Backing up and restoring Tivoli Security Information and Event Manager 177

v AIX: /opt/IBM/tsiem/sim/depotv Linux: /opt/ibm/tsiem/sim/depotv Windows: \IBM\TSIEM\sim\depot
d. Restore the contents of the Tivoli Security Information and Event ManagerIndexes folder:v AIX: /opt/IBM/tsiem/sim/Indexesv Linux: /opt/ibm/tsiem/sim/Indexesv Windows: IBM\TSIEM\sim\Indexes
3. Restore Tivoli Security Information and Event Manager Software. Beforerestoring the folders, rename all folders listed below on the clean system beforecopying the backed up folders.a. Locate the installation folder. The following are the default locations:
v AIX: /opt/IBM/tsiemv Linux: /opt/ibm/tsiemv Windows: IBM\TSIEM
b. Restore the following folders:v _uninst
v registry
v AIX or Linux: sim/iViewWindows: sim\iView
v AIX or Linux: sim/serverWindows: sim\server
v AIX or Linux: sim/webappsWindows: sim\webapps
v AIX or Linux: sim/consolidationWindows: sim\consolidation
v tip
4. Perform any post-restore operations.5. Restore the Deployment Engine database.
a. Perform Deployment Engine database restore. For more information, seeAppendix E, “Backing up and restoring the Deployment Engine database,”on page 203.
What to do next
After the Restore finishes, start the Tivoli Security Information and Event ManagerServices. For more information, see Appendix D, “Stopping and starting services,”on page 195.
Security ServerIn case the Tivoli Security Information and Event Manager 2.0 Enterprise Server orStandard Server has a Security Server role, perform the following additional stepafter running the Restore procedure mentioned in previous sections.v Restore the contents of the following LDAP tree in the IBM Tivoli Directory
Server (that, is the LDAP Server):– cn=cif,o=ibm (For more information, see Appendix C, “Backing up and
restoring the LDAP tree,” on page 191.)
178 Tivoli Security Information and Event Manager V2.0: Administrators Guide

Appendix A. Configuration Parameters
This section describes the list of configuration parameters that need to bepreserved during reinstallation of Tivoli Security Information and Event Manager.The parameters are categorized per Tivoli Security Information and Event Managerserver configuration type.
When the Tivoli Security Information and Event Manager Server takes on aSecurity or Grouped Role, additional configuration parameters must be preserveddepending on the server's role.
The default configuration parameters for each of the Tivoli Security Informationand Event Manager Server configurations or role types are displayed in tables.When you install Tivoli Security Information and Event Manager, write the valuesthat you used for the parameters in the table column titled "Actual Value." Thesevalues are useful if you need to reinstall the product.
In the table, the columns have the following meaning:v Parameter Name: The parameter name that you accept or modify (from the
default value) in the Tivoli Security Information and Event Manager Installationand Deployment wizard screens.
v Default Value: The value that is filled-in by the Installer or Deployment Wizard.When there is no Default value, it is left empty.
v Actual Value: The value that you entered in the Tivoli Security Information andEvent Manager Installation and Deployment wizard screens.
Log Management ServerThis section describes the Log Management Server configuration parameters thatmust be preserved when you reinstall Tivoli Security Information and EventManager
Keep track of the following configuration parameters. You can enter the values foryour system in the Actual Value column.
Table 33. Log Management Server configuration parameters
Parameter Name Default Value Actual Value
TSIEM Server SoftwareInstall Folder
v AIX: /opt/IBM/tsiem
v Linux: /opt/ibm/tsiem
v Windows: C:\IBM\TSIEM
TIP Admin User tipadmin
TIP Admin Password
OS Username for TSIEMServer Services
cifadmin ordomain\cifadmin
OS Account Password forTSIEM Server Services
Server Display Name ofTSIEM Server
Hostname of TSIEM Server
© Copyright IBM Corp. 1998, 2011 179
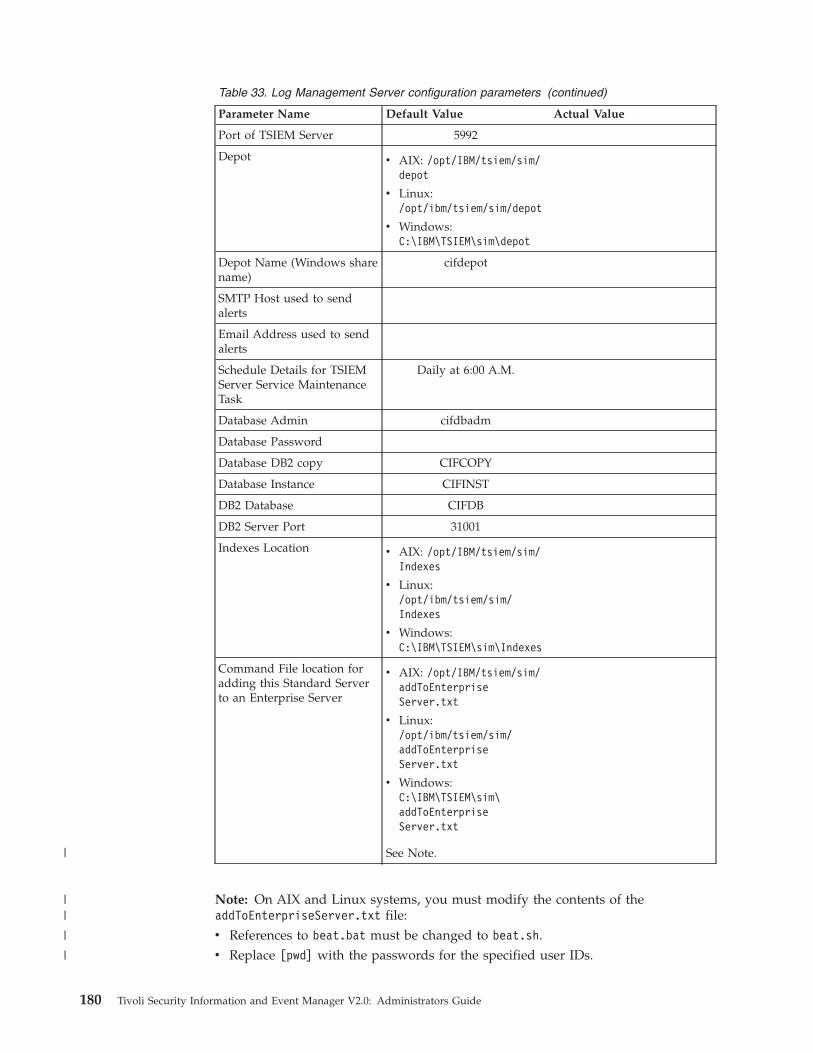
Table 33. Log Management Server configuration parameters (continued)
Parameter Name Default Value Actual Value
Port of TSIEM Server 5992
Depot v AIX: /opt/IBM/tsiem/sim/depot
v Linux:/opt/ibm/tsiem/sim/depot
v Windows:C:\IBM\TSIEM\sim\depot
Depot Name (Windows sharename)
cifdepot
SMTP Host used to sendalerts
Email Address used to sendalerts
Schedule Details for TSIEMServer Service MaintenanceTask
Daily at 6:00 A.M.
Database Admin cifdbadm
Database Password
Database DB2 copy CIFCOPY
Database Instance CIFINST
DB2 Database CIFDB
DB2 Server Port 31001
Indexes Location v AIX: /opt/IBM/tsiem/sim/Indexes
v Linux:/opt/ibm/tsiem/sim/Indexes
v Windows:C:\IBM\TSIEM\sim\Indexes
Command File location foradding this Standard Serverto an Enterprise Server
v AIX: /opt/IBM/tsiem/sim/addToEnterpriseServer.txt
v Linux:/opt/ibm/tsiem/sim/addToEnterpriseServer.txt
v Windows:C:\IBM\TSIEM\sim\addToEnterpriseServer.txt
See Note.
Note: On AIX and Linux systems, you must modify the contents of theaddToEnterpriseServer.txt file:v References to beat.bat must be changed to beat.sh.v Replace [pwd] with the passwords for the specified user IDs.
180 Tivoli Security Information and Event Manager V2.0: Administrators Guide
|
||
|
|
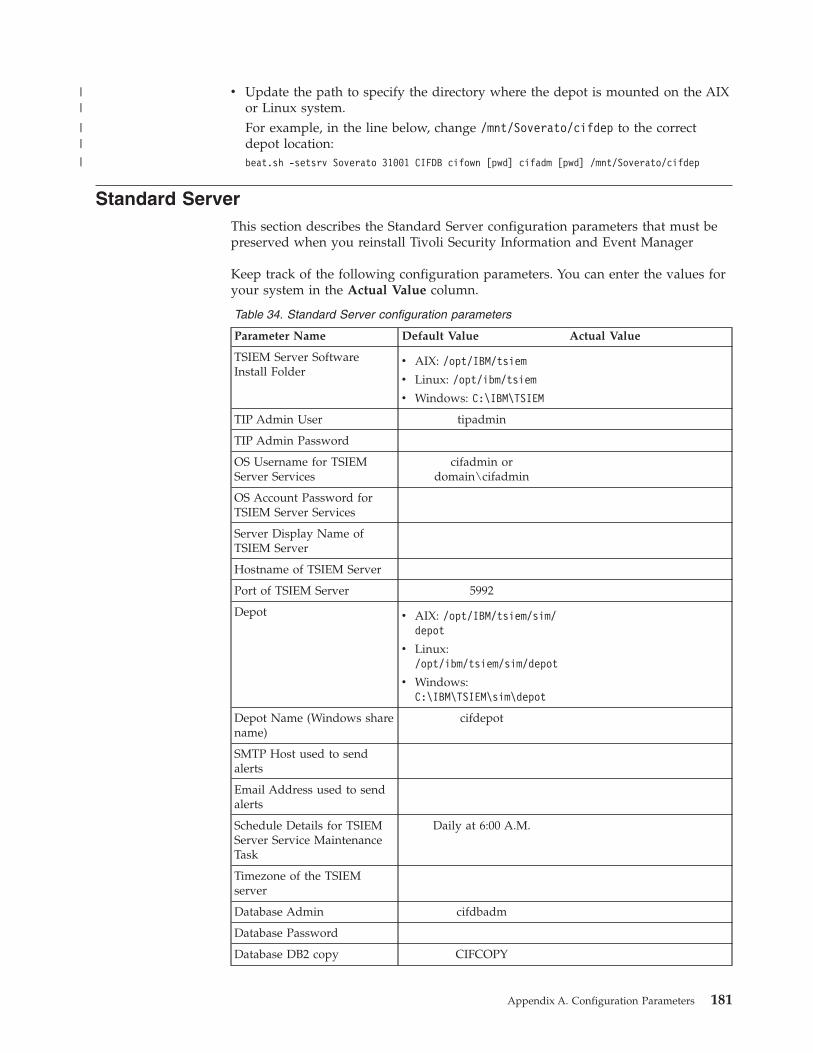
v Update the path to specify the directory where the depot is mounted on the AIXor Linux system.For example, in the line below, change /mnt/Soverato/cifdep to the correctdepot location:beat.sh -setsrv Soverato 31001 CIFDB cifown [pwd] cifadm [pwd] /mnt/Soverato/cifdep
Standard ServerThis section describes the Standard Server configuration parameters that must bepreserved when you reinstall Tivoli Security Information and Event Manager
Keep track of the following configuration parameters. You can enter the values foryour system in the Actual Value column.
Table 34. Standard Server configuration parameters
Parameter Name Default Value Actual Value
TSIEM Server SoftwareInstall Folder
v AIX: /opt/IBM/tsiem
v Linux: /opt/ibm/tsiem
v Windows: C:\IBM\TSIEM
TIP Admin User tipadmin
TIP Admin Password
OS Username for TSIEMServer Services
cifadmin ordomain\cifadmin
OS Account Password forTSIEM Server Services
Server Display Name ofTSIEM Server
Hostname of TSIEM Server
Port of TSIEM Server 5992
Depot v AIX: /opt/IBM/tsiem/sim/depot
v Linux:/opt/ibm/tsiem/sim/depot
v Windows:C:\IBM\TSIEM\sim\depot
Depot Name (Windows sharename)
cifdepot
SMTP Host used to sendalerts
Email Address used to sendalerts
Schedule Details for TSIEMServer Service MaintenanceTask
Daily at 6:00 A.M.
Timezone of the TSIEMserver
Database Admin cifdbadm
Database Password
Database DB2 copy CIFCOPY
Appendix A. Configuration Parameters 181
||
|||

Table 34. Standard Server configuration parameters (continued)
Parameter Name Default Value Actual Value
Database Instance CIFINST
DB2 Database CIFDB
DB2 Server Port 31001
Command File location foradding this Standard Serverto an Enterprise Server
v AIX: /opt/IBM/tsiem/sim/addToEnterpriseServer.txt
v Linux:/opt/ibm/tsiem/sim/addToEnterpriseServer.txt
v Windows:C:\IBM\TSIEM\sim\addToEnterpriseServer.txt
See Note.
Note: On AIX and Linux systems, you must modify the contents of theaddToEnterpriseServer.txt file:v References to beat.bat must be changed to beat.sh.v Replace [pwd] with the passwords for the specified user IDs.v Update the path to specify the directory where the depot is mounted on the AIX
or Linux system.For example, in the line below, change /mnt/Soverato/cifdep to the correctdepot location:beat.sh -setsrv Soverato 31001 CIFDB cifown [pwd] cifadm [pwd] /mnt/Soverato/cifdep
Enterprise ServerThis section describes the Enterprise Server configuration parameters that must bepreserved when you reinstall Tivoli Security Information and Event Manager
Keep track of the following configuration parameters. You can enter the values foryour system in the Actual Value column.
Table 35. Enterprise Server configuration parameters
Parameter Name Default Value Actual Value
TSIEM Server SoftwareInstall Folder
v AIX: /opt/IBM/tsiem
v Linux: /opt/ibm/tsiem
v Windows: C:\IBM\TSIEM
TIP Admin User tipadmin
TIP Admin Password
OS Username for TSIEMServer Services
cifadmin ordomain\cifadmin
OS Account Password forTSIEM Server Services
Server Display Name ofTSIEM Server
182 Tivoli Security Information and Event Manager V2.0: Administrators Guide
|
||
|
|
||
|||

Table 35. Enterprise Server configuration parameters (continued)
Parameter Name Default Value Actual Value
Hostname of TSIEM Server
Port of TSIEM Server 5992
Depot v AIX: /opt/IBM/tsiem/sim/depot
v Linux:/opt/ibm/tsiem/sim/depot
v Windows:C:\IBM\TSIEM\sim\depot
Depot Name (Windows sharename)
cifdepot
SMTP Host used to sendalerts
Email Address used to sendalerts
Schedule Details for TSIEMServer Service MaintenanceTask
Daily at 6:00 A.M.
Timezone of the TSIEMserver
Database Admin cifdbadm
Database Password
Database DB2 copy CIFCOPY
Database Instance CIFINST
DB2 Database CIFDB
DB2 Server Port 31001
Indexes Location v AIX: /opt/IBM/tsiem/sim/Indexes
v Linux:/opt/ibm/tsiem/sim/Indexes
v Windows:C:\IBM\TSIEM\sim\Indexes
Security ServerWhen the Tivoli Security Information and Event Manager Log Management Server,Standard Server, or Enterprise Server takes on a Security Server role, the followingconfiguration parameters must be preserved in addition to the parametersmentioned previously.
Keep track of the following configuration parameters. You can enter the values foryour system in the Actual Value column.
Table 36. Security Server configuration parameters
Parameter Name Default Value Actual Value
Security Server Username cifowner
Security Server Password
Appendix A. Configuration Parameters 183
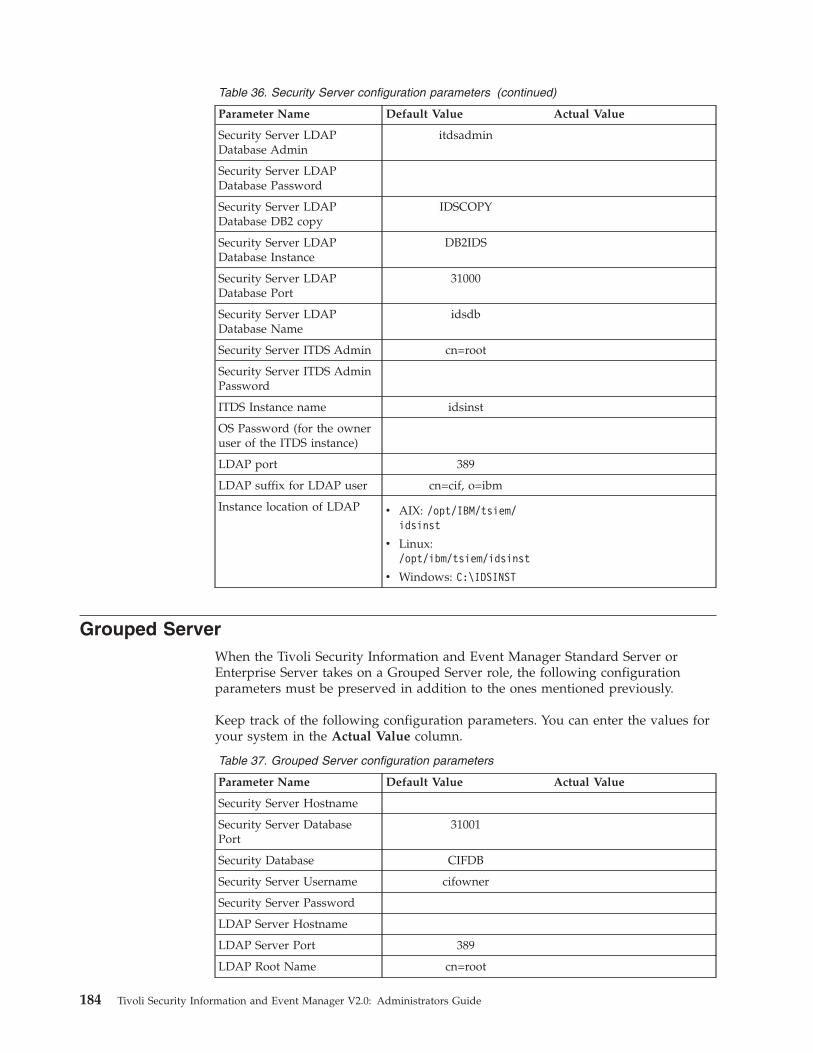
Table 36. Security Server configuration parameters (continued)
Parameter Name Default Value Actual Value
Security Server LDAPDatabase Admin
itdsadmin
Security Server LDAPDatabase Password
Security Server LDAPDatabase DB2 copy
IDSCOPY
Security Server LDAPDatabase Instance
DB2IDS
Security Server LDAPDatabase Port
31000
Security Server LDAPDatabase Name
idsdb
Security Server ITDS Admin cn=root
Security Server ITDS AdminPassword
ITDS Instance name idsinst
OS Password (for the owneruser of the ITDS instance)
LDAP port 389
LDAP suffix for LDAP user cn=cif, o=ibm
Instance location of LDAP v AIX: /opt/IBM/tsiem/idsinst
v Linux:/opt/ibm/tsiem/idsinst
v Windows: C:\IDSINST
Grouped ServerWhen the Tivoli Security Information and Event Manager Standard Server orEnterprise Server takes on a Grouped Server role, the following configurationparameters must be preserved in addition to the ones mentioned previously.
Keep track of the following configuration parameters. You can enter the values foryour system in the Actual Value column.
Table 37. Grouped Server configuration parameters
Parameter Name Default Value Actual Value
Security Server Hostname
Security Server DatabasePort
31001
Security Database CIFDB
Security Server Username cifowner
Security Server Password
LDAP Server Hostname
LDAP Server Port 389
LDAP Root Name cn=root
184 Tivoli Security Information and Event Manager V2.0: Administrators Guide
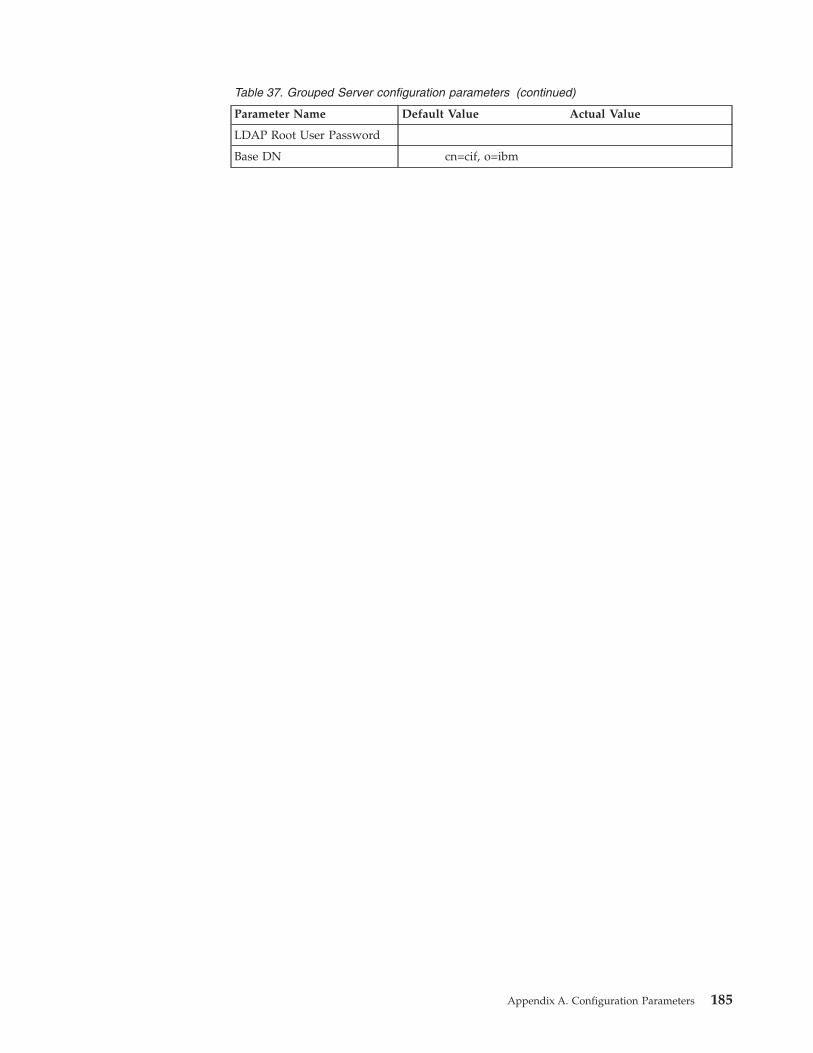
Table 37. Grouped Server configuration parameters (continued)
Parameter Name Default Value Actual Value
LDAP Root User Password
Base DN cn=cif, o=ibm
Appendix A. Configuration Parameters 185

186 Tivoli Security Information and Event Manager V2.0: Administrators Guide
Appendix B. Backing up and restoring the Tivoli SecurityInformation and Event Manager DB2 database
This section explains how to backup and restore the Tivoli Security Informationand Event Manager DB2 database (default database name: CIFDB).
Backing up the DB2 databasePerform a full database export of Tivoli Security Information and Event ManagerDB2 database.
Before you begin
Ensure that the Backup destination is large enough to hold the full databaseexport.
About this task
The full database export will make a backup of the entire contents of the DB2database (default database name: CIFDB), including data in EPRISEDB, LMDB,CLMDB, BEAT and SIM Reporting Databases, such as the SELFAUDIT database.
Procedure1. Force any applications off the database under the Tivoli Security Information
and Event Manager DB2 administrator OS account credentials (default accountname: cifdbadm).a. On AIX and Linux:
1) # su - cifdbadm
2) $ db2 force application all
b. On Windows: CMD> runas /user:cifdbadm db2 force application all
2. Stop and start the DB2 database manager under the Tivoli Security Informationand Event Manager OS user account credentials. On Windows, use a memberof the Administrators group. On AIX and Linux systems, the default accountname is cifadmin.
Note: On AIX and Linux systems, db2stop and db2start are located under thehome directory of the Tivoli Security Information and Event Manager DB2administrator: ~sqllib/adm/db2stop and ~sqllib/adm/db2start.a. On AIX and Linux:
1) $ su -cifadmin
2) $ /home/cifdbadm/sqllib/adm/db2stop force
3) $ /home/cifdbadm/sqllib/adm/db2start
b. On Windows:1) CMD> db2stop force
2) CMD> db2start
3. Perform a full backup of Tivoli Security Information and Event Manager DB2database (CIFDB) under the Tivoli Security Information and Event ManagerDB2 administrator OS account credentials (default account name: cifdbadmin).
© Copyright IBM Corp. 1998, 2011 187
|
|
|

AIX $ su -cifdbadm
$ db2 backup database CIFDB user cifowner using cifpasswd totmp/Backup/YYYYMMDD
Linux $ su -cifdbadm
$ db2 backup database CIFDB user cifowner using cifpasswd totmp/Backup
WindowsCMD> db2 backup database CIFDB user cifowner using cifpasswd toX:\Backup\YYYYMMDD
where:v CIFDB is the database name of Tivoli Security Information and Event
Manager DB2 database (default value is CIFDB).v cifowner is the Tivoli Security Information and Event Manager administrative
user (default value is cifowner)v cifpasswd is the Tivoli Security Information and Event Manager
administrative user's passwordv tmp/Backup/YYYYMMDD, tmp/Backup, or X:\Backup\YYYYMMDD is the
destination to which the backup data is stored. Back up to a folder namewith a date format that identifies when the Backup was made. Note that youcannot specify a file name on Linux systems.
Restoring the DB2 databasePerform a full database import of Tivoli Security Information and Event ManagerDB2 database (CIFDB).
About this task
The full database export will restore the entire contents of the CIFDB, includingdata in EPRISEDB, LMDB, CLMDB, BEAT and SIM Reporting Databases, such asthe SELFAUDIT database.
Procedure1. Force any applications off the database under the Tivoli Security Information
and Event Manager DB2 administrator OS account credentials (default accountname: cifdbadm).a. On AIX and Linux:
1) # su - cifdbadm
2) $ db2 force application all
b. On Windows: CMD> db2 force application all
2. Stop and start the DB2 database manager under the Tivoli Security Informationand Event Manager OS user account credentials (default account name:cifadmin).a. On AIX and Linux:
1) $ su -cifadmin
2) $ /home/cifdbadm/sqllib/adm/db2stop force
3) $ /home/cifdbadm/sqllib/adm/db2start force
b. On Windows:1) CMD> db2stop force
188 Tivoli Security Information and Event Manager V2.0: Administrators Guide
||
||
||

2) CMD> db2start
3. Perform a full restore of Tivoli Security Information and Event Manager DB2database (CIFDB) under the Tivoli Security Information and Event ManagerDB2 administrator OS account credentials (default account name: cifdbadm).
AIX and Linux$ db2 restore database CIFDB user cifowner using cifpasswd fromtmp/Backup/YYYYMMDD
WindowsCMD> db2 restore database CIFDB user cifowner using cifpasswdfrom X:\Backup\YYYYMMDD
where:v CIFDB is the database name of Tivoli Security Information and Event
Manager DB2 database (default value is CIFDB).v cifowner is the Tivoli Security Information and Event Manager administrative
user (default value is cifowner)v cifpasswd is the Tivoli Security Information and Event Manager
administrative user's passwordv tmp/Backup/YYYYMMDD or X:\Backup\YYYYMMDD is the location where
the backup data is stored. Back up to a folder name with a date format thatidentifies when the Backup was made.
Appendix B. Backing up and restoring the Tivoli Security Information and Event Manager DB2 database 189

190 Tivoli Security Information and Event Manager V2.0: Administrators Guide

Appendix C. Backing up and restoring the LDAP tree
This section explains how to backup and restore the LDAP tree.
Backing up the Tivoli Security Information and Event Manager LDAPtree
Perform an export of entries under the Tivoli Security Information and EventManager LDAP tree (default is cn=cif,o=ibm) .
About this task
Run the following commands under a local administrator account.
Procedure1. Change to the bin folder of the Tivoli Directory Server installation using the
default path:a. On AIX: /opt/IBM/ldap/V6.2/binb. On Linux: /opt/ibm/ldap/V6.2/binc. On Windows: CMD> cd /d “C:\IBM\TSIEM\ldap\bin”
2. Use the ldapsearch command to retrieve all entries under the Tivoli SecurityInformation and Event Manager LDAP tree and write the results to the backupdestinationa. On AIX and Linux: # ./ldapsearch –L –h localhost –p 389 –D cn=root –w
rootpwd –b cn=cif,o=ibm –s sub objectclass=* > tmp/Backup/YYYYMMDD/ldapbackup.ldif where
b. On Windows: CMD> ldapsearch –L –h localhost –p 389 –D cn=root –wrootpwd –b cn=cif,o=ibm –s sub objectclass=* > X:\Backup\YYYYMMDD\ldapbackup.ldif wherev localhost is used to export locally from the Tivoli Security Information and
Event Manager Server.v 389 is the default LDAP Server listening port.v cn=root is the IBM Tivoli Directory Server administrative account (default
value is used).v rootpwd is the corresponding password of the IBM Tivoli Directory Server
administrative account.v cn=cif,o=ibm represents the base of the Tivoli Security Information and
Event Manager LDAP tree, default value is used.v tmp/Backup/YYYYMMDD or X:\Backup\YYYYMMDD is the destination to
which the backup data is stored. Back up to a folder name with a dateformat that identifies when the Backup was made.
Restoring the Tivoli Security Information and Event Manager LDAPtree
Perform an export of entries under the Tivoli Security Information and EventManager LDAP tree (default is cn=cif,o=ibm) .
© Copyright IBM Corp. 1998, 2011 191

About this task
The Restore procedure consists of using the backup copy of TSIEM LDAP tree andperforming the following two steps:1. Add any missing Tivoli Security Information and Event Manager LDAP entries
into the Tivoli Security Information and Event Manager LDAP tree.2. Update any existing Tivoli Security Information and Event Manager LDAP
entries that differ from Backup.
Run the following commands under a local administrator account.
Procedure1. Change to the bin folder of the Tivoli Directory Server installation using the
default path:a. On AIX: /opt/IBM/ldap/V6.2/binb. On Linux: /opt/ibm/ldap/V6.2/binc. On Windows: CMD> cd /d “C:\IBM\TSIEM\ldap\bin”
2. Import any new Tivoli Security Information and Event Manager LDAP entries.Modify any existing Tivoli Security Information and Event Manager LDAPentries that differ from the Backup.a. To add LDAP entries:
v On AIX and Linux: # ./ldapadd –L –h localhost –p 389 –D cn=root –wrootpwd –b cn=cif,o=ibm –s sub objectclass=* > tmp/Backup/YYYYMMDD/ldapbackup.ldif where
v On Windows: CMD> ldapadd –c –h localhost –p 389 –D cn=root –wrootpwd –v –i X:\Backup\YYYYMMDD\ldapbackup.ldif
v localhost is used to export locally from the Tivoli Security Information andEvent Manager Server.
v 389 is the default LDAP Server listening port.v cn=root is the IBM Tivoli Directory Server administrative account (default
value is used).v rootpwd is the corresponding password of the IBM Tivoli Directory Server
administrative account.v cn=cif,o=ibm represents the base of the Tivoli Security Information and
Event Manager LDAP tree, default value is used.v tmp/Backup/YYYYMMDD or X:\Backup\YYYYMMDD is the location
where the backup data is stored. Back up to a folder name with a dateformat that identifies when the backup was made.
b. To modify LDAP entries:v On AIX and Linux: # ./ldapmodify –L –h localhost –p 389 –D cn=root –w
rootpwd –b cn=cif,o=ibm –s sub objectclass=* > tmp/Backup/YYYYMMDD/ldapbackup.ldif where
v On Windows: CMD> ldapmodify –c –h localhost –p 389 –D cn=root –wrootpwd –v –i X:\Backup\YYYYMMDD\ldapbackup.ldif where
v localhost is used to export locally from the TSIEM Server.v 389 is the default LDAP Server listening port.v cn=root is the IBM Tivoli Directory Server administrative account (default
value is used).v rootpwd is the corresponding password of the IBM Tivoli Directory Server
administrative account.
192 Tivoli Security Information and Event Manager V2.0: Administrators Guide

v cn=cif,o=ibm represents the base of the Tivoli Security Information andEvent Manager LDAP tree, default value is used.
v tmp/Backup/YYYYMMDD or X:\Backup\YYYYMMDD is the locationwhere the backup data is stored. Back up to a folder name with a dateformat that identifies when the backup was made.
Appendix C. Backing up and restoring the LDAP tree 193

194 Tivoli Security Information and Event Manager V2.0: Administrators Guide

Appendix D. Stopping and starting services
This section explains how to stop and start Tivoli Security Information and EventManager services.
Syntax for AIX systemsThis section provides the command line syntax for stopping, starting, andrestarting middleware services on AIX systems.
To stop, start, or restart middleware services on AIX systems:1. Log on as root.2. In a terminal, type
# /etc/rc.d/init.d/tsiem_service_name_service.sh action
where
service_nameis the name of the service:
db2 DB2 processes
sim Tivoli Security Information and Event Manager server processes
ldap Tivoli Directory Server (LDAP) server processes
tip Tivoli Integrated Portal processes
action the action to perform on the service:
start Start the processes.
stop Stop the processes.
restart Stop and start the processes.
status Obtain the status of the processes.
Syntax for Linux systemsThis section provides the command line syntax for stopping, starting, andrestarting middleware services on Linux systems.
To stop, start, or restart middleware services on Linux systems:1. Log on as root.2. In a terminal, type
# /etc/init.d/tsiem_service_name_service.sh action
where
service_nameis the name of the service:
db2 DB2 processes
sim Tivoli Security Information and Event Manager server processes
ldap Tivoli Directory Server (LDAP) server processes
© Copyright IBM Corp. 1998, 2011 195
|
||
|
|
|
|
|
||
||
||
||
||
||
||
||
||
||
|
|

tip Tivoli Integrated Portal processes
action the action to perform on the service:
start Start the processes.
stop Stop the processes.
restart Stop and start the processes.
status Obtain the status of the processes.
Syntax for Windows systemsThis section provides the command line syntax for stopping, starting, andrestarting middleware services on Windows systems.
To stop, start, or restart middleware services on Windows systems:1. Log on as the administrator.2. In a terminal, type
CMD> net action service_name
where
action the action to perform on the service:
start Start the service.
stop Stop the service.
service_nameis the name of the service:
CEAgentTivoli Security Information and Event Manager server process
CIFAuthDaemonTivoli Security Information and Event Manager Authorizationdaemon
CIFIndexerHOSTNAMETivoli Security Information and Event Manager Indexer Service
CIFEventMapperGEMDBNAMETivoli Security Information and Event Manager Event MapperServices (Reporting Databases)
"IBMWAS61Service - TIPProfile_Port_16310"Tivoli Integrated Portal processes
More information on these processes are provided in the following sections.
Stopping Tivoli Security Information and Event Manager servicesThis section explains how to stop Tivoli Security Information and Event Managerservices.
On Microsoft Windows systems, the Tivoli Security Information and EventManager services must be stopped in the following sequence:1. Tivoli Security Information and Event Manager Server process.2. Tivoli Security Information and Event Manager Authorization (Auth) Daemon
service.
196 Tivoli Security Information and Event Manager V2.0: Administrators Guide

3. Tivoli Integrated Portal service.4. Tivoli Security Information and Event Manager Event Mapper services
(Reporting Databases).5. Tivoli Security Information and Event Manager Indexer services (only applies
to Enterprise Servers).
On AIX and Linux systems, the tsiem_sim_service.sh script ensures that theserver processes are stopped in the correct order.
The procedures for stopping each of these processes are described in the followingsections.
Stopping the Tivoli Security Information and Event ManagerServer Service
The Tivoli Security Information and Event Manager Server process runs under theWindows Service “IBM TSIEM - SIM Server”.
In order to stop the Tivoli Security Information and Event Manager Server service,use the following commands:
AIX/etc/rc.d/init.d/tsiem_sim_service.sh stop
Linux/etc/init.d/tsiem_sim_service.sh stop
WindowsCMD> net stop CEAgent
Stopping the Tivoli Security Information and Event ManagerAuthorization (Auth) Daemon Service
The Tivoli Security Information and Event Manager Authorization daemon runs asa Windows Service by name "IBM TSIEM - SIM Auth Daemon".
In order to stop the service, use the following commands:
AIX/etc/rc.d/init.d/tsiem_sim_service.sh stop
Linux/etc/init.d/tsiem_sim_service.sh stop
Windowsnet stop CIFAuthDaemon
Stopping the Tivoli Integrated Portal ServiceThe Tivoli Integrated Portal process runs as a Windows Service under the name“Tivoli Integrated Portal - TIPProfile_Port_16310”.
In order to stop the Tivoli Integrated Portal service, use the following commands:
AIX/etc/rc.d/init.d/tsiem_tip_service.sh stop
Linux/etc/init.d/tsiem_tip_service.sh stop
WindowsCMD> net stop "IBMWAS61Service - TIPProfile_Port_16310"
Appendix D. Stopping and starting services 197
||
||
||
||
||
||
||
||
||

In some cases, the Tivoli Integrated Portal service might not stop as a result ofissuing these commands. To verify that the service has stopped:
AIX/etc/rc.d/init.d/tsiem_tip_service.sh status
Linux/etc/init.d/tsiem_tip_service.sh status
WindowsCMD> sc query "IBMWAS61Service - TIPProfile_Port_16310" | find "RUNNING"
If the Tivoli Integrated Portal service is still running, in most cases you can force itto stop by using the following command:
AIX/opt/IBM/tsiem/tip/bin/stopServer.sh server1
Linux/opt/ibm/tsiem/tip/bin/stopServer.sh server1
WindowsC:\ibm\TSIEM\tip\bin\stopServer.bat server1
In rare instances, you might need to use the kill command to kill the process.
Stopping the Tivoli Security Information and Event ManagerEvent Mapper Services (Reporting Databases)
The Reporting Database runs as an Event Mapper service "IBM Tivoli SecurityInformation and Event Manager - Event Mapper GEMDBNAME". One suchWindows service is defined for each Reporting Database (GEMDBNAME) definedin the Tivoli Integrated Portal.
In order to stop the service, use the following commands:
AIX/etc/rc.d/init.d/tsiem_sim_service.sh stop/etc/rc.d/init.d/tsiem_tip_service.sh stop
Linux/etc/init.d/tsiem_sim_service.sh stop/etc/init.d/tsiem_tip_service.sh stop
Windowsnet stop CIFEventMapperGEMDBNAME
where GEMDBNAME is the name of the Reporting Database defined inTivoli Integrated Portal.
The previous net stop command must be performed for each ReportingDatabase name (GEMDBNAME) defined in the Tivoli Integrated Portal.
Stopping the Tivoli Security Information and Event ManagerIndexer Service
The Tivoli Security Information and Event Manager Indexer runs as a WindowsService by name "IBM TSIEM - Indexer HOSTNAME".
198 Tivoli Security Information and Event Manager V2.0: Administrators Guide
||
||
||
||
||
||
||
||
|
|||
|||
||
||
||
The Tivoli Security Information and Event Manager Indexer service runs only onthe Enterprise Server. There is one Tivoli Security Information and Event ManagerIndexer service for each Tivoli Security Information and Event Manager server thatis part of the cluster.
In order to stop the Tivoli Security Information and Event Manager Indexer, usethe following commands:
AIX/etc/rc.d/init.d/tsiem_sim_service.sh stop
Linux/etc/init.d/tsiem_sim_service.sh stop
WindowsCMD> net stop CIFIndexerHOSTNAME
where HOSTNAME is the name of the Tivoli Security Information andEvent Manager server that is part of the Tivoli Security Information andEvent Manager Cluster.
The net stop command must be performed for each HOSTNAME linked tothe Tivoli Security Information and Event Manager Indexer Service seen inthe Windows Services panel (services.msc).
Starting Tivoli Security Information and Event Manager servicesThis section explains how to start Tivoli Security Information and Event Managerservices.
On Microsoft Windows systems, the Tivoli Security Information and EventManager services must be started in the following sequence:1. Tivoli Security Information and Event Manager Server process.2. Tivoli Security Information and Event Manager Authorization (Auth) Daemon
service.3. Tivoli Security Information and Event Manager Event Mapper services
(Reporting Databases).4. Tivoli Security Information and Event Manager Indexer services (only applies
to Enterprise Servers).5. Tivoli Integrated Portal service.
On AIX and Linux systems, the tsiem_sim_service.sh script ensures that theserver processes are started in the correct order.
The procedures for starting each of these processes are described in the followingsections.
Starting Tivoli Security Information and Event Manager ServerService
The Tivoli Security Information and Event Manager Server process runs under theWindows Service “IBM TSIEM - SIM Server”.
In order to start the Tivoli Security Information and Event Manager Server service,use the following commands:
AIX/etc/rc.d/init.d/tsiem_sim_service.sh start
Appendix D. Stopping and starting services 199
||
||
||
|||
|||
||

Linux/etc/init.d/tsiem_sim_service.sh start
WindowsCMD> net start CEAgent
Starting Tivoli Security Information and Event ManagerAuthorization (Auth) Daemon Service
The Tivoli Security Information and Event Manager Authorization daemon runs asa Windows Service by name "IBM TSIEM - SIM Auth Daemon".
In order to start the service, use the following commands:
AIX/etc/rc.d/init.d/tsiem_sim_service.sh start
Linux/etc/init.d/tsiem_sim_service.sh start
Windowsnet start CIFAuthDaemon
Starting Tivoli Security Information and Event Manager EventMapper Services (Reporting Databases)
The Reporting Database runs as an Event Mapper service "IBM Tivoli SecurityInformation and Event Manager - Event Mapper GEMDBNAME". One suchWindows service is defined for each Reporting Database (GEMDBNAME) definedin the Tivoli Integrated Portal.
In order to start the service, use the following commands:
AIX/etc/rc.d/init.d/tsiem_sim_service.sh start/etc/rc.d/init.d/tsiem_tip_service.sh start
Linux/etc/init.d/tsiem_sim_service.sh start/etc/init.d/tsiem_tip_service.sh start
Windowsnet start CIFEventMapperGEMDBNAME
where GEMDBNAME is the name of the Reporting Database defined inTivoli Integrated Portal.
The net start command must be performed for each Reporting Databasename (GEMDBNAME) defined in the Tivoli Integrated Portal.
Starting the Tivoli Security Information and Event ManagerIndexer Service
The Tivoli Security Information and Event Manager Indexer runs as a WindowsService by name "IBM TSIEM - Indexer HOSTNAME".
The Tivoli Security Information and Event Manager Indexer service runs only onthe Tivoli Security Information and Event Manager Enterprise Server. There is oneTivoli Security Information and Event Manager Indexer service for each TivoliSecurity Information and Event Manager server that is part of the Tivoli SecurityInformation and Event Manager cluster.
200 Tivoli Security Information and Event Manager V2.0: Administrators Guide
||
||
||
||
||
|||
|||
||
||
||

In order to start the Tivoli Security Information and Event Manager Indexer, usethe following commands:
AIX/etc/rc.d/init.d/tsiem_sim_service.sh start
Linux/etc/init.d/tsiem_sim_service.sh start
WindowsCMD> net start CIFIndexerHOSTNAME
where HOSTNAME is the name of the Tivoli Security Information andEvent Manager server that is part of the Tivoli Security Information andEvent Manager Cluster.
The net start command must be performed for each HOSTNAME linkedto the Tivoli Security Information and Event Manager Indexer Service seenin the Windows Services panel (services.msc).
Starting the Tivoli Integrated Portal ServiceThe Tivoli Integrated Portal process runs as a Windows Service under the name“Tivoli Integrated Portal - TIPProfile_Port_16310”.
In order to start the Tivoli Integrated Portal service, use the following commands:
AIX/etc/rc.d/init.d/tsiem_tip_service.sh start
Linux/etc/init.d/tsiem_tip_service.sh start
WindowsCMD> net start "IBMWAS61Service - TIPProfile_Port_16310"
Appendix D. Stopping and starting services 201
||
||
||
|||
|||
||
||
||

202 Tivoli Security Information and Event Manager V2.0: Administrators Guide

Appendix E. Backing up and restoring the Deployment Enginedatabase
This section explains how to backup and restore the Deployment Engine (DE).
Tivoli Security Information and Event Manager components and MaintenanceDelivery Vehicles are registered in the Deployment Engine.
Backing up the Deployment Engine databasePerform a full backup of the current Deployment Engine installation database.
Before you begin
Ensure that the backup destination is large enough to hold the full databaseexport.
About this task
This task backs up the current Deployment Engine installation database.
Procedure1. Locate the Deployment Engine installation directory.
Query the value of the SI_PATH environment variable to determine the location.The default directories are:
AIX /usr/ibm/common/acsi/bin
Linux /usr/ibm/common/acsi/bin
Windows (32-bit)C:\Program Files\IBM\Common\acsi
Windows (64-bit)C:\Program Files (x86)\IBM\Common\acsi
2. Run the following command from the Deployment Engine installation directory.
AIX and Linuxde_backupdb –bfile backupfile
Windowsde_backupdb.cmd –bfile backupfile
where backupfile is the name of the backup file. If you do not specify the nameof the backup file as a fully qualified file name, then the backup file is locatedin the directory from which you issued the de_backupdb command. If you donot specify the location and name, then the default location is the backupdbsdirectory in the Deployment Engine installation directory and the default filename is a time stamp in the form of YYYYMMDDhhmm.
Note: On Linux systems, you must specify a file name.
Restoring the Deployment Engine databaseRestore the Deployment Engine installation database.
© Copyright IBM Corp. 1998, 2011 203
|
||
||
||
||
||
|
||
||
||||||
|

Before you begin
Before restoring the Deployment Engine database, first restore all of the TivoliSecurity Information and Event Manager files and the DB2 database.
About this task
This task restores the current Deployment Engine installation database.
Procedure1. Locate the Deployment Engine installation directory.
Query the value of the SI_PATH environment variable to determine the location.The default directories are:
AIX /usr/ibm/common/acsi/bin
Linux /usr/ibm/common/acsi/bin
Windows (32-bit)C:\Program Files\IBM\Common\acsi
Windows (64-bit)C:\Program Files (x86)\IBM\Common\acsi
2. Run the following command from the Deployment Engine installation directory.
AIX and Linuxtsiem_restorede backupfile
Windowstsiem_restorede backupfile
where backupfile is the name of the backup file. The default location of thebackup file is the backupdbs directory in the Deployment Engine installationdirectory. The default file name is a time stamp in the form ofYYYYMMDDhhmm.
3. Start the IBM ADE Service.
AIX and Linuxacsisrv.sh -start
Windowsnet start "IBM ADE Service"
204 Tivoli Security Information and Event Manager V2.0: Administrators Guide
|
||
||
||
||
||
|
||
||
||||
|
||
||

Appendix F. Using DR550 with Tivoli Security Information andEvent Manager
You can use IBM System Storage® DR550 (DR550) for storing the Tivoli SecurityInformation and Event Manager Log Management Depot after you perform someinitial setup.
Before you start working with a DR550 shared drive, you must make the driveavailable to Tivoli Security Information and Event Manager. See “Mounting theDR550 drive on AIX and Linux systems using CIFS” and “Mounting the DR550drive on Windows systems” on page 206.
You can then manage the Log Management Depot using the DR550 shared drive.See “Moving data between the DR550 drive and the Log Management Depot” onpage 208.
Mounting the DR550 drive on AIX and Linux systems using CIFSA DR550 drive can be accessed through either NFS or CIFS. These instructionsexplain how to access the drive from an AIX system or a Linux system using CIFS.
Before you begin
Be sure that the "write once read many" policy is not enabled on the DR550 drive.
Note: On AIX systems, the runtime for SMBFS must be installed. The SMBFSruntime is found in the bos.cifs_fs fileset (bos.cifs_fs.rte).
About this task
Tivoli Security Information and Event Manager uses several user accounts to accessthe Tivoli Integrated Portal, Reporting Databases, and the Tivoli Directory Server.The DR550 drive by default will assign a UID and GID of 0 to files in the mountpoint. Tivoli Security Information and Event Manager by default runs under thecifadmin user and cifusers group. In order for Tivoli Security Information andEvent Manager to read and write to the DR550, it must be mounted using the UIDand GID of the cifadmin user and cifusers group.
Procedure1. Login to Tivoli Security Information and Event Manager as the root user.2. Create a mount point.
For example:$ mkdir /dr550mount
3. Mount the DR550 drive.v On AIX, use the mkcifsmnt command.
The syntax for the mkcifsmnt command is:mkcifsmnt -f MountPoint -d RemoteShare -h RemoteHost
-c user [-p password] [-m MountTypeName] [-A|-a] [-I|-B|-N][-t {rw|ro}] [-u uid] [-g gid] [-x fmode] [-w wrkgrp]
For example:
© Copyright IBM Corp. 1998, 2011 205

$ mkcifsmnt -f /dr550mount -d /dr550test -h redoubt.example.com-c dr550test -p dr550pwd -A -u 206 -g 205
v On Linux, use the mount.cifs command.The syntax for the mount.cifs command is:mount.cifs {service} {mount_point} [-o options]
For example:$ mount.cifs //redoubt.example.com/dr550test /dr550mount
-o user=dr550test,password=dr550test,uid=504,gid=504
What to do next
You can now export the data from the depot to the DR550 or relocate the depot tothe DR550 using the mount point.
Mounting the DR550 drive on Windows systemsOn Windows systems, there are two ways that you can use to mount the drive.
Use one of the following methods:v Mount the DR550 shared drive, specifying an existing DR550 user that is
separate from the Tivoli Security Information and Event Manager users. See“Using separate user accounts on the DR550 and Tivoli Security Information andEvent Manager.”
v Create on the DR550 the same operating system user ID that Tivoli SecurityInformation and Event Manager uses and mount the DR550 drive as a commondrive. See “Creating the same user on the DR550 and Tivoli Security Informationand Event Manager systems” on page 207.
Using separate user accounts on the DR550 and TivoliSecurity Information and Event Manager
When you use DR550 storage for the Tivoli Security Information and EventManager depot, you can use separate user accounts on the DR550 system and theTivoli Security Information and Event Manager system.
Before you begin
Be sure that the "write once read many" policy is not enabled on the DR550.
About this task
Tivoli Security Information and Event Manager uses several user accounts to accessthe Tivoli Integrated Portal, databases, and Tivoli Directory Server. The DR550 alsouses different user accounts to access the file system. If you use DR550 storage forthe Tivoli Security Information and Event Manager depot, the account used by theTivoli Security Information and Event Manager service must have access rights tostore files on the DR550. For convenience, you can make the Tivoli SecurityInformation and Event Manager and DR550 accounts independent of each other.You can then run the Tivoli Security Information and Event Manager service withthe user account it normally uses and still access the DR550, while the TivoliSecurity Information and Event Manager account has no rights on the DR550. Usethe following steps to create this setup.
206 Tivoli Security Information and Event Manager V2.0: Administrators Guide

Procedure1. Create a network drive, using the following command on the Tivoli Security
Information and Event Manager system:net use drive_letter: \\computer_name\path_to_dr550_drive password
/user:user_name
wherev \\computer_name\path _to_dr550_drive is the path to DR550 shared network
drive.v user_name and password are the DR550 user account credentials to access the
shared DR550 drive.2. Make this network drive permanent
a. Create a batch file that contains the net use command shown in step 1.b. Create a Windows scheduler task to run the batch file as the Windows
SYSTEM account each time the computer starts. Schedule a short delaybefore the task runs, about 5-10 seconds.
After the computer is restarted, the computer network drive is available toTivoli Security Information and Event Manager.
What to do next
After you mount the DR550 drive, you can export the data from the depot to theDR550 or relocate the depot to the DR550 using the network drive that youcreated.
Creating the same user on the DR550 and Tivoli SecurityInformation and Event Manager systems
When you use DR550 storage for the Tivoli Security Information and EventManager depot, you can create identical user accounts on the Tivoli SecurityInformation and Event Manager and DR550 systems.
Before you begin
Be sure that the Write Once Read Many (WORM) policy is not enabled on theDR550.
About this task
Tivoli Security Information and Event Manager uses several user accounts to accessthe Tivoli Integrated Portal, databases, and Tivoli Directory Server. The DR550 alsouses different user accounts to access the file system. If you use DR550 storage forthe Tivoli Security Information and Event Manager Log Management Depot data,the account used by the Tivoli Security Information and Event Manager servicemust have access rights to store files on the DR550. You can create a user ID on theDR550 system with the same user name and password as an account used byTivoli Security Information and Event Manager.
Procedure1. Choose a user ID on the Tivoli Security Information and Event Manager that
can access the Tivoli Integrated Portal (for example, cifadmin).2. On the DR550 system, create an operating system user ID with the same user
name and password.
Appendix F. Using DR550 with Tivoli Security Information and Event Manager 207

3. Map the DR550 shared drive on the Tivoli Security Information and EventManager system. Refer to the network drive as a common drive (for example,\\192.168.236.22\test\export\).
What to do next
You can now export the data from the depot to the DR550 or relocate the depot tothe DR550 using the network drive that you created.
Managing Log Management Depot data with a DR550 driveAfter you make the shared DR550 drive available to Tivoli Security Informationand Event Manager, you can move Log Management Depot data between the twosystems.
You can use one of the following methods:
Export and import the data from the depot to the DR550 shared driveIf the Log Management Depot is not actually on the DR550 shared drive,you must export the Log Management Depot data periodically to keep thedata up to date on the DR550, and then import the data back to the LogManagement Depot on the Tivoli Security Information and Event Managersystem. See “Moving data between the DR550 drive and the LogManagement Depot.”
Relocate the depot itself to DR550 shared driveIn this case, Tivoli Security Information and Event Manager writescollected chunks directly to the DR550. See “Relocating the LogManagement Depot to the DR550 shared drive on Windows” on page 210.
Moving data between the DR550 drive and the LogManagement Depot
If the Log Management Depot itself is not on the DR550 shared drive, you mustmove the Log Management Depot data between the DR550 drive and the LogManagement Depot on the Tivoli Security Information and Event Manager system.
You must export and import the Log Management Depot data.v To export data, see “Exporting data from the Log Management Depot to the
DR550 drive.”v To import data, see “Importing data from the DR550 drive to the Log
Management Depot” on page 209.
Exporting data from the Log Management Depot to the DR550driveIf you do not store the Log Management Depot on the DR550 system, you mustexport the data to the DR550 system periodically.
Before you begin
Before you export data:v Be sure that you have mounted the DR550 drive.v Be sure that you have configured a DR550 user with DR550 write/read
permission for mounting the network drive or for direct access to the networkshare.
208 Tivoli Security Information and Event Manager V2.0: Administrators Guide

v See the information about archiving audit data in the IBM Tivoli SecurityInformation and Event Manager Administrators Guide.
About this task
You can store Log Management Depot data on the DR550 shared drive by usingthe Tivoli Integrated Portal.
Procedure1. Log on to Tivoli Security Information and Event Manager.2. In the Tivoli Integrated Portal navigation panel, expand the Tivoli Security
Information and Event Manager topic.3. Expand the Configuration and Management topic.4. Expand the Archive Tools topic.5. Click Export Audit Data. The Export Audit Data page opens.6. Complete all required fields to set up a schedule for exporting data to the
DR550. In the Export logs to path on Server field, type the path to the sharedDR550 drive. The following paths are examples of the path you might type inthis field:v On AIX and Linux systems:
– /dr550mount/coalbrook
v On Windows systems:– \\192.168.236.22\test\export\ if you created a DR550 user ID that is
identical to the user ID on the Tivoli Security Information and EventManager system.
– z:\depot\ if you mounted the DR550 drive specifying a DR550 user.7. Click OK to begin exporting the data.
Note: The original logs will be removed from depot.8. When the export is complete, check the export results. Be sure that a folder
with the current date as its name is present.
What to do next
You can also import the data from the DR550 drive to the depot to the LogManagement Depot.
Importing data from the DR550 drive to the Log ManagementDepotIf you do not store the Log Management Depot on the DR550 system, you mustimport data that you have exported to the DR550 system back to the LogManagement Depot.
Before you begin
Before you import data:v Be sure that you have mounted the DR550 drive.v Be sure that you have configured a DR550 user with DR550 write/read
permission for mounting the network drive or for direct access to the networkshare.
v Be sure that you have exported Log Management Depot to the DR550 shareddrive.
Appendix F. Using DR550 with Tivoli Security Information and Event Manager 209

v See the information about archiving audit data in the IBM Tivoli SecurityInformation and Event Manager Administrators Guide.
About this task
After you store Log Management Depot data on the DR550 shared drive, you canuse the Tivoli Integrated Portal to import the data.
Procedure1. Log on to Tivoli Security Information and Event Manager.2. In the Tivoli Integrated Portal navigation panel, expand the Tivoli Security
Information and Event Manager topic.3. Expand the Configuration and Management topic.4. Expand the Archive Tools topic.5. Click Import Audit Data. The Import Audit Data page opens.6. In the User ID and Password fields, type the user ID and password of the user
that you configured with DR550 write/read permission.v On AIX and Linux systems:
– Type the user ID and password of the Tivoli Integrated Portal user. Thedefault user ID is cifowner.
v On Windows systems:– Type the user ID and password of the user you configured with DR550
write/read permission.7. In the Import logs from path on Server field, type the path to the shared
DR550 drive. The following paths are examples of the path you might type inthis field:v On AIX and Linux systems:
– /dr550mount/coalbrook/20100818
v On Windows systems:– \\192.168.236.22\test\export\ if you created a DR550 user ID that is
identical to the user ID on the Tivoli Security Information and EventManager system.
– z:\depot\ if you mounted the DR550 drive specifying a DR550 user.8. Click OK to begin importing the data.
Results
When the import completes successfully, the log information has been restored tothe depot.
What to do next
No further action is required.
Relocating the Log Management Depot to the DR550 shareddrive on Windows
If you did not specify the path to the depot as a DR550 drive during TivoliSecurity Information and Event Manager installation, you can relocate the depot toa DR550 drive after installation.
210 Tivoli Security Information and Event Manager V2.0: Administrators Guide

Before you begin
Be sure that you have mounted the DR550 drive.
About this task
This task is needed only if you specified a non-DR550 drive as the location for thedepot during installation, and you want to move the depot to a DR550 shareddrive.
Procedure1. Create a folder named install in the %TSIEM_HOME%\sim\server folder.2. Copy the following files to the folder you created:
v db2asc.exe
v asc2db.exe
These files are originally located in the %TSIEM_HOME%\sim\server\bin folder.3. Open a Command Prompt window and go to the install folder you created.4. Type cd ..\run and press the Enter key.5. Type ..\install\db2asc.exe blrec ..\install\blrec.asc and press the Enter
key.6. Open the blrec.asc file in the install folder with a text editor.7. Change the depot path in the blrec.asc file in the line containing the string
Chunklog Depot Path. For example:((string)"Chunklog Depot Path") = (((objval) ((string) "\\192.168.236.22\test\depot\*")))
8. Save the blrec.asc file.9. Return to the command window.
10. Type ..\install\asc2db.exe blrec ..\install\blrec.asc and press the Enterkey.
11. Restart the IBM TSIEM - SIM Server service.All collected chunks will now be written to the DR550 shared drive.
12. On the Enterprise Server, modify the depot location in the%TSIEM_HOME%\sim\consolidation\ini\beat.ini file to reflect the new locationof the depot.
13. On the Enterprise Server, restart the appropriate indexer process.
What to do next
No further action is required.
Relocating the Log Management Depot to the DR550 shareddrive on AIX and Linux
This section provides instructions for moving the Log Management Depot to aDR550 shared drive on AIX and Linux systems.
Before you begin
Be sure that you have mounted the DR550 drive.
Appendix F. Using DR550 with Tivoli Security Information and Event Manager 211

About this task
This task is needed only if you specified a non-DR550 drive as the location for thedepot during installation, and you want to move the depot to a DR550 shareddrive.
Procedure1. Login to the Tivoli Security Information and Event Manager system as the
cifadmin user.2. Create a new directory named install using the following command:
$ mkdir $TSIEM_HOME/sim/server/install
3. Copy the db2asc and asc2db programs to the directory that you just created:$ cd $TSIEM_HOME/sim/server/install$ cp ../bin/db2asc .$ cp ../bin/asc2db .
4. Run the db2asc command to dump the configuration information to a file:$ cd $TSIEM_HOME/sim/server/run$ ../install/db2asc blrec ../install/blrec.asc
5. Edit the blrec.asc file to change the location of the depot to a directory on theDR550. Change the line containing the Chunklog Depot Path:$ cd $TSIEM_HOME/sim/server/install$ vi blrec.asc
For example:((string) "Chunklog Depot Path") = (((objval) ((string) "/dr550mount/coalbrookdepot/")))
6. Run the asc2db command to update the configuration information:$ cd $TSIEM_HOME/sim/server/run$ ../install/asc2db blrec ../install/blrec.asc
7. Login to the Tivoli Security Information and Event Manager system as the rootuser and restart the SIM server:$ cd /etc/rc.d/init.d$ ./tsiem_sim_service.sh stop$ ./tsiem_sim_service.sh start
8. On the Enterprise Server, modify the depot location in the beat.ini file toshow the new location of the depot and then restart the appropriate indexerprocess.$ cd $TSIEM_HOME/sim/consolidation/ini$ vi beat.ini
What to do next
No further action is required.
212 Tivoli Security Information and Event Manager V2.0: Administrators Guide

Appendix G. Upgrading to DB2 version 9.7
This section explains how to upgrade the DB2 database used by Tivoli SecurityInformation and Event Manager from version 9.5 to DB2 version 9.7.
Upgrading a single system to DB2 version 9.7Follow this procedure to upgrade an existing Tivoli Security Information and EventManager DB2 CIFINST instance from DB2 version 9.5 to DB2 version 9.7.
Before you begin
Ensure that Tivoli Security Information and Event Manager fix pack 4 or later, hasbeen installed on the system.
Note: If you are upgrading a Tivoli Security Information and Event Managercluster, see “Upgrading a cluster to DB2 version 9.7” on page 214.
Procedure1. Perform a full backup of your Tivoli Security Information and Event Manager
data as described in “Backing up” on page 166.2. Stop all Tivoli Security Information and Event Manager services as described in
“Stopping Tivoli Security Information and Event Manager services” on page196. A summary of those steps is:
AIX/etc/rc.d/init.d/tsiem_sim_service.sh stop/etc/rc.d/init.d/tsiem_tip_service.sh stop
Linux/etc/init.d/tsiem_sim_service.sh stop/etc/init.d/tsiem_tip_service.sh stop
Windowsnet stop CEAgentnet stop CIFAuthDaemonnet stop "IBMWAS61Service - TIPProfile_Port_16310"net stop CIFEventMapperGEMDBNAMEnet stop CIFIndexerHOSTNAME
where:v GEMDBNAME is the name of the Reporting Database. The net stop
command must be performed for each Reporting Database name(GEMDBNAME) defined in the Tivoli Integrated Portal.
v HOSTNAME is the name of the Tivoli Security Information andEvent Manager server that is part of the Tivoli Security Informationand Event Manager Cluster. The net stop command must beperformed for each HOSTNAME linked to the Tivoli SecurityInformation and Event Manager Indexer Service seen in theWindows Services panel (services.msc).
3. Upgrade the Tivoli Security Information and Event Manager DB2 instance anddatabase using the procedure for your operating system.
AIX “Upgrading an AIX system” on page 215
© Copyright IBM Corp. 1998, 2011 213
|
|
||
||
||
|
||
||
|
||
|||
|||
|||
||||||
|
|||
||||||
||
||

Linux “Upgrading a Linux system” on page 218
Windows“Upgrading a Windows system” on page 221
What to do next
If the upgrade to DB2 version 9.7 fails, you must perform a full restore of youroriginal Tivoli Security Information and Event Manager environment, as describedin “Performing a full restore” on page 174.
Upgrading a cluster to DB2 version 9.7When upgrading a Tivoli Security Information and Event Manager cluster to DB29.7, all Standard Servers and the Enterprise Server must be upgraded to DB2 9.7.Mixed versions of DB2 are not supported in a Tivoli Security Information andEvent Manager cluster.
Before you begin
Ensure that Tivoli Security Information and Event Manager fix pack 4 or later, hasbeen installed on all systems in the cluster.
Procedure
When upgrading a Tivoli Security Information and Event Manager cluster:1. Perform a full backup of your Tivoli Security Information and Event Manager
data on all systems in the cluster as described in “Backing up” on page 166.2. Stop all Tivoli Security Information and Event Manager services on all the
Standard Servers as described in “Stopping Tivoli Security Information andEvent Manager services” on page 196.
3. Stop all Tivoli Security Information and Event Manager services on theEnterprise Server as described in “Stopping Tivoli Security Information andEvent Manager services” on page 196, except the IDS service.
4. Follow the appropriate procedure for upgrading DB2 on the Standard Servers.
AIX “Upgrading an AIX system” on page 215
Linux “Upgrading a Linux system” on page 218
Windows“Upgrading a Windows system” on page 221
5. Follow the appropriate procedure for upgrading DB2 on the Enterprise Server.
AIX “Upgrading an AIX system” on page 215
Linux “Upgrading a Linux system” on page 218
Windows“Upgrading a Windows system” on page 221
6. Restart all Tivoli Security Information and Event Manager services on theEnterprise Server as described in “Starting Tivoli Security Information andEvent Manager services” on page 199.
7. Restart all Tivoli Security Information and Event Manager services on theStandard Servers as described in “Starting Tivoli Security Information andEvent Manager services” on page 199.
214 Tivoli Security Information and Event Manager V2.0: Administrators Guide
||
||
|
|||
||
||||
|
||
|
|
||
|||
|||
|
||
||
||
|
||
||
||
|||
|||
What to do next
If the upgrade to DB2 version 9.7 fails, you must perform a full restore of youroriginal Tivoli Security Information and Event Manager environment. This task isdescribed in “Performing a full restore” on page 174.
Upgrading an AIX systemFollow this procedure to upgrade an existing AIX system from DB2 version 9.5 toDB2 version 9.7.
Before you begin
Ensure that Tivoli Security Information and Event Manager fix pack 4 or later, hasbeen installed on the system.
Ensure that you have performed a full backup and stopped all Tivoli SecurityInformation and Event Manager services as described in “Upgrading a singlesystem to DB2 version 9.7” on page 213.
You can verify that the services are stopped by running the following twocommands as the root user:/etc/rc.d/init.d/tsiem_sim_service.sh status/etc/rc.d/init.d/tsiem_tip_service.sh status
Procedure1. Log in as the root user.2. Ensure that you have installed the required service packs needed for DB2
version 9.7.For more information, see the DB2 Information Center.
http://publib.boulder.ibm.com/infocenter/db2luw/v9r7/index.jsp3. Connect to the database and ensure that no database transactions are currently
in progress.From a command prompt, enter:db2 list indoubt transactions
The command completes with a response like:SQL1251W No data returned for heuristic query. SQLSTATE=00000
Otherwise, wait for the transactions to complete or cancel them.4. Verify that the DB2 database is in a consistent state.
Log in as cifdbadm (or use: su - cifdbadm)From a command prompt, enter:db2 get database config | grep consistent
The command completes with a response like:Database is consistent = YES
If the response is:Database is consistent = NO
Appendix G. Upgrading to DB2 version 9.7 215
|
|||
||
||
|
||
|||
||
||
|
|
||
|
|
||
|
|
|
|
|
|
|
|
|
|
|
|
|
You must get the database into a consistent state before continuing with theupgrade.
Restarting DB2db2stopdb2start
Terminating DB2 and then restarting itdb2stop forcedb2 terminatedb2start
5. Edit the /etc/profile file and comment out all lines in the Tivoli SecurityInformation and Event Manager section which relate to setting and exportingDB2 environment variables.These environment variables are associated with the currently installed DB2version 9.5 installation. Leaving these values in the file prevents the upgradeto DB2 version 9.7 from being successful.The environment variables to be commented out are similar to the following:CLASSPATH="${CLASSPATH}:/opt/IBM/tsiem/db2/java/db2java.zip"export CLASSPATH
CLASSPATH="${CLASSPATH}:/opt/IBM/tsiem/db2/java/db2jcc.jar"export CLASSPATH
CLASSPATH="${CLASSPATH}:/opt/IBM/tsiem/db2/java/db2jcc_license_cu.jar"export CLASSPATH
CLASSPATH="${CLASSPATH}:/opt/IBM/tsiem/db2/java/Common.jar"export CLASSPATH
CLASSPATH="${CLASSPATH}:/opt/IBM/tsiem/db2/bin"export CLASSPATH
DB2CLP=DB20FADEexport DB2CLP
DB2INSTANCE=cifdbaexport DB2INSTANCE
DB2PATH=/opt/IBM/tsiem/db2export DB2PATH
PATH="${PATH}:/opt/IBM/tsiem/db2/bin"export PATH
6. Ensure that DB2 version 9.5 has been stopped.a. Log in as cifdbadm.
Or use: su - cifdbadm
b. Enter db2stop force.c. Enter db2 terminate.d. Enter exit.
7. Access the DB2 version 9.7 installation DVD.a. Insert and mount the DB2 version 9.7 installation DVD.
Note: The mount point cannot contain any spaces.b. Start the installation program.
db2_install
Install DB2 version 9.7 in a new directory. In most cases, the default value of/opt/IBM/db2/V9.7 can be used. Choose the ESE server type when prompted.
216 Tivoli Security Information and Event Manager V2.0: Administrators Guide
||
|||
||||
|||
|||
|
||||||||||||||||||||||||||
|
|
|
|
|
|
|
|
|
|
|
||

8. Upgrade the CIFINST instance to DB2 version 9.7 using the db2iupgradecommand. Detailed upgrade information can be found in the DB2 informationcenter.http://publib.boulder.ibm.com/infocenter/db2luw/v9r7/topic/com.ibm.db2.luw.qb.upgrade.doc/doc/t0007200.htmlAssuming the default values, in most cases you can upgrade the instanceusing the following two commands:v /opt/IBM/db2/V9.7/instance/db2ckupgrade cifdbadm -l /tmp/db2ckupgrade.log
Review the db2ckupgrade.log file for any errors or warnings. Warningsrelating to the EPRISEDB.FAP_V_AUTH_GRANTS view can be ignored. Do notproceed with the upgrade if any other errors or warnings appear in the logfile. Correct the problems before continuing.
v /opt/IBM/db2/V9.7/instance/db2iupgrade cifdbadm
The db2iupgrade command should end with the following message:DBI1070I Program db2iupgrade completed successfully.
If this message does not appear, do not continue until the problems areresolved.
9. After upgrading the instance, copy the $TSIEM_HOME/db2/cfg/IBMLDAPSecurity.ini file to the /home/cifdbadm/sqllib/cfg directory.
10. Change all occurrences of /opt/IBM/tsiem/db2 to /opt/IBM/db2/V9.7 in thefollowing files.a. /home/cifadmin/.tsiem_env
b. /opt/IBM/tsiem/sim/server/config/services/CIFAuthDaemon.cfg
Note: Treat occurrences of ../../../db2 in this file as if they were/opt/IBM/tsiem/db2.
c. /opt/IBM/tsiem/sim/server/config/services/CIFEventMapperSELFAUDIT.cfg
d. /opt/IBM/tsiem/sim/server/config/services/CIFEventMapper<additional_reportinf_dbs>.cfg
e. /opt/IBM/tsiem/sim/server/config/services/CIFIndexer_<host_name>.cfg
f. /etc/profile
g. /opt/IBM/tsiem/sim/server/bin/autopolicy.sh
h. /opt/IBM/tsiem/sim/server/bin/gem2beat.sh
i. /opt/IBM/tsiem/sim/server/bin/gsltest.sh
j. /opt/IBM/tsiem/sim/server/bin/mainmap.sh
k. /opt/IBM/tsiem/sim/server/bin/startmapper.sh
l. /opt/IBM/tsiem/sim/server/bin/validate.sh
m. /opt/IBM/tsiem/sim/server/consolidation/bin/beat.sh
n. /etc/rc.d/init.d/ITMAgents1
o. /etc/rc.d/init.d/ITMAgents2
Note: The default directory and file names are shown. Use the directory andfile names you specified when you originally installed Tivoli SecurityInformation and Event Manager if you did not use the default values.
11. Restore (uncomment) the lines in the /etc/profile file that were commentedout in step 5 on page 216.
12. Start DB2.db2start
Appendix G. Upgrading to DB2 version 9.7 217
|||
||
|||
|||||
|
|
||
||
||
|
|
||
||
||
|
|
|
|
|
|
|
|
|
|
|
|||
||
|
|

13. Connect to the database and ensure no applications are running.db2 list applications
If any applications are displayed, force them to complete.db2 force application all
Ensure that no applications are running before continuing.14. Upgrade the cifdb database.
db2 upgrade database cifdb user cifdbadm using password
Note: If you receive the following message:SQL1035N The database is currently in use. SQLSTATE=57019
repeat step 13 and try the upgrade command again.15. Upgrade the DB2 Administration Server.
/opt/IBM/db2/V9.7/instance/dasmigr
16. Add the SECADM privilege to the cifowner user ID and other authorizedaccounts by logging in as cifdbadm and entering the following DB2 command.db2 GRANT SECADM on DATABASE to CIFOWNER
This step is required because of changes made between DB2 version 9.5 andversion 9.7. For more information, see:
http://ibm.com/support/docview.wss?uid=swg2138580117. Reboot the system or restart all Tivoli Security Information and Event
Manager services as described in “Starting Tivoli Security Information andEvent Manager services” on page 199.
Upgrading a Linux systemFollow this procedure to upgrade an existing Linux system from DB2 version 9.5to DB2 version 9.7.
Before you begin
Ensure that Tivoli Security Information and Event Manager fix pack 4 or later, hasbeen installed on the system.
Ensure that you have performed a full backup and stopped all Tivoli SecurityInformation and Event Manager services as described in “Upgrading a singlesystem to DB2 version 9.7” on page 213.
You can verify that the services are stopped by running the following twocommands as the root user:/etc/init.d/tsiem_sim_service.sh status/etc/init.d/tsiem_tip_service.sh status
Procedure1. Log in as the root user.2. Connect to the database and ensure that no database transactions are currently
in progress.From a command prompt, enter:db2 list indoubt transactions
The command completes with a response like:
218 Tivoli Security Information and Event Manager V2.0: Administrators Guide
|
|
|
|
|
|
|
|
|
|
|
|
||
|
||
|
|||
||
||
|
||
|||
||
||
|
|
||
|
|
|

SQL1251W No data returned for heuristic query. SQLSTATE=00000
Otherwise, wait for the transactions to complete or cancel them.3. Verify that the DB2 database is in a consistent state.
Log in as cifdbadm (or use: su - cifdbadm)From a command prompt, enter:db2 get database config | grep consistent
The command completes with a response like:Database is consistent = YES
If the response is:Database is consistent = NO
You must get the database into a consistent state before continuing with theupgrade.
Restarting DB2db2stopdb2start
Terminating DB2 and then restarting itdb2stop forcedb2 terminatedb2start
4. Edit the /etc/profile file and comment out all lines in the Tivoli SecurityInformation and Event Manager section which relate to setting and exportingDB2 environment variables.These environment variables are associated with the currently installed DB2version 9.5 installation. Leaving these values in the file prevents the upgradeto DB2 version 9.7 from being successful.The environment variables to be commented out are similar to the following:CLASSPATH="${CLASSPATH}:/opt/ibm/tsiem/db2/java/db2java.zip"export CLASSPATH
CLASSPATH="${CLASSPATH}:/opt/ibm/tsiem/db2/java/db2jcc.jar"export CLASSPATH
CLASSPATH="${CLASSPATH}:/opt/ibm/tsiem/db2/java/db2jcc_license_cu.jar"export CLASSPATH
CLASSPATH="${CLASSPATH}:/opt/ibm/tsiem/db2/java/Common.jar"export CLASSPATH
CLASSPATH="${CLASSPATH}:/opt/ibm/tsiem/db2/bin"export CLASSPATH
DB2CLP=DB20FADEexport DB2CLP
DB2INSTANCE=cifdbaexport DB2INSTANCE
DB2PATH=/opt/ibm/tsiem/db2export DB2PATH
PATH="${PATH}:/opt/ibm/tsiem/db2/bin"export PATH
5. Ensure that DB2 version 9.5 has been stopped.
Appendix G. Upgrading to DB2 version 9.7 219
|
|
|
|
|
|
|
|
|
|
||
|||
||||
|||
|||
|
||||||||||||||||||||||||||
|

a. Log in as cifdbadm.Or use: su - cifdbadm
b. Enter db2stop force.c. Enter db2 terminate.d. Enter exit.
6. Access the DB2 version 9.7 installation DVD.a. Insert and mount the DB2 version 9.7 installation DVD.
Note:
1) The mount point cannot contain any spaces.2) If the DVD is automatically mounted, the noexec option is applied by
default for removable media. This option prevents executing files onthe mounted file system and causes the installation to fail. To correctthe problem, remount the DVD with the exec option. For example:mount -o remount,exec /media/DB2
b. Start the installation program.db2_install
Install DB2 version 9.7 in a new directory. In most cases, the default value of/opt/ibm/db2/V9.7 can be used. Choose the ESE server type when prompted.
7. Upgrade the CIFINST instance to DB2 version 9.7 using the db2iupgradecommand. Detailed upgrade information can be found in the DB2 informationcenter.http://publib.boulder.ibm.com/infocenter/db2luw/v9r7/topic/com.ibm.db2.luw.qb.upgrade.doc/doc/t0007200.htmlAssuming the default values, in most cases you can upgrade the instanceusing the following two commands:v /opt/ibm/db2/V9.7/instance/db2ckupgrade cifdbadm -l /tmp/db2ckupgrade.log
Review the db2ckupgrade.log file for any errors or warnings. Warningsrelating to the EPRISEDB.FAP_V_AUTH_GRANTS view can be ignored. Do notproceed with the upgrade if any other errors or warnings appear in the logfile. Correct the problems before continuing.
v /opt/ibm/db2/V9.7/instance/db2iupgrade cifdbadm
The db2iupgrade command should end with the following message:DBI1070I Program db2iupgrade completed successfully.
If this message does not appear, do not continue until the problems areresolved.
8. After upgrading the instance, copy the $TSIEM_HOME/db2/cfg/IBMLDAPSecurity.ini file to the /home/cifdbadm/sqllib/cfg directory.
9. Change all occurrences of /opt/ibm/tsiem/db2 to /opt/ibm/db2/V9.7 in thefollowing files.a. /home/cifadmin/.tsiem_env
b. /opt/ibm/tsiem/sim/server/config/services/CIFAuthDaemon.cfg
Note: Treat occurrences of ../../../db2 in this file as if they were/opt/ibm/tsiem/db2.
c. /opt/ibm/tsiem/sim/server/config/services/CIFEventMapperSELFAUDIT.cfg
d. /opt/ibm/tsiem/sim/server/config/services/CIFEventMapper<additional_reportinf_dbs>.cfg
220 Tivoli Security Information and Event Manager V2.0: Administrators Guide
|
|
|
|
|
|
|
|
|
||||
|
|
|
||
|||
||
|||
|||||
|
|
||
||
||
|
|
||
||
||
e. /opt/ibm/tsiem/sim/server/config/services/CIFIndexer_<host_name>.cfg
f. /etc/profile
g. /opt/ibm/tsiem/sim/server/bin/autopolicy.sh
h. /opt/ibm/tsiem/sim/server/bin/gem2beat.sh
i. /opt/ibm/tsiem/sim/server/bin/gsltest.sh
j. /opt/ibm/tsiem/sim/server/bin/mainmap.sh
k. /opt/ibm/tsiem/sim/server/bin/startmapper.sh
l. /opt/ibm/tsiem/sim/server/bin/validate.sh
m. /opt/ibm/tsiem/sim/server/consolidation/bin/beat.sh
n. /etc/init.d/ITMAgents1
o. /etc/init.d/ITMAgents2
Note: The default directory and file names are shown. Use the directory andfile names you specified when you originally installed Tivoli SecurityInformation and Event Manager if you did not use the default values.
10. Restore (uncomment) the lines in the /etc/profile file that were commentedout in step 4 on page 219.
11. Start DB2.db2start
12. Connect to the database and ensure no applications are running.db2 list applications
If any applications are displayed, force them to complete.db2 force application all
Ensure that no applications are running before continuing.13. Upgrade the cifdb database.
db2 upgrade database cifdb user cifdbadm using password
Note: If you receive the following message:SQL1035N The database is currently in use. SQLSTATE=57019
repeat step 12 and try the upgrade command again.14. Upgrade the DB2 Administration Server.
/opt/ibm/db2/V9.7/instance/dasmigr
15. Add the SECADM privilege to the cifowner user ID and other authorizedaccounts by logging in as cifdbadm and entering the following DB2 command.db2 GRANT SECADM on DATABASE to CIFOWNER
This step is required because of changes made between DB2 version 9.5 andversion 9.7. For more information, see:
http://ibm.com/support/docview.wss?uid=swg2138580116. Reboot the system or restart all Tivoli Security Information and Event
Manager services as described in “Starting Tivoli Security Information andEvent Manager services” on page 199.
Upgrading a Windows systemFollow this procedure to upgrade an existing Windows system from DB2 version9.5 to DB2 version 9.7.
Appendix G. Upgrading to DB2 version 9.7 221
|
|
|
|
|
|
|
|
|
|
|
|||
||
|
|
|
|
|
|
|
|
|
|
|
|
|
|
||
|
||
|
|||
||
||
Before you begin
Ensure that Tivoli Security Information and Event Manager fix pack 4 or later, hasbeen installed on the system.
Ensure that you have performed a full backup and stopped all Tivoli SecurityInformation and Event Manager services as described in “Upgrading a singlesystem to DB2 version 9.7” on page 213.
Procedure1. Log on as a member of the Administrators group, such as Administrator.
This user ID must also be a member of the DB2ADMNS group.2. If User Account Control (UAC) in Windows is enabled, disable it and reboot
the system.3. Make a backup copy of the current %DB2PATH%\cfg\IBMLDAPSecurity.ini file.4. Connect to the database and ensure that no database transactions are currently
in progress.From a command prompt, enter:db2 list indoubt transactions
The command completes with a response like:SQL1251W No data returned for heuristic query. SQLSTATE=00000
Otherwise, wait for the transactions to complete or cancel them.5. Verify that the DB2 database is in a consistent state.
From a command prompt, enter:db2 get database config | findstr consistent
The command completes with a response like:Database is consistent = YES
If the response is:Database is consistent = NO
You must get the database into a consistent state before continuing with theupgrade.
Terminating DB2 and then restarting itdb2stop forcedb2 terminatedb2start
If your database is still in a non-consistent state, you might need to stop the"IBM TSIEM - SIM Server service" as it is probably running again.
6. Stop DB2.db2stop force
7. Upgrade DB2 using the procedure described in the DB2 information center.http://publib.boulder.ibm.com/infocenter/db2luw/v9r7/topic/com.ibm.db2.luw.qb.upgrade.doc/doc/t0007199.htmla. Use the GUI-based setup.exe command.b. Select the DB2 copy to be upgraded, such as "CIFCOPY (default)".
222 Tivoli Security Information and Event Manager V2.0: Administrators Guide
|
||
|||
|
|
|
||
|
||
|
|
|
|
|
|
|
|
|
|
|
|
||
||||
||
|
|
|
||
|
|

Unlike upgrading an AIX or Linux system, you do not need to install DB2version 9.7 in a separate directory when upgrading a Windows system.You can upgrade the currently installed version to the latest level.
c. When prompted, allow running DB2 processed to be killed.d. Accept the License Agreement.e. Choose Typical installation type.f. Select Install DB2 Enterprise Server Edition on this computer.g. On the Set user information for the default DB2 instance panel, change the
owner of the default DB2 instance from the default (db2admin) to cifdbadm.h. Do not install the SAMP function that is included with DB2 version 9.7.i. Connect to the DB2 instance CIFINST using port number 30001.
Record this information for future reference.j. If you encounter a Destination folder Access Denied window indicating
that you have insufficient permissions to update the CIFCOPY folder, clickCancel to continue the installation.
k. Ensure that you have enabled DB2 extended Windows security.You must add DB2 users that need to run DB2 local applications or toolsto either the DB2 administrators group or DB2 users group.Confirm the warning about the existing DB2ADMNS and DB2USERS groups.Allow the installer to restart or to switch off the running applications anddatabases.
l. The DB2 instance is created as a single-partition instance. To enable amultiple-partition instance environment, see the DB2 information center, inthe topic entitled "Adding a database partition server to an instance".
8. Restore the backup copy of the IBMLDAPSecurity.ini file to the %DB2PATH%\cfgdirectory.
9. Start DB2.db2start
If you have run the db2val.exe command, restart the database instead.10. Upgrade the cifdb database.
db2 upgrade database cifdb user cifdbadm using password
11. Upgrade the DB2 Administration Server.%TSIEM_HOME%\db2\bin\dasmigr.exe
12. Add the SECADM privilege to the cifowner user ID and other authorizedaccounts by logging in as cifdbadm and entering the following DB2 command.db2 GRANT SECADM on DATABASE to CIFOWNER
This step is required because of changes made between DB2 version 9.5 andversion 9.7. For more information, see:
http://ibm.com/support/docview.wss?uid=swg2138580113. Reboot the Windows system.
What to do next
After the upgrade is complete, you might get an error like the following whenrunning DB2 command line processor commands:SQL1046N The authorization ID is not valid. SQLSTATE=28000
If you encounter this condition, you must update the login information for thefollowing two Windows services:
Appendix G. Upgrading to DB2 version 9.7 223
|||
|
|
|
|
||
|
|
|
|||
|
||
|||
|||
||
|
|
|
|
|
|
|
||
|
||
|
|
|
||
|
||

DB2 - CIFCOPY - CIFINST-0DB2 Governor (CIFCOPY)
Change the login user for both services from db2admin to cifdbadm.
Check the authdaemon.log file for errors like the following:[20101119 06:43:08 utc] INFO: CIFAD0044E: STATUS: Synchronization run has failed.
Exception: CIFWI0411E: unable to execute sql:REVOKE INSERT, UPDATE, DELETE ON EPRISEDB.FAP_DIRTY_FLAG FROM USER CIFDBADM
DB2 SQL Error: SQLCODE=-558, SQLSTATE=42504, SQLERRMC=CIFDBADM;CIFDBADM;CONTROL, DRIVER=3.59.81
These errors indicate that DB2 user synchronization is not occurring as expected.You must correct any synchronization problems to enable the correct operation ofTivoli Security Information and Event Manager. Try the following two commands:REVOKE control ON EPRISEDB.FAP_DIRTY_FLAG FROM USER CIFDBADM
REVOKE INSERT, UPDATE, DELETE ON EPRISEDB.FAP_DIRTY_FLAG FROM USER CIFDBADM
If the problem is not resolved, consult the DB2 information center for additionaltroubleshooting information.
224 Tivoli Security Information and Event Manager V2.0: Administrators Guide
||
|
|||||
|||
|||
||
Notices
This information was developed for products and services offered in the U.S.A.IBM may not offer the products, services, or features discussed in this document inother countries. Consult your local IBM representative for information about theproducts and services currently available in your area. Any reference to an IBMproduct, program, or service is not intended to state or imply that only that IBMproduct, program, or service may be used. Any functionally equivalent product,program, or service that does not infringe any IBM intellectual property right maybe used instead. However, it is the user responsibility to evaluate and verify theoperation of any non-IBM product, program, or service.
IBM may have patents or pending patent applications covering subject matterdescribed in this document. The furnishing of this document does not give youany license to these patents. You can send license inquiries, in writing, to:
IBM Director of LicensingIBM CorporationNorth Castle DriveArmonk, NY 10504-1785U.S.A.
For license inquiries regarding double-byte (DBCS) information, contact the IBMIntellectual Property Department in your country or send inquiries, in writing, to:
IBM World Trade Asia CorporationLicensing2-31 Roppongi 3-chome, Minato-kuTokyo 106-0032, Japan
The following paragraph does not apply to the United Kingdom or any othercountry where such provisions are inconsistent with local law:INTERNATIONAL BUSINESS MACHINES CORPORATION PROVIDES THISPUBLICATION “AS IS” WITHOUT WARRANTY OF ANY KIND, EITHEREXPRESS OR IMPLIED, INCLUDING, BUT NOT LIMITED TO, THE IMPLIEDWARRANTIES OF NON-INFRINGEMENT, MERCHANTABILITY OR FITNESSFOR A PARTICULAR PURPOSE. Some states do not allow disclaimer of express orimplied warranties in certain transactions, therefore, this statement may not applyto you.
This information could include technical inaccuracies or typographical errors.Changes are periodically made to the information herein; these changes will beincorporated in new editions of the publication. IBM may make improvementsand/or changes in the product(s) and/or the program(s) described in thispublication at any time without notice.
Any references in this information to non-IBM Web sites are provided forconvenience only and do not in any manner serve as an endorsement of those Websites. The materials at those Web sites are not part of the materials for this IBMproduct and use of those Web sites is at your own risk.
IBM may use or distribute any of the information you supply in any way itbelieves appropriate without incurring any obligation to you.
© Copyright IBM Corp. 1998, 2011 225

Licensees of this program who wish to have information about it for the purposeof enabling: (i) the exchange of information between independently createdprograms and other programs (including this one) and (ii) the mutual use of theinformation which has been exchanged, should contact:
IBM Corporation2Z4A/10111400 Burnet RoadAustin, TX 78758U.S.A.
Such information may be available, subject to appropriate terms and conditions,including in some cases, payment of a fee.
The licensed program described in this information and all licensed materialavailable for it are provided by IBM under terms of the IBM Customer Agreement,IBM International Program License Agreement, or any equivalent agreementbetween us.
Information concerning non-IBM products was obtained from the suppliers ofthose products, their published announcements or other publicly available sources.IBM has not tested those products and cannot confirm the accuracy ofperformance, compatibility or any other claims related to non-IBM products.Questions on the capabilities of non-IBM products should be addressed to thesuppliers of those products.
All statements regarding IBM future direction or intent are subject to change orwithdrawal without notice, and represent goals and objectives only.
This information contains examples of data and reports used in daily businessoperations. To illustrate them as completely as possible, the examples include thenames of individuals, companies, brands, and products. All of these names arefictitious and any similarity to the names and addresses used by an actual businessenterprise is entirely coincidental.
If you are viewing this information softcopy, the photographs and colorillustrations may not be displayed.
TrademarksIBM, the IBM logo, and ibm.com are trademarks or registered trademarks ofInternational Business Machines Corporation in the United States, other countries,or both. If these and other IBM trademarked terms are marked on their firstoccurrence in this information with a trademark symbol (® or ™), these symbolsindicate U.S. registered or common law trademarks owned by IBM at the time thisinformation was published. Such trademarks may also be registered or commonlaw trademarks in other countries. A current list of IBM trademarks is available onthe Web at Copyright and trademark information (http://www.ibm.com/legal/copytrade.shtml).
Adobe, Acrobat, PostScript and all Adobe-based trademarks are either registeredtrademarks or trademarks of Adobe Systems Incorporated in the United States,other countries, or both.
226 Tivoli Security Information and Event Manager V2.0: Administrators Guide

Cell Broadband Engine and Cell/B.E. are trademarks of Sony ComputerEntertainment, Inc., in the United States, other countries, or both and is used underlicense therefrom.
Intel, Intel logo, Intel Inside, Intel Inside logo, Intel Centrino, Intel Centrino logo,Celeron, Intel Xeon, Intel SpeedStep, Itanium, and Pentium are trademarks orregistered trademarks of Intel Corporation or its subsidiaries in the United Statesand other countries.
IT Infrastructure Library is a registered trademark of the Central Computer andTelecommunications Agency which is now part of the Office of GovernmentCommerce.
ITIL is a registered trademark, and a registered community trademark of the Officeof Government Commerce, and is registered in the U.S. Patent and TrademarkOffice.
Java and all Java-based trademarks and logos are trademarks or registeredtrademarks of Sun Microsystems, Inc. in the United States, other countries, or both.
Linux is a trademark of Linus Torvalds in the United States, other countries, orboth.
Microsoft, Windows, Windows NT, and the Windows logo are trademarks ofMicrosoft Corporation in the United States, other countries, or both.
UNIX is a registered trademark of The Open Group in the United States and othercountries.
Other company, product, and service names may be trademarks or service marksof others.
Notices 227

228 Tivoli Security Information and Event Manager V2.0: Administrators Guide

Index
Aaccessibility xivadministrator
See systems administratoragent groups
about 44creating 45deleting 45organizing 44renaming 46
alertsalert handler 118configuring 113creating 114delaying 121deleting 115editing 115editing protocol
email 116script 117SNMP 116
event severity 124managing 113preventing repeated alerts 122protocol
edit 115reducing time between alerts and
events 121script protocol 117SNMP protocol 116special attention rules 123special attention severity 123viewing 113
archive tools 125about 125export audit data 126import audit data 128
attention rulescreating 106deleting 107editing 107importing 107
audit dataexporting 126importing 128
audited machineproperties 29
audited machinesaudited machine
See agent groupsconfiguring 27Create Machine Wizard 31creating 31deleting 42identifying 44managing 28reattaching 43viewing 27viewing properties 29
Bbacking up
about 163, 166Enterprise Server 168Log Management Server 166Standard Server 167
booksSee publications
Ccommitted policy
See policiesconventions
typeface xvcreating
attention rules 106
DDB2 187
upgrade to version 9.7 213deleting
attention rules 107group definition sets 97groups 100policy rules 105
directory names, notation xvdomain controller 13DR550
exporting data from Log ManagementDepot 208
importing data to Log ManagementDepot 209
managing Log Management Depotdata 208
moving data to and from the LogManagement Depot 208
relocating depot to 211setup using identical user
accounts 207setup using separate user
accounts 206using to store depot data 205
Eediting
attention rules 107education
See Tivoli technical trainingenvironment variables, notation xvevent sources
adding event source to database 74advanced properties 51collection schedule 63Create Event Wizard 53creating 53creating audited machine 62
event sources (continued)deleting 62managing 48properties 50, 51removing event source from
database 74setting audit profile 65user information sources
collection schedule 63viewing 47viewing properties 49
event sourcesReporting Database 73
FFirefox
browser caching 10cookies 9encryption 8
Gglobalized domain names
configuring 13group definition sets
deleting 97importing 98renaming 97
group significance 100groups
changing group significance 100defining a group platform 95deleting 100renaming 100
IIBM System Storage DR550
exporting data from Log ManagementDepot 208
importing data to Log ManagementDepot 209
managing Log Management Depotdata 208
moving data to and from the LogManagement Depot 208
relocating depot to 211setup using identical user
accounts 207setup using separate user
accounts 206using to store depot data 205
importingattention rules 107group definition sets 98policy rules 105
installing language filesAsian languages (Chinese, Japanese,
and Korean) 12
© Copyright IBM Corp. 1998, 2011 229

Internet ExplorerActiveX 6browser caching 10cookies 9encryption 8enhanced security configuration 7error messages 10JavaScript 5Trusted sites list 6
LLaunchpad
about 23editing registry entry 25refreshing server list 25starting a server 24viewing 23
logoncredentials 17
Mmanuals
See publications
Nnotation
environment variables xvpath names xvtypeface xv
Oonline publications
accessing xiiiordering publications xiii
Ppasswords
See also userschanging user passwords 134changing your own password 135managing with policies 135requirements 134
path names, notation xvplatform
See also groupsdeleting 95
policies 85automatic polices 91committed 90creating 88deleting 89duplicating 89managing 85Policy Explorer 85renaming 90testing 108unlocking 91
policymanage 87
Policy Editor 88, 93
Policy Editor (continued)platforms 94
Policy Exploreropening policies 88viewing policies 87
Policy Generatorconfiguring policies 109creating a policy 110opening 109users 112
policy rulesdeleting 105importing 105
publications xiaccessing online xiiiordering xiii
Rrenaming
group definition set 97groups 100
Reporting Databaseadding event source to database 74clearing 82configuring 67creating 72deleting 73event sources 73Load Database Wizard 77loading 75, 77managing 68properties 70removing event source from
database 74viewing 67viewing policy 83
restoringabout 163Enterprise Server 173, 177full restore 174Log Management Server 171, 175partial restore 170Standard Server 172, 176
rolesSee users
SScoping
about 149administrator privileges 158asset ownership rules 152auditor privileges 159configuring 149data structure 151disabling 153, 154enabling 153, 154groups 155, 156members 157moving assets 160opening 149structure 151terminology 153types of users 152user interface 153
Scoping (continued)using 154
Security Groupcomponents 146Grouped Server 145Security Server 145user management 145
SIM Reporting DatabaseSee Reporting Database
SIM Reporting DatabasesSee also userspermissions 136
special attention rulessending alert 123
system locale 13systems administrator 1
administratorSee systems administrator
responsibilities 1skills 3
Ttesting
policies 108Tivoli Information Center xiiiTivoli Integrated Portal
configuring 5log size 15
Tivoli technical training xivTivoli user groups xivtraining, Tivoli technical xivtypeface conventions xv
Uuser groups, Tivoli xivuser information source
deleting 62user information sources
Create User Information SourceWizard 60
creating 60properties 52viewing properties 52
user managementcentralized user management 145
user namesSee also usersrequirements 132
usersSee also deletingadding 133assigning roles 138changing passwords 134creating 133managing 131setting database access 136user roles 139, 143viewing 131
Vvariables, notation for xv
230 Tivoli Security Information and Event Manager V2.0: Administrators Guide

Wweb browser
See also FirefoxSee also Internet Explorerbrowser caching 9cookies 9enabling JavaScript and ActiveX 5
Index 231

232 Tivoli Security Information and Event Manager V2.0: Administrators Guide


����
Printed in USA
SC23-9688-02