Embed Size (px)
Citation preview
© 2018 Titanium Software
Titanium Schedule
User Manual
2
© 2018 Titanium Software
Table of Contents
Section I Overview 5
Section II Billing 8
................................................................................................................................... 81 Add/Edit Charges
................................................................................................................................... 122 Add/Edit Payments
................................................................................................................................... 173 Find Invoices
................................................................................................................................... 174 Generate/Process Insurance Claims
................................................................................................................................... 225 Process Sliding Scale Billing
................................................................................................................................... 236 Write Offs and Adjustments
................................................................................................................................... 267 Print Account Records
Section III Client Import 28
Section IV Clients 29
................................................................................................................................... 301 Add/Edit/Delete Client
................................................................................................................................... 342 Add/Edit/Remove Flags
................................................................................................................................... 363 Add/Edit Demographics
................................................................................................................................... 374 Disabled Clients
................................................................................................................................... 395 Add Form to Client File
................................................................................................................................... 426 Email Clients
................................................................................................................................... 427 Text Clients
................................................................................................................................... 448 Add/Edit/Delete Client Photo
................................................................................................................................... 459 Review Client File
................................................................................................................................... 4710 Search for Clients
................................................................................................................................... 4711 Form Letters
Section V Electronic Prescribing 50
................................................................................................................................... 511 Add Prescriptions
................................................................................................................................... 542 Edit Prescriptions
................................................................................................................................... 573 Refill Requests
Section VI My Clients List 58
Section VII Notes 59
................................................................................................................................... 591 Add/Edit/Delete Note
................................................................................................................................... 622 Add Attachment to Other Appointment
................................................................................................................................... 633 Group Notes
3Contents
3
© 2018 Titanium Software
................................................................................................................................... 654 Supervisor Review
................................................................................................................................... 665 Document Prescriptions
................................................................................................................................... 696 Make Diagnosis
Section VIII Outreach and Non-Clients 71
................................................................................................................................... 711 Add/Edit/Delete Non-Client Notes
................................................................................................................................... 722 Convert Non-Client to Client
................................................................................................................................... 733 Schedule/Document Outreach
Section IX Printer Settings 75
Section X Reports 76
Section XI Scheduling 77
................................................................................................................................... 781 Add/Edit Appointment
................................................................................................................................... 802 Appointment Reminders
................................................................................................................................... 833 Search for Appointment
................................................................................................................................... 834 Groups
................................................................................................................................... 845 Mark Attendance
................................................................................................................................... 866 Placeholders
................................................................................................................................... 877 Schedule Groups
................................................................................................................................... 898 Waitlist
Section XII Supervision 92
................................................................................................................................... 921 Add/Edit/Delete Intern
................................................................................................................................... 942 Add/Edit Intern Appointment
................................................................................................................................... 973 Add/Edit/Delete Intern Notes
................................................................................................................................... 1024 My Interns List
................................................................................................................................... 1035 Search for Intern
Section XIII Task List 104
Section XIV User Configuration 105
................................................................................................................................... 1051 User Defaults Tab
................................................................................................................................... 1072 User Schedule Viewer Layout
................................................................................................................................... 1083 User Schedule Viewer Colors
................................................................................................................................... 1104 User Interface Tab
................................................................................................................................... 1115 Calendar Sync
................................................................................................................................... 1146 CCMH
Section XV User Permissions 115

4
© 2018 Titanium Software
Section XVI Web Component 117
Section XVII Building Lists 120
Index 123
Overview 5
© 2018 Titanium Software
1 Overview
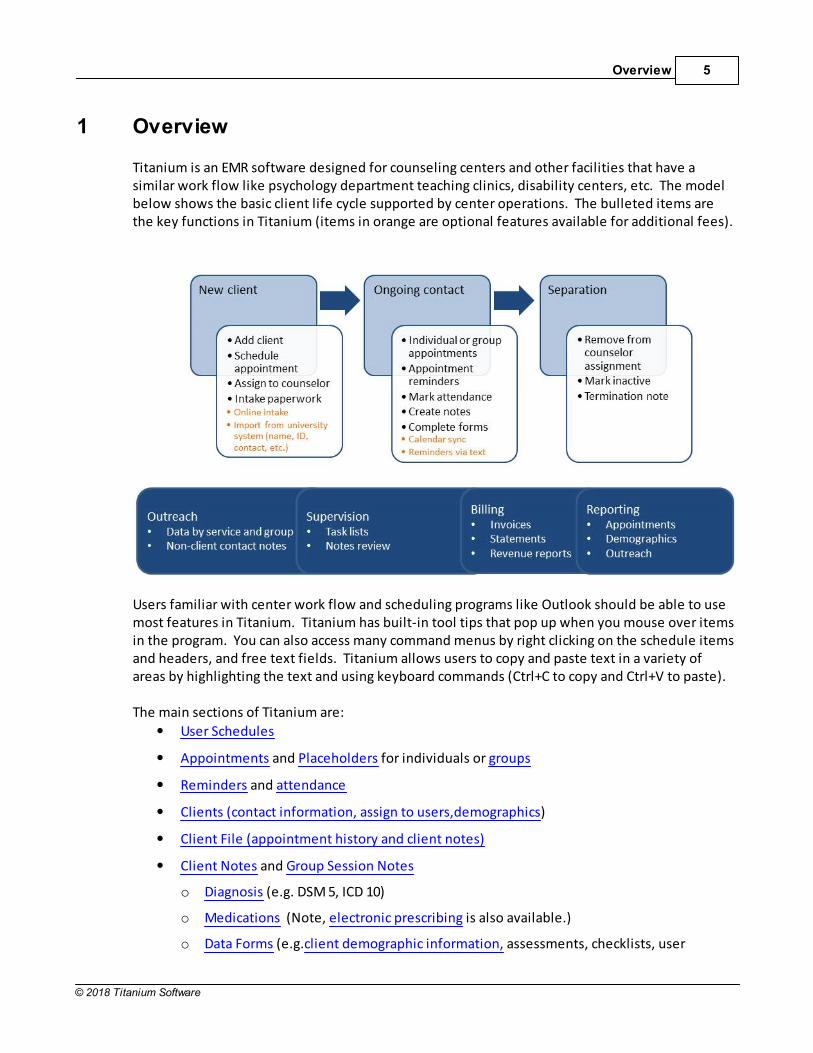
Titanium is an EMR software designed for counseling centers and other facilities that have asimilar work flow like psychology department teaching clinics, disability centers, etc. The modelbelow shows the basic client life cycle supported by center operations. The bulleted items arethe key functions in Titanium (items in orange are optional features available for additional fees).
Users familiar with center work flow and scheduling programs like Outlook should be able to usemost features in Titanium. Titanium has built-in tool tips that pop up when you mouse over itemsin the program. You can also access many command menus by right clicking on the schedule itemsand headers, and free text fields. Titanium allows users to copy and paste text in a variety ofareas by highlighting the text and using keyboard commands (Ctrl+C to copy and Ctrl+V to paste).
The main sections of Titanium are:
User Schedules
Appointments and Placeholders for individuals or groups
Reminders and attendance
Clients (contact information, assign to users,demographics)
Client File (appointment history and client notes)
Client Notes and Group Session Notes
o Diagnosis (e.g. DSM 5, ICD 10)
o Medications (Note, electronic prescribing is also available.)
o Data Forms (e.g.client demographic information, assessments, checklists, user
6
© 2018 Titanium Software
defined questionnaires, etc.)
o Attachments
o Supervisor reviews
Outreach activities/Non-client notes
Billing
Reports
In addition, Titanium contains productivity tools to help you with your daily work flow.
User Configuration: Customizable settings for appearance (fonts, colors, schedule days,pop-up windows) and behaviors (appointment announcements, note and report defaults)
My Clients: list of all your active clients which allows at-a-glance basic appointmentstatistics for each client and access to client files
Task List: reminders to complete tasks assigned by your center administrator (e.g. markattendance, create note, sign note, etc.)
Waitlist: highly customizable feature allows creation of one or more waitlists and addclients with searchable filters like priority and date added
Client Flags: set alerts for at-risk or special needs clients, which will appear in variousscreens in the program
Client Appointment Reminders: send reminders via email or text message (additional feefor text messaging) to help reduce client no show rates. Message content can becustomized by your center administrator.
The following are add-on features to Titanium and have an extra fee.
Web Component: allows import of forms completed by clients via a web site, includingintake forms, assessments, and surveys
Client Import: allows clients to be added/edited by importing information from anexternal data source (i.e., school’s student registration system). Can also be used to verifyenrollment.
Calendar Sync: Copies non-confidential appointment information from Titanium toMicrosoft Exchange (Outlook) or Google calendar. This feature is commonly used to show“busy” times on Outlook calendars, and to allow Titanium users to view their appointmentschedules when they are out of the office.
Titanium has been customized for use by your center's administrator.
We encourage new users to view the complete suite of training videos available on our websiteat www.TitaniumSchedule.com. The Getting Started with Titanium video on our website containsa demonstration of commonly used features. At our website, click the Support tab for contact

Overview 7
© 2018 Titanium Software
information for the Titanium Support team, link to our Knowledge Base, and system/hardwarerequirements. For user questions, email is often the best contact method because you caninclude a screen shot and details. To discuss best practices, processes, and collaborate with otherusers, you can join the users Listserv. A link to the Listserv is available on our website. Weencourage the system administrator at new facilities to sign up for the Listserv.
8
© 2018 Titanium Software
2 Billing
The Billing feature allows you to create invoices and statements, and track charges and paymentsfor clients. The Billing/Invoice feature automatically tracks all outstanding charges and credits forthe clients you have invoiced. If your center administrator has chosen to use this feature, theywill set the bill codes, descriptions and fees.
If your center administrator chooses, the invoices needed feature may be used to reviewappointments for which invoices should be prepared. Your center administrator will enter a cutoff date. Appointments prior to that date will not appear on the invoices needed screen. You canalso document sliding scale billing agreements.
This feature is configured by your center administrator.
2.1 Add/Edit Charges
Users can add charges for clients by using invoices or adding service lines using the billing filescreen. Centers that are not using Titanium to generate insurance claim forms should use invoicesto enter charges. Centers that are generating claim forms using Titanium should enter chargesfrom the billing file.
What would you like to do?
o Add charge to an invoice
o Edit charge on an invoice
o Add charge to bill insurance
o Edit insurance billing charge
Add Charge to an Invoice
These steps allow you to add charges on the invoice screen. The charges created on the invoicescreen will be visible on the Billing File screen.
1. Open the Invoice screen:
o On the calendar screen, right click on the appointment and click Billing, or
o On the clients tab of group appointments, click the desired client and click Billing or
o On the calendar screen, click to open an appointment and click the Billing icon on the menubar, or
o From the calendar screen, click Open > Invoices Needed, double click on a list item to openthe appointment screen, and click the Billing icon on the menu bar or billing button on the
Billing 9
© 2018 Titanium Software
clients tab for group appointments (Note: If your center administrator enabled this feature, acut off date will be set. Invoices needed prior to the cut off date will not be shown.) or
o From the calendar screen, click Open > Billing, and click Find to search for the client (Note: You will be prompted to associate the charge).
2. Add Invoice Items.
o Click Add to create a line item for the service.
o Choose a billing code from the pull down menu.
o If necessary, click in the date, description or amount fields to edit them.
o Repeat these steps to add additional invoice items. Click a line and click Remove to removethe line.
3. If necessary, use the pull down menus on the invoice screen to select other information to beadded to the invoice. (Note: Your center administrator may not have enabled these items).
o Provider
o Supervisor, if any
o Diagnosis (Note: Titanium will not automatically enter a diagnosis on the invoice screen fromthe client's file.)
4. Click the check box to set the selections as the default for invoices for the client.
5. Click Save.
6. Click Exit.
Edit Charge on an Invoice
Note: You may be unable to edit charges that have been used to generate insurance claim.
1. From the calendar screen, click Open > Billing.
2. Click the Find icon on the menu screen.
3. To see invoices from the current day, click Show Today's Invoices.
4. To see a client's invoices, click Select Client and search for the client. All invoices for the clientare shown.
5. Double click to open the desired invoice.
6. Click Edit on the menu bar. (Note: To delete the invoice, click Delete on the menu bar. If the
10
© 2018 Titanium Software
invoice charges have been used to create an insurance claim, you may be unable to edit thecharges or delete the invoice.)
7. Make desired changes.
8. Click Save.
9. Click Exit.
Add Charge to Bill Insurance
These steps allow you to add charges from the Billing File screen, for the purpose of billinginsurance. An invoice is created at the same time, and can be viewed/printed using the Print >Invoice option from the menu bar.
1. Navigate to the billing file screen by:
o On the calendar screen, right click on the appointment and click Billing File, or
o On the clients tab of group appointments, click the desired client and click Billing File, or
o Search for the desired client, and click the Billing File icon on the menu bar, or
o From the calendar screen, click Open > Billing File, and click Find to search for the client.(Note that you can work with multiple client accounts by clicking Find Clients, setting thefilters and clicking Search. Click Ok to view the accounts of all clients who match the searchcriteria.)
2. Open the service lines window by clicking New, or clicking Selection Actions or right clicking inthe account and choosing Post New Services. (Note: You may be prompted to associate thecharge with an appointment, if your center is using the invoices needed list.)
3. On the service line window, add charges by:
o Use the pull down menus to choose counselor and supervisor, if not associated with anappointment.
o Check the box to indicate that the entries on the screen will be the default for the client, ifappropriate. (Note: If this box is marked, future service line entries will pre-populate withthe information for this service line.)
o Click Add, and use the pull down menus to choose service date, and billing code from the listcreated by your center administrator.
o If necessary, click in the description or amount fields to edit them.
Billing 11
© 2018 Titanium Software
o Check the box to indicate that the item will be billed to insurance.
o Repeat these steps to add additional service lines. Click a service line and click Remove toremove the line.
4. E the default insurance items chosen by your center administrator as necessary (days/units,emergency, HCPCS/CPT code, place of service, Early & Periodic Screening, Family Planning,Supplemental Information, Outside Lab).
5. Click Add to add diagnosis, then click the new diagnosis line to select the diagnosis. (Note: Titanium will not automatically add the diagnosis from the client's file.)
6. Click Save.
7. Click Exit.
Edit Insurance Billing Charge
Note: If a charge has been used to generate an insurance claim, it may not be possible to edit theservice line.
1. Navigate to the billing file screen by:
o On the calendar screen, right click on the appointment and click Billing File, or
o Search for the desired client, and click the Billing File icon on the menu bar, or
o From the calendar screen, click Open > Billing File, and click Find to search for the client.(Note that you can work with multiple client accounts by clicking Find Clients, setting thefilters and clicking Search. Click Ok to view the accounts of all clients who match the searchcriteria.)
2. Click on the desired service line.
3. Open the service lines window by clicking Select Actions or right clicking in the account andchoosing View Service Lines.
4. On the service line window, click Edit on the menu bar. (Note: To delete the service line,select the service line item from the record of account, and click Delete on the menu bar.)
5. Use the pull down menus and buttons to make desired changes.
6. Click Save.
7. Click Exit.

12
© 2018 Titanium Software
2.2 Add/Edit Payments
What would you like to do?
o Add payment to the client account
o Add payment to an invoice
o Add insurance payment
o Edit payment on the client account
o Edit payment on an invoice
o Edit insurance payment
o Allocate account credit
Add Payment to the Client Account
These steps allow you to add payments from the Billing File screen. Payments will be reflectedon the invoices to which the payment is allocated.
1. Navigate to the billing file screen by:
o On the calendar screen, right click on the appointment and click Billing File, or
o On the clients tab of group appointments, click the desired client and click Billing File, or
o Search for the desired client, and click the Billing File icon on the menu bar, or
o From the calendar screen, click Open > Billing File, and click Find to search for the client.(Note that you can work with multiple client accounts by clicking Find Clients, setting thefilters and clicking Search. Click Ok to view the accounts of all clients who match the searchcriteria.)
2. Open the payment window by clicking Selection Actions or right clicking in the account andchoosing Post Payment.
3. On the payment window, add payment by:
o For centers that use Titanium to generate insurance claims, review the CoPay column(s) in thetable. (Note: The co-pay amount is based on the entries made in the client's insuranceinformation.)
o Use the pull down menus to choose payment date and payment type. (Note: Click here forinstructions to post an insurance payment for a claim created using Titanium. Use the
Billing 13
© 2018 Titanium Software
insurance payment type in this window only to record payments for claims generated outsideTitanium.)
o Type in payment amount and description. (Note: If you right clicked on an existing serviceline to open the payment window, the payment amount will default to match the service lineamount.)
o Click in the Allocated Amount column, and type in the amount of the payment to be allocatedto unpaid charges. (Note: Payments can be used to pay any unpaid charges showing in thewindow, in any combination. If you right clicked on an existing service line to open thepayment window, the payment will default to that service line.)
4. Click Ok to save the payment. (Note: If the payment is not fully allocated to existing charges, apop-up warning will be shown notifying the user that there is a credit. Click No to return to thepayment window and allocate the entire payment. Click Yes if the client is pre-paying for servicesnot yet rendered.)
5. To make an explanation of benefits adjustment, right click on the line item and choose AdjustItem. Enter the amount and click Ok.
6. Click Exit.
Add Payment to an Invoice
These steps allow you to add payments on the invoice screen. The payments created on theinvoice screen will be visible on the Client Billing File screen.
1. Open the Invoice screen:
o On the calendar screen, right click on the appointment and click Billing, or
o On the clients tab of group appointments, click the desired client and click Billing or
o On the calendar screen, click to open an appointment and click the Billing icon on the menubar, or
o From the calendar screen, click Open > Invoices Needed, double click on a list item to openthe appointment screen, and click the Billing icon on the menu bar or billing button on theclients tab for group appointments (Note: If your center administrator enabled this feature, acut off date will be set. Invoices needed prior to the cut off date will not be shown.) or
o From the calendar screen, click Open > Billing, and click Find to search for the client (Note: This will not clear the invoices needed list items).
2. Click Add in payments section.
3. On the payment window, add payment by:
14
© 2018 Titanium Software
o Use the pull down menus to choose payment date and payment type. (Note: Click here forinstructions to post an insurance payment for a claim created using Titanium. Use theinsurance payment type in this window only to record payments for claims generated outsideTitanium.)
o Type in payment amount and description. (Note: The payment amount will default to theamount of the invoice charges.)
o Click in the Allocated Amount column, and type in the amount of the payment to be allocatedto unpaid charges. (Note: Payments can be used to pay any unpaid charges showing in thewindow, in any combination. Titanium will default to showing payments in the charges forthe current invoice.)
4. Click Ok to save the payment. (Note: If the payment is not fully allocated to existing charges, apop-up warning will be shown notifying the user that there is a credit. Click No to return to thepayment window and allocate the entire payment. Click Yes if the client is pre-paying for servicesnot yet rendered.)
5. Click Save.
6. Click Exit.
Add Insurance Payment
1. Navigate to the billing file screen by:
o On the calendar screen, right click on the appointment and click Billing File, or
o On the clients tab of group appointments, click the desired client and click Billing File, or
o Search for the desired client, and click the Billing File icon on the menu bar, or
o From the calendar screen, click Open > Billing File, and click Find to search for the client.(Note that you can work with multiple client accounts by clicking Find Clients, setting thefilters and clicking Search. Click Ok to view the accounts of all clients who match the searchcriteria.)
2. Click the service line and click Selection Actions, or right click on a service line used to createthe insurance claim and choose Post Primary Insurance Payment. (Note: The claim must bemarked Complete before a payment can be posted. If payment is for the client's secondaryinsurance, choose Post Secondary Insurance Payment.)
3. Use the insurance company explanation of benefits to enter the amounts in payment andcontractual adjustments for the service lines on the insurance claim.
4. Click Ok.
5. Click Exit.
Billing 15
© 2018 Titanium Software
Edit Payment on the Client Account
1. Navigate to the billing file screen by:
o On the calendar screen, right click on the appointment and click Billing File, or
o On the clients tab of group appointments, click the desired client and click Billing File or
o Search for the desired client, and click the Billing File icon on the menu bar, or
o From the calendar screen, click Open > Billing File, and click Find to search for the client.(Note that you can work with multiple client accounts by clicking Find Clients, setting thefilters and clicking Search. Click Ok to view the accounts of all clients who match the searchcriteria.)
2. Open the service lines window by clicking Selection Actions or right clicking in the account andchoosing Edit Payment. (Note: To delete a payment, choose Delete Payment and click Ok.)
3. On the payments window, make desired changes and click Ok.
4. Click Exit.
Edit Payment on an Invoice
1. From the calendar screen, click Open > Billing.
2. Click the Find icon on the menu screen.
3. To see invoices from the current day, click Show Today's Invoices.
4. To see a client's invoices, click Select Client and search for the client. All invoices for the clientare shown.
5. Double click to open the desired invoice.
6. Click Edit on the menu bar.
7. Click the payment and click View/Edit. (Note: To delete the payment, click Remove.)
8. Made desired changes on the edit payment window and click Ok.
8. Click Save.
9. Click Exit.
16
© 2018 Titanium Software
Edit Insurance Payment
1. Navigate to the billing file screen by:
o On the calendar screen, right click on the appointment and click Billing File, or
o On the clients tab of group appointments, click the desired client and click Billing File or
o Search for the desired client, and click the Billing File icon on the menu bar, or
o From the calendar screen, click Open > Billing File, and click Find to search for the client.(Note that you can work with multiple client accounts by clicking Find Clients, setting thefilters and clicking Search. Click Ok to view the accounts of all clients who match the searchcriteria.)
2. Click the service line and click Selection Actions, or right click on a service line used to createthe insurance claim and choose Edit Primary Insurance Payment. (Note: If payment is for theclient's secondary insurance, choose Edit Secondary Insurance Payment. To delete payments,click Delete Insurance Payment.)
3. Use the insurance company explanation of benefits to edit the payment amounts and requiredadjustments for the service lines on the insurance claim. (Note: If a secondary insurance claimhas been generated, you may be unable to edit primary insurance payments.)
4. Click Ok.
5. Click Exit.
Allocate Account Credit
1. Navigate to a client invoice or client's billing file screen.
2. Click on the Unallocated Payments link (blue underline).
3. Click to select the payment to be allocated.
4. Click Allocate.
5. On the Edit Payment window, click in the Allocated Amount column to enter the desiredamount.
6. Click Ok.
Billing 17
© 2018 Titanium Software
2.3 Find Invoices
1. From the calendar screen, click Open > Billing.
2. To see invoices from the current day, click Show Today's Invoices.
3. To see a client's invoices, click Select Client and search for the client. All invoices for the clientare shown.
4. Double click to open the desired invoice. (Note: There is an Outstanding Accounts reportavailable in the reporting feature of Titanium.)
2.4 Generate/Process Insurance Claims
Titanium allows users to print hard copy insurance claim forms, using pre-printed CMS 1500 paper. This feature is activated and configured by your center administrator. Prior to generating claims,users who bill insurance may also have to configure settings, depending on choices made by thecenter administrator.
Titanium does not electronically interface with any third-party insurance clearinghouses, butclaim information can be exported into .pdf files on plain backgrounds which might be suitable forupload to some third-party processing websites.
What would you like to do?
o Add client insurance information
o Edit client insurance information
o Review client insurance information
o Generate bulk claims
o Generate claims for single client
o Process claims
Add Client Insurance Information
1. Navigate to the billing file screen by:
o From the calendar screen, click Open > Billing File, and click Find to search for the client.(Note: You can work with multiple client accounts by clicking Find Clients, setting the filtersand clicking Search. Click Ok to view the accounts of all clients who match the search criteria.)or
o Search for the desired client, and click the Billing File icon on the menu bar, or
o Click Open, click Find, enter the client information and double click to open the client record.
18
© 2018 Titanium Software
2. Click the Client Insurance icon on the menu bar or screen.
3. Click Edit.
4. Click Select to enter the insurance carrier:
o Click the carrier from the list. (Note: Enter search criteria if the list is long.)
o Click the Add New Carrier radio button and click Ok. Then enter insurance carrier informationon the pop up window and click Ok.
5. Use the pull down menus and text boxes to enter the client's insurance information.
6. Enter a prior authorization number and number of visits, if applicable. (Note: Titanium will notperform any automatic calculations using this information.)
7. Enter the client's co-pay type (flat rate or percentage) and rate or percent. (Note: Titanium willuse this information to automatically calculate the client's co-payments.)
8. Click the Other Insurance Details tab, and use the pull down menus and text boxes to enterinformation required on insurance claims. (Note: You should consult with your centeradministrator or use the state or federal guidelines for CMS 1500 claim forms to learn more aboutthese fields.)
9. If the client has secondary insurance, click the Secondary Insurance tab and enter information.
10. If desired, attach a copy of the client's insurance card by clicking Insurance Cards, and usingthe Windows interface to navigate to the desired file. Enter the file name, and click Ok. (Note: To manage insurance cards, right click on the card and choose Delete, Edit Description, Open orPrint.)
11. Click Save.
12. Click Exit.
Edit Client Insurance Information
1. Navigate to the billing file screen by:
o From the calendar screen, click Open > Billing File, and click Find to search for the client.(Note that you can work with multiple client accounts by clicking Find Clients, setting thefilters and clicking Search. Click Ok to view the accounts of all clients who match the searchcriteria.) or
o Search for the desired client, and click the Billing File icon on the menu bar
2. Click the Client Insurance icon on the menu bar.
Billing 19
© 2018 Titanium Software
3. Click Edit.
4. Click the desired tab, and edit the information. (Note: Click Clear All on the menu bar toremove all client insurance information. To clear information for a single tab, delete the carrier. If the secondary coverage has become primary, click Swap on the menu bar to switch the order inwhich claims will be submitted.)
5. Click Save.
6. Click Exit.
Review Client Insurance Information
o On the invoice screen, click Insurance CoPays to review client insurance information.
o On the Billing File screen, click Client Insurance to review insurance information.
Generate Bulk Claims
1. From the schedule screen, click Open > Insurance Claims Needed.
2. If desired, used the date filters to search for desired claims (e.g., last month).
3. Click on the Claim Issues tab to resolve problems with claims:
o Click the Issue/Resolution column.
o For each item, click Fix Issue.
o If Titanium redirects to a screen, click Edit on the menu bar, make changes, and click Save andExit.
o For issues in system configuration, user configuration or client insurance information, reviewthe pop-up message to determine the problem. Then exit the billing file, and navigate to thecorrect screen in Titanium to fix the problem.
4. When the Pending Claim Issues tab is blank, click the Ready for Generation tab. Click the checkbox next to the desired claims from the list or the Select All icon on the menu bar.
5. To preview claims, click the Preview icon on the menu bar. Close the preview window andnavigate to the client billing file or insurance to make changes to charges or client insuranceinformation.
20
© 2018 Titanium Software
6. To generate claims, click the Generate Claims icon on the menu bar. Click Ok on the pop upwindow.
7. To print claims, click the Print Claims icon on the menu bar.
o Select the claims to print.
o Insert CMS 1500 printer paper. (Note: To save claim information on plain background to a .pdffile, click printer set up, choose a third party .pdf generator, and click Ok. After clicking thePrint Icon and Ok, use the Windows interface to save the .pdf file.)
o Click the Print icon on the menu bar and click Ok.
o Click Exit.
Generate Claims for One Client
1. Navigate to the billing file screen by:
o From the calendar screen, click Open > Billing File, and click Find to search for the client.(Note that you can work with multiple client accounts by clicking Find Clients, setting thefilters and clicking Search. Click Ok to view the accounts of all clients who match the searchcriteria.) or
o Search for the desired client, and click the Billing File icon on the menu bar
2. Click the Client Insurance icon on the menu bar.
3. Click on the Pending Claim Issues tab to resolve problems with claims:
o Click the Issue/Resolution column.
o For each item, click Fix Issue.
o If Titanium redirects to a screen, click Edit on the menu bar, make changes, and click Save andExit.
o For issues in system configuration, user configuration or client insurance information, reviewthe pop-up message to determine the problem. Then exit the billing file, and navigate to thecorrect screen in Titanium to fix the problem.
4. When the Pending Claim Issues tab is blank, click the Claims Pending Generation tab. Click thedesired claims from the list.
5. To preview claims, click the Preview icon on the menu bar. Close the preview window and clickRecord of Account or Client Insurance to make changes to charges or client insurance information.
Billing 21
© 2018 Titanium Software
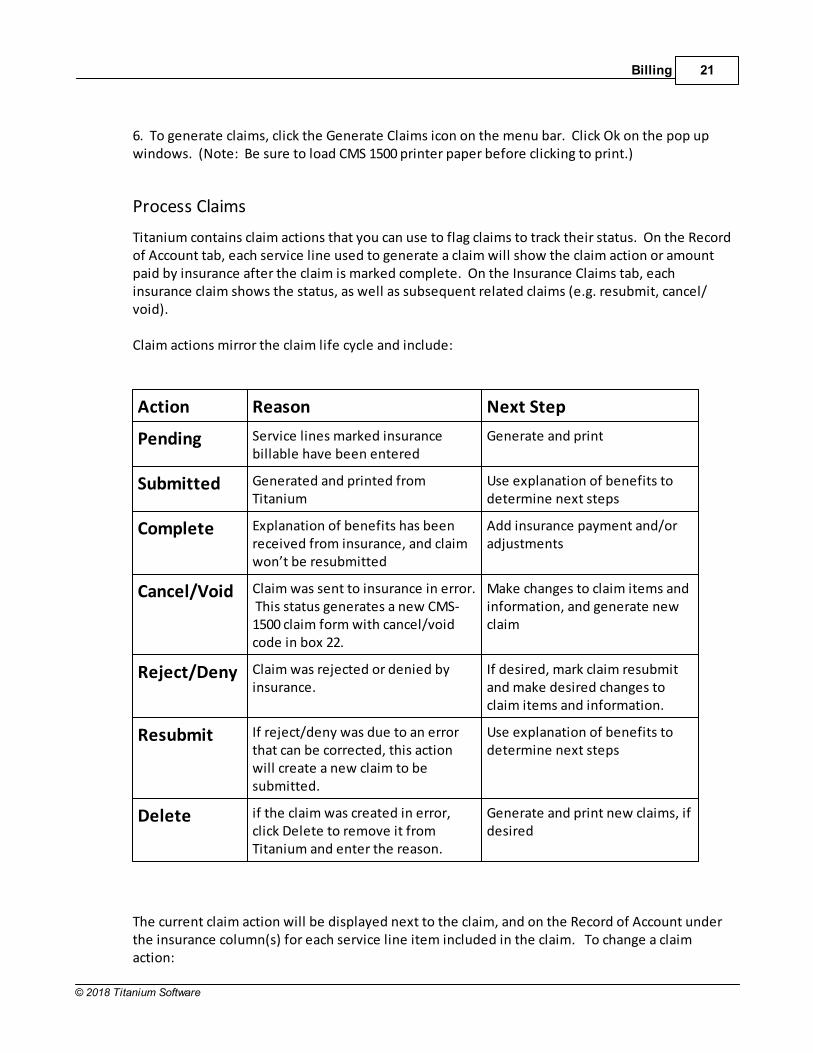
6. To generate claims, click the Generate Claims icon on the menu bar. Click Ok on the pop upwindows. (Note: Be sure to load CMS 1500 printer paper before clicking to print.)
Process Claims
Titanium contains claim actions that you can use to flag claims to track their status. On the Recordof Account tab, each service line used to generate a claim will show the claim action or amountpaid by insurance after the claim is marked complete. On the Insurance Claims tab, eachinsurance claim shows the status, as well as subsequent related claims (e.g. resubmit, cancel/void).
Claim actions mirror the claim life cycle and include:
Action Reason Next Step
Pending Service lines marked insurancebillable have been entered
Generate and print
Submitted Generated and printed fromTitanium
Use explanation of benefits todetermine next steps
Complete Explanation of benefits has beenreceived from insurance, and claimwon’t be resubmitted
Add insurance payment and/oradjustments
Cancel/Void Claim was sent to insurance in error. This status generates a new CMS-1500 claim form with cancel/voidcode in box 22.
Make changes to claim items andinformation, and generate newclaim
Reject/Deny Claim was rejected or denied byinsurance.
If desired, mark claim resubmitand make desired changes toclaim items and information.
Resubmit If reject/deny was due to an errorthat can be corrected, this actionwill create a new claim to besubmitted.
Use explanation of benefits todetermine next steps
Delete if the claim was created in error,click Delete to remove it fromTitanium and enter the reason.
Generate and print new claims, ifdesired
The current claim action will be displayed next to the claim, and on the Record of Account underthe insurance column(s) for each service line item included in the claim. To change a claimaction:
22
© 2018 Titanium Software
1. Navigate to the billing file screen by:
o From the calendar screen, click Open > Billing File, and click Find to search for the client.(Note that you can work with multiple client accounts by clicking Find Clients, setting thefilters and clicking Search. Click Ok to view the accounts of all clients who match the searchcriteria.) or
o Search for the desired client, and click the Billing File icon on the menu bar
2. Click the Insurance Claims tab.
3. Right click on the insurance claim, and choose the desired claim action. If required, enter areason for the action and click Ok. (Note: If the claim action does not follow the claim life cycle,you will see an information window explaining the next step. Click Ok to close the window.)
4. To undo a claim, action, right click on the claim and click Undo. The claim will be returned to itsformer state. If required, enter a reason for the action.
2.5 Process Sliding Scale Billing
Your center may choose to bill clients on a sliding scale based on income or other factors. Titanium allows center administrators to configure a tab on the client screen (bottom of theContact Information tab) for users to enter billing comments. Those comments will be visible atthe bottom of the invoice screen. To process sliding scale billing:
1. Create a charge as you normally would.
2. Review Client Billing Note box at the bottom of the invoice screen or service line item screen.
3. Manually calculate the adjustment required based on the Client Billing Note.
4. Add charge. If necessary, click in the amount field to edit as instructed in the billingcomments.
5. Complete the charge as you normally would.
Billing 23
© 2018 Titanium Software
2.6 Write Offs and Adjustments
Adjustments are used to reduce charges, based on contractual agreements with insurancecarriers. Write offs are used to make adjustments because collection attempts for client accountshave been unsuccessful. The ability to add write offs may be restricted by certain users by yourcenter administrator.
What would you like to do?
o Adjust charge
o Write off charge
o Write off account balance
o Issue Refund
Adjust Charge
If a service line was included in an insurance claim, the claim status must be complete to make anadjustment. Titanium will automatically prompt users to enter insurance payments when a claimis marked complete, so a separate adjustment is unlikely to be needed.
1. Navigate to the billing file screen by:
o On the calendar screen, right click on the appointment and click Billing File, or
o On the clients tab of group appointments, click the desired client and click Billing File, or
o Search for the desired client, and click the Billing File icon on the menu bar, or
o From the calendar screen, click Open > Billing File, and click Find to search for the client.(Note that you can work with multiple client accounts by clicking Find Clients, setting thefilters and clicking Search. Click Ok to view the accounts of all clients who match the searchcriteria.)
2. Right click on the service line and choose Post Payment.
3. If required, choose Insurance payment type.
4. Enter the amount paid by insurance, if any.
5. Enter the amount of the adjustment.
6. Click Ok to save.
24
© 2018 Titanium Software
Write off Charge
1. Navigate to the billing file screen by:
o On the calendar screen, right click on the appointment and click Billing File, or
o On the clients tab of group appointments, click the desired client and click Billing File, or
o Search for the desired client, and click the Billing File icon on the menu bar, or
o From the calendar screen, click Open > Billing File, and click Find to search for the client.(Note that you can work with multiple client accounts by clicking Find Clients, setting thefilters and clicking Search. Click Ok to view the accounts of all clients who match the searchcriteria.)
2. Write click on the charge and choose Write Off.
3. Enter the amount and reasons, if desired.
4. Click Ok.
5. Click Exit.
Write off Account
1. Navigate to the billing file screen by:
o On the calendar screen, right click on the appointment and click Billing File, or
o On the clients tab of group appointments, click the desired client and click Billing File, or
o Search for the desired client, and click the Billing File icon on the menu bar, or
o From the calendar screen, click Open > Billing File, and click Find to search for the client.(Note that you can work with multiple client accounts by clicking Find Clients, setting thefilters and clicking Search. Click Ok to view the accounts of all clients who match the searchcriteria.)
2. Click the Write Off icon on the menu bar.
3. Click Write Off Client Balance button.
4. Click Ok.
5. Click Ok.
6. Click Exit.
Billing 25
© 2018 Titanium Software
Issue Refund
1. Navigate to the billing file screen by:
o On the calendar screen, right click on the appointment and click Billing File, or
o On the clients tab of group appointments, click the desired client and click Billing File, or
o Search for the desired client, and click the Billing File icon on the menu bar, or
o From the calendar screen, click Open > Billing File, and click Find to search for the client.(Note that you can work with multiple client accounts by clicking Find Clients, setting thefilters and clicking Search. Click Ok to view the accounts of all clients who match the searchcriteria.)
2. Click the Invoices tab.
3. Double click to open the invoice with the payment to be refunded.
4. Click Edit on the menu bar.
5. Choose whether to document the refund by entering a charge or editing the original payment.
6. If entering a charge:
o Click Add
o Choose the billing code created by your system administrator for use to document refunds
o Enter a description, if desired
o Edit the amount to the amount to be refunded.
o Skip to Step 8.
7. If editing the payment:
o Click the desired payment and click View/Edit.
o In the description, enter information about the refund. (Note: Consider entering the refunddate, amount, reason and user initials).
o Manually subtract the refund from the total payment. Enter the remaining amount in theTotal Payment Amount box, if any.
o If the remaining payment is more than $0, click in the Allocated Amount column and enterthe allocation for the payment. If the remaining payment is $0, click in the Allocated Amount
26
© 2018 Titanium Software
column to delete any allocations.
o Click Ok to save the changes to the payment window.
8. Click Save.
9. Click Exit.
2.7 Print Account Records
Titanium allows users to print invoices, statements or account transactions shown in the billingfile, for single clients or in bulk. Some invoice and statement information is configured by thecenter administrator.
What would you like to do?
o Print client invoice/statement/account transactions
o Print bulk invoices
o Print bulk statements
o Print bulk account transactions
Print Client Invoice/Statement/Account Transactions
This process uses the billing file screen. Invoices and statements can also be printed from theinvoice screen, by using the icons on the menu bar.
1. Navigate to the billing file screen by:
o From the calendar screen, click Open > Billing File, and click Find to search for the client.(Note that you can work with multiple client accounts by clicking Find Clients, setting thefilters and clicking Search. Click Ok to view the accounts of all clients who match the searchcriteria.) or
o Search for the desired client, and click the Billing File icon on the menu bar
2. Use the filters to limit the transactions shown by date, status or insurance claim. Use thecollapse/expand all controls in the upper left corner to hide or show transactions.
3. Click the Print icon on the menu bar and choose invoice, statement or view.
o The invoice printed will include transaction selected on the Record of Account tab
o Use the filters on the statement window to select the desired time frame, and click Print
o Use the printer icon on the View pop -up window to print the transactions.

Billing 27
© 2018 Titanium Software
Print Bulk Invoices
1. From the schedule screen, click the Reports icon
2. Click Print Invoices.
3. Use the filter to set the desired invoice create date range.
4. Click Print. (Note: Click Preview and use the Export options to save the file to your computer.)
Print Bulk Statements
1. From the schedule screen, click the Reports icon
2. Click Print Statements.
3. Use the filter to set the desired transaction date range.
4. Click Print. (Note: Click Preview and use the Export options to save the file to your computer.)
Print Bulk Account Transactions
1. From the schedule screen, click the Reports icon
2. Click Billing File report
3. Use the filters to select the desired content (transactions, transaction detail, list of invoices, listof insurance claims) and date.
4. Click Select to search for clients. Set filters and click Search. Click Ok to use the clients in thereport.
5. Click Print. (Note: Click Preview and use the Export options to save the file to your computer.)
28
© 2018 Titanium Software
3 Client Import
This feature will import some client data from an external data source, like a universityregistration system. It can be used to update existing clients or add new clients. The dataimported is chosen by your center's administrator, and may include the information on the Contact Information tab on the client screen, and the data form being used for demographics inyour center.
This feature is configured by your center administrator.
Update an Existing Client
1. Search for the client.
2. Click the Edit icon on the menu bar.
3. Click the Client Import icon on the menu bar.
4. Click OK on the warning message and to update the client's information.
5. Click OK to confirm that the client has been updated.
6. Click Save.
7. Click Exit.
Adding a New Client
1. From the calendar screen, click Open > Client.
2. Enter the unique identifying information required for the client import (most likely the studentID number)
3. Hit the tab key. If a match is found in the external system, a green information message willappear at the top of the search screen.
4. Click New Client.
5. Click Yes to add the client using the imported data. The client screen for the new client opens.
6. Complete your center's process for adding new clients. (Note: It is likely that the client'scontact information and demographics form(s) are not complete, and remaining data must beentered manually.)

Clients 29
© 2018 Titanium Software
4 Clients
Client information can be found on the client screen or in the client file. Depending on your userpermissions, you may be unable to view or edit clients or files for clients who have not beenassigned to you.
The client screen includes:
Contact Information tab: Full name, date of birth, Student ID number, contact methods. Depending on how your center administrator configured the system, you may also seepreferred name, preferred pronoun and check boxes for whether it is okay to contact the clientusing those methods and tabs with free text fields (i.e., comments, billing comments, etc.).
Medical Information tab: Depending on how your center administrator configured the system,you may see the medical information tab which contains client pharmacies and allergies.
Disability tab: If your center administrator chooses, disabilities and accommodations are addedand removed on this tab. Non-confidential comments about the items can also be added to thistab.
Client Security Tab: Security access level for the client and users are assigned to the client.
Client Flags Tab: Your center administrator may choose to use flags to communicate vital clientinformation at a glance. Flags assigned to the client and removed on this tab. Flag colors,descriptions, and behaviors are set by your center's administrator. The Flags button appears onthe menu bar of several screens in Titanium (e.g., appointment, client file, client screen). If aflag has been assigned for a client, the Flags button will be colored and a small flag icon willappear throughout the program when the client's name is shown (e.g., My Clients list,appointment screen/blocks, on search lists, etc.).
Menu Bar Icons
o Med Log: If your center administrator may chooses to use the feature, click to accesscompiled information from medication notes in the client's file.
o Client file: The client file contains appointment history and notes. Double click any item inthe client file to open it.
Entries for client allergies, medications, and disabilities are shown at the top of the clientfile. Calendar icons in the client file represent appointments. Yellow notebook iconsrepresent notes. Items that are contained within others are indented and connected witha dotted line. For instance, diagnoses, medications, data forms and attachments willalways appear indented under notes because they are part of the note. Notes may beindented under appointments if they are associated with the appointment.
o Waitlist: If your center administrator chooses to use the feature, click to add entries for clienton center waitlist(s)
o Demographics: Data form containing information about client background/characteristics
30
© 2018 Titanium Software
attached to a note in the client's file.
4.1 Add/Edit/Delete Client
What would you like to do?
o Add a client
o Edit a client
o Terminate client assignment
o Deactivate client
o Delete a client
Add a Client
1. Navigate to the Find/Add client screen by:
o Right click on the schedule to add an individual appointment.
o From the calendar screen, click Open > Clients
2. Enter the Student ID and press the tab key, or enter the full or partial last name and click Find.
3. If the client is not found, enter the last and first name, and click New Client.
4. Click Yes to confirm.
5. The client screen will open in a new window. Enter information required by your center. (Note: If you are entering a client to make an appointment, you will most likely enter only acontact method, and then edit the client after intake. You may see a prompt to add yourself as auser on the client security tab. The Medical Information tab for pharmacies and allergies will onlybe shown if your center administrator has chosen to use the MedLog feature.)
6. Click Save.
7. Click Exit.
Edit a Client
If you are not assigned to a client, you may not have rights to edit the client.
Clients 31
© 2018 Titanium Software
1. Navigate to client screen from:
o Any screen that has Client icon on the menu bar (e.g., appointment screen, My Clients list)
o From the calendar screen, click Open > Clients and search for the client
2. Click Edit on the menu bar on the client screen.
3. Add or change information as required. (Note: Use the termination or deactivation processesbelow to change user assignment to a client or client status. Click here to obtain informationabout working with client photos.)
4. Click Save.
5. Click Exit.
Terminate Client Assignment
Your center administrator may have chosen to use the Titanium termination features. Thetermination feature creates a work flow process of tasks, notes and prompts to end a user'sassignment to a client, and allow the user to document the termination in the client file. Clickhere if your center is not using the termination feature. If your center is using this feature, followthe steps below to terminate a client.
1. Double click the termination task on your task list. (Note: If you create a note using the notetype designated by your center administrator for termination notes, you will see prompts to guideyou through the termination process.)
2. Click Yes on the pop-up box to remove the user assignment to the client. If you click No, thetask will remain on your task list.
3. Handle termination note creation:
o If your center administrator requires a termination note, click Ok on the pop-up box to createa note. Add the note as you normally would, including signing and locking the note. (Note: The termination note type and any required data forms were selected by your centeradministrator.)
o If a termination note is optional, click Yes on the pop-up box to create a termination note. Add the note as you normally would, including signing and locking the note.
o If a termination note is optional and you do not want to create a note, click No to skip creatinga termination note.
4. Click Yes to confirm that the user assignment is being terminated. If you click No, the task willremain on your task list.
5. Depending on the settings chosen by your center administrator, if all users have been
32
© 2018 Titanium Software
unassigned from the client, a pop up box will appear prompting you to deactivate the client. ClickYes to change the client status to inactive. Click No to leave the client's status active.
6. Depending on the settings chosen by your center administrator, a pop up box will appearprompting you to restrict access to the client file. Click Yes to restrict the client file. Click No tomake no changes.
7. Handle deactivation note creation:
o Depending on the settings chosen by your center administrator, a pop up box will appearprompting you to create a deactivation note.
o Click Yes on the pop-up box to create a deactivation note. Add the note as you normallywould, including signing and locking the note. (Note: The deactivation note type and anyrequired data forms were selected by your center administrator.)
o Click No to skip creating the deactivation note.
To terminate assignments to clients without the termination feature:
1. Search for the client.
2. Click the Edit icon on the menu bar on the client screen.
3. Click on the client security tab.
4. Click to uncheck the Active boxes for the desired users.
5. Click Save.
6. Click Exit.
7. Add a note to the client file, if required by your center administrator.
Deactivate a Client
Your center administrator may have chosen to use the Titanium deactivation features. Thedeactivate feature creates a work flow of prompts and notes to deactivate the client, and allowthe user to document the deactivation in the client's file. Click here if your center is not using thetermination features in Titanium. If your center is using this feature, follow the steps below todeactivate a client.
1. Navigate to the client screen.
2. Click Edit on the menu bar.
Clients 33
© 2018 Titanium Software
3. Click the Client Security Tab. If users are assigned to the client, for each user:
o Click the user and click to uncheck the box in the Active column.
o Click Yes on the pop up box to terminate the user assignment to the client.
o Click Ok on the pop-up box.
o Handle creating a termination note.
If your center administrator requires a termination note, click Ok on the pop-up box tocreate a note. Add the note as you normally would, including signing and locking the note. (Note: The termination note type and any required data forms were selected by yourcenter administrator.)
If a termination note is optional, click Yes on the pop-up box to create a termination note. Add the note as you normally would, including signing and locking the note.
If a termination note is optional and you do not want to create a note, click No to skipcreating a termination note.
o Repeat for all remaining users.
o Skip to Step 5.
4. If no users are assigned to the click, click to uncheck the Active box on the Contact Informationtab.
5. Click Yes to deactivate the client.
6. Depending on the settings chosen by your center administrator, a pop up box will appearprompting you to restrict access to the client file. Click Yes to restrict the client file. Click No tomake no changes.
7. Depending on the settings chosen by your center administrator, a pop up box will appearprompting you to create a deactivation note. Click Yes on the pop-up box to create a deactivationnote. Click No to skip writing the deactivation note.
8. Add the note as you normally would, including signing and locking the note. (Note: Thedeactivation note type and any required data forms were selected by your center administrator. If you create a note using the note type designated by your center administrator for deactivationnotes, you will see prompts to guide you through the deactivation process.)
To deactivate clients without the termination feature:
1. Search for the client.
34
© 2018 Titanium Software
2. Click the Edit icon on the menu bar on the client screen.
3. Click in the Active box.
4. Click Save.
5. Click Exit.
6. Add a note to the client file, if required by your center administrator.
Delete a Client
You can delete a client if you have sufficient permission, and no notes or appointments have beenadded to the client file. It is recommended that clients be deactivated instead of deleted. Clientscannot be deleted if their files contain notes or appointments. Unless you are a systemadministrator, each note and appointment must be deleted individually before the client can bedeleted.
To delete a client:
1. Navigate to the client screen from:
o Any screen that has Client icon on the menu bar (e.g., appointment screen, My Clients list)
o From the calendar screen, click Open > Clients and search for the client
2. Click Delete on the menu bar on the client screen.
3. Click Yes to confirm.
4.2 Add/Edit/Remove Flags
Your center administrator may choose to use flags to communicate vital client information at aglance. Flag descriptions, and behaviors are set by your center's administrator. Flags set as"critical" by your center administrator will show as red throughout the program. Other flags willshow as white on a green background.
The Flags button appears on the menu bar of several screens in Titanium (e.g., appointment,client file, client screen). If a flag has been assigned for a client, the Flags button will be coloredand a small flag icon will appear throughout the program when the client's name is shown (e.g.,My Clients list, appointment screen/blocks, on search lists, etc.). Depending on your permissions,you may be unable to add or edit flags.

Clients 35
© 2018 Titanium Software
What would you like to do?
o Add a flag
o Edit a flag
o Remove a flag
Add a Flag
1. Click the Flags button on the menu bar on any screen on which it appears.
2. Click Manage Flags. The client screen will open with the Client Flags tab selected.
3. Click Add.
4. On the Add Client Flag pop-up window, use the pull down menu to select the desired flag, andenter a description if desired.
5. Click OK.
6. Click Save.
7. Click Exit.
Edit a Flag
1. Click the Flags button on the menu bar on any screen on which it appears.
2. Click Manage Flags. The client screen will open with the Client Flags tab selected.
3. Click on the desired flag.
4. Click View/Edit.
5. Make desired changes, and click OK.
Remove a Flag
Deleting flags will remove them from Titanium and they will not be available for reportingpurposes. Unless the flag was entered in error, we recommend deactivating the flag when it is nolonger applicable.
1. Click the Flags button on the menu bar on any screen on which it appears.
2. Click Manage Flags. The client screen will open with the Client Flags tab selected.
36
© 2018 Titanium Software
3. Click on the desired flag.
4. To deactivate the flag, click Deactivate. Enter the reason and click OK.
5. To delete the flag, click Delete.
4.3 Add/Edit Demographics
Demographic information for clients is recorded on a data form which is attached to a note in theclient's file. The data form was created by your center's administrator.
What would you like to do?
o Add a new demographics form
o Edit a demographics form
Add a New Demographics Form
1. Search for the desired client.
2. Click the Demographics icon on the menu bar on the client screen. (Note: The Demographicsicon is a short cut that allows you to create a note in the client file with the demographics dataform attached to it.)
3. To copy and edit a prior form, click Copy (latest date) demographics to new. To add a newdemographics form from scratch, click Add new.
4. Enter (or edit) required information.
5. Click Save.
6. Click Exit.
Edit a Demographics Form
If your center has clients complete paperwork via the online web component or if your centeruses the client import feature, some or all demographics data may be completed automatically. Ifsome data has already been entered, you may need to edit the demographics form.
1. Search for the desired client.
2. Click the Demographics icon on the menu bar on the client screen.
4. Click Open Latest.
Clients 37
© 2018 Titanium Software
5. Click Edit.
6. Make desired changes.
7. Click Save.
8. Click Exit.
4.4 Disabled Clients
Your center administrator may choose to activate the disability tab for clients. On the disability,users can track disabilities and accommodations, using the lists created by your centeradministrator. Additionally, the information documented can be exported from Titanium. If yourcenter has a third-party document creation/editing software like Microsoft Word, you might beable to populate accommodation letters for your clients.
What would you like to do?
o Add Disabilities/Accommodations
o Delete Disabilities/Accommodations
o Create Accommodation Letters
Add Disabilities/Accommodations
1. Navigate to client screen from:
o Any screen that has Client icon on the menu bar (e.g., appointment screen, My Clients list)
o From the calendar screen, click Open > Clients and search for the client
2. Click Edit on the menu bar on the client screen.
3. Click the Disability tab.
4. Click in the text boxes to record the name and email address of the client's adviser, if desired.
5. Click the Add button next to either the disabilities or accommodations section.
6. Use the pull down menus to select the desired disability/accommodation.
7. For disabilities, select the desired status from the pull down menu.
8. For accommodations, click to enter the effective and expires dates for the accommodation.
9. Click in the text box to add a brief comment or description regarding the disability/accommodation. (Note: Do not enter confidential information in these fields. The informationon this tab is viewable by all users.)

38
© 2018 Titanium Software
10. Repeat steps 4-8 to add additional disabilities/accommodations as desired.
11. Click Save.
12. Click Exit.
Delete Disabilities/Accommodations
1. Navigate to client screen from:
o Any screen that has Client icon on the menu bar (e.g., appointment screen, My Clients list)
o From the calendar screen, click Open > Clients and search for the client
2. Click Edit on the menu bar on the client screen.
3. Click the Disability tab.
4. Click on the desired disability or accommodation.
5. Click the Delete button.
6. Repeat Steps 4-5 as desired.
7. Click Save.
8. Click Exit.
Create Accommodation Letters
This process is recommended for centers who need to create accommodation letters for multipleclients at the same time. It requires the use of Microsoft Word, a third-party software. You willbe unable to follow this process unless your center administrator has given you access to exportraw data from Titanium.
1. From the schedule screen, click Reports on the menu bar.
2. Click Export Data.
3. For data to export, use the pull down menu to choose Client Accommodations.
4. Choose the date range. (Note: This is the date when the accommodation was marked aseffective on the disability tab in the client screen.)
5. Click the check boxes to include client identifying information.
Clients 39
© 2018 Titanium Software
6. Use the pull down menu to choose .csv as the Export Data type.
7. Use the windows interface to save the .csv file on your computer.
8. Open the .csv file to review/change the names of the column headers.
9. Create the accommodation letter as a Word template, using the desired column headers asdata fields. (Note: Titanium Support cannot provide assistance with Word or Excel. You shoulduse the Help in Word for more information about Steps 8-11. (https://support.microsoft.com/en-us/kb/294683)
10. Use the mail merge function in Word, by choosing the .csv file as the data source for themerge.
11. Save the new Word file containing the accommodation letters.
12. Distribute accommodation letters as desired.
4.5 Add Form to Client File
You can add data forms created or approved by your center administrator (e.g., intake,assessment, survey) or scanned hard copy documents to a client's file as part of a note.
What would you like to do?
o Add a data form to a client file
o Add a hard copy document to a client file
o Print data form for client
Add a Data Form
Depending on your center's settings, you can click the Demographics or Short Cuts icons on themenu bar to choose data forms to be added to the client file, including copying and updating aprior form. Complete the form, and click Save and Exit. If the forms that you want are notavailable, follow the steps below:
1. Add a note as you normally would.
2. Click the Data Forms icon on the note menu bar. (Note: Data forms cannot be added to non-client notes.)
3. Click the desired form from the list available for your use.
40
© 2018 Titanium Software
4. Complete the data form.
o Enter the desired information on the form.
o Update prior data form:
Click Copy on the menu bar.
Hover over "Copy Data From Previously Entered Data Form." (Note: Data entered on oneform cannot be copied to a different form, only to a new instance of the same data form.)
Click to select the prior version.
Edit the desired information on the new data form.
5. Click Save.
6. Click Exit.
7. Complete the note as you normally would.
(If your center uses CCAPS data forms, you should consult the CCAPS 2015 User Manual from CCMHfor more information.)
Add Hard Copy Document
Documents cannot be directly scanned into a client's file. Because documents cannot be scannedto a client's file, there are no specifications or recommendations regarding the type of scannerused.
To add scanned documents to a client file, first scan the documents and save in a location on yourcomputer. Then follow the steps below.
1. Add a note as you normally would.
2. Click the Attach icon on the note menu bar.
3. Click Attach a File.
4. Use the Windows interface on your computer to locate the file to be attached. (Note: File sizeis limited to 16 mb.)
5. Click the file to select it and click Open.
6. Use the pull down menu to select a description, or type in a description of the file.
7. Repeat steps 3-6 to add as many attachments as desired.
Clients 41
© 2018 Titanium Software
8. Click Close to return to the note. (Note: Depending on the settings chosen by your centeradministrator, files added as note attachments may be moved to a designated computer folderafter they have been attached.)
9. Complete the note as you normally would.
10. Delete the files from your computer. (Note: Files are stored in the secure Titanium databaseafter being attached to the note, and do not need to be stored in a separate location. Dependingon the settings chosen by your center administrator, files may automatically be moved from onesystem file to another when they are attached to notes. If files seem to disappear after thisprocess, consult with your center administrator regarding system settings.)
Print Data Form for Client
Centers that do not use the web component might want to print a data form for a client tocomplete manually. Then the client's answers will be added to the client file by transcribing theiranswers. A form printed using this process will have the client's name at the top, so it should beused only for that client. Contact your center administrator for assistance in printing blank dataforms that do not have a client name.
To print a form for the client:
1. Add a note as you normally would.
2. Click the Data Forms icon on the note menu bar. (Note: Data forms cannot be added to non-client notes.)
3. Click the desired form from the list available for your use.
4. Click the Copy icon for the pull down menu.
5. Choose Copy screen capture of data form to clipboard.
6. Click Save and Exit. (Note: If there are required questions on the data form, you will not beallowed to save the blank form. Instead, click Cancel to leave the screen without saving the formand click Yes on the pop up box to confirm.)
7. To save the note to enter the data form later, click Save and Exit. (To leave the screen withoutsaving the note, click Cancel, and click Yes on the pop-up box to confirm.)
8. Open desired third-party program (i.e., Word, Paint).
9. Press CTRL+V to paste the data form image from the computer clipboard into the program (oruse the program's mouse click sequence to paste).
10. For long data forms, use the third-party program's functions to crop, rotate and resize the
42
© 2018 Titanium Software
image to print properly.
11. Use the third-party program's mouse click sequence to print.
4.6 Email Clients
1. Navigate to a screen with an Email All icon on the menu bar (e.g. My Clients, Advanced ClientSearch, clients tab of a group appointment screen, etc.).
2. If necessary, use the function on that screen to search for the desired clients.
3. Click the Email All icon.
4. On the pop-up screen, you will see information about the clients email address/preferences.
o Click Yes to open a new message in your email program and copy client email addresses to thebcc field (Note: If you are emailing more than 100 clients, this may not be successful and youshould choose No and follow the instructions below.)
o Click No to copy the client email addresses to your computer's clipboard
o Click Cancel to stop the email function (i.e., to edit client screens with email addresses/preferences)
5. If you clicked No on the information message:
o Open your email program.
o Open a new email message.
o Right click in the bcc field and click Paste
6. Use your email program as you normally would to create and send the email message.
4.7 Text Clients
Your center may have purchased the ability to send SMS text messages. Each text will incur acharge. To view your credit balance, from the calendar screen, click Open > Client AppointmentReminders. The remaining balance is in the lower left corner. Your center administrator shouldvisit our website to add credit to their SMS text account. If a center exceeds their credit, they willnot be allowed to send SMS text messages.
Clients can stop receiving text messages by replying STOP, UNSUBSCRIBE, CANCEL OR QUIT. Clients can resume receiving text messages by replying START or YES. Other responses will not bereceived or processed. Client responses do not affect any "ok to contact" settings on the client
Clients 43
© 2018 Titanium Software
contact tab of the client screen.
What would you like to do?
o Text a single client
o Text a group of clients
Text a Single Client
1. Search for the desired client.
2. Click the Send SMS button.
3. Choose the desired message from the list created by your center administrator.
4. Click Yes.
5. Click Ok on the confirmation message.
Text a Group of Clients
1. From the calendar screen, click Open > Advanced Client Search. (Note: If you do not havesufficient permission, you will be unable to use this feature.)
2. Choose Client Fields, and check "Exclude non-SMS-able."
3. Choose other desired filters (e.g. appointment dates, attendance status)
4. Click Search on the menu bar.
5. Click SMS (Text) All on the menu bar.
6. Choose the desired message from the list created by your center administrator.
7. Click Yes.
8. Click Ok on the confirmation message.

44
© 2018 Titanium Software
4.8 Add/Edit/Delete Client Photo
Your center administrator may choose to activate the client photo feature. If this feature is active,anyone with permission to edit a client screen can add, edit or delete a photo on the ContactInformation tab of the client screen.
Some institutions that use the Client Import feature may be able to import client photos alongwith other client data. You should check with your center administrator to determine whetherclient photos will be added via client import or manually.
What would you like to do?
o Add a photo
o Edit a photo
o Delete a photo
Add a Photo
1. Obtain a client photo that meets the following minimum criteria:
o Format: .jpg, .jpeg, .png, .gif, .wmf, .emfo At least 78 x 77 pixels (Note: If the photo is larger than 1024 x 768, it will be automatically
resized to 1024 x 768.)
2. Place the client photo on your computer.
3. Navigate to the Contact Information tab of the client's screen.
4. Click Edit on the menu bar.
5. Click and drag the client photo onto the photo place holder square at the right side of theContact Information tab. (Note: If you hover your mouse over the photo, a pop-up window willappear showing a larger version of the photo.)
6. Click Save.
7. Click Exit.
Edit a Photo
1. Obtain a client photo that meets the following minimum criteria:
Clients 45
© 2018 Titanium Software
o Format: .jpg, .jpeg, .png, .gif, .wmf, .emfo At least 78 x 77 pixels (Note: If the photo is larger than 1024 x 768, it will be automatically
resized to 1024 x 768.)
2. Place the client photo on your computer.
3. Navigate to the Contact Information tab of the client's screen.
4. Click Edit on the menu bar.
5. Click the photo place holder square.
6. On the Edit Photo pop up window, either click and drag the photo into the edit window, or clickOpen on the menu bar and navigate to select the photo.
7. Click on the photo with your mouse to select a rectangular area to be displayed on the ContactInformation tab. (Note: If the area you drew is incorrect, click Clear Selection on the menu barand repeat this step.)
8. Click Ok.
9. Click Save.
10. Click Exit.
Delete a Photo
1. Navigate to the Contact Information tab of the client's screen.
2. Click Edit on the menu bar.
3. Right click on the client photo.
4. Click Delete.
5. Click Save.
6. Click Exit.
4.9 Review Client File
The client file contains appointments and notes, along with information about client allergies anddisabilities/accommodations if your center is using the disabilities feature. Entries for clientallergies, MedLog and disabilities will be shown at the top of the client file. If your center is notusing these features, these entries will not be displayed. The remainder of the file will be entries
46
© 2018 Titanium Software
for appointments and notes. The diagnoses, medications, data forms and attachments that arepart of the note will be displayed as icons associated with the note.
Items placed in the wrong client file cannot be moved. They must be manually recreated in thecorrect client file.
If you are not assigned to a client, you may not have rights to view the client's file.
Open a Client's File
1. Right click on an appointment for the desired client, and choose client file from the menu bar,or
2. From your My Clients list, click to select the desired client and click the Client File icon on themenu bar, or
3. Search for the client. Open the client screen and click on the Client File icon on the menu bar.
Search for Items in a Client's File
1. To expand or collapse an entry, click the plus and or minus sign to the left of it.
2. To expand or collapse all entries, Click the Expand All and Collapse All buttons.
3. To search for specific types of entries, use the Filter pull down menu to see only the desireditems.
Print a Client's File
1. Open a client's file.
2. Click the Print icon on the menu bar.
3. Use the check boxes and pull down menus to select the items to be printed.
4. Click Print.
(Note: There are no print set up options for client files. To print with your institution or centerlogo, use pre-printed letterhead paper.)
Clients 47
© 2018 Titanium Software
4.10 Search for Clients
My Clients list
1. On the calendar screen, click Open > My Clients
2. If you have permission as a supervisor, use the pull down menu to change the user (will defaultto you) to see
o Clients assigned to other users
o Clients assigned to your trainees
Single Client Search
1. From the calendar screen, click Open > Clients
2. Enter the Student ID and press the tab key, or enter the full or partial last name and click Find.
3. If required, double click on the client from the search results list. (Note: If you do not have sufficient permission, you will be unable to open client screens/files.)
Multiple Clients: Advanced Client Search feature
1. From the calendar screen, click Open > Advanced Client Search. (Note: If you do not havesufficient permission, you will be unable to use this feature.)
2. Set the search filters (e.g., users, appointment types, attendance, dates, client flags,completed data forms, active/inactive, etc. Use the My Clients List to find unassigned, all and allactive clients.)
3. Click Search.
4. If desired, double click on the desired client from the search results list. (Note: If you do nothave sufficient permission, you will be unable to open client screens/files.)
4.11 Form Letters
Titanium allows users to populate selected fields in a Word template using the data from theclient record. You can only generate one form letter at a time, for one client at a time. You must
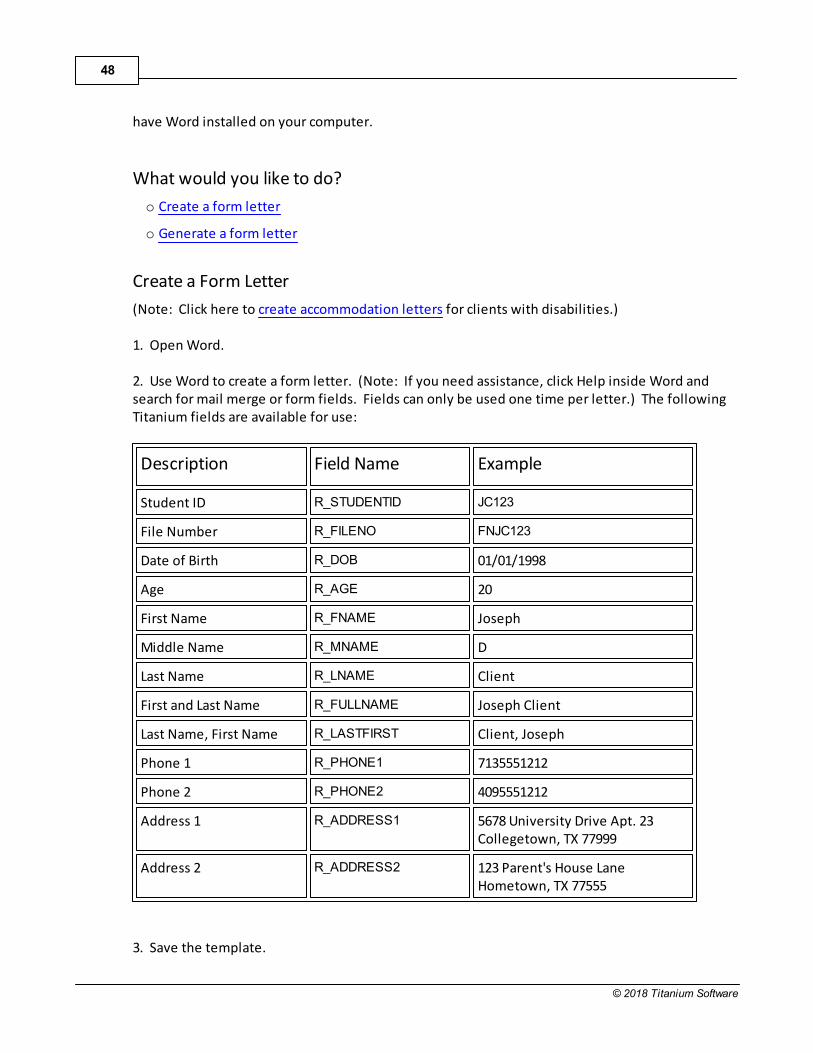
48
© 2018 Titanium Software
have Word installed on your computer.
What would you like to do?
o Create a form letter
o Generate a form letter
Create a Form Letter
(Note: Click here to create accommodation letters for clients with disabilities.)
1. Open Word.
2. Use Word to create a form letter. (Note: If you need assistance, click Help inside Word andsearch for mail merge or form fields. Fields can only be used one time per letter.) The followingTitanium fields are available for use:
Description Field Name Example
Student ID R_STUDENTID JC123
File Number R_FILENO FNJC123
Date of Birth R_DOB 01/01/1998
Age R_AGE 20
First Name R_FNAME Joseph
Middle Name R_MNAME D
Last Name R_LNAME Client
First and Last Name R_FULLNAME Joseph Client
Last Name, First Name R_LASTFIRST Client, Joseph
Phone 1 R_PHONE1 7135551212
Phone 2 R_PHONE2 4095551212
Address 1 R_ADDRESS1 5678 University Drive Apt. 23Collegetown, TX 77999
Address 2 R_ADDRESS2 123 Parent's House LaneHometown, TX 77555
3. Save the template.
Clients 49
© 2018 Titanium Software
4. Store the template file in the Forms folder in the Titanium Schedule application. (Note: If youdo not have access to the server where the Titanium Schedule application is installed, you willneed to ask your IT group for assistance.)
Generate a Form Letter
1. In Titanium, click Open and Form Letters.
2. Use the pull down menu to select the desired form letter.
3. Click Select client.
4. Use the Find/Add screen to locate and select the desired client.
5. Click Load Form and Client. (Note: Word will automatically open the completed form letter.)
6. Use Word to finish desired actions like printing or saving the form letter.
50
© 2018 Titanium Software
5 Electronic Prescribing
Electronic prescribing is an optional feature which may have been purchased by your center. Thisfeature is available to clients in the United States only. It allows prescribers to access a third partyportal in which prescriptions can be written and reviewed. Limited client information istransferred into the portal from Titanium (client name, date of birth, sex, address).
Your should ask your center administrator whether you have rights as a transcriber or a prescriber. For complete instructions on portal use, navigate to Open > eRx, and click the Training Videoslink in the upper right corner of the portal.
Set Up Controlled Substances Prescribing
Prescribers of controlled substances will use one of their own mobile devices (e.g. cell phone,tablet) to receive tokens for two step authentication.
1. Download the Verizon Soft Token app to your device from Apple's App Store or Google Playstore.
2. After receiving an email from Verizon, navigate to https://universalid.verizon.com/uid/index.php/slogin/profile/emd
3. Enter the user name and password from the Verizon email.
4. Enter the information required on the site.
5. When you have finished, click Get Activation Code.
6. Open the soft token app on your mobile device to receive the activation code.
7. Enter the code on the website.
8. Get your EPCS PIN number from your center administrator.
9. In Titanium, navigate to Open > eRx.
10. On the portal window, click Admin > Account Management > Manage Caregiver.
11. Click the Approve button.
12. Enter the EPCS PIN number received from your center administrator.
13. Choose your mobile device for the soft token app.
14. Open the soft token app on your mobile device to receive the activation code.
Electronic Prescribing 51
© 2018 Titanium Software
15. Enter the activation code and click Sign.
Manage Preference Lists
Lists of commonly used diagnoses, pharmacies and prescriptions can be created to simplify dataentry. Site admins can create lists for the facility. Prescribers can create lists for their own use. When a list has been created, it can be accessed by pull down menu or on the search window forvarious fields on the prescription.
1. Click Open > eRx
2. On the menu bar, click Admin > Preference Lists.
3. Choose the desired list.
4. Use the screen to search for items to add to the list, and enter preference.
5. Click Select to add to the list. Click an item and click Remove to remove it from the list.
5.1 Add Prescriptions
What would you like to do?
o Document medicine that a client reports taking
o Document a medicine that I'm prescribing
o Prepare prescription to be issued
Document a Medicine that a Client Reports Taking
1. Navigate to the eRx portal by:
o Right click on an individual appointment, and click eRx
o From the client screen or client file, click eRx on the menu bar
o Click Open > eRx, click Find Patient on the menu bar, and search for the client
(Note: You may see a message that some fields are required. If so, edit the field on the clientrecord, and then return to the eRx portal.)
52
© 2018 Titanium Software
2. Click the Rx History tab. (Note: The drop down menu defaults to active prescriptions. Click AllPrescriptions to see the client's history associated with Titanium users.)
3. Click External Drug History.
4. If the prescription(s) being reported by the patient are listed, click to select the prescriptionsand click Add Selected to History. If not, click Close. (Note: Only prescriptions paid for withinsurance plans will be shown.)
5. Click Reported Rx.
6. Add information for the prescription (e.g. date, drug, SIG, quantity, fill date, refills, pharmacy, and prescriber etc.) (Note: The magnifying glass allows searching for items. The pull downarrow allows access to the saved favorites list or recommended items, depending on thefield.)
7. Click Save to save the prescription to the patient history.
Document a Medicine that I'm Prescribing
1. Navigate to the eRx portal by:
o Right click on an individual appointment, and click eRx
o From the client screen or client file, click eRx on the menu bar
o Click Open > eRx, click Find Patient on the menu bar, and search for the client
(Note: You may see a message that some fields are required. If so, edit the field on the clientrecord, and then return to the eRx portal.)
2. Click the Rx History tab. (Note: The drop down menu defaults to active prescriptions. Click AllPrescriptions to see the client's history associated with Titanium users.)
3. Click New Rx.
4. On the Benefit Plan, click the Select button next to the patient's insurance plan. Click Use Noneif the patient does not have insurance.
5. Add information for the prescription (e.g. date, drug, SIG, quantity, fill date, refills, pharmacy, and prescriber etc.) (Note: The magnifying glass allows searching for items. The pull downarrow allows access to the saved favorites list or recommended items, depending on thefield.)o Depending on the insurance plan, you may see a list of preferred medications, generics,
Electronic Prescribing 53
© 2018 Titanium Software
copays, and drug tiers. Select the desired medication, or click Keep Current Drug.o Choices on "issue via" depend on your permission level. For controlled substances,
prescribers must be set up for EPCS to issue electronically. The two step verification willsend a code to your mobile device that must be entered to issue the prescription.
o Depending on the patient history, DUR warnings may appear. Enter override reasons foreach warning and click "Accept & Return". Or click Close and issue a different medication.
6. Click Issue.
7. Click Exit to return to the eRx portal home screen.
Prepare a Prescription to be Issued
This can be used by transcribers to prepare prescriptions to be issued by prescribers.
1. Navigate to the eRx portal by:
o Right click on an individual appointment, and click eRx
o From the client screen or client file, click eRx on the menu bar
o Click Open > eRx, click Find Patient on the menu bar, and search for the client
(Note: You may see a message that some fields are required. If so, edit the field on the clientrecord, and then return to the eRx portal.)
2. Click the Rx History tab. (Note: The drop down menu defaults to active prescriptions. Click AllPrescriptions to see the client's history associated with Titanium users.)
3. Click New Rx.
4. On the Benefit Plan, click the Select button next to the patient's insurance plan. Click Use Noneif the patient does not have insurance.
5. Add information provided by the prescriber (e.g. date, drug, SIG, quantity, fill date, refills,pharmacy, and prescriber etc.) (Note: The magnifying glass allows searching for items. Thepull down arrow allows access to the saved favorites list or recommended items, dependingon the field.)
6. Click Hold.
(Remaining steps are completed by a prescriber.)
7. Click Open > eRx.
54
© 2018 Titanium Software
8. Click the underlined number next to New Rx(s) on the home screen of the portal.
9. Click to check the prescription.
10. Click Authorize.
5.2 Edit Prescriptions
What would you like to do?
o Edit a prescription that has been placed on hold
o Edit a prescription that has been issued (renew)
o Void a prescription
o Cancel a prescription
o Discontinue a prescription
Edit a Hold Prescription
These steps will allow you to edit a prescription created by a transcriber and placed on hold to beissued.
1. Click Open > eRx.
2. Click the underlined number next to New Rx(s) on the home screen of the portal.
3. Click to check the prescription.
4. Click Details.
5. Edit the prescription, as desired.
6. Click Issue.
Edit an Issued Prescription
Electronic Prescribing 55
© 2018 Titanium Software
Prescriptions that have been issued can be discontinued or voided. To change an issuedprescription, it must be renewed.
1. Navigate to the eRx portal by:
o Right click on an individual appointment, and click eRx
o From the client screen or client file, click eRx on the menu bar
o Click Open > eRx, click Find Patient on the menu bar, and search for the client
(Note: You may see a message that "sex at birth" is required. If so, edit that field on the clientrecord, and then return to the eRx portal.)
2. Click the Rx History tab. (Note: The drop down menu defaults to active prescriptions. Click AllPrescriptions to see the client's history associated with Titanium users.)
3. Click to select the desired prescription in the list.
4. Click Renew.
5. Make the desired changes.
6. Click Issue.
Void
1. Navigate to the eRx portal by:
o Right click on an individual appointment, and click eRx
o From the client screen or client file, click eRx on the menu bar
o Click Open > eRx, click Find Patient on the menu bar, and search for the client
(Note: You may see a message that "sex at birth" is required. If so, edit that field on the clientrecord, and then return to the eRx portal.)
2. Click the Rx History tab. (Note: The drop down menu defaults to active prescriptions. Click AllPrescriptions to see the client's history associated with Titanium users.)
3. Click to select the desired prescription in the list.
4. Click the Void button.
56
© 2018 Titanium Software
5. Click Ok.
Cancel
1. Navigate to the eRx portal by:
o Right click on an individual appointment, and click eRx
o From the client screen or client file, click eRx on the menu bar
o Click Open > eRx, click Find Patient on the menu bar, and search for the client
(Note: You may see a message that "sex at birth" is required. If so, edit that field on the clientrecord, and then return to the eRx portal.)
2. Click the Rx History tab. (Note: The drop down menu defaults to active prescriptions. Click AllPrescriptions to see the client's history associated with Titanium users.)
3. Click to select the desired prescription in the list.
4. Click the Cancel button.
5. Click Ok.
Discontinue
1. Navigate to the eRx portal by:
o Right click on an individual appointment, and click eRx
o From the client screen or client file, click eRx on the menu bar
o Click Open > eRx, click Find Patient on the menu bar, and search for the client
(Note: You may see a message that "sex at birth" is required. If so, edit that field on the clientrecord, and then return to the eRx portal.)
2. Click the Rx History tab. (Note: The drop down menu defaults to active prescriptions. Click AllPrescriptions to see the client's history associated with Titanium users.)
3. Click to select the desired prescription in the list.
4. Click the Discontinue button.
Electronic Prescribing 57
© 2018 Titanium Software
5. Click Ok.
5.3 Refill Requests
If your center administrator configured electronic refill requests, prescribers can authorizerequests in the electronic prescribing portal. To authorized electronic requests from pharmacies:
1. Click Open > eRx.
2. Click the underlined number next to Renewal Rx(s) on the home screen of the portal.
3. Click to check the desired prescription.
4. Click Match and search for the client. (Note: This will add the renewal to the client's RXhistory.)
5. To edit the refill request, click Review and then edit the prescription.
5. Click Authorize. (Note: To deny, click the renewal request, click Deny and enter a reason.)
58
© 2018 Titanium Software
6 My Clients List
The My Clients list provides the user currently logged into Titanium with their personal list ofclients. To open your My Clients list, from the calendar screen, click Open > My Clients.
If a user is listed on the security tab of the client record, then the client will be shown on thatuser's My Clients list. By default, only active clients are displayed. Additionally, the list showsonly clients for whom the user is actively assigned.
The screen also provides appointment statistics for your clients, and access to the client screenand client file. If you have been given permission as a supervisor, you can view another user's MyClients list by selecting their name from the pull down menu.
Settings to locate unassigned clients, all active clients, and all clients are shown below:
Unassigned, active clients:
Show clients for: All
Include clients that are: Active
Include clients with users that are: Not assigned
All active clients:
Show clients for: All
Include clients that are: Active
Include clients with users that are: Actively assigned, inactively assigned, not assigned
All clients:
Show clients for: All
Include clients that are: Active, inactive
Include clients with users that are: Actively assigned, inactively assigned, not assigned
Notes 59
© 2018 Titanium Software
7 Notes
Notes are stored in the client file. Most notes will be associated with appointments, but notescan be added that are not related to appointments. Notes can also be created to track interactionswith individuals who are not clients. There are three types of notes in Titanium:
o General use notes: Normally used for file maintenance (e.g., add intake paperwork or forms
completed by clients to file), can be viewed by all users
o Progress notes: Confidential note that can only be created/viewed by users with sufficient
permissions. Used to document appointments, diagnoses, medications, or to add forms or
attachments to client files.
o Process/Psychotherapy: Confidential note that can only be created/viewed by users withsufficient permissions. Used to document treatment process or supervision feedback (rarelyused), and cannot be printed as part of the client's file.
Your user and supervisor permission levels will affect the notes that you can create, sign, viewand edit.
Notes can include the following sections:
o Narrative (information entered in the narrative is not searchable/reportable)
o Data forms (i.e., assessments, checklists, intake forms, etc. used to capture searchable/reportable data)
o Attachments
o Depending on the settings chosen by your center administrator:
Diagnosis
Medication (document medications prescribed by a Titanium user or reported by clients)
Your center administrator has configured the notes required for various types of appointments,
and sections available for each type of note.
If your center uses supervision features, see the Supervision section for information about intern
notes.
7.1 Add/Edit/Delete Note
What would you like to do?

60
© 2018 Titanium Software
o Add a note
o Edit an unlocked note
o Edit a locked note
o Delete a note
Add a Note
You do not have to complete notes all at once. Click Save and Exit to save your note. Open thenote and click Edit to continue writing. Titanium creates note back ups periodically, and back upscan be recovered in the event of system failure. (Note: Click here for the process to createtermination or deactivation notes, if your center is using this feature. Click here for the processto create intern notes, if your center is using the supervision features.)
1. To open a note:
o Click the note task on your task list, or
o Right click on the appointment and click Client Note, or
o Click on the appointment to open it, and click the Client Note icon on the menu bar, or
o Open the client file, click the New Note icon on the menu bar, and click Yes to confirm thatyou are creating a note not related to an appointment
2. On the Narrative tab, choose the note type from the pull down menu.
3. Complete the note narrative.
o Date and time automatically populate. Use the controls to make desired changes. (Note: Your center administrator may choose to not display note date and time.)
o Enter desired information in the text box on the Narrative tab.
o If desired, right click to choose a note template (outline created by your center'sadministrator).
o If desired, right click to open to full screen view or use the spell check function. (Note: Userscan click Options on the Spell Check tab to change the color used to indicate misspelledwords. Titanium will retain the user settings. This is useful for users who are red/green colorblind.)
4. To review or copy/paste narrative text from prior notes:
o Click the Save icon on the menu bar.
o Click Navigate.

Notes 61
© 2018 Titanium Software
o Choose the desired note to review.
o Highlight the desired text and press Ctrl + C on your keyboard
o Click Navigate to return to the current note.
o Click in the narrative text box, and press Ctrl + V on your keyboard (or right click and choosePaste from the menu).
5. If desired, click the Diagnosis tab and add a diagnosis.
6. If desired, click the Data Form icon on the menu bar and add data form(s).
7. If desired, click the Attach icon on the menu bar and add an attachment.
8. On the narrative tab, click the highest number available to you to sign the note. If you signedon Line 3, click Yes to confirm that you want to lock the note.
9. If you signed on Line 1 or 2, forward the note for review:
o If necessary, use the pull down menu to select the reviewer.
o If desired, add a Forward To message.
10. Click Save.
11. Click Exit.
Edit an Unlocked Note
Unlocked notes are either unsigned, or signed on Lines 1 or 2.
1. From the client file or appointment, open the note.
2. Click the Edit icon on the menu bar.
3. If the note has been signed on Line 1 or 2, the user who signed the note must click to removetheir signature.
4. Make desired changes.
5. Sign the note as you normally would, including forwarding the note for signature.
62
© 2018 Titanium Software
Edit a Locked Note
Locked notes (signed on Line 3) cannot be changed by users, including information on thenarrative and diagnosis tabs, data forms, attachments, and medication tab (if being used). However, addenda can be added to the narrative text.
1. From the client file or appointment, open the note.
2. Click the Edit icon on the menu bar.
3. Click Addendum on the menu bar.
4. Type the desired narrative in the addendum. The addendum text box has the samefunctionality as the note narrative text box.
5. Sign the addendum in the same way that you sign notes, including forwarding for signature.
Delete a Note
Locked notes (signed on Line 3) cannot be deleted.
1. From the client file or appointment, open the unlocked note.
2. If the note has been signed on Line 1 or 2, the user who signed the note must click to removetheir signature.
3. Click the Delete icon on the menu bar.
4. Click Yes to confirm.
7.2 Add Attachment to Other Appointment
Notes cannot be associated with "other" appointment types. Users can add attachments to"other" appointments for documentation purposes (e.g. staff meeting agendas.) To add anattachment:
1. Double click to open the appointment.
2. Click Edit on the menu bar.
3. Click the Attach icon on the menu bar.
4. Use the Windows interface to navigate to the desired file. (Note: File size is limited to 16 mb.)
Notes 63
© 2018 Titanium Software
5. Enter a name for the attachment and click Ok.
6. Repeat Steps 3-5 to add additional attachments.
7. To manage attachments, hover over the attachment and choose Open, Print, Edit Description orDelete.
8. Click Save.
9. Click Exit.
7.3 Group Notes
To track progress for every member of a group, you can use group notes. After a group note hasbeen distributed to client files, it cannot be edited but client-level addenda to the note narrativecan be added. (Note: Click here for the process to create notes for intern groups, if your center isusing supervision features.)
What would you like to do?
o Add a group note to all client files
o Add a client note related to a group note
o Edit an unlocked, undistributed group note
o Edit a locked, undistributed group note
o Delete a group note
Add a group note
1. Open the group appointment screen by clicking on the group appointment on the calendarscreen, or clicking on the group note task on your task list.
2. If it has not already been done, mark attendance for the appointment.
3. Click the Group Note icon on the menu bar. (Note: If your center is using CCAPS, you can clickon the Group CCAPS icon on the menu bar to view CCAPS for individual group members.)
4. Create and sign the note as you normally would.
5. After the note has been signed on Line 3 and saved, click the Distribute icon on the group notemenu bar.
6. On the pop-up box, click a button to select the client files to which to distribute the group note.
7. Click OK to confirm.
64
© 2018 Titanium Software
Add a Client Note Related to a Group Note
1. Open the group note in the client's file by:
o Click on the clients tab in the group appointment screen, select the desired client and clickthe Client Note button or
o Open the client's file and click on the group note inside the client's file.
2. Click the Edit icon on the menu bar.
3. Click the Addendum icon on the menu bar.
4. Add an addendum to edit the note as you normally would.
Edit an Unlocked and Undistributed Group Note
Unlocked notes are either unsigned, or signed on Lines 1 or 2.
1. Open the group appointment screen by clicking on the group appointment on the calendarscreen.
2. Click the Group Note icon on the menu bar.
3. Click the Edit icon on the menu bar.
4. If the note has been signed on Line 1 or 2, the user who signed the note must click to removetheir signature.
5. Make desired changes.
6. Sign the note as you normally would, including forwarding it for signature.
Edit a Locked and Undistributed Group Note
Locked notes (signed on Line 3) cannot be changed, including information on the narrative tab,data forms, and attachments. However, addenda can be added to the narrative text if the notehas not been distributed. If a note has been distributed, it cannot be edited at the group level,but a related client-level note narrative addendum can be added.
1. Open the group appointment screen by clicking on the group appointment on the calendarscreen.
2. Click the Group Note icon on the menu bar.
3. Click the Edit icon on the menu bar.
4. Click Addendum on the menu bar.
5. Type the desired narrative in the addendum. The addendum text box has the same
Notes 65
© 2018 Titanium Software
functionality as the note narrative text box.
6. Sign the addendum the same way that you sign notes, including forwarding for signature.
Delete a Group Note
Locked notes (signed on Line 3) cannot be deleted.
1. Open the group appointment screen by clicking on the group appointment on the calendarscreen.
2. Click the Group Note icon on the menu bar.
3. Click the Edit icon on the menu bar.
4. If the note has been signed on Line 1 or 2, the user who signed the note must click to removetheir signature.
5. Click the Delete icon on the menu bar.
6. Click Yes to confirm.
7.4 Supervisor Review
1. From the calendar screen, click Open > Task List.
2. Double click on the Review Note or Sign Note task on your task list to open the note.
3. Review the note.
4. If necessary, return the note for revision by:
o Select your supervisee's name in the Forward To drop down list.
o Enter desired text in the Forward To Note box.
o Click Save.
o Click Exit.
5. To sign the note, click on Line 3 and click Yes to confirm that the note will be locked.
6. Click Exit.
Depending on the settings chosen by your center administrator, it may be possible to forwardsigned/locked notes in order to teach via examples, or consultation between qualified providers.
66
© 2018 Titanium Software
7.5 Document Prescriptions
If your center's administrator chooses to use the Medication Log (MedLog) feature, you will beassigned rights to as a transcriber or a prescriber. Support Staff users cannot transcribemedication notes, because these notes are confidential and Support Staff do not have permissionto create/view/edit confidential notes. The prescription information from medication notes issummarized on the MedLog screen accessed via the MedLog icon on the menu bar of the clientscreen or client file.
This feature is configured by your center administrator.
(Note: The MedLog is not eprescribing. Click here for information about eprescribing.)
What would you like to do?
o Document medicine that a client reports taking
o Document a medicine (prescription/sample) that I'm prescribing
o Document a medicine that our psychiatrist (or doctor/nurse practitioner) is prescribing
Document a Medicine that a Client Reports Taking
1. Open a note:o Click the note task on your task list, or
o Right click on the appointment and click Client Note, or
o Click on the appointment to open it, and click the Client Note icon on the menu bar, or
o Open the client file or client screen, click the MedLog icon on the menu bar, and click New
Medication Note icon on the menu bar
2. If required, choose a note type that includes the medication tab.
3. Click the medication tab for the note.
4. To add a medication to the note: o Click Add > Client Reported Medication.
o On the prescription pop-up window, add information about the prescription. (Note:
Consult with your center administrator if you need instructions (Sigs) or medications that
are not on the pre-populated lists.)
o Click OK.
5. To renew a medication:o Click on the medication in the Active medications window.
o Click Renew > as Client Reported Medication.
Notes 67
© 2018 Titanium Software
o Make edits on the prescription pop-up window.
o Click OK.
6. To discontinue a medication:
o Click on the medication in the Active medications window.
o Click Discontinue
o On the pop-up window, choose a reason and date.
o Click OK.
7. When the medication tab is correct, complete the note as you normally would. (Note: Multiple medications, renewals and discontinues can be documented using a single note,including renewals and discontinued medications.)
Document a Medicine that I'm Prescribing
1. Open a note:o Click the note task on your task list, or
o Right click on the appointment and click Client Note, or
o Click on the appointment to open it, and click the Client Note icon on the menu bar, or
o Open the client file or client screen, click the MedLog icon on the menu bar, and click New
Medication Note icon on the menu bar
2. If required, choose a note type that includes the medication tab.
3. Click the medication tab for the note.
4. To add a medication to the note: o Click Add, and choose Sample Provided or Prescription
o On the prescription pop-up window, add information about the prescription. (Note:
Consult with your center administrator if you need instructions (Sigs) or medications that
are not on the pre-populated lists.)
o Click OK.
o Click OK on the acknowledgment.
5. To renew a medication:o Click on the medication in the Active medications window.
o Click Renew > and choose As Sample Provided or As Prescription
o Make edits on the prescription pop-up window.
o Click OK.
o Click OK on the acknowledgment.

68
© 2018 Titanium Software
6. To discontinue a medication:
o Click on the medication in the Active medications window.
o Click Discontinue.
o On the pop-up window, choose a reason and date.
o Click OK.
7. When the medication tab is correct, complete the note as you normally would, includingsigning the note on Line 3. (Note: Multiple medications, renewals and discontinues can bedocumented using a single note, including renewals and discontinued medications.)
Document a Medicine that is Being Prescribed
1. Open the client screen or client file.
2. Click the MedLog icon on the menu bar.
3. Click the New Medication Note icon on the menu bar.
4. On the pop-up window:o Click the Transcribe radio button
o Choose the prescriber from the pull down list.
o Enter a note in the text box.
o Click OK.
5. To add a medication to the note: o Click Add, and choose Sample Provided or Prescription
o On the prescription pop-up window, add information about the prescription. (Note:
Consult with your center administrator if you need instructions (Sigs) or medications that
are not on the pre-populated lists.)
o Click OK.
o Click OK on the acknowledgment.
6. To renew a medication:o Click on the medication in the Active medications window.
o Click Renew > and choose As Sample Provided or As Prescription
o Make edits on the prescription pop-up window.
o Click OK.
o Click OK on the acknowledgment.
7. To discontinue a medication:
Notes 69
© 2018 Titanium Software
o Click on the medication in the Active medications window.
o Click Discontinue.
o On the pop-up window, choose a reason and date.
o Click OK.
8. As instructed by the prescriber, complete the remainder of the note (narrative, diagnosis, dataforms, attachments). (Note: Multiple medications, renewals and discontinues can bedocumented using a single note, including renewals and discontinued medications.)
9. Click Save.
10. Click Exit.
A task to review/sign the note is added to the prescriber's task list.
7.6 Make Diagnosis
Your center administrator will choose whether to use a diagnosis classification system (e.g. DSM-5or ICD-10). Depending on how your center administrator has configured Titanium, you may beable to select the diagnosis classification system that you will use for your notes (e.g., DSM-5 orICD-10). From the calendar screen, click Configuration > User Configuration, and select thedesired classification from the pull down menu on the Defaults tab.
1. Add a note as you normally would.
2. Click the Diagnosis tab.
3. To add a new diagnosis:
o Click Add.
o On the diagnosis pop-up window, enter the full or partial diagnosis code or search term, andclick Find.
o Click on the desired diagnosis.
o On the pop-up window, use the pull down menu to select certainty, enter any specifiers, andclick OK.
4. To copy a prior diagnosis:
o Click Copy From.
o Choose the desired diagnosis from the list.
70
© 2018 Titanium Software
5. To edit a diagnosis, click the item and click View/Edit.
6. To remove a diagnosis, click the item and click Remove.
7. Complete the note as you normally would.
Outreach and Non-Clients 71
© 2018 Titanium Software
8 Outreach and Non-Clients
Your administrator will set the definition of "client" to be used in your center (i.e., visited thecenter, completed intake paperwork, and attended at least one appointment). To track one-on-one interactions with people who are not clients without adding them to your client database,use the non-client note feature in Titanium. Your user and supervisor permissions for non-clientnotes will be the same as for client notes. If necessary, non-clients can later be converted toclients, and non-client notes placed in the client file. Clients in Titanium cannot be converted tonon-clients.
Outreach refers to services provided to individuals or groups who aren't "clients" as defined byyour center administrator. Examples might include workshops or lectures to community orcampus groups. Outreach activities can be added to your Titanium schedule. Your centeradministrator may configure Titanium so that outreach activities can be documented for reportingpurposes on an Additional Information tab on the outreach appointments.
8.1 Add/Edit/Delete Non-Client Notes
Add a Non-Client Note
1. From the calendar screen, click Open > Non-Client Notes.
2. Click the New Non-Client Note button.
3. Enter identifying information for the person.
4. Complete the note as you normally would, including signing and forwarding for signature ifrequired.
Edit an Unlocked Non-Client Note
Unlocked notes are either unsigned, or signed on Lines 1 or 2.
1. From the calendar screen, click Open > Non-Client Notes.
2. Set the search criteria and click Find.
3. Double click to open the non-client note.
4. Edit the note as you normally would.
Edit a Locked Non-Client Note
Locked notes (signed on Line 3) cannot be changed, including information on the narrative and

72
© 2018 Titanium Software
diagnosis tabs, data forms, attachments, and medication tab (if being used). However, addendacan be added to the narrative text.
1. From the calendar screen, click Open > Non-Client Notes.
2. Set the search criteria and click Find.
3. Double click to open the non-client note.
4. Edit the note as you normally would.
Delete a Non-Client Note
Locked notes (signed on Line 3) cannot be deleted.
1. From the calendar screen, click Open > Non-Client Notes.
2. Set the search criteria and click Find.
3. Double click to open the non-client note.
4. Delete the note as you normally would.
8.2 Convert Non-Client to Client
What would you like to do?
o Add a client and place a single non-client note in the client's file
o Add a non-client note to an existing client file
Add a Client and Place a Single Non-Client Note in the Client's File
1. From the calendar screen, click Open > Non-Client Notes.
2. Set the search criteria and click Find.
3. Double click to open the non-client note.
4. Click the File icon on the menu bar.
5. Click Yes.
6. Enter the Student ID and press the tab key, or enter the full or partial last name and click Find.
7. If the client is not found, enter the last and first name, and click New Client.
8. Click Yes to confirm.
9. The client screen will open in a new window. Enter information required by your center.
Outreach and Non-Clients 73
© 2018 Titanium Software
10. Click Save.
11. Click Exit.
Add a Non-Client Note to an Existing Client File
If you don't have sufficient permission to view/edit the client, you may see an error message atStep 7. Additionally, you may be unable to see the non-client note after it has been added to theclient file, even if you created the note.
1. From the calendar screen, click Open > Non-Client Notes.
2. Set the search criteria and click Find.
3. Double click to open the non-client note.
4. Click the File icon on the menu bar.
5. Click Yes.
6. Enter the Student ID and press the tab key, or enter the full or partial last name and click Find.
7. Double click the client.
8. Click Save.
9. Click Exit.
8.3 Schedule/Document Outreach
To add an outreach activity to your schedule, add an "other" appointment using an outreachappointment code. Be sure to include all users/resources who will be part of the appointment byclicking on the Scheduling tab.
If your center administrator has configured Titanium to capture details of outreach activity:
1. Mark attendance for the users/resources associated with the outreach activity.
2. If not already open, click on the appointment to open it.
3. Click the Edit icon on the menu bar.
4. Click the Additional Information tab. (Note: This is optional, and your center administratormay have chosen to not use this tab to capture outreach information.)
5. Enter the information required by your center administrator (e.g., number attended, serviceprovided to, etc.)
74
© 2018 Titanium Software
6. Click Save.
7. Click Exit.
Printer Settings 75
© 2018 Titanium Software
9 Printer Settings
When you click the print icon or button on any screen in Titanium, the selection will be sent toyour default printer. To set up your default printer:
1. Open the printer setup by:
o From the calendar screen, click File > Pinter Setup.
o From the calendar screen, click Reports > Printer Setup. (Note: Depending on your userpermissions, you may be unable to access the Reports feature.)
2. Click to select your desired printer from the list. (Note: The list contains printers mapped onyour computer. If you do not see your desired printer, use the Windows control panel to locateand add the printer, or contact your IT group for assistance.)
3. Click the Preferences button.
4. On the pop-up window, set desired preferences, and click Ok.
5. Click Ok.
76
© 2018 Titanium Software
10 Reports
There are a variety of reports in Titanium. The data in the reports can be customized using thefilters on the report windows. If your center administrator has given you access, you will be ableto view and save reports and/or export raw data create custom reports, charts and graphs. (Note: By default, all users can view and save reports, but only center administrators can export rawdata.)
Generate a Report
1. From the calendar screen, click the Reports icon on the menu bar. (Note: If the icon is grayedout, your center administrator has not given you access to reporting.)
2. Hover over report titles to see previews and locate the report that you want.
3. Click on the desired reported title.
4. Use the options on the pop-up window to set preferences for the report.
5. Click the Preview button. (Note: The formulas used to calculate the report data are shown atthe bottom of the report. Data with similar labels across reports may not be calculated using thesame formulas.)
6. Use the menu bar on the report viewer to review, save or print the report.
Export Data
1. From the calendar screen, click the Reports icon on the menu bar.
2. Choose Data Form Statistics, Data Form Statistics by Appointment, or Export Data.
3. Use the pop-up window to set preferences for the data export.
4. Click Export.
5. Use the Windows interface to save the exported data file.
6. Use a spreadsheet software like Excel to open the data file, and create desired reports/charts/graphs.
Scheduling 77
© 2018 Titanium Software
11 Scheduling
The calendar can contain appointments and placeholders. Appointments can be for individualclients, or multiple clients (group/couple). "Other" appointments are those that don't involveclients (i.e., outreach, vacations, staff meetings, etc.). Each of the three appointment types canbe scheduled using recurring settings. Hover over items on the screen to see what they mean. Toview an appointment, click on the appointment on the calendar screen.
For ease of use, you can search for open appointment slots or for appointments already scheduledfor a client. You can also add a new client in Titanium while in the process of making anappointment. To assist with scheduling, your center administrator may choose to use one ormore waitlists. Group sign up sheets can be created to track group members.
For reporting purposes, scheduling appointments includes assigning appointment codes from thelist configured by your center administrator. Also attendance status can be marked for eachappointment. If your center administrator chooses to use them, appointment reminders can besent to clients via email (and SMS text if purchased by your center).
Placeholders are used to add details to the schedule without scheduling appointments. Forexample, placeholders can be used to "pencil in" appointments for clients, or to communicateamong staff members, like to indicate working hours for part time users or staff who are on callfor certain appointment types like walk ins. Placeholders can also be used like post it notes asreminders to perform tasks.
What does everything on the calendar mean?
Some of the settings on the schedule can be changed by clicking Configure > User Configuration >Schedule Viewer Layout tab.
What do the appointment block colors mean? Appointment and placeholder block colors areconfigured by your center administrator.
What do the icons on the appointment block mean? Four icons may be displayed on theappointment block: appointment type, comments from the appointment screen, attendance,client flags (if used in your center). Your center administrator will set the default icons to bedisplayed, and you can alter these settings in user configuration.
Why are the days different colors? By default, Monday's and weekend days are a different colorthan the rest of the week, but your center administrator can change this setting.
Why can't I see weekends? Your center administrator may choose to not show weekends onthe schedule. You can add weekends to your schedule in user configuration.
Why can't I see the times when I want to schedule appointments? Your center administratorsets the default schedule times. You can scroll up or down to set appointments for earlier or
78
© 2018 Titanium Software
later times. You can also set your schedule to view earlier or later daily times in UserConfiguration.
What does the lock icon mean at the top of a schedule? Either you do not have access to theschedule, or the day you are reviewing is in the past and cannot be changed.
Why are there two appointments in a time slot? Titanium will not prevent scheduling twoappointments in a time slot, if one of the appointments is an "other" appointment type. If anappointment is shown with strike through font, it means that the appointment has beencanceled. If you do not want to see canceled appointments, change the setting in UserConfiguration.
How do I see only my schedule? Right click on the header for your column on the schedule. Ifyou want to see only your schedule by default, change the setting in user configuration. (Note: If you have sufficient user permissions, you can print your schedule by clicking Reports >Schedules and choosing your schedule.)
What is a schedule group? A group of users/resources. These groups can be created by yourcenter administrator or by users with sufficient permission.
Why is the schedule blank? This might occur for a number of reasons including:
o You're looking at a weekend, or other day/time that has no appointments scheduled.
o The user group you've chosen has no users.
o You've chosen to view recurring definitions, placeholders or canceled appointments only, andthere aren't any to be displayed. Click View > Normal to return to the default view.
11.1 Add/Edit Appointment
What would you like to do?
o Add an appointment
o Copy an appointment
o Edit an appointment
Note: Your center's administrator has set permissions and rights for schedules. If you do not havesufficient privileges, you may be unable to view, add, edit or delete appointments on any otherschedules, or view appointments or information on schedules for other users.
If your center users supervision features, see the supervision section for information about internappointments.
Scheduling 79
© 2018 Titanium Software
Add Appointment
1. On the calendar screen, right click in the time slot/schedule where you want to add theappointment. (Note: By default, weekend days are not displayed but this setting can be changedby your center administrator. To navigate to days not displayed from the calendar screen, clickthe Go To button on the menu bar and use the calendar pop-up window to select the desired day,or use the arrow navigation icons.)
2. Click Add > type of appointment to be addedo Individual: One cliento Group/Couple: Multiple clientso Other: Does not involve clients (e.g., outreach, holidays, vacation, staff meetings, etc.)
3. For individual appointments:o Enter the Student ID and hit the tab key, oro Enter the full or partial last name and click Find. Double click the client from the search list.
4. Enter Appointment Information:o For recurring appointments, set the end date for the series or number of appointments to be
scheduled.o Choose an appointment codeo Add location, description and comments as desired. (Note: Do not put confidential
information in these fields.)
5. If desired, click the Scheduling tab to add other users or resources (e.g. rooms, equipment) sothe appointment is added to these schedules.
6. For group appointments, click the Clients tab:o Click Add to search for individual clients one at a time, oro Choose a group sign up sheet from the pull down menu, and click Copy Members. (Note: It is
recommended that the group sign up sheet be copied the day before the appointment toensure the most current sheet is used. Appointment reminders are based on clients added tothe appointment, not the group sign up sheet.)
7. Click Save. (Note: Depending on the settings chosen by your center administrator, you maysee prompts to add the appointment to your schedule, that either you or the client has aconflicting appointment, or assign a new client to yourself.)
8. Click Exit.
Copy an Existing Appointment
1. Right click the appointment and choose Copy or Copy to Next Week.
2. Make any desired changes on the appointment screen.
80
© 2018 Titanium Software
3. Click Save.
4. Click Exit.
Edit Appointment
How do I change recurring appointments? If the first appointment hasn't passed, open the firstappointment, click the Recurring icon on the menu bar, make desired changes and click Save andExit. If the start date for the series has passed, right click on the first appointment to be changedand click Split. Click Yes. Change the recurring appointment definition, and click Save and Exit.
How do I change user, day, time, length? Drag and drop the appointment on the calendar, or clickand drag the bottom border of the appointment.
How do I change appointment code, client(s), add users/resources?
1. Click the appointment on the schedule.
2. Click Edit on the menu bar.
3. Make desired changes.
4. Click Save.
5. Click Exit.
What does the padlock icon mean on the appointment screen? The appointment is locked or youdon't have rights to change it. This may also occur because your center administrator has chosento not allow appointments in the past to be edited. Contact your center administrator to requestchanges to locked appointments.
How do I delete an appointment? Deleting appointments will remove them from Titanium, sothey will not be included in reports. So, you should only delete appointments made in error. Forcancellations, right click on the attendance code icon on the appointment block and choose theappropriate reason. To delete an appointment made in error, right click on the appointment andclick delete. If a note is associated with an appointment, the appointment cannot be deletedwithout deleting the note first.
11.2 Appointment Reminders
The appointment reminder feature is optional. If your center administrator chooses to use thisfeature, they will assign some users rights to use the appointment reminder function. Only thecenter administrator can edit email/text messages. This feature is configured by your centeradministrator.
Scheduling 81
© 2018 Titanium Software
Appointment reminders are automated, but cannot be set to be sent automatically. They must besent by a Titanium user.
Your center may have purchased the ability to send reminders via SMS text message. Eachreminder sent via text will incur a charge. To view your credit balance, from the calendar screen,click Open > Client Appointment Reminders. The remaining balance is in the lower left corner. Your center administrator should visit our website to add credit to their SMS text account. If acenter exceeds their credit, they will not be allowed to send SMS text messages.
Clients can stop receiving text messages by replying STOP, UNSUBSCRIBE, CANCEL OR QUIT. Clients can resume receiving text messages by replying START or YES. Other responses will not bereceived or processed. Client responses do not affect any "ok to contact" settings on the clientcontact tab of the client screen.
What would you like to do?
o Send reminders
o Resend reminders
o View sent reminders
Send Reminders
Note: Reminders must be sent more than one hour in advance of the scheduled appointmenttime.
1. From the calendar screen, click Open > Client Appointment Reminders.
2. Set the desired search preferences. (Note: You can search from 1-10 calendar days in thefuture.)
3. Click Search on the menu bar.
4. Edit clients with no set reminder preferences by:o Click to select the client in the list, and click the Client icon on the menu bar to edit the
client screen.o Click View/Modify Reminder Preferences for Clients (Note: If your center uses both SMS
text and email, and clients have information and permission for both, then reminders willbe sent using each method.)
Click Edit on the menu barUse the pull down menus and text fields to enter client reminder preferences andinformationClick Save. Click Exit.
5. Click Send Reminders on the menu bar.
82
© 2018 Titanium Software
6. Review the summary results to view the reminders that were sent/process. Click Exit.6. Click Exit.
(Note: If you receive an error message that you have exceeded your SMS text credit limit, contactyour center administrator. Your center must pay for additional text messages before morereminders can be sent via text message. The amount of credit remaining on your account isshown in red text in the lower, left corner of the appointment reminder screen.)
Resend Reminders
Titanium will only allow you to send one reminder per client per appointment. If you want tosend multiple reminders about a single appointment, you must reset the reminder:
1. From the calendar screen, click Open > Client Appointment Reminders.
2. To see the most recent reminder sent, set the filters.
3. Uncheck the box in the upper right corner for hide results for reminders already sent.
4. Click Search on the menu bar.
5. Click on the client for whom you want to reset the reminder.
6. Click the Reset Status button on the menu bar.
7. Use the pull down menu to choose whether to reset the email, SMS text or both reminders forthe selected client/appointment.
8. Repeat steps 5-7 for all desired clients.
9. Send reminders as you normally would.
View Sent Reminders
You can view the reminders that have already been sent by:
1. From the calendar screen, click Open > Client Appointment Reminders.
2. To see the most recent reminder sent, click History on the menu bar. Set the filters and clickSearch.
3. Click Search on the menu bar.
Scheduling 83
© 2018 Titanium Software
4. To view the email or text reminder, click the desired line, and click View Email or View SMSfrom the menu bar.
11.3 Search for Appointment
How do I find scheduled appointments for a client? From the calendar screen, click Find on thetool bar. Search for the client.
How do I find open appointment slots? From the calendar screen, click Find Open on the tool bar,and enter search criteria. If searches have been saved, use the pull down menu to select a priorsearch. (Note: To search for all available openings, set schedules and appointment type searchfilters to Group: All.)
If you frequently perform the same search, you can save your search by:
1. Set search filters.
2. Select Manage Saved Searches to save settings for your own future searches. (Note: Centeradministrators can save searches to be used by all staff.)
3. On the pop-up window, click Edit on the menu bar and enter a name for the search. (Note: Youcan also delete searches that are no longer required by selecting the search from the list, andclicking Delete on the menu bar.)
4. Click Save.
5. Click Exit.
11.4 Groups
Group sign up sheets allow you to maintain a list of planned groups and workshops, and maintainthe client roster for each group. They also allow you to efficiently create appointments for largegroups who will have appointments regularly over a period of time. Group sign up sheets can beprinted, if desired. Printed sheets include email addresses and phone numbers for clients whohave approved being contacted via these methods. If your center users supervision features, seethe Supervision section for information about intern groups.
What would you like to do?
o Create a group
o Edit a group
84
© 2018 Titanium Software
o Use a group sign up sheet to set a group appointment
Create a Group Sign Up Sheet
1. From the calendar screen, click Open > Group Sign Up Sheets.
2. Click New Group Sign Up Sheet.
3. On the Group Information tab, enter information about the group (name, status, code, users,group size, etc.).
4. On the Group Member Sign Up tab, add group members by:
o Click Add.
o Search for the client.
o Click OK.
o Continue adding members as desired.
5. Click Save.
6. Click Exit.
Edit a Group Sign Up Sheet
1. From the calendar screen, click Open > Group Sign Up Sheets.
2. Double click on a sign up sheet to open it.
3. Click the Edit icon on the menu bar.
4. Make desired changes.
5. Click Save.
6. Click Exit.
11.5 Mark Attendance
Your center administrator may have configured Titanium to automatically mark all "other"appointment types as "attended."
Scheduling 85
© 2018 Titanium Software
Mark Attendance from the Calendar Screen
1. If displayed on the appointment block, click on the attendance icon shown on the appointmentblock, and choose the desired status from the menu, or
2. Right click on the appointment block, click Attendance, and choose the desired status.
Mark Attendance for a Group Appointment from the Calendar Screen
1. If displayed on the appointment block, click the attendance icon, or right click on theappointment block to click Attendance.
2. Choose the desired status from the menu.
3. On the pop-up warning box, click to confirm the desired status for all users and attendees. (Note: If all users and attendees do not have the same status, you must mark attendance from theappointment screen.)
Mark Attendance from the Appointment Screen
1. Click on the appointment block to open the appointment screen.
2. Click the Edit icon on the menu bar
3. For an individual appointment, use the pull down menu to change the status from Scheduled tothe desired status.
4. If there are multiple users assigned to the appointment:
o Click the Scheduling tab
o Click All Attendance and choose the desired status and/or
o Use the pull down menus to mark attendance for each resources
5. For group appointments:
o Click the Clients tab
o Click All Attendance and choose the desired status and/or
o Use the pull down menus to set the attendance for each client
6. Click Save.
7. Click Exit.
86
© 2018 Titanium Software
11.6 Placeholders
What would you like to do?
o Schedule a placeholder
o Edit a placeholder
o Schedule an appointment based on a placeholder
Schedule a Placeholder
1. On the calendar screen, right click in the time slot/schedule where you want to add theplaceholder
2. Click Add > Placeholder foro Individual: One cliento Group/Couple: Multiple clientso Other: Does not involve clients (e.g., outreach, vacation, staff meetings, etc.)
4. Enter placholder Information:o Set the end date for the series or number of placeholders to be scheduled.o Choose an appointment codeo Add location, description and comments as desired.
5. If desired, associate client(s) with placeholder by:o Individual: Click Select Client and search for the client as you normally wouldo Group: Click the Clients tab and click Add to search for individual clients or choose a group
sign up sheet and click Copy Members
6. If desired, change the display to Duplicate Header on Every Line to display the appointmentcode repeatedly on the block.
7. If desired, click the Scheduling tab to add other users or resources (e.g. rooms, equipment) sothe placeholder is added to these schedules.
8. Click Save.
8. Click Exit.
Edit a Placeholder
Note: If the start date for the series has passed, the placeholder cannot be edited. Instead, clickto split the series and edit the remaining placeholders.

Scheduling 87
© 2018 Titanium Software
How do I change user, day, time, length? Drag and drop the placeholder on the calendar, or clickand drag the bottom border of the placeholder.
How do I change appointment code, client(s), add users/resources?
1. Click the placeholder on the schedule.
2. Click Edit on the menu bar.
3. Make desired changes.
4. Click Save.
5. Click Exit.
What does the padlock icon mean on the placeholder screen? The placeholder is locked or youdon't have rights to change it.
How do I delete a placeholder? Right click on the placeholder and click delete.
Schedule an Appointment Based on a Placeholder
1. Right click on the placeholder.
2. Click Add > Appointment Based on Placeholder.
3. Add the appointment as you normally would.
11.7 Schedule Groups
The center administrator can create users schedule groups to serve several purposes including:
o View only a subset of schedules (i.e., senior staff, interns reporting to a given supervisor,resources, rooms, staff working at different campus locations, etc.)
o Filter for openings for appointments
o Filter and summarize data for reports
o Filter for advanced client search
Users with sufficient permission can create their own users and schedules groups. These groupscan be used only to restrict views to a subset of schedules. Groups created by users cannot beused for reporting or search purposes.
88
© 2018 Titanium Software
What would you like to do?
o Create groups
o Manage Saved Groups
Create Groups
1. From the calendar screen, click the Schedules pull down menu and choose Create/Manage YourGroups.
2. Use the list screen to add users/schedules to the group. To add all of the group members of anexisting users and schedules group created, click Add Members from Group and choose thedesired group.
3. Click the check box "Set Number of Columns Displayed to Match Selected Schedule Count" tostretch or shrink the schedule screen when all group members are shown.
4. Click the Active check box to make the group active or inactive.
5. To save the group for future use, click the check box. Type the name of the group in theDescription box. (Note: If you only need the group once, click Ok to display the groupmembers chosen).
6. Repeat Steps 2 - 5 for all desired groups.
7. Click Save.
8. Click Exit.
Manage Saved Groups
1. From the calendar screen, click the Schedules pull down menu and choose Create/Manage YourGroups.
2. Click the Manage Your Groups button.
3. Use the list screen to edit or delete list items.
4. Click Save.
5. Click Exit.
6. Click Ok.
Scheduling 89
© 2018 Titanium Software
11.8 Waitlist
Your center administrator may choose to use one or more waitlists. You should check with yourcenter administrator to learn about your permissions for waitlists (add clients, manage entries ornone). This feature is configured by your center administrator.
What do you want to do?
o See if the client is on the waitlist
o Add a client to the waitlist
o Edit a waitlist entry
o Manage the waitlist
o Re-open a waitlist entry
See if a Client is on the Waitlist
The waitlist icon appears on multiple screens in Titanium (e.g. client screen, client file,appointment, etc.). If the waitlist icon is green, the client is entered on a waitlist.
Add a Client to the Waitlist
1. Click the waitlist icon on any screen for the client.
2. Click Add to the Waitlist.
3. Complete the entries on the waitlist pop-up window as required by your center'sadministrator.
4. Click Save.
5. Click Exit.
Edit a Waitlist Entry
Unless you are designated as a waitlist manager, you are only able to edit entries that you createdwithin 24 hours after you create them.
1. Click the waitlist icon on any screen for the client.
2. Click Open Existing Waitlist Entry.
If it has been less than 24 hours since the waitlist entry was added:
3. Click Edit.
90
© 2018 Titanium Software
4. Make desired changes.
If it has been longer than 24 hours since the waitlist entry was added:
5. Click New Line above the notes box to add notes to the entry. (Note: Your center administratormay have disabled this option.)
6. Click Save.
7. Click Exit.
Manage the Waitlist
1. From the calendar screen, click Open > Waitlist Management
2. Use the pull down menus on the Listing tab of the waitlist management screen to change thewaitlist entries that are displayed. (Note: Your center administrator may have chosen a cut offdate so that older entries are not displayed.)
3. Double click an entry on the waitlist to view the waitlist details tab for the entry.
4. Click Edit on the menu bar.
5. Edit information on the waitlist details tab.
6. Click Mark Complete to remove an entry from the waitlist.
7. Click Save.
8. Click the Listing tab to view other entries.
Re-Open a Waitlist Entry
1. From the calendar screen, click Open > Waitlist Management
2. Use the pull down menus on the Listing tab of the waitlist management screen to viewCompleted waitlist entries. (Note: Your center administrator will set the date after whichcompleted entries can no longer be viewed.)
3. Double click an entry on the waitlist to view the waitlist details tab for the entry.
4. Click Edit on the menu bar.
5. Click Re-Open.
6. Enter a reason in the pop-up window.
Scheduling 91
© 2018 Titanium Software
7. Click OK.
8. Click Save.
92
© 2018 Titanium Software
12 Supervision
Titanium contains features that allow teaching or training clinics to create appointments, recordsand files for their interns. These features allow information about programs to be kept separatefrom information about clients. Your center administrator may choose to activate and configurethese features for use in your center.
Many of the features available in intern screens and files are similar to those in client screens/files, and function in the same way. For those features, links will be provided to the instructionsin the client sections of the help/manual.
By default, Titanium displays the term "intern." All instructions and documentation use this term. Your center administrator may change this term as desired (i.e., trainee, supervisee, studentclinician, etc.) to change all displays in Titanium will be changed. Your center administrator hasconfigured the appointments, notes, data forms, and screens for interns.
Note that all interns must be users in Titanium. Intern records/files do not affect on the usersettings, which are controlled by the system administrator via system configuration.
What would you like to do?
o Add/edit/delete intern
o Search for interns
o Add/edit intern appointment
o Add/edit/delete intern notes
o Review intern assignments and data
12.1 Add/Edit/Delete Intern
What would you like to do?
o Add an intern
o Edit an intern
o Deactivate an intern
o Delete an intern
Note that all interns must be users in Titanium. Intern records/files do not affect on the usersettings, which are controlled by the system administrator via system configuration.
Add an Intern
Interns files can only be created by system administrators. You should contact your center
Supervision 93
© 2018 Titanium Software
administrator for assistance.
Edit an Intern
If you are not assigned to an intern, you may not have rights to edit the intern.
1. Navigate to intern screen from:
o Any screen that has Intern icon on the menu bar (e.g., appointment screen, My Interns list)
o From the calendar screen, click Open > Interns and double click on the intern.
2. Click Edit on the menu bar on the intern screen.
3. Add or change information as required.
4. Click Save.
Deactivate an Intern
Deactivating the intern file will not affect the intern's ability to log into or use Titanium. Usersettings must be changed by the system administrator in configuration. To deactivate interns:
1. Search for the interns.
2. Click the Edit icon on the menu bar on the intern screen.
3. Click in the Active box.
4. Click Save.
5. Click Exit.
Delete an Intern
You can delete an intern if you have sufficient permission, and no notes or appointments havebeen added to the file. It is recommended that interns be deactivated instead of deleted. Internscannot be deleted if their files contain notes or appointments. Unless you are a systemadministrator, each note and appointment must be deleted individually before the intern can bedeleted. (Note: Deleting an intern file will not affect the intern's ability to log in or use Titanium.
94
© 2018 Titanium Software
User settings must be changed by the system administrator in configuration).
To delete an intern:
1. Navigate to the intern screen from:
o Any screen that has Intern icon on the menu bar (e.g., appointment screen, My Interns list)
o From the calendar screen, click Open > Interns and double click on the intern.
2. Click Delete on the menu bar on the Intern screen.
3. Click Yes to confirm.
12.2 Add/Edit Intern Appointment
Your center's administrator has configured appointment codes to be used for meetings betweensupervisors and interns, or groups of interns for things like case presentations or programmeetings. The appointments created using these codes will be automatically placed on theTitanium schedules of the supervisor and all interns added to the appointment. Appointmentinformation will be added to the files of the interns. When creating intern appointments, onlythe codes designated by your center administrator as intern codes will be available. (Note: Attendance for intern appointments is marked in the same way as for client appointments.)
What would you like to do?
o Add an appointment
o Copy an appointment
o Edit an appointment
Note: Your center's administrator has set permissions and rights for schedules. If you do not havesufficient privileges, you may be unable to view, add, edit or delete appointments on any otherschedules, or view appointments or information on schedules for other users.
Add Appointment
1. On the calendar screen, right click in the time slot of the supervisor schedule where you wantto add the appointment.
2. Click Add > Intern Appointment > type of appointment to be added. o Individual: One interno Group: Multiple interns
Supervision 95
© 2018 Titanium Software
3. Add interns to the appointment:o For individual appointments, double click the intern from the list. o For group appointments, click the Interns tab:
Click Add to choose individual interns one at a time, orChoose an intern group sign up sheet from the pull down menu, and click Copy Members.
4. Enter Appointment Information:o For recurring appointments, set the end date for the series or number of appointments to be
scheduled.o Choose an intern appointment codeo Add location, description and comments as desired. (Note: Do not put confidential
information in these fields.)
5. If desired, click the Scheduling tab to add other users or resources (e.g. rooms, equipment) sothe appointment is added to these schedules. (Note: Do NOT add the intern to the schedulingtab. The appointment will automatically be added to the intern's schedule in Titanium.)
6. Click Save.
7. Click Exit.
Copy an Existing Appointment
1. Right click the appointment and choose Copy or Copy to Next Week.
2. Make any desired changes on the appointment screen.
3. Click Save.
4. Click Exit.
Edit Appointment
How do I change recurring appointments? If the start date for the series has not passed, recurringappointments are edited the same way as other appointments. If the start date for the series haspassed, the appointment cannot be edited. Instead, delete the remaining appointments in theseries and add a new series.
How do I change user, day, time, length? Drag and drop the appointment on the calendar, or clickand drag the bottom border of the appointment.
How do I change appointment code, intern, add users/resources?
1. Click the appointment on the schedule.
96
© 2018 Titanium Software
2. Click Edit on the menu bar.
3. Make desired changes.
4. Click Save.
5. Click Exit.
What does the padlock icon mean on the appointment screen? The appointment is locked or youdon't have rights to change it. This may also occur because your center administrator has chosento not allow appointments in the past to be edited. Contact your center administrator to requestchanges to locked appointments.
How do I delete an appointment? Deleting appointments will remove them from Titanium, sothey will not be included in reports. So, you should only delete appointments made in error. Forcancellations, right click on the attendance code icon on the appointment block and choose theappropriate reason. To delete an appointment made in error, right click on the appointment andclick delete. If a note is associated with an appointment, the appointment cannot be deletedwithout deleting the note first.
Intern Group Sign Up Sheets
Intern group sign up sheets allow you to easily populate intern group appointments and createrosters.
What would you like to do?
o Create an intern group
o Edit an intern group
Create a Group Sign Up Sheet
1. From the calendar screen, click Open > Intern Group Sign Up Sheets.
2. Click New Group Sign Up Sheet.
3. On the Group Information tab, enter information about the group (name, status, code, users,group size, etc.).
4. On the Group Member Sign Up tab, add group members by clicking on interns from the list.
5. Click Save.
6. Click Exit.
Supervision 97
© 2018 Titanium Software
Edit a Group Sign Up Sheet
1. From the calendar screen, click Open > Intern Group Sign Up Sheets.
2. Double click on a sign up sheet to open it.
3. Click the Edit icon on the menu bar.
4. Make desired changes.
5. Click Save.
6. Click Exit.
12.3 Add/Edit/Delete Intern Notes
The purpose of intern notes is to record information about the intern's training and programprogress, as part of the supervision process. Notes about client sessions/treatment should becreated in client files.
Your center administrator has created note types and data forms specifically for use in intern files. The only notes and data forms that can be added to intern files are those designated by yourcenter administrator as intern notes and data forms.
Your user and supervisor permission levels will affect the notes that you can create, sign, viewand edit.
Notes can include the following sections:
o Narrative (information entered in the narrative is not searchable/reportable)
o Data forms (i.e., assessments, checklists, intake forms, etc. used to capture searchable/reportable data)
o Attachments
What would you like to do?
o Add a note
o Edit an unlocked note
98
© 2018 Titanium Software
o Edit a locked note
o Add an intern group note
o Add intern note to distributed group note
o Delete a note
Add a Note
You do not have to complete notes all at once. Click Save and Exit to save your note. Open thenote and click Edit to continue writing. Titanium creates note back ups periodically, and back upscan be recovered in the event of system failure.
1. To open a note:
o Right click on the intern appointment and click Note, or
o Click on the appointment to open it, and click the Note icon on the menu bar, or
o Open the intern file, click the New Note icon on the menu bar, and click Yes to confirm thatyou are creating a note not related to an appointment
2. On the Narrative tab, choose the note type from the pull down menu.
3. Complete the note narrative.
o Date and time automatically populate. Use the controls to make desired changes. (Note: Your center administrator may choose to not display note date and time.)
o Enter desired information in the text box on the Narrative tab.
o If desired, right click to choose a note template (outline created by your center'sadministrator).
o If desired, right click to open to full screen view or use the spell check function. (Note: Userscan click Options on the Spell Check tab to change the color used to indicate misspelledwords. Titanium will retain the user settings. This is useful for users who are red/green colorblind.)
4. To review or copy/paste narrative text from prior notes:
o Click the Save icon on the menu bar.
o Click Navigate.
o Choose the desired note to review.
o Highlight the desired text and press Ctrl + C on your keyboard
Supervision 99
© 2018 Titanium Software
o Click Navigate to return to the current note.
o Click in the narrative text box, and press Ctrl + V on your keyboard (or right click and choosePaste from the menu).
5. If desired, add a data form:
o Click on the data forms icon on the menu bar
o Use the pull down menu to select the desired form
o Complete the data form.
Enter the desired information on the form.
Update prior data form:
Click Copy on the menu bar.
Hover over "Copy Data From Previously Entered Data Form." (Note: Data entered on oneform cannot be copied to a different form, only to a new instance of the same data form.)
Click to select the prior version.
Edit the desired information on the new data form.
o Click Save.
o Click Exit.
6. If desired, click the Attach icon on the menu bar and add an attachment.
o Click the Attach icon on the note menu bar.
o Click Attach a File.
o Use the Windows interface on your computer to locate the file to be attached. (Note: Filesize is limited to 16 mb.)
o Click the file to select it and click Open.
o Use the pull down menu to select a description, or type in a description of the file.
o Repeat steps to add as many attachments as desired.
o Click Close to return to the note.
7. On the narrative tab, click the highest number available to you to sign the note. If you signedon Line 3, click Yes to confirm that you want to lock the note.
8. If you signed on Line 1 or 2, forward the note for review:
100
© 2018 Titanium Software
o If necessary, use the pull down menu to select the reviewer.
o If desired, add a Forward To message.
10. Click Save.
11. Click Exit.
Edit an Unlocked Note
Unlocked notes are either unsigned, or signed on Lines 1 or 2.
1. From the intern file or appointment, open the note.
2. Click the Edit icon on the menu bar.
3. If the note has been signed on Line 1 or 2, the user who signed the note must click to removetheir signature.
4. Make desired changes.
5. Sign the note as you normally would, including forwarding the note for signature.
Edit a Locked Note
Locked notes (signed on Line 3) cannot be changed by users, including information on thenarrative tab, data forms, and attachments (if being used). However, addenda can be added tothe narrative text.
1. From the intern file or appointment, open the note.
2. Click the Edit icon on the menu bar.
3. Click Addendum on the menu bar.
4. Type the desired narrative in the addendum. The addendum text box has the samefunctionality as the note narrative text box.
5. Sign the addendum in the same way that you sign notes, including forwarding for signature.
Supervision 101
© 2018 Titanium Software
Add a group note
1. Open the group appointment screen by clicking on the group appointment on the calendarscreen.
2. If it has not already been done, mark attendance for the appointment.
3. Click the Group Note icon on the menu bar.
4. Create and sign the note as you normally would.
5. After the note has been signed on Line 3 and saved, click the Distribute icon on the group notemenu bar.
6. On the pop-up box, click a button to select the client files to which to distribute the group note.
7. Click OK to confirm.
Add an Intern Note Related to a Group Note
1. Open the group note in the intern's file by:
o Click on the interns tab in the group appointment screen, select the desired intern andclick the Intern Note button or
o Open the intern's file and click on the group note inside the intern's file.
2. Click the Edit icon on the menu bar.
3. Click the Addendum icon on the menu bar.
4. Add an addendum to edit the note as you normally would.
Delete a Note
Locked notes (signed on Line 3) cannot be deleted.
1. From the intern file or appointment, open the unlocked note.
2. If the note has been signed on Line 1 or 2, the user who signed the note must click to removetheir signature.
3. Click the Delete icon on the menu bar.
4. Click Yes to confirm.
102
© 2018 Titanium Software
12.4 My Interns List
The My Interns list provides the user currently logged into Titanium with their personal list ofinterns assigned to them. To open your My Interns list, from the calendar screen, click Open > MyInterns.
Intern Statistics
The screen also provides statistics for your interns, and access to the intern screen and intern file:
o Next Appt: This is the date of the next intern appointment with the supervisor
o # Clients: This is the number of clients to whom the intern has been assigned as a user on theclient security tab (e.g., count of clients on the intern's My Clients list)
o # Attended Appts Year: This is the number of client appointments the intern has attendedduring the year. (Note: Dates that define the year are set by the center administrator insystem configuration.)
o # Hours Attended Year: This is the amount of time that the intern has attended clientappointments during the year. (Note: Dates that define the year are set by the centeradministrator in system configuration.)
Intern Search
If you have been given permission as a supervisor, you can view another user's My Interns list byselecting their name from the pull down menu.
Because creating an intern requires at least one supervisor and interns are automatically assignedto their own record, it should be rare for any intern to be unassigned to a user in Titanium. Settings to locate unassigned interns, all active interns, and all interns are shown below:
Unassigned, active interns:
Show interns for: All
Include interns that are: Active
Include interns with users that are: Not assigned
All active interns:
Show interns for: All
Include interns that are: Active

Supervision 103
© 2018 Titanium Software
Include interns with users that are: Actively assigned, inactively assigned, not assigned
All interns:
Show interns for: All
Include interns that are: Active, inactive
Include interns with users that are: Actively assigned, inactively assigned, not assigned
12.5 Search for Intern
My Interns list
1. On the calendar screen, click Open > My Interns
2. The list will default to your interns.
3. If you have permission as a supervisor, use the pull down menu to change the user for internsassigned to other users.
Single Intern Search
1. From the calendar screen, click Open > Interns
2. Double click on the desired intern from the list.
104
© 2018 Titanium Software
13 Task List
Your center's administrator has established a set of record keeping activities that are required foreach user role. Depending on the settings chosen by your center administrator, there may also betermination or client deactivation tasks for the center. The task list shows the activities that youshould complete and provides a single window from which to work.
You cannot add items to your own task list. Instead, consider using placeholders as "post-it" noteson your schedule to remind yourself to complete tasks. The only way to remove an item fromyour task list is to complete it. When a task is completed, it will automatically be removed fromthe task list. Depending on your permissions and settings in Titanium, you can remove tasks tosign notes by double clicking the task list item, and choosing another user in the Forward To:section of the note, and clicking Save and Exit.
Complete Items on my Task List
1. From the calendar screen, click Open > Task List.
2. Review the item on your task list to determine what needs to be done. (Note: Your centeradministrator may choose to use a color coding scheme to indicate the number of days since thetask was added to the list. You should ask your center administrator the meaning of colorhighlights seen on this screen.)
3. Double click the item on your task list to open the screen where you need to complete the task. (Note: You can only complete one task at a time.)
4. Complete the required action (e.g. mark attendance, add a note, sign a note), or respond to theprompts.
5. Close the screen to return to your task list.
Monitor my Supervisee's Task List
If you have been given permission as a supervisor, you can view another user's task list byselecting their name from the pull down menu.
User Configuration 105
© 2018 Titanium Software
14 User Configuration
Your center's administrator has configured Titanium with default settings, menus and options. You are able to override some of those settings to personalize Titanium displays and functions. The settings that you choose are linked to your user account, so they'll only apply when you arelogged in. Options for each of the user configuration tabs are shown below.
To configure settings:
1. From the calendar screen, click Configure > User Configuration.
2. On the tabs, use the pull down menus, check boxes and text boxes to set desired options.
3. Click:
o Apply to see the effects of your changes
o OK to save changes and exit configuration
o Cancel to exit configuration without saving changes
14.1 User Defaults Tab
Defaults
1. Use the pull down menu to select the default users and schedules group for which reports willbe generated.
2. Use the pull down menu to select the default user or schedule for which reports will begenerated.
3. Use the pull down menu to select the user to whom notes will be forwarded by default.
4. Enter how frequently notes will be saved when you are creating them. (Note: This will providea back up in the event of computer failure, so that notes can be recovered.)
5. Click in the check box to display a screen showing the number of tasks on your task list after login.
6. Click in the check box to turn on a prompt when making individual appointments for otherusers to add the appointment to your schedule as well.
7. To change your password, click log in account status and change the password button.
o Click change password.
o Enter your new password twice and click OK. (Note: Titanium requires strong passwords of 8-32 characters, containing at least one upper case and one lower case letter and a number. Your center administrator may require use of symbols. Passwords cannot be reused until 50password changes have occurred.)
106
© 2018 Titanium Software
o Click save
(Note: Titanium Support is unable to log onto your Titanium application, if passwords areforgotten. We cannot reset passwords. If you are locked out of Titanium, contact your centeradministrator for assistance.)
8. Click the Reset your spell check dictionary to default button to remove anything that you addedto the spell check dictionary. (Spell check is based on the regional and language settingschosen in Windows. The default is US English.)
9. If your center is using insurance billing, click the Billing Settings button:
o Use the pull down menus and text boxes to enter insurance billing information for the user. (Note: You should consult with your center administrator or use the state or federalguidelines for CMS 1500 claim forms to learn more about these fields.)
o If desired, use the mouse or touch pad to enter a signature to be added to insurance claims.
o Click Close.
10.If desired, change appointment notifications (pop up window and chimes) which will notifyyou when appointments on your schedule have been marked as attended, canceled orrescheduled. (Note: Your computer speakers and volume must also be set to enable you tohear audio. Chimes only notify of arrivals, not when appointments end.)
o Click in the check boxes to turn on/off notifications when appointment attendance is markedas "attended" or as "canceled" or "rescheduled"
o Use the pull down menus to change the sound file used for notifications.
o Use the pull down menu to change the volume, if desired.
11. For users granted sufficient permission by the center administrator to approve incoming webcomponent data, change new incoming data notification as desired ((Note: Your computerspeakers and volume must also be set to enable you to hear audio.)
o Click in the check boxes to turn notification on/off.
o Use the pull down menu to change the sound file used for notifications.
o Use the pull down menu to change the volume, if desired.
User Configuration 107
© 2018 Titanium Software
14.2 User Schedule Viewer Layout
On this tab, you can set defaults for the layout of the calendar (schedule) screen. Options on thisscreen include:
Start time: Click in this box to change the time that shows at the top of the schedule. (Note: You are able to scroll up on the schedule to set earlier appointments can be added to theschedule.)
Interval time: Click in this box to change the time intervals (in minutes) displayed on theschedule.
Number of rows: Click in this box to change the number of rows which will appear on theschedule. (Note: The amount of time will vary based on intervals and number of rows. So, ifintervals are set for 30 minutes, and rows are set for 24, then 12 hours will be displayed on theschedule.)
Number of columns: Click in this box to change the number of columns that will appear on theschedule. (Note: The green arrow buttons at the top of the calendar screen can be used tonavigate among columns that are not displayed by default.)
Weekly format: Use the pull down menu to show or suppress weekends. (Note: The Go Tobutton on the menu bar can be used to navigate directly to a weekend day, even if weekendsare suppressed.)
Day header format: Click in this box to change from the standard day header format of"Weekday, Month Date" to a different Windows standard format.
Schedule header font: Click the ellipse button (3 dots) to open the font selection window tochoose a different font for the top header row on the schedule when viewing multiple userschedules for a single day.
Day header font: Click the ellipse button (3 dots) to open the font selection window to choose adifferent font for the second row on the schedule when viewing multiple user schedules for asingle day.
Swap header fonts: When viewing a single schedule over multiple days, there will be only oneheader row. Click this check box to use the Schedule Header Font as the header row font insingle schedule view.
Enable refresh: If desired, click the check box to refresh the screen when you are working inTitanium and set the refresh interval in seconds. (Note: If you do not check this box, when youare working in Titanium for a long period of time, you will not see updated data).
108
© 2018 Titanium Software
Limit refresh: If you clicked to refresh user screens, click in the next check box to limit refreshto when you do not have a window open (i.e., when only the calendar screen is displayed).
Enable quick date navigation: Click in this check box to allow users to navigate the scheduleusing short cut keys instead of a mouse. (Note: On the calendar screen, click Navigate on themenu to see a list of keyboard short cut keys which will be disabled unless this option ischecked.)
Schedule to be displayed on log in: Click one of the radio buttons to set the default scheduledisplay when you log in to either their own schedule, or schedules for a group. If you choose todisplay schedules for a user group, click the pull down menu to choose the desired user group.
Appointment block font: Click the ellipse button (3 dots) to open the font selection window tochoose a different font for the text displayed on appointment blocks.
Appointment block information display format: Use the pull down menu to choose theinformation shown on schedule blocks.
Appointment icons: Click in the check boxes to choose the icons that will be displayed inappointment blocks.
Canceled appointment format: Use the pull down menu to select whether/how canceledappointments will be displayed on the schedule.
Display appointment length: Use the pull down menu to choose whether appointment lengthwill be displayed in the appointment block. (Note: Because you will be able to see the start/end times for appointments on the schedule, this option is not used often.)
Display description: Check this box to display information in the appointment description fieldin the appointment block.
Mouse-over display: Click in these check boxes if you want provider appointment count for theclient, center appointment count for the client, or client student ID to display with the youhover over the appointment with your mouse.
Intake appointments in count: If you click in this check box, intake appointments will not becounted in the mouse-over displays for appointment counts.
14.3 User Schedule Viewer Colors
On this tab, you will set the default colors for your schedule. This is much like creating a theme inWindows. The colors of appointment and placeholder blocks are set by your center administratorand cannot be changed. To set colors:
1. Click in the colored box for the item that you want to change. (Note: See list of items below.)

User Configuration 109
© 2018 Titanium Software
2. If required, choose an option from the menu. (Note: Foreground is text color, and backgroundis item color.)
3. On the color picker window, choose a new color. (Note: Click the Define Custom Colors buttonfor more color options.)
4. Click OK.
5. Click Apply to see the effects of your changes.
6. If you don't like your changes, click the Reset to System Colors button to return to settingschosen by your center administrator.
Item List:
Schedule header: Top row on the schedule screen
Selected schedule header: Top row on the schedule screen for the schedule where your mouseis located
Day header: Second row on the schedule screen
Selected day header: Second row on the schedule screen for the schedule where your mouse islocated
Default background: Schedule where no appointments are shown
Weekend background: Schedule where no appointments are shown on weekend days asdesignated on the Schedule Viewer Layout tab
First weekday background: Schedule where no appointments are shown on Mondays
Cursor box: Box that appears around the space on which your mouse is located on the schedule
Appointment highlight: Box that appears around the appointment block
Appointment highlight: Box that appears around the appointment block when you hover over itwith your mouse
Vertical grid lines: Lines that appear between user schedules or days of the week
Horizontal grid lines 1: Lines that appear before hours on the schedule
Horizontal grid lines 2: Lines that appear before interval times chosen on the Schedule ViewerLayout tab
Foreground 1: Color of the font of hours that appear on the time line at the left of the schedule
Foreground 2: Color of the interval times that appear on the time line at the left of theschedule
Background view normal: Color in the background of the time line at the left of the schedule
Background canceled view: Background color of the schedule time line at the left of theschedule when viewing only canceled appointments on the schedule. (Note: To display onlycanceled appointments, from the calendar screen, click View > View Only CanceledAppointments).
110
© 2018 Titanium Software
Background placeholder view: Background color of the schedule time line at the left of theschedule when viewing only placeholders or recurring appointments on the schedule. (Note: To display only canceled appointments, from the calendar screen, click View > View RecurringDefinitions and Placeholders Only).
14.4 User Interface Tab
On this tab, you can set defaults for the way Titanium behaves when you are logged in. Optionson this screen include:
Default application font: Click the ellipse button (3 dots) to open the font selection window tochoose a different font for the screens in Titanium.
Default application toolbar font: Click the ellipse button (3 dots) to open the font selectionwindow to choose a different font for the tool bars in Titanium.
Screen font for note narrative: Click the ellipse button (3 dots) to open the font selectionwindow to choose a different font for the narrative tab in notes.
Remember and reuse last report viewer zoom settings: Click in the check box to have Titaniumre-use the viewer settings on the preview screen for reports (Note: Zoom settings are accessedon the Page Width pull down menu of the report preview screen.)
Show advanced export options: Users with permission to generate reports can export somereports if this box is checked.
Alternate sound player: Click in this check box to use an alternate sound player, instead of yourcomputer's speakers
Show tooltip: Click the check box to see tool tips about right click menus when working withnarrative text boxes
Automatically expand all: Click the check box to view client files in expanded format by default
Display first line of note narrative: Check this box to view the first line of a note in the clientfile view with the date and note author to label notes.
Show confirmation prompt for edit mode: Click the check box if you want Titanium to show aprompt if you click escape or cancel without saving changes.
Show confirmation prompt for overlapping appointments: Click the check box if you wantTitanium to prompt you if changes to an appointment will cause an overlap with anotherappointment.
Show confirmation prompt for appointments moved using drag and drop. Click the check box ifyou want Titanium to prompt you if you edit appointments by using a mouse (drag, drop).
Number of items in drop down box: Enter a the number of of items that should be displayed in
User Configuration 111
© 2018 Titanium Software
drop down boxes (pull down menus) throughout the program
Window settings persistence: If you resize Titanium windows while working and want thewindows to retain your custom sizing, click in the Remember and reuse window check box andclick size and/or position to indicate what you want the program to remember. To return toTitanium defaults, click in the Forget window settings check box and forget window settingsnow button.
14.5 Calendar Sync
Calendar Sync is an optional feature which may have been purchased by your center. This featurecopies non-confidential appointment information from Titanium to Microsoft Exchange (Outlook)or Google calendars. Placeholders will not be copied to your external calendar.
This feature is commonly used to show “busy” times on Outlook or Exchange calendars, and toallow Titanium users to view their Titanium schedules when they are out of the office. Youshould ask your center administrator how calendar sync will function in your center, includingtype of external calendar you can use, when calendar sync will occur, and whether you can createappointments on your external calendar to be copied into Titanium.
This feature is configured by your center administrator.
Notes: If you want to sync to a Google web mail calendar, create your Google account beforeproceeding.
What would you like to do?
o Configure Calendar Sync
o Create Appointments to be Copied into Titanium
o Manually Sync Calendars
Configure Calendar Sync
1. Ask your center administrator whether sync will be to Exchange, Google or both.
2. From the calendar screen, click Configure > User Configuration.
3. Click the Calendar Sync tab. (Note: If your center is not using this feature, the tab will not bevisible.)
4. For Exchange calendar sync, enter the first section of your email address which appears beforethe @ sign in the Exchange mailbox field. Then skip to Step 5. (Note: If your center usesOffice365, enter the entire email address.)
5. For Google calendar sync:
o Click Authorize.
112
© 2018 Titanium Software
o If necessary, click to allow your web browser to open.
o Log into your Google account.
o Click Accept.
o Close your browser window.
o In Titanium, click OK on the "Authorization request successfully completed" window.
o Use the pull down menu to select the calendar to sync with Titanium. (Note: You can stop thesync to the Google calendar in the future by clicking Revoke.)
6. Click Ok.
Create Appointments to be Copied into Titanium
If your system administrator chooses to do so, it is possible for appointments created on externalcalendars to be copied into Titanium. If your system administrator has chosen to use this feature,they should provide a subject prefix. To create an external appointment that will be copied intoTitanium:
1. On your external calendar, open a new appointment.
2. In the subject field, enter the prefix provided by your system administrator.
3. Enter the rest of the subject.
4. Enter the appointment information and save as you normally would.
5. After the next full calendar sync copies the appointment to Titanium, edit the appointment tomake required changes to appointment type, appointment code, and client information.
Note: Recurring meetings or those with multiple attendees will not automatically be synced toTitanium. Users must manually create or copy these appointments. If you accept a meetingnotice from someone else, you must either manually add the prefix in Step 2 above (for Outlook)or duplicate the appointment and enter the prefix (Google).
Manually Sync Calendar
1. Click the Titanium Calendar icon on your system tray.
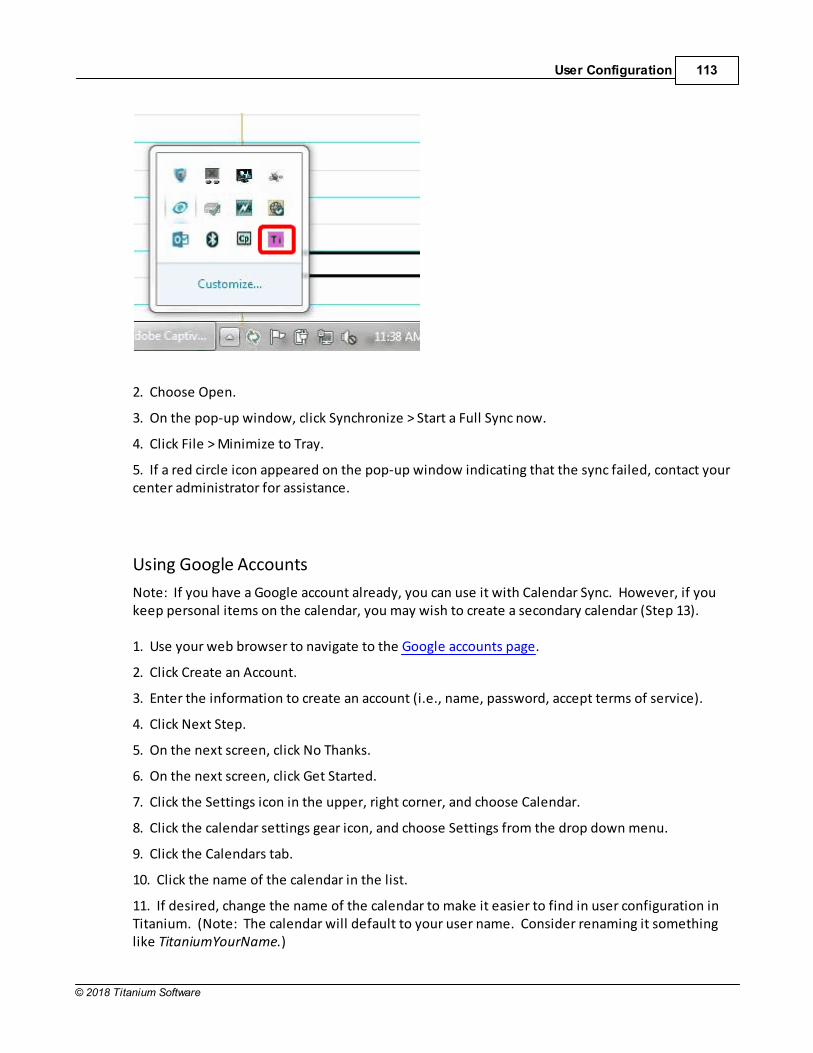
User Configuration 113
© 2018 Titanium Software
2. Choose Open.
3. On the pop-up window, click Synchronize > Start a Full Sync now.
4. Click File > Minimize to Tray.
5. If a red circle icon appeared on the pop-up window indicating that the sync failed, contact yourcenter administrator for assistance.
Using Google Accounts
Note: If you have a Google account already, you can use it with Calendar Sync. However, if youkeep personal items on the calendar, you may wish to create a secondary calendar (Step 13).
1. Use your web browser to navigate to the Google accounts page.
2. Click Create an Account.
3. Enter the information to create an account (i.e., name, password, accept terms of service).
4. Click Next Step.
5. On the next screen, click No Thanks.
6. On the next screen, click Get Started.
7. Click the Settings icon in the upper, right corner, and choose Calendar.
8. Click the calendar settings gear icon, and choose Settings from the drop down menu.
9. Click the Calendars tab.
10. Click the name of the calendar in the list.
11. If desired, change the name of the calendar to make it easier to find in user configuration inTitanium. (Note: The calendar will default to your user name. Consider renaming it somethinglike TitaniumYourName.)
114
© 2018 Titanium Software
12. Click Save.
13. To create a secondary calendar, click Create New Calendar.
o Enter the desired calendar name.
o Click Create Calendar.
14. Log out.
14.6 CCMH
The Center for Collegiate Mental Health (CCMH) is a multi-disciplinary, member-driven researchcenter focused on providing accurate and up-to-date information about the mental health oftoday's college students. Their mission is to bridge the gap between the science and practice ofproviding college student mental health services. CCMH has created a national database using de-identified data from college counseling centers nationwide. Centers that choose to participate inthis initiative transmit data to CCMH and are allowed to access for research purposes.
If your center administrator chooses to participate in the initiative, your demographic data will betransmitted. To enter demographic data:
1. Navigate to User Configuration > CCMH tab.
2. Click Enter Information About Yourself button.
3. Click Edit on the menu bar.
4. Use the radio buttons, check boxes, text boxes and pull down menus to enter information.
5. Click Save.
6. Click Exit.

User Permissions 115
© 2018 Titanium Software
15 User Permissions
The information below is for default permissions. Some settings can be changed on tabsthroughout the system configuration screen.
User Security Levels assigned by System Administrator:
Provider 1: View/modify all schedules, create/access all data for all clients and non-clients, assignclients to counselors, automatically added to client screen when creating clients, view/createinvoices
Provider 2: View all schedules, modify only assigned schedules, create/access all data for allclients and non-clients, assign clients to counselors
Provider 3: View all schedules, modify only assigned schedules, see client names onappointments only on own schedule, create/access all data for assigned clients (Note: Provider 3users may be restricted to viewing only their own schedules. If so, then they will be unable to usethe Find Open feature to search for appointments.), create/access group notes for groupappointments on which they are a resource, create/access non-confidential non-client notes orassigned confidential non-client notes
Support Staff: View/modify all schedules, create/access non-confidential data for all clients andnon-clients, assign clients to counselors, view/create invoices
IT Staff: View version information, complete some diagnostic checks, and check for and installsoftware updates
Temporary Emergency Access: Allows access in the event that no System Administrator can log on(forgotten passwords, unavailable). This level allows a one-time access to the Users andSchedules tab in system configuration, for the purposes of resetting a System Administratorpassword. Titanium strongly recommends creating at least one Temporary Emergency Accessaccount, and storing the information securely in the center. Titanium Support is unable to assistyou in logging into the system if System Administrators forget their passwords or are unavailable.
SystemAdmin: Unabridged rights to perform any actions throughout the entire system includingbut not limited to configure system, create all user accounts, view/modify all schedules, create/access all data for all clients, able to combine clients, able to delete and purge clients from system(electronic shred), able to export raw data and billing using Reports function
Supervision Levels assigned by System Administrator:
Supervisor: Can sign notes on Lines 1, 2 and 3, able to view My Clients/task lists of other users
Supervisor in Training 1: Can sign notes on Line 2, and Line 3 if Line 1 is not blank, able to view MyClients/task lists of other users
Supervisor in Training 2: Can sign notes on Lines 1 and 2, able to view My Clients/task lists of
116
© 2018 Titanium Software
other users
Unsupervised: Can sign notes on Lines 2 or 3, but only if Line 1 is blank
Under Supervision: Can sign notes on Line 1
N/A: Cannot sign notes
Client-Level Security Settings:
System Admin users can change client-level security settings from standard to more restrictedsettings.
Standard: User settings above apply to the client
Confidential: Restricts access to the client’s confidential client notes to only the SystemAdminuser and the users assigned to the client
Entire case file: Restricts access to the entire client’s file (including non-confidential notes andappointment history) to only the SystemAdmin user and the users assigned to the client
Reports:
By default, all users can view and save reports. By default only System Admin users can export raw data. System Administrators can change these defaults on the Security tab in systemconfiguration.

Web Component 117
© 2018 Titanium Software
16 Web Component
The online web component feature allows clients to complete forms for intake, follows ups,surveys or research via an internet browser running on a computer or tablet. This feature isconfigured by your center administrator. Note that, if clients enter contact information on theweb component, it will overwrite any information already in their client screen.
(Note: To have clients of the center complete anonymous surveys, create a new client calledSurvey and set the student ID to an easily recalled number. When clients complete the survey onthe web component, have them enter the ID number of the survey client, and then complete thesurvey. The surveys will be added to the file of the Survey client.)
What would you like to do?
o Approve incoming data
o Find missing data
Approve Incoming Data
After clients enter their information, a Titanium user must approve the incoming data to ensurethat it is valid and correct. If your center administrator has given you permission to do so, approveincoming data by:
1. From the calendar screen, click Open > Approve Incoming Data.
2. Review the entries based on the following table.
Status Column Meaning User Action
MATCH Incoming data is an exactmatch for an existing client
Process the entry if it appears to be valid
NO MATCH No matching client in Titanium.
If this is a new client, then process the data tocreate the client in Titanium. If it is anexisting client, edit the student ID or birthdate on either the incoming data or existingclient screen.
NAMEMISMATCH
There is a client with the sameStudent ID and birth date butthe names do not match.
If the names are similar, then edit the nameson incoming data or existing client screen. Ifthe names are not similar, then edit thestudent ID or birth date in the incoming data.
MULTIPLEMATCH
Multiple clients with the sameStudent ID and birth date
Combine clients in Titanium to remove theduplicate entries.
NO STUDENT IDOR BIRTH DATE
There's no incoming data tomatch to a client in Titanium
Manually match the incoming data with anexisting client.
118
© 2018 Titanium Software
3. If necessary, edit incoming data:
o Click on the desired entry to select it.
o Click the Incoming Data icon on the menu bar.
o Click Edit icon on the menu bar.
o Make the desired changes.
o Click Save.
o Click Exit.
4. If necessary, manually match incoming data to an existing client:
o Click the Matching in Titanium icon on the menu bar.
o Search for the desired client.
o Click Yes to confirm.
5. Click the Reset/Refresh icon.
6. Select entries to be processed by clicking check boxes to the left of desired entries or using theSelect icon on the menu bar.
7. Click Process Selected.
8. Depending on the settings chosen by your center administrator, use the pop-up window todetermine whether to associate the incoming data forms with an appointment
o Uncheck the box to review appointments not on the current day
o Click on the desired appointment with which to associate the forms
o Click the blank entry to create a note in the client file that is not associated with anappointment.
Find Missing Data
If forms do not appear in the client file:
1. Perform a client search using a partial name to determine whether a duplicate client wascreated. If a duplicate client was created, contact your system administrator to combine theclients.
2. Perform an advanced client search for data forms added to Titanium on the day the data wasprocessed. If the data form was placed in the wrong client file, a user can recreate the form as

Web Component 119
© 2018 Titanium Software
part of a note, or the client can complete the web component form again.
3. Notify your center administrator that the forms may have been deleted. Ask the centeradministrator to run an audit on the actions associated with that client. If the forms have beendeleted, a user can recreate the form as part of a note, or the client can complete the webcomponent form again.
4. CCAPS 2015 or newer forms will not be placed in client files unless your center administratorhas entered CCMH membership information in the System Configuration area in Titanium. IfCCAPS forms are not being placed in client files, contact your center administrator for assistance.

120
© 2018 Titanium Software
17 Building Lists
Throughout Titanium's, you will encounter screens on which you will build lists for variouspurposes. These screens mostly have the same menu options and functionality.
What would you like to do?
o Add list item
o Edit list item
o Delete list item
o Reorder list items
o View only active items
o Select columns shown on screen
Add List Items
1. Click the New icon on the menu bar.
2. Click on the name or description field to enter text.
3. Use the pull down menus and check boxes to select desired settings.
4. Click the Active check box to make the item available for use.
5. Click Save.
6. Click Exit
Edit List Items
After a list item has been used, best practice is to uncheck the Active check box to discontinue useof the item, and create a new item.
1. Click on the list item to select it.
2. Click Edit icon on the menu bar.
3. Make desired changes.
4. If entering new entries on a Listing tab, click on the Details tab to make settings or addinformation, if required.
Building Lists 121
© 2018 Titanium Software
5. Click Save.
6. Click Exit.
Delete List Items
After a list item has been used, you will probably be unable to delete it. Instead, uncheck theActive check box to discontinue use of the item, and create a new item.
1. Click on the list item to select it.
2. Click the Delete icon on the menu bar.
3. If a pop-up warning appears, click OK or Yes to delete the item.
4. Click Save.
5. Click Exit.
Reorder List Items
Note: Many lists are used to create pull down menus from which users will choose. The itemswill appear on the user pull down menu in the order shown on the list that you are creating.
Predefined order.
1. Click the Reorder icon on the menu bar.
2. Choose an option from the pull down menu.
Custom Order
1. Click in the gray square to the left of the desired list item.
2. Drag it to the desired position.
View Only Active Items
Click the Hide Inactive Records check box at the top of the screen, or
122
© 2018 Titanium Software
Use Show pull down menu to select a filter option
Select Columns Shown on Screens
Note: Only items shown in the Selected pane will be seen on the screen. The first item in theSelected pane will appear at the left of the Titanium user screen.
1. Click a list item in the Not Selected pane. (Note: Click in the Display Alphabetically check boxto show items in alphabetical order.)
2. Click the Add button in the center of the window to move the list item to the Selected pane.
3. Click a list item in the Selected pane.
4. Click the Remove button in the center of the window to move the list item to the Not Selectedpane.
5. Repeat Steps 1-4 until all desired headings are shown in the Selected pane.
6. To reorder items, click in the gray square to the left of an item in the Selected pane and drag tothe desired position. (Note: Items will appear on Titanium user screens in order from left toright. If you click Sort Alphabetically, items will be shown in alphabetical order on both theconfiguration and user screens. Therefore, alphabetical sort may not be the best choice forselected items.)
7. Click OK to save changes.
Index 123
© 2018 Titanium Software
Index- A -Accommodation 29, 37
Accommodation Letters 37
Accommodations 29, 37
Add client to waitlist 89
Allocate Payments 12
Anonymous Surveys 117
Applied Credit 12
Apply Credit 12
Appointment
Add 78
Copy 78
Copy to Next Week 78
Delete 78
Edit 78
Intern 94
Recurring 78
Appointment icons
User Configuration 107
Appointment Reminders 77
Resend 80
Send 80
Appointments 77
Add 78
Copy 78
Copy to Next Week 78
Delete 78
Edit 78
Recurring 78
Approve Incoming Data 117
Attendance 77
Mark 84
Track 84
- B -Background color
User Configuration 108
Billing
Charges 8
Client Billing Note 22
Credits 8
Invoices 8
Sliding Scale 8, 22
Statements 8
Billing File
Add charges 8
Add insurance payments 12
Add payments 12
Adjustment 23
Edit charges 8
Edit insurance payments 12
Edit payments 12
Refund 23
Write off 23
- C -Calendar Sync
External appointments 111
Manual sync 111
User configuration 111
CCAPS 117
CCMH 117
User Configuration 114
User Demographics 114
Change password 105
Chimes
User configuration 105
Client 29
Add 30
Advanced client search 47
Client file 45
Client flags 34
Deactivate 30
Delete 30
Demographics 36
Edit 30
Email 42
Find 47
Flags 34
Forms 39
My Clients List 47
Search 47
Security 30
Terminate 30
Text 42
Client Account
Add charges 8
Add insurance payments 12
124
© 2018 Titanium Software
Client Account
Add payments 12
Edit charges 8
Edit insurance payments 12
Edit payments 12
Client file 29
Forms 39
Open 45
Print 45
Scanning 39
Search 45
Client flags 29, 34
Client Import
Add new client 28
Update client 28
Client Insurance Information
Add 17
Edit 17
Review 17
Client Photo 44
Client screen 29
Clients List 58
CMS 1500 17
Colors
User Configuration 108
Completed Intern Appointments 102
Completed Intern Hours 102
Completed Supervised Hours 102
Convert Non-Client 72
Couple Appointment 78
- D -Data Forms
Print for client 39
Deactivate clients 30
Deactivate intern 92
Default Printer 75
Delete clients 30
Delete intern 92
Demographics 29
Add 36
Edit 36
Diagnosis
Make diagnosis 69
Notes tab 59
Disabilities 29, 37
Disability 29, 37
Display weekends
User Configuration 107
- E -Electronic Prescribing
Authentication 50
Cancel 54
Client reported medication 51
Controlled Substances 50
Create prescription 51
Discontinue 54
Edit 54
EPCS 50
Hold prescription 51
Issue prescription 51
New prescription 51
Preferences 50
Refills 57
User setup 50
Void 54
Emails
Clients 42
eprescribing
Authentication 50
Cancel 54
Client reported medication 51
Controlled Substances 50
Create prescription 51
Discontinue 54
Edit 54
EPCS 50
Hold prescription 51
Issue prescription 51
New prescription 51
Preferences 50
Refills 57
User setup 50
Void 54
eRx
Authentication 50
Cancel 54
Client reported medication 51
Controlled Substances 50
Create prescription 51
Discontinue 54
Edit 54
EPCS 50
Index 125
© 2018 Titanium Software
eRx
Hold prescription 51
Issue prescription 51
New prescription 51
Preferences 50
Refills 57
User setup 50
Void 54
Expand full screen 59
- F -Find Client Appointment 83
Find Open 83
Flags
Add 34
Colors 34
Delete 34
Edit 34
Fonts
User Configuration 107
Form Letters 47
- G -Grid line color
User Configuration 108
Group
Appointment 83
Sign Up Sheet 83
Group Appointment 78
Group Appointments 77
Group Intern Appointment 94
Group Notes
Add 63
Addendum 63
Distribute 63
Edit 63
Intern 97
Group Sign Up Sheet
Add 83
Edit 83
Use 83
Groups 83
- H -Holidays 78
- I -Individual Appointment 78
Insurance
Provide signature 105
Provider details 105
Insurance Claims
Generate 17
Print 17
Process 17
Intern 92
Add 92
Deactivate 92
Delete 92
Edit 92
Find 103
Flags 92
My Interns List 103
Search 103
Security 92
Intern Appointments
Add 94
Copy 94
Delete 94
Edit 94
Recurring 94
Intern Data 102
Intern file 92
Intern Group
Appointment 94
Sign Up Sheet 94
Intern Group Sign Up Sheet
Add 94
Edit 94
Use 94
Intern Hours 102
Intern Notes
Add 97
Attachments 97
Data forms 97
Delete 97
Edit 97
126
© 2018 Titanium Software
Intern Notes
Group Note 97
Lock 97
Narrative 97
Sign 97
Unlock 97
Intern Program Hours 102
Intern screen 92
Intern Statistics 102
Interns List 102
Invoice
Adjustment 23
Write off 23
Invoices 26
Add charges 8
Add payments 12
Edit charges 8
Edit payments 12
Find 17
IT Staff 115
- L -Lock notes 59
- M -Mark Attendance 77, 84
Medication 59
Medication Log
Edit 66
Review 66
Medication Notes
Add 66
Client reported medications 66
Edit 66
Prescriber 66
Prescriptions 66
Samples 66
Transcriber 66
MedLog 29, 66
Multiple Match 117
My Clients List 58
My Interns List 102
- N -Name Mismatch 117
Non-Client Conversion 72
Non-Client Notes
Add 71
Add to Client File 72
Addendum 71
Delete 71
Edit 71
Lock 71
Sign 71
Unlock 71
Non-Clients 71
Note Templates 59
Note Types 59
Notes
Add 59
Addendum 59
Attachments 59
Data forms 59
Delete 59
Diagnosis 59, 69
Edit 59
Group notes 63
Intern 97
Intern Group 97
Lock 59
Medication 59, 66
Narrative 59
Non-client 71
Other Appointments 62
Sign 59
Supervisor review 65
Types 59
Unlock 59
- O -Other Appointment 78
Outreach 71
Document 73
Schedule 73
Index 127
© 2018 Titanium Software
- P -Password reset
Turn off chimes 105
Photo
Add 44
Delete 44
Edit 44
Placeholders 77
Add 86
Appointment based on 86
Delete 86
Edit 86
Prescriber 66
Accounts 26
Invoices 26
Statements 26
Print Schedule 77
Printer Settings 75
Provider 1 115
Provider 2 115
Provider 3 115
- R -Recurring Appointment 78
Refund 23
Reports
Export Data 76
Generate 76
Preview 76
Print 76
Run 76
Resize windows 110
- S -Scanner 39
Scanning 39
Schedule Viewer Colors
User Configuration 108
Scheduling 77
Search for appointment 83
Search for open appointment 83
Sign notes 59
SMS Credit 80
Start time
User Configuration 107
Statements 26
Supervised Hours 102
Supervision 92
Notes 65
Trainee task list 104
Supervisor 115
Supervisor in Training 1 115
Supervisor in Training 2 115
Support Staff 115
System Configuration
User Permissions 115
SystemAdmin 115
- T -Task List
Add items 104
Complete items 104
User 104
Terminate clients 30
Text
Clients 42
Text boxes
Enlarge 59
Expand 59
Transcriber 66
Turn off chimes 105
- U -Unassigned Clients 58
Under Supervision 115
Unlock notes 59
Unsupervised 115
User Configuration 105
Appointment icons 107
CCMH 114
Change password 105
Defaults tab 105
Display weekends 107
Fonts 107, 110
Resize windows 110
Schedule colors 108
Schedule Layout 107

128
© 2018 Titanium Software
User Configuration 105
Start time 107
User interface tab 110
User Permissions
IT Staff 115
Provider 1 115
Provider 2 115
Provider 3 115
Supervisor 115
Supervisor in Training 1 115
Supervisor in Training 2 115
Support Staff 115
SystemAdmin 115
Under Supervision 115
Unsupervised 115
Users and Schedules Groups 87
- V -Vacation 78
- W -Waitlist 29, 77
Add client 89
Complete entry 89
Edit entry 89
Manage 89
Re-open entry 89
View entry 89
Web Component
Anonymous surveys 117
Approve incoming data 117
Edit incoming data 117
Multiple Match 117
Name Mismatch 117
No Student ID or Birth Date 117
Troubleshooting 117
Window size 110
Write Off
Account balance 23
Charge 23