Embed Size (px)
Citation preview

Chromebook Tips & Tricks GuideHandy hints to help you get the most
from your Chromebook

Topics
Productivity
Screenshot shortcuts
Manage notifications & do not disturb mode
Work offline
Use CAPS LOCK on a Chromebook
Switch between profiles on Chrome OS
How to ‘right click’ on a Chromebook
Search for anything on your Chromebook
Chromebook keyboard shortcuts
Customization
Use Chromebook in tablet mode with shortcuts
Sync your Chrome account settings
Pin websites to your desktop
Add custom features to your Chromebook
Security
Share your device using Guest Mode
Three ways to keep your Chromebook safe and secure
Apps and features
Chat faster with Hangouts Chat
Switch to Night Light to give your eyes a rest
Hear text read aloud with built-in screen reader
Save web pages using the Google Keep Chrome Extension
Tip: to make this menu ‘clickable’, download the PDF from Drive. Then, you can jump from menu items straight to each tip.
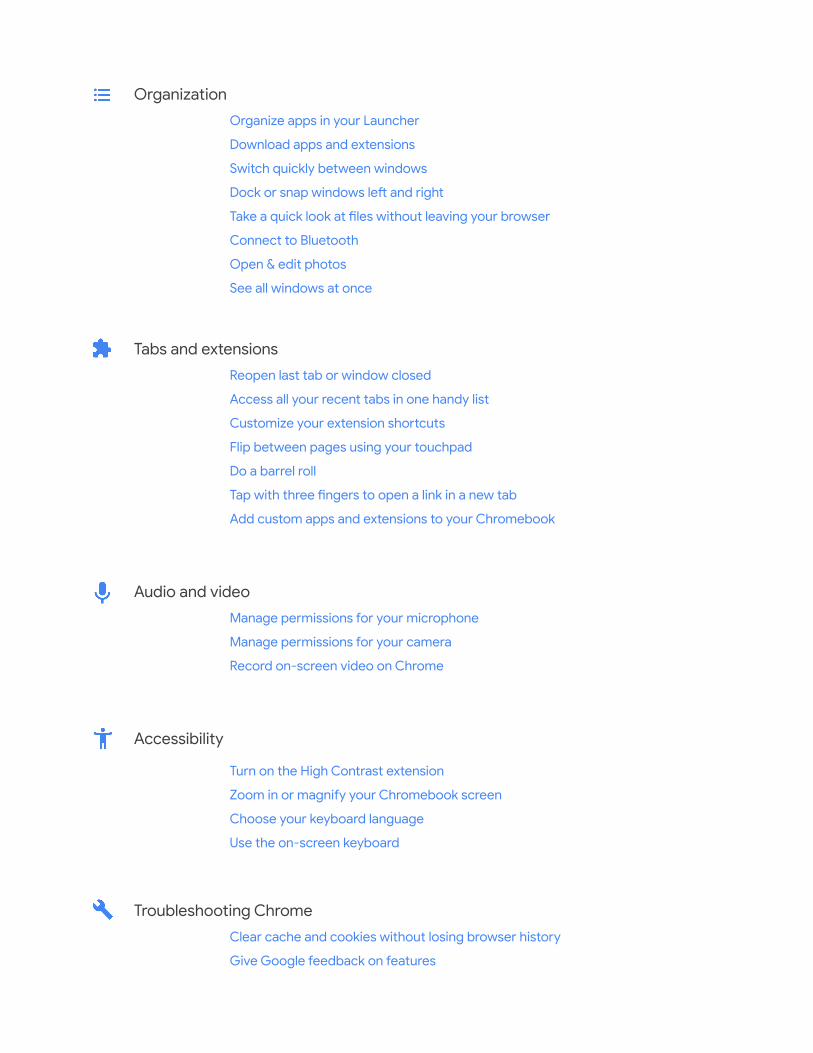
Organization
Organize apps in your Launcher
Download apps and extensions
Switch quickly between windows
Dock or snap windows left and right
Take a quick look at files without leaving your browser
Connect to Bluetooth
Open & edit photos
See all windows at once
Tabs and extensions
Reopen last tab or window closed
Access all your recent tabs in one handy list
Customize your extension shortcuts
Flip between pages using your touchpad
Do a barrel roll
Tap with three fingers to open a link in a new tab
Add custom apps and extensions to your Chromebook
Audio and video
Manage permissions for your microphone
Manage permissions for your camera
Record on-screen video on Chrome
Accessibility
Turn on the High Contrast extension
Zoom in or magnify your Chromebook screen
Choose your keyboard language
Use the on-screen keyboard
Troubleshooting Chrome
Clear cache and cookies without losing browser history
Give Google feedback on features

ProductivityScreenshot shortcutsWant to take a screenshot of something you’re working on? It’s easy. You can capture the entire screen or a portion of a page by using simple keyboard shortcuts.
All screenshots are saved to your downloads folder. You can easily upload them to your Google Drive for cloud access.
To capture the full screen
Hold down Ctrl + Switch window. Watch a werewolf do it.
Hint: The “switch window” key has a rectangle and two lines on it. On
most keyboards, it’s in the top row between the “full-screen” and
“brightness down” buttons (the old F5).
To capture part of your screen
Step 1. Hold down Ctrl + Shift + Switch window.
Step 2: Chrome’s cursor will be temporarily replaced with a crosshair.
Click and drag a square or rectangle across the part of the screen
you want to capture, then release the trackpad or mouse button.
See all keyboard shortcuts.

Manage notifications & do not disturb modeTo get all your important meeting reminders, pings and chats, you’ll need to make sure your notifications are turned on and that Do not disturb mode is turned off. Here’s how they both work.
Notifications
By default, Chrome alerts you whenever a website, app, or extension wants to send you notifications. You can change this setting at any time.
Note: If you’re browsing in Incognito mode, you won’t get notifications.
To allow or block notifications from sites:
1. On your computer, open Chrome
2. At the top right, click More ( ) > Settings
3. Click Advanced
4. Under Privacy and security, click Content settings
5. Click Notifications
6. Choose to block or allow notifications from a site:
● Block all: Turn off Ask before sending
● Block a site: Next to Block, click Add. Enter the site and click Add.
● Allow a site: Next to Allow, click Add. Enter the site and click Add.
Do not disturb
So you don’t miss a beat, turn off Do not disturb for the apps that you’d like to receive notifications from. Here’s how:
1. Click the time on the bottom right of your Chromebook
2. Click the gear/settings icon in the top right
3. Open the notifications panel under the Do not disturb icon
4. Select the apps you want to receive notifications from
Learn more about turning off notifications.

Work offlineNo Wi-Fi? No problem. You can keep working offline via G Suite or working in the Android version of the app you need (which you can download from the Google Play Store). Your Chromebook saves recently opened docs so they are always ready to go.
Before you start working offline (that is, before you lose Wi-Fi), you’ll need to adjust your Google Drive settings:
1. Connect to the Internet
2. Open the Google Docs Offline extension
3. Click Add to Chrome (if the button says Added to Chrome, you’ve already installed it)
4. Go to drive.google.com/drive/settings
5. In the Offline area, check the box (it might take a few minutes for the offline access setting to turn on)
6. Click Done
Then, to work on a file when your Chromebook isn’t connected to the Internet:
1. Click the Launcher in the bottom left of your screen, then click the up arrow
2. Click on Google Drive
3. Find the file you’d like to work on, and double-click to open it
4. Go to File and click Make available offline – a check mark will appear in the bottom left corner to show that the file is available offline
5. Once you’ve finished working on your file, any changes will sync to Google Drive the next time your Chromebook connects to the Internet
Learn more about working offline.
Finished Work? See how to watch movies offline.
Use CAPS LOCK on a ChromebookYou’ve probably noticed that there’s no Caps Lock key on a Chromebook keyboard. Don’t worry – if you need constant capitals, simply press Search + ALT. And again to turn it off. Seriously, see how how easy it is.
Note: If you’re using a Windows or Mac keyboard, press the Windows key or Command key instead of Search.
See all keyboard shortcuts.
Switch between profiles on Chrome OS
To set up multiple profiles
1. Sign out of all accounts
2. Add your personal account to the device by clicking Add person in the bottom left of the screen
3. Sign out of all accounts again, then sign into your work account
4. Click on your profile icon at the bottom right, which will then pull up both your work and personal accounts
5. Select the accounts you would like to sign in with
Tip: Use CTRL + ALT + < or CTRL + ALT + > to toggle between profiles.
Learn more about setting up and using multiple profiles.
Did you know that you can use your work Google Account alongside your personal Google Account? To have them both running simultaneously so you can easily switch between the two, you’ll just need to set up profiles for each (or more, if you want). Once it’s set up, you can also move windows between accounts with a couple of clicks.
How to ‘right click’ on a ChromebookYou’ve got two options here. You can either press the touchpad with two fingers to open the right-click menu, or you can click Alt and just use one finger on the touchpad.
You can change how your touchpad works, too. Here’s how and what you can do:
1. Select the time
2. Select Settings
3. In the Device section, select Touchpad (or Touchpad and mouse)
4. Then, here’s what you can change:
● Turn tap-to-click on or off
● Turn on tap dragging
● Swap your primary mouse button, if you use a mouse
● Change the speed your pointer moves across the screen
● Switch scrolling directions
Learn more about using your touchpad.

Search for anything on your ChromebookSearch for whatever comes to mind with Chromebook. From apps and files to things you’re curious about, the search button awaits.
Simply press Search on your keyboard to bring up the search bar. Then, start typing. This video shows you how it works.
Chromebook keyboard shortcutsFeel the need for speed? Memorise your most-used keyboard shortcuts to get stuff done faster.
Tip: Press Ctrl + f on this page to find your favourite. (“Undo your last action”, anyone?)
Some of the more popular keyboard shortcuts include:
● Take a screenshot: Press Ctrl + Show windows (or Ctrl + F5)
● Take a partial screenshot: Press Shift + Ctrl + Show windows (or Shift + Ctrl + F5), then click and drag
● Take a screenshot (on tablets): Press Power button + Volume down button
● Turn Caps Lock on or off: Press Search + Alt
● Lock your screen: Press Search + L
● Sign out of your Google Account: Press Shift + Ctrl + q (twice)
● See all keyboard shortcuts: Press Ctrl + Alt + /
Shortcuts on external keyboards
If you’re using a Windows or Mac keyboard, press the Windows key or Command key instead of Search .
To change how a specific keyboard key works:
1. Select the time (or press Alt + Shift + s)
2. Select Settings
3. Under Device, choose Keyboard
4. Change the function of one or more keys.
See all keyboard shortcuts.

CustomizationUse Chromebook in tablet mode with shortcutsSome Chromebooks can work as a laptop and a tablet.
If you have one of these models, the on-screen keyboard automatically opens when you flip the screen over the hinge. If a mouse is connected, you’ll stay in laptop mode.
In tablet mode, you can use these shortcuts to get stuff done faster:
● Take a screenshot: Press Power + Volume down buttons
● Turn off tablet or sign out: Press and hold the Power button until you see a menu to Power off or Sign out
● Turn off display: Quickly tap the Power button and release
● Use the on-screen keyboard: Tap any text box to show the on-screen keyboard. To hide the keyboard, tap anywhere outside the keyboard or tap Hide keyboard on the bottom right of your screen.
If you want, you can also use handwriting. Tap any text box to bring up the on-screen keyboard. Tap Handwrite and then, in the pad that appears, write text with your fingertip or touchscreen stylus.
Learn more about using your Chromebook as a tablet.

Sync your Chrome account settingsIf your device is dedicated to you, you can sync your Chromebook with any other devices you use. Syncing saves info like bookmarks, browsing history, passwords and other settings to your Google Account – so the info is available on any device you sign in to. By syncing, you get your info back if you lose your phone or get a new laptop.
Benefits of syncing your settings and data to your Google Account:
● Your saved settings appear when you sign in to the same account on a different Chromebook
● If your Chromebook is stolen or broken, simply sign in on a new device to access your history, settings, data, bookmarks, apps, extensions and themes (note: downloads are not synced)
● Changes to Chrome sync right away, so you can switch seamlessly between devices that you’re signed in to
To choose what info to sync:
1. Select the time
2. Select Settings
3. In the People section, select Sync
4. Choose what you'd like to sync (or, to use the same settings on every Chromebook that you sign in to, choose Sync everything)
Learn more about syncing your account settings.
Pin a web page to your desktopIf you often go to the same web page, you can pin it to your desktop for easy access. Here’s how:
1. Open the web page in Chrome
2. Click More ( )> Create shortcut
3. To add the shortcut to your shelf, click Create
Learn more about adding apps to your shelf.

Add custom features to your ChromebookAt the bottom or side of your screen, you'll see a row of apps. This is your shelf. You can add or remove apps from your shelf. You can bookmark web pages here, too.
To move your shelf:
1. Right-click anywhere on your shelf (press the touchpad with two fingers, or click Alt and just use one finger on the touchpad)
2. Point to Shelf position
3. Choose where you’d like the shelf to go
You can hide your shelf by right-clicking and then selecting Auto-hide shelf. To make it appear, simply move your pointer to the side of the screen it’s on.
Next to your account picture, you can see notifications, check your Chromebook’s battery life, raise or lower the volume, or change other settings.
Learn more about customizing your desktop.

SecurityShare your device using Guest ModeColleague needs to borrow your device? No problem. Simply switch to Guest Mode – this way, they can’t see your files, browsing activity, and other data but they still get to enjoy the full Chromebook experience.
In Guest Mode, your guest uses a separate temporary drive. When they’re done, their browsing session and files are erased – you simply sign into your profile to get back to work.
To switch over to Guest Mode:
1. If you’re signed in to your Chromebook, sign out
2. At the bottom, click Browse as Guest
Watch a magician do it.
To sign out of Guest Mode:
1. Click on the time
2. Click Exit Guest
Note: While any files, cookies, website data, and browsing activity created in Guest Mode are deleted from the device, the activity might still be visible to your network administrator or to the websites you visited.
Learn more about Guest Mode.

Three ways to keep your Chromebook safe and secure At Google, we take online security seriously. Though Chromebooks are designed with multiple layers of protection, it never hurts to take additional safety measures. Here’s what we recommend.
Tip 1: Do a monthly security checkup
Receive personalized security recommendations for your Google Account.
Tip 2: If you haven't already, turn on two-step verification
This makes it much harder for someone to break into your account. Even if they have your password, they (hopefully) don’t have your phone – with two-step verification, you need both.
Tip 3: Lock your Chromebook screen when you’re not using it
Before walking away from your device, press Search + L or, at the bottom right of your screen, click the time > Lock symbol. This locks your screen so others can’t access your device.
Note: When left idle, your Chromebook screen will automatically turn off in 6-8 minutes (depending if it’s plugged in or not).
Learn more about two-step verification.

Useful apps & featuresChat faster with Hangouts Chat Want a faster, more reliable chat window? Install the Hangouts Chat – a progressive web app that gives you a powerful yet simple way to message coworkers, have group conversations, and more.
Follow the steps below to install Hangouts Chat:
1. Navigate to chat.google.com
2. Make sure you are signed in with the correct G-suite work profile
3. Wait for the page to load (let the loading toast disappear first)
4. Open the Chrome Settings dropdown ( ) and select Install Hangouts Chat
Once installed, the app is integrated with other apps in your Chrome OS browser and can be launched with a simple click.
Learn more about using Hangouts.
What is a progressive web app?
Think of a progressive web app (PWA) like a website, but it feels and acts like an app.
You can install and experience a PWA like Hangouts Chat as a stand-alone app, independent of the browser. Once installed, PWAs can be launched from the home screen or the Chromebook shelf, running in their own windows by default. PWA's can also be written so that certain features will continue to work offline, when there is no Internet connectivity.

Switch to Night Light to give your eyes a restAs the light fades in the evening, you might want to switch over to Night Light mode. With warmer red hues, this can be easier on your eyes and help you fall asleep faster.
To toggle it on or off, click the time > Night Light
To customize your screen color and set it to change automatically at night:
1. Click the time and select Settings
2. In the Device section, select Displays
3. Scroll down to Night Light and toggle Night Light on
4. Adjust the Color temperature to your liking
5. Choose a Schedule for Night Light mode:
● Custom: Enter your own start and end times
● Sunset to sunrise: This uses your current location’s sunset and sunrise times
● Never: This stops the automatic switch-over
Learn more about changing your screen color.

Hear text read aloud with built-in screen reader
To hear pages read aloud to you, turn on your Chromebook’s built-in screen reader:
1. Click on the time or press Alt + Shift + s
2. Click Settings
3. At the bottom, click Advanced
4. In the Accessibility section, click Manage accessibility features
5. Under Text-to-Speech, turn on Enable ChromeVox
Once activated, you should see a Screen Reader icon at the top of your screen.
You can turn ChromeVox on or off from any page by pressing Ctrl + Alt + z.
Watch this video tutorial to learn more about ChromeVox.
Your Chromebook can read to you. The built-in screen reader can read full pages, parts of a page, or specific words using Select-to-speak.
Save web pages using theGoogle Keep Chrome extension
To save specific content as a note
1. Select the content you want to save
2. Right-click > click Save to Keep or Save selection to Keep
To save a whole webpage
1. Go to the webpage you want to save
2. In the top right of your browser, click Keep
Learn more about Google Keep.
Found a web page, image or quote that you want to save for later? Use the Google Keep Chrome extension to file it away. You can even add notes or labels to help you find it later.
If you haven’t already, install the Google Keep Chrome extension.

Organization Organize apps in your Launcher Got app overload in your Launcher window? It’s time to get organized! You can create folders and sort apps into categories so they’re easier to find.
To organize your apps:
1. Click or tap an app you want to organize and drag it on top of another app icon
2. This creates a folder with both apps in it
3. Click or tap to open the folder and give it a name
Tip: If you ever want to take an app out of a folder, just click and drag the app outside of the folder.
Learn more about finding and organizing apps.
Download apps and extensionsTo add an app or extension:
1. Open the Chrome Web Store
2. In the left column, click Apps or Extensions
3. Browse or search for what you'd like to add
4. When you find an app or extension you'd like to add, click Add to Chrome
5. If you're adding an extension:
a. Review the types of data that the extension will be able to access
b. Click Add extension
6. New apps will appear in your Launcher

Switch quickly between windowsMove from window to window like a pro. Simply hold down Alt and press Tab to move to the next open window. Keep hitting Tab if you want to move through multiple windows.
Learn more about multitasking with open windows.
Dock or snap windows left and rightWant to view two windows at once? It’s a snap.
Use window snapping to split your screen so you don’t have to click back and forth between windows. You’ve got two options to snap windows.
1. Drag the window
● Select the window you want to dock and drag it to the far left or right of the screen. Wait for the split screen frame to appear. Release the window, snapping it into place.
2. Window snapping shortcut
● To dock (or snap) a window to the left of the screen press Alt + [
● To dock (or snap) a window to the right of the screen press Alt + ]
Learn more about multitasking with open windows.
Take a quick look at your files without leaving your browser Need a quick peek into your file folder? But don’t want to leave the website you’re on?
Simply press Ctrl + O to open your file folder while you’re still in the Chrome browser. You can then look through your files and get back to browsing in no time.
Learn more about opening, saving, and deleting files.

Connect to BluetoothCue the music! Connecting your Chromebook to Bluetooth is super simple, as this video shows.
Here’s how:
1. Make sure the Bluetooth device you want to connect is switched on, nearby, and ready to pair
2. Click on the Quick Settings Panel at the bottom right of your screen
3. Click Bluetooth
4. Select the device you want to pair with
5. Follow any additional instructions on screen
Learn more about connecting to Bluetooth.
Open & edit photosTouch up your pictures like a pro. This pirate shows how easy it is (hello, pretty bird).
Here’s how:
1. Open Google Photos from the Launcher
2. Choose a photo
3. Click the Edit icon
4. Make your adjustments
5. Click Done to save your changes
Learn more about editing photos.
See all windows at onceGet a clear picture of everything you’re working on by pulling up all your windows at once. It’s easy – just use the three-finger swipe, as this magician shows you.
Here’s how:
1. On the trackpad, swipe down or up with three fingers in a single motion
2. With all your windows visible, you can then select one to work on

Tabs and extensionsReopen the tab or window you closed lastHave you ever accidentally closed a tab or window while you’re working? No need to worry! You can reopen your most recent window using a quick keyboard shortcut and get right back to work.
Simply press Ctrl + Shift + t – and, hey presto, that window or tab reappears.
Learn more about Chromebook keyboard shortcuts.
Access all your recent tabs in one handy list
Here’s how to get started:
1. Install Tabs extension
2. Press Alt+T to toggle a heads-up list of all your tabs
How to fix hardware and system problems.
Multitask, much? If you work with a ton of tabs, then you’ll love the Tabs extension.
It provides a simple, usable index of all your recent tabs – which you can search, select, and manage from one window.

Customize your extension shortcutsHands up if you love a good shortcut. Two hands up if you find it hard to memorize all the default commands on your extensions.
Good news! You can customize an extension’s default shortcuts if you want to use different key combinations, or if the default shortcuts conflict with other apps or extensions you use.
Here’s how:
● In your Chrome browser, type chrome://extensions/shortcuts into the search bar and press Enter
● Navigate down the page and find the extension you’d like to create a customized shortcut for
● Enter your custom shortcut command into the text box next to the function you want to customize
● When you're finished editing shortcuts, close the browser tab or window.
Note: All commands must begin with Ctrl, Alt, or Search

Tap with three fingers to open a link in a new tab
If you’re browsing the web and want to open a link in a new tab, there’s a shortcut. It’s the three-fingered tap.
Simply point to the link you want to open, tap your touchpad with three fingers, and voila, the link opens.
See the two-finger swipe in action.
Flip between pages using your touchpadDid you know you can flip between pages in your browser with a simple two-finger swipe?
If you want to go back one page, swipe left with two fingers. Change your mind? Go forward again with by swiping right with two fingers.
See the two-finger swipe in action.
Do a barrel rollYes, a barrel roll. Channel your inner Maverick and go Top Gun on your Chromebook.
Simply press and hold Ctrl + Alt + Shift + Rotate to make your open window perform a barrel roll.
See what a barrel roll looks like.

Add custom apps and extensions to your Chromebook Want a few extra bells and whistles? You can easily customize your Chromebook with extra apps to suit the way you work. Installing apps is easy – and there’s no need to restart your computer once done. Once installed, they work like regular programs and will appear in your launcher and on your Chrome OS toolbar.
Here’s how to install corporate apps or extensions from the Google Play Store:
1. Open the Chrome Web Store
2. In the left navbar, click Apps or Extensions
3. Browse or search for the app you want
4. When you find it, click Add to Chrome
5. If you're adding an extension:
a. Check with your System Admin or IT team that you are allowed to download extensions
b. If yes, review the types of data that the extension will be able to access
c. Click Add extension
Complete the installation and you’re all set!
Learn more about apps and extensions.

Audio and videoManage permissions for your microphone When you visit sites like Google Hangouts or Skype on Chrome, you’ll need to give the site permission to access your device’s microphone. You can change your mic permissions for individual sites within your device settings.
Here’s how to give a specific site permission to use your mic:
1. Open Chrome
2. Go to the site that wants to use your microphone
3. When prompted, choose Allow or Block
Then, here’s what you need to know about how sites use your mic:
● Sites can start to record when you're on the site (if you're in a different Chrome tab or a different app, the site can't record)
● If you lock your phone screen, the site will stop using your camera – but it can still use your mic
● If you’ve blocked a site, that site may not work properly – for example, on a conferencing site, listeners won’t be able to hear you if your mic is blocked
If you’ve blocked a site from accessing your mic, but then change your mind, follow these steps to allow access:
1. Open Chrome
2. At the top-right, click More > Settings
3. At the bottom, click Advanced
4. Under 'Privacy and security', click Content settings
5. Click Microphone
6. Turn Ask before accessing on or off
To remove an existing exception or permission, click Delete.
Learn more about changing site permissions.
Manage permissions for your cameraEver try to use an app like Google Hangouts or Skype, but can’t get the video to work? You may need to change your device’s camera permissions. Within settings, you can alter permissions for individual sites.
Here’s how to give a site permission to use your camera:
1. Open Chrome
2. Go to the site that wants to use your camera
3. When prompted, choose Allow or Block
Then, here’s what you need to know about allowed or blocked sites:
● Allowed sites: Sites can start to record when you're on the site. If you're using a different Chrome tab or a different app, a site can't start recording.
● Blocked sites: Some sites won't work if you block them. For example, you won't be able to join a video conference.
Learn more about changing site permissions.
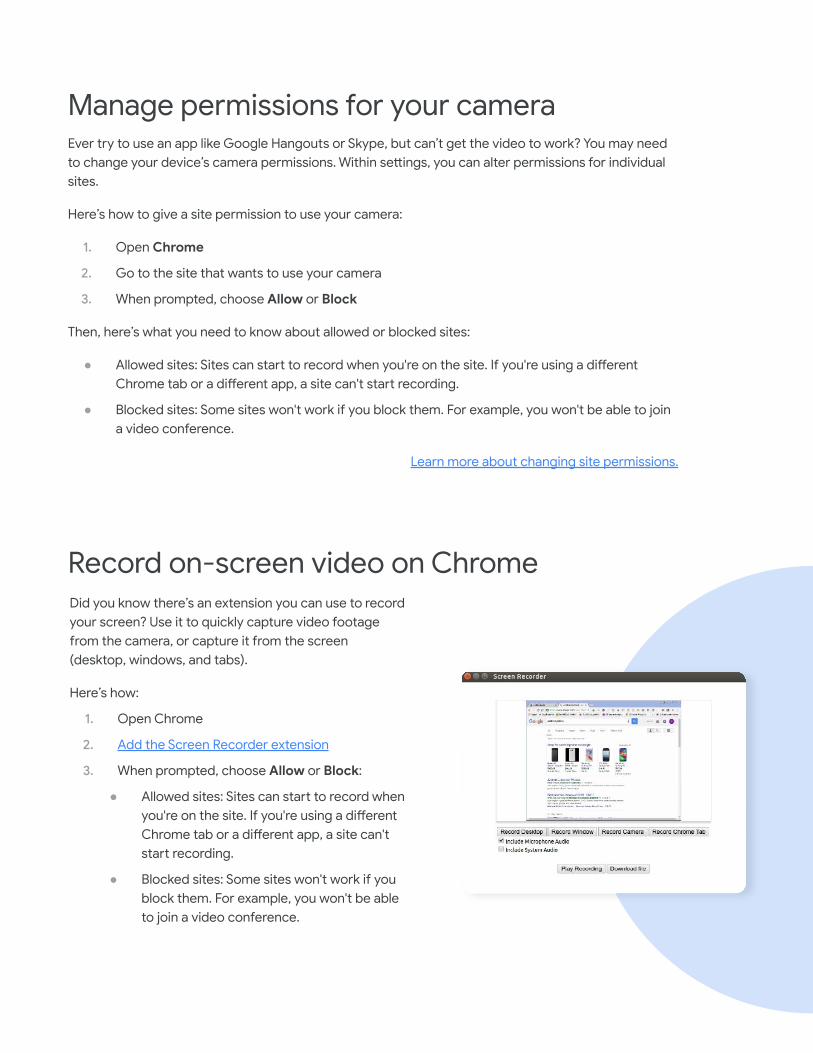
Record on-screen video on ChromeDid you know there’s an extension you can use to record your screen? Use it to quickly capture video footage from the camera, or capture it from the screen (desktop, windows, and tabs).
Here’s how:
1. Open Chrome
2. Add the Screen Recorder extension
3. When prompted, choose Allow or Block:
● Allowed sites: Sites can start to record when you're on the site. If you're using a different Chrome tab or a different app, a site can't start recording.
● Blocked sites: Some sites won't work if you block them. For example, you won't be able to join a video conference.

Accessibility Turn on the High Contrast extensionDid you know you can invert the colors on-screen so it’s easier on your eyes? The High Contrast extension gives you a few options for changing the way things look on-screen – you can play with filters to adjust color contrast, flip black and white, or remove colors altogether. You can also customize your settings by website.
Here’s how:
1. Install the extension
2. Turn it on by clicking High Contrast (to the right of the address bar)
3. Under Color scheme for [site], select the color scheme you want
4. To turn it off, click High Contrast > Disable
Some built-in webpages on Chrome can't be adjusted, like the Chrome Web Store, the New Tab page, and the Chrome settings page.
Learn more about Chromebook accessibility features.

Zoom in or magnify your Chromebook screenNeed to zoom in on the fine print? No problem. You can easily change your screen resolution, zoom in, or magnify your screen.
To adjust a single page, while keeping other parts of your screen the same:
● To make it bigger, press Ctrl and +
● To make it smaller, press Ctrl and -
● To reset, press Ctrl and 0
You can also make all pages bigger or change the font size.
To make everything on your screen bigger or smaller, including your row of apps and tabs:
● To go bigger, press Ctrl and Shift and +
● To go smaller, press Ctrl and Shift and -
● To reset, press Ctrl and Shift and 0
Got a touchscreen? You can zoom in by touching an area with two fingers, then spreading your fingers. Or pinch your fingers together to zoom in.
To quickly magnify your whole screen, you can press Ctrl + Search + m or follow these steps:
1. Click your account photo or press Alt + Shift + s
2. Click Settings
3. At the bottom, click Advanced
4. In the Accessibility section, click Manage accessibility features
5. Under Display, turn on Enable fullscreen magnifier
6. To choose your zoom level, next to Full Screen zoom level, click the down arrow
Note: On a touchscreen, use two fingers to move around the screen after zooming in.
This video walks you through your zoom options.
Learn more about zooming and magnifying your screen.

Choose your keyboard languageOla! Ciao! Howdy! Bonjour!
Did you know that you can switch between keyboard languages on your Chromebook? You can also change your spell check settings and special characters like accents or currency symbols.
Here’s how to add languages to your keyboard:
1. Click the time
2. Select Settings > Advanced
3. Select Language > Add languages
4. Choose your language(s) and select Add
5. In the Languages and input section, select Input method > Manage input methods
6. Check the boxes next to the keyboard languages you'd like to use
Then, to select a particular language:
1. Select the keyboard language you want to use (you’ll see Enabled listed under the current keyboard)
2. To see all your keyboard language options on your desktop, turn on Show input options in the shelf
If you have more than one keyboard language turned on, you can easily switch between keyboard languages by pressing Ctrl + Shift + Space until you see the language you want (press Ctrl + Space to switch back).
To set your spell check language:
1. Click the time
2. Select Settings > Advanced
3. In the Languages and input section, select Spell check
4. Choose the languages you want to use for spell check
Learn more about keyboard languages.

Use the on-screen keyboardTo type or handwrite text, or to add images to files, documents, and emails, you can use your Chromebook’s on-screen keyboard.
Here’s how to turn it on:
1. Click the time
2. Tap Settings
3. At the bottom, tap Advanced
4. Under Accessibility, tap Manage accessibility features
5. Under Keyboard, tap Enable on-screen keyboard
Then, you can adjust keyboard settings like:
● Turn keypress sound on and off
● Set the level of automatic correction you'd like
● Erase all changes you've made to your dictionary
● Turn auto-capitalization on and off
● Choose whether a double space automatically adds a period
Learn more about using your on-screen keyboard.
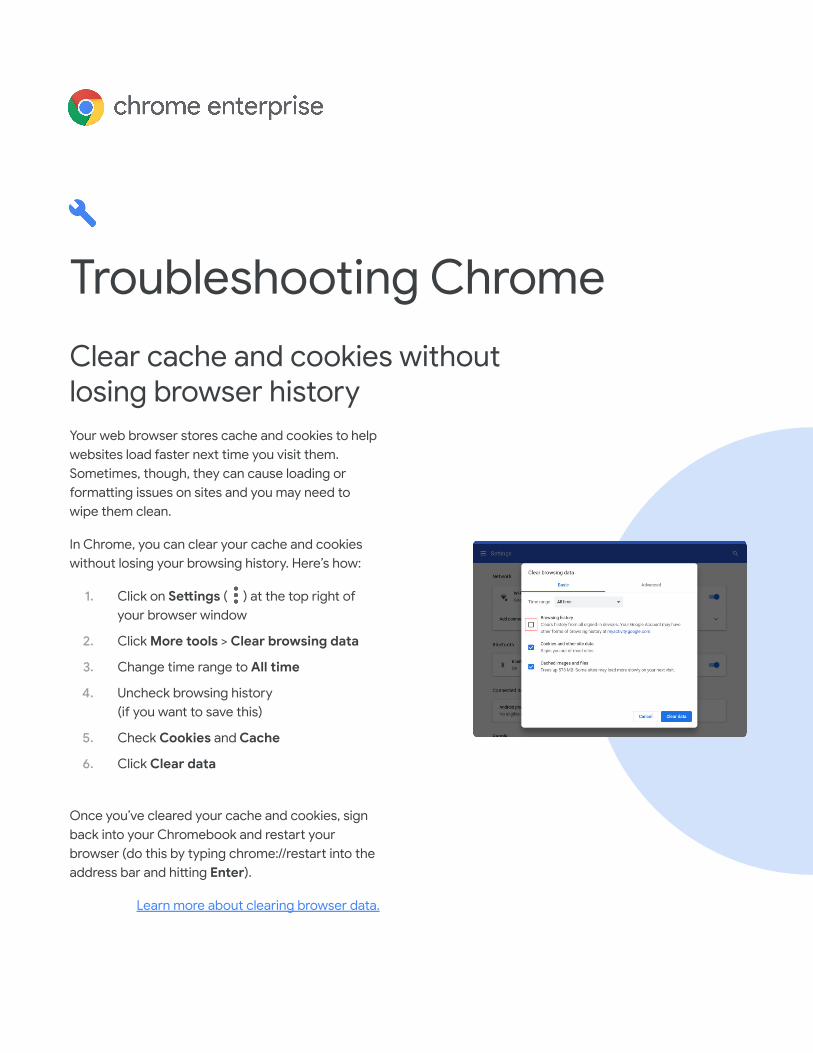
Troubleshooting ChromeClear cache and cookies withoutlosing browser historyYour web browser stores cache and cookies to help websites load faster next time you visit them. Sometimes, though, they can cause loading or formatting issues on sites and you may need to wipe them clean.
In Chrome, you can clear your cache and cookies without losing your browsing history. Here’s how:
1. Click on Settings ( ) at the top right of your browser window
2. Click More tools > Clear browsing data
3. Change time range to All time
4. Uncheck browsing history(if you want to save this)
5. Check Cookies and Cache
6. Click Clear data
Once you’ve cleared your cache and cookies, sign back into your Chromebook and restart your browser (do this by typing chrome://restart into the address bar and hitting Enter).
Learn more about clearing browser data.

Something bugging you? If there’s a bug or issue with your Chrome OS, we recommend that you report it to both your IT team and to Google.
Providing feedback to Google is easy using the product feedback keyboard shortcut. The shortcut opens a feedback window, where you can briefly describe the problem, link to the page where the issue is occuring, capture a screenshot, or attach a file with additional information.
Here’s how to report an issue to Google:
1. Press Alt + shift + i
2. Describe the issue in the textbox
3. Use your Google Account whenever possible to file reports or, if using a personal account, include your google.com email for reference
4. Include any additional information such as a screenshot or document that may help to show what’s wrong
5. Click Submit
Note: This shortcut only works when used outside of Docs and Sheets.
Learn more about reporting a problem.
Give Google feedback on features