Embed Size (px)
Citation preview

Contact Us AKDesigns Boutique
Updated 4/4/2016 [email protected] Page 1 of 13
www.akdesignsboutique.com
Copyright 2016
Tips & Tricks
This tips & tricks document was created and is maintained with all embroidery levels in mind, from beginner to
expert. At different points, we all need to be refreshed on basics or just need a new trick for a special project that
we’re working on. So, no matter your skill level, you should find this document helpful.
To search the tips & tricks, just type 1 keyword into the search box
[pictured below] and press enter. This will take you to the first place
that the word exists in the document, then press the arrow pointing to
the right to go to the next occurrence until you find the topic you’re
looking for.
First Things First...
1. The User Manual for your specific embroidery machine should be a tool that you have handy
or use frequently. Because the “search/find” feature is so much faster than thumbing through an
actual book, an online machine manual is best.
2. There are so many variables with every stitch out that when problems arise, you must be an
investigator to determine what part of the process went wrong. The tips in this document are
meant to help you along the way and serve as a guide.
3. Stabilizing is KEY – stabilizing is one of the most important parts of embroidery. Always
choose the right stabilizer for the fabric/design that you're working on to ensure that your items
won't be able to shift or move while the design is being stitched.
4. Start an Embroidery Notebook – right after you finish a project [especially a project you don't
do all the time], just jot down a few key notes about how it turned out and the products you
used. A notebook entry example is shown below.
Item
Stitched
Type of
Stabilizer
Used
Type of
Needle
Used
Type of
Thread
Used
Type of Bobbin
Thread Used
Design Name & Size if applicable
- note any changes made to
original designs before stitching
Topping
Used?
Comments
Thin
Nylon
Backpack
8x8 Cutaway
- 1 sheet
Ballpoint
75/11
Madeira Red Magna-Glide
White
#32 Fun Font – no adjustments Solvy Stitched
perfect

Contact Us AKDesigns Boutique
Updated 4/4/2016 [email protected] Page 2 of 13
www.akdesignsboutique.com
Copyright 2016
Help by Topic in Alphabetical Order
Aligning letters – when you combine/merge letters and designs together, they are usually brought in the viewing
area on top of each other, so you will need to move and align them before stitching. Below are some basic steps.
o Left click the letter to select it – once you left click a box will appear around it [pictured below].
o Now that the letter is selected, “left click and hold” anywhere inside the box, then “drag” it where you want it using
your mouse.
o Viewing the Grid Lines can help with alignment also. Just click on View, then Grid Lines
o Repeat until all letters/designs are aligned
Applique – Every applique design is different and has different border widths and stitch types, so this will always vary
from design to design. Below are some general tips & tricks that should help.
o Read the applique instructions that are included with the design or click here
http://www.akdesignsboutique.com/pages/Helpful-Tips-%26-Docs.html to see the Applique Instructions on our
website [link is located on Helpful Tips & Docs page]
o Stitch on scrap fabric first to ensure that you have a good feel for how the design will stitch
o You might consider 2 test stitches ~ one cutting the applique fabric in the hoop and one using the pattern to see
which method you prefer
o Consider using a sheet of solvy topping on top of the applique fabric before the final stitch to cut down of some of
the pokies that you might otherwise have – especially with fabric that frays easily or has a nap. Solvy, in addition
to preparing with fusible backing and trimming closer to the cutting line, will ensure a great applique stitch every
time.
o Don't skip preparing the applique fabric with fusible interfacing of some kind [like Fuse Adhere – click here
http://www.akdesignsboutique.com/products/Fuse-Adhere-Fusible-Backing-11-3%7B47%7D4%22-x-8%22-
pre%252dcut-square.html to see it on our website or use the search box and search for "fuse"] - it makes a big
difference in the final product
o Stabilizer is always key to a nicely stitched embroidery project
o Sometimes the satin stitch or any other final stitch may stitch out of order to make the design stitch more easily and
efficiently
o If you must resize – use the no more than 20% rule [larger or smaller] and always test stitch after making any
design changes.
o Use an Applique Frame to cover a mistake
o Use small embroidery scissors to trim around cutting stitches in the hoop [like Belmont or Squeezers – click here
http://www.akdesignsboutique.com/categories/Embroidery-Supplies/Scissors/ to see all the scissors on our
website or use the search box and search for "scissors"
o Thread Color – use this guide to determine thread color
Satin Stitch – use the same color thread for all stitches so that the cutting and tack down stitches won’t be
seen.
Zig Zag Stitch – Cutting Stitch – use a color that closely matches your fabric
Heirloom Stitch – Cutting Stitch – use the same color that you plan to use for the Heirloom Stitch
Diamond Stitch – Cutting Stitch – use the same color that you plan to use for the Diamond Stitch
Feather Stitch - Cutting Stitch – use the same color that you plan to use for the Feather Stitch
Jack & Jill Stitch - Cutting Stitch – use the same color that you plan to use for the Jack & Jill Stitch

Contact Us AKDesigns Boutique
Updated 4/4/2016 [email protected] Page 3 of 13
www.akdesignsboutique.com
Copyright 2016
Appliqué Fabric - Make sure to allow for nap when stitching appliqué designs on items like towels and minky
blankets.
If you use the pattern cutting method, make sure to allow for extra "seam" allowance when cutting out your fabric.
This will help to ensure that the fabric covers the area fully. Try to visualize the nap as "padding" under the appliqué
fabric. So, the thicker, more plush the nap is, the more fabric will be needed.
Appliqué Fabric Prep – press and apply a fusible backing to your applique fabric. This will keep your fabric
stable and ensure that the edges don’t fray. It will also give your applique an overall cleaner look. Use our Appliqué
Instructions for a step by step guide with pictures - click here
https://www.myotherdrive.com/dyn/file/546.003320.31012010.19144.6a65fi/Applique+Instructions.pdf or you can
view it on our website [link is located on Helpful Tips & Docs page]
o Fuse Adhere is a good choice for fusible backing – click here
http://www.akdesignsboutique.com/products/Fuse-Adhere-Fusible-Backing-11-3%7B47%7D4%22-x-8%22-
pre%252dcut-square.html to see it on our website or use the search box and search for "fuse"
Bird’s nest – many things can cause a bird’s nest. Below are some things to do to troubleshoot, to consider & check.
o To Consider or Check Did you resize the design? Making a design smaller will sometime’s cause a bird's nest, thread breaks and
needle breaks
Use a thread stand that stands behind the machine. It allows the thread unwind and flow nicely to the
machine
Use a thread sock [click here http://www.akdesignsboutique.com/products/6-Pack-of-Thread-Socks-or-
Stockings.html to see it on our website or use the search box and search for "sock"]. It’s a mesh sock that
stretches to hold thread snugly eliminating tangles, snarls and wasted thread
Is this a new thread ~ have you stitched other designs with this thread without problems?
Is the design too dense ~ have you stitched this design before without problems?
Was the item stabilized sufficiently?
o To Do to Troubleshoot Totally unthread top thread, check all guides for debris and rethread
Take the bobbin out of the case, check for debris and put it back in or put a new bobbin in
Change your needle – it may be dull, bent or have a bur on it causing the thread to not pass through it
smoothly
Make sure the tension is set correctly for the thread you are using [sometimes different thread weight and
brands need different tension settings]
After trying/considering all above, test stitch a design that you've stitched in the past without problems.
Bobbin casing – regularly clean and oil your bobbin area [the case and the race]. Your manual will tell you how to
clean and oil [click here http://www.akdesignsboutique.com/products/Pre%252dfilled-Hollow-Needle-Precision-Oil-
Dispenser.html to see our oil the website or use the search box and search for "oil"] – all machines are a little different.
Bobbin thread – before starting to stitch a new item, make sure you have enough bobbin thread on the bobbin to
complete it; especially if it will be difficult or impossible to change your bobbin in the middle of the stitch out.
Creating curved words using Embird [or a similar program] – click here
http://www.akdesignsboutique.com/pages/Helpful-Tips-%26-Docs.html to find the instructions on our website [link is
located on Helpful Tips & Docs page]

Contact Us AKDesigns Boutique
Updated 4/4/2016 [email protected] Page 4 of 13
www.akdesignsboutique.com
Copyright 2016
Combining / Merging letters or other embroidery designs – below are some basic steps. o Open Embroidery Software
o Open the design/letter that you want to stitch first [in the back]
o Once that design is opened, click on File/Save As and name the file that you intend to make [example: if you are
going to spell “Angie” in the CurlyQue font, you could name it "AngieCurlyQue"]. This will ensure that you don't
modify or change the original file in any way. Also, remember to merge/combine in the order that you want them
to stitch ~ the first design brought in will stitch first, etc.
o Click on File/Merge or Insert to bring in the next letter/design
o Repeat until you have all the letters/designs
o Now you can resize [see Resizing Design below for guidelines] and align [see Aligning Letters above]
o Save – make sure to save in a format that your machine can use
o Send your new design to your machine to stitch!
Design, Appliqué & Template Choices - Our Design, Appliqué & Template Catalog will help guide
you through our selection. Just go to the website and click on AKD Catalogs to see the most current catalogs.
Design thread colors – the colors listed in the design are just suggested colors or sometimes just “place holders”.
Feel free to use your imagination and make the design your own by changing the colors. If the design you’re working on
has several stitch angles and stitch types, you can even eliminate some of the colors [stitch them in the same color] because
the angles and types will all reflect the light differently to make them appear to be different colors.
Designs – Remember that all designs are not for all projects. Below are just a few examples and tips.
o Some designs are too narrow or skinny for plush items like fleece & minky blankets
o Some designs are too dense and large for thin & stretchy knits.
o Some design elements are complex and are “lost” on fabrics that are too busy or are too plush
o Tips:
Use your embroidery software to make adjustments
Make the letters or designs more bold or thick
Make letters or designs less dense
Remember to always test stitch once you've made any adjustments to ensure that it will stitch properly.
Embroidery Software – How to Choose which is best? Visit our website and click on Selecting Embroidery
Software under the Help menu.
Embroidery Supply Choices - Our Embroidery Supply Catalog will help guide you through our selection.
Just go to the website and click on AKD Catalogs to see the most current catalogs.
Font, Monogram, Number & Symbol Choices - Our Font, Monogram, Number & Symbol Catalog
will help guide you through our selection. Just go to the website and click on AKD Catalogs to see the most current
catalogs.

Contact Us AKDesigns Boutique
Updated 4/4/2016 [email protected] Page 5 of 13
www.akdesignsboutique.com
Copyright 2016
Font size – How to Choose – This question is asked periodically and it’s never an easy question to answer. There are
many things to consider when making a decision on what size fonts you need to purchase because you will need so many
different sizes and types for different projects. Below are a few things to consider.
o What size hoops do you have? You'll want to make sure that you're able to spell names in the hoop without resizing
too much.
o What kind of projects will you be stitching? Will you need large or small fonts/letters for those projects?
o Will you be combining the fonts/letters with designs? If so, you'll want to make sure that the fonts/letters plus the
design can all fit in your hoop.
o Are you looking at fonts for names, or monograms that are stackable, single letter monograms or 3 letter monograms?
o For 4x4 hoops, 1" and 1.5" fonts fit best. They are also a good size when combining with designs.
o Fonts to spell names - the most popular sizes are 1", 1.5" and 2".
o Stackable Monograms - the most popular sizes are 3.5" and 4".
o 3 Letter Monograms - the most popular sizes are 3" & 1.5" [one set includes the 3” & 1.5” letters], and the various
sizes of large sets [approx. "8 & 5"].
o Single Letter Monograms - the most popular sizes are 4" and 1" [1” is good for ribbon].
o A calculation that might help [a little] - There's no exact way of knowing how wide a certain name will be once all of
the letters are combined. So, you'll want to look at the letters in the font you're considering to determine if it runs
wide, normal or narrow. Let's say that a normal letter has about the same height and width [2" x 2"]. Let's also assume
that the lowercase letters are half the width of the uppercase letters [1"]. So, if you want to create a 4 letter name, it
might be about 5" wide [2"+1"+1"+1"]. Again, this isn't exact by any means, but it might give you a little better idea
of what you can expect.
Frame & Border Choices - Our Frame & Border Catalog will help guide you through our selection. Just go
to the website and click on AKD Catalogs to see the most current catalogs.
Hooping – Steps to hoop stabilizer ONLY and properly align item without hooping
o Hoop your stabilizer
o Use your hoop template to make your alignment dots on the stabilizer
o You may or may not want to use a small ruler to connect the dots to draw alignment lines [I don't, but some people
do]
o Use your hoop template and a pen or chalk pencil that is removable to mark the same alignment dots [just the dots,
not lines] on your item where you want your design to stitch. Just remember the center of the hoop is the center of
the design, so start by putting the center of the hoop template where you want the center of the design.
o Optional - Spray a little adhesive spray on the stabilizer [I have a box under my work table that I spray in so that I
don't get spray all over my work table/floor, etc.]
o Lay your item over the alignment dots. This step is a bit of guess work because you can't usually see through your
item to know if you have it aligned or not - don't worry, just lay it over about where you think the dots on the item
will line up with the dots on the stabilizer
o Align1 - Place a pin in your alignment dots that are on your item [make sure you penetrate the item well]. I use the
long quilting pins for this step, the longer pins are just easier to work with.
o Align2 - Lift your item enough so that you can see under it and see the alignment dots on the stabilizer. You should
also be able to see all of the pins in the item.
o Align3 - Start with the pin/dot furthest away from the edge that you are lifting and place the pin in the dot in
the stabilizer. Repeat for all the alignment dots. I have a sewing table with fabric covered foam, so this part is tricky
if you're working on a "hard" surface.
o Align4 - Once you have all of the pins aligning the dots you can gently smooth the surface of the item [t-shirts, polos,
etc., but bags won't really need to be smoothed] to make sure that it's laying nice and flat and aligned in the hoop.
o Align5 - Now, you will gently lift your item and hoop from the table and actually pin the item to stabilizer. This is
why I use a little spray adhesive, so that my item stays put for this step.
o Make sure that you pin where it isn't going to stitch or you can pin where it will stitch and remove the pins just before
it stitches there [I've had to do this, so please be careful that you don't stitch your finger! :) ]
o Now you're ready to stitch it!
Contact Us AKDesigns Boutique
Updated 4/4/2016 [email protected] Page 6 of 13
www.akdesignsboutique.com
Copyright 2016
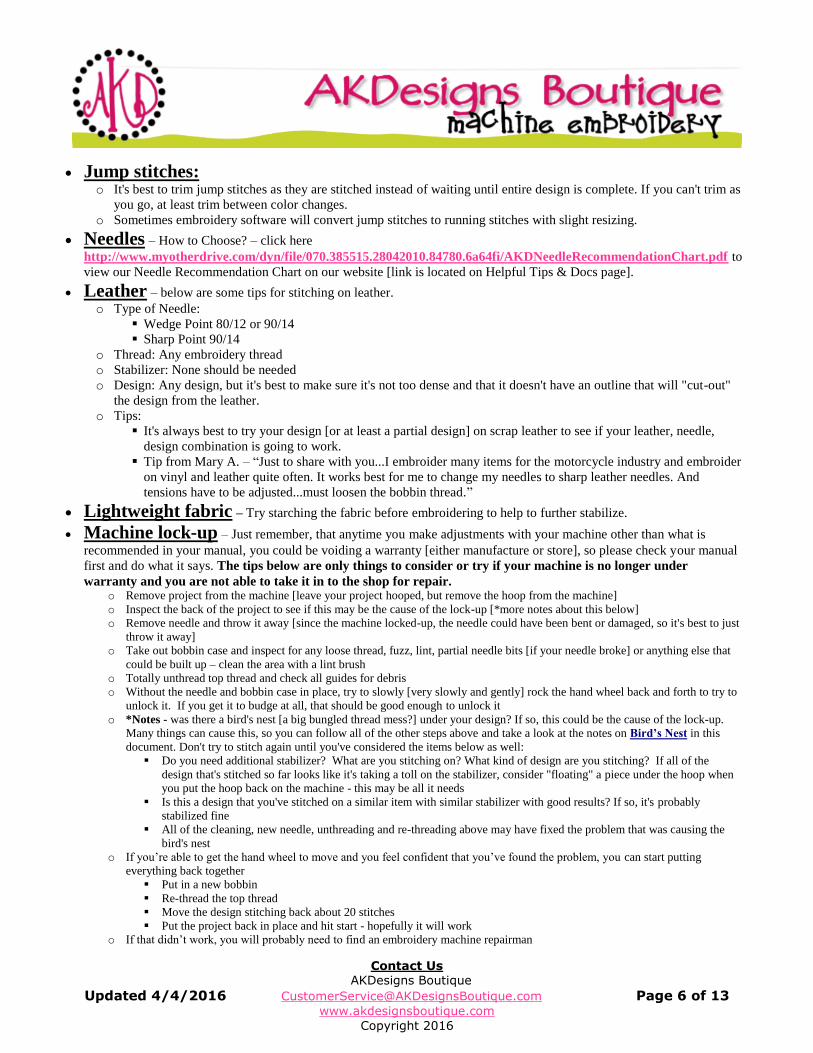
Jump stitches: o It's best to trim jump stitches as they are stitched instead of waiting until entire design is complete. If you can't trim as
you go, at least trim between color changes.
o Sometimes embroidery software will convert jump stitches to running stitches with slight resizing.
Needles – How to Choose? – click here
http://www.myotherdrive.com/dyn/file/070.385515.28042010.84780.6a64fi/AKDNeedleRecommendationChart.pdf to
view our Needle Recommendation Chart on our website [link is located on Helpful Tips & Docs page].
Leather – below are some tips for stitching on leather.
o Type of Needle:
Wedge Point 80/12 or 90/14
Sharp Point 90/14
o Thread: Any embroidery thread
o Stabilizer: None should be needed
o Design: Any design, but it's best to make sure it's not too dense and that it doesn't have an outline that will "cut-out"
the design from the leather.
o Tips:
It's always best to try your design [or at least a partial design] on scrap leather to see if your leather, needle,
design combination is going to work.
Tip from Mary A. – “Just to share with you...I embroider many items for the motorcycle industry and embroider
on vinyl and leather quite often. It works best for me to change my needles to sharp leather needles. And
tensions have to be adjusted...must loosen the bobbin thread.”
Lightweight fabric – Try starching the fabric before embroidering to help to further stabilize.
Machine lock-up – Just remember, that anytime you make adjustments with your machine other than what is
recommended in your manual, you could be voiding a warranty [either manufacture or store], so please check your manual
first and do what it says. The tips below are only things to consider or try if your machine is no longer under
warranty and you are not able to take it in to the shop for repair. o Remove project from the machine [leave your project hooped, but remove the hoop from the machine]
o Inspect the back of the project to see if this may be the cause of the lock-up [*more notes about this below]
o Remove needle and throw it away [since the machine locked-up, the needle could have been bent or damaged, so it's best to just
throw it away]
o Take out bobbin case and inspect for any loose thread, fuzz, lint, partial needle bits [if your needle broke] or anything else that
could be built up – clean the area with a lint brush
o Totally unthread top thread and check all guides for debris
o Without the needle and bobbin case in place, try to slowly [very slowly and gently] rock the hand wheel back and forth to try to
unlock it. If you get it to budge at all, that should be good enough to unlock it
o *Notes - was there a bird's nest [a big bungled thread mess?] under your design? If so, this could be the cause of the lock-up.
Many things can cause this, so you can follow all of the other steps above and take a look at the notes on Bird’s Nest in this
document. Don't try to stitch again until you've considered the items below as well:
Do you need additional stabilizer? What are you stitching on? What kind of design are you stitching? If all of the
design that's stitched so far looks like it's taking a toll on the stabilizer, consider "floating" a piece under the hoop when
you put the hoop back on the machine - this may be all it needs
Is this a design that you've stitched on a similar item with similar stabilizer with good results? If so, it's probably
stabilized fine
All of the cleaning, new needle, unthreading and re-threading above may have fixed the problem that was causing the
bird's nest
o If you’re able to get the hand wheel to move and you feel confident that you’ve found the problem, you can start putting
everything back together
Put in a new bobbin
Re-thread the top thread
Move the design stitching back about 20 stitches
Put the project back in place and hit start - hopefully it will work
o If that didn’t work, you will probably need to find an embroidery machine repairman

Contact Us AKDesigns Boutique
Updated 4/4/2016 [email protected] Page 7 of 13
www.akdesignsboutique.com
Copyright 2016
Metallic thread – There are a few things that will help with metallic thread.
o Slow down the speed of your machine
o Make sure the design is not too dense
o Use a thread sock [click here http://www.akdesignsboutique.com/products/6-Pack-of-Thread-Socks-or-
Stockings.html to see it on our website or use the search box and search for "sock"]
o Move your thread farther away from your machine on a thread stand ~ this will give it more time to “unwind” as
it’s coming off the spool, so it won’t feed through the needle all twisted
o Tip from Jessica in my Yahoo Group - between the spool of thread (which was on a thread stand) and the machine,
thread the metallic thread through a packing peanut – it helped to untwist it before it went in to the machine.
Needle breaks – When the needle breaks while stitching a project, make sure to back-up about 20 stitches before
starting again so that all of the thread is secure. Listed below are a few things to help troubleshoot needle breaks:
o Make sure that all parts and pieces of the broken needle are removed from the bobbin area before starting again
o Totally unthread top thread, check all guides for debris and rethread
o Take out bobbin case and inspect for any loose thread, fuzz, lint, partial needle bits [if your needle broke] or
anything else that could be built up – clean the area with a lint brush
o Put new bobbin in bobbin case
o Make sure the tension is set correctly for the thread you are using [different thread weight and brands sometimes
need different tension settings].
o Gently pull the thread through the needle, is it flowing smoothly or does it seem to be caught on something? If it
isn’t flowing smoothly, this can easily cause a needle to break.
o Did you resize the design? Making a design smaller will sometime’s cause a bird's nest, thread breaks and needle
breaks [see Resizing Designs in this document for more information]
Needle is gummy/sticky – try Sewers Aid – here’s what Linda, from my Yahoo Group had to say about it: “I
learned about Sewer's Aid from a friend that has the PR600. She was taught to put a few drops on a Q-tip and rub up and
down the needle with the "wet" tip. The Sewers Aid helps the thread glide through the needle and also helps keep the
needle from gumming up if you use sticky back (or some of the sprays). Imagine "greasing" the needle...kind of what it
does. It is not supposed to leave any stain on fabric.”
Outlines / Registration – Are your outlines not lining up with your fill [also known as registration problems]? If
yes, see the tips below.
o Stabilize, stabilize, stabilize…really, this is more important than most realize
o See Stabilizer in this document for more information
o It’s usually not a design flaw, it’s usually a part of the design that pulls the thread a little more than your item can
handle, which means that a little more stabilizer will fix it. We strive to account for some of this while digitizing,
but we can only do so much because if someone has properly stabilized their item, they will have the opposite
problem [the fill will be well outside the outline].

Contact Us AKDesigns Boutique
Updated 4/4/2016 [email protected] Page 8 of 13
www.akdesignsboutique.com
Copyright 2016
Plastic hoop template – Use these directions to make your own plastic hoop templates if your machine didn’t
come with them. These instructions are for a 5” x 7” hoop.
o Determine sewing field size [hoop size – 4” x 4”, 5” x 7”, etc.] and hoop opening size [measure actual hoop
opening]
o Purchase the clear plastic for making patterns at your local craft store. If available, purchase the plastic that already
has a grid printed on it. Make sure it’s at least 1” larger on both sides than the hoop opening size [7” x 10” for this
example]
o Lay the plastic on the work table
o Place a small piece of double sided tape or rolled tape on each corner of the bottom of the hoop ~ this will help it
stay in place while you make your marks
o Lay the hoop on top of the plastic. If using plastic with the grid, line the notches in the hoop up with the grid lines.
o Draw a thin/fine line around the inside of the hoop on the plastic only where there aren’t “ledges” like the picture
shows ~ this will help determine your cutting line later
o Find the little notches on all 4 sides of your hoop
o Make dots on the plastic where the 4 notches are located
o Remove the hoop
o Draw lines connecting the dots, but make sure you can still see the original dots
because you will need to know where these points are later
o Now there are horizontal and vertical lines to help with alignment
o Mark the sewing field width by holding the ruler on the horizontal line with the
center point lined up with the center of the hoop size [3.5” for a 5” x 7” hoop], then
make a dot or small vertical line at the beginning of the ruler and at 7”
o Do the same thing with the vertical line to mark the sewing field height
o Now the sewing field is marked and clearly visible
o Finish drawing your cutting line by connecting the lines you’ve already drawn by using your best guess about
where they should be. Remember, it’s better to cut too large the first time because you can always trim it to make
it smaller.
o Cut on the outside of the line
o Lay inside the hoop to determine fit and make any necessary adjustments. Remember to ensure that the notches
and the original notch dots are lined up while making your trims
o Once the fit is good, mark where to cut the notches
o Cut all 4 notches
o Add alignment holes in the center and at the other 4 sewing field lines that intersect
NOTES:
Make sure you use a marker that will be permanent. I used a Sharpie Pen for the black lines and they
were smearing a little while I was working on this. I’m not sure if it’s because I didn’t allow proper
drying time or if this would continue to be a problem. I used a Vis a Vis pen for the red lines and
they didn’t smear or smudge, but they will eventually wear off.
The alignment holes need to be big enough for the tip of a disappearing marker or a chalk pencil to
make marks.

Contact Us AKDesigns Boutique
Updated 4/4/2016 [email protected] Page 9 of 13
www.akdesignsboutique.com
Copyright 2016
Pull Compensation – This is a feature that’s available in some [not all] embroidery software programs. Adjusting
the pull compensation allows you to apply “bold” to your letters or designs.
o Letters ~ allows you to make letters bold so that they will stitch better on towels and other fabrics with a
nap or just stand out more [examples pictured below].
o Designs with fill stitches ~ allows you to make regular designs “more bold” to account for the “pull” of the
thread on the fabric. This isn’t needed too much if your item is stabilized well because the stabilizer doesn’t
allow your fabric to “pull”. But, this feature is helpful when you’re having troubles with the outline being
too far away from the fill stitch [extra/better/thicker stabilizer will help as well]. The “bold” is applied to
the direction of the stitches [they are running left to right in the picture below]. Notice how much farther
the stitches are extended past the outline stitch in the second picture. I can’t think of a situation where you
would want to make the settings like the second picture, but it shows the difference.

Contact Us AKDesigns Boutique
Updated 4/4/2016 [email protected] Page 10 of 13
www.akdesignsboutique.com
Copyright 2016
Resizing designs – Please keep in mind that just because your embroidery software will allow you to resize a design
to half its size does not mean that it will stitch well. Please keep all of points below in mind when resizing designs.
o The rule of thumb is that you can resize a design 20% larger or smaller and it should still stitch well.
o When resizing a design with your software or embroidery machine, the software decides where the stitches will be
in the larger/smaller version, so it's no longer the design that was purchased.
o Since resizing a design is in essence creating a new design that hasn't been tested yet, you'll want to run a test stitch
before you stitch it on something important.
o All designs resize differently and all software re-sizes differently, so the 20% rule is just a guideline.
o Any time you are resizing or editing designs, ensure that you are working with a copy so that you don’t modify the
original design.
o Resizing can cause bird's nests, thread breaks & needle breaks. See more about these items in their areas.
o Example of a potential resizing problem: Let's assume you resized a letter 50% smaller and your software left too
many stitches in the design, so it was just too dense. Then, depending on what you're stitching on and how it's
stabilized, this can easily cause a "bird's nest" [sometimes caused by your needle trying to make too many
penetrations too close together] and bird's nests can easily cause your needle to break.
o ALWAYS REMEMBER: There are so many variables with every stitch out that when problems arise, you have to
be an investigator to determine what part of the process went wrong. These tips are meant to help you along the
way :)
Shifting while stitching – So many things can cause your item to shift while stitching. Here are a few things to
consider:
o Hoop won’t tighten enough, so the stabilizer and item slowly started coming out of hoop while stitching - SOLVE
by making sure hoop is tight enough before starting, or if the hoop is as tight as it can go and your stabilizer still
"slips", you can put double sided tape on the inside of either the inside or outside hoop to help it have more "grip".
o Sometimes something will prevent your hoop from moving the full range that it's supposed to while it's stitching -
SOLVE by making sure your sewing area is free of objects that could be in the way of your hoop while your item
is stitching.
o Item is not hooped, only stabilizer is hooped and the item shifts while being stitched - SOLVE by using a basting
stitch to attach your item to the stabilizer before stitching your design. I hope this helps!
Spacing and Alignment – Are you putting the names together on your machine or in embroidery software on
your computer? If you're working on your machine, it will be much easier if you do it in software on your computer. I
think the screen on most machines are just too small to really get a good feel for how well a name is put together and make
sure that it's aligned, etc. If you're already working on your computer, just remember that all fonts will be a little different
and the spacing is somewhat of a personal preference or sometimes forced to be tight if it's a long name and you don't have
much room. I've added a screenshot below of how different some fonts look with different spacing, so just have
confidence that the more you work with them, the easier it will get for you to know what you like.

Contact Us AKDesigns Boutique
Updated 4/4/2016 [email protected] Page 11 of 13
www.akdesignsboutique.com
Copyright 2016
Sparse stitching – too much space between stitches. This problem could be caused by a few different things or
combination of things. Below are some items to consider.
o Did you resize the design? If so, this could be the problem. Try test stitching the design in its original form to see if
there’s a problem.
o Is the item stabilized properly? If not, this can cause lots of different problems. Try adding another sheet of
stabilizer or switching to a heavier or cutaway stabilizer.
o Are you stitching on an item with nap or texture? If so, make sure you use a solvy wash away topping on top to
help keep the nap or texture pushed down so that the stitches look better.
Stabilizer – Stabilizing is KEY. Consider the items below when working on your next project.
o Keep in mind that stabilizer is a tool, it is used to keep your fabric stable so that is doesn’t shift or move while
stitching and after the fact during washing, wearing, etc.
o Very few fabrics don't need stabilizer.
o Always choose the right stabilizer for the fabric/design combination.
o If you're having registration issues [outlines not lining up with your fill], you probably need more/better stabilizer.
o Quick Guide for Which to Use When ~ just remember that this is just a guide and there will be some overlap
Cutaway
Washable fabric
Knit fabric
Fabric that is stretchy
Fabric with a lot of "give"
Thin fabric
Synthetic fabric
Tearaway
Non-washable fabric
Woven fabric [including denim and canvas]
Fabric that is not stretchy
Fabric without much "give"
Medium/thick fabric
o Our Embroidery Supply Catalog that will help guide you to the correct stabilizer for your next project. Just go to
the website and click on AKD Catalogs to see the most current catalogs.
Stitching Circles, Dots and Round Objects - when the machine is stitching dots and circles, it's
"pulling" your fabric inward toward the inside of the circle. Below are a few things that will help you get better results:
o Have you ever noticed some circles or dots look more like ovals after you stitch them? If so, you probably just need
to use a little more stabilizer.
o Use a little extra stabilizer just in case, don't wait until you've ruined something - it's just not worth it.
o Keep in mind that everything stitches best on fabric that is stable - make sure there's enough stabilizer so that your
fabric isn't able to stretch, pull, shift or move during the stitching process.
Contact Us AKDesigns Boutique
Updated 4/4/2016 [email protected] Page 12 of 13
www.akdesignsboutique.com
Copyright 2016
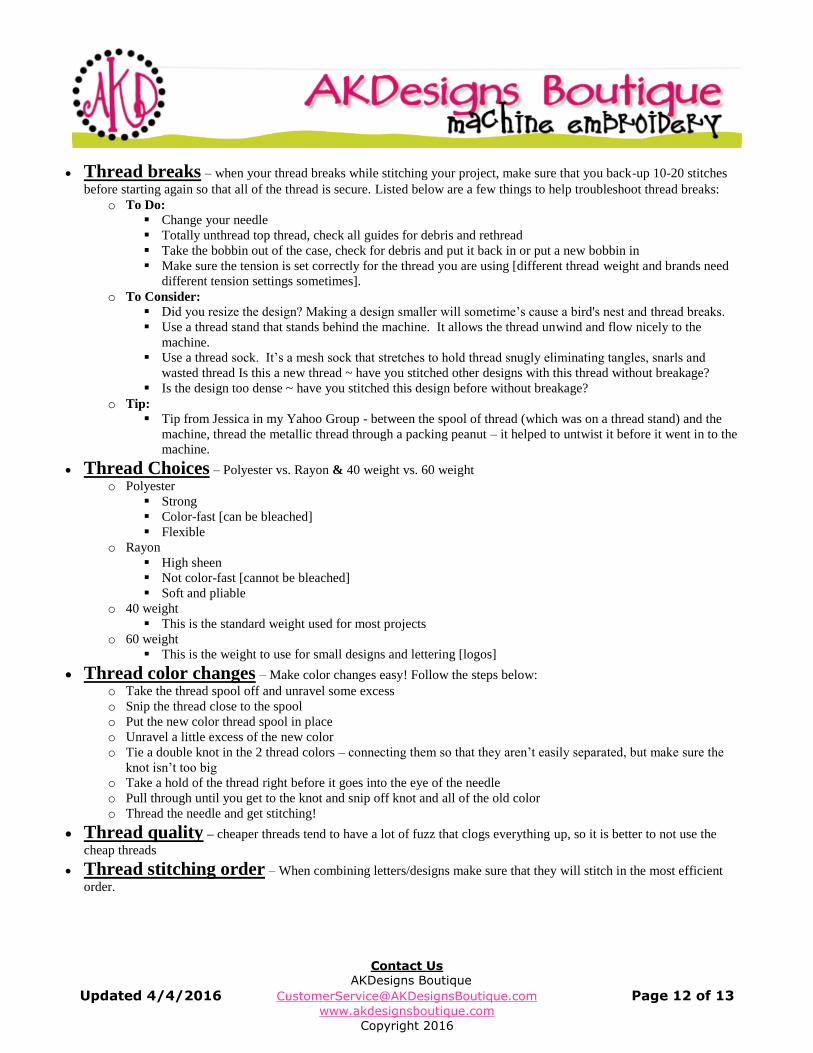
Thread breaks – when your thread breaks while stitching your project, make sure that you back-up 10-20 stitches
before starting again so that all of the thread is secure. Listed below are a few things to help troubleshoot thread breaks:
o To Do:
Change your needle
Totally unthread top thread, check all guides for debris and rethread
Take the bobbin out of the case, check for debris and put it back in or put a new bobbin in
Make sure the tension is set correctly for the thread you are using [different thread weight and brands need
different tension settings sometimes].
o To Consider:
Did you resize the design? Making a design smaller will sometime’s cause a bird's nest and thread breaks.
Use a thread stand that stands behind the machine. It allows the thread unwind and flow nicely to the
machine.
Use a thread sock. It’s a mesh sock that stretches to hold thread snugly eliminating tangles, snarls and
wasted thread Is this a new thread ~ have you stitched other designs with this thread without breakage?
Is the design too dense ~ have you stitched this design before without breakage?
o Tip:
Tip from Jessica in my Yahoo Group - between the spool of thread (which was on a thread stand) and the
machine, thread the metallic thread through a packing peanut – it helped to untwist it before it went in to the
machine.
Thread Choices – Polyester vs. Rayon & 40 weight vs. 60 weight
o Polyester
Strong
Color-fast [can be bleached]
Flexible
o Rayon
High sheen
Not color-fast [cannot be bleached]
Soft and pliable
o 40 weight
This is the standard weight used for most projects
o 60 weight
This is the weight to use for small designs and lettering [logos]
Thread color changes – Make color changes easy! Follow the steps below: o Take the thread spool off and unravel some excess
o Snip the thread close to the spool
o Put the new color thread spool in place
o Unravel a little excess of the new color
o Tie a double knot in the 2 thread colors – connecting them so that they aren’t easily separated, but make sure the
knot isn’t too big
o Take a hold of the thread right before it goes into the eye of the needle
o Pull through until you get to the knot and snip off knot and all of the old color
o Thread the needle and get stitching!
Thread quality – cheaper threads tend to have a lot of fuzz that clogs everything up, so it is better to not use the
cheap threads
Thread stitching order – When combining letters/designs make sure that they will stitch in the most efficient
order.

Contact Us AKDesigns Boutique
Updated 4/4/2016 [email protected] Page 13 of 13
www.akdesignsboutique.com
Copyright 2016
Thread tension – if you have bobbin thread showing on the front of your design, you might need to loosen the top
thread tension. Here's an easy way to remember how to tell what tension is too tight/too loose.
o Think of it as a tug of war between the top thread and bobbin thread.
o Ideally you want the bobbin thread to barely be “winning” by pulling all of the top thread to the back of the item,
but the top thread to have enough tension that the bobbin thread is showing on the back too.
o If your top thread is "winning" the tug of war [it's pulling the bobbin thread to the top] your top tension is probably
too tight.
o Ideal thread distribution on the backside of your stitch-out ~ 1/3 top thread, 1/3 bobbin thread, 1/3 top thread.
o Tip: If you think the tension is fine, but you’re having problems, consider these items.
Is something in one of the tension discs for the top thread that's making the tension not work?
Is there something obstructing the bobbin thread making it not feed correctly - like lint, small piece of
broken thread, etc.?
Towels – Please consider the items below when stitching on towels:
o Thickness of towel ~ thicker towels tend to be more stable and require less stabilizer
o Make of towel ~ 100% Cotton will tend to shrink, so consider pre-washing
o Always use a Solvy topping to hold down the nap while stitching
Unzipping design downloads – Click here http://www.akdesignsboutique.com/pages/Helpful-Tips-%26-
Docs.html to see the How to Unzip Designs help document [link is located on Helpful Tips & Docs page].
We will continue to add tips & tricks to this page, but if you have a question just send us an e-mail to
[email protected] and we'll get an answer for you and add it to this page for future
reference.