Embed Size (px)
Citation preview

Tiny Hardware FirewallWelcome! 2
Requirements ! 3
A Note on Operating Modes ! 3
Operation Mode #1: Client Mode! 5
Operation Mode #2: AP (Wireless to Client)! 7
Operation Mode #3: AP (Wireless to Everything)! 9
First Log on! 11
Connecting to a Wireless Access Point! 14
Connecting to The VPN! 18
Using the THF as a VPN AP access point! 20
Using the THF in Wireless - Wireless Mode! 24
The Help Desk and Diagnostics ! 27
Copyright © 2014, WiFiConsulting, inc. All rights reserved.
1
WelcomeThe IP Address of your WiFiConsulting HotSpotVPN Tiny Hardware Firewall VPN Client (THF) is
172. ______ . ______ . ______
To configure your THF you will enter the ip address into a browser after
http://orhttps://
For example, if the ip address was 172.17.17.1 then you would enter
http://172.17.17.1
or https://172.17.17.1
into your browser to log into and configure the THF. If you choose https then you will have to tell the browser it is ok to use the self signed certificate on the THF.
The Username for your THF is:
admin
The password for your THF is:
thisisatest
This default password should be changed as soon as you make your first login. The maximum password length is 48 characters.
Please note that we can not help you recover this password once changed. There is no reset and we can not recover it for you. The THF would have to be shipped back to WiFiConsulting for re-flashing.
Copyright © 2014, WiFiConsulting, inc. All rights reserved.
2

Known Bugs and Other Features1.The THF will not associate with the Apple AirPort Extreme. We are in the early stages
of investigation.
2.The THF will not associate with an ssid with the “ ` “ character in the ssid. This character is just below the tilde ~ on your keyboard.
RequirementsTo configure the THF you will require a computing device with an Ethernet port configured for DHCP. This is the default configuration of almost all computers out of the box. When the unit is in Access Point or Wireless Only mode any wireless device that is WPA2 compatible can also be a client.
The Second Generation Tiny Hardware Firewalls are small computers with one Ethernet port and “two” virtual WiFi Radios. It is configured to operate as a firewall and VPN client in three modes, wired, wireless and wireless only.
The Original THF is a small computer with one Ethernet port and a WiFi Radio. It is configured to operate as a firewall and VPN client in two modes, wired and wireless.
A Note on Operating ModesThere are three modes; Client Mode, AP or Access Point Mode, and Wireless - Wireless Mode.
When the unit is new and first turned on it is in Client Mode where it assumes it will communicate with the computers it will protect via an Ethernet cable and any Internet access is provided via a wireless access point.
When you switch to one of the other modes it assumes you will connect to it wirelessly and it provides you with a randomly generated ssid and password. To connect to the THF wirelessly you will need to correctly input the ssid and the password into your computer, phone or tablet. If you incorrectly copy these and can not login that is ok, just power off the device and it will revert to Client Mode.
Once you have proven to the THF that you can successfully associate and login wirelessly to the THF you will have the option of making the mode “permanent”. It is not really “permanent” since you can switch modes whenever you want, the important thing to remember is that making the mode “permanent” will enable the mode to persist and survive a power cycle. Every time you turn it on it will boot up in the mode last chosen as permanent.
Copyright © 2014, WiFiConsulting, inc. All rights reserved.
3
The ssid and ssid password in AP and Wireless - Wireless modes are persistent unless the user forces a change.
When changing modes you may have to refresh or close and re-open your browser.
Please note that you must remember the ssid and the ssid password. We can not recover these for you. The THF would have to be shipped back to WiFiConsulting for re-flashing.
Copyright © 2014, WiFiConsulting, inc. All rights reserved.
4
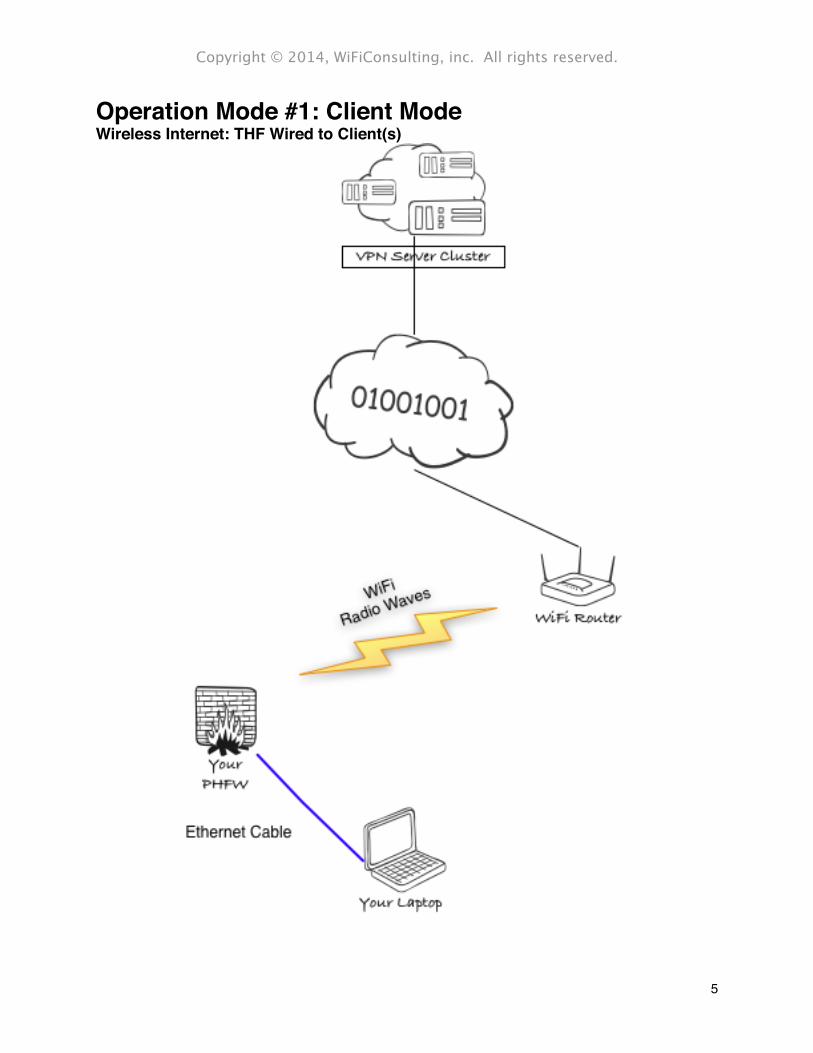
Operation Mode #1: Client ModeWireless Internet: THF Wired to Client(s)
Copyright © 2014, WiFiConsulting, inc. All rights reserved.
5
Internet Source: Wireless Access PointClient Connection: Ethernet CableScenario: Laptop in a coffee shop
This is the default and most secure mode. In this mode your computer plugs into the THF via a wired Ethernet port and the THF connects to the Internet via a wireless access point. You can use the THF just as a firewall or you can use it as a firewall and vpn client. In this mode you can also plug the Ethernet cable into a hub or switch and plug up to four computers into the switch. All four would be protected by the THF and all four would pass all data through the VPN tunnel if the vpn is activated.
In this mode for maximum security it is recommended that you turn off your laptop’s wifi radio. Some wifi radios can be hacked into even when they are not associate with an access point.
Copyright © 2014, WiFiConsulting, inc. All rights reserved.
6

Operation Mode #2: AP (Wireless to Client)
Copyright © 2014, WiFiConsulting, inc. All rights reserved.
7

Internet Source: Wired Ethernet Connection to InternetClient Connection: Wireless to the THFScenario: Hotel room with an Ethernet connection
In this mode the THF connects to the Internet via an Ethernet cable and acts as a very secure Access Point Firewall with a built in VPN client. The THF gets an IP address via DHCP, and any four WPA2 compatible WiFi devices can connect to the THF access point. If the VPN tunnel is activated all traffic from all connected devices will go through the encrypted tunnel.
Copyright © 2014, WiFiConsulting, inc. All rights reserved.
8

Operation Mode #3: AP (Wireless to Everything)
Copyright © 2014, WiFiConsulting, inc. All rights reserved.
9

Internet Source: Wireless Access Point Client Connection: Wired and Wireless to the THFScenario: Coffee shop with just a phone or a tablet
Note: It takes three minutes for the the THF to properly reboot into this mode. This mode is only available in Firmware 1.91 or later and only on Second Generation THF. It is not available on the original THF.
In this mode the THF connects to the Internet via a wireless access point. Your protected clients can be wireless and or wired. The THF will create a secure AP for wireless clients to connect to and also serve wired clients via the Ethernet port. This is great if you want to travel with just a battery powered unit and a tablet and or phone. You can leave the THF in your purse, backpack, or brief case and enjoy fire-walled vpn security.
Copyright © 2014, WiFiConsulting, inc. All rights reserved.
10

First Log onConnect the THF to a power supply and switch on if it has an on - off switch. It takes about 20 seconds to power up. If this is your first connection please use the AC adapter just in case your USB port does not supply enough power. If it is a battery powered unit please charge for a few moments before starting. Some battery powered units do not come with a recharger but instead depend on being plugged into an existing USB charger or computer to recharge.
Connect a computer to the THF with an Ethernet cable. Make sure your computer’s Ethernet port is configured to use DHCP. Most computers are configured this way by default. Point your browser to https://172.x.x.x or http://172.x.x.x (see first page or your welcome sheet for your ip address). You will get a warning about the https certificate. Bypass the warning to get to the login screen.
The Username for your THF is:
admin
The password for your THF is:
thisisatest
Copyright © 2014, WiFiConsulting, inc. All rights reserved.
11
Copyright © 2014, WiFiConsulting, inc. All rights reserved.
12

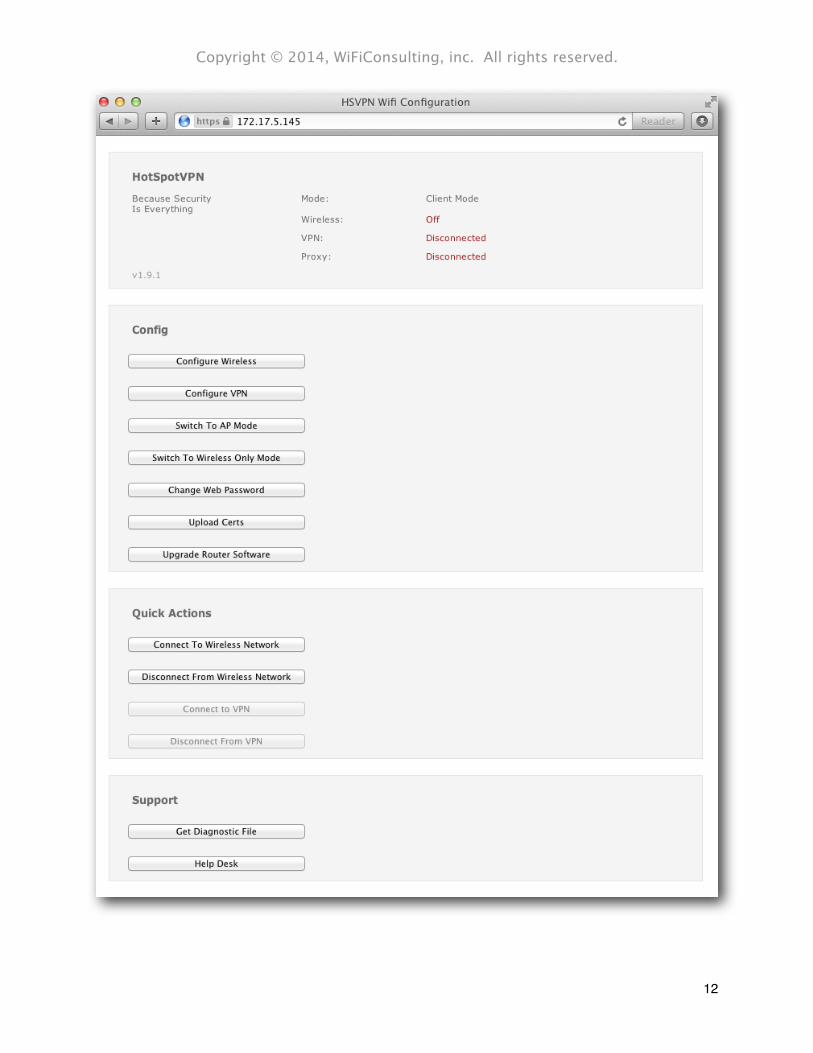
This will leave you on the home page of the THF. There are Four main sections: The top section is the Status section followed by Config, Quick Actions, and Support. Your first task is to change the default password.
Please note that we can not help you recover this password once changed. There is no reset and we can not recover it for you.
In the Config section please press the “Change Web Password” button to change the default password.
Once you press the change password button carefully type your new password (32 characters maximum) into the change password dialog twice and press change password.
After the password has been changed the THF will ask you to log in with your new password. Your username is still admin. Your password is now only known to you.
Please do not write it on the bottom of the unit with a sharpie.
Copyright © 2014, WiFiConsulting, inc. All rights reserved.
13

Connecting to a Wireless Access PointGo to the THF home page. The status section the mode should say “Client Mode”, Wireless should be “off” or “Disconnected” and VPN, and Proxy should be “Disconnected”.
Please choose the “Configure Wireless” button in the config section. Now press the “Scan” button. After a few seconds a list of all visible access points will be shown sorted by signal strength strongest first. If it can not find an access point or reports an error please try again. The radio might have been turned off. If you choose an access point with WEP or WPA or WPA2 PSK encryption you will be shown a dialog to enter the wireless password.
Copyright © 2014, WiFiConsulting, inc. All rights reserved.
14

Copyright © 2014, WiFiConsulting, inc. All rights reserved.
15
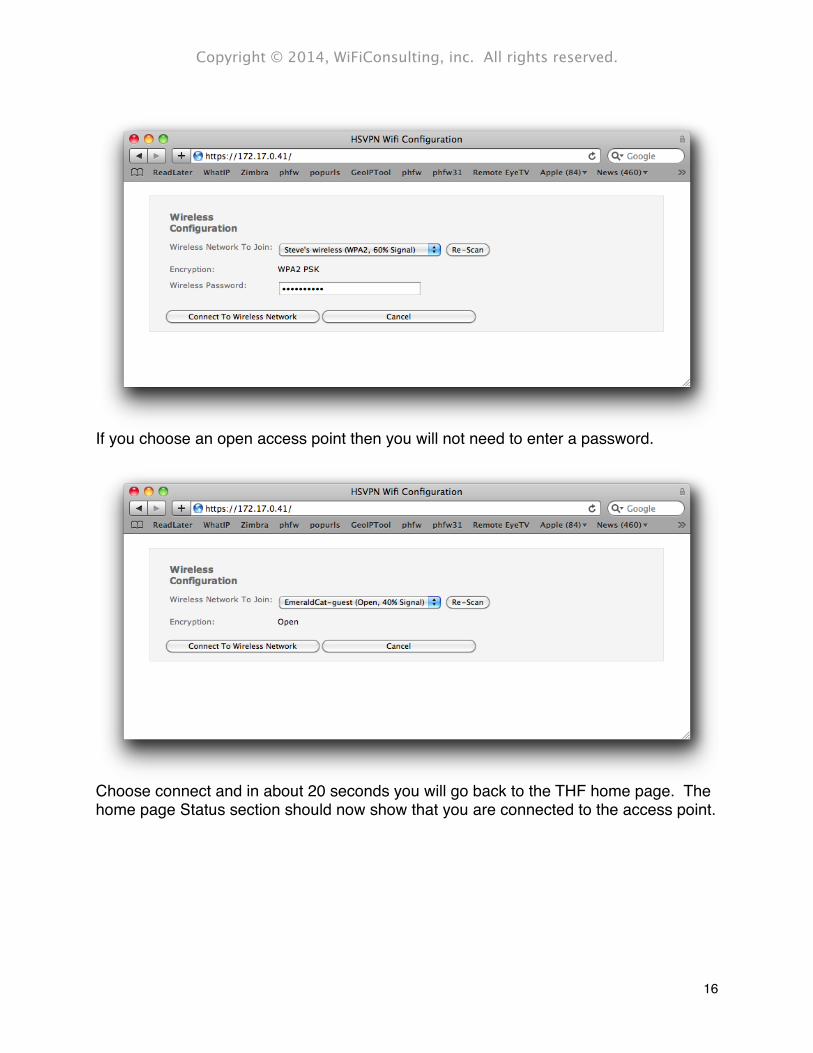
If you choose an open access point then you will not need to enter a password.
Choose connect and in about 20 seconds you will go back to the THF home page. The home page Status section should now show that you are connected to the access point.
Copyright © 2014, WiFiConsulting, inc. All rights reserved.
16

In this case an iPhone was put in “Portable Hotspot” mode and used as the Internet connection.
At this point your computer is connected to the Internet and protected by the THF as a firewall. The default mode of the firewall is to reject all unsolicited outside packets and to allow all protected clients to communicate freely with the outside world. The firewall will only allow conversations initiated by the protected computers on the inside of the firewall. In this mode for maximum security it is recommended that you turn off your laptop’s wifi radio.
Copyright © 2014, WiFiConsulting, inc. All rights reserved.
17

Connecting to The VPN
After you are connected to the Internet you can connect to the VPN. On the home page press the “Configure VPN” button.
The defaults are pre chosen. You can choose “Save” and then connect at any time by clicking the “Connect to VPN” button in the “Quick Connect” section or you can choose the “Save and Connect” button to connect to the vpn from this dialog.
There are two ports to choose from, 443 and 53. Port 443 is usually used for https web connections so a VPN connection should always work if a browser on that network can initiate a https connection to any website. Port 53 is the DNS port and is usually but not always available on open networks.
The protocols are UDP and TCP. UDP should be the first choice for the VPN and TCP should only be chosen when UDP out is blocked. UDP is faster and applications running in a VPN recover from dropped packets much faster when the VPN is using UDP. Some restrictive networks do not allow UDP traffic.
The Proxy can only be used when the VPN is active and must be set at connect time. It automatically routes all of your port 80 http traffic through the WiFiConsulting proxy farm. There are two settings. The first setting blocks known malware and scans all binaries headed your way for viruses. The second setting also blocks most known ad and ad tracking servers from sending you advertisements. Occasionally trojans and other viruses are served by ad networks on sites a user would normally trust (Microsoft and Yahoo to name a few).
Copyright © 2014, WiFiConsulting, inc. All rights reserved.
18
The Preferred Server field is for the ip address of a preferred VPN server cluster. You can choose this in consultation with HotSpotVPN tech support. For instance you could choose the nearest VPN server cluster or use a stealth VPN cluster that is not yet DNS’d and therefore not blocked by a restrictive network or nation.
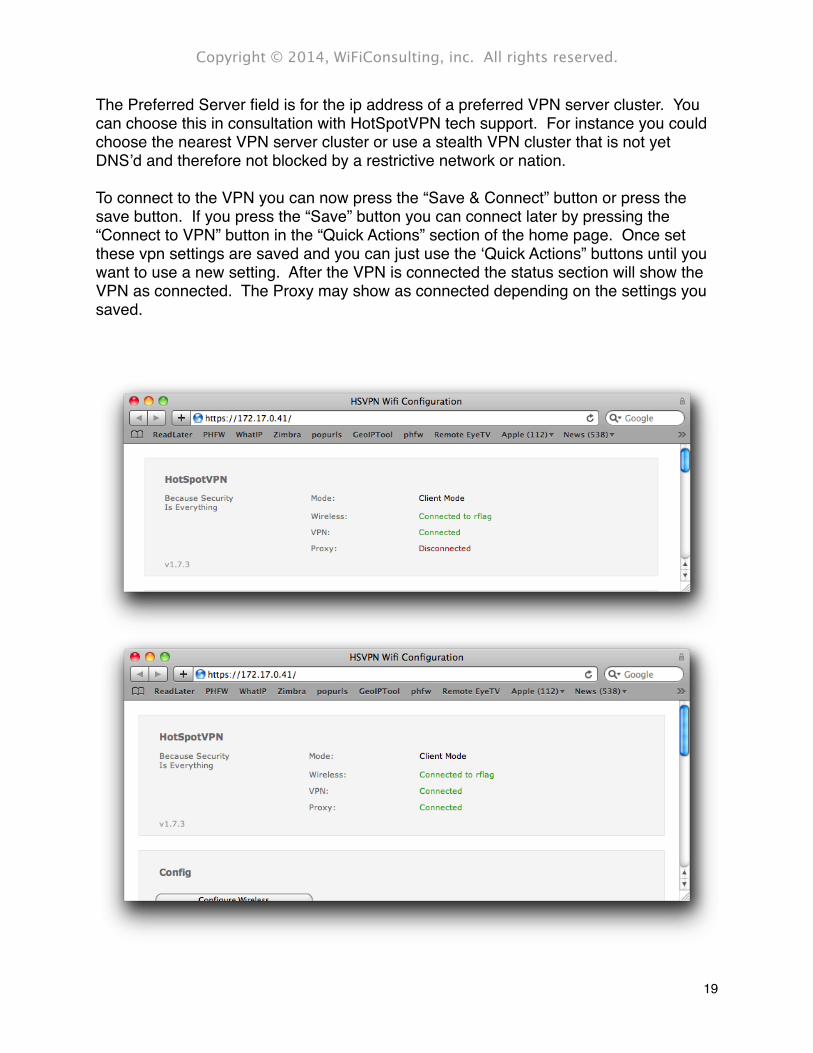
To connect to the VPN you can now press the “Save & Connect” button or press the save button. If you press the “Save” button you can connect later by pressing the “Connect to VPN” button in the “Quick Actions” section of the home page. Once set these vpn settings are saved and you can just use the ‘Quick Actions” buttons until you want to use a new setting. After the VPN is connected the status section will show the VPN as connected. The Proxy may show as connected depending on the settings you saved.
Copyright © 2014, WiFiConsulting, inc. All rights reserved.
19
You can disconnect from the VPN and stay on the Internet using the “Disconnect from VPN” button in the quick actions section.Using the THF as a VPN AP access pointIn the Config section of the THF home page click the “Switch to AP Mode” button. The AP Mode Activation screen will appear.
Copyright © 2014, WiFiConsulting, inc. All rights reserved.
20

Copyright © 2014, WiFiConsulting, inc. All rights reserved.
21
Both the SSID and the WPA2 password are randomly created. You can click on the “Regenerate” button a few times to generate new names and passwords. It is usually good to choose a SSID that starts early in the alphabet range if your client operating system list AP’s alphabetically. Now is a good time to create the wireless configuration on your wireless devices (before rebooting the device). If you are on a laptop you can highlight and copy the information into your clipboard temporarily.
Once you are on this screen you have two choices. You can press Cancel and go back to your previous mode or you can click on Reboot Now. If you are using the original THF you can just unplug the unit from power (count to three and then plug it back in) to complete the change to AP mode.
At this point the unit will only stay in AP mode until it is rebooted or powered off again. You can make AP mode persistent when you log back into the THF.
When the unit comes back online you will need to plug the Ethernet port into a wired Internet connection. Now connect your laptop or other WiFi device to the SSID with the password provided in the screen above. It will be a WPA2 connection with a pre shared key (the password). After connecting the the access point you should be on the Internet, or at least on the network you plugged the THF into.
After you have connected to the AP you can connect a browser to the same ip address shown on page one of this document to log into the unit. The home page will look about the same with some logical changes. The Mode will show “Temporary AP Mode” instead of “Client Mode” and there will not be any wireless setup choices.
Copyright © 2014, WiFiConsulting, inc. All rights reserved.
22
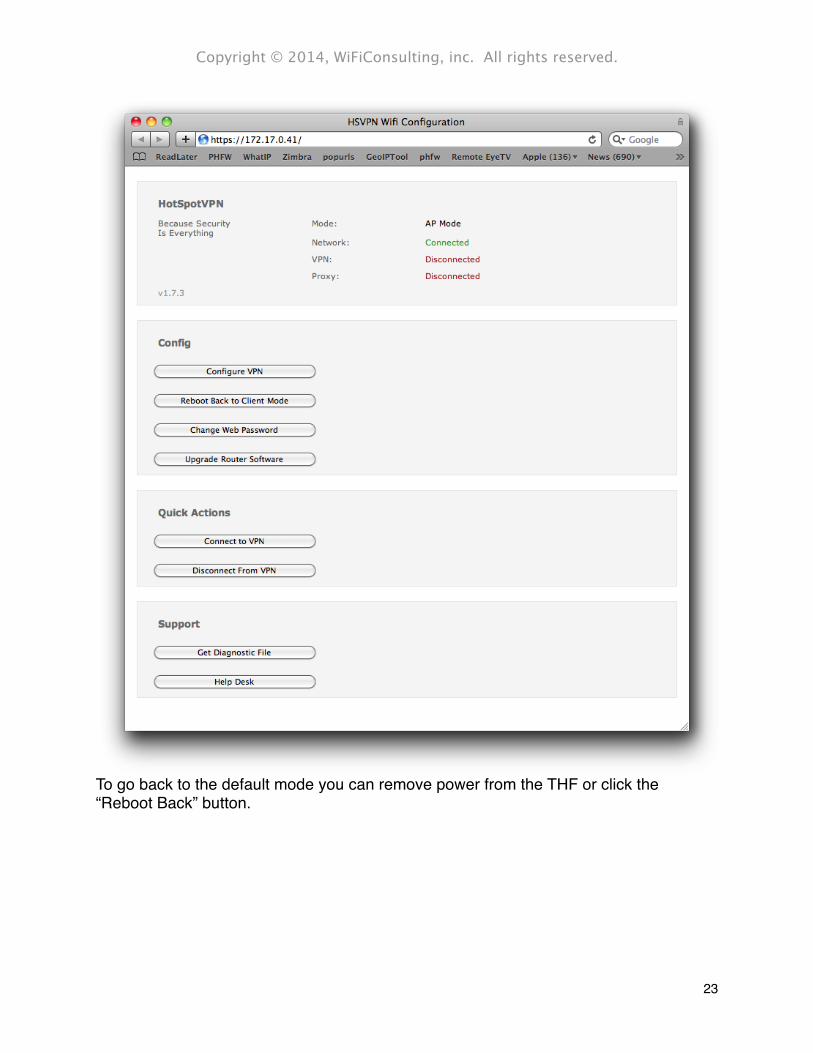
To go back to the default mode you can remove power from the THF or click the “Reboot Back” button.
Copyright © 2014, WiFiConsulting, inc. All rights reserved.
23

Using the THF in Wireless - Wireless ModeIn the Config section of the THF home page choose Switch to Wireless Only Mode.
Copyright © 2014, WiFiConsulting, inc. All rights reserved.
24

Please note that it takes three minutes to fully reboot the THF into this mode.
In this mode pretend the THF has two wifi radios, one to connect to some Internet access point and the other just to serve as your private access point.
Both the SSID and the WPA2 password are randomly created. You can click on the “Regenerate” button a few times to generate new names and passwords. It is usually good to choose a SSID that starts early in the alphabet range if your client operating system list AP’s alphabetically. Now is a good time to create the wireless configuration on your wireless devices (before rebooting the device). If you are on a laptop you can highlight and copy the information into your clipboard temporarily.
Once you are on this screen you have two choices. You can press Cancel and go back to your previous mode or you can click on Reboot Now.
After the reboot the THF will only stay in Wireless - Wireless mode until it is rebooted or powered off again. You can make Wireless - Wireless mode persistent when you log back into the THF.
After the THF reboots connect your device either by Ethernet cable or wirelessly by associating to the SSID with the password provided in the screen above. The wireless connection will be a WPA2 connection with a pre shared key (the password).
After you have plugged into or wirelessly associated with the THF you can connect a browser to the same ip address shown on page one of this document to log into the unit. The home page will look about the same with some logical changes. The Mode will show “Temporary Wireless Only Mode” instead of the previous mode.
To connect to the Internet go to the wireless config section and choose an access point just as you would in the default mode.
Copyright © 2014, WiFiConsulting, inc. All rights reserved.
25

Copyright © 2014, WiFiConsulting, inc. All rights reserved.
26

The Help Desk and DiagnosticsIf the THF is connected to the Internet pressing the “Help Desk” button will open a web page to the HotSpotVPN Help Desk. If it is your first time there just create an account with a password you can remember.
If you wish you can use https on the help desk.
It is a good idea to have a diagnostic file from your THF read to upload to the help desk. If you press the “Get Diagnostic” file button the THF will create one and make it available for download to your computer. Once it is there you can upload it to the help desk. The diagnostic file is an encrypted binary and will not upload any personal information about you, just the THF. Your customer information, email address or name is not stored in the unit.
Copyright © 2014, WiFiConsulting, inc. All rights reserved.
27

Copyright © 2014, WiFiConsulting, inc. All rights reserved.
28