Embed Size (px)
Citation preview

AestheticDentistry
586 DentalUpdate November 2011
Tif Qureshi
Minimally Invasive Cosmetic Dentistry: Alignment, Bleaching and Bonding (ABB)Abstract: This article will outline how combining existing techniques in a new and unique manner can potentially redefine the traditional approach to smile design planning and execution. Alignment, tooth whitening and edge bonding with new highly polishable nano-hybrid composites can make cosmetic dentistry far simpler and less invasive. Patients’ perceptions of their end smile result can change dramatically if they are allowed to see their teeth improve gradually.Clinical Relevance: This technique will highlight a choice of pathways available in cosmetic dentistry making it much less invasive for the patient and less risky for dentists.Dent Update 2011; 38: 586–592
The United Kingdom has seen a large increase in the demand and provision of cosmetic dentistry over the last 10 years.
Smile Design Principles have provided a format for dentists and orthodontists to create what has been widely accepted as an aesthetic target to achieve in the treatments of their patients.
Smile design theory can be broken down into four components:1
Facial aesthetics; Gingival aesthetics; Microaesthetics; and Macroaesthetics.
Facial aestheticsFacial aesthetics forms the frame
of the smile with the lips and surrounding soft tissues, which vary from patient to patient and can change depending on various positions of speech and when smiling or laughing.
Gingival aestheticsGingival aesthetics particularly
relates to gum health. Unhealthy and inflamed gums may be generally considered unaesthetic. Too much gum display is also sometimes considered unaesthetic, even if the gums are healthy and pink.
MicroaestheticsMicroaesthetics relates to specific
anatomical details that characterize teeth, such as surface contour and texture, incisal translucency, halo effect.
MacroaestheticsThe macroaesthetic requirements
for smile design theory may be considered to encapsulate several requirements to achieve what is arguably a correct aesthetic smile.
These include: Position and direction of the facial midline related to the central incisor teeth;2–4
Incisal embrasures, which are the pattern of edges of the maxillary teeth against the darker background. The size and volume of the incisal embrasures between teeth
Tif Qureshi, BDS, President Elect of the British Academy of Cosmetic Dentistry, General Practitioner, Dental Elegance, Sidcup, Kent DA15 8PT, UK.
increases as the dentition progresses away from the midline;5
Symmetrically reducing contact points from the incisors to the canines often following a 50–40–30 rule6 of tooth length in proportion to contact point length; Harmonious but gently medial tipping of the axial inclinations of the anterior teeth;7
Width of the buccal corridor. It is generally considered more aesthetic for the teeth behind the canines to be visible in a wide smile.8
These elements have traditionally been important when assessing patients requesting cosmetic dentistry. Many patients currently experiencing cosmetic dentistry may be shown their teeth improving with imaging software or through wax mock-ups. While these tools can be useful for conveying the possibilities, there is also an argument that they set up an ‘ideal image’ in a patient’s mind to the point where alternative options are not fully considered or previewed. As a result, many patients requesting cosmetic dentistry often ended up with multiple veneer preparations.
However, with ABB the progressive nature of the treatment allows the patients to visualize the appearance of their teeth improving and see their own teeth
pg586-592 Minimally Invasive Cosmetic Dentistry.indd 586 08/12/2011 12:01

November 2011 DentalUpdate 587
AestheticDentistry
looking more attractive. They can then decide at any point whether they are satisfied.
While textbook, full-mouth, non-compromise orthodontics should always be offered, practically speaking, patients may be put off by the time, cost and perceived discomfort involved and instead choose veneers. Combined ABB, while sometimes being a compromise on the ideal, could potentially offer patients who were considering irreversible, potentially destructive dentistry a real practical alternative.
The case described will highlight this.
Case exampleThe patient, a 27-year-old female,
requested an improved smile. Her main complaint was that her front teeth were protruded and she had a large diastema. She complained that she couldn’t smile with confidence. She was considering veneers to perform an instant smile make-over and had attended another practice where a digital simulation of her corrected smile had been given. She was considering heavy tooth preparations just to achieve this proposed result.
On examination, several aesthetic problems existed. Her front teeth were protruding but occlusal space existed to retract these and this would close the diastema. The teeth were also clearly different lengths meaning that, even when the teeth retracted, they would still have an irregular outline. The teeth were also shade A2–A3 (Figures 1–4).
All options were presented in detail. The patient was shown side and occlusal photographs of her teeth and it was clear that a large amount of tooth structure would need to be removed if veneers were to be used without orthodontics. The patient had previously seen a specialist orthodontist and considered fixed and clear braces but refused both options, based on the lack of removability of fixed and the time quoted for clear aligners.
The patient wanted a removable solution and something that would work quickly. She understood that the Inman Aligner (Figure 5) could only treat the anterior region. She was made aware that a small space mesial to her upper right premolar would not close totally. She was
also made aware of the need for permanent retention and the potential for relapse if this was not maintained.
Patient selection criteriaCase selection for the Inman
Aligner is critical. Only certain types of movement are possible and some patients will still need conventional orthodontic treatment or indirect restorations.
Certain criteria were met before her treatment was carried out: Her case should require movement of incisor and/or canine teeth only; Root formation of the teeth to be moved was complete; Crowding or spacing was to be 3 mm. Arch evaluation would be performed to determine the amount of space required (see next section); The patient’s posterior teeth were well positioned to facilitate retentive clasps, with a reasonably well-aligned arch form to facilitate the path of insertion of the appliance; She had good periodontal health. Cases should be stable or preferably free from periodontal disease; Compliance: The patient agreed to wear the aligner for about 20 hours a day and to be responsible for good appliance and oral hygiene; Compliance: The patient accepted the need for some measured inter-proximal reduction (IPR) to be carried out if necessary.
Model evaluation/arch analysis with Spacewize
Arch analysis should be
performed before any aligner case is attempted. This is to ensure that the case is suitable and, if not, what additional space creation techniques will be needed to allow the Inman Aligner to work. The amount of crowding or spacing present is calculated9
Figure 1. Before full facial
Figure 2. Before smile view.
Figure 3. Side profile view.
Figure 4. Close front view.
Figure 5. An Inman Aligner.
pg586-592 Minimally Invasive Cosmetic Dentistry.indd 587 08/12/2011 12:01

AestheticDentistry
588 DentalUpdate November 2011
by measuring the sum of the mesial-distal widths of the teeth to be moved. This distance is called the ‘Required Space’ or ‘The Teeth’. If canines and incisors are to be moved, this distance will be measured from the distal surface of one canine to the distal surface of the other.
Using a jeweller’s chain or a polishing strip, the ideal arch form is then measured from the distal of each canine and letting it align with the most ideal arch form after orthodontics. Critically, the curve needs to run through the suggested position of the contact points and not the incisal edges. This is described as the ‘Available Space’ or ‘The Curve’.
Now it is possible to perform this task more quickly and accurately with software such as Spacewize™. Just one simple occlusal photograph is required, taken at the chairside.
One tooth needs to be measured for calibration. A curve can be set up digitally and this is normally easier when observing the patient’s aesthetic requirements and occlusion directly; a result for the amount of crowding can be produced immediately (Figure 6).
It was clear from this digital calculation that, even with the large amount of space present, some inter-proximal reduction (IPR) would need to be carried out once the spaces closed and a good incisal position was achieved
TreatmentImpressions were taken and the
Aligner was constructed on a Kesling model set up in wax according to the Spacewize™ prescription. It was clear that there was space to retract the teeth and regain anterior
incisal contacts, with a small amount of IPR needed to upright the teeth. The Inman Aligner was made on this model. Anterior and canine guidance would be protected and potentially improved.
On the first appointment, the Aligner was fitted and the patient shown how to insert and remove it. Instructions for use and oral hygiene were given. The patient was asked to wear the aligner for 18–20 hours a day, removing the Aligner every few hours to eat. As intermittent forces are less likely to cause root resorption, it is important for patients to remove their braces for a few hours a day.10–12 The palatal component of the Inman Aligner was removed at this stage to improve comfort and to ease speech. It would be needed later but currently, because the main movement was retraction, it could be removed. Two composite anchors were placed on the upper central incisors about 4 mm from the gingival margins. These were placed to ensure the labial bow stayed in the incisal third to ensure good efficiency.
The patient returned 3 weeks later and movement was already evident. The Aligner was checked to ensure that the bow was still tensioned and seating correctly.
The patient returned again after another 3 weeks and the contacts were starting to close. The palatal bow of the Aligner was re-inserted to help control the final movement. Approximately 0.1 mm per contact of IPR was carried out from the mesial of the upper left canine to the mesial of the upper right canine at this stage to allow a little more retraction. This was carried out using a 0.1 mm Vision-flex diamond strip.
Simultaneous whiteningThe patient returned after a
further 2 weeks. Her teeth were found to be aligning well and the midline diastema was closing. At this point impressions were taken for home whitening. Instructions were given and close-fitting sealed trays were provided to the patient. She would whiten her teeth with Day White ACP™ (7.5% hydrogen peroxide) (supplied by Discus Dental, Philips Oral Healthcare, Guildford) for 35 minutes a day during times when the Inman Aligner was out. A small amount of IPR was carried out with hand strips on the tight contacts from the mesial of canine to canine. No more
than 0.1 mm per contact was carried out over six contacts.
Studies by El-Mangoury et al13
and Radlanski14 have shown that there is no increased risk of caries after IPR provided surfaces are smoothed correctly.
Studies by Heins et al15 and Tal16 have shown that there is no increased risk of periodontal disease despite the decreased interproximal space. Indeed, they showed it to be beneficial to periodontal health.
Three weeks later the patient returned. Her teeth had moved fully to the position determined by the Inman Aligner. Her teeth had also whitened from A2/A3 to B1 shade. At this point she commented that she felt her teeth were more aesthetic and that she was very pleased with the outcome. The only problem now was the irregular incisal edge outline. This outline was due to differential toothwear which may become more apparent when teeth reach alignment. This was confirmed by measuring the lengths of the teeth. Rather than resort to porcelain veneers, it was clear
Figure 6. Spacewize™ result.
Figure 7. Before retracted view.
Figure 8. Inman Aligner in position.
Figure 9. Inman Aligner after 10 weeks.
pg586-592 Minimally Invasive Cosmetic Dentistry.indd 588 08/12/2011 12:01

AestheticDentistry
590 DentalUpdate November 2011
that simple incisal edge bonding could improve the outline and final aesthetics. Flowable composite was used to mock up a potential outline for the patient and she was pleased with the set up. The patient was then provided with a clear Essix retainer to maintain the position and to wear full time (Figures 7–9).
Incisal edge bondingOne week later the patient
returned for edge bonding on the front six teeth. No local anaesthesia was required. No bevels were cut. A nano-hybrid material was chosen for strength in thin sections and ease of colour blending. Venus Diamond (Heraeus Kulzer, Newbury, Berks, UK) was chosen for this case.
The front six teeth were dried, the teeth lightly roughened to improve bond strength and the incisal thirds were etched with phosphoric acid. Optibond FL (Kerr, Peterborough, Cambs) was used as a bonding agent. The composite was built incrementally to replace and enhance the short-incisal edge outline to a more aesthetic position. This can be made easier by ordering a wax-up and creating a silicone stent that is placed in the mouth so that the composite can be built into it to make placement easier.
This case was carried out free hand. Shade OL dentine was used initially to replace the missing dentine layer. Shade B1 was used to build the core outline, then a thin
application of Incisal CL clear was layered over the facial surface and incisal edge to build and enhance the outer aesthetic layer. This was repeated on each tooth from canine to canine.
The initial contouring was carried out with a medium then fine roughness soflex disc. A rubber Pogo stick from Dentsply (Weybridge, UK) was then used, polishing vertically to hide the join. Enamelise diamond polishing paste and Flexibuff discs were then used to heighten the polish. A high level of chameleon-like blending is possible with materials such as this. Large bevels are not required as much as with previous materials because of the better opacity of the dentine material.
The occlusion was checked, then lateral and canine guidance checked to ensure positive deflection, but also to ensure that the guidance was not too steep (Figures 10–15).
RetentionAt this point an impression was
taken for a permanent wire retainer to be fitted in a week. The previous Essix retainer was cut back so that the incisal edges poked through to allow fit and temporary stability. The patient was instructed to continue wearing the retainer full time.
One week later a retainer was fitted.17–20 This was made using a technique where a multistrand stainless steel wire is pre-bent by a technician on the finished model. An acrylic jig is then made to allow
correct seating.In the mouth the teeth were
isolated and the palatal surfaces of the teeth roughened slightly using a diamond bur to ensure the composite used to bond the retainer was exposed to subsurface enamel.21 The teeth were etched with phosphoric acid for 15 seconds, washed, Optibond Solo was used as the bonding resin, cured, then the jig was reseated and flowable composite used to bond the wire on each tooth from canine to canine. The jig was cut free from the wire, the occlusion was checked and residual resin was removed using interdental brushes and the
Figure 10. Close view after retraction. Figure 11. Preps-roughened edges.Figure 12. Venus Diamond dentine OL and B1 placed.
Figure 13. Venus Diamond incisal clear enamel. Figure 14. Basic polish. Figure 15. High polish.
Figure 16. Before occlusal view.
Figure 17. After ABB-retainer in place (12 weeks).
pg586-592 Minimally Invasive Cosmetic Dentistry.indd 590 08/12/2011 12:01
November 2011 DentalUpdate 591
AestheticDentistry
patient was shown how to clean interdentally.At the same appointment, the
composite was re-polished and contoured to ensure that the edges were relatively symmetrical and the patient was happy. Advantages of this method are that
the flexibility of the archwire allows for physiological tooth movement and reduces the risk of bond fracture through occlusal forces. Periodontal ligament stability is also achieved with this technique (Figures 16 and 17)
DiscussionThis patient previously had
been put off by traditional orthodontics. Ultimately, she knew she could have achieved a more ideal orthodontic result with fixed brackets, but the patient was adamant that she did not want to go down this route. Instead, she had considered porcelain veneers, which would have involved far greater tooth reduction and the associated biological risk. She had looked at the results of other veneer cases and, because she had been shown computer
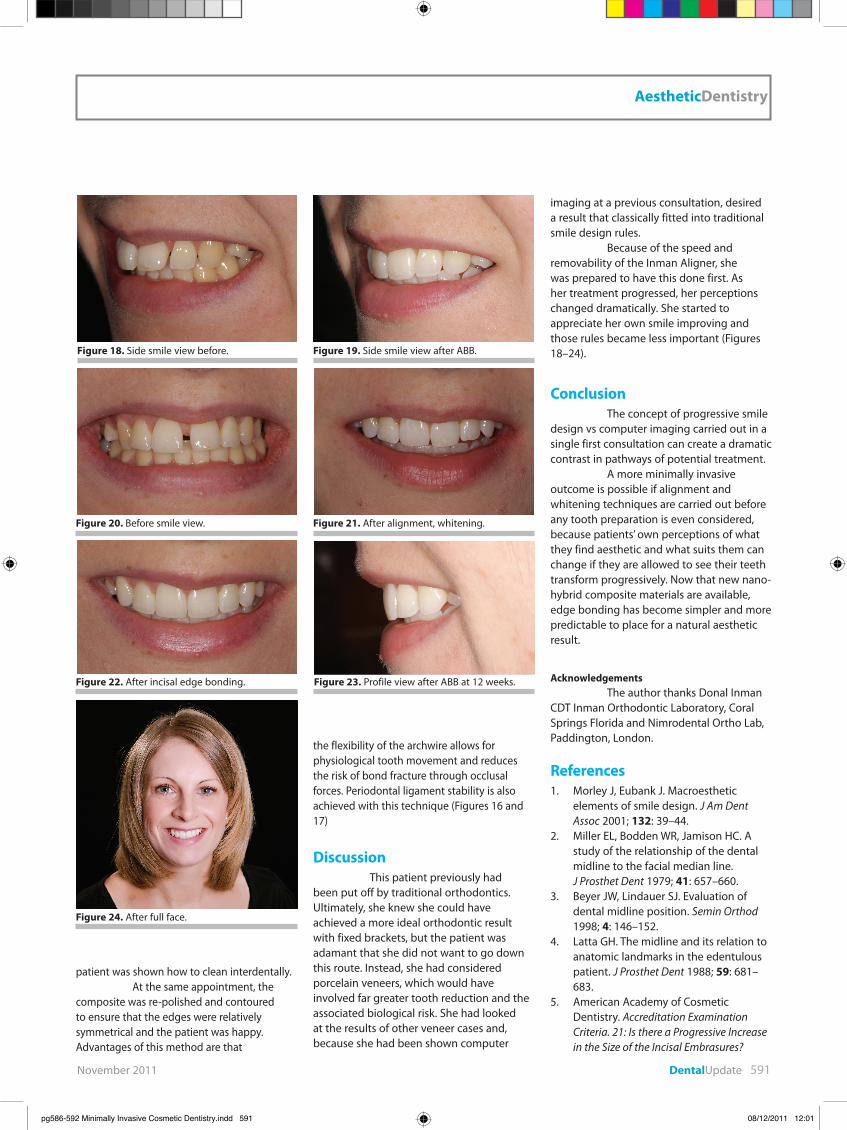
imaging at a previous consultation, desired a result that classically fitted into traditional smile design rules.
Because of the speed and removability of the Inman Aligner, she was prepared to have this done first. As her treatment progressed, her perceptions changed dramatically. She started to appreciate her own smile improving and those rules became less important (Figures 18–24).
ConclusionThe concept of progressive smile
design vs computer imaging carried out in a single first consultation can create a dramatic contrast in pathways of potential treatment.
A more minimally invasive outcome is possible if alignment and whitening techniques are carried out before any tooth preparation is even considered, because patients’ own perceptions of what they find aesthetic and what suits them can change if they are allowed to see their teeth transform progressively. Now that new nano-hybrid composite materials are available, edge bonding has become simpler and more predictable to place for a natural aesthetic result.
AcknowledgementsThe author thanks Donal Inman
CDT Inman Orthodontic Laboratory, Coral Springs Florida and Nimrodental Ortho Lab, Paddington, London.
References1. Morley J, Eubank J. Macroesthetic
elements of smile design. J Am Dent Assoc 2001; 132: 39–44.
2. Miller EL, Bodden WR, Jamison HC. A study of the relationship of the dental midline to the facial median line.
J Prosthet Dent 1979; 41: 657–660.3. Beyer JW, Lindauer SJ. Evaluation of
dental midline position. Semin Orthod 1998; 4: 146–152.
4. Latta GH. The midline and its relation to anatomic landmarks in the edentulous patient. J Prosthet Dent 1988; 59: 681–683.
5. American Academy of Cosmetic Dentistry. Accreditation Examination Criteria. 21: Is there a Progressive Increase in the Size of the Incisal Embrasures?
Figure 18. Side smile view before. Figure 19. Side smile view after ABB.
Figure 20. Before smile view. Figure 21. After alignment, whitening.
Figure 22. After incisal edge bonding. Figure 23. Profile view after ABB at 12 weeks.
Figure 24. After full face.
pg586-592 Minimally Invasive Cosmetic Dentistry.indd 591 08/12/2011 12:01

AestheticDentistry
592 DentalUpdate November 2011
Madison, Wis: American Academy of Cosmetic Dentistry, 1999.
6. Morley J. A multidisciplinary approach to complex aesthetics restoration with diagnostic planning. Prac Perio Aesth Dent 2000; 12: 575–577.
7. Lombardi RE. The principles of visual perception and their clinical application to denture esthetics.
J Prosthet Dent 1973; 29: 358–382.8. Morley J, Eubank J. Advanced Smile
Design. Course presented at 141st Annual Session of the American Dental Association, Chicago: Oct 17, 2000.
9. Hancher P. Orthodontics for esthetic dentistry Part 1. J Cosmetic Dent 2005; 20: 80–92.
10. Kameyama T, Matsumoto Y, Warita H, Soma K. Inactivated Periods of Constant Orthodontic Forces Related to Desirable Tooth Movement in Rats. Tokyo Medical and Dental University, Japan, 2003.
11. Linge BO, Linge L. Apical root resorption in upper anterior teeth: Eur J Orthod 1983; 5(3): 173–183; doi:10.1093/ejo/5.3.173.
12. Kumasako-Haga T, Kanoo T, Hayashi H. Effect of 8-hour intermittent orthodontic force on osteoclasts and root resorption. Am J Orthod Dentofacial Orthop 2009; 135: 278.e1–278.e8.
13. El-Mangoury NH, Moussa M, Mostafa Y, Girgis A. In vivo remineralization after air-rotor stripping. J Clin Orthod 1991; 25(2): 75–78.
14. Radlanski R. Morphology of interdentally stripped enamel one year after treatment. J Clin Orthod 1991; 23(11): 748–750.
15. Heins PJ, Thomas RG, Newton JW. The relationship of interradicular width and bone loss. J Periodont 1988; 59(2): 73–79.
16. Tal H. Relationship between the
interproximal distance of roots and the prevalence on intrabony pockets.
J Periodont 1984; 55(10): 604–607.17. Reprinted: Case CS. Principles of
retention in orthodontia. Am J Orthod Dentofacial Orthop 2003;124(4): 352–361.
18. Little RM, Reidel RA, Artun J. An evaluation of changes in mandibular anterior alignment from 10 to 20 years post retention. Am J Orthod Dentofacial Orthop 1988; 93: 423–428.
19. Blake M, Bibby K. Retention and relapse: a review of the literature. Am J Orthod Dentofacial Orthop 1998; 114: 299–306.
20. Becker A, Goultschin J. The multistrand retainer and splint. Am J Orthod 1984; 85: 470–474.
21. Hadad R, Hobson RS, McCabe JF. Micro-tensile bond strength to surface and subsurface enamel. Dent Mater 2006; 22(9): 870–874. Epub 2006 Jan 24.
CAn FISSURe SeAlAnTS DelIveR A ‘DoUble-whAMMy’?In situ evaluation of the remineralizing capacity of pit and fissure sealants containing amorphous calcium phosphate and/or fluoride. Silva KG, Pedrini D, Delbem ACB, Ferriera L and Cannon M. Acta Odont Scand 2010; 68: 11–18.
Fissure sealants are a powerful weapon in prevention programmes, but some people still express concern on the possibility of inadvertently sealing over an active carious lesion. [Clinically the technique of the preventive resin restoration, whereby a suspicious fissure was investigated with a bur before applying the sealant, has now been termed the destructive resin restoration and has largely been abandoned in teaching centres.] This paper reports early work with a new form of fissure sealant that contains amorphous calcium phosphate (ACP). Three different commercial sealants containing a mixture of ACP and fluoride were tested to compare the remineralization of artificially induced carious lesions in ten volunteer patients who wore acrylic palatal devices for the five days of the double-blind experiment.
The paper describes the
Abstractschemistry and dental material science involved, but concludes that the sealants containing ACP and/or fluoride were able to promote in situ remineralization of artificially induced carious lesions on smooth enamel surfaces. This in situ methodology was able to distinguish the effect of fluoride and calcium-phosphate releasing materials using different analyses and may be applied in tests of new formulations of dental materials.
An interesting paper, from both a dental material science and a clinical dentistry perspective.
IS TheRe A lIGhT MeTeR In yoUR PRACTICe?Curing efficiency of three different curing lights at different distances for a hybrid composite. Zhu S and Platt JA. Am J Dent 2009; 22: 381–386.
Research papers, especially those reporting a laboratory based study, often appear boring and irrelevant to the busy general practitioner faced with a pile of journals to read after a busy day in practice. The American Journal of Dentistry always includes a paragraph entitled ‘Clinical Significance’ and for this particular piece of research it really is quite significant,
especially for your patient. The curing ability of three curing lights was tested on a 2mm thick sample of composite resin. Full polymerization was achieved if the tip of the most powerful light was held 15mm from the material, whereas the weakest light had to be only 6mm away. If the light is held at a greater distance than these then full depth curing – that is at the top and the bottom of the restoration - may not occur.
The resultant restoration may therefore depend on three factors. First, the output of the curing light, which varies with different models and which should be tested regularly using an appropriate light meter. Second, the distance the curing tip is held from the surface of the restoration, ensuring that the distance remains constant throughout the procedure. Thirdly, although this is not mentioned in this research paper, is the training given to the dental nurse responsible for holding the curing light. This paper may be a useful reference during a staff training session, to show how apparently esoteric academic research is actually very relevant to everyday clinical practice. Evidence based dentistry in a different form?
Peter CarrotteGlasgow
pg586-592 Minimally Invasive Cosmetic Dentistry.indd 592 08/12/2011 12:01


![Redefining Adult Cosmetic Orthodontics · 2018. 11. 6. · I) is truly beneficial for the patient. “Minimally invasive cosmetic dentistry” as Maini [9] describes adult aesthetic](https://img.dokumen.tips/doc/110x75/6126d66fa91ae64adf70b151/redefining-adult-cosmetic-orthodontics-2018-11-6-i-is-truly-beneficial-for.jpg)