Embed Size (px)
Citation preview

DEPLOYMENT GUIDE
Thunder ADC for SAP Business Suite

2
Deployment Guide | Thunder ADC for SAP Business Suite
DisclaimerThis document does not create any express or implied warranty about A10 Networks or about its products or services, including but not limited to
fitness for a particular use and noninfringement. A10 Networks has made reasonable efforts to verify that the information contained herein is accurate,
but A10 Networks assumes no responsibility for its use. All information is provided “as-is.” The product specifications and features described in this
publication are based on the latest information available; however, specifications are subject to change without notice, and certain features may not
be available upon initial product release. Contact A10 Networks for current information regarding its products or services. A10 Networks’ products and
services are subject to A10 Networks’ standard terms and conditions.
Table of Contents
Introduction ....................................................................................................................................................................................................................................3
Deployment Guide Prerequisites .....................................................................................................................................................................................3
Application Specific Deployment Notes .....................................................................................................................................................................3
Accessing the Thunder ADC Load Balancer ...............................................................................................................................................................4
Architecture Overview .............................................................................................................................................................................................................5
Feature Template Preparation .............................................................................................................................................................................................6
SSL Offload ......................................................................................................................................................................................................................................6
Import or Generate Certificate ............................................................................................................................................................................................7
Option 1: Generate a Self-Signed Certificate from Thunder ADC (Optional) .........................................................................................7
Option 2: Import SSL Certificate and Key (preferred option) ...........................................................................................................................8
Configure and Apply Client SSL Template ...................................................................................................................................................................8
End-to-End SSL .............................................................................................................................................................................................................................9
Cookie Persistence ...................................................................................................................................................................................................................10
Create Cookie Persistence Template .....................................................................................................................................................................10
TCP Proxy .......................................................................................................................................................................................................................................11
IP Source NAT ..............................................................................................................................................................................................................................12
Create IP Source NAT Template ................................................................................................................................................................................12
Server Load Balancing Configuration ..........................................................................................................................................................................13
Server Configuration .......................................................................................................................................................................................................13
Health Monitor Configuration ...................................................................................................................................................................................14
Service Group Configuration .....................................................................................................................................................................................15
Virtual Server for CRM .....................................................................................................................................................................................................16
Configuration Templates .....................................................................................................................................................................................................16
X.509 Certificate Based Client Authentication .......................................................................................................................................................17
Web Application Firewall (Optional) ...........................................................................................................................................................................19
DDoS Protection (Optional) ...............................................................................................................................................................................................20
Summary and Conclusion ..................................................................................................................................................................................................21
Appendix .......................................................................................................................................................................................................................................21
About A10 Networks .............................................................................................................................................................................................................22

3
Deployment Guide | Thunder ADC for SAP Business Suite
IntroductionSAP, the global market leader in business resource planning and business management, has multiple product suites and application platforms that are integrated and certified with A10 Networks® Application Delivery Controllers (ADC). SAP applications and cloud services enable companies of all sizes to work together more efficiently and use business insight more effectively.
This document shows how A10 Networks Thunder® ADC line of Application Delivery Controllers can be deployed with the SAP Business Suite and Business Intelligence Solutions. The solution shown in this document is centered on the software-based vThunder® ADC running on Amazon Web Services (AWS) Cloud infrastructure. The solution is also applicable for Thunder ADC hardware appliances, other vThunder editions, and the Thunder Hybrid Virtual Appliance (HVA). This deployment guide provides a detailed description about how to administer and configure Thunder ADC for use with SAP application systems.
Deployment Guide Prerequisites The deployment guide was tested with the following:
A10 Networks
• Thunder ADC version 2.7.1 P3 or higher
SAP
• SAP Business Suite 7.x components, such as CRM
• SAP NetWeaver 7.x a platform components, such as the SAP NetWeaver Portal and Business Warehouse
• SAP Business Intelligence components such as Business Object Explorer
Note: For additional deployment options and features that Thunder ADC can support, please visit the following URL: http://www.a10networks.com/solutions/enterprise_data_center_solutions.php
Application Specific Deployment Notes This section of the deployment guide provides implementation and deployment notes on how to expedite deployment of A10 solutions into SAP application landscapes. Please be aware that SAP CRM was used as an example for ABAP (Advanced Business Application Programming) platform-based solutions.
1. The A10 solutions can be deployed in different topologies with options of being deployed in a physical, virtual or cloud solutions. The solution can be deployed in mixed topologies such as physical and cloud, or virtual and cloud (AWS/Azure) mix. For redundancy options, the A10 solution can support VRRP-A and GSLB. For further information, refer to A10 documentations for the feature details.
2. We recommend that you use SSL encrypted communication for all SAP applications. There are three (3) SSL termination options available: SSL offload; end-to-end SSL; and pass-through SSL (optional).
a. SSL offload: The SSL traffic is terminated by Thunder ADC as a reverse proxy. The traffic is then sent to the SAP backend server as unencrypted traffic (HTTP). This configuration allows the reverse proxy to become the defense point for outside attacks.
b. End-to-end SSL: This is similar to SSL offload in that it terminates frontend SSL traffic at the ADC. However, SSL is again used for backend traffic between the ADC and SAP application servers. Both frontend and backend traffic are encrypted and there is no clear text transmission on wires. This is the recommended SAP solution to secure connectivity from both clients and application servers.
c. Pass-through SSL (optional): Thunder ADC is either not used, acts only as a network router or as a Layer 4 server load balancer (SLB), is TCP-based, and utilizes A10 features such as access control lists (ACLs) and Distributed Denial of Service (DDoS) protection. The network connections are not terminated (decrypted) at the ADC but only at the SAP backend application. This is an optional SSL termination approach and no configuration is provided in this guide.
d. For the solution to work, Thunder ADC, acting as a reverse proxy, must follow a two-step process: The first step is to check the x.509 certificate provided by the client/SAP Cloud to make sure that it is valid. The second step then inserts the x.509 certificate into the HTTP/HTTPS header for the backend systems for

4
Deployment Guide | Thunder ADC for SAP Business Suite
authentication purposes. To achieve this solution, we use A10 Networks aFleX® Deep Packet Inspection (DPI) Scripting Technology to insert a client certificate into the HTTP/HTTPS header. Sample scripts are provided within the guide. Another option is to export the Thunder ADC self-signed certificate to the SAP Cloud for the purpose of authentication.
In order for the SAP backend application to authenticate a client, the certificate needs to be forwarded by the ADC to the backend system. At the same time, A10 needs to authenticate itself as a trusted intermediary to the backend applications (SAP). x.509 client authentication mechanism is recommended for the authentication of web service based on API calls to the backend system; this applies to SAML 2.0 which is available in ACOS 4.0 release or higher.
HTTPS/Reverse Proxy Certi�cateHeader: Cloud X.509 HTTPS/Cloud X.509
SAP BackendApplication
Reverse Proxy
Business LogicExecution
Technical User
IDMAdd X.509to HTTP’s
header
TerminateSSL, checkvalidity of
X.509SAP Cloud
Figure 1: SAP cloud with client certification insertion into HTTP header
Note: For additional SAP reference design you can download the original reference called Technical Connectivity Guide for OnDemand - OnPremise Hybrid Applications at https://websmp101.sap-ag.de/~sapdownload/012002523100013711112014E/SAP_OD_TCG_FINAL_V13.pdf (SAP Customer will require login credentials to download the materials).
3. The Web Application Firewall (WAF) feature has been tested within SAP business applications and the A10 solution. The test was successful and the configuration details of the WAF solution will be included in the WAF section.
4. A10’s DDoS protection feature set was deployed in the SAP test bed and the Thunder ADC was able to protect the SAP applications from DDoS attacks. The DDoS feature consumes a low amount of CPU resources and can be enabled when needed. This is highly recommended for organizations that may be attack targets.
5. SAP business applications run on different and configurable TCP ports. These can include SAP Business Objects, which uses port 80; SAP CRM/DIA, which use ports 44300; and SAP Portal, which uses port 5000. Hence, we can use only one virtual IP (VIP) address for simple implementation and management. If applications are managed by different groups, the solution can also be implemented using different VIP addresses for the three applications.
Note: The SAP Portal port 5000 mention for HTTP are just sample configurations for testing purposes. SAP customers can freely configure any port they prefer. For security purposes, it is strongly recommended that the use of port 80 (HTTP) and 443 (HTTPS) be avoided for internal networks.
Accessing the Thunder ADC Load BalancerThis section describes how to access the Thunder ADC device. The Thunder ADC can be accessed either from a command-line interface (CLI) or graphical user interface (GUI):
• CLI – Text-based interface in which you type commands on a command line. You can access the CLI directly through the serial console or over the network using either of the following protocols:
- Secure protocol – Secure Shell (SSH) version 2
- Unsecure protocol – Telnet (if enabled)
Note: SAP strongly recommend to only enable SSH only.

5
Deployment Guide | Thunder ADC for SAP Business Suite
• GUI – Web-based interface in which you click to access configuration or management pages and type or select values to configure or manage the device. You can access the GUI using the following protocol:
- Secure protocol – Hypertext Transfer Protocol over Secure Socket Layer (HTTPS)
Note: HTTP requests are redirected to HTTPS by default on the Thunder device.
• Default Username: “admin”
• Default password: “a10”
• Default IP address of the device: “172.31.31.31”
Note: It is strongly recommended that the default admin and password of the Thunder ADC must be changed after the first initial login. For detailed information about how to access the Thunder ADC device, refer to the document “A10 Thunder Series System Configuration and Administration (SAG) Guide.pdf1.”
Architecture OverviewThe network topology shown in Figure 2 is a sample diagram of how SAP CRM and Dialog are deployed with cloud redundancy between a regional data center and cloud solutions using Amazon AWS.
Internet
Thunder ADC
SAP CRM 1 SAP CRM 1Dialog 1
SAP CRM 2 SAP CRMDialog 2
Thunder ADC (AWS)
Database
(Active) (Active)
Regional Data Center
Figure 2: Thunder ADC and SAP Business Objects topology
1 To download the “A10 Thunder Series System Configuration and Administration (SAG) Guide.pdf,” please go to the A10 Thunder Series Support Login page at https://www.a10networks.com/support/index.php > Technical Library > SLB / Application Delivery Documentation section.

6
Deployment Guide | Thunder ADC for SAP Business Suite
Feature Template PreparationThis section describes how to prepare Thunder ADC to enhance SAP CRM components by deploying at least 2 or more nodes. These features provide web application acceleration, optimize CRM web server’s performance and increase reliability. The templates below will be bound with the HTTPS (44300) Virtual Service once the VIP is created.
• SSL deployment
- SSL offload
- End-to-end SSL
• Cookie persistence
• TCP Proxy
• x.509 certificate authentication and insertion
• Web Application Firewall (WAF)
• Distributed Denial of Service (DDoS) protection
SSL OffloadSSL offload acts as an acceleration feature by removing the burden of processing SSL traffic from the SAP CRM servers. Instead of having the CRM/Dialog servers handling SSL processing, Thunder ADC decrypts and encrypts all HTTPS traffic, forwarding the traffic to the server over HTTP (unsecured).
HTTPS HTTP
Figure 3: SSL offload overview
For any secured SAP VIP configured in the Thunder ADC, you can either use a self-signed certificate or you could import an SSL digital certificate signed by a trusted certificate authority (CA).
To configure SSL offload, the following configuration steps are required:
• Use HTTP for the communication between SAP web servers and Thunder ADC
• Use HTTPS on VIP for the communication between clients and Thunder ADC
• Import existing CRM/Dialog web server SSL certificate or create self-signed CA on the Thunder ADC
For every VIP for external facing SSL traffic, it is required that you need a server certificate in the Thunder ADC. You can get certificate deployed in multiple ways:
1) Create a self-signed certificate from a certificate server or from the Thunder ADC. Self-signed certificates are appropriate for test and lab systems.
2) For production systems, customers would likely want to deploy a server certificate signed by a Certificate Authority like GoDaddy, Symantec and others, whose root certificates are known to most common clients, in particular all common browsers end users might use.
3) The server certificate in the Thunder ADC can also be used at the same time as the SAP backend server. Note: this is optional and it is up to the customer to decide.
• Create SSL template and associate VIP with the SSL template
Note: The use of Certificate Authority (CA) certificates are highly recommended above to avoid any cert rejections from the client side.

7
Deployment Guide | Thunder ADC for SAP Business Suite
Import or Generate CertificateNavigate to Config Mode > SLB > SSL Management > Certificate
There are two options to configure when installing an SSL template from the Thunder ADC:
Option 1: Generate a self-signed CA from Thunder ADC
Option 2: Import an SSL certificate and key; export existing CA certificate from CRM/Dialog web servers and import to Thunder ADC
Option 1: Generate a Self-Signed Certificate from Thunder ADC (Optional)
1. Click Create to add a new SSL certificate from the SSL Management tab
2. Enter the File Name of the certificate: “WS”
3. Select “Self“ from the certificate Issuer dropdown menu, and then enter the following values:
a. Common Name: “crm”
b. Division: “a10”
c. Organization: “a10”
d. Locality: ”sanjose”
e. State or Province: “ca”
f. Country: “USA”
g. Email Address: “[email protected]”
h. Valid Days: “730” (Default)
i. Key Size (Bits): “2048”
Note: Thunder ADC supports 1028-, 2048- and 4096-bit SSL keys. The higher the SSL key size, the more CPU processing will be required.
Note: Thunder ADC SSL models handle the SSL transaction in hardware when dedicated SSL security processors are present.
4. Click OK and Save configuration
Figure 4: Client SSL certificate creation

8
Deployment Guide | Thunder ADC for SAP Business Suite
Option 2: Import SSL Certificate and Key (preferred option)1. Click Import to add a new SSL certificate from the SSL Management tab
2. Enter a name for the certificate “crm”
3. Select Local from Import Certificate from: (value depends on where the certificate is originating from)
4. Enter Certificate Password (if applicable)
5. Enter Certificate Source (if applicable)
6. Click OK and Save your configuration
Note: If you are importing a CA-signed certificate for which you used the Thunder device to generate the certificate signing request (CSR), you do not need to import the key. The key is automatically generated on the Thunder device when you generate the CSR.
Figure 5: Import SSL certificate
Configure and Apply Client SSL TemplateThis section describes how to configure a client SSL template and apply it to the VIP.
1. Navigate to Config Mode > SLB > Template > SSL > Client SSL
2. Click Add
3. Enter Name: “clientssl”
4. Enter Certificate Name: “crm”
5. Enter Key Name: “crm”
6. Enter Pass Phrase: “example”
7. Enter Confirm Pass Phrase: “example”
8. Session Cache Size: “8000000” (optional)
9. Session Cache Timeout: “28800” (optional)
10. Session Ticket Lifetime: “28800” (optional)

9
Deployment Guide | Thunder ADC for SAP Business Suite
Figure 6: Client SSL
Once the Client SSL template is completed, you must bind the Client SSL to the HTTPS VIP (Port 44300), as follows:
1. Navigate to Config Mode > SLB > Virtual Server
2. Click on “Virtual Server name”
3. Select “44300” and click Edit
4. Apply the Client SSL template created by clicking the Client-SSL template dropdown menu
5. Select “clientssl” from the dropdown menu
Figure 7: Client SSL binding
6. Click OK and Save configuration
End-to-End SSLThis section of the deployment guide describes the continuation of the SSL offload feature that was discussed in the previous section. The difference is that the end-to-end or full SSL feature enables an encrypted transaction on the backend also, which makes end-to-end communication fully encrypted. To make the SSL offload a full SSL solution, the backend connection has to be re-configured from HTTP to HTTPS. To deploy the full SSL solution, a certificate will not be required but you need to bind the Server SSL template to the HTTPS VIP with SSL cipher supported and an optional CA if required to validate the server certificate.

10
Deployment Guide | Thunder ADC for SAP Business Suite
HTTPS HTTP
Figure 8: End-to-end SSL overview
Note: Please be sure that you read the Application Specific Deployment Notes starting on page 4 for detailed information about how to deploy an end-to-end SSL solution with SAP CRM.
1. Navigate to Config Mode > SLB > Template > SSL > Server SSL
2. Click Add
3. Enter Name: “serverssl”
Once the Server SSL template is completed, you must bind the Server SSL to the HTTPS VIP (Port 44300) as follows:
Note: To complete the Server SSL template, you must create the Server SSL certificate first. You can either import or create a self-signed CA.
1. Navigate to Config Mode > SLB > Virtual Server
2. Click on “Virtual Server name”
3. Select “44300” and click Edit
4. Apply the serverssl template created by clicking the Server-SSL template dropdown menu
5. Select “clientssl” from the dropdown menu
Figure 9: End-to-end SSL overview
Cookie PersistenceSAP business applications are designed as stateful and establishes a session state, which requires a load balancer to send requests from a particular client to the same SAP application node on every transaction. The load balancing decisions by the Thunder ADC can only be made for newly incoming http/s session request for which a new session context is yet to be created in one of the SAP backend application server nodes. Cookies are used for subsequent requests of a client to guarantee routing to the right server node with the client’s user session.
Cookie persistence enables you to insert a cookie into server responses to clients, in order to direct clients to the same service group, real server or real service port for a subsequent request for this service. The advantage of cookie persistence within the CRM/Dialog solution is that it directs all requests to the same CRM/Dialog backend server that was recently visited, as long as the expiry time has not been exceeded.
Create Cookie Persistence TemplateTo enable cookie persistence, the template must be created first as follows:
1. Navigate to Config mode > SLB > Template > Persistent > Cookie Persistence
2. Click Add to add a new cookie persistence template
3. Select the Expiration, check the box and enter “15900” in the Seconds field
11
Deployment Guide | Thunder ADC for SAP Business Suite
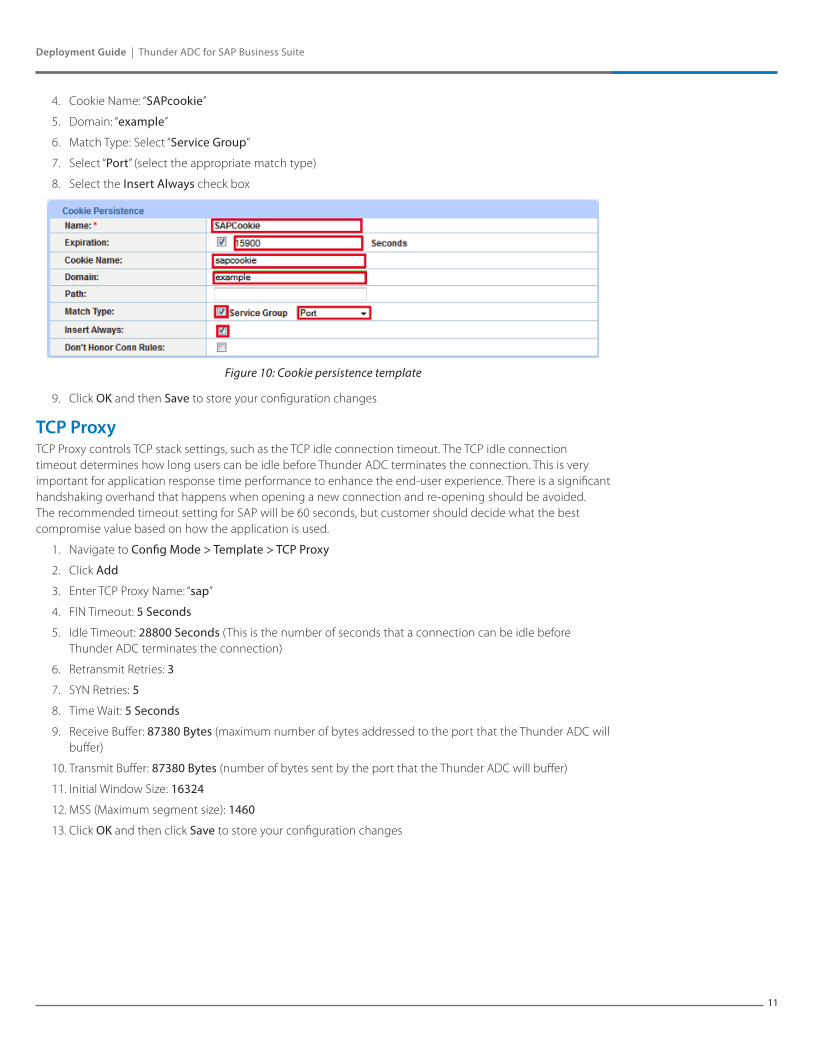
4. Cookie Name: “SAPcookie”
5. Domain: “example”
6. Match Type: Select “Service Group”
7. Select “Port” (select the appropriate match type)
8. Select the Insert Always check box
Figure 10: Cookie persistence template
9. Click OK and then Save to store your configuration changes
TCP ProxyTCP Proxy controls TCP stack settings, such as the TCP idle connection timeout. The TCP idle connection timeout determines how long users can be idle before Thunder ADC terminates the connection. This is very important for application response time performance to enhance the end-user experience. There is a significant handshaking overhand that happens when opening a new connection and re-opening should be avoided. The recommended timeout setting for SAP will be 60 seconds, but customer should decide what the best compromise value based on how the application is used.
1. Navigate to Config Mode > Template > TCP Proxy
2. Click Add
3. Enter TCP Proxy Name: “sap”
4. FIN Timeout: 5 Seconds
5. Idle Timeout: 28800 Seconds (This is the number of seconds that a connection can be idle before Thunder ADC terminates the connection)
6. Retransmit Retries: 3
7. SYN Retries: 5
8. Time Wait: 5 Seconds
9. Receive Buffer: 87380 Bytes (maximum number of bytes addressed to the port that the Thunder ADC will buffer)
10. Transmit Buffer: 87380 Bytes (number of bytes sent by the port that the Thunder ADC will buffer)
11. Initial Window Size: 16324
12. MSS (Maximum segment size): 1460
13. Click OK and then click Save to store your configuration changes

12
Deployment Guide | Thunder ADC for SAP Business Suite
Figure 11: TCP proxy template
IP Source NATThis section configures the IP address pool to be used for IP Source Network Address Translation (SNAT). When incoming traffic from a client accesses the VIP address (for example: 172.16.1.200), the client requests are “Source NAT-ed,” which means that Thunder ADC replaces the client’s source IP address based on the configured address pool of the Source NAT. SNAT is required when your network topology is based on “one-arm” deployment and if you have internal clients that reside on the same subnet as the VIP. The Source NAT template must be applied in the virtual server port for the NAT to take effect.
Create IP Source NAT Template1. Navigate to Config Mode > IP Source NAT > IPv4 Pool
2. Click Add
3. Enter IP Source NAT Name: “SNAT”
4. Enter Start IP Address: 172.16.1.250 (Example)
5. Enter End IP Address: 172.16.1.250 (Example)
6. Enter Netmask: 255.255.255.0

13
Deployment Guide | Thunder ADC for SAP Business Suite
Figure 12: IP source NAT configuration
7. Click OK and Save configuration
Note: Apply the SNAT template to the Virtual Server Port. If the SAP CRM environment will consist of many concurrent users, it is advisable to configure multiple SNAT IP addresses. One IP address can be used for up to 64,000 flows. If the solution is deployed using AWS cloud, refer to the details in the Amazon AWS Configuration regarding SNAT.
Server Load Balancing ConfigurationIn this section of the deployment guide, SLB servers, service group, virtual services and VIP are configured. Once the SLB components are configured, we will be able to apply all of the pre-configured templates that were created from the previous sections.
Server ConfigurationThis section demonstrates how to configure the CRM components in Thunder ADC. The SAP CRM and Dialog servers should be added using the same port “44300.”
1. Navigate to Config Mode > SLB > Service > Server
2. Click Add to add a new server
3. Within the Server section, enter the following required information:
a. Name: “crm1”
b. IP address /Host: 172.16.1.10
Note: Enter additional servers for CRM and Dialog, if needed.
Figure 13: Real server configuration
4. To add ports to the server configuration, navigate to: Config Mode > SLB > Service > Server > Port section
5. Enter Port “44300”
6. Protocol “TCP” type and then click Add
14
Deployment Guide | Thunder ADC for SAP Business Suite
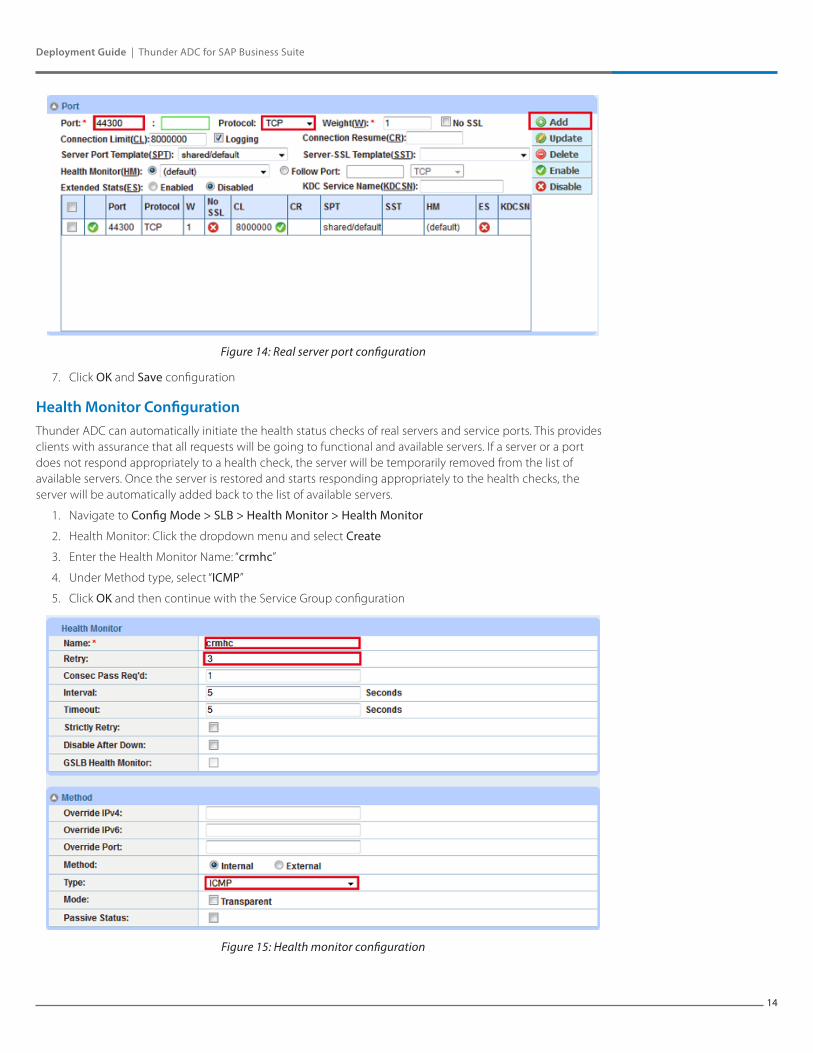
Figure 14: Real server port configuration
7. Click OK and Save configuration
Health Monitor ConfigurationThunder ADC can automatically initiate the health status checks of real servers and service ports. This provides clients with assurance that all requests will be going to functional and available servers. If a server or a port does not respond appropriately to a health check, the server will be temporarily removed from the list of available servers. Once the server is restored and starts responding appropriately to the health checks, the server will be automatically added back to the list of available servers.
1. Navigate to Config Mode > SLB > Health Monitor > Health Monitor
2. Health Monitor: Click the dropdown menu and select Create
3. Enter the Health Monitor Name: “crmhc”
4. Under Method type, select “ICMP”
5. Click OK and then continue with the Service Group configuration
Figure 15: Health monitor configuration

15
Deployment Guide | Thunder ADC for SAP Business Suite
Service Group ConfigurationThis section demonstrates how to configure the CRM and Dialog web servers in a service group. A service group contains a set of real servers from which Thunder ADC can select to service client requests. A service group supports multiple CRM and Dialog real servers as one logical server.
1. Navigate to Config Mode > SLB > Service > Service Group
2. Click Add to add a new service group
3. Within the Server Group section, enter the following required information:
a. Name: “sgcrm”
b. Type: Select “TCP” from the dropdown menu
c. Algorithm: “Round Robin” from the dropdown menu
d. Health Monitor: Select “crmhc”
Note: This can be a different method of server group health check, and you can specify the method type or you can select the default “ping” health check. In this guide, you can either use default icmp, http or https depending on the setup and health you wish to validate.
Figure 16: Service group configuration
4. From the Server section of the window, add one or more servers from the server dropdown list:
a. Server: Select “crm1” from the dropdown menu
b. Port: Enter “44300”
5. Click Add and enter all available CRM web servers
In Figure 17, the server names crm1 and crm2 are entered, each with port 44300.
Figure 17: Service group server configuration
6. Once completed, click OK and Save configuration
Note: Since SAP systems are deployed in multi-node clusters with a CRM central instance/server and Dialog instance/servers, you can load balance the servers by adding both CRM and Dialog server on the same service group (called “sgcrm” in this example).

16
Deployment Guide | Thunder ADC for SAP Business Suite
Virtual Server for CRMThis section demonstrates how to configure the VIP with Thunder ADC.
1. Navigate to Config Mode > SLB > Service > Virtual Server
2. Within the General section, enter the following required CRM information:
a. Name: “VIPCRM”
b. IP Address or CIDR Subnet: 203.0.113.100
Note: In case the solution is being deployed in the AWS environment, a private address can also be associated with an AWS cloud elastic IP (EIP).
Figure 18: Virtual server or VIP configuration
3. In the Port section:
a. Click Add
b. Enter the Virtual Server Port information:
c. Type: From the dropdown menu select “HTTPS”
d. Port: “44300”
e. Service Group: From the dropdown menu select “sgcrm” to bind the virtual server to the real servers
Figure 19: Virtual server port configuration
4. Click OK and then click Save to store your configuration changes
Configuration TemplatesOnce the templates such as SSL, TCP Proxy and Persistence are configured, you can now bind the templates to the CRM and Dialog virtual service port on the VIP (VIPCRM) to make them operational.
1. Navigate to Config Mode > SLB > Virtual Service
2. Click on the virtual service name

17
Deployment Guide | Thunder ADC for SAP Business Suite
Apply the features by selecting the templates from the applicable dropdown lists.
Figure 20: Applying features
3. Click OK, then click the Save icon at the top of the GUI window to save the configuration
X.509 Certificate Based Client AuthenticationThis section of the deployment guide shows how an x.509 certificate provided by the SAP Cloud can be used to authenticate the SAP Cloud as a valid client to the SAP backend application. The x.509 certificate is imported into the SAP backend application Identity Management (IDM) system and mapped to an existing application user account. That way the x.509 client certificate can be used for authenticating an incoming request as coming from the user who is identified by the x.509 certificate. The SAP backend IDM also stores the authorization a user has to execute certain allocation functions. That way authenticity of a client request as well as authorization for processing and answering a request is managed in SAP applications.
In order for the x.509 authentication to function properly with the Thunder ADC in the middle of the traffic path between a client and the SAP backend application, the original client certificate needs to be forwarded to the SAP backend system despite the fact the ADC is an SSL termination point. The way to forward the certificate to the SAP backend system is for the Thunder ADC to copy the original x.509 client certificate into http header field of the request which the Thunder ADC forwards to the SAP backend system.
Adding the x.509 certificate within the HTTP/HTTPS header can be initiated using an aFleX script. Once the aFleX script is created, you must bind the script to the VIP (VIPCRM) for the x.509 insertion to the header to happen.
1. To initiate the header insertion, navigate to the Client SSL template Config Mode > Template > SSL > Client SSL
2. In the Client Certificate Check section: Select “Request” within the mode section
Figure 21: Client certificate check
1. Navigate to Config Mode > SLB > aFleX
2. Click Add, then name the aFleX as “x.509” and use the script below:

18
Deployment Guide | Thunder ADC for SAP Business Suite
Figure 22: aFleX x.509 certificate
3. Click OK, then click the Save
Sample aFleX script: when HTTP_REQUEST {set cert [X509::whole [SSL::cert 0]]set cipherver [SSL::cipher version]set cipherkey [SSL::cipher bits] regsub -all {\n|-----BEGIN CERTIFICATE-----|-----END CERTIFICATE-----} $cert “” sapcertHTTP::header insert “SSL_CLIENT_CERT” $sapcertHTTP::header insert “SSL_CIPHER_SUITE” $cipherverHTTP::header insert “SSL_CLIENT_USEKEYSIZE” $cipherkey}
4. (Optional) If you want Thunder ADC to validate the client certificate, you must import the certificate first, then select the mode as “Require” and select the SAP Cloud certificate from the dropdown on the CA Certificate Menu, then click Add
Figure 23: Client certificate check menu

19
Deployment Guide | Thunder ADC for SAP Business Suite
Web Application Firewall (Optional) This part of the deployment guide will provide guidance about adding additional security protection to the SAP applications using Web Application Firewall. To deploy this solution, you need to create a WAF template within Config Mode > Security > WAF > Template. Then click Add.
1. Enter Name: “sapwaf”
2. Select Deployment Mode as “Active”
Figure 24: WAF general configuration
3. This section of the WAF feature is the location to enable the WAF request protection features. To understand the details of each of the features, refer to the A10 Web Application Firewall Guide2, then select the protection required for your deployment.
Figure 25: WAF request protection configuration
4. This section will be used to configure the Response Protection required for your deployment.
2 To view or download the “A10 Web Application Firewall Guide” please go to the A10 Thunder Series Support Login page at https://www. a10networks.com/support/index.php > Technical Library > Documentation for A10 Thunder Series and AX Series Version 4.0.

20
Deployment Guide | Thunder ADC for SAP Business Suite
Figure 26: WAF response protection configuration
Once configured, click OK and bind the WAF feature to the HTTPS virtual port for the feature to work.
Figure 27: WAF template
5. Once completed, click OK and Save configuration
DDoS Protection (Optional)This section is an additional security feature to protect the SAP application from DDoS attacks. To configure this feature within the Thunder ADC solution, navigate to Config Mode > Security > Network > DDoS Protection.
The DDoS protection feature is a global configuration. To enable this feature, you will need to select the DDoS attacks you would like to drop. In the diagram below, we have selected the DDoS attack protection required.
1. Once completed, click OK and Save configuration
Figure 28: DDoS protection
In addition, these two command lines are also required to deploy system-wide, policy-based server load balancing (PBSLB) using CLI.
system pbslb bw-list sap system pbslb over-limit lockup 5 logging 10
The blacklist/whitelist (BW-List) is applied to the system-wide PBSLB within a locking time of 5 minutes and logging interface of 10 minutes.
Note: The sample BW-List contains group ID 1; however, you don’t need to configure the group ID in PBSLB configuration since a wildcard address is used in the list. To use a specific host or subnet address in the list, please configure the action (reset or drop) for each group ID accordingly.
21
Deployment Guide | Thunder ADC for SAP Business Suite
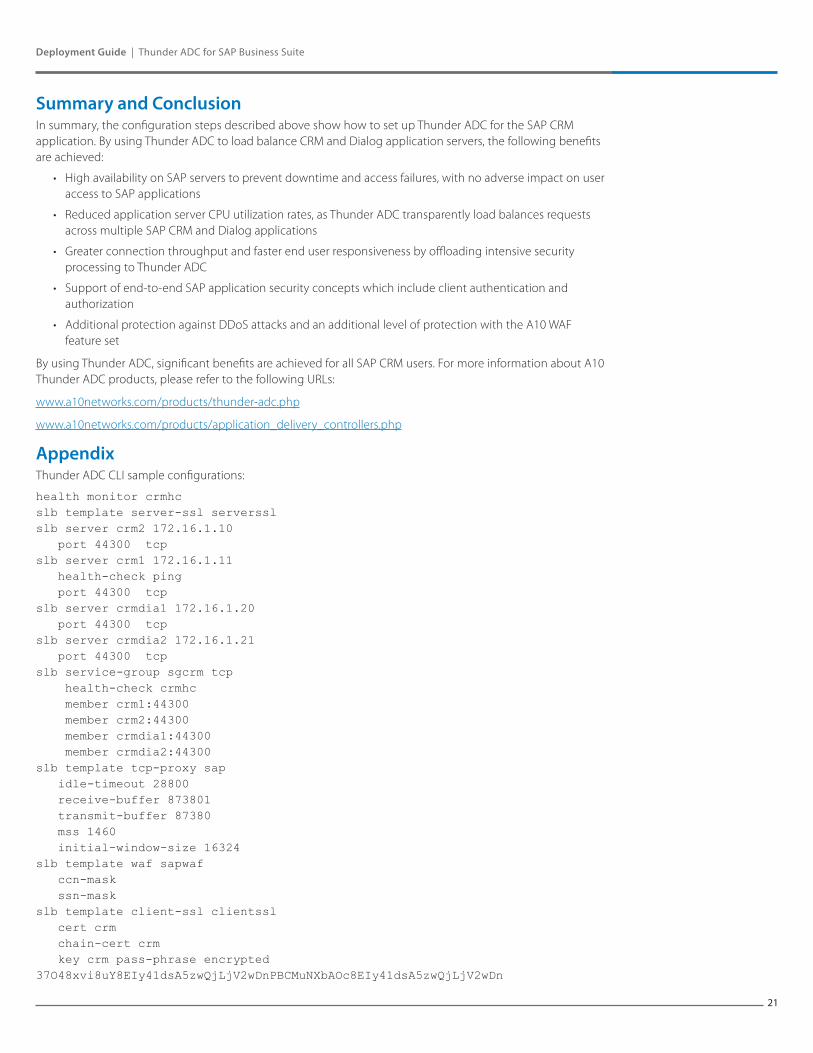
Summary and ConclusionIn summary, the configuration steps described above show how to set up Thunder ADC for the SAP CRM application. By using Thunder ADC to load balance CRM and Dialog application servers, the following benefits are achieved:
• High availability on SAP servers to prevent downtime and access failures, with no adverse impact on user access to SAP applications
• Reduced application server CPU utilization rates, as Thunder ADC transparently load balances requests across multiple SAP CRM and Dialog applications
• Greater connection throughput and faster end user responsiveness by offloading intensive security processing to Thunder ADC
• Support of end-to-end SAP application security concepts which include client authentication and authorization
• Additional protection against DDoS attacks and an additional level of protection with the A10 WAF feature set
By using Thunder ADC, significant benefits are achieved for all SAP CRM users. For more information about A10 Thunder ADC products, please refer to the following URLs:
www.a10networks.com/products/thunder-adc.php
www.a10networks.com/products/application_delivery_controllers.php
AppendixThunder ADC CLI sample configurations:
health monitor crmhcslb template server-ssl serversslslb server crm2 172.16.1.10 port 44300 tcpslb server crm1 172.16.1.11 health-check ping port 44300 tcpslb server crmdia1 172.16.1.20 port 44300 tcpslb server crmdia2 172.16.1.21 port 44300 tcpslb service-group sgcrm tcp health-check crmhc member crm1:44300 member crm2:44300 member crmdia1:44300 member crmdia2:44300slb template tcp-proxy sap idle-timeout 28800 receive-buffer 873801 transmit-buffer 87380 mss 1460 initial-window-size 16324slb template waf sapwaf ccn-mask ssn-maskslb template client-ssl clientssl cert crm chain-cert crm key crm pass-phrase encrypted 37O48xvi8uY8EIy41dsA5zwQjLjV2wDnPBCMuNXbAOc8EIy41dsA5zwQjLjV2wDn

22
Deployment Guide | Thunder ADC for SAP Business Suite
Corporate HeadquartersA10 Networks, Inc3 West Plumeria Ave.San Jose, CA 95134 USATel: +1 408 325-8668Fax: +1 408 325-8666www.a10networks.com
Part Number: A10-DG-16148-EN-01 Mar 2015
Worldwide OfficesNorth [email protected] [email protected] America [email protected] [email protected] [email protected]
Taiwan [email protected] [email protected] Kong [email protected] Asia [email protected]/New Zealand [email protected]
To learn more about the A10 Thunder Application Service Gateways and how it can enhance your business, contact A10 Networks at: www.a10networks.com/contact or call to talk to an A10 sales representative.
©2015 A10 Networks, Inc. All rights reserved. The A10 logo, A10 Harmony, A10 Lightning, A10 Networks, A10 Thunder, aCloud, ACOS, ACOS Policy Engine, Affinity, aFleX, aFlow, aGalaxy, aVCS, AX, aXAPI, IDaccess, IDsentrie, IP-to-ID, SoftAX, SSL Insight, Thunder, Thunder TPS, UASG, VirtualN, and vThunder are trademarks or registered trademarks of A10 Networks, Inc. All other trademarks are property of their respective owners. A10 Networks assumes no responsibility for any inaccuracies in this document. A10 Networks reserves the right to change, modify, transfer, or otherwise revise this publication without notice.
session-cache-timeout 28800 session-cache-size 8000000 session-ticket-lifetime 28800slb template persist cookie SAPCookie name sapcookie domain sap expire 15900 match-type service-groupslb template persist source-ip PortalSIP match-type serverslb virtual-server VIPCRM 203.0.113.100 port 44300 https template tcp-proxy sap template waf sapwaf template client-ssl clientssl template server-ssl serverssl template persist cookie SAPCookie aflex x.509end
About A10 Networks A10 Networks is a leader in application networking, providing a range of high-performance application networking solutions that help organizations ensure that their data center applications and networks remain highly available, accelerated and secure. Founded in 2004, A10 Networks is based in San Jose, California, and serves customers globally with offices worldwide. For more information, visit: www.a10networks.com