Embed Size (px)
Citation preview

User Guide
Thor VM3Vehicle-Mount Computerwith Microsoft® Windows® Embedded Compact 7.0

ii Thor VM3 with Microsoft Windows Embedded Compact 7 User Guide
DisclaimerHoneywell International Inc. (“HII”) reserves the right to make changes in specifications and other information contained in this
document without prior notice, and the reader should in all cases consult HII to determine whether any such changes have been made. The information in this publication does not represent a commitment on the part of HII.
HII shall not be liable for technical or editorial errors or omissions contained herein; nor for incidental or consequential damages resulting from the furnishing, performance, or use of this material. HII disclaims all responsibility for the selection and use of soft-ware and/or hardware to achieve intended results.
This document contains proprietary information that is protected by copyright. All rights are reserved. No part of this document may be photocopied, reproduced, or translated into another language without the prior written consent of HII.Copyright 2014 - 2018 Honeywell International Inc. All rights reserved.
Web Address: www.honeywellaidc.com
TrademarksRFTerm is a trademark or registered trademark of EMS Technologies, Inc. in the United States and/or other countries.
Microsoft®, Windows®, ActiveSync®, MSN, Outlook®, Windows Mobile®, the Windows logo, and Windows Media are registered trademarks or trademarks of Microsoft Corporation in the United States and/or other countries.
Intel® and Atom™ are trademarks or registered trademarks of Intel Corporation or its subsidiaries in the United States and other countries.
Wi-Fi®, WMM®, Wi-Fi Mutlimedia™, Wi-Fi Protected Access®, WPA™, WPA2™ and the Wi-Fi CERTIFIED™ logo are trademarks or regis-tered trademarks of Wi-Fi Alliance.
The Bluetooth® word mark and logos are owned by the Bluetooth SIG, Inc.
Symbol® is a registered trademark of Symbol Technologies. MOTOROLA, MOTO, MOTOROLA SOLUTIONS and the Stylized M Logo are trademarks or registered trademarks of Motorola Trademark Holdings, LLC and are used under license.
RAM® and RAM Mount™ are both trademarks of National Products Inc., 1205 S. Orr Street, Seattle, WA 98108.
Verizon® is a registered trademark of Verizon Trademark Services LLC.
AT&T® is a registered trademark of AT&T Intellectual Property.
SD and SDHC are trademarks or registered trademarks of SD-3C, LLC in the United States and/or other countries.
Other product names or marks mentioned in this document may be trademarks or registered trademarks of other companies and are the property of their respective owners.
PatentsFor patent information, refer to www.hsmpats.com.

Thor VM3 with Mic
TABLE OF CONTENTS
Chapter 1 - Customer Support...................................................................................... 1Technical Assistance.........................................................................................................................................1
Product Service and Repair............................................................................................................................1
Limited Warranty................................................................................................................................................1
Send Feedback ....................................................................................................................................................1
Chapter 2 - Getting Started........................................................................................... 3Overview.................................................................................................................................................................3
About this Guide .................................................................................................................................................4
Out of the Box ......................................................................................................................................................4
Initial Setup for Thor VM3...............................................................................................................................5Hardware Setup............................................................................................................................................5Software...........................................................................................................................................................5
Dock.........................................................................................................................................................................7VM1D Standard Dock.................................................................................................................................8VM3D Enhanced Dock...............................................................................................................................9VMXD Enhanced Dock............................................................................................................................10VMXD Enhanced Dock for Off-Vehicle Use....................................................................................11
Additional Connectors...................................................................................................................................12
Scanners .............................................................................................................................................................12
Components......................................................................................................................................................13Front View - Thor VM3 ............................................................................................................................13Back View - Thor VM3 .............................................................................................................................14Access Panels - Thor VM3 .....................................................................................................................15Front View - Dock ......................................................................................................................................15
rosoft Windows Embedded Compact 7 User Guide iii

Back View - Dock .......................................................................................................................................16Top View - Enhanced Dock....................................................................................................................17
Backlights and Indicators ............................................................................................................................17Display Backlight ......................................................................................................................................17Keypad Backlight ......................................................................................................................................17Speaker Volume.........................................................................................................................................18
Power Up.............................................................................................................................................................18Rebooting the Thor VM3........................................................................................................................19
Tapping the Touch Screen with a Stylus ................................................................................................20
Setup Terminal Emulation Parameters ..................................................................................................21
Cleaning..............................................................................................................................................................21Cleaning the Thor VM3 and the Dock...............................................................................................21Cleaning the Touch Screen...................................................................................................................21
Startup Help ......................................................................................................................................................21
Chapter 3 - Hardware Overview .................................................................................23System Hardware ............................................................................................................................................23
802.11a/b/g/n Wireless Client ...........................................................................................................23Central Processing Unit .........................................................................................................................23Input/Output Components ..................................................................................................................23System Memory.........................................................................................................................................23Video Subsystem.......................................................................................................................................24Audio Interface ..........................................................................................................................................24Card Slots.....................................................................................................................................................24Bluetooth......................................................................................................................................................24
Power....................................................................................................................................................................25Vehicle DC Power Supply.......................................................................................................................25External AC Power Supply .....................................................................................................................25Uninterruptible Power Supply .............................................................................................................25Backup Battery ..........................................................................................................................................28Fuse................................................................................................................................................................28Power Management Modes..................................................................................................................28Power Controls...........................................................................................................................................31
External Connectors ......................................................................................................................................33Serial Connector (COM1 and COM2) ...............................................................................................33USB Connector(s) .....................................................................................................................................34
iv Thor VM3 with Microsoft Windows Embedded Compact 7 User Guide

Ethernet Connector .................................................................................................................................34CANbus / Audio Connector ..................................................................................................................35Power Supply Connector........................................................................................................................35Antenna Connections .............................................................................................................................36
Keyboard Options............................................................................................................................................37USB Keyboards ..........................................................................................................................................38PS/2 Keyboards.........................................................................................................................................40USB Keyboard / Mouse ..........................................................................................................................43
LED Functions..................................................................................................................................................44System LEDs...............................................................................................................................................44Connection LEDs......................................................................................................................................46Keyboard LEDs ..........................................................................................................................................47
Display .................................................................................................................................................................48Touch Screen ..............................................................................................................................................48Touch Screen Defroster..........................................................................................................................48Screen Blanking ........................................................................................................................................48Display Backlight Control......................................................................................................................48
Chapter 4 - Vehicle Mounting and Accessory Installation ...................................51Introduction.......................................................................................................................................................51
Prepare for Vehicle Mounting ....................................................................................................................52Quick Start ...................................................................................................................................................52
Maintenance - Vehicle Mounted Devices..............................................................................................53
Cleaning..............................................................................................................................................................53
Place Thor VM3 in the Dock........................................................................................................................53Dock I/O Pin Cover. ..................................................................................................................................55Padlock..........................................................................................................................................................55Laptop Security Cable.............................................................................................................................55
Install RAM Mount ..........................................................................................................................................56Components - RAM Mounting Kits ...................................................................................................56Procedure - RAM Mount Assembly....................................................................................................58
Install U Bracket Mount................................................................................................................................69Components - U Bracket Mounting Assembly..............................................................................69Procedure - U Bracket Assembly ........................................................................................................70
Connect Cables ................................................................................................................................................73Strain Relief Cable Clamps ...................................................................................................................73
Thor VM3 with Microsoft Windows Embedded Compact 7 User Guide v

Connect Power...........................................................................................................................................74Connect USB Keyboard ....................................................................................................................... 109Connect PS/2 Keyboard...................................................................................................................... 110Connect USB Host................................................................................................................................. 112Connect USB Client .............................................................................................................................. 114Connect Serial Device .......................................................................................................................... 115Connect Headset Cable....................................................................................................................... 115Connect CANbus Cable....................................................................................................................... 117Install External Antenna...................................................................................................................... 117Install Remote Antenna....................................................................................................................... 118
Apply Touch Screen Protective Film ..................................................................................................... 122Installation ............................................................................................................................................... 122Removal ..................................................................................................................................................... 123
Disconnect UPS Battery ............................................................................................................................ 124Equipment Required ............................................................................................................................ 124Disconnect Procedure ......................................................................................................................... 124
Install mSATA Drive ..................................................................................................................................... 125Equipment Required ............................................................................................................................ 125Installation Procedure ......................................................................................................................... 125
Install SIM Card(s) ....................................................................................................................................... 127Equipment Required ............................................................................................................................ 127Installation Procedure ......................................................................................................................... 127
Replace Front Panel .................................................................................................................................... 129Front Panel Options.............................................................................................................................. 129Equipment Required ............................................................................................................................ 129Replacement Procedure ..................................................................................................................... 129
Chapter 5 - Software .................................................................................................. 131Introduction.................................................................................................................................................... 131
Operating System ........................................................................................................................................ 131
Windows Embedded Compact Operating System.......................................................................... 131General Windows Embedded Compact Keyboard Shortcuts............................................... 131Save Changes to the Registry ........................................................................................................... 132
Software Load................................................................................................................................................ 133Software Applications .......................................................................................................................... 133ActiveSync................................................................................................................................................. 133
vi Thor VM3 with Microsoft Windows Embedded Compact 7 User Guide

RFTerm (Optional) ................................................................................................................................. 133Enterprise TE (Optional) ..................................................................................................................... 133Music Player ............................................................................................................................................ 134Enterprise Client Pack ......................................................................................................................... 134CloneNGo.................................................................................................................................................. 134
Thor VM3 Utilities......................................................................................................................................... 135LAUNCH.EXE .......................................................................................................................................... 135LAUNCH.EXE and Persistent Storage........................................................................................... 136REGEDIT.EXE........................................................................................................................................... 137WARMBOOT.EXE.................................................................................................................................... 137Thor VM3 Command-line Utilities .................................................................................................. 137
Desktop ............................................................................................................................................................ 137Desktop Icons.......................................................................................................................................... 138My Device Folders.................................................................................................................................. 139Internet Explorer .................................................................................................................................... 139
Start Menu ...................................................................................................................................................... 139Communication...................................................................................................................................... 140Command Prompt................................................................................................................................. 140Internet Explorer .................................................................................................................................... 140Media Player ............................................................................................................................................ 140File Viewers............................................................................................................................................... 140Microsoft WordPad ............................................................................................................................... 141Remote Desktop Connection ............................................................................................................ 141Settings...................................................................................................................................................... 141Windows Explorer .................................................................................................................................. 141
Taskbar ............................................................................................................................................................. 142General....................................................................................................................................................... 142Advanced................................................................................................................................................... 142
Thor VM3 OS Upgrade ............................................................................................................................... 143Introduction ............................................................................................................................................. 143Preparation............................................................................................................................................... 143Procedure.................................................................................................................................................. 144
BIOS................................................................................................................................................................... 144Accessing the BIOS Setup.................................................................................................................. 145
Control Panel ................................................................................................................................................. 146About........................................................................................................................................................... 148
Thor VM3 with Microsoft Windows Embedded Compact 7 User Guide vii

Accessibility ............................................................................................................................................. 150Battery........................................................................................................................................................ 151Bluetooth Printing................................................................................................................................. 152Bluetooth Scanning.............................................................................................................................. 154Certificates ............................................................................................................................................... 159Date / Time............................................................................................................................................... 160Dialing ........................................................................................................................................................ 161Display........................................................................................................................................................ 162Enterprise Settings ............................................................................................................................... 164Error Reporting....................................................................................................................................... 169Input Panel ............................................................................................................................................... 170Internet Options ..................................................................................................................................... 171Keyboard.................................................................................................................................................... 173Keyboard Remapper ............................................................................................................................. 174Mixer ........................................................................................................................................................... 177Mouse......................................................................................................................................................... 179Network and Dialup Connections ................................................................................................... 180Network Capture .................................................................................................................................... 182Options....................................................................................................................................................... 185Owner.......................................................................................................................................................... 188Password ................................................................................................................................................... 190PC Connection ........................................................................................................................................ 192Peripherals ............................................................................................................................................... 193Power .......................................................................................................................................................... 194Power Configuration Mode................................................................................................................ 196Regional Settings................................................................................................................................... 200Registry ...................................................................................................................................................... 201Remove Programs ................................................................................................................................. 202Screen Control ........................................................................................................................................ 203Storage Manager ................................................................................................................................... 204Stylus .......................................................................................................................................................... 205System........................................................................................................................................................ 206Terminal Server Client Licenses ...................................................................................................... 208Volume and Sounds.............................................................................................................................. 209ZoomZone ................................................................................................................................................. 211
Automatic Firmware Update Utility....................................................................................................... 214Firmware Distribution Files ............................................................................................................... 214
viii Thor VM3 with Microsoft Windows Embedded Compact 7 User Guide

Update Process....................................................................................................................................... 214
Configuration Cloning Utility (CCU)..................................................................................................... 215Configuration Cloning Utility GUI................................................................................................... 215
Chapter 6 - ActiveSync .............................................................................................. 221Introduction.................................................................................................................................................... 221
Initial Setup..................................................................................................................................................... 222
Connect via Serial Port............................................................................................................................... 222Configure the serial port for ActiveSync....................................................................................... 222Configure ActiveSync Settings......................................................................................................... 222Configure PC Connection Settings ................................................................................................ 223Setup PC or Laptop............................................................................................................................... 223Start the ActiveSync Connection..................................................................................................... 224
Explore.............................................................................................................................................................. 224
Backup Data Files using ActiveSync..................................................................................................... 224Prerequisites............................................................................................................................................ 224Connect...................................................................................................................................................... 224
Disconnect ...................................................................................................................................................... 224
Reset and Loss of Host Re-connection ............................................................................................... 225
ActiveSync Help ............................................................................................................................................ 225
Chapter 7 - Wireless Network Connections .......................................................... 227Managing Wireless Connections ........................................................................................................... 227
WLAN Wireless Configuration Utility (WCU)..................................................................................... 227Dynamic vs. Fixed IP Address ........................................................................................................... 227
Important Notes............................................................................................................................................ 228
Using the Wireless Configuration Utility ............................................................................................ 228Tasks ........................................................................................................................................................... 229Status.......................................................................................................................................................... 229Profile List................................................................................................................................................. 229Admin Login............................................................................................................................................. 230Browse Nearby Wireless Networks.................................................................................................. 231Creating a Profile ................................................................................................................................... 232Advanced Profile Configuration....................................................................................................... 233Roam Management .............................................................................................................................. 255Advanced Settings................................................................................................................................. 259
Thor VM3 with Microsoft Windows Embedded Compact 7 User Guide ix

Certificates...................................................................................................................................................... 260Quick Start ................................................................................................................................................ 260Generate a Root CA Certificate......................................................................................................... 260Install a Root CA Certificate............................................................................................................... 263Generate a User Certificate................................................................................................................ 264Install a User Certificate...................................................................................................................... 267
VM3 WWAN Connection Manager ........................................................................................................ 270Home .......................................................................................................................................................... 271Link Settings............................................................................................................................................ 272System Settings...................................................................................................................................... 276GPS.............................................................................................................................................................. 281About........................................................................................................................................................... 282
Appendix A - Key Maps .............................................................................................. 283Integrated Keypad........................................................................................................................................ 283
Integrated Keypad and BIOS............................................................................................................. 284
External 21-Key Keyboard ........................................................................................................................ 285
External 95-Key Keyboard ........................................................................................................................ 287
External 60-Key Keyboard ........................................................................................................................ 28860 Key KeyMap 101-Key Equivalencies........................................................................................ 288
Appendix B - Specifications and Reference Material.......................................... 293Technical Specifications............................................................................................................................ 293
Thor VM3................................................................................................................................................... 293VM1D Standard Dock........................................................................................................................... 294VM3D Enhanced Dock......................................................................................................................... 295VMXD Enhanced Dock......................................................................................................................... 296VMXD Enhanced Dock for Off-Vehicle Use (QM3AC)............................................................. 297
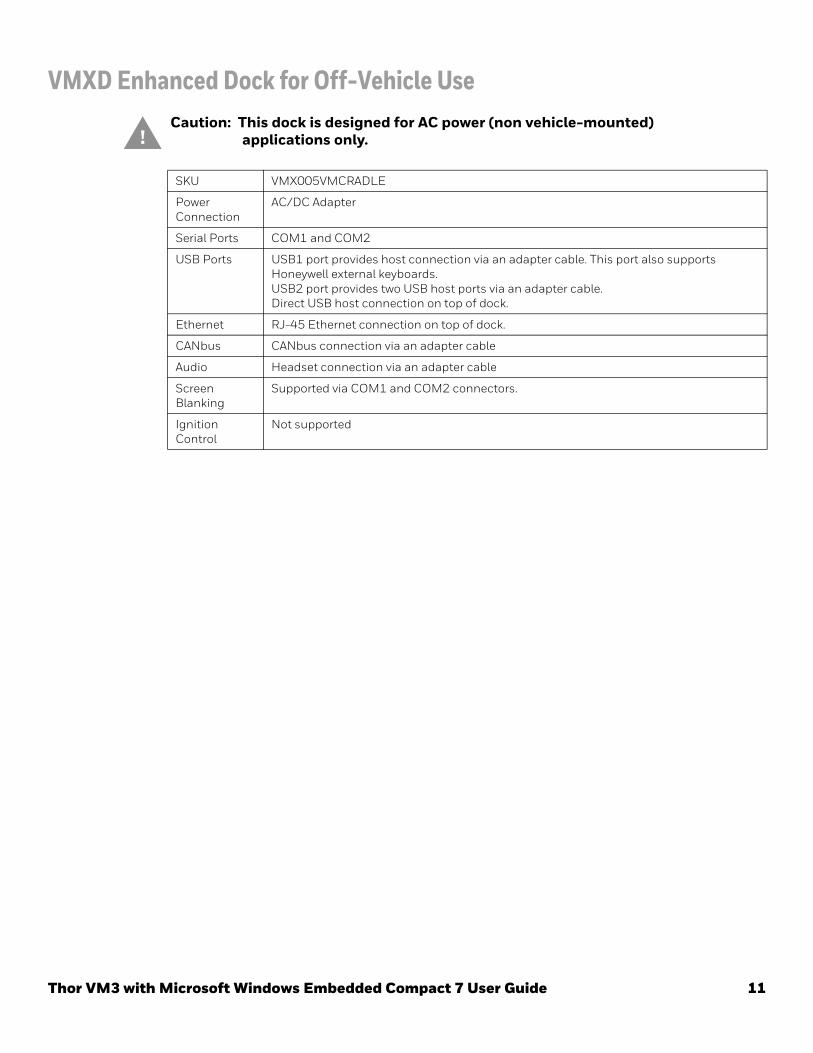
Dimensions..................................................................................................................................................... 298Thor VM3................................................................................................................................................... 298VM1D Standard Dock........................................................................................................................... 298VM3D and VMXD Enhanced Dock.................................................................................................. 298
Environmental Specifications................................................................................................................. 299Thor VM3 and Dock............................................................................................................................... 299
Network Card Specifications ................................................................................................................... 300WLAN - Qualcomm Atheros 802.11a/b/g/n .............................................................................. 300
x Thor VM3 with Microsoft Windows Embedded Compact 7 User Guide

WPAN - Bluetooth.................................................................................................................................. 300WWAN ........................................................................................................................................................ 300
Port and Connector Pinouts .................................................................................................................... 301Power Supply Connector..................................................................................................................... 301COM1 and COM2 Connector ............................................................................................................ 303USB and USB1 Connector.................................................................................................................. 303USB2 Connector..................................................................................................................................... 306CANbus / Audio Connector ............................................................................................................... 309
Hat Encoding ................................................................................................................................................. 312
Licenses of Third Party Software ........................................................................................................... 314
Appendix C - Thor VM3 Agency Information........................................................ 363Label Locations ............................................................................................................................................ 363
Thor VM3 with Microsoft Windows Embedded Compact 7 User Guide xi

xii Thor VM3 with Microsoft Windows Embedded Compact 7 User Guide

CHAPTER
1
Thor VM3 with Mic
CUSTOMER SUPPORT
Technical AssistanceTo search our knowledge base for a solution or to log in to the Technical Support portal and report a problem, go to www.hsmcontactsupport.com.
For our latest contact information, see www.honeywellaidc.com/locations.
Product Service and RepairHoneywell International Inc. provides service for all of its products through service cen-ters throughout the world. To obtain warranty or non-warranty service, return your product to Honeywell (postage paid) with a copy of the dated purchase record. To learn more, go to www.honeywellaidc.com and select Service & Repair at the bottom of the page.
Limited WarrantyFor warranty information, go to www.honeywellaidc.com and click Get Resources > Product Warranty.
Send FeedbackYour feedback is crucial to the continual improvement of our documentation. To provide feedback about this manual, contact the Honeywell Technical Communications depart-ment at [email protected].
rosoft Windows Embedded Compact 7 User Guide 1

2 Thor VM3 with Microsoft Windows Embedded Compact 7 User Guide

CHAPTER
2
Thor VM3 with Mic
GETTING STARTED
OverviewThe Thor VM3 Vehicle Mount Computer (VMC) is a rugged, vehicle mounted computer running a Microsoft® Windows® Embedded Compact 7 operating system and capable of wireless data communications from a fork-lift truck or any properly configured vehicle. Wireless communications are supported over a 802.11 WLAN network and, optionally, over a WWAN network. The Bluetooth® module supports Bluetooth printers and scan-ners.
The Thor VM3 is designed for use with a vehicle dock. Two models of docks are sup-ported, a Standard Dock and an Enhanced Dock. The dock installs in the vehicle and connects to vehicle power. The dock provides conditioned input power for the Thor VM3. Peripheral connections are on the dock. The Thor VM3 is designed to easily be removed from the dock with a latch on the lower rear of the Thor VM3 housing. Since the dock remains attached to the vehicle, the Thor VM3 computer can easily be moved from one vehicle equipped with a dock to another vehicle equipped with a dock.
The Thor VM3 contains a UPS battery which, when fully charged, can power the Thor VM3 for a minimum of 30 minutes. This can be when the Thor VM3 is not attached to a dock or when the Thor VM3 is attached to a dock but the vehicle power is interrupted, such as when the vehicle battery is being changed.
The Thor VM3 can be used with or without an external keyboard. There are 7 program-mable keys (P1-P7) on the front bezel and, when used with the Orange modifier key, provide 7 additional programmable keys (P8-P14).
Contact Technical Assistance for information on the latest upgrades for your Thor VM3.
Caution: Before shipping the Thor VM3, be sure to Disconnect UPS Battery
rosoft Windows Embedded Compact 7 User Guide 3

About this GuideThis user’s guide has been developed for a Thor VM3 with a Microsoft® Windows® Embedded Compact 7 operating system.
Out of the BoxThe following items may be packaged separately:
• Thor VM3
• Standard or Enhanced Dock (includes 10-60VDC power cable)
• RAM or U-Bracket vehicle mount kit
If you ordered additional accessories for the Thor VM3, verify they are also included with the order. Keep the original packaging material in the event the Thor VM3 should need to be returned for service. For details, see Technical Assistance.
P8P1 P14P7P13P6P12P5P11P4P10P3P9P2
4 Thor VM3 with Microsoft Windows Embedded Compact 7 User Guide

Initial Setup for Thor VM3This page lists a quick outline of the steps you might take when setting up a new Thor VM3. More instruction for each step is listed later in this guide.
Contact Technical Assistance if you need additional help.
Hardware Setup
1. Install RAM Mount or Install U Bracket Mount to the vehicle.
2. Place Thor VM3 in the Dock.
3. Secure the optional external keyboard to either an integrated or remote mounting bracket.
4. Connect Cables for any peripherals.
5. Connect Power.
6. Secure all cables in Strain Relief Cable Clamps.
7. Press the Power Switch on the dock to the on position.
8. Press the Power Button on the Thor VM3.
Note: After the initial power on, the Thor VM3 can be configured to automatically power on, either when power is attached or the vehicle ignition is turned on.
9. Perform touch screen Calibration.
Software
LanguagesThe Thor VM3 is shipped with a multi-language operating system. To change the lan-guage displayed, go to the User Interface Language tab of the Regional Settings con-trol panel. Available languages are displayed in a pull-down list. After selecting the desired language a reboot may be necessary. Use the Restart option on the Registry control panel to reboot.
First BootWhen a new Thor VM3 starts up a EULA (End User License Agreement) may be dis-played on the touch screen. It remains on the screen until the Accept or Decline button is tapped with a stylus.
Tap the Accept button to accept the EULA terms and the Thor VM3 continues the startup process. The EULA is not presented to the user again.
Caution: If the Thor VM3 has connectors for external antennas, do not power up the Thor VM3 without the external antennas connected. Damage to the WLAN radio may result.
Thor VM3 with Microsoft Windows Embedded Compact 7 User Guide 5

Tap the Decline button to decline the EULA and the Thor VM3 reboots. It will continue to reboot until the Accept button is tapped with the stylus.
Software SetupHardware setup should be completed before starting software setup.
1. If prompted, perform touch screen Calibration.
2. Set Power Configuration Mode and Power scheme timers.
3. Adjust Speaker Volume.
4. Configure Bluetooth Printing and Bluetooth Scanning.
5. Set wireless client parameters using the WLAN Wireless Configuration Utility (WCU).
6. Set terminal emulation parameters.
7. Save Changes to the Registry.
6 Thor VM3 with Microsoft Windows Embedded Compact 7 User Guide

DockThe Thor VM3 assembly consists of two parts, the Thor VM3 computer and the dock. The Thor VM3 contains an internal UPS battery that, once fully charged, powers the Thor VM3 for a minimum of 30 minutes when the unit is not mounted in the dock.
There are three available vehicle-mount docks for the Thor VM3:
• VM1D Standard Dock
• VM3D Enhanced Dock
• VMXD Enhanced Dock
Additionally an off-vehicle dock is available for the Thor VM3 for use in environment such as an office where AC power is available:
• VMXD Enhanced Dock for Off-Vehicle Use
All docks provide:
• A mount for the Thor VM3 computer. The dock attaches to a vehicle via a RAM or U-bracket mount or to a RAM table stand for use in an office environment.
• Conditioned power for the Thor VM3. The vehicle-mount docks accept 10-60VDC power input directly or 50-150VDC power input with a DC/DC converter. The off-vehicle dock requires an AC/DC power supply.
• Mobility of the Thor VM3, since the dock remains attached to the vehicle the Thor VM3 computer can easily be moved from one vehicle equipped with a dock to another.
• I/O ports as described in the below.
• Strain relief provisions for cables.
• Headset connection via an adapter cable. When a headset is not attached, the microphone and speakers on the Thor VM3 are active.
Features of the docks are described in the following sections.
Thor VM3 with Microsoft Windows Embedded Compact 7 User Guide 7

VM1D Standard DockCaution: This dock is designed for DC power vehicle-mounted
applications only.
SKUs VM1001VMCRADLE (with RAM ball)VM1002VMCRADLE VM1003VMCRADLE
Power Connection
Direct or DC/DC power supply
Serial Ports COM1 and COM2
USB Ports USB port provides host connection via an adapter cable. This port also supports Honeywell external keyboards.
Ethernet N/A
CANbus CANbus connection via an adapter cable
Audio Headset connection via an adapter cable
Screen Blanking
Supported via COM1 and COM2 connectors.
Ignition Control
Supported
8 Thor VM3 with Microsoft Windows Embedded Compact 7 User Guide
VM3D Enhanced DockCaution: This dock is designed for DC power vehicle-mounted
applications only.
SKU VM3001VMCRADLE
Power Connection
Direct or DC/DC power supply
Serial Ports COM1 and COM2
USB Ports USB1 port provides host connection via an adapter cable. This port also supports Honeywell external keyboards.USB2 port provides two USB host ports via an adapter cable.Direct USB host connection on top of dock.
Ethernet RJ-45 Ethernet connection on top of dock.
CANbus CANbus connection via an adapter cable
Audio Headset connection via an adapter cable
Screen Blanking
Supported via COM1 and COM2 connectors.
Ignition Control
Supported
Thor VM3 with Microsoft Windows Embedded Compact 7 User Guide 9

VMXD Enhanced Dock
This dock is designed for use when the Thor VM3 is replacing a Thor VX8 or Thor VX9. This dock utilizes the existing vehicle wiring from the earlier computer and supports screen blanking through that wiring.
Note: For the VMX Enhanced Dock: COM1 is used for screen blanking (via the power cable connector) and is unavailable when the screen blanking box is attached. When a screen blanking box is attached, any external serial device such as a scanner, must be connected to the COM2 port on the dock. If a screen blanking box is not connected via the power cable, the COM1 port on the dock is available for a serial device.
Caution: This dock is designed for DC power vehicle-mounted applications only.
SKUs VMX004VMCRADLE
Power Connection
Designed to connect to existing Thor VX8 or Thor VX9 power cable only, using existing DC/DC power supply
Serial Ports COM1 and COM2 (see note below)
USB Ports USB1 port provides host connection via an adapter cable. This port also supports Honeywell external keyboards.USB2 port provides two USB host ports via an adapter cable.Direct USB host connection on top of dock.
Ethernet RJ-45 Ethernet connection on top of dock.
CANbus CANbus connection via an adapter cable
Audio Headset connection via an adapter cable
Screen Blanking
Supported via power cable connector. (see note below)
Ignition Control
Not supported
10 Thor VM3 with Microsoft Windows Embedded Compact 7 User Guide
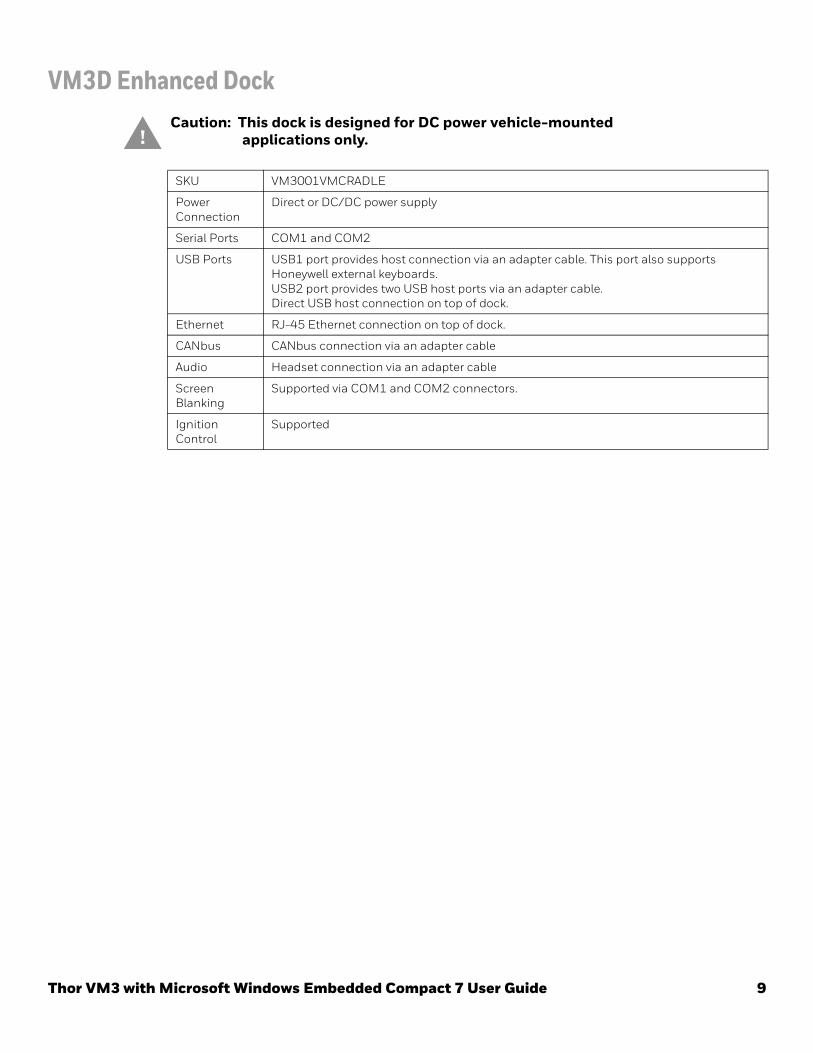
VMXD Enhanced Dock for Off-Vehicle UseCaution: This dock is designed for AC power (non vehicle-mounted)
applications only.
SKU VMX005VMCRADLE
Power Connection
AC/DC Adapter
Serial Ports COM1 and COM2
USB Ports USB1 port provides host connection via an adapter cable. This port also supports Honeywell external keyboards.USB2 port provides two USB host ports via an adapter cable.Direct USB host connection on top of dock.
Ethernet RJ-45 Ethernet connection on top of dock.
CANbus CANbus connection via an adapter cable
Audio Headset connection via an adapter cable
Screen Blanking
Supported via COM1 and COM2 connectors.
Ignition Control
Not supported
Thor VM3 with Microsoft Windows Embedded Compact 7 User Guide 11

Additional ConnectorsExternal antenna connectors may be present on the back of the Thor VM3. The connec-tors may include:
• 802.11 WLAN antenna connectors, used when the Thor VM3 is not equipped with internal antennas.
• External GPS antenna connector, when the Thor VM3 is equipped with GPS.
• External WWAN antenna connectors, when the Thor VM3 is equipped with WWAN. Optional WWAN radio (available in North America, Europe, New Zealand, and Australia only).
ScannersThe Thor VM3 supports external scanners. These scanners may be:
• A tethered scanner attached to a serial port. See Connect a Tethered Scanner for details on connecting a serial scanner. See Enterprise Settings for information on processing scanned bar code data.
• A tethered scanner attached to a USB port. See USB Scanner for details on connecting a USB scanner. See Enterprise Settings for information on processing scanned bar code data.
• A Bluetooth scanner. See Bluetooth Scanning for details on connecting a Bluetooth scanner. See Enterprise Settings for information on processing scanned bar code data.
Caution: If the Thor VM3 has connectors for external antennas, do not power up the Thor VM3 without the external antennas connected. Damage to the WLAN radio may result.
12 Thor VM3 with Microsoft Windows Embedded Compact 7 User Guide

Components
Front View - Thor VM3
P8P1 P14P7P13P6P12P5P11P4P10P3P9P2
Speakers
Microphone
PowerButton
AmbientLightSensor
Thor VM3 with Microsoft Windows Embedded Compact 7 User Guide 13

Back View - Thor VM3
Provision for Padlock Quick Release Handle
SIMCardandmSATA Access Panel
WWAN Antenna CableAccess Panel
External Antenna Connectors
Provision forLaptop Security
Cable
Dock Contact Pads
14 Thor VM3 with Microsoft Windows Embedded Compact 7 User Guide

Access Panels - Thor VM3
Front View - Dock
Standard Dock
Enhanced DockThe Enhanced Dock has a foam surround around the dock contact pad.
SIM and mSATA Card Access Panel with door removed
mSATA expansion card slot
SIM card slotsUPS Disconnect
DockContactPads
DockContactPads
FoamSurround
Thor VM3 with Microsoft Windows Embedded Compact 7 User Guide 15

Back View - DockThe connectors on the back of the dock vary by dock model.
Standard Dock
Enhanced Dock
Note: For the VMX Enhanced Dock: COM1 is used for screen blanking (via the power cable connector) and is unavailable when the screen blanking box is attached. When a screen blanking box is attached, any external serial device such as a scanner, must be connected to the COM2 port on the dock. If a screen blanking box is not connected via the power cable, the COM1 port on the dock is available for a serial device
Strain Relief Clamps
Fuse
Power Connector
Power Switch
RAM Ball
COM 1
COM2
USB
CANbus / Audio
Strain Relief Clamps
CANbus / Audio
COM2
COM1
USB1
USB2
Fuse
Power Connector
Power Switch
RAM Ball
AccessoryMount
AccessoryMount
16 Thor VM3 with Microsoft Windows Embedded Compact 7 User Guide

Top View - Enhanced DockOnly the Enhanced Dock has these connectors on the top. The connectors are located behind water tight plugs.
Backlights and Indicators
Display BacklightThere are several configuration options for the Thor VM3 display backlight:
Power ManagementThe display backlight is controlled by power management. When the user activity timer expires, the display backlight is turned off. Timeouts can be set for the available power management schemes.
See Power for configuration options.
Backlight BrightnessThe intensity of the display backlight can be manually configured:
1. Press the Blue key to enter Blue mode
2. Press the P5 key to increase backlight brightness or the P6 key to decrease backlight brightness.
3. Press the Blue key to exit Blue mode.
Refer to the Screen Control panel for the current display brightness level.
Screen BlankingThe Thor VM3 can be configured to blank (blackout) the display while the vehicle is in motion.
Refer to ZoomZone for information.
Keypad BacklightBy default, the integrated keypad backlight follows the display backlight. The integrated keypad backlight can be disabled.
USB Host Ethernet
Thor VM3 with Microsoft Windows Embedded Compact 7 User Guide 17

To change this behavior, see the Misc tab of the Options control panel.
The external USB keyboard backlight is manually controlled.
Speaker VolumeThe speaker volume can be adjusted via the Thor VM3 keypad:
1. Press the Blue key to enter Blue mode
2. Press the P1 key to increase speaker volume or the P2 key to decrease speaker volume.
3. Press the Blue key to exit Blue mode.
The current volume level can be viewed on the Mixer control panel. This control panel can also be used to adjust speaker volume.
Power Up
The dock has a power switch on the back.
The “On” side of this rocker switch has a raised bump to allow the state of the switch to be determined when the switch may not be easily viewed, for example, after the dock is mounted in a vehicle.
After external power has been connected and the Thor VM3 has been mounted in the dock, press the side of the power switch with the raised bump to pass power from the dock to the Thor VM3.
Next locate the power button on the front of the Thor VM3.
If a USB drive, such as a thumb drive is attached to the Thor VM3, the device may attempt to boot from the USB drive. Remove the USB drive and power up the Thor VM3 again.
Standard Dock Enhanced Dock
18 Thor VM3 with Microsoft Windows Embedded Compact 7 User Guide

Press the power button to turn the Thor VM3 on. When the Windows desktop is dis-played or an application begins, the power up sequence is complete.
After initial power on, the Thor VM3 can be configured to automatically power on. See Power Controls for more information.
Rebooting the Thor VM3
• If the USB drive contains a bootable sector, the Thor VM3 boots from the USB drive.
• If the USB drive does not contain a bootable sector, the Thor VM3 does not boot. Remove the USB drive and boot the Thor VM3 again.
WarmbootA warmboot reboots the Thor VM3 without erasing any registry data. Configuration set-tings and data in RAM are preserved during a warmboot. Network sessions are lost and any data in running applications that has not been previously saved may be lost. CAB files already installed remain installed.
There are several warmboot methods available:
• Using the Registry, select Start > Settings > Control Panel > Registry and tap the Warmboot button. The Thor VM3 immediately warmboots.
• Using the Start menu, select Start > Run and type WARMBOOT in the text box. Press Enter. The Thor VM3 immediately warmboots. The WARMBOOT text command is not case-sensitive.
• Use the P1 + P7 + Orange key press sequence to reboot the Thor VM3. The keys must be pressed in sequence; they do not need to be held down simultaneously.
If a USB drive, such as a thumb drive is attached to the Thor VM3, the device attempts to boot from the USB drive:
Thor VM3 with Microsoft Windows Embedded Compact 7 User Guide 19

RestartA restart reboots the Thor VM3 without erasing any registry data. Configuration settings are preserved during a restart. Network sessions are lost and any data in running appli-cations that has not been previously saved may be lost. The contents of RAM are erased and the operating system and CAB files are reloaded.
To initiate a restart:
• Using the Registry, select Start > Settings > Control Panel > Registry and tap the Restart button. The Thor VM3 immediately restarts.
• Using the Start menu, select Start > Run and type RESTART in the text box. Press Enter. The Thor VM3 immediately restarts. The RESTART text command is not case-sensitive.
Clearing Persistent Storage / Reset to Default SettingsUse the Registry control panel Load Factory Defaults button to set the Thor VM3 regis-try back to factory defaults. No other clearing is available or necessary.
Tapping the Touch Screen with a StylusNote: Always use the point of the stylus for tapping or making strokes on the touch screen.
Never use an actual pen, pencil, or sharp/abrasive object to write on the touch screen.
Hold the stylus as if it were a pen or pencil. Touch an element on the screen with the tip of the stylus then remove the stylus from the screen.
Firmly press the stylus into the stylus holder when the stylus is not in use.
Using a stylus is similar to moving the mouse pointer then left-clicking icons on a desk-top computer screen.
Using the stylus to tap icons on the touch screen is the basic action that can:
• Open applications
• Choose menu commands
• Select options in dialog boxes or drop-down boxes
• Drag the slider in a scroll bar
• Select text by dragging the stylus across the text
• Place the cursor in a text box prior to typing in data
• Place the cursor in a text box prior to retrieving data using a scanner/imager.
A right-click can be simulated by touching the touch screen with the stylus and holding it for a short time.
A stylus replacement kit is available.
20 Thor VM3 with Microsoft Windows Embedded Compact 7 User Guide

Setup Terminal Emulation ParametersThe Thor VM3 offers both RFTerm and Enterprise TE. For details on configuring these terminal emulators, refer to the appropriate user’s guide at www.honeywellaidc.com.
Cleaning
Cleaning the Thor VM3 and the DockDampen a cloth with the cleaner and then wipe the surface. Do not spray the cleaner directly onto the Thor VM3 or the dock. Avoid harsh chemicals. The following cleaners are recommended:
• Windex® Glass Cleaner
• Formula 409® All-Purpose Cleaner or Glass and Surface Cleaner
• Fantastik® All Purpose Cleaner
• Liquid hand soap
Cleaning the Touch ScreenNote: These instructions are for components made of glass. If there is a removable protective
film sheet on the display, remove the film sheet before cleaning the screen.
Keep rough or sharp objects away from the Thor VM3 touch screen and, if installed, the bar code reader scanning aperture.
If the glass becomes soiled or smudged, clean only with a standard household cleaner such as Windex® without vinegar or use isopropyl alcohol. Dampen the cloth with the cleaner and then wipe the surface.
Do not use paper towels or harsh-chemical-based cleaning fluids since they may result in damage to the glass surface. Use a clean, damp, lint-free cloth.
Do not scrub optical surfaces. If possible, clean only those areas which are soiled. Lint and particulates can be removed with clean, filtered canned air.
Startup HelpContact Technical Assistance if you need more help.
Thor VM3 seems to lockup as soon as it is rebooted.
There may be slight delays while the wireless client connects to the network, authorization for voice-enabled applications complete, and Bluetooth relationships establish or re-establish. When an application begins, the Thor VM3 is ready for use.
Thor VM3 with Microsoft Windows Embedded Compact 7 User Guide 21

22 Thor VM3 with Microsoft Windows Embedded Compact 7 User Guide

CHAPTER
3
Thor VM3 with Mic
HARDWARE OVERVIEW
System Hardware
802.11a/b/g/n Wireless ClientThe Thor VM3 has an 802.11a/b/g/n network card that supports diversity with two internal or external antennas. Power management for the network card is configured with the WLAN Wireless Configuration Utility (WCU).
Central Processing Unit The CPU is a 1.5 GHz Dual Core Intel Atom processor.
The operating system is Microsoft Windows Embedded Compact 7.
The OS image is stored on an internal mSATA memory card and is loaded into DRAM for execution.
Input/Output ComponentsThe Thor VM3 supports the following I/O components of the core logic:
• Two 9-pin RS-232 serial ports, COM1 and COM2, on dock.
• One slot for mSATA card for operating system storage.
• Second slot for mSATA memory card for storage expansion.
• Integrated keyboard with programmable keys.
• Ports available via adapter cables on dock: USB host port, CANbus, Audio. Direct connections on Enhanced Dock: Ethernet and USB host.
System MemoryMain system memory is 2 or 4 GB SDRAM.
rosoft Windows Embedded Compact 7 User Guide 23

Video SubsystemThe Thor VM3 video subsystem consists of a color TFT display. The video subsystem complies with the VESA VL bus standard. The resolution of this display is 800 x 600 or 1024 x 768 pixels. This resolution complies with the SVGA graphics industry standard.
The display supports screen blanking to eliminate driver distraction when the vehicle is in motion.
Audio InterfaceSpeakers are located on the bottom front of the Thor VM3. A headset adapter cable pro-vides a connection for headset operation. When a headset is plugged into the adapter cable, the main speakers are disabled.
A microphone is located at the upper right of the Thor VM3 display, near the Thor VM3 emblem. When a headset is plugged into the adapter cable, the internal microphone is disabled.
Card Slots
mSATA SlotsThere are two mSATA slots. The lower slot contains an mSATA card loaded with the oper-ating system.
The upper slot is available for a user installable mSATA card for storage expansion.
BluetoothThe Thor VM3 contains Bluetooth version 2.0 with Enhanced Data Rate (EDR) up to 3.0 Mbit/s over the air. Bluetooth device connection (or pairing) can occur at distances up to 32.8 ft (10 meters) Line of Sight. The wireless client retains wireless connectivity while Bluetooth is active.
The user cannot select PIN authentication or encryption on connections from the Thor VM3. However, the Thor VM3 supports authentication requests from pairing devices. If a pairing device requests authentication or encryption, the Thor VM3 displays a prompt for the PIN or passcode. Maximum encryption is 128 bit. Encryption is based on the length of the user’s passcode.
Bluetooth simultaneously supports one printer as a slave Bluetooth device and one scanner, either as a slave or as a master Bluetooth device.
• The LED on the Bluetooth scanner illuminates during a scanning operation.
• Multiple beeps may be heard during a bar code scan using a mobile Bluetooth scanner. The mobile Bluetooth scanner may beep as the bar code data is accepted/rejected and the Thor VM3 may beep during final bar code data manipulation.
24 Thor VM3 with Microsoft Windows Embedded Compact 7 User Guide

WWAN (Wireless Wide Area Networking) is available on the Thor VM3. Two slots are pro-vided for SIM cards.
Power
Vehicle DC Power Supply
Vehicle power input for the Thor VM3 dock is 10V to 60V DC and is accepted without the need to perform any manual operation within the Thor VM3 dock, see 12-48 VDC Vehicles (10-60 VDC Direct Connection). The dock provides a conditioned power output for the Thor VM3. By using a specified DC/DC power supply, input voltage of 50-150V DC can be accepted, see 60-144 VDC Vehicles (50-150 VDC Power Supply, Screws on Top of Lid) or 60-144 VDC Vehicles (50-150 VDC Power Supply, Screws on Top of Lid).
Power input is fused for protection and the fuse is externally accessible, see Fuse.
External AC Power SupplyIf DC power is not available – for example, in an office environment – an optional exter-nal Universal Input Power Supply can be used to convert AC wall power to an appropri-ate DC level. AC to DC power input for the Thor VM3 is delivered to the dock via an optional external power supply and adapter cable. See External AC/DC Power Supply.
Uninterruptible Power SupplyThe Thor VM3 contains an internal UPS battery.
The UPS battery is automatically charged when the Thor VM3 is placed in a powered dock, provided the safe charging temperature conditions below are met.
When external power is removed, the UPS automatically powers the Thor VM3 with no user intervention. When running on UPS power, the power management timeouts may be different than when vehicle power is applied.
The UPS allows the Thor VM3 to continue operation when not mounted in a dock or when the vehicle battery is being swapped. When fully charged the UPS battery is designed to power the Thor VM3 for a minimum of 30 minutes at temperatures of -30ºC (-22ºF) or greater.
If operating on UPS power and the UPS battery becomes critically low, the Thor VM3 performs a controlled shutdown.
If there is no external power available, there must be 35% or greater power in the UPS battery or the Thor VM3 does not power on.
The UPS status LED and the Battery Control Panel can be used to monitor the state of
Caution: Vehicle DC power supply connections require a DC-compatible Dock.
Thor VM3 with Microsoft Windows Embedded Compact 7 User Guide 25

To determine the safe temperature charging range, it is necessary to view the Battery FW Version on the About tab.
If the Battery FW Version is 3 or lower:
If the Battery FW Version is 4 or higher:
Safe Charging Temperature RangeThe temperature of the Thor VM3 is the trigger for UPS battery charging.
• If the Battery FW Version is 3 or lower:
◦ The UPS battery is not charged when the internal Thor VM3 temperature is below -20°C (-4°F). This corresponds to an ambient (room) temperature of approximately -30°C (-22°F).
◦ The UPS battery is not charged when the internal Thor VM3 temperature is above 60°C (140°F). This corresponds to an ambient (room) temperature of approximately 50°C (122°F).
• If the Battery FW Version is 4 or higher:
◦ The UPS battery is not charged when the internal Thor VM3 temperature is below 0°C (32°F). This corresponds to an ambient (room) temperature of approximately -10°C (-14°F).
◦ The UPS battery is not charged when the internal Thor VM3 temperature is above 45°C (113°F). This corresponds to an ambient (room) temperature of approximately 35°C (95°F).
• Move the Thor VM3 to a different location to charge the UPS battery.
When the Thor VM3 is operated in an environment where the UPS battery is not able to charge due to temperature extremes, the Thor VM3 should be removed to a location within the safe charging temperature range during off hours. A discharged UPS battery cannot protect against data loss in the event vehicle power is interrupted.
Charging Timeout• A fully discharged UPS battery normally recharges in less than 4 hours when the Thor
VM3 is in a powered dock and within the safe charging temperature range.
• If the UPS battery is not charged before an 8 hour timeout period expires, the UPS Status LED then flashes super-fast red.
Safety requirements restrict the temperature at which the Li-Ion UPS bat-tery can be charged. Charging is disabled if the temperature is outside of the -20ºC to 60ºC safe charging range. In order to maintain UPS charge the Thor VM3 should have power applied while the unit is within the safe charging range for at least an hour each day.
Safety requirements restrict the temperature at which the Li-Ion UPS bat-tery can be charged. Charging is disabled if the temperature is outside of the 0ºC to 35ºC safe charging range. In order to maintain UPS charge the Thor VM3 should have power applied while the unit is within the safe charging range for at least an hour each day.
26 Thor VM3 with Microsoft Windows Embedded Compact 7 User Guide

• If the charge timeout occurs, remove the Thor VM3 from the dock and Disconnect UPS Battery. Reinstall the Thor VM3 in the dock and power on.
Charging and Power Management• Charging does not occur when the Thor VM3 is in ignition mode and the ignition is
inactive.
• Charging of the UPS battery continues when the Thor VM3 is in power management (user idle, system idle or suspend modes).
Thor VM3 with Microsoft Windows Embedded Compact 7 User Guide 27

Backup BatteryThe Thor VM3 has a permanent Lithium battery installed to maintain time, date and CMOS setup information for a minimum of 90 days. The lithium battery is not user ser-viceable and should last four years with normal use before it requires replacement.
Note: The backup battery should only be changed by authorized service personnel.
Fuse
Power Management Modes
On Mode (D0)When the Thor VM3 is attached to either vehicle power or an external power supply or is operating from the UPS battery and the power button is pressed, the Thor VM3 is in the On mode. In this mode, the keypad, touch screen and any attached peripherals such as a scanner function normally. The display remains on until the backlight timer (if enabled) expires.
User Idle / Backlight Off Mode (D1)Backlight is dimmed, but display is readable. The Thor VM3 transitions to this mode from On after the User Idle timeout period has passed without a primary even occurring.
Warning: Improper replacement or repair could damage the battery, cause overheating, risk of explosion, and result in injury. The battery should be disposed of properly. The battery should not be disassembled or crushed. The battery should not be heated above 212˚F (100˚C) or incinerated. The battery must be recycled or disposed of separately from household waste.
Standard Dock Enhanced Dock
The Thor VM3 uses an 8A time delay (slow blow) fuse that is externally accessible and user replaceable. The fuse is located on the back of the dock. The fuse is accessed by unscrewing the cap as indicated.
Should it need replacement, replace with same size, rating and type of fuse:
• Littelfuse 0215008.MXP
• Cooper Bussmann BK1/S506-8-R
• Bel Fuse 5HT 8-R
or equivalent.
Fuse has voltage on it even when power is off. Always disconnect input power before chang-ing the fuse.
28 Thor VM3 with Microsoft Windows Embedded Compact 7 User Guide

System Idle / Display Off Mode (D2)Backlight and display are off. The status LED is solid green. The Thor VM3 transitions to this mode from User Idle after the System Idle timeout period has passed without a pri-mary event occurring.
Suspend mode (D3)All devices that are not configured as wakeup events are powered off. The status LED is blinking green if external power is connected and off if external power is not connected. The Thor VM3 transitions to this mode from System Idle after the Suspend timeout period has passed without a primary event occurring.
By default power is turned off to the USB port when the Thor VM3 is in Suspend. The Thor VM3 can be configured to provide power to the USB port in Suspend using the Options control panel.
Additionally the power button can be used to enter or exit Suspend mode:
• If the Thor VM3 is On, pressing the power button immediately transitions the unit to Suspend.
• If the Thor VM3 is in Suspend mode, pressing the power button transitions the unit to On.
Shutdown / Off Mode (D4)The Thor VM3 shuts down when the Thor VM3 is operating on power and the UPS bat-tery becomes critically low regardless of the current power management state. The Thor VM3 remains Off until external power is applied. The Thor VM3 may restart automati-cally when external power is applied or may require the user to press the power button depending on installation and configuration.
The Thor VM3 transitions to Off mode from Suspend after the Shutdown timeout period has passed without a primary event occurring. If the Thor VM3 has external power applied or a sufficiently charged UPS battery the Thor VM3 may restart automatically or may require the user to press the power button depending on installation and configu-ration.
A Real Time Clock (RTC) powered by an internal battery maintains the date and time while the Thor VM3 is off.
Primary Events
User Primary Events A User Primary Event transitions the Thor VM3 to D0 (On) mode. When no user event happens for the specified time period, the Thor VM3 transitions to D1 (User Idle), then D2 (System Idle) and then D3 (Suspend). Timeout periods are set via the Schemes tab in the Power control panel.
User primary events include:
• Any key press on the integrated keypad or external USB keyboard
Thor VM3 with Microsoft Windows Embedded Compact 7 User Guide 29

• Touch on the touch screen
System Primary EventsA System Primary Event allows the Thor VM3 to transition to D2 (System Idle) but the Thor VM3 does not enter D3 (Suspend) as long the system event occurs.
System primary events include:
• Serial data transfer
• USB data transfer
Wake Source EventsThese events wake the Thor VM3 from suspend:
• Power button
• Touch on the touch screen
• External power connection (AC/DC, Auto-On, Ignition Control/Ignition On power modes only)
• USB client connection
• Ignition (switched from Off to On, Ignition Control/Ignition Off power mode only)
• RTC
• Serial port CTS control line
• Headset connection (this is not enabled by default, but can be configured to wake the Thor VM3)
Events generated by these actions are not processed. For example, the touch screen tap that wakes the Thor VM3 is ignored.
The following events DO NOT wake the Thor VM3 from suspend:
• Bluetooth keyboard or mouse
• Bluetooth connection
• USB client disconnect
• USB host data (unless enabled via API)
• USB host connection
• SDIO interrupt
• Serial data
• 802.11 radio
• External power disconnect
30 Thor VM3 with Microsoft Windows Embedded Compact 7 User Guide

Power Controls
Power Switch
Power Button
Power Configuration ModeThe Power Configuration Mode control panel is used to select desired power configura-tion behavior.
Please refer to the Power Configuration Mode control panel for complete details.
For information on the Ignition input signal see Vehicle 10-60VDC Direct Power Connection and Auto-On Control Wiring Diagram.
Standard Dock Enhanced Dock
After all cables are connected, the Thor VM3 can be powered on.
There is a power switch located on the back of the dock. The power switch is a rocker switch.
The power switch has a raised bump to identify the switch position even when it is hidden from view. When the side of the switch with the raised bump is pressed, the power switch is On. If the dock is connected to external power, the dock delivers power to the Thor VM3.
Generally, once the dock is powered On, there is no need to power it off. The dock power can remain On even when the Thor VM3 is not attached.
The power button is located at the lower left of the Thor VM3.
If the Thor VM3 is Off, pressing the power button starts the power up sequence.
Note: This assumes that the Thor VM3 is docked in a powered dock or that the internal UPS battery has a sufficient charge to power the Thor VM3. If no external power is available and the UPS battery does not have a charge, pressing the power button causes no action.
If the Thor VM3 is On, pressing the power button places the unit in Suspend.
Thor VM3 with Microsoft Windows Embedded Compact 7 User Guide 31

AC/DCThe Thor VM3 is designed to power on whenever external power is attached. Due to the presence of external power, longer default power management timeouts are used.
Ignition ControlThe Thor VM3 is configured to power on when the vehicle ignition is switched on. When the vehicle ignition is on, longer default power management timeouts are used. If the vehicle ignition is turned off, shorter default power management timeouts are used.
Auto-OnThe Thor VM3 is designed to power on whenever external power is attached. Due to the presence of external power, longer default power management timeouts are used.
UPSThe Thor VM3 uses the UPS mode whenever external power is not available. Due to the absence of external power, much shorter default power management timeouts are used.
32 Thor VM3 with Microsoft Windows Embedded Compact 7 User Guide

External ConnectorsPower the Thor VM3 off before attaching a cable to any port (serial, USB, Audio/CAN, etc.).
The external I/O connectors for the Thor VM3 are located on the right side of the dock (when viewed from the back).
The Power Supply Connector is on the left side of the dock (when viewed from the back).
Antenna connectors are located on the top rear of the Thor VM3.
Serial Connector (COM1 and COM2)
Screen BlankingThe screen blanking signal can be provided either by a Honeywell Screen Blanking Box or a user supplied switch or relay. See Screen Blanking for information on connecting screen blanking accessories.
Standard Dock
Enhanced Dock
The COM1 and COM2 connectors are D-9 male connectors located on the back of the dock.
Power the Thor VM3 off before attaching a cable to any port (serial, USB, Audio/CAN, etc.).
The serial connectors are industry-standard RS-232, PC/AT standard 9–pin “D” male connector. See COM1 and COM2 Connector for connector pinout detail.
See Connect Serial Device for more information.
If a COM port is not being used for a scanner, it can be used for Screen Blanking when the vehicle is in motion.
COM1
COM2
USB
CANBUS/AUDIO
Thor VM3 with Microsoft Windows Embedded Compact 7 User Guide 33

USB Connector(s)
An additional USB host port is located on the top of the Enhanced Dock. Lift the cover to access the USB port.
Ethernet ConnectorAn Ethernet port is located on the top of the Enhanced Dock. Lift the cover to access the Ethernet port.
Standard Dock
Enhanced Dock
The USB or USB1 connector is a D-9 female connector located on the back of the dock. See USB and USB1 Connector for connector pin-out detail.
The USB-2 connector is a D-15 female connector located on the back of the dock. See USB2 Connector for connector pinout detail.
Power the Thor VM3 off before attaching a cable to any port (serial, USB, Audio/CAN, etc.).
COM1
COM2
USB
CANBUS/AUDIO
34 Thor VM3 with Microsoft Windows Embedded Compact 7 User Guide

CANbus / Audio Connector
Power Supply Connector
Standard Dock
Enhanced Dock
The CANbus/Audio connector is a D-15 male connector located on the back of the dock.
The connector supports a headset adapter cable or a CANbus cable. The Thor VM3 does not support connecting audio and CANbus simultaneously.
See CANbus / Audio Connector for connector pinout detail.
A headset cable attaches to the CANbus / Audio connector and provides a quick connect connec-tion for a headset. See Connect Headset Cable for more informa-tion.
The CANbus Y cable has a 9 pin F SAE J1939 (Deutsch) and 9 pin M SAE J1939 (Deutsch) connector. See Connect CANbus Cable for more information.
The CANbus interface is a virtual COM port. This port can be accessed using standard Windows API calls.
Standard Dock Enhanced Dock
Power is supplied to the Thor VM3 through the power connector. Additionally this assembly provides a connection point for the vehicle’s chassis ground to be connected internally to the conductive chassis of the computer.
The Thor VM3 internal power supply can accept DC input voltages in the range of 10 to 60 Volts DC when using the VM1D standard dock or VM3D enhanced docks. Other docks have different power requirements. See Dock for details.
See Power Supply Connector for connector pin-out detail. See Connect Power for more infor-mation on connecting power to the Thor VM3.
COM1
COM2
USB
CANBUS/AUDIO
Thor VM3 with Microsoft Windows Embedded Compact 7 User Guide 35

Antenna Connections
External Antenna Connector
Internal 802.11 AntennaIf the internal 802.11 antenna option is ordered, antennas are mounted inside the Thor VM3. The internal antennas are not user accessible.
Vehicle Remote AntennaThe external antennas can be remotely mounted on the vehicle. See Install Remote Antenna for instructions. External antenna kits are available for the 802.11 Wi-Fi radio, GPS and WWAN.
The Thor VM3 is equipped with an 802.11 radio and can be ordered with internal antennas, external antennas or exter-nal remote mount antennas. When the Thor VM3 is ordered with internal antennas, the external antenna connectors are not used. GPS and WWAN are optional on the Thor VM3 and require external remote mount antennas.
1. WI-FI (MAIN) 802.11 Main Exter-nal Antenna Con-nector
2. WAN (MAIN) (Blue label) Main WWAN Antenna Connector
3. GPS (Green label) GPS Antenna Connector
4. WAN (AUX) (Blue label) Auxiliary WWAN Antenna Connector
5. WI-FI (AUX) 802.11 Auxiliary External Antenna Connector
When the Thor VM3 is ordered with the internal antenna option, the 802.11 antenna connectors on the back are not connected to the 802.11 radio. Instead the internal antenna connector is connected to the 802.11 radio.
Remove the rubber cap, if present, from the antenna connector before connecting an external antenna.
1 2 3 4 5
36 Thor VM3 with Microsoft Windows Embedded Compact 7 User Guide

Keyboard Options
The integrated keypad contains seven programmable keys, a blue modifier key and an orange modifier key.
The P1 though P7 keys are user programmable.
• When used with no modifier key, P1 through P7 can be configured for a user programmable function.
• When used with the Orange modifier key, P1 through P7 provide secondary programmable keys, P8 through P14, and can be configured for a user programmable function.
• The programmable keys can be remapped to provide a single keypress, a string of keypresses or to execute an application or command. Key remapping is configured via the Keyboard Remapper option in the Control Panel.
• Programmable keys persist across a warmboot or power cycle.
• When used with the Blue modifier key, P1 and P2 keys are used to adjust speaker volume and P5 and P6 keys are used to adjust display brightness.
The P1 through P7 keys provide limited functionality before the operating system loads, such as during BIOS configuration. See Integrated Keypad and BIOS for available key-strokes.
The Thor VM3 integrated keypad is backlit.
• By default, the integrated keypad backlight follows the display backlight. When the display backlight is on, the integrated keypad backlight is on.
• If the display backlight brightness is increased (or decreased) the integrated keypad backlight brightness does not change.
• The integrated keypad backlight and the display share the same timer, which is configured in the Power control panel.
• The integrated keypad backlight can be disabled via the Misc tab of the Options control panel.
Keypad LEDsSee Keyboard LEDs for details.
P8P1 P14P7P13P6P12P5P11P4P10P3P9P2
Thor VM3 with Microsoft Windows Embedded Compact 7 User Guide 37

USB KeyboardsTwo Honeywell ruggedized USB keyboards are available, 95-key alphanumeric and 21-key numeric.
95-Key USB KeyboardThe 95-key USB keyboard may have any of the following markings on the decal on the back of the keyboard:
• 164288-0001
• 95 KEY USB
• 9000160KEYBRD
If the keyboard looks similar but has a different part number refer to 95-key PS/2 Keyboard.
If the keyboard is labeled as 164288-0001 Revision B (or greater) the keyboard has sticky keys for Alt, Ctrl and Shift. These keys will remain active for the next keypress. Ear-lier versions of this keyboard (Revision A) do not have sticky keys implemented.
The Thor VM3 uses an optional rugged QWERTY 95 key keyboard, designed for ease of use with the Windows operating system. The USB keyboard connects directly to the D9 USB connector (Standard Dock) or USB1 connector (Enhanced Dock).
• The 95 key keyboard supports all 104 keyboard functions (101 standard keyboard plus Windows keys) and includes an integrated pointing device and left and right mouse buttons. However, because the keyboard only has 95 keys, all functions are not visible (or printed on the keyboard). Therefore the keyboard supports what is called hidden keys - keys that are accessible but not visible on the keyboard.
• The 95 key keyboard keys are backlit. The keyboard backlight is manually controlled.
Keyboard BacklightThe keyboard backlight key in the top right hand corner has a light bulb icon.
The keyboard keys are backlit. The keyboard backlight is manually controlled using the backlight key in the upper right hand corner of the keyboard. Pressing the backlight key cycles the keyboard backlight through the levels of backlight intensity: Off, Low inten-sity, Medium intensity, Maximum intensity, Off, etc. When the Thor VM3 is powered on, the keyboard backlight defaults to Off.
Esc F2 F3 F4 F5 F6 F7 F8 F9 F10 F11 F12 PrintScreenSysRq
ScrollLock
PauseBreak
Fn
` 1 2 3 4 5 6 7 8 9 0 - =BackSpace Num
Lock/ * -
Tab Q W E R T Y U I O P[ ] \{ } | 7 8 9
4 5 6
1 2
0
3
Home PgUp
Caps A S D F G H J K L; ': " Enter
Ctrl Alt
X C V B N M , . /< > ? Shift
Alt CtrlIns
End PgDn
+
~ ! @ # $ % ^ & * ( )_ +
Lock
Shift Z
L R
Enter.Del
F1
38 Thor VM3 with Microsoft Windows Embedded Compact 7 User Guide

Since the keyboard is a USB device, by default the external keyboard backlight is turned off when the Thor VM3 enters Suspend. This behavior can be changed by enabling USB power in Suspend on the Misc tab of the Options control panel.
21-key Numeric KeypadA numeric keypad is available for the Thor VM3 in applications where a full keyboard may not be needed. The USB keyboard connects directly to the D9 USB connector (Standard Dock) or USB1 connector (Enhanced Dock).
Keyboard BacklightThe keyboard backlight key has a light bulb icon.
The keyboard keys are backlit. The keyboard backlight is manually controlled using the backlight key in the upper right hand corner of the keyboard. Pressing the backlight key cycles the keyboard backlight through the levels of backlight intensity: Off, Low inten-sity, Medium intensity, Maximum intensity, Off, etc. When the Thor VM3 is powered on, the keyboard backlight defaults to Off.
Since the keyboard is a USB device, by default the external keyboard backlight is turned off when the Thor VM3 enters Suspend. This behavior can be changed by enabling USB power in Suspend on the Misc tab of the Options control panel.
The PF key can be programmed using the Keyboard Remapper control panel.
Thor VM3 with Microsoft Windows Embedded Compact 7 User Guide 39

PS/2 KeyboardsLegacy PS/2 keyboards can be used with the Thor VM3 via a USB to PS/2 adapter cable. PS/2 keyboards are available in 60-key and 95-key versions and were used with the VX6, VX7, Thor VX8 or Thor VX9.
Note: The PS/2 adapter cable does not work with the Thor VM3 and the VM1D Standard Dock. The PS/2 adapter cable works with either the VM3D or VMXD Enhanced Docks.
95-key PS/2 KeyboardThe 95-key PS/2 keyboard may have any of the following markings on the decal on the back of the keyboard:
• 160491-0001
• 95 KEY PS-2
• 9000154KEYBRD (also available as VX89154KEYBRD)
If the keyboard looks similar but has a different part number refer to 95-Key USB Keyboard.
An adapter cable is required to attach this keyboard to the Thor VM3. See Connect PS/2 Keyboard for details.
Note: If the keyboard was previously used with Thor VX8 or Thor VX9, the adapter cable for the Thor VX8/VX9 is not used. The new PS/2 to USB adapter cable must be used.
This keyboard is visually similar to the USB external keyboard.
Key MapsThe 95-key keyboard supports all 104 keyboard functions (101 keyboard standard plus Windows keys) and includes an integrated pointing device and left and right mouse buttons. However, because the keyboard only has 95 keys, all functions are not visible (or printed on the keyboard). Therefore the Thor VM3 keyboard supports what is called hidden keys -- keys that are accessible but not visible on the keyboard. Refer to External 95-Key Keyboard for keymaps.
Esc F2 F3 F4 F5 F6 F7 F8 F9 F10 F11 F12 PrintScreenSysRq
ScrollLock
PauseBreak
Fn
` 1 2 3 4 5 6 7 8 9 0 - =BackSpace Num
Lock/ * -
Tab Q W E R T Y U I O P[ ] \{ } | 7 8 9
4 5 6
1 2
0
3
Home PgUp
Caps A S D F G H J K L; ': " Enter
Ctrl Alt
X C V B N M , . /< > ? Shift
Alt CtrlIns
End PgDn
+
~ ! @ # $ % ^ & * ( )_ +
Lock
Shift Z
L R
Enter.Del
F1
The mouse pointer function on the PS/2 keyboard is not available when connected via an adapter cable to the Thor VM3.
40 Thor VM3 with Microsoft Windows Embedded Compact 7 User Guide

NumLockFor the 95-key PS/2 keyboard, the NumLock key and the numeric keys are backlit green when NumLock is off. When NumLock is on, the backlight for the NumLock key and the numeric keys is amber.
CapsLock and Scroll LockFor the 95-key PS/2 keyboard, the CapsLock key is backlit green when CapsLock is off. When CapsLock is on, the backlight for the CapsLock key is amber.
The Scroll Lock key is backlit green when Scroll Lock is off. When Scroll Lock is on, the backlight for the Scroll Lock key is amber.
The default values for CapsLock and Scroll Lock are Off.
Keyboard BacklightThe keyboard keys are backlit. The keyboard backlight is manually controlled using the backlight key in the upper right hand corner of the keyboard. Pressing the backlight key cycles the keyboard backlight through the levels of backlight intensity: Off, Low inten-sity, Medium intensity, Maximum intensity, Off, etc.
60-key PS/2 KeyboardThe 60-key PS/2 keyboard is part number 160068-0001 (see decal on back of key-board).
An adapter cable is required to attach this keyboard to the Thor VM3. See Connect PS/2 Keyboard for details.
The 60-key keyboard has 101 keyboard functions, including a numeric keyboard pad.
Key MapsThe 60-key keyboard supports all 101 keyboard functions. However, because the key-board only has 60 keys, all functions are not visible (or printed on the keyboard). There-fore the Thor VM3 keyboard supports what is called hidden keys - keys that are accessible but not visible on the keyboard.
On standard keyboards many keys are found in the Alphanumeric section as well as on the Numeric keypad (i.e. the 1 key is found on the numeric keypad and above the alpha characters on standard keyboards). However these keys send distinctly different scan codes when the keys are pressed. The default codes for the Thor VM3 number keys cor-respond to the numeric keypad on standard keyboards. In order to duplicate the codes sent when the alphanumeric key is pressed, the hidden keystroke must be used.
Refer to External 60-Key Keyboard for keymaps.
Thor VM3 with Microsoft Windows Embedded Compact 7 User Guide 41

NumLockThe 60-key keyboard does not have a NumLock indicator or key. NumLock can be tog-gled On or Off using the 2nd SHIFT F10 keypress sequence.
Keyboard Backlight The keyboard keys are backlit with LEDs. The backlight is manually controlled using the 2nd + CTRL + F10 keypress sequence. The keyboard backlight is off when the Thor VM3 is powered up. The backlight must be manually turned on with the 2nd + CTRL + F10 key sequence.
Control KeysThe VMT keyboard has several control keys. Because of the construction of the Thor VM3 and the Microsoft Windows operating system, many of the Control Keys are not used on the Thor VM3.
• The 2nd functions of the F4 and F5 keys are not used as the display brightness is adjusted via the buttons on the Thor VM3.
• The 2nd functions of the F6 and F7 keys are not used as the Thor VM3 has TFT LCD screen with no provision for contrast adjustments.
• The 2nd functions of the F8 and F9 keys are not used as the sound volume on the Thor VM3 is controlled with the Sound icon in the Microsoft Windows System Tray.
• The F10 key is used to toggle the backlight as part of the keypress sequence 2nd + CTRL + F10. This key sequence immediately toggles the status of the keyboard backlight. Pressing 2nd + F10 has no effect on the keyboard backlight.
Keyboard LEDsCAPS LED
This LED indicates the state of the keyboard CapsLock mode. If CapsLock is enabled this LED is illuminated green. When CapsLock is off, the LED is dark.
Press 2nd then F1 to toggle CapsLock On and Off.
The default value of CapsLock is Off.Secondary Keys LED
The VMT keyboard is equipped with several secondary keys. These keys are identified by the superscripted text found on the keyboard keys. The secondary keys are accessible by using two (2) keystrokes: the 2nd key followed by the superscripted key.
Once the 2nd state is enabled (by pressing the 2nd key) the Secondary Mode LED is illu-minated and the 2nd state is enabled until another key is pressed. The 2nd key is tog-gled on with a 2nd keypress and then immediately off with another 2nd keypress.
• Press 2nd and F1 to turn CapsLock on and off.
• Press 2nd and ? (up arrow) to initiate the PgUp command.
• Press 2nd and Q to type the “!” key.
• Press 2nd and BkSp to enter the Insert (Ins) mode.
42 Thor VM3 with Microsoft Windows Embedded Compact 7 User Guide

USB Keyboard / MouseA standard USB keyboard or mouse can be attached to the Thor VM3 using the appro-priate adapter cable.
The Y cable attaches to the Thor VM3 and provides a USB connector. Please refer to documentation provided with the USB keyboard or mouse for more information on their operation.
Thor VM3 with Microsoft Windows Embedded Compact 7 User Guide 43

LED Functions
System LEDs
SYS (System Status) LED
Connection LEDs
System LEDs
Blue LED Orange LED
Programmable LED
UPS
SYS
SSD
SYS (System Status) LED
UPS (Uninterruptible Power Supply) LED
SSD (Solid State Drive) LED
LED Behavior System State
Solid Green • On
• On but Backlight Off
• On but Display Off
Green blinking very slowlyExternal power present(1/2 sec. on, 4 1/2 sec. off)
• Suspend
OffExternal power present
• Off
OffExternal power not present
• Suspend
• Off
OffExternal power not present
• SuspendOff
44 Thor VM3 with Microsoft Windows Embedded Compact 7 User Guide

UPS Status LEDThe color of the UPS LED identifies the charge level, while the behavior of the LED iden-tifies the charging state.
Charge Level
Charging State
UPS Unavailable
SSD (Solid State Drive) LED
LED Color Status
Green Fully charged (>90%)
Amber Less than fully charged, but more than 2 minutes runtime remaining
Red Low battery, less than 2 minutes runtime until shutdown
LED Behavior Status
Slow Blink(1 sec. on, 3 sec. off)
Charging
Fast Blink(1/2 sec. on, 1/2 sec. off)
UPS supplying power and discharging
On Neither charging or discharging
Off Unit is off or is in Suspend
LED Behavior Status
Super-Fast Blink(1/8 sec. on, 1/8 sec. off)
• Out of charging temperature range
• Charge timeout
• UPS is not installed
LED Behavior Status
Flashing Green SSD read or write activity
Off No SSD read or write activity
Thor VM3 with Microsoft Windows Embedded Compact 7 User Guide 45

Connection LEDs
WWAN LED
Wi-Fi LED
Bluetooth LED
Wi FiWi-Fi LED
Bluetooth LED
WWAN LED
LED Behavior Status
Solid Green Indicates a WWAN connection to a network
Off Indicates no WWAN connection
LED Behavior Status
Solid Green Indicates a connection with an IP address to an Access Point
Off Indicates no connection to an Access Point
LED Behavior Status
On Bluetooth hardware is on
Off Bluetooth hardware has been turned off
46 Thor VM3 with Microsoft Windows Embedded Compact 7 User Guide

Keyboard LEDsThe keyboard LEDs are located near the specified key.
Blue LED
Orange LED
Programmable LEDThe Programmable LED is available for user applications. The LED defaults to Off unless activated by user application.
The LED behavior is controlled by the NLedDriverSetDevice API.
LED Behavior Status
Solid Blue • Indicates the Blue modifier key is active
• Pressing the Blue key a second time exits this modifier mode and turns off the LED
• Pressing the Orange key exits the Blue mode and turns off the Blue LED
• When Blue mode is active, keys P1 and P2 provide volume adjustment and keys P5 and P6 provide brightness adjustment functions
Off Blue mode is not invoked
LED Behavior Status
Solid Orange • Indicates the Orange modifier key is active. Orange mode is invoked for the next keypress only
• Pressing the Orange key a second time exits this modifier mode and turns off the LED
• Pressing the Blue key exits the Orange mode and turns off the Orange LED
Off Orange mode is not invoked.
Thor VM3 with Microsoft Windows Embedded Compact 7 User Guide 47

DisplayThe display is a thin-film transistor display capable of supporting SXGA graphics modes. Display size is 1024x768 pixels. The display covering is designed to resist stains. The display supports screen blanking to eliminate driver distraction when the vehicle is in motion.
Touch ScreenThe touch screen is a Resistive Panel with a scratch resistant finish that can detect touches by a stylus, and translate them into computer commands. In effect, it simulates a computer mouse. Only Delrin or plastic styluses should be used. A right mouse click is simulated by touching and holding the screen for the appropriate time interval.
When a dialog box is too large for the display, tap and drag the dialog box up or down or from side to side to view the remainder of the dialog box.
Always use the point of the stylus for tapping or making strokes on the display. Never use an actual pen, pencil, sharp or abrasive object to write on the touch screen.
An extra or replacement stylus may be ordered.
A replaceable touch screen protective film is available when the Thor VM3 is used in an abrasive environment. Contact Technical Assistance for availability.
Note: If the touch screen is disabled or loses calibration on a Thor VM3, you must use a USB mouse or keyboard attached to the Thor VM3 to access the control panel to re-enable or recalibrate the touch screen unless a programmable key has been assigned to that function.
Touch Screen DefrosterExtended temperature versions of the Thor VM3 contain a touch screen defroster. The touch screen defroster can be disabled when not needed via the Peripherals control panel. The defroster trip point is configurable. The defroster is always disabled when the device is operating from UPS battery power.
Screen BlankingScreen blanking (blackout) can be enabled when the vehicle is in motion. See Screen Blanking for hardware setup and Screen Control for software setup to enable screen blanking. Once screen blanking is enabled, the display is blanked out any time when the cable sends the signal that the vehicle is in motion. If the cable is removed, screen blanking is disabled and the display remains on.
Display Backlight ControlThe display brightness on a Thor VM3 equipped with an outdoor display can be config-ured to automatically adjust depending on the ambient light level via Screen Control.
48 Thor VM3 with Microsoft Windows Embedded Compact 7 User Guide

The display brightness can be adjusted manually, via the keypad:
1. Press the Blue key to enter Blue mode.
2. Press P5 to increase brightness or P6 to decrease brightness.
3. Press the Blue key to exit Blue mode.
Thor VM3 with Microsoft Windows Embedded Compact 7 User Guide 49

50 Thor VM3 with Microsoft Windows Embedded Compact 7 User Guide

CHAPTER
4
Thor VM3 with Mic
VEHICLE MOUNTING AND ACCESSORY INSTALLATION
Introduction
• For a vehicle installation with 10-60 VDC direct connection: Use either a VM1D standard dock or a VM3D enhanced dock.
• For a vehicle installation with 60-144 VDC connection: Use a DC/DC power supply with either a VM1D standard dock or a VM3D enhanced dock.
• To replace a Thor VX8 or Thor VX9: Use the existing power supply and wiring with a VMXD enhanced dock.
• To replace a VX6, VX7 or CV61: Use the appropriate adapter cable and either a VM1D standard dock or a VM3D enhanced dock. Voltage must be 10-60 VDC.
• For an AC powered application: Use an AC/DC power supply and the VMXD off-vehicle enhanced dock.
The Thor VM3 is designed to be mounted to a dock in a vehicle with either a RAM mount or U Bracket system. A power cable is provided with the Thor VM3 dock. An optional 21 key numeric or 95 key laptop-style USB keyboard and keyboard mounts are available. An integrated scanner mount is also offered. Optional communication cables are avail-able.
Vehicle mounting brackets are specifically designed for vehicle mount applications. The vehicle mounted assembly restrains the Thor VM3 and isolates it from shock and vibra-tion. A RAM metal table stand is available to secure the Thor VM3 and dock when in an office environment, for example.
The vehicle mount holds the dock and the Thor VM3 attaches to the dock. The dock remains attached to the vehicle, however, the Thor VM3 has a quick release located on the lower rear side that allows the Thor VM3 to easily be removed from the dock. The Thor VM3 can be operated for a minimum of 30 minutes from an internal UPS battery when not attached to a dock. The Thor VM3 can be transferred from one dock equipped vehicle to another for easy portability. The dock provides accessory attachment and conditioned power for the Thor VM3.
Warning: The correct dock must be selected for the installation:
rosoft Windows Embedded Compact 7 User Guide 51

Overhead, dash and roof support pillar mounting is via a RAM Mount or U-bracket accessory which includes all the hardware required for vehicle mounting.
Never put the Thor VM3 into the vehicle mounted assembly until the assembly is securely fastened to the vehicle.
Prepare for Vehicle Mounting The Thor VM3 should be secured to an area in the vehicle where it:
• Does not obstruct the driver's vision or safe vehicle operation.
• Will be protected from rain or inclement weather.
• Will be protected from extremely high concentrations of dust or wind-blown debris.
• Can be easily accessed by a user seated in the driver's seat while the vehicle is not in operation.
Quick StartThe following list outlines, in a general way, the process to follow when mounting the Thor VM3 in a vehicle. Refer to the following sections in this document for more details.
1. Install RAM Mount or Install U Bracket Mount to the vehicle.
2. Place Thor VM3 in the Dock.
3. Secure accessories such as an optional external keyboard or a scanner holder to either an integrated or remote mounting bracket.
4. Adjust the Thor VM3 to the best viewing angle.
5. Install Remote Antenna or Install External Antenna if necessary.
6. Connect Cables for any peripherals.
7. Connect vehicle power:
• 12-48 VDC Vehicles (10-60 VDC Direct Connection)
• 60-144 VDC Vehicles (50-150 VDC Power Supply, Screws on Top of Lid)
• 60-144 VDC Vehicles (50-150 VDC Power Supply, Screws on Side of Lid).
• Thor VX8 / Thor VX9 Adapter Cable
• VX6 / VX7 Adapter Cable
8. Secure all cables in Strain Relief Cable Clamps.
The Thor VM3 is ready for use.
52 Thor VM3 with Microsoft Windows Embedded Compact 7 User Guide

Maintenance - Vehicle Mounted DevicesCheck the vehicle mounting hardware frequently and re-tighten if necessary.
If the vehicle mounting hardware and connections become broken, loose or cracked, the assembly must be taken out of service and replaced. Contact Technical Assistance for help.
CleaningIf it becomes necessary to clean the Thor VM3, dock, peripherals or mounting hardware see:
• Cleaning the Thor VM3 and the Dock
• Cleaning the Touch Screen
Place Thor VM3 in the Dock
1. Locate the notch on the upper rear of the Thor VM3.
2. Slide this notch over the top lip of the dock. Slide the Thor VM3 from side to side on the dock to make sure it fully engages on the lip of the dock. If the Thor VM3 cannot be slid side to side, the lip is engaged.
3. Pull the quick release lever on the Thor VM3 down and push the Thor VM3 against the dock.
4. Release the quick release lever. The quick release lever catches the lower lip on the dock and secures the Thor VM3 to the dock. Be sure the red quick release lever is pushed all the way in to secure the Thor VM3 to the dock.
Back of Thor VM3 Front of Dock
Notch onThor VM3
Release Lever
Upper Lip on Dock
Lower Lip on Dock
Thor VM3 with Microsoft Windows Embedded Compact 7 User Guide 53

5. If necessary, adjust the viewing angle of the Thor VM3.
When the Thor VM3 is placed in the dock, the following may happen:
• If the Thor VM3 is off and power is connected to the dock, the Thor VM3 may boot when placed in the dock. The behavior depends on the Power Configuration Mode selected. See Ignition Control Mode and Auto-On Mode.
• If the Thor VM3 is on and power is connected to the dock, the Thor VM3 power management timers may change when the Thor VM3 is placed in the dock. See Power.
When the Thor VM3 is removed from the dock, the following may happen:
• If the Thor VM3 is on and power is connected to the dock, the Thor VM3 power management timers may change when the Thor VM3 is placed in the dock. See Power.
54 Thor VM3 with Microsoft Windows Embedded Compact 7 User Guide

Dock I/O Pin Cover.
Padlock
Laptop Security Cable
The dock contains a tethered I/O Pin Cover to protect the I/O pins on the dock when a Thor VM3 is not mounted in the dock.
• When the Thor VM3 is not installed in the dock, use the I/O Pin Cover to protect the pins on the dock as shown.
• When a Thor VM3 is installed in the dock, the I/O Pin Cover can be placed out of the way behind the dock.
It may be desirable to secure the Thor VM3 in the dock so it cannot be removed from the dock. The quick release handle on the Thor VM3 is notched to allow a user supplied stan-dard padlock to be placed through a hole in the bracket on the back of the Thor VM3 in the location shown below. Once the padlock is installed, the release handle cannot be moved so the Thor VM3 cannot be removed from the dock. The padlock shackle must be smaller than 3/16” (4.76mm).
A cable tie wrap can be used instead of a pad-lock if desired.
The Thor VM3 can be secured with a stan-dard laptop security cable using the slot on the back of the Thor VM3.
Thor VM3 with Microsoft Windows Embedded Compact 7 User Guide 55

Install RAM Mount
Before installation begins, verify you have the applicable vehicle mounting bracket assembly components necessary, as shown in the following figures.
Components - RAM Mounting KitsMounting kits that do not include an external keyboard are shown below.
Mounting kits that include a provision for an external keyboard include the parts on this page plus the parts on the next page.
In addition to the kits below, individual RAM mounting components are also available.
Mounting Kits without KeyboardsEach mounting kit contains:
Caution: This device is intended to transmit RF energy. For protection against RF exposure to humans and in accordance with FCC rules and Industry Canada rules, this transmitter should be installed such that a minimum separation distance of at least 20 cm (7.8 in.) is maintained between the antenna and the general population. This device is not to be co-located with other transmitters.
• RAM Ball (Size D) for back of Thor VM3 dock with hardware (screws and washers) to attach RAM ball to dock
• RAM Arm (Size D), length varies by kit selected
• One of three mounting options:
◦ RAM Ball mount (Size D, may include 3 cone washers), or
56 Thor VM3 with Microsoft Windows Embedded Compact 7 User Guide

Mounting Kits with Integrated Keyboard MountingAdditionally, the kits for the Thor VM3 with an integrated 95 key keyboard mount include:
◦ RAM Clamp mount (Size D), or
◦ RAM Plate mount with RAM Ball (Size D) with Hardware (cone washers and nuts) to attach Ball to Plate
• Thor VM3 Keyboard Mounting Bracket
• RAM Ball (Size C) with hardware (nuts) to attach RAM ball to Keyboard Mounting Bracket
• RAM Arm (Size C)
• Keyboard Mounting Plate with RAM Ball (Size C) and hardware (screws and washers) to attack Keyboard to Mounting Plate
Thor VM3 with Microsoft Windows Embedded Compact 7 User Guide 57

Accessory Mounting KitsAn accessory mounting kit is also available. This kit mounts the 21 key numeric key-board or the Thor scanner holder to the Enhanced Dock.
Note: This accessory mount kit is only for use with the Enhanced Dock.
Procedure - RAM Mount AssemblyEquipment Needed: Sockets, screwdriver and a Torque wrench capable of measuring to 50 inch pounds (5.64±.56 N/m).
Note: Torquing tool is not supplied by Honeywell. Tools needed to attach the RAM Clamp Mount to the vehicle are not supplied by Honeywell.
Torque MeasurementYou will need a torquing tool capable of torquing to 20 inch pounds (1.10 N/m). Torque all screws and bolts according to the following table:
Step 1a – Attach RAM Ball to VehicleNote: If you are using the RAM clamp mount, please go to Step 1b – Mount RAM Clamp to
Vehicle. If you are using the RAM plate mount, please go to Step 1c – Attach RAM Plate to Vehicle and Attach RAM Ball.
1. Determine the position for mounting the RAM ball base. Be sure to position the RAM bracket to allow access to the switches and ports on the bottom of the Thor VM3.
2. Attach the RAM ball base to the vehicle mounting surface using three or four 1/4 bolts (not included) or equivalent fasteners. If the mounting kit includes cone washers, use those as illustrated below.
IMPORTANT: Mount to the most rigid surface available.
• Accessory RAM Ball This accessory RAM ball mounts to the back of the Enhanced Dock.
• RAM Ball (Size C) to attach RAM ball to 21key numeric keyboard or scanner holder.
• RAM Arm (Size C)
For these nuts… Torque to
10-32 lock nuts 17 - 20 in/lb (0-95 - 1.10 N/m)
58 Thor VM3 with Microsoft Windows Embedded Compact 7 User Guide
Mounting Dimensions
Note: Drill and tap holes for three 1/4 bolts. Drawing not to scale.
120º120º
60º60º
2.75" / 69.85 mm3.69" / 93.73 mm
Thor VM3 with Microsoft Windows Embedded Compact 7 User Guide 59

Step 1b – Mount RAM Clamp to VehicleNote: If you are using the RAM ball mount, please go to Step 1a – Attach RAM Ball to Vehicle. If
you are using the RAM plate mount, please go to Step 1c – Attach RAM Plate to Vehicle and Attach RAM Ball.
1. Determine the position for mounting the RAM clamp mount. The clamp mount can be used on a beam (such as on a fork lift truck) up to 2.5” (63.5 mm) wide and approximately 2” (50.8 mm) thick. The clamp may be attached to a thicker beam by substituting longer bolts (not included). Be sure to position the RAM clamp mount to allow access to the switches and ports on the bottom of the Thor VM3.
Position the upper clamp piece with ball on the beam. Place the bolts through the holes in the upper clamp piece.
2. Position the lower clamp piece below the beam. Align the bolts with the holes in the lower clamp piece.
3. Place the nylon locking nuts on the bolts and tighten the bolts.
Mounting Dimensions
Note: Drawing not to scale.
Upper clamp piece
Bolts
Lower clamp piece
Nuts
2.56” / 65.02mm 1.84” (46.74mm)
60 Thor VM3 with Microsoft Windows Embedded Compact 7 User Guide

Step 1c – Attach RAM Plate to Vehicle and Attach RAM BallNote: If you are using the RAM ball mount, please go to Step 1a – Attach RAM Ball to Vehicle If
you are using the RAM clamp mount, please go to Step 1b – Mount RAM Clamp to Vehicle.
1. Determine the position for mounting the RAM ball plate. Be sure to position the RAM plate to allow access to the switches and ports on the bottom of the Thor VM3.
2. Attach the RAM ball plate to the vehicle mounting surface using four 1/4 bolts (not included) or equivalent fasteners.
3. If not already attached, attach the RAM ball to the RAM ball plate using three M6 nuts and washers.
IMPORTANT: Mount to the most rigid surface available.
Mounting DimensionsThere are 4 mounting holes in the plate. Use four 1/4 bolts to secure the plate to the vehicle.
Note: Drawing not to scale.
176 mm6.99”
200 mm7.87”
76mm 2.99”
100mm 3.94”
Thor VM3 with Microsoft Windows Embedded Compact 7 User Guide 61
Step 2 – Attach RAM Mount Ball to the Thor VM3 Dock1. Turn the Thor VM3 off before attaching the RAM mount ball.
2. Place the Thor VM3 face down on a stable surface.
3. If using the external keyboard mount, position the Keyboard Bracket and the Size D RAM ball on the rear of the Thor VM3 dock, aligning the holes on the back of the Thor VM3 dock with the holes on the bracket and the RAM ball base.
4. If not using the external keyboard mount, position the RAM ball on the rear of the Thor VM3 dock, aligning the holes on the back of the Thor VM3 dock with the holes on the RAM ball base. Attach with four M5 screws, flat washers and lock washers.
5. If using the external keyboard mount, attach the Size C RAM ball to the Thor VM3 Keyboard bracket with four M5 nuts, flat washers and lock washers.
62 Thor VM3 with Microsoft Windows Embedded Compact 7 User Guide

Step 3 – Attach Thor VM3 Assembly to RAM Mount1. Slip the Size D RAM arm over the ball on the vehicle RAM mount (RAM Ball mount
shown).
2. Insert the ball on the dock into the RAM arm and tighten the knob on the RAM arm using the supplied RAM wrench.
Thor VM3 with Microsoft Windows Embedded Compact 7 User Guide 63

Step 4 – Place the Thor VM3 into the DockIf the Thor VM3 is not already mounted to the dock, Place Thor VM3 in the Dock
If the optional external keyboard is not used, the mounting process is complete.
64 Thor VM3 with Microsoft Windows Embedded Compact 7 User Guide

Step 5 – Attach Alphanumeric Keyboard to Mounting Plate (Optional)Note: This step is only for a Thor VM3 with the optional external keyboard.
If using the optional integrated keyboard mount, attach the keyboard to keyboard mounting plate, using four #8 screws, flat washers and lock washers.
Note: Excess keyboard cable length can be looped around the hooks on the bottom of the keyboard mounting plate.
Thor VM3 with Microsoft Windows Embedded Compact 7 User Guide 65

Step 6 – Attach Keyboard Assembly to Thor VM3 Assembly (Optional)Note: This step is only for a Thor VM3 with the optional external keyboard.
1. Slip the Size C RAM arm over the ball on the Thor VM3 Keyboard Bracket.
2. Slip the ball on the Keyboard Mounting Plate into the other end of the Size C RAM arm.
3. Tighten the knob on the RAM arm using the supplied RAM wrench.
Note: Some components omitted for detail clarity.
66 Thor VM3 with Microsoft Windows Embedded Compact 7 User Guide

Step 7 - Attach Numeric Keypad (Optional)This step is only for use with the Enhanced Dock.1. Attach the accessory RAM ball to the Enhanced Dock. There are two mounting pro-
visions, one on either side of the Enhanced Dock and either can be used to mount the numeric keypad.
Note: Some components omitted for detail clarity.2. Attach the RAM ball to the back of the keypad.
3. Slip the RAM arm over the accessory RAM ball.4. Slip the RAM ball on the keyboard into the RAM arm.
5. Tighten the knob on the RAM arm while adjusting to the desired angle.
Thor VM3 with Microsoft Windows Embedded Compact 7 User Guide 67

Step 8 - Attach Scanner Holder (Optional)This step is only for use with the Enhanced Dock.1. Attach the accessory RAM ball to the Enhanced Dock. There are two mounting pro-
visions, one on either side of the Enhanced dock and either can be used to mount the scanner holder.
Note: Some components omitted for detail clarity.2. Attach the RAM ball to the back of the scanner holder.
3. Slip the RAM arm over the accessory RAM ball.4. Slip the RAM ball on the scanner holder into the RAM arm.
5. Tighten the knob on the RAM arm while adjusting to the desired angle.
68 Thor VM3 with Microsoft Windows Embedded Compact 7 User Guide

Install U Bracket MountNote: This mounting system does not have provisions for an integrated external keyboard
mount or scanner holder. These accessories can be mounted remotely if desired. Contact Technical Assistance for details.
Before installation begins, verify you have the applicable vehicle mounting bracket assembly components necessary, as shown in the following figures.
Components - U Bracket Mounting AssemblyThe U bracket kit is available in two configurations:
• With a U Bracket included for new vehicle installations
• Without a U Bracket for installing the Thor VM3 in place of a previous Honeywell vehicle mounted computer, such as a VX6 or VX7.◦ U Bracket (only necessary for new
installations)
◦ Adapter Bracket (includes screws, flat washers and lock washers to attach Adapter Bracket to Thor VM3 and to U Bracket). The U bracket may already be installed on the vehicle where a VX1, VX2, VX4, VX5, VX6 or VX7 was previously installed.
Thor VM3 with Microsoft Windows Embedded Compact 7 User Guide 69

Procedure - U Bracket AssemblyEquipment Needed: Sockets and a Torque wrench capable of measuring to 50 inch pounds (5.64±.56 N/m).
Note: Torquing tool is not supplied by Honeywell.
Torque MeasurementYou will need a torquing tool capable of torquing to 35-50 inch pounds (1.10 N/m). Torque all screws and bolts according to the following table:
Mounting PositionsThe adapter bracket can be mounted in a high or low position, depending on viewing position, as shown below.
Additionally, the slotted U bracket allows the Thor VM3 to be mounted vertically or tilted forward or backward for best viewing angle.
For these bolts… Torque to
1/4-20x5/8 Bolts 50 in/lb (5.6 N/m)
M5x16mm Bolts 35 in/lb (4.0 N/m)
1/4 Bolts (user supplied) 50.0±5 in/lb (5.64±.56 N/m)
[
70 Thor VM3 with Microsoft Windows Embedded Compact 7 User Guide

Step 1 - Install U Bracket to Vehicle1. Position the bracket to allow access to the switches and ports on the bottom of the
Thor VM3.
2. Attach the bottom mounting bracket to the vehicle mounting surface using a minimum of four 1/4 bolts (or equivalent) fasteners.
Note: 1/4 bolts and washers not included. It is recommended to use lock washers and flat washers on the fasteners.
IMPORTANT: Mount to the most rigid surface available.
After the bottom bracket has been attached to a rigid surface, you are ready to assemble the Thor VM3 bracket configuration.
Mounting Dimensions
Note: Drawing not to scale.1. 14.40 in / 359.2 mm
2. 12.10 in / 307.3 mm
3. 6.05 in / 153.6 mm
4. 1.02 in / 25.9 mm
5. 3.38 in / 85.85 mm
6. Vehicle Mount Footprint
7. 0.406 in / 10.312 mm
8. 0.88 in / 22.3 mm
9. 1.25 in / 31.75 mm
1
2
34
5
6 7
8
9
Thor VM3 with Microsoft Windows Embedded Compact 7 User Guide 71

Step 2 - Remove RAM BallIf the Thor VM3 dock has a RAM ball attached, the RAM ball must be removed from the dock to use the U Bracket mount.
Remove the RAM ball. The hardware used to attach the RAM ball to the dock is not reused for the U bracket mount.
Step 3 - Attach Adapter Bracket
Note: For the steps below, always place the lock washer on the bolt before the flat washer.
1. Attach the Adapter Bracket to the Thor VM3 dock using four each M5x16mm bolt, M5 lock washer and M5 flat washer. Torque to 35 in/lbs (4.0 N/m).
2. Attach the Thor VM3/Adapter Bracket assembly to the U Bracket using 4 each 1/4-20x5/8 bolt, 1/4 lock washer and 1/4 flat washer.
3. If the Thor VM3 is not already mounted to the dock, Place Thor VM3 in the Dock.
4. Adjust the Thor VM3 to the desired viewing angle.
5. Torque the 14-20 bolts to 50 in/lbs (5.6 N/m).
72 Thor VM3 with Microsoft Windows Embedded Compact 7 User Guide

Connect CablesThere are many cables available for the Thor VM3 including power cables, and data/ communication cables.
Strain Relief Cable ClampsEquipment Required: Phillips screwdriver (not supplied by Honeywell)
There are five strain relief cable clamps secured to the Standard Dock.
There is one strain relief cable clamp and three strain relief brackets for securing cables to the Enhanced Dock.
Use the strain relief clamps to secure audio, power, and I/O cables attached to the Thor VM3 dock.
Use the left-most strain relief clamp for the power cable.
To use the strain relief clamp(s):
1. Determine the proper strain relief cable clamp. There are three sizes of cable clamps on the Standard Dock which should be matched to the cable to be secured. For example, the largest clamp (on the left when viewing the back of the dock) is designed to secure the power cable. For the Enhanced Dock there is a single cable clamp. Use this clamp for the power cable, Use the brackets for all other cables.
2. Remove the strain relief clamp from the Thor VM3 by turning the screw counterclockwise. Put the screw aside in a safe location.
3. Slide the strain relief clamp over the cable.
4. Using a Phillips screwdriver and the screw that was removed, refasten the clamp holding the cable to the Dock. Do not stretch the cable. Leave enough slack in the cable to allow it to be connected and disconnected easily when needed.
5. Continue in this manner until all cables are secured to the dock.
Standard Dock Enhanced Dock
Thor VM3 with Microsoft Windows Embedded Compact 7 User Guide 73

To use the stradin relief brackets (Enhanced Dock only):
1. Secure the cable to the bracket with plastic tie straps (cable ties).
2. If necessary, the cable ties can be trimmed to length after installation. Cut the excess tie length off flush and not at an angle to prevent sharp edges that may cause cuts.
Connect PowerSee Power Supply Connector for connector pinout
For the VM1D Standard Dock and VM3D Enhanced Dock, power options include:
• 12-48 VDC Vehicles (10-60 VDC Direct Connection) - Direct connection to vehicle power.
• 60-144 VDC Vehicles (50-150 VDC Power Supply, Screws on Side of Lid) - Requires the use of a DC/DC power supply.
• 60-144 VDC Vehicles (50-150 VDC Power Supply, Screws on Top of Lid) - Requires the use of a DC/DC power supply.
• VX6 / VX7 Adapter Cable - For applications where the Thor VM3 replaces a previously installed VX6 or VX7.
• Thor VX8 / Thor VX9 Adapter Cable - For applications where the Thor VM3 (with a VM1D Standard Dock or VM3D Enhanced dock (replaces a previously installed Thor VX8 or Thor VX9.
• CV61 Adapter Cable - For applications where the Thor VM3 replaces a previously installed CV61.
• Screen Blanking - Optional connection to blank the Thor VM3 display while the vehicle is in motion.
For the VMXD Enhanced Dock, power options include:
• VMXD Enhanced Dock with Thor VX8/Thor VX9 Power Cable - For applications where a Thor VM3 (with a VMXD Enhanced Dock) replaces a previously installed Thor VX8 or Thor VX9.
When using the Thor VM3 with AC power, use the VMXD Enhanced Dock for Off-Vehi-cle Use and:
• External AC/DC Power Supply - For use when DC power is not available to power the Thor VM3, such as in an office environment.
74 Thor VM3 with Microsoft Windows Embedded Compact 7 User Guide

Power Cable Cautions
• Route power cable away from the outside of the fork truck.
• Choose a mounting location so that the power cable does not extend outside the vehicle and that provides sufficient clearance so that the power cable (especially the dock connector end) is not pressed against part of the vehicle.
• Use the proper Strain Relief Cable Clamps to secure cable.
• The power cable is less flexible in low temperature environments. Avoid sharp bends.
Power Cable Routing
Caution: When routing the power cable:
Caution: Regularly inspect power cable for damage, especially in low temperature environments. Contact Technical Assistance for replacement cable options.
Thor VM3 with Microsoft Windows Embedded Compact 7 User Guide 75

12-48 VDC Vehicles (10-60 VDC Direct Connection)
Fuse Requirements
• For 12VDC input, use the 10A fuse from the kit or a slow blow fuse that has a DC voltage rating greater than 12VDC.
• For 24VDC input, use the 6A fuse from the kit or a slow blow fuse that has a DC voltage rating greater than 24VDC.
• For 36VDC input, use the 4A fuse from the kit or a slow blow fuse that has a DC voltage rating greater than 36VDC.
• For 48VDC input, use the 3A fuse from the kit or a slow blow fuse that has a DC voltage rating greater than 48VDC.
Note: For North America, a UL Listed fuse is to be used.
Power Cable IdentificationThe DC power cable is included with the dock:
Note: Correct electrical polarity is required for safe and proper installation. See the figures below for additional wire color-coding specifics.
The Thor VM3 DC input wires (Red, Red/White DC+ and Black, Black/White DC-) and the Blue ignition input wire are galvanically isolated. The Green ground input is used for electrostatic discharge (ESD) protection.
Caution: For installation by trained service personnel only.
Caution: Use caution when routing the power cable. See Power Cable Cautions.
Caution: These instructions for use with VM1D Standard Dock and VM3D Enhanced Dock only.
Warning: For proper and safe installation, the input power cable must be connected to a fused circuit on the vehicle. If the supply connection is made directly to the battery, the fuse should be installed in the positive lead within 5 inches of the battery’s positive (+) terminal. Use VM3055FUSE (or equivalent) to install the fuse as shown below:
Wire Color Connection
Red DC + (10-60 VDC)
Red/White DC + (10-60 VDC)
Black DC -
Black/White DC -
Twist the red and red/white wires together and twist the black and black/white wires together before connecting to vehicle power.
Green Ground
Blue Ignition Input (optional)
76 Thor VM3 with Microsoft Windows Embedded Compact 7 User Guide

Vehicle 10-60VDC Direct Power Connection
1. The Thor VM3 must not be mounted in the dock. The power switch on the dock must be turned Off. The power cable must be UNPLUGGED from the dock.
2. While observing the Fuse Requirements, connect the power cable as close as possible to the actual battery terminals of the vehicle (if using unswitched power).
3. Use proper electrical and mechanical fastening means for terminating the cable. Properly sized “crimp” type electrical terminals are an accepted method of termination. Please select electrical connectors sized for use with 20AWG (0.81mm2) conductors.
4. Refer to the wiring diagrams following this section for wire colors and connections:
• Ignition Control Wiring Diagram
• Auto-On Control Wiring Diagram
• Manual Control Wiring Diagram
5. Route the power cable the shortest way possible removing any left-over cable. The cable is rated for a maximum temperature of 105°C (221°F). Therefore, when routing this cable it should be protected from physical damage and from surfaces that might exceed this temperature. Cable should be protected from physical damage from moving parts. Do not expose the cable to chemicals or oil that may cause the wiring insulation to deteriorate. Always route the cable so that it does not interfere with safe operation and maintenance of the vehicle.
6. Provide mechanical support for the cable by securing it to the vehicle structure at approximately one foot intervals, taking care not to over tighten and pinch conductors or penetrate outer cable jacket.
7. Connect the watertight connector end of the power cable to the Thor VM3 dock power connector by aligning the connector pins to the power connector; push down on the watertight connector and twist it to fasten securely.
8. Secure the power cable to the Thor VM3 using the Strain Relief Cable Clamps.
9. Place Thor VM3 in the Dock
10. If using the Screen Blanking feature, install the screen blanking box or switch.
11. Press the Power Switch on the back of the Thor VM3 dock.
12. Press the Power Button on the front of the Thor VM3 to turn on the Thor VM3.
Thor VM3 with Microsoft Windows Embedded Compact 7 User Guide 77

Ignition Control Wiring Diagram
.
• Twist the red and red/white wires together and connect to battery positive.
• Black and black/white wires must be connected to battery negative. Twist these wires together and connect to battery negative.
• Green wire must be connected to the vehicle chassis ground.
• Twist the red and red/white wires together and connect to battery positive.
• Twist the black wire and a black/white together and connect to battery negative.
• Green wire is connected to the vehicle chassis ground, which can also be battery negative.
Fuse Requirements
• For 12VDC input, use the 10A fuse from the kit or a slow blow fuse that has a DC voltage rating greater than 12VDC.
• For 24VDC input, use the 6A fuse from the kit or a slow blow fuse that has a DC voltage rating greater than 24VDC.
Existing Circuitry On Vehicle
Battery
Main Switch
-Vo+Vo
Fuse - SeeWarning statement below
Ignition
See Caution statement below
Quick MountSmart Dock
CircularPowerConnector
COM1 or COM2Connector
Cable for optionalscreen blanking
connection
Red
Black
Green
Blue
Red/White (if present)
Black/White (if present)
Caution: For battery powered vehicles:
Caution: For internal combustion engine powered vehicles:
Warning: For proper and safe installation, the input power cable must be connected to a fused circuit on the vehicle. If the supply connection is made directly to the battery, the fuse should be installed in the positive lead within 5 inches of the battery’s positive (+) terminal. Use VM3055FUSE (or equivalent) to install the fuse as shown below:
78 Thor VM3 with Microsoft Windows Embedded Compact 7 User Guide

• For 36VDC input, use the 4A fuse from the kit or a slow blow fuse that has a DC voltage rating greater than 36VDC.
• For 48VDC input, use the 3A fuse from the kit or a slow blow fuse that has a DC voltage rating greater than 48VDC.
Note: For North America, a UL Listed fuse is to be used.
Thor VM3 with Microsoft Windows Embedded Compact 7 User Guide 79

Auto-On Control Wiring Diagram
.
• Twist the red and red/white wires together and connect to battery positive.
• Black and black/white wires must be connected to battery negative. Twist these wires together and connect to battery negative.
• Green wire must be connected to the vehicle chassis ground.
• Twist the red and red/white wires together and connect to battery positive.
• Twist the black wire and a black/white together and connect to battery negative.
• Green wire is connected to the vehicle chassis ground, which can also be battery negative.
Fuse Requirements
• For 12VDC input, use the 10A fuse from the kit or a slow blow fuse that has a DC voltage rating greater than 12VDC.
• For 24VDC input, use the 6A fuse from the kit or a slow blow fuse that has a DC voltage rating greater than 24VDC.
Quick MountSmart Dock
CircularPowerConnector
COM1 or COM2Connector
Existing Circuitry On Vehicle
Battery
Main Switch
-Vo+Vo Cable for optionalscreen blanking
connection
See Caution statement below
Fuse - SeeWarning statement below
(not connected)
Red
Black
Green
Blue
Red/White (if present)
Black/White (if present)
Caution: For battery powered vehicles:
Caution: For internal combustion engine powered vehicles:
Warning: For proper and safe installation, the input power cable must be connected to a fused circuit on the vehicle. If the supply connection is made directly to the battery, the fuse should be installed in the positive lead within 5 inches of the battery’s positive (+) terminal. Use VM3055FUSE (or equivalent) to install the fuse as shown below:
80 Thor VM3 with Microsoft Windows Embedded Compact 7 User Guide

• For 36VDC input, use the 4A fuse from the kit or a slow blow fuse that has a DC voltage rating greater than 36VDC.
• For 48VDC input, use the 3A fuse from the kit or a slow blow fuse that has a DC voltage rating greater than 48VDC.
Note: For North America, a UL Listed fuse is to be used.
Thor VM3 with Microsoft Windows Embedded Compact 7 User Guide 81

Manual Control Wiring Diagram
• Twist the red and red/white wires together and connect to battery positive.
• Black and black/white wires must be connected to battery negative. Twist these wires together and connect to battery negative.
• Green wire must be connected to the vehicle chassis ground.
• Twist the red and red/white wires together and connect to battery positive.
• Twist the black wire and a black/white together and connect to battery negative.
• Green wire is connected to the vehicle chassis ground, which can also be battery negative.
Fuse Requirements
• For 12VDC input, use the 10A fuse from the kit or a slow blow fuse that has a DC voltage rating greater than 12VDC.
• For 24VDC input, use the 6A fuse from the kit or a slow blow fuse that has a DC voltage rating greater than 24VDC.
Quick MountSmart Dock
CircularPowerConnector
COM1 or COM2Connector
Existing Circuitry On Vehicle
Battery
Main Switch
-Vo+Vo Cable for optionalscreen blanking
connection
See Caution statement below
Fuse - SeeWarning statement below
(not connected)
Red
Black
Green
Blue
Red/White (if present)
Black/White (if present)
Caution: For battery powered vehicles:
Caution: For internal combustion engine powered vehicles:
Warning: For proper and safe installation, the input power cable must be connected to a fused circuit on the vehicle. If the supply connection is made directly to the battery, the fuse should be installed in the positive lead within 5 inches of the battery’s positive (+) terminal. Use VM3055FUSE (or equivalent) to install the fuse as shown below:
82 Thor VM3 with Microsoft Windows Embedded Compact 7 User Guide

• For 36VDC input, use the 4A fuse from the kit or a slow blow fuse that has a DC voltage rating greater than 36VDC.
• For 48VDC input, use the 3A fuse from the kit or a slow blow fuse that has a DC voltage rating greater than 48VDC.
Note: For North America, a UL Listed fuse is to be used.
Thor VM3 with Microsoft Windows Embedded Compact 7 User Guide 83

60-144 VDC Vehicles (50-150 VDC Power Supply, Screws on Side of Lid)
This option requires DC/DC external power supply Honeywell Part no. 9000313PWR-SPLY.
If the DC/DC power supply does not have screws in the side of the lid, see 60-144 VDC Vehicles (50-150 VDC Power Supply, Screws on Top of Lid).
These instructions are for use with VM1D Standard Dock and VM3D Enhanced Dock only.
Shown With Lid Attached
• Lid is secured with screws on the side of lid.
Shown With Lid Removed
• Input and output connector blocks under lid.
• One positive (Vin+), negative (Vin-) and ground ( ) connection in input block.
• One positive (Vo+) and negative (Vo-) connection in output block.
Caution: For installation by trained service personnel only.
Caution: Usage in areas where moisture can affect the power supply connections should be avoided. The power supply should be mounted in a dry location within the vehicle or placed in a suitable protective enclosure.
Caution: Use caution when routing the power cable. See Power Cable Cautions.
84 Thor VM3 with Microsoft Windows Embedded Compact 7 User Guide

Fuse Requirements
• For all voltages, use the 3A fuse from the kit or a slow blow fuse that has a DC voltage rating greater than the vehicle input voltage.
Note: For North America, a UL Listed fuse is to be used.
Power Cable IdentificationThe DC power cable is included with the dock:
Note: Correct electrical polarity is required for safe and proper installation. See Wiring Diagram for additional wire color-coding specifics.
The Thor VM3 DC input wires (Red, Red/White DC+ and Black, Black/White DC-) and the Blue ignition input wire are galvanically isolated. The Green ground input is used for electrostatic discharge (ESD) protection.
Warning: For proper and safe installation, the input power cable must be connected to a fused circuit on the vehicle. If the supply connection is made directly to the battery, the fuse should be installed in the positive lead within 5 inches of the battery’s positive (+) terminal. Use VM3055FUSE (or equivalent) to install the fuse as shown below:
Wire Color Connection
Red DC + (10-60 VDC)
Red/White DC + (10-60 VDC)
Black DC -
Black/White DC -
Twist the red and red/white wires together and twist the black and black/white wires together before connecting to vehicle power.
Green Ground
Blue Ignition Input (optional)
Thor VM3 with Microsoft Windows Embedded Compact 7 User Guide 85

Vehicle 50-150VDC Power Connection1. Please review the Wiring Diagram, before beginning power cable install.2. The Thor VM3 must not be mounted in the dock. The power switch on the dock must
be turned Off. The power cable must be UNPLUGGED from the dock.3. Route the cable from the Thor VM3 to the DC/DC power supply. Route the power
cable the shortest way possible. The cable is rated for a maximum temperature of 105°C (221°F). When routing this cable, it should be protected from physical damage and from surfaces that might exceed this temperature. Do not expose the cable to chemicals or oil that may cause the wiring insulation to deteriorate. Always route the cable so that it does not interfere with safe operation and maintenance of the vehicle.
4. Cut the cable to length and strip the wire ends.5. Remove the lid from the DC/DC power supply.6. Connect the stripped end of the positive wires (red and red/white twisted together)
to the output block. See Power Cable Identification.7. Connect the stripped end of the negative wires (black and black/white twisted
together) to the output. See Power Cable Identification.
Note: The input block has VIN+, VIN- and GND terminals. The output block has VO+ and VO- terminals.
8. Connect the ground (green) wire from the Thor VM3 to the GND terminal on the input side of the DC/DC power supply.
9. Route the wiring from the DC/DC power supply to the vehicle’s electrical system. Do not connect to vehicle power at this time.
10. Strip the wire ends and connect to the input side of the DC/DC power supply.11. Use looms and wire ties to secure all wiring as shown. 12. Reattach the cover with the screws.13. Connect the DC/DC power supply to the vehicle’s electrical system as directed
below:Caution: For battery powered vehicles:
• VIN+ is connected to battery positive.
• ViN- must be connected to battery negative.
• GND must be connected to the vehicle chassis ground.Caution: For internal combustion engine powered vehicles:
86 Thor VM3 with Microsoft Windows Embedded Compact 7 User Guide

Note: Ignition control is not available for trucks over 60VDC.
• VIN+ is connected to battery positive.
• ViN- is connected to battery negative.
• GND is connected to the vehicle chassis ground, which can also be battery negative.
14. While observing the Fuse Requirements connect the power cable as close as possi-ble to the actual battery terminals of the vehicle. When available, always connect to unswitched terminals in the vehicle fuse panel, after providing proper fusing.
ATTENTION: For uninterrupted power, electrical supply connections should not be made at any point after the ignition switch of the vehicle.
15. Use proper electrical and mechanical fastening means for terminating the cable. Properly sized “crimp” type electrical terminals are an accepted method of termina-tion. Select electrical connectors sized for use with 18AWG (1mm2) conductors.
16. Provide mechanical support for the cable by securing it to the vehicle structure at approximately one foot intervals, taking care not to over tighten and pinch conduc-tors or penetrate the outer cable jacket.
17. Connect the watertight connector end of the power cable to the Thor VM3 dock power connector by aligning the connector pins to the power connector; push down on the watertight connector and twist it to fasten securely. Flip the power switch on the back of the dock to On.
18. Secure the power cable to the Thor VM3 using the Strain Relief Cable Clamps.19. Place Thor VM3 in the Dock.20. If using the Screen Blanking feature, install the screen blanking box or switch.21. Press the Power Switch on the back of the Thor VM3 dock.22. Press the Power Button on the front of the Thor VM3 to turn on the Thor VM3.
Thor VM3 with Microsoft Windows Embedded Compact 7 User Guide 87

Wiring Diagram
• GND must be connected to the vehicle chassis ground.
• GND is connected to the vehicle chassis ground, which can also be battery negative.Fuse Requirements
• For all voltages, use the 3A fuse from the kit or a slow blow fuse that has a DC voltage rating greater than the vehicle input voltage.
Note: For North America, a UL Listed fuse is to be used.
Main Switch
CircularPowerConnectoron Dock
VIN-
VO-
-Vo+Vo COM1 or COM2Connectoron Dock
VO+
VIN+GND
User supplied serialcable for optionalscreen blanking
connection,see below
Existing Circuitry on Vehicle
Forklift Battery
DC/DCPowerSupply
Fuse - SeeWarning statement below
See Caution statementbelow
(not connected)
Black
Green
Blue
Red
Red/White (if present)
Black/White (if present)
Quick MountSmart Dock
Caution: For battery powered vehicles:
Caution: For internal combustion engine powered vehicles:
Warning: For proper and safe installation, the input power cable must be connected to a fused circuit on the vehicle. If the supply connection is made directly to the battery, the fuse should be installed in the positive lead within 5 inches of the battery’s positive (+) terminal. Use VM3055FUSE (or equivalent) to install the fuse as shown below:
88 Thor VM3 with Microsoft Windows Embedded Compact 7 User Guide
60-144 VDC Vehicles (50-150 VDC Power Supply, Screws on Top of Lid)
This option requires DC/DC power supply Honeywell Part no. VX89303PWRSPLY shown below.
If the DC/DC power supply does not have screws in the top of the lid, see 60-144 VDC Vehicles (50-150 VDC Power Supply, Screws on Side of Lid).
These instructions are for use with VM1D Standard Dock and VM3D Enhanced Dock only.
Shown With Lid Attached
• Lid is secured with screws on the top of lid.
Shown With Lid Removed
• Input and output connector blocks under lid.
• Two positive (+), negative (-) and ground ( ) connections per terminal block
Caution: For installation by trained service personnel only.
Caution: The VX89303PWRSPLY power supply is sealed per IPXX. Usage in areas where moisture can affect the power supply connections should be avoided. The power supply should be mounted in a dry location within the vehicle or placed in a suitable protective enclosure.
Caution: Use caution when routing the power cable. See Power Cable Cautions.
Thor VM3 with Microsoft Windows Embedded Compact 7 User Guide 89

Fuse Requirements
• For all voltages, use the 3A fuse from the kit or a slow blow fuse that has a DC voltage rating greater than the vehicle input voltage.
Note: For North America, a UL Listed fuse is to be used.
Power Cable IdentificationThe DC power cable is included with the dock:
Note: Correct electrical polarity is required for safe and proper installation. See Wiring Diagram for additional wire color-coding specifics.
The Thor VM3 DC input wires (Red, Red/White DC+ and Black, Black/White DC-) and the Blue ignition input wire are galvanically isolated. The Green ground input is used for electrostatic discharge (ESD) protection.
Warning: For proper and safe installation, the input power cable must be connected to a fused circuit on the vehicle. If the supply connection is made directly to the battery, the fuse should be installed in the positive lead within 5 inches of the battery’s positive (+) terminal. Use VM3055FUSE (or equivalent) to install the fuse as shown below:
Wire Color Connection
Red DC + (10-60 VDC)
Red/White DC + (10-60 VDC)
Black DC -
Black/White DC -
Twist the red and red/white wires together and twist the black and black/white wires together before connecting to vehicle power.
Green Ground
Blue Ignition Input (optional)
90 Thor VM3 with Microsoft Windows Embedded Compact 7 User Guide

Vehicle 50-150VDC Power Connection1. Please review the Wiring Diagram, before beginning power cable install. 2. The Thor VM3 must not be mounted in the dock. The power switch on the dock must
be turned Off. The power cable must be UNPLUGGED from the dock.3. Route the cable from the Thor VM3 to the DC/DC power supply. Route the power
cable the shortest way possible. The cable is rated for a maximum temperature of 105°C (221°F). When routing this cable, it should be protected from physical dam-age and from surfaces that might exceed this temperature. Do not expose the cable to chemicals or oil that may cause the wiring insulation to deteriorate. Always route the cable so that it does not interfere with safe operation and maintenance of the vehicle.
4. Cut the cable to length and strip the wire ends.5. Remove the lid from the DC/DC power supply.6. Connect the stripped end of the positive wires (red and red/white twisted together)
to the output block. See Power Cable Identification.7. Connect the stripped end of the negative wires (black and black/white twisted
together) to the output. See Power Cable Identification.
Note: The input and output blocks each have two + (plus), two – (minus) and two (ground) connectors. Either connector in the block can be used to connect the matching polarity wire.
8. Route the wiring from the DC/DC power supply to the vehicle’s electrical system. Do not connect to vehicle power at this time.
9. Strip the wire ends and connect to the input side of the DC/DC power supply.10. Use looms and wire ties to secure all wiring as shown. 11. Reattach the cover with the screws.12. Connect the DC/DC power supply to the vehicle’s electrical system as directed
below:Caution: For battery powered vehicles:
• + is connected to battery positive.
• - must be connected to battery negative.
• must be connected to the vehicle chassis ground.Caution: For internal combustion engine powered vehicles:
• + is connected to battery positive.
• - must be connected to battery negative.
• must be connected to the vehicle chassis ground.
Thor VM3 with Microsoft Windows Embedded Compact 7 User Guide 91

Note: Ignition control is not available for trucks over 60VDC.Wiring Diagram
must be connected to the vehicle chassis ground.
13. While observing the Fuse Requirements, connect the power cable as close as possi-ble to the actual battery terminals of the vehicle. When available, always connect to unswitched terminals in the vehicle fuse panel, after providing proper fusing.
ATTENTION: For uninterrupted power, electrical supply connections should not be made at any point after the ignition switch of the vehicle.
14. Use proper electrical and mechanical fastening means for terminating the cable. Properly sized “crimp” type electrical terminals are an accepted method of termina-tion. Select electrical connectors sized for use with 18AWG (1mm2) conductors.
15. Provide mechanical support for the cable by securing it to the vehicle structure at approximately one foot intervals, taking care not to over tighten and pinch conduc-tors or penetrate the outer cable jacket.
16. Connect the watertight connector end of the power cable to the Thor VM3 dock power connector by aligning the connector pins to the power connector; push down on the watertight connector and twist it to fasten securely. Flip the power switch on the back of the dock to On.
17. Secure the power cable to the Thor VM3 using the Strain Relief Cable Clamps.18. Place Thor VM3 in the Dock.19. If using the Screen Blanking feature, install the screen blanking box or switch.20. Press the Power Switch on the back of the Thor VM3 dock.21. Press the Power Button on the front of the Thor VM3 to turn on the Thor VM3.
PowerConnector
-
-
-Vo
Black
Green
Blue(not connected)
+VoCOM1 or COM2Connector
+
+
User supplied serialcable for optionalscreen blanking
connection,see below
Existing Circuitry on Vehicle
Forklift Battery
Main Switch
Quick MountSmart Dock
DC/DCPowerSupply
Fuse - SeeWarning statement below
See Caution statement below
Red
Red/White (if present)
Black/White (if present)
Caution: For battery powered vehicles:
Caution: For internal combustion engine powered vehicles:
92 Thor VM3 with Microsoft Windows Embedded Compact 7 User Guide

is connected to the vehicle chassis ground, which can also be battery negative.Fuse Requirements
• For all voltages, use the 3A fuse from the kit or a slow blow fuse that has a DC voltage rating greater than the vehicle input voltage.
Note: For North America, a UL Listed fuse is to be used.
Warning: For proper and safe installation, the input power cable must be connected to a fused circuit on the vehicle. If the supply connection is made directly to the battery, the fuse should be installed in the positive lead within 5 inches of the battery’s positive (+) terminal. Use VM3055FUSE (or equivalent) to install the fuse as shown below:
Thor VM3 with Microsoft Windows Embedded Compact 7 User Guide 93

VX6 / VX7 Adapter Cable
An adapter cable is available to attach the Thor VM3 to a vehicle previously equipped with a VX6/VX7 DC power cable. The adapter cable has a 5-pin connector to match with the VX6/VX7 power supply cable on one end and a 6-pin connector to match to the Thor VM3 on the other end. This section assumes the VX6/VX7 power cable is properly con-nected to vehicle power. Refer to the VX6 or VX7 Vehicle Mounting Reference Guide for details.
When this adapter cable is used, there is no provision for an ignition switch input. Therefore the vehicle ignition monitoring function is not available when using this cable.
Connect to VX6 / VX7 Power Cable
1. Connect the adapter cable to the Thor VM3 power cable by aligning the connector pins to the power connector; push down on the watertight connector and twist it to fasten securely.
2. The cable is rated for a maximum temperature of 105°C (221°F). Therefore, routing this cable it should be protected from physical damage and from surfaces that might exceed this temperature. Cable should be protected from physical damage from moving parts. Do not expose the cable to chemicals or oil that may cause the wiring insulation to deteriorate. Always route the cable so that it does not interfere with safe operation and maintenance of the vehicle.
3. Provide mechanical support for the cable by securing it to the vehicle structure at approximately one foot intervals, taking care not to over tighten and pinch conductors or penetrate outer cable jacket.
4. Connect the watertight connector end of the power cable to the Thor VM3 dock power connector by aligning the connector pins to the power connector; push down on the watertight connector and twist it to fasten securely.
5. Secure the power cable to the Thor VM3 using the Strain Relief Cable Clamps.
6. Place Thor VM3 in the Dock
7. If using the Screen Blanking feature, install the screen blanking box or switch.
8. Press the Power Switch on the back of the Thor VM3 dock.
9. Press the Power Button on the front of the Thor VM3 to turn on the Thor VM3.
These instructions are for use with VM1D Standard Dock and VM3D Enhanced Dock only.
Warning: Because the VX6/VX7 supports 10-60 VDC power input, verify input voltages before using this adapter cable with an existing VX6 or VX7 power connection installation.
To Power Connector on Dock
To VX6/VX7 Power Supply Cable
94 Thor VM3 with Microsoft Windows Embedded Compact 7 User Guide

Thor VX8 / Thor VX9 Adapter Cable
An adapter cable is available to attach the Thor VM3 to a vehicle previously equipped with a VX8/VX9 DC power cable. The adapter cable has a 6-pin connector to match the VX8/XVX9 power supply cable on one end and a 6-pin connector to match the Thor VM3 on the other end. The cable also has bare wires for ground and ignition sense con-nection plus a D9 cable to connect to a COM port on the Thor VM3 dock to provide a screen blanking signal. This section assumes the VX8/VX9 power cable is properly con-nected to vehicle power. Refer to the VX8 or VX9 Vehicle Mounting Reference Guide for details.
Connect to Thor VX8 / VX9 Power Cable
These instructions for use with VM1D Standard Dock and VM3D Enhanced Dock only. This cable is not used for the VMXD Enhanced Dock
To COM port on Dock
To Power Connectoron Dock
To VX8/VX9Power Cable
To Ground andIgnition Sense
1. Connect the adapter cable to the Thor VX8/VX9 power cable by aligning the connec-tor pins to the power connector; push down on the watertight connector and twist it to fasten securely.
2. Connect the green wire to vehicle groundCaution: For battery powered vehicles:
• The green wire must be connected to the vehicle chassis ground.Caution: For internal combustion engine powered vehicles:
• The green wire is connected to the vehicle chassis ground, which can also be battery negative.
3. If ignition control will be used, connect the blue wire to an ignition switched circuit (less than 1mA over input voltage range). If ignition control is not used, the blue wire can be left disconnected,
4. If the VX8/VX9 cable is connected to a screen blanking box or switch, connect the D9 connector to a COM port on the dock.
5. The cable is rated for a maximum temperature of 105°C (221°F). Therefore, when routing this cable it should be protected from physical damage and from surfaces that might exceed this temperature. Cable should be protected from physical dam-age from moving parts. Do not expose the cable to chemicals or oil that may cause the wiring insulation to deteriorate. Always route the cable so that it does not inter-fere with safe operation and maintenance of the vehicle.
Thor VM3 with Microsoft Windows Embedded Compact 7 User Guide 95

6. Provide mechanical support for the cable by securing it to the vehicle structure at approximately one foot intervals, taking care not to over tighten and pinch conduc-tors or penetrate outer cable jacket.
7. Connect the watertight connector end of the power cable to the Thor VM3 dock power connector by aligning the connector pins to the power connector; push down on the watertight connector and twist it to fasten securely.
8. Secure the power cable to the Thor VM3 using the Strain Relief Cable Clamps.9. Place Thor VM3 in the Dock.10. If using the Screen Blanking feature, install the screen blanking box or switch if not
previously installed.11. Press the Power Switch on the back of the Thor VM3 dock.12. Press the Power Button on the front of the Thor VM3 to turn on the Thor VM3.
96 Thor VM3 with Microsoft Windows Embedded Compact 7 User Guide

CV61 Adapter Cable
An adapter cable is available to attach the Thor VM3 to a vehicle previously equipped with a CV61 DC power cable. The adapter cable has a 5-pin connector to match with the VV61 power supply cable on one end and a 6-pin connector to match to the Thor VM3 on the other end. This section assumes the CV61 power cable is properly connected to vehicle power. Refer to the CV61 documentation for details.
When this adapter cable is used, there is no provision for an ignition switch input. Therefore the vehicle ignition monitoring function is not available when using this cable.
Connect to CV61 Power Cable
1. Connect the adapter cable to the CV61 power cable by aligning the connector pins to the power connector; push down on the watertight connector and twist it to fasten securely.
2. The cable is rated for a maximum temperature of 105°C (221°F). Therefore, routing this cable it should be protected from physical damage and from surfaces that might exceed this temperature. Cable should be protected from physical damage from moving parts. Do not expose the cable to chemicals or oil that may cause the wiring insulation to deteriorate. Always route the cable so that it does not interfere with safe operation and maintenance of the vehicle.
3. Provide mechanical support for the cable by securing it to the vehicle structure at approximately one foot intervals, taking care not to over tighten and pinch conductors or penetrate outer cable jacket.
4. Connect the watertight connector end of the power cable to the Thor VM3 dock power connector by aligning the connector pins to the power connector; push down on the watertight connector and twist it to fasten securely.
5. Secure the power cable to the Thor VM3 using the Strain Relief Cable Clamps.
6. Place Thor VM3 in the Dock
7. If using the Screen Blanking feature, install the screen blanking box or switch.
8. Press the Power Switch on the back of the Thor VM3 dock.
9. Press the Power Button on the front of the Thor VM3 to turn on the Thor VM3.
These instructions for use with VM1D Standard Dock and VM3D Enhanced Dock only.
To Power Connector on Dock
To CV41 Power Supply Cable
Thor VM3 with Microsoft Windows Embedded Compact 7 User Guide 97

Screen BlankingPrerequisite: The steps outlined in either 12-48 VDC Vehicles (10-60 VDC Direct Connection), 60-144 VDC Vehicles (50-150 VDC Power Supply, Screws on Side of Lid) or 60-144 VDC Vehicles (50-150 VDC Power Supply, Screws on Top of Lid) have been com-pleted.
Screen blanking is accomplished by either a Screen Blanking Box or a user supplied switch.
Fuse Requirements
Note: For North America, a UL Listed fuse is to be used.
Screen Blanking CableWhen routing any additional cables for screen blanking:
• Route the cable the shortest way possible removing any left-over cable
• Fuses and cabling are user supplied. Therefore, route these cables so they are protected from physical damage and from surfaces that might exceed the cable's rated temperature threshold.
• Cable should be protected from physical damage from moving parts
• Do not expose the cable to chemicals or oil that may cause the wiring insulation to deteriorate
• Always route the cable so that it does not interfere with safe operation and maintenance of the vehicle.
• Provide mechanical support for the cable by securing it to the vehicle structure at approximately one foot intervals, taking care not to over tighten and pinch conductors or penetrate outer cable jacket.
Honeywell Screen Blanking Box Cable
An optional Honeywell Screen Blanking Box Cable is available.
Caution: For installation by trained service personnel only.
Warning: For proper and safe installation, the input power lead to the Screen Blanking Box requires a 3 Amp maximum time delay (slow blow) high interrupting rating fuse.
98 Thor VM3 with Microsoft Windows Embedded Compact 7 User Guide

Note: Wire colors only apply to optional Honeywell Screen Blanking Box Cable, VM1080CABLE. Wire colors may vary in a user-supplied cable.
The optional Honeywell Screen Blanking Box Cable, VM1080CABLE, is installed as fol-lows:
1. Connect the gray wire of the cable to the switched side of the Screen Blanking Box.
2. Connect the black wire of the cable to the unswitched side of the Screen Blanking Box.
3. Connect the D9 serial connector to either COM1 or COM2 serial port on the Thor VM3 dock.
User-Supplied Cable
A user-supplied cable can be used as well. Pins 7 and 8 must be connected as detailed below. No other pins are to be connected.
The user-supplied cable is installed as follows:
1. Connect the wire from Pin 8 of the cable to the switched side of the Screen Blanking Box or to a user-supplied switch.
2. Connect the wire from Pin 7 of the cable to the unswitched side of the Screen Blanking Box or to a user-supplied switch.
DB9 Female Function with Screen Blanking Box Wire color
1 -6, 9 Not Used
7 (RTS) Connected to Screen Blanking Box, unswitched side
Black (see note)
8 (CTS) Connected to Screen Blanking Box, switched side
Gray (see note)
DB9 Female Function with Screen Blanking Box Function with Switch
1 -6, 9 Not Used Not Used
7 (RTS) Connected to Screen Blanking Box, unswitched side
Connected to Switch
8 (CTS) Connected to Screen Blanking Box, switched side Connected to Switch
PIN 7PIN 8
PIN 5 PIN 1
Thor VM3 with Microsoft Windows Embedded Compact 7 User Guide 99

3. Connect the D9 serial connector to either COM1 or COM2 serial port on the Thor VM3 dock.
Screen Blanking Box
It is assumed that the motion sensing circuitry in the illustrations below is powered by internal vehicle circuitry.
Please refer to the appropriate illustration below for Screen Blanking Box wiring dia-grams.
Note: The black and gray wire colors in the illustration only apply to the optional Honeywell Screen Blanking Box Cable, VM1080CABLE. The wire colors may be different in a user-supplied cable.
Screen Blanking Box Terminal Connection
12-xxV Input from vehicle motion sensing circuitry.Please refer to label on Screen Blanking Box for allowable voltage input range.
GND DC -
These two terminals are for connecting a serial cable:
• If using an optional Honeywell screen blanking cable, VM1080CABLE, connect the gray wire to the switched side of the connection and connect the black wire to the unswitched side.
• If using a user-supplied cable, the cable must be constructed so that Pin 7 (RTS) connects to switched side of the connection and Pin 8 (CTS) connects to the unswitched side.
Unswitched Switched
Warning: Do not exceed the maximum input voltage, either 60 or 72VDC, specified on the Screen Blanking Box label when using this configuration.
MOTIONCIRCUITRY
To -Vo on vehicle,i.e. Negative
battery terminal
3A fuse
+V
i
GN
D
To pin 7 of COM1 or COM2
To pin 8 of COM1 or COM2
100 Thor VM3 with Microsoft Windows Embedded Compact 7 User Guide

Screen Blanking with SwitchIn applications where it is impractical to use the screen blanking box due to vehicle volt-age or lack of a motion sensing signal, screen blanking can be controlled via a user sup-plied switch or relay that provides an electrical conductive connection on vehicle motion.
Pins 7 and 8 must be connected as shown in the illustration above. No other pins are to be connected.
To pins 7 and 8of COM1 or COM2
port on dock
Thor VM3 with Microsoft Windows Embedded Compact 7 User Guide 101

VMXD Enhanced Dock with Thor VX8/Thor VX9 Power Cable
Determine the type of power supply used with the previous Thor VX8 or Thor VX9 instal-lation:
• DC/DC Power Supply with Screws on Top of Lid
• DC/DC Power Supply with Screws on Side of Lid
Caution: This dock is recommended for use when replacing an existing Thor VX8 or Thor VX9 where screen blanking is used. This dock eliminates the need for wiring changes by enabling the existing VX8/VX9 power cable and screen blanking box to be used when the VX8/VX9 is replaced by a Thor VM3 computer. These instructions are for this dock model only! The Ignition Control feature is not available when this dock is used.
Warning: The external DC/DC converter previously used with the Thor VX8 or Thor VX9 must be left in place to provide ground isolation. Connecting the dock power input directly to vehicle power could result in a safety hazard or equipment damage.
Warning: The cable shielding must be connected to chassis ground. Consult the instructions later in this section for the respective power supply type.
Caution: COM1 is used for screen blanking (via the power cable connector) and is unavailable when the screen blanking box is attached. When a screen blanking box is attached, any external serial device such as a scanner, must be connected to the COM2 port on the dock. If a screen blanking box is not connected via the power cable, the COM1 port on the dock is available for a serial device connection.
These instructions for use with VMXD Enhanced Dock only.
102 Thor VM3 with Microsoft Windows Embedded Compact 7 User Guide

DC/DC Power Supply with Screws on Top of Lid
• + is connected to battery positive.
• - must be connected to battery negative.
• must be connected to the vehicle chassis ground
Caution: Inspect the cable shield to verify it is connected to chassis ground. If there is no connection from the cable shield to chassis ground, one must be added at this time. Use a jumper wire to connect the cable shield to chassis ground as shown below for the appropriate type of power supply installed on the vehicle. A jumper wire, as shown in the illustrations below, may be present to attach the chassis ground to the white wire of the power cable. This wire is not necessary but can be left in place if present. For proper screen blanking, verify the yellow and green wires are attached to the screen blanking box as shown in the illustrations below.
For this model, follow the diagram below to attach the power cable shield to chassis ground:
CircularPowerConnector
DC/DCPowerSupply
Supplied Power Cable(Shielding to be trimmed)
5
6
1
3
Green
Yellow
Brown
White
Existing Circuitry on Vehicle
Forklift Battery
-Vo+Vo
10A slow fuseClose to powersource
Main Switch
VMX004VMCRADLEVehicle MountSmart Dock
-
+
-+
MOTIONCIRCUITRY
3A fuse
+V
i
GN
D
Caution: For battery powered vehicles:
Thor VM3 with Microsoft Windows Embedded Compact 7 User Guide 103
• + is connected to battery positive.
• - is connected to battery negative.
• is connected to the vehicle chassis ground, which can also be battery negative.
Caution: For internal combustion engine powered vehicles:
104 Thor VM3 with Microsoft Windows Embedded Compact 7 User Guide

DC/DC Power Supply with Screws on Side of Lid
• VIN+ is connected to battery positive.
• ViN- must be connected to battery negative.
• GND must be connected to the vehicle chassis ground.
Caution: Inspect the cable shield to verify it is connected to chassis ground. If there is no connection from the cable shield to chassis ground, one must be added at this time. Use a jumper wire to connect the cable shield to chassis ground as shown below for the appropriate type of power supply installed on the vehicle. A jumper wire, as shown in the illustrations below, may be present to attach the chassis ground to the white wire of the power cable. This wire is not necessary but can be left in place if present. For proper screen blanking, verify the yellow and green wires are attached to the screen blanking box as shown in the illustrations below.
For this model, follow the diagram below to attach the power cable shield to chassis ground:
CircularPowerConnector
-Vi
-Vo
+Vo
5
6
1
3
-Vi
-Vo+Vo
+ViGND
10A slow fuseClose to powersource
Cable Shield
Existing Circuitry on Vehicle
Forklift Battery
Main Switch
Green
Yellow
Brown
White
DC/DCPowerSupply
MOTIONCIRCUITRY
3A fuse
+V
i
GN
D
VMX004VMCRADLEVehicle MountSmart Dock
Caution: For battery powered vehicles:
Thor VM3 with Microsoft Windows Embedded Compact 7 User Guide 105

• VIN+ is connected to battery positive.
• ViN- is connected to battery negative.
• GND is connected to the vehicle chassis ground, which can also be battery negative.
Caution: For internal combustion engine powered vehicles:
106 Thor VM3 with Microsoft Windows Embedded Compact 7 User Guide

External AC/DC Power Supply
The optional external AC/DC power supply is for use in environments, such as an office, where DC power is not available.
Note: The Honeywell-approved AC/DC Power Supply and Adapter Cable are only intended for use in a 40ºC (104ºF) maximum ambient temperature environment.
In North America, this unit is intended for use with a UL Listed ITE power supply with output rated 15 VDC, 4 Amp (maximum), 60 W (maximum). Outside North America, this unit is intended for use with an IEC certified ITE power supply with output rated 15 VDC, 4 Amp (maximum), 60 W (maximum).
The external power supply may be connected to either a 120V, 60Hz supply or, outside North America, to a 230V, 50Hz supply, using the appropriate detachable cordset. In all cases, connect to a properly grounded source of supply provided with maximum 15 Amp overcurrent protection (10 Amp for 230V circuits).
Connect External Power Supply
1. Connect the provided detachable cordset (US only, all others must order cable sepa-rately) to the external power supply (IEC 320 connector).
2. Plug cordset into appropriate, grounded, electrical supply receptacle (AC mains).
3. Connect the DC output cable end to the corresponding connector on the adapter cable.
4. Connect the watertight connector end of the Adapter Cable to the VMXD Off-Vehicle Dock power connector by aligning the connector pins to the power connector; push down on the watertight connector and twist it to fasten securely.
5. Press the Power Switch on the back of the Thor VM3 dock.
6. Press the Power Button on the front of the Thor VM3 to turn on the Thor VM3.
These instructions for use with VMXD Enhanced Dock for Off-Vehicle Use only.
AC Input Cable (US only)DC Output Cable
To DC Output Cable To Dock
Thor VM3 with Microsoft Windows Embedded Compact 7 User Guide 107

Table StandWhen the Thor VM3 is used in an office environment, it can be mounted in a table stand. To use the table stand:
1. Attach the RAM ball to the RAM Metal Table Stand with the supplied screws and nuts.
2. If not present, attach a RAM ball to the VMXD off-vehicle dock. If using an external keyboard mount, attach it now. See Step 2 – Attach RAM Mount Ball to the Thor VM3 Dock for more details.
3. Slide the size D RAM arm over the ball on the table mount.
4. Insert the ball on the dock into the RAM arm and tighten the knob on the RAM arm using the supplied RAM wrench.
5. If the Thor VM3is not already mounted to the dock, Place Thor VM3 in the Dock.
6. If mounting the keyboard to the Thor VM3, see Step 5 – Attach Alphanumeric Keyboard to Mounting Plate (Optional) and Step 6 – Attach Keyboard Assembly to Thor VM3 Assembly (Optional).
108 Thor VM3 with Microsoft Windows Embedded Compact 7 User Guide

Connect USB KeyboardThere are two external USB keyboard options
• 95-key keyboard (part number 164288-0001)
• 21-key numeric keyboard.
These USB keyboards have a D9 connector which attaches to the USB port on the Stan-dard Dock or the USB1 connector on the Enhanced Dock.
1. Seat the keyboard cable connector over the USB or USB1 connector on the dock.
2. Tighten the thumbscrews in a clockwise direction. Do not over tighten.
3. Secure the cable to the Thor VM3 with Strain Relief Cable Clamps.
95-Key USB KeyboardPart number 164288-0001
21-Key Numeric USB Keyboard
RL
1!
2
Esc Print
SysRqScreen Scroll
LockFnPause
BreakF2 F3 F4 F5 F6 F7 F8 F9 F10 F11 F12F1
3#@
4$
5%
6^
0)
8*
7&
-_
9(
=+
BackSpace NumLock
/ * =~
`
Q W E R T UY I OTab
A S D F G JH K
Z X C V B MN.>
,<
/?
L ;:
'"
P ]}
\|
[{ 8
PgUp9
Home7
2PgDn3
End1
5 64
+
Ins0
Del.CtrlAlt
Enter
Shift
EnterCtrl Alt
Shift
CapsLock
Thor VM3 with Microsoft Windows Embedded Compact 7 User Guide 109

Connect PS/2 Keyboard
Note: While the 95-key USB keyboard and the 95-key PS/2 keyboard look similar the installation procedure is different.
A legacy PS/2 keyboard (used with VX6, VX7, Thor VX8 or Thor VX9), available in either 60-key or 95-key versions can be used with the Thor VM3 via a PS/2 to USB adapter cable. This function is only supported with the VM3D or VMXD Enhanced Docks. It is not supported with the VM1D Standard Dock.
1. Seat the male connector of the cable over the USB connector on the Thor VM3 dock.
2. Tighten the thumbscrews in a clockwise direction. Do not over tighten.
3. Seat the keyboard connector over the female connector of the cable.
4. Tighten the thumbscrews in a clockwise direction. Do not overtighten.
60-Key PS/2 Keyboard
Part number 160068-0001
Requires PS/2 to USB adapter cable
Not supported on the Thor VM3 with VM1D Standard Dock
Note: The keyboard backlight must be turned on manually. It does not come on automatically at boot up.
95-Key PS/2 Keyboard
Part number 160491-0001
Requires PS/2 to USB adapter cable
Not supported on the Thor VM3 with VM1D Standard Dock
Note: The mouse function is not supported with this keyboard.
CAPS
2nd
987/ - +
4 5 6INS
BKSPCTRL #
E*
I!
Q@
W O(
P)
R$
T%
U&
Y^ = }{
PgUp ENTERSHIFT :D
;F
"G
'H
.K 1 2 3L
?S
\A
|J
’ ] >[
Home PgDn ENDALT SP ~
BC VXZDEL
0M_
N´ < .
CAPS BREAK R/S BKLTESC 2ND F1 F2 F3 F4 F5 F6 F7 F8 F9 F10
RL
1!
2
Esc Print
SysRqScreen Scroll
LockFnPause
BreakF2 F3 F4 F5 F6 F7 F8 F9 F10 F11 F12F1
3#@
4$
5%
6^
0)
8*
7&
-_
9(
=+
BackSpace NumLock
/ * =~
`
Q W E R T UY I OTab
A S D F G JH K
Z X C V B MN.>
,<
/?
L ;:
'"
P ]}
\|
[{ 8
PgUp9
Home7
2PgDn3
End1
5 64
+
Ins0
Del.CtrlAlt
Enter
Shift
EnterCtrl Alt
Shift
CapsLock
110 Thor VM3 with Microsoft Windows Embedded Compact 7 User Guide

5. Secure the cable to the Thor VM3 with Strain Relief Cable Clamps. The strain relief must capture the keyboard cable.
Thor VM3 with Microsoft Windows Embedded Compact 7 User Guide 111

Connect USB Host
Host / Client Y Cable
See USB and USB1 Connector for connector pinouts.
Note: The USB client connection is not available on the Thor VM3.
1. Seat the D9 connector firmly over the USB (Standard Dock) or USB1 (Enhanced Dock) connector on the dock.
2. Tighten the thumbscrews in a clockwise direction. Do not over tighten.
3. The USB-host connector provides a connector for a USB device such as a USB thumb drive.
4. Secure the cables to the Thor VM3 with Strain Relief Cable Clamps.
Dual Host Y Cable
See USB2 Connector for connector pinouts.
1. Seat the D15 connector firmly over the USB2 (Enhanced Dock only) connector on the dock.
2. Tighten the thumbscrews in a clockwise direction. Do not over tighten.
3. The USB-host connectors provide a connector for a USB device such as a USB thumb drive.
4. Secure the cables to the Thor VM3 with Strain Relief Cable Clamps.
USB ScannerNote: If using Enterprise Settings to configure the USB scanner, it may be necessary to unplug
the scanner and plug it back into the USB port (or remove and reattach the cable) in order for the auto-detect function to display the scanner settings.
D9 ConnectorUSB Host Connector
USB Client Connector
D15 Connector
USB Host Connectors
112 Thor VM3 with Microsoft Windows Embedded Compact 7 User Guide

There are several ways to attach a USB scanner:
• A USB scanner can be attached to the USB host port on the Enhanced Dock.
• A USB scanner can be attached to the host port on either USB adapter Y-cable.
• Certain USB scanners can be attached directly to the USB or USB-1 connector using cable CBL-500-300-S00, as shown below.
To use the CBL-500-300-S00 cable:
1. Seat the D9 connector of the cable over the USB or USB11 connector on the Thor VM3 dock.
2. Tighten the thumbscrews in a clockwise direction. Do not over tighten.
3. Follow the instructions provided with the scanner to attach the RJ50 end of the cable to the scanner.
See USB Host to Scanner Cable for pinout details.
D9 ConnectorRJ50 (10-pin) Connector
Thor VM3 with Microsoft Windows Embedded Compact 7 User Guide 113

Connect USB ClientNote: The USB client connection is not used on the Thor VM3.
114 Thor VM3 with Microsoft Windows Embedded Compact 7 User Guide

Connect Serial DeviceNote: Pin 9 of the desired COM port must be configured to provide +5V or RI as needed for the
connected device. See the Options control panel for details.
Note: By default, COM1 and COM2 ports are used by Enterprise Data Collection. To use a COM port for screen blanking, access Enterprise Settings and set Data Collection > Tethered Scanners > Tethered Scanner (COMx) - Enable Scanner Port to off (where COMx is either COM1 or COM2).
See COM1 and COM2 Connector for connector pinouts.
1. Seat the cable end connector firmly over the serial COM port on the dock.
2. Turn the thumbscrews in a clockwise direction. Do not over tighten.
3. Secure the cables to the Thor VM3 with Strain Relief Cable Clamps.
4. Connect the other cable end to the desired serial device.
Connect a Tethered Scanner1. The scanner cable is attached to either the COM1 or COM2 port on the dock.
2. Connect the serial cable for the scanner as directed above.
3. When the Thor VM3 is powered on, it provides power to the serial scanner.
4. Configure the Data Collection (DC) Wedge to manipulate scanned data as desired.
Connect Headset CableThe CANbus/Audio connector supports a headset adapter cable or a CANbus cable. The Thor VM3 does not support connecting audio and CANbus simultaneously.
See CANbus / Audio Connector for connector pinouts.
Headphones
MicrophoneTo Audio cable
To Audio connectoron dock
To headset
Thor VM3 with Microsoft Windows Embedded Compact 7 User Guide 115

1. Seat the D15 cable end connector firmly over the CANbus/Audio Connector on the dock.
2. Tighten the thumbscrews in a clockwise direction. Do not over tighten.
3. Slide the cable ends together until they click shut. Do not twist or bend the connectors. The Thor VM3 internal microphone and speakers are automatically disabled when the headset is connected.
Adjust Headset / Microphone and Secure Cable
The headset consists of an earpiece, a microphone, a clothing clip and a cable.
1. Do not twist the microphone boom when adjusting the microphone. The micro-phone should be adjusted to be about two finger widths from your mouth.
2. Make sure the microphone is pointed at your mouth. Note the small “Talk” label near the mouthpiece. Make sure the Talk label is in front of your mouth. The microphone cable can be routed over or under clothing.
3. Follow the safety guidelines below when wearing the headset.
Under Clothing• Leave the cable exposed only at the top of the collar.
• Be sure to leave a small loop of cable to allow movement of your head.
Over Clothing• Use clothing clips to hold the cable close to your body.
• Tuck the cable under the belt, but leave a small loop where it goes under the belt.
• Do not wear the cable on the front of your body. It may get in your way or get caught on protruding objects.
click!
116 Thor VM3 with Microsoft Windows Embedded Compact 7 User Guide

Connect CANbus CableThe CANbus/Audio connector supports a headset adapter cable or a CANbus Y cable. The Thor VM3 does not support connecting audio and CANbus simultaneously.
See CANbus / Audio Connector for connector pinouts.
1. Seat the D15 cable end connector firmly over the CANbus/Audio Connector on the dock.
2. Tighten the thumbscrews in a clockwise direction. Do not over tighten.
3. The CANbus Y cable has a 9 pin F SAE J1939 (Deutsch) and 9 pin M SAE J1939 (Deutsch) connector. Connect the appropriate cable connector as needed.
Install External AntennaThe external antenna cannot be used by devices with an internal antenna.
1. Remove the rubber cap, if present, from the antenna connector before connecting an external antenna.
2. Place the antenna over the antenna connector. If only one antenna is used, be sure to connect it to the Wi-Fi Main connector.
3. Push down and twist the antenna base clockwise until secure.
4. Repeat for second antenna, if used.
Caution: If the Thor VM3 has connectors for external antennas, do not power up the Thor VM3 without the external antennas connected. Damage to the WLAN radio may result.
Thor VM3 with Microsoft Windows Embedded Compact 7 User Guide 117

Install Remote AntennaRemote antennas are available for the 802.11 WLAN radio, the WWAN radio and the GPS.
802.11 Remote Mount Antenna
Components and Mounting Diagram
Caution: If the Thor VM3 has connectors for external antennas, do not power up the Thor VM3 without the external antennas connected. Damage to the WLAN radio may result.
The Remote Antenna Installation Kit consists of two brackets (base plate and right angle), cable, and antenna. Tools are not included.The desired remote antenna bracket is mounted on the top of a forklift, truck or other vehicle and cabled to the Thor VM3 inside the vehicle.The Vehicle Remote Mount Antenna cannot be used by devices with an internal antenna.
NutWasher
WasherBracket
To antenna
To antenna connector on computer
BracketTo antenna
Antenna
118 Thor VM3 with Microsoft Windows Embedded Compact 7 User Guide

Typical Installation
Mounting Instructions
1. Attach and secure the desired mounting bracket to the highest point on the safety cage, following these precautions:
• The plate must be mounted so the antenna is not damaged while the vehicle or any of its parts are moving.
• The antenna mounting portion of the bracket must be parallel to the floor.
• If using two antennas, they must be mounted at least 12 inches (304.8mm) apart.
2. Attach the female connector of the coaxial cable to the antenna connector on the vehicle mounted Thor VM3.
3. Secure the whip antenna to the mounting bracket.
4. Connect the antenna cable to the whip antenna.
5. Use cable ties to secure the coaxial cable to the vehicle as necessary. Make sure the cable is routed so it is not damaged by any moving parts of the vehicle.
6. Connect the cable to the antenna connector (Wi-Fi Main or Wi-Fi Aux) on the Thor VM3. If only one antenna is used, be sure to connect it to the Wi-Fi Main connector.
7. Repeat the steps above for the second 802.11 antenna.
Antenna Mounting Bracket
Vehicle Safety Cage Cable Vehicle MountedComputer
Thor VM3 with Microsoft Windows Embedded Compact 7 User Guide 119

WAN Remote Mount AntennaThe WAN remote mount antenna can be either a magnetic mount or an adhesive mount antenna.
The Remote Antenna Installation Kit consists of the WAN antenna and an extension cable. The remote antenna is mounted on the top of a forklift, truck or other vehicle and cabled to the Thor VM3 inside the vehicle.
1. Locate a mounting position on highest point on the vehicle, following these precau-tions:
• The antenna must be mounted so the antenna is not damaged while the vehicle or any of its parts are moving.
2. Clean the area where the antenna is to be mounted.
3. If using an adhesive mount antenna, remove the protective backing paper from the adhesive on the antenna.
4. Position the antenna on the vehicle.
5. Attach the one end of the coaxial cable to the antenna and the other end to the Mobile Net WWAN connector on the vehicle mounted Thor VM3.
6. Use cable ties to secure the coaxial cable to the vehicle as necessary. Make sure the cable is routed so it is not damaged by any moving parts of the vehicle.
Magnetic Mount WAN Antenna Adhesive Mount WAN Antenna
To extension cable
To antenna
To antennaconnector oncomputer
To extension cable
To antennaTo antenna connector oncomputer
120 Thor VM3 with Microsoft Windows Embedded Compact 7 User Guide

GPS Remote Mount AntennaThe external GPS antenna is an adhesive mount antenna.
1. Locate a mounting position on highest point on the vehicle, following these precau-tions:
• The antenna must be mounted so the antenna is not damaged while the vehicle or any of its parts are moving.
2. Clean the area where the antenna is to be mounted.
3. Remove the protective backing paper from the adhesive on the antenna and position the antenna on the vehicle.
4. Attach the connector on the coaxial cable to the GPS antenna connector on the vehicle mounted Thor VM3.
5. Use cable ties to secure the coaxial cable to the vehicle as necessary. Make sure the cable is routed so it is not damaged by any moving parts of the vehicle.
The Remote Antenna Installation Kit consists of the antenna and an inte-grated cable. The remote antenna is mounted on the top of a forklift, truck or other vehicle and cabled to the Thor VM3 inside the vehicle.
Thor VM3 with Microsoft Windows Embedded Compact 7 User Guide 121

Apply Touch Screen Protective FilmThe optional Thor VM3 touch screen protective film is shipped in packs of 10. The pro-tective film is flexible and treated with an anti-glare coating on the outer surface.
Installation1. Make sure the touch screen is clean and dry before installation. See Cleaning for
instructions on suitable cleaning agents.
2. Pull the release tab to separate the protective backing from the rear of the protective film. Avoid touching the rear side of the protective film while removing the liner.
3. Place the rear side of the protective film against the Thor VM3 display, roughly centering the protective film over the display.
4. Slide the protective film until one corner can be slid back between the touch screen and the display housing as the protective film is re-centered on the display. It may be necessary to press the edges of the protective film against the display to ensure the entire edge slides under the display housing. It is easiest to start with one of the bottom corners.
5. Slide the protective film away from the other bottom corner. The film may bulge slightly away from the Thor VM3 as it is being slid. Only slide the protective film enough so that the protective film can slide under the display housing on that corner when the protective film is returned to center.
6. Repeat with each of the top corners, sliding the protective film away from the corner just enough that the protective film can slide under the display housing when the protective film is returned to center.
7. It may be necessary to flex the protective film during the install, however use care not to flex the protective film so much that the protective film kinks.
8. Once all corners are secure under the display housing, adjust the protective film, if necessary, so it is centered on the touch screen.
The protective film is slightly larger than the Thor VM3 touch screen, however the notches on the edge of the protective film (indicated by the arrows) corre-spond to the display size of the Thor VM3. The protective film is not adhesive. The corner edges are designed to fit between the Thor VM3 display and the display housing to hold the protective film in place.
A protective backing is applied to the rear surface of the protective film. A pull tab is attached to the protective backing for easy removal of the protective back-ing from the film.
Pull Tab
122 Thor VM3 with Microsoft Windows Embedded Compact 7 User Guide

Removal1. To remove the protective film, slide the protective film in one direction until the edge
clears.
2. Lift up on the edge of the protective film so it does not slide between the touch screen and display housing when the protective film is slid back to the center.
3. Repeat until all edges are free and remove the protective film.
Thor VM3 with Microsoft Windows Embedded Compact 7 User Guide 123

Disconnect UPS Battery
Equipment RequiredThe following equipment is user-supplied:
• Torquing tool capable of measuring inch pounds
• #2 Phillips screwdriver bit
Disconnect Procedure1. For convenience, the Thor VM3 can be removed from the dock, though it is not nec-
essary.
2. If the Thor VM3 remains in the dock, disconnect the power cable from the dock.
3. Place the Thor VM3 in Suspend by pressing the power button.
4. Place the Thor VM3 face down on a stable surface.
5. Use a #2 Phillips bit to loosen the captive M3 screws on the access panel with the mSATA and SIM labels.
6. Locate the small push button located just below the SIM card installation slot.
7. Press the push button to disconnect the UPS. The UPS battery maintains its charge but is disconnected from the power circuitry of the Thor VM3.
8. Reattach the access panel, torquing the M3 screws to 7.0 ± 0.5 inch pounds using a #2 Phillips bit.
9. When the Thor VM3 is attached to external power, the UPS battery is automatically reconnected.
10. Restart the Thor VM3
Caution: The UPS battery must be disconnected before you ship the Thor VM3 or Replace Front Panel.
124 Thor VM3 with Microsoft Windows Embedded Compact 7 User Guide

Install mSATA DriveNote: Install SIM Card(s) before installing the mSATA drive.
An mSATA card slot is provided for storage expansion.
Equipment RequiredThe following equipment is user-supplied:
• Torquing tool capable of measuring inch pounds
• mSATA card
Installation ProcedureNote: Install any SIM cards before installing the mSATA drive.
1. Place the Thor VM3 in Suspend by pressing the power button.
2. Remove the Thor VM3 from the dock.
3. Disconnect UPS Battery.
4. Place the Thor VM3 face down on a stable surface.
5. Use a #2 Phillips bit to loosen the captive M3 screws on the access panel with the mSATA and SIM labels. This panel is on the right hand side when the Thor VM3 is face down with the top away from the user.
• Only mSATA drives with pin 43 not connected are supported.
• Connecting an mSATA drive with connector pin 43 grounded can result in system instability such as a failure to boot or non-functional accessories such as keyboard or mouse.
Thor VM3 with Microsoft Windows Embedded Compact 7 User Guide 125

6. Locate the mSATA card installation slot.
7. Tilt the card at a 45º angle and insert the connector end of cards into the slot.
8. Once the connector end is inserted, lower the card until the other end is captured and secured by the anchor pins.
9. Reattach the access panel, torquing the screws to 7.0 ± 0.5 inch pounds.
10. Reinstall the Thor VM3 in the dock.
11. Restart the Thor VM3.
12. When using Windows explorer to view My Computer, the mSATA expansion card is identified as System2.
126 Thor VM3 with Microsoft Windows Embedded Compact 7 User Guide

Install SIM Card(s)The Thor VM3 supports two SIM cards for WWAN switching. The Thor VM3 can switch between carriers, but the WWAN connection is lost during this switch as the first carrier must be disconnected before the second carrier can be connected. See VM3 WWAN Connection Manager for software configuration.
Note: The SIM card is not hot-swappable. After installing or removing a SIM card, the Thor VM3 must be rebooted for the change to take effect.
Equipment RequiredThe following equipment is user-supplied:
• SIM card(s) for desired carrier(s)
• Torquing tool capable of measuring inch pounds
• #2 Phillips screwdriver bit
Installation Procedure1. Place the Thor VM3 in Suspend by pressing the power button.
2. Remove the Thor VM3 from the dock.
3. Disconnect UPS Battery.
4. Place the Thor VM3 face down on a stable surface.
5. Use a #2 Phillips bit to loosen the captive M3 screws on the access panel with the mSATA and SIM labels. This panel is on the right hand side when the Thor VM3 is face down with the top away from the user.
6. Locate the SIM card holders. The VM3 WWAN Connection Manager identifies the top slot (the slot
Thor VM3 with Microsoft Windows Embedded Compact 7 User Guide 127

closest to the top of the Thor VM3 as slot 1 (SIM 1) and the lower slot as slot 2 (SIM 2).
Note: If an mSATA drive has been installed, it is necessary to remove the drive before installing the SIM card(s).
7. Slide the silver retainer clip toward the center of the Thor VM3.
8. After the clip is slid in, lift the outer edge of the SIM holder so it is at a 45º to 90º angle (compared to the circuit board on which it is mounted).
9. Insert the SIM card into the SIM holder.
Note: The SIM card does not have a “spring lock” type holder. Slide the SIM card into the holder but do not push it expecting it to lock into place. The SIM card will be held in place when the card holder is closed.
10. Lower the SIM holder to back to its flat position.
11. Slide the silver retainer clip back toward the outside edge of the Thor VM3. This locks the SIM card in place.
12. Reattach the access panel, torquing the screws to 7.0 ± 0.5 inch pounds.
13. Reinstall the Thor VM3 in the dock.
14. Resume the Thor VM3 from Suspend.
15. Restart the Thor VM3 (Start > Settings > Control Panel > Registry and tap the Restart button).
SIM
128 Thor VM3 with Microsoft Windows Embedded Compact 7 User Guide

Replace Front Panel
Front Panel OptionsThe front panel of the Thor VM3 is field replaceable. The front panel assembly contains the keypad, touch screen and optional defroster. Should any of these components fail, the front panel assembly can easily be replaced to reduce downtime. The replacement front panel is available in these configurations:
• Standard temperature with resistive touch screen
• Cold storage with resistive touch screen
• Outdoor with resistive touch screen
Note: The Thor VM3 with Microsoft Windows Embedded Compact operating system does not support PCAP touch screens.
Equipment RequiredThe following equipment is user-supplied:
• Torquing tool capable of measuring inch pounds
• #2 Phillips screwdriver bit
Replacement Procedure
1. Place the Thor VM3 on a clean, well-lit surface before performing the front panel replacement.
2. Place the Thor VM3 in Suspend by pressing the power button.
3. Remove the Thor VM3 from the dock.
4. Disconnect UPS Battery.
5. Loosen the sixteen (16) captive M3 screws holding the front panel. Use a #2 Phillips bit.
Caution: Before replacing the Thor VM3 front panel, Disconnect UPS Battery.
14
16
11
1 795 4
3 6108 2
12
15
13
Thor VM3 with Microsoft Windows Embedded Compact 7 User Guide 129

6. Carefully lift the front panel away from the device.
7. Position the replacement front panel so wiring connector on the back of the front panel lines up with the connector on the Thor VM3.
8. Gently press the front panel into place.
9. Tighten the sixteen (16) captive M3 screws. In the order shown in the top figure above, use a #2 Phillips bit and torque the screws to 7 ± 0.5 inch pounds.
10. Reinstall the Thor VM3 in the dock.
11. When the Thor VM3 is placed in the powered dock, the UPS battery automatically reconnects.
12. Restart the Thor VM3.
13. If adding or removing a defroster, update the Thor VM3 configuration by selecting Start > Settings > Control Panel > Peripherals and tap the Test button.
14. Close any open control panel windows.
15. Perform a touch screen Calibration.
16. The Thor VM3 is ready for use.
Wiring Connector on Thor VM3
Wiring Connector on Front Panel
130 Thor VM3 with Microsoft Windows Embedded Compact 7 User Guide

CHAPTER
5
Thor VM3 with Mic
SOFTWARE
IntroductionThere are several different aspects to the setup, configuration and operation of the Thor VM3. Many of the setup and configuration settings are dependent upon the optional features such as hardware and software installed on the unit. The examples found in this section are to be used as examples only, the configuration of your specific Thor VM3 computer may vary. The following sections provide a general reference for the con-figuration of the Thor VM3 and some of its optional features.
Operating SystemYour Thor VM3 operating system is Microsoft® Windows® Embedded Compact 7. The Thor VM3 operating system revision is displayed on the Desktop. This is the default set-ting for the Desktop Display Background.
Windows Embedded Compact Operating SystemThis segment assumes the system administrator is familiar with Microsoft Windows options and capabilities loaded on most standard Windows computers.
Therefore, the sections that follow describe only those Windows capabilities that are unique to the Thor VM3 and its Windows environment.
General Windows Embedded Compact Keyboard ShortcutsUse the keyboard shortcuts in the chart below to navigate with the Thor VM3 keyboard. These are standard keyboard shortcuts for Windows Embedded Compact applications.
Press these keys … To …
CTRL + C Copy
CTRL + X Cut
CTRL + V Paste
CTRL + Z Undo
rosoft Windows Embedded Compact 7 User Guide 131

The touch screen provides equivalent functionality to a mouse:
• A touch on the touch screen is equivalent to a left mouse click.
• Many items can be moved by the “drag and drop” method, touching the desired item, moving the stylus across the screen and releasing the stylus in the desired location.
• A double stylus tap is equivalent to a double-click.
• A touch and hold is equivalent to a right mouse click. Some applications may not support this right-click method. Please review documentation for the application to see if it provides for right mouse click configuration.
• Devices with Shift and Ctrl Keys: The Shift and Ctrl keys can be used with the touch screen for multiple selection of items.
• To select disconnected items, press the Ctrl key and then touch each item to be selected in the set. Press the Ctrl key again to terminate this mode.
• To select a connected set of items, press the Shift key, then touch the first item in the series. Touch the last item in the series. Press the Shift key again to terminate the selection mode.
Save Changes to the RegistryThe Thor VM3 saves the registry when you:
• Warmboot - either from the Registry control panel, the warmboot command or the reboot keypress sequence.
• Restart - from the Registry control panel
• Suspend/Resume - Either user initiated or upon Suspend timer expiration.
• Shutdown - The registry is saved during a controlled shutdown, such as when the UPS charge reaches a critically low level and external power is not available.
The registry save process takes 0 – 3 seconds. If nothing has been changed, nothing is saved (e.g., 0 seconds).
DELETE Delete
SHIFT with any of the arrow keys Select more than one item in a window or on the desktop, or select text within a document.
CTRL+A Select all.
ALT+ESC Cycle through items in the order they were opened.
CTRL+ESC Display the Start menu.
ALT+Underlined letter in a menu name Display the corresponding menu.
Underlined letter in a command name on an open menu
Carry out the corresponding command.
ESC Cancel the current task.
Press these keys … To …
132 Thor VM3 with Microsoft Windows Embedded Compact 7 User Guide

Software LoadThe software loaded on the Thor VM3 consists of Microsoft® Windows® Embedded Compact 7 OS, hardware-specific OEM Adaptation Layer, device drivers, Internet Explorer and utilities. The software supported is summarized below:
• Full Operating System License: Includes all operating system components, including Microsoft® Windows® Embedded Compact 7 kernel, file system, communications, connectivity (for remote APIs), device drivers, events and messaging, graphics, keyboard and touch screen input, window management, and common controls.
• Network and Device Drivers
• Bluetooth
Note: Please contact Honeywell Technical Assistance for software updates and CAB files as they are released by Honeywell.
Software ApplicationsThe following applications are included:
• WordPad
• Enterprise Client Pack
• ActiveSync
• Internet Explorer
• Word Viewer
• Excel Viewer
• PDF Viewer
• PowerPoint Viewer
Note that the viewer applications allow viewing documents, but not editing them.
ActiveSyncActiveSync is preloaded. Using Microsoft ActiveSync you can copy files from your Thor VM3 to your desktop/laptop and vice versa.
RFTerm (Optional)Start > Programs > Honeywell RFTerm
RFTerm is preloaded when ordered. The application can also be accessed by double-clicking the RFTerm desktop icon.
Enterprise TE (Optional)Start > Programs > Enterprise TE
Thor VM3 with Microsoft Windows Embedded Compact 7 User Guide 133

Enterprise TE is preloaded when ordered. The application can also be accessed by dou-ble-clicking the Enterprise TE desktop icon.
Music PlayerMusic Player is supported on the VM3. However, the Save function should not be used due to an issue within this Microsoft product.
Enterprise Client PackThere are several components of the Enterprise Client Pack installed on the Thor VM3. For more information on these programs visit the Thor VM3 product page at www.honeywellaidc.com.
Enterprise TEStart > All Programs > Honeywell > Enterprise TE
Optional terminal emulation software. The application can also be accessed by double-clicking the Enterprise TE desktop icon.
Enterprise BrowserStart > All Programs > Honeywell > Enterprise Browser
Optional lock-down web client software. The application can also be accessed by dou-ble-clicking the Enterprise Browser desktop icon.
Enterprise Browser is designed for users running web-based applications to limit access to other applications, web sites, or other parts of the operating system
Enterprise Browser can be used alone or with Launcher.
LauncherStart > All Programs > Honeywell > Launcher
Optional lock-down menu software. The application can also be accessed by double-clicking the Launcher desktop icon.
End users must log in and can only access authorized programs.
Launcher can be used alone or with Enterprise Browser.
CloneNGoTo launch CloneNGo, double-click the CloneNGo icon on the desktop.
For information on using CloneNGo on the Thor VM3, refer to the CloneNGo User Guide available at www.honeywellaidc.com.
134 Thor VM3 with Microsoft Windows Embedded Compact 7 User Guide

Thor VM3 UtilitiesThe following files are preloaded.
LAUNCH.EXELaunch works in coordination with registry settings to allow drivers or applications to be loaded automatically into DRAM at system startup. Registry settings control what gets launched; see the App Note for information on these settings. For examples, you can look at the registry keyHKEY_LOCAL_MACHINE \ Software \ HSM \ Persist
Launch will execute .CAB files, .BAT files, or .EXE files.
App NoteAll applications to be installed into persistent memory must be in the form of CAB files. These CAB files exist as separate files from the main installation image, and are copied to the device using ActiveSync, or using removable media such as a USB drive. The CAB files are copied from into the folder System, which is the persistent storage virtual drive. Then, information is added to the registry, if desired, to make the CAB file auto-launch at startup.
The registry information needed is under the key HKEY_LOCAL_MACHINE \ Software \ HSM \ Persist, as follows. The main subkey is any text, and is a description of the file. Then four mandatory values are added:
FileName is the name of the CAB file, with the path (usually \System).
Installed is a DWORD value of 0, which changes to 1 once auto-launch installs the file.
FileCheck is the name of a file to look for to determine if the CAB file is installed. This will be the name of one of the files (with path) installed by the CAB file. Since the CAB file installs into DRAM, when memory is lost this file is lost, and the CAB file must be reinstalled.
Order is used to force a sequence of events. Order=0 is first, and Order=99 is last. Order must be greater than 4 for the Thor VM3. Two items which have the same order will be installed in the same pass, but not in a predictable sequence.
There are two optional fields that may be added:
1. Delay is used to add a delay after the item is loaded, before the next is loaded. The delay is given in seconds, and defaults to 0 if not specified. If the install fails (or the file to be installed is not found), the delay does not occur.
2. PCMCIA is used to indicate that the file (usually a CAB file) being loaded is a radio driver, and the PCMCIA slots should be started after this file is loaded. By default, the PCMCIA slots are off on powerup, to prevent the “Unidentified PCMCIA Slot” dialog from appearing. Once the drivers are loaded, the slot can be turned on. The value in the PCMCIA field is a DWORD, representing the number of seconds to wait after installing the CAB file, but before activating the slot (a latency to allow the thread loading the driver to finish installation). The default value of 0 means the slot
Thor VM3 with Microsoft Windows Embedded Compact 7 User Guide 135

is not powered on. The default values for the default radio drivers (listed below) is 1, meaning one second elapses between the CAB file loading and the slot powering up.
The auto-launch process proceeds as follows:
1. The launch utility opens the registry database and reads the list of CAB files to auto-launch.
2. First it looks for FileName to see if the CAB file is present. If not, the registry entry is ignored. If it is present, and the Installed flag is not set, auto-launch makes a copy of the CAB file (since it gets deleted by installation), and runs the Microsoft utility WCELOAD to install it.
3. If the Installed flag is set, auto-launch looks for the FileCheck file. If it is present, the CAB file is installed, and that registry entry is complete. If the FileCheck file is not present, memory has been lost, and the utility calls WCELOAD to reinstall the CAB file.
4. Then, the whole process repeats for the next entry in the registry, until all registry entries are analyzed.
5. To force execution every time (for example, for AUTOEXEC.BAT), use a FileCheck of “dummy”, which will never be found, forcing the item to execute.
6. For persist keys specifying .EXE or .BAT files, the executing process is started, and then Launch will continue, leaving the loading process to run independently. For other persist keys (including .CAB files), Launch will wait for the loading process to complete before continuing. This is important, for example, to ensure that a .CAB file is installed before the .EXE files from the .CAB file are run.
7. Note that the auto-launch process can also launch batch files (*.BAT), executable files (*.EXE), registry setting files (*.REG), or sound files (*.WAV). The mechanism is the same as listed above, but the appropriate application is called, depending on file type.
Note: Registry entries may vary depending on software revision level and options ordered with the Thor VM3.
LAUNCH.EXE and Persistent StorageIf any of the following directories are created in the System folder, Launch automatically copies all of the files in these directories:
This function copies only the folder contents, no sub-folders.
System\Desktop copied to Windows\Desktop
System\Favorites copied to Windows\Favorites
System\Fonts copied to Windows\Fonts
System\Help copied to Windows\Help
System\Programs copied to Windows\Programs
AppMgr copied to Windows\AppMgr
Recent copied to Windows\Recent
136 Thor VM3 with Microsoft Windows Embedded Compact 7 User Guide

The Windows\Startup folder is not copied on startup because copying this folder has no effect on the system or an incorrect effect.
Files in the Startup folder are executed, but only from System\Startup. Win-dows\Startup is parsed too early in the boot process so it has no effect.
Executables in System\Startup must be the actual executable, not a shortcut, because shortcuts are not parsed by Launch.
Note: Files in the Startup folder are executed, but only from System > Startup. They are not copied to another folder.
REGEDIT.EXERegistry Editor – Use caution when editing the Registry. Make a backup copy of the reg-istry before changes are made.
WARMBOOT.EXEDouble-click this file to warm boot the computer (i.e., all RAM is preserved). It automati-cally saves the registry before rebooting which means configuration changes are not lost.
Thor VM3 Command-line UtilitiesCommand line utilities can be executed by Start > Run > [program name].
PrtScrn.EXECommand line utility which performs a screen print and saves the file in .BMP format in the \System folder. Tap Start > Run and type prtscrn and tap OK, or press Enter. There is a 10 second delay before the screen print is made. The device beeps and the screen captured file (scrnnnnn.bmp) is placed in the \System folder. The numeric filename is incremented by 1 each time the PrtScrn function is activated. The command is not case-sensitive.
DesktopThe Thor VM3 Desktop appearance is similar to that of a desktop PC running a Windows operating system.
At the bottom of the screen is the Start button. Tapping the Start button causes the Start Menu to display. It contains the standard Windows menu options: Programs, Favorites, Documents, Settings, Help, and Run.
Thor VM3 with Microsoft Windows Embedded Compact 7 User Guide 137

Desktop IconsAt a minimum, the desktop displays icons for My Device, Internet Explorer and the Recycle Bin. Following are a few of the other icons that may be on the Thor VM3 Desk-top. Contact Technical Assistance about the latest updates and upgrades for your oper-ating system.
Taskbar
The number and type of icons displayed are based on the device type, installed options and configuration of the Thor VM3.
Icon Function
Access files and programs.
Storage for files that are to be deleted.
Storage for downloaded files / applications.
Displays web pages from the Internet/Intranet.
Used for access the WLAN Wireless Configuration Utility (WCU).
RFTerm is an optional terminal emulation program. When RFTerm is installed, this icon is displayed on the desktop.
Enterprise TE is an optional terminal emulation program. When Enterprise TE is installed, this icon is displayed on the desktop.
Launcher is lock-down menu software used to restrict users to only authorized programs.
Enterprise Browser is a lock-down web client software used to restrict user’s access to other applications, web sites and the operating system.
HTML5 Browser is for web applications designed to run on-line, off-line or a combination.
Bluetooth scanning is sued to discover and pair certain Bluetooth scanners.
A shortcut to the Remote Desktop Connection utility.
Start button. Access programs, select from the Favorites listing, documents last worked on, change/view settings for the control panel or taskbar, on-line help or run programs.
138 Thor VM3 with Microsoft Windows Embedded Compact 7 User Guide

My Device Folders
Internet ExplorerStart > Programs > Internet Explorer
There are a few changes in the Windows Embedded Compact version of Internet Explorer as it relates to the general desktop Windows PC Internet Explorer options. Tap the ? button to access Internet Explorer Help.
Start MenuThe following list represents a typical factory default program installation. Your system may contain different items from those shown below, based on the software and hard-ware options purchased.
Folder Description Preserved uponReboot?
Application Data Data saved by running applications No
My Documents Storage for downloaded files / applications No
Network Mounted network drive No
Program Files Applications No
System Internal mSATA (CAB file storage) Yes
Temp Location for temporary files No
Windows Operating System in Secure Storage No
Communication Stores Network communication options
Start (or Stop) FTP Server Begin / end connection to FTP server
Command Prompt The command line interface in a separate window
Internet Explorer Access web pages on the Internet/Intranet
File Viewers
JETCET PDF Viewer View Adobe PDF Documents
Excel Viewer View Excel and compatible documents
PowerPoint Viewer View PowerPoint and compatible documents
Word Viewer View Word and compatible documents
Microsoft WordPad Opens an ASCII notepad
Remote Desktop Connection Log on to a Windows Terminal Server
Honeywell RFTerm Option. Terminal emulation application.
Enterprise Browser Lock down software.
Enterprise TE Terminal emulation application.
HTML5 Browser Lock-down menu software.
Launcher Browser for web applications.
Settings Access to all Control Panels, a shortcut to the Network and Dialup Control Panel and access to Taskbar options.
Thor VM3 with Microsoft Windows Embedded Compact 7 User Guide 139

• If installed, RFTerm runs automatically at the conclusion of each reboot.
• The wireless client connects automatically during each reboot.
• Bluetooth re-connects to nearby paired devices automatically at the conclusion of each reboot.
CommunicationStart > Programs > Communication
Start FTP Server / Stop FTP Server Start > Programs > Communication > Start (or Stop) FTP Server
These shortcuts call the Services Manager to start and stop the FTP server. The server defaults to Off (for security) unless it is explicitly turned on from the menu.
Command PromptStart > Programs > Command Prompt
Type help cmd at the command prompt to view valid Pocket PC (Console) commands.
Exit the command prompt by typing exit at the command prompt or tap File > Close.
Internet ExplorerStart > Programs > Internet Explorer
There are a few changes in the Windows Embedded Compact version of Internet Explorer as it relates to the general desktop Windows PC Internet Explorer options. Tap the ? button to access Internet Explorer Help.
Media PlayerStart > Programs > Media Player
There are few changes in the Windows Embedded Compact version of Media Player as it relates to the general desktop Windows PC Microsoft Media Player options.
After the Media Player application is running, click the ? button to access Media Player Help.
File ViewersThe following applications are included:
• JETCET PDF Viewer
Windows Explorer File management program
140 Thor VM3 with Microsoft Windows Embedded Compact 7 User Guide

• Excel Viewer
• PowerPoint Viewer
• Word Viewer
Note: The viewer applications allow viewing documents, but not editing them.
Microsoft WordPadStart > Programs > Microsoft WordPad
Create and edit documents and templates in WordPad, using buttons and menu com-mands that are similar to those used in the desktop PC version of Microsoft WordPad.
By default WordPad files are saved as .PWD files. Documents can be saved in other for-mats e.g., .RTF or .DOC.
Tap the ? button to access WordPad Help.
Remote Desktop ConnectionStart > Programs > Remote Desktop
There are few changes in the Windows Embedded Compact version of Remote Desktop as it relates to the general desktop Windows PC Microsoft Remote Desktop options.
If installed, Remote Desktop on the Thor VM3 can be accessed by Start > Programs > Remote Desktop.
Select a computer from the drop down list or enter a host name and tap the Connect button.
Tap the Options >> button to access the General, Display, Local Resources, Programs and Experience tabs. Tap the ? button to access Remote Desktop Connection Help.
SettingsStart > Settings
The Settings menu option may include the following:
Windows ExplorerStart > Programs > Windows Explorer
There are a few changes in the Windows Embedded Compact version of Windows Explorer as it relates to the general desktop PC Windows Explorer options. Tap the ? button to access Windows Explorer Help.
Control Panel All control panels
Network and Dialup Connections
Shortcut to control panel. Connect to a network, create a new connection, and adjust parameters for client connections.
Taskbar Set Taskbar parameters
Thor VM3 with Microsoft Windows Embedded Compact 7 User Guide 141

TaskbarStart > Settings > Taskbar
There are a few changes in the Windows Embedded Compact version of Taskbar as it relates to the general desktop PC Windows Taskbar options.
When the taskbar is auto hidden, press the Ctrl key then the Esc key to make the Start button appear.
Clicking the Taskbar option on the Settings menu displays the General and Advanced Taskbar tabs.
GeneralFactory Default Settings
Advanced
Expand Control PanelTap the checkbox to have the Control Panel folders appear in drop down menu format from the Settings > Control Panel menu option.
Clear Contents of Document FolderTap the ton to remove the contents of the Document folder.
Taskbar IconsAs Thor VM3 devices and applications open and change state, icons are placed in the Taskbar. In most cases, tapping the icon in the Taskbar opens the related application.
Always on Top Enabled
Auto hide Disabled
Show Clock Enabled
142 Thor VM3 with Microsoft Windows Embedded Compact 7 User Guide
Refer to Start > Help for an explanation of standard Windows Embedded Compact task-bar icons.
Following are a few of the Thor VM3 taskbar icons that may appear in the Taskbar. These icons are in addition to the Windows Embedded Compact taskbar icons.
Thor VM3 OS Upgrade
IntroductionDepending on the size of the operating system, the total time required for a successful upgrade may require several minutes.
There may be firmware and BIOS upgrades available for the Thor VM3. Contact Technical Assistance for upgrade information and instructions. In some cases, it may be necessary to upgrade firmware before upgrading the operating system.
Preparation• Contact Technical Assistance to get the OS upgrade files.
• Honeywell Technical Assistance may advise you that additional upgrades such as BIOS or firmware are required before upgrading the OS. Please follow any additional upgrade instructions provided by Technical Assistance.
• Use ActiveSync to back up Thor VM3 user files and store them elsewhere before beginning an upgrade on the Thor VM3.
• Maintain an uninterrupted AC/DC power source to the Thor VM3 throughout this process.
Wireless Zero Config Inactive / Connected / Not Connected.Clicking on the icon opens the Wireless Zero Config utility.
ActiveSync connection
UPS battery charge indicator. Percent of battery charge is indicated.
External power connected / connected and UPS battery charging.
Current time. Clicking the time display opens the Date / Time control panel.
Click this icon to return to the Desktop.
Input method, keyboard / input panel.
CapsLock active.
Caution: The Thor VM3 must be connected to external power before upgrading the BIOS, firmware or operating systems.If the Thor VM3 is operating on UPS battery power, the upgrade process does not initiate and the Thor VM3 is not upgraded.
Thor VM3 with Microsoft Windows Embedded Compact 7 User Guide 143

• The mSATA card with the OS and systems files must be present for the Thor VM3 to boot.
• Always perform OS updates when the Thor VM3 has a dependable external power source connected to the Thor VM3.
Procedure1. Verify a dependable power source is applied to the Thor VM3 and will stay connected
during the upgrade procedure.
2. Copy the OS files to a USB thumb drive.
3. Copy the files from the USB drive to the Thor VM3's System folder.
4. During the file copy process to the Thor VM3 System folder, when asked “Overwrite?”, select Yes to All.
5. Review the files that were downloaded to the System folder.
6. Remove the USB drive.
7. Restart the Thor VM3.
8. When the OS finishes loading, check the OS update version by selecting Start > Settings > Control Panel > About > Software tab.
The touch screen may require calibration, however some Windows OS versions save the calibration data, eliminating the need to calibrate.
If the Thor VM3 won't boot up after the upgrade is finished, contact Technical Assistance for re-imaging options.
BIOSThe Microsoft Windows Embedded Compact operating system is installed before ship-ping. The default BIOS parameters are configured at that time. In most cases, it is unnecessary to modify the BIOS parameters.
Generally, it is only necessary to enter the BIOS setup to change the boot order of the drives.
This section is not intended to detail all features of the BIOS, instead it is intended to cover the most commonly used setup options.
Caution: Be very careful when using this utility to modify BIOS Setup parameters. The Thor VM3 may generate unexpected results when incorrect or conflicting parameter values are entered. Selecting incorrect or invalid options may require the Thor VM3 to be returned for repairs.The parameters should only be modified by Information Services personnel or the system administrator.
144 Thor VM3 with Microsoft Windows Embedded Compact 7 User Guide

The Thor VM3 front panel key can be used to maneuver the BIOS screens in the event an external keyboard is not used. See Integrated Keypad and BIOS for front panel key assignments.
Accessing the BIOS SetupWhen the Press F2 for System Utilities prompt is displayed at power up, press the P2 key on the Thor VM3 or the F2 key on an external keyboard to enter BIOS setup.
Use the arrow keys to move around the screen.
Boot OrderTo view or edit the boot order, select the Boot tab.
By default, the first device in the boot order is USB Hard Drive.
The boot drive can also be selected at bootup. Press P5 from the Thor VM3 keypad or press F5 from an external keyboard. Use the arrows on the external keypad to make a selection. This does not change the default boot order and the next bootup will return to the default drive without user intervention.
Exiting BIOS SetupTo exit the BIOS setup, select the Exit tab and select one of these options:
• Exit Saving Changes
• Exit Discarding Changes
• Load Setup Defaults for WEC 7 (do not use options for other operating systems as this can cause unexpected results)
Thor VM3 with Microsoft Windows Embedded Compact 7 User Guide 145

Control Panel Start > Settings > Control Panel or My Device > Control Panel
Tap the ? button for Help when changing Thor VM3 Control Panel options.
Option Function
About Software, hardware, versions and network IP. No user intervention allowed.
Accessibility Customize the way the keyboard, audio, display or mouse function for users with hearing or viewing difficulties.
Battery View voltage and status of the internal UPS battery.
Bluetooth Printing Discover and pair Bluetooth printers.
Bluetooth Scanning Discover and pair Bluetooth scanners.
Certificates Manage digital certificates used for secure communication.
Date / Time Set Date, Time, Time Zone, and Daylight Savings.
Dialing Connection setup for modem attached to COM port or CompactFlash slot. CompactFlash slot not available for modem use on Thor VM3.
Display Set background graphic and scheme. Set touch screen and keypad backlight properties and timers.
Enterprise Settings Configure data collection, Bluetooth, certain applications, etc.
Error Reporting Reports software errors to Microsoft.
Input Panel Select the current key / data input method. Select custom key maps.
Internet Options Set General, Connection, Security, Privacy, Advanced and Popups options for Internet connectivity.
Keyboard Set key repeat delay and key repeat rate.
Keyboard Remapper Remap programmable keys on Thor VM3 front panel or keys on an external USB keyboard.
Mixer Adjust the input and output parameters – volume, sidetone, and record gain, for headphone, software and microphone.
Mouse Set the double-tap sensitivity for stylus taps on the touch screen.
Network and Dialup Connections
Set network driver properties and network access properties.
Network Capture Set network logging options.
Options Set various device specific configuration options.
Owner Set the mobile device owner details (name, phone, etc.). Enter notes. Enable / disable Owner display parameters. Enter Network ID for the device – user name, password, domain.
Password Set OS access password properties for signon and/or screen saver.
PC Connection Control the connection between the mobile device and a local desktop or laptop computer.
Peripherals Enable or disable touch screen defroster (heater), if installed.
Power Set power scheme properties. Review device status.
Power Configuration Mode Set power configuration mode.
Regional Settings Set appearance of numbers, currency, time and date based on country region and language settings.
146 Thor VM3 with Microsoft Windows Embedded Compact 7 User Guide

Registry Load or save user defaults, load factory defaults, warmboot or restart.
Remove Programs Select to remove specific user installed programs in their entirety.
Screen Control Configure screen blanking.
Storage Manager Displays the available storage drives.
Stylus Set double-tap sensitivity properties and/or calibrate the touch panel.
System Review System and Computer data and revision levels. Adjust Storage and Program memory settings. Enter device name and description. Review copyright notices.
Terminal Server Client Licenses
Select a server client license from a drop down list.
Volume and Sounds Enable / disable volume and sounds. Set volume parameters and assign sound WAV files to events.
ZoomZone Configures screen blanking.
Option Function
Thor VM3 with Microsoft Windows Embedded Compact 7 User Guide 147

AboutStart > Settings > Control Panel > About
The data cannot be edited by the Thor VM3 user on these panels.
Software
Firmware VersionsThe Software tab lists the firmware versions installed. The BIOS, EC and Screen MCU firmware versions are shown on this tab.
Battery FW Version
The battery firmware version identifies the type of UPS battery installed in the Thor VM3.
LanguageThe Software tab displays the localized language version of the OS image. The lan-guage is identified as English only or + an additional language.
The languages are ordered separately and built-in to the OS image. The Thor VM3 may be preloaded with an English only OS. Contact Technical Assistance for information on installing an OS for a different language. The built-in languages are added to registry entries and are available immediately upon startup.
Tab Contents
Software GUID, Serial Number, Windows Embedded Compact Version, OAL Version, Compile Version, and Language. Language indicates localized version.
Hardware CPU Type, Codec Type, Display, and DRAM memory
Versions Revision level of software modules and .NET Compact Framework Version.
Network IP Current network connection IP and MAC address.
148 Thor VM3 with Microsoft Windows Embedded Compact 7 User Guide
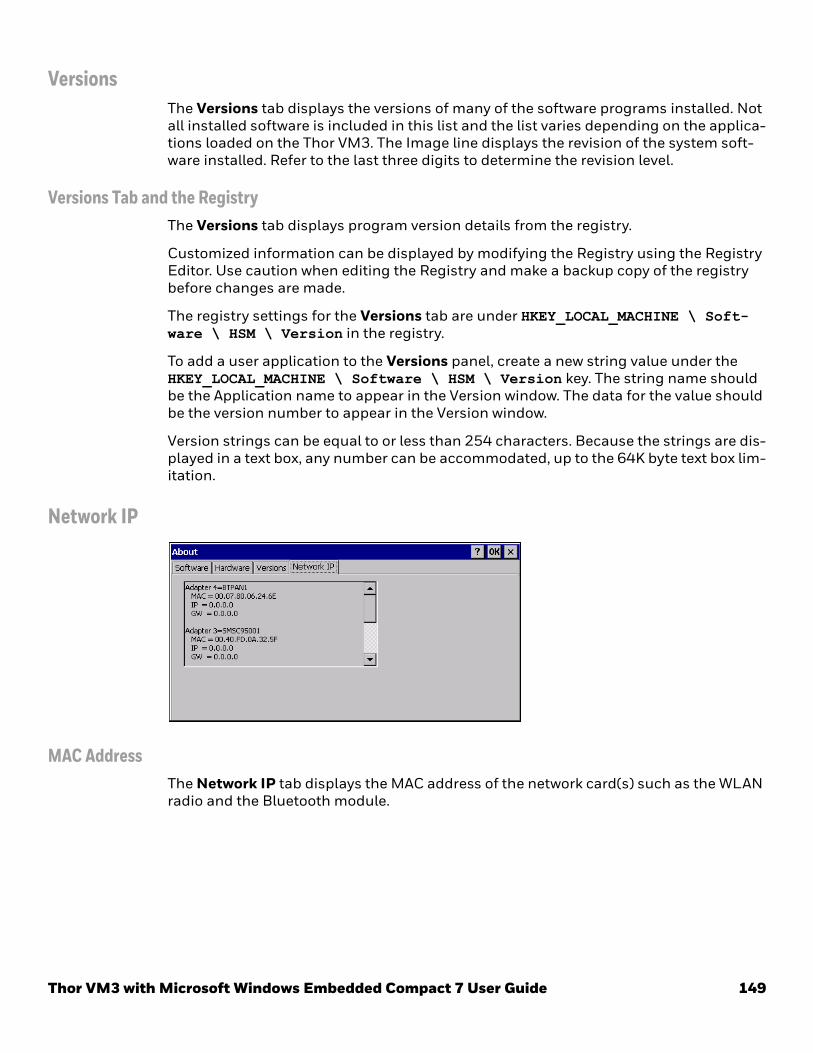
Versions The Versions tab displays the versions of many of the software programs installed. Not all installed software is included in this list and the list varies depending on the applica-tions loaded on the Thor VM3. The Image line displays the revision of the system soft-ware installed. Refer to the last three digits to determine the revision level.
Versions Tab and the RegistryThe Versions tab displays program version details from the registry.
Customized information can be displayed by modifying the Registry using the Registry Editor. Use caution when editing the Registry and make a backup copy of the registry before changes are made.
The registry settings for the Versions tab are under HKEY_LOCAL_MACHINE \ Soft-ware \ HSM \ Version in the registry.
To add a user application to the Versions panel, create a new string value under the HKEY_LOCAL_MACHINE \ Software \ HSM \ Version key. The string name should be the Application name to appear in the Version window. The data for the value should be the version number to appear in the Version window.
Version strings can be equal to or less than 254 characters. Because the strings are dis-played in a text box, any number can be accommodated, up to the 64K byte text box lim-itation.
Network IP
MAC AddressThe Network IP tab displays the MAC address of the network card(s) such as the WLAN radio and the Bluetooth module.
Thor VM3 with Microsoft Windows Embedded Compact 7 User Guide 149

AccessibilityStart > Settings > Control Panel > Accessibility
Customize the way the Thor VM3 keyboard, sound, display, mouse, automatic reset and notification sounds function. There are a few changes from general Windows desktop Accessibility options.
The following exceptions are due to a limitation in the Microsoft Windows Embedded Compact operating system:
• If the ToggleKeys option is selected, please note that the ScrollLock key does not produce a sound as the CapsLock and NumLock keys do.
• If the SoundSentry option is selected, please note that ScrollLock does not produce a visual warning as the CapsLock and NumLock keys do.
Tab Contents
Keyboard Sticky Keys - Disabled (cannot be enabled). ToggleKeys - Disabled by default. Tap the Use ToggleKeys checkbox to enable this option. Tap the Settings button to view or change parameters.
Sound SoundSentry is disabled by default. Tap the Use SoundSentry checkbox to enable this option. Tap the Settings button to view or change parameters.
Display High Contrast is disabled by default. Tap the Use High Contrast checkbox to enable this option. Tap the Settings button to view or change parameters.
Mouse MouseKeys is disabled by default. Tap the Use MouseKeys checkbox to enable this option. Tap the Settings button to view or change parameters.
General Automatic reset is disabled by default. Tap the Turn off accessibility features checkbox to enable this option and use the dropdown option to assign a timer.Notification is enabled by default. Sounds are emitted when turning a feature on or off.
150 Thor VM3 with Microsoft Windows Embedded Compact 7 User Guide

BatteryStart > Settings > Control Panel > Battery
This panel is used to view the status and percentage of power remaining in the Thor VM3 UPS battery.
The Status box indicates if the UPS battery is receiving external power.
The battery gas gauge icon resides in the system tray and shows four levels of charge – 100%, 75%, 50%, 25%. At a point below 25% the gas gauge icon will turn red indicating the battery is low.The battery gauge icon is enabled by default, but can be disabled on the Thor VM3 Battery control panel. The UPS LED turns red when there is approximately 2 minutes of run time remaining.
Thor VM3 with Microsoft Windows Embedded Compact 7 User Guide 151

Bluetooth PrintingStart > Settings > Control Panel > Bluetooth Printing
To configure your computer for Bluetooth wireless printing, you need to:
• Create an application that opens the wireless printing COM port on your computer. For help, see the Bluetooth Resource Kit, which is part of the Intermec Developer Library (IDL), available from the Intermec website at www.intermec.com/idl.
• Select the current wireless printer on your computer. For help, see the Printer Options section of Enterprise Settings
Note: You can also print wirelessly using Microsoft APIs with Bluetooth extensions for Winsock and Bluetooth. For help, see the Bluetooth Resource Kit documentation.
The Bluetooth Printing wizard supports the following Honeywell printers:
• PR2
• PR3
• PB31
• PB21
• PB42
• PB50
To connect a printer using the search option:
1. Turn on the printer.
2. Select Bluetooth Printing from the control panel.
3. Tap Search.
Note: The printer can also be specified by taping the Manual button and entering the MAC address of the printer.
4. A list of available Bluetooth printers is displayed.
Note: By default only printers are displayed in the search results.
152 Thor VM3 with Microsoft Windows Embedded Compact 7 User Guide

5. Select the desired printer from the list and tap the Set button.
6. If this is the first time a printer is connected, it may take 40-45 seconds for the driver to install.
7. If no error message is displayed, the printer is ready. If an error message is displayed, the timeout may have happened before the driver installation has completed.
To continue after this error:
• Dismiss the error.
• Return to the Bluetooth Printing control panel and repeat the process starting with step 3.
8. The Bluetooth printer is shown. Print a test page if desired.
Thor VM3 with Microsoft Windows Embedded Compact 7 User Guide 153

Bluetooth ScanningStart > Settings > Control Panel > Bluetooth Scanning
Tap Add Device for the available options:
• Quick Connect
• Search
• Manual Connect
154 Thor VM3 with Microsoft Windows Embedded Compact 7 User Guide

Quick ConnectThere are two different bar codes printed on decals on the side of the Thor VM3.
Note: The bar codes below are samples. Do not scan these to connect a Bluetooth scanner. Scan the bar code on your device.
Using Quick Connect with Preprinted LabelsScan the applicable bar code as indicated below:
Use the LnkB bar code on either side of the Thor VM3 to connect the following scan-ners:
• Honeywell/LXE 8650 family of Bluetooth ring scanners
• Honeywell Granit 1911i Bluetooth scanner
• Honeywell Granit 1981i Bluetooth scanner
• LXE 88x0 family of Bluetooth scanners
Use the bar code Quick Connect bar code on either side of the Thor VM3 to connect the following scanners:
• Intermec SF51 Bluetooth scanner
• Intermec SF61 Bluetooth scanner
• Intermec SR61 Bluetooth scanner
LnkB Bar Code Sample Quick Connect Bar Code Sample
LnkB00078006111AAA Bluetooth Quick Connect 007806111AAA
Thor VM3 with Microsoft Windows Embedded Compact 7 User Guide 155
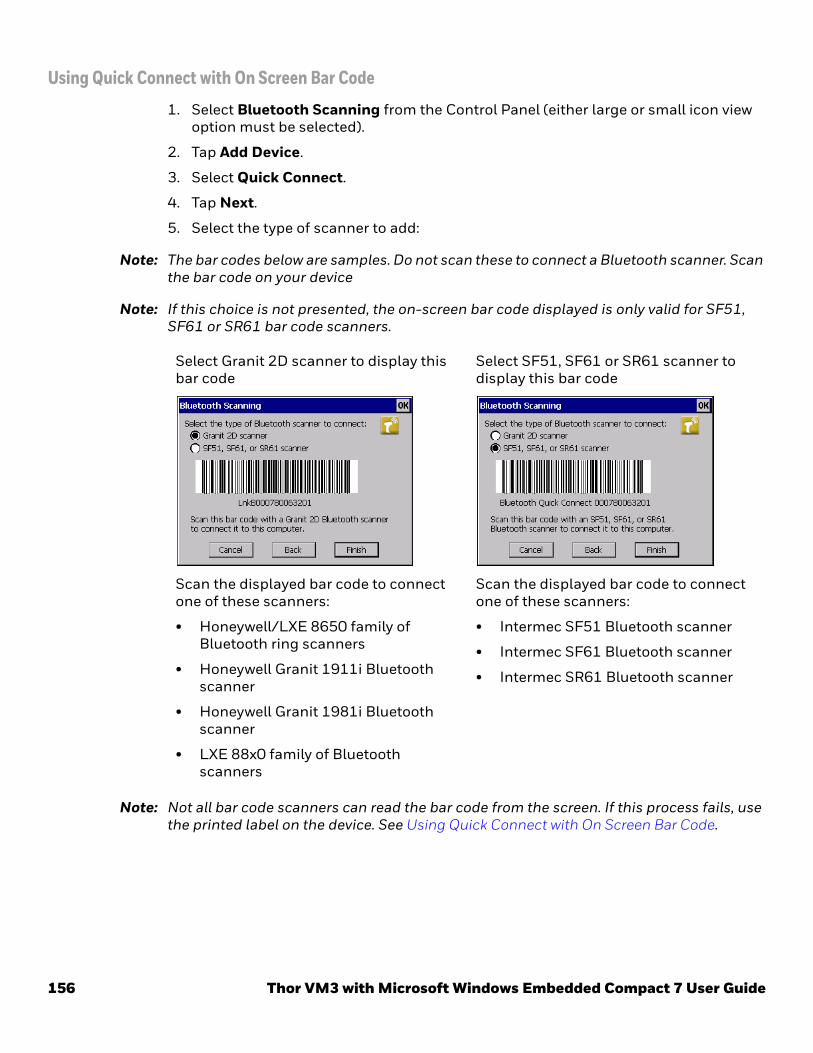
Using Quick Connect with On Screen Bar Code
1. Select Bluetooth Scanning from the Control Panel (either large or small icon view option must be selected).
2. Tap Add Device.
3. Select Quick Connect.
4. Tap Next.
5. Select the type of scanner to add:
Note: The bar codes below are samples. Do not scan these to connect a Bluetooth scanner. Scan the bar code on your device
Note: If this choice is not presented, the on-screen bar code displayed is only valid for SF51, SF61 or SR61 bar code scanners.
Note: Not all bar code scanners can read the bar code from the screen. If this process fails, use the printed label on the device. See Using Quick Connect with On Screen Bar Code.
Select Granit 2D scanner to display this bar code
Select SF51, SF61 or SR61 scanner to display this bar code
Scan the displayed bar code to connect one of these scanners:
• Honeywell/LXE 8650 family of Bluetooth ring scanners
• Honeywell Granit 1911i Bluetooth scanner
• Honeywell Granit 1981i Bluetooth scanner
• LXE 88x0 family of Bluetooth scanners
Scan the displayed bar code to connect one of these scanners:
• Intermec SF51 Bluetooth scanner
• Intermec SF61 Bluetooth scanner
• Intermec SR61 Bluetooth scanner
156 Thor VM3 with Microsoft Windows Embedded Compact 7 User Guide

SearchTo search for a Bluetooth scanner:
1. Select Bluetooth Scanning from the Control Panel (either large or small icon view option must be selected).
2. Tap Add Device.
3. Select Search.
4. Tap Next.
5. Select the scanner from the devices shown.
6. Tap Next.
Manual Connect1. Select Bluetooth Scanning from the Control Panel (either large or small icon view
option must be selected).
2. Tap Add Device.
3. Select Manual.
4. Tap Next.
5. Enter the MAC address of the Bluetooth scanner.
6. Tap Next.
Troubleshooting• The Honeywell Xenon 1902 Bluetooth scanner does not work with Quick Connect. It
must be connected using the Search or Manual options.
• Make sure the scanner is in the correct mode. Bar codes to set the mode can be found in the manual provided with the Bluetooth scanner.
◦ The scanner must be a master device to use the Quick Connect option.
◦ The scanner must be a slave device to use the Search or Manual option.
• The Motorola/Symbol LS3578 family of scanners may not support the Quick Connect feature (depending on firmware installed). If Quick Connect does not work, use the other options to connect these scanners.
• If the Honeywell Granit 1911i and Granit 1981i scanners cannot be found with the Search option, scan the PDAs/Mobility Systems Devices bar code from the scanner manual and search again.
• If the Honeywell Granit 1911i and Granit 1981i scanners cannot connect using the manual option, scan the PDAs/Mobility Systems Devices bar code from the scanner manual then repeat the manual add process again.
• If the Honeywell Granit 1911i and Granit 1981i scanners are not removed after using the Remove option, the auto-reconnect option is enabled on the Granit scanner (this is the default option). To remove the scanner:
Thor VM3 with Microsoft Windows Embedded Compact 7 User Guide 157

◦ Scan the disable auto-reconnect bar code from the Granit scanner manual then tap Remove, or
◦ Scan BT_RMV to unlink and disconnect the scanner the tap Remove.
• If a Honeywell/LXE ring scanner is not connecting, scan the Restore Factory Defaults bar code in the scanner manual and try connecting again.
158 Thor VM3 with Microsoft Windows Embedded Compact 7 User Guide

CertificatesStart > Settings > Control Panel > Certificates
Manage digital certificates used for secure communication.
Note: Digital certificates are date sensitive. If the date on the Thor VM3 is incorrect, wireless authentication will fail.
The Certificates stores tab lists the certificates trusted by the Thor VM3 user.
These values may change based on the type of network security resident in the client, access point or the host system.
Tap the Import button to import a digital certificate file.
Tap the View button to view a highlighted digital certificate.
Note: Tap the Remove button to remove highlighted certificate files.
Note: Tap the ? button and follow the instructions in the Windows Help file when working with trusted authorities and digital certificates.
Thor VM3 with Microsoft Windows Embedded Compact 7 User Guide 159

Date / TimeStart > Settings > Control Panel > Date/Time - or - Time in Desktop Taskbar
Use this Thor VM3 panel to set Date, Time, Time Zone, and assign a Daylight Savings location.
Factory Default Settings
There is very little functional change from general desktop or laptop Date/Time Proper-ties options.
Double-tapping the time displayed in the Desktop Taskbar causes the Date/Time Prop-erties screen to appear.
Date and time can be set to automatically synchronize with a time server on the Com-munications tab of the Options control panel. See Autolaunch TimeSync.
Time Zone GMT-08:00
Daylight Savings Enabled
160 Thor VM3 with Microsoft Windows Embedded Compact 7 User Guide

DialingStart > Settings > Control Panel > Dialing
Set dialup properties for internal modems (not supplied or supported on the Thor VM3).
Factory Default Settings
Location Work
Area Code 425
Tone Dialing Enabled
Country/Region 1
Disable Call Waiting Disabled (blank)
Thor VM3 with Microsoft Windows Embedded Compact 7 User Guide 161

DisplayStart > Settings > Control Panel > Display
The display might also called the touch screen.
Select the desktop background image and appearance scheme for the Thor VM3. Using the options on the Backlight tab, set the display backlight and keypad backlight timers when running on battery or external power.
Adjust the settings and tap the OK button to save the changes. Saved changes take effect immediately.
Factory Default Settings
Background
There is very little change from general desktop PC Display Properties / Background options. Select an image from the dropdown list (or tap the Browse button to select an image from another folder) to display on the Desktop, and then tap the OK button to save the change. The change takes effect immediately.
Background
Image Windows CE
Tile image on background
Disabled
Appearance
Schemes Windows Standard
Backlight
Battery power 30 seconds
External power Varies by Power Configuration Mode selected
162 Thor VM3 with Microsoft Windows Embedded Compact 7 User Guide

Appearance
There is very little change from general desktop PC Appearance options. Select a scheme from the dropdown list and make changes to the parameters. The default is High Contrast White for monochrome displays and Windows Standard for color dis-plays. Tap the Save button to save any changes, renaming the scheme if desired. Tap the Delete button to delete schemes. Tap the Apply button to apply the selected scheme to the display.
Backlight
When the backlight timer expires, the touch screen backlight is dimmed, not turned off. When both checkboxes are unchecked, the backlight never turns off (or dims).
The default value for external power varies by the scheme selected on the Power control panel (and for Ignition Control, the status of the vehicle ignition). The default value is 1 minute when operating on the internal UPS battery.
Thor VM3 with Microsoft Windows Embedded Compact 7 User Guide 163

Enterprise SettingsStart > Settings > Control Panel > Enterprise Settings
Use Enterprise Settings to configure parameters for Enterprise applications on the computer. You can configure parameters for important functions like data collection and communications.
External bar code scanners are supported by connecting the scanner to a COM port, USB port, or by Bluetooth. The scanners parameters, including bar code symbologies, can be configured using Enterprise Settings > Data Collection.
About the Structure of Enterprise SettingsUse the tables below to help find the parameters in Enterprise Settings that you want to configure. Each table contains the parameters for one of the Enterprise Settings Main Menu options.
If you see > next to a menu option, there are more screens available in the next level. If you see ... next to a menu option, there is only one more screen available.
Most parameters are saved as soon as you tap OK. Some settings require you to reboot the computer for the changes to take effect.
Data Collection Parameters
Tethered Scanners
Tethered/USB-Configure on Connect
Auto-configure on connect:
• Overwrite with computer settings (default)
• Keep scanner settings
Tethered Scanner (COM1) • Enable scanner port (On by default, see note below)
• Symbologies
• Symbology Options
• Scanner Settings
• Scanner port Settings
• Decode Security
164 Thor VM3 with Microsoft Windows Embedded Compact 7 User Guide

Tethered Scanner (COM2) • Enable scanner port (On by default, see note below)
• Symbologies
• Symbology Options
• Scanner Settings
• Scanner port Settings
• Decode Security
Note: By default, COM1 and COM2 are enabled as scanner ports. To use the COM port for another use (such as screen blanking), set the Enable Scanner Port to Off for the desired port.
Bluetooth Scanners
BT-Configure on Connect Auto-configure on connect:
• Overwrite with computer settings
• Keep scanner settings
Bluetooth Parameters
Power • Off
• On (default)
Discoverable • Disable (default)
• Enable
Connectable • Disable
• Enable (default)
Class of Device Hardware information (no user entry)
IBT Hardware information (no user entry)
Radio Hardware information (no user entry)
Device Address Hardware information (no user entry)
Printers Parameters
Information Printer Configlet Version
Memory The settings that appear in these menus depend on the printer paired with the Thor VM3. The printer must be using the Bluetooth Printing application.
Display
Print Engine
Media
Print Defs
Freed Adj
Power
Bluetooth Communication
Data Collection Parameters
Thor VM3 with Microsoft Windows Embedded Compact 7 User Guide 165

Applications Parameters
Launcher • Program Version
• Application Launch Buttons
◦ Caption text Color
◦ Application Button 1 - 21
• Background Image
• Single Application Auto Start
• Default Password
• Keypad Options
• Advanced Options
Enterprise Terminal Emulation Enterprise Terminal Emulation Configuration Options
Auto Start Auto Start Options
• None (default)
• Launcher
• Enterprise Browser
• Enterprise Terminal Emulation
• HTML5 Browser
Enterprise Browser Program VersionBrowser EngineGeneralMenu OptionsSecurityPrivacyAppearanceMenu and Toolbar Actions
HTML5 Browser Program VersionGeneralSecurityPrivacyAppearance
Core Messaging Service Parameters
Server IP Server IP (read-only)
Broadcast Name Broadcast Name
Port Port (read-only)
Keep Alive Ping Interval Keep alive ping interval
SmartSystem information Parameters
Identity Identity information (hardware version, firmware version, OS version, etc.) (read-only)
Administrator Administrator settings (name, phone, and email)
Location Location settings (country, state, city, campus, and detail)
Information Device Notes (read-only
166 Thor VM3 with Microsoft Windows Embedded Compact 7 User Guide

Device Manager Parameters
Device Health Controls • Enable Data Health Collection
• Enable Blue Light (LED)
• Set Rule File Location
• Set Data Refresh periods
Disabled Executables Disabled Executables Template
Device Wipe • Enable Wipe
• Interval (in days)
Virtual Wedge Parameters
Enable Virtual Wedge Enable virtual wedge
Virtual Wedge Method • Adapt to Application (default)
• Character mode
• Block mode
Barcode Scanner Wedge • Barcode Scanner Grid
• Label Encoding (Code Page)
Applications Parameters
Launcher • Program Version
• Application Launch Buttons
◦ Caption text Color
◦ Application Button 1 - 21
• Background Image
• Single Application Auto Start
• Default Password
• Keypad Options
• Advanced Options
Enterprise Terminal Emulation Enterprise Terminal Emulation Configuration Options
Auto Start Auto Start Options
• None (default)
• Launcher
• Enterprise Browser
• Enterprise Terminal Emulation
• HTML5 Browser
Enterprise Browser Program VersionBrowser EngineGeneralMenu OptionsSecurityPrivacyAppearanceMenu and Toolbar Actions
HTML5 Browser Program VersionGeneralSecurityPrivacyAppearance
Thor VM3 with Microsoft Windows Embedded Compact 7 User Guide 167

Bar Code Scanners and Enterprise SettingsThe following types of bar code scanners are supported on the Thor VM3:
• A tethered scanner connected to COM1 or COM2
• A wireless scanner connected via Bluetooth
Note: USB scanners are not supported by or configured through Enterprise Settings. See USB Scanners.
The scanner symbologies can be updated through Enterprise data collection software.
Serial ScannersTo configure a particular scanner to work with Enterprise data collection software, select Start > Control Panel > Enterprise Settings > Data Collection > Tethered Scan-ner > Tethered Scanner (COM1) or (COM2) > Scanner Settings.
Select the appropriate scanner model (SR Intermec Scanner, ASCII, SR60). By default, both COM1 and COM2 are opened so the appropriate scanners (see below) can work without changing factory defaults:
Tethered Scanner (COM1)
By default the Scanner Model is set to SR Intermec Scanner, which covers models such as SR61T, SR30, and SR31.
Tethered Scanner (COM2)
By default the Scanner Model is set to ASCII to connect with a scanner with baud rate of 9600, 8 data bits, no parity, 1 stopbit, and no flow control.
Bluetooth ScannersSee Bluetooth Scanning for information on connecting Bluetooth scanners.
Always use Enterprise Settings to configure Bluetooth parameters. Do not use the Blue-tooth configuration options available from the Bluetooth icon in the system tray.
USB ScannersWhen a HID enabled USB scanner is connected to the Thor VM3 the scanned data is transmitted to the active windows as keystroke messages. Any data handling to be applied to the scanned data (for example to strip leading or trailing characters) must be programmed into the scan engine. This is done by scanning configuration bar codes from the scanner manufacturer or handled by the application accepting the data. Note that Enterprise Settings data collection does not support USB Scanners.
License Manager Parameters
About Information on License Vault
License Vault None (displays applications that are licensed)
168 Thor VM3 with Microsoft Windows Embedded Compact 7 User Guide

Error ReportingStart > Settings > Control Panel > Error Reporting
By default, error reporting is enabled (requires Internet connection).
Thor VM3 with Microsoft Windows Embedded Compact 7 User Guide 169

Input PanelStart > Settings > Control Panel > Input Panel
Set the current Thor VM3 keys and data input method.
Factory Default Settings
Use this panel to make the Input Panel (on-screen keyboard) or the physical keypad pri-marily available when entering data on any screen. Selecting Keyboard enables both.
Tap the Options button to set the size of the keys displayed on-screen and whether ges-tures are enabled or disabled.
Input Panel
Input Method Keyboard
Allow applications to change input panel state Enabled
Options button
Keys Small keys
Use gestures Disabled
170 Thor VM3 with Microsoft Windows Embedded Compact 7 User Guide

Internet OptionsStart > Settings > Control Panel > Internet Options
Set options for Thor VM3 Internet connectivity.
Select a tab. Adjust the settings and tap the OK button. The changes take effect imme-diately.
Factory Default Settings
General
Start Page http://www.honeywell.com
Search Page http://search.msn.com
User Agent N/A
Cache Size 5120 KB
Connection
Use LAN Disabled
Autodial Name None
Proxy Server Disabled
Bypass Proxy Disabled
Security
Internet Default site
Advanced
Stylesheets Enabled
Theming Support Enable
Multimedia All options enabled
Security All options enabled
Thor VM3 with Microsoft Windows Embedded Compact 7 User Guide 171

Security Tab: Use the Settings button to set ActiveX control, scripting and plug-in behavior for each zone (Internet, Local Intranet, Trusted Sites, Restricted Sites). Use the Sites button to add sites to each zone.
172 Thor VM3 with Microsoft Windows Embedded Compact 7 User Guide

KeyboardStart > Settings > Control Panel > Keyboard
Set keypad key map, keypad key repeat delay, and key repeat rate.
Factory Default Settings
Repeat character Enable
Repeat Delay Short
Repeat Rate Slow
Thor VM3 with Microsoft Windows Embedded Compact 7 User Guide 173

Keyboard RemapperStart > Settings > Control Panel > Keyboard Remapper
Keyboard Remapper is designed to remap keys on the integrated keypad (P1 thought P7) or keys on an attached USB keyboard (such as the Honeywell 21-key numeric key-board).
1. If a USB keyboard has already been attached, remove the USB keyboard to program the integrated keys.
2. Start the remapping utility.
3. Program the integrated programmable keys (i.e.: P1 - P7) on the Thor VM3.
4. Exit the remapping utility.
5. Attach the USB keyboard.
6. Restart the remapping utility.
7. Remap any keys desired on the USB keyboard.
If any modifications need to be made to the P1 - P7 keys at a later time, it is necessary to remove any USB keyboard to edit these keys in the remapping utility.
To remap a key:
1. Select the desired key to remap from the Physical Key pull-down list.
2. Select the desired modifier key, for example:
• Normal (no modifier), Orange or Blue for the integrated programmable keys (P1-P7)
• Normal (no modifier), Yellow or Green for the 21-key numeric keyboard.
3. Select the desired value for the remapped key from the Key Value pull-down list.
Keyboard Remapper for integrated Programmable
Keys
Keyboard Remapper for 21-key Numeric Keyboard
If programming both the integrated programmable keys and keys on a USB keyboard, follow the process below.
174 Thor VM3 with Microsoft Windows Embedded Compact 7 User Guide

4. Tap Add Key Definition.
5. The value for the remapped key shows in the box below.
6. To return any key to the default value, select Key Default Value from the Key Value list.
7. Changes are saved when the remapping utility is exited.
AbortTap the Abort button to exit without saving changes.
MenuThe following options are available.
AboutDisplays information about the keyboard remapper utility.
Import KeymapUse this option to import a keymap file.
1. Tap Menu > Import Keymap.
2. Enter the file name to import. If no location is specified, the default is to look in the root of the drive. Otherwise enter the path and file name.
3. Tap Import to import the keymap or Abort to cancel without importing.
4. If the import is not successful (i.e.: an incorrect file name or location was specified) an error message is displayed. Otherwise the keymap has been imported.
Export KeymapUse this option to export a keymap file.
1. Tap Menu > Export Keymap.
2. Enter the file name to export. If no location is specified, the default is to export to the root of the drive. Otherwise enter the path and file name.
3. Tap Export to import the keymap or Abort to cancel without exporting.
4. If there are unsaved changes in the keymap, a message is displayed:
• Tap OK to save the changes and export the keymap file.
• Tap cancel (X) to the keymap to a file without any unsaved changes included.
5. If the import is not successful (i.e.: an invalid file name or location was specified) an error message is displayed. Otherwise the keymap has been exported.
Restore DefaultsTap Restore Defaults to apply the default values for all keys.
Thor VM3 with Microsoft Windows Embedded Compact 7 User Guide 175

If more than one keyboard was remapped, this function only applies to the current key-board in the remapping utility. For example, if the integrated programmable keys on the Thor VM3 were remapped then a USB keyboard was attached only they remapped keys on the USB keyboard would be reset to default values. Remove the USB keyboard and relaunch the remapper utility to restore defaults to the integrated programmable keys.
Remap a Key to Launch an ApplicationIn order to use Keyboard Remapper to launch an application it is necessary to edit the Windows registry. Follow the process below. In this example, Orange P1 (P8) is remapped to the command prompt.
1. Launch the registry editor. See REGEDIT.EXE.
2. Locate the following key in the registry:HKEY_LOCAL_MACHINE\Software\Microsoft\Shell\Keys
3. There are entries for each of the currently defined key values. These values are C1 through C6, representing VK_APP_LAUNCH1 through VK_APP_LAUNCH6. All six values may not be associated with a keypress and therefore not currently defined in the registry.
4. Add a key for the application launch VKEY you are adding. In this example, assuming C4 is not used, add a C4 subkey to the keys under:
HKEY_LOCAL_MACHINE\Software\Microsoft\Shell\Keys.
5. Add the values for the C4 key that was created. In this example, cmd.exe (command prompt) is added:
6. Launch the Keyboard Remapper.
7. Select the desired key to remap. In this example select Orange P1 for Physical Key.
8. Add the desired action. In this example, select App 4 for Key Value.
9. Click the Add Key Definition button.
10. Exit the Keyboard Remapper.
11. Pressing Orange + P1 opens a command prompt window.
Name Format Description Example
Application
“appname.exe”
The name of the application
“cmd.exe”
Path “\Windows” The path of the application “\Windows”
176 Thor VM3 with Microsoft Windows Embedded Compact 7 User Guide

MixerStart > Settings > Control Panel > Mixer
The Thor VM3 has two speakers (located at the bottom front of the unit) and one micro-phone (located at the top front of the unit).
Use the settings on these panels to adjust the master volume, record gain and sidetone.
Factory Default Settings
Output Panel
Tap and hold the Master Volume slider and move either left or right, or tap the left and right arrows, to adjust Speaker volume decibel level.
Tap the Test button to play a sample sound at the selected volume.
Input Panel
Output
Master Volume - dB
Input
Record Gain 0.0 dB
Sidetone Disabled
Thor VM3 with Microsoft Windows Embedded Compact 7 User Guide 177

By default the side tone is muted. If needed, the user should enable the side tone. If this causes interfering noise, the side tone should be disabled. The VM3 audio is designed to be used with or without the side tone. This is acceptable permissible performance for the Thor VM3.
Use the radio buttons to enable or disable the sidetone.
Tap and hold the Record Gain or Sidetone sliders and move either left or right, or tap the left and right arrows, to adjust the levels.
178 Thor VM3 with Microsoft Windows Embedded Compact 7 User Guide

MouseStart > Settings > Control Panel > Mouse
Use this option to set the double-tap sensitivity for stylus taps on the Thor VM3 touch screen.
Thor VM3 with Microsoft Windows Embedded Compact 7 User Guide 179

Network and Dialup ConnectionsStart > Settings > Control Panel > Network and Dialup Connections
Set Thor VM3 network driver properties and network access properties. Select a con-nection to use, or create a new connection.
Create a New Connection1. On the mobile device, select Start > Settings > Control Panel > Network and Dialup
Connections. A window is displayed showing the existing connections.
2. Assuming the connection you want does not exist, double-tap Make New Connection.
3. Give the new connection an appropriate name (My Connection @ 9600, etc.). Tap the Direct Connection radio button. Tap the Next button.
4. From the popup menu, choose the port you want to connect to. Only the available ports are shown.
5. Tap the Configure... button.
6. Under the Port Settings tab, choose the appropriate baud rate. Data bits, parity, and stop bits remain at 8, none, and 1, respectively.
7. Under the Call Options tab, be sure to turn off Wait for dial tone, since a direct connection will not have a dial tone. Set the timeout parameter (default is 5 seconds). Tap OK.
8. TCP/IP Settings should not need to change from defaults. Tap the Finish button to create the new connection.
9. Close the Remote Networking window.
10. To activate the new connection select Start > Settings > Control Panel > PC Connection and tap the Change Connection… button.
11. Select the new connection. Tap OK twice.
12. Close the Control Panel window.
13. Connect the desktop PC to the mobile device with the appropriate cable.
14. Click the desktop Connect icon to test the new connection.
180 Thor VM3 with Microsoft Windows Embedded Compact 7 User Guide

You can activate the connection by double-tapping on the specific connection icon in the Remote Networking window, but this will only start an RAS (Remote Access Ser-vices) session, and does not start ActiveSync properly.
Thor VM3 with Microsoft Windows Embedded Compact 7 User Guide 181

Network CaptureStart > Settings > Control Panel > Network Capture
Note: Verify the Date / Time before using the logging utilities to ensure meaningful data.
The Network Capture panels provide configuration options for logging utilities. Two types of logging are configurable:
• Netlog is a Windows utility that monitors network traffic. Netlog creates a .CAP file that can be read using Microsoft Windows Network Monitor or any compatible tool that supports .CAP files.
• NDISLog monitors the NDIS interface between the WLAN radio and the NDIS driver. This utility creates a .TXT log file.
Factory Default Settings
NetlogUse this control panel to configure the Netlog utility. By configuring Netlog using the control panel, Netlog remains running across a warmboot. However, please note that:
• Netlog first stores data to a file named netlog0.cap, then netlog1.cap. Any time the current file reaches maximum size, Netlog switches to the other file.
• If the log file is stored in the root directory, any previous data is lost and a new log file started after the warmboot
• If the log file is stored in \System, all previous data is saved across the warmboot.
• If Netlog is enabled across the warmboot, a series of brief popups may be displayed during the boot cycle. No user interaction is required.
Netlog
Command options
pkt_size in bytes 5000
cap_size in bytes 500000
.cap file \netlog
Promiscuous Mode Disabled
NDISLog
Command stop
file \ndislog.txt
182 Thor VM3 with Microsoft Windows Embedded Compact 7 User Guide

Command
Options
Run cmdPerforms the command selected. For example, to run Netlog and modify the packet size do the following:
1. Select load from the Commands list and click the Run cmd button.
2. Select stop from the Commands list and click the Run cmd button.
3. Select options from the Commands list, enter the new packet size in the Options list and click the Run cmd button.
NDISLogNDISLog creates a .TXT file that can be viewed with any text editor program that sup-ports .TXT files.
Command Function
options Specifies the option to perform. See the table below for the option parameters and values.
load Loads and starts Netlog.
start Starts the Netlog process of logging the network traffic.
stop Stops Netlog from logging network traffic.
unload Unloads Netlog.
Options Function
pkt_size in bytes
Specifies the maximum packet size captured in bytes. This option should only be run after you have called load and stop. Default is 5000.
cap_size in bytes
Specifies the maximum size of Netlog0.cap or Netlog1.cap in bytes. This option should only be run after you have called load and stop. Default is 500,000.
.cap file Specifies the name of the file to which network traffic information is saved. This option should only be run after you have called load and stop. Default is \netlog.
Thor VM3 with Microsoft Windows Embedded Compact 7 User Guide 183

Command
fileSpecifies the name of the file to which NDISLog information is stored.
Save FileStores the file name.
Run cmdPerforms the selected start or stop command.
Command Function
start Starts logging the network traffic.
stop Stops logging network traffic.
184 Thor VM3 with Microsoft Windows Embedded Compact 7 User Guide

OptionsStart > Settings > Control Panel > Options
It may be necessary to warmboot the Thor VM3 after making desired changes. A pop up window indicates if a warmboot is required.
CommunicationOptions on this tab configure communication options for the Thor VM3.
Allow Remote Desktop AutologonBy default, Remote Desktop Autologon is disabled. Check this checkbox to enable Remote Desktop Autologon.
Note: The .RDP file must be saved in the \System folder. When prompted, use the Save As button to save the .RDP file is the \System directory. If the .RDP file is saved in the default root folder location, the .RDP file will not persist across a warmboot.
Autolaunch TimeSyncBy default, TimeSync does not automatically run on the Thor VM3. To enable TimeSync to run automatically on the Thor VM3, check this checkbox.
Synchronize with a Local Time Server
By default, GrabTime synchronizes via an Internet connection. To synchronize with a local time server:
1. Use ActiveSync (or a USB thumb drive) to copy GrabTime.ini from the My Device > Windows folder on the mobile device to the host PC.
2. Edit the copy of GrabTime.ini on the host PC. Add the local time server’s domain name to the beginning of the list of servers. You can optionally delete the remainder of the list.
3. Copy the modified GrabTime.ini file to the My Device > System folder on the mobile device.
The System/GrabTime.ini file takes precedence over the Windows/GrabTime.ini file. System/Grabtime.ini also persists after a coldboot; Windows/Grabtime.ini does not persist.
Thor VM3 with Microsoft Windows Embedded Compact 7 User Guide 185

MiscOptions on this tab configure device specific options. Note that options not available on the Thor VM3are dimmed or grayed out.
CapsLockBy default, CapsLock is off after a warmboot. Check this box to turn CapsLock on after a warmboot.
Touch Screen DisableBy default, the Thor VM3 touch screen is enabled. To disable the touch screen after a warmboot, click this checkbox.
Note: If the touch screen is disabled on a Thor VM3, you must use a USB mouse or keyboard attached to the Thor VM3 to access this tab to re-enable the touch screen unless a key has been assigned to enable the touch screen using Keyboard Remapper.
Enable Keypad Backlight By default, the keypad backlight default setting is to follow the display backlight setting until it is changed by the user.
Click the checkbox to disable the keypad backlight.
This keypad backlight setting only applies to the integrated keypad on the Thor VM3. The keyboard backlight on an attached USB keyboard is not affected by this setting.
USB Powered in SuspendBy default, power to attached USB devices is turned off when the Thor VM3 is in Sus-pend mode. Check this box to maintain power to attached USB devices in Suspend.
The external keyboard is a USB device. If USB devices are not powered in Suspend the external keyboard backlight turns off when the Thor VM3 enters Suspend.
5V on COM1By default, Pin 9 of COM1 provides +5V, such as for an external scanner tethered to the COM1 port. Uncheck this box to configure Pin 9 of COM1 to provide RI.
186 Thor VM3 with Microsoft Windows Embedded Compact 7 User Guide

5V on COM2By default, Pin 9 of COM2 provides +5V, such as for an external scanner tethered to the COM2 port. Uncheck this box to configure Pin 9 of COM2 to provide RI.
Wakeup TimerThe default the value for the wakeup timer varies by operating system revision level. Check this box to enable it.
It is recommended that the Wakeup Timer be enabled.
Screen ResolutionBy default screen resolution is set to 1024x768. A restart is required to change resolu-tion.
Thor VM3 with Microsoft Windows Embedded Compact 7 User Guide 187

OwnerStart > Settings > Control Panel > Owner
Set the Thor VM3 owner details. The Network ID is used when logging into a remote net-work.
Factory Default Settings
Identification
Name Blank
Company Blank
Address Blank
Telephones Blank
Display owner ID at power-on Disabled
Notes
Notes Blank
Display notes at power-on Disabled
Network ID
User Name Blank
Password Blank
Domain Blank
188 Thor VM3 with Microsoft Windows Embedded Compact 7 User Guide

Enter user name, password and domain to be used when logging into network resources.
Thor VM3 with Microsoft Windows Embedded Compact 7 User Guide 189

PasswordStart > Settings > Control Panel > Password
Important: This password must be entered before performing a Load Factory Defaults.
If entering a power-on or screen saver password does not allow you to disable this pass-word protection or perform a Load Factory Defaults, contact Technical Assistance.
Factory Default Settings
Password
• The password and password settings are saved during a restart.
• After a password is assigned and saved, each time a Settings > Control Panel option is selected, the user will be required to enter the password before the Control Panel will open.
Check the box to enable the password, enter a timeout and select a password type.
Enter the password in the Password text box, then press Tab and type the password again to confirm it.
A changed/saved password is in effect immediately.
Prompt if device unused for Disabled
Timeout 0 minutes
Password Blank
190 Thor VM3 with Microsoft Windows Embedded Compact 7 User Guide

Hint
Use this screen to enter a hint in case the password is forgotten.
Thor VM3 with Microsoft Windows Embedded Compact 7 User Guide 191

PC ConnectionStart > Settings > Control Panel > PC Connection
Use these options to control a cabled connection (USB, serial) between the Thor VM3 and a nearby desktop/laptop computer.
Factory Default Settings
Tap the Change button to change the direct connect setting.
Tap the drop-down box to view a list of preconfigured connection settings.
The Thor VM3 does not support a USB client connection. ActiveSync is only available via serial connection.
In order to use a serial port for ActiveSync, the port must be disabled in Enterprise Settings and pin 9 must be set to RI in Options.
Enable direct connection Disabled
Connect using ActiveSync
192 Thor VM3 with Microsoft Windows Embedded Compact 7 User Guide

PeripheralsStart > Settings > Control Panel > Peripherals
This panel is used to enable and disable the touch screen defroster.
Factory Default Settings
DefrosterNote: Settings have no effect if the defroster is not installed.
The screen displays the information about the defroster:
• If the defroster is installed
• The current state of the defroster, ON or OFF
• If the defroster is Enabled or Disabled
• The defroster trip point.
Tap the Test button to determine the presence of the defroster. Use this button when the front panel of the Thor VM3 has been swapped. For example, if the Thor VM3 did not contain a defroster but a new front panel with a defroster is installed, tap the Test but-ton to update the defroster presence status on this tab.
If a defroster is installed, the defroster can be switched between the Enabled and Dis-abled states using the radio buttons on this tab. The default is Enabled.
Specify the Defroster trip point. The default trip point is 40º C (104º F).
Defroster
Defroster Enabled (if installed)
Defroster Trip Point 40º C (104º F)
Thor VM3 with Microsoft Windows Embedded Compact 7 User Guide 193

PowerStart > Settings > Control Panel > Power
The Thor VM3 power mode timers are cumulative.
The System Idle timer begins the countdown after the User Idle timer has expired and the Suspend timer begins the countdown after the System Idle timer has expired.
When the User Idle timer is set to “Never”, the power scheme timers never place the device in User Idle, System Idle or Suspend modes (even when the device is idle).
The Display > Backlight setting is synchronized with the User Idle setting in the Schemes tab in the Power control panel.
Factory Default Settings
The default Power Scheme selected for the Thor VM3 depends on:
• if external power is connected to the Thor VM3,
• and, for ignition control, the status of the vehicle ignition signal.
The Power Schemes are defined below. The active Power Scheme depends on the user-selected power configuration mode. However, if no external power is present, the Thor VM3 uses the UPS Power Scheme regardless of user selected Power Configuration mode.
• AC/DC - When AC/DC has been selected for the Power Configuration mode, this Power Scheme is selected. Because of the presence of external power, this Power Scheme has longer timeout values.
194 Thor VM3 with Microsoft Windows Embedded Compact 7 User Guide

• Ignition Control/Ignition On - When either Ignition Control option has been selected for the Power Configuration mode and the Ignition Switch is On, this Power Scheme is selected. Because of the presence of external power, this Power Scheme has longer timeout values.
• Ignition Control/Ignition Off - When either Ignition Control option has been selected for the Power Configuration mode and the Ignition Switch is Off, this Power Scheme is selected. This Power Scheme has shorter timeout values (compared to Ignition On) to preserve the vehicle battery.
• Auto-On - When Auto-On has been selected for the Power Configuration mode, this Power Scheme is selected. Because of the presence of external power, this Power Scheme has longer timeout values.
• UPS - When any Power Configuration Mode is selected but no external power is present, the UPS Power Scheme is used. This Power Scheme has much shorter timeout values designed to shut down the Thor VM3 before the UPS battery is depleted.
Because of the cumulative effect, if the Thor VM3 is operating from the UPS, for exam-ple:
• The backlight turns off after 30 seconds of no activity,
• The display turns off after 1 minute and 30 seconds of no activity (30 sec + 1 min),
• The Thor VM3 enters Suspend after 11 minutes and 30 seconds of no activity.
• The Thor VM3 shuts down after 31 minutes and 30 seconds of no activity.
• If the User Idle timer is set to Never, the power scheme timers never place the Thor VM3 in User Idle, System Idle or Suspend modes.
Thor VM3 with Microsoft Windows Embedded Compact 7 User Guide 195

Power Configuration ModeStart > Settings > Control Panel > Power Configuration Mode
There are three user selectable power configuration modes for the Thor VM3 available. Additionally a UPS power configuration mode is supported and automatically selected regardless of the user selected mode any time external power is not present.
Power control panel timeout values vary by the power configuration mode selected.
AC/DC ModeThis is the default power mode. In AC/DC mode the Thor VM3 is turned On when power is connected. Ignition input is ignored when AC/DC Mode is enabled.
Note: When the UPS battery has been depleted or disconnected (the Thor VM3 is first powered out of the box, the front panel has been replaced, etc.) power the Thor VM3 manually by pressing the power button. After the initial power up, the Thor VM3 powers on automatically when power is attached and AC/DC mode is selected.
Note: When AC/DC is used to power the Thor VM3 on automatically the Wakeup Timer must be enabled.
Thor VM3 is OffConditions
The Thor VM3 is Off and gets external power, such as
• Thor VM3 is installed on a powered dock with the dock power switch On
• Thor VM3 is already mounted to a dock and external power is applied to the dock
• Thor VM3 is already mounted to a dock and the dock power switch is turned OnResult
The Thor VM3 boots. Once booted the Thor VM3 follows the AC/DC power scheme with timers reset after the boot completes.
Thor VM3 is OnConditions
The Thor VM3 is On and gets external power, such as
• Thor VM3 is installed on a powered dock with the dock power switch On
196 Thor VM3 with Microsoft Windows Embedded Compact 7 User Guide

• Thor VM3 is already mounted to a dock and external power is applied to the dock
• Thor VM3 is already mounted to a dock and the dock power switch is turned OnResult
The Thor VM3 continues to run and follows the AC/DC power scheme with timers reset at the time power was connected.
Ignition Control ModeIn Ignition mode, the Thor VM3 is turned On when the ignition switch is activated with no user interaction required. The ignition input wire must be connected.
Note: When the UPS battery has been depleted or disconnected (the Thor VM3 is first powered out of the box, the front panel has been replaced, etc.) power the Thor VM3 manually by pressing the power button. After the initial power up, the Thor VM3 powers on automatically when the Ignition Control Mode is enabled and the ignition is turned on.
Note: When ignition control is used to power the Thor VM3 on automatically the Wakeup Timer must be enabled.
Thor VM3 is Off and Vehicle Ignition is OffConditions
The Thor VM3 is Off and vehicle ignition is Off.Result
The Thor VM3 remains Off regardless of external power. UPS charging is disabled.Conditions
The Thor VM3 has external power but vehicle ignition is Off. The power button is pressed.
Result
The Thor VM3 boots. Once booted the Thor VM3 follows the Ignition Control/Ignition Off power scheme with timers reset after the boot completes.
Thor VM3 is Off and Vehicle Ignition is Switched to OnConditions
The Thor VM3 is Off and vehicle ignition changes from Off to On.Result
The Thor VM3 boots. Once booted the Thor VM3 follows the Ignition Control/Ignition On power scheme with timers reset after the boot completes.
Thor VM3 is On and Vehicle Ignition is Switched to OnConditions
The Thor VM3 is On and vehicle ignition changes from Off (or not present) to On.
Thor VM3 with Microsoft Windows Embedded Compact 7 User Guide 197

Result
The Thor VM3 continues to run and follows the Ignition Control/Ignition On power scheme with timers reset at the time Ignition switched to Active.
An example of this case would be a Thor VM3 that is running on UPS and is then mounted on a dock that has truck power and the ignition switch is already On.
Thor VM3 is On and Vehicle Ignition is Switched to OffConditions
The Thor VM3 is On and vehicle ignition changes from On to Off.Result
The Thor VM3 follows the Ignition Control/Ignition Off power scheme with timers reset at the time Ignition switched to Inactive. UPS charging is disabled.
An example of this case would be a Thor VM3 that is running on UPS and is then mounted on a dock that has truck power and the ignition switch is already Off.
Auto-On ModeIn Auto-On mode, the Thor VM3 is turned On by the presence of external power with no user interaction required. Ignition input is ignored when Auto-On Mode is enabled.
Note: When the UPS battery has been depleted or disconnected (the Thor VM3 is first powered out of the box, the front panel has been replaced, etc.) power the Thor VM3 manually by pressing the power button. After the initial power up, the Thor VM3 powers on automatically when power is attached and Auto-On mode is selected.
Note: When Auto-On is used to power the Thor VM3 on automatically the Wakeup Timer must be enabled.
Thor VM3 is OffConditions
The Thor VM3 is Off and gets external power, such as
• Thor VM3 is installed on a powered dock with the dock power switch On
• Thor VM3 is already mounted to a dock and external power is applied to the dock
• Thor VM3 is already mounted to a dock and the dock power switch is turned OnResult
The Thor VM3 boots. Once booted the Thor VM3 follows the Auto-On power scheme with timers reset after the boot completes.
Thor VM3 is OnConditions
The Thor VM3 is On and gets external power, such as
• Thor VM3 is installed on a powered dock with the dock power switch On
198 Thor VM3 with Microsoft Windows Embedded Compact 7 User Guide

• Thor VM3 is already mounted to a dock and external power is applied to the dock
• Thor VM3 is already mounted to a dock and the dock power switch is turned OnResult
The Thor VM3 continues to run and follows the Auto-On power scheme with timers reset at the time power was connected.
UPS ModeThis mode is selected any time external power is not present, regardless of selected Power Configuration. Ignition Input is ignored.
Thor VM3 is OffConditions
• The Thor VM3 is Off and the power button is pressed the Thor VM3 and both the following conditions are met:
• UPS power is over 10% capacity
• CPU temperature is over 20ºCResult
The Thor VM3 boots and follows the UPS power scheme with power management tim-ers reset at boot up.
Conditions
The Thor VM3 is Off and the power button is pressed the Thor VM3 and at least one of the following conditions are met:
• UPS power is under 10% capacity
• CPU temperature is under 20ºCResults
The Thor VM3 remains Off.
Thor VM3 is OnConditions
The Thor VM3 is On and external power is removed, such as:
• Thor VM3 is removed from a powered dock (Dock power switch On)
• Thor VM3 is mounted to a dock and truck power is removed from the dock
• Thor VM3 is mounted to a dock and the dock power switch is turned OffResult
The Thor VM3 continues to run and follows the UPS mode power scheme with power management timers reset at the time of power removal. UPS charging is disabled.
Thor VM3 with Microsoft Windows Embedded Compact 7 User Guide 199

Regional SettingsStart > Settings > Control Panel > Regional Settings
Set the appearance of numbers, currency, time and date based on regional and lan-guage settings. Set the Thor VM3 user interface language and the default input lan-guage.
Factory Default Settings
Region
Locale English (United States)
Number 123,456,789.00 / -123,456,789.00 neg
Currency $123,456,789.00 pos / ($123,456,789.00) neg
Time h:mm:ss tt (tt=AM or PM)
Date M/d/yy short / dddd,MMMM,dd,yyyy long
Language
User Interface English (United States)
Input
Language English (United States)-US
Installed English (United States)-US
200 Thor VM3 with Microsoft Windows Embedded Compact 7 User Guide

Registry
Start > Settings > Control Panel > Registry
Choose options for managing the registry and rebooting the Thor VM3.
Button Action
Load User Defaults
When clicked, a standard load file dialog is opened, to allow the user to pick a Registry Save (.RSG) file. The applet then copies the specified User registry file to the Active registry. The user is asked to verify a reboot, and then the applet does a warmboot to activate the new registry.
Note: When the Thor VM3 is set to user defaults, a second reboot must be performed to load the WLAN driver. When the Thor VM3 has finished booting, return to the Registry panel and tap Restart,
Save User Defaults
When clicked, a standard Save File dialog is opened, to allow the user to name the Registry Save (.RSG) file. The applet then copies the Active registry to the specified User registry file and reboots the device.
Load Registry Defaults
The applet copies the Factory Default registry from the OS to the Active registry (by deleting the current registry). The user is asked to verify a reboot, and then the applet performs a restart to activate the factory default registry. If a user password has been set, the applet warns the user that the password will be erased, and asks them to enter it before the reboot is allowed.
Note: When the Thor VM3 is reset to factory defaults, a second reboot must be performed to load the WLAN driver. When the Thor VM3 has finished booting, return to the Registry panel and tap Restart,
Restart When clicked, the OS performs a registry save, and then a restart. OS and CAB files are reloaded.
Thor VM3 with Microsoft Windows Embedded Compact 7 User Guide 201

Remove ProgramsStart > Settings > Control Panel > Remove Programs
Note: Lists programs installed in RAM that have been marked for removal.
Select a program and tap Remove. Follow the prompts on the screen to uninstall Thor VM3 user-installed only programs. The change takes effect immediately.
Files stored in the My Documents folder are not removed using this option.
Note: Do not remove factory installed programs using this option. Contact Technical Assistance if factory installed programs must be deleted.
202 Thor VM3 with Microsoft Windows Embedded Compact 7 User Guide

Screen ControlStart > Settings > Control Panel > Screen Control
Set screen properties for the Thor VM3.
Factory Default Settings
Note: If Automatic Brightness Control is enabled for an outdoor display, the value for LCD Brightness depends on the Ambient Light %. Otherwise, the display defaults to 100% brightness.
Note: There is no default value for Ambient Light % as it varies depending on the level of light where the Thor VM3 is located. If the Thor VM3 has an indoor display it does not have an ambient light sensor and the Ambient Light % is always 0.
Note: Touch screen defroster controls are located on the Peripherals control panel.
Current LevelLCD brightness displays the current LCD brightness level. The default brightness is 100%.
Current Level
LCD Brightness (%) 100 (see note)
Ambient Light (%) (see note)
Automatic Brightness Control
Automatic brightness control is only available on a Thor VM3 with an outdoor display.
Enable automatic brightness control
Disabled
Low to medium light level (%)
25
Medium to high light level (%)
75
Thor VM3 with Microsoft Windows Embedded Compact 7 User Guide 203
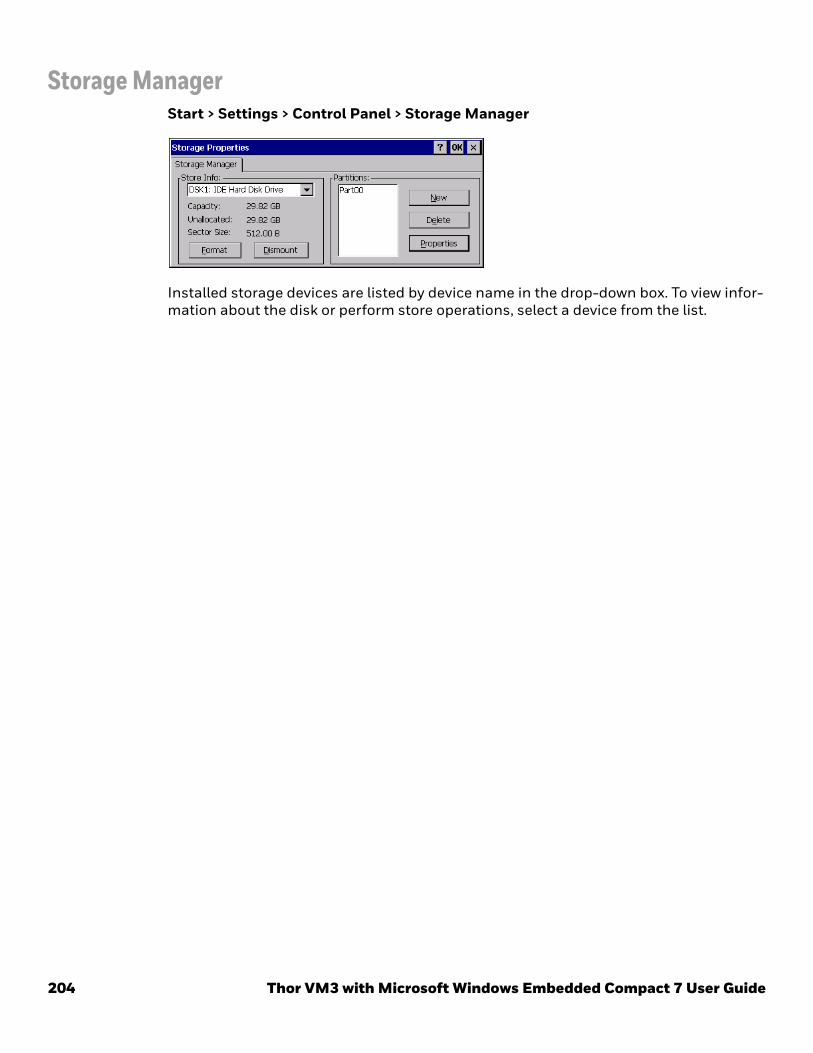
Storage ManagerStart > Settings > Control Panel > Storage Manager
Installed storage devices are listed by device name in the drop-down box. To view infor-mation about the disk or perform store operations, select a device from the list.
204 Thor VM3 with Microsoft Windows Embedded Compact 7 User Guide

StylusStart > Settings > Control Panel > Stylus
Use this control panel option to set stylus double-tap sensitivity properties and cali-brate the Thor VM3 touch panel when needed.
Double-TapFollow the instructions on the screen and tap the OK button to save any double-tap changes.
CalibrationCalibration involves tapping the center of a target. If you miss the center, keep the stylus on the screen, slide it over the target's center, and then lift the stylus.
To begin, tap the Recalibrate button on the screen with the stylus. Press and hold the stylus on the center of the target as it moves around the screen. Press the Enter key to keep the new calibration setting or press the Esc key to revert to the previous calibration settings.
Thor VM3 with Microsoft Windows Embedded Compact 7 User Guide 205

SystemStart > Settings > Control Panel > System
Use these Thor VM3 panels to:
• Review System and mobile device data and revision levels.
• Adjust Storage and Program memory settings.
• Assign a device name and device descriptor.
Factory Default Settings
General
System: This screen is presented for information only. The System parameters cannot be changed by the user.
Computer: The processor type is listed. The type cannot be changed by the user. Total computer memory and the identification of the registered user is listed and cannot be changed by the user.
Memory sizes given do not include memory used up by the operating system. For exam-ple, a system with 128 MB may only report 99 MB memory, since 29 MB is used by the operating system. This is actual DRAM memory, and does not include internal flash used for storage.
General No user interaction
Memory 1/4 storage, 3/4 program memory
Device Name Unique to equipment type
Device Description Unique to equipment type
Copyrights No user interaction
206 Thor VM3 with Microsoft Windows Embedded Compact 7 User Guide
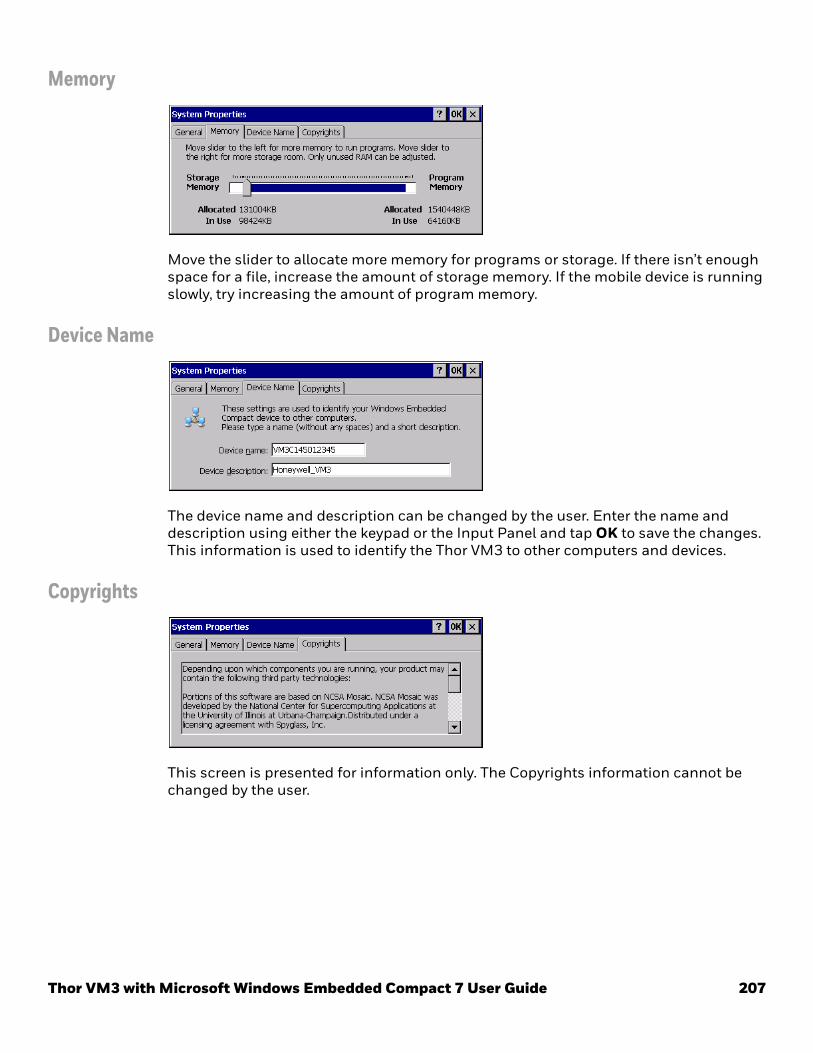
Memory
Move the slider to allocate more memory for programs or storage. If there isn’t enough space for a file, increase the amount of storage memory. If the mobile device is running slowly, try increasing the amount of program memory.
Device Name
The device name and description can be changed by the user. Enter the name and description using either the keypad or the Input Panel and tap OK to save the changes. This information is used to identify the Thor VM3 to other computers and devices.
Copyrights
This screen is presented for information only. The Copyrights information cannot be changed by the user.
Thor VM3 with Microsoft Windows Embedded Compact 7 User Guide 207

Terminal Server Client LicensesStart > Settings > Control Panel > Terminal Server Client Licenses
Any licenses stored on the Thor VM3 appear in the drop-down list. Select a license and tap the Close button. The license is available for use immediately.
208 Thor VM3 with Microsoft Windows Embedded Compact 7 User Guide

Volume and SoundsStart > Settings > Control Panel > Volume & Sounds
Note: An application may override the control of the speaker volume. Turning off sounds saves power and prolongs battery life.
Set volume parameters and assign sound WAV files to events using these options.
You can also select / deselect sounds for key clicks and screen taps and whether each is loud or soft.
As the volume scrollbar is moved between Loud and Soft, the Thor VM3 emits a tone each time the volume increases or decreases.
Volume must be enabled when you want to adjust volume settings using keypad keys.
Factory Default Settings
Volume
Events Enabled
Application Enabled
Notifications Enabled
Volume One level below Loud
Key click Disabled
Screen tap Disabled
Sounds
Scheme LOUD!
Thor VM3 with Microsoft Windows Embedded Compact 7 User Guide 209

The volume setting is stored in the registry and is recalled at power on.
Note: Rejected bar codes generate a bad scan beep. In some cases, the receipt of data from the scanner triggers a good scan beep from a tethered scanner, and then the rejection of scanned bar code data by the bar code processing causes a bad scan beep from the mobile device on the same data.
Good Scan and Bad Scan Sounds Good scan and bad scan sounds are stored in the Windows directory, as SCAN-GOOD.WAV and SCANBAD.WAV. These are unprotected WAV files and can be replaced by a WAV file of the user’s choice.
By default a good scan sound on the Thor VM3 is a single beep, and a bad scan sound is a double beep.
210 Thor VM3 with Microsoft Windows Embedded Compact 7 User Guide

ZoomZoneStart > Settings > Control Panel > ZoomZone
ZoomZone can be used to configure screen blanking behavior.
Motion Detection ActionDetermine what to do when motion is detected:
• Display Always Active - The display does not change when motion is detected.
• Display Black - The display is blacked out when motion is detected.
• Display freeze - The display is frozen at the time motion is detected.
• Use Zoom Area - A preconfigured zoom area is displayed when motion is detected.
Motion Detection MethodSelect the motion detection method.
The Thor VM3 supports the screen blanking box to determine motion. Select the port (COM1 or COM2) to which the blanking box is attached.
Note: By default, COM1 and COM2 ports are used by Enterprise Data Collection. To use a COM port for screen blanking, access Enterprise Settings and set Data Collection > Tethered Scanners > Tethered Scanner (COMx) - Enable Scanner Port to off (where COMx is either COM1 or COM2).
Motion Timeout SettingsScreen blanking can be configured to provide delays.
• Delay on Motion - Configure the delay between motion detection and screen blanking. The default is 2 seconds.
Thor VM3 with Microsoft Windows Embedded Compact 7 User Guide 211

• Delay on Stop - Configure the delay between motion stopping and the screen resuming normal behavior. The default is 2 seconds.
Change passwordBy default, no password is assigned to ZoomZone. If a password is set, the password must be entered to access the ZoomZone user interface to view or change configuration parameters.
To set a password:
1. Tap the Change Password button.
2. Enter the current password. If no password is assigned, leave this entry blank.
3. Enter and confirm the new password. To remove a previously set password, leave the new password blank.
4. Tap OK to confirm changes or Cancel to discard changes.
Set Zoom AreaThe ZoomArea can be selected from the current active desktop display. To set the zoom area:
1. Display the desired content on the Thor VM3 desktop.
2. Open the ZoomZone interface.
3. Tap the Set Zoom Area button.
4. Select the desired zoom area by tapping on the upper left corner of the desired area and dragging to the lower right corner of the desired area. The selected area is highlighted by a red outline.
Note: Be sure to select the desired area from the upper left corner to the lower right. Selecting the area from a different corner may result in nothing (a black box) being displayed.
5. If the selected are is not satisfactory, repeat the step above to reselect an area.
6. At the top of the display, tap File and select one of the available options:
• Save - Saves the selected zoom area are returns to the ZoomZone user interface.
• Test - Previews the zoom area as it would be displayed during screen blanking.
◦ Tap Accept Zoom to keep the zoom area and finish, or
◦ Tap Reject Zoom to discard the zoom are and be returned to select a different zoom area.
• Exit - Discards changes and returns to the ZoomZone user interface.
Show Zoom AreaTap the Show Zoom Area button to show the currently selected zoom area. The selected area is highlighted in red.
212 Thor VM3 with Microsoft Windows Embedded Compact 7 User Guide

To see how the zoom area would be displayed during screen blanking, tap the Test Zoom Area button.
When finished, at the top of the display tap File > Exit to exit.
Test Zoom AreaTap the Test Zoom Area button.
The zoom image is displayed.
When finished, at the top of the display tap File > Exit to exit.
Thor VM3 with Microsoft Windows Embedded Compact 7 User Guide 213

Automatic Firmware Update UtilityThe automatic firmware update utility provides an automated process to update the firmware on the Thor VM3. Firmware that can be updated includes BIOS, EC (Embed-ded Controller) and Screen MCU (Micro Controller Unit). Firmware updates are distrib-uted as cabinet (.cab) files. The .cab file contains the necessary firmware files (BIOS, EC and Screen MCU) and a utility to install firmware files. The firmware update utility is installed as part of the factory software load. This utility can be used to install newer firmware or to revert to older firmware.
Use the Software tab of the About control panel to determine the currently installed firmware versions.
It may be necessary to update firmware before installing an updated operating system.
Firmware Distribution FilesThe following software files must be copied to the \System\FWUpdate folder in the order listed. The files can be copied to the folder manually or remotely. Contact Technical Assistance for upgrade files.
FWxxyyzz.cab - This file contains the firmware update files and a utility to verify version compatibility and install the firmware files. The file name is structured such that xx identifies the last digits of the BIOS firmware version, yy identifies the Embedded Con-troller firmware version and zz identifies the screen MCU version.
UpdateFW.tag - The file that triggers the update utility to begin. Be sure to copy this file only after the .cab file has been copied. As soon as the Thor VM3 detects the presence of this file, the unit reboots in five seconds.
Update Process1. Copy the files listed above to the \System\FWUpdate folder. Copy the.cab file first
then the .tag file.
2. The Thor VM3 automatically reboots and starts the update process after detecting the updatefw.tag file. No user intervention is required to reboot the Thor VM3 or run the update utility after the reboot. The update utility operates in a DOS screen.
3. If the update is not successful, the update is tried three more times.
4. If the update fails, the \System\FWUpdate folder is cleaned up leaving flashapp.exe, a flashlog.txt and a retry.tag file.
5. Review the flashlog.txt file. The log file lists what firmware (if any) has been installed. If an error has occurred during the update process, it is detailed in the flashlog.txt file.
Be sure to copy the updatefw.tag file to the \System\FWUpdate folder last. The Thor VM3 begins the reboot process after detecting this file.
214 Thor VM3 with Microsoft Windows Embedded Compact 7 User Guide

6. Review the Software tab of the About to verify the installed firmware versions. Compare the digits from the name of the cab file (see above) with those shown in the About control panel.
Configuration Cloning Utility (CCU)This utility provides an automated process to read the configuration settings from one Thor VM3 and then apply those settings to one or more other Thor VM3s with the same operating system. The Configuration Cloning Utility (CCU) is installed as part of the fac-tory software load. Configuration settings for the following items may be included:
• RFTerm
• Honeywell Control Panels:
◦ USB powered in Sleep
◦ Enable/disable touch screen
• Defroster settings
◦ COM port pin 9 +5V or RI
The CCU allows a configuration file (ccf file) to be created by:
• Reading the current program settings from the source Thor VM3
• Reading the default program settings from a ddf file.
If desired, settings can be modified (advanced user only) before saving the ccf file. If any changes have been made, the CCU can also apply them to the source Thor VM3.
The configuration file can then be copied and deployed to the destination Thor VM3(s). Options include:
• Import changes only - Only those configuration settings which have been modified from their default value are applied to the destination Thor VM3. All other settings on the destination Thor VM3 are left unchanged.
• Import changes and defaults - All configuration settings are applied to the destination Thor VM3. If a setting was modified on the source Thor VM3 the modified value is applied to the destination Thor VM3. Otherwise the default value is applied for that setting on the destination Thor VM3.
The Configuration Cloning Utility can be run as a GUI or command line interface.
Configuration Cloning Utility GUITo launch the Client Configuration Utility, locate the CCU icon either on the desktop or by selecting Start > Programs > CCU.
Thor VM3 with Microsoft Windows Embedded Compact 7 User Guide 215

Menu Options
FileThe File menu contains information for working with the configuration files.
About
Displays version and copyright information for the Configuration Cloning Utility.Open
Opens a configuration file. The CCU looks for configuration files in the \System\DDF folder. CCU can open the following files types:
• ddf files - These files contain the factory default values for the software. These files are placed on the Thor VM3 when the applicable software was installed or upgraded. Use this option if you wish to start a configuration settings file based on the factory defaults.
• ccf files - These files contain the modified values for the software settings. These files are created with the CCU . ccf files are encrypted for security. Once a ccf file is created on one Thor VM3 it can be copied to other Thor VM3s to duplicate the configuration. An existing ccf file can be opened, modified, applied to the Thor VM3, saved, saved with a different name, etc.
Close
Closes the open data file. Save
Saves the open data file as a ccf file.
• If a ccf file was opened, it is saved with the same name and in the same location.
• If a ddf file was opened, a prompt is displayed for the name to assign to the new ccf file. By default a new file is saved at \System\DDF though a different location can be specified.
Save As
Saves the open data file as a ccf. If a ccf file was opened, this option allows a new name or location for the data file to be specified during the save process.
216 Thor VM3 with Microsoft Windows Embedded Compact 7 User Guide

Exit
Exits the CCU. A prompt may be displayed if there are unsaved ccf changes.
EditProvides access to the standard Windows Cut, Copy and Paste functions. These func-tions can be used to manipulate the settings within the configuration file.
RegistryReads values from and writes values to the system registry.
Import Settings
Imports the current settings from the Windows registry for the selected application(s). When selected, the available programs from which settings can be read are displayed in a tree format.
Apply Settings
Applies the current settings to the Windows registry for the selected applications. During the process, a Default all Non-Configured Parameters prompt is displayed:
• Tap Yes to set all parameters not configured in the ccf file to defaults on the destination device.
• Tap No to apply the values from the ccf file and leave all other parameters as-is on the destination device.
• Tap Cancel to exit with no changes to the destination device.
Upon completion, exit the CCU and reboot the Thor VM3 so changes can take effect.
UserSelects the desired user access level:
• Basic - Basic users can open files and import setting from the system registry. Basic users cannot modify settings from an opened file or setting imported from the registry. Basic users can apply setting to the system registry.
• Advanced - Advanced users can open files and import settings registry. Advanced users can modify the values from either an opened file or imported from the system registry. Advanced users can apply settings to the system registry.
ShortcutsThe table below lists the valid shortcut key combinations within the CCU.
Shortcut key Action
CTRL + A Opens About screen
CTRL + O Opens folder with CCF files (\System\DDF)
CTRL + C Closes the open file (only valid when a ccf or ddf file
CTRL + S Application is saved
CTRL + E Application is closed
Thor VM3 with Microsoft Windows Embedded Compact 7 User Guide 217

Modifying SettingsAdvanced user only. Basic user cannot view the expanded tree or modify settings.
When settings have been loaded (either from Registry > Import Settings or File > Open) the following screen is displayed.
The left side of the upper pane displays the current program settings that have been imported or are part of the open ccf file. Click the + icon to expand the tree or the - icon to condense the tree. When the tree is expanded sufficiently to view the settings, the settings are displayed in the right portion of the upper pane. When a parameter is selected, the name of the parameter is highlighted in blue. The parameter name remains highlighted in blue (regardless of if the value was changed or not) until the parameter name button is tapped a second time. Enter a new value for the parameter as desired. Depending on the parameter selected, the following entry types are available:
• Text box - This is an open entry field and a new value can be typed into the text box. Depending on the parameter, there may be validity checking to ensure the entry in the text box is within the valid range.
• Pull-down list - A down arrow indicates the setting must be selected from a pull-down list of available values. Expand the list and select the desired setting from the list of options.
CTRL + X Cuts the data
CTRL + C Copies the selected data to the clipboard
CTRL + V Pastes the data from the clipboard at the current location
CTRL + I Displays import setting list
CTRL + L Modified settings are applied
CTRL + B Basic settings are displayed
CTRL + D Advanced settings are displayed
Shortcut key Action
218 Thor VM3 with Microsoft Windows Embedded Compact 7 User Guide

• Button - Items with two choices (such as Off or On) are displayed as a button. Tapping the button switches the value for the parameter.
When all desired parameter settings have been made, tap File > Save to save as a ccf file which can be used to deploy these settings on another Thor VM3.
If the parameter setting changes should also be applied to this Thor VM3, select Regis-try > Import Settings. After importing the settings, a reboot is necessary for the changes to take effect on the Thor VM3.
Using the CCURefer to the following examples for instructions on using the CCU.
Example 1: Import the current settings and save to a fileTo import the current settings from the Thor VM3 running the CCU:
1. If you want to view the settings, tap User and select Advanced.
2. Tap Registry > Import settings.
3. Select the desired program(s) from which to import the settings.
4. Select File > Save then specify a file name and tap Save to save the settings to a ccf file.
5. The ccf file can be used to configure another Thor VM3. See Example 4.
Example 2: Modify settings on the current device and save to a fileTo modify the settings on the Thor VM3 running the CCU:
1. Tap User and select Advanced.
2. Tap Registry > Import settings.
3. Select the desired program(s) from which to import the settings.
4. Make any desired changes to the settings.
5. Tap Registry > Apply settings.
6. Select File > Save then specify a file name and tap Save to save the settings to a ccf file.
7. Reboot the Thor VM3 for the new settings to take effect.
8. The ccf file can be used to configure another Thor VM3. See Example 4.
Example 3: Reset a device to system defaultsTo import and apply the default values to the Thor VM3 running the CCU:
1. If you want to view the default settings before applying, User and select Advanced.
2. Tap File > Open and change the file type to ddf files (*.ddf).
3. Select the desired ddf file(s) for the software program(s) to return to default values.
4. Tap File > Save and specify a file name for the ccf file.
Thor VM3 with Microsoft Windows Embedded Compact 7 User Guide 219

5. Tap Registry > Apply settings.
6. Reboot the Thor VM3 for the new settings to take effect.
7. The ccf file can be used to configure another Thor VM3. See Example 4.
Example 4: Clone settings to another device
1. Create a ccf file using any of the above examples.
2. Copy the ccf file to \System\DDF on the destination Thor VM3.
Note: Rather than using the CCU GUI, the command line can be used to apply the settings to the destination device.
3. Open the CCU on the destination device.
4. Tap File > Open and select the ccf file that was copied to the device.
5. Tap Registry > Import.
6. When prompted to Default all Non-Configured Parameters:
• Tap Yes to set all parameters not configured in the ccf file to defaults on the destination device.
• Tap No to apply the values from the ccf file and leave all other parameters as-is on the destination device.
• Tap Cancel to exit with no changes to the destination device.
7. Reboot the Thor VM3 for the new settings to take effect.
220 Thor VM3 with Microsoft Windows Embedded Compact 7 User Guide

CHAPTER
6
Thor VM3 with Mic
ACTIVESYNC
IntroductionRequirement - ActiveSync (version 4.5 or higher for Windows XP desktop/laptop com-puters) must be resident on the host (desktop/laptop) computer. Windows Mobile Device Center (version 6.1 or higher) is required for a Windows Vista/Windows 7/Win-dows 8 desktop/laptop computer. ActiveSync and Windows Mobile Device Center for the PC is available from the Microsoft website. Follow their instructions to locate, down-load and install ActiveSync or Windows Mobile Device Center on your desktop com-puter.
Note: For readability in this section, ActiveSync will be used in instructions and explanations. If you have a Windows Vista, Windows 7, or Windows 8 operating system on your desktop/laptop, replace ActiveSync with Windows Mobile Device Center.
Using Microsoft ActiveSync, you can synchronize information on your desktop com-puter with the Thor VM3 and vice versa. Synchronization compares the data on your mobile device with your desktop computer and updates both with the most recent data.
For example, you can:
• Back up and restore your device data.
• Copy (rather than synchronize) files between your device and desktop computer.
• Control when synchronization occurs by selecting a synchronization mode. For example, you can synchronize continually while connected to your desktop computer or only when you choose the synchronize command.
By default, ActiveSync does not automatically synchronize all types of information. Use ActiveSync Options to specify the types of information you want to synchronize. The synchronization process makes the data (in the information types you select) identical on both your desktop computer and your device.
When installation of ActiveSync is complete on your desktop computer, the ActiveSync Setup Wizard begins and starts the following processes:
• connect your device to your desktop computer,
• set up a partnership so you can synchronize information between your device and your desktop computer, and
• customize your synchronization settings.
rosoft Windows Embedded Compact 7 User Guide 221

Because ActiveSync is already installed on your device, your first synchronization pro-cess begins automatically when you finish setting up your desktop computer in the ActiveSync wizard. For more information about using ActiveSync on your desktop com-puter, open ActiveSync, then open ActiveSync Help.
Initial SetupThe Thor VM3 supports ActiveSync over a serial port. The Thor VM3 does not support a USB ActiveSync connection.
Connect via Serial PortIn order to use a serial port for ActiveSync:
• A full-wired serial null-modem cable is required
• By default, COM1 and COM2 ports are used by Enterprise Data Collection and this must be disabled for the port being used for ActiveSync.
• Pin 9 of the desired COM port must be set to RI,
Configure the serial port for ActiveSync1. Select Start > Settings > Control Panel > Enterprise Settings.
2. From Enterprise Settings, select Data Collection >Tethered Scanners.
3. Select the desired port, Tethered Scanner (COM1) or Tethered Scanner (COM2).
4. Select Enable scanner port.
5. Uncheck Enable scanner port.
6. Select OK to confirm.
7. Select Menu > Exit to close Enterprise Settings.
8. From the control panel, select Options > Misc tab.
9. Uncheck the box for 5V on COM1 or 5V on COM2 as appropriate. When unchecked, pin 9 provides the Ring Indicator (RI) signal instead of delivering power on pin 9.
10. Click OK to save the change and close the Options panel.
11. The COM port is now ready for ActiveSync.
Configure ActiveSync Settings1. Select Start > Settings > Control Panel > Network and Dial-up Connections.
2. Right-click on ActiveSync.
3. Select Properties.
4. Select Serial Cable on COM1: or Serial Cable on COM2: as appropriate.
222 Thor VM3 with Microsoft Windows Embedded Compact 7 User Guide

5. Tap Configure.
6. Configure the baud rate and other parameters as desired.
Note: The default baud rate is 19200. The higher the baud rate chosen, the less reliable the connection tends to be.
7. Tap OK to close and save the Device Properties window,
8. Tap TCP/IP Settings.
9. All settings should be checked except Use Slip.
10. Tap OK to close TCP/IP Settings window.
11. Tap Security Settings.
12. Make sure Use data Encryption, Use Extensible Authentication Protocol (EAP) and Preview user name and password are unchecked. All other options should be checked.
13. Close OK to close all open panels.
Configure PC Connection Settings1. Select Start > Settings > Control Panel > PC Connection.
2. Check Allow connection with desktop computer when device is attached.
3. Verify that pane says Connect using ‘ActiveSync’. If necessary, tap the Change button to select the correct setting.
Note: Do not use USB as this option is not supported on the Thor VM3.
4. Click OK to confirm settings and close the open window.
Setup PC or LaptopThe PC or laptop must have a Windows operating system.
1. Verify Windows Mobile Device Center (WMDC) is installed if the PC or laptop is run-ning a Windows 7 or greater operating system. For a PC or laptop with a Windows XP operating system, ActiveSync must be installed.
Note: WMDC can be downloaded from microsoft.com.
2. Open WMDC and select Mobile Device Settings > Connection Settings.
3. Make sure Allow connections to one of the following is checked.
4. Select the COM port to which the full-wired null-modem cable is attached.
5. Check the option Allow automatic device authentication.
6. Check the option Allow data connections on the device when connected to the PC.
7. Click OK to save the settings and close the open window.
Thor VM3 with Microsoft Windows Embedded Compact 7 User Guide 223
Start the ActiveSync ConnectionThe ActiveSync connection should start automatically when the Thor VM3 is connected to the PC or laptop.
If ActiveSync does not start automatically, it can be started manually:
1. On the Thor VM3, select Start > Settings > Network Connections and double-click ActiveSync.
2. On the Thor VM3, select Start > Run and type in the repllog.exe command and press Enter.
Note: Do not use the ActiveSync link on the Thor VM3 desktop as this link attempts to connect to a server to synchronize emails.
Explore• From the ActiveSync Dialog on the Desktop PC, tap the Explore button.
• From the Windows Mobile Device Center interface select File Management > Browse the contents of your device.
This function allows you to explore the Thor VM3 from the PC side, with some limita-tions. You can copy files to or from the mobile device by drag-and-drop. You will not be allowed to delete files or copy files out of the \Windows folder on the mobile device. (Technically, the only files you cannot delete or copy are ones marked as system files in the original build of the Windows image. This, however, includes most of the files in the \Windows folder).
Backup Data Files using ActiveSyncUse the following information to backup data files from the Thor VM3 to a desktop or laptop PC using the appropriate cable and Microsoft’s ActiveSync.
PrerequisitesA partnership between the mobile device and ActiveSync has been established.
ConnectConnect the serial cable to the PC (the host) and the mobile device (the client).
The “Get Connected” wizard on the host PC checks COM ports to establish a connection for the first time.
Disconnect• Disconnect the cable from the Thor VM3.
224 Thor VM3 with Microsoft Windows Embedded Compact 7 User Guide

• Open the status bar icon in the lower right hand corner of the status bar. Then tap the Disconnect button.
When the Thor VM3 loses connection, e.g.: enters Suspend Mode, etc., the connection to ActiveSync will be lost.
Reset and Loss of Host Re-connectionActiveSync assigns a partnership between a Thor VM3 (the client) and a host computer. A partnership is defined by two objects – a unique computer name and a random num-ber generated when the partnership is first created. An ActiveSync partnership between a unique client can be established to two hosts.
When the mobile device is reset (return to default settings), the random number is deleted – and the partnership with the last one of the two hosts is also deleted. The host retains the random numbers and unique names of all devices having a partnership with it. Two clients cannot have a partnership with the same host if they have the same name. (Control Panel > System > Device Name)
If the reset mobile device tries to reestablish the partnership with the same host PC, a new random number is generated for the mobile device and ActiveSync will insist the unique name of the mobile device be changed. If the mobile device is associated with a second host, changing the name will destroy that partnership as well. This can cause some confusion when re-establishing partnerships with hosts.
ActiveSync HelpActiveSync on the host says that a device is trying to connect, but it cannot identify it
Verify the cable is attached to the Thor VM3. Disconnect and reconnect the cable from the PC.
Check that the correct connection is selected.
See Reset and Loss of Host Re-connection, above.
ActiveSync indicator on the host (disc in the toolbar tray) turns green and spins as soon as you connect the cable, before tapping the Connect icon (or REPLLOG.EXE in the Windows directory).
One or more control lines are tied together incorrectly. This is usually a cable problem.
ActiveSync indicator on the host turns green and spins, but connection never occurs
Check that the correct connection is selected.
-or-
Incorrect or broken data lines in cable.
Thor VM3 with Microsoft Windows Embedded Compact 7 User Guide 225

226 Thor VM3 with Microsoft Windows Embedded Compact 7 User Guide

CHAPTER
7
Thor VM3 with Mic
WIRELESS NETWORK CONNECTIONS
Managing Wireless ConnectionsThe Thor VM3 has an 802.11 a/b/g/n WLAN radio and an optional WWAN radio.
• The WLAN radio is configured using the WLAN Wireless Configuration Utility (WCU).
• The WWAN radio is configured using the VM3 WWAN Connection Manager.
• The VM3 Connection Manager also provides configuration options for hyper-roaming between WLAN and WWAN connections.
WLAN Wireless Configuration Utility (WCU)The 802.11 wireless client device is a Qualcomm Atheros AR950 802.11 a/b/g/n WLAN adapter. This wireless radio is configured by the Wireless Configuration Utility (WCU).
Dynamic vs. Fixed IP AddressTo change between dynamic and fixed IP address select (Start > Control Panel > Net-work and Sharing Center > Change Adapter Settings, right click on desired adapter, and select Properties > Internet Protocol Version 4 (TCP/IPv4) > Properties). Always reboot the Thor VM3 after changing the IP address type.
rosoft Windows Embedded Compact 7 User Guide 227

Important Notes
Using the Wireless Configuration UtilityNote: When finished making changes the device should be restarted afterwards.
Start > All Programs > Honeywell > Honeywell (version ID) > WCU or
WCU Icon on Desktop
This screen contains several items:
• Tasks
• Status
• Profile List
It is important that all dates are correct on the Thor VM3 and host computers when using any type of certificate. Certificates are date sensitive and if the date is not cor-rect authentication will fail.When using the 802.11 radio, the U-NII 1 band is the preferred band for indoor oper-ation. For regulatory domains in which the U-NII 3 band is allowed, the following channels are supported: 149, 153, 157 and 161. The AP must be configured accord-ingly.
Status
Profile List
Tasks
When using any profile that requires the user to enter credentials (user name, password), the user should enter those credentials when the window pops up. If the credentials are not entered then, the credentials window may be hidden by other windows.
228 Thor VM3 with Microsoft Windows Embedded Compact 7 User Guide

TasksTasks are listed on the left side of the screen:
• Browse Nearby Wireless Networks
• Roam Management
• Admin Login
StatusThe status of the radio card is shown in the upper right hand of the screen:
Note: The radio status can only be changed when the admin is logged on. Tapping the icon has no effect when not logged in.
The status of the network connection is above the profile list.
Profile ListAll profiles that have been created are listed in this section. Profiles can be configured for auto connect or manual connect and are subdivided by connection type in this list.
Radio is on.
Tapping the button turns the radio off.Radio is off.
Tapping the button turns the radio on.
The radio has been turned off.
• Tap the radio off icon to turn the radio on.
• When the status of the radio is changing a message may be displayed such as “Radio has been turned on”.
The radio is on but is not connected:
• If there are one or more auto profiles, none of them are able to connect.
• If there are one or more manual profiles, none of them have been activated.
The radio has successfully connected to the network:
• If security is enabled, the authentication process has been completed.
• The SSID of the network is displayed below the access point icon.
Thor VM3 with Microsoft Windows Embedded Compact 7 User Guide 229

From the profile list, an admin can:
• Organize - Open or rename a profile
• New - Create a new profile
• Delete - Delete an existing profile
• Activate - Make an inactive profile the active profile. The inactive profile may be either a manual or an auto profile not currently in use.
• Deactivate - When the current active profile is selected, this option deactivates that profile. If there is an inactive auto profile, that profile may become active.
• Up - If there are multiple profiles, the Up feature moves the selected profile up the list. This feature is available for both the Auto and Manual profiles.
• Down - If there are multiple profiles, the Down feature moves the selected profile down the list. This feature is available for both the Auto and Manual profiles.
Similar features are also available by right clicking on a profile name:
• New - Create a new profile.
• Open - Open the selected profile to view or edit properties.
• Activate - Make an inactive profile the active profile. The inactive profile may be either a manual or an auto profile not currently in use.
• Deactivate - When the current active profile is selected, this option deactivates that profile. If there is an inactive auto profile, that profile may become active.
• Disconnect - If the selected profile is connected, this option disconnects the profile.
Admin LoginAll users can select from existing profiles and use the browse feature to view nearby networks.
It is necessary to log in to create or edit profiles, turn the radio off or on and to adjust the roaming parameters.
The appearance of the icon indicates if the admin is logged in or not.
To log in:
1. Tap the Admin Login icon.
2. Enter the password. The default password is Honeywell.
Admin is not logged in
Admin is logged in
230 Thor VM3 with Microsoft Windows Embedded Compact 7 User Guide

3. Tap the Login button to log in or Cancel to exit without logging in.
To change the default password:
1. Tap the Admin Login icon.
2. Tap the Reset Password button.
3. Enter the current password.
4. Enter and confirm the new password.
5. Tap Reset to save the new password or Cancel to exit without changing the password.
Browse Nearby Wireless NetworksTap the Browse nearby wireless networks to open the open this window.
Tap the Refresh button to update the network list.
For each network discovered the following attributes are listed:
• Network Name (SSID) - Name of the network (Service Set ID).
• BSSID - Basic Service Set ID, a unique ID to an access point in the network.
• Security - Indefinites if the access point is using security. A lock icon is displayed if the network is using security.
• Signal - A graphic representation of the signal strength plus (0 to 4 bars) plus a text description of signal strength.
• Radio Type - The type of radio in the access point, i.e. 802.11a, 802.11g, etc.
Thor VM3 with Microsoft Windows Embedded Compact 7 User Guide 231

• Channel - The channel the access point is using.
• 11n - If an icon is displayed, the access point supports 802.11n.
• Super - If an icon is displayed, the access point supports Atheros’ Super AG features.
• XR - If an icon is displayed, the access point supports Atheros’ extended range (ER) technology.
• WPS - If an icon is displayed, the access point supports WPDS (Wi-Fi Protected Setup).
• Type - Identifies the network type, infrastructure or Ad Hoc.
Note: Tapping on any of the column headings will sort the network list by the contents of that column.
If logged on as admin, tap on any network in the list to create a profile for that network.
Creating a ProfileTo create from the Profile list,
1. Log in as admin.
2. Tap the New button.
3. Select the desired profile type - auto connect, manual connect or Ad Hoc.
4. Enter a profile name and network name.
5. Tap Next.
6. Tap Connect To... to connect to the network or tap Change connection settings for additional configuration options including Security.
To create a profile from the nearby networks:
1. Log in as admin.
2. Tap the Browse button.
3. Tap the desired network then tap the Connect icon or double tap the desired network.
4. Change the profile name if desired.
5. Tap Advanced security settings for additional configuration options including Security.
6. Tap OK to exit and save the profile or type Cancel to exit without creating a profile.
232 Thor VM3 with Microsoft Windows Embedded Compact 7 User Guide

Advanced Profile Configuration
Connection
This tab shows the basic information used to create the profile.
Options include:
• Connect automatically when this network is in range - If the profile was created as an auto connect profile, this box is checked. If created as a manual profile, this box is unchecked.
• Connect to a more preferred network if available
• Connect even if the network is not broadcasting its name (SSID) - If a network is not broadcasting its SSID, check this box.
• Enable Atheros connection settings.
Note: Atheros connection settings must be enabled to use CCX. It is disabled by default.
SecurityThe options available on the tab will depend on the security type and encryption type selected.
Review the appropriate section for configuring the WCU for network security:
• Open (No Security)
• WEP
• WPA2-Personal
• PEAP-TLS
• PEAP-MSCHAP
Thor VM3 with Microsoft Windows Embedded Compact 7 User Guide 233

• PEAP-GTC
• LEAP
• EAP-FAST PEAP
• EAP-FAST TLS
• EAP-TLS
• EAP-TTLS
234 Thor VM3 with Microsoft Windows Embedded Compact 7 User Guide

Open (No Security)
To configure for open (no security):
1. Set Security Type to No authentication (Open).
2. Set Encryption Type to none.
3. Tap OK.
4. From the profile listing, make sure the desired profile is active.
5. Verify the connection using Status.
Thor VM3 with Microsoft Windows Embedded Compact 7 User Guide 235

WEP
To configure for WEP:
1. Set Security Type to No authentication (Open).
2. Set Encryption Type to WEP.
3. Enter the Network Security Key.
4. Select the Key Index.
5. Tap OK.
6. From the profile listing, make sure the desired profile is active.
7. Verify the connection using Status.
236 Thor VM3 with Microsoft Windows Embedded Compact 7 User Guide

WPA2-Personal
To configure for WPA2-Personal:
1. Set Security Type to WPA2-Personal.
2. Set Encryption Type to AES.
3. Enter the Network Security Key.
4. Tap OK.
5. From the profile listing, make sure the desired profile is active.
6. Verify the connection using Status.
Thor VM3 with Microsoft Windows Embedded Compact 7 User Guide 237

PEAP-TLS
To configure for PEAP-TLS:
1. Set Security Type to WPA2-Enterprise or CCKM.
2. Set Encryption Type to AES.
3. Set network authentication method to Protected EAP (PEAP).
4. Tap the Settings button.
5. Select the Connection tab.
6. Select Validate server certificate.
7. Select the trusted root certificate from the listed certificates.
238 Thor VM3 with Microsoft Windows Embedded Compact 7 User Guide

8. Select the User Credentials tab.
9. Select Use certificate on this computer.
10. Select the Authentication tab.
11. Select Use certificate on this computer.
12. Select EAP-TLS as the authentication method.
13. Tap OK to close any open windows.
14. From the profile listing, make sure the desired profile is active.
15. Verify the connection using Status.
Thor VM3 with Microsoft Windows Embedded Compact 7 User Guide 239

PEAP-MSCHAP
To configure for PEAP-MSCHAP:
1. Set Security Type to WPA2-Enterprise or CCKM.
2. Set Encryption Type to AES.
3. Set network authentication method to Protected EAP (PEAP).
4. Tap the Settings button.
5. Select the Connection tab.
6. Select Validate server certificate.
7. Select the trusted root certificate from the listed certificates.
240 Thor VM3 with Microsoft Windows Embedded Compact 7 User Guide

8. Select the User Credentials tab.
9. Select the desired credentials method of providing credentials. Prompt automatically for username and password is recommended.
10. If saved username and password is selected, enter the credentials now.
11. Select the Authentication tab.
12. Select EAP-MSCHAPv2 as the authentication method.
13. Tap OK to close any open windows.
14. From the profile listing, make sure the desired profile is active.
15. Verify the connection using Status.
Thor VM3 with Microsoft Windows Embedded Compact 7 User Guide 241
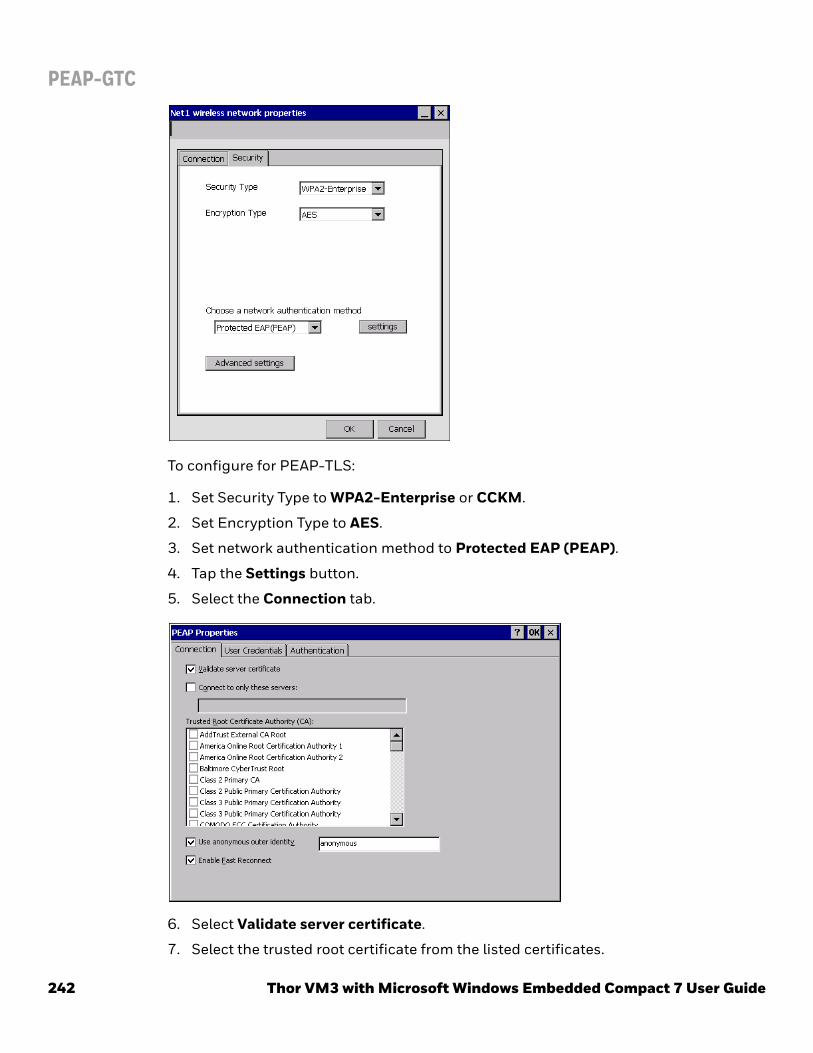
PEAP-GTC
To configure for PEAP-TLS:
1. Set Security Type to WPA2-Enterprise or CCKM.
2. Set Encryption Type to AES.
3. Set network authentication method to Protected EAP (PEAP).
4. Tap the Settings button.
5. Select the Connection tab.
6. Select Validate server certificate.
7. Select the trusted root certificate from the listed certificates.
242 Thor VM3 with Microsoft Windows Embedded Compact 7 User Guide

8. Select the User Credentials tab.
9. Select Prompt automatically for username and password.
10. Select the Authentication tab.
11. Select EAP-GTC as the authentication method.
12. Tap OK to close any open windows.
13. From the profile listing, make sure the desired profile is active.
14. Verify the connection using Status.
Thor VM3 with Microsoft Windows Embedded Compact 7 User Guide 243

LEAP
To configure for Cisco LEAP:
1. Set Security Type to WPA2-Enterprise or CCKM.
2. Set Encryption Type to AES.
3. Set network authentication method to CISCO-LEAP.
4. Tap the Settings button.
5. Select the desired credentials method of providing credentials. Prompt automatically for username and password is recommended.
6. If saved username and password is selected, enter the credentials now.
7. The About tab provides Cisco copyright information.
8. Tap OK to close all open windows.
244 Thor VM3 with Microsoft Windows Embedded Compact 7 User Guide

9. From the profile listing, make sure the desired profile is active.
10. If prompt for username and password option was selected, enter the credentials when prompted.
Note: If the credentials are not entered when to window first pops up, the credentials window can become hidden behind other windows.
11. Verify the connection using Status.
Thor VM3 with Microsoft Windows Embedded Compact 7 User Guide 245

EAP-FAST PEAP
To configure for Cisco EAP-FAST PEAP:
1. Set Security Type to WPA2-Enterprise or CCKM.
2. Set Encryption Type to AES.
3. Set network authentication method to CISCO-FAST.
4. Tap the Settings button.
246 Thor VM3 with Microsoft Windows Embedded Compact 7 User Guide

5. Select the User Credentials tab.
6. Select the desired credentials method of providing username and password. Prompt automatically for username and password is recommended.
7. If saved username and password is selected, enter the credentials now.
8. Tap the Authentication tab.
9. Select the desired authentication method. Any of the available options may be used.
10. The About tab provides Cisco copyright information.
Thor VM3 with Microsoft Windows Embedded Compact 7 User Guide 247

11. Tap OK to close all open windows.
12. From the profile listing, make sure the desired profile is active.
13. If prompt for username and password option was selected, enter the credentials when prompted.
Note: If the credentials are not entered when to window first pops up, the credentials window can become hidden behind other windows.
14. Verify the connection using Status.
248 Thor VM3 with Microsoft Windows Embedded Compact 7 User Guide

EAP-FAST TLS
To configure for Cisco EAP-FAST TLS:
1. Set Security Type to WPA2-Enterprise or CCKM.
2. Set Encryption Type to AES.
3. Set network authentication method to Cisco:EAP-FAST.
4. Tap the Settings button.
Thor VM3 with Microsoft Windows Embedded Compact 7 User Guide 249

5. Select the User Credentials tab.
6. Select Use certificate on this computer.
7. No entries are needed on the Authentication tab.
8. The About tab provides Cisco copyright information.
9. Tap OK to close all open windows.
10. From the profile listing, make sure the desired profile is active.
11. Verify the connection using Status.
250 Thor VM3 with Microsoft Windows Embedded Compact 7 User Guide

EAP-TLS
To configure for EAP-TLS:
1. Set Security Type to WPA2-Enterprise or CCKM.
2. Set Encryption Type to AES.
3. Set network authentication method to Microsoft Smart Card or other certificate.
4. Tap the Settings button.
Note: If a user certificate has already been selected, the details would be populated on this screen.
5. Tap Select to select a user certificate on this computer.
Thor VM3 with Microsoft Windows Embedded Compact 7 User Guide 251

6. Select the certificate from the listed certificates.
7. Tap OK.
8. The selected certificate is displayed.
9. Tap OK to close any open windows.
10. From the profile listing, make sure the desired profile is active.
11. Verify the connection using Status.
252 Thor VM3 with Microsoft Windows Embedded Compact 7 User Guide

EAP-TTLS
To configure for EAP-TTLS:
1. Set Security Type to WPA2-Enterprise or CCKM.
2. Set Encryption Type to AES.
3. Set network authentication method to EAP_TTLS.
4. Tap the Settings button.
5. Select the Connection tab.
6. Select Validate server certificate.
Thor VM3 with Microsoft Windows Embedded Compact 7 User Guide 253

7. Select the trusted root certificate from the listed certificates.
8. Select the User Credentials tab.
9. Select the desired credentials method of providing username and password. Prompt automatically for username and password is recommended.
10. If saved username and password is selected, enter the credentials now.
11. Tap OK to close any open windows.
12. From the profile listing, make sure the desired profile is active.
13. If prompt for username and password option was selected, enter the credentials when prompted.
Note: If the credentials are not entered when to window first pops up, the credentials window can become hidden behind other windows.
14. Verify the connection using Status.
254 Thor VM3 with Microsoft Windows Embedded Compact 7 User Guide

Roam Management
GeneralThe General tab provides information on the current connection. There are no user entries on this screen.
Thor VM3 with Microsoft Windows Embedded Compact 7 User Guide 255
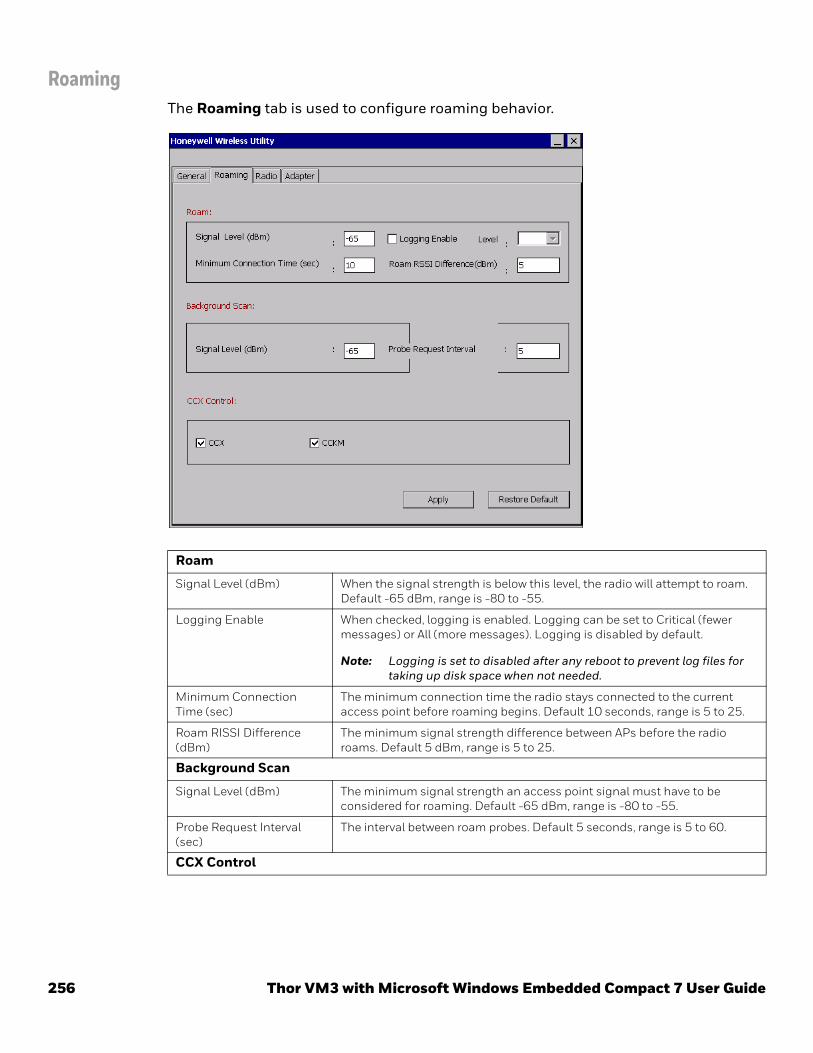
RoamingThe Roaming tab is used to configure roaming behavior.
Roam
Signal Level (dBm) When the signal strength is below this level, the radio will attempt to roam. Default -65 dBm, range is -80 to -55.
Logging Enable When checked, logging is enabled. Logging can be set to Critical (fewer messages) or All (more messages). Logging is disabled by default.
Note: Logging is set to disabled after any reboot to prevent log files for taking up disk space when not needed.
Minimum Connection Time (sec)
The minimum connection time the radio stays connected to the current access point before roaming begins. Default 10 seconds, range is 5 to 25.
Roam RISSI Difference (dBm)
The minimum signal strength difference between APs before the radio roams. Default 5 dBm, range is 5 to 25.
Background Scan
Signal Level (dBm) The minimum signal strength an access point signal must have to be considered for roaming. Default -65 dBm, range is -80 to -55.
Probe Request Interval (sec)
The interval between roam probes. Default 5 seconds, range is 5 to 60.
CCX Control
256 Thor VM3 with Microsoft Windows Embedded Compact 7 User Guide

To save changes, tap the Apply button. Confirmation dialogs may be displayed.
To exit without saving changes, tap the X in the upper right of the window.
Tap restore default values, tap Restore Default Values then tap Apply.
Radio
Note: For CCX to be enabled, two settings must be enabled:
• CCX must be enabled (checked) on this screen.
• Enable Atheros Connection Settings must be enabled (checked) on the Connection tab.If both settings are not enabled, the WLAN radio does not identify itself as CCX V4 compatible when associating to an access point.
CCX Use CCX (Cisco Client Extensions) for faster roaming. Default is enabled.
CCKM Use CCKM (Cisco Centralized Key Management) for faster roaming. Default is enabled.
Power Save Set the power save level. Options are Off (default) and Auto-PSM.
Note: Power save level is reset to the default (Off) after reboot.
Band Selection Select the bands to use. Options are: A, BG, G, ABG (default).
DataRate Selection
To limit data rates, check the Limit DataRate checkbox. If checked, select the desired rate (MCS0 to MCS15). MCS0 (Modulation and Coding Scheme) 0 is slowest, MCS15 is fastest but subject to more errors. Default is disabled.
Note: DataRate selection is reset to default (Disabled) after reboot.
Diversity Selection
By default, diversity is on.
Thor VM3 with Microsoft Windows Embedded Compact 7 User Guide 257

AdapterThe Adapter tab provides information on the radio card. There are no user entries on this screen.
258 Thor VM3 with Microsoft Windows Embedded Compact 7 User Guide

Advanced Settings
802.11 Settings
Determines the method used for fast roaming:
• Enable Standard Pairwise Master key caching - When standard Pairwise Master Key (PMK) is enabled, authentication can be skipped if the client has already authenticated to the access point previously. A connection to a new access point uses the 802.11x authentication process while a reconnect to the access point can skip the authentication.
• Enable OKC- Opportunistic Key Caching (OKC) allows a client to skip 802.11x authentication when roaming to an access point under a controller based infrastructure. After the client authenticates with one access point, it can roam to others under the same controller by handshaking rather than authentication.
Thor VM3 with Microsoft Windows Embedded Compact 7 User Guide 259

CertificatesNote: Please refer to the Security Primer to prepare the Authentication Server and Access Point
for communication.
Note: It is important that all dates are correct on the Thor VM3 and host computers when using any type of certificate. Certificates are date sensitive and if the date is not correct authentication will fail.
Quick StartRoot Certificates are necessary for EAP-TLS, PEAP/GTC and PEAP/MSCHAP.
1. Generate a Root CA Certificate and download it to a PC.
2. Connect the Thor VM3 to the desktop PC using ActiveSync and copy the certificate to the Thor VM3 \System folder or use a USB thumb drive to transfer the certificate file.
3. Install a Root CA Certificate.
User Certificates are necessary for EAP-TLS.
1. Generate a User Certificate and private key file and download them to a PC.
2. Connect the Thor VM3 to the desktop PC using ActiveSync and copy the certificate and private key file to the Thor VM3 \System folder.
3. Install a User Certificate and the private key file.
4. After installation, perform a Suspend/Resume.
5. Verify Installation.
Generate a Root CA CertificateNote: It is important that all dates are correct on the Thor VM3 and host computers when using
any type of certificate. Certificates are date sensitive and if the date is not correct authentication will fail.
The easiest way to get the root CA certificate is to use a browser on a PC to navigate to the Certificate Authority. To request the root CA certificate, open a browser to
http://<CA IP address>/certsrv.
Sign into the CA with any valid username and password.
260 Thor VM3 with Microsoft Windows Embedded Compact 7 User Guide
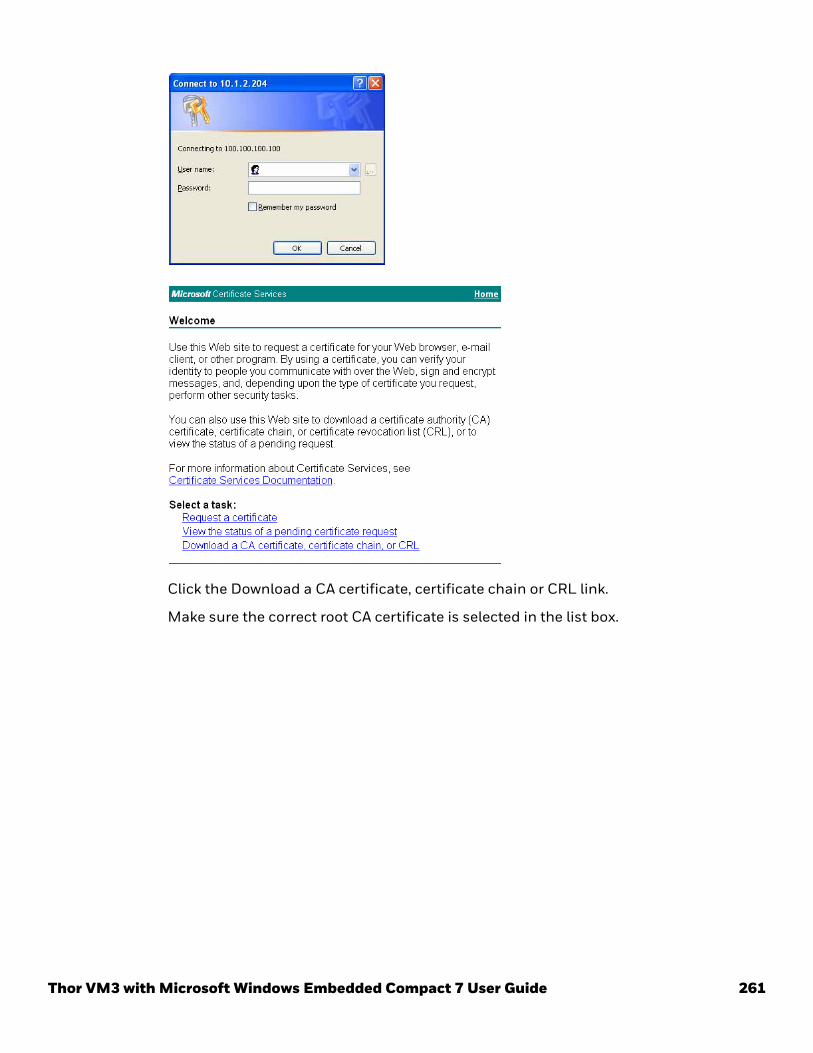
Click the Download a CA certificate, certificate chain or CRL link.
Make sure the correct root CA certificate is selected in the list box.
Thor VM3 with Microsoft Windows Embedded Compact 7 User Guide 261

Click the DER button.
To download the CA certificate, click on the Download CA certificate link.
Click the Save button and save the certificate. Make sure to keep track of the name and location of the certificate.
Install the certificate on the Thor VM3.
262 Thor VM3 with Microsoft Windows Embedded Compact 7 User Guide

Install a Root CA CertificateCopy the certificate file to the Thor VM3. Import the certificate by navigating to Start > Control Panel > Certificates.
Tap the Import button.
Make sure From a File is selected and tap OK.
Using the explorer buttons, browse to the location where you copied the certificate, select the certificate desired and tap OK.
Tap Yes to import the certificate.
Once the certificate is installed, return to the proper authentication section, earlier in this manual.
Thor VM3 with Microsoft Windows Embedded Compact 7 User Guide 263

Generate a User CertificateThe easiest way to get the user certificate is to use a browser on a PC to navigate to the Certificate Authority. To request the user certificate, open a browser to
http://<CA IP address>/certsrv.
Sign into the CA with the username and password of the person who will be logging into the mobile device.
This process saves a user certificate and a separate private key file. Windows Embedded Compact equipped devices such as the Thor VM3 require the private key to be saved as a separate file rather than including the private key in the user certificate.
Click the Request a certificate link.
264 Thor VM3 with Microsoft Windows Embedded Compact 7 User Guide

Click on the advanced certificate request link.
Click on the Create and submit a request to this CA link.
For the Certificate Template, select User.
Check the Mark keys as exportable and the Export keys to file checkboxes.
Thor VM3 with Microsoft Windows Embedded Compact 7 User Guide 265

Type the full path on the local PC where the private key is to be copied. Also specify the private key filename.
DO NOT check to use strong private key protection.
Make any other desired changes and click the Submit button.
If any script notifications occur, click the Yes button to continue the certificate request.
When prompted for the private key password:
• Click None if you do not wish to use a password, or
• Enter and confirm your desired password then click OK.
Click the Download certificate link.
Be sure to note the name used for the private key file, for example AAAUSER.PVK. The certificate file created later in this process must be given the same name, for example, AAAUSER.CER.
266 Thor VM3 with Microsoft Windows Embedded Compact 7 User Guide

Click Save to download and store the user certificate to the PC. Make sure to keep track of the name and location of the certificate. The private key file is also downloaded and saved during this process.
Be sure use the same name for the certificate file as was used for the private key file. For example, it the private key was saved as AAAUSER.PVK then the certificate file created must be given the same name, for example, AAAUSER.CER.
Install the user certificate.
Install a User CertificateCopy the certificate and private key files to the Thor VM3. Import the certificate by navi-gating to Start > Control Panel > Certificates.
Select My Certificates from the pull-down list.
Tap the Import button.
Thor VM3 with Microsoft Windows Embedded Compact 7 User Guide 267

Make sure From a File is selected and tap OK.
Using the explorer buttons, browse to the location where you copied the certificate, select the certificate desired and tap OK.
The certificate is now shown in the list.
With the certificate you just imported highlighted, tap View.
From the Field pull-down menu, select Private Key.
• If the private key is present, the process is complete.
• If the private key is not present, import the private key.
To import the private key, tap OK to return to the Certificates screen.
Tap import.
268 Thor VM3 with Microsoft Windows Embedded Compact 7 User Guide

Using the explorer buttons, browse to the location where you copied the private key file, change the Type pull-down list to Private Keys, select the certificate desired and tap OK. Enter the password for the certificate if appropriate.
Verify InstallationTap on View to see the certificate details again.
The private key should now say present. If it does not, there is a problem. Possible items to check:
• Make sure the certificate was generated with a separate private key file, as shown earlier in this section. If the certificate was not generated with a separate private key file, generate a new certificate and follow the import process again.
• Make sure the certificate and private key file have the same name, for example AAAuser.cer for the certificate and AAAuser.pvk for the private key file. If the file names are not the same, rename the private key file and import it again.
Thor VM3 with Microsoft Windows Embedded Compact 7 User Guide 269

VM3 WWAN Connection ManagerAccess the VM3 Connection Manager from the icon in the system tray. Double tap the Connection Manager icon (or right-click the icon and select Configuration Panel). The Connection Manager icon looks like this:
Use the VM3 Connection Manager to:
• Configure WWAN connections
• Configure hyper-roaming between WWAN carriers or between WWAN and WLAN..
• The Connection Manager roams from WLAN to WWAN when the WLAN signal is weak enough to allow the roaming. Due to the fact that WWAN signals are present in most areas, it is unlikely the Connection Manager will roam back to a WLAN connection automatically. User intervention may be required to switch back to WLAN.
• Roaming to or between WWAN carriers is different than roaming between WLAN access points. In order for WWAN to roam, the Connection Manager must first disconnect from the old WWAN carrier then establish a connection to the new WWAN carrier.
• When hyper-roaming (either between WWAN carriers or between WLAN/WWAN) the network connection is temporarily lost during the switching process. When switching to or between WWAN carriers, the connection manager must load carrier firmware and this can take several minutes.
• If there is a connection issue, the first step in troubleshooting is to verify the APN on the Connection Type tab.
VM3 Connection Manager icon when there is no active WLAN or WWAN connection. The icon may be flashing in the system tray when there is no connection.WVM3 Connection Manager icon when there is an active WLAN connection.
VM3 connection manager icon when a WWAN connection is active. The icon indicates which SIM card is used (1 or 2) and the strength of the connection (1 to 4 bars).
Hyper-Roaming Notes:
Connection troubleshooting:
270 Thor VM3 with Microsoft Windows Embedded Compact 7 User Guide

HomeThe Home tab lists the available connections and information on these connections. The order of the connections listed are specified on the Link Settings tab.
Each configured connection (or link) is identified by name, either WLAN (for a WLAN connection) or the name of the carrier (for a WWAN connection). If a connection is not configured, there is no name after the link and the status field is empty.
The active connection displays the IP address and signal strength (RSSI). Inactive con-nections show the status as Standby.
If a WWAN connection is active, the roaming status (Home or Roam) is displayed.
Thor VM3 with Microsoft Windows Embedded Compact 7 User Guide 271

Link SettingsThe available network connections are shown on this tab:
The WLAN network can be enabled or disabled from this tab, however configuration settings for the 802.11 a/b/g/n radio are set with the WLAN Wireless Configuration Utility (WCU).
The WWAN networks, if any, are shown on this page. A WWAN network is only displayed if a SIM card has been installed for that network. The Thor VM3 supports two SIM cards. See Install SIM Card(s) for SIM card installation instructions. A WWAN network can be enabled or disabled from this screen, however the connection is configured by tapping the applicable Network Settings button.
To change the order (Priority) of the networks:
1. Select the desired network. When selected, the network has a green check mark to the left.
2. Tap the Up or Down button to move the network in the desired direction.
3. Tap the Save button after the order is set.
To change the other options (Enable, Threshold, Dwell, Connect Attempts):
1. To enable or disable a carrier, tap the checkbox to the left of the carrier name. When checked, the carrier is enabled.
2. For other parameters, double tap the cell containing the value that is to be changed. The value in the cell can now be edited.
3. Enter the desired value.
272 Thor VM3 with Microsoft Windows Embedded Compact 7 User Guide

4. Tap anywhere else on the screen to exit the editing mode.
5. The values that can be changed are:
• Threshold - The signal strength (in dBm) before roaming can occur to this connection. The default is -93 dBm.
• Dwell - The length of time (in seconds) to wait before attempting the connection. The default is 10 seconds.
• Connect Attempts - The number of times this connection is tried. If there is no successful connection after this many tries, the next connection is tried.
To configure a WWAN network, tap the View Network Settings button. To configure the WLAN connection use the WLAN Wireless Configuration Utility (WCU).
Thor VM3 with Microsoft Windows Embedded Compact 7 User Guide 273

Connection TypeUse this tab to configure the connection parameters. The tab is identified by the type of connection, i.e.: UMTS, LTE, UDMA, etc. The label on this tab corresponds to the Tech-nology field on the About tab.
Note that the SIM card being configured (Sim1 or Sim2) is identified at the top of this tab.
After all entries are completed, tap the Save button.
If the WWAN radio fails to connect, please check that the correct APN is entered. This entry can be verified by contacting the WWAN carrier.
An APN mismatch may generate an error message, however this is not always the case. The first step in diagnosing a connection error should be to verify the APN.
274 Thor VM3 with Microsoft Windows Embedded Compact 7 User Guide

PIN/PUKNext select the PIN/PUK tab. Note that the SIM card being configured (Sim1 or Sim2) is identified at the top of this tab.
Enter the PIN or PUK and tap Save then tap Exit to return to the Connection Manager.
Thor VM3 with Microsoft Windows Embedded Compact 7 User Guide 275

System SettingsUse this screen to configure WWAN settings.
Enable LoggingCheck to enable logging. Specify the maximum file size and the location for the log file.
By default logging is disabled.
TcpWindow Size=128kCheck to set the TCP window size to 128k.
By default this options is disabled.
Enable On-screen Connection IconCheck to enable an on-screen connection icon. The icon is displayed in the lower right corner of the screen, above the date/time.
This icon is in addition to the connection icon in the system tray.
By default the on-screen icon is disabled.
Connected Not connected
276 Thor VM3 with Microsoft Windows Embedded Compact 7 User Guide

Enable Firmware UpdateThe WWAN card supports firmware update over the air (Firmware Over The Air, or FOTA). By default, FOTA is disabled. See Using FOTA
Restore DefaultsUse this option to return all Connection Manager settings to the default value.
Thor VM3 with Microsoft Windows Embedded Compact 7 User Guide 277

Using FOTAHoneywell recommends distributing firmware via a WLAN connection rather than the WWAN connection. This requires an HTTP server which can be hosted on the Internet or the same Intranet (i.e.: the same network domain) as the Thor VM3. Honeywell tested FOTA using:
• Uniform Server: https://sourceforge.net/projects/miniserver/
• IIS: Microsoft Internet Information Services, Windows 2012 server
To use FOTA, the following steps must be completed before initial use:
• Configure HTTP Server
• Load Firmware Updates
• Configure the Thor VM3
For subsequent updates, it is only necessary to Load Firmware Updates.
Configure HTTP ServerThe instructions below are for Uniform Server (UniServer). Setup information for IIS server is widely available on line. Follow the same folder setup as in step 4 below for IIS.
1. After installing, browse to the installation folder and run the server by double-click-ing UniController.exe.
2. Click the Start Apache button. The indicator changes from red to green when the server is running. The button label also changes to Stop Apache.
3. Display the test page by clicking the View www button or typing http://localhost into a web browser.
4. Create the folder structure on the web server:<Server URL>/<wwan>/<Carrier Number>/<Version>.Assuming initroot is root folder for the HTTP server, create a wwan folder underneath initroot. Then create folders under wwan numbered 0-15 to represent each carrier number. The structure is shown below. As firmware updates are received, create version folders under the appropriate carrier number. Notice the version folders under the <3> folder in this example.<initroot>
<wwan>
<0>
278 Thor VM3 with Microsoft Windows Embedded Compact 7 User Guide

5. Click on the Apache tab and select Access and Passwords > Folder www access and passwords.
6. Select Password Disabled and Local, Intranet and Internet Access.
7. Verify server setup:
• Ping the sever from the Thor VM3 to verify connectivity between the devices.
• Open the web browser on the Thor VM3 and verify the URL of the server can be accessed.
<1>
<2>
<3>
1.0.0
1.0.1
1.0.2
<4>
<5>
...
<14>
<15>
Thor VM3 with Microsoft Windows Embedded Compact 7 User Guide 279

Load Firmware UpdatesThe firmware update is provided by Honeywell customer support. The update consists of a version string and a zip file. The version string is three numbers separated by peri-ods, i.e.: 1.0.0 or 3.1.12.
Top load the firmware files:
1. Create a subfolder under the applicable carrier number that matches the version string. For example, if update 1.0.3 is received for carrier number 6, the folder would be:<Server URL>/<wwan>/<6>/<1.0.3>
2. Unzip the firmware file. The firmware update consists of three files:
• carrier_pri.nvu
• imageInfo.xml
• spkg_sblz.cwe
3. Copy the three files into the update folder created above.
Configure the Thor VM3Repeat these steps for each Thor VM3 that will be using FOTA. Once configured, the Thor VM3 continues to check for firmware updates at the specified interval.
On the System Settings tab of the Connection Manager:
1. Check the Enable Firmware Update checkbox.
2. Select the desired frequency (daily or weekly) to Check for Updates.
3. Specify the Firmware Storage Path. This path includes the address of the web server but does not include the carrier number or version folders created. The carrier folder and update folder are automatically detected by the update utility. For example, if the web server is hosted at http://127.0.0.1, the path is entered ashttp://127.0.0.1/wwan/ Important - the trailing / must be included after wwan.
280 Thor VM3 with Microsoft Windows Embedded Compact 7 User Guide

GPSThis screen displays GPS data. A WWAN connection is not required for the GPS data, however an antenna must be attached to the GPS port.
Tap the Start button to begin receiving GPS data. Once started, the button label changes to Stop and GPS data on screen is populated.
Tap the Clear GPS Data button to erase the GPS data.
Thor VM3 with Microsoft Windows Embedded Compact 7 User Guide 281

AboutThe about screen has no user-configurable parameters. It identifies the firmware and hardware versions, the carrier selected, MEID, etc. for the WWAN radio.
282 Thor VM3 with Microsoft Windows Embedded Compact 7 User Guide

APPENDIX
A
Thor VM3 with Mic
KEY MAPS
Integrated Keypad
There are seven integrated programmable keys located on the Thor VM3 below the dis-play. Each programmable key can be modified by the Orange key for a total of 14 pro-grammable keys.
See Keyboard Remapper to remap these keys.
The default values for these keys are:
P8P1 P14P7P13P6P12P5P11P4P10P3P9P2
To get this Programmable Key Press These Keys in this Order Default Key Value
P1 (Programmable key 1) P1 F1
P2 (Programmable key 2) P2 F2
P3 (Programmable key 3) P3 F3
P4 (Programmable key 4) P4 F4
P5 (Programmable key 5) P5 F5
P6 (Programmable key 6) P6 Open/Close Soft Keyboard
P7 (Programmable key 7) P7 Enter
P8 (Programmable key 8) Orange P1 <none>
P9 (Programmable key 9) Orange P2 <none>
P10 (Programmable key 10) Orange P3 <none>
P10 (Programmable key 11) Orange P4 <none>
P10 (Programmable key 12) Orange P5 <none>
P10 (Programmable key 13) Orange P6 <none>
P10 (Programmable key 14) Orange P7 <none>
Increase speaker volume Blue P1 Increase speaker volume
Decrease speaker volume Blue P2 Decrease speaker volume
Increase display brightness Blue P5 Increase display brightness
rosoft Windows Embedded Compact 7 User Guide 283

The Blue plus P3, P4 or P7 key press sequences cause no action.
Integrated Keypad and BIOSThe front panel keys have limited functionality before booting completes. However, the following key functions are available during BIOS setup and before Windows has com-pleted loading (i.e.: to maneuver a Windows boot menu).
• P1 - Up Arrow
• P2 - F2
• P3 - Down Arrow
• P4 - Left Arrow
• P5 - F5
• P6 - Right Arrow
• P7 - Esc (Escape)
• Blue - Tab
• Orange - Enter
Decrease display brightness Blue P6 Decrease display brightness
To get this Programmable Key Press These Keys in this Order Default Key Value
284 Thor VM3 with Microsoft Windows Embedded Compact 7 User Guide

External 21-Key Keyboard
The table below shows the results of the keypress combinations. Each key has an unshifted mode, a Yellow shifted mode and a Green shifted mode.
• To enter Yellow shifted mode, press the Yellow key. The keypad remains in Yellow shifted mode until any other key is pressed or the Yellow key is pressed again.
• To enter Green shifted mode, press the Green key. The keypad remains in Green shifted mode until any other key is pressed or the Green key is pressed again.
• Pressing the Yellow key then the Green key cancels Yellow mode and the keypad is in Green shifted mode.
• Pressing the Green key then the Yellow key cancels Green mode and the keypad is in Yellow shifted mode.
• Arrow keys are unaffected by Yellow or Green shifted mode.
• Keypress combinations marked as N/A do nothing (the keystroke is consumed by the keyboard and not sent to the Thor VM3).
• Keys marked as programmable can be assigned a value using the Keyboard Remapper control panel.
• Pressing the backlight key (alone or after the Green or Yellow keys) cycles the keypad backlight through Low, Medium, High, Off then repeats.
Key Non-Shifted Yellow-Shifted Green-Shifted
1 1 F1 F11
2 2 F2 F12
3 3 F3 F13
4 4 F4 F14
5 5 F5 F15
6 6 F6 F16
7 7 F7 F17
8 8 F8 F18
9 9 F9 F19
Thor VM3 with Microsoft Windows Embedded Compact 7 User Guide 285

0 0 F10 F20
PF Programmable Programmable N/A
Del Delete Backspace N/A
Tab Tab Backtab N/A
Left Left Left Left
Right Right Right Right
Up Up Up Up
Down Down Down Down
Key Non-Shifted Yellow-Shifted Green-Shifted
286 Thor VM3 with Microsoft Windows Embedded Compact 7 User Guide

External 95-Key Keyboard
These key functions apply to both the 95-Key USB Keyboard and the 95-key PS/2 Keyboard.
The key map table that follows lists the commands used for the Thor VM3. Note that since the Thor VM3 uses a Microsoft Windows operating system, no DOS Terminal Emulation keypress sequences are provided.
There are 10 hidden keys on the 95 key keyboard. Each of the hidden keys is accessed by pressing the <Fn> key (located in the top right hand corner) plus a key on the numeric keypad on the right. Additional function keys are supported as well.
Esc F2 F3 F4 F5 F6 F7 F8 F9 F10 F11 F12 PrintScreenSysRq
ScrollLock
PauseBreak
Fn
` 1 2 3 4 5 6 7 8 9 0 - =BackSpace Num
Lock/ * -
Tab Q W E R T Y U I O P[ ] \{ } | 7 8 9
4 5 6
1 2
0
3
Home PgUp
Caps A S D F G H J K L; ': " Enter
Ctrl Alt
X C V B N M , . /< > ? Shift
Alt CtrlIns
End PgDn
+
~ ! @ # $ % ^ & * ( )_ +
Lock
Shift Z
L R
Enter.Del
F1
To get this Key / Function Press These Keys in this Order
Insert FN 0 (numeric keypad)
Home FN 7 (numeric keypad)
Page Up FN 9 (numeric keypad)
Delete FN . (numeric keypad)
End FN 1 (numeric keypad)
Page Down FN 3 (numeric keypad)
Up Arrow FN 8 (numeric keypad)
Left Arrow FN 4 (numeric keypad)
Down Arrow FN 2 (numeric keypad)
Right Arrow FN 6 (numeric keypad)
Thor VM3 with Microsoft Windows Embedded Compact 7 User Guide 287

External 60-Key Keyboard
The key map table that follows lists the commands used when using the Thor VM3 with the 60-key PS/2 Keyboard.
The 60-key keyboard does not have a NumLock indicator or key. NumLock can be tog-gled On or Off using the 2nd SHIFT F10 keypress sequence. The default for NumLock is On. Changes made to the NumLock status persist across a Windows restart.
When running RFTerm, please refer to the RFTerm Reference Guide for equivalent keys and keypress sequences.
60 Key KeyMap 101-Key Equivalencies• The following keymap is used on a Thor VM3 that is NOT running RFTerm.
• When using a sequence of keys that includes the 2nd key, press the 2nd key first then the rest of the key sequence.
• When the Thor VM3 boots, the default condition of Caps (or CapsLock) is Off. The Caps (or CapsLock) condition can be toggled with a 2nd + F1 key sequence. The CAPS LED is illuminated when CapsLock is On. The keymaps below assume Caps is Off.
• The Thor VM3 keyboard has several control keys. The following control keys are not used:
◦ The 2nd function of the F3 key is not used as Windows Power Management controls all power management modes on the Thor VM3.
◦ The 2nd functions of the F4 and F5 keys are not used as the display brightness is adjusted via the buttons on the front of the Thor VM3.
◦ The 2nd functions of the F6 and F7 keys are not used as the Thor VM3 has TFT LCD screen with no provision for contrast adjustments.
◦ The 2nd functions of the F8 and F9 keys are not used as the sound volume on the Thor VM3 is controlled with a Microsoft Windows Control Panel.
◦ The 2nd function of the F10 key is not used as the display backlight timer also controls the keyboard backlight.
To get this Key / Function Press These Keys in this Order
Power On/Off Power
2nd 2nd
288 Thor VM3 with Microsoft Windows Embedded Compact 7 User Guide

Shift Shift
Alt Alt
Ctrl Ctrl
Esc Esc
Space Sp
Enter Enter
Enter (numeric) 2nd Enter
CapsLock (Toggle) 2nd F1
Back Space BkSp
Tab Tab
Back Tab 2nd Tab
Ctrl-Break Ctrl 2nd F2
Pause 2nd F2
Up Arrow Up Arrow
Down Arrow Down Arrow
Right Arrow Right Arrow
Left Arrow Left Arrow
Insert 2nd Bksp
Delete (numeric) 2nd DOT
Home 2nd Left Arrow
End 2nd Right Arrow
Page Up 2nd Up Arrow
Page Down 2nd Down Arrow
ScrollLock 2nd Shift F10
F1 F1
F2 F2
F3 F3
F4 F4
F5 F5
F6 F6
F7 F7
F8 F8
F9 F9
F10 F10
F11 2nd Shift F1
F12 2nd Shift F2
a A
b B
c C
d D
To get this Key / Function Press These Keys in this Order
Thor VM3 with Microsoft Windows Embedded Compact 7 User Guide 289

e E
f F
g G
h H
i I
j J
k K
l L
m M
n N
o O
p P
q Q
r R
s S
t T
u U
v V
w W
x X
y Y
z Z
A Shift A
B Shift B
C Shift C
D Shift D
E Shift E
F Shift F
G Shift G
H Shift H
I Shift I
J Shift J
K Shift K
L Shift L
M Shift M
N Shift N
O Shift O
P Shift P
Q Shift Q
R Shift R
To get this Key / Function Press These Keys in this Order
290 Thor VM3 with Microsoft Windows Embedded Compact 7 User Guide

S Shift S
T Shift T
U Shift U
V Shift V
W Shift W
X Shift X
Y Shift Y
Z Shift Z
1 1
2 2
3 3
4 4
5 5
6 6
7 7
8 8
9 9
0 0
DOT DOT
< 2nd 0
[ 2nd 1
] 2nd 2
> 2nd 3
= 2nd 4
{ 2nd 5
} 2nd 6
/ (numeric) 2nd Ctrl 7
/ (alpha) 2nd 7
- (numeric) 2nd Ctrl 8
- (alpha) 2nd 8
+ (numeric) 2nd Ctrl 9
+ (alpha) 2nd 9
* (numeric) 2nd I (letter i)
* (alpha) 2nd Ctrl I (letter i)
: (colon) 2nd D
; (semicolon) 2nd F
? 2nd L
` 2nd N
_ (underscore) 2nd M
, (comma) 2nd J
To get this Key / Function Press These Keys in this Order
Thor VM3 with Microsoft Windows Embedded Compact 7 User Guide 291

' (apostrophe) 2nd H
~ (tilde) 2nd B
\ 2nd S
| 2nd A
" 2nd G
! 2nd Q
@ 2nd W
# 2nd E
$ 2nd R
% 2nd T
^ 2nd Y
& 2nd U
( 2nd O
) 2nd P
To get this Key / Function Press These Keys in this Order
292 Thor VM3 with Microsoft Windows Embedded Compact 7 User Guide

CHAPTER
B
Thor VM3 with Mic
SPECIFICATIONS AND REFERENCE MATERIAL
Technical Specifications
Thor VM3Processor Intel Atom Dual Core CPU operating at 1.46GHz
Memory 2 or 4 GB DDR3 RAM
Mass Storage 2 GB mSATA
Storage Expansion 4 GB mSATA (user installable)
Operating System Microsoft Windows Embedded Compact 7
Radio Modules 802.11 a/b/g/n radio / Bluetooth
Scanner Options No integrated scanner, Optional serial, USB or Bluetooth scanners
Display Technology Intel HD graphics processorActive matrix TFTResolution: 1024 x 468 pixels (maximum)400 NIT (indoor) or 900 NIT (outdoor) brightness, 12.1” (measured horizontally) displayTransmissive with LED backlightAutomatic brightness control on outdoor displayVehicle motion screen blanking available
Keyboard Integrated 7-key keypadOptional 95-key USB keyboardOptional numeric-only keyboardOptional adapter cable for Honeywell PS/2 keyboards
Touch Screen Impact resistive, standard hardenedOptional defrosterField replaceable front panel including touch screen and optional defroster
External Connectors Optional external 802.11 / GPS / WWAN antenna connectorsAdditional connectors on dock, see below
Beeper Minimum loudness greater than 95dBm at 10 cm in front of unit
Power Supply 10 to 60 VDC isolated
Uninterruptible Power Supply Internal UPS battery, 30-minute life at -30°C (-22°F)
Backup Battery (RCT) Internal lithium battery maintains Real Time Clock
rosoft Windows Embedded Compact 7 User Guide 293

VM1D Standard DockCaution: This dock is designed for DC power vehicle-mounted
applications only.
SKUs VM1001VMCRADLE (with RAM ball)VM1002VMCRADLE VM1003VMCRADLE
Power Connector 6-pin connector:Direct10-60V DC input powerOptional external converter for extended range DC (60-150 VDC)
COM1Connector 9-pin male, RS-232 serial port, COM1 with switchable power on pin 9
COM2 Connector 9-pin male, RS-232 serial port, COM2 with switchable power on pin 9
CANBUS/AUDIO Connector 15-pin male, CANbus/Audio connector supports either audio/microphone via adapter cable or J1939 Female and J1939 Male connectors via CANbus cable
USB Connector 9-pin female, USB connector supports USB host port via adapter cable
Power Switch Sealed power switch
Input Power DC Input Voltage: 10- 60 VDC, Input Current: 4.6 Amps (typical),Input Fuse: 8A Time Delay. Replace with same size, rating and type of fuse:
• Littelfuse 0215008.MXP
• Cooper Bussmann BK1/S506-8-R
• Bel Fuse 5HT 8-Ror equivalent.
External Power Supply 50-150 VDC DC power supply available for vehicles over 60 VDC
Note: Use dock VMX005VMCRADLE (VMXD Enhanced Dock of Off-Vehicle Use) in AC power applications.
294 Thor VM3 with Microsoft Windows Embedded Compact 7 User Guide

VM3D Enhanced DockCaution: This dock is designed for DC power vehicle-mounted
applications only.
SKU VM3001VMCRADLE
Power Connector 6-pin connector:Direct10-60V DC input powerOptional external converter for extended range DC (60-150 VDC)
COM1Connector 9-pin male, RS-232 serial port, COM1 with switchable power on pin 9
COM2 Connector 9-pin male, RS-232 serial port, COM2 with switchable power on pin 9
CANBUS/AUDIO Connector 15-pin male, CANbus/Audio connector supports either audio/microphone via adapter cable or J1939 Female and J1939 Male connectors via CANbus cable
USB1 Connector 9-pin female, USB connector supports USB host port via adapter cable
Note: USB Client port may not be supported by the Thor VM3 operating system.
USB 2 Connector 15-pin female, USB connector supports 2 USB host ports via adapter cable
USB2 Connector 15-pin female, USB connector supports two USB host ports via adapter cable
USB Host Connector One USB Host connector behind waterproof cap
Ethernet One RJ45 Ethernet connector behind waterproof cap
Power Switch Sealed power switch
Input Power DC Input Voltage: 10- 60 VDC, Input Current: 4.6 Amps (typical),Input Fuse: 8A Time Delay. Replace with same size, rating and type of fuse:
• Littelfuse 0215008.MXP
• Cooper Bussmann BK1/S506-8-R
• Bel Fuse 5HT 8-Ror equivalent.
External Power Supply 50-150 VDC DC power supply available for vehicles over 60 VDC
Note: Use dock VMX005VMCRADLE (VMXD Enhanced Dock of Off-Vehicle Use) in AC power applications.
Thor VM3 with Microsoft Windows Embedded Compact 7 User Guide 295

VMXD Enhanced DockCaution: This dock is designed for DC power vehicle-mounted
applications only.
SKUs VMX004VMCRADLE
Power Connector 6-pin connector:13.2VDC input power; requires DC power supplyConnector is also used for screen blanking via COM1 CTS and RTS signals
COM1Connector 9-pin male, RS-232 serial port, COM1 with switchable power on pin 9Do not use COM1 when screen blanking box is attached to avoid port conflicts.
COM2 Connector 9-pin male, RS-232 serial port, COM2 with switchable power on pin 9
CANBUS/AUDIO Connector 15-pin male, CANbus/Audio connector supports either audio/microphone via adapter cable or J1939 Female and J1939 Male connectors via CANbus cable
USB1 Connector 9-pin female, USB connector supports USB host port via adapter cable
Note: USB Client port may not be supported by the Thor VM3 operating system.
USB 2 Connector 15-pin female, USB connector supports 2 USB host ports via adapter cable
USB2 Connector 15-pin female, USB connector supports two USB host ports via adapter cable
USB 2 Connector 15-pin female, USB connector supports 2 USB host ports via adapter cable
USB Host Connector One USB Host connector behind waterproof cap
Ethernet One RJ45 Ethernet connector behind waterproof cap
Power Switch Sealed power switch
External Power Supply AC Adapter, 120-240VAC to 12VDC
Input Power DC Input Voltage: 13.2VDC, Input Current: 4.6 Amps (typical),Input Fuse: 8A Time Delay. Replace with same size, rating and type of fuse:
• Littelfuse 0215008.MXP
• Cooper Bussmann BK1/S506-8-R
• Bel Fuse 5HT 8-Ror equivalent.
External Power Supply 50-150 VDC DC power supply required for all installations
Note: Use dock VMX005VMCRADLE (VMXD Enhanced Dock of Off-Vehicle Use) in AC power applications.
296 Thor VM3 with Microsoft Windows Embedded Compact 7 User Guide

VMXD Enhanced Dock for Off-Vehicle Use (QM3AC)Caution: This dock is designed for AC power (non vehicle-mounted)
applications only.
SKU VMX005VMCRADLE
Power Connector 6-pin connector:15VDC input power via required AC/DC Adapter
COM1Connector 9-pin male, RS-232 serial port, COM1 with power on pin 9
COM2 Connector 9-pin male, RS-232 serial port, COM2 with power on pin 9
CANBUS/AUDIO Connector 15-pin male, CANbus/Audio connector supports either audio/microphone via adapter cable or J1939 Female and J1939 Male connectors via CANbus cable
USB1 Connector 9-pin female, USB connector supports USB host port via adapter cable
Note: USB Client port may not be supported by the Thor VM3 operating system.
USB 2 Connector 15-pin female, USB connector supports 2 USB host ports via adapter cable
USB2 Connector 15-pin female, USB connector supports two USB host ports via adapter cable
USB 2 Connector 15-pin female, USB connector supports 2 USB host ports via adapter cable
USB Host Connector One USB Host connector behind waterproof cap
Ethernet One RJ45 Ethernet connector behind waterproof cap
Power Switch Sealed power switch
External Power Supply AC Adapter, 120-240VAC to 15VDC
Input Power DC Input Voltage: 15VDC, Input Current: 4 Amps (maximum),Input Fuse: 8A Time Delay. Replace with same size, rating and type of fuse:
• Littelfuse 0215008.MXP
• Cooper Bussmann BK1/S506-8-R
• Bel Fuse 5HT 8-Ror equivalent.
External Power Supply AC Adapter, 120-240VAC to 15VDC required
Note: This dock for use in AC power applications. See other docks for DC power applications.
Thor VM3 with Microsoft Windows Embedded Compact 7 User Guide 297

Dimensions
Thor VM3
VM1D Standard DockNote: The RAM ball is not included in the following measurements.
VM3D and VMXD Enhanced DockNote: The RAM ball is not included in the following measurements.
Width 12.6” (31.9 cm)
Height 10.3” (26.1 cm)
Depth 2.4” (6.2 cm)
Weight 6.75 lb. (3.1 kg)
Length 7.1” (18.0 cm)
Width 6.1” (15.5 cm)
Height 2.5” (6.4 cm), measurement includes strain relief cable clamps
Weight 3.2 lb. (1.5 kg)
Length 7.1” (18.0 cm)
Width 6.1” (15.5 cm)
Height 2.1” (5.4 cm), measurement includes strain relief cable clamps
Weight 2.4 lb. (1.1 kg)
298 Thor VM3 with Microsoft Windows Embedded Compact 7 User Guide

Environmental Specifications
Thor VM3 and DockOperating Temperature -22º to 122º F (-30ºC to 50ºC) [non-condensing]
Storage Temperature -22°F to 140°F (-30°C to 60°C) [non-condensing]
Operating Humidity Up to 95%
Water and Dust IEC 60529 compliant to IP66
ESD 15 kV air, 8kV direct contact
Vibration MIL-STD-810F, composite wheeled vehicles.
Crash SAE-J 1455
Thor VM3 with Microsoft Windows Embedded Compact 7 User Guide 299

Network Card Specifications
WLAN - Qualcomm Atheros 802.11a/b/g/n
WPAN - Bluetooth
WWAN
Bus Interface PCIe Mini Card
Wireless Frequencies(varies by regulatory domain)
2.4 to 2.4895 GHz IEEE 802.11b / 802.11g DSSS OFDM5.15 to 5.82 GHz IEEE 802.11a DSSS OFDM
RF Data Rates 802.11a (OFDM) 6, 9, 12, 18, 24, 36, 48, 54 Mbps802.11b (DSSS) 1, 2, 5.5, 11 Mbps802.11g (OFDM) 6, 9, 12, 18, 24, 36, 48, 54 Mbps802.11n (OFDM 20 MHz chs) 13, 26, 39, 52, 78, 104, 117, 130 Mbps802.11n (OFDM 40 MHz chs) 27, 54, 81, 108, 162, 216, 243, 270 Mbps
RF Power Level 50 mW max.
Channels FCC: 1-11, 36, 40 ,44, 48, 149, 153, 157, 161ETSI: 1-13, 36, 40, 44 ,48, 52, 56, 60, 64, 100, 104, 108, 112, 116, 120, 124, 128, 132, 136, 140
Connectivity TCP/IP, Ethernet, ODI
Diversity Yes
Bus Interface USB
Enhanced Data Rate Up to 3.0 Mbit/s over the air
Connection No less than 32.80 feet (10 meters) line of sight
Bluetooth Version 2.0 + EDR
Operating Frequency 2.402 - 2.480 GHz
QDID B013455
Device Software definable (data only), includes GPS
Technology 4G radio: LTE/UMTS/HSPA+/GSM/GPRS/EDGE/ EV-DOSupports 2 SIM cards for hyper-roaming between WWAN carriers
300 Thor VM3 with Microsoft Windows Embedded Compact 7 User Guide

Port and Connector Pinouts
Power Supply Connector
VM1D Standard Dock and VM3D Enhanced Dock
VMXD Enhanced Dock
Pin Signal Description
1 V In+ 10-60V DC input +
2 V In+ 10-60V DC input +
3 V In- input -
4 V In- input -
5 GND Chassis ground
6 Ignition +0V to 60V to start terminal
Pin Signal Description
1 V In+ 13.2V DC Input + provided by DC/DC power supply
2 V In+ 13.2V DC Input + provided by DC/DC power supply
3 V In- Input -
4 V In- Input -
5 COM1RTS
Screen Blanking Box + The green wire in the power cable must be connected to the switched side of the screen blanking box. See the applicable wiring diagram below.
6 COM1CTS
Screen Blanking Box - The white wire in the power cable must be connected to the unswitched side of the screen blanking box. See applicable wiring diagram below.
Cable shell provides chassis ground connection.
3
1
6
5
2
4
3
1
6
5
2
4
Thor VM3 with Microsoft Windows Embedded Compact 7 User Guide 301

VMXD Enhanced Dock for Off-Vehicle Use (QM3AC)
VMXD enhanced dock for off-vehicle use requires adapter cable VM1076CABLE to connect the dock to the AC/DC adapter. This cable is included in the AC kit for off-vehicle use.
Pin Signal Description
1 V In+ 15V DC Input + provided by AC/DC adapter
2 V In+ 15V DC Input + provided by AC/DC adapter
3 V In- Input -
4 V In- Input -
5 GND No connection.
6 Ignition No connection
3
1
6
5
2
4
302 Thor VM3 with Microsoft Windows Embedded Compact 7 User Guide

COM1 and COM2 Connector
VMXD Enhanced Dock only: Because the power supply connector port for the VMXD Enhanced Dock con-tains COM1 RTS and CTS signals, the COM1 port on the dock should not be used when the power cable is used for screen blanking to avoid port conflicts.
USB and USB1 ConnectorThe Standard Dock has a USB connector. The Enhanced Dock has a USB1 connector.
Pin Signal Description
1 DCD Data Carrier Detect – Input
2 RXD Receive Data – Input
3 TXD Transmit Data – Output
4 DTR Data Terminal Ready – Output
5 GND Signal/Power Ground
6 DSR Data Set Ready – Input
7 RTS Request to Send – Output
8 CTS Clear to Send – Input
9 +5VDC Bar Code Scanner Power - 500mA max
Shell CGND Chassis Ground
Pin Signal Description
1 GND Common ground
2 USBC_D+ USB client data signal (not used)
3 USBC_D- USB client data signal (not used)
4 USB_H1_PWR USB host 1; 5V output power
5 GND Common ground
6 GND Common ground
7 USB_H1_D+ USB host 1 data signal
8 USB_H1_D- USB host 1 data signal
9 USBC_VBUS USB client 5V detect from attached host
PIN 9PIN 6
PIN 5PIN 1
PIN 6PIN 9
PIN 1PIN 5
Thor VM3 with Microsoft Windows Embedded Compact 7 User Guide 303

USB Host/Client Y Cable
D9 Male Connector
USB Host Connector
USB Client ConnectorThe USB client connection is not supported on the Thor VM3.
Pin Signal Description
1 GND Common ground
2 USBC_D+ USB client data signal (not used)
3 USBC_D- USB client data signal (not used)
4 USB_H1_PWR USB host 5V output power
5 GND Common ground
6 GND Common ground
7 USB_H1_D+ USB host 1 data signal
8 USB_H1_D- USB host 1 data signal
9 USBC_VBUS USB client 5V detect from attached host
Pin Signal Description
1 5V_USB USB Power, Current Limited
2 USB_H1_D- USB D-
3 USB_H1_D+ USB D+
4 GND USB Power Return
Shell CGND Chassis Ground
PIN 9PIN 6
PIN 5PIN 1
PIN 4
PIN 1
304 Thor VM3 with Microsoft Windows Embedded Compact 7 User Guide

USB Host to Scanner Cable
D9 Male Connector
RJ50 Connector
Pin Signal Description
1 Not used
2 Not used
3 Not used
4 USB_H1_PWR USB host 5V output power
5 GND Common ground
6 Not used
7 USB_H1_D+ USB host 1 data signal (twisted pair)
8 USB_H1_D- USB host 1 data signal (twisted pair)
9 USBC_VBUS USB client 5V detect from attached host
Pin Signal Description
1 Drain To D9 connector shell
2 Not used
3 GND Common ground
4 Not used
5 Not used
6 Not used
7 USB_H1_PWR USB host 5V output power
8 Not used
9 USB_H1_D+ USB host 1 data signal (twisted pair)
10 USB_H1_D- USB host 1 data signal (twisted pair)
PIN 9PIN 6
PIN 5PIN 1
PIN 10
PIN 1
Thor VM3 with Microsoft Windows Embedded Compact 7 User Guide 305

USB2 ConnectorThe USB2 connector is only present on the Enhanced Dock.
Pin Signal Description
1 Not Used
2 Not Used
3 Not Used
4 Not Used
5 Not Used
6 USB_H2_PWR USB host 2 5V output power
7 USB_H2_D+ USB host 2 data signal
8 USB_H2_D- USB host 2 data signal
9 GND Common ground
10 GND Common ground
11 USB_H3_PWR USB host 3 5V output power
12 USB_H3_D+ USB host 3 data signal
13 USB_H3_D- USB host 3 data signal
14 GND Common ground
15 GND Common ground
PIN 11
PIN 6
PIN 15
PIN 10 PIN 1PIN 5
306 Thor VM3 with Microsoft Windows Embedded Compact 7 User Guide

USB Dual Host Y Cable
D15 Male Connector
USB Host Connectors
Pin Signal Description
1 Not Used
2 Not Used
3 Not Used
4 Not Used
5 Not Used
6 USB_H2_PWR USB host 2 5V output power
7 USB_H2_D+ USB host 2 data signal
8 USB_H2_D- USB host 2 data signal
9 GND Common ground
GND Common ground
USB_H3_PWR USB host 3 5V output power
USB_H3_D+ USB host 3 data signal
USB_H3_D- USB host 3 data signal
GND Common ground
GND Common ground
Pin Signal Description
1 5V_USB USB Power, Current Limited
2 USB_H2_D- USB D-
3 USB_H2_D+ USB D+
4 GND USB Power Return
Shell CGND Chassis Ground
PIN 11
PIN 6
PIN 15
PIN 10PIN 1 PIN 5
PIN 4
PIN 1
Thor VM3 with Microsoft Windows Embedded Compact 7 User Guide 307

PS/2 to USB Keyboard Adapter CableNote: This cable is not supported when the Thor VM3 is used with the VM1D Standard Dock.
D9 Male Connector - USB
D9 Female Connector - PS/2
Pin Signal Description
1 Not Used
2 Not Used
3 Not Used
4 USB_H1_PWR USB host 5V output power
5 Not Used
6 GND Ground
7 USB_H1_D+ USB host 1 data signal
8 USB_H1_D- USB host 1 data signal
9 USBC_VBUS
Pin Signal Description
1 KBDAT Keyboard data
2 Not Used
3 Not Used
4 Not Used
5 GND Ground
6 Not Used
7 KBCLK Keyboard clock
8 GND Ground
9 VCC Keyboard power
PIN 9PIN 6
PIN 5PIN 1
PIN 6PIN 9
PIN 1PIN 5
308 Thor VM3 with Microsoft Windows Embedded Compact 7 User Guide

CANbus / Audio ConnectorPin Signal Description
1 - CAN reserved
2 CAN_L CAN_L bus line dominant low
3 CAN_GND CAN Ground
4 - CAN reserved
5 GND Optional ground
6 Audio return Headset return
7 Audio output Headset output
8 Mic input Microphone input
9 Mic return Microphone return
10 Audio Return
11 GND Optional ground
12 CAN_SHLD
13 CAN_H CAN_H bus line dominant high
14 - CAN reserved
15 CAN_V+ Option CAN external Power Supply
PIN 15
PIN 10
PIN 11
PIN 6 PIN 5PIN 1
Thor VM3 with Microsoft Windows Embedded Compact 7 User Guide 309

Headset Adapter Cable
D15 Female Connector
Quick Connect Headset Connector
Pin Signal Description
1 Not used
2 Not used
3 Not used
4 Not used
5 Not used
6 Audio return Headset return
7 Audio output Headset output
8 Mic input Microphone input
9 Mic return Microphone return
10 Not used
11 Not used
12 Not used
13 Not used
14 Not used
15 Not used
Pin Signal Description
1 Mic input Microphone input
2 Mic return Microphone return
3 Audio output Headset output
4 Audio return Headset return
PIN 15
PIN 10
PIN 11
PIN 6PIN 5 PIN 1
PIN 4
PIN 1
310 Thor VM3 with Microsoft Windows Embedded Compact 7 User Guide
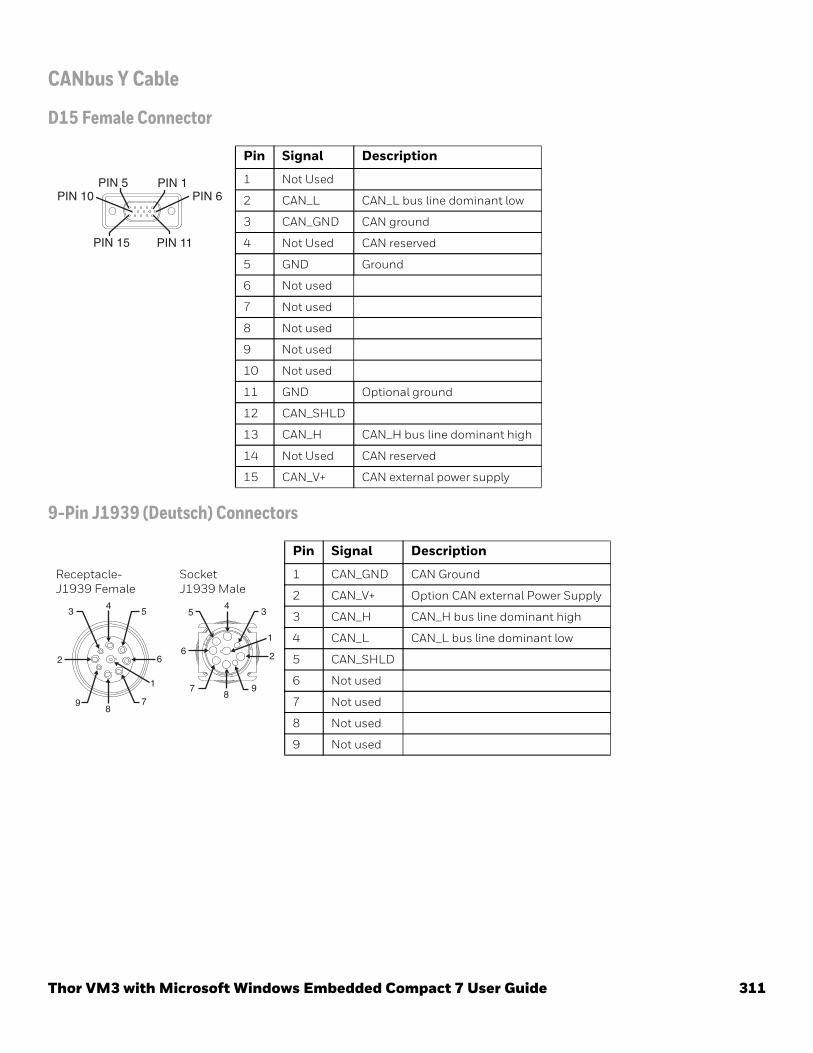
CANbus Y Cable
D15 Female Connector
9-Pin J1939 (Deutsch) Connectors
Pin Signal Description
1 Not Used
2 CAN_L CAN_L bus line dominant low
3 CAN_GND CAN ground
4 Not Used CAN reserved
5 GND Ground
6 Not used
7 Not used
8 Not used
9 Not used
10 Not used
11 GND Optional ground
12 CAN_SHLD
13 CAN_H CAN_H bus line dominant high
14 Not Used CAN reserved
15 CAN_V+ CAN external power supply
Pin Signal Description
Receptacle- J1939 Female
Socket J1939 Male
1 CAN_GND CAN Ground
2 CAN_V+ Option CAN external Power Supply
3 CAN_H CAN_H bus line dominant high
4 CAN_L CAN_L bus line dominant low
5 CAN_SHLD
6 Not used
7 Not used
8 Not used
9 Not used
PIN 15
PIN 10
PIN 11
PIN 6PIN 5 PIN 1
1
2
34
5
6
78
9
1
2
34
5
6
78
9
Thor VM3 with Microsoft Windows Embedded Compact 7 User Guide 311

Hat EncodingDesired ASCII Hex Value Hat Encoded Desired ASCII Hex Value Hat Encoded
NUL 0X00 ^@ HTJ 89 ~^I
SOH 0X01 ^A VTS 8A ~^J
STX 0X02 ^B PLD 8B ~^K
ETX 0X03 ^C PLU 8C ~^L
EOT 0X04 ^D RI 8D ~^M
ENQ 0X05 ^E SS2 8E ~^N
ACK 0X06 ^F SS3 8F ~^O
BEL 0X07 ^G DCS 90 ~^P
BS 0X08 ^H PU1 91 ~^Q
HT 0X09 ^I PU2 92 ~^R
LF 0X0A ^J STS 93 ~^S
VT 0A0B ^K CCH 94 ~^T
FF 0X0C ^L MW 95 ~^U
CR 0X0D ^M SPA 96 ~^V
SO 0X0D ^N EPA 97 ~^W
SI 0X0E ^O 98 ~^X
DLE 0X0F ^P 99 ~^Y
DC1 (XON) 0X10 ^Q 9A ~^Z
DC2 0X11 ^R CSI 9B ~^[
DC3 (XOFF) 0X12 ^S ST 9C ~^\\
DC4 0X13 ^T OSC 9D ~^]
NAK 0X14 ^U PM 9E ~^^
SYN 0X15 ^V APC 9F ~^_ (underscore)
ETB 0X16 ^W (no-break space) A0 ~ (tilde and space)
CAN 0X17 ^X ¡ A1 ~!
EM 0X18 ^Y ¢ A2 ~”
SUB 0X19 ^Z £ A3 ~#
ESC 0X1A ^[ ¤ A4 ~$
FS 0X1B ^\\ ¥ A5 ~%
GS 0X1C ^] ¦ A6 ~&
RS 0X1D ^^ § A7 ~’
US 0X1E ^_ (underscore) ¨ A8 ~(
0X1F ^? © A9 ~)
80 ~^@ ª AA ~*
81 ~^A « AB ~+
82 ~^B ¬ AC ~,
83 ~^C (soft hyphen) AD ~- (dash)
IND 84 ~^D ® AE ~. (period)
NEL 85 ~^E ¯ AF ~/
SSA 86 ~^F ° B0 ~0 (zero)
ESA 87 ~^G ± B1 ~1
HTS 88 ~^H ² B2 ~2
312 Thor VM3 with Microsoft Windows Embedded Compact 7 User Guide

³ B3 ~3 Ú DA ~Z
´ B4 ~4 Û DB ~[
µ B5 ~5 Ü DC ~\\
¶ B6 ~6 Ý DD ~]
· B7 ~7 Þ DE ~\^
¸ B8 ~8 ß DF ~_ (underscore)
¹ B9 ~9 à E0 ~‘º BA ~: á E1 ~a
» BB ~; â E2 ~b
¼ BC ~< ã E3 ~c
½ BD ~= ä E4 ~d
¾ BE ~> å E5 ~e
¿ BF ~? æ E6 ~f
À C0 ~@ ç E7 ~g
Á C1 ~A è E8 ~h
 C2 ~B é E9 ~i
à C3 ~C ê EA ~j
Ä C4 ~D ë EB ~k
Å C5 ~E ì EC ~l
Æ C6 ~F í ED ~m
Ç C7 ~G î EE ~n
È C8 ~H ï EF ~o
É C9 ~I ð F0 ~p
Ê CA ~J ñ F1 ~q
Ë CB ~K ò F2 ~r
Ì CC ~L ó F3 ~s
Í CD ~M ô F4 ~t
Î CE ~N õ F5 ~u
Ï CF ~O ö F6 ~v
Ð D0 ~) ÷ F7 ~w
Ñ D1 ~Q ø F8 ~x
Ò D2 ~R ù F9 ~y
Ó D3 ~S ú FA ~z
Ô D4 ~T û FB ~{
Õ D5 ~U ü FC ~|
Ö D6 ~V ý FD ~}
× D7 ~W þ FE ~~
Ø D8 ~X ÿ FF ~^?
Ù D9 ~Y
Desired ASCII Hex Value Hat Encoded Desired ASCII Hex Value Hat Encoded
Thor VM3 with Microsoft Windows Embedded Compact 7 User Guide 313

Licenses of Third Party SoftwareThis product contains software provided by third parties, which may include the below listed components. The Honeywell product that includes this file does not necessarily use all of the third party software components referred to below.
.. contents::
Package(s) using GPLv3 & LGPLv3 license
============================
* LPCProg and LPCProgCE
[Copyright:(c) Martin Maurer 2003-2008, All rights reserved
Portions Copyright (c) by Aeolus Development 2004]
License Text (GPLv3 and LGPLv3 license)
--------------------------
GNU GENERAL PUBLIC LICENSE
Version 3, 29 June 2007
Copyright (C) 2007 Free Software Foundation, Inc. <http://fsf.org/>
Everyone is permitted to copy and distribute verbatim copies
of this license document, but changing it is not allowed.
Preamble
The GNU General Public License is a free, copyleft license for
software and other kinds of works.
The licenses for most software and other practical works are designed
to take away your freedom to share and change the works. By contrast,
the GNU General Public License is intended to guarantee your freedom to
share and change all versions of a program--to make sure it remains free
software for all its users. We, the Free Software Foundation, use the
GNU General Public License for most of our software; it applies also to
any other work released this way by its authors. You can apply it to
your programs, too.
When we speak of free software, we are referring to freedom, not
price. Our General Public Licenses are designed to make sure that you
have the freedom to distribute copies of free software (and charge for
them if you wish), that you receive source code or can get it if you
want it, that you can change the software or use pieces of it in new
free programs, and that you know you can do these things.
To protect your rights, we need to prevent others from denying you
these rights or asking you to surrender the rights. Therefore, you have
certain responsibilities if you distribute copies of the software, or if
you modify it: responsibilities to respect the freedom of others.
For example, if you distribute copies of such a program, whether
gratis or for a fee, you must pass on to the recipients the same
freedoms that you received. You must make sure that they, too, receive
314 Thor VM3 with Microsoft Windows Embedded Compact 7 User Guide

or can get the source code. And you must show them these terms so they
know their rights.
Developers that use the GNU GPL protect your rights with two steps:
(1) assert copyright on the software, and (2) offer you this License
giving you legal permission to copy, distribute and/or modify it.
For the developers' and authors' protection, the GPL clearly explains
that there is no warranty for this free software. For both users' and
authors' sake, the GPL requires that modified versions be marked as
changed, so that their problems will not be attributed erroneously to
authors of previous versions.
Some devices are designed to deny users access to install or run
modified versions of the software inside them, although the manufacturer
can do so. This is fundamentally incompatible with the aim of
protecting users' freedom to change the software. The systematic
pattern of such abuse occurs in the area of products for individuals to
use, which is precisely where it is most unacceptable. Therefore, we
have designed this version of the GPL to prohibit the practice for those
products. If such problems arise substantially in other domains, we
stand ready to extend this provision to those domains in future versions
of the GPL, as needed to protect the freedom of users.
Finally, every program is threatened constantly by software patents.
States should not allow patents to restrict development and use of
software on general-purpose computers, but in those that do, we wish to
avoid the special danger that patents applied to a free program could
make it effectively proprietary. To prevent this, the GPL assures that
patents cannot be used to render the program non-free.
The precise terms and conditions for copying, distribution and
modification follow.
TERMS AND CONDITIONS
0. Definitions.
"This License" refers to version 3 of the GNU General Public License.
"Copyright" also means copyright-like laws that apply to other kinds of
works, such as semiconductor masks.
"The Program" refers to any copyrightable work licensed under this
License. Each licensee is addressed as "you". "Licensees" and
"recipients" may be individuals or organizations.
To "modify" a work means to copy from or adapt all or part of the work
in a fashion requiring copyright permission, other than the making of an
exact copy. The resulting work is called a "modified version" of the
earlier work or a work "based on" the earlier work.
Thor VM3 with Microsoft Windows Embedded Compact 7 User Guide 315

A "covered work" means either the unmodified Program or a work based
on the Program.
To "propagate" a work means to do anything with it that, without
permission, would make you directly or secondarily liable for
infringement under applicable copyright law, except executing it on a
computer or modifying a private copy. Propagation includes copying,
distribution (with or without modification), making available to the
public, and in some countries other activities as well.
To "convey" a work means any kind of propagation that enables other
parties to make or receive copies. Mere interaction with a user through
a computer network, with no transfer of a copy, is not conveying.
An interactive user interface displays "Appropriate Legal Notices"
to the extent that it includes a convenient and prominently visible
feature that (1) displays an appropriate copyright notice, and (2)
tells the user that there is no warranty for the work (except to the
extent that warranties are provided), that licensees may convey the
work under this License, and how to view a copy of this License. If
the interface presents a list of user commands or options, such as a
menu, a prominent item in the list meets this criterion.
1. Source Code.
The "source code" for a work means the preferred form of the work
for making modifications to it. "Object code" means any non-source
form of a work.
A "Standard Interface" means an interface that either is an official
standard defined by a recognized standards body, or, in the case of
interfaces specified for a particular programming language, one that
is widely used among developers working in that language.
The "System Libraries" of an executable work include anything, other
than the work as a whole, that (a) is included in the normal form of
packaging a Major Component, but which is not part of that Major
Component, and (b) serves only to enable use of the work with that
Major Component, or to implement a Standard Interface for which an
implementation is available to the public in source code form. A
"Major Component", in this context, means a major essential component
(kernel, window system, and so on) of the specific operating system
(if any) on which the executable work runs, or a compiler used to
produce the work, or an object code interpreter used to run it.
The "Corresponding Source" for a work in object code form means all
the source code needed to generate, install, and (for an executable
work) run the object code and to modify the work, including scripts to
control those activities. However, it does not include the work's
System Libraries, or general-purpose tools or generally available free
316 Thor VM3 with Microsoft Windows Embedded Compact 7 User Guide

programs which are used unmodified in performing those activities but
which are not part of the work. For example, Corresponding Source
includes interface definition files associated with source files for
the work, and the source code for shared libraries and dynamically
linked subprograms that the work is specifically designed to require,
such as by intimate data communication or control flow between those
subprograms and other parts of the work.
The Corresponding Source need not include anything that users
can regenerate automatically from other parts of the Corresponding
Source.
The Corresponding Source for a work in source code form is that
same work.
2. Basic Permissions.
All rights granted under this License are granted for the term of
copyright on the Program, and are irrevocable provided the stated
conditions are met. This License explicitly affirms your unlimited
permission to run the unmodified Program. The output from running a
covered work is covered by this License only if the output, given its
content, constitutes a covered work. This License acknowledges your
rights of fair use or other equivalent, as provided by copyright law.
You may make, run and propagate covered works that you do not
convey, without conditions so long as your license otherwise remains
in force. You may convey covered works to others for the sole purpose
of having them make modifications exclusively for you, or provide you
with facilities for running those works, provided that you comply with
the terms of this License in conveying all material for which you do
not control copyright. Those thus making or running the covered works
for you must do so exclusively on your behalf, under your direction
and control, on terms that prohibit them from making any copies of
your copyrighted material outside their relationship with you.
Conveying under any other circumstances is permitted solely under
the conditions stated below. Sublicensing is not allowed; section 10
makes it unnecessary.
3. Protecting Users' Legal Rights From Anti-Circumvention Law.
No covered work shall be deemed part of an effective technological
measure under any applicable law fulfilling obligations under article
11 of the WIPO copyright treaty adopted on 20 December 1996, or
similar laws prohibiting or restricting circumvention of such
measures.
When you convey a covered work, you waive any legal power to forbid
circumvention of technological measures to the extent such circumvention
is effected by exercising rights under this License with respect to
Thor VM3 with Microsoft Windows Embedded Compact 7 User Guide 317

the covered work, and you disclaim any intention to limit operation or
modification of the work as a means of enforcing, against the work's
users, your or third parties' legal rights to forbid circumvention of
technological measures.
4. Conveying Verbatim Copies.
You may convey verbatim copies of the Program's source code as you
receive it, in any medium, provided that you conspicuously and
appropriately publish on each copy an appropriate copyright notice;
keep intact all notices stating that this License and any
non-permissive terms added in accord with section 7 apply to the code;
keep intact all notices of the absence of any warranty; and give all
recipients a copy of this License along with the Program.
You may charge any price or no price for each copy that you convey,
and you may offer support or warranty protection for a fee.
5. Conveying Modified Source Versions.
You may convey a work based on the Program, or the modifications to
produce it from the Program, in the form of source code under the
terms of section 4, provided that you also meet all of these conditions:
a) The work must carry prominent notices stating that you modified
it, and giving a relevant date.
b) The work must carry prominent notices stating that it is
released under this License and any conditions added under section
7. This requirement modifies the requirement in section 4 to
"keep intact all notices".
c) You must license the entire work, as a whole, under this
License to anyone who comes into possession of a copy. This
License will therefore apply, along with any applicable section 7
additional terms, to the whole of the work, and all its parts,
regardless of how they are packaged. This License gives no
permission to license the work in any other way, but it does not
invalidate such permission if you have separately received it.
d) If the work has interactive user interfaces, each must display
Appropriate Legal Notices; however, if the Program has interactive
interfaces that do not display Appropriate Legal Notices, your
work need not make them do so.
A compilation of a covered work with other separate and independent
works, which are not by their nature extensions of the covered work,
and which are not combined with it such as to form a larger program,
in or on a volume of a storage or distribution medium, is called an
"aggregate" if the compilation and its resulting copyright are not
used to limit the access or legal rights of the compilation's users
318 Thor VM3 with Microsoft Windows Embedded Compact 7 User Guide

beyond what the individual works permit. Inclusion of a covered work
in an aggregate does not cause this License to apply to the other
parts of the aggregate.
6. Conveying Non-Source Forms.
You may convey a covered work in object code form under the terms
of sections 4 and 5, provided that you also convey the
machine-readable Corresponding Source under the terms of this License,
in one of these ways:
a) Convey the object code in, or embodied in, a physical product
(including a physical distribution medium), accompanied by the
Corresponding Source fixed on a durable physical medium
customarily used for software interchange.
b) Convey the object code in, or embodied in, a physical product
(including a physical distribution medium), accompanied by a
written offer, valid for at least three years and valid for as
long as you offer spare parts or customer support for that product
model, to give anyone who possesses the object code either (1) a
copy of the Corresponding Source for all the software in the
product that is covered by this License, on a durable physical
medium customarily used for software interchange, for a price no
more than your reasonable cost of physically performing this
conveying of source, or (2) access to copy the
Corresponding Source from a network server at no charge.
c) Convey individual copies of the object code with a copy of the
written offer to provide the Corresponding Source. This
alternative is allowed only occasionally and noncommercially, and
only if you received the object code with such an offer, in accord
with subsection 6b.
d) Convey the object code by offering access from a designated
place (gratis or for a charge), and offer equivalent access to the
Corresponding Source in the same way through the same place at no
further charge. You need not require recipients to copy the
Corresponding Source along with the object code. If the place to
copy the object code is a network server, the Corresponding Source
may be on a different server (operated by you or a third party)
that supports equivalent copying facilities, provided you maintain
clear directions next to the object code saying where to find the
Corresponding Source. Regardless of what server hosts the
Corresponding Source, you remain obligated to ensure that it is
available for as long as needed to satisfy these requirements.
e) Convey the object code using peer-to-peer transmission, provided
you inform other peers where the object code and Corresponding
Source of the work are being offered to the general public at no
charge under subsection 6d.
Thor VM3 with Microsoft Windows Embedded Compact 7 User Guide 319

A separable portion of the object code, whose source code is excluded
from the Corresponding Source as a System Library, need not be
included in conveying the object code work.
A "User Product" is either (1) a "consumer product", which means any
tangible personal property which is normally used for personal, family,
or household purposes, or (2) anything designed or sold for incorporation
into a dwelling. In determining whether a product is a consumer product,
doubtful cases shall be resolved in favor of coverage. For a particular
product received by a particular user, "normally used" refers to a
typical or common use of that class of product, regardless of the status
of the particular user or of the way in which the particular user
actually uses, or expects or is expected to use, the product. A product
is a consumer product regardless of whether the product has substantial
commercial, industrial or non-consumer uses, unless such uses represent
the only significant mode of use of the product.
"Installation Information" for a User Product means any methods,
procedures, authorization keys, or other information required to install
and execute modified versions of a covered work in that User Product from
a modified version of its Corresponding Source. The information must
suffice to ensure that the continued functioning of the modified object
code is in no case prevented or interfered with solely because
modification has been made.
If you convey an object code work under this section in, or with, or
specifically for use in, a User Product, and the conveying occurs as
part of a transaction in which the right of possession and use of the
User Product is transferred to the recipient in perpetuity or for a
fixed term (regardless of how the transaction is characterized), the
Corresponding Source conveyed under this section must be accompanied
by the Installation Information. But this requirement does not apply
if neither you nor any third party retains the ability to install
modified object code on the User Product (for example, the work has
been installed in ROM).
The requirement to provide Installation Information does not include a
requirement to continue to provide support service, warranty, or updates
for a work that has been modified or installed by the recipient, or for
the User Product in which it has been modified or installed. Access to a
network may be denied when the modification itself materially and
adversely affects the operation of the network or violates the rules and
protocols for communication across the network.
Corresponding Source conveyed, and Installation Information provided,
in accord with this section must be in a format that is publicly
documented (and with an implementation available to the public in
source code form), and must require no special password or key for
unpacking, reading or copying.
320 Thor VM3 with Microsoft Windows Embedded Compact 7 User Guide

7. Additional Terms.
"Additional permissions" are terms that supplement the terms of this
License by making exceptions from one or more of its conditions.
Additional permissions that are applicable to the entire Program shall
be treated as though they were included in this License, to the extent
that they are valid under applicable law. If additional permissions
apply only to part of the Program, that part may be used separately
under those permissions, but the entire Program remains governed by
this License without regard to the additional permissions.
When you convey a copy of a covered work, you may at your option
remove any additional permissions from that copy, or from any part of
it. (Additional permissions may be written to require their own
removal in certain cases when you modify the work.) You may place
additional permissions on material, added by you to a covered work,
for which you have or can give appropriate copyright permission.
Notwithstanding any other provision of this License, for material you
add to a covered work, you may (if authorized by the copyright holders of
that material) supplement the terms of this License with terms:
a) Disclaiming warranty or limiting liability differently from the
terms of sections 15 and 16 of this License; or
b) Requiring preservation of specified reasonable legal notices or
author attributions in that material or in the Appropriate Legal
Notices displayed by works containing it; or
c) Prohibiting misrepresentation of the origin of that material, or
requiring that modified versions of such material be marked in
reasonable ways as different from the original version; or
d) Limiting the use for publicity purposes of names of licensors or
authors of the material; or
e) Declining to grant rights under trademark law for use of some
trade names, trademarks, or service marks; or
f) Requiring indemnification of licensors and authors of that
material by anyone who conveys the material (or modified versions of
it) with contractual assumptions of liability to the recipient, for
any liability that these contractual assumptions directly impose on
those licensors and authors.
All other non-permissive additional terms are considered "further
restrictions" within the meaning of section 10. If the Program as you
received it, or any part of it, contains a notice stating that it is
governed by this License along with a term that is a further
restriction, you may remove that term. If a license document contains
a further restriction but permits relicensing or conveying under this
Thor VM3 with Microsoft Windows Embedded Compact 7 User Guide 321

License, you may add to a covered work material governed by the terms
of that license document, provided that the further restriction does
not survive such relicensing or conveying.
If you add terms to a covered work in accord with this section, you
must place, in the relevant source files, a statement of the
additional terms that apply to those files, or a notice indicating
where to find the applicable terms.
Additional terms, permissive or non-permissive, may be stated in the
form of a separately written license, or stated as exceptions;
the above requirements apply either way.
8. Termination.
You may not propagate or modify a covered work except as expressly
provided under this License. Any attempt otherwise to propagate or
modify it is void, and will automatically terminate your rights under
this License (including any patent licenses granted under the third
paragraph of section 11).
However, if you cease all violation of this License, then your
license from a particular copyright holder is reinstated (a)
provisionally, unless and until the copyright holder explicitly and
finally terminates your license, and (b) permanently, if the copyright
holder fails to notify you of the violation by some reasonable means
prior to 60 days after the cessation.
Moreover, your license from a particular copyright holder is
reinstated permanently if the copyright holder notifies you of the
violation by some reasonable means, this is the first time you have
received notice of violation of this License (for any work) from that
copyright holder, and you cure the violation prior to 30 days after
your receipt of the notice.
Termination of your rights under this section does not terminate the
licenses of parties who have received copies or rights from you under
this License. If your rights have been terminated and not permanently
reinstated, you do not qualify to receive new licenses for the same
material under section 10.
9. Acceptance Not Required for Having Copies.
You are not required to accept this License in order to receive or
run a copy of the Program. Ancillary propagation of a covered work
occurring solely as a consequence of using peer-to-peer transmission
to receive a copy likewise does not require acceptance. However,
nothing other than this License grants you permission to propagate or
modify any covered work. These actions infringe copyright if you do
not accept this License. Therefore, by modifying or propagating a
covered work, you indicate your acceptance of this License to do so.
322 Thor VM3 with Microsoft Windows Embedded Compact 7 User Guide

10. Automatic Licensing of Downstream Recipients.
Each time you convey a covered work, the recipient automatically
receives a license from the original licensors, to run, modify and
propagate that work, subject to this License. You are not responsible
for enforcing compliance by third parties with this License.
An "entity transaction" is a transaction transferring control of an
organization, or substantially all assets of one, or subdividing an
organization, or merging organizations. If propagation of a covered
work results from an entity transaction, each party to that
transaction who receives a copy of the work also receives whatever
licenses to the work the party's predecessor in interest had or could
give under the previous paragraph, plus a right to possession of the
Corresponding Source of the work from the predecessor in interest, if
the predecessor has it or can get it with reasonable efforts.
You may not impose any further restrictions on the exercise of the
rights granted or affirmed under this License. For example, you may
not impose a license fee, royalty, or other charge for exercise of
rights granted under this License, and you may not initiate litigation
(including a cross-claim or counterclaim in a lawsuit) alleging that
any patent claim is infringed by making, using, selling, offering for
sale, or importing the Program or any portion of it.
11. Patents.
A "contributor" is a copyright holder who authorizes use under this
License of the Program or a work on which the Program is based. The
work thus licensed is called the contributor's "contributor version".
A contributor's "essential patent claims" are all patent claims
owned or controlled by the contributor, whether already acquired or
hereafter acquired, that would be infringed by some manner, permitted
by this License, of making, using, or selling its contributor version,
but do not include claims that would be infringed only as a
consequence of further modification of the contributor version. For
purposes of this definition, "control" includes the right to grant
patent sublicenses in a manner consistent with the requirements of
this License.
Each contributor grants you a non-exclusive, worldwide, royalty-free
patent license under the contributor's essential patent claims, to
make, use, sell, offer for sale, import and otherwise run, modify and
propagate the contents of its contributor version.
In the following three paragraphs, a "patent license" is any express
agreement or commitment, however denominated, not to enforce a patent
(such as an express permission to practice a patent or covenant not to
sue for patent infringement). To "grant" such a patent license to a
Thor VM3 with Microsoft Windows Embedded Compact 7 User Guide 323

party means to make such an agreement or commitment not to enforce a
patent against the party.
If you convey a covered work, knowingly relying on a patent license,
and the Corresponding Source of the work is not available for anyone
to copy, free of charge and under the terms of this License, through a
publicly available network server or other readily accessible means,
then you must either (1) cause the Corresponding Source to be so
available, or (2) arrange to deprive yourself of the benefit of the
patent license for this particular work, or (3) arrange, in a manner
consistent with the requirements of this License, to extend the patent
license to downstream recipients. "Knowingly relying" means you have
actual knowledge that, but for the patent license, your conveying the
covered work in a country, or your recipient's use of the covered work
in a country, would infringe one or more identifiable patents in that
country that you have reason to believe are valid.
If, pursuant to or in connection with a single transaction or
arrangement, you convey, or propagate by procuring conveyance of, a
covered work, and grant a patent license to some of the parties
receiving the covered work authorizing them to use, propagate, modify
or convey a specific copy of the covered work, then the patent license
you grant is automatically extended to all recipients of the covered
work and works based on it.
A patent license is "discriminatory" if it does not include within
the scope of its coverage, prohibits the exercise of, or is
conditioned on the non-exercise of one or more of the rights that are
specifically granted under this License. You may not convey a covered
work if you are a party to an arrangement with a third party that is
in the business of distributing software, under which you make payment
to the third party based on the extent of your activity of conveying
the work, and under which the third party grants, to any of the
parties who would receive the covered work from you, a discriminatory
patent license (a) in connection with copies of the covered work
conveyed by you (or copies made from those copies), or (b) primarily
for and in connection with specific products or compilations that
contain the covered work, unless you entered into that arrangement,
or that patent license was granted, prior to 28 March 2007.
Nothing in this License shall be construed as excluding or limiting
any implied license or other defenses to infringement that may
otherwise be available to you under applicable patent law.
12. No Surrender of Others' Freedom.
If conditions are imposed on you (whether by court order, agreement or
otherwise) that contradict the conditions of this License, they do not
excuse you from the conditions of this License. If you cannot convey a
covered work so as to satisfy simultaneously your obligations under this
License and any other pertinent obligations, then as a consequence you may
324 Thor VM3 with Microsoft Windows Embedded Compact 7 User Guide

not convey it at all. For example, if you agree to terms that obligate you
to collect a royalty for further conveying from those to whom you convey
the Program, the only way you could satisfy both those terms and this
License would be to refrain entirely from conveying the Program.
13. Use with the GNU Affero General Public License.
Notwithstanding any other provision of this License, you have
permission to link or combine any covered work with a work licensed
under version 3 of the GNU Affero General Public License into a single
combined work, and to convey the resulting work. The terms of this
License will continue to apply to the part which is the covered work,
but the special requirements of the GNU Affero General Public License,
section 13, concerning interaction through a network will apply to the
combination as such.
14. Revised Versions of this License.
The Free Software Foundation may publish revised and/or new versions of
the GNU General Public License from time to time. Such new versions will
be similar in spirit to the present version, but may differ in detail to
address new problems or concerns.
Each version is given a distinguishing version number. If the
Program specifies that a certain numbered version of the GNU General
Public License "or any later version" applies to it, you have the
option of following the terms and conditions either of that numbered
version or of any later version published by the Free Software
Foundation. If the Program does not specify a version number of the
GNU General Public License, you may choose any version ever published
by the Free Software Foundation.
If the Program specifies that a proxy can decide which future
versions of the GNU General Public License can be used, that proxy's
public statement of acceptance of a version permanently authorizes you
to choose that version for the Program.
Later license versions may give you additional or different
permissions. However, no additional obligations are imposed on any
author or copyright holder as a result of your choosing to follow a
later version.
15. Disclaimer of Warranty.
THERE IS NO WARRANTY FOR THE PROGRAM, TO THE EXTENT PERMITTED BY
APPLICABLE LAW. EXCEPT WHEN OTHERWISE STATED IN WRITING THE COPYRIGHT
HOLDERS AND/OR OTHER PARTIES PROVIDE THE PROGRAM "AS IS" WITHOUT WARRANTY
OF ANY KIND, EITHER EXPRESSED OR IMPLIED, INCLUDING, BUT NOT LIMITED TO,
THE IMPLIED WARRANTIES OF MERCHANTABILITY AND FITNESS FOR A PARTICULAR
PURPOSE. THE ENTIRE RISK AS TO THE QUALITY AND PERFORMANCE OF THE PROGRAM
IS WITH YOU. SHOULD THE PROGRAM PROVE DEFECTIVE, YOU ASSUME THE COST OF
Thor VM3 with Microsoft Windows Embedded Compact 7 User Guide 325

ALL NECESSARY SERVICING, REPAIR OR CORRECTION.
16. Limitation of Liability.
IN NO EVENT UNLESS REQUIRED BY APPLICABLE LAW OR AGREED TO IN WRITING
WILL ANY COPYRIGHT HOLDER, OR ANY OTHER PARTY WHO MODIFIES AND/OR CONVEYS
THE PROGRAM AS PERMITTED ABOVE, BE LIABLE TO YOU FOR DAMAGES, INCLUDING ANY
GENERAL, SPECIAL, INCIDENTAL OR CONSEQUENTIAL DAMAGES ARISING OUT OF THE
USE OR INABILITY TO USE THE PROGRAM (INCLUDING BUT NOT LIMITED TO LOSS OF
DATA OR DATA BEING RENDERED INACCURATE OR LOSSES SUSTAINED BY YOU OR THIRD
PARTIES OR A FAILURE OF THE PROGRAM TO OPERATE WITH ANY OTHER PROGRAMS),
EVEN IF SUCH HOLDER OR OTHER PARTY HAS BEEN ADVISED OF THE POSSIBILITY OF
SUCH DAMAGES.
17. Interpretation of Sections 15 and 16.
If the disclaimer of warranty and limitation of liability provided
above cannot be given local legal effect according to their terms,
reviewing courts shall apply local law that most closely approximates
an absolute waiver of all civil liability in connection with the
Program, unless a warranty or assumption of liability accompanies a
copy of the Program in return for a fee.
END OF TERMS AND CONDITIONS
How to Apply These Terms to Your New Programs
If you develop a new program, and you want it to be of the greatest
possible use to the public, the best way to achieve this is to make it
free software which everyone can redistribute and change under these terms.
To do so, attach the following notices to the program. It is safest
to attach them to the start of each source file to most effectively
state the exclusion of warranty; and each file should have at least
the "copyright" line and a pointer to where the full notice is found.
<one line to give the program's name and a brief idea of what it does.>
Copyright (C) <year> <name of author>
This program is free software: you can redistribute it and/or modify
it under the terms of the GNU General Public License as published by
the Free Software Foundation, either version 3 of the License, or
(at your option) any later version.
This program is distributed in the hope that it will be useful,
but WITHOUT ANY WARRANTY; without even the implied warranty of
MERCHANTABILITY or FITNESS FOR A PARTICULAR PURPOSE. See the
GNU General Public License for more details.
You should have received a copy of the GNU General Public License
along with this program. If not, see <http://www.gnu.org/licenses/>.
326 Thor VM3 with Microsoft Windows Embedded Compact 7 User Guide

Also add information on how to contact you by electronic and paper mail.
If the program does terminal interaction, make it output a short
notice like this when it starts in an interactive mode:
<program> Copyright (C) <year> <name of author>
This program comes with ABSOLUTELY NO WARRANTY; for details type `show w'.
This is free software, and you are welcome to redistribute it
under certain conditions; type `show c' for details.
The hypothetical commands `show w' and `show c' should show the appropriate
parts of the General Public License. Of course, your program's commands
might be different; for a GUI interface, you would use an "about box".
You should also get your employer (if you work as a programmer) or school,
if any, to sign a "copyright disclaimer" for the program, if necessary.
For more information on this, and how to apply and follow the GNU GPL, see
<http://www.gnu.org/licenses/>.
The GNU General Public License does not permit incorporating your program
into proprietary programs. If your program is a subroutine library, you
may consider it more useful to permit linking proprietary applications with
the library. If this is what you want to do, use the GNU Lesser General
Public License instead of this License. But first, please read
<http://www.gnu.org/philosophy/why-not-lgpl.html>.
GNU LESSER GENERAL PUBLIC LICENSE
Version 3, 29 June 2007
Copyright (C) 2007 Free Software Foundation, Inc. <http://fsf.org/>
Everyone is permitted to copy and distribute verbatim copies
of this license document, but changing it is not allowed.
This version of the GNU Lesser General Public License incorporates
the terms and conditions of version 3 of the GNU General Public
License, supplemented by the additional permissions listed below.
0. Additional Definitions.
As used herein, "this License" refers to version 3 of the GNU Lesser
General Public License, and the "GNU GPL" refers to version 3 of the GNU
General Public License.
"The Library" refers to a covered work governed by this License,
other than an Application or a Combined Work as defined below.
An "Application" is any work that makes use of an interface provided
Thor VM3 with Microsoft Windows Embedded Compact 7 User Guide 327

by the Library, but which is not otherwise based on the Library.
Defining a subclass of a class defined by the Library is deemed a mode
of using an interface provided by the Library.
A "Combined Work" is a work produced by combining or linking an
Application with the Library. The particular version of the Library
with which the Combined Work was made is also called the "Linked
Version".
The "Minimal Corresponding Source" for a Combined Work means the
Corresponding Source for the Combined Work, excluding any source code
for portions of the Combined Work that, considered in isolation, are
based on the Application, and not on the Linked Version.
The "Corresponding Application Code" for a Combined Work means the
object code and/or source code for the Application, including any data
and utility programs needed for reproducing the Combined Work from the
Application, but excluding the System Libraries of the Combined Work.
1. Exception to Section 3 of the GNU GPL.
You may convey a covered work under sections 3 and 4 of this License
without being bound by section 3 of the GNU GPL.
2. Conveying Modified Versions.
If you modify a copy of the Library, and, in your modifications, a
facility refers to a function or data to be supplied by an Application
that uses the facility (other than as an argument passed when the
facility is invoked), then you may convey a copy of the modified
version:
a) under this License, provided that you make a good faith effort to
ensure that, in the event an Application does not supply the
function or data, the facility still operates, and performs
whatever part of its purpose remains meaningful, or
b) under the GNU GPL, with none of the additional permissions of
this License applicable to that copy.
3. Object Code Incorporating Material from Library Header Files.
The object code form of an Application may incorporate material from
a header file that is part of the Library. You may convey such object
code under terms of your choice, provided that, if the incorporated
material is not limited to numerical parameters, data structure
layouts and accessors, or small macros, inline functions and templates
(ten or fewer lines in length), you do both of the following:
a) Give prominent notice with each copy of the object code that the
Library is used in it and that the Library and its use are
328 Thor VM3 with Microsoft Windows Embedded Compact 7 User Guide

covered by this License.
b) Accompany the object code with a copy of the GNU GPL and this license
document.
4. Combined Works.
You may convey a Combined Work under terms of your choice that,
taken together, effectively do not restrict modification of the
portions of the Library contained in the Combined Work and reverse
engineering for debugging such modifications, if you also do each of
the following:
a) Give prominent notice with each copy of the Combined Work that
the Library is used in it and that the Library and its use are
covered by this License.
b) Accompany the Combined Work with a copy of the GNU GPL and this license
document.
c) For a Combined Work that displays copyright notices during
execution, include the copyright notice for the Library among
these notices, as well as a reference directing the user to the
copies of the GNU GPL and this license document.
d) Do one of the following:
0) Convey the Minimal Corresponding Source under the terms of this
License, and the Corresponding Application Code in a form
suitable for, and under terms that permit, the user to
recombine or relink the Application with a modified version of
the Linked Version to produce a modified Combined Work, in the
manner specified by section 6 of the GNU GPL for conveying
Corresponding Source.
1) Use a suitable shared library mechanism for linking with the
Library. A suitable mechanism is one that (a) uses at run time
a copy of the Library already present on the user's computer
system, and (b) will operate properly with a modified version
of the Library that is interface-compatible with the Linked
Version.
e) Provide Installation Information, but only if you would otherwise
be required to provide such information under section 6 of the
GNU GPL, and only to the extent that such information is
necessary to install and execute a modified version of the
Combined Work produced by recombining or relinking the
Application with a modified version of the Linked Version. (If
you use option 4d0, the Installation Information must accompany
the Minimal Corresponding Source and Corresponding Application
Code. If you use option 4d1, you must provide the Installation
Thor VM3 with Microsoft Windows Embedded Compact 7 User Guide 329

Information in the manner specified by section 6 of the GNU GPL
for conveying Corresponding Source.)
5. Combined Libraries.
You may place library facilities that are a work based on the
Library side by side in a single library together with other library
facilities that are not Applications and are not covered by this
License, and convey such a combined library under terms of your
choice, if you do both of the following:
a) Accompany the combined library with a copy of the same work based
on the Library, uncombined with any other library facilities,
conveyed under the terms of this License.
b) Give prominent notice with the combined library that part of it
is a work based on the Library, and explaining where to find the
accompanying uncombined form of the same work.
6. Revised Versions of the GNU Lesser General Public License.
The Free Software Foundation may publish revised and/or new versions
of the GNU Lesser General Public License from time to time. Such new
versions will be similar in spirit to the present version, but may
differ in detail to address new problems or concerns.
Each version is given a distinguishing version number. If the
Library as you received it specifies that a certain numbered version
of the GNU Lesser General Public License "or any later version"
applies to it, you have the option of following the terms and
conditions either of that published version or of any later version
published by the Free Software Foundation. If the Library as you
received it does not specify a version number of the GNU Lesser
General Public License, you may choose any version of the GNU Lesser
General Public License ever published by the Free Software Foundation.
If the Library as you received it specifies that a proxy can decide
whether future versions of the GNU Lesser General Public License shall
apply, that proxy's public statement of acceptance of any version is
permanent authorization for you to choose that version for the
Library.
Package(s) using Boost regex library License
============================
* The Boost C++ Libraries
[Copyright (c) 1998-2002 Dr John Maddock
Copyright (c) 2001, 2002 Peter Dimov and Multi Media Ltd.
Copyright (C) boost.org 1999]
330 Thor VM3 with Microsoft Windows Embedded Compact 7 User Guide

License Text (Boost regex library License)
--------------------------
Boost Software License - Version 1.0 - August 17th, 2003
Permission is hereby granted, free of charge, to any person or organization obtaining a copy of the software and accompanying documentation covered by this license (the 'Software') to use, reproduce, display, distribute, execute, and transmit the Software, and to prepare derivative works of the Software, and to permit third-parties to whom the Software is furnished to do so, all subject to the following:
The copyright notices in the Software and this entire statement, including the above license grant, this restriction and the following disclaimer, must be included in all copies of the Software, in whole or in part, and all derivative works of the Software, unless such copies or derivative works are solely in the form of machine-executable object code generated by a source language processor.
THE SOFTWARE IS PROVIDED 'AS IS', WITHOUT WARRANTY OF ANY KIND, EXPRESS OR IMPLIED, INCLUDING BUT NOT LIMITED TO THE WARRANTIES OF MERCHANTABILITY, FITNESS FOR A PARTICULAR PURPOSE, TITLE AND NON-INFRINGEMENT. IN NO EVENT SHALL THE COPYRIGHT HOLDERS OR ANYONE DISTRIBUTING THE SOFTWARE BE LIABLE FOR ANY DAMAGES OR OTHER LIABILITY, WHETHER IN CONTRACT, TORT OR OTHERWISE, ARISING FROM, OUT OF OR IN CONNECTION WITH THE SOFTWARE OR THE USE OR OTHER DEALINGS IN THE SOFTWARE.
Package(s) using Log4CPP License
============================
* Log4cpp v1.0
[Copyright (C) 2000-2002 LifeLine Networks bv
Copyright (C) 2000-2002 Bastiaan Bakker]
License Text (Log4CPP License)
--------------------------
GNU LESSER GENERAL PUBLIC LICENSE
Version 2.1, February 1999
Copyright (C) 1991, 1999 Free Software Foundation, Inc.
59 Temple Place, Suite 330, Boston, MA 02111-1307 USA
Everyone is permitted to copy and distribute verbatim copies
of this license document, but changing it is not allowed.
[This is the first released version of the Lesser GPL. It also counts
as the successor of the GNU Library Public License, version 2, hence
the version number 2.1.]
Preamble
The licenses for most software are designed to take away your
freedom to share and change it. By contrast, the GNU General Public
Licenses are intended to guarantee your freedom to share and change
free software--to make sure the software is free for all its users.
This license, the Lesser General Public License, applies to some
specially designated software packages--typically libraries--of the
Free Software Foundation and other authors who decide to use it. You
can use it too, but we suggest you first think carefully about whether
this license or the ordinary General Public License is the better
Thor VM3 with Microsoft Windows Embedded Compact 7 User Guide 331

strategy to use in any particular case, based on the explanations below.
When we speak of free software, we are referring to freedom of use,
not price. Our General Public Licenses are designed to make sure that
you have the freedom to distribute copies of free software (and charge
for this service if you wish); that you receive source code or can get
it if you want it; that you can change the software and use pieces of
it in new free programs; and that you are informed that you can do
these things.
To protect your rights, we need to make restrictions that forbid
distributors to deny you these rights or to ask you to surrender these
rights. These restrictions translate to certain responsibilities for
you if you distribute copies of the library or if you modify it.
For example, if you distribute copies of the library, whether gratis
or for a fee, you must give the recipients all the rights that we gave
you. You must make sure that they, too, receive or can get the source
code. If you link other code with the library, you must provide
complete object files to the recipients, so that they can relink them
with the library after making changes to the library and recompiling
it. And you must show them these terms so they know their rights.
We protect your rights with a two-step method: (1) we copyright the
library, and (2) we offer you this license, which gives you legal
permission to copy, distribute and/or modify the library.
To protect each distributor, we want to make it very clear that
there is no warranty for the free library. Also, if the library is
modified by someone else and passed on, the recipients should know
that what they have is not the original version, so that the original
author's reputation will not be affected by problems that might be
introduced by others.
Finally, software patents pose a constant threat to the existence of
any free program. We wish to make sure that a company cannot
effectively restrict the users of a free program by obtaining a
restrictive license from a patent holder. Therefore, we insist that
any patent license obtained for a version of the library must be
consistent with the full freedom of use specified in this license.
Most GNU software, including some libraries, is covered by the
ordinary GNU General Public License. This license, the GNU Lesser
General Public License, applies to certain designated libraries, and
is quite different from the ordinary General Public License. We use
this license for certain libraries in order to permit linking those
libraries into non-free programs.
When a program is linked with a library, whether statically or using
a shared library, the combination of the two is legally speaking a
332 Thor VM3 with Microsoft Windows Embedded Compact 7 User Guide

combined work, a derivative of the original library. The ordinary
General Public License therefore permits such linking only if the
entire combination fits its criteria of freedom. The Lesser General
Public License permits more lax criteria for linking other code with
the library.
We call this license the "Lesser" General Public License because it
does Less to protect the user's freedom than the ordinary General
Public License. It also provides other free software developers Less
of an advantage over competing non-free programs. These disadvantages
are the reason we use the ordinary General Public License for many
libraries. However, the Lesser license provides advantages in certain
special circumstances.
For example, on rare occasions, there may be a special need to
encourage the widest possible use of a certain library, so that it becomes
a de-facto standard. To achieve this, non-free programs must be
allowed to use the library. A more frequent case is that a free
library does the same job as widely used non-free libraries. In this
case, there is little to gain by limiting the free library to free
software only, so we use the Lesser General Public License.
In other cases, permission to use a particular library in non-free
programs enables a greater number of people to use a large body of
free software. For example, permission to use the GNU C Library in
non-free programs enables many more people to use the whole GNU
operating system, as well as its variant, the GNU/Linux operating
system.
Although the Lesser General Public License is Less protective of the
users' freedom, it does ensure that the user of a program that is
linked with the Library has the freedom and the wherewithal to run
that program using a modified version of the Library.
The precise terms and conditions for copying, distribution and
modification follow. Pay close attention to the difference between a
"work based on the library" and a "work that uses the library". The
former contains code derived from the library, whereas the latter must
be combined with the library in order to run.
GNU LESSER GENERAL PUBLIC LICENSE
TERMS AND CONDITIONS FOR COPYING, DISTRIBUTION AND MODIFICATION
0. This License Agreement applies to any software library or other
program which contains a notice placed by the copyright holder or
other authorized party saying it may be distributed under the terms of
this Lesser General Public License (also called "this License").
Each licensee is addressed as "you".
A "library" means a collection of software functions and/or data
Thor VM3 with Microsoft Windows Embedded Compact 7 User Guide 333

prepared so as to be conveniently linked with application programs
(which use some of those functions and data) to form executables.
The "Library", below, refers to any such software library or work
which has been distributed under these terms. A "work based on the
Library" means either the Library or any derivative work under
copyright law: that is to say, a work containing the Library or a
portion of it, either verbatim or with modifications and/or translated
straightforwardly into another language. (Hereinafter, translation is
included without limitation in the term "modification".)
"Source code" for a work means the preferred form of the work for
making modifications to it. For a library, complete source code means
all the source code for all modules it contains, plus any associated
interface definition files, plus the scripts used to control compilation
and installation of the library.
Activities other than copying, distribution and modification are not
covered by this License; they are outside its scope. The act of
running a program using the Library is not restricted, and output from
such a program is covered only if its contents constitute a work based
on the Library (independent of the use of the Library in a tool for
writing it). Whether that is true depends on what the Library does
and what the program that uses the Library does.
1. You may copy and distribute verbatim copies of the Library's
complete source code as you receive it, in any medium, provided that
you conspicuously and appropriately publish on each copy an
appropriate copyright notice and disclaimer of warranty; keep intact
all the notices that refer to this License and to the absence of any
warranty; and distribute a copy of this License along with the
Library.
You may charge a fee for the physical act of transferring a copy,
and you may at your option offer warranty protection in exchange for a
fee.
2. You may modify your copy or copies of the Library or any portion
of it, thus forming a work based on the Library, and copy and
distribute such modifications or work under the terms of Section 1
above, provided that you also meet all of these conditions:
a) The modified work must itself be a software library.
b) You must cause the files modified to carry prominent notices
stating that you changed the files and the date of any change.
c) You must cause the whole of the work to be licensed at no
charge to all third parties under the terms of this License.
334 Thor VM3 with Microsoft Windows Embedded Compact 7 User Guide

d) If a facility in the modified Library refers to a function or a
table of data to be supplied by an application program that uses
the facility, other than as an argument passed when the facility
is invoked, then you must make a good faith effort to ensure that,
in the event an application does not supply such function or
table, the facility still operates, and performs whatever part of
its purpose remains meaningful.
(For example, a function in a library to compute square roots has
a purpose that is entirely well-defined independent of the
application. Therefore, Subsection 2d requires that any
application-supplied function or table used by this function must
be optional: if the application does not supply it, the square
root function must still compute square roots.)
These requirements apply to the modified work as a whole. If
identifiable sections of that work are not derived from the Library,
and can be reasonably considered independent and separate works in
themselves, then this License, and its terms, do not apply to those
sections when you distribute them as separate works. But when you
distribute the same sections as part of a whole which is a work based
on the Library, the distribution of the whole must be on the terms of
this License, whose permissions for other licensees extend to the
entire whole, and thus to each and every part regardless of who wrote
it.
Thus, it is not the intent of this section to claim rights or contest
your rights to work written entirely by you; rather, the intent is to
exercise the right to control the distribution of derivative or
collective works based on the Library.
In addition, mere aggregation of another work not based on the Library
with the Library (or with a work based on the Library) on a volume of
a storage or distribution medium does not bring the other work under
the scope of this License.
3. You may opt to apply the terms of the ordinary GNU General Public
License instead of this License to a given copy of the Library. To do
this, you must alter all the notices that refer to this License, so
that they refer to the ordinary GNU General Public License, version 2,
instead of to this License. (If a newer version than version 2 of the
ordinary GNU General Public License has appeared, then you can specify
that version instead if you wish.) Do not make any other change in
these notices.
Once this change is made in a given copy, it is irreversible for
that copy, so the ordinary GNU General Public License applies to all
subsequent copies and derivative works made from that copy.
This option is useful when you wish to copy part of the code of
Thor VM3 with Microsoft Windows Embedded Compact 7 User Guide 335

the Library into a program that is not a library.
4. You may copy and distribute the Library (or a portion or
derivative of it, under Section 2) in object code or executable form
under the terms of Sections 1 and 2 above provided that you accompany
it with the complete corresponding machine-readable source code, which
must be distributed under the terms of Sections 1 and 2 above on a
medium customarily used for software interchange.
If distribution of object code is made by offering access to copy
from a designated place, then offering equivalent access to copy the
source code from the same place satisfies the requirement to
distribute the source code, even though third parties are not
compelled to copy the source along with the object code.
5. A program that contains no derivative of any portion of the
Library, but is designed to work with the Library by being compiled or
linked with it, is called a "work that uses the Library". Such a
work, in isolation, is not a derivative work of the Library, and
therefore falls outside the scope of this License.
However, linking a "work that uses the Library" with the Library
creates an executable that is a derivative of the Library (because it
contains portions of the Library), rather than a "work that uses the
library". The executable is therefore covered by this License.
Section 6 states terms for distribution of such executables.
When a "work that uses the Library" uses material from a header file
that is part of the Library, the object code for the work may be a
derivative work of the Library even though the source code is not.
Whether this is true is especially significant if the work can be
linked without the Library, or if the work is itself a library. The
threshold for this to be true is not precisely defined by law.
If such an object file uses only numerical parameters, data
structure layouts and accessors, and small macros and small inline
functions (ten lines or less in length), then the use of the object
file is unrestricted, regardless of whether it is legally a derivative
work. (Executables containing this object code plus portions of the
Library will still fall under Section 6.)
Otherwise, if the work is a derivative of the Library, you may
distribute the object code for the work under the terms of Section 6.
Any executables containing that work also fall under Section 6,
whether or not they are linked directly with the Library itself.
6. As an exception to the Sections above, you may also combine or
link a "work that uses the Library" with the Library to produce a
work containing portions of the Library, and distribute that work
under terms of your choice, provided that the terms permit
336 Thor VM3 with Microsoft Windows Embedded Compact 7 User Guide

modification of the work for the customer's own use and reverse
engineering for debugging such modifications.
You must give prominent notice with each copy of the work that the
Library is used in it and that the Library and its use are covered by
this License. You must supply a copy of this License. If the work
during execution displays copyright notices, you must include the
copyright notice for the Library among them, as well as a reference
directing the user to the copy of this License. Also, you must do one
of these things:
a) Accompany the work with the complete corresponding
machine-readable source code for the Library including whatever
changes were used in the work (which must be distributed under
Sections 1 and 2 above); and, if the work is an executable linked
with the Library, with the complete machine-readable "work that
uses the Library", as object code and/or source code, so that the
user can modify the Library and then relink to produce a modified
executable containing the modified Library. (It is understood
that the user who changes the contents of definitions files in the
Library will not necessarily be able to recompile the application
to use the modified definitions.)
b) Use a suitable shared library mechanism for linking with the
Library. A suitable mechanism is one that (1) uses at run time a
copy of the library already present on the user's computer system,
rather than copying library functions into the executable, and (2)
will operate properly with a modified version of the library, if
the user installs one, as long as the modified version is
interface-compatible with the version that the work was made with.
c) Accompany the work with a written offer, valid for at
least three years, to give the same user the materials
specified in Subsection 6a, above, for a charge no more
than the cost of performing this distribution.
d) If distribution of the work is made by offering access to copy
from a designated place, offer equivalent access to copy the above
specified materials from the same place.
e) Verify that the user has already received a copy of these
materials or that you have already sent this user a copy.
For an executable, the required form of the "work that uses the
Library" must include any data and utility programs needed for
reproducing the executable from it. However, as a special exception,
the materials to be distributed need not include anything that is
normally distributed (in either source or binary form) with the major
components (compiler, kernel, and so on) of the operating system on
which the executable runs, unless that component itself accompanies
the executable.
Thor VM3 with Microsoft Windows Embedded Compact 7 User Guide 337

It may happen that this requirement contradicts the license
restrictions of other proprietary libraries that do not normally
accompany the operating system. Such a contradiction means you cannot
use both them and the Library together in an executable that you
distribute.
7. You may place library facilities that are a work based on the
Library side-by-side in a single library together with other library
facilities not covered by this License, and distribute such a combined
library, provided that the separate distribution of the work based on
the Library and of the other library facilities is otherwise
permitted, and provided that you do these two things:
a) Accompany the combined library with a copy of the same work
based on the Library, uncombined with any other library
facilities. This must be distributed under the terms of the
Sections above.
b) Give prominent notice with the combined library of the fact
that part of it is a work based on the Library, and explaining
where to find the accompanying uncombined form of the same work.
8. You may not copy, modify, sublicense, link with, or distribute
the Library except as expressly provided under this License. Any
attempt otherwise to copy, modify, sublicense, link with, or
distribute the Library is void, and will automatically terminate your
rights under this License. However, parties who have received copies,
or rights, from you under this License will not have their licenses
terminated so long as such parties remain in full compliance.
9. You are not required to accept this License, since you have not
signed it. However, nothing else grants you permission to modify or
distribute the Library or its derivative works. These actions are
prohibited by law if you do not accept this License. Therefore, by
modifying or distributing the Library (or any work based on the
Library), you indicate your acceptance of this License to do so, and
all its terms and conditions for copying, distributing or modifying
the Library or works based on it.
10. Each time you redistribute the Library (or any work based on the
Library), the recipient automatically receives a license from the
original licensor to copy, distribute, link with or modify the Library
subject to these terms and conditions. You may not impose any further
restrictions on the recipients' exercise of the rights granted herein.
You are not responsible for enforcing compliance by third parties with
this License.
11. If, as a consequence of a court judgment or allegation of patent
338 Thor VM3 with Microsoft Windows Embedded Compact 7 User Guide

infringement or for any other reason (not limited to patent issues),
conditions are imposed on you (whether by court order, agreement or
otherwise) that contradict the conditions of this License, they do not
excuse you from the conditions of this License. If you cannot
distribute so as to satisfy simultaneously your obligations under this
License and any other pertinent obligations, then as a consequence you
may not distribute the Library at all. For example, if a patent
license would not permit royalty-free redistribution of the Library by
all those who receive copies directly or indirectly through you, then
the only way you could satisfy both it and this License would be to
refrain entirely from distribution of the Library.
If any portion of this section is held invalid or unenforceable under any
particular circumstance, the balance of the section is intended to apply,
and the section as a whole is intended to apply in other circumstances.
It is not the purpose of this section to induce you to infringe any
patents or other property right claims or to contest validity of any
such claims; this section has the sole purpose of protecting the
integrity of the free software distribution system which is
implemented by public license practices. Many people have made
generous contributions to the wide range of software distributed
through that system in reliance on consistent application of that
system; it is up to the author/donor to decide if he or she is willing
to distribute software through any other system and a licensee cannot
impose that choice.
This section is intended to make thoroughly clear what is believed to
be a consequence of the rest of this License.
12. If the distribution and/or use of the Library is restricted in
certain countries either by patents or by copyrighted interfaces, the
original copyright holder who places the Library under this License may add
an explicit geographical distribution limitation excluding those countries,
so that distribution is permitted only in or among countries not thus
excluded. In such case, this License incorporates the limitation as if
written in the body of this License.
13. The Free Software Foundation may publish revised and/or new
versions of the Lesser General Public License from time to time.
Such new versions will be similar in spirit to the present version,
but may differ in detail to address new problems or concerns.
Each version is given a distinguishing version number. If the Library
specifies a version number of this License which applies to it and
"any later version", you have the option of following the terms and
conditions either of that version or of any later version published by
the Free Software Foundation. If the Library does not specify a
license version number, you may choose any version ever published by
the Free Software Foundation.
Thor VM3 with Microsoft Windows Embedded Compact 7 User Guide 339

14. If you wish to incorporate parts of the Library into other free
programs whose distribution conditions are incompatible with these,
write to the author to ask for permission. For software which is
copyrighted by the Free Software Foundation, write to the Free
Software Foundation; we sometimes make exceptions for this. Our
decision will be guided by the two goals of preserving the free status
of all derivatives of our free software and of promoting the sharing
and reuse of software generally.
NO WARRANTY
15. BECAUSE THE LIBRARY IS LICENSED FREE OF CHARGE, THERE IS NO
WARRANTY FOR THE LIBRARY, TO THE EXTENT PERMITTED BY APPLICABLE LAW.
EXCEPT WHEN OTHERWISE STATED IN WRITING THE COPYRIGHT HOLDERS AND/OR
OTHER PARTIES PROVIDE THE LIBRARY "AS IS" WITHOUT WARRANTY OF ANY
KIND, EITHER EXPRESSED OR IMPLIED, INCLUDING, BUT NOT LIMITED TO, THE
IMPLIED WARRANTIES OF MERCHANTABILITY AND FITNESS FOR A PARTICULAR
PURPOSE. THE ENTIRE RISK AS TO THE QUALITY AND PERFORMANCE OF THE
LIBRARY IS WITH YOU. SHOULD THE LIBRARY PROVE DEFECTIVE, YOU ASSUME
THE COST OF ALL NECESSARY SERVICING, REPAIR OR CORRECTION.
16. IN NO EVENT UNLESS REQUIRED BY APPLICABLE LAW OR AGREED TO IN
WRITING WILL ANY COPYRIGHT HOLDER, OR ANY OTHER PARTY WHO MAY MODIFY
AND/OR REDISTRIBUTE THE LIBRARY AS PERMITTED ABOVE, BE LIABLE TO YOU
FOR DAMAGES, INCLUDING ANY GENERAL, SPECIAL, INCIDENTAL OR
CONSEQUENTIAL DAMAGES ARISING OUT OF THE USE OR INABILITY TO USE THE
LIBRARY (INCLUDING BUT NOT LIMITED TO LOSS OF DATA OR DATA BEING
RENDERED INACCURATE OR LOSSES SUSTAINED BY YOU OR THIRD PARTIES OR A
FAILURE OF THE LIBRARY TO OPERATE WITH ANY OTHER SOFTWARE), EVEN IF
SUCH HOLDER OR OTHER PARTY HAS BEEN ADVISED OF THE POSSIBILITY OF SUCH
DAMAGES.
END OF TERMS AND CONDITIONS
How to Apply These Terms to Your New Libraries
If you develop a new library, and you want it to be of the greatest
possible use to the public, we recommend making it free software that
everyone can redistribute and change. You can do so by permitting
redistribution under these terms (or, alternatively, under the terms of the
ordinary General Public License).
To apply these terms, attach the following notices to the library. It is
safest to attach them to the start of each source file to most effectively
convey the exclusion of warranty; and each file should have at least the
"copyright" line and a pointer to where the full notice is found.
<one line to give the library's name and a brief idea of what it does.>
Copyright (C) <year> <name of author>
340 Thor VM3 with Microsoft Windows Embedded Compact 7 User Guide

This library is free software; you can redistribute it and/or
modify it under the terms of the GNU Lesser General Public
License as published by the Free Software Foundation; either
version 2.1 of the License, or (at your option) any later version.
This library is distributed in the hope that it will be useful,
but WITHOUT ANY WARRANTY; without even the implied warranty of
MERCHANTABILITY or FITNESS FOR A PARTICULAR PURPOSE. See the GNU
Lesser General Public License for more details.
You should have received a copy of the GNU Lesser General Public
License along with this library; if not, write to the Free Software
Foundation, Inc., 59 Temple Place, Suite 330, Boston, MA 02111-1307 USA
Also add information on how to contact you by electronic and paper mail.
You should also get your employer (if you work as a programmer) or your
school, if any, to sign a "copyright disclaimer" for the library, if
necessary. Here is a sample; alter the names:
Yoyodyne, Inc., hereby disclaims all copyright interest in the
library `Frob' (a library for tweaking knobs) written by James Random Hacker.
<signature of Ty Coon>, 1 April 1990
Ty Coon, President of Vice
That's all there is to it!
Package(s) using OpenSSL License
============================
* OpenSSL
Copyright (c) 1998-2008 The OpenSSL Project. All rights reserved.
Copyright (C) 1995-1998 Eric Young ([email protected]). All rights reserved.
License Text (OpenSSL (Cisco EAP Security) License)
--------------------------
LICENSE ISSUES
==============
The OpenSSL toolkit stays under a dual license, i.e. both the conditions of
the OpenSSL License and the original SSLeay license apply to the toolkit.
See below for the actual license texts. Actually both licenses are BSD-style
Open Source licenses. In case of any license issues related to OpenSSL
please contact [email protected].
Thor VM3 with Microsoft Windows Embedded Compact 7 User Guide 341

OpenSSL License
---------------
/* ====================================================================
* Copyright (c) 1998-2008 The OpenSSL Project. All rights reserved.
*
* Redistribution and use in source and binary forms, with or without
* modification, are permitted provided that the following conditions
* are met:
*
* 1. Redistributions of source code must retain the above copyright
* notice, this list of conditions and the following disclaimer.
*
* 2. Redistributions in binary form must reproduce the above copyright
* notice, this list of conditions and the following disclaimer in
* the documentation and/or other materials provided with the
* distribution.
*
* 3. All advertising materials mentioning features or use of this
* software must display the following acknowledgment:
* "This product includes software developed by the OpenSSL Project
* for use in the OpenSSL Toolkit. (http://www.openssl.org/)"
*
* 4. The names "OpenSSL Toolkit" and "OpenSSL Project" must not be used to
* endorse or promote products derived from this software without
* prior written permission. For written permission, please contact
*
* 5. Products derived from this software may not be called "OpenSSL"
* nor may "OpenSSL" appear in their names without prior written
* permission of the OpenSSL Project.
*
* 6. Redistributions of any form whatsoever must retain the following
* acknowledgment:
* "This product includes software developed by the OpenSSL Project
* for use in the OpenSSL Toolkit (http://www.openssl.org/)"
*
* THIS SOFTWARE IS PROVIDED BY THE OpenSSL PROJECT ``AS IS'' AND ANY
* EXPRESSED OR IMPLIED WARRANTIES, INCLUDING, BUT NOT LIMITED TO, THE
* IMPLIED WARRANTIES OF MERCHANTABILITY AND FITNESS FOR A PARTICULAR
* PURPOSE ARE DISCLAIMED. IN NO EVENT SHALL THE OpenSSL PROJECT OR
* ITS CONTRIBUTORS BE LIABLE FOR ANY DIRECT, INDIRECT, INCIDENTAL,
* SPECIAL, EXEMPLARY, OR CONSEQUENTIAL DAMAGES (INCLUDING, BUT
* NOT LIMITED TO, PROCUREMENT OF SUBSTITUTE GOODS OR SERVICES;
* LOSS OF USE, DATA, OR PROFITS; OR BUSINESS INTERRUPTION)
* HOWEVER CAUSED AND ON ANY THEORY OF LIABILITY, WHETHER IN CONTRACT,
* STRICT LIABILITY, OR TORT (INCLUDING NEGLIGENCE OR OTHERWISE)
* ARISING IN ANY WAY OUT OF THE USE OF THIS SOFTWARE, EVEN IF ADVISED
* OF THE POSSIBILITY OF SUCH DAMAGE.
* ====================================================================
*
342 Thor VM3 with Microsoft Windows Embedded Compact 7 User Guide

* This product includes cryptographic software written by Eric Young
* ([email protected]). This product includes software written by Tim
* Hudson ([email protected]).
*
*/
Original SSLeay License
-----------------------
/* Copyright (C) 1995-1998 Eric Young ([email protected])
* All rights reserved.
*
* This package is an SSL implementation written
* by Eric Young ([email protected]).
* The implementation was written so as to conform with Netscapes SSL.
*
* This library is free for commercial and non-commercial use as long as
* the following conditions are aheared to. The following conditions
* apply to all code found in this distribution, be it the RC4, RSA,
* lhash, DES, etc., code; not just the SSL code. The SSL documentation
* included with this distribution is covered by the same copyright terms
* except that the holder is Tim Hudson ([email protected]).
*
* Copyright remains Eric Young's, and as such any Copyright notices in
* the code are not to be removed.
* If this package is used in a product, Eric Young should be given attribution
* as the author of the parts of the library used.
* This can be in the form of a textual message at program startup or
* in documentation (online or textual) provided with the package.
*
* Redistribution and use in source and binary forms, with or without
* modification, are permitted provided that the following conditions
* are met:
* 1. Redistributions of source code must retain the copyright
* notice, this list of conditions and the following disclaimer.
* 2. Redistributions in binary form must reproduce the above copyright
* notice, this list of conditions and the following disclaimer in the
* documentation and/or other materials provided with the distribution.
* 3. All advertising materials mentioning features or use of this software
* must display the following acknowledgement:
* "This product includes cryptographic software written by
* Eric Young ([email protected])"
* The word 'cryptographic' can be left out if the rouines from the library
* being used are not cryptographic related :-).
* 4. If you include any Windows specific code (or a derivative thereof) from
* the apps directory (application code) you must include an acknowledgement:
* "This product includes software written by Tim Hudson ([email protected])"
*
* THIS SOFTWARE IS PROVIDED BY ERIC YOUNG ``AS IS'' AND
* ANY EXPRESS OR IMPLIED WARRANTIES, INCLUDING, BUT NOT LIMITED TO, THE
* IMPLIED WARRANTIES OF MERCHANTABILITY AND FITNESS FOR A PARTICULAR PURPOSE
Thor VM3 with Microsoft Windows Embedded Compact 7 User Guide 343

* ARE DISCLAIMED. IN NO EVENT SHALL THE AUTHOR OR CONTRIBUTORS BE LIABLE
* FOR ANY DIRECT, INDIRECT, INCIDENTAL, SPECIAL, EXEMPLARY, OR CONSEQUENTIAL
* DAMAGES (INCLUDING, BUT NOT LIMITED TO, PROCUREMENT OF SUBSTITUTE GOODS
* OR SERVICES; LOSS OF USE, DATA, OR PROFITS; OR BUSINESS INTERRUPTION)
* HOWEVER CAUSED AND ON ANY THEORY OF LIABILITY, WHETHER IN CONTRACT, STRICT
* LIABILITY, OR TORT (INCLUDING NEGLIGENCE OR OTHERWISE) ARISING IN ANY WAY
* OUT OF THE USE OF THIS SOFTWARE, EVEN IF ADVISED OF THE POSSIBILITY OF
* SUCH DAMAGE.
*
* The licence and distribution terms for any publically available version or
* derivative of this code cannot be changed. i.e. this code cannot simply be
* copied and put under another distribution licence
* [including the GNU Public Licence.]
*/
Package(s) using ZLIB/LIBPNG License
============================
* Nullsoft Scriptable Install System
[Copyright (C) 1999-2015 Contributors]
License Text (ZLIB/LIBPNG License)
--------------------------
APPLICABLE LICENSES
-------------------
* All NSIS source code, plug-ins, documentation, examples, header files and graphics, with the exception of the compression modules and where otherwise noted, are licensed under the zlib/libpng license.
* The zlib compression module for NSIS is licensed under the zlib/libpng license.
* The bzip2 compression module for NSIS is licensed under the bzip2 license.
* The LZMA compression module for NSIS is licensed under the Common Public License version 1.0.
ZLIB/LIBPNG LICENSE
-------------------
This software is provided 'as-is', without any express or implied warranty. In no event will the authors be held liable for any damages arising from the use of this software.
Permission is granted to anyone to use this software for any purpose, including commercial applications, and to alter it and redistribute it freely, subject to the following restrictions:
1. The origin of this software must not be misrepresented; you must not claim that you wrote the original software. If you use this software in a product, an acknowledgment in the product documentation would be appreciated but is not required.
2. Altered source versions must be plainly marked as such, and must not be misrepresented as being the original software.
3. This notice may not be removed or altered from any source distribution.
BZIP2 LICENSE
-------------
344 Thor VM3 with Microsoft Windows Embedded Compact 7 User Guide

This program, "bzip2" and associated library "libbzip2", are copyright (C) 1996-2000 Julian R Seward. All rights reserved.
Redistribution and use in source and binary forms, with or without modification, are permitted provided that the following conditions are met:
1. Redistributions of source code must retain the above copyright notice, this list of conditions and the following disclaimer.
2. The origin of this software must not be misrepresented; you must not claim that you wrote the original software. If you use this software in a product, an acknowledgment in the product documentation would be appreciated but is not required.
3. Altered source versions must be plainly marked as such, and must not be misrepresented as being the original software.
4. The name of the author may not be used to endorse or promote products derived from this software without specific prior written permission.
THIS SOFTWARE IS PROVIDED BY THE AUTHOR ``AS IS'' AND ANY EXPRESS OR IMPLIED WARRANTIES, INCLUDING, BUT NOT LIMITED TO, THE IMPLIED WARRANTIES OF MERCHANTABILITY AND FITNESS FOR A PARTICULAR PURPOSE ARE DISCLAIMED. IN NO EVENT SHALL THE AUTHOR BE LIABLE FOR ANY DIRECT, INDIRECT, INCIDENTAL, SPECIAL, EXEMPLARY, OR CONSEQUENTIAL DAMAGES (INCLUDING, BUT NOT LIMITED TO, PROCUREMENT OF SUBSTITUTE GOODS OR SERVICES; LOSS OF USE, DATA, OR PROFITS; OR BUSINESS INTERRUPTION) HOWEVER CAUSED AND ON ANY THEORY OF LIABILITY, WHETHER IN CONTRACT, STRICT LIABILITY, OR TORT (INCLUDING NEGLIGENCE OR OTHERWISE) ARISING IN ANY WAY OUT OF THE USE OF THIS SOFTWARE, EVEN IF ADVISED OF THE POSSIBILITY OF SUCH DAMAGE.
Julian Seward, Cambridge, UK.
COMMON PUBLIC LICENSE VERSION 1.0
---------------------------------
THE ACCOMPANYING PROGRAM IS PROVIDED UNDER THE TERMS OF THIS COMMON PUBLIC LICENSE ("AGREEMENT"). ANY USE, REPRODUCTION OR DISTRIBUTION OF THE PROGRAM CONSTITUTES RECIPIENT'S ACCEPTANCE OF THIS AGREEMENT.
1. DEFINITIONS
"Contribution" means:
a) in the case of the initial Contributor, the initial code and documentation distributed under this Agreement, and
b) in the case of each subsequent Contributor:
i) changes to the Program, and
ii) additions to the Program;
where such changes and/or additions to the Program originate from and are distributed by that particular Contributor. A Contribution 'originates' from a Contributor if it was added to the Program by such Contributor itself or anyone acting on such Contributor's behalf. Contributions do not include additions to the Program which: (i) are separate modules of software distributed in conjunction with the Program under their own license agreement, and (ii) are not derivative works of the Program.
"Contributor" means any person or entity that distributes the Program.
"Licensed Patents " mean patent claims licensable by a Contributor which are necessarily infringed by the use or sale of its Contribution alone or when combined with the Program.
"Program" means the Contributions distributed in accordance with this Agreement.
Thor VM3 with Microsoft Windows Embedded Compact 7 User Guide 345

"Recipient" means anyone who receives the Program under this Agreement, including all Contributors.
2. GRANT OF RIGHTS
a) Subject to the terms of this Agreement, each Contributor hereby grants Recipient a non-exclusive, worldwide, royalty-free copyright license to reproduce, prepare derivative works of, publicly display, publicly perform, distribute and sublicense the Contribution of such Contributor, if any, and such derivative works, in source code and object code form.
b) Subject to the terms of this Agreement, each Contributor hereby grants Recipient a non-exclusive, worldwide, royalty-free patent license under Licensed Patents to make, use, sell, offer to sell, import and otherwise transfer the Contribution of such Contributor, if any, in source code and object code form. This patent license shall apply to the combination of the Contribution and the Program if, at the time the Contribution is added by the Contributor, such addition of the Contribution causes such combination to be covered by the Licensed Patents. The patent license shall not apply to any other combinations which include the Contribution. No hardware per se is licensed hereunder.
c) Recipient understands that although each Contributor grants the licenses to its Contributions set forth herein, no assurances are provided by any Contributor that the Program does not infringe the patent or other intellectual property rights of any other entity. Each Contributor disclaims any liability to Recipient for claims brought by any other entity based on infringement of intellectual property rights or otherwise. As a condition to exercising the rights and licenses granted hereunder, each Recipient hereby assumes sole responsibility to secure any other intellectual property rights needed, if any. For example, if a third party patent license is required to allow Recipient to distribute the Program, it is Recipient's responsibility to acquire that license before distributing the Program.
d) Each Contributor represents that to its knowledge it has sufficient copyright rights in its Contribution, if any, to grant the copyright license set forth in this Agreement.
3. REQUIREMENTS
A Contributor may choose to distribute the Program in object code form under its own license agreement, provided that:
a) it complies with the terms and conditions of this Agreement; and
b) its license agreement:
i) effectively disclaims on behalf of all Contributors all warranties and conditions, express and implied, including warranties or conditions of title and non-infringement, and implied warranties or conditions of merchantability and fitness for a particular purpose;
ii) effectively excludes on behalf of all Contributors all liability for damages, including direct, indirect, special, incidental and consequential damages, such as lost profits;
iii) states that any provisions which differ from this Agreement are offered by that Contributor alone and not by any other party; and
iv) states that source code for the Program is available from such Contributor, and informs licensees how to obtain it in a reasonable manner on or through a medium customarily used for software exchange.
When the Program is made available in source code form:
a) it must be made available under this Agreement; and
b) a copy of this Agreement must be included with each copy of the Program.
Contributors may not remove or alter any copyright notices contained within the Program.
Each Contributor must identify itself as the originator of its Contribution, if any, in a manner that reasonably allows subsequent Recipients to identify the originator of the Contribution.
346 Thor VM3 with Microsoft Windows Embedded Compact 7 User Guide

4. COMMERCIAL DISTRIBUTION
Commercial distributors of software may accept certain responsibilities with respect to end users, business partners and the like. While this license is intended to facilitate the commercial use of the Program, the Contributor who includes the Program in a commercial product offering should do so in a manner which does not create potential liability for other Contributors. Therefore, if a Contributor includes the Program in a commercial product offering, such Contributor ("Commercial Contributor") hereby agrees to defend and indemnify every other Contributor ("Indemnified Contributor") against any losses, damages and costs (collectively "Losses") arising from claims, lawsuits and other legal actions brought by a third party against the Indemnified Contributor to the extent caused by the acts or omissions of such Commercial Contributor in connection with its distribution of the Program in a commercial product offering. The obligations in this section do not apply to any claims or Losses relating to any actual or alleged intellectual property infringement. In order to qualify, an Indemnified Contributor must: a) promptly notify the Commercial Contributor in writing of such claim, and b) allow the Commercial Contributor to control, and cooperate with the Commercial Contributor in, the defense and any related settlement negotiations. The Indemnified Contributor may participate in any such claim at its own expense.
For example, a Contributor might include the Program in a commercial product offering, Product X. That Contributor is then a Commercial Contributor. If that Commercial Contributor then makes performance claims, or offers warranties related to Product X, those performance claims and warranties are such Commercial Contributor's responsibility alone. Under this section, the Commercial Contributor would have to defend claims against the other Contributors related to those performance claims and warranties, and if a court requires any other Contributor to pay any damages as a result, the Commercial Contributor must pay those damages.
5. NO WARRANTY
EXCEPT AS EXPRESSLY SET FORTH IN THIS AGREEMENT, THE PROGRAM IS PROVIDED ON AN "AS IS" BASIS, WITHOUT WARRANTIES OR CONDITIONS OF ANY KIND, EITHER EXPRESS OR IMPLIED INCLUDING, WITHOUT LIMITATION, ANY WARRANTIES OR CONDITIONS OF TITLE, NON-INFRINGEMENT, MERCHANTABILITY OR FITNESS FOR A PARTICULAR PURPOSE. Each Recipient is solely responsible for determining the appropriateness of using and distributing the Program and assumes all risks associated with its exercise of rights under this Agreement, including but not limited to the risks and costs of program errors, compliance with applicable laws, damage to or loss of data, programs or equipment, and unavailability or interruption of operations.
6. DISCLAIMER OF LIABILITY
EXCEPT AS EXPRESSLY SET FORTH IN THIS AGREEMENT, NEITHER RECIPIENT NOR ANY CONTRIBUTORS SHALL HAVE ANY LIABILITY FOR ANY DIRECT, INDIRECT, INCIDENTAL, SPECIAL, EXEMPLARY, OR CONSEQUENTIAL DAMAGES (INCLUDING WITHOUT LIMITATION LOST PROFITS), HOWEVER CAUSED AND ON ANY THEORY OF LIABILITY, WHETHER IN CONTRACT, STRICT LIABILITY, OR TORT (INCLUDING NEGLIGENCE OR OTHERWISE) ARISING IN ANY WAY OUT OF THE USE OR DISTRIBUTION OF THE PROGRAM OR THE EXERCISE OF ANY RIGHTS GRANTED HEREUNDER, EVEN IF ADVISED OF THE POSSIBILITY OF SUCH DAMAGES.
7. GENERAL
If any provision of this Agreement is invalid or unenforceable under applicable law, it shall not affect the validity or enforceability of the remainder of the terms of this Agreement, and without further action by the parties hereto, such provision shall be reformed to the minimum extent necessary to make such provision valid and enforceable.
If Recipient institutes patent litigation against a Contributor with respect to a patent applicable to software (including a cross-claim or counterclaim in a lawsuit), then any patent licenses granted by that Contributor to such Recipient under this Agreement shall terminate as of the date such litigation is filed. In addition, if Recipient institutes patent litigation against any entity (including a cross-claim or counterclaim in a lawsuit) alleging that the Program itself (excluding combinations of the Program with other software or hardware) infringes such Recipient's patent(s), then such Recipient's rights granted under Section 2(b) shall terminate as of the date such litigation is filed.
All Recipient's rights under this Agreement shall terminate if it fails to comply with any of the material terms or conditions of this Agreement and does not cure such failure in a reasonable period of time after becoming aware of such noncompliance. If all Recipient's rights under this Agreement terminate, Recipient agrees to cease use and distribution of the Program as soon as reasonably practicable. However, Recipient's obligations under this Agreement and any licenses granted by Recipient relating to the Program shall continue and survive.
Everyone is permitted to copy and distribute copies of this Agreement, but in order to avoid inconsistency the Agreement is copyrighted and may only be modified in the following manner. The Agreement Steward reserves the right to publish new versions (including revisions) of this Agreement from time to time. No one other than the Agreement Steward has the right to modify this Agreement. IBM is the initial Agreement Steward. IBM may assign the responsibility to serve as the Agreement Steward to a suitable separate entity. Each new version of the Agreement will be given a distinguishing version number. The Program (including Contributions) may always be distributed subject to the version of the Agreement under which it was received. In addition, after a new version of the Agreement is published, Contributor may elect to distribute the
Thor VM3 with Microsoft Windows Embedded Compact 7 User Guide 347

Program (including its Contributions) under the new version. Except as expressly stated in Sections 2(a) and 2(b) above, Recipient receives no rights or licenses to the intellectual property of any Contributor under this Agreement, whether expressly, by implication, estoppel or otherwise. All rights in the Program not expressly granted under this Agreement are reserved.
This Agreement is governed by the laws of the State of New York and the intellectual property laws of the United States of America. No party to this Agreement will bring a legal action under this Agreement more than one year after the cause of action arose. Each party waives its rights to a jury trial in any resulting litigation.
SPECIAL EXCEPTION FOR LZMA COMPRESSION MODULE
---------------------------------------------
Igor Pavlov and Amir Szekely, the authors of the LZMA compression module for NSIS, expressly permit you to statically or dynamically link your code (or bind by name) to the files from the LZMA compression module for NSIS without subjecting your linked code to the terms of the Common Public license version 1.0. Any modifications or additions to files from the LZMA compression module for NSIS, however, are subject to the terms of the Common Public License version 1.0.
Package(s) using Literacies License
============================
* Literacies
[Copyright (c) 1998 CORE SDI S.A., Buenos Aires, Argentina.]
License Text (Literacies License)
--------------------------
* Copyright (c) 1998 CORE SDI S.A., Buenos Aires, Argentina.
*
* All rights reserved. Redistribution and use in source and binary
* forms, with or without modification, are permitted provided that
* this copyright notice is retained.
*
* THIS SOFTWARE IS PROVIDED ``AS IS'' AND ANY EXPRESS OR IMPLIED
* WARRANTIES ARE DISCLAIMED. IN NO EVENT SHALL CORE SDI S.A. BE
* LIABLE FOR ANY DIRECT, INDIRECT, INCIDENTAL, SPECIAL, EXEMPLARY OR
* CONSEQUENTIAL DAMAGES RESULTING FROM THE USE OR MISUSE OF THIS
* SOFTWARE.
Package(s) using MIT License
============================
* Putty
[PuTTY is copyright 1997-2015 Simon Tatham.]
License Text (MIT License)
--------------------------
PuTTY is copyright 1997-2015 Simon Tatham.
Portions copyright Robert de Bath, Joris van Rantwijk, Delian Delchev, Andreas Schultz, Jeroen Massar, Wez Furlong, Nicolas Barry, Justin Bradford, Ben Harris, Malcolm Smith, Ahmad Khalifa, Markus Kuhn, Colin Watson, Christopher Staite, and CORE SDI S.A.
Permission is hereby granted, free of charge, to any person obtaining a copy of this software and associated documentation files (the "Software"), to deal in the Software without restriction, including without limitation the rights to use, copy, modify, merge, publish, distribute, sublicense, and/or sell copies of the Software, and to permit persons to whom the Software is furnished to do so, subject to the following conditions:
The above copyright notice and this permission notice shall be included in all copies or substantial portions of the Software.
348 Thor VM3 with Microsoft Windows Embedded Compact 7 User Guide

THE SOFTWARE IS PROVIDED "AS IS", WITHOUT WARRANTY OF ANY KIND, EXPRESS OR IMPLIED, INCLUDING BUT NOT LIMITED TO THE WARRANTIES OF MERCHANTABILITY, FITNESS FOR A PARTICULAR PURPOSE AND NONINFRINGEMENT. IN NO EVENT SHALL SIMON TATHAM BE LIABLE FOR ANY CLAIM, DAMAGES OR OTHER LIABILITY, WHETHER IN AN ACTION OF CONTRACT, TORT OR OTHERWISE, ARISING FROM, OUT OF OR IN CONNECTION WITH THE SOFTWARE OR THE USE OR OTHER DEALINGS IN THE SOFTWARE.
Package(s) using MIT License
============================
* Bootstrap
[Copyright (c) 2011-2015 Twitter, Inc]
License Text (MIT License)
--------------------------
Permission is hereby granted, free of charge, to any person obtaining a copy
of this software and associated documentation files (the "Software"), to deal
in the Software without restriction, including without limitation the rights
to use, copy, modify, merge, publish, distribute, sublicense, and/or sell
copies of the Software, and to permit persons to whom the Software is
furnished to do so, subject to the following conditions:
The above copyright notice and this permission notice shall be included in
all copies or substantial portions of the Software.
THE SOFTWARE IS PROVIDED "AS IS", WITHOUT WARRANTY OF ANY KIND, EXPRESS OR
IMPLIED, INCLUDING BUT NOT LIMITED TO THE WARRANTIES OF MERCHANTABILITY,
FITNESS FOR A PARTICULAR PURPOSE AND NONINFRINGEMENT. IN NO EVENT SHALL THE
AUTHORS OR COPYRIGHT HOLDERS BE LIABLE FOR ANY CLAIM, DAMAGES OR OTHER
LIABILITY, WHETHER IN AN ACTION OF CONTRACT, TORT OR OTHERWISE, ARISING FROM,
OUT OF OR IN CONNECTION WITH THE SOFTWARE OR THE USE OR OTHER DEALINGS IN
THE SOFTWARE.
Package(s) using Apache v2.0 License
============================
* cas
License Text (Apache v2.0 License)
--------------------------
Licensed to Apereo under one or more contributor license
agreements. See the NOTICE file distributed with this work
for additional information regarding copyright ownership.
Apereo licenses this file to you under the Apache License,
Version 2.0 (the "License"); you may not use this file
except in compliance with the License. You may obtain a
copy of the License at the following location:
http://www.apache.org/licenses/LICENSE-2.0
Unless required by applicable law or agreed to in writing,
software distributed under the License is distributed on an
"AS IS" BASIS, WITHOUT WARRANTIES OR CONDITIONS OF ANY
KIND, either express or implied. See the License for the
Thor VM3 with Microsoft Windows Embedded Compact 7 User Guide 349

specific language governing permissions and limitations
under the License.
Package(s) using BSD License
============================
* wosk wosk-EnterpriseTE-version
[Copyright (c) 2008, Andrzej Rusztowicz (ekus.net)]
License Text (BSD License)
--------------------------
Copyright (c) 2008, Andrzej Rusztowicz (ekus.net)
All rights reserved.
Redistribution and use in source and binary forms, with or without modification, are permitted provided that the following conditions are met:
* Redistributions of source code must retain the above copyright notice, this list of conditions and the following disclaimer.
* Redistributions in binary form must reproduce the above copyright notice, this list of conditions and the following disclaimer in the documentation and/or other materials provided with the distribution.
* Neither the name of ekus.net nor the names of its contributors may be used to endorse or promote products derived from this software without specific prior written permission.
THIS SOFTWARE IS PROVIDED BY THE COPYRIGHT HOLDERS AND CONTRIBUTORS "AS IS" AND ANY EXPRESS OR IMPLIED WARRANTIES, INCLUDING, BUT NOT LIMITED TO, THE IMPLIED WARRANTIES OF MERCHANTABILITY AND FITNESS FOR A PARTICULAR PURPOSE ARE DISCLAIMED. IN NO EVENT SHALL THE COPYRIGHT OWNER OR CONTRIBUTORS BE LIABLE FOR ANY DIRECT, INDIRECT, INCIDENTAL, SPECIAL, EXEMPLARY, OR CONSEQUENTIAL DAMAGES (INCLUDING, BUT NOT LIMITED TO, PROCUREMENT OF SUBSTITUTE GOODS OR SERVICES; LOSS OF USE, DATA, OR PROFITS; OR BUSINESS INTERRUPTION) HOWEVER CAUSED AND ON ANY THEORY OF LIABILITY, WHETHER IN CONTRACT, STRICT LIABILITY, OR TORT (INCLUDING NEGLIGENCE OR OTHERWISE) ARISING IN ANY WAY OUT OF THE USE OF THIS SOFTWARE, EVEN IF ADVISED OF THE POSSIBILITY OF SUCH DAMAGE.
Package(s) using (CPOL) 1.02 License
============================
* ProcessCE
[Copyright ? 2009, Frank van de Ven, all rights reserved.]
License Text ((CPOL) 1.02 License)
--------------------------
Preamble
This License governs Your use of the Work. This License is intended to allow developers to use the Source Code and Executable Files provided as part of the Work in any application in any form.
The main points subject to the terms of the License are:
Source Code and Executable Files can be used in commercial applications;
Source Code and Executable Files can be redistributed; and
Source Code can be modified to create derivative works.
No claim of suitability, guarantee, or any warranty whatsoever is provided. The software is provided "as-is".
The Article(s) accompanying the Work may not be distributed or republished without the Author's consent
This License is entered between You, the individual or other entity reading or otherwise making use of the Work licensed pursuant to this License and the individual or other entity which offers the Work under the terms of this License ("Author").
License
350 Thor VM3 with Microsoft Windows Embedded Compact 7 User Guide

THE WORK (AS DEFINED BELOW) IS PROVIDED UNDER THE TERMS OF THIS CODE PROJECT OPEN LICENSE ("LICENSE"). THE WORK IS PROTECTED BY COPYRIGHT AND/OR OTHER APPLICABLE LAW. ANY USE OF THE WORK OTHER THAN AS AUTHORIZED UNDER THIS LICENSE OR COPYRIGHT LAW IS PROHIBITED.
BY EXERCISING ANY RIGHTS TO THE WORK PROVIDED HEREIN, YOU ACCEPT AND AGREE TO BE BOUND BY THE TERMS OF THIS LICENSE. THE AUTHOR GRANTS YOU THE RIGHTS CONTAINED HEREIN IN CONSIDERATION OF YOUR ACCEPTANCE OF SUCH TERMS AND CONDITIONS. IF YOU DO NOT AGREE TO ACCEPT AND BE BOUND BY THE TERMS OF THIS LICENSE, YOU CANNOT MAKE ANY USE OF THE WORK.
Definitions.
"Articles" means, collectively, all articles written by Author which describes how the Source Code and Executable Files for the Work may be used by a user.
"Author" means the individual or entity that offers the Work under the terms of this License.
"Derivative Work" means a work based upon the Work or upon the Work and other pre-existing works.
"Executable Files" refer to the executables, binary files, configuration and any required data files included in the Work.
"Publisher" means the provider of the website, magazine, CD-ROM, DVD or other medium from or by which the Work is obtained by You.
"Source Code" refers to the collection of source code and configuration files used to create the Executable Files.
"Standard Version" refers to such a Work if it has not been modified, or has been modified in accordance with the consent of the Author, such consent being in the full discretion of the Author.
"Work" refers to the collection of files distributed by the Publisher, including the Source Code, Executable Files, binaries, data files, documentation, whitepapers and the Articles.
"You" is you, an individual or entity wishing to use the Work and exercise your rights under this License.
Fair Use/Fair Use Rights. Nothing in this License is intended to reduce, limit, or restrict any rights arising from fair use, fair dealing, first sale or other limitations on the exclusive rights of the copyright owner under copyright law or other applicable laws.
License Grant. Subject to the terms and conditions of this License, the Author hereby grants You a worldwide, royalty-free, non-exclusive, perpetual (for the duration of the applicable copyright) license to exercise the rights in the Work as stated below:
You may use the standard version of the Source Code or Executable Files in Your own applications.
You may apply bug fixes, portability fixes and other modifications obtained from the Public Domain or from the Author. A Work modified in such a way shall still be considered the standard version and will be subject to this License.
You may otherwise modify Your copy of this Work (excluding the Articles) in any way to create a Derivative Work, provided that You insert a prominent notice in each changed file stating how, when and where You changed that file.
You may distribute the standard version of the Executable Files and Source Code or Derivative Work in aggregate with other (possibly commercial) programs as part of a larger (possibly commercial) software distribution.
The Articles discussing the Work published in any form by the author may not be distributed or republished without the Author's consent. The author retains copyright to any such Articles. You may use the Executable Files and Source Code pursuant to this License but you may not repost or republish or otherwise distribute or make available the Articles, without the prior written consent of the Author.
Any subroutines or modules supplied by You and linked into the Source Code or Executable Files of this Work shall not be considered part of this Work and will not be subject to the terms of this License.
Patent License. Subject to the terms and conditions of this License, each Author hereby grants to You a perpetual, worldwide, non-exclusive, no-charge, royalty-free, irrevocable (except as stated in this section) patent license to make, have made, use, import, and otherwise transfer the Work.
Restrictions. The license granted in Section 3 above is expressly made subject to and limited by the following restrictions:
You agree not to remove any of the original copyright, patent, trademark, and attribution notices and associated disclaimers that may appear in the Source Code or Executable Files.
You agree not to advertise or in any way imply that this Work is a product of Your own.
The name of the Author may not be used to endorse or promote products derived from the Work without the prior written consent of the Author.
You agree not to sell, lease, or rent any part of the Work. This does not restrict you from including the Work or any part of the Work inside a larger software distribution that itself is being sold. The Work by itself, though, cannot be sold, leased or rented.
You may distribute the Executable Files and Source Code only under the terms of this License, and You must include a copy of, or the Uniform Resource Identifier for, this License with every copy of the Executable Files or Source Code You distribute and ensure that anyone receiving such Executable Files and Source Code agrees that the terms of this License apply to such Executable Files and/or Source Code. You may not offer or impose any terms on the Work that alter or restrict the terms of this License or the recipients' exercise of the rights granted hereunder. You may not sublicense the Work. You must keep intact all notices that refer to this License and to the disclaimer of warranties. You may not distribute the Executable Files or Source Code with any technological measures that control access or use of the Work in a manner inconsistent with the terms of this License.
You agree not to use the Work for illegal, immoral or improper purposes, or on pages containing illegal, immoral or improper material. The Work is subject to applicable export laws. You agree to comply with all such laws and regulations that may apply to the Work after Your receipt of the Work.
Thor VM3 with Microsoft Windows Embedded Compact 7 User Guide 351

Representations, Warranties and Disclaimer. THIS WORK IS PROVIDED "AS IS", "WHERE IS" AND "AS AVAILABLE", WITHOUT ANY EXPRESS OR IMPLIED WARRANTIES OR CONDITIONS OR GUARANTEES. YOU, THE USER, ASSUME ALL RISK IN ITS USE, INCLUDING COPYRIGHT INFRINGEMENT, PATENT INFRINGEMENT, SUITABILITY, ETC. AUTHOR EXPRESSLY DISCLAIMS ALL EXPRESS, IMPLIED OR STATUTORY WARRANTIES OR CONDITIONS, INCLUDING WITHOUT LIMITATION, WARRANTIES OR CONDITIONS OF MERCHANTABILITY, MERCHANTABLE QUALITY OR FITNESS FOR A PARTICULAR PURPOSE, OR ANY WARRANTY OF TITLE OR NON-INFRINGEMENT, OR THAT THE WORK (OR ANY PORTION THEREOF) IS CORRECT, USEFUL, BUG-FREE OR FREE OF VIRUSES. YOU MUST PASS THIS DISCLAIMER ON WHENEVER YOU DISTRIBUTE THE WORK OR DERIVATIVE WORKS.
Indemnity. You agree to defend, indemnify and hold harmless the Author and the Publisher from and against any claims, suits, losses, damages, liabilities, costs, and expenses (including reasonable legal or attorneys’ fees) resulting from or relating to any use of the Work by You.
Limitation on Liability. EXCEPT TO THE EXTENT REQUIRED BY APPLICABLE LAW, IN NO EVENT WILL THE AUTHOR OR THE PUBLISHER BE LIABLE TO YOU ON ANY LEGAL THEORY FOR ANY SPECIAL, INCIDENTAL, CONSEQUENTIAL, PUNITIVE OR EXEMPLARY DAMAGES ARISING OUT OF THIS LICENSE OR THE USE OF THE WORK OR OTHERWISE, EVEN IF THE AUTHOR OR THE PUBLISHER HAS BEEN ADVISED OF THE POSSIBILITY OF SUCH DAMAGES.
Termination.
This License and the rights granted hereunder will terminate automatically upon any breach by You of any term of this License. Individuals or entities who have received Derivative Works from You under this License, however, will not have their licenses terminated provided such individuals or entities remain in full compliance with those licenses. Sections 1, 2, 6, 7, 8, 9, 10 and 11 will survive any termination of this License.
If You bring a copyright, trademark, patent or any other infringement claim against any contributor over infringements You claim are made by the Work, your License from such contributor to the Work ends automatically.
Subject to the above terms and conditions, this License is perpetual (for the duration of the applicable copyright in the Work). Notwithstanding the above, the Author reserves the right to release the Work under different license terms or to stop distributing the Work at any time; provided, however that any such election will not serve to withdraw this License (or any other license that has been, or is required to be, granted under the terms of this License), and this License will continue in full force and effect unless terminated as stated above.
Publisher. The parties hereby confirm that the Publisher shall not, under any circumstances, be responsible for and shall not have any liability in respect of the subject matter of this License. The Publisher makes no warranty whatsoever in connection with the Work and shall not be liable to You or any party on any legal theory for any damages whatsoever, including without limitation any general, special, incidental or consequential damages arising in connection to this license. The Publisher reserves the right to cease making the Work available to You at any time without notice
Miscellaneous
This License shall be governed by the laws of the location of the head office of the Author or if the Author is an individual, the laws of location of the principal place of residence of the Author.
If any provision of this License is invalid or unenforceable under applicable law, it shall not affect the validity or enforceability of the remainder of the terms of this License, and without further action by the parties to this License, such provision shall be reformed to the minimum extent necessary to make such provision valid and enforceable.
No term or provision of this License shall be deemed waived and no breach consented to unless such waiver or consent shall be in writing and signed by the party to be charged with such waiver or consent.
This License constitutes the entire agreement between the parties with respect to the Work licensed herein. There are no understandings, agreements or representations with respect to the Work not specified herein. The Author shall not be bound by any additional provisions that may appear in any communication from You. This License may not be modified without the mutual written agreement of the Author and You.
Package(s) using zlib License
============================
* Tiny XML
www.sourceforge.net/projects/tinyxml
Original file by Yves Berquin.
* zlib
[ Copyright (C) 1995-2013 Jean-loup Gailly and Mark Adler]
License Text (zlib License)
--------------------------
This software is provided 'as-is', without any express or implied
warranty. In no event will the authors be held liable for anydamages arising from the use of this software.
352 Thor VM3 with Microsoft Windows Embedded Compact 7 User Guide

Permission is granted to anyone to use this software for any
purpose, including commercial applications, and to alter it and
redistribute it freely, subject to the following restrictions:
1. The origin of this software must not be misrepresented; you must
not claim that you wrote the original software. If you use this
software in a product, an acknowledgment in the product documentation
would be appreciated but is not required.
2. Altered source versions must be plainly marked as such, and
must not be misrepresented as being the original software.
3. This notice may not be removed or altered from any source
distribution.
Package(s) using RSA License
============================
* netwars (MD5)
[Copyright (C) 1991-2, RSA Data Security, Inc. Created 1991]
License Text (RSA License)
--------------------------
MD5
converted to C++ class by Frank Thilo ([email protected])
for bzflag (http://www.bzflag.org)
based on:
md5.h and md5.c
reference implementation of RFC 1321
Copyright (C) 1991-2, RSA Data Security, Inc. Created 1991. All
rights reserved.
License to copy and use this software is granted provided that it
is identified as the "RSA Data Security, Inc. MD5 Message-Digest
Algorithm" in all material mentioning or referencing this software
or this function.
License is also granted to make and use derivative works provided
that such works are identified as "derived from the RSA Data
Security, Inc. MD5 Message-Digest Algorithm" in all material
mentioning or referencing the derived work.
RSA Data Security, Inc. makes no representations concerning either
the merchantability of this software or the suitability of this
software for any particular purpose. It is provided "as is"
without express or implied warranty of any kind.
These notices must be retained in any copies of any part of this
documentation and/or software.
Package(s) using ML-PL License
============================
* WindowsFirewall.cpp
[Copyright (C) Microsoft. All Rights Reserved.]
* Rathaxes
Thor VM3 with Microsoft Windows Embedded Compact 7 User Guide 353

[Copyright (c) 1997 Microsoft Corporation]
License Text (ML-PL License)
--------------------------
Microsoft Limited Public License
This license governs use of code marked as “sample” or “example” available on this web site without a license agreement, as provided under the section above titled “NOTICE SPECIFIC TO SOFTWARE AVAILABLE ON THIS WEB SITE.” If you use such code (the “software”), you accept this license. If you do not accept the license, do not use the software.
1. Definitions
The terms “reproduce,” “reproduction,” “derivative works,” and “distribution” have the same meaning here as under U.S. copyright law.
A “contribution” is the original software, or any additions or changes to the software.
A “contributor” is any person that distributes its contribution under this license.
“Licensed patents” are a contributor’s patent claims that read directly on its contribution.
2. Grant of Rights
(A) Copyright Grant - Subject to the terms of this license, including the license conditions and limitations in section 3, each contributor grants you a non-exclusive, worldwide, royalty-free copyright license to reproduce its contribution, prepare derivative works of its contribution, and distribute its contribution or any derivative works that you create.
(B) Patent Grant - Subject to the terms of this license, including the license conditions and limitations in section 3, each contributor grants you a non-exclusive, worldwide, royalty-free license under its licensed patents to make, have made, use, sell, offer for sale, import, and/or otherwise dispose of its contribution in the software or derivative works of the contribution in the software.
3. Conditions and Limitations
(A) No Trademark License- This license does not grant you rights to use any contributors’ name, logo, or trademarks.
(B) If you bring a patent claim against any contributor over patents that you claim are infringed by the software, your patent license from such contributor to the software ends automatically.
(C) If you distribute any portion of the software, you must retain all copyright, patent, trademark, and attribution notices that are present in the software.
(D) If you distribute any portion of the software in source code form, you may do so only under this license by including a complete copy of this license with your distribution. If you distribute any portion of the software in compiled or object code form, you may only do so under a license that complies with this license.
(E) The software is licensed “as-is.” You bear the risk of using it. The contributors give no express warranties, guarantees or conditions. You may have additional consumer rights under your local laws which this license cannot change. To the extent permitted under your local laws, the contributors exclude the implied warranties of merchantability, fitness for a particular purpose and non-infringement.
(F) Platform Limitation - The licenses granted in sections 2(A) and 2(B) extend only to the software or derivative works that you create that run on a Microsoft Windows operating system product.
Package(s) using blowfish License
============================
* blowfish
354 Thor VM3 with Microsoft Windows Embedded Compact 7 User Guide

License Text (blowfish License)
--------------------------
// blowfish.cpp C++ class implementation of the BLOWFISH encryption algorithm
// _THE BLOWFISH ENCRYPTION ALGORITHM_
// by Bruce Schneier
// Revised code--3/20/94
// Converted to C++ class 5/96, Jim Conger
Blowfish is a symmetric block cipher that can be used as a drop-in replacement for DES or IDEA. It takes a variable-length key, from 32 bits to 448 bits, making it ideal for both domestic and exportable use. Blowfish was designed in 1993 by Bruce Schneier as a fast, free alternative to existing encryption algorithms. Since then it has been analyzed considerably, and it is slowly gaining acceptance as a strong encryption algorithm. Blowfish is unpatented and license-free, and is available free for all uses.
Package(s)
============================
* touch
License Text (Public domain License)
--------------------------
This package is in public domain
Package(s) using MPL v2.0 License
============================
* mozilla-central (mozilla)
License Text (MPL License)
--------------------------
Mozilla Public License Version 2.0
==================================
1. Definitions
--------------
1.1. "Contributor"
means each individual or legal entity that creates, contributes to
the creation of, or owns Covered Software.
1.2. "Contributor Version"
means the combination of the Contributions of others (if any) used
by a Contributor and that particular Contributor's Contribution.
1.3. "Contribution"
means Covered Software of a particular Contributor.
1.4. "Covered Software"
means Source Code Form to which the initial Contributor has attached
the notice in Exhibit A, the Executable Form of such Source Code
Form, and Modifications of such Source Code Form, in each case
including portions thereof.
1.5. "Incompatible With Secondary Licenses"
Thor VM3 with Microsoft Windows Embedded Compact 7 User Guide 355

means
(a) that the initial Contributor has attached the notice described
in Exhibit B to the Covered Software; or
(b) that the Covered Software was made available under the terms of
version 1.1 or earlier of the License, but not also under the
terms of a Secondary License.
1.6. "Executable Form"
means any form of the work other than Source Code Form.
1.7. "Larger Work"
means a work that combines Covered Software with other material, in
a separate file or files, that is not Covered Software.
1.8. "License"
means this document.
1.9. "Licensable"
means having the right to grant, to the maximum extent possible,
whether at the time of the initial grant or subsequently, any and
all of the rights conveyed by this License.
1.10. "Modifications"
means any of the following:
(a) any file in Source Code Form that results from an addition to,
deletion from, or modification of the contents of Covered
Software; or
(b) any new file in Source Code Form that contains any Covered
Software.
1.11. "Patent Claims" of a Contributor
means any patent claim(s), including without limitation, method,
process, and apparatus claims, in any patent Licensable by such
Contributor that would be infringed, but for the grant of the
License, by the making, using, selling, offering for sale, having
made, import, or transfer of either its Contributions or its
Contributor Version.
1.12. "Secondary License"
means either the GNU General Public License, Version 2.0, the GNU
Lesser General Public License, Version 2.1, the GNU Affero General
Public License, Version 3.0, or any later versions of those
licenses.
1.13. "Source Code Form"
means the form of the work preferred for making modifications.
356 Thor VM3 with Microsoft Windows Embedded Compact 7 User Guide

1.14. "You" (or "Your")
means an individual or a legal entity exercising rights under this
License. For legal entities, "You" includes any entity that
controls, is controlled by, or is under common control with You. For
purposes of this definition, "control" means (a) the power, direct
or indirect, to cause the direction or management of such entity,
whether by contract or otherwise, or (b) ownership of more than
fifty percent (50%) of the outstanding shares or beneficial
ownership of such entity.
2. License Grants and Conditions
--------------------------------
2.1. Grants
Each Contributor hereby grants You a world-wide, royalty-free,
non-exclusive license:
(a) under intellectual property rights (other than patent or trademark)
Licensable by such Contributor to use, reproduce, make available,
modify, display, perform, distribute, and otherwise exploit its
Contributions, either on an unmodified basis, with Modifications, or
as part of a Larger Work; and
(b) under Patent Claims of such Contributor to make, use, sell, offer
for sale, have made, import, and otherwise transfer either its
Contributions or its Contributor Version.
2.2. Effective Date
The licenses granted in Section 2.1 with respect to any Contribution
become effective for each Contribution on the date the Contributor first
distributes such Contribution.
2.3. Limitations on Grant Scope
The licenses granted in this Section 2 are the only rights granted under
this License. No additional rights or licenses will be implied from the
distribution or licensing of Covered Software under this License.
Notwithstanding Section 2.1(b) above, no patent license is granted by a
Contributor:
(a) for any code that a Contributor has removed from Covered Software;
or
(b) for infringements caused by: (i) Your and any other third party's
modifications of Covered Software, or (ii) the combination of its
Contributions with other software (except as part of its Contributor
Version); or
(c) under Patent Claims infringed by Covered Software in the absence of
Thor VM3 with Microsoft Windows Embedded Compact 7 User Guide 357

its Contributions.
This License does not grant any rights in the trademarks, service marks,
or logos of any Contributor (except as may be necessary to comply with
the notice requirements in Section 3.4).
2.4. Subsequent Licenses
No Contributor makes additional grants as a result of Your choice to
distribute the Covered Software under a subsequent version of this
License (see Section 10.2) or under the terms of a Secondary License (if
permitted under the terms of Section 3.3).
2.5. Representation
Each Contributor represents that the Contributor believes its
Contributions are its original creation(s) or it has sufficient rights
to grant the rights to its Contributions conveyed by this License.
2.6. Fair Use
This License is not intended to limit any rights You have under
applicable copyright doctrines of fair use, fair dealing, or other
equivalents.
2.7. Conditions
Sections 3.1, 3.2, 3.3, and 3.4 are conditions of the licenses granted
in Section 2.1.
3. Responsibilities
-------------------
3.1. Distribution of Source Form
All distribution of Covered Software in Source Code Form, including any
Modifications that You create or to which You contribute, must be under
the terms of this License. You must inform recipients that the Source
Code Form of the Covered Software is governed by the terms of this
License, and how they can obtain a copy of this License. You may not
attempt to alter or restrict the recipients' rights in the Source Code
Form.
3.2. Distribution of Executable Form
If You distribute Covered Software in Executable Form then:
(a) such Covered Software must also be made available in Source Code
Form, as described in Section 3.1, and You must inform recipients of
the Executable Form how they can obtain a copy of such Source Code
Form by reasonable means in a timely manner, at a charge no more
358 Thor VM3 with Microsoft Windows Embedded Compact 7 User Guide

than the cost of distribution to the recipient; and
(b) You may distribute such Executable Form under the terms of this
License, or sublicense it under different terms, provided that the
license for the Executable Form does not attempt to limit or alter
the recipients' rights in the Source Code Form under this License.
3.3. Distribution of a Larger Work
You may create and distribute a Larger Work under terms of Your choice,
provided that You also comply with the requirements of this License for
the Covered Software. If the Larger Work is a combination of Covered
Software with a work governed by one or more Secondary Licenses, and the
Covered Software is not Incompatible With Secondary Licenses, this
License permits You to additionally distribute such Covered Software
under the terms of such Secondary License(s), so that the recipient of
the Larger Work may, at their option, further distribute the Covered
Software under the terms of either this License or such Secondary
License(s).
3.4. Notices
You may not remove or alter the substance of any license notices
(including copyright notices, patent notices, disclaimers of warranty,
or limitations of liability) contained within the Source Code Form of
the Covered Software, except that You may alter any license notices to
the extent required to remedy known factual inaccuracies.
3.5. Application of Additional Terms
You may choose to offer, and to charge a fee for, warranty, support,
indemnity or liability obligations to one or more recipients of Covered
Software. However, You may do so only on Your own behalf, and not on
behalf of any Contributor. You must make it absolutely clear that any
such warranty, support, indemnity, or liability obligation is offered by
You alone, and You hereby agree to indemnify every Contributor for any
liability incurred by such Contributor as a result of warranty, support,
indemnity or liability terms You offer. You may include additional
disclaimers of warranty and limitations of liability specific to any
jurisdiction.
4. Inability to Comply Due to Statute or Regulation
---------------------------------------------------
If it is impossible for You to comply with any of the terms of this
License with respect to some or all of the Covered Software due to
statute, judicial order, or regulation then You must: (a) comply with
the terms of this License to the maximum extent possible; and (b)
describe the limitations and the code they affect. Such description must
be placed in a text file included with all distributions of the Covered
Software under this License. Except to the extent prohibited by statute
Thor VM3 with Microsoft Windows Embedded Compact 7 User Guide 359

or regulation, such description must be sufficiently detailed for a
recipient of ordinary skill to be able to understand it.
5. Termination
--------------
5.1. The rights granted under this License will terminate automatically
if You fail to comply with any of its terms. However, if You become
compliant, then the rights granted under this License from a particular
Contributor are reinstated (a) provisionally, unless and until such
Contributor explicitly and finally terminates Your grants, and (b) on an
ongoing basis, if such Contributor fails to notify You of the
non-compliance by some reasonable means prior to 60 days after You have
come back into compliance. Moreover, Your grants from a particular
Contributor are reinstated on an ongoing basis if such Contributor
notifies You of the non-compliance by some reasonable means, this is the
first time You have received notice of non-compliance with this License
from such Contributor, and You become compliant prior to 30 days after
Your receipt of the notice.
5.2. If You initiate litigation against any entity by asserting a patent
infringement claim (excluding declaratory judgment actions,
counter-claims, and cross-claims) alleging that a Contributor Version
directly or indirectly infringes any patent, then the rights granted to
You by any and all Contributors for the Covered Software under Section
2.1 of this License shall terminate.
5.3. In the event of termination under Sections 5.1 or 5.2 above, all
end user license agreements (excluding distributors and resellers) which
have been validly granted by You or Your distributors under this License
prior to termination shall survive termination.
************************************************************************
* *
* 6. Disclaimer of Warranty *
* ------------------------- *
* *
* Covered Software is provided under this License on an "as is" *
* basis, without warranty of any kind, either expressed, implied, or *
* statutory, including, without limitation, warranties that the *
* Covered Software is free of defects, merchantable, fit for a *
* particular purpose or non-infringing. The entire risk as to the *
* quality and performance of the Covered Software is with You. *
* Should any Covered Software prove defective in any respect, You *
* (not any Contributor) assume the cost of any necessary servicing, *
* repair, or correction. This disclaimer of warranty constitutes an *
* essential part of this License. No use of any Covered Software is *
* authorized under this License except under this disclaimer. *
* *
************************************************************************
360 Thor VM3 with Microsoft Windows Embedded Compact 7 User Guide

************************************************************************
* *
* 7. Limitation of Liability *
* -------------------------- *
* *
* Under no circumstances and under no legal theory, whether tort *
* (including negligence), contract, or otherwise, shall any *
* Contributor, or anyone who distributes Covered Software as *
* permitted above, be liable to You for any direct, indirect, *
* special, incidental, or consequential damages of any character *
* including, without limitation, damages for lost profits, loss of *
* goodwill, work stoppage, computer failure or malfunction, or any *
* and all other commercial damages or losses, even if such party *
* shall have been informed of the possibility of such damages. This *
* limitation of liability shall not apply to liability for death or *
* personal injury resulting from such party's negligence to the *
* extent applicable law prohibits such limitation. Some *
* jurisdictions do not allow the exclusion or limitation of *
* incidental or consequential damages, so this exclusion and *
* limitation may not apply to You. *
* *
************************************************************************
8. Litigation
-------------
Any litigation relating to this License may be brought only in the
courts of a jurisdiction where the defendant maintains its principal
place of business and such litigation shall be governed by laws of that
jurisdiction, without reference to its conflict-of-law provisions.
Nothing in this Section shall prevent a party's ability to bring
cross-claims or counter-claims.
9. Miscellaneous
----------------
This License represents the complete agreement concerning the subject
matter hereof. If any provision of this License is held to be
unenforceable, such provision shall be reformed only to the extent
necessary to make it enforceable. Any law or regulation which provides
that the language of a contract shall be construed against the drafter
shall not be used to construe this License against a Contributor.
10. Versions of the License
---------------------------
10.1. New Versions
Mozilla Foundation is the license steward. Except as provided in Section
10.3, no one other than the license steward has the right to modify or
publish new versions of this License. Each version will be given a
Thor VM3 with Microsoft Windows Embedded Compact 7 User Guide 361

distinguishing version number.
10.2. Effect of New Versions
You may distribute the Covered Software under the terms of the version
of the License under which You originally received the Covered Software,
or under the terms of any subsequent version published by the license
steward.
10.3. Modified Versions
If you create software not governed by this License, and you want to
create a new license for such software, you may create and use a
modified version of this License if you rename the license and remove
any references to the name of the license steward (except to note that
such modified license differs from this License).
10.4. Distributing Source Code Form that is Incompatible With Secondary
Licenses
If You choose to distribute Source Code Form that is Incompatible With
Secondary Licenses under the terms of this version of the License, the
notice described in Exhibit B of this License must be attached.
Exhibit A - Source Code Form License Notice
-------------------------------------------
This Source Code Form is subject to the terms of the Mozilla Public
License, v. 2.0. If a copy of the MPL was not distributed with this
file, You can obtain one at http://mozilla.org/MPL/2.0/.
If it is not possible or desirable to put the notice in a particular
file, then You may include the notice in a location (such as a LICENSE
file in a relevant directory) where a recipient would be likely to look
for such a notice.
You may add additional accurate notices of copyright ownership.
Exhibit B - "Incompatible With Secondary Licenses" Notice
---------------------------------------------------------
This Source Code Form is "Incompatible With Secondary Licenses", as
defined by the Mozilla Public License, v. 2.0.
362 Thor VM3 with Microsoft Windows Embedded Compact 7 User Guide

APPENDIX
C
Thor VM3 with Mic
THOR VM3 AGENCY INFORMATION
Thor VM3 vehicle-mount computers meet or exceed the requirements of all applicable standards organizations for safe operation. The best way to ensure safe operation is to use the mobile computer according to the agency guidelines in this user guide and on the regulatory sheet shipped with the terminal. Read all guidelines before using your Dolphin terminal. To download product documentation for the Thor VM3 computer, go to www.honeywellaidc.com.
This documentation is relevant for the following Thor models: VM3.
The EU declaration of conformity, if applicable, and other publicly downloadable certifi-cates are available at www.honeywellaidc.com/compliance.
Label LocationsCompliance labels are located in the dock well area on the back of the Thor VM3, as indicated by the shaded areas below. The Thor VM3 must be removed from the dock to view the labels.
Model number, serial number and other identifiers are located on these labels.
rosoft Windows Embedded Compact 7 User Guide 363

™
Honeywell 9680 Old Bailes RoadFort Mill, SC 29707
www.honeywellaidc.com
VM3-WEC-UG Rev F4/18