Embed Size (px)
Citation preview
Page 1 of 59
POLICY
N/A
SCOPE
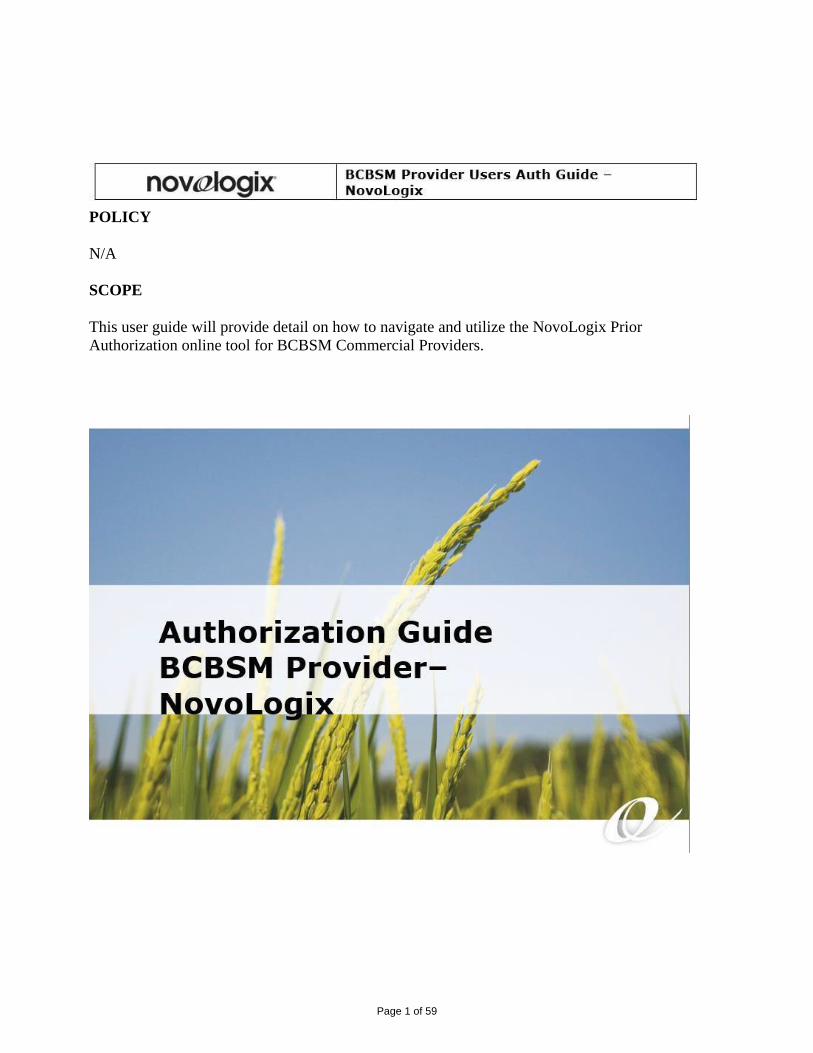
This user guide will provide detail on how to navigate and utilize the NovoLogix Prior
Authorization online tool for BCBSM Commercial Providers.
Page 2 of 59
Table of Contents
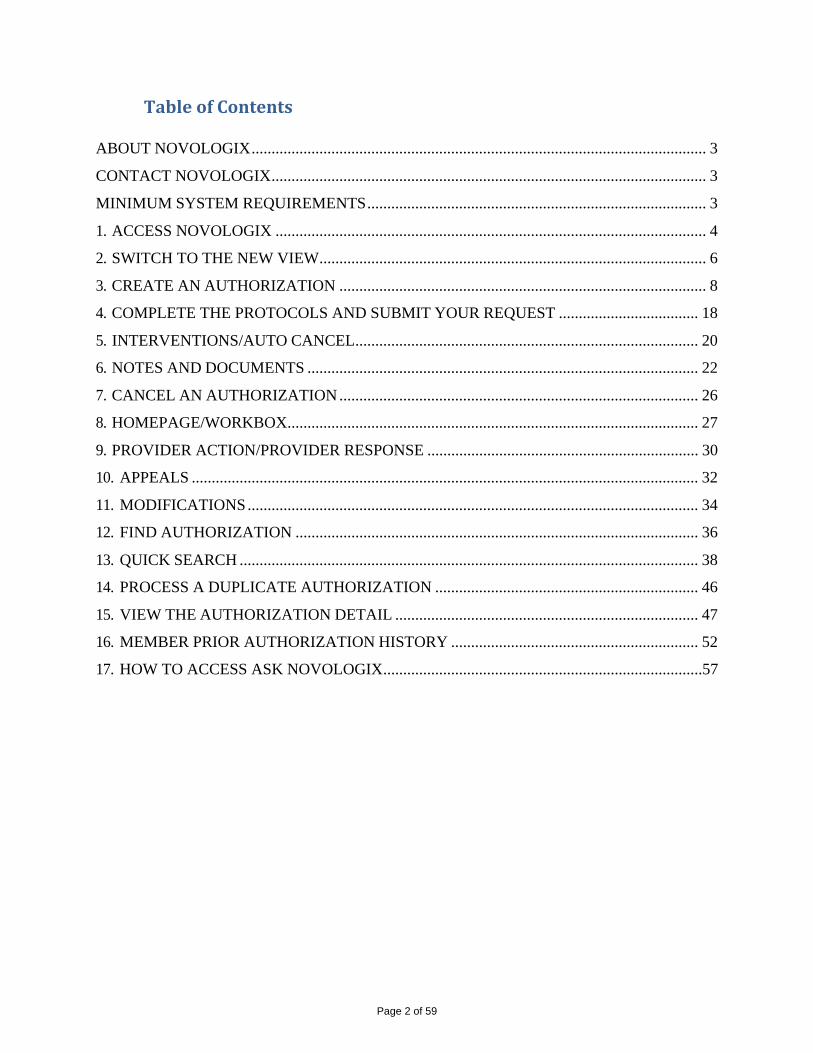
ABOUT NOVOLOGIX .................................................................................................................. 3
CONTACT NOVOLOGIX ............................................................................................................. 3
MINIMUM SYSTEM REQUIREMENTS ..................................................................................... 3
1. ACCESS NOVOLOGIX ............................................................................................................ 4
2. SWITCH TO THE NEW VIEW ................................................................................................. 6
3. CREATE AN AUTHORIZATION ............................................................................................ 8
4. COMPLETE THE PROTOCOLS AND SUBMIT YOUR REQUEST ................................... 18
5. INTERVENTIONS/AUTO CANCEL ...................................................................................... 20
6. NOTES AND DOCUMENTS .................................................................................................. 22
7. CANCEL AN AUTHORIZATION .......................................................................................... 26
8. HOMEPAGE/WORKBOX....................................................................................................... 27
9. PROVIDER ACTION/PROVIDER RESPONSE .................................................................... 30
10. APPEALS ............................................................................................................................... 32
11. MODIFICATIONS ................................................................................................................. 34
12. FIND AUTHORIZATION ..................................................................................................... 36
13. QUICK SEARCH ................................................................................................................... 38
14. PROCESS A DUPLICATE AUTHORIZATION .................................................................. 46
15. VIEW THE AUTHORIZATION DETAIL ............................................................................ 47
16. MEMBER PRIOR AUTHORIZATION HISTORY .............................................................. 52
17. HOW TO ACCESS ASK NOVOLOGIX ................................................................................57
Page 3 of 59
ABOUT NOVOLOGIX Novologix is a company developed and led by Clinical, IT, and Business professionals who are
dedicated to driving healthcare innovation. Throughout our history, we have introduced
revolutionary ideas, advanced processes and pioneering technologies to many of the nation's
leading health plans and thousands of healthcare providers.
Through our Software-as-a-Service (SaaS) platform, we deliver innovative software solutions to
the medical pharmacy industry. Our software enables our clients to stay ahead of the shifting
healthcare landscape, changes in the administration and sites of care, and other competitive
forces affecting their bottom line.
CONTACT NOVOLOGIX Novologix Client Support Services are available Monday – Friday, 7:00am to 6:00pm Central
Time. Contact Client Support Services by e-mail at [email protected] or by phone at the
number provided for the Health Plan for which you are seeking assistance. Please do not include
Protected Health Information (PHI) when sending e-mail messages to Novologix. For application
assistance or to request a User ID and password, contact Novologix Client Support Services by
e-m ail at [email protected].
MINIMUM SYSTEM REQUIREMENTS The Novologix system supports the use of Microsoft Internet Explorer and Firefox web
browsers. The standard browser options for cookies and JavaScript must be enabled. We
strongly recommend users upgrade to the most recent version, which will provide the best user
experience.
To install the most recent version of Internet Explorer you can use the following link:
http://www.microsoft.com/ie.
1. Add app.Novologix.net to Internet Explorer’s list of trusted sites
2. Open the new site in Internet Explorer
3. Go to Tools > Internet Options
4. Open the Security tab
5. Select Trusted sites
6. Click the Sites button
7. The site URL should be showing in the Add this website to the zone: box. Click Add
8. Click Close
9. Click OK
Page 4 of 59
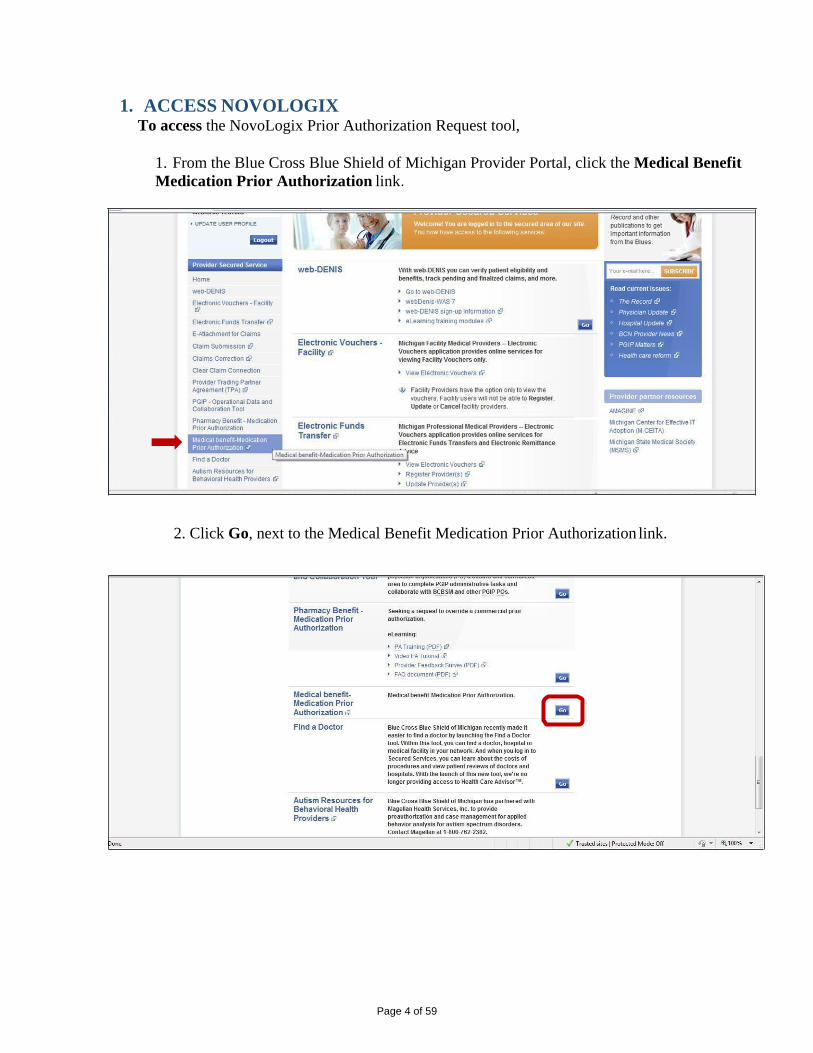
1. ACCESS NOVOLOGIX To access the NovoLogix Prior Authorization Request tool,
1. From the Blue Cross Blue Shield of Michigan Provider Portal, click the Medical Benefit
Medication Prior Authorization link.
2. Click Go, next to the Medical Benefit Medication Prior Authorization link.

Page 5 of 59
3. From there, you will be prompted to select or type your NPI number, then click go and you will be
brought to your NovoLogix homepage.
Page 6 of 59
2. SWITCH TO THE NEW VIEW
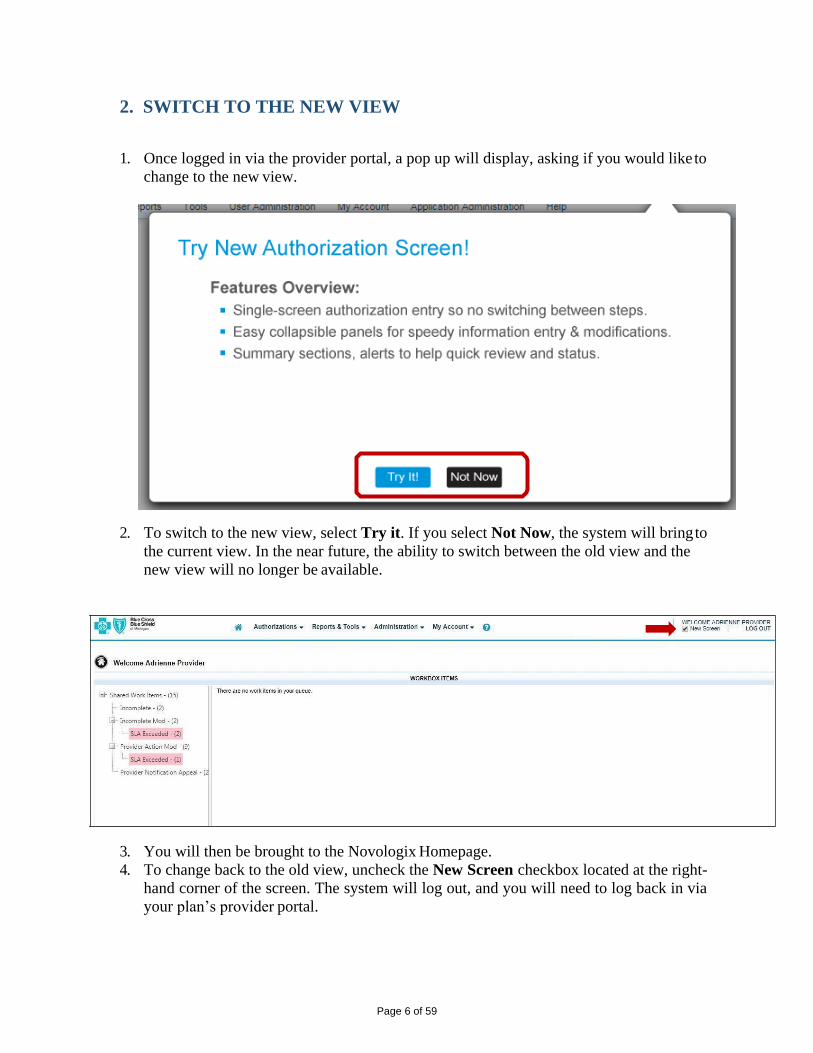
1. Once logged in via the provider portal, a pop up will display, asking if you would like to
change to the new view.
2. To switch to the new view, select Try it. If you select Not Now, the system will bring to
the current view. In the near future, the ability to switch between the old view and the
new view will no longer be available.
3. You will then be brought to the Novologix Homepage.
4. To change back to the old view, uncheck the New Screen checkbox located at the right-
hand corner of the screen. The system will log out, and you will need to log back in via
your plan’s provider portal.
Page 7 of 59
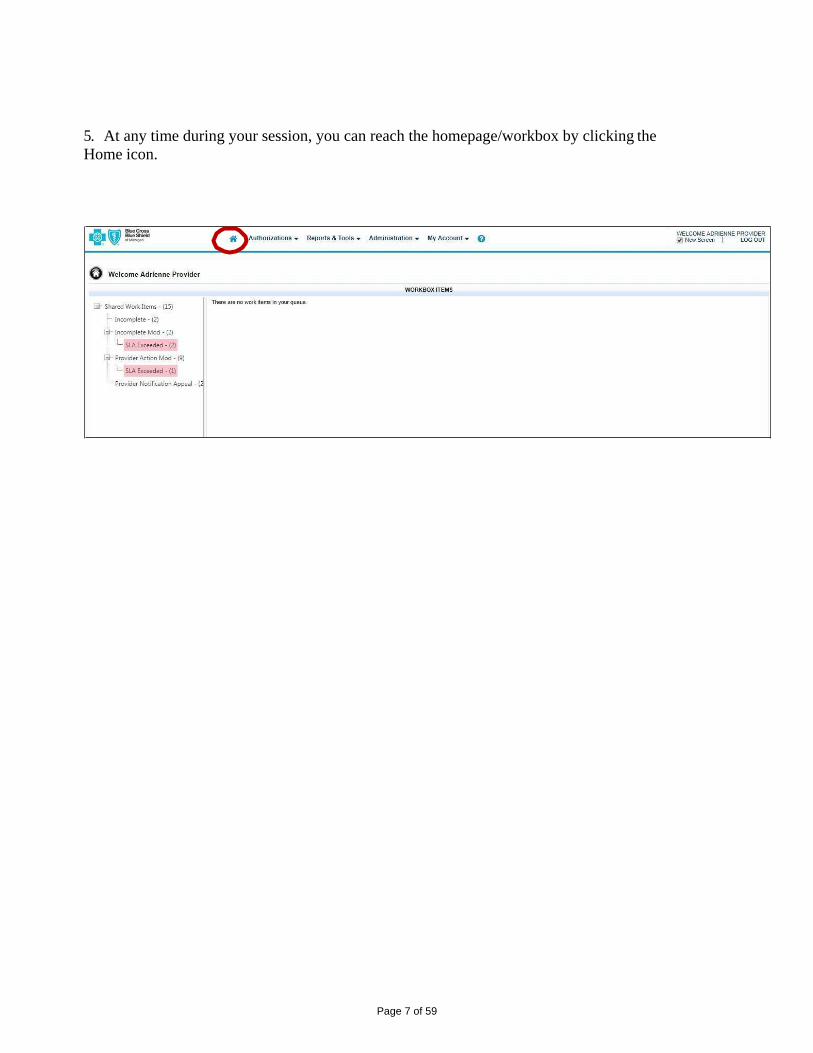
5. At any time during your session, you can reach the homepage/workbox by clicking the
Home icon.
Page 8 of 59
3. CREATE AN AUTHORIZATION
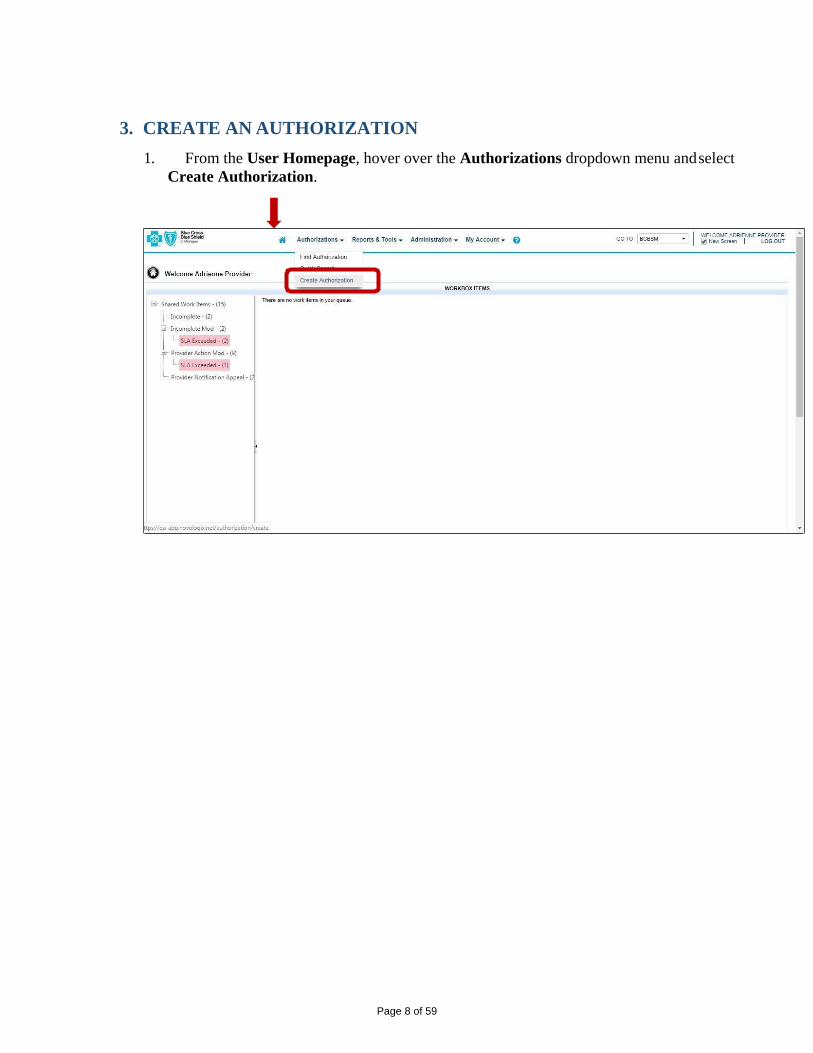
1. From the User Homepage, hover over the Authorizations dropdown menu and select
Create Authorization.
Page 9 of 59
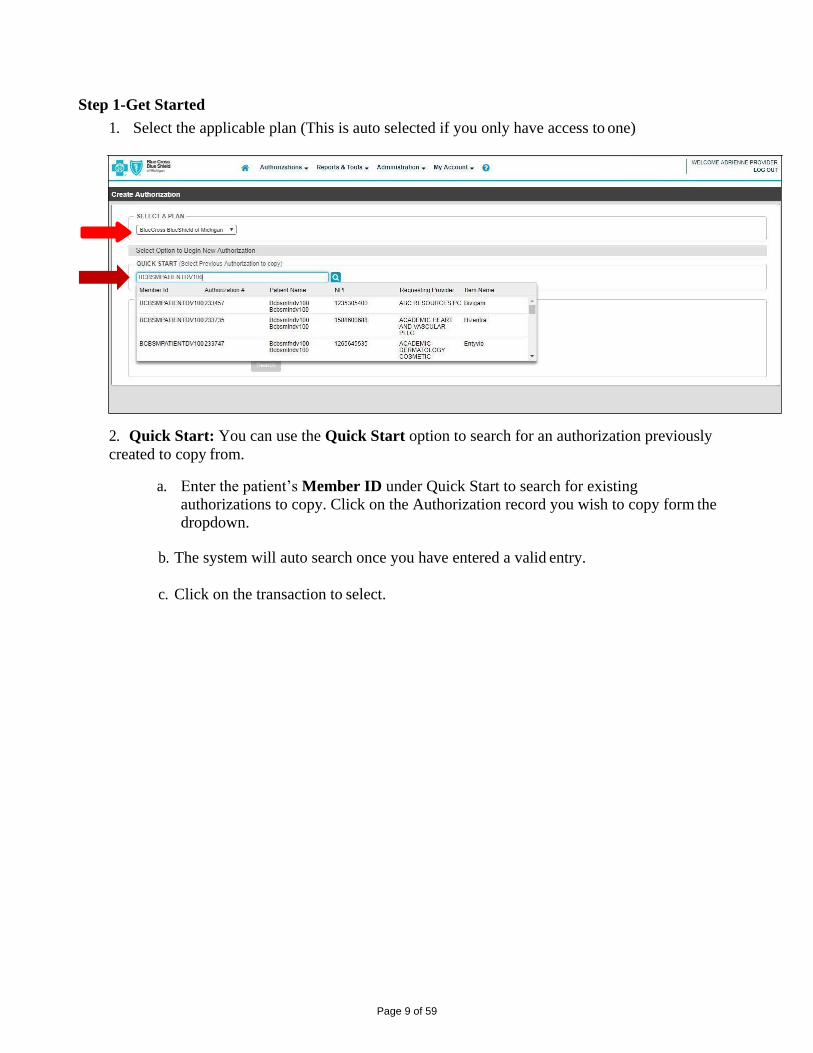
Step 1-Get Started
1. Select the applicable plan (This is auto selected if you only have access to one)
2. Quick Start: You can use the Quick Start option to search for an authorization previously
created to copy from.
a. Enter the patient’s Member ID under Quick Start to search for existing
authorizations to copy. Click on the Authorization record you wish to copy form the dropdown.
b. The system will auto search once you have entered a valid entry.
c. Click on the transaction to select.
Page 10 of 59
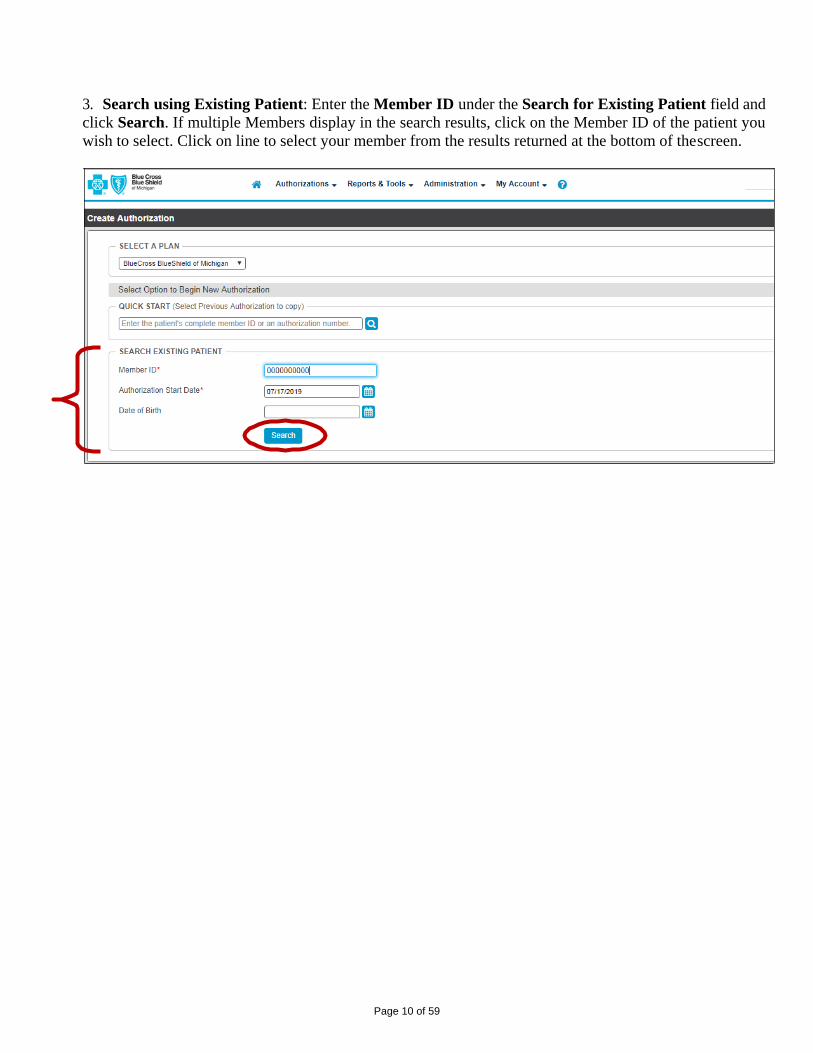
3. Search using Existing Patient: Enter the Member ID under the Search for Existing Patient field and
click Search. If multiple Members display in the search results, click on the Member ID of the patient you
wish to select. Click on line to select your member from the results returned at the bottom of the screen.
Page 11 of 59
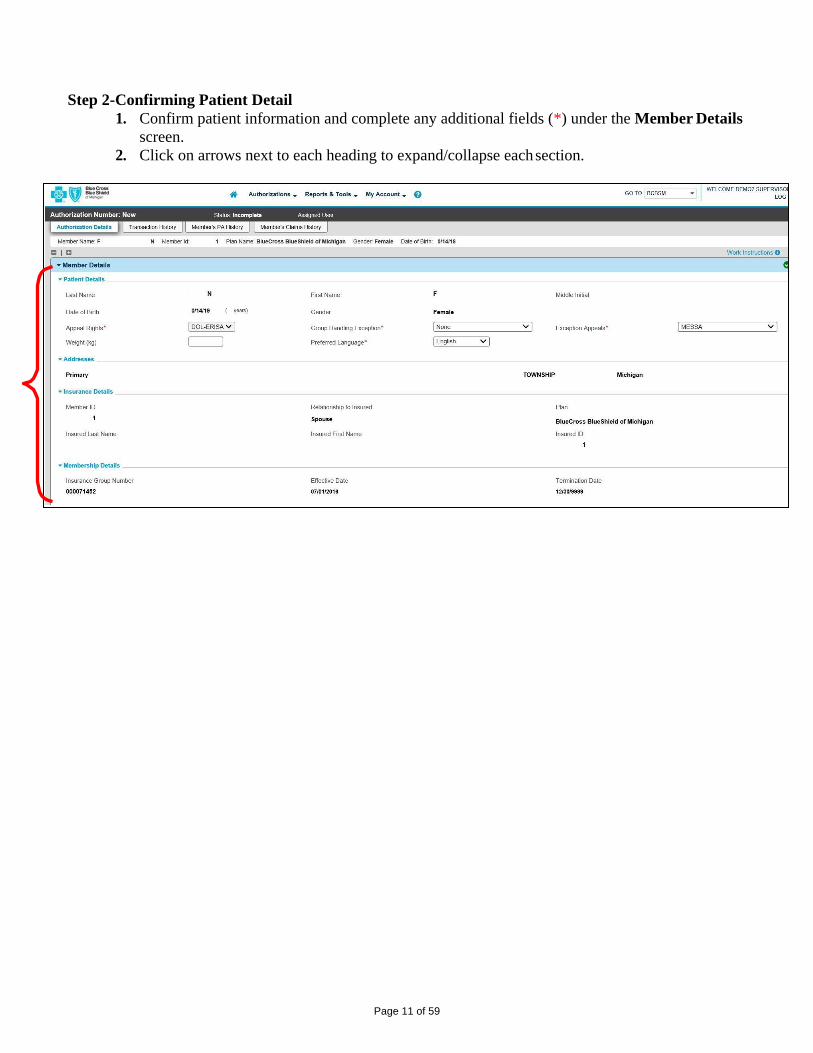
Step 2-Confirming Patient Detail
1. Confirm patient information and complete any additional fields (*) under the Member Details
screen.
2. Click on arrows next to each heading to expand/collapse each section.
Page 12 of 59
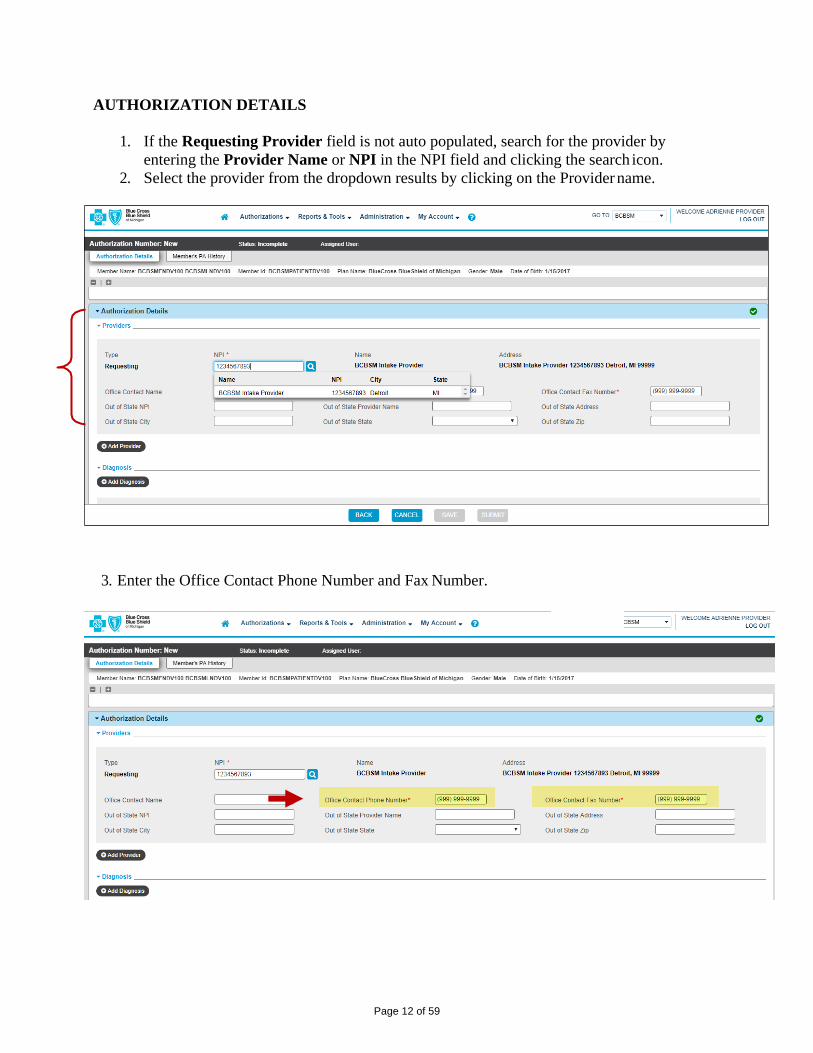
AUTHORIZATION DETAILS
1. If the Requesting Provider field is not auto populated, search for the provider by
entering the Provider Name or NPI in the NPI field and clicking the search icon.
2. Select the provider from the dropdown results by clicking on the Provider name.
3. Enter the Office Contact Phone Number and Fax Number.
Page 13 of 59
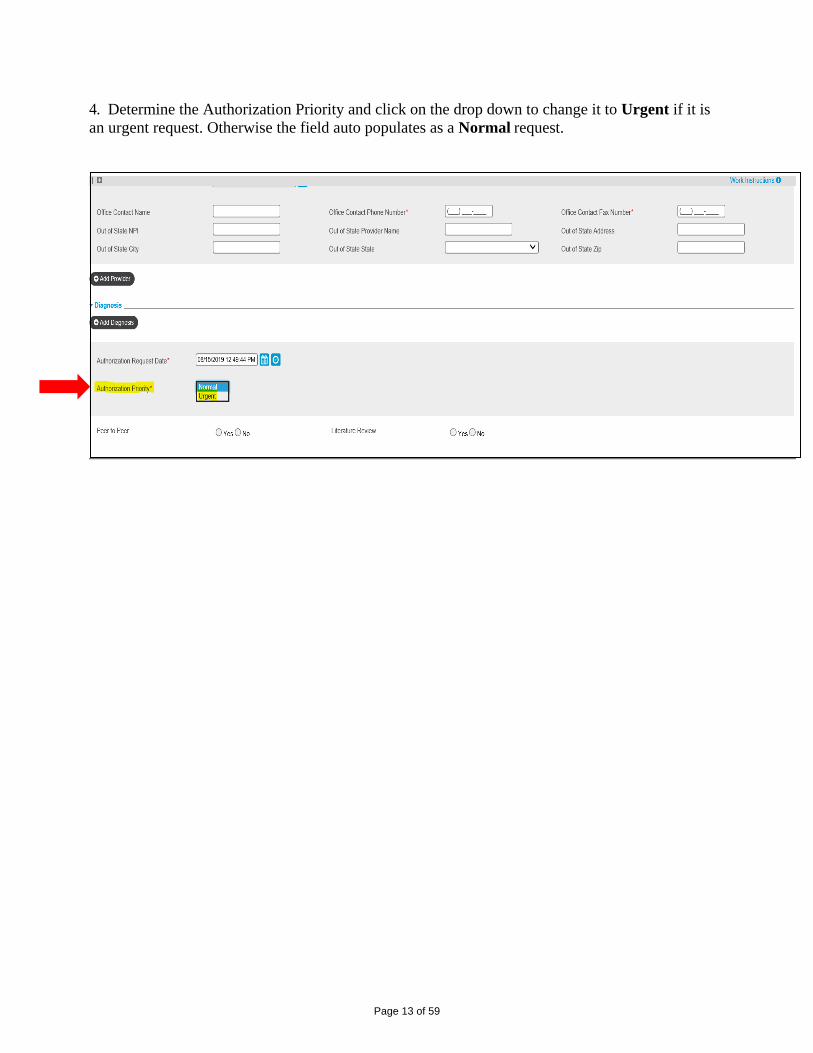
4. Determine the Authorization Priority and click on the drop down to change it to Urgent if it is
an urgent request. Otherwise the field auto populates as a Normal request.
Page 14 of 59
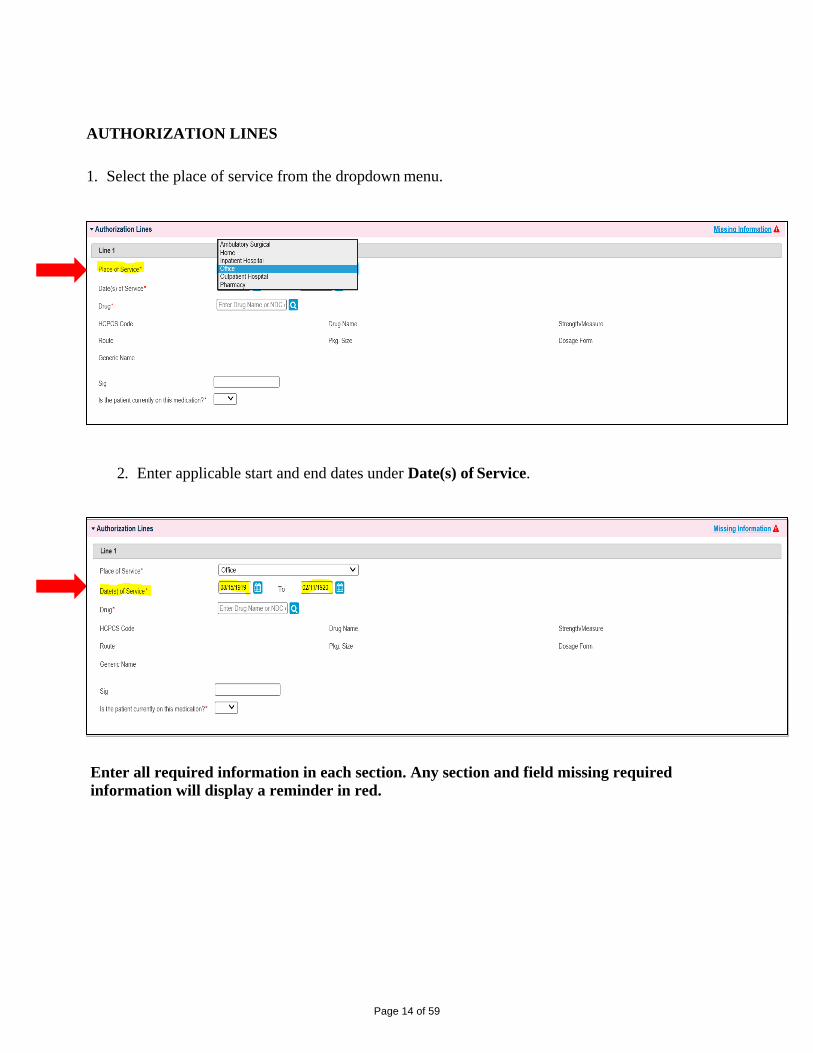
AUTHORIZATION LINES
1. Select the place of service from the dropdown menu.
2. Enter applicable start and end dates under Date(s) of Service.
Enter all required information in each section. Any section and field missing required
information will display a reminder in red.
Page 15 of 59
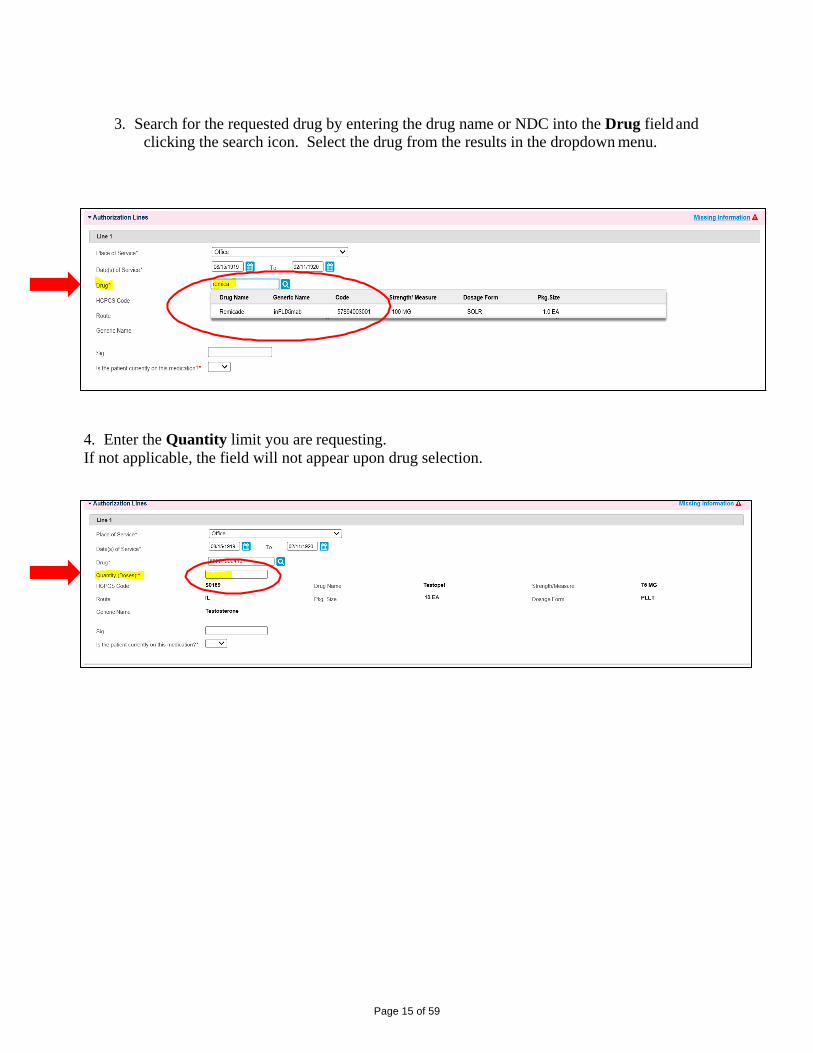
3. Search for the requested drug by entering the drug name or NDC into the Drug field and clicking the search icon. Select the drug from the results in the dropdown menu.
4. Enter the Quantity limit you are requesting.
If not applicable, the field will not appear upon drug selection.

Page 16 of 59
5. Select the correct answer to, “Is the patient currently on this medication?”
*Please note: It is important to answer this question accurately, as this could affect
the outcome of your authorization request.

Page 17 of 59
6. Review information entered under the Authorization Detail Screen. Once all required
information has been entered, each section will display a green checkmark in each section
heading.
7. If no changes are needed, select Submit.

Page 18 of 59
4. COMPLETE THE PROTOCOLS AND SUBMIT YOUR REQUEST
1. Upon clicking Submit, you will be prompted through a series of protocol questions.
2. Answer clinical questions as they are presented in the pop-up screen that displays and
click Next to move on to the next question. If you are unable to complete all the protocol
questions, you can click Save and Close to complete the question set later.
Page 19 of 59
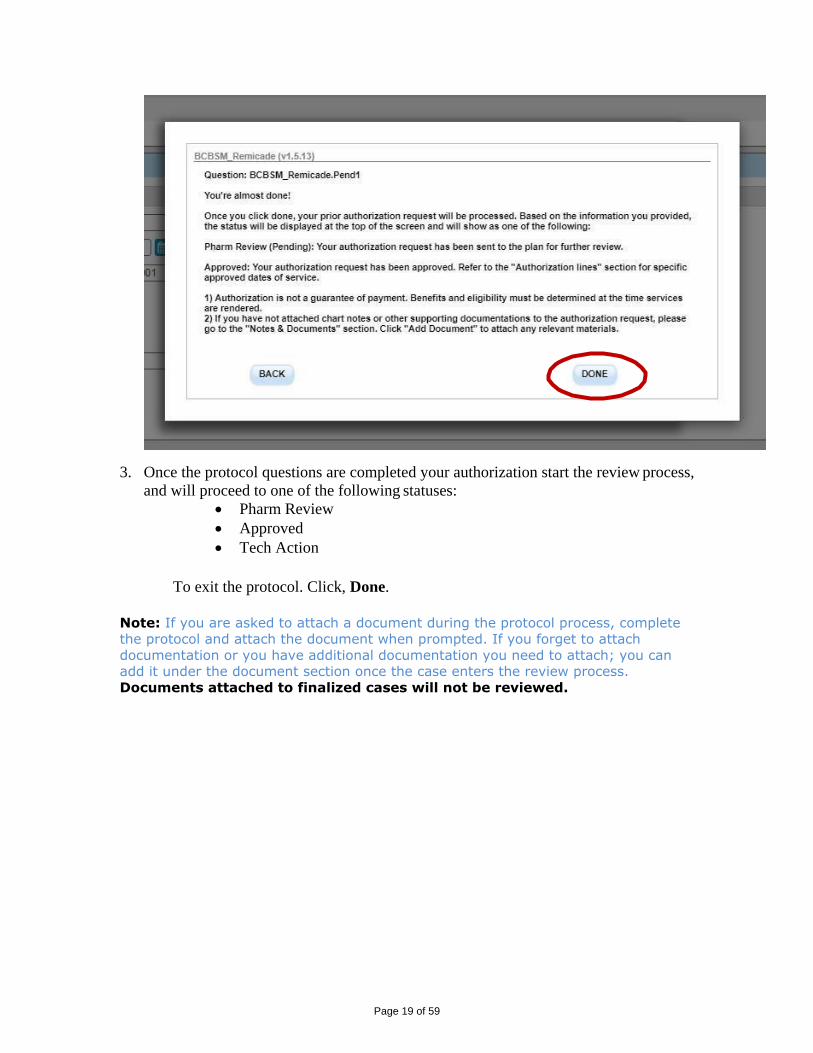
3. Once the protocol questions are completed your authorization start the review process,
and will proceed to one of the following statuses:
• Pharm Review
• Approved
• Tech Action
To exit the protocol. Click, Done.
Note: If you are asked to attach a document during the protocol process, complete
the protocol and attach the document when prompted. If you forget to attach
documentation or you have additional documentation you need to attach; you can add it under the document section once the case enters the review process.
Documents attached to finalized cases will not be reviewed.

Page 20 of 59
5. INTERVENTIONS/AUTO CANCEL There may be an instance, based on the answers to the protocol questions, when you will be
presented with an intervention. Once presented with the intervention question, you will be
asked if you would like to cancel your request.
a. To Cancel your request, select Yes then Next. This will auto cancel your request.
b. The status of your request will now be Cancelled, and no further action will be
taken on the request.
Page 21 of 59
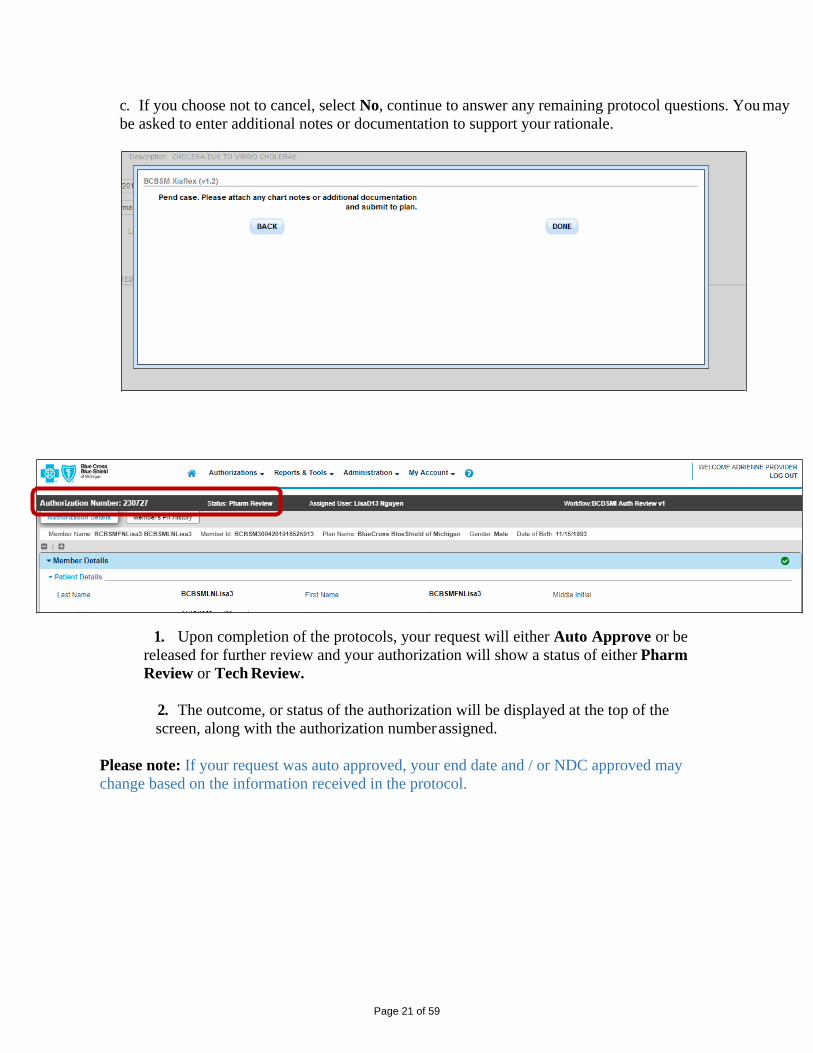
c. If you choose not to cancel, select No, continue to answer any remaining protocol questions. You may
be asked to enter additional notes or documentation to support your rationale.
1. Upon completion of the protocols, your request will either Auto Approve or be
released for further review and your authorization will show a status of either Pharm
Review or Tech Review.
2. The outcome, or status of the authorization will be displayed at the top of the
screen, along with the authorization number assigned.
Please note: If your request was auto approved, your end date and / or NDC approved may
change based on the information received in the protocol.
Page 22 of 59
6. NOTES AND DOCUMENTS
Once the Authorization has been created, you will have the ability to add notes or
documents directly to the Authorization.
NOTES
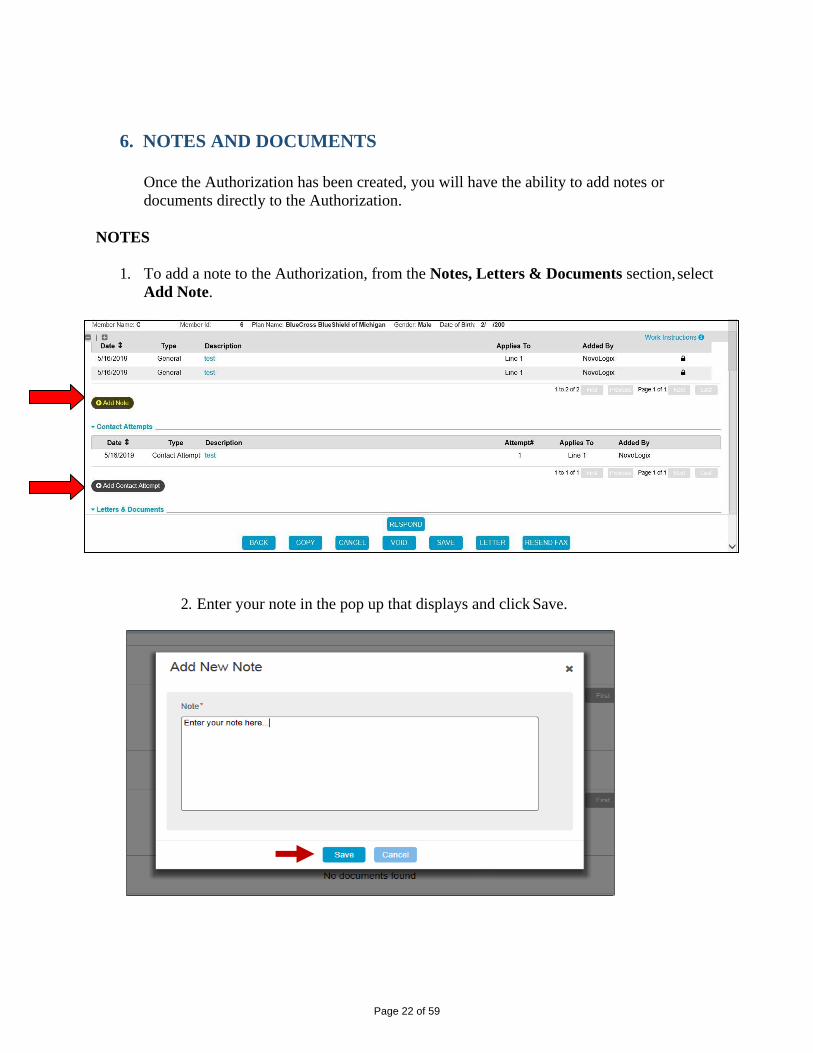
1. To add a note to the Authorization, from the Notes, Letters & Documents section, select
Add Note.
2. Enter your note in the pop up that displays and click Save.

Page 23 of 59
3. Your note will then be saved under the Authorization’s Notes, Letters &Documents
section. To view a note, click on the note Description in blue.
4. You can also view the note by hovering over the note Description in blue.
Page 24 of 59
DOCUMENTS
1. If prompted to add a document during the clinical question process, you
can do one of the following:
a. Add the document when prompted during the protocol.
b. Add after the questions have been completed.
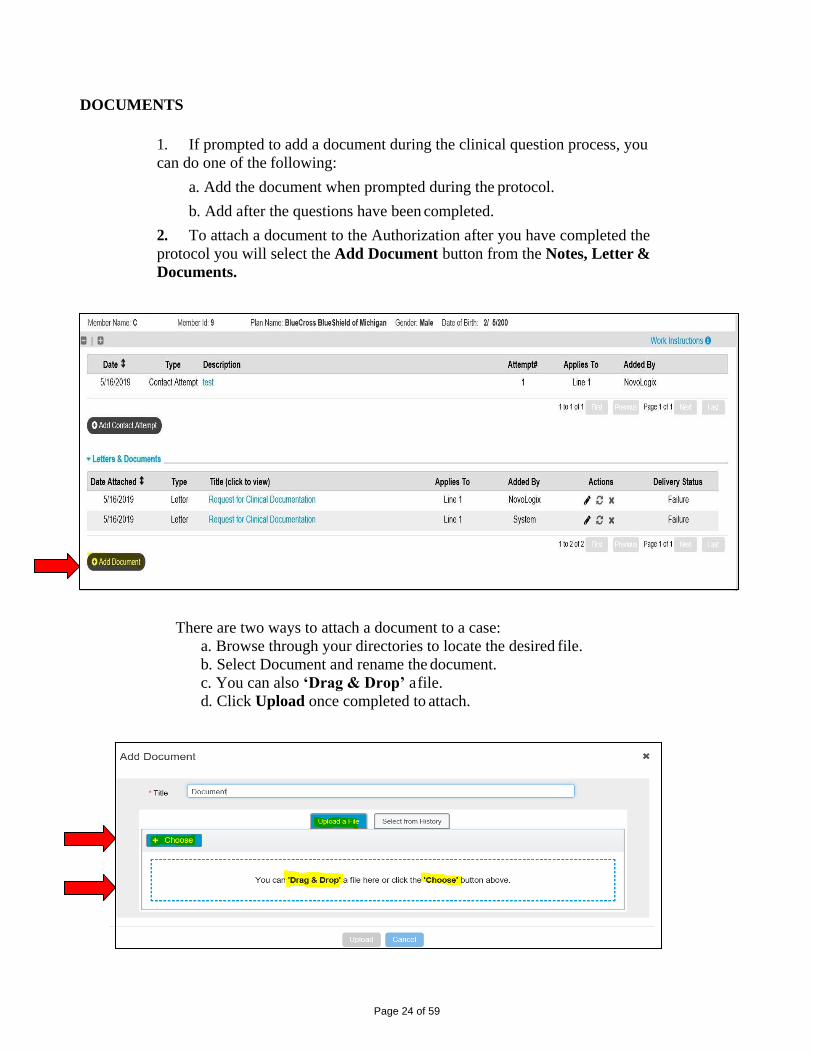
2. To attach a document to the Authorization after you have completed the
protocol you will select the Add Document button from the Notes, Letter &
Documents.
There are two ways to attach a document to a case:
a. Browse through your directories to locate the desired file.
b. Select Document and rename the document.
c. You can also ‘Drag & Drop’ a file.
d. Click Upload once completed to attach.

Page 25 of 59
1. Your document will then be saved in the Documents section of the Authorization detail.
2. To view a document, click on the Document title in blue.
Page 26 of 59
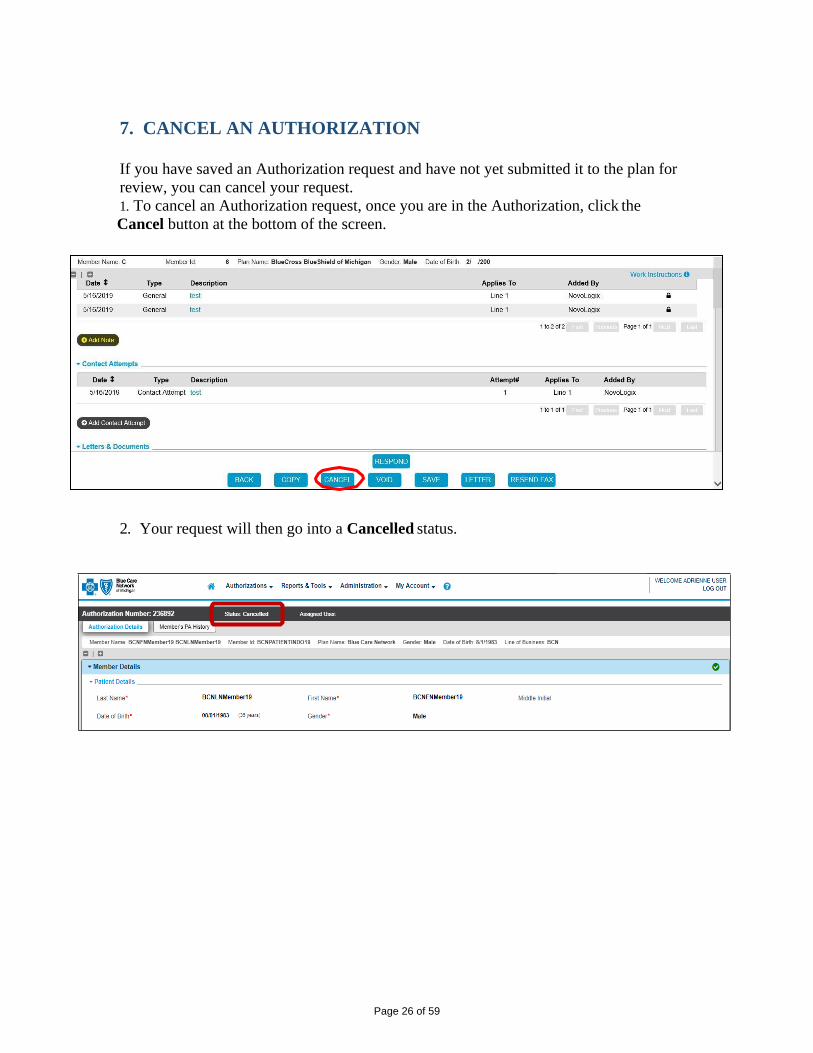
7. CANCEL AN AUTHORIZATION
If you have saved an Authorization request and have not yet submitted it to the plan for
review, you can cancel your request.
1. To cancel an Authorization request, once you are in the Authorization, click the
Cancel button at the bottom of the screen.
2. Your request will then go into a Cancelled status.

Page 27 of 59
8. HOMEPAGE/WORKBOX The homepage contains the user’s Workbox. The Workbox contains all authorizations
assigned to the user (My Work Items), and any authorizations assigned to users
associated with your provider’s office (Shared Work Items).
1. Any authorizations assigned to you, the user, will be listed under the
heading My Work Items.
2. To expand the list of authorizations under a specific Workbox, click on the
“+” sign to view individual type of authorizations within that Workbox.
Page 28 of 59
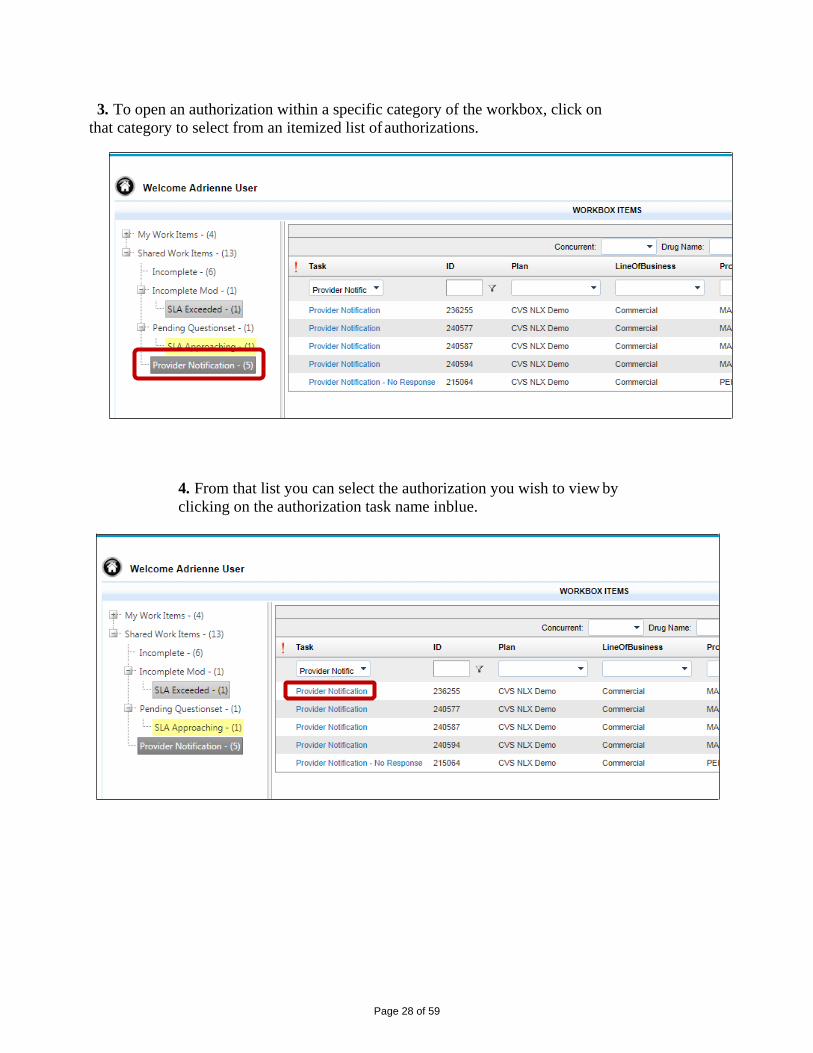
3. To open an authorization within a specific category of the workbox, click on
that category to select from an itemized list of authorizations.
4. From that list you can select the authorization you wish to view by
clicking on the authorization task name inblue.

Page 29 of 59
1. If an authorization in the Shared work queue is assigned to another user, when you click on
that authorization task name, a message will appear on the screen to ask if you would like to
take control of that authorization.
a. If you select yes, assignment of that authorization will be taken away from that
user and assigned to you.
b. If you select no, the authorization will stay assigned to the current user, but still
allowyou to review the authorization detail information.
c. If you select an authorization that is in the Shared Work Items queue that is currently
unassigned, that authorization will automatically be assigned to you when you click
on the authorization number to view.

Page 30 of 59
9. PROVIDER ACTION/POVIDER RESPONSE
There may be instances when you have submitted an authorization request and
upon review the plan will need additional information from you, the Provider.
The Pharmacist/Tech can request this additional documentation online through
the web site, directly to your homepage. This request is called, Provider Action.
1. To review a Provider Action, click the authorization you wish to review.
2. The description of what is being requested will appear under the Notes section of
the Authorization detail.
Page 31 of 59
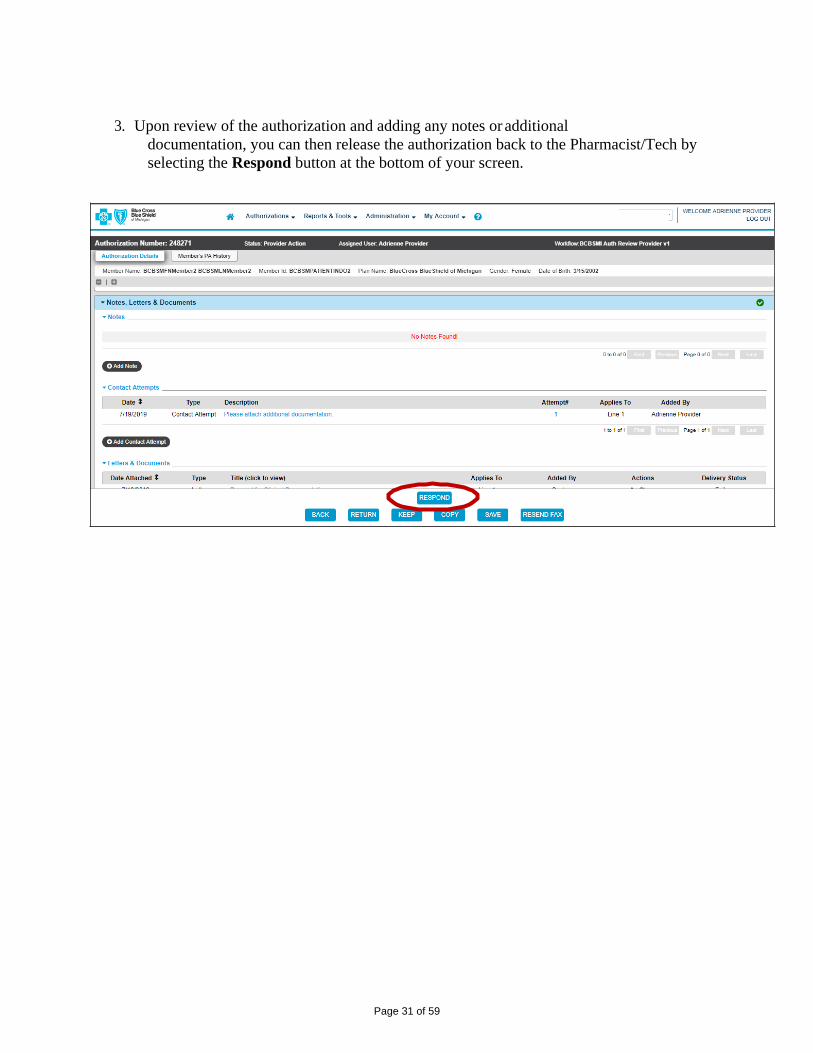
3. Upon review of the authorization and adding any notes or additional
documentation, you can then release the authorization back to the Pharmacist/Tech by
selecting the Respond button at the bottom of your screen.
Page 32 of 59
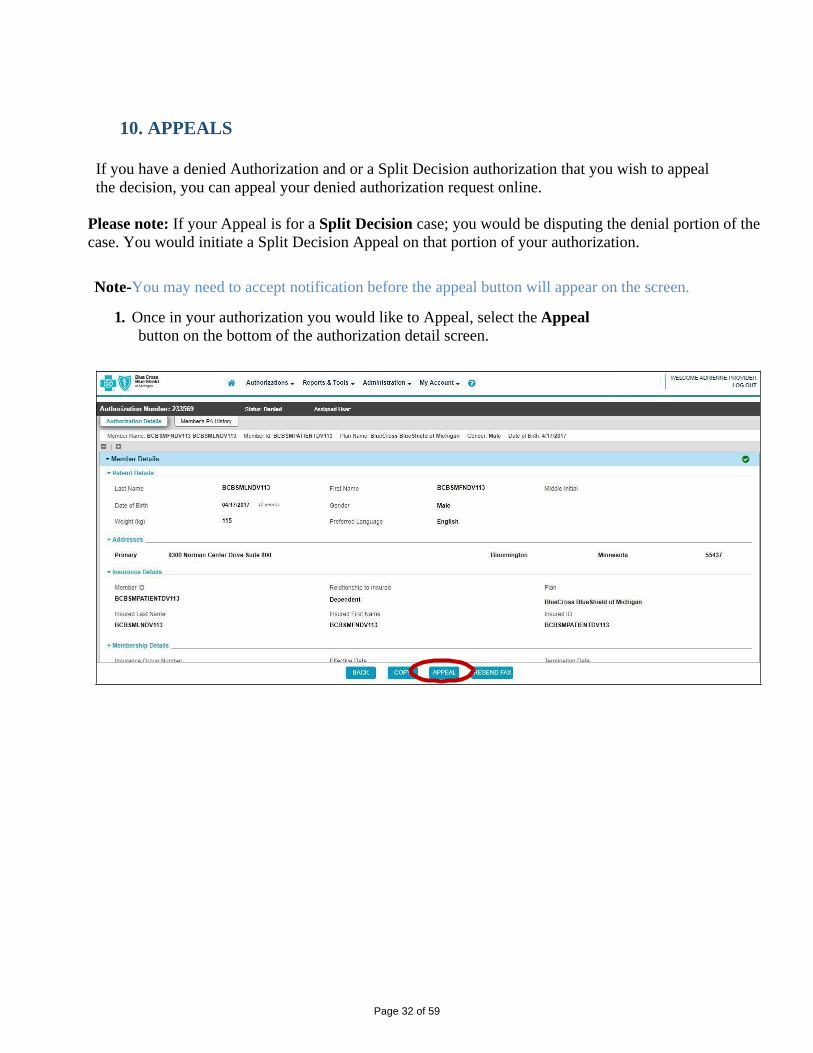
10. APPEALS
If you have a denied Authorization and or a Split Decision authorization that you wish to appeal
the decision, you can appeal your denied authorization request online.
Please note: If your Appeal is for a Split Decision case; you would be disputing the denial portion of the
case. You would initiate a Split Decision Appeal on that portion of your authorization.
Note-You may need to accept notification before the appeal button will appear on the screen.
1. Once in your authorization you would like to Appeal, select the Appeal
button on the bottom of the authorization detail screen.
Page 33 of 59
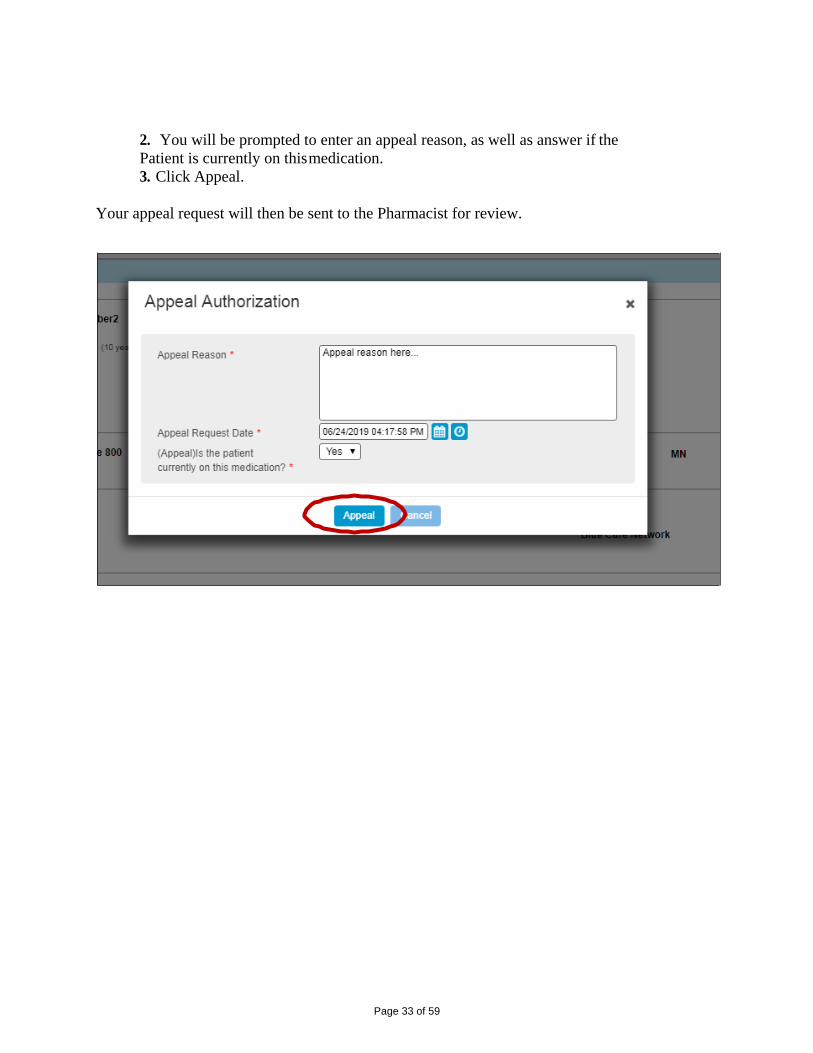
2. You will be prompted to enter an appeal reason, as well as answer if the
Patient is currently on this medication.
3. Click Appeal.
Your appeal request will then be sent to the Pharmacist for review.
Page 34 of 59
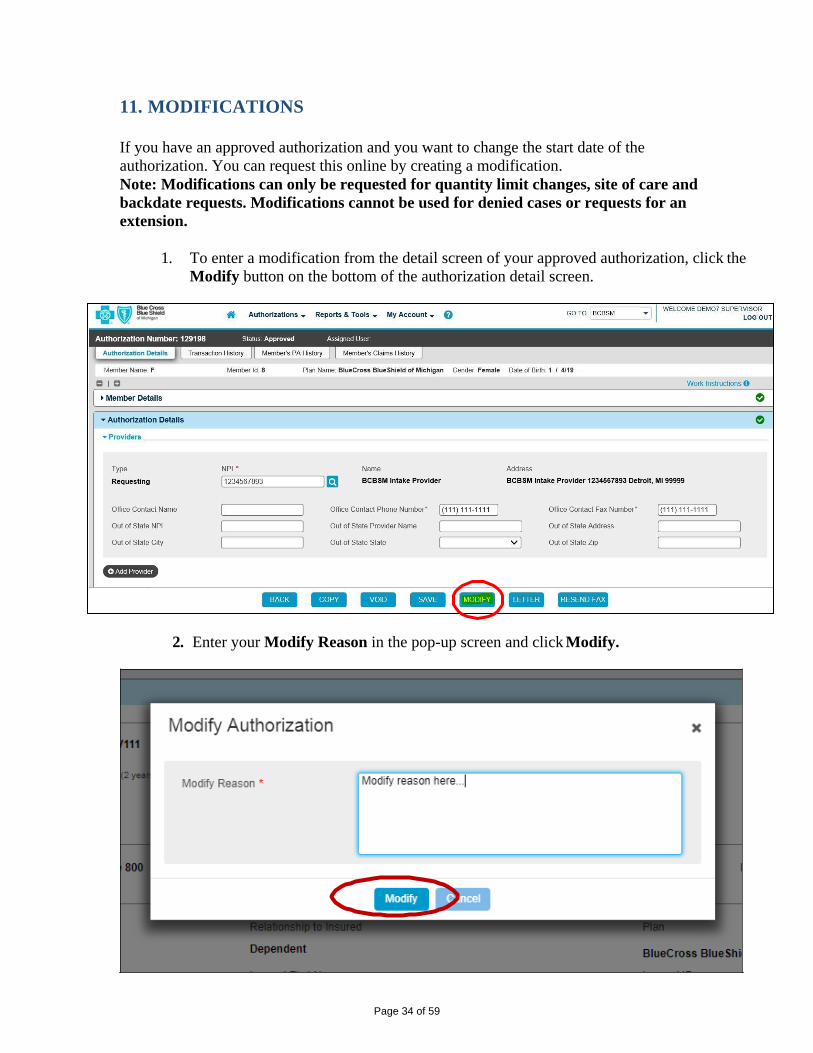
11. MODIFICATIONS
If you have an approved authorization and you want to change the start date of the
authorization. You can request this online by creating a modification.
Note: Modifications can only be requested for quantity limit changes, site of care and
backdate requests. Modifications cannot be used for denied cases or requests for an
extension.
1. To enter a modification from the detail screen of your approved authorization, click the
Modify button on the bottom of the authorization detail screen.
2. Enter your Modify Reason in the pop-up screen and click Modify.
Page 35 of 59
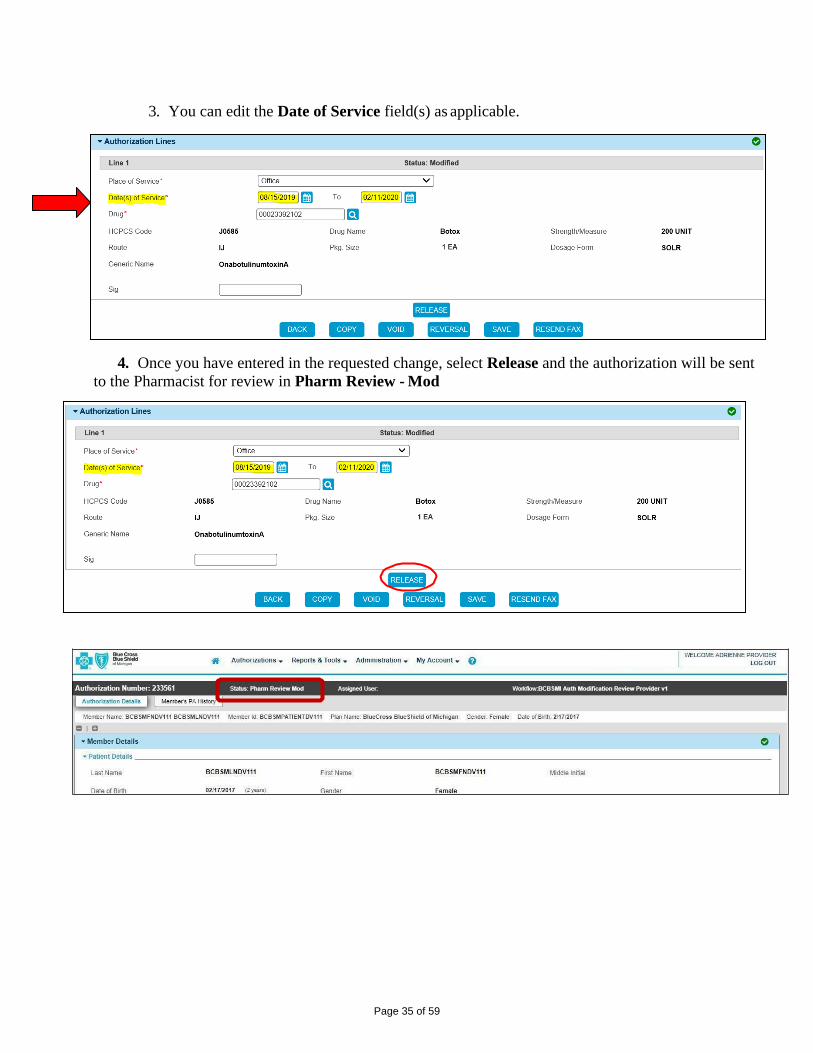
3. You can edit the Date of Service field(s) as applicable.
4. Once you have entered in the requested change, select Release and the authorization will be sent
to the Pharmacist for review in Pharm Review - Mod

Page 36 of 59
12. FIND AN AUTHORIZATION
The Find Authorization features allows users to look up any authorizations in the system
submitted by your Provider office. Since the Quick Search feature have been implemented in
the system, the Find Authorization feature will be discontinued at some point in the future.
1. From the Homepage select Find Authorization from the Authorizations from the top
navigation menu.
2. Enter search criteria in either the Authorization search box or the Member ID search box.
3. Click Search.

Page 37 of 59
4. Select the Authorization you wish to view by clicking on the Auth# in blue from the
search results presented at the bottom of the screen.
Page 38 of 59
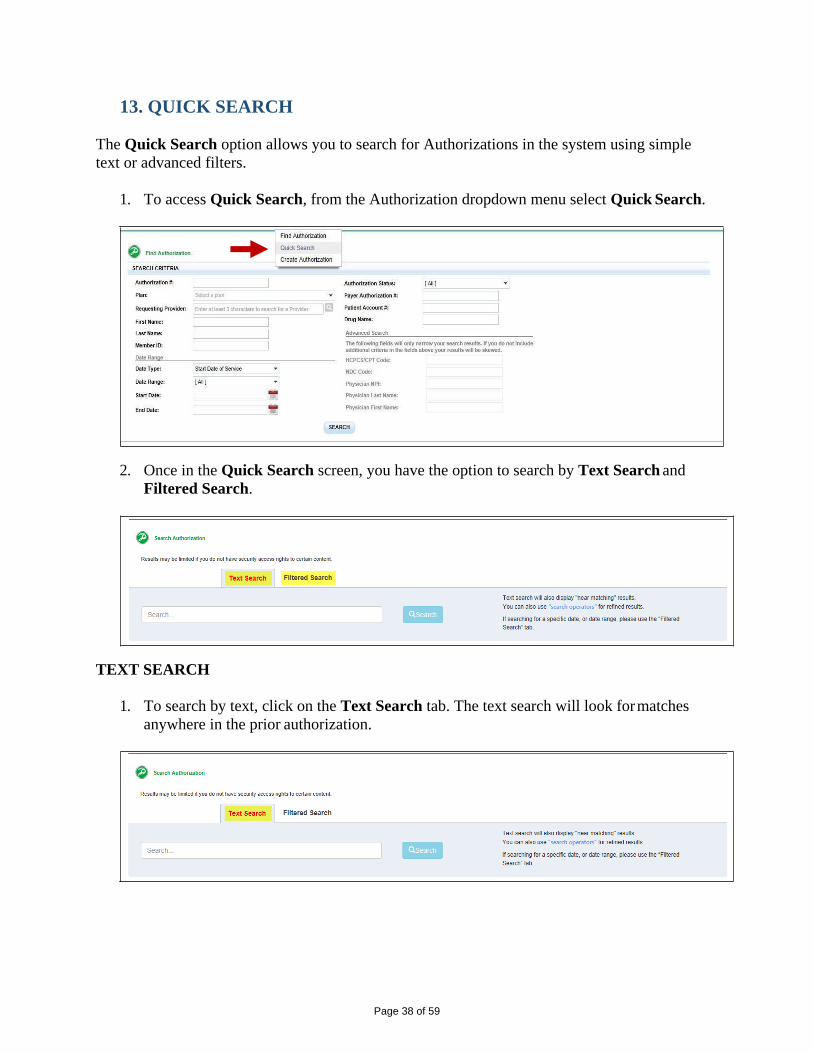
13. QUICK SEARCH
The Quick Search option allows you to search for Authorizations in the system using simple
text or advanced filters.
1. To access Quick Search, from the Authorization dropdown menu select Quick Search.
2. Once in the Quick Search screen, you have the option to search by Text Search and
Filtered Search.
TEXT SEARCH
1. To search by text, click on the Text Search tab. The text search will look for matches
anywhere in the prior authorization.

Page 39 of 59
2. Enter your search term in the search field and click Search. Your results will display at
the bottom of the screen.
3. From the search results, you can view the high-level detail of an Authorization
record (i.e., Novologix authorization number, provider, member name and ID, etc).
Note: The sort feature will only sort what is displayed on the page you are on. If your
results are more than one page; your sort results will only reflect on the page shown.
You will have to go to the next page and select sort for the information on that page.
Page 40 of 59
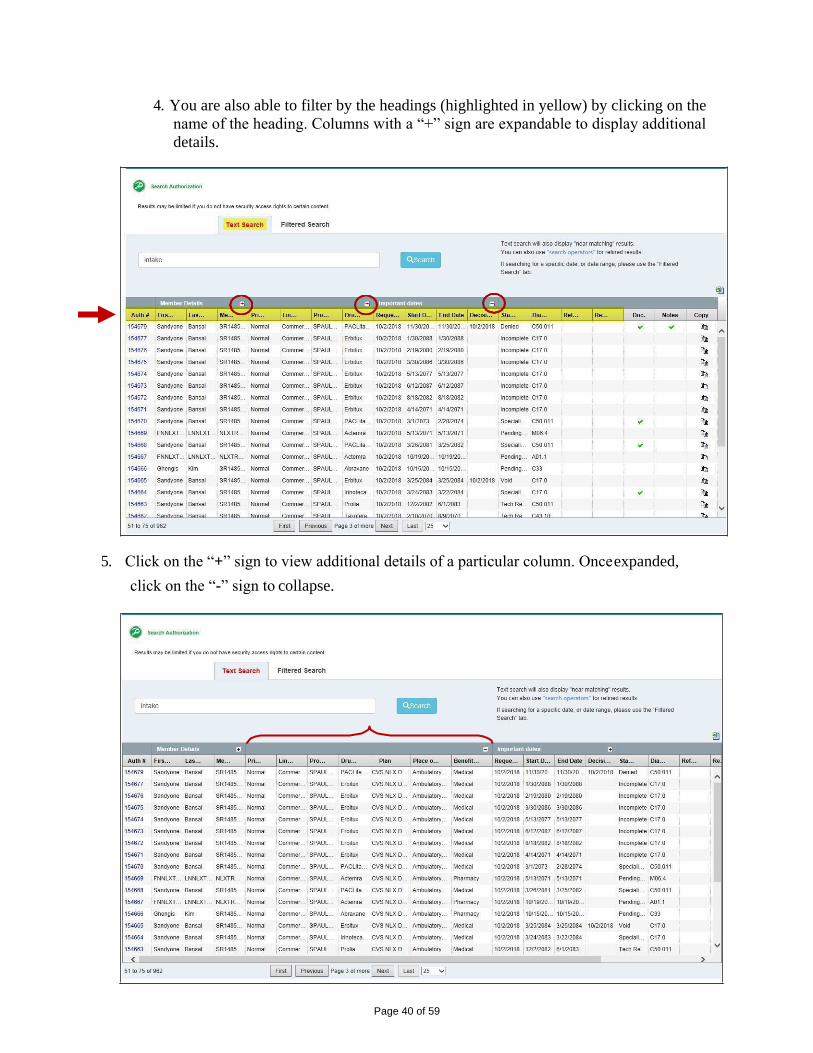
4. You are also able to filter by the headings (highlighted in yellow) by clicking on the
name of the heading. Columns with a “+” sign are expandable to display additional
details.
5. Click on the “+” sign to view additional details of a particular column. Once expanded,
click on the “-” sign to collapse.

Page 41 of 59
6. Columns are also moveable. Click on the column you would like to move.
Page 42 of 59
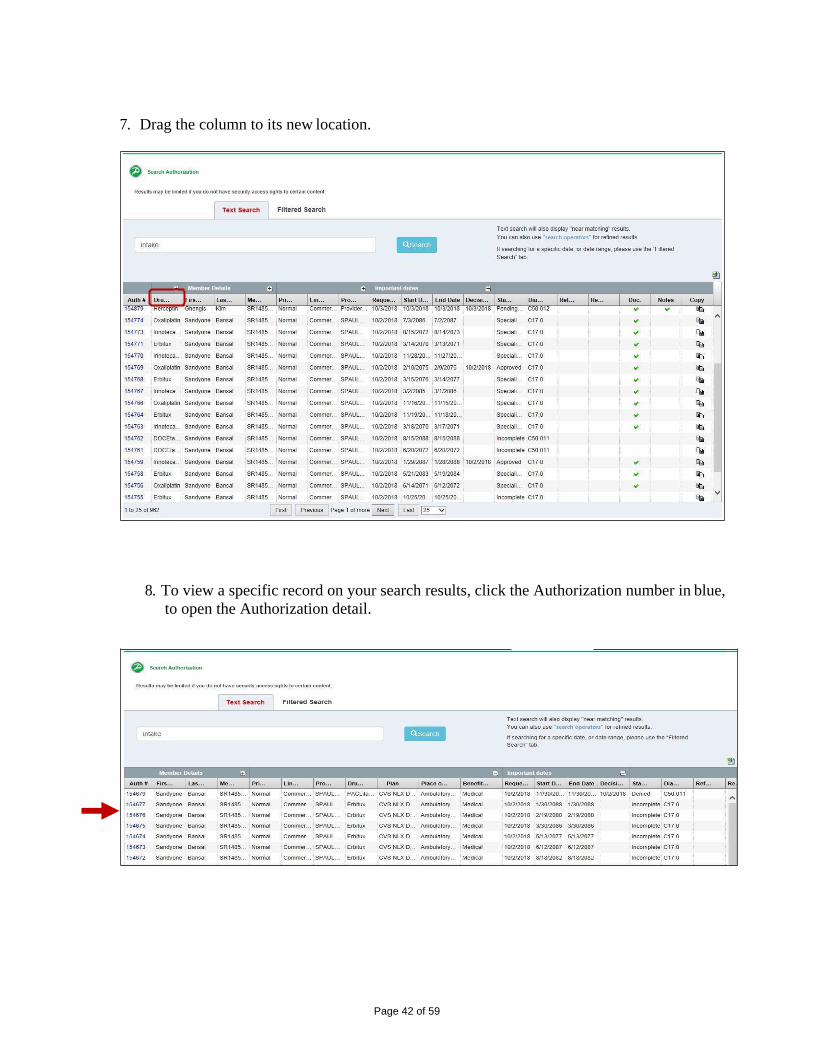
7. Drag the column to its new location.
8. To view a specific record on your search results, click the Authorization number in blue,
to open the Authorization detail.
Page 43 of 59
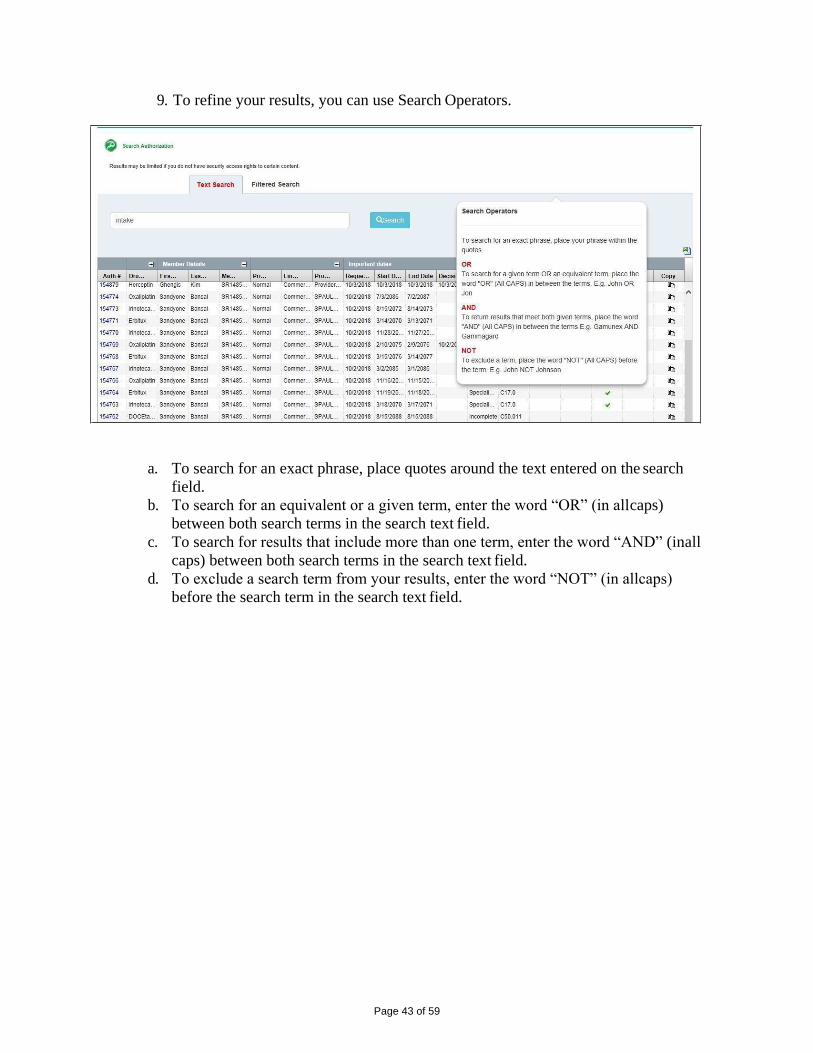
9. To refine your results, you can use Search Operators.
a. To search for an exact phrase, place quotes around the text entered on the search
field.
b. To search for an equivalent or a given term, enter the word “OR” (in all caps)
between both search terms in the search text field.
c. To search for results that include more than one term, enter the word “AND” (inall
caps) between both search terms in the search text field.
d. To exclude a search term from your results, enter the word “NOT” (in allcaps)
before the search term in the search text field.

Page 44 of 59
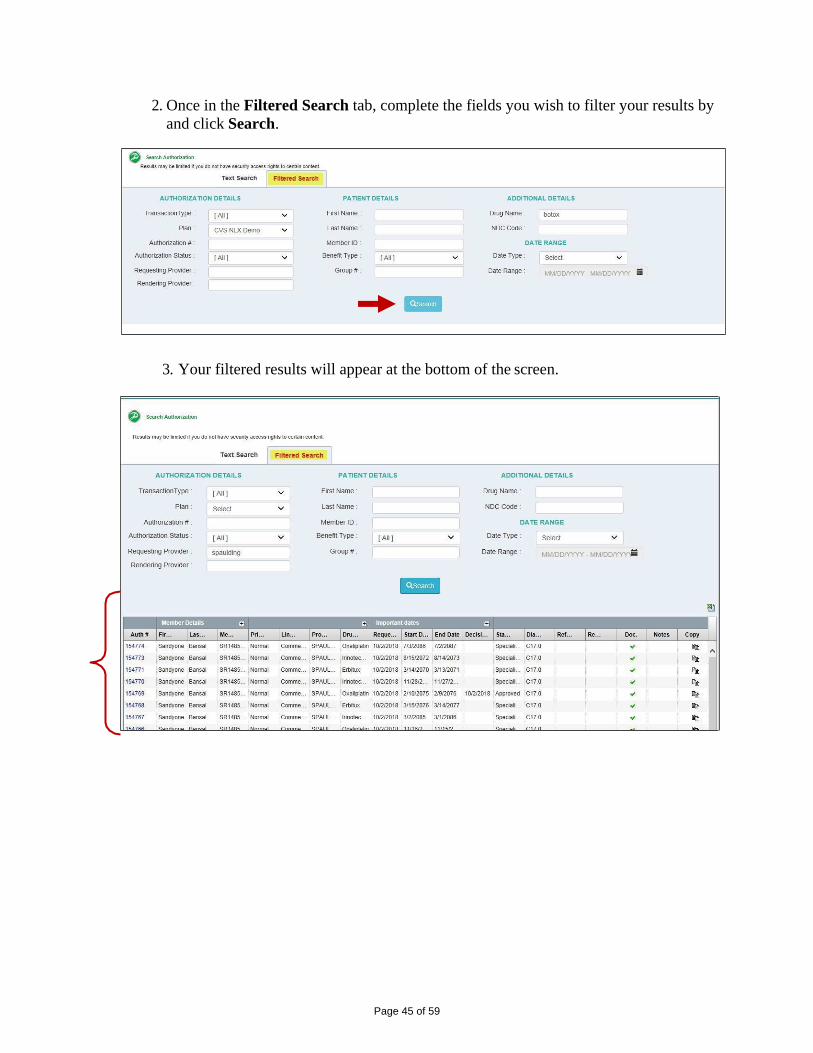
FILTERED SEARCH
Filtered Search provides the same filtering results as the Find Authorization feature.
1. To reach Filtered Search, click the Filtered Search tab.
Page 45 of 59
2. Once in the Filtered Search tab, complete the fields you wish to filter your results by
and click Search.
3. Your filtered results will appear at the bottom of the screen.
Page 46 of 59
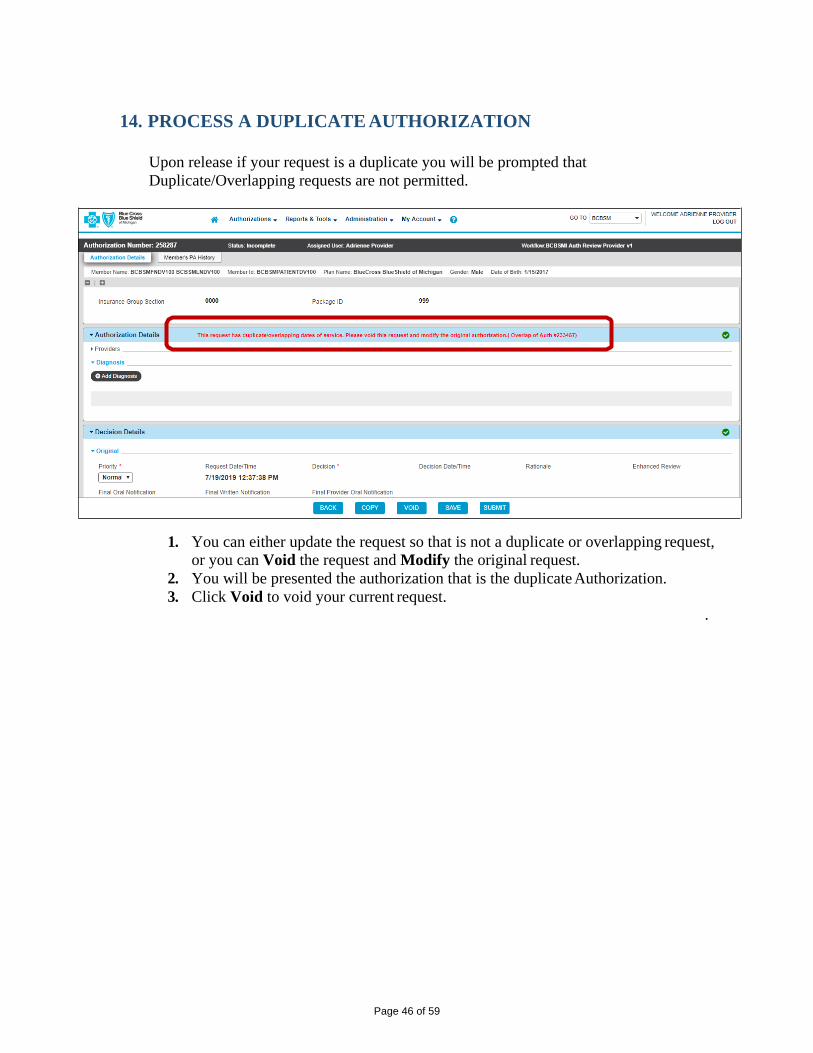
14. PROCESS A DUPLICATE AUTHORIZATION
Upon release if your request is a duplicate you will be prompted that
Duplicate/Overlapping requests are not permitted.
1. You can either update the request so that is not a duplicate or overlapping request,
or you can Void the request and Modify the original request.
2. You will be presented the authorization that is the duplicate Authorization.
3. Click Void to void your current request. .
Page 47 of 59
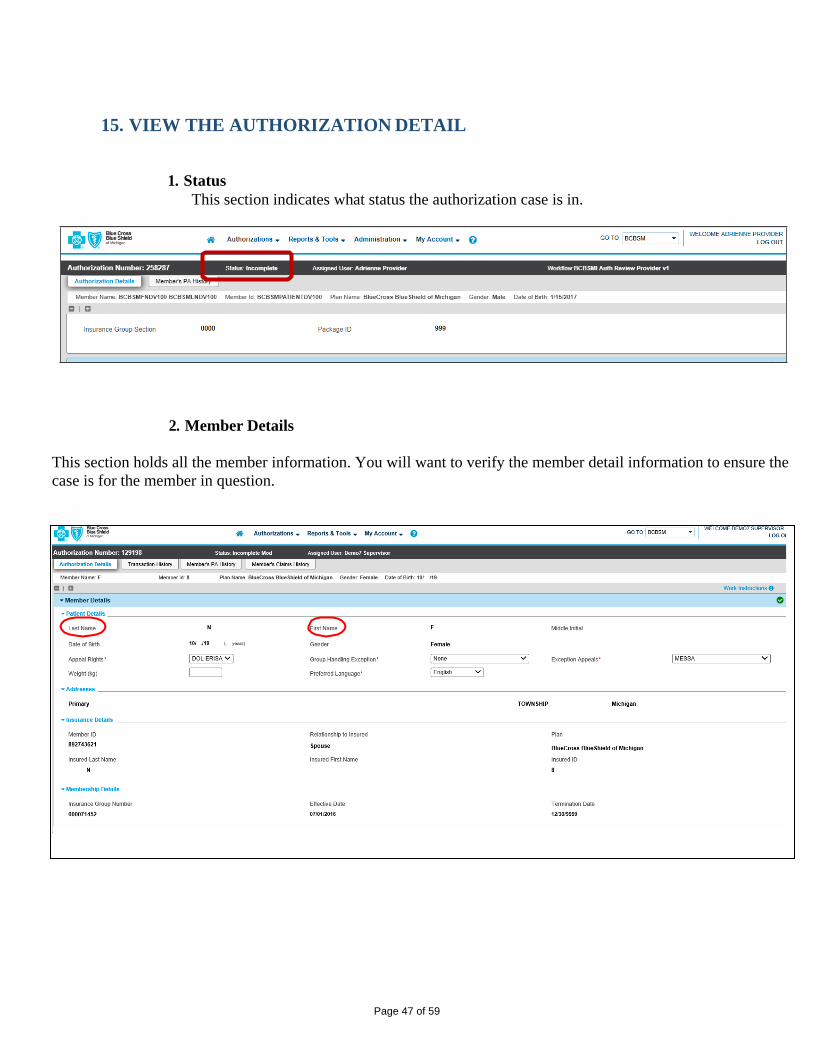
15. VIEW THE AUTHORIZATION DETAIL
1. Status
This section indicates what status the authorization case is in.
2. Member Details
This section holds all the member information. You will want to verify the member detail information to ensure the
case is for the member in question.

Page 48 of 59
3. Authorization Lines
The Authorization Lines section of the authorization contains the information for the
drug requested. The information here includes Place of Service, Date(s) of Service,
NDC code, Quantity, NDC Name, Strength/ Dosage form and the Sig.

Page 49 of 59
4. Notes
Any notes that you or the pharmacist have added will be found here, including
denial reasons (if applicable).
5. Documents and Letters
All documentation that you have attached will be included here. This will also
include copies of any letters the plan has generated.

Page 50 of 59
6. Approval Grey Box
The grey box supplies the authorization detail information pertaining to the drug and its approval.
Note: The Grey box is only applicable if the authorization is Approved. If the case is denied the grey box will
not appear.
7. Provider Authorization Detail Section
This section provides the Requesting provider information that was input on the authorization
request.
Page 51 of 59
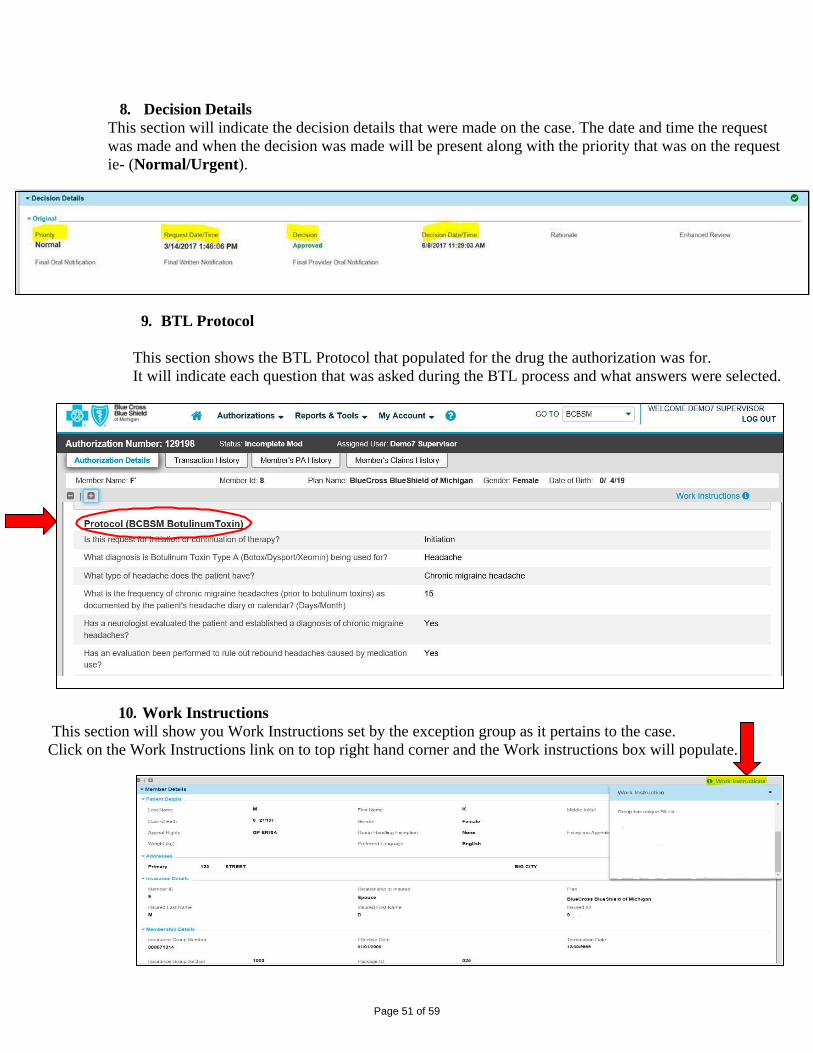
8. Decision Details
This section will indicate the decision details that were made on the case. The date and time the request
was made and when the decision was made will be present along with the priority that was on the request
ie- (Normal/Urgent).
9. BTL Protocol
This section shows the BTL Protocol that populated for the drug the authorization was for.
It will indicate each question that was asked during the BTL process and what answers were selected.
10. Work Instructions
This section will show you Work Instructions set by the exception group as it pertains to the case.
Click on the Work Instructions link on to top right hand corner and the Work instructions box will populate.
Page 52 of 59
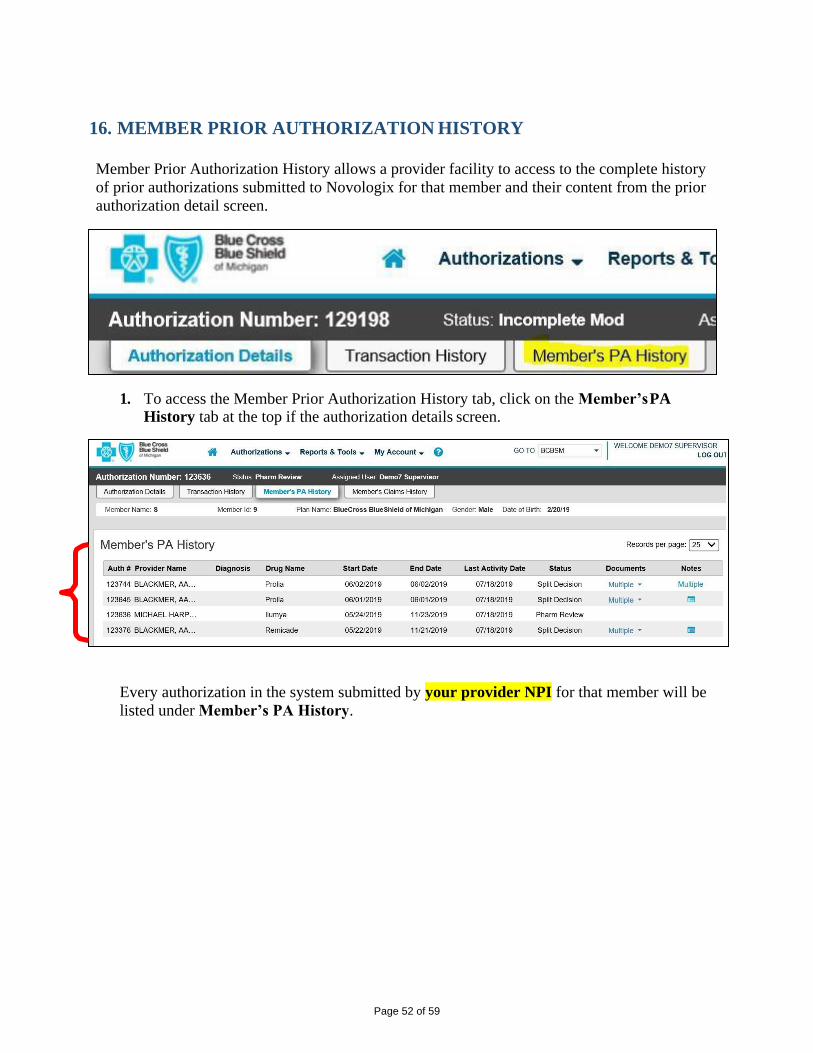
16. MEMBER PRIOR AUTHORIZATION HISTORY
Member Prior Authorization History allows a provider facility to access to the complete history
of prior authorizations submitted to Novologix for that member and their content from the prior
authorization detail screen.
1. To access the Member Prior Authorization History tab, click on the Member’s PA
History tab at the top if the authorization details screen.
Every authorization in the system submitted by your provider NPI for that member will be
listed under Member’s PA History.
Page 53 of 59
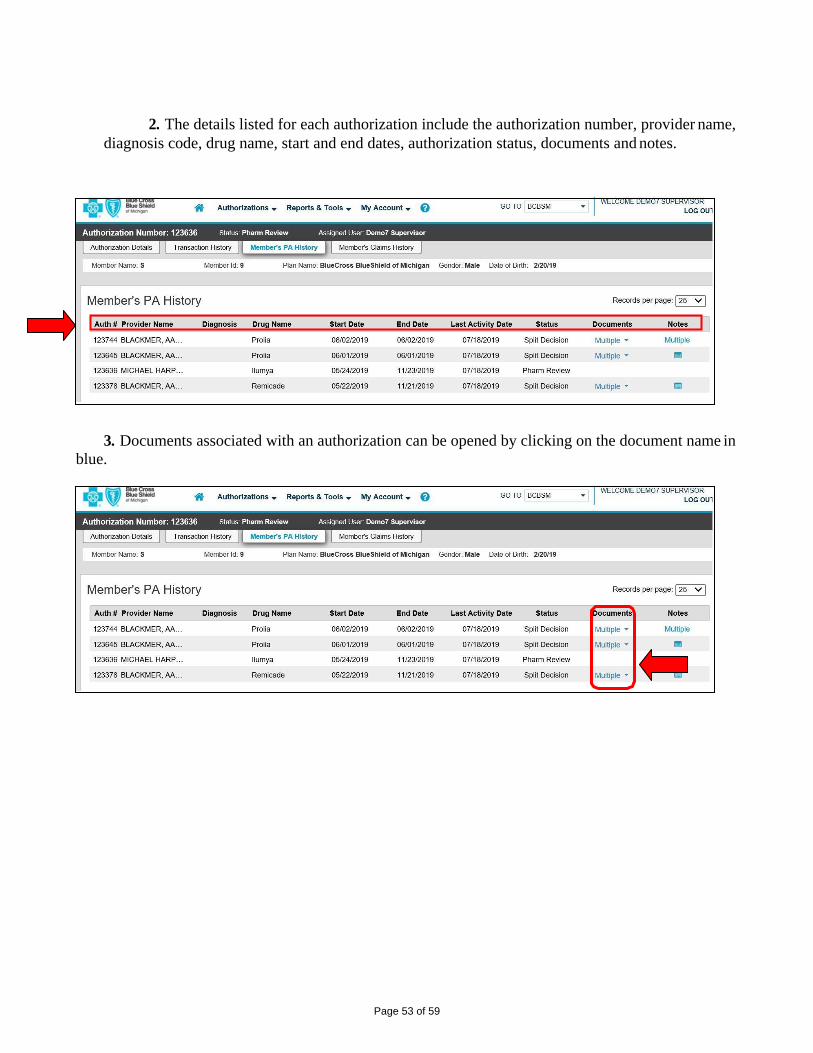
2. The details listed for each authorization include the authorization number, provider name,
diagnosis code, drug name, start and end dates, authorization status, documents and notes.
3. Documents associated with an authorization can be opened by clicking on the document name in
blue.
Page 54 of 59
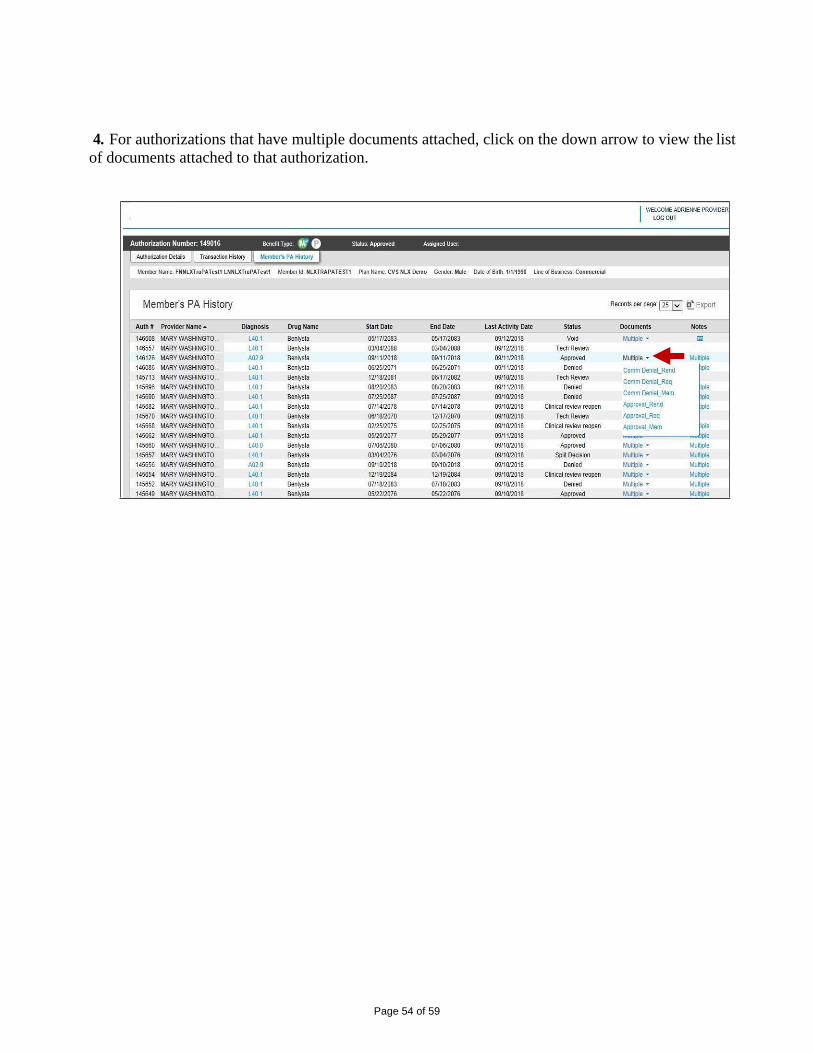
4. For authorizations that have multiple documents attached, click on the down arrow to view the list
of documents attached to that authorization.
Page 55 of 59
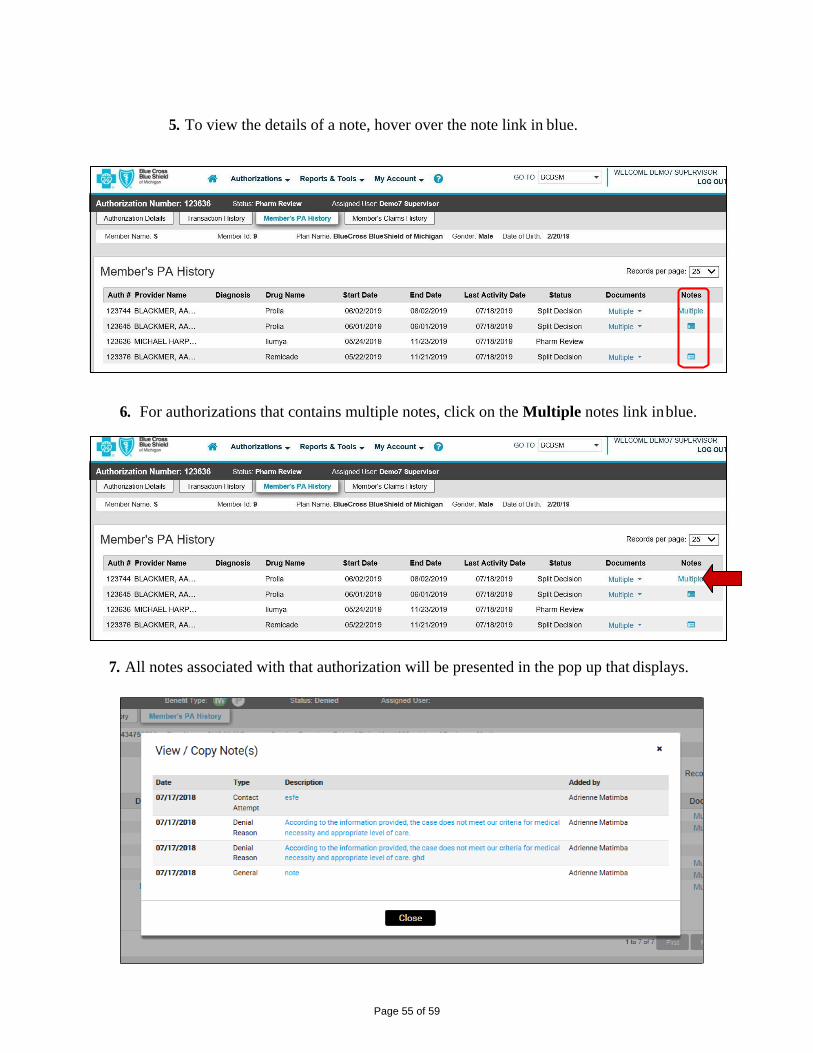
5. To view the details of a note, hover over the note link in blue.
6. For authorizations that contains multiple notes, click on the Multiple notes link in blue.
7. All notes associated with that authorization will be presented in the pop up that displays.
Page 56 of 59
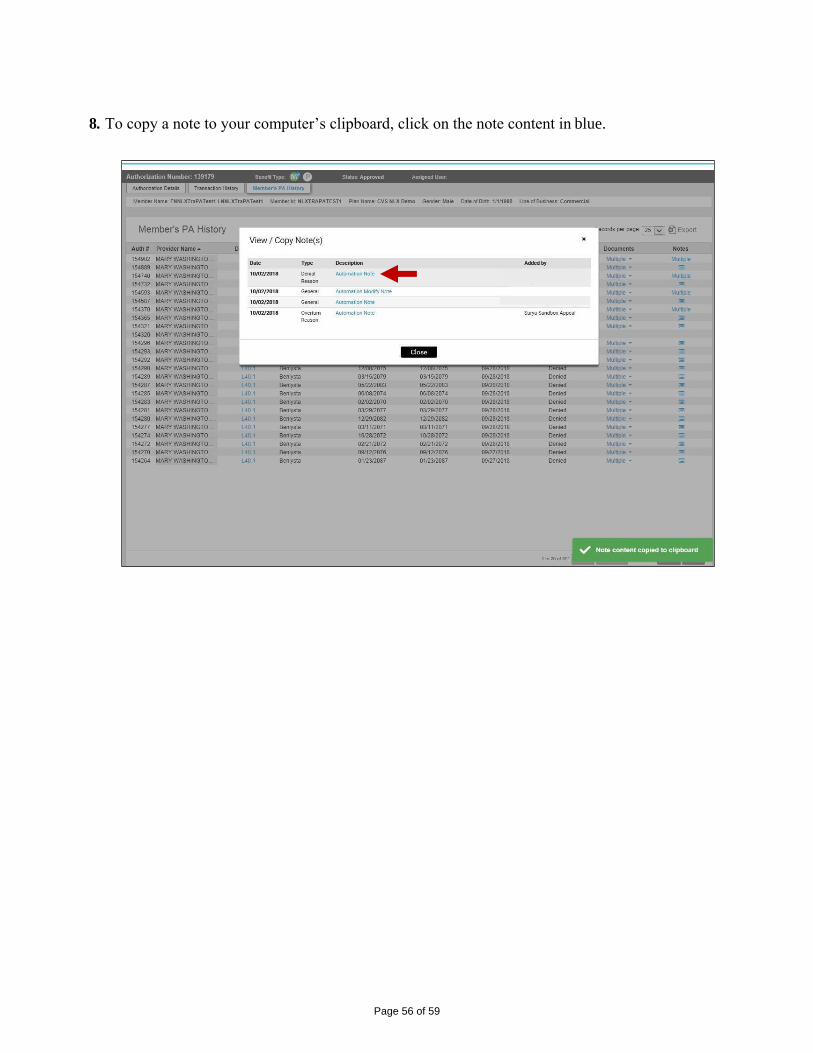
8. To copy a note to your computer’s clipboard, click on the note content in blue.

Page 57 of 59
17. HOW TO ACCESS ASK NOVOLOGIX The Ask NovoLogix system was established to assist users in gaining access to
items such as forms, user manuals and videos.
1. Select Help and Ask NovoLogix
2. This will take you to the FAQ Category interface and search engine.
Page 58 of 59
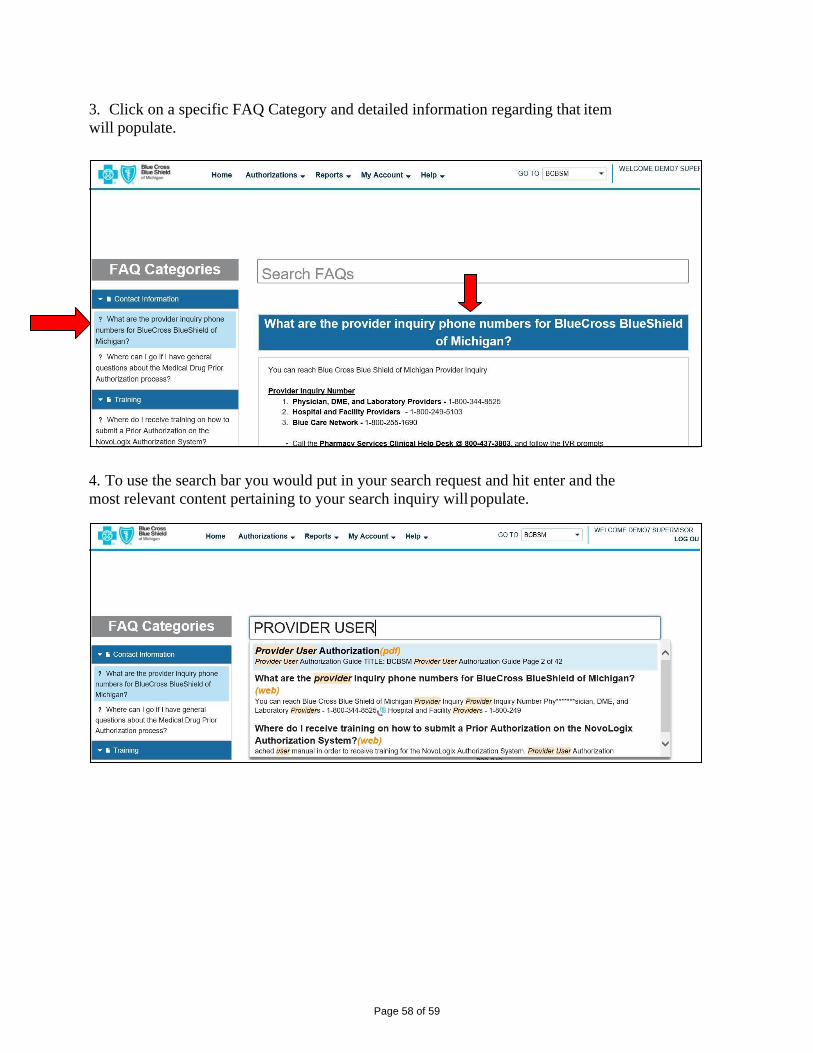
3. Click on a specific FAQ Category and detailed information regarding that item
will populate.
4. To use the search bar you would put in your search request and hit enter and the
most relevant content pertaining to your search inquiry will populate.

Page 59 of 59
GLOSSARY
• Authorization number- The authorization number assigned to the prior authorization request in the Novologix system.
• Document Attachments – All documentation that you have attached to the case will be included
in this section. This will also include copies of any letters the plan has generated.
• Line Details – The Line Detail section of the authorization contains the information for the drug requested. The information here includes Place of Service, Date(s) of Service, NDC code, NDC Name, Strength/ Dosage form and the Sig.
• Member Details – This will hold all demographic information on file from the payer. Please contact
payer directly with any questions on informationprovided.
• Notes – Any notes that you or the Payer have added will be included here. Including Denial reasons
(if applicable).
• Status
o Cancelled-Provider selects to cancel a prior authorization request they have inprocess.
o Final Status – Approved, Approved Mod, Appeal Approved, Appeal Approved Mod or Denied,
Appeal Denied (Denial reason will be in notes), Split Decision, Appeal Split Decision.
o Incomplete, Incomplete Appeal, Appeal Incomplete Mod, Incomplete Mod– Still with the
Provider, click Submit to continue.
o Pending, Pending Appeal, Pending Mod, Appeal Pending Mod-The authorization in in
processing of finalizing. Once the case has been finalized, determination letters are sent out.
o Provider Action, Provider Action Appeal, Provider Action Mod, Appeal Provider Action Mod-
The authorization is waiting for a response from the provider for additional information needed to complete the case review.
o Pharm Review, MD Review, Pharm Review Appeal, MD Review Appeal, Executive Services
Review Appeal, Pharm Review Mod, MD Review Mod, Appeal MD Review Mod, Appeal Pharm Review Mod, Appeal Tech Action Mod – The Authorization is under review with Pharmacy Services staff.
o Tech Action, Tech Action Appeal, Tech Action Mod, Appeal Tech Action Mod-The case is
under review with Prior authorization staff.
o Void-To be used by internal staff.