Embed Size (px)
Citation preview

Warren's column covers a wide range of topics of
interest to hosta aficionados
This and That: 2015
Warren I. Pollock Glen Mills, PA
Troughs and Minis Go Together
Remember the song “Love and Marriage” (lyrics by Sammy Cahn, music by Jimmy Van Heusen) that Frank Sinatra popularized? Love and marriage, love and marriage Go together like a horse and carriage This I can tell you, brother You can’t have one without the other.
Troughs and minis go together too…like, well, Mickey and Minnie. Troughs are ideal for miniature hostas; minis are ideal for troughs. In the last dozen or so years, Hosta ‘Blue Mouse Ears’ (Emile & Jane Deckert - 2000), generally designated BME, pronounced be-me, and its numerous, if not over abundant, ruffled, and variegated- leaf sports have become extremely popular. Is there a hosta collection without BME and likely some BME sports, too? I doubt it. Their attractive, little leaf size, along with low mound and scape heights, make troughs a perfect match. I think it fair to say that BME is the poster hosta for troughs.
Hypertufa trough showcasing H. ‘Blue Mouse Ears’ in Inta Krombolz garden, West
Chester, Pa., 2012. (Note other troughs rear right.) (Photo by Conny Parsons)

Hypertufa trough, 19” long, 14” wide, 7” tall. Conny Parsons garden, Glen Mills, Pa. H. ‘Pixie Vamp’ (front center), H. ‘Itsy Bitsy Spider’ (front left), H. ‘Crepe Soul’’ (rear left
corner), H. ‘Lakeside Down Size’ (rear right corner). (Photo by Conny Parsons)
Hypertufa trough, 11” by 4½”, planted with H. ‘Pandora’s Box’
(front) and H. ‘Tortifons’. Conny Parsons garden, Glen Mills, Pa. (Photo by Conny Parsons)

Troughs can be made of many different materials such as clay (terracotta), wood, stone, concrete, ceramic, metal, and plastic. For troughs in home gardens though, hypertufa (a.k.a. hyper tufa) is generally considered the premium. It is fairly inexpensive, long lasting, and wears well in all weather. What is hypertufa? Tufa is an easily-mined, porous, natural, volcanic rock. It is easily carved and formerly was inexpensive. I recall seeing tufa containers and ornaments of all sorts, as well as large pieces used as decorative landscape boulders, in high-end nurseries when I started gardening decades ago. However, I’m told mining, craftsmanship, and transportation costs skyrocketed, and today there are few genuine tufa products available in nurseries. One nurseryman noted that antique dealers have cornered the market for tufa planters. With some lichen and moss growing on them, they can command enormous prices in specialty antique stores and at premium horticultural events. Hypertufa is a man-made material with properties and appearance similar to the naturally obtained rock, and, most important, it is much cheaper. Basically, it is various aggregate materials, principally perlite, peat moss, and builder’s sand (also called sharp sand), bonded with Portland cement. With some training and skill, hypertufa can be shaped into troughs, pots, garden decorations, and numerous other objects. They are porous, light weight, and quite strong, withstanding harsh temperature, e.g., -20
degrees F. (-29o C.). Hypertufa planters are considered frost proof, they can be left outdoors in winter. The classic hypertufa formula is equal parts Portland cement, peat moss, and perlite, plus water. A popular mixture which is stronger—but heavier—is 1¼ part Portland cement, 1 part peat, 1 part perlite and ¼ part builder’s sand; water, about ¾ to 1 part, is added to make a creamy mixture. I am very fortunate that there are two hypertufa buffs in my area, Rebecca “Becca” Boylan, Pottstown, PA, former president of the Delaware Valley Hosta Society, and Mary Tilger, Collegeville, PA. They have given demonstrations on making troughs, step-by-step lessons where attendees construct their own planters. (Sessions are a day plus, as the cement needs to dry overnight and be surface treated the next day.) Both enthusiasts make and sell a large variety of hypertufa troughs, including custom-made ones.
Hypertufa troughs and ornament constructed by Rebecca Boyland, Pottstown, Pa., 2015.
(Photo by Rebecca Boylan)

Hypertufa troughs constructed by Mary Tilger, Collegeville, Pa., 2015. (Photo by Mary Tilger)
(This is a good spot to mention that the AHS National Convention in 2018 will be in the Philadelphia-Southeast Pennsylvania-Northern Delaware area, June 20 through June 23. Titled “Phifty in Philly,” it will celebrate the 50th anniversary of the founding of The American Hosta Society. Expect to see many garden troughs planted with minis. Likely, the Hosta Leaf Show Divisions for containers, II and III, will have a plethora of interesting trough entrees. Also, there might be a trough-making demonstration at the convention, perhaps as an optional day feature. There might also be a vendor selling troughs in the vending area. In addition, attendees touring Becca and Dan Boylan’s garden will find hypertufa troughs for sale.) In the Spring 2013 (Vol. 44, No. 1) issue of The Hosta Journal, pages 36-38, Becca Boylan authored an excellent article, “Growing Mini Hostas in Troughs.” She gave a lot of useful advice from her experiences. Following are some tips from my experiences. Tip 1: The wire screen covering drainage holes is important. Not only does it deepen the soilless mix in the container, it prevents critters from entering the trough through these possible entrances. I use two by two inch squares of either aluminum or fiberglass screening. I have found it is best to secure the screening to the bottom of the trough. I do this by fastening the corners of each screen to the trough with thin strips of duct tape. Don’t put a piece (worst yet several layers) of geotextile landscape cloth over the wire screening thinking the fabric is porous and water will pass through. Unlike claims on the packaging, studies show that some of these products do not let water through for very long. The little holes are quickly filled with soil particles and water puddles on top of the fabric and does not drip through. The trough then is a bathtub with standing water. Foremost, don’t put pebbles, stones, rocks or shards at the bottom of the trough thinking they will help drainage. This is a deeply imbedded myth that continues, unfortunately, to be propagated. They don’t

improve drainage. In fact, they can even slow down drainage. Furthermore, they take up space that the root system of heathy, thriving hostas will need, especially if plants are crowded in the container. It is best if troughs are elevated at least 1/16 inch above the surface they sit on. This helps assure drainage holes are not blocked and creates a pathway for water to easily flow out. There are pot feet and toes and plants stands on the market, but look awkward, unattractive, with troughs. Whatever elevates the containers should not be noticed. I have successfully used old credit cards cut into one-inch squares, stacking one on top of another and fastening the two together with contact cement or instant glue. Three and more of these two-card-high feet are under each trough. They work best on smooth, hard level surfaces, such as wood deck flooring, concrete, and flagstone paving. Tip 2: Becca’s trough mix starts with a bag of Organic Mechanic© Container Blend Potting Soil; there’s a photo on page 38 of her article. This product is soilless, peat free, earth friendly, and fast draining, containing compost, pine bark, coir (outer brown husk of the coconut), worm castings and perlite. It’s available in some nurseries and garden centers in the mid-Atlantic area. For availability elsewhere, check manufacture’s website (http://www.organicmechanicsoil.com/products-catalog-organic-potting-soil.html. Suggestion: When at the 2018 Philly AHS convention, inquire where it’s available nearby and stock up. Becca adds poultry grit (crushed granite) to improve drainage, 1 part grit to 2 parts of commercial potting mix. My preference is 1 part grit to 3 or 3½ parts potting soil. This mix is sufficiently fast draining and requires less watering than Becca’s mixture. Poultry grit, fed to poultry to help digestion, sold in farm supply stores, in several sizes. “Starter” is the size you want. It is packaged in 50 lb. bags (seen also in Becca’s photo), which likely is much more grit than you’ll need for just a couple of troughs. Sharp builder’s sand can be substituted, but make sure it is clean; quality varies considerably at construction supply sites. Do not use play or beach sand, it is too fine and beach sand can have high salt content. Though expensive, I’ve used white and gray aquarium gravel; my local pet-supply store sells 1 lb. packages. Tip 3: Make sure you thoroughly water a newly planted trough, thoroughly water means soaking. My
method: I water the troughs until I see water coming out the drain holes. Then I wait 10-15 minutes and
water again until water comes out.
Tip 4: Troughs planted with hostas and other items often are “artistic creations” with the soilless mix up
to the trough’s rim. Sometimes the mix is mounted higher in the middle of the trough to give a “hill”
appearance. You have to be careful in watering these troughs. A strong jet of water can badly damage the
carefully groomed surface and badly disrupt plants and decorative objects in the display. You have to
water gently. I prefer a watering can with a fine spray rose (nozzle). My preference is the English Haws
water cans made of coated metal, plastic, and even copper. Several different roses are available. They
were designed in 1866 and remain the best, being professional, and top grade. Go online for availability.
Watering troughs can be a slow process!
Tip 5: I am always amazed at how much water a relatively little hosta plant can take up in a day’s time,
even growing in partial shade. When temperatures are greater than about 80 degrees F. (~26.7o C.), I
usually water every day. I follow Tip 3: Water until water runs out the drainage holes, and then 10-15
minutes later water again until water runs out. You cannot overwater if the soilless mix is fast draining
and drainage holes are not clogged.
Tip 6: Hostas with poor root systems, roots that circle, kink, and have tied themselves in knots, often
don’t take up water well. In planting hostas with these roots masses, when possible, I tease the roots

apart and straighten them out. For roots that have entirely circled the root ball and formed a dense
tightly compacted casing, I make a couple of long vertical cuts with a knife, through the outermost roots
and pull the root ball, apart forming a more open root system which I plant. For roots that have grown
into a dense impenetrable mat along the bottom of the root system, I cut them off as a thin slice and
discard. Don’t be concerned that there will be a lot of discarded roots. Done in early season, new roots
soon develop and grow outward.
Tip 7: Becca adds fish emulsion to the water to give the shocked plants a head start. Research shows
that it can take four and more weeks for fish oil to break down for plants to use its N, P and K. and that
applies if the garden soil is rich with beneficial microbes. However, since soilless soil is sterile with no
microbial activity nor, I’ll add, beneficial earthworms. My starter fertilizer is half-strength solution of
standard 10-15-10 plant food plus SUPERthrive©, a vitamin B-1 tonic with a smidgen of nutrients, at
manufacture’s recommended dosage.
Tip 8: Planting hostas in troughs does not make them immune to slug and snail damage. Apply slug and
snail bait after planting and reapply each season afterward. Although the white-colored iron phosphate
pellets (widely available as Sluggo©) are not my favorite slug bait, I use them in troughs as they are
unobtrusive in the potting mix, blending in with the white perlite and poultry grit. My preferred bait is
Deadline©MPs™, containing 4% methaldehyde, available in 10 lb. bags online. Pellets are blue and tiny,
less than 1/16 inch diameter and 1/8- to ¼-inch long. Only a couple are needed around each plant.
========================================================
AHS Member Jonathan Hogarth Wins ‘Best in Show’ Award at
2015 RHS Hampton Court Palace Flower Show
Jonathan Hogarth lives in Wokingham, Berkshire, England. An AHS member since 2006, he attended his first AHS national convention in 2005 and every convention thereafter. “It’s a way of life,” he says. Over the years we became friends with a common interest in mini hostas, especially the H. ‘Blue Mouse Ears’ sports. He has a large collection that I featured in “Potpourri” column in the Fall 2012 (43.2) issue of The Hosta Journal; there’s a full-page photo of his BMEs in pots on page 19 in that issue. At the AHS National Convention in Raleigh last June, in the afternoon of the first day, Wednesday, June 17, I met the group of attending Brits, Jonathan, John Baker (former editor of the British Hosta and Hemerocallis Society Bulletin) who lives at Nara in Lindford, Hampshire, with partner June Colley (noted THJ author and photographer); and Christopher and Denise Cotterill of Tattershall, Lincolnshire. Before I could offer my “Hello” and “Welcome to the U.S. and the hosta convention,” John, or maybe it was Chris, burst forth about Jonathan’s being invited to exhibit at the upcoming Royal Horticultural Society’s Hampton Court Palace Flower Show, and it starts in less than a week and a half! With the excitement and hustle and bustle of the convention, I didn’t get a chance to talk to Jonathan about his stand [exhibit] at the RHS show, and on returning home, frankly, I forgot about it. It wasn’t until I read the BHHS Newsletter’s July 2015 issue, which arrived in my mailbox in early August that I knew of Jonathan’s winning a major award. I immediately emailed him for details and he responded with a long reply. This led to a barrage of questions from me, which he kindly answered. His stand’s interesting backstory and construction follow.
Jonathan Hogarth being presented with ‘Best in Show’ Trophy by Sir Nicholas Bacon, RHS President, for his stand in
The Plant Heritage Marquee at 2015 Royal Horticulture Society Hampton Court Palace Flower Show. Photo taken Tuesday morning, June 30th. (Photo courtesy Jonathan Hogarth)
“Two years ago,” Jonathan wrote me, “Diana [Diana Grenfell (Mrs. Diana Grounds), BHHS Co-Vice President, of Upper Merton House in Newham, Gloucestershire] asked me if I’d like to be nominated as the recipient of the status of a UK national collection holder for small and miniature hostas. She felt it was time for others to have a chance of holding the title. “The Plant Heritage Society was set up to help and assist garden lovers who have a passion for their collected plants. This includes everything from the smallest plant to the largest tree. A lot of hoops have to be jumped through before you are considered to be a collection holder. Diana’s status was Small and Miniature Hostas growing in the ground; mine are in pots. It took a year of talks to receive approval. “About a year after I received O.K., as a new collection holder, I was asked if I would like to be considered to exhibit at Hampton Court. I answered yes and applied. I was then asked what shows I had entered and what awards I had received. I filled in NONE. Still, I was accepted to exhibit at the Hampton Court Palace show. “Well, I have never shown my collection or been invited to any local, county or top show ever, so this was quite a thrill. But it also was worrisome. I had booked my attending the AHS convention in Raleigh some months before, and I would be returning home on Monday, 22nd June. This meant I had only some five days to get over any jet lag, finalize my design, with a lot of help and advice from Sandra [Sandra Bond, the highly regarded hosta authority and proprietor of Goldbrook Plants in Suffolk, a foremost hosta nursery that won many Gold Medals at RHS shows)] and produce a stand worthy of entry at a prestigious RHS show. Fortunately, I had considerable help from my wife. The show ran from 10am until 7:30pm every day from Tuesday, 30th June, to Sunday, 5th July. On Saturday and Sunday, 27th and 28th June, I constructed my stand. On Monday, 29th, it was judged and on Tuesday, 30th, the award was announced and presented.
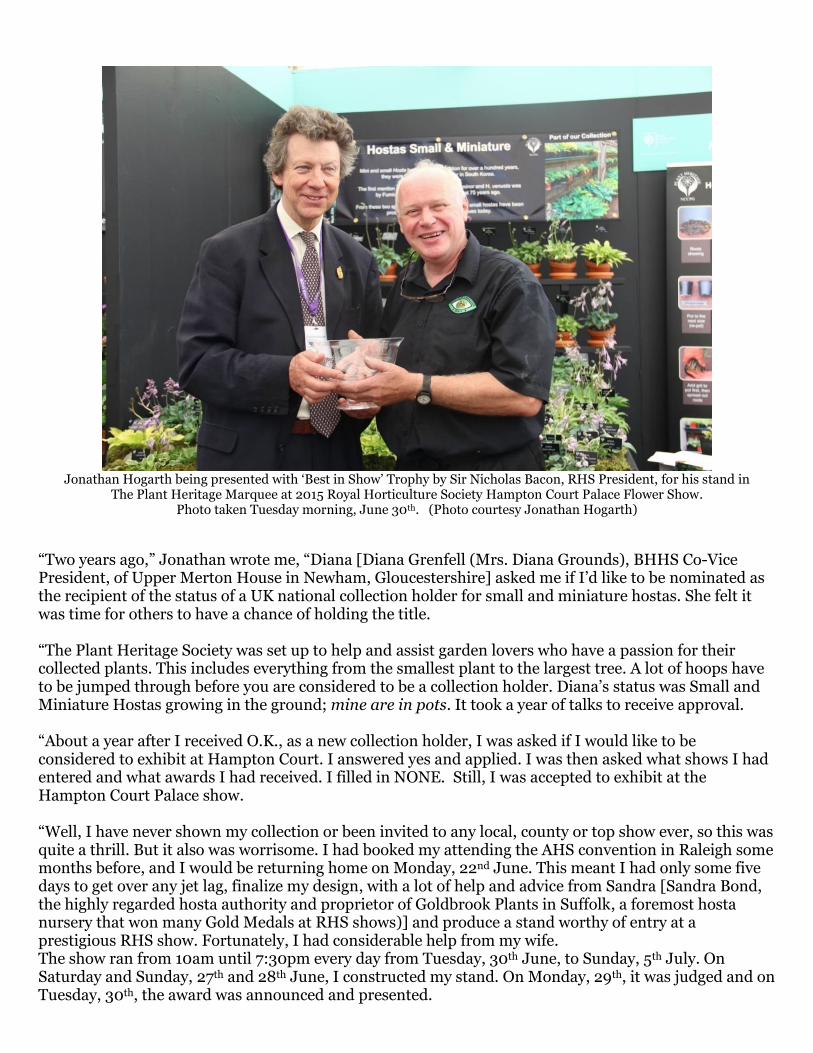
On Sunday evening I was chatting with a bystander who was looking at the finished display. I asked if he had any ideas that may be of use to me. He said he was the senior judge and could not say. I felt quite honored and delighted that he was interested in my stand. About an hour later a lot of people appeared at my stand. It turned out the senior judge had said for them to take a look at it on their way out.
Jonathan Hogarth’s stand, about 6 feet by 6 feet, in The Plant Heritage Marquee at 2015 RHS Hampton
Court Palace Flower Show. (Photo courtesy Jonathan Hogarth)
Monday morning was judging day, Jonathan continued. I was asked to leave while decisions were made. Tuesday I arrived early to find a letter on top of a stack of my How to Grow Hostas notes. I opened it. It said I would receive my award later in the morning. Being my first attempt, I expected to receive some helpful advice on how to improve my display, and at best an invitation to try again next year. So this letter puzzled me. I picked up the next paper. It read that my stand was categorized from excellent to good. Of the four categories, I received three excellent and one good. Things were getting better. Next was a card. I turned it over. It stated I had been given the top award, a GOLD AWARD. I was now puzzled about the award presentation; I turned over the last card. It read that I had been awarded the top prize in The Plant Heritage Marquee. I cried, but manned up quickly. My award was presented by Sir Nicholas Bacon, president of the RHS. I never expected to walk away with any awards; I never expected to achieve Hosta Shangri-La. As a result, I’ve been invited to display at five shows next year. One of them is the RHS Chelsea Flower Show in May, the top flower show in the world. Do you think I should exhibit there? You guessed it. I have applied. It will be great promotion for our beloved plants.

Jonathan Hogarth plans to have a stand at next year’s Plant Heritage Marquee at the RHS Hampton Court Palace Flower Show. Open days are Tuesday, July 5, through Saturday, July 10. What about next year, 2016, Jonathan? I asked. He said: My Plant Heritage display companions announced that it would be downhill from now on (with a good natured smile thrown in). Sue Biggins, RHS Director General, said it was like being at school: You get a tick for good work or a cross for bad work. I was told I had achieved a tick for next year and everyone was looking forward to my new ideas. As I see it, the 2015 award is not the end but a beginning. I’m sure all AHS members wish Jonathan Hogarth the best in his future show entries. I intend to have a report on his stand at the 2016 Hampton Court Show in “This and That: 2016” column in next year’s Online Hosta Journal. I expect Jonathan will attend next year’s AHS National Convention in St. Louis, June 15-June 18. On coming home, he’ll have nearly a fortnight to firm up the design, collect plants and sundry materials, and build and assemble a new stand. I don’t think that will be a problem for him!
========================================================
Combatting Vole Damage Ask hosta gardeners what are the most destructive animals in their gardens, and likely they will respond:
Deer, Rabbits, and
Voles.
Deer and rabbits eat hosta leaves, leaving the plants pretty sorry looking, but at least the rhizomes are alive. Voles eat hostas rhizomes and roots. Many hosta enthusiasts claim voles are bigger problem than deer and rabbits.
Vole found in Brashear-Meyer garden, Woodbury, Conn. Meadow voles are five to seven inches long,
counting the tail, usually weighing only an ounce or two. (Photo by Carol Brashear)

BAIT STATIONS Bait stations are not traps. They don’t capture nor kill voles. Instead, they are confinements containing poison bait. Voles enter the sites and eat the toxic bait, or, as likely, take the bait away to their nest and eat it there, sharing it with other voles. They don’t die in the stations; they die somewhere else, likely in their nests. So don’t expect to see dead voles in the stations, or from my experiences, anywhere else. You know the stations have been active because after a couple of days, sometimes just one day, there is missing bait; sometimes all of it is gone. Along with the missing bait there is, or at least there should be, less vole activity in the area. Walter Cullerton, who wrote the article in the DVHS Newsletter, and I have had good success in combating voles with baited one-inch PVC pipe stations. Mine, as my article illustrated, are somewhat intricate assembles of pipe fittings available at home improvement stores. It is best to anchor these pipe stations to the ground to prevent birds and pets getting at the bait. I use large “U” staples. Kathy Miller’s photo (above) shows a commercial bait station for rodents, Tomcat© Rodent Station made by Motomco in Madison, Wisconsin, www.motomoco.com. It’s a big (9 by 8 inches, 4½ inches high) rigid black plastic box with two 2-inch holes on oppose sides. The lid is hinged and locks shut, you need a special key to open it. Inside is a 3-inch wide x 8-inch long chamber for bait. An advantage of this station, according to the manufacturer, is you can put in a lot of bait at one time, so you don’t have to refill often. A big advantage for toxic bait stations is you can use them in established gardens where hostas are already planted in the ground. Some instructions: Place the toxic bait stations close to the “vole holes.” They’re about ½ to 1¼ inch diameter. Sometimes they’re easily seen; other times you have to “probe around” for them. Importantly, don’t block their entrances. You want the vole holes clear, open, so voles can easily come out of (and go back into) the warren of tunnels, having had easy access to the bait stations. Also, plugging the holes with dirt, rocks and other objects will not keep voles from damaging your hostas. They simply will make another entrance/exit to their tunnels. As good as bait stations are, I must point out that after voiding (or more likely mostly voiding) an area in the garden of voles, they often do a good job in establishing themselves elsewhere in the garden (or perhaps your neighbor’s property). You have to continually be on the alert for new holes that need stations nearby. Once voles are in your garden, I don’t think you ever can completely eliminate them—at least with bait stations. Toxic baits: I don’t know if one type or brand is better than another. The one shown here worked for me.
WIRE CAGES The wire cages that Carol Brashear recommended and used by Bill Meyer and Carol in their Woodbury, Conn., garden are wire mesh, waste baskets, usually vinyl coated and preferably black colored, sold in

“dollar and less” stores. Carol says they keep a stock pile on hand, usually visiting these outlets throughout the year, as often they’re sold out. These cages will protect rhizomes and roots within the wire cage. (See photos), but roots that have grown through the wire cage and are on the outside of the cage are not protected. They can be eaten by voles.
H. ‘Wheee!’PP23,565 (William Meyer - NR) growing in H. ‘Hidden Agenda’ (Ali Pollock - 2005) growing in Kathie Sisson’s garden, Avon, Conn., in a cage for wire basket Carol Brashear-Bill Meyer garden, Woodbury, vole protection. Note about an inch of basket Conn. in wire cage (basket) for vole protection. Note about is above ground. Photo taken at 2011 AHS National an inch of basket is above ground. Photo taken Convention. (Photo by Carol Brashear) May 2005. (Photo by Carol Brashear)
“Voles are surface scavengers,” Carol explained. “They travel along the soil surface until they find a plant. If unprotected, they start down into the crown. If they bump their noses on a cage sunk in the ground, they go around it and move on to the next thing they bump into. They don't climb, even a little bit. That is why there is an inch of wire cage above the soil surface. It stops them.” “Wire waste baskets usually are tall, about 12 inches. Tall baskets should be shortened, since you usually don’t need a hole in the ground that deep for hostas. Wide holes are better than deep holes. Hosta roots usually extend as far from the center of the plant as the foliage does. Seven inches usually is deep enough. The baskets should show an inch or so above the ground. Voles bump into the exposed collar and move on.” “We put a plant in a basket,” Carol detailed, “leveling the soil around the plant about an inch below the top of the basket. When we put the basket in the hole, we plant it so that the soil level in the basket is even with the soil level of the bed, leaving the inch of wire above the surface.”
Standard wire basket, about 12 inches tall; shortened basket about 8 inches tall. Protected hosta was removed from shortened cage.
Note tree roots penetrated into and through cage. (Photo by Carol Brashear)
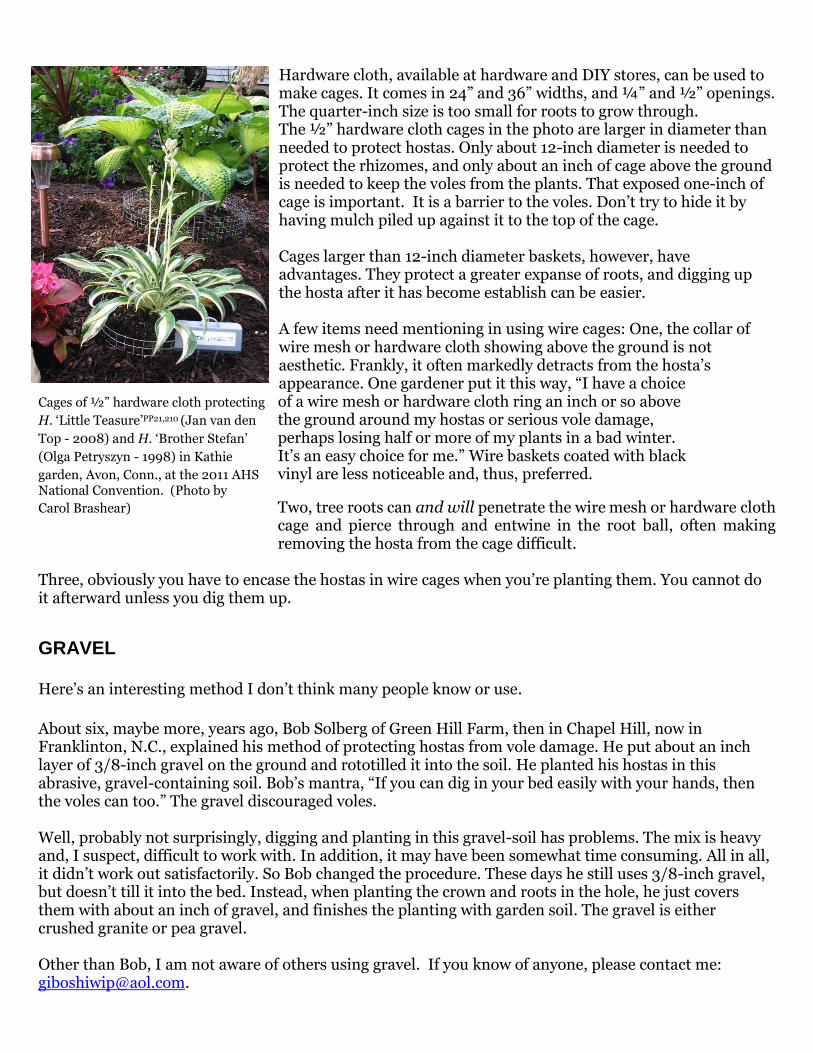
Hardware cloth, available at hardware and DIY stores, can be used to make cages. It comes in 24” and 36” widths, and ¼” and ½” openings. The quarter-inch size is too small for roots to grow through. The ½” hardware cloth cages in the photo are larger in diameter than needed to protect hostas. Only about 12-inch diameter is needed to protect the rhizomes, and only about an inch of cage above the ground is needed to keep the voles from the plants. That exposed one-inch of cage is important. It is a barrier to the voles. Don’t try to hide it by having mulch piled up against it to the top of the cage. Cages larger than 12-inch diameter baskets, however, have advantages. They protect a greater expanse of roots, and digging up the hosta after it has become establish can be easier. A few items need mentioning in using wire cages: One, the collar of wire mesh or hardware cloth showing above the ground is not aesthetic. Frankly, it often markedly detracts from the hosta’s appearance. One gardener put it this way, “I have a choice
Cages of ½” hardware cloth protecting of a wire mesh or hardware cloth ring an inch or so above
H. ‘Little Teasure’PP21,210 (Jan van den the ground around my hostas or serious vole damage, Top - 2008) and H. ‘Brother Stefan’ perhaps losing half or more of my plants in a bad winter. (Olga Petryszyn - 1998) in Kathie It’s an easy choice for me.” Wire baskets coated with black
garden, Avon, Conn., at the 2011 AHS vinyl are less noticeable and, thus, preferred. National Convention. (Photo by
Carol Brashear) Two, tree roots can and will penetrate the wire mesh or hardware cloth cage and pierce through and entwine in the root ball, often making removing the hosta from the cage difficult.
Three, obviously you have to encase the hostas in wire cages when you’re planting them. You cannot do it afterward unless you dig them up.
GRAVEL Here’s an interesting method I don’t think many people know or use.
About six, maybe more, years ago, Bob Solberg of Green Hill Farm, then in Chapel Hill, now in Franklinton, N.C., explained his method of protecting hostas from vole damage. He put about an inch layer of 3/8-inch gravel on the ground and rototilled it into the soil. He planted his hostas in this abrasive, gravel-containing soil. Bob’s mantra, “If you can dig in your bed easily with your hands, then the voles can too.” The gravel discouraged voles. Well, probably not surprisingly, digging and planting in this gravel-soil has problems. The mix is heavy and, I suspect, difficult to work with. In addition, it may have been somewhat time consuming. All in all, it didn’t work out satisfactorily. So Bob changed the procedure. These days he still uses 3/8-inch gravel, but doesn’t till it into the bed. Instead, when planting the crown and roots in the hole, he just covers them with about an inch of gravel, and finishes the planting with garden soil. The gravel is either crushed granite or pea gravel. Other than Bob, I am not aware of others using gravel. If you know of anyone, please contact me: [email protected].
CASTOR OIL and DISH DETERGENT Here’s an interesting method I wasn’t aware of until this year. Richard Merritt, owner of New Hampshire Hostas, South Hampton, N. H., has an “environmentally-friendly organic solution to prevent those pesky critters from destroying his extensive hosta gardens and lawn.” Merritt waters the ground with castor oil and dish detergent. For large areas, using a hose-end sprayer, his recipe is: 1-2 oz. castor oil (Do NOT use unscented castor oil). He buys his castor oil from http://www.shayandcompany.com/castor-oil-1-gallon.html 1-2 oz. dish detergent.
Add the mixture to the jar of a hose-end sprayer and then fills the jar with water.
Attach the jar to a garden hose and thoroughly water every desired location to deter the pest from. For hose-end sprayers with a dial, the setting would be the highest.
For small areas with a watering can, the recipe is: 1 teaspoon of castor oil (Do NOT use unscented castor oil) 1 teaspoon dish detergent
Add this mixture to 1 gallon of water and thoroughly water the area to be protected. His comments:
You want to water the ground, not spray it. You should thoroughly wet the soil, so that the mixture penetrates a few inches. It is hard to say how much lawn and garden area the solution will cover. You just want to make sure you get the mixture into the soil.
You do NOT have to re-apply after a rain. You may want to re-apply in the spring if you have damage during the growing season. Some people do and some don't. Mostly, vole damage is just a winter issue, as the pests are desperate for a food source.
You want to apply the organic vole control mixture before the ground freezes and after you have cleaned away all the leaves from your garden. This typically is after a few frosts.
This castor oil solution is organic and will not harm wildlife or pets. It just makes those garden pests move out of your gardens.
Remember! Voles (and mice) will eat wherever the solution is NOT applied! Richard Merritt has a video describing his castor oil method. It very interesting and well done. It was made in his nursery and he narrates. To view: http://www.nhhostas.com/voles-and-mice/. I’m sure others have used Merritt’s castor oil method. If you have, or know of someone who has, please contact me at [email protected].
========================================================

Abating Slugs and Snails - I
When to Start Your Program Start slug and snail abatement programs early in the season. By early, I mean before hosta noses or pips are seen emerging from the ground. You want bait around your plants before the hungry destructive critters begin to be active. For many parts of the country, this probably still is winter on the calendar. There is a classic photo that was published in THJ 25-30 years ago. (Unfortunately I wasn’t able to locate it for this item.) It’s very educational. Taken by the late Queen of Hostas, Mildred Seaver, it shows a just unfurling hosta division with every leaf having a hole through it in precise sequence and size. The damage was done by one slug to a division just emerging from the ground in one big bite when the leaves were still tightly packed together. Chris Wilson’s Hallson Gardens (Cement City, Mich.) online forum has this worthwhile advice:
TWO slug abatement applications are needed. The most important one is in the fall to kill the adults before they breed. The follow-up is in the spring to kill any that overwintered and to kill the young hatchlings. Chris adds, “We still spot treat in summer, as we find some areas we must have missed.” Chris’ program makes a lot of sense. It is better than the one I’ve been advocating. Instead of starting your slug and snail abatement treatment in early season, start the program late in the fall of the season before. Apply the first application of bait when the plants have gone dormant and leaves have dried up and are gone. Slugs and snails may still be active then. Apply the second application in early season the following year, as discussed above. There are two types of toxic slug and snail baits available to home gardeners in America these days, iron phosphate and methaldehyde. My preference, which is mentioned in the item on hypertufa troughs at the beginning of this column, is Deadline©MPs™ containing 4% methaldehyde. There have been discussions on the safety of using bait pellets in The Hosta Journal and The Online Hosta Journal. This is information was in last year’s OLJ: http://www.americanhostasociety.org/AHSMembers/OnlineJournals/45/ColumnWIP.html
========================================================
Abating Slugs and Snails - II
Ammonia Drench
The ammonia drench method is very effective for combating slugs and snails. Ammonia is an effective molluscicide, killing slugs and slug’s eggs in contact with it. Here is information from the 2010 issue of The Online Hosta Journal, “Ammonia Drench Mitigates Slug Problem.” (This is the first OLJ issue and available on the AHS website.) http://www.americanhostasociety.org/AHSMembers/OnlineJournals/41/ColumnWIP.htm
========================================================
Abating Slugs and Snails - III
Sheep Wool Pellets
I detailed this method in last year’s Online Hosta Journal. http://www.americanhostasociety.org/AHSMembers/OnlineJournals/45/ColumnWIP.html. It’s a British product called “Slug Gone” a.k.a. “Slug Gone Wool Pellets.” Derived from pure wool, it produces a naturally effective, environmentally friendly barrier claimed to stop slugs and snails. I’m including it in this year’s OLJ because a vendor of this product was at this year’s AHS convention in Raleigh. He had bags you could purchase. From my observations, over the several days he was in the vending area, a lot of attendees purchased it. So, there should be a fair amount of experience with Slug Gone in the U.S. Thus, I would greatly appreciate reports on its effectiveness and problems (there likely are some) for a follow-up article in next year’s OLJ. My address is [email protected]. If you happened to miss last year’s article, refer to the article here. (http://www.americanhostasociety.org/AHSMembers/OnlineJournals/45/ColumnWIP.html.)
========================================================

Rules for Sporting in Hosta
In the Spring 2015 (Volume 46, No. 1) issue of The Hosta Journal, pages 58-60, Ben J. M. Zonneveld, Leiden, The Netherlands, updated his rules for sporting in hostas. Several rules were refreshed, and several new rules were added. Rule 2 requires alteration. It was labeled: yellow parent sporting to green or variegated or streaked sport. Streaked should be deleted. Rule 2 should read:
yellow parent sporting to green or variegated sport. The illustration for Rule 2 on page 59 of Spring 2015 THJ should be:
The explanation for Rule 2 remains the same: mitotic recombination in the meristem. (Mitosis is cell division.) Mitotic recombination or somatic crossing over is exchange of parts of the chromosomes in the nucleus of the dividing cell. All mitotic recombinations are different genetically. Ben Zonneveld’s THJ article, with altered Rule 2 and colored illustrations, is available as an email attachment. It’s three pages, 8½ x 11 inches. Request copy at [email protected].
========================================================
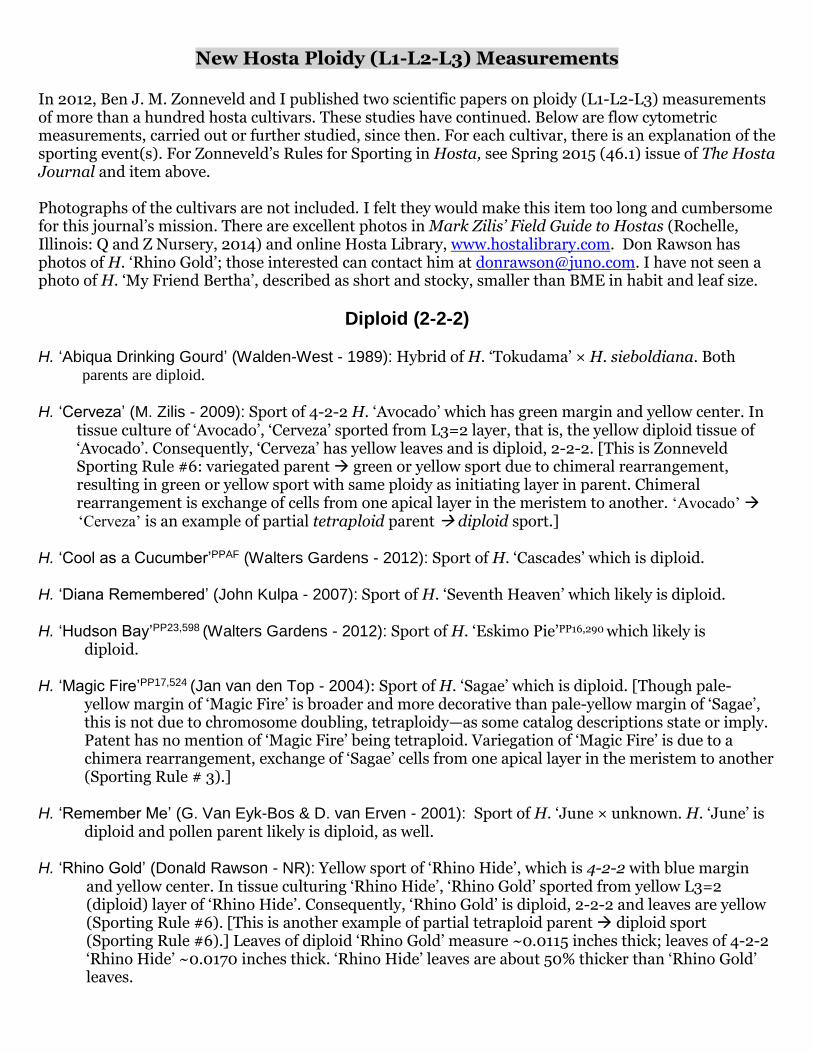
New Hosta Ploidy (L1-L2-L3) Measurements
In 2012, Ben J. M. Zonneveld and I published two scientific papers on ploidy (L1-L2-L3) measurements of more than a hundred hosta cultivars. These studies have continued. Below are flow cytometric measurements, carried out or further studied, since then. For each cultivar, there is an explanation of the sporting event(s). For Zonneveld’s Rules for Sporting in Hosta, see Spring 2015 (46.1) issue of The Hosta Journal and item above. Photographs of the cultivars are not included. I felt they would make this item too long and cumbersome for this journal’s mission. There are excellent photos in Mark Zilis’ Field Guide to Hostas (Rochelle, Illinois: Q and Z Nursery, 2014) and online Hosta Library, www.hostalibrary.com. Don Rawson has photos of H. ‘Rhino Gold’; those interested can contact him at [email protected]. I have not seen a photo of H. ‘My Friend Bertha’, described as short and stocky, smaller than BME in habit and leaf size.
Diploid (2-2-2) H. ‘Abiqua Drinking Gourd’ (Walden-West - 1989): Hybrid of H. ‘Tokudama’ × H. sieboldiana. Both parents are diploid.
H. ‘Cerveza’ (M. Zilis - 2009): Sport of 4-2-2 H. ‘Avocado’ which has green margin and yellow center. In tissue culture of ‘Avocado’, ‘Cerveza’ sported from L3=2 layer, that is, the yellow diploid tissue of ‘Avocado’. Consequently, ‘Cerveza’ has yellow leaves and is diploid, 2-2-2. [This is Zonneveld Sporting Rule #6: variegated parent green or yellow sport due to chimeral rearrangement, resulting in green or yellow sport with same ploidy as initiating layer in parent. Chimeral rearrangement is exchange of cells from one apical layer in the meristem to another. ‘Avocado’ ‘Cerveza’ is an example of partial tetraploid parent diploid sport.] H. ‘Cool as a Cucumber’PPAF (Walters Gardens - 2012): Sport of H. ‘Cascades’ which is diploid. H. ‘Diana Remembered’ (John Kulpa - 2007): Sport of H. ‘Seventh Heaven’ which likely is diploid. H. ‘Hudson Bay’PP23,598 (Walters Gardens - 2012): Sport of H. ‘Eskimo Pie’PP16,290 which likely is diploid. H. ‘Magic Fire’PP17,524 (Jan van den Top - 2004): Sport of H. ‘Sagae’ which is diploid. [Though pale- yellow margin of ‘Magic Fire’ is broader and more decorative than pale-yellow margin of ‘Sagae’, this is not due to chromosome doubling, tetraploidy—as some catalog descriptions state or imply. Patent has no mention of ‘Magic Fire’ being tetraploid. Variegation of ‘Magic Fire’ is due to a chimera rearrangement, exchange of ‘Sagae’ cells from one apical layer in the meristem to another (Sporting Rule # 3).]
H. ‘Remember Me’ (G. Van Eyk-Bos & D. van Erven - 2001): Sport of H. ‘June × unknown. H. ‘June’ is diploid and pollen parent likely is diploid, as well. H. ‘Rhino Gold’ (Donald Rawson - NR): Yellow sport of ‘Rhino Hide’, which is 4-2-2 with blue margin
and yellow center. In tissue culturing ‘Rhino Hide’, ‘Rhino Gold’ sported from yellow L3=2 (diploid) layer of ‘Rhino Hide’. Consequently, ‘Rhino Gold’ is diploid, 2-2-2 and leaves are yellow (Sporting Rule #6). [This is another example of partial tetraploid parent diploid sport (Sporting Rule #6).] Leaves of diploid ‘Rhino Gold’ measure ~0.0115 inches thick; leaves of 4-2-2 ‘Rhino Hide’ ~0.0170 inches thick. ‘Rhino Hide’ leaves are about 50% thicker than ‘Rhino Gold’ leaves.

H. ‘Royal Wedding’PPAF (Walters Gardens - NR): Sport of ‘Diana Remembered’ which is diploid.
Partial Tetraploid (4-2-2) a.k.a. Ploidy Chimera and Tetraploidy Chimera
H. ‘Ivory Coast’ (Dennis Savory - 1999): ‘Sport of ‘Sagae’, which is diploid. Partial chromosome doubling of ‘Sagae’ occurred, likely in tissue culture.
H. ‘Liberty’PP12,531 (John Machen, Jr. - 2000): Sport of ‘Sagae’. Partial chromosome doubling, resulting from unintentional drift of pre-emergent herbicide in the nursery.
H. ‘Rhino Hide’PP23,665 (Donald Rawson - 2007): Found growing in bed of blue-leaved ‘Love Pat’, which is diploid. Accordingly, ‘Rhino Hide’ presumably occurred in culturing ‘Love Pat’. Two stages were required. First, a DNA mutation occurred, resulting in a variegated sport with yellow center and blue margin [Sporting Rule #1]. Second, in the same culture at the same time or soon afterward, partial chromosome doubling occurred, resulting in the sport becoming 4-2-2 [Sporting Rule #8]. ‘Rhino Hide’ leaves measure ~0.0170 inches thick, ‘Love Pat’ leaves, ~0.0115 inches. ‘Rhino Hide’ leaves are about 50% thicker than ‘Love Pat’ leaves.
Full Tetraploid (4-4-4) H. ‘Final Victory’ (Danny Van Eechaute - 2012): Sport of ‘Victory’, which likely is diploid. Apparently, chromosome doubling [Sporting Rule #8] of ‘Victory’ was intentionally induced with a chemical.
H. ‘Fire and Ice’ (Hans Hansen - 1999): Sport of ‘Patriot’, which is 4-4-4. Found in tissue culturing ‘Patriot’.
H. ‘Loyalist’ (G. Van Ejik-Bos - 1998): Sport of ‘Patriot’, which is 4-4-4. Found in tissue culturing ‘Patriot’.
H. ‘My Friend Bertha’ (Walters Gardens - NR): This is a thick-leaved, small blue sport of ‘Blue Mouse Ears’ (commonly called BME, pronounced be-me). In tissue culturing blue-leaved BME, which is diploid, chromosome doubling occurred, resulting in a 4-4-4 sport. It was given the name ‘My Friend Bertha’ or MFB. (Note: ‘My Friend Bertha’ was reported in 2012 as “Tetraploid Sport ‘Blue Mouse Ears’; its cultivar name was not known then.)
H. ‘Rhino Blue’ (Donald Rawson - 2010): Sport of 4-2-2 ‘Rhino Hide’, which has blue margin and yellow center. In tissue culture, ‘Rhino Blue’ sported from blue L1=4 (tetraploid) layer of ‘Rhino Hide’. Accordingly, ‘Rhino Blue’ leaves are blue and 4-4-4 (Sporting Rule #7). Leaves of ‘Rhino Blue’ measure ~0.0180 inches thick. (Note: 4-4-4 ploidy of ‘Rhino Blue’ was reported in 2012 but with no explanation.)
Aneuploidy Chimera (3.2-4-4) H. ‘Fireworks’PP16,062 (Walters Gardens - 2001): Sport of ‘Loyalist’. See explanatory article in Fall 2015 (46.2) issue of The Hosta Journal.
Aneuploid (3.2-3.2-3.2) H. ‘Sparkler’PP25,399 (Walters Gardens - 2012): Sport of ‘Fireworks’. See the explanatory article in the Fall 2015 (46.2) issue of The Hosta Journal.
========================================================
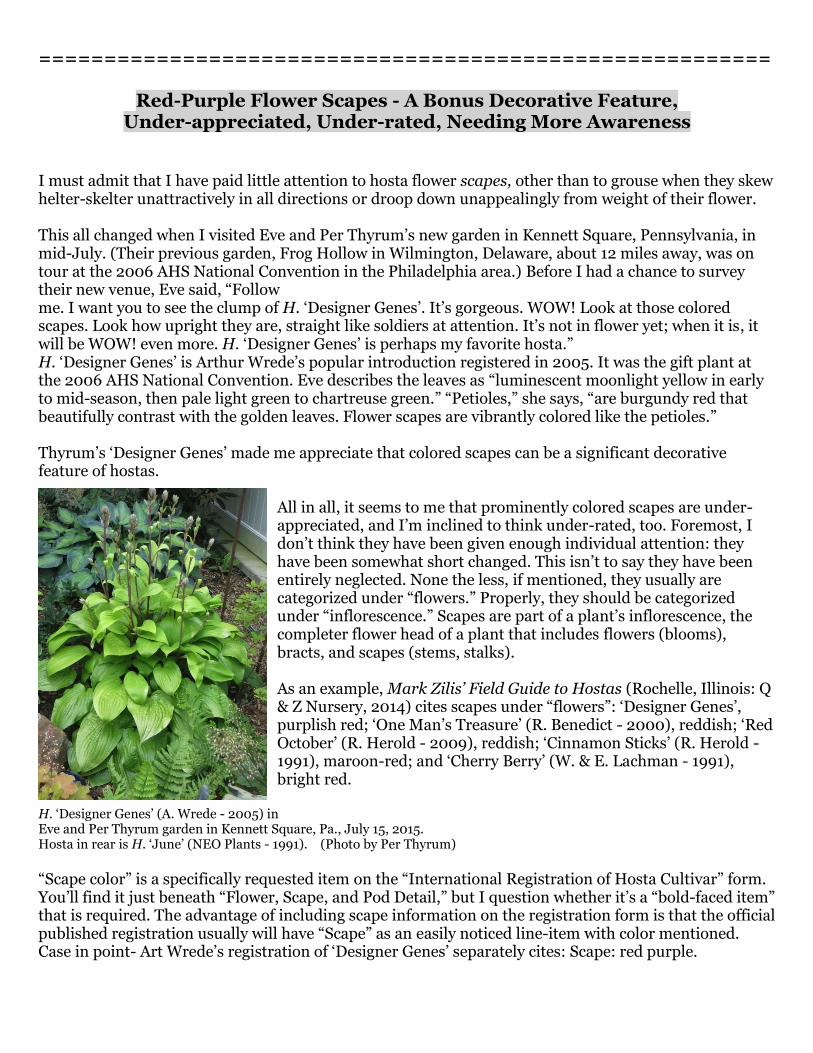
Red-Purple Flower Scapes - A Bonus Decorative Feature, Under-appreciated, Under-rated, Needing More Awareness
I must admit that I have paid little attention to hosta flower scapes, other than to grouse when they skew helter-skelter unattractively in all directions or droop down unappealingly from weight of their flower. This all changed when I visited Eve and Per Thyrum’s new garden in Kennett Square, Pennsylvania, in mid-July. (Their previous garden, Frog Hollow in Wilmington, Delaware, about 12 miles away, was on tour at the 2006 AHS National Convention in the Philadelphia area.) Before I had a chance to survey their new venue, Eve said, “Follow me. I want you to see the clump of H. ‘Designer Genes’. It’s gorgeous. WOW! Look at those colored scapes. Look how upright they are, straight like soldiers at attention. It’s not in flower yet; when it is, it will be WOW! even more. H. ‘Designer Genes’ is perhaps my favorite hosta.” H. ‘Designer Genes’ is Arthur Wrede’s popular introduction registered in 2005. It was the gift plant at the 2006 AHS National Convention. Eve describes the leaves as “luminescent moonlight yellow in early to mid-season, then pale light green to chartreuse green.” “Petioles,” she says, “are burgundy red that beautifully contrast with the golden leaves. Flower scapes are vibrantly colored like the petioles.” Thyrum’s ‘Designer Genes’ made me appreciate that colored scapes can be a significant decorative feature of hostas.
All in all, it seems to me that prominently colored scapes are under-appreciated, and I’m inclined to think under-rated, too. Foremost, I don’t think they have been given enough individual attention: they have been somewhat short changed. This isn’t to say they have been entirely neglected. None the less, if mentioned, they usually are categorized under “flowers.” Properly, they should be categorized under “inflorescence.” Scapes are part of a plant’s inflorescence, the completer flower head of a plant that includes flowers (blooms), bracts, and scapes (stems, stalks). As an example, Mark Zilis’ Field Guide to Hostas (Rochelle, Illinois: Q & Z Nursery, 2014) cites scapes under “flowers”: ‘Designer Genes’, purplish red; ‘One Man’s Treasure’ (R. Benedict - 2000), reddish; ‘Red October’ (R. Herold - 2009), reddish; ‘Cinnamon Sticks’ (R. Herold - 1991), maroon-red; and ‘Cherry Berry’ (W. & E. Lachman - 1991), bright red.
H. ‘Designer Genes’ (A. Wrede - 2005) in Eve and Per Thyrum garden in Kennett Square, Pa., July 15, 2015. Hosta in rear is H. ‘June’ (NEO Plants - 1991). (Photo by Per Thyrum)
“Scape color” is a specifically requested item on the “International Registration of Hosta Cultivar” form. You’ll find it just beneath “Flower, Scape, and Pod Detail,” but I question whether it’s a “bold-faced item” that is required. The advantage of including scape information on the registration form is that the official published registration usually will have “Scape” as an easily noticed line-item with color mentioned. Case in point- Art Wrede’s registration of ‘Designer Genes’ separately cites: Scape: red purple.

Registrants can also include scape color in another item that’s on the form. “What diagnostic characteristics make this cultivar unique from other hostas?” Examples: Bob Solberg mentioned “bright red scapes” as a Notable Characteristic in registration of H. ‘Peach Sala’ in 2012; Don Dean, “saturated burgundy petioles, matching scapes” in registration of H. ‘Kinky Boots’ in 2014. Donald A. Rawson, Comstock, Mich., in his excellent reference Hosta Lists (April 2015), has “Red-Petioled Hostas” as a separate list. He introduces it with, “Some hosta cultivars and species have red petioles. Others have green petioles, but have red scapes, and some hostas have both red petioles and red scapes.” Listed are nearly 500 hostas with pink, purple, or reddish petioles and/or scapes. It would be most helpful if those with colored scapes are identified, making hosta enthusiasts more aware of this attractive feature.
This brings me to the enlightening article, “Looking at Red Petioles,” by Steven C. Chamberlain, THJ Scientific Editor, in the Fall 2013 (34.2) issue of The Hosta Journal, pp. 22-23. It describes his going into his garden in Manlius, New York, in July 2013 and cutting off same-length pieces of 19 hosta petioles that were red-purple colored. (H. ‘Designer Gene’s was not included because it hadn’t been introduced yet.) Steve photographed them lined up, so easy comparisons could be made of the colors and variegations of the different petioles. Interestingly, a large number have ornate stippling variegation. Red-purple scapes need more attention. They are an important attractive feature neither sufficiently documented nor studied. Some things I’d like to see: separate list of hostas with red-purple scapes; photos of lined-up red-colored petioles from different hostas matched, side-by-side, with same hostas’ scapes; discussion why some hostas with colored petioles do not have colored scapes; and perhaps an explanation of the stippling.
Figure 1 of Steve Chamberlain’s article, There is good news on the horizon: Steve Chamberlain is “Looking at Red Petioles,” in Fall 2004 planning to write an article on reddish-purplish scapes next (34.2) issue of The Hosta Journal, pages year. Look for it in the Fall 2016 (Vol. 47.2) issue of The (Note: This is corrected figure on page Hosta Journal. Also, Don Rawson is preparing a list of hostas 69 of Convention 2004 [34.3] issue of THJ.) with red-purple scapes. Look for it in the next edition of his Hosta Lists due out in February 2016.
========================================================

H. ‘Tattoo’ PP11,603 (T. Avent - 1998), Bought at 2014 Online Auction as OS (Originator Stock),
Growing O.K. in Purchaser’s Iowa Garden
In last year’s Online Hosta Journal, I have an item on Julie Johnston’s purchasing a clump of H. ‘Tattoo’PP11,603 (T. Avent -1998) at the 2014 BADITC online auction. Julie lives in Packwood, Iowa. She always liked ‘Tattoo’, but hadn’t had any success in growing it. The clump offered at the auction was identified as OS, that is Originator Stock, so she thought it might do better. The plant was donated by Trudy and Bruce Van Wyck of Pella, Iowa, about an hour-and-a-quarter drive away from Julie. For the item, http://www.americanhostasociety.org/AHSMembers/OnlineJournals/45/ColumnWIP.html I mentioned last year that I plan to contact Julie from time to time to see how ‘Tattoo’ is doing, and will keep readers of this column updated. I emailed her last summer and she said, “Clump is about 7½ inches high and 15 inches across. Approximate leaf size is 3 by 3½ inches.” “I don’t think it has grown much in height, but it has more leaves, perhaps another division. Leaves are about the same size, though I think they appear to be less upright than last year. The plant in general seems to be floppier; maybe the stems are not as sturdy? I don’t know what that signifies, if anything. “Overall, I am just glad it has survived so far. We shall see what it does next year. If it doesn’t make it, it is the last ‘Tattoo’ I will probably ever have. At some point you have to say, ‘I tried.’ I can’t remember for certain, but I don’t think any that I had before ever survived more than a year.” Yes, Julie, let’s see what your ‘Tattoo’ does next year. I plan to contact you in early summer and I’ll file my report in next year’s Online Hosta Journal.
H. ‘Tattoo’, purchased as OS (Originator Stock), growing in Julie Johnston’s garden in Packwood, Iowa, July 2015. (Photo by Julie Johnston)